

Page 1

Introduction
TOSHIBA Pocket PC e740
Pocket PC e740
User's Manual
TOSHIBA Pocket PC e740 i
Page 2

Introduction
Introduction
Thank you very much for your purchase of this Toshiba Pocket PC e740.
Please be sure to read this user’s manual before using the Toshiba
Pocket PC, and ensure that you are aware of the correct handling
procedures.
■ Please be sure to read the “Safety precautions” section in this
document to learn about important safety issues.
■ After reading this document, keep it in a convenient place for future
reference.
Copyright Information
© 2002 by Toshiba Corporation. All rights reserved. Under the copyright
laws, this manual cannot be reproduced in any form without the prior
written permission of Toshiba. No patent liability is assumed, with respect
to the use of the information contained herein.
TOSHIBA Pocket PC e740 User’s Manual
First edition March 2002
Trademarks
Microsoft, ActiveSync, Outlook, Pocket Outlook, Windows, Windows CE,
and the Windows logo are either registered trademarks or trademarks of
Microsoft Corporation in the United States and/or other countries.
Microsoft products are licensed to OEMs by Microsoft Licensing, Inc., a
wholly owned subsidiary of Microsoft Corporation.
®
and IMAGEON® are registered trademarks of ATI Technologies, Inc.
ATI
IA Album
of IA Style, Inc., and Information In Action(tm) is a trademark of IA Style,
Inc.
CompactFlash is a registered trademark of Scandisk Corporation.
Toshiba uses the trademark of Bluetooth based upon a license
agreement.
The names of all other products contained herein are trademarks or
registered trademarks of their respective companies.
TOSHIBA Pocket PC e740 ii
®
, IA Presenter®, and IA Screen Mirror® are registered trademarks
Page 3
Introduction
Safety precautions
■ Please carefully read “Safety precautions” before using the Toshiba
Pocket PC and ensure that you are aware of correct handling
procedures.
■ The precautions provide essential information for the protection of the
user and others from possible injury and property damage. They also
provide information on the safe handling of this product .
■ Please check that you fully understand the definition of the following
messages (signs and graphical symbols) before reading the text, and
always follow the instructions provided.
Safety instructions
There are two categories of Safety Instructions included in this manual:
Product Warnings, (i.e., what must never be done to assure avoiding
those hazards that could cause bodily injury or property damage); and
User Directions (i.e., what must always be done to assure the safe use of
your Pocket PC).
The Safety Instructions contained in this manual have been categorized in
accordance with the seriousness of the potential hazards through the use
of Signal Words.
Signal icons for WARNING, CAUTION, and NOTE, will be followed by
important safety information that must be carefully reviewed.
Icon Meaning
WARNING
Indicates a potentially hazardous situation, which
could result in death or serious injury (*1) if you
do not follow instructions.
CAUTION
Indicates a potentially hazardous situation, which
if not avoided, can result in minor injury (*2) or
property damage (*3).
NOTE
*1: Serious injury corresponds to an injury that leaves some aftereffect, and requires hospital
treatment or long term treatment as an outpatient such as blindness, injuries, burns (high
temperature, low temperature), electric shock, fractures, poisoning, etc.
*2: Minor injury corresponds to an injury that does not require hospital treatment or long term
treatment as an outpatient, that is to say, injuries, burns, electric shock, etc.
*3: Property damage corresponds to the extensive damage with regard to the house
structure, household goods, livestock, pets, etc.
TOSHIBA Pocket PC e740 iii
Gives you helpful information.
Page 4

Introduction
Supplementary
Information:
“The product complies with the requirements of
the Low Voltage Directive 73/23/EEC and the
EMC Directive 89/336/EEC.”
Weitere
Informationen:
“Das Produkt entspricht den Anforderungender
Niederspannungs Richtlinie 73 23/EG und der
EMC-Richtlinie 89/336/EG.”
Informations
complérnentaires:
“Ce produit est conforme aux exigences de la
directive sur les basses tensions 73/23/CEE et
de la directive EMC 89/336/CEE.”
Información
complementaria:
“El Producto cumple los requistos de baja
tensión de la Directiva 73/ 23/CEE y la Directiva
EMC 89/336/CEE.”
Ulteriori informazioni: “Il prodotto é conforme ai requisiti della direttiva
sulla bassa tensione 73/23/EG e la direttiva EMC
89/336/EG.”
Ytteligare
information:
“Produkten uppfyller kraven enligt
lägspänningsdirektiver 73/23/EEC och EMCdirektiv 89/336/EEC.”
Limitation of liability
■ Toshiba Corporation is in no way liable for any damage resulting from
earthquakes, fire, actions on the part of a third party, other accidents
beyond the control of Toshiba Corporation or intentional acts,
negligence or misuse on the part of the user or any usage under
abnormal conditions.
■ Toshiba Corporation is in no way liable for any damage, including but
not limited to change or loss of stored data, loss of business profit,
lost profits, interruption of business, or lost communication
opportunities that are caused by usage or non-usability of this
product.
■ Toshiba Corporation is in no way liable for any damage resulting from
failure to comply with the contents of this instruction manual.
■ Toshiba Corporation is in no way liable for any damage resulting from
malfunction due to usage in combination with connection devices,
software, or devices other than those provided by Toshiba
Corporation with the product.
TOSHIBA Pocket PC e740 iv
Page 5

Introduction
Handling the unit (including the batteries)
WARNINGS
■ Turn the power off in areas where usage is prohibited, such as
onboard an aircraft or in a hospital and do not use the Pocket PC.
Usage in such areas can cause an accident due to negative effects on
equipment such as aviation equipment onboard or medical
equipment.
■ Keep the Pocket PC no less than 22 cm away from persons with a
heart pacemaker implant when using the device in combination with a
mobile phone.
Failure to maintain this distance can cause an accident due to
negative effects on the pacemaker at close proximity.
■ Do not use the Pocket PC when driving a car, etc. or while walking.
Usage when driving a car or while walking can cause a traffic accident
or injury.
■ Do not allow metallic objects, such as staples and clips, to enter
inside the Pocket PC.
■ Do not connect the terminals (metallic parts) with metallic objects.
Entry of or contact with foreign objects can cause heat generation or
ignition.
■ If the Pocket PC emits an unusual smell or sound, or generates
smoke, turn the battery switch to the off position immediately and
disconnect the AC adaptor from the power outlet.
Continued use of the Pocket PC under any of these conditions can
cause fire.
Please contact the dealer from whom the Pocket PC was purchased
and request inspection or repair service.
■ Do not use or store in the following locations.
■ Locations such as a bathroom where the Pocket PC can be
subjected to water splashes or conditions of high humidity.
■ Locations where rain, fog, etc. can enter directly.
■ Locations subject to high temperatures, such as near to a fire or
heating equipment.
■ Locations exposed to direct sunlight.
■ Inside a tightly closed car under hot sunlight.
The battery can suffer liquid leakage, ignition, or rupture.
■ Do not drop the Pocket PC or allow the Pocket PC to be subjected to
any severe shock.
The battery can suffer liquid leakage, ignition, or rupture.
TOSHIBA Pocket PC e740 v
Page 6

Introduction
■ If the battery leaks liquid, or emits an unusual smell, remove it
immediately from the vicinity of any source of fire.
Continued use of the Pocket PC under any of these conditions can
cause ignition of the leaked liquid, or rupture.
■ If liquid leaks from the battery, do not touch it.
If such liquid is allowed to come into contact with the skin, it can
cause eye or skin injuries. If the liquid should enter the eyes, irrigate
the eyes thoroughly with clean water and immediately seek medical
attention. If the liquid should come into contact with the skin or
clothing, wash it away immediately with clean water.
■ Do not disassemble, remodel or repair.
Disassembly, remodeling, or repair can cause injury.
Please contact the dealer from whom the Pocket PC was purchased
and request repair service.
CAUTIONS
■ When using the Pocket PC with the earphone (sold separately)
connected to it, do not raise the sound volume level too high.
Raising the sound to high volume levels can impair your hearing ability.
■ If the display is broken, and the liquid crystal (liquid) leaks out, do not
touch it.
In the event of contact with the skin, the liquid crystal can cause a
rash on the skin. If the liquid crystal should come into contact with the
skin or clothing, wash it off immediately with clean water.
■ Keep the Pocket PC out of the reach of infants.
Placing within the reach of infants can cause injury.
Dispose of used batteries
Do not dispose of used batteries with your ordinary waste. Dispose of the
batteries as required by local ordinances or regulations. Use only
batteries recommended by Toshiba as replacements.
Handling AC adaptor, power cord, cradle
WARNINGS
■ Use only the AC adaptor supplied with the Pocket PC.
Using an AC adaptor other than that supplied can cause smoke or
ignition.
■ Insert the power plug to a household electric outlet.
When travelling abroad, never plug the AC Adapter into a power
source that does not correspond to both the voltage and the
frequency specified on the rating plate of the unit, as equipment
damage will result.
TOSHIBA Pocket PC e740 vi
Page 7

Introduction
■ Do not connect or disconnect the power plug with wet hands.
Connecting or disconnecting under these conditions can cause
electric shock.
■ Do not leave open containers filled with liquid, such as cups, near the
AC adaptor.
Spilt liquid entering the Pocket PC can cause ignition or electric shock.
■ Do not use the Pocket PC in locations, such as a bathroom, where it
will be subjected to liquid splashes.
Exposure to liquid can cause ignition or electric shock.
■ If dust is found on or around the pins of the power plug, turn off the
Pocket PC and disconnect the power plug from the outlet, then wipe
off the dust using a dry cloth.
Dust accumulation on the power plug can cause fire due to loss of
insulation.
■ Do not disassemble, remodel, or repair.
Disassembly, remodelling, or repair can cause fire, electric shock, or
injury.
Please contact the dealer from whom the Pocket PC was purchased
and request repair service.
CAUTIONS
■ When unplugging the power plug from the outlet, disconnect the
power cord by grasping the power plug itself.
Pulling out the power cord by grasping the cable can cause ignition or
electric shock due to cable damage.
■ When handling the power cord, observe the following rules.
■ Do not damage the power cord.
■ Do not tamper with the power cord.
■ Do not twist the power cord.
■ Do not forcibly bend the power cord.
■ Do not pull the power cord.
■ Do not overload the power cord.
■ Do not heat the power cord.
■ Do not place it close to heating apparatus.
Failure to do so can cause fire or electric shock.
If you find that the power cord is damaged, please call the dealer from
whom the Pocket PC was purchased and purchase a new power cord.
■ Do not connect terminals (metallic parts) with metallic objects, such as
wires.
Connecting the terminals (metallic parts) with metallic objects can
cause heat generation or burns.
■ Keep the Pocket PC out of the reach of infants.
Placing within the reach of infants can cause injury.
TOSHIBA Pocket PC e740 vii
Page 8

Introduction
NOTES
■ Use the Pocket PC only in locations with the following ambient
environmental conditions.
When operating temperature 0°C to 40°C, Humidity 30% to 80%
When charging temperature 5°C to 35°C
■ Do not use or store the Pocket PC in the following locations.
■ Locations subject to extremely high or low temperatures
■ Dusty locations
■ Locations subject to strong vibration
Usage or storage in such locations can cause failure, malfunction, or
loss of stored data.
■ Do not allow the Pocket PC to be subjected to sharp temperature
changes.
The resulting moisture condensation can cause failure, malfunction, or
loss of stored data.
If moisture condensation is generated, use the Pocket PC only after
allowing it to dry completely.
■ When charging the battery, the case of the AC adaptor can become
warm, but this is not abnormal.
■ Disconnect the power plug from the outlet when not in use.
■ Avoid inadvertently sitting while the Pocket PC is inserted in the back
pocket of trousers, etc.
Sitting under these circumstances can cause damage or failure.
■ Do not place objects or drop them on top of the Pocket PC.
When the Pocket PC is placed in a bag containing heavy items, do not
allow it to be caught underneath them.
Placing it under these conditions can cause damage or failure.
■ Clean the terminals (metallic parts) occasionally with a Q-tip.
Dirty terminals can cause disconnection or poor charging.
■ Do not use organic solvents such as benzene or thinner to clean the
Pocket PC.
Use of these solvents can cause deformation or discoloration.
Wipe dirty parts with a soft dry cloth.
■ Do not wipe the display with a wet cloth. Do not touch it with wet
hands.
Wiping or touching under these conditions can cause failure or
malfunction.
Wipe the display with a soft dry cloth.
TOSHIBA Pocket PC e740 viii
Page 9

Introduction
■ It is recommended that important data stored in the unit should be
either noted down occasionally, or saved to a memory card (sold
separately) or personal computer (data transfer with Active Sync).
The following can result in loss of stored data.
■ Misuse of the Pocket PC
■ Subjecting the main unit to the effects of static electricity or
electric noise
■ Total loss of charge in the battery due to an extended period of
non-use
■ Failure or repair servicing of the Pocket PC
■ Toshiba Corporation is in no way liable for change or loss of stored
data resulting from failure or repair of the unit. Please understand this
before usage.
■ When using the optional (sold separately) “SD memory card”, please
be sure to read the relevant instruction manual and ensure that you
are aware of correct handling procedures.
■ Do not allow the card to be subjected to any severe shock while
connected to the unit. Such shocks can cause damage or failure.
■ Do not carry the unit with the card still connected.
Carrying the unit with the card connected can cause loss of the card
due to it falling from the unit.
■ A lithium ion battery is used as the battery.
Please request the dealer from whom the Pocket PC was purchased
to replace the battery when this becomes necessary. Lithium ion
batteries are recyclable. When you replace your battery, please
request that the repair center recycle the battery. Never dispose of the
battery with ordinary waste.
The battery is a lithium ion battery, which can explode if not properly
replaced, used, handled or disposed of. Dispose of the battery as required
by local ordinances or regulations. Use only batteries recommended by
Toshiba as replacements.
TOSHIBA Pocket PC e740 ix
Page 10

Introduction
Working environment
This product was designed to fulfill the EMC (electromagnetic
compatibility) requirements for “residential, commercial and light industry
environments”.
Toshiba does not approve the use of this product in working
environments other than “residential, commercial and light industry
environments”.
For example, the following environments are not approved:
■ Industrial Environments (environments with a mainvoltage >230V~)
■ Medical Environments
■ Automotive Environments
■ Aircraft Environments
Any consequences resulting from the use of this product in working
environments that are not approved are not the responsibility of Toshiba
Corporation. The consequences of the use of this product in nonapproved working environments may be:
■ Interference with other devices or machines in the nearby surrounding
area
■ Malfunction of, or data loss from, this product caused by disturbances
generated by other devices or machines in the nearby surrounding
area
Therefore Toshiba strongly recommends that the electromagnetic
compatibility of this product be suitably tested in all non-approved
working environments before use. In the case of automobiles or aircraft,
the manufacturer or airline respectively should be asked for permission
before use of this product.
Furthermore, for general safety reasons, the use of this product in
environments with explosive atmospheres is not permitted.
CE compliance
This product and the original options are designed to observe the related
EMC (Electromagnetic compatibility) and safety standards. However,
Toshiba cannot guarantee that this product still observes these EMC
standards if options or cables not produced by Toshiba are connected or
implemented. In this case, the persons who have connected /
implemented those options / cables have to make sure that the system
(PC plus options / cables) still fulfils the required standards. To avoid
general EMC problems, the following advice should be observed:
■ Only CE marked options should be connected / implemented
■ Only best shielded cables should be connected
TOSHIBA Pocket PC e740 x
Page 11

Introduction
FCC Notice “Declaration of Conformity”
This equipment has been tested and found to comply with the limits for a
Class B digital device, pursuant to part 15 of the FCC Rules. These limits
are designed to provide reasonable protection against harmful
interference in a residential installation. This equipment generates, uses
and can radiate radio frequency energy and, if not installed and used in
accordance with the instructions, may cause harmful interference to radio
communications. However, there is no guarantee that interference will not
occur in a particular installation. If this equipment does cause harmful
interference to radio or television reception, which can be determined by
turning the equipment off and on, the user is encouraged to try to correct
the interference by one or more of the following measures:
■ Reorient or relocate the receiving antenna
■ Increase the separation between the equipment and receiver
■ Connect the equipment into an outlet on a circuit different from that to
which the receiver is connected
■ Consult the dealer or an experienced radio/TV technician for help.
Only peripherals complying with the FCC class B limits may be attached to
this equipment. Operation with non-compliant peripherals or peripherals not
recommended by Toshiba is likely to result in interference to radio and TV
reception. Shielded cables must be used between the external devices and
the computer’s USB ports, external monitor port, PS/2 keyboard port and
PS/2 mouse port. Changes or modifications made to this equipment, not
expressly approved by Toshiba or parties authorized by Toshiba could void
the user’s authority to operate the equipment.
This device complies with part 15 of the FCC Rules. Operation is subject
to the following two conditions:
1 This device may not cause harmful interference
2 This device must accept any interference received, including
interference that may cause undesired operation.
Canadian Regulatory Information (Canada Only)
This digital apparatus does not exceed the Class B limits for radio noise
emissions from digital apparatus as set out in the Radio Interference
Regulation of the Canadian Department of Communications.
Note that Canadian Department of Communications (DOC) regulations
provide, that changes or modifications not expressly approved by
TOSHIBA Corporation could void your authority to operate this equipment.
This Class B digital apparatus meets all requirements of the Canadian
Interference-Causing Equipment Regulations.
Cet appareil numérique de la class B respecte toutes les exgences du
Règlement sur le matériel brouilleur du Canada.
TOSHIBA Pocket PC e740 xi
Page 12

Introduction
FCC Class B Digital Devices & Peripheral Devices (Declaration of Conformity or Certification Authorization)
Declaration of Conformity Label & Marking Requirements
User Manual must provide user information in accordance with
±15.19(a)(3), 15.21, 15.27 and 15.105(b):
Instruction Manual Federal Communication Commission Interference Statement
This equipment has been tested and found to comply with the limits for a
Class B digital device, pursuant to Part 15 of the FCC Rules. These limits
are designed to provide reasonable protection against harmful
interference in a residential installation. This equipment generates, uses
and can radiate radio frequency energy and, if not installed and used in
accordance with the instructions, may cause harmful interference to radio
communications. However, there is no guarantee that interference will not
occur in a particular installation. If this equipment does cause harmful
interference to radio or television reception, which can be determined by
turning the equipment off and on, the user is encouraged to try to correct
the interference by one of the following measures:
■ Reorient or relocate the receiving antenna
■ Increase the separation between the equipment and receiver
■ Connect the equipment into an outlet on a circuit different from that to
which the receiver is connected
■ Consult the dealer or an experienced radio/TV technician for help.
FCC Caution: Assure continued compliance (for example, use only
shielded interface cables when connecting to computer or peripheral
devices). Any changes or modifications not expressly approved by the
manufacturer of this device could void the user's authority to operate this
equipment.
This device complies with Part 15 of the FCC Rules. Operation is subject
to the following two conditions: (1) This device may not cause harmful
interference, and (2) this device must accept any interference received,
including interference that may cause undesired operation.
TOSHIBA Pocket PC e740 xii
Page 13

Table of Contents
TOSHIBA Pocket PC e740
Table of Contents
Chapter 1 Getting Started.........................................................1-1
Welcome ................................................................................................1-1
Where to Find Information....................................................................1-2
Chapter 2 Basic Skills ...............................................................2-1
Parts Names and Function ...................................................................2-1
Battery Charging ...................................................................................2-6
How to Use the optional Expansion Pack.........................................2-10
Initial Setup ..........................................................................................2-12
Connecting to a Computer .................................................................2-17
Today Screen.......................................................................................2-19
Programs .............................................................................................2-21
Navigation Bar and Command Bar ....................................................2-22
Pop-up Menus .....................................................................................2-23
Notifications.........................................................................................2-23
Enter Information on Your Toshiba Pocket PC.................................2-24
Find and Organize Information...........................................................2-33
Customize Your Toshiba Pocket PC .................................................2-34
Chapter 3 Microsoft ActiveSync ..............................................3-1
Chapter 4 Microsoft Pocket Outlook ......................................4-1
Calendar: Scheduling Appointments and Meetings...........................4-2
Contacts: Tracking Friends and Colleagues.......................................4-5
Tasks: Keeping a To Do List.................................................................4-8
Notes: Capturing Thoughts and Ideas...............................................4-11
Inbox: Sending and Receiving E-mail Messages..............................4-13
TOSHIBA Pocket PC e740 xiii
Page 14

Table of Contents
Chapter 5 Companion Programs .............................................5-1
Pocket Word ..........................................................................................5-1
Pocket Excel ..........................................................................................5-6
MSN Messenger ....................................................................................5-7
Windows Media Player........................................................................5-11
Microsoft Reader.................................................................................5-12
Chapter 6 Pocket Internet Explorer.........................................6-1
The Mobile Favorites Folder.................................................................6-1
Favorite Links ........................................................................................6-1
Mobile Favorites....................................................................................6-2
Using AvantGo Channels......................................................................6-3
Using Pocket Internet Explorer............................................................6-3
Chapter 7 Getting Connected ..................................................7-1
Transfer Items Using Infrared ..............................................................7-2
Connect to the Internet.........................................................................7-2
Connect to Work ...................................................................................7-4
End a Connection..................................................................................7-6
Connect Directly to an E-mail Server ..................................................7-6
Get Help on Connecting .......................................................................7-6
Chapter 8 Wi-Fi (IEEE 802.11b) WLAN Adaptor......................8-1
Overview ................................................................................................8-1
IP Address Page ....................................................................................8-3
TMU-Traffic Monitoring Utility ...........................................................8-12
Chapter 9 Bluetooth Settings Help..........................................9-1
Bluetooth Settings.................................................................................9-1
Specifications ........................................................................................9-2
Setup ......................................................................................................9-3
Bluetooth™ Connection .......................................................................9-4
Bluetooth™ Settings ...........................................................................9-13
Disconnecting/Exiting Bluetooth™ Connection...............................9-17
Bluetooth Chat.....................................................................................9-21
BPU-Bluetooth Management Utility...................................................9-22
Error Messages ...................................................................................9-25
TOSHIBA Pocket PC e740 xiv
Page 15

Table of Contents
Chapter 10 ATI Presentation Pack ........................................10-1
Introduction .........................................................................................10-1
IA Presenter .........................................................................................10-2
Opening a Presentation and Using View Modes ..............................10-4
IA Screen Mirror ................................................................................10-12
Copyright and Contact Information.................................................10-13
Chapter 11 Optional Functions ..............................................11-1
Home ....................................................................................................11-1
Home Help ...........................................................................................11-6
How to Make a Backup.....................................................................11-10
Carrying Out Restore Operation ......................................................11-12
Data Backup Help .............................................................................11-13
Chapter 12 Additional Information ........................................12-1
Troubleshooting ..................................................................................12-1
Resetting..............................................................................................12-4
Initializing .............................................................................................12-5
Specifications ......................................................................................12-5
Appendix A FAQ about Wireless LAN..................................... A-1
TOSHIBA Pocket PC e740 xv
Page 16

Getting Started
TOSHIBA Pocket PC e740
Chapter 1
Getting Started
Welcome
Congratulations on purchasing your Toshiba Pocket PC e740. Due to the
size and capabilities of this device, you can keep your most important
business and personal information up-to-date and close at hand.
Microsoft
you to synchronize the information on your desktop or laptop computer
with your device. Picture yourself in the following situations:
■ While walking with a colleague, your cell phone rings and your
■ You’re meeting your friends tonight for dinner and a movie. You
■ A Calendar reminder alerts you that it is time to catch the bus. You
®
ActiveSync® increases the power of your device by allowing
manager asks if you two are free this afternoon for an emergency
meeting. While your colleague fumbles through his paper organizer,
you press a button on your device and instantly see a list of today’s
appointments and meetings. You are quickly able to tell your manager
your available times. For more information on scheduling
appointments and meetings, see Chapter 4.
download the latest movie information from the Internet to your
computer and then synchronize it with your device. At dinner, you pull
out your Toshiba Pocket PC device and review your movie options
with your friends. For more information on downloading Web pages to
your device, see Chapter 6.
grab your Toshiba Pocket PC device and catch the bus just in time.
Because ActiveSync keeps the information on your device up-to-date,
you leisurely review your task list, make notes about the new books
and CDs you want to buy, and read and respond to e-mail messages.
When you get back to the office, ActiveSync transfers any task
changes you made, your notes, and your e-mail message responses
to your computer. For more information on ActiveSync, see Chapter 3.
User's Manual 1-1
Page 17

Getting Started
Where to Find Information
This book describes your Pocket PC’s hardware, provides an overview of
the programs on your Pocket PC, and explains how to connect your
Pocket PC to a computer, a network, or the Internet. For instructions on
setting up your Pocket PC and installing ActiveSync, see the Quick Start
Card. The following table is a guide to additional information to help you
use your Pocket PC.
For information on: See this source:
Programs on your
Pocket PC
Additional programs
that can be installed on
the Pocket PC
Connecting to and
synchronizing with a
computer
Last-minute updates
and detailed technical
information
Up-to-date information
on your Toshiba
Pocket PC
This User's Manual and device Help. To view
Help, tap
The Toshiba Pocket PC Companion CD.
The Quick Start Card or ActiveSync Help on your
computer. To view Help, click Help and then
Microsoft ActiveSync Help.
The Read Me files, located in the Microsoft
ActiveSync folder on the computer and on the
Toshiba Pocket PC Companion CD.
http://www.pda.toshiba.com
and then Help.
User's Manual 1-2
Page 18
Basic Skills
TOSHIBA Pocket PC e740
Chapter 2
Basic Skills
You can easily learn to use your Toshiba Pocket PC. This chapter
describes the use and customization of your Toshiba Pocket PC.
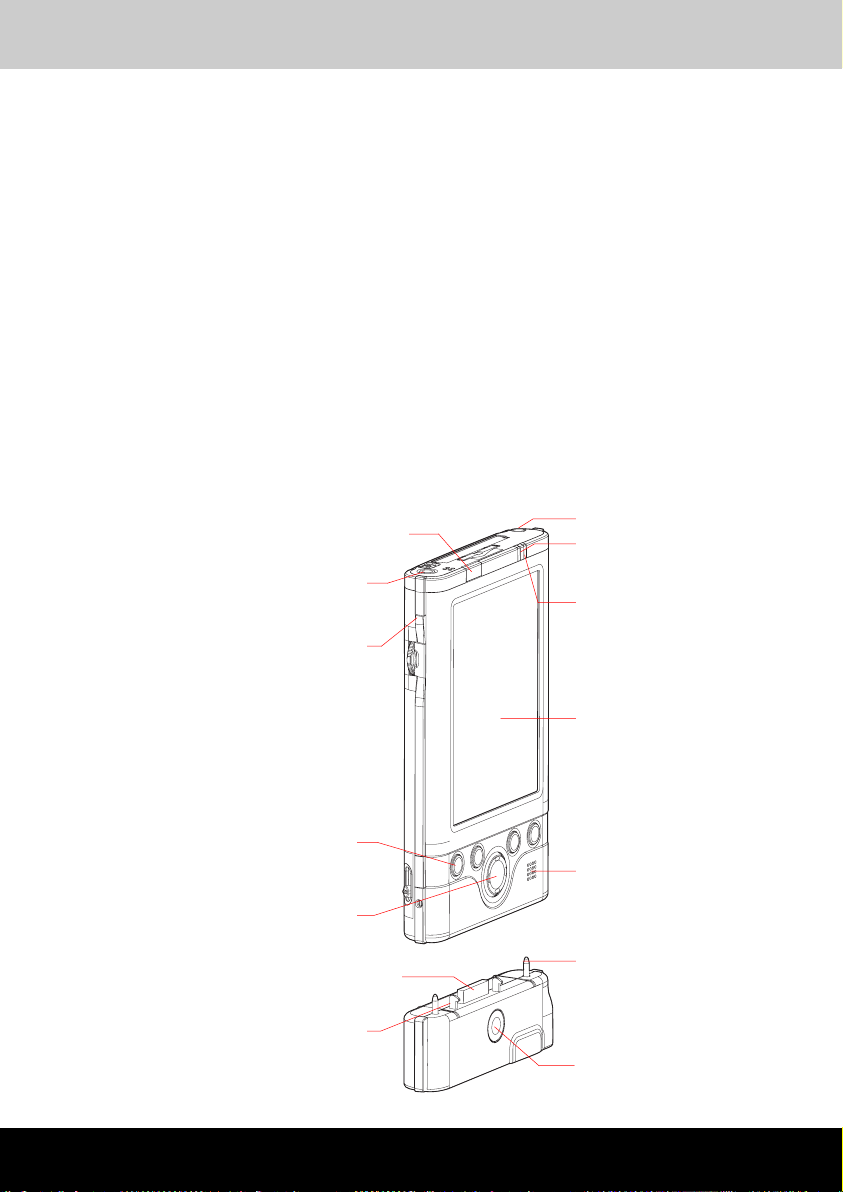
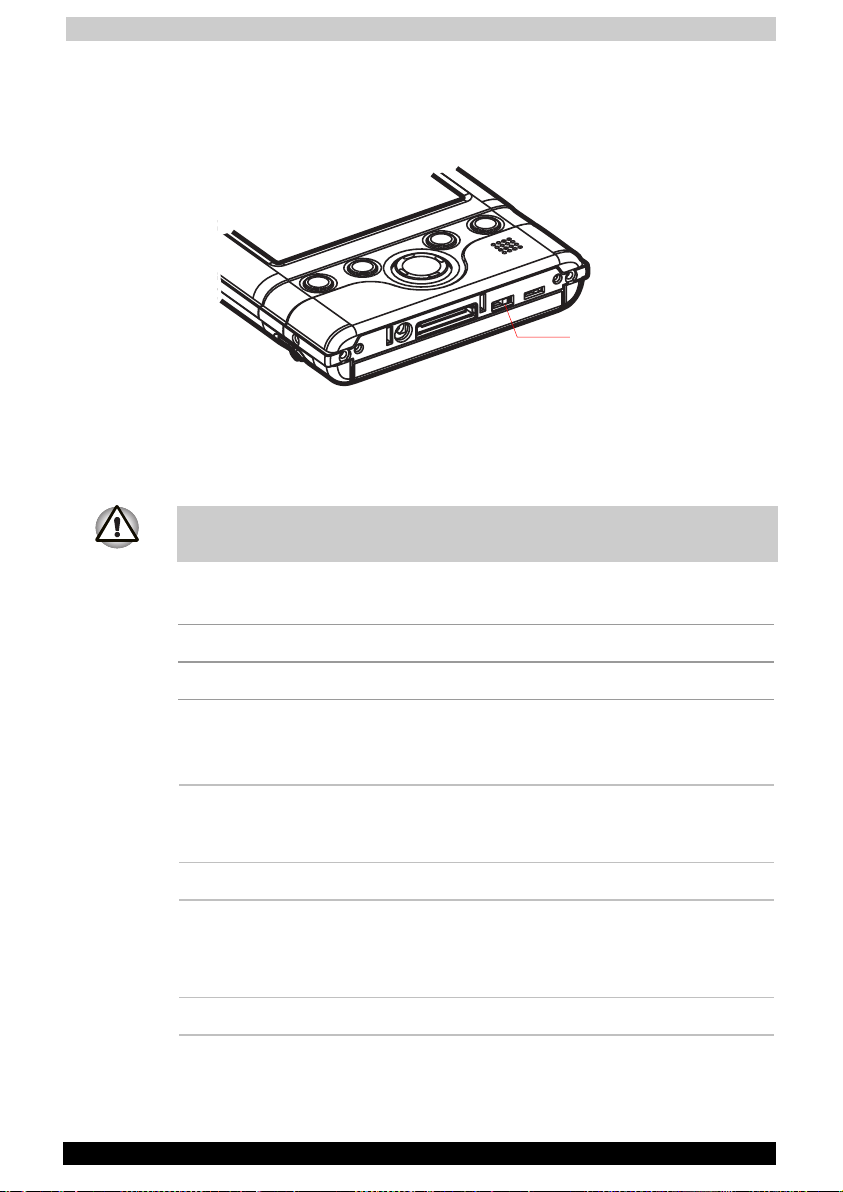
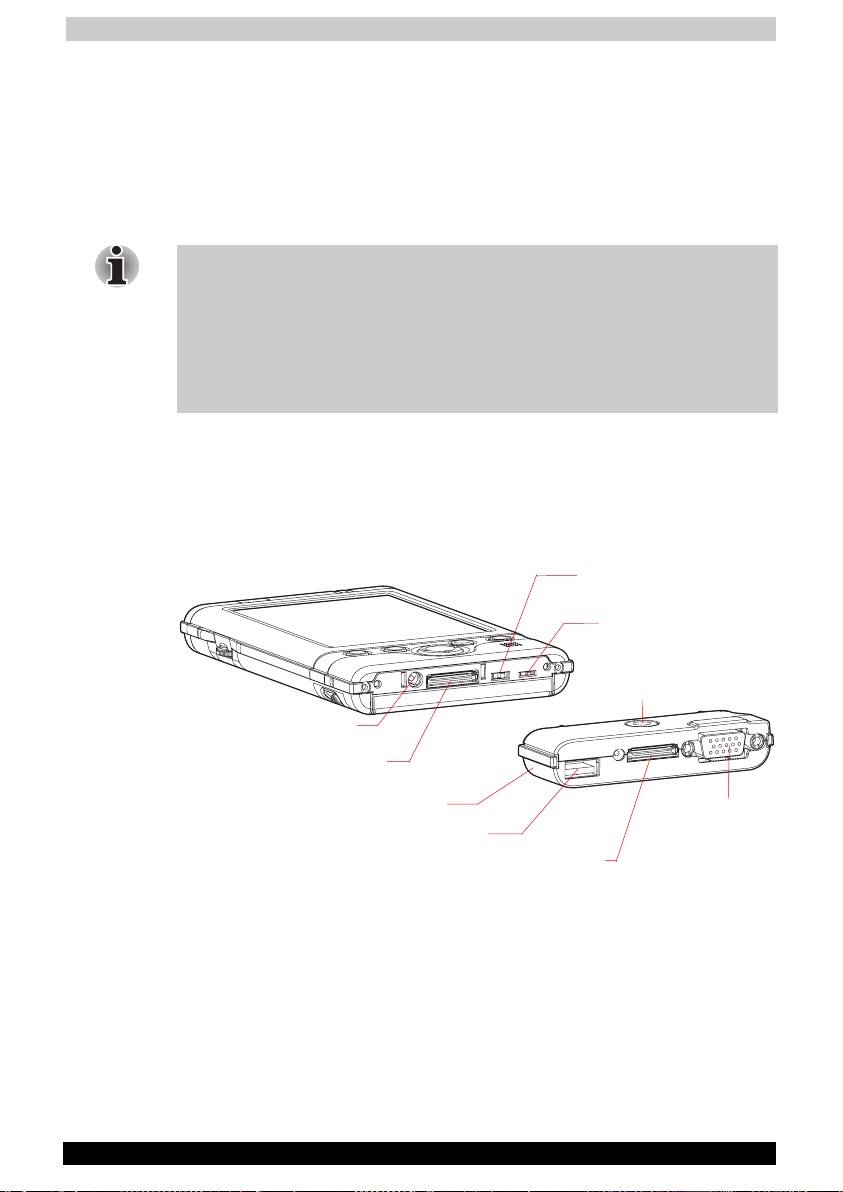
Parts Names and Function
Main unit and optional Expansion Pack (front view)
Power Button
Stylus
Battery/Alarm LED
Stereo Headphone Jack
Recording Button
(Program Button 5)
Program Buttons 1, 2, 3, & 4
(from the left)
Cursor Button /
Navigation Button
Cradle Connection Port
Lock
Wireless Communication LED
(Wireless LAN/Bluetooth models
only)
Touch Screen
Speaker
Guide Pin
Release Button
User's Manual 2-1
Page 19
Basic Skills
DC IN Socket
Cradle Connection Port
The Cradle
Expansion Pack (optional)
USB Port
Battery Switch
Wireless Communication
Switch (Wireless LAN/
Bluetooth models only
Cradle Connection Port
External Monitor
Port
Initial Setting of Program Button
Program button 1 = Calendar
Program button 2 = Tasks
Program button 3 = Home
Program button 4 = Contacts
Program button 5 = Voice recorder
User's Manual 2-2
Page 20
Basic Skills
Main unit (back view)
SD Card Slot
Stylus
Microphone
Stereo Headphone Jack
Toshiba Scroller
CF II Card slot
CF Release Button
Battery Pack Lock
Expansion Pack
DC-IN Socket
Power Button
The power button turns the unit and the front light on and off.
Power button When the power is
off
Infrared Port
Reset Button
When the power is
on
Press and hold it. The power turns on. The front light
alternately turns on/off.
Press it quickly. The power turns on. The power turns off.
User's Manual 2-3
Page 21
Basic Skills
Battery Switch
The battery switch supplies/cuts off the battery power to the Toshiba
Pocket PC.
Battery Switch
Supply ←→ Stop
The setting of this switch at shipment is “stop”. When using the Toshiba
Pocket PC for the first time, slide this switch to the left (the “supply” side)
with the stylus.
Switching the battery switch to the “stop” position at any time will lead to
loss of data.
Wireless Communication Switch and LED
Off Wireless Communication Switch is turned OFF
Orange Wireless Communication Switch is turned ON
Battery/Alarm LED
The alarm lamp indicates the machine condition.
Flashing orange When the preset alarm time, which was set
Orange Indicates charging of the battery.
Flashing yellow The battery charging process is stopped due to
through Calendar or Tasks, goes off, the lamp
flashes.
the ambient temperature being too high or low.
Charge the battery in an ambient temperature of
approx. 5°C to 40°C.
Green Indicates full charge of the battery.
User's Manual 2-4
Page 22

Basic Skills
How to Use the Stylus
The stylus is used for menu selection or data input on the touch-screen of
the Toshiba Pocket PC e740.
■ Tap: Touch the screen once with the stylus to open items and select
options.
■ Drag: Hold the stylus on the screen and drag it across to select text
and images. Drag in a list to select multiple items.
■ Tap and hold: Tap and hold the stylus on an item to see a list of
actions available for that item. On the pop-up menu that appears, tap
the action you want to perform.
When you operate the touch screen of the Toshiba Pocket PC e740, use
the supplied stylus.
If the tip of the stylus is damaged, do not use it. If you operate the touch
screen with a damaged stylus or a ballpoint pen, the touch screen may be
damaged.
When the stylus is damaged, please purchase a new one.
About the Cursor Button
You can move a cursor (selection display) on the screen by pressing the
upper, lower, right or left part of the cursor button.
You can select a program to launch by pressing the center part of the
cursor button.
The cursor movement is different depending on the screen. When the
cursor is at the right or the left side of the screen, it may not move.
About the Scroller
You can also move the cursor on the screen by moving the scroller up
and down.
You can select a program to launch by pressing the scroller.
User's Manual 2-5
Page 23
Basic Skills
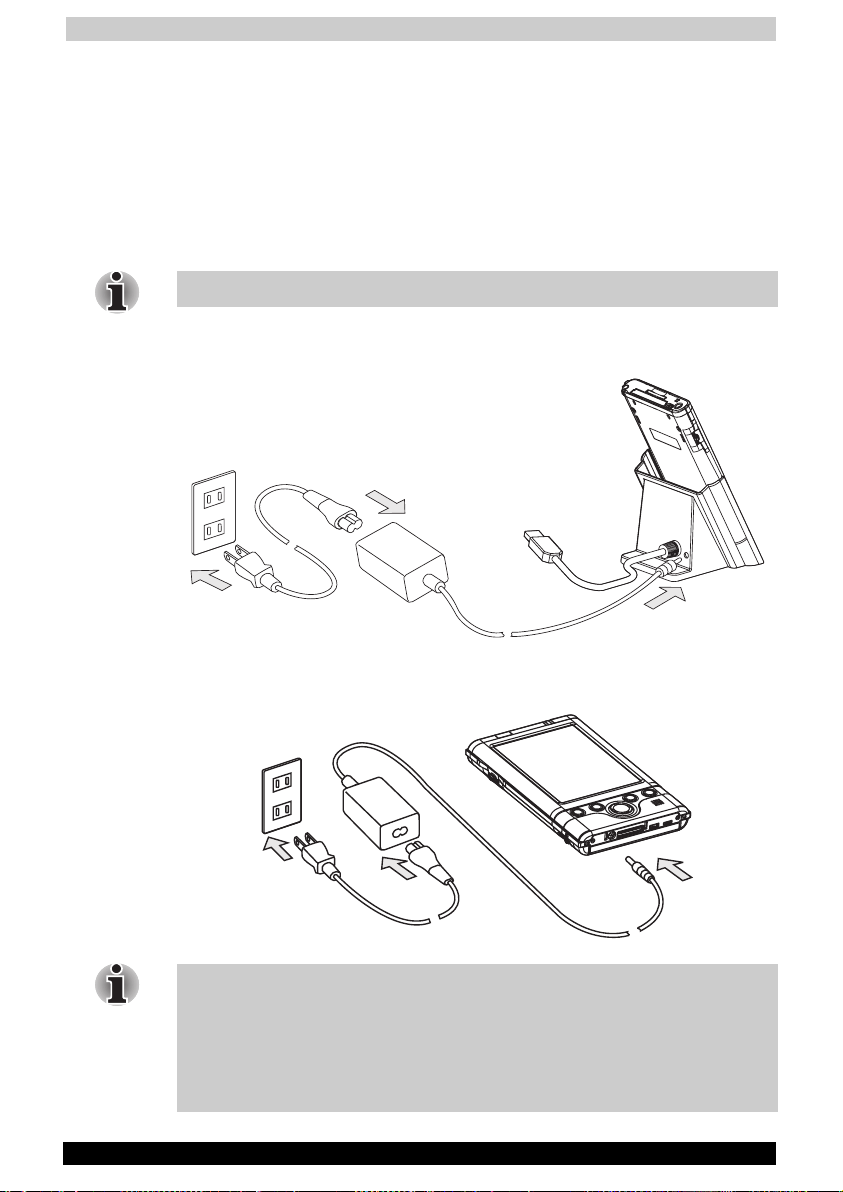
Battery Charging
A battery is installed in the Toshiba Pocket PC. When using the Toshiba
Pocket PC for the first time, set the battery switch to the supply side, and
then charge the battery with the supplied AC adapter.
How to Charge the Battery
You can use two charging methods.
Turn the unit off before connecting the AC Adapter and Pocket PC.
Method 1. Connect the supplied AC adapter and the cradle as shown in
the figure below, and then insert the Toshiba Pocket PC into the cradle.
Method 2. Connect the supplied AC adapter and the Toshiba Pocket PC
as shown in the figure below.
For charging the battery, maintain an ambient temperature from approx.
5°C to 40°C.
When the lamp glows orange or green during the battery charging, you
can use the Toshiba Pocket PC e740.
When the battery is completely charged, the Battery/Alarm LED color will
change to green.
User's Manual 2-6
Page 24
Basic Skills
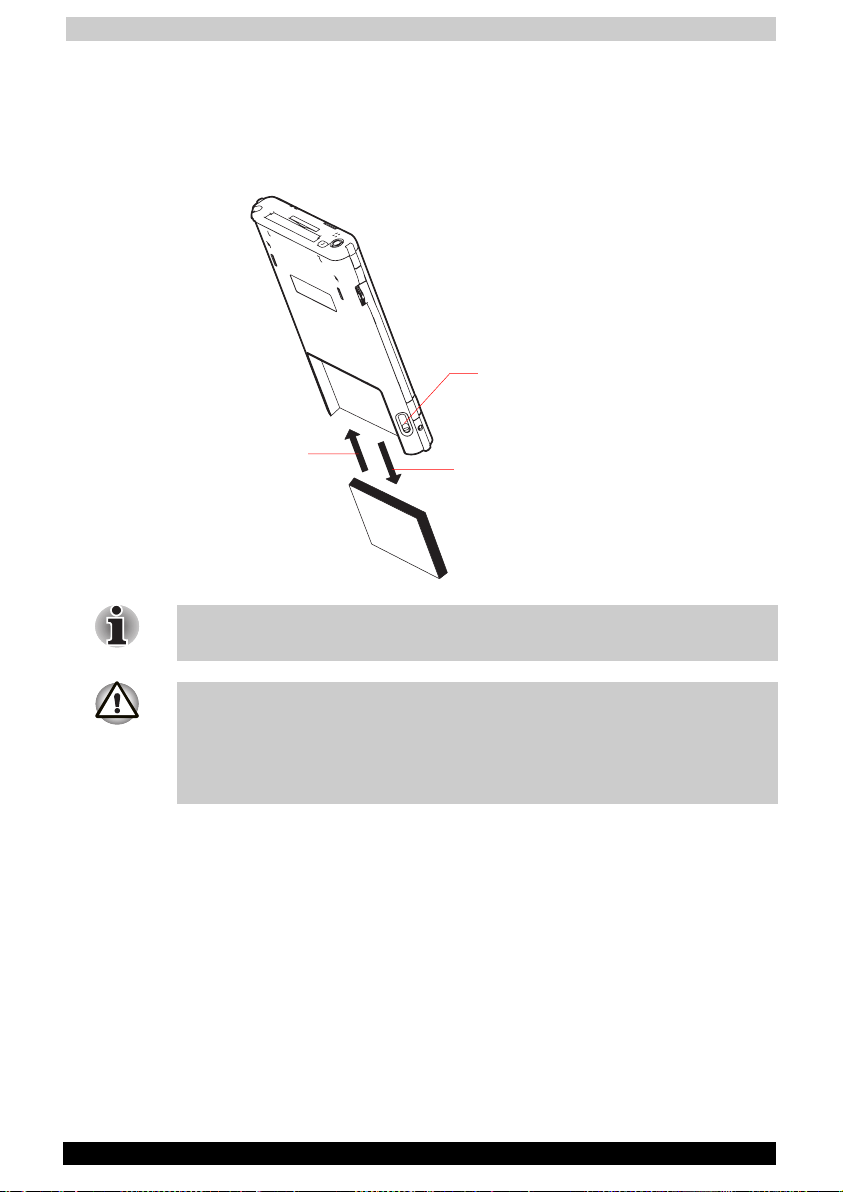
How to Attach/Detach the Main Battery Pack
1 Turn off the power.
2 Switch the Battery Pack Lock to release the battery pack.
3 Attach/Detach battery from the Pocket PC.
Battery Pack Lock
Switch V to Lock
Switch W to Release
Attach
Release
You cannot turn on the power if the Battery Pack Lock is at the Release
position.
You can change the main battery without data loss because your Toshiba
Pocket PC e740 has a rechargeable backup battery.
But the capacity of the backup battery is small. When you change the
main battery, please attach the new main battery and switch Battery Pack
Lock to the Lock position as soon as possible.
User's Manual 2-7
Page 25
Basic Skills
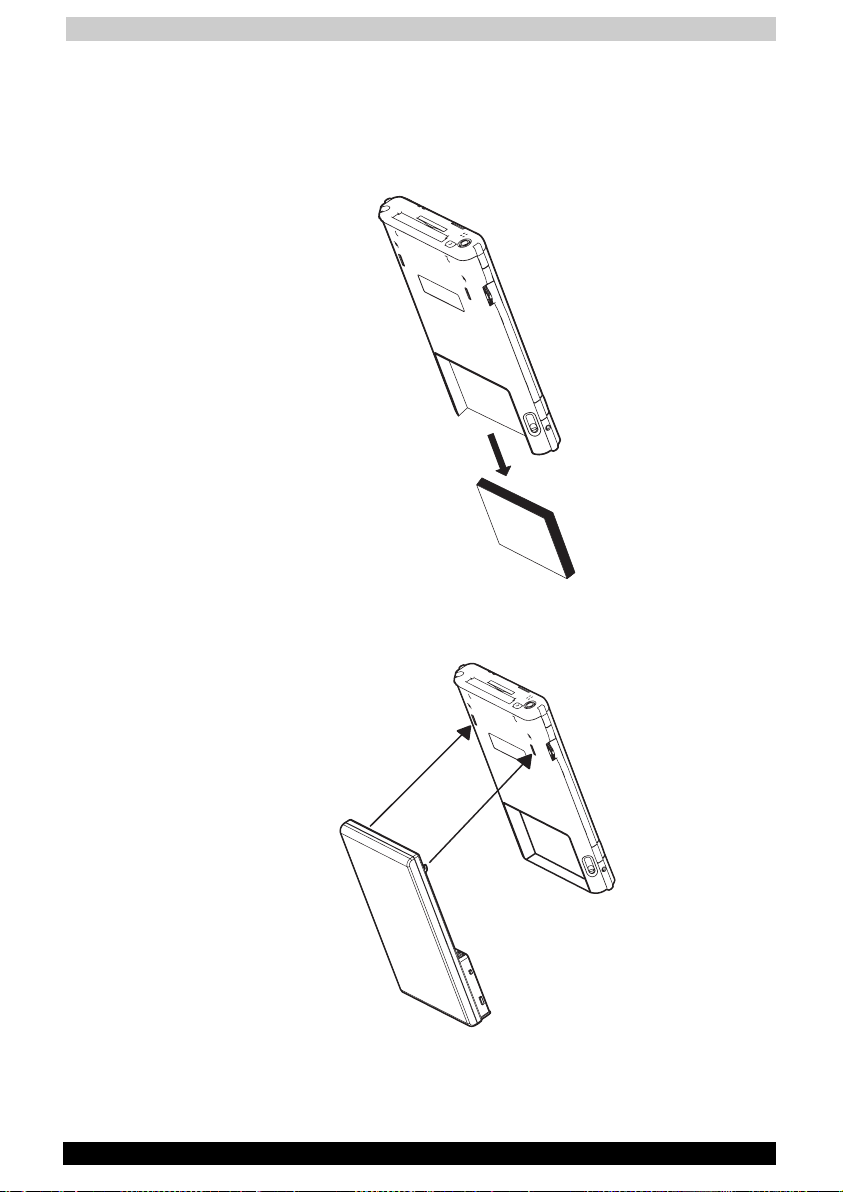
How to Use the High Capacity Battery Pack
1 Turn off the power.
2 Switch the Battery Pack Lock to release the battery pack.
3 Remove battery from the Pocket PC.
4 Connect the High Capacity Battery pack to the Pocket PC.
5 Switch the Battery Pack Lock to lock the High Capacity Battery pack.
User's Manual 2-8
Page 26

Basic Skills
How to Prolong Battery Life
■ Use the Toshiba Pocket PC e740 with the AC adapter.
When you use the Toshiba Pocket PC under the following conditions,
the power consumption will be higher than normal. Please use the AC
adapter when:
■ The Toshiba Pocket PC e740 is operated while connected to your
computer.
■ The Toshiba Pocket PC e740 is operated with a storage card or
with any other optional equipment.
■ Select the short power-off time in the setting menu. This will shorten
the time the unit will remain on if not used. For more information, see
“Customize Your Toshiba Pocket PC” in this chapter.
■ Turn off the front light.
■ Set the screen brightness to power save mode (Med Bright or low
Bright). Also shorten the light turn-off time. For more information, see
“Customize Your Toshiba Pocket PC” in this chapter.
■ Use the Toshiba Pocket PC with an ambient temperature between
15°C (59°F) and 25°C (77°F). This temperature range is the most
effective for the battery.
■ When you use the Toshiba Pocket PC e740 in high or low
temperature environments, the operable time is shortened due to
the decrease of the battery capacity.
■ Turn off the Wireless Communication Switch when you don’t use
Bluetooth or Wireless LAN (Bluetooth and Wireless LAN models
only).
Battery Life
The battery has a limited life. Repeated charging/discharging of the
battery gradually decreases operable time.
■ Do not leave the Toshiba Pocket PC in a place of high or low
temperature. It may shorten battery life.
If you have not used the Toshiba Pocket PC for several days, its battery
charge level reading may be inaccurate. Fully recharge the battery before
using.
User's Manual 2-9
Page 27
Basic Skills
Battery Charge Level and Stored Data Protection
If the battery charge level becomes extremely low, or is completely
discharged, the memory data stored in the Toshiba Pocket PC will be
lost.
When the low battery status icon or the alarm message appears,
immediately connect the AC adapter to your Toshiba Pocket PC and
charge the battery.
The battery gradually discharges even if the device is not being used.
When the Toshiba Pocket PC is left for a long time, the battery of the
Toshiba Pocket PC may completely discharge.
As a precaution, it is recommended that you save the Toshiba
Pocket PC’s memory data to your computer or to a storage card.
The manufacturer is not responsible for data change or data loss due to
battery discharge.
How to Use the optional Expansion Pack
You can use the optional Expansion Pack to connect the Pocket PC e740
to additional peripherals.
DC IN Socket
Cradle Connection Port
EXPANSION PACK (optional)
User's Manual 2-10
USB Port
Cradle Connection Port
Battery Switch
Wireless Communication
Switch (Wireless
LAN/Bluetooth models only)
Release Button
External Monitor
Port
Page 28

Basic Skills
Parts and Functions of the Expansion Pack
Cradle Connection Port: The Cradle Connection Port allows you to
connect the Expansion Pack to the Cradle.
External Monitor Port: The External Monitor Port is a standard 15-pin
RGB port for connecting an external display device such as a monitor or
projector. Supported resolutions are:
■ 640 x 480 256 colors @60Hz
■ 640 x 480 64K colors @60Hz
■ 800 x 600 256 colors @75Hz
Only IA-Presenter and IA Screen Mirror (see chapter 10) can output the
image to the external monitor. Other applications cannot output the image
to the external monitor.
USB Port: The USB Port allows you to connect a USB keyboard to the
Pocket PC.
Only use a Microsoft Pocket PC compatible keyboard.
Release Button: When being pressed, the Release Button
releases the Expansion Pack from the Pocket PC e740.
Connecting the Expansion Pack to the Pocket PC
1 Plug the Guide Pins into the corresponding jacks on the Pocket PC.
2 The locks will give a light click when the Expansion Pack is in place.
The locks are based on foolproof design to help you connect the
Expansion Pack to the Pocket PC with the right face-up, i.e. the face with
the Release Button.
Releasing the Expansion Pack from the Pocket PC
Press the Release Button on the Expansion Pack and gently remove the
Pack from the Pocket PC.
User's Manual 2-11
Page 29

Basic Skills
Initial Setup
When using the Toshiba Pocket PC e740 for the first time, carry out the
initial setup according to the procedures below after the battery has been
charged.
1 Move the battery switch to the “supply” position. The Toshiba
Pocket PC powers on automatically and the Welcome screen
appears. Tap the screen to start the following setup.
2 Execute touch screen alignment.
When the alignment screen appears, tap the center of the cross target
with the stylus. The next target position changes upon tapping the
target. Five taps completes the positioning alignment. The screen then
changes to the Stylus screen.
■ If a finger or any other object besides the stylus touches the
screen during alignment, the alignment will be cancelled and you
must repeat the procedure.
3 Read how to use the stylus.
■ Read and understand the stylus operation, and then tap NEXT.
For more information on stylus operation, see “How to Use the Stylus” in
this chapter.
4 Learn the pop-up menu operation.
■ Read the on-screen explanation and then follow the instructions.
Display the pop-up menu, and cut and paste the data according to
the screen instructions.
■ After you finish the paste operation, this stage is completed. Tap
NEXT.
5 Set the TIME ZONE.
■ When tapping the right W mark, the city and the time zone list
appears. Tap the desired city and time zone.
■ When the setup is completed, tap NEXT.
6 Complete the initial setup.
■ When the Complete screen appears, the initial setup is completed.
■ After tapping the screen, you can use the Toshiba Pocket PC.
When you tap the Complete screen, the Today screen appears. For more
information, see “Today screen” in this chapter.
User's Manual 2-12
Page 30
Basic Skills
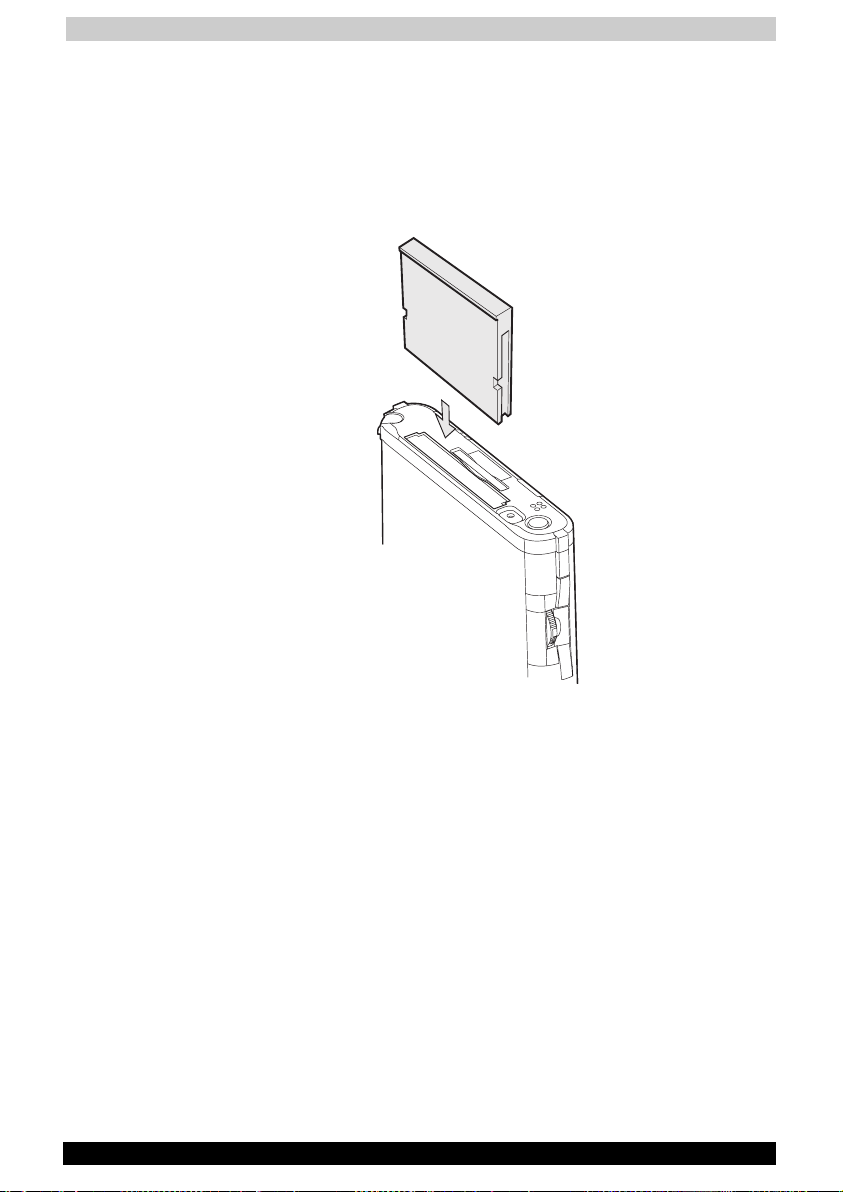
Inserting a CF II Card
1 Turn off the power.
2 Remove the dummy card.
3 Insert the CF II card confirming the direction of the card. Line up the
side grooves of the card and the groove edge of the card slot. Insert
the card smoothly and completely.
User's Manual 2-13
Page 31

Basic Skills
To remove a card:
1 Turn off the power.
2 Lightly press down the release button with the stylus. The button will
pop out. Press down on the release button again. The card will
withdraw slightly from the slot.
3 Pull the card straight up to remove.
Release Button
Use the stylus to release the CF II card.
User's Manual 2-14
Page 32

Basic Skills
Inserting an SD Card
1 Turn off the power.
2 Remove the dummy card.
3 Insert the card with its contact surface (metal contact surface) facing
the back of the Toshiba Pocket PC.
4 Press down until it clicks.
User's Manual 2-15
Page 33

Basic Skills
To remove a card:
1 Turn off the power.
2 Lightly press the card down until a clicking sound is heard. The card
will pop out slightly from the slot.
3 Pull the card straight up to remove it.
When storage cards are inserted in both the CF and SD card slots, one of
them may only be accessible depending on the application or the Settings
operation (typically, the first storage card inserted is accessed).
Typical examples:
- Notes of Pocket Outlook.
- Saving the destination selection of the Options item of the Tools menu of
Pocket Word.
User's Manual 2-16
Page 34

Basic Skills
Connecting to a Computer
Before connecting your Toshiba Pocket PC to a computer, check the
following:
■ ActiveSync has been installed on your computer. (See Chapter 3.)
■ The position of connecting port on the computer may differ according
to the computer type.
To Connect Using the Supplied Cradle:
1 Connect the USB cradle to your computer as shown in the illustration
below.
2 Insert the Pocket PC into the cradle.
User's Manual 2-17
Page 35

Basic Skills
To connect directly using a connection cable:
Connect the Pocket PC directly to your computer using an optional USB
Client cable.
When the Pocket PC is connected to another device via a USB Client
cable do not plug the AC adapter directly into the Pocket PC as this may
lead to interference. Instead, plug the AC adapter into the port on the
USB Client cable connector.
User's Manual 2-18
Page 36

Basic Skills
Today Screen
When you turn on your device for the first time each day (or after 4 hours
of inactivity), you’ll see the Today screen. You can also display it by
tapping and then Today. On the Today screen, you can see at a
glance important information for the day.
Tap to switch to a
program.
Tap to create a new item.
Tap to view notification messages.
Tap to change the volume level or mute all sounds.
Tap to change date and time.
Tap to open an item.
Your day at a glance.
Tap to view connection status.
User's Manual 2-19
Page 37

Basic Skills
Following are some of the status icons you may see.
Status Icon Meaning
/ /
/ /
Traffic Monitoring Utility (Wireless LAN model
only). Refer to chapter 8.
Bluetooth Power Management Utility (Bluetooth
model only). Refer to chapter 9.
Turns all sounds on and off
Backup battery is low
Main batteries are charging
Main batteries are low
Main batteries are very low
Main batteries are full
Connection is active
Synchronization is beginning or ending
Synchronization is occurring
Notification that one or more instant messages
were received
Notification that one or more e-mail messages
were received
If more notification icons need to be displayed than there is room to
display them, the Notification icon, , will display. Tap the icon to view all
notification icons.
User's Manual 2-20
Page 38

Basic Skills
Programs
You can switch from one program to another by selecting it from the
menu. (You can customize which programs you see on this menu. For
information, see “Adjusting Settings,” later in this chapter.) To access
some programs, you’ll need to tap
name.
You can also switch to some programs by pressing a program button.
Your device has one or more program buttons located on the front or side
of the device. The icons on the buttons identify the programs they switch
to.
Some programs have abbreviated labels for check boxes and drop-down
menus. To see the full spelling of an abbreviated label, tap and hold the
stylus on the label. Drag the stylus off the label so that the command is
not carried out.
The following table contains a partial list of programs that are on your
device. Look on the Toshiba Pocket PC Companion CD for additional
programs that you can install onto your device.
Icon Program Description
ActiveSync Synchronize information between your
Pocket PC and computer.
, Programs, and then the program
Calendar Keep track of your appointments and create
Contacts Keep track of your friends and colleagues.
Inbox Send and receive e-mail messages.
Pocket Internet Explorer Browse Web and WAP sites, and download new
Notes Create handwritten or typed notes, drawings,
Tasks Keep track of your tasks.
Pocket Excel Create Excel spreadsheet or view and edit Excel
MSN Messenger Send and receive instant messages with your
Pocket Word Create new documents or view and edit Word
User's Manual 2-21
meeting requests.
programs and files from the Internet.
and recordings.
spreadsheet created on your computer.
MSN Messenger contacts.
documents created on your computer.
Page 39

Basic Skills
Navigation Bar and Command Bar
The navigation bar is located at the top of the screen. It displays the
active program and current time, and allows you to switch to programs
and close screens.
Use the command bar at the bottom of the screen to perform tasks in
programs. The command bar includes menu names, buttons, and the
Input Panel button. To create a new item in the current program, tap
New. To see the name of a button, tap and hold the stylus on the button.
Drag the stylus off the button so that the command is not carried out.
Tap to change volume or mute the Pocket PC.
Tap to quickly select a program you have recently used.
Tap to select a program.
Tap to see additional programs.
Tap to customize the Pocket PC.
Input panel button. New button.
Menu names.
User's Manual 2-22
Buttons.
Page 40

Basic Skills
Pop-up Menus
With pop-up menus, you can quickly choose an action for an item. For
example, you can use the pop-up menu in the contact list to quickly
delete a contact, make a copy of a contact, or send an e-mail message to
a contact. The actions in the pop-up menus vary from program to
program. To access a pop-up menu, tap and hold the stylus on the item
name that you want to perform the action on. When the menu appears, lift
the stylus, and tap the action you want to perform. To close the menu
without performing an action, tap anywhere outside the menu.
Tap and hold to display the pop-up menu.
Lift the stylus and tap the action you want.
Tap outside the menu to close it without performing
an action.
Notifications
Your device reminds you in a variety of ways when you have something to
do. For example, if you’ve set up an appointment in Calendar, a task with
a due date in Tasks, or an alarm in Clock, you’ll be notified in any of the
following ways:
■ A message box appears on the screen
■ A sound, which you can specify, is played
■ A light flashes on your device
To choose reminder types and sounds for your device, tap
Settings. In the Personal tab, tap Sounds & Notifications. The options
you choose here apply throughout the device.
User's Manual 2-23
and then
Page 41

Basic Skills
Enter Information on Your Toshiba Pocket PC
You have several options for entering new information:
■ Use the input panel to enter typed text, either by using the soft
keyboard or other input method
■ Write directly on the screen
■ Draw pictures on the screen
■ Speak into your device microphone to record a message
■ Use Microsoft
your desktop computer to your device. For more information on
ActiveSync, see ActiveSync Help on your computer.
Entering Text Using the Input Panel
Use the input panel to enter information in any program on your device.
You can either type using the soft keyboard or write using Letter
Recognizer, Block Recognizer, or Transcriber. In either case, the
characters appear as typed text on the screen.
To show or hide the input panel, tap the Input Panel button. Tap the
arrow next to the Input Panel button to see your choices.
®
ActiveSync® to synchronize or copy information from
Select an input method.
Tap to see your choices.
Input panel button.
User's Manual 2-24
Page 42

Basic Skills
When you use the input panel, your device anticipates the word you are
typing or writing and displays it above the input panel. When you tap the
displayed word, it is inserted into your text at the insertion point. The
more you use your device, the more words it learns to anticipate.
Tap here if this is the right word.
To change word suggestion options, such as the number of words
suggested at one time, tap , Settings, Personal tab, Input, and then
the Word Completion tab.
To type with the soft keyboard:
1 Tap the arrow next to the Input Panel button and then Keyboard.
2 On the soft keyboard that is displayed, tap the keys with your stylus.
To use Letter Recognizer:
With Letter Recognizer you can write letters using the stylus just as you
would on paper.
1 Tap the arrow next to the Input Panel button and then Letter
Recognizer.
2 Write a letter in the box.
When you write a letter, it is converted to typed text that appears on the
screen. For specific instructions on using Letter Recognizer, with Letter
Recognizer open, tap the question mark next to the writing area.
User's Manual 2-25
Page 43

Basic Skills
To use Block Recognizer:
With Block Recognizer you can input character strokes using the stylus
that are similar to those used on other devices.
1 Tap the arrow next to the Input Panel button and then Block
Recognizer.
2 Write a letter in the box.
When you write a letter, it is converted to typed text that appears on the
screen. For specific instructions on using Block Recognizer, with Block
Recognizer open, tap the question mark next to the writing area.
To use Transcriber:
With Transcriber you can write anywhere on the screen using the stylus
just as you would on paper. Unlike Letter Recognizer and Block
Recognizer, you can write a sentence or more of information. Then, pause
and let Transcriber change the written characters to typed characters.
1 Tap the arrow next to the Input Panel button and then Transcriber.
2 Write anywhere on the screen.
For specific instructions on using Transcriber, with Transcriber open, tap
the question mark in the lower right hand corner of the screen.
To select typed text:
If you want to edit or format typed text, you must select it first.
■ Drag the stylus across the text you want to select.
You can cut, copy, and paste text by tapping and holding the selected
words and then tapping an editing command on the pop-up menu, or by
tapping the command on the Edit menu.
User's Manual 2-26
Page 44

Basic Skills
Writing on the Screen
In any program that accepts writing, such as the Notes program, and in
the Notes tab in Calendar, Contacts, and Tasks, you can use your stylus
to write directly on the screen. Write the way you do on paper. You can
edit and format what you’ve written and convert the information to text at
a later time.
To write on the screen:
■ Tap the Pen button to switch to writing mode. This action displays
lines on the screen to help you write.
Tap the Pen button and use your stylus like a pen.
Some programs that accept writing may not have the Pen button. See the
documentation for that program to find out how to switch to writing
mode.
To select writing:
If you want to edit or format writing, you must select it first.
1 Tap and hold the stylus next to the text you want to select until the
insertion point appears.
2 Without lifting, drag the stylus across the text you want to select.
If you accidentally write on the screen, tap Tools, then Undo and try
again. You can also select text by tapping the Pen button to deselect it
and then dragging the stylus across the screen.
You can cut, copy, and paste written text in the same way you work with
typed text: tap and hold the selected words and then tap an editing
command on the pop-up menu, or tap the command on the Edit menu.
User's Manual 2-27
Page 45

Basic Skills
To convert writing to text:
■ Tap Tools and then Recognize.
If you want to convert only certain words, select them before tapping
Recognize on the Tools menu (or tap and hold the selected words and
then tap Recognize on the pop-up menu). If a word is not recognized, it
is left as writing.
Select the text you want to convert
and Tap Recognize on the pop-up menu.
User's Manual 2-28
The writing is turned into text.
Page 46

Basic Skills
If the conversion is incorrect, you can select different words from a list of
alternates or return to the original writing. To do so, tap and hold the
incorrect word (tap one word at a time). On the pop-up menu, tap
Alternates. A menu with a list of alternate words appears. Tap the word
you want to use, or tap the writing at the top of the menu to return to the
original writing.
Tap to return to your original writing.
Or, tap the word you want to use.
Tips for getting good recognition:
■ Write neatly.
■ Write on the lines and draw descenders below the line. Write the cross
of the “t” and apostrophes below the top line so that they are not
confused with the word above. Write periods and commas above the
line.
■ For better recognition, try increasing the zoom level to 300% using the
Tools menu.
■ Write the letters of a word closely and leave big gaps between words
so that the device can easily tell where words begin and end.
■ Hyphenated words, foreign words that use special characters such as
accents, and some punctuation cannot be converted.
■ If you add writing to a word to change it (such as changing a “3” to an
“8”) after you attempt to recognize the word, the writing you add will
not be included if you attempt to recognize the writing again.
User's Manual 2-29
Page 47

Basic Skills
Drawing on the Screen
You can draw on the screen in the same way that you write on the
screen. The difference between writing and drawing on the screen is how
you select items and how they can be edited. For example, selected
drawings can be resized, while writing cannot.
To create a drawing
■ Cross three ruled lines on your first stroke. A drawing box appears.
Subsequent strokes in or touching the drawing box become part of
the drawing. Drawings that do not cross three ruled lines will be
treated as writing.
The drawing box indicates the boundaries of the
drawing.
Pen button.
You may want to change the zoom level so that you can more easily work
on or view your drawing. Tap Tools and then a zoom level.
To select a drawing
If you want to edit or format a drawing, you must select it first.
■ Tap and hold the stylus on the drawing until the selection handle
appears. To select multiple drawings, deselect the Pen button and
then drag to select the drawings you want.
You can cut, copy, and paste selected drawings by tapping and holding
the selected drawing and then tapping an editing command on the popup
menu, or by tapping the command on the Edit menu. To resize a drawing,
make sure the Pen button is not selected, and drag a selection handle.
User's Manual 2-30
Page 48

Basic Skills
Recording a Message
In any program where you can write or draw on the screen, you can also
quickly capture thoughts, reminders, and phone numbers by recording a
message. In Calendar, Tasks, and Contacts, you can include a recording
in the Notes tab. In the Notes program, you can either create a
standalone recording or include a recording in a written note. If you want
to include the recording in a note, open the note first. In the Inbox
program, you can add a recording to an e-mail message.
To create a recording:
1 Hold your device’s microphone near your mouth or other source of
sound.
2 Press and hold the Recording button on your Pocket PC until you hear
a beep.
3 While holding down the Recording button, make your recording.
4 To stop recording, release the Recording button. Two beeps will
sound.
The new recording appears in the note list or as an embedded icon.
You can also make a recording by tapping the Recording button on the
Recording toolbar.
To play a recording, tap it in the list or tap its icon in the note.
Indicates an embedded recording.
Tap to begin recording.
Tap to show or hide the Recording toolbar.
User's Manual 2-31
Page 49

Basic Skills
Using My Text
When using Inbox or MSN Messenger, use My Text to quickly insert
preset or frequently used messages into the text entry area. To insert a
message, tap My Text and tap a message.
You can add text after inserting a My Text message before sending it.
To edit a My Text message, in the Tools menu, tap Edit and then tap My
Text Messages. Select the message you wish to edit and make desired
changes.
Tap to select a prewritten message.
User's Manual 2-32
Page 50

Basic Skills
Find and Organize Information
The Find feature on your device helps you quickly locate information.
■ On the
data type, and then tap Go to start the search.
To quickly find information that is taking up storage space on your
Pocket PC, select Larger than 64 KB in Type.
menu, tap Find. Enter the text you want to find, select a
You can also use the File Explorer to find files on your device and to
organize these files into folders. On the
menu, tap Programs, and
then File Explorer.
Tap to change folders.
Select the sort order for the list.
Tap the folder name to open it.
Tap and hold to create a new folder.
You can move files in File Explorer by tapping and holding the item you
want to move, and then tapping Cut or Copy and Paste on the pop-up
menu.
User's Manual 2-33
Page 51

Basic Skills
Customize Your Toshiba Pocket PC
You can customize your device by adjusting device settings and installing
additional software.
Adjusting Settings
You can adjust device settings to suit the way you work. To see available
options, tap
bottom of the screen.
You might want to adjust the following:
■ Clock, to change the time or to set alarms
■ Menus, to customize what appears on the
pop-up menu from the New button
■ Owner Information, to enter your contact information
■ Password, to limit access to your device
■ Power, to maximize battery life
■ Today, to customize the look and the information that is displayed on
the Today screen
Adding or Removing Programs
Programs added to your device at the factory are stored in ROM (readonly memory). You cannot remove this software, and you’ll never
accidentally lose ROM contents. ROM programs can be updated using
special installation programs with a *.xip extension. All other programs
and data files added to your device after factory installation are stored in
RAM (random access memory).
You can install any program created for your device, as long as your
device has enough memory. The most popular place to find software for
your device is on the Pocket PC Web site
(http://www.microsoft.com/mobile/pocketpc).
, Settings, then the Personal or System tab located at the
menu, and to enable a
To add programs using ActiveSync
You’ll need to install the appropriate software for your device on your
desktop computer before installing it on your device.
1 Determine your device and processor type so that you know which
version of the software to install. Tap
System tab, tap About. In the Version tab, make a note of the
information in Processor.
2 Download the program to your computer (or insert the CD or disk that
contains the program into your computer). You may see a single *.xip,
*.exe,, or *.zip file, a Setup.exe file, or several versions of files for
different device types and processors. Be sure to select the program
designed for the Toshiba Pocket PC and your device processor type.
3 Read any installation instructions, Read Me files, or documentation
that comes with the program.
Many programs provide special installation instructions.
User's Manual 2-34
and then Settings. On the
Page 52

Basic Skills
4 Connect your Pocket PC and computer.
5 Double-click the *.exe file.
■ If the file is an installer, the installation wizard will begin. Follow the
directions on the screen. Once the software has been installed on
your computer, the installer will automatically transfer the software
to your device.
■ If the file is not an installer, you will see an error message stating
that the program is valid but it is designed for a different type of
computer. You will need to move this file to your device. If you
cannot find any installation instructions for the program in the
Read Me file or documentation, use ActiveSync Explore to copy
the program file to the Program Files folder on your Pocket PC.
For more information on copying files using ActiveSync, see
ActiveSync Help.
Once installation is complete, tap
icon to switch to it.
, Programs, and then the program
To add a program to the Start menu
Tap , Settings, Menus , the Start Menu tab, and then mark the check
box for the program. If you do not see the program listed, you can either
use File Explorer on the device to move the program to the Start Menu
folder, or use ActiveSync on the computer to create a shortcut to the
program and place the shortcut in the Start Menu folder.
■ Using File Explorer on the device:Tap
and locate the program (tap the folder list, labeled My Documents by
default, and then My Device to see a list of all folders on the device).
Tap and hold the program and tap Cut on the pop-up menu. Open the
Start Menu folder located in the Windows folder, tap and hold a blank
area of the window, and tap Paste on the pop-up menu. The program
will now appear on the menu. For more information on using File
Explorer, see “Find and Organize Information,” earlier in this chapter.
■ Using ActiveSync on the computer:Use the Explorer in ActiveSync
to explore your device files and locate the program. Rightclick the
program, and then click Create Shortcut. Move the shortcut to the
Start Menu folder in the Windows folder. The shortcut now appears on
the
menu. For more information, see ActiveSync Help.
, Programs, File Explorer,
To remove programs
■ Tap and then Settings. On the System tab, tap Remove
Programs
If the program does not appear in the list of installed programs, use File
Explorer on your device to locate the program, tap and hold the program,
and then tap Delete on the pop-up menu.
User's Manual 2-35
Page 53

Basic Skills
Setting a Password
You can protect data or settings from a third person by setting a
password which is requested when turning power on.
1 Tap and then Settings. On the Personal tab, tap Password.
2 Select the type of password you would like to use.
3 Enter a password and tap OK.
4 Tap YES on the confirmation screen. The password is saved and the
screen returns to the Personal tab screen
If you tab YES on the confirmation screen to return to the Personal tab
screen, it becomes necessary to enter the password even for displaying
the Password setting screen.
In case you forget the password, it is necessary to initialize the Pocket PC.
Please note that when initialization is executed, data or settings stored in
the Pocket PC are all deleted.
To Set Front Light
You can set the screen brightness for better sight according to a place of
use. You can also set the time that elapses until the front light turns off
automatically after the last operation.
1 Tap
2 Set the Front light on battery power…
and then Settings. On the System tab, tap Front light.
Check to make the front light turn off
automatically when the Pocket PC hasn’t been
used for a user-set amount of time.
Set the time that elapses until the front light turns
off automatically.
Check to make the front light turn off
automatically when the AC adaptor (external
power) is in use.
User's Manual 2-36
Page 54

Basic Skills
…or set the front light on External power
3 Set the Brightness level.
Tap and set the front light brightness level by
move the cursor up or down. If Power Save is
activated, the front light turns off.
4 When finished, tap OK to return to the System tab screen.
User's Manual 2-37
Page 55

Basic Skills
Setting Power
You can set to confirm the battery remaining power and the time that
elapses until the power turns off after the last operation.
1 Tap and then Settings. On the System tab, tap Power.
2 Perform your Power settings according to your needs.
3 When finished, tap OK to return to the System tab screen.
Setting Memory
You can adjust the data storing memory and the program running
memory. You can also confirm the free space of a storage card and so
on. Memory for the Pocket PC is managed automatically.
To change Memory allocation:
1 Tap and then Settings. On the System tab, tap Memory to display
the Memory setting screen.
2 Drag the knob widthwise to adjust the memory allocation between
Storage and Program.
3 When finished, tap OK to return to the System tab screen.
To confirm usage status of a storage card:
1 Tap Storage Card tab on the Memory setting screen.
2 When finished, tap OK to return to the System tab screen.
User's Manual 2-38
Page 56

Basic Skills
Setting Microphone
Tap and then Settings. On the System tab, tap Microphone.
■ This program is setting AGC Enable or Disable.
■ Enable AGC: Turn on automatic gain control for Microphone.
■ Disable AGC: Adopt a fix gain’s for Microphone.
User's Manual 2-39
Page 57

Microsoft ActiveSync
TOSHIBA Pocket PC e740
Chapter 3
Microsoft ActiveSync
Using Microsoft® ActiveSync®,you can synchronize the information on
your computer with the information on your device. Synchronization
compares the data on your device with your PC and updates both
computers with the most recent information. For example:
■ Keep Pocket Outlook data up-to-date by synchronizing your device
with Microsoft Outlook data on your PC.
■ Synchronize Microsoft Word and Microsoft Excel files between your
device and computer.
Your files are automatically converted to the correct format.
By default, ActiveSync does not automatically synchronize all types of
information. Use ActiveSync options to turn synchronization on and off for
specific information types.
With ActiveSync, you can also:
■ Back up and restore your device data.
■ Copy (rather than synchronize) files between your device and
computer.
■ Control when synchronization occurs by selecting a synchronization
mode. For example, you can synchronize continually while connected
to your computer or only when you choose the synchronize
command.
■ Select which information types are synchronized and control how
much data is synchronized. For example, you can choose how many
weeks of past appointments you want synchronized.
Before you begin synchronization, install ActiveSync on your PC from the
Toshiba Pocket PC Companion CD. For more information on installing
ActiveSync, see your Quick Start card. ActiveSync is already installed on
your device.
After installation is complete, the ActiveSync Setup Wizard helps you
connect your Pocket PC to your PC, set up a partnership so you can
synchronize information between your Pocket PC and your PC, and
customize your synchronization settings. Your first synchronization
process will automatically begin when you finish using the wizard.
User's Manual 3-1
Page 58

Microsoft ActiveSync
After your first synchronization, take a look at Calendar, Contacts, and
Tasks on your device. You’ll notice that information you’ve stored in
Microsoft Outlook on your PC has been copied to your device, and you
didn’t have to type a word. Disconnect your device from your PC and
you’re ready to go!
Once you have set up ActiveSync and completed the first synchronization
process, you can initiate synchronization from your device. To switch to
ActiveSync on your device, tap
, and then tap ActiveSync.
For information about using ActiveSync on your PC, start ActiveSync on
your PC and then see ActiveSync Help.
For more information about ActiveSync on your device, switch to
ActiveSync, tap
, and then tap Help.
View connection status.
Tap to connect and synchronize.
Tap to stop synchronization.
View synchronization status.
Tap to synchrinize via IR or change
synchronization settings.
User's Manual 3-2
Page 59

Microsoft Pocket Outlook
TOSHIBA Pocket PC e740
Chapter 4
Microsoft Pocket Outlook
Microsoft® Pocket Outlook includes Calendar, Contacts, Tasks, Inbox,
and Notes. You can use these programs individually or together. For
example, e-mail addresses stored in Contacts can be used to address email messages in Inbox.
Using ActiveSync® you can synchronize information in Microsoft Outlook
or Microsoft Exchange on your computer with your device. You can also
synchronize this information directly with a Microsoft Exchange server.
Each time you synchronize, ActiveSync compares the changes you made
on your device and computer or server and updates both computers with
the latest information. For information on using ActiveSync, see
ActiveSync Help on the computer.
You can switch to any of these programs by tapping them on the
menu.
User's Manual 4-1
Page 60

Microsoft Pocket Outlook
Calendar: Scheduling Appointments and Meetings
Use Calendar to schedule appointments, including meetings and other
events. You can check your appointments in one of several views
(Agenda, Day, Week, Month, and Year) and easily switch views by using
the View menu.
Tap to go to today.
Tap to display or edit the appointment details.
Tap to create a new appointment.
You can customize the Calendar display, such as changing the first day of
the week, by tapping Options on the Tools menu.
User's Manual 4-2
Page 61

Microsoft Pocket Outlook
To create an appointment
1 If you are in Day or Week view, tap the desired date and time for the
appointment.
2 Tap New.
Tap to return to the calendar (the appointment is
saved automatically).
Tap to choose from predefined text.
Tap to choose from previously entered locations.
Tap to select a time.
Tap to select a date.
Notes is a good place for maps and directions.
3 Using the input panel, enter a description and a location. Tap first to
select the field.
4 If needed, tap the date and time to change them.
5 Enter other desired information. You will need to hide the input panel
to see all available fields.
6 To add notes, tap the Notes tab. You can enter text, draw, or create a
recording. For more information on creating notes, see “Notes:
Capturing Thoughts and Ideas,” later in this chapter.
7 When finished, tap OK to return to the calendar.
If you select Remind me in an appointment, your device will remind you
according to the options set in , Settings, Personal tab, Sounds &
Notifications.
User's Manual 4-3
Page 62

Microsoft Pocket Outlook
Using the Summary Screen
When you tap an appointment in Calendar, a summary screen is
displayed. To change the appointment, tap Edit.
View appointment details.
View.
Tap to change appointment.
Creating Meeting Requests
You can use Calendar to set up meetings with users of Outlook or Pocket
Outlook. The meeting request will be created automatically and sent
either when you synchronize Inbox or when you connect to your e-mail
server. Indicate how you want meeting requests sent by tapping Tools
and then Options. If you send and receive e-mail messages through
ActiveSync, select ActiveSync.
To schedule a meeting:
1 Create an appointment by tapping New.
2 In the appointment details, hide the input panel, and then tap
Attendees.
3 From the list of e-mail addresses you’ve entered in Contacts, select
the meeting attendees.
The meeting notice is created automatically and placed in the Outbox
folder.
For more information on sending and receiving meeting requests, see
Calendar Help and Inbox Help on the device.
User's Manual 4-4
Page 63

Microsoft Pocket Outlook
Contacts: Tracking Friends and Colleagues
Contacts maintains a list of your friends and colleagues so that you can
easily find the information you’re looking for, whether you’re at home or
on the road. Using the device infrared (IR) port, you can quickly share
Contacts information with other device users.
Select the category of contacts you want
displayed in the list.
Tap and enter part of a name to quickly find it in
the list.
Tap to see additional phone numbers and e-mail
addresses.
Tap to display or edit the contact details.
Tap and hold to display a pop-up menu of
actions.
Tap to create a new contact.
To change the way information is displayed in the list, tap Tools and then
Options.
User's Manual 4-5
Page 64

Microsoft Pocket Outlook
To create a contact:
1 Tap New.
Tap to return to the contact list (the contact is
saved automatically).
Scroll to see more fields.
Notes is a good place for maps and directions.
2 Using the input panel, enter a name and other contact information.
You will need to scroll down to see all available fields.
3 To assign the contact to a category, scroll to and tap Categories and
select a category from the list. In the contact list, you can display
contacts by category.
4 To add notes, tap the Notes tab. You can enter text, draw, or create a
recording. For more information on creating notes, see “Notes:
Capturing Thoughts and Ideas,” later in this chapter.
5 When finished, tap OK to return to the contact list.
Finding a contact
There are four ways to find a contact:
■ In the contact list, enter a contact name in the box under the
navigation bar. To show all contacts again, clear text from the box or
tap the button to the right of the box.
■ In the contact list, tap the category list (labeled All Contacts by
default) and select the type of contact that you want displayed. To
show all contacts again, select All Contacts. To view a contact not
assigned to a category, select No Categories.
■ To view the names of companies your contacts work for, in the
contact list, tap View > By Company. The number of contacts that
work for that company will be displayed to the right of the company
name.
■ Tap
User's Manual 4-6
, Find, enter the contact name, select Contacts for the type,
and then tap Go.
Page 65

Microsoft Pocket Outlook
Using the Summary Screen
When you tap a contact in the contact list, a summary screen is
displayed. To change the contact information, tap Edit.
View contact details.
Tap to change contact information.
Tap to view notes.
User's Manual 4-7
Page 66

Microsoft Pocket Outlook
Tasks: Keeping a To Do List
Use Tasks to keep track of what you have to do.
Select the category of tasks you want displayed in
the list.
Select the sort order of the list.
Indicates high priority.
Tap to display or edit the task details.
Tap and hold to display a pop-up menu of
actions.
Tap to create a new task.
To change the way information is displayed in the list, tap Tools and then
Options.
User's Manual 4-8
Page 67

Microsoft Pocket Outlook
To create a task:
1 Tap New.
Tap to return to the task list (the task is saved
automatically).
Tap to choose from predefined subjects.
Notes is a good place for maps and drawings.
2 Using the input panel, enter a description.
3 You can enter a start date and due date or enter other information by
first tapping the field. If the input panel is open, you will need to hide it
to see all available fields.
4 To assign the task to a category, tap Categories and select a
category from the list. In the task list, you can display tasks by
category.
5 To add notes, tap the Notes tab. You can enter text, draw, or create a
recording. For more information on creating notes, see “Notes:
Capturing Thoughts and Ideas,” later in this chapter.
6 When finished, tap OK to return to the task list.
To quickly create a task with only a subject, tap Entry Bar on the Tools
menu. Then, tap Tap here to add a new task and enter your task
information.
User's Manual 4-9
Page 68

Microsoft Pocket Outlook
Using the Summary Screen
When you tap a task in the task list, a summary screen is displayed. To
change the task, tap Edit.
View task details.
Tap to show and hide additional summary
information.
View notes.
Tap to change task.
User's Manual 4-10
Page 69

Microsoft Pocket Outlook
Notes: Capturing Thoughts and Ideas
Quickly capture thoughts, reminders, ideas, drawings, and phone
numbers with Notes. You can create a written note or a recording. You
can also include a recording in a note. If a note is open when you create
the recording, it will be included in the note as an icon. If the note list is
displayed, it will be created as a stand-alone recording.
Tap to change the sort order of the list.
Tap to open a note or play a recording.
Tap and hold to display a pop-up menu of
actions.
Tap to record.
Tap to show or hide the Recording toolbar.
Tap to create a new item.
User's Manual 4-11
Page 70

Microsoft Pocket Outlook
To create a note:
1 Tap New.
2 Create your note by writing, drawing, typing, and recording. For more
information about using the input panel, writing and drawing on the
screen, and creating recordings, see Chapter 2.
Tap to return to the note list (the note is saved
automatically).
Tap to write on the screen.
Tap to show or hide the input panel.
Tap to add a recording to the note.
User's Manual 4-12
Page 71

Microsoft Pocket Outlook
Inbox: Sending and Receiving E-mail Messages
Use Inbox to send and receive e-mail messages in either of these ways:
■ Synchronize e-mail messages with Microsoft Exchange or Microsoft
Outlook on your computer.
■ Send and receive e-mail messages by connecting directly to an e-mail
server through an Internet Service Provider (ISP) or a network.
Synchronizing E-mail Messages
E-mail messages can be synchronized as part of the general
synchronization process. You will need to enable Inbox synchronization in
ActiveSync. For information on enabling Inbox synchronization, see
ActiveSync Help on the PC.
During synchronization:
■ Messages are copied from the mail folders of Exchange or Outlook on
your computer to the ActiveSync folder in Inbox on your device. By
default, you will receive messages from the past three days only, the
first 100 lines of each message, and file attachments of less than
100 KB in size.
■ E-mail messages in the Outbox folder on your device are transferred
to Exchange or Outlook, and then sent from those programs.
■ E-mail messages in subfolders must be selected in ActiveSync on
your computer in order to be transferred.
Using the Message List
Messages you receive are displayed in the message list. By default, the
most recently received messages are displayed first in the list.
Select the service and folder you want to display.
Select the sort order for messages.
Tap and hold to display a pop-up menu of
actions.
Tap to connect to the selected service.
Tap to connect and to send and receive e-mail.
User's Manual 4-13
Page 72

Microsoft Pocket Outlook
When you receive a message, tap it to open it. Unread messages are
displayed in bold.
Tap to return to the message list.
Tap to delete this message.
Tap to reply or to forward this message.
Tap to view the previous or next message.
When you connect to your e-mail server or synchronize with your
computer, by default, you’ll receive messages from the last five days only,
the first 100 lines of each new message, and file attachments of less than
100 KB in size. The original messages remain on the e-mail server or your
computer.
You can mark the messages that you want to retrieve in full during your
next synchronization or e-mail server connection. In the message list, tap
and hold the message you want to retrieve. On the pop-up menu, tap
Mark for Download. The icons in the Inbox message list give you visual
indications of message status.
You specify your downloading preferences when you set up the service or
select your synchronization options. You can change them at any time:
■ Change options for Inbox synchronization using ActiveSync options.
For more information, see ActiveSync Help.
■ Change options for direct e-mail server connections in Inbox on your
device. Tap Tools and then tap Options. On the Service tab, tap the
service you want to change. Tap and hold the service and select
Delete to remove a service.
User's Manual 4-14
Page 73

Microsoft Pocket Outlook
Composing Messages
To compose a message:
1 Tap New.
2 In the To field, enter an e-mail or SMS address of one or more
recipients, separating them with a semicolon, or select a name from
the contact list by tapping the Address Book button. All e-mail
addresses entered in the e-mail fields in Contacts appear in the
Address Book.
Tap to show or hide the complete header.
Tap to send the message.
Tap to insert common message.
Tap to display the address book.
Tap to show/hide the recording toolbar.
3 Compose your message. To enter preset or frequently used
messages, tap My Text and select a message.
4 Tap Send when you’ve finished the message. If you are working
offline, the message is moved to the Outbox folder and will be sent
the next time you connect.
If you are sending an SMS message and want to know if it was received,
tap Edit, Options, and select Request SMS text message delivery
notification before sending the message.
User's Manual 4-15
Page 74

Microsoft Pocket Outlook
Managing E-mail Messages and Folders
By default, messages are displayed in one of five folders for each service
you have created: Inbox, Deleted Items, Drafts, Outbox, and Sent Items.
The Deleted Items folder contains messages that have been deleted on
the device. The behavior of the Deleted and Sent Items folders depends
on the options you have chosen. In the message list, tap Tools and then
Options. On the Message tab, select your options.
If you want to organize messages into additional folders, tap Tools, and
then Manage Folders to create new folders. To move a message to
another folder, in the message list, tap and hold the message and then
tap Move to on the pop-up menu.
Folder behavior with a direct connection to an e-mail
server
The behavior of the folders you create depends on whether you are using
ActiveSync, SMS, POP3, or IMAP4.
■ If you use ActiveSync, e-mail messages in the Inbox folder in Outlook
will automatically be synchronized with your device. You can select to
synchronize additional folders by designating them for ActiveSync.
The folders you create and the messages you move will then be
mirrored on the server. For example, if you move two messages from
the Inbox folder to a folder named Family, and you have designated
Family for synchronization, the server creates a copy of the Family
folder and copies the messages into that folder. You can then read the
messages while away from your computer.
■ If you use SMS, messages are stored in the Inbox folder.
■ If you use POP3 and you move e-mail messages to a folder you
created, the link is broken between the messages on the device and
their copies on the mail server. The next time you connect, the mail
server will see that the messages are missing from the device Inbox
and delete them from the server. This prevents you from having
duplicate copies of a message, but it also means that you will no
longer have access to messages that you move to folders created
from anywhere except the device.
■ If you use IMAP4, the folders you create and the e-mail messages you
move are mirrored on the server. Therefore, messages are available to
you anytime you connect to your mail server, whether it is from your
device or computer. This synchronization of folders occurs whenever
you connect to your mail server, create new folders, or rename/ delete
folders when connected.
User's Manual 4-16
Page 75

Companion Programs
TOSHIBA Pocket PC e740
Chapter 5
Companion Programs
The companion programs consist of Microsoft® Pocket Word, Microsoft®
Pocket Excel, Microsoft
Pocket PC, and Microsoft
To switch to a companion program on your device, tap Programs on the
menu, and then tap the program name.
Pocket Word
Pocket Word works with Microsoft Word on your computer to give you
easy access to copies of your documents. You can create new
documents on your device, or you can copy documents from your
computer to your device. Synchronize documents between your
computer and your device so that you have the most up-to-date content
in both locations.
Use Pocket Word to create documents, such as letters, meeting minutes,
and trip reports. To create a new file, tap
and then New. A blank document appears. Or, if you’ve selected a
template for new documents in the Options dialog box, that template
appears with appropriate text and formatting already provided. You can
open only one document at a time; when you open a second document,
you’ll be asked to save the first. You can save a document you create or
edit in a variety of formats, including Word (.doc), Pocket Word (.psw),
Rich Text Format (.rtf), and Plain Text (.txt).
®
Money, Windows Media™ Player for Toshiba
®
Reader.
, Programs, Pocket Word,
User's Manual 5-1
Page 76

Companion Programs
Pocket Word contains a list of the files stored on your device. Tap a file in
the list to open it. To delete, make copies of, and send files, tap and hold
a file in the list. Then, select the appropriate action on the popup menu.
Tap to change the sort order of the list.
Select the type of folder you want displayed in the
list.
Tap to open a document.
Tap and hold an item to display a pop-up menu of
actions.
Tap to create a new document.
You can enter information in Pocket Word in one of four modes (typing,
writing, drawing, and recording), which are displayed on the View menu.
Each mode has its own toolbar, which you can show and hide by tapping
the Show/Hide Toolbar button on the command bar.
You can change the zoom magnification by tapping View and then Zoom.
Then select the percentage you want. Select a higher percentage to enter
text and a lower one to see more of your document.
If you’re opening a Word document created on a computer, select Wrap
to Window on the View menu so that you can see the entire document.
User's Manual 5-2
Page 77

Companion Programs
Typing Mode
Using the input panel, enter typed text into the document. For more
information on entering typed text, see Chapter 2.
To format existing text and to edit text, first select the text. You can select
text as you do in a Word document, using your stylus instead of the
mouse to drag through the text you want to select. You can search a
document to find text by tapping Edit and then Find/Replace.
Tap to return to the document (changes are saved
automatically).
Tap and hold to see a pop-up menu of actions.
Tap to change formatting options.
Tap to format text.
Tap to show or hide the toolbar.
User's Manual 5-3
Page 78

Companion Programs
Writing Mode
In writing mode, use your stylus to write directly on the screen. Ruled
lines are displayed as a guide, and the zoom magnification is greater than
in typing mode to allow you to write more easily. For more information on
writing and selecting writing, see Chapter 2.
With Space button selected, drag to insert space.
An arrow appears showing the space direction
and size.
Space button.
Tap to highlight selected text.
Pen button.
If you cross three ruled lines in a single stylus stroke, the writing becomes
a drawing, and can be edited and manipulated as described in the
following section.Written words are converted to graphics (metafiles)
when a Pocket Word document is converted to a Word document on your
computer.
User's Manual 5-4
Page 79

Companion Programs
Drawing Mode
In drawing mode, use your stylus to draw on the screen. Gridlines appear
as a guide. When you lift your stylus off the screen after the first stroke,
you’ll see a drawing box indicating the boundaries of the drawing. Every
subsequent stroke within or touching the drawing box becomes part of
the drawing. For more information on drawing and selecting drawings,
see Chapter 2.
Resize an object by dragging the selection
handles.
Tap an arrow to see your choices.
Tap to select formatting options, such as line
weight, fill colour, and line colour.
Pen button.
Recording Mode
In recording mode, embed a recording into your document. Recordings
are saved as .wav files. For more information on recording, see Chapter 2.
For more information on using Pocket Word, tap and then Help.
User's Manual 5-5
Page 80

Companion Programs
Pocket Excel
Pocket Excel works with Microsoft Excel on your computer to give you
easy access to copies of your workbooks. You can create new
workbooks on your device, or you can copy workbooks from your
computer to your device. Synchronize workbooks between your
computer and your device so that you have the most up-to-date content
in both locations.
Use Pocket Excel to create workbooks, such as expense reports and
mileage logs. To create a new file, tap , Programs, Pocket Excel, and
then New. A blank workbook appears. Or, if you’ve selected a template
for new workbooks in the Options dialog box, that template appears with
appropriate text and formatting already provided. You can open only one
workbook at a time; when you open a second workbook, you’ll be asked
to save the first. You can save a workbook you create or edit in a variety
of formats, including Pocket Excel (.pxl) and Excel (.xls).
Pocket Excel contains a list of the files stored on your device. Tap a file in
the list to open it. To delete, make copies of, and send files, tap and hold
a file in the list. Then select the appropriate action from the pop-up menu.
Pocket Excel provides fundamental spreadsheet tools, such as formulas,
functions, sorting, and filtering. To display the toolbar, tap View and then
Toolbar.
Cell contents appear here as you enter them.
Format button.
Zoom button.
AutoSum button.
If your workbook contains sensitive information, you can protect it with a
password. To do so, open the workbook, tap Edit, and then Password.
Every time you open the workbook, you will need to enter the password,
so choose one that is easy for you to remember but hard for others to
guess.
User's Manual 5-6
Page 81

Companion Programs
Tips for Working in Pocket Excel
Note the following when working in large worksheets in Pocket Excel:
■ View in full-screen mode to see as much of your worksheet as
possible. Tap View and then Full Screen. To exit full-screen mode,
tap Restore.
■ Show and hide window elements. Tap View and then tap the
elements you want to show or hide.
■ Freeze panes on a worksheet. First select the cell where you want to
freeze panes. Tap View and then Freeze Panes. You might want to
freeze the top and leftmost panes in a worksheet to keep row and
column labels visible as you scroll through a sheet.
■ Split panes to view different areas of a large worksheet. Tap View and
then Split. Then drag the split bar to where you want it. To remove the
split, tap View and then Remove Split.
■ Show and hide rows and columns. To hide a hidden row or column,
select a cell in the row or column you want to hide. Then tap Format,
then Row or Column, and then Hide. To show a hidden row or
column, tap Tools, then Go To, and then type a reference that is in
the hidden row or column. Then tap Format, then Row or Column,
and then Unhide.
For more information on using Pocket Excel, tap
and then Help.
MSN Messenger
MSN® Messenger on your mobile device is an instant messaging program
that lets you:
■ See who is online.
■ Send and receive instant messages.
■ Have instant message conversations with groups of contacts.
To use MSN Messenger, you must have a Microsoft Passport™ account
or a Microsoft Exchange e-mail account. You must have a Passport to
use MSN Messenger Service. If you have a Hotmail
you already have a Passport. Once you have obtained either a Microsoft
Passport or a Microsoft Exchange account, you are ready to set up your
account.
Sign up for a Microsoft Passport account at http://www.passport.com.
Get a free Microsoft Hotmail e-mail address at http://www.hotmail.com.
To switch to MSN Messenger, tap , Programs, and then tap MSN
Messenger.
User's Manual 5-7
®
or MSN account,
Page 82

Companion Programs
Setting Up
Before you can connect, you must enter Passport or Exchange account
information.
To set up an account and sign in:
1 In the Tools menu, tap Options .
2 In the Accounts tab, enter your Passport or Exchange account
information.
3 To sign in, tap the sign-in screen and enter your e-mail address and
password.
If you already use MSN Messenger on your computer, your contacts will
show up on your device without being added again.
Working with Contacts
The MSN Messenger window shows all of your messenger contacts at a
glance, divided into Online and Not Online categories. From this view,
while connected, you can chat, send an e-mail, block the contact from
chatting with you, or delete contacts from your list using the pop-up
menu.
Tap a contact to start a chat.
Tap and hold to see a pop-up menu of actions.
To see others online without being seen, in the Tools menu, tap My
Status and select Appear Offline.
If you block a contact, you will appear offline but will remain on the
blocked contact’s list. To unblock a contact, tap and hold the contact,
then tap Unblock on the pop-up menu.
User's Manual 5-8
Page 83

Companion Programs
Chatting with Contacts
Tap a contact name to open a chat window. Enter your message in the
text entry area at the bottom of the screen, or tap My Text to enter a
preset message, and tap Send. To invite another contact to a multi-user
chat, in the Tools menu, tap Invite and tap the contact you want to invite.
Enter message here.
Tap to send message.
Contacts button. To revert back to your chat window, tap Chats and
select the person whom you were chatting with.
User's Manual 5-9
To switch back to the main window without closing a chat, tap the
Page 84

Companion Programs
To know if the contact you are chatting with is responding, look for the
message under the text entry area.
View full chat.
View status of the chat.
For more information on using MSN Messenger, tap
and then Help.
User's Manual 5-10
Page 85

Companion Programs
Windows Media Player
Use Microsoft Windows Media Player to play digital audio and video files
that are stored on your device or on a network. To switch to Windows
Media Player for Toshiba Pocket PC, tap , Programs, and then tap
Windows Media.
Indicates the progress of the current track.
Tap to adjust volume.
Tap to skip to the next track.
Tap to play a previous track.
Tap to stop.
Tap to play or pause.
Use Microsoft Windows Media Player on your computer to copy digital
audio and video files to your Toshiba Pocket PC. You can play Windows
Media and MP3 files on your Toshiba Pocket PC.
For more information about using Windows Media Player for Toshiba
Pocket PC, tap
User's Manual 5-11
, and then tap Help.
Page 86

Companion Programs
Microsoft Reader
Use Microsoft Reader to read eBooks on your device. Download books to
your computer from your favorite eBook Web site. Then, use ActiveSync
to copy the book files to your activated device. The books appear in the
Microsoft Reader Library, where you can tap them in the list to open
them.
Each book consists of a cover page, an optional table of contents, and
the pages of the book. You can:
■ Page through the book by using the Up/Down control on your device
or by tapping the page number on each page.
■ Annotate the book with highlighting, bookmarks, notes, and drawings.
■ Search for text and look up definitions for words.
The Guidebook contains all the information you'll need to use the
software.
To open the Guidebook, tap Help on the Microsoft Reader command bar.
Or, on a book page, tap and hold on the book title, and then tap Help on
the pop-up menu.
To switch to Microsoft Reader, tap
Reader.
Getting Books on Your Device
You can download book files from the Web. Just visit your favorite eBook
retailer and follow the instructions to download the book files.
Sample books and a dictionary are also included in the MSReader folder
in the Extras folder on the Toshiba Pocket PC Companion CD.
Use ActiveSync to download the files from your computer to your
activated device as described in the Read Me file in the MSReader folder.
, Programs, and then Microsoft
User's Manual 5-12
Page 87

Companion Programs
Using the Library
The Library is your MSReader home page; it displays a list of all books
stored on your device or storage card.
To open the Library:
■ On the MSReader command bar, tap Library.
■ On a book page, tap the book title, and then tap Library on the popup
menu.
To open a book, tap its title in the Library list.
Tap to scroll through
the Library list.
Tap to select a sort
Tap to specify the
books you want to
display in the list.
Tap to navigate to
other parts of the
order.
reader.
Tap to open a book.
User's Manual 5-13
Page 88

Companion Programs
Reading a Book
Each book consists of a cover page, an optional table of contents, and
the actual pages of the book. Navigation options are listed in the bottom
portion of the cover page.
The first time you open a book, you will probably want to go to the first
page or to the table of contents, if there is one. Subsequently, whenever
you open the book, you’ll be automatically taken to the last page read.
In addition to the text, each book page includes a page number and book
title.
You can also page through a book by using the Up/Down control on your
device.
Tap to select a navigation option.
Drag to select text and then tap an option.
Tap arrows to turn the page, or tap and hold
page # to bring up page riffle.
User's Manual 5-14
Page 89

Companion Programs
Using Reader Features
Reading a book electronically gives you several options not available with
paper books. These options are available on any book page.
Select text by dragging across the text on the page. Then, tap an option
on the pop-up menu, as described here:
■ Search for Text: Find text in a book by tapping Find on the pop-up
menu. Enter the word you want to search for, and tap the desired Find
option. MSReader highlights the text on the page. To close Find , tap
outside the box. To return to your original page, tap the title and then
tap Return on the pop-up menu.
■ Copy Text: You can copy text from books that support this feature
into any program that accepts text. On a book page, select the text
you want to copy. Then, tap Copy Text on the pop-up menu. The text
can be pasted into the program of your choice.
■ Bookmarks: When you add a bookmark to a book, a color-coded
bookmark icon appears in the right margin. You can add multiple
bookmarks to a book. Then, from anywhere in the book, tap the
bookmark icon to go to the bookmarked page.
■ Highlights: When you highlight text, it appears with a colored
background.
■ Notes: When you attach a note to text, you enter the text in a note
pad that appears on top of the book page. A Note icon will display in
the left margin. To show or hide the note, tap the icon.
■ Drawings: When you add a drawing, a Drawing icon appears in the
bottom-left corner of the page, and drawing tools appear across the
bottom of the page. Draw by dragging your stylus.
■ To see a list of a book’s annotations, including bookmarks, highlights,
text notes, and drawings, tap Annotations Index on the book’s cover
page. You can tap an entry in the list to go to the annotated page.
Removing a Book
When you finish reading a book, you can delete it to conserve space on
your device. If a copy of the book is stored on your computer, you can
download it again at any time.
To remove a book from your device, tap and hold the title in the Library
list, and then tap Delete on the pop-up menu.
User's Manual 5-15
Page 90

Pocket Internet Explorer
TOSHIBA Pocket PC e740
Chapter 6
Pocket Internet Explorer
Use Microsoft® Pocket Internet Explorer to view Web or WAP pages in
either of these ways:
■ During synchronization with your computer, download your favorite
links and mobile favorites that are stored in the Mobile Favorites
subfolder in Internet Explorer on the computer.
■ Connect to an Internet service provider (ISP) or network and browse
the Web. To do this, you’ll need to create the connection first, as
described in Chapter 7.
When connected to an ISP or network, you can also download files and
programs from the Internet or intranet.
To switch to Pocket Internet Explorer, tap
and then Internet Explorer.
The Mobile Favorites Folder
Only items stored in the Mobile Favorites subfolder in the Favorites folder
in Internet Explorer on your desktop computer will be synchronized with
your device. This folder was created automatically when you installed
ActiveSync.
Favorite Links
During synchronization, the list of favorite links in the Mobile Favorites
folder on your computer is synchronized with Pocket Internet Explorer on
your device. Both computers are updated with changes made to either
list each time you synchronize. Unless you mark the favorite link as a
mobile favorite, only the link will be downloaded to your device, and you
will need to connect to your ISP or network to view the content. For more
information on synchronization, see ActiveSync Help on the computer.
User's Manual 6-1
Page 91

Pocket Internet Explorer
Mobile Favorites
If you are using Microsoft Internet Explorer 5.0 or later on your computer,
you can download mobile favorites to your device. Synchronizing mobile
favorites downloads Web content to your device so that you can view
pages while you are disconnected from your ISP and computer.
Use the Internet Explorer plug-in installed with ActiveSync to create
mobile favorites quickly.
To create a mobile favorite:
1 In Internet Explorer on your computer, click Tools and then Create
Mobile Favorite.
2 To change the link name, enter a new name in the Name box.
3 In Update, select a desired update schedule.
4 Click OK. Internet Explorer downloads the latest version of the page
to your computer.
5 If you want to download the pages that are linked to the mobile
favorite you just created, in Internet Explorer on your PC, right-click
the mobile favorite and then click Properties. In the Download tab,
specify the number of links deep you want to download. To conserve
device memory, go only one level deep.
6 Synchronize your device and computer. Mobile favorites that are
stored in the Mobile Favorites folder in Internet Explorer are
downloaded to your device.
If you did not specify an update schedule in step 3, you will need to
manually download content to keep the information updated on your
computer and device. Before synchronizing with your device, in Internet
Explorer on your computer, click Tools and then Synchronize. You will
see the last time content was downloaded to the computer, and you can
manually download content if needed.
You can add a button to the Internet Explorer toolbar for creating mobile
favorites. In Internet Explorer on your computer, click View, Toolbars, and
then Customize.
To save device memory
Mobile favorites take up storage memory on your device. To minimize the
amount of memory used:
■ In the settings for the Favorites information type in ActiveSync
options, turn off pictures and sounds, or stop some mobile favorites
from being downloaded to the device. For more information, see
ActiveSync Help.
■ Limit the number of downloaded linked pages. In Internet Explorer on
the computer, right-click the mobile favorite you want to change and
then Properties. In the Download tab, specify 0 or 1 for the number
of linked pages you want to download.
User's Manual 6-2
Page 92

Pocket Internet Explorer
Using AvantGo Channels
AvantGo is a free interactive service that gives you access to
personalized content and thousands of popular Web sites. You subscribe
to AvantGo channels directly from your device. Then, you synchronize
your device and computer, or connect to the Internet to download the
content. For more information, visit the AvantGo Web site.
To sign up for AvantGo:
1 In ActiveSync options on the computer, turn on synchronization for
the AvantGo information type.
2 In Pocket Internet Explorer on your device, tap the Favorites button to
display your list of favorites.
3 Tap the AvantGo Channels link.
4 Tap the Activate button.
5 Follow the directions on the screen. You will need to synchronize your
device with your computer and then tap the My Channels button to
complete the AvantGo setup.
When synchronization is complete, tap the AvantGo Channels link in your
list of favorites to see a few of the most popular channels. To add or
remove channels, tap the Add or Remove link.
Using Pocket Internet Explorer
You can use Pocket Internet Explorer to browse mobile favorites and
channels that have been downloaded to your device without connecting
to the Internet. You can also connect to the Internet through an ISP or a
network connection and browse the Web.
Back button.
Refresh button.
Home button.
Favourites button.
Hide pictures button.
User's Manual 6-3
Page 93

Pocket Internet Explorer
To view mobile favorites and channels:
1 Tap the Favorites button to display your list of favorites.
Tap the favourite you want to view.
Tap to add or delete a folder or favourite link.
2 Tap the page you want to view.
You’ll see the page that was downloaded the last time you synchronized
with your computer. If the page is not on your device, the favorite will be
dimmed. You will need to synchronize with your computer again to
download the page to your device, or connect to the Internet to view the
page.
To browse the Internet:
1 Set up a connection to your ISP or corporate network using
Connections, as described in Chapter 7.
2 To connect and start browsing, do one of the following:
■ Tap the Favorites button, and then tap the favorite you want to
view.
■ Tap View and then Address Bar. In the address bar that appears
at the top of the screen, enter the Web address you want to visit
and then tap Go. Tap the arrow to choose from previously entered
addresses.
To add a favorite link while using the device, go to the page you want to
add, tap and hold on the page, and tap Add to Favorites.
User's Manual 6-4
Page 94

Getting Connected
TOSHIBA Pocket PC e740
Chapter 7
Getting Connected
You can use your device to exchange information with other mobile
devices as well as your computer, a network, or the Internet. You have
the following connection options:
■ Use the infrared (IR) port on your device to send and receive files
between two devices. If this is the method you want to use, see the
following section “Transfer Items Using Infrared.”
■ Connect to your Internet service provider (ISP). Once connected, you
can send and receive e-mail messages by using Inbox and view Web
or WAP pages by using Microsoft
communication software for creating an ISP connection is already
installed on your device. Your service provider will provide software
needed to install other services, such as paging and fax services. If
this is the method you want to use, see “Connect to an Internet
Service Provider” later in this chapter.
■ Connect to the network at your company or organization where you
work. Once connected, you can send and receive e-mail messages by
using Inbox, view Web or WAP pages by using Pocket Internet
Explorer, and synchronize with your computer. If this is the method
you want to use, see “Connect to Work” later in this chapter.
■ Connect to your computer to synchronize remotely. Once connected,
you can synchronize information such as your Pocket Outlook
information. If this is the method you want to use, see ActiveSync
Help on your computer or Connections Help on the device.
®
Pocket Internet Explorer. The
User's Manual 7-1
Page 95

Getting Connected
Transfer Items Using Infrared
Using infrared (IR), you can send and receive information, such as
contacts and appointments, between two devices.
To send information:
1 Switch to the program where you created the item you want to send
and locate the item in the list.
2 Align the IR ports so that they are unobstructed and within a close
range.
3 Tap and hold the item, and tap Beam Item on the pop-up menu.
You can also send items, but not folders, from File Explorer. Tap and hold
the item you want to send, and then tap Beam File on the pop-up menu.
To receive information:
1 Align the IR ports so that they are unobstructed and within a close
range.
2 Have the owner of the other device send the information to you. Your
device will automatically receive it.
Connect to the Internet
You can connect to your ISP, and use the connection to send and receive
e-mail messages and view Web or WAP pages.
You can connect to work in one of two ways:
■ Create a modem connection. If this is the method you want to use,
see “To create a modem connection to an ISP.”
■ Use an Ethernet card and a net tap to connect to the network. If this is
the method you want to use, see “To create an Ethernet connection to
an ISP.”
To create a modem connection to an ISP:
1 Obtain the following information from your ISP: ISP dial-up access
telephone number, user name, password, and TCP/IP settings. Some
ISPs require information in front of the user name, such as
MSN/username.
2 If your device does not have a built-in modem, install a modem card,
or use or use a NULL modem cable and appropriate adaptors to
connect an external modem to your device through the serial port.
3 Tap
4 In the Modem tab, tap New.
5 Enter a name for the connection, such as “ISP Connection.”
User's Manual 7-2
and then Settings. In the Connections tab, tap Connections.
Under The Internet settings, select Internet Settings and tap Modify.
Page 96

Getting Connected
6 In the Select a modem list, select your modem type. If your modem
type does not appear, try reinserting the modem card. If you are using
an external modem that is connected to your device with a cable,
select Hayes Compatible on COM1.
7 You should not need to change any settings in Advanced. Most ISPs
now use a dynamically-assigned address. If the ISP you are
connecting to does not use a dynamically-assigned address, tap
Advanced and then the TCP/IP tab, and enter the address. When
finished, tap OK and then Next.
8 Enter the access phone number, and tap Next.
9 Select other desired options, and tap Finish.
10 In the Dialing Locations tab, specify your current location and phone
type (most phone lines are tone). These settings will apply to all
connections you create.
To start the connection, simply start using one of the following programs.
Your device will automatically begin connecting. Once connected, you
can:
■ Send and receive e-mail messages by using Inbox. Before you can
use Inbox, you need to provide the information it needs to
communicate with the e-mail server. For specific instructions, see
“Connect Directly to an E-mail Server,” later in this chapter.
■ Visit Web and WAP pages by using Pocket Internet Explorer. For more
information, see Chapter 6.
■ Send and receive instant messages with MSN Messenger. For more
information, see “MSN Messenger” in Chapter 5.
To create an Ethernet connection to an ISP:
1 You do not need to create a new connection on your device. Instead,
you must purchase and configure an Ethernet card that is compatible
with your device.
2 Obtain the following information from your ISP: user name, password,
and domain name.
3 Insert the Ethernet card into your device. For instructions on inserting
and using the Ethernet card, see the owner’s manual for the card.
4 The first time you insert the card, Network Settings will appear
automatically so that you can configure the Ethernet card. Most
networks use DHCP, so you should not have to change these settings
unless your network administrator instructs you to do so. Tap OK. (If it
does not appear or to change settings later, tap
In the Connections tab, tap Network Adapters, tap the adaptor you
want to change, and then tap Properties.)
5 Connect the Ethernet card to the network by using a network cable.
For information, see your owner's manual.
6 Tap
, Settings, Connections tab, and then Connections. From the
My network card connects to list, select The Internet.
User's Manual 7-3
and then Settings.
Page 97

Getting Connected
To start the connection, simply start using one of the programs listed in
the preceding section. Once connected, you can perform the same
activities as listed in the preceding section.
Connect to Work
If you have access to a network at work, you can send e-mail messages,
view intranet pages, synchronize your device, and possibly access the
Internet. You can connect to work in one of two ways:
■ Create a modem connection by using a RAS account. Before you can
create this modem connection, your network administrator will need
to set up a RAS account for you. If this is the method you want to use,
see “To create a modem connection to a network.” Your network
administrator may also give you VPN settings.
■ Use an Ethernet card and a net tap to connect to the network. If this is
the method you want to use, see “To create an Ethernet connection to
a network.”
To create a modem connection to a network:
1 Get the following information from your network administrator: dial-up
access telephone number, user name, password, domain name, and
TCP/IP settings.
2 If your device does not have a built-in modem, install a modem card.
3 Tap
4 In the Modem tab, tap New.
5 Enter a name for the connection, such as “Company Connection.”
6 In the Select a modem list, select your modem type. If your modem
7 You should not need to change any settings in Advanced. Most
8 Enter the access phone number, and tap Next.
9 Select other desired options, and tap Finish.
10 In the Dialing Locations tab, specify your current location and phone
and then Settings. In the Connections tab, tap Connections.
Under The Internet settings, select Internet Settings and tap Modify.
type does not appear, try reinserting the modem card. If you are using
an external modem that is connected to your device with a cable,
select Hayes Compatible on COM1.
servers now use a dynamically assigned address. If the server you are
connecting to does not use a dynamically assigned address, tap
Advanced and then the TCP/IP tab and enter the address. When
finished, tap OK and then Next.
type (most phone lines are tone). These settings will apply to all
connections you create.
User's Manual 7-4
Page 98

Getting Connected
To start the connection, simply start using one of the following programs.
Your device will automatically begin connecting. Once connected, you
can:
■ Send and receive e-mail messages by using Inbox. Before you can
use Inbox, you need to provide the information it needs to
communicate with the e-mail server. For specific instructions, see
“Connect Directly to an E-mail Server,” later in this chapter.
■ Visit Internet or intranet Web or WAP pages by using Pocket Internet
Explorer.
■ Send and receive instant messages with MSN Messenger. For more
information, see “MSN Messenger” in Chapter 5.
■ Synchronize. For more information, see ActiveSync Help on the
computer.
To create an Ethernet connection to a network:
1 You do not need to create a new connection on your device. Instead,
you must purchase and configure an Ethernet card that is compatible
with your device.
2 Get the following information from your network administrator: user
name, password, and domain name.
3 Insert the Ethernet card into your device. For instructions on inserting
and using the Ethernet card, see the owner’s manual for the card.
4 The first time you insert the card, Network Settings will appear
automatically so that you can configure the Ethernet card. Most
networks use DHCP, so you should not have to change these settings
unless your network administrator instructs you to do so. Tap OK. (If it
does not appear or to change settings later, tap and then Settings.
On the Connections tab, tap Network Adapters, tap the adaptor you
want to change, and then tap Network Adapters.)
5 Connect the Ethernet card to the network by using a network cable.
For information, see your owner's manual.
6 Tap
7 If you want to synchronize your device, tap
To start the connection, simply start using one of the programs listed in
the preceding section. Once connected, you can perform the same
activities as listed in the preceding section.
, Settings , Connections tab, and then Connections. From
the My network card connects to list, select Work.
, and then ActiveSync.
In the Tools menu, tap Options. In the PC tab, select Include PC
when synchronizing remotely and connect to, and select your
computer's name. Remote synchronization with a computer will work
only if you have set up a partnership with that computer through
ActiveSync and have set ActiveSync to allow remote connections.
Other restrictions apply. For more information on synchronizing
remotely, see ActiveSync Help on the computer.
User's Manual 7-5
Page 99

Getting Connected
End a Connection
To disconnect, do one of the following:
■ When connected via dial-up or VPN, tap the Connection icon, , on
your navigation bar, and then tap End.
■ When connected via cable or cradle, detach your device from the
cable or cradle.
■ When connected via Infrared, move the device away from the PC.
■ When connected via a network (Ethernet) card, remove the card from
your device.
Connect Directly to an E-mail Server
You can set up a connection to an e-mail server so that you can send and
receive e-mail messages by using a modem or network connection and
Inbox on your device.
The ISP or network must use a POP3 or IMAP4 e-mail server and an
SMTP gateway.
You can use multiple e-mail services to receive your messages. For each
e-mail service you intend to use, first set up and name the e-mail service.
If you use the same service to connect to different mailboxes, set up and
name each mailbox connection.
To set up an e-mail service:
■ In Inbox on your device, tap Services, and then New Service. Follow
the directions in the New Service wizard.
For an explanation of a screen, tap
connect to your e-mail server, tap Services and then Connect. For more
information on using the Inbox program, see “Inbox: Sending and
Receiving E-mail Messages” in Chapter 4.
and then Help. When finished, to
Get Help on Connecting
More information on the procedures described here, as well as
information on additional procedures, can be found in the following
locations:
■ “Inbox: Sending and Receiving E-mail Messages” in Chapter 4.
■ Online Help on the device. Tap
Installed Help, and then Inbox or Connections.
■ ActiveSync Help on the computer. In ActiveSync, click Microsoft
ActiveSync Help on the Help menu.
■ For troubleshooting information, see the Pocket PC Web site at:
http://www.microsoft.com/mobile/pocketpc
User's Manual 7-6
and then Help. Tap View, All
Page 100

Wi-Fi (IEEE 802.11b) WLAN Adaptor
TOSHIBA Pocket PC e740
Chapter 8
Wi-Fi (IEEE 802.11b) WLAN Adaptor
Overview
Your Pocket PC e740 may be equipped with a IEEE 802.11b WLAN
Adaptor which can connect your Pocket PC e740 wirelessly to the
existing IEEE 802.11b wireless networks or form its own Wireless
Network. Using the adaptor in the Pocket PC, you can enjoy the complete
mobile and high-speed wireless Internet connectivity while in range of a
Wi-Fi compatible access point .
Please read this chapter carefully to get familiar with this feature.
Turning on Wireless LAN
1 To enable the Wireless LAN module, turn the Wireless Communication
Switch on. (The default setting is Off. Slide the switch to the left to
turn the power on.)
2 If this is your first time turning on the switch, the IP Address Page will
pop up for you to set the IP address, Subnet mask and Default
gateway.
Wireless Communication Switch
(On ←→ Off)
User's Manual 8-1
 Loading...