

Page 1

ST -6500 Setup Guide for Windows
TOSHIBA TEC CORPORATION
Page 2

Windows Setup Guide for ST-6500/ST -6500-C7
1
1. Introduction
This setup guide describes the procedure and notes for installing the drivers on the
ST-6500/ST-6500-C7.
The procedure outline to set up the OS for the ST-6500/ST-6500-C7 is described below. Some
drivers supported by some OS will be automatically installed, when the OS is installed.
Procedure outline to set up the ST-6500/ST-6500-C7 on Windows
1) Setting up BIOS
2) Installing Windows
3) Installing the 810E2 chipset software
4) Installing the SM712 graphic driver (for the ST-6500-C7)
5) Installing the PnP touch panel driver
6) Changing the serial port setting
TOSHIBA TEC CORPORATION
Page 3
Windows Setup Guide for ST-6500/ST -6500-C7
2
2. Setup on Windows 98/Windows 98SE
1) Setting up BIOS
By pressing the F2 key on the keyboard, when the machine starts up, the BIOS Setup Menu
is selected. Select the following item for BIOS setup.
[Exit]-> Load Setup Defaults (Win98/Me)
2) Installing Windows
Install Windows 98 or Windows 98SE.
3) Installing the 810E2 Chipset Software
w Installing the Intel Chipset Installation Utility
Execute Chipset¥Chipset¥Disk1¥Setup.exe contained in the driver kit, and install “Intel
Chipset Installation Utility.”
w Installing the Intel 810/815 Chipset Family Graphics Driver
To enable the CRT display, this driver must be installed.
Execute Chipset¥Graphics¥Win9x¥Graphics¥Setup.exe contained in the driver kit, and
install “Intel 810/815 Chipset Family Graphics Driver.”
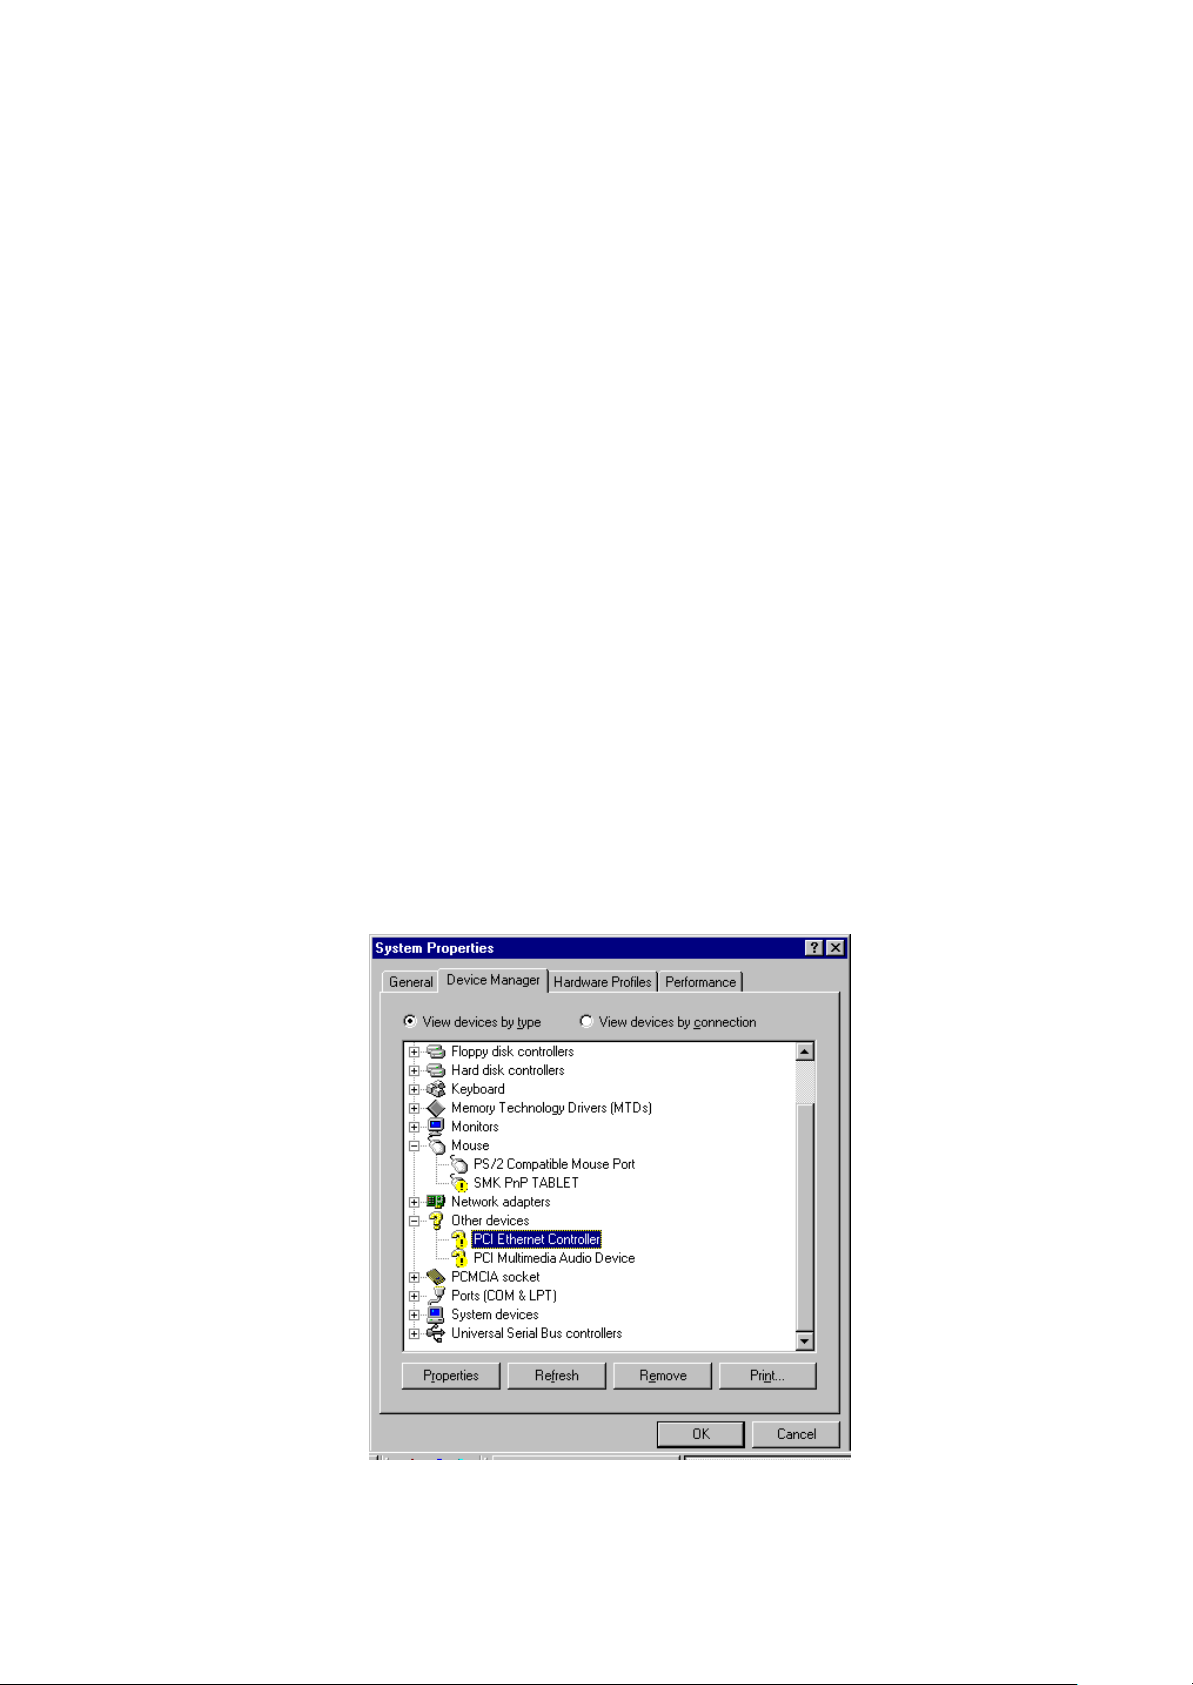
w Installing the Intel® PRO/100 VE Network Connection Driver
Execute Chipset¥LAN¥100pdisk.exe contained in the driver kit, to extract the files onto the
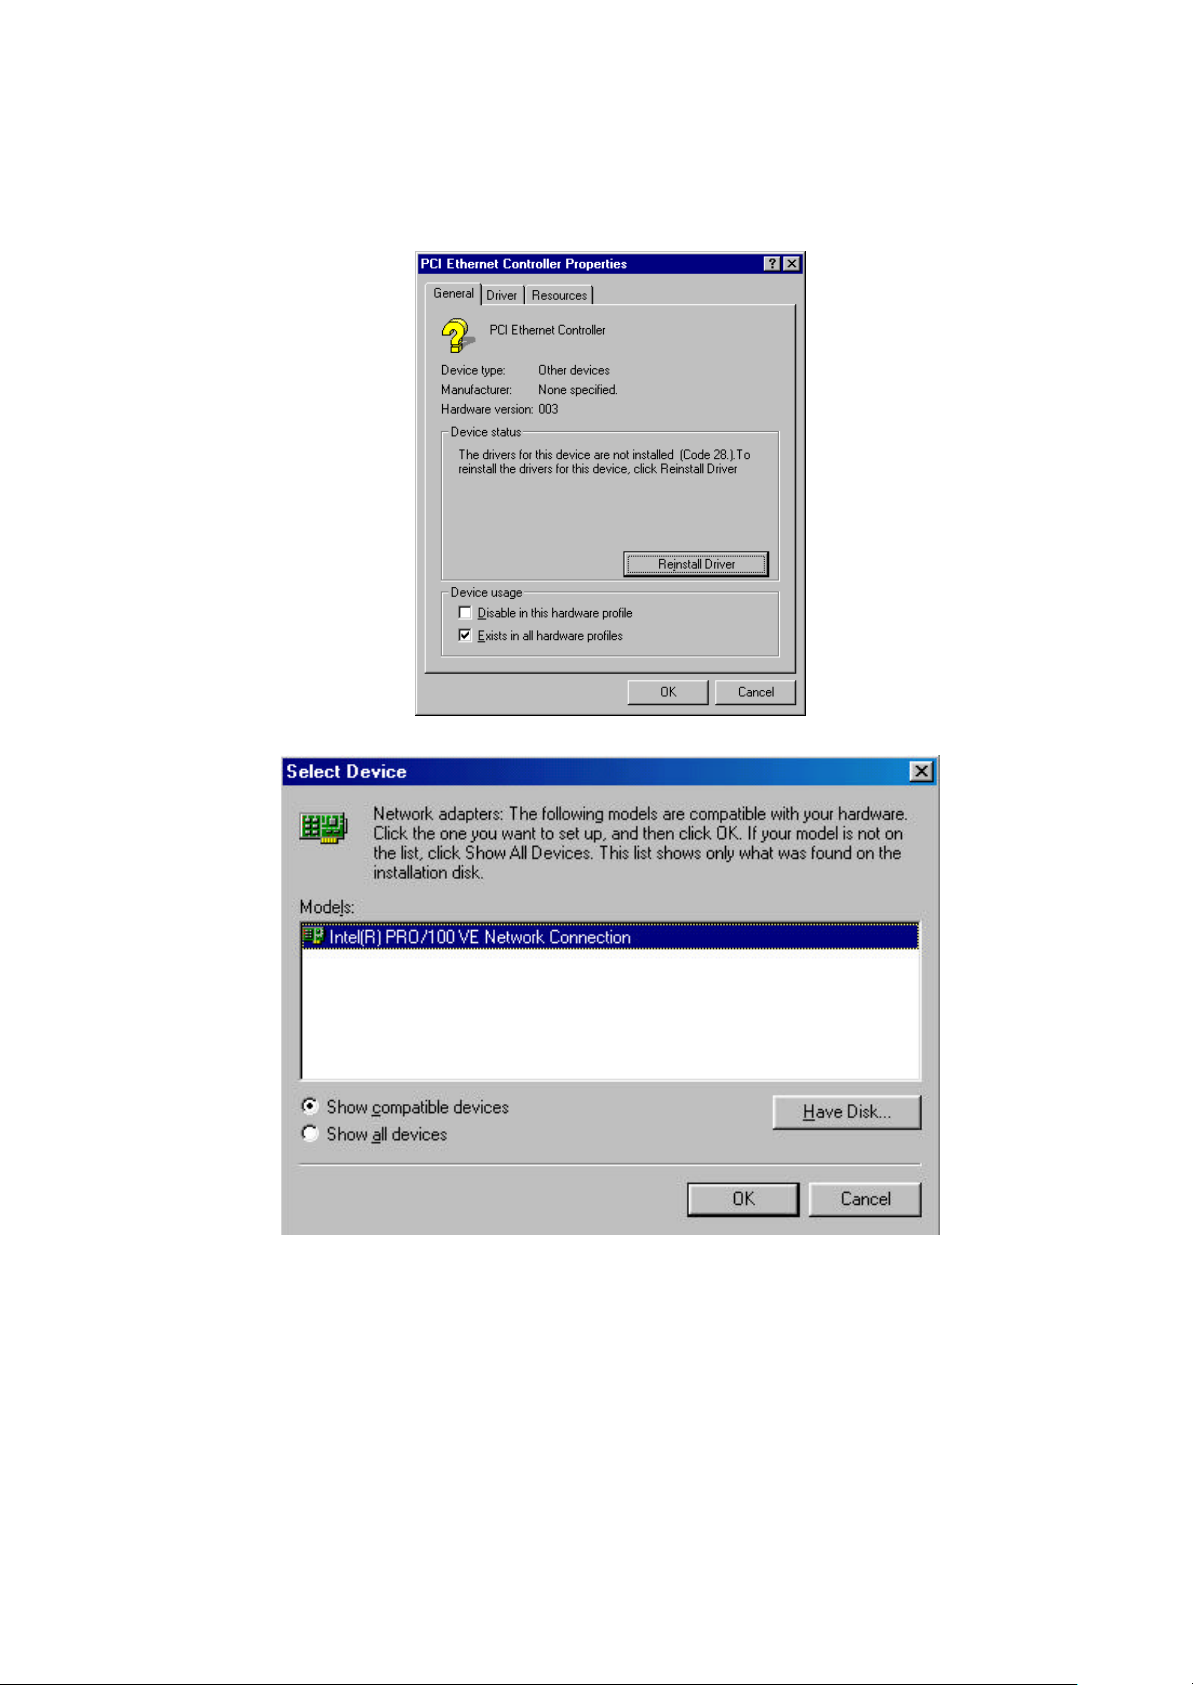
hard disk. Select [PCI Ethernet Controller] in the Device Manager and click on the
“Properties” button.
TOSHIBA TEC CORPORATION
Page 4
Windows Setup Guide for ST-6500/ST -6500-C7
3
The following screen appears. Select “Reinstall Driver” to install the driver.
Select the folder to extract 100pdisk.exe to, as the folder containing the driver to be installed.
Select “Intel® PRO/100 VE Network Connection” to install the driver.
For detailed installation procedure, refer to Intel’s documents and online help.
TOSHIBA TEC CORPORATION
Page 5
Windows Setup Guide for ST-6500/ST -6500-C7
4
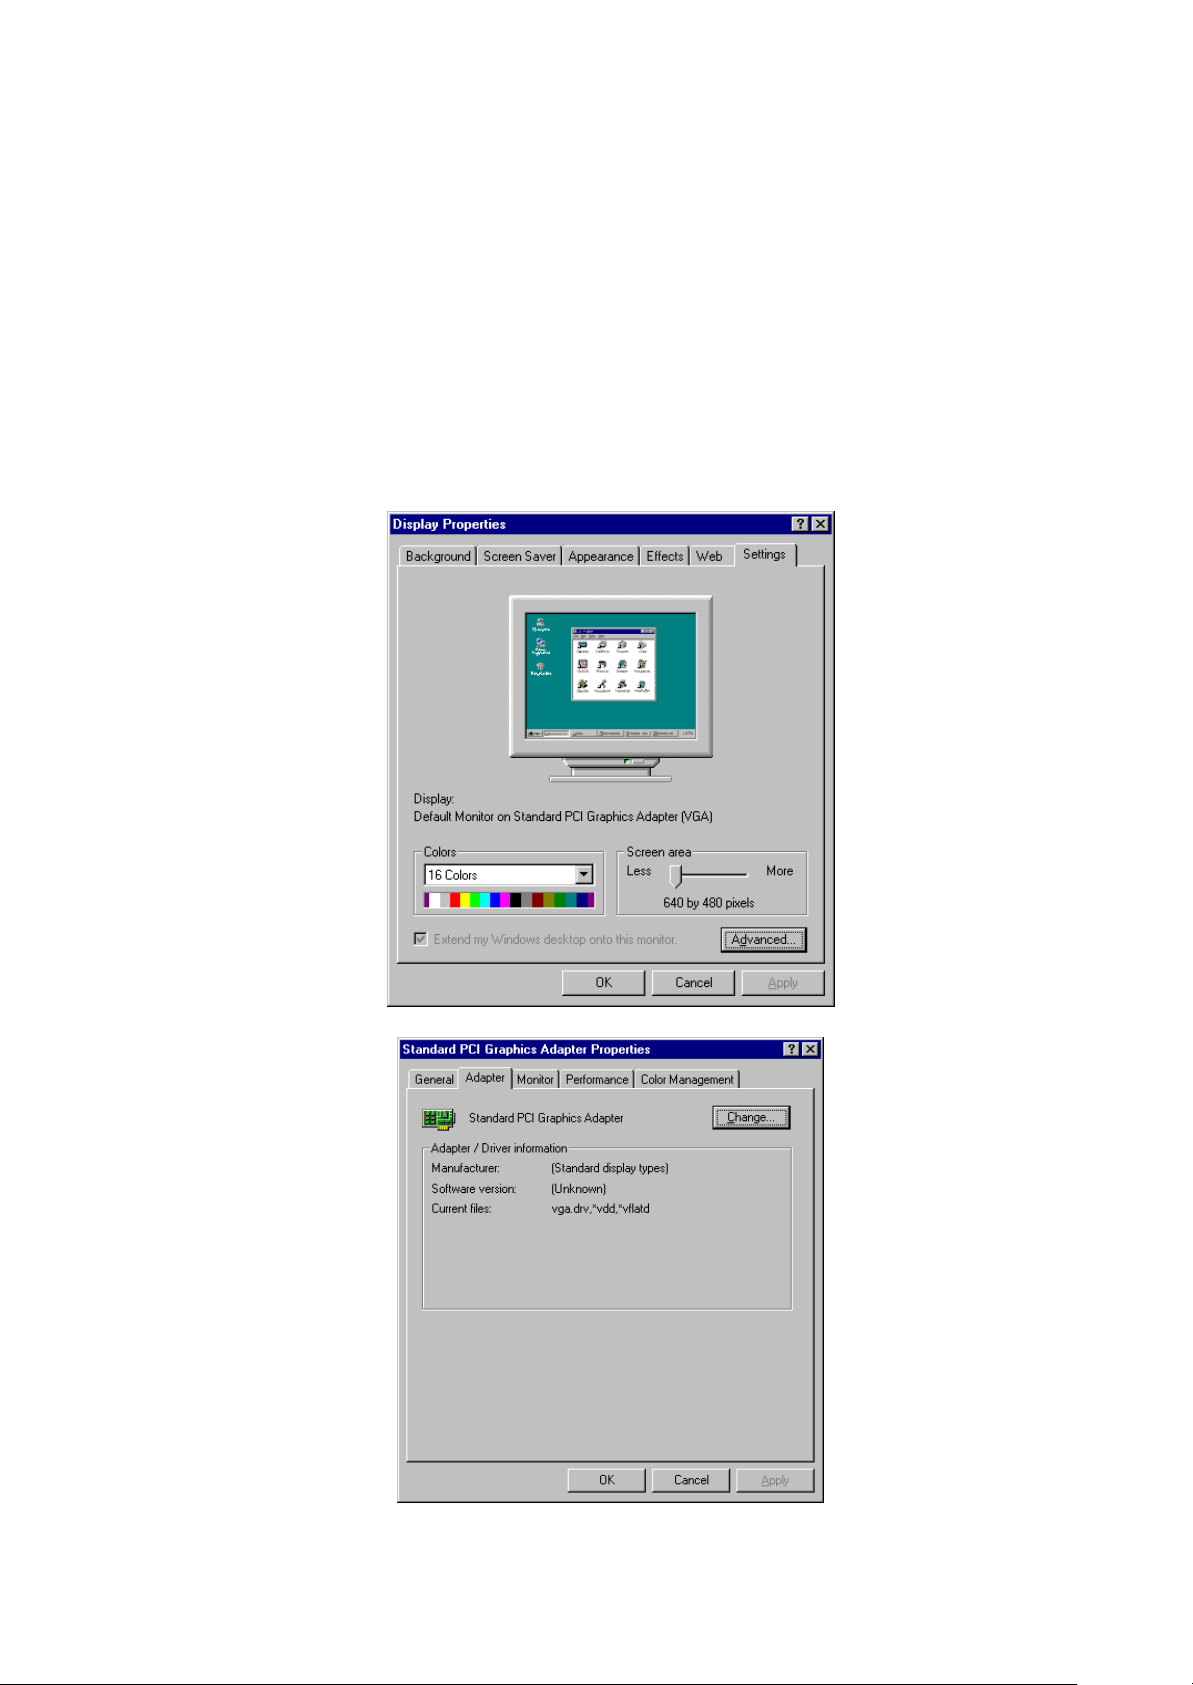
4) Installing the SM712 Graphic Driver
Select [Display] on the Control Panel and display the “Display Properties” screen. On this
screen, select [Settings] – [Advanced] to display the “Standard PCI Graphics Adapter
Properties” screen. Select [Adapter] – [Change] on this screen. Select
“Display¥SM712¥Win98” in the driver kit to install “Silicon Motion LynxEM+.”
5) Installing the CHIPS Graphic Driver
Select [Display] on the Control Panel and display the “Display Properties” screen. On this
screen, select [Settings] – [Advanced] to display the “Standard PCI Graphics Adapter
Properties” screen. Select [Adapter] – [Change] on this screen. Select
“Display¥Chips¥Win98” in the driver kit to install “Chips And Technologies, Accelerator.”
TOSHIBA TEC CORPORATION
Page 6

Windows Setup Guide for ST-6500/ST -6500-C7
5
6) Installing the PnP Touch Panel Driver
Select “SMK PnP TABLET ” in the Device Manager, and click on the “Properties” button. On
the “SMK PnP TABLET properties” screen, select [General] – [Reinstall Driver] to install the
driver.
Select “Tablet¥PnPTablet¥Win9x” in the driver kit to install “SMK PnP Tablet Driver.”
Reboot the machine. Select [Touch Panel] on the Control Panel to display the “Touch Panel
Property” screen. On this screen, select [Calibration] – [Execute] to set up calibration.
TOSHIBA TEC CORPORATION
Page 7

Windows Setup Guide for ST-6500/ST -6500-C7
6
IMPORTANT:
* Unless any of the PS/2 mouse, the serial mouse, or the USB mouse is used, the
touch panel is not detected. When installing the driver, connect any of the mice
and let the machine detect the touch panel.
* Do not check the “Beep when touched” checkbox on the Sound tab page.
This function is not av ailable on Windows 98. (Windows 98 cannot keep the
sound constant.)
7) Changing the Serial Port Setting
IRQ for COM4 has been set incorrectly. Change the IRQ to “11.” No additional operation
for the SIO1 port is required, since it cannot be actually used due to hardware configuration.
TOSHIBA TEC CORPORATION
Page 8

Windows Setup Guide for ST-6500/ST -6500-C7
7
8) Setting up the Dual Display
To enable the dual display, carry out this setup.
The ST-6500-C7 enables the dual display using the Dual Display functions supported by
Windows.
Select [Display] on the Control Panel to display the “Display Properties” screen. On this
screen, select [Settings] – [Display]. Select the on-board VGA (Intel810E2)-equipped
display. Check the “Extend my Windows desktop onto this monitor” checkbox at the lower
left, then click on the “Apply” button. The on-board VGA will be enabled.
Select proper “Colors” and “Screen area”.
IMPORTANT:
* Windows 98/98SE/2000/XP can use the Dual Display functions supported by the
OS. However, Windows NT cannot use the Dual Display functions, since
Windows NT does not support them.
TOSHIBA TEC CORPORATION
Page 9

Windows Setup Guide for ST-6500/ST -6500-C7
8
IMPORTANT:
* If the SM712 VGA board (SMI) has been inserted on the machine, when Windows
98 is installed, the on -board VGA (Intel810E2) cannot be used after Windows 98
has been installed. On the “Device Manager” tab of the “System Properties”
screen, the on-board VGA (Intel810E2) is marked with “!”, which indicates the
device is disabled. (See the screen below.)
To solve this problem, remove the SM712 VGA board from the machine, then
start up the PC. It will make the on-board VGA (Intel810E2) enabled.
TOSHIBA TEC CORPORATION
Page 10

Windows Setup Guide for ST-6500/ST -6500-C7
9
9) Cautions of dual-screen use by Windows98 and Windows98SE.
If a dual-screen is set up by Windows 98 and Windows 98SE, an error may occur. iIn order
to set up a dual -screen without generating an error, please set up the follows;
Settings tab of Display Properties Control Panel.
When screen is in the state of disable, as shown in a figure, it is displayed faintly.
A second screen can be enabled by clicking the second display of a figure.
And then the following message boxes are displayed, choose Yes.
TOSHIBA TEC CORPORATION
Page 11

Windows Setup Guide for ST-6500/ST -6500-C7
10
Apply button is clicked.
Please perform PC re -starting or PC shutdown in the state having opened the control panel.
Please do not click OK button or Cancel button of a display properties control pan el.
(If “OK” button or “Cancel” button are clicked, error may occur.)
TOSHIBA TEC CORPORATION
Page 12

Windows Setup Guide for ST-6500/ST -6500-C7
11
3. Setup on Windows NT 4.0
1) Setting up BIOS
By pressing the F2 key on the keyboard when the machine starts up, the BIOS Setup Menu
is selected. Select the following item for BIOS setup.
[Exit]-> Load Setup Defaults (DOS/WinNT/Other)
2) Installing Windows
Connect the PS/2 mouse and install Windows NT 4.0.
IMPORTANT:
* When Windows NT is installed without connecting the PS/2 mouse, the touch
panel driver cannot be installed. Be sure to connect the PS/2 mouse before
installing Windows NT.
3) Installing the Service Pack (SP)
Some drivers require a new version service pack. Install the required service pack.
4) Installing the 810E2 Chipset Software
w Installing the Intel 810/815 Chipset Family Graphics Driver
To enable the CRT display, this driver must be installed.
Execute Chipset¥Graphics¥Win9x¥Graphics¥Setup.exe contained in the driver kit, and
install “Intel 810/815 Chipset Family Graphics Driver.”
w Installing the Intel® PRO/100 VE Network Connection Driver
Execute Chipset¥LAN¥100pdisk.exe contained in the driver kit and extract the files onto the
hard disk. Select [Network] on the Control Panel and execute “Network Setup Wizard.”
TOSHIBA TEC CORPORATION
Page 13

Windows Setup Guide for ST-6500/ST -6500-C7
12
Click on the “Select from list” button, and select the extracted folder to install the driver.
For the detailed installation procedure, refer to Intel’s documents or online help.
IMPORTANT:
* If a LAN-related component is installed and the machine is rebooted after the
service pack is installed, the message indicating the service is not functioning is
displayed. The following event error is recorded in the event log.
Even ID: 7001
Source: Service control manager
Type: Error
Explanation: The Computer Browser service depends on the Server service
which failed to start because of the following error:
Not enough server storage is available to process this command.
To clear this error, install the service pack again.
TOSHIBA TEC CORPORATION
Page 14

Windows Setup Guide for ST-6500/ST -6500-C7
13
5) Installing the SM712 Graphic Driver
To use the SM712 VGA board (SMI), install this driver.
Select [Display] on the Control Panel to display the “Display Properties” screen. On this
screen, select [Settings] – [Display Type]. Select “Display¥SM712¥WinNT” in the driver kit,
to install “Silicon Motion LynxEM+.”
6) Installing the CHIPS Graphic Driver
Select [Display] on the Control Panel and display the “Display Properties” screen. On this
screen, select [Settings] – [Advanced] to display the “Standard PCI Graphics Adapter
Properties” screen. Select [Adapter] – [Change] on this screen. Select
“Display¥Chips¥WinNT” in the driver kit to install “Chips And Technologies, Accelerator.”
TOSHIBA TEC CORPORATION
Page 15

Windows Setup Guide for ST-6500/ST -6500-C7
14
7) Installing the PnP Touch Panel Driver
Select [Mouse] on the Control Panel to display the “Mouse Properties” screen. Select
[General] – [Change]. Select the “PnPTablet¥WinNT” fonder in the driver kit to install “SMK
PnP Tablet Driver.”
After rebooting the machine, select [Start] – [Run] and run “tabcalNT.exe” to set up
calibration.
8) Setting up the Dual Display
Since Windows NT does not support the Dual Display functions, the Dual Display functions
cannot be used.
TOSHIBA TEC CORPORATION
Page 16

Windows Setup Guide for ST-6500/ST -6500-C7
15
4. Setup on Windows 2000
1) Setting up BIOS
By pressing the F2 key on the keyboard, when the machine starts up, the BIOS Setup Menu
is selected. Select the following item for BIOS setup.
[Exit]-> Load Setup Defaults (Win2000/XP)
2) Installing Windows
Install Windows 2000.
3) Installing the 810E2 Chipset Software and the PnP Touch Panel Driver
w Installing the Intel Chipset Installation Utility
Execute Chipset¥Chipset¥Disk1¥Setup.exe contained in the driver kit and install “Intel
Chipset Installation Utility.”
The following message is displayed after the machine is rebooted. Install the touch panel
driver.
TOSHIBA TEC CORPORATION
Page 17

Windows Setup Guide for ST-6500/ST -6500-C7
16
On the “Found New Hardware Wizard” screen, select “Search for suitable driver for my
device” and click on [Next].
Then, select “Specify a location” and designate the “Tablet¥PnPTablet¥Win2K” folder in the
driver kit to install the driver.
TOSHIBA TEC CORPORATION
Page 18

Windows Setup Guide for ST-6500/ST -6500-C7
17
w Installing the Intel 810/815 Chipset Family Graphics
To enable the CRT display, install this driver.
Execute “Chipset¥Graphics¥Win2K_XP¥Graphics¥Setup.exe” contained in the driver kit,
and install the “Intel 810/815 Chipset Family Graphics Driver.”
Reboot the machine. Select [Touch Panel] on the Control Panel to display the “Touch
Panel Property” screen. On this screen, select [Calibration] – [Execute] to set up
calibration.
IMPORTANT:
* Unless any of the PS/2 mouse, the serial mouse or the USB mouse has been
connected, the touch panel driver cannot be loaded properly, disabling the
calibration setup. Connect any of the mice to let the machine recognize it.
4) Installing Other PCI Device Drivers
Execute “Chipset¥LAN¥100pdisk.exe” contained in the driver kit, and extract the files onto
the hard disk.
The Windows 2000 Device Manager indicates that “Ethernet Controller” and “Video
Controller” are not properly installed.
Open the properties screen for the device with the “?” mark and click on “Reinstall Driver. ”
Install these controllers in the same manner as the PnP Tablet Driver.
Designate the following folders:
Ethernet Controller: Folder that 100pdisk.exe was extracted to
Video Controller: “Display¥SM712¥Win2K” in the driver kit
TOSHIBA TEC CORPORATION
Page 19

Windows Setup Guide for ST-6500/ST -6500-C7
18
5) Changing the Serial Port Setting
On Windows 2000, COM4 is recognized as if there are two. Therefore, either of them must
be changed from COM4 to COM5 (SIO1).
IMPORTANT:
* No additional operation for the SIO1 port is required, since it cannot be actually
used due to hardware configuration. However, since COM4 is recognized as if
there are two, either of them must be changed from COM4 to COM5 (SIO1). The
port addresses and IRQs for COM4 and COM5 should be set as below:
• COM4
Port address: 270-277
IRQ: IRQ11
• COM5 (SIO1)
Port address: 2E8-2EF
IRQ: IRQ15
6) Updating the Driver
The driver kit contains drivers newer than those supported by Windows. Update the drivers,
as required.
TOSHIBA TEC CORPORATION
Page 20

Windows Setup Guide for ST-6500/ST -6500-C7
19
7) Setting up the Dual Display
Refer to 8) Setting up the Dual Display of Section 2. Setup on Windows 98/Windows 98SE.
IMPORTANT:
* On Windows 2000/XP, when the mouse pointer is moved on the screen of MPEG
data on the CRT monitor in the dual display, another mouse pointer may appear
on the TFT monitor.
To prevent this phenomenon from occurring, perform the following procedure:
Display the “Display Properties” screen. Select [Settings] – [Advanced] –
[Troubleshooting]. On the displayed screen, set the “Hardware acceleration”
level to any level other than “FULL”. This phenomenon will not occur.
TOSHIBA TEC CORPORATION
Page 21

Windows Setup Guide for ST-6500/ST -6500-C7
20
IMPORTANT:
* On Windows 2000, the on-board VGA (Intel810E2) is set as primary monitor.
After Windows 2000 is installed, the on-board VGA is used for the screen
display.
To perform the dual display, after installing the SM712 VGA board (SMI) driver,
the TFT and the CRT monitors should be set as primary and secondary
monitors, respectively.
To set the TFT monitor as primary monitor, select [Display] on the Control Panel
to display the “Display Properties” screen. On this screen, select [Settings] –
[Display]. Select “Silicon Motion LynxEM+.” Check the “Use this device as
the primary monitor” checkbox at the lower left, then click on the “Apply”
button. The TFT monitor is set as primary monitor.
To use only the TFT monitor, set the TFT monitor as primary monitor, then
disable the on-board VGA (Intel810E2).
TOSHIBA TEC CORPORATION
Page 22

Windows Setup Guide for ST-6500/ST -6500-C7
21
5. Setup on Windows XP
1) Setting up BIOS
By pressing the F2 key on the keyboard when the machine starts up, the BIOS Setup Menu
is selected. Select the following item for BIOS setup.
[Exit]-> Load Setup Defaults (Win2000/XP)
2) Installing Windows
Install Windows XP.
3) Installing the PnP Touch Panel Driver
The Windows XP Device Manager indicates that “SMK PnP Tablet” is not properly installed.
Open the properties screen and click on “Reinstall Driver” to install the PnP Tablet Driver.
TOSHIBA TEC CORPORATION
Page 23

Windows Setup Guide for ST-6500/ST -6500-C7
22
On the “Found New Hardware Wizard” screen, select “Install from list or specific location”
and click on [Next].
Select “Include this location in the search” and designate the “PnPTablet¥WIN2K ” folder in
the driver kit to install the driver.
TOSHIBA TEC CORPORATION
Page 24

Windows Setup Guide for ST-6500/ST -6500-C7
23
Reboot the machine. Select [Control Panel] – [Touch Panel] to display the “Touch Panel
Property” screen. On this screen, select [Calibration] – [Execute] to set up calibration.
IMPORTANT:
* Unless any of the PS/2 mouse, the serial mouse or the USB mouse has been
connected, the touch panel driver cannot be loaded properly, disabling the
calibration setup. Connect any of the mice to let the machine recognize it.
4) Installing Other PCI Device Drivers
Designate the following folder to install the driver:
Video Controller: “Display¥SM712¥WinXP” in the driver kit
5) Changing the Serial Port Setting
On Windows XP, COM4 is recognized as if there are two. Therefore, either of them must be
changed from COM4 to COM5 (SIO1).
IMPORTANT:
* No additional operation for the SIO1 port is required, since it cannot be actually
used due to hardware configuration. However, since COM4 is recognized as if
there are two, either of them must be changed from COM4 to COM5 (SIO1). The
port addresses and IRQs for COM4 and COM5 should be set as below:
• COM4
Port address: 270-277
IRQ: IRQ11
• COM5 (SIO1)
Port address: 2E8-2EF
IRQ: IRQ15
6) Updating the Driver
The driver kit contains divers newer than those supported by Windows. Update the drivers
as required.
TOSHIBA TEC CORPORATION
Page 25

Windows Setup Guide for ST-6500/ST -6500-C7
24
7) Setting up the Dual Display
Refer to 8) Setting up the Dual Display of Section 2. Setup on Windows 98/Windows 98SE.
IMPORTANT:
* On Windows 2000/XP, when the mouse pointer is moved on the screen of MPEG
data on the CRT monitor in the dual display, another mouse pointer may appear
on the TFT monitor.
To prevent this phenomenon from occurring, perform the following procedure:
Display the “Display Properties” screen. Select [Settings] – [Advanced] –
[Troubleshooting]. On the displayed screen, set the “Hardware acceleration”
level to any level other than “FULL”. This phenomenon will not occur.
TOSHIBA TEC CORPORATION
 Loading...