

Toshiba DLP 56HM66, DLP 50HM66, 50HM66, 56HM66 Operating Manual

TOSHIBA
IMPORTANTNOTE
Beforeconnecting,operating,oradjustingthisproduct,carefully
readtheImportantSafety,Installation,Care,andService
informationintheInstallationGuide,
ForanoverviewofstepsforsettingupyournewTV,seepage4.
Note:TodisplayaHighDefinitionpicture,theTVmustbereceivinga
HighDefinitionsignal(suchasan over:the-airHighDefinitionTV
broadcast,aHighDefinitiondigitalcableprogram,or aHighDefinition
digitalsatelliteprogram).FOrdetails,pleasegontadyourTVanteana
instaiier,cabieprovider,or sateiiiteprovider.
Note:!fthe rV is poweredoti and_henquicklyonagainwhenthe
]ampunii is hot,it may_akeseveralminutesforthe picturetoappear
on:screen.This isa propertyofDLP_TV[amptechnologyandisNOT
asignof malfunction.Fordetaib,see'IMPORTANTNOTICEABOUT
HOTLAMPRESTART"on page2.
HM66 ENbook Page 2 Tlmrsdav Februa W 23 2006 2:49 PM
CAUTION: This television is for use only with
the Toshiba stand indicated below. Use with other
carts or stands is capable of resulting in
instability, causing possible injury.
Television Stand Model
50HM66 ST5066
56HM66 ST5666
Welcometo Toshiba
Thank you for purchasing this Toshiba TV, one of the most
innovative DLP "lxfprojection TVs on the market. We have
provided two separate guides to facilitate the installation and
operation of your TV.
Please use the Guides in the order shown below to get the most
enjoyment from your new TV.
• The "h*smllation GuMe" explains tmw to connect your TV to
your antenna and equipment.
• The "Operating GuMe" (this Guide) provides step-by-step
instructions for using your TV's many features.
importantnotesabeutyour
B£PrMprejectien Tg
1) The light source for this TV is a projection lamp unit with a
limited service life. When the lamp wears out, the picture
may become dark or black or the lamp may fail, at which time
you must replace the lamp unit. See "Lamp unit replacement
and care" (re pages 47-49).
2) When the lamp mode is set to Low Power, every time the
TV is powered on, the lamp will initially be in High Bright
mode but will switch to Low Power mode after a short
period of time. You may notice a change in screen brightness
when this happens. This is normal and is not a sign of
malfunction.
(r_ page 42 for details.)
3) Every time the TV is powered on, itmay take several minutes
for the picture to obtain full brightness (t_¢"IMPORTANT
NOTICE ABOUT "HOT LAMP RESTART," at right).
4) The TV's display is manufactured using an extremely high
level of precision technology; however, an occasional pixel
(dot of light) may show constantly on the screen. This is a
structural property of DLP "lxf(Digital Light i%'ocessing "lxf)
technology and is not a sign of malfunction. Such pixels are
not visible when the picture is viewed from a normal viewing
distance.
5) Always sit approximately 10-25 feet away from the TV and
as directly in front of it as possible. The picture quality may
be affected by your viewing position and length of viewing
time. If you sit too closely to the TV for too long, you may
suffer from eye fatigue. See item 29 of the "care" information
in the separate Installation Guide.
6) Depending on the media you are viewing, it is possible,
although unlikely, that a limited number of viewers may see
a "rainbow effect" on the screen, w,hich can, in rare instances,
result in eye fatigue. This is a rare occurrence related to DLP
technology and is not a sign of TV malfunction.
7) This TV contains several cooling fans to moderate the
internal temperature. You may be able to hear the
fans for several minutes after the TV is turned off.
This is a function of the Quick RestarO x_feature
and is not a sign of TV malfunction. You can set
the Quick RestarO xffeature to stop the fans as soon as the TV
is powered off. See "Setting the Quick RestarO xffeature"
(r_ page 20).
8) The yellow and blue LED lights at the bottom center of the
TV front indicate your TV's current status. If either light
flashes, see "LED indications" (re page 46).
9) Every time the TV power cord is plugged in, the yellow LED
will blink until the TV enters standby mode (plugged in but
not powered on). This is normal and is not a sign of
malfunction.
"Voice announce" feature
When certain non-standard conditions occur, the LEDs on
the TV will blink and the TV will play a recorded
"voice announcement" describing the condition (see the
LED indication table on page 46 for the specific conditions
that include a voice announcement).
To repeat the voice announcement and hear additional
information, press the MENU button on the TV while the
LEDs are blinking.
IMPORTANTNOTICEABOUT"NOT LAMP RESTART"
When the TV has been powered on long enough for the lamp
unit to get hot, it may take several minutes for the picture to
appear on-screen in the following situations:
• When the Quick Restart TM feature is set to OFF and
you turn the TV off and then on again within a few
minutes; or
• Ifthe TV is on when a short-term power failure, power
surge, or other similar power failure occurs, such that
the TV loses and regains power within a few minutes,
This is a property of DLP TV lamp technology and is
NOT a sign of malfunction.
Ifthis occurs, the yellow LED on the TV front panel will blink
(and the blue LED will be lit solid) until the TV is finished
restarting the lamp and the normal picture appears. If both
LEDs are blinking, you will need to turn the TV off and then
on again to restart the lamp.
#ademm'kinfermatien
• This product incorporates copyright protection technology that is
protected by U.S. patents and other intellectual property rights. Use
of this copyright protection technology must be authorized by
Macrovision, and is intended for home and other limited viewing
uses only unless otherwise authorized by Macrovision. Reverse
engineering or disassembly is prohibited.
• WOW, SRS and (e) symbol are trademarks of SRS Labs, Inc.
WOW technology is incorporated under license from SRS Labs, Inc.
• *Manufactured under license from Dolby Laboratories. Dolby and
the double-D symbol are registered trademarks of Dolby
Laboratories.
• CableCARD TM is a trademark of Cable Television Laboratories, Inc.
• HDMI, the HDMI logo and High-Definition Multimedia Interface are
trademarks or registered trademarks of HDMI Licensing LLC.
• Digital Light Processing TM, DLP TM and the DLP TM medallion are
trademarks of Texas Instruments.
HM66 (E/F) Web 213:276

HM66 ENbook Page 3 Thursday, Febnta W 23, 2006 2:49 PM
Chapter 1: Introduction ............................ 4
Features of'tour new TV ............................ 4
Overview of steps for installing, setting up, and using
your new TV .................................. 4
TV l?'ont and side panel controls and connections ......... 5
TV back panel conuectious ........................... 6
Chapter2: Usingthe remote control................... 7
Prepm'iug the remote control for use .................... 7
Installing the remote control batteries .................. 7
Remote control efl_:ctive rauge ........................ 7
Learning about the remote control ..................... 8
Usiug the remote control to control your other devices ..... 9
Remote Control functional key chart .................. 10
Programming tile remote control to control your other
devices ...................................... I 1
Remote control codes .............................. 12
Chapter3: IVlenu layoutandnavigation................. 14
Main menu la2rout ................................. 14
Setup/Installation menu layout ....................... 15
Navigating the menu system ......................... 15
Chapter 4: Setting up your IV ........................ 16
Selecting the menu lmlguage ........................ 16
Configuring the autenna input sources for the ANT 1
and ANT 2 terminals ........................... 16
Programming channels into the TV's channel memory .... 17
Programmiug channels automatically .............. 17
Manually adding and deleting channels in the chanuel
memory .................................. 17
Programmiug your lavorite channels .................. 18
Setting the ColorStream HD audio mode ............... 211
Setting the HDMP x_audio mode ..................... 20
Viewiug the CableCARD I_1menu .................... 20
Settiug the Quick Restart Ix1 feature ................... 20
Viewiug the digital signal meter ...................... 21
Viewiug the system status ........................... 22
Chapter 5: Using the TV's basic features ................ 23
Selecting the video input source to view ............... 23
Labeling the video input sources ..................... 23
Tuning chamlels .................................. 24
Using the Cha*mel Browser jx_ .................... 24
Tuuing your favorite cha*mels .................... 26
Tuning to the next programmed cham_el ............ 26
Tuning to a specific cha*mel (programmed or
unprogrammed) ............................ 26
Switching between two chanuels using Channel
Return ................................... 26
Switching between two channels using SurfLock jxl ... 26
Selecting the picture size ........................... 27
Scrolling the TheaterWide ® picture (TheaterWide 2
and 3 only) ................................... 28
Using the auto aspect ratio li:ature .................... 29
Selecting the ciuema mode
(480i signals only) ............................. 29
Adjusting the picture ............................... 30
Selecting the picture mode ....................... 30
Adjusting the picture quality ..................... 30
Using the closed caption mode ....................... 31
Closed Captiou Advanced ....................... 31
Digital closed captions .......................... 32
Adjusting the audio ................................ 32
Muting the sound .............................. 32
Usiug the digital audio selector ................... 32
Selecting stereo/SAP broadcasts .................. 33
Adjusting the audio quality ...................... 33
Using the StableSound ® feature ................... 34
Turning off the built-in speakers .................. 34
Selecting the optical audio output format ........... 34
Using the Locks menu ............................. 35
Entering the PIN code .......................... 35
If you canuot remember your PIN code ............. 35
(banging your PIN code ........................ 35
Blocking TV programs and movies
by rating (V-Chip) .......................... 36
Blocking channels ............................. 37
Unlocking programs temporarily .................. 38
Using the iuput lock feature ...................... 38
Using the control panel lock feature ............... 39
Setting the sleep timer .............................. 39
Displaying TV setting information on-screeu using
RECALL .................................... 40
Understanding the auto power off li:attlre .............. 40
Understanding the last mode memory feature ........... 40
Chapter6:Usingthe lV's advancedfeatures............. 41
Using the adv:mced picture settings li:atures ............ 41
Using dyuamic contrast ......................... 41
Using CableClear®/DNR (digital noise reduction) .... 41
Using MPEG noise reduction ..................... 41
Selecting the color temperature ................... 42
Selecting the lamp mode ........................ 42
Using the Game Mode feature .................... 43
Using the advauced audio settings features ............. 43
Using the SRS WOW I_1 surround sound feature ...... 43
Chapter 7: Troubleshooting ......................... 44
General troubleshooting ............................ 44
LED iudicatious .................................. 46
Chapter 8: Appendix.............................. 47
Lamp unit replacement and care ...................... 47
Replacing the lamp unit
(User-replaceable component) ................. 47
When to replace the lamp uuit .................... 47
How to replace the lamp unit ..................... 48
Disposing of the used lamp unit ................... 49
Specifications .................................... 50
Lfinited United States Warranty
li_)r[)LP _x_Television Models .................... 51
Limited Canada Warranty
for DLP Ix(Televisiou Models .................... 52
Index........................................ 54
HM66 (E/F) Web 213:27(
HM66 ENbook Page 4 Tlmrsdav Februa W 23 2006 2:49 PM
NOTICE OF POSSIBLE TV STAND INSTABILITY
DANGER: RISK OF SERIOUS PERSONAL
INJURY OR DEATH! Use this TV only with
the TOSHIBA TV stand listed in the
"Specifications" section of this manual. Use with other
stands may result in instability, causing possible injury or
death.
CAUTION:This television is for use only with the Toshiba
stand indicated below. Use with other carts or stands is
capable of resulting in instability, causing possible injury.
Television Stand Model
50HM66 ST5066
56HM66 ST5666
FeaturesofyournewTV
The following are just a few of the many exciting features of
your new Toshiba widescreen, integrated HD, DLP TM
projection TV:
• Integrated digital tuning (8VSB ATSC and QAM)
eliminates the need for a separate digital converter set-top
box (in most cases).
• Digital CableCARD TM slot for viewing encrypted digital
Cable TV programs (ir_ hlstallation Guide).
• Two HI)MI TM digital, high-definition multimedia
interfaces (ir__ Installation Guide).
• Two sets of ColorStream® HD high-resolution component
video inputs (Ir_r"Installation GuMe).
• SRS WOW TM (Ir_> page 43), audio technologies.
• Digital Audio Out optical audio connection with Dolby _
Digital optical output format (ir_> page 34; also see
Installation Guide).
• CableClear ® DNR digital picture noise reduction
(tr_> page 41).
"Voice announce" feature
When certain non-standard conditions occur, the LEDs on
the TV will blink and the TV will play a recorded
"voice announcement" describing the condition (see the
LED indication table on page 46 for the specific conditions
that include a voice announcement).
To repeat the voice announcement and hear additional
information, press the MENU button on the TV while the
LEDs are blinking.
Overviewofstepsfor installing,
settingup, andusingyournewTV
Follow these steps to set up your TV and begin using its many
exciting features.
2
3
4
5
6
7
8
9
10
11
12
13
14
15
16
17
Carefully read the important safety, installation, care, and
service information in the separate Installation Guide.
Keep this manual tor future reference.
Observe the following when choosing a location for the
TV:
• Read the separate Installation Guide.
• Read "Important notes about your DLP TM projection
TV" (ir_ page 2).
• Place the TV on the applicable optional TV stand listed
in the "Specifications" section (if available for this TV
model) or on a sturdy, level, stable surface that can
safely support the size and weight of the unit.
• Place the TV in a location where light does not reflect
on the screen.
• Place the TV far enough from walls and other objects to
allow proper ventilation. Inadequate ventilation may
cause overheating, which will damage the TV. THIS
TYPE OF DAMAGE IS NOT COVERED UNDER
THE TOSHIBA WARRANTY.
Do not plug in any power cords until AFTER you have
connected all cables and devices to your TV.
BEFORE connecting cables or devices to the TV, learn
the functions of the TV's connections and controls
(Ir_ pages 5-6).
Connect your other electronic device(s) to the TV
(1>;€hlstallation Guide).
Install the batteries in the remote control (Irgvpage 7).
See "Learning about the remote control" (rW page 8) for
an overview of the buttons on the remote control.
Program the remote control to operate your other
device(s) (Irgv pages 9-13).
AFTER connecting all cables and devices, plug in the
power cords for your TV and other devices.
After you plug in the TV power cord, the yellow LED
ion the TV front ) will blink 3 times. Wait several
seconds until the yellow LED stops blinking and then
press _E, on the TV or remote control.
See "LED indications" (ir_ page 46).
See "Menu layout and navigation" for a quick overview of
navigating the TV's menu system (r:_ page 14).
Program channels into the TV's channel memory
(__ page 17).
For details on using the TV's features, see Chapters 5
and 6.
For help, refer to the Troubleshooting Guide
(Irw Chapter 7).
For lamp unit replacement instructions, see Chapter 8.
For technical specifications and warranty information, see
Chapter 8.
Enjoy your new TV!
HM66 (E/F) Web 213:276
HM66 ENbook Page 5 Tlmrsdav Februa W 23 2006 2:49 PM
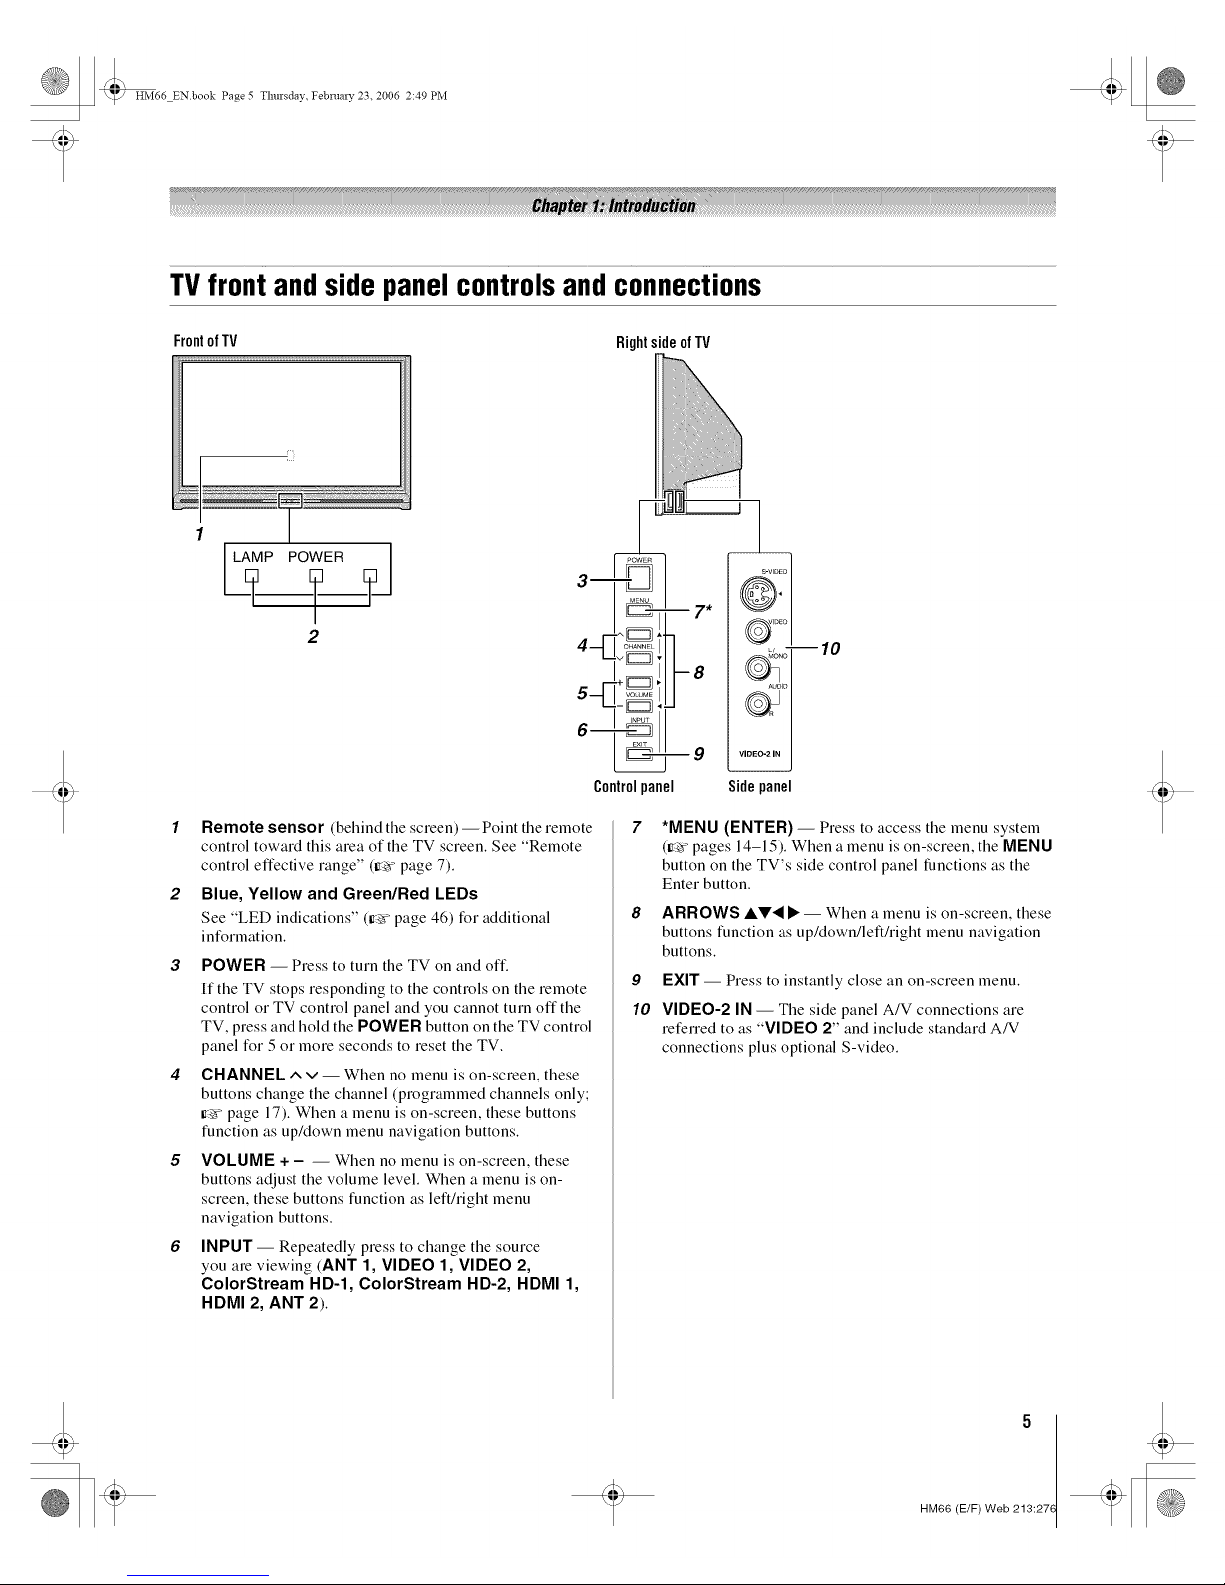
TVfrontandsidepanelcontrolsandconnections
Frontof TV Rightsideof TV
LE_[LAMP POWER ]
2
1 Remote sensor (behind the screen) -- Point the remote
control toward this area of the TV screen. See "Remote
control effective range" (ire'vpage 7).
2 Blue, Yellow and Green/Red LEDs
See "LED indications" (ir_ page 46) for additional
information.
3 POWER -- Press to turn tile TV on and oft:
If the TV stops responding to the controls on the remote
control or TV control panel and you cannot turn offthe
TV, press and hold the POWER button on the TV control
panel for 5 or more seconds to reset the TV.
CHANNEL ^ v -- When no menu is on-screen, these
buttons change the channel (programmed channels only;
_r_'_page 17). When a menu is on-screen, these buttons
function as up/down menu navigation buttons.
VOLUME + - -- When no menu is on-screen, these
buttons adjust the volume level. When a menu is on-
screen, these buttons function as left/right menu
navigation buttons.
INPUT -- Repeatedly press to change the source
you are viewing (ANT 1, VIDEO 1, VIDEO 2,
ColorStream HD-1, ColorStream HD-2, HDMI 1,
HDMI 2, ANT 2).
9
Controlpanel Sidepanel
9
10
*MENU (ENTER) -- Press to access the menu system
(Ir_>"pages 14-15). When a menu is on-screen, the MENU
button on the TV's side control panel functions as the
Enter button.
ARROWS AV'4 • -- When a menu is on-screen, these
buttons function as up/down/left/right menu navigation
buttons.
EXIT -- Press to instantly close an on-screen menu.
VIDEO-2 IN -- The side panel A/V connections are
referred to as "VIDEO 2" and include standard A/V
connections plus optional S-video.
HM66 (E/F) Web 213:27(
t
HM66 ENbook Page 6 Thursday Februal T 23 2006 2:49 PM
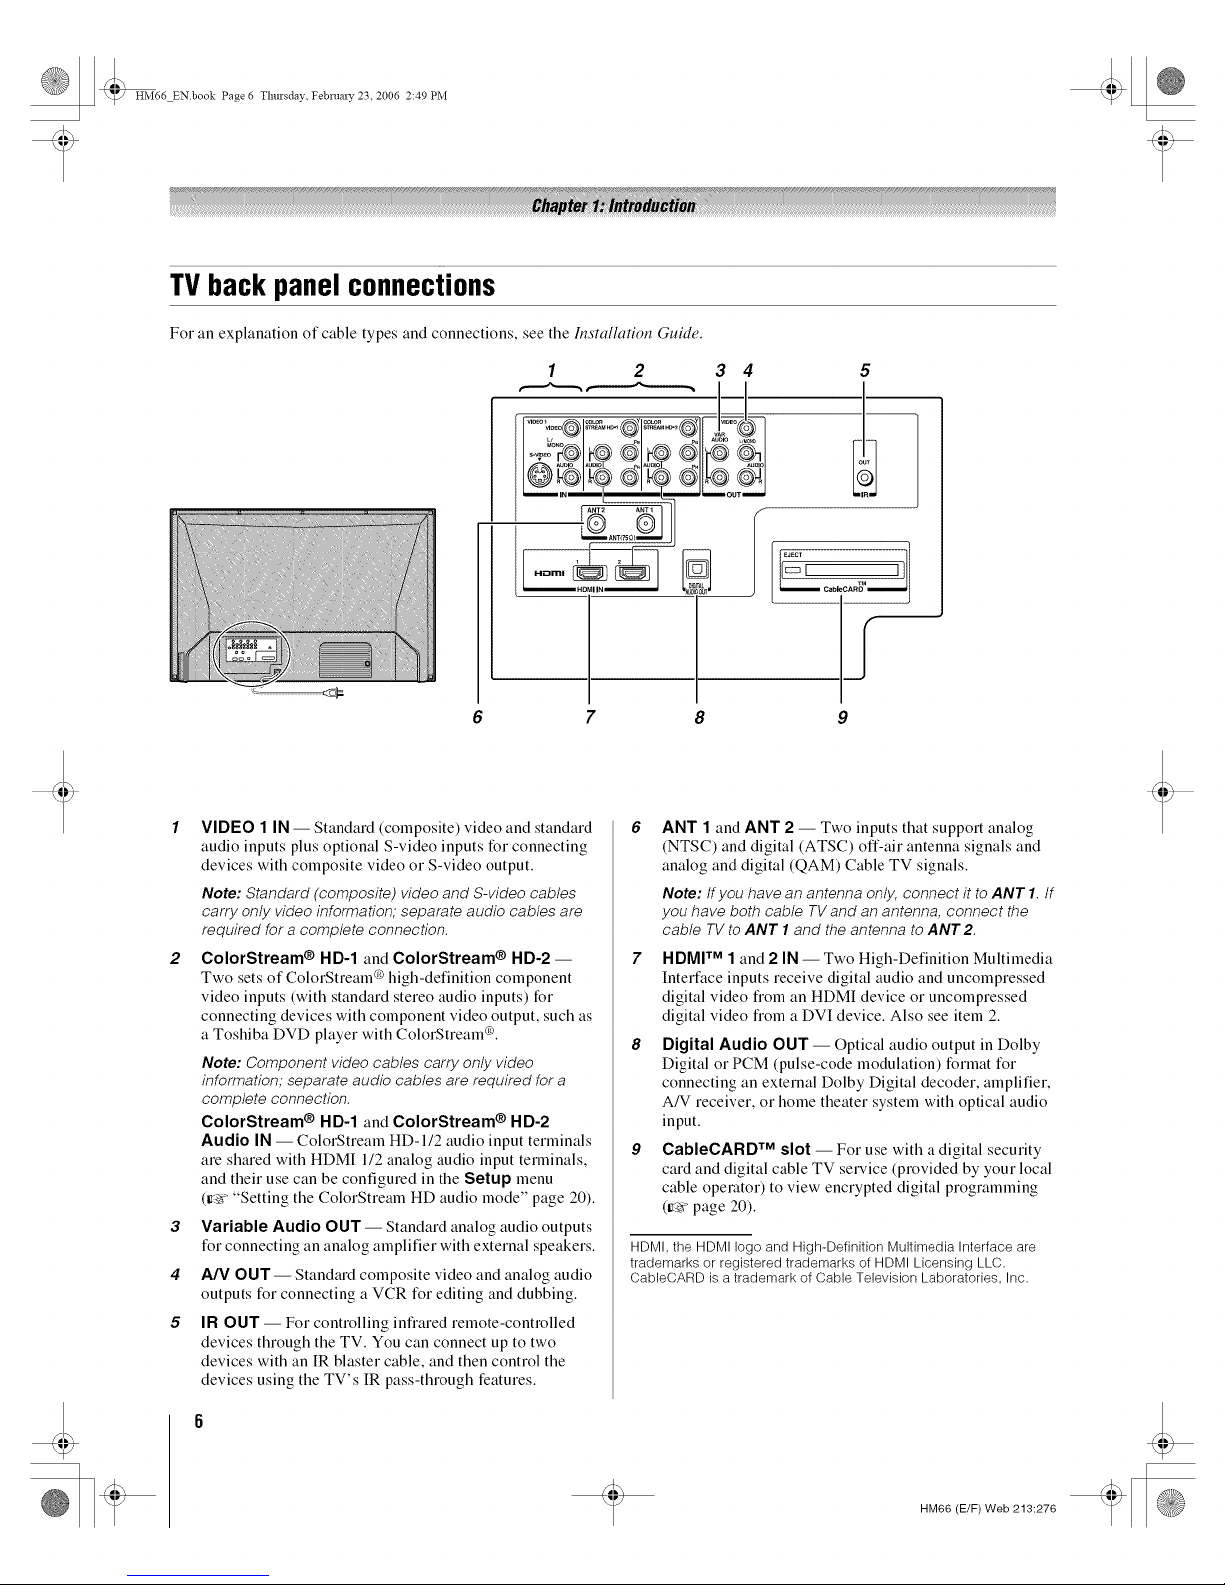
TVbackpanelconnections
For an explanation of cable types and connections, see the Installation Guide.
8 9
2
3
4
5
VIDEO 1 IN -- Standard (composite) video and standard
audio inputs plus optional S-video inputs for connecting
devices with composite video or S-video output.
Note: Standard (composite) video and S-video cables
carry only video information; separate audio cables are
required for a complete connection.
ColorStream ® HD-1 and ColorStream ® HD-2-
Two sets of ColorStream ® high-defnition component
video inputs (with standard stereo audio inputs) for
connecting devices with component video output, such as
a Toshiba DVD player with ColorStream ®.
Note: Component video cables carry only video
information; separate audio cables are required for a
complete connection.
ColorStream ® HD-1 and ColorStream ® HD-2
Audio IN -- ColorStream HD-I/2 audio input terminals
are shared with HDMI 1/2 analog audio input terminals,
and their use can be configured in the Setup menu
(ir_v "Setting the ColorStream HD audio mode" page 20).
Variable Audio OUT-- Standard analog audio outputs
for connecting an analog amplifier with external speakers.
A/V OUT- Standard composite video and analog audio
outputs for connecting a VCR for editing and dubbing.
IR OUT -- For controlling infiared remote-controlled
devices through the TV. You can connect up to two
devices with an IR blaster cable, and then control the
devices using the TV's IR pass-through features.
ANT 1 and ANT 2 -- Two inputs that support analog
(NTSC) and digital (ATSC) off-air antenna signals and
analog and digital (QAM) Cable TV signals.
Note: If you have an antenna only, connect it to ANT I. tf
you have both cable TVand an antenna, connect the
cable TV to ANT 1and the antenna to ANT2
HDMI TM 1 and 2 IN -- Two High-Definition Multimedia
Interface inputs receive digital audio and uncompressed
digital video from an HDMI device or uncompressed
digital video from a DVI device. Also see item 2.
Digital Audio OUT -- Optical audio output in Dolby
Digital or PCM (pulse-code modulation) format for
connecting an external Dolby Digital decoder, amplifier,
A/V receiver, or home theater system with optical audio
input.
CableCARD TM slot -- For use with a digital security
card and digital cable TV selwice (provided by your local
cable operator) to view encrypted digital programming
(try> page 20).
HDMI, the HDMI logo and High-Definition Multimedia Interface are
trademarks or registered trademarks of HDMI Licensing LLC.
CableCARD is a trademark of Cable Television Laboratories, Inc.
HM66 (E/F) Web 213:276
t
HM66 ENbook Page 7 Thursday Februal T 23 2006 2:49 PM
Preparingthe remotecontrol
for use
Your TV remote control can operate your TV and many other
devices such as cable converter boxes, satellite receivers,
VCRs, DVD players, and HTIBs (home theater in a box), even
if they are different brands.
If you have a Toshiba device:
Your TV remote control is preprogrammed to operate most
Toshiba devices (ir_vpage 11).
If you have a non-Toshiba device or a Toshiba device
that the remote control is not preprogrammed to
operate:
You can program tile TV remote control so it will operate tile
other device (Ire'r"pages 9-13).
Installingtheremotecontrol
batteries
1 Remove the battery cover flom the back of the remote
control.
Squeeze tab and l|_]l _)liftcover.
2 Install two "AAA" size batteries, making sure to match
the + and- signs on the batteries to the signs on the battery
compartment.
3 Reinsell the battery cover in the remote control until the
tab snaps.
Caution: Never throw batteries into a fire.
Notes:
• Be sure to use AAA size batteries.
• Dispose of batteries in a designated disposal area.
° Batteries should always be disposed of with the
environment in mind. Always dispose of batteries in
accordance with applicable laws and regulations.
° tf the remote control does not operate correctly, or if the
operating range becomes reduced, replace batteries with
new ones.
° When necessary to replace batteries in the remote control,
always replace both batteries with new ones. Never mix
battery types or use new and used batteries in combination.
° Always remove batteries from remote control if they are
dead or if the remote control is not to be used for an
extended period of time. This will prevent battery acid from
leaking into the battery compartment.
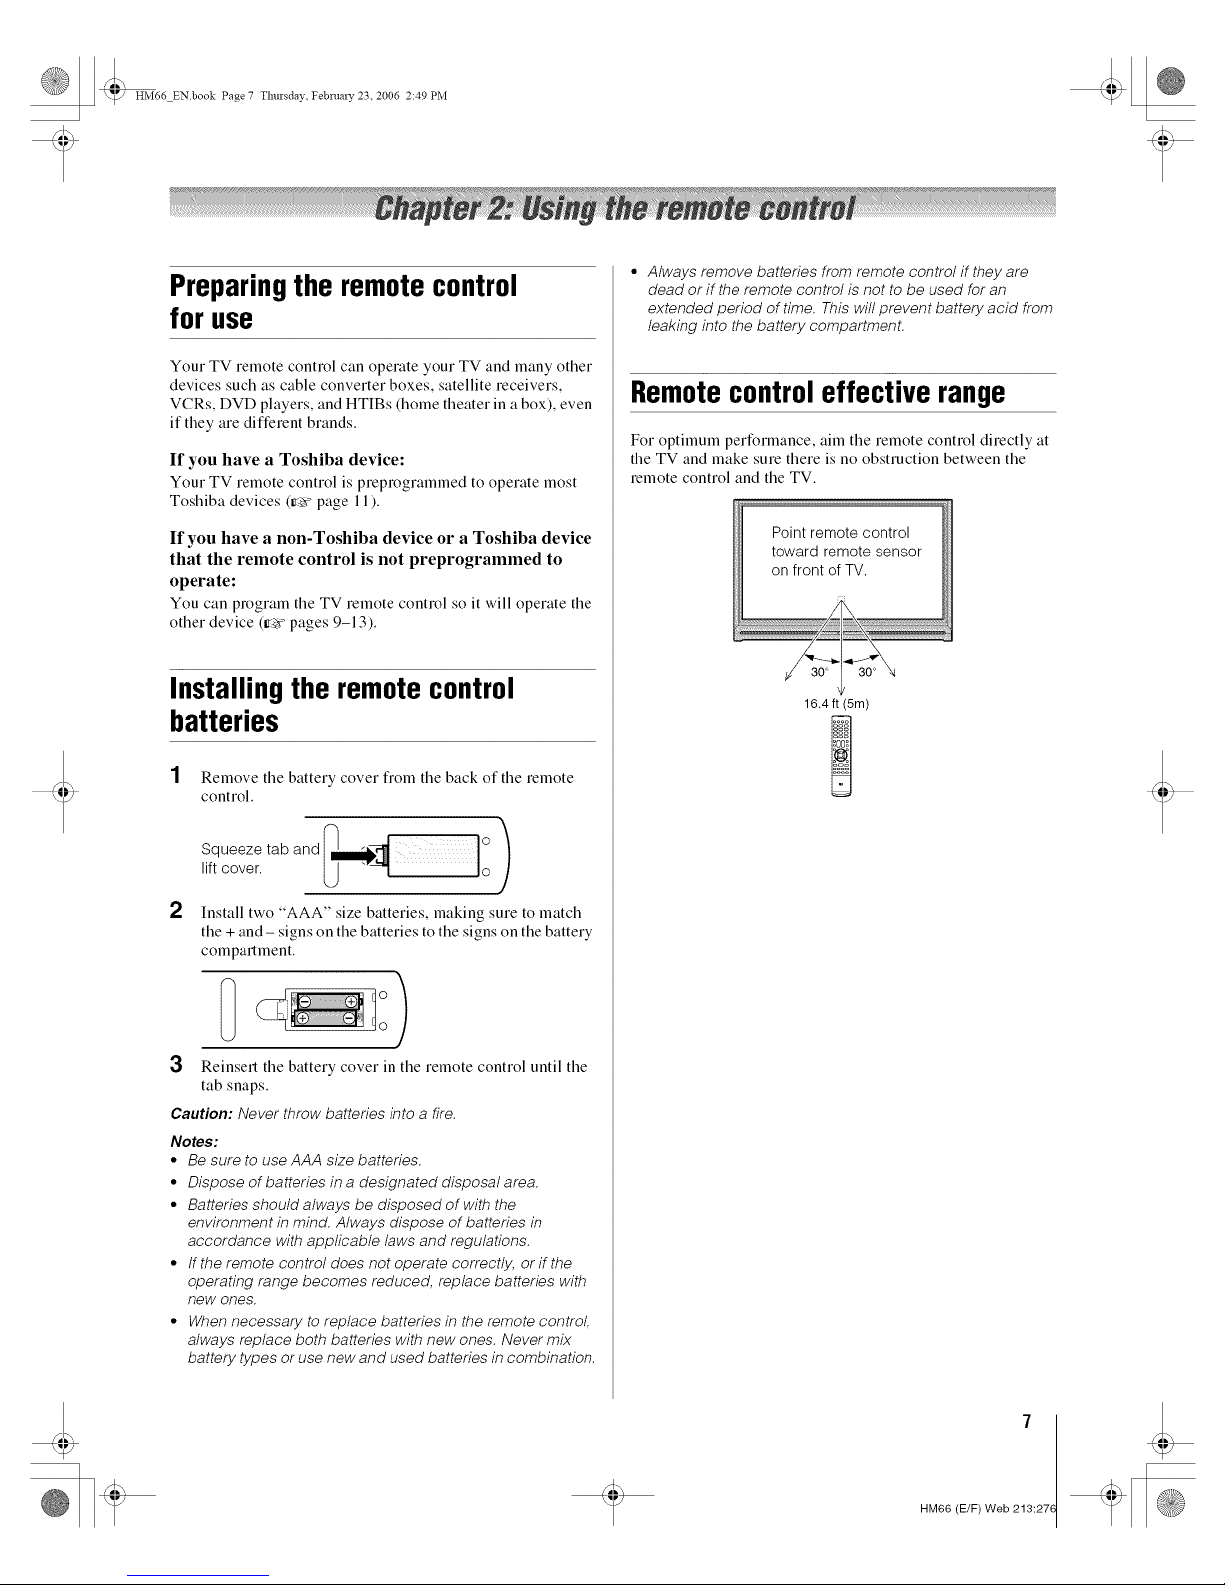
Remotecontroleffectiverange
For optimum performance, aim the remote control directly at
the TV and make sure there is no obstruction between the
remote control and the TV.
Point remote control
toward remote sensor
on front of TV.
16.4 ft (5m)
t
HM66 (E/F) Web 213:27(
t
HM66 ENbook Page 8 Tlmrsdav Februa W 23 2006 2:49 PM
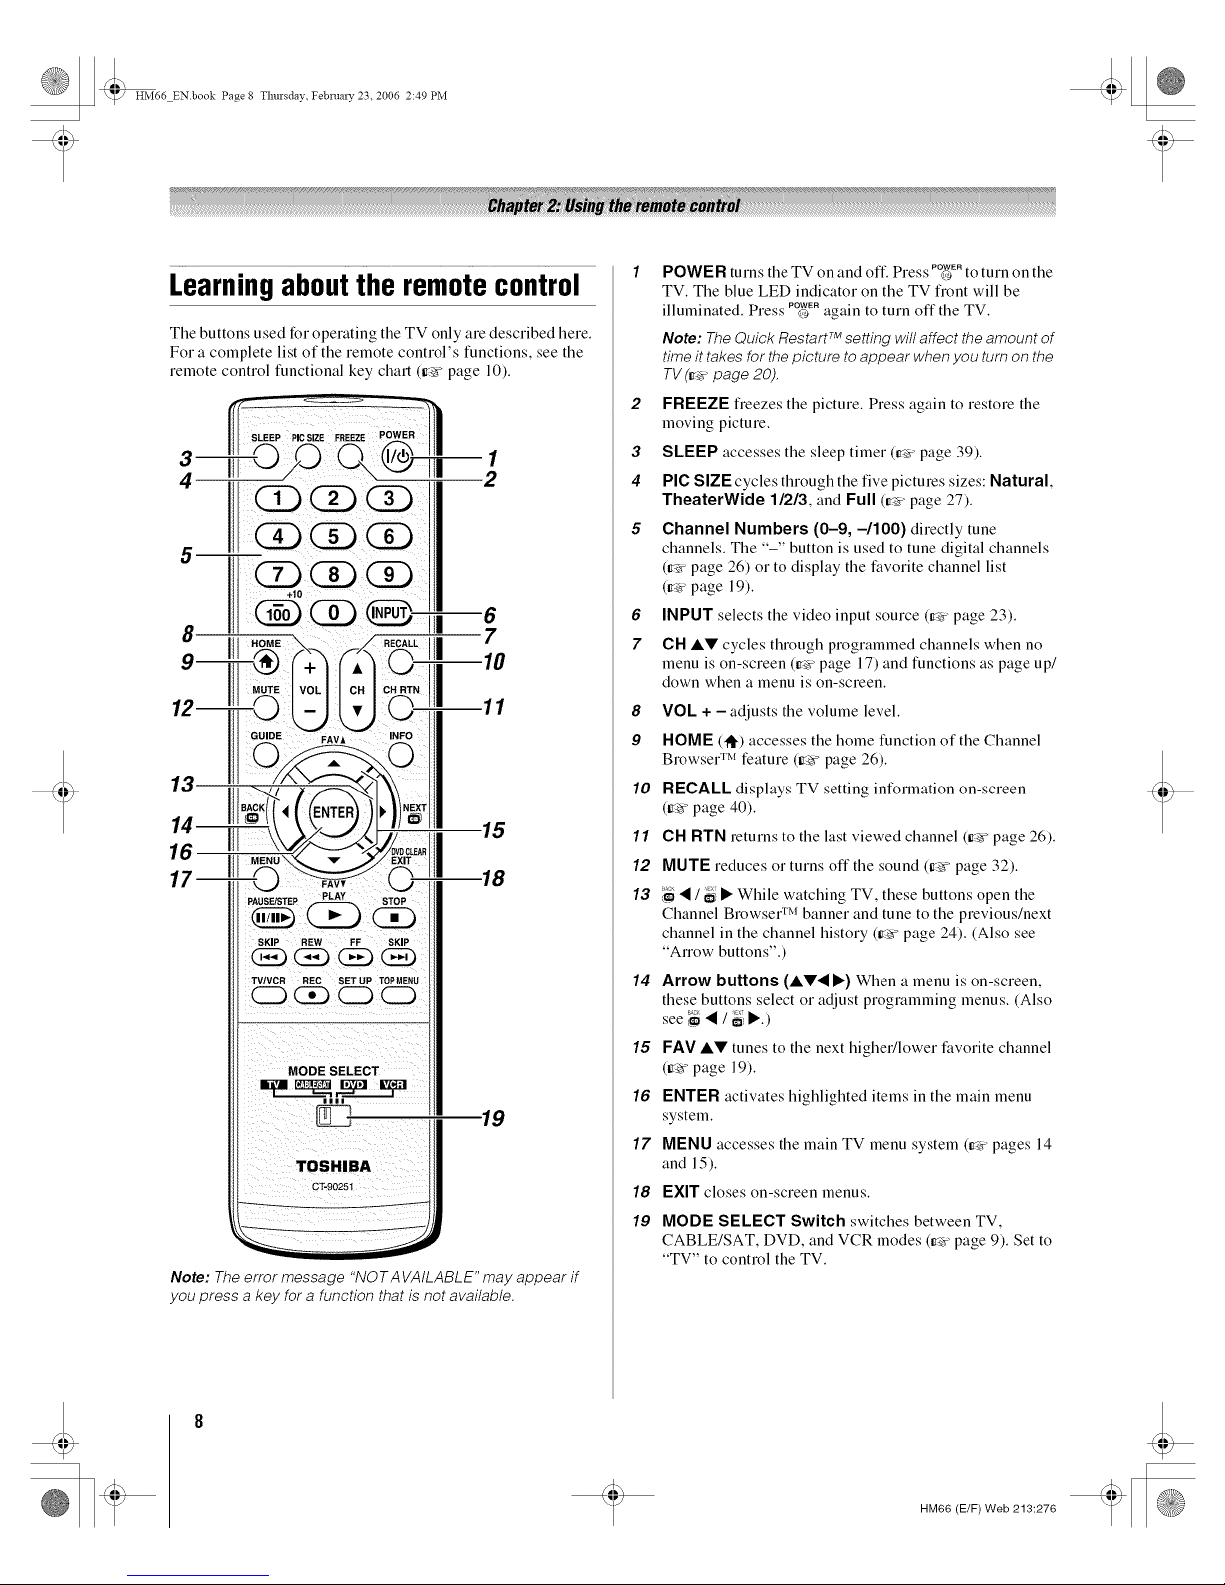
Learningaboutthe remotecontrol
Tile buttons used for operating tile TV only are described here.
For a complete list of the remote control's functions, see the
remote control functional key chart (_'_ page 10).
5
+10
III 6
7
]l| 10
11
14 -15
17 -18
Note: The error message "NOTA VAILABLE" may appear if
you press a key for a function that is not available.
1 - - POWER
POWER turns tile TV on and off. Press O to turn on tile
TV. The blue LED indicator on the TV front will be
illuminated. Press P_ERagain to turn off the TV.
Note: TheQuick RestartTM setting willaffect theamount of
time it takesfor thepicture toappear when you turnon the
TV(ri_ page 20).
2 FREEZE fieezes the picture. Press again to restore the
moving picture.
3 SLEEP accesses the sleep timer (_'r page 39).
4 PIC SIZE cycles through the five pictures sizes: Natural,
TheaterWide 1/2/3, and Full (t_> page 27).
5 Channel Numbers (0-9, -/100) directly tune
channels. The "-" button is used to tune digital channels
(tr_'rpage 26) or to display the favorite channel list
(Ir,'r"page 19).
6 INPUT selects the video input source (_'r page 23).
7 CH AV cycles through programmed channels when no
menu is on-screen (r,'r"page 17) and functions as page up/
down when a menu is on-screen.
8 VOL + - adjusts the volume level.
9 HOME (lql')accesses the home function of the Channel
Browser TM feature (ir_> page 26).
10 RECALL displays TV setting intk)rmation on-screen
(ir_ypage 40).
11 CH RTN returns to the last viewed channel (Ir_>"page 26).
12 MUTE reduces or turns off the sound (ir_ page 32).
1,7 • / a;i• While watching TV, these buttons open the
Channel Browser TM banner and tune to the pmvious/next
channel in the channel history (ir_> page 24). (Also see
"Arrow buttons".)
14 Arrow buttons (AV• •) When a menu is on-screen,
these buttons select or adjust programming menus. (Also
see '_ • / _4•.)
15 FAV AV tunes to the next higher/lower favorite channel
(Ire'r"page 19).
16 ENTER activates highlighted items in the main menu
system.
17 MENU accesses the main TV menu system (tr_'rpages 14
and 15).
18 EXIT closes on-screen menus.
19 MODE SELECT Switch switches between TV,
CABLE/SAT, DVD, and VCR modes (_'r page 9). Set to
"TV" to control the TV.
HM66 (E/F) Web 213:276
t
HM66 ENbook Page 9 Tlmrsdav Februa W 23 2006 2:49 PM
Usingthe remotecontroltocontrol
yourotherdevices
If you have a non-Toshiba device or a Toshiba device that the
remote control is not preprogrammed to operate, you must first
program the remote control to recognize the device (if you
have not aheady done so) (Ire'r"pages 11-13).
To use your TV remote control to operate a:
• Cable converter box or satellite receiver, set the MODE
SELECT Switch to CABLE/SAT.
• VCR, set the MODE SELECT Switch to VCR
• DVD player or HTIB, set the MODE SELECT Switch to
DVD.
Note: Even after the TV remote control is programmed, it may
not operate certain features on your other device, tf this
happens and you wish to use those features, you will need to
use the device's original remote control.
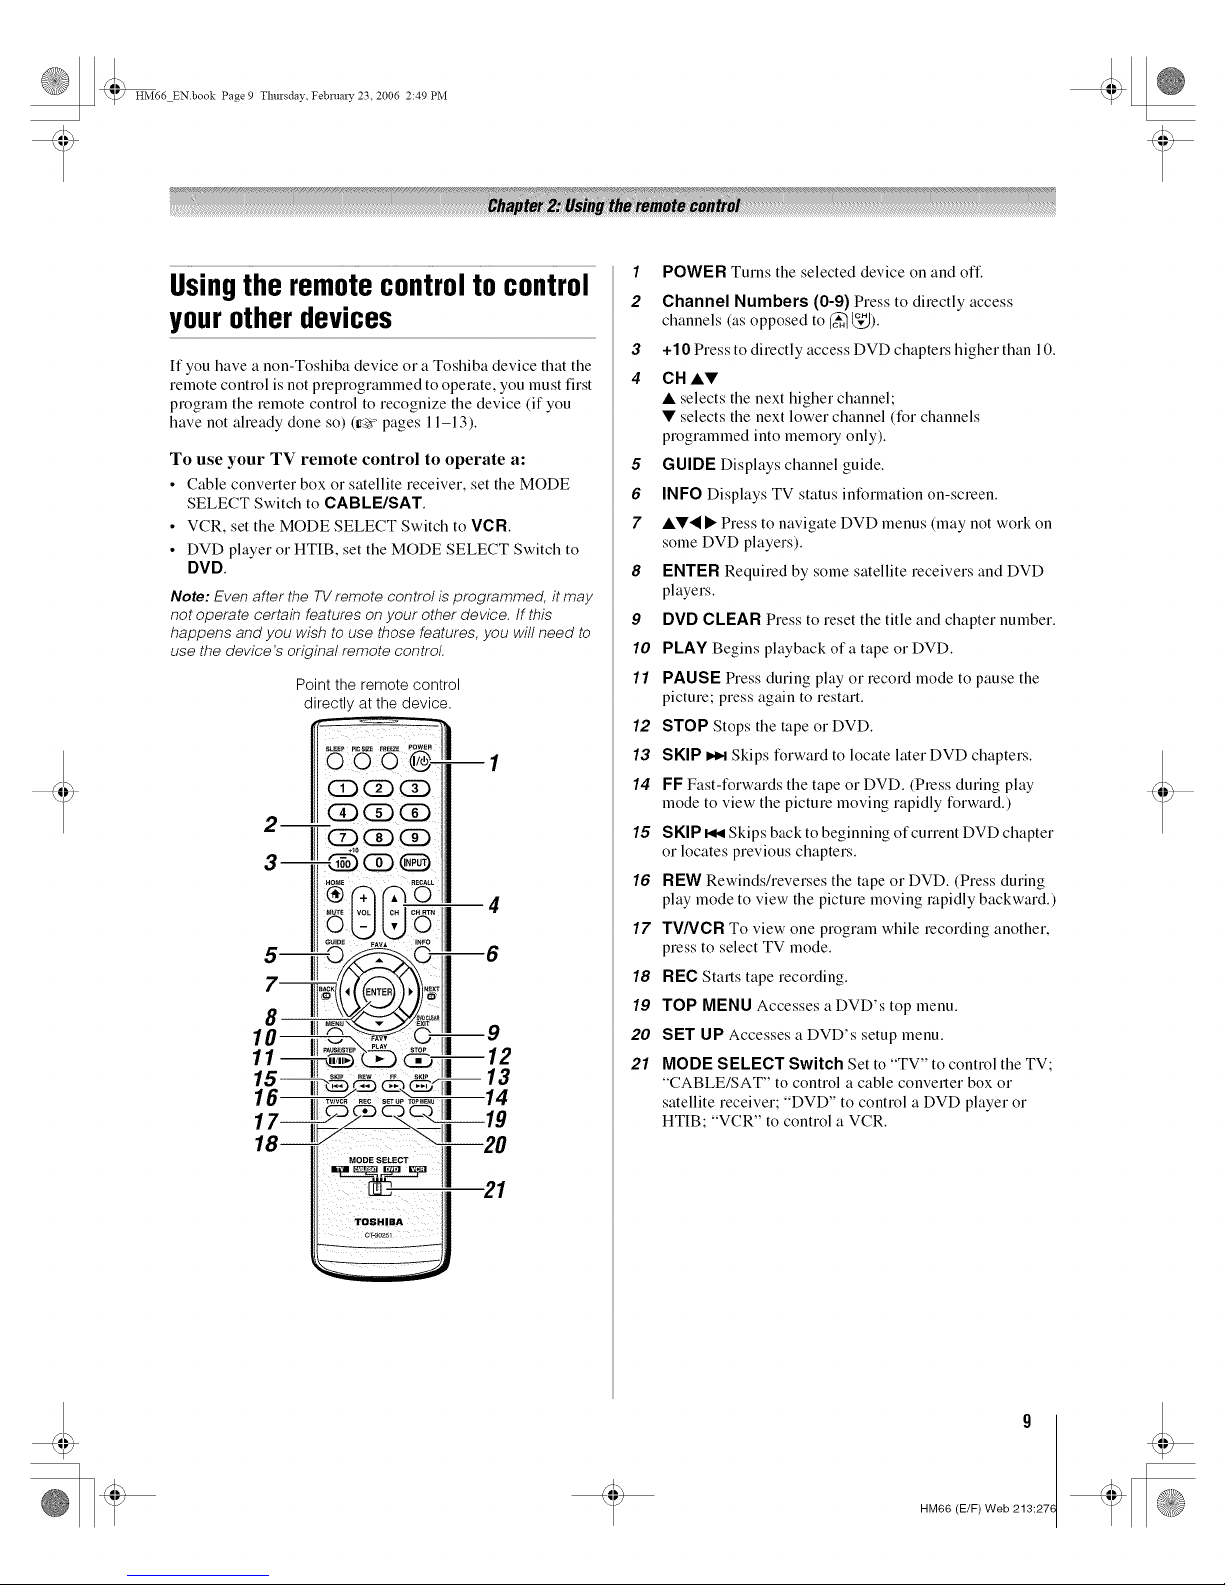
Point the remote control
directly at the device.
CD : Q
2 QQCD
Q CD(:i:)
a--
4 4 lit _AUS_STEp>---.-.._ stop I1| 4 _'J
13
1"'7 /c 111...................c-<o _11|""19
181___1 -- 11" J!i20
1 POWER Turns the selected device on and off
2 Channel Numbers (0-9) Press to directly access
channels (as opposed to _ _,").
3 +10 Press to directly access DVD chapters higher than 10.
4 CH ,&•
• selects the next higher channel;
• selects the next lower channel (for channels
programmed into memo U only).
8 GUIDE Displays channel guide.
6 INFO Displays TV status information on-screen.
7 ••'_ • Press to navigate DVD menus (may not work on
some DVD players).
8 ENTER Required by some satellite receivers and DVD
players.
9 DVD CLEAR Press to reset the title and chapter number.
10 PLAY Begins playback of a tape or DVD.
11 PAUSE Press during play or record mode to pause the
picture; press again to restart.
12 STOP Stops the tape or DVD.
13 SKIP _ Skips forward to locate later DVD chapters.
14 FF Fast-forwards the tape or DVD. (Press during play
mode to view the picture moving rapidly forward.)
15 SKIP _ Skips back to beginning of current DVD chapter
or locates previous chapters.
16 REW Rewinds/reverses the tape or DVD. (Press during
play mode to view the picture moving rapidly backward.)
17 TV/VCR To view one program while recording another,
press to select TV mode.
18 REC Starts tape recording.
19 TOP MENU Accesses a DVD's top menu.
20 SET UP Accesses a DVD's setup menu.
21 MODE SELECT Switch Set to "TV" to control theTV;
"CABLE/SAT" to control a cable converter box or
satellite receiver; "DVD" to control a DVD player or
HTIB; "VCR" to control a VCR.
HM66 (E/F) Web 213:27(
t
HM66 ENbook Page 10 Thursday February 23. 2006 2:49 PM
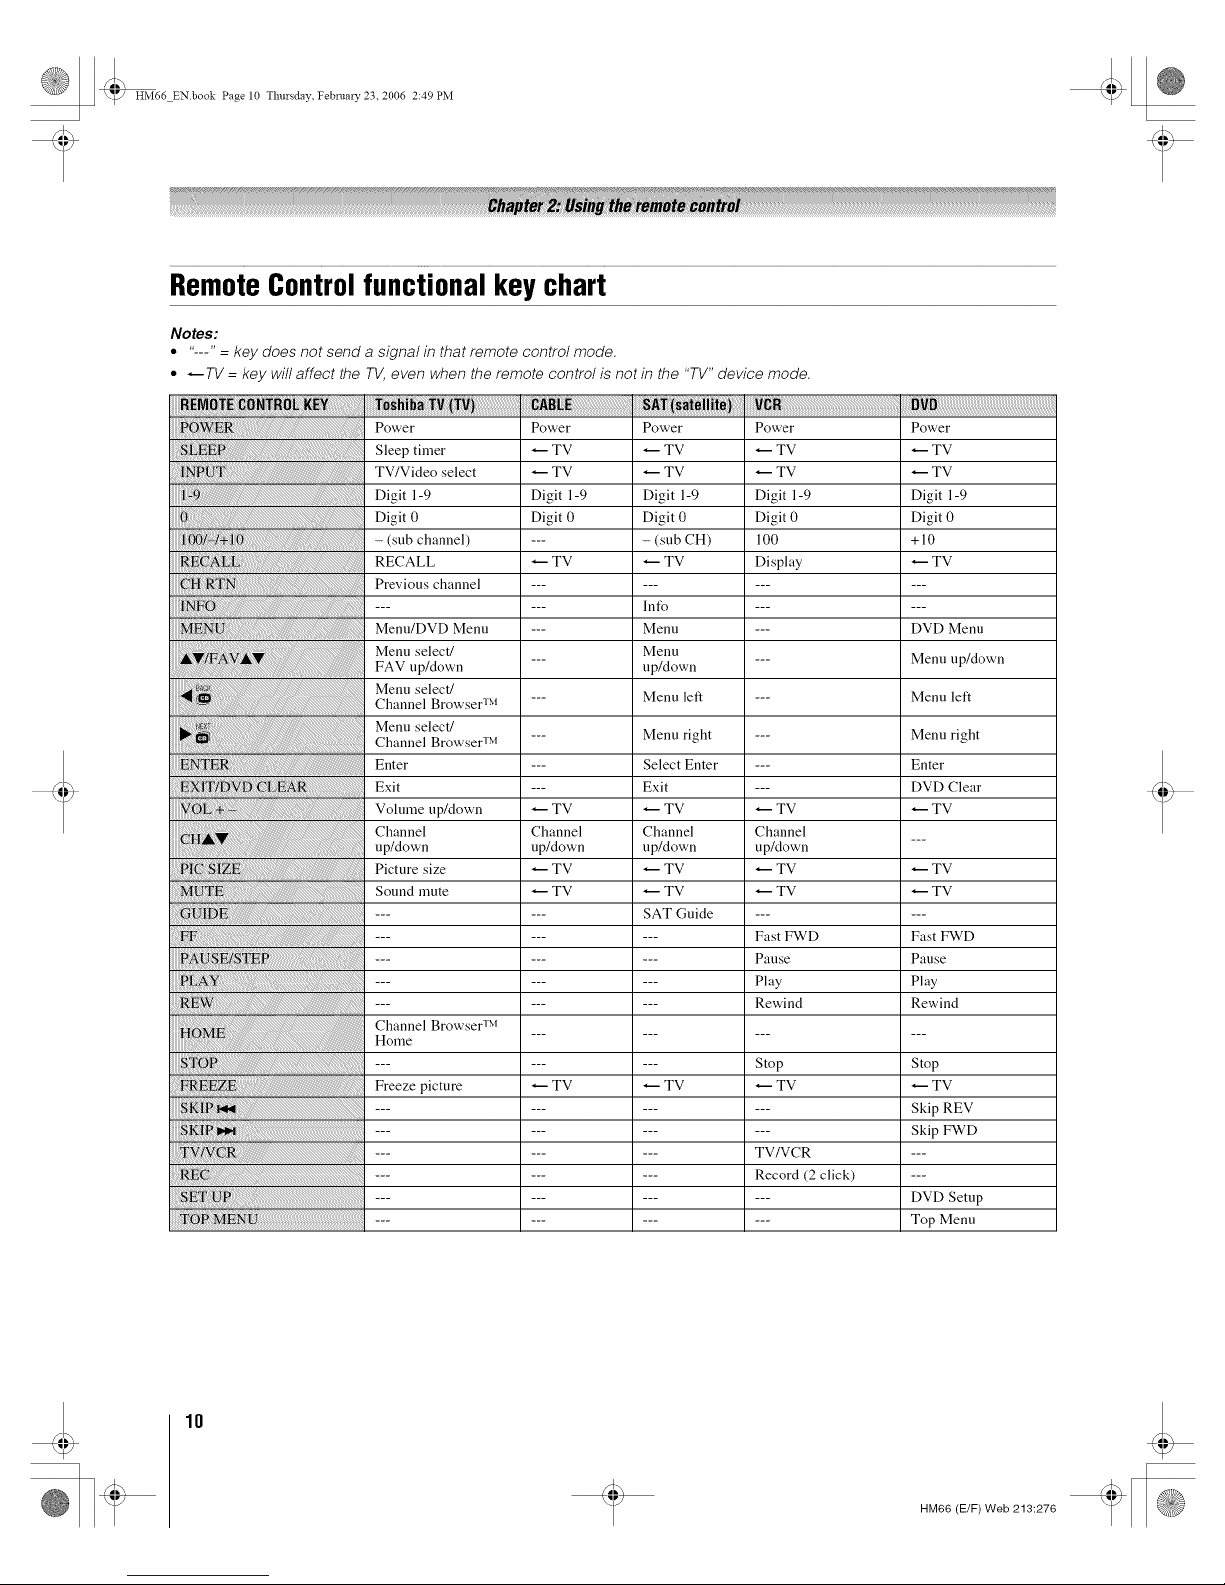
RemoteControlfunctional key chart
Notes:
• "---" = key does not send a signal in that remote control mode.
° _TV = key will affect the TV, even when the remote control is not in the "TV" device mode.
Power
Sleep timer
TV/Video select
Digit 1-9
Digit 0
- (sub channel)
RECALL
Previous channel
Menu/DVD Menu
Menu select/
FAV up/down
Menu select/
Channel Browser TM
Menu select/
Channel Browser TM
Enter
Exit
Volume up/down
Channel
up/down
Picture size
Sound mute
Channel Browser TM
Home
Freeze picture
Power
TV
TV
Digit 1-9
Digit 0
TV
TV
Channel
up/down
TV
TV
TV
Power
TV
TV
Digit 1-9
Digit 0
- (sub CH)
TV
lnfo
Menu
Menu
up/down
Menu left
Menu right
Select Enter
Exit
TV
Channel
up/down
TV
TV
SAT Guide
TV
Power
TV
TV
Digit 1-9
Digit 0
100
Display
TV
Channel
upAtown
TV
TV
Fast FWD
Pause
Play
Rewind
Stop
TV
TV/VCR
Record (2 click)
Power
TV
TV
Digit 1-9
Digit 0
+10
TV
DVD Menu
Menu up/down
Menu left
Menu right
Enter
DVD Clear
TV
TV
TV
Fast FWD
Pause
Play
Rewind
Stop
TV
Skip REV
Skip FWD
DVD Setup
Top Menu
10
HM66 (E/F) Web 213:276
t
HM66 ENbook Page 11 Thursday February 23. 2006 2:49 PM
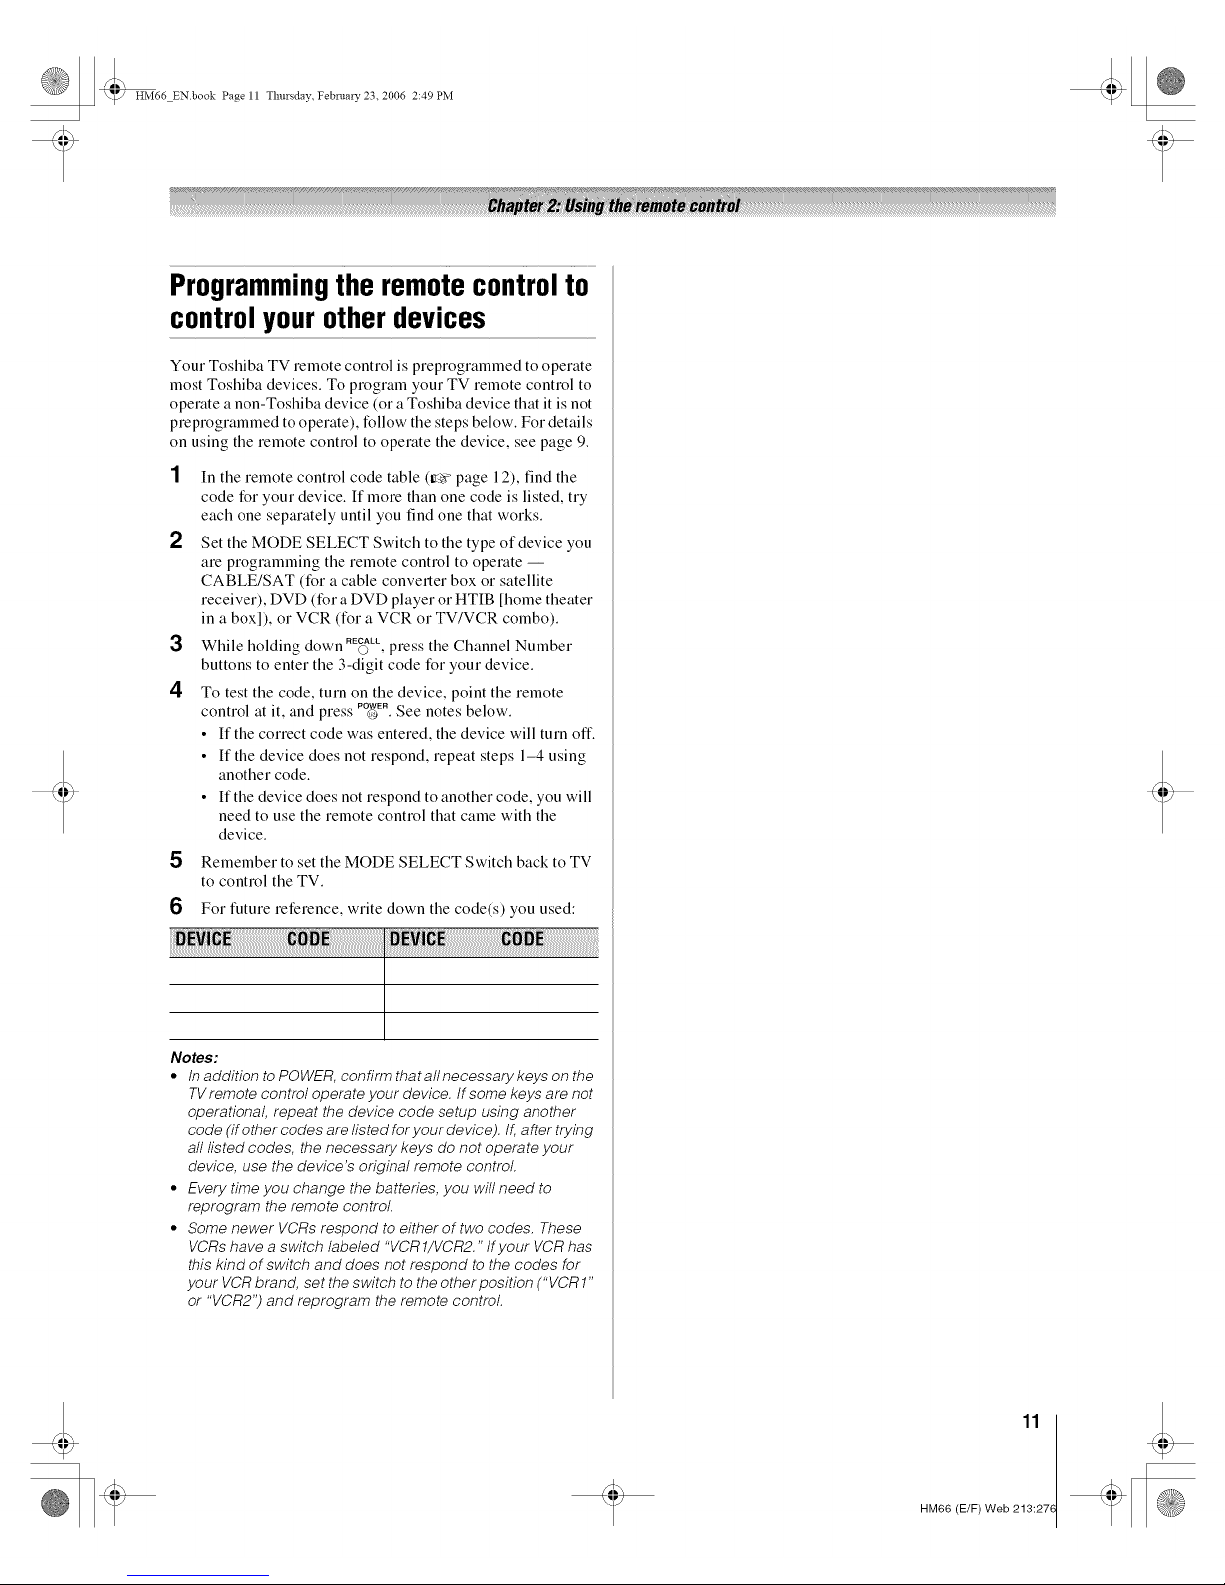
Programmingthe remote controlto
controlyour other devices
Your Toshiba TV remote control is preprogrammed to operate
most Toshiba devices. To program your TV remote control to
operate a non-Toshiba device (or a Toshiba device that it is not
preprogrammed to operate), follow the steps below. For details
on using the remote control to operate the device, see page 9.
2
3
4
In tile remote control code table (ir_ page 12), find tile
code for your device. If more than one code is listed, try
each one separately until you find one that works.
Set the MODE SELECT Switch to the type of device you
are programming the remote control to operate --
CABLE/SAT (for a cable converter box or satellite
receiver), DVD (for a DVD player or HTIB [home theater
in a boxl), or VCR (for a VCR or TV/VCR combo).
While holding down ,E_LL,press the Channel Number
buttons to enter the 3-digit code for your device.
To test the code, turn on the device, point the remote
control at it, and press ,_E, See notes below,
• If the correct code was entered, the device will turn off,
• If the device does not respond, repeat steps 1-4 using
another code,
• If the device does not respond to another code, you will
need to use the remote control that came with the
device,
5 Remember to set the MODE SELECT Switch back to TV
to control the TV,
6 For future reference, write down the code(s) you used:
Notes:
• tn addition to POWER, confirm thatallnecessarykeys on the
TVremote control operate your device, tf some keys are not
operational, repeat the device code setup using another
code (if other codes are listed for your device). If,after trying
all listed codes, the necessary keys do not operate your
device, use the device's original remote control.
• Every time you change the batteries, you will need to
reprogram the remote control.
• Some newer VCRs respond to either of two codes. These
VCRs have a switch labeled "VCR1/VCR2." tfyour VCR has
this kind of switch and does not respond to the codes for
your VCR brand, set the switch to the other position ("VCR1"
or "VCR2") and reprogram the remote control.
11
HM66 (E/F) Web 213:27(
t
HM66 ENbook Page 12 Thursday Februarv 23. 2006 2:49 PM
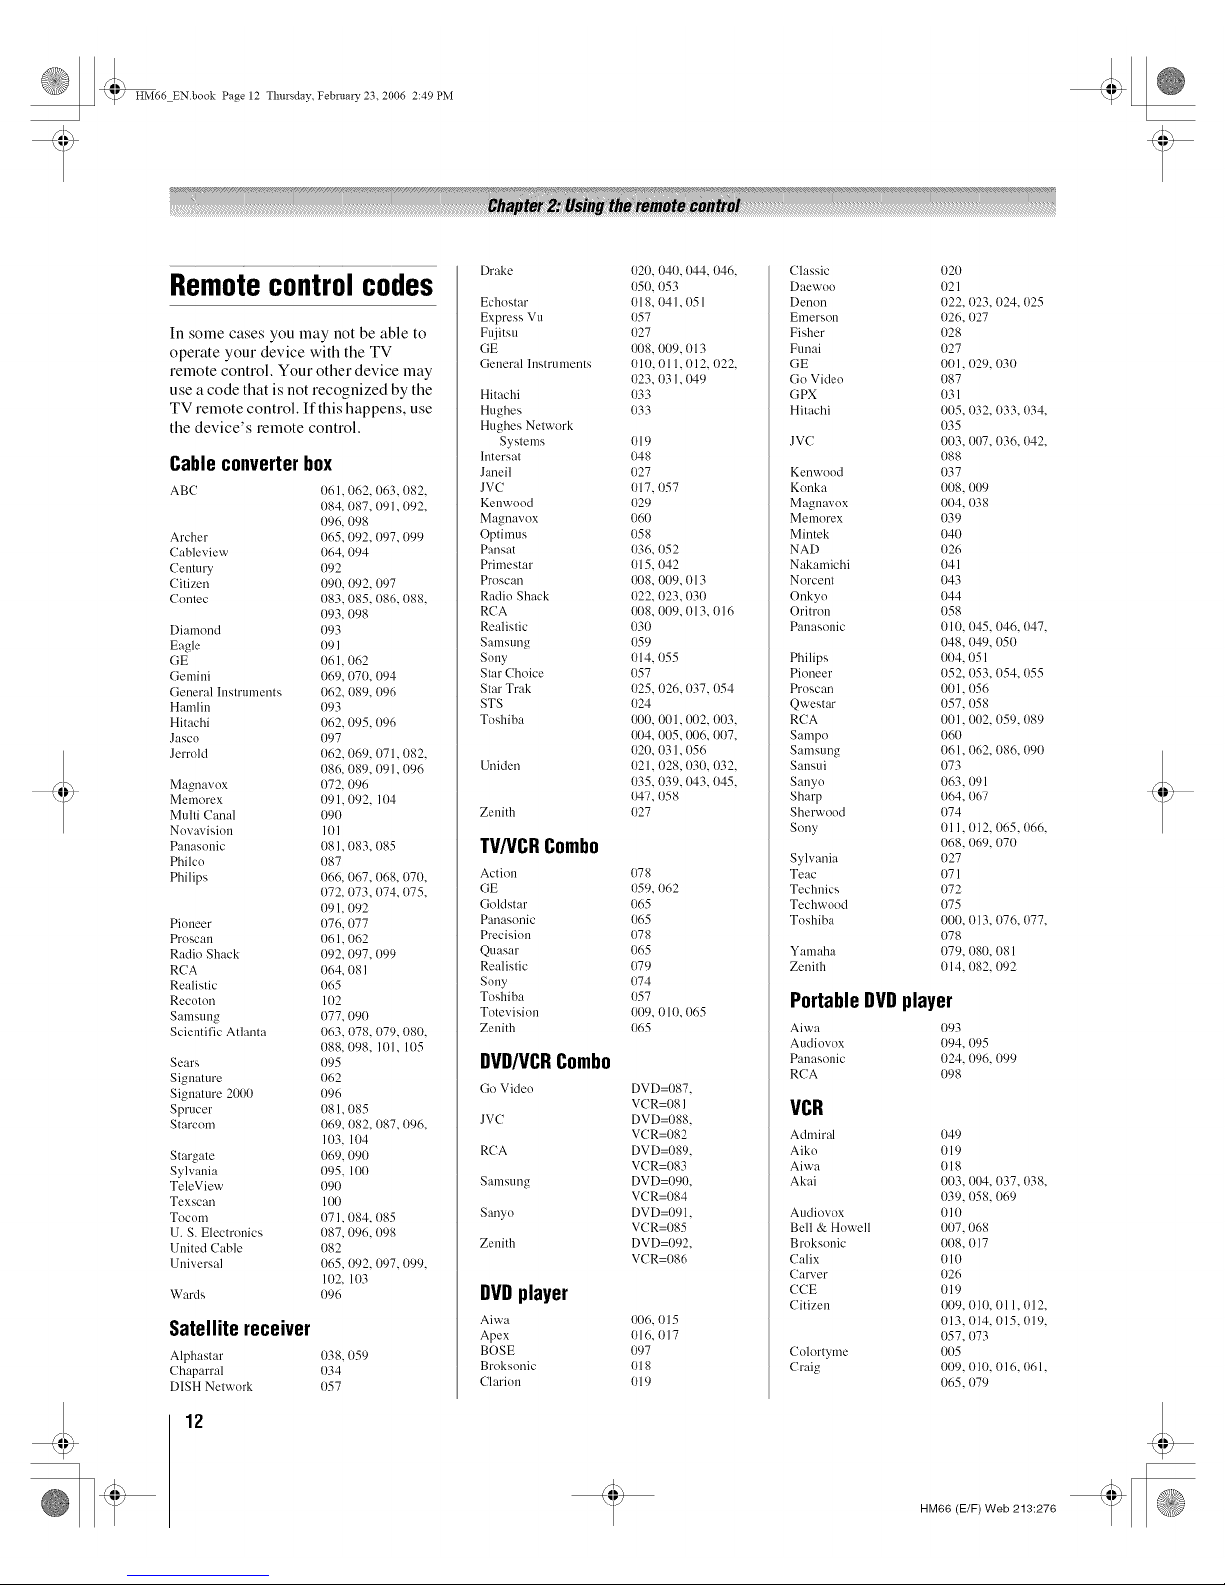
Remotecontrolcodes
In some cases you may not be able to
operate your device with the TV
remote control. Your other device may
use a code that is not recognized by the
TV remote control. If this happens, use
the device's remote control.
Cable converter box
ABC 061. 062. 063. 082.
084. 087. 091. 092.
I)96. 098
Archer I)65. 092. 097.099
Cableview 064. 094
Century 092
Citizen 090. 092. 097
Contec 083. 085. 086.088.
093. 098
Diamond 093
Eagle 1)91
GE 061,062
Gemini 069,070, 094
General Instruments 062. 089. 096
Hamlin 093
Hitachi 062.095. 096
Jasco 097
Jerrold 062.069. 071. 082.
086. 089. 091. 096
Magnavox {)72. 096
Memorex {)91.092. 104
Multi Canal 090
Novavision 101
P:m:tsonic 081. 083. 085
Philco 087
Philips {)66. 067. 068. 070.
072. 073. 074.075.
091. 092
Pioneer 076.077
Proscau 061. 062
Radio Shack I)92.097. 099
RCA I)64. 081
Realistic 065
Recoton 11)2
Samsung 077.090
Scientific Atlanta 063. 078. 079.080.
088. 098. 101. 105
Sears 095
Signature 062
Signature 2000 096
Sprucer 081. 085
Starcom 069. 082. 087.096.
103. 104
Stargate 069.090
Sylvania 095. 100
TeleView 090
Texscan 100
Tocom {)71. 084. 085
13.S. Electronics 087.096. 098
1Jnited Cable 082
13niversal 065. 092. 097.099.
102. 103
Wards 1)96
Satellite receiver
Alphast:u" 038.059
Chaparral 034
DISH Network 057
12
[)rake 020. 040. I)44. 046.
050. 1)53
Echostar 018.04 I. 051
Express Vu 057
Fujitsu 027
GE 008. 009. 013
General Instruments 010. 011.012. 022.
023.03 I. 1}49
Hitachi 033
Hughes 033
Hughes Network
Systems 019
lntersat 048
Janeil 027
JVC 017.1)57
Kenwood 029
Magnavox 060
Optimus 058
Pansat 036. 052
Primestar 015.1)42
Proscan 008. 009. 013
Radio Shack 022. 023. 030
RCA {}{)8.01)9.013. 016
Realistic 030
Samsung 1)59
Sony 014. 055
Star Choice 057
Star Trak 025. 026. 037. 054
STS 024
Toshiba 1}{)0.001. (}{)2.003.
I}{)4,005, {}{}6,007,
020, 031,056
Uniden 021. 028, 030. 032.
035. {)39. {M3. 045.
047,058
Zenith 027
TV/VCRCombo
Action 078
GE 059, 062
Goldstar 065
Panasonic 065
Precision 078
Quasar 065
Realistic 079
Sony 074
Toshiba 057
Totevision 009. 010. 065
Zenith 065
DVD/VCRCombo
Go Video DVD={}87
VCR=081
JVC DVD=088
VCR=082
RCA DVD=089
VCR=083
Samsung DVD=090
VCR=084
Sanyo DVD=091
VCR=085
Zenith DVD=092
VCR=086
DVDplayer
Aiwa {}{t6,{}15
Apex 016, 017
BOSE 097
Broksonic 0l 8
Clarion 019
Classic 020
Daewoo 021
Denon 022. 023. 024. 025
Emerson 026. 027
Fisher 028
Funai 027
GE 001. 029. 030
Go Video 087
GPX 031
Hitachi 005. 032. 033. {)34.
035
JVC 003. 007. 036. 042.
088
Kenwood 037
Konka 008. {)09
Magnavox 004. 038
Memorex 039
Mintek 040
NAD 026
Nakamichi 041
Norcent 043
Onkyo 044
Oritron 058
Pauasonic 010. 045. 046. 047.
048. 049, 050
Philips 004. 051
Pioneer 052. 053. 054. 055
Proscan 001. 056
Qwestar 057. 058
RCA 001. 002. 059. 089
Sampo 060
Samsung 061. 062. 086. 090
Sausui 073
Sauyo 063, 091
Shm'p 064, 067
Sherwood 074
Sony 01 l, 012, 065,066,
068, 069, 070
Sslvania 027
Teac 071
Technics 072
Techwood 075
Toshiba 000. 013. 076. 077.
078
Yamaha 079. 080. 081
Zenith 014. 082. 092
Portable DVDplayer
Aiwa 093
Audiox ox 1}94,{)95
Pauasonic 024. 096. 099
RCA 098
VCR
Admiral
Aiko
Aiwa
Akai
Audiovox
Bell & Howell
Broksonic
Calix
Carver
CCE
Citizen
Colortyme
Craig
049
019
018
003. 004. 037. 038.
039. 058. 069
010
007.068
008, 017
o I0
026
019
1}{}9,010, 011, 012,
013. 014. 015. 019.
057. 073
005
009. 010. 016. 061.
065. 079
HM66 (E/F) Web 213:276
t
HM66 ENbook Page 13 Thursday February 23. 2006 2:49 PM
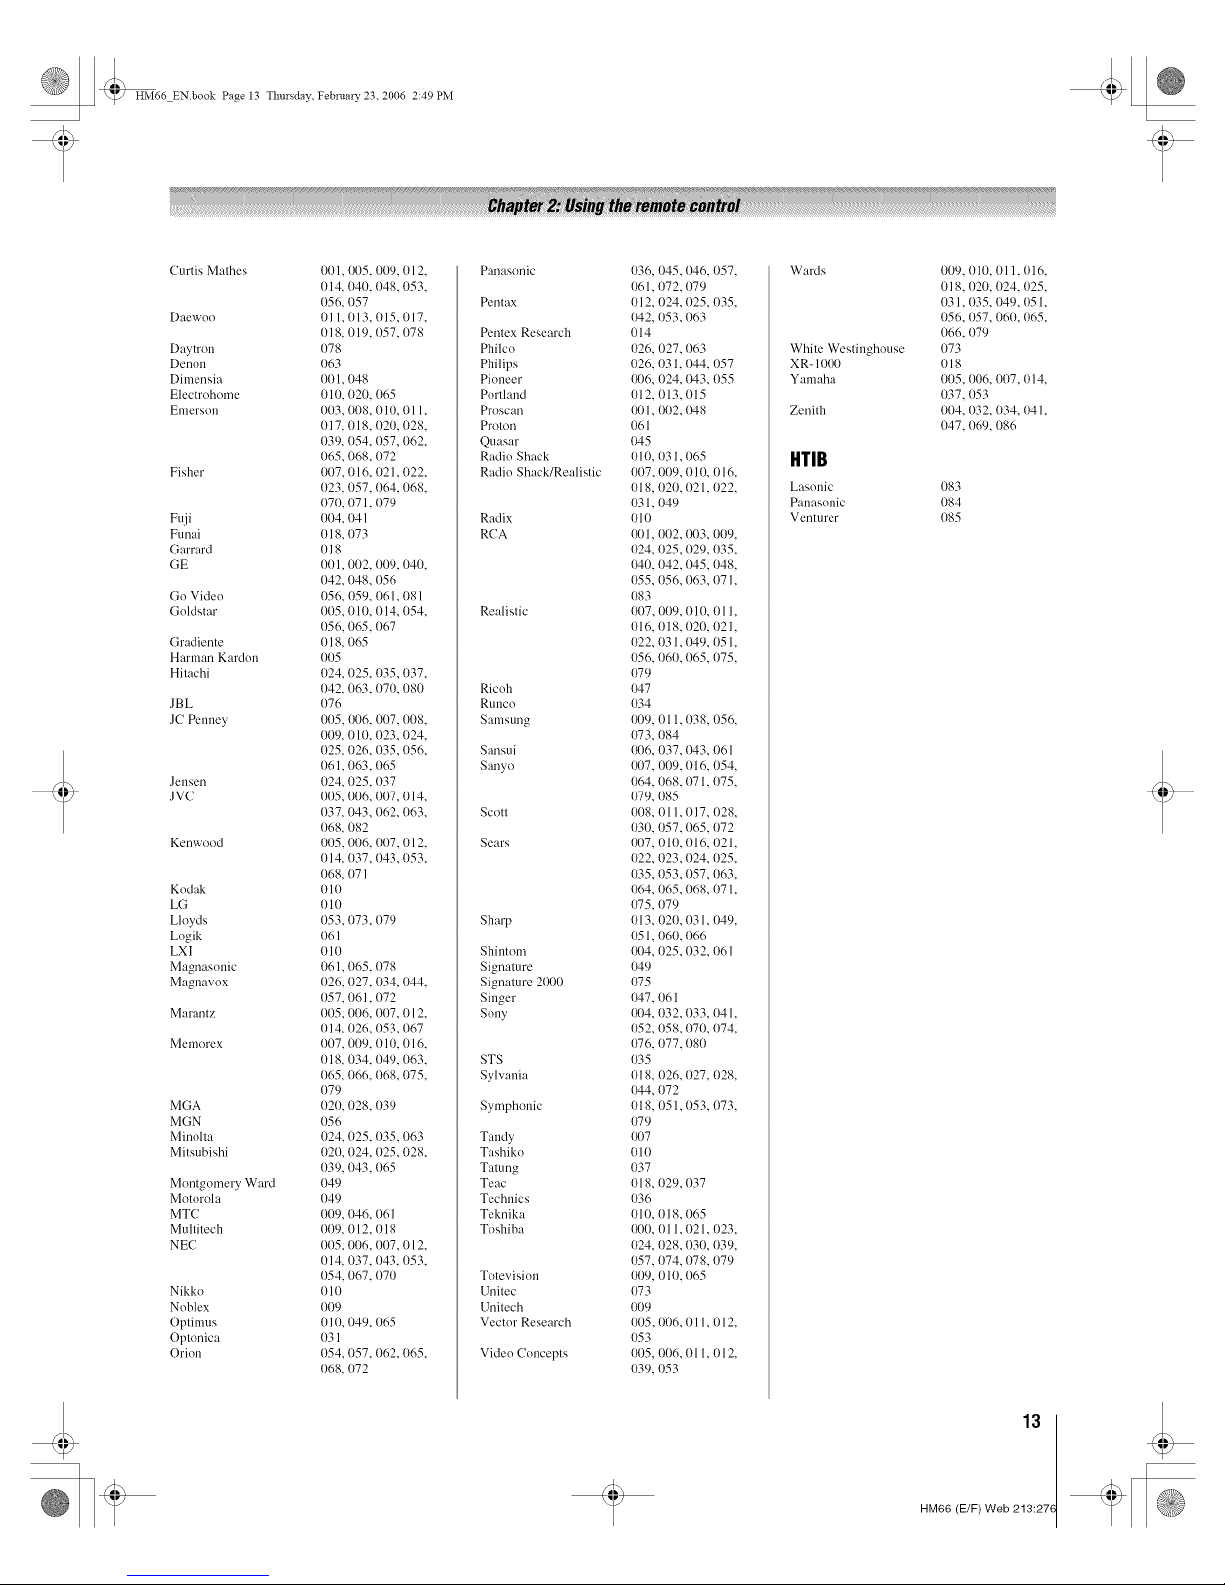
Curtis Mathes 001, I}{)5, 009, 012,
014, 040, 048,053,
056, 057
Daewuo 0l 1,013, 015, 017,
018, 019, 057,078
Daytron {)78
Denun 063
Dimensia 001,048
Electrohome 010, 020, (165
Emerson 003, (108, 010, 011,
017, 018, 020, 028,
039, (154, 057,062,
065,068, 072
Fisher 007, 016, 021, (122,
023, 057, 064, 068,
070, 071,079
Fuji 004, 041
Funai 018,073
Garrard 018
GE 001,002, 009,040,
042,048, 056
Go Vide() 056, 059, (161,081
Guldstar 005, 010, 014, (154,
056,065,067
Gradiente 018, 065
Harman Kardun 0(./5
Hitachi (124, 025, 035,037,
042, (163, I)71),080
JBL 076
JC Penuey 0{)5, {}{)6,007, (108,
0(.19,010, 023,024,
025, 026, 035, (156,
061,063, {165
Jensen 024,025, 037
J VC {){)5,006, {)t.17,014,
037, 043,062, (163,
068, 082
Kenwood 0(.15,(106,(I{)7,012,
014, (137, 043,053,
068, 07 I
Kodak 010
LG 010
Lloyds {)53,073,079
Logik {)61
LXI 01(.1
Magnasonic 061, (165, {)78
Magnavox {)26,027, 034, 044,
057,061,072
Marantz 0(.15,(106,0{)7, 012,
014, (126, {)53,067
Memorex 007,009, 01{1,016,
018, 034, 049,063,
065, 066, 068,075,
079
MGA 020, 028, 039
MGN 056
Minolta 024, (125, 035,063
Mitsubishi (120, 024, 025,028,
039,043,065
Montgomery Ward 049
Motorola 049
MTC 009, (146, 06 I
Multitech {)09,012, 018
NEC {)05,006, 0(.17,012,
014, 037, 043, (153,
054, 067, 070
Nikko 010
Noblex 009
Optimus (I] 0, 049, 065
Optonica 031
Orion 054,057, 062, (165,
068, 072
Panasonic
Pentax
Pentex Research
Philco
Philips
Pioneer
Porthmd
Proscan
Proton
Quasar
Radiu Shack
Radiu Shack/Realistic
Radix
RCA
Realistic
Ricuh
RUUCO
Samsung
Sansui
Sanyo
Scott
Sears
Sharp
Shiutom
Signature
Signature 2{}{)0
Singer
Suny
STS
Sylvania
Symphonic
Taudy
Tashiko
Tatung
Teac
Technics
Teknika
Toshiba
Totevisiuu
Unitec
Unitech
Vectur Research
Vide(( Concepts
036, 045,046, 057,
061,072, 079
012, 024, 025, (135,
{,'42,053,063
014
026, 027, 063
026, 031,044, 057
{}{}6,024, {}43,055
012, 013,015
{}{}1, 002, {_8
061
045
010, 031,065
007,009, 01(.1,016,
018, 020, 021,022,
031,049
010
{}{)1,002, {}{}3,009,
024, 025,029, 035,
{}40,042, 045, 048,
055, 056, 063, 07 I,
083
007,009, 010, 011,
016, 018, 020, 021,
022, 031, {}49,051,
056, 060, 065, 075,
079
O47
034
{}{}9,011, 038, 056,
{}73,084
{}{}6,037, 043, 061
{}{t7,009, 016, 054,
064, {t68, 071,075,
079, 085
008, 011,017, 028,
030, 057, 065, 072
{}{}7,010, 016, 021,
022, 023, {)24, 025,
035, {)53, {)57, 063,
064, 065,068, 071,
{}75,079
013, 020, 031,049,
051,060, 066
{}{}4,025,032, {161
{)49
075
{_7, 06l
I}{}4,032, 033, 041,
052, 058, 070, 074,
076, 077, 080
O35
018, 026, 027, 028,
044, 072
018, 051,053, (173,
079
{}{}7
o 1o
037
018, 029, 037
036
010, 018, 065
{}{10,011, 021, 023,
024, 028, 030, 039,
057, 074, 078, 079
009, 010, 065
073
009
005,006, 011,012,
053
005, 006, 011, 012,
039, 053
Wards
White Westinghouse
XR- 101}{)
Yamaha
Zenith
HTIB
Lasunic
Panasunic
Venturer
009, 010, Ol 1,016,
Ol8, 020, 024, {t25,
031,035, 049, 051,
056, 057, 060, 065,
066, 079
073
018
005, 006, (I(17,014,
037, 053
004, 032, (134, 041,
(147, 069, 086
083
084
085
13
HM66 (E/F) Web 213:27(
t
HM66 ENbook Page 14 Thursday February 23. 2006 2:49 PM
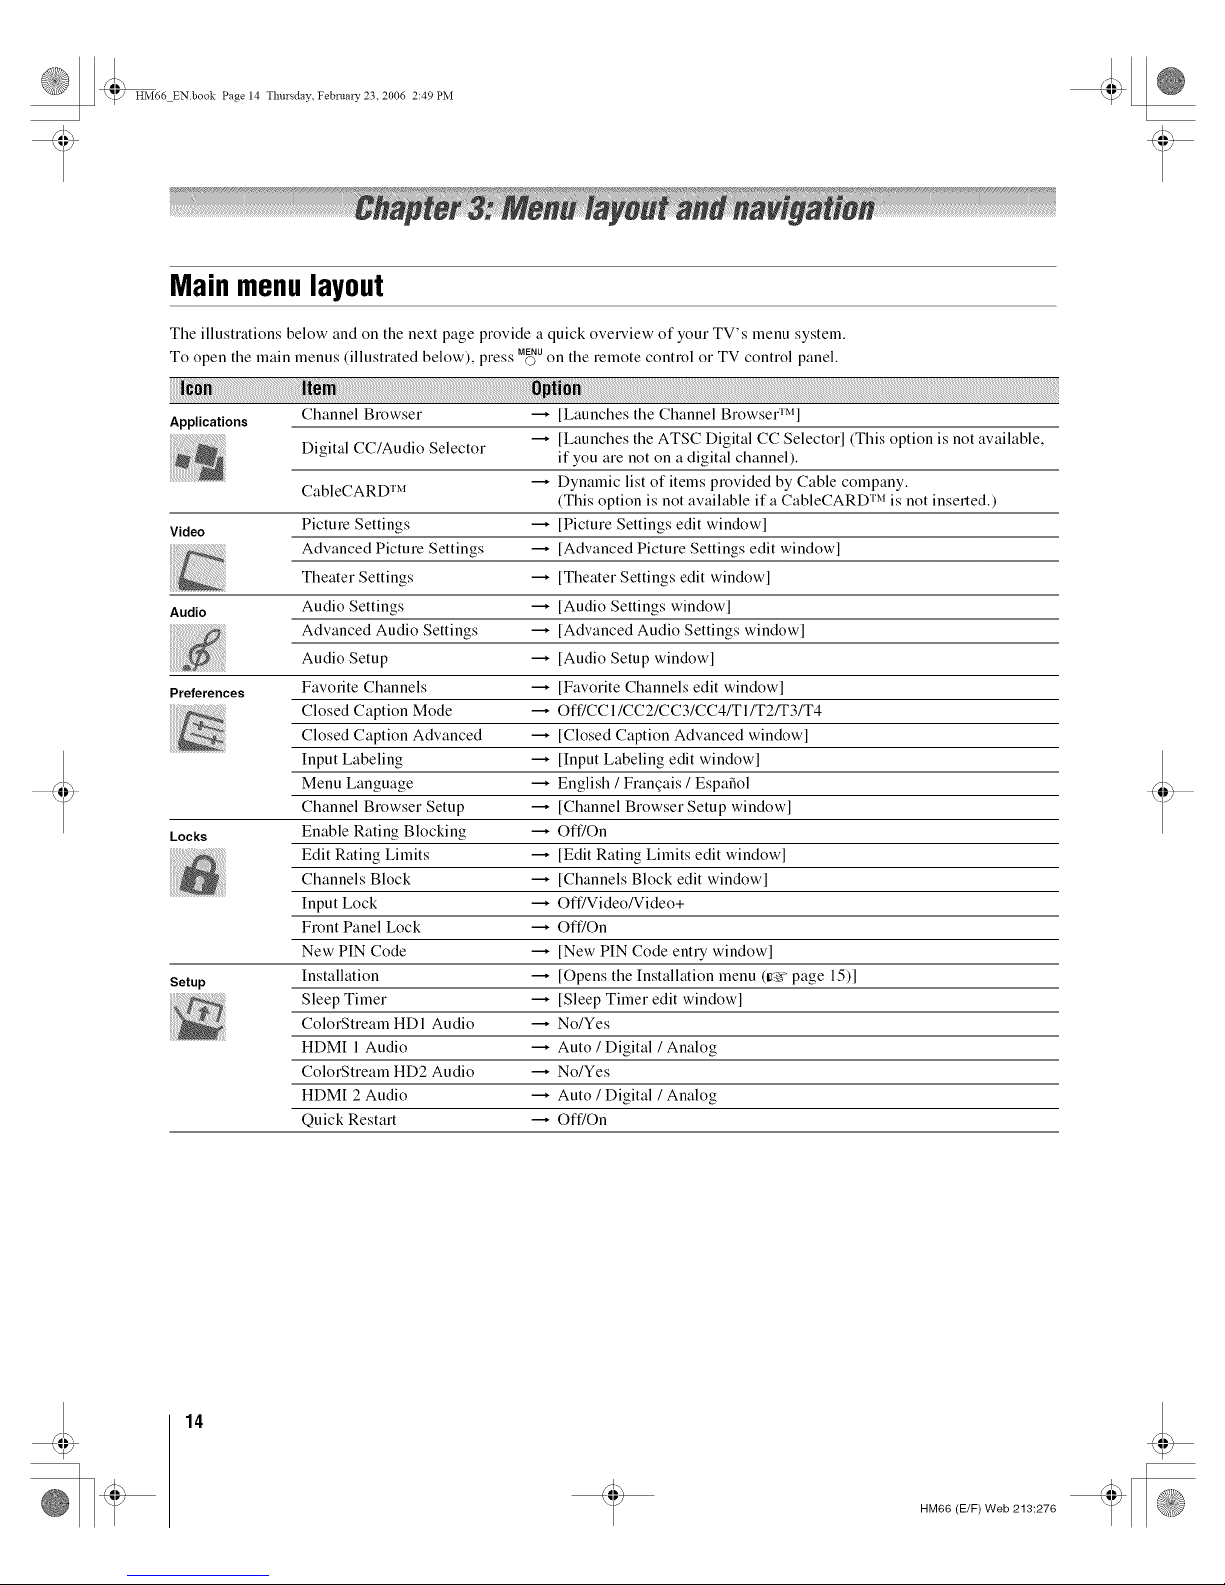
Mainmenulayout
Tile illustrations below and on tile next page provide a quick overview of your TV's menu system.
To open the main menus (illustrated below), " ss MENUpie.. O on the remote control or TV control panel.
Channel Browser ---* [Launches the Channel BrowsegrMl
Applications
[Launches the ATSC Digital CC Selectorl (This option is not awfilable,
Digital CC/Audio Selector
if you are not on a digital channel).
Dynamic list of items provided by Cable company.
CabIeCARD TM
(This option is not available ifa CableCARD TM is not inserted.)
Video Picture Settings ---* [Picture Settings edit window]
Advanced Picture Settings ---* [Advanced Picture Settings edit window]
Theater Settings _ [Theater Settings edit windowl
Audio Audio Settings _ [Audio Settings window]
Advanced Audio Settings ---* [Advanced Audio Settings window]
Audio Setup _ [Audio Setup window]
Preferences Favorite Channels ---* [Favorite Channels edit window]
Closed Caption Mode ---* Off/CCI/CC2/CC3/CC4/TI/T2/T3/T4
Closed Caption Advanced ---* [Closed Caption Advanced window]
Input Labeling _ [Input Labeling edit window]
Menu Language _ English / Franqais / EspalSol
Channel Browser Setup _ [Channel Browser Setup window]
Locks Enable Rating Blocking _ Off/On
Edit Rating Limits ---* [Edit Rating Limits edit window]
Channels Block _ [Channels Block edit window]
Input Lock _ Off/Video/Video+
Front Panel Lock _ Off/On
New PIN Code _ [New PIN Code entry windowl
Setup Installation _ [Opens the Installation menu (ir_ page 15)1
Sleep Timer _ [Sleep Timer edit windowl
ColorStream HDI Audio ---* No/Yes
HDMI 1 Audio ---* Auto / Digital / Analog
ColorStream HD2 Audio _ No/Yes
HDM[ 2 Audio _ Auto / Digital / Analog
Quick Restart ---* Off/On
14
HM66 (E/F) Web 213:276
t
HM66 ENbook Page 15 Thursday February 23. 2006 2:49 PM
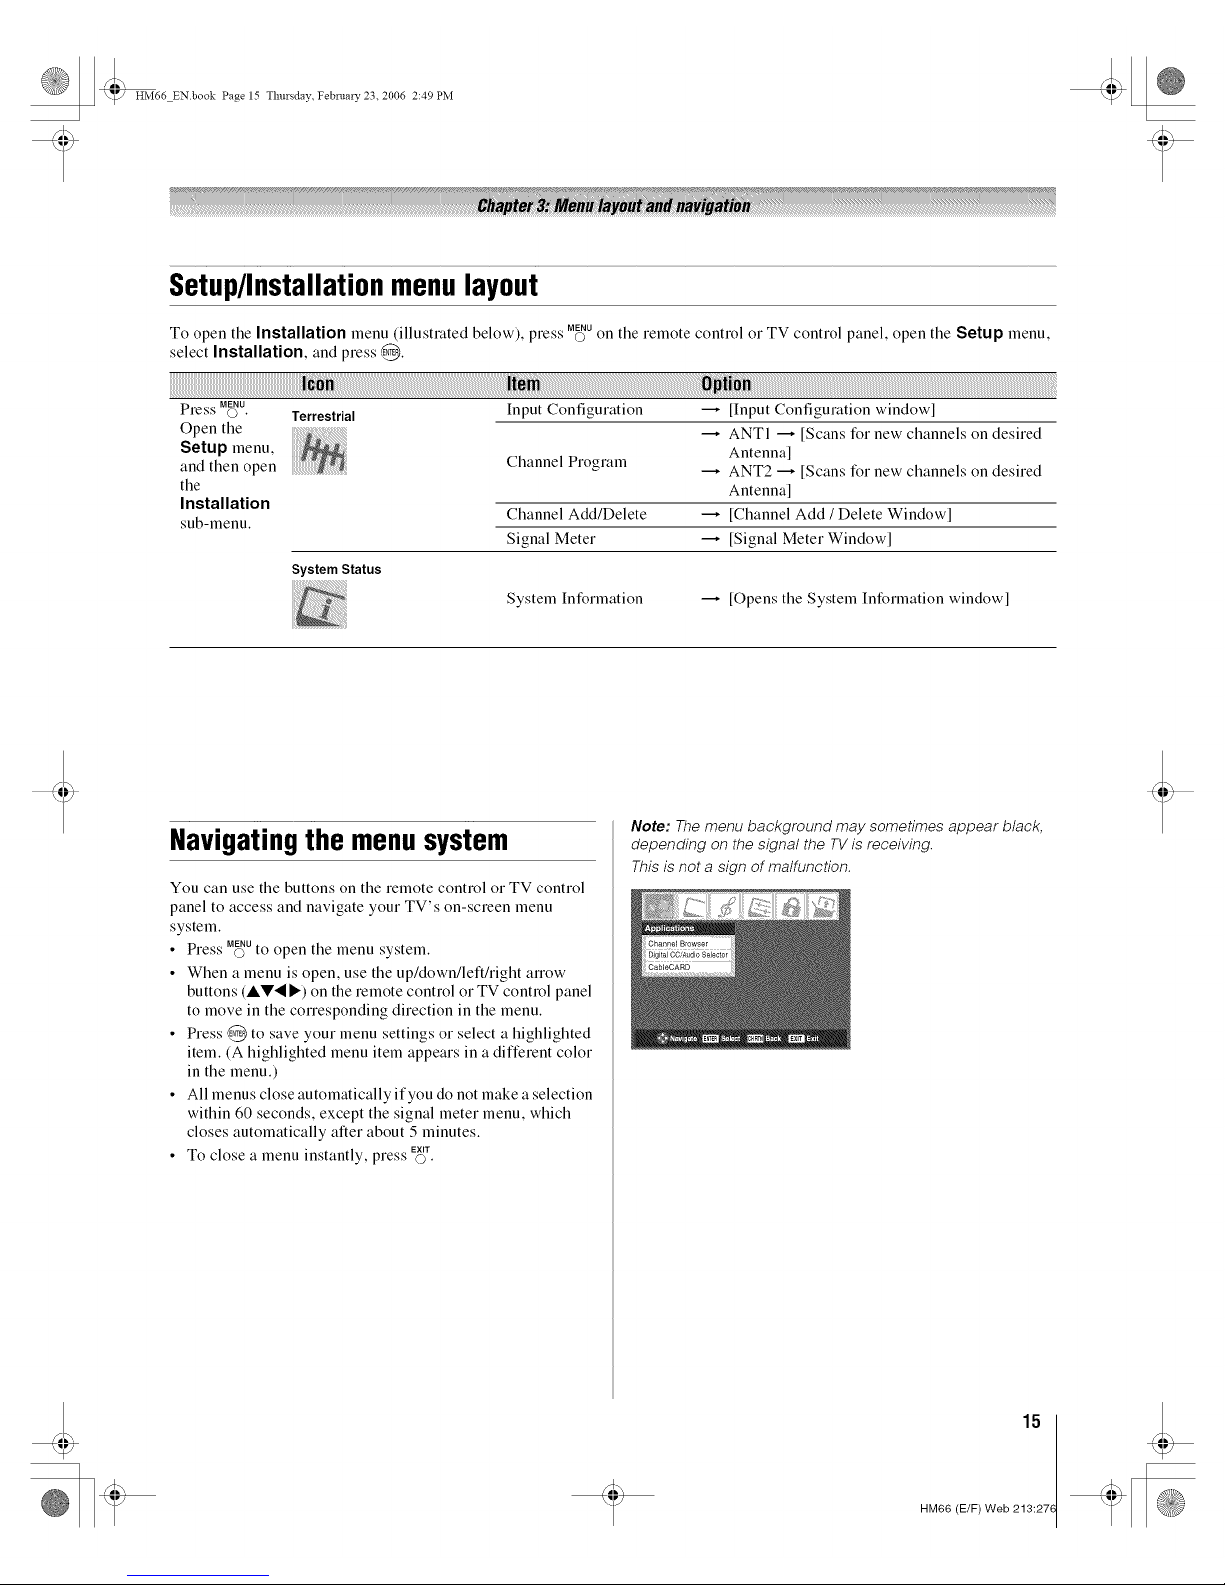
Setup/Installationmenulayout
• S SS MENU
To open the Installation menu (illustrated below), press o on the remote control or TV control panel, open tile Setup menu,
select Installation, and press @.
SS MENU
Pre,_'s©. Terrestrial
Open tile
Setup menu,
and then open
tile
Installation
sub-menu.
System Status
Input Configuration _ [Input Configuration window[
ANTI _ [Scans for new channels on desired
Channel Program Antenna]
ANT2 _ [Scans for new channels on desired
Antenna]
Channel Add/Delete _ [Channel Add / Delete Window[
Signal Meter _ [Signal Meter Window[
System Information _ [Opens tile System Information windowl
Navigatingthe menusystem
You can use tile buttons on tile remote control or TV control
panel to access and navigate your TV's on-screen menu
system.
• Press M_Uto open the menu system.
• When a menu is open, use tile up/down/left/right arrow
buttons (AV._I_) on tile remote control or TV control panel
to move in the corresponding direction in the menu.
• Press @ to save your menu settings or select a highlighted
item. (A highlighted menu item appears in a different color
in the menu.)
• All menus close automatically if you do not make a selection
within 60 seconds, except the signal meter menu, which
closes automatically after about 5 minutes.
• To close a menu instantly, press EX,¢_.
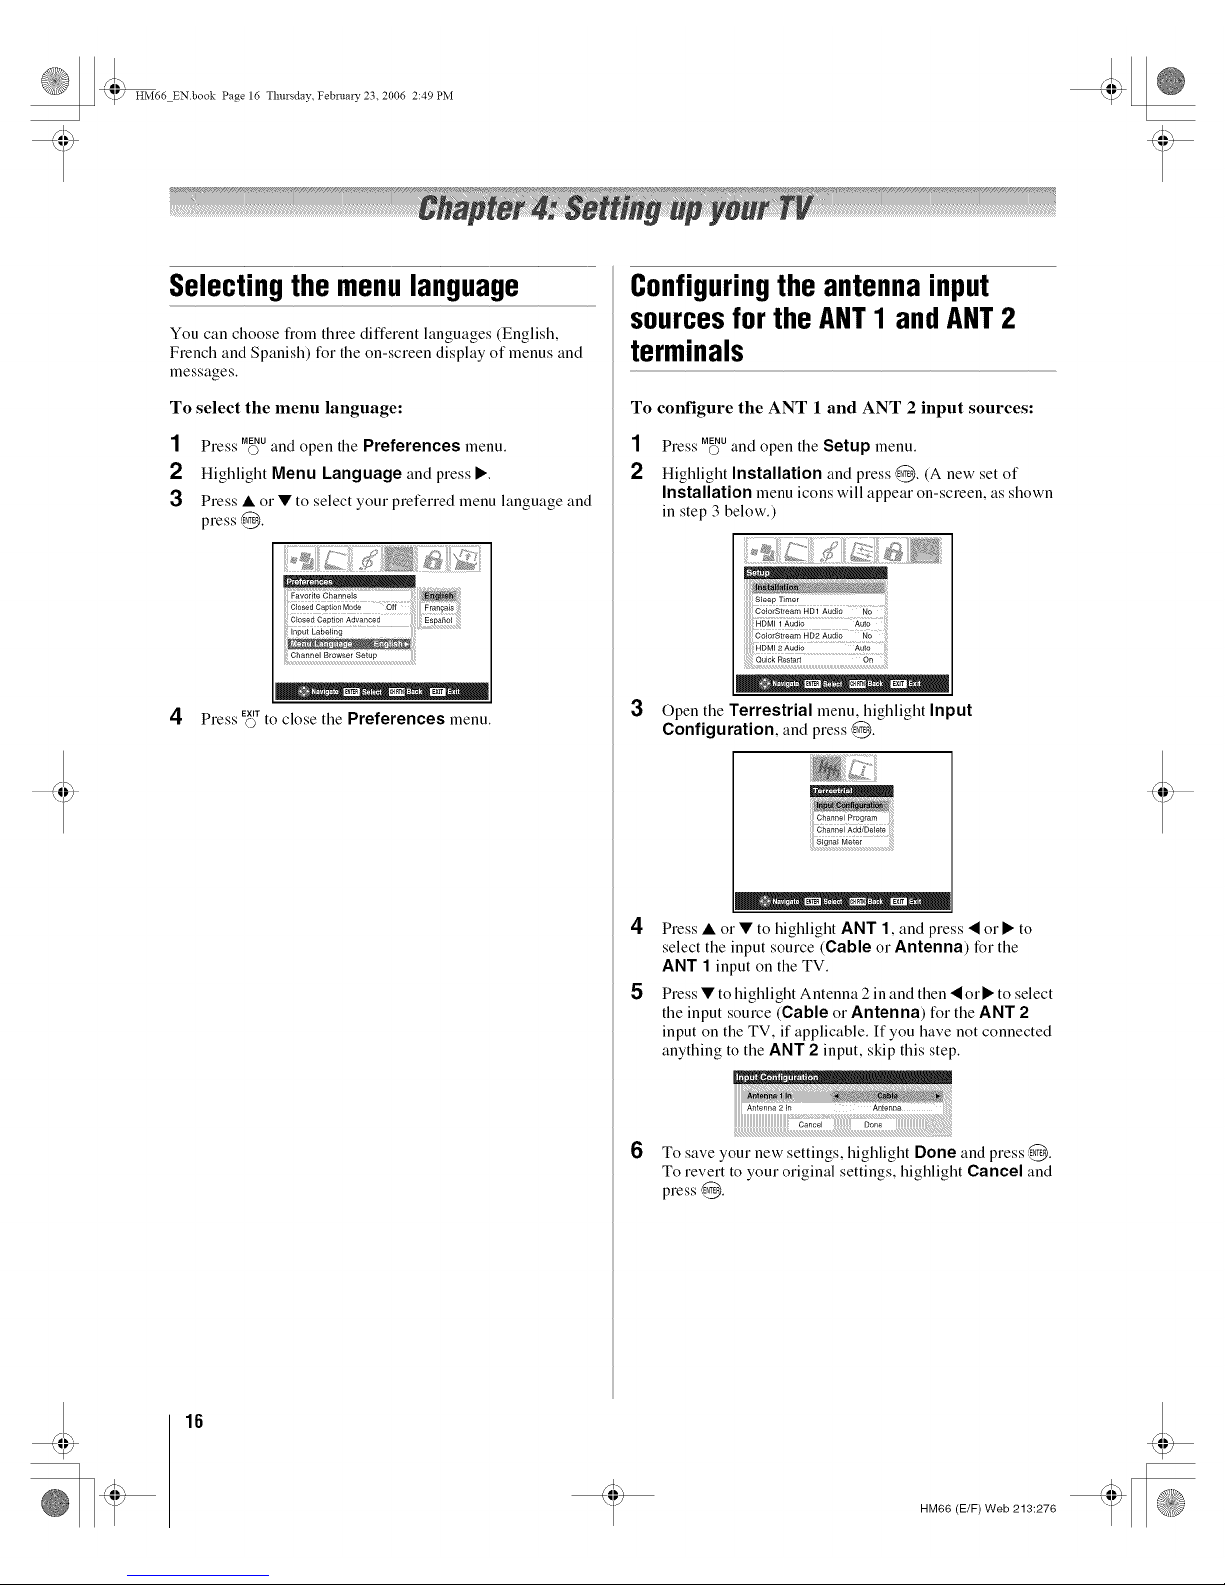
Note: The menu background may sometimes appear black,
depending on the signal the TV is receiving.
This is not a sign of malfunction.
15
HM66 (E/F) Web 213:27(
HM66 ENbook Page 16 Thursday February 23. 2006 2:49 PM
Selectingthemenulanguage
You can choose flom three different languages (English,
French and Spanish) for the on-screen display of menus and
messages.
To select the menu language:
1 Press M_uand open the Preferences menu.
2 Highlight Menu Language and press •.
3 Press • or • to select your preferred menu language and
press @.
.... ENTER• • CH_r_: EXIT
EXIT
4 Press co to close tile Preferences menu.
Configuringtheantennainput
sourcesfor the ANT1 andANT2
terminals
To configure the ANT 1 and ANT 2 input sources:
1 Press M_uand open tile Setup menu.
2 Highlight Installation and press @. (A new set of
Installation menu icons will appear on-screen, as shown
in step 3 below.)
Sleep Timer
HDMI 1 Audio
3
• • _ • Etl_R •• CH_T_:• EXIT
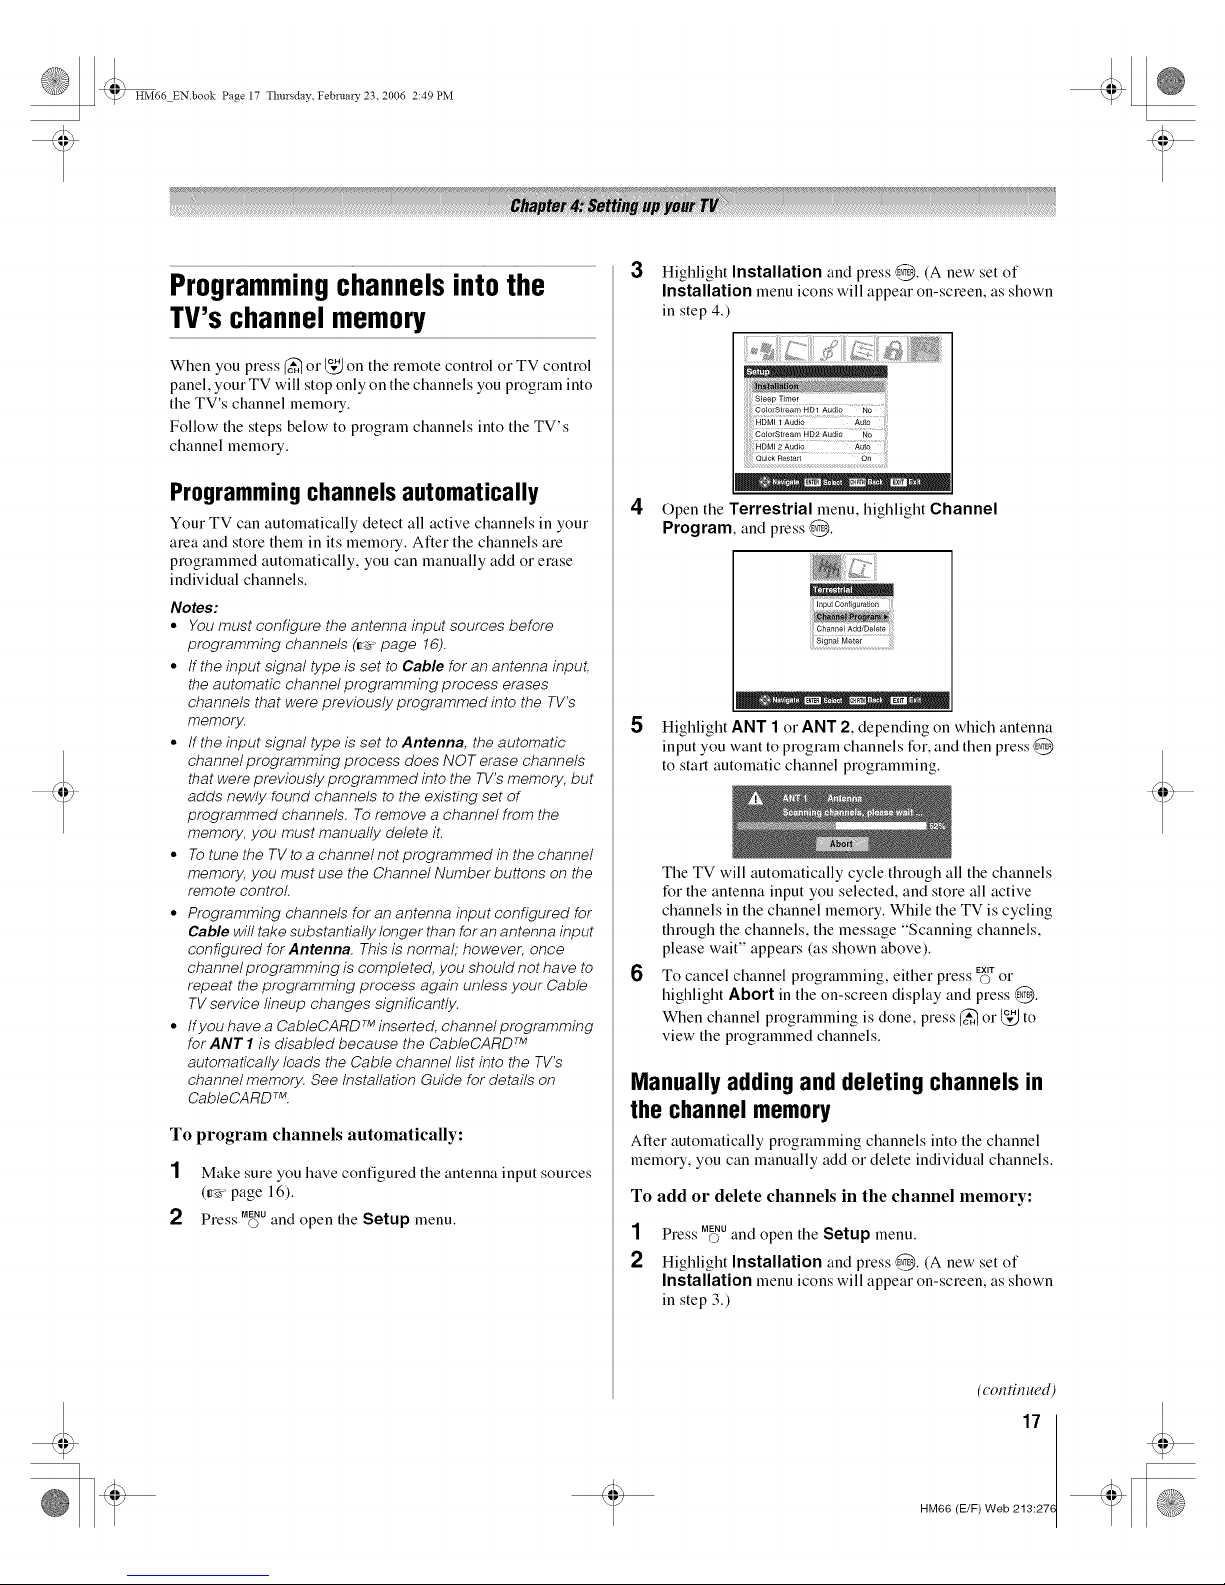
Open tile Terrestrial menu, highlight Input
Configuration, and press@.
!!!ChannelProgram i!il
iiigi;,_;i M;i;; iiiii
_• • EN_R • _H_rN:• Exrr
4 Press • or • to highlight ANT 1, and press • or • to
select the input source (Cable or Antenna) for the
ANT 1 input on the TV.
5 Press • to highlight Antenna 2 in and then • or • to select
the input source (Cable or Antenna) tor the ANT 2
input on the TV, if applicable. It"you have not connected
anything to the ANT 2 input, skip this step.
6
Antenna 2 In Antenna
To save your new settings, highlight Done and press @.
To revert to your original settings, highlight Cancel and
press @.
16
HM66 (E/F) Web 213:276
t
HM66 ENbook Page 17 Thursday February 23. 2006 2:49 PM
Programmingchannelsintothe
TV'schannelmemory
When you press _ or _," on the remote control or TV control
panel, your TV will stop only on the channels you program into
the TV's channel memory.
Follow the steps below to program channels into the TV's
channel memory.
Programmingchannels automatically
Your TV can automatically detect all active channels in your
area and store them in its memory. Alter the channels are
programmed automatically, you can manually add or erase
individual channels.
Notes:
• You must configure the antenna input sources before
programming channels (_. page 16).
° If the input signal type is set to Cable for an antenna input,
the automatic channel programming process erases
channels that were previously programmed into the TV's
memory.
° tf the input signal type is set to Antenna, the automatic
channel programming process does NOT erase channels
that were previously programmed into the TV's memory, but
adds newly found channels to the existing set of
programmed channels. To remove a channel from the
memory, you must manually delete it.
° To tune the TV toa channel not programmed in the channel
memory, you must use the Channel Number buttons on the
remote control.
° Programming channels for an antenna input configured for
Cable will take substantially longer than for an antenna input
configured for Antenna. This is normal; however, once
channel programming is completed, you should not have to
repeat the programming process again unless your Cable
TV service lineup changes significantly.
° If you have a CableCARD TM inserted, channelprogramming
for ANT I is disabled because the CableCARD TM
automatically loads the Cable channel list into the TV's
channel memory. See Installation Guide for details on
CableCARD TM.
To program channels automatically:
1 Make sure you have configured the antenna input sources
(_'r page 16).
2 Press Mff_uand open tile Setup menu.
3 Highlight Installation and press @. (A new set of
Installation menu icons will appear on-screen, as shown
in step 4.)
. • ENTER • • CH_I =• EXIT
4 Open the Terrestrial menu, MgMight Channel
Program, and press ,_.
5
Highlight ANT 1 or ANT 2, depending on which antenna
input you want to program channels for, and then press @
to start automatic channel programming.
6
The TV will automatically cycle through all the channels
for the antenna input you selected, and store all active
channels in the channel memory. While the TV is cycling
through the channels, the message "Scanning channels,
please wait" appears (as shown above).
To cancel channel . " EXIT
programming, either press O or
highlight Abort in the on-screen display and press @.
When channel programming is done, press _ or _," to
view the programmed channels.
Manually adding and deleting channels in
the channel memory
After automatically programming channels into the channel
memory, you can manually add or delete individual channels.
To add or delete channels in the channel memory:
1 Press Mff_uand open the Setup menu.
2 Highlight Installation and press @. (A new set of
Installation menu icons will appear on-screen, as shown
in step 3.)
(con tin ued)
17
HM66 (E/F) Web 213:27(
 Loading...