

Toshiba CN27D90 Owner’s Manual
R'SMANUAL
Dear Customer
Congratulations! You have purchased one of the
finest Color TV's on the market[
This manual will help you use the many exciting
and useful features to make your TV viewing more
enjoyable than ever before.
Before operating your TV set, please read all these
safety and operating instructions completely and
then retain for future reference.
SAFETY PRECAUTIONS
Customer's Record
You will find the model number and serial number on
the back of your TV set.
Record these numbers in the spaces provided below.
Refer to them whenever you call upon your TOSHIBA
dealer regarding this product.
Model Number
Serial Number
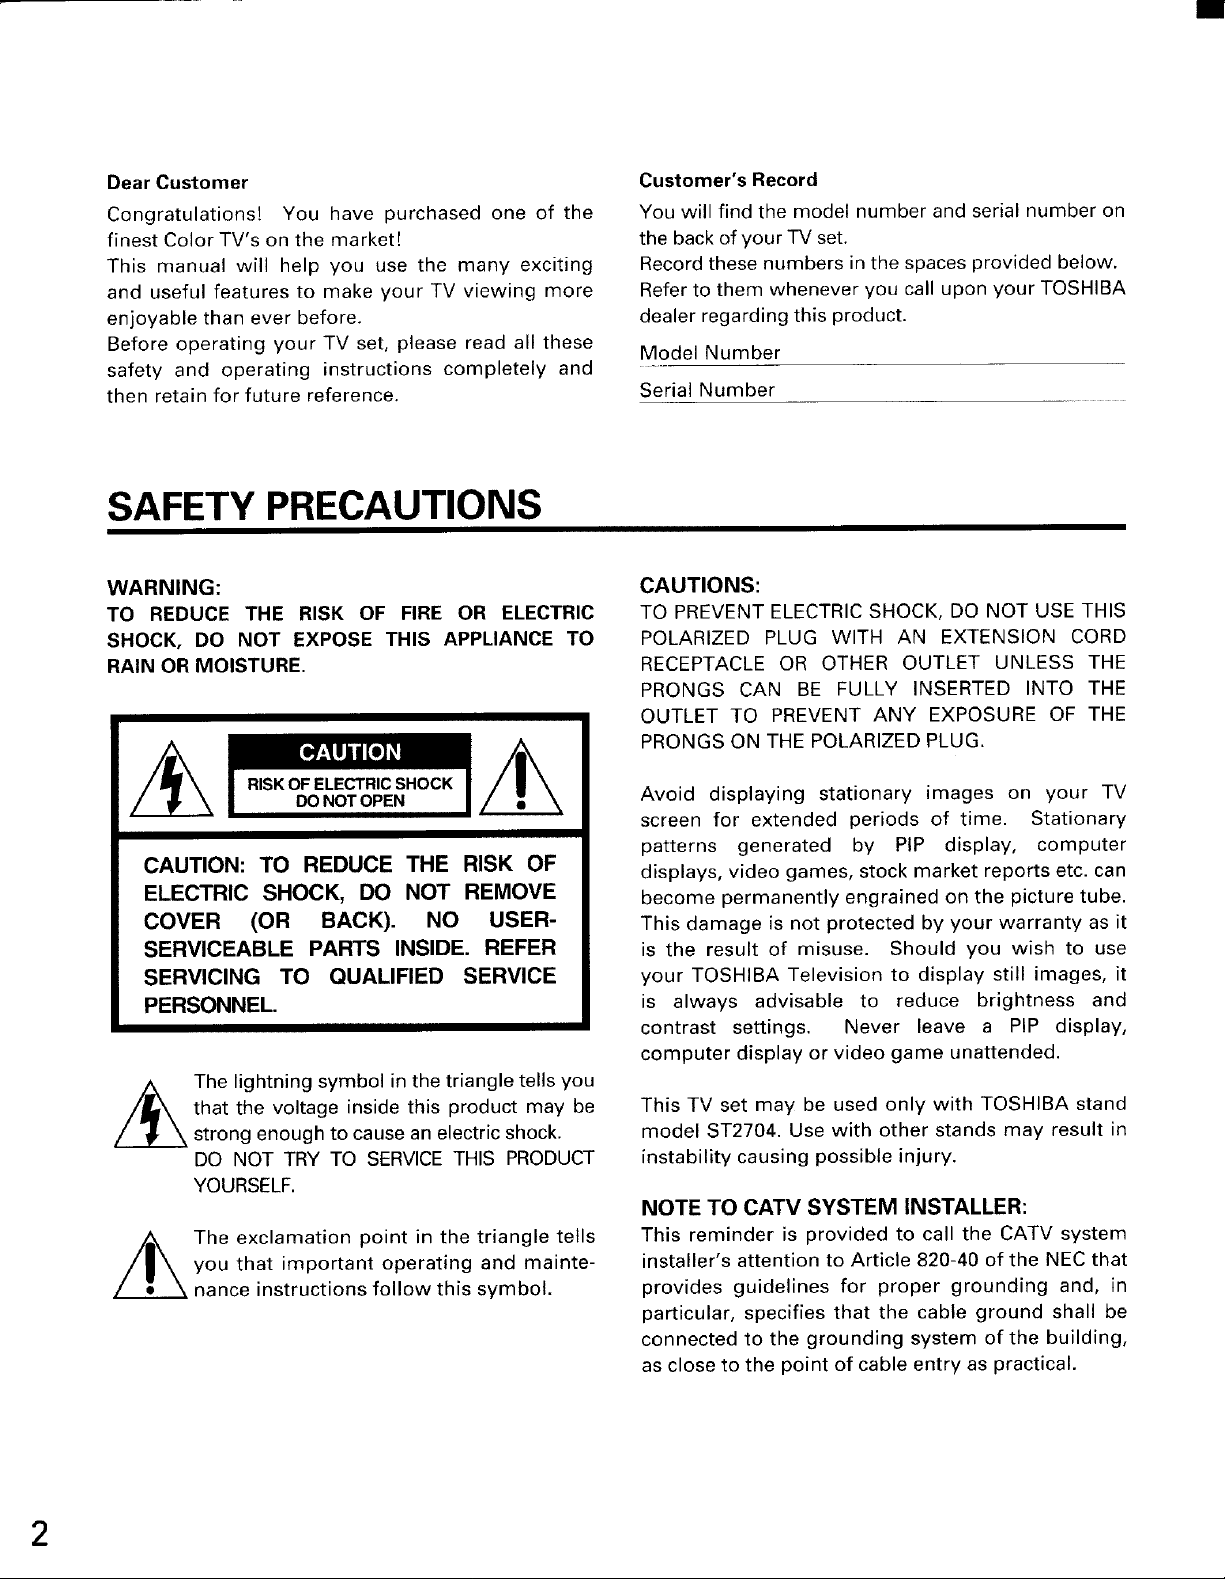
WARNING:
TO REDUCE THE RISK OF FIRE OR ELECTRIC
SHOCK, DO NOT EXPOSE THIS APPLIANCE TO
RAIN OR MOISTURE.
CAUTION: TO REDUCE THE RISK OF
ELECTRIC SHOCK, DO NOT REMOVE
COVER (OR BACK). NO USER-
SERVICEABLE PARTS INSIDE. REFER
SERVICING TO QUALIFIED SERVICE
PERSONNEL.
The lightning symbol in the triangle tells you
that the voltage inside this product may be
strong enough to cause an electric shock.
DO NOT TRY TO SERVICE THIS PRODUCT
YOURSELF.
you that important operating and mainte-
The exclamation point in the triangle tells
nance instructions follow this symbol.
CAUTIONS:
TO PREVENT ELECTRIC SHOCK, DO NOT USE THIS
POLARIZED PLUG WITH AN EXTENSION CORD
RECEPTACLE OR OTHER OUTLET UNLESS THE
PRONGS CAN BE FULLY INSERTED INTO THE
OUTLET TO PREVENT ANY EXPOSURE OF THE
PRONGS ON THE POLARIZED PLUG.
Avoid displaying stationary images on your TV
screen for extended periods of time. Stationary
patterns generated by PIP display, computer
displays, video games, stock market reports etc. can
become permanently engrained on the picture tube.
This damage is not protected by your warranty as it
is the result of misuse. Should you wish to use
your TOSHIBA Television to display still images, it
is always advisable to reduce brightness and
contrast settings. Never leave a PIP display,
computer display or video game unattended.
This TV set may be used only with TOSHIBA stand
model ST2704. Use with other stands may result in
instability causing possible injury.
NOTE TO CATV SYSTEM INSTALLER:
This reminder is provided to call the CATV system
installer's attention to Article 820-40 of the NEC that
provides guidelines for proper grounding and, in
particular, specifies that the cable ground shall be
connected to the grounding system of the building,
as close to the point of cable entry as practical.
2
TABLE OF CONTENTS
Set Up
Installing your TV set ............................................. 4
Antenna/Cable TV general information ............... 5
Home antenna connection .................................... 6
Cable TV connection .............................................. 7
Antenna/Cable TV and VCR connections ............. 8
Preparation
Location of controls (TV set) ............................... 10
Location of controls (Remote Control) ............... 12
Before using the Remote Control ....................... 13
Using the Remote with VCR or
Cable TV converter .......................................... 14
Programming the Remote Control ..................... 15
Menu function (general instructions) ................. 18
TV channels .......................................................... 20
Selecting the antenna input ................................ 21
Programming channel memory ......................... 22
Equipment Connections
Monitor panel ....................................................... 40
Connecting a standard VCR ................................ 41
Connecting a VCR with an S-video jack ............. 42
Connecting a camcorder ..................................... 43
Connecting an audio amplifier ........................... 44
Connecting external speakers ............................. 45
Reference Section
Cleaning and care ................................................ 46
Specifications ....................................................... 46
Before calling service personnel ........................ 47
Limited warranty .................................................. 48
Basic Operation
Watching TV programs ........................................ 24
Convenient Remote functions ............................ 25
Adjusting the Picture ........................................... 26
Adjusting the Sound ............................................ 27
Selecting Stereo/SAP broadcasts ....................... 28
Advanced Operation
Enhancing the Surround sound effect ............... 29
Watching Picture in Picture (PIP) ........................ 30
Captioning channels ............................................ 32
Locking channels .................................................. 34
Operating closed captioning feature .................. 36
Changing on-screen display language .............. 38
Activating on-screen demonstration ................. 39
3

INSTALLING YOUR TV SET
WARNING:
TO AVOID INJURY TO A CHILD OR ADULT:
• Do not place the TV on an uneven floor or on unstable stand.
• Do not stand or climb on the TV.
• Do not put a VCR or any heavy object on top of the TV.
DO NOT:
• Place your TV set in a room where direct lighting
strikes the screen.
• Place your TV set too close to a wall, in a confined
area or in a very warm location.
• Change the plug's safety prong.
CAUTION:
As a safety feature, the plug has one prong wider than the other.
It will fit only one way into a standard electrical outlet. If the plug
will not fit into the outlet, try turning it around. If the plug will not
fit either way, the outlet is probably old and non-standard. You
will need to have a new outlet installed by an electrician.
DO NOT CHANGE THE SAFETY FEATURE OF THE PLUG.
DO:
• Use soft and indirect lighting.
• Sit at least 6 feet away from the set.
• Provide normal air circulation for reliable long life.
• Plug into an electrical outlet with standard house
power (120 volt AC, 60 Hz).
4
ANTENNA/CABLE TV GENERAL INFORMATION
• You can use either an indoor or outdoor antenna to receive VHF and/or UHF channels.
• Channels 2-13 are VHF channels, and channels 14-69 are UHF channels.
• We recommend using an outdoor antenna for better picture quality.
• You can receive Cable TV by contacting your local cable company.
• Cable TV delivers both VHF and UHF channels and other channels not available to your antenna.
TYPES OF ANTENNA CABLES
Shown below are two basic types of antenna cables.
Signals from a home antenna may be conveyed by either type. Cable TV
signals will always be conveyed by a 75 ohm coaxial cable.
1 A 75 ohm coaxial cable is generally a round cable with F-type
connectors that can easily be attached to a terminal without tools.
Optional F-type connector
2 A 300 ohm cable is a flat "twin lead" cable that can be attached to a
terminal through an antenna adapter supplied as an accessory.
_,iii!__I,ii_/
€
.£
o
€
i
€
>
I-
_e
£
c
rmzrrrrnn
zzzzz_ztzzz_
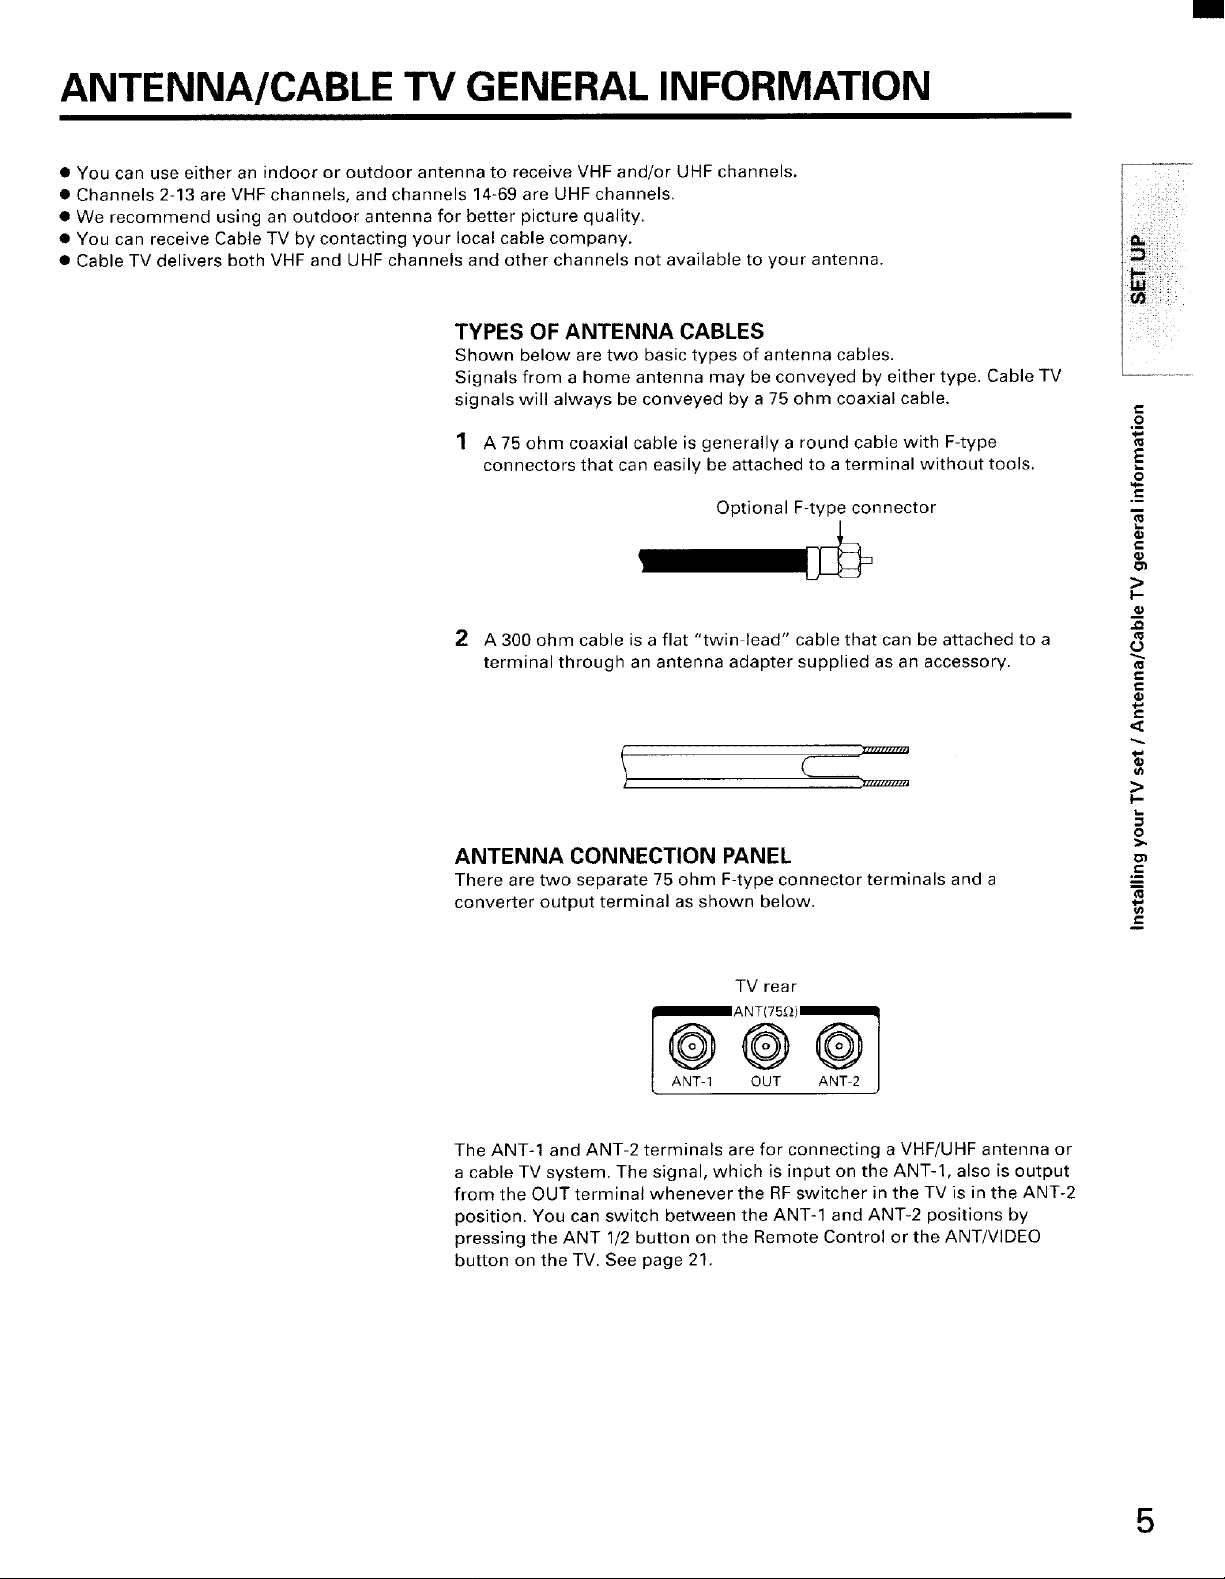
ANTENNA CONNECTION PANEL
There are two separate 75 ohm F-type connector terminals and a
converter output terminal as shown below.
TV rear
The ANT-1 and ANT-2 terminals are for connecting a VHF/UHF antenna or
a cable TV system. The signal, which is input on the ANT-l, also is output
from the OUT terminal whenever the RF switcher in the TV is in the ANT-2
position. You can switch between the ANT-1 and ANT-2 positions by
pressing the ANT 1/2 button on the Remote Control or the ANT/VIDEO
button on the TV. See page 21.
,<
>
I-
O
OR
u
5
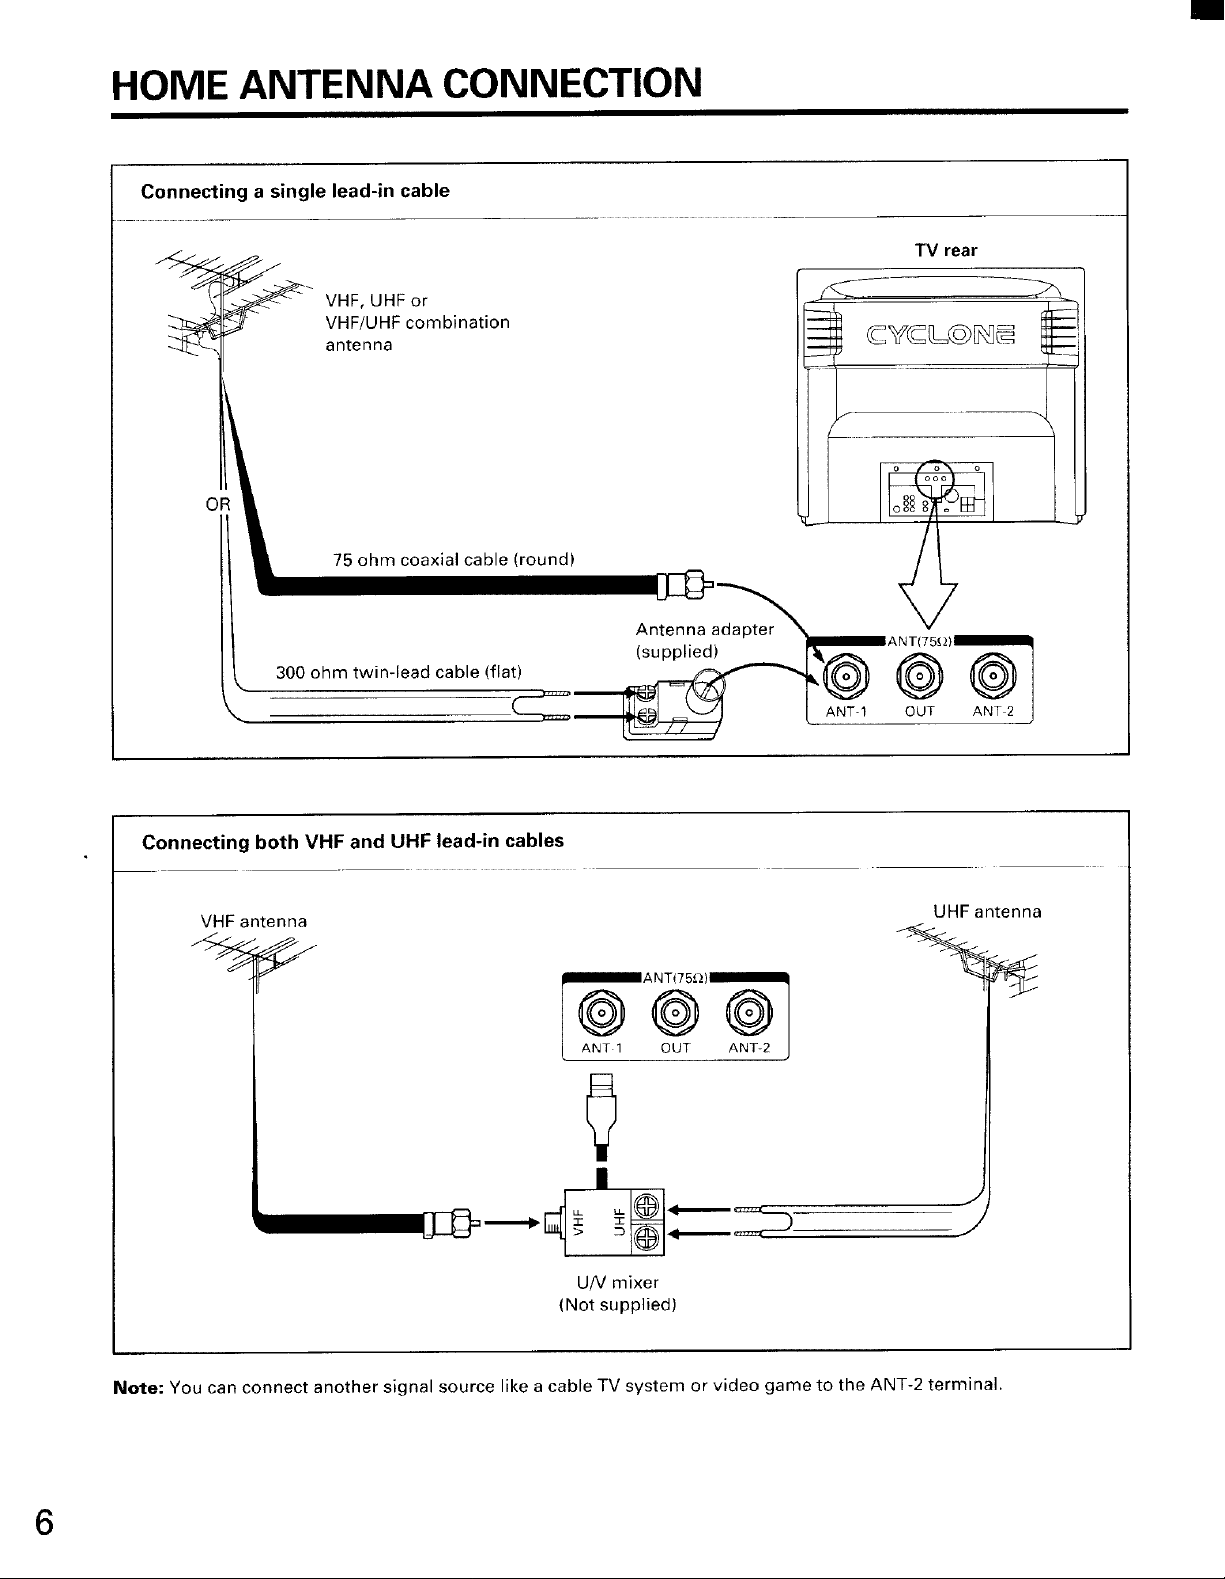
HOME ANTENNA CONNECTION
Connecting a single lead-in cable
VHF, UHF or
VHF/UHF combination
antenna
OR
75 ohm coaxial cable (round)
TV rear
/
k. 300 ohm twin-lead cable (flat)
3cc_ m
Connecting both VHF and UHF lead-in cables
VHF antenna
UHF antenna
OUT ANT-2 J
,J
J
6
U!V mixer
(Not supplied)
Note: You can connect another signal source like a cable TV system or video game to the ANT-2 terminal.
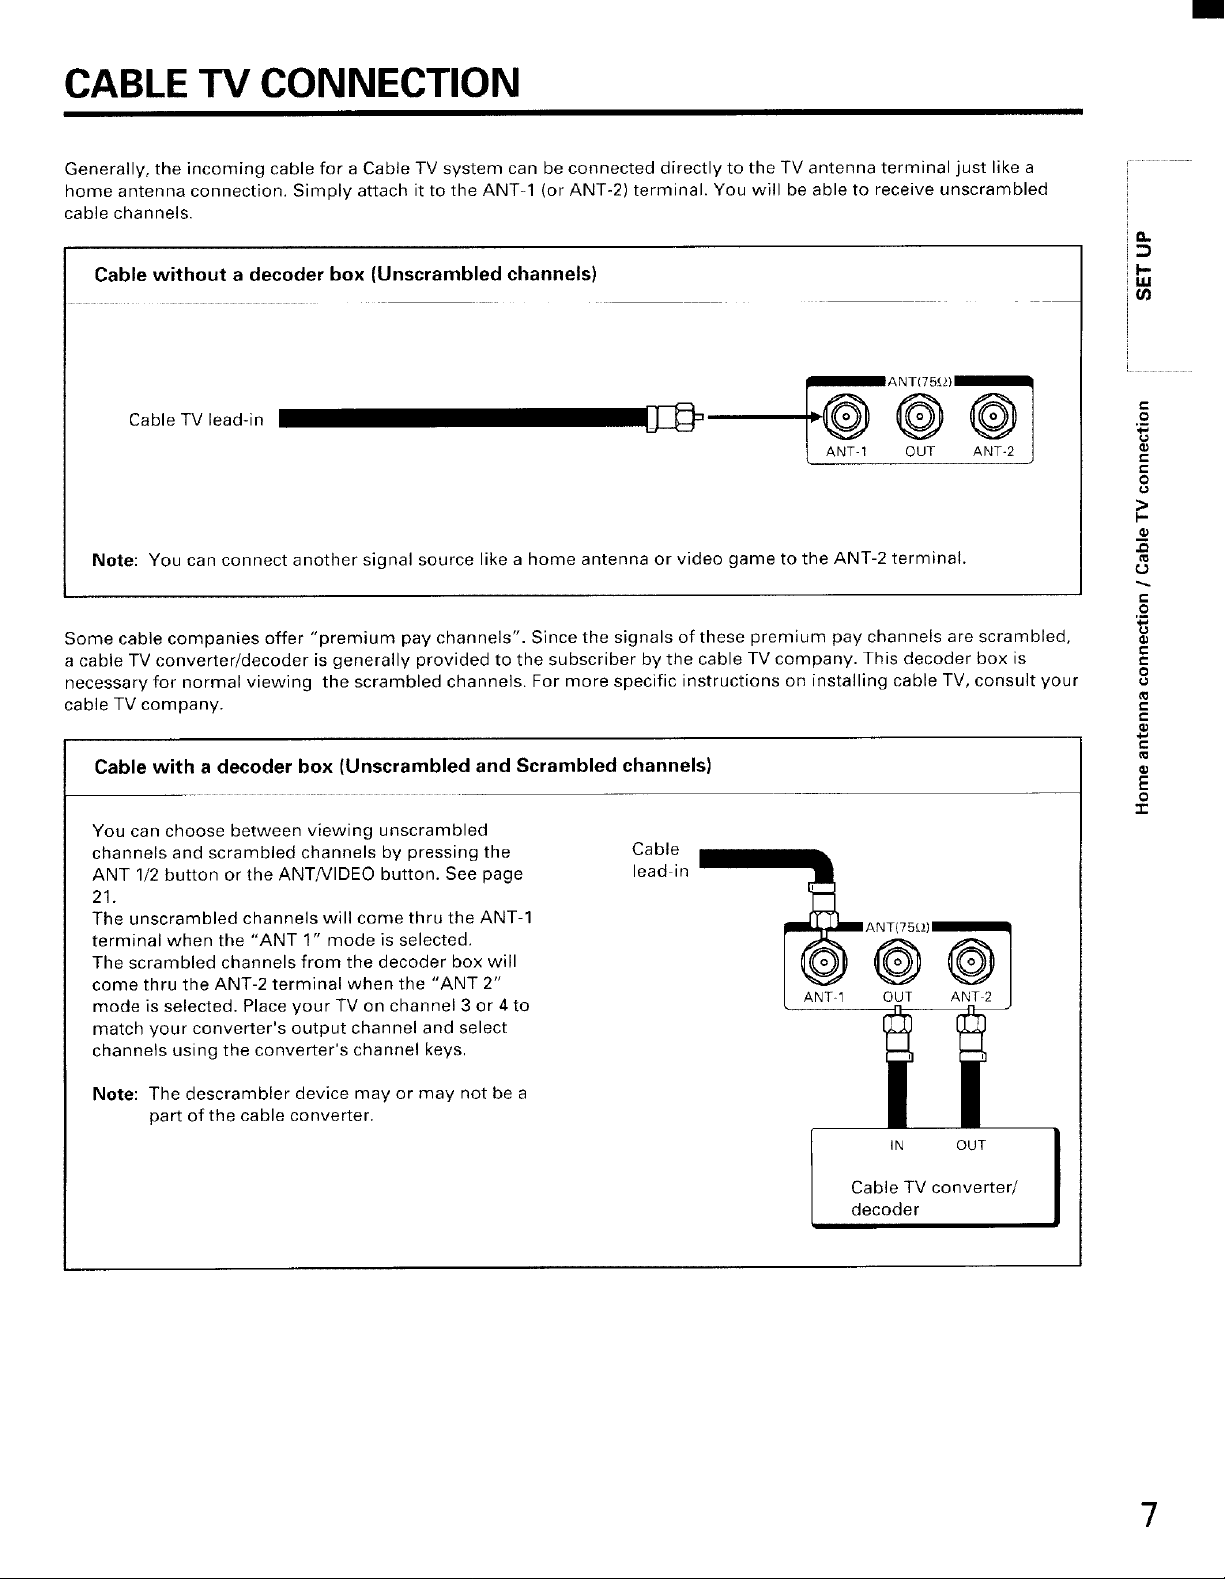
CABLE TV CONNECTION
Generally, the incoming cable for a Cable TV system can be connected directly to the TV antenna terminal just like a
home antenna connection. Simply attach it to the ANT-1 (or ANT-2) terminal. You will be able to receive unscrambled
cable channels.
Cable without a decoder box (Unscrambled channels)
_ANT(75_2)_
Cable TV lead-in 1[[[_
ANT 1 OUT ANT-2
Note: You can connect another signal source like a home antenna or video game to the ANT-2 terminal.
Some cable companies offer "premium pay channels". Since the signals of these premium pay channels are scrambled,
a cable TV converter/decoder is generally provided to the subscriber by the cable TV company. This decoder box is
necessary for normal viewing the scrambled channels. For more specific instructions on installing cable TV, consult your
cable TV company.
Cable with a decoder box (Unscrambled and Scrambled channels)
You can choose between viewing unscrambled
channels and scrambled channels by pressing the
ANT 1/2 button or the ANT/VIDEO button. See page
21.
The unscrambled channels will come thru the ANT-1
terminal when the "ANT 1" mode is selected.
The scrambled channels from the decoder box will
come thru the ANT-2 terminal when the "ANT 2"
mode is selected. Place your TV on channel 3 or 4to
match your converter's output channel and select
channels using the converter's channel keys.
Cable
lead in
n
I-
14.1
t-
.£
c
o
>
l-
t-
.£
€
c
0
€
c
€
E
o
-1-
Note: The descrambler device may or may not be a
part of the cable converter.
IN OUT
Cable TV converter/
decoder
7
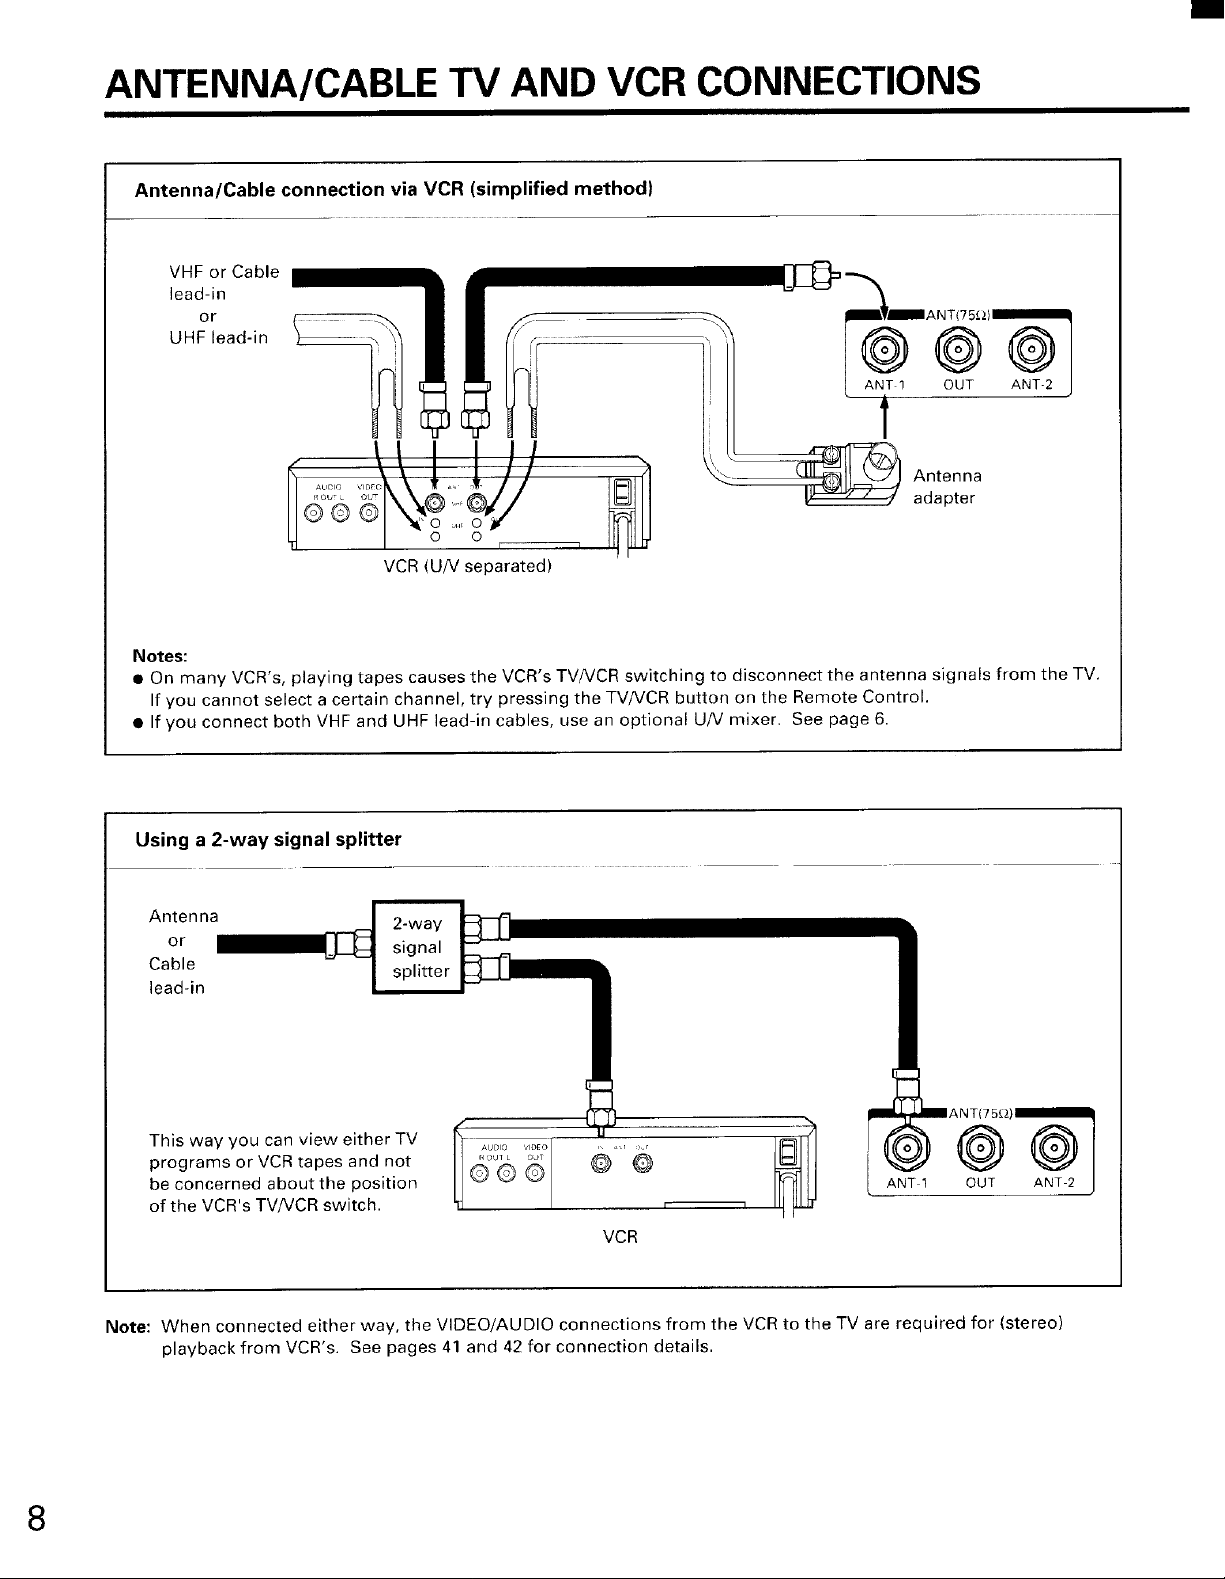
ANTENNA/CABLE TV AND VCR CONNECTIONS
Antenna/Cable connection via VCR (simplified method)
VHF or Cable
lead-in
or
UHF lead-in
Notes:
• On many VCR's, playing tapes causes the VCR's TV/VCR switching to disconnect the antenna signals from the TV.
If you cannot select a certain channel, try pressing the TV/VCR button on the Remote Control.
• lf you connect both VHF and UHF lead-in cables, use an optional U/V mixer. See page 6.
...... _, //-
6%
VCR (U/V separated)
Using a 2-way signal splitter
Antenna
or
Cable
lead-in
This way you can view either TV
programs or VCR tapes and not
be concerned about the position
of the VCR's TV/VCR switch.
Note: When connected either way, the VIDEO/AUDIO connections from the VCR to the TV are required for (stereo)
playback from VCR's. See pages 41 and 42 for connection details.
2-way
signal
splitter
VCR
8
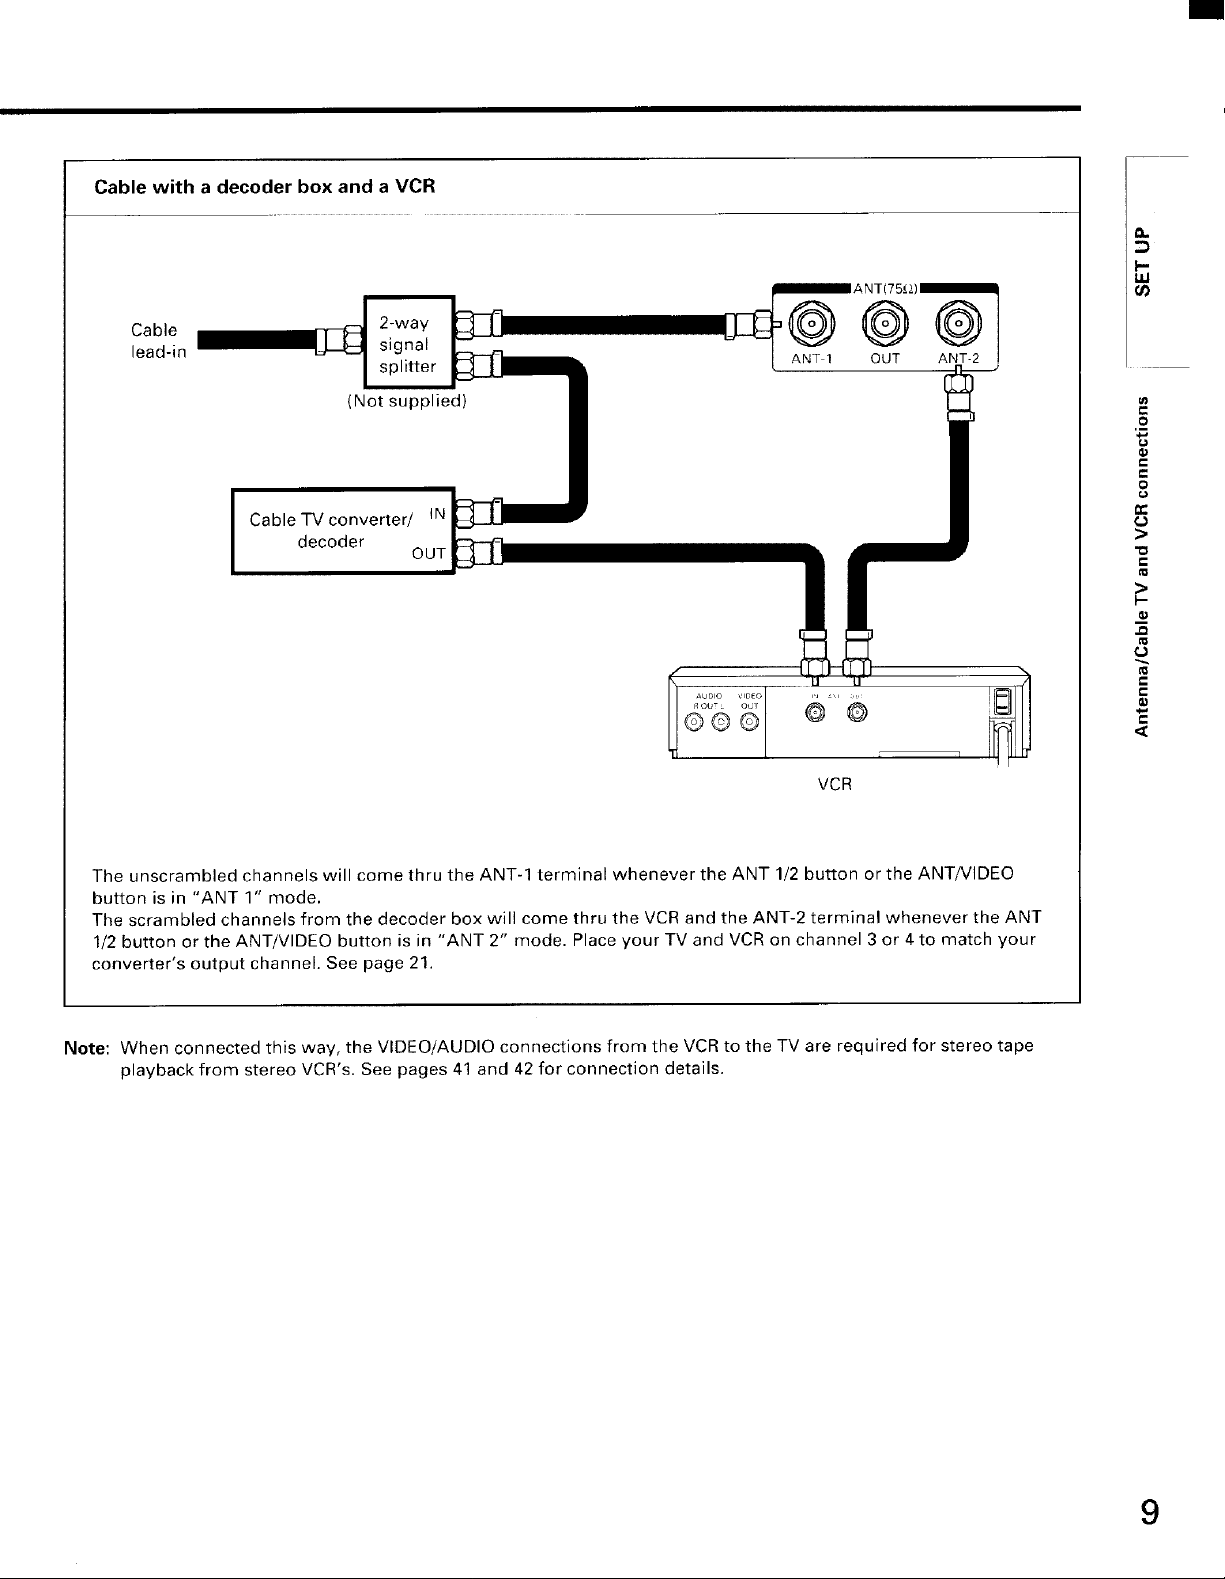
Cable with a decoder box and a VCR
__ .
Cable 2-way _ _;_)
lead-in signal
(Not supplied)
Cable TV converter/ iN
decoder
splitter ANT 1 OUT ANT-2
OUT
a.
.£
c
o
r_
>
"o
>
.o
€
VCR
The unscrambled channels will come thru the ANT-1 terminal whenever the ANT 1/2 button or the ANTNIDEO
button is in "ANT 1" mode.
The scrambled channels from the decoder box will come thru the VCR and the ANT-2 terminal whenever the ANT
1/2 button or the ANT/VIDEO button is in "ANT 2" mode. Place your TV and VCR on channel 3 or 4to match your
converter's output channel. See page 21.
Note: When connected this way, the VIDEO/AUDIO connections from the VCR to the TV are required for stereo tape
playback from stereo VCR's. See pages 41 and 42 for connection details.
9

LOCATION OF CONTROLS (TV set)
For specific use of each control, consult the corresponding page numbers in brackets.
Front view
POWER button [24]
Remote sensor
I \ Pres_t°r °Pe n_
Behind the door
(
SUn STR SAP POWER PO_R
l {
-- SURROUND indicator (Orange)
VIDEO/AUDIO INPUT jacks (VIDEO 1} [43]
(P q) _/
PO icator (Red)
-- SAP indicator (Orange)
-- STEREO indicator {Green)
10
I
VIDEO 1 SELECT button [41]
MENU button [18] ANNEL
ANT/VIDEO button [21]
ADV button [18]
-- VOLUME V/A buttons [24]
-/+ buttons [18]
V/A buttons [24]
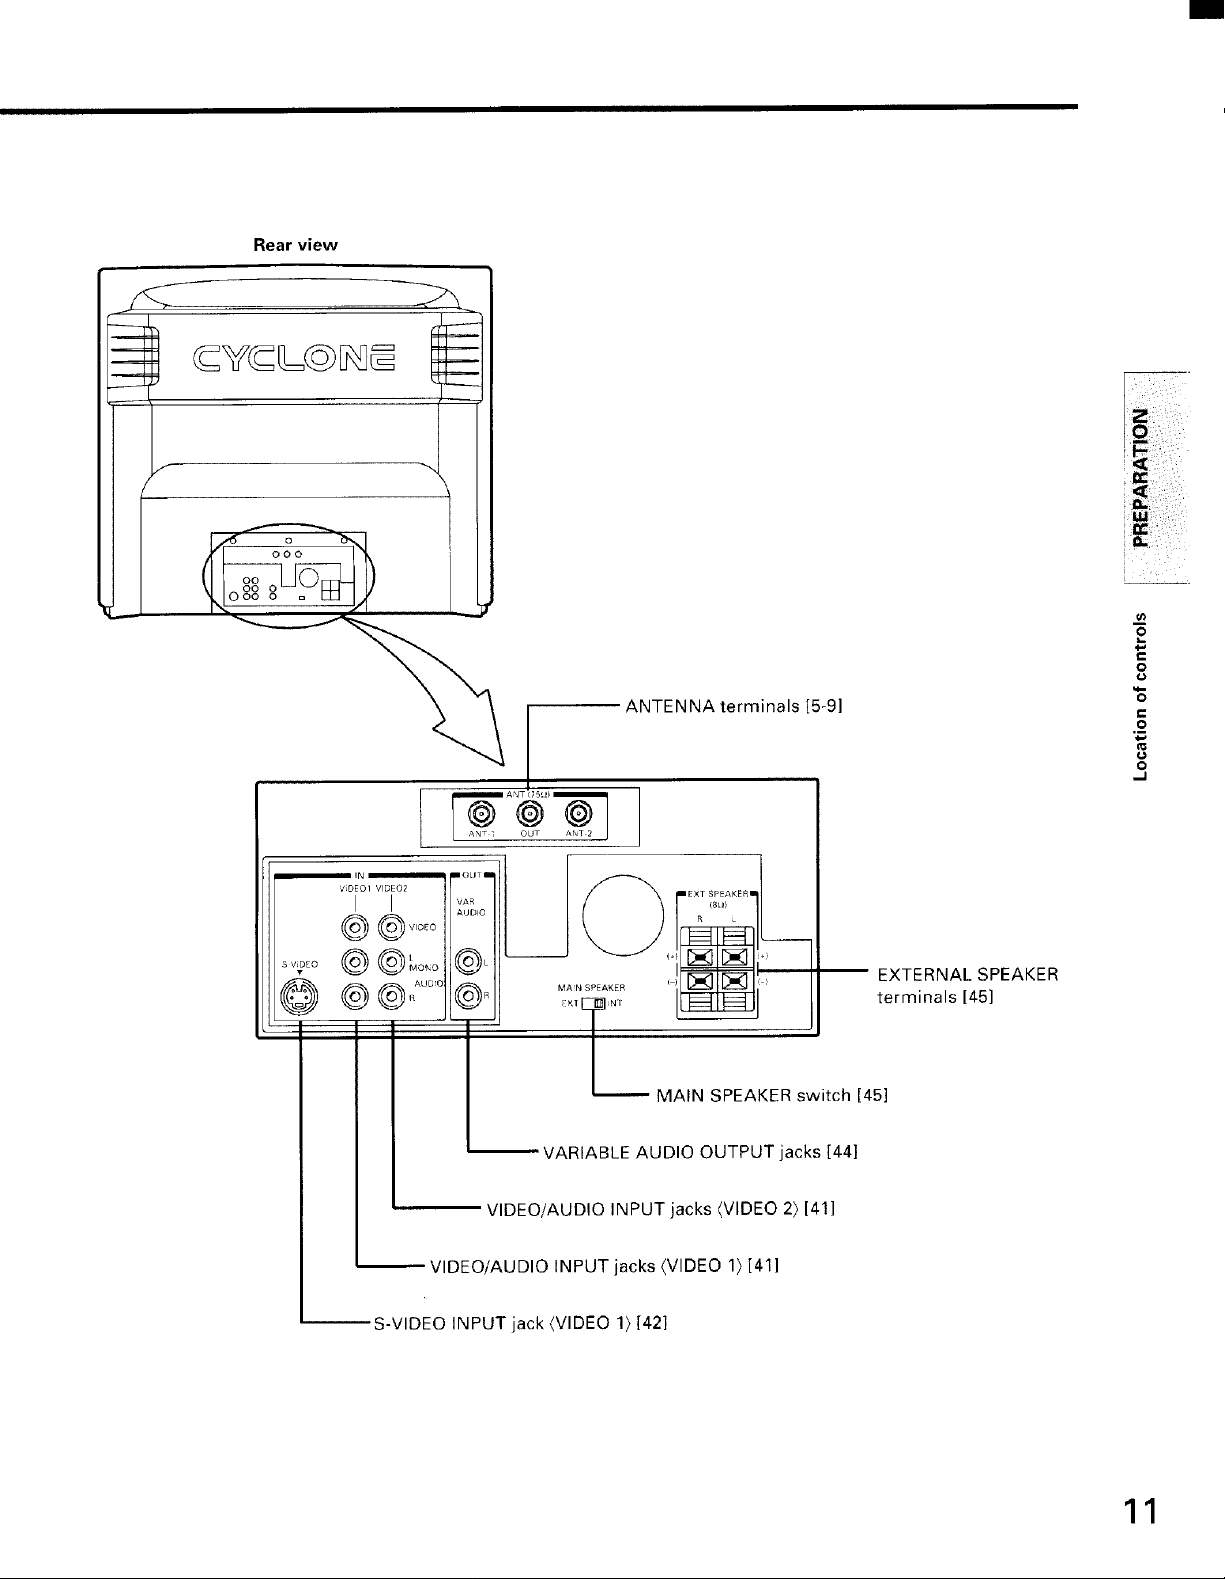
Rear view
o
o00
O0 0 =
ANTENNA terminals [5-9]
"6
.M
=o
O
t"
O
o
MAN SPEAKER
×,L_ terminals [45]
_VARIABLE AUDIO OUTPUT jacks [44]
VIDEO/AUDIO INPUT jacks (VIDEO 2} [41]
VIDEO/AUDIO INPUT jacks (VIDEO 1}[41 ]
_S-VIDEO INPUT jack {VIDEO 1} [42]
EXTERNAL SPEAKER
MAIN SPEAKER switch [451
11
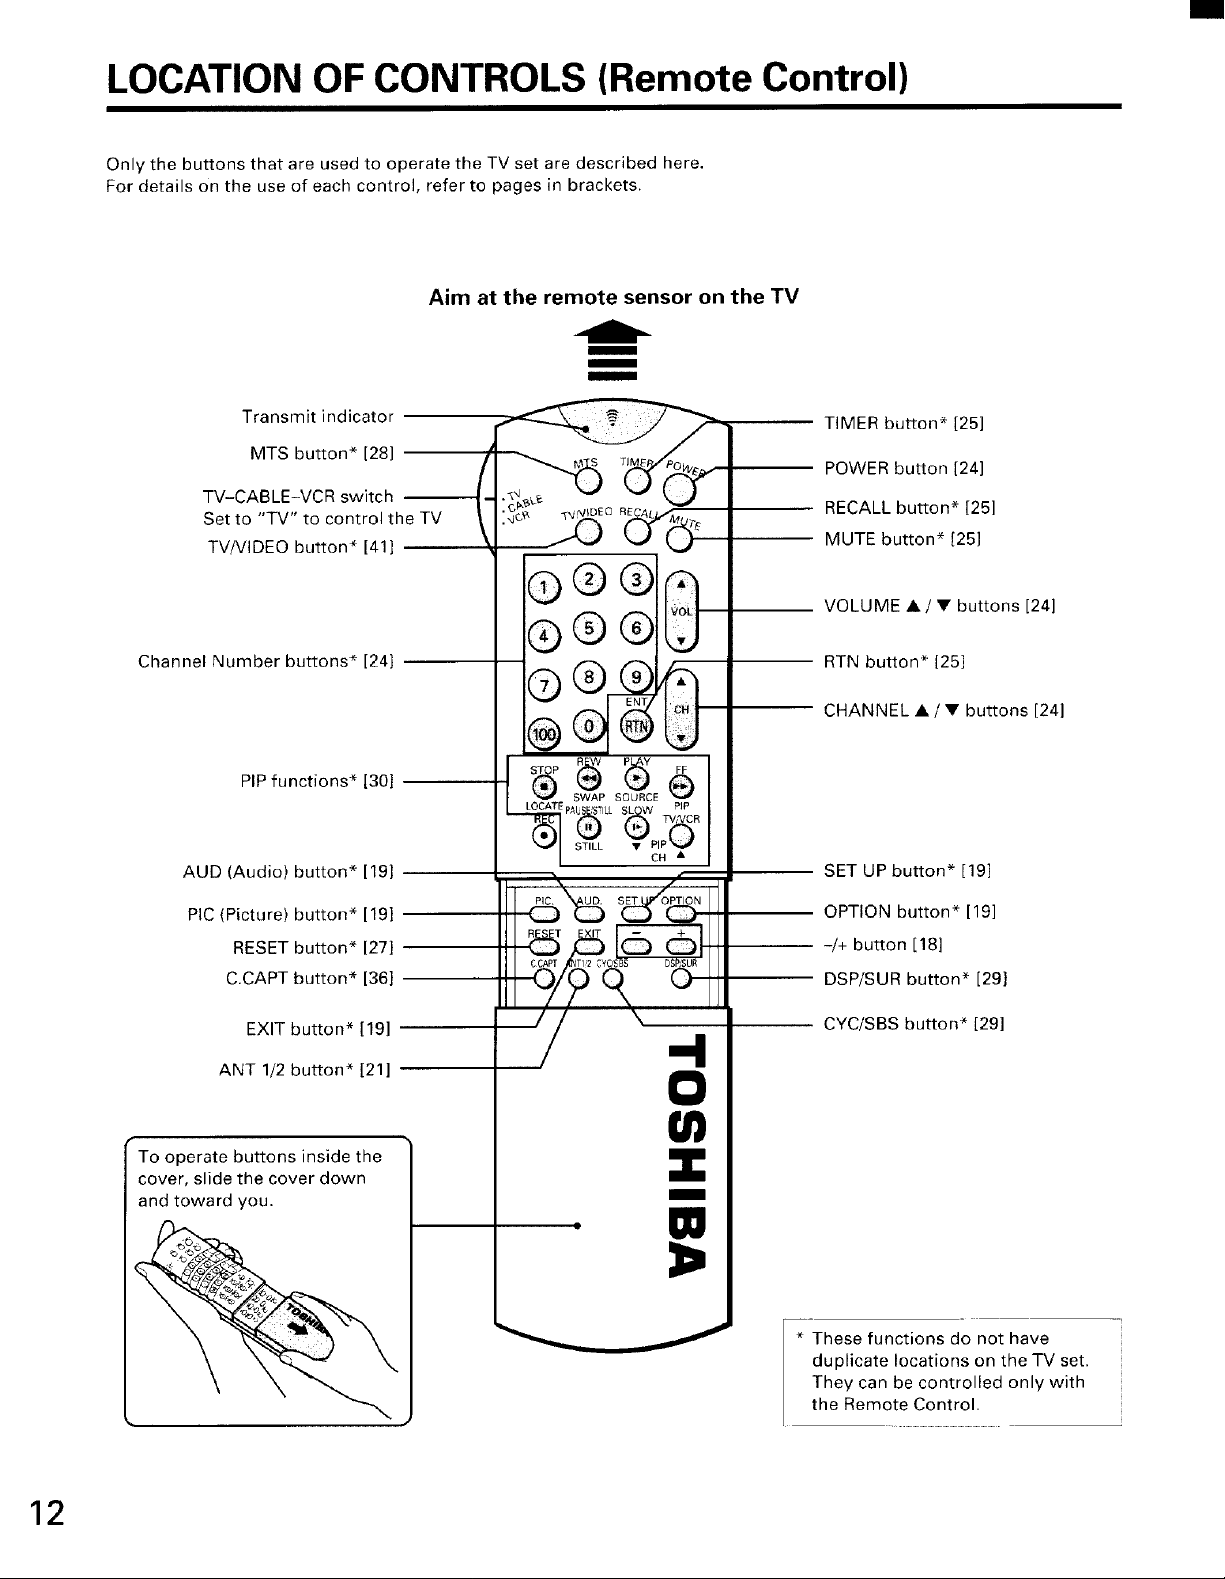
LOCATION OF CONTROLS (Remote Control)
Only the buttons that are used to operate the TV set are described here.
For details on the use of each control, refer to pages in brackets.
Aim at the remote sensor on the TV
m
m
mmmm
Transmit indicator
MTS button* [28]
TV-CABLE-VCR switch
Set to "TV" to control the TV
TV/VIDEO button* [41]
Channel Number buttons* [24]
PIP functions* [30]
AUD (Audio) button* [19]
PIC (Picture) button* [19]
RESET button* [27]
C.CAPT button* [36]
SWAP SOURCE
PAL,S_5_ILL SL W PIP
STILL_ • PIPO
TV'VCR
CH •
TIMER button* [25]
POWER button [24]
RECALL button* [25]
MUTE button* [25]
VOLUME •/• buttons [24]
RTN button _ (25]
CHANNEL • / • buttons [24]
SET UP button* [19]
OPTION button* [19]
-/+ button [18]
DSP/SUR button* [29]
12
EXIT button* [19]
ANT 1/2 button* [21]
To operate buttons inside the
cover, slide the cover down
and toward you.
CYC/SBS button* [29]
-4
0
W
m
• W
* These functions do not have
duplicate locations on the TV set.
They can be controlled only with
the Remote Control.
BEFORE USING THE REMOTE CONTROL
INTRODUCTIONS
With this Remote Control, you can operate your TV and
most models of remote-controlled VCR's and Cable TV
Converters even if they are different brands.
However, this Remote Control must be programmed to
control other brands of VCR's and/or Converters. If you
will be using your TV set with a TOSHIBA VCR, your
Remote has already been preprogrammed for yOUr
• Before attempting to operate your Remote Control,
install the batteries according to the section
"INSTALLING AND REPLACING BATTERIES" shown
below.
• For more detailed instructions, see the section
"PROGRAMMING THE REMOTE CONTROL" on page 15.
Notes:
• After installing new batteries, the Remote Control will
set itself to the codes for TOSHIBA's TV and VCR. If
you are using the Remote Control to operate
equipment that uses different codes, it will have to be
reprogrammed for those codes.
• This Remote Control may have functions not available
on the original remote control.
• These functions may or may not operate your VCR or
Cable TV Converter. Refer to the owner's manuals
supplied with the equipments to see which functions
are available.
• The remote control supplied with your VCR or Cable TV
Converter may have keys not duplicated on this
Remote Control. If these functions are desired, the
original remote will have to be used.
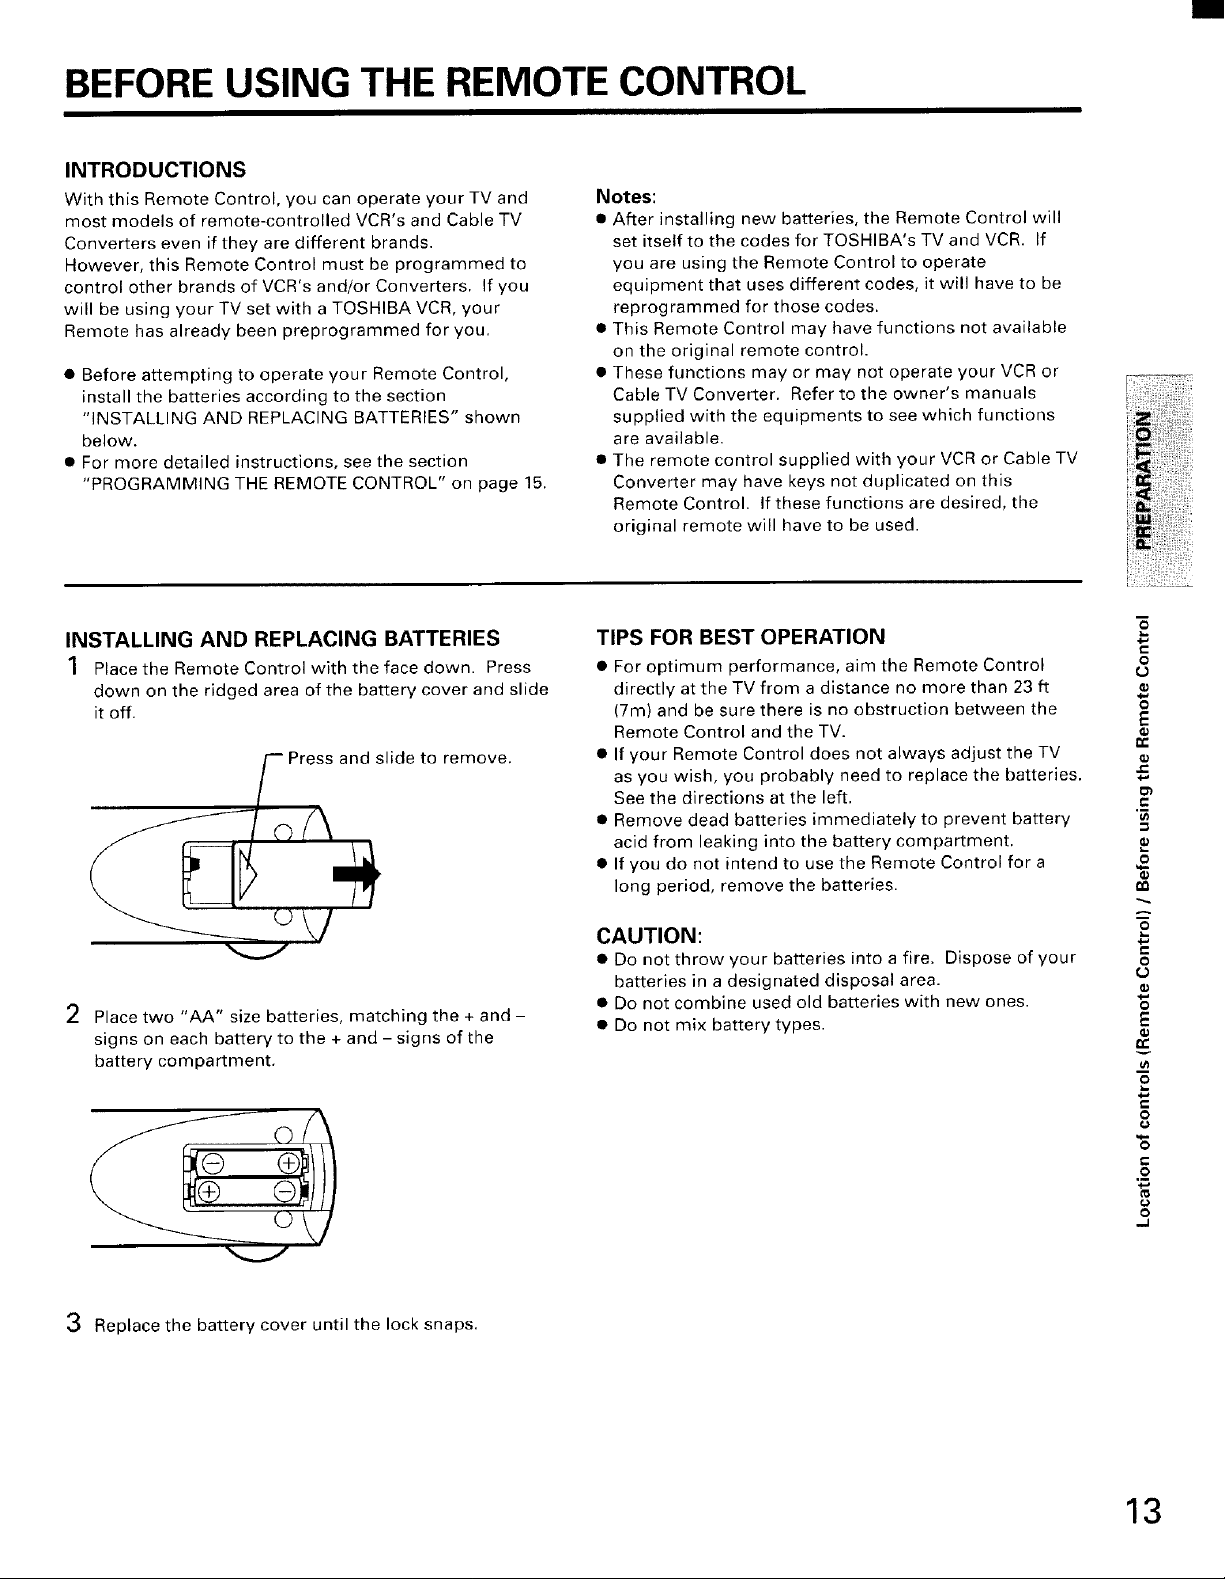
INSTALLING AND REPLACING BATTERIES
1 Place the Remote Control with the face down. Press
down on the ridged area of the battery cover and slide
it off.
_( )Press and slide to remove.
\/
2 Place two "AA" size batteries, matching the + and -
signs on each battery to the + and- signs of the
battery compartment.
TIPS FOR BEST OPERATION
• For optimum performance, aim the Remote Control
directly at the TV from a distance no more than 23 ft
(7m) and be sure there is no obstruction between the
Remote Control and the TV.
• If your Remote Control does not always adjust the TV
as you wish, you probably need to replace the batteries.
See the directions at the left.
• Remove dead batteries immediately to prevent battery
acid from leaking into the battery compartment.
• If you do not intend to use the Remote Control for a
long period, remove the batteries.
CAUTION:
• Do not throw your batteries into a fire. Dispose of your
batteries in a designated disposal area.
• Do not combine used old batteries with new ones.
• Do not mix battery types.
-5
#,
t_
"6
.2
c
O
(3
E
r-
e
#,
r-
e
E
O
#,
€
o
€
3 Replace the battery cover until the lock snaps.
o
13
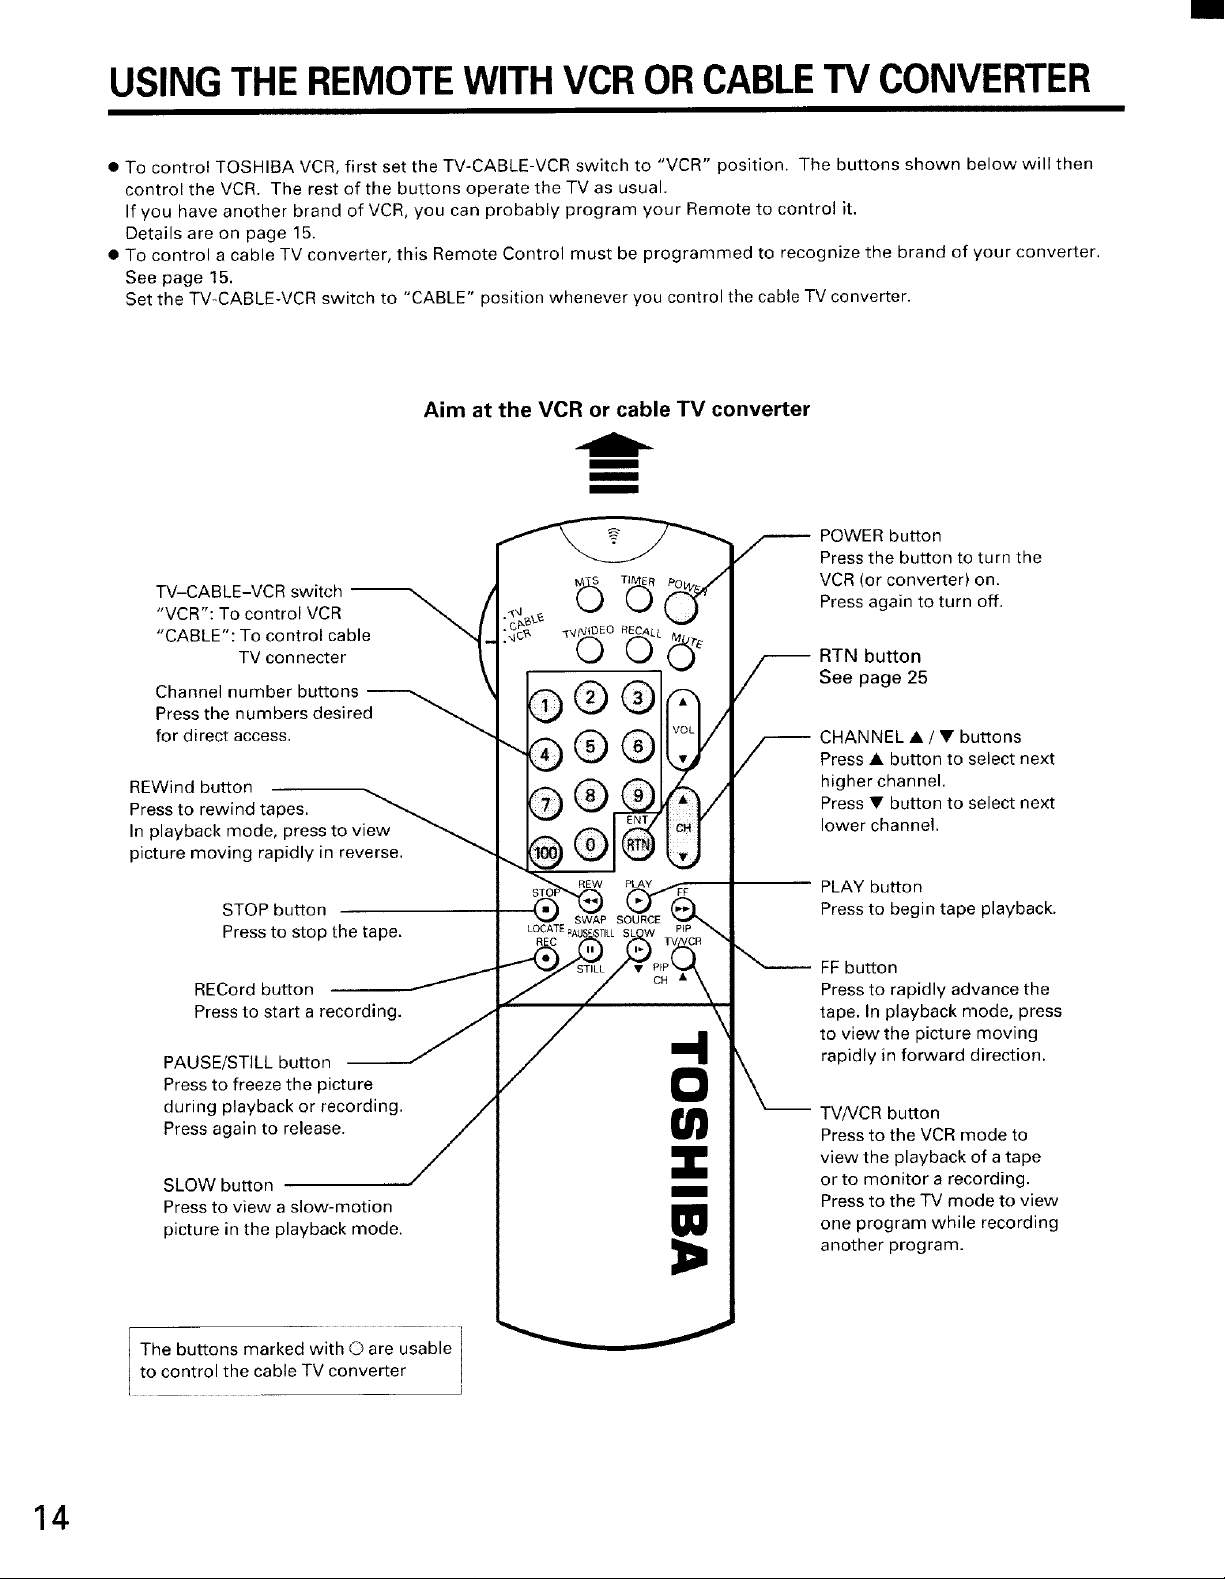
USINGTHEREMOTEWITH VCROR CABLETV CONVERTER
• To control TOSHIBA VCR, first set the TV-CABLE-VCR switch to "VCR" position. The buttons shown below will then
control the VCR. The rest of the buttons operate the TV as usual.
If you have another brand of VCR, you can probably program your Remote to control it.
Details are on page 15.
• To control a cable TV converter, this Remote Control must be programmed to recognize the brand of your converter.
See page 15.
Set the TV-CABLE-VCR switch to "CABLE" position whenever you control the cable TV converter.
Aim at the VCR or cable TV converter
m
mm
m
POWER button
Press the button to turn the
VCR (or converter) on.
"VCR": To control VCR
"CABLE": To control cable
TV-CABLE-VCR switch _,_
Channel number buttons
Press the numbers desired
for direct access.
REWind button
Press to rewind tapes.
In playback mode, press to view
picture moving rapidly in reverse.
PAUSE/STILL button
Press to freeze the picture
during playback or recording.
Press again to release.
SLOW button
Press to view a slow-motion
picture in the playback mode.
TV connecter
STOP button
Press to stop the tape.
RECord button
Press to start a recording.
REW _FF
-4
0
(n
m
W
Press again to turn off.
RTN button
--
See page 25
CHANNEL • / • buttons
--
Press • button to select next
higher channel.
Press • button to select next
lower channel.
PLAY button
Press to begin tape playback.
FF button
Press to rapidly advance the
tape. In playback mode, press
to view the picture moving
rapidly in forward direction.
TV/VCR button
Press to the VCR mode to
view the playback of a tape
or to monitor a recording.
Press to the TV mode to view
one program while recording
another program.
14
The buttons markedwith 0 are usable
I to control the cable TV converter I
PROGRAMMING THE REMOTE CONTROL
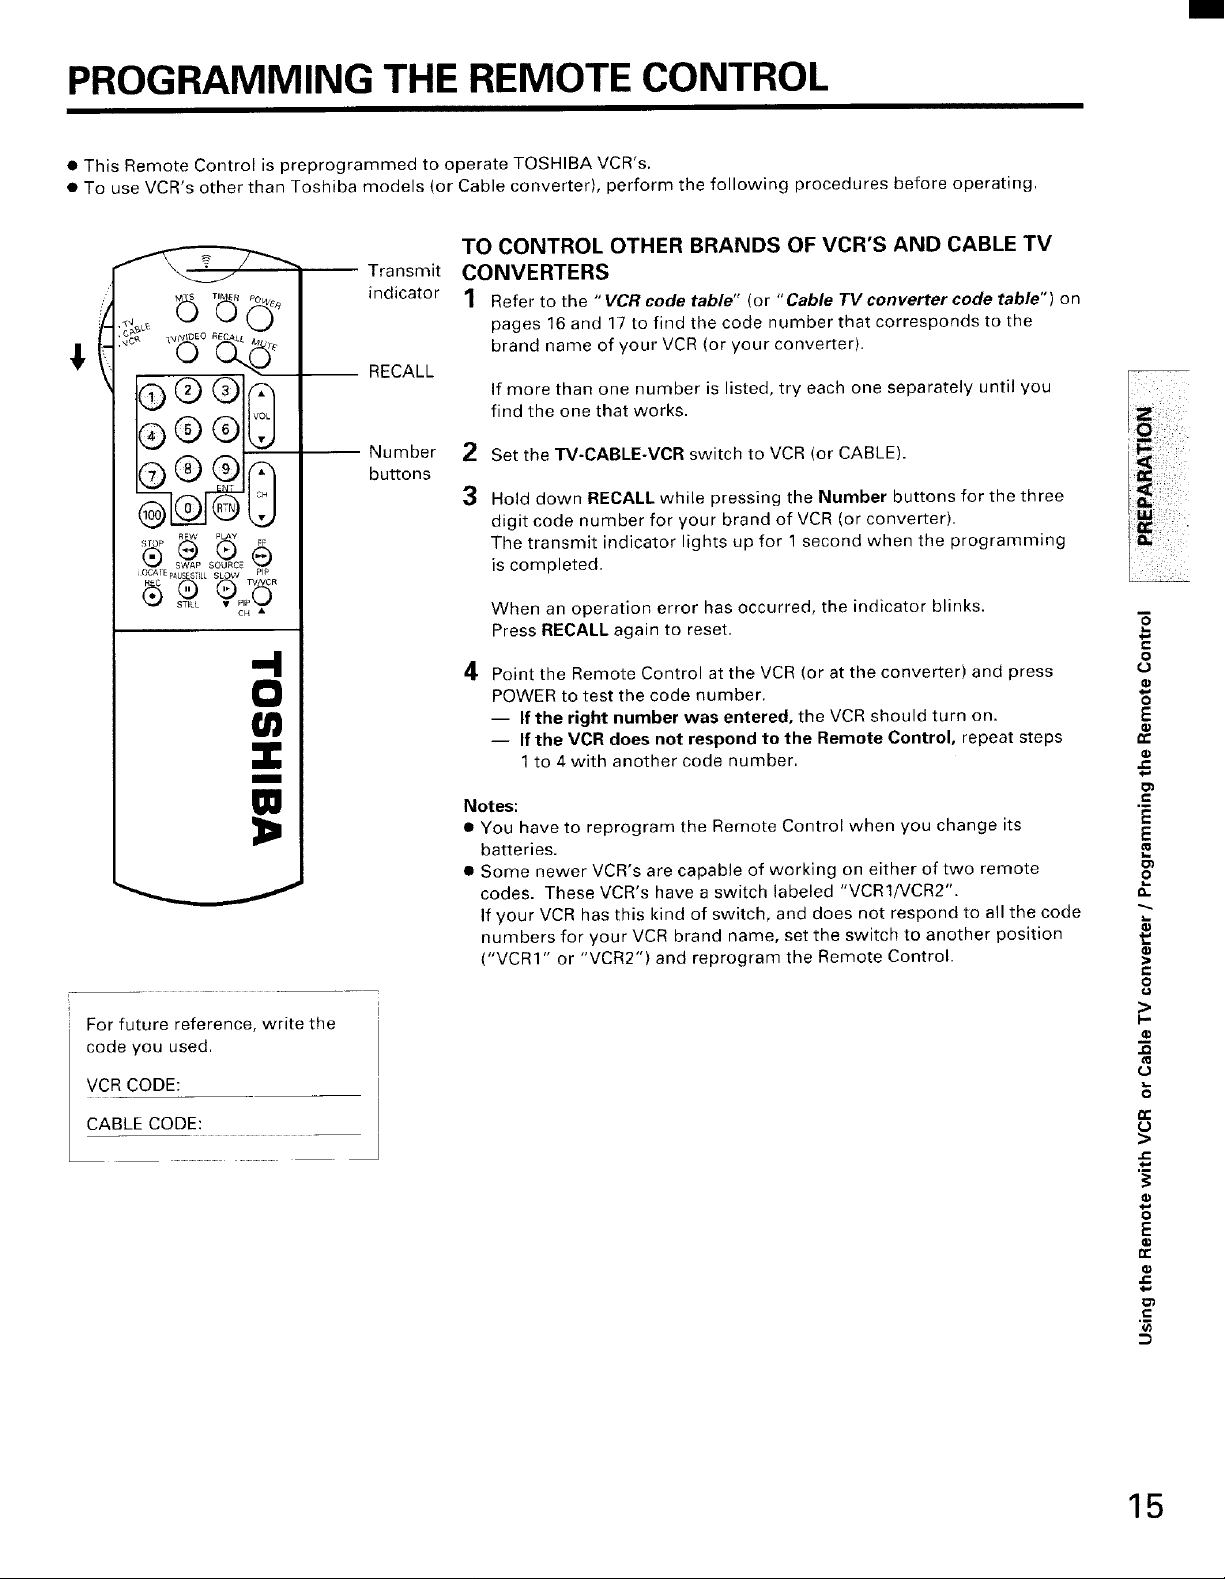
• This Remote Control is preprogrammed to operate TOSHIBA VCR's.
• To use VCR's other than Toshiba models (or Cable converter), perform the following procedures before operating.
TO CONTROL OTHER BRANDS OF VCR'S AND CABLE TV
$
Transmit
indicator
RECALL
®®® .
CONVERTERS
1 Refer to the " VCR code table" (or "Cable TV converter code table") on
pages 16 and 17 to find the code number that corresponds to the
brand name of your VCR (or your converter).
If more than one number is listed, try each one separately until you
find the one that works.
b®® •
REW FLAy
....G®6
(_ SWAP SOURCE pip
OCA f E p_USEST/L SLOW
CH •
-4
0
(n
I
m
For future reference, write the
code you used.
Number
bu_ons
2 Set the rV-CABLE-VCR switch to VCR (or CABLE).
3
Hold down RECALL while pressing the Number buttons for the three
digit code number for your brand of VCR (or converter).
The transmit indicator lights up for 1 second when the programming
is completed.
When an operation error has occurred, the indicator blinks.
Press RECALL again to reset.
4
Point the Remote Control at the VCR (or at the converter) and press
POWER to test the code number.
-- If the right number was entered, the VCR should turn on.
-- If the VCR does not respond to the Remote Control, repeat steps
1 to 4with another code number.
Notes:
• You have to reprogram the Remote Control when you change its
batteries.
• Some newer VCR's are capable of working on either of two remote
codes. These VCR's have a switch labeled "VCR1/VCR2".
If your VCR has this kind of switch, and does not respond to all the code
numbers for your VCR brand name, set the switch to another position
("VCR1" or "VCR2") and reprogram the Remote Control.
a.
>
1.-
_=
c-
o
E
c
E
o
>
c-
o
U
VCR CODE:
CABLE CODE:
G:
u
>
O
E
15
 Loading...