

Page 1
TOSHIBA
OWNER'S Manual
Video Monitor
■III
■• ,i:i
H
’> ^ i ;1
^m
Mi
Page 2

Important Information
WARNING:
TO REDUCE THE RISK OF FIRE OR ELECTRIC SHOCK, DO NOT EXPOSE THIS
APPLIANCE TO RAIN OR MOISTURE.
The lightning symbol in the triangle
WARNING
M
AVIS: RISQUE DE CHOC
ELECTRIQUE-NE PAS OUVRIR
WARNING: TO REDUCE THE RISK
OF ELECTRIC SHOCK, DO NOT
REMOVE COVER (OR BACK). NO
USER-SERVICEABLE PARTS IN
SIDE. REFER SERVICING TO
QUAUFIEDSERVICE PERSONNEL.
CAUTION:
TO PREVENT ELECTRIC SHOCK, DO NOT USE THIS POLARIZED PLUG WITH AN
EXTENSION CORO RECEPTACLE OR OTHER OUTLET UNLESS THE PRONGS CAN BE
FULLY INSERTED INTO THE OUTLET TO PREVENT ANY EXPOSURE OF THE PRONGS
ON THE POLARIZED PLUG.
FCC NOTICE
This equipment has been tested and found to comply with the limits for a Class B digital device,
pursuant to Part 15 of the FCC Rules. These limits are designed to provide reasonable
protection against harmful Interference In a residential Installation. This equipment generates,
uses and can radiate radio frequency energy and, if not installed and used in accordance with
the instructions, may cause harmful interference to radio communications. However, there is
no guarantee that interference will not occur in a particular installation. If this equipment does
cause harmful interference to radio ortetevision reception, which can be determined by turning
the equipment off and on, the user is encouraged to try to correct the interference by one or more
of the following measures:
• Reorient or relocate the receiving antenna.
• Increase the separation between the equipment and receiver.
• Connect the equipment into an outlet on a circuit different from that to which the receiver Is
connected.
• Consult the dealer or an experienced radio/TV technician for help.
NOTE TO CATV SYSTEM INSTALLERS IN THE USA:
This reminder is provided to cedi the CATV system in^aUer's a№nUon to Artkite 820-22 erf Ihe
N.E.C., that provides guidelines for proper ffoum&ig and, te parfcirfar.^jeerfflw that the cairfe
ground shall be connected to thegrometeig ^i^em of the buildir^, asck»etottwperimof(%irfe
entry as practicai.
mil
tells you that the voltage inside this
A
product may be strong enough to
cause an electric shock.
DO NOT TRY TO SERVICE THIS
PRODUCT YOURSELF.
The exclamation point in the triangle
tells you that Important operating
and maintenance instructions follow
this symbol.
Page 3
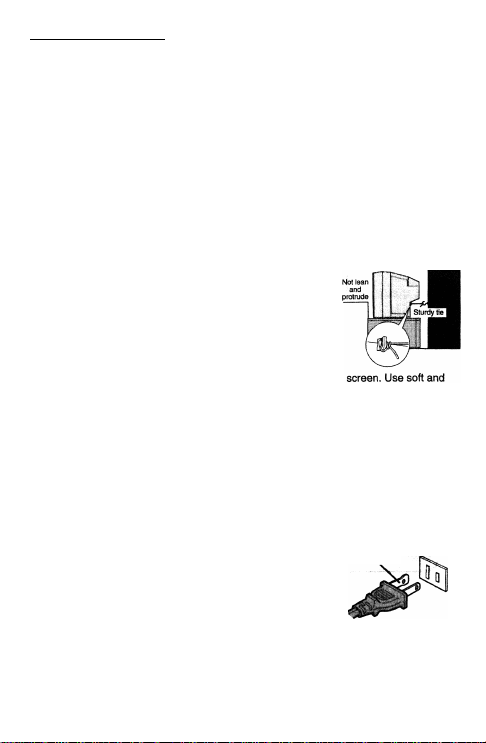
Table of Contents
Installing Your Video Monitor...................................................................... 3
Location of Controls...............................................................................4
Basic Operation
Adjusting the Picture.......................................................................... 6
Changing the On-Screen Display Language................................................... 7
Maintenance and Care............................................................................8
Specifications.......................................................................................8
Limited Warranty
Troubleshooting
_________________________________
...................................................................................
................................................................................
........................................................................
Back cover
5
9
Installing Your Video Monitor
Where to install
Place the monitor on the floor or on a sturdy platform. The
mounting surface should be flat and steady. Use a sturdy tie
between the monitor hook on the back and the rear wall, pillar,
etc., to secure the monitor.
Lighting
Do not place the monitor In a room where direct lighting strikes the
indirect lighting.
Air circulation
Place the monitor far enough from the walls to allow proper ventilation. This)
monitor from overheating and avoid possible damage to the monitor.
Avoid dusty places too.
Power suppiy
Plug into an electifcal outlet with standard household power (120 volt AC, 60Hz).
As a safety feature, the plug has one prong wider than the other. It will fit only one
way into a standard electrical outlet.fif the plug will notflt intothe
outlet, try turning it around. If the plug will not fit either way, the
outlet is probably old and non-standard.
You will need to have anew outlet installed by an electrician.
DO NOT CHANGE THE SAFETY FEATURE OF THE PLUG.
! prevent the
Wide prong
Page 4

Location of Controls
For the use of each control, see the pages in brackets.
Front view
Page 5

Basic Operation
Setting the impedance select switch
When the VIDEO OUT jack Is used to connect another video monitor, set the impedance
select switdi to HIGH (left) position.
When the VIDEO OUT jack is not used, set the switch to 75 (right) position.
nm
HIGH-75
VIDEO
Turning the Video monitor on
Press the POWER button to turn the video monitor on.
To turn the video monitor off, press the button again.
Adjusting the voiume
To increase the volume, press the VOLUME > button. To decrease the volume, pn
VOLUME < button. Press and hold either button until your desired volume level is
obtained.
DJJ-
6
The VOLUME < > buttons will operate as t
display is on the screen.
I menu < > buttons while the menu
Page 6

Adjusting the Picture
You can adjust the picture quality to your personal preference, inciuding the contrast,
brightness, sharpness, color and tint.
To adjust the picture quality
1. Press MENU until the Picture menu appears.
MENU VOLUME
tyjj
b
2. Press V or A until the Item you want to adjust is displayed in purple.
3. Press < or > to adjust the level.
CONTRAST ............
BRIGHTNESS-
......
SHARPNESS -
......
COLOR -|.
TINT -
.....
RESET
MOVE [A?] ADJUST
I|.
jjjj
b b
KPmaim >
contrast lower
brightness
sharpness
color
tint
To reset your adjustments to the factory settings.
1. Press MENU until the Picture menu appears.
2. Press V or A until RESET is displayed in purple.
3. Press < or >.
darker
softer
paler
reddish
higher
brighter
Sharper
deeper
greenish
Page 7

Changing the On-Screen Display Language
You can choose from three different languages (English, French and Spanish) for the on
screen displays
______________
To select a language:
1. Press MENU until the Language menu appears.
MENU VOLUME
QOQQ
IÂNGUAGÉ;^ENGLISK FRANÇAIS
ESPAÑOL
fb
SELECT [◄ >]
2. Press < Of > until your desired language Is displayed in purple. If you select
FRANÇAIS, the display language changé to French.
«itENU VOLUME
►FRANÇAIS
DQSDO
CKO I S I R
-7-
Page 8

Maintenance and Care
WARNING: Video Monitor use High Voltages. Do not try to remove
the cabinet back. Refer servicing to qualified service
personnel.
■ To clean the monitor screen:
1. First remove the plug from the power outlet.
2. Use a clean cellulose sponge or chamois cloth dampened with a solution of mild
detergent and warm water to clean monitor screen and trim. Do not use too much
water on the monitor screen.
3. Remove any extra moisture with the same cloth or a dry one.
■ To maintain the finish and appearance of the cabinet, polish it from time to time with a
quality furniture polish.
Specifications
Power Source
Power Consumption
Audio Power
VIdeo/AudIo Terminals
Horizontal Resolution
Dimensions
Mass
Design and specifications are subject to change without notice.
120 V AC, 60Hz
CM1320A: 43 W (average)
CM1920A: 52 W (average)
1 W
S-VIDEO INPUT
Y-INPUT: IVp-p, 75 ohm, negative sync.
C-INPUT: 0.286Vp-p (burst signal), 75 ohm
AUDIO INPUT (phono jack)
150mVrms, 47k ohm or more
VIDEO INPUT/OUTPUT (BNC jack)
IVp-p, 75 ohm/HIGH, negative sync.
450
CM1320A
....
Width
Height
Depth
CM1920A
Width
Height.......
Depth
CM1320A: 19.6 lbs (8.9 kg)
CM1920A: 37.0 lbs (16.8 kg)
ISVb Inches (384 mm)
........
....
132V32 inches (347 mm)
......
....
1423/64 inches (367 mm)
.......
....
20^Vs2 Inches (520mm)
........
....
17^2/32 inches (441 mm)
....
182^64 Inches (467 mm)
.......
-8-
Page 9

Limited Warranty
The imaging Syaiems Division of Toshiba America Information Systems, Inc. (“ISD”) makes the foUowIng limited warranties with
regard to this Color Monitor f Producf). These limited warranties extend to the Origirtal Énd-User (^oulfH-
On® (t) Year Umited Warranty of Labor and Parts ISD warrants that this Product will perform In accordance with specifications
for a period of one (1) year from the date of purchase by the Original End-User. During this one (1) year period, ISD wiS repafr
or replace the Product, if it does not perform as warranted. In order to take advantage of mis Limited Warranty, You must: (a)
deliver the Product to an ISD Authorized Service Provider (“ASP”); and (b) pay ail transportation and insurance charges for
shipment of the Product to the ASP. ISD reserves the right to substitute factory refurbished parts In piece of those in need of
repair.
tnstructton Manual (0«tmer% Manual): You should read the Instmctton Manual (Owner's Manual) thoroughly before operating
this Product. Before seeking warranty service, you should check the troubleshooting guide in the Instruction Manual (Owner’s
Manual) and follow the instructions to correct the prcH)lem.
Your Responsibilities: This Limited Warranty is sul^ to toe following conditions;
1. You must provide the blH Of sale or proof of purchase at the time that warranty service is required.
2. You must notify an ASP within thirty (30) days after You disc over that the Product does not perform in accordance with
specifications during the Limited Warranty period.
3. All warranty servicing of this product must be mskto by an ISD Authorized Service Provider.
4. You must pack the Product in its original carton using the original packing materia!, then insert the original carton containing
the Product Into another carton with additional packing material before shipping the Product to an ASP.
DISCLAIMERS:
ALL OTHER EXPRESS OR IMPLIED WARRANTIES ON TI«S PRODUCT, INCLUDING THE IMPLIED WARRANTIES OP
MERCHANTABILITY AND FITNESS FOR A PARTICULAR PURPOSE, ARE HEREBY DISCLAIMED. SOME STATES DO
NOT ALLOW THE EXCLUSION OF IMPUED WARRANTIES OR LIMITATIONS ON HOW LONG AN IMPUED WARRANTY
LASTS, SO THE ABOVE UMITATtONS MAY NOT APPLY TO YOU.
IF THIS PRODUCT IS NOT IN GOOD WORKING ORDER AS WARRANTED ABOVE, YOUR SOLE AND EXCLUSIVE
REMEDY SHALL BE T№ REPAIR OR REPLACEMENT OF THE PRODUCT. IN NO EVENT WILL ISD OR ITS PARENT
COMPANY OR ANY ASP BE LIABLE TO YOU OR ANY THIRD PARTY FOR ANY DAMAGES IN EXCESS OF THE
PURCHASE PRICE OF THE PRODUCT. THIS LIMITATION APPLIES TO DAMAGES OF ANY KIND, INCLUDING ANY
DIRECT OR INDIRECT DAMAGES, LOST PROFITS, LOST SAVINGS OR OTHER SPECIAL, INCIDENTAL, EXEMPLARY
OR CONSEQUENTIAL DAMAGES, WHETHER FOR BREACH OF CONTRACT, TORT OR OTHERWISE, OR WHETHER
ARISING OUT OF THE USE OF OR INABIUTY TO USE SUCH PRODUCT, EVEN IF TAIS, ITS PARENT COMPANY, OR
AN ASP HAS BEEN ADVISED OF THE POSSIBILITY OF SUCH DAMAGES OR OF ANY CLAIM BY ANY OTHER PARTY.
SOME STATES DO NOT ALLOW THE EXOLUSION OR LIMITATION OF INCIDENTAL OR CONSEQUENTIAL DAMAGES
FOR SOME PRODUCTS, SO THE ABOVE UMITATINS OR EXCLUSIONS MAY NOT APPLY TO YOU.
THIS WARRANTY GIVES YOU SPECIFIC LEGAL RIGHTS, AND YOU MAY ALSO HAVE OTHER RIGHTS WHICH MAY
VARY FROM STATE TO STATE.
THIS UMITED WARRANTY SHALL BE VOID IF THE PRODUCT OR PARTS HAVE BEEN SUBJECTED TO MISUSE,
ABUSE, ACCIDENT, IMPROPER INSTALLATION, IMPROPER MAINTENANCE, OR USE IN VIOLATION OF ISO’S
WRITTEN INSTRUCTIONS, OR WHERE THE PRODUCT HAS BEEN ALTERED OR MODIFIED WITHOUT ISO’S PRIOR
AUTHORIZATION, OR UPON THE REMOVAL OR ALTERATION OF ISO’S FACTORY SERIAL NUMBER. LABOR
SERVICE CHARGES FOR PRODUCT INSTALLATION, SET UP AND ADJUSTMENT OF CONTROLS ARE NOT COVERED
BY THIS LIMITED WARRANTY.
How to Obtain Warranty Service - Step-By-Step Procedures: To obtain warranty service. You should:
1. Contact an ASP for warranty service within thirty (30) days after the Product fails to comply with specifications.
2. Arrange for shipment of the Product to an ASP.
3. Securely pack the Product as described above, Insure the carton, and include a letter explaining the problem and a copy of
the bill of sale or proof of purchase.
4. Prepay all transportation and insurance costs.
Question®? If you have any questiorts, please check ISO’s websito or send an e-rnali as follows:
No person, agent, distributor, dealer, authorized service provider, or company is authorized to change, rnocWy, or extend the
terms of this Limited Warranty in any manner whatsoever. The time within which an action must be commenced to enforce
any QbHgation of ISD arising under this Limited Warranty or under any statute, or law of the United States or any state thereof ,
is hereby limited to one (1) year from the date You discover or should have discovered the problem. This limltafion does not
apply to implied warranties arising under slate taw. Some steles do not fietinft Kmitetionof the time wItNn which You may
bring an action beyond the limits provided by state law, so the above provision may not apply to You. This Limited Warranty
gives You specific legal rights and You may also have other rights which vary from state to state.
Websft©:i
E-mail: CCTVtech.suDDOrt@tais.tQShtoa.com
-9-
Page 10

Troubleshooting
Before caiilng a service technician, please check the following table for a possible cause of
the problem and some solution.
Problem
Monitor will not turn on
No picture, no sound
No sound, picture OK
Poor picture, sound OK • Check cable connections.
Poor color or no color
Exempllcms
ISO are not liable for:
(1) damage caused by fires, natural disaster (such as, earthquake, etc.), acts by third person, accidents,
owner's misuse, or use in other improper conditions;
(2) incidental damages (such as profit loss or interruption in business, modification or erasure of record
data, and so forth) caused by use or inability to use of this product;
(3) damage caused by neglect of the instructions described in the owner's manual; and
(4) damage caused by misuse or malfunction through simultaneous use of this product and the connected
equipment.
Solution
Make sure the power cord Is plugged In, then press
POWER button.
Check cable connections.
Try pressing VOLUME > button.
• Check if the impedance select switch is properly
set.
• Adjust Picture menu.
Adjust TINT and /or COLOR in the Picture menu.
If you change the direction of the monitor while the
monitor ^ activated, the picture may suffer from
color shading. If so, turn off the monitor and allow
for about 30 minutes to cool, then turn on the
nrK)nitor again.
The picture should improve.
TOSHIBA AMERICA INFORMATIOIM SYSTEMS. INC.
9740 IRVINE BLVD., IRVINE, CA 92618-1697
TEL: (949) 583-3000
MANUFACTURED BY
P.T. TOSHIBA CONSUMER PRODUCTS INDONESIA.
Printed in Indonesia
(04-06)
TOSHIBA
 Loading...