

Page 1
Toshiba CIX Telephone
End User Training
Reference
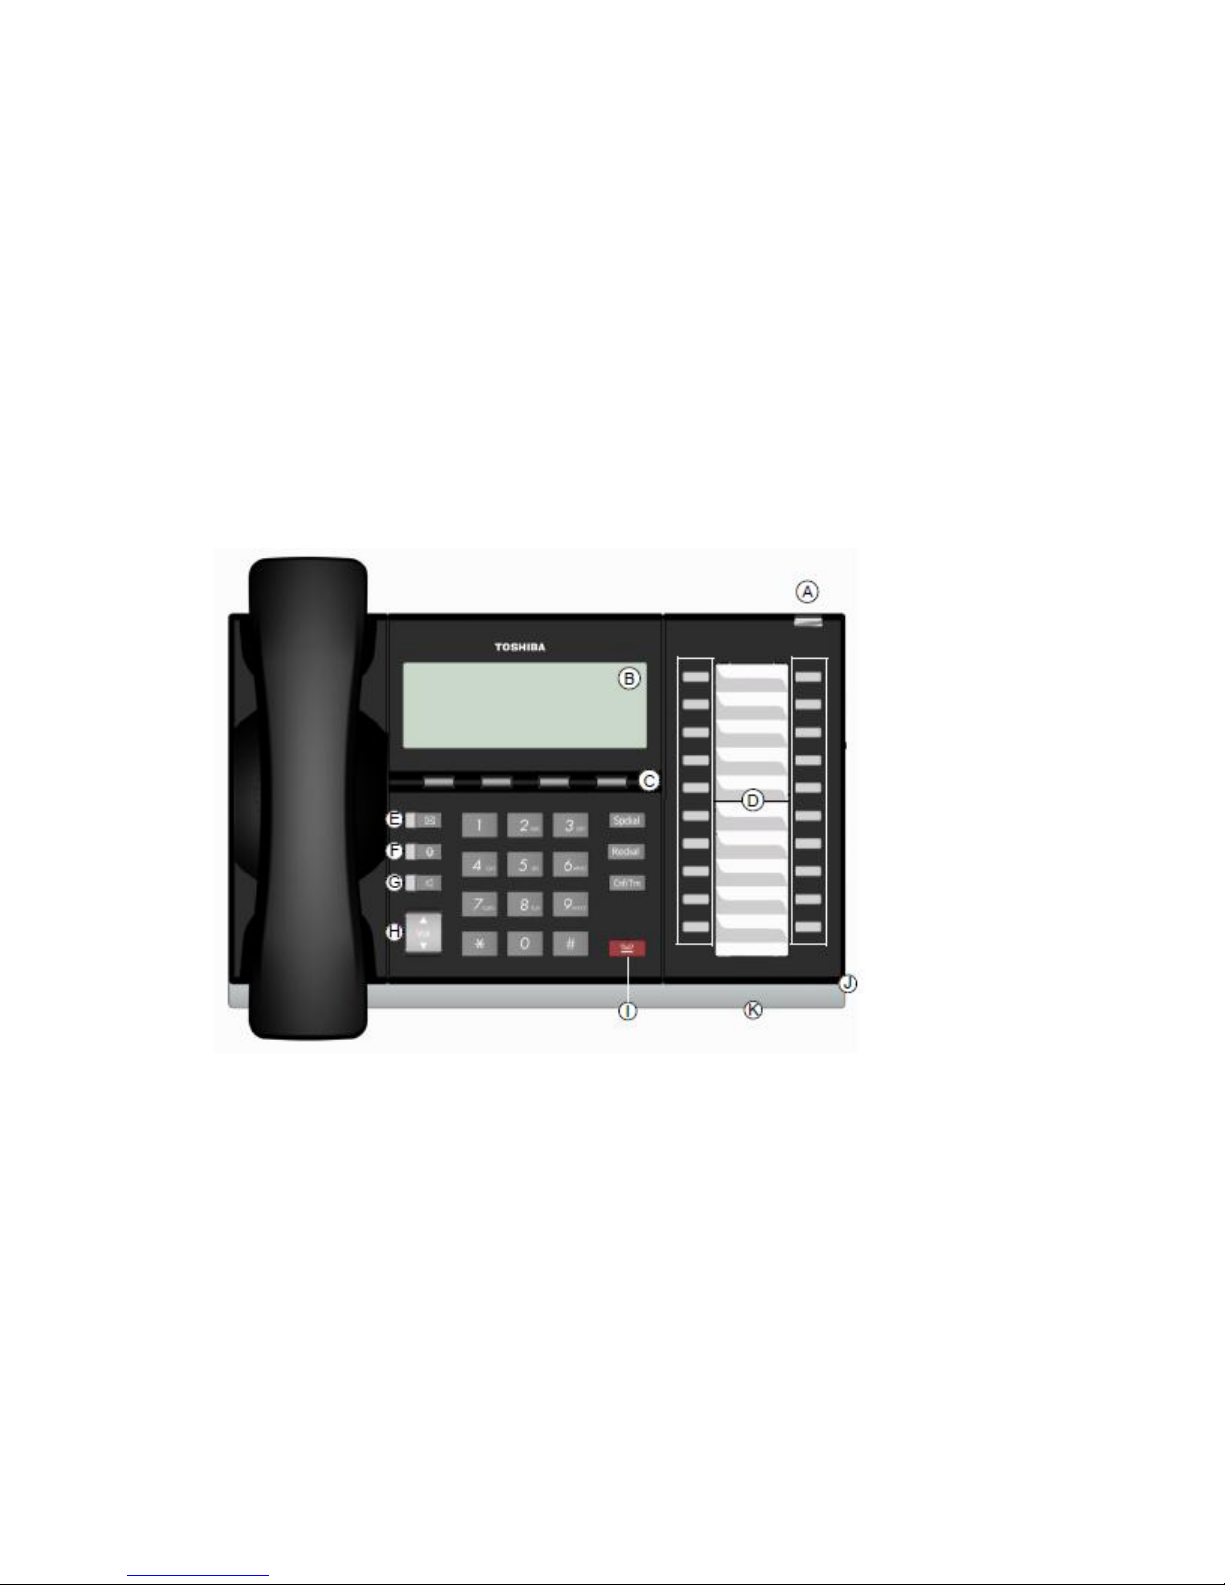
Legend
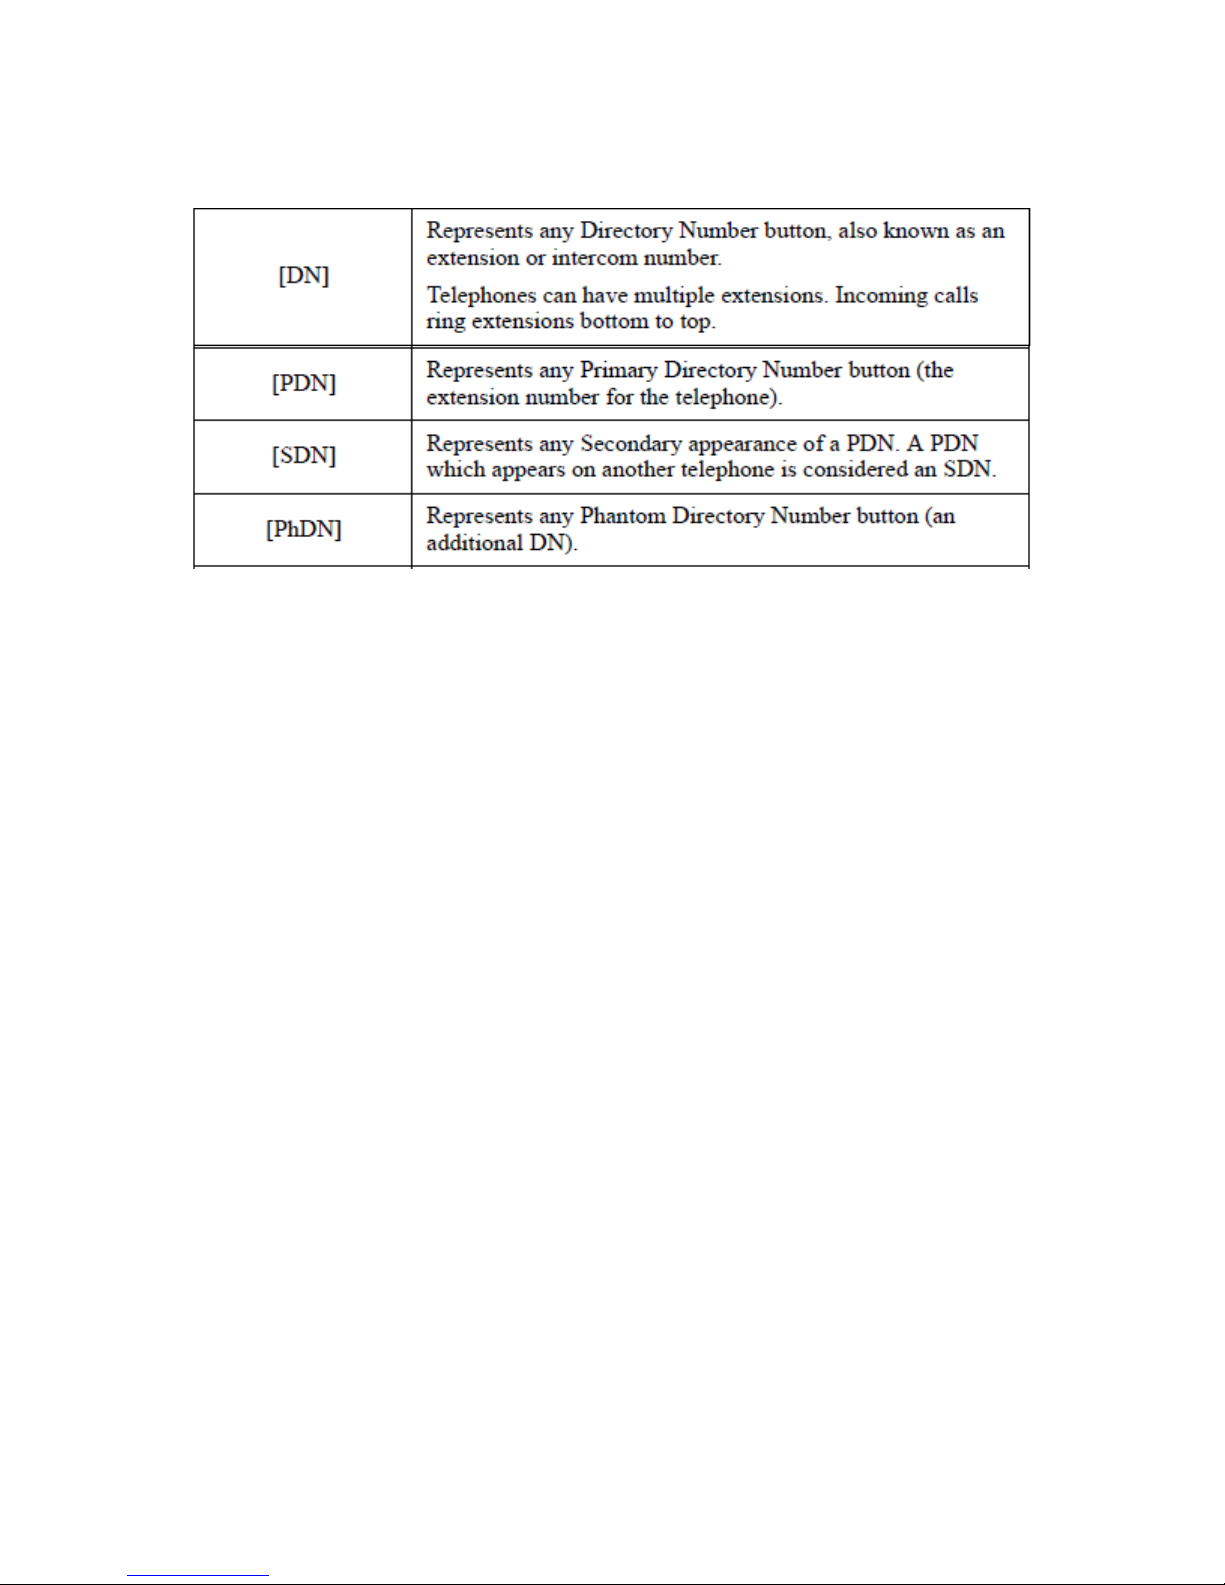
A. Status LED (message and ringing) B. LCD Display
C. Softkeys D. Programmable Feature Buttons
E. Message Waiting LED Button F. Microphone LED Button
G. Speaker LED Button H. Volume
I. Hold Button J. Microphone
K. Tilt stand
Page 2
Page 3

Fixed Keys
SPKR
For HANDSFREE operation you can switch from your handset to
speakerphone by pressing this button and placing your handset in
the cradle. To revert back to handset mode, pick up your handset.
MIC
Key used on speakerphone calls to mute when the MIC key is not
lit. Also used simultaneously with VOL keys to adjust LCD
contrast.
HOLD
HOLD is used to place a call on hold at your phone. By pressing
HOLD key twice, a call is on exclusive hold and can be picked up
at your phone only. Line flashes fast.
CONF/TRN
CONF/TRN is used to transfer calls to another station by pressing
key and dialing another ext and hanging up. Also used in
conference by pressing key dial 9 plus phone number (for OS
lines) and by pressing key again to join all parties. This can be
repeated for up to 6 OS and 2 internal parties.
REDIAL
Redials last dialed number.
SPEED DIAL
Can have up to 100 per station. Assign in increments of 10.
1.
While the phone is idle, pressing volume up or volume down
changes the RING VOLUME.
2.
By pressing the speaker key followed by volume up or down, this
will change the VOLUME OF SPEAKERPHONE calls,
intercom paging, and background music.
3.
While on a call using your HANDSET you can adjust the volume.
This volume level will return to the middle setting on each handset
call.
4.
You can adjust KEY BEEP volume on phones by dialing #6101
and using the volume keys.
5.
SPEAKERPHONE MIC SENSITIVITY can be adjusted by
pressing 3+6+9+hold simultaneously. Then press 0. Press your
3RD flexible key to the ON position to lower sensitivity, then press
the HOLD key to save.
6.
DISPLAY CONTRAST adjustments use the MIC key pressed
with the volume up and down to change.
VOLUME UP/DOWN KEY
Page 4

7.
If your station stores CALLER ID, volume keys will scroll your
display through recent calls. (The display soft key labeled page
when pressed will display date, time and action.)
MSG KEY
This is an indicator of a message left in voicemail. Pressing the
key will dial into your voicemail box and prompt you for your
security code. After you have finished listening to your new
messages and saved or deleted them, the light will automatically
shut off. Station to station messaging can also be used by dialing
the ext number and pressing the MSG key, the digit 7, or the key
labeled MSG in your displays soft keys. The light can be turned
off manually by pressing your DN or INTERCOM button and
dialing #409.
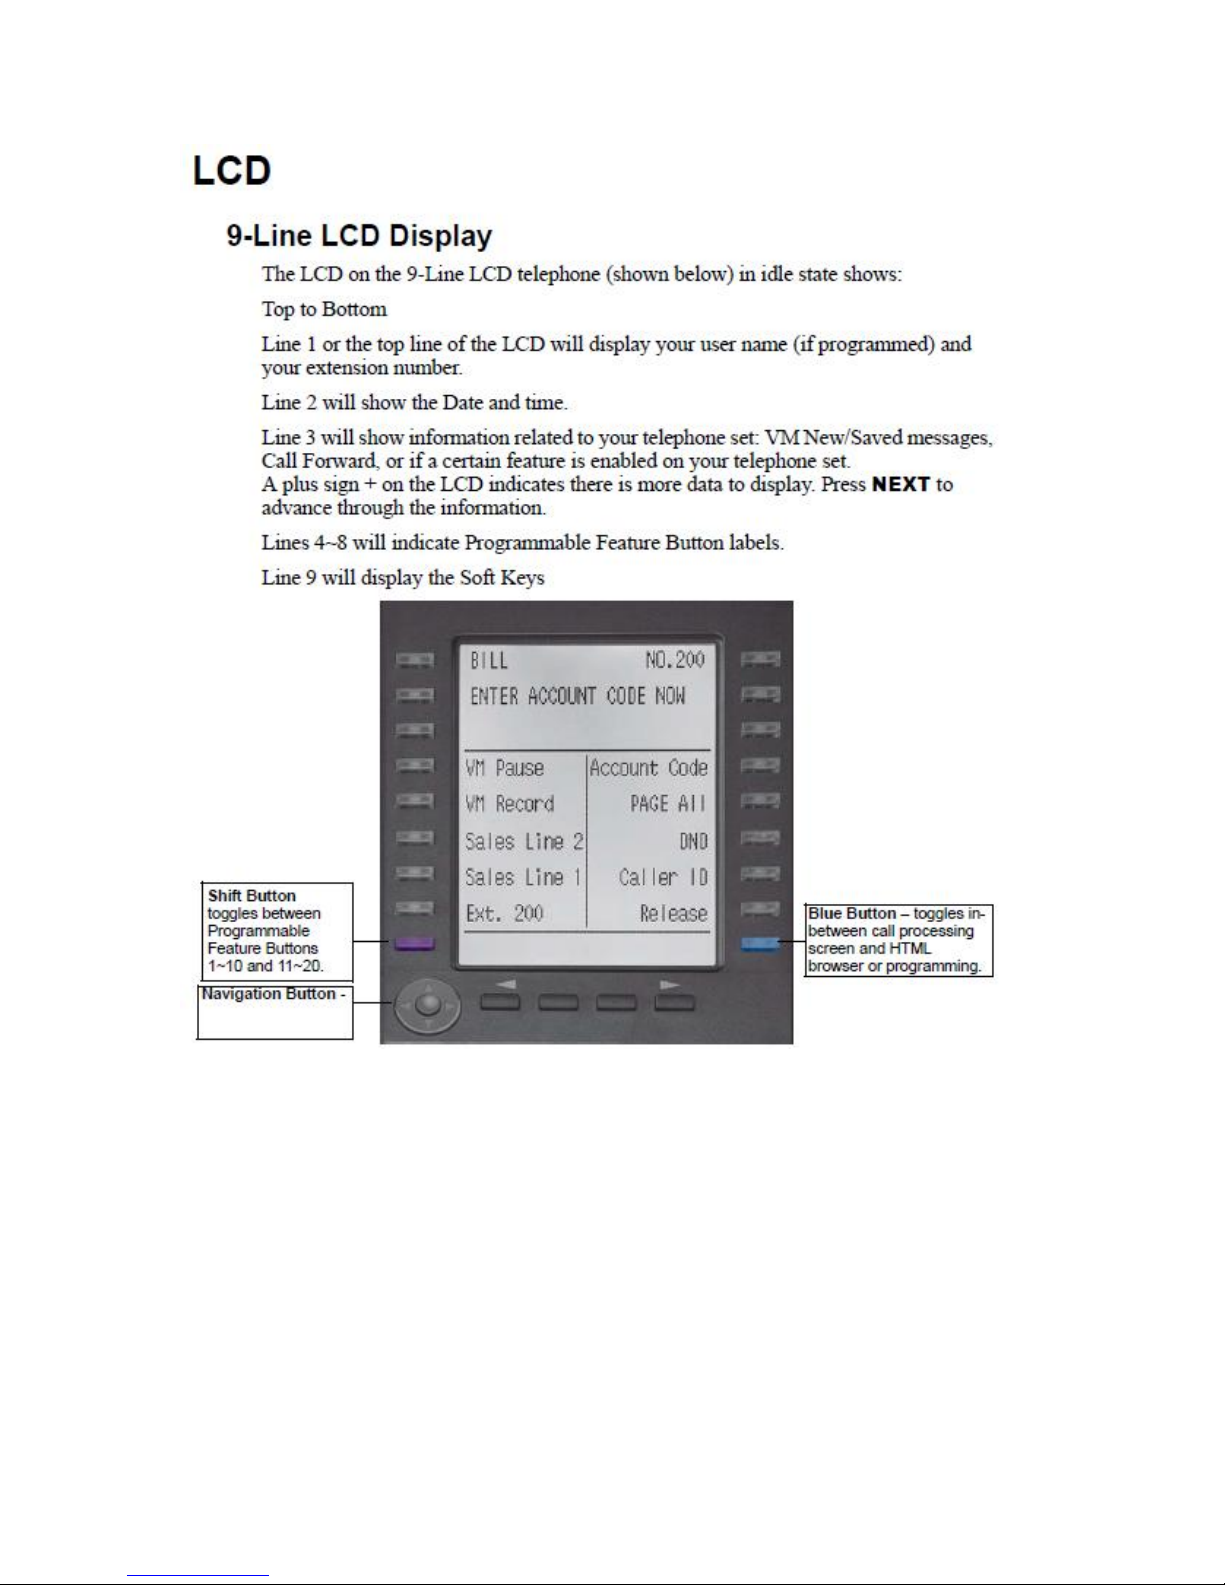
SK1-SK4
These keys may be labeled as MODE, PAGE, SCROLL, and
FEATURE. When soft key prompts appear on your LCD screen
you can press the soft key directly below that feature description
to activate. There are features such as ABR (Automatic Busy
Redial) that on an outbound call, if a busy signal is detected; this
key can be pressed to automatically redial the number after a
programmed time.
SK1- MODE
This is used as a soft key.
SK2-PAGE
This changes your display to show call forward status or user
name.
SK3-SCROLL
This key will advance phone through any active information.
SK4-FEATURE
This key is used as a soft key.
LCD CONTROL BUTTONS/SOFT KEYS
Page 5
ABR
Auto Busy Redial. Once encountering a busy signal, press this
key to enable the system to redial the busy destination at regular
intervals. The manual code to set is CNF/TRN#441. (to cancel is
#442)
ACB
Auto Call Back. Once encountering a busy station in your
system, press this key to have the system monitor that stations
busy status. Once that station returns to an idle state, your station
is notified and the internal call is connected. The manual code to
set this feature is the number 4. (to cancel #431)
Commonly used flexible button features.
Page 6

CALL FORWARD
Call Forward All Calls
Forwards all calls immediately.
Call Forward Busy/Do Not Disturb
Forwards calls immediately when your extension is
busy or in Do Not Disturb (DND) mode.
Call Forward - No Answer
Forwards all calls to your station whenever you do
not answer the call within a designated time (set by
you when you enable the feature).
Call Forward Busy/Do Not
Disturb/No Answer
Forwards all calls to your station whenever you are
busy, in the DND mode, or after ringing and you do
not answer the call within a designated time (set by
you when you enable the feature).
Call Forward Cancel
Cancels the set Call Forward feature. Notice that
each category of Call Forward has a different code
for canceling.
There are two types of Call Forwarding that you can set. One is System Call Forward
(set in system Programming) which automatically directs calls to a predefined location,
such as Voice Mail. The other type is Station Call Forwarding. You can use Station
Call Forwarding to replace your System CF destination with a custom CF setting made
from your station.
System Call Forward directs calls to a destination preset by an Administrator for
each telephone, commonly set to voice mail.
To turn on System Call Forward for your telephone, press #620. Confirmation
tone (three short tones) and “DATA PROGRAMMED” indicate the data is
set.
To turn off System Call Forward for your telephone, press #621. Confirmation
tone (three short tones) and “DATA PROGRAMMED” indicate the data is
set.
Station Call Forward enables you to assign Call Forward destinations for each
extension on your telephone that will override the telephone’s System CF settings.
Each extension can be independently set Station Call Forward to a unique
destination.
The following calls to your station can be forwarded:
Internal calls
Auto Attendant calls
Outside lines that ring only your station
Transferred internal or incoming line calls
Call Forward Settings
Page 7

Call Forward Any Call - Internal and Incoming Line Calls
Forwards any call, whether an internal call or incoming line call.
All Calls to an extension.
Press ext. button + #6011 (tone) + dial the dest. ext. no. (tone)
All Calls to outside telephone no. Busy to an ext.
Press ext. button + #6021 (tone) + dial the dest. ext. no. (tone) telephone
no.
Press ext. button + #6031 (tone) + dial the dest. ext. no. + timer (08~60)
(tone)
Busy No Answer to an ext.
Press ext. button + #6041 + dial the dest. ext. no. # (tone) + timer (08~60)
(tone)
Cancel Press ext. button + #6051 (tone)
DSS
This optional feature enables you to use a DSS button to connect directly to another
station’s line extension. The DSS LED shows the status (idle/busy) of the station and/or
the station’s primary extension. For example, a station’s DSS button LED shows busy
(light steady red) when the station is:
busy on a call on any button
idle but all appearances of the station’s extension are in use by other
stations.
When the station is in DND, the LED flashes red. To connect directly to another
station’s extension:
When connected to a line or another station, press DSS. The original
party is put on-hold. You can call a station even if the DSS LED shows
busy (steady red).
Announce the call...or transfer the call by hanging up or pressing Release.
Note you can transfer the call to an idle or busy station.
PARK
The Call Park feature enables you to hold a call temporarily in a location other than your
telephone. These areas are called orbits. You or another telephone user can retrieve a
parked call from its orbit by specifying the orbit number. You can specify one of 20
General Park Orbits (7000~7019) or a valid extension number within the system. Once
you have parked a call in an orbit, you can:
Hang up and retrieve the parked call at a later time
Originate another call
Access a voice paging device to announce the parked call for pickup from
another station
Page 8

If you park a call and it is not retrieved, it will recall to the parking station and one of the
following occurs:
If your station is idle when the system Call Park recall timer expires, the
parked call automatically recalls to your station.
If your station is busy, the parked call camps on. If you have an LCD
telephone, you can let the system automatically select an available orbit
number which displays on your LCD.
Advanced Operation
Call Park Orbits park a call
1. While on a call, press Park in Orbit or Cnf/Trn + #33. The LED flashes green
(consultation-hold). If you were on an extension during the call, and you have line
button on your telephone, the line LED will flash until the call is picked up
(depending on programming).
2. Specify the Park Orbit using one of the following:
Press * and the system automatically selects a General Park Orbit between
7000~7019. The chosen orbit appears on the LCD.
Enter a valid extension.
Press # and the system automatically selects your extension as the orbit.
3. Hang up. The caller’s extension or line number and the orbit number are shown.
If the parked call is not retrieved within a specified time, the call rings back to
your telephone. When a parked call recalls your telephone, the LCD shows the
line or extension that is recalling and the orbit number. To retrieve a parked call:
Press Park in Orbit...or press your extension button + #32.
Enter the Orbit Number where the call is parked or # for the extension
from which you are calling. You cannot use * to retrieve a parked call.
The extension LED flashes at the in-use rate when the call is retrieved.
PAGE
All Call Page
You can make an All Call Page to telephones assigned to the “All Call Page Group.”
Stations are assigned to the “All Call Page Group” in system programming.
To make an All Call Page
1. With the handset off-hook, press All Call Page...or dial #30. This pages all
telephones in the All Call Page Group but, depending on system programming,
you may or may not page external speakers.
2. Make your announcement then hang up.
Page 9

PICKUP
Call Pickup
You can pick up a call that is ringing another station’s extension, a call placed on hold at
another station and other types of calls. When you pick up an internal call, the calling
station and the called station displays on your LCD.
Group Pickup
Stations can be assigned in system programming to Pickup Groups. As many as 32
groups can be created to enable you to easily pick up incoming (new or transferred) or
internal calls that are ringing stations that are in your group or in other groups. This
feature does not pick up held calls.
Ringing, Page or Held Call Pickup
This feature picks up ringing or held calls, including Group Page and All Call Page calls.
If these types of calls occur at the same time, the pickup priority is station-to station and
then Page calls in the order of occurrence. In some systems, this feature can be applied to
pick up All Call Page exclusively.
To perform Call Pickup for Ringing Calls To Pick Up:
Press Ext. Button, then dial the access sequence below:
Directed DN
A call ringing or held at the Extension Number. #5#6 + Ext. No.
A call Ringing, held or parked at the Ext. No. #5#29 + Ext. No.
Group A call ringing a member of your pickup group. #5#34
Directed Ext.
A call ringing on any line of this Primary Ext. No. #5#5 + Primary Ext. No.
Directed Group
A call ringing an extension in this Pickup Group. #5#32 + Group No.
Ext. No.
A call ringing this Ext. No. only. Other lines ringing on the same phone are
unaffected. #5#22 + Ext. No.
Outside Calls
Any incoming outside line call. #5#9
Page 10

VMT
The system enables you to transfer a call directly to a voice mailbox without first ringing
that person’s telephone. To transfer a call directly to Voice Mail (VM)
1. While on a call, press Cnf/Trn. You hear feature dial tone.
2. Enter #407. You hear entry tone.
3. Enter the VM mailbox number (usually the same as the extension number), then
press #. The call transfers immediately and your extension becomes idle.
DND
If your station is in Do Not Disturb (DND) mode, internal, external and transferred calls
do not ring your station and Off-hook Call Announce calls are denied. You can continue
to make calls while in the DND mode. When originating a call in DND mode, you will
hear a short burst of interrupted dial tone followed by continuous dial tone. You can start
dialing at any time during either tone.
If you put your Primary extension into DND mode, all calls to that telephone are rejected.
If your extension is set for Call Forward-Busy or Call Forward-Busy/No Answer, the call
is redirected to the forwarding destination immediately.
If you put an extension other than the Primary extension into DND, only calls to that
extension on your telephone will be blocked. Appearances of that extension on other
telephones continue to ring.
To activate DND on your Primary extension
Press Do Not Disturb or #6091 (hear Success Tone). The LED lights steady red
and DND mode is activated for the entire station.
To deactivate DND
Press Do Not Disturb or #6092 (hear Success Tone). The LED lights goes out and
DND mode is de-activated.
CLID
Incoming calls with Caller ID information can be optionally recorded into a rolling list
for the station where the call is ringing. The call is placed in the list along with the
number, name (if provided), time and date of the call, and status of the call (answered,
abandoned, or redirected). You can access this list from an LCD telephone with a flexible
Caller ID button.
To view Call History
When your station is idle, press the Caller ID button. The Caller ID LED lights
green and the latest record displays.
Page 11

RECORD
While on an active call, a station user can record the conversation and store it in a
Stratagy voice mailbox. Recordings can also be paused or restarted. Depending upon the
options selected by your System Administrator, you are given either a manual method of
recording that allows you to designate the mailbox where the recording will be sent or an
auto method that automatically sends the recording to a predefined mailbox that is
assigned to the phone you are using. This may be your personal mailbox.
Note: Ask your System Administrator which method to use when recording a call. This
feature requires the presence of a Record and a PS/RES (Pause/Resume) button on your
telephone. Feature codes are not available. Important! Stratagy ES mailboxes have a
definable time limit on the length of a message can be. If you plan on making lengthy
recordings, see your System Administrator so your message recording time can be
properly defined.
To record a call
1. With a call in progress, press Record. If you are using the auto method,
the Record LED flashes rapidly and there is approximately a one second
interval (in extreme busy conditions, up to five seconds) before the
recording starts and the Record LED changes to the in-use interval flash
rate. You are now recording. Continue to Step 3.or if you are using the
manual method, the Record LED flashes green rapidly. Continue to Step
2.
2. (Manual method only) If you want to record the call to the predefined
mailbox associated with the phone you are using, press #. The Record
LED flashes rapidly and there is approximately a one second interval (in
extreme busy conditions, up to five seconds) before the recording starts
and the Record LED changes to the in-use interval flash rate. You are now
recording. Or if you want to record this call to another mailbox, enter the
mailbox number (usually the extension number). Finish by pressing #. The
Record LED flashes rapidly and there is approximately a one second
interval (in extreme busy conditions, up to five seconds) before the
recording starts and the Record LED changes to the in-use interval flash
rate. You are now recording.
3. To stop recording, press Record. The LED turns off and the recording
stops. To resume recording at this point, you need to begin a new
recording, see Step 1 Notes.
The following notes apply to telephone systems that are networked. For instance, if your
company is so large that some departments are connected to one system (node) and others
are on another (either in the same building or in another city), the telephones on the other
node are considered “remote” stations.
When a station that started voice recording puts a line on hold
(consultation-hold or line-hold), voice recording stops and cannot be
resumed.
Page 12

When a local Attendant “splits” two callers that were conferenced, voice
recording stops. When a remote Attendant “splits” two callers, voice
recording is unaffected.
If a recorded call is put on Line hold, voice recording stops when that held
call is picked up by another station. When the held call is in a different
node, voice recording is unaffected when the held call is picked up.
ACD or Attendant call monitoring cannot be used if voice recording is
taking place. Conversely, if ACD or Attendant call monitoring is taking
place, you cannot use voice recording.
Pause/Resume Recording
You can pause the recording while continuing the conversation by pressing PS/RES. The
PS/RES LED flashes red. Your conversation is no longer being recorded. To resume
recording as part of the same message, press the PS/RES button again. You can pause
and resume indefinitely throughout the conversation. The only limit may be a message
length imposed by the voice mail system.
SPEED DIAL
Storing a System/Station Speed Dial Number
1. Dial #66. The display shows “SPEED DIAL” and you hear Entry Tone.
2. Dial the Station Speed Dial number (100~199) or System Speed Dial number
(200~999). The LCD shows your digits and you hear Entry Tone.
3. Dial the telephone number to be stored + #. Include any required access and area
codes. The LCD shows “SPEED DIAL” + the Speed Dial Number + destination +
#. You hear Success Tone.
4. Release the telephone. To enter another number, repeat the process, starting with
Step 1. Refer to Table 6 below.
Example: To store a Station Speed Dial number on Index 100, dial #66 + 100 +
97432130 + #.
Feature Access Code Sequences Speed Dial (Storing a SD number)
1. Stations must be assigned/enabled Speed Dial capabilities in system programming
by an Administrator
2. Station SD #66 + nnn + Phone No.2 + # nnn = 100~199 SD bin numbers
3. System SD #66 + nnn + Phone No.2 + # nnn = 200~999 SD bin numbers
Page 13

Handset Adjustment
Page 14

Feature Access
Codes
Page 15

Page 16

Page 17

Page 18

Feature Button Codes
Page 19

Page 20

Page 21

Page 22

Speed Dial Number and Name Programming
1. Enter user programming mode by dialing #9876
2. Press Spdial key
3. Enter speed dial number personal 100-199, system 200-999
4. Enter speed dial number (9-1-800-555-1212)
5. Press speaker key to set names
6. Enter name entry
7. Press Spdial key to store
For questions or to set up a service call
please call 309-743-2130 or email
info@hughesnt.com.
Page 23

User guides and video training resources are
also available on our website
http://www.hughesnt.com
 Loading...