

Page 1
TOSHIBA
DP5000-series Telephone
Quick Reference Guide
STRATA
CIX
®
Business Telephones
Helping You
Communicate Better
Page 2
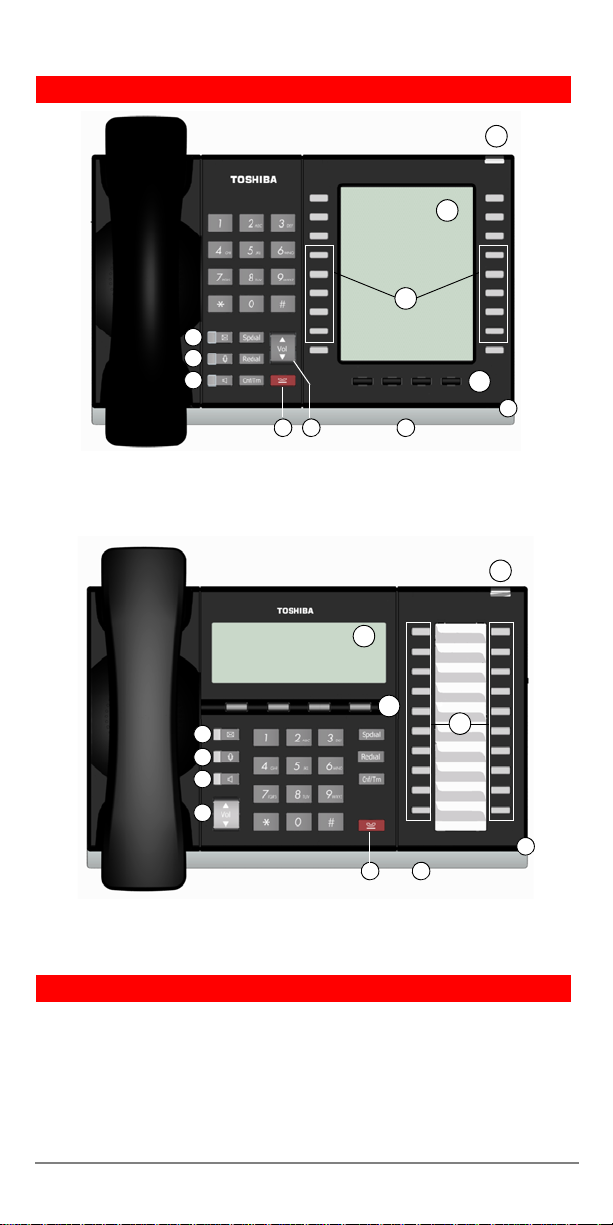
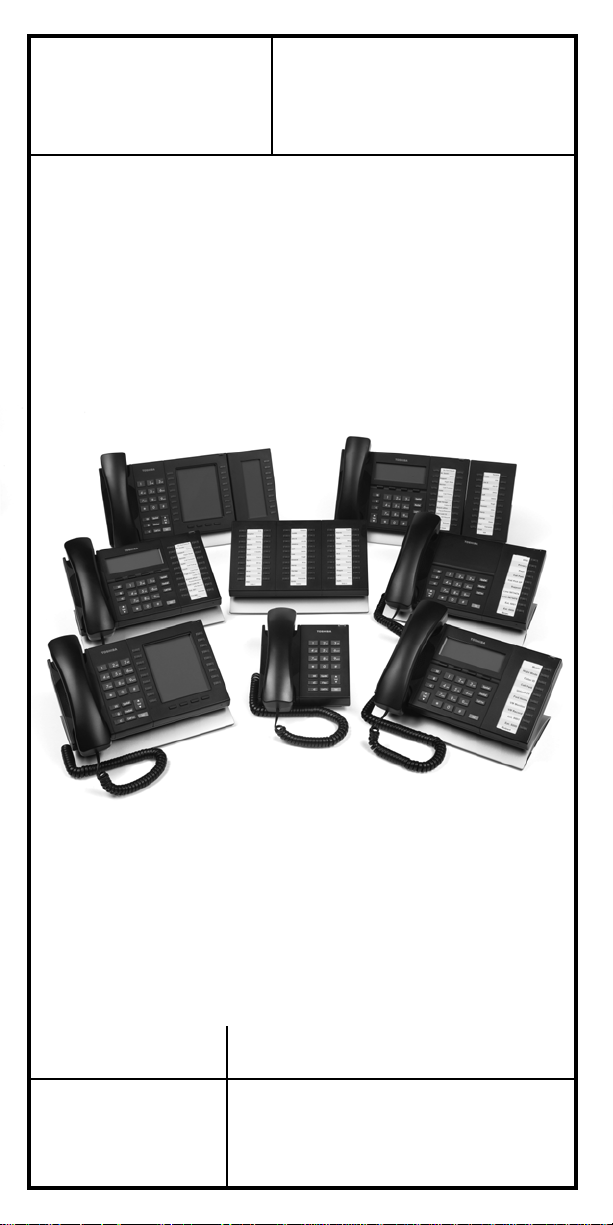
DP5000-Series Telephones
E
F
G
10 Programmable Feature Buttons
9-Line LCD
A
B
D
C
J
KI H
A
B
C
E
F
G
H
I
D
J
K
20 Programmable Feature Buttons
4-Line LCD
Legend >>>
A. Status LED (message and ringing)
B. LCD Display
C. Softkeys
D. Programmable Feature Buttons
E. Message Waiting LED Button
F. Microphone LED Button
2 Strata CIX DP5000-series Telephone Quick Reference Guide 11/07
Page 3
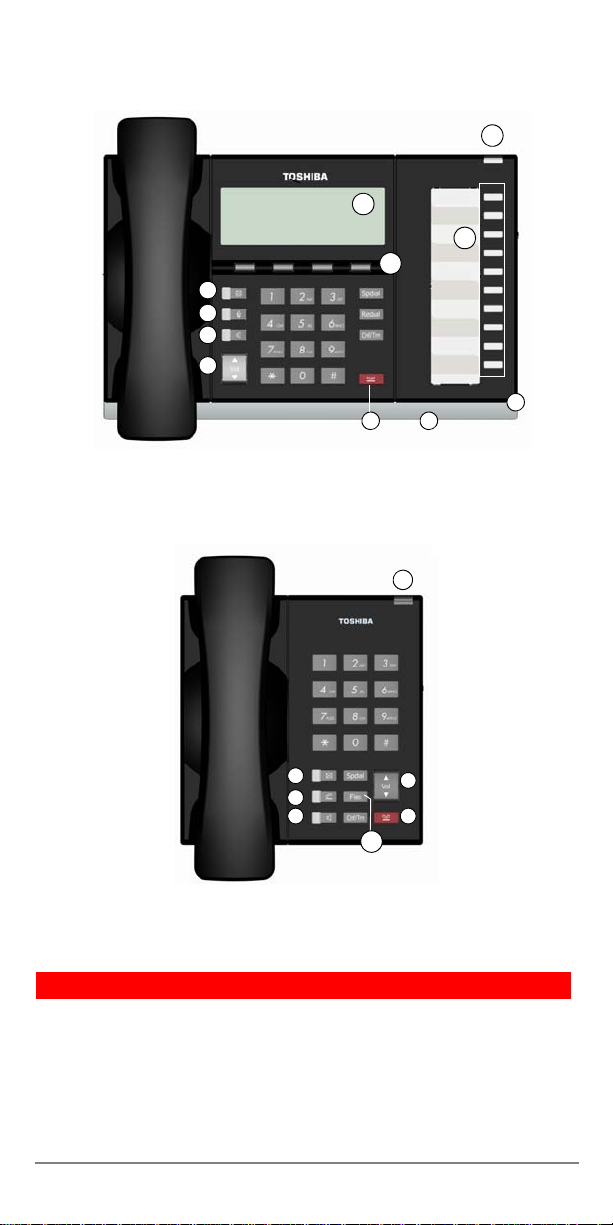
A
B
D
C
E
F
G
H
10 Programmable Feature Buttons
4-Line LCD
A
E
L
G
D
Single Line Telephone
1 Programmable Button
KI
J
H
I
Legend (continued)
G. Speaker LED Button
H. Volume
I. Hold Button
J. Microphone
K. Tilt stand
L. Off-Hook Button (Single Line Telephone)
Strata CIX DP5000-series Telephone Quick Reference Guide 11/07 3
Page 4

Personal Preferences
To customize your telephone, you can adjust the following settings.
Volume Control
³ To adjust handset volume
³ During a call, press down Vol V or Vol W. When you hang
up, volume returns to default.
³ To adjust the speaker volume for internal/external calls and
background music
³ Press Spkr and use Vol V or Vol W to adjust volume level.
Press
Spkr to exit.
³ To adjust Ring Tone, Handsfree Answerback and Speaker
Off-hook Call Announce
³ With an idle phone and handset on-hook, press Vol V or
Vol W.
LCD Contrast
Av ailable on backlit telephones and backlit add-on module.
³ To adjust the LCD contrast on the backlit telephones
1. Press and hold down the Mic button.
2. Pres s and release
Note Holding down the Vol key does not continue to change
the setting. The key must be pressed for each step of contrast
change.
³ To adjust the LCD contrast on the Add-on Module
1. Press
2. Press
3. Lift the handset off-hook / on-hook to save settings.
Hold+3+6+9 (simultaneously).
Contrast + or Contrast - softkey / button to
increase or decrease contrast.
Vol V or Vol W repeatedly.
Brightness Control
Av ailable on backlit telephones and backlit add-on module.
³ To change the LCD back light brightness
1. Press
2. To increase or decrease brightness, press
3. Lift the handset off-hook / on-hook to save the settings.
Hold+3+6+9 (simultaneously).
softkey on the telephone, and
add-on module.
Bright or Dim
Bright or Dim button on the
4 Strata CIX DP5000-series Telephone Quick Reference Guide 11/07
Page 5

Backlight On / Off
Av ailable on backlit telephones and backlit add-on module.
³ To change Backlight Settings
1. Press
2. Press the
3. Use table below to choose preferred settings.
4. Press
Notes
• Use the four programmable feature buttons on the bottom of
• Synchronized setting turns the backlight on when there is
Hold+3+6+9 (simultaneously).
Mic button.
Hold to save settings.
Always On
Shaded = Red LED On
the row. If you have two rows of buttons, use the ones on the
left hand side.
any activity on the telephone, and then keeps the backlight
on for 30 seconds (This is the default setting). Refer to
DP5000-series Telephone User Guide for additional
settings.
Synchronized Always Off
Quick Reference Features
Below is a list of features to help you with basic telephone functionality.
Making a Call
Handset
1. To make a call, lift the handset, then dial the number.
2. When connected, you can continue to use the hand set or switch
to speakerphone by pressing Spkr and replacing the
handset.
Spkr Button
1. To make a call, press Spkr.
2. Dial the number.
3. When connected, you can continue to use the speakerphone or
lift the handset and continue the conversation.
Dial Directory
1. Press DIR soft key to access the Select Directory menu.
2. Choose the directory you wish to access and use the dial pad to
enter the name.
The soft keys on the Select Directory are:
My = Personal Speed Dial Names
EXTR= System Speed Dial Names
INTR = Directory Number Names
Dial = Cancel directory, get dial tone.
(continued)
Strata CIX DP5000-series Telephone Quick Reference Guide 11/07 5
Page 6

• Press FIND to start the directory search.
• Press
• Press
• Press
NEXT to move forward.
BACK to move backwards.
CALL to connect to the directory entry
selected.
• Press
Notes
• If a directory is not selected and a name is entered, all
directories will be searched.
• To enter names from the dial pad, press the dial pad button
associated with the letter to be entered. Press the button once
for the first letter, twice for the second letter, etc. Left and
Right Soft Keys are available to move the cursor.
CNCL to quit the directory search.
Answering a Call
Incoming calls will ring on your telephone and be accompanied by a
green flashing PDN button (your extension button). The status light on
the top of your phone will also flash:
RED for incoming external call
GREEN for incoming internal call.
³ Lift the handset or press Spkr.
Note If you don’t have Ringing Line Preference: press the
flashing line or extension button and lift the handset.
Caller ID Button
³ To scroll through a list of numbers that called your telephone
The following steps require your telephone to have a
programmed feature button for Caller ID.
1. Press the Caller ID button.
2. Use
3. Press
Vol V and Vol W or NEXT and PREV softkeys to
scroll through the numbers.
CALL to dial the number.
Call Forward - Any Calls (Internal & External)
³ Enter the button sequence below
All Calls: Press Ext. + #6011 + Destination Number
Busy: Press Ext. + #6021 + Destination Number
No Answer: Press Ext. + #6031 + Destination Number +
Timer (seconds, 2-digits) +
Busy No Answer: Press Ext. + #6041 + Destination Number +
(seconds, 2-digits) + #
Timer
Cancel: Press Ext. + #6051
#
6 Strata CIX DP5000-series Telephone Quick Reference Guide 11/07
Page 7

Call Park Orbits
³ To park a call
1. While on a ca ll, press
2. Specify the Park Orbit using one of the following:
• Press
• Enter a valid extension.
• Press
3. Hang up. If the parked call is not retr ieved, the call rings back
to your phone.
³ To retrieve a parked call
1. Press
2. Enter the Orbit Number where the call is parked.
and the system automatically selects a General
*
Park Orbit between
appears on the LCD.
# and the system automatically selects your
extension as the orbit.
Call Park.
Call Park.
7000~7019. The chosen orbit
Call Transfer
³ Simple Transfer
1. While on a ca ll, press TRNS soft key.
2. Dial the extension number and th e ca ll is transferred.
³ If your telephone doesn’t have a display, or if you would like
to announce the call
1. While on a ca ll, press
2. Dial the extension number. (Optional: Stay on the line to
announce the call).
3. Hang Up.
Note During call transfer you can reconnect to the original
caller by pressing your flashing extension button.
Cnf/Trn.
Conference Calls
1. While on a ca ll, press Cnf/Trn.
2. Call another station or outside line.
3. When the called party answers, press
conferenced.
Note If you receive a busy tone or if the station does not
answer, press the flashing line button to return to the original call.
4. Repeat Steps 1~3 to add more lines. You can conference up to
eight parties.
³ To transfer conference control
Note When the person who initiates the conference (master)
hangs up, control transfers to the first internal station added to the
conference. If no internal stations are in the conferen c e, the call
disconnects.
1. Perform Steps 1 and 2 above to add the line to which you wish
to transfer conference control.
2. Announce the call and hang up to transfer the call. This station
is now the conference “master” with the ability to add or delete
parties.
Strata CIX DP5000-series Telephone Quick Reference Guide 11/07 7
Cnf/Trn. All parties are
Page 8

³ To hold a conference call
³ If you are the “master” conference controller, press Hold
once (or twice for Executive Hold) to place the conference
call on hold.
The conference continues and you can join at any time
without giving up “master” abilities. Music-on-hold is
suppressed in this mode.
³ To conference two outside Lines
1. While talking on an outside call, press
2. Access an outside line.
3. After the party answers, press
Note If you receive a busy tone or if the station does not
answer, press the flashing line button to return to the original call.
Cnf/Trn twice and hang up.
Cnf/Trn.
Hold
1. To place a call on Hold, press the Hold button.
2. To return to the held call, press the held line’s button.
If you do not return to the held call, it rings back to your phone.
If you are busy on another call, you hear two tone bursts. If the
held party hangs up, the call is released.
³ To place a call on Exclusive Hold
³ While on a call, press Hold twice. This places the call on
Exclusive Hold; no one else will be able to access that line.
³ To place a call on Automatic Hold
³ While on a call, press another extension button to receive/
originate a new call. You can switch between calls without
having to press Hold.
Make sure this feature is programmed on your system; if not,
existing calls will drop.
Mic/Mute Button
Mute on the DP5000-series telephones mutes not only the microphone
but also the handset microphone as well. The MIC button on the
telephones toggles between Mic and Mute. When Mic button is lit,
handsfree communication is supported, when
is off, Mute is enabled.
Mic is pressed and light
³ During a handsfree conversation, press the Mic key, the red
indicator will turn off; the microphone and handset are
muted.
³ Press the Mic key again to resume hands free communication,
the red indicator will turn on.
8 Strata CIX DP5000-series Telephone Quick Reference Guide 11/07
Page 9

One Touch
³ To store a number on the One Touch button
1. Dial
2. Press a
3. Enter the number to be stored.
4. Press the
Note One Touch buttons must be programmed on a
Programmable Feature Button.
#9876.
One Touch button.
One Touch button again.
Paging
³ To make an All Call Page
1. W ith the handset of f-hook, press
all phones in the All Call Page Group, and may page external
speakers (depends on programming).
2. Make your announcement, then hang up.
All Call Page. This pages
Speed Dial
³ To store a Station Speed Dial Number
1. Dial #9876.
2. Press
3. Enter a Speed Dial Code (100~199).
4. Enter the number to be stored (32 digits max.).
5. Press
6. Repeat steps 2~5 to add more speed dial numbers.
7. To end programming session, lift and replace the handset.
³ To clear a number from a Station Speed Dial code
Spdial.
Spdial button to store the entry.
³ Repeat the previous procedure skipping Step 4.
³ To make a call using Speed Dial
1. Lift the handset. Press
Number.
2. Access a outside line (if necessary).
Note You may need to lift the handset and access an outside
line before pressing
setup).
Spdial, then dial the Speed Dial
Spdial (depending on your telephone
CAUTION! Do not use cleansers that co ntain ben zene, pai nt
thinner, alcohol or other solvents on the
telephone's rubber feet. The color of the rubber
may transfer to the desk or mounting surface.
Strata CIX DP5000-series Telephone Quick Reference Guide 11/07 9
Page 10

DP5000-QRG-VA
Version A, November 2007
Toshiba America Information Systems, Inc.,
Telecommunication Systems Division
9740 Irvine Blvd., Irvine, CA 92618-1697
(949) 583-3700 www.telecom.toshiba.com
© 2007 Toshiba America Information Systems, Inc. Printed in U.S.A.
All product, service and company names are trademarks, registered
trademarks or service marks of their respective owners. Information including
specifications, content and contact information is subject to change without
notice. Some features require optional hardware to support full capabilities.
 Loading...