

Page 1

Telecommunication Systems Division
®
Net Phone
Administrator Guide
April 2008
Page 2

Publication Information
Toshiba America Information Systems, Inc.
Telecommunication Systems Division
Publication Information
Toshiba America Information Systems, Inc., Telecommunication Systems Division, reserves
the right, without prior notice, to revise this information publication for any reason, including,
but not limited to, utilization of new advances in the state of technical arts or to simply change
the design of this document.
Further, Toshiba America Information Systems, Inc., Telecommunication Systems Division,
also reserves the right, without prior notice, to make such changes in equipment design or
components as engineering or manufacturing methods may warrant.
CIX-AG-NP-VA
Version A, April 2008
Our mission to publish accurate, complete and user accessible documentation. At the time of
printing the information in this document was as accurate and current as was reasonably
possible. However, in the time required to print and distribute this manual additions,
corrections or other changes may have been made. To view the latest version of this or other
documents please refer to the Toshiba FYI web site.
Toshiba America Information Systems shall not be liable for any commercial losses, loss of
revenues or profits, loss of goodwill, inconvenience, or exemplary, special, incidental, indirect
or consequential damages whatsoe ver, or claims of third parties, regardless of the form of any
claim that may result from the use of this document.
THE SPECIFICATIONS AND INFORMATION PROVIDED HEREIN ARE FOR
INFORMATIONAL PURPOSES ONLY AND ARE NOT A WARRANTY OF ACTUAL
PERFORMANCE, WHETHER EXPRESSED OR IMPLIED. THE SPECIFICATIONS AND
INFORMATION ARE SUBJECT TO CHANGE WITHOUT NOTICE. ACTUAL
PERFORMANCE MAY VA RY BASED ON INDIVIDUAL CONFIGURATIONS, USE OF
COLLATERAL EQUIPMENT, OR OTHER FACTORS.
Page 3

© Copyright 2008
This document is copyrighted by Toshiba America Information Systems, Inc. with all rights
reserved. Under the copyright laws, this docume nt cannot be repro duced in any form or by any
means—graphic, electronic, or mechanical, including recording, taping, photocopying, without
prior written permission of Toshiba. No patent liability is assumed, however, with respect to the
use of the information contained herein.
Trademarks
Strata, SD (Secure Digital) and CIX are registered trademarks of Toshiba Corporation.
Strat agy, eManager, My Phone Manager and Info Manager are registered trademarks of
Toshiba America Information Systems, Inc.
Windows and Microsoft are registered trademarks of Microsoft.
Trademarks, registered trademarks, and service marks are the property of their respective
owners.
Page 4

TOSHIBA AMERICA INFORMATION SYSTEMS, INC. (“TAIS”)
Y
Y
w
Y
Y
w
Y
A
Telecommunication Systems Division License Agreement
IMPORTANT: THIS LICENSE AGREEMENT (“AGREEMENT”) IS A LEGAL AGREEMENT BETWEEN YOU (“YOU”) AND TAIS. CAREFULLY READ THIS LICENSE AGREEMENT. USE OF ANY
SOFTWARE OR ANY RELATED INFORMATION (COLLECTIVELY, “SOFTWARE”) INSTALLED ON OR SHIPPED WITH A TAIS DIGITAL SOLUTIONS PRODUCT OR OTHERWISE MADE AVAILABLE TO
OU BY TAIS IN WHATEVER FORM OR MEDIA, WILL CONSTITUTE YOUR ACCEPTANCE OF THESE TERMS, UNLESS SEPARATE TERMS ARE PROVIDED BY THE SOFTWARE SUPPLIER. IF
OU DO NOT AGREE WITH THE TERMS OF THIS LICENSE AGREEMENT, DO NOT INSTALL, COPY OR USE THE SOFTWARE AND PROMPTLY RETURN IT TO THE LOCATION FROM WHICH YOU
OBTAINED IT IN ACCORDANCE WITH APPLICABLE RETURN POLICIES. EXCEPT AS OTHERWISE AUTHORIZED IN WRITING BY TAIS, THIS SOFTWARE IS LICENSED FOR DISTRIBUTION
THROUGH TAIS AUTHORIZED CHANNELS ONLY TO END-USERS PURSUANT TO THIS LICENSE AGREEMENT.
1. License Grant. The Software is not sold; it is licensed upon payment of applicable charges. TAIS grants to you a personal, non-transferable and non-exclusive right to use the copy of the Software
provided under this License Agreement. You agree you will not copy the Software except as necessary to use it on one TAIS system at a time at one location. Modifying, translating, renting, copying,
distributing, printing, sublicensing, transferring or assigning all or part of the Software, or any rights granted hereunder, to any other persons and removing any proprietary notices, labels or marks from the
Software is strictly prohibited except as permitted by applicable law; you agree violation of such restrictions will cause irreparable harm to TAIS and provide grounds for injunctive relief, without notice,
against you or any other person in possession of the Software. You and any other person whose possession of the software violates this License Agreement shall promptly surrender possession of the
Software to TAIS, upon demand. Furthermore, you hereby agree not to create derivative works based on the Software. TAIS reserves the right to terminate this license and to immediately repossess the
software in the event that you or any other person violates this License Agreement. Execution of the Software for any additional capabilities require a valid run-time license.
2. Intellectual Property. You acknowledge that no title to the intellectual property in the Software is transferred to you. You further acknowledge that title and full ownership rights to the Software will remain
the exclusive property of TAIS and/or its suppliers, and you will not acquire any rights to the Software, except the license expressly set forth above. You will not remove or change any proprietary notices
contained in or on the Software. The Software is protected under US patent, copyright, trade secret, and/or other proprietary laws, as well as international treaties. Any transfer, use, or copying of the
software in violation of the License Agreement constitutes copyright infringement. You are hereby on notice that any transfer, use, or copying of the Software in violation of this License Agreement constitutes
a willful infringement of copyright.
3. No Reverse Engineering. You agree that you will not attempt, and if you employ employees or engage contractors, you will use your best efforts to prevent your employees and contractors from
attempting to reverse compile, reverse engineer, modify, translate or disassemble the Software in whole or in part. Any failure to comply with the above or any other terms and conditions contained herein
ill result in the automatic termination of this license and the reversion of the rights granted hereunder back to TAIS.
4. Limited Warranty. THE SOFTWARE IS PROVIDED “AS IS” WITHOUT WARRANTY OF ANY KIND. TO THE MAXIMUM EXTENT PERMITTED BY APPLICABLE LAW, TAIS AND ITS SUPPLIERS
DISCLAIM ALL WARRANTIES WITH REGARD TO THE SOFTWARE, EITHER EXPRESS OR IMPLIED, INCLUDING, BUT NOT LIMITED TO, THE WARRANTY OF NON-INFRINGEMENT OF THIRD
PARTY RIGHTS, THE WARRANTY OF YEAR 2000 COMPLIANCE, AND THE IMPLIED WARRANTIES OF MERCHANTABILITY AND FITNESS FOR A PARTICULAR PURPOSE. THE ENTIRE RISK AS
TO THE QUALITY AND PERFORMANCE OF THE SOFTWARE IS WITH YOU. NEITHER TAIS NOR ITS SUPPLIERS WARRANT THAT THE FUNCTIONS CONTAINED IN THE SOFTWARE WILL MEET
OUR REQUIREMENTS OR THAT THE OPERATION OF THE SOFTWARE WILL BE UNINTERRUPTED OR ERROR-FREE. HOWEVER, TAIS WARRANTS THAT ANY MEDIA ON WHICH THE
SOFTWARE IS FURNISHED IS FREE FROM DEFECTS IN MATERIAL AND WORKMANSHIP UNDER NORMAL USE FOR A PERIOD OF NINETY (90) DAYS FROM THE DATE OF DELIVERY TO
OU.
5. Limitation Of Liability. TAIS’ ENTIRE LIABILITY AND YOUR SOLE AND EXCLUSIVE REMEDY UNDER THIS LICENSE AGREEMENT SHALL BE AT TAIS’ OPTION REPLACEMENT OF THE MEDIA OR
REFUND OF THE PRICE PAID. TO THE MAXIMUM EXTENT PERMITTED BY APPLICABLE LAW, IN NO EVENT SHALL TAIS OR ITS SUPPLIERS BE LIABLE TO YOU FOR ANY CONSEQUENTIAL,
SPECIAL, INCIDENTAL OR INDIRECT DAMAGES FOR PERSONAL INJURY, LOSS OF BUSINESS PROFITS, BUSINESS INTERRUPTION, LOSS OF BUSINESS INFORMATION/DATA, OR ANY
OTHER PECUNIARY LOSS OF ANY KIND ARISING OUT OF THE USE OR INABILITY TO USE THE SOFTWARE, EVEN IF TAIS OR ITS SUPPLIER HAS BEEN ADVISED OF THE POSSIBILITY OF
SUCH DAMAGES. IN NO EVENT SHALL TAIS OR ITS SUPPLIERS BE LIABLE FOR ANY CLAIM BY A THIRD PARTY.
6. State/Jurisdiction Laws. SOME STATES/JURISDICTIONS DO NOT ALLOW THE EXCLUSION OF IMPLIED WARRANTIES OR LIMITATIONS ON HOW LONG AN IMPLIED WARRANTY MAY LAST, OR
THE EXCLUSION OR LIMITATION OF INCIDENTAL OR CONSEQUENTIAL DAMAGES, SO SUCH LIMITATIONS OR EXCLUSIONS MAY NOT APPLY TO YOU. THIS LIMITED WARRANTY GIVES YOU
SPECIFIC RIGHTS AND YOU MAY ALSO HAVE OTHER RIGHTS WHICH VARY FROM STATE/JURISDICTION TO STATE/JURISDICTION.
7. Export Laws. This License Agreement involves products and/or technical data that may be controlled under the United States Export Administration Regulations and may be subject to the approval of the
United States Department of Commerce prior to export. Any export, directly or indirectly, in contravention of the United States Export Administration Regulations, or any other applicable law, regulation or
order, is prohibited.
8. Governing Law. This License Agreement will be governed by the laws of the State of California, United States of America, excluding its conflict of law provisions.
9. United States Government Restricted Rights. The Software is provided with Restricted Rights. The Software and other materials provided hereunder constitute Commercial Computer Software and
Software Documentation and Technical Data related to Commercial Items. Consistent with F.A.R. 12.211 and 12.212 they are licensed to the U.S. Government under, and the U.S. Government’s rights
therein are restricted pursuant to, the vendor’s commercial license.
10. Severability. If any provision of this License Agreement shall be held to be invalid, illegal or unenforceable, the validity, legality and enforceability of the remaining provisions hereof shall not in any way
be affected or impaired.
11. No Waiver. No waiver of any breach of any provision of this License Agreement shall constitute a waiver of any prior, concurrent or subsequent breach of the same or any other provisions hereof, and no
aiver shall be effective unless made in writing and signed by an authorized representative of the waiving party.
12. Supplier Software. The Software may include certain software provided by TAIS suppliers. In such event, you agree that such supplier may be designated by TAIS as a third party beneficiary of TAIS with
rights to enforce the Agreement with respect to supplier’s software.
OU ACKNOWLEDGE THAT YOU HAVE READ THIS LICENSE AGREEMENT AND THAT YOU UNDERSTAND ITS PROVISIONS. YOU AGREE TO BE BOUND BY ITS TERMS AND CONDITIONS. YOU
FURTHER AGREE THAT THIS LICENSE AGREEMENT CONTAINS THE COMPLETE AND EXCLUSIVE AGREEMENT BETWEEN YOU AND TAIS AND SUPERSEDES ANY PROPOSAL OR PRIOR
GREEMENT, ORAL OR WRITTEN, OR ANY OTHER COMMUNICATION RELATING TO THE SUBJECT MATTER OF THIS LICENSE AGREEMENT.
Toshiba America Information Systems, Inc.
Telecommunication Systems Division
9740 Irvine Boulevard
Irvine, California 92618-1697
United States of America
DSD 020905
5932
Page 5

Toshiba America Information Systems, Inc.
Te lecommunication Systems Division
Limited Warranty
Toshiba America Information Systems, Inc., (“TAIS”) warrants that:
• The CIX Attendant Console equipment, such as the PC (except for fuses, lamps, and other consumables) will, upon delivery
by TAIS or an authorized TAIS dealer to a retail customer in new condition, be free from defects in material and
workmanship for twelve (12) months after delivery.
• And that the Toshiba telephone equipment (except for fuses, lamps, and other consumables) will, upon delivery by TAIS or
an authorized TAIS dealer to a retail customer in new condition, be free from defects in material and workmanship for
twenty-four (24) months after delivery.
This warranty is void (a) if the equipment is used under other than normal use and maintenance conditions, (b) if the equipment is
modified or altered, unless the modification or alteration is expressly authorized by T AIS, (c) if the equipment is subject to abuse,
neglect, lightning, electrical fault, or accident, (d) if the equipment is repaired by someone other than TAIS or an authorized TAIS
dealer, (e) if the equipment’s serial number is defaced or missing, or (f) if the equipment is installed or used in combination or in
assembly with products not supplied by TAIS and which are not compatible or are of inferior quality, design, or performance.
The sole obligation of TAIS or Toshiba Corporation under this warranty, or under any other legal obligation with respect to the
equipment, is the repair or replacement by TAIS or its authorized dealer of such defective or missing parts as are causing the
malfunction with new or refurbished parts (at their op tion). If TAIS or one of its authorized dealers does not replace or repair such
parts, the retail customer’s sole remedy will be a refund of the price charged by TAIS to its dealers for such parts as are proven to
be defective, and which are returned to TAIS through one of its authorized dealers within the warranty period and no later than
thirty (30) days after such malfunction, whichever first occurs.
Under no circumstances will the retail customer or any user or dealer or other person be entitled to any direct, special, indirect,
consequential, or exemplary damages, for breach of contract, tort, or otherwise. Under no circumstances will any such person be
entitled to any sum greater than the purchase price paid for the item of equipment that is malfunctioning.
To obtain service under this warranty, the retail customer must bring the malfunction of the machine to the attention of one of
TAIS’ authorized dealers within the twenty-four (24) month period and no later than thirty (30) days after such malfunction,
whichever first occurs. Failure to bring the malfunction to the attention of an authorized TAIS dealer within the prescribed time
results in the customer being not entitled to warranty service.
THERE ARE NO OTHER WARRANTIES FROM EITHER TOSHIBA AMERICA INFORMATION SYSTEMS, INC., OR
TOSHIBA CORPORATION WHICH EXTEND BEYOND THE FACE OF THIS WARRANTY. ALL OTHER WARRANTIES,
EXPRESS OR IMPLIED, INCLUDING THE WARRANTIES OF MERCHANTABILITY, FITNESS FOR A PARTICULAR
PURPOSE, AND FITNESS FOR USE, ARE EXCLUDED.
No TAIS dealer and no person other than an officer of TAIS may extend or modify this warranty. No such modification or
extension is effective unless it is in writing and signed by the vice president and general manager, Telecommunication Systems
Division.
Page 6

WARRANTIES FOR NON-TOSHIBA BRANDED
THIRD PARTY PRODUCTS
A valuable element of Toshiba’s product strategy is to offer our customers a complete product
portfolio. To provide this value to our customers at the most optimal prices, we offer both
Toshiba-branded and third-party manufactured products that support our Toshiba Strata CIX
product portfolio. Similar to other resellers of software, hardware and peripherals, these thirdparty manufactured products carry warranties independent of our Toshiba limited warranty
provided with our Toshiba-branded products. Customers should note that third-party
manufacturer warranties vary from product to product and are covered by the warranties
provided through the original manufacturer and p assed on int act to the p urchaser by Toshiba.
Customers should consult their product documentation for third-party warranty information
specific to third-party products. More information may also b e available in some cases from the
manufacturer’s public website.
While Toshiba offers a wide selection of software, hardware and peripheral products, we do
not specifically test or guarantee that the third-party products we offer work under every
configuration with any or all of the various models of the Toshiba Strata CIX. T oshiba does not
endorse, warrant nor assume any liability in connection with such third party products or
services. If you have questions about compatibility, we recommend and encourage you to
contact the third-party software, hardware and peripheral product manufacturer directly.
Page 7

Contents
Introduction
Organization.........................................................................................................................v
Conventions ........................................................................................................................vi
Related Documents/Media................................................................................................ vii
Chapter 1 — Overview
Net Phone Software Enhancement History..........................................................................3
Version 6.0........................................................................................................................3
Version 5.1........................................................................................................................4
Version 5.0........................................................................................................................4
Requirements .......................................................................................................................9
PC Requirements..............................................................................................................9
LAN Requirements...........................................................................................................9
Phone System.......................................................................................................... .... ......9
Power-Up..........................................................................................................................9
Support Plan (Maintenance).................... .... ............................................................... ....10
Beta Versions.....................................................................................................................10
Chapter 2 — Installation
Installing Net Phone............................................................................ ..... ..........................12
Setup User Profiles ............................................................................................................14
Voice over IP Audio ..........................................................................................................17
Strata CIX Net Phone AG 04/08 i
Page 8

Contents
Chapter 3 – Deploying Net Phone
Chapter 3 — Deploying Net Phone
Server-based Automatic Upgrades ....................................................................................20
How it Works.....................................................................................................................20
Setting Up Net Server for Automatic Upgrades................................................................21
Advanced Information .......................................................................................................23
Chapter 4 — Server-based Dial Plan
Dial Plan Setup ..................................................................................................................25
Calling Within My Home Area Code......................................................................... ....27
Calling Outside the Home Area Code............................................................................28
Test a Phone Number......................................................................................................28
Chapter 5 — Server-based Net Phone COS
Step 1: Create User Groups (Net Server) ..........................................................................30
Step 2: Assign Users to Net Phone Application (Net Server) ..........................................32
Step 3: Assigning Users to User Groups (Net Server) ......................................................36
Step 4: Create Configuration Files using Admin Net Phone ............................................39
Step 5: Publishing the Configuration Files .......................................................................41
Verification of Settings.................................................................................................. ....42
Managing files on the Server.............................................................................................42
Duplicating Configuration Files to Other PCs...................................................................43
Dial Plan Configuration File...........................................................................................43
Net Phone Configuration Files.......................................................................................43
Button Configurations ....................................................................................................44
Directory Files................................................................................................................44
User Defined Actions ...................................................................... ..... ..........................45
Personal Call Handling Rules.........................................................................................46
Advanced Configuration....................................................................................................47
Post Call Survey .............................................................................................................47
Using Extra Information in Personal Call Handler Rules..................................................48
Editing .INI Files ...............................................................................................................50
Editing the AG_COS.INI File (COS).............................................................................50
Editing the Agnt_Ph.INI File (Net Phone Main)............................................................52
Editing the NP_Rec.INI File (Recording) .........................................................................57
ii Strata CIX Net Phone AG 04/08
Page 9

Chapter 6 – Open Architecture Interfaces
Editing the ONP_ACD.INI File (ACD)..................................................................... .... ....59
Editing Chat_COS.INI File (Chat) ....................................................................................60
Chapter 6 — Open Architecture Interfaces
Registry Entries..................................................................................................................62
Companion Applications Suite ..........................................................................................62
Configuration..................................................................................................................62
Open Architecture Links....................................................................................................63
DDE Command Interface...............................................................................................63
Call Control Commands.................................................................................................63
Phone Control Commands..............................................................................................66
ACD Commands.............................................................................................................67
Other Commands............................................................................................................68
Command File Interface ....................................................................................................70
OLE / COM Interface ........................................................................................................70
Call Control Commands.................................................................................................71
Phone Control Commands..............................................................................................73
ACD Agent Commands..................................................................................................74
Other Commands............................................................................................................75
Contents
Appendix A — Trouble Shooting
Installation Problems .........................................................................................................79
TAPI Service Provider Problems.......................................................................................80
Configuration Problems.....................................................................................................82
Third Party Out Dialing/Screen Pop Problems ..................................................................84
Miscellaneous Problems ....................................................................................................85
Strata CIX Net Phone AG 04/08 iii
Page 10

This page is intentionally left blank.
Page 11

Introduction
This user guide describes how to use the Toshiba Net Phone software with Strata
CIX670, CIX200, CIX100, CIX100-S, and CIX40 telephone systems:
Organization
• Chapter 1 – Overview provides an overview of the Net Phone Administrator
screens and functions.
• Chapter 2 – Installation covers the Net Phone software installation.
• Chapter 3 – Deploying Net Phone describes three server-based configuration
items plus instructions for duplicating configuration data from one Net Phone onto
other Net Phones.
• Chapter 4 – Server-based Dial Plan shows how to set up the dial plan using the
Preferences dialog box.
• Chapter 5 – Server-based Net Phone COS steps.
• Chapter 6 – Open Architecture Interfaces describes integrating applications
within Net Phone, such as the Personal Power Dialer or Chat as well as provides
enabling links for other programs running on the PC.
• Appendix A – Trouble Shooting includes the causes and solutions to various
issues that could be encountered when using Net Phone.
Strata CIX Net Phone AG 04/08 v
Page 12

Introduction
Conventions
Conventions
Conventions Description
Represents any Directory Number button, also known as an extension or
[DN]
intercom number.
Telephones can have multiple extensions. Incoming calls ring extensions
bottom to top.
[PDN]
[SDN]
[PhDN] Represents any Phantom Directory Number button (an additional DN).
Note
Important!
Arial Bold
+
Tilde (~) Means “through.” Example: 350~640 Hz frequency range.
See Figure 10
Represents any Primary Directory Number button (the extension number
for the telephone).
Represents any Secondary appearance of a PDN. A PDN which appears
on another telephone is considered an SDN.
Elaborates specific items or references other information. Within some
tables, general notes apply to the entire table and numbered notes apply to
specific items.
Calls attention to important instructions or information.
Represents telephone buttons.
shows a multiple PC keyboard or telephone button entry. Entries without
spaces between them show a simultaneous entry.
Example: Delete+Enter.
Entries with spaces between them show a sequential entry.
Example:
Grey words within the printed text denote cross-references. In the
electronic version of this document (Library CD-ROM or FYI Internet
download), cross-references appear in blue hypertext.
# + 5.
vi Strata CIX Net Phone AG 04/08
Page 13

Related Documents/Media
Note Some documents listed here may appear in different versions on electronically
or in print. To find the most current version, check the version/date in the
Publication Information on the back of the document’s title page.
Refer to the following for more information:
• Strata CIX Net Phone User Guide.
• Strata Net Phone Help file included with the Software.
Introduction
Related Documents/Media
Strata CIX Net Phone AG 04/08 vii
Page 14

This page is left intentionally blank.
Page 15

Overview 1
This document is the System Administrator’s Guide for the Net Phone. This book
contains information for a system administrator to install and administer one or more
installations of Net Phones. The ‘System Administrator’ is assumed to be a person
familiar with the phone system, computers, and LANs. This document is NOT a ‘User
Guide’ for the Net Phone user. The on-line manual and help file in Net Phone should
be used in conjunction with the Administrator’s Guide to provide a complete
operation of Net Phone.
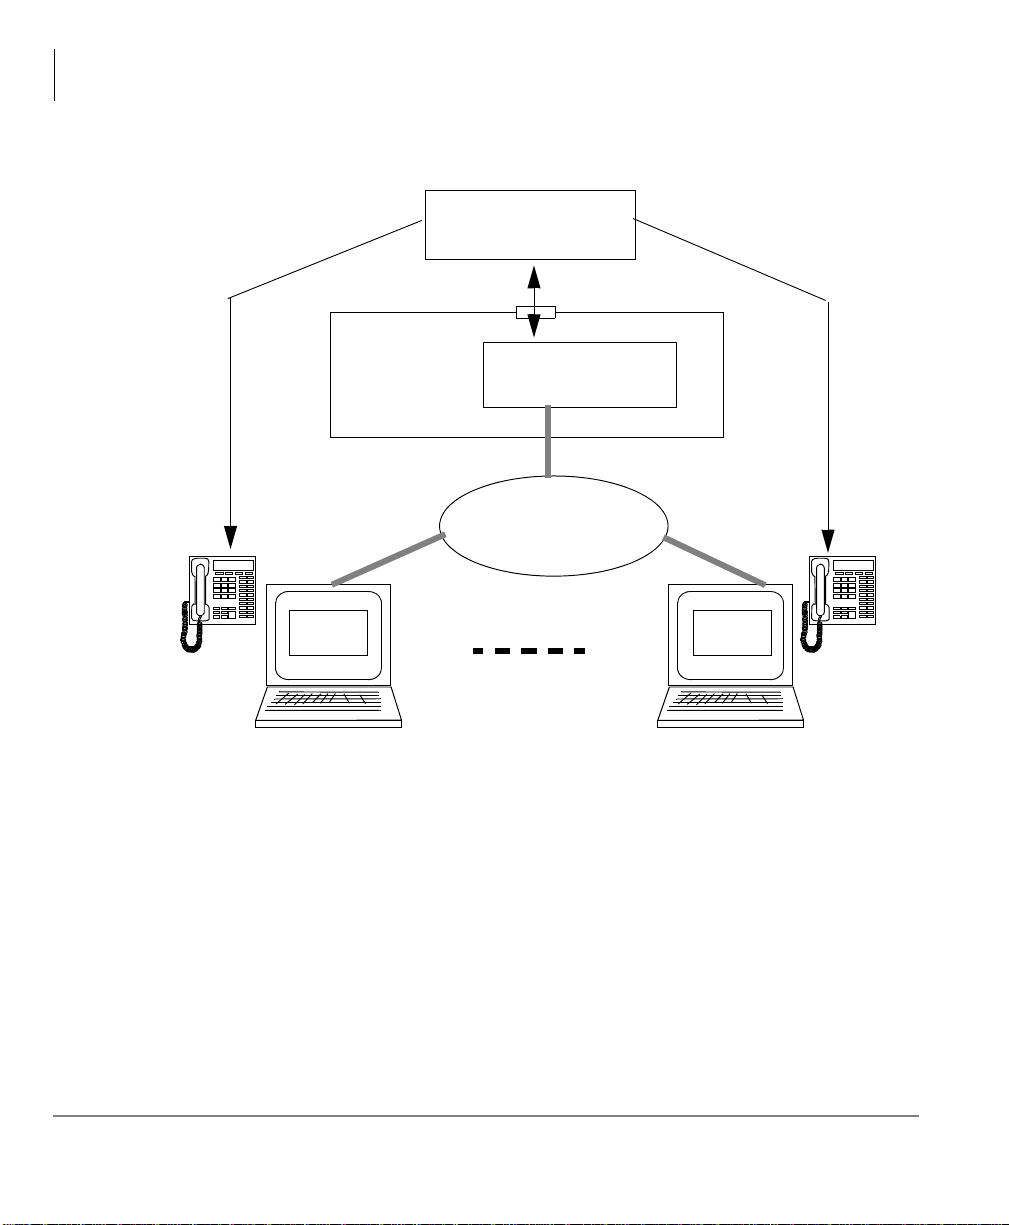
The Net Phone is a PC Phone software program that is used on PCs. It is a “Client”
program of the Toshiba Net Server. At each PC there is no physical connection
between the phone and the PC, because Net Phone uses a ‘virtual’ connection to
control the phone (see
Figure 1).
Strata CIX Net Phone AG 04/08 1
Page 16
Overview
PBX
Server
PC
Net Server
LAN
Net Phone Net Phone
Figure 1 Installation
Starting in V5.0, two levels of software licensing is provided and contro lled by the Net
Server (using a software copy key) at the Server PC. No copy key or software
licensing is required at the PC. Net Phone can be installed on any number of PCs, and
when each PC runs its copy of Net Phone, the Net Server validates whether it has
sufficient licenses to run that additional copy of Net Phone. If not, that PC will be
restricted to running Net Phone in Demo mode (which will run most features but will
time out after a while).
Net Phone licenses have two levels, one that controls the features for working in
conjunction with a desktop phone enhancing the way that phone works while all
speech is provided by the desktop phone. The second level, added beginning with
2 Strata CIX Net Phone AG 04/08
Page 17

Overview
Net Phone Software Enhancement History
V5.0, provides a complete speech path for Voice over the Internet (VoIP) to provide a
complete phone without using a desktop phone. This second interface can also work
using a desktop phone or standalone by virtue of changing the “profile” settings.
This document provides a quick reference for a System Administrator for getting Net
Phone installed and running. Once it is installed and operational, the On-Line Help
file for Net Phone provides extensive detail on using various features.
Note All of the features mentioned in this document are not available on all types of
PBXs. Please refer to your PBX documentation or contact Computer T elephony
Solutions, Inc. if you need assistance.
Net Phone Software Enhancement History
Version 6.0
• Presence Viewer - Net Phone now has the Presence Viewer window that combines
all the status information and communication tools with other members of the
group. The Presence Viewer can provide the user with the following status of other
members and initiate a call or a chat session with another user.
• Phone status – shows if the telephone is in an Idle, Busy, Do Not Disturb state.
• Status Message – shows the message status set by Net Phone such as “In Meeting”,
“Leave a message”, “Out to Lunch” and other canned messages as well as free text
created by the user.
• Chat Status – shows if the Net Phone is launched and is online to accept the chat
requests.
• IP Mobility – Net Phone is compatible with IP Mobility feature which Strata CIX
R5.0 or above provides. There user can switch between Net Phone VoIP and other
IPT or SoftIPT using the same directory number. When switching from Net Phone
VoIP to other phone, Net Phone will release the audio path while it continue to
associate with the phone so that it can provide screen pop and other CTIS features
that Net Phone can provide.
Strata CIX Net Phone AG 04/08 3
Page 18

Overview
Net Phone Software Enhancement History
Version 5.1
• ACD Viewer – The Net Phone ACD V iewer allows users connected to Strata ACD
to view the status of all ACD groups to which they belong. This additional
functionality does not require MIS software to be installed.
Net Phone shows the operating status of each group. Group view can be expanded to
see the number of calls and the status of each of the agents and supervisors in the
group. Each group contains a “My Status” icon showing agent’s own status in the
group (logged in, logged out, busy, in wrap-up, etc.), and when you right-click on your
icon you can change your status.
ACD Viewer requires Enhanced Strata ACD system.
Version 5.0
(Please note: The initial production release of this version is identified with the
version number 5.0.200).
• VoIP Audio – Added the ability to interact with VoIP audio as a licensed option.
This feature includes showing an “Audio Key” on Net Phone when the profile
indicates the use of VoIP. This feature provides ringing and support for USB
devices to be used with the audio stream. Also includes Plantronics wireless
headset controls, called PerSonoCall, for a seemless integration using Plantronics
devices.
• Secondary Extensions – Secondary extension support is important for people who
may use a desk phone while in the office and use the VoIP capability assigned a
different DN when away from his desk. The ability to answer and monitor both
extensions is an important feature:
• Handles calls for the secondary extension.
• Supports a DSS capability
• DND and FWD support for the secondary extension.
• New Actions to allow DND of Secondary and Primary to be synchronized
using Personal Call Handler Rules.
• Connection Profiles – Net Phone added the ability to define and select a user
connection profile for logging into Net Server. User profiles makes it easier for
mobile users to use a desk phone at times or use their IP phone at other times by
4 Strata CIX Net Phone AG 04/08
Page 19

Overview
Net Phone Software Enhancement History
selecting the correct profile. The profile defines the Extension DN(s) for Net
Phone including whether only a single DN or also a Second ary DN are moni tored.
It selects whether the audio is coming via VoIP or via the PBX phone and each
profile can define its own “skin” appearance.
• Docking Enhancements – Users of “docked” configurations for Net Phone now
have more capabilities that include using either the LCD window or the Calls
Window for call information. It also expands the “Extra Buttons” to provide the
same capabilities as the right-side drop down buttons. Items added include:
• Added drag and drop dialing to LCD window in the same manner as the Calls
Window.
• LCD window now displays and supports Extra Info icon operation.
• User-defined actions can now be used on the “Extra Buttons”.
• OAISYS T racer Integrations Improvements – The integration with Tracer
recordings has been expanded to include getting a copy of a recording for emailing to someone or reading and passing the file name of the current call
recording.
• Added feature to request an e-mail copy of a recording.
• Added the ability to dynamically add new bookmarks text strings.
• Added a new token (%X (“~RECFNAME”)) to read/pass file name. Also
possible to show in the Extra Info screen.
• Outlook Calendar Integration – The new Outlook Link (V1.3.10 or higher)
supports new Calendar items to create actions to inform the user of an appointment
or a reminder of an appointment. The items added include:
• T wo new Personal Call Handler triggers: “Outlook Calendar Appointment” and
“Outlook Calendar Reminder”.
• Two new Outlook Information tokens for use in the User-defined Actions:
%OC (“fieldname”) for appointments and %OR (“fieldname”) for reminders.
The “fieldname” values are:
• SUBJECT – Subject field of Outlook event.
• START – Start Date/Time event.
• END – End Date/Time event.
• IMPORTANCE – Importance (Low, Normal, High) of event.
Strata CIX Net Phone AG 04/08 5
Page 20

Overview
Net Phone Software Enhancement History
• LOCATION – Location of event.
• ADVANCE – Number of minutes of advance notice this reminder is given.
• STATUS – Busy status (Free, Busy, Out of Office) of event.
• Post Call Survey Support – Supports an “auto transfer” on hang-up for use as a
Post Call Survey. Uses two Extra Info fields titled “~PC_DEST” or “PC_DEST”.
• Personal Call Handler/User-defined Action Enhancements – User-defined
Actions are a key building block for customizing Net Phone to take action when
the Personal Call Handling rules have specified triggering events were
encountered. These actions have been expanded to provide the following
functions:
• Added an on screen Call Handler rules enable/disable control to make it easy to
selectively use some rules at different times.
• Added a right-click menu that includes “copy” a rule as well as “delete” a rule.
• Added the availability of using Extra Info fields when defining Personal Call
Handling rules when “Call Ringing” or “Call Answered” conditions exist.
• The Run Program type has been expanded to run “.lnk” and other file types.
• Added Set Phone DND to On/Off or On w/DND Msg. Including ability set or
reset DND for either the Primary phone (Soft Phone) or the Secondary phone.
• Added Set Status Message to set a status message on your Net Phone.
• Added Set Phone Forwarding to set PBX call forwarding.
• Changed Time token (&T) to support time+’x’ minutes so that &T+35 will be
current time plus 35 minutes. Thus creating an action Set Status Message for
OUT TO LUNCH TIL &T+30 will show you returning in 30 minutes from the
time it is invoked.
• Added new Time token (&U) to show time in US format of time followed by
AM/PM which also supports the +’x’ minutes. Thus an action “OUT TIL
&U+30 created at 14:25 will read OUT TIL 3:05PM.
• Admin Controls – Several additions have been made for administering Net
Phones. These include new background files for centralized control of multiple Net
Phone configurations, structural changes for working within Windows plus a new
change for the user to control Call History contents.
• A new configuration file (NP_AppBs.ini) was added for centralized COS
administration of Application keys with the ability to publish these settings for
other Net Phone users.
6 Strata CIX Net Phone AG 04/08
Page 21

• Added COS setting to prevent selected users from ‘accidentally’ exiting Net
Phone.
• Made software structural changes to better support Microsoft recommended
procedures for applications running the Windows operating systems.
• Added a new set of definitions in Preferences allowing the user to easily turn on
Call Logging (Call History) and determine the types of calls to include within
the list.
• ACD Enhancements – Adds to Net Phone improved interaction with Strata ACD
to allow the supervisor to make a choice at the time of logging in whether to accept
calls or not.
• Give ACD Supervisors, at time of login, the option to “take calls”.
• Provide a ‘Y’ or ‘N’ indicator per group for “taking calls”
• Changes the displays of Supervisor’s Net Phone to show “Call Monitor” when
monitoring an agent and “In Conf” when the call is joined, but an Agent’s Net
Phone to not show any markings of the call being monitored or joined.
• Agents who use Net Phone will no longer see the “In Conf” display when a
supervisor is monitoring the call, while the supervisor using Net Phone will
continue to show this status. Thus “Silent Monitoring” is maintained.
• Message Waiting – Expanded operation of the Message Waiting feature.
• Added MsgWait Count indication on LED.
• Added right-click on LED to show list of messages and allow selecting a
message to dial.
• Fixed Msg Wait feature to work with multiple V-mail boxes and dial directly
back to the target V-mailbox containing the message (requires using Axxess
V5.3 or higher).
• Added option playing a sound (WAV file) when the Message Wait indication
changes from none to 1.
• DSS Keys – Added the ability to distinguish “busy” status from “ringback” status.
• Chat Enhancements – Several new features have been added to Chat:
• A new menu item has been added when right clicking on the name in the Chat
listing to offers to “Call on Phone” as well as “Chat Call”.
• Added an option to show or not show off-line users in the <<Everyone>>
group.
Strata CIX Net Phone AG 04/08 7
Page 22

Overview
Net Phone Software Enhancement History
• Added dynamic key re-sizing for Quick Response keys on the bottom of the
Chat window.
• Added a Whiteboard capability within Chat to allow the sharing of the screen
with another user within the Chat domain.
• Share screen with other user and display files on other persons PC.
• Pen colors and sizes for drawing on the screen.
• Short-cut keys for quick changes to pen size or color.
• Debug/T r oubleshooting Tools – A Ziplog Utility has been added to Net Phone for
making debug and troubleshooting of problems much easier. Also the control for
turning on the Advanced menu option to get to the Event and Calls Windows has
now been enabled via the Preferences settings. The user can now go to Setup >
Preferences >Advanced Tab to zip and send all pertinent files to for detailed
troubleshooting.
• Improved Skins Designer – The Skins Designer now provides a within the screen
set of controls with sliders for adjusting the color selections when designing or
making new skins. These sliders provide instant feedback to the effects of the
changes while designing or changing a skin.
• Application Integration Enhancements – The interfaces for working with 3rd
party applications have been expanded in a couple of areas to provide more
opportunities for customizing the interface to meet your application. The additions
provided in this release include:
• Add to COM Interface “GetInfo( )” a “DATAPATH” to complement “EXEPATH”.
• Add to COM Interface “GetInfo( ) an “ACTSLIST” to support user-defined
actions on external buttons.
• T wo new DDE commands added to support other 3rd party applicat ions wanting to
send calendar status and reminder commands:
• CALSTATUS,<BusyStatus>,<Start>,<End>,<|Subject|>,<Importance>,<|Locatio
n|>, <RemindBefore> where: <BusyStatus> =0 (Free), =2 (Busy), =3 (Out of
Office) and <Importance> =0 (Low), =1 (Normal), =2 (High).
• CALREMIND,
<BusyStatus>,<Start>,<End>,<|Subject|>,<Importance>,<|Location|>,
<RemindBefore> where: <BusyStatus> =0 (Free), =2 (Busy), =3 (Out of
Office) and <Importance> =0 (Low), =1 (Normal), =2 (High).
8 Strata CIX Net Phone AG 04/08
Page 23

Requirements
PC Requirements
Net Phone only
The Net Phone software can be loaded on a standard IBM-compatible PC running
Windows 98, Windows NT, Windows XP, Windows 2000 or 32bit Windows Vista
software. The specific requirements of this PC can vary; follow the recommended
configuration for each operation.
Net Phone with Soft Phone Audio
The PC requirements for running the VoIP Soft Phone software requires at least
Windows 2000, XP or 2003, but not XP Home Edition to operate. Follow Microsoft’s
recommendations or higher for memory needs. The VoIP is not supported on the older
Microsoft Operating Systems except for Net Phone operation only without audio.
Physical devices to be used for headsets or handsets require a USB port.
LAN Requirements
The Net Phone communicates with the Net Server using a Microsoft network over
TCP/IP, thus this type of network must be installed and running. If your site already
runs a different network protocol, such as Novell IPS, you’ll need to run a dual stack
configuration.
Overview
Requirements
Phone System
The Net Phone works with various telephone systems using a System OAI connection
to the Net Server. The VoIP connection, when used, is made to another connection
where the PBX supports the extension ports for VoIP. The phone system can be
configured for either G.711 (standard) or the G.729 (compressed) formats. Speech can
be played using the PC’s sound card or for better quality you can use USB handset for
a USB adapter for connecting a headset
Power-Up
The PC running the Net Phone software should typically be configured to
automatically initiate the program whenever the PC is restarted or reset. When you
startup the application, the Net Phone will automatically detect what type of PBX it is
connected to and change it’s user interface.
Strata CIX Net Phone AG 04/08 9
Page 24
Overview
Beta Versions
Support Plan (Maintenance)
Net Phone requires a license that is controlled in the Net Server to operate normally or
it will run in a demo mode for a limited time period. This license contains the start
date and support date. Toshiba offers free upgrades and technical assistance for all
sites that maintain their system by extending their support date. The software will
continue to run after the support date expires, but upgrades to add the latest features
cannot work until the license is brought back into the support plan.
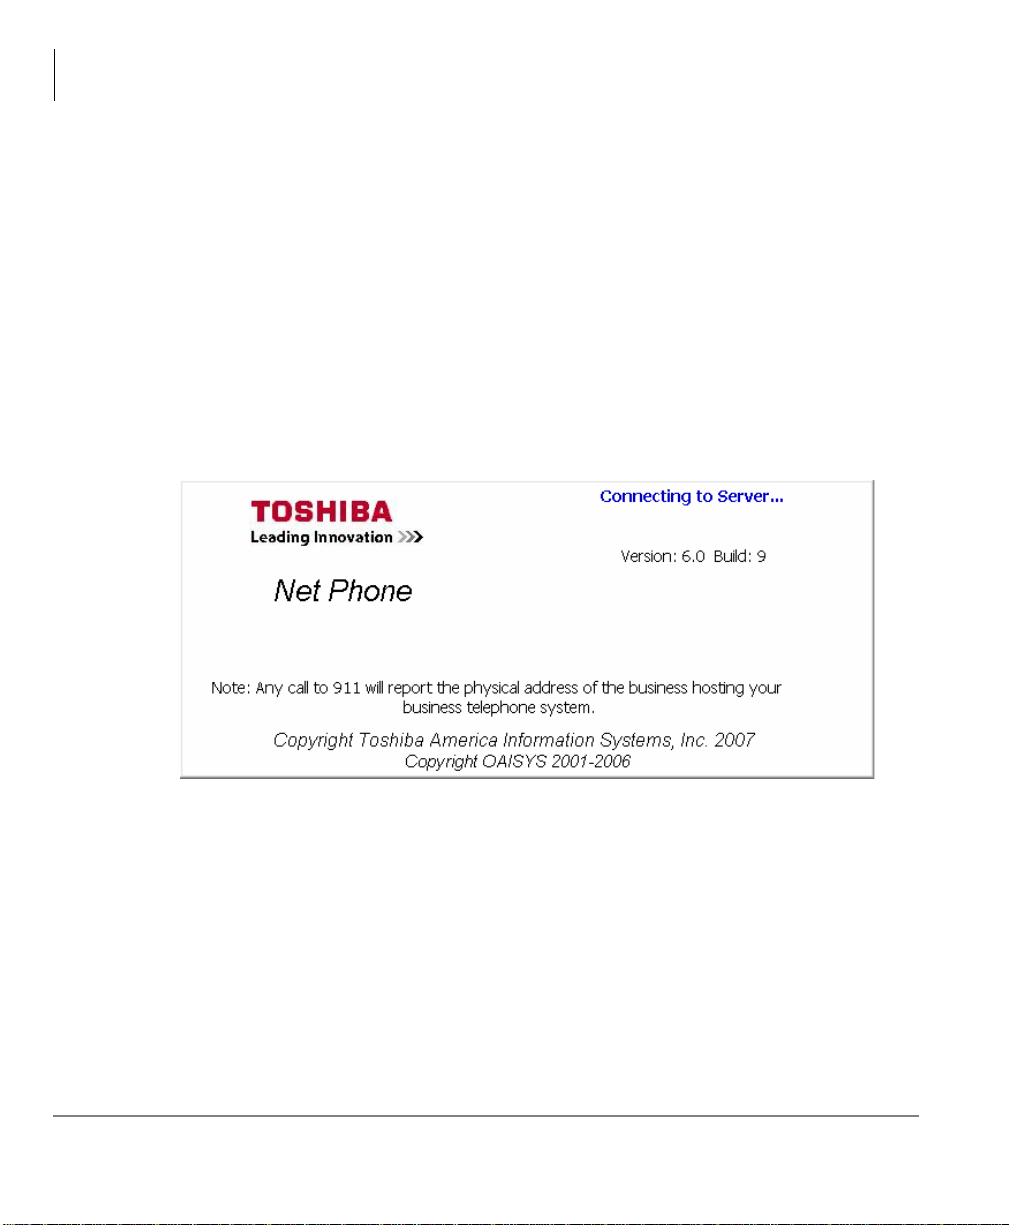
When you launch Net Phone you will see the Toshiba Splash Screen. By default the
splash screen will not show support plan information. If you have
ShowMaintOnSplash enabled in your COS file, the splash screen will display your
Support Contract information. This is recommended as a reminder to the administrator
of the date your plan expires. If your maintenance expires, you should Toshiba TSD
Customer Service. The splash screen will look similar to the one below:
Beta Versions
Before attempting to run Beta Versions of Net Phone, the site must be current or “In
Maintenance”. That is, the target Toshiba system must on a current maintenance
contract through the expected end of the BETA cycle for Beta Net Phone software to
operate.
Important! Also, each Beta version of Net Phone MUST is replaced with a released
version of Net Phone at the end of the Beta cycle. If it is not replaced,
Net Phone will revert to operating in “Demo Mode” once the date has
been reached. The splash screen for BETA versions provides a
reminder that includes the date of expiration.
10 Strata CIX Net Phone AG 04/08
Page 25

Installation 2
Two different Setup files are offered for installing Net Phone. The one titled
Netphone_xxx.exe provides a complete installation for any individual PC. The
second is titled NP_xxx_Server.exe and offers both an ability to install on an
individual PC or installing on the Net Server PC for automatic updates.
To install the software on a number of different PCs can be made easier by either
installing the Server-based version on the Net Server and opening a ‘file share’ to get
a copy on each PC to create the initial installation. Even if not using the automatic
upgrade capability , posting the individual setup file on a common PC to be accessed
for installing on client PCs can save much time.
The following describes using the individual Net Phone Setup file. When using the
Server Setup file, one additional step is needed to choose to install using the Client
Installation instead of using the Server Upgrade Installation.
Strata CIX Net Phone AG 04/08 11
Page 26
Installing Net Phone
• Start by checking to see that Net Server is installed and is operating on a Server PC
on the network. Version 4.3.36 minimum is required for the V oIP audio capabilities
to work. Take note of the “Network Name” of this server PC. This “Network
Name” would be: 1) The NET BIOS name if the target PC is on the same LAN
segment; 2) Or the complete domain name if reaching across a router or over a
WAN.
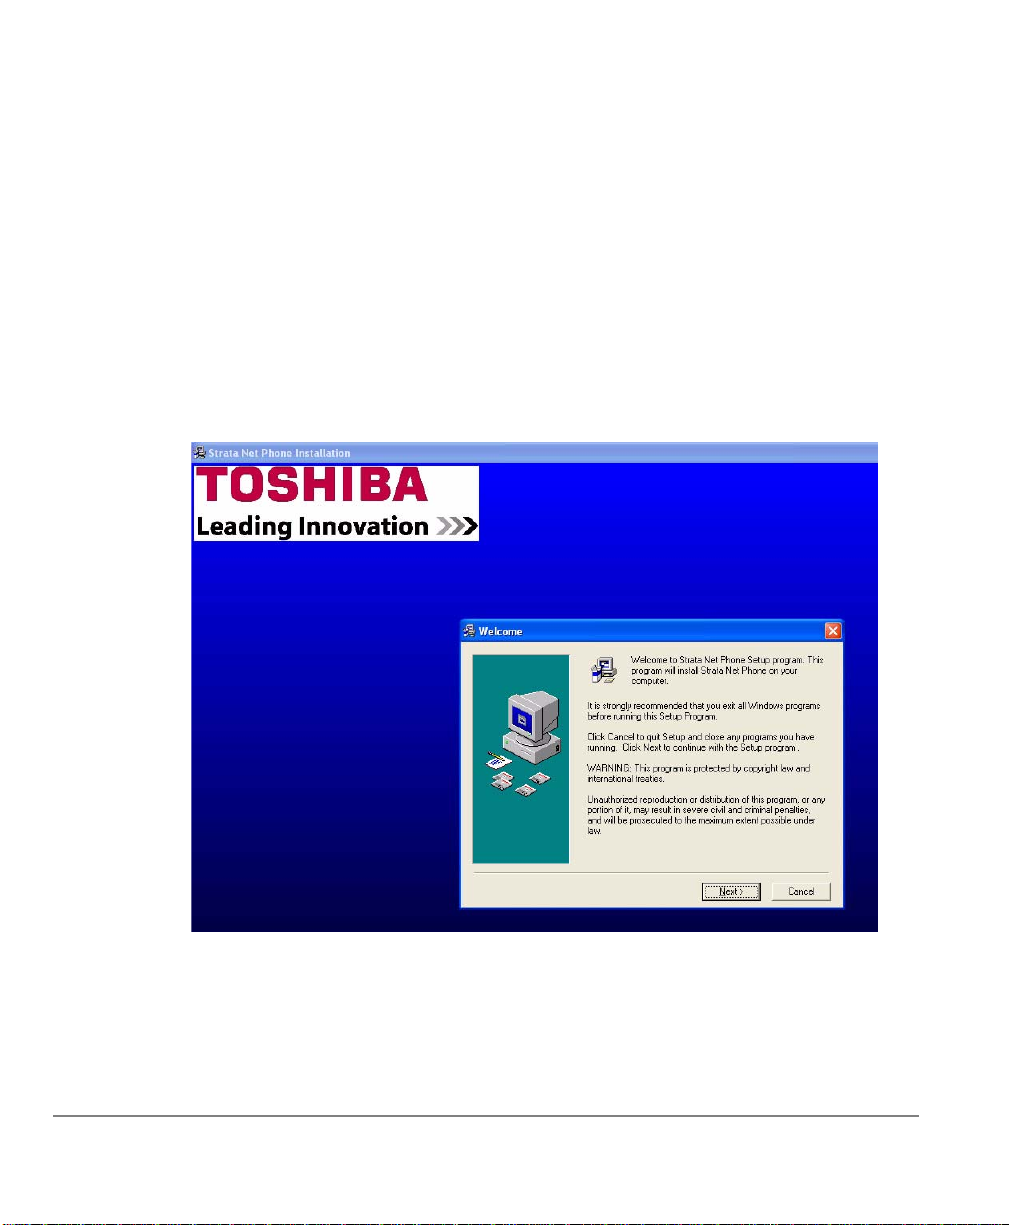
•Run the Netphone_xxx.exe program to install Net Phone on the target PC. This
opens the Installation Wizard (shown below), which will direct you through the
following steps.
Figure 2 Strata Net Phone Installation Wizard
Page 27

1. The initial screen will advise you to shut down all Windows programs to ensure
that all modules can be installed. Click Next.
2. Please read the License Agreement and click the I Agree button if you agree with
the licensing provision and want to continue with the installation process.
3. It is hig hly recommen ded that the default destination directory be used as the
installation directory. If desired, you can browse to a different location for
installing the software. Click Next.
4. Select the Windows Program Group for placing the start icons. Again, leaving as
default (TOSHIBA) is recommended. Click Next.
5. The Select S tartup Settings screen is used to pre-configure Net Phone to meet your
individual needs. Select the radio button, if given the choice, to indicate whether
you are going to login to the Net Phone with an Agent ID, login by E xtension or if
you plan to use the Net Phone for a Standard Desktop Phone. Also, enter a
checkmark next to Soft Phone Audio to enable the VoIP Audio capabilities
(requires a separate license). Click Next
Note This step is bypassed or has fewer options on some installations.
6. Select the options to be included with Net Phone. These options will appear on the
Options Buttons along the bottom of Net Phone. A check in OAISYS Replay
enables Step 7 for setting the Record Button options. Click Next.
7. If the Option Button OAISYS Replay were selected, then the Select Record
Options offers the ability to Show Record Button, to manually Stop and Start the
OAISYS Tracer recording, and the ability to enter Bookmarks on the active call.
Click Next.
8. The installation process offers a wizard for the integration settings for a number of
popular applications to be used with Net Phone. Make a selection from the list. If
your application is not listed select “None” and contact Technical Support for an
application note, if one exists, that note will provide instructions for making your
application work. Click Next.
9. This step pauses to ensure you have made that all the parameters settings needed
prior to prior to proceeding with the actual installation and making final settings.
Click Next.
10.Finally , once all fi les and settings are completed, t his screen will inform you of the
completion. It is recommended that Net Phone be added to the Startup Group.
Click Finish. Typically, you will be asked to restart your PC for all the settings to
take place.
Strata CIX Net Phone AG 04/08 13
Page 28
Installation
Setup User Profiles
Setup User Profiles
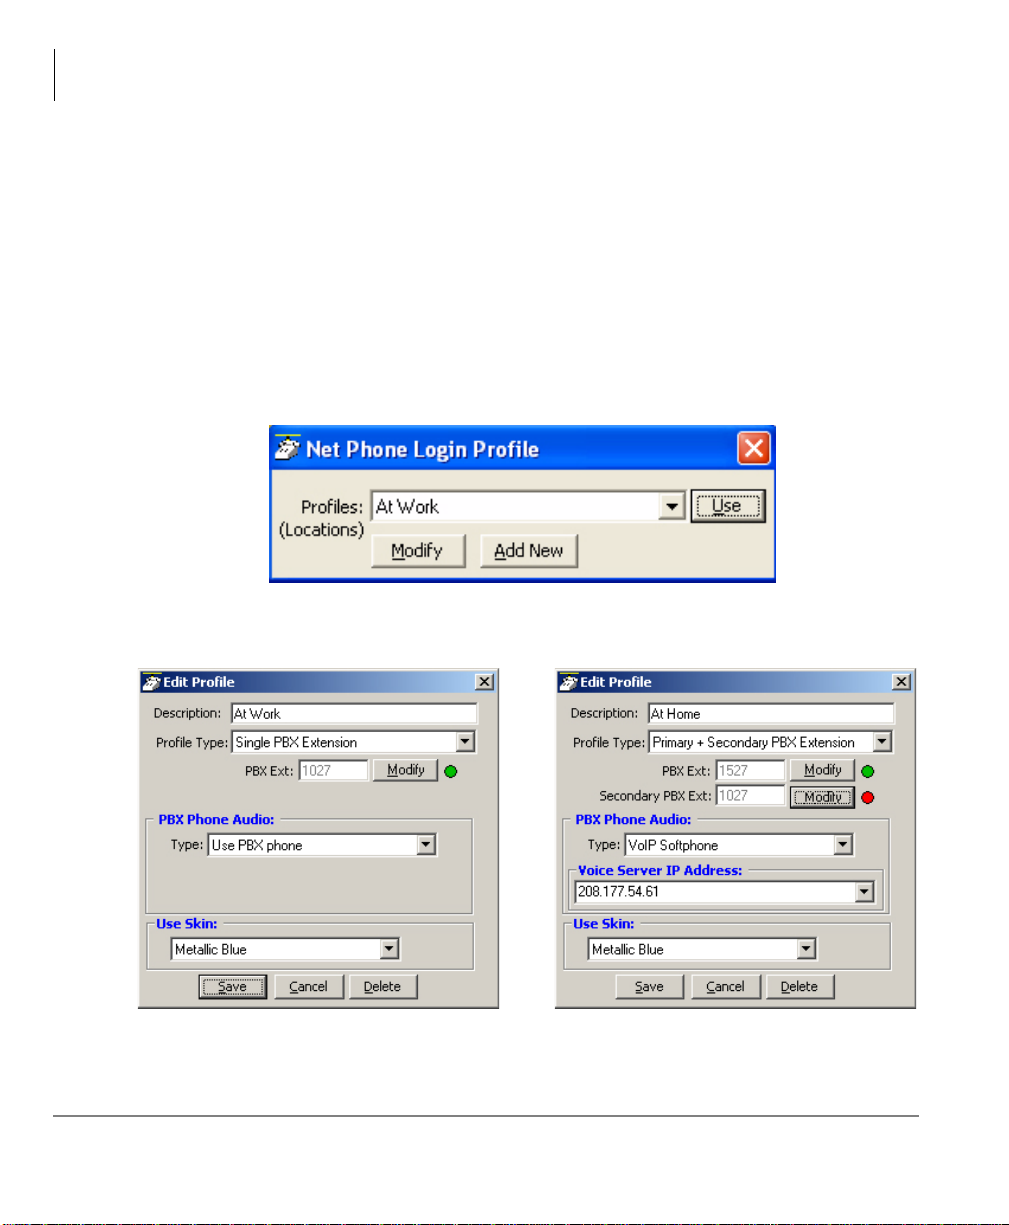
When Net Phone is started, the first item that will need to be defined is at least one
User Profile.
³ To define a User Profile
1. Go to the Main Menu > File > Change Login. The Net Phone Login Pro file dial og
box displays.
2. Select from existing profiles and click Use to set this profile into an active state.
or click Add New to create a new profile or Modify to change the selected profile.
The definitions and offerings of both the Edit Profile and Add Profile dialog provide
the same set of choices as shown in the Edit Profile screen shown below:
14 Strata CIX Net Phone AG 04/08
Page 29
Installation
Setup User Profiles
• Description – Enter a name (or modify the name) to call the profile.
• Profile Type – Use the pull down list and choose a type.
• Single PBX Extension – Defines a single PBX DN that will be monitored for
calls.
• Primary and Secondary PBX Extension – Defines a primary and a secondary
PBX DN that will be monitored for calls. This allows having a primary
extension number, usually a VoIP station, plus still be able to get calls from
your desktop phone.
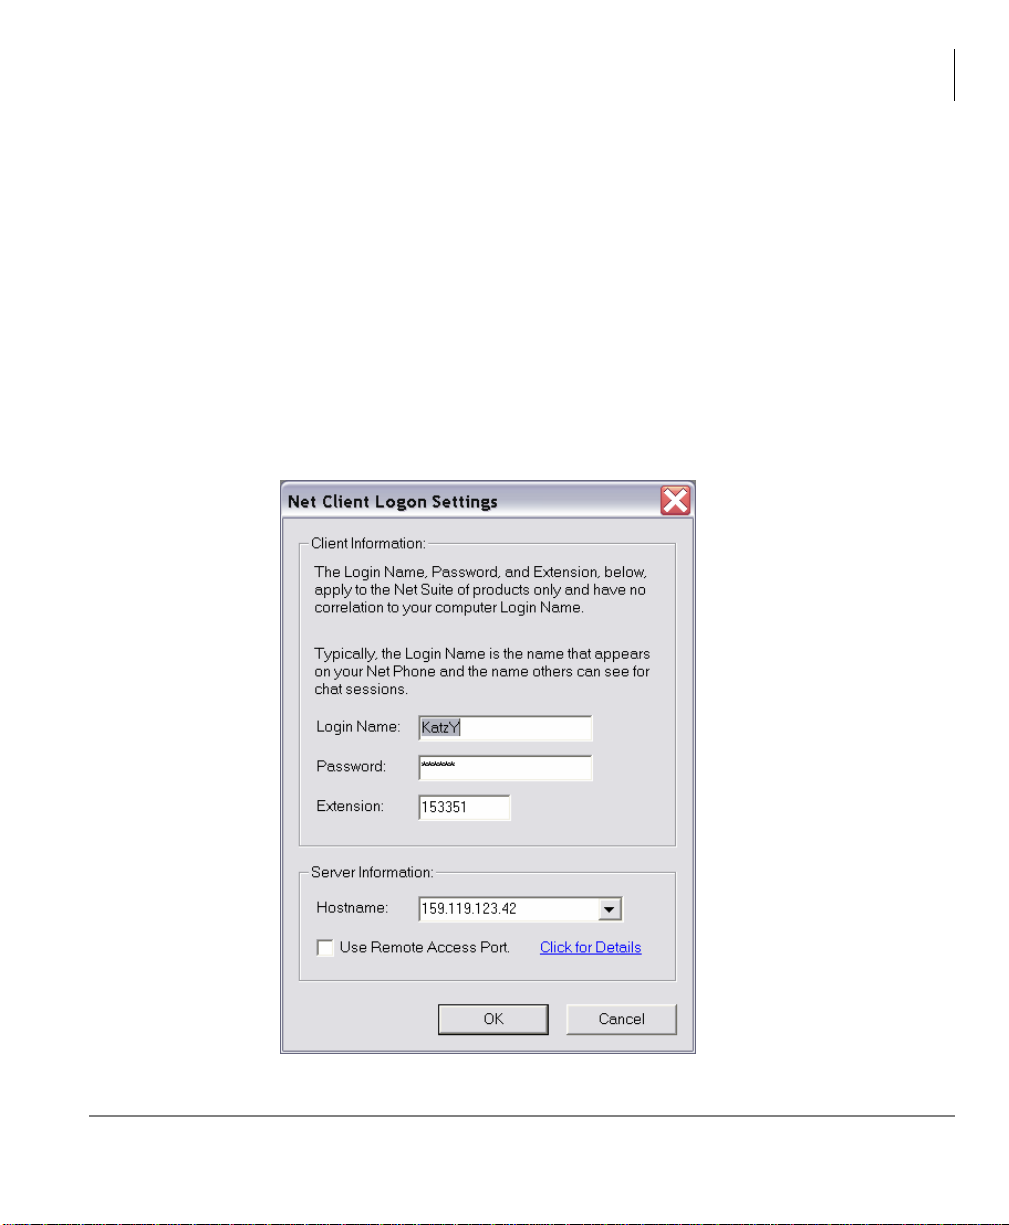
• PBX Ext – Click the Modify button to open the Net Client Logon Settings dialog.
• Client Information – Enter the User name, Password (optional), and extension
number for the primary extension.
• Server Information – Enter the Net Server PC’s network name or IP address.
Strata CIX Net Phone AG 04/08 15
Page 30
Installation
Setup User Profiles
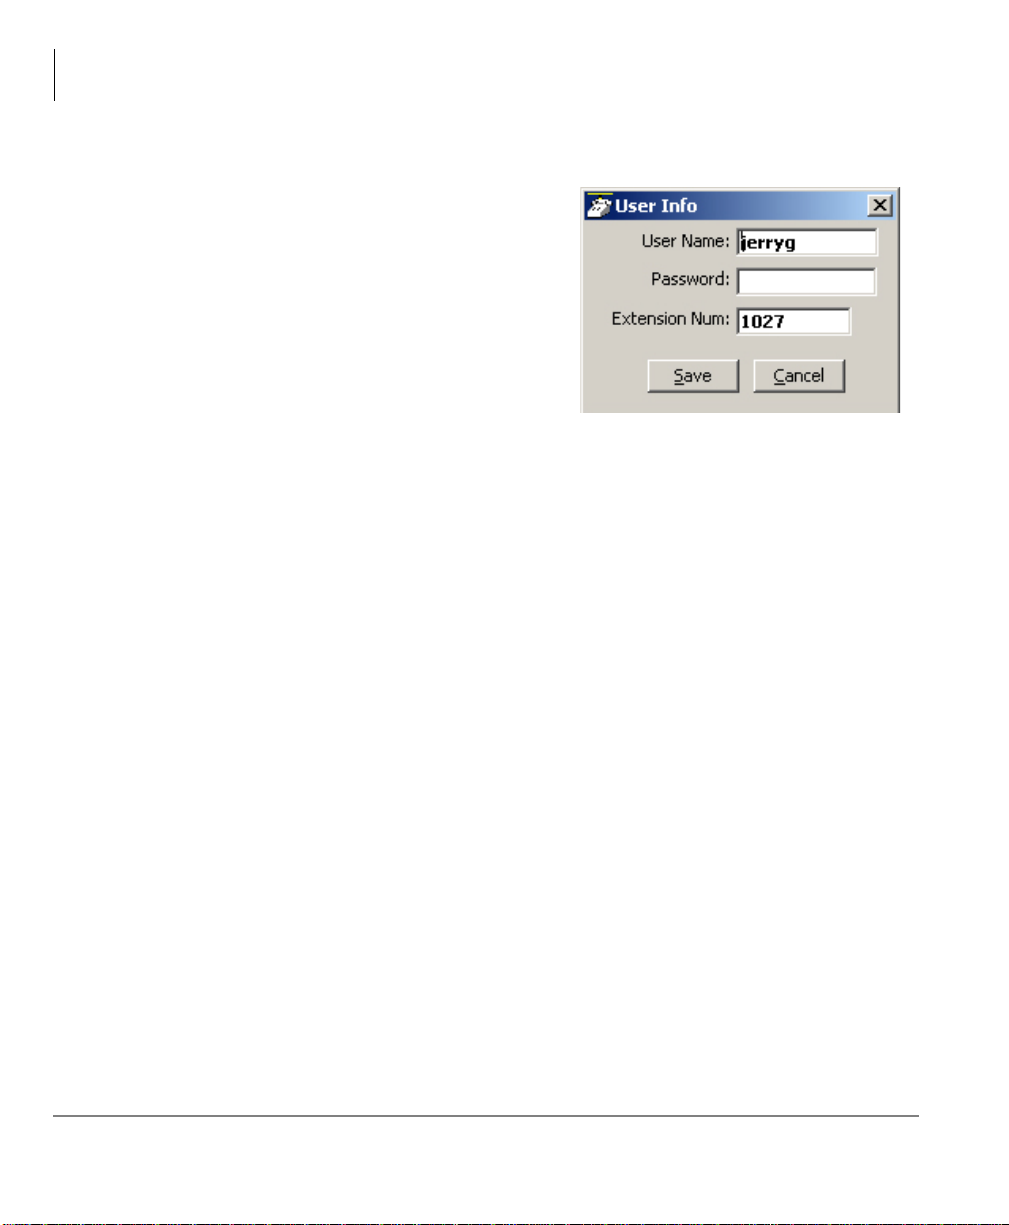
• Secondary PBX Ext – Click the Modify button to open the User Info dialog.
• User Info – Enter the User Name,
• PBX Phone Audio – Use the pull down
menu and choose whether the primary
connection is using the PBX Phone or
VoIP Audio for the speech path.
• Voice Server IP Address – When
• Use Skin – Each profile can choose which Net Phone Skin design to use. Use the
pull down list and select a skin to use whenever this profile is selected for use.
Password (optional), and Extension
Number for the secondary DN to
monitor. Click Save when done.
VoIP is selected, enter an IP address
for the voice server providing the PBX extension.
16 Strata CIX Net Phone AG 04/08
Page 31

Voice over IP Audio
When Voice over IP is used for the Audio connection, some additional choices are
necessary for determining how the audio path will be connected to the PC. When VoIP
is the primary DN, an additional button appears on the main screen of Net Phone. This
button defaults showing Headset and when pressed shows SPKR. Right click on this
button and the Audio Setup dialog will appear. This screen defines how the audio is
handled and the device type used for primary (#1) connection (Headset button
position) and for the secondary (#2) connection (SPKR button position). Each of these
positions has speaker and microphone volume adjustments.
Installation
Voice over IP Audio
• Talking (Phone) Audio – Choose the Sound Board/Device to be used and the
Audio Device Type from the pull down menus for both #1 and #2 devices.
• Ringer Settings – Choose the Sound Device to be used for the ringing indications.
Choose the WAV file for the ringing sound.
• Voice Server – This provides access to the Modify Profile screen to make changes
if needed and also provides the status of the connection with the PBX.
Strata CIX Net Phone AG 04/08 17
Page 32

This page is left intentionally blank.
Page 33

Deploying Net Phone 3
When installing a system involving a number of Net Phones, using server-based
configurations and/or copying of configuration files onto other PCs can improve the
on-going administration. This section describes three server-based configuration items
plus instructions for duplicating configuration data from one Net Phone onto other Net
Phones. Typically, a combination of these items is used for deploying multiple Net
Phones in your organization.
• Server-based Automatic Updates – Upgrades to Net Phone can be published on
the server. Each time a Net Phone client attempts to make a connection to the
server, its version is checked, when an update is available, this update may be
offered or forced to the user causing the client PC to be updated.
• Server-based Dial Plan – A Dial Plan for making calls and how to treat Caller ID
information is required for many Net Phone features. This can be a complex issue
for many users, thus having a server-based common definition administered and
tested by one person makes the settings for all other people. This makes it much
easier for each user.
• Server-based Net Phone COS – The Server controlled COS requires the Net
Phone configuration files to be stored on and used from the central server. This
allows the system administrator to setup a configuration, save it to the server, and
then have a group of Net Phones use that configuration from the server. Thus by
making a single configuration change, the system administrator can cause that
change take affect on all users (in the group).
• Copying Configuration Files to Other PCs – As an alternative to creating a
centralized COS or Dial Plan, it may be useful to create a configuration on one PC
and copy these configuration files from this PC to others being setup. This
operation saves time and may be practical for smaller installations.
Strata CIX Net Phone AG 04/08 19
Page 34

Deploying Net Phone
Server-based Automatic Upgrades
Server-based Automatic Upgrades
Net Phone supports an automatic upgrade feature to ease the burden of installing new
releases on dozens of workstations, and setup files are released for each new version
of Net Phone:
Netphone_xxx.exe = Complete Setup file for Net Phone clients.
NP_xxx_Server.exe = Configures Net Server for automatic Net Phone updates. This
setup file contains a file called NP_Upgrade.exe used for patchable updates when
needed.
Where xxx is the specific PBX version of the file.
All files are available on the Toshiba FYI site.
How it Works
Net Phone connects to Net Server at startup. During the login phase, Net Server
checks the version of Net Phone and compares it to the upgrade information in an
“.INI” file. If the client is current, Net Server allows the connection. If the client is out
of date, Net Server compares the client version to a list of “patchable” versions. If the
client is “patchable,” Net Server sends a copy of NP_Update.exe to the client. If the
client is not “patchable,” Net Server sends a copy of Netphone_xxx.exe to the client.
The client receives the appropriate upgrade file via the Toshiba Transfer Protocol.
This protocol operates on the normal Toshiba TCP port (8767). Clients connecting to
Net Server through a firewall will receive upgrades normally through the standard
8767 port, i.e., if Net Phone can connect to Net Server, it is eligible to receive
Automatic Upgrades.
Net Phone displays either an “Upgrade in progress” dialog box (Forced Upgrade), or
notifies the user that an upgrade is available and offers the option to upgrade now
(Optional Upgrade). If the user chooses to upgrade, Setup displays a warning if it
detects other TOSHIBA applications (Chat, DSS) active on the PC and asks the user
to exit those applications. If the user does not exit before continuing, Setup may
attempt to restart the PC after completing the upgrade. Setup does this to ensure all
TOSHIBA applications are using the current files.
20 Strata CIX Net Phone AG 04/08
Page 35

Deploying Net Phone
Setting Up Net Server for Automatic Upgrades
Setting Up Net Server for Automatic
Upgrades
The System Administrator must install the upgrade files on the Net Server. Launch
NP_xxx_Server.exe on the Net Server PC.
Choose your Installation Type. Select Server Upgrade Installation.
• Client Installation runs the normal Net Phone Setup to install a copy for use on
the local PC.
• Server Upgrade Installation installs the appropriate files on the server PC.
Click Next.
Strata CIX Net Phone AG 04/08 21
Page 36

Deploying Net Phone
Setting Up Net Server for Automatic Upgrades
Select whether to Force the Update on Each User or Give User Option to Upgrade.
For most LAN installations, forcing the users to upgrade is the best choice. If you
support users who connect via IP devices over relatively slow WAN links, you should
give your users the option to decline the upgrade. Users on slow links can choose to
upgrade during periods of low activity, or after hours.
22 Strata CIX Net Phone AG 04/08
Page 37

Advanced Information
Setup creates a folder called “NetPhone\Install” in the Net Server folder. Setup places
copies of netphone_xxx.exe, NP_Upgrade.exe, and InstallVersion.ini in the Install
folder.
The InstallVersion.ini file is part of each release of NP_xxx_Server.exe. Do not
modify the contents of InstallVersion.ini unless specifically directed by a CTS
Technical Support Engineer. The contents of a sample file is defined in the table
below:
[Version] Settings Definitions
Deploying Net Phone
Advanced Information
NewVersion="V4.0.202"
Date="01/03/2002"
FullFile="netphone_xxx.EXE"
PatchFile="NP_Update.exe"
ForcedUpdate=N
FromVersion="V4.0.32;
V4.0.33; V4.0.34; V4.0.35;
V4.0.36; V4.0.37; V4.0.38;
V4.0.39; V4.0.200; V4.0.201"
New Version = Text string indicating the now current version
of Net Phone.
Date = Text string indicating the ship date of the now
current Net Phone.
FullFile = Text string containing the filename of the full Net
Phone Setup file.
PatchFile = Text string containing the filename of the
incremental patch file.
ForcedUpdate = Y or N — indicates whether user has the
option to decline the upgrade.
FromVersion = Text string containing a list of versions from
which a PatchFile upgrade is valid. If the current client
version appears in the FromVersion list, Net Server sends
the PatchFile to the client. If the current version does not
appear in the list, Net Server sends the FullFile to the
client.
Strata CIX Net Phone AG 04/08 23
Page 38

This page is left intentionally blank.
Page 39

Server-based Dial Plan 4
Each Net Phone can be configured to follow a local Dial Plan or a Server-based Dial
Plan. This is controlled in Net Phone’s Preferences dialog box under the Dialing Tab.
How a person accesses outside lines and the numbers to be dialed can be fairly
complex and is best administered using a central set of rules and a person familiar
with the PBX and local dialing rules. Thus we recommend that a central Dial Plan be
established, which will update all users whenever changes are made in the PBX or
outside dialing patterns.
Dial Plan Setup
Each area of the US uses a different set of rules for determining which calls are local
or long distance calls. The opening pages of your phone book are a good source for
how to dial different numbers in your area. Your PBX administrator will also need to
define access codes for reaching outside lines. These pages generally define how to
dial different areas and provide a listing of prefix codes for the local calling areas.
Three typical examples are:
1. Phoenix, AZ – all calls within the "602", “480”, and “623” area codes are
considered to be local calls, while all calls outside those area codes are considered
long distance.
2. Santa Fe, NM – calls to some office codes within the "505" area code are
considered to be local calls, while other calls to the "505" area code are considered
long distance.
3. Atlanta, GA – all calls to area codes "770" are considered to be local calls while
some calls to the "404" and "678" area codes are also considered to be local calls.
Therefore to correctly handle the dialing of numbers you should create a dialing plan.
Strata CIX Net Phone AG 04/08 25
Page 40

Server-based Dial Plan
Dial Plan Setup
³ To Setup a Dial Plan on the Server
1. Go into the Net Server, under Processes, Show the Dial Plan Service (right-click
and choose Show Service).
2. In the Dial Plan Service dialog box, click the Setup Dial Plan button to show the
following screens:
26 Strata CIX Net Phone AG 04/08
Page 41

Server-based Dial Plan
Dial Plan Setup
Calling Within My Home Area Code
• Home Area Code – Set this to the Area code where the phone is located. This will
be used by Net Phone to determine which dialed calls are within your home area
code and when searching a contact manager (reverse screen-pop) the dialed
number will need the area code included, i.e. Microsoft Outlook.
• Local Calls? – Select either All Calls in my Area Code or only Calls to these
Office Codes.
• Local Office Codes – When you choose Call to these Office Codes, the pull down
listing shows the exchange codes (prefix codes) that are considered to be a local
call from your location. To add, delete or change any codes, click the C button to
display the "Change Dial Rules" screen.
• To Add Local Prefix Codes – Enter the prefix code and click Add. The wild
card character ‘#’ can be entered at the end of a prefix code entry to represent a
range of codes. For example, 75# would represent all codes 750 to 759 and 7##
would represent codes 700 to 799.
• To Delete Local Prefix Codes – Highlight a prefix entry and click Delete
button. The delete button removes the entire entry from the list, thus if the entry
has a wild card, then it removes all codes represented by the wild card.
• To Delete a Specific Prefix Code – To delete on prefix code that is part of a
range of codes entered using a wild card character, enter the prefix code to be
considered not local in the Long Distance box and click Add. For example, if
prefix code 755 is long distance but all other 75# codes are local, first enter 75#
into the local list and the add 755 as Long Distance – the resultant local list will
be 750, 751, 752, 753, 754, 756, 757, 758 and 759.
• Dial Area Code on Local Calls – Enable this feature in areas, such as Atlanta,
where you must always dial the full 10-digit phon e number (includ e the area code)
even when the call is local. Most areas of the US, local calls do not include the area
code and dial only 7 digit numbers for local calls. Any number dialed from another
program or hot key dialing will be down to its base 7 digits by removing the Home
Area Code before it is dialed.
• Add+1 – Check the box if you need to dial a leading 1 before the number for calls
within your Home Area Code.
• Dial Area Code Plus the Number – Check the box when the home area code is al so
to be dialed.
Strata CIX Net Phone AG 04/08 27
Page 42

Server-based Dial Plan
Dial Plan Setup
Calling Outside the Home Area Code
• Local calls? – Select either None or Only Calls to These Area+Office Codes.
• Local Area+Office Codes – This entry is only presented when you chose Only
Call to These Area+Office Codes in the previous step. The pull down listing shows
the codes (area code plus prefix codes) that are considered to be a local call from
your location. Click the C button to add, delete, or change codes by displaying the
"Change Dial Rules" screen.
• To Add Local Area+Prefix Codes – Enter the six digit area+prefix code and
click Add. The wild card character ‘#’ can be entered at the end of a prefix code
entry to represent a range of codes. For example, 602### would represent all
prefix codes in area code 602.
• To Delete Local Area+Pre fix Co de s – Highlight a prefix entry and click
Delete button. The delete button removes the entire entry from the list, thus if
the entry has a wild card, then it removes all codes represented by the wild card.
• To Delete a Specific Area+Prefix Code – To delete one prefix code that is part
of a range of codes entered using a wild card character, enter the prefix code to
be considered not local in the Long Distance box and click Add.
• For Long Distance Calls add +1 – Check the box when you need to have a
leading one ("1") added when making long distance calls outside your home area
code.
• Click Save when done.
Test a Phone Number
Test a Phone Number – Dialing plans can become complex. Use these boxes to enter
different telephone numbers and check to see the number that will be dialed. The
dialed number should be identical to what you need to dial when using your phone to
manually dial.
28 Strata CIX Net Phone AG 04/08
Page 43

Server-based Net Phone COS 5
The creation of a Server-based Class of Service for Net Phone begins in Net Server
using the Net Server Administrator program, followed by creating your configuration
on the Admin Net Phone, then publishing the configuration files to the Net Server PC.
The steps are as follows:
“Step 1: Create User Groups (Net Server)” on page 30
“Step 2: Assign Users to Net Phone Application (Net Server)” on page 32
“Step 3: Assigning Users to User Groups (Net Server)” on page 36
“Step 4: Create Configuration Files using Admin Net Phone” on page 39
“Step 5: Publishing the Configuration Files” on pag e 41
The following steps show an example creating two user groups, users and
administrators, and assigning a class of service to each. Multiple groups can be
assigned, each with its own configuration created by the Administrator common to
that group.
Strata CIX Net Phone AG 04/08 29
Page 44

Server-based Net Phone COS
Dial Plan Setup
Step 1: Create User Groups (Net Server)
1. Open Net Server Administrator by selecting Setup/Administration from within Net
Server.
2. Log in with username admin and password admin.
3. Select the User Groups tab.
4. Click the Add New Record button (see circled button on following diagram).
5. Type in a name to represent the Net Phone Administrator (NetPhoneAdmin in this
example) and click Okay.
30 Strata CIX Net Phone AG 04/08
Page 45

6. Click the Add New Record button again, and this time, type in a name to represent
the Net Phone Users’ group (NetPhoneUsers in this example).
7. Click Okay.
8. Repeat the above steps to create any other Net Phone user groups as needed. The
Net Server User Groups should now look like this:
Strata CIX Net Phone AG 04/08 31
Page 46

Server-based Net Phone COS
Dial Plan Setup
Step 2: Assign Users to Net Phone
Application (Net Server)
By assigning User Groups to the Net Phone application allows you to assign a
common “Class of Service” and “Configurations” for all users in a group. Individuals
that are not part of a group can also be assigned as a Net Phone application user.
1. Select the Applications tab. Highlight the Net Phone entry.
• Named User Groups – You can create named groups (like “NetPhoneAdmin”,
“NetPhoneUsers”, etc.) for assignment of a common “Class of Service” and
“Configurations” for everyone in the group.
• Individuals – Setup individuals as an Application User ONLY to exclude them
from the <Default> group.
• <Default> group – Setup this group as a ‘catch-ALL’ group. That is, anyone not
specifically listed in a named group is assumed to belong to this <Default>
group.
32 Strata CIX Net Phone AG 04/08
Page 47

Server-based Net Phone COS
Dial Plan Setup
2. Add User Groups to Net Phone – Click Add New Record (see circled button
above). The following window pops up:
• Select the newly created NetPhoneAdmin Group from the Client/(Group):
drop-down box.
• Select World for both Read Level and Modify Level from their respective drop-
down boxes.
• Place a checkmark in the Server Admin Privilege checkbox. The window
should now look like this:
Strata CIX Net Phone AG 04/08 33
Page 48

Server-based Net Phone COS
Dial Plan Setup
• Click Done.
3. Repeat by highlighting the NetPhone entry and click the Add New Record button
again.
• Select the NetPhoneUsers Group created previously from the Client/(Group)
drop-down box.
• Select Denied for both the Read Level and Modify Level from their respective
drop-down boxes.
• Uncheck the Server Admin Privilege checkbox.
• Place a checkmark in the Use Server-based Configurations checkbox. The
window should now look like this:
34 Strata CIX Net Phone AG 04/08
Page 49

Server-based Net Phone COS
• Click Done.
4. Repeat the preceding steps to add any remaining Net Phone user groups.
Dial Plan Setup
Strata CIX Net Phone AG 04/08 35
Page 50

Server-based Net Phone COS
Dial Plan Setup
Step 3: Assigning Users to User Groups
(Net Server)
1. Select the Users tab. The following screen appears:
36 Strata CIX Net Phone AG 04/08
Page 51

Server-based Net Phone COS
³ To Assign Users as Net Phone Administrators
1. Scroll down the list of User Names.
2. Double-click on the User Name (NPAdmin – 1000 in this example.) to be a Net
Phone Administrator.
3. Create a new user if not found.
4. Place a checkmark in both the Admin and Users groups as is shown in the
following screen:
Dial Plan Setup
5. Click Do ne.
6. Repeat for other Net Phone users to be assigned as Administrators.
Strata CIX Net Phone AG 04/08 37
Page 52

Server-based Net Phone COS
Dial Plan Setup
³ Assign Users as Net Phone Users
1. Scroll down the list of User Names
2. Double-click on the User Name (NPAdmin – 1000 in this example.) to be a Net
Phone User.
3. Place a checkmark in the User group only as is shown in the following screen:
4. Click Do ne.
5. Repeat for other Net Phone users to be assigned as Users.
38 Strata CIX Net Phone AG 04/08
Page 53

Server-based Net Phone COS
Dial Plan Setup
Step 4: Create Configuration Files using
Admin Net Phone
Restart the Administrator’s Net Phone, if Net Phone is running, shut it down and
restart. Set up the buttons, Call Handler rules, skins, etc. as you would like the users’
Net Phones to be configured. Use the Net Phone User’s Guide as needed for how to
configure Net Phone. Additional advanced configuration information can be found
later in this document.
³ To Change the COS Configuration
1. Once the configuration is done, click the Main Menu icon on Net Phone (top left)
and select File > Publish. The following window appears:
2. Select the Server Group: NetPhoneUsers (the group created earlier for users).
3. Left-click on the file name “AG_COS.INI” to highlight it.
Strata CIX Net Phone AG 04/08 39
Page 54

Server-based Net Phone COS
Dial Plan Setup
4. Right-click on the highlighted file and
choose Edit. The window shown right
appears:
5. Change each value from ‘=Y’ to ‘=N’
that should be set and controlled from
the Server . Any items left using the ‘=Y’
setting will allow the user to change and
keep those settings on that local PC. The
file from the server will not be
downloaded. (See “Editing the
AG_COS.INI File (COS)” on page 50)
6. Click File > Save to save the changes.
Close the “AG_COS.INI” file.
40 Strata CIX Net Phone AG 04/08
Page 55

Server-based Net Phone COS
Dial Plan Setup
Step 5: Publishing the Configuration Files
When a Net Phone is assigned with “Admin” privileges (either
the Server Admin Privilege or the Group Admin Privilege #1),
then a Publish item will be provided on the File menu.
When the Publish menu is selected a screen similar to the
screen shown right. If you only have the Group Admin
Privilege (and not the Server Admin Privilege) then the Group
name field will show your group name and you will not be
allowed to change it. However if you have the Server Admin Privilege you can
publish to any group by entering the group name. By blanking out the group n ame you
will be publishing to the <Default> group area.
• Select NetPhoneUsers
from the Server
Group drop-down
box. From the file list,
highlight the files you
would like to apply to
the users’ Net Phones.
It is recommended
that all files be
selected.
• To publish files to the
selected Server
Group, click the
Publish to Server
button.
Note Always publish the Class of Service Settings file (AG_COS.INI) after editing it
to the user-desired settings.
Strata CIX Net Phone AG 04/08 41
Page 56

Server-based Net Phone COS
Verification of Settings
Verification of Settings
The Net Phone at each desk must be restarted for the configuration changes to take
effect. If you have included the button files in this configuration, verify that the user
does not have the ability to change the buttons’ features. If you have included Call
Handler rules in the configuration, verify that the user’s Call Handler has the
appropriate rules set up. If anything else was included in the configuration, check
those settings as well.
Managing files on the Server
Sometimes it may be useful to view and manage the configuration files on the Server.
When the radial button on the top of the Manage Server Configuration Files screen is
changed to Server Files, a list of the files posted on the server for that group is
displayed. Any file can be retrieved from the server by highlighting that file, then right
clicking and choose to Copy File from Server. A warning dialog box will appear
asking if you want to replace the corresponding file on your PC. If you answer yes,
then you can now edit or test that configuration. After making changes, use Publish to
move the updated file back to the Server.
Note Always use extreme caution when editing files to only make changes that are
appropriate. Any changes in the configuration files will take affect on each Net
Phone in the group the next time the Net Phone is either “Reset” or restarted.
42 Strata CIX Net Phone AG 04/08
Page 57

Server-based Net Phone COS
Duplicating Configuration Files to Other PCs
Duplicating Configuration Files to Other
PCs
Another method for rolling out Net Phones on multiple PCs is to define the
configuration on one Net Phone and copy the appropriate configuration files onto
other PCs. This method allows users to control their own configurations, while they
start from a common configuration. This may be preferable for some installations,
especially sites having only a few Net Phones.
All files controlling the configuration can be found in your user’s Local Settings,
typically “Documents and Settings\<user name>\Application Data\CTS\Netphone”.
Dial Plan Configuration File
The Dial Plan is a key file that can take time to create and test to ensure it works. If not
using a server-based Dial Plan, copying this file onto other PCs can save a lot of time
in getting multiple Net Phones working.
Config File Description
DIALRULE.INI
Local Dial Plan Rules. Can also be copied to Server for
Server-based Dial Plan.
Net Phone Configuration Files
The following .INI files control the major configuration parameters for Net Phone.
Use caution when copying these files since using Net Phone continuo usly stores
information in these files. It is recommended to copy these files when initially
deploying Net Phone, but since personal preferences are also stored in these files,
overwriting these files after users have started using their Net Phone could erase these
settings.
Config File Description
AGNT_PH.INI Main Configuration File
ONP_ACD.INI ACD Feature Settings
NP_REC.INI Record-a-Call Settings
Strata CIX Net Phone AG 04/08 43
Page 58

Server-based Net Phone COS
Duplicating Configuration Files to Other PCs
Button Configurations
The buttons can be defined on one PC and copied to other PCs to create an identical
set of functions. The following files define the configurations of the buttons on the
phone.
Key Configs Description
NP_KEYS1.INI
NP_KEYS2.INI Configuration of the ACD wide keys on Main NP screen.
NP_KEYS3.INI Configuration of keys on right-slide out button grouping.
Defines Shortcut Keys, Keys on Main NP screen (except
ACD wide keys), and current Skin selection.
NP_AppBs.INI
NP_XKYS1~8.DAT 1st ~ 8th Bank of Extra Keys
Configuration of links (keys) for optional application
features.
Directory Files
The directory files are frequently compiled automatically, but sometimes they may be
manually created or manually edited and the same copy needed on multiple Net
Phones.
Directory Files Description
Net Phone looks for MainDir.txt in the application folder. If
MainDir.txt
ExtDir.txt The default Extension Directory
FeatDir.txt The default Feature Code directory listing.
MyDir.txt The default Personal Speed Dial listing.
found, Net Phone automatically creates: FeatDir .txt and/or
the ExtDir.txt file.
44 Strata CIX Net Phone AG 04/08
Page 59

Server-based Net Phone COS
Duplicating Configuration Files to Other PCs
User Defined Actions
Net Phone uses the compiled list of User Defined Actions. Actions can be created,
tested and exported to create *.AC files. Renaming these files accordingly (exported
files have a numeric value for a name) and changing the suffix when needed can
provide the best way to copy selected actions to other PCs.
Action Files Description
AGT_PHN.ACS Compiled User Defined Actions
*.AC Exported Action file.
Imported by Net Phone upon startup only when an action
of the same name does not exist in the compiled set of
actions (AGT_PHN.ACS). Thus, when this file exists and
*.ACI
*.AC1
*.ACO
*.AC0
the user made changes to this action, the user can revert
back to the original operation by deleting the current action
in Net Phone, then stopping and restarting Net Phone.
This file is renamed to *.AC once imported.
When the last character of the file name extension is a ‘1’
(number), the file is always imported, overwriting an
existing action. The file is deleted once imported.
When the last character of the file name is ‘O’ (letter), the
file is always imported upon startup, overwriting an
existing action. The file is not deleted.
When the last character of the file name is ‘0’ (number),
the file is only imported upon startup if the compiled actio n
file is missing (AGT_PHN.ACS).
Strata CIX Net Phone AG 04/08 45
Page 60

Server-based Net Phone COS
Duplicating Configuration Files to Other PCs
Personal Call Handling Rules
Net Phone uses the compiled list of Personal Call Handling Rules. PCH Rules can be
created, tested and exported to create *.RU files. Renaming these files accordingly
(exported files have a numeric value for a name) and changing the suffix when needed
can provide the best way to copy selected rules to other PCs.
Directory Files Description
NET_PHN.RUL Compiled Personal Call Handler Rules
*.RU Exported Personal Call Handling Rule
Imported by Net Phone upon startup only when a rule of
the same name does not exist in the compiled set of rules
(NET_PHN.RUL). Thus, when this file exists and the user
*.RUI
*.RU1
*.RUO
*.RU0
made changes to this rule, the user can revert back to the
original operation by deleting the current rule in Net
Phone, then stopping and restarting Net Pho ne. This file is
renamed to *.RU once imported.
When the last character of the file name extension is a ‘1’
(number), the file is always imported, overwriting an
existing rule. The file is deleted once imported.
When the last character of the file name is ‘O’ (letter), the
file is always imported upon startup, overwriting an existing
rule. The file is not deleted.
When the last character of the file name is ‘0’ (number),
the file is only imported upon startup if the compiled rule
file is missing (NET_PHN.RUL).
46 Strata CIX Net Phone AG 04/08
Page 61

Advanced Configuration
Some items of the configuration can be changed but are not always present in the
Administration interface available to the user. This includes an ability to create a Post
Call Survey type of operation, using Extra Call Info items as part of the conditions for
creating Personal Call Handling rules and some hidden parameters that should not be
readily changed except as part of the initial setup.
Post Call Survey
For Net Phone to conduct a post call survey , a call variable labeled either PC_DEST or
~PC_DEST , needs to be creat ed that contains an extension number where the call will
be transferred when and only if the Net Phone hang up button is pressed.
Automatically the call will be transferred to the destination defined. This Extra Info
field can be created and a value entered using Call Router, Voice Assistant and any
Net Phone.
Example
A user would like to have selected calls automatically move to another location when
the call is finished. This could be for a Post Call Survey or it could be for an assistant
to collect more detailed information. In this example, the agent uses an assistant to
collect more details from the call and wants to send the call to extension 1027.
Server-based Net Phone COS
Advanced Configuration
• Create a User-defined Actio n of the type Modify Call Information and name it Post
Call Followup, choose the Extra Info option and enter a Field Name: PC_DEST
and a Value: 1027.
• Create a Programmable Button by right-clicking on a blank b utto n, choose the
colors and enter a Label, in this case I will use FollowUp. Choose an Action: User
Defined Actions and then select your action Post Call Followup.
• The user now can handle a call and if post call followup is needed, press the
FollowUp button and when he ends the call by pressing F12 or clicking key, the
call will automatically transfer to extension 1027, his assistant.
Strata CIX Net Phone AG 04/08 47
Page 62

Server-based Net Phone COS
Using Extra Information in Personal Call Handler Rules
Using Extra Information in Personal Call
Handler Rules
The Personal Call Handler supports the use of Extra Information when the triggering
event is either Call Ringing or Call Answered. The only choice offered in the pull
down list is CallerID Name. Additional fields can be inserted by typing the name in
the entry box. The syntax for the parameter must match t he field exactly with that used
within TOSHIBA. Following is a list of field names that can be entered into the
Personal Call Handler Extra Info field.
Extra Info Field Name Description
Account Account code attached to the call
ACDAGT ACD agent’s name
ACDAGTN ACD agent’s code (number)
ACDGRP ACD group’s name
ACDGRPN ACD group’s number
CalledID Name of called number (DID/DNIS Name)
CalledIDNum Number called (DID/DNIS number)
CallerID CallerID/ANI name
CallerIDNum CallerID/ANI number
CALLPRIORITY Priority of call within ACD
LastRedir Last redirected extension number
PC_DEST or ~PC_DEST Post call survey destination
PREFAGENT ACD preferred agent’s code (number)
~RECFNAME Tracer/ACR recording file name for this call
~ When a tilde is the lead character in an Extra Info field name, that field cannot be
edited and will not display in the Extra Info screen.
48 Strata CIX Net Phone AG 04/08
Page 63

Server-based Net Phone COS
Using Extra Information in Personal Call Handler Rules
Example
The Net Phone user may want a special alerting tone whenever a call rings when the
caller has selected or indicated to the system the call should be directed to specific
agent. In this case, we want to play the Whistle WAV file for this alert function. Thus,
we would create a new Personal Call Handling Rule:
• Triggering Event: Call Ringing
• Call Type: Any
• Phone State: Any
• CallerID Number: none Required
• Extra Info: PREFAGENT, Is Present
• Account Code: none Required
• Action (Immediately): Blow Whistle (Action defined to Play WAV file previously
created)
• Action (After ‘x’ seconds): none
Strata CIX Net Phone AG 04/08 49
Page 64

Server-based Net Phone COS
Editing .INI Files
Editing .INI Files
Editing the .INI files can change a number of advanced configuration settings. These
files contain configuration information, some of which is dynamically written by the
application, some are set using the Admin tools on the Main Menu, and others are in
the background and require manual editing to cause a different behavior. It is
recommended that only those lines shown in the following sections be changed
without consultation of TOSHIBA Te chnical Support.
Editing the INI files can change some advanced configuration settings.
• First, you MUST exit the Net Phone program before making the changes. Changes
made while Net Phone is running will revert back to their original settings upon
exiting Net Phone.
• Use Notepad or other text editor to make the appropriate changes based upon the
following descriptions.
• Upon restarting Net Phone, the new settings will take effect.
Editing the AG_COS.INI File (COS)
The most important file on server-based configurations is the Net Phone Class of
Service file (AG_COS.INI file). This file not only determines what a Net Phone user
can or cannot change on his/her phone but also which configuration files should be
used from the server.
Note This file MUST be setup for each group for server-based configuration to
operate for that group. Repeat the above procedure for each group.
For each setting =N in this file, the user is not allowed to change that part of the
configuration on his/her phone. Also the appropriate configuration file must exist on
the server and will be used by the Net Phone.
Item Config File Description
Chg_Actions=Y AGT_PHN.ACS User-defined Actions
Chg_Rules=Y NET_PHN.RUL Personal Call Handler Rules
Chg_StdKeys=Y NP_KEYS1.INI 1st Bank of Programmable Keys
Chg_PgmKeys=Y NP_KEYS2.INI 2nd Bank of Programmable Keys
50 Strata CIX Net Phone AG 04/08
Page 65

Server-based Net Phone COS
Editing .INI Files
Item Config File Description
Chg_BotKeys=Y NP_KEYS3.INI 3rd Bank of Programmable Keys
Chg_MainSet=Y AGNT_PH.INI Main Configuration
Chg_OutLookSet=Y None Outlook Link Settings*
Chg_InfoSet=Y CALLINFO.INI Extra Info Feature Configuration
Chg_Recording=Y NP_REC.INI Record-a-Call Settings
Chg_ACD=Y ONP_ACD.INI ACD Feature Settings
ShowMaintOnSplash=N None
Chg_AppKeys=Y NP_AppBs.INI Optional Application Link Buttons
Chg_Docking=Y NP_WDock.INI Screen Docking Configuration
Chg_XtraKeys1=Y NP_XKYS1.DAT 1st Bank of Extra Keys
Chg_XtraKeys2=Y NP_XKYS2.DAT 2nd Bank of Extra Keys
Chg_XtraKeys3=Y NP_XKYS3.DAT 3rd Bank of Extra Keys
Chg_XtraKeys4=Y NP_XKYS4.DAT 4th Bank of Extra Keys
Show maintenance expiration date
on splash screen
Chg_XtraKeys5=Y NP_XKYS5.DAT 5th Bank of Extra Keys
Chg_XtraKeys6=Y NP_XKYS6.DAT 6th Bank of Extra Keys
Chg_XtraKeys7=Y NP_XKYS7.DAT 7th Bank of Extra Keys
Chg_XtraKeys8=Y NP_XKYS8.DAT 8th Bank of Extra Keys
* Settings, once made, can be locked into place by changing this setting to “N”.
It is highly recommended that all configuration changes be made on the
Administrator’s Net Phone and then published to the server . Most of the configuration
items can be set up following the Net Phone Settings section of the “Net Phone User’s
Guide”.
Strata CIX Net Phone AG 04/08 51
Page 66

Server-based Net Phone COS
Editing .INI Files
Editing the Agnt_Ph.INI File (Net Phone Main)
This configuration file contains many topics, some are controlled using the
Preferences Menu settings, some are dynamic and written by Net Phone during its use
and others are static and can only be changed by manually editing this file. This
section describes those items that need to be manually edited. DO NOT chan ge other
items unless instructed by TOSHIBA Technical Support.
Setting the Format of Phone Numbers
Applications some times need a specific format for recognizing phone numbers.
Changing the “HypenFormat1” (%H) and “HyphenFormat2” (%J) parameters will
define how the dialed number or CallerID/ANI number will be treated when each of
these Call Variables. The phone number received (%P) using ANI or Caller ID is
typically 10 digits without any formatting.
[General]
HypenFormat1=xxx-xxx-xxxx
HypenFormat2=(xxx)xxx-xxxx
Speed Dial Name
When you dial using a Speed Dial key the label of the key will automatically are
attached as the 'name' on that call. To disable this feature set this flag to =N for No.
[General]
SD_UseName=Y
Calls to Act Upon
When you use a Programmable Key with a "User-Defined Action" or a System/PBX
Command that action may attempt to affect a call (i.e. Transfer, Divert, etc.). If more
than one call is present on the phone, which call should be affected? This CallsToAct
value determines which calls and in which order: "T"=Talking, "H"=Holding,
"R"=Ringing, and "C"=Clearing. If for example, you wanted to act on Ringing then
holding calls you would set the value to "RH". To disable actions for affecting calls,
set the value to =N for None.
[General]
CallsToAct=THR
52 Strata CIX Net Phone AG 04/08
Page 67

Server-based Net Phone COS
Editing .INI Files
Message Lamp
On some installations the Red Message lamp (next to the MSG key), may not be
desirable as message information is also displayed on the LCD Display. To disable the
message lamp, set this flag to =N for No.
[General]
MsgLamp2=Y
Call Logging
Call logging is the process of capturing and writing out call information to a “logging
file” at the completion of each call. TOSHIBA Net Phone supports logging as a
standard feature, writing out the information to a text file so it can be viewed or
imported into other programs or databases. Net Phone’s Preferences Setup dialogs
provide the user ability to enable/disable call logging and choose the types of calls to
be reported. The administrator including the format of the data, its header line, the file
name, and whether calls to the primary DN or all DNs on the phone are to be included
can change other items.
[Logging] Settings Definitions
DataHeader=Date&tTime&tDir&t
Phone&tName&tDur&tAnswer&t
Acct&tType&tNotes&tGUID
DataFormat=&D&t&T&t%B&t%H
&t%N&t%L&t%S&t%A&t%T&t%
X("Notes")&t%X("~CHdbGUID")
LogFile=CallLog.txt
Enabled=Y
MaxSize=1
CallType=CO1
LogSDNcalls=False
1
DataHeader – Column header for log file.
Typically you would us e a tab-delimited format.
DataFormat – Data and format of a data record.
Typically you would us e a tab-delimited format.
LogFile – Path and filename of text file where
logging will occur.
Enabled – Logging feature enabled “Y”es or “N”o
MaxSize – Maximum size of log file (in
megabytes)
CallType – Call types that should be logged:
“CO”, “A”ll, or “IC
Change to =T to log all calls including secondary
appearances.
1. These items are now controlled using Setting Preferences (General Tab) and should not be
changed by editing this .INI file.
Strata CIX Net Phone AG 04/08 53
Page 68

Server-based Net Phone COS
Editing .INI Files
Exporting Call Information
The Exporting Call Information is an action, which can be triggered from a Personal
Call Handler rule or by the user pressing a programmable key set with this action. The
action first pops up an "Export Information" screen that allows the user to add/review
the information to be saved. If any required fields are empty , the user must enter them
before being allowed to export. Then when the user presses the Save button, the action
formats and exports the information to a text file at the desired location.
The only parameter needed when defining the action is the Path & Filename to which
the export should occur. Typically, the target destination will be over a LAN to a
system-level PC/database, so it's usually appropriate to have a network drive mapped
specifically to the target location (i.e. F:\). Also since exports could be occurring
simultaneously from many different PCs, it is recommended to use one of the system
variables like &E (your extension number) as part of the filename so that the export
filename is unique for each PC – for example: EXT&E.IMP
Export Information requires file-sharing access with Write permissions to the target
folder. Users must be able to browse to the target folder and create a file, or Export
Information will fail.
The export action can be configured and customized by changing fields in the
[Export] section of the Agnt_Ph.INI file. Following is an example configuration.
[EXPORT]
RequiredFields=MP
RequiredFields – This parameter is used to
designate which fields the user will be required
to enter (cannot be left blank) when the "Export
Information" screen is presented. The choices of
fields includes:
M = Main Listed Telephone Number
P = Phone number (CallerID or ANI on the call)
N = Name (CallerID name)
A = Account code
D = Destination.
Settings Definitions
54 Strata CIX Net Phone AG 04/08
Page 69

Server-based Net Phone COS
Editing .INI Files
[EXPORT]
HideFields=D
Line1=@@LOGON,EXT&E,&E
Line2=@@LEARN,M,%M,%P
Line3=@@DONEIF,SUCCESS
Line4=%P,"%N",@@DEF,@@D
EF,@@DEF,
@@DEF,@@DEF,@@DEF
DefAcct=
DefDest=
DefName=
Settings Definitions
HideFields – This parameter is used to
designate which fields to hide from the user
when the "Export Information" screen is
presented. Use this to hide fields your agents do
not need to enter. The choices of fields includes:
M = Main Listed Telephone Number
P = Phone number (CallerID or ANI on the call)
N = Name (CallerID name)
A = Account code
D = Destination.
Important: Do not Hide a Required field. Users
will be unable to save their information if they
cannot enter data into all Required fields. You
cannot enter data into a Hidden field.
Line1 - Line4 – Up to 4 lines of text can be
written on each export. Line1 through Line4
determine the text output to the target file. These
lines can contain text; call variables and system
variables to provide all of the static and real-time
information needed.
DefAcct, DefDest, DefName – These will be
used as the default Account, Destination, and
Name fields shown on the "Export Information"
screen if these are not already present on the
call.
Strata CIX Net Phone AG 04/08 55
Page 70

Server-based Net Phone COS
Editing .INI Files
[EXPORT]
AutoModify=Y
Path=F:\
File=&E.IMP
Settings Definitions
AutoModify – When the user has entered
information into the "Export Information" screen,
it is typically desirable to immediately attach this
information to the telephone call in progress.
This flag is used to turn on this feature by setting
it to "Y" for Yes.
Note If a "Main Listed #" is entered (and this
feature is enabled), this main phone
number is then substituted for the Calling
number on the call, which typically helps
ensure success on subsequent screenpop attempts.
Path and File – Default values for the location
and name of the Export file. These values are
only used if the Export Information Action does
not include the path and file parameter.
56 Strata CIX Net Phone AG 04/08
Page 71

Server-based Net Phone COS
Editing the NP_Rec.INI File (Recording)
Editing the NP_Rec.INI File (Recording)
When using OAISYS Tracer or Auto Call Record, a button can appear on Net Phone
to show the recording status, offer the ability to start or stop the recording, and to enter
a bookmark into the recording record. These are controlled in the NP_Rec.INI file and
can be selected during installation if the OAISYS Replay Option were chosen during
installation or can be changed later by manual editing. The file contains a list of
default bookmarks and each can be changed to meet your needs or additional ones
added by adding a line and incrementing the numerical value.
³ To Show Recording Status
T o have a button appear on the main Net Phone screen to show the status of T racer call
recording set Recd_ViewStatus to “Y”.
[Recording]
Recd_ViewStatus=N
³ To Stop/Start Recording
To make the Record button active to allow the ability to either or both start and stop
the recording set the following to “Y”. Setting these to “Y” also makes this feature
available in System/PBX Commands for creating User Defined Actions.
[Recording]
Recd_Start=N
Recd_Stop=N
Strata CIX Net Phone AG 04/08 57
Page 72

Server-based Net Phone COS
Editing the NP_Rec.INI File (Recording)
³ To Enable Inserting Bookmarks
Net Phone can be used to manually insert bookmarks into the OAISYS Tracer
recordings while the call is recording. Change Set_Bookmark to =Y. This setting also
makes this feature available in System/PBX Commands for creating User Defined
Actions. The lines marked Bookmark1= to Bookmark’x’= provides a naming list for
a selection of bookmarks to be inserted. The number of choices can be reduced or
increased. Delete lines not needed or add new default bookmarks by incrementing the
numerical value accordingly. Replace the text following the ‘=’ character as needed to
meet your needs. These bookmarks can be are presented to the user when the user
right-clicks the Record button for making a selection.
[Recording]
Set_BookMark=N
Bookmark1=Important Point
Bookmark2=Listen Here
Bookmark3=Phone Number
Bookmark4=Abusive Language
Bookmark5=Customer Service Issue
Bookmark6=Customer Order
Bookmark7=Confirmation
Some applications may want to create unique buttons for frequently used bookmarks.
This can be done by creating a User Defined Action, selecting System/PBX
Command, then choosing RECORDBKMARK=“Bookmark Text”. This button will
work independently of the bookmarks defined above, thus the user does not need to
have the Record Button on Net Phone, but will require the setting Set_Bookmark=Y.
If for example, abusive language is a problem, a button can be created using the
Record Bookmark action and replacing “Bookmark Text” with “Abusive Language”.
When the user presses this button this bookmark is inserted into the recording record.
58 Strata CIX Net Phone AG 04/08
Page 73

Server-based Net Phone COS
Editing the ONP_ACD.INI File (ACD)
Editing the ONP_ACD.INI File (ACD)
This file controls the ACD features allowing or disallowing the use of ACD keys on
the Net Phone. These controls define a set of functions for use with ACD including the
ability for the ACD Supervisor to login and take calls or not take calls. The default
setting of this configuration file is highly dependant upon the PBX that this Net Phone
is connected.
[ACD] Description
Enabled=N
SetWrapUpCOS=N
3rdLoginCOS=N
ACDLCDenabled=Y Will display ACD messages when =Y.
PDNenabled=Y
MakeUnavailable=N Does not matter.
ACD_RingOnLCD=Y Displays ringing call on LCD display when =Y.
ACD_SuperRcvCalls=N
Set this to =Y to enable this for PBX ACD function or to
=C for CTS (TOSHIBA) ACD functions.
Set this to =Y to allow users to control the ACD Wrap
feature.
Set this to =Y to allow this Ne t Phon e to be us ed to Login
or Logout other ACD agents. This allows an application
such as TASKE to manually login and logout agents.
Net Phone will only look for calls on the PDN when set to
=Y. Will look for calls on all DNs when =N.
Does not matter. This is controlled while logging into or
out of ACD from Net Phone itself.
Strata CIX Net Phone AG 04/08 59
Page 74

Server-based Net Phone COS
Editing Chat_COS.INI File (Chat)
Editing Chat_COS.INI File (Chat)
The Class-of-Service INI file has the following settings that can be changed using a
simple text editor.
[COS]
EnableDND_COS=N Set to =Y to enable the use of a DND function.
SendBroadcastMsgs=N
ShowEveryoneGroup=N
AddNewGroup=N
When set to =Y this user is capable of sending a
broadcast message.
When set to =Y this user will have a group that shows
everyone on the system.
When set to =Y, this user can create new groupings of
users.
Settings Definitions
60 Strata CIX Net Phone AG 04/08
Page 75

Open Architecture Interfaces 6
The Open Architecture provides for integrating applications within Net Phone, such as
the Personal Power Dialer or Chat as well as provides enabling links for other
programs running on the PC.
The Net Phone is specifically designed to cooperatively work with many different
Windows applications. This allows you to do many different things including:
• dialing from other applications.
• automatically screen pop a contact database when a call rings in.
• automatically open call journals to take notes on a call.
• beep your pager when an important call is ringing.
• Log call activity for a permanent record.
Following are a list of the major interfaces provided in Net Phone to integrate with
other programs:
• TAPI Dialing Interface – This allows TAPI enabled applications, for example
Goldmine 4.0, to dial calls using Net Phone.
• DDE Command Interface – Non-TAPI applications can use this feature to dial and
answer calls.
• Command File Interface – For applications that don't have TAPI or DDE
capabilities, this interface provides another alternative to dial and answer calls.
• OLE/COM Interface – Net Phone is an OLE server and as such supports a number
of Methods that other applications can use to perform actions like to dial and
answer calls.
• Outlook Phone Link – Microsoft Outlook is a powerful contact management
program with which Net Phone works very closely. This requires the installation
of the Outlook Link application.
Strata CIX Net Phone AG 04/08 61
Page 76

Open Architecture Interfaces
Registry Entries
Note Toshiba reserves the right to make changes (including changes, additions, and
deletions) to these open architecture interfaces without notification. The
information in this section cannot be guaranteed to be 100% accurate and some
commands may not work with all PBXs.
Registry Entries
To help other applications know if and where TOSHIBA Net Phone is installed on a
PC, the following registry entries are provided:
HKLM\SOFTWARE\Computer Telephony Solutions\NetPhone\install_path
(C:\Program Files\Toshiba\NetPhone)
HKLM\SOFTWARE\Computer Telephony Solutions\NetPhone\exe_path
(C:\Program Files\Toshiba\NetPhone\netphone.exe)
Companion Applications Suite
The Net Phone has a powerful “open architecture” capability that allows companion
applications to be installed to extend the features and functions of Net Phone. These
companion applications inherit the look-and-feel of Net Phone so they act as if the are
“part of the Net Phone”.
Many companion applications have already been developed including: “Call History”,
“Extension Directory”, “Personal Directory”, “Extra Buttons” and an “Integrated W eb
Window”. Plus more companion applications will be provided in the future.
When a companion application is installed, one or more additional Options Buttons
will appear at the bottom of the main Net Phone screen. These buttons provide the
access to the companion application for the user. The companion applications rollout
from and dock to the bottom of the main Net Phone screens.
Configuration
The appearance and configuration of these buttons is setup and controlled by registry
entries. Please contact Technical Support for details before adding an application not
specified in the Installation File.
62 Strata CIX Net Phone AG 04/08
Page 77

Open Architecture Links
DDE Command Interface
The TOSHIBA Net Phone provides a DDE interface so that other programs can be
setup to send commands to dial, answer, and hang-up calls plus other capabilities.
This is quite useful, for example, when using a PIM or contact manager program like
Commence or DayTimer Organizer (or any program that supports DDE dialing) to
look up and dial a phone number.
This DDE interface requires the following:
Application Name: AGNTPLUS
Topic: SYSTEM
DDE Execute String: <Command> See below for available commands.
Call Control Commands
Dial Call To dial an extension or outside phone number
1) DIAL, "Phone Number", "Name", "Account"
Formats:
Where:
Answer Call Answer the oldest Ringing or Holding call.
Formats:
Where:
Hang Up Hangup on a call.
Formats:
Where:
2) [DIAL, "Phone Number", "Name", "Account"]
3) [DialNumber ("Phone Number", "Outside Number", "name",
"account")]
Phone Number = number to be dialed
Name = Name of person (for outside calls only)
Account = account number to attach (for outside calls only)
1) ANSWER
2) [ANSWER]
3) [AnswerCall (" ")]
4) ANSWERCALL,<CallID> Answer a specific call.
1) DropCall
2) [DropCall ( )]
Open Architecture Interfaces
Open Architecture Links
Strata CIX Net Phone AG 04/08 63
Page 78

Open Architecture Interfaces
Open Architecture Links
Divert Call Send a ringing call to another destination.
Format: DIVERT, "CallID","Phone Number","Mbox"
Where:
Modify Call Change or attach info to an Outside call.
Format: MODIFY, "CallID", "Phone Number", "Name", "Acct"
Where:
DSS Call Dial or XFR call (depending on whether the phone is on a call)
Formats:
Outside Calls
Internal Calls
Where:
Hold Call Place a call on hold.
Format: 1) HOLD
Where:
CallID = PBXCall ID of call, or if “” then Longest Ringing call
will be assumed.
Phone Number = Inside or Outside phone number, Outside
must have a comma – if comma is first , use Trunk Access
Code programmed in Net Phone.
Mbox = Voice Mailbox extension if call is going to V-mail.
CallID = PbxCall ID of call.
Phone Number = Outside phone number.
Name = Outside number’s name.
Acct = Account number to be attached to the call.
1) DSS, KEY, "Phone Number", “Name", "Acct", XfrType
2) DSS, KEY,"Ext #", "Mbox”,"", XfrType
Phone Number = Outside phone number.
Name = Outside number’s name.
Acct = Account number to be attached to the call.
Ext# = Extension number.
Mbox = Voice Mailbox extension if call is going to V-mail
XfrType = 0 -- Allow transfer to be announced (use Centrex if
outside to outside)
= 1 -- Do immediate (Blind) transfer
= 2 -- Transfer to Hole (IC destinations only)
>= 10 -- Don't transfer (Dial only)
64 Strata CIX Net Phone AG 04/08
Page 79

Open Architecture Interfaces
Open Architecture Links
Dial Feature To dial a feature code.
Format: FEAT, “feature code
Where: Feature code = Your PBX’s feature activation code.
Start Recording
To start recording the call using either Auto Call Record or
Tracer.
Format: REC_START, PBX_CallID, Ext#
PBX_CallID = ID of call to be recorded. If left blank the
Where:
“Talking” call will be assumed..
Ext# = Extension on call, if blank the Net Phone Ext will be
assumed
Stop Recording To stop recording.
Format: REC_STOP, PBX_CallID, Ext#
PBX_CallID = ID of call to be recorded. If blank the existing
Where:
“Talking” call will be assumed.
Ext# = Extension on call, if blank the Net Phone Ext will be
assumed.
Add Bookmark Add bookmark to recording in progress.
Format: REC_BKMARK, PBX_CallID,BookMarkStr
PBX_CallID = ID of call to be bookmarked. If blank the
Where:
existing “Talking” call is assumed.
BookMarkStr = Tesst of bookmark. If blank the users
extension number is used.
Transfer Call Transfer a call.
Format: XFR,”CallID”,”Phone Number”,”Mbox”,XfrFlag,DNDFlag
CallID = ID of call to be transferred. If blank the existing
“Talking” call is assumed.
Phone Number = Inside or outside phone number, outside
must have comma – if comma is first, use Trunk Access Code
Where:
from Dial Plan.
Mbox = If CallID is blank, and Mbox is blank, Mbox = Ext
number of Net Phone.
XfrFlag = “1” – blind Xfr, = 2 – Xfr to Hold, else – Announced.
DNDFlag = “Y” for DND override.
Strata CIX Net Phone AG 04/08 65
Page 80

Open Architecture Interfaces
Open Architecture Links
Phone Control Commands
Minimize Net Phone
Window
Formats:
Where:
Restore Net Phone
Window
Formats:
Where:
Dial A Feature Code
String
Formats: FEAT,”Feature Code
Where: Feature Code = The feature code to be dialed.
Set DND To turn on or off DND with an optional message.
Format: SET_DND, DNDnum, Msg
Where:
Sends the Net Phone window down into the tray.
1) MINIMIZE
2) [Minimize ( )]
Brings the Net Phone window back into its last position on
the screen before being minimized.
1) RESTORE
2) [Restore ( )]
Dial a feature code string.
DNDnum = 0 = DND off, 1 – 20 = Top-line of DND
message.
Msg = 2nd line of DND message
66 Strata CIX Net Phone AG 04/08
Page 81

Open Architecture Interfaces
ACD Commands
Agent Login Log into an ACD Group.
Format: ACD_LOGIN, AgentID, Pilot, ForExt, popup
AgentID = leave blank if not by AgentID, “*” = use last Agent ID
used
Pilot = ACD group extension, left blank = ALL
Where:
Example: ACD_LOGIN,,, = Log me into all my ACD groups
Agent Logout Log out of an ACD Group.
Format: ACD_LOGOUT, AgentID, Pilot, ForExt, popup
Where:
Set Wrapup End or set a wrapup time.
Format: ACD_WRAPUP, AgentID, TimeSecs
Where:
Monitor Call Monitor a call on this extension.
Format: MONITOR_CALL, Ext#
Where: Ext# = Extension of phone on a call
Add Me As Agent Help Supervisor for this extension
Format: ADD_TOCALL, Ext#
Where: Ext# = Extension of phone on a call
ForExt = Blank = 1st-party, Non-blank – target 3rd-party
extension
Popup = Non-blank – means popup Net Phone. If = “L” then also
popup the Login/Logout screen.
AgentID = Leave blank if not by AgentID, “*” = use last Agent ID
used
Pilot = ACD group extension, left blank = ALL
ForExt = Blank = 1st-party, Non-blank – target 3rd-party
extension
Popup = Non-blank – means popup Net Phone. If = “L” then also
popup the Login/Logout screen.
AgentID = Leave blank if not by AgentID, “*” = use last Agent ID
used
TimeSecs = If blank or zero – it will “Clear Wrapup”, If non-zero it
will set the agent state to Wrapup (WNR) for this amount of time.
Open Architecture Links
Strata CIX Net Phone AG 04/08 67
Page 82

Open Architecture Interfaces
Open Architecture Links
Other Commands
Run Action To run a Net Phone User Defined Action.
Format: DO_ACTION, ActionName
Where: ActionName = Name of user-defined action to be run
Copy Info To copy information about this call into Windows Clipboard.
Format: CLIP_CALL, CID, FieldName, CallStatus
Where:
Example:
Set Info Set information value on a call.
Format: SET_INFO, CID, FieldName, “FieldValue”, CallStatus
Where:
CID = leave blank to use ‘CallStatus’ or Net Phone’s ‘Most
Likely
FieldName = Name of field to be read - “CID”, “CallerID”,
“CallerIDNum”, “CallStatus “, “Account” are ‘standard’
fields, but any ‘extra-info’ field can also be read.
CallSt atus = Only used if CID blank, find first call matching
these types "T"alking, "R"inging, "H"olding, or "C"learing.
Note: If no calls match, it will put a Null on the clipboard.
CLIP_CALL, , CID, “T” = Return the Call ID of the first
“T”alking call.
CID = Net Phone’s Call ID for the desired call. This could
be provided using the %I variable. Or leave blank (“ “) if
you want to use CallStatus or Net Phone’s most likely call.
FieldName = Name of the field to be set – “CallerID”,
“CallerIDNum”, “Account” are standard fields, but any
“extra-info” field can also be set.
FieldValue = The Info string that is to be attached.
CallStatus = Only used if CID is blank. Find first call
matching these types “T”a.lking, “R”in ging, “H”olding,
“C”learing. However , this this field is also blank, Net Phone
will use the mostly likely call.
68 Strata CIX Net Phone AG 04/08
Page 83

Open Architecture Interfaces
System Command Execute a system/PBX command.
Format: SYSTEMCMD, Command String
Command String = Command string and parameters to be
Where:
performed. See PBX/System commands in User-Defined
Actions of the Net Phone User’s Guide.
Outlook Calendar sends an indication whenever the
appointment status is changed. Typically, these will occur
Calendar
Appointment
when an appointment starts and again when it ends. This
command could also be used by other applications to send
information to Net Phone. Use the %OC token in a Userdefined Action to access the information.
Format:
Where:
CALSTATUS,BusyStatus,Start,End,|Subject|,Importance,|L
ocation|,RemindBefore
BusyStatus = 0 (Free), 2 (Busy), 3 (Out of Office)
Importance = 0 (Low), 1 (Normal), 2 (High)
Open Architecture Links
Example:
CALSTATUS,2,8/18/2005 4:12:00 PM,8/18/2005 4:42:00
PM,|Staff Meeting|,1,|Tempe|, 15
Outlook Calendar sends an indication relating to the
reminder of an appointment. This command could also be
Calendar Reminder
used by other applications to send information to Net
Phone. Use the %OR token in a User-defined Action to
access the information.
Format:
Where:
Example:
Strata CIX Net Phone AG 04/08 69
CALREMIND,BusyStatus,Start,End,|Subject|,Importance,|L
ocation|,RemindBefore
BusyStatus = 0 (Free), 2 (Busy), 3 (Out of Office)
Importance = 0 (Low), 1 (Normal), 2 (High)
CALREMIND,1,8/19/2005 10:25:00 AM,8/19/2005
10:30:00 AM,|Meeting|,1,|Home|,5
Page 84

Open Architecture Interfaces
Command File Interface
Command File Interface
Net Phone also supports all of the above commands through a 'command file' interface
so that programs that don't have DDE capabilities can send commands if they can
simply create and write to a TXT file. The Net Phone monitors its "\REQ"
subdirectory for command request files to appear with the filename <fname>.REQ or
an <fname>.RER. It will then open the file and read one line for a command (in the
format above), attempt to execute the command, and then delete the command file.
For example, if you create a file called "MY_CMD.REQ" (in the "\REQ"
subdirectory) that contains one line containing the text string: DIAL, "496-9040”, Net
Phone will detect this file and execute this command, dialing the phone number "4969040".
OLE / COM Interface
The TOSHIBA Net Phone also supports many of the above commands plus some
additional commands through an "OLE interface" so programs that support OLE can
call methods directly.
In VBA script, the script code would look similar to the following example to
"Answer" a call.
Dim ApNet As Object
Dim Suc As Integer
Set ApNet = New AgntPlus.cPhone
Suc% = ApNet.Answer( )
70 Strata CIX Net Phone AG 04/08
Page 85

Open Architecture Interfaces
Call Control Commands
Answer Call Answer the first ringing or holding call.
Answer ( )
Format:
Where: PBX_CallID = PBX CallID as represented in ‘&B’.
Dial Call To dial an extension or outside phone number.
Format: Dial (Num, Name, Account)
Where:
Hold Call To place a call on hold.
Format: Hold ( )
Where:
Hang Up Hangup on a call.
Format: Hangup ( )
Where:
Divert Call Move a ringing call to another destination.
Format: Divert (ID, Num, Mbox)
Where:
Transfer Call Transfers a call to a specific destination.
Format: Transfer (CID, Num, Mbox, XfrFlag, DNDoverride)
AnswerCallID (PBX_CallID) Answers a specific call, ringing or
holding.
Num = number to be dialed
Name = Name of person (for outside calls only)
Account = account number to attach (for outside calls only)
ID = “ ” then longest ringing call will be assumed
Num = Inside or outside phone number, outside must have
comma – if comma is first, use Trunk Access Code
programmed in Dial Plan.
Mbox = If ID is blank, and Mbox is Blank, Mbox = Ext number of
Net Phone
OLE / COM Interface
Strata CIX Net Phone AG 04/08 71
Page 86

Open Architecture Interfaces
OLE / COM Interface
Where:
Example:
Start Recording
Format: RecordStart (PBX_CallID, Ext#)
Where:
Stop Recording To stop recording.
Format: RecordStop (PBX_CallID, Ext#)
Where:
Record a
Bookmark
Format: RecordBkMark (PBX_CallID, BookMarkStr)
Where:
CID = Net Phone’s Call ID for the desired call (i.e. this could
have been provided to the app using an event from Net Phone
with %I variable). Or leave blank (“ ”) if want to use the call on
which you are presently “Talking”.
Num = Inside or outside phone number, outside number msut
have a comma – if comma is first, use T runk Access Code from
the Dial Plan.
Mbox = Mailbox number to receive the call if “Num” is V-mail
number.
XfrFlag = 1= Blind Xfr, 2 = Xfr to Hold, else - Announced
DNDoverride = "Y" for DND override (if available)
Transfer (“” , 2502, 1010, “”, “”) = Transfer call to V-m ail
extension into V-mailbox “1010”.
To start recording the call using either Auto Call Record or
Tracer.
PBX_CallID = ID of call to be recorded
Ext# = Extension on call, if blank the Net Phone Ext will be
assumed
PBX_CallID = ID of call to be recorded
Ext# = Extension on call, if blank the Net Phone Ext will be
assumed.
Add a bookmark to the recording in progress.
PBX_CallID = ID of call to be bookmarked. If blank the
existing “Talking” call will be assumed.
BookMarkStr = Text of bookmark. If blank the user’s extension
number will be used.
72 Strata CIX Net Phone AG 04/08
Page 87

Phone Control Commands
Open Architecture Interfaces
OLE / COM Interface
Set Phone View
Formats: SetPhoneView (ViewType)
Where: ViewType = 0 = Normal , 1 = Minimized
Dial Feature Code Dial a feature code string.
Formats: DialFeature (FeatStr)
Where: FeatStr = Feature code of the PBX.
Set DND To turn on or off DND with an optional message.
Format: SetDND (DNDNum, Line2)
Where:
Sends the Net Phone window down into the tray or brings
it back to its normal view on the screen.
DNDnum = 0 = DND off, 1 – 20 = Top-line of DND
message.
Line2 = 2nd line of DND message.
Strata CIX Net Phone AG 04/08 73
Page 88

Open Architecture Interfaces
OLE / COM Interface
ACD Agent Commands
Agent Login Lo g into an ACD Group.
Format: ACD_LogIn (AgentID, PilotExt, PhoneExt, PopUp)
Where:
Agent Logout Log out of an ACD Group.
Format: ACD_LogOut (AgentID, PilotExt, PhoneExt, PopUp)
Where:
Monitor Call Monitor a call on this extension.
Format: MonitorCall (Ext#)
AgentID = Leave blank if not by AgentID, “*” = use last
Agent ID used
PilotExt = ACD group extension, left blank = ALL
PhoneExt = Blank = 1st-party, Non-blank – target 3rd-
party extension
PopUp = Non-blank – means popup Net Phone
AgentID = Leave blank if not by AgentID, “*” = use last
Agent ID used
PilotExt = ACD group extension, left blank = ALL
PhoneExt = Blank = 1st-party, Non-blank – target 3rd-
party extension
PopUp = Non-blank – means popup Net Phone
Where: Ext# = Extension of phone on a call
Add Me As Agent Help Supervisor for this extension.
Format: AddMeToCa ll (Ext#)
Where: Ext# = Extension of phone on a call.
74 Strata CIX Net Phone AG 04/08
Page 89

Open Architecture Interfaces
Other Commands
Perform Action To run a Net Phone User Defined Action.
Format: PerformAction (ActName, ActType, ActParm )
ActName – Can be the label on a key.
ActType – Number of action: 1 = dial feature, 2=dial number;
Where:
Run Action To run a Net Phone User-Defined Action.
Format: PerformUserAction (ActionName)
Where: ActionName = Name of User-Defined action to be run
Get File Retrieve a file from Server.
Format: GetFile (FromPath, ToPath)
Where:
3=OAI command; 5=User-Defined action, 7=Pop URL;
8=Run Pgm
ActParam -- Parameter for the selected action (i.e.
“4969060” for phone number).
FromPath = Complete path name of file to retrieve.
ToPath = Complete path name folder to place file.
OLE / COM Interface
Get Info
Format: GetInfo (FieldName)
Where:
Get Call Info
Format: GetCallInfoField (CID, FieldName, CallTypes)
Strata CIX Net Phone AG 04/08 75
This can be used to read a number of different values of
information. Returns a string value.
FieldName = Value to be read back including:
AGENTID – present setting of the last used AgentID
EXEPATH – path to where the NetPhone is running
DND – setting of DND feature (“ ” = off)
FWD – setting of FWD feature (“ ” = off)
EXTNAME – PBX username associated with NetPhone
PDN – Primary Directory Number for NetPhone
“ ” – Return PBX Extension Number for NetPhone
Returns a sting value containing the value of the field
designated.
Page 90

Open Architecture Interfaces
OLE / COM Interface
Where:
Example:
Copy Info
Format: ClipCallInfoField (CID, FieldName, CallTypes)
Where:
Get Feature List Returns bit list (long integer) of enabled features as follows:
Format: GetFeatBitList ( )
CallID = Leave blank if want to use ‘CallTypes
FieldName = Name of field to be read -- “CID”, “CallerID”,
“CallerIDNum”, “CallS tatus “, “A ccount” are ‘st andard’ fields,
but any ‘extra-info’ field can also be read.
CallTypes – Only used if CID blank, Find first call matching
these types "T"alking, "R"inging, "H"olding, "C"learing.
Note: If no calls match, a Null string will be returned.
GetCallInfoField (“ ” , Account, “R”) = Return the Account
number of the first “R”inging call
Copy Info about call into Windows Clipboard – Copies a
string value containing the value of the designated field into
the clipboard.
CID = leave blank if you want to use “CallTypes” or Net
Phone’s most likely call.
FieldName = Name of field to be read – “CID”, “CallerID”,
“CallerIDNum”, “CallS tatus”, “Account” are standard fields,
but any extra-info field can also be read.
CallTypes = Only used if CID is blank. Finds first call
matching these types – “Talking”, “R”inging, “H”olding,
“C”learing. If no call matches, it will place a NULL on the
clipboard.
SHOWRECORD = &H1& -- allowed to show “Recording-inprogress” indication
STARTRECORD = &H2& -- allowed to manually start a
Recording
STOPRECORD = &H4& -- allowed to manually stop a
Where:
Recording
ACDENABLED = &H8& -- allowed to access ACD features
(login, logout)
ACDLOGIN3RD = &H10& -- allowed to access ACD features
for 3rd parties (that is other phones).
Note: The ACDENABLED bit must also be set.
76 Strata CIX Net Phone AG 04/08
Page 91

Open Architecture Interfaces
OLE / COM Interface
Set Info Field Set information field on a call.
Format: SetCallInfoField (CID, FieldName, FieldValue, CallStatus)
CID = Net Phone’s Call ID for the desired call (i.e. this could
have been provided to the app using an event from Net
Phone with %I variable). Or leave blank (“ ”) if you want to
use CallStatus or Net Phone’s most likely call.
FieldName = Name of field to be Set -- “CallerID”,
Where:
“CallerIDNum”, “Account” are ‘standard’ fields, but any
‘extra-info’ field can also be set.
FieldValue = The Info string that should be attach ed.
CallStatus = Only used if CID blank, Find first call matching
these types "T"alking, "R"inging, "H"olding, "C"learing. If no
calls match this request, a NULL string is set.
Example:
SetCallInfoField (“” , “Notes”, “Testing”,“T”) = Set the Notes
field to “Testing” on the call in which I am “T”alkingl.
OutLook Lookup Lookup phone number in Microsoft Outlook.
Format:
Outlook_LookUp (CID, SearchType, SearchFor, NoMatch,
ExactMatch, MultiMatch)
CID = Net Phone’s Call ID for the desired call (i.e. this could
have been provided to the app using an event from Net
Phone with %I variable). Or leave blank (“ ”)
SearchType = “P” for phone number
Where:
SearchFor = Phone number string
NoMatch = What to do if no matches found
ExactMatch = What to do if Exact (single) match is found
MultiMatch = What to do if multiple matches are found
Example: Outlook_LookUp ("", "P", “4804969040”, "U", "C", "U")
System Command Perform a PBX/System command.
Format: PerformSystemCommand (CommandStr)
CommandStr = Command and parameters to perform. See
Where:
Net Phone User Guide’s User-Defined Actions for details of
commands available.
Strata CIX Net Phone AG 04/08 77
Page 92

Send Chat Send a Chat message using TOSHIBA chat client.
Format: SendChat (sExt, sName, sMsgType, sMsg, sSendOption)
sExt = The Extension number of the person to chat with. If
you leave this blank, the main Chat window will pop up and
allow you to manually select the person
sName = (don’t need to supply if sExt is provided) – The
name of the person to chat with. If you leave this blank, the
Where:
Example: SendChat (“1001”, “”, “”, “Help! I have an abusive call”, “I”)
General Command
Format: GenCmd (CommandStr)
Where: CommandStr = Command and parameters to perform.
Example:
main Chat window will pop up and allow you to manually
select the person
sMsgType = Future feature – leave blank for now
sMsg = Message to be sent
sSendOption = "I" - Immediate Message -- send message
immediately or "C" (or blank) -- Canned message -- type
message into user buffer but wait for user to press SEND
General (or DDE) Command – this can be used to execute
any of the DDE commands described earlier in this
document.
GenCmd (“ACD_WRAPUP,,30”) = Set Agent state to
Wrapup for the next 30 seconds.
Note: This command is a low-level command that will allow
specialty applications to operate.
Page 93

Trouble Shooting A
Installation Problems
Cause(s): Solution(s):
TAPI Service Provider Not Matched
Ensure the TOSHIBA Net Server TSP is
Net Phone searches the installed list of
TAPI Service Providers for any entry
containing the words “Net Server” The
error appears when Net Phone is
unable to match the specified text to
any TAPI Service Provider.
Net Phone Cannot be Installed over the Net work
Network permissions may prevent
users from executing files, or the setup
file may not be available on a network
share.
installed and appears in the Telephony
section of Control Panel.
Ensure the TAPI Service Provider entry in
Net Phone Setup | Preferences | Main
contains a valid TSP name.
Re-install Net Phone with the latest version
available to your maintenance plan from
Toshiba FYI.
Check the permissions for the remote user
and ensure they have Read and Execute
on the setup file.
Make sure the setup file is available in a
folder or device shared to the network.
Contact the local Network Administrator for
additional assistance.
Strata CIX Net Phone AG 04/08 79
Page 94

Trouble Shooting
TAPI Service Provider Problems
TAPI Service Provider Problems
Cause(s): Solution(s):
Couldn't Resolve Hostname
Check the spelling of the hostname.
Ping the Net Server by name. If this
The hostname in the configuration dialog is
misspelled or does not exist. DNS name
resolution may be configured incorrectly.
Connection Failed to Host
Net Phone contacted the PC listed in
hostname, but there was no response from
Net Server.
Invalid Access Password
The extension is already listed in Net Server
Admin with another password.
TAPI Service Provider Not Operational
Windows 98 SE supported the Windows
Automatic Update feature. In some cases,
Windows Update installed a new version of
the TAPI Server on the PC. This updated
version was incompatible with the Net
Phone TSP.
fails, try pinging by IP address.
If the ping by name fails but the ping
by address works, contact the
Network Administrator to resolve the
DNS problem. Or , use the IP address
instead of the hostname.
Make sure Net Server is running on
the target PC. If connecting through
a firewall, ensure TCP port 8767 is
open for two-way communication.
Check the Client Password in Net
Server Admin. This feature prevents
malicious users from assuming
control of other keysets without
permission.
Check the date on
\Windows\System\TAPISRV.EXE – if
it is 5/99, it is incompatible with the
Net Phone TSP. Current versions of
Net Phone Setup automatically install
the correct version. Microsoft
Windows Update now also installs a
newer, compatible version.
80 Strata CIX Net Phone AG 04/08
Page 95

Cause(s): Solution(s):
Software Key Feature Points Unavailable
The copykey is not installed on Net Server
PC.
The copykey does not contain Net Phone
licenses, or all available Net Phone licenses
are currently in use.
Service Unavailable
Net Phone connected to Net Server, but
Level 2 OAI Service has not yet logged into
Net Server. OAI connection may be down.
Extension Already Exists
Problem occurs because Net Phone is
attempting to connect with an extension
number that already exists in the db . Name
and Password must match exactly for this to
work. This feature prevents people from
using Net Phone to take over other phones
(intentionally or accidentally.)
Could Not Add New Client to Database
The username is already listed in the Net
Server Database with another extension.
Trouble Shooting
TAPI Service Provider Problems
Attach the hardware key to the Net
Server PC parallel port and click ReRead Copy Key on Net Server
Copykey tab.
View the number of points available
on the key using the Copykey service
entry on the Net Server Services tab.
DFES determines the number of Net
Phones allowed. Net Phone requires
22 DFES units per copy. Other
applications may also use DFES
units, such as DSS and Chat. If other
users are running copies of these
programs without permission, those
applications may be using feature
units intended for Net Phone users.
You may need to add additional
points to the key by purchasing
additional software licenses.
Check Net Server and Level 2 OAI.
Make sure Level 2 OAI is
communicating with the PBX.
Install Net Server Administrator, and
either remove the Client Extension
record, or copy the name and
password to the PC client(s).
Change the username, or delete the
existing user from Net Server
Administrator.
Strata CIX Net Phone AG 04/08 81
Page 96

Trouble Shooting
Configuration Problems
Configuration Problems
Cause(s): Solution(s):
Net Phone is Running in Demo Mode
May not be connecting to NetServer.
May not have enough feature points to
run Net Phone.
If you received a feature point upgrade,
the Copy Key Upgrader may not have
accepted the enabler code.
Net Phone Buttons are Transparent
Verify NetServer is operational and Net
Phone is pointing to the server’s name or
IP address.
Check the available feature points on Net
Server. Make sure there are sufficient
licenses available for the number of
active copies of Net Phone.
Copy Key Upgrader didn’t add all of the
feature points. Check that you are using
the latest version of Net Server. You can
also download a Copy Key patch file for
Net Server 3.1.128 or lower. Apply the
patch or install a current Net Server.
Then re-apply the enabler code.
NetServer could be down. Verify that NetServer is operational.
You may have the wrong IP address
selected for the Net Server.
Some early versions of Net Phone did
not install properly.
The color settings may be incorrect.
The screen resolution may be
interfering with Net Phone.
The video driver may not work with Net
Phone.
Verify the server name/IP address in Net
Phone.
Reinstall a current version of Net Phone.
One can be downloaded from http://
support.Toshiba.com.
Try a different color depth (256 colors,
true color).
Try a different screen resolution
(640x480, 800x600, 1024x768).
Get the model number of the video board.
Check for more current drivers.
82 Strata CIX Net Phone AG 04/08
Page 97

Cause(s): Solution(s):
Net Phone is Dialing an Area Code for Local Calls
Go to Setup | Preferences | Main and
The local Dial Plan Rules are configured
incorrectly.
check the local Dial Plan settings. Make
sure "Dial Area Code on all Local Calls" is
not checked.
Go to Setup | Preferences | Main and
Check Plan next to "Use SERVER Dial
The Server Dial Plan Rules are
configured incorrectly.
Plan." Test local numbers using the
Tester. If the numbers are formatted
incorrectly, modify the Dial Plan Server
settings on the TOSHIBA PC.
None of the Buttons on Net Phone Work
3rd party call control and/or system level
events may not be enabled.
3rd party call control and System Level
Events must be turned on in the PBX
programming.
Net Phone Drops into the System Tray and Will Not Run.
Check the hostname: Open Control
You may have the wrong hostname for
the NetServer.
Panel/Telephony and select the
telephony drivers tab. There, select the
TOSHIBA Net Server TAPI Service
Provider press the Configure button.
Undetermined problem with hostname
resolution.
This problem may be resolved by using
the IP Address instead of the hostname.
Strata CIX Net Phone AG 04/08 83
Page 98

Trouble Shooting
Third Party Out Dialing/Screen Pop Problems
Third Party Out Dialing/Screen Pop
Problems
Cause(s): Solution(s):
GoldMine is Not Dialing Out on Net Phone
Some early versions of Net Phone could
not properly control Goldmine or other 3rd
Party TAPI applications.
Net Phone Hangs Up when Clicking Anywhere in Goldmine
The Goldmine TAPI subsystem does not
respond properly after initiating a T API dial.
Clicking anywhere in Goldmine sends a
T API disconnect to Net Phone, causing Net
Phone to hang up the call.
TAPI Outdial is Not Working with Goldmine on Win2000
The TAPI Service may not allow users to
access the service.
Net Phone Will Not Screen Pop Outlook
Outlook Link is not installed.
Use Net Phone 3.2 or higher.
Re-install Net Phone with the latest
version available to your maintenance
plan from Toshiba FYI.
Install TAPI Link and configure
Goldmine to use it instead of the Net
Phone TSP.
Review the Goldmine Application Note
for details on allowing PC users to
interact with the Teleph on y se rvic e.
Net Phone requires Outlook Link to
work with Outlook.
Download and install the latest Outlook
Link from Toshiba FYI or re-install Net
Phone choosing Microsoft Outlook on
the screen asking to select an
integration option (Step 7 of the
Installation instructions).
Note: Outlook cannot be running when
you install Outlook Link.
84 Strata CIX Net Phone AG 04/08
Page 99

Miscellaneous Problems
Cause(s): Solution(s):
Call History File is getting too big
Call History is logged to a file, by default,
the calllog.txt file in the User’s Local
Settings folder. When the calllog.txt file
The Call History feature logs all calls to
a text file.
Net Phone Hangs Up After Dialing an Outgoing Call
Personal Call Handler may have a rule
configured incorrectly.
exceeds the limit defined in the
Agnt_Ph.INI configuration file (default size
is 1 Mbyte), the calllog.txt file is renamed
calllog.prv and a new calllog.txt will
automatically be started.
Review the PCH Rules for any that might
attempt a Transfer or Disconnect when a
call is answered. Also look for any rules
that might execute a Transfer or
disconnect while the phone is active on
another call and a new call arrives.
Trouble Shooting
Miscellaneous Problems
Net Phone Error using btn32x10.ocx
Install Internet Explorer 5.0, or re-install
IE 5 may not be installed. Net Phone
requires IE 5.
DLL's may be missing or the .ocx file
may not have been registered on
install.
Net Phone Message Light blinks, "No Message to Retrieve" when clic ked
System OAI does not provide complete
information on message indicators.
Net Phone must track message status
internally, and sometimes loses sync
with the actual message count.
Strata CIX Net Phone AG 04/08 85
Net Phone with the latest version available
to your maintenance plan from http://
support.Toshiba.com
Make sure msvcrt40.dll and mfc40.dll are
present in <Windows root>\system or
\winnt\system32. Run "regsvr32
<systemroot>\<system32>\btn32x10.ocx"
from a DOS prompt.
Restart Net Phone.
Page 100

This is the last page of the document.
 Loading...