

Page 1

Telecommunication Systems Division
®
Net Phone
User Guide
April 2008
Page 2

Publication Information
Toshiba America Information Systems, Inc.
Telecommunication Systems Division
Publication Information
Toshiba America Information Systems, Inc., Telecommunication Systems Division, reserves
the right, without prior notice, to revise this information publication for any reason, including,
but not limited to, utilization of new advances in the state of technical arts or to simply change
the design of this document.
Further, Toshiba America Information Systems, Inc., Telecommunication Systems Division,
also reserves the right, without prior notice, to make such changes in equipment design or
components as engineering or manufacturing methods may warrant.
CIX-UG-NP-VA
Version A, April 2008
Our mission to publish accurate, complete and user accessible documentation. At the time of
printing the information in this document was as accurate and current as was reasonably
possible. However, in the time required to print and distribute this manual additions,
corrections or other changes may have been made. To view the latest version of this or other
documents please refer to the Toshiba FYI web site.
Toshiba America Information Systems shall not be liable for any commercial losses, loss of
revenues or profits, loss of goodwill, inconvenience, or exemplary, special, incidental, indirect
or consequential damages whatsoe ver, or claims of third parties, regardless of the form of any
claim that may result from the use of this document.
THE SPECIFICATIONS AND INFORMATION PROVIDED HEREIN ARE FOR
INFORMATIONAL PURPOSES ONLY AND ARE NOT A WARRANTY OF ACTUAL
PERFORMANCE, WHETHER EXPRESSED OR IMPLIED. THE SPECIFICATIONS AND
INFORMATION ARE SUBJECT TO CHANGE WITHOUT NOTICE. ACTUAL
PERFORMANCE MAY VA RY BASED ON INDIVIDUAL CONFIGURATIONS, USE OF
COLLATERAL EQUIPMENT, OR OTHER FACTORS.
Page 3

© Copyright 2008
This document is copyrighted by Toshiba America Information Systems, Inc. with all rights
reserved. Under the copyright laws, this docume nt cannot be repro duced in any form or by any
means—graphic, electronic, or mechanical, including recording, taping, photocopying, without
prior written permission of Toshiba. No patent liability is assumed, however, with respect to the
use of the information contained herein.
Trademarks
Strata, SD (Secure Digital) and CIX are registered trademarks of Toshiba Corporation.
Strat agy, eManager, My Phone Manager and Info Manager are registered trademarks of
Toshiba America Information Systems, Inc.
Windows and Microsoft are registered trademarks of Microsoft.
Trademarks, registered trademarks, and service marks are the property of their respective
owners.
Page 4

TOSHIBA AMERICA INFORMATION SYSTEMS, INC. (“TAIS”)
Y
Y
w
Y
Y
w
Y
A
Telecommunication Systems Division License Agreement
IMPORTANT: THIS LICENSE AGREEMENT (“AGREEMENT”) IS A LEGAL AGREEMENT BETWEEN YOU (“YOU”) AND TAIS. CAREFULLY READ THIS LICENSE AGREEMENT. USE OF ANY
SOFTWARE OR ANY RELATED INFORMATION (COLLECTIVELY, “SOFTWARE”) INSTALLED ON OR SHIPPED WITH A TAIS DIGITAL SOLUTIONS PRODUCT OR OTHERWISE MADE AVAILABLE TO
OU BY TAIS IN WHATEVER FORM OR MEDIA, WILL CONSTITUTE YOUR ACCEPTANCE OF THESE TERMS, UNLESS SEPARATE TERMS ARE PROVIDED BY THE SOFTWARE SUPPLIER. IF
OU DO NOT AGREE WITH THE TERMS OF THIS LICENSE AGREEMENT, DO NOT INSTALL, COPY OR USE THE SOFTWARE AND PROMPTLY RETURN IT TO THE LOCATION FROM WHICH YOU
OBTAINED IT IN ACCORDANCE WITH APPLICABLE RETURN POLICIES. EXCEPT AS OTHERWISE AUTHORIZED IN WRITING BY TAIS, THIS SOFTWARE IS LICENSED FOR DISTRIBUTION
THROUGH TAIS AUTHORIZED CHANNELS ONLY TO END-USERS PURSUANT TO THIS LICENSE AGREEMENT.
1. License Grant. The Software is not sold; it is licensed upon payment of applicable charges. TAIS grants to you a personal, non-transferable and non-exclusive right to use the copy of the Software
provided under this License Agreement. You agree you will not copy the Software except as necessary to use it on one TAIS system at a time at one location. Modifying, translating, renting, copying,
distributing, printing, sublicensing, transferring or assigning all or part of the Software, or any rights granted hereunder, to any other persons and removing any proprietary notices, labels or marks from the
Software is strictly prohibited except as permitted by applicable law; you agree violation of such restrictions will cause irreparable harm to TAIS and provide grounds for injunctive relief, without notice,
against you or any other person in possession of the Software. You and any other person whose possession of the software violates this License Agreement shall promptly surrender possession of the
Software to TAIS, upon demand. Furthermore, you hereby agree not to create derivative works based on the Software. TAIS reserves the right to terminate this license and to immediately repossess the
software in the event that you or any other person violates this License Agreement. Execution of the Software for any additional capabilities require a valid run-time license.
2. Intellectual Property. You acknowledge that no title to the intellectual property in the Software is transferred to you. You further acknowledge that title and full ownership rights to the Software will remain
the exclusive property of TAIS and/or its suppliers, and you will not acquire any rights to the Software, except the license expressly set forth above. You will not remove or change any proprietary notices
contained in or on the Software. The Software is protected under US patent, copyright, trade secret, and/or other proprietary laws, as well as international treaties. Any transfer, use, or copying of the
software in violation of the License Agreement constitutes copyright infringement. You are hereby on notice that any transfer, use, or copying of the Software in violation of this License Agreement constitutes
a willful infringement of copyright.
3. No Reverse Engineering. You agree that you will not attempt, and if you employ employees or engage contractors, you will use your best efforts to prevent your employees and contractors from
attempting to reverse compile, reverse engineer, modify, translate or disassemble the Software in whole or in part. Any failure to comply with the above or any other terms and conditions contained herein
ill result in the automatic termination of this license and the reversion of the rights granted hereunder back to TAIS.
4. Limited Warranty. THE SOFTWARE IS PROVIDED “AS IS” WITHOUT WARRANTY OF ANY KIND. TO THE MAXIMUM EXTENT PERMITTED BY APPLICABLE LAW, TAIS AND ITS SUPPLIERS
DISCLAIM ALL WARRANTIES WITH REGARD TO THE SOFTWARE, EITHER EXPRESS OR IMPLIED, INCLUDING, BUT NOT LIMITED TO, THE WARRANTY OF NON-INFRINGEMENT OF THIRD
PARTY RIGHTS, THE WARRANTY OF YEAR 2000 COMPLIANCE, AND THE IMPLIED WARRANTIES OF MERCHANTABILITY AND FITNESS FOR A PARTICULAR PURPOSE. THE ENTIRE RISK AS
TO THE QUALITY AND PERFORMANCE OF THE SOFTWARE IS WITH YOU. NEITHER TAIS NOR ITS SUPPLIERS WARRANT THAT THE FUNCTIONS CONTAINED IN THE SOFTWARE WILL MEET
OUR REQUIREMENTS OR THAT THE OPERATION OF THE SOFTWARE WILL BE UNINTERRUPTED OR ERROR-FREE. HOWEVER, TAIS WARRANTS THAT ANY MEDIA ON WHICH THE
SOFTWARE IS FURNISHED IS FREE FROM DEFECTS IN MATERIAL AND WORKMANSHIP UNDER NORMAL USE FOR A PERIOD OF NINETY (90) DAYS FROM THE DATE OF DELIVERY TO
OU.
5. Limitation Of Liability. TAIS’ ENTIRE LIABILITY AND YOUR SOLE AND EXCLUSIVE REMEDY UNDER THIS LICENSE AGREEMENT SHALL BE AT TAIS’ OPTION REPLACEMENT OF THE MEDIA OR
REFUND OF THE PRICE PAID. TO THE MAXIMUM EXTENT PERMITTED BY APPLICABLE LAW, IN NO EVENT SHALL TAIS OR ITS SUPPLIERS BE LIABLE TO YOU FOR ANY CONSEQUENTIAL,
SPECIAL, INCIDENTAL OR INDIRECT DAMAGES FOR PERSONAL INJURY, LOSS OF BUSINESS PROFITS, BUSINESS INTERRUPTION, LOSS OF BUSINESS INFORMATION/DATA, OR ANY
OTHER PECUNIARY LOSS OF ANY KIND ARISING OUT OF THE USE OR INABILITY TO USE THE SOFTWARE, EVEN IF TAIS OR ITS SUPPLIER HAS BEEN ADVISED OF THE POSSIBILITY OF
SUCH DAMAGES. IN NO EVENT SHALL TAIS OR ITS SUPPLIERS BE LIABLE FOR ANY CLAIM BY A THIRD PARTY.
6. State/Jurisdiction Laws. SOME STATES/JURISDICTIONS DO NOT ALLOW THE EXCLUSION OF IMPLIED WARRANTIES OR LIMITATIONS ON HOW LONG AN IMPLIED WARRANTY MAY LAST, OR
THE EXCLUSION OR LIMITATION OF INCIDENTAL OR CONSEQUENTIAL DAMAGES, SO SUCH LIMITATIONS OR EXCLUSIONS MAY NOT APPLY TO YOU. THIS LIMITED WARRANTY GIVES YOU
SPECIFIC RIGHTS AND YOU MAY ALSO HAVE OTHER RIGHTS WHICH VARY FROM STATE/JURISDICTION TO STATE/JURISDICTION.
7. Export Laws. This License Agreement involves products and/or technical data that may be controlled under the United States Export Administration Regulations and may be subject to the approval of the
United States Department of Commerce prior to export. Any export, directly or indirectly, in contravention of the United States Export Administration Regulations, or any other applicable law, regulation or
order, is prohibited.
8. Governing Law. This License Agreement will be governed by the laws of the State of California, United States of America, excluding its conflict of law provisions.
9. United States Government Restricted Rights. The Software is provided with Restricted Rights. The Software and other materials provided hereunder constitute Commercial Computer Software and
Software Documentation and Technical Data related to Commercial Items. Consistent with F.A.R. 12.211 and 12.212 they are licensed to the U.S. Government under, and the U.S. Government’s rights
therein are restricted pursuant to, the vendor’s commercial license.
10. Severability. If any provision of this License Agreement shall be held to be invalid, illegal or unenforceable, the validity, legality and enforceability of the remaining provisions hereof shall not in any way
be affected or impaired.
11. No Waiver. No waiver of any breach of any provision of this License Agreement shall constitute a waiver of any prior, concurrent or subsequent breach of the same or any other provisions hereof, and no
aiver shall be effective unless made in writing and signed by an authorized representative of the waiving party.
12. Supplier Software. The Software may include certain software provided by TAIS suppliers. In such event, you agree that such supplier may be designated by TAIS as a third party beneficiary of TAIS with
rights to enforce the Agreement with respect to supplier’s software.
OU ACKNOWLEDGE THAT YOU HAVE READ THIS LICENSE AGREEMENT AND THAT YOU UNDERSTAND ITS PROVISIONS. YOU AGREE TO BE BOUND BY ITS TERMS AND CONDITIONS. YOU
FURTHER AGREE THAT THIS LICENSE AGREEMENT CONTAINS THE COMPLETE AND EXCLUSIVE AGREEMENT BETWEEN YOU AND TAIS AND SUPERSEDES ANY PROPOSAL OR PRIOR
GREEMENT, ORAL OR WRITTEN, OR ANY OTHER COMMUNICATION RELATING TO THE SUBJECT MATTER OF THIS LICENSE AGREEMENT.
Toshiba America Information Systems, Inc.
Telecommunication Systems Division
9740 Irvine Boulevard
Irvine, California 92618-1697
United States of America
DSD 020905
5932
Page 5

Toshiba America Information Systems, Inc.
Te lecommunication Systems Division
Limited Warranty
Toshiba America Information Systems, Inc., (“TAIS”) warrants that:
• The CIX Attendant Console equipment, such as the PC (except for fuses, lamps, and other consumables) will, upon delivery
by TAIS or an authorized TAIS dealer to a retail customer in new condition, be free from defects in material and
workmanship for twelve (12) months after delivery.
• And that the Toshiba telephone equipment (except for fuses, lamps, and other consumables) will, upon delivery by TAIS or
an authorized TAIS dealer to a retail customer in new condition, be free from defects in material and workmanship for
twenty-four (24) months after delivery.
This warranty is void (a) if the equipment is used under other than normal use and maintenance conditions, (b) if the equipment is
modified or altered, unless the modification or alteration is expressly authorized by T AIS, (c) if the equipment is subject to abuse,
neglect, lightning, electrical fault, or accident, (d) if the equipment is repaired by someone other than TAIS or an authorized TAIS
dealer, (e) if the equipment’s serial number is defaced or missing, or (f) if the equipment is installed or used in combination or in
assembly with products not supplied by TAIS and which are not compatible or are of inferior quality, design, or performance.
The sole obligation of TAIS or Toshiba Corporation under this warranty, or under any other legal obligation with respect to the
equipment, is the repair or replacement by TAIS or its authorized dealer of such defective or missing parts as are causing the
malfunction with new or refurbished parts (at their op tion). If TAIS or one of its authorized dealers does not replace or repair such
parts, the retail customer’s sole remedy will be a refund of the price charged by TAIS to its dealers for such parts as are proven to
be defective, and which are returned to TAIS through one of its authorized dealers within the warranty period and no later than
thirty (30) days after such malfunction, whichever first occurs.
Under no circumstances will the retail customer or any user or dealer or other person be entitled to any direct, special, indirect,
consequential, or exemplary damages, for breach of contract, tort, or otherwise. Under no circumstances will any such person be
entitled to any sum greater than the purchase price paid for the item of equipment that is malfunctioning.
To obtain service under this warranty, the retail customer must bring the malfunction of the machine to the attention of one of
TAIS’ authorized dealers within the twenty-four (24) month period and no later than thirty (30) days after such malfunction,
whichever first occurs. Failure to bring the malfunction to the attention of an authorized TAIS dealer within the prescribed time
results in the customer being not entitled to warranty service.
THERE ARE NO OTHER WARRANTIES FROM EITHER TOSHIBA AMERICA INFORMATION SYSTEMS, INC., OR
TOSHIBA CORPORATION WHICH EXTEND BEYOND THE FACE OF THIS WARRANTY. ALL OTHER WARRANTIES,
EXPRESS OR IMPLIED, INCLUDING THE WARRANTIES OF MERCHANTABILITY, FITNESS FOR A PARTICULAR
PURPOSE, AND FITNESS FOR USE, ARE EXCLUDED.
No TAIS dealer and no person other than an officer of TAIS may extend or modify this warranty. No such modification or
extension is effective unless it is in writing and signed by the vice president and general manager, Telecommunication Systems
Division.
Page 6

WARRANTIES FOR NON-TOSHIBA BRANDED
THIRD PARTY PRODUCTS
A valuable element of Toshiba’s product strategy is to offer our customers a complete product
portfolio. To provide this value to our customers at the most optimal prices, we offer both
Toshiba-branded and third-party manufactured products that support our Toshiba Strata CIX
product portfolio. Similar to other resellers of software, hardware and peripherals, these thirdparty manufactured products carry warranties independent of our Toshiba limited warranty
provided with our Toshiba-branded products. Customers should note that third-party
manufacturer warranties vary from product to product and are covered by the warranties
provided through the original manufacturer and p assed on int act to the p urchaser by Toshiba.
Customers should consult their product documentation for third-party warranty information
specific to third-party products. More information may also b e available in some cases from the
manufacturer’s public website.
While Toshiba offers a wide selection of software, hardware and peripheral products, we do
not specifically test or guarantee that the third-party products we offer work under every
configuration with any or all of the various models of the Toshiba Strata CIX. T oshiba does not
endorse, warrant nor assume any liability in connection with such third party products or
services. If you have questions about compatibility, we recommend and encourage you to
contact the third-party software, hardware and peripheral product manufacturer directly.
Page 7

Contents
Introduction
Organization.........................................................................................................................v
Conventions ........................................................................................................................vi
Related Documents/Media................................................................................................ vii
Chapter 1 — The Grand Tour
The Main Screen...................................................... ............................................................2
The Streamlined View......................................................................................................2
Expanded View.................................................................................................................5
Screen Docked Views.......................................................................................................7
Net Phone Main Menu......................................................................................................7
The Side Window Screen.....................................................................................................9
Call Handler Mode ...........................................................................................................9
Buttons Mode.................................................... ..............................................................10
Companion Application Windows.....................................................................................11
Skins...................................................................................................................................12
To Change Skin Selection ..............................................................................................12
Chapter 2 — Net Phone Settings
Preferences.........................................................................................................................13
General Tab ....................................................................................................................14
Dialing Tab.....................................................................................................................20
Docking Tab ...................................................................................................................25
Advanced Tab.................................................................................................................26
Setting Up Hot Key Dialing & Popup ...............................................................................29
Setting Shortcut Keys.....................................................................................................29
Strata CIX Net Phone UG 04/08 i
Page 8

Contents
Chapter 3 – User-Defined Actions
Options Buttons .................................................................................................................30
Option Button Key Types...............................................................................................31
User Programmable Keys ..................................................................................................39
To Initialize Key.............................................................................................................39
To Swap Keys.................................................................................................................39
To Copy This Key ..........................................................................................................39
To Change Key...............................................................................................................40
Chapter 3 — User-Defined Actions
Creating Actions ................................................................................................................47
Attach Acct Code............................................................................................................48
Export Call Info..............................................................................................................49
Log Info to File...............................................................................................................49
Lookup in Outlook..........................................................................................................50
Minimize Phone Screen..................................................................................................50
Modify Call Information.................................................................................................51
Play WAV File ...............................................................................................................53
Pop External Web Browser ............................................................................................53
Pop Internal Web Browser..............................................................................................54
Popup Call Info Screen...................................................................................................56
Popup Phone Screen.......................................................................................................57
Run another Program......................................................................................................58
Send DDE Msg...............................................................................................................59
Send Keystrokes to a Program........................................................................................60
Set Phone Do Not Disturb ..............................................................................................63
Set Phone Status Message ..............................................................................................64
Set Phone Forwarding.....................................................................................................64
System/PBX Command..................................................................................................65
Transfer Call...................................................................................................................66
Action Variables ................................................................................................................67
Call Variables .................................................................................................................67
System Variables............................................................................................................69
Exporting Actions...........................................................................................................70
Importing Actions...........................................................................................................71
Testing Actions...............................................................................................................72
ii Strata CIX Net Phone UG 04/08
Page 9

Chapter 4 – Using Net Phone Features
Chapter 4 — Using Net Phone Features
Call Handling Features ......................................................................................................73
Making Outgoing Calls...................................................................................................73
Answering Calls..............................................................................................................75
Transferring Calls...........................................................................................................76
Viewing Extra Call Information.....................................................................................77
Holding Calls..................................................................................................................78
Phone Feature Operation............................................................ ........................................79
Status Messages........................................................................................ ..... .... .............79
Call Fowarding ...............................................................................................................80
Call Center Features...........................................................................................................81
Logging In or Out...........................................................................................................81
Changing Agent Status...................................................................................................82
Chapter 5 — Connecting Headsets
Plantronics Wireless Headset ............................................................................................83
CS50-USB and CS60-USB DECT.................................................................................83
Installation ......................................................................................................................84
Headset Controls and Operation.....................................................................................85
Net Phone Audio Setup Screen.......................................................................................86
Trouble Shooting ...............................................................................................................87
Contents
Chapter 6 — Using Microsoft Outlook
Dialing from within Outlook .............................................................................................89
Incoming Calls.................................................................................................. .... ..... .... ....89
While on a Call ..................................................................................................................91
Integrating with Outlook Calendar ....................................................................................92
Step 1: Create Actions to set and clear the DSS Message ..........................................92
Step 2: Create Personal Call Handler Rules .....................................................................93
Step 3: The Final PCH Rules ............................................................................................94
Strata CIX Net Phone UG 04/08 iii
Page 10

Contents
Chapter 7 – Personal Call Handler
Chapter 7 — Personal Call Handler
Creating Personal Call Handling Rules .............................................................................96
Like Matches....................................................................................................................104
Unlike Matches................................................................................................................105
Export Rules.....................................................................................................................106
Importing Rules ...............................................................................................................107
Chapter 8 — Using Companion Applications
Directories........................................................................................................................109
Sorting Entries..............................................................................................................109
Finding Entries............................................................................................................ ..110
Extension Directory......................................................................................................110
Speed Dial Directory ....................................................................................................112
Call History......................................................................................................................113
Browser Window .............................................................................................................118
Presence Viewer...............................................................................................................119
Other Applications...........................................................................................................122
Chat...............................................................................................................................122
Personal Power Dialer ..................................................................................................122
Replay..........................................................................................................................122
Index ....................................................................................................................................123
iv Strata CIX Net Phone UG 04/08
Page 11

Introduction
This user guide describes how to use the Toshiba Net Phone software with Strata
CIX670, CIX200, CIX100, CIX100-S, and CIX40 telephone systems:
Organization
• Chapter 1 – The Grand Tour provides an overview of the Net Phone buttons and
screens.
• Chapter 2 – Net Phone Settings covers the customizable settings.
• Chapter 3 – User-Defined Actions includes setting up actions for personal call
handling and programmable keys.
• Chapter 4 – Using Net Phone Features shows how to use PBX features from Net
Phone.
• Chapter 5 – Connecting Headsets describes the user information when
connecting to a Plantronics USB Wireless headset.
• Chapter 6 – Using Microsoft Outlook explains the interactions between Net
Phone and Outlook.
• Chapter 7 – Personal Call Handler explains the details of personal call handler
feature of Net Phone.
• Chapter 8 – Using Companion Applications explains how to use applications,
such as Call History, Extension Directory, Feature Directory, Personal Speed Dial
Directory, Extra Buttons, Presence, and an Integrated Web Browser.
Strata CIX Net Phone UG 04/08 v
Page 12

Introduction
Conventions
Conventions
Conventions Description
Elaborates specific items or references other information. Within some
Note
tables, general notes apply to the entire table and numbered notes apply to
specific items.
Important!
Calls attention to important instructions or information.
Press to answer a call to the Extension Number. Each station can have
multiple extension buttons. Incoming calls ring the extension button(s)
from the top down. For example, station 10's extensions ring 10-1 first,
Extension
Number
then 10-2, 10-3, and 10-4. A station is considered busy when all
extensions are being used.
Note The naming convention for DKT assignments within Toshiba is
Directory Numbers. For clarity and ease of understanding, the
terms Extension Number and Phantom Extension Number will be
used in this document in lieu of PDN and PhDN.
Arial Bold
Represents telephone buttons.
shows a multiple PC keyboard or telephone button entry. Entries without
spaces between them show a simultaneous entry.
+
Example: Delete+Enter.
Entries with spaces between them show a sequential entry.
Example:
# + 5.
Tilde (~) Means “through.” Example: 350~640 Hz frequency range.
Grey words within the printed text denote cross-references. In the
See Figure 10
electronic version of this document (Library CD-ROM or FYI Internet
download), cross-references appear in blue hypertext.
vi Strata CIX Net Phone UG 04/08
Page 13

Related Documents/Media
Note Some documents listed here may appear in different versions on the
CD-ROM or in print. T o find the most current version, check the version/date in
the Publication Information on the back of the document’s title page.
Refer to the following for more information:
• Strata CIX Net Phone System Administrator Manual
• Net Phone On-line Help
Introduction
Related Documents/Media
Strata CIX Net Phone UG 04/08 vii
Page 14

This page is intentionally left blank.
Page 15

The Grand Tour 1
The Net Phone works with Net Server to provide a small but powerful "PC-Phone"
for use by telephone users to provide productivity enhancements.
The Net Phone is designed to run on a PC with Microsoft® Windows '98, Windows
NT 4.0, Windows 2000, Windows XP or 32-bit Windows Vista operating systems
connected to a standard TCP/IP network with the Net Server. The Net Server must be
installed with the proper software license(s) for Net Phone to operate correctly. Net
Phone will operate in Demo Mode if the appropriate licenses are unavailable. Demo
mode lets you use the software for Demonstration purposes only for a limited period
of time.
Net Phone provides the following major functions:
• It allows you to place, answer, handle, view, and manage phone calls all from your
computer screen, keyboard, and mouse.
• Using the VoIP Audio capabilities can provide a complete speech path when using
a PC with the proper speech component support.
• It allows you to setup rules and actions to automatically activate when calls arrive
even while you are away.
• It provides the glue to easily interface with many popular programs (like Microsoft
Outlook, Goldmine, ACT, etc.). This allows you to dial from and “screen-pop”
into these programs or the Internet/Intranet.
Strata CIX Net Phone UG 04/08 1
Page 16
The Grand Tour
The Main Screen
The Main Screen
This section gives an overview of the main user interface of the Net Phone, including
the buttons, displays, and indicators, which allow you to easily and ef ficiently operate
your phone. Net Phone provides two views, Streaml ined and Expanded, allowin g you
to operate using only the space on your screen that you want.
Note You can easily change the color scheme and appearance of your Net Phone by
right-clicking your mouse on the logo and selecting one of the “Skins” on page
6 from the Phone colors menu.
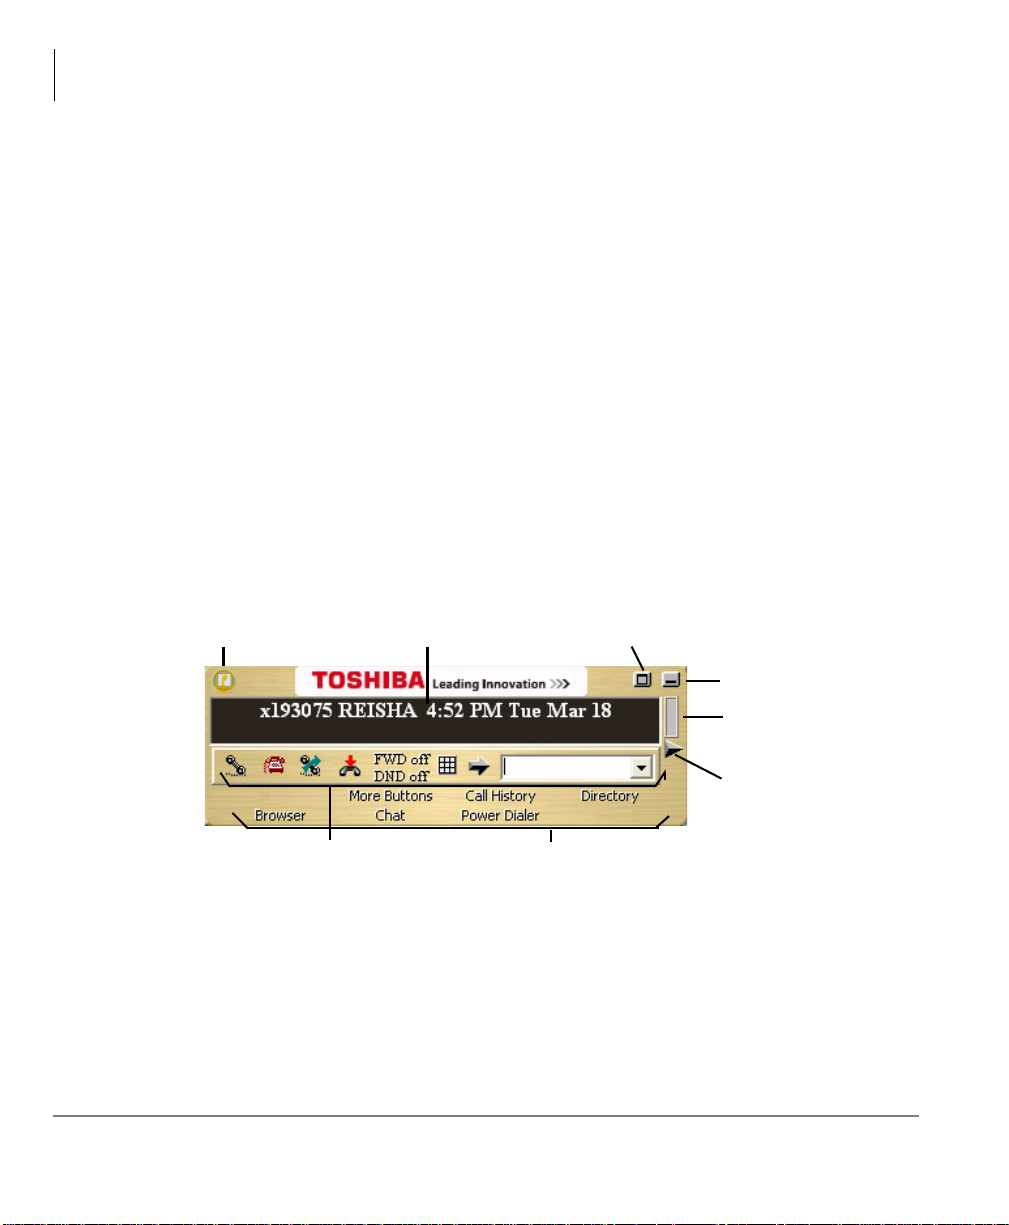
The Streamlined View
In “Streamlined” view Net Phone consumes minimal screen space but still provides
the user with indictors, information, and buttons to effectively operate the phone. This
view is most effective when users handle one call at a time, or have very little
available screen space available. Below is a sample view and information about the
various parts of Net Phone.
Main Menu
Button
Call Handling
Tool ba r
Information LCD
Display
Expand
Button
Minimize Button
Message Waiting
Indicator
Slide Window
Rollout
Option Buttons
(Applications)
2 Strata CIX Net Phone UG 04/08
Page 17

Button / Icon Description
Main Menu
Information LCD Display
Expand Button
Minimize Button
Message Waiting
Indicator
Side Window Rollout
Button
Options Buttons
(Applications)
Call Handling Keys These keys
Call Handling Keys
Do-Not-Disturb Key and
Indicator
Call Forward Key and
Indicator
Click this button to access Net Phone configuration menus and
Help.
This window simulates a phone LCD and provides different types
of information depending on current status. If your phone is idle,
it shows the date/time, Extension number, and current Name.
While a call is active on your phone it shows information about
the call — Duration, CallerID or Name (if present.) When a call is
active in the window, right-click on the LCD to access to popup a
menu of call control options.
Used to change the phone to/from its "Streamlined" view and its
"Expanded" view.
Hides Net Phone into the system tray. Simply click on the Net
Phone icon (shown left) in the system tray to return the Net
Phone to the screen.
This indicator blinks a Red light when you have messages
waiting.
Press this button to rollout a side window that has additional
programmable buttons.
A number of optional functions and companion programs can be
configured to add significant functionality to the Net Phone.
Each Companion Application uses an Option Button to provide
easy access to the features/functions of the application.
The first four keys allow you to (from left to right) Answer, Hold,
Transfer, and Hang up a call. Should you forget, you can hover
your mouse over a key to be reminded what function a key
performs.
Displays the current Do Not Disturb status of your phone. Hover
the mouse over this area to see the current DND status
message. Right-click to change your DND status and message.
Displays the current "PBX call forwarding" status for your phone.
Hover the mouse over this area to see the entire FWD status.
Right-click to change your PBX forwarding status and
destination.
The Grand Tour
The Main Screen
Strata CIX Net Phone UG 04/08 3
Page 18
The Grand Tour
The Main Screen
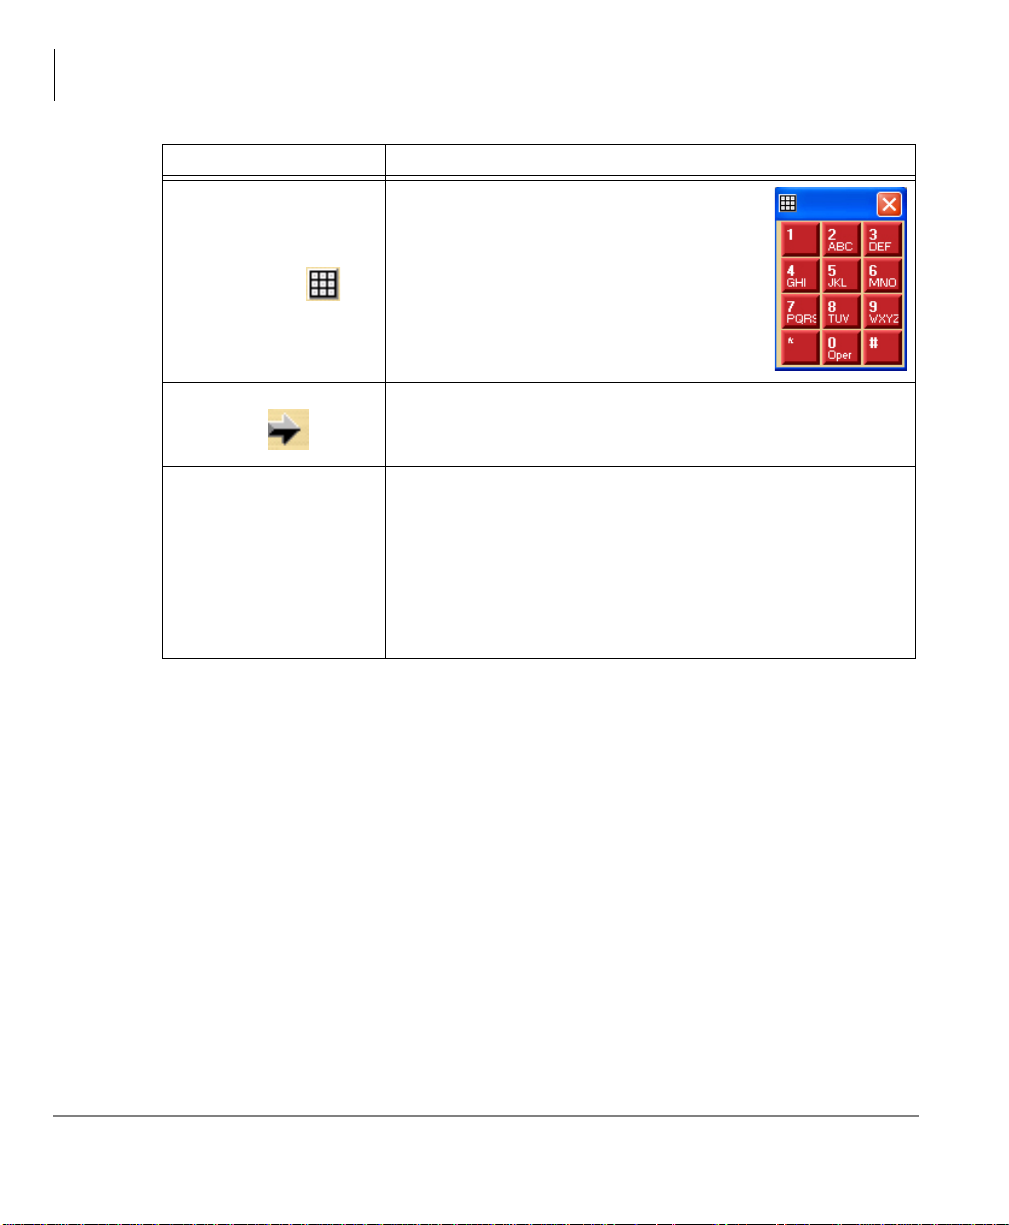
Dial Pad Button
Dial Button Click the dial button to dial the number shown in the Dial Buffer.
Dial Buffer and Redial
Selection
Button / Icon Description
Click the dial pad button to expose and hide
the popup Dial Pad. Use the Dial Pad when
you reach a recording that says “...Press 1 for
sales, 2 for support,...”. When this dial pad is
displayed you can use your mouse to click the
digits to dial or use the number keys or
NumLock keypad on your computer keyboard
to dial digits.
Type a number into this space and press Enter or click the “Dial”
button to the left of the box. Click the drop-down arrow to view
the last 10 outside phone numbers you dialed. Select a number
from the drop-down and press Enter or click Dial to redial that
number. You can even Copy/Paste phone numbers from other
programs into this window to dial. You may also include letters in
the dial number — Net Phone automatically converts the letters to
the matching numbers on the telephone keypad (i.e. 1-800IFLYSWA).
A number of shortcut keys allow you to use the keyboard in place of the mouse to
control Net Phone. The list of Shortcut keys can be found using the menu selection
Setup>Shortcut Keys. Note: The F1 key is the HELP key a can be pressed at any time
to access Help.
4 Strata CIX Net Phone UG 04/08
Page 19
The Grand Tour
The Main Screen
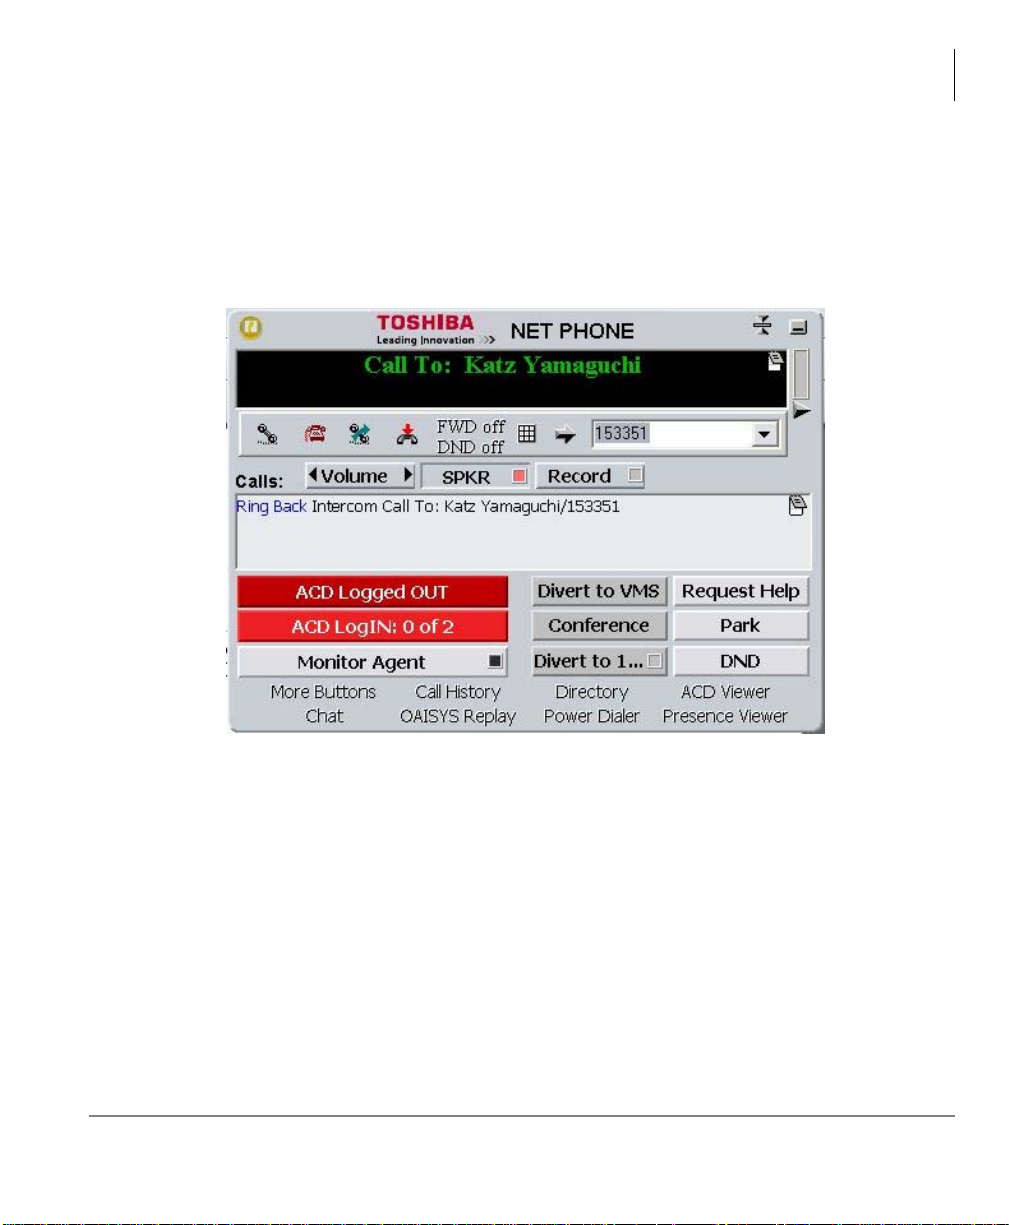
Expanded View
In “Expanded” view the Net Phone is enlarged beyond the streamlined view to
provide the user with additional buttons, indictors, information to manage multiple
simultaneous calls and to access many other features. The follow describes the
additional items in the “Expanded” view.
• Volume Controls – These buttons provide control over volume settings on the
phone. Note: These volume control settings are only available when the PBX
software version supports Volume Control commands.
• Audio Control – The audio control is your line button with a status indicator for
that line when using the VoIP audio interface.
• Recording Button & Indicator – The indicator light works in conjunction with
OAISYS Tracer and OAISYS Auto Call Record. Users with appropriate
permissions will have this indicator on their Net Phone. If the light is red, this
means the user’s call is currently being recorded. If the light is gray, it is not being
recorded. The user can click on this button and select ‘Start Recording’ to initiate
recording of the call. If the call is being recorded the user can click on the button
to terminate the recording.
Strata CIX Net Phone UG 04/08 5
Page 20

The Grand Tour
The Main Screen
• Streamline Button – Used to change Net Phone back to its "Streamlined" view.
• Calls Window – This window displays that status and associated information for
each active phone call on the phone. Thus you can easily view and manage
multiple phone calls. Right click the mouse on any call to view a menu of options
for handling the call (like Hold, Transfer to Voice Mail, Hang Up, etc.).
• Call Info Indicators – on the right side of the Call Window is a “Call Info
Indicator" that indicates if Extra call information is attached to a call. A gray
notebook icon means no information is attached, a blue notebook icon means
standard information is attached, and a red notebook icon indicates priority
information is attached to the call. Press the Call Notes icon to view or change
Notes information on the call. Notes are retained with the call even when you
transfer it to another person. You may use Call Notes with an IVR to attach a
Customer Name, Credit Card Number, and Zip Code to the call before you answer ,
saving you from asking the caller for this information.
• Programmable Buttons – A number of keys can be easily configured by the user as
"Feature" keys, "Speed Dial" keys, "Call" keys, "User Action" keys, etc. To
change one of these keys simply Right-Click the mouse over the key and use the
Setup Key window to configure the settings for the key (for details on
programming these buttons refer to the “User Programmable Keys” on page 22).
Note: To expose more programmable buttons click the Side Window rollout
button.
• ACD Buttons – ACD keys are larger programmable buttons that would give ACD
agents easy login/logout of ACD groups. These keys also display the current ACD
agent status, and allow agents to control their Wrap-Up mode.
6 Strata CIX Net Phone UG 04/08
Page 21
The Grand Tour
The Main Screen
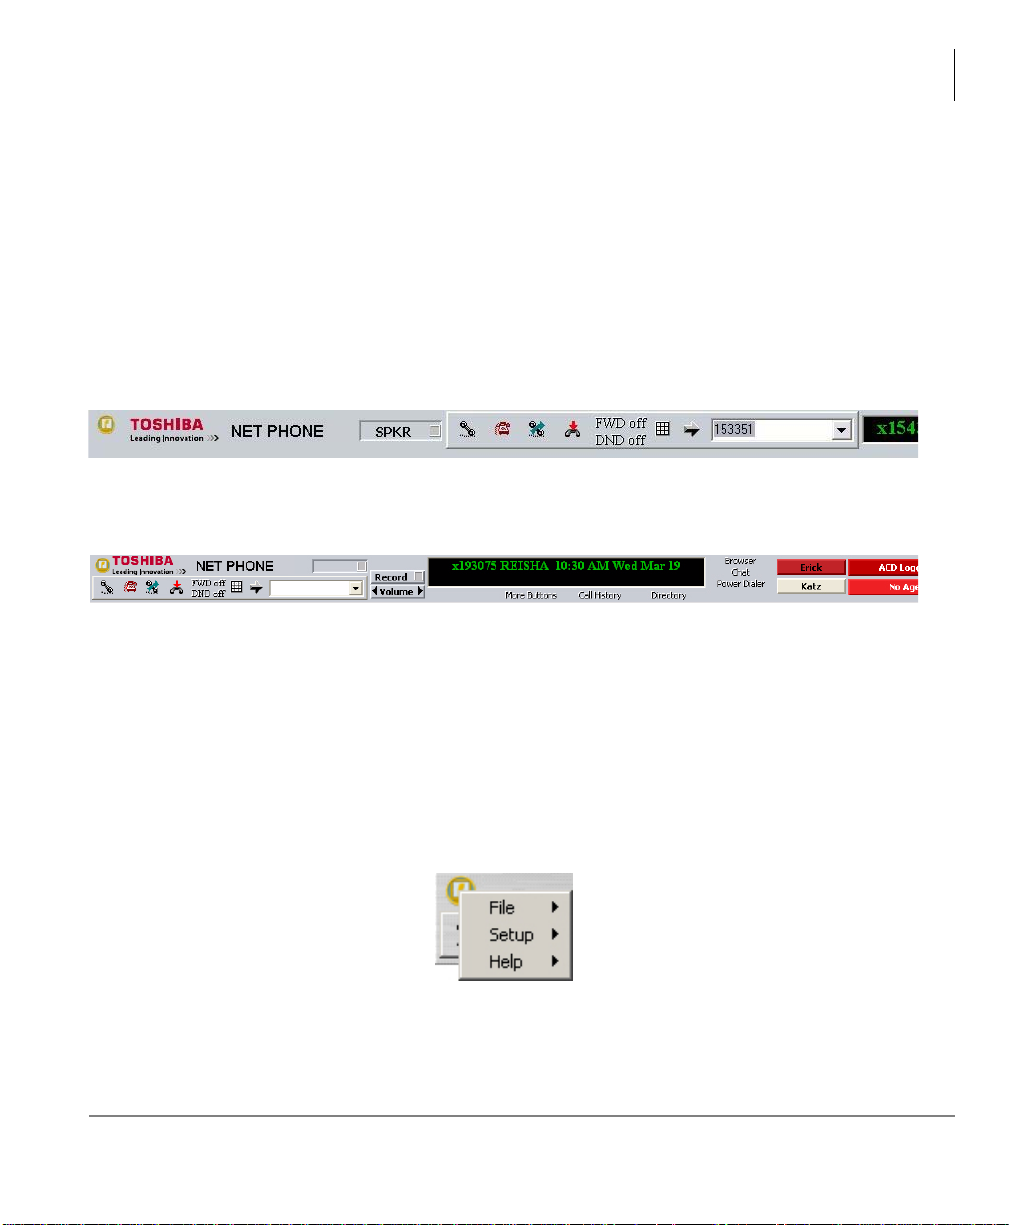
Screen Docked Views
Net Phone provides a screen-docking feature (in Ver. 4.7 and after) where the Net
Phone can dock to the top or bottom of your PC screen. When screen docked the Net
Phone takes on a very low profile using only a small portion of the screen, and stays
accessible even when other applications are maximized. This allows user’s to access
the features of Net Phone while consuming a minimal amount of PC screen space.
Two screen-docked profiles are available, slim and regular, as shown below:
Slim Screen-docked profile
Regular Screen-docked profile
Most of the phone display, buttons, and controls that appear on each screen-docking
profile can be chosen by the user from the “Docking Tab” on page 16 in Net Phone
Preferences.
Net Phone Main Menu
T o reach Net Phones Main Menu, click on the icon in the upper left-h and corner. The
Main Menu opens as shown below:
Strata CIX Net Phone UG 04/08 7
Page 22

The Grand Tour
The Main Screen
The File menu item expands into an ability to Change the Login settings, an ability to
reset the phone to its default settings, or exit the Net Phone application.
The Setup menu item expands into six sub-menu items for setting parameters for your
Net Phone. These include Personal Call Handling rules, User Defined Actions,
Preferences, Advanced, when enabled, provides event and call views of activity that
has occurred during operation, Shortcut Keys, and Auto Devices Setup. See the Net
Phone System Administrator Guide for instructions on enabling the advanced menu
item.
The Help menu item expands into Contents for the on-line User Guide, Other
Applications has sub-menus for other help files including Net Phone System
Administration Guide and application note for the installed integration with an outside
application, such as MS Outlook or ACT! 2007.
8 Strata CIX Net Phone UG 04/08
Page 23
The Side Window Screen
Click the “Side Window Rollout” button on the main screen to cause the side window
to appear just to the right side of the main window or below when the main window is
docked. The side window provides access to the Personal Call Handler window and
additional programmable buttons can also be reached.
This window can be docked (connected) to or undocked (moved away) from the main
window . While docked to the main window, whenever the main window is moved the
side window will move with it. And likewise whenever the main window is
minimized (into the system tray) or restored, the side window will move with it.
When the side window is undocked, it floats separately from the main window and
can be moved and resized separately.
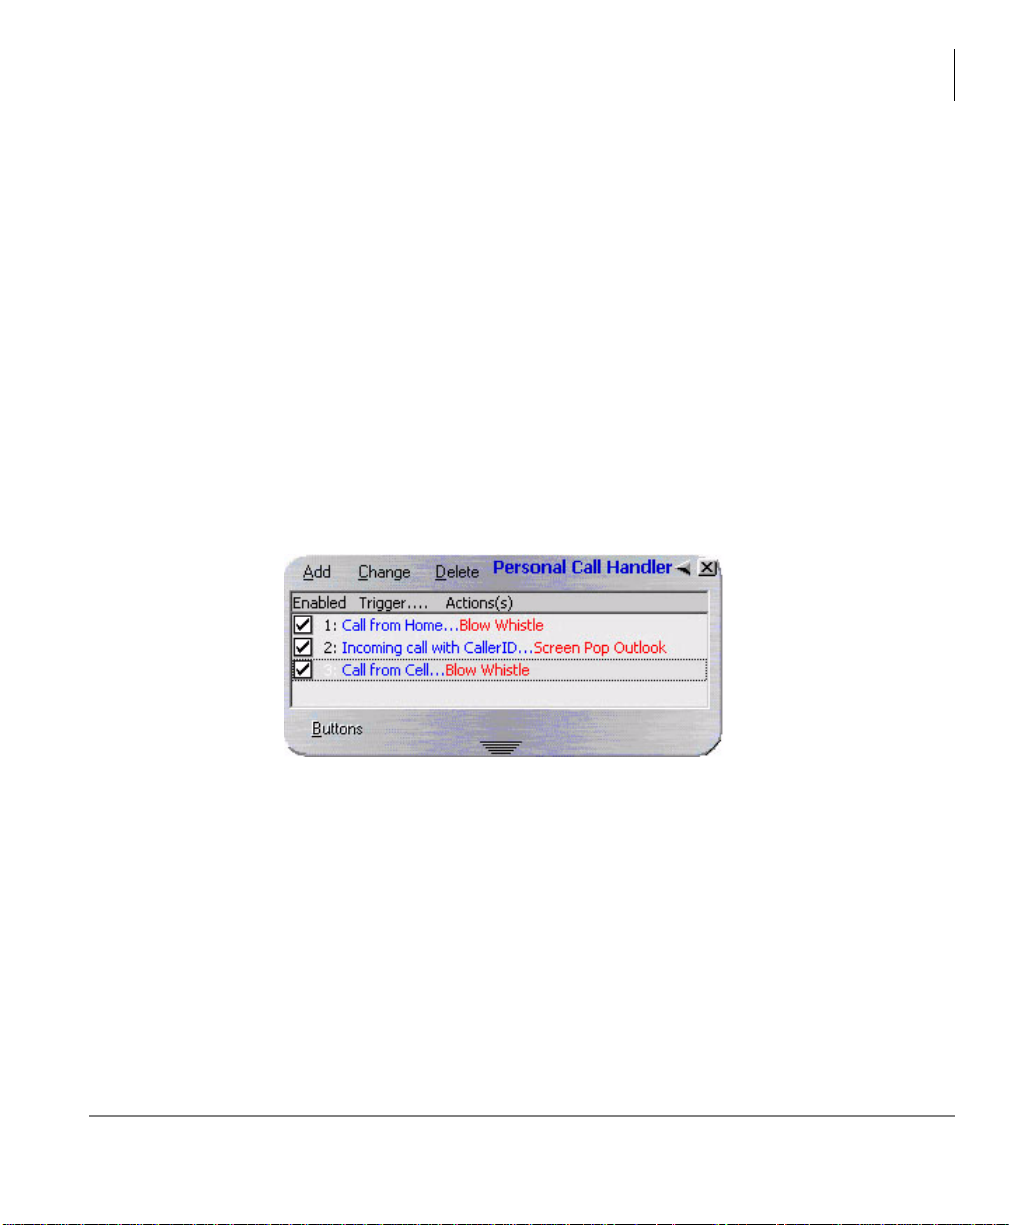
Call Handler Mode
The Grand Tour
The Side Window Screen
• Call Handler Management Buttons – Used to Add, Change, or Delete Personal Call
Handler rules.
• Dock Button – Use to dock the window back to the main screen (if detached) or
hide inside the main screen (if attached.)
• Close Button – Use to close the Call Handler window.
• Call Handler Rules Window – Displays the current Call Handler rules along with
an enabled (checked) and disabled (unchecked) box per rule. The triggering event
is show in blue text while the action to take place is shown in red text for easier
viewing.
• Buttons Mode Button – Use to switch the window from the “Call Handler” mode
to the “Buttons” mode.
Strata CIX Net Phone UG 04/08 9
Page 24
The Grand Tour
The Side Window Screen
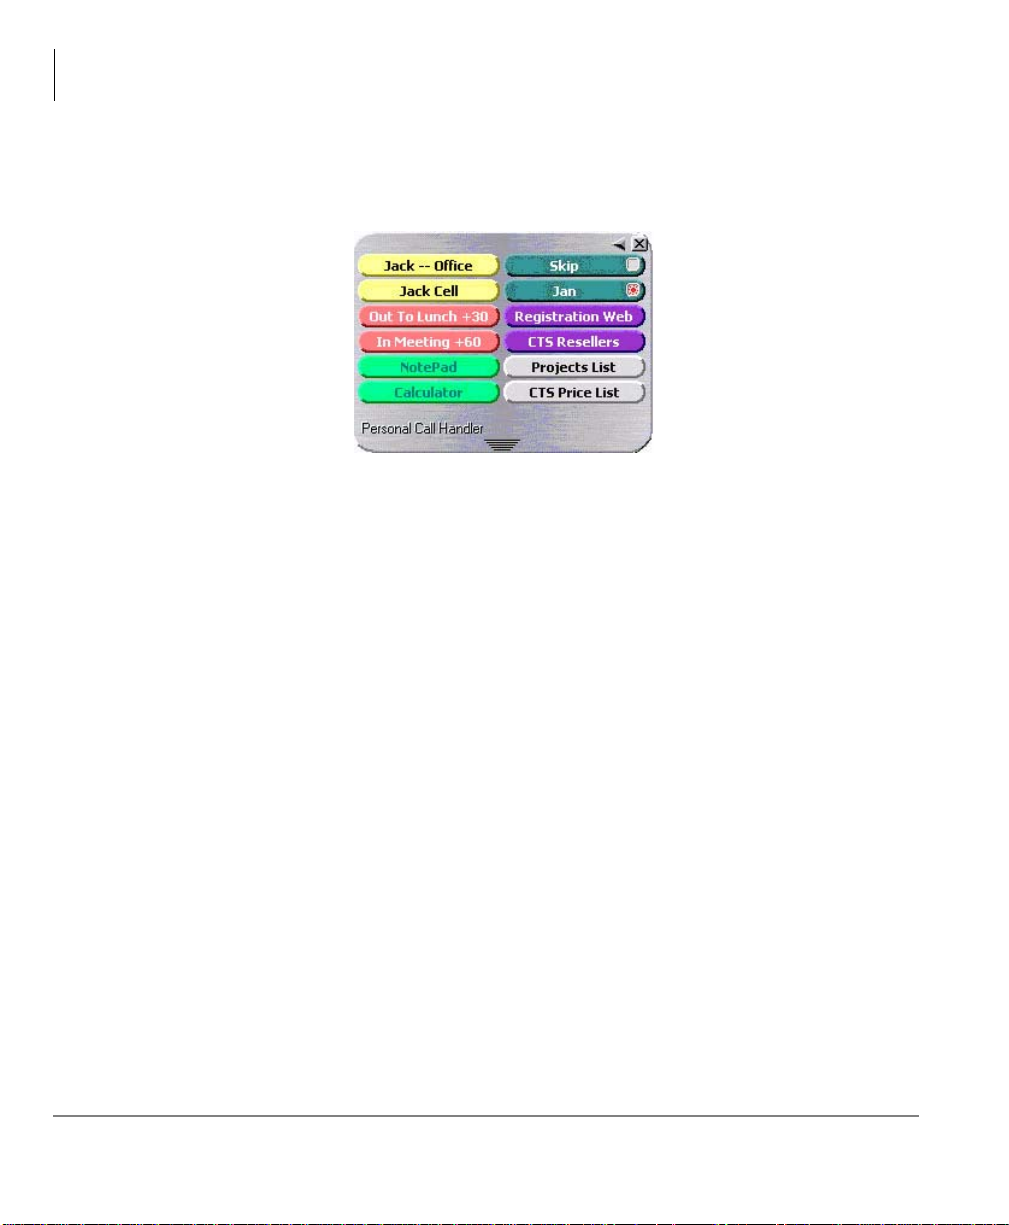
Buttons Mode
Below is a sample view of the side window screen in Buttons mode, which provides
12 user-programmable buttons for the user.
• Dock button – Use to dock the window back to the main screen (if detached) or
hide inside the main screen (if attached.)
• Close button – Use to close the side window.
• User Programmable Buttons – A number of keys can be easily configured by the
user as “Feature” keys, “Speed Dial” keys, “Call” keys, “User Action” keys, etc.
For programming details see “User Programmable Keys” on page 22.
• Resize Points – Click and drag to resize the side window. The buttons will
automatically rearrange to the shape of the window. Small sizes cause some
buttons to hide.
• Call Handler Button – Use to switch the window from “Buttons” mode to the “Call
Handler” mode.
10 Strata CIX Net Phone UG 04/08
Page 25

Companion Application Windows
Companion Application Windows
Companion Application Windows open as the result of clicking one of the Option
Keys on Net Phone. These windows open docked (connected) to the bottom side of
the main window or can be undocked (moved away) from the main window. While a
companion window is docked with the main window, whenever the main window is
moved the companion window will move with it. And likewise whenever the main
window is minimized (into the system tray) or restored, the companion window(s)
moves with it.
When companion windows are undocked, they float separately from the main window
and can be moved and resized separately.
The More Buttons companion application provides an optional capability allowing the
window to dock to either the left or right side of the screen. The buttons change
configuration to show in a single vertical column and remain in view with other
applications open on the desktop.
The Grand Tour
Strata CIX Net Phone UG 04/08 11
Page 26

The Grand Tour
Skins
Skins
Skins provide the method for changing the color scheme and button appearance.
Skins can affect the following elements of Net Phone:
• Screen colors, texture, rounding, and appearance.
•LCD colors
• Calls window size.
• Programmable Button shapes and colors
• Dial Pad button shape and colors
• Graphic on the main screen
To Change Skin Selection
Right-click your mouse on the logo on the main window.
• Select one of the “Skins” from the Phone Colors menu or choose the <Skin
Designer> to create a new design. Note: When you design a new “Skin” and save
it as a new file name, this change will not appear in the Phone Colors menu until
the next time you restart Net Phone.
12 Strata CIX Net Phone UG 04/08
Page 27

Net Phone Settings 2
This section defines settings that are available to the user for customizing Net Phone
to meet their needs. A number of additional settings are available for the System
Administrator for setting more advanced features such as controlling access to some
features, creating a server-based rules and configurations. This section will
concentrate on the settings readily available to the user.
These settings are arranged into Preferences, Hot Keys, Option Buttons, User
Programmable Buttons, and User Defined Actions. Each of these sections will define
the settings and how to change these settings to match your needs.
Preferences
Setup Preferences has a number of settings for making Net Phone work and look the
way you choose. To access Setup Preferences click on then select Setup >
Preferences. The settings in Preferences are divided between four tabs each defined
below.
Note: Depending on your configuration you may not be able to change the
Preferences, in which case you should check with your System Administrator.
Strata CIX Net Phone UG 04/08 13
Page 28
Net Phone Settings
Preferences
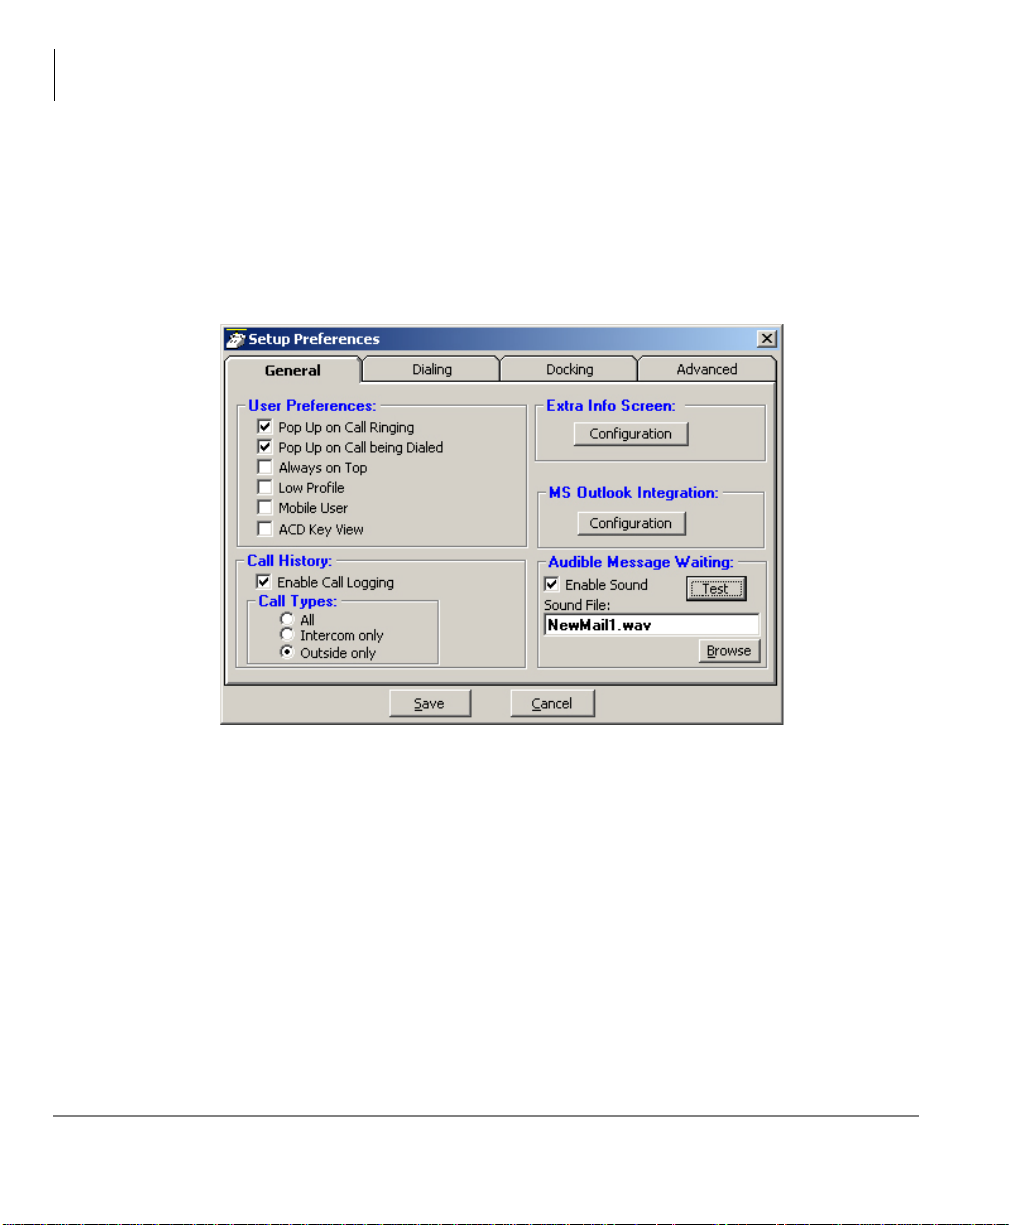
General Tab
These settings control how Net Phone interacts with other Windows-based programs
and how it should react when calls ring or are being dialed. Extra Call Information
can be enabled and content to be displayed defined as well as details for Microsoft
Outlook Integration when used.
User Preferences
• Pop Up on Call Ringing – Check this option if you'd like your Net Phone to
automatically pop up when a call rings on your phone.
• Pop Up on Call being Dialed – Check this option if you'd like your Net Phone to
automatically pop up whenever a call is being dialed from another program (via
TAPI or DDE dialing) or dialed via Hot Key dialing.
• Always on Top – Use this option to keep Net Phone on top of all other programs.
This makes it easily accessible.
• Low Profile – Enabling this option makes the Net Phone very thin in the
“Streamlined Mode” by eliminating the Option Buttons on the bottom of the
screen.
14 Strata CIX Net Phone UG 04/08
Page 29

Net Phone Settings
• Mobile User – some users travel with a laptop PC from desktop to desktop each
time using the Net Phone with a different PBX extension. This Mobile User option
will pop up a “Login” screen each time Net Phone is started so that they can log
into the appropriate PBX phone extension.
• ACD Key View – This option changes the keys on the left side of the main Net
Phone screen to wide keys, which can then be programmed to ACD functions, like
login/logout, ACD status, etc.
Call History
• Enable Call Logging – To have Net Phone collect and display Call History, Call
Logging must be enabled.
• Call Types – Once Call Logging is enabled, a choice needs to be made to log All,
Intercom Only, or Outside Only calls.
Audible Message Waiting
An audible sound can be played when the Message Waiting indication turns on. The
sound played can be any .WAV file of your choosing.
• Enable Sound – Placing a check mark in the box enables playing a sound in the file
shown. Clicking the Test button will allow you to listen to the sound selected.
Preferences
• Sound File – Enter the path to the .WAV file to be played. Use the Browse button
when needed to search for the path to the sound file.
Strata CIX Net Phone UG 04/08 15
Page 30
Net Phone Settings
Preferences
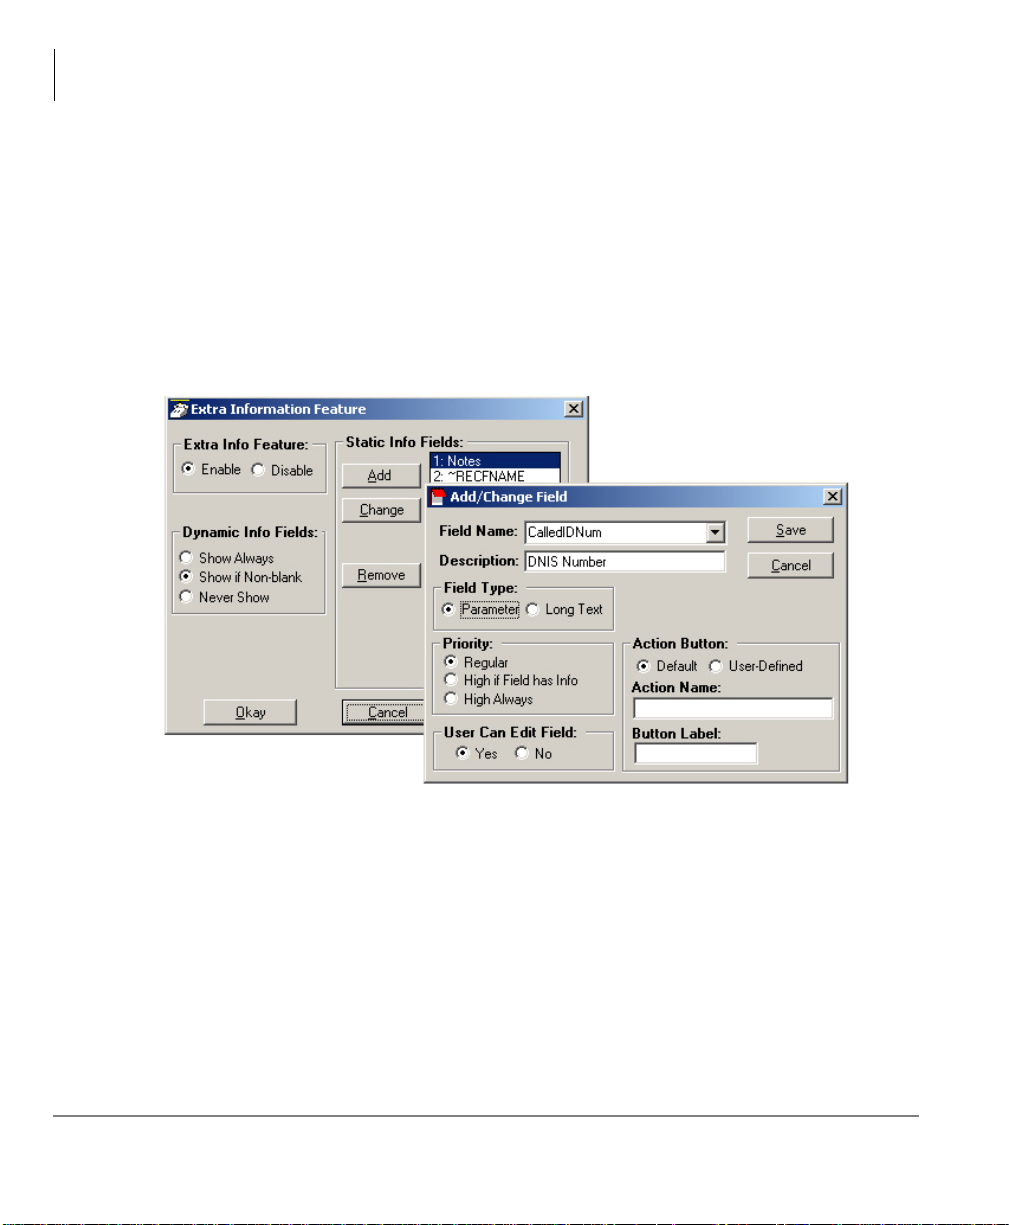
Extra Info Screen
Each call may have additional information attached to the call that may be useful.
With the Extra Info Feature enabled, this symbol appears with each call. When the
symbol is gray, no information is present, when cyan, information is attached and
when red, high priority information is available.
The Configuration button in the window accesses the screen for enabling this feature
as well as choosing the extra information items to be displayed along with their
properties shown below:
• Extra Info Feature – Provides for enabling or disabling this feature. When
disabled, the Call Information icon will not appear with each call.
• Static Information Fields – These fields will have a fixed area within the Call
Notes window for the information to be displayed. You have the ability to Add,
Change an existing or Remove any field.
16 Strata CIX Net Phone UG 04/08
Page 31

Net Phone Settings
³ To Add or Change a Static Info Field:
• Field Name – Select from the pre-defined list of fields or create you own field
name. This name must match exactly the information field where the information
is held.
• Description – Enter any description you desire to mark this field.
• Field Type – Each field can be selected to be either a fixed parameter (1 line) or
long text (multiple lines) fields.
• Priority – The field priority selected will mark the color of the icon attached to the
call.
• User Can Edit Field – This determines if this field can be changed or fixed.
• Action Button – A button can be defined to use trigger user defined Action. The
Action Name must match exactly the name of the Action defined in User Defined
Actions.
• Dynamic Info Fields – Allows the choice of when these fields will show. provides
a large set of fields, which are automatically filled in based upon the call
information. Dynamic fields are fields set by another application and are not predefined in .
Preferences
Strata CIX Net Phone UG 04/08 17
Page 32

Net Phone Settings
Preferences
MS Outlook Integration
Net Phone is specifically designed to work in harmony with Microsoft's Outlook
contact management program.
• Initial Setup – Click the Configuration button to reach the Outlook Preferences
screen with the following options:
• Enable Outlook Integration – This main option enables/disables the Outlook
Integration features. This must be checked for any Outlook features to work. If
you're not using Outlook, then this should be disabled.
• Home Area Code – Enter your home area code. This is used for dialing local calls
when the area code needs to be stripped from the dialing.
• On Manual Dialing – Lookup In Outlook – When enabled, whenever you dial a
phone number manually, the phone number will be looked up in Outlook to see if
there is a match. If there is an exact match (only one Contact entry matches) the
name and account number from the Contact will be automatically attached to the
call. Typically this should always be enabled.
18 Strata CIX Net Phone UG 04/08
Page 33

Net Phone Settings
Preferences
• Automatically Open a CONTACT for each Call – When enabled, whenever you
dial a phone number that matches an Outlook Contact, that contact will be popped
only – sometimes referred to as "Reverse Screen-Pop".
• Add New Contact if No Match Found – When enabled, if no contact matches this
phone number, a “New” contact in Outlook will automatically pop up.
• Automatically Open a JOURNAL for each Call – Using Outlook Journal entry
makes it convenient to keep track of phone calls made (or received) and to takes
notes while on a call. By enabling this option a New Journal entry will be popped
open whenever you make a call. Also, if the phone number exactly matches an
Outlook Contact, then this new Journal entry will be automatically "associated"
with that Contact.
• Automatically View the Contact’s Web Page – When enabled, if the contact record
contains a W eb address for the caller, this web page will pop up within the browser .
• Calendar – Enable appointment and reminder events from Outlook Calendar.
• Outlook Phone Link – W ith the Outlook Li nk application installed, click the Setup
button to access the Setup Configuration for Outlook Link. For details on setting
up Outlook Link see the Application Note “Screen Pop Outlook”.
Strata CIX Net Phone UG 04/08 19
Page 34

Net Phone Settings
Preferences
Dialing Tab
The biggest choice to make in this tab is to determine whether to follow a Serverbased dial plan, use a dial plan defined for your station, or dial all the codes yourself.
The last option is not practical when using a database or using “hot key” dialing since
other applications never know what is a valid number to dial including entering a
trunk access code when needed. If your System Administrator has set up the Serverbased Dial Plan, this is the best choice and will save you a lot of time.
Local Dialing Plan
• Trunk Access Code – This must be set to the access code you need to dial to get an
outside line or trunk. Making outside calls using "Speed Dial" keys or dialing
from another program, a Trunk Access Code will automatically be dialed to access
a trunk before dialing the phone number.
• Home Area Code – Your local area code should be defined here. This is used only
when you choose to use the Local Dial Plan.
20 Strata CIX Net Phone UG 04/08
Page 35

Net Phone Settings
Dialing Outside Numbers
• Dial same as User Dialed – With this option selected, outside phone numbers will
be dialed exactly how the user dialed them (unchanged by Net Phone).
• Use Local Dial Plan – When this option is selected, the user dials an outside phone
number, the number will be analyzed according the dial plan and the number will
be automatically modified (add "1+" for Long distance, etc) before Net Phone
dials it. Use the Change Plan button to view and/or change the settings of the dial
plan.
• Use SERVER Dial Plan – When this option is selected, the dial plan that is
configured on the NET Server will be used as the dial plan. You can press the
Check Plan button to bring up the Server Dial Plan Tester screen that allows you to
enter a T est Phone Number and see how it will be dialed. It is the responsibility of
the System Administrator to setup and maintain the server dial plan.
Preferences
Power Dialer
When the Power Dialer option is installed, two action buttons can be defined for use
with the Power Dialer. These user-defined buttons can appear on both the Ready to
Dial and the Results screens used with the Power Dialer. Please see the “Power Dialer
Administrator’s Guide” for details.
• Ready to Dial – Enable the Action button and select the Action to be performed
when the button is pressed. Optionally, the label can be changed to meet your
needs.
• Call Results – Enable the Action button and select the Action to be performed
when the button is pressed. Optionally, the label can be changed to meet your
needs.
Strata CIX Net Phone UG 04/08 21
Page 36

Net Phone Settings
Preferences
Defining a Local Dialing Plan
Each area of the US uses a different set of rules for determining which calls are local
calls or long distance. For your area, a good source for determining how to define
your dialing plan, use the opening pages of your phone book. These pages generally
define how to dial different areas and provide a listing of prefix codes for the local
calling areas. Three typical examples are:
1. Phoenix, AZ – all calls within the "602", “480”, and “623” area codes are
considered to be local calls, while all calls outside those area codes are considered
long distance.
2. Santa Fe, NM – calls to some office codes within the "505" area code are
considered to be local calls, while other calls to the "505" area code are considered
long distance.
3. Atlanta, GA – all calls to area codes "770" are considered to be local calls while
some calls to the "404" and "678" area codes are also considered to be local calls.
If you chose to use the Local Dialing Plan, you need to create a dialing plan. If you
chose SERVER Dial Plan, then you should check with your System Administrator if
you have questions.
22 Strata CIX Net Phone UG 04/08
Page 37

Net Phone Settings
Calling Within My Home Area Code
• Home Area Code – Set this to the Area code where the phone is located. This will
be used by Net Phone to determine which dialed calls are within your home area
code and when searching a contact manager (reverse screen-pop) the dialed
number will need the area code included, i.e. Microsoft Outlook. This is a
duplicate of the entry to the one made in the Dialing Tab, thus the value entered
previously will show here.
• All Home Area Code Numbers Local? – Select either All Calls in my Area Code or
only Calls to these Office Codes.
• Local Office Codes – This entry is only presented if you chose Call to these Office
Codes in the previous step. The pull down listing shows the exchange codes
(prefix codes) that are considered to be a local call from your location. Click the C
button to display the "Change Dial Rules" screen.
• To Add Local Prefix Codes – Enter the prefix code and click Add. The wild
card character ‘#’ can be entered at the end of a prefix code entry to represent a
range of codes. For example, 75# would represent all codes 750 to 759 and 7##
would represent codes 700 to 799.
• To Delete Local Prefix Codes – Highlight a prefix entry and click Delete
button. The delete button removes the entire entry from the list, thus if the
entry has a wild card, then it removes all codes represented by the wild card
character.
• To Delete a Specific Prefix Code – To delete one prefix code that is part of a
range of codes entered using a wild card character, enter the prefix code to be
considered not local in the Long Distance box and click Add. For example, if
prefix code 755 is long distance but all other 75# codes are local, first enter 75#
into the local list and the add 755 as Long Distance – the resulting local list will
be 750, 751, 752, 753, 754, 756, 757, 758 and 759.
• Dial Area Code on Local Calls – Enable this feature in areas, such as Atlanta,
where you must always dial the full 10-digit phon e number (includ e the area code)
even when the call is local. Most areas of the US, local calls do not include the
area code and dial only 7 digit numbers for local calls. Any number dialed from
another program or hot key dialing will be down to its base 7 digits by removing
the Home Area Code before it is dialed.
• Add+1 – Check the box if you need to dial a leading 1 before the number for calls
within your Home Area Code.
• Dial Area Code Plus the Number – Check the box when the home area code is al so
to be dialed.
Preferences
Strata CIX Net Phone UG 04/08 23
Page 38

Net Phone Settings
Preferences
Calling Outside My Home Area Code
• Any calls outside your Home Area Code LOCAL calls? – Select either None or
Only Calls to These Area+Office Codes.
• Local Area+Office Codes – This entry is only presented when you chose Only Call
to These Area+Office Codes in the previous step. The pull down listing shows the
codes (area code plus prefix codes) that are considered to be a local call from your
location. Click the C button to display the "Change Dial Rules" screen.
• To Add Local Area+Prefix Codes – Enter the six digit area+prefix code and
click Add. The wild card character ‘#’ can be entered at the end of a prefix
code entry to represent a range of codes. For example, 602### would represent
all prefix codes in area code 602.
• To Delete Local Area+Prefix Codes – Highlight a prefix entry and click Delete
button. The delete button removes the entire entry from the list, thus if the
entry has a wild card, then it removes all codes represented by the wild card.
• To Delete a Specific Area+Prefix Code – To delete one prefix code that is part
of a range of codes entered using a wild card character, enter the prefix code to
be considered not local in the Long Distance box and click Add.
• For Long Distance Calls add +1 – Check the box when yo u need to have a leading
one ("1") added when making long distance calls outside your home area code.
Test a Phone Number
Dialing plans can become complex. Use these boxes to enter different telephone
numbers and check to see the number that will be dialed. The dialed number should
be identical to what you need to dial when using your phone.
24 Strata CIX Net Phone UG 04/08
Page 39
Net Phone Settings
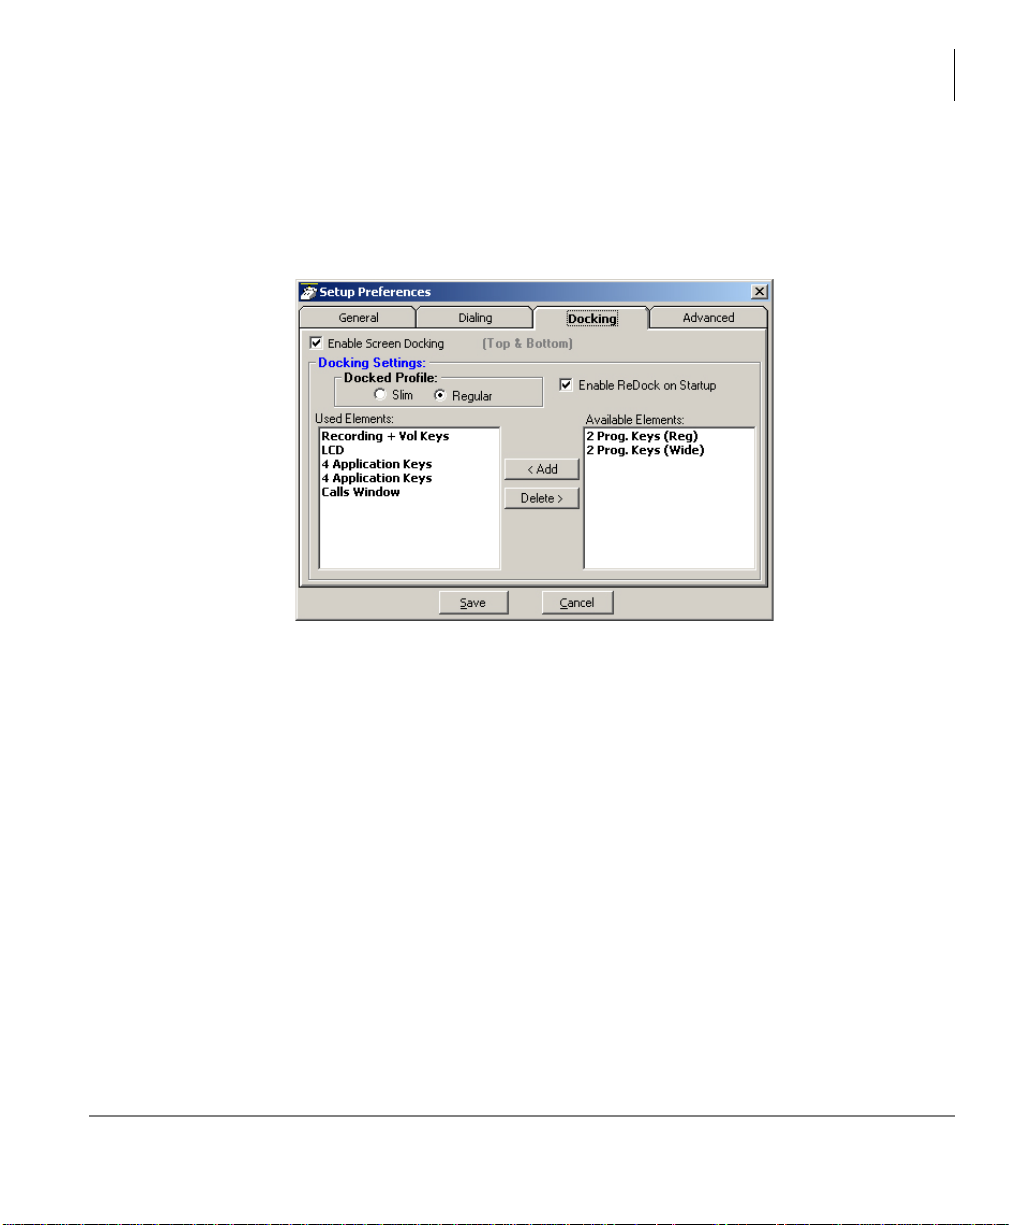
Docking Tab
The docking tab defines the contents of Net Phone when docked to the top or bottom
of the screen. This includes whether docking is enabled or disabled, uses the slim or
regular profile and a listing of contents by display priority (space limits what can be
displayed).
Preferences
• Enable Screen Docking – When enabled, the Net Phone will automatically ‘dock’
to the top or bottom of the PC screen when it is moved to the top or bottom.
Docking Settings
• Docked Profile – Once screen-docked the Net Phone will take on either a Slim or a
Regular profile selected here.
• Enable ReDock on Startup – Place a check in the box to cause Net Phone to startup
in the same position and condition as when it was last shut down.
• Used Elements – The displays, buttons, etc. to be used in each profile are
configured by moving available elements to the “Used Elements” list. Whenever
the Net Phone is screen docked, it will place the elements from the “Used
Elements” list on its screen starting from the top of the list, using as many elements
as possible until it runs out of space on the right side of the PC screen. Some types
of elements can only be used once (like an “LCD”) whereas other elements (like
“Programmable Keys”) can be used numerous times.
• Available Elements – The “Available Elements” list shows the types of elements
that are available for use in this profile. Note: Once you’ve changed the screendocking settings, the new settings will not be used until the Net Phone is
‘undocked’ (if it’s already screen-docked) and then re-docked.
Strata CIX Net Phone UG 04/08 25
Page 40

Net Phone Settings
Preferences
Advanced Tab
This screen allows the changing of the basic connection for Net Phone and provides
for the ability to send log files to Technical Support for debugging problems
encountered in the field. The TAPI Service Provider should not be changed unless
your System Administrator has instructed you to update the settings for finding Net
Server for your application.
TAPI Service Provider
• Enter the Service Provider Name – This must be set to access the TAPI service
provider to be used – typically, this would be set to: Net Server.
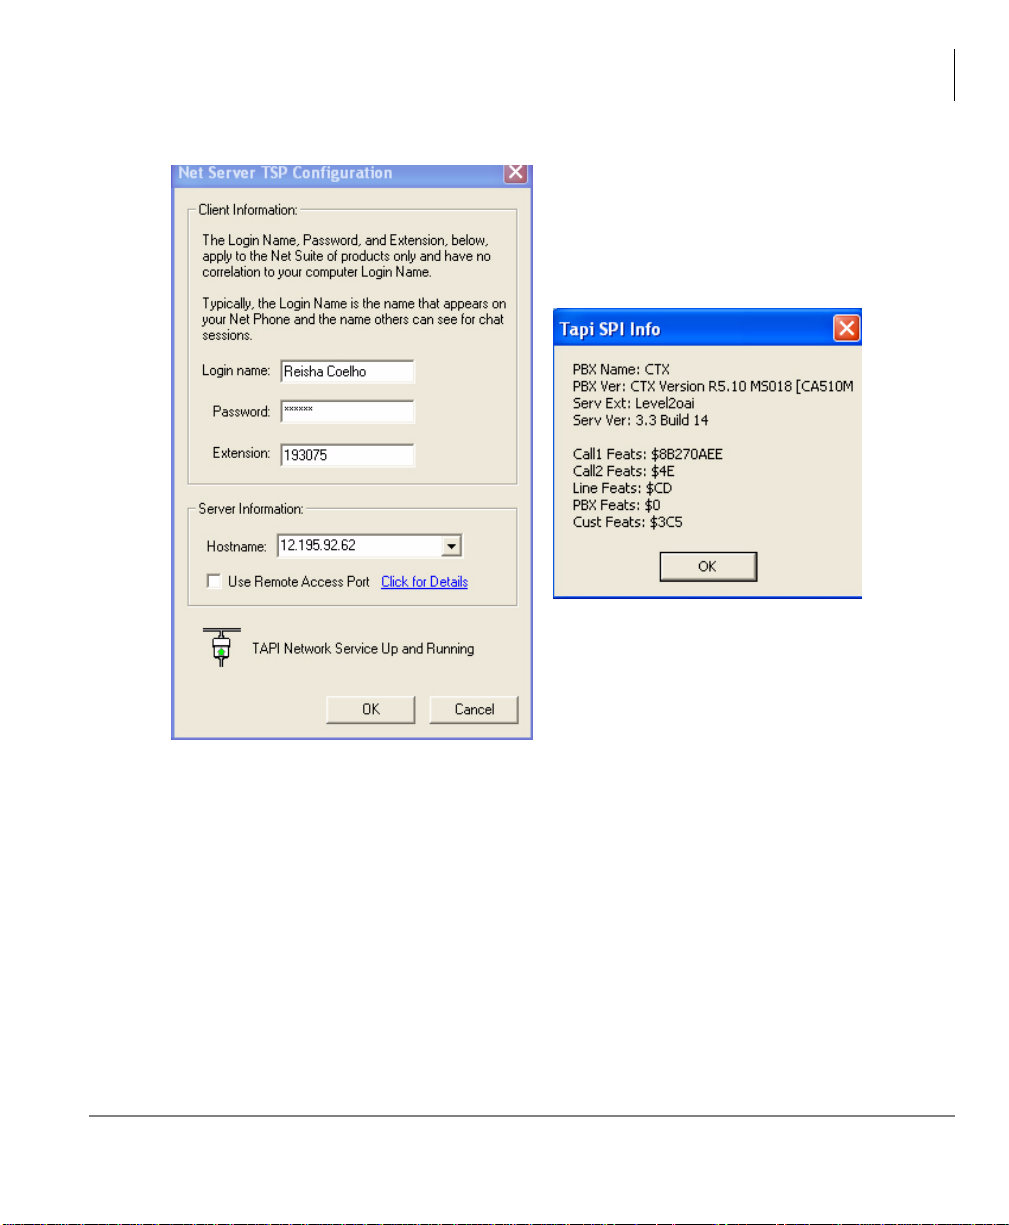
• Setup – Clicking the Setup button opens a screen to define the TAPI Service
Provider as shown in the diagram below. The I button is a handy status indicator
for reading the version levels and license codes for the system and is shown in the
Tapi SPI Info screen below.
26 Strata CIX Net Phone UG 04/08
Page 41
Net Phone Settings
Preferences
• Login name – Enter your Login name. If a new installation, a client will
automatically be created in Net Server for this name. Many times the
administrator will have defined your client Login name, see your administrator
for the name to use.
• Password – Enter an optional password for protecting the connection, when
needed.
• Extension – Enter the extension number of the phone this Net Phone is
monitoring for call information.
• Hostname – Enter the name of the Server PC where Net Server resides.
• Use Remote Access Port – Check this box only when connecting remotely
through the Internet. When connected locally through your LAN, do not check
this box.
Strata CIX Net Phone UG 04/08 27
Page 42

Net Phone Settings
Preferences
Diagnostic Logging/Uplink
This section allows enabling of the Debug utility and have it show on the Main Menu
under Settings as well as provide an easy utility for sending all the important
information about Net Phone to assist Technical Support to help diagnose any
problems when necessary.
• Show Advanced Menu – Place a check in the box to enable the Main Menu >
Settings > Advanced menu option. This needs to be enabled to capture events or
show call information when Net Phone is operating. Note: The statement “TAPI
SPI Logging: DISABLED” is the normal indication and is provided to show Tech
Support of the status of this device. T ech Support will provide specific instructions
for turning on this setting.
• Uplink Debug Files Button – Click this button to access the screen for creating a
site name, a contact for the file transfer, and the changing of any options for
reporting a problem.
• Site Name – Before using the Uplink Debug Files button, a site name and contact
must to be selected. The site name is a unique identifier to make it easier to find
the log files for your site and typically, the contact should be assigned “Any Tech
Support” to ensure the log files are seen by someone. Use a specific contact name
once you are working with an agent and they request you send the “Zip Log Files”
to them.
• Description – It is highly recommended to write a description of the problem
including all pertinent details such as the conditions and approximate time the
incident occurred. These descriptions aid in narrowing down where to look in the
log files for the problem encountered.
• Options – Clicking the Options button opens a screen to provide options for how
the files are to be sent. The default and recommended option is to “Send Directly
to FTP Site”. As an option, when direct Internet access is not available from that
PC, the files can be zipped into smaller files, saved on your PC in your Local
Settings folder, typically “Ö\Documents and Settings\jgreen\Local
Settings\Application Data\CTS\NetPhone\Zip”. These files can then be e-mailed
to .
28 Strata CIX Net Phone UG 04/08
Page 43
Setting Up Hot Key Dialing & Popup
Setting Up Hot Key Dialing & Popup
Net Phone provides two global “Hot Keys” that you can press within any application
to send a request to Net Phone. The first key is the Dial Hot Key will provide a
method for dialing a number from any application. For example, you may have a
phone number in a Microsoft Word document that you can highlight in the Word
document and press the hot key combination assigned. This dials the number in Net
Phone. By default the Hot Key is F11.
The second key is the Popup Hot Key, which will bring Net Phone to the front on the
screen. This can be very useful if the Net Phone is minimized or is behind other
windows on your screen. Net Phone must be running for this hot key to work.
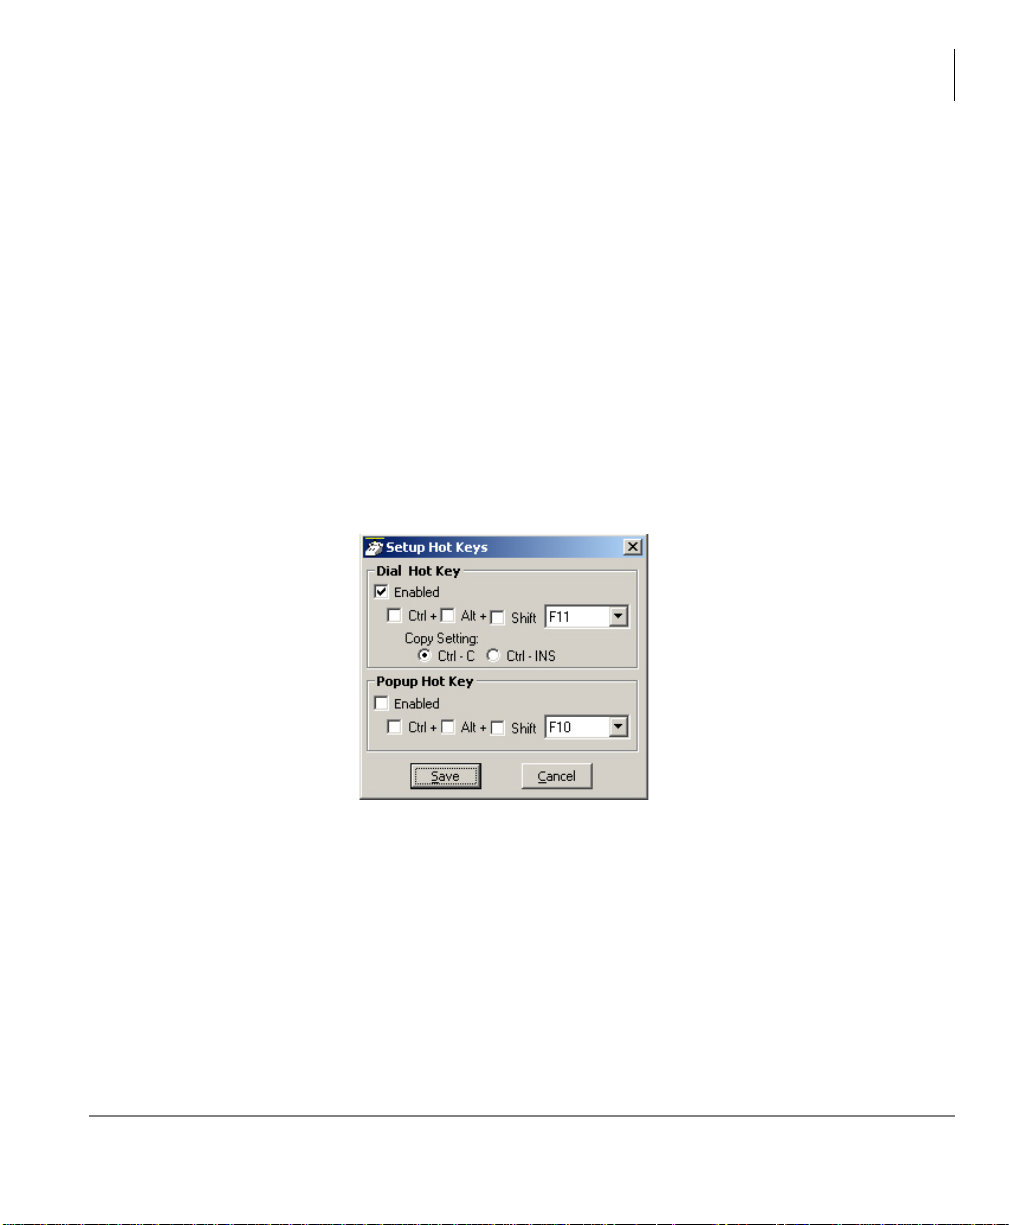
Setting Shortcut Keys
Click the main menu icon and then Setup > Shortcut Keys > Hot Key Dialing &
Popup to access the settings for defining the “hot keys”:
Net Phone Settings
• Dial Hot Key – Enable the hot key button and select the key to use including any
modifying keys to be used in combination.
• Popup Hot Key – Enable the hot key button and select the key to use including any
modifying keys to be used in combination.
Note Five other Shortcut Keys also appear on the Setup > Shortcut Keys menu.
Many applications use various “hot keys” or keyboard shortcuts. These keys
are defined in advanced settings that your administrator can change if you
encounter a conflict with another application. See “Net Phone System
Administration Manual” for details.
Strata CIX Net Phone UG 04/08 29
Page 44

Net Phone Settings
Options Buttons
Options Buttons
Net Phone provides a powerful architecture that allows companion applications to add
features and functions. These companion applications inherit the look-and-feel of Net
Phone and act as if they are “part of the Net Phone” and are provided as Options
Buttons. These companion applications were provided as choices when Net Phone
was installed on your PC.
Up to eight individual buttons may be configured to view on the main window. Your
ability to change these may be restricted by the administrator. The companion
applications open and dock to the bottom of Net Phone. Users may also detach the
companion applications and place them anywhere on the desktop.
Access to Option Buttons applications is also possible using the User-Defined Action,
see “Pop Internal Web Browser” on page 30 for details. This action can be placed on
any Programmable key to expand the number of Option Buttons available or the
action can be used in the Personal Call Handler to automatically open an application
based upon certain call triggers.
³ To Copy this Button onto Another Button
1. Right-click on the Option Button to copy.
2. Click the Option Button to receive the copy.
³ To Swap Two Buttons
1. Right-click on the first Option Button in the swap.
2. Click the second Option Button to complete the swap.
³ To Change Button
³ Right-click on the Option Button to change.
• Key Type – Select a type of companion application from the pull down listing.
See the Button types that follow for specifics for each one.
• Key Label – The label will default for the Key Type selected, change the label,
if needed.
• Tool tip – This entry will appear in the “bubble” when the mouse hovers over
this button.
• Save Setting – Click the Okay button to save the setting or Cancel to exit
without saving.
30 Strata CIX Net Phone UG 04/08
Page 45

Option Button Key Types
Directory Button
Extension Directory
Net Phone Settings
Options Buttons
• Chat Menu – Enables right-click access to Chat another user from the Directory
window.
• Edit Menu – Enables right-click access to the Edit menu for Directory listings.
• Show ACD Exts – Hunt Group/ACD Group extensions will appear in the
Directory listing.
• Show Vmail Exts – Voice Mail extensions will appear in the Directory listing.
• Show AutoAtt & Announce Exts – Application extensions will appear in the
Directory listing.
• Show Type Column – The Extension Type column will appear in the Directory
listing. N = Name, H = Hunt Group, A = Application, etc.
• Caption – Enter a name to be displayed in the window to distinguish this directory
listing from other directory listings.
Strata CIX Net Phone UG 04/08 31
Page 46

Net Phone Settings
Options Buttons
Feature Directory Button
Feature Directory
• Show Standard Features – Display standard PBX feature codes in the Directory
listing.
• Show Operator Features – Display Operator feature codes in the Directory listing.
• Show Debug Features – Display Debug features in the Directory listing.
• Show Type Column – The Feature Type column will appear in the Directory
listing. S = Standard, O = Operator, D = Debug.
• Caption – Enter a name to be displayed in the window to distinguish this directory
listing from other directory listings.
32 Strata CIX Net Phone UG 04/08
Page 47

Net Phone Settings
Speed Dial Button
Personal Directory
• Edit Menu – Allow right-click access to edit records in the Personal Directory.
• Outlook Menu – Allow right-click access to Outlook features in the Personal
Directory.
Options Buttons
• Filename – File to store the personal Speed Dial records.
• Caption – Enter a name to be displayed in the window to distinguish this directory
listing from other directory listings.
Strata CIX Net Phone UG 04/08 33
Page 48

Net Phone Settings
Options Buttons
Call History Button
Call History
• View Info Menu – Enables the View Info menu in the Call History Window.
Right-click a Call Record to access the View Info Menu.
• Show Notes Column – Allows Call History to show the Notes field for each Call
Record.
More Buttons
34 Strata CIX Net Phone UG 04/08
Page 49

Net Phone Settings
Options Buttons
Bank of Buttons
• Bank # – Specifies the group number of the button bank. You must specify a
unique number for each bank of buttons. If you assign the same bank to more than
one button, each of those buttons will show the same bank of keys.
• Caption – Enter text to appear as a “title bar” for the new button bank.
• Rows – Defines the number of rows of keys on the button bank.
• Columns – Defines the number of columns of keys on the button bank.
• Auto Startup – Place a checkmark in the box to automatically open this bank of
buttons whenever Net Phone starts up.
• Screen Dockable – Place a checkmark in the box if you want this bank of buttons
to be capable of docking to the left or right side of your screen.
Browser Button
Web Browser Button
• URL – Enter the URL to act as the Home Page with the Net Phone Browser
window.
• Show URL Window – Display the URL tex t box, al lowing you to enter new URLs
while browsing.
Strata CIX Net Phone UG 04/08 35
Page 50

Net Phone Settings
Options Buttons
• Auto Startup – Allow the Browser to start automatically with Net Phone. Useful
for screen pop or data access applications.
• Auto Start Hidden – When used with Auto Startup, it opens a web page, but the
Browser window remains hidden.
• Buttons – Place a checkmark in the box next to the Browser controls to show in the
Browser window.
Chat Button
An integrated text-messaging function that allows you communicate with other Net
Phone users using text messaging ‘calls’ even while you’re busy on the phone. See
the Chat Administrator’s Manual for more details.
Chat
• Auto Startup – When enabled, Chat will startup when Net Phone starts. This
provides your “on-line” status to all other Chat users. The Chat dialog box will
also open.
• Auto Start Hidden – This mode allows Chat to be active, providing status to other
Chat users, that you are ‘on-line’, but the Chat dialog box will not display until
someone calls you or you press the button to make a call using Chat.
36 Strata CIX Net Phone UG 04/08
Page 51

Net Phone Settings
Power Dial Button
Allow you to automatically call a list of phone numbers or dial phone numbers at
specified dates and times. See the Power Dialer Administrator Manual for details.
Personal Power Dialer
Options Buttons
• Auto Startup – When enabled, Power Dialer will startup when Net Phone starts.
The Power Dialer dialog box will also open. With the Power Dialer started,
scheduled calls can function as planned.
• Auto Start Hidden – This mode allows the Power Dialer to be active, but the Chat
dialog box will not display.
Strata CIX Net Phone UG 04/08 37
Page 52

Net Phone Settings
Options Buttons
Replay Button
Replay is a client application for OAISYS Tracer . Replay must be installed on this PC
to access call history and recorded files from Tracer. See the OAISYS Replay
Administrator’s Manual for details.
System Call History (Replay)
• Show just my Calls – If the permissions for Replay allow more than just your calls,
this option can limit those viewed using this Option button will be filtered to “my
Calls” only .
38 Strata CIX Net Phone UG 04/08
Page 53

User Programmable Keys
The Net Phone has many different User Programmable keys on the main screen, on
the Side Window, or on the Extra Button windows. These keys and can be easily
configured by the user as "Feature" keys, "Speed Dial" keys, "User Action" keys,
“DSS” keys, “Web Access” keys, “Run another Application” keys, or “ACD” keys,
etc. This provides the user with one-touch access to features, applications, files,
phone numbers, employees, and more. To change any of these keys simply right-click
the mouse over the key and select from the menu one of the following options:
To Initialize Key
This resets the key to a blank default state. This makes it much easier to use the drag
and drop techniques for setting up keys.
Net Phone Settings
User Programmable Keys
To Swap Keys
T o swap the configuration of two programmable keys you can simply drag & drop one
to the other. To do this, hold the Ctrl key down while using the left mouse button to
drag a key to another location. Or select Swap Keys and then drag &drop key to new
location. Keys will swap within the same window and between the Side window and
the Main Screen. Keys on the Main Screen or the Side window will not swap with
keys on the Extra Buttons windows or vice versa.
To Copy This Key
T o Copy the configur ation of one programmable key to another hold the keyboard Ctrl
and Shift keys down while using the left mouse button to drag the key to be copied to
its target. Or select Copy This Key and then drag & drop to new location. Keys will
copy within the same window and between the Side window and the Main Screen.
Keys on the Main Screen or the Side window will not copy to keys on the Extra
Buttons windows or vice versa.
Strata CIX Net Phone UG 04/08 39
Page 54

Net Phone Settings
User Programmable Keys
To Change Key
This opens the Setup Key configuration settings shown below. Several items in the
upper portion of this window define the appearance and label of the button. Selecting
an Action from the pull down listing will present additional parameters needed to
define the choice. Details for each Action follow this procedure. Note: Some users
may not have permission to change buttons and keys.
• Sample – Displays the appearance of the following selections.
• Key Label – Type a label for the key.
• Back Color – Choose the color of the key.
• Text Color – Choose the text color to use for the key label.
• Default Colors – Pressing this button will reset the colors of the key and text to the
default for the skin used.
• Action – Choose an action to be performed. This selection will open additional
settings corresponding to that action. See the settings below for the different
possible actions.
Feature Code Keys
Provides one-button access to a Feature
Code on the PBX. You can include
additional digits when appropriate. The
PBX used will determine access to the
Feature Codes available. For example,
to log into ACD Group x2000, you
could set the Parameter to “326 2000” to
work as a Log In key.
40 Strata CIX Net Phone UG 04/08
Page 55
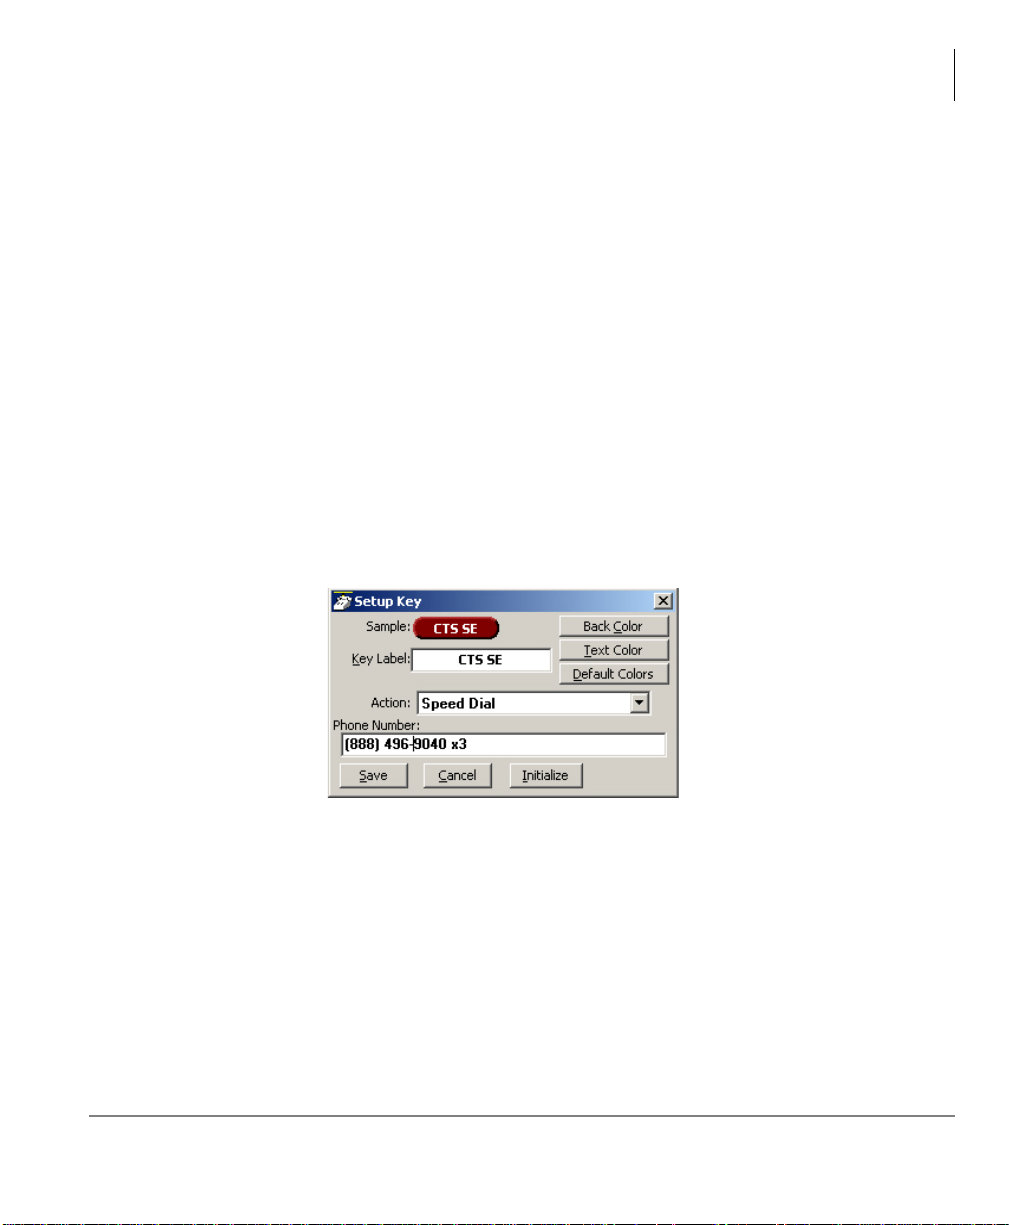
Net Phone Settings
User Programmable Keys
Speed Dial Keys
Creates a speed dial key for one-button dialing. Net Phone automatically inserts the
Trunk Access Code when a Dial Plan has been specified, making it unnecessary to
enter this code in the speed dial number. Speed Dial numbers can be any number 0~9
and * and # digits. You can include commas to insert a 2-second pause in the dial
string, i.e., setting up a key to call V-mail (x2502) and logon to a mailbox (1000 with
password 12345) then enter “2502, *1000,12345”.
You can also include an "X" character in a pho ne number string to have the dialing
stop at that point and queue up the rest of the number in the dial buffer. The user can
listen to the call and click the Dial button to dial the rest of the digits at the
appropriate time. Examples include: (1) dialing a person who has an extension
number (i.e. "4969040 x1008"), (2) dialing a pager and you want to display a number
on the LCD of the pager (i.e. "5551234x4969040#"), or (3) dialing a long distance
access code (i.e. "8884083279 x17135551234"). Note: You can use more than one
"X" in the phone number and it will wait after each "X" (i.e. "4969040 x8
x*1009,1234").
Strata CIX Net Phone UG 04/08 41
Page 56

Net Phone Settings
User Programmable Keys
System/PBX Command Keys
The System/PBX command keys are maintained for backward compatibility. It is
highly recommended that the user create User Defined Actions for System/PBX
Commands. The User Defined Actions have expanded the options available for a
number of these commands and thus offer better choices.
The description below shows the possible features that appear in the Setup Key
window. Some of the features listed are dependant upon Net Phone System
Administration settings such as the Auto Call Record/Tracer Recording features,
which only appear when the System Administrator enables those items. Others are
dependant upon the PBX used by Net Phone.
The commands that may be available will depend upon the PBX you are using.
Commands that may be available include:
PBX Call Control Auto Call Record/Tracer Recording
Answer — Current call. Start Record
Conference — Simulates pushing Conf key. Stop Record
Dial xxxxxx — xxxx= the number to dial. Set Bookmark “Msg”
Hangup — Hangup current call. Call Center
Hold — Hold current call. ACD — Agent Help
* Modify Call “Field” “Value ACD — Call Pickup
* Transfer Set Work Units “Value”
* An enhanced feature is available in User Defined Actions
42 Strata CIX Net Phone UG 04/08
Page 57

Net Phone Settings
User Programmable Keys
User Defined Action Keys
Customized features can be placed on keys by using Use r Defined Actions. Actions
that have been defined will be available in the pull down list. To create a new action,
go to the User Defined Actions section to create the action before defining the key. If
the programmable key in on the Main Screen or the Right side window, an Edit button
appears that is a short cut to the User-Defined Actions.
ACD Keys (Main Screen only)
These ACD Keys Actions are only available on the wide keys on the Main Screen
(Net Phone must be set to use “ACD Key View” in Preferences). Depending on the
configuration of your call center, these keys can be used to: (1) Login or Logout of
ACD groups (via Agent ID and phone Extension) and/or (2) to Show/Set your Agent
status. Other ACD functions may be available in the User-Defined Actions depending
upon the PBX used with Net Phone. Note: The color of ACD Keys cannot be
changed as the colors are determined by the ACD State for the key.
Strata CIX Net Phone UG 04/08 43
Page 58
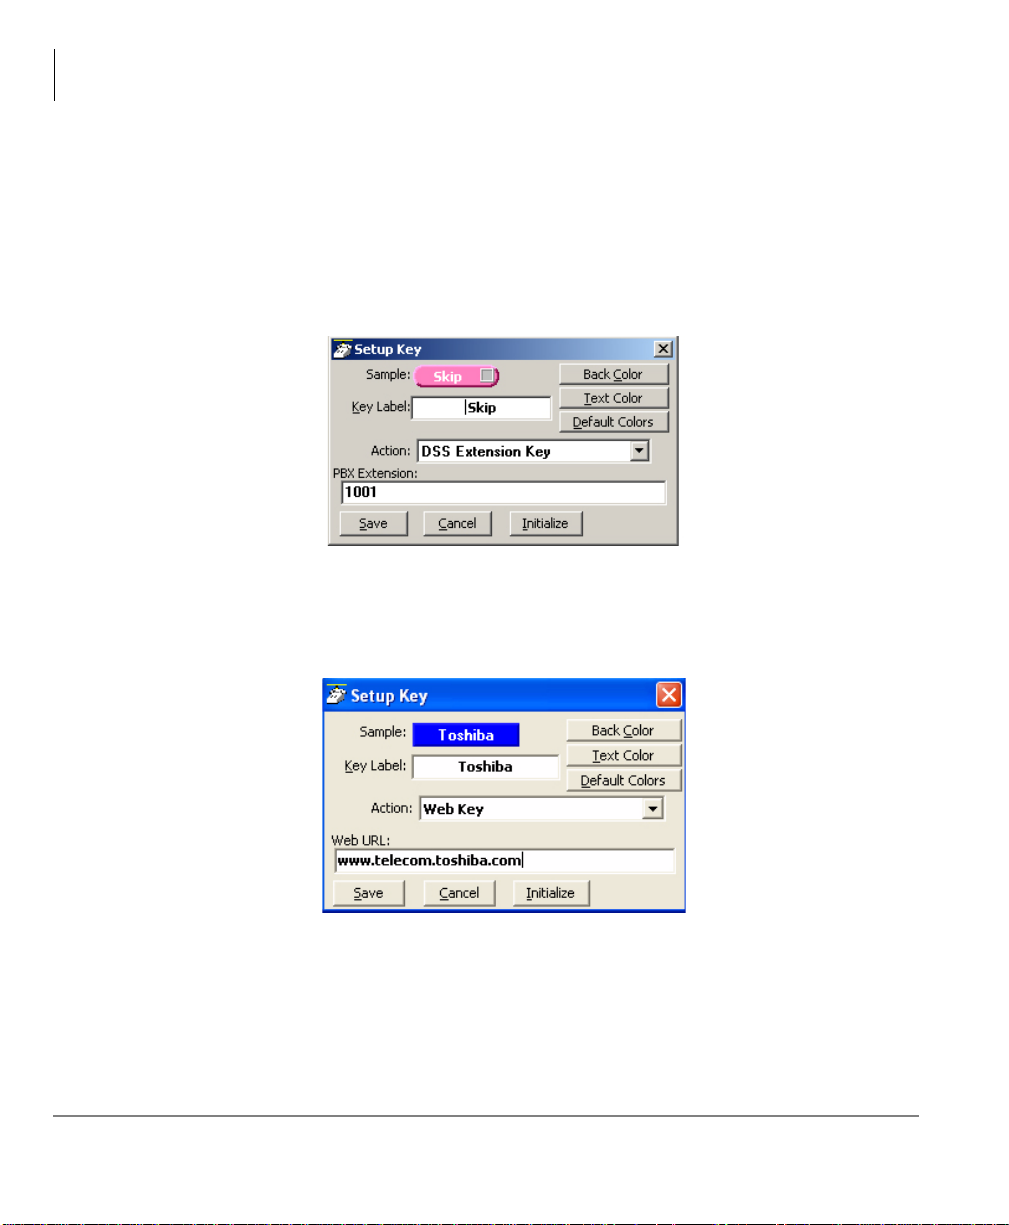
Net Phone Settings
User Programmable Keys
DSS Extension Keys
Direct Station Selection provides one-button dialing to a specific station. DSS Keys
also provide a visual status indicator of the station: Ringing, Busy, Idle, or Do-NotDisturb. An easy method for creating DSS keys is to open the Directory and drag and
drop names in the Directory onto keys. You can then change the colors and edit the
name for easy identification.
Web Keys
Web keys allow you to program an Internet (or intranet) URL into the key. Press the
key to open the default web browser to the specified web page.
44 Strata CIX Net Phone UG 04/08
Page 59

Net Phone Settings
User Programmable Keys
Run Program Keys
This sets the key to run a specific application or load a specific document. For
example you could create a “Calculator” key to run the windows calculator by setting
the “Program filename” to CALC.EXE. Alternatively you could create a key to show
your “projects” Excel spreadsheet by simply setting the “Program or Document
Filename” to: PROJECTS.XLS.
Creating Keys using Drag & Drop
Program unused keys by simply dragging phone numbers or feature codes from other
programs. Some examples include:
• Drag a Contact from Microsoft Outlook to a key to create a Speed Dial button
• Drag a call from the Call History to create a Speed Dial button
• Drag an entry from the Personal Speed Dial Directory to create a Speed Dial button
• Drag an entry from the Extension Directory to create a DSS key for that extension.
• Drag an entry from the Feature Directory to create a phone Feature key.
Strata CIX Net Phone UG 04/08 45
Page 60

This page is intentionally left blank.
Page 61

User-Defined Actions 3
You can define powerful actions that can be used with both the Personal Call Handler
and under the Programmable Keys. These actions can be as simple as playing a .W AV
file to as powerful as sending a specific DDE message to another programs to "Screen
Pop" a database. When defining a new action, it's usually a good idea to test the
action to make sure it works correctly . The screens for creating actions also provide a
testing facility to make this testing easy.
Note Depending on your configuration you may not be able to change the User-
Defined Actions, in which case you should check with your System
Administrator.
Creating Actions
The Creating of Actions can be done by going to the Main Menu Icon > Setup > User
Defined Actions.
A window pops up showing a listing of currently defined actions an d options that you
can Add, Copy, Edit/Test or Delete. Pressing the Add, Copy, or Edit/Test buttons
Strata CIX Net Phone UG 04/08 47
Page 62
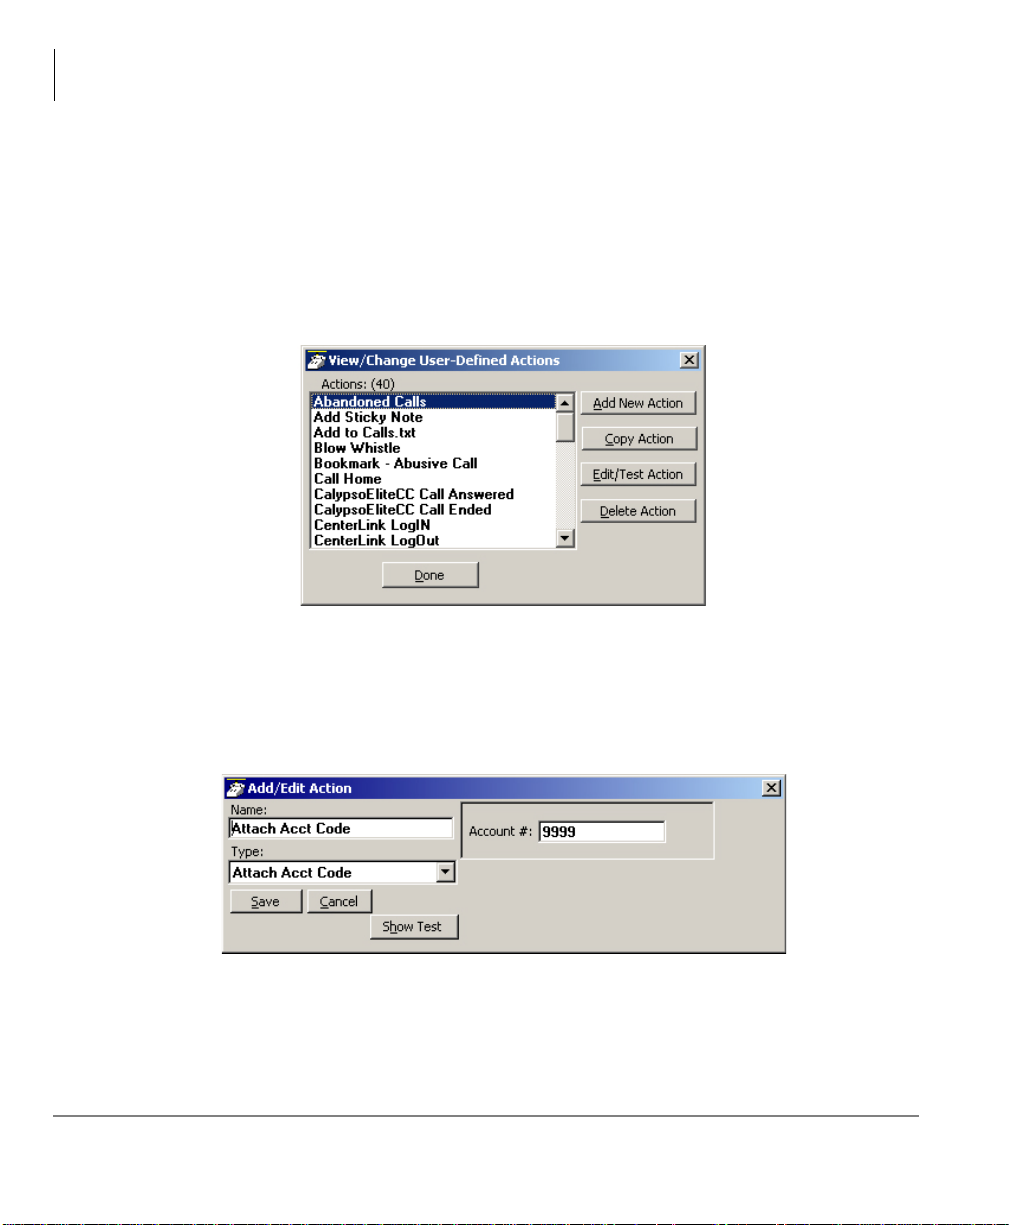
User-Defined Actions
Creating Actions
takes you to a screen for creating or editing an action. The types of actions that can be
created are defined below. When actions are copied, created, or edited, those changes
are stored in the compiled actions file (NET_PHN.acs). If this file is lost for some
reason and Net Phone is restarted, all actions will revert to the individual actions
stored in the User’s Local Settings Net Phone folder. Thus, it is wise to save new
actions by exporting the action for backup (see “Exporting Actions” on page 39 and
“Importing Actions” on page 39).
Attach Acct Code
This action attaches an account code to the active call. This account code is passed to
other applications such as Insight or TASKE Contact.
* Account # – Enter an accounting number to be associated with this call.
48 Strata CIX Net Phone UG 04/08
Page 63

User-Defined Actions
Creating Actions
Export Call Info
This action is used to export call information to another program (like the CTI Call
Handler) in order to keep its Call Info Database current. When this action is triggered
it will Popup an "Export Call Info" screen allowing the user to fill in any missing call
information (typically the 'Main Listed Phone #') before they press SAVE to export the
information to the centralized database.
• Path & Filename – Enter the complete path name for writing the exported file or
browse to find the path.
Log Info to File
This action writes a string of information to a text file. This can be used to make a call
log, like personal SMDR, and/or to trigger actions in other programs. A wide range o f
call and system variables (see “Action Variab les” on page 37) may be used to create
the information to be written into the file.
• Log Filename – Enter the complete path name of the file to log the information.
Use the Browse button to find the file name, when needed.
Strata CIX Net Phone UG 04/08 49
Page 64

User-Defined Actions
Creating Actions
• Log String – Create the string defining the content to be written into the file. The
above example created the following entries into the file “CallsLog.txt”. Note:
The number of characters sent for the name variable was limited to the first 10
characters (%+10N), which truncated the names in the file to the first 10
characters. See “Action Variables” on page 37 for details.
12/02/04 16:27 In 1027 480-496-9040 Joe Blow I No
12/02/04 16:28 In 1027 480-629-8723 Joyce Gree Yes
12/02/04 16:28 In 1027 949-853-3351 Katz Yamag Yes
Lookup in Outlook
This action will lookup the phone number in Microsoft Outlook and then selectively
opens a contact, creates a new contact, or adds a journal entry.
Minimize Phone Screen
This action shrinks the Net Phone screen to an Icon in the Tool Tray. To return Net
Phone to its original position requires the user to either double-click the icon in the
tray or right-click and select Show.
50 Strata CIX Net Phone UG 04/08
Page 65

User-Defined Actions
Creating Actions
Modify Call Information
This action changes the Caller ID name, Caller ID name, or Account code of the
active call on this phone and when the PBX supports the changes, the same
information held in the PBX. Using the Extra Info (shown on
provides for entering or changing any other information associated with the call.
• Information Type – Select either Standard Info or Extra Info. The Standard Info
option supports updating the information in the PBX when supported by the PBX.
The Extra Info option can enter or change any field for this call.
page 52) option
Standard Info
• Phone Number – Enter a phone number to be used as the Caller ID number for this
call. This replaces an existing number or adds a number, if blank.
• Name – Enter a name for the caller to be used as the Caller ID name. This replaces
an existing name or adds a name, if blank.
• Account # – Enter an account code for the call. This replaces an existing number
or adds a number, if blank.
Strata CIX Net Phone UG 04/08 51
Page 66
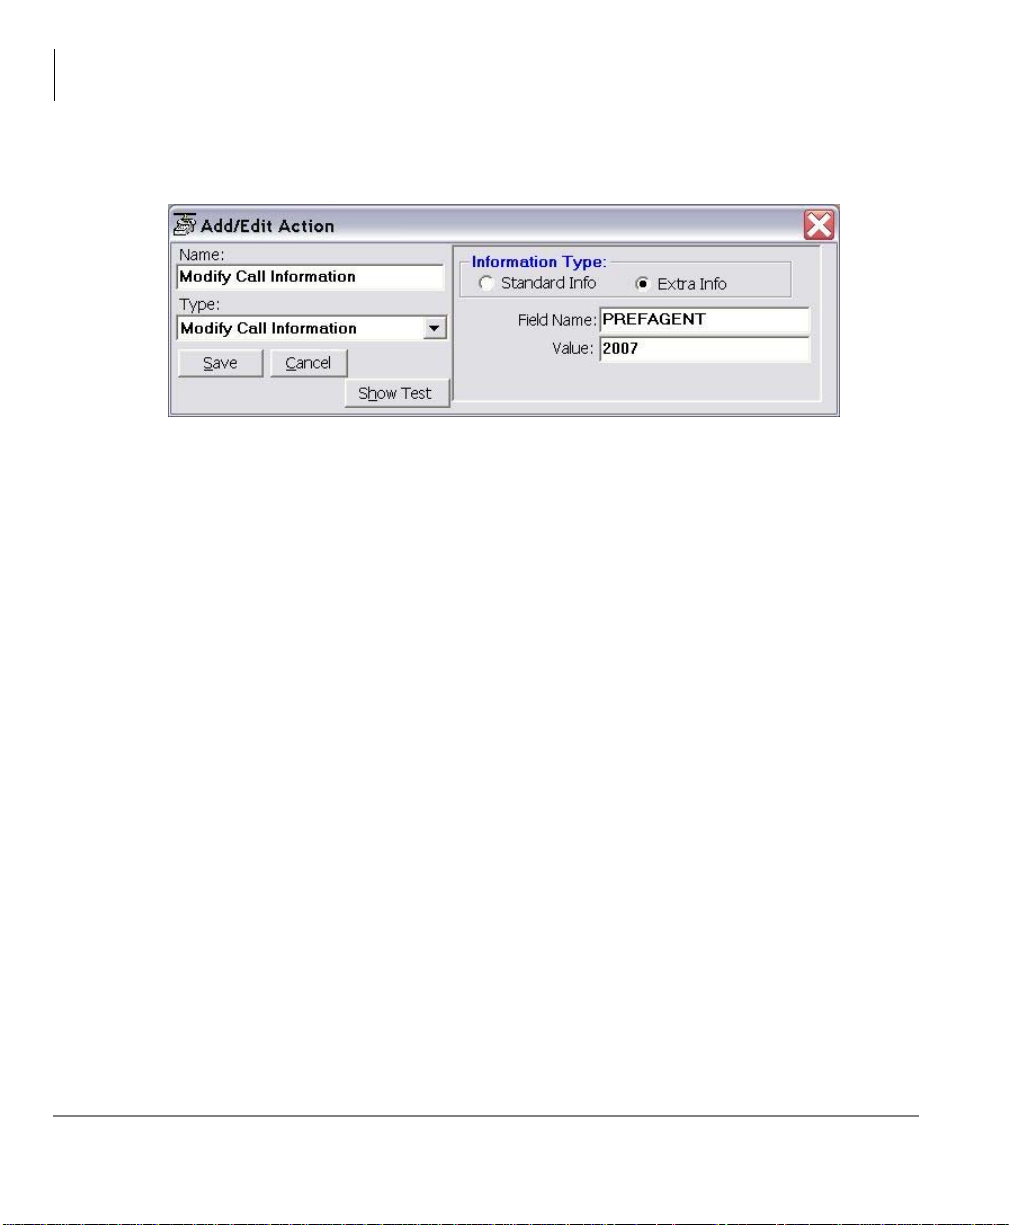
User-Defined Actions
Creating Actions
Extra Info
• Field Name – Enter the name of the field to be changed. This name must match
exactly the field name including uppercase and lowercase syntax. For example, a
user may want to create User Programmable Keys identifying the “Preferred
Agent” for the call prior to transferring the call into a queue. The Field Name
would be entered as PREFAGENT. The value would be the agent’s ID code.
• Value – Enter the value to be used for this field. Following the above example,
then the agent’s ID code would be entered into this field.
52 Strata CIX Net Phone UG 04/08
Page 67

User-Defined Actions
Creating Actions
Play WAV File
This action will play a specified WAV file on the PC sound card.
• Path & Filename – Enter the complete path name for the WAV file to be played or
browse to find the path of the file.
Pop External Web Browser
This action sends a URL to the PC’s default web browser (run the web browser if it
isn't already running). Works with Netscape Navigator and Microsoft Internet
Explorer.
URL – Enter the complete URL name for the Web site to be opened in your browser.
The URL can contain Action Variables to make the lookup use call information.
Strata CIX Net Phone UG 04/08 53
Page 68

User-Defined Actions
Creating Actions
Pop Internal Web Browser
This action can be used to send a URL to the ‘built-in’ web browser of the Net Phone
(when installed) or can be used to create access to other companion application
programs.
An example of using your Personal Call Handler to automatically open the Integrated
Web Window, whenever an outside call rings in, to provide a script to for answering
that call. The URL can contain action variables for example using the DID/DNIS
number used for the call to open a page created for each DID/DNIS number. Thus
when the call arrives, a screen opens for a script or questions to use for that call.
Another use may be to have several “Personal Directories” where the 8 button limit
may not allow access to more directories. Assigning a programmable button can
allow opening these personal directories using one-click access.
• Button Name – Enter the name of an existing Option button (bottom-row buttons
on Net Phone). This name must exactly match the name as displayed. This action
uses the specified button as the parent window.
• URL (Param1) – Enter a URL or other Param1 parameters as indicated in the table
below. The URL can contain Action Variables as part of the entry.
• Param 2 – Optional parameters. See table below for details.
54 Strata CIX Net Phone UG 04/08
Page 69

Button Name: URL (Param1): Param 2:
If blank, it uses the default
Speed Dial
Directory
Note: The default
settings when Param 2
is blank has Edit and
Outlook menu options
enabled and Chat
disabled.
Feature Dir
Note: A feature directory
can be created using
Directory when a
Feature Dir Option Key
does not exist.
Browser
Call History <blank>
More Buttons
“MyDir.txt” file or enter a file
name for your Speed Dial
directory.**
If this field is blank, the
default file is used based
upon the code in Param 2.
Param 2 should contain
either \P or \F and a file
name of your choice with a
suffix code of TXT can be
used for a private directory.
In this latter case enter the
file name to be used and
create a file following the
format of PersonalDir.txt or
FeatDir.txt edited for your
needs.**
If blank, it uses the default
“FeatDir.txt” file or enter a file
name for your Feature Dial
directory.**
Enter a URL to be opened.
If blank, the default URL of
the Option key is accessed.
Enter a number ‘n’ where
n=1~8 representing the
button bank to be displayed.
<blank>
\P — Enable PersonalDir.txt
\F — Enable FeatDir.txt (see below
for add’l codes)
\C — Enable Chat menu option
\NC — Disable Chat menu option
\E — Enable Edit menu option
\NE — Disable Edit menu option
\O — Enable Outlook menu option
\NO — Disable Outlook menu option
\T — Show Type column
\+H — Add Hunt Grp/ACD
extensions
\+V — Add Vmail extensions
\+A — Add AutoAttd extensions
\-N — Remove normal extensions
\+D — Add Debug features
\+O — Add Operator features
\-S — Remove standard features
\T — Show Type column
\NB — Do not show Back button
\B — Show Back button
\F — Show Forward button
\W — Show Web URL
\NX — Hide Notes column
\NV — Hide View Info option
<blank>
User-Defined Actions
Creating Actions
Strata CIX Net Phone UG 04/08 55
Page 70

User-Defined Actions
Creating Actions
Button Name: URL (Param1): Param 2:
Chat <blank> <blank>
Power Dialer <blank> <blank>
Replay <blank> <blank>
Note Specifying a new file name in Param 1 and requires manually creating that file
of the same name in the “Documents and Settings\<User Name>\Local
Settings\Application Data\CTS\Net Phone” folder may be used. This method
allows multiple personal directories to be created, each showing only the names
listed in that directory.
Popup Call Info Screen
This action will pop open either the Standard Call Info screen or Extra Call Info
screen. The Standard Call Info screen allows the user to type in the Caller ID name or
number or Account code of a call, lookup the phone numb er in Outlook and/or Open a
Contact or Journal, or Divert a Ringing call to another location. The either screen
allows you to view , change, or attach additional extra information to a call. The fields
shown in this window are defined in Preferences, General Tab (see
Screen” on page 16).
“Extra Info
Standard Call Information window
Extra Call Information window
56 Strata CIX Net Phone UG 04/08
Page 71

User-Defined Actions
Creating Actions
• Popup Info Screen T ype – Choose either Standard Info or Extra Info. When Extra
Info is selected, choose when the popup will occur: Always, Any Info Attached, or
Any Priority Info.
Popup Phone Screen
This action causes a popup (Restore) of the Net Phone screen from an icon.
• Phone Screen Size – Select the size for Net Phone’s main screen. The choices are
to restore to the Last Size Used, Small (or streamlined view), or Large (or
expanded view). When Net Phone is docked to the top or bottom, Net Phone
restores to settings defined in the Preferences Docking tab.
Strata CIX Net Phone UG 04/08 57
Page 72

User-Defined Actions
Creating Actions
Run another Program
This action triggers the running of another program on the PC.
• Program EXE – Enter the name and path of the program to be run. In the examp le
above, the program is Outlook.exe. Use the Browse button to find the file as
needed.
• Parameters – Enter any additional parameters that may be accepted as part of the
command line to startup the program. The example above uses Outlook to pop
open a “sticky note” with data and time recorded.
58 Strata CIX Net Phone UG 04/08
Page 73

User-Defined Actions
Creating Actions
Send DDE Msg
This action sends a DDE Execute message to another program on the PC. Frequently
this is used to "Screen Pop" a contact management program, such as Goldmine.
• App Name Topic – The application will specify both the application name and
topic name used for making the communication link. Follow the application note
or that application’s documentation for specifics. Note: The pipe character ‘|’ mus t
separate the application name and topic name.
• DDE Message – Follow the application note or the application’s documentation to
define the message to be sent for that application. The format and syntax is
defined by that application.
• Run Program and Program EXE – If the target program is NOT found to be
running, you can have the action attempt to automatically start the program.
Strata CIX Net Phone UG 04/08 59
Page 74
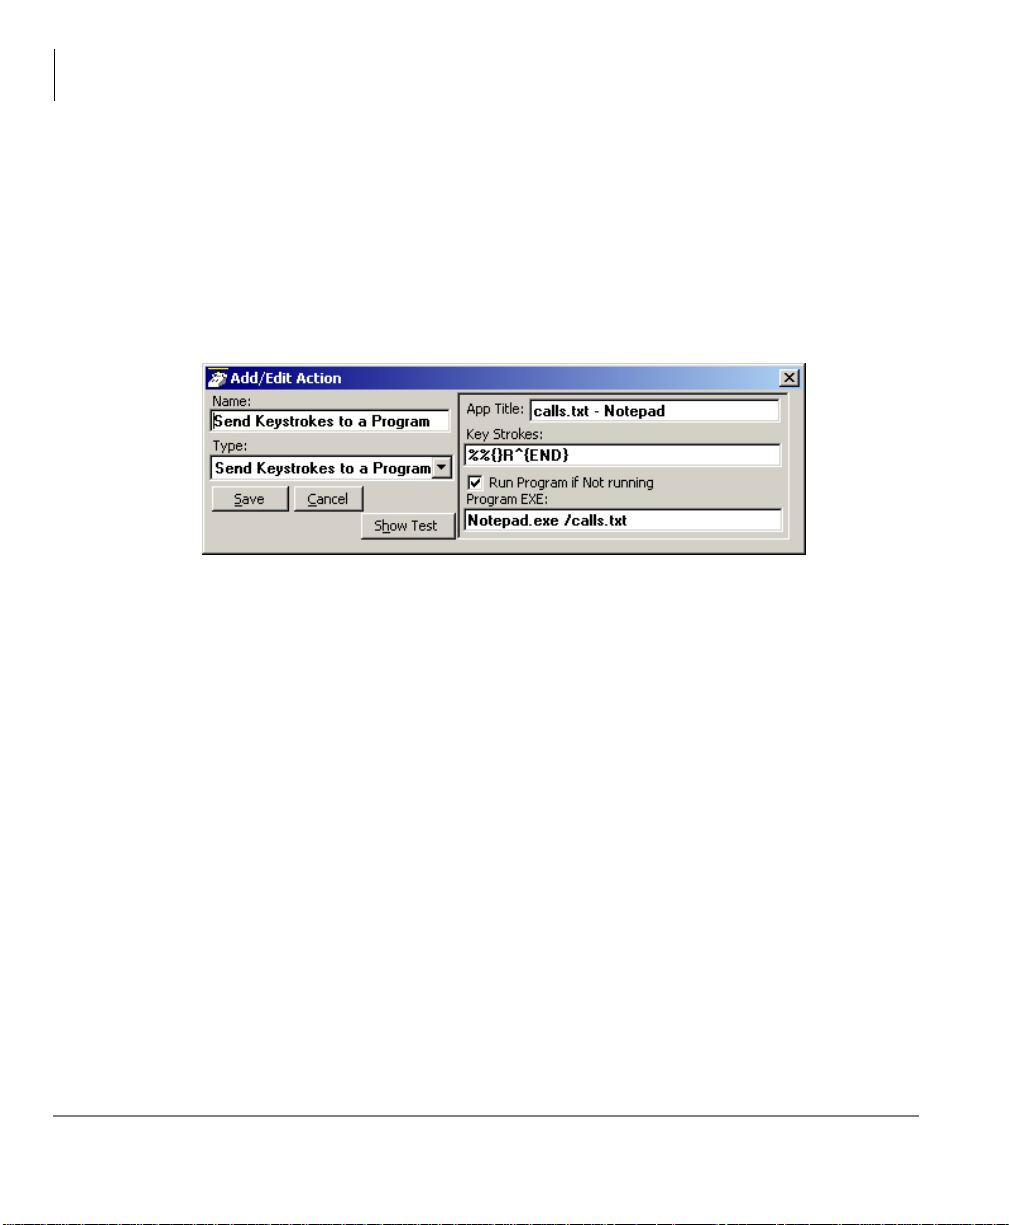
User-Defined Actions
Creating Actions
Send Keystrokes to a Program
This action provides a way to send keystrokes to another Windows program just as if
the user typed them into that program. This can be used, for example, to pop up
another program whenever a call rings in. Note: Use this action carefully because
when the action is triggered, the keystrokes will be sent to the target program
regardless of the state of that program (i.e. even when the user is in the middle of some
action in that program).
• App Title – must exactly match the text in the title bar of the target program (not
case sensitive).
• Key Strokes – You can send any keys including special keys (see below). One or
more characters represent each keystroke. To specify a single keyboard character,
use the character itself. For example, to represent the letter A, use "A" for key text.
If you want to represent more than one character, append each additional character
to the one preceding it. To represent the letters A, B, and C, use "ABC" for key
text.
• Run Program if Not Running – If the target program is NOT found running, you
can have the action attempt to automatically start the program.
• Program EXE – Enter the path to the program to be run and a command-line
parameter when needed to the target program for startup. Use a forward slash after
the EXE name and before the command line parameter(s).
Example Action:
The example in the diagram sends keystrokes to the Notepad program to Popup
(restore) the program and to move the cursor to the end of the file.
1. App Title: The App Title must match exactly what appears in the title bar of
Notepad: calls.txt - Notepad
60 Strata CIX Net Phone UG 04/08
Page 75

User-Defined Actions
Creating Actions
2. Key Strokes: To restore Notepad (Alt Sp R): Key Strokes:= %%{ }R and to
move to the end of the file (Control+End): append to Key Strokes: ^{END}
3. In Program EXE: Enter program name and file name to open “Notepad.exe /
calls.txt”.
Note The forward slash after "Notepad.exe" is needed to allow the command-line
parameter "/calls.txt" to be used. The result is that the file “calls.txt” will open,
if not open, and popup with the cursor at the end of the file allowing additional
entries to be made.
Special Keys
The plus sign (+), caret (^), percent sign (%), tilde (~), and parentheses ( ) have special
meanings. To specify one of these characters, enclose it inside braces. For example,
to specify the plus sign, use {+}. Brackets ([ ]) also must enclose them in braces. To
send brace characters, use {{} and {}}.
T o specify characters that aren't displayed when you press a key (such as Enter or Tab)
and keys that represent actions rather than characters, use the codes shown below:
Key Code Key Code
Backspace {BS} or {BKSP} Tab {TAB}
Break {BREAK} Up Arrow {UP}
Caps Lock {CAPSLOCK} F1 {F1}
Clear {CLEAR} F2 {F2}
Del {DEL} F3 {F3}
Down Arrow {DOWN} F4 {F4}
End {END} F5 {F5}
Enter {ENTER} F6 {F6}
Esc {ESC} F7 {F7}
Help {HELP} F8 {F8}
Home {HOME} F9 {F9}
Ins {INS} F10 {F10}
Strata CIX Net Phone UG 04/08 61
Page 76

User-Defined Actions
Creating Actions
Combination Keys
To specify keys combined with any combination of Shift, Ctrl, and Alt keys, precede
the regular key code with Shift, Ctrl, or Alt code.
T o specify that Shift, Ctrl, and/or Alt should be held down while several other keys are
pressed, enclose the code in parentheses. For example, to have the Shift key held
down while E and C are pressed, use "+(EC)". The code “+EC” will send the
characters Ec instead of EC and “E+C” will send the characters eC.
Key Code Key Code
Left Arrow {LEFT} F11 {F11}
Num Lock {NUMLOCK} F12 {F12}
Page Down {PGDN} F13 {F13}
Page Up {PGUP} F14 {F14}
Right Arrow {RIGHT} F15 {F15}
Scroll Lock {SCROLLLOCK} F16 {F16}
Spacebar { } Control ^
Shift + Alt %%
T o specify repeating keys, use the form {key number}; you must put a space between
key and number. For example, {LEFT 42} means press the Left Arrow key 42 times;
{h 10} means press h 10 times.
Note Keystrokes cannot be sent to an application that is not designed to run in
Microsoft Windows (MS-DOS programs, even in a DOS window) nor can the
Print Screen (PRTSC) key be sent to any application.
62 Strata CIX Net Phone UG 04/08
Page 77

User-Defined Actions
Creating Actions
Set Phone Do Not Disturb
This action sets the phone’s Do Not Disturb feature in the PBX (requires the PBX to
support this feature via OAI link) and sets a reason for this status. This reason
message displays on the phone’s display as well as appearing on Net Phone and the
DSS keys of other users of Net Phone.
• DND Message – The normal is to use the message defined below, but can be
created to provide the same message as provided on the phone.
• Set DND On – Choose the device for which this action is to apply, the primary
phone or the secondary phone.
• Choose DND Message – Select from the available messages in the drop down list
for the message that appears in the upper line of the phone’s display.
• Custom 2nd Line – Optionally enter a second line to display on the lower line of
the phone’s display message. Note: Action Variables may be used including the
time variable plus ‘x’ minutes to set a current time plus 60 minutes in the example
above.
Strata CIX Net Phone UG 04/08 63
Page 78

User-Defined Actions
Creating Actions
Set Phone Status Message
This action works much the same as Set Phone Do Not Disturb except it does not
change the phone’s DND status and the message only appears within Net Phone and
the DSS keys on other users of Net Phone.
• Choose DND Message – Select from the available messages in the drop down list
for the message that appears in the upper line of the phone’s display.
• Custom 2nd Line – Optionally enter a second line to display on the lower line of
the phone’s display message. Note: Action Variables may be used including the
time variable plus ‘x’ minutes to set a current time plus 60 minutes in the example
above.
Set Phone Forwarding
This action changes the Call Forwarding setting of the phone in the PBX for the prime
DN of the phone. The action can determine the type of forwarding (Immediate, Busy,
No Answer, Busy/No Answer, or Off) and the destination.
• Choose Forwarding – Select from the drop down list the forwarding action to use.
• Destination – Define the number for the destination of the forwarding. This is left
blank when using Forwarding Off.
64 Strata CIX Net Phone UG 04/08
Page 79

User-Defined Actions
Creating Actions
System/PBX Command
This action can be used to send appropriate OAI commands to the PBX to perform
functions. For example, you could have an action that sets your DND message to
"UNAVAILABLE" us ing the following: N 16. You could then set this action to run
each time you shutdown your phone.
• System/PBX Command – Select from the list of available commands and edit the
variable values (shown in quotation marks) as needed. The commands available
are as follows:
ANSWER
CONFERENCE
Where xxxxxÖ is the number to be dialed. Digits 0~9,*,#. A ‘,’
DIALxxxxx
HANGUP
HOLD
MODIFYCALL “Field”,
“Value
TRANSFER Recommend using Transfer Call action.
Recording Option When Recording is active on Net Phone.
RECORD
RECORDBKMAKR “Text Substitute your bookmark text for “Text”
RECORDSTOP
is a pause and ‘!’ is a hook-flash.. Parenthesis, semi-colons,
dashes, and spaces are ignored, thus (480) 496-9040 can be
entered.
Recommend using Modify Call Information or Attach Acct Code
action.
Strata CIX Net Phone UG 04/08 65
Page 80

User-Defined Actions
Creating Actions
ACD Option When ACD is available on some PBXs.
ACD HELP
ACD PU
SET WORKUNITS
Transfer Call
This action causes the active call to be transferred to another phone, directly to a
specific Voice mailbox, or to an outside phone number (i.e. 9,4969040).
• Transfer To – Enter an extension number or outside number to be called.
• Transfer Mbox – Enter a mailbox number if going to a Voice Mail number.
66 Strata CIX Net Phone UG 04/08
Page 81

Action Variables
Net Phone uses variables to provide information to actions. Net Phone replaces the
variable token code with the appropriate value when the action executes. For
example, %P becomes ‘4804969040’ when you receive a call from CTS.
Call Variables
Refer to the table below for call variables and their values.
Variable Information
%A Account Number
%B Call Direction ("In" or "Out")
%C DNIS Called Name
%D DNIS/DID Number
%E
%F Call Forwarded from Extension number
%G
%H Calling Number (hyphenated — type 1, format defined in agnt_ph.ini)
%I TAPI Call ID
%J Calling Number (hyphenated — type 2, format defined in agnt_ph.ini)
%L Elapsed Time of Call (H:MM:SS)
%M Main Listed Phone Number (Use with Export Call Info actions)
%N CallerID Name (outside calls only, requires CallerID)
This Net Phone’s Extension Number. (Can be used for Primary DN or
Secondary DN when using Set DND Action.)
DND Message, when phone is in DND. (Can be used for Primary DN or
Secondary DN when using Set DND Action.)
User-Defined Actions
Action Variables
Strata CIX Net Phone UG 04/08 67
Page 82

User-Defined Actions
Action Variables
Variable Information
%OR(“field”) or
%OC(“field”)
%P Incoming: CallerID Number / ANI; Outgoing: Dialed Number
%S Call Answered ("Y"es or "N"o)
%T Call Type ("IC" or "CO"): IC= Intercom call; CO= Outside call.
%V
%W
%X(“name”)
%Y
%Z Call Status ("Ringing", "Talking", etc.)
Outlook Calendar/Reminder “fields”:
1. “SUBJECT” — subject field of Outlook event.
2. “START” — start Date/Time of event.
3. “END” — ending Date/Time of event.
4. “IMPORTANCE” — Importance (Low, Normal, High) of event.
5. “LOCATION” — location of event.
6. “ADVANCE” — number of minutes of advance notice.
7. “STATUS” — Busy status (Free, Busy, Out of Office) of event.
8. “STIM” — start Time without the Date.
9. “DIFF” — time difference before event start, e.g., 15 minutes will report
“15 Minutes”. Used for text to speech announcments.
The Extra Call Info screen allows you to configure a button for each Call
Info field. This variable, %V, contains the value of that Call Info field for use
when defining an Action trigger.
Contains ‘1’ if Outlook Link found a match in Outlook. Contains ‘0’ if
Outlook Link did not find a match, or was not active.
Extra Call Info Field, i.e. %X("Notes"). The name of the field must be in
double quotations. For a list of field names in your system, go to
Preferences>General Tab>Extra Info button, Add and use the pull down list
for fields available on your system.
Contains the Outlook Unique Identifier if Outlook Link found a matching
record in Outlook.
Note Insert +x following the ‘%’ character to restrict the variable value to the first ‘x’
or leftmost characters. Insert –x to restrict the variable value to the last ‘x’ or
rightmost characters. For example, to pass the first 8 characters of the Calling
Party Name, enter: %+8N. To send the last 4 digits of the Calling Phone
Number, enter: %-4P.
68 Strata CIX Net Phone UG 04/08
Page 83

User-Defined Actions
Action Variables
System Variables
Net Phone also uses System Variables for Action parameter strings, such as Date and
Time. They can also provide some control over text logging actions with Carriage
Return, Line Feed, Tab, and Random Numbers (for file names.) Note: Many System
Variables duplicate the Action Variables to provide increased compatibility with
legacy applications and 3rd Party Application Notes.
Variable Information
&A Account Number
&B PBX Call ID
&C Insert a Carriage Return character
&D Insert the Date in format: “mm/dd/yy”
&E Insert Extension Number of My Phone
&F ACD Group Name
&G Agent ID
&H Calling Phone Number (hyphenated - type 1)
&I TAPI Call ID
&J Calling Phone Number (hyphenated - type 2)
&K ACD Group extension number
&L Insert a Line Feed character
&N Calling Party Name (outside calls only)
&n
&P Calling Phone Number
&Q Random Variable (6 digits)
&R Random Variable (8 digits)
&T Insert the Time in format: "HH:MM" (24 hour clock). See Note 1.
&U Insert the Time in US format: “H:MM AM/PM”. See Note 1.
&V1 VoIP Ringer Audio device (Soft Phone must be used to use)
&V2 VoIP Headset Audio device (Soft Phone must be used to use)
&X Destination Field (for Export of Call Info)
&Y Call Type ("IC" or "CO"): IC= Intercom call; CO= Outside call.
&t Insert a Tab Character
%% Insert a Percent "%" character
&& Insert an Ampersand "&" character
Insert the Date and/or time in user-specified format
i.e. "&Nhh:mm:ss AM/PM&"
Strata CIX Net Phone UG 04/08 69
Page 84

User-Defined Actions
Action Variables
Note &T and &U variables accept a relative addition of time in the format &U+’30’
results in the current time plus 30 minutes. The number of minutes must be
within single quotation marks. Example: A Set Phone Status Message action
can be specified selecting the OUT TO LUNCH message and a second line of
UNTIL &U+’30’. If this action is used at 11:55 AM, then the resulting
message on Net Phone is OUT TO LUNCH UNTIL 12:25 PM.
Examples for Text Reader/Announcer:
Speak Reminder: SPEAK,"Reminder,%OR("SUBJ"),Starting %OR("DIFF")",&V1,&V2
Speak Appointment: SPEAK,"Appointment,%OC("SUBJ"),Starting Now",&V1,&V2
Announce Call: CA,%T,&F,"%N",%H,&V1,&V2
Exporting Actions
Once an action has been designed, exporting the action is recommended to provide a
backup copy as well as a file that can be copied to other Net Phones. To export an
action, you will need to be in the Add/Edit Action screen and click the Show Test
button to reveal the testing parameters and the Export Action button. Pressing Export
Action copies the details of the action into a special file named: xx.ACI where 'xx' is
a number assigned by the software corresponding to the action number (i.e. 2.ACI).
This file is exported into the user’s application data folder (typically, “Ö\Documents
and Settings\<user name>\Local Settings\Application Data\CTS\netphone”). In order
to identify the file more easily you may want to user Explorer to rename that file to
something more appropriate (i.e. PLAYBELL.ACI). When renaming an action file
always limit the file name to 8 characters prior to the .ACI extension. This file can
then be copied to another PC to give a copy of the action to another user of Net Phone.
Leaving a copy in this folder provides a backup copy of the action. That will be then
be loaded at startup if that action were deleted in the Actions List (see Importing
Actions below for more details).
Note: When exporting an action, if a file with that name already exists, an error
message will occur and the action will not be copied – when this occurs you will need
to use Explorer to rename the existing file and then export again.
70 Strata CIX Net Phone UG 04/08
Page 85

User-Defined Actions
Action Variables
Importing Actions
When the Net Phone program starts up, it automatically imports actions from the
compiled NET_PHN.ACS action file plus all action files (*.ACx) it finds in its startup
folder. The last character used in the extension of the file n ame defines how the action
file is treated on importing:
• .ACI – These files are individual actions created by Exporting Actions. These will
be imported only when an action using the same action name does not exist in the
compiled file. Thus, when this file exists and the user had made changes to this
action, the user can revert back to the original operation by deleting the current
action in Net Phone then stopping and restarting Net Phone.
• .AC1 – Upon startup, Net Phone always imports all “One-Shot” action files
(*.AC1). When an action of the same name exists, the action will be overwritten.
Once imported, the One-Shot export files are deleted. These one-shot files can
thus be used to import an action just one time allowing the user to change or delete
the action as desired.
• .ACO – Upon startup, Net Phone always imports all “Over-W rite” action files and
overwrites any action with the same name. These are useful to ensure the actions
do not get changed or when making corrections on other Net Phones.
• .AC0 – This type of file is only imported at initial startup of the Net Phone or when
the compiled actions file “AGT_PHN.ACS” is not found at startup.
These files allow you to design an action, export it, rename it, and then copy the file to
all PCs that need that action. These are also useful to overcome a user accidentally
deleting an action since they can have a copy of that file on their PC, when they exit
and restart Net Phone that action will be restored.
Strata CIX Net Phone UG 04/08 71
Page 86

User-Defined Actions
Action Variables
Testing Actions
While in the Add/Edit Action screen, a Show Test/Done Testing button is offered.
Pressing this button when it is titled Show Test, will expand the window to a set of
“Test Values" that can be set representing the variables used within the action. This
sets the values of any real time variables for testing your action. For example, if your
action will be using the "Phone Number" variable (%P, %H, or %J) you will want to
set the test value of %P to the phone number you want to simulate (i.e. 7145551234).
Then press the Perform Test button to test your action. The "Test Results" screen will
show the results of the test and if the action fails, you can change the parameters of the
action and test again. When another application is involved in the action, that
application, in general, will need to be installed and running to perform the test.
Pressing the button titled Done Testing will close the “Test Window”.
Note If the action seems to work fine when you test it from this screen, but doesn't
seem to work properly when the action is used by the Call Handler you may
want to open the Main Menu Icon --> Setup --> Advanced --> Show Events
screen (see your System Administrator if you do not have the Advance menu
item) to see what is actually occurring when that action is being used.
72 Strata CIX Net Phone UG 04/08
Page 87

Using Net Phone Features 4
This chapter defines how to use PBX features from Net Phone. Features included are
Call Handling, PBX, Call Center, and Outlook features. Personal Call Handler rules
can be created to respond and take actions on calls automatically, or Programmable
Buttons can be used for even easier access to many features.
Call Handling Features
Call Handling features include how to dial, answer, hold, transfer and hang up calls. It
also includes how to view the Extra Call Information when attached to a call.
Making Outgoing Calls
Net Phone supports a number of ways to place calls including open architecture links
to other programs or contact managers, which can also be used to dial calls. The
following are some of the typical ways to place a call using Net Phone.
³ Manual On-screen Dialing
1. Click within the dialing number window and enter the number from the keyboard.
2. Press Enter when done to start the number to be dialed.
³ Re-dial a Recently Used Number
1. Pull down the list of numbers in the dialing window and select the number to dial.
2. Click the dial button for dialing to proceed.
Strata CIX Net Phone UG 04/08 73
Page 88

Using Net Phone Features
Call Handling Features
³ Using Net Phone Dialpad
1. Click the dialpad button to expose the dialpad.
2. Enter the number to be dialed including a trunk access code; the call will proceed
automatically once a valid number is entered.
³ Hot Key Dialing
1. Highlight a telephone number in another application.
2. Using the keyboard, press the key combination assigned for Hot Key Dialing. The
call will proceed dialing the number highlighted.
³ Using Drag and Drop
• Use the mouse to drag and drop a call from either the Call History or Speed Dial
list into the Dialing window. The call will proceed to dial.
• or use the mouse to drag and drop a call from either the Call History or Speed Dial
list into the LCD Display window. The call will proceed to dial.
³ Using Personal Speed Dial List
1. Click the Speed Dial Companion Option button to open your Personal Speed Dial
listing.
2. Make a selection from the listing and double-click the name to proceed dialing
or right-click on the selected name and choose Call Now to proceed.
³ Using Call History to Re-dial a Number
1. Click the Call History button.
2. scan the list for a recently dialed number or look for a number of someone that
called you.
3. Right-click on the line with the person to call and select Call Now
or double-click on the line with the person to call.
³ Using Speed Dial User Button
³ Click on a User Programmable button that has been programmed as a Speed Dial
button. The call will proceed immediately.
74 Strata CIX Net Phone UG 04/08
Page 89

Using Net Phone Features
Call Handling Features
Answering Calls
T ypically the longest ringing calls are answered first, but calls can be answered in any
order with a click of the button.
³ To Answer Oldest Call
³ While a call is ringing, click the Answer button .
or double-click on the top call in the Calls View Window.
or press the Answer Hot Key (F9). Note: Net Phone must have focus for the key to
work.
³ To Answer Calls in Any Order
³ Double-click on the selected call in the Calls View Window.
³ To Answer a Call while Talking (Call Waiting)
While on an existing conversation, another call may ring. The existing call can be
placed on hold and the ringing call answered.
³ While talking on an existing call and another call rings in (not marked “Campon”),
click the Answer button
or double-click on the ringing call in the Calls View Window
or press the Answer Hot Key (F9). Note: Net Phone must have focus for the key to
work.
³ Hanging Up or Disconnecting Calls
³ When the call is completed, click the hangup button to disconnect the call
or right-click on the call in the Call View Window and select Hangup.
or press the Hangup Hot Key (F12). Note: Net Phone must have focus for the key
to work.
Strata CIX Net Phone UG 04/08 75
Page 90
Using Net Phone Features
Call Handling Features
Transferring Calls
³ Using Transfer Button
1. While talking with a caller, click the transfer button to get intercom dial tone
or right-click on the call in the Call View Window and select Transfer.
2. Using the keyboard enter the number to transfer the caller to, press Enter when
done.
or use the on-screen dial pad and dial the number. Once the PBX
recognizes a valid number, the call will proceed automatically.
³ Using Drag and Drop
³ While talking with a caller, use the mouse to drag and drop the call from the Calls
Window onto a DSS button for immediate transfer to another station.
or use the mouse to drag and drop the call from the LCD display window onto a
DSS button for immediate transfer to another station.
76 Strata CIX Net Phone UG 04/08
Page 91

Using Net Phone Features
Call Handling Features
Viewing Extra Call Information
Net Phone has the ability to attach, retain, and display extra information taken on a
call. This could include information input by an IVR, added/attached information by
the Call Router, attached from a database, or added by any user who handled the call.
This information is retained with the call as it is transferred about in the phone system.
The following Call Info icons are displayed in the Calls window or LCD Display to
indicate the presence of additional information. The icon changes color depending
upon the information available:
• – No call information attached to this call.
• – Normal call information attached to this call.
• – At least one field of priority call information is attached.
³ To View Call Information
Click the "Call Info" icon on the right side of the Call key for the desired call.
This window can contain many different fields depending on your configuration and
the call information attached. Note: These windows can automatically popup
whenever a new call arrives by using the Popup Call Info Screen action in the
Personal Call Handler.
Strata CIX Net Phone UG 04/08 77
Page 92

Using Net Phone Features
Call Handling Features
³ To Add or Change Information
1. With the “Call Info” window open, place the cursor into the box to be changed and
use the keyboard to add or erase information.
Note The ability to add or change information is controlled by Preferences>Extra
Info settings.
2. Click the Update button to save the new information. Once changed, other
programs will use this information. For example, the call is being screened and
transferred into an ACD queue; the caller could define a Preferred Agent by
entering an agent’s ID into the Preferred Agent Information field. When the call is
transferred this information is available to be used by the ACD application.
³ To Copy Call Information to Another Application
With the “Call Info” window open, click the Copy button to place that specific
information on the Windows clipboard for pasting into another program. For
example, the user may need to use the Customer number to look up the status of an
order. Clicking Copy and switching to the other program and pasting into the
appropriate field allows for a fast lookup.
Holding Calls
³ To Place Call on Hold
³ While talking with a caller, click the hold button to place call on hold
or right-click on the call in the Call View Window and select Hold from the menu.
³ To Retrieve Call
³ To re-connect a held call, click the hold button again
or double-click on the held call in the Call View Window
or right-click on the held call and select Answer from the menu.
78 Strata CIX Net Phone UG 04/08
Page 93

Phone Feature Operation
Status messages and Call Forwarding is available on Net Phone.
Status Messages
User can set the Status message so that others can know the user’s status.
Using Net Phone Features
Phone Feature Operation
³ Setting DND Message Only
1. Right-click the button to bring up the Set DND or Status Message
window.
2. Change the selection to Status Msg Only On
3. Use the pull down listing and select a DND Message.
4. When needed enter additional information on the Custom 2nd Line.
5. Click the Save button when done. DND will not active, but the status message will
appear on the DSS keys throughout the system.
³ Turning Off DND or Message Only
1. Right-click the button to bring up the Set DND or Status Message
window.
2. Click the All Off button to remove either DND and/or the Status Message.
Strata CIX Net Phone UG 04/08 79
Page 94
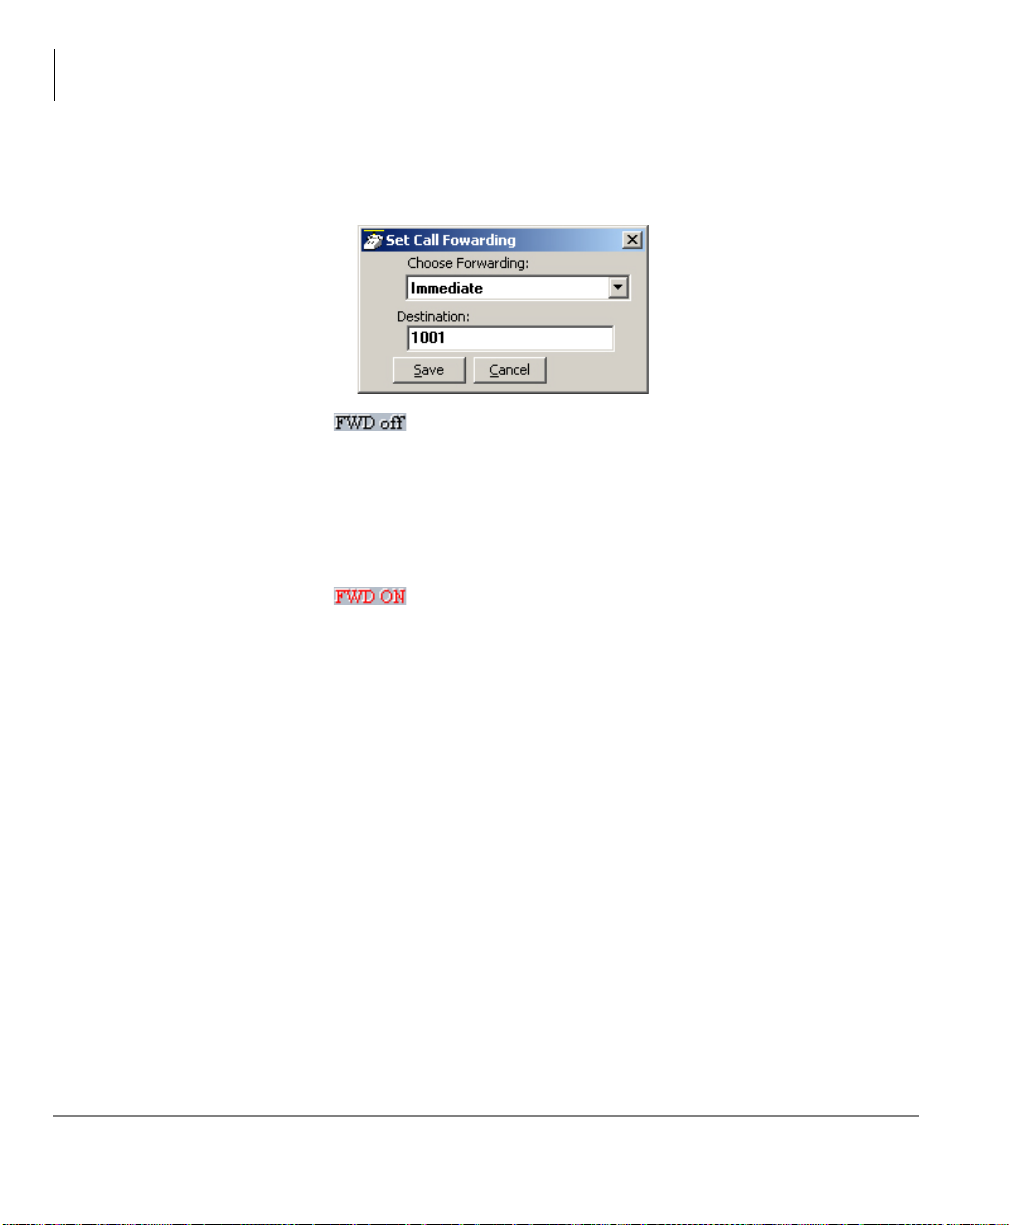
Using Net Phone Features
Phone Feature Operation
Call Fowarding
³ To Set Call Forwarding
1. Right-click the button.
2. Choose a Forwarding type from the pull-down listing.
3. Enter a Destination for the forwarded calls.
4. Click Save to compete the setting.
³ To Clear Call Forwarding
1. Right-click the button.
2. Choose <None> from the pull-down listing.
3. Click Save to remove the previous setting.
80 Strata CIX Net Phone UG 04/08
Page 95

Call Center Features
The ACD actions can be used to Log In / Log Out to/from ACD groups. Going
temporarily unavailable and an ability to end wrap times can be part of the features
available. Additional Call Center features are possible using User Programmable
buttons.
Logging In or Out
³ Click the ACD Log button to open the ACD Login/Logout window.
Using Net Phone Features
Call Center Features
Note The right list box shows available groups for the identified agent number. The
left list box shows groups currently logged into.
³ To log into or out of one or more groups
1. Highlight the group name(s) in the right-hand box and click <<Log In. If your
Agent ID is listed as a Supervisor, then the Supervisor: Take Calls check box will
be offered on your screen. Placing a check in this box will log you in to take calls
for the group(s) selected when <<Log In was pressed.
2. Click Done when finished.
3. The ACD Key will display the number of ACD groups the extension is logged into
and the total number of ACD groups you are a member.
Strata CIX Net Phone UG 04/08 81
Page 96

Using Net Phone Features
Call Center Features
³ To Log Out
1. Highlight the group name(s) in the left-hand box and click the >>Log Out button.
2. Click Done when finished.
Changing Agent Status
1. Click the ACD Status button. The following ACD Agent Status window will
appear:
³ To Make Agent Unavailable
1. Use pull-down list and choose a reason.
2. Click the Make Unavailable button.
3. Click Do ne.
³ To Make Agent Available
1. Click the Make Available button.
2. Click Do ne.
³ To Set the ACD Status to WrapUp
1. Click Set WrapUp button.
2. Click Do ne.
Note The Set WrapUp button is NOT available on all installations.
³ To End WrapUp
1. Click the ACD Status button.
2. Click the End WrapUp button.
3. Click Do ne.
82 Strata CIX Net Phone UG 04/08
Page 97

Connecting Headsets 5
Plantronics Wireless Headset
CS50-USB and CS60-USB DECT
This is a User Guide for Plantronics USB
Wireless headsets used with Net Phone 5.0
Softphone.Key features when used with Net
Phone 5.0 include:
• Net Phone interfaces directly with the CS50USB or CS60-USB DECT headsets without
any middleware software.
• Each Net Phone user can select from 100’s of
different sounds to be played when a call is
ringing. Also, a ringer in the headset can be
activated by checking the USB Ringer option
(“Use USB Ringer?”) in the Net Phone
Audio Settings.
• The “Answer” button on the side of the
headset can be used to answer and terminate
calls directly from the headset.
• A “Smart” button on the back of the headset
can be used to hold a current call and answer
a waiting call
Strata CIX Net Phone UG 04/08 83
Page 98

Connecting Headsets
Plantronics Wireless Headset
• The headset power is automatically turned off by Net Phone whenever a call is not
active and automatically restored upon receiving a call to save talk time battery.
• The speech volume (listening) can be adjusted on the headset as well as on Net
Phone, and the microphone volume (talking) can be easily adjusted in Net Phone.
Please refer to Plantronics User’s Guides for installation, setup, battery changing and
other items for operating your Wireless Headset.
Installation
• The software modules needed for Plantronics are installed automatically with the
Net Phone installation. All configuration information for Plantronics to work
properly is part of this installation.
• We recommend not running the Plantronics PerSonoCall application -- disable the
option to “Launch PerSonoCall whenever Windows starts,” and shut down the
application.
• If you are running the Plantronics PerSonoCall, always disable the option: “Enable
headset only for phone calls (extends battery life).”
Note Plug in the headset USB cord and make the power connection for the base unit
– Some PC USB ports provide enough power so that the external AC power
transformer does not need to be used.
• With Net Phone running, right-click the Audio/SPKR button to access the Audio
Settings dialog box. Make the following settings:
Sound Board/Device:
Audio Device Type: USB Headset
USB Audio Device
or CS50/CS60-USB Headset
The device for the headset
This activates the control
buttons on the headset.
84 Strata CIX Net Phone UG 04/08
Page 99

Headset Controls and Operation
• Charging Indication (1) – Red LED on
left side of base indicates when the
headset is being charged. This indication
is part of the Plantronics Headset base and
not affected by Net Phone 5.0.
• Status Indication (2) – Green LED on
right side of base lights when powered.
This LED flashes when the wireless
connection is active and transmitting. It
will be steady when powered up and idle.
Net Phone 5.0 sends a command to shut
down the wireless transmission when no
call is active to conserve the battery for
talk time.
Connecting Headsets
Plantronics Wireless Headset
• Answer/End Call Button (3) – This button functions like a “Speaker” key on a
phone -- Pressing this button will answer a ringing call. Pressing the button again
will end the call. If disconnecting a call while another call is holding, the first
press of this button will end the current call and then a second pressing will pickup
the holding call.
Strata CIX Net Phone UG 04/08 85
Page 100

Connecting Headsets
Plantronics Wireless Headset
• Listen Volume Control (4) – Pushing the button up will raise the volume in the
ear piece, pulling the button down will lower the volume in the ear piece. Each
push will step the volume level up or down one level.
• Smart Button (4) – This button functions similarly to a Hold button on a phone –
note you must press and hold this button for 2 to 3 seconds for it to operate. If
you’re talking on a call, pressing this button will put the call on hold -- to retrieve
the call from hold, simple press this button again or press the Answer/End Call
button. If you’re talking on a call and a 2nd call rings into your phone you will
hear a Call Waiting ring – pressing this button will put the 1st call on hold and
answer the 2nd call. You can put the 2nd call on hold but pressing the button
again, and then pressing it again will retrieve the 1st call from hold, and so on.
• Talk Indication (5) – An LED that lights when the user is talking (active) over the
headset.
Net Phone Audio Setup Screen
86 Strata CIX Net Phone UG 04/08
 Loading...