

Page 1

SMART MANAGER
Network Configuration Guide
Model name:
BMS-SM1280HTLE
Page 2
Smart Manager
Prohibited
Network Configuration Guide
Never connect the Smart Manager to
the Internet.
We assume no responsibility for any
problems resulting from connection to the
Internet.
Only local area connection is allowed for
the Smart Manager.
This guide describes the setting procedure for
connecting the Smart Manager to your personal
computer (abbreviated to “PC” hereinafter) via
the network.
PC operation to monitor and control air
conditioners is detailed in the Owner’s Manual
(Web Version).
1. System Configuration of PC
The PC to be connected must meet the following
system configuration conditions so that the Smart
Manager operates normally.
<Operating system>
• Microsoft Windows XP
• Microsoft Windows Vista
• Microsoft Windows 7
<Hardware>
• Screen resolution 1024 × 768 pixels or more
<Browser>
• Firefox 2.0, 3.0, 3.5 or 3.6
• Internet Explorer 7.0 or 8.0
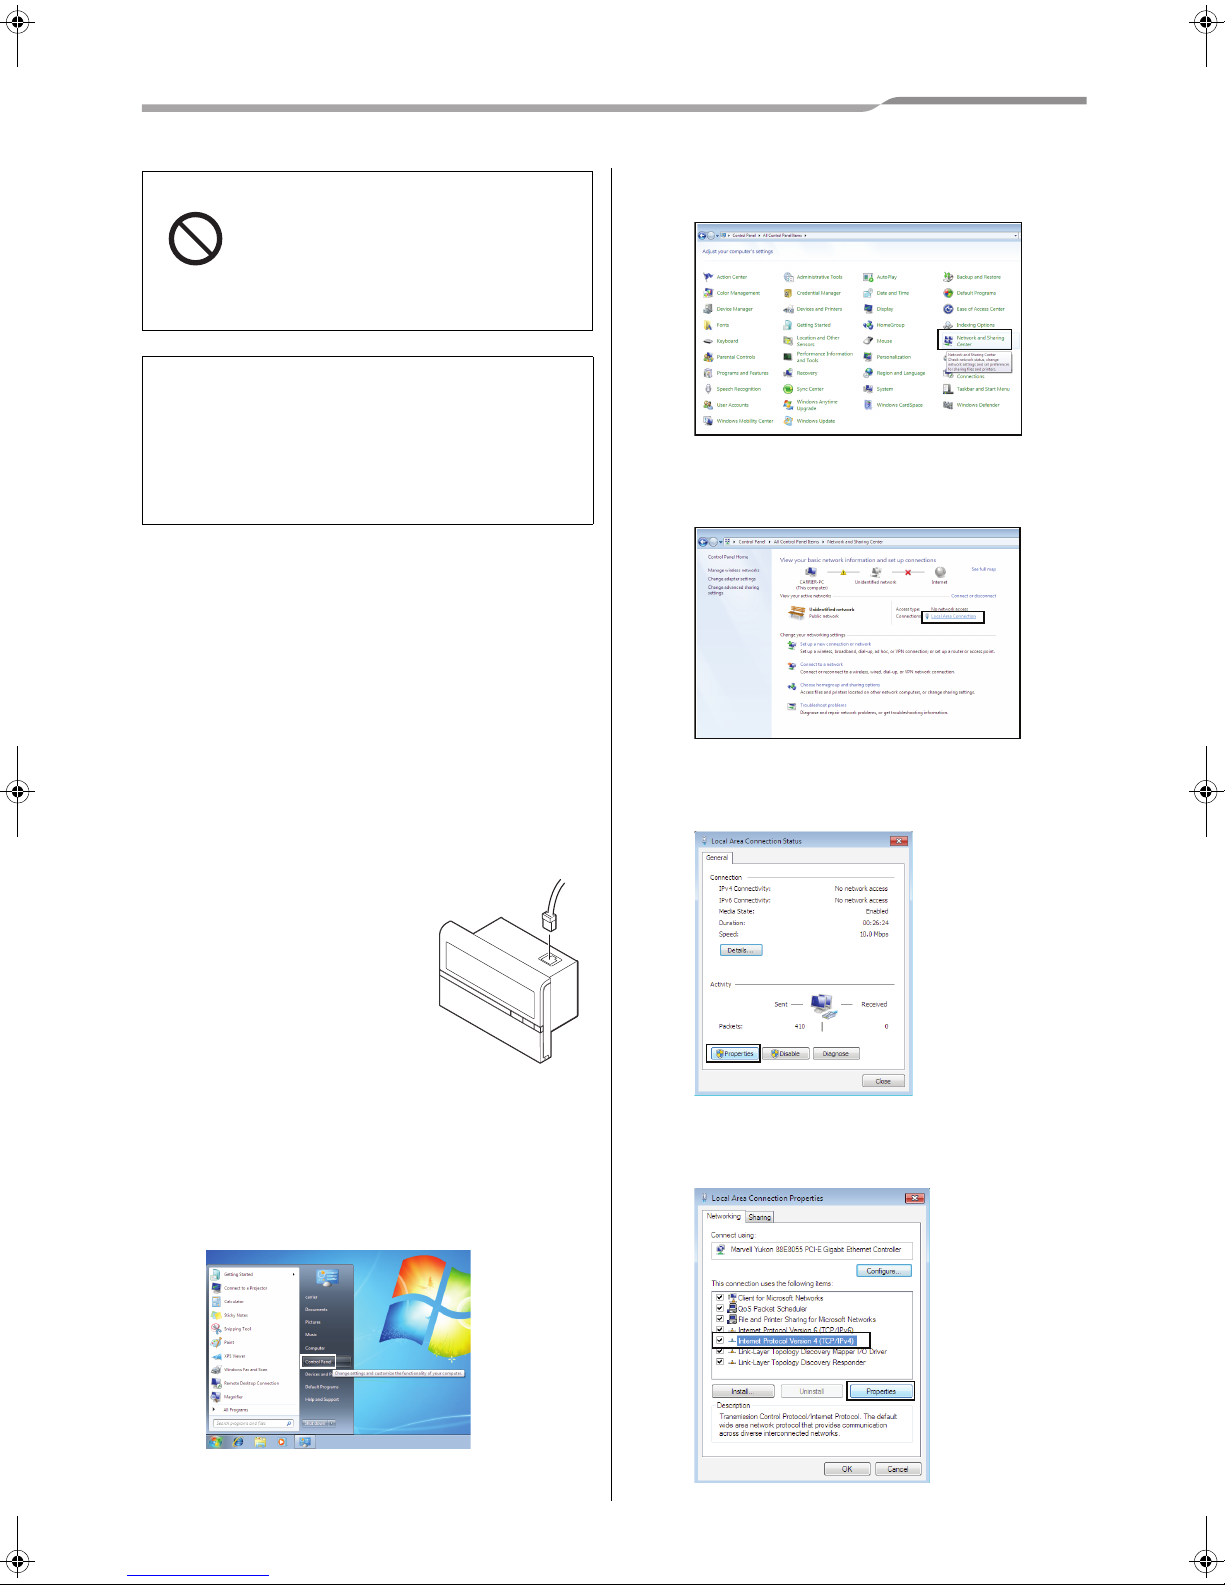
3) Click [Network and Sharing Center]. (Fig.2)
Fig.2
4) Click “Local Area Connection” of View your
active networks. (Fig.3)
Fig.3
5) Click [Properties] in the Local Area Connection
Status window. (Fig.4)
Fig.4
2. Connecting LAN
Cable
Connect the LAN cable to the
connector on the top of the
Smart Manager.
3. Client PC Settings
3-1. Setting IP Address
1) Log on to the system with the PC
administrator’s account.
2) Click [Start] -> [Control Panel]. (Fig.1)
Fig.1
6) Select the “Internet Protocol Version 4 (TCP/
IPv4)” checkbox, and click [Properties]. (Fig.5)
Fig.5
-EN
2
Page 3

Smart Manager
Network Configuration Guide
7) Select the “Use the following IP address:” radio
button, and set as follows:
IP address: 192.168.2.*** (***: Excluding 30)
Subnet mask: 255.255.255.0.
Then click [OK]. (Fig.6)
Fig.6
8) Close all the windows.
3-2. Setting Browser
<Internet Explorer>
1) Start Internet Explorer.
2) Click [Tools] on the toolbar. (Fig.1)
Fig.1
3) Choose “Internet Options” from the pull-down
menu. (Fig.2)
Fig.2
4) Click the “Connections” tab. (Fig.3)
Fig.3
5) Click [LAN settings]. (Fig.4)
Fig.4
3
EN
-EN
Page 4

Smart Manager
Network Configuration Guide
6) Clear the “Use a proxy server for your LAN”
checkbox (Fig.5) or select the “Bypass proxy
server for local addresses” checkbox (Fig.6),
and then click [Advanced].
Fig.5
Fig.6
Add “192.168.2.30” to the “Do not use proxy
server for addresses beginning with:” field.
(Fig.7)
Fig.7
<Firefox>
1) Start Firefox.
2) Click [Tools] and choose “Options” from the
pull-down menu. (Fig.1)
Fig.1
3) Click [Advanced]. (Fig.2)
Fig.2
4) Click the “Network” tab. (Fig.3)
Fig.3
7) Select a URL by language and type it into the
address bar to connect to the Smart Manager
(Web type air conditioning control system).
Table 1
English http://192.168.2.30/en/index.html
German http://192.168.2.30/de/index.html
Italian http://192.168.2.30/it/index.html
French http://192.168.2.30/fr/index.html
Spanish http://192.168.2.30/es/index.html
Chinese http://192.168.2.30/cn/index.html
-EN
4
5) Click [Settings]. (Fig.4)
Fig.4
Page 5

Smart Manager
Select the “No proxy” checkbox (Fig.5) or the
“Manual proxy configuration:” checkbox, and then
add “192.168.2.30” to the “No Proxy for:” field in the
Connection Settings window. (Fig.6)
Fig.5
Fig.6
Network Configuration Guide
6) Select a URL by language and type it into the
address bar to connect to the Smart Manager
(Web type air conditioning control system).
Table 1
English http://192.168.2.30/en/index.html
German http://192.168.2.30/de/index.html
Italian http://192.168.2.30/it/index.html
French http://192.168.2.30/fr/index.html
Spanish http://192.168.2.30/es/index.html
Chinese http://192.168.2.30/cn/index.html
5
EN
-EN
Page 6

Smart Manager
Network Configuration Guide
4. Displaying and Changing IP
address of the Smart Manager
IP address, subnet mask, default gateway, and
address setting of the Smart Manager can be
displayed and changed using the following
procedures (CODE No. settings).
CODE
No.
10
11 IP address 168 0 to 255
12 IP address 2 0 to 255
13
14
15 Subnet mask 255 0 to 255
16 Subnet mask 255 0 to 255
17
18
19 Default gateway 0 0 to 255
1A Default gateway 0 0 to 255
1B
1C Address setting 0
Item
IP address
(MSB)
IP address
(LSB)
Subnet mask
(MSB)
Subnet mask
(LSB)
Default gateway
(MSB)
Default gateway
(LSB)
Factory
setting
192 0 to 255
30 0 to 255
255 0 to 255
0 0 to 255
0 0 to 255
0 0 to 255
4-1. Displaying IP address
1) Change the mode to the CODE No. setting
change mode.
Press the (CHECK), (CL), and ZONE
buttons simultaneously for at least 4
seconds.
( and CODE No. flash.)
2) Select the CODE No. for IP address.
1. Change the CODE No. to “10” to “1B” with
the SET TEMP. or button.
2. The address of each item is displayed as
setup data.
3) Press the (CHECK) button to finish the IP
address display.
Data
Setting range
0: Display only
1: Manual setting
4-2. Changing IP address
The following procedure describes how to change
an IP address using an example of changing IP
address to 192.168.2.38.
1) Change the mode to the CODE No. setting
change mode.
Press the (CHECK), (CL), and ZONE
buttons simultaneously for at least 4
seconds.
( and CODE No. flash.)
2) Set the data of the CODE No..
1. Change the CODE No. to “1C” with the SET
TEMP. or button.
2. Change the set data to “1” with the GROUP
or button.
( and CODE No. are still flashing.)
3. Press the (SET) button to determine the
data. ( and CODE No. change to
lighting.)
4. Change the CODE No. to “13” with the SET
TEMP. or button.
5. Change the set data to “38” with the GROUP
or button.
NOTE)
At this time, the entered data of the selected CODE
No. has not been saved yet.
3) Exit the CODE No. setting change mode.
Press the (CHECK) button to write the
updated data in the memory of the Smart
Manager.
* When the data has completely been written
in the memory, the CODE No. setting
change mode is exited.
4) Press the Reset button to restart the Smart
Manager.
* IP address is set during the restart process.
When the IP address of the Smart Manager has been
changed, be sure to change the IP address of the
client PC to the address in the same segment. Also
change the setting of the browser to the IP address of
the Smart Manager.
-EN
6
Page 7

Smart Manager
Network Configuration Guide
Air Conditioning Control System
Network Configuration Guide
(For Smart Manager)
Jan, 2011
©Copyright Toshiba Carrier Corporation
2004-2011
7
EN
-EN
Page 8

DE93919301(EN)
 Loading...