

Page 1

TCS-NET RELAY INTERFACE
Installation Manual
TCS-NET Relay Interface
Model name:
BMS-IFLSV4UL
Page 2

TCS-NET Relay Interface
• Thank you very much for purchasing this TOSHIBA / Carrier TCS-NET Relay Interface.
• Please read this manual carefully beforehand for proper installation of the relay interface.
Installation Manual
Contents
1 Precautions for safety. . . . . . . . . . . . . . . . . . . . . . . . . . . . . . . . . . . . . . . . . . . . . . . . . . 2
2 Introduction . . . . . . . . . . . . . . . . . . . . . . . . . . . . . . . . . . . . . . . . . . . . . . . . . . . . . . . . . . 3
3 Before installation . . . . . . . . . . . . . . . . . . . . . . . . . . . . . . . . . . . . . . . . . . . . . . . . . . . . . 4
4 Installation . . . . . . . . . . . . . . . . . . . . . . . . . . . . . . . . . . . . . . . . . . . . . . . . . . . . . . . . . . . 4
5 Connection of power cables / earth wires / communication cables . . . . . . . . . . . . . 5
6 Setting. . . . . . . . . . . . . . . . . . . . . . . . . . . . . . . . . . . . . . . . . . . . . . . . . . . . . . . . . . . . . . . 8
7 Test run. . . . . . . . . . . . . . . . . . . . . . . . . . . . . . . . . . . . . . . . . . . . . . . . . . . . . . . . . . . . . . 9
1-EN
–1–
Page 3
TCS-NET Relay Interface
Installation Manual
1 Precautions for safety
• Read these “Precautions for Safety” carefully before installation.
• The precautions described below include important items regarding safety. Observe them without fail.
Understand the following details (indications and symbols) before reading the body text, and follow the
instructions.
• After the installation work has been completed, perform a test run to check for any problems. Explain how to use
and maintain the unit to the customer.
• Ask customer to keep this Manual at accessible place for future reference.
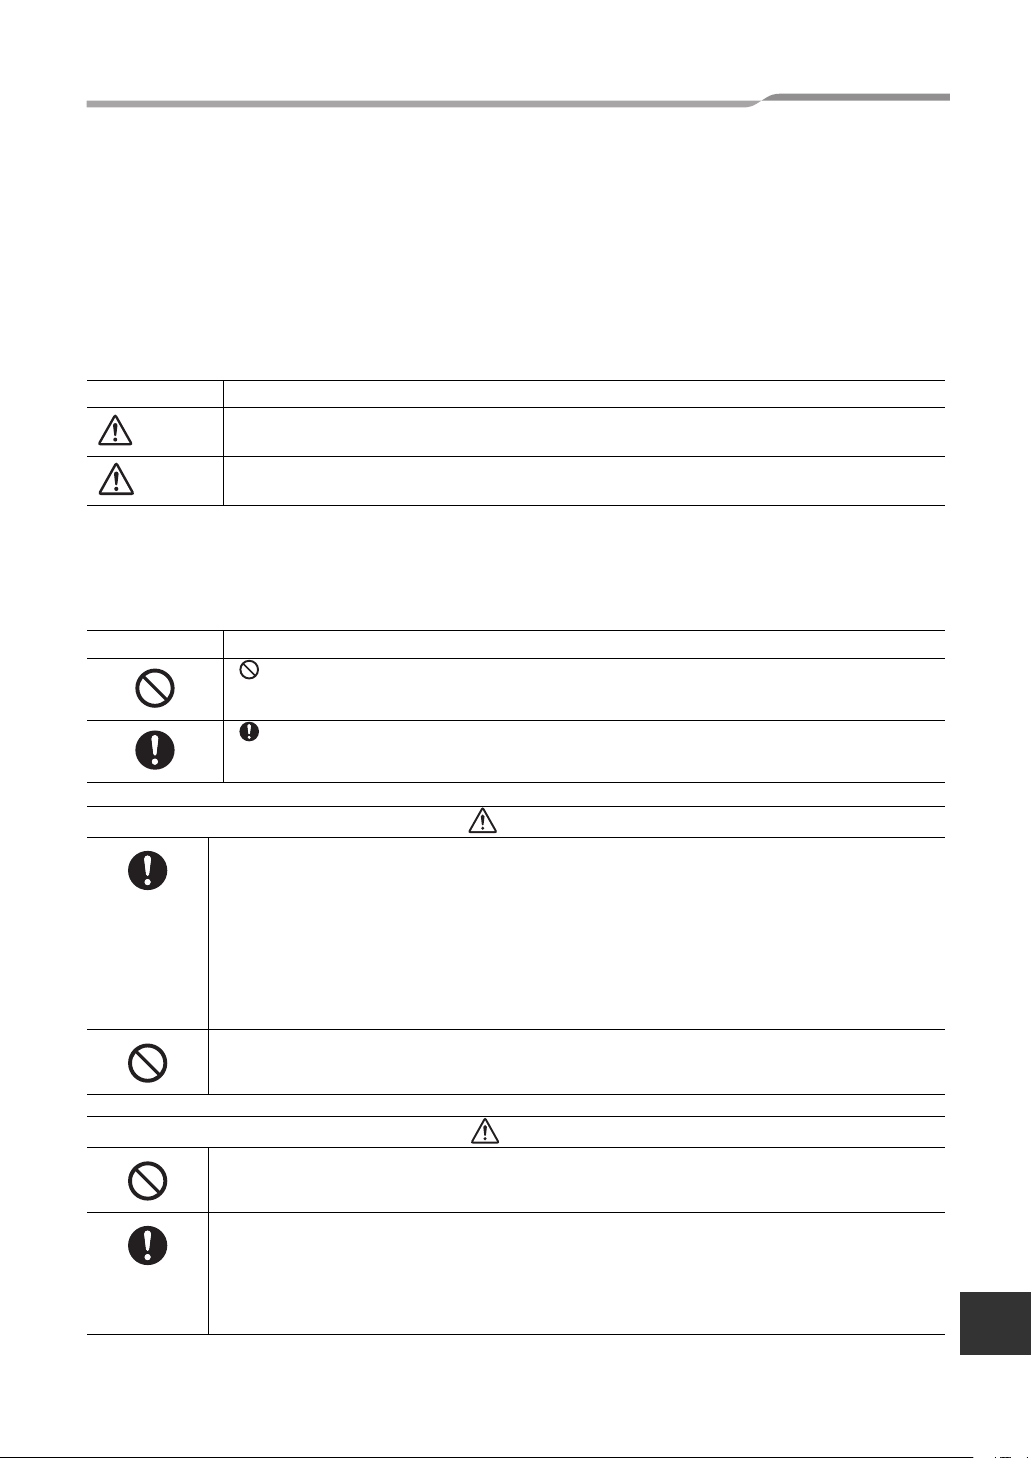
Indication Meaning of Indication
WARNING
CAUTION
Symbols Meaning of Symbols
Text set off in this manner indicates that failure to adhere to the directions in the warning could result in
serious bodily harm (*1) or loss of life if the product is handled improperly.
Text set off in this manner indicates that failure to adhere to the directions in the caution could result in
serious bodily injury (*2) or damage (*3) to property if the product is handled improperly.
*1: Serious bodily harm indicates loss of eyesight, injury, burns, electric shock, bone fracture, poisoning, and other
injuries which leave aftereffect and require hospitalization or long-term treatment as an outpatient.
*2: Bodily injury indicates injury, burns, electric shock, and other injuries which do not require hospitalization or long-
term treatment as an outpatient.
*3: Damage to property indicates damage extending to buildings, household effects, domestic livestock, and pets.
“ " Indicates prohibited items.
The actual contents of the prohibition are indicated by a picture or text placed inside or next to the graphic
symbol.
“ " Indicates compulsory (mandatory) items.
The actual contents of the obligation indicated by a picture or text placed inside or next to the graphic
symbol.
WARNING
• Ask an authorized dealer or qualified installation professional to install or reinstall this unit.
Inappropriate installation may result in electric shock or fire.
• Electrical work must be performed by a qualified electrician in accordance with this installation
manual.
The work must satisfy all local, national and international regulations.
Inappropriate work may result in electric shock or fire.
• Be sure to turn off all main power supply switches before starting any electrical work.
Failure to do so may result in electric shock.
• Do not modify the unit.
A fire or an electric shock may occur.
CAUTION
• Do not install this unit where flammable gas may leak.
If gas leaks and accumulates around the unit, it may cause a fire.
• Perform wiring correctly in accordance with specified the current capacity.
Failure to do so may result in short-circuiting, overheating or fire.
• Use predefined cable and connect them certainly. Keep the connecting terminal free from
external force.
It may cause an exothermic or a fire.
EN
–2–
2-EN
Page 4
TCS-NET Relay Interface
Installation Manual
2 Introduction
Applications / functions / specifications
Applications
• The TCS-NET Relay Interface is used to connect air conditioners (with TCC-LINK installed) to the air
conditioning control system or BACnet system.
Functions
• The TCS-NET Relay Interface converts signals between TCC-LINK and RS-485.
Specifications
Power supply 120 VAC, 60 Hz
Power consumption 3 W
Operating temperature / humidity 32 to 104 °F (0 to 40 °C), 10 to 90% RH (no condensation)
Storage temperature -4 to 140 °F (-20 to +60 °C)
Chassis material Galvanized sheet metal 0.8 t
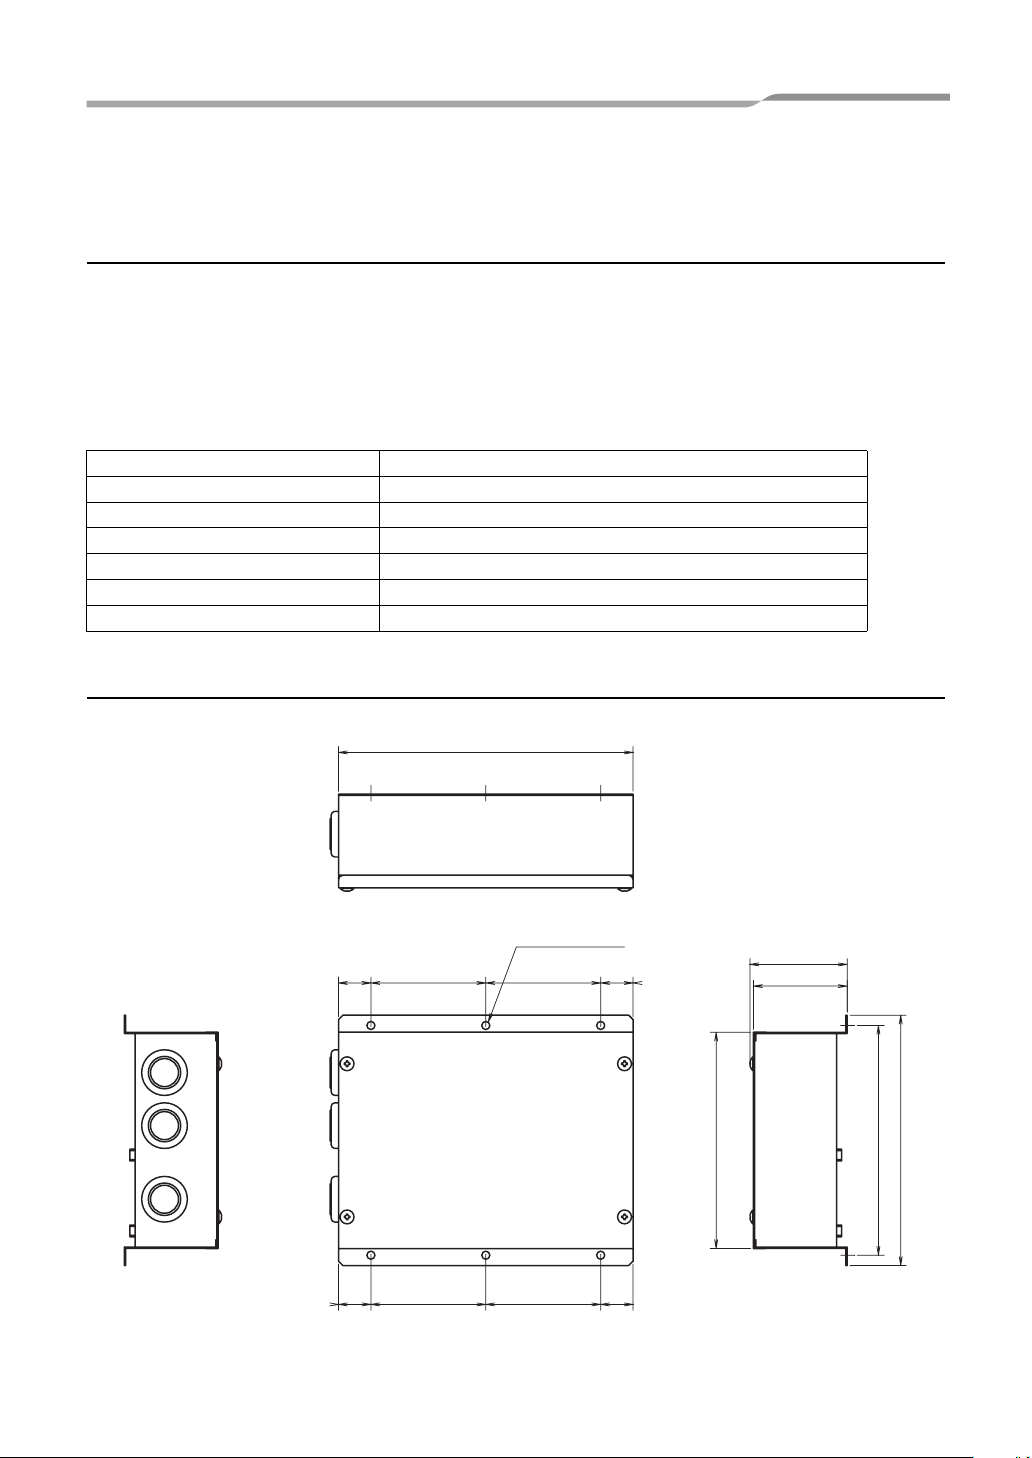
Dimensions 2.59” (H) x 6.69” (W) x 7.87” (D) inch (66 (H) x 170 (W) x 200 (D) mm)
Mass 2.43 lb (1.1 kg)
External view
0.86"
(22)
3.07" (78)
7.87" (200)
6-Ø7/32” (6-Ø5.5)
mounting holes
3.07" (78)
0.86"
(22)
2.59" (66)
2.5" (63.6)
5.78" (146.9)
Unit: inch (mm)
6.69" (170)
6.14" (156)
3-EN
0.86"
(22)
3.07" (78)
3.07" (78)
–3–
0.86"
(22)
Page 5

TCS-NET Relay Interface
Installation Manual
3 Before installation
Check the following package contents.
No. Item Quantity Remarks
1 TCS-NET Relay Interface 1
2 Installation Manual 1
3 Screw 4 5/32” x 0.47” (M4 x 12 mm) tapping screws
4Cable clamp 1
Use the following wiring materials to connect the communication cables and power cables. (locally procured)
No. Line Description
1
For TCC-LINK
2
For RS-485
3
For power
Type 2-core shielded wires
Wire size AWG16 (1.25 mm
Length
Type 2-core shielded wires
Wire size
Length
Type
Wire size
AWG14 (2.00 mm
(total length including air conditioner area)
AWG16 (1.25 mm
(total length)
UL, CSA approved power supply wire
AWG18 (0.75 mm
2
), 3200 ft (1000 m) max.
2
), 6500 ft (2000 m) max.
2
), 1600 ft (500 m) max.
2
), 160 ft (50 m) max.
4 Installation
TCS-NET Relay Interface installation method and orientation
There are five installation methods for this relay interface as shown below: surface mount and wall mounts. Use
the attached screws.
No good
REQUIREMENT
Do not install the unit in any of the following places.
• Humid or wet place
• Dusty place
• Place exposed to direct sunlight
• Place where there is a TV set or radio within one meter
• Place exposed to rain (outdoors, under eaves, etc.)
Installation space and maintenance space
A side space for connecting through cable inlets and an upper space for maintenance
must be reserved before installation.
The other sides can be adjacent to surrounding objects.
3.94”(100)
7.87”
(200)
EN
–4–
4-EN
Page 6

TCS-NET Relay Interface
Installation Manual
5 Connection of power cables / earth wires /
communication cables
CAUTION
• The RS-485 communication cables have polarity. Connect A to A, and B to B. If connected with incorrect polarity, the
unit will not work.
• The TCC-LINK communication cable have no polarity.
Connect power cables, earth wires, and communications cables to the specified terminals on the terminal block.
Length of stripped RS-485
communication cable (address 1)
1.97"
(50)
0.39"
(10)
0.39"
(10)
Length of stripped RS-485
(address of other than 1) and TCCLINK communication cable
1.97"
(50)
0.39"
(10)
Length of stripped power cable
1.38"
0.39"
(35)
(10)
L
N
(address 1)
The RS-485 communication cable must be earthed
on address 1 (Relay Interface address SW=1)
TCS-NET Relay Interface. Fix the shielded wire of
RS-485 communication cable with metal cable
clamp and screw it to the chassis to earth it.
Clamping communication cableClamping RS-485 communication cable
Do not connect the shield wire
to the earth. It should be open
and insulated.
2.17"
(55)
0.39"
(10)
5-EN
–5–
Page 7

TCS-NET Relay Interface
Installation Manual
To connect 2 cables,
change the preset cable
clamp to the provided o ne
and fix the cables with the
cable clamp as shown in
the figure left.
Air conditioner
BACnet Server
Connect the earth wire to the
earth terminal on the chassis.
Power supply
120 VAC, 60 Hz
Remove the grommet from the power
supply wire hole. Attach the conduit
pipe to the plate with a lock nut.
Use 1/2 inch conduit pipe.
Conduit pipe
Lock nut
Power supply wire hole
(Ø7/8” (22.2))
The TCC-LINK
communication cable must
be earthed on the air
conditioner. Do not connect
the shield wire to the
terminal block. It should be
open and insulated.
TCC-LINK
U1 U2 FG
RS-485
A B L N
SG
Connect the power supply cable
and earth wire to the terminals
using ring terminals with insulation
sleeve.
The RS-485 communication cable must be
earthed on address 1 (Relay Interface
address SW=1) TCS-NET Relay Interface.
The shielded wires must be crimped with
closed end connectors on interfaces with
address of other than 1. The shielded wire
ends must be insulated and left open.
LED4
SW2
SW7SW6SW5
LED3
LED2
SW1
LED1
SW4
LED5
SW3
1234
REQUIREMENT
Disconnect the appliance from the main power supply.
This appliance must be connected to the main power supply by a circuit breaker or switch with a contact separation of at least
3mm.
Fasten the screws to the terminal with torque of 0.5 Nm.
–6–
EN
6-EN
Page 8

TCS-NET Relay Interface
Installation Manual
Wiring connection
The following describes a connection example when two or more TCS-NET Relay Interface units are used.
Terminator resistor setting (See “6 Setting” for the setting method.)
• Set the RS-485 terminator resistor to “120 ohm” for address1 (Relay Interface address SW1=1) TCS-NET Relay
Interface unit, and set to “open” for other units.
• Set the TCC-LINK terminator resistor to “open” as it is set on the air conditioner side.
Shield earthing
• The RS-485 communication cable must be earthed on address 1 (Relay Interface address SW=1) TCS-NET
Relay Interface. Fix the shielded wire of RS-485 communication cable with metal cable clamp and screw it to the
chassis to earth it. The shielded wires must be crimped with closed end connectors on interfaces with address
of other than 1. The shielded wire ends must be insulated and left open.
• Do not connect the shield wire to the terminal block. It should be open and insulated. The TCC-LINK
communication cable must be earthed on the air conditioner.
Do not connect the shielded wire of
TCC-LINK communication cable to
the earth.
BACnet
SERVER
Connect the
shielded wires of
the two cables.
TCC-LINK U1 and
U2 have no polarity.
Red/Orange
Brown/Yellow
Crimp 3
A
B
Red
Yellow
Orange Brown
The RS-485 communication cable
must be earthed on address 1
wires with a
closed end
wire joint.
CAUTION: RS-485 communication
cables A and B have polarity. Be
careful when connecting the RS-485
wires.
Set the RS-485 terminator resistor on the
address1 unit (relay interface address
SW1=1) and host system. Do not set it here.
U1
U2FG
A
B
TCC-LINK
ABSG
RS-485
LN
SW1
SW6SW5
Power supply
U1
U2FG
TCC-LINK
ABSG
RS-485
LN
Power
supply
SW6SW5
TCC-LINK terminator resistor is set on
the air conditioner side. SW6 should
be OFF.
8
U4U3
U2 U1
Outdoor
unit
U2 U1
Indoor unit
Remote
Outdoor
controller
U4U3
U2 U1
unit
U2 U1
SW1
1
Indoor unit
Remote
controller
U2 U1
U2 U1
U4 U3
U4U3
U2 U1
Outdoor
unit
U2U1
Central
remote controller
Indoor unit
Indoor unit
Indoor unit
Remote
controller
U4 U3
U4U3
U2 U1
Outdoor
unit
U2U1
Remote
controller
Central
Indoor unit
remote controller
7-EN
RS-485 terminator resistor is set
by relay interface of address
setting switch SW1=1 only.
Set the TCS-NET Relay Interface address with SW1. Assign
1 to C(12) to each address to avoid duplication.
CAUTION: The SW1 setting is read when the power is
turned on. Push the reset switch SW7 after changing the
address.
–7–
Page 9
TCS-NET Relay Interface
Installation Manual
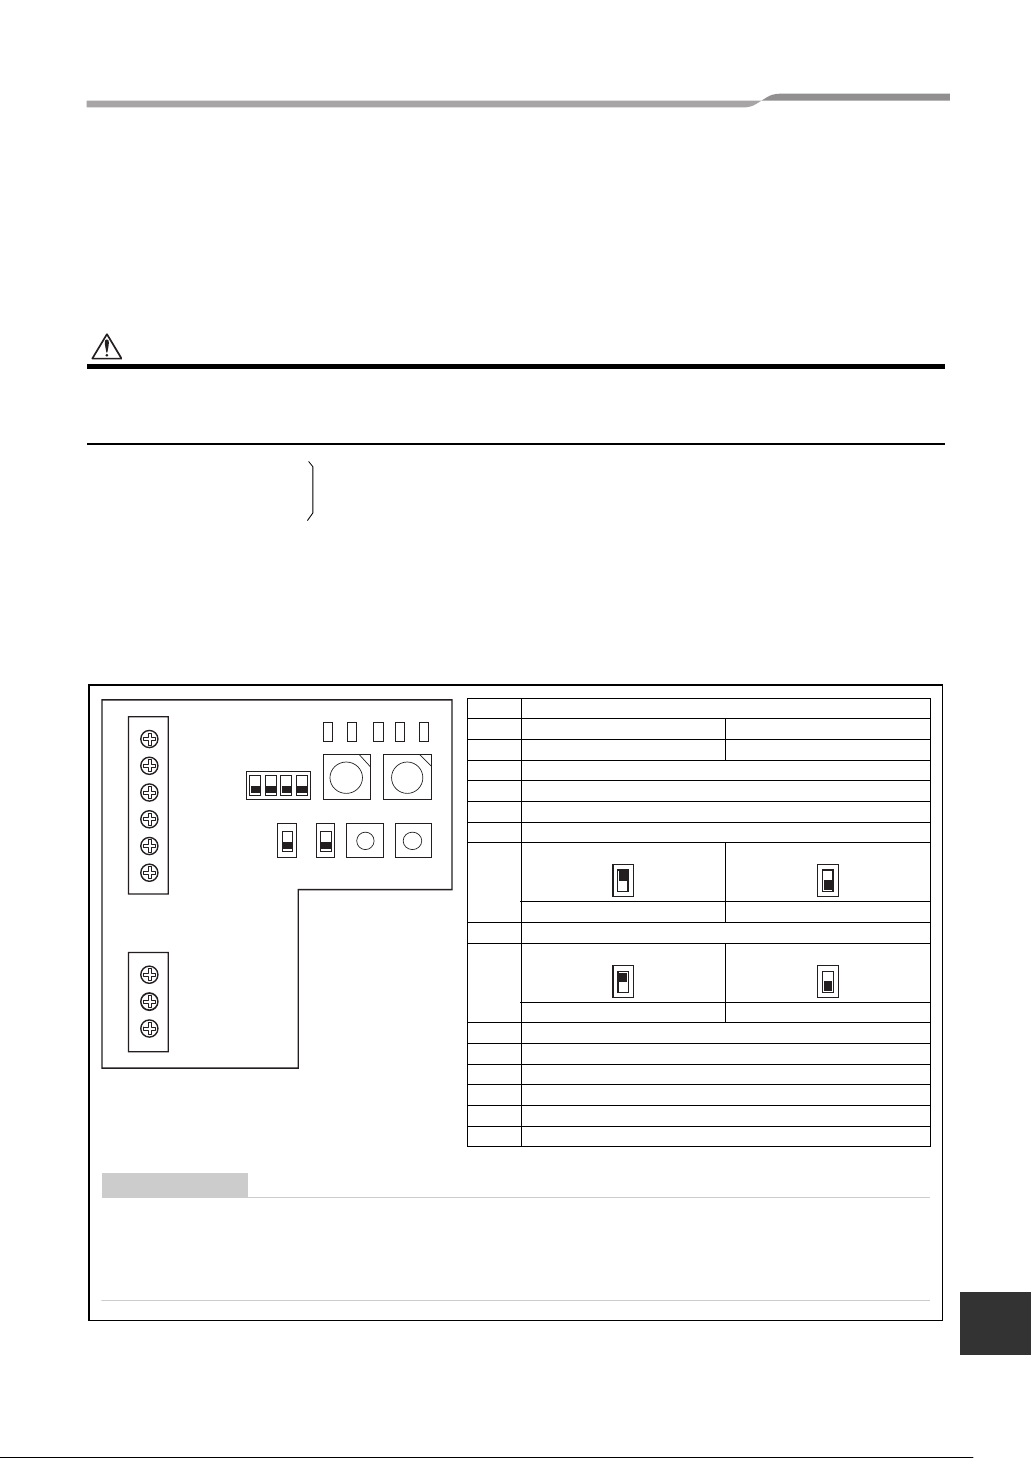
6 Setting
The following settings are necessary to use TCS-NET Relay Interface.
• SW1 TCS-NET Relay Interface address set switch
When two or more TCS-NET Relay Interface are used, set a different address for SW1 to avoid address
duplication.
Assign addresses in an ascending order.
CAUTION
• Set relay interface addresses according to the air conditioner address table.
For the relay interface whose address SW1=1, perform terminator resistor setting.
• When the SW1 setting has been changed, push the reset switch SW7. The new address setting is read.
• SW2 Test switch
• SW3 Test switch
• SW4 Test switch
Not used during operation.
Set these switches to zero (0) or “all OFF”.
• SW5 RS-485 terminator resistor select switch
Set “120 ohm” only when the relay interface address SW=1, and set “open” for other relay interfaces.
• SW6 TCC-LINK terminator resistor select switch
The TCC-LINK terminator resistor is set on the air conditioner side. Set SW6 to “open”.
• SW7 Reset switch
When performing an address setting with SW1, push this reset switch after the address setting to read
the set value.
LED2
U1 U2 FG
TCC-LINK RS-485
A
BSG
LN
SW3
1234
LED5
SW6SW5
LED4
SW2
SW7
LED3
LED1
SW1
SW4
SW1 Relay interface address set switch
1-C Relay interface address
0, D-F Not used
SW2 Test switch (0 usually)
SW3 Test switch (all OFF usually)
SW4 Test switch
SW5 RS-485 terminator resistor select switch
ON ON
120 ohm Open
SW6 TCC-LINK terminator resistor select switch
ON ON
100 ohm Open
SW7 Reset switch
LED1 Power indicator
LED2 RS-485 communication status indicator
LED3 TCC-LINK Communication status indicator
LED4 TCC-LINK Communication error indicator
LED5 Test indicator
REQUIREMENT
• RS-485 terminator resistor select switch SW5.
Set “120 ohm” only when the TCS-NET Relay Interface address SW=1, and set “open” for other relay
interfaces.
• The TCC-LINK terminator resistor is set on the air conditioner side. Set SW6 to “open”.
–8–
EN
8-EN
Page 10

TCS-NET Relay Interface
Installation Manual
7 Test run
Before starting test run
Complete the air conditioner test run.
Turn on the power of the TCS-NET Relay Interface after all cable connections and settings are completed.
Then turn on power of the BACnet Server.
Test run
Check the TCC-LINK and RS-485 communication status of the TCS-NET Relay Interface by checking the blinking
of the LEDs.
LED Normal operation Abnormal operation
LED1 Power indicator ON OFF
LED2 RS-485 communication status indicator Blinking OFF
LED3 TCC-LINK communication status indicator Blinking OFF
LED4 TCC-LINK communication error indicator OFF ON
LED5 TEST indicator OFF ON
LED1 Power indicator
ON: While power is on
OFF: When power is not turned on
LED2 RS-485 communication status indicator
Blinking: When RS-485 communication with the host system is normal
OFF: When RS-485 communication with the host system is disabled
LED3 TCC-LINK communication status indicator
Blinking: When TCC-LINK communication with any of the air conditioners is normal
OFF: When TCC-LINK communication with all air conditioners is disabled
LED4 TCC-LINK communication error indicator
ON: This LED will be turned on, when there is no reply from the air conditioner response to
signals from the Relay Interface.
OFF: This LED will be turned off, when there is reply from the air conditioner response to signals
from the Relay Interface.
LED5 Test indicator
Not used in normal operation
Displayed only in the test mode
Trademarks
• BACnet is a registered trademark of ASHRAE (American Society of Heating, Refrigerating and Air-Conditioning
Engineers, Inc.).
–9–
Page 11

TCS-NET Relay Interface
Installation Manual
MEMO
...................................................................................................
...................................................................................................
...................................................................................................
...................................................................................................
...................................................................................................
...................................................................................................
...................................................................................................
...................................................................................................
...................................................................................................
...................................................................................................
...................................................................................................
...................................................................................................
...................................................................................................
...................................................................................................
...................................................................................................
...................................................................................................
...................................................................................................
...................................................................................................
...................................................................................................
...................................................................................................
...................................................................................................
...................................................................................................
...................................................................................................
...................................................................................................
...................................................................................................
...................................................................................................
...................................................................................................
...................................................................................................
...................................................................................................
...................................................................................................
...................................................................................................
–10–
EN
Page 12

DE93129101
 Loading...