

Page 1

Model
BMS-CT5121E
Owner's Manual
TOUCH SCREEN CONTROLLER
for Air Conditioning Control System
English
Page 2

TOUCH SCREEN CONTROLLER for Air Conditioning Control System Owner's Manual
Contents
1 Precautions for safety . . . . . . . . . . . . . . . . . . . . . . . . . . . . . . . . . . . . . . . . . . . . . . . . . . 5
2 Main functions . . . . . . . . . . . . . . . . . . . . . . . . . . . . . . . . . . . . . . . . . . . . . . . . . . . . . . . . 6
3 Names and functions of main screens . . . . . . . . . . . . . . . . . . . . . . . . . . . . . . . . . . . . 7
3-1. Control screen . . . . . . . . . . . . . . . . . . . . . . . . . . . . . . . . . . . . . . . . . . . . . . . . . . 7
3-2. Air conditioner status list display . . . . . . . . . . . . . . . . . . . . . . . . . . . . . . . . . . 8
3-3. Icon display . . . . . . . . . . . . . . . . . . . . . . . . . . . . . . . . . . . . . . . . . . . . . . . . . . . 10
[1] Group icons . . . . . . . . . . . . . . . . . . . . . . . . . . . . . . . . . . . . . . . . . . . . . . . . . . . . . . . . . . . . 10
[2] Menu icons . . . . . . . . . . . . . . . . . . . . . . . . . . . . . . . . . . . . . . . . . . . . . . . . . . . . . . . . . . . . . 11
[3] Display switching icons. . . . . . . . . . . . . . . . . . . . . . . . . . . . . . . . . . . . . . . . . . . . . . . . . . . . 11
4 How to operate. . . . . . . . . . . . . . . . . . . . . . . . . . . . . . . . . . . . . . . . . . . . . . . . . . . . . . . 12
4-1. Moving levels . . . . . . . . . . . . . . . . . . . . . . . . . . . . . . . . . . . . . . . . . . . . . . . . . . 12
[1] Moving to a lower level on the control screen . . . . . . . . . . . . . . . . . . . . . . . . . . . . . . . . . . 12
[2] Moving to an upper level on the control screen . . . . . . . . . . . . . . . . . . . . . . . . . . . . . . . . . 12
4-2. Changing air conditioner settings . . . . . . . . . . . . . . . . . . . . . . . . . . . . . . . . . 13
[1] Changing individual settings of air conditioners on the control screen. . . . . . . . . . . . . . . . 13
[2] Changing multiple settings of air conditioners on the control screen . . . . . . . . . . . . . . . . . 14
[3] Changing the advanced functions of air conditioners on the control screen . . . . . . . . . . . 15
4-3. Schedule settings . . . . . . . . . . . . . . . . . . . . . . . . . . . . . . . . . . . . . . . . . . . . . . 17
[1] Creating new master schedules in the Running Schedule screen . . . . . . . . . . . . . . . . . . . 18
[2] Creating schedules in the Master Schedule Detailed Settings screen. . . . . . . . . . . . . . . . 19
[3] Copying daily schedule in the Master Schedule Weekly Pattern Settings screen . . . . . . . 20
[4] Setting special days in the Master Schedule Special Day Pattern Settings screen . . . . . . 20
[5] Changing, copying, and deleting master schedules in the Running Schedule screen. . . . 21
[6] Registering new master schedules in the Running Schedule screen. . . . . . . . . . . . . . . . . 22
[7] Confirming and changing the content of schedules registered in the Running
Schedule screen. . . . . . . . . . . . . . . . . . . . . . . . . . . . . . . . . . . . . . . . . . . . . . . . . . . . . . . . . 23
[8] Returning the content of the changes to the operating schedule to the master
schedule . . . . . . . . . . . . . . . . . . . . . . . . . . . . . . . . . . . . . . . . . . . . . . . . . . . . . . . . . . . . . . . 24
4-4. Billing Schedule settings . . . . . . . . . . . . . . . . . . . . . . . . . . . . . . . . . . . . . . . . 25
[1] Creating new billing schedules in the Billing Schedule screen. . . . . . . . . . . . . . . . . . . . . . 26
[2] Creating schedules in the Billing Schedule Detailed Settings screen . . . . . . . . . . . . . . . . 27
[3] Copying daily schedule in the Billing Schedule Weekly Pattern Settings screen . . . . . . . . 27
[4] Setting special days in the Billing Schedule Special Day Pattern Settings screen. . . . . . . 27
[5] Changing, copying, and deleting billing schedules in the Billing Schedule screen. . . . . . . 27
[6] Registering billing schedules in the Billing Schedule screen . . . . . . . . . . . . . . . . . . . . . . . 27
-EN
2
Page 3

TOUCH SCREEN CONTROLLER for Air Conditioning Control System Owner's Manual
4-5. Setting outdoor demand schedule. . . . . . . . . . . . . . . . . . . . . . . . . . . . . . . . . 28
[1] Opening the Outdoor Demand Schedule screen . . . . . . . . . . . . . . . . . . . . . . . . . . . . . . . . 28
[2] Creating new outdoor demand schedules in the Outdoor Demand Schedule screen . . . . 29
[3] Creating schedules in the Outdoor Demand Schedule Detailed Settings screen . . . . . . . 30
[4] Copying daily schedule in the Outdoor Demand Schedule Weekly Pattern
Settings screen. . . . . . . . . . . . . . . . . . . . . . . . . . . . . . . . . . . . . . . . . . . . . . . . . . . . . . . . . . 30
[5] Setting special days in the Outdoor Demand Schedule Special Day Pattern
Settings screen. . . . . . . . . . . . . . . . . . . . . . . . . . . . . . . . . . . . . . . . . . . . . . . . . . . . . . . . . . 30
[6] Changing, copying, or deleting Outdoor Demand Schedules in the Outdoor
Demand Schedule screen . . . . . . . . . . . . . . . . . . . . . . . . . . . . . . . . . . . . . . . . . . . . . . . . . 30
[7] Registering outdoor demand schedules in the Outdoor Demand Schedule screen. . . . . . 30
4-6. Alarm List and Alarm History List screen . . . . . . . . . . . . . . . . . . . . . . . . . . . 31
[1] Alarm List screen . . . . . . . . . . . . . . . . . . . . . . . . . . . . . . . . . . . . . . . . . . . . . . . . . . . . . . . . 31
[2] Alarm History List screen . . . . . . . . . . . . . . . . . . . . . . . . . . . . . . . . . . . . . . . . . . . . . . . . . . 31
4-7. List display . . . . . . . . . . . . . . . . . . . . . . . . . . . . . . . . . . . . . . . . . . . . . . . . . . . . 32
4-8. Monitor screen . . . . . . . . . . . . . . . . . . . . . . . . . . . . . . . . . . . . . . . . . . . . . . . . . 34
[1] Changing the settings of air conditioners on the Monitor screen . . . . . . . . . . . . . . . . . . . . 34
4-9. Layout screen (TOUCH SCREEN CONTROLLER only) . . . . . . . . . . . . . . . . 35
[1] Checking the position of air conditioners . . . . . . . . . . . . . . . . . . . . . . . . . . . . . . . . . . . . . . 35
[2] Selecting the air conditioner on the layout screen . . . . . . . . . . . . . . . . . . . . . . . . . . . . . . . 36
[3] Changing the settings of air conditioners on the layout screen . . . . . . . . . . . . . . . . . . . . . 36
[4] Zooming in and out of the layout diagram . . . . . . . . . . . . . . . . . . . . . . . . . . . . . . . . . . . . . 37
[5] Moving the position of the display of a zoomed in layout diagram . . . . . . . . . . . . . . . . . . . 37
[6] Moving to other layout diagrams . . . . . . . . . . . . . . . . . . . . . . . . . . . . . . . . . . . . . . . . . . . . 38
[7] Registering the air conditioner in the layout diagram . . . . . . . . . . . . . . . . . . . . . . . . . . . . . 39
[7-1] Changing to layout registration mode from the control screen. . . . . . . . . . . . . . . . 39
[7-2] Registering the air conditioner to the layout diagram from layout
registration mode . . . . . . . . . . . . . . . . . . . . . . . . . . . . . . . . . . . . . . . . . . . . . . . . . . 40
[7-3] Changing to layout registration mode with the layout screen. . . . . . . . . . . . . . . . . 41
[8] Changing and clearing the air conditioner registration of the layout diagram. . . . . . . . . . . 42
4-10. Changing the top level . . . . . . . . . . . . . . . . . . . . . . . . . . . . . . . . . . . . . . . . . . 43
[1] Changing the top level on the control screen . . . . . . . . . . . . . . . . . . . . . . . . . . . . . . . . . . . 43
4-11. Switching the display of the unit names . . . . . . . . . . . . . . . . . . . . . . . . . . . . 44
[1] Switching unit names in the control screen . . . . . . . . . . . . . . . . . . . . . . . . . . . . . . . . . . . . 44
4-12. Option screen. . . . . . . . . . . . . . . . . . . . . . . . . . . . . . . . . . . . . . . . . . . . . . . . . . 45
[1] Settings related to air conditioners . . . . . . . . . . . . . . . . . . . . . . . . . . . . . . . . . . . . . . . . . . . 45
[1-1] Release Outdoor Demand . . . . . . . . . . . . . . . . . . . . . . . . . . . . . . . . . . . . . . . . . . . 45
[1-2] Disabling schedules . . . . . . . . . . . . . . . . . . . . . . . . . . . . . . . . . . . . . . . . . . . . . . . . 46
[1-3] Operation mode restriction . . . . . . . . . . . . . . . . . . . . . . . . . . . . . . . . . . . . . . . . . . . 46
[2] System settings . . . . . . . . . . . . . . . . . . . . . . . . . . . . . . . . . . . . . . . . . . . . . . . . . . . . . . . . . 47
[2-1] Contact information . . . . . . . . . . . . . . . . . . . . . . . . . . . . . . . . . . . . . . . . . . . . . . . . 47
[2-2] Clock and calendar setting . . . . . . . . . . . . . . . . . . . . . . . . . . . . . . . . . . . . . . . . . . . 47
[2-3] Automatic Meter-Reading . . . . . . . . . . . . . . . . . . . . . . . . . . . . . . . . . . . . . . . . . . . 48
-EN
3
Page 4

TOUCH SCREEN CONTROLLER for Air Conditioning Control System Owner's Manual
[2-4] Manual Meter-Reading (TOUCH SCREEN CONTROLLER only) . . . . . . . . . . . . . 48
[2-5] Icon settings (TOUCH SCREEN CONTROLLER only) . . . . . . . . . . . . . . . . . . . . . 49
[2-6] Display Settings (TOUCH SCREEN CONTROLLER only) . . . . . . . . . . . . . . . . . . 49
[2-7] Password Setting (TOUCH SCREEN CONTROLLER only) . . . . . . . . . . . . . . . . . 50
[2-8] IP Address Setting (TOUCH SCREEN CONTROLLER only) . . . . . . . . . . . . . . . . 51
[2-9] User Account Setting (TOUCH SCREEN CONTROLLER only) . . . . . . . . . . . . . . 52
[2-10] Output to USB memory (TOUCH SCREEN CONTROLLER only). . . . . . . . . . . . . 53
[2-11] System initialize (TOUCH SCREEN CONTROLLER only) . . . . . . . . . . . . . . . . . . 53
[2-12] Alarm email address setting (TOUCH SCREEN CONTROLLER only) . . . . . . . . . 53
4-13. Indoor unit graph screen (TOUCH SCREEN CONTROLLER only) . . . . . . . 54
[1] Displaying the indoor unit graph screen. . . . . . . . . . . . . . . . . . . . . . . . . . . . . . . . . . . . . . . 54
[2] Displaying the indoor unit graph . . . . . . . . . . . . . . . . . . . . . . . . . . . . . . . . . . . . . . . . . . . . . 55
[3] Displaying the graphs of other indoor units . . . . . . . . . . . . . . . . . . . . . . . . . . . . . . . . . . . . 56
[4] Displaying graphs of other dates . . . . . . . . . . . . . . . . . . . . . . . . . . . . . . . . . . . . . . . . . . . . 57
4-14. Power graph screen (TOUCH SCREEN CONTROLLER only) . . . . . . . . . . . 58
[1] Displaying the power graph screen . . . . . . . . . . . . . . . . . . . . . . . . . . . . . . . . . . . . . . . . . . 58
[2] Displaying the total power graph . . . . . . . . . . . . . . . . . . . . . . . . . . . . . . . . . . . . . . . . . . . . 59
[3] Displaying the system power graph . . . . . . . . . . . . . . . . . . . . . . . . . . . . . . . . . . . . . . . . . . 60
[4] Displaying graphs of other dates . . . . . . . . . . . . . . . . . . . . . . . . . . . . . . . . . . . . . . . . . . . . 61
5 Monitoring/controlling using a computer . . . . . . . . . . . . . . . . . . . . . . . . . . . . . . . . . 62
5-1. Log on/Log off . . . . . . . . . . . . . . . . . . . . . . . . . . . . . . . . . . . . . . . . . . . . . . . . . 62
5-2. Air conditioner status list display . . . . . . . . . . . . . . . . . . . . . . . . . . . . . . . . . 63
5-3. Entering numbers . . . . . . . . . . . . . . . . . . . . . . . . . . . . . . . . . . . . . . . . . . . . . . 64
5-4. Schedule detailed settings screen display . . . . . . . . . . . . . . . . . . . . . . . . . . 65
5-5. Changing the top level . . . . . . . . . . . . . . . . . . . . . . . . . . . . . . . . . . . . . . . . . . 65
5-6. Option screen display . . . . . . . . . . . . . . . . . . . . . . . . . . . . . . . . . . . . . . . . . . . 66
6 Important information . . . . . . . . . . . . . . . . . . . . . . . . . . . . . . . . . . . . . . . . . . . . . . . . . 67
-EN
4
Page 5
TOUCH SCREEN CONTROLLER for Air Conditioning Control System Owner's Manual
The following instructions
must be observed.
Prohibited
Compulsory
Caution
Ask
professional
Disassembly
prohibited
Compulsory
Compulsory
Prohibited
1 Precautions for safety
• The product and this manual are provided with important safety notices to ensure safe use and protect the user
and other people from hazards and preclude damage to property.
Be sure that you fully understand the following contents (expressions and graphic symbols) and read this manual
carefully. Always observe the precautions.
• Keep this Manual at accessible place for future reference.
Expressions
Warning
Caution
*1: Serious bodily harm indicates loss of eyesight, injury, burns, electric shock, bone fracture, poisoning, and other injuries which leave
aftereffect and require hospitalization or long-term treatment as an outpatient.
*2: Bodily injury indicates injury, burns, electric shock, and other injuries which do not require hospitalization or long-term treatment as an
outpatient.
*3: Damage to property indicates damage extending to buildings, household effects, domestic livestock, and pets.
Text set off in this manner indicates that failure to adhere to the directions in the warning could result in
serious bodily harm (*1) or loss of life if the product is handled improperly.
Text set off in this manner indicates that failure to adhere to the directions in the caution could result in
serious bodily injury (*2) or damage (*3) to property if the product is handled improperly.
Graphic symbols
“ ” indicates prohibited items.
The actual contents of the prohibition are indicated by a picture or text placed inside or next to the graphic
symbol.
“ ” indicates compulsory (mandatory) items.
The actual contents of the obligation are indicated by a picture or text placed inside or next to the graphic
symbol.
“ ” indicates caution items.
The actual contents of the caution are indicated by a picture or text placed inside or next to the graphic symbol.
Warning
Ask your dealer or a professional for
installation of your system.
Installation requires specialized knowledge.
If you install your system yourself, fire,
electric shock or injury may be caused.
Power OFF in the event of an alarm (odor,
etc.).
Failure to do so may cause fire or electric
shock.
Ask your dealer for repair.
Do not disassemble, alter, repair or
relocate the system alone.
This may cause fire, electric shock or injury.
Ask your dealer for repair or relocation.
Before cleaning the unit, be sure to stop
operation and turn OFF the power.
Failure to do so may cause electric shock or
injury.
Caution
Do not touch any button with wet fingers.
This may cause electric shock.
5-
EN
Page 6
TOUCH SCREEN CONTROLLER for Air Conditioning Control System Owner's Manual
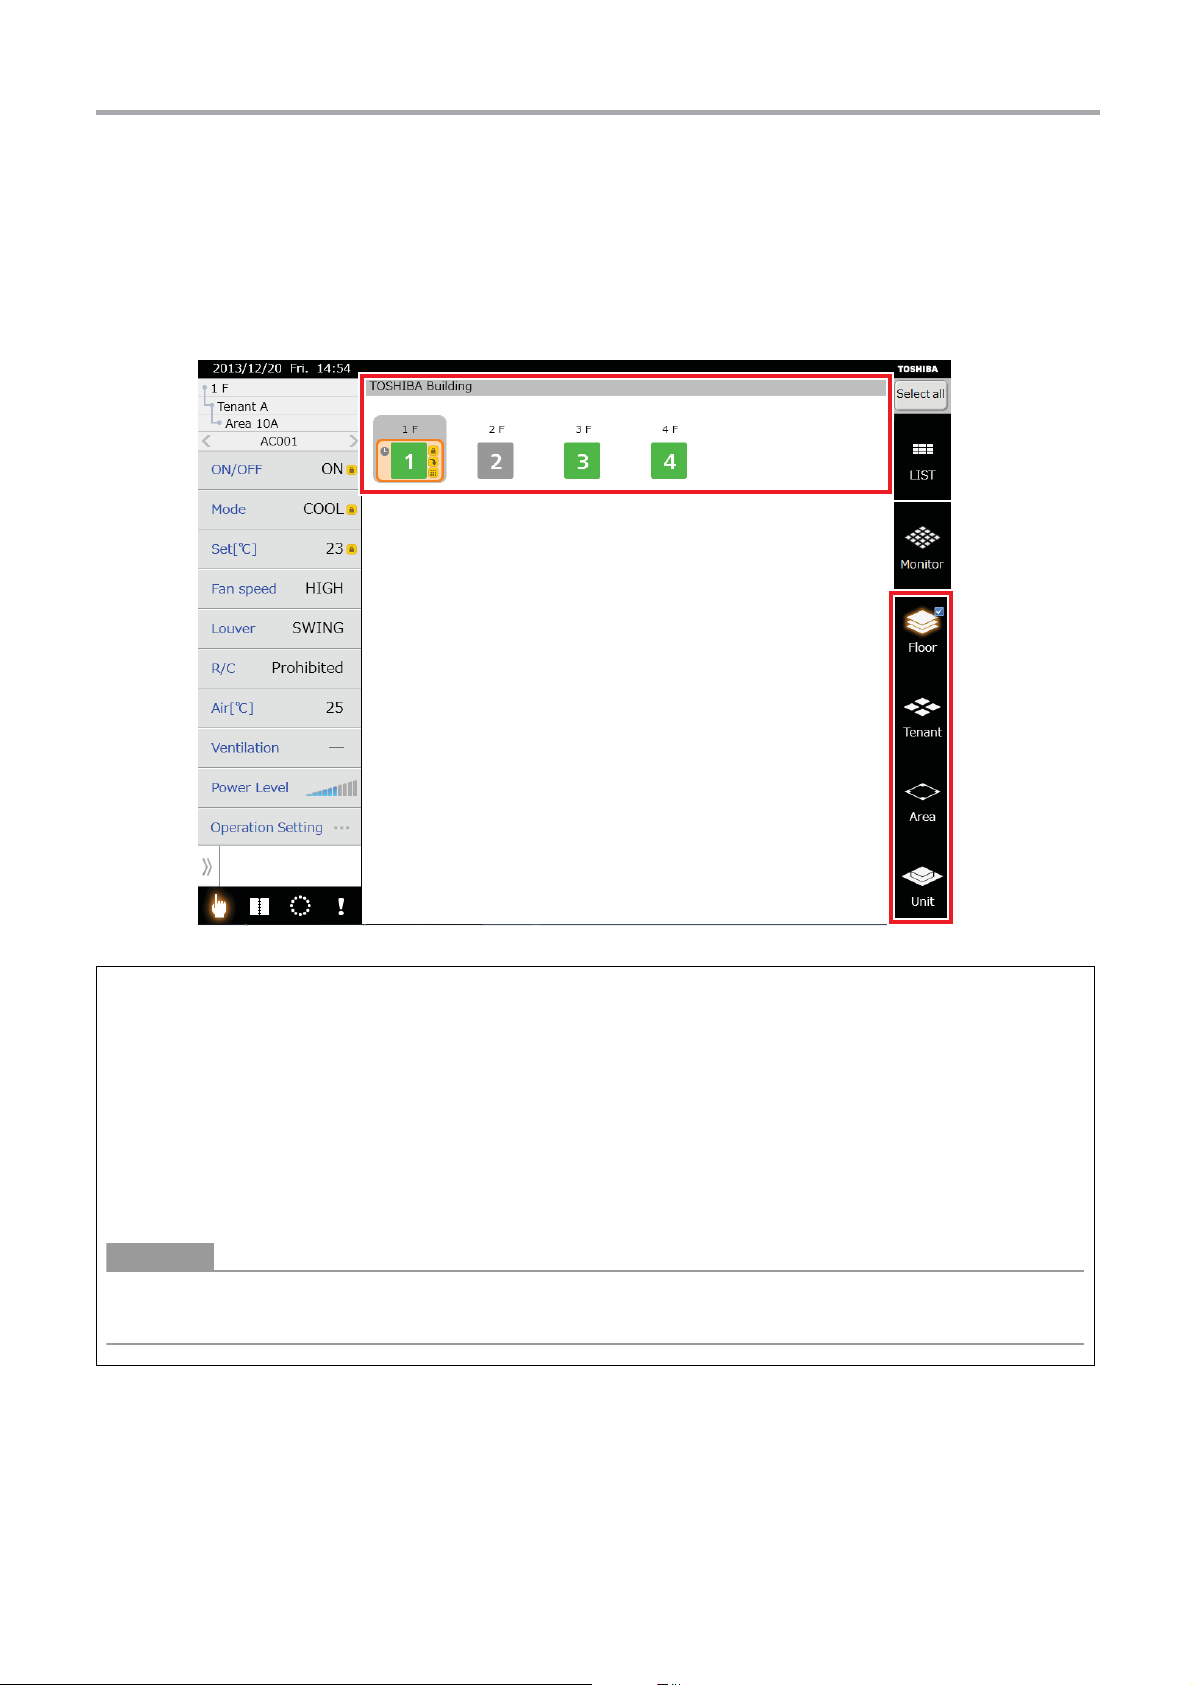
2 Main functions
Monitoring and controlling air conditioners
The TOUCH SCREEN CONTROLLER for Air Conditioning Control System (hereafter TOUCH SCREEN CONTROLLER) can
turn on and off operations, change settings, monitor the operating status, settings, and the occurrence of errors of all the air
conditioners.
The air conditioners can be classified by naming their level, unit, area, tenant, and floor. The air conditioners can be set
individually or in batches according to area, tenant, or floor.
In addition, an optional digital I/O interface makes it possible to gang control the air conditioners' demand alarm signals, fire
alarm signals, and locking signals.
Scheduling operation of air conditioners
The TOUCH SCREEN CONTROLLER can schedule operations of all the air conditioners. A maximum of 20 settings can be
done each day, and the air conditioners can be set to turn off in case people forget. The TOUCH SCREEN CONTROLLER can
schedule operations by turning on, off, operation mode, temperature, enable or disable the local remote control, return back,
save, and ventilation modes.
With the master schedule, it is possible to set weekly schedules, five special days, and monthly schedules for the upcoming
year.
Power distribution system
The TOUCH SCREEN CONTROLLER can distribute power to each of the air conditioners. However, this is not according to
calculation methods. The billing schedule can be set to total operating time and power distribution separately for in working
hours and out of working hours.
However, the optional power meter interface is required for power distribution.
Alarm list display
The TOUCH SCREEN CONTROLLER can display a list of current alarms. It can also show a history of past alarms.
-EN
6
Page 7
TOUCH SCREEN CONTROLLER for Air Conditioning Control System Owner's Manual
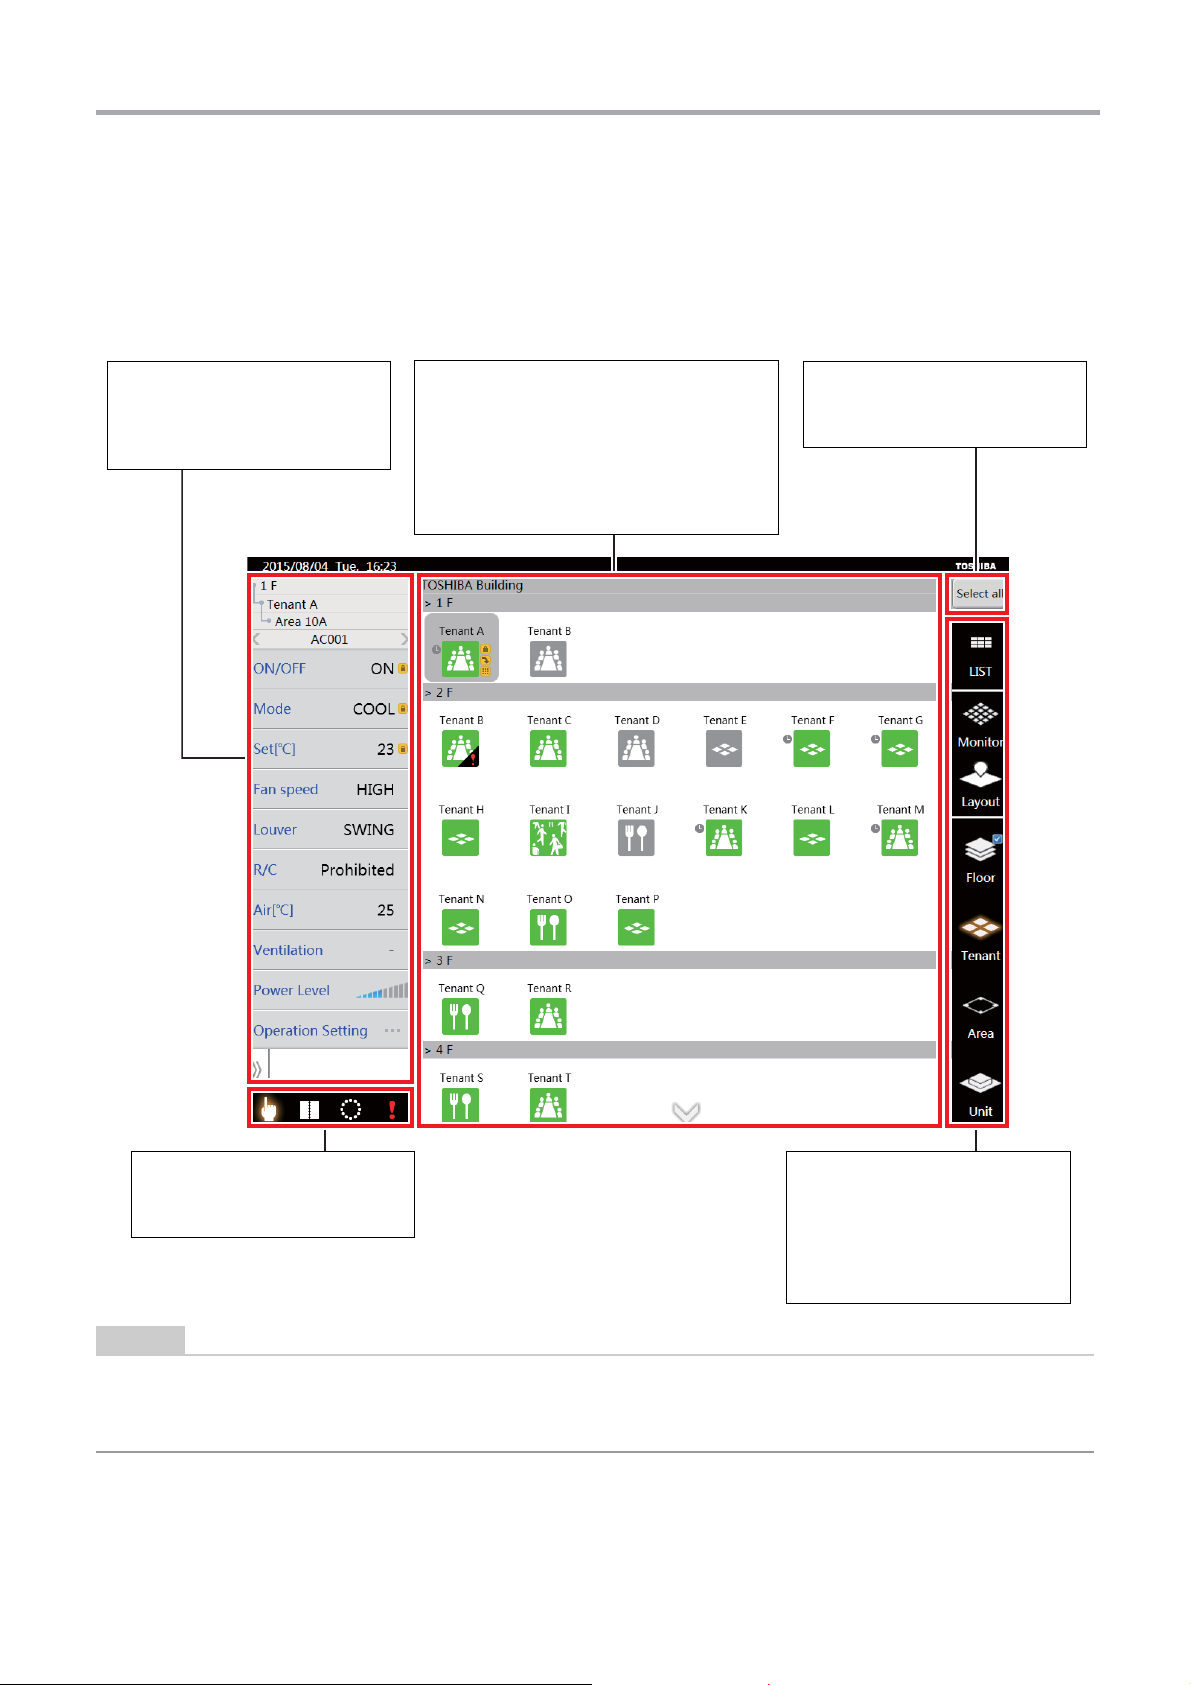
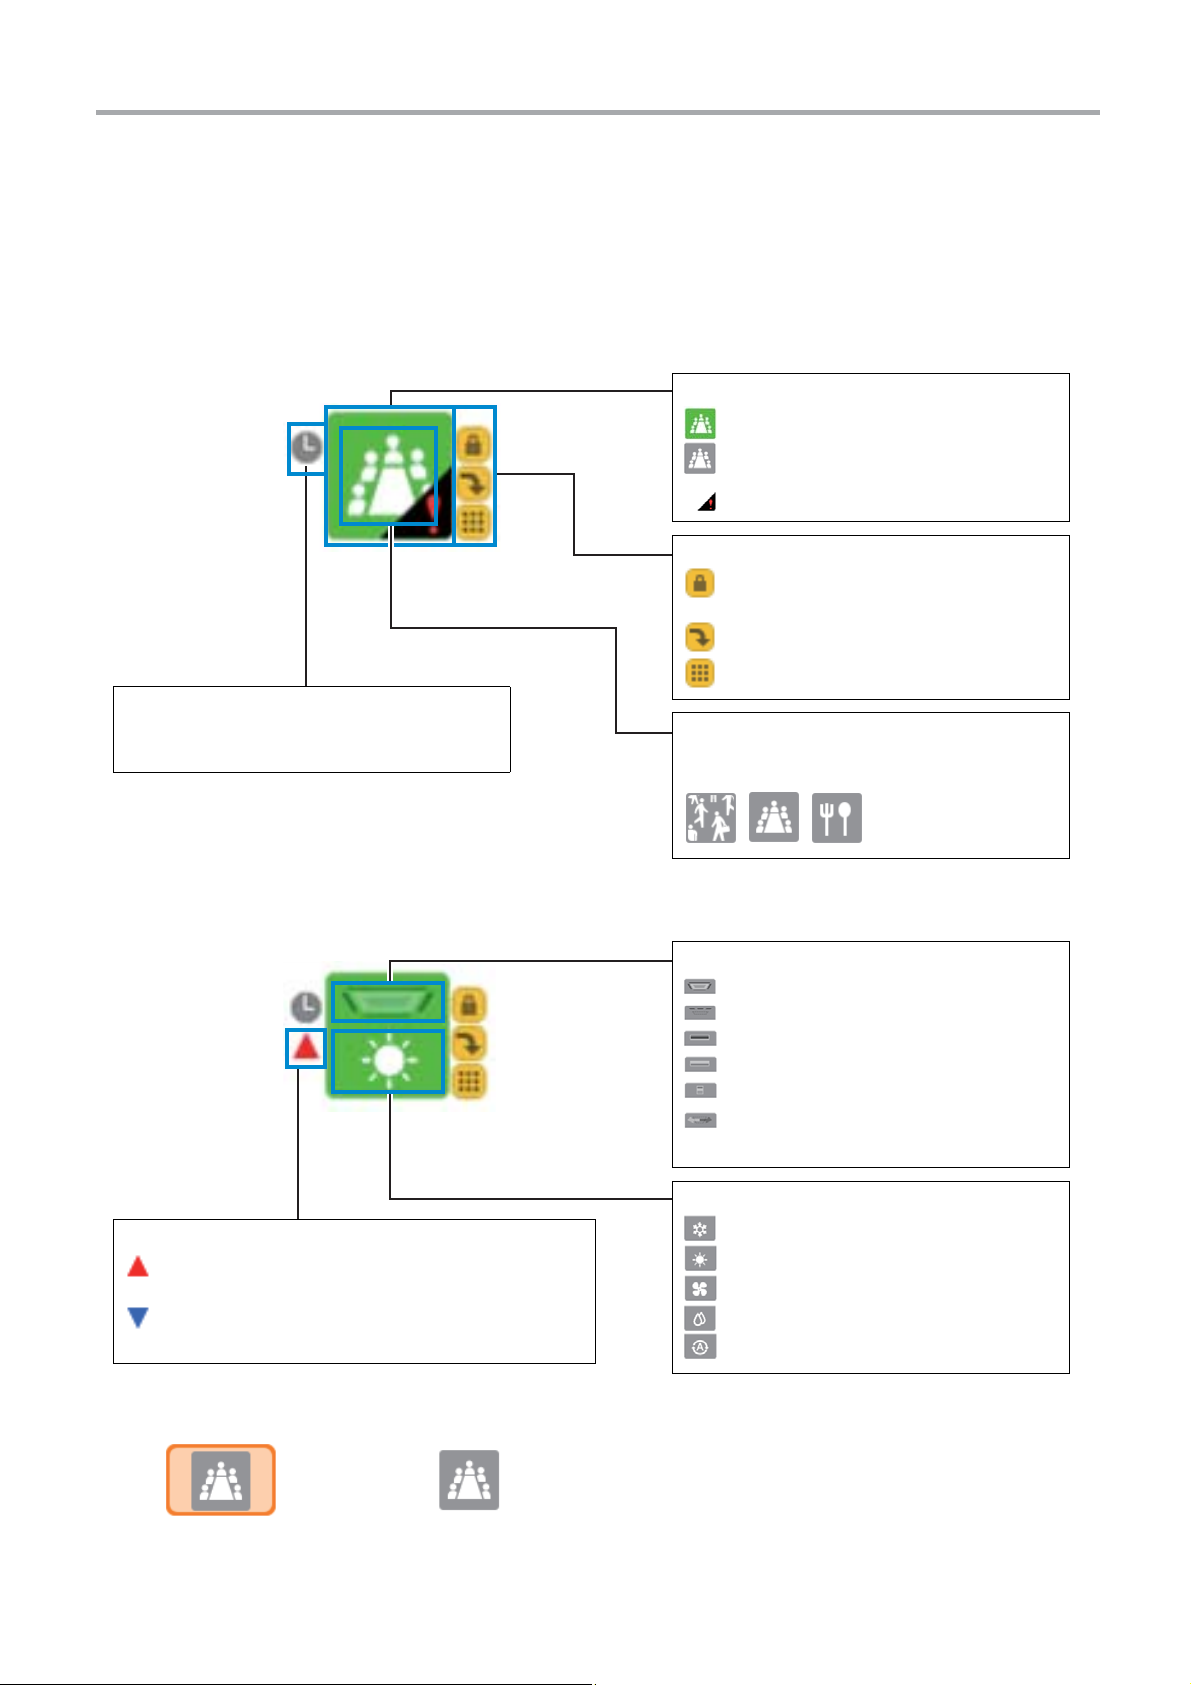
NOTE
Air conditioner status list
Shows the name of the level of air
conditioners to display and
change status of settings.
[Control screen]
Group icon area
Shows the group icons of air conditioners
for controlling the air conditioning. They are
displayed in categories from the top level. It
is possible to check the status of air
conditioners by the colour and pattern of the
icons. ->For details, see "3-3.Icon display".
Select all button
Selects all the icons shown in a
group icon area.
Menu icon area
Moves the screen to various
functions.
Display switching icon area
Changes the classification of the
displayed group icons.
* The [Layout] icon only appears
when the layout screen is
enabled.
3 Names and functions of main screens
3-1. Control screen
This screen allows you to set and check the operating status of the air conditioners.
Screensaver
If the screen is not touched for a long time (about 10 minutes), the LCD's backlight turns off.
If the screen is touched, the LCD's backlight turns on again.
7-
EN
Page 8

TOUCH SCREEN CONTROLLER for Air Conditioning Control System Owner's Manual
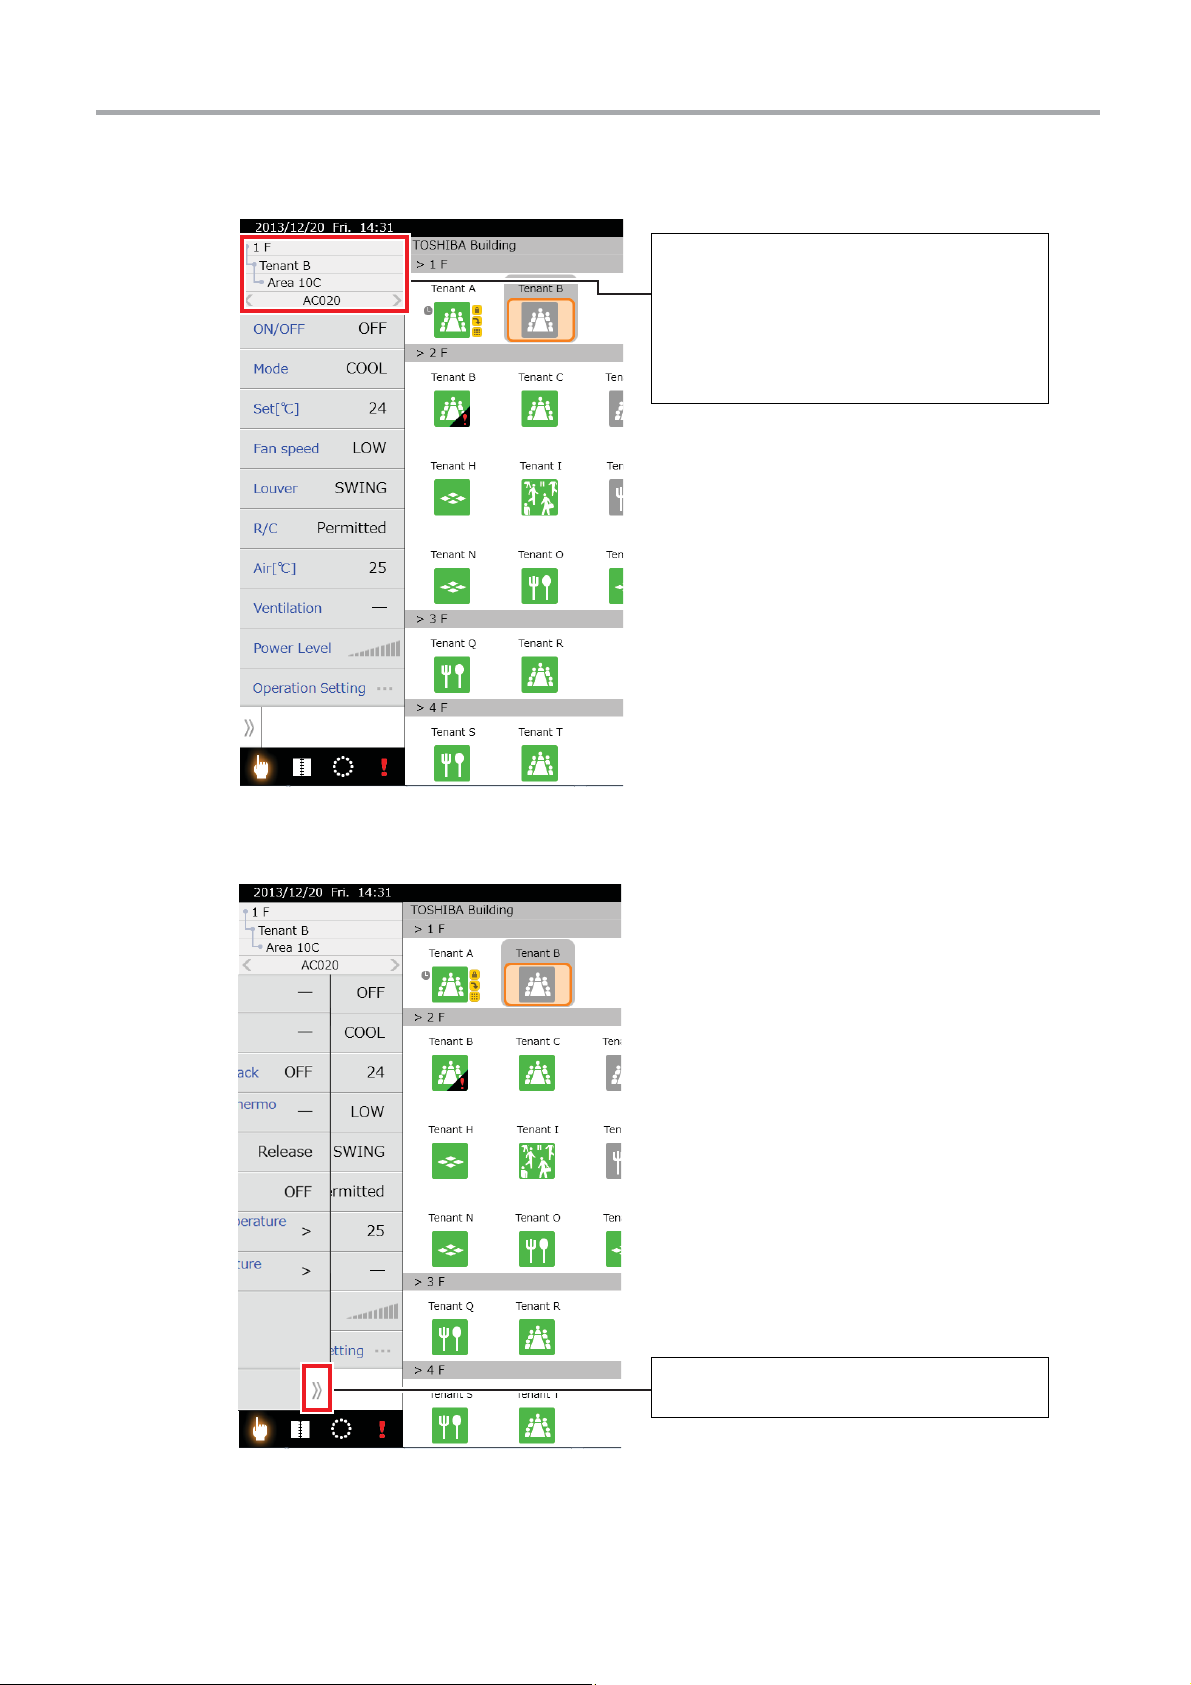
Shows the status of the air
conditioner that is the very
first of the group icons.
First of the group icons
The background of the icon that is
being shown on the air
conditioner status list is grey.
The status of the air
conditioner that is the very
first of the selected group icon
is shown.
Selected group icon
3-2. Air conditioner status list display
Shows the status of the air conditioner that is the first of the selected group icon. If no group icon is selected, the status of the
air conditioner that is the very first of the displayed group icon is shown.
▼ When a group icon is not selected
▼ When a group icon is selected
-EN
8
Page 9
TOUCH SCREEN CONTROLLER for Air Conditioning Control System Owner's Manual
Flicking the name of the level on the air
conditioner status list moves the air conditioner
into the selected group icon.
Right to left flick: Moves to the next air
conditioner
Left to right flick: Moves to the previous air
conditioner
Dragging the Advanced tag on the air
conditioner list shows advanced functions.
▼ Changing the air conditioner that is shown on the air conditioner status list
▼ Showing advanced items on the air conditioner status list
9-
EN
Page 10
TOUCH SCREEN CONTROLLER for Air Conditioning Control System Owner's Manual
Icon status
: Indicates it is operating (red or green).
: Indicates it is not operating (grey).
: Indicates an alarm has occurred.
Schedule icon
Indicates that a running schedule has been
registered.
Indicator icons
: Indicates remote control operation is
prohibited.
: Indicates forced thermo OFF.
: Indicates there is a filter sign.
Group icon images
You can change the image to one you like on
the icon settings screen.
...
Air conditioner type icon
: Indicates a cassette type.
: Indicates a duct type.
: Indicates a ceiling type.
: Indicates a high wall type.
: Indicates a floor standing type.
: Indicates Air to Air Heat Exchanger and
fresh air type.
Air temperature level icons
: Indicates the air temperature is higher than the set
temperature.
: Indicates the air temperature is lower than the set
temperature.
Operation mode icons
: Indicates cooling.
: Indicates heating.
: Indicates fan.
: Indicates Drying.
: Indicates automatic operation.
3-3. Icon display
This section describes the icon displays.
[1] Group icons
▼ Icons show floors, tenants, and areas individually
▼ Icons that show individual units
▼ Icons when selected
-EN
10
Selected Not selected
Page 11
TOUCH SCREEN CONTROLLER for Air Conditioning Control System Owner's Manual
CAUTION
[2] Menu icons
▼ Appearance and functions of menu icons
These icons display the various screens. Icons are orange when they appear on screen. The alarm icon flashes red when an
alarm occurs.
Control screen Running schedule screen Option screen Alarm List screen
[3] Display switching icons
▼ Appearance and functions of display switching icons
These icons change the display of group icons. Icons that are on the screen that is currently displayed are orange.
• Screen switching
List screen Monitor screen
• Level switching
Floor display Tenant display Area display Unit display
The layout icon only appears when the layout screen is enabled.
Layout screen
(TOUCH SCREEN
CONTROLLER only)
11-
EN
Page 12
TOUCH SCREEN CONTROLLER for Air Conditioning Control System Owner's Manual
CAUTION
<1><1>
<2><2>
[Control screen]
4 How to operate
4-1. Moving levels
[1] Moving to a lower level on the control screen
(1) Using the display switching icon to move
Tap the group icon
<2> of the level to which you want to move.
icon
(2) Long tapping to move (TOUCH SCREEN CONTROLLER only)
Long tap a group icon, to move it under the group icon you long tapped.
[2] Moving to an upper level on the control screen
Tap the display switching icon of the upper level to move to the upper level.
<1> (more than one can be selected) you want to move to a lower level, then tap the display switching
If a level is skipped, such as from a floor to an area, then you cannot move to the skipped level. Return to the highest level
and then move to it.
-EN
12
Page 13
TOUCH SCREEN CONTROLLER for Air Conditioning Control System Owner's Manual
CAUTION
<1><1>
<2><2>
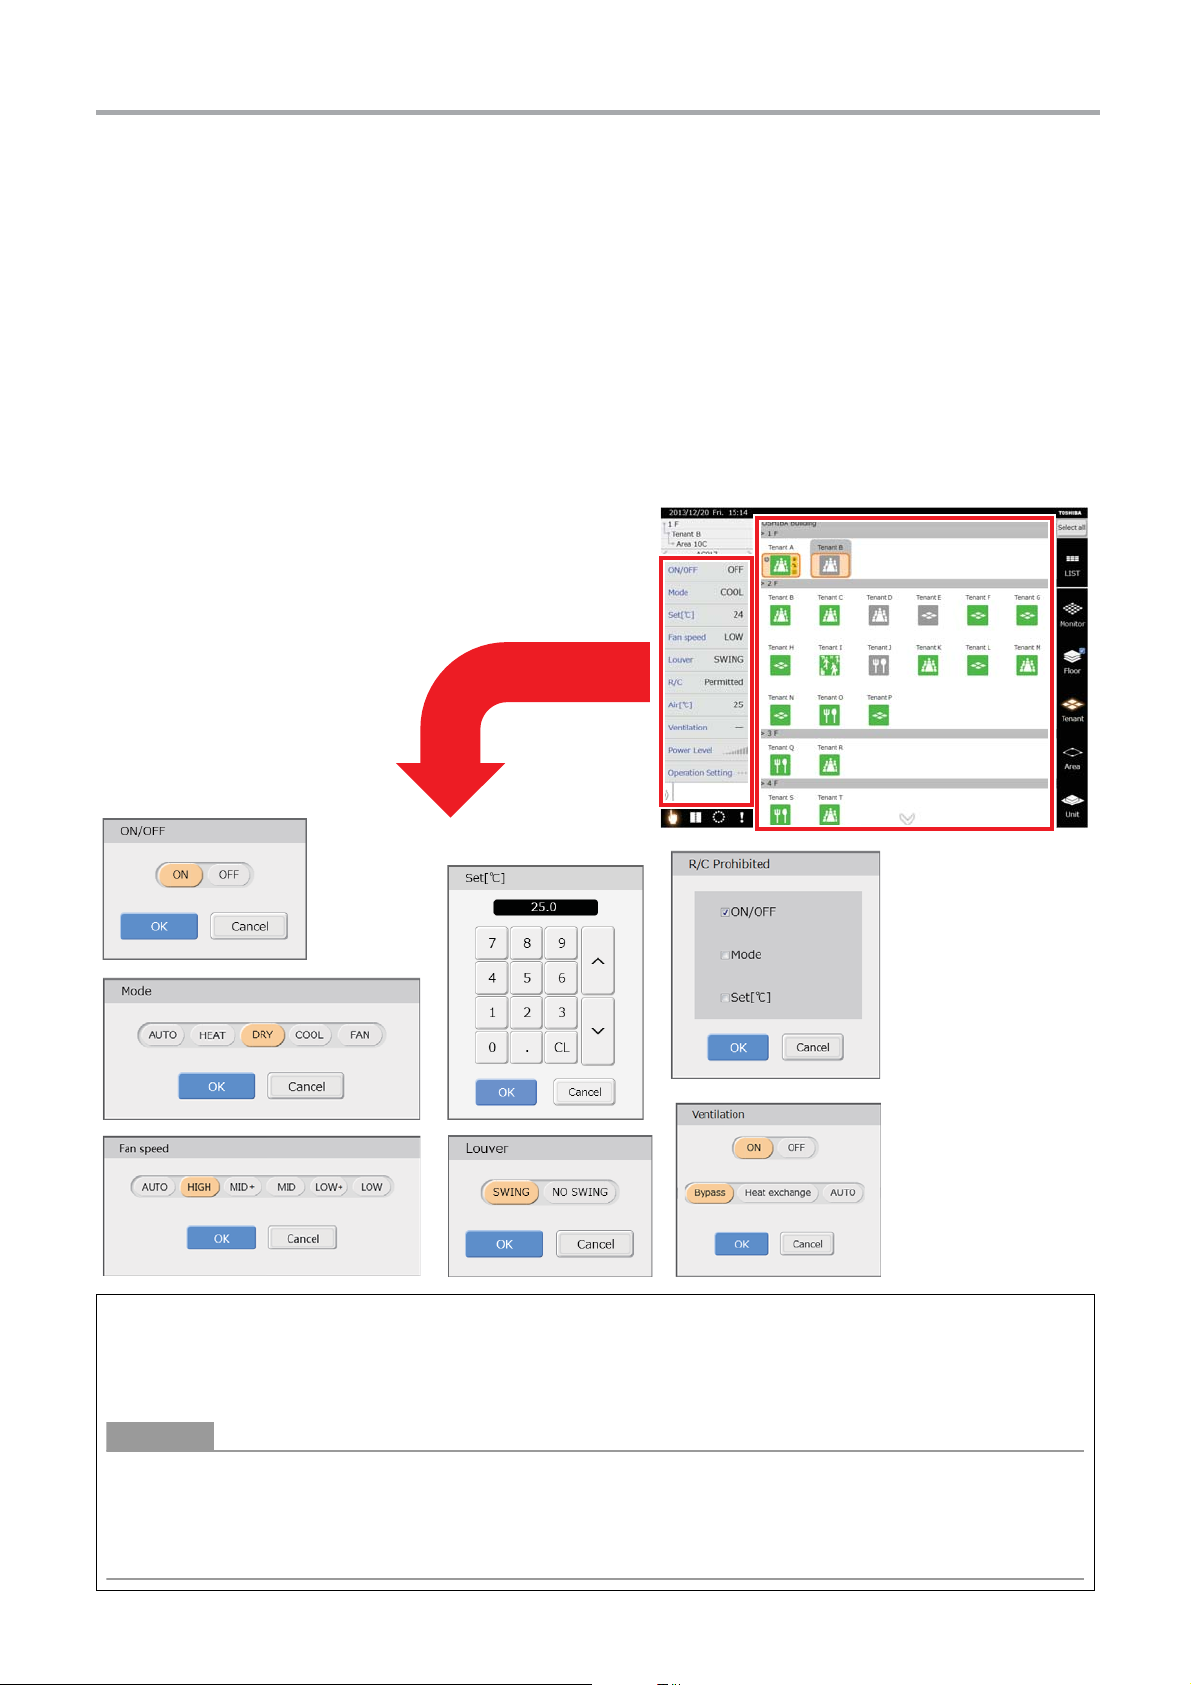
4-2. Changing air conditioner settings
You can change the settings and turn on or off the air conditioner. You can change the air conditioner's settings from the control
screen.
If "-" appears on the air conditioner status list, that function cannot be used, so you cannot set it even if you tap it.
▼ You can set air conditioners in the following groupings.
• Set all air conditioners in a batch
• Set air conditioners by floor in a batch
• Set air conditioners by tenant in a batch
• Set air conditioners by area in a batch
• Set air conditioners individually
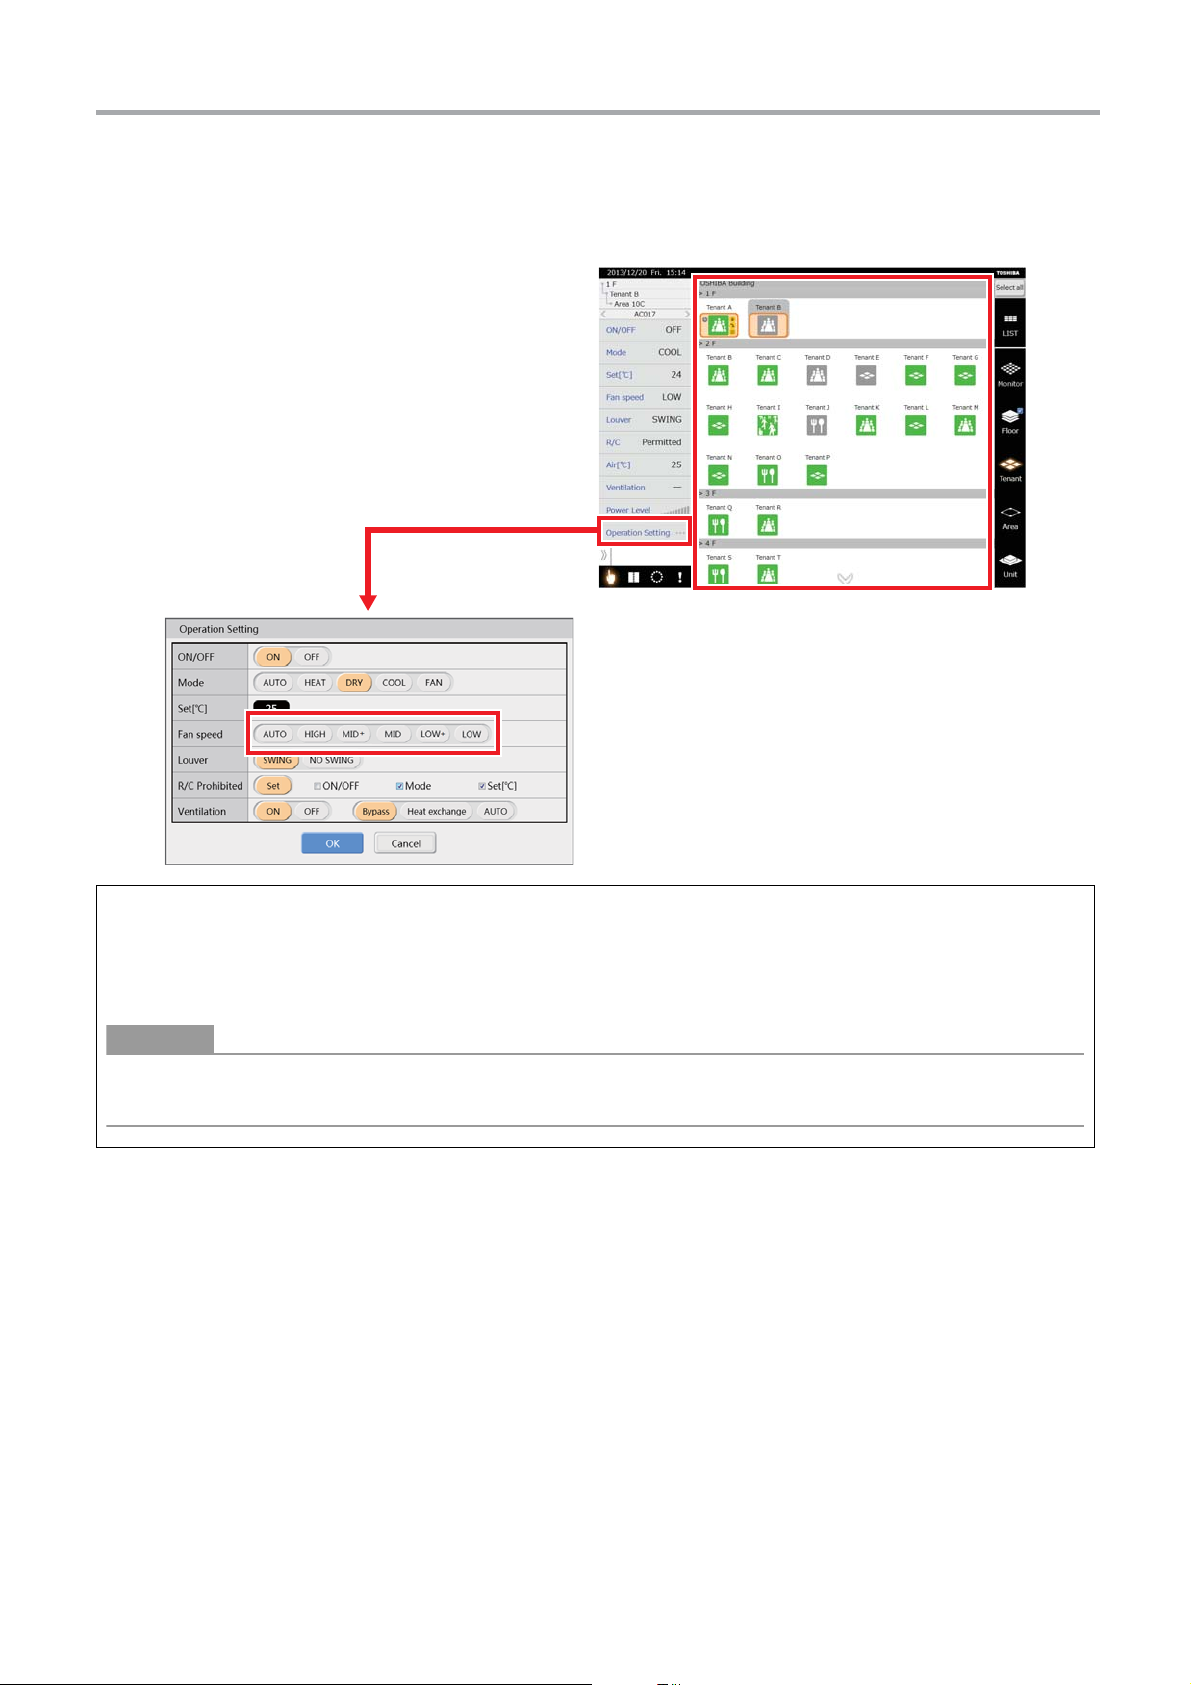
[1] Changing individual settings of air conditioners on the control screen
You can turn air conditioners on or off, change the operation mode, set temperatures, fan speeds, louvers, and ventilation, and
remote control prohibited.
(1) Move to another level and tap the group icon <1> that you want to set. (More than one can be selected)
(2) Tap the item that you want to change on the "Air conditioner status list" <2>.
The screen for changing settings appears.
(3) Set the changes and tap the [OK] button.
The settings are applied to the air conditioners in the group icon that was selected in (1).
Power level shows the performance status of the air conditioner that is operating in 10 steps. The more bars are lit, the
stronger the operation.
Air temperature and power level are indicators only, they cannot be set.
Some functions cannot be used, depending on the model of the air conditioner. Refer to the Owner’s Manual for each air
conditioner.
13-
EN
Page 14
TOUCH SCREEN CONTROLLER for Air Conditioning Control System Owner's Manual
CAUTION
<1><1>
<2><2>
AA
[2] Changing multiple settings of air conditioners on the control screen
You can turn air conditioners on or off, change the operation mode, set temperatures, fan speeds, louvers, and ventilation, and
remote control prohibited in batches.
(1) Move to another level and tap the group icon <1> that you want to set. (More than one can be selected)
(2) Tap [Operation Setting] on the "Air conditioner status list"
The Operation Setting screen appears.
(3) Set the changes and tap the [OK] button.
The settings are applied to the air conditioners in the group icon that was selected in (1).
Unset items are not set to the air conditioners. (See A)
To clear a setting that is selected, tap the selected item again.
<2>.
-EN
14
Page 15
TOUCH SCREEN CONTROLLER for Air Conditioning Control System Owner's Manual
<2><2>
<1><1>
<3><3>
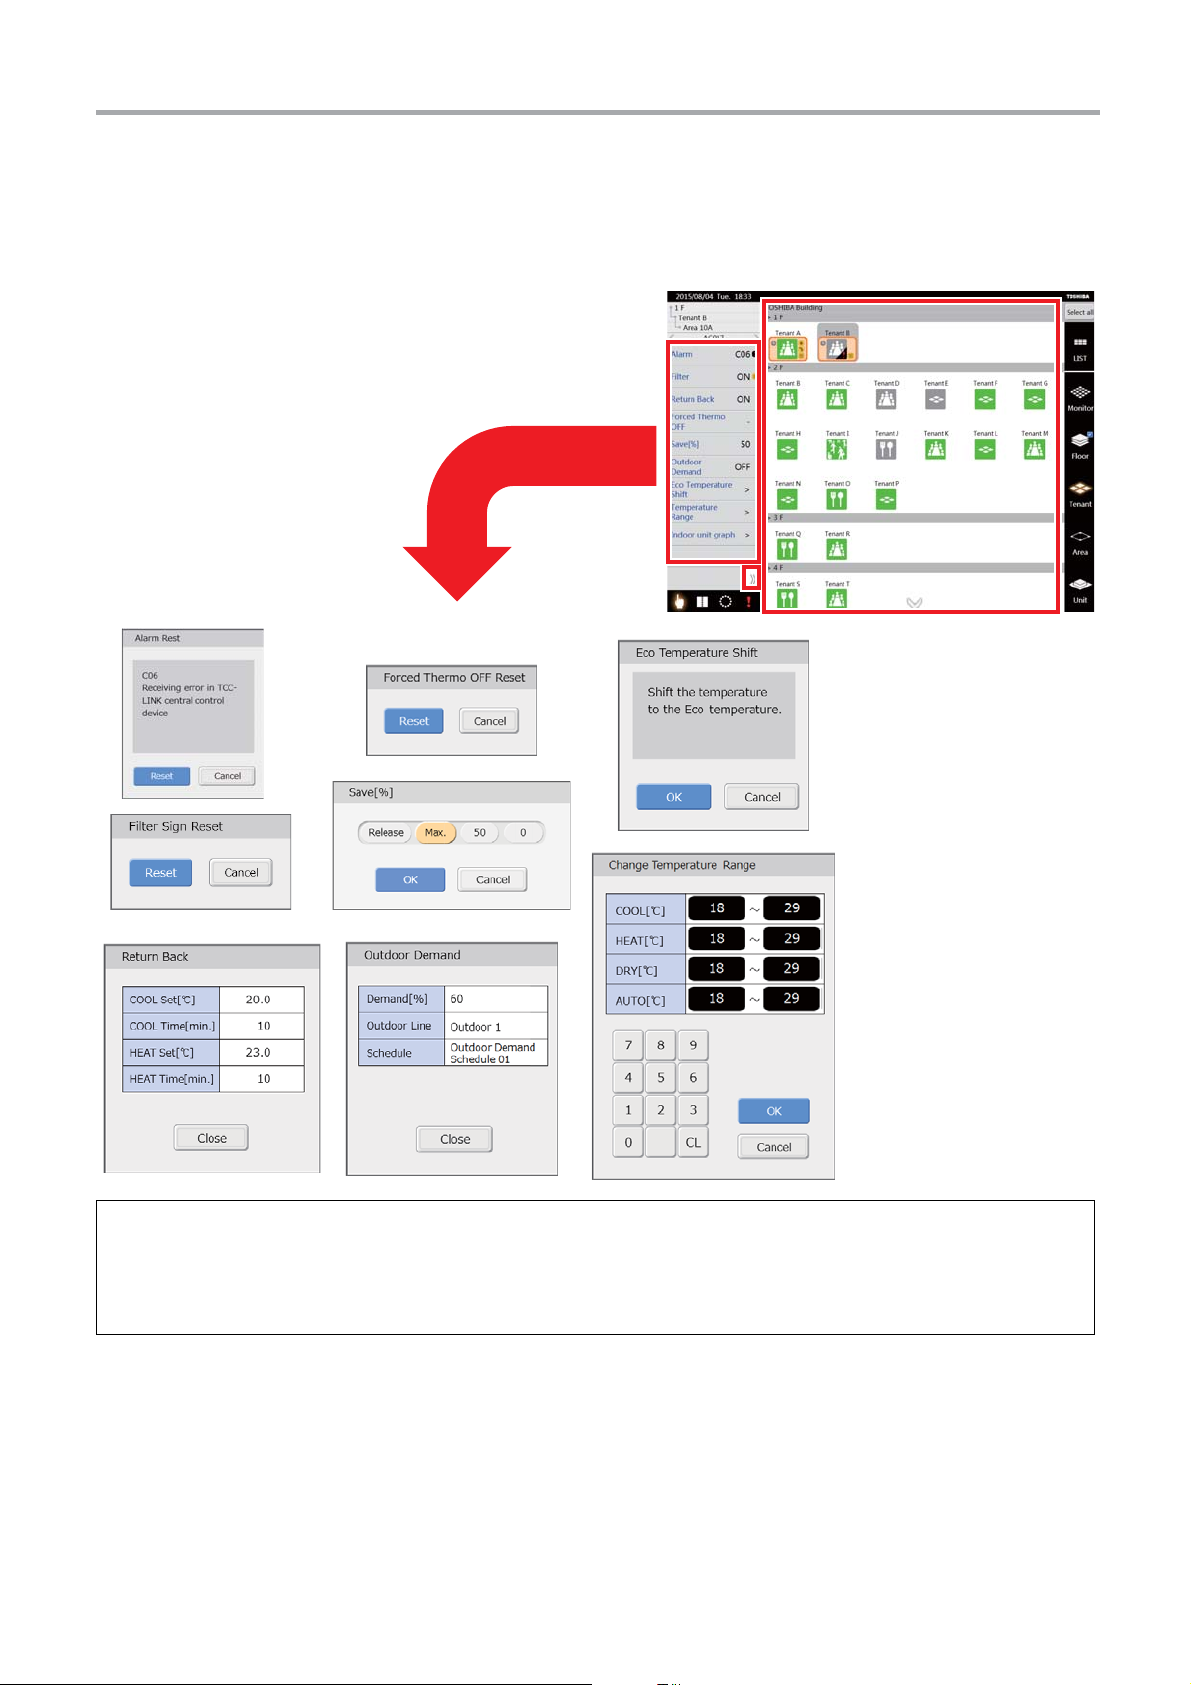
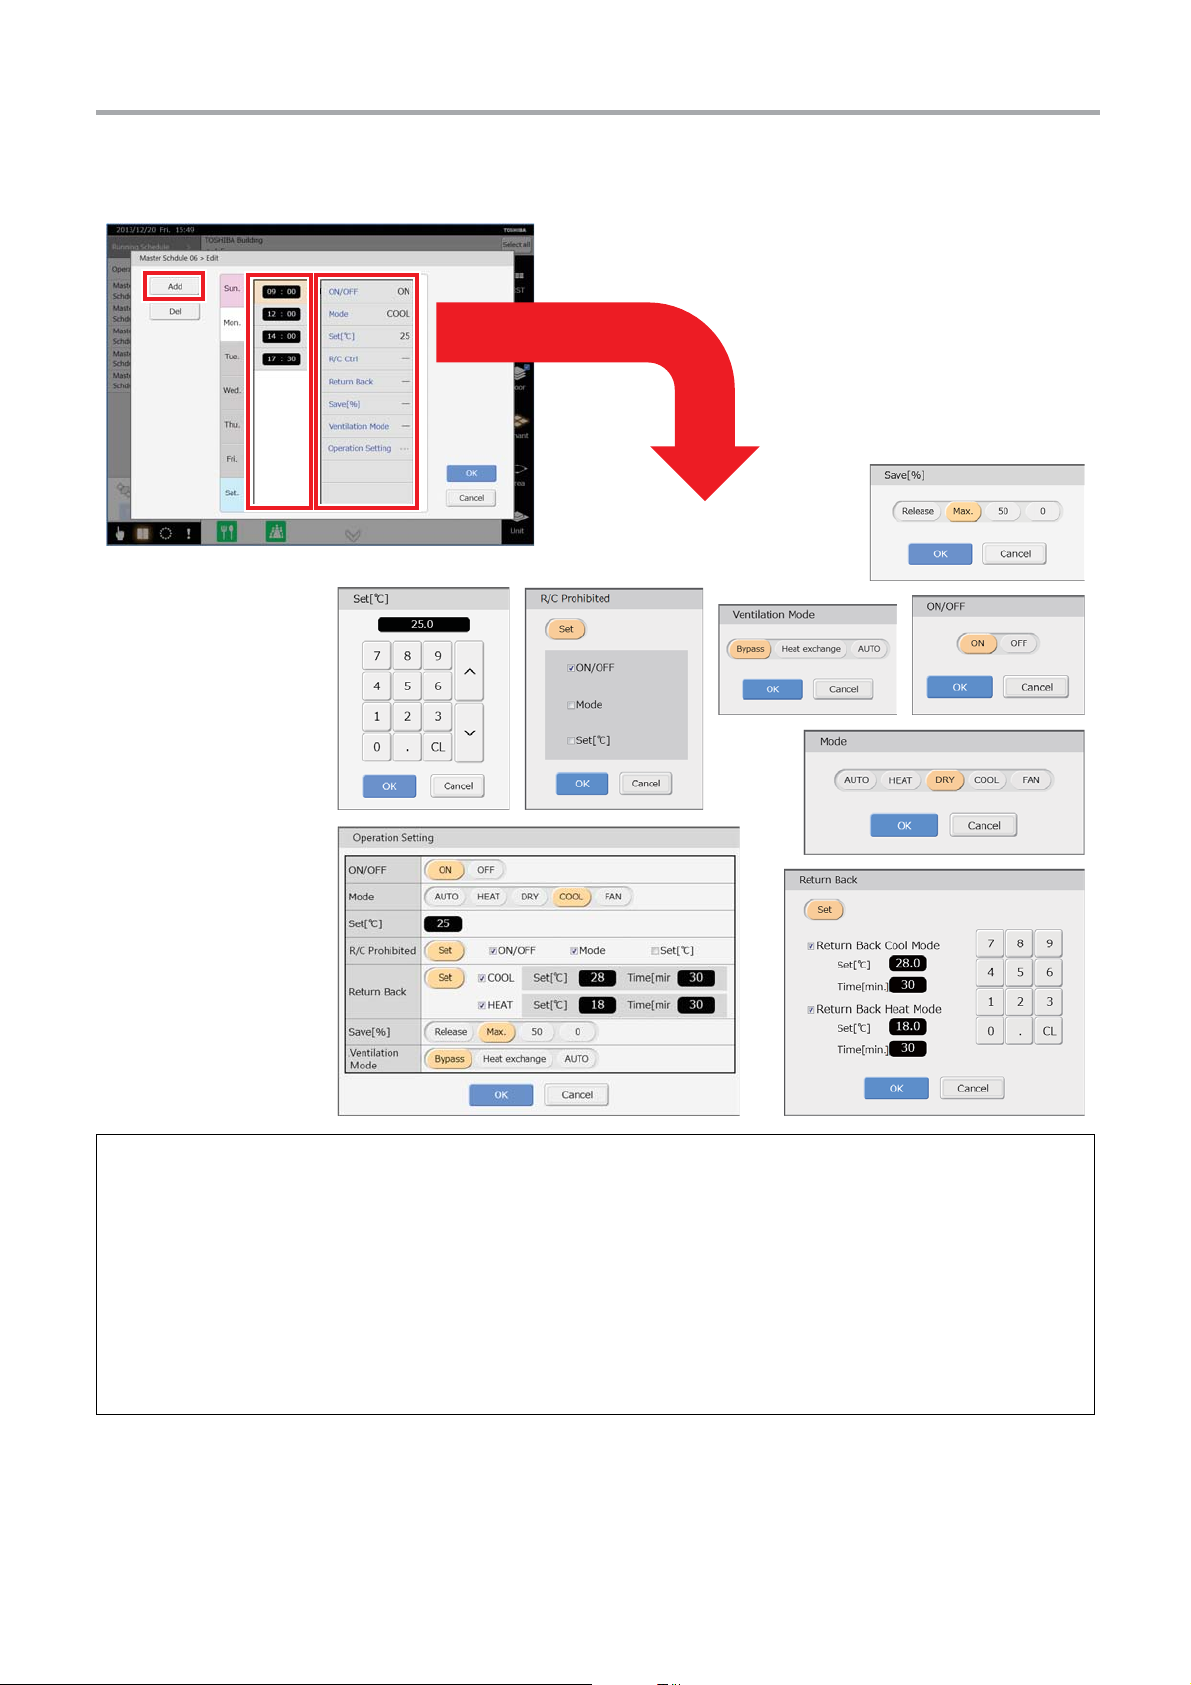
[3] Changing the advanced functions of air conditioners on the control screen
You can open the advanced list by sliding the Advanced tag <1>. You can change the set temperature range, the eco
temperature shift, save, filter sign reset, alarm reset, and forced thermo OFF reset. You can only check the settings of Return
Back and Outdoor Demand. If advanced functions are not operating or registered, "-" appears.
(1) Move to another level and tap the group icon <2> that you want to set. (More than one can be selected)
(2) Tap what you want to change on the "Advanced list"
The screen for settings appears.
(3) Set the changes and tap the [OK], [Reset] button.
The settings are applied to the air conditioners in the group icon that was selected in (1).
<3>.
15-
EN
Page 16

TOUCH SCREEN CONTROLLER for Air Conditioning Control System Owner's Manual
About advanced functions
▼ Alarm Reset
Transmits an error clear signal and eliminates error signals.
▼ Filter Sign Reset
Transmits a filter sign clear signal and clears the filter sign.
▼ Return Back
If a temperature is set that is lower (when cooling) or higher (when heating) than the Return Back temperature, which has been
set in advance, then the setting is automatically returned to the temperature set for the Return Back temperature after a certain
period of time. You can check the time and temperature of the Return Back setting.
▼ Reset Forced Thermo OFF
Clears the status of air conditioners that have had Forced Thermo OFF done to them by the demand signal from the digital I/O
interface.
▼ Save
Operates the air conditioners with suppressed performance. Settings are shown below.
Release: No power saving
Max: 99 - 50 % power saving
50: 50 % power saving
0: Thermo off
▼ Outdoor Demand
You can check the outdoor demand schedule, outdoor line, outdoor demand ratio set for the outdoor units that are connected.
▼ Eco Temperature Shift
The set temperatures are shifted in a batch by ±2 °C.
Example: +2 °C during cooling, -2 °C during heating
▼ Change Temperature Range
Set the upper and lower limits of the temperature for each mode (COOL, HEAT, DRY, AUTO).
16
-EN
Page 17

TOUCH SCREEN CONTROLLER for Air Conditioning Control System Owner's Manual
Schedule list
Shows the operating schedule and the
master schedule.
Schedule title
Switches between the running schedule and the
billing schedule.
Master schedule operating area
: Creates new master schedules.
: Copies master schedules.
: Deletes master schedules.
Master schedule registration operating
area
Enabled when a master schedule is selected.
->For details, see "4-3.[6]Registering new
master schedules in the Running Schedule
screen".
: Registers a master schedule for the
selected air conditioner.
: Unselects a selected air conditioner.
[Running Schedule screen]
Schedule icon
Appears if a running
schedule has been
registered.
4-3. Schedule settings
The TOUCH SCREEN CONTROLLER can schedule operations of the air conditioners.
▼ The following settings can be set for scheduled operations.
ON / OFF, operation mode, set temperature, operation of remote control prohibited / permitted, return back, save, and
ventilation mode.
▼ Glossary of schedule settings
• Master Schedule: Schedule assigned to air conditioners
• Operating Schedule: Schedule up to one week from the present that is assigned to each air conditioner
• Weekly pattern: Schedule for one week
• Special Day pattern: Schedule that is different from the weekly pattern
• Monthly settings: Sets the daily operations for special day patterns
▼ Procedure for setting scheduled operations
(1) Creation of a master schedule
Creates a weekly pattern.
Creates monthly settings and creates schedules for special days if special day patterns are required.
(2) Registration of a master schedule
Schedules are set by registering a master schedule used for each air conditioner.
You can check the content of a schedule that is set in the Operating Schedule settings screen.
(3) Changes to schedules
You can change a schedule from the operating schedule settings screen.
17-
EN
Page 18
TOUCH SCREEN CONTROLLER for Air Conditioning Control System Owner's Manual
<2><2>
<1><1>
<4><4>
<6><6>
<5><5>
<3><3>
[Running Schedule screen]
[Master Schedule Weekly Pattern Settings screen]
[Master Schedule Detailed Settings screen]
[Schedule Setup screen]
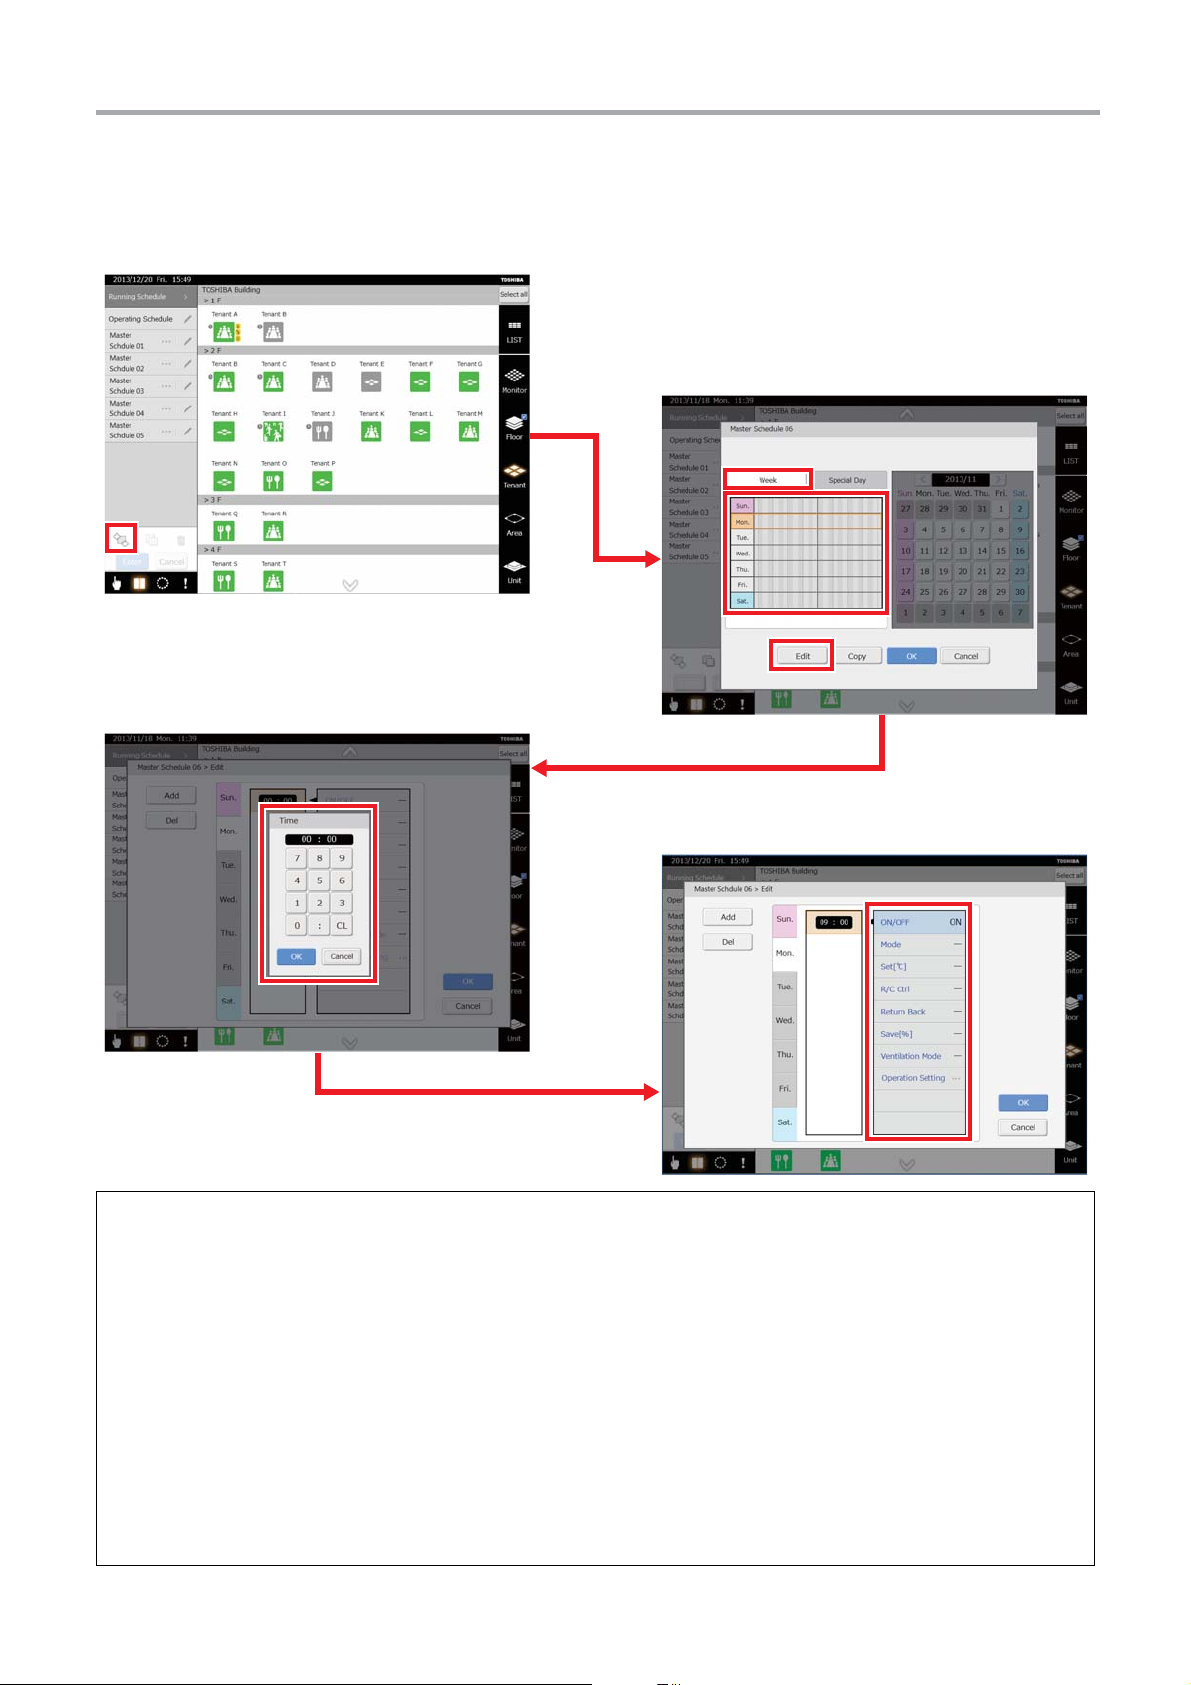
[1] Creating new master schedules in the Running Schedule screen
(1) Tap the [Create New] icon <1>.
The Master Schedule Weekly Pattern Settings screen appears.
(2) Tap the [Week] tab
(3) Tap the day
(4) Tap the [Edit] button
The screen for setting the time appears.
(5) Set the "Schedule Time"
Tap the [OK] button to add the scheduled time to the Master Schedule Detailed Settings screen.
(6) Tap what you want to change on the "Operations list"
The screen for changing settings appears.
(7) Set the changes and tap the [OK] button.
The changes are reflected in the Master Schedule Detailed Settings screen.
(8) Tap the [OK] button in the Master Schedule Detailed Settings screen.
The changes are reflected in the Master Schedule Weekly Pattern Settings screen.
(9) Tap the [OK] button in the Master Schedule Weekly Pattern Settings screen to create a new master schedule.
<3> that you want to set.
<2>.
<4>.
<5>.
<6>.
18
-EN
Page 19
TOUCH SCREEN CONTROLLER for Air Conditioning Control System Owner's Manual
<1><1>
<2><2> <3><3>
[2] Creating schedules in the Master Schedule Detailed Settings screen
▼ Add
(1) Tap the [Add] button <1>.
The screen for setting the time appears.
(2) Set the schedule time.
Tap the [OK] button to add a new time to the "Time list"
▼ Change
(1) Tap the schedule that you want to change on the "Time list" <2>.
The schedule is highlighted and the "Operations list"
(2) Tap the item that you want to change on the schedule or "Operations list"
(3) Set the changes and tap the [OK] button.
<2>.
<3> for the set times appears.
<3>.
19-
EN
Page 20
TOUCH SCREEN CONTROLLER for Air Conditioning Control System Owner's Manual
<3><3>
<2><2>
<4><4>
<1><1>
[Master Schedule Weekly Pattern Settings screen]
[Copy screen]
<2><2>
<1><1> <3><3>
[Master Schedule Special Day Pattern Settings screen]
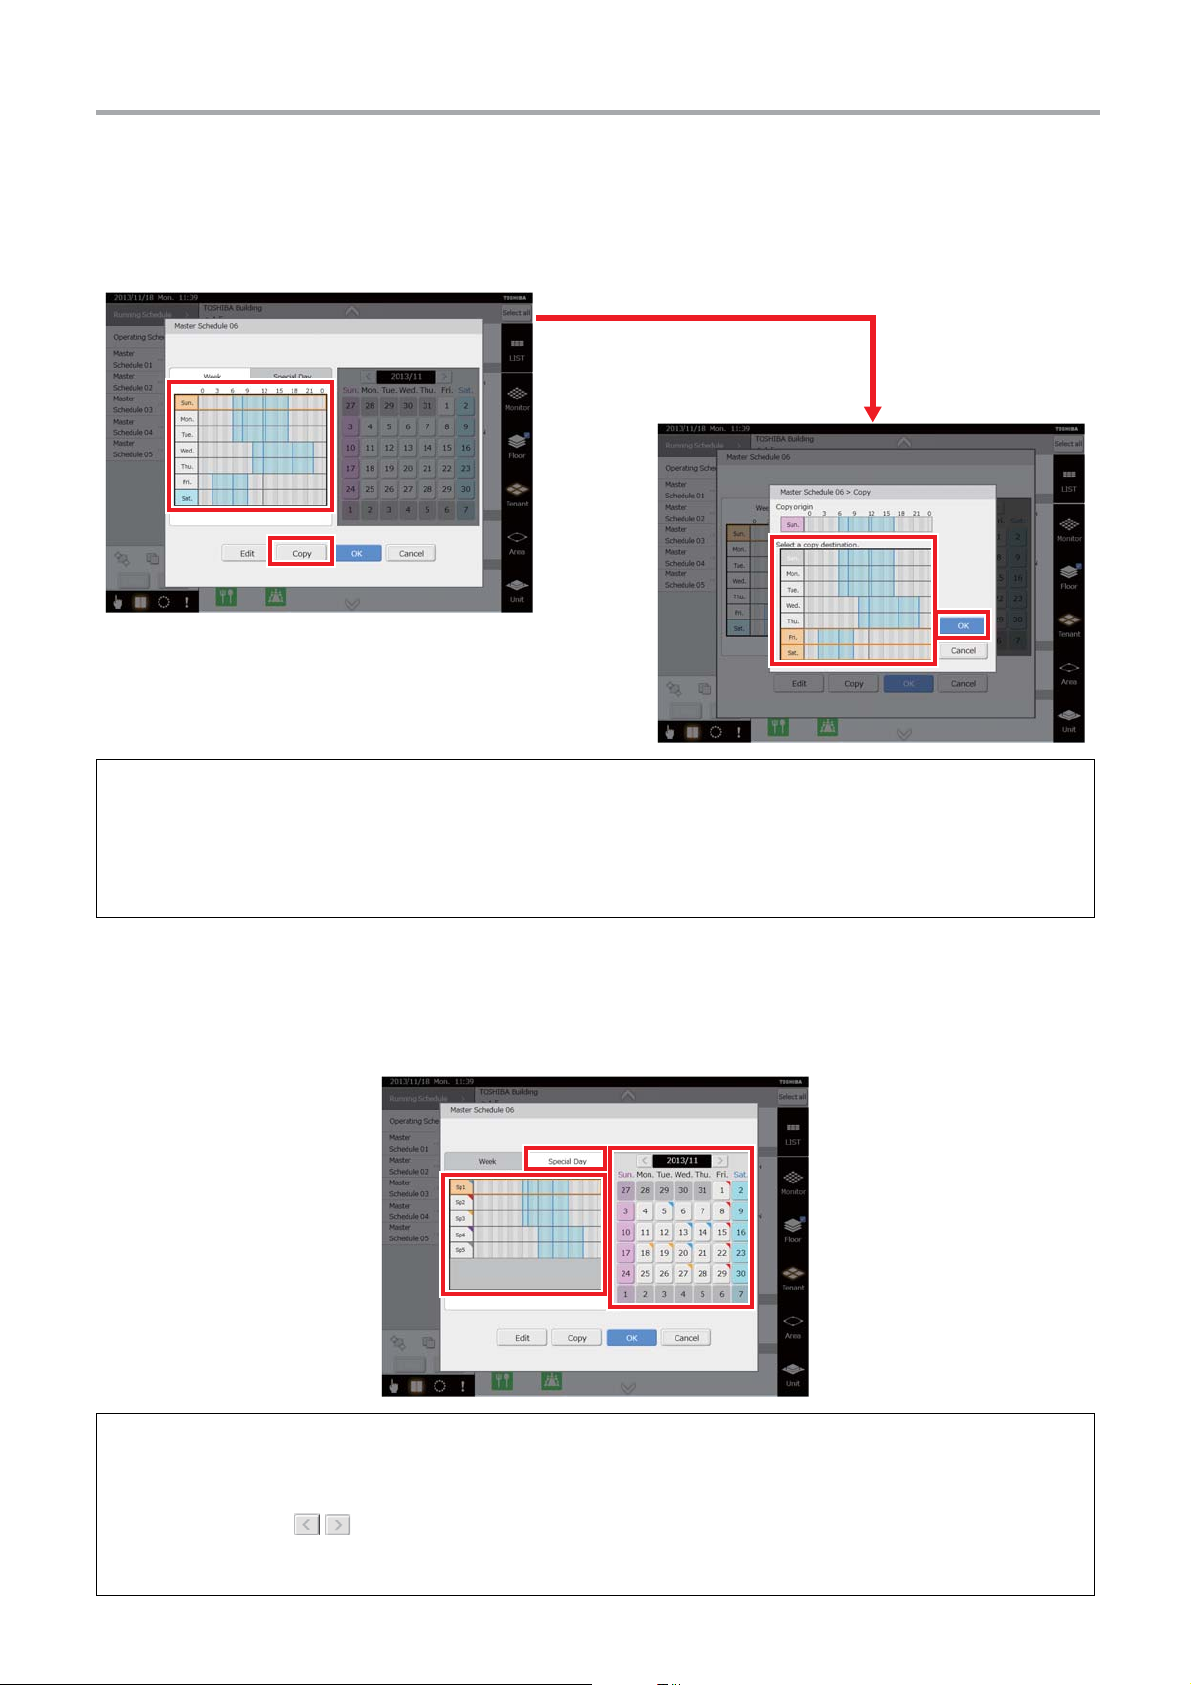
[3] Copying daily schedule in the Master Schedule Weekly Pattern Settings screen
The setup details completed for the day can be copied to other days.
(1) Tap the day to copy <1>.
(2) Tap the [Copy] button
The screen for copying appears.
(3) Tap the place to copy to
(4) Tap the [OK] button
The Master Schedule Weekly Pattern Settings screen appears and the schedule has been copied to it.
<2>.
<3>. (More than one can be selected)
<4>.
[4] Setting special days in the Master Schedule Special Day Pattern Settings screen
Sets days that are special days and creates schedules for special days.
20
(1) Tap the [Special Day] tab <1>.
The setting procedure is the same as the weekly pattern.
(2) Do monthly settings.
Tap the special day
(3) Tap the [Calendar] button
(4) Tap the date on the calendar
It appears the same colour as a special day.
-EN
<2> to set.
<3> for the month and year you want to set to select them.
<3> that you want to set as a special day.
Page 21
TOUCH SCREEN CONTROLLER for Air Conditioning Control System Owner's Manual
<1><1>
<2><2>
<3><3> <4><4>
[Running Schedule screen]
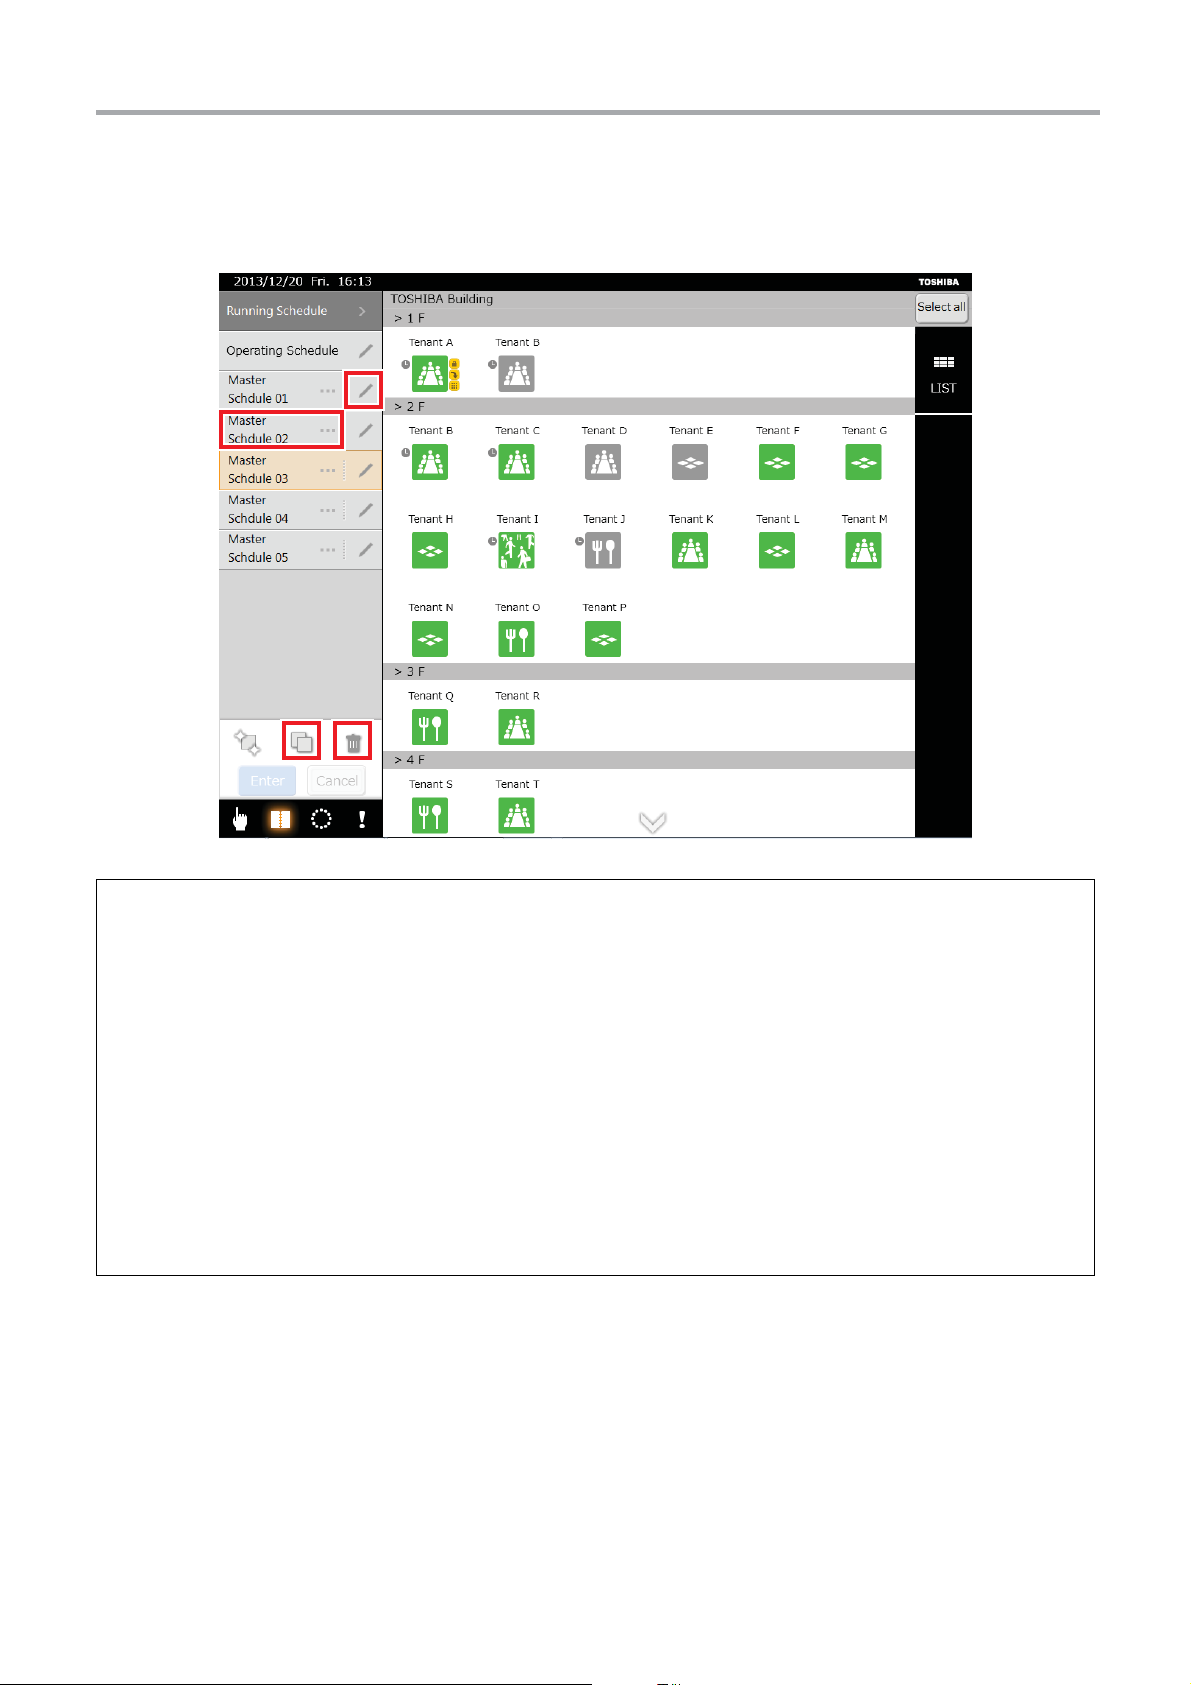
[5] Changing, copying, and deleting master schedules in the Running Schedule screen
▼ Changing a master schedule
(1) Tap the [Edit] icon <1> for the name of the master schedule you want to edit.
The Master Schedule Weekly Pattern Settings screen appears.
(2) Edit the master schedule in the same way you created it.
▼ Copying a master schedule
(1) Tap the "Master schedule name" <2> for the one to copy.
(2) Tap the [Copy] icon
The copied master schedule is created.
<3>.
▼ Deleting a master schedule
(1) Tap the "Master schedule name" <2> for the one to delete.
(2) Tap the [Delete] icon
The confirmation screen appears.
(3) Tap the [OK] button.
The master schedule is deleted.
<4>.
21-
EN
Page 22

TOUCH SCREEN CONTROLLER for Air Conditioning Control System Owner's Manual
<1><1>
<2><2>
<5><5>
<4><4>
<3><3>
[Running Schedule screen]
[6] Registering new master schedules in the Running Schedule screen
Schedules are set by registering a master schedule to an air conditioner.
(1) Do "Level Shift" <1> to a level on which there is a group icon you want to register.
(2) Tap the master schedule name
The system enters the schedule registration mode, and you cannot shift levels. The group Icon
master schedule was registered is highlighted so you can confirm the current registration status.
(3) Tap the group icon that you want to register.
The selection frame of the group icon
(4) Tap the [Enter] button
The selection frame of the group icon lights, the schedule icon appears, and registration is finished.
<5>.
<2> you want to register.
<4> that you tapped flashes.
▼ Condition of icons in schedule registration mode
A schedule has been
registered.
Schedules have been
registered to some air
conditioners.
A different schedule has
▼ Condition of icons in schedule registration mode, registered or deleted
been registered.
<3> to which the selected
A schedule has not been
registered.
22
-EN
Register schedules.
(Frame flashes)
Reset schedules.
(grey)
Page 23

TOUCH SCREEN CONTROLLER for Air Conditioning Control System Owner's Manual
<3><3>
<4><4>
<2><2>
<1><1>
<5><5>
<6><6> <7><7>
[Running Schedule screen]
[Operating Schedule Settings screen]
[Operating Schedule Detailed Settings screen]
[7] Confirming and changing the content of schedules registered in the Running Schedule
screen
You can confirm and change the content of a schedule that is registered for each air conditioner up to a week from the present.
(1) Tap the group icon <1> for the schedule that you want to confirm or change.
(2) Tap [Operating Schedule]
The Operating Schedule Settings screen appears.
(3) Tap the [Date] tab
(4) Tap the "Air Conditioner"
(5) Tap the [Edit] button
The Operating Schedule Detailed Settings screen appears.
(6) Tap the time
Changing the schedule turns the colour of the air conditioner's name and the schedule gauge to pink on the Operating
Schedule Settings screen.
The procedure to create a schedule is the same as for the master schedule.
<3> for the schedule that you want to confirm or change.
<6> and the setting contents <7> that you want to confirm or change.
<2>.
<4> for the schedule details that you want to confirm or change.
<5>.
23-
EN
Page 24

TOUCH SCREEN CONTROLLER for Air Conditioning Control System Owner's Manual
<4><4>
<3><3>
<2><2>
<1><1>
[Running Schedule screen]
[Operating Schedule Settings screen]
[8] Returning the content of the changes to the operating schedule to the master schedule
Air conditioners that have a changed schedule appear pink in the Operating Schedule Detailed Settings screen. Return this
schedule to the settings of the master schedule.
(1) Tap the group icon <1> for the operating schedule you want to return to the master schedule.
(2) Tap [Operating Schedule]
The Operating Schedule Settings screen appears.
(3) Tap the [Return to the Master Schedule] button
The confirmation screen appears.
(4) Tap the [OK] button.
Return all the edited content of the operating schedule to the master schedule. (Names that were pink and gauges return
to black or blue.)
(5) Tap the [OK] button
<2>.
<3>.
<4> to confirm.
24
-EN
Page 25

TOUCH SCREEN CONTROLLER for Air Conditioning Control System Owner's Manual
0:00 10:00 12:00 13:00 17:00 24:00
In working hours
Out of working hours
Schedule title
Switches between the Running Schedule and
the Billing Schedule.
Schedule list
Shows the list of billing schedules.
[Billing Schedule screen]
Schedule icon
Appears if a billing schedule has been
registered.
4-4. Billing Schedule settings
The billing schedule can be set to total operating time and power distribution separately for in working hours and out of working
hours.
▼ The periods for in working hours can be set for the billing schedule.
Example: If 10:00 to 12:00 and 13:00 to 17:00 are set as in working hours in the billing schedule, then the periods for in working
hours and out of working hours for one day are shown below.
▼ Procedure for setting the billing schedule
(1) Create a billing schedule
Creates a weekly pattern.
Creates monthly settings and creates schedules for special days if special day patterns are required.
(2) Register the billing schedule
Billing schedules are set by registering a billing schedule used for each air conditioner.
25-
EN
Page 26

TOUCH SCREEN CONTROLLER for Air Conditioning Control System Owner's Manual
<2><2>
<1><1>
<4><4>
<6><6>
<5><5>
<3><3>
[Billing Schedule screen]
[Billing Schedule Weekly Pattern Settings screen]
[Billing Schedule Detailed Settings screen]
[Schedule Setup screen]
[1] Creating new billing schedules in the Billing Schedule screen
(1) Tap the [Create New] button <1>.
The Billing Schedule Weekly Pattern Settings screen appears.
(2) Tap the [Week] tab
(3) Tap the day
(4) Tap the [Edit] button
The screen for setting the Start time for normal time appears.
(5) Set the "Start time"
Tap the [OK] button to add the start time to the Billing Schedule Detailed Settings screen.
(6) Tap the end time in "Normal Time Period list"
The screen for setting the end time for normal time appears.
(7) Set the end time and tap the [OK] button.
The end time is added to the Billing Schedule Detailed Settings screen.
(8) Tap the [OK] button in the Billing Schedule Detailed Settings screen.
The settings are reflected in the Billing Schedule Weekly Pattern Settings screen.
(9) Tap the [OK] button in the Billing Schedule Weekly Pattern Settings screen.
A new billing schedule is created.
<2>.
<3> that you want to set.
<4>.
<5>.
<6>.
26
-EN
Page 27

TOUCH SCREEN CONTROLLER for Air Conditioning Control System Owner's Manual
<2><2>
<1><1>
[2] Creating schedules in the Billing Schedule Detailed Settings screen
▼ Add
(1) Tap the [Add] button <1>.
The screen for setting the time to start normal time appears.
(2) Set the "Start time".
Tap the [OK] button to add a new time to the "Normal Time Period list"
<2>.
▼ Change
(1) Tap the period that you want to change on the "Normal Time Period list" <2>.
The period is highlighted.
(2) Tap the time that you want to change.
The screen for setting the time appears.
(3) Set the time and tap the [OK] button.
The following items are the same as for the master schedule.
[3] Copying daily schedule in the Billing Schedule Weekly Pattern Settings screen
[4] Setting special days in the Billing Schedule Special Day Pattern Settings screen
[5] Changing, copying, and deleting billing schedules in the Billing Schedule screen
[6] Registering billing schedules in the Billing Schedule screen
27-
EN
Page 28

TOUCH SCREEN CONTROLLER for Air Conditioning Control System Owner's Manual
<1>
[Outdoor Demand Schedule screen]
[Option screen]
Schedule title
Returns to the option screen.
Outdoor line icon area
Each outdoor line is shown by an
icon.
Schedule list
Shows the list of outdoor
demand schedules.
Schedule icon
Appears if an outdoor demand
schedule has been registered.
4-5. Setting outdoor demand schedule
The schedule can be managed for the demand function of the air conditioner (outdoor) according to the peak hour by 90 - 0%.
▼ The content that can be set in the outdoor demand schedule is the outdoor demand rate.
▼ Procedure for setting outdoor demand schedule
(1) Creating outdoor demand schedule
Creates a weekly pattern.
Creates monthly settings and creates schedules for special days if special day patterns are required.
(2) Registering outdoor demand schedule
Register a created demand schedule to the outdoor line to perform scheduled running of the outdoor demand.
[1] Opening the Outdoor Demand Schedule screen
<1>
Tap the [Outdoor Demand Schedule] <1> in the option screen.
The Outdoor Demand Schedule screen appears.
-EN
28
Page 29

TOUCH SCREEN CONTROLLER for Air Conditioning Control System Owner's Manual
<2><2>
<1><1>
<4><4>
<6><6>
<5><5>
<3><3>
[Outdoor Demand Schedule screen]
[Outdoor Demand Schedule Weekly Pattern Settings screen]
[Schedule Setup screen]
[Outdoor Demand Schedule Detailed Settings screen]
[2] Creating new outdoor demand schedules in the Outdoor Demand Schedule screen
(1) Tap the [Create New] icon <1>.
The Outdoor Demand Schedule Weekly Pattern Settings screen appears.
(2) Tap the [Week] tab
(3) Tap the day
(4) Tap the [Edit] button
The screen for setting the time appears.
(5) Set the "Schedule Time"
Tap the [OK] button to add the scheduled time to the Outdoor Demand Schedule Detailed Settings screen.
(6) Select a demand rate
(7) Tap the [OK] button.
The changes are reflected in the Outdoor Demand Schedule Weekly Pattern Settings screen.
(8) Tap the [OK] button in the Outdoor Demand Schedule Weekly Pattern Settings screen to create a new outdoor demand
schedule.
<2>.
<3> that you want to set.
<4>.
<6>.
<5>.
29-
EN
Page 30

TOUCH SCREEN CONTROLLER for Air Conditioning Control System Owner's Manual
<1><1>
<2><2>
[3] Creating schedules in the Outdoor Demand Schedule Detailed Settings screen
▼ Add
(1) Tap the [Add] button <1>.
The screen for setting the time appears.
(2) Set the time.
Tap the [OK] button to add a new time to the "Operations list"
<2>.
▼ Change
(1) Tap the schedule that you want to change on the "Operations list" <2>.
The schedule is highlighted.
(2) Tap the schedule and select demand rate or change time.
The following items are the same as for the Master Schedule.
[4] Copying daily schedule in the Outdoor Demand Schedule Weekly Pattern Settings
screen
[5] Setting special days in the Outdoor Demand Schedule Special Day Pattern Settings
screen
[6] Changing, copying, or deleting Outdoor Demand Schedules in the Outdoor Demand
Schedule screen
30
[7] Registering outdoor demand schedules in the Outdoor Demand Schedule screen
-EN
Page 31

TOUCH SCREEN CONTROLLER for Air Conditioning Control System Owner's Manual
<1><1>
<2><2>
<1><1>
4-6. Alarm List and Alarm History List screen
[1] Alarm List screen
Tapping the alarm icon in the menu opens the Alarm List screen. A list of current errors is displayed. Displays the name of the
air conditioner, date the error occurred, and a description of the error.
Resetting the error
Tapping the [Reset] button <1> sends a clear error signal to the air conditioner.
Displaying new alarms
Tap the [Renew] button <2> to renew the screen and display the latest alarms.
[2] Alarm History List screen
Tapping the [Alarm History List] tab in the Alarm List screen opens the Alarm History List screen. It can show a history of past
alarms. Displays the name of the air conditioner, date the error occurred, and a description of the error.
Displaying the entire alarm history
Tap the [Display all] button <1>.
The entire alarm history is displayed. A maximum of 5120 items.
31-
EN
Page 32

TOUCH SCREEN CONTROLLER for Air Conditioning Control System Owner's Manual
[List display screen] ([General] tab)
Level name
Shows the floors, tenants, and area names of
the air conditioners.
Tab
: Changes to the [General] tab.
: Changes to the [Advanced] tab.
: Changes to the [Schedule] tab.
Air conditioner status
Shows the operating status and
air conditioner's name.
[List display screen] ([Advanced] tab)
Power Level
Displays the performance status of the running air conditioner in 10 steps. The more bars are lit, the stronger the operation.
Return Back
Displays "ON" while Return Back is set.
Forced Thermo OFF
Displays "ON" while Forced Thermo OFF is set.
Save
Displays "Release", "Max", "50", "0".
Outdoor Demand
Displays "ON" while Outdoor Demand is set.
4-7. List display
By tapping the list icon in the display switch icon area, you can check the set schedule and the operating status of the selected
air conditioner in the list. Or, in the outdoor demand schedule screen, display the name of the air conditioner that is connected
to the selected outdoor line.
-EN
32
Page 33

TOUCH SCREEN CONTROLLER for Air Conditioning Control System Owner's Manual
Master Schedule
Displays the name of registered master schedules.
Billing Schedule
Displays the name of registered billing schedules.
Outdoor Demand Schedule
Displays the name of outdoor demand schedules registered to outdoor units that are connected.
[List display screen] ([Schedule] tab)
Name of indoor unit
Displays the level name and name of indoor units connected to
outdoor units.
[List display screen] (moves from the Outdoor Demand Schedule screen)
Name of outdoor line
Displays the name of the outdoor unit.
33-
EN
Page 34

TOUCH SCREEN CONTROLLER for Air Conditioning Control System Owner's Manual
<1><1>
<2><2>
[Monitor screen]
Unit icon area
Shows the status of air conditioners.
: Indicates it is operating (red or green).
: Indicates it is not operating (grey).
: Indicates an alarm has occurred.
4-8. Monitor screen
Tapping the [Monitor] icon in the display switching icon area opens the Monitor screen. You can check the operating status of
many air conditioners in a single screen. It is also possible to change the status of air conditioners.
[1] Changing the settings of air conditioners on the Monitor screen
(1) Tap the unit icon group <1> that you want to set.
All the levels to which that unit belongs are highlighted.
(2) Change the air conditioner settings in the same way as "4-2.Changing air conditioner settings" from the "Air conditioner
status list"
<2>.
34
-EN
Page 35

TOUCH SCREEN CONTROLLER for Air Conditioning Control System Owner's Manual
<4><4>
<5><5>
<1><1>
<3><3>
<2><2>
[Control screen]
Unit icon display on the layout screen
: Selected
: Not selected
[Layout screen]
4-9. Layout screen (TOUCH SCREEN CONTROLLER only)
You must create a separate image file of layouts. (Paid service)
You can display unit icons on the layout diagram so that you know the position of the air conditioners. Tapping the layout icon
in the display switching icon area opens the layout screen.
[1] Checking the position of air conditioners
(1) On the control screen, select the group icon <1> for the position you want to confirm.
(2) Tap the [Layout] icon
The layout screen <3> in which the selected group icon is installed appears.
The air conditioner appears as a Unit icon
* The location where the air conditioner is installed is displayed in the air conditioner status list
layout screen, even when multiple group icons are selected.
<2>.
<4>.
<5> that appears on the
35-
EN
Page 36

TOUCH SCREEN CONTROLLER for Air Conditioning Control System Owner's Manual
<1><1>
<3><3>
<2><2>
<1>
<2>
[2] Selecting the air conditioner on the layout screen
Tap the Unit icon <1> for the air conditioner that you want to select.
Only the unit icon <2> you tapped is selected and the air conditioner status list <3> is renewed.
* You cannot select multiple unit icons.
[3] Changing the settings of air conditioners on the layout screen
<2>
<1>
36
(1) Tap the Unit icon
(2) Change the air conditioner settings in the same way as "4-2.Changing air conditioner settings" from the "Air conditioner
status list"
* You cannot change the settings of multiple air conditioners all at once.
<2>.
<1>
for the air conditioner that you want to set. Only the unit icon you tapped is selected.
-EN
Page 37

TOUCH SCREEN CONTROLLER for Air Conditioning Control System Owner's Manual
<1>
<2>
Display magnification
From ×1 to ×5
Zoom out
Zoom in
<1><1>
[4] Zooming in and out of the layout diagram
<1>
<2>
▼ Zoom in
Pinch out <1> within the layout diagram. You can zoom in up to 5 times normal size.
▼ Zoom out
Pinch in
<2> within the layout diagram. This zooms out the zoomed in layout diagram.
[5] Moving the position of the display of a zoomed in layout diagram
Swipe <1> within the layout diagram. You can move the position of the display.
37-
EN
Page 38

TOUCH SCREEN CONTROLLER for Air Conditioning Control System Owner's Manual
<1>
<2>
<3>
<4>
[Layout screen]
[Layout screen]
[Layout list screen]
[6] Moving to other layout diagrams
<2>
<1>
<4>
<3>
▼ Move from the layout screen
Tap the arrow button
This moves you to the next layout diagram.
* You can move to the next layout diagram by swiping up when the diagram is not zoomed in.
▼ Move from the layout list screen
38
(1) Tap the [List] button
The layout list screen appears.
(2) An arrow button
the next page.
* Swiping up will also move you to the next page.
(3) If there is a layout diagram
This moves you to the layout diagram that you tapped.
-EN
<1>.
<2>.
<3> is displayed if there are more than five screens. Tapping the arrow button <3> will move you to
<4> that you want to display, tap that diagram.
Page 39

TOUCH SCREEN CONTROLLER for Air Conditioning Control System Owner's Manual
<1><1>
<
2><2>
<3><3> <4><4>
[Control screen]
[Layout list registration screen]
[Registration
confirmation screen]
The air conditioner that is
displayed in the air conditioner
status list is registered when
multiple group icons are selected.
[7] Registering the air conditioner in the layout diagram
[7-1] Changing to layout registration mode from the control screen
(1) Tap the Group icon <1> of the layout diagram that you want to register.
(2) Tap the [Layout] button
The registration confirmation screen appears if the selected air conditioner is not registered in the layout diagram.
(3) Tap the [Register] button <3>.
The layout list registration screen appears and the system enters registration mode.
* Tapping the [List] button
<2>.
<4> displays the layout list screen.
39-
EN
Page 40

TOUCH SCREEN CONTROLLER for Air Conditioning Control System Owner's Manual
<1>
<2>
<3>
<5>
<4>
[Layout list registration screen]
[Layout registration
screen]
The name of the air conditioner
to register appears.
[7-2] Registering the air conditioner to the layout diagram from layout registration mode
<1>
<3>
<5>
(1) Tap the layout diagram that you want to register <1>.
(2) Long tap the layout position that you want to register
(3) The Unit icon
(4) Tapping the [Apply] button
(5) Tapping the [Display] button
The layout registration screen appears.
<3> is displayed as flashing.
<4>
<2>
<2>.
<4> lights the unit icon and the air conditioner is registered on the layout diagram.
<5> ends registration mode.
40
-EN
Page 41

TOUCH SCREEN CONTROLLER for Air Conditioning Control System Owner's Manual
<1><1>
<
2><2>
<3><3>
<
5><5><6><6>
<
4><4>
[Layout screen]
[Layout registration
screen]
The names of air conditioners that
are already registered do not appear.
[7-3] Changing to layout registration mode with the layout screen
(1) Tap the [Register] button <1>.
This moves you to the layout registration screen.
(2) Tap "Air conditioner name"
The list of air conditioner names is displayed.
(3) From the "List of air conditioner names" <3>, select the name of the air conditioner that you want to register.
(4) Long tap the layout position that you want to register
(5) Tapping the [Apply] button
(6) You can register air conditioners consecutively in the layout diagram by repeating steps 2 through 5.
(7) Tapping the [Display] button
<2>.
<4> to display the unit icon as flashing.
<5> lights the unit icon and the air conditioner is registered on the layout diagram.
<6> shows the layout screen.
EN
41-
Page 42

TOUCH SCREEN CONTROLLER for Air Conditioning Control System Owner's Manual
<1><1>
<2><2>
<3><3>
<
4><4>
[Layout registration screen]
[8] Changing and clearing the air conditioner registration of the layout diagram
▼ Change
(1) Tap the Unit icon
The unit icon is selected.
(2) Long tap the position to change
The unit icon is moved and displayed as flashing.
(3) Tapping the [Apply] button
▼ Clear
(1) Long tap the Unit icon
(2) The Unit icon
<1> that you want to change.
<4> disappears.
<2>.
<3> lights the unit icon and the air conditioner is registered on the layout diagram.
<1> that you want to clear.
42
-EN
Page 43

TOUCH SCREEN CONTROLLER for Air Conditioning Control System Owner's Manual
<1><1>
<2><2>
[Control screen] (separate display for each floor)
[Control screen] (separate display for each tenant)
4-10. Changing the top level
By long tapping the [Floor], [Tenant], [Area], or [Unit] icon on the display switch icon, you can change the top level to floor,
tenant, area, or unit. Floor is normally selected for the top level. If the top level is below tenant, it is not possible to move to a
level higher than the top level. (Example: If the top level is area, it is not possible to tap the floor/tenant icon.)
[1] Changing the top level on the control screen
(1) Long tap any one of the [Display Switch (level switch)] icons <1>.
(2) Moves to the level for which the top level mark
<2> was long-tapped and that level becomes the top level.
43-
EN
Page 44

TOUCH SCREEN CONTROLLER for Air Conditioning Control System Owner's Manual
<2><2>
<1><1>
<3><3>
[Per floor unit display]
Switch name button
Appears when skipping levels when moving. See "4-
1.Moving levels" regarding moving between levels.
Example: When moving between levels by tapping the
unit icon in the floor display
4-11. Switching the display of the unit names
You can switch the display from air conditioner name to upper level name if the unit display skips a level such as from floor
display to unit display. By using this function, you can check the names of the levels of all the air conditioners at one time.
[1] Switching unit names in the control screen
(1) Tap the [Switch name] icon <1>.
The list of level names is displayed.
(2) Tap the level name
(3) Unit name changes to the level name
<2> that you want to display. (Example: Tap an area name)
<3> selected in (2). (Example: Changes to area name)
44
-EN
Page 45

TOUCH SCREEN CONTROLLER for Air Conditioning Control System Owner's Manual
Optional functions list
Each function is shown in the list. The functions can be
used by selecting them.
Swiping scrolls the list.
Optional function screen
Tapping a function in the list opens that function's
screen.
4-12. Option screen
Tapping the option icon in the menu icon area opens the option screen. You can do system settings, such as date and time
settings and support information and settings related to the air conditioners, such as Outdoor Demand Schedule settings (see
"4-5.Setting outdoor demand schedule") and Operation mode restriction.
[1] Settings related to air conditioners
[1-1] Release Outdoor Demand
Tap the [OK] button to release demand for all the outdoor units.
45-
EN
Page 46

TOUCH SCREEN CONTROLLER for Air Conditioning Control System Owner's Manual
<2><2>
<1><1>
<2>
<1>
[1-2] Disabling schedules
You can set whether to operate an outdoor demand schedule or operating schedule.
(1) Select the "Schedule" <1> that you will not operate.
(2) Tap the [OK] button
<2> to apply the setting.
[1-3] Operation mode restriction
This is used only when the system's operation modes are limited to cooling (COOL, DRY, or FAN) or heating (HEAT or FAN).
Use it to prohibit heating or cooling with multiple air conditioners.
<1>
<2>
(1) Select [HEAT,FAN], [COOL,DRY,FAN] or [All Permitted] <1>.
(2) Tap the [OK] button
<2> to apply the setting.
46
-EN
Page 47

TOUCH SCREEN CONTROLLER for Air Conditioning Control System Owner's Manual
<1><1>
<
3><3>
<
2><2>
<
4><4>
▼ When daylight savings
time is set
[2] System settings
[2-1] Contact information
Shows the versions of the software and contact information.
[2-2] Clock and calendar setting
You can set the clock and calendar. You can also set the clock for daylight savings time.
Setting the clock and calendar
(1) Tap the year, month, date, hour, or minute <1> that you want to change.
(2) Enter a new value
(3) Tap the [OK] button
Setting daylight savings time
(1) Tap the [ON] button under [Daylight-saving setting] <3>. The time setting advances one hour.
(2) Tap the [OK] button
A daylight savings time mark appears near the clock when daylight savings time is set.
<2>.
<4> to apply the setting.
<4> to apply the setting.
Tap the [OFF] button under [Daylight-saving setting] to set the clock back one hour. (Daylight savings time is cleared)
47-
EN
Page 48

TOUCH SCREEN CONTROLLER for Air Conditioning Control System Owner's Manual
<1>
<2>
<3>
<4>
<5>
<1>
<2>
<3>
[2-3] Automatic Meter-Reading
Use this setting if you want to add or change automatic meter reading days. The initial values for the settings are set in the
settings files.
<1>
<2>
<3>
<4>
<5>
Setting for each month individually
(1) Select the month <1> to change or set.
(2) Tap the date
(3) Tap the [OK] button
To change the meter reading date, tap the date that is clear the setting, it will no longer be highlighted.
Batch setting all months together
(1) Tap the date <3> that you want to batch set.
The Date screen appears.
(2) Set the date to set.
(3) Tap the [Renew] button
(4) Tap the [OK] button
<2> that you want to change.
<5> to apply the settings.
<4>. The date selected in (2) is highlighted in all the months.
<5> to apply the settings.
[2-4] Manual Meter-Reading (TOUCH SCREEN CONTROLLER only)
Use this setting if you want to do provisional totalling before the date that the meter is read automatically. The period from the
last meter reading until the current date appears in [Data reading in progress] <1>. Operating time and power distribution are
reset, and new calculations start after totalling.
<1>
<2>
<3>
Tap the [Go] button <2>.
Totalling is done, and the file is added to "Meter reading file list"
<3>.
48
-EN
Page 49

TOUCH SCREEN CONTROLLER for Air Conditioning Control System Owner's Manual
<1>
<2>
<3>
<4>
<1><1>
<
2><2>
<
3><3>
[2-5] Icon settings (TOUCH SCREEN CONTROLLER only)
You can set the images that appear for group icons.
<1>
<2>
<3>
<4>
Setting the icons for each level name
(1) Tap the [Name] tab of the level <1> that you want to change.
(2) Tap the name that you want to change on the "Name list"
(3) Tap the icon that you want to register on the "Icon list"
(4) Repeat operations (1) to (3) to set icons for each level name.
(5) Tap the [OK] button
<4> to apply the setting.
<2>.
<3>.
[2-6] Display Settings (TOUCH SCREEN CONTROLLER only)
You can set whether the Air temperature level is displayed and the colour of icons that indicate air conditioners are operating.
Setting the colour displayed during operations
(1) Tap the [Colour] <1> that you want to set.
(2) Tap the [OK] button
Displaying the Air temperature level
(1) Tap the [ON] button for [Display of Air temperature level] <2>.
(2) Tap the [OK] button
<3> to apply the setting.
<3> to apply the setting.
Tap the [OFF] button for the Air temperature level display to not display the Air temperature level.
49-
EN
Page 50

TOUCH SCREEN CONTROLLER for Air Conditioning Control System Owner's Manual
<1><1>
<
2><2>
<
3><3>
<
5><5> <4><4>
[2-7] Password Setting (TOUCH SCREEN CONTROLLER only)
Input a password and use it to prevent people from operating the air conditioner, or checking or setting schedules or option icons
until the system is unlocked.
▼ Setting limits on operations
50
(1) Tap [Password setting] <1>.
The Password Input
(2) Enter a four digit password. The initial default settings is set to 1048.
(3) Set the [Protection level during lock]
Release: Do not limit functions with the password.
Level 1: Prevent setting and checking operations done with the [Schedule] and [Option] icons.
Level 2: Prevent setting and checking operations done with the [Schedule] and [Option] buttons and operations to set air
conditioners.
(4) If you want to change the password, tap the [Change password] button
The Password Input screen opens. Enter any four digit password. When you tap the [OK] button a screen for re-entering
the password appears, enter the password again.
(5) Tap the [OK] button
-EN
<2> screen appears.
<3>.
<5> to apply the settings.
<4>.
Page 51

TOUCH SCREEN CONTROLLER for Air Conditioning Control System Owner's Manual
<1><1>
<3><3>
<2><2>
<1><1>
<
2><2>
<
3><3>
▼ Limiting operations and clearing limits on operations on the control screen
When operation limits are set, the [Unlock/Lock] button <1> appears on the control screen. This button limits operations and
clears the limits on operations.
(1) The [Lock] button <1> is on the control screen when it opens.
(2) Tap the [Lock] button
It becomes impossible to do the operations at the level set in the password setting screen. (Refer to the menu icon display
(3) Tap the [Unlock] button <3>.
The Password input screen appears. Enter the password that was set and tap the [OK] button.
The [Unlock] button becomes the [Lock] button, and operation limits are released. However, note that if the wrong
password is input three times, the password cannot be entered again for 30 minutes.
<1> or do no operations for five minutes.
[2-8] IP Address Setting (TOUCH SCREEN CONTROLLER only)
This is used to set the TOUCH SCREEN CONTROLLER IP address. The controller is restarted if the settings are changed.
The default settings are as follows.
• IP address: 192.168.2.80
• Subnet mask: 255.255.255.0
• Default gateway: 0.0.0.0 (not set)
(1) Tap the address that you wish to change <1>.
(2) Enter the new value
(3) Tap the [OK] button
A confirmation screen appears.
(4) Tap the [OK] button. The TOUCH SCREEN CONTROLLER restarts, and the new IP address is set.
<2>.
<3>.
<2>
)
EN
51-
Page 52

TOUCH SCREEN CONTROLLER for Air Conditioning Control System Owner's Manual
<1>
<7>
<8>
<2>
<3>
<5>
<6>
<4>
[User Account Setting screen]
[User Account Creation
screen]
[2-9] User Account Setting (TOUCH SCREEN CONTROLLER only)
This is used to set up user accounts.
A user account is required to use your computer to monitor and control air conditioners via the TOUCH SCREEN
CONTROLLER. Access levels can be set to limit the operations possible.
* There are three access levels.
Administrators: Administrators can perform all operations possible from a computer.
Power users: Power users cannot change or confirm settings using the [Schedule] and [Options] icons.
Guests: Guests cannot change or confirm settings using the [Schedule] and [Option] buttons, and cannot perform operations
to set air conditioners.
▼ Adding/deleting/changing a user account
<5>
<6>
▼ Adding a user account
(1) Tap the [Add] button <1>.
The User Account Creation screen appears.
(2) Enter a user name, password, and then the password again
You can enter between 1 and 24 characters.
(3) Select the "Access level"
(4) Tap the [OK] button
(5) The newly created user is added to the User account list
(6) Tap the [OK] button
▼ Deleting a user account
(1) Tap the user you wish to delete from the User account list <5>.
(2) Tap the [Del] button
(3) The User account list
(4) Tap the [OK] button
▼ Changing a user account
(1) Tap the user you wish to change in the User account list <5>.
(2) Tap the [Change] button
The User Account Creation screen appears.
(3) Enter a new password, and then the same password again
name cannot be changed.
(4) Select the “Access level”
(5) Tap the [OK] button
(6) The user appears on the User account list
(7) Tap the [OK] button
<3>.
<4>.
<6> to confirm.
<7>.
<5> is updated.
<6> to confirm.
<8>.
<3>.
<4>.
<6> to confirm.
<1>
<7>
<8>
<2>.
<5>.
<2>. You can enter between 1 and 24 characters. The user
<5>.
<2>
<3>
<4>
52
-EN
Page 53

TOUCH SCREEN CONTROLLER for Air Conditioning Control System Owner's Manual
<1><1>
<1><1>
<
2><2>
<1>
<2>
<3>
[2-10] Output to USB memory (TOUCH SCREEN CONTROLLER only)
This is used to output alarm data and data for power distribution to a USB memory that is connected.
(1) Connect a USB memory to the USB port.
(2) Tap the [OK] button
(3) The [OK] button
<1> to output the alarm files, and monthly and daily reports to the USB memory.
<1> is enabled, when the process is complete, remove the USB memory.
[2-11] System initialize (TOUCH SCREEN CONTROLLER only)
Restarts and resets the selected machine.
(1) Select the machine <1> to reset.
(2) Tap the [OK] button
<2> to reset the selected machine.
[2-12] Alarm email address setting (TOUCH SCREEN CONTROLLER only)
When abnormalities occur, the name of the air conditioner, the time and date of the abnormalities, and information about the
abnormalities are sent to the email addresses set as recipients.
<1>
<3>
▼ Setting addresses
(1) Enter your email address in [Address]
(2) Tap the [OK] button
▼ Test transmission
(1) The [Test transmission] button <3> is enabled when the addresses are set, so tap it.
* A test email is transmitted to the email address that is set.
<2> to apply the settings.
<1>. (Maximum of 5 addresses)
<2>
53-
EN
Page 54

TOUCH SCREEN CONTROLLER for Air Conditioning Control System Owner's Manual
<1><1>
<
2><2>
[Control screen]
Display area of the graph
Displays the graph selected in the
graph list.
Title
Returns to the control screen.
Graph list
Displays the list of indoor unit graphs.
[Indoor unit graph screen]
4-13. Indoor unit graph screen (TOUCH SCREEN CONTROLLER only)
Display graphs for the outdoor temperature, indoor temperature, set temperature, and operating time of the air conditioner you
selected.
When multiple air conditioners are selected, each value is as shown below.
• Operating time: the total value for the selected air conditioner
• Set temperature, indoor temperature, and outdoor temperature: the average value for the selected air conditioner
[1] Displaying the indoor unit graph screen
(1) Tap the Group icon <1> that you want to display as a graph. (More than one can be selected)
(2) Tap the [Indoor unit graph]
The Indoor unit graph screen appears.
<2> of the advanced items for the air conditioner status list.
-EN
54
Page 55

TOUCH SCREEN CONTROLLER for Air Conditioning Control System Owner's Manual
<1><1>
<
2><2>
[Indoor unit graph screen]
[Indoor unit graph by
day screen]
[Indoor unit graph by
month screen]
[2] Displaying the indoor unit graph
▼ Indoor unit graph by day
Tap [Indoor unit data by day]
The indoor unit graph by day appears.
▼ Indoor unit graph by month
Tap [Indoor unit data by month]
The indoor unit graph by month appears.
* When multiple air conditioners are selected, the operating time is a total value and the set temperature, indoor temperature,
and outdoor temperature are average values.
<1>.
<2>.
55-
EN
Page 56

TOUCH SCREEN CONTROLLER for Air Conditioning Control System Owner's Manual
<1>
<2>
<3>
<4>
[Indoor unit graph by day screen]
[Group icon selection
screen]
[Indoor unit graph by
day screen]
When indoor unit data by day is selected
[3] Displaying the graphs of other indoor units
<1>
<3>
<4>
<2>
(1) Tap the [Unit] button <1>.
-EN
56
The screen changes to the group selection screen.
(2) From the Unit display of the icon
(3) Tap [Indoor unit data by day]
The indoor unit graph of the selected icon appears.
* When multiple air conditioners are selected, the operating time is a total value and the set temperature, indoor temperature,
and outdoor temperature are average values.
<3>. (When you want to display by month, tap [Indoor unit data by month] <4>.)
<2>, select the group icon that you want to make into a graph.
Page 57

TOUCH SCREEN CONTROLLER for Air Conditioning Control System Owner's Manual
<1>
<2>
<3>
<4>
[Indoor unit graph by day screen]
[Calendar screen]
[4] Displaying graphs of other dates
<2>
<1>
<3>
▼ Display graphs of other dates by using the arrow button
(1) Tapping the arrow button
Indoor unit graph by the day: moves the graph by daily units.
Indoor unit graph by the month: moves the graph by monthly units.
▼ Display graphs of other dates by using the calendar
(1) Tap [Day]
The calendar appears.
(2) Select the day or month from the calendar <3>. The units that can be selected are as follows.
Indoor unit graph by the day: can be selected by daily units.
Indoor unit graph by the month: can be selected by monthly units.
(3) Tapping the [OK] button
<2>.
* You can display graphs for every 2 years.
<4>
<1> displays the graph of another date. The units that can be changed are as follows.
<4> displays the graph for the selected day or month.
57-
EN
Page 58

TOUCH SCREEN CONTROLLER for Air Conditioning Control System Owner's Manual
<1><1>
[Option screen]
Display area of the graph
Displays the graph selected in the
graph list.
Title
Returns to the option screen.
Graph list
Displays the power graph list.
[Power graph screen]
4-14. Power graph screen (TOUCH SCREEN CONTROLLER only)
Display the power measured by the electricity meter in a graph.
[1] Displaying the power graph screen
Tap [Power graph] <1> in the option screen.
The power graph screen appears.
-EN
58
Page 59

TOUCH SCREEN CONTROLLER for Air Conditioning Control System Owner's Manual
<1><1>
<
2><2>
[Power graph screen]
[Total power graph by
day screen]
[Total power graph by
month screen]
[2] Displaying the total power graph
The total values from the connected electricity meter are displayed as a graph.
▼ Total power graph by day
Tap [Total power by day] <1>.
The total power graph by day screen appears.
▼ Total power graph by month
Tap [Total power by month]
The total power graph by month screen appears.
<2>.
59-
EN
Page 60

TOUCH SCREEN CONTROLLER for Air Conditioning Control System Owner's Manual
<1><1>
<
2><2>
<
3><3>
<
4><4>
[Power graph screen]
[Electricity meter
selection screen]
[System power graph by
day screen]
[3] Displaying the system power graph
(1) Tap [System power by day] <1>. (When you want to display by month, tap [System power by month] <2>.)
The electricity meter icon appears.
(2) Select the Electricity meter icon
(3) Tap the [Enter] button
The system power graph is displayed.
* When multiple electricity meters are selected, it is a total value of the selected electricity meters.
<4>.
<3> that you want to make into a graph. (More than one can be selected)
60
-EN
Page 61

TOUCH SCREEN CONTROLLER for Air Conditioning Control System Owner's Manual
<1>
<2>
<3>
<4>
[Total power graph by day screen]
[Calendar screen]
[4] Displaying graphs of other dates
<2>
<1>
<3>
▼ Display the past by using the arrow button
(1) Tapping the arrow button
Total power graph by day/system power graph by day: moves the graph by daily units.
Total power graph by month/system power graph by month: moves the graph by monthly units.
▼ Display the past by using the calendar
(1) Tap [Day]
The calendar appears.
(2) Select the day or month from the calendar <3>. The units that can be selected are as follows.
Total power graph by day/system power graph by day: can be selected by daily units
Total power graph by month/system power graph by month: can be selected by monthly units
(3) Tapping the [OK] button
<2>.
<4> displays the graph for the selected day or month.
* You can display graphs for every 2 years.
<4>
<1> displays the graph of another date. The units that can be changed are as follows.
61-
EN
Page 62

TOUCH SCREEN CONTROLLER for Air Conditioning Control System Owner's Manual
<1>
<2>
<3>
<4>
[Log on screen]
[Computer control screen]
5 Monitoring/controlling using a computer
You can use your computer to monitor and control air conditioners via the TOUCH SCREEN CONTROLLER. This section
explains operations that differ from those performed using the TOUCH SCREEN CONTROLLER.
*Refer to the network connection guide for information on how to connect the computer and TOUCH SCREEN CONTROLLER.
The display may be slowed down if the number of group icons is large.
5-1. Log on/Log off
<1>
<2>
<3>
▼ Log on
Make a note of the user name and password set in "[2-9]User Account Setting (TOUCH SCREEN CONTROLLER only)" in
4-12.Option screen.
(1) Open your browser and connect to the TOUCH SCREEN CONTROLLER.
A log on screen appears.
(2) Enter your [User name]
(3) Enter your [Password]
(4) Click the [Log on] button
The computer control screen appears.
*Up to 2 users can be logged on.
The system will automatically log off at 1 am to protect the TOUCH SCREEN CONTROLLER. Log on again if you want to
continue to monitor and control the system from a PC.
▼ Log off
(1) Click the [Log off] button <4>.
The browser will return to the log on screen.
<4>
<1>.
<2>.
<3>.
62
NOTE
* The screen configuration and operations that can be performed after logging on are fundamentally the same as on the
TOUCH SCREEN CONTROLLER. For operation procedures, refer to [4. How to operate]. However, as some of the screens
and operations differ, be sure to read the following information.
-EN
Page 63

TOUCH SCREEN CONTROLLER for Air Conditioning Control System Owner's Manual
Right arrow: Moves to the next air
conditioner
Left arrow: Moves to the previous air
conditioner
<1><1>
<1><1>
5-2. Air conditioner status list display
▼ Changing the air conditioner that is shown on the air conditioner status list
The "flick" gesture has been replaced by arrow buttons. Click the arrow buttons to move between the air conditioners in the
selected group icon.
▼ Showing advanced items on the air conditioner status list
The "Advanced tag" has changed to an [Advanced] button <1>. Click the [Advanced] button <1> to turn the advanced display
on or off.
63-
EN
Page 64

TOUCH SCREEN CONTROLLER for Air Conditioning Control System Owner's Manual
▼ Examples of screens that do not have a number input button
▼ Examples of screens that do not have a number input screen
5-3. Entering numbers
Numbers are entered directly from the computer for things such as the set temperature and schedule times. For this reason,
the number input button and number input screens (e.g. screen for setting the time) are not included.
64
-EN
Page 65

TOUCH SCREEN CONTROLLER for Air Conditioning Control System Owner's Manual
<1><1> <2><2>
[Master Schedule Detailed Settings screen]
<1>
<2>
[Control screen] (separate display for each floor)
[Control screen] (separate display for each tenant)
5-4. Schedule detailed settings screen display
The settings displayed on the Master Schedule Detailed Settings screen and Operating Schedule Detailed Settings screen are
different. All settings for each time in the schedule can be changed at the same time.
* To release the return back function, clear the check box
<2> while [Set] <1> is selected.
5-5. Changing the top level
The "long tap" gesture has been replaced by right clicking. You can change the top level to floor, tenant, area, or unit by right
clicking the [Floor], [Tenant], [Area], or [Unit] icon in the display switch icons.
<1>
(1) Right click one of the [Display switch] icons <1>.
(2) The top level mark
<2> moves to the level that was right clicked, and that level becomes the top level.
<2>
65-
EN
Page 66

TOUCH SCREEN CONTROLLER for Air Conditioning Control System Owner's Manual
5-6. Option screen display
Each function on the option screen now has a dialog box.
[Option screen]
▼ Each function on the Option screen
[Contact Information screen] [Release Outdoor Demand screen]
[Scheduler Operation screen] [Clock and Calendar Settings screen]
[Operation Mode Restriction screen] [Automatic Meter-Reading screen]
66
-EN
Page 67

TOUCH SCREEN CONTROLLER for Air Conditioning Control System Owner's Manual
6 Important information
Extracting monthly report data and power distribution data
Use the Report Creation Software provided to create reports from monthly report data and power distribution data.
Refer to the Owner’s Manual of the Report Creation Software for data extraction and operating procedures.
Troubleshooting
Has the backlight gone out?
Nothing appears on the screen
→Tap the screen. The backlight turns on, and the screen
contents appear.
Operations cannot be performed even when the screen is
tapped.
The scheduler does not work even if a schedule is set.
The remote control does not work. Has operation of the remote control been prohibited?
Cooling/Heating cannot be performed during the storage
operation at night.
Turn the power off and then on again.
Is only the master schedule set?
Is the schedule setting disabled?
Is a heater (or cooler) on the same refrigerant line operating?
Is the local remote control set so the operation mode cannot be
changed?
Is a heater (or cooler) selected in the selected operation mode
range?
Contact your dealer
• To change the names of the floors, tenants, areas, or refrigerant lines
• To install more air conditioners
• To output a power distribution report
67-
EN
Page 68

DEA3319001
 Loading...