


User Manual
For
Bluetooth USB Dongle

Table of Contents
Introduction............................................................................................................................1
- Introduction to Bluetooth Wireless Technology
- Introduction to Bluetooth USB Adapter
- Box Content and Picture
System Requirement..............................................................................................................2
- PC System Requirement:
- Mac System Requirement:
Software Installation..............................................................................................................3
Pairing Guide..........................................................................................................................8
- What’s pairing?
- Pass Key
- How to pair devices?
- Example 1, pair with a Bluetooth Mouse.
- Example 2, pair with a Bluetooth Headset.
Connect and Disconnect.....................................................................................................21
- Connect
- Note:
- Example 1, connect/disconnect with a Bluetooth Mouse.
- Example 2, connect/disconnect with a Bluetooth Headset.
French...................................................................................................................................30
Geman...................................................................................................................................59
Spanish..................................................................................................................................89
Italian...................................................................................................................................119
Dutch...................................................................................................................................148
Portuguese..........................................................................................................................177
CE Statements....................................................................................................................207
FCC Safety Statements......................................................................................................207
Warning...............................................................................................................................207

Introduction
Introduction to Bluetooth Wireless Technology
Bluetooth is a short- range wirel ess communi cation technol ogy. It allows wir eless connecti ons
between Bluetooth devices such as cellular phones, personal digital assistants (PDA),
desktop and notebooks computers, input-output devices (mouse, keyboards, and printers),
and home appliances. Bluetooth refers to a worldwide standard designed to operate in the
internationally recognized ISM (Industrial Scientific and Medical) frequency band. Within the
ISM band (2.4 GHz – 2.48 GHz) Bluetooth transmissions hop between 79 separate
frequencies 1,600 times every second, and with a communication range of about 10 meters
(33 feet) for class II or 100 meters (330 feet) for class I.
Introduction to Bluetooth USB Adapter
Bluetooth USB Adapter is a Bluetooth enabler, that enables your desktop or notebook
computer to connect wirelessly to any other Bluetooth enabled computers and devices. It
allows a working range of up to 10 (class 2)/100 (class 1) meters (33/330 feet) with a 723
Kbps data rate transmission, and complies with Bluetooth 1.2 and USB 1.1 (support the two
lower data-transfer rates of either 1.5 Mb/s or 12 Mb/s)/2.0(support all three data rates: 1.5
Mb/s, 12 Mb/s, and 480 Mb/s. the fast data-transfer rate of 480 Mb/s) specifications.
Bluetooth USB Adapter is an ideal solution for home and mobile networking needs. It is easy
to install and use for wireless connectivity to such as cellular phones, PDAs, printers,
computers, keyboards, mice etc.
Box Content and Picture
- Bluetooth USB Adapter
- Driver CD
- Quick Guide and User Manual
1

System Requirement
PC System Requirement:
- CPU: Intel Pentium III 500MHz or above.
- Memory: 256MB or more.
- Hard disk space: at least 50MB.
- OS: Windows 98SE/Me/2000/XP
- A free USB port, USB 1.1/2.0 compliant.
- CD-ROM Drive.
Mac System Requirement:
- MAC OS: 10.1.4 or later
- Mac OS driver and software provided by Apple.
- A free USB port, USB 1.1/2.0 compliant.
- CD-ROM Drive.
2
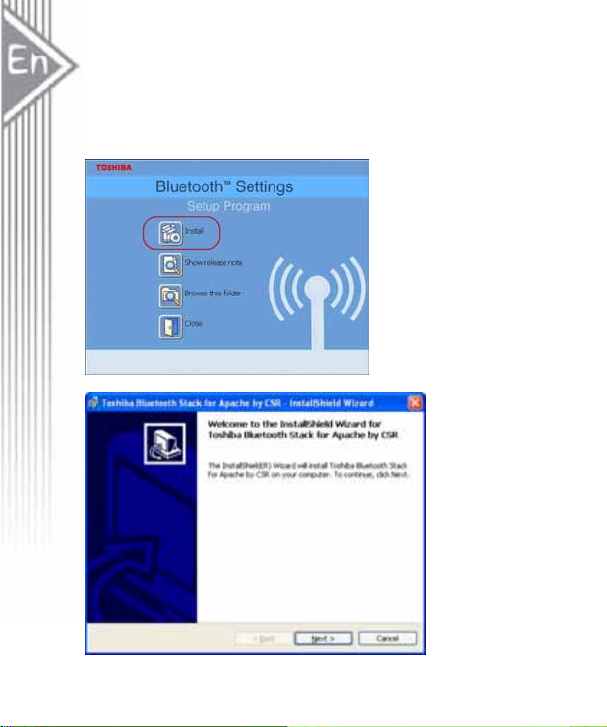
Software Installation
Note: Do not plug your Bluetooth USB Adapter into USB port until you have completed the
software installation as the following:
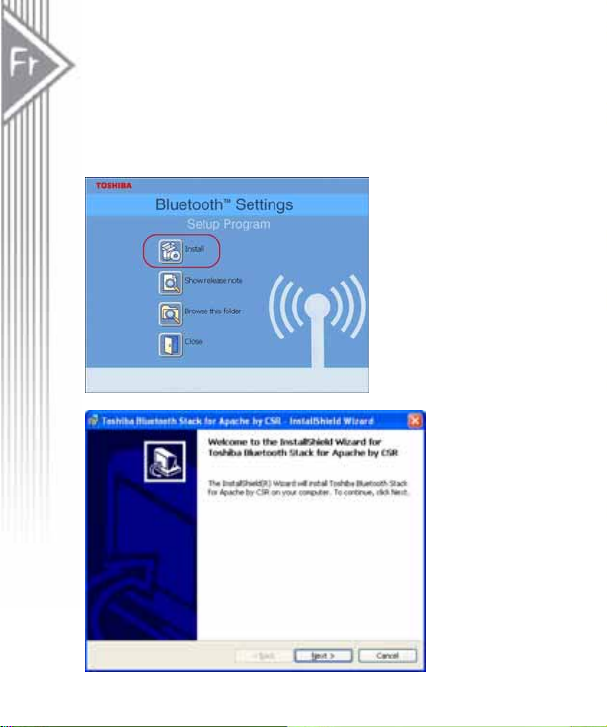
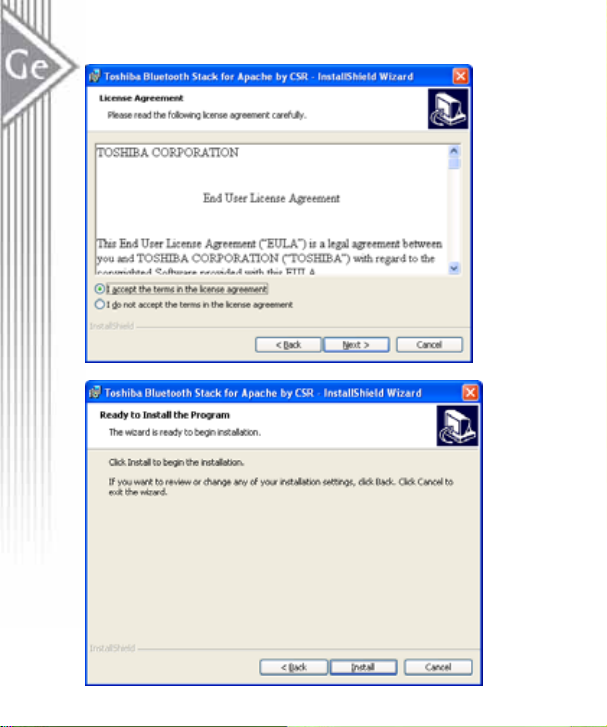
1. Insert the software CD comes with your USB adapter. The “InstallShield Wizard”
should automatically start running. If it doesn’t load, run its “Setup.exe” file.
2. A menu window appears for you to select settings items. Click “Install” to start
installation process.
3. The InstallShiel Wizard window should now appear, Click “Next”.
3
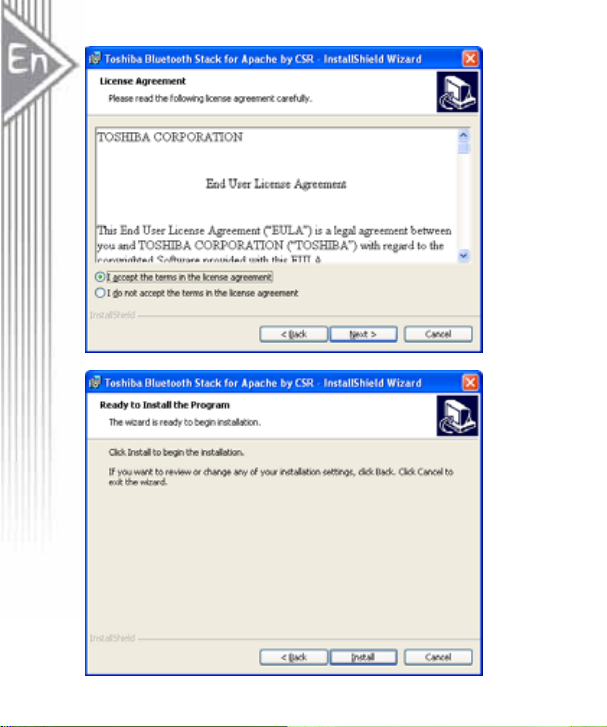
4. Select “Yes” to accept License Agreement.
5. Click “Install” to begin the installation.
4

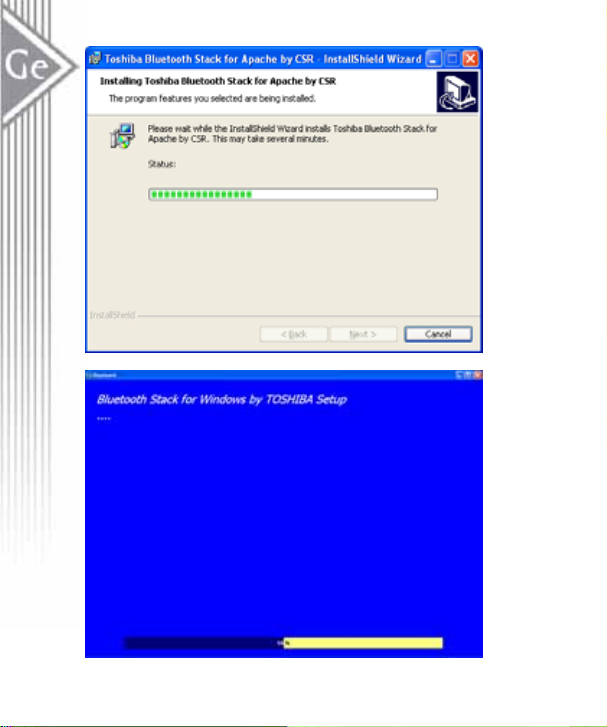
6. InstallShiel is processing.
7. Wait for the setup.
5
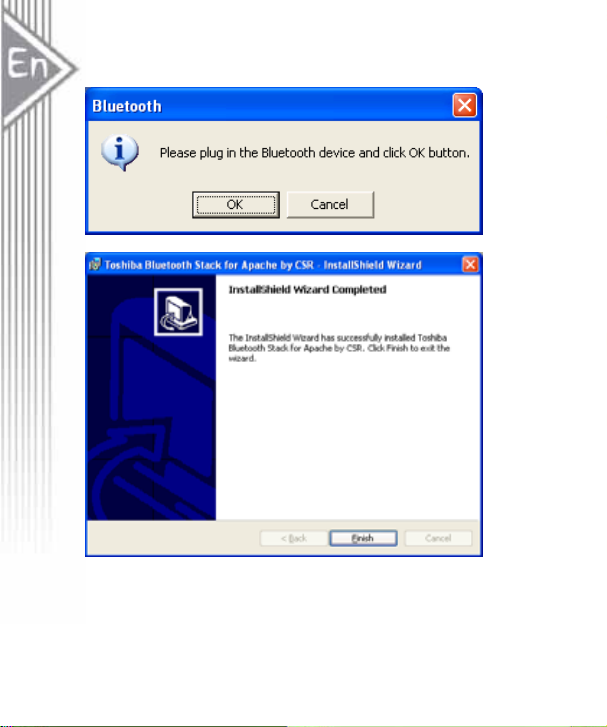
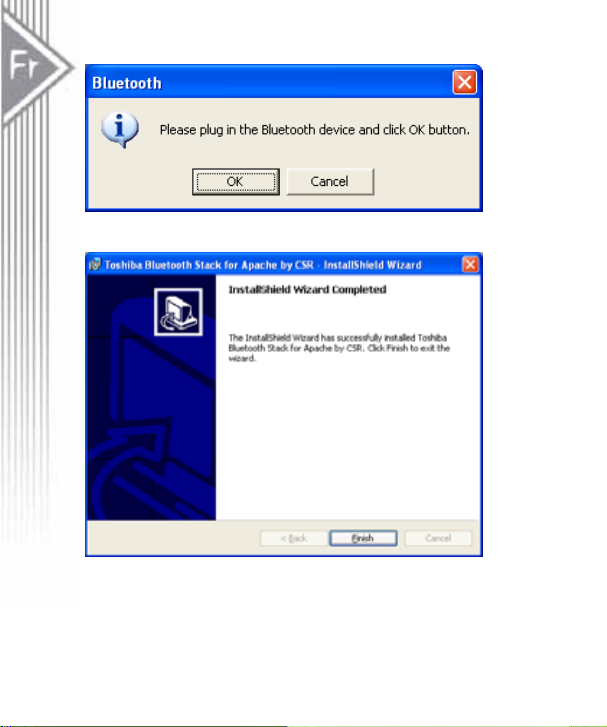
8. Now plug the EDR USB adapter onto an av ailable U SB port and cl ic k “OK” to conti nue
installation.
9. Click “Finish” to finish the installation.
6
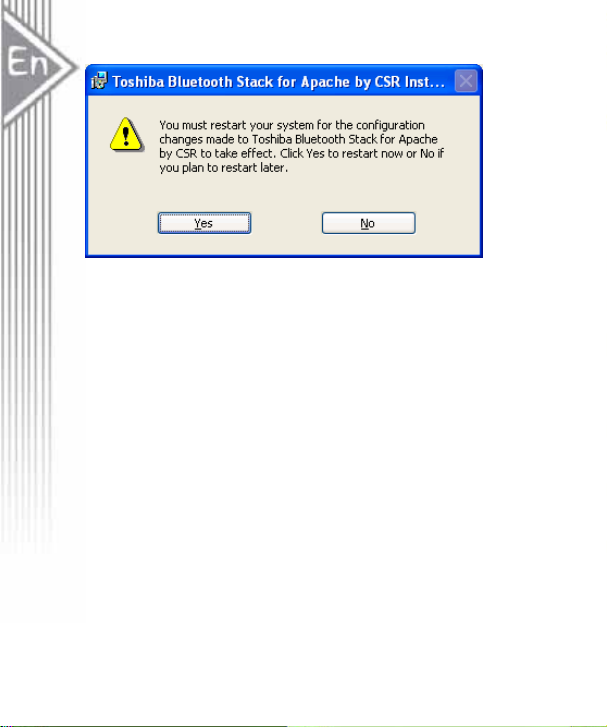
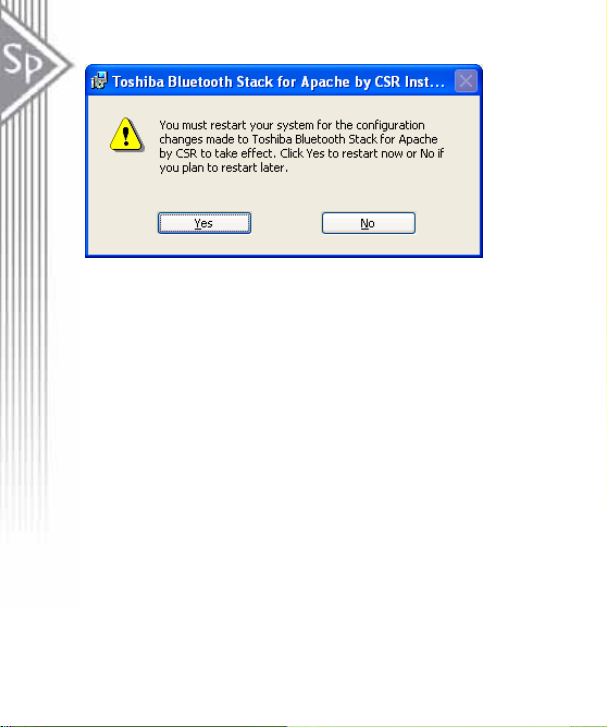
10. You will be asked to restart system. Click “Yes” to restart immediately or click “No” to
restart later.
7

Pairing Guide
What’s pairing?
Pairing is a process of associating Bluetooth devices with each other. It allows avoiding
entering access information every time when a connection is requested. Bluetooth devices
need to be paired with each other before attempting a connection at first time.
Paired devices will remain paired, even if:
1. One of the devices is un-powered.
2. A service connection is interrupted or stopped.
3. One or both devices are rebooted.
Pass Key
Paired devices share a unique Pass Key (also referred to as Link Key), by which they
authenticate with each other when co nnec ting. The Pass Key can b e alpha numer ic, numb ers,
or letters, and must consist of one or up to 16 characters.
How to pair devices?
Automatically -- If a passkey is required before connection, devices will pair automatically the
first time they connect (a passkey must be successfully exchanged).
Manually -- In the main window of Bluetooth Manager, right click a device, select Pair Device
from the popup menu, and then input a same passkey on both sides.
8
Example 1, pair with a Bluetooth Mouse.
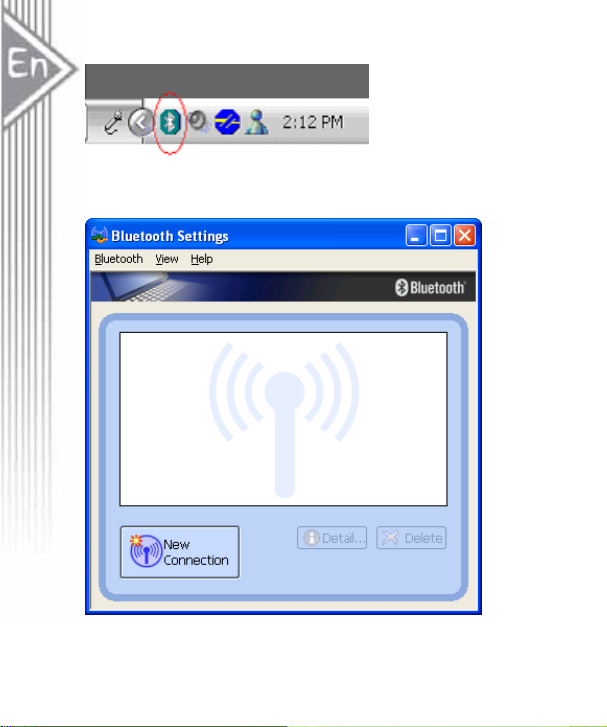
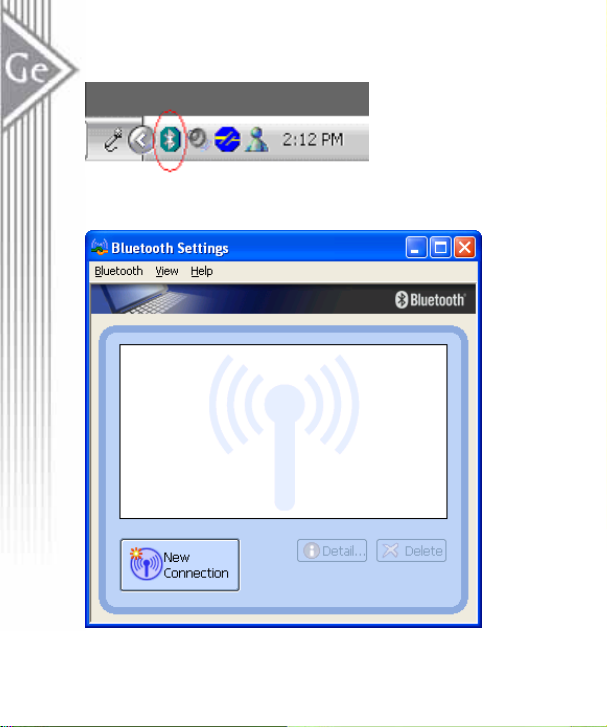
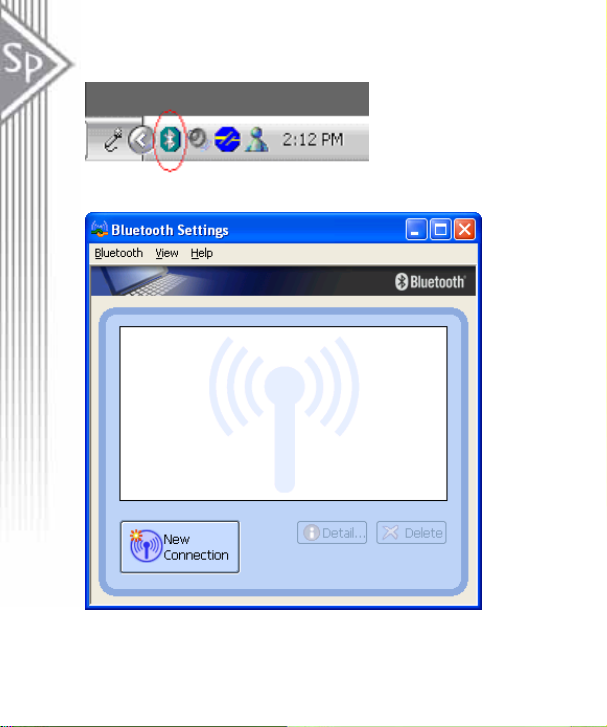
1. Open Bluetooth Manager main window by clicking Bluetooth icons on task bar.
2. Set the Bluetooth Mouse into pairing mode. Click “New Connection” button to start
Bluetooth device searching.
9
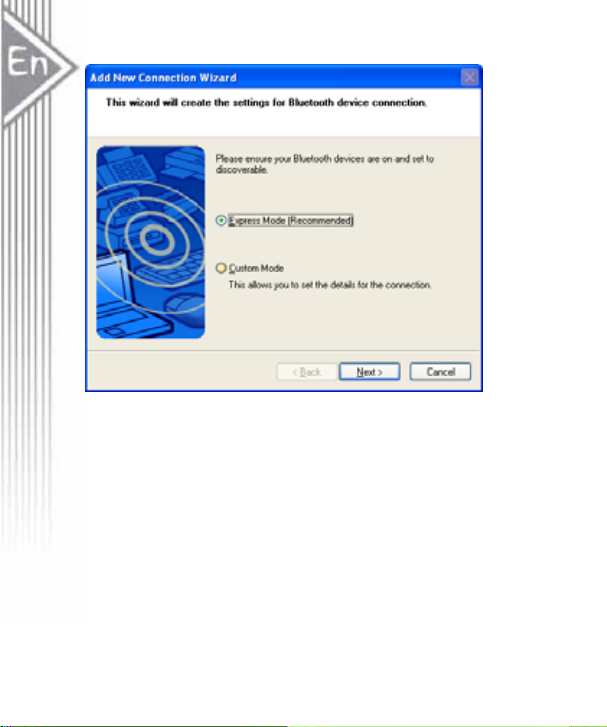
3. Select “Express Mode” and click “Next”. System starts searching Bluetooth devices in
working range.
10
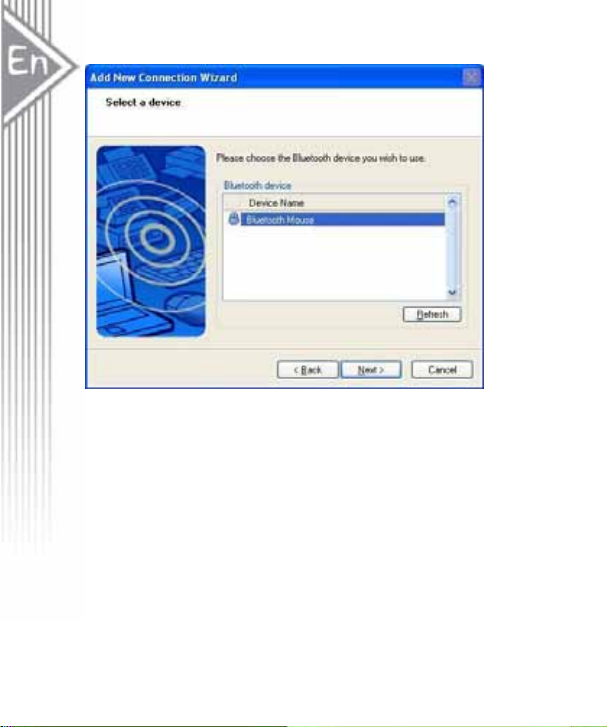
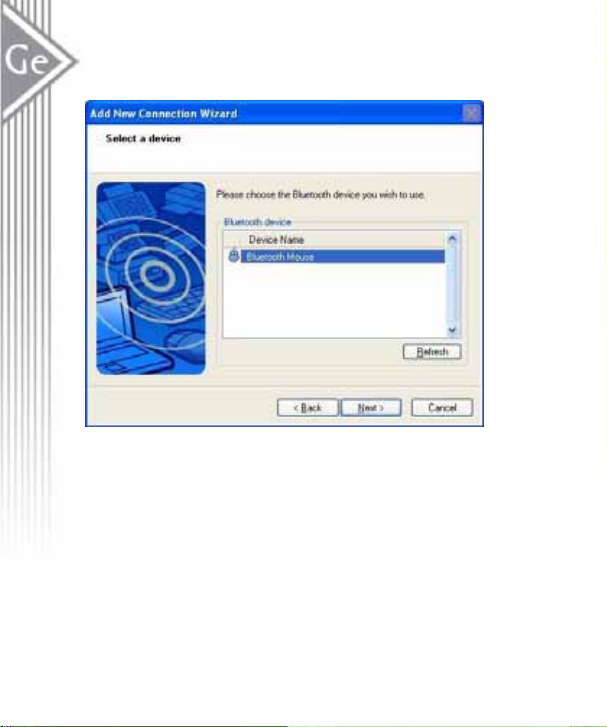
4. Select the “Bluetooth Mouse” in the Bluetooth Device list and click “Next”. If you can’t
find the device you want to pair with, click “Refresh” to search again.
11
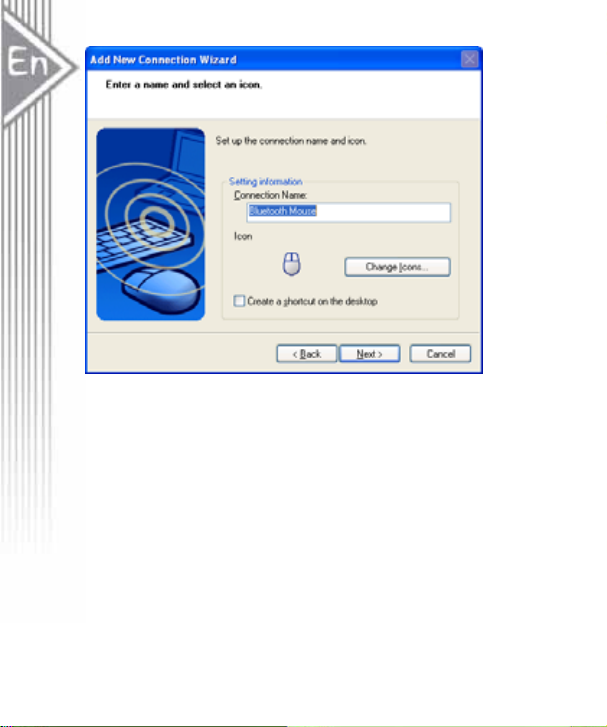
5. Enter a name and select an icon.
12
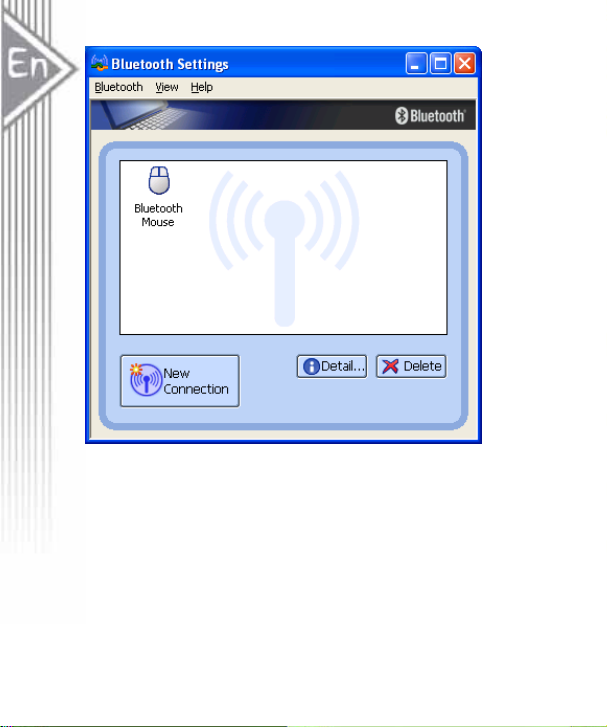
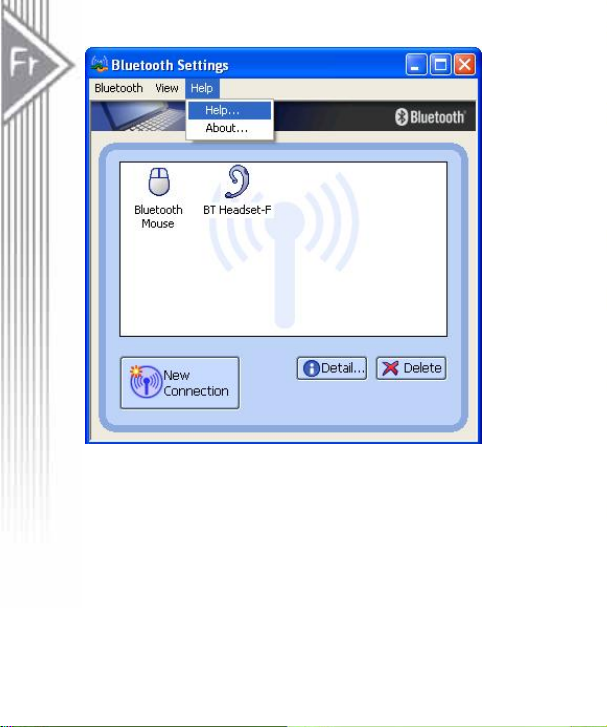
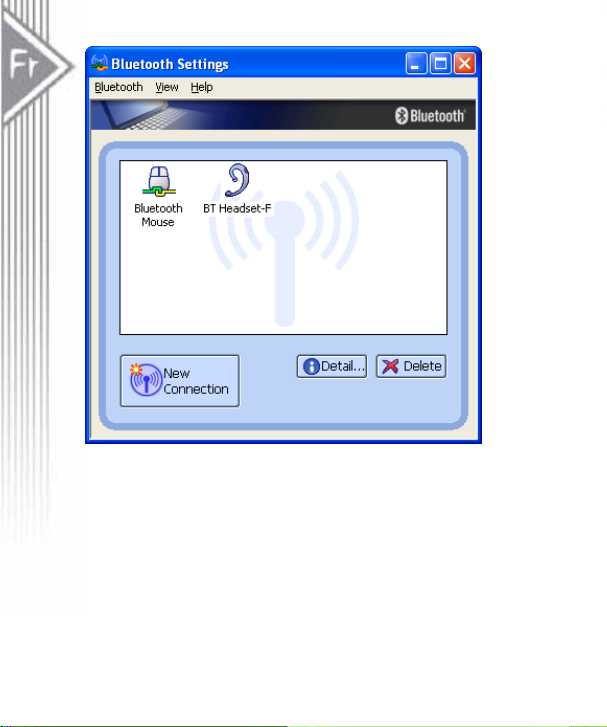
6. An icon “Bluetooth Mouse” will appear after pairing process completed.
13

Example 2, pair with a Bluetooth Headset.
1. Open Bluetooth Manager main window by clicking Bluetooth icons on task bar.
2. Set the Bluetooth Mouse into pairing mode. Click “New Connection” button to start
Bluetooth device searching.
14

3. Select “Express Mode” and click “Next”. System starts searching Bluetooth devices in
working range.
15
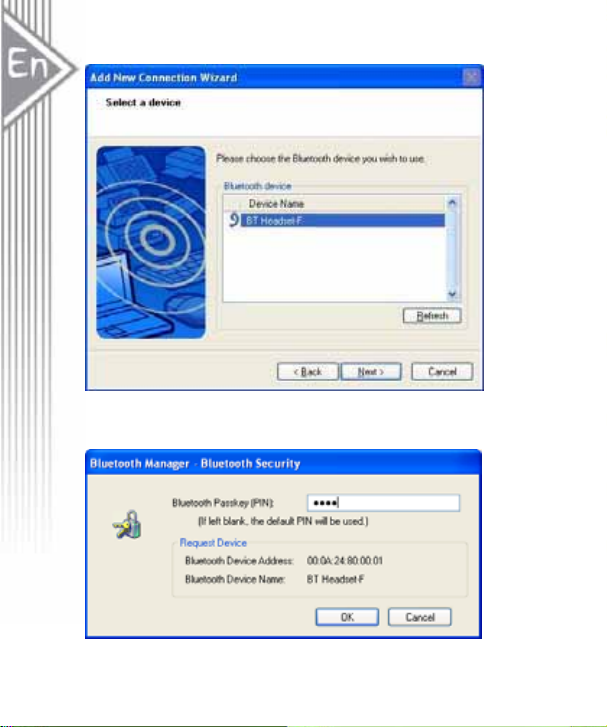
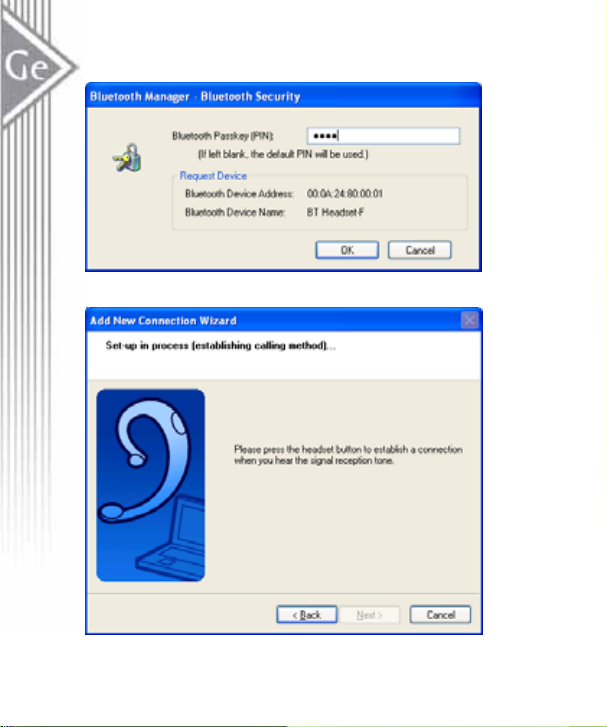
4. Select the “BT Headset-F” in the Bluetooth Device list and click “Nex t”. If you c an’t fi nd
the device you want to pair with, click “Refresh” to search again
5. You will be required to enter Passkey (PIN Code). Check headset’s manual for the
passkey and enter it.
16
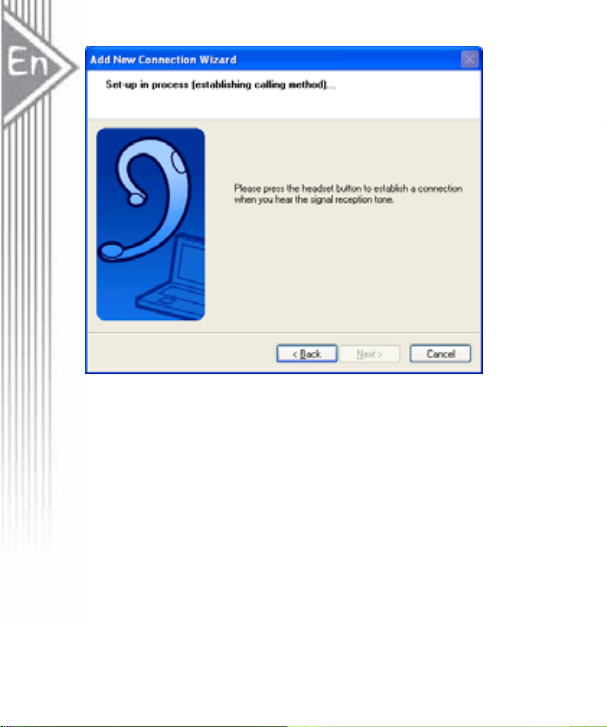
6. Press Answer button of the headset to continue pairing process.
17

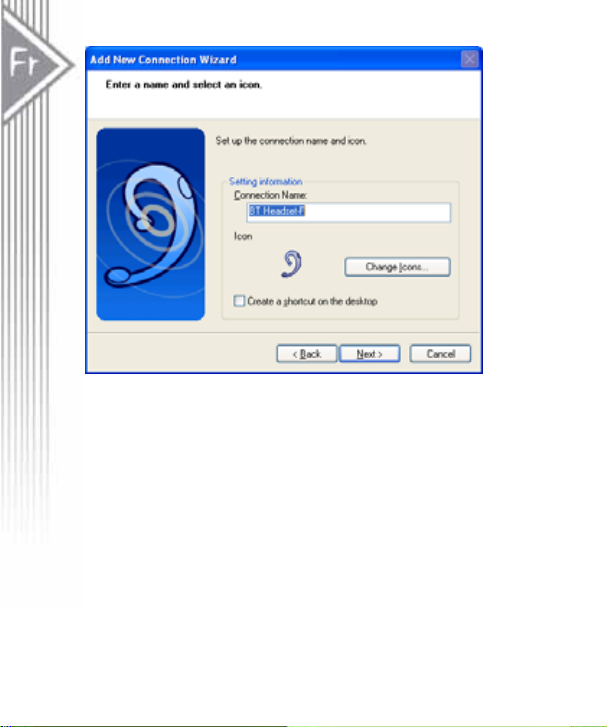
7. Enter a name and select an icon.
18

8. An icon “BT Headset-F” will appear after pairing process completed.
19

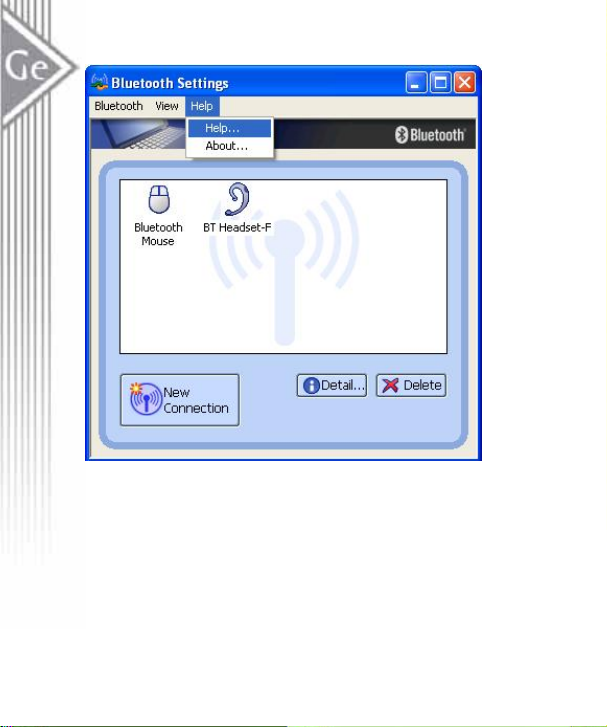
Note! Read Help file of “Bluetooth Settings” for detail information.
20

Connect and Disconnect
Connect
There are two ways to setup a Bluetooth connection.
Select Remote Device First
Select a remote device and double click it to refresh its services. Bluetooth passkey may be
asked if security level of either side of the connection is set to High and they are not paired
devices. After service searching finished, the services that the remote device supports are
found and the corresponding service icons on the top of the main window will change to be
pink color.
Double click the pink color service icon you want to connect on the top of the Main Window.
Connection will be setup. After connection is OK, the remote device and the service icon will
turn green.
Note:
PAN: If the PAN server side does not connect to a DHCP server, it will take about 45 seconds
to assign the IP address for the PAN client. Users hav e to w ait about 45 seconds be fore usi ng
TCP/IP.
DUN: There will be a dial-up dialog box. The user needs to input the ISP phone number, its
name and the password.
FTP: After connection is setup, a FTP Window will pop up. The window shows the shared
directories of the remote device. The window may be empty if there is no file or directory on
the remote site.
OPP: There are four kinds of operation modes for OPP: Send My Card, Get Card, Send
Objects and Exchange Cards. At the beginning, the default operat ion i s Sen d M y Card. Users
can right click the icon to select operation on the popup menu. Send My Card will send my
card directly to the remote device. Get Card will try to require the owner’s card from th e
remote device. Exchange Cards will send my card first and then get the remote device card.
Send Objects will pop up a file dialog box to let users to select some object files to send t o the
remote device. Object means the files in the format of vCards2.1, vCalendar1.0, vMessage
and vNote.
21

Synchronization: There will be a dialog to let user to operate.
Printer: After the connection is established, users can use the printer to print with any other
Windows applications that support printing.
Select Service Icon First
Select a service icon on the top of the main Window. If you have ever browsed the ser v i ces of
some remote devices, the device that supports the service will be highlighted in yellow.
Double click the remote browse first to check whether the device has the service and then
connect to it. If the remote device does not have the service, connection will fail. The
Bluetooth passkey may be asked if the security level of either side of the connection is set to
High and they are not paired devices.
Note:
There are corresponding operation menu on the remote device icon and the service icon.
Users can also start the connection using the pop up menu.
Disconnect
Select the remote device first and right click the service icon on the top of the main window.
On the pop up menu, select Disconnect.
Select the remote device and right click the device icon. On the pop up menu, select
Disconnect / submenu (the connection you want to disconnect).
With FTP and Synchronization, close their operation widow and the connection will be
disconnected.
The remote device side can disconnect the connection directly.
If the local Bluetooth device is removed or the remote device is removed, all the connections
will be disconnected. If the remote device moves out of the radio range, all the connections
with the remote device will be disconnected after about 1 minute.
Note:
When the program starts, it will show some words in the bottom right hand corner of the
screen.
22
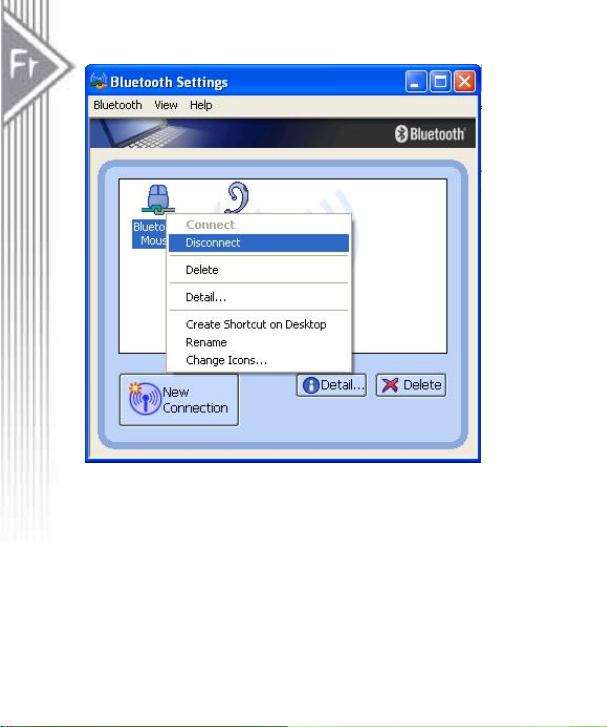
Example 1, connect/disconnect with a Bluetooth Mouse.
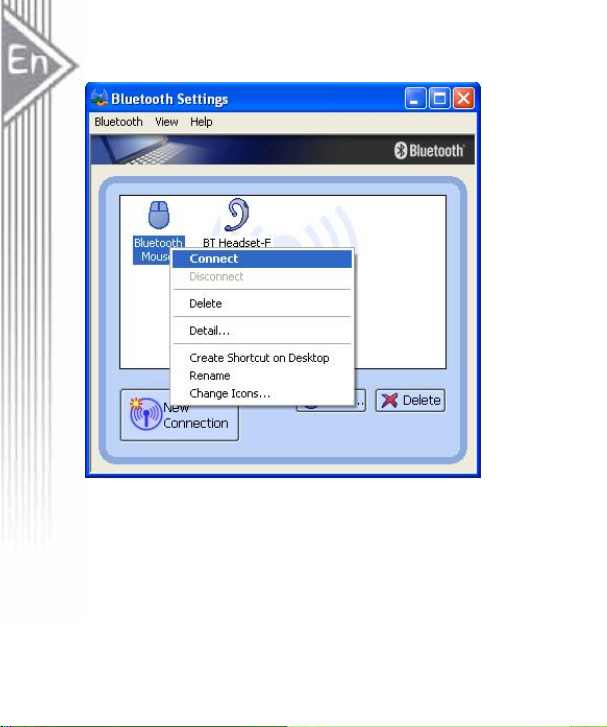
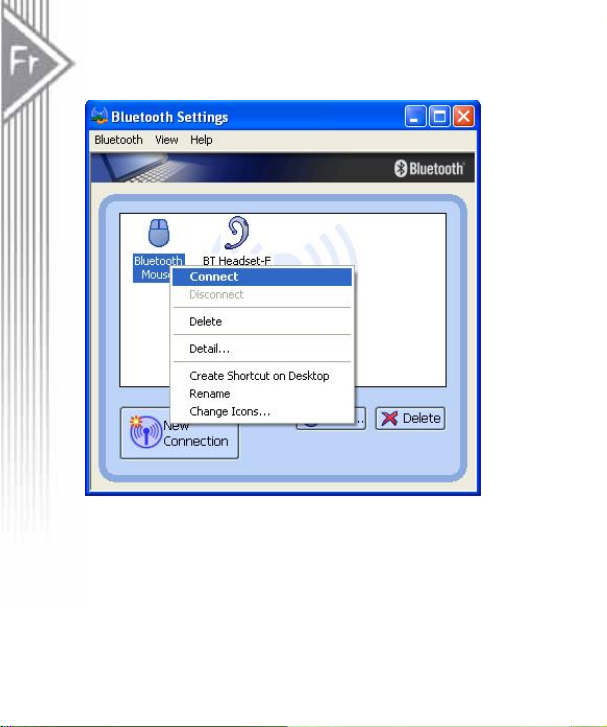
1. Turn on the Bluetooth Mouse. Move the cursor over the icon of Bluetooth Mouse in
Bluetooth Settings. Right click it and select “Connect”.
23

2. The icon of Bluetooth Mouse will be changed to connecting status.
24
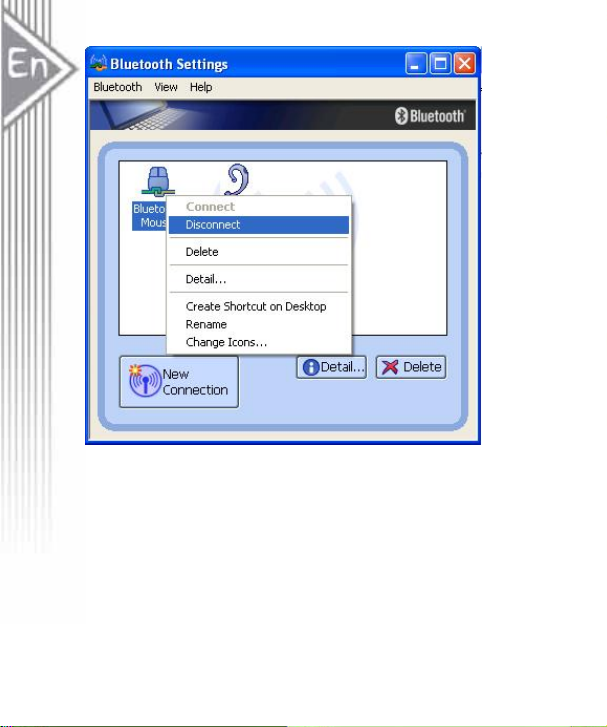
3. To disconnect the mouse, right click on the icon and select “Disconnect”.
25
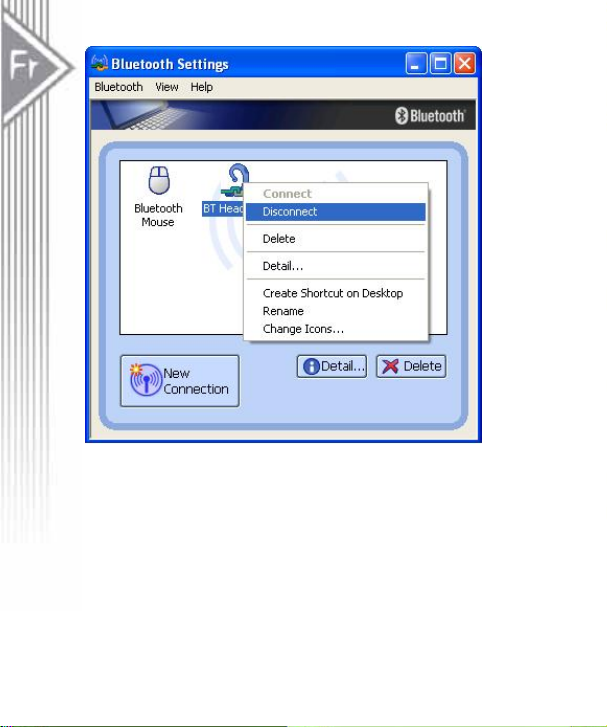
Example 2, connect/disconnect with a Bluetooth Headset.
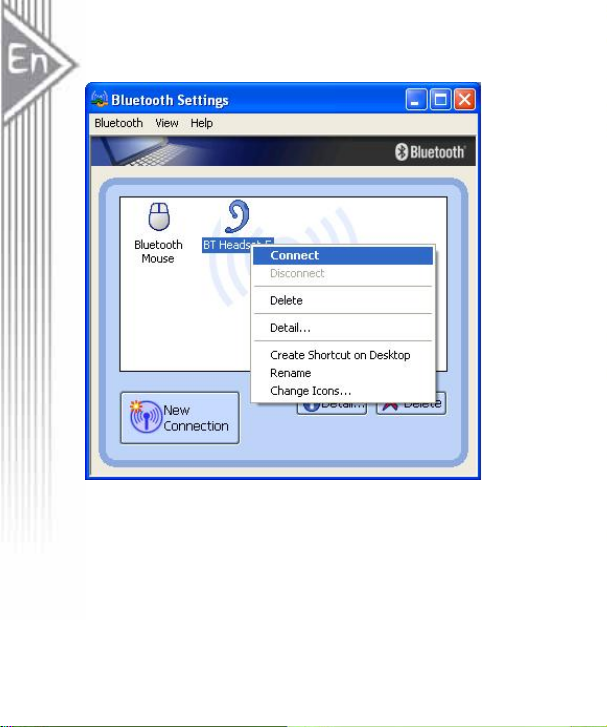
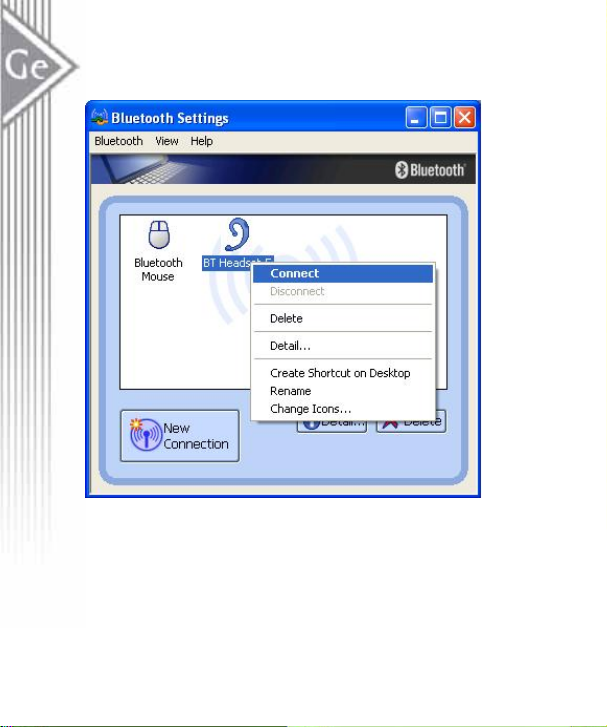
1. Turn on the Bluetooth H eadse t. M ov e the cursor over the icon of Blu etoo th H ea dset i n
Bluetooth Settings. Right click it and select “Connect”.
26
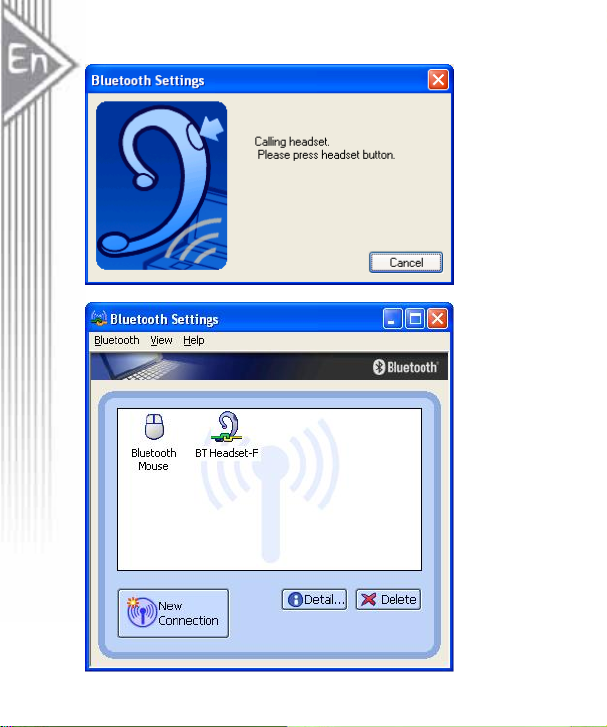
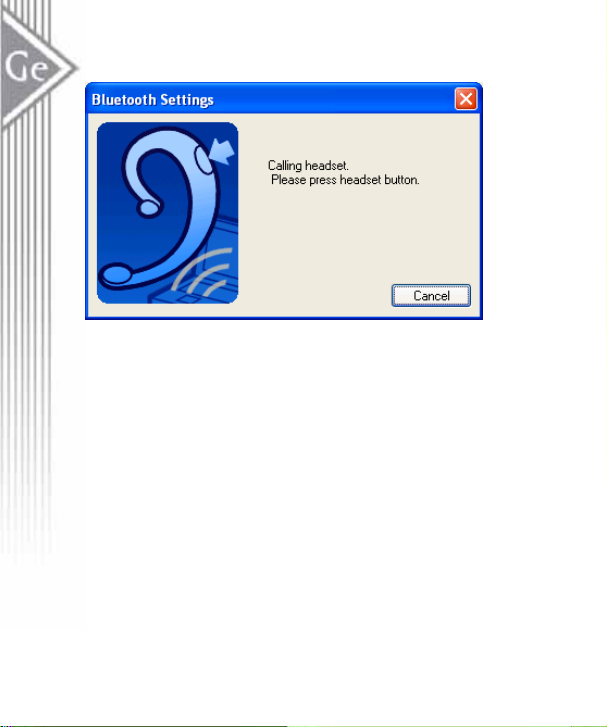
2. System is calling the headset. You will hear ring tone from the headset. Press answer
button to continue connecting process.
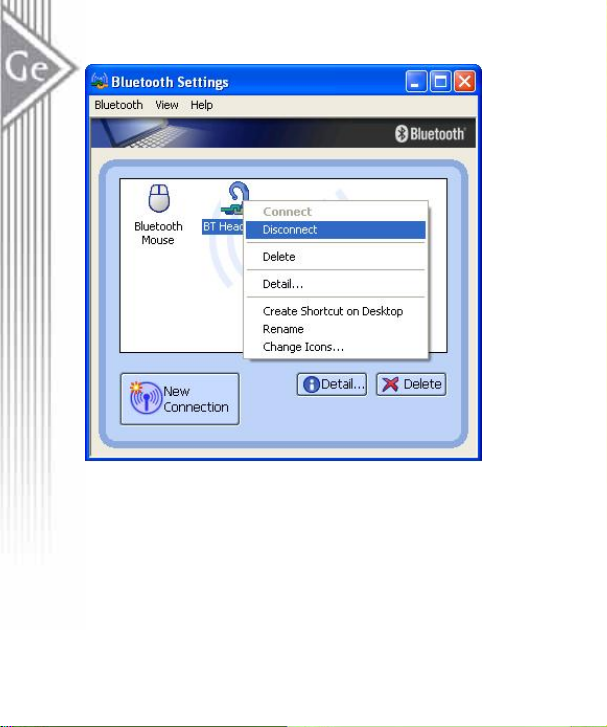
3. The icon of Bluetooth Headset will be changed to connecting status.
27

4. To disconnect the mouse, right click on the icon and select “Disconnect”.
28

Note! Read Help file of “Bluetooth Settings” for detail information.
29

Introduction
Présentation de la technologie sans fil Bluetooth
Bluetooth est une technologie de communication sans fil à faible portée. Elle permet des
connexions sans fil entre les matériels Bluetooth tels que des téléphones cellulaires, des
assistants numériques personnels (PDA), des ordinateurs de bureau et portables, des
matériels d’entrée/sortie (souris, claviers, et imprimantes), et appareils domestiques.
Bluetooth se réfère à un standard mondial conçu pour fonctionner dans une bande de
fréquence ISM (Industrial Scientific and Medical) reconnue au niveau international. A
l’intérieur de la bande ISM (2,4GHz – 2,48GHz) les transmissions de Bluetooth fonctionnent
parmi 79 fréquences séparées 1600 fois par seconde, avec une portée de communication d’
environ 10 mètres (33 pieds) pour la classe II ou 100 mètres (330 pieds pour la classe I
Présentation de l'adaptateur USB Bluetooth
L’adaptateur USB Bluetooth est un activateur Bluetooth, permettant à votre ordinateur de
bureau ou portable d’établir une connexion sans fil avec tout autre ordinateur et matériel
adapté Bluetooth. Il offre une plage de travail allant jusqu'à 10 (classe 2)/100 (classe 1)
mètres (33/330 pieds) avec une vitesse de transmission de 723 Kbps, et est conforme aux
spécifications Bluetooth 1.2 et USB 1,1. (prend en charge les deux vitesses de transfert les
plus faibles de 1,5 Mb/s ou 12 Mb/s)/2.0 (prend en charge les trois vitesses de transmission :
1,5 Mb/s, 12 Mb/s, et 480 Mb/s. la vitesse de trans fert élev ée de 480 M b/s). L’adaptateur USB
Bluetooth est une solution idéale pour les bes oi ns des r és eaux domestiques et mobiles. Il est
facile à installer et à utiliser en connectivité sans fil avec des appareils comme des
téléphones cellulaires, PDA, imprimantes, ordinateurs, Claviers, Souris, etc.
Contenu de la Boîte et Image
- Adaptateur USB Bluetooth
- CD de pilotes
- Guide rapide et manuel de l'utilisateur
30

Configuration Requise
Configuration Requise pour PC :
- CPU : Intel Pentium III 500MHz ou supérieur.
- Mémoire : 256 Mo ou plus.
- Espace sur le disque dur : au moins 50Mo.
- SE : Windows 98SE/Me/2000/XP
- Un port USB libre, conforme USB 1.1/2.0.
- Lecteur de CD-ROM.
Configuration Requise pour Mac :
- MAC OS : 10.1.4 ou plus récent
- Pilote et logiciel Mac OS fourni par Apple.
- Un port USB libre, conforme USB 1.1/2.0.
- Lecteur de CD-ROM.
31
Installation du Logiciel
Remarque : Ne branchez pas votre Adaptateur USB Bluetooth au port USB tant que vous
n’avez pas terminé l’installation logicielle suivante :
1. Insérez le CD de logiciels qui accompagne votre adaptateur USB. L'“Assistant
d'installation” devrait démarrer automatiquement. S'il ne démarre pas, exécutez son
fichier “Setup.exe”.
2. Une fenêtre de menu apparaît, vous permettant de sélectionner les éléments de
paramètres. Cliquez sur “Installer” pour démarrer l’Installation.
3. La fenêtre de l'Assistant d'installation devrait apparaître, cliquez sur "Suivant".
4. Sélectionnez “Oui” pour accepter le Contrat de Licence.
32

5. Cliquez sur "Installer" pour lancer l'installation.
33

6. L'assistant d'installation est en cours d'exécution.
7. Patientez pendant l'installation.
34
8. A présent branchez l'adaptateur USB EDR sur un port USB disponible et cliquez sur
“OK” pour continuer l'installation.
9. Cliquez sur "Terminer" pour terminer l'installation.
35

10. Vous serez invité à redémarrer le système. Cliquez sur “Oui” pour redémarrer
immédiatement ou cliquez sur “Non” pour redémarrer plus tard.
36

Guide de jumelage
Qu’est-ce que le jumelage ?
Le jumelage est un processus permettant d’associer des matériels Bluetooth les uns aux
autres. Cela permet d’éviter d’entrer des informations d’accès chaque fois qu’une connexion
est requise. Les matériels Bluetooth doivent être ap pariés les uns aux autres avant d’essayer
d’établir une connexion pour la première fois.
Les matériels appariés restent appariés, même si :
1. Un des matériels n’est pas alimenté.
2. Une connexion de service est interrompue ou arrêtée.
3. Un ou les deux matériels sont redémarrés.
Clé d'entrée
Les matériels appariés partagent une Clé d'entrée unique (aussi appelée Clé de Liaison), par
laquelle ils s’authentifient les uns avec les autres lors de la connexion. La Clé d'entrée peut
être alphanumérique, comporter des chiffres, ou des lettres, et doit être constituée de 1 à 16
caractères.
Comment jumeler des matériels?
Automatiquement – Si une clé d'entrée est requise avant la connexion, les matériels seront
jumelés automatiquement la première fois qu'ils se connecteront (une clé d'entrée doit être
échangée avec succès).
Manuellement – Dans la fenêtre principale du gestionnaire Bluetooth, faites un clic droit sur
un matériel, sélectionnez Matériel jumelé dans le menu déroulant, et entrez ensuite une
même clé d'entrée des deux côtés.
37

Exemple 1, jumeler avec une souris Bluetooth.
1. Ouvrez la fenêtre principale du Gestionnaire Bluetooth en cliquant sur les icônes sur
la barre des tâches.
2. Paramétrez la souris Bluetooth en mode de jumelage. Cliquez sur le bouton
“Nouvelle connexion” pour démarrer la recherche du matériel Bluetooth.
38

3. Sélectionnez “Mode Express” et cliquez sur “Suivant”. Le système commence à
rechercher les matériels Bluetooth dans la plage de travail.
39

4. Sélectionnez la “Souris Bluetooth” dans la liste de matériels Bluetooth et cliquez sur
“Suivant”. Si vous ne trouvez pas le matériel avec lequel vous voulez effectuer le
jumelage, cliquez sur “Actualiser” pour effectuer une nouvelle recherche.
40

5. Saisissez un nom et sélectionnez une icône.
41

6. Une icône “Souris Bluetooth” apparaîtra à la fin du processus de jumelage.
42

Exemple 2, jumeler avec un casque Bluetooth.
1. Ouvrez la fenêtre principale du Gestionnaire Bluetooth en cliquant sur les icônes sur
la barre des tâches.
2. Paramétrez la souris Bluetooth en mode de jumelage. Cliquez sur le bouton “Nouvelle
connexion” pour démarrer la recherche du matériel Bluetooth.
43

3. Sélectionnez “Mode Express” et cliquez sur “Suivant”. Le système commence à
rechercher les matériels Bluetooth dans la plage de travail.
44

4. Sélectionnez le “Casque-F BT” dans la liste de matériels Bluetooth et cliquez sur
“Suivant”. Si vous ne trouvez pas le matériel avec lequel vous voulez effectuer le
jumelage, cliquez sur “Actualiser” pour effectuer une nouvelle recherche
5. Vous serez invité à saisir la clé d'entrée (Code PIN). Reportez-vous au manuel du
casque pour connaître la clé d'entrée et saisissez-la.
45

6. Appuyez sur le bouton Répondre du casq ue p our co ntinuer l e proces sus d e jum elag e.
46
7. Saisissez un nom et sélectionnez une icône.
47

8. Une icône “Casque-F BT” apparaîtra à la fin du processus de jumelage.
48
Remarque ! Lisez le fichier Aide des “Paramètres Bluetooth” pour les informations détaillées.
49

Connecter et Déconnecter
Connecter
Il existe deux manières de configurer une connexion Bluetooth.
Sélectionnez d'abord le matériel distant
Sélectionnez un matériel distan t et double cliquez sur celui-ci po ur actualiser ses services. La
clé d'entrée Bluetooth peut vous être demandée si l e niveau de sécu rité de l'un des côtés d e la
connexion est paramétré sur Haute et qu'il n'y a pas de matériels jumelés. Une fois que la
recherche de service est terminée, les services pris en charge par le matériel distant sont
trouvés et les icônes de service correspondantes situées au sommet de la fenêtre principale
deviendront roses.
Double cliquez sur l'icône de service de couleur rose que vous voulez connecter au sommet
de la Fenêtre Principale. La connexion sera installée. Une fois que la connexion est OK, le
matériel distant et l'icône de service deviendront verts.
Remarque :
PAN : Si le côté du serveur PAN ne se connecte pas à un serveur DHCP, 45 secondes
environ seront nécessaires pour attribuer l'adresse IP au client PAN. Les utilisateurs doivent
attendre 45 secondes avant d'utiliser TCP/IP.
DUN : Une boîte de dialogue apparaîtra. L'utilisateur doit entrer le numéro de téléphone de
l'ISP, son nom et le mot de passe.
FTP : Une fois que la connexion est établie, une fenêtre FTP apparaît. La fenêtre affiche les
répertoires partagés du mat éri el dis t ant. La fenêtre peu t êtr e v ide s' il n'y a pas d e fichier ou d e
répertoire sur le site distant.
OPP : Il existe quatre sortes de modes de fonctionnement pour OPP : Envoyer Ma Carte,
Obtenir la Carte, Envoyer des Objets et Echanger des Cartes. Au début, l'opération par
défaut est Envoyer Ma Carte. Les utilisateurs peuvent faire un clic droit sur l'icône pour
sélectionner l'opération dans le menu déroulant. Envoyer Ma Carte enverra ma carte
directement au matériel distant. Obtenir la Carte essaiera d'obtenir la carte du propriétaire
depuis le matériel distant. Echanger des Cartes enverra d'abord ma carte et obtiendra
ensuite la carte du matériel distant. E nv oyer des Objets fera apparaître une boîte de dialogue
de fichiers pour permettre aux utilisateurs de sélectionner certains fichiers d'objets à envoyer
au matériel distant. Objet signifie les fichiers au format de vCards2.1, vCalendar1.0,
vMessage et vNote.
50

Synchronisation : Une boîte de dialogue permettra à l'utilisateur d'intervenir.
Imprimante : Une fois que la connexion est établie, les utilisateurs peuvent utiliser
l'imprimante pour imprimer avec les autres applications Windows prenant en charge
l'impression.
Sélectionnez d'abord l'icône de Service
Sélectionnez une icône de service au sommet de la fenêtre principale. Si vous avez déjà
parcouru les services de certains matér iels dis tant s, le mat ériel q ui prend en char ge le serv ice
sera mis en surbrillance jaune.
Double cliquez sur le matériel distant, parcourez d'abord pour vérifier si le matériel a le
service et ensuite connectez-le. Si le matériel distant n'a pas le service, la connexion
échouera. La clé d'entrée Bluetooth peut vous être demandée si le niveau de sécurité de l'un
des côtés de la connexion est paramétré sur Haute et qu'il n'y a pas de matériels appariés.
Remarque :
Il y a les menus d'opération correspondants sur l'icône du matériel distant et sur l'icône de
service. Les utilisateurs peuvent aussi démarrer la connexion à l'aide du menu déroulant.
Déconnecter
Sélectionnez d'abord le matériel distant et cliquez avec le bouton droit de la souris sur l'ic ône
de service au sommet de la fenêtre principale. Sur le menu déroulant, sélectionnez
Déconnecter.
Sélectionnez le matériel distant et cliquez avec le bouton droit de la souris sur l'icône du
matériel. Dans le menu déroulant, sélectionnez Déconnecter / sous-menu (la connexion que
vous voulez déconnecter).
Avec FTP et Synchronisation, fermez leur fenêtre de fonctionnement et la connexion sera
déconnectée.
Le côté du matériel distant peut déconnecter directement la connexion.
Si le matériel Bluetooth local est supprimé ou le matériel distant est supprimé, toutes les
connexions seront déconnectées. Si le matériel distant sort de la plage radio, toutes les
connexions avec le matériel distant seront déconnectées au bout d'environ 1 minute.
Remarque :
Quand le programme démarre, il affiche certains mots en bas à droite de l'écran.
51
Exemple 1, connecter/déconnecter avec une souris Bluetooth.
1. Allumez la souris Bluetooth. Déplacez le curseur sur l'icône de la souris Bluetooth
dans les paramètres Bluetooth. Faites un clic droit sur cette icône et sélectionnez
“Connecter”.
52
2. L'icône de la souris Bluetooth se changera en état de connexion.
53
3. Pour déconnecter la souris, faites un clic droit sur l'icône et sélectionnez
“Déconnecter”.
54

Exemple 2, connecter/déconnecter avec un casque Bluetooth.
1. Allumez le casque Bluetooth. Déplacez le curseur sur l'icône du casque Bluetooth
dans les paramètres Bluetooth. Faites un clic droit sur cette icône et sélectionnez
“Connecter”.
55

2. Le système appelle le casque. Vous entendrez la tonalité depuis le casque. Appuyez
sur le bouton Répondre pour continuer le processus de connexion.
56
3. L'icône du casque Bluetooth se changera en état de connexion.
57

Remarque ! Lisez le fichier Aide des “Paramètres Bluetooth” pour les informations détaillées.
58

Einleitung
Einleitung zur kabellosen Bluetooth-Technologie
Bluetooth ist eine kabellose Kommunikationstechnologie mit kurzer Reichweite. Es
ermöglicht kabellose Verbindungen zwischen Bluetooth- Geräten, wie beispielsweise z el l uläre
Telefone, Personal Digital Assistants (PDA), Desktop- und Notebook-Computern,
Eingangs-Ausgangs-Geräte (Maus, Tastatur und Drucker) sowie Haushaltgeräte. Bluetooth
bezieht sich auf eine weltweite Norm für den Betrieb im international anerkannten
ISM-Frequenzband (Industrial Scientific and Medical). Innerhalb des ISM-Frequenzbandes
(2,4 GHz – 2,48 GHz) decken die Bluetooth-Übertragungen zwischen 79 separate
Frequenzen 1600 Mal pro Sekunde ab, wobei die Reichweite ungefähr 10 Meter (33 Fuß) für
Geräte der Klasse II oder 100 Meter (330 Fuß) für Geräte der Klasse I beträgt.
Einleitung zum Bluetooth-USB-Adapter
Der Bluetooth-USB-Adapter ist ein Bluetooth-Aktivierer, mit dem Ihr Desktop- oder
Notebook-Computer kabellos mit Bluetooth-aktivierten Computern und Geräten verbunden
werden kann. Er ermöglicht einen Betriebsbereich von bis zu 10 Metern (Klasse 2)/100
(Klasse 1) bzw. 100 Metern (33/330 Fuß) mit einer Datenübertragungsrate von 723 und
entspricht den Bluetooth 1.2- und USB 1.1(unterstützt die beiden niedrigeren
Datenübertragungsraten von entweder 1,5 Mb/s oder 12 Mb/s)/2.0 (unterstützt alle drei
Datenübertragungsraten: 1,5 MB/S, 12 MB/S und 480 MB/S und die schnellste
Datenübertragungsrate von 480 MB/S).-Spezifikationen. Der Bluetooth-USB-Adapter ist eine
ideale Lösung für den Netzwerkbetrieb sowohl zu Hause als auch unterwegs. Er kann leicht
installiert und für die kabellose Verknüpfbarkeit für die Verbindung mit z. B. zellulären
Telefonen, PDAs, Drucker, Computern, Tastaturen, Mäusen usw. eingesetzt werden.
Inhalt der Verpackung und Abbildung
- Bluetooth-USB-Adapter
- CD mit Treiber
- Kurzanleitung und Benutzerhandbuch
59

Systemvoraussetzung
PC-Systemvoraussetzung
- CPU: Intel Pentium III 500MHz oder höher.
- Speicher: 256MB oder mehr.
- Platz auf der Festplatte: mindestens 50MB.
- OS: Windows 98SE/Me/2000/XP
- Ein freier USB-Port, kompatibel mit USB 1.1/2.0.
- CD-ROM-Laufwerk.
Mac-Systemvoraussetzung:
- MAC OS: 10.1.4 oder höher
- Mac-OS-Treiber und Software von Apple.
- Ein freier USB-Port, kompatibel mit USB 1.1/2.0.
- CD-ROM-Laufwerk.
60

Software-Installation
Hinweis: Schließen Sie Ihren Bluetooth USB-Adapter erst dann an den USB-Port an,
nachdem Sie die nachstehend beschriebene Software wie folgt vollständig installiert haben:
1. Legen Sie die mit dem USB-Adapter mitgelieferte Software-CD ein. Der “InstallShield
Wizard” (InstallShield-Installationsassistent) sollte automatisch gestartet werden.
Wenn nicht, starten Sie dessen “Setup.exe”-Datei.
2. Ein Menüfenster erscheint, in dem Sie die Elemente für die Einstellungen auswählen
können. Zum Starten des Installationsvorgangs klicken Sie auf “Installieren”.
3. Das Fenster mit dem InstallShield-Installationsassistent sollte nun erscheinen. Auf
“Weiter” klicken.
61
4. Zum Akzeptieren des Lizenzvertrages auf “Ja” klicken.
5. Zum Starten der Installation auf “Installieren” klicken.
62
6. InstallShield wird ausgeführt.
7. Warten Sie, bis der Installationsvorgang abgeschlossen ist.
63

8. Den EDR-USB-Adapter nun an einen freien USB-Port anschließen und zum
Fortsetzen der Installation auf “OK” klicken.
9. Zum Beenden der Installation auf “Beenden” klicken.
64

10. Sie werden aufgefordert, das System neuzustarten. Zum sofortigen Neustarten auf
“Ja” oder zum Neustarten zu einem späteren Zeitpunkt auf “Nein” klicken.
65

Anleitung zur Paarbildung
Was ist Paarbildung?
Die Paarbildung ist der Vorgang zum Verbinden der Bluetooth-Geräte miteinander. Hiermit
wird eine Eingabe der Zugangsinformationen für jedes Herstellen einer Verbindung
vermieden. Vor dem erstmaligen Herstellen einer Verbindung zwischen den
Bluetooth-Geräten muß zwischen diesen zuerst eine Paarbildung hergestellt werden.
Die Paarbildung zwischen den gepaarten Geräte bleibt selbst unter den folgenden
Umständen erhalten:
1. Eines der Geräte wird ausgeschaltet.
2. Eine Verbindung wurde unterbrochen oder die Funktion wurde abgebrochen.
3. Ein Gerät oder beide Geräte werden neugestartet.
Paß-Schlüssel
Die mit Paarbildung miteinander verbundenen Geräten verwenden gemeinsam einen
einzigartigen Paß-Schlüssel (auch als Verbindungsschlüssel bezeichnet), mit dem sie beim
Herstellen der Verbindung einander authentifizieren. Dieser Paß-Schlüssel kann aus
alphanumerischen Zeichen, Ziffern oder aus Buchstaben und muß aus 1 bis 16 Zeichen
bestehen.
Wie wird die Paarbildung zwischen den Geräten hergestellt?
Automatisch – Falls ein Paß-Schlüssel vor dem Herstellen einer Verbindung erforderlich ist
wird beim Herstellen der ersten Verbindung eine Paarbildung zwischen den Geräten
hergestellt (ein Paß-Schlüssel muß erfolgreich ausgetauscht werden können).
Manuell – Im Hauptfenster des Bluetooth-Managers rechtsklicken Sie auf ein Gerät und
wählen Sie im Aufklappmenü den Eintrag “Pair Device” (Gerät paaren) und geben Sie dann
auf beiden Seiten denselben Paß-Schlüssel ein.
66
Beispiel 1: Paarbildung mit einer Bluetooth-Maus.
1. Das Hauptfenster des Bluetooth-Managers durch Anklicken der Bluetooth-Symbole
auf der Task-Leiste öffnen.
2. Aktivieren Sie den Paarbildungsmodus der Bluetooth-Maus. Zum Starten der Suche
nach dem Bluetooth-Gerät klicken Sie auf “New Connection” (Neue Verbindung).
67

3. “Express Mode” (Express-Modus) wählen und auf “Weiter” klicken. Das System
beginnt mit der Suche nach den Bluetooth-Gerätren im Betriebsbereich.
68
4. Auf der Liste mit den Bluetooth-Geräten wählen Sie die “Bluetooth Mouse”
(Bluetooth-Maus) und klicken dann auf “Weiter”. Falls das zu paarende Gerät nicht
vorhanden ist klicken Sie auf “Refresh” (Wiederauffrischen), um die Suche neu zu
starten.
69

5. Geben Sie einen Namen ein und wählen Sie ein Symbol aus.
70

6. Ein “Bluetooth Mouse”-Symbol (Bluetooth-Maus) erscheint nach dem Ende des
Paarbildungsvorgangs.
71

Beispiel 2: Paarbildung mit einem Bluetooth-Kopfhörer.
1. Das Hauptfenster des Bluetooth-Managers durch Anklicken der Bluetooth-Symbole
auf der Task-Leiste öffnen.
2. Aktivieren Sie den Paarbildungsmodus der Bluetooth-Maus. Zum Starten der Suche
nach dem Bluetooth-Gerät klicken Sie auf “New Connection” (Neue Verbindung).
72

3. “Express Mode” (Express-Modus) wählen und auf “Weiter” klicken. Das System
beginnt mit der Suche nach den Bluetooth-Gerätren im Betriebsbereich.
73

4. Auf der Liste mit den Bluetooth-Geräten wählen Sie die “BT Headset-F”
(BT-Kopfhörer-F) und klicken dann auf “Weiter”. Falls das zu paarende Gerät nicht
vorhanden ist klicken Sie auf “Refresh” (Wiederauffrischen), um die Suche neu zu
starten.
74
5. Sie müssen dann den Paß-Schlüssel (PIN-Kode) eingeben. Den Paß-Schlüssel
entnehmen Sie dem Benutzerhandbuch des Kopfhörers. Geben Sie dann diesen
Paß-Schlüssel ein.
6. Zum Fortsetzen des Paarbildungsvorgangs drücken Sie die “Answer”-Taste
(Antworttaste).
75

7. Einen Namen eingeben und ein Symbol auswählen.
76

8. Nach dem Ende des Paarbildungsvorgangs erscheint ein “BT Headset-F”-Symbol
(BT-Kopfhörer-F).
77
Hinweis! Für weitere Informationen lesen Sie die Hilfe-Datei unter “Bluetooth Settings”
(Bluetooth-Einstellungen).
78

Verbindung herstellen und abbrechen
Verbindung herstellen
Zum Herstellen einer Bluetooth-Verbindung stehen zwei Methoden zur Verfügung.
Zuerst das Remote-Gerät wählen
Ein Remote-Gerät auswählen und auf dessen Symbol doppelklicken, um seine
Dienstleistungen wiederaufzufrischen. Der Bluetooth-Paß-Schlüssel muß eventuell
eingegeben werden, falls die Sicherheitsstufe auf eine der Seiten der Verbindung auch Hoch
eingestellt ist und zwischen diesen Geräten keine Paarbildung hergestellt wurde. Nach dem
Beenden der Suche nach der Dienstleistung werden die Dienstleistungen, die vom
Remote-Gerät unterstützt werden, gefunden und die Farbe der Sy mbol e der entsprechenden
Dienstleistungen oben im Hauptfenster wird auf rosarot abgeändert.
Auf das rosarote Dienstleistungssymbol oben im Hauptfenster klicken, mit welchem eine
Verbindung hergestellt werden soll. Die Verbindung wird hergestellt. Nach dem erfolgreichen
Herstellen der Verbindung wird die Farbe des Symbols des Remote-Gerätes und jenes der
Dienstleistung auf grün abgeändert.
Hinweis:
PAN: Falls von der Seite des PAN-Servers keine Verbindung mit einem DHCP-Server
hergestellt wird dauert es ungefähr 45 Sekunden, bis die IP-Adresse für den PAN-Clienten
zugeordnet wird. Warten Sie u ngefähr 4 5 Sekunden, b evor Sie den TCP/IP benutz en können.
DUN: Ein Dialogfenster zum Anwählen erscheint. Geben Sie die ISP-Telefonnummer, dessen
Namen und das Paßwort ein.
FTP: Nach dem Herstellen der Verbindung erscheint ein FTP-Fenster. Das Fenster zeigt die
gemeinsam benutzten Verzeichnisse des Remote-Geräte. Das Fenster ist leer, falls auf der
Remote-Seite keine Datei oder kein Verzeichnis vorhanden ist.
OPP: Für den OPP stehen vier Betriebsmodi zur Verfügung: Meine Karte senden, Karte
abrufen, Subjekte senden und Karten austauschen. Zu Beginn ist der Betriebsmodus auf
Meine Karte senden eingestellt. Zum Auswählen des Betriebsmodus im Aufklappmenü
rechtsklicken Sie auf das Symbol. Mit dem Betr iebsmodus M eine K ar te senden w ir d die Kar te
direkt an das Remote-Gerät gesendet. Mit Karte abrufen wird die Karte vom Remote-Gerät
abgerufen. Mit Karten austauschen wird zuerst Ihre Karte gesendet und dann die Karte vom
Remote-Gerät abgerufen. Mit Subjekte senden erscheint ein Dialogfenster, in dem Sie einige
Subjekt-Dateien zum Senden an das Remote-Gerät auswählen können. Subjekt bedeutet,
dass die Dateien im Format der vCards2.1, vCalendar1.0, vMessage und vNote sind.
Synchronisierung: Ein Dialogfenster erscheint für die Bedienung durch den Benutzer.
Drucker: Nach dem Herstellen der Verbindung kann der Benutzer den Drucker zum Drucken
79

unter einem beliebigen Windows-Anwendungsprogramm, das das Ausdrucken unterstützt,
benutzen.
Zuerst das Service-Symbol wählen
Wählen Sie oben im Hauptfenster ein Service-Symbol aus. Falls Sie jemals die
Dienstleistungen einiger Remote-Geräte durchsucht haben wird das Gerät, das die
Dienstleistung unterstützt, gelb markiert.
Zuerst auf das Remote-Durchsuchen doppelklicken, um nachzuprüfen, ob das Gerät die
Dienstleistung zur Verfügung stellt, und stellen Sie danach eine Verbindung mit diesem Gerät
her. Falls das Remote-Gerät die Dienstleistung nicht zur V erfügung stellt kann die Verbindung
nicht hergestellt werden. Der Bluetooth-Paß-Schlüssel muß eventuell eingegeben werden,
falls die Sicherheitsstufe auf eine der Seiten der Verbindung auch Hoch eingestellt ist und
zwischen diesen Geräten keine Paarbildung hergestellt wurde.
Hinweis:
Unter dem Symbol des Remote-Gerätes und dem Service-Symbol sind die entsprechenden
Betriebsmenüs vorhanden. Die Verbindung kann auch im Aufklappmenü gestartet werden.
Verbindung abbrechen
Wählen Sie zuerst das Remote-Gerät und rechtsklicken Sie auf das Service-Symbol oben im
Hauptfenster. Im Aufklappmenü wählen Sie “Disconnect” (Verbindung abbrechen).
Wählen Sie das Remote-Gerät und rechtsklicken Sie auf das Symbol dieses Gerätes. Im
Aufklappmenü wählen Sie Disconnect / submenu (Verbindung abbrechen / Untermenü) (die
abzubrechende Verbindung).
Mit FTP und Synchronisierung schließen Sie deren Betriebsfenster, wonach die Verbindung
abgebrochen wird.
Von der Seite der Fernbedienung kann die Verbindung direkt abgebrochen werden.
Falls das Bluetooth-Gerät oder das Remote-Gerät entfernt wird werden alle Verbindungen
abgebrochen. Wird das Remote-Gerät außerhalb des Funkbereiches bewegt werden
sämtliche Verbindung en mi t dies em Re mote- Gerät n ach ung e fähr einer Minute a bgebr ochen.
Hinweis:
Beim Starten des Programms erscheinen einige Worte in der rechten unteren Ecke des
Bildschirms.
80

Beispiel 1: Verbindung mit einer Bluetooth-Maus herstellen/abbrechen.
1. Schalten Sie die Bluetooth-Maus ein. Bewegen Sie den Kursor auf das Symbol der
Bluetooth-Maus unter Bluetooth-Einstellungen. Rechtsklicken und “Connect”
(Verbindung herstellen) auswählen.
81

2. Das Symbol der Bluetooth-Maus wird in den Verbindungsstatus gesetzt.
82

3. Zum Abbrechen der Verbindung mit der Maus auf das Symbol rechtsklicken und
“Disconnect” (Verbindung abbrechen) auswählen.
83
Beispiel 2: Verbindung mit einem Bluetooth-Kopfhörer herstellen/abbrechen.
1. Schalten Sie den Bluetooth-Kopfhörer ein. Bewegen Sie den Kursor auf das Symbol
des Bluetooth-Kopfhörers unter Bluetooth-Einstellungen. Rechtsklicken und
“Connect” (Verbindung herstellen) auswählen.
84
2. Das System ruft den Kopfhörer an. Vom Kopfhörer ertönt ein Klingelzeichen. Zum
Fortsetzen des Verbindungsvorgangs drücken Sie auf die “Answer”-Taste
(Antworttaste).
85

3. Das Symbol des Bluetooth-Kopfhörers wird in den Verbindungsstatus gesetzt.
86
4. Zum Abbrechen der Verbindung mit der Maus rechtsklicken Sie auf das Symbol und
wählen Sie “Disconnect” (Verbindung abbrechen) aus.
87

Hinweis! Für weitere Informationen lesen Sie die Hilfe-Datei unter “Bluetooth Settings”
(Bluetooth-Einstellungen).
88

Introducción
Introducción a la tecnología inalámbrica Bluetooth
Bluetooth es una tecnología de comunicación inalámbrica de corto alcance. Permite
conexiones entre dispositivos Bluetooth tales como teléfonos celulares, asistentes
personales digitales (PDA), computadores de escritorio y portátil, dispositivos de entrada y
salida (ratón, teclado, impresoras), y aparatos del hogar. Bluetooth se refiere a un estándar
mundial diseñado para funcionar en la banda de frecuencia internacionalmente reconocida
de ISM (siglas en inglés de Científico y Médico Industriales). Dentro de la banda de ISM
(2.4Ghz - 2.48Ghz), las transmisiones Blueto oth s alta n entr e 79 frec uencias sep ara das 1.6 00
veces por segundo, y con un rango de comunicación de alrededor de 10 metros (33 pies)
para clase II ó 100 metros (330 pies) para clase I.
Introducción al Adaptador Bluetooth USB
El Adaptador Bluetooth USB es un habilitador Bluetooth, que habilita su computadora de
mesa o portátil para conectar inalámbricamente a cualquier otra computadora o dispositivo
habilitado para Bluetooth. Permite rango de trabajo de hasta 10 (clase 2)/100 (clase 1)
metros (33/330 pies) con una velocidad de transmisión de datos de 723 Kbps, y es
compatible con especificaciones Bluetooth 1.2 y USB 1.1(soporta las dos velocidades bajas
de trasnferencia de datos de 1.5 Mb/s ó 12 Mb/s)/2.0(soporta las tres velocidades de datos:
1.5 Mb/s, 12 Mb/s, y 480 Mb/s. la velocidad más rápida de transferencia de datos de 480
Mb/s).El Adaptador Blu etoo t h USB es una solución ideal para las ne cesi dad es del hogar y de
conectividad móbil. Es fácil de instalar y usar para conectividad inalámbrica a dispositivos
tales como teléfonos celulares, PDAs, impresoras, computadoras, teclados, ratón, etc.
Contenido del Paquete y dibujos
- Adaptador Bluetooth USB
- CD del controlador
- Guía Rápida y Manual del Usuario.
89

Requerimiento del Sistema
Requerimiento del Sistema Compatible PC:
- CPU: Intel Pentium III 500MHz ó superior.
- Memoria: 256MB ó más.
- Espacio del Disco Duro: al menos 50MB.
- Sistema Operativo: Windows 98SE/Me/2000/XP
- Un puerto USB libre, compatible USB 1.1/2.0.
- Unidad CD-ROM.
Requerimiento del Sistema Mac:
- Sistema Operativo MAC: 10.1.4 ó más avanzado
- Controlador Sistema Operativo Mac y software proporcionado por Apple.
- Un puerto USB libre, compatible USB 1.1/2.0.
- Unidad CD-ROM.
90

Instalación del Software
Nota: No enchufe su Adaptador Bluetooth USB al puerto USB hasta que haya completado la
instalación del software como sigue:
1. Inserte el CD del software que viene con su a dapt ador US B en la uni dad CD ROM. El
ayudante de Instalación debe empez ar automáti camente. Si el ayud ante no se car ga,
inicie el archivo “Setup.exe”.
2. Una ventana de menú aparecerá para que Ud. seleccione las configuraciones. Haga
clic en “Install” para comenzar el proceso de instalación.
3. La ventana del ayudante de Instalación debe aparecer ahora, haga clic en “Next”.
91

4. Seleccione “Yes” para aceptar el Contrato de Licencia.
5. Haga clic en “Install” para comenzar la instalación.
92

6. El Ayudante está procesando información.
7. Espere que el software configure el adaptador.
93

8. Enchufe ahora el adaptador EDR USB a un puerto disponible USB y haga clic en
“OK” para continuar con la instalaciónto.
9. Haga clic en “Finish” para finalizar con la instalación.
94
10. Se le pedirá reiniciar el sistema. Haga clic en “Yes” para reiniciar inmediatamente o
haga clic en “No” para reiniciar más tarde.
95

Guía de Emparejamiento
Qué es Emparejamiento?
Emparejamiento es un proceso de asociación uno con el otro entre dispositivos Bluetooth.
Permite omitir ingresar informaciones de acceso cada vez que una conexión es requerida.
Dispositivos Bluetooth necesitan ser emparejados mutuamente antes de intentar una
conexión por primera vez.
Dispositivos emparejados permanecerán emparejados, aún cuando:
1. Uno de los dispositivos está sin energía.
2. Una conexión de servicio es interrumpida o cortada.
3. Uno o ambos dispositivos es reiniciado.
Clave de Acceso
Los dispositivos emparejados comparten una Clave de Acceso única (también es referida
como Clave de Enlace), mediante la cual aut enti fican un o con el o tro cuan do se conec t an. La
Clave de Acceso puede ser alfanumérica, números, o letras, y debe consistir en uno o hasta
16 caracteres.
Cómo emparejar dispositivos?
Automáticamente – Si una clave de acceso es requerida antes de conexión, los dispositivos
se emparejarán automáticamente la primera vez que se conectan ( una cl ave de acceso debe
ser intercambiado exitosamente).
Manualmente -- En la ventana principal de BlueSoleil, haga clic con el botón derecho del
ratón a un dispositivo, seleccione “Pair Device” desde el menú emergente, luego ingrese la
misma clave de acceso en ambos lados.
96
Eemplo 1, emparejar con un ratón Bluetooth.
1. Inicie la ventana principal del Administrador Bluetooth haciendo clic en el ícono
Bluetooth en la barra de tareas.
2. Coloque el ratón Bluetooth en modo de emparejamiento. Haga clic en el botón “New
Connection” para iniciar la búsqueda de dispositivos Bluetooth.
97

3. Seleccione “Express Mode” y haga clic en “Next”. El sistema comienza a buscar
dispositivos Bluetooth dentro del rango efectivo de trabajo.
98
 Loading...