

Page 1

i
GB TOSHIBA Bluetooth Module Installation...................... 1
FR Installation du module Bluetooth TOSHIBA................. 7
DE Installation des TOSHIBA Bluetooth-Moduls ............. 13
ES Instalación del módulo Bluetooth de TOSHIBA ......... 19
IT Installazione del modulo Bluetooth TOSHIBA ........... 25
NL Installatie van TOSHIBA Bluetooth-module............... 31
Page 2

ii
Page 3

GB-1
TOSHIBA Bluetooth Module Installation
This sheet provides information on installing the Bluetooth module in the
TECRA S3.
Installing the Bluetooth module
1. Discharge static electricity from your body by touching a metal object,
before you handle the card.
2. Turn off the power and disconnect the AC adaptor.
3. Turn the computer upside down.
4. Remove the battery pack from the computer. For instructions on
removing the battery pack, refer to Chapter 6 in the online manual.
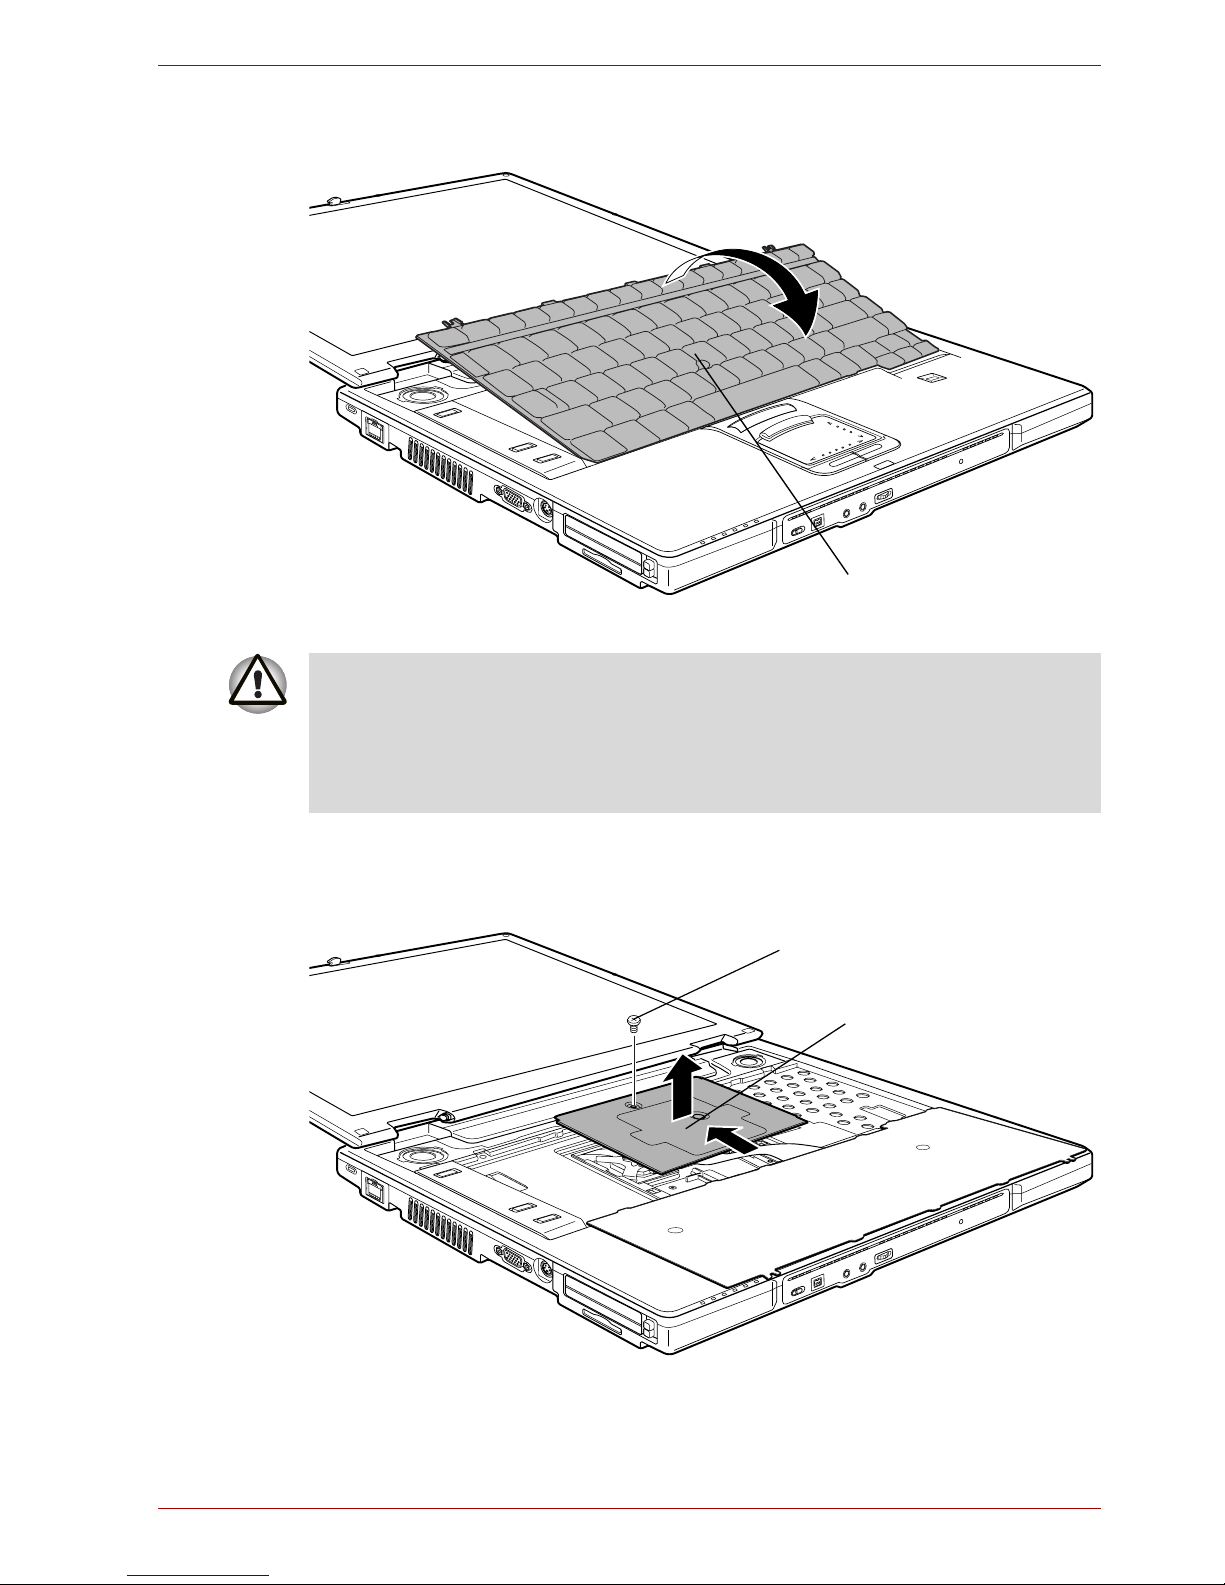
5. Turn the computer right side up, open the display panel and make it flat.
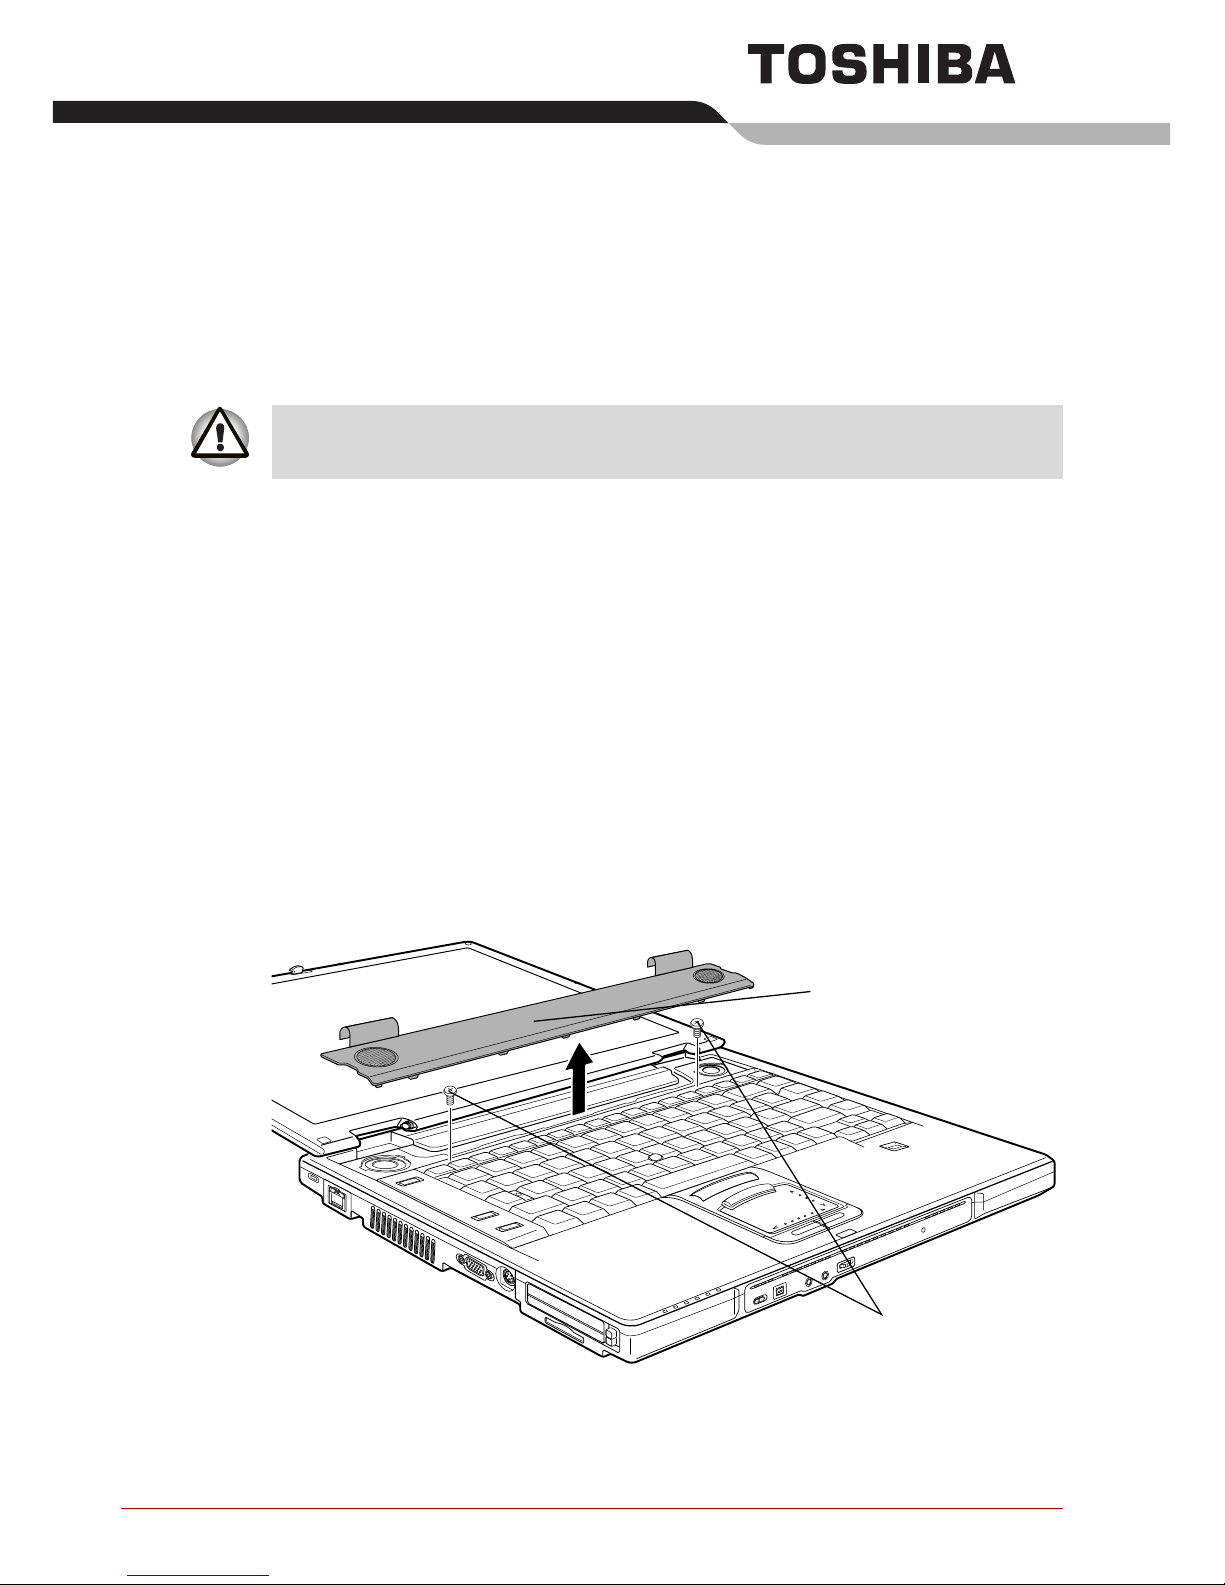
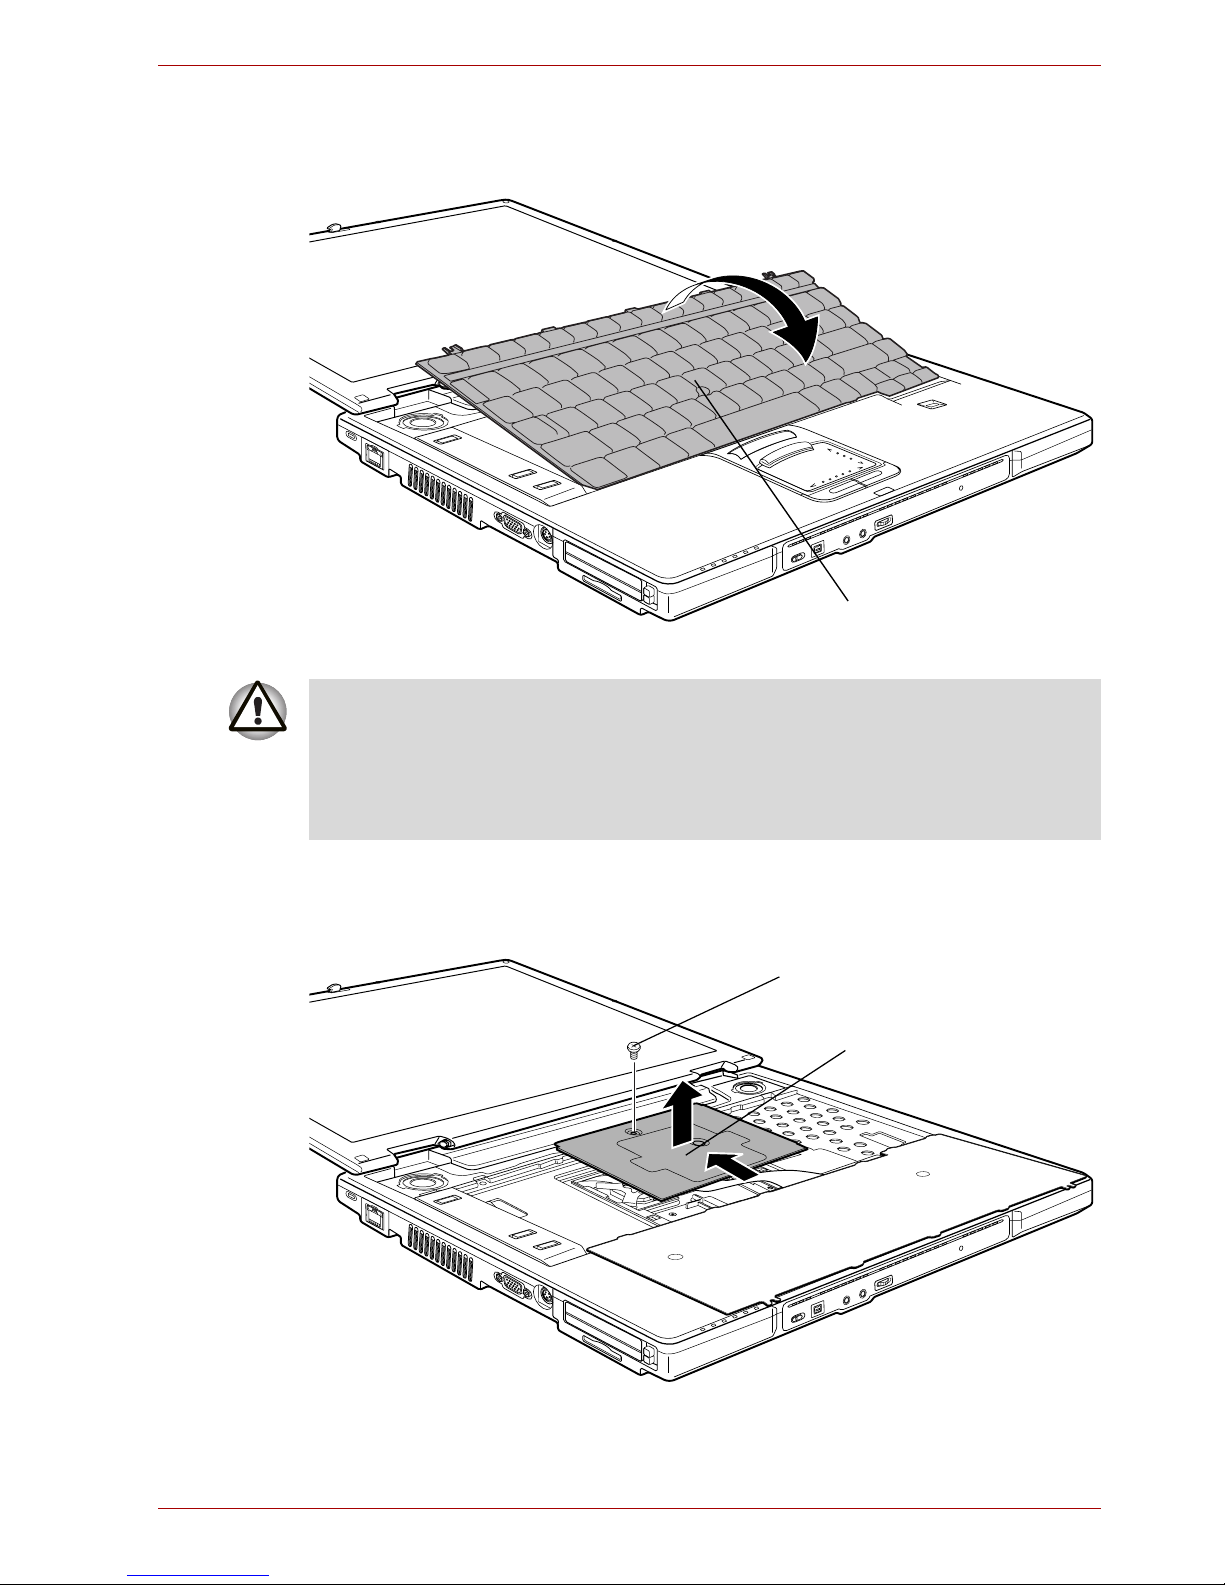
6. Insert a thin object into the notches of both sides of the speaker cover
and lift it out.
7. Remove two screws securing the keyboard.
Figure 1: Removing the speaker cover and two screws
This sheet is for information only. The Bluetooth module must be installed
by dealers of TOSHIBA or TOSHIBA OEM products.
Speaker cover
Screws
Page 4
GB-2
TOSHIBA Bluetooth Module Installation
8. Lift up the back of the keyboard while releasing the three latches, rotate
it toward you and lay it face down on the palm rest.
Figure 2: Rotating the keyboard
9. Remove one screw securing the keyboard support plate.
10. Peel off the adhered portion (adhered to the CPU holder) of the
keyboard support plate, and slid to remove it.
Figure 3: Removing the keyboard support plate
Keyboard
When you move the keyboard forward, do not touch the keys. Doing so
could cause misalignment. Hold the keyboard by the sides and lay it gently
on the palm rest.
The keyboard is connected to the computer by the keyboard ribbon cable.
Be careful not to apply tension to this cable when you lift up the keyboard.
Screw
Keyboard support plate
Page 5

GB-3
TOSHIBA Bluetooth Module Installation
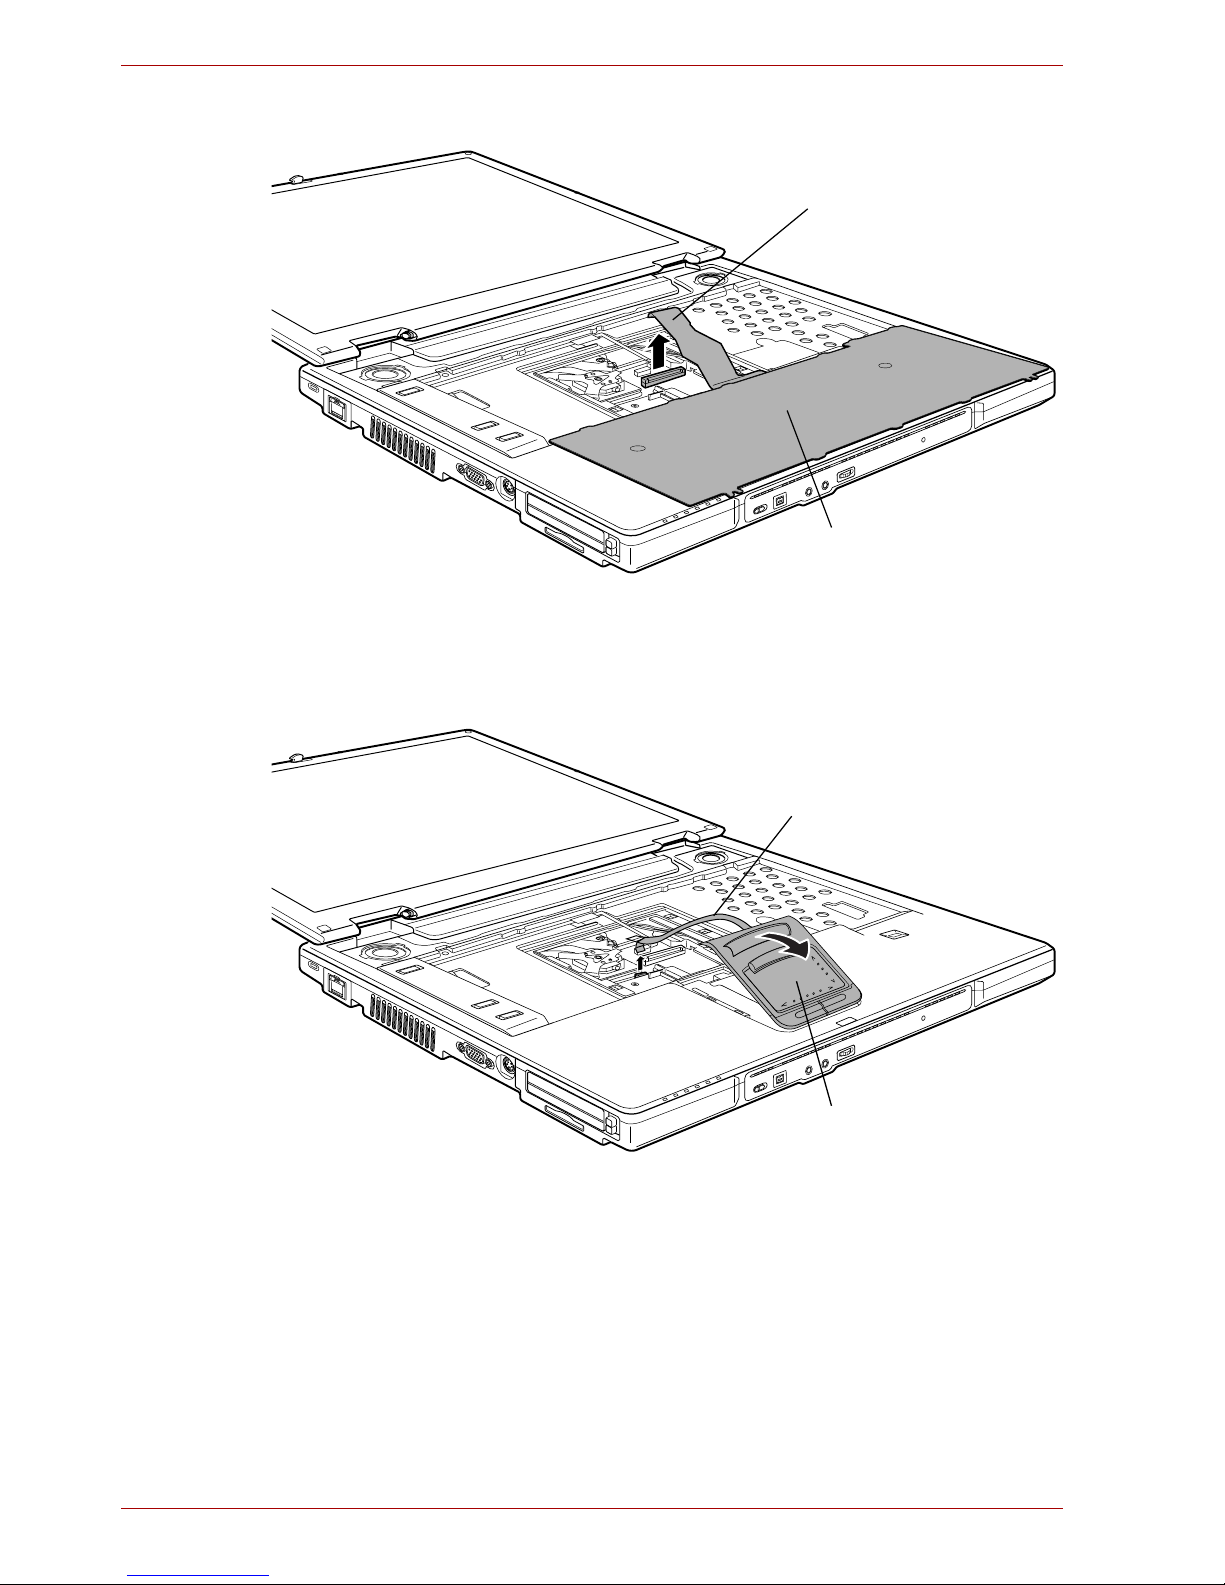
11. Disconnect the keyboard ribbon cable and remove the keyboard.
Figure 4: Removing the keyboard
12. Disconnect the touch pad cable.
13. Remove the touch pad assembly while releasing the latches on both
sides of it.
Figure 5: Removing the touch pad assembly
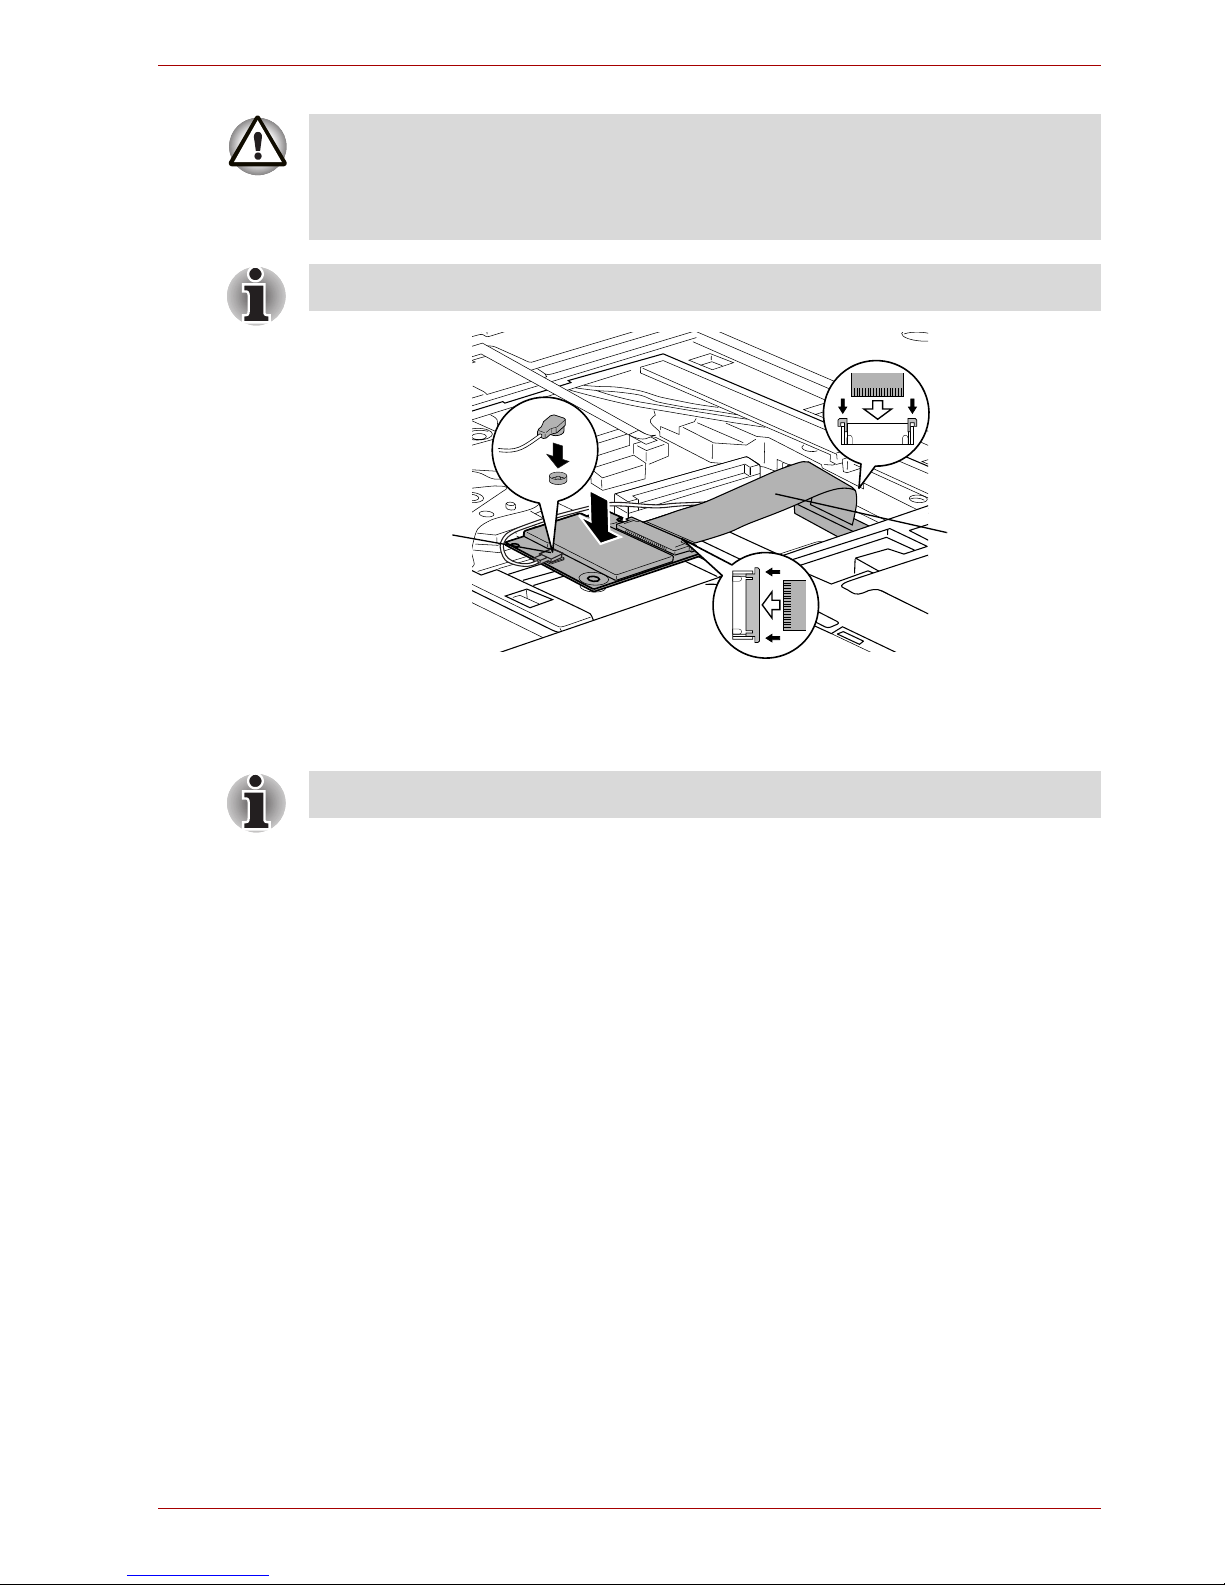
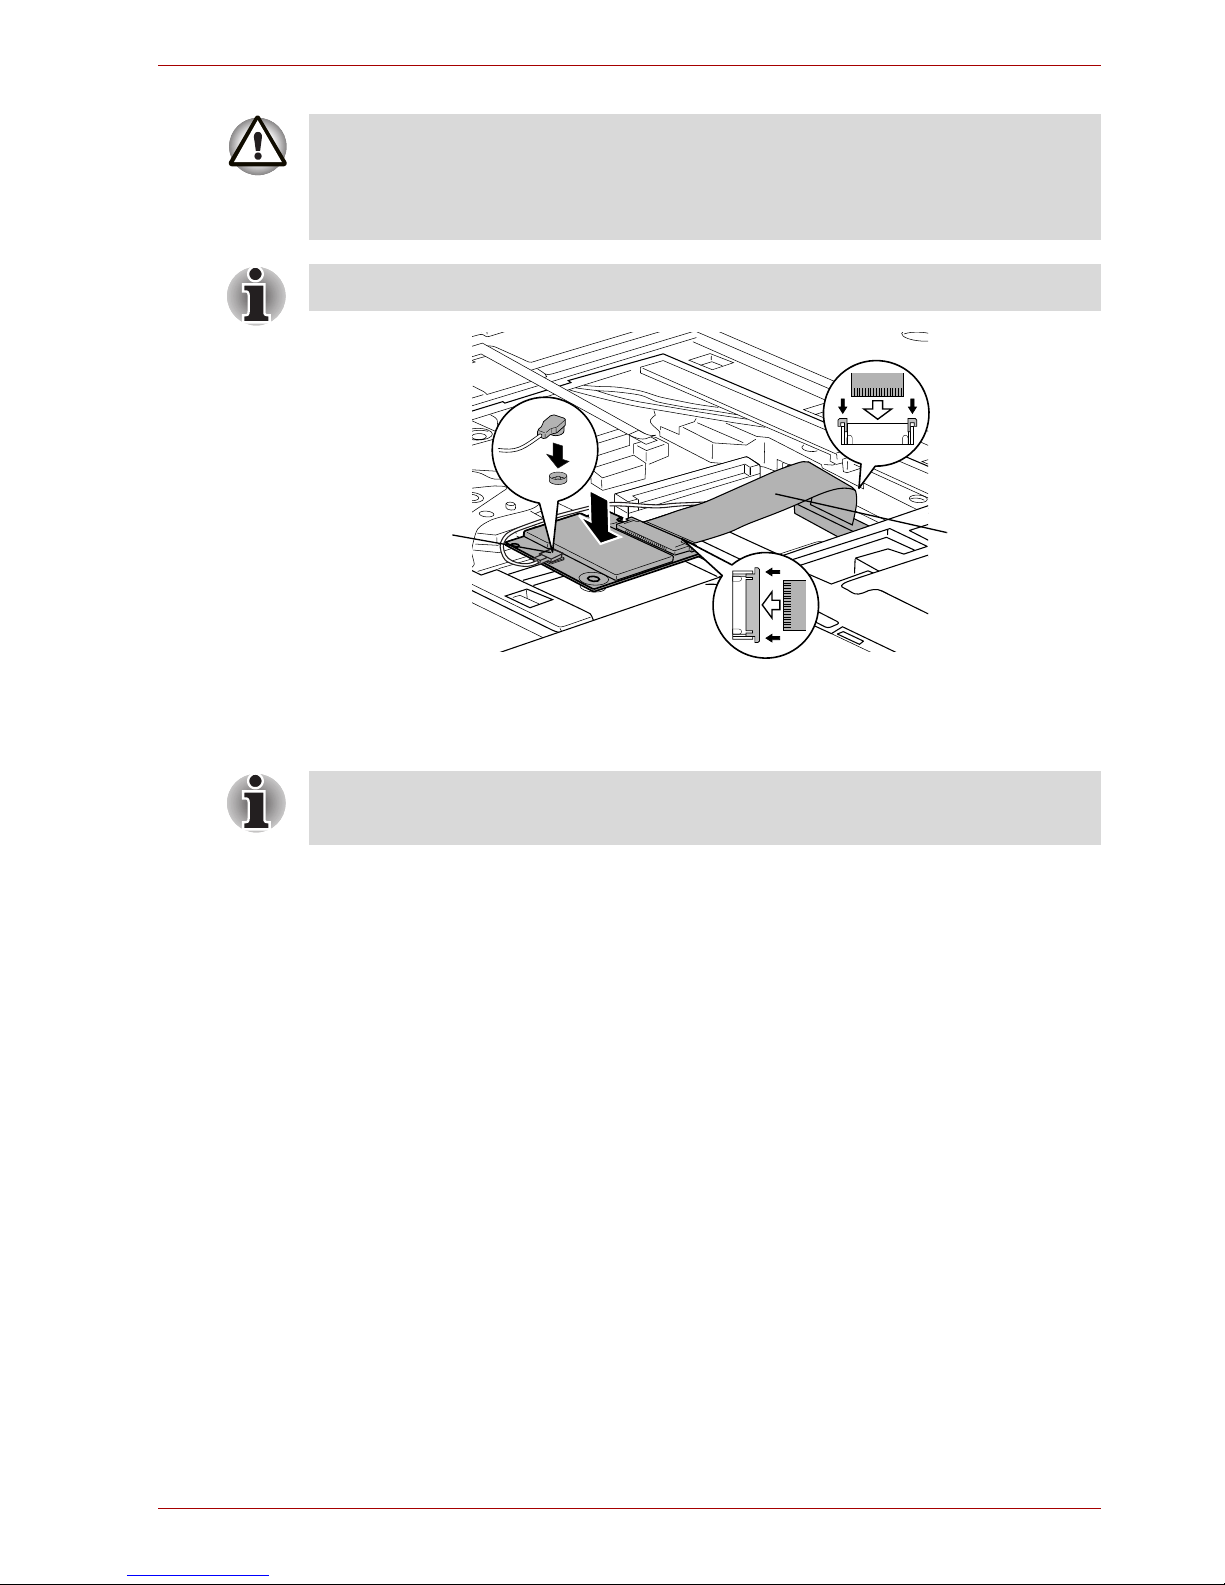
14. Connect the antenna cable to the Bluetooth module.
15. Connect the other end of the flexible cable to the Bluetooth module.
16. Connect one end of the flexible cable to the connector on the computer.
17. Seat the Bluetooth module.
18. Pass the antenna cable to the slit.
Keyboard ribbon cable
Keyboard
Touch pad cable
Touch pad assembly
Page 6
GB-4
TOSHIBA Bluetooth Module Installation
Figure 6: Connecting the flexible cable and antenna cable
19. Install the touch pad assembly to the slot of the palm rest and connect
the touch pad cable.
20. Seat the keyboard and connect the keyboard ribbon cable.
21. Slide the keyboard support plate toward you and attach it while sticking
the adhered portion on to the CPU holder.
22. Secure one screw of the keyboard support plate.
23. Seat the keyboard down, set the three latches and screw in the two
screws.
24. Seat the speaker cover and press to secure latches.
25. Close the display panel and turn the computer upside down.
26. Install the battery pack.
Hold the Bluetooth module by the sides only. Do not touch the connector
on the card or on the computer. Debris on the connectors may cause
access problems. Be careful not to apply pressure to the ICs on the
Bluetooth module.
Fold up a flexible cable after seating the Bluetooth module.
Flexible cable
Antenna cable
Check that the touch pad cable is above the antenna cable.
Page 7

GB-5
Applying labels
Applying labels
The figures below show the locations of labels.
Label positions
The letters A and B correspond to labels identified in later illustrations. The
applied labels will vary according to your computer’s configuration.
Figure 7: Label positions
A
B
Page 8
GB-6
Applying labels
New labels
Refer to figures above and below when you apply new labels.
1. Remove the battery pack. Refer to Chapter 6 in the online manual for
details.
2. Apply the Bluetooth label to position B.
These labels are samples.
Figure 8: Bluetooth label
Figure 9: Wireless LAN label
Page 9
FR-7
Installation du module Bluetooth
TOSHIBA
Cette fiche vous informe sur l’installation du module Bluetooth sur le
TECRA S3.
Installation du module Bluetooth
1. Déchargez-vous de toute électricité statique en touchant un objet
métallique avant de manipuler la carte.
2. Mettez l’ordinateur hors tension et déconnectez l’adaptateur secteur.
3. Retournez l’ordinateur (écran vers la surface de travail).
4. Sortez la batterie de l’ordinateur. Pour des instructions sur le retrait de
la batterie principale, reportez-vous au chapitre 6 du manuel de
l’utilisateur en ligne.
5. Remettez l’ordinateur à l’endroit et ouvrez complètement l’écran.
6. Insérez un objet fin entre les encoches situées des deux côtés du capot
du haut-parleur et soulevez ce dernier.
7. Enlevez les deux vis fixant le clavier.
Illustration 1 : Retrait du capot de haut-parleur et deux vis
Cette fiche est à conserver pour référence. Le module Bluetooth doit être
installé par des revendeurs de produits TOSHIBA ou TOSHIBA OEM.
Capot du haut-parleur
Vis
Page 10
FR-8
Installation du module Bluetooth TOSHIBA
8. Soulevez l’arrière du clavier tout en relâchant les trois loquets, faites-le
tourner vers vous et posez le côté comportant les touches sur le
repose-mains.
Illustration 2 : Rotation du clavier
9. Enlevez la vis de fixation de la plaque de support du clavier.
10. Retirez la partie adhérente (sur le boîtier de l’unité centrale) de la
plaque de support du clavier et faites-la glisser pour la retirer.
Illustration 3 : Retirez la plaque du support de clavier.
Clavier
N’appuyez pas sur les touches lorsque vous déplacez le clavier vers
l’avant. Cela pourrait entraîner un désalignement. Tenez le clavier par les
cotés et posez-le avec précaution sur le repose-mains.
Le clavier est connecté à l’ordinateur par un câble souple. Veillez à ne pas
tirer sur ce câble en soulevant le clavier.
Vis
Plaque de support du
clavier
Page 11
FR-9
Installation du module Bluetooth TOSHIBA
11. Déconnectez le câble souple du clavier et retirez le clavier.
Illustration 4 : Retrait du clavier
12. Déconnectez le câble de Touch Pad.
13. Enlevez le bloc de Touch Pad tout en déverrouillant les loquets des
deux côtés.
Illustration 5 : Retrait du bloc Touch Pad
14. Connectez le câble de l’antenne au module Bluetooth.
15. Connectez l’autre extrémité du câble souple au module Bluetooth.
16. Connectez une extrémité du câble souple au connecteur de
l’ordinateur.
17. Installez le module Bluetooth.
18. Faites passer le câble de l’antenne par la fente.
Câble souple du clavier
Clavier
Câble de Touch Pad
Bloc Touch Pad
Page 12
FR-10
Installation du module Bluetooth TOSHIBA
Illustration 6 : Connexion du câble souple et du câble de l’antenne
19. Installez le bloc Touch Pad dans le logement du repose-mains et
connectez le câble Touch Pad.
20. Installez le clavier et connectez son câble souple.
21. Faites glisser la plaque de support du clavier vers vous et fixez le
clavier tout en reposant la partie adhérente sur le boîtier de l’unité
centrale.
22. Posez une vis sur la plaque de support du clavier.
23. Installez le clavier, engagez les trois loquets et serrez les deux vis.
24. Posez le capot du haut-parleur et appuyez pour fixer les taquets.
25. Fermez l’écran et retournez l’ordinateur.
26. Installez la batterie.
Tenez le module Bluetooth uniquement par les côtés. Ne touchez pas les
connecteurs de la carte ou de l’ordinateur. Les débris ou poussières
déposés sur les connecteurs risquent d’entraîner des dysfonctionnements.
Veillez à ne pas appuyer sur les IC du module Bluetooth.
Pliez le câble souple après avoir installé le module Bluetooth.
Câble souple
Câble d’antenne
Assurez-vous que le câble Touch Pad est situé au-dessus du câble
d’antenne.
Page 13

FR-11
Application des étiquettes
Application des étiquettes
Les figures ci-dessous indiquent l’emplacement des étiquettes.
Positions des étiquettes
Les lettres A et B correspondent aux étiquettes identifiées dans les
illustrations suivantes. Les étiquettes appliquées seront différentes en
fonction de la configuration de votre ordinateur.
Illustration 7 : Positions des étiquettes
A
B
Page 14

FR-12
Application des étiquettes
Nouvelles étiquettes
Reportez-vous aux figures précédentes et suivantes lorsque vous apposez
de nouvelles étiquettes.
1. Retirez la batterie. Pour tout complément d’information, reportez-vous
au chapitre 6 du manuel en ligne.
2. Appliquez l’étiquette Bluetooth à la position B.
Ces étiquettes sont des échantillons.
Illustration 8 : Etiquette Bluetooth
Illustration 9 : Etiquette LAN sans fil
Page 15

DE-13
Installation des TOSHIBA
Bluetooth-Moduls
In diesem Informationsblatt wird die Installation des Bluetooth-Moduls in
den TECRA S3-Computer beschrieben.
Bluetooth-Modul installieren
1. Leiten Sie elektrische Aufladungen von Ihrem Körper ab, indem Sie
einen Gegenstand aus Metall berühren, bevor Sie die Karte anfassen.
2. Schalten Sie den Computer aus und ziehen Sie den Netzadapter ab.
3. Legen Sie den Computer mit der Unterseite nach oben hin.
4. Nehmen Sie den Akku aus dem Computer. Hinweise zur Entnahme des
Akkus finden Sie in Kapitel 6 des Onlinehandbuchs.
5. Drehen Sie den Computer wieder richtig herum, öffnen Sie den
Bildschirm und klappen Sie ihn flach auf.
6. Führen Sie einen schmalen Gegenstand in die Aussparungen auf
beiden Seiten der Lautsprecherabdeckung und heben Sie diese ab.
7. Entfernen Sie zwei Schrauben, mit denen die Tastatur gesichert ist.
Abb. 1: Lautsprecherabdeckung und zwei Schrauben entfernen
Das vorliegende Dokument dient lediglich zur Information.
Das Bluetooth-Modul muss durch Händler von TOSHIBA- oder
TOSHIBA-OEM-Produkten installiert werden.
Lautsprecherabdeckung
Schrauben
Page 16

DE-14
Installation des TOSHIBA Bluetooth-Moduls
8. Heben Sie den hinteren Rand der Tastatur an, indem Sie die drei
Laschen lösen, klappen Sie die Tastatur in Ihre Richtung und legen Sie
sie auf der Handballenauflage ab.
Abb. 2: Tastatur aufklappen
9. Entfernen Sie eine Schraube, mit der die Tastaturunterlage gesichert
ist.
10. Heben Sie den Teil der Tastaturunterlage ab, der an der CPU-
Halterung befestigt ist, und schieben Sie die Unterlage zur Seite, um
sie zu entfernen.
Abb. 3 Tastaturunterlage entfernen
Tastatur
Berühren Sie nicht die Tasten, wenn Sie die Tastatur nach vorn schieben.
Sie könnten ihre Ausrichtung verändern. Halten Sie die Tastatur an den
Seiten fest und legen Sie sie vorsichtig auf der Handballenauflage ab.
Die Tastatur ist durch ein Tastaturbandkabel mit dem Computer
verbunden. Ziehen Sie nicht an diesem Kabel, wenn Sie die Tastatur
aufklappen.
Schraube
Tastaturunterlage
Page 17

DE-15
Installation des TOSHIBA Bluetooth-Moduls
11. Trennen Sie das Tastaturbandkabel ab und nehmen Sie die Tastatur ab.
Abb. 4: Tastatur entfernen
12. Trennen Sie das Touchpadkabel ab.
13. Entfernen Sie das Touchpadmodul, indem Sie die Laschen auf beiden
Seiten lösen.
Abb. 5: Touchpadmodul entfernen
14. Schließen Sie das Antennenkabel an das Bluetooth-Modul an.
15. Schließen Sie das andere Ende des flexiblen Kabels an das BluetoothModul an.
16. Verbinden Sie ein Ende des flexiblen Kabels mit dem Anschluss am
Computer.
17. Setzen Sie das Bluetooth-Modul ein.
18. Führen Sie das Antennenkabel durch den Schlitz.
Tastaturbandkabel
Tastatur
Touchpadkabel
Touchpadmodul
Page 18

DE-16
Installation des TOSHIBA Bluetooth-Moduls
Abb. 6: Flexibles Kabel und Antennenkabel anschließen
19. Installieren Sie das Touchpadmodul in der Aussparung der
Handballenauflage und schließen Sie das Touchpadkabel an.
20. Setzen Sie die Tastatur ein und schließen Sie das Tastaturbandkabel
an.
21. Schieben Sie die Tastaturunterlage in Ihre Richtung und befestigen Sie
sie, indem Sie einen Teil wieder an der CPU-Halterung anlegen.
22. Sichern Sie eine Schraube der Tastaturunterlage.
23. Setzen Sie die Tastatur an ihre Position, sichern Sie die drei Laschen
und die beiden Schrauben.
24. Setzen Sie die Lautsprecherabdeckung ein und drücken Sie sie fest,
damit die Laschen einrasten.
25. Schließen Sie den Bildschirm und legen Sie den Computer mit der
Unterseite nach oben hin.
26. Installieren Sie den Akku.
Halten Sie das Bluetooth-Modul nur an den Seiten fest. Berühren Sie nicht
die Anschlüsse des Bluetooth-Moduls oder des Computers. Kleinste
Fremdkörper auf den Anschlüssen können zu Zugriffsproblemen führen.
Achten Sie darauf, nicht auf die Schaltkreise des Bluetooth-Moduls zu
drücken.
Falten Sie das flexible Kabel zusammen, nachdem Sie das BluetoothModul eingesetzt haben.
Flexibles Kabel
Antennenkabel
Vergewissern Sie sich, dass das Touchpadkabel über dem Antennenkabel
liegt.
Page 19

DE-17
Anbringen der Aufkleber
Anbringen der Aufkleber
Die Abbildungen unten zeigen die Positionen für die Aufkleber.
Anordnung der Aufkleber
Die Buchstaben A und B beziehen sich auf Aufkleber, die in Abbildungen
weiter unten zu sehen sind. Die angebrachten Aufkleber unterscheiden
sich je nach Konfiguration des Computers.
Abb. 7: Anordnung der Aufkleber
A
B
Page 20

DE-18
Anbringen der Aufkleber
Neue Aufkleber
Orientieren Sie sich an den oben stehenden und folgenden Abbildungen,
wenn Sie neue Aufkleber anbringen.
1. Nehmen Sie den Akku heraus. Informationen hierzu finden Sie in
Kapitel 6 des Benutzerhandbuchs.
2. Kleben Sie den Bluetooth-Aufkleber auf Position B.
Diese Aufkleber sind Beispiele.
Abb. 8: Bluetooth-Aufkleber
Abb. 9: Wireless LAN-Aufkleber
Page 21

ES-19
Instalación del módulo Bluetooth de
TOSHIBA
Esta documentación contiene información referente a la instalación del
módulo Bluetooth en TECRA S3.
Instalación del módulo Bluetooth
1. Descargue la electricidad estática que haya podido acumular en su
cuerpo tocando un objeto metálico antes de manipular la tarjeta.
2. Apague el ordenador y desconecte el adaptador de CA.
3. Dé la vuelta verticalmente al ordenador.
4. Extraiga la batería del ordenador. Para obtener instrucciones de cómo
extraer la batería, consulte el Capítulo 6 del manual en línea.
5. De la vuelta al ordenador para colocarlo en su posición normal y abra el
panel de visualización para colocarlo plano.
6. Introduzca un objeto delgado en las ranuras situadas a ambos lados de
la cubierta de altavoz y extráigala.
7. Retire los dos tornillos que aseguran el teclado.
Figura 1: Extracción de la cubierta del altavoz y los dos tornillos
Estas instrucciones se facilitan exclusivamente a título informativo. El
módulo Bluetooth debe instalarlo el distribuidor de productos TOSHIBA u
OEM de TOSHIBA.
Cubierta de altavoz
Tornillos
Page 22

ES-20
Instalación del módulo Bluetooth de TOSHIBA
8. Levante la parte posterior del teclado mientras ligera los tres pestillos,
gírelo hacia usted y déjelo apoyado sobre el reposamuñecas.
Figura 2: Giro del teclado
9. Retire el tornillo que asegura la placa de apoyo del teclado.
10. Pele la parte adherida (al soporte de la CPU) de la placa de apoyo del
teclado y deslícela para extraerla.
Figura 3: Extracción de la placa de apoyo del teclado
Teclado
Al mover el teclado hacia delante, no toque las teclas. Si lo hace, podría
provocar un problema de alineación. Sujete el teclado por los lados y
hágalo descansar sobre el reposamuñecas con cuidado.
El teclado está conectado al ordenador mediante un cable de cinta de
teclado. Tenga cuidado de no tensar este cable al elevar el teclado.
Tornillo
Placa de apoyo del
teclado
Page 23

ES-21
Instalación del módulo Bluetooth de TOSHIBA
11. Desconecte el cable de cinta de teclado y retire el teclado.
Figura 4: Extracción del teclado
12. Desconecte el cable del panel táctil.
13. Extraiga el módulo del panel táctil mientras libera los pestillos situados
a ambos lados de éste.
Figura 5: Extracción del módulo del panel táctil
14. Conecte el cable de antena al módulo Bluetooth.
15. Conecte el otro extremo del cable flexible al módulo Bluetooth.
16. Conecte un extremo del cable flexible al conector del ordenador.
17. Coloque el módulo Bluetooth.
18. Pase el cable de antena por la ranura.
Cable de cinta del
teclado
Teclado
Cable del panel táctil
Módulo del panel
táctil
Page 24

ES-22
Instalación del módulo Bluetooth de TOSHIBA
Figura 6: Conexión del cable flexible y el cable de antena
19. Instale el módulo de panel táctil en la ranura del reposamuñecas y
conecte el cable del panel táctil.
20. Conecte el teclado y conecte el cable de cinta del teclado.
21. Deslice la placa de apoyo del teclado hacia usted y fíjela mientras pega
la parte adherida al soporte de la CPU.
22. Asegure el tornillo de la placa de apoyo del teclado.
23. Baje el teclado, coloque los tres pestillos y fije los dos tornillos.
24. Coloque la cubierta del altavoz y presione para asegurar los pestillos.
25. Cierre el panel de visualización y coloque el ordenador boca abajo.
26. Instale la batería.
Sujete el módulo Bluetooth sólo por los lados. No toque el conector de la
tarjeta ni del ordenador. Cualquier resto de suciedad depositado en ellos
podría provocar problemas de acceso. Tenga cuidado de no ejercer una
presión excesiva sobre los IC del módulo Bluetooth.
Pliegue el cable flexible tras colocar el módulo Bluetooth.
Cable flexible
Cable de antena
Compruebe que el cable del panel táctil está por encima del cable de
antena.
Page 25

ES-23
Adhesión de etiquetas
Adhesión de etiquetas
Las siguientes figuras muestran las ubicaciones de las etiquetas.
Posiciones de las etiquetas
Las letras A y B corresponden a las etiquetas identificadas en ilustraciones
posteriores. Las etiquetas empleadas varían en función de la configuración
de su ordenador.
Figura 7: Posiciones de las etiquetas
A
B
Page 26

ES-24
Adhesión de etiquetas
Nuevas etiquetas
Consulte las figuras anteriores y siguientes a la hora de adherir nuevas
etiquetas.
1. Extraiga la batería. Consulte el Capítulo 6 del manual en línea para
obtener información.
2. Adhiera la etiqueta de Bluetooth en la posición B.
Estas etiquetas son muestras.
Figura 8: Etiqueta de Bluetooth
Figura 9: Etiqueta de LAN inalámbrica
Page 27

IT - 25
Installazione del modulo Bluetooth
TOSHIBA
Questa scheda contiene informazioni relative all’installazione del modulo
Bluetooth nel computer TECRA S3.
Installazione del modulo Bluetooth
1. Scaricare l’elettricità statica dal proprio corpo toccando un oggetto
metallico prima di maneggiare la scheda.
2. Spegnere il computer e scollegare l’adattatore CA.
3. Capovolgere il computer.
4. Rimuovere il gruppo batterie dal computer. Per istruzioni sulla
rimozione del gruppo batterie, consultare il capitolo 6 del manuale in
linea.
5. Girare il computer dal lato corretto e aprire completamente il pannello di
visualizzazione.
6. Infilare un oggetto fine sotto le tacche su entrambi i lati del coperchio
dell’altoparlante, sollevare il coperchio ed estrarlo.
7. Rimuovere le due viti che fissano la tastiera.
Figura 1: Rimozione del coperchio dell’altoparlante e di due viti
questo documento viene fornito a titolo puramente informativo. Il modulo
Bluetooth deve essere installato da un rivenditore di prodotti TOSHIBA o
TOSHIBA OEM.
Coperchio
dell’altoparlante
Viti
Page 28

IT -26
Installazione del modulo Bluetooth TOSHIBA
8. Sollevare la parte posteriore della tastiera sbloccando i tre fermi,
ruotarla verso di sé e appoggiarla a faccia in giù sul poggiapolsi.
Figura 2: Rotazione della tastiera
9. Rimuovere la vite che fissa la piastra di supporto della tastiera.
10. Staccare la parte collegata (collegata al supporto della CPU) della
piastra di supporto della tastiera e rimuovere la piastra facendola
scorrere.
Figura 3: Rimozione della piastra di supporto della tastiera
Tas tie ra
Quando si sposta la tastiera in avanti, fare attenzione a non toccare i tasti.
In caso contrario si rischia di provocare un disallineamento della lente.
Tenere la tastiera per i lati e appoggiarla delicatamente sul poggiapolsi.
La tastiera è collegata al computer mediante un cavo piatto. Fare
attenzione a non tendere il cavo quando si solleva la tastiera.
Vite
Piastra di supporto
della tastiera
Page 29

IT - 27
Installazione del modulo Bluetooth TOSHIBA
11. Scollegare il cavo della tastiera dalla fessura e rimuovere la tastiera.
Figura 4: Rimozione della tastiera
12. Scollegare il cavo del touch pad.
13. Rimuovere il gruppo touch pad sbloccando i fermi posti su entrambi i
lati.
Figura 5: Rimozione del gruppo touch pad
14. Collegare il cavo dell’antenna al modulo Bluetooth.
15. Collegare un’estremità del cavo flessibile al modulo Bluetooth.
16. Collegare l’altra estremità del cavo flessibile al connettore del computer.
17. Inserire il modulo Bluetooth.
18. Inserire il cavo dell’antenna nella fessura.
Cavo piatto della
tastiera
Tas tie ra
Cavo del touch pad
Gruppo touch pad
Page 30

IT -28
Installazione del modulo Bluetooth TOSHIBA
Figura 6: Collegamento del cavo flessibile e del cavo dell’antenna
19. Installare il gruppo touch pad nello slot del poggiapolsi e collegare il
cavo del touch pad.
20. Montare la tastiera e collegare il cavo tastiera piatto.
21. Tirare verso di sé la piastra di supporto della tastiera e farla aderire al
supporto della CPU.
22. Fissare la vite della piastra di supporto della tastiera.
23. Installare la tastiera, bloccare i tre fermi e fissare le due viti.
24. Montare il coperchio dell’altoparlante e premere per bloccare i fermi.
25. Chiudere il pannello di visualizzazione e capovolgere il computer.
26. Installare il gruppo batterie.
Tenere il modulo Bluetooth solo per i lati. Non toccare il connettore della
scheda o del computer. Eventuali depositi sui connettori possono causare
problemi di accesso alla scheda. Fare attenzione a non esercitare
pressione sui circuiti integrati del modulo Bluetooth.
Ripiegare il cavo flessibile dopo aver installato il modulo Bluetooth.
Cavo flessibile
Cavo antenna
Assicurarsi che il cavo del touch pad sia posizionato sopra al cavo
dell’antenna.
Page 31

IT - 29
Applicazione delle etichette
Applicazione delle etichette
Le figure riportate sotto indicano la posizione delle etichette.
Posizioni delle etichette
Le lettere A e B corrispondono alle etichette identificate dalle illustrazioni
seguenti. Le etichette da applicare cambiano a seconda della
configurazione del computer.
Figura 7: Posizioni delle etichette
A
B
Page 32

IT -30
Applicazione delle etichette
Nuove etichette
Per applicare nuove etichette, fare riferimento alle figure riportate sopra e
sotto.
1. Estrarre il gruppo batterie. Per informazioni dettagliate, consultare il
capitolo 6 del manuale in linea.
2. Applicare l’etichetta Bluetooth nella posizione B.
Queste etichette sono esempi.
Figura 8: Etichetta Bluetooth
Figura 9: Etichetta della rete locale senza fili
Page 33

NL-31
Installatie van TOSHIBA
Bluetooth-module
Dit addendum verschaft informatie over de installatie van de
Bluetooth-module in de TECRA S3.
De Bluetooth-module installeren
1. Ontlaad statische elektriciteit in uw lichaam door een metalen voorwerp
aan te raken voor u de kaart beetpakt.
2. Zet de computer uit en verwijder de netadapter.
3. Zet de computer ondersteboven.
4. Verwijder de accu-eenheid uit de computer. Raadpleeg hoofdstuk 6 in
de online handleiding voor informatie over het verwijderen van de
accu-eenheid.
5. Zet de computer rechtop, open het beeldscherm en klap dit helemaal
open.
6. Duw een dun voorwerp in de inkepingen aan weerszijden van de
luidsprekerklep en til deze omhoog.
7. Verwijder de twee schroeven waarmee het toetsenbord is bevestigd.
Afbeelding 1: De luidsprekerklep en de twee schroeven verwijderen
Dit addendum is uitsluitend ter informatie bedoeld. De Bluetooth-module
moet worden geïnstalleerd door leveranciers van TOSHIBA- of TOSHIBA
OEM-producten.
Luidsprekerklep
Schroeven
Page 34

NL-32
Installatie van TOSHIBA Bluetooth-module
8. Til het toetsenbord aan de achterkant op terwijl u de drie klemmetjes
losmaakt, draai het toetsenbord naar u toe en leg het ondersteboven op
de polssteun.
Afbeelding 2: Het toetsenbord omdraaien
9. Verwijder één schroef waarmee de steunplaat van het toetsenbord is
bevestigd.
10. Trek het klevende gedeelte (vastgeplakt aan de CPU-houder) van de
steunplaat van het toetsenbord los en verwijder dit.
Afbeelding 3: De steunplaat van het toetsenbord verwijderen
Toetsenbord
Raak de toetsen tijdens het verplaatsen van het toetsenbord niet aan.
Hierdoor kunt u de uitlijning van de toetsen verstoren. Houd het
toetsenbord aan de zijkanten vast en leg het voorzichtig op de polssteun.
Het toetsenbord is via een lintkabel op de computer aangesloten. Zorg dat
u deze kabel niet strak trekt wanneer u het toetsenbord optilt.
Schroef
Steunplaat van
toetsenbord
Page 35

NL-33
Installatie van TOSHIBA Bluetooth-module
11. Koppel de lintkabel van het toetsenbord los en verwijder het
toetsenbord.
Afbeelding 4: Het toetsenbord verwijderen
12. Koppel de kabel van het touchpad los.
13. Verwijder het touchpad terwjil u de klemmetjes aan weerszijden ervan
loshaalt.
Afbeelding 5: Het touchpad verwijderen
14. Sluit de antennekabel aan op de Bluetooth-module.
15. Sluit het andere uiteinde van de flexibele kabel aan op de Bluetoothmodule.
16. Sluit het ene uiteinde van de flexibele kabel aan op de connector op de
computer.
17. Plaats de Bluetooth-module.
18. Leid de antennekabel door de opening.
Lintkabel van
toetsenbord
Toetsenbord
Touchpadkabel
Touchpad
Page 36

NL-34
Installatie van TOSHIBA Bluetooth-module
Afbeelding 6: De flexibele kabel en de antennekabel aansluiten
19. Plaats het touchpad in de sleuf van de polssteun en sluit de
touchpadkabel aan.
20. Plaats het toetsenbord terug en sluit de lintkabel van het toetsenbord
aan.
21. Schuif de steunplaat van het toetsenbord naar u toe en bevestig dit
terwijl u het klevende gedeelte op de CPU-houder plakt.
22. Bevestig één schroef van de steunplaat van het toetsenbord.
23. Druk het toetsenbord omlaag, plaats de drie klemmetje terug en schroef
de twee schroeven vast.
24. Plaats de luidsprekerklep terug en druk erop tot de klemmetjes
vastklikken.
25. Sluit het beeldscherm en leg de computer ondersteboven.
26. Installeer de accu-eenheid.
Houd de Bluetooth-module alleen aan de zijkanten vast. Raak de
connectoren van de kaart of op de computer niet aan. Vuil op de
connectoren kan toegangsproblemen veroorzaken. Wees voorzichtig dat u
geen druk uitoefent op de geïntegreerde schakelingen op de Bluetoothmodule.
Vouw de flexibele kabel op nadat u de Bluetooth-module hebt geplaatst.
Flexibele kabel
Antennekabel
Zorg dat de touchpadkabel zich boven de antennekabel bevindt.
Page 37

NL-35
Labels aanbrengen
Labels aanbrengen
De volgende afbeeldingen illustreren de positie van de labels.
Labelposities
De letters A en B komen overeen met labels die in illustraties verderop
worden toegelicht. De gebruikte labels verschillen, al naar gelang de
configuratie van uw computer.
Afbeelding 7: Labelposities
A
B
Page 38

NL-36
Labels aanbrengen
Nieuwe labels
Raadpleeg de voorgaande en onderstaande afbeeldingen wanneer u
nieuwe labels op de computer aanbrengt.
1. Verwijder de accu-eenheid. Raadpleeg hoofdstuk 6 in de online
handleiding voor meer informatie.
2. Plaats het Bluetooth-label op positie B.
Deze labels zijn voorbeelden.
Afbeelding 8: Bluetooth-label
Afbeelding 9: Wireless LAN-label
 Loading...