

Toshiba BDX3000KC Owner's Manual
Blu-ray Disc Player
OWNER’S MANUAL
BDX3000KC
Owner’s Record
The model number and serial number are on the back of the
unit. Record these numbers in the spaces below. Refer to
these numbers whenever you communicate with your Toshiba
dealer about this unit.
Model number:
Serial number :
© 2010 Toshiba Corporation
INTRODUCTION CONNECTIONS PLAYBACK
FUNCTION SETUP
OTHERS
2
Introduction
SAFETY PRECAUTIONS
The lightning fl ash with an arrowhead symbol, within the equilateral
triangle, is intended to alert the user to the presence of uninsulated
“dangerous voltage” within the product’s enclosure that may be of
suffi cient magnitude to constitute a risk of electric shock to persons.
The exclamation point within the equilateral triangle is intended to
alert the user to the presence of important operating and maintenance
(servicing) instructions in this owner’s manual.
CAUTION: VISIBLE LASER RADIATION WHEN
OPEN. DO NOT STARE INTO BEAM.
AVIS
WARNING:TO REDUCE THE RISK OF ELECTRIC
SHOCK, DO NOT REMOVE COVER (OR BACK).
NO USER-SERVICEABLE PARTS INSIDE. REFER
SERVICING TO QUALIFIED SERVICE PERSONNEL.
WARNING: TO REDUCE THE RISK OF FIRE OR ELECTRIC SHOCK, DO
NOT EXPOSE THIS APPLIANCE TO RAIN OR MOISTURE. DANGEROUS
HIGH VOLTAGES ARE PRESENT INSIDE THE ENCLOSURE. DO NOT OPEN
THE CABINET. REFER SERVICING TO QUALIFIED PERSONNEL ONLY.
The symbol for Class II (Double lnsulation)
15. Do not overload wall outlets; extension cords, or integral convenience receptacles as this can result in a risk of fi re or electric
shock.
16. Never expose the apparatus to dripping or splashing or place items such as vases, aquariums, any other item fi lled with liquid,
or candles on top of the unit.
17. Keep your fi ngers well clear of the disc tray as it is closing. Neglecting to do so may cause serious personal injury.
18. Do not place anything on top of this unit.
19. Do not place the apparatus on amplifi ers or equipment that may produce heat.
20. Never block or cover the slots or openings in the unit.
Never place the unit: 1) on a bed, sofa, rug or similar surface; 2) too close to drapes, curtains, or walls; or 3) in a confi ned
space such as a bookcase, built-in cabinet, or any other place with poor ventilation.
The slots and openings are provided to protect the unit from overheating and to help maintain reliable operation.
21. Do not use a cracked, deformed, or repaired disc. These discs are easily broken and may cause serious personal injury and
apparatus malfunction.
22. If the apparatus should emit smoke or an unusual odor, immediately disconnect the power cord from the wall outlet. Wait until
the smoke or smell stops, then ask your dealer for a check and repair. Neglecting to do so may cause fi re.
23. During thunderstorms, do not touch the connecting cables or the apparatus.
24. Warning: To prevent spread of fi re, keep candles or other open fl ames away from this product at all times.
ADDITIONAL SAFETY INSTRUCTIONS
IMPORTANT SAFETY INSTRUCTIONS
1. Read these instructions.
2. Keep these instructions.
3. Heed all warnings.
4. Follow all instructions.
5. Do not use this apparatus near water.
6. Clean only with a dry cloth.
7. Do not block any of the ventilation openings. Install in accordance with the manufacturer’s instructions.
8. Do not install near any heat sources such as radiators, heat registers, stoves, or other apparatus (including amplifi ers) that
produce heat.
9. Do not defeat the safety purpose of the polarized or grounding-type plug. A polarized plug has two blades with one wider than
the other. A grounding type plug has two blades and a third grounding prong. The wide blade or the third prong is provided
for your safety. If the provided plug does not fi t into your outlet, consult an electrician for replacement of the obsolete outlet.
10. Protect the power cord from being walked on or pinched particularly at plugs, convenience receptacles, and the point where
they exit from the apparatus.
11. Only use attachments/accessories specifi ed by the manufacturer.
12. Use only with the cart, stand, tripod, bracket, or table specifi ed by the manufacturer, or sold with the
apparatus. When a cart is used, use caution when moving the cart/apparatus combination to avoid injury
from tip-over.
13. Unplug this apparatus during lightning storms or when unused for long periods of time.
14. Refer all servicing to qualifi ed service personnel. Servicing is required when the apparatus has been damaged in any way, such
as the power-supply cord or plug is damaged, liquid has been spilled or objects have fallen into the apparatus, the apparatus
has been exposed to rain or moisture, does not operate normally, or has been dropped.

3
INTRODUCTION
PRECAUTIONS
CAUTION:
• To prevent direct exposure to laser beam, do not try to open the enclosure. Visible and invisible laser radiation when open and
interlocks defeated. DO NOT STARE INTO BEAM.
• Use of controls or adjustments or performance of procedures other than those specifi ed may result in hazardous radiation
exposure.
• Danger of explosion if battery is incorrectly replaced. Replace only with the same or equivalent type.
Warning: Batteries shall not be exposed to excessive heat such as sunshine, fi re or the like.
FCC Information
This device complies with Part 15 of the FCC Rules. Operation is subject to the following two conditions: (1) this device may
not cause harmful interference, and (2) this device must accept any interference received, including interference that may cause
undesired operation.
The party responsible for compliance to these rules is:
Toshiba America Consumer Products, L.L.C.
82 Totowa Rd. Wayne, NJ 07470.
Ph: 1-800-631-3811
Note: This equipment has been tested and found to comply with the limits for a Class B digital device, pursuant to part 15 of the
FCC Rules. These limits are designed to provide reasonable protection against harmful interference in a residential installation.
This equipment generates, uses, and can radiate radio frequency energy and, if not installed and used in accordance with the
instructions, may cause harmful interference to radio communications.
However, there is no guarantee that interference will not occur in a particular installation. If this equipment does cause harmful
interference to radio or television reception, which can be determined by turning the equipment off and on, the user is encouraged
to try to correct the interference by one or more of the following measures:
- Reorient or relocate the receiving antenna.
- Increase the separation between the equipment and receiver.
- Connect the equipment into an outlet on a circuit different from that to which the receiver is connected.
- Consult the dealer or an experienced radio/TV technician for help.
FCC Radiation Exposure Statement:
This equipment complies with FCC radiation exposure limits set forth for an uncontrolled environment.
This equipment should be installed and operated with minimum distance 20cm between the radiator and your body.
This class B digital apparatus complies with Canadian ICES-003.
Cet appareil numérique de la classe B est conforme à la norme NMB-003 du Canada.
WARNING: Changes or modifi cations to this unit not expressly approved by Toshiba, or parties authorized by Toshiba, could void
the user’s authority to operate the equipment.
Notes On Copyright
This product incorporates copyright protection technology that is protected by U.S. patents and other intellectual property rights.
Use of this copyright protection technology must be authorized by Rovi Corporation, and is intended for home and other limited
viewing uses only unless otherwise authorized by Rovi Corporation. Reverse engineering or disassembly is prohibited.
On Placement
• Do not use this unit in places which are extremely hot, cold, dusty or humid.
• Do not restrict the air fl ow of this unit by placing it somewhere with poor air fl ow, by covering it with a cloth, or by placing it on
bedding or carpeting.
• Be sure to remove the disc and unplug the AC power cord from the outlet before carrying the unit.
On Safety
• Do not handle the AC power cord with wet hands and do not put your fi ngers or objects into the unit.
• When connecting or disconnecting the AC power cord, grip the plug and not the cord itself. Pulling the cord may damage it
and create a hazard.
• When you are not going to use the unit for a long period of time, disconnect the AC power cord.
On Condensation
• When left in a heated room where it is warm and damp, water droplets or condensation may form inside the equipment.
When there is condensation inside the unit, the unit may not function normally. Let the unit stand for 1-2 hours before turning
the power on or gradually heat the room and allow the unit to dry before use.
On Recycling
• This unit’s packaging materials are r ecyclable and c an be reused. Pleas e dispos e of any material s i n
accordance with your local recycling regulations.
• Batteries should never be thrown a way or i ncinerated but disp osed of i n accor dance wi th your local
regulations concerning chemical wastes.
Products that earn the ENERGY STAR® prevent greenhouse gas emissions by meeting strict energy effi ciency
guidelines set by the U.S. Environmental Protection Agency and the U.S. Department of Energy. ENERGY STAR and
the ENERGY STAR mark are registered U.S. marks.
4
Introduction
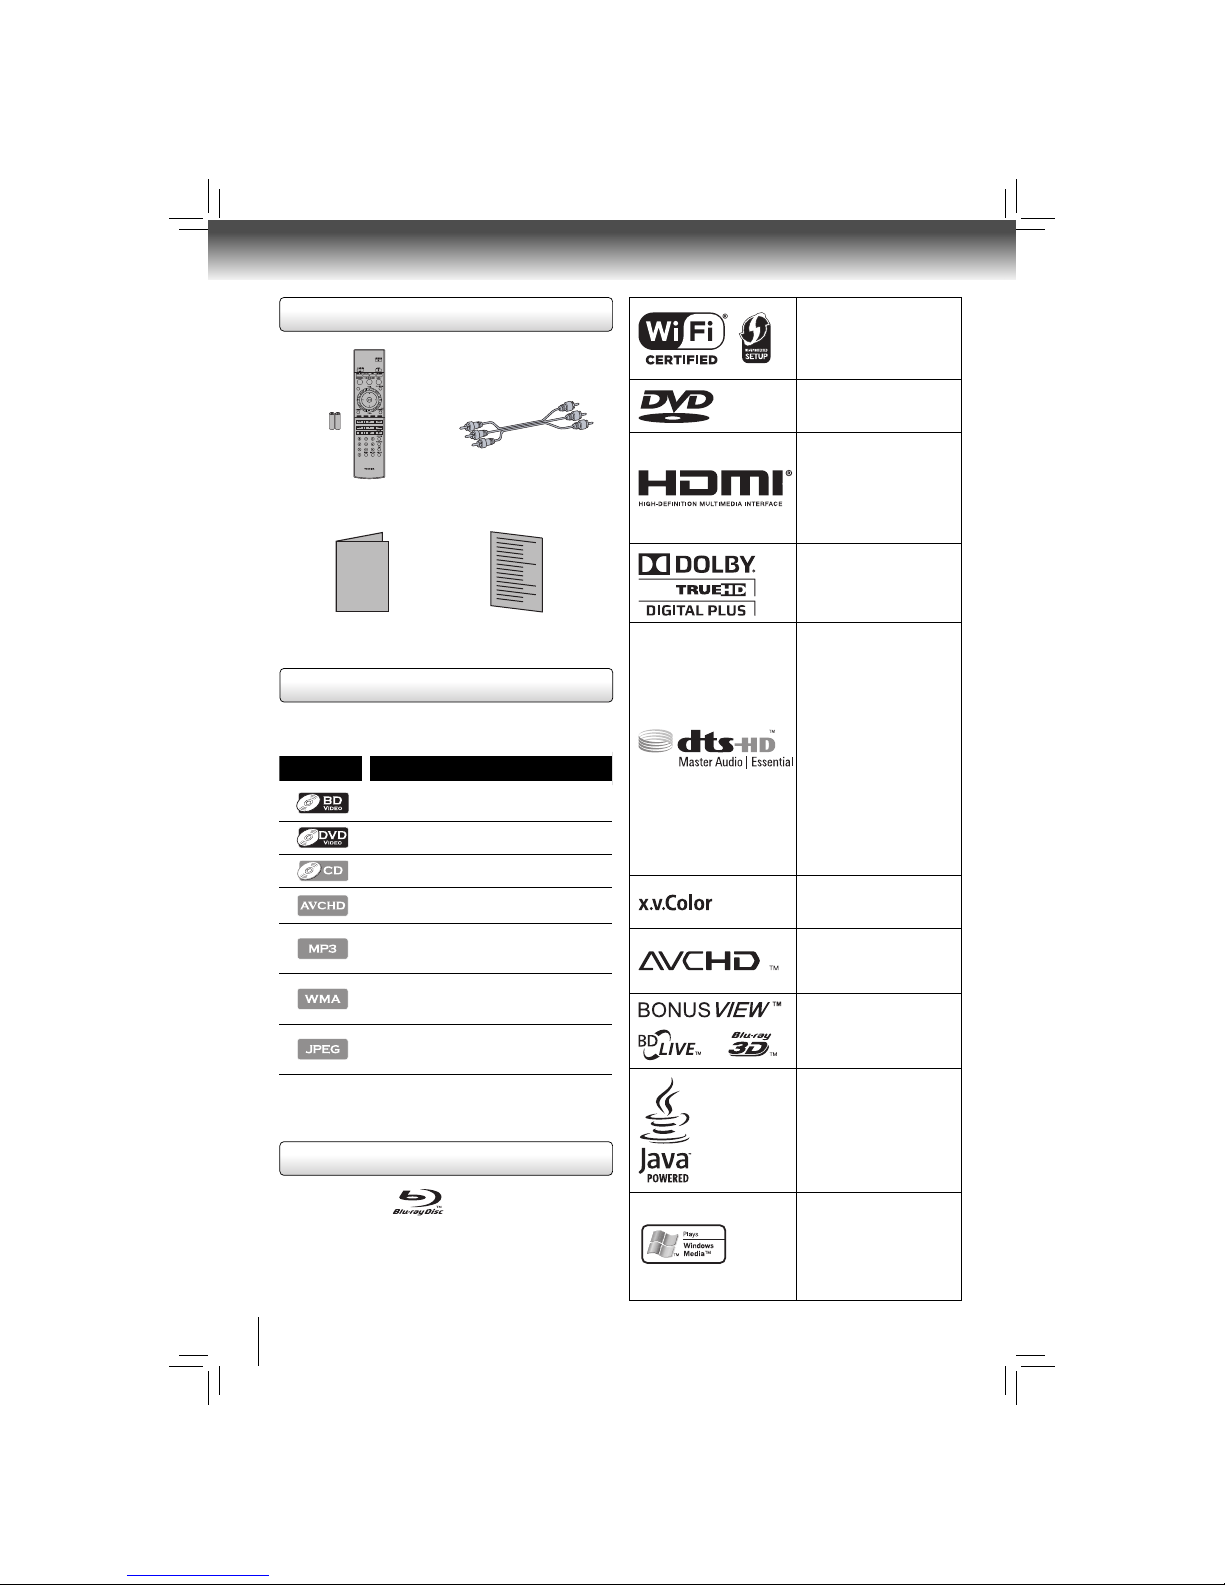
Supplied Accessories
Trademark Information
Symbols Used in this Manual
BONUSVIEW
OWNER’S MANUAL
To specify for which media type each function is, we put the
following symbols at the beginning of each item to operate.
If you do not fi nd any of the symbols listed above under the
function heading, the operation is applicable to all media.
Symbol Description
Description refers to BD-video and BD-RE
/ BD-R recorded in BDMV format
Description refers to DVD-video
Description refers to Audio CD / DTS-CD
Description refers to DVD-RW/-R with
AVCHD fi les
Description refers to BD-RE/-R, DVDRW/-R, CD-RW/-R and SD Memory Card
with MP3 fi les
Description refers to BD-RE/-R, DVDRW/-R, CD-RW/-R and SD Memory Card
with Windows Media™ Audio fi les
Description refers to BD-RE/-R, DVDRW/-R, CD-RW/-R and SD Memory Card
with JPEG fi les
Remote Control with
Batteries (AAA x 2)
Owner’s Manual
(EN)
Composite Audio / Video
Cables
Quick Start Guide
(EN/FR)
“Wi-Fi CERTIFIED” logo is
a registered trademark of
Wi-Fi Alliance. “Wi-Fi PROTECTED SETUP” logo is a
trademark of Wi-Fi Alliance.
“DVD” logo is a trademark
of DVD Format / Logo
Licensing Corporation.
HDMI, the HDMI logo, and
High-Defi nition Multimedia
Interface are trademarks
or registered trademarks
of HDMI Licensing LLC in
the United States and other
countries.
Manufactured under license
from Dolby Laboratories.
Dolby and the double-D
symbol are trademarks of
Dolby Laboratories.
Manufactured under license
under U.S. Patent #’s:
5,451,942; 5,956,674;
5,974,380; 5,978,762;
6,226,616; 6,487,535;
7,392,195; 7,272,567;
7,333,929; 7,212,872 &
other U.S. and worldwide
patents issued & pending.
DTS and the Symbol are
registered trademarks, &
DTS-HD, DTS-HD Master
Audio | Essential and the
DTS logos are trademarks
of DTS, Inc. Product
includes software. © DTS,
Inc. All Rights Reserved.
“x.v.Color” and “x.v.Color”
logo are trademarks of Sony
Corporation.
“AVCHD” and the “AVCHD”
logo are trademarks of
Panasonic Corporation and
Sony Corporation.
“BONUSVIEW™”, “BDLIVE™” and “Blu-ray 3D™”
are trademarks of Blu-ray
Disc Association.
Oracle and Java are
registered trademarks
of Oracle and/or its
affi liates. Other names
may be trademarks of their
respective owners.
Windows Media and the
Windows logo are
trademarks or registered
trademarks of Microsoft
Corporation in the United
States and/or other
countries.
“Blu-ray Disc™” and
are trademarks of Blu-ray Disc
Association.
Netfl ix is a registered trademark of Netfl ix Inc.

5
INTRODUCTION
Table of Contents
Introduction
SAFETY PRECAUTIONS .....................................2
IMPORTANT SAFETY INSTRUCTIONS ............ 2
PRECAUTIONS .................................................. 3
Supplied Accessories ....................................... 4
Symbols Used in this Manual ........................... 4
Trademark Information ..................................... 4
Table of Contents .............................................. 5
Features .............................................................. 6
Identifi cation of Controls .................................. 7
Front panel .................................................................... 7
Rear panel ..................................................................... 7
Using the Remote Control ................................ 8
Remote Control ............................................................. 8
Installing batteries .........................................................9
Operating with the remote control ............................... 10
Front Panel Display ..................................................... 10
Connections
Connecting to a TV .......................................... 11
Connecting to a TV using an HDMI cable ................... 12
Connecting to a TV using a component video cable ... 12
Connecting to a TV using an A/V cable ...................... 12
Connecting to an Audio System .....................13
Via 2-Channel Analog Audio Output ........................... 13
Via Digital Audio Output .............................................. 13
Via HDMI Audio Output ............................................... 13
Network Connection .........................................14
Connecting your player to a wired router .................... 14
Connecting your player to a wireless access point or
router........................................................................... 14
Connecting the Speakers .................................15
Positioning the Speakers ..................................16
Playback
Information on Playback .................................. 17
Playable Discs and Files ............................................ 17
Unplayable Discs and Files ........................................ 17
Color Systems ............................................................ 18
Region Codes ............................................................ 18
Structure of Disc/SD Card Contents .......................... 18
Playing a Disc ................................................... 19
Basic playback ........................................................... 19
Variable Speed Playback ................................. 20
Playing in fast reverse / forward directions. ............... 20
Playing frame by frame .. ........................................... 20
Playing in slow motion ............................................... 20
Locating a Desired Section ............................. 20
Locating a title using the top menu ............................ 20
Locating a specifi c chapter or track ............................ 21
Accessing a Specifi c Location Directly .......... 21
Locating a specifi c title/chapter/time ......................... 21
Repeating a Title, Chapter, Track or Specifi c
Segment ............................................................ 22
Repeating a title, chapter or track .............................. 22
Repeating a specifi c segment ................................... 22
Playing in a Random Order ............................. 22
Playing tracks or fi les in a random order ................... 22
PIP(BONUSVIEW) Setting ................................ 23
Camera Angle ................................................... 23
Audio Selection ................................................ 23
Subtitle Selection ............................................. 24
Displaying On-screen Information .................. 24
Playing AVCHD/MP3/WMA/JPEG Files ............25
Playing fi les on a data disc ......................................... 25
Using an SD Card ..............................................26
Inserting an SD card ................................................. 26
Using a USB Device ..........................................27
Operating a USB device ............................................ 27
Customizing the Function Settings
General Operations ...........................................28
Info Menu ............................................................28
Performing Quick-Setup ...................................28
Using BD-Live
TM
Features ................................28
Display Setting ...................................................29
Audio Setting .....................................................31
Speaker Setting .................................................32
Language Setting ..............................................33
Parental Control .................................................33
System Setting ...................................................34
Upgrading Your Player’s Firmware .................35
Network Connection Setting ............................36
Using the Connected Applications ................. 39
Watching Movies with Netfl ix® .................................... 39
Others
Troubleshooting & Maintenance ......................40
Troubleshooting... ................................................. ..... 40
Maintenance .............................................................. 41
Glossary .............................................................42
Specifi cations ....................................................44
Limited Warranty ...............................................45

6
Introduction
Features
Blu-ray Disc
You can enjoy Blu-ray Disc which is capable of storing fi ve times
more data than a conventional DVD.
BD-Java
With some BDs which support Java applications, you can enjoy
the interactive functions such as games or interactive menus.
BD-Live
BD-Live (BD-ROM version 2 Profi le 2.0) that allows interactive
functions to be used when this unit is connected to the Internet
in addition to the BONUSVIEW function. The various functions
differ depending on the disc.
Full high-defi nition video playback
Watch movies in the highest picture quality available for your
HDTV. This unit offers full high-defi nition video playback up to
1080p resolution for an amazing viewing experience. A highly
detailed picture and increased sharpness delivers a more trueto-life picture.
DVD Upconversion for enhanced picture quality
Your current DVD will look even better than before thanks to
video upconversion. Upconversion will increase the resolution
of standard defi nition DVD to high defi nition up to 1080p over
an HDMI connection. The picture will be less jagged and more
realistic for a near high-defi nition experience.
Enjoy your content on different kinds of media
Full backwards compatibility with BD, DVD, CD and SD card
ensures that you can continue to enjoy your current audio-video
collection. Additionally, you can view JPEG digital pictures or
listen to MP3 or Windows Media™ Audio music fi les.
Experience rich multi-channel surround sound
Multi-channel surround sound, which recognizes real-to-life
sound and makes you feel like you are really there.
PIP (BONUSVIEW)
Some BD-videos have the PIP function which enables you to
display the secondary video in the primary video. You can call
up the secondary video by pressing BONUSVIEW whenever
the scene contains the secondary video.
Pop-up menu
Some BD-video have pop-up menu which is a navigation menu
that can be called up and be operated on the TV screen without
interrupting the playback. You can call up the pop-up menu by
pressing POPUP/TOP MENU or MENU. Contents in the pop-up
menu vary depending on the disc.
Playback of Content from an SD Memory Card
You can play back MP3 / WMA / JPEG fi les stored in an SD
Memory Card. You can store picture-in-picture commentary,
subtitles or other extras for BD-ROM ver. 2 (Profi le 2.0 / Profi le
1.1) fi les in an SD Memory Card and play back with the BDvideo.
Playing back AVCHD fi les
This unit supports playback of AVCHD format fi les (new format
for high defi nition video camcorders) recorded on disc. Your high
defi nition personal archive is playable in HD quality.
x.v.Color
This unit supports playback of video contents on discs recorded
with “x.v.Color” technology. To watch this video content with
the “x.v.Color”, a TV or other display device supporting both
video image reproduction using the “x.v.Color” standard and
capable of manually switching it’s color setting is required.
Please refer to the owner’s manual of your display device for
further information.
Wi-Fi CERTIFIED
The Wi-Fi CERTIFIED logo is an assurance that Wi-Fi Alliance
has tested a product in numerous confi gurations and with a
diverse sampling of other devices to ensure compatibility with
other Wi-Fi CERTIFIED equipment that operates in the same
frequency band.
Blu-ray 3D Feature
This product can play 3D contents through an HDMI cable.
To implement the 3D effect, connect a 3D device (3D-compliant
AV receiver, 3D-compliant TV) to the product using an HDMI
cabl e, and play the 3D conten t while weari ng 3D vision
glasses.
Easy and simple connection to your HDTV via HDMI
Connect this unit to your HDTV with one single HDMI (HighDefi nition Multimedia Interface) cable. It is recommended to
use a High Speed HDMI Cable for better compatibility. The high
defi nition video output signal will be transferred to your HDTV
without conversion to analog signals, so you will get excellent
picture and sound quality.
Thanks to other multiple outputs, you can also easily connect
to your home theater system or amplifi er.
HDMI CEC (Consumer Electronics Control)
This unit supports HDMI CEC, which allows integrated system
control over HDMI and is part of the HDMI standard.
This function may not work properly on some devices.
HDMI 1080p/24F output (BD only)
This unit is equipped with a feature which can provide the
smooth movement in the playback of fi lm originated material
with the frame rate of 24 frames per second with progressive
scan. (Available only when the TV is connected by an HDMI
cable and compatible with 1080p/24F frame input.)
Refer to “Display Setting” in
“Customizing the Function
Settings” on page 29.
Copyright protection system
To play back the digital video images of a BD / DVD via an HDMI
connection, it is necessary that both the unit and the TV (or an
AV amplifi er) support a copyright protection system called HDCP
(high-bandwidth digital content protection system). HDCP is
copy protection technology that comprises data encryption and
authentication of the connected AV device. This unit supports
HDCP. Please read the operating instructions of your TV (or AV
amplifi er) for more information.
7
INTRODUCTION
Identifi cation of Controls
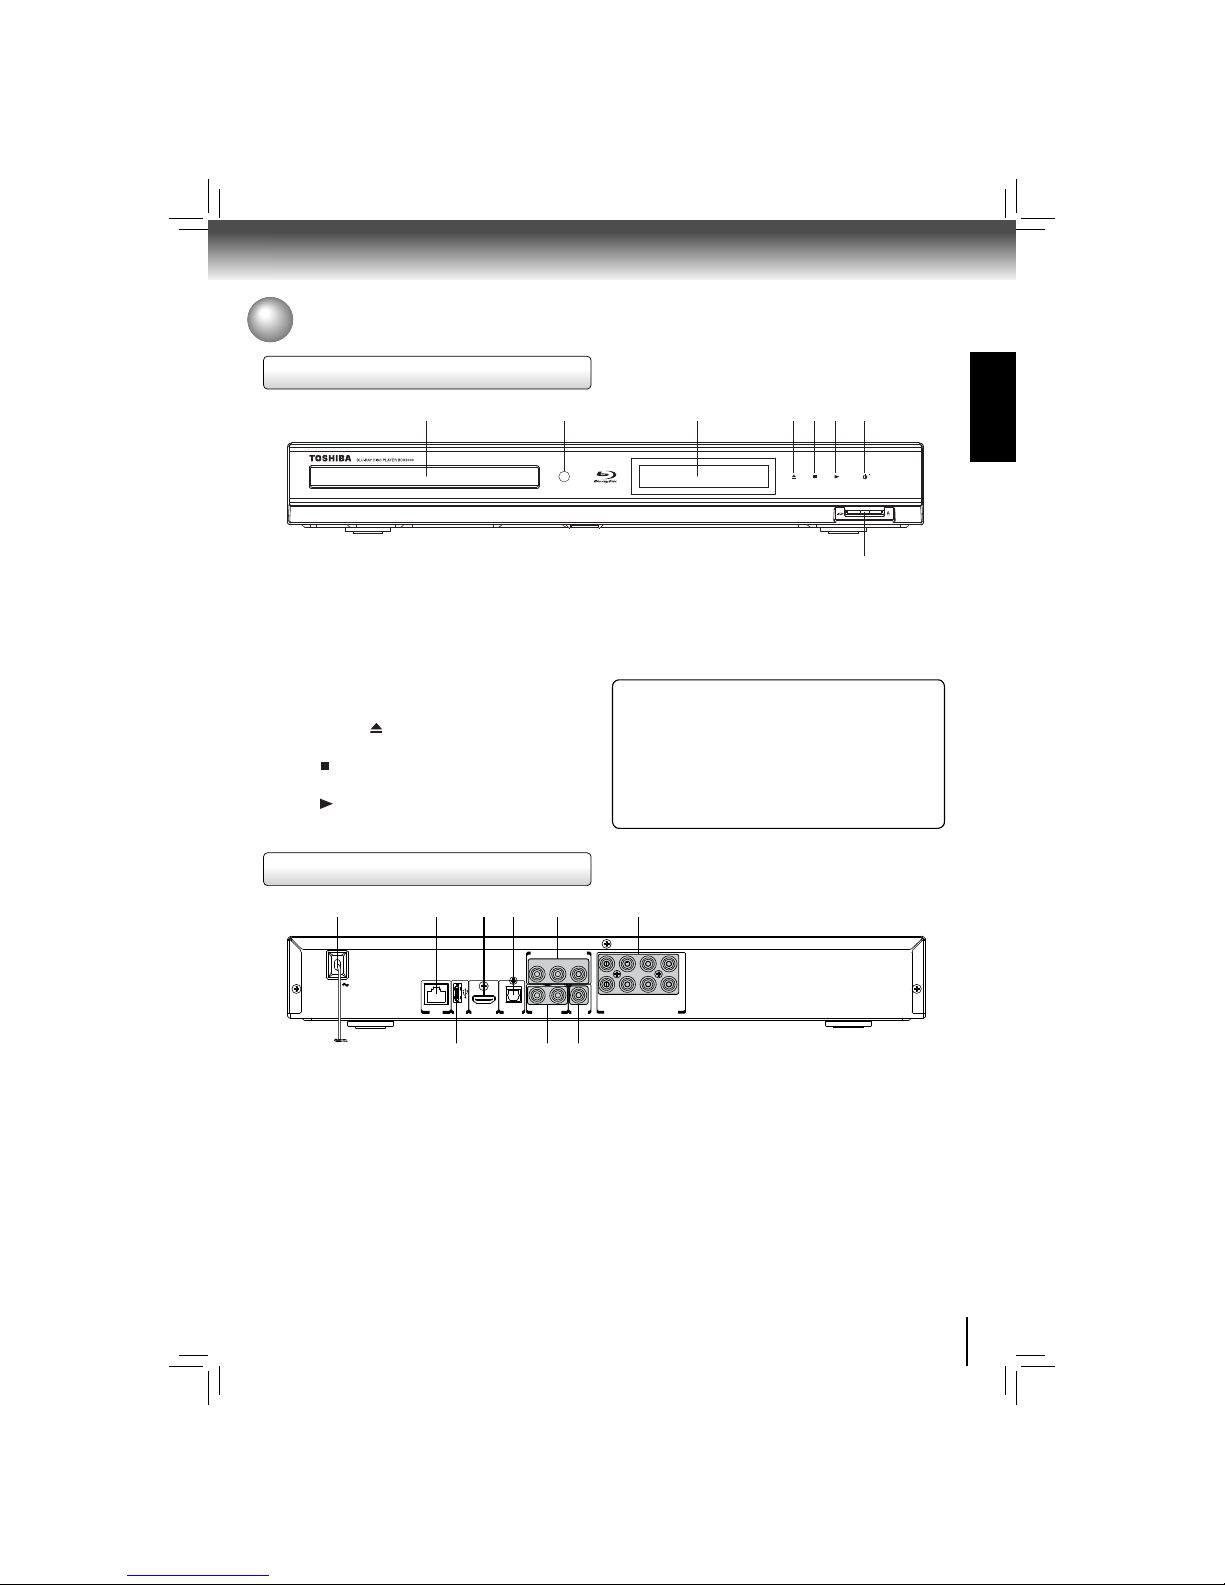
Front panel
Rear panel
1 2 3 4 5 6
7 8 9
AC IN
LAN
MULTI CHANNEL AUDIO OUTPUT
R
ANALOG AUDIO
OUTPUT
L
VIDEO
OUTPUT
USB
HDMI OUT
BITSTREAM / PCM
OPTICAL
Y PB PR
SBL
C SL FL
SBR
SW SR FR
COMPONENT VIDEO OUTPUT
1 2 3 4* 5* 6* 7*
8
1. Disc tray
2. Remote sensor
3. Display
• Refer to “Front Panel Display” on page 10.
4. OPEN/CLOSE indicator
• When invoked (white), tap to open/close the disc tray.
5. STOP indicator
• When invoked (white), tap to stop playback.
6. PLAY indicator
• When invoked (white), tap to start playback.
1. AC power cord
• Connect to a standard AC outlet to supply power to this
unit.
• Unplug this cord from the AC outlet to completely turn
off the unit.
2. LAN terminal
• Use to connect a network equipment with LAN cable.
3. HDMI OUT jack
• Use to connect a TV with an HDMI compatible port via
an HDMI cable.
4. OPTICAL jack
• Use to connect an AV receiver / amplifi er, Dolby Digital /
DTS decoder or other device with a digital audio optical
input jack using a digital audio optical cable.
5. COMPONENT VIDEO OUT jacks
• Use to connect a TV with component video inputs using
a component video cable.
6. MULTI CHANNEL AUDIO OUTPUT jacks
• Use to connect an AV receiver / amplifi er with a audio
cable.
7. USB jack
• Use to connect USB fl ash drives (not included).
8. AUDIO OUT jacks
• Use to connect a TV, an AV receiver / amplifi er or other
device with a composite audio cable.
9. VIDEO OUT jack
• Use to connect a TV, an AV receiver or other device with
a composite video cable.
(*) Notes:
1. These indicators are located in the sensor fi eld.
2. When this unit is off, these indicators are dimmed. If a
fi nger is brought close to the sensor fi eld, the indicators
will be invoked and light up.
7. ON/STANDBY indicator
• When invoked (white), tap to turn on the unit, or to turn
the unit into the standby mode. (To completely turn off
the unit, you must unplug the AC power cord.)
8. SD card slot
How to Power On Your Unit ?
1. Connect to a standard AC outlet to supply power to this
unit, the ON/STANDBY indicator lights in red and then
turns white at once.
2. After about 10 seconds, the ON/STANDBY indicator will
turn red automatically.
3. Touch the ON/STANDBY button to turn on the unit. The
ON/STANDBY indicator will remain white (ON mode).
8
Introduction
Using the Remote control
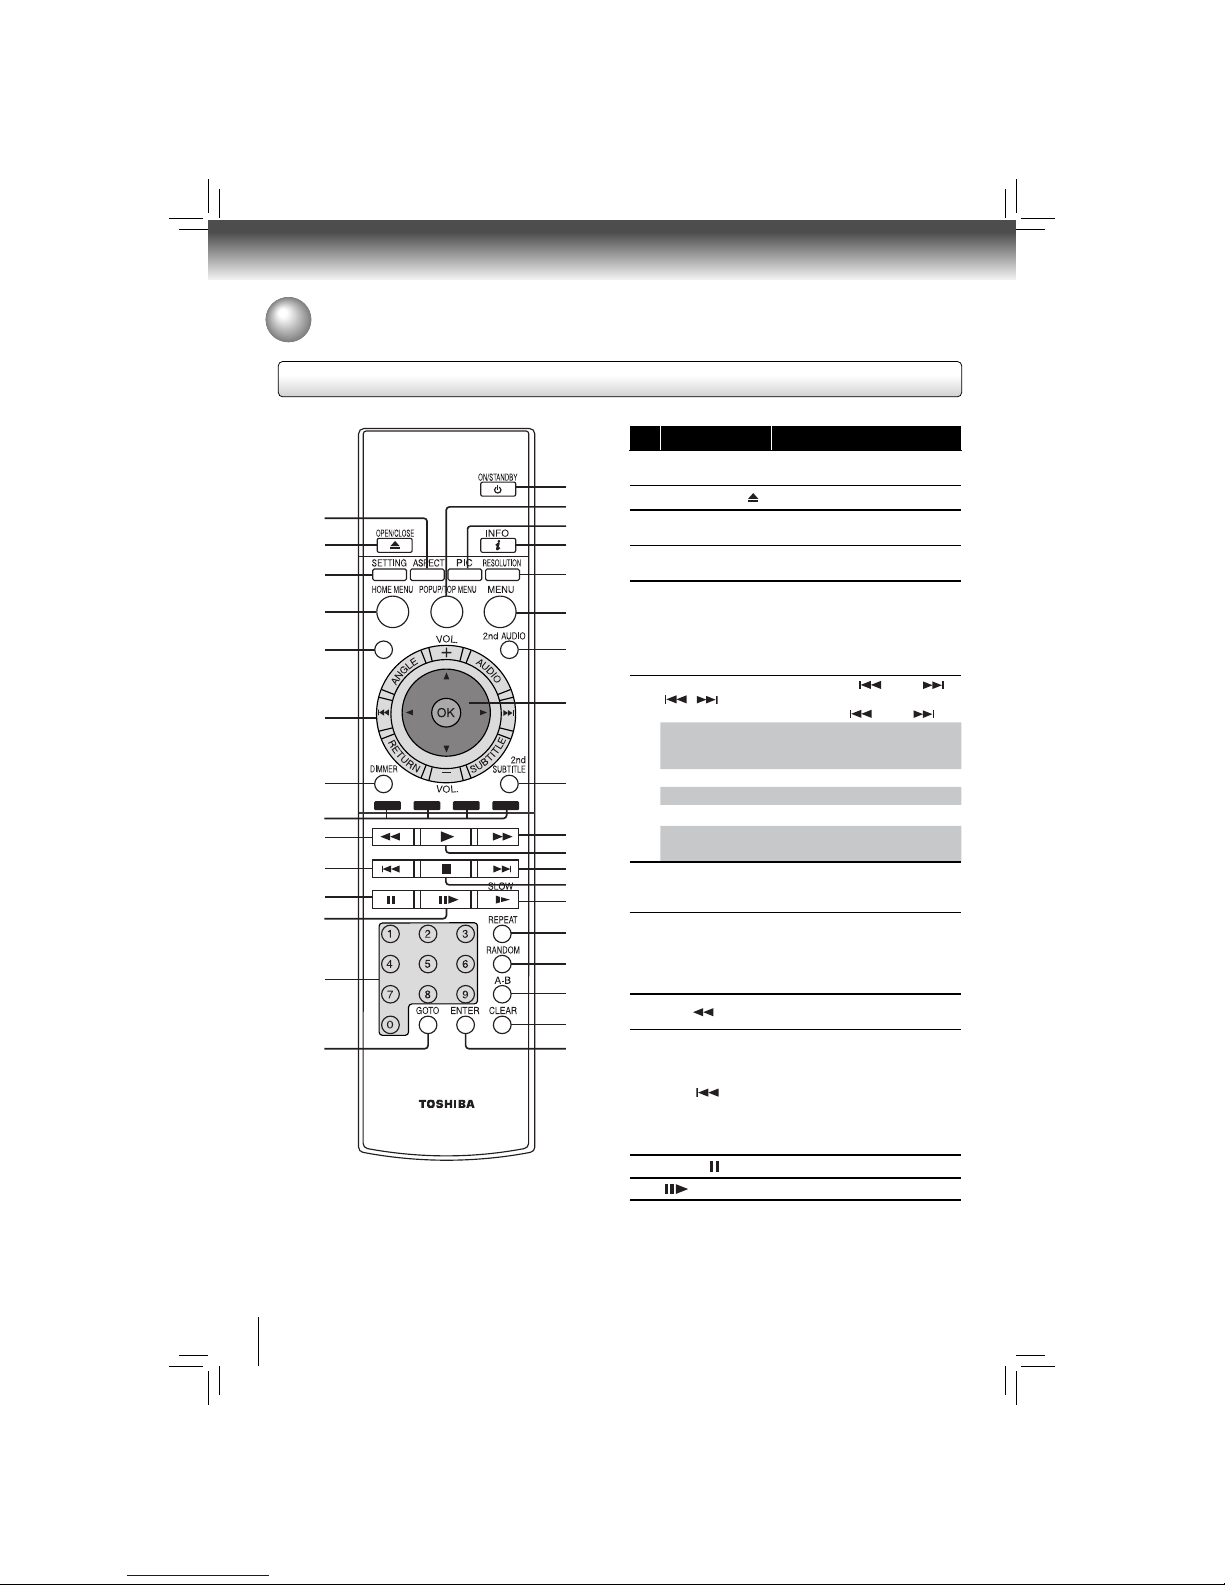
Remote control
No. Item Description
1
ASPECT
Press to adjust aspect ratio in full
stop mode.
2
OPEN/CLOSE
Press to open or close the disc tray.
3
SETTING
Press to display the settings in
home menu.
4
HOME MENU
Press to display the Connected in
home menu.
5
BONUSVIEW
Press to switch picture-in-picture
feature on or off (only applicable
to BD-video which supports the
PIP function). For more details,
see “PIP (BONUSVIEW) Setting”
on page 23.
6
/
Same as SKIP
/ SKIP .
For detailed operations, please
refer to SKIP / SKIP .
ANGLE
Press to select a viewing angle if
multiple angles are available on
the disc.
VOLUME + / -
Press to adjust the volume.
AUDIO
Press to select the audio mode.
SUBTITLE
Press to display the subtitle menu.
RETURN
Press to return to the previous
menu.
7
DIMMER
Press to adjust the brightness of
display on the front of the Blu-ray
disc player.
8
RED / GREEN /
BLUE / YELLOW
• Press to select items on some
BD contents.
• When fi le list / thumbnail list is
shown, press to switch between
pages.
9
REV
During playback, press to fast
reverse the playback.
10
SKIP
•
During playback, press once to
return to the beginning of the
current title, chapter, track or fi le.
• During playback, press twice
to return to the previous title,
chapter, track or fi le.
•
During the JPEG playback, press
to return to the previous fi le.
11
PAUSE
• Press to pause playback.
12
Press to advance one frame.
1
15
16
17
18
19
20
21
22
23
24
25
26
27
28
29
30
31
32
33
2
3
4
5
6
7
8
9
10
11
12
13
14
BONUSVIEW
9
INTRODUCTION
13
Number buttons
• In playback mode, press GOTO,
then press the number buttons
to enter a title, chapter, track,
time or fi le number.
• In menu mode, press to enter
the parental code password.
14
GOTO
Press to display the search
menu.
15
ON/STANDBY
Press to turn on the unit, or to turn
the unit into the standby mode. (To
completely turn off the unit, you
must unplug the power cord.)
16
POPUP/TOP MENU
• During Blu-ray Disc playback,
press to open a menu that
lets you control Blu-ray Disc
playback.
• During DVD playback, press
to open the DVD menu (if
available).
17
PIC
In playback mode, press to adjust
picture quality according to your
preference (Actual effect to picture
may vary depending on TV.):
• E.P.M (Enhanced Picture Mode):
The picture is sharper with
enhanced color.
• Sharpness
18
INFO
Press to display disc information.
19
RESOLUTION
Press to select the video resolution
in full stop mode.
20
MENU
Press to return to the previous
menu.
21
2nd AUDIO
In PIP mode, press to turn the
audio for the secondary video on
or off. For more details, see “PIP
(BONUSVIEW) Setting” on page
23.
22
/ / /
Press to select items or settings.
OK
Press to confi rm or select menu
items.
23
2nd SUBTITLE
In PIP mode, press to turn the
subtitle for the secondary video
on or off.
24
FWD
During playback, press to fast
forward the playback.
25
PLAY
Press to start playback or resume
playback.
26
SKIP
•
During playback, press to skip to
the next title, chapter, track or fi le.
• During the JPEG playback,
press to go to the next fi le.
27
STOP
Press to stop playback.
28
Press to play back the disc in slow
motion.
29
REPEAT
Press to toggle between various
repeat modes.
30
RANDOM
Press to turn random function on
or off.
31
A-B
Press to play back a defi ned
section between point A and B
repeatedly.
32
CLEAR
Press to clear an input error.
33
ENTER
Press to confi rm or select menu
items.
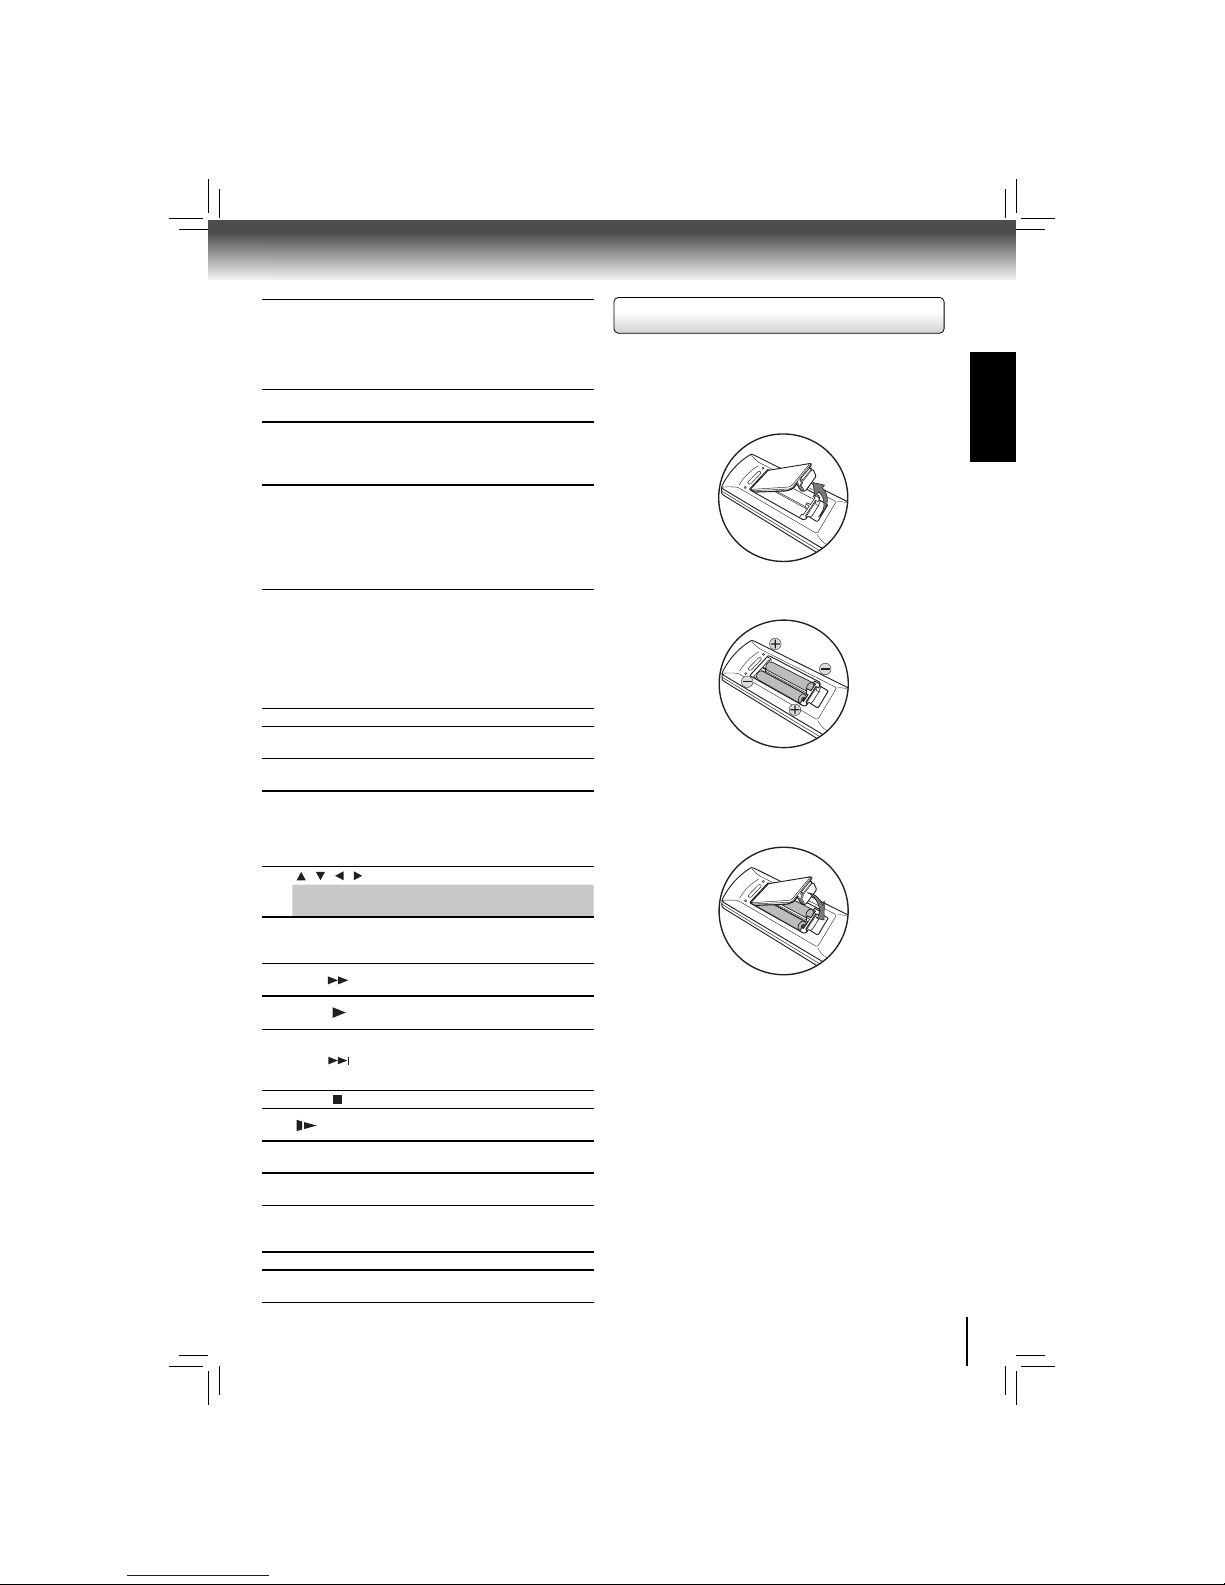
Open the cover.
Insert batteries.
2
Installing batteries
1
Install the batteries (AAAx2) matching the polarity indicated
inside battery compartment of the remote control.
Make sure to match the + and – on the batteries to the
marks indicated in the battery compartment.
Close the cover.
3
Caution: Never throw batteries into a fi re.
Notes:
• Do not mix different battery types or combine used batteries
with new ones.
• If the remote control does not operate correctly, or if the
operating range becomes reduced, replace both batteries
with new ones.
• If the batteries are dead or if you will not be using the remote
control for a long time, remove the batteries to prevent battery
acid from leaking into the battery compartment.
10
Introduction
1080ip
DVD
CD
TRK
2 c h
MULTI
HDMI
720p
480ip
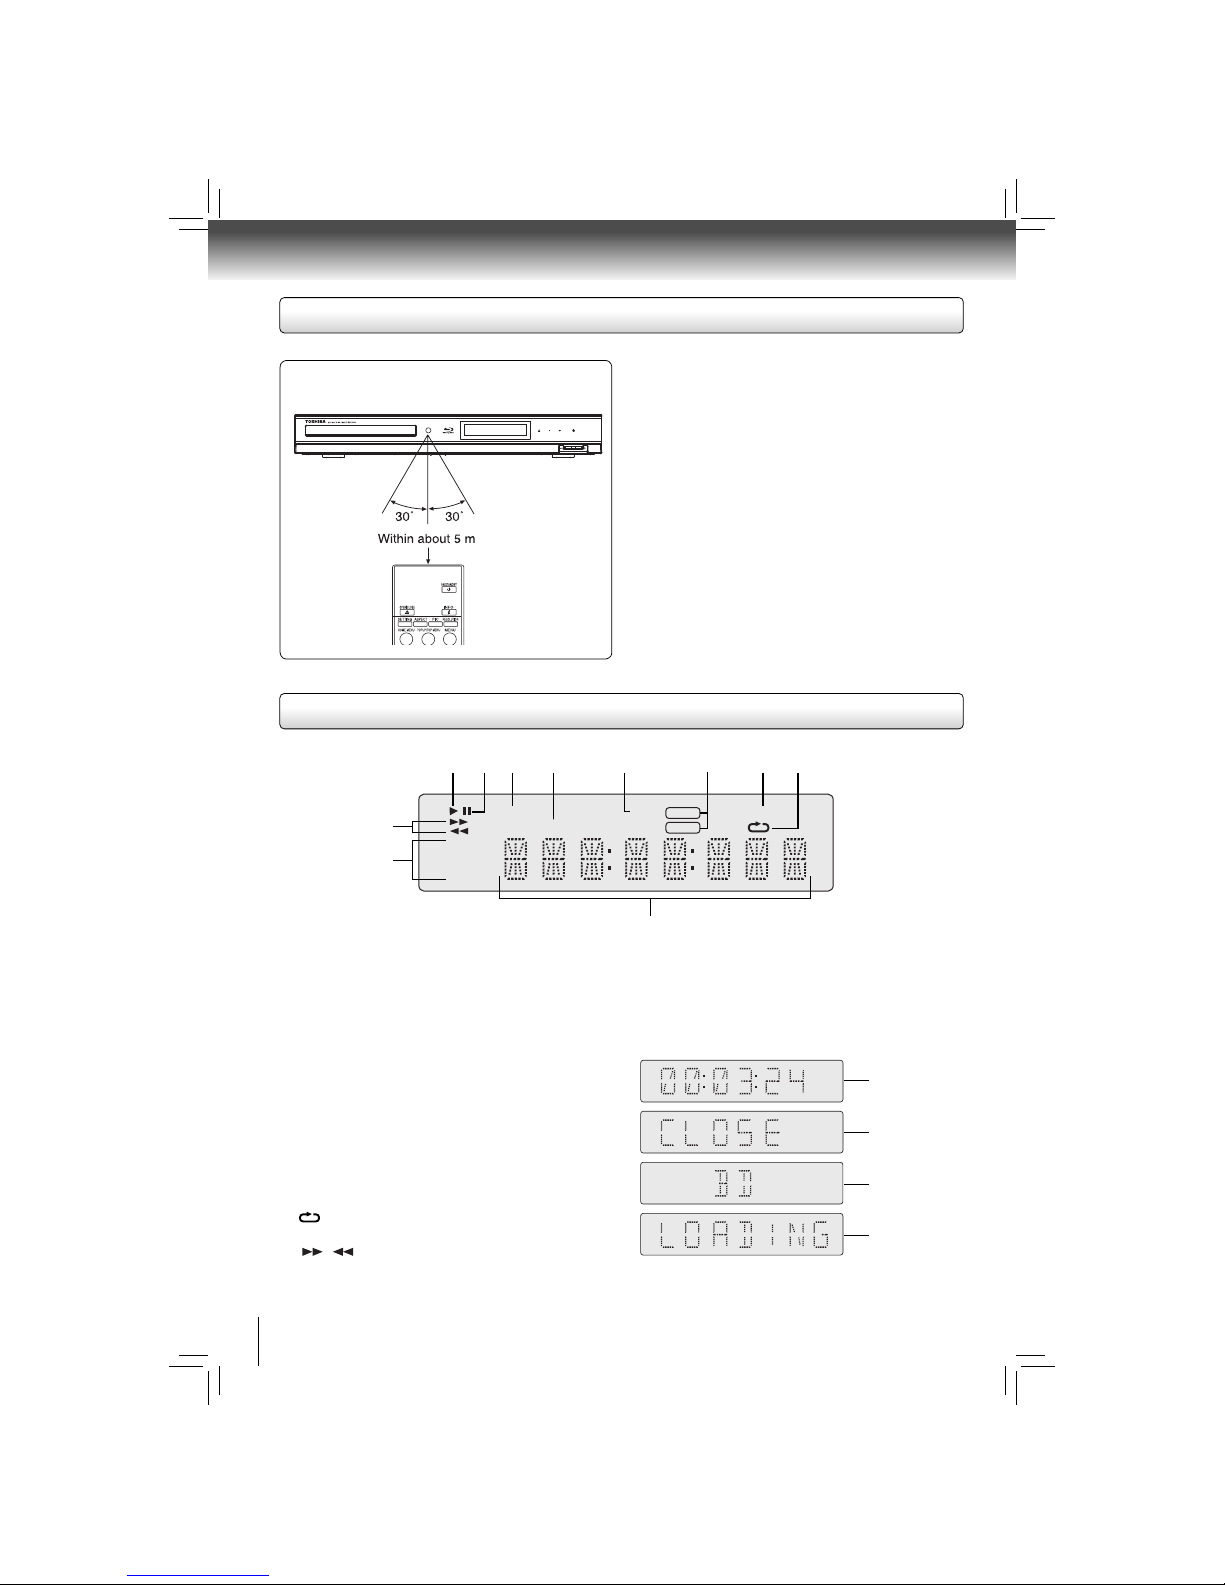
Operating with the remote control
Front Panel Display
Point the remote contr ol at the remote
sensor and press the buttons.
* Do not expose the remote sensor of the Blu-ray disc player
to a strong light source such as direct sunlight or other
illumination. If you do so, you may not be able to operate
the Blu-ray disc player via the remote control.
Notes:
• Direct the remote control at the remote sensor of the Blu-ray
disc player.
• When using the remote control, press the buttons at intervals
of about 1 second to ensure the correct mode of operation.
• Do not drop or give the remote control a shock.
• Do not leave the remote control near an extremely hot or humid
place.
• Do not spill water or put anything wet on the remote control.
• Do not open the remote control.
• If the remote control is not going to be used for a long time,
remove the battery to avoid damage caused by battery leakage
corrosion.
Distance:
About 5 m fr om the
fro nt of the rem ote
sensor.
Angle:
Ab ou t 30° i n each
direction of the front of
the remote sensor.
1 2 3 4 5 6 7 8
11
10
9
1. PLAY indicator
Lights when playing.
2. PAUSE indicator
Lights when paused.
3. DVD indicator
Lights when a DVD disc is inserted.
4. CD indicator
Lights when a CD disc is inserted.
5. TRK (TRACK) indicator
Lights when a CD/MP3 disc is inserted.
6. Audio Channel indicator
Shows the audio channel of the current DVD/BD.
7. HDMI indicator
Lights when HDMI TV is connected.
8.
(REPEAT) indicator
Illuminates when REPEAT is pressed.
9.
/ SKIP indicator
Lights while in fast forward / fast reverse mode.
10. Resolution indicator
Shows resolution of video output.
11. Character indicators
Displays various kinds of information such as elapsed time
or message, etc. (See Example shown as below.)
Indicates the
elapsed time
Closing the
disc tray
Loading a disc
Indicates that a
Blu-ray disc is
inserted
11
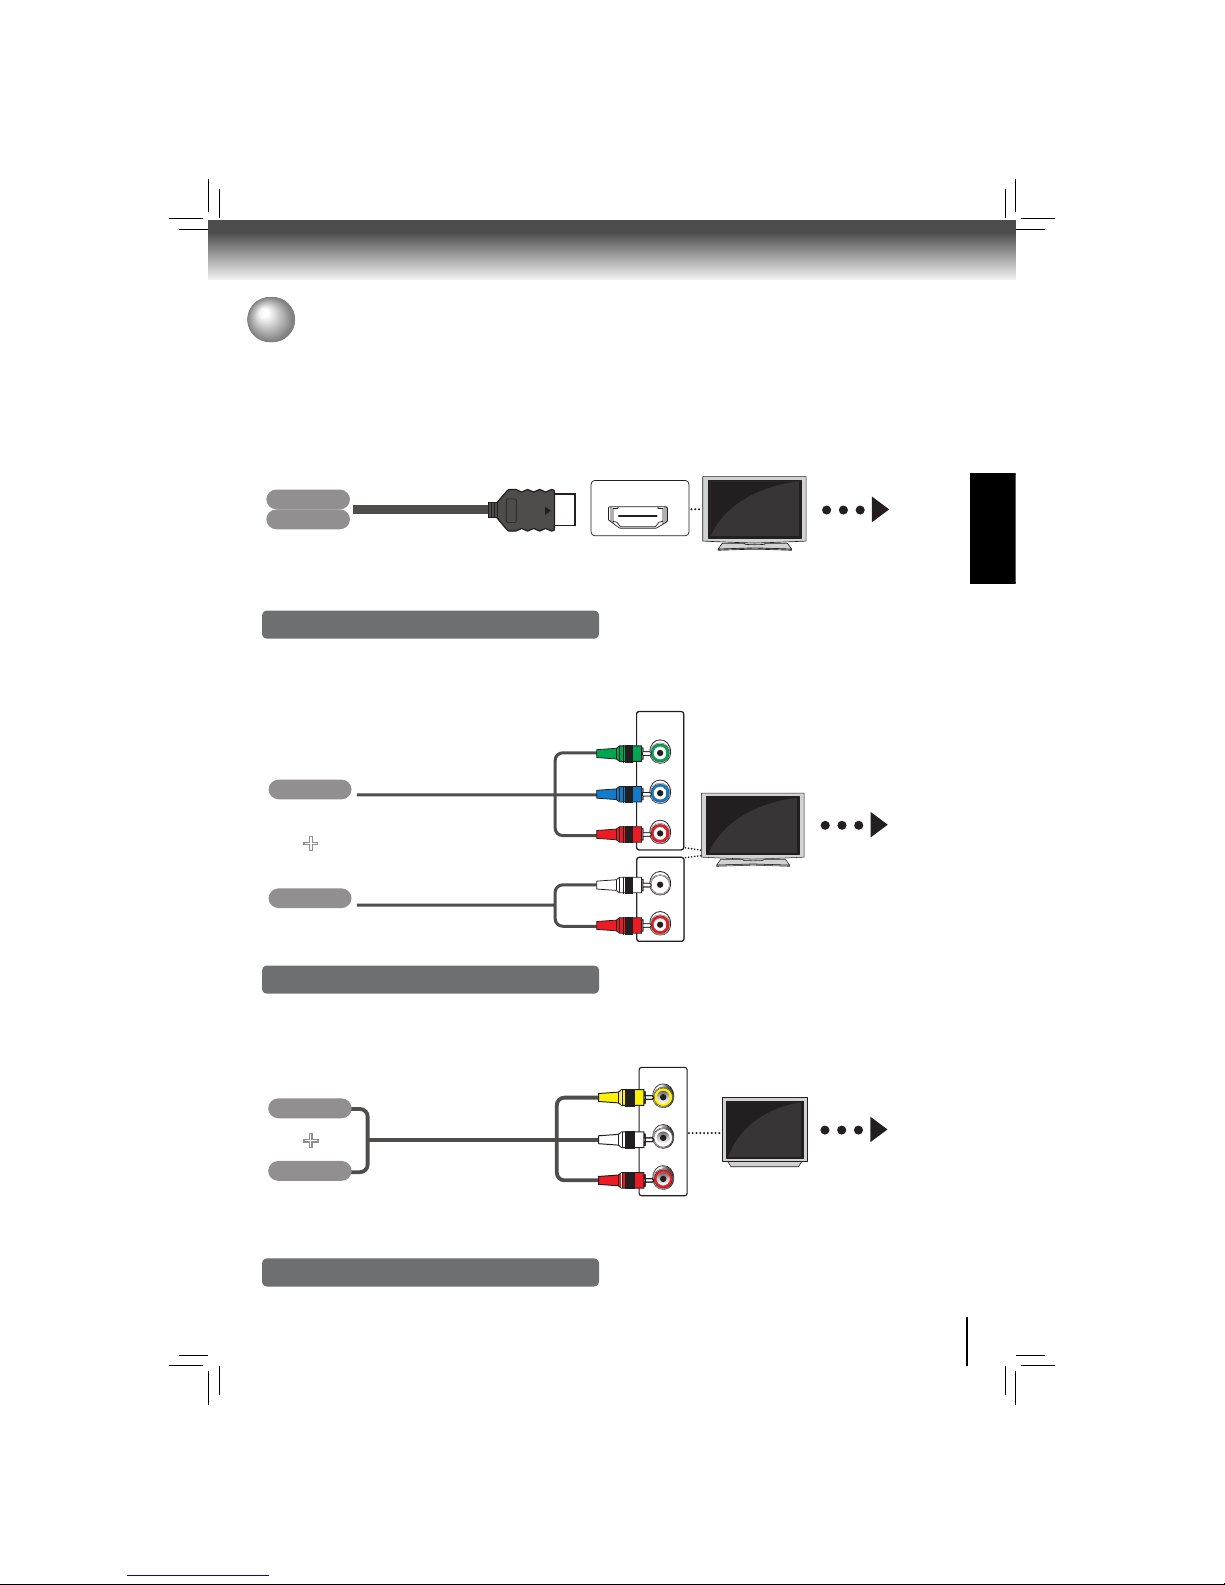
CONNECTIONS
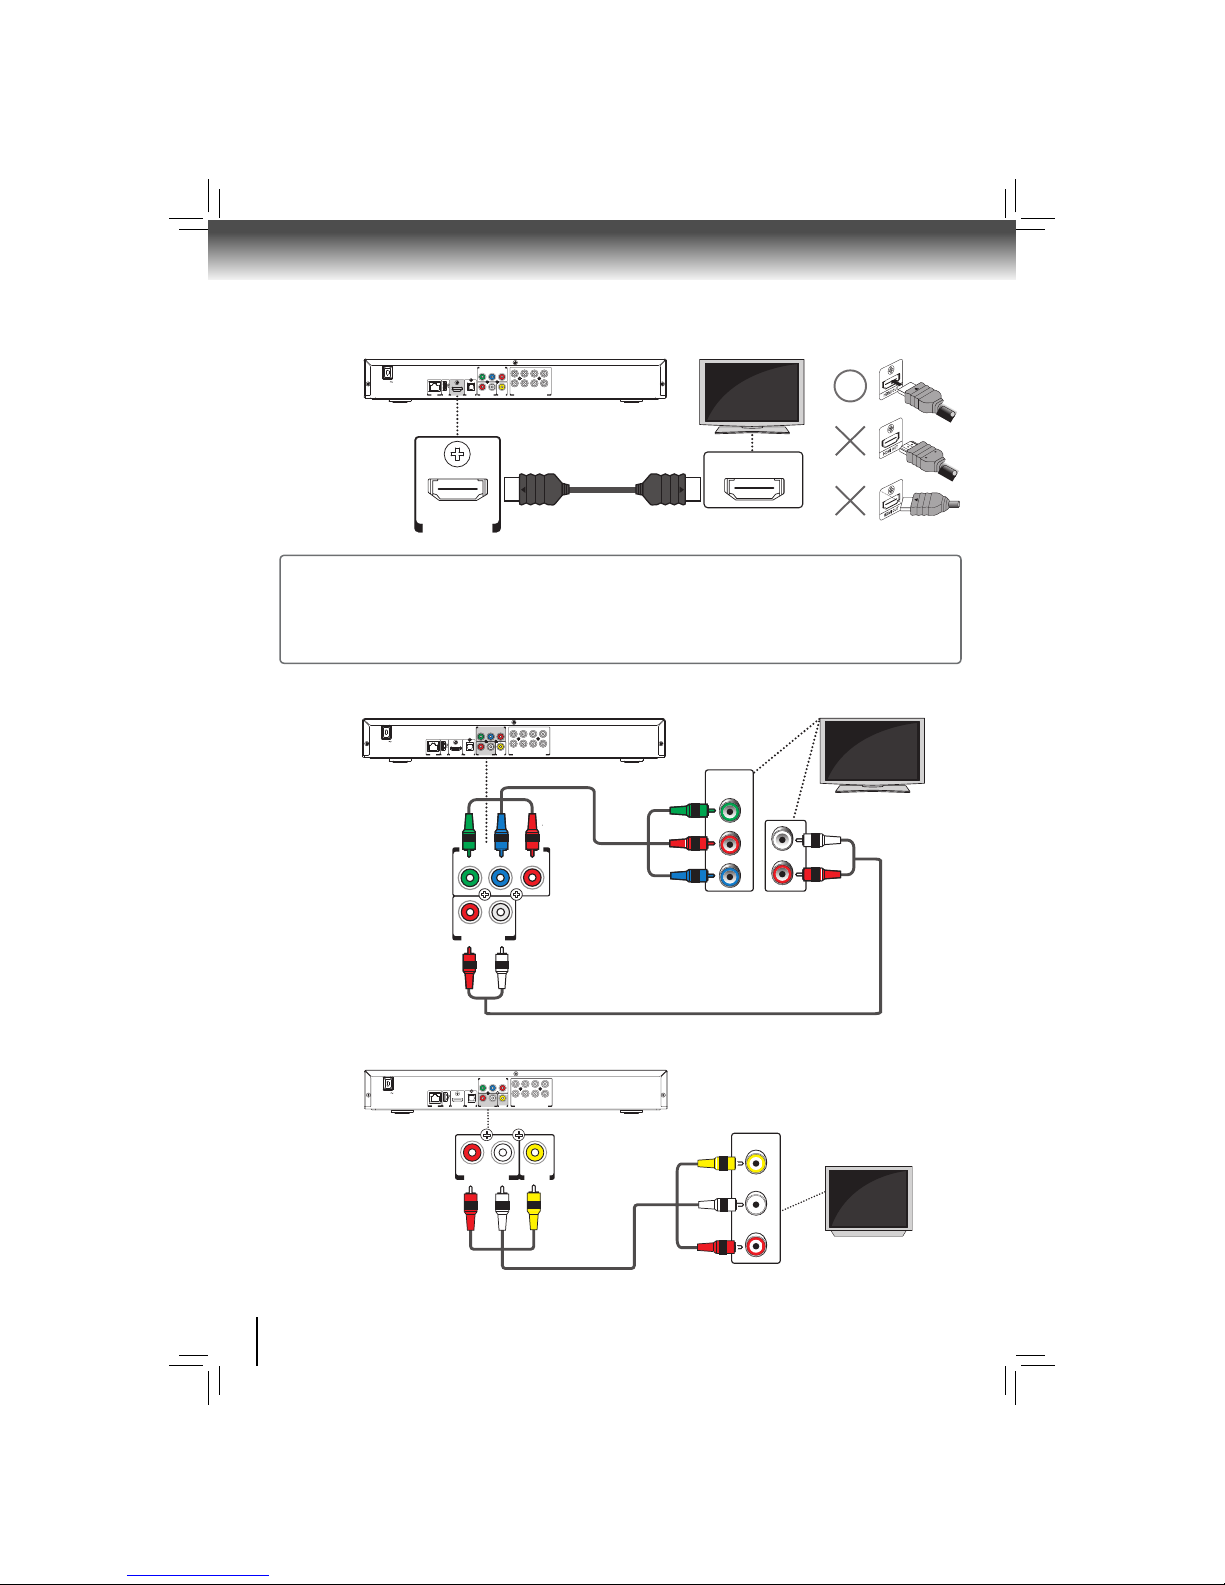
1. Choose the appropriate connection, then proceed to the corresponding instruction (A, B or C) on the
next page.
Best (Supports up to 1080i/1080p, 1080p/24F resolution.)
Better (Supports up to 1080i resolution.)
Basic (Supports only 480i resolution.)
Connecting to a TV
Connect the Blu-ray player to your TV.
HDMI IN
A
Video
Audio
HDMI cable
Your TV
Go To
High
Definition
TV
C
Go To
AUDIO IN
R
L
VIDEO IN
+
Video
Audio
Your TV
composite audio video cable
Standard
Definition
TV
Component Video Cable NOT INCLUDED
Connect this unit directly to the TV. If the composite audio / video cables are connected to a VCR, pictures may be •
distorted due to the copyright protection system.
Composite Video / Audio Cables INCLUDED
B
Go To
COMPONENT
VIDEO IN
Y
P
B/CB
PR/CR
AUDIO IN
R
L
+
Video
Audio
component video cable
Your TV
composite audio cable
High
Definition
TV
No analog audio connection required.
To enjoy the viewing of 3D content, an HDMI connection with High Speed HDMI cable is required.•
HDMI Cable NOT INCLUDED
12
Connections
2. Connect the cables by following the illustrations below.
Connecting to a TV using an HDMI cable (Best)
Connecting to a TV using a component video cable (Better)
Connecting to a TV using an A/V cable (Good)
A
HDMI IN
HDMI cable
Your TV
HDMI OUT
AC IN
LAN
R L
USB
Y PB PR
HDMI OUT
SBL
C SL FL
SBR
SW SR FR
MULTI CHANNEL AUDIO OUTPUT
BITSTREAM / PCM
OPTICAL
AUDIO OUT
VIDEO
OUT
COMPONENT VIDEO OUT
B
ANALOG AUDIO
OUTPUT
COMPONENT VIDEO OUT
COMPONENT
VIDEO IN
Y
PR/CR
PB/CB
AUDIO IN
R
L
Your TV
composite audio cable
component
video cable
AC IN
LAN USB
SBL
C SL FL
SBR
SW SR FR
HDMI OUT
R
L
Y PB PR
R
Y P
B PR
L
Y PB PR
MULTI CHANNEL AUDIO OUTPUT
BITSTREAM / PCM
OPTICAL
AUDIO OUT
VIDEO
OUT
COMPONENT VIDEO OUT
C
composite audio video cable
AC IN
LAN USB
SBL
C SL FL
SBR
SW SR FR
HDMI OUT
R L
Y P
B PR
R L
MULTI CHANNEL AUDIO OUTPUT
BITSTREAM / PCM
OPTICAL
AUDIO OUT
VIDEO
OUT
COMPONENT VIDEO OUT
ANALOG AUDIO
OUTPUT
VIDEO
OUTPUT
Your TV
AUDIO IN
R
L
VIDEO IN
Notes:
Do not tilt the connector when inserting it into the HDMI jack, and make sure the shapes of the jack and the connector •
are matched.
When using non-HDCP compatible TV, the image will not display properly.•
An HDMI cable carries both video and audio signals. If you want to use TV speakers, you do not need to make an •
additional audio connection if you are using an HDMI cable.
13
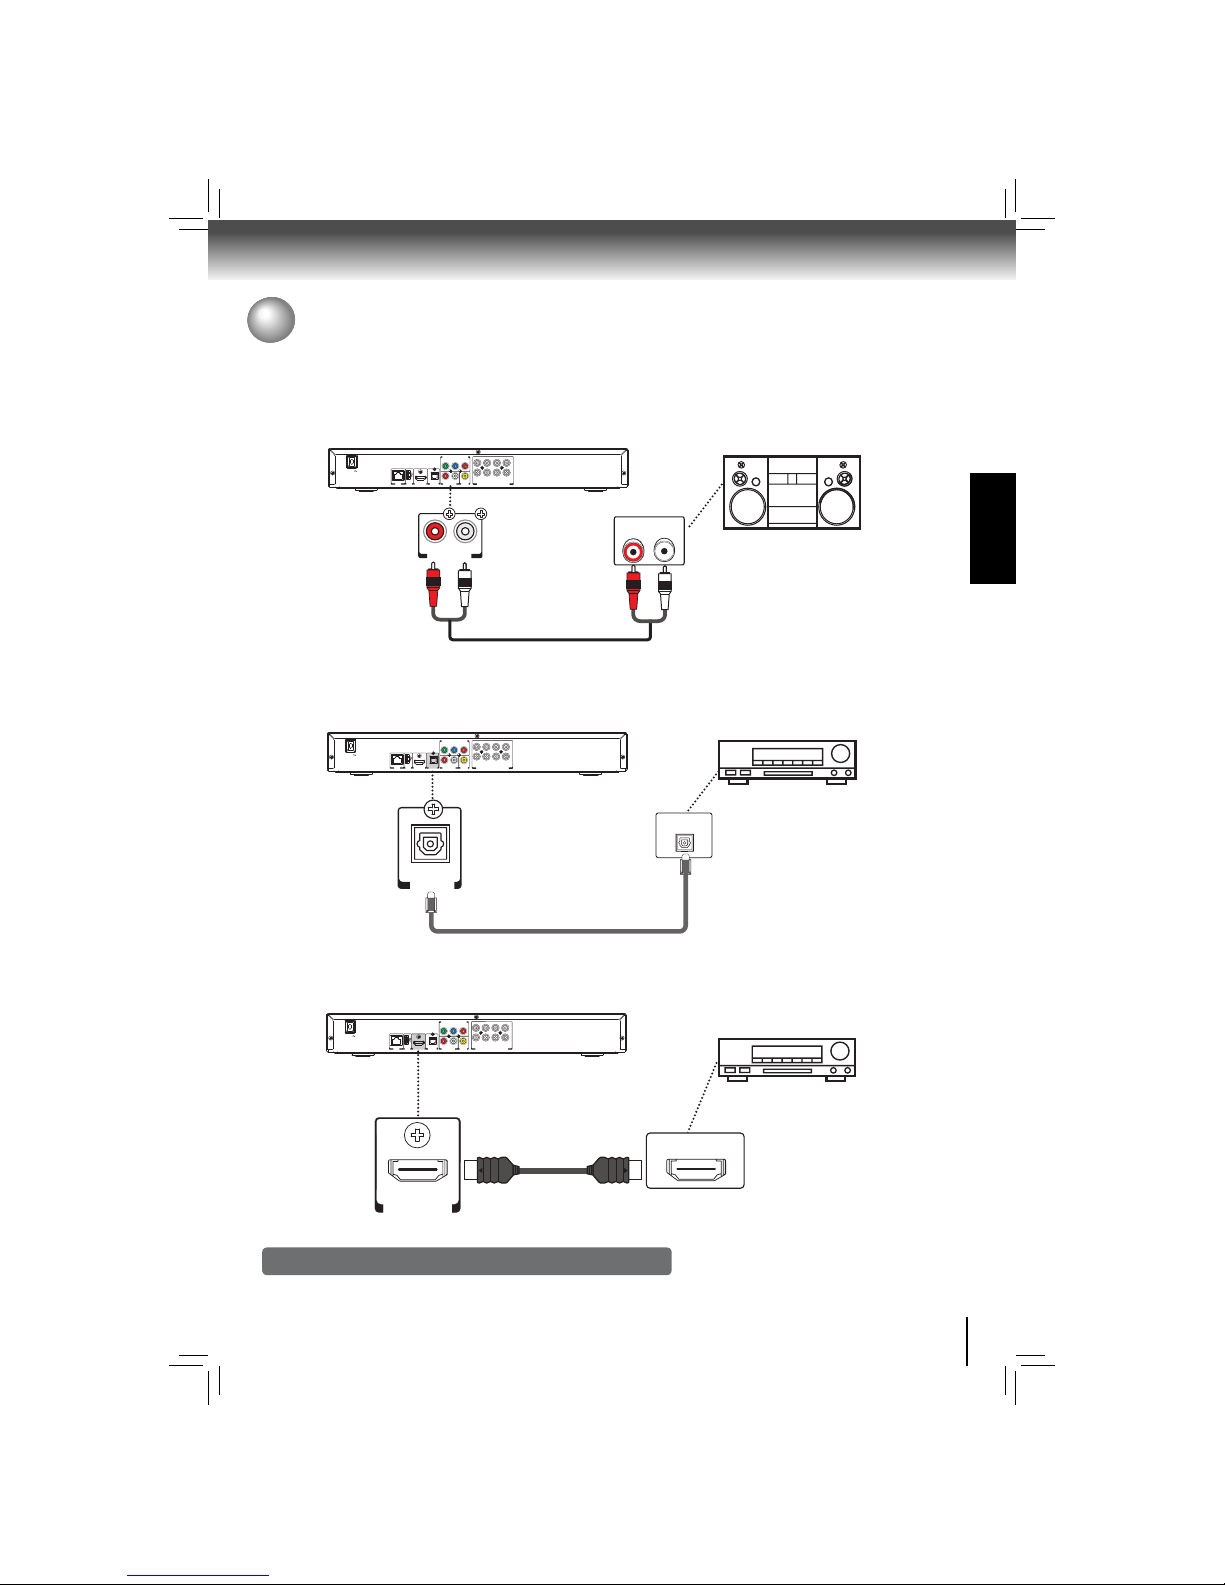
CONNECTIONS
When you change the connections, all devices should be turned off.•
Refer to the manual accompanying external devices for more information.•
Connecting to an Audio System
Via 2-Channel Analog Audio Output
Via Digital Audio Output
Via HDMI Audio Output
composite audio cable
AC IN
LAN USB
HDMI OUT
R L
Y P
B PR
R
ANALOG AUDIO
OUTPUT
L
Stereo system
SBL
C SL FL
SBR
SW SR FR
MULTI CHANNEL AUDIO OUTPUT
BITSTREAM / PCM
OPTICAL
AUDIO OUT
VIDEO
OUT
COMPONENT VIDEO OUT
AUDIO IN
L
R
AC IN
LAN USB
HDMI OUT
R L
Y P
B PR
AV receiver / amplifier
digital audio optical cable
BITSTREAM/PCM
OPTICAL
OPTICAL
DIGITAL AUDIO INPUT
SBL
C SL FL
SBR
SW SR FR
MULTI CHANNEL AUDIO OUTPUT
BITSTREAM / PCM
OPTICAL
AUDIO OUT
VIDEO
OUT
COMPONENT VIDEO OUT
AC IN
LAN USB
HDMI OUT
R L
Y P
B PR
AV receiver / amplifier
with an HDMI input jack
HDMI IN
HDMI cable
HDMI OUT
SBL
C SL FL
SBR
SW SR FR
MULTI CHANNEL AUDIO OUTPUT
BITSTREAM / PCM
OPTICAL
AUDIO OUT
VIDEO
OUT
COMPONENT VIDEO OUT
.
Digital Audio Optical Cable and HDMI Cable NOT INCLUDED.
14
Connections
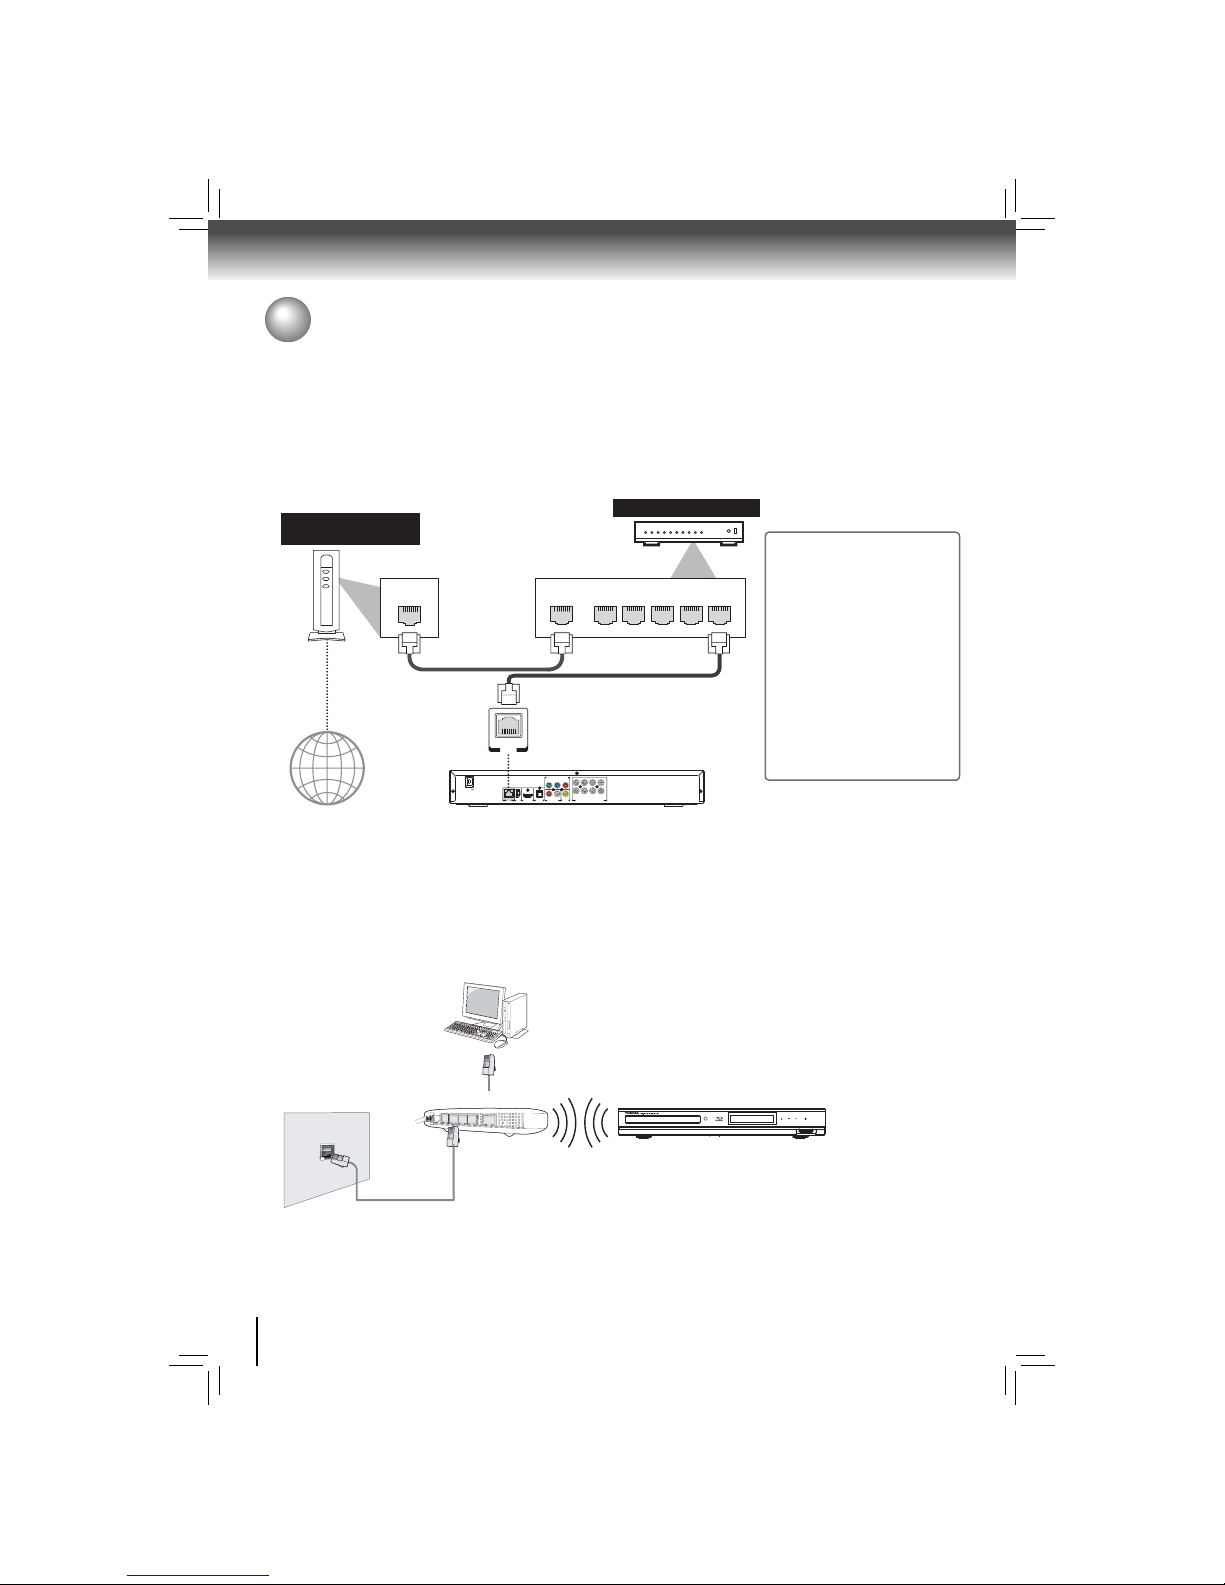
Network Connection
LAN
WAN LAN
12345
LAN
Internet
LAN cable
LAN cable
Hub or broadband router
Networking equipment
(modem, etc.)
AC IN
LAN USB
HDMI OUT
R L
Y PB PR
SBL
C SL FL
SBR
SW SR FR
MULTI CHANNEL AUDIO OUTPUT
BITSTREAM / PCM
OPTICAL
AUDIO OUT
VIDEO
OUT
COMPONENT VIDEO OUT
Your Blu-ray disc player can be connected to your home network:
By connecting an Ethernet cable to the ETHERNET jack on the rear of your player and to a wired hub or router. Using •
a wired network provides the best performance, because the attached devices connect directly to the network and are
not subject to radio frequency interference.
By connecting through the built-in wireless device and a wireless access point or router.•
Connecting your player to a wired router:
Connect an Ethernet cable (CAT5 or better with RJ45 connector) to the • ETHERNET jack on the back of your player
and to an Ethernet jack on a hub or broadband router.
Notes:
Do not connect a modul ar •
phone cable to the ETHERNET
jack.
When plugging or unplugging •
the cable, hold the connector
on the end of the cable. When
unplugging, do not pull on the
cable. Press down the lock tab
and pull the connector out of
the jack.
Because there are vario us •
con nec tio n conf igurati ons ,
follo w the instr uction s from
your telecommunication carrier
or Internet service provider.
Connecting your player to a wireless access point or router:
Your Blu-ray disc player has an integrated Wi-Fi device and antenna. No physical connection to the wireless router is
necessary.
Confi gure your player to access the wireless access point or router. For more information, see “Confi guring a wireless •
Internet connection” on page 36.
The network confi guration and connection method may vary depending on the equipment in use and the network •
environment. Your Blu-ray disc player is equipped with an IEEE 802.11n wireless module, which also supports the
802.11 a/b/g/n standards. For the best wireless performance, we recommend using an IEEE 802.11n certifi ed Wi-Fi
network (access point or wireless router).
Wireless access point
Modem Cable
Modem Port
Notes:
You must use a wireless IP sharer that supports IEEE 802.11 a/b/g/n. •
(n is recommended for stable operation of the wireless network.)
Wireless LAN, in its nature, may cause interference, depending on the •
use condition (AP performance, distance, obstacle, interference by
other radio devices, etc.).
Set the wireless IP sharer to Infrastructure mode. Ad-hoc mode is not •
supported.
When applying the security key for the AP (wireless IP sharer), only •
the following is supported.
1) Authentication Mode : WPAPSK, WPA2PSK
2) Encryption Type : WEP, TKIP, AES
15
CONNECTIONS
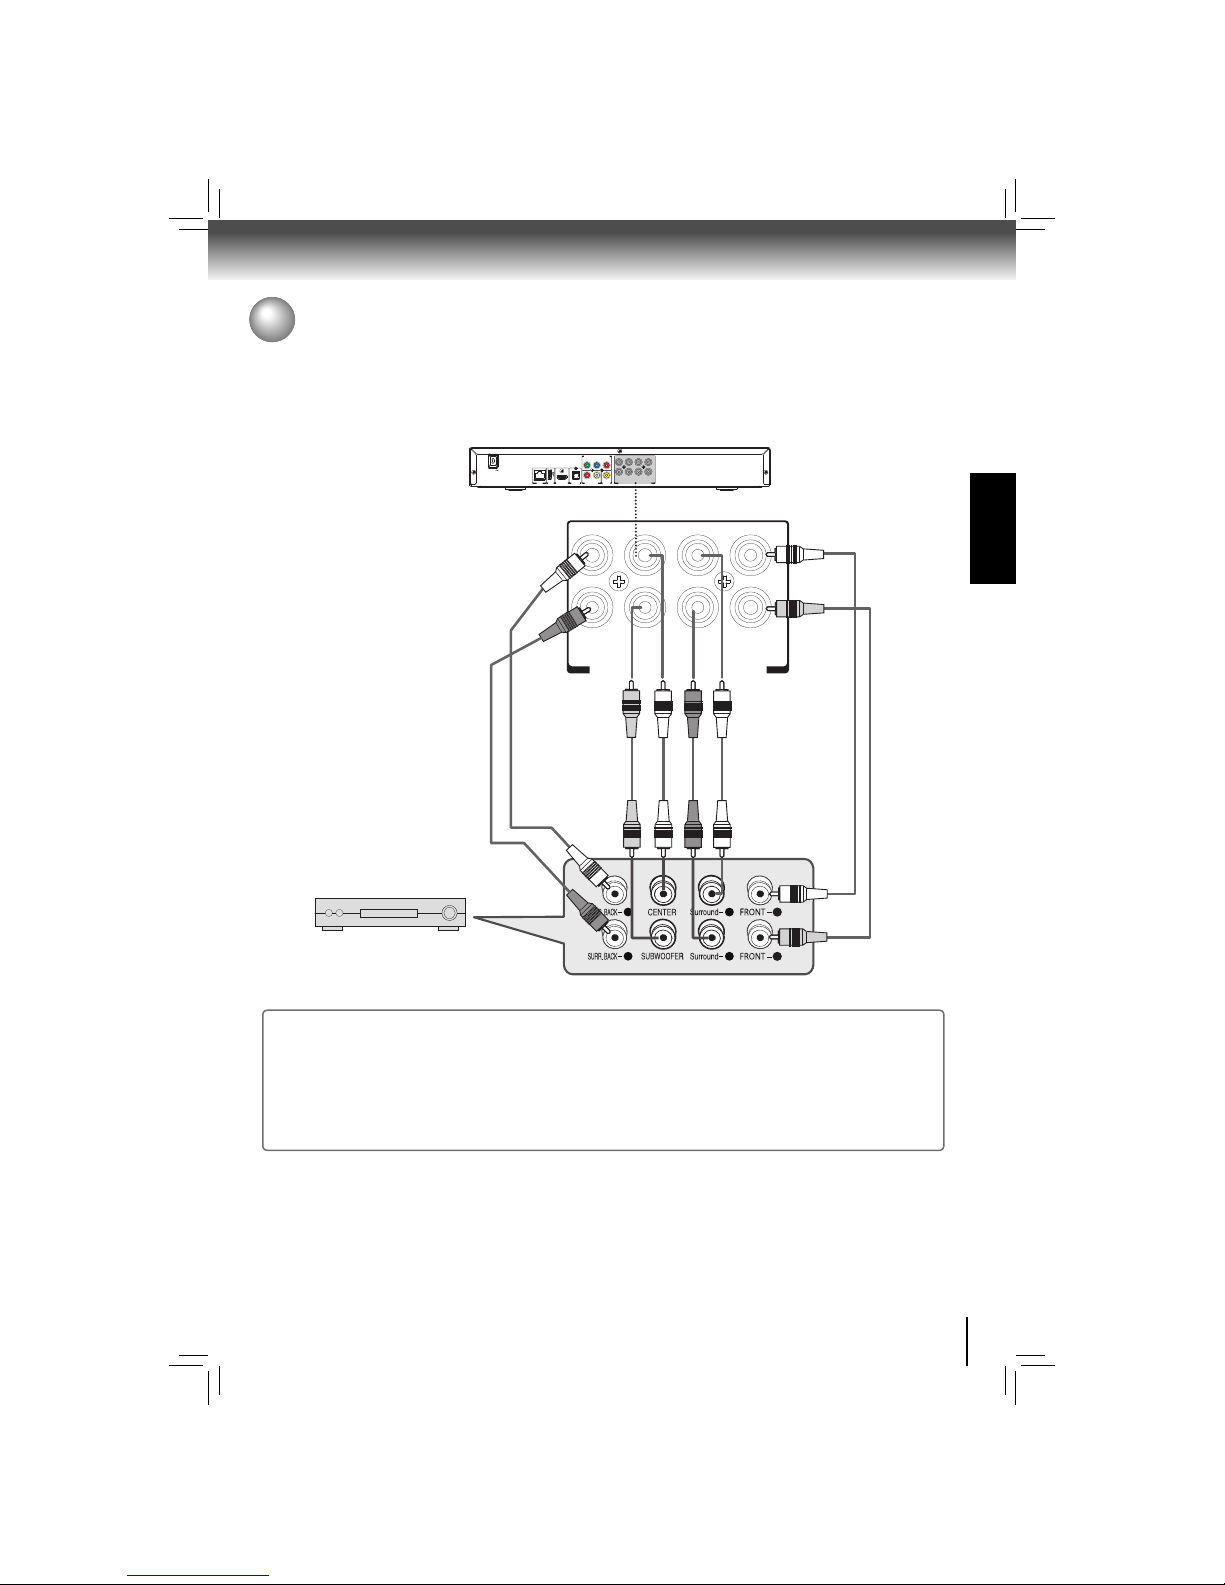
Connecting the Speakers (For 7.1 Audio Channel)
AC IN
LAN USB
HDMI OUT
R L
Y P
B PR
SBL
C SL FL
SBR
SW SR FR
MULTI CHANNEL AUDIO OUTPUT
BITSTREAM / PCM
OPTICAL
AUDIO OUT
VIDEO
OUT
COMPONENT VIDEO OUT
SBL
C SL FL
SBR
SW SR FR
MULTI CHANNEL AUDIO OUTPUT
7.1 Channel Amplifier
L
R
L
R
L
R
Notes:
Please turn the volume down when you turn on the Amplifi er. Sudden loud sound may cause damage to the speakers •
and your ears.
The position of terminals may vary depending on the Amplifi er. Please refer to the user’s manual of your Amplifi er.•
The front left and right outputs on your player and 7.1 channel amplifi er must be connected to hear disc menu audio •
from certain Blu-ray discs.
When connecting to a 5.1 channel home theater or receiver, connect all the •
MULTI CHANNEL AUDIO OUTPUT jacks
from the player except for the SBL (Surround Back Left) / SBR (Surround Back Right) outputs.
You can connect the speakers as shown in the following diagram to obtain the 7.1 audio channels effects. Using the audio
cables, connect the MULTI CHANNEL AUDIO OUTPUT (SBL, SBR, C, SW, SL, SR, FL & FR) terminals on the rear of
the Blu-ray disc player to 7.1 Channel ANALOG AUDIO IN terminals of your Amplifi er.
For speaker confi guration, please refer to “Speaker Setting” on page 32.
16
Connections
How you set up your speakers can affect the bass and the sound fi eld. Note the following points:
Place speakers on fl at secure bases.•
Placing speakers too close to fl oors, walls, and corners can result in excessive bass. Cover walls and windows with •
thick curtains.
Keep your speakers at least 10 mm away from the system for proper ventilation.•
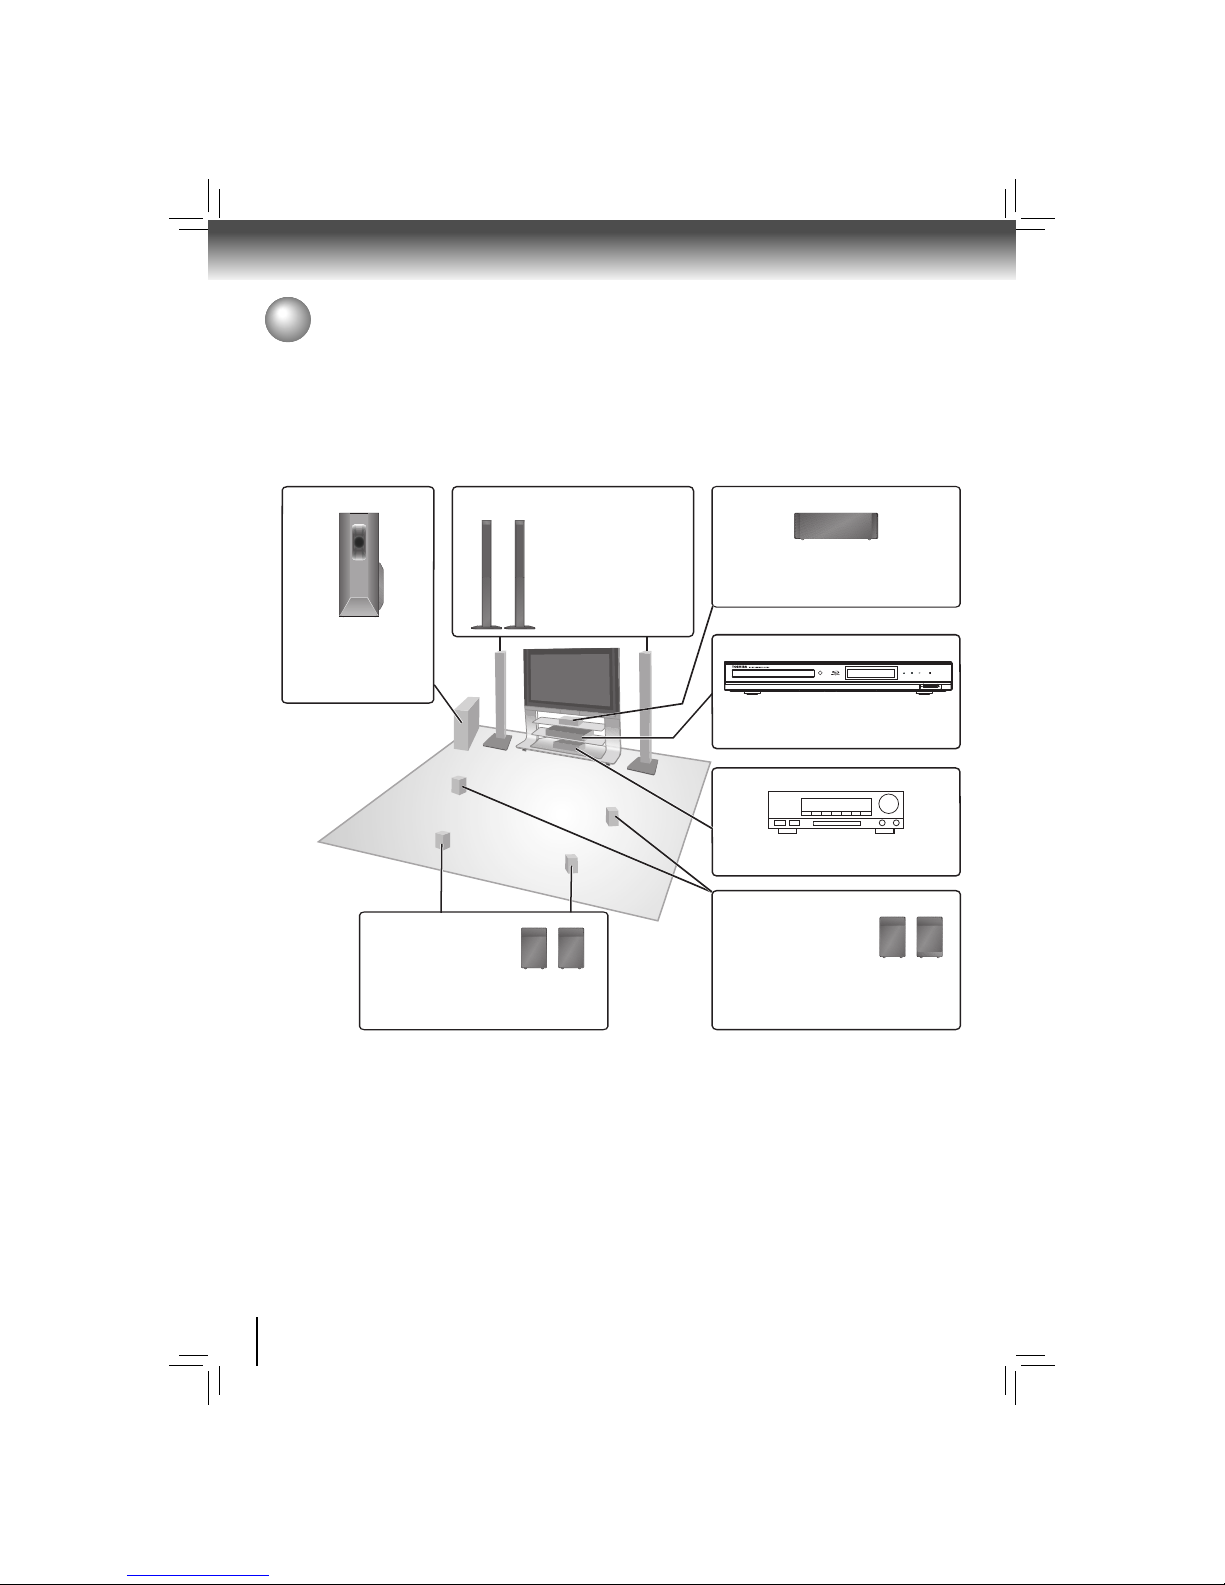
Setup example (For 7.1 audio channels)
Positioning the Speakers (For 7.1 Audio Channel)
Note:
The above setup illustration is a basic overview on what to expect when hooking speakers up to your home theater system. The
placement may vary depending on how many and what type of loudspeakers you have, as well as your room size, shape, and
acoustical properties.
Front speakers
To allow for proper ventilation and to maintain
good airflow around the main unit, position it with
at least 5 cm of space on all sides.
Place the surround back speakers behind the
listening position - slightly to the left and right at about 140
o
-150o from the center speaker.
Place the center speaker directly in front of the
listening area, either above or below the TV.
Vibration caused by the speaker can disrupt the
picture if it is placed on directly on the TV.
Center speaker
Surround Back speakers
(may be elevated above
the listener)
Place the left and right surround speakers to the
left and right side of the listening position, in line
with or slightly behind the listening position about 90
o
-110o from the center.
Left & Right Surround speakers
(may be elevated above
the listener)
Main unit
Subwoofer
Place to the right or left of the
TV, on the floor or a sturdy
shelf so that it will not cause
vibration. Leave about 30 cm
from the TV.
Place the left and right front
speakers equidistant from the
center speaker, about 30
o
angle from the center channel.
AV receiver
Place the AV receiver directly in front of the
listening area, either above or below the TV.
17
PLAYBACK
Playback
Information on Playback
Before you start playing back a disc, read the following
information.
This unit is compatible to play back the following discs /
fi les.
To play back a disc / fi le, make sure that it meets the
requirem ents for regi on codes and colo r system s as
described below. You can play back discs that have the
following logos.
Other disc types are not guaranteed to play back.
Unplayable Discs and Files
Playable Discs and Files
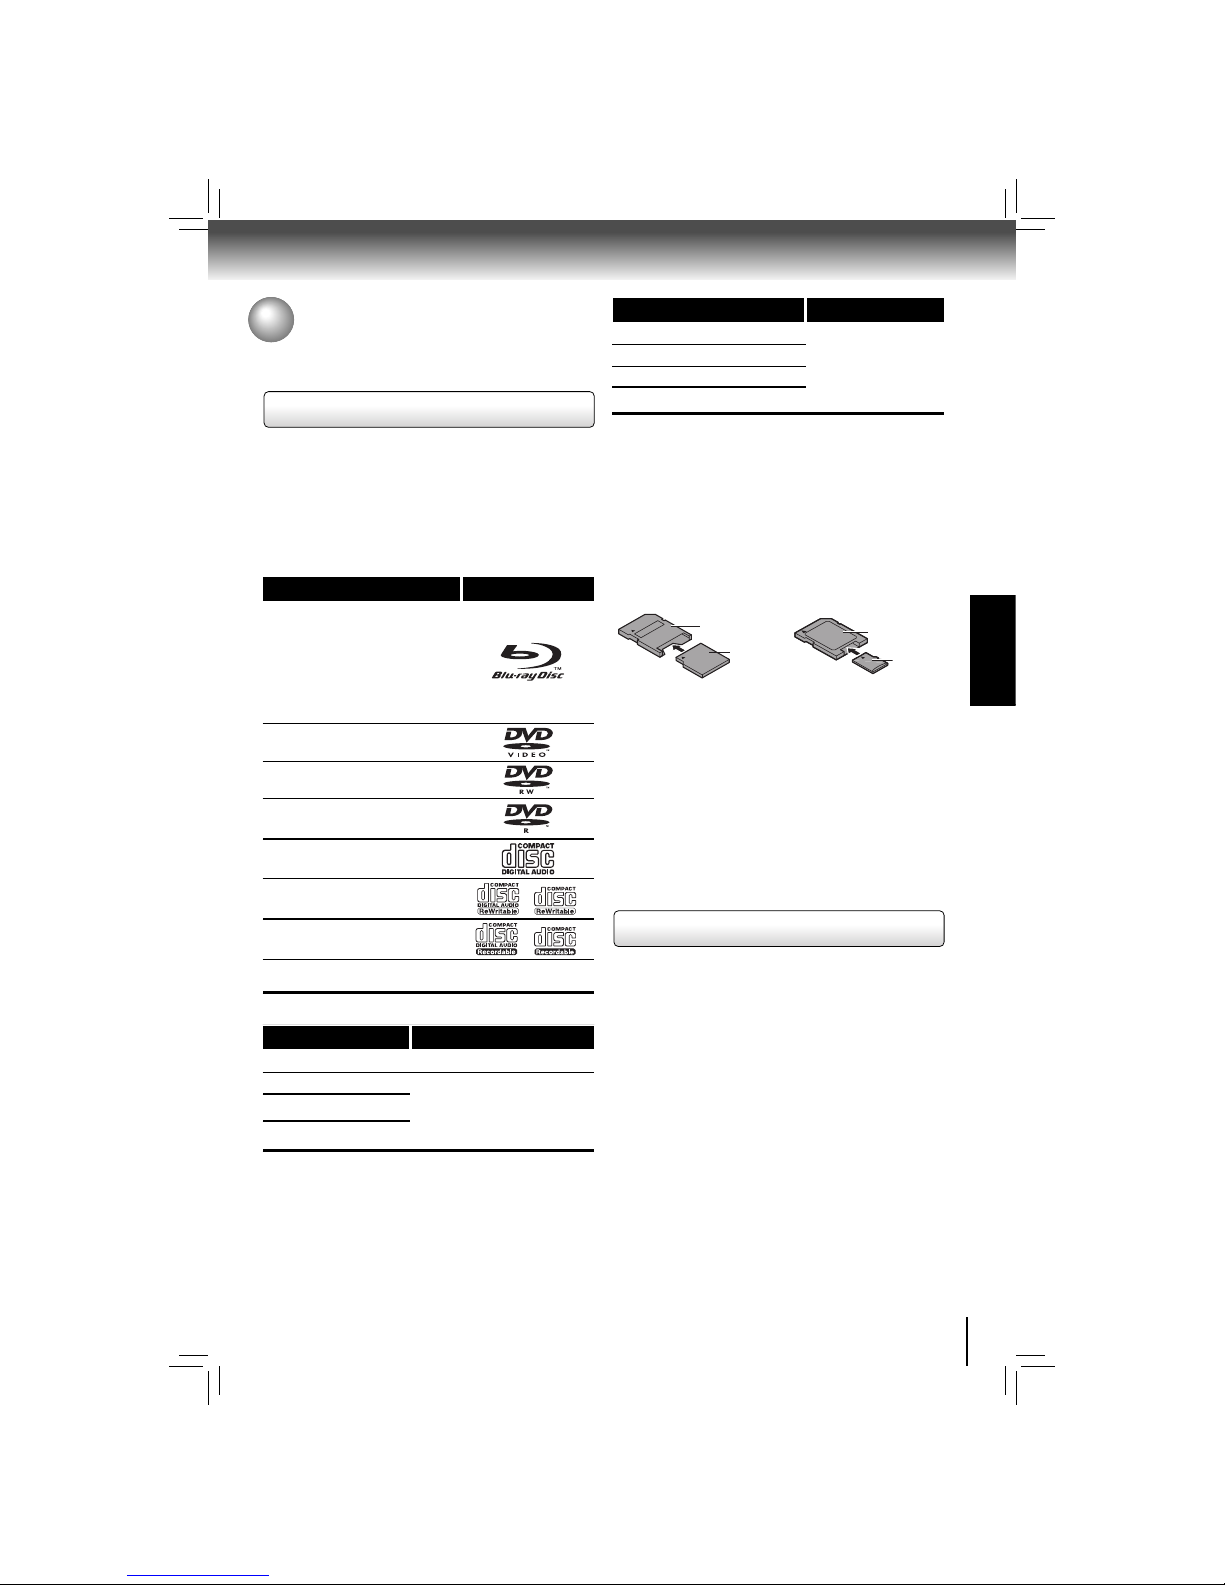
Playable discs Logos
Blu-ray Disc
- BD-ROM (single / dual layer)
- BD-RE (single / dual layer)
(Recorded in BDMV format)
- BD-R (single / dual layer)(Recorded
in BDMV format) (Unclosed discs
may not be played back.)
DVD-ROM
DVD-RW
DVD-R
CD-DA (audio CD)
CD-RW
CD-R
DTS-CD -
Playable fi les Media
AVCHD DVD-RW/-R
MP3
BD-RE/-R, DVD-RW/-R, CDRW/-R, SD Memory Card
(including SDHC), miniSD Card,
microSD Card
Windows MediaTM Audio
JPEG
• This unit cannot playback the disc contents protected by
Windows MediaTM Digital Rights Management (DRM).
Readable cards Playable fi les/data
SD Memory Card (8 MB - 2 GB)
MP3, Windows MediaTM
Audio, JPEG, picturein-picture commentary,
subtitles or other extras
for BD-ROM
SDHC Memory Card (4 GB - 8 GB)
miniSD Card (8 MB - 2 GB)
microSD Card (8 MB - 2 GB)
• This unit supports SD Memory Card with FAT12/FAT16
fi le system, and SDHC Memory Card with FAT32 fi le
system.
• This unit does not support NTFS fi le system.
• This unit may not read the SD Memory Cards formatted
on a computer. If that is the case, please reformat the SD
Memory Cards in this unit and try again.
• This unit does not support miniSDHC and microSDHC
Memory Card.
• For miniSD Card and microSD Card, the adapter is
necessary.
• Portions of this product are protected under copyright
law and are provided under license by ARIS / SOLANA /
4C.
• Please keep the SD Memory Cards in their cases when
you are not using them.
• Do not try to open or modify the card.
• Do not touch the terminal surface with your fi ngers or
any metals.
• Do not attach additional labels or stickers to cards.
• Do not remove the label of the SD Memory Cards.
• This unit recognizes up to 8 characters of fi le name in
the SD Memory Card. Characters after 8th will not be
displayed.
The following discs will not be played back in this unit.
• CD-ROM
• CD-I (compact disc-interactive)
• DVD-RAM
• VSD (video single disc)
• DVD-audio
• HD DVD
• VIDEO CD
• Unfi nalized disc
• SACD
• BD / DVD / SD Memory Card contains DivX® fi les.
• BD / DVD hybrid disc (played back as a BD-video only)
• BD that contains AVCHD fi les
• DVD-RW/-R recorded in non compatible recording
format.
• Super Audio CD - Only the sound on the CD layer can be
heard. The sound on the high-density Super Audio CD
layer cannot be heard.
• Playability of dual discs are not guaranteed.
miniSD Card
adapter
miniSD Card
microSD
Card
microSD Card
adapter
18
Playback
Color Systems
Region Codes
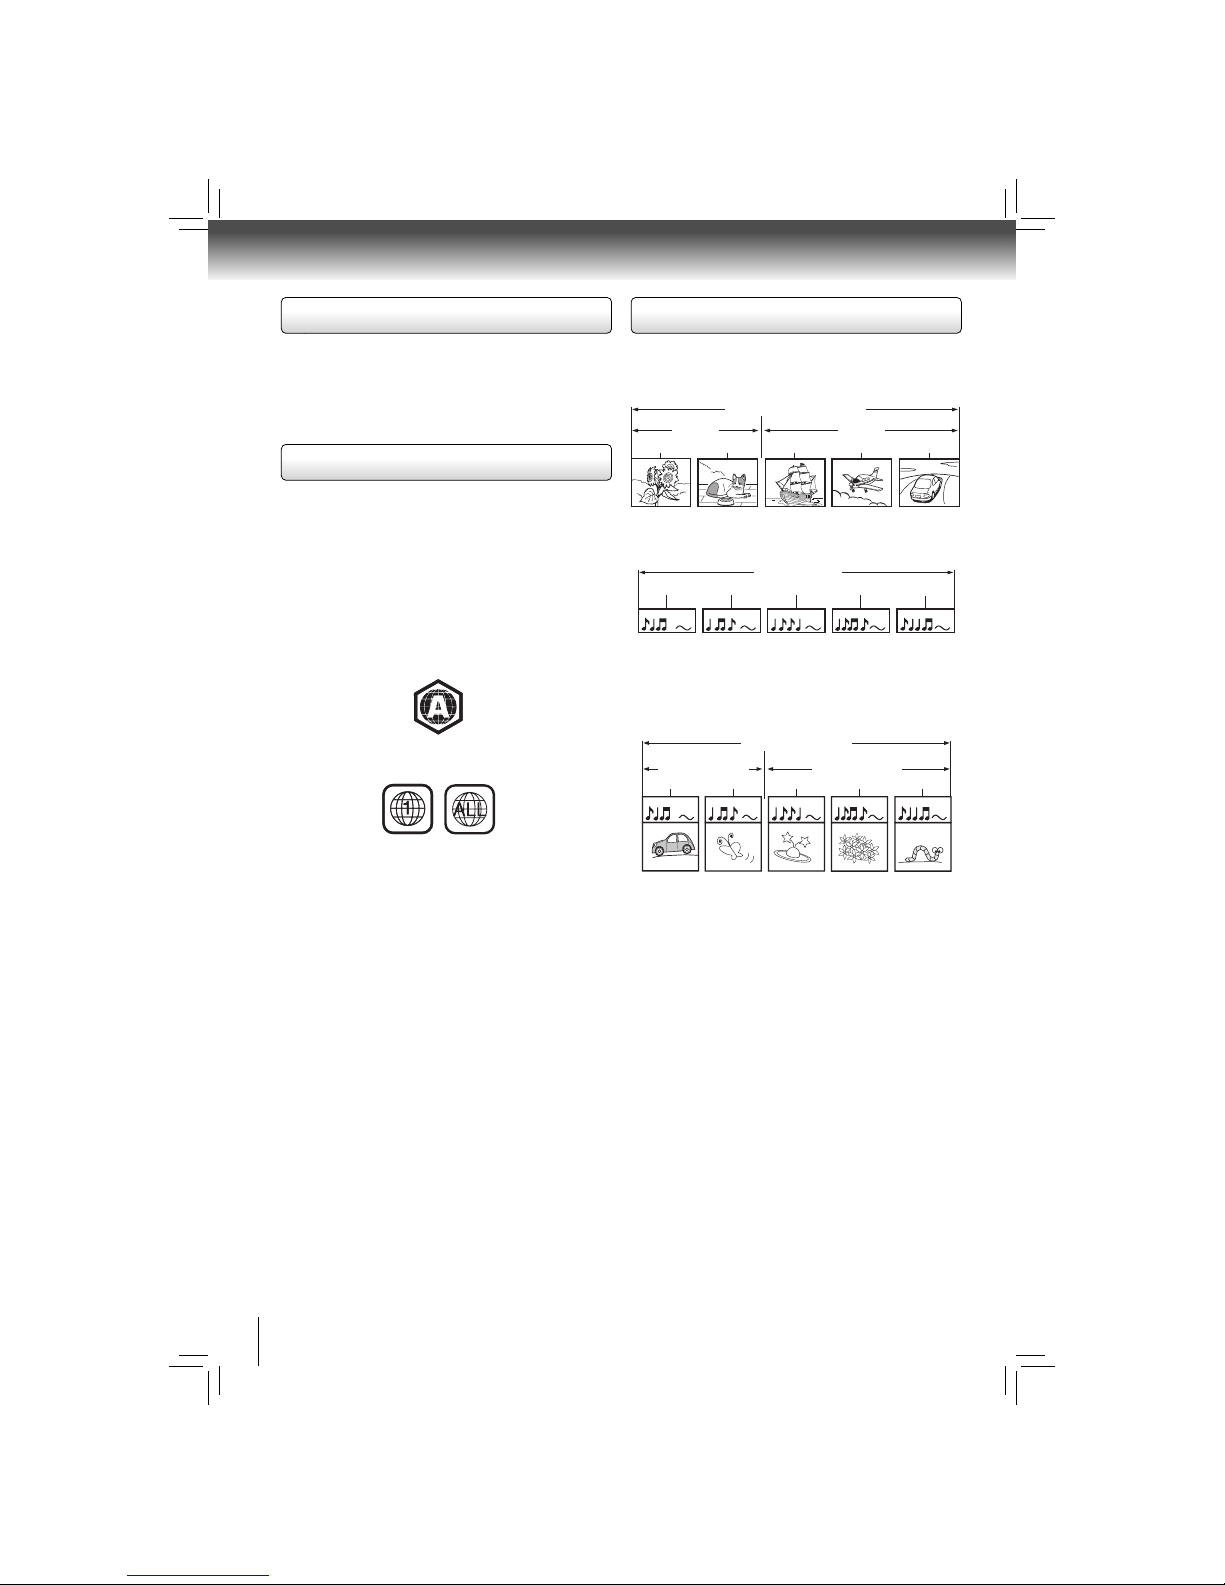
Structure of Disc/SD Card Contents
BD-video and DVD-video are recorded in different color
systems throughout the world. The most common color
system is NTSC (which is used primarily in the United
States and Canada).
This unit has been designed to play back BD-video with
region “A” and DVD-video with region “1” or “ALL”. You
cannot play back BD-video or DVD-video that are labeled
for other regions. Look for the symbols on the right on your
BD-video or DVD-video.
If these region symbols do not appear on your BD-video or
DVD-video, you cannot play back the disc in this unit. The
letter or number inside the globe refers to region of the world.
A BD-video or DVD-video labeled for a specifi c region can
only be played back in the unit with the same region code.
BD-video
DVD-video
The contents of BD / DVD / AVCHD are generally divided into
titles. Titles may be further subdivided into chapters.
Audio CD is divided into tracks.
Data discs, USB device, SD Memory Cards containing MP3
/ WMA /JPEG are divided into folders, and the folders are
subdivided into fi les.
BD / DVD / AVCHD
title 1 title 2
chapter 1
chapter 2 chapter 2chapter 1 chapter 3
audio CD
track 1 track 2 track 3 track 4 track 5
MP3 / WMA / JPEG
folder (group) 1
folder (group) 2
file 1
file 2 file 3 file 4 file 5
19
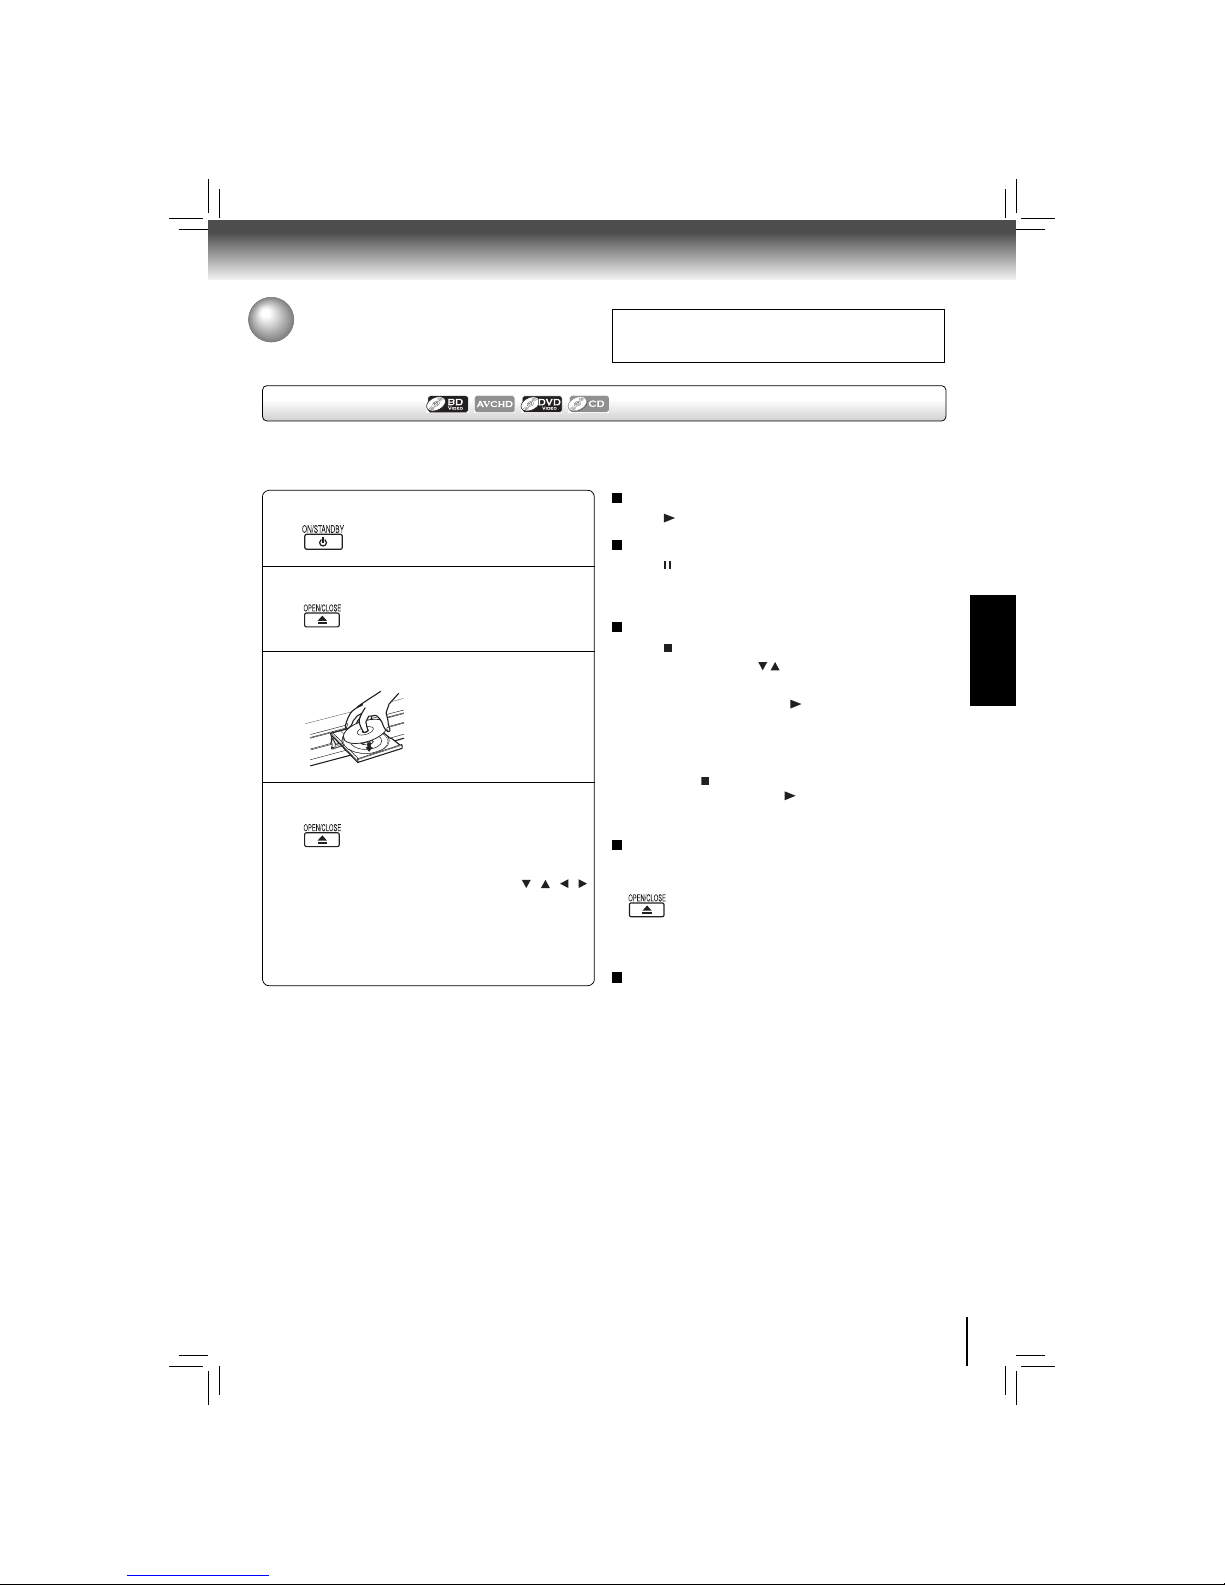
PLAYBACK
Press the ON/STANDBY button.
The Blu-ray disc player turns on.
Press OPEN/CLOSE.
The disc tray opens.
Place the disc on the disc tray.
With the playback side
down
Press OPEN/CLOSE to close the disc tray.
Playback starts.
Playing a Disc
This section shows you the basics on how to play a disc.
CAUTION:
Keep your fi ngers well clear of the disc tray as it is closing.
Neglecting to do so may cause serious personal injury.
Preparations
• When you want to view a disc, turn on the TV and select the video input connected to the Blu-ray disc player.
Basic playback
If you insert a Blu-ray disc or a DVD that contains
a top menu, a menu may appear. Use
/ / /
to select the title you want to view, then press OK
to start playback.
• You may need to press the POPUP/TOP MENU or
MENU button to display disc menu (depending on
the actual Blu-ray disc or DVD.)
1
2
3
4
To start playback in the stop mode
Press PLAY.
To pause playback (still mode)
Press PAUSE during playback.
To resume normal playback, press the PLAY button.
• The sound is muted during still mode.
To stop playback
Press STOP. The home menu is displayed.
For Blu-ray discs, press / to select BD-ROM, then press
OK to start playback at the beginning of the disc.
For DVDs/audio CDs, press
PLAY to resume normal
playback.
• Depending on the disc, playback starts where it stopped
or at the beginning of the disc.
• If you press
STOP twice, playback stops completely. To
stat playback again, press PLAY. Playback starts at
the beginning of the disc.
To remove the disc
Press OPEN/CLOSE.
Remove the disc after the disc tray opens
completely.
Be sure to press the OPEN/CLOSE button
to close the disc tray after you remove
the disc.
To turn the power off
Press ON/STANDBY button to turn the unit off.
 Loading...