

Page 1
1
Blu-ray Disc
TM
player
BDX2550KB
Owner’s Manual
Page 2

2
English
EU Conformity Statement
Warning:
Risk of overheating! Never install the product
in a confined space. Always leave a space of
at least 10cm around the product for
ventilation. Ensure curtains or other objects
never cover the ventilation slots on the product.
Never place the product, remote control or
batteries near naked flames or other heat
sources, including direct sunlight.
Only use this product indoors. Keep this
product away from water, moisture and
liquid-filled objects.
Never place this product on other electrical
equipment.
Keep away from this product during lightning
storms.
Where the mains plug or an appliance coupler is
used as the disconnect device, the disconnect
device shall remain readily operable.
Always consider the environment when
disposing of batteries.
The use of apparatus in moderate climate.
•
•
•
•
•
•
•
•
LASER CAUTION:
USE OF CONTROLS OR ADJUSTMENTS OR
PERFORMANCE OF PROCEDURES OTHER THAN
THOSE SPECIFIED HEREIN MAY RESULT IN
HAZARDOUS RADIATION EXPOSURE.
CAUTION:
VISIBLE AND INVISIBLE LASER RADIATION
WHEN OPEN AND INTERLOCKS DEFEATED. DO
NOT STARE INTO BEAM.
LOCATION:
INSIDE, NEAR THE DECK MECHANISM.
The rating plate and the safety caution are
located on the rear enclosure of the player.
This product is labeled with the CE Mark in
accordance with the related European Directives,
notably Low Voltage Directive 2006/95/EC,
Electromagnetic Compatibility Directive 2004/
108/EC and RoHS Directive 2011/65/EU.
Furthermore the product complies with the
Ecodesign Directive 2005/32/EC (EuP) and
2009/125/EC (ErP) and its related implementing
measures.
Responsible for CE-marking is
TOSHIBA EUROPE GMBH
Hammfelddamm 8, 41460 Neuss, Germany
REACH information
The European Union (EU) chemical regulation,
REACH (Registration, Evaluation, Authorization
and Restriction of Chemicals), entered into force
on 1 June 2007, with phased deadlines to 2018.
Toshiba will meet all REACH requirements and is
committed to provide our customers with
information about the presence in our articles of
substances included on the candidate list
according to REACH regulation.
Please consult the following website
www.toshiba.eu/reach for information about
the presence in our articles of substances
included on the candidate list according to
REACH in a concentration above 0.1 % weight
by weight.
The crossed out wheeled dust bin symbol indicates
that products must be collected and disposed of
separately from household waste. Integrated
batteries and accumulators can be disposed of with
the product. They will be separated at the recycling
centres.
The black bar indicates that the product was
placed on the market after August 13, 2005. By
participating in separate collection of products
and batteries, you will help to assure the proper
disposal of products and batteries and thus help
to prevent potential negative consequences for the
environment and human health.
Following information is only valid for EU-
member States:
Disposal of products
For more detailed information about the
collection and recycling programmes
available in your country, please visit our
website (http://www.recycle-more.
co.uk/) or alternatively please contact your
retailer where the product was purchased.
Contents
1 Important ...........................................................................................3-5
Safety and important notice ....................................................................... 3
Disposal of your old product and batteries ............................................... 3-4
Notice for Trademark ................................................................................. 5
2 Your Product .......................................................................................6-8
Regions codes............................................................................................6
Product overview........................................................................................7
Remote control...........................................................................................8
3 Connections ............................................................................................9
Connecting to a TV ....................................................................................9
Connecting to the digital amplier/receiver ..................................................9
Connecting to Home network via wired router ............................................ ..9
Connecting USB device ............................................................................. ..9
Connecting Power .....................................................................................9
4 Preparation...........................................................................................10
Prepare the remote control ...................................................................... 10
Setting up the player ............................................................................... 10
5 Playback .........................................................................................11-14
Playback Functions ..............................................................................11-14
6 Customizing ....................................................................................15-18
Audio ..................................................................................................... 15
System ..............................................................................................15-16
Network............................................................................................ 16-17
Language ................................................................................................ 17
Security ..................................................................................................17
Information ............................................................................................. 17
Playback.............................................................................................17-18
Display....................................................................................................18
7 Network Functional description .....................................................19-20
8 Specications ...................................................................................... 21
9 Troubleshooting ............................................................................. 22-23
10 Glossary .......................................................................................... 24-25
11 License Information ....................................................................... 26-61
Page 3
3
English
EU Conformity Statement
Warning:
Risk of overheating! Never install the product
in a confined space. Always leave a space of
at least 10cm around the product for
ventilation. Ensure curtains or other objects
never cover the ventilation slots on the product.
Never place the product, remote control or
batteries near naked flames or other heat
sources, including direct sunlight.
Only use this product indoors. Keep this
product away from water, moisture and
liquid-filled objects.
Never place this product on other electrical
equipment.
Keep away from this product during lightning
storms.
Where the mains plug or an appliance coupler is
used as the disconnect device, the disconnect
device shall remain readily operable.
Always consider the environment when
disposing of batteries.
The use of apparatus in moderate climate.
•
•
•
•
•
•
•
•
LASER CAUTION:
USE OF CONTROLS OR ADJUSTMENTS OR
PERFORMANCE OF PROCEDURES OTHER THAN
THOSE SPECIFIED HEREIN MAY RESULT IN
HAZARDOUS RADIATION EXPOSURE.
CAUTION:
VISIBLE AND INVISIBLE LASER RADIATION
WHEN OPEN AND INTERLOCKS DEFEATED. DO
NOT STARE INTO BEAM.
LOCATION:
INSIDE, NEAR THE DECK MECHANISM.
The rating plate and the safety caution are
located on the rear enclosure of the player.
This product is labeled with the CE Mark in
accordance with the related European Directives,
notably Low Voltage Directive 2006/95/EC,
Electromagnetic Compatibility Directive 2004/
108/EC and RoHS Directive 2011/65/EU.
Furthermore the product complies with the
Ecodesign Directive 2005/32/EC (EuP) and
2009/125/EC (ErP) and its related implementing
measures.
Responsible for CE-marking is
TOSHIBA EUROPE GMBH
Hammfelddamm 8, 41460 Neuss, Germany
REACH information
The European Union (EU) chemical regulation,
REACH (Registration, Evaluation, Authorization
and Restriction of Chemicals), entered into force
on 1 June 2007, with phased deadlines to 2018.
Toshiba will meet all REACH requirements and is
committed to provide our customers with
information about the presence in our articles of
substances included on the candidate list
according to REACH regulation.
Please consult the following website
www.toshiba.eu/reach for information about
the presence in our articles of substances
included on the candidate list according to
REACH in a concentration above 0.1 % weight
by weight.
The crossed out wheeled dust bin symbol indicates
that products must be collected and disposed
of
separately from household waste. Integrated
batteries and accumulators can be disposed of with
the product. They will be separated at the recycling
centres.
The black bar indicates that the product
was
placed on the market after August 13, 2005. By
participating in separate collection of
products
and batteries, you will help to assure the
proper
disposal of products and batteries and thus help
to prevent potential negative consequences for the
environment and human health.
Following information is only valid for EUmember States:
Disposal of products
For more detailed information about the
collection and recycling programmes
available in your country, please visit our
website (http://www.recycle-more.
co.uk/) or alternatively please contact your
retailer where the product was purchased.
Safety and important notice
Disposal of your old product and
batteries
1 Important
About “dispose” and “transfer” of product
We recommend you to initialize personal
information by resetting all setting to its initial
default state by performing a Factory Reset.
Ensure that you have made a backup of all
information before proceeding with a Factory
Reset operation; please see Factory Reset on
page 16 for details.
Page 4
4
English
Pb,Hg,Cd
disposalof
products and batteries and thus help to
prevent
potential negative consequences for the
environment and human health
.
For more detailed information about the
collection and recycling programmes
available in your country, please visit our
website
(http://www.recycle-more.co
.uk/
) or alternatively please contact your
retailer where the product was
purchased.
The crossed out wheeled dust bin symbol indicates
that
batteries and/or accumulators must be
collected
and disposed of separately from household
waste. If the battery or accumulator contains more
than
the specifi ed values of lead (Pb), mercury
(Hg),
and/or cadmium (Cd) defi ned in the Battery
Directive (2006/66/EC), then the chemical symbols
for
lead (Pb), mercury (Hg) and/or cadmium (Cd)
will
appear below the crossed out wheeled dust
bin
symbol. By participating in separate collection
of
batteries, you will help to assure the proper
Disposal of batteries and/or accumulators
IMPORTAN
T
The
wires in this mains lead are coloured in
accordance with the following code:
BLUE: NEUTRAL
BROWN: LIVE
As
the colours of the wires in the mains lead of this
unit
may not correspond with the coloured
markings
identifying the terminals in your
plug, proceed as
follows:
The
wire that is coloured blue must be connected to
the
terminal in the plug which is marked with the
l
etter N or coloured black.
The
wire that is coloured brown must be
connected to
the terminal which is marked with the
l
etter L or coloured red.
General Informatio
n
This
appliance may be fitted with a non-rewireable
plug.
If it is necessary to change the fuse in a
non-rewireable
plug the fuse cover must be
refitted.
If the fuse cover is lost or damaged, the
plug
must not be used until a replacement available
from
the appliance manufacturer is obtained. If the
plug
has to be changed because it is not suitable for
your
socket, or becomes damaged, it should be cut
off
and an appropriate plug fitted following the
wiring instructions below.
The
plug removed must be disposed of safely as it
is hazardous if inserted into a live socket
.
The symbol for CLASS II (Double Insulation)
Do
not connect either wire to the earth terminal
which
is marked by the letter E or by the safety
earth
symbol or coloured green or
green-and-yellow. Use a 5A
BS1362 fuse which is
approved by ASTA or BSI. Always
replace the fuse
cover after changing the fuse.
Copyright notice
This product incorporates copyright protection
technology that is protected by U.S. patents and
other intellectual property rights. Use of this
copyright protection technology must be authorized
by Rovi Corporation, and is intended for home and
other limited viewing uses onlyunless otherwise
authorized by Rovi Corporation. Reverse
engineering or disassembly is prohibited.
Page 5

5
English
AVCHD Related Logos are trademarks of Panasonic
Corporation and Sony Corporation.
Manufactured
under license from Dolby
Laboratories.
Dolby and the double-D symbol are
trademarks of Dolby Laboratories
.
For DTS patents, see http://patents.dts.com.
Manufactured
under license from DTS Licensing
Limited.
DTS, the Symbol, & DTS and the Symbol
together
are registered trademarks, and DTS 2.0+
Digital Out is a trademark of DTS, Inc. © DTS, Inc.
All Rights Reserved
.
The terms HDMI and HDMI High-Defi nition
Multimedia Interface, and the HDMI Logo are
trademarks or registered trademarks of HDMI
Licensing LLC in the United States and other
countries.
Oracle and Java are registered trademarks of
Oracle and/ or its affiliates. Other names may
be trademarks of their respective owners.
‘DVD Video Logo’ is a trademark of DVD Format/Logo
Licensing Corporation.
DLNA
TM
and DLNA CERTIFIEDTM are trademarks or
registered
trademarks of Digital Living Network
Alliance.
All rights reserved. Unauthorized use is
strictly prohibited
.
Blu-ray DiscTM, Blu-rayTM, BD-Live
TM
, BONUSVIEWTM,
and the logos are trademarks of the Blu-ray Disc
Association.
Picasa and YouTube are trademark of Google Inc.
Netflix is a registered trademark of Netflix, Inc.
Notice for Trademark
Page 6
6
English
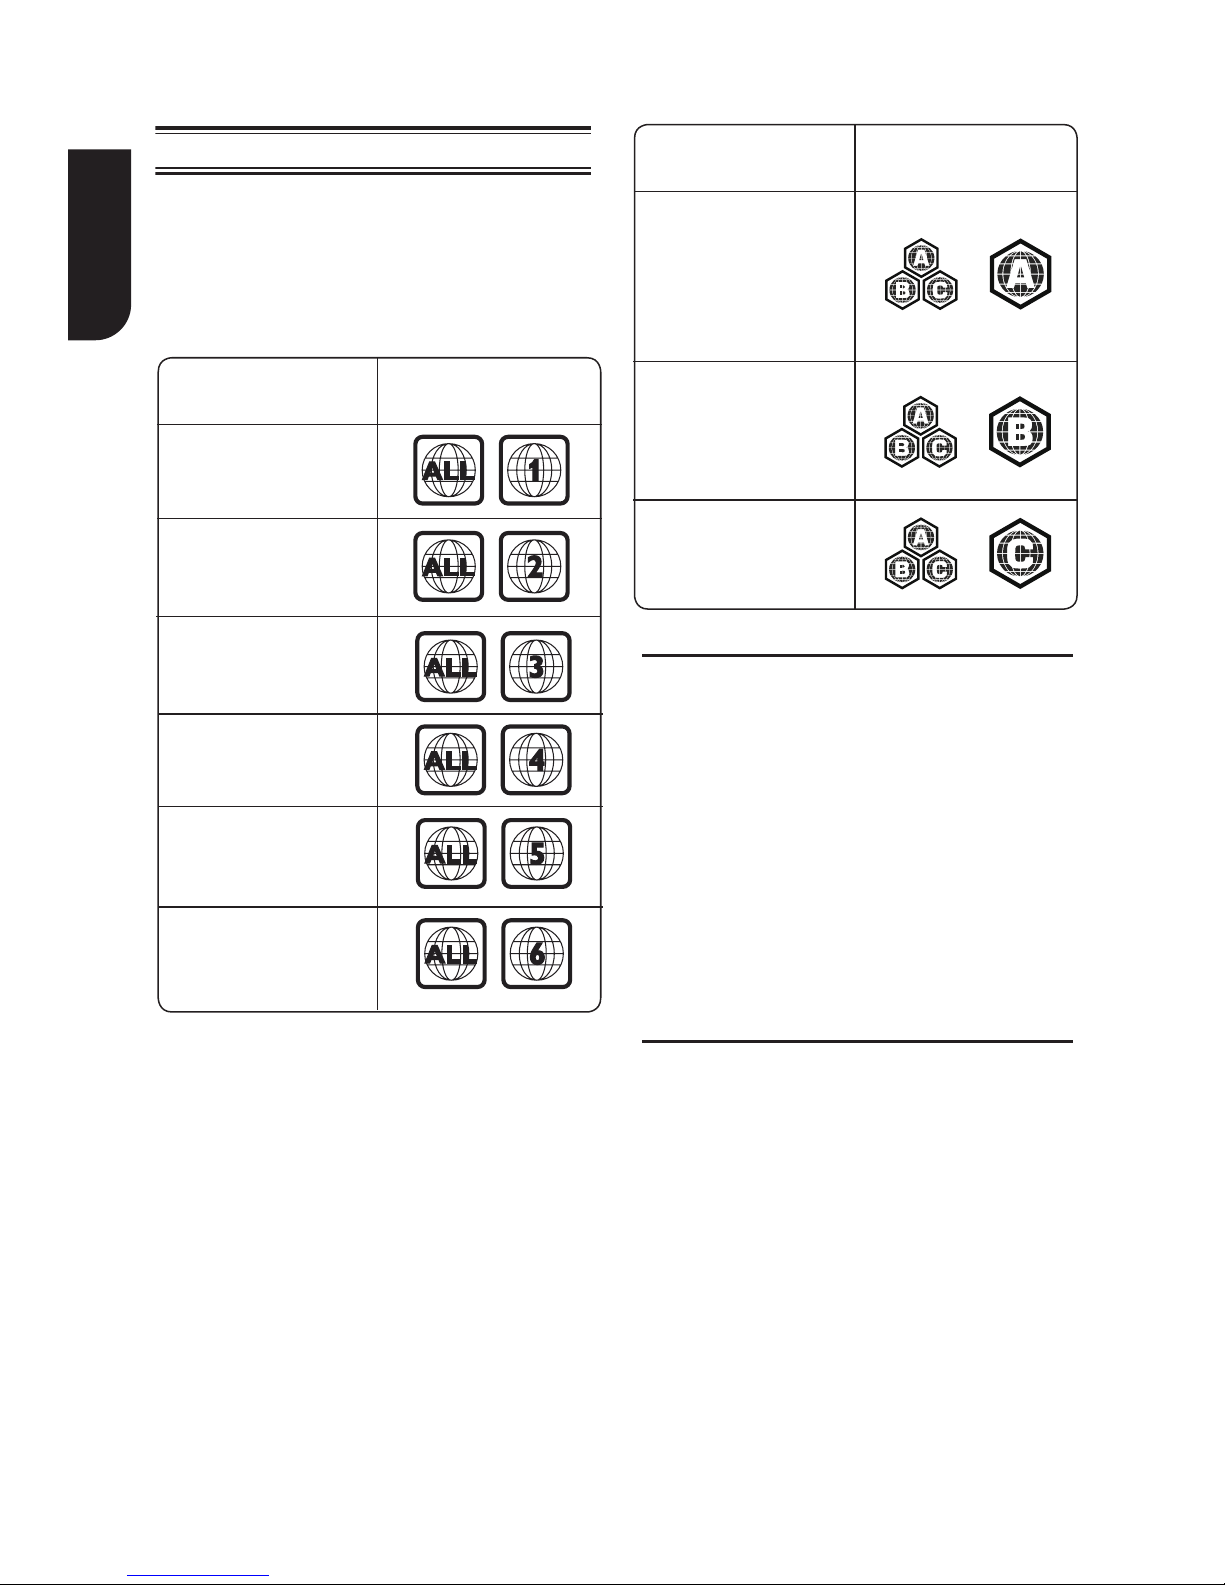
Region
DVD discs that can
be played
U.S.A. and Canada
regions
U.K., Europe regions
and Japan
Region
Blu-ray™ discs that
can be played
North America,
Central America,
South America,
Korea, Japan, Taiwan,
Hong Kong and
South East Asia
Europe, Greenland,
French territories,
Middle East, Africa,
Australia and
New Zealand.
India, China, Russia,
Central and
South Asia.
Both the Blu-ray DiscTM Player and the discs are
coded by region. These regional codes must
match in order to play the disc. If the codes do not
match, the disc will not play. The Region Number
for this Blu-ray Disc
TM
Player is described on the
rear panel of the Blu-ray Disc
TM
player.
Feature highlights
High-Definition entertainment
Watch high-definition content disc with HDTV
(High Definition Television). Connect it through
a high speed HDMI cable. You can enjoy excellent
picture quality up to 1080p resolution with the
frame rate of 24 frames per second with
progressive scan output.
BD-Live
TM
Connect this player to the movie studios website
via the LAN jack to access a variety of up-to-date
content (e.g. refreshed previews and exclusive
special features).
Blu-ray Disc
TM
Java
Blu-ray Disc
TM
Java (BD-J) Application the
BD-ROM format supports Java for interactive
functions. “BD-J” offers content providers
almost unlimited functionality when creating
interactive BD-ROM titles.
Russia and
India regions
China, Calcos Islands,
Walls and Futuna
Islands
Asia Pacifi c, Taiwan,
Korea
Australia,
New Zealand,
Latin America
Regions codes
2 Your Product
123
4
56 7
Front panel
Item Description Function
1Load a disc into the disc drive.
2
Point the remote control at the IR sensor.
3
Connect a USB device.
4
Open or close the disc compartment.
5
Stop playback.
6
Disc compartment
IR Sensor
USB jack
Playback/pause.
7
Turn the power on (indicator glows green) or restore the unit to the
standby mode (indicator is off).
123
4
Back panel
Item Description Function
1 AC power cord Connect to a standard AC outlet.
3
2
HDMI OUT jack
COAXIAL DIGITAL jack
4
Output video/audio signals to a connected TV, monitor or AV
receiver/amplifier. Connect to a TV, monitor or AV receiver/amplifier
equipped with HDMI input.
Output digital audio signals when connecting the coaxial digital cable.
LAN jack
Use this to connect to a network with an always-on broadband
connection. It is reserved for future usage of BD-Live™, bonus content,
Media Server Search, Picasa and YouTube.
Page 7

7
English
123
4
56 7
Front panel
Item Description Function
1Load a disc into the disc drive.
2
Point the remote control at the IR sensor.
3
Connect a USB device.
4
Open or close the disc compartment.
5
Stop playback.
6
Disc compartment
IR Sensor
USB jack
Playback/pause.
7
Turn the power on (indicator glows green) or restore the unit to the
standby mode (indicator is off).
123
4
Back panel
Item Description Function
1 AC power cord Connect to a standard AC outlet.
3
2
HDMI OUT jack
COAXIAL DIGITAL jack
4
Output video/audio signals to a connected TV, monitor or AV
receiver/amplifier. Connect to a TV, monitor or AV receiver/amplifier
equipped with HDMI input.
Output digital audio signals when connecting the coaxial digital cable.
LAN jack
Use this to connect to a network with an always-on broadband
connection. It is reserved for future usage of BD-Live™, bonus content,
Media Server Search, Picasa and YouTube.
Product overview
Page 8
8
English
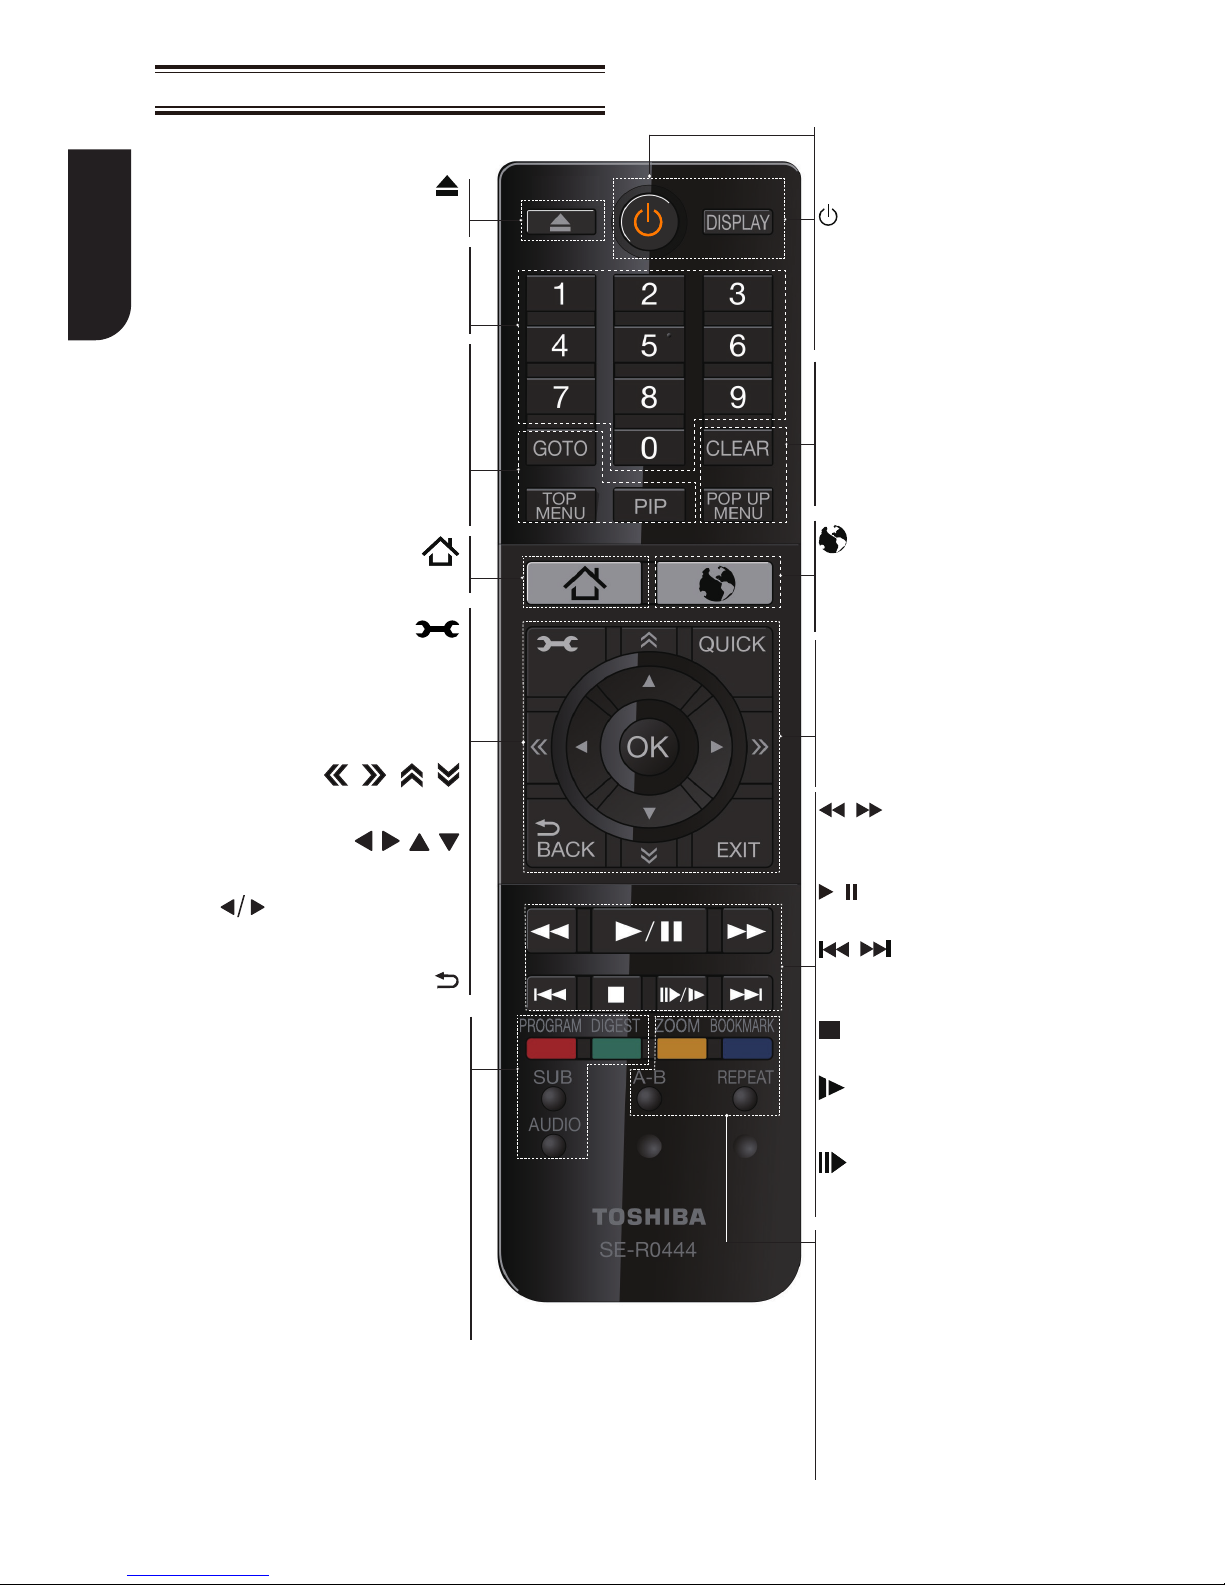
Remote control
Opens/Closes the disc tray
Number Buttons
Select numbered items in a menu
Enters track/chapter/title numbers/
password directly
GOTO
Goes to a title, chapter, track or
playing time
TOP MENU
Displays the disc title during playback
PIP
Pops PIP page
· Enters ePortal page
· Opens the system setup menu
OK
Acknowledges/Conrms menu
selection
Navigates the ePortal page
Navigations/Cursors buttons for
moving to the left/right/up/down
Press during JPEG playback
to rotate the current photo track, but
the JPEG playback will be paused
BACK
Returns to previous menu
PROGRAM
Accesses program list.
DIGEST
Accesses JPEG thumbnail view during
playback
SUB
Displays subtitle; press repeatedly
to select different subtitles available
in your disc
AUDIO
Selects the sound stream; presses
repeatedly to select different audio
streams available in your disc
·
·
·
·
·
·
·
·
·
·
·
·
·
·
·
·
·
·
·
·
·
·
·
·
·
·
·
·
·
·
·
·
·
REMOTE SIGNAL EMITTER
Points remote control to the
sensor on the front panel
Turns the unit to ON or standby
mode
DISPLAY
Displays a window to locate a
title, chapter or track
CLEAR
Clears an entry or the bookmark
and program you have set
POP UP MENU
Displays a menu included on some
Blu-ray Disc™/DVD video discs
Accesses the Internet for searching,
browsing, and bookmarking
your favorite content
QUICK
Accesses the On Screen Control
menu
EXIT
Exits the Internet or current
menu
Fast reverses/fast forwards
playback
/
Starts/Pauses playback
Skips to previous/next chapter/
title/track
Stops playback
Does a slow forward during
normal playback
Advances the picture frame-byframe during pause mode
A-B
ZOOM
Zooms out/in
BOOKMARK
Bookmarks at any point during
playback
Repeats from A to B
REPEAT
Selects various repeat modes
/
/
Page 9
9
English
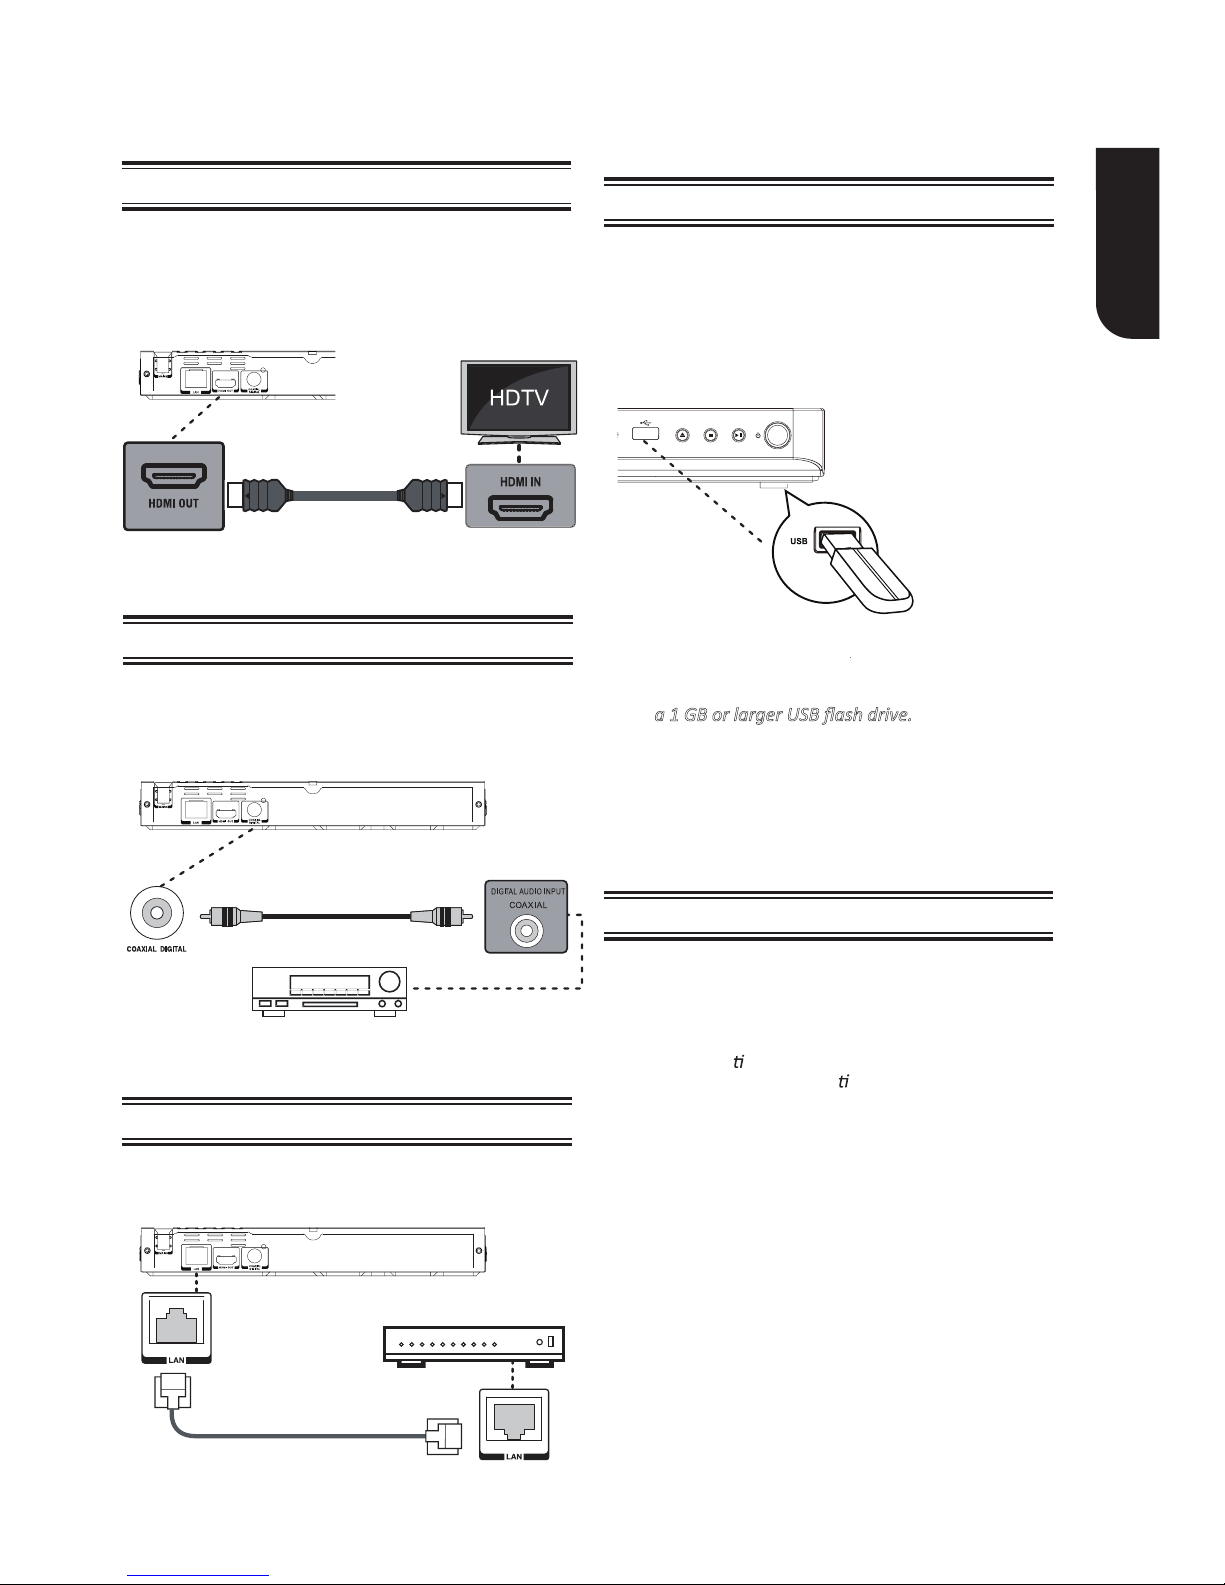
Connecting to a TV
Connecting to the digital amplier/receiver
Connecting USB device
Connecting Power
Connecting to Home network via wired router
3 Connections
Make the following connection to use this product.
R
oute the sound from this player to other device to
enhance audio output
.
Connect
a coaxial cable from the COAXIAL jack on
this product to the COAXIAL jack on the device
.
After all the AV connections are made, connect the
AC power cable to the wall socket.
• The product is ready to be set up for use.
Notes:
• Before connec
ng the AC power cord, ensure you have
completed all other connec
ons.
• Risk of product damage! Ensure that the power supply
voltage corresponds to the voltage printed on the
back of the unit.
• The type plate is located on the back of the unit.
Connect the USB device to the front side of the
player. The USB input supports USB flash drives
(some Flash drives may not be compatible).
USB flash drives can be used to enjoy playback of
Photo/Video/Music files (shown in compatible file
formats table), and software upgrades (if
available).
Connect
a HDMI cable from the HDMITM output jack
on this player to the HDMI
TM
input jack on the TV.
An
HDMI cable carries both video and audio
signals.
If you wish to use TV speakers, you do not
need to make an additional audio connection
.
HDMI cable
(not supplied)
USB device
Digital AV receiver/amplifier
Notes:
• To enjoy BD-Live™ bonus content, as your local storage,
use a 1 GB or larger USB flash drive
.
• For some Blu-rayTM discs with BD-LiveTM feature, you
may need to plug in the USB flash drive before
loading the disc. Otherwise, the disc may not playback.
• TOSHIBA does not guarantee 100% compability
with all USB flash drives.
• The manufacturer will not be responsible for any
damage or data loss on USB flash drives.
Notes:
• Do not connect a modular phone cable to the LAN jack.
• Follow the connecon configuraons instrucons
from your telecommunicaon carrier or Internet
service provider.
Digital audio coaxial cable
(not supplied)
Connect
the network cable from the LAN jack on the
product to the
LAN jack on the network system.
(Sample Illustraon) Connecng to a TV - HDMI cable
(Sample Illustraon) Connecng to a digital AV receiver/amplifier
LAN cable
(not supplied)
hub or broadband router
(Sample Illustraon) Connecng via a wired router
(Sample Illustraon) Connecng a USB device
Page 10
10
English
Always follow the instructions in this chapter in
sequence.
Find the correct viewing input
1. Press
to turn on this product.
2. Turn on the TV and switch to the correct video-in
input (refer to the TV user manual on how to
select the correct input).
Initial Setting
When you turn on this unit for the fi rst time, or
restore all settings to factory defaults, the system
will prompt you to perform Easy Setup.
1. Follow the on-screen instructions to customize
the following settings to your preference:
OSD Language
Resolution
Aspect ratio
Portal Auto Start
2. After setting, press OK to confi rm and exit.
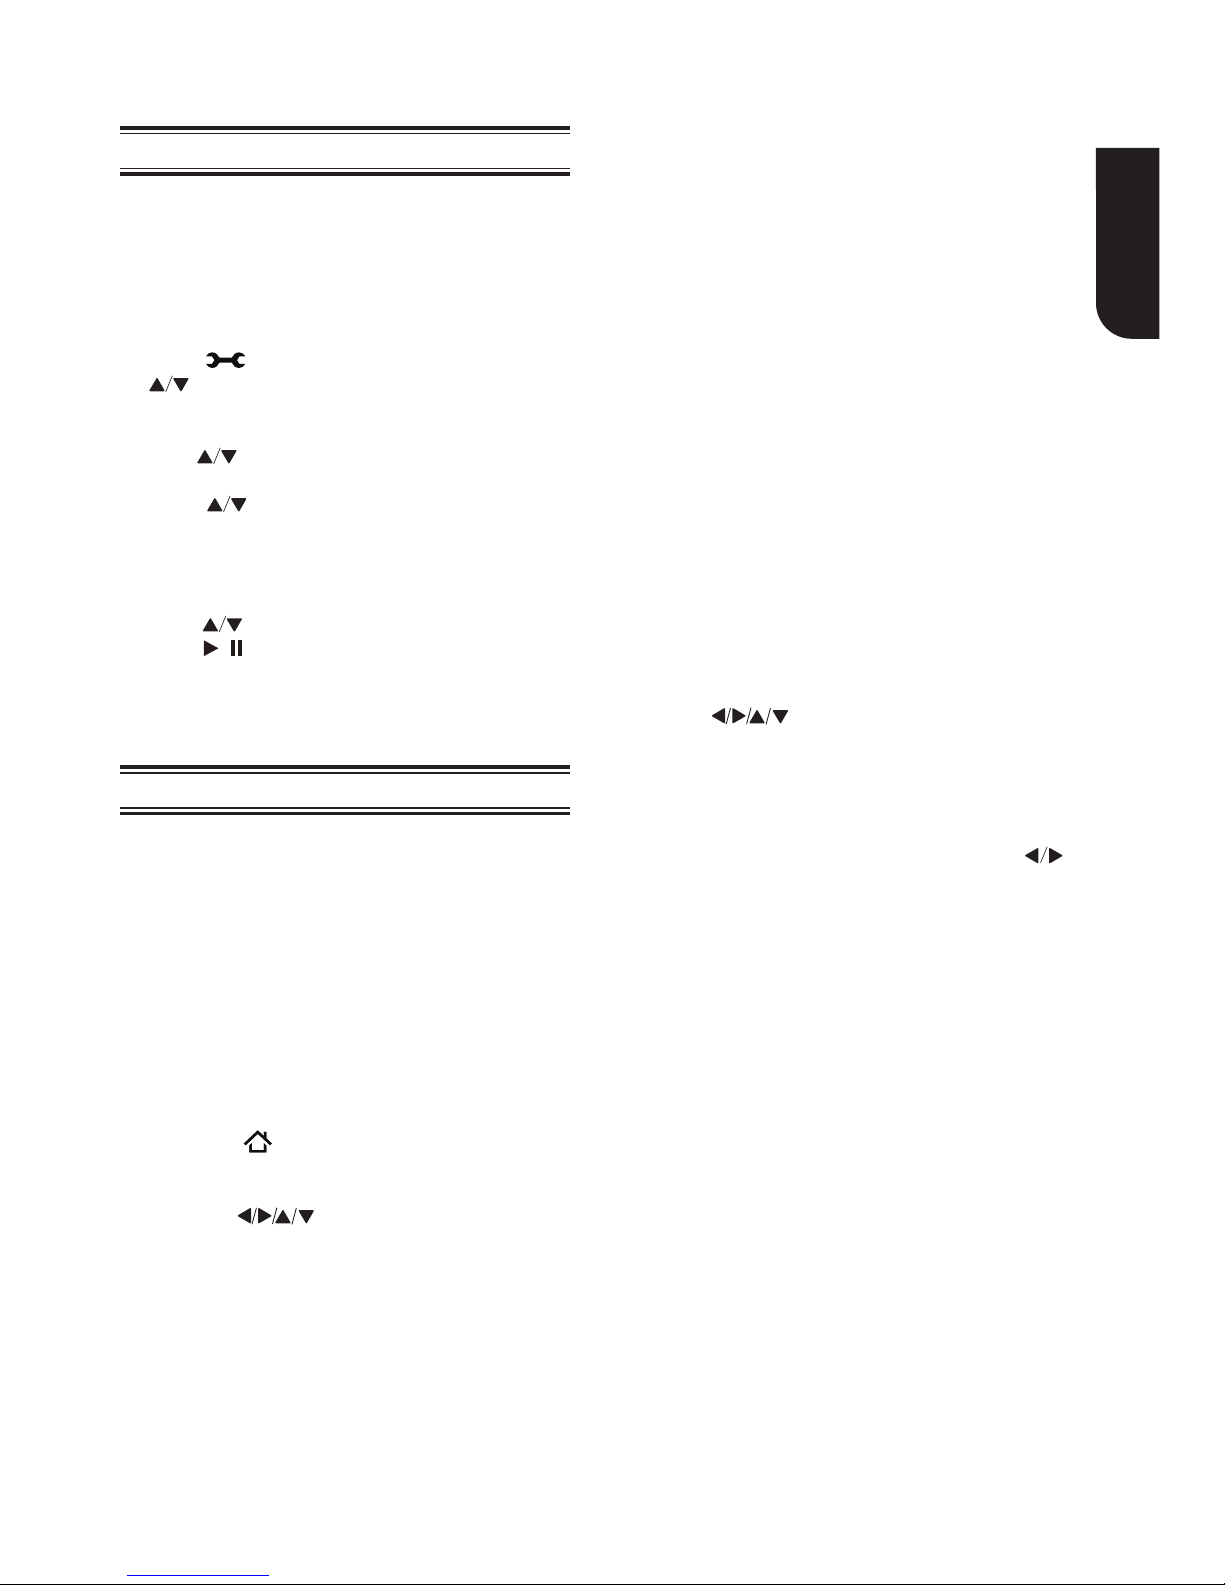
Use the SETTING menu
1. Press to display the setup screen in stop
mode or no disc playback.
• The maximum operable ranges from the
unit are as follows.
Note:
- Use of controls or adjustments or performance of
procedures other than herein may result in hazardous
radia
on exposure or other unsafe opera on.
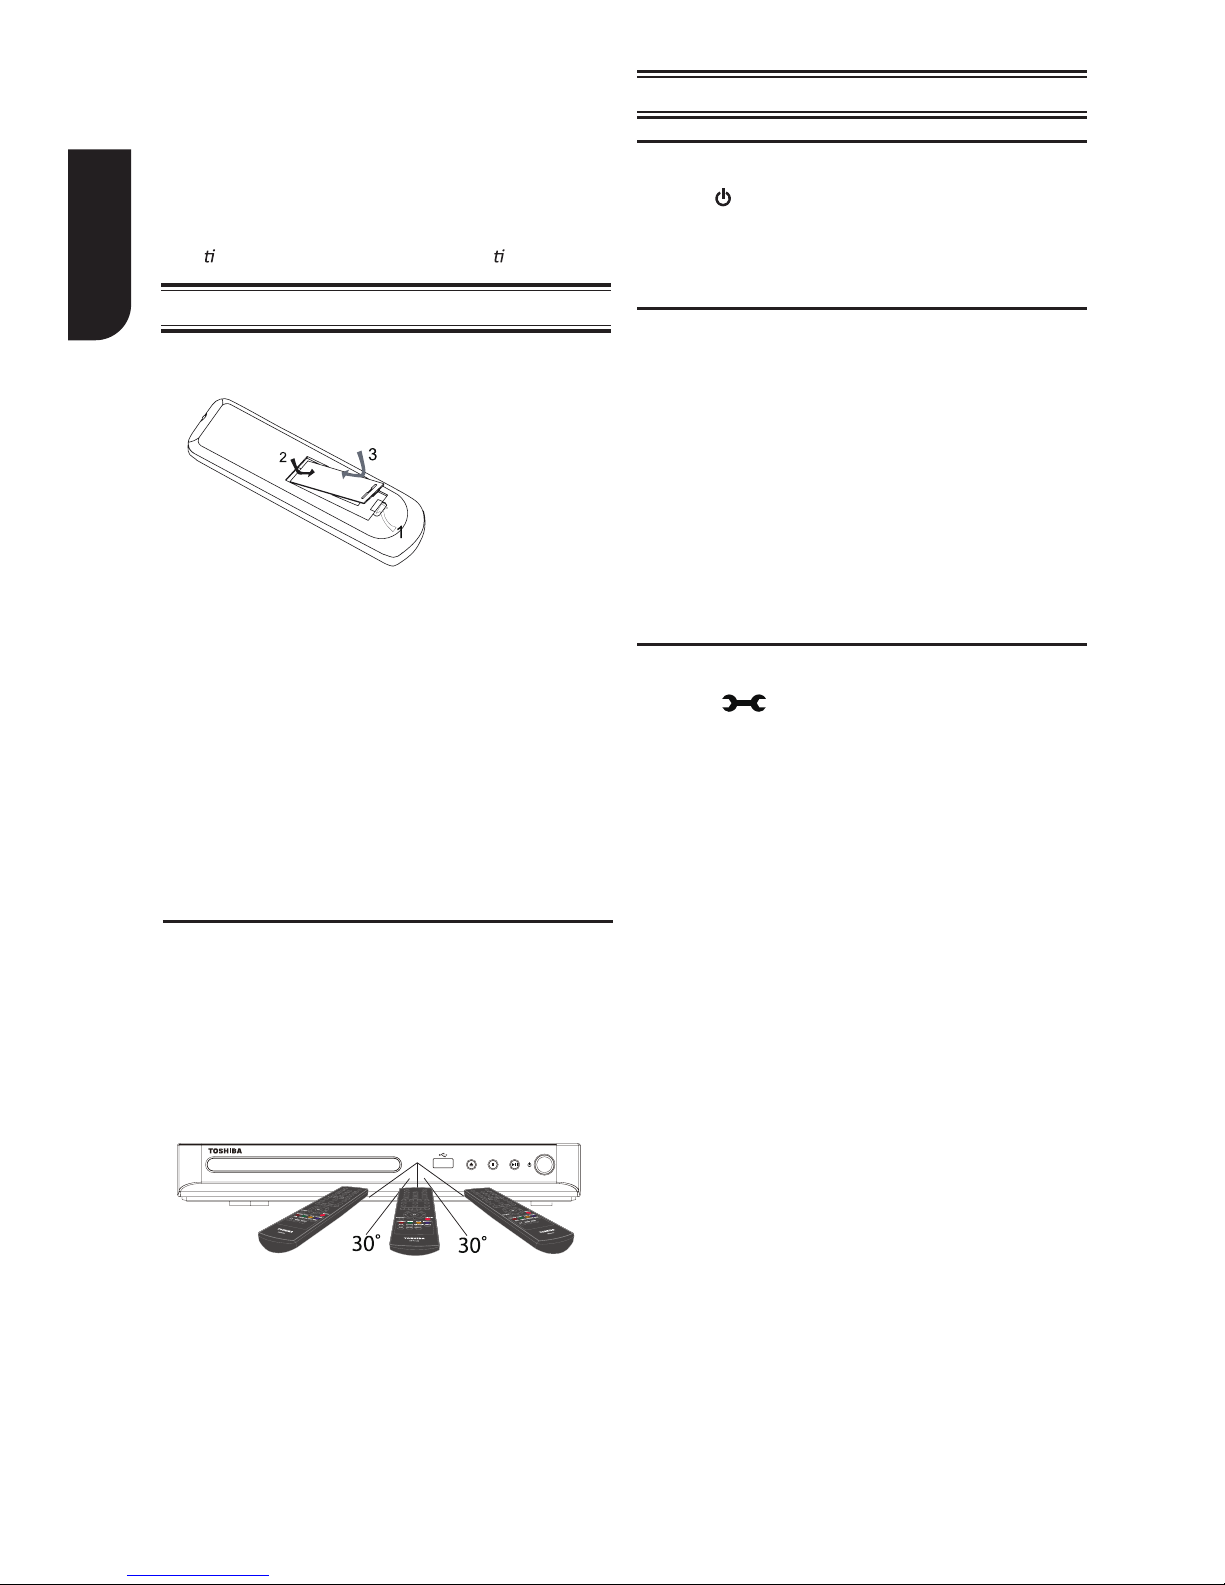
Notes:
1. Open the battery cover down.
2. Insert two AAA batteries with correct polarity (+
/ -) as indicated.
3. Close the battery cover.
- If you are not going to use the remote control for a long
me, remove the baeries.
- Do not use old and new or different types of baeries
in combinaon.
- Risk of explosion! Keep baery away from heat, sunshine
or fire. Never discard baery in fire.
- Line of sight: approx. 10 m (original state)
- Either side of the centre: approx. 7 m within 30°
(original state)
- Above: approx. 7 m within 30° (original state)
- Below: approx. 7 m within 30° (original state)
7m 10m 7m
(Sample Illustraon) Remote control - Opening
the baery cover
Prepare the remote control
Setting up the player
4 Preparation
Page 11
11
English
Still Off
Instant Search and Instant Replay
Basic Playback
Pause playback
1. Press button to pause playback.
2. Press button to resume the playback.
1.
2.
3.
4.
5.
6.
7.
Press button on the front panel or the remote
control, your Blu-ray Disc™ player will turn on.
The unit will take around 20 seconds to warm
up. When the power supply is first switched on,
the setting of the Power Down Mode is in Normal
mode.
Turn on the TV, and then select the input setting
on the TV that matches the connection method
you used to connect your player.
Press to slide out the disc tray.
The disc loading time depends on the types of
disc you are loading, and loading a Blu-ray
Disc
TM
will take longer time.
If the disc does not start playing automatically,
please press to start playback.
If a Blu-ray Disc
TM
or DVD menu displays, use
cursor buttons to select PLAY. Then, press OK
buttom to confirm.
To eject the disc, press .
1. Press the button to continue to playback
when in still off mode.
1. Press the button once to go to resume mode,
the TV screen will show the resume logo.
Press the button to resume playback from
the point where playback is stopped.
2. Press the button twice to stop the playback
completely and the setup screen appears.
Use the button to select BD/DVD, and press
the OK button to begin playback from the
beginning of the disc.
Not all Blu-ray
TM
discs support the resume
feature.
Stop playback
/
1. Press the button to fast forward through the
disc. The fast forward speed changes based on
how many times you pressed the button.
Fast Forward and Fast Reverse
2. Press the button to fast reverse through the
disc. The fast reverse speed changes based on
how many times you pressed the button.
The speed will increase through the following
sequence: 2X, 4X, 8X, 16X, 32X.
3. Press the button to resume normal playback.
1. During playback, press and hold the button,
you can search 30 seconds forward.
2 During playback, press and hold the button,
you can instant replay the content from 10
seconds before.
Previous and Next
1. During playback, press the button to skip
back to the beginning of the current chapter or
track or the previous chapter or track.
2. Press the button during playback will allow
you to skip the playback to next chapter or track.
Slow Forward
1. Press the button during normal playback. The
slow forward speed is 1/16 in default.
2. To change slow forward speed, press the
button repeatedly, and the slow forward speed
will be changed in the following sequence:
1/16, 1/8, 1/4, 1/2, normal.
3. To exit slow forward mode and return to normal
playback, press the button.
Step Forward
Use this feature to help you to enjoy the
video
frame by frame.
Press the DISPLAY button and the screen will
display some information about disc, such as: Title
number, Chapter number, Track number, Elapsed
Time, Mode, Audio, Angle, and Subtitle languages.
Press this button again to turn off the information
display.
1. Press the button during normal playback,
then playback will change to pause state.
2. Press the button repeatedly to advance the
picture frame by frame.
3. Press the button to resume normal playback.
Advanced Playback
DISPLAY
Playback Functions
5 Playback
Page 12
12
English
POP UP MENU
During Blu-ray Disc
TM
playback, press the POP UP
MENU button to display the disc title, and the
playback will not be stopped even the menu is on
the screen.
REPEAT
Press the REPEAT button repeatedly to select
different repeat modes.
Blu-ray Disc
TM
: Repeat Chapter and Title.
DVD: Repeat Chapter, Title and All.
VCD PBC Off/CD-DA/JPEG/MP3: Repeat Track and
All.
A-B
1. To play certain section within the video or song,
press the A-B button to set the start point.
2. Press A-B button again to set the end point and
complete the setting. The selected section will
be played repeatedly.
3. Press the A-B button the third time to cancel
this function.
The end point cannot be set until 5 seconds of
playback has elapsed from the start point.
Not all Blu-ray
TM
discs support the repeat A-B
feature.
BACK
Press the BACK button to return to the previous
on-screen menu in setting menu such as External
Memory, Parental Control, etc.
During MP3/JPEG/VIDEO playback, press BACK
button once, it will return back to Media Center
page.
During VCD disc playback and PBC On is selected,
press the BACK button to return to PBC Menu.
TOP MENU
You may press this TOP MENU button at any time,
and the Blu-ray Disc
TM
or DVD video disc playback
will pop up the disc menu.
1.
4.
3.
2.
Press the GOTO button to edit Title, Chapter,
and Time.
Press and OK button on the remote control
to select Title, Chapter, or Time.
Press the numeric buttons or and then press
OK. The playback will skip to the desired
location.
For Time Search, press to select TT (Title)
or CH (Chapter) time search.
GOTO
During playback,
3. Press the POP UP MENU button, a pop up
menu will appear, then press and OK
button to select "Add to Playlist" to add the
files to the Playlist. "Select all" and "Clear
all" options are also available. Select
"Cancel" to exit the pop up menu.
All the selected files will be added to the
"Playlist" folder. You can play or delete the
files in the playlist.
Press the POP UP MENU button to delete the
selected files in "Playlist".
/
1.
2.
Press the buttons to select an option,
then press OK to confirm.
Press the POP UP MENU button to close the
menu.
During DVD playback, press the POP UP MENU
button to open the disc menu.
During VCD playback, press the POP UP MENU
button to switch PBC On/Off.
During displaying USB and Data Disc file content
in media center, press the POP UP MENU
button to add the Photo/Music/Video files to the
playlist.
/
/
/
/ //
1.
2.
Press the buttons to select an option
under the Photo/Music/Video files.
In the file browser, press to select the file(s)
to be added to the playlist. "√ " will appear
beside the selected files.
PROGRAM
During DVD/CD playback, you can press the
PROGRAM button to edit the sequence of the
playlist.
DIGEST
During playback of JPEG disc, press the DIGEST
button to view a page of 12 thumbnail images.
1.
2.
Use the buttons to select an image.
Press OK to view the selected image in
full-screen and subsequent images will be
displayed one after another automatically.
Press the or buttons to view the previous
or next thumbnail screen.
ZOOM
Press the ZOOM button repeatedly to Zoom in/out
playback in the video.
Zoom mode : Zoom 2x -> Zoom 3x -> Zoom 4x ->
Zoom 1/2 -> Zoom 1/3 -> Zoom 1/4.
BOOKMARK
During VCD/DVD disc playback, press the
BOOKMARK button to add the bookmark; press
and hold for a few seconds to display the list of
bookmark which you added before on the screen,
then you can press the OK button to select the
bookmark or CLEAR button to delete the
bookmark.
/ //
/ //
Page 13

13
English
- The specified operaon for each item will vary with
disc types. And some items are available only when
the disc is supportable.
Note:
Press the button, and the screen will display
some information about the player, such as: Video;
Music; Photo; Setting; Disc.
AUDIO
Press the AUDIO button on the remote control to
select the audio streams that set within the
Blu-ray
TM
or DVD disc.
The screen will display:
AUDIO: X / XX XXX XXXX
“X” - The current audio stream number
“XX” - The total number of audio streams
“XXX” - Audio Language
“XXXX” - Audio Technology
QUICK
Press the QUICK button to open the On Screen
Control menu during playback. In this menu, you
chapters in total. Select your desired chapter to
playback.
[Time]: View the elapsed/remaining playback
time of title/chapter. Use the button to view:
the elapsed playback time of title, the remaining
playback time of title, the elapsed playback time of
chapter, and the remaining playback time of
chapter.
[Mode]: Selects playback mode among shuffle,
random, and normal.
[Audio]: The Blu-ray Disc
TM
/DVD disc’s sound
-track language. Use the button to view the
audio available in the disc and select your desired
Audiotype.
[Angle]: The angle view of current playback/the
angles in total. Use the button to select your
desired angle view.
[Subtitle]: The Subtitle in current playback.
Use the button to view the subtitles available
in the disc and select your desired subtitle type or
turn it off.
[Subtitle Style]: When you play the Blu-ray
Disc
TM
or DVD disc and if it has an external subtitle,
you will see it in OSC menu.
[Second Video]: Turns On/Off the secondary video.
[Second Audio]: Turns On/Off the secondary audio.
/
can access the playback-related control options.
The on screen control contains following items:
[Title]: The title in current playback/titles in total.
Select your desired title to play.
[Chapter]: The chapter in the current playback/
SUB
Press the SUB button repeatedly and the screen
will display “X/XX XXX” or “Off”.
“X” indicates the current number of this language;
“XX” indicates the total number of language;
“XXX” indicates the language.
The number of available languages depends on the
disc.
[Bitrate]: Use the button to select audio or
video bitrate.
[Still Off]: Closes the Still feature.
For some Blu-ray Disc
TM
or DVD discs, a certain
video picture will be frozen as a still picture during
the process of playback to let the user has a better
view of certain picture. To continue playback,
select Still Off.
[Instant Search]: Instant search 30 seconds
forward.
[Instant Replay]: Replays the content from 10
seconds before.
/
/
/
/
/
PIP
Some Blu-ray™ discs have the PIP function
enabling you to display the secondary video in the
primary video.
You can call up the secondary video by pressing
the PIP button when the scene contains the
secondary video. See the documentation that
came with the disc for playback instructions.
1.
3.
Turn on secondary video by pressing the PIP
button.
Press the PIP button again to turn off the
secondary video.
2. Press the QUICK button and scroll down to select
Second Audio and use the button to turn on
the audio for secondary video (PIP).
In order to hear the secondary audio, the PIP
feature on the disc must be turned on.
Primary video
Secondary video
with Secondary
Audio
(Sample Illustraon) PIP view funcon
This function is not available when the primary
video is played in Search, Slow-Motion, or
Frame-by-Frame or Fast Forward/ Reverse mode.
To listen to the secondary audio, the digital audio
output must be set to “Bitstream”, “Re-encode” or
“PCM”. Otherwise, only the primary audio can be
heard.
Notes:
- Not all the Blu-ray™ discs can support this funcon.
- High Definion PIP (Secondary Video) is not supported.
Page 14
14
English
Playing MP3/JPEG/MPEG4
You can play MP3/JPEG/MPEG4 that have been
recorded on a disc or a USB flash drive on the
player.
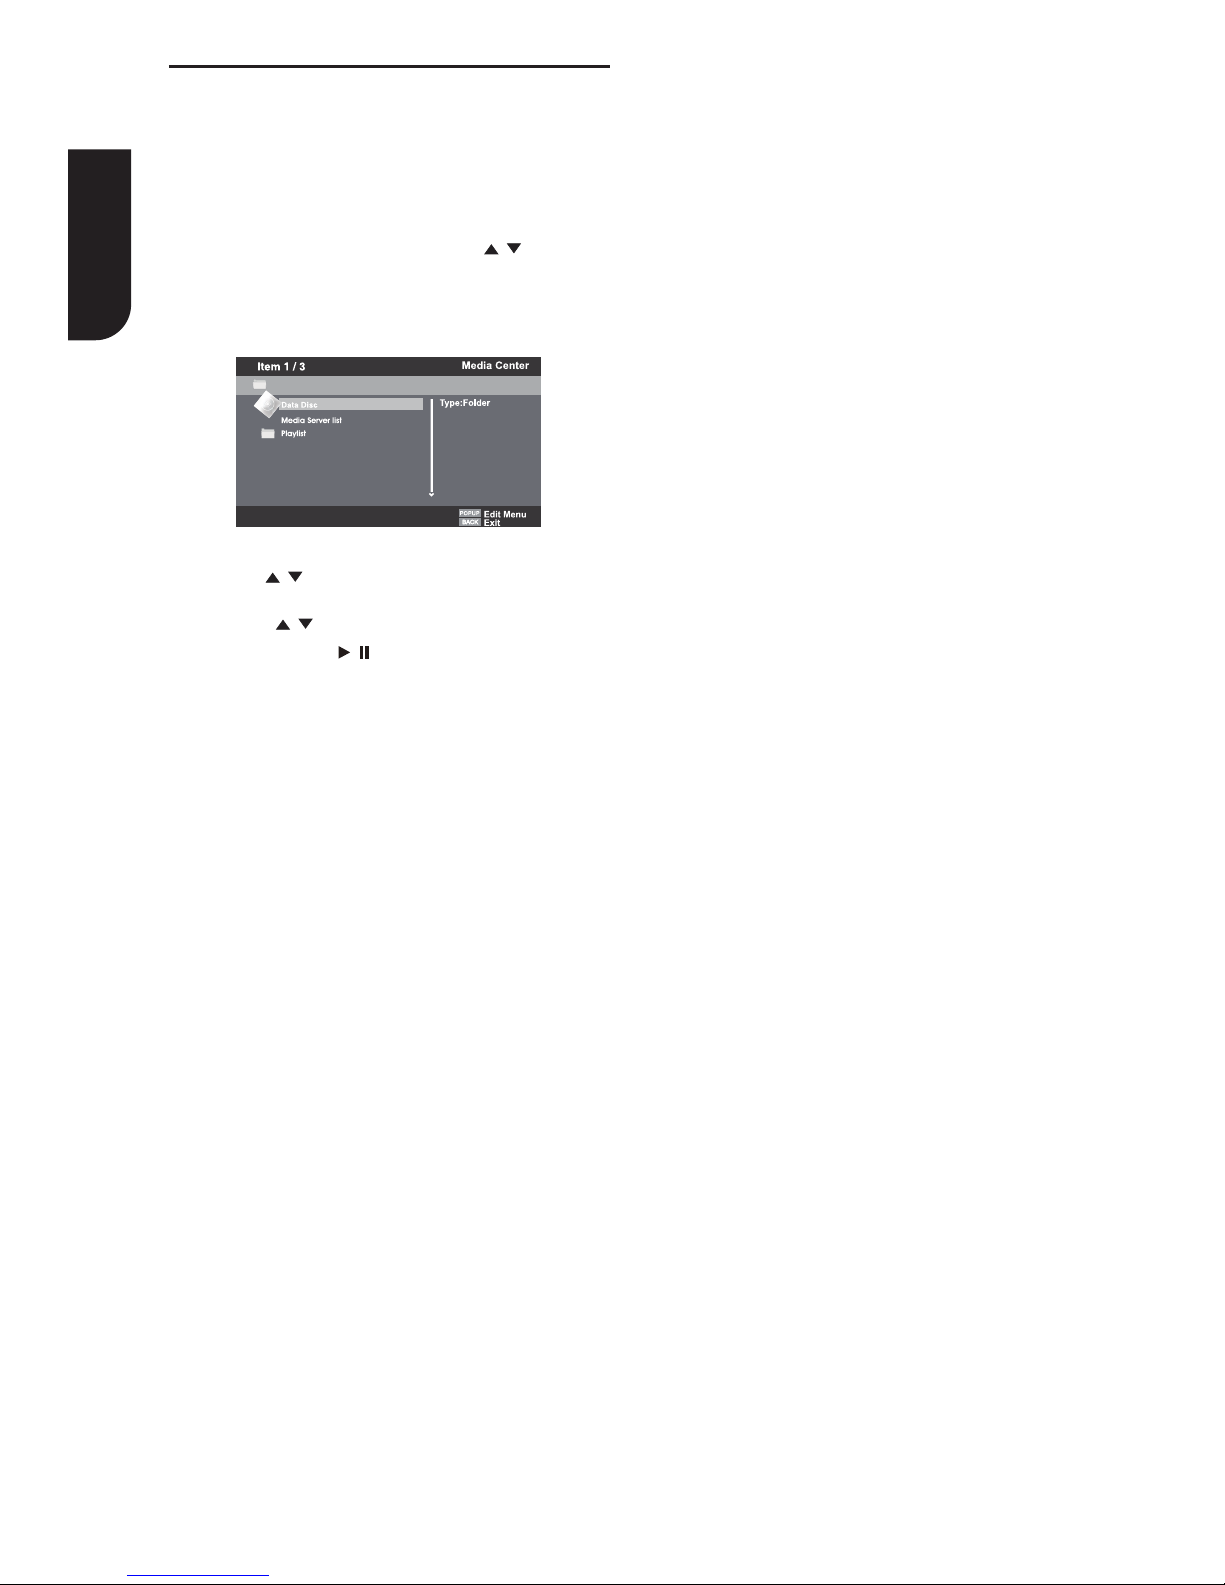
1.
2.
Load a disc or insert a USB flash drive that
contains MP3/JPEG/MPEG4.
On the setup screen, press the button to
select Video, Music, or Photo, and then
press
OK.
/
3.
4.
Press the button to select Data Disc or USB1,
and press OK
Press the button to select a file (or folder)
and press OK or to start playback.
It should match the selection on the setup
screen. (If you selected Video on the setup
screen, you also should select Video here.)
Note:
- Not all media formats are supported .
(Sample Illustraon) Media Center menu
/
/
The Media Center menu appears on the screen.
/
This product uses Cinavia technology to limit the
use of unauthorized copies of some commercially
produced film and videos and their soundtracks.
When a prohibited use of an unauthorized copy
is detected, a message will be displayed and
playback will be interrupted. More information
about Cinavia technology is provided at the Cinavia
Online Consumer Information Center at http://www.
cinavia.com. To request additional information about
Cinavia by mail, send a postcard with your mailing
address to: Cinavia Consumer Information Center,
P.O. Box 86851, San Diego, CA, 92138, USA.
Watermark
Page 15
15
English
1. In Setting menu, use to select System
and
press OK.
/
2. Use / to select an option and press OK.
3. Press or the BACK
button to return to the
previous menu.
[Down_sampling]
Select the digital audio signal sampling frequency.
(Only Coaxial)
{48k} - For discs recorded at sampling rate of 48
kHz.
{96k} - For discs recorded at sampling rate of 96
kHz.
{192k} - For discs recorded at sampling rate
of
192 kHz.
[HDMI]
When you connected a HDMI device to the HDMI
OUT jack, the available options are:
{Bitstream} - Selects Bitstream output if your
receiver HDMI IN supports Dolby or DTS or
PCM
audio signal.
{PCM} - Selects PCM output if your receiver HDMI
IN only supports PCM audio signal.
{Re-encode} - Selects Re-encode if your
receiver’s HDMI IN supports Dolby or DTS and
you
want to hear both PIP audio and movie audio on
Blu-ray™ video.
{Off} - No audio will be output via HDMI
OUT
jack.
[Stereo Down Mix]
Select whether to downmix the multi-channel
audio
into fewer channels.
[Dolby DRC]
Select the Dynamic Range Control mode
which
makes it available to listen to a movie at a
low
volume without losing sound clarity.
{Off} - Non-dynamic range compress.
{On} - Dynamic range compress.
{Auto} - Adjust the DRC according to
input
audio.
The setting of Auto is effective for Dolby TrueHD.
{Stereo} - Downmixes the multi-channel
audio
into two channel stereo. Choose when the Blu-ra
y
Disc™ player is connected to equipment that does
not support virtual surround function such as
Dolby
Pro Logic.
{Surround Encoded (Lt/Rt)} - Downmixe
s
the multichannel audio into surround compatible
stereo. Choose when the Blu-ray Disc™
player
is connected to equipment that supports virtual
surround function such as Dolby Pro Logic.
This section describes the various setting option of
this Blu-ray Disc
TM
player.
If the setup option is greyed out, it means the
setting cannot be changed at the current state.
1. Press the button in stop mode to display the
setup screen.
2. Press OK to enter the Setting menu.
3. Use
/ to select an option and press OK.
4. Press
or the BACK button to return to the
previous menu.
[SPDIF]
When you connect an audio system to the COAXIAL
DIGITAL output jack, the options are:
{Bitstream} - Selects Bitstream output if your
receiver SPDIF (Coaxial) IN supports Dolby or DTS
or PCM audio signal.
{PCM} - Selects PCM output if your receiver
SPDIF (Coaxial) IN only supports PCM stereo audio
signal.
{Re-encode} - Selects Re-encode output if your
receiver SPDIF (Coaxial) IN supports Dolby or DTS
and you want to hear both PIP audio and the movie
audio on Blu-ray™ video.
{Off} - No audio will be output via COAXIAL
DIGITAL output jack.
1. In Setting menu, use to select Audio and /
press OK.
2. Press
/ to select an option and press OK.
3. Use
/ to select the desired audio setting and
press OK.
4. Press
or the BACK button to return to the
previous menu.
Portal
No Disc
System
6 Customizing
Audio
Page 16

16
English
[Screen Saver]
Turn On or Off the screen saver mode. It helps to
protect the TV screen.
{On} - Set the screen saver active after
approximately 5 minutes without operation.
- The Blu-ray Disc
TM
player will switch to standby
mode if there is no operation after the screen saver
is engaged for approximately 20 minutes.
{Off} - Turn off the screen saver mode.
- The Blu-ray Disc
TM
will not show the Screen Saver
[Disc Auto Play]
Turn On or Off the disc automatic playback
switching mode.
{On} - The disc playback automatically after loading.
{Off} - Turn off disc auto play mode.
[CEC]
[Factory Reset]
Reset all settings of Blu-ray Disc
TM
player to initial
default state.
- Follow the instruction on the TV screen to confirm
the default setting operation.
[External Memory]
[Upgrade]
To apply the deactivation, unplug the player after
operating deactivation.
[Deactivate Setting]
This option allows to update your product software
via a Disc, USB Storage or Network.
The External Memory can be used in the BD-Live
TM
function. When you plug in the USB flash drive,
which has at least 1GB free space to play BD-Live
TM
function, the Blu-ray Disc
TM
system creates a
directory named "BUDA" automatically.
It will display the Free size on the Media
Information screen.
- Press OK to select “Format external memory” and
it will display “Format Ok” message.
- Press OK again and the data in the BUDA folder
will be cleared.
This player supports REGZA-LINK which uses the
HDMI CEC (Consumer Electronics Control) protocol.
You can use one single remote control to control all
REGZA-LINK-compliant devices that are connected
through HDMI connectors.
{On} - Turns on REGZA-LINK features.
- With CEC on, during TV standby with the Blu-ray
Disc
TM
player on, pressing , will power on
the TV. When you turn the TV off, this unit will
automatically turn off.
{Off} - Disables REGZA-LINK features.
[Portal Auto Start]
{On} - The player enter to ePortal menu
automatically when it is power on.
- If a disc is inside the player, the disc will playback
automatically and will not enter to ePortal menu.
{Off} - Turn off Portal Auto Start mode.
1. In Setting menu, use
/ to select Network
and press OK.
2. Press
/ to select an option and press OK.
3. Press or the BACK button to return to the
previous menu.
[Internet Connection]
To enable/disable the Internet connection.
[IP Setting]
{Auto} - Auto obtain network information.
{Manual} - Manual setup network information.
[Information]
Display all Network Information.
[Connection Test]
Selecting the Connection Test will cause the
player to attempt to communicate with your home
network, and if successful, with a known Internet
address. If both attempts are successful, your
network connection should be good. If the player
can successfully connect to your home network,
but not to the known Internet address, your
Internet service may be “down”, or your security
fi rewall may be blocking access of the player to the
Internet.
[BD-Live Connection]
{Permitted} - During playback of BD-Live
TM
disc,
the disc may automatically download all information
from appointed network.
{Partial Permitted} - During playback of BDLive™ disc, the disc may automatically download
partial of the information from appointed network.
{Prohibited}- Disable downloading information
from network.
[External Control Setting]
{Device name} - You can change to your desired
device name. The player default device name is
TOSHIBA-BDPL, maximum 15 characters.
/
[Media Sever Search]
Media Sever Search function enables you to create
an interoperability network with other devices for
resource sharing based on a network.
maximum 15 characters.
{Port Number} - The player default port number
is 4000 and it is not recommended to change this
setting.
{User Name} - You can change to your desired
user name. The player default user name is ROOT,
maximum 16 characters.
{Password} - You can set your desired
password. The player default password is 1234,
Network
Page 17

17
English
[OSD]
Select the on-screen menu language
.
[Menu]
Select the disc menu language
.
[Audio]
Select the audio language of your preference.
[Subtitle]
[USB keyboard for open browser
]
Select the keyboard language
.
Select your preferred subtitle language
.
1.
In Setting menu, use to select Language /
and press OK.
2.
Press / to select an option and press OK.
3.
Use / to select the preferred language.
4.
Press or the BACK button to return to the
previous menu.
1. In Setting menu, use to select
Security
/
and press OK.
2.
Press / to select an option and press OK.
3.
Press or the BACK button to return to the
previous menu.
[Change Password
]
F
ollow the instruction on the TV screen to change
the
password for locked discs and play restricted
Blu-
rayTM discs/DVDs.
1.
Use NUMBER keys to enter four digit old
password. The default password is “0000”.
2.
Enter the new password.
3.
Enter the new password again to confi rm.
If
you forget the password, you can erase
your
current password by entering the default
password
.
[Angle Mark]
Some Blu-ray
TM
discs/DVDs contain the scenes
recorded with multiple angles, which allow you to
enjoy the videos with your desired angles, therefore
the angle mark is displayed only when the Blu-ray
Disc™/DVD disc is supportable for multi-angle and
Angle Mark is set to ON.
{On} - Display the angle mark.
{Off} - Hide the angle mark.
1. In Setting menu, use to select Playback
and press OK.
/
2. Press / to select an option and press OK.
3. Use
/ to select On/Off, and press OK to
confi rm.
4. Press
or the BACK button to return to the
previous menu.
Notes:
- Rated discs above the level you set in [Parental Control]
require a password to be entered.
- The ra
ngs are country-depended. To allow all discs to
play, select ‘Off ’.
1. In Setting menu, use to select Information
and press OK.
/
2. The current software version, MAC address and
Netflix ESN will be displayed.
3. Press
or the BACK button to return to the
previous menu.
1 [Kid safe] Safe for kids
2 [G] All children and general guidance
3 [PG] Parental guidance
4 [PG-13] Parental guidance for children
under 13
5 [PG-R] Parental guidance recommended
6 [R] Restricted viewing
7 [NC-17] No one 17 and under allowed
8 [Adult] Adult only
ItemsDescription
[Parental Control]
[PIP Mark]
The Picture -In- Picture (PIP) mode display
two
pictures on the TV screen at the same time,
the
full screen picture is called Main Window and
the
small inset window is called Sub Window. The
PIP
Re
stricts access to discs that are unsuitable for
children.
These discs must be recorded with
ra
ting.
1.
Use NUMBER keys to enter the password.
2.
Select a rating level, then press OK.
Language
Security
Information
Playback
See Media Server Search on page 19 for details.
Page 18
18
English
Note:
-
Not all the Blu-rayTM discs can support this func on.
1. In Setting menu, use to select Display
and press OK.
/
2. Press / to select an option and press OK.
3. Use
/ to select the desired option, and press
OK to confirm.
4. Press
or the BACK button to return to the
previous menu.
[TV Screen]
Select the screen format according to how you
want the picture to appear on the TV.
{16:9 Full} - For a disc with the aspect ratio of
4:3, the output video is stretched into 16:9 full
screen.
{16:9 Normal} - For a disc with the aspect ratio
of 4:3, the output video is resized vertically to
match what will be seen on the display.
{4:3 Pan&Scan} - For standard TV, it displays a
wide picture on the entire screen and cuts off the
redundant portions.
{4:3 Letterbox} - For standard TV, it displays a
wide picture with two black borders on the top and
bottom of 4:3 screen.
[Resolution]
Select a video output resolution that is compatible
with your TV display capability.
{Auto} - Select the most suitable resolution
according to the TV.
[Secondary Audio]
{On} - Display Secondary Audio.
{Off} - Hide the Secondary Audio.
[Last Memory]
If you open the disc tray or switch this Blu-ray
Disc™ player to standby state during normal
playback, the Blu-ray Disc™ player can memorize
the end playing point, the player will start playback
from the memorized point next time.
{On} - Enables Last Memory feature.
{Off} - Disables Last Memory feature.
{480i/576i, 480p/576p, 720p, 1080i, 1080p}
- Select a video resolution setting that is best
supported by the TV. See TV manual for details.
Notes about HDMI 1080/24p:
If you want the 1080/24p output, it should fulfi ll
below
3 condi ons:
1. TV supports the 1080/24p display;
2. Player choose the 1080/24p op
on in the se ng
menu;
3. Media must be the 1080/24p video.
Note:
- This resoluon becomes effecve only when the
playing Blu-ray Disc™ contents are Film source.
[HDMI Deep Color]
This feature is available only when the display
device is connected by a HDMI cable, and when it
supports Deep Color feature.
[Color Space]
Select a predefi ned Color Space of picture.
{RGB} - Select RGB Color Space.
{YCbCr} - Select YCbCr Color Space.
{YCbCr422} - Select YCbCr422 Color Space.
{Full RGB} - Select Full RGB Color Space.
{On} - Enable HDMI Deep Color.
{Off} - Disable HDMI Deep Color.
[HDMI 1080/24p]
Movies are recorded on film at a rate of 24 pictures
(frames) per second. Many of the movies on
Blu-ray™ discs are placed on the discs at this
frame rate. However, not all TVs can display 24
progressive frames/second of video. If the TV
cannot display this frame rate, you need to turn off
HDMI 1080/24p.
{On} - Enable 1080/24p video resolution setting.
{Off} - Disable 1080/24p video resolution setting.
[Video Adjust]
{Brightness} - Press
/ to adjust the brightness
of display, goes left means dark and right means
bright.
{Contrast} - Press
/ to adjust the contrast
of display, goes left means low contrast and right
means high contrast.
{Hue} - Press
/ to adjust the Hue of display,
goes left means low hue and right means high
hue.
{Saturation} - Press / to adjust the saturation
of display, goes left means low Saturation and right
means high saturation.
{On} - Display the PIP mark.
{Off} - Hide the PIP mark.
mark is displayed when in PIP mode and PIP Mark
is set to ON.
Display
[Sharpness]
Select the level of sharpness: Low, Middle, High.
{Low} - Select Low sharpness level.
{Middle} - Select Middle sharpness level.
{High} - Select High sharpness level.
Page 19
19
English
7 Network Functional description
Media Server Search
Navigating the ePortal Menu
With this player connected to network, you can play
video, music and photo les from the media server.
1. Connect this player to server network and set the
Media Server Search to Enable.
See Network on page 16 for details.
2. Press to enter the setup screen and use
to select Video, Music, or Photo, then press
OK.
The Media Center menu appears on the screen.
3. Press to select Media Server list, and then
press OK.
4. Press to a kind of media (Photo, Music,
Video) and press OK.
It should match the selection on the setup screen.
(If you selected Video on the setup screen, you
also should select Video here.)
5. Press to select a le (or folder) and press
OK or / to start playback.
Note:
- Not all media formats are supported.
A ePortal page is easy to navigate and provides
graphical access to a variety of services such
as Apps, Internet, Videos, Music, Photos, Portal
Settings and others.When you first entered to the
ePortal menu, you will be prompted by the setup
wizard for account set up under Toshiba Cloud
Service. Follow the on-screen setup instructions and
customize your preferences.
Note:
- You need to configure a home network before using this
feature.
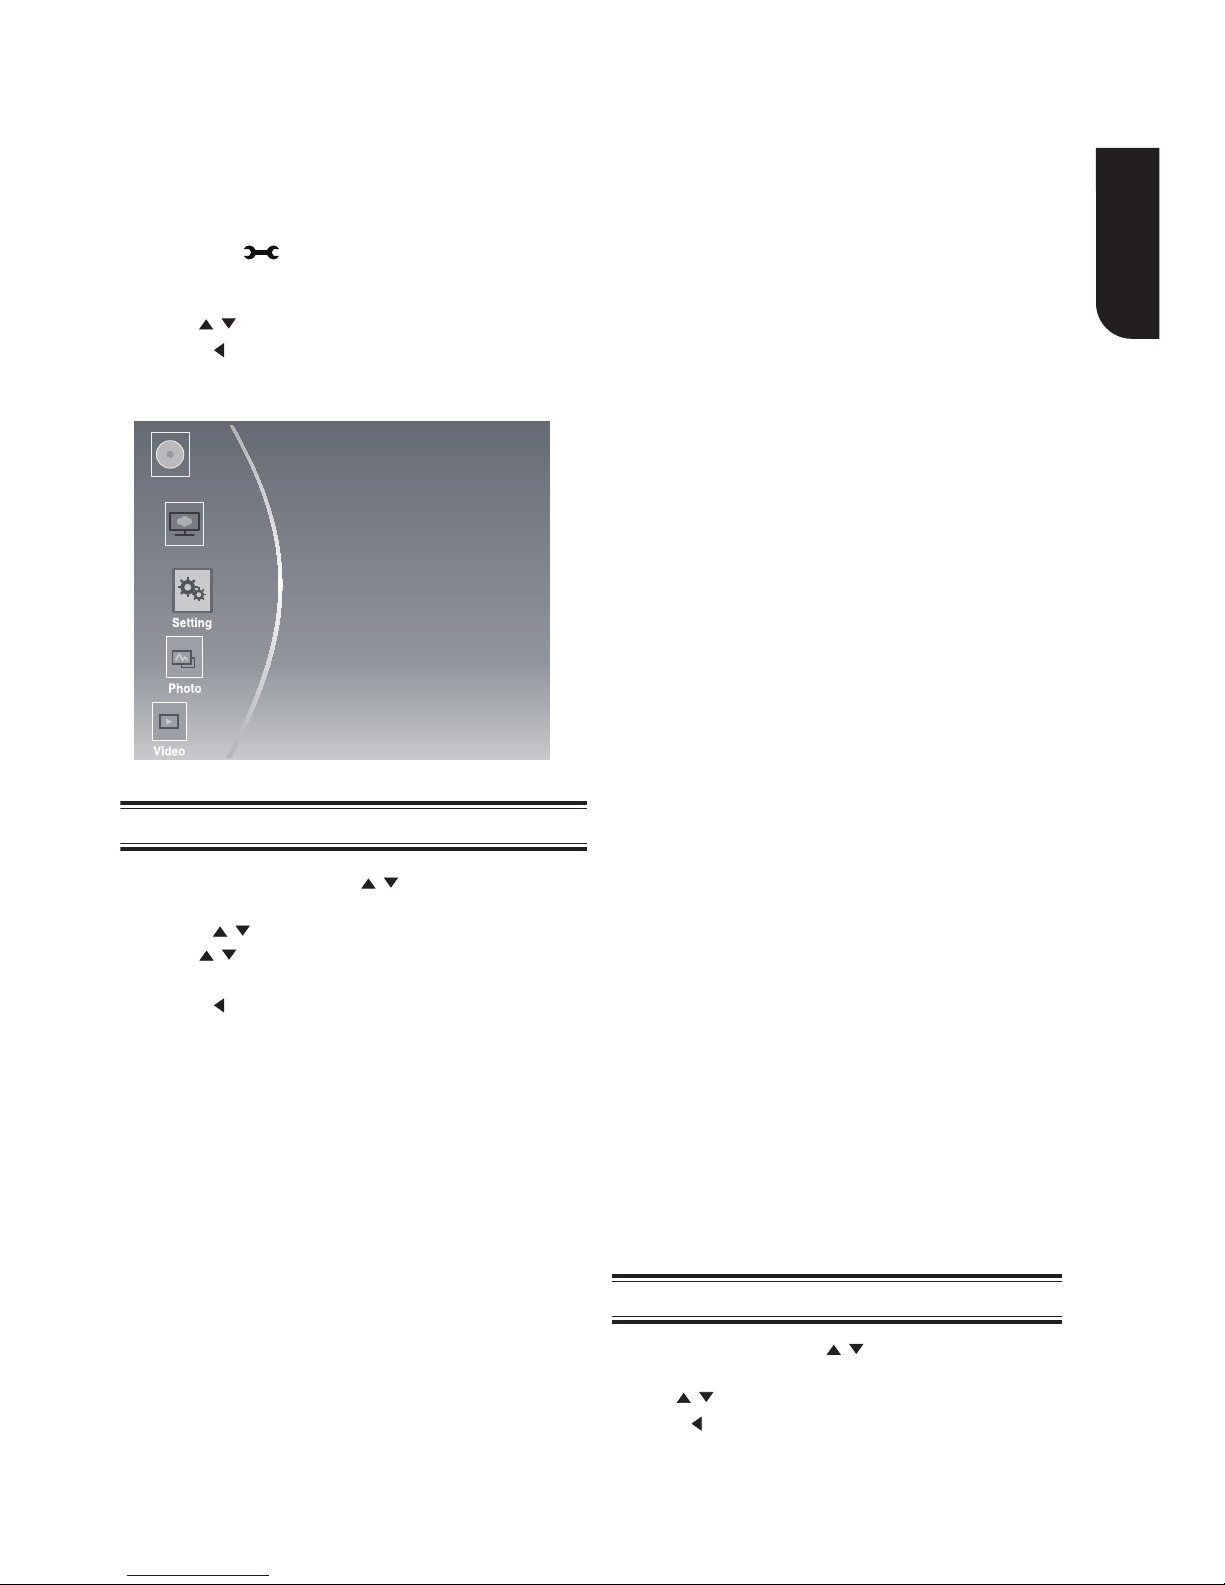
1. Press the button on the remote control or
select Portal in the setup screen to display the
Home screen.
2. Press the (arrow) buttons to select the
desired icon and press the OK button.
3. To close a menu, press the EXIT button.
ePortal Home Page
• Player Settings - customizes your player's options.
• Internet - access the Internet for searching,
browsing, and bookmarking your favorite content.
• Disc - plays the disc that is loaded into the disc tray.
• Videos - view your video content.
• Music - play and listen to your music.
• Photos - view your personal photos
• Portal Settings - customizes the ePortal settings.
• Apps - access the Network features, such as Netix®
and others.
Notes:
Some features require an always-on broadband
Internet connection, firmware update and/or
additional bandwidth dedicated to this product.
Third party Internet services not provided by Toshiba,
may change or be discontinued at any time and may
be subject to Internet service provider restrictions.
Toshiba makes no warranties, representations,
or assurances about the content, availability or
functionality of third-party content or services. Use
of third party Internet services may require the
creation of a separate account through a computer
with Internet access and payment of one-time and/
or recurring charges and membership. Not all services
or content may be available on this product, in your
country or with your language. In order to experience
the full capabilities of this product, fully compatible
devices may be required. For more information, visit
http://www.toshiba.eu/cloudtv-bluray
.
This service may be Forcibly blocked according to the
situation of CSP service.
Internet
1. Use the (arrow) buttons to select the
Internet icon.
2. Press the OK button to enter Toshiba’s home
website.
3. Press the DISPLAY button on the remote control
or the TAB key of USB keyboard to turn on/off
the Internet menu bar. You can use the
button to select Home, Go To, Search, History,
Bookmark, Display, Tool or Exit on the Internet
menu bar and press the OK button.
4. Press the BACK button on the remote control to
exit and return to the ePortal Home page.
• Home - accesses the Toshiba’s home website.
• Go to - inputs target web address.
• Search - inputs key words to search.
• History - refered web site page.
• Bookmark - adds current web site page as Favorite.
• Display - zooms in/out the current display screen.
• Tool - clears Cookies, History, Cache or Certication.
• Exit - exits and returns to the ePortal Home page.
The web browser on this device
• may not support certain functions used in web
pages.
• may not display web pages as intended, or may
not function.
• does not support platform-dependent
technologies such as ActiveX®.
• only supports preinstalled plug-ins.
-
-
• uses a single built-in font. Some text may not
be displayed as intended.
• does not support downloading of les or fonts.
In addition, some web pages may exceed the
memory allotment of the web browser. The web
browser will close when this happens.
Page 20

20
English
Watching movies with Netix
®
To use the Netix® service, connect this player to
your network, and congure the network settings
if they are not yet finished. In order to use this
service, you must set up or use an existing account.
Launching Netix® movie
1. Press the button on the remote control
or select Portal in the setup screen to display
the ePortal Home.
2. Use the buttons to select Netix icon,
and then press OK to enter the Netix® menu.
Creating Netix® account
1. If you are not a Netix® member: Select no.
2. Read the instructions displayed on the TV
screen, and visit http://www.netix.com/
toshiba from your PC.
3. Sign up to create your account, then select
“I’m now a member”.
4. If you are a Netix® member, select Sign in.
5. Enter a valid email address and password.
Preparing Instant Queue
To play streaming video via Netflix® service,
Netix® player needs to be activated. Read the
instructions displayed on the TV screen. Sign in
to your Netix® account with your email address
and password. Now you can view Netflix®
streaming video. After having activated
Netflix® player and prepared Instant Queue,
movies and TV episodes in your Instant Queue
appear on the TV screen. Select your desired
one using the remote control of the player.
Note:
- Resolution of video streamed from Netflix® varies
depending on communication speed or bitrate of
each content, etc.
Watching movies with YouTube
TM
1. Press the button on the remote control or
select Portal in the setup screen to display
the ePortal Home.
2. Use the buttons to select YouTube
icon, and press OK.
3. Now you can select the video content you wish
to watch.
3. Now you can select the video content you wish to
watch.
Browsing photos with Picasa
TM
To use the PicasaTM service, connect this player to your
network, and configure the network settings if they
are not yet nished. In order to use this service, you
must set up or use an existing account.
Signing in with your account
To display photos in your web album on the screen,
you need to sign in with your Picasa™ account.
1. Press the button on the remote control or select
Portal in the setup screen to display the ePortal
Home.
2. Use the buttons to select Picasa icon, and
press OK.
3. Enter your user name using the virtual keyboard,
and press the OK button while [Login] is selected
on the screen.
4. Enter the password using the virtual keyboard, and
press the OK button while [Login] is selected on
the screen.
Your web album is displayed on the screen.
Creating a new Picasa™ account on your PC
Visit http://picasa.google.com/ to create a new
account.
Watching movies with Dailymotion
1. Press the button on the remote control or
select Portal in the setup screen to display the
ePortal Home.
2. Use the buttons to select Dailymotion
icon, and press OK.
Page 21

21
English
Note:
- Product specificaons, configuraons, prices, system/component/opons availability are all subject to c
hange
without noce.
Disclaimer
1080p capable display required for viewing in 1080p. Viewing HD content and up-converting DVD content
may require an HDCP capable input on your display device. While up-converting DVD video content may
result in a picture that appears to be near HD quality, results may vary depending on content, display and
settings. Firmware update may be required.
For Dolby
®
TrueHD playback, content encoded in Dolby® Tr ueHD format required. Viewing 1080p/24 fps
output requires 1080p/24 fps encoded content and an HD display capable of accepting a 1080p/24Hz
signal. Supported file types: JPEG, MP3, WMA, and AVCHD. Some recordable media, cards or files may not
be supported. Product specifications, information and availability are all subject to change without notice.
Playable media
Audio
• Digital output (Coaxial): 0.5 Vp-p (75 Ω)
• HDMI output
Main Unit
• Power supply rating: 200V-240V, 50/60Hz
• Power consumption: 12W
• Power consumption in standby mode: <0.5W
• Dimensions (w x h x d): 270 ×38× 200 (mm)
• Net Weight: 0.95 kg
USB
• USB terminal: 5V
500mA
• USB 1.1/USB 2.0 Full-speed/USB 2.0 High-speed
• Supporting range: USB Mass Storage Class Device,
Card reader, Flash disk.
• Supported file system: FAT32
• Maximum size supported: 1000GB (HDD needs
self-powered)
• Does not support unpowered HDD
Accessories supplied
• Remote control (SE-R0444)
• Two AAA size batteries
• Quick start Guide
Video
Signal system: PAL/NTSC
HDMI Output: 480i/576i, 480p/576p, 720p, 1080i,
1080p, 1080/24p
Compatible fi le formats
MP3 tracks
JPEG
• Supported fi le extension: ‘.jpg’ or ‘.jpeg’
• JPEG/ISO format
• Does not support Picture CD
Other formats
• MP4 (‘.mp4’, ‘.mov’), AVI (‘.avi’), MPEG (‘.mpg’,
‘.mpeg’)
MKV
Supported file extensions: ‘.MKV’
Supported video codecs: H264 MP/HP,
MPEG4 SP/ASP, MPEG1, MPEG2
Supported audio codecs: AAC 2ch & 5.1ch, MP2,
MP3, AC3, DTS, LPCM
Supported subtitles: Text/UTF8, SSA, SMI, SUB,
SRT, ASS
Playback of MKV files in CD-R/RW may not be
compatible
Some MKV format discs may not play, depending
on the video resolution and frame rate condition
•
•
•
•
•
This product can play:
• Blu-ray Disc™-Video, BD-R/RE2.0,BDAV
• DVD, DVD-Video, DVD+R/+RW, DVD-R/-RW,
DVD+R/-R DL (Dual Layer)
• Video CD/SVCD
• Audio CD, CD-R/CD-RW
• AVCHD
• USB flash drive
• Supported file extension: '.mp3'
• Supported audio codec: MP3
• ISO format
• Supported corresponding bitrate: 8kbps-320 kbps
• Supported sampling frequencies: 32kHz, 44.1kHz,
48kHz
• Operating temperature: 5°C to 35°C
• Operating humidity: Less than 80 %
(no condensation)
8 Specications
Page 22

22
English
9 Troubleshooting
If you experience any of the following difficulties while using this unit, check the list below before
consulting your nearest TOSHIBA dealer.
Problem Tip
No reaction to the remote
control.
Connect the product to the power outlet.
Point the remote control at the product.
Insert the battery correctly.
Insert new battery in the remote control.
No video signal on the display
device.
Turn on the TV.
Set the TV to the correct external input.
Select the correct video resolution.
Set TV System of TV correctly.
Incorrect or no audio/video
signal on the amplifier/display
device via HDMI cable.
If the unit is connected to the unauthorized display device with
an HDMI cable, the audio/video signal may not be output.
Ensure the amplifier/display devices setting match the Blu-ray
Disc™ player.
No high-definition video signal
on the TV.
Does the disc contain high-definition video? High-definition
video is not available when the disc does not contain it.
Does the TV support high-definition video? High-definition
video is not available when the TV does not support it.
No audio signal from the
loudspeakers of the audio
system.
Turn on the audio system.
Set the audio system to the correct external input.
Increase the volume level of the audio system.
Cannot play back a disc.Make sure that the Blu-ray Disc™ player supports the disc.
Make sure that the Blu-ray Disc™ player supports the region
code of the DVD or Blu-ray Disc™.
For DVD+RW/+R or DVD-RW/-R, make sure that the disc is
finalized.
Clean the disc.
Cannot play back JPEG files
from a disc.
Make sure that the disc was recorded in the JPEG/ISO format.
Cannot play MP3 files from a
disc.
Make sure that the disc was recorded in the ISO format.
Make sure that the bit rate of the MP3 files is between 8 and
320 kbps.
Make sure that the sample rate of the MP3 files is 32kHz,
44.1kHz or 48kHz.
Page 23

23
English
Cannot find a JPEG file. Make sure that the selected group (folder) does not contain
more than 9,999 files for DVD and 999 files for CD.
Make sure that the file extension is .jpg, .JPG, .jpeg or .JPEG.
Cannot find a MP3 file. Make sure that the selected folder does not contain more
than 9,999 files for DVD and 999 files for CD.
Make sure that the file extension is .mp3 or .MP3.
Cannot upgrade SW.When you upgrade the system with USB flash drive, you
should make a new folder named UPG_ALL, and copy the
upgrade file into this folder.
Sometimes the options of setup
menu cannot be selected.
Cannot connect to the network
Check that the LAN cable connection is properly made.
Check that the broadband router and/or modem is correctly
connected.
Check the Network Connection Setting.
When playing a DVD disc or Blu-ray Disc
TM
, press STOP
button once, the player will go into stop resume mode,
meanwhile you cannot change some settings in setup
menu such as language subitem menu, audio, subtitle
etc. If you want to change that, press STOP button twice,
the player will go into full stop mode, then you can do it.
Page 24

24
English
10 Glossary
Dolby® TrueHD
Dolby TrueHD is a lossless coding technology
developed for next generation optical discs. Blu-ra
y
DiscTM supports 7.1 multi-channel surround sound
output.
Aspect
ratio
Aspect
ratio refers to the length to height ratio of
TV
screens. The ratio of a standard TV is 4:3, while
the
ratio of a high defi nition or wide TV is 16:9. The
letterbox
allows you to enjoy a picture with a wider
perspective on a standard 4:3 screen
.
Blu-
ray Disc
TM
Blu-
ray DiscTM is a next generation optical video
disc
capable of storing fi ve times more data than
a
conventional DVD. The large capacity makes it
possible
to benefi t from the features such as high-
de
fi nition videos, multichannel surround sound,
inter
active menus and so on.
Chapter
Just
as a book is split up into several chapters,
a
title on a Blu-ray Disc™-video or DVD-video is
usually divided into chapters
.
BD
-Java
TM
With
some Blu-ray Disc™ which support Java™
applications,
you can enjoy the interactive functions
such as games or inter
active menus.
A
VCHD™
A
VCHD™ is a new format for high defi nition video
camcorders
which can record and play high-
resolution HD images
.
AV
I
Audio
Video Interleave, known by its acronym
A
VI, is a multimedia container format. AVI fi les
can
contain both audio and video data in a fi le
container
that allows synchronous audio-with-video
playback
.
DTS
®
DTS is a multi-channel surround sound system. By
connecting to DTS decoder, you can enjoy
movie
dynamic and realistic sound like movie theater. DT
S
surround sound technologies were developed
by
DTS, Inc.
Dolby
®
Digital
The system to compress digital sound
developed
by Dolby Laboratories. It offers you sound of stereo
(2ch) or multichannel audio.
Dolby
®
Digital Plus
Dolby Digital Plus is the next generation
digital
audio compression technology developed as an
extension to Dolby Digital. Blu-ray DiscTM supports
7.1 multi-channel surround sound output.
BONUSVIEW
TM
This
is a Blu-ray DiscTM-Video (Final Standard
Profile
or Profile 1.1) that supports interactive
content
encoded on the disc, such as
picture-in-picture.
This means you can play the
primary video and secondary video simultaneously
.
BD-Live™
BD-Live™ is a BD-video (BD-ROM version 2.5
Profile 2 ) which contains new functions (e.g.
Internet connection), in addition to the BONUSVIEW™
function
.
Digital Audi
o
Digital
Audio is a sound signal that has been
converted
into numerical values. Digital sound
can
be transmitted through multiple channels.
A
nalogue sound can only be transmitted through
two channels
.
HDMI
®
High-Defi nition Multimedia Interface (HDMI)
is
a high-speed digital interface that can transmit
uncompressed high defi nition video and digital
multichannel audio. It delivers high quality
picture and sound quality. HDMI is fully backward
compatible with DVI. As required by the
HDMI
standard, connecting to HDMI or DVI products
without HDCP (High bandwidth Digital Content
Protection) will result in no Video or Audio output.
HDCP
High-bandwidth Digital Content Protection. This
is
a specifi cation that provides a secure transmission
of digital contents between different devices
(to
prevent unauthorized copyright.)
DTS 2.0+Digital Out
TM
DTS 2.0+Digital OutTM denotes the dual ability to
pass the DTS encoded digital bistream to an
external DTS decoder for playback as well as fold
down the digital surround soundtrack for playback
in a 2-channel environment through analog
outputs.
IP Address
A set of numbers which are assigned to devices
participating in a computer network.
Page 25

25
English
fi nd the
Region code
A
system that allows discs to be played only in the
region designated. This unit only plays discs that
have compatible region codes. You can
region code of your unit on the product label. Some
discs are compatible with more than one region (or
A
LL regions).
Track
Audio CD use tracks to divide up the content of
a disc. The Blu-ray Disc™-video or DVD-video
equivalent is called a chapter. See also “Chapter”.
Title
A collection of chapters on Blu-ray Disc™-video or
DVD-video.
A file format with a sound data compression
system. MP3 is the abbreviation of Motion Picture
Experts Group 1 (or MPEG-1) Audio Layer 3. With
the MP3 format, one CD-R or CD-RW can contain
about 10 times more data than a regular CD.
MP4
MP4 file format is a multimedia container format
standard specified as a part of MPEG-4. It is most
commonly used to store digital video and digital
audio streams, especially those defined by MPEG
(MPEG4, H264…) but can also be used to store
other data such as subtitles and still images.
JPEG
A
very common digital still picture format. A stillpicture data compression system proposed by the
Joint Photographic Expert Group, which features
small decrease in image quality in spite of its high
compression ratio. Files are recognized by their file
extension ‘.jpg’ or ‘.jpeg’.
MP3
PCM
Pulse Code Modulation. A digital audio encoding
system.
LAN (Local Area Network)
A group of linked devices in a company, school
or home. Indicates the boundaries of a particular
network.
Local storage
This storage area is used as destination for storing
additional contents from BD-Live™ enabled Blu-ray
Disc™-Video.
Sampling Frequency
The rate which sound is measured by a specified
interval to turn into digital audio data. The
numbers of sampling in one second defines as
sampling frequency. The higher the rate, the
better the sound quality.
MKV
The Matroska Multimedia Container is an open
standard free container format, a file format that
can hold an unlimited number of video, audio,
picture or subtitle tracks inside a single file. It is
intended to serve as a universal format for storing
common multimedia content, like movies or TV
shows.
Page 26

26
English
The
software pre-installed in this product consists of multiple, independent software components. Each
software
component is copyrighted by a third party. This product uses software components that are
distributed
as freeware under a third-party end-user license agreement or copyright notice (hereinafter
referred
to as a “EULA”). Some EULAs require that the source code of the applicable component be
disclosed
as the condition for distributing the software component in executable format. You can check
the
software components subject to such EU
LA requirements on the following e-mail address:
E-mail address: linux@toshiba-dme.co.jp
TO
SHIBA provides a warranty for this product you have purchased under conditions set forth by TOSHIBA.
Howeve
r, some of the software components distributed under an EULA are made available for use by
the
user on the assumption that they are not copyrighted or warranted by a third party. These software
components
are licensed to the user free of charge and therefore not covered by any warranty within
the
scope of the applicable laws. These software components are not subject to any copyrights or
other
third-part
y rights and are provided in “as is” condition without any warranty, whether express or implied.
“W
arranty” here includes, but not limited to, an implied warranty for marketability or fi tness for specifi c
uses.
All risks associated with the quality or performance of these software components are assumed by
the
user. TOSHIBA shall not be liable whatsoever for any cost of repair or correction or other incidental
expense
incurred in connection with a defect found in any of these software components. Unless specifi ed
under
the applicable laws or in a written agreement, a party who changes or redistributes the software
with consent from the copyright holders or based on the aforementioned licenses shall not be held liable
whatsoever
for any loss arising from the use of or inability to use such software components. The same
applies even when the copyright holders or relevant third parties have been informed of the possibility of
such
loss. “Loss” here includes normal, special, incidental and indirect loss (including, but not limited to,
the loss of data or its accu
racy; loss incurred by the user or any third party; and interface incompatibility
with
other software). Please read each EULA for details on the use conditions and items that must be
observed regarding these software components
.
The
table below lists the software components pre-installed in this product, which are subject to EULAs.
The
user should read the applicable EULAs carefully before using these software components. The EULA
s
are exhibited in their original text (English) as exactly written by the respective parties
.
This document is statement purpose only. Not concerned with operation of
this product.
SquashFS GPLv2
iputils GPLv2
udhcpc GPLv2
net-tools
GPLv2
Linux kernel GPLv2
gcc libgcc
GPLv3.txt and gcc-exception.txt (GPLv3 with GCC Runtime Library
Exception)
gcc libstdc++
GPLv3.txt and gcc-exception.txt (GPLv3 with GCC Runtime Library
Exception)
glibc LGPLv2.1
OSS name
OSS license
11 License Information on the Software Used in This Product
Page 27

27
English
util-linux-ngGPLv2
procps (ps, top) LGPLv2
psmisc GPLv2
coreutils GPLv2
gawk GPLv2
grep GPLv2
module-init-toolsGPLv2
findutils GPLv2
bash GPLv2
tarGPLv2
sed GPLv2
gzip
GPLv2
inetutils GPLv2
ncursesncurses.txt
libjpeg libjpeg-7.txt
c-ares c-arse.txt
mtd-utils GPLv2
libmtpLGPLv2.1
zlib zlib.txt
OpenSSL openssl.txt
FreeType FreeType.txt
Expat expat.txt
libcurl libcurl.txt
gdb (gdbserver) GPLv2
Das U-Boot GPLv2
International Components for Unicode ICULicense.txt
sysvinit GPLv2
dibbler GPLv2
iproute2 GPLv2
mcr-tcpdump BSD
Page 28

28
English
Fusion GPLv2
SaWMan LGPLv2.1
libpng libpng.txt
Qt LGPLv2.1
libxml2 libxml.txt (MIT License)
xmlrpc-c xmlrpc-c.txt
DirectFBLGPLv2.1
tinyxmltinyxml.txt
gSOAPgSOAP.txt (gSOAP Public License 1.3a)
SQLite sqlite.txt (public domain)
David M. Gay's dtoa and strtod DMG's dtoa and strtod.txt
Bison generated parser
bison_parser.txt
Doug Lea's malloc dmalloc.txt
EMX sprintf and scanfEMX_sprintf_sscanf.txt
ntp
ntfsprogsGPLv2
libavformatLGPLv2
libavutil LGPLv2
libavcodec LGPLv2
lighttpdBSD License
nmbd GPLv2
JSON_ParserJSON_Parser.txt
Lua interpreter lua.txt (MIT License)
zziplib zziplib.txt
HarfBuzzHarfBuzz.txt
Unicode Bidirectional AlgorithmUnicode_Bidirectional_Algorithm.txt
Wireless Tools GPLv2
libusb LGPLv2.1
libusb-compatLGPLv2.1
Page 29

29
English
GNU GPLv2
GNU GENERAL PUBLIC LICENSE
Version 2, June 1991
Copyright (C) 1989, 1991 Free Software Foundation,
Inc., 51 Franklin Street, Fifth Floor, Boston, MA
02110-1301
USA Everyone is permitted to copy and distribute
verbatim copies of this license document, but
changing it is not allowed.
Preamble
The licenses for most software are designed to
take away your freedom to share and change it.
By contrast, the GNU General Public License is
intended to guarantee your freedom to share and
change free software--to make sure the software
can change the software or use pieces of it in new
free programs; and that you know you can do these
things.
is free for all its users. This General Public License
applies to most of the Free Software Foundation’s
software and to any other program whose authors
commit to using it. (Some other Free Software
Foundation software is covered by the GNU Lesser
General Public License instead.) You can apply it to
your programs, too.
When we speak of free software, we are referring
to freedom, not price. Our General Public Licenses
are designed to make sure that you have the
freedom to distribute copies of free software (and
charge for this service if you wish), that you receive
source code or can get it if you want it, that you
libelf GPLv2
TERMS AND CONDITIONS FOR COPYING,
DISTRIBUTION AND MODIFICATION
0. This License applies to any program or other
work which contains a notice placed by the
copyright holder saying it may be distributed
under the terms of this General Public License. The
“Program”, below, refers to any such program or
work, and a “work based on the Program” means
either the Program or any derivative work under
copyright law: that is to say, a work containing
Finally, any free program is threatened constantly
by software patents. We wish to avoid the danger
that redistributors of a free program will individually
obtain patent licenses, in effect making the program
proprietary. To prevent this, we have made it clear
that any patent must be licensed for everyone’s
free use or not licensed at all.
The precise terms and conditions for copying,
distribution and modifi cation follow.
For example, if you distribute copies of such a
program, whether gratis or for a fee, you must
give the recipients all the rights that you have. You
must make sure that they, too, receive or can get
the source code. And you must show them these
terms so they know their rights.
We protect your rights with two steps: (1) copyright
the software, and (2) offer you this license which
gives you legal permission to copy, distribute and/
or modify the software.
Also, for each author’s protection and ours, we
want to make certain that everyone understands
that there is no warranty for this free software.
If the software is modifi ed by someone else and
passed on, we want its recipients to know that what
they have is not the original, so that any problems
introduced by others will not refl ect on the original
authors’ reputations.
To
protect your rights, we need to make restrictions
that
forbid anyone to deny you these rights or to
ask
you to surrender the rights. These restrictions
tr
anslate to certain responsibilities for you if you
distribute copies of the software, or if you modify it.
xz
cpio
copyright notice and disclaimer of warranty; keep
intact all the notices that refer to this License and
to the absence of any warranty; and give any other
any medium, provided that you conspicuously
and
appropriately publish on each copy an
appropriate
of the Program’s source code as you receive it,
in
Activities other than copying, distribution and
modifi cation are not covered by this License;
they are outside its scope. The act of running the
Program is not restricted, and the output from the
Program is covered only if its contents constitute a
work based on the Program (independent of having
been made by running the Program). Whether that
is true depends on what the Program does.
1. You may copy and distribute verbatim copies
the Program or a portion of it, either verbatim or
with modifi cations and/or translated into another
language. (Hereinafter, translation is included
without limitation in the term “modifi cation”.) Each
licensee is addressed as “you”.
Page 30

30
English
b) You must cause any work that you distribute
or
publish, that in whole or in part contains or is
derived
from the Program or any part thereof, to be
licensed as a whole at no charge to all third parties
under the terms of this License
.
c) If the modifi ed program normally reads
commands interactively when run, you must cause
it, when started running for such interactive use
in the most ordinary way, to print or display an
announcement including an appropriate copyright
notice and a notice that there is no warranty (or
else, saying that you provide a warranty) and that
users may redistribute the program under these
conditions, and telling the user how to view a copy
of this License. (Exception: if the Program itself
These requirements apply to the modifi ed work as
a
whole. If identifi able sections of that work are not
derived
from the Program, and can be reasonably
considered
independent and separate works in
themselves,
then this License, and its terms, do
not
apply to those sections when you distribute
them
as separate works. But when you distribute
the
same sections as part of a whole which is a
work based on the Prog
ram, the distribution of the
whole must be on the terms of this License, whose
permissions
for other licensees extend to the entire
whole,
and thus to each and every part regardless
of who wrote it
.
Thus, it is not the intent of this section to claim
rights
or contest your rights to work written entirely
by
you; rather, the intent is to exercise the right
to control the distribution of deri
vative or collective
works based on the Progr
am.
You may charge a fee for the physical act of
tr
ansferring a copy, and you may at your option
offer warr
anty protection in exchange for a fee.
2. You may modify your copy or copies of the
Prog
ram or any portion of it, thus forming a work
based
on the Program, and copy and distribute
such
modifi cations or work under the terms of
Section 1 above, provided that you also meet all of
these conditions
:
a) You must cause the modifi ed fi les to carry
prominent
notices stating that you changed the
fi
les and the date of any change.
3. You may copy and distribute the Progra
m (or a
work based on it, under Section 2) in object code
or executable form under the terms of Sections 1
and 2 above provided that you also do one of
the
following:
a) Accompany it with the complete corresponding
machine-readable source code, which must be
distributed under the terms of Sections 1 and 2
above on a medium customarily used for software
interchange; or,
In addition, mere aggregation of another work
not
based on the Program with the Program (or
with a work based on the Prog
ram) on a volume of
a
storage or distribution medium does not bring the
other work under the scope of this License.
b) Accompany it with a written offer, valid for at
least three years, to give any third party, for a charge
no more than your cost of physically performing
source distribution, a complete machine-readable
copy of the corresponding source code, to be
distributed under the terms of Sections 1 and 2
above on a medium customarily used for software
interchange; or,
c) Accompany it with the information you received
as to the offer to distribute corresponding source
code. (This alternative is allowed only for noncommercial distribution and only if you received
is interactive but does not normally print such an
announcement, your work based on the Program is
not required to print an announcement.)
the program in object code or executable form with
such an offer, in accord with Subsection b above.)
The source code for a work means the preferred
form of the work for making modifi cations to it. For
an executable work, complete source code means
all the source code for all modules it contains, plus
recipients of the Program a copy of this License
along with the Prog
ram.
scripts used to control compilation and installation
of the executable. However, as a special
exception, the source code distributed need not
include anything that is normally distributed (in
either source or binary form) with the major
components (compiler, kernel, and so on) of the
operating system on which the executable runs,
unless that component itself accompanies the
executable.If distribution of executable or object
code is made by offering access to copy from a
designated place, then offering equivalent access
to copy the source code from the same place
counts as distribution of the source code, even
though third parties are not compelled to copy the
source along with the object code.
4. You may not copy, modify, sublicense, or
distribute the Program except as expressly
provided under this License. Any attempt
otherwise to copy, modify, sublicense or distribute
the Program is void, and will automatically
terminate your rights under this License. However,
parties who have received copies, or rights, from
you under this License will not have their licenses
terminated so long as such parties remain in full
compliance.
Page 31

31
English
6. Each time you redistribute the Program (or
any
work based on the Program), the recipient
automatically
receives a license from the original
licensor
to copy, distribute or modify the Program
subject
to these terms and conditions. You may not
impose
any further restrictions on the recipients’
ex
ercise of the rights granted herein. You are
not
responsible for enforcing compliance by third
parties to this License
.
7. If, as a consequence of a court judgment or
allegation
of patent infringement or for any other
reason
(not limited to patent issues), conditions are
imposed
on you (whether by court order, agreement
or
otherwise) that contradict the conditions of this
License,
they do not excuse you from the conditions
of
this License. If you cannot distribute so as to
satisf
y simultaneously your obligations under this
License
and any other pertinent obligations, then as
a
consequence you may not distribute the Program
If any portion of this section is held invalid or
unenforceable
under any particular circumstance,
the balance of the section is intended to apply and
the
section as a whole is intended to apply in other
circumstances
.
It is not the purpose of this section to induce
you
to infringe any patents or other property right
claims
or to contest validity of any such claims;
this
section has the sole purpose of protecting the
integrity
of the free software distribution system,
which
is implemented by public license practices.
Many
people have made generous contributions to
the
wide range of software distributed through that
system
in reliance on consistent application of that
system;
it is up to the author/donor to decide if
he
or she is willing to distribute software through
any
other system and a licensee cannot impose
that choice.
This section is intended to make thoroughly clear
what
is believed to be a consequence of the rest
of this License
.
gr
ants you permission to modify or distribute the
Prog
ram or its derivative works. These actions are
prohibited by law if you do not accept this License.
Therefore,
by modifying or distributing the Program
(or
any work based on the Program), you indicate
your
acceptance of this License to do so, and all
its
terms and conditions for copying, distributing or
modif
ying the Program or works based on it.
8. If the distribution and/or use of the Program
is restricted in certain countries either by patents
or by copyrighted interfaces, the original copyright
5. You are not required to accept this License,
since
you have not signed it. However, nothing else
9. The Free Software Foundation may publish
revised and/or new versions of the General Public
License from time to time. Such new versions
will be similar in spirit to the present version,
but may differ in detail to address new problems
or concerns.
holder who places the Program under this License
may add an explicit geographical distribution
limitation excluding those countries, so that
distribution is permitted only in or among countries
not thus excluded. In such case, this License
incorporates the limitation as if written in the body
of this License.
at
all. For example, if a patent license would not
permit
royalty-free redistribution of the Program by
Each version is given a distinguishing version
number. If the Program specifi es a version number
of this License which applies to it and “any later
version”, you have the option of following the terms
and conditions either of that version or of any later
version published by the Free Software Foundation.
If the Program does not specify a version number
of this License, you may choose any version ever
published by the Free Software Foundation.
10. If you wish to incorporate parts of the Program
into other free programs whose distribution
conditions are different, write to the author to ask
for permission. For software which is copyrighted
by the Free Software Foundation, write to the
Free Software Foundation; we sometimes make
exceptions for this. Our decision will be guided by
the two goals of preserving the free status of all
derivatives of our free software and of promoting
the sharing and reuse of software generally.
all
those who receive copies directly or indirectly
through
you, then the only way you could satisfy
both
it and this License would be to refrain entirely
from distribution of the Program.
NO WARRANTY
11. BECAUSE THE PROGRAM IS LICENSED FREE
OF CHARGE, THERE IS NO WARRANTY FOR THE
PROGRAM, TO THE EXTENT PERMITTED BY
APPLICABLE LAW. EXCEPT WHEN OTHERWISE
STATED IN WRITING THE COPYRIGHT HOLDERS
AND/OR OTHER PARTIES PROVIDE THE PROGRAM
“AS IS” WITHOUT WARRANTY OF ANY KIND,
EITHER EXPRESSED OR IMPLIED, INCLUDING,
BUT NOT LIMITED TO, THE IMPLIED WARRANTIES
OF MERCHANTABILITY AND FITNESS FOR A
PARTICULAR PURPOSE. THE ENTIRE RISK AS
TO THE QUALITY AND PERFORMANCE OF THE
PROGRAM IS WITH YOU. SHOULD THE PROGRAM
PROVE DEFECTIVE, YOU ASSUME THE COST
OF ALL NECESSARY SERVICING, REPAIR OR
CORRECTION.
12. IN NO EVENT UNLESS REQUIRED BY
APPLICABLE LAW OR AGREED TO IN
WRITING
Page 32

32
English
THE
PROGRAM AS PERMITTED ABOVE, BE
LIABLE
TO YOU FOR DAMAGES, INCLUDING
A
NY GENERAL, SPECIAL, INCIDENTAL OR
CONSEQUENTIAL
DAMAGES ARISING OUT OF
When we speak of free software, we are
referring
to freedom, not price. Our General Public
Licenses
are designed to make sure that you have
the
freedom to distribute copies of free software
(and charge for them if you wish), that you receive
source
code or can get it if you want it, that you
can
change the software or use pieces of it in new
free
programs, and that you know you can do these
things.
To protect your rights, we need to prevent
others
from denying you these rights or asking
you
to surrender the rights. Therefore, you have
certain
responsibilities if you distribute copies of
the
software, or if you modify it: responsibilities to
respect the freedom of others.
For example, if you distribute copies of such
a program, whether gratis or for a fee, you
must
pass on to the recipients the same freedoms that
you received. You must make sure that they, too,
receive or can get the source code. And you
must
show them these terms so they know their rights.
Developers that use the GNU GPL protect your
rights with two steps: (1) assert copyright on
the
software, and (2) offer you this License giving
you
legal permission to copy, distribute and/or modify
it.
THE
USE OR INABILITY TO USE THE PROGRAM
WITH ANY OTHER PROGRAMS), EVEN IF SUCH
HOLDER OR OTHER PARTY HAS BEEN ADVISED OF
THE POSSIBILITY OF SUCH DAMAGES.
GNU GPLv3
GNU GENERAL PUBLIC LICENSE
Version 3, 29 June 2007
Copyright (C) 2007 Free Software Foundation, Inc.
<http://fsf.org/>
Everyone is permitted to copy and distribute
verbatim copies of this license document, but
changing it is not allowed.
Preamble
The GNU General Public License is a free, copyleft
license for software and other kinds of works.
The licenses for most software and other practical
works are designed to take away your freedom to
share and change the works. By contrast, the GNU
General Public License is intended to guarantee
this
way by its authors. You can apply it to your
prog
rams, too.
(INCLUDING BUT NO
T LIMITED TO LOSS OF DATA
OR
DATA BEING RENDERED INACCURATE OR
LOSSES
SUSTAINED BY YOU OR THIRD PARTIES
OR
A FAILURE OF THE PROGRAM TO OPERATE
For the developers’ and authors’ protection, the
GPL clearly explains that there is no warranty
for
this free software. For both users’ and authors’
sake, the GPL requires that modified versions be
marked as changed, so that their problems will not
be attributed erroneously to authors of previous
versions.
Some devices are designed to deny users
access
to install or run modified versions of the
software
inside them, although the manufacturer can do
so.
This is fundamentally incompatible with the aim of
protecting users’ freedom to change
the
software. The systematic pattern of such
abuse
occurs in the area of products for individuals to use,
which is precisely where it is most unacceptable.
Therefore, we have designed this version of
the
GPL to prohibit the practice for those products. If
such problems arise substantially in other domains,
we stand ready to extend this provision to
those
domains in future versions of the GPL, as needed to
protect the freedom of users.
Finally, every program is threatened constantly
by software patents. States should not
allow
for
all its users. We, the Free Software Foundation,
use
the GNU General Public License for most of our
software;
it applies also to any other work released
your
freedom to share and change all versions of
a
program--to make sure it remains free software
WILL ANY COPYRIGHT HOLDER, OR ANY OTHER
PA
RTY WHO MAY MODIFY AND/OR REDISTRIBUTE
patents to restrict development and use of software
on general-purpose computers, but in those that
do, we wish to avoid the special danger that
patents applied to a free program could make it
effectively proprietary. To prevent this, the
GPL
assures that patents cannot be used to render
the
program non-free.
The precise terms and conditions for
copying,
distribution and modifi cation follow.
TERMS AND CONDITIONS
0. Defi nitions.
“This License” refers to version 3 of the
GNU
General Public License.
“Copyright” also means copyright-like
laws
that apply to other kinds of works, such as
semiconductor masks.
“The Program” refers to any
copyrightable
work licensed under this License. Each licensee
is
addressed as “you”. “Licensees” and
“recipients”
may be individuals or organizations.
Page 33

33
English
A “covered work” means either the unmodifi ed
Prog
ram or a work based on the Program.
To “propagate” a work means to do anything
with
it that, without permission, would make you
directly
or secondarily liable for infringement under
applicable
copyright law, except executing it on a
computer
or modifying a private copy. Propagation
includes
copying, distribution (with or without
modi
fi cation), making available to the public, and
in some countries other activities as well
.
To “convey” a work means any kind of
propagation
that enables other parties to make
or
receive copies. Mere interaction with a user
through
a computer network, with no transfer of a
copy
, is not conveying.
An interactive user interface displays “Appropriate
Legal
Notices” to the extent that it includes a
convenient and prominently visible feature that (1)
displays
an appropriate copyright notice, and (2)
tells
the user that there is no warranty for the work
(except
to the extent that warranties are provided),
that
licensees may convey the work under this
License,
and how to view a copy of this License. If
the
interface presents a list of user commands or
options,
such as a menu, a prominent item in the
list meets this criterion.
1. Source Code.
The “source code” for a work means the
preferred form of the work for making modifi cations
to it. “Object code” means any non-source form of
a work.
A “Standard Interface” means an interface that
either is an offi cial standard defi ned by a recognized
standards body, or, in the case of interfaces
specifi ed for a particular programming language,
one that is widely used among developers working
in that language.
The “System Libraries” of an executable work
include anything, other than the work as a whole,
that (a) is included in the normal form of packaging
a Major Component, but which is not part of that
Major Component, and (b) serves only to enable
use of the work with that Major Component, or
to implement a Standard Interface for which
an implementation is available to the public in
source code form. A “Major Component”, in this
context, means a major essential component
(kernel, window system, and so on) of the specifi
c
operating system (if any) on which the ex
ecutable
work runs, or a compiler used to produce the
work,
or an object code interpreter used to run it.
The “Corresponding Source” for a work in
object
code form means all the source code needed to
generate, install, and (for an executable work)
run
the object code and to modify the work, including
scripts to control those activities. However, it does
not include the work’s System Libraries, or generalpurpose tools or generally available free programs
which are used unmodifi ed in performing
those
activities but which are not part of the work. Fo
r
example, Corresponding Source includes interface
defi nition fi les associated with source fi les for
the
work, and the source code for shared libraries
and
specifi
dynamically linked subprograms that the work
is
cally designed to require, such as by
intimate
data communication or control fl
ow between those
subprograms and other parts of the work.
The Corresponding Source need not
include
anything that users can regenerate automatically
from other parts of the Corresponding Source.
The Corresponding Source for a work in
source
code form is that same work.
2. Basic Permissions.
All rights granted under this License are gr
anted
for the term of copyright on the Program,
and
are irrevocable provided the stated conditions
are
met. This License explicitly affi rms your
unlimited
permission to run the unmodifi ed Program.
The
output from running a covered work is
covered
by this License only if the output, given
its
To “modify” a work means to copy from or
adapt all or part of the work in a fashion requiring
copyright permission, other than the making of an
exact copy. The resulting work is called a “modifi ed
version” of the earlier work or a work “based on”
the earlier work.
You may make, run and propagate covered
works that you do not convey, without conditions
so long as your license otherwise remains in force.
You may convey covered works to others for the
sole purpose of having them make modifi cations
exclusively for you, or provide you with facilities for
running those works, provided that you comply with
the terms of this License in conveying all material
for which you do not control copyright. Those
thus making or running the covered works for
you must do so exclusively on your behalf, under
your direction and control, on terms that prohibit
them from making any copies of your copyrighted
material outside their relationship with you.
content, constitutes a covered work. This License
acknowledges your rights of fair use or
other
equivalent, as provided by copyright law.
Conveying under any other circumstances is
permitted solely under the conditions stated below.
Sublicensing is not allowed; section 10 makes it
unnecessary.
Page 34

34
English
3. Protecting Users’ Legal Rights From Anti-
Circumvention La
w.
No covered work shall be deemed part of
an
effective technological measure under any
applicable
law fulfi lling obligations under article
11
of the WIPO copyright treaty adopted on 20
December
1996, or similar laws prohibiting or
restricting circumvention of such measures.
When you convey a covered work, you waive any
legal
power to forbid circumvention of technological
measures
to the extent such circumvention is
effected
by exercising rights under this License with
respect
to the covered work, and you disclaim any
intention
to limit operation or modifi cation of the
work
as a means of enforcing, against the work’s
users,
your or third parties’ legal rights to forbid
circumvention of technological measures
.
4. Conveying Verbatim Copies.
You may convey verbatim copies of the
Prog
ram’s source code as you receive it, in any
medium,
provided that you conspicuously and
appropriately
publish on each copy an appropriate
copyright
notice; keep intact all notices stating that
this
License and any non-permissive terms added
in
accord with section 7 apply to the code; keep
intact
all notices of the absence of any warranty;
and
give all recipients a copy of this License along
with the Prog
ram.
You may charge any price or no price for each
copy
that you convey, and you may offer support or
warranty protection for a fee.
5. Conveying Modifi ed Source Versions.
You may convey a work based on the Program,
or
the modifi cations to produce it from the Program,
in
the form of source code under the terms of
section
4, provided that you also meet all of these
conditions:
a) The work must carry prominent notices stating
that you modi
fi ed it, and giving a relevant date.
b) The work must carry prominent notices
stating
that it is released under this License and any
conditions
added under section 7. This requirement
modi
fi es the requirement in section 4 to “keep
intact all notices”
.
c) You must license the entire work, as a whole,
under
this License to anyone who comes into
possession
of a copy. This License will therefore
appl
y, along with any applicable section 7 additional
terms,
to the whole of the work, and all its parts,
regardless
of how they are packaged. This License
gives
no permission to license the work in any other
wa
y, but it does not invalidate such permission if
you have separately received it
.
d) If the work has interactive user interfaces,
each must display Appropriate Legal Notices;
however, if the Program has interactive interfaces
that do not display Appropriate Legal Notices, your
work need not make them do so.
A compilation of a covered work with other
separate and independent works, which are not by
their nature extensions of the covered work, and
which are not combined with it such as to form
a larger program, in or on a volume of a storage
or distribution medium, is called an “aggregate”
if the compilation and its resulting copyright are
not used to limit the access or legal rights of the
compilation’s users beyond what the individual
works permit. Inclusion of a covered work in an
aggregate does not cause this License to apply to
the other parts of the aggregate.
6. Conveying Non-Source Forms.
You may convey a covered work in object code
form under the terms of sections 4 and 5, provided
that you also convey the machine-readable
Corresponding Source under the terms of this
License, in one of these ways:
a) Convey the object code in, or embodied in, a
physical product (including a physical distribution
medium), accompanied by the Corresponding
Source fi xed on a durable physical medium
customarily used for software interchange.
b) Convey the object code in, or embodied in, a
physical product (including a physical distribution
medium), accompanied by a written offer, valid
for at least three years and valid for as long as
you offer spare parts or customer support for that
product model, to give anyone who possesses the
object code either (1) a copy of the Corresponding
Source for all the software in the product that is
covered by this License, on a durable physical
medium customarily used for software interchange,
for a price no more than your reasonable cost of
physically performing this conveying of source, or
(2) access to copy the Corresponding Source from
a network server at no charge.
c) Convey individual copies of the object code
with a copy of the written offer to provide the
Corresponding Source. This alternative is allowed
only occasionally and noncommercially, and only if
you received the object code with such an offer, in
accord with subsection 6b.
d) Convey the object code by offering access
from a designated place (gratis or for a charge),
and offer equiva
lent access to the Corresponding
Source in the same way through the same place at
no further charge. You need not require recipients
to copy the Corresponding Source along with the
Page 35

35
English
party)
that supports equivalent copying facilities,
provided
you maintain clear directions next to the
object
code saying where to fi nd the Corresponding
Source.
Regardless of what server hosts the
Corresponding
Source, you remain obligated to
ensure
that it is available for as long as needed to
satisf
y these requirements.
e) Convey the object code using peer-to-peer
tr
ansmission, provided you inform other peers
where
the object code and Corresponding Source
of
the work are being offered to the general public
at no charge under subsection 6d
.
A separable portion of the object code, whose
source
code is excluded from the Corresponding
Source
as a System Library, need not be included in
conveying the object code work
.
A “User Product” is either (1) a “consumer
product”
, which means any tangible personal
property
which is normally used for personal,
fa
mily, or household purposes, or (2) anything
designed
or sold for incorporation into a dwelling.
In
determining whether a product is a consumer
product,
doubtful cases shall be resolved in favor
of
coverage. For a particular product received by a
particular
user, “normally used” refers to a typical
“Installation Information” for a User Product
means
any methods, procedures, authorization
keys,
or other information required to install and
ex
ecute modifi ed versions of a covered work in
that
User Product from a modifi ed version of its
Corresponding
Source. The information must
suffi
ce to ensure that the continued functioning of
the
modifi ed object code is in no case prevented
or
interfered with solely because modifi cation has
been made
.
If you convey an object code work under this
section
in, or with, or specifi cally for use in, a User
Product,
and the conveying occurs as part of a
tr
ansaction in which the right of possession and use
of
the User Product is transferred to the recipient
in perpetuity or for a
fi xed term (regardless of how
the
transaction is characterized), the Corresponding
Source
conveyed under this section must be
accompanied
by the Installation Information. But
object code on the User Product (for example, the
work has been installed in ROM).
The requirement to provide Installation
Information does not include a requirement to
continue to provide support service, warranty,
or updates for a work that has been modifi ed or
installed by the recipient, or for the User Product
in which it has been modifi ed or installed. Access
to a network may be denied when the modifi cation
itself materially and adversely affects the operation
of the network or violates the rules and protocols
for communication across the network.
Corresponding Source conveyed, and Installation
Information provided, in accord with this section
must be in a format that is publicly documented
(and with an implementation available to the
public in source code form), and must require no
special password or key for unpacking, reading or
copying.
7. Additional Terms.
“Additional permissions” are terms that
supplement the terms of this License by making
exceptions from one or more of its conditions.
Additional permissions that are applicable to the
or common use of that class of product, regardless
of the status of the particular user or of the way in
which
the particular user actually uses, or expects
entire Program shall be treated as though they were
included in this License, to the extent that they are
or
is expected to use, the product. A product is
a
consumer product regardless of whether the
product
has substantial commercial, industrial or
non-consumer
uses, unless such uses represent the
only signifi
cant mode of use of the product.
valid under applicable law. If additional permissions
apply only to part of the Program, that part may
be
used separately under those permissions, but the
entire Program remains governed by this License
without regard to the additional permissions.
object code. If the place to copy the object code
is a network serve
r, the Corresponding Source may
be
on a different server (operated by you or a third
this requirement does not apply if neither you nor
any third party retains the ability to install modified
When you convey a copy of a covered
work,
you may at your option remove any additional
permissions from that copy, or from any
part
of it. (Additional permissions may be written to
require their own removal in certain cases
when
you modify the work.) You may place additional
permissions on material, added by you to a
covered
work, for which you have or can give
appropriate
copyright permission.
Notwithstanding any other provision of this
License, for material you add to a covered
work,
you may (if authorized by the copyright holders
of
that material) supplement the terms of this License
with terms:
a) Disclaiming warranty or limiting liability
differently from the terms of sections 15 and 16
of
this License; or
b) Requiring preservation of specifi ed reasonable
legal notices or author attributions in that material
or in the Appropriate Legal Notices displayed by
works containing it; or
Page 36

36
English
English
c) Prohibiting misrepresentation of the origin of
that material, or requiring that modifi ed versions
of such material be marked in reasonable ways as
different from the original version; or
d) Limiting the use for publicity purposes of
names of licensors or authors of the material; or
e) Declining to grant rights under trademark
law for use of some trade names, trademarks, or
service marks; or
f) Requiring indemnifi cation of licensors and
authors of that material by anyone who conveys
the material (or modifi ed versions of it) with
contractual assumptions of liability to the recipient,
for any liability that these contractual assumptions
directly impose on those licensors and authors.
All other non-permissive additional terms are
considered “further restrictions” within the meaning
of section 10. If the Program as you received it, or
any part of it, contains a notice stating that it is
governed by this License along with a term that is a
further restriction, you may remove that term. If a
license document contains a further restriction but
permits relicensing or conveying under this License,
you may add to a covered work material governed
by the terms of that license document, provided
that the further restriction does not survive such
relicensing or conveying.
If you add terms to a covered work in accord
Additional terms, permissive or non-permissive,
may
be stated in the form of a separately written
license,
or stated as exceptions; the above
requirements apply either wa
y.
8. Termination.
You may not propagate or modify a covered work
except
as expressly provided under this License.
A
ny attempt otherwise to propagate or modify it
is
void, and will automatically terminate your rights
under
this License (including any patent licenses
gr
anted under the third paragraph of section 11).
However, if you cease all violation of this License,
then
your license from a particular copyright holder
is
reinstated (a) provisionally, unless and until the
copyright
holder explicitly and fi nally terminates
your
license, and (b) permanently, if the copyright
holder
fails to notify you of the violation by some
reasonable
means prior to 60 days after the
cessation
.
Moreover, your license from a particular
copyright
holder is reinstated permanently if the
the violation prior to 30 days after your receipt
of
the notice.
Termination of your rights under this section
does not terminate the licenses of parties
who
have received copies or rights from you under this
License. If your rights have been terminated
and
not permanently reinstated, you do not qualify to
receive new licenses for the same material
under
section 10.
9. Acceptance Not Required for Having Copies.
You are not required to accept this License in
order to receive or run a copy of the Program.
Ancillary propagation of a covered work occurring
solely as a consequence of using peer-to-peer
transmission to receive a copy likewise does
not
require acceptance. However, nothing other than
this License grants you permission to
propagate
or modify any covered work. These
actions
infringe copyright if you do not accept this License.
Therefore, by modifying or propagating a
covered
work, you indicate your acceptance of this
License
to do so.
10. Automatic Licensing of
Downstream
Recipients.
Each time you convey a covered work,
the
recipient automatically receives a license from
the
original licensors, to run, modify and
propagate
that work, subject to this License. You are
not
responsible for enforcing compliance by
third
with this section, you must place, in the relevant
source fi les, a statement of the additional terms
that apply to those fi les, or a notice indicating
where to fi nd the applicable terms.
copyright holder notifi es you of the violation by
some reasonable means, this is the fi rst time
you
have received notice of violation of this License (for
any work) from that copyright holder, and you cure
parties with this License.
An “entity transaction” is a transaction transferring
control of an organization, or substantially all assets
of one, or subdividing an organization, or merging
organizations. If propagation of a covered work
results from an entity transaction, each party to that
transaction who receives a copy of the work also
receives whatever licenses to the work the party’s
predecessor in interest had or could give under the
previous paragraph, plus a right to possession of
the Corresponding Source of the work from the
predecessor in interest, if the predecessor has it or
can get it with reasonable efforts.
You may not impose any further restrictions on
the exercise of the rights granted or affi rmed under
this License. For example, you may not impose
a license fee, royalty, or other charge for exercise
of rights granted under this License, and you may
not initiate litigation (including a cross-claim or
counterclaim in a lawsuit) alleging that any patent
claim is infringed by making, using, selling, offering
Page 37

37
English
11. Patents.
A “contributor” is a copyright holder who
authorizes use under this License of the Program
or a work on which the Program is based. The work
thus licensed is called the contributor’s “contributor
version”.
A contributor’s “essential patent claims” are all
patent claims owned or controlled by the contributor,
whether already acquired or hereafter acquired,
that would be infringed by some manner, permitted
by this License, of making, using, or selling its
contributor version, but do not include claims
that would be infringed only as a consequence
of further modifi cation of the contributor version.
For purposes of this defi nition, “control” includes
the right to grant patent sublicenses in a manner
consistent with the requirements of this License.
Each contributor grants you a non-exclusive,
worldwide, royalty-free patent license under the
contributor’s essential patent claims, to make,
use, sell, offer for sale, import and otherwise
run, modify and propagate the contents of its
contributor version.
In the following three paragraphs, a “patent
license” is any express agreement or commitment,
however denominated, not to enforce a patent
(such as an express permission to practice a patent
or covenant not to sue for patent infringement).
To “grant” such a patent license to a party means
to make such an agreement or commitment not to
enforce a patent against the party.
If you convey a covered work, knowingly relying
of the work is not available for anyone to copy,
free of charge and under the terms of this License,
through a publicly available network server or other
readily accessible means, then you must either (1)
cause the Corresponding Source to be so available,
or (2) arrange to deprive yourself of the benefi t
of the patent license for this particular work,
or (3) arrange, in a manner consistent with the
requirements of this License, to extend the patent
license to downstream recipients. “Knowingly
relying” means you have actual knowledge that,
but for the patent license, your conveying the
covered work in a country, or your recipient’s use of
the covered work in a country, would infringe one
or more identifi able patents in that country that you
have reason to believe are va
lid.
If, pursuant to or in connection with a single
transaction or arrangement, you convey, or
propagate by procuring conveyance of, a covered
work, and grant a patent license to some of the
parties receiving the covered work authorizing
copy of the covered work, then the patent
license
you grant is automatically extended to all
recipients
of the covered work and works based on it.
A patent license is “discriminatory” if it does
not include within the scope of its covera
ge,
prohibits the exercise of, or is conditioned on
the
non-exercise of one or more of the rights that
are
specifi cally granted under this License. You
may
not convey a covered work if you are a party to
an arrangement with a third party that is in
the
business of distributing software, under which
you
make payment to the third party based on the extent
of your activity of conveying the work, and
under
which the third party grants, to any of the
parties
who would receive the covered work from you,
a
discriminatory patent license (a) in connection with
copies of the covered work conveyed by you (or
copies made from those copies), or (b) primarily
for and in connection with specifi c products or
compilations that contain the covered work, unless
you entered into that arrangement, or that patent
license was granted, prior to 28 March 2007.
Nothing in this License shall be construed as
excluding or limiting any implied license or
other
defenses to infringement that may otherwise be
available to you under applicable patent law.
12. No Surrender of Others’ Freedom.
If conditions are imposed on you
(whether
by court order, agreement or otherwise) that
contradict the conditions of this License, they
do
not excuse you from the conditions of this License.
If you cannot convey a covered work so as to
satisfy simultaneously your obligations under this
License and any other pertinent obligations, then
as a consequence you may not convey it at all.
on a patent license, and the Corresponding Source
for sale, or importing the Program or any portion
of it.
them to use, propagate, modify or convey a specific
For example, if you agree to terms that obligate
you to collect a royalty for further conveying
from
those to whom you convey the Program, the
only
way you could satisfy both those terms and this
License would be to refrain entirely from
conveying
the Program.
13. Use with the GNU Affero General Public
License.
Notwithstanding any other provision of this
License, you have permission to link or combine
any
covered work with a work licensed under
version
3 of the GNU Affero General Public License into
a
single combined work, and to convey the
resulting
work. The terms of this License will continue to
apply to the part which is the covered work, but
the special requirements of the GNU Affero Genera
l
Public License, section 13, concerning interaction
through a network will apply to the
combination
as such.
Page 38

38
English
14. Revised Versions of this License.
The Free Software Foundation may publish
revised
and/or new versions of the GNU General
Public
License from time to time. Such new versions
will
be similar in spirit to the present version, but
may
differ in detail to address new problems or
concerns.
Each version is given a distinguishing version
numbe
r. If the Program specifi es that a certain
numbered
version of the GNU General Public
License
“or any later version” applies to it, you have
the
option of following the terms and conditions
either
of that numbered version or of any later
version
published by the Free Software Foundation.
If
the Program does not specify a version number
of
the GNU General Public License, you may choose
any
version ever published by the Free Software
F
oundation.
If the Program specifi es that a proxy can decide
which
future versions of the GNU General Public
License
can be used, that proxy’s public statement
of
acceptance of a version permanently authorizes
you to choose that version for the Prog
ram.
Later license versions may give you additional
or
different permissions. However, no additional
obligations
are imposed on any author or copyright
holder as a result of your choosing to follow a later
version.
15. Disclaimer of Warranty.
THERE IS NO WARRANTY FOR THE PROGRAM,
TO
THE EXTENT PERMITTED BY APPLICABLE
LA
W. EXCEPT WHEN OTHERWISE STATED IN
WRITING
THE COPYRIGHT HOLDERS AND/OR
OT
HER PARTIES PROVIDE THE PROGRAM “AS
IS”
WITHOUT WARRANTY OF ANY KIND, EITHER
EXPRES
SED OR IMPLIED, INCLUDING, BUT
NO
T LIMITED TO, THE IMPLIED WARRANTIES
OF
MERCHANTABILITY AND FITNESS FOR A
PA
RTICULAR PURPOSE. THE ENTIRE RISK AS
TO
THE QUALITY AND PERFORMANCE OF THE
PROGRAM
IS WITH YOU. SHOULD THE PROGRAM
PROVE
DEFECTIVE, YOU ASSUME THE COST
OF
ALL NECESSARY SERVICING, REPAIR OR
CORRECTION.
16. Limitation of Liability.
IN NO EVENT UNLESS REQUIRED BY APPLICABLE
LA
W OR AGREED TO IN WRITING WILL ANY
COPYRIGHT
HOLDER, OR ANY OTHER PARTY
WHO
MODIFIES AND/OR CONVEYS THE PROGRAM
A
S PERMITTED ABOVE, BE LIABLE TO YOU FOR
DAMAGES,
INCLUDING ANY GENERAL, SPECIAL,
INCIDENT
AL OR CONSEQUENTIAL DAMAGES
A
RISING OUT OF THE USE OR INABILITY TO USE
THE
PROGRAM (INCLUDING BUT NOT LIMITED
TO
LOSS OF DATA OR DATA BEING RENDERED
INACCURA
TE OR LOSSES SUSTAINED BY YOU OR
THIRD PARTIES OR A FAILURE OF THE PROGRAM
TO OPERATE WITH ANY OTHER PROGRAMS),
EVEN IF SUCH HOLDER OR OTHER PARTY
HAS
BEEN ADVISED OF THE POSSIBILITY OF SUCH
DAMAGES.
17. Interpretation of Sections 15 and 16.
If the disclaimer of warranty and limitation
of
liability provided above cannot be given local
legal
effect according to their terms, reviewing
courts
shall apply local law that most closely approximates
an absolute waiver of all civil liability in connection
with the Program, unless a warranty or assumption
of liability accompanies a copy of the Program in
return for a fee.
END OF TERMS AND CONDITIONS
How to Apply These Terms to Your New Programs
If you develop a new program, and you want it
to be of the greatest possible use to the public,
the
best way to achieve this is to make it free software
which everyone can redistribute and change
under
these terms.
To do so, attach the following notices to
the
program. It is safest to attach them to the start
of each source fi le to most effectively state
the
exclusion of warranty; and each fi le should have at
least the “copyright” line and a pointer to where
the
full notice is found.
<one line to give the program’s name and a
brief
idea of what it does.>
Copyright (C) <year> <name of author>
This program is free software: you
can
redistribute it and/or modify it under the terms
of
the GNU General Public License as published
by
the Free Software Foundation, either version 3
of
the License, or (at your option) any later version.
This program is distributed in the hope that it
will
be useful, but WITHOUT ANY WARRANTY; without
even the implied warranty of MERCHANTABILITY
or FITNESS FOR A PARTICULA
R PURPOSE. See the
GNU General Public License for more details.
You should have received a copy of the
GNU
General Public License along with this program. If
not, see <http://www.gnu.org/licenses/>.
Also add information on how to contact you
by
electronic and paper mail.
If the program does terminal interaction, make
it output a short notice like this when it starts in an
interactive mode:
<program> Copyright (C) <year> <name
of
author>
This program comes with ABSOLUTELY NO
WARRANTY; for details type `show w’.
This is free software, and you are welcome to
Page 39

39
English
redistribute it under certain conditions; type `show
c’ for details.
The hypothetical commands `show w’ and
`show c’ should show the appropriate parts of the
General Public License. Of course, your program’s
commands might be different; for a GUI interface,
you would use an “about box”.
You should also get your employer (if you work
as a programmer) or school, if any, to sign a
“copyright disclaimer” for the program, if necessary.
For more information on this, and how to apply and
follow the GNU GPL, see <http://www.gnu.org/
licenses/>.
The GNU General Public License does not
permit incorporating your program into proprietary
programs. If your program is a subroutine library,
you may consider it more useful to permit linking
proprietary applications with the library. If this is
what you want to do, use the GNU Lesser General
Public License instead of this License. But fi rst,
please read <http://www.gnu.org/philosophy/whynot-lgpl.html>.
GCC-EXCEPTION
GCC RUNTIME LIBRARY EXCEPTION
Version 3.1, 31 March 2009
Copyright (C) 2009 Free Software Foundation, Inc.
<http://fsf.org/>
Everyone is permitted to copy and distribute
verbatim copies of this license document, but
changing it is not allowed.
This GCC Runtime Library Exception (“Exception”)
is an additional permission under section 7 of the
GNU General Public License, version 3 (“GPLv3”). It
applies to a given fi le (the “Runtime Library”) that
bears a notice placed by the copyright holder of the
fi le stating that the fi le is governed by GPLv3 along
with this Exception.
“GPL-compatible Software” is software whose
conditions of propagation, modifi cation and use
would permit combination with GCC in accord with
the license of GCC.
“Target Code” refers to output from any compiler
for a real or virtual target processor architecture,
in executable form or suitable for input to
an assembler, loader, linker and/or execution
phase. Notwithstanding that, Target Code does
not include data in any format that is used as a
compiler intermediate representation, or used
for producing a compiler intermediate
representation.
The “Compilation Process” transforms code entirely
represented in non-intermediate languages designed
for human-written code, and/or
in Java Virtual Machine
byte code, into Target Code. Thus, for example, use
of source code generators and preprocessors need
not be considered part of the Compilation Process,
since the Compilation Process can be understood
as starting with the output of the generators or
preprocessors.
A Compilation Process is “Eligible” if it is done
using GCC, alone or with other GPL-compatible
software, or if it is done without using any
work based on GCC. For example, using nonGPL-compatible Software to optimize any GCC
intermediate representations would not qualify as
an Eligible Compilation Process.
1. Grant of Additional Permission.
You have permission to propagate a work of
Target Code formed by combining the Runtime
Library with Independent Modules, even if such
propagation would otherwise violate the terms
of GPLv3, provided that all Target Code was
generated by Eligible Compilation Processes. You
may then convey such a combination under terms
When you use GCC to compile a program, GCC may
combine portions of certain GCC header fi les and
runtime libraries with the compiled program. The
purpose of this Exception is to allow compilation of
non-GPL (including proprietary) programs to use,
in this way, the header fi les and runtime libraries
covered by this Exception.
0. Defi nitions.
Afi le is an “Independent Module” if it either
requires the Runtime Library for execution after a
Compilation Process, or makes use of an interface
provided by the Runtime Library, but is not
otherwise based on the Runtime Library.
“
GCC” means a version of the GNU Compiler
Collection, with or without modifi cations, governed
by version 3 (or a specifi ed later version) of
the GNU General Public License (GPL) with the
option of using any subsequent versions published
by the FSF.
of your choice, consistent with the licensing of the
Independent Modules.
2. No Weakening of GCC Copyleft.
The availability of this Exception does not imply
any general presumption that third-party software
is unaffected by the copyleft requirements of the
license of GCC.
<html>
<head>
<title>Runtime Error</title>
<style>
body {font-family:”Verdana”;font-weight:normal;
font-size:.7em;color:black;}
p {font-family:”Verdana”;font-weight:normal;
color:black;margin-top:-5px}
Page 40

40
English
b {font-family:”Verdana”;font-weight:bold;
color:black;margin-top:-5px}
H1 {font-family:”Verdana”;font-weight:normal;
font-size:18pt;color:red }
H2 {font-family:”Verdana”;font-weight:normal;
font-size:14pt;color:maroon}
pre {font-family:”Lucida Console”;font-size:.9em}
.marker {font-weight:bold;color:black;text-
decoration:none;}
.version {color:gray;}
.error {margin-bottom:10px;}
.expandable {text-decoration:underline;font-weigh
t:bold;color:navy;cursor:hand;}
</style>
</head>
<body bgcolor=”white”>
<span><H1>Server Error in ‘/’ Application.<hr
width=100% size=1 color=silver></H1>
<h2> <i>Runtime Error</i> </h2></span>
<font face=”Arial, Helvetica, Geneva, SunSans-
Regular, sans-serif “>
<b> Description: </b> An application error
occurred on the server. The current custom error
settings for this application prevent the details of
the application error from being viewed remotely
(for security reasons). It could, however, be viewed
by browsers running on the local server machine.
<br><br>
<b>Details:</b> To enable the details of this
specifi c error message to be viewable on remote
machines, please create a <customErrors>
tag within a "web.confi g" confi guration
fi le located in the root directory of the current web
application. This <customErrors> tag should
then have its "mode" attribute set to
"Off".<br><br>
</td>
</tr>
</table>
<br>
<b>Notes:</b> The current error page you are
seeing can be replaced by a custom error page
by modifying the "defaultRedirect"
attribute of the application’s <customErrors>
confi guration tag to point to a custom error page
URL.<br><br>
<table width=100% bgcolor=”#ffffcc”>
<tr>
<td>
<code><pre>
<!--Web.Confi g Confi guration File-->
<confi guration>
<system.web>
<customErrors mode="RemoteOnly"
defaultRedirect="mycustompage.htm"/>
</system.web>
</confi guration></pre></code>
</td>
</tr>
</table>
<br>
</body>
</html>
LGPLv2.1
GNU LESSER GENERAL PUBLIC LICENSE
Version 2.1, February 1999
Copyright (C) 1991, 1999 Free Software Foundation,
Inc. 51 Franklin Street, Fifth Floor, Boston, MA
02110-1301 USA
Everyone is permitted to copy and distribute verbatim
copies of this license document, but changing it is
not allowed.
<table width=100% bgcolor=”#ffffcc”>
<tr>
<td>
<code><pre>
<!--Web.Confi g Confi guration File-->
<confi guration>
<system.web>
<customErrors mode="Off"/>
</system.web>
</confi guration></pre></code>
[This is the fi rst released version of the Lesser
GPL. It also counts as the successor of the GNU
Library Public License, version 2, hence the version
number 2.1.]
Preamble
The licenses for most software are designed to
take away your freedom to share and change it.
By contrast, the GNU General Public Licenses are
intended to guarantee your freedom to share and
change
free software--to make sure the software is
free for all its users.
This license, the Lesser General Public License,
applies to some specially designated software
packages--typically libraries -- of the Free Software
Foundation and other authors who decide to use it.
You can use it too, but we suggest you fi rst think
carefully about whether this license or the ordinary
Page 41

41
English
When we speak of free software, we are referring
to freedom of use, not price. Our General Public
Licenses are designed to make sure that you have
the freedom to distribute copies of free software
(and charge for this service if you wish); that you
receive source code or can get it if you want it; that
you can change the software and use pieces of it in
new free programs; and that you are informed that
you can do these things.
To protect your rights, we need to make restrictions
that forbid distributors to deny you these rights
or to ask you to surrender these rights. These
restrictions translate to certain responsibilities for
you if you distribute copies of the library or if you
modify it.
For example, if you distribute copies of the
library, whether gratis or for a fee, you must give
the recipients all the rights that we gave you. You
must make sure that they, too, receive or can get
the source code. If you link other code with the
library, you must provide complete object fi les to
the recipients, so that they can relink them with
the library after making changes to the library and
recompiling it. And you must show them these
terms so they know their rights.
We protect your rights with a two-step method:
(1) we copyright the library, and (2) we offer you
this license, which gives you legal permission to
copy, distribute and/or modify the library.
To protect each distributor, we want to make it
very clear that there is no warranty for the free
library. Also, if the library is modifi ed by someone
else and passed on, the recipients should know that
what they have is not the original version, so that
the original author’s reputation will not be affected
by problems that might be introduced by others.
Finally, software patents pose a constant threat
to the existence of any free program. We wish
to make sure that a company cannot effectively
restrict the users of
a free program by obtaining a
restrictive license from a patent holder. Therefore,
we insist that any patent license obtained for a
version of the library must be consistent with the
full freedom of use specifi ed in this license.
Most GNU software, including some libraries,
is covered by the ordinary GNU General Public
License. This license, the GNU Lesser General Public
License, applies to certain designated libraries, and
is quite different from the ordinary General Public
License. We use this license for certain libraries in
order to permit linking those libraries into non-free
programs.
When a program is linked with a library, whether
statically or using a shared library, the combination
of the two is legally speaking a combined work,
a derivative of the original library. The ordinary
General Public License therefore permits such
linking only if the entire combination fi ts its criteria
of freedom. The Lesser General Public License
permits more lax criteria for linking other code with
the library.
We call this license the “Lesser” General Public
License because it does Less to protect the user’s
freedom than the ordinary General Public License.
It also provides other free software developers
Less of an advantage over competing non-free
programs. These disadvantages are the reason we
use the ordinary General Public License for many
libraries. However, the Lesser license provides
advantages in certain special circumstances.
For example, on rare occasions, there may be a
special need to encourage the widest possible use
of a certain library, so that it becomes a de-facto
standard. To achieve this, non-free programs must
be allowed to use the library. A more frequent case
is that a free library does the same job as widely
used non-free libraries.
In this case, there is little to gain by limiting the
free library to free software only, so we use the
Lesser General Public License. In other cases,
permission to
use a particular library in non-free
programs enables a greater number of people to
use a large body of free software. For example,
permission to use the GNU C Library in non-free
programs enables many more people to use the
whole GNU operating system, as well as its variant,
the GNU/Linux operating system.
Although the Lesser General Public License is Less
protective of the users’ freedom, it does ensure that
the user of a program that is linked with the Library
has the freedom and the wherewithal to run that
program using a modi
fi ed version of the Library.
The precise terms and conditions for copying,
General Public License is the better strategy to use
in any particular case, based on the explanations
below.
distribution and modi
fi cation follow. Pay close
attention to the difference between a “work based
on the library” and a “work that uses the library”.
The former contains code derived from the library,
whereas the latter must be combined with the
library in order to run.
TERMS AND CONDITIONS FOR COPYING,
DISTRIBUTION AND MODIFICATION
0. This License Agreement applies to any software
library or other program which contains a notice
placed by the copyright holder or other authorized
party saying it may be distributed under the terms
of this Lesser General Public License (also called
“this License”). Each licensee is addressed as “you”.
Page 42

42
English
The “Library”, below, refers to any such software
lib
rary or work which has been distributed under
these
terms. A “work based on the Library” means
either
the Library or any derivative work under
copyright law: that is to sa
y, a work containing the
Lib
rary or a portion of it, either verbatim or with
modi
fi cations and/or translated straightforwardly
into
another language. (Hereinafter, translation
is
included without limitation in the term
“modi
fi cation”.)
“Source code” for a work means the preferred
form
of the work for making modifi cations to it.
Fo
r a library, complete source code means all the
source
code for all modules it contains, plus any
associated interf
ace defi nition fi les, plus the scripts
used
to control compilation and installation of the
lib
rary.
Activities other than copying, distribution and
modi
fi cation are not covered by this License;
they
are outside its scope. The act of running a
prog
ram using the Library is not restricted, and
output
from such a program is covered only if its
contents
constitute a work based on the Library
(independent
of the use of the Library in a tool for
writing
it). Whether that is true depends on what
the
Library does and what the program that uses
the Lib
rary does.
1. You may copy and distribute verbatim copies of
the
Library’s complete source code as you receive
it, in any medium, provided that you conspicuously
and
appropriately publish on each copy an
appropriate
copyright notice and disclaimer of
warranty;
keep intact all the notices that refer to
this
License and to the absence of any warranty;
and distribute a copy of this License along with the
Lib
rary. You may charge a fee for the physical act
of
transferring a copy, and you may at your option
offer warr
anty protection in exchange for a fee.
2. You may modify your copy or copies of the
Libr
ary or any portion of it, thus forming a work
based
on the Library, and copy and distribute such
modi
fi cations or work under the terms of Section
1
above, provided that you also meet all of these
conditions:
a) The modifi ed work must itself be a software
lib
rary.
b) You must cause the fi les modifi ed to carry
prominent
notices stating that you changed the
fi
les and the date of any change.
c) You must cause the whole of the work to be
licensed
at no charge to all third parties under the
terms of this License.
d) If a facility in the modifi ed Library refers to a
function or a table of data to be supplied by an
application program that uses the facility, other
than as an argument passed when the facility is
invoked, then you must make a good faith effort
to ensure that, in the event an application does
not supply such function or table, the facility
still operates, and performs whatever part of its
purpose remains meaningful. (For example, a
function in a library to compute square roots has a
purpose that is entirely well-defi ned independent of
the application. Therefore, Subsection 2d requires
that any application-supplied function or table used
by this function must be optional: if the application
does not supply it, the square root function must
still compute square roots.)
These requirements apply to the modifi ed work
as a whole. If identifi able sections of that work are
not derived from the Library, and can be reasonably
considered independent and separate works in
themselves, then this License, and its terms, do
not apply to those sections when you distribute
them as separate works. But when you distribute
the same sections as part of a whole which is a
work based on the Library, the distribution of the
whole must be on the terms of this License, whose
permissions for other licensees extend to the entire
whole, and thus to each and every part regardless
of who wrote it.
Thus, it is not the intent of this section to claim
rights or contest your rights to work written entirely
by you; rather, the intent is to exercise the right
to control the distribution of derivative or collective
works based on the Library.
In addition, mere aggregation of another work
not based on the Library with the Library (or with
a work based on the Library) on a volume of a
storage or distribution medium does not bring the
other work under the scope of this License.
3. You may opt to apply the terms of the ordinary
GNU General Public License instead of this License
to a given copy of the Library.
To do this, you must alter all the notices that refer
A
“library” means a collection of software functions
and/or
data prepared so as to be conveniently
linked
with application programs (which use some
of those functions and data) to form ex
ecutables.
to this License, so that they refer to the
ordinary
GNU General Public License, version 2, instead
of
to this License. (If a newer version than
version
2 of the ordinary GNU General Public License
has
appeared, then you can specify that version
instead
if you wish.) Do not make any other change
in
these notices.
Once this change is made in a given copy, it
is
irreversible for that copy, so the ordinary
GNU
General Public License applies to all
subsequent
copies and derivative works made from that copy.
This option is useful when you wish to copy
part
of the code of the Library into a program that is
not a library.
Page 43

43
English
4. You may copy and distribute the Library (or
a
portion or derivative of it, under Section 2) in
object
code or executable form under the terms
of
Sections 1 and 2 above provided that you
accompany
it with the complete corresponding
machine-readable
source code, which must be
distributed
under the terms of Sections 1 and 2
above
on a medium customarily used for software
interchange.
If distribution of object code is made
by
offering access to copy from a designated place,
then
offering equivalent access to copy the source
code
from the same place satisfi es the requirement
to
distribute the source code, even though third
parties are not compelled to copy the source along
with the object code.
5. A program that contains no derivative of any
portion of the Libr
ary, but is designed to work with
the
Library by being compiled or linked with it,
is
called a “work that uses the Library”. Such a
work,
in isolation, is not a derivative work of the
Lib
rary, and therefore falls outside the scope of this
License.
However, linking a “work that uses the
Lib
rary” with the Library creates an executable that
is
a derivative of the Library (because it contains
portions
of the Library), rather than a “work that
uses
the library”. The executable is therefore
covered
by this License. Section 6 states terms for
distribution of such ex
ecutables.
When a “work that uses the Library” uses material
from
a header fi le that is part of the Library, the
object
code for the work may be a derivative work
of
the Library even though the source code is not.
Whether
this is true is especially signifi cant if the
work
can be linked without the Library, or if the
work
is itself a library. The threshold for this to be
true is not precisely de
fi ned by law.
If such an object fi le uses only numerical
pa
rameters, data structure layouts and accessors,
and
small macros and small inline functions (ten
lines
or less in length), then the use of the object
fi
le is unrestricted, regardless of whether it is
legally
a derivative work. (Executables containing
this
object code plus portions of the Library will still
fa
ll under Section 6.)
Otherwise, if the work is a derivative of the
Libr
ary, you may distribute the object code for the
work
under the terms of Section 6.Any executables
containing
that work also fall under Section 6,
whether
or not they are linked directly with the
Libr
ary itself.
6. As an exception to the Sections above, you may
also
combine or link a “work that uses the Library”
with
the Library to produce a work containing
portions
of the Library, and distribute that work
under
terms of your choice, provided that the terms
permit modifi cation of the work for the customer’s
own
use and reverse engineering for debugging
such modifi cations. You must give prominent notice
with each copy of the work that the Library is used
in it and that the Library and its use are covered
by this License. You must supply a copy of this
License. If the work during execution displays
copyright notices, you must include the copyright
notice for the Library among them, as well as a
reference directing the user to the copy of this
License. Also, you must do one of these things:
a) Accompany the work with the complete
corresponding machine-readable source code
for the Library including whatever changes were
used in the work (which must be distributed
under Sections 1 and 2 above); and, if the work
is an executable linked with the Library, with the
complete machine-readable “work that uses the
Library”, as object code and/or source code, so
that the user can modify the Library and then relink
to produce a modifi ed executable containing the
modifi ed Library. (It is understood that the user
who changes the contents of defi nitions fi les in the
Library will not necessarily be able to recompile the
application to use the modifi ed defi nitions.)
b) Use a suitable shared library mechanism for
linking with the Library. A suitable mechanism is
one that (1) uses at run time a copy of the library
already present on the user’s computer system,
rather than copying library functions into the
executable, and (2) will operate properly with a
modifi ed version of the library, if the user installs
one, as long as the modifi ed version is interface
- compatible with the version that the work was
made with.
c) Accompany the work with a written offer, valid
for at least three years, to give the same user the
materials specifi ed in Subsection 6a, above, for a
charge no more than the cost of performing this
distribution.
d) If distribution of the work is made by offering
access to copy from a designated place, offer
equivalent access to copy the above speci
fi ed
materials from the same place.
e) Verify that the user has already received a copy
of these materials or that you have already sent this
user a copy. For an executable, the required form
of
the “work that uses the Library” must include
any
data and utility programs needed for
reproducing
the executable from it. However, as a
special
exception, the materials to be distributed
need
not include anything that is normally
distributed
(in either source or binary form) with the
major
components (compiler, kernel, and so on) of
the
operating system on which the executable
runs,
unless that component itself accompanies
the
executable.
Page 44

44
English
It may happen that this requirement contradicts
the license restrictions of other proprietary libraries
that do not normally accompany the operating
system. Such a contradiction means you cannot
use both them and the Library together in an
executable that you distribute.
7. You may place library facilities that are a work
based on the Library side-by-side in a single library
together with other library facilities not covered by
this License, and distribute such a combined library,
provided that the separate distribution of the work
based on the Library and of the other library
facilities is otherwise permitted, and provided that
you do these two things:
a) Accompany the combined library with a copy of
the same work based on the Library, uncombined
with any other library facilities. This must be
distributed under the terms of the Sections above.
b) Give prominent notice with the combined
library of the fact that part of it is a work based
on the Library, and explaining where to
fi nd the
accompanying uncombined form of the same
work.
8. You may not copy, modify, sublicense, link
with, or distribute the Library except as expressly
provided under this License. Any attempt otherwise
to copy, modify, sublicense, link with, or distribute
the Library is void, and will automatically terminate
your rights under this License. However, parties who
have received copies, or rights, from you under this
License will not have their licenses terminated so
long as such parties remain in full compliance.
9. You are not required to accept this License,
since you have not signed it. However, nothing else
grants you permission to modify or distribute the
Library or its derivative works. These actions are
prohibited by law if you do not accept this License.
Therefore, by modifying or distributing the Library
(or any work based on the Library), you indicate
your acceptance of this License to do so, and all
its terms and conditions for copying, distributing or
modifying the Library or works based on it.
10. Each time you redistribute the Library (or
any work based on the Library), the recipient
automatically receives a license from the original
licensor
to copy, distribute, link with or modify the
Libr
ary subject to these terms and conditions. You
may
not impose any further restrictions on the
recipients’
exercise of the rights granted herein.
Yo
u are not responsible for enforcing compliance
by third parties with this License.
11. If, as a consequence of a court judgment or
allegation
of patent infringement or for any other
reason
(not limited to patent issues), conditions are
imposed
on you (whether by court order, agreement
or otherwise) that contradict the conditions of this
satisfy simultaneously your obligations under this
License and any other pertinent obligations, then as
a consequence you may not distribute the Library
at all. For example, if a patent license would not
permit royalty-free redistribution of the Library
by
all those who receive copies directly or
indirectly
through you, then the only way you could satisf
y
both it and this License would be to refr
ain entirely
from distribution of the Library.
If any portion of this section is held invalid or
unenforceable under any particular
circumstance,
the balance of the section is intended to apply, a
nd
the section as a whole is intended to apply in
other
circumstances.
It is not the purpose of this section to induce
you to infringe any patents or other property right
claims or to contest validity of any such claims;
this section has the sole purpose of protecting
the
integrity of the free software distribution system
which is implemented by public license practices.
Many people have made generous contributions
to the wide range of software distributed through
that system in reliance on consistent application
of
that system; it is up to the author/donor to decide
if he or she is willing to distribute software through
any other system and a licensee cannot
impose
that choice.
This section is intended to make thoroughly
clear
what is believed to be a consequence of the rest
of this License.
12. If the distribution and/or use of the Library
is restricted in certain countries either by patents
or by copyrighted interfaces, the original copyright
holder who places the Library under this License
may add an explicit geographical distribution
limitation excluding those countries, so that
distribution is permitted only in or among countries
not thus excluded. In such case, this License
incorporates the limitation as if written in the body
of this License.
13. The Free Software Foundation may
publish
revised and/or new versions of the Lesser Genera
l
Public License from time to time. Such new versions
will be similar in spirit to the present version, but
License, they do not excuse you from the conditions
of this License. If you cannot distribute so as to
may differ in detail to address new problems
or
concerns.
Each version is given a distinguishing
version
number. If the Library specifi es a version number
of this License which applies to it and “any later
version”, you have the option of following the terms
and conditions either of that version or of any later
version published by the Free Software F
oundation.
If the Library does not specify a license
version
number, you may choose any version ever
published
by the Free Software Foundation.
Page 45

45
English
14. If you wish to incorporate parts of the Library
into
other free programs whose distribution
conditions
are incompatible with these, write to the
author
to ask for permission. For software which is
copyrighted
by the Free Software Foundation, write
to
the Free Software Foundation; we sometimes
make
exceptions for this. Our decision will be
guided
by the two goals of preserving the free
status
of all derivatives of our free software and
of
promoting the sharing and reuse of software
gener
ally.
NO WARRANTY
15. BECAUSE THE LIBRARY IS LICENSED FREE
OF
CHARGE, THERE IS NO WARRANTY FOR
THE
LIBRARY, TO THE EXTENT PERMITTED BY
APPLICABLE
LAW. EXCEPT WHEN OTHERWISE
ST
ATED IN WRITING THE COPYRIGHT HOLDERS
AND/OR
OTHER PARTIES PROVIDE THE LIBRARY
“A
S IS” WITHOUT WARRANTY OF ANY KIND,
EITHER
EXPRESSED OR IMPLIED, INCLUDING,
BUT
NOT LIMITED TO, THE IMPLIED WARRANTIES
OF
MERCHANTABILITY AND FITNESS FOR A
PA
RTICULAR PURPOSE. THE ENTIRE RISK AS
TO
THE QUALITY AND PERFORMANCE OF THE
LIBRARY
IS WITH YOU. SHOULD THE LIBRARY
PROVE
DEFECTIVE, YOU ASSUME THE COST
OF
ALL NECESSARY SERVICING, REPAIR OR
CORRECTION.
16. IN NO EVENT UNLESS REQUIRED BY
APPLICABLE
LAW OR AGREED TO IN WRITING
WILL
ANY COPYRIGHT HOLDER, OR ANY OTHER
PA
RTY WHO MAY MODIFY AND/OR REDISTRIBUTE
THE
LIBRARY AS PERMITTED ABOVE, BE LIABLE TO
YOU
FOR DAMAGES, INCLUDING ANY GENERAL,
SPECIAL,
INCIDENTAL OR CONSEQUENTIAL
DAMAGES
ARISING OUT OF THE USE OR
INABILIT
Y TO USE THE LIBRARY (INCLUDING BUT
NO
T LIMITED TO LOSS OF DATA OR DATA BEING
RENDERED
INACCURATE OR LOSSES SUSTAINED
ICU License - ICU 1.8.1 and later
COPYRIGHT AND PERMISSION NOTICE
Copyright (c) 1995-2011 International Business
Machines Corporation and others
All rights reserved.
Permission is hereby granted, free of charge, to
any person obtaining a copy of this software and
associated documentation fi les (the “Software”), to
deal in the Software without restriction, including
without limitation the rights to use, copy, modify,
merge, publish, distribute, and/or sell copies of
the Software, and to permit persons to whom the
Software is furnished to do so, provided that the
above copyright notice(s) and this permission notice
appear in all copies of the Software and that both
the above copyright notice(s) and this permission
notice appear in supporting documentation.
THE SOFTWARE IS PROVIDED “AS IS”,
WITHOUT WARRANTY OF ANY KIND, EXPRESS
OR IMPLIED, INCLUDING BUT NOT LIMITED
TO THE WARRANTIES OF MERCHANTABILITY,
FITNESS FOR A PARTICULAR PURPOSE AND
NONINFRINGEMENT OF THIRD PARTY RIGHTS. IN
NO EVENT SHALL THE COPYRIGHT HOLDER OR
HOLDERS INCLUDED IN THIS NOTICE BE LIABLE
FOR ANY CLAIM, OR ANY SPECIAL INDIRECT OR
CONSEQUENTIAL DAMAGES, OR ANY DAMAGES
WHATSOEVER RESULTING FROM LOSS OF USE,
DATA OR PROFITS, WHETHER IN AN ACTION OF
CONTRACT, NEGLIGENCE OR OTHER TORTIOUS
ACTION, ARISING OUT OF OR IN CONNECTION
WITH THE USE OR PERFORMANCE OF THIS
SOFTWARE.
Except as contained in this notice, the name of a
copyright holder shall not be used in advertising or
otherwise to promote the sale, use or other dealings
in this Software without prior written authorization
of the copyright holder.
BY
YOU OR THIRD PARTIES OR A FAILURE OF
THE
LIBRARY TO OPERATE WITH ANY OTHER
SO
FTWARE), EVEN IF SUCH HOLDER OR OTHER
PA
RTY HAS BEEN ADVISED OF THE POSSIBILITY
OF SUCH DAMAGES.
openssl
LICENSE ISSUES
The OpenSSL toolkit stays under a dual license,
i.e. both the conditions of the OpenSSL License
and the original SSLeay license apply to the toolkit.
See below for the actual license texts. Actually
both licenses are BSD-style Open Source licenses.
In case of any license issues related to OpenSSL
please contact openssl-core@openssl.org.
OpenSSL License
Copyright (c) 1998-2008 The OpenSSL Project.
All rights reserved.
Redistribution and use in source and binary
forms, with or without modification, are permitted
provided that the following conditions are met:
1. Redistributions of source code must retain the
above copyright notice, this list of conditions and
the following disclaimer.
2. Redistributions in binary form must reproduce
the above copyright notice, this list of
conditions
and the following disclaimer in the
documentation
and/ or other materials provided with
the
distribution.
Page 46

46
English
3. All advertising materials mentioning features
or
use of this software must display the following
acknowledgment:”
This product includes software
developed
by the OpenSSL Project for use in the
Open
SSL Toolkit. (http://www.openssl.org/)”
4. The names “OpenSSL Toolkit” and “OpenSSL
Project”
must not be used to endorse or promote
products
derived from this software without prior
written
permission. For written permission, please
contact openssl-core@openssl.org.
5. Products derived from this software may not
be
called “OpenSSL” nor may “OpenSSL” appear in
their names without prior written permission of the
Open
SSL Project.
6. Redistributions of any form whatsoever must
retain
the following acknowledgment: “This product
includes
software developed by the OpenSSL
Project
for use in the OpenSSL Toolkit (http://www.
openssl.org/)”
THIS SOFTWARE IS PROVIDED BY THE
Open
SSL PROJECT “AS IS’’ AND ANY EXPRESSED
OR
IMPLIED WARRANTIES, INCLUDING, BUT
NO
T LIMITED TO, THE IMPLIED WARRANTIES
OF
MERCHANTABILITY AND FITNESS FOR A
PA
RTICULAR PURPOSE ARE DISCLAIMED. IN NO
EVENT
SHALL THE OpenSSL PROJECT OR ITS
CONTRIBU
TORS BE LIABLE FOR ANY DIRECT,
INDIRECT
, INCIDENTAL, SPECIAL, EXEMPLARY,
OR CONSEQUENTIAL DAMAGES (INCLUDING, BUT
NO
T LIMITED TO, PROCUREMENT OF SUBSTITUTE
GOODS
OR SERVICES; LOSS OF USE, DATA,
OR
PROFITS; OR BUSINESS INTERRUPTION)
HOWEVER
CAUSED AND ON ANY THEORY OF
LIABILIT
Y, WHETHER IN CONTRACT, STRICT
LIABILIT
Y, OR TORT (INCLUDING NEGLIGENCE OR
OT
HERWISE) ARISING IN ANY WAY OUT OF THE
USE
OF THIS SOFTWARE, EVEN IF ADVISED OF
THE PO
SSIBILITY OF SUCH DAMAGE.
This product includes cryptographic software
written
by Eric Young (eay@cryptsoft.com). This
product
includes software written by Tim Hudson
(tjh@cryptsoft.com).
Original
SSLeay License
Copyright (C) 1995-1998 Eric Young (eay@
cryptsoft.com)
All rights reserved.
This package is an SSL implementation written
by
Eric Young (eay@cryptsoft.com). The
implementation
was written so as to conform with
Netscapes
SSL.
This library is free for commercial and non-
commercial
use as long as the following conditions
are adhered to. The following conditions apply to all
code found in this distribution, be it the RC4,
RSA,
lhash, DES, etc., code; not just the SSL code.
The
SSL documentation included with this distribution is
covered by the same copyright terms except that
the holder is Tim Hudson (tjh@cryptsoft.com).
Copyright remains Eric Young’s, and as such
any Copyright notices in the code are not to be
removed. If this package is used in a product, Eric
Young should be given attribution as the author
of
the parts of the library used. This can be in
the
form of a textual message at program startup or
in documentation (online or textual) provided
with
the package.
Redistribution and use in source and
binary
forms, with or without modifi cation, are permitted
provided that the following conditions are met:
1. Redistributions of source code must retain
the
copyright notice, this list of conditions and
the
following disclaimer.
2. Redistributions in binary form must
reproduce
the above copyright notice, this list of conditions
and
the following disclaimer in the documentation and/
or other materials provided with the distribution.
3. All advertising materials mentioning features
or use of this software must display the
following
acknowledgement: “This product
includes
cryptographic software written by Eric Yo
ung
(eay@cryptsoft.com)” The word ‘cryptographic’
can be left out if the routines from the library being
used are not cryptographic related :-).
4.
If you include any Windows specifi c code
(or
a derivative thereof) from the apps directory
(application code) you must include an
acknowledgement: “This product includes software
written by Tim Hudson (tjh@cryptsoft.com)”
THIS SOFTWARE IS PROVIDED BY ERIC
YOUNG ``AS IS’’ AND ANY EXPRESS OR
IMPLIED
WARRANTIES, INCLUDING, BUT NOT LIMITED TO
,
THE IMPLIED WARRANTIES OF MERCHANTABILIT
Y
AND FITNESS FOR A PARTICULAR PURPOSE ARE
DISCLAIMED. IN NO EVENT SHALL THE AUTHOR
OR CONTRIBUTORS BE LIABLE FOR ANY DIRECT
,
INDIRECT, INCIDENTAL, SPECIAL, EXEMPLARY, OR
CONSEQUENTIAL DAMAGES (INCLUDING,
BUT
NOT LIMITED TO, PROCUREMENT OF
SUBSTITUTE
GOODS OR SERVICES; LOSS OF USE, DAT
A,
OR PROFITS; OR BUSINESS INTERRUPTION)
HOWEVER CAUSED AND ON ANY THEORY OF
LIABILITY, WHETHER IN CONTRACT, STRICT
LIABILITY, OR TORT (INCLUDING NEGLIGENCE OR
OTHERWISE) ARISING IN ANY WAY OUT OF
THE
USE OF THIS SOFTWARE, EVEN IF ADVISED OF
Page 47

47
English
THE POSSIBILITY OF SUCH DAMAGE.
The licence and distribution terms for any
publically
available version or derivative of this code
cannot
be changed. i.e. this code cannot simply be
copied
and put under another distribution licence
[including the GNU Public Licence.
]
zlib
zlib.h
-- interface of the ‘zlib’ general purpose
compression lib
rary
version 1.2.3, July 18th, 2005
Copyright (C) 1995-2005 Jean-loup Gailly and
Mark Adle
r
This software is provided ‘as-is’, without any
express
or implied warranty. In no event will the
authors
be held liable for any damages arising from
the use of this software.
Permission is granted to anyone to use this
software
for any purpose, including commercial
applications,
and to alter it and redistribute it freely,
subject to the following restrictions:
1. The origin of this software must not be
misrepresented;
you must not claim that you wrote
the
original software. If you use this software in
a
product, an acknowledgment in the product
documentation
would be appreciated but is not
required
.
2. Altered source versions must be plainly marked
as
such, and must not be misrepresented as being
the original software.
3. This notice may not be removed or altered from
any source distribution.
Jean-loup Gailly jloup@gzip.org
Mark Adler madler@alumni.caltech.edu
The FreeType Project LICENSE
2006
-Jan-27
Copyright
1996-2002, 2006 by David Turner, Robert
Wilhelm, and W
erner Lemberg
Introduction
============
The FreeType Project is distributed in several
archive
packages; some of them may contain, in
addition
to the FreeType font engine,various tools
and
contributions which rely on, or relate to, the
Free
Type Project.
This license applies to all fi les found in such
packages,
and which do not fall under their
own
explicit license. The license affects thus
the
FreeType font engine, the test programs,
documentation and make
fi les, at the very least.
This license was inspired by the BSD, Artistic,
and IJG (Independent JPEG Group) licenses, which
all encourage inclusion and use of free software
in commercial and freeware products alike. As a
consequence, its main points are that:
We don’t promise that this software
works.
However, we will be interested in any kind of
bug
reports. (`as is’ distribution) You can use this
software for whatever you want, in parts or
full
form, without having to pay us. (`royalty
-free’
usage)
You may not pretend that you wrote this
software. If you use it, or only parts of it, in
a
program, you must acknowledge somewhere in
your documentation that you have used
the
FreeType code. (`credits’)
We specifi cally permit and encourage the inclusion
of this software, with or without modifi cations, in
commercial products. We disclaim all warranties
covering The FreeType Project and assume no
liability related to The FreeType Project.
Finally, many people asked us for a
preferred
form for a credit/disclaimer to use in
compliance
with this license. We thus encourage you to
use
the following text:
“””
Portions of this software are copyright © <year>
The FreeType Project (www.freetype.org).
All
rights reserved.
“””
Please replace <year> with the value from
the
FreeType version you actually use.
Legal Terms
===========
0. Defi nitions
Throughout this license, the terms `package’,
`FreeType Project’, and `FreeType archive’ refer to
the set of fi
les originally distributed by the authors
(David Tu rner, Robert Wilhelm, and Werner
Lemberg) as the `FreeType Project’, be they
named
as alpha, beta or fi nal release.
`Y
ou’ refers to the licensee, or person using the
project, where`using’ is a generic term including
compiling the project’s source code as well as
linking it to form a `program’ or `executable’.
This program is referred to as `a program
using
the FreeType engine’.
This license applies to all fi les distributed in
the
original FreeType Project, including all source
code,
binaries and documentation, unless
otherwise
stated in the fi le in its original, unmodifi ed form as
distributed in the original archive.
If you are unsure whether or not a particular fi le
is covered by this license, you must contact us to
verify this.
Page 48

48
English
The FreeType Project is copyright (C) 1996-2000
by
David Turner, Robert Wilhelm, and Werner
Lemberg.
All rights reserved except as specifi ed
belo
w.
1. No
Warranty
THE FREETYPE PROJECT IS PROVIDED `AS IS’
WITHOUT
WARRANTY OF ANY KIND, EITHER
EXPRES
S OR IMPLIED, INCLUDING, BUT NOT
LIMITED
TO, WARRANTIES OF MERCHANTABILITY
A
ND FITNESS FOR A PARTICULAR PURPOSE.
IN
NO EVENT WILL ANY OF THE AUTHORS OR
COPYRIGHT
HOLDERS BE LIABLE FOR ANY
DAMAGES
CAUSED BY THE USE OR THE INABILITY
TO
USE, OF THE FREETYPE PROJECT.
2. R
edistribution
This license grants a worldwide, royalty-free,
perpetual
and irrevocable right and license to use,
ex
ecute, perform, compile, display, copy, create
deri
vative works of, distribute and sublicense
the
FreeType Project (in both source and object
code
forms) and derivative works thereof for any
purpose;
and to authorize others to exercise some
or
all of the rights granted herein, subject to the
following conditions:
Redistribution of source code must retain this
license
fi le (`FTL.TXT’) unaltered; any additions,
deletions
or changes to the originalfi les must be
clearly
indicated in accompanying documentation.
The
copyright notices of the unaltered, original
fi
les must be preserved in all copies of source
fi
les.
Redistribution in binary form must provide a
disclaimer
that states that the software is based
in
part of the work of the FreeType Team, in the
distribution
documentation. We also encourage
you
to put an URL to the FreeType web page in
your documentation, though this isn’
t mandatory.
These conditions apply to any software derived
from
or based on the FreeType Project, not just
the
unmodifi ed fi les. If you use our work, you must
acknowledge
us. However, no fee need be paid
to us
.
3. Advertising
Neither the FreeType authors and contributors
nor
you shall use the name of the other for
commercial,
advertising, or promotional purposes
without speci
fi c prior written permission.
We suggest, but do not require, that you use
one
or more of the following phrases to refer to
this
software in your documentation or advertising
materials:
`FreeType Project’, `FreeType Engine’,
`Fre
eType library’, or `FreeType Distribution’.
As you have not signed this license, you are not
required
to accept it. However, as the FreeType
Project
is copyrighted material, only this license,
or another one contracted with the authors, grants
you the right to use, distribute, and modify it.
Therefore, by using, distributing, or modif
ying
the FreeType Project, you indicate that
you
understand and accept all the terms of this
license.
4. Contacts
There are two mailing lists related to FreeType:
freetype@nongnu.org
Discusses general use and applications
of
FreeType, as well as future and wanted
additions
to the library and distribution.
If you are looking for support, start in this
list
if you haven’t found anything to help you in
the
documentation.
freetype-devel@nongnu.org
Discusses bugs, as well as engine
internals,design
issues, specifi c licenses, porting, etc.
Our home page can be found at
http://www.freetype.org
Expat
Copyright (c) 1998, 1999, 2000 Thai Open Source
Software Center Ltd and Clark Cooper
Copyright (c) 2001, 2002, 2003, 2004, 2005, 2006
Expat maintainers.
Permission is hereby granted, free of charge, to
any person obtaining a copy of this software
and
associated documentation fi les (the Software), to
deal in the Software without restriction, including
without limitation the rights to use, copy, modify
,
merge, publish, distribute, sublicense, and/or
sell
copies of the Software, and to permit persons to
whom the Software is furnished to do so, subject to
the following conditions:
The above copyright notice and this permission
notice shall be included in all copies or
substantial
portions of the Software.
THE SOFTWARE IS PROVIDED “AS IS”,
WITHOUT WARRANTY OF ANY KIND, EXPRES
S
OR IMPLIED, INCLUDING BUT NOT LIMITED
TO THE WARRANTIES OF MERCHANTABILITY,
FITNESS FOR A PARTICULAR PURPOSE
AND
NONINFRINGEMENT.
IN NO EVENT SHALL THE AUTHORS OR COPYRIGHT
HOLDERS BE LIABLE FOR ANY CLAIM,
DAMAGES
OR OTHER LIABILITY, WHETHER IN AN
ACTION
OF CONTRACT, TORT OR OTHERWISE, ARISING
FROM, OUT OF OR IN CONNECTION WITH
THE
SOFTWARE OR THE USE OR OTHER DEALINGS IN
THE SOFTWARE.
Page 49

49
English
libcurl
COPYRIGHT AND PERMI
SSION NOTICE
Copyright
(c) 1996 - 2011, Daniel Stenberg,
<daniel@haxx.se>.
All rights reserved.
P
ermission to use, copy, modify, and distribute this
software
for any purpose with or without fee is
hereby
granted, provided that the above copyright
notice
and this permission notice appear in all
copies
.
THE
SOFTWARE IS PROVIDED “AS IS”,
WITHOUT
WARRANTY OF ANY KIND, EXPRESS
OR
IMPLIED, INCLUDING BUT NOT LIMITED
TO
THE WARRANTIES OF MERCHANTABILITY,
FITNES
S FOR A PARTICULAR PURPOSE AND
NONINFRINGEMENT OF THIRD
PARTY RIGHTS. IN
NO
EVENT SHALL THE AUTHORS OR COPYRIGHT
HOLDERS
BE LIABLE FOR ANY CLAIM, DAMAGES
OR
OTHER LIABILITY, WHETHER IN AN ACTION
OF
CONTRACT, TORT OR OTHERWISE, ARISING
FROM,
OUT OF OR IN CONNECTION WITH THE
SO
FTWARE OR THE USE OR OTHER DEALINGS IN
THE SO
FTWARE.
Except
as contained in this notice, the name of a
copyright holder shall not be used in advertising or
otherwise
to promote the sale, use or other dealings
in
this Software without prior written authorization
of the copyright holder
.
libjpeg-7
1.
We don’t promise that this software works. (But
if you
fi nd any bugs,please let us know!)
2.
You can use this software for whatever you want.
Y
ou don’t have to pay us.
3.
You may not pretend that you wrote this
software.
If you use it in a program, you must
acknowledge
somewhere in your documentation
that you’ve used the IJG code
.
In legalese
:
The
authors make NO WARRANTY or representation,
either
express or implied, with respect to this
software,
its quality, accuracy, merchantability, or
fi
tness for a particular purpose.
This
software is provided “AS IS”, and you, its
use
r, assume the entire risk as to its quality and
accu
racy.
This
software is copyright (C) 1991-1998, Thomas
G. Lane
.
All Rights R
eserved except as speci
fi ed below.
P
ermission is hereby granted to use, copy, modify,
and
distribute this software (or portions thereof)
for
any purpose, without fee, subject to these
conditions
:
(1) If any part of the source code for this software
is distributed, then this README fi le must be
included, with this copyright and no-warranty notice
unaltered; and any additions, deletions, or
changes
to the original fi les must be clearly indicated in
accompanying documentation.
(2) If only executable code is distributed, then
the accompanying documentation must state that
“this software is based in part on the work of
the
Independent JPEG Group”.
(3) Permission for use of this software is gr
anted
only if the user accepts full responsibility for
any
undesirable consequences; the authors accept NO
LIABILITY for damages of any kind.
These conditions apply to any software
derived
from or based on the IJG code, not just to
the
unmodifi ed library. If you use our work, you ought
to acknowledge us.
Permission is NOT granted for the use of any
IJG
author’s name or company name in
advertising
or publicity relating to this software or
products
derived from it. This software may be referred to
only as “the Independent JPEG Group’s software”.
We specifi cally permit and encourage the use
of
this software as the basis of commercial
products,
provided that all warranty or liability claims
are
assumed by the product vendor.
ansi2knr.c is included in this distribution
by
permission of L. Peter Deutsch, sole proprietor
of
its copyright holder, Aladdin Enterprises of Menlo
Park, CA. ansi2knr. c is NOT covered by the
above
copyright and conditions, but instead by the
usual
distribution terms of the Free Software Fo
undation;
principally,that you must include source code
if
you redistribute it. (See the fi le ansi2knr.c for
full
details.) However, since ansi2knr. c is not needed as
part of any program generated from the IJG
code,
this does not limit you more than the foregoing
paragraphs do.
The Unix confi guration script “confi gure”
was
produced with GNU Autoconf. It is
copyright
by the Free Software Foundation but is freely
distributable. The same holds for its
supporting
scripts (confi g.guess, confi g.sub,ltconfi g, ltmain.
sh). Another support script, install-sh, is
copyright
by X Consortium. but is also freely distributable.
The IJG distribution formerly included code to read
and write GIF fi les. To avoid entanglement with
the
Unisys LZW patent, GIF reading support has been
removed altogether, and the GIF writer has been
simplifi ed to produce uncompressed GIFs. This
technique does not use the LZW algorithm;
the
resulting GIF fi les are larger than usual, but
are
readable by all standard GIF decoders.
We are required to state that “The Gr
aphics
Interchange Format(c) is the Copyright property
Page 50

50
English
of CompuServe Incorporated. GIF(sm) is a Service
Mark property of CompuServe Incorpor
ated.”
c-ares
Copyright
1998 by the Massachusetts Institute of
Te
chnology.
P
ermission to use, copy, modify, and distribute this
software
and its documentation for any purpose
and
without fee is hereby granted, provided that
the above copyright notice appear in all copies and
that
both that copyright notice and this permission
notice
appear in supporting documentation, and
that
the name of M.I.T. not be used in advertising
or
publicity pertaining to distribution of the software
without
specifi c, written prior permission. M.I.T.
makes
no representations about the suitability of
this software for any purpose. It is provided “as is”
without express or implied warr
anty.
libpng
This copy of the libpng notices is provided for your
convenience.
In case of any discrepancy between
this
copy and the notices in the fi le png.h that is
included
in the libpng distribution, the latter shall
pre
vail.
COPYRIGHT NO
TICE, DISCLAIMER, and LICENSE:
If
you modify libpng you may insert additional
notices immediately following this sentence.
This code is released under the libpng license
.
libpng
versions 1.2.6, August 15, 2004, through
1.5
.7, December 15, 2011, are Copyright (c)
2004,
2006-2011 Glenn Randers-Pehrson, and are
distributed
according to the same disclaimer and
license as libpng-1.2.5 with the following individual
added to the list of Contributing Authors
Cosmin T
ruta
libpng
versions 1.0.7, July 1, 2000, through 1.2.5 -
October
3, 2002, are Copyright (c) 2000-2002 Glenn
Randers-P
ehrson, and are distributed according to
the
same disclaimer and license as libpng-1.0.6
with
the following individuals added to the list of
Contributing Authors
Simon-Pierre Cadieux
Eric S. Raymond
Gilles Vollant
and with the following additions to the disclaimer:
There is no warranty against interference with your
enjoyment
of the library or against infringement.
There
is no warranty that our efforts or the library
will
fulfi ll any of your particular purposes or needs.
This
library is provided with all faults, and the entire
risk
of satisfactory quality, performance, accuracy,
and effort is with the use
r.
libpng versions 0.97, January 1998, through 1.0.6,
March 20, 2000, are Copyright (c) 1998, 1999 Glenn
Randers-Pehrson, and are distributed according to
the same disclaimer and license as
libpng-0.96,
with the following individuals added to the list
of
Contributing Authors:
Tom Lane
Glenn Randers-Pehrson
Willem van Schaik
libpng versions 0.89, June 1996, through 0.96,
May
1997, are Copyright (c) 1996, 1997 Andreas Dilger
Distributed according to the same disclaimer
and
license as libpng-0.88, with the following
individuals
added to the list of Contributing Authors:
John Bowler
Kevin Bracey
Sam Bushell
Magnus Holmgren
Greg Roelofs
Tom Ta nner
libpng versions 0.5, May 1995, through
0.88,
January 1996, are Copyright (c) 1995, 1996
Guy
Eric Schalnat, Group 42, Inc.
For the purposes of this copyright and
license,
“Contributing Authors” is defi ned as the
following
set of individuals:
Andreas Dilger
Dave Martindale
Guy Eric Schalnat
Paul Schmidt
Tim Wegner
The PNG Reference Library is supplied “AS IS”.
The
Contributing Authors and Group 42, Inc.
disclaim
all warranties, expressed or implied,
including,
without limitation, the warranties of merchantability
and of fi tness for any purpose. The
Contributing
Authors and Group 42, Inc. assume no liability
for
direct, indirect, incidental, special, exemplary, or
consequential damages, which may result from the
use of the PNG Reference Library, even if
advised
of the possibility of such damage.
Permission is hereby granted to use, copy, modify
,
and distribute this source code, or portions hereof
,
for any purpose, without fee, subject to
the
following restrictions:
1. The origin of this source code must not be
misrepresented.
2. Altered versions must be plainly marked as
such and must not be misrepresented as being the
original source.
3. This Copyright notice may not be
removed
or altered from any source or altered
source
distribution.
The Contributing Authors and Group 42, Inc.
specifi cally permit, without fee, and encour
age
the use of this source code as a component to
Page 51

51
English
supporting the PNG fi le format in commercial
products. If you use this source code in a product,
acknowledgment
is not required but would be
appreciated.
A
“png_get_copyright” function is available, for
convenient use in “about” box
es and the like:
printf(“%s”
,png_get_copyright(NULL));
A
lso, the PNG logo (in PNG format, of course) is
supplied
in the fi les “pngbar.png” and “pngbar. jpg
(88x31) and “pngnow
.png” (98x31).
Libpng
is OSI Certifi ed Open Source Software. OSI
Certifi
ed Open Source is a certifi cation mark of the
Open Source Initiative
.
Glenn Randers-Pehrson
glennrp at users.sourceforge.net
December 15, 2011
libxml (MIT License)
Open Source Initiative OSI - The MIT License
(MIT):Licensing
The MIT License (MIT
)
Copyright (c) <year> <copyright holders
>
P
ermission is hereby granted, free of charge, to
any
person obtaining a copy of this software and
associated documentation
fi les (the “Software”), to
deal
in the Software without restriction, including
without
limitation the rights to use, copy, modify,
merge,
publish, distribute, sublicense, and/or sell
copies
of the Software, and to permit persons to
whom
the Software is furnished to do so, subject to
the f
ollowing conditions:
The
above copyright notice and this permission
notice
shall be included in all copies or substantial
portions of the Software.
THE
SOFTWARE IS PROVIDED “AS IS”,
WITHOUT
WARRANTY OF ANY KIND, EXPRESS
OR
IMPLIED, INCLUDING BUT NOT LIMITED
TO
THE WARRANTIES OF MERCHANTABILITY,
FITNES
S FOR A PARTICULAR PURPOSE AND
NONINFRINGEMENT
. IN NO EVENT SHALL THE
A
UTHORS OR COPYRIGHT HOLDERS BE LIABLE
FOR
ANY CLAIM, DAMAGES OR OTHER LIABILITY,
WHETHER
IN AN ACTION OF CONTRACT, TORT
OR
OTHERWISE, ARISING FROM, OUT OF OR IN
CONNECTION
WITH THE SOFTWARE OR THE USE
OR
OTHER DEALINGS IN THE SOFTWARE.
DMG’s dtoa and strtod
The author of this software is David M. Ga
y.
Copyright
(c) 1991, 2000, 2001 by Lucent
Te
chnologies.
P
ermission to use, copy, modify, and distribute this
software
for any purpose without fee is hereby
gr
anted, provided that this entire notice is included
in all copies of any software which is or includes
a copy or modifi cation of this software and in
all
copies of the supporting documentation for such
software.
THIS SOFTWARE IS BEING PROVIDED “AS IS”,
WITHOUT ANY EXPRESS OR IMPLIED WARRANTY
.
IN PARTICULAR, NEITHER THE AUTHOR
NOR
LUCENT MAKES ANY REPRESENTATION OR
WARRANTY OF ANY KIND CONCERNING
THE
MERCHANTABILITY OF THIS SOFTWARE OR ITS
FITNESS FOR ANY PARTICULAR PURPOSE.
bison_parser
The distribution terms for Bison-generated
parsers
permit using the parsers in nonfree progra
ms.
Before Bison version 2.2, these extra
permissions
applied only when Bison was generating L
ALR(1)
parsers in C. And before Bison version 1.24, Bisongenerated parsers could be used only in programs
that were free software.
The other GNU programming tools, such as
the GNU C compiler, have never had such
a
requirement. They could always be used for
non
free software. The reason Bison was different
was
not due to a special policy decision; it resulted
from
applying the usual General Public License to all
of
the Bison source code.
The output of the Bison utility the Bison parser fi le
contains a verbatim copy of a sizable piece of
Bison,
which is the code for the parser’s
implementation.
(The actions from your grammar are inserted into
this implementation at one point, but most of
the
rest of the implementation is not changed.) When
we applied the GPL terms to the skeleton code
for the parser’s implementation, the effect was to
restrict the use of Bison output to free software.
We didn’t change the terms because of sympathy
for people who want to make software proprietary.
Software should be free. But we concluded that
limiting Bison’s use to free software was doing little
to encourage people to make other software
free.
So we decided to make the practical conditions
for
using Bison match the practical conditions for using
the other GNU tools.
This exception applies when Bison is genera
ting
code for a parser. You can tell whether the
exception
applies to a Bison output fi le by inspecting the fi le
for text beginning with ¨As a special exception....
The text spells out the exact terms of
the
exception.
dmalloc
This is a version (aka dlmalloc) of malloc/
free/realloc written by Doug Lea and released
to the public domain, as explained at http://
creativecommons.org/licenses/publicdomain. Send
Page 52

52
English
questions, comments, complaints, performance
data, etc to dl@cs.oswego.edu.
EMX_sprintf_sscanf
The emx libraries are not distributed under the
GPL.
Linking an application with the emx libraries
does
not cause the executable to be covered by
the
GNU General Public License. You are allowed
to
change and copy the emx library sources if you
keep
the copyright message intact. If you improve
the
emx libraries, please send your enhancements
to
the emx author (you should copyright your
enhancements
similar to the existing emx
lib
raries).
JSON_Parser
P
ermission is hereby granted, free of charge, to
any
person obtaining a copy of this software and
associated documentation
fi les (the “Software”), to
deal
in the Software without restriction, including
without
limitation the rights to use, copy, modify,
merge,
publish, distribute, sublicense, and/or sell
copies
of the Software, and to permit persons to
whom
the Software is furnished to do so, subject to
the f
ollowing conditions:
The
above copyright notice and this permission
notice
shall be included in allcopies or substantial
portions
of the Software. The Software shall be
used for Good, not Evil.
ncurses
THE
SOFTWARE IS PROVIDED “AS IS”,
WITHOUT
WARRANTY OF ANY KIND, EXPRESS
OR
IMPLIED, INCLUDING BUT NOT LIMITED
TO
THE WARRANTIES OF MERCHANTABILITY,
FITNES
S FOR A PARTICULAR PURPOSE AND
NONINFRINGEMENT
. IN NO EVENT SHALL THE
A
UTHORS OR COPYRIGHT HOLDERS BE LIABLE
FOR
ANY CLAIM, DAMAGES OR OTHER LIABILITY,
WHETHER
IN AN ACTION OF CONTRACT, TORT
OR
OTHERWISE, ARISING FROM, OUT OF OR IN
CONNECTION
WITH THE SOFTWARE OR THE USE
OR
OTHER DEALINGS IN THE SOFTWARE.
------------------------------------------------------------Copyright
(c) 1998-2000,2006 Free Software
F
oundation, Inc.
P
ermission is hereby granted, free of charge, to
any
person obtaining a copy of this software and
associated
documentation fi les (the ”Software”),
to
deal in the Software without restriction,
including
without limitation the rights to use,
copy
, modify, merge, publish, distribute, distribute
with
modifi cations, sublicense, and/or sell copies
of the Software, and to permit persons to whom
following conditions:
The above copyright notice and this permission
notice shall be included in all copies or
substantial
portions of the Software.
THE SOFTWARE IS PROVIDED “AS IS”,
WITHOUT
WARRANTY OF ANY KIND, EXPRESS OR
IMPLIED, INCLUDING BUT NOT LIMITED TO
THE
WARRANTIES OF MERCHANTABILITY, FITNESS
FOR
A PARTICULAR PURPOSE AND NONINFRINGEMENT
.
IN NO EVENT SHALL THE ABOVE
COPYRIGHT
HOLDERS BE LIABLE FOR ANY CLAIM,
DAMAGES
OR OTHER LIABILITY, WHETHER IN AN
ACTION
OF CONTRACT, TORT OR OTHERWISE,
ARISING
FROM, OUT OF OR IN CONNECTION WITH
THE
SOFTWARE OR THE USE OR OTHER DEALINGS IN
THE SOFTWARE. Except as contained in this notice,
the name(s) of the above copyright holders
shall
not be used in advertising or otherwise to promote
the sale, use or other dealings in this
Software
without prior written authorization.
xmlrpc-c
The copyright owners of this package license
the
public to copy it (and do other things with it
which
are controlled by copyright law) under a few simple
conditions.
Each source fi le describes the copyright license
for
that particular fi le. This fi le summarizes the licenses
for your convenience.
All the code written specifi cally for
Xmlrpc-c,
which is most of the code, and the aggregation,
is licensed under the XML-RPC FOR C/C++ license
shown below.
Some of the code was written for another
purpose
and copied into Xmlrpc-c. Its copyright owners
license the code under a different license:
The Expat Licence applies to the contents of
the
directory lib/expat, the ABYSS Web Server
License
applies to the contents of the directory
lib/abyss
and parts of the fi le src/xmlrpc_abyss.c.
The Python 1.5.2 license applies to parts of the fi le
src/xmlrpc_base64.c.
And as for the tools/directory, you’ll have to
examine the licenses on your own.
These same licenses have been offered throughout
Xmlrpc-c’s history.
XML-RPC For C/C++ License
-------------------------
Copyright (C) 2001 by First Peer, Inc. All
rights
reserved.
Copyright (C) 2001 by Eric Kidd. All
rights
reserved.
the Software is furnished to do so, subject to the
Page 53

53
English
Redistribution and use in source and binary forms,
with
or without modifi cation, are permitted provided
that the following conditions are met
:
1.
Redistributions of source code must retain the
above
copyright notice, this list of conditions and
the following disclaimer
.
2.
Redistributions in binary form must reproduce the
above
copyright notice, this list of conditions and
the following disclaimer in the documentation and/
or other materials provided with the distribution.
3.
The name of the author may not be used to
endorse
or promote products derived from this
software without speci
fi c prior written permission.
THIS
SOFTWARE IS PROVIDED BY THE AUTHOR
AND
CONTRIBUTORS “AS IS’’ AND ANY EXPRESS
OR
IMPLIED WARRANTIES, INCLUDING, BUT
NO
T LIMITED TO, THE IMPLIED WARRANTIES
OF
MERCHANTABILITY AND FITNESS FOR A
PA
RTICULAR PURPOSE ARE DISCLAIMED. IN NO
EVENT
SHALL THE AUTHOR OR CONTRIBUTORS BE
LIABLE FOR ANY DIRECT
, INDIRECT, INCIDENTAL,
SPECIAL,
EXEMPLARY, OR CONSEQUENTIAL
DAMAGES
(INCLUDING, BUT NOT LIMITED TO,
PROCUREMENT
OF SUBSTITUTE GOODS OR
SERVICES;
LOSS OF USE, DATA, OR PROFITS; OR
BUSINE
SS INTERRUPTION) HOWEVER CAUSED
A
ND ON ANY THEORY OF LIABILITY, WHETHER
IN
CONTRACT, STRICT LIABILITY, OR TORT
(INCLUDING
NEGLIGENCE OR OTHERWISE)
A
RISING IN ANY WAY OUT OF THE USE OF
THIS
SOFTWARE, EVEN IF ADVISED OF THE
POS
SIBILITY OF SUCH DAMAGE.
Expat License
------------Copyright
(c) 1998, 1999, 2000 Thai Open Source
Software Center Lt
d
P
ermission is hereby granted, free of charge, to
any
person obtaining a copy of this software and
associated documentation
fi les (the “Software”), to
deal
in the Software without restriction, including
without
limitation the rights to use, copy, modify,
merge,
publish, distribute, sublicense, and/or sell
copies
of the Software, and to permit persons to
whom
the Software is furnished to do so, subject to
the following conditions:
The
above copyright notice and this permission
notice
shall be included in all copies or substantial
portions of the Software.
THE
SOFTWARE IS PROVIDED “AS IS”,
WITHOUT
WARRANTY OF ANY KIND, EXPRESS
OR
IMPLIED, INCLUDING BUT NOT LIMITED
TO
THE WARRANTIES OF MERCHANTABILITY,
FITNES
S FOR A PARTICULAR PURPOSE AND
NONINFRINGEMENT
. IN NO EVENT SHALL THE
AUTHORS
OR COPYRIGHT HOLDERS BE LIABLE
FOR ANY CLAIM, DAMAGES OR OTHER LIABILITY,
WHETHER IN AN ACTION OF CONTRACT, TORT
OR OTHERWISE, ARISING FROM, OUT OF OR IN
CONNECTION WITH THE SOFTWARE OR THE
USE
OR OTHER DEALINGS IN THE SOFTWARE.
ABYSS Web Server License
-----------------------Copyright (C) 2000 by Moez Mahfoudh <mmoez@
bigfoot.com>. All rights reserved.
Redistribution and use in source and binary forms,
with or without modifi cation, are permitted
provided
that the following conditions are met:
1. Redistributions of source code must retain
the
above copyright notice, this list of conditions
and
the following disclaimer.
2. Redistributions in binary form must reproduce
the
above copyright notice, this list of conditions
and
the following disclaimer in the documentation and/
or other materials provided with the distribution.
3. The name of the author may not be used to
endorse or promote products derived from this
software without specifi c prior written permission.
THIS SOFTWARE IS PROVIDED BY THE AUTHOR
AND CONTRIBUTORS “AS IS’’ AND ANY EXPRES
S
OR IMPLIED WARRANTIES, INCLUDING,
BUT
NOT LIMITED TO, THE IMPLIED WARRANTIES
OF MERCHANTABILITY AND FITNESS FOR
A
PARTICULAR PURPOSE ARE DISCLAIMED. IN NO
EVENT SHALL THE AUTHOR OR CONTRIBUTORS BE
LIABLE FOR ANY DIRECT, INDIRECT, INCIDENTAL,
SPECIAL, EXEMPLARY, OR
CONSEQUENTIAL
DAMAGES (INCLUDING, BUT NOT LIMITED TO
,
PROCUREMENT OF SUBSTITUTE GOODS OR
SERVICES; LOSS OF USE, DATA, OR PROFITS; OR
BUSINESS INTERRUPTION) HOWEVER
CAUSED
AND ON ANY THEORY OF LIABILITY, WHETHER
IN CONTRACT, STRICT LIABILITY, OR TORT
(INCLUDING NEGLIGENCE OR OTHERWISE)
ARISING IN ANY WAY OUT OF THE USE OF
THIS SOFTWARE, EVEN IF ADVISED OF
THE
POSSIBILITY OF SUCH DAMAGE.
Python 1.5.2 License
-------------------Copyright 1991, 1992, 1993, 1994 by
Stichting
Mathematisch Centrum, Amsterdam,
The
Netherlands.
All Rights Reserved
Permission to use, copy, modify, and distribute this
software and its documentation for any
purpose
and without fee is hereby granted, provided that
the above copyright notice appear in all copies and
that both that copyright notice and this
permission
notice appear in supporting documentation,
and
that the names of Stichting Mathematisch Centrum
Page 54

54
English
or CWI or Corporation for National Research
Initiatives
or CNRI not be used in advertising or
publicity
pertaining to distribution of the software
without speci
fi c, written prior permission.
While
CWI is the initial source for this software,
a
modifi ed version is made available by the
Corpo
ration for National Research Initiatives (CNRI)
at the Internet address ftp://ftp.python.org.
STICHTING
MATHEMATISCH CENTRUM AND
CNRI
DISCLAIM ALL WARRANTIES WITH REGARD
TO
THIS SOFTWARE, INCLUDING ALL IMPLIED
W
ARRANTIES OF MERCHANTABILITY AND FITNESS,
IN
NO EVENT SHALL STICHTING MATHEMATISCH
CENTRUM
OR CNRI BE LIABLE FOR ANY SPECIAL,
INDIRECT
OR CONSEQUENTIAL DAMAGES OR ANY
DAMAGES
WHATSOEVER RESULTING FROM LOSS
OF
USE, DATA OR PROFITS, WHETHER IN AN
A
CTION OF CONTRACT, NEGLIGENCE OR OTHER
TO
RTIOUS ACTION, ARISING OUT OF OR IN
CONNECTION
WITH THE USE OR PERFORMANCE
OF THIS SO
FTWARE.
gSOAP Public License
Ve
rsion 1.3b
The
gSOAP public license is derived from the
Mozilla
Public License (MPL1.1). The sections that
were
deleted from the original MPL1.1 text are
1.0.1,
2.1.(c),(d), 2.2.(c),(d), 8.2.(b), 10, and 11.
Section
3.8 was added. The modifi ed sections are
2.1.(b),
2.2.(b), 3.2 (simplifi ed), 3.5 (deleted the
last sentence), and 3.6 (simplifi
ed).
This
license applies to the gSOAP software package,
with
the exception of the soapcpp2 and wsdl2h
source
code located in gsoap/src and gsoap/wsdl,
all
code generated by soapcpp2 and wsdl2h, the
UDDI
source code gsoap/uddi2, and the Web
server
sample source code samples/webserver. To
use
any of these software tools and components
commercially
, a commercial license is required and
can be obtained from www
.genivia.com.
1 DEFINITIONS
.
1.0.1.
1.1. “Contributor
”
means
each entity that creates or contributes to
the creation of Modi
fi cations.
1.2. “Contributor
Version”
means
the combination of the Original Code,
prior
Modifi cations used by a Contributor, and the
Modi
fi cations made by that particular Contributor.
1.3. “Covered Code”
means
the Original Code, or Modifi cations or the
combination
of the Original Code, and Modifi cations,
in each case including portions thereo
f.
1.4. “Electronic Distribution Mechanism”
means a mechanism generally accepted in the
software development community for the electronic
transfer of data.
1.5. “Executable”
means Covered Code in any form other than Source
Code.
1.6. “Initial Developer”
means the individual or entity identifi ed as the
Initial Developer in the Source Code notice required
by Exhibit A.
1.7. “Larger Work”
means a work which combines Covered Code or
portions thereof with code not governed by the
terms of this License.
1.8. “License”
means this document.
1.8.1. “Licensable”
means having the right to grant, to the maximum
extent possible, whether at the time of the initial
grant or subsequently acquired, any and all of the
rights conveyed herein.
1.9. “Modifi cations”
means any addition to or deletion from the
substance or structure of either the Original Code
or any previous Modifi cations. When Covered Code
is released as a series of fi les, a Modifi cation is:
A.
Any addition to or deletion from the contents
of a fi le containing Original Code or previous
Modifi cations.
B.
Any new fi le that contains any part of the Original
Code, or previous Modifi cations.
1.10. “Original Code”
means Source Code of computer software code
which is described in the Source Code notice
required by Exhibit A as Original Code, and which,
at the time of its release under this License is not
already Covered Code governed by this License.
1.10.1. “Patent Claims”
means any patent claim(s), now owned or hereafter
acquired, including without limitation, method,
process, and apparatus claims, in any patent
Licensable by grantor.
1.11. “Source Code”
means the preferred form of the Covered Code
for making modifi cations to it, including all
modules it contains, plus any associated interface
defi nition fi les, scripts used to control compilation
and installation of an Executable, or source code
differential comparisons against either the Original
Code or another well known, available Covered
Code of the Contributor’s choice. The Source Code
Page 55

55
English
can be in a compressed or archival form, provided
the
appropriate decompression or de-archiving
software is widely av
ailable for no charge.
1.12. “Y
ou” (or “Your”)
means
an individual or a legal entity exercising
rights
under, and complying with all of the terms
of
, this License or a future version of this License
issued
under Section 6.1. For legal entities, “You”
includes
any entity which controls, is controlled
by
, or is under common control with You. For
purposes of this de
fi nition, “control” means (a) the
powe
r, direct or indirect, to cause the direction or
management
of such entity, whether by contract
or
otherwise, or (b) ownership of more than
fi
fty percent (50%) of the outstanding shares or
benefi
cial ownership of such entity.
2 SOURCE CODE LICENSE.
2.1. The Initial Developer Gr
ant.
The
Initial Developer hereby grants You a world-
wide,
royalty-free, non-exclusive license, subject to
third party intellectual property claims:
(a
)
under
intellectual property rights (other than patent
or
trademark) Licensable by Initial Developer to use,
reproduce,
modify, display, perform, sublicense and
distribute
the Original Code (or portions thereof)
with
or without Modifi cations, and/or as part of a
Larger
Work; and
(b)
under
patents now or hereafter owned or controlled
by
Initial Developer, to make, have made, use and
sell
(“offer to sell and import”) the Original Code,
Modi
fi cations, or portions thereof, but solely to the
extent
that any such patent is reasonably necessary
to
enable You to utilize, alone or in combination with
other
software, the Original Code, Modifi cations, or
any combination or portions thereo
f.
(c
)
(d)
2.2. Contributor Gr
ant.
Subject
to third party intellectual property claims,
each
Contributor hereby grants You a world-wide,
ro
yalty-free, non-exclusive license
(a
)
under
intellectual property rights (other than
patent
or trademark) Licensable by Contributor,
to
use, reproduce, modify, display, perform,
sublicense
and distribute the Modifi cations created
by
such Contributor (or portions thereof) either on
an
unmodifi ed basis, with other Modifi cations, as
Covered
Code and/or as part of a Larger Work;
an
d
(b)
under patents now or hereafter owned or controlled
by Contributor, to make, have made, use and sell
(“offer to sell and import”) the Contributor Ve
rsion
(or portions thereof), but solely to the extent that
any such patent is reasonably necessary to enable
You to utilize, alone or in combination with
other
software, the Contributor Version (or
portions
thereof).
(c)
(d)
3 DISTRIBUTION OBLIGATIONS.
3.1. Application of License.
The Modifi cations which You create or to which Yo
u
contribute are governed by the terms of this
License,
including without limitation Section 2.2. The
Source
Code version of Covered Code may be distributed
only under the terms of this License or a future
version of this License released under Section 6.1,
and You must include a copy of this License with
every copy of the Source Code You distribute. Yo
u
may not offer or impose any terms on any
Source
Code version that alters or restricts the applicable
version of this License or the recipients’
rights
hereunder. However, You may include an additional
document offering the additional rights
described
in Section 3.5.
3.2. Availability of Source Code.
Any Modifi cation created by You shall be
provided
to the Initial Developer in Source Code form
and
are subject to the terms of the License.
3.3. Description of Modifi cations.
You must cause all Covered Code to which Y
ou
contribute to contain a fi le documenting the
changes
You made to create that Covered Code and
the
date of any change. You must include a prominent
statement that the Modifi cation is derived,
directly
or indirectly, from Original Code provided by
the
Initial Developer and including the name of
the
Initial Developer in (a) the Source Code, and
(b)
in any notice in an Executable version or related
documentation in which You describe the origin
or
ownership of the Covered Code.
3.4. Intellectual Property Matters.
(a) Third Party Claims.
If Contributor has knowledge that a license under
a
third party’s intellectual property rights is
required
to exercise the rights granted by such
Contributor
under Sections 2.1 or 2.2, Contributor must
include
a text fi le with the Source Code distribution titled
“LEGAL” which describes the claim and the
party
making the claim in suffi cient detail that a recipient
will know whom to contact. If Contributor obtains
such knowledge after the Modifi cation is made
available as described in Section 3.2, Contributor
shall promptly modify the LEGAL fi le in all copies
Contributor makes available thereafter and
shall
Page 56

56
English
take other steps (such as notifying appropriate
mailing
lists or newsgroups) reasonably calculated
to
inform those who received the Covered Code
that new knowledge has been obtained.
(b) Contributor APIs.
If
Contributor’s Modifi cations include an application
prog
ramming interface and Contributor has
knowledge of patent licenses which are reasonably
necessary to implement that API, Contributor must
also include this information in the LEGAL
fi le.
(c) R
epresentations.
Contributor
represents that, except as disclosed
pursuant
to Section 3.4(a) above, Contributor
believes
that Contributor’s Modifi cations are
Contributo
r’s original creation(s) and/or Contributor
has
suffi cient rights to grant the rights conveyed by
this License.
3.5. R
equired Notices.
Yo
u must duplicate the notice in Exhibit A in each
fi
le of the Source Code. If it is not possible to put
such
notice in a particular Source Code fi le due to
its
structure, then You must include such notice
in
a location (such as a relevant directory) where
a
user would be likely to look for such a notice.
If
You created one or more Modifi cation(s) You
may
add your name as a Contributor to the notice
described in Exhibit A.
You must also duplicate this
License
in any documentation for the Source Code
where
You describe recipients’ rights or ownership
rights
relating to Covered Code. You may choose
to offe
r, and to charge a fee for, warranty, support,
indemnity
or liability obligations to one or more
recipients
of Covered Code. However, You may do
so
only on Your own behalf, and not on behalf of
the Initial Developer or any Contributo
r.
3.6. Distribution of Ex
ecutable Versions.
Yo
u may distribute Covered Code in Executable
form
only if the requirements of Section 3.1-3.5
have
been met for that Covered Code. You may
distribute
the Executable version of Covered
Code
or ownership rights under a license of Your
choice,
which may contain terms different from this
License,
provided that You are in compliance with
the
terms of this License and that the license for
the
Executable version does not attempt to limit
or
alter the recipient’s rights in the Source Code
version
from the rights set forth in this License.
If
You distribute the Executable version under a
different
license You must make it absolutely clear
that
any terms which differ from this License are
offered
by You alone, not by the Initial Developer
or
any Contributor. If you distribute executable
versions
containing Covered Code as part of a
product,
you must reproduce the notice in Exhibit
B
in the documentation and/or other materials
provided with the product.
3.7. Larger Works.
You may create a Larger Work by
combining
Covered Code with other code not governed by
the
terms of this License and distribute the Larger Work
as a single product. In such a case, You must make
sure the requirements of this License are fulfi lled
for the Covered Code.
3.8. Restrictions.
You may not remove any product identifi
cation,
copyright, proprietary notices or labels from
gSOAP.
4 INABILITY TO COMPLY DUE TO STATUTE OR
REGULATION.
If it is impossible for You to comply with any
of
the terms of this License with respect to some or
all of the Covered Code due to statute, judicial
order, or regulation then You must: (a) comply with
the terms of this License to the maximum extent
possible; and (b) describe the limitations and
the
code they affect. Such description must be
included
in the LEGAL fi
le described in Section 3.4 and must
be included with all distributions of the Source
Code. Except to the extent prohibited by
statute
or regulation, such description must be suffi
ciently
detailed for a recipient of ordinary skill to be able
to understand it.
5 APPLICATION OF THIS LICENSE.
This License applies to code to which the
Initial
Developer has attached the notice in Exhibit A
and
to related Covered Code.
6 VERSIONS OF THE LICENSE.
6.1. New Versions.
Grantor may publish revised and/or new versions
of
the License from time to time. Each version will be
given a distinguishing version number.
6.2. Effect of New Versions.
Once Covered Code has been published under
a
particular version of the License, You may always
continue to use it under the terms of that version.
You may also choose to use such Covered
Code
under the terms of any subsequent version of
the
License.
6.3. Derivative Works.
If You create or use a modifi ed version of this
License (which you may only do in order to
apply
it to code which is not already Covered
Code
governed by this License), You must (a) rename
Your license so that the phrase “gSOAP” or
any
confusingly similar phrase do not appear in
your
license (except to note that your license differs
from
this License) and (b) otherwise make it clear that
Your version of the license contains terms
which
differ from the gSOAP Public License. (Filling
in
Page 57

57
English
the name of the Initial Developer, Original Code or
Contributor
in the notice described in Exhibit A shall
not
of themselves be deemed to be modifi cations
of this License
.)
7 DISCL
AIMER OF WARRANTY.
COVERED
CODE IS PROVIDED UNDER THIS
LICENSE
ON AN “AS IS” BASIS, WITHOUT
W
ARRANTY OF ANY KIND, WHETHER EXPRESS,
IMPLIED
OR STATUTORY, INCLUDING, WITHOUT
LIMI
TATION, THE IMPLIED WARRANTIES
OF
MERCHANTABILITY, OF FITNESS FOR A
PA
RTICULAR PURPOSE, NONINFRINGEMENT
OF
THIRD PARTY INTELLECTUAL PROPERTY
RIGHTS,
AND ANY WARRANTY THAT MAY ARISE
BY
REASON OF TRADE USAGE, CUSTOM, OR
COURSE
OF DEALING. WITHOUT LIMITING THE
FOREGOING,
YOU ACKNOWLEDGE THAT THE
SO
FTWARE IS PROVIDED “AS IS” AND THAT THE
AUTHORS
DO NOT WARRANT THE SOFTWARE
WILL
RUN UNINTERRUPTED OR ERROR FREE.
LIMITED
LIABILITY THE ENTIRE RISK AS TO
RESU
LTS AND PERFORMANCE OF THE SOFTWARE
IS
ASSUMED BY YOU. UNDER NO CIRCUMSTANCES
WILL
THE AUTHORS BE LIABLE FOR ANY
SPECIAL,
INDIRECT, INCIDENTAL, EXEMPLARY
OR
CONSEQUENTIAL DAMAGES OF ANY KIND
OR
NATURE WHATSOEVER, WHETHER BASED
ON
CONTRACT, WARRANTY, TORT (INCLUDING
NEGLIGENCE),
STRICT LIABILITY OR OTHERWISE,
ARISING
OUT OF OR IN ANY WAY RELATED
TO
THE SOFTWARE, EVEN IF THE AUTHORS
HA
VE BEEN ADVISED ON THE POSSIBILITY OF
SUCH
DAMAGE OR IF SUCH DAMAGE COULD
HA
VE BEEN REASONABLY FORESEEN, AND
NO
TWITHSTANDING ANY FAILURE OF ESSENTIAL
PURPOSE
OF ANY EXCLUSIVE REMEDY PROVIDED.
SUCH
LIMITATION ON DAMAGES INCLUDES,
BUT
IS NOT LIMITED TO, DAMAGES FOR LOSS
OF
GOODWILL, LOST PROFITS, LOSS OF DATA
OR
SOFTWARE, WORK STOPPAGE, COMPUTER
F
AILURE OR MALFUNCTION OR IMPAIRMENT OF
OT
HER GOODS. IN NO EVENT WILL THE AUTHORS
BE
LIABLE FOR THE COSTS OF PROCUREMENT
OF
SUBSTITUTE SOFTWARE OR SERVICES. YOU
ACKNOWLEDGE
THAT THIS SOFTWARE IS NOT
DESIGNED
FOR USE IN ON-LINE EQUIPMENT
IN
HAZARDOUS ENVIRONMENTS SUCH AS
OPERA
TION OF NUCLEAR FACILITIES, AIRCRAFT
NA
VIGATION OR CONTROL, OR LIFE-CRITICAL
APPLICA
TIONS. THE AUTHORS EXPRESSLY
DISCL
AIM ANY LIABILITY RESULTING FROM
USE
OF THE SOFTWARE IN ANY SUCH ON-LINE
EQUIPMENT
IN HAZARDOUS ENVIRONMENTS
AND
ACCEPTS NO LIABILITY IN RESPECT OF
ANY
ACTIONS OR CLAIMS BASED ON THE USE
OF
THE SOFTWARE IN ANY SUCH ON-LINE
EQUIPMENT
IN HAZARDOUS ENVIRONMENTS BY
YOU.
FOR PURPOSES OF THIS PARAGRAPH, THE
TERM “LIFE-CRITICAL APPLICATION” MEANS
AN APPLICATION IN WHICH THE
FUNCTIONING
OR MALFUNCTIONING OF THE SOFTWARE MA
Y
RESULT DIRECTLY OR INDIRECTLY IN
PHYSICAL
INJURY OR LOSS OF HUMAN LIFE. THIS
DISCLAIMER OF WARRANTY CONSTITUTES AN
ESSENTIAL PART OF THIS LICENSE. NO USE OF
ANY COVERED CODE IS AUTHORIZED
HEREUNDER
EXCEPT UNDER THIS DISCLAIMER.
8 TERMINATION.
8.1.
This License and the rights granted
hereunder
will terminate automatically if You fail to comply
with terms herein and fail to cure such breach
within 30 days of becoming aware of the
breach.
All sublicenses to the Covered Code which
are
properly granted shall survive any termination of
this License. Provisions which, by their
nature,
must remain in effect beyond the termination
of
this License shall survive.
8.2.
8.3.
If You assert a patent infringement claim
against
Participant alleging that such Participant’s
Contributor Version directly or indirectly
infringes
any patent where such claim is resolved (such as
by license or settlement) prior to the initiation of
patent infringement litigation, then the reasonable
value of the licenses granted by such Participant
under Sections 2.1 or 2.2 shall be taken
into
account in determining the amount or va
lue of any
payment or license.
8.4.
In the event of termination under Sections 8.1 or
8.2
above, all end user license agreements (excluding
distributors and resellers) which have been validly
granted by You or any distributor hereunder
prior
to termination shall survive termination.
9 LIMITATION OF LIABILITY.
UNDER NO CIRCUMSTANCES AND UNDER NO
LEGAL THEORY, WHETHER TORT
(INCLUDING
NEGLIGENCE), CONTRACT, OR OTHERWISE,
SHALL YOU, THE INITIAL DEVELOPER,
ANY
OTHER CONTRIBUTOR, OR ANY DISTRIBUT
OR
OF COVERED CODE, OR ANY SUPPLIER OF
ANY
OF SUCH PARTIES, BE LIABLE TO ANY PERSON
FOR ANY INDIRECT, SPECIAL, INCIDENTAL,
OR
CONSEQUENTIAL DAMAGES OF ANY CHARACTER
INCLUDING, WITHOUT LIMITATION,
DAMAGES
FOR LOSS OF GOODWILL, WORK STOPPA
GE,
COMPUTER FAILURE OR MALFUNCTION, OR
ANY AND ALL OTHER COMMERCIAL
DAMAGES
OR LOSSES, EVEN IF SUCH PARTY SHALL HAVE
BEEN INFORMED OF THE POSSIBILITY OF SUCH
DAMAGES. THIS LIMITATION OF LIABILIT
Y
Page 58

58
English
SHALL NOT APPLY TO LIABILITY FOR DEATH
OR
PERSONAL INJURY RESULTING FROM
SUCH
PARTY’S NEGLIGENCE TO THE EXTENT
APPLICABLE
LAW PROHIBITS SUCH LIMITATION.
SOME
JURISDICTIONS DO NOT ALLOW THE
EXCLUSION
OR LIMITATION OF INCIDENTAL OR
CONSEQUENTIAL
DAMAGES, SO THIS EXCLUSION
AND LIMI
TATION MAY NOT APPLY TO YOU.
10 U.S. GOVERNMENT END USERS.
11 MISCELL
ANEOUS.
12 RESPONSIBILI
TY FOR CLAIMS.
As
between Initial Developer and the Contributors,
each
party is responsible for claims and damages
arising,
directly or indirectly, out of its utilization
of
rights under this License and You agree to work
with
Initial Developer and Contributors to distribute
such
responsibility on an equitable basis. Nothing
herein is intended or shall be deemed to constitute
any admission of liability
.
EXHIBIT A.
“The
contents of this fi le are subject to the gSOAP
Public
License Version 1.3 (the “License”); you
may not use this
fi le except in compliance with the
License.
You may obtain a copy of the License at
http://ww
w.cs.fsu.edu/engelen/soaplicense.html
Software
distributed under the License is distributed
on
an “AS IS” basis, WITHOUT WARRANTY OF ANY
KIN
D, either express or implied. See the License
for
the specifi c language governing rights and
limitations under the License.
The
Original Code of the gSOAP Software is:
stdsoap.h,
stdsoap2.h, stdsoap.c, stdsoap2.c,
stdsoap.cpp
, stdsoap2.cpp, soapcpp2.h,
soapcpp2.c,
soapcpp2_lex.l, soapcpp2_yacc.y,
error2.h,
error2.c, symbol2.c, init2.c, soapdoc2.
html,
and soapdoc2.pdf, httpget.h, httpget.c, stl.h,
stldeque.h, stllist.h, stlvecto
r. h, stlset.h.
The
Initial Developer of the Original Code is Robert
A.
van Engelen. Portions created by Robert A. van
Engelen
are Copyright (C) 2001-2004 Robert A. van
Engelen, Genivia inc. All Rights
Reserved.
Contributor(s)
:
“________________________.
”
[Note:
The text of this Exhibit A may differ slightly
form
the text of the notices in the Source Code fi les
of
the Original code. You should use the text of this
Exhibit
A rather than the text found in the Original
Code Source Code for
Your Modifi cations.]
EXHIBIT B.
“P
art of the software embedded in this product is
gSOAP software.
Po
rtions created by gSOAP are Copyright (C) 2001-
THE SOFTWARE IN THIS PRODUCT WAS IN PART
PROVIDED BY GENIVIA INC AND ANY EXPRES
S
OR IMPLIED WARRANTIES, INCLUDING,
BUT
NOT LIMITED TO, THE IMPLIED WARRANTIES
OF MERCHANTABILITY AND FITNESS FOR
A
PARTICULAR PURPOSE ARE DISCLAIMED. IN
NO EVENT SHALL THE AUTHOR BE LIABLE
FOR ANY DIRECT, INDIRECT, INCIDENTAL,
SPECIAL, EXEMPLARY, OR
CONSEQUENTIAL
DAMAGES (INCLUDING, BUT NOT LIMITED TO
,
PROCUREMENT OF SUBSTITUTE GOODS OR
SERVICES; LOSS OF USE, DATA, OR PROFITS; OR
BUSINESS INTERRUPTION) HOWEVER CAUSED
AND ON ANY THEORY OF LIABILITY, WHETHER
IN CONTRACT, STRICT LIABILITY, OR TORT
(INCLUDING NEGLIGENCE OR OTHERWISE)
ARISING IN ANY WAY OUT OF THE USE OF
THIS SOFTWARE, EVEN IF ADVISED OF
THE
POSSIBILITY OF SUCH DAMAGE.”
SQLite
SQLite Copyright
SQLite is in the Public Domain
All of the deliverable code in SQLite has been
dedicated to the public domain by the authors.
All
code authors, and representatives of the
companies
they work for, have signed affi davits dedicating
their
contributions to the public domain and originals
of
those signed affi davits are stored in a fi resafe at
the main offi ces of Hwaci. Anyone is free to copy
,
modify
, publish, use, compile, sell, or distribute the
original SQLite code, either in source code form or
as a compiled binary, for any purpose, commercial
or non-commercial, and by any means.
The previous paragraph applies to the delivera
ble
code in SQLite - those parts of the SQLite library
that you actually bundle and ship with a larger
application. Portions of the documentation
and
some code used as part of the build process might
fall under other licenses. The details here
are
unclear. We do not worry about the licensing of
the
documentation and build code so much because
none of these things are part of the core delivera
ble
SQLite library.
All of the deliverable code in SQLite has been
written from scratch. No code has been
taken
from other projects or from the open
internet.
Every line of code can be tr
aced back to its original
author, and all of those authors have public domain
dedications on fi le. So the SQLite code base is
clean
and is uncontaminated with licensed code from
other projects.
2009 Robert A. van Engelen, Genivia inc. All Rights
Reserved.
Page 59

59
English
BSD License
Copyright (c) 2004, Jan Kneschke, incremental
All rights reserved.
Redistribution and use in source and binary forms,
with or without modifi cation, are permitted provided
that the following conditions are met:
- Redistributions of source code must retain the
above copyright notice, this list of conditions and
the following disclaimer.
- Redistributions in binary form must reproduce the
above copyright notice, this list of conditions and
the following disclaimer in the documentation and/
or other materials provided with the distribution.
- Neither the name of the ‘incremental’ nor the
names of its contributors may be used to endorse
or promote products derived from this software
without specifi c prior written permission.
THIS SOFTWARE IS PROVIDED BY THE COPYRIGHT
HOLDERS AND CONTRIBUTORS “AS IS” AND ANY
EXPRESS OR IMPLIED WARRANTIES, INCLUDING,
BUT NOT LIMITED TO, THE IMPLIED WARRANTIES
OF MERCHANTABILITY AND FITNESS FOR A
PARTICULAR PURPOSE ARE DISCLAIMED. IN
NO EVENT SHALL THE COPYRIGHT OWNER OR
CONTRIBUTORS BE LIABLE FOR ANY DIRECT,
INDIRECT, INCIDENTAL, SPECIAL, EXEMPLARY,
OR CONSEQUENTIAL DAMAGES (INCLUDING, BUT
NOT LIMITED TO, PROCUREMENT OF SUBSTITUTE
GOODS OR SERVICES; LOSS OF USE, DATA,
OR PROFITS; OR BUSINESS INTERRUPTION)
HOWEVER CAUSED AND ON ANY THEORY OF
LIABILITY, WHETHER IN CONTRACT, STRICT
LIABILITY, OR TORT (INCLUDING NEGLIGENCE
OR OTHERWISE) ARISING IN ANY WAY OUT
OF THE USE OF THIS SOFTWARE, EVEN IF
ADVISED OF THE POSSIBILITY OF SUCH DAMAGE.
BSD
Copyright (c) <YEAR>, <OWNER>
All rights reserved.
Redistribution and use in source and binary forms,
with or without modifi cation, are permitted provided
that the following conditions are met:
Redistributions of source code must retain the
above copyright notice, this list of conditions and
the following disclaimer.
Redistributions in binary form must reproduce the
above copyright notice, this list of conditions and
the following disclaimer in the documentation and/
or other materials provided with the distribution.
Neither the name of the <ORGANIZATION>
nor the names of its contributors may be used to
endorse or promote products derived from this
software without specifi c prior written permission.
THIS SOFTWARE IS PROVIDED BY THE COPYRIGHT
HOLDERS AND CONTRIBUTORS “AS IS” AND ANY
EXPRESS OR IMPLIED WARRANTIES, INCLUDING,
BUT NOT LIMITED TO, THE IMPLIED WARRANTIES
OF MERCHANTABILITY AND FITNESS FOR A
PARTICULAR PURPOSE ARE DISCLAIMED. IN
NO EVENT SHALL THE COPYRIGHT HOLDER OR
CONTRIBUTORS BE LIABLE FOR ANY DIRECT,
INDIRECT, INCIDENTAL, SPECIAL, EXEMPLARY,
OR CONSEQUENTIAL DAMAGES (INCLUDING, BUT
NOT LIMITED TO, PROCUREMENT OF SUBSTITUTE
GOODS OR SERVICES; LOSS OF USE, DATA,
OR PROFITS; OR BUSINESS INTERRUPTION)
HOWEVER CAUSED AND ON ANY THEORY OF
LIABILITY, WHETHER IN CONTRACT, STRICT
LIABILITY, OR TORT (INCLUDING NEGLIGENCE OR
OTHERWISE) ARISING IN ANY WAY OUT OF THE
USE OF THIS SOFTWARE, EVEN IF ADVISED OF
THE POSSIBILITY OF SUCH DAMAGE.
Unicode_Bidirectional_Algorithm
"UNICODE, INC. LICENSE AGREEMENT - DATA
FILES AND SOFTWARE Unicode Data Files include
all data files under the directories
http://www.unicode.org/Public/, http:// www
.unicode.org/reports/, and http://www.
unicode.org/cldr/data/. Unicode Software includes
any source code published in the Unicode Standard
or under the directories http://www.
unicode.org/Public/, http://www.unicode.org/
reports/, and http://www.unicode.org/cldr/data/.
NOTICE TO USER: Carefully read the following legal
agreement. BY DOWNLOADING, INSTALLING,
COPYING OR OTHERWISE USING UNICODE INC.'S
DATA FILES (""DATA FILES""), AND/OR SOFTWARE
(""SOFTWARE""), YOU UNEQUIVOCALLY ACCEPT,
AND AGREE TO BE BOUND BY, ALL OF THE TERMS
AND CONDITIONS OF THIS AGREEMENT. IF YOU
DO NOT AGREE, DO NOT DOWNLOAD, INSTALL,
COPY, DISTRIBUTE OR USE THE DATA FILES OR
SOFTWARE.
COPYRIGHT AND PERMISSION NOTICE
Copyright c 1991-2009 Unicode, Inc. All rights
reserved. Distributed under the Terms of Use in
http://www.unicode.org/copyright.html.
Permission is hereby granted, free of charge, to any
person obtaining a copy of the Unicode data files
and any associated documentation (the ""Data
Files"") or Unicode software and any associated
documentation (the ""Software"") to deal in the
Data Files or Software without restriction, including
without limitation the rights to use, copy, modify,
merge, publish, distribute, and/or sell copies of the
Data Files or Software, and to permit persons to
Page 60

60
English
whom the Data Files or Software are furnished to
do so, provided that (a) the above copyright
notice(s) and this permission notice appear with all
copies of the Data Files or Software, (b) both the
above copyright notice(s) and this permission
notice appear in associated documentation, and (c)
there is clear notice in each modified Data File or in
the Software as well as in the documentation
associated with the Data File(s) or Software that
the data or software has been modified.
THE DATA FILES AND SOFTWARE ARE PROVIDED
""AS IS"", WITHOUT WARRANTY OF ANY KIND,
EXPRESS OR IMPLIED, INCLUDING BUT NOT
LIMITED TO THE WARRANTIES OF
MERCHANTABILITY, FITNESS FOR A PARTICULAR
PURPOSE AND NONINFRINGEMENT OF THIRD
PARTY RIGHTS. IN NO EVENT SHALL THE
COPYRIGHT HOLDER OR HOLDERS INCLUDED IN
THIS NOTICE BE LIABLE FOR ANY CLAIM, OR ANY
SPECIAL INDIRECT OR CONSEQUENTIAL
DAMAGES, OR ANY DAMAGES WHATSOEVER
RESULTING FROM LOSS OF USE, DATA OR Except
as contained in this notice, the name of a copyright
holder shall not be used in advertising or otherwise
to promote the sale, use or other dealings in these
Data Files or Software without prior written
authorization of the copyright holder."
HarfBuzz
HarfBuzz was previously licensed under different
licenses. This was changed in January 2008. If you
need to relicense your old copies, consult the
announcement of the license change on the
internet. Other than that, each copy of HarfBuzz is
licensed under the COPYING file included with it.
The actual license follows:
Permission is hereby granted, without written
agreement and without license or royalty fees, to
use, copy, modify, and distribute this software and
its documentation for any purpose, provided that
the above copyright notice and the following two
paragraphs appear in all copies of this software.
IN NO EVENT SHALL THE COPYRIGHT HOLDER BE
LIABLE TO ANY PARTY FOR DIRECT, INDIRECT,
SPECIAL, INCIDENTAL, OR CONSEQUENTIAL
DAMAGES ARISING OUT OF THE USE OF THIS
SOFTWARE AND ITS DOCUMENTATION, EVEN IF
THE COPYRIGHT HOLDER HAS BEEN ADVISED OF
THE POSSIBILITY OF SUCH DAMAGE.
THE COPYRIGHT HOLDER SPECIFICALLY
DISCLAIMS ANY WARRANTIES, INCLUDING, BUT
NOT LIMITED TO
, THE IMPLIED WARRANTIES OF
MERCHANTABILITY AND FITNESS FOR A
PARTICULAR PURPOSE. THE SOFTWARE PROVIDED
HEREUNDER IS ON AN "AS IS" BASIS, AND THE
COPYRIGHT HOLDER HAS NO OBLIGATION TO
PROVIDE MAINTENANCE, SUPPORT, UPDATES,
ENHANCEMENTS, OR MODIFICATIONS.
tinyxml
lua.txt (MIT License)
www.sourceforge.net/projects/tinyxml
Original code (2.0 and earlier ) copyright (c) 20002006 Lee Thomason
(www.grinninglizard.com)
This software is provided 'as-is', without any express
or implied warranty. In no event will the authors be
held liable for any damages arising from the use of
this software.
Permission is granted to anyone to use this software
for any purpose, including commercial applications,
and to alter it and redistribute it freely, subject to
the following restrictions:
1. The origin of this software must not be
misrepresented; you must not claim that you wrote
the original software. If you use this software in
a product, an acknowledgment in the product
documentation would be appreciated but is not
required.
2. Altered source versions must be plainly marked as
such, and must not be misrepresented as being the
original software.
3. This notice may not be removed or altered
from any source distribution.
Lua is free software distributed under the terms of
the MIT license reproduced here. Lua may be used
for any purpose, including commercial purposes,
at absolutely no cost. No paperwork, no royalties,
no GNU-like "copyleft" restrictions, either. Just
download it and use it.
Lua is certified Open Source software. Its license
is simple and liberal and is compatible with GPL.
Lua is not in the public domain and PUC-Rio keeps
its copyright.
The spirit of the Lua license is that you are free to
use Lua for any purpose at no cost without having
to ask us. The only requirement is that if you do
use Lua, then you should give us credit by
including the copyright notice somewhere in your
product or its documentation. A nice, but optional,
way to give us further credit is to include a Lua
logo and a link to our site in a web page for your
product.
The Lua language is entirely designed, implemented,
Page 61

61
English
and maintained by a team at PUC-Rio in Brazil.
The implementation is not derived from licensed
software.
Before Lua 5.0, Lua used its own license, which
was very close to the zlib license and others, but
not quite the same. Check the source distribution
for the exact license text for each version before
Lua 5.0. Nevertheless, if you wish to use those old
versions, you may hereby assume that they have all
been re-licensed under the MIT license as described
above.
Copyright © 1994–2014 Lua.org, PUC-Rio.
Permission is hereby granted, free of charge, to
any person obtaining a copy of this software and
associated documentation les (the "Software"), to
deal in the Software without restriction, including
without limitation the rights to use, copy, modify,
merge, publish, distribute, sublicense, and/or sell
copies of the Software, and to permit persons to
whom the Software is furnished to do so, subject to
the following conditions:
The above copyright notice and this permission
notice shall be included in all copies or substantial
portions of the Software.
THE SOFTWARE IS PROVIDED "AS IS", WITHOUT
WARRANTY OF ANY KIND, EXPRESS OR
IMPLIED, INCLUDING BUT NOT LIMITED TO THE
WARRANTIES OF MERCHANTABILITY, FITNESS FOR
A PARTICULAR PURPOSE AND NONINFRINGEMENT.
IN NO EVENT SHALL THE AUTHORS OR COPYRIGHT
HOLDERS BE LIABLE FOR ANY CLAIM, DAMAGES
OR OTHER LIABILITY, WHETHER IN AN ACTION
OF CONTRACT, TORT OR OTHERWISE, ARISING
FROM, OUT OF OR IN CONNECTION WITH THE
SOFTWARE OR THE USE OR OTHER DEALINGS IN
THE SOFTWARE.
zziplib
The zziplib library is intentionally lightweight, it
offers the ability to easily extract data from files
archived in a single zip le. Applications can bundle
les into a single zip archive and access them. The
implementation is based only on the (free) subset
of compression with the zlib algorithm which is
actually used by the zip/unzip tools.
The library allows reading zip archives in a number
of ways,
archive mode:
reading the zip directory and extracting les from
it. This is the traditional mode as seen with unzip-
utilities. Some extra unzip-utiles for transparent/
magic mode are shipped as well.
replacement mode:
Use ZZIP_FILE / ZZIP_DIR pointers provided by
zziplib and put them to work with routines originally
developped to work with real directories and file
handles. The API calls do follow traditional synopsis
from posix/stdio.
transparent mode:
Use replacement handles and allow the open()-calls
to automatically detect when a le is contained in a
zip archive or when it is a real le in the le system.
A filepath can be partly in a real filesystem and
partly within the zip archive when one is seen.
ext magic:
Use the same lepath to access either a zipped or
real le - it looks for a real le and there is none
then every subdirectory of the path is checked,
a ".zip" extension appended, and the zipped file
transparently opened. This can speed up dat-file
development dramatically.
io/xor magic:
The access to the filesystem can be hooked up examples are given for xor obfuscation which is
great for game artwork and AI data. A small intro
for SDLrwops usage is given as well.
 Loading...