

Page 1
TOSHIBA
OwNER·s
LCD
Hi:JrTII'"
H1GH-DEF1N1T10N
[I]
TV
MuLr1ME01A
INTERFACE
DOLBY
AUDIO™
MANUAL
~db
TruSurround
androidtv
43U775* Series
49U775* Series
55U775*
Series
65U775* Series
Owner's
Record
You
will
find
the
back
provided
your
TOSHIBA
Model
number:
Serial
number:
the
of
the
below.
model
TV.
Record
Refer
dealer
--------
--------
number
these
to
them
regarding
and
serial
numbers
whenever
this
product.
number
in
the
you
call
on
spaces
upon
Page 2
Welcome
• Thank you
newTV.
• Instructions in this manual are based
• Please read all safety and operating instructions in this manual carefully, and keep this manual
reference.
• LCDTV
• Design and specifications are subject
• Never service
to
Toshiba
for
purchasing this Toshiba
is
LCD
Panel
with
or
remodel
LED
the
LCD
TV.
This manual will help you use
on
using
the
Backlight.
to
change
without
TV
by
yourself. It may expose you
remote control.
notice.
to
a fire hazard
the
exciting features
or
dangerous voltages.
Contents
for
of
your
future
Introduction/
Pedestal Stand Assembling
Important
Connecting
TV Panel Controls
Learning
Connecting
.......................................................................................
Wall-hanging Bracket
Using
Initial Setup
Selecting
Electronic Program Guide
Time-shift Function
Live TV Settings
Back Connections
Getting
Started
Safety Instructions
an
Aerial
...................................................
about
the
the
AC
the
Basic
Features
·····························································12
Input
Source
......................................................
..................................................
................................
............................
............................................
Remote Control
Power Cord
...........................................
..............................................
to
........................................
(EPG)
......................
...............
Your TV
3
4
7
8
9
,,
, 1
, 2
12
13
, 3
, 8
Using
the
Smart
Display
the
Google Assistant
Media Player
Settings
Reference
Appendix
Troubleshooting
Broadcast System
Specifications
Home
...........................................................
....................................................................
Section
.................................................................
features
Page
......................................
...................................................
...................................................
.................................................
.........................................................
20
20
20
21
22
24
25
25
2
Page 3
Introduction I Getting
Started
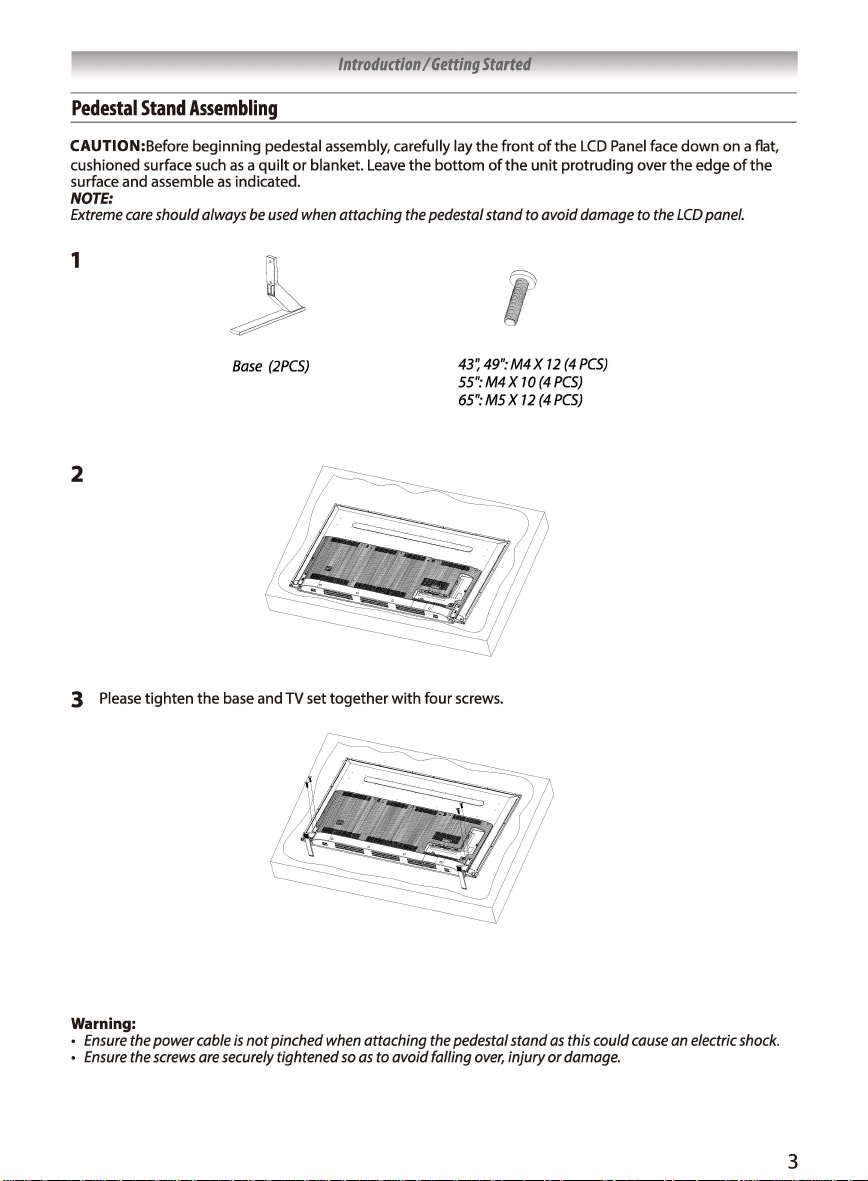
Pedestal
CAUTION:Before beginning pedestal assembly, carefully
cushioned surface such as a quilt or blanket. Leave
surface
NOTE:
Extreme
Stand
Assembling
and
assemble as indicated.
care
should always
be
used
when
attaching
the
bottom
the
pedestal stand to avoid damage
1
Base
(2PCSJ
2
lay
the
of
43~
49":
55":M4X
65":
MS X 12
front of
the
the
M4X
70
LCD
unit protruding over
12
(4
PCS)
(4PCS)
(4
PCS)
Panel face down
the
edge
to
the
LCD
panel.
on a flat,
of
the
3 Please tighten
Warning:
Ensure
the
the
power
screws
•
Ensure
the
cable
are
base and
is
not pinched
securely
TV
set
when
tightened
together
attaching
so
as
to avoid falling
with four screws.
the
pedestal stand
over,
as
injury or
this
could
damage.
cause
an
electric
shock.
3
Page 4
Introduction I Getting
Started
Important
Be
sure
precautions
to
observe
Safety
the
to
ensure safe
Instructions
following
Installation
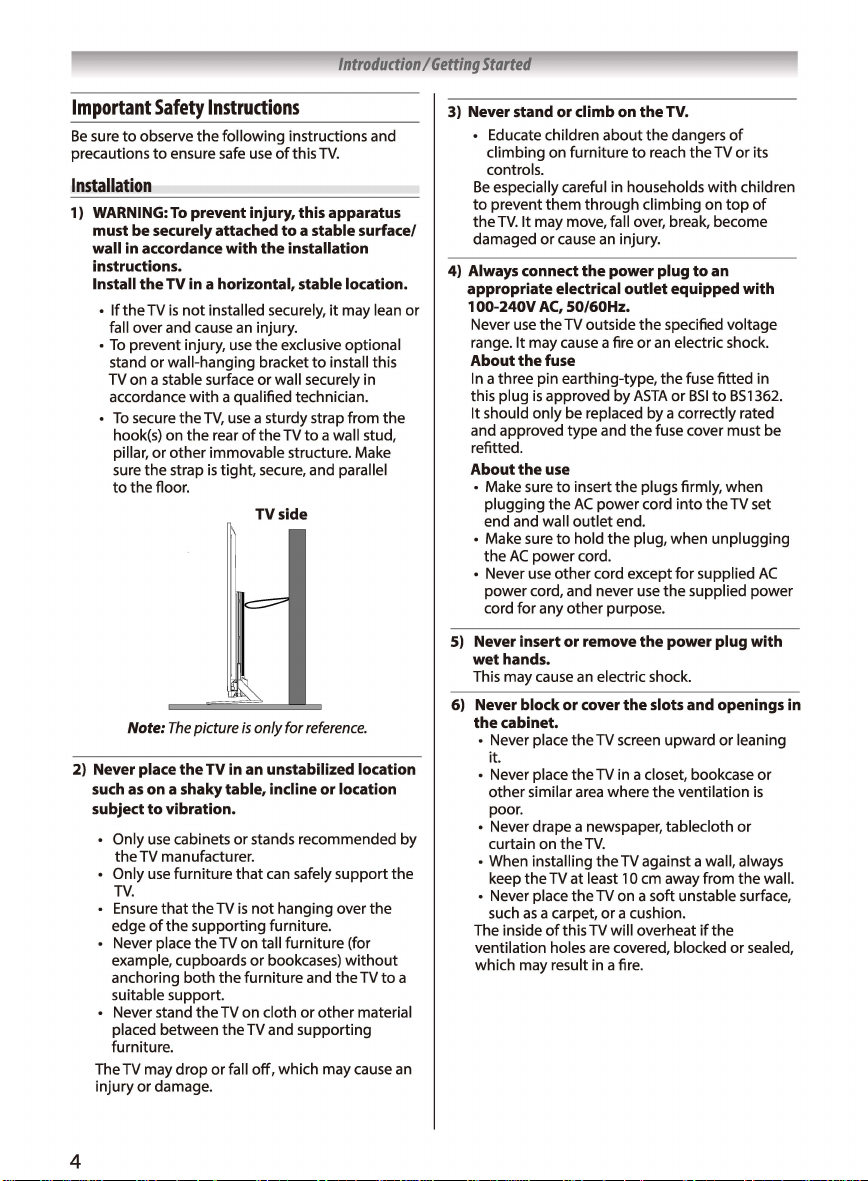
1) WARNING:
must be securely attached
wall in accordance
instructions.
Install
•
fall over and cause
•
To
stand
TV on a stable surface
accordance
2) Never place
such
subject
The TV may
injury
To
prevent injury, this apparatus
the
TV
in a horizontal, stable location.
If
the
TV
is
not
installed securely,
prevent injury,
or
wall-hanging bracket
with
a qualified technician.
To
secure
the
hook(s) on
pillar,
sure
to
the
Note:
as
Only
the
TV manufacturer.
Only
TV.
Ensure
edge
Never place
example, cupboards
anchoring
suitable support.
Never stand
placed between
furniture.
or
TV,
the
or
the
on a shaky table, incline or location
to
use
use
of
rear
other
immovable structure. Make
strap
is
floor.
damage.
tight, secure, and parallel
The
picture
the
TV
vibration.
cabinets
furniture
that
the
TV
the
supporting furniture.
the
TV on tall furniture (for
both
the
the
TV on cloth
the
drop
or
instructions and
use
of
this
TV.
to
with
an
use
use
in an unstabilized location
or
that
is
fall
a stable surface/
the
installation
it
injury.
the
or
wall securely in
a sturdy strap from
of
the
TV
side
is
only for
stands recommended
can safely support the
not
hanging over
or
bookcases)
furniture and
TV and supporting
off,
which may cause
may lean
exclusive optional
to
install this
TV
to
a wall stud,
reference.
without
the
TV
or
other
material
the
the
to
an
3) Never stand
4) Always connect
appropriate electrical
or
by
a
100-240V
5) Never insert
6) Never block
or
climb on
• Educate children
climbing on furniture
controls.
Be
especially careful in households
to
prevent
the
damaged
Never
range.
About
In
this plug
It should
and approved
refitted.
About
• Make sure
• Make sure
• Never use
wet
This may cause an electric shock.
the
• Never place the TV screen upward
• Never place the TV in a closet, bookcase
• Never drape a newspaper, tablecloth
• When installing
• Never place the TV on a soft unstable surface,
The inside
ventilation holes are covered, blocked or sealed,
which may result in a fire.
them
TV.
It
may move, fall over, break, become
or
cause
AC,
50/60Hz.
use
the
TV outside
It
may cause a fire
the
fuse
a three pin earthing-type,
is
approved by
only
be replaced by a correctly rated
type
the
use
to
plugging
end and wall
the
AC
power
cord for any
hands.
cabinet.
it.
other
poor.
curtain on
keep
such
insert
the
AC
outlet
to
hold
power cord.
other
cord, and never
other
or
or
similar area where
the
the
TV at least 10 cm away from
as
a carpet,
of
this TV will overheat
the
TV.
about
the
dangers
to
reach
the
TV
through
climbing on
an
injury.
the
power plug
outlet
the
or
ASTA
and
the
the
plugs firmly, when
power
cord
end.
the
plug, when unplugging
cord except for supplied
use
purpose.
remove
the
cover
the
TV.
the
TV against a wall, always
or
a cushion.
with
to
an
equipped
specified voltage
an
electric shock.
the
fuse
fitted
or
BSI
to
fuse cover must be
into
the
the
supplied
power plug with
slots and openings in
the
ventilation
if
the
of
or
children
top
with
BS1362.
TV set
or
leaning
or
the
its
of
in
AC
power
or
is
wall.
4
Page 5
Introduction I Getting
7)
Never place the TV near a heater or
in
direct
sunlight.
The surface
melt
of
the
and result in a fire
cabinet
or
power cord may
or
an
electric shock.
8) Never place the TV in an area exposed to high
humidity levels,
close
to a humidifier.
This may cause a fire
such
as
in
or
an electric shock.
a bathroom or
9) Never place the TV next to a stove where it
will be exposed to oil, smoke, or steam, or
a location where there
is
a large quantity of
in
dust.
This may cause a fire
1
OJ
Precautions for moving the TV
When moving
plug from
aerial cable and audio/video cables, any steady
ties and
mounting
shock may result
When carrying
needed.
Be
Never carry
down.
11) Precautions for installing
An outside aerial system should
in the vicinity
electric
light
lfthe
aerial falls
injury
or
an electric shock.
the
sure
the
of
or
power
or
an electric shock.
the
TV,
be sure
wall
outlet
screw. A fire
if
the
the
TV,
at least
to
carry
TV
with
overhead
circuits.
down
or
to
remove
and disconnect
or
power cord
it
the
power
drops,
an electric
two
people are
upright.
screen facing
on
outdoor aerial
not
be located
lines,
it
may cause
the
is
damaged.
or
other
the
up
or
an
Use
1) Never place hot objects or open flame
such
as
lighted candles or nightlights,
close
to the TV.
High temperatures can
fires.
melt
plastic and lead
2) The apparatus shall not be exposed to
dripping or splashing and that no objects
filled with liquids,
placed
on
When liquids are spilled
dropped inside
electric shock.
If
small objects
TV and remove
immediately and contact a service technician.
such
the apparatus.
or
the
TV,
this may cause a fire
drop
inside
the
power
as
vases,
small items are
the
TV,
plug from
sources,
on
shall be
turn
off
the
outlet
or
or
the
to
an
Started
3) Never insert objects (metal or paper) or pour
water inside the TV through ventilation holes
and other openings.
These items may cause a fire
If
these objects are inserted inside
off
the
TV and remove
the
outlet
technician.
not
immediately and contact a service
Be
insert objects in the
especially careful
4) When the TV will not be
of
time,
such
as
during vacation or travel,
remove the power plug from the wall outlet
for safety.
• The TV
is
not
the power supply line,
consumed even when
turned off.
The Mains plug
used
the disconnect device shall remain readily
operable.
SJ
Never pull
completely disconnected from
as
or
the
disconnect device, therefore
on
the power
the plug from the wall outlet.
Always hold
the
damaged and a fire
occur.
the
power cord
plug firmly when removing it.
is
yanked,
or
6) Never cut, break, modify, twist, bunch up
or bent the cord or apply
tension to it.
Never place heavy objects on
it
to
overheat
an electric shock. Contact a service technician
the
power cord
7)
If
there
as
this may cause damage, a fire or
is
damaged.
is
thunder or lightning, never touch
the aerial cable or other connected cables.
You
may suffer an electric shock.
8) Turn off the TV before unplugging the power
cord.
Failure
to
do
so,
may cause a malfunction.
9) Listening to music at high volume levels and for
extended durations
In
order
to
reduce
high
the
the
levels.
one should lower
comfortable level, and reduce
1
OJ
listening
at
In dry environment due
product may restart and return to the main
OSD
interface,
previous
It
is
normal and you can continue
when this phenomenon appears.
source
USB
mode.
or
an
electric shock.
the
TV,
children
current
force or
cord
or
one's
to
hearing,
amount
turn
allow
hearing.
of
the
power plug from
that
TV.
used
for a long period
as
minute
the
<!l
Power switch
an
appliance coupler
cord
when removing
the
cord may become
an
electric shock may
excessive
the
can
damage
risk
of
damage
volume
to a safe,
the
to
static electricity, the
player interface or the
to
use
the
do
is
is
is
if
time
TV
If
5
Page 6
Introduction I Getting
Started
Service
1) Never repair, modify
yourself.
It
may cause a fire
Consult a service technician for inspection and
repairs.
2) When a malfunction occurs,
an unusual odor comes from
the
TV
and remove
outlet immediately.
Make sure
then contact a service technician.
used in this condition,
electric shock.
3)
If
turn off
from
If
a fire
be careful when handling
injury.
Contact a service technician for inspection and
repair.
4) When
ask a qualified service technician
dispose
that
the
TV
is
dropped or
the
TV
the
outlet immediately.
the
TV
has
power in this condition,
or
an electric shock.
the
TV
of
the
or
or
an electric shock.
the
the smoke
it
and remove
reaches
the
TV.
disassemble
power plug from
or
smell
may cause a fire
the
cabinet
the
If
the
the
end
or
if
smoke
the
TV, turn
has
If
the
is
power plug
it
cabinet
TV
to
prevent an
of
its useful life,
to
the
stopped,
TV
broken,
may cause
is
properly
Cleaning
CAUTION: Avoid using chemicals (such
refreshers, cleaning agents, etc.) on or near
the
TV
pedestal. Studies indicate
may
weaken and crack over
combination effects
mechanical stress (such
to
follow these instructions could result in
serious injury and/or permanent damage
and
TV
pedestal.
1) Remove
Never use solvents such
clean
If
dry
When cleaning
wipe
cloth.
2) Periodically disconnect
the
If
connectors, clean
This dust may cause a fire due
insulation on
the
power plug before cleaning.
the
TV.
These solvents may
damage its finish.
If
rubber
or
with
the
cloth.
outlet and check it.
dust has collected on
vinyl products remain in contact
the
TV for a long time, a stain may result.
cabinet becomes dirty, clean
the
the
panel surface
the
plug.
time
of
chemical agents and
as
weight
as
benzine
distort
the
surface
of
gently
the
power plug from
the
the
dust with a
power plug
off
from
the
with
to
that
plastics
the
ofTV).
or
thinner
cabinet
it
with
LCD
display,
a soft,
reduced
as
Failure
or
dry
6
TV
by
or
off
the
is
still
or
an
broken,
air
to
TV
to
a soft,
dry
cloth.
Im
ortant
Information
1) About
2) About cabinet and
3) About afterimage
4) Some pixels
5) About Interference
6) About using under
7) When disposing
Recommended
LCD
If
the
locating
Never press
it, and never
will damage
Never spray volatile compounds such
insecticide on
This may cause a discoloration
cabinet and
If
a still picture
remain on
This
The
extremely high level
however sometimes some pixels
may be missing picture elements
luminous spots. This
The
sound, etc.
receives electromagnetic waves (e.g. AM radios
and video equipment).
If
you
the
LCD
malfunction.
of
the
Before disposing
of
the
There
Vivid and Hi-Bright)
The
for home viewing. If you wanna restore the
picture mode
of
"Reset Default"
can
Picture menu.
1
).
Press
2).
Press
3).
Press
Mode" or "Reset Default".
4).
Press
default value in "Reset Default".
Note:
after operating the
screen
you have
is
LCD
LCD
picture brightness may vary until
monitor
default one
set the desired picture mode directly in
main menu.
or"Setup" menu.
ode "Vivid"
button
the
LCD
LCD
screen will be damaged.
the
LCD
the
not
a sign
of
display panel
display may cause interference in image,
of
use
the
warms up. This
TV
TV,
perform "Resetting the
are
five choices(User, Cinema, Sport,
to
MENU and
Ji.IT and
Ji.IT and
Ji.IT button to select the recommended
to
restore
All
the
user
screen facing
TV close
to a window
the
LCD
screen strongly
put
anything on it. These actions
the
LCD
screen.
LCD
screen
the
cabinet and
screen.
is
displayed, an afterimage may
screen, however
of
malfunction.
the
screen
is
manufactured using an
of
precision technology,
is
not
sign
other
electronic
the
TV in
Picture
Please
in
low
the
room
of
or
transferring ownership
of
or
transferring ownership
Mode
in
picture mode setting.
is
Vivid, which
Vivid, you
settings
can
in
Setup menu. And also you
refer
to
OK
buttons
OK
buttons
OK
buttons
"Picture Mode",or
all
the user settings
will
feature
of"Reset Default".
to
Be
or
LCD
screen.
or
damage
it
will disappear.
do
not
light
of
the
or
have
of
malfunction.
equipment
temperature places
of
0°C
or
the
is
not
a sign
TV".
is
recommended
operate the setting
the following.
to
enter the
to
select "Video"
to
select "Picture
press
lose
completely
the
sun,
aware
outdoors.
or
scratch
as
the
up
screen
that
less,
of
OK
to
the
of
Page 7
Introduction I Getting
Exemptions
Toshiba
is
not
by
fires, natural disaster (such
earthquake, etc.), acts by
owner's misuse,
conditions.
Toshiba
(such
modification
caused
Toshiba
by neglect
owner's manual.
Toshiba
misuse
of
this
When
Using a Wireless
CAUTION:
8/uetooth® and Wireless
within
interfere
and Wireless
occasionally experience a
network
connection.
If
you should experience any such problem,
immediately
Wireless
Actual performance can vary, including lower
wireless
range and coverage.
Performance depends on many factors, conditions
and variables, including distance from
point,
and construction, operating system used,
wireless products used, interference and
adverse conditions.
liable for any damage caused
or
uses
is
not
liable for incidental damages
as
profit
loss
or
or
erasure
by
use
or
inability
is
not
liable for any damage caused
of
the
instructions described in
is
not
liable for any damage caused
or
malfunction
product
and
the
as
thunder,
third
parties, accidents,
in
other
improper
interruption in business,
of
record data, etc.)
to
use
of
product.
through
simultaneous use
connected equipment.
Network
LAN
the
same radio frequency range and may
with
one another.
LAN
devices simultaneously, you may
performance
turn
off
LAN
device.
network
capacity, data
volume
of
network
devices operate
If
you
less
or
even lose your
either
your
traffic,
use
than optimal
8/uetooth®
throughput
building
the
by
8/uetooth®
network
or
rate,
the
access
materials
mix
other
Started
In
some situations
Wireless
of
the
building
the
organization. Such restrictions may
environments where
other
devices
as
harmful.
If
you are uncertain
use
of
wireless devices in a specific organization
or
environment, you are encouraged
authorization
turning
When
Using
Using these functions
{i,e.,
changing the
purpose
prohibited under
States and
civil and criminal liability.
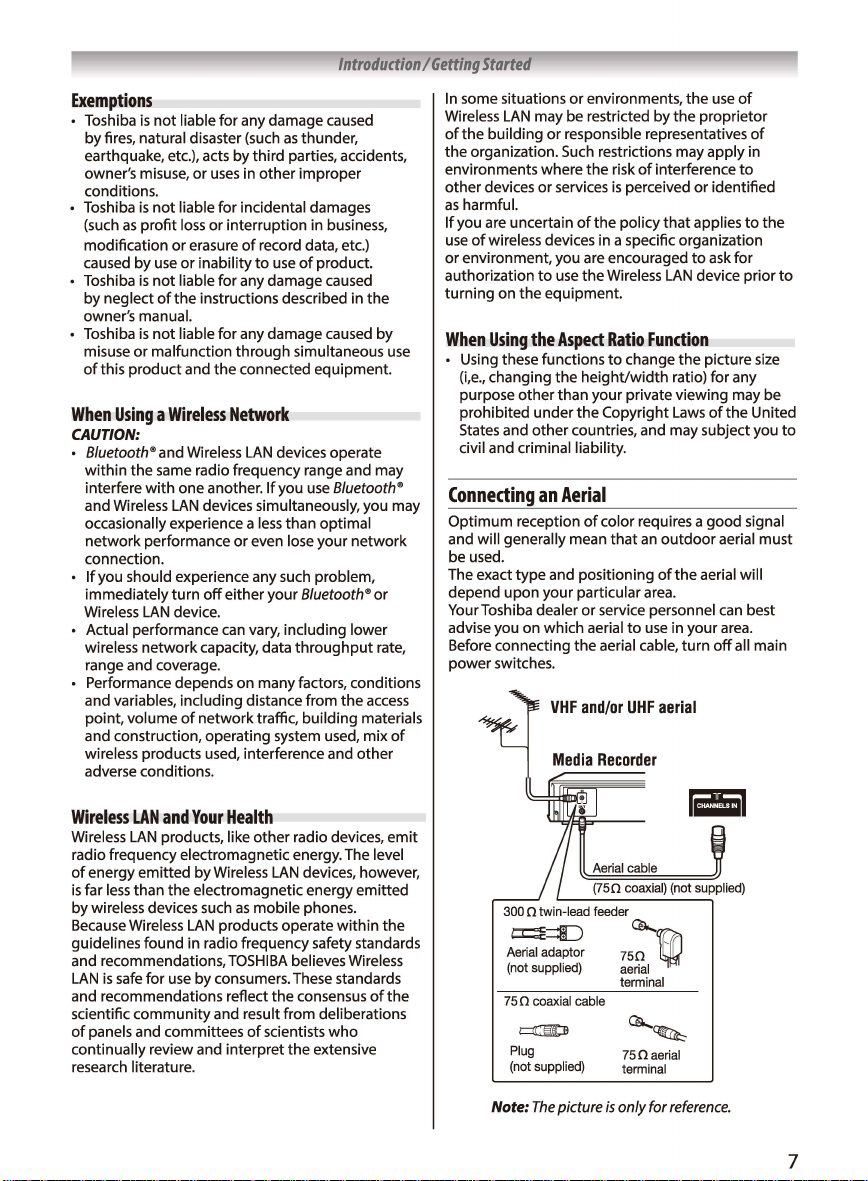
Connecting
Optimum
and will generally mean
be used.
The exact
depend
Your Toshiba dealer
advise you on which aerial
Before connecting
power switches.
of
or
LAN
on
the
other
reception
type
upon
environments,
may be restricted by
or
responsible representatives
the
risk
or
services
to
use
equipment.
the
Aspect
than your private viewing may be
the
other
countries, and may subject you
an
Aerial
and positioning
your particular area.
the
Media
of
is
perceived
of
the
policy
the Wireless
Ratio
Function
to
change
height/width
Copyright Laws
of
color requires a
that
an
or
service personnel can best
to
use
aerial cable,
Recorder
the
use
the
proprietor
apply
interference
or
identified
that
applies
to
ask for
LAN
device prior
the
picture size
ratio) for any
of
good
outdoor
aerial must
of
the
aerial will
in
your
area.
turn
off
of
of
in
to
to
the
United
signal
all main
the
to
to
Wireless
Wireless
radio frequency electromagnetic energy. The level
of
is
by wireless devices such
Because Wireless
guidelines found in radio frequency safety standards
and recommendations,
LAN
and recommendations reflect
scientific
of
continually review and interpret the extensive
research literature.
LAN
and
LAN
energy emitted
far
less
is
safe for
panels and committees
Your
products, like
by
than
community
Wireless
the
electromagnetic energy emitted
LAN
products operate
use
by consumers. These standards
and result from deliberations
Health
other
LAN
as
mobile
TOSHIBA
the
of
scientists
radio devices,
devices, however,
phones.
believes Wireless
consensus
within
who
of
emit
the
the
300 O twin-lead feeder
Aerial adaptor
(not supplied)
75
0 coaxial cable
t:::JI3:]l
Plug
(not supplied)
Note:
The
picture
Aerial cable
(750
coaxial) (not supplied)
Ql....
750
~
aerial
terminal
Ql....~
750aerial
terminal
is
only for
iii
reference.
7
Page 8
Introduction I Getting
Started
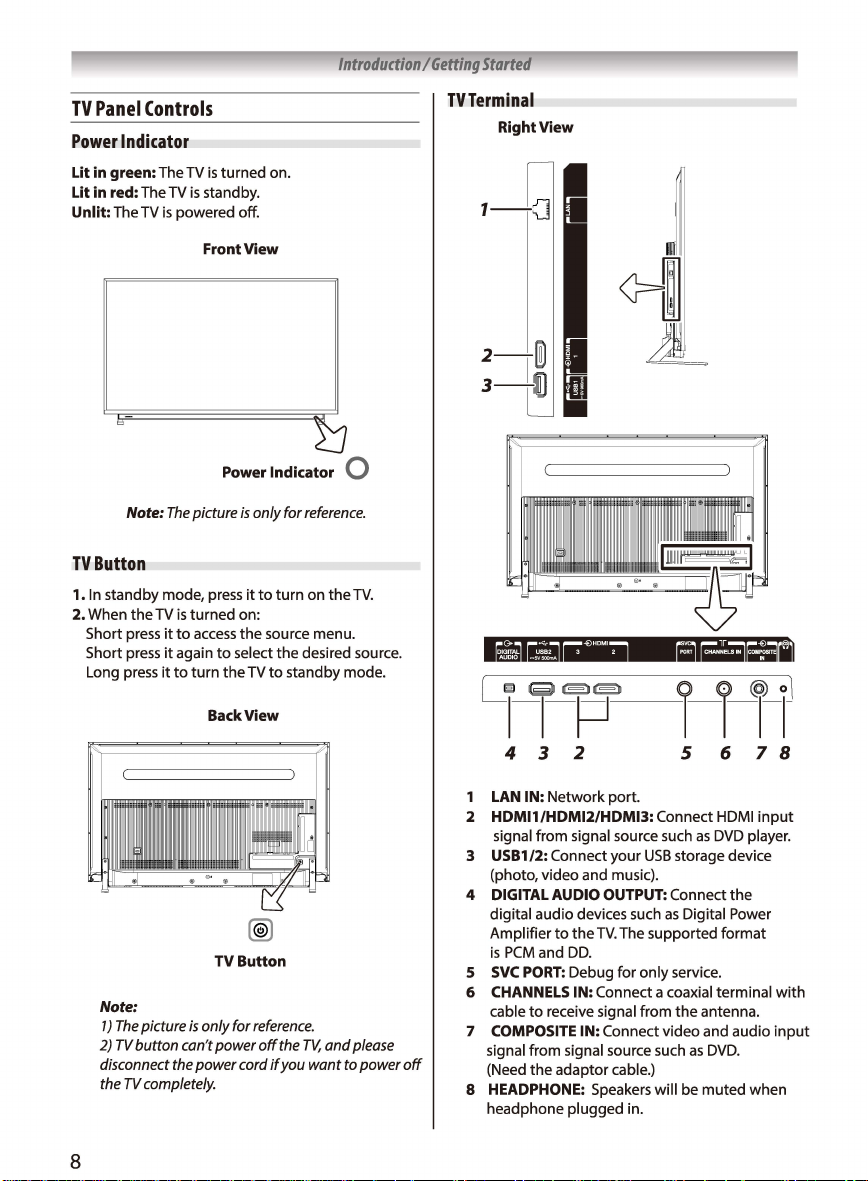
TV
Panel
Controls
Power
Indicator
Lit in green: The TV
Lit in red: The TV
Unlit: The TV
TV
Button
1.
In
2. When
Short press
Short press
Long press
is
powered off.
Note:
The
standby mode, press
the
TV
is
it
to
it
again
it
to
is
turned on.
is
standby.
Front View
Power Indicator Q
picture
is
only for
it
to
to
the
the
select
turn
source menu.
the
TV
to
standby mode.
turned on:
access
turn
reference.
on
the
TV.
desired source.
TVTerminal
Right View
Note:
2)
disconnect
the
8
1)
The
picture
TV
button can't power
the
TV
completely.
BackView
TV
Button
is
only for
power cord
reference.
off
the
TV,
and
if
you want to power
please
off
~,r
=r
4 3 2 5 6 7 8
1
LAN
IN:
2 HDMl1/HDMl2/HDMl3: Connect HDMI
3
4
5
6
7
signal from signal source such
(Need
8 HEADPHONE: Speakers will be
headphone plugged in.
Network port.
signal
from
USB1
(photo, video and music).
DIGITAL
digital audio devices such
Amplifier
is
PCM
SVC
CHANNELS
cable
COMPOSITE
signal source such
/2: Connect your
AUDIO
to
the
and
DD.
PORT:
Debug for
IN: Connect a coaxial terminal
to
receive signal from
IN: Connect video and audio
the
adaptor cable.)
USB
OUTPUT:
TV.
The supported
only
as
DVD
storage device
Connect
as
the
Digital Power
format
service.
the
antenna.
as
DVD.
muted
input
player.
with
input
when
Page 9

Introduction I Getting
Started
Learning
Remote
about
Control
11
12
14 _______
16
26
24
0 0 0
Note:
The
picture
the
Function
..............
;;;;:;J----t--
0
TOSHIBA
CT-8536
is
only for
Remote
0
0
reference.
Control
2
4
17
19
21
23
25
1.
Microphone
2.
POWER(
3.
SOURCE
4.
Mute
5.
SOUND:
6.
PICTURE:
7.
SIEEP:
8.
FAVORITE:
a program
9.AD:Turn
or
visually-impaired viewers.
10.
ASPECT:
11.
Number
12.
CH
13.
FREEZE:
14.
HOME
15.
VOICE:
16.
Volume
17.
Program
18.
NETFLIX:
standby mode.
19:
Google
20.
MENU:
21.
GUIDE:
22.
Navigation
Navigate
23.
OK:
24.
Back:
watched program.
25.
EXIT:
26.
USB
<USB
<
27.
SUBTITLE:
28.
INFO
29.
NICAM
the
30.
Color
function in specific mode.
(
.e,
):
Speak
C)):Turn
(-B
): Select
(I~):
Mute
Select
Select
Setup
the
View
to/from
on
the
Select the aspect ratio.
Buttons
LIST:
Access
Freeze
(Cl
):
Access
Start the function
Up/Down
Up/Down
Access
Play:
Access
Access
Access
buttons
the
menu.
Confirm
the
Exit
the
Exit
the
or
Teletext
Play
Control
Play
(►):Start
Pause
(
II
):
function
Stop
Fast
Fast
Teletext
TEXT:
SIZE
HOLD(@):
SUB-PAGE:
REVEAL(
INDEX
MIX
or
CANCEL
searching for a Teletext page.
broadcasting channel.
Pause
in
(
■
):
Stop the playback.
Backward
Forward
Buttons>
Enter
(@):Enlarge
Hold
Enter
la2l):
( @): Display
(@):Superimpose the teletext over
return
to
(
@81):
Open
([B
):
Show
1/11
(ml/ll):
Buttons
(RED/GREEN/YELLOW/BLUE):
to
the
TV on
the
input
or
restore
the
sound mode.
the
picture mode.
sleep
timer
your
assigned favorite channels,
the
favorite list.
function
(0-9): Choose
the
channel list.
or
unfreeze
the
home page.
(
..:::1
+/-):
(P
+/-):
Change
the
Netflix interface,
to
the
the main menu.
the
EPG
interface in
(Up/Down/Left/Right
selection.
current menu,
current operation.
Buttons.
Buttons>
the
playback.
the
playback,
DTV
mode.
(.-):Fast
(
•►):Fast
or
exit
the
the
or
release
or
exit subpage mode.
Display
or
the
normal teletext mode.
Return
to
or
close
the
detailed information.
Select
the
the
TV while using Google Assistant.
or
standby.
source.
the
sound.
to
turn
off
the TV automatically.
or
add/remove
of
audio description
the
channel directly.
the
picture on
of
Google Assistant.
Increase
or
decrease
to
the
Google Play interface.
DTV
(.a.
or
return back
or
turn
backward
forward
teletext menu.
teletext display.
hide
index page.
TV program temporarily while
the
desired sound
the
the
playback.
the
teletext page.
the
concealed information.
subtitle.
the
next
or
turn
mode.
/T
/◄I
on
playback.
output
Execute
to
help
screen.
the
sound volume.
or
previous program.
on
the
TV from
►):
to
the
previously
the
Time-shift
the
TV program
depending on
the
prompt
the
blind
9
Page 10

Introduction I Getting
Started
Learning
How
This
please pair
are for your reference :
Step 1:
Step 2: Select "Settings" at the home page.
Step 3: Enter"Settings"to select"Remote &
Step 4: Select"Add accessory"to enter the interface
Step
Step 6: Check and select the name, and the default
Step 7:
Step 8: Then the screen will display "Connecting
Step 9:The screen will display"Paired"ifthe remote
Note:
or
the above
Installing
Remove the battery cover.
Insert
polarities
battery compartment.
about
the
Remote
to
Pair
Remote
is
a Bluetooth remote control, and before using it,
it
Press
accessories";
of"Searching for accessories''.
S:
Press
while until there shows the name
Bluetooth remote control on the
interface.
name is"TV
Press
remote control. The screen will display
"Pairing
control
Bluetooth remote control
successfully for your usage right now.
If
you wait more than 2 minutes and
the
screen
steps
the
two
R03
of
Control
with
the
TV
HOME
button
HOME and
BLE
OK
button
..
:'.
is
paired successfully. After pairing, the
displayed
"COULDN'T
for pairing again.
Remote
(AAA)
batteries matching
the battery
Control
with
the
TV
firstly. The following steps
to
enter the home page.
◄
button
together for a
of
your
TV
searching
Remote''.
to
start pairing the Bluetooth
has
been connected
it
can't pair
PAIR';
please
Control
Batteries
to
the-/+
the-/+
marks inside the
..
repeat
Caution:
•
• Attention should
•
Note:
•
•
• Batteries should
Effective
:'.
Dispose
of
batteries
in
Batteries must not
as
sunshine,
aspects
of
Never
mix battery
with new
If
the remote control
the
operating range
batteries with new
If
the batteries
fire or
battery
ones.
be
are
be
exposed
the
like.
drawn to
disposal.
types
or combine
does
not operate correctly, or
becomes
ones.
dead or
if
remote control for a long time,
a designated disposal
to
excessive
the
environmental
reduced,
you will not
remove
used
replace
the
area.
heat
batteries
both
use
the
batteries
such
to prevent battery acid from leaking into the battery
compartment.
be
limited to alkaline batteries.
Range
..,.--;-;;/T<,
.,...-
.,,
,,."'
, ,
5 m
only for
I
I
,'
I
reference.
Note:
-~- ,,-'
-_,
0
,,.__,
30
,'
30° ,'
within
The
picture
is
..,..,. ...
if
10
Note:
The
picture
is
only for
reference.
Page 11

Introduction I Getting
Started
Connecting
Connect the
the
AC
Power
Cord
to
AC
power cord firmly with the
Your
TV
TV
by inserting
BackView
AC
power cord (supplied)
Note:
The
picture
is
Wall-hanging
Please
contact your local dealer
Bracket
to
purchase the recommended wall-hanging bracket.
• Screws for wall-hanging bracket installation
• For the
49U77-,
we
recommend flat/flush brackets
(
-
Screw for fixing
with
top fixing screw bracket.
Doptholmaw
Top (M6} Maximum
43" 49"
Minimum 20 mm Minimum 25 mm
-------------+---------1
Bottom(T3.5)
Maxlmum20mm Maxlmum12mm
Minimum10mm Minimum10mm
the
only for
reference.
25
mm Maximum 30 mm
TV
onto
it
into the
AC
IN
55"
Maximum30mm
Minimum
20
mm
Maxfmum20mm
Minimum
10
mm
the
wall-hanging bracket
connector on the back
Top(M6)
65n
Maximum27mm
Minimum
20
mm
Bottom
(M6)
Maximum 27 mm
Minimum
20
mm
of
the
TV.
• Rear
of
the
TV
43"
a:
b:
c:200mm
Cautions:
•
Failure
Always
resulting
200mm 49"
200mm
to
use
be
sure
in
injury and product
a:
400mm
b:
250mm
c:
300mm
a bracket or choosing
to
ask
a qualified technician
your unit will void your warranty.
•
When
any optional
are
followed
•
Do
not mount
high
heat.
•
Take
care
the
•
To
when
wall.
Always
prevent fall and injury,
accessories
fully.
the
unit directly below ceiling lights(such
Doing
so
may warp or damage plastic cabinet parts.
fixing wall
ensure
brackets
that
remove
55" a:400mm
Note:
to
mount
damage.
or wall hanging
to
there
the
are
no electrical
the
TV
b:280mm
c:400mm
The
graphics
the
to
carry out
unit yourself will
b:300mm
c:400mm
are
only for
be
set
up.
Incorrect fitting may
reference.
done
at
the
risk
of
the
cause
consumer.
equipment to
fall,
Any damage resulting from not having a professional installer mount,
brackets
are
used,
always
ensure
that
the
instructions provided
as
65" a:400mm
wall.
from
spotlights or halogen lights) which typically give
Wall
mounted equipment shall not
cables
or
pipes
its
fixed
wall position
in
when
be
grounded by metal within
the wall before hanging
it
is
no
longer
in
use.
bracket.
off
11
Page 12

Using
the
Basic
Features
Initial
Setup
When you
show a wizard
initial settings:
Step 1: Select
Step 2: (Only for some countries) Select
not
Note:
the
you don't wanna
TV,
Step 3: Select whether
set
Note:
network,
updates and
to sign
Step 4: Read
and privacy policy.
Step
party
Step 6: Select
help improve your Android TV.
Step 7: Select a name for your
you like.
turn
on
the
to
guide
the
menu language
to
use an Android device
If
you want to
TV,
please
please
go
to
the
If
you have connected the
it
in
to your
S:
Select
to
use your
use
operate
use
your Android
on
with the following operations.
WLAN network.
will
check
for updates like
so
on.
Then
Google
to
accept
whether
TV
whether
TV for
the
you
to
finish
to
your Android
as
indicated
or
not
TV
please
select whether
account.
the
Google terms
or
not
location.
or
not
first time, there will to what is indicated on the screen.
the
as
you need.
setup
device
on
the
screen.
device
to setup
to
connect your
to
the
WLAN
Google
to
let Google
to
allow Google
TV
or
rename
following
whether
the
TV.
to setup
If
service
or
not
of
service
or
it
Note:
1 J
2)
time,
and enter "Device"
in
or
Select
•
the
•
•
TV
third
to
Note:
1 J
2)
as
1)
You need
If
you want to restart the initial setup after the first
you
"Storage
Press
source.
Press
Press
to
can
access
list.
& reset".
the
Input
SOURCE
button
J,,J'fto select
OK
button
to
finish all initial settings according
the home
page.
Then
Open
select "Factory data reset"
"Settings"
Source
to
access
the
list
of
input
the
desired
input
enter
the
source.
selected source.
Input
DTV
El
ATV
El
IC!]
HDMI
1
IC!] HDMl2
IC!]
HDMl3
Composite
m
The
picture
is
only for
reference.
It will appear the
you update
in
Google
the
TV
account.
source
system,
of
Google
Play
connect the network, or log
Movies
after
Step 8: Select
Step 9: (Only for some countries) Input
postal code.
Step 10: Read
Step 11: Select
Step 12: Select
Step 13: Select
Scan'~
Note:
If
setting
firstly before starting
Step 14: Introduction on main functions
Android TV.
the
the
the
the
whether
no,
the
channel
of
global settings.
country.
software notice.
TV
source.
tuner
mode.
or
not
to
scan
can
be
performed
connect signal cable
scan.
the
Please
channel
start "Channel
12
the
of
local
in
TV
your
Electronic
EPG
program providers and offers information
programs
mode
control.
Program
(Electronic Program Guide)
to
be broadcast.
by
pressing GUIDE
Note:
The
picture
Guide
You
button
is
only for
(EPG)
is
supplied
can
access
on the remote
reference.
by
the
about
it
in
DTV
the
Page 13

Using
the
Basic
Features
1 After entering the
are watching will be highlighted.
2
Press
MENU
Programme Guide.
"Time"
or
3 lf"Channel"
line of"Current Select"to select the channel. After
a brief moment, there will show the program list
of
different
4 lf"Time"
5
is
line of"Current Select"to select the date. After
a brief moment, there will show the program list
of
different channels for the selected date.
Press
BACK/EXIT
Time-shift
Brief
Introduction
Time-shift
viewing
button
record the program.
playing the program from when you paused.
button
Note:
1)
to ensure there
2)
automatically
time-shift function.
3)
more space for recording
to
beginning
been played for
is
is
interrupted
to
pause playing the
to
stop time-shift function.
Before time-shift, you'd better
The
recorded
If
time-shift recording lasts
play
the
program
to
EPG
interface, the channel you
button
to
skip
to
the line
Press
◄/
►
◄/►
to
exit the
button
◄/►
button
"Channel''.
is
selected, press
time
periods for the selected channel.
selected,
press
button
Function
used
to
record a
DTV
or
Press ► button
is
enough space
program
playing
automatically
new
program
of
new
after
release the space
program when your
delayed.
Press
DTV
program and start
format
for
time-shift recording.
time-shift
the
program
too
long,
program, the TV
from the recording
of
program
recording.
will
of
button
EPG
II
to
continue
your
be cleared
or
and
which has
to
in the
menu.
CT.SHIFT)
USB
stopping
there
select
in the
Press
device
is
will
Step 3: Select whether
device.
Step 4: Select the file
Choices
are
2.5GB, 3.0GB, 3.5GB and 4.0GB.
Step 5:
Test
Step 6: Show the result
time-shift function.
Note:
1)
If
you
have setup
able
to
use
again.
2)
If
you
want
function, please select "Reset Timeshift"
Setting" in "Setup" menu.
Live
TV
Settings
Menu
Operation
Step 1:
Press
to
■
no
start
then select "Menu" and press OK
enter "Live
Step 2:
Press
Video, Audio, TV, Setup or Parental.
Step 3:
Press
submenu.
Step 4:
Press
Step 5:
Press
Step 6:
Press
Step 7:
Press
menu.
Step 8:
Press
Note: Some items
some models
512MB, 1.0GB, 1.5GB, 2.0GB,
the speed
for
time-shift function directly
to change the settings
MENU
button
TV
Ji../'f
button
OK
button
Ji../'f
button
OK
button
Ji../'f
or
BACK
button
EXIT
button
may
or
some
input
or
not
to
format the
size
for time-shift function.
of
the
USB
device.
that
the
USB
time-shift function,
to
display"Menu Options''.
Settings''.
to
select a submenu:
to
enter the selected
to
select
to
enter the selected item.
◄/
►
to
adjust the item.
to
back
to
exit"Live
not
be available for some regions,
sources.
USB
is
ready for
you
without
for
time-shift
of
"Record
button
an
item.
to
the upper-level
TV
Settings''.
will
setup
be
to
Time-shift
The first
will show a setup wizard
setup your
function.
Step 1: Select the
Step 2: Select the setup mode: Auto or Manual.
Settings
time
when you use time-shift function, there
USB
•
If
Auto
settings automatically. What you need
only
to
wait for the result.
•
If
Manual
following steps.
to
device for the best usage
is
guide you on
USB
path.
selected, the
is
selected, please
TV
will finish related
go
how
of
time-shift
on
with
to
to
do
the
is
13
Page 14

Using
the
Basic
Features
Video
Picture
Mode
Vivid
Active
Backlight
Off
Back
Light
·oo
Brightness
so
Contrast
LiveTVSettings
Video
Note:
The
picture
•
Picture
Mode
Select the picture mode: User, Cinema, Sport, Vivid
or
Hi-Bright.
Note:
The
"Vivid"
•
Turn on
recommended home viewing picture mode
mode,
which
Active
Backlight
to
adjust the screen backlight automatically
depending on the surrounding ambient brightness.
•
Back
Light
Adjust backlight parameter
•
Brightness
Adjust the lightness
•
Contrast
Adjust the difference between
the picture (0~100).
•
Saturation
Adjust the colorfulness
brightness (0~100).
Saturation
60
Sharpness
60
Gamma
Mddr
Color
Temperature
Advanced
Video
is
only for
is
the
default picture
of
the picture (0~100).
of
the picture (0~100).
light
of
the color relative
reference.
mode.
and dark
areas
to
its own
•
HUE
Adjust the color
•
Sharpness
Adjust the edge
tint
of
the picture
of
the picture (0~100).
(0
•Gamma
Adjust the
are
•
Color
Adjust the overall color tone
are
•
Advanced
Make adjustments
performance.
is
light
Dark,
intensity
Middle
of
and Bright.
original image. Choices
Temperature
Cool, Standard and Warm.
Video
of
advanced features for video
MPEG
Flesh
Adaptive
MC'd1u..,
Blue
Off
DI
Film
Auto
Blue
Off
Game
Off
Super
o"
Note:
The
picture
is
only for
of
the picture. Choices
NR
Tone
Luma
Control
Mute
Mode
Stretch
Mode
Resolution
reference.
* DNR: Remove the noise from the video signal.
* MPEG
NR:
Reduce the noise created while
compressing
* Flesh Tone: Adjust the flesh tone
or
converting the
MPEG
of
* Adaptive Luma Control: Adjust the luma
picture automatically depending on the
* Blue Mute:
and the sound will be muted when there
of
* DI Film Mode: Suppress the image shaking
achieve a stable and fluent play
picture.
* Blue Stretch: Turn on
brightness and
* Game Mode:Turn on
more fluently.
* Super Resolution: Turn on
serrations
If
it
is
set on, the screen will
low
saturation more blue.
of
the picture.
of
the dynamic
to
make the part
to
make the video played
to
reduce the
~ 100).
signal.
the picture.
of
input
turn
blue
is
no signal.
to
of
high
the
signal.
14
Page 15

Using
Audio
Balance
Treble
,o
DTS
TruSurround
Qo
Equalizer
Live
TV
Settings
Audio
Note:
The
picture
•
Balance
Control
the
sound balance between
speakers (-50~50).
•
Bass
Adjust
the
lower frequency
•
Treble
Adjust
the
higher frequency
•
DYS
Trusurround
Turn on
or
turn
off
system.
•
Equalizer
Select
the
Rock, Pop, Live, Dance, Tech no, Classic and Soft.
•
Turn on
•
Select
Dolby
•
Adjust
•
Turn on
depending on
appropriate sound mode. Choices are Off,
Speaker
or
turn
off
SPDIFType
the
SPDIF
sound
Digital
and PCM.
SPDIF
Delay
the
value
of
Auto
Volume
Control
to
adjust
the
the
input
•Type
Select
the
Choices are
preferred audio
Normal
Off
Speaker
Oo
SPDIFType
""
SPDIF
Delay
0
Auto
Volume
Off
Visually
is
only for
Control
Impaired
reference.
right
of
the
sound (0~100).
of
the
sound (0~100).
the
DTS
TruSurround sound
the
TV speaker.
output
type. Choices are Off,
SPDIF
sound
output
sound
volume
automatically
signal.
type
for different purposes.
and Visually Impaired.
and left
delay (0~250)
the
Basic
Features
•
Visually
Adjust related audio settings
Impaired
to
help
visually-impaired viewers understand and enjoy the
program. Choices are Speaker and Volume.
Note:
This
function
is
selected
to
be
"Visually Impaired''.
only available
when
TV
Tuner
Mode
DVB-T/T2
Audio
Language
English
Audio
Language
English
Channels
is
only for
or
It
is
only
of
channel scan, channel
Channel
Scan
Single
RF
Scan
Channel
Skip
Channel
Move
Channel
Edit
Clear
Channel
picture
is
only for
reference.
available for
List
reference.
Note:
_•Tuner
Mode
Select
the
available for
_•
Country
Select
Region
the
Australia.
•
Audio
Language
Select
the
for
DTV
source.
•
Audio
Language
Select
the
available for
•
Channels
Execute
the
and
so
on.
Note:
Live
TV
Settings
TV
The
picture
tuner
mode: DVB-T/T2,
DTV
source.
country
region.
primary audio language. It
2nd
secondary audio language.
DTV
source.
function
The
the
blind
Type
2nd
DVB-C. It
is
only
available
It
is
only
or
is
is
edit
only
15
Page 16

Using
the
Basic
Features
* Channel Scan: Search
automatically. Select
starting
the
scanning, press
continue
* Single
Channels Manually.
RF
Channel
press
the
* Analog
for analog channels Manually.
the
"Scan
start frequency. Select"Scan
frequency lower than the start frequency.
to
cancel
OK
channel scan.
the
scanning.
RF
Scan: (Only
No.
BACK
button,
scanning.
Manual
interface
button
of
Up"to
search towards frequency higher than the
the
scanning, press
to
continue
for
the
desired TV source before
BACK
button,
for
Press
If
inputting
◄/►
you
want
and press OK
Scan: (Only for
the
the
the
channels
If
you
want
to
and press OK
DTV
button
to
cancel
Press
start frequency. Select
Down"to
BACK
scanning.
cancel
source) Search for
to
select
the
scanning,
button
to
ATV
source) Search
OK
button
search towards
If
button,
* Channel Skip/Move/Edit: Skip/move/edit
channel you want.
* Analog Channel Fine Tune: (Only for
If
the
reception
the
channel,
searching and storing operation.
or
distorted, fine
◄/►
button
is
clear.
* Clear Channel List: Clear
as
to
is
clear, you
this
is
done automatically
tune
the
adjust
channel manually.
the
frequency until
don't
the
ATV
have
to
If
the
signal
channel list.
fine
during
the
the
to
RF
the
continue
to
ente
you
want
and press
the
source)
tune
is
weak
Press
image
Setup
Sticker
Demo
Fast
Boot
Screen
Mode
Auto
Standby
0•
HBBTV
Support
""
Time
Setup
LiveTVSettings
Setup
Note:
The
•
Sticker
Turn on
for a shop display.
Turn on
1)
menu, and press POWER(!)
Both
energy. In such
on
2)
menu, and press POWER(!)
TV,
continuously.
to
Select
Normal, Letterbox, Panorama, Zoom and
Dot.
Note:
searched
2)
Demo
to
demonstrate main features
•
Fast
Boot
or
turn
If
you
turn
the
TV and
the
TV again.
If
you
turn
the TV will close,
power on
•
Screen
Mode
the
desired screen mode. Choices are Auto,
1)
This
function
for
Choices
differ
off
off"Fast Boot" function in "Setup"
the
case,
on "Fast
In
such
the
TV again.
is
only available after
channels.
by
Subtitle
Teletext
Network
HDMI
Postal
DisClaimer
Record
Signal
Standby
""
Reset
picture
is
only for
the
function
to
system will close
it
will take long
Boot"function
button
but
the
system still runs
case,
it
will take short
different input
2.0
Setting
Code
Setting
Information
Auto
Tuning
Default
reference.
of
fast boot.
power
time
to
you
signals.
of
the
off
to
fully save
in "Setup"
power
have
the
to
TV
TV.
power
off
time
Dot
the
by
16
Page 17

Using
the
Basic
Features
•
Auto
Standby
Open
to
turn
off
the
signals and operations for a
are signals
•
Turn on
It
is
•Time
Setup
Sleep Timer.
•
Setup for
Subtitle, Digital Subtitle Language, Digital Subtitle
Language
Note: "Hearing Impaired" in Subtitle Type
the
enjoy the program.
•
Setup for
Teletext Language, Decoding Page Language and
TTX Presentation Level.
•
Turn on
on WLAN (WOW), and display
The followings are for
the
Step 1: Turn on WOL/WOW
Step 2: Connect
same wired/wireless network.
Step
the
Step 4: Open YouTube on
Step
Step 6: Find and connect
Step 7: The TV will be turned on
but
HBBTV
Support
or
turn
only
available for Australia and New Zealand.
Setup
the
TV time. Choices are Time Zone, Time and
Subtitle
the
deaf
or
hearing-inpaired viewers understand
Teletext
the
Network
the
function
3:
Press
TV
to
standby mode.
S:
Click Cast icon on
TV automatically
function
of
Wake
your
TV and
on
the
few
reference
function
your
the
your
the
no
operations for 4hours.
off
the
subtitle function. Choices are Digital
2nd
and Subtitle Type.
teletext function. Choices are Digital
function
of
WOL/WOW:
the
C)
button
if
there are
minutes,
or
if
of
HBBTV
support.
is
used to he/
on
Lan (WOLi or Wake
the
Netflix
ESN
to
understand
on
the
mobile phone
remote control
mobile
top
TV
phone.
display ofYouTube.
as
an
available device
from
standby mode.
there
TV.
no
and
code.
to
to
the
turn
•OAD
Select
whether
upgrade
Note:
1)
If
you
the TV software over the air, press MENU
display "Menu Options~ then press ► button
"Manual
2) "OAD" &
for
some countries.
•
HDMI
Select HDMI signal format. Choices are
4K@60Hz
•
Postal
Use
Number
code. It
•
DisClaimer
Declaration
arising from user's failure in operating
network,
•
Record
Setup for
Info
and Reset Timeshift.
•
Signal
Show
the
available for
•
Standby
Turn on
the
TV turns
Malaysia and Singapore.
•
Reset
Restore menu settings
settings on
operating this feature.
or
not
to
the
TV software over the air.
want
to
manually
OAD Download''.
"Manual
2.0
Setting
4:2:0 and
automatically
OAD
Download"
4K@60Hz
download
download
and
upgrade
button
are
only
4:4:4/4:2:2.
Code
Buttons (0~9)
is
only
available for Indonesia.
to
disclaim any responsibility
USB
and
so
on
to
input
the
..
the
Setting
the
Time-shift function. Choices are Device
Information
current signal information. It
DTV
source.
Auto
Tuning
to
automatically search for channels when
to
standby mode. It
is
only
is
available for
Default
to
the
the
TV will lose completely after
factory defaults. All user
and
to
to select
available
local postal
or
liability
TV
on
only
Note:
1)
WOL/WOW can
by
wired/wireless network.
turned off.
consume more energy.
2) WOL/WOW
Setup
menu
If
you
is
is
turned on.
turn
turn
only
on
the TV from standby
By
default, WOL/WOW
on
WOLIWOW function,
available
after
Fast Boot
mode
it
will
in
is
17
Page 18

Using
the
Basic
Features
Parental
Password
The default password
is
needed for entering
Live
TV
Parental
Note:
•
Channel
(Only for
access
information.
•
Restrict unauthorized
based on the age rating. Choices are
and
Note:
1)
is
2) The choices
countries.
•
Restrict unauthorized
based on
•
Disable
•
Change
•
Clean all user settings
made.
Block
DTV & ATV
to
specific channel based on
Program
Block
Restriction
Age Rating
turned
on.
Input
Block
the
Panel
Lock
the
Change
Password
the
Clean
All
is
Settings
The
picture
source) Restrict unauthorized
access
of
Access.
is
only available
of
Age
Rating
source type.
function
ofTV
current password
the
"0000".
Channel
Program
Input
Block
Panel
Lock
Change
Clean
All
is
only for
to
specific programs
when
differ
access
to
button.
of
of
parental system you have
parental system.
Block
Block
Password
reference.
the
Channel
Rating
Enable
Rating Enable
by
different
specific
input
parental system.
source
Back
Connections
Connection
Audio
Before connecting any external equipment,
off
The unauthorized recording
DVDs,
infringe
Additional
supplied
Connecting
You
connecting
Note:
•
Refer
equipment
•
When
sure
equipment from
example
Back
system
Note:
The
picture
all main
power
video tapes and
upon
the provisions
equipment
with
this
an
the
to
the
owner'.s
as
you connect
to
turn
off
Audio
TV
well.
the
can enjoy high
View
switches.
TV.
~
~
DVD
video player
or
VCR
(Normal)
is
only for
reference.
ofTV
other
and cables shown are
programs,
materials may
of
copyright law.
System
quality
dynamic sound by
to
an
audio system.
manual
of
the connected
the
TV
to
power and unplug all
the
other equipment,
wall outlet before making any
connections.
•
The
output sound
range.
Be
to
a moderate listening level before turning
power.
Otherwise,
may
be
Turn
damaged by
off
the amplifier
•
disconnect the
amplifier power
sure
to
adjust the audio
TV'.s
on,
of
the
the
sudden
power
the
TV
has
speakers
high volume audio.
before
you connect or
cord.
speakers
a wide dynamic
amplifier'.s
and your hearing
If
you
leave
may
be
turn
not
be
of
the
volume
on
the
the
damaged.
18
Connecting
When
turn
device.
When
turn
the
turning
on
turning
off
TV.
HDMI
the
the
or
DVI
on
your
TV first, and
off
your
HDMI and
devices
electronic components,
then
the
HDMI and
electronic components,
DVI
device first, and then
DVI
Page 19

Using
the
Basic
Features
This TV may
or
specifications
This TV
Digital on 32/44.1/48
This TV
it
is
operate properly
•
HDMI
The HDMI
and uncompressed digital video from a HDMI and
uncompressed digital video from a
This
input
material in digital from CEA-861-D
consumer electronic devices (such
and
DVD
The HDMI
with
480i /480p/720p/1080i/1080p(60Hz)
(Video Format).
highdefinition video signals,
and display 576i /576p/720p/1080i
Format), 1080P 24Hz/25Hz/30Hz/50Hz/60Hz
(Video Format), 3840X2160 24Hz/30Hz/50Hz/60Hz
(Video Format).
• HDMI: High-Definition Multimedia Interface
•
HDCP:
• CEA-861-D compliance covers
uncompressed digital video
digital
standardized for reception
video signals. Because this
it
is
possible
properly
• Acceptable
VGA
5-VGA (800 x 600) 60
XGA
W-XGA
W-XGA
5-XGA
However, these signal formats are converted
match
Therefore,
properly.
If
you connect this
image
picture
not
be read.
•
L-PCM:
• Supported Audio format:
sample rate 32/44.1
not
be compatible
that
is
only
is
able
possible
or
DVI
input
is
designed
player
input
High-bandwidth Digital Content Protection
content
that
with
the
PC
(640 x 480) 60
(1024 x 768) 60
(1280 x 768) 60
(1360 x 768) 60
(1280 x 1024) 60
the
number
the
TV may
is
displayed in
quality
Linear-Pulse Code Modulation
may be added in the future.
operable
kHz.
to
connect
that
some HDMI devices may
with
this
Specifications
on your TV receives digital audio
to
with
HDMI and
is
designed for best performance
protection, which
some devices may
TV.
signal format:
Hz
Hz
Hz
of
pixels
not
unit
to
5-XGA
may deteriorate and characters may
/48
with
features
with
L-PCM
and Dolby
with
HDMI devices. But
TV.
DVI
accept
but
with
of
high-definition
is
an evolving technology,
Hz
Hz
Hz
of
display small
your
mode, therefore
L-PCM,
kHz
device.
HDCP
program
compliant
as
a set
DVI
output).
will also accept
(S0Hz)
the
transmission
high-bandwidth
is
being
not
operate
the
LCD
panel.
text
PC,
the
compressed
Dolby Digital
top
(Video
and/
not
box
to
the
•
Connecting a HDMI
One HDMI cable (type A connector)
For proper operation,
use
a short HDMI cable.
HDMI cable transfers
◄-
--
I
Device
it
is
recommended
both
video and audio.
_r-----.----
--~
liilii1 I
HDMI
Device
Note:
The
picture
is
only for
reference.
•
Connecting a DVI
One HDMI (type A connector)-to-DVI adapter cable
of
and audio cables.
HDMI
(type A connector)-to-DVI
For
proper operation,
DVI
adapter cable should
recommended length
• Audio from
cable
is
connected
of
AV
input.
DVI
Device
Device
adapter
the
length
not
exceed 3 m. The
is
DVI
2 m.
devices can be heard
to
audio (red/white) terminal
of
an HDMl-to-
that
cable
if
audio
you
Note:
The
picture
is
only for
reference.
19
Page 20

Displaying
Please
enjoy
the
press HOME
the
following
Home
button
functions.
Page
to
enter
the
home page
Using
the
Smart
Features
To
make
the
best
make related settings in home page.
at
the
to
left-bottom
"Speech" in
you can adjust
use
corner
the
list of"Preferences" setting, and then
the
related settings
of
Google Assistant, you could
of
the
Access
home
Page.
of
Google Assistant.
"Settings"
Select
''
Note:
The
picture
is
only for
1.
Google Assistant: Click
Assistant
2. Text Searching: Click
typing
3. Notifications: Remind you
information, such
or
4.
Input: Select
S.
Settings:
settings.
6.
Apps: Show
access
7. Play Next: Show
or
by long pressing
Play Next''.
8.
Customize Channels: Add
channel
Note:
1)
The
of
the
the
text.
account errors,
the
Access
the
the
application center.
about
to
watch.
as
you like.
functions
of
countries or models.
2)
Before
using network functions
network applications and
to
the
network firstly.
Google
Assistant
Google Assistant
your
virtual personal helper.
start and enjoy it. It
it
instantly! With Google Assistant, you can
you
want
your
voice. There
typing, and
yourTV.
is
easily and quickly by using
is
what
you need
to
TV.
input
the
list
the
OK
interact
to
start
the
searching by
of
as
low
network
of
You
button
system-critical
disk space, Google sign in
connectivity issues, etc.
source.
system setting
favorite applications,
program you are watching
can add
the
, then selecting "Add
or
remove
home page may vary by different
in
on,
Press
to
please
your
do
home page like
VOICE
that
or
is
just
so
available on
is
so
wonderful
no
complicated
reference.
with
Google
of
global
or
desired program
the
selected
connect
the
TV
Android TV
the
boring
speaking
as
button
to
you will love
get
what
power
of
text
to
Note: Google Assistant
languages.
sure
with the
Media
If
you select
top
Before
that you have paired your Bluetooth remote control
TV
successfully.
Player
Media
screen
of
Media Player
Playback
~
Note:
The
Media
Operation
Step 1: Connect
Step 2:
Press
Step 3:
Step 4:
Step
to
Step 6:
Step 7:
Video
While playing
display
terns.
I
Play/Pause Play
Repeat
Show Info
Picture
Screen
Picture Setting
Audio
Last
Subtitle Encoding
HOME
Press
JJ..IT
enter"Media Player".
Press
◄/►
a file type: Video, Photo, Audio or Text.
S:
Press
JJ../T
play
the
file
type
Press
USB
(
►/
II/
Press
BACK
Menu
the
video menu. It consists
Item
Mode
Mode
Setting
Memory
is
only available for
using Google Assistant,
Player and then press OK,
is
displayed.
lilll
picture
is
only for
reference.
your
USB
device
to
button
to
►
and OK
and
to
or
pause
the
to
to
B_R/
ASCI
enter
button
button
OK
button
control
the
to
exit
the
Description
the
video playback
information
Menu Video
Menu Audio
6/BIGS/GB/GBl 8030
!◄!
and OK
/◄/►
desired media file which
as
which you have selected in Step
Play Control Buttons
■/.-/
►►}
button
the
video, press MENU
None/Repeat One/Repeat All
Show
User/Cinema/Sport/Vivid/Hi-Bright
Auto/Normal/Scan/Dot
Access
Access
Off/On
AlJTO/UTFB/UTFl
/KOl
some
please
~
the
TV.
the
home page.
to
select and
to
select and enter
to
select and
is
the
playback.
media player.
button
the
following I
of
the
by
Dot
to
video
of
make
the
same
4.
I
20
Page 21

Using
the
Smart
Features
Photo
Menu
While browsing
display
items.
I
Play/Pause Play
Repeat None/Repeat One/Repeat All
Shuffle Shuffle Off/Shuffle
Duration(For
Effect(For
Rotate(For
Zoom (For
Show Info
the
the
photo, press MENU
photo
menu.
It
consists
of
Item Description
or
pause the
photo
On
Play)
Short/Medium/Long
None/Dissolve/Wipe right/Wipe
Play)
Wipe up/Wipe down/Box-in/Box-out/
Random
Pause)
Rotate the picture
Pause)
Enlarge the
Show
the
information
photo
button
the
of
the
following
left/
photo
There are
employs
to
the Chromecast Built-in technology;The second
allows mirroring
Google Chrome (with
a personal computer.
l
initiated
* Sound: Setup
sound
* Apps: Permission settings on downloaded and
system apps.
* Screen saver: Select
start
* Storage & reset: Setup device & removable storage,
and reset
Note:
operating the function
* About: Show
Audio
Menu
While playing
display
items.
I
Play/Pause
Repeat None/Repeat One/Repeat All
Shuffle Shuffle Off/Shuffle On
Show Info
Lyric Options
Audio Settig
Text
While reading
display
items.
...._
_______________
Font
Show Info Show
the
the
audio, press MENU
audio menu. It consists
of
button
the
following
to
Item Description
Play
or
pause
the
audio
Show
the
You
Access
can set
to
information
Menu Audio
the
Lyric options
of
the
audio
Menu
the
the
text, press MENU
text
menu. It consists
Item Description I desired accessibility settings for different purposes in
Size/Style/Color Note:
the
of
the following
information
button
,__
____
of
the
to
text
Settings
Device
* Network: Connect
network.
* Inputs: Settings on connected inputs, standby
inputs and
so
* Chromecast built-in: Make
the
Chromecast built-in function, which allows
mobile
or
media playback on
content
quality.
PC
from
on.
to
be used
your
the
the
TV.
mobile
TV
to
You
or
to
wired
or
wireless
the
settings realted
select and control
can cast your favorite
PC
to
the
TV in full
the
Preferences
* Date & Time: Select the
time,
* Language: Select
* Keyboard: Select
I
* Home screen: Setup
and Apps & games
* Search: Settings on
and
* Google: Settings on
and
* Speech: Setup
the
* Accessibility: Provide a better viewing experience
for
who
"watching" means listening
"listening" means reading
_.
Home
(turn
(turn
with it.
Remote & accessories
_Setup
Personal
* Location: Select
location.
* Security & restrictions: Setup
applications
to
* Usage & Diagnostics: Select
your
allow Google
by sending diagnostic and usage data.
Accounts
_5ign
two
methods
mobile
through
as
you like.
time
and
so
the
user settings
All
the user settings
time
zone and
so
on.
so
on.
function
of
the
viewers
is
deaf
or
hearing impaired. For such viewers,
Page.
In
Accessibility
off)
the Talkback function, please also turn on
off)
the Talkback
to
pair
the
into
to
into
your
Google account.
to
device and
of
the
the
the
Google Assistant.
who
the
help improve
cast content:
web
apps
content
from the
the
cast extension) running on
In
both
the
system sound and surround
on.
detailed information
so
the
the
row
is
Bluetooth devices
whether
cases,
cast icon on
the
of
"Factory data
on.
desired menu language.
current keyboard
the
of
the
the
speech language and
blind
settings,
Assistant
TV.
the
screen saver and setup its
to
the default value.
will
lose completely after
type
of
automatic date &
Recommendations row,
the
home page.
Apps searching function,
Google searching function,
or
visually impaired,
with
descriptions,
the
captions.
If
you
function together
or
not
to
to
whether
the
TV automatically
the
first
that
support
web
browser
playback
sender device.
reset''.
about
as
you like.
so
You
can make
want
to turn on
with
the
TV.
share
the
install safe
or
not
is
the
on for
or
or
TV
to
TV.
21
Page 22

Appendix
Media
Player
Video:
Supported
Formats
Reference
Section
Video Codec(fi
MPEG1
MPEG2
(unsupported
MPEG4
type:Mpeg4
H.263
H.264
H265
MVC
WMV
{unsupported type:wmv7/wm>£)
VC1
VP9
le
V'3/
type)
Mpeg4
F
ile
ASF/WMV( .wmv
MP4 {.mp4 .m4v .mov .3gp)
MPEG
{.DAT,
TS (.ts .m2ts
ASF/WMV(
MP4 {.mp4 .m4v .mov .3gp)
MPEG
{.DAT,
TS (.ts .m2ts
ASF/WMV(
v.2)
ASF/WMV( .wmv .asf .asx)
MP4 {.mp4 .m4v .mov .3gp)
ASF/WMV( .wmv .asf .asx)
TS
Video ES(.m1v .m2v .m4v
MP4 {.mp4 .m4v .mov .3gp)
TS
Video ES(.m1v .m2v .m4v
TS
ASF/WMV{ .wmv .asf .asx)
TS
Video ES(.m1v .m2v .m4v
Exten
sion
AVI (.a\4)
.asf
OGM
(.ogm)
MKV
{.mkv
.mks)
program stream
.VOB, .MPG,
.tis
AVI
(.a\4)
.wmv .asf .asx)
OGM
(.ogm)
MKV
{.mkv
.mks)
program stream
.VOB,
.MPG,
.tis
AVI (.a\4)
.wmv .asf .asx)
MKV
{.mkv
.mks)
AVI
(.a\4)
(.ts .m2ts .tis .mpg)
AVI
(.a\1)
MKV {.mkv .mks)
{.ts .m2ts .tis .mpg)
.265)
{.ts .m2ts .tis .mpg)
{.ts .m2ts .tis .mpg)
MKV {.mkv .mks)
Name
.asx)
.MPEG)
.mpg)
.MPEG)
.mpg)
.264
.264
.264
.'£1)
.-..c1
.-..c1)
Sampling rate SPEC
720*576@30fps
1920"1080@ 60fps
1920*1080@
60fps
1920"1080 @60fps
3840x2304 @ 30fps
3840x2304 @ 60fps
1920*1080
@60fps
1920*1080
@60fps
3840x2304 @ 30fps
3840x2304 @ 60fps
1920*1080
@60fps
1920*1080
@60fps
1920*1080@60fps
1920*1080
@60fps
3840x2304 @ 30fps
3840x2304 @ 60fps
BltRate Profi
80Mbps
80Mbps
80Mbps
80Mbps
80Mbps
80Mbps
80Mbps
80Mbps
80Mbps @La\8I3
6()Mbps
. Simple Profile
Main
ASP
. Main Profile
.
High
LS.1
LS.2
L4.2
.
Main
L4.1
LS.0
LS.1
L4.1
. Simple Profile
.
Main
.
Ad1,0nced
le
Profile
L5
Profile
Profile
Profile
Profile
22
Some
files may not
be
played
Page 23

Media
Audio:
Media
Photo:
Player
Audio
Player
Supported
Codec(flle type)
MPEG1/2
MPEG4
AC3
EAC3
AAC
WMA
FLAG
Supported
Formats
Formats
Reference
Section
Audio
Audio
Audio
FIie
MP4
(.DAT, .VOB, .MPG,
ASF/WMV(
(.DAT, .VOB, .MPG,
ASF/WMV(
(.DAT, .VOB, .MPG,
ES(.amr
.ape .ac3 .ec3
(.DAT, .VOB, .MPG,
ES(.amr
.ape .ac3 .ec3
ASF/WMV(
(.DAT, .VOB, .MPG,
ASF/WMV(
ASF/WMV(
ES(.amr
.ape .ac3 .ec3
Extension
(.mp4
.m4v .mov
MKV
(.mkv
MPEG
program stream
.wmv .asf .asx)
MPEG
program stream
.wmv .asf .asx)
MKV
(.mkv
MPEG
program stream
MKV
(.mkv
MPEG
program stream
AVl(.a,)
.wrnv
OGM (.ogm)
MPEG
program
AVl(.a\1)
.wmv
OGM (.ogm)
.wrnv
Name
.3gp)
.mks)
.MPEG)
.MPEG)
.mks)
.MPEG)
.mp2
.mp3 .wav
.mks)
.MPEG)
.mp2
.mp3 .wav .flac .ogg)
.asf
.asx)
stream
.MPEG)
.asf
.asx)
.asf
.asx)
.mp2
.mp3 .wav .flac .egg)
Some
:Hae
.ogg)
files may not
be
played
Conta
iner FIie
JPEG
GIF .gif
PNG .png
BMP .bmp
Media
Player
Supported
Text:
Number
1
Extension
.jpeg
Formats
Conta
text
Name
iner
Photo
Base-line 17000x10000
Progressi>ve
static
animation
F
ie
Some
Extension
files may
.1xt
Name
not
be played
Resolution
4000x4000
16383x 16383
Remark
No-limitation(depend
No-limitation(depend
No-limitation(depend on dram
Some
files may
size)
size)
size)
not
on
on
be
dram
dram
played
23
Page 24

Reference
Section
Troubleshooting
Before calling a service technician, please check
following
and some solutions.
Symptom
TV
No
No
table for a possible cause
and
solution
will
not
turn
• Make sure
• The remote control batteries may be dead.
picture,
• Check
sound,
on
the
then
press (I).
Replace
no
picture
The sound may be muted.
power cord
the
batteries.
sound
the
aerial connections.
OK
of
the symptom
is
plugged in, and
Press
VOL+, -or
oo.
The station may have broadcast difficulties.
Try another channel.
If
the
problem happens when
connected
please change
to
HDMI
switch
Poor
sound,
• The station may have broadcast difficulties.
Try another channel.
Poor
picture,
• Check
• The station may have broadcast difficulties.
Try another channel.
• Adjust
Poor
reception
• Check
• The station may have broadcast difficulties.
Try another channel.
• Make sure the
Teletext
problems
• Check
• Good performance
strong broadcast signal.
to
HDMI 1
the
be "4K@60Hz 4:2:0"(MENU->SETUP->
2.0
Setting->Signal Format),
to
connect
picture
sound
the
the
of
the
the
setting
DVD
OK
OK
aerial connections.
PICTURE
broadcast
aerial connections.
aerial connections.
Color
menu.
channels
System
of
DVD
or
HDMI 2 terminal,
of"
Signal Format"
with
HDMI 3
is
properly
text
depends on a
is
or
directly
terminal.
set.
the
good
Some
pixels
of
the
screen
do
not
light
• The
LCD
display panel
using
an
extremely high level
technology, however, sometimes some pixels
of
the
screen may be missing picture elements
or
have luminous spots. This
malfunction.
The
picture
brightness
the
TV
on.
•
If
you switch
until
the
Multiple
images
• The station may have broadcast difficulties.
Try another channel.
• Aerial reception may be poor.
directional
• Check
changed.
Poor
color
or
no
• The station may have broadcast difficulties.
Try another channel.
• Adjust
The
remote
control
• Remove all obstructions between
control and
varies
the
TV on at
warms up.
outdoor
if
the
aerial.
direction
color
the
picture settings in Video menu.
does
not
the
remote control sensor on
is
manufactured
is
when
you
0°C
of
the
aerial
operate
up
of
precision
not
display
and under,
Use
a high
has
the
TV.
The remote control batteries may be dead.
Replace
the
batteries.
a sign
switch
remote
of
wait
the
a
24
Page 25

Reference
Section
Broadcast
Broadcast
or
region
System
transmission
systems
AsiaM.E.
Country
Bahrain, Kuwait, Israel, Oman,
Qatar,
United Arab Emirates, Yemen.
Indonesia, Malaysia,
Singapore, Thailand, etc.
China, Vietnam
China
Iraq, Islamic Republic
Lebanon, Saudi Arabia, etc.
Russian Federation, etc.
Myanmar, Republic
Philippines, etc.
or
Hong
region
Kong
of
of
Iran,
the
Oceania
Country
Australia,
or
region
New
Zealand, etc.
Africa
Country
Republic
South
Country
Brazil
Chile, Colombia, etc.
or
region
of
South Africa, etc.
America
or
region
NOTE:
PAL,
SECAM
and
NTSC
3.58
(MHz)
signal broadcast transmission
different countries or region.
in
special
VCRs
through
PAL
to playback
TV
equipment.
NTSC
of
each
Color
PAL
PAL
PAL
SECAM
SECAM
NTSC
Color
PAL
Color
PAL
Color
PAL
NTSC
are
different co/ors
systems
NTSC
applicable to
4.43
(MHz)
recorded video tape
country
Sound
B/G
D/K
B/G
D/K
M
Sound
B/G
Sound
Sound
M
M
is
used
Specifications
Power
source
43/49/55/65": 1 00V-240V
Power consumption
43": 100
W,
49": 120
55": 160
65": 200
Dimensions
43" :966
49" :1099
55" :1236
65" :1456
Dimensions (Without stand)
43" :966
49" :1099
55" :1236
65" :1456
Net
43":
49":
55":
65":
Net
43":
49":
55":
65":
TV
Analog
Channel coverage:
PAL
PAL
PAL
SECAM
SECAM
NTSC
<0.5W(standby)
W,
<0.5W(standby)
W,
<0.SW(standby)
W,
<0.SW(standby)
(Withstand)
mm
(W) 608
(W) 685
(W) 762
(W) 895
(W) 584
(W) 660
(W) 738
(W) 865
(CCIR)
(UK)
(CHINA)
(CCIR)
(OIRT)
(US)
mm
mm
mm
mm
mm
mm
mm
mm
systems
VHF
UHF
CATV
VHF
UHF
CATV
VHF
UHF
CATV
VHF
UHF
CATV
VHF
UHF
CATV
VHF
UHF
CATV
mm
mm
mm
mm
mm
mm
mm
Weight (With stand)
10.0 kg
13.1
kg
16.4 kg
25.2 kg
Weight (Without stand)
9.5 kg
12.2 kg
15.5 kg
23.7 kg
system (Aerial input)
broadcast
B/G
D/K
B/G
D/K
M
AC,
(HJ
(H)
(H)
(H)
(HJ
(H)
(H)
(H)
50/60Hz
196
211
211
280
74
77
79
80
mm
(DJ
mm
(D)
mm
(D)
mm
(DJ
mm
(DJ
mm
(D)
mm
(D)
mm
(D)
2-12
21
-69
X-Z+2,51-541
21
-69
1-12
13-57
Z1-Z38
2-12
21
-69
X-Z+2,51-541
1 -12
21
-69
Xl
-X19
2-13
14-79
A6-A1, A-W, AAZZ,AAA,
BBB
25
Page 26

Reference
section
Digital broadcast system
DVB-T
and
DVB-C Broadcast systems
Standard
PAL,
Aspect
VIDEO
SECAM,
ratio
INPUTterminals (Color
NTSC
3.58/4.43
16:9
Visible
size
(diagonal)
43":
108cm
49":
123cm
55":
139cm
65":
164cm
Number
of
pixels
43'~ 49'~
55'~
65" : 3840(H) dots x 2160(V) dots
Audio power
10W+
10W
Speakers
•
43'~
49'~
55":
Woofer(Main): 227.2 X 32 X
Tweeter: 47.5 X 17.2 X 16
11
• 65
:
Woofer(Main): 299 X 32 X
Tweeter: 47.5 X 17.2 X 16
41
mm
55
mm
mm
2pcs .
mm
2pcs.
2pcs.
2pcs.
System)
Operating condition
Temperature
Humidity
0°C -35°C
20% - 80% (No moisture
condensation)
Supplied
Owner's manual
Batteries
Pedestal stand
Screws (
accessories
(2),
43'~
65": M5X12 4
(1
),
Remote control
AC
power cable
(2),
49": M4X12 4
PCS).
(1
),
PCS;
55": M4X10 4
Design and specifications are subject
without
notice.
Never service
may expose you
or
remodel
to
the
TV by yourself.
a fire hazard
or
dangerous
voltages.
(1
),
to
PCS,
change
It
Input/Output terminals
Cfr
DIGITAL
--0
HDMl1-3
--0
COMPOSITE
Cfr
Headphone
/Lineout
--0
CHANNELS
LAN
USB
SVC
AUDIO
port
port
USB
USB
PORT
Output
Input
19
IN
Input
Output
3.5
IN
Antenna
RJ-45
Media
1
USB3.0
2
USB2.0
USB
File
For
26
(type
pin
(Video
mm
(Diameter)
Player
class:
system:
only
A)
and
Interface
Mass
FAT32
service
Audio
stereo
Storage
SPDIF
AN
Digital
UR)
IEC
type
version:
(Optical)
Page 27

Reference
Section
Trademark Information
• The
Adopted
High-Definition
HDMI Logo are trademarks
trademarks
in
the
•
Manufactured
Laboratories.Dolby,
double-D
Laboratories.
•
THIS
PATENT
AND NONCOMMERCIAL
TO
(i)
THE
DECODE
A CONSUMER ENGAGED
NONCOMMERCIAL ACTIVITY AND/OR
OBTAINED
TO
PROVIDE
OR
SHALL
ADDITIONAL INFORMATION MAY
FROM
SEE
•
MPEG
from
•
THIS
4 VISUAL
THE
OF
A CONSUMER
IN
COMPLIANCE WITH
STANDARD (MPEG-4 VIDEO) AND/OR (ii)
DECODING MPEG-4 VIDEO THAT
BY
A CONSUMER
AND NON COMMERCIAL ACTIVITY AND/OR
OBTAINED
BY
MPEG
LICENSE
ANY
INCLUDING THAT
INTERNAL AND COMMERCIAL
LICENSING
L.C.
SEE
• This
certain intellectual
Use
this
license(s)
• This
Microsoft
distributed
Licensing,
Trademarks HDMI, HDMI
Multimedia
of
HDMI Licensing Administrator, Inc.
United
States and
under
symbol
are trademarks
PRODUCT
ENCODE
AVC
HTTP://WWW.MPEGLA.COM
Fraunhofer
PRODUCT
PERSONAL
OTHER
HTTP://WWW.MPEGLA.COM
product
or
product
product
IS
PORTFOLIO
MPEG
Layer-3
distribution
LICENSED
VIDEO
STANDARD (AVCVIDEO) AND/OR (ii)
AVCVIDEOTHATWAS ENCODED
FROM
A VIDEO
AVCVIDEO. NO
BE
IMPLIED
LA,
L.L.C.
audio
LLS
IS
LICENSED
PATENT
PORTFOLIO
AND NON COMMERCIAL
FOR
ENGAGED
FROM
A VIDEO
LA
TO
PROVIDE
IS
GRANTED
USE.
ADDITIONAL INFORMATION
RELATING
MAY
BE
contains
is
prohibited
from
Microsoft.
includes
Corporation
without
GP.
Interface,
or
registered
other
license
Dolby
LICENSE
coding
and Thomson.
OBTAINED FROM
property
of
a license
countries .
from
Audio
and
of
UNDER
FORTHE
USE
OF
IN
FOR
(i) ENCODING VIDEO
THE
OR
technology
this
technology
and can
A CONSUMER
COMPLIANCE WITH
IN A PERSONAL
PROVIDER
LICENSE
ANY
OTHER
technology
UNDER
LICENSE
MPEG-4 VISUAL
WAS
IN A PERSONAL
PROVIDER
MPEG-4 VIDEO. NO
SHALL
BE
TO
PROMOTIONAL,
USES
rights
technology
without
not
from
Dolby
Dolby
THE
BE
OBTAINED
THE
IMPLIED
AND
subject
of
the
owned
be used
Microsoft
and
the
the
AVC
PERSONAL
BY
AND
WAS
LICENSED
IS
GRANTED
USE.
licensed
MPEG-
FOR
USE
ENCODED
WAS
LICENSED
FOR
MPEG
LA,
to
Microsoft.
outside
appropriate
by
or
L.
of
DTS
TruSurro.f.li\t
~
Symbol
DTS
Inc. All Rights Reserved.
Android
are trademarks
0
Bluetooth"
of
such marks
Other
respective owners.
End
User
•
Open
include
source license agreements, and such
software
additional
in "Legal
Such
"AS
IS"
applicable
License" section
licensing terms.
the
terms
source license
and
license
applicable
Until
the
Software,
code
file
by
service
will
send
DTS
patents, see
cits.com.Manufactured
db
license
TruSurrouoci
DTS,
together
TruSurround
TV,
trademarks and
License
Source Software. Portions
software
files are
information"
open
basis
conditions
agreement
the
date
corresponding
sending
at
you a link
the
are registered trademarks, and
is a trademark
Google
Play, Chromecast
of
Google
The
8/uetooth®
are registered trademarks
the
Bluetooth
by
[licensee name] is
trade
Agreement
files
subject
terms
and
source
software
to
the
maximum
law. Please carefully read "Open Source
for
the
If
there
and
conditions
agreement
of
the
prevail
open
source software.
that
is
three
you
may
to
a request
http://tsb-latam.com,
to
http://patents.
from
DTS
Symbol, &
LLC.
word
SIG,
names are
subject
to
to
the
conditions
of
device's "Settings"
files are
extent
relevant
is
any
discrepancy
of
the
and
applicable
with
years
obtain a copy
the
binaries
to
TOSHIBA
such source code.
under
Licensing Limited.
DTS
and
the
of
DTS,
Inc.©
and
Youtube
mark
and logos
owned
Inc.
and
any
under
of
the
certain
notices and
that
provided
copyright
applicable
the
EULA,
open
respect
after
for
and TOSHIBA
use
license.
those
of
their
Software
open
open
source
are referenced
menu.
permitted
on
and
between
open
the
terms
source
to
the
you
acquire
of
the
source
GPL-licensed
customer
DTS,
by
an
by
27
 Loading...