Toshiba 62373831 User Manual

6 F 8 A 0 5 2 1
OPERATION MANUAL
DENSITY METER
TYPE LQ500


6 F 8 A 0 5 2 1
INTRODUCTION
Thank you very much for your purchase of the LQ500 Density Meter (Hereafter, LQ500).
This manual is prepared for people in charge of installation, operation or maintenance. The manual
describes the precautions in using the meter, and explains about installing, adjusting, calibrating and
maintaining the LQ500 meter.
Carefully read this manual before using the meter for efficient and safe operation. Al ways keep the
manual in a place where you can easily access.
◆ About Safety Precautions
Carefully read the Safety Precautions that appear in the following pages before using the Meter.
The safety signs used in the Safety Precautions will appear again in the following sections for your
safety.
■ Notice
1. Do not copy or transcribe this manual in part or entirety without written permission from Toshiba.
2. The manual is subject to change without notice.
3. Although we tried hard to make this manual error free, if you find any errors or unclear passages,
kindly let us know.
1
6 F 8 A 0 5 2 1
Yellow
Red
SAFETY PRECAUTIONS
Important information is shown on the product itself and in the operation manual to protect users
from bodily injuries and property damages, and to enable them to use the product safely and
correctly.
Please be sure to thoroughly understand the meanings of the following signs and symbols
before reading the sections that follow, and observe the instructions given herein. Keep the
manual in a place you can easily access to whenever you need it.
[Explanation of Signs]
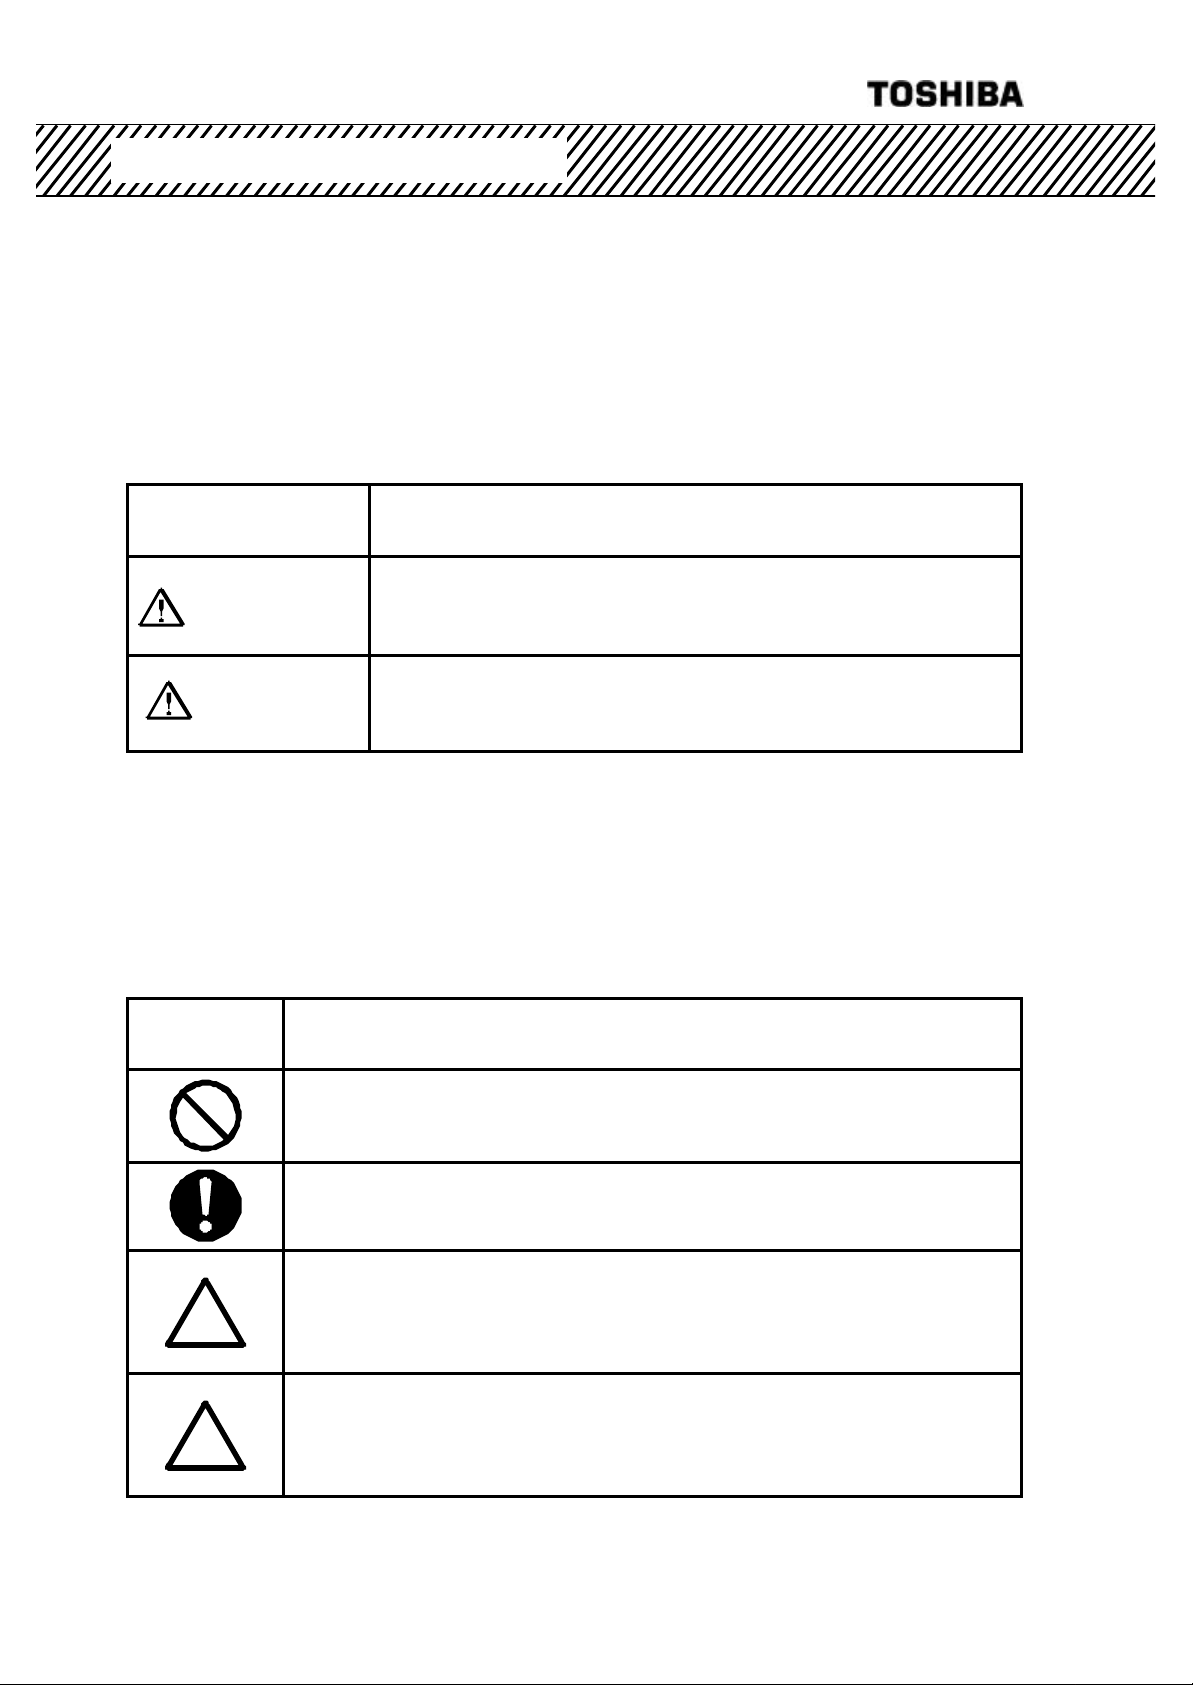
Sign Description
Indicates a potentially hazardous situation which could result in
WARNING
CAUTION
Note 1: Serious injury refers to cases of loss of eyesight, wounds, burns (high or low temperature),
electric shock, broken bones, poisoning, etc., which leave after-effects or which require
hospitalization or a long period of outpatient treatment of cure.
Note 2: Minor or moderate injury refers to cases of burns, electric shock, etc., which do not require
hospitalizat ion or a long period of outpatient treatment for cure; equipment damage refers
to cases of extensive damage involving damage to property or equipment.
[Explanation of the Symbols]
death or serious injury, if you do not follow the instructions in this
manual.
Indicates a potentially hazardous situation which may result in
minor or moderate injury*1, and/or equipment-only-damage*2, if
you do not follow the instruction in this manual.
Symbol Description
This sign indicates PROHIBITION (Do not).
The content of prohibition is shown by a picture or words beside the
symbol.
This sign indicates MANDATORY ACTION (You are required to do).
The content of action is shown by a picture or words beside the symbol.
This shape or symbol indicates WARNING.
The content of WARNING is shown by a picture or words beside the
symbol.
◆Color back : red, flame, picture and words : black
This shape or symbol indicates CAUTION.
The content of CAUTION is shown by a picture or words beside the
symbol.
◆Color back : yellow, flame, picture and words : black
2
Contents
SAFETY PRECAUTIONS (Continued)
6 F 8 A 0 5 2 1
For a safe use of the LQ500 Density Meter, take precautions described in this manual and
observe ordinances in making the installation and operation. Toshiba is not responsible for any
accident arising from the use that does not conform to above.
INSTALLATION PRECAUTIONS
Red
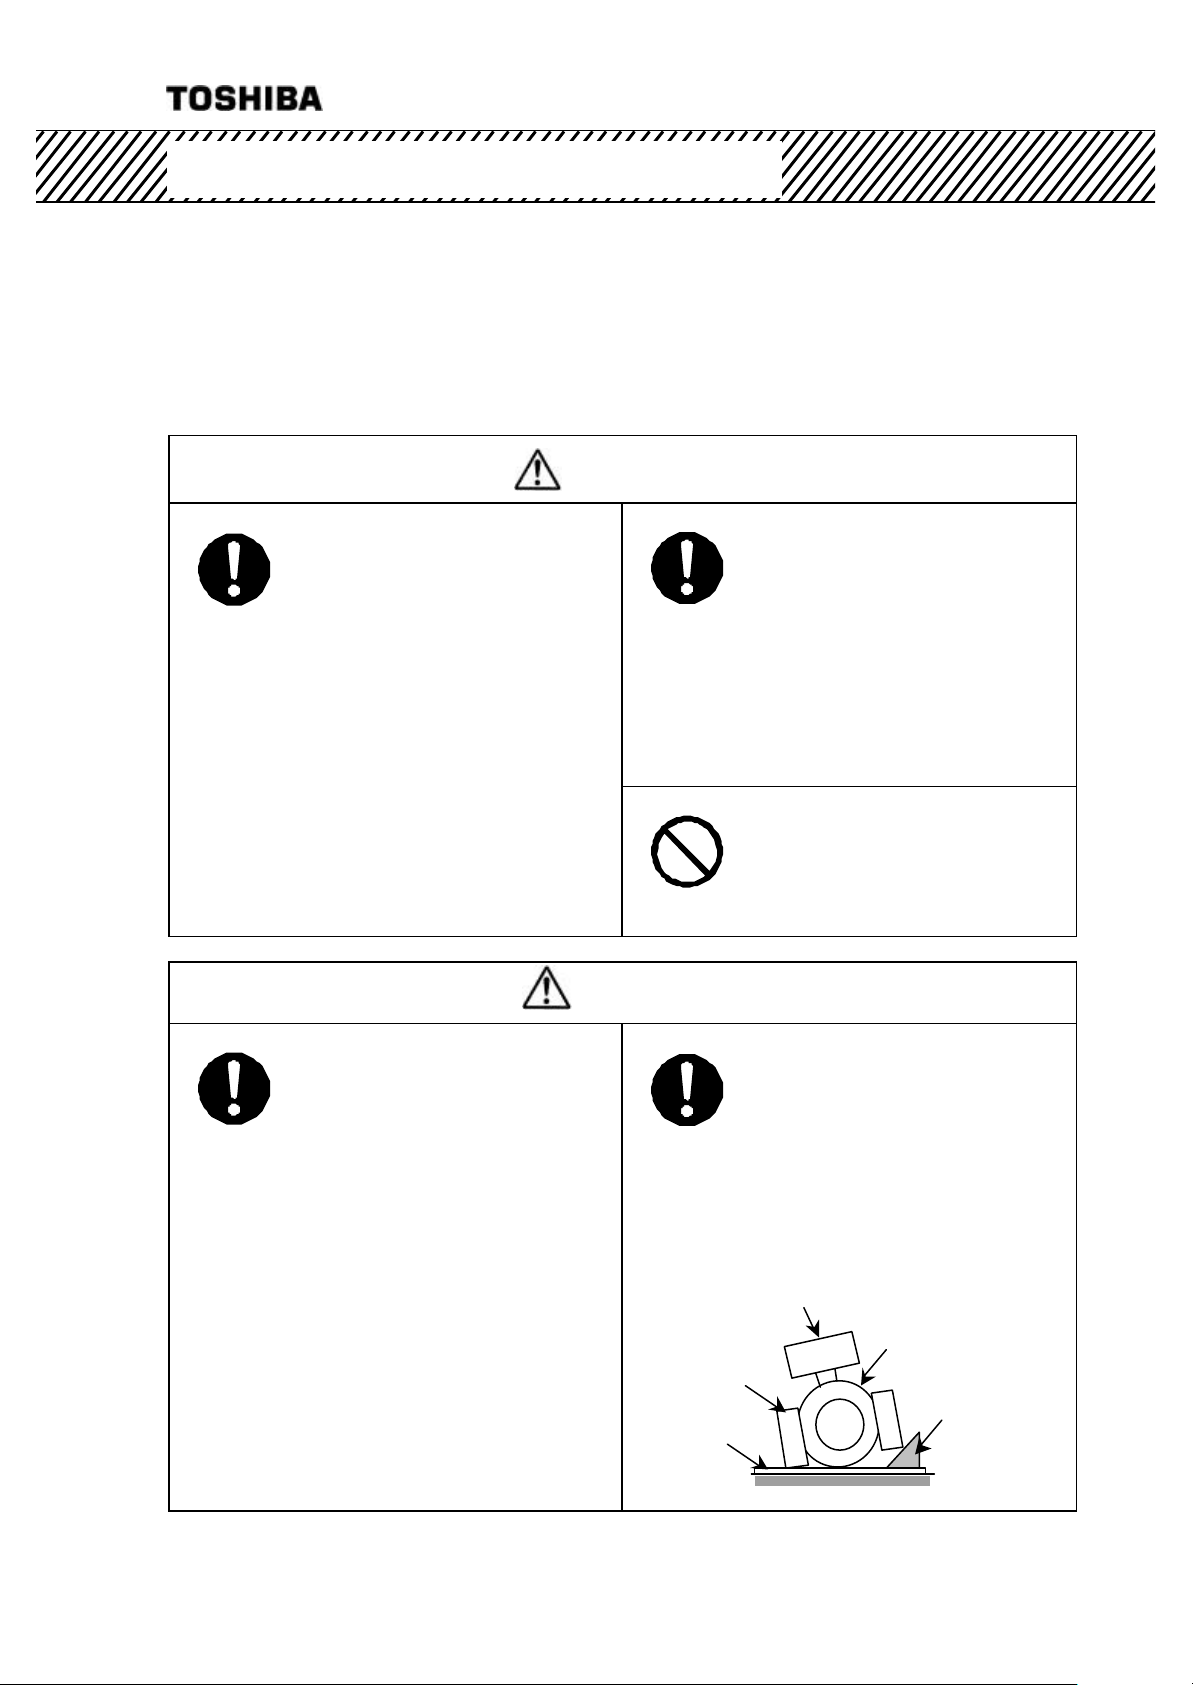
■The meter is heavy. To move
the meter for relocation or
installation, a qualified operator
must handle it by using
DO
equipment such as a truck, a
crane or a sling.
In addition, when you lift the
meter with its lifting bolts, make
sure the bolts have been
securely tightened to the end.
Overturning or dropping can cause
injuries or equipment failure.
Yellow
■Avoid installing the meter in
any of the following places:
Otherwise, a fire or equipment
DO
breakdown or failure can occur.
l Dusty place
l Place where corrosive gases
(SO2, H2S) or flammable gases
may be generated.
l Place exposed to strong vibration
or shock.
l Place exposed to condensation
due to abrupt change in
temperature.
l Place too cold or hot for
installation
l Near an apparatus that generates
strong radio waves or strong
magnetic field.
WARNING
DO
DON’T
CAUTION
DO
Applicator
Cure sheet
■Electrical work, installation
work are needed for the meter.
Please consult with the sales
agent you purchased the meter,
some of the companies
specialized in this field or your
Toshiba representative.
If any of these work items is
performed incorrectly, this can
cause fire or explosion.
■Do not operate where there is
a possibility of leakage of
flammable or explosive gas.
A fire or explosion can occur.
■Install the meter in a place
easier for operation,
maintenance and inspection.
In addition, when you place the
meter temporarily in a stocking
area, make sure to execute fall
prevention measures.
Stumbling over the meter or a fall of
the meter can cause injury.
RF section
Detector
Roll-over
prevention
stopper
3
6 F 8 A 0 5 2 1
SAFETY PRECAUTIONS (Continued)
WIRING PRECAUTIONS
DO
DO
Yellow
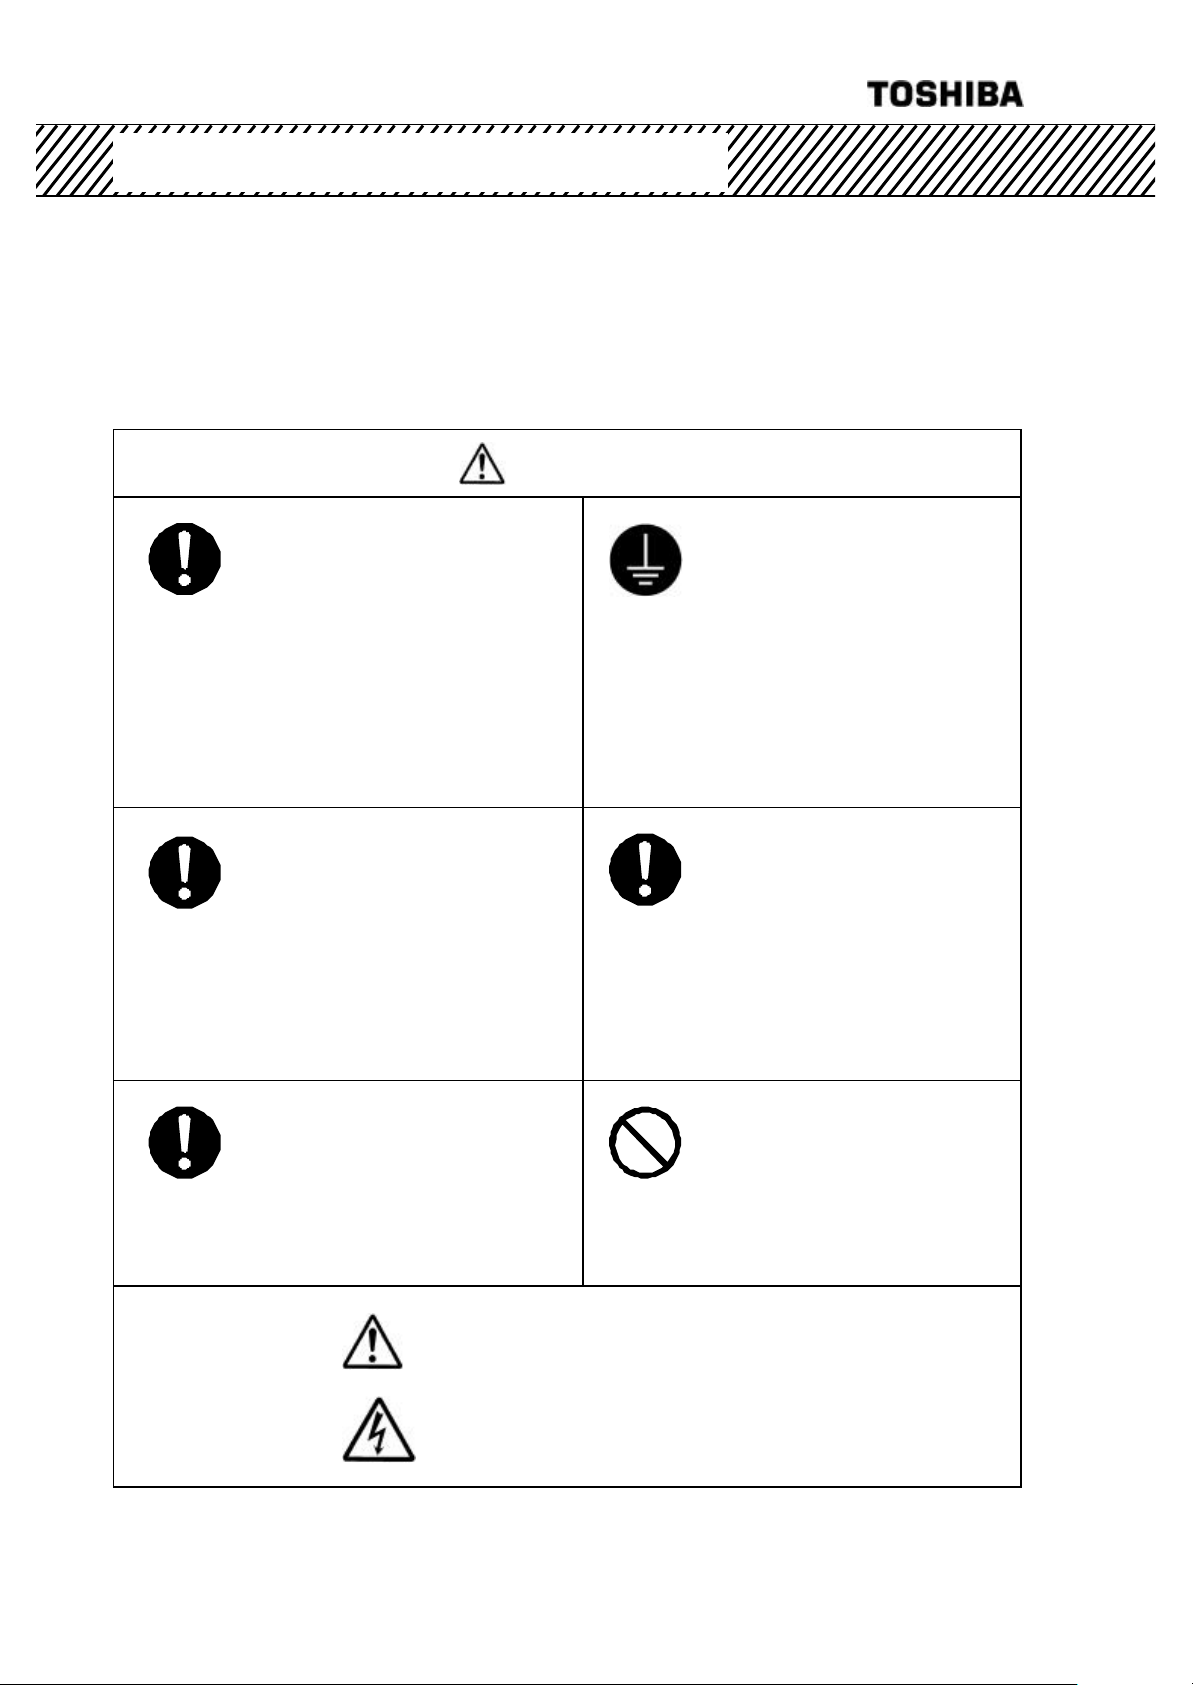
■Be sure to install a fuse and a
switch to disconnect the
equipment from the power
source.
Failure to observe this can cause
electric shock or equipment failure.
■Make sure that the main
power line is off before wiring or
cabling.
Wiring or cabling without switching
off the main power line can cause
electric shock.
WARNING
DO
DO
■Be sure to ground the
equipment using a grounding
wire separate from those used
for power tools.
(Grounding resistance: 100 Ω or
less)
Without grounding, electric shock,
malfunction, or equipment failure
can be caused by electric
leakage.
■Use crimp terminals with
insulation sleeves for power
line and grounding wire
terminals.
A disconnected cable or wire from
the terminal or a loose terminal
can cause electric shock or
generate heat and cause a fire or
equipment failure.
DO
■Wiring and cabling should be
done as shown in the wiring and
connection diagrams.
Wrong wiring or cabling can cause
malfunctions, overheating, sparking,
or electric shock.
Yellow
DON’T
The label shown left appears near a terminal block on
the equipment to which power is supplied. Take
■Do not wire or cable with wet
hands.
A wet hand can cause electric
shock.
precautions to avoid electric shock.
Yellow
4
The label shown at left is
6 F 8 A 0 5 2 1
Contents
SAFETY PRECAUTIONS (Continued)
PRECAUTIONS REGARDING MAINTENANCE, INSPECTION,
AND PARTS REPLACEMENT
Yellow
WARNING
DO
DON’T
DON’T
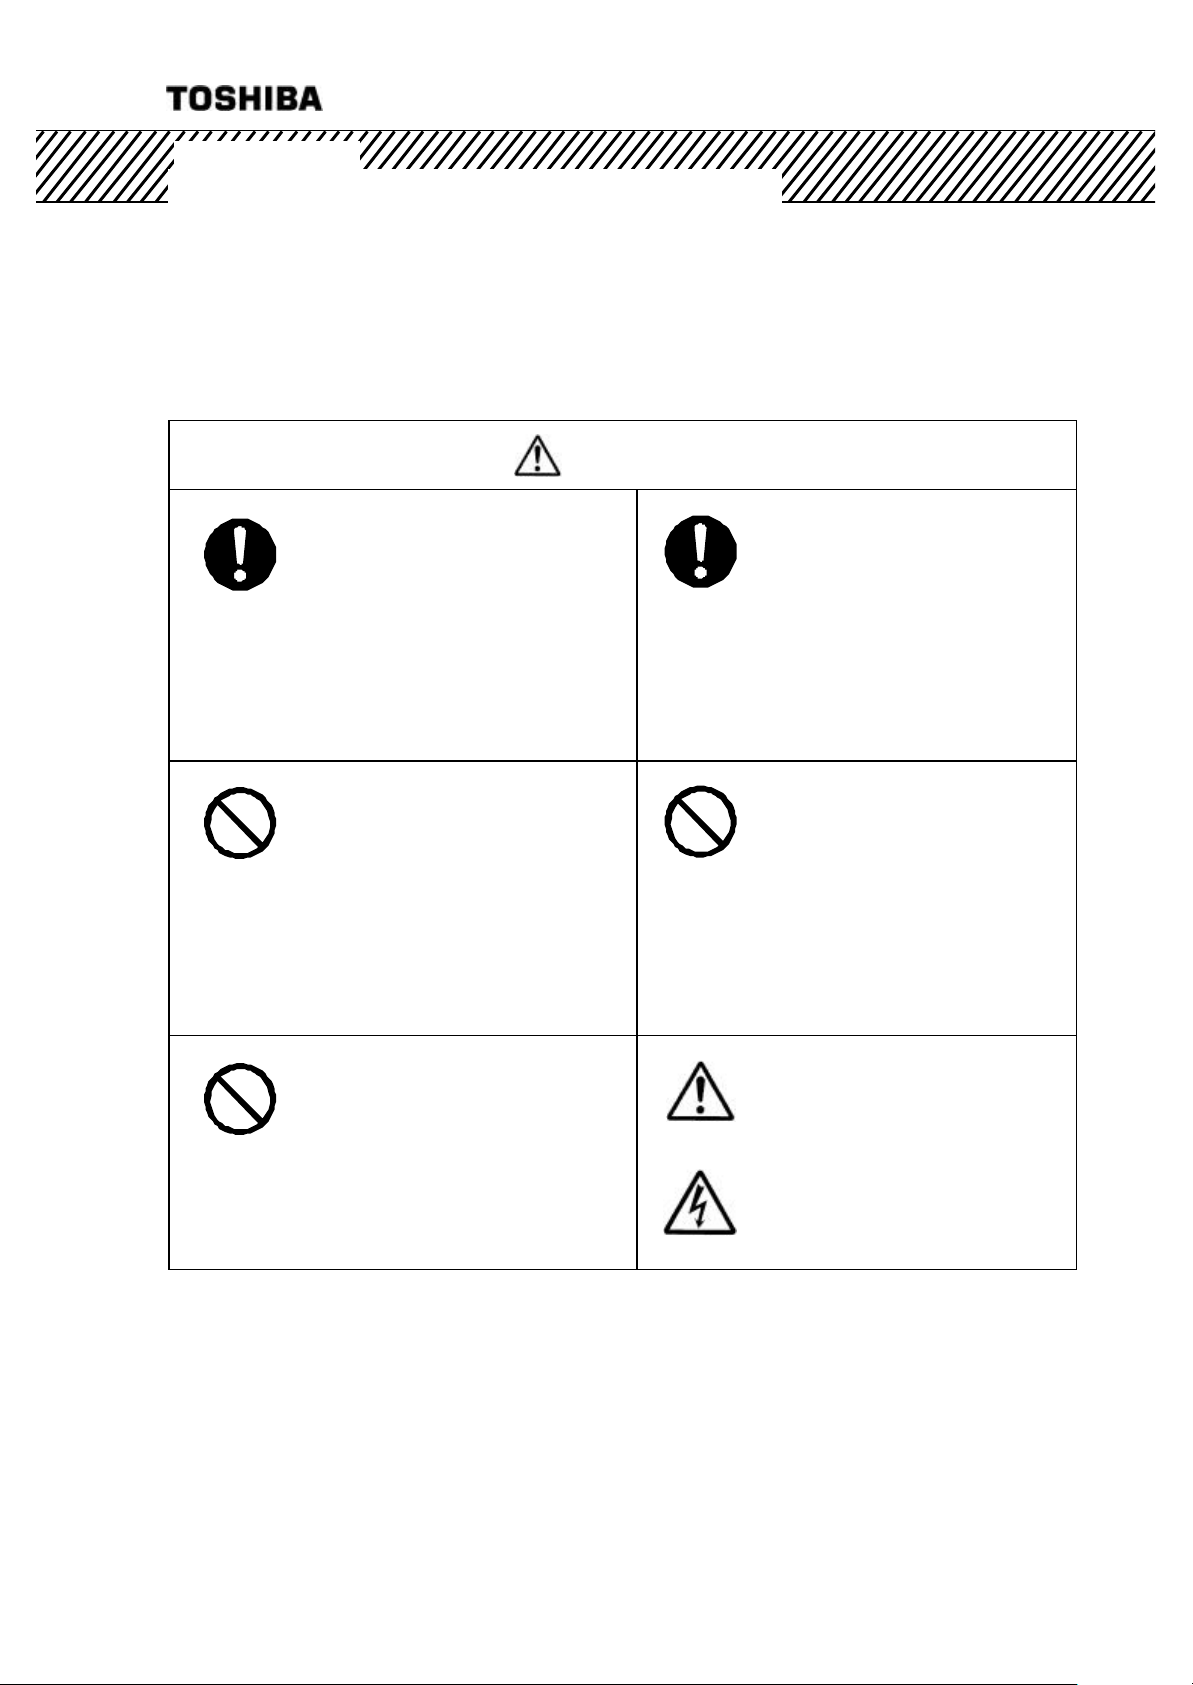
■Be sure to set the power
switch on the equipment to the
OFF position before doing
maintenance or inspection
inside the equipment or
replacing its parts.
Failure to observe this can cause
electric shock or equipment failure.
■Do not touch the terminal
block during maintenance or
inspection. If it is necessary to
touch the terminal block, set the
power switch on the equipment
to the OFF position in advance.
Failure to observe this can cause
electric shock.
■Do not touch the detector
pipe when high temperature
liquid is flowing in the detector
pipe. The detector pipe also
gets hot from the flowing liquid.
Otherwise, a burn can result.
DO
DON’T
Yellow
Yellow
■Be sure to set the powe r
switch on the equipment to the
OFF position before replacing
the fuse.
Failure to observe this can cause
electric shock.
■Do not attempt disassemble
or modify the equipment.
Failure to observe this can cause
electric shock or equipment
failure.
placed near each
terminal block on the
equipment to which
power is supplied. Be
careful of electric shock.
5

6 F 8 A 0 5 2 1
SAFETY PRECAUTIONS (Continued)
Limited Applications of the product
• This produc t is designed and manufactured for use in systems such as general industrial equipment
(food manufacturing line control, various process control, manufacturing line control water treatment
facility and so on). This product is not designed or manufactured for the purpose of applying to the
systems, such as shown below, which require the level of safety that directly concerns with human
life. When your use includes potential applications in those systems, contact Toshiba for consultation.
(Example)
• Main control system for atomic power generating plant/Safety protection system for
nuclear facilities/Other critical safety systems
• Medical control system for sustaining life
• This product is manufactured under strict quality control but components might fail and if this product
is likely to be applied to a system that concerns with human life or it is likely to be applied to a facility
that may cause serious effects, please give special consideration to make the system safe regarding
the operation, maintenanc e and management of the system.
• This product is not approved as an explosion-proof device. Do not use this product in an area of
explosive atmosphere (explosion protected area).
Liability Exemptions
• Toshiba assumes liability exemptions from the following examples.
• Damages caused by fire, earthquake, actions by third party, other accidents, abuse or
faulty use whether accidental or intentional by the user, or by other uses of abnormal
conditions.
• Damages or losses that are incidental to the us e of or disuse of the product (loss of
business profit, interruption of business operation, etc.)
6

Contents
[NOTE] Sign
When an explanation is made in the text regarding the Safety Precautions, the [NOTE] sign
shown below appears in the left margin of a page. The [NOTE] gives you directions to follow in
the following instances.
• To use product correctly and effectively.
• To prevent abnormal or degrading performance of the product.
• To prevent faulty actions.
• To store the product when you do not use the product for a long time.
6 F 8 A 0 5 2 1
7
6 F 8 A 0 5 2 1
Important Notes of Use of LQ500 Density Meter
Be sure to observe following instructions in order to maintain the original performance of the
LQ500 Density Meter and safely use it over a long period of time.
• Toshiba is not he ld responsible for any fault or result caused by not observing the precautions
described in this manual or by not observing the laws or regulations in installing or using the product.
[NOTE] Do not install or store the product in the following places.
Otherwise, meter performance can deteriorate and malfunction, fault, or breakage can
occur.
Place exposed to direct sunlight
Hot, humid place
Place exposed to severe vibration and shock
Place that can be under water
Place of corrosive atmosphere
[NOTE] Use a separate wire for grounding the meter. Do not share the same
grounding wire with other devices.
Otherwise, malfunction, fault, or breakage can occur.
[NOTE] Lay the output signal cable through their own conduit away from the AC power
cable and other so urces of noise.
Noise can interrupt correct measurement.
[NOTE] Perform periodic maintenance and inspection.
A long period of reliable measurement requires periodic span calibration
[NOTE] Be careful not to let water or moisture into the applicator mount of the detector,
converter, or cable ends.
Water or moisture can adversely affect performance and shorten parts service life.
Close the covers and doors securely, and make the cable outlets airtight.
[NOTE] Turn on power when the meter is installed on metal pipe.
When you install or remove the meter, make sure to turn off power beforehand.
This can affect other equipment due to leakage of radio waves.
[NOTE] Do not remove the cover of the applicator mount of the detector as well as the
Important Notes of Use of LQ500 Density Meter
cover of the detector RF section while the meter is in operation after power is
applied.
This can affect other equipment due to leakage of radio waves.
[NOTE] Do not step on any part of the density meter (applicator mount, converter for
example) when you do piping wo rk. Do not place any heavy object on it.
Otherwise, deformation or fault can occur.
8
6 F 8 A 0 5 2 1
Contents
[NOTE] Do not use a transceiver, handy telephone, or other wireless device nearby.
Such a device can adversely affect correct measurement. In the event one must be
used, observe the following precautions.
(1) When using a transceiver, make sure that its output power is 5W or less.
(2) When using a transceiver or a handy telephone, keep the converter and signal
cable at least 30cm away from the antenna.
(3) Do not use a tr ansceiver or a portable telephone nearby while the density meter
is in online operation. This is important to protect if from being affected by a
sudden output power change.
(4) Do not install the fixed antenna of a wireless device in the area around the
converter and signal cable.
[NOTE] Use a fuse of the specified rating.
A fuse other than that specified can cause density meter malfunction or breakage.
[NOTE] Do not modify or disassemble the density meter unnecessarily. Do not use
parts other than sp ecified.
Failure can cause malfunction and density meter fault.
[NOTE] When moving the meter elsewhere for installation, be careful not to drop, hit,
or subject to strong shock.
Otherwise, the density meter may be broken, resulting in malfunction or fault.
[NOTE] Before returning your meter to Toshiba for repair, etc., make sure to inform us
about the measured matter remaining in the density meter pipe, including
whether it is dangerous or not to touch the material and then clean the meter
so that no me asured matter remains in its pipe.
About disposal
[NOTE] When you dispose of this density meter, follow the ordinance or regulations of
your state.
[FCC notice]
This equipment has been tested and found to comply with the limits for a field disturbance
sensor, pursuant to Part 15 of the FCC rules. These limits are designed to provide reasonable
protection against harmful interference in a residential installation. This equipment generates,
uses and can radiate radio frequency energy and, if not installed and used in accordance with the
instructions, it may cause harmful interference to radio communications. However, there is no
guarantee that interference will not occur in a particular installation. If this equipment does cause
harmful interference to radio or television reception, which can be determined by turning the
equipment off and on, the user is encouraged to try to correct the interference by one or more of
the following measures.
• Reorient the receiving antenna.
• Increase the separation between the equipment and receiver.
• Connect the equipment into an outlet on a circuit different fr6m' that to which the receiver
is connected.
• Consult the dealer or an experienced radio,'1'V technician for help.
WARNING: This equipment has been certified to comply with the limits for a field disturbance
sensor, pursuant to Subpart C of part 15 FCC rules. Except AC power cable, shielded cables must be
used between the external devices and the terminals of the converter of the equipment.
Changes or modifications made to this equipment, not expressly approved by Toshiba or parties
authorized by Toshiba could void the user's authority to operate the equipment.
9

6 F 8 A 0 5 2 1
Contents
SAFETY PRECAUTIONS..........................................................................................................2
[NOTE] SIGN.............................................................................................................................7
IMPORTANT NOTES OF USE OF LQ500 DENSITY METER ..............................................8
1 OVERVIEW........................................................................................................................13
1.1 Principle of Measurement .................................................................................................13
1.2 Features.........................................................................................................................14
2. UNPACKING .....................................................................................................................15
2.1 Standard Components.....................................................................................................15
2.2 Standard Accessories .....................................................................................................15
3. INSTALLATION.................................................................................................................16
3.1 Precautions for Installation...............................................................................................16
3.2 Installation Location.........................................................................................................17
3.3 Installation and Piping......................................................................................................18
3.4 Precautions for wiring ......................................................................................................21
3.5 Wiring............................................................................................................................22
4. PART NAMES AND FUNCTIONS....................................................................................25
4.1 Detector.........................................................................................................................25
4.2 Converter........................................................................................................................27
5. OPERATION PROCEDURE ............................................................................................29
5.1 Parameter and Set Values ...............................................................................................29
5.2 Menus and operations .....................................................................................................31
5.2.1. Main menu ................................................................................................................31
5.2.2 Setting keys .............................................................................................................32
5.2.3 Menu display .............................................................................................................33
5.2.4 Monitoring menu display and operating procedures .......................................................36
5.2.5. Setting menu display and operating procedures............................................................37
5.2.6 Measuring mode display and operating procedures .......................................................38
5.2.7 Reading of parameters display and operating procedures ..............................................38
5.2.8 Measured values display and operating procedures.......................................................41
5.2.9 Self-diagnosis data display operating procedures ..........................................................41
5.2.10 Parameter setting display and operating procedures .....................................................43
5.2.11 Zero calibration display and operating procedures .........................................................46
5.2.12 Span calibration display and operating procedures ........................................................46
5.2.13 Phase angle rotation correction display and operating procedures ..................................47
5.2.14 Linearize/conductity correction display and operating procedures ...................................48
10

6 F 8 A 0 5 2 1
Contents
5.2.15 Additives correction display and operating procedures .................................................. 51
5.2.16 Other menus display and operating procedures ............................................................ 54
6. OPERATIONS...................................................................................................................56
6.1 Procedures for Preparing and Running .............................................................................. 56
6.2 Preparations before Turning on Power............................................................................... 57
6.3 Power on and Preparations for Measuring.......................................................................... 57
6.3.1 Turning power on ....................................................................................................... 57
6.3.2 Verifying and setting measurement conditions ............................................................. 58
6.4 Zero Calibration............................................................................................................... 60
6.5 Span Calibration ............................................................................................................. 62
6.6 Operation....................................................................................................................... 64
6.7 External Synchronized Operation ..................................................................................... 65
6.7.1 Movement of the ext ernal synchronized operation......................................................... 65
6.7.2 Setting the external synchronized operation................................................................. 66
6.8 Functions Related to Operation........................................................................................ 67
7. MAINTENANCE ................................................................................................................68
7.1 Precautions for Maintenance, Inspection and Parts Replacement ........................................ 68
7.2 Maintenance and Inspection Items.................................................................................... 69
8. TROUBLESHOOTING.....................................................................................................71
8.1 Troubleshooting .............................................................................................................. 71
8.2 Error Indications and Recovery Operations ........................................................................ 73
9. CORRECTIONS IN DENSITY CALCULATION.............................................................75
9.1 Density Calculation......................................................................................................... 75
9.2 Various Kinds of Corrections............................................................................................ 76
9.2.1 Phase angle rotation correction .................................................................................. 76
9.2.2 Fluid temperature correction ....................................................................................... 76
9.2.3 RF correction ............................................................................................................ 77
9.2.4 Ambient temperature correction.................................................................................. 77
9.3 Phase Angle Rotation Correction (Details)......................................................................... 78
9.3.1 Care point concerning phase angle rotation.................................................................. 78
9.3.2 Phase angle rotation in external synchronized operation................................................ 78
9.3.3 Outline of automatic adjustment function of phase angle rotations................................. 78
9.3.4 Judgment conditions and adjustments for automatic adjustment of phase angle rotations 78
9.3.5 Restrictions and invalidation in applying the automatic adjustment of phase angle rotations
............................................................................................................................... 79
9.3.6 Invalidation by setting the automatic adjustment of phase angle rotations ...................... 79
9.3.7 Actions after invalidating the automatic adjustment of phase angle rotations .................. 80
9.3.8 Return to the normal through manual input of the phase angle rotations ......................... 81
11
6 F 8 A 0 5 2 1
Contents
10. VARIOUS FUNCTIONS....................................................................................................82
10.1 Various Functions and their Outlines .................................................................................82
10.2 Moving Average ...............................................................................................................83
10.2.1 Function of moving average ........................................................................................83
10.2.2 Setting of the moving average times ............................................................................83
10.2.3 Cautions in using the moving average function.............................................................83
10.3 Change-rate limit .............................................................................................................84
10.3.1 Outline of change-rate limit function............................................................................84
10.3.2 Examples of operating the change-rate limit function ....................................................84
10.3.3 Cautions in using the change-rate limit factor ...............................................................85
10.3.4 Setting the change-rate limit .......................................................................................86
10.4 Electric Conductivity Correction........................................................................................87
10.4.1 Standard conductivity correction factors ......................................................................87
10.4.2 How to obtain and set a correction factor .....................................................................88
10.5 Additives Correction Factor ..............................................................................................92
10.5.1 Additive Correction Function .......................................................................................92
10.5.2 Density calculation ....................................................................................................93
10.5.3 Procedures for using the additives correction function...................................................94
10.5.4 How to set the additives correction function .................................................................95
10.5.5 Simplified Correction on Additives...............................................................................96
10.6 LINEARIZER SETTING ....................................................................................................97
10.6.1 Linearizer function.....................................................................................................97
10.6.2 Linearizer setting .......................................................................................................98
10.7 Density Multiplier Switching by External Signals.............................................................. 100
10.7.1 Density multiplier switching function by external signals.............................................. 100
10.7.2 Setting the density multiplier switching by external signals .......................................... 100
11. SPECIFICATIONS...........................................................................................................102
11.1 General Specifications................................................................................................... 102
11.2 Detector Specifications.................................................................................................. 103
11.3 Conveter Specifications.................................................................................................. 104
11.4 Model Number Table...................................................................................................... 106
APPENDIX..............................................................................................................................107
Attached Figure1. Detector outline dimensions .......................................................................... 107
Attached Figure2. Converter dimensions .................................................................................... 109
12
Microwave
Density
Phase difference
t t t
Drinking
Reception
Substance to
be measured
6 F 8 A 0 5 2 1
1 OVERVIEW
The LQ500 Density Meter measures the density of a substan ce that flows through a pipe by means
of a phase difference method using microwaves.
This method is little affected by the presence of contamination. It uses no moving mechanical parts
or mechanism that is often used in other measuring methods for cleaning, sampling, or defoaming.
It permits continuous measurement.
The density meter, which outputs measured density in electric current, is suitable for an application
in a process for monitoring and controlling.
1.1 Principle of Measurement
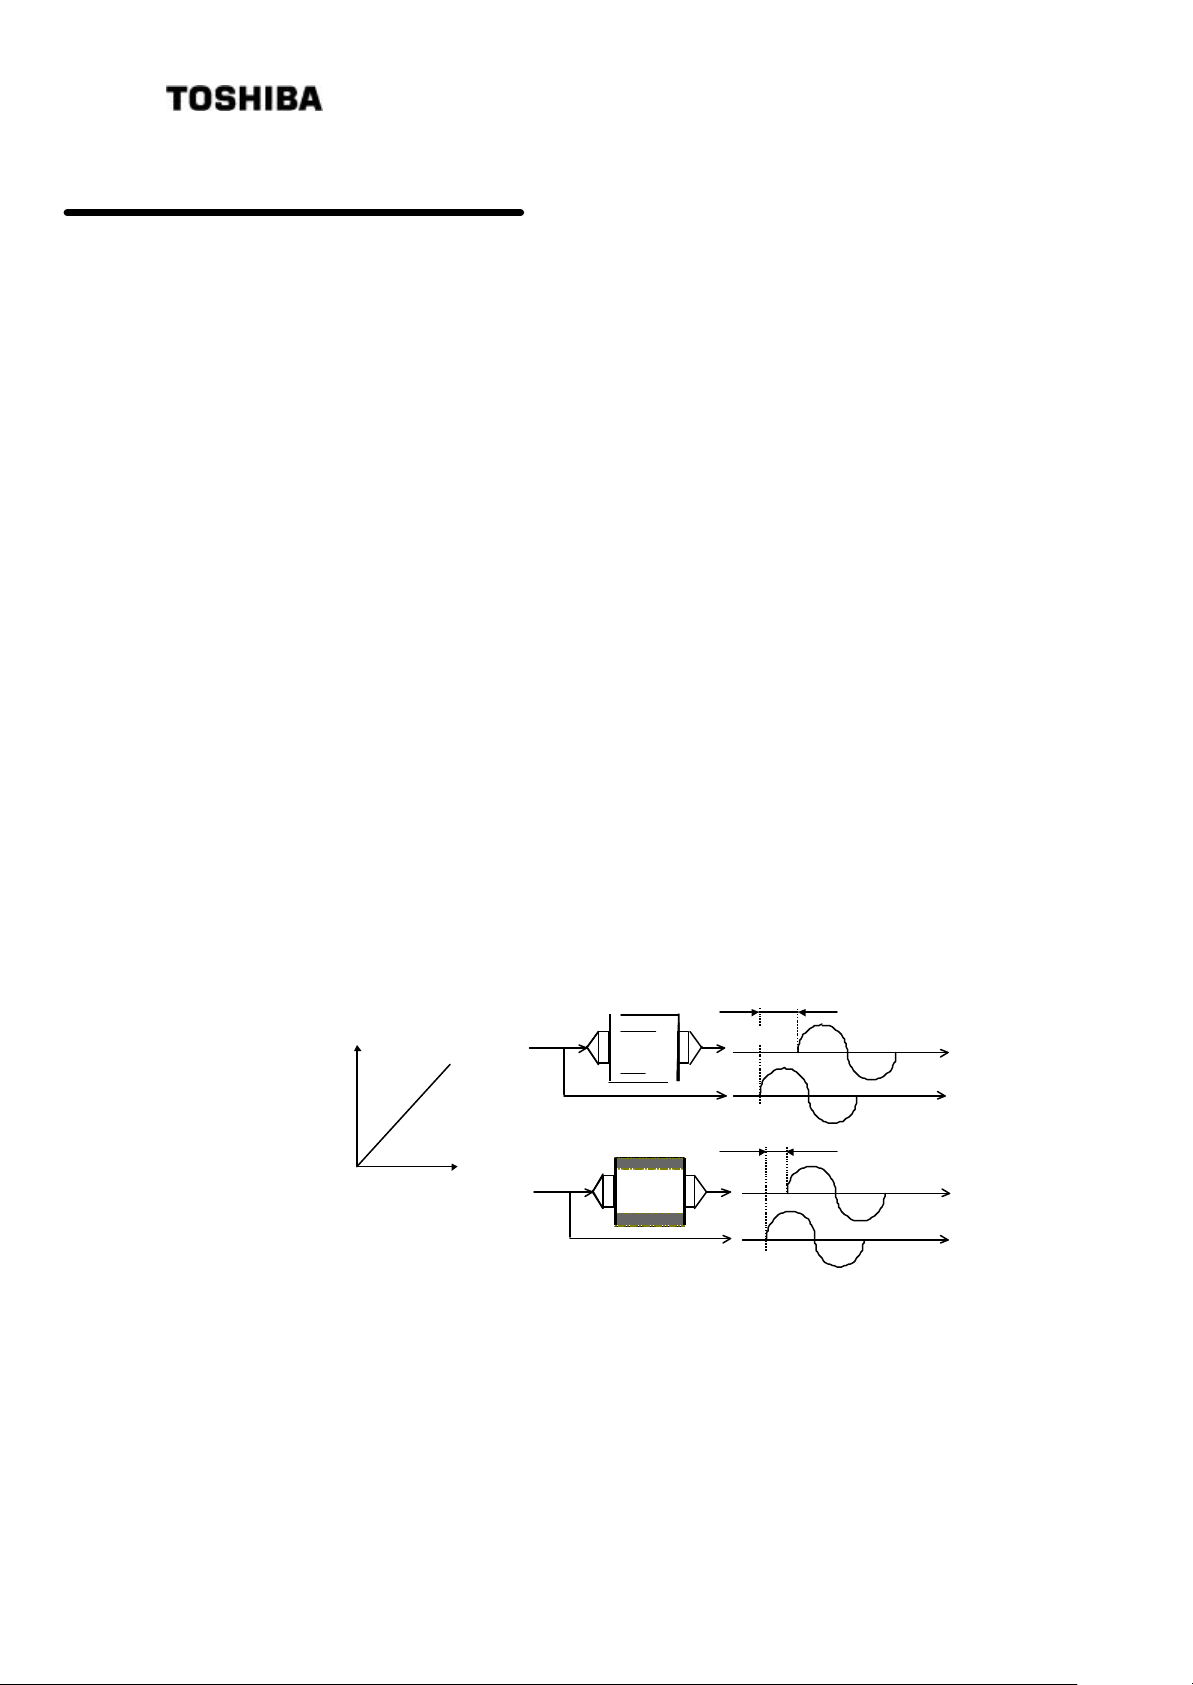
This density me ter has adopted a new measuring method called “Phase difference method by
microwaves.” When microwaves go through a substance and comes out of it, by measuring the
phase lag of the waves, we get a certain physical property of the substance that is proportional to
the density.
The theory of density measurement based on the phase difference method is shown in Figure 1.1
The difference between the phase lagθ1 of the microwave received through water (density 0%)
and the phase lagθ2 of the microwave received through the object substance, that is,
Δθ = θ2 − θ1
is determined, and since the differenceΔθis in direct proportion to the density, the density of the
object substance is measured.
transmission
Phase lag θW
Δθ
Phase difference Δθ=
Density =K・Δθ (K: Coefficient)
θW−θ
S
Fig. 1.1 Principle of phase angle difference
water
Phase lagθs
t
13

6 F 8 A 0 5 2 1
1.2 Features
Compared with the conventional method, this phase difference measurement method using micro
waves, in principle, has the following features.
(1) Not easily affected by contamination.
This method is measuring the variation of the transmission time but not for measuring the
attenuation of the wave motion strength that has been transmitted into the measured matter.
Therefore, it is unnecessary for the window part for sending/receiving microwaves to be
transparent as the optical type.
(2) This meter is not affected as much as an ultrasonic type is by air bubbles
In an ultrasonic system, measurement is affected by attenuation of wave motion by foreign
matters such as air bubbles but the feature of the microwave method is that measurement is
not easily affected by foreign matters such as air bubbles because the method is not using the
attenuation of wave motion strength.
(3) High liability and simple maintenance.
Having no movable part of the rotating pulp density meter nor the protruding portion into the
pipe as with the blade-type pulp density meter, the new method is free from fiber tangling, thus
realizing a high level of reliability. Requiri ng no consumable parts such as bearings and pulleys,
the maintenance is also easy and simple.
(4) Not easily affected by the speed of flow.
Taking density measurements captivating the dielectric change following the density change in
the measured matter, this method is not affected by the speed of flow.
(5) Not easily affected by the pulp material type or freeness.
Taking density measurements captivating the dielectric change following the density change in
the measured matter, the new method has the featur e of not easily affected by the pulp
material type or freeness, etc.
(6) Being of the flow -through type, the new method is capable of continuous measurement.
As others, the new density meter model LQ500 boasts of the following features.
(7) Can easily change the measurement range.
(8) The operation is simple because complex processings such as density calculation and
correction, etc. are performed automatically by micro computers.
(9) Remote control is made possible by using the hand-held terminal AF100LQ3 type (optional),
which is a specialized terminal for communication.
<Supplementary Explanation>
Density meter LQ500 is equipped with the display/operation consoles as standard.
Therefore, if the meter is installed on a location easy for maintenance, the hand-held
terminal is not always needed.
(10) Measurable up to 50% TS density
(11) Conforming to low -level radio wave equipment
The microwave output of this meter is low with about 10mW and this meter conforms to
“Low-level radio wave equipment” specified by Radio Law. Therefore, the customer is free
to use this meter without applying for permission, notification or licensing of this meter.
14

6 F 8 A 0 5 2 1
2. UNPACKING
Check items by the following list and table at unpacking.
2.1 Standard Components
(1) Density Meter : 1 unit (One unit each of Detector and Converter,)
(2) Standard accessories : 1 unit (One set of cables,Fuse,Operation manual)
<Supplementary Explanation>
In the event of performing remote control through communications, you are required to have the
hand-held terminal AF100 type (type code: AF100LQ4BAA3, Instruction Manual: 6F8A0763),
which is a specialized terminal for communications. Therefore, please purchase one separately.
2.2 Standard Accessories
Table.2.1 Standard accessories
Accessory Specifications Qty
Used to supply DC power from the converter to the RF section
Power supply
cable
Communication
cable
Fuse
Operation manual (The document you are reading. ) 1
(detector)
Overall diameter: 11.0 to 13.0 mm
JCS 258 C 2-core CVV-S
Used between the conve rter and the RF section (detector) to
communicate with each other.
Overall diameter: 11.0 to 13.0 mm
JCS 258 C 4-core CVV-S
2A(T),250V cartridge, glass tubular fuse,
5.2mm outer dia. x 20mm long
Shape/characteristics: 5NM or equivalent (based on JIS C
6575)
10m
(32.8ft)
10m
(32.8ft)
2
15
6 F 8 A 0 5 2 1
3. INSTALLATION
3.1 Precautions for Installation
DON’T
DO
WARNING
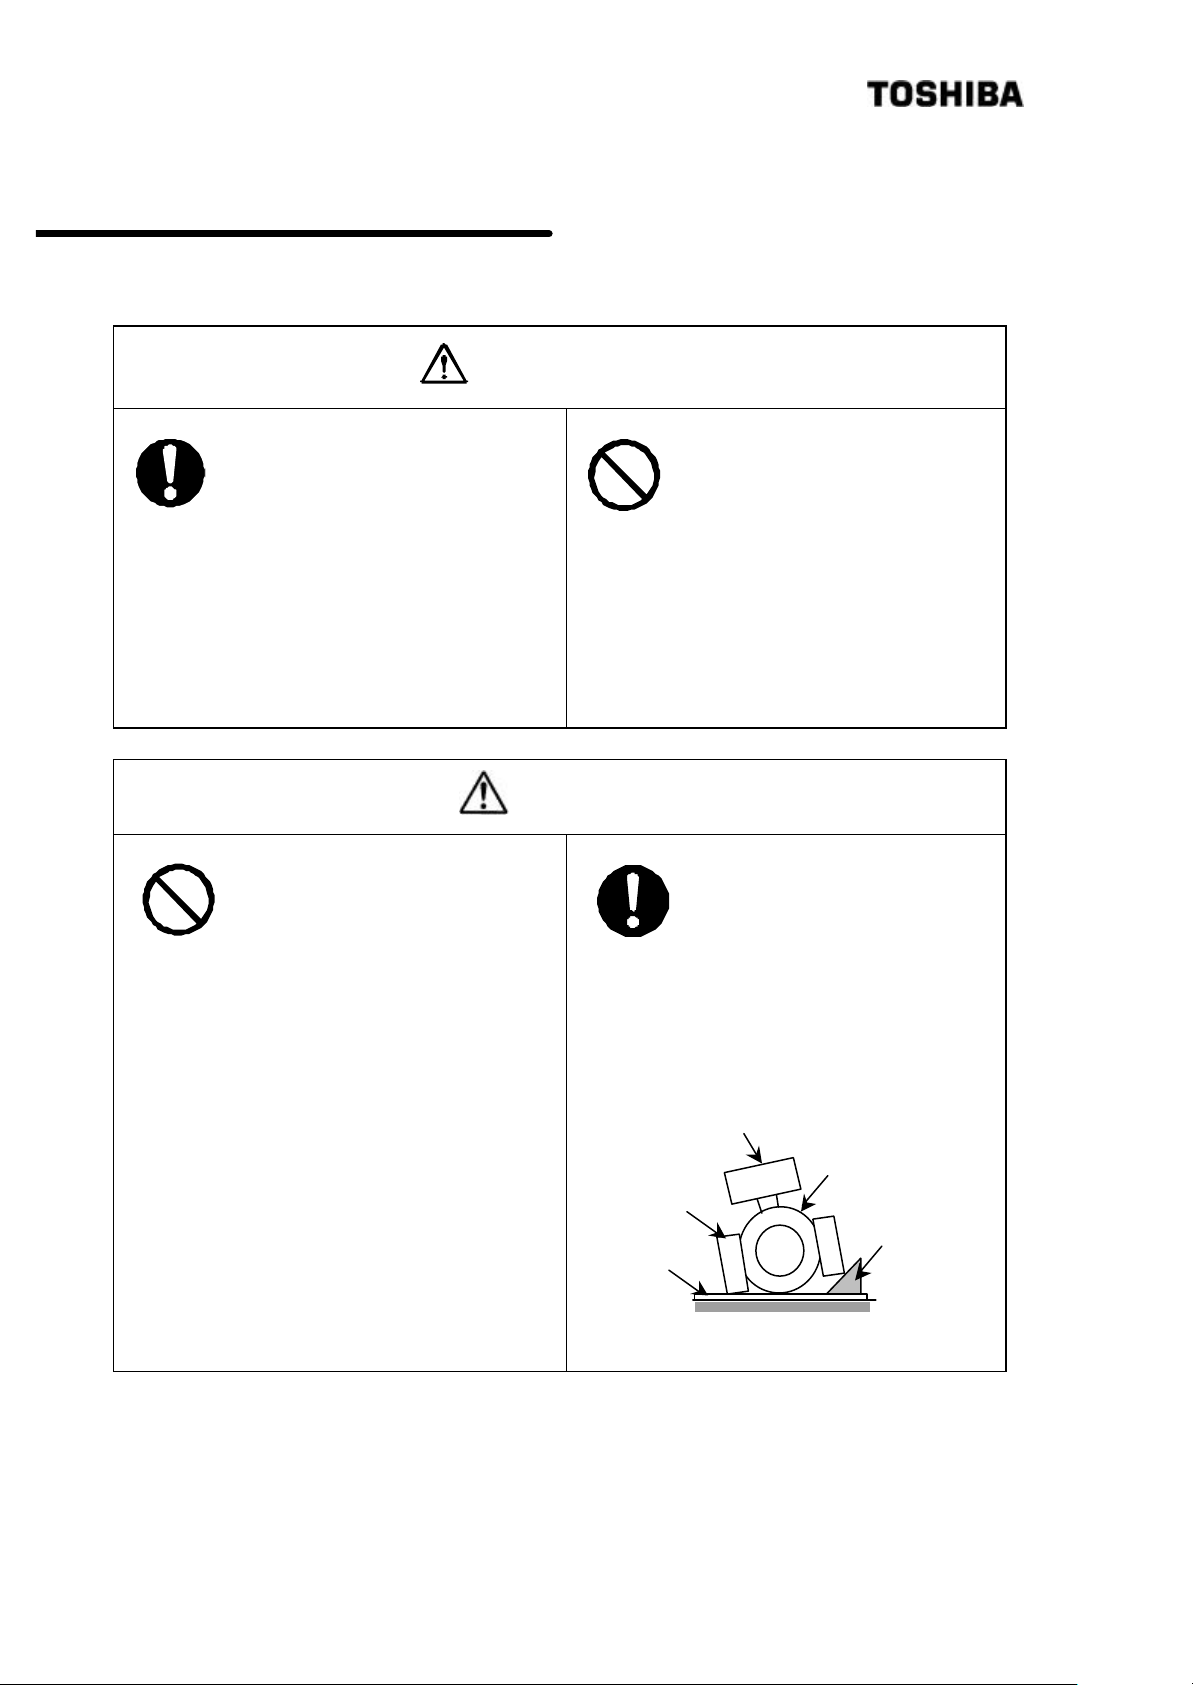
■The meter is heavy. To move
the meter for relocation or
installation, a qualified operator
must handle it by using
equipment such as a truck, a
crane or a sling.
In addition, when you lift the meter
with its lifting bolts, make sure the
bolts have been securely
tightened to the end.
Overturning or dropping can cause
injuries or equipment failure.
■Avoid installing the meter in
any of the following places:
Otherwise, a fire or equipment
breakdown or failure can occur.
l Dusty place
l Place where corrosive gases
(SO2, H2S) or flammable gases
may be generated.
l Place exposed to vibration or
shock that exceeds permissible
level.
l Place exposed to condensation
due to abrupt change in
temperature.
l Place too cold or hot for
installation
l Place too humid for installation
l Near an apparatus that generates
strong radio waves or strong
magnetic field.
DON’T
CAUTION
DO
Applicator
Cure sheet
■Do not operate where there is
a possibility of leakage of
flammable or explosive gas.
A fire or explosion can occur.
Install the meter in a place
easier for operation,
maintenance and inspection.
In addition, when you place the
meter temporarily in a stocking
area, make sure to execute fall
prevention measures.
Stumbling over the meter or a fall
of the meter can cause injury.
RF section
Detector
Roll-over
prevention
stopper
16
3.2 Installation Location
[NOTE]
◆ Determine an indoor installation place in accordance with the following instructions.
(1) Choose a place that is free of vibrations and corrosive gasses, and has ample space for
maintenance.
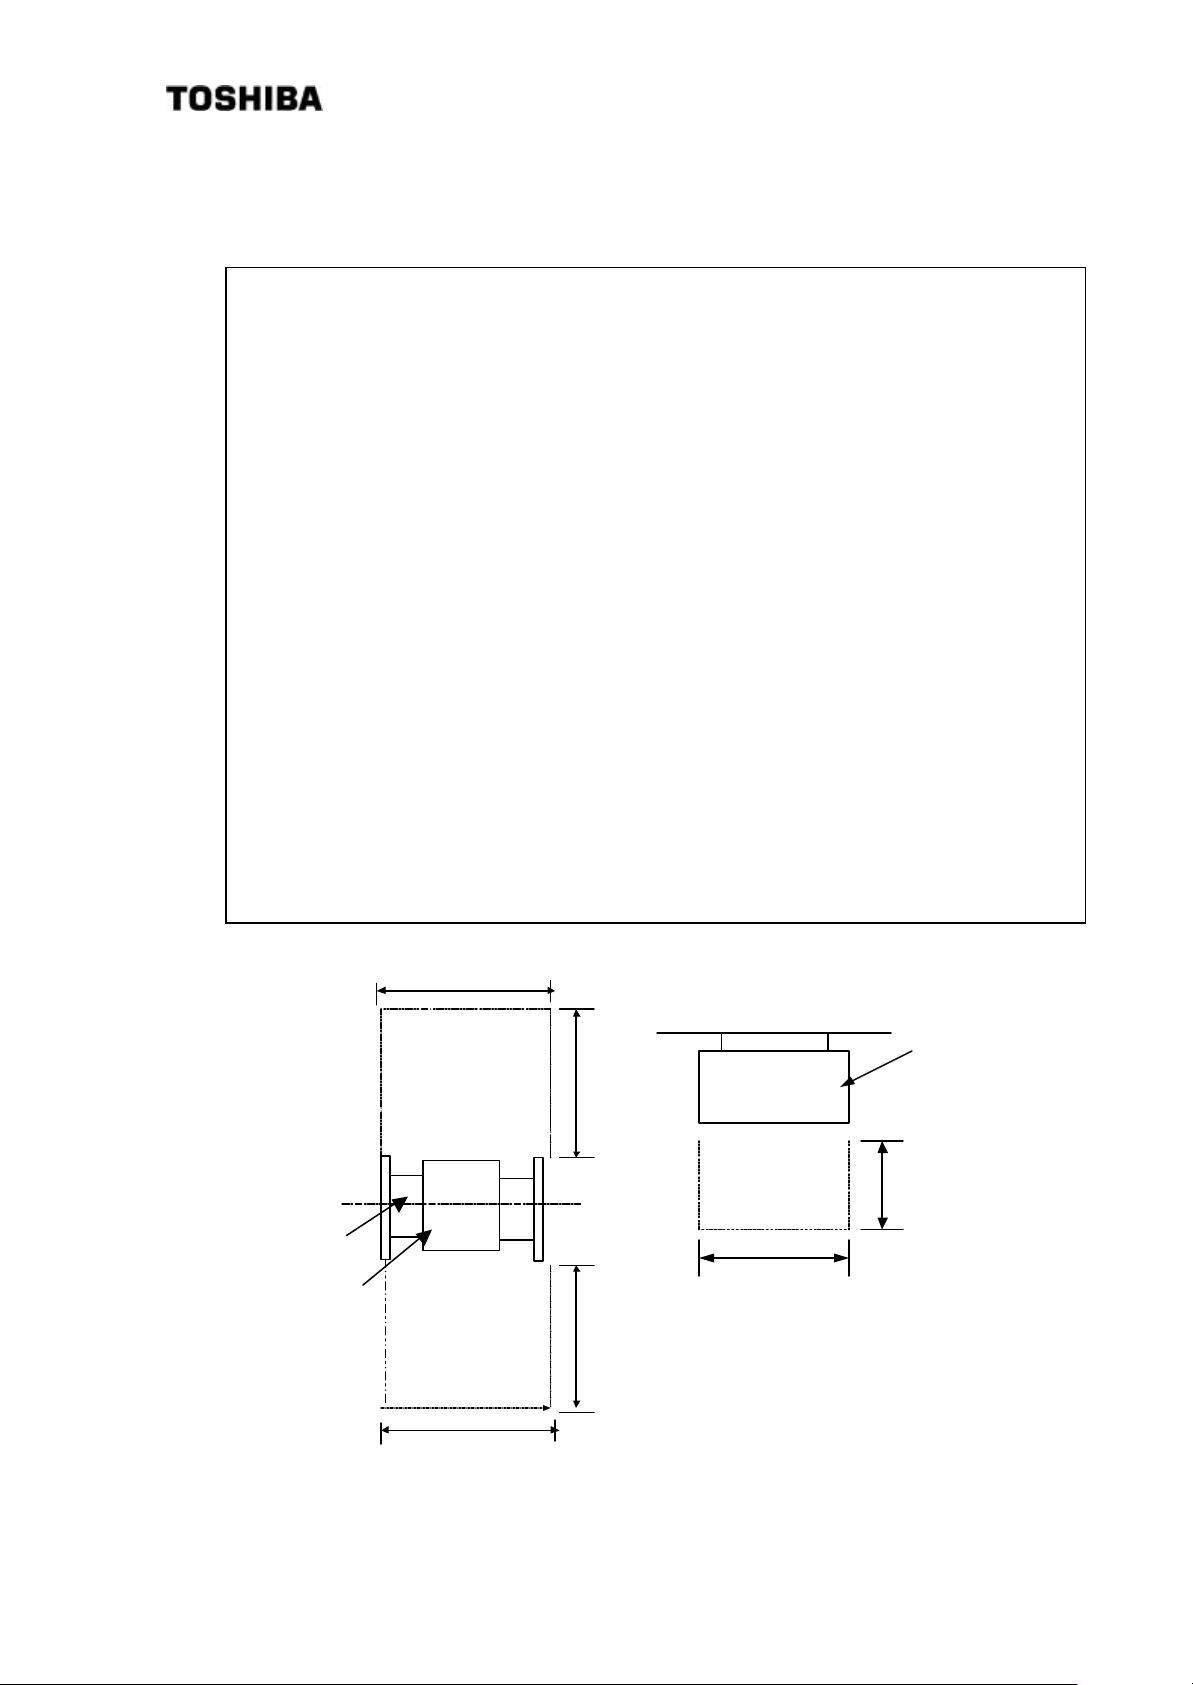
(2) Secure maintenance space in front, rear and above the density meter. (Refer to fig. 3.2.11)
(3) In the case of outdoor insta llation, provide covering against sun .
(4) Do not install the meter in a place where there is a possibility of leakage of flammable or
explosive gas.
(5) Do not install the meter in any of the following places:
• A place where condensation due to a sudden temperature change occurs.
• A place where extreme low or high temperatures occur outside the specification range.
• A place near the equipment generating strong radio waves or electric fields.
(6) Make sure the upstream and downstream pipes have enough strength to hold the density
meter. If it is not possible, provide a supporting base to hold the density meter.
(7) Install the meter in a place where density distribution is uniform. If the distribution inside the
pipe is uneven, manual analysis data and the indicated value of the density meter may not
show the same value.
(8) Install the meter in a place where air bubbles are not generated, inside the pipe is always
filled, and sedimentation and accumulation of solid matters do not occur.
(9) The liquid contacting materials of this meter are stainless steel SCS14A(equivalent to
316SS) and polysulfone. Install the meter in a place where measuring liquid or environment
does not corrode these materials.
(10) If the cover of the density meter is removed or the density meter is disassembled while the
meter is powered, radio waves will leak out. (However, the amount is about equal toPHS
and one tenth of mobile phones.)
6 F 8 A 0 5 2 1
Detector
RF section
500
Maintenance
space
Back
Convertor
Front
Maintenance
space
500
600
600
In addition, provide maintenance
space of 500mm in height above
the RF section and the Converter.
Fig. 3.2.1 Space for Maintenance
Converter
600
500
17

6 F 8 A 0 5 2 1
3.3 Installation and Piping
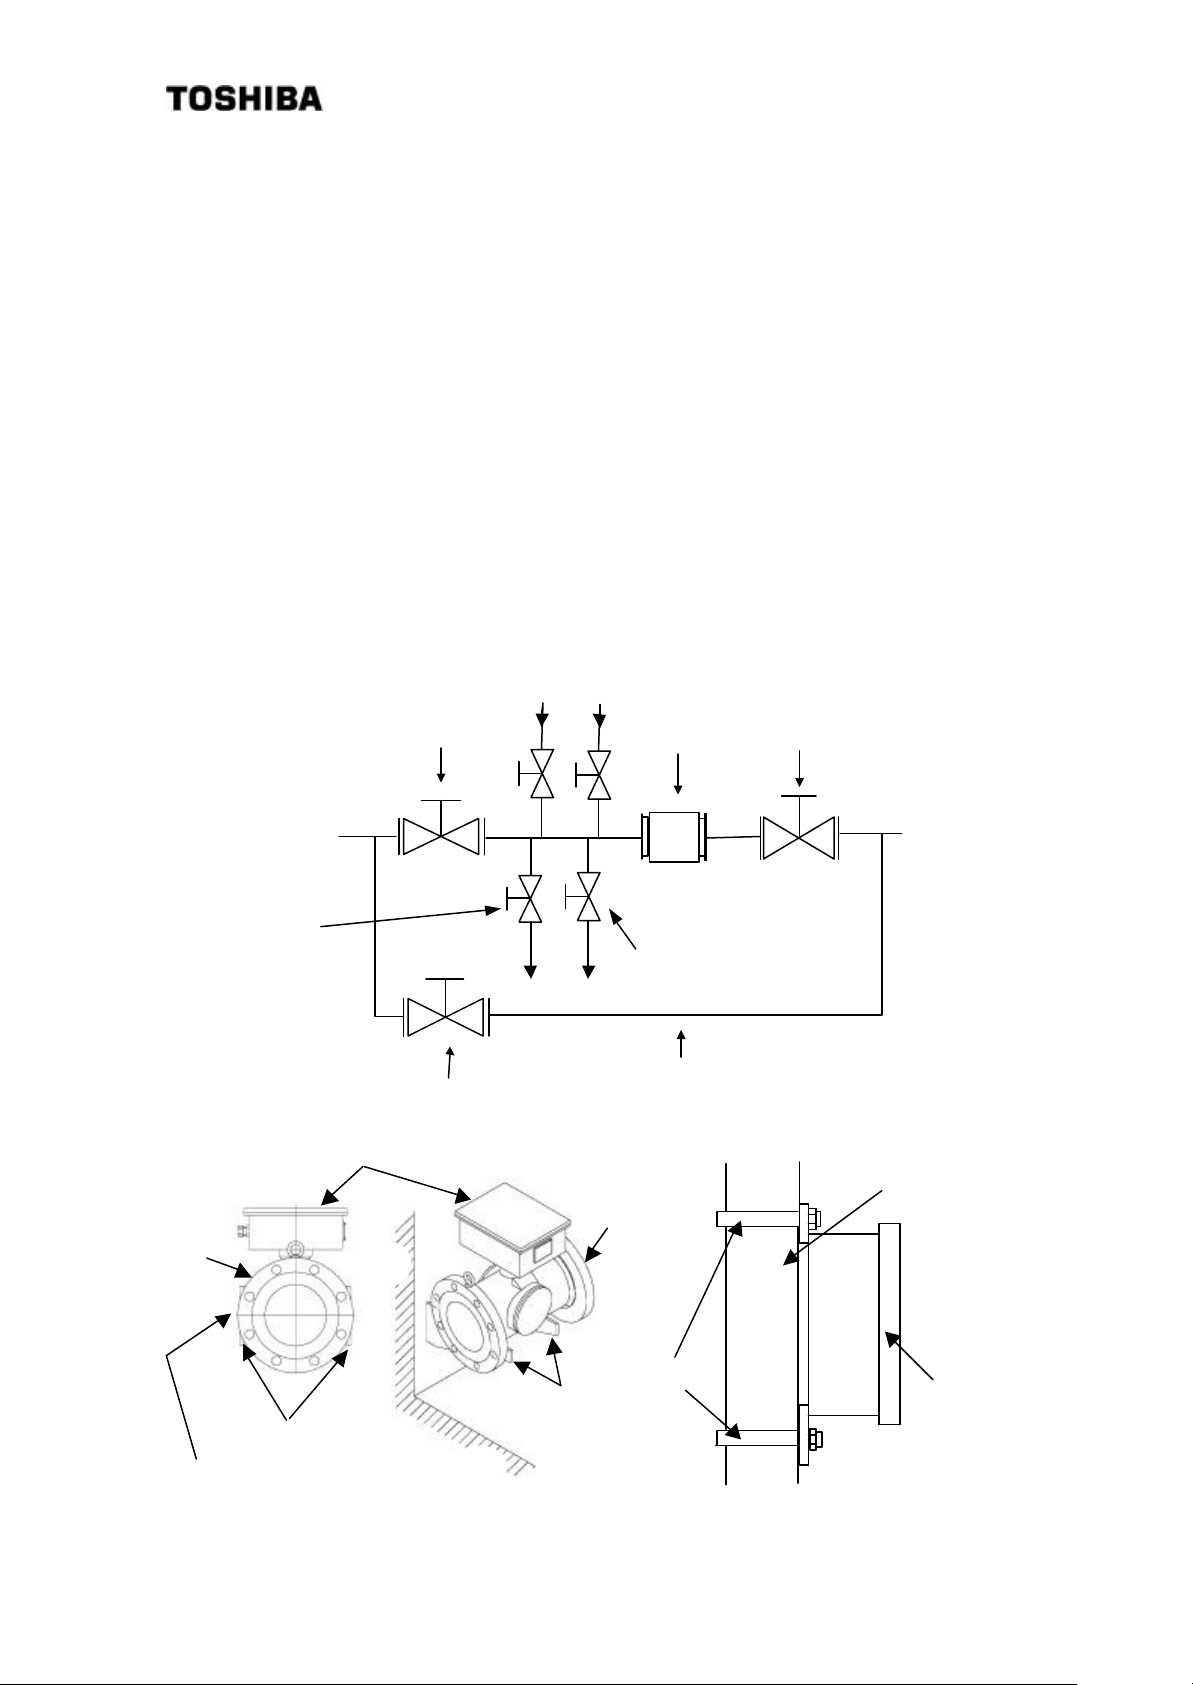
Figures 3.3.1 through 3.3.4 are examples of density meter installation.
[NOTE]
(1) Install the meter in a place where density distribution is uniform.
(2) Avoid such a location where the measured matter will settle and build up on the bottom of
the density meter.
(3) Avoid such a location which will allow bubbles to move into the pipe line.
(4) We recommend that this density meter should be installed to a vertical piping system.
Horizontal installation can also be used with the same performance but under the following
conditions, vertical installation must be chosen:
(5) Especially in the following situations, make sure that the piping is vertical.
a) Bubbles may stay in the pipe.
b) Slow flow speed or other factors may cause the measured matter to sink or float
substantially making the distribution of the measured-matter density uneven in the pipe.
c) The main pipe has been enlarged thus using the density meter of a diameter greater than
that of the main pipe.
(6) When installing on the horizontal pipi ng, make sure that the meter is installed directly on top
of the converter section for purposes of maintenance and performance assurance (in other
words, so that the paired applicator sections are placed directly side by side).
(7) This density meter does not distinguish between the upstream side and the downstream side.
Neither does it require a straight tube length. Install it in a direction that will make
maintenance easy.
(8) The front side of the density meter's converter section is equipped with an LCD density
display section. When installing the meter, choose a location and direction in which this
density display section will be easily visible. (See Fig. 3.3.3)
(9) When you anticipate a marginal error between the side -to-side dimensions of this density
meter and the installation space of the piping line, prepare a loose mechanism in advance.
(10) To minimize the impact of the bubbles mingled, it is recommended that the meter be installed
on a location as far as possible from the pipe outlet for air release but still within the distance
where a reasonable degree of hydraulic pressure is applied.
(11) In the event that the density meter may no longer be full of the fluid while the pump is shut
down or the density distribution in the density meter may beco me uneven, make sure to take
measurements only while the pump is operating by using the external interlock function.
(12) Take necessary measures to prevent vibration from a pump or other equipment applied to
the density meter transmitted through the pipin g.
(13) On both the upstream and downstream sides of the density meter, install shutoff valves.
Furthermore, between these valves and the density meter, install the sampling port, the zero
water supply port, the air release port, the drain port with a shutoff valve attached
respectively. In the event that the flow of the pipe line cannot be stopped, provide a bypass
pipe halfway with a shutoff valve attached. When performing zero point calibration, these
are needed to discharge the measured matter out of the density meter through its drain port
and fill up the meter with fresh water of zero density. (See Fig.3.3.1 and Fig.3.3.2)
(14) As for gaskets to be used in piping, select the one with the dimension conforming to the
flange standard and of the material appropriate for the substance to be measured.
(15) If the cover of the density meter is removed or the density meter is disassembled while the
meter is powered, radio waves will leak out. (However, the amount is about equal to PHS
and one tenth of mobile phones.)
18
6 F 8 A 0 5 2 1
[NOTE]
◆Sampling valve: Used to extract fluids for manual analysis. Install this valve to the side
of the pipe in the case of horizontal installation. It is recommended that
a 1-inch ball valve be installed to the side of the pipe.
◆Zero point water valve: Used to supply drinking water (density or consistency 0%) to the
detector pipe for zero point adjustment. Install this valve at the top of
the pipe in the case of horizontal installation. It is recommended that a
1-inch ball valve be installed in the top of the pipe and zero point water
is supplied through this inlet using a vinyl hose etc.
If valve water pipe is connected to this valve, air cannot be extracted.
Therefore, another valve (vent valve) is needed to extract air.
◆Vent valve: Used to vent process fluids to open air when performing zero
adjustment. This helps the drinking water (density or consistency 0%)
enter the detector pipe easily. Install this valve in the top of the pipe in
the case of horizontal installatio n.
◆Drain valve: Used to drain the fluids before supplying drinking water (density or
consistency 0%) to the detector pipe for zero adjustment. Install this
valve at the lowest point of the pipe. It is recommended that a 1-inch
ball valve be installed at the lowest point of the pipe.
Vent valve
Zero point water valve
Sampling valve
Detector
Stop valve
Stop valve
Fig.3.3.1 Meter mounted horizontally
RF section (RF section must stay at the top.)
Wall
Density meter
Drain valve
Bypass piping
Detector
Stop valve
Wall mounting or
pipe mounting
U-bolt
Base frame
Applicator (one pair)
This section must be level.
Fig 3.3.2 Setting example (Horizontally)
Floor
Fig 3.3.2 Setting example (from converter side)
19
Converter
6 F 8 A 0 5 2 1
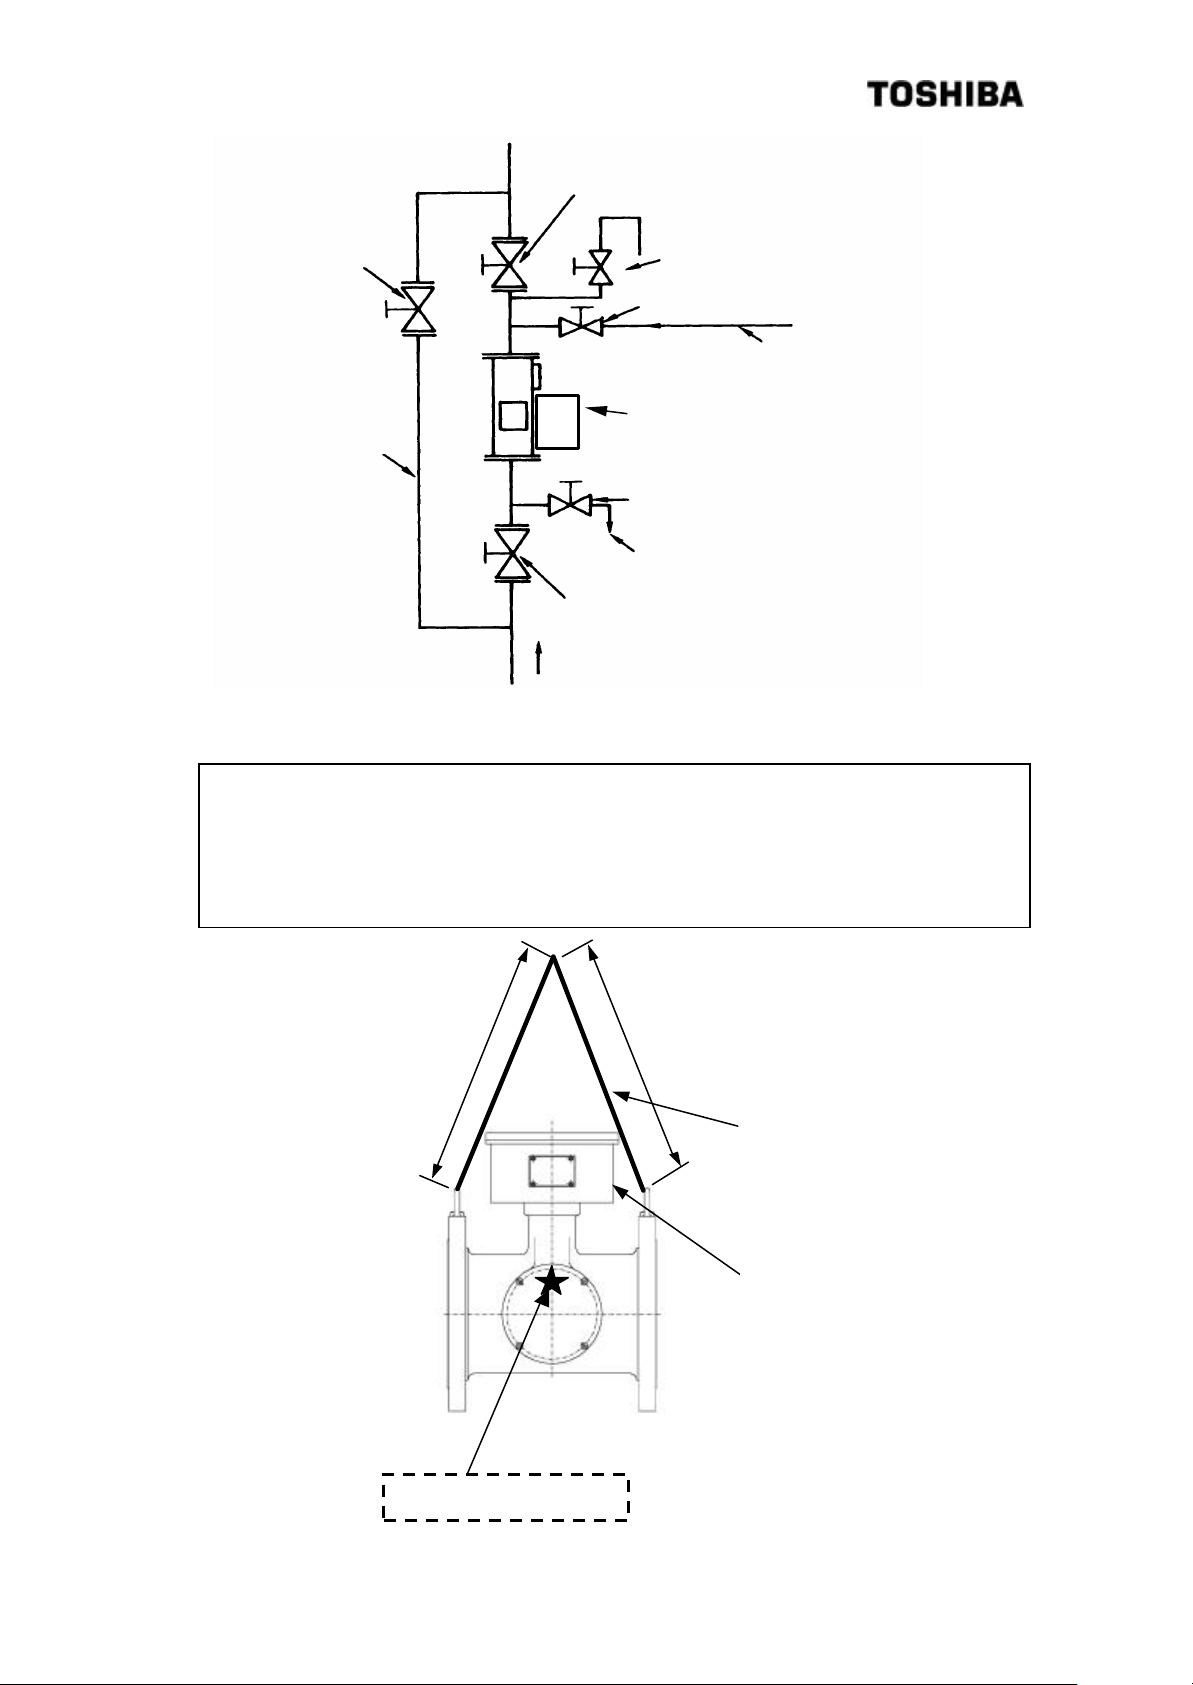
Stop valve
Stop valve
Bypass piping
Stop valve
Direction of flow Upward
Air release valve
Zero point water valve
Zero water piping
Density meter
Drain valve
Drain
Fig.3.3.4 Meter mounted vertically
[NOTE] When you lift the meter using a lifting wire for relocation, installation or for other purposes, use
the wire so that the wire does not touch the RF section of the density meter. We recommend
you use a lifting wire of 2m or more in length (A/2 + A/2 shown below). In case the lifting wire
rubs against the RF section, the RF section may be damaged. Care should be taken not to
damage the RF section by applying cure such as cushioning materials between the lifting wire
and the RF section.
A/2
A/2
Lifting wire
RF section
The center of gravity
Figure 3.3.5 Lifting the Density Meter with a Lifting Wire
20
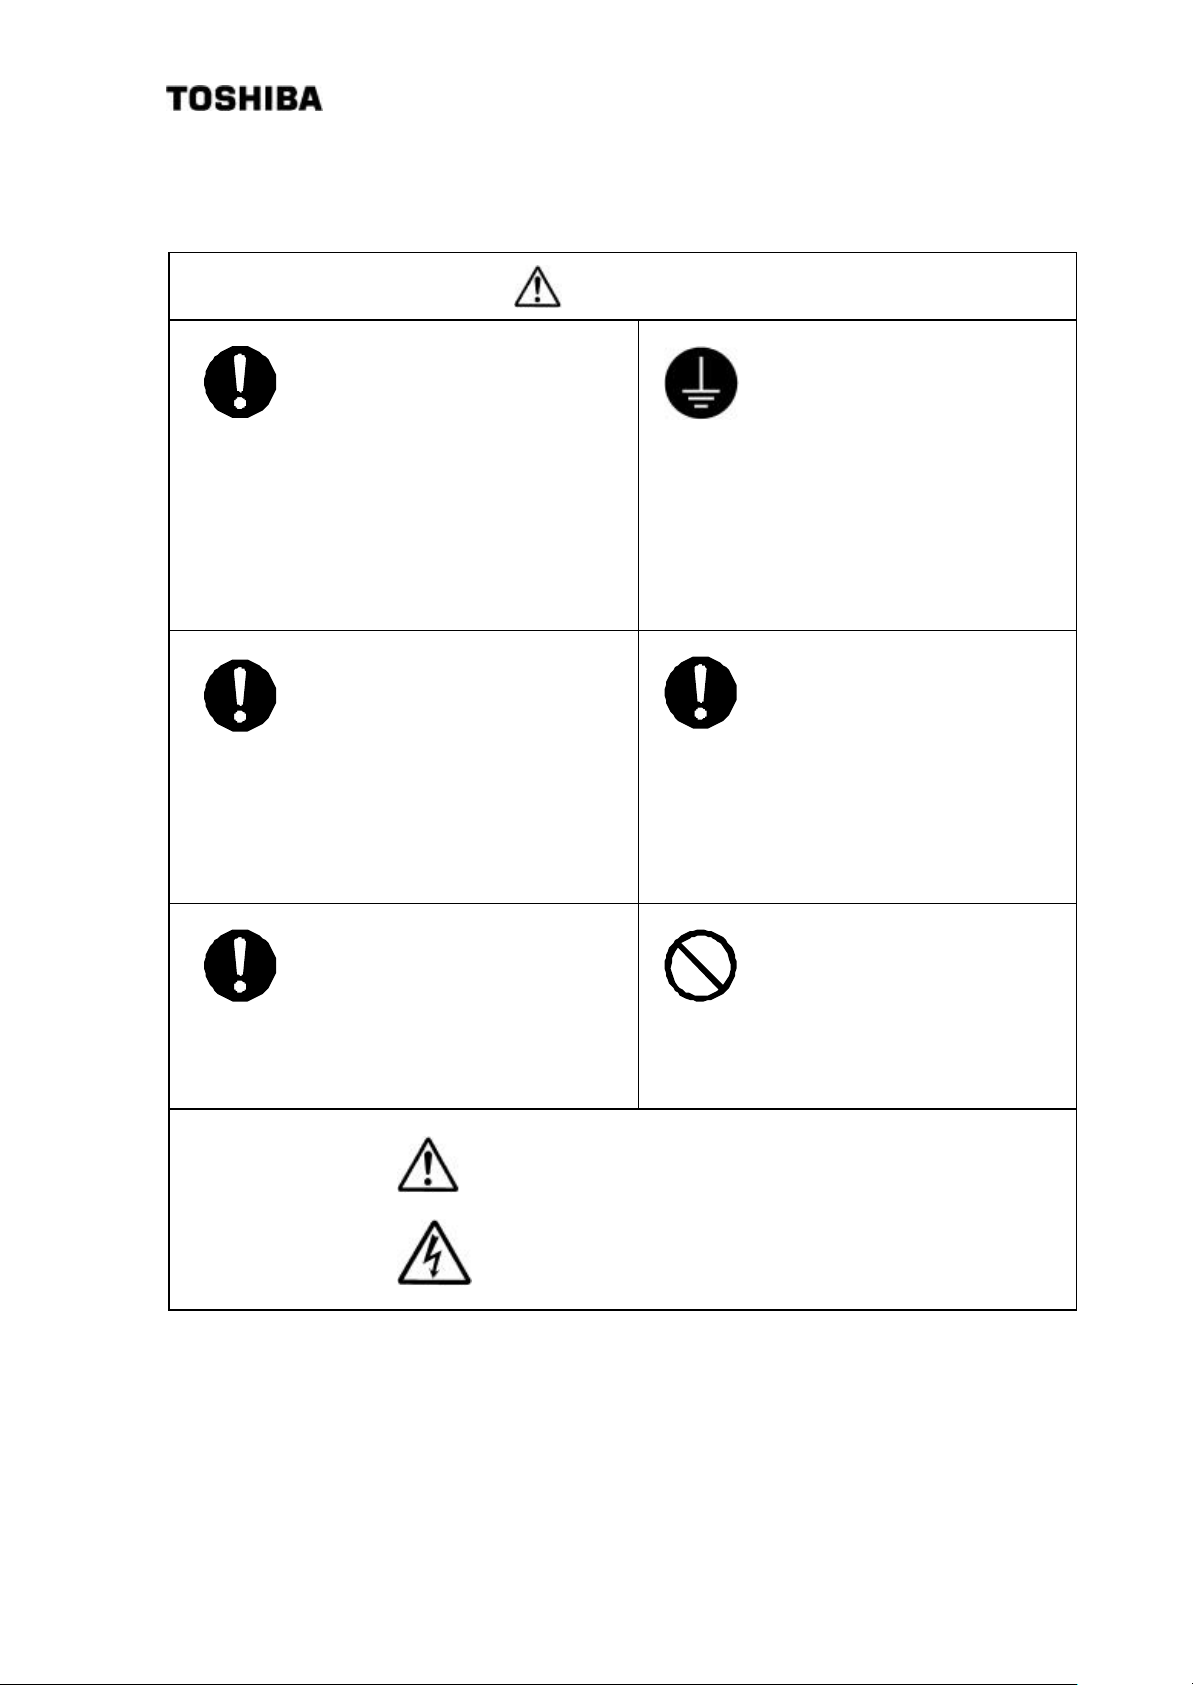
3.4 Precautions for wiring
6 F 8 A 0 5 2 1
DO
DO
Yellow
■Be sure to install a fuse and a
switch to disconnect the
equipment from the power
source.
Failure to observe this can cause
electric shock or equipment failure.
■Make sure that the main
power line is off before wiring or
cabling.
Wiring or cabling without switching
off the main power line can cause
electric shock.
WARNING
DO
DO
■Be sure to ground the
equipment using a grounding
wire separate from those used
for power tools.
(Grounding resistance: 100 Ω or
less)
Without grounding, electric shock,
malfunction, or equipment failure
can be caused by electric
leakage.
■Use crimp terminals with
insulation sleeves for power
line and grounding wire
terminals.
A disconnected cable or wire from
the terminal or a loose terminal
can cause electric shock or
generate heat and cause a fire or
equipment failure.
DO
■Wiring and cabling should be
done as shown in the wiring and
connection diagrams.
Wrong wiring or cabling can cause
malfunctions, overheating, sparking,
or electric shock.
Yellow
DON’T
The label shown left appears near a terminal block on
the equipment to which power is supplied. Take
■Do not wire or cable with wet
hands.
A wet hand can cause electric
shock.
precautions to avoid electric shock.
Yellow
21

6 F 8 A 0 5 2 1
3.5 Wiring
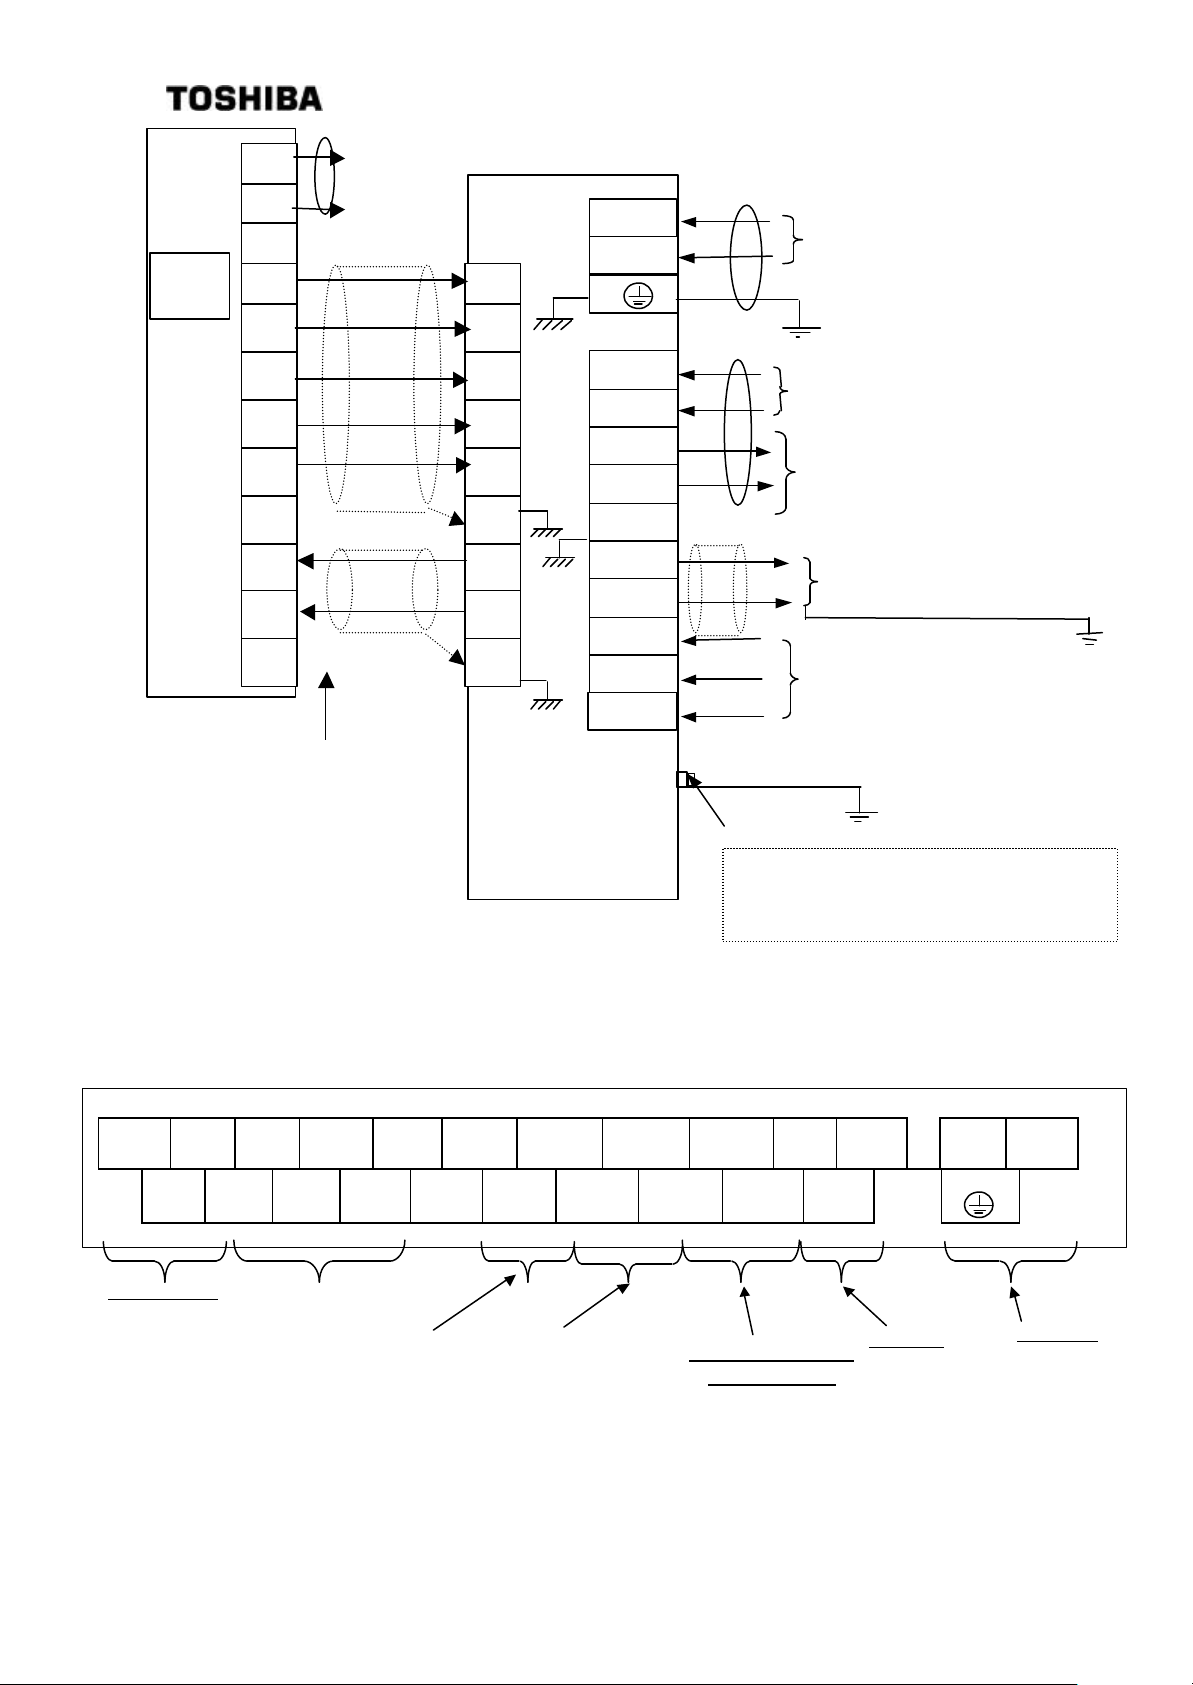
Figure 3.5.1 on the next page shows connections to the density meter and the external units. Figure
3.5.2 shows wiring assignment to a converter terminal. Refer to these figures for correct wiring.
[IMPORTANT]
(1) A density meter has to be separated from the power supply line when performing the
maintenance and inspection operation. A fuse must be installed on the power supply side to
protect a switch and the power. A power requirement for this unit is approximately 50 VA.
Power consumption of this meter is 24VA (at 100VAC).
(2) Grounding resistance should be 100 Ω or less and the gro unding should be made independently
from the one used for power equipment.
(3) To connect between the detector and the converter, use the attached power cable (to supply
DC power supply) and communication cable. Connect these cables by matching the terminal
symbols of the detector RF section’s terminal block (can be seen when the RF section cover
is removed) and the converter’s terminal block with those shown on each cable.
(4) Use power cables of 2 mm2 or more in sectional area and its voltage drop should be 2V
maximum. In addition, use an M4 size crimped terminal for each terminal connections.
(5) Consider wiring when installed so that vibration or sway will not be applied to cables.
(6) Output signal wires should be installed in thick walled steel conduit and separated from AC
power supply, control signal, alarm signal and other wires that may become a source of noise.
(7) Signal wires of the density meter measured value (4-20 mA output) should be a 2-conductor
shielded cable (CVVS 2 mm2) and the grounding of the shield should be made on the receiving
instrument side. When conductivity correction is employed, use the same type of 2-conductor
shielded cable (CVVS 2 mm2) for conductivity signal wires and the grounding of the shield
should be made on the receiving instrument side.
(8) Cable wiring port is airtight with gland and packing; therefore, tighten the cable gland securely
when wiring is completed. Applicable cable sizes are 11 to 13 mm in diameter. If the cable
diameter is smaller than the inside diameter of the gasket, wind tape or something around the
cable until the cable diameter becomes about the size of the inside diameter of the gasket.
(9) Tighten terminal screws securely. Appropriate tightening torque for terminal block screws is
1.2 N•m (1.4 N•m MAX).
(10)Do not apply power when the density meter is not installed properly in the piping system.
Leakage of radio waves may cause interference with other equipment.
22
Note: The ground should be connected to either the PE
terminal of the terminal bock inside converter or to the
CVVS
SG FG
V
FG
SG FG
V
Note: The FG wires of the dedicated
connected to the FG terminal on the
CVVS
CVVS
put DI,
6 F 8 A 0 5 2 1
RF
section
Ec+
Ec-
FG
Tx+
Tx-
Conductivity
signal input
(4 ~ 20mADC)
Rx+
Rx-
Communication
cable
+24
0V
FG
Power
cable
cables A and B should not be
detector (measuring section) side.
Tx+
Tx-
Rx+
Rx-
+24
0V
Converter
COM
COM1
COM2
L1
L2
DI
DO1
FG
AO+
AO-
DI2
DI3
CVV
Power 100 to 240VAC, 50/60Hz
Ground (PE)
(Ground resistance: 100Ω or less)
CVV
External sync contact input
(Contact capacity: 24VDC, 1A or more)
Density meter error or
maintenance-in-progress contact
output
Measured density output
(4-20mADC, 750Ω or less, isolated
Density correction multiplier switching
voltage input signal
(H: 20-30VDC, L: 2VDC or less, input
resistance about 3kΩ)
Ground
(Ground resistance: 100Ω or less)
Grounding terminal
grounding terminal of the case.
Terminal block
+24V 0V Tx+
Tx− Rx−
FG
Power supply
Rx+
SG (FG) COM COM1 (FG) COM2
Communication
External sync in
COM
Fig. 3.5.1 External connection
NC (FG) DI D01 DI2 DI3 AO+
AO−
Density meter error or
maintenance-in-progress
signal: DO1, COM1
Multiplier switching:
DI2, DI3, COM2
AO (+, −)
4-20mA
Density output
(HART)
Fig. 3.6 Terminals inside the converter
L1 L2
AC Power
23
6 F 8 A 0 5 2 1
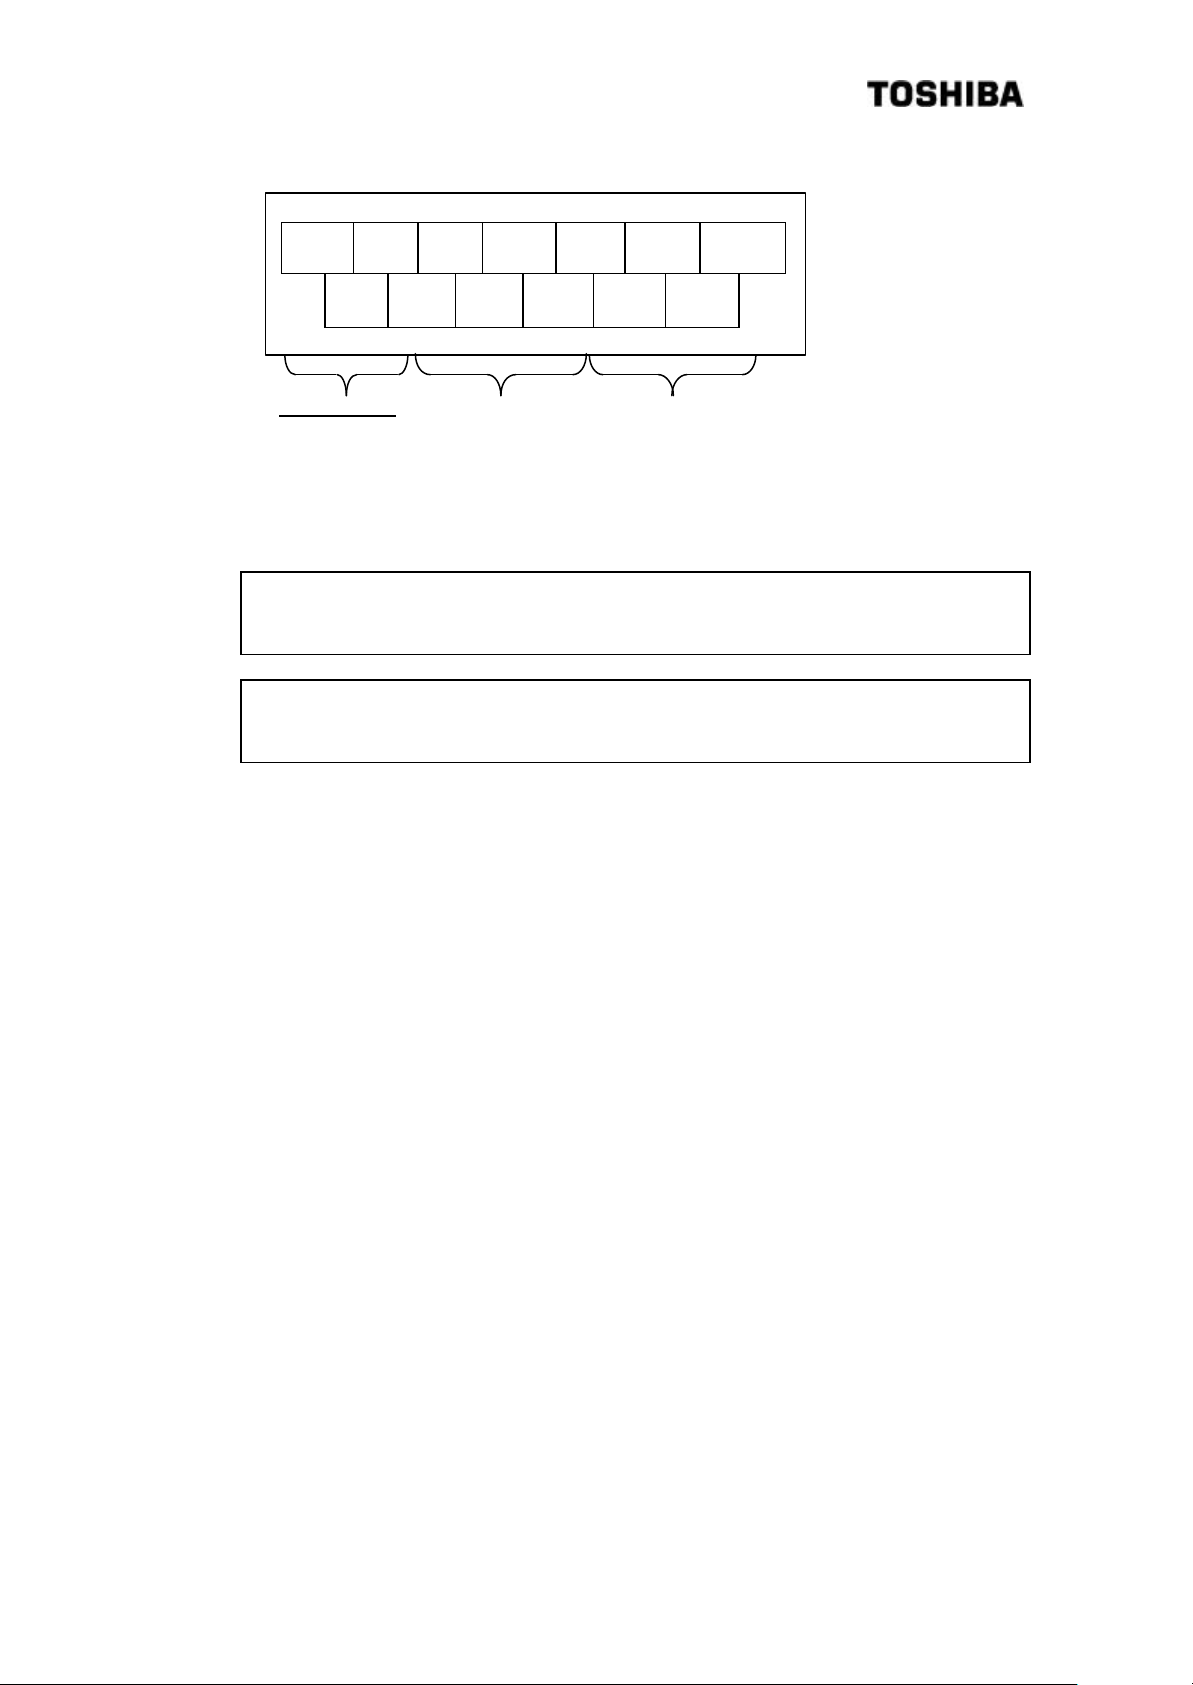
[NOTE] For connection between the converter and the RF section, connect cables according to
[NOTE] For connection between the converter and the RF section, make sure to use the attached
Terminal block
+24V 0V Tx+
FG
Power supply
Rx+
Tx− Rx−
Communication
FG EC+
SG
NC
EC−
FG
Conductivity signal input
(4 ~ 20 mADC)
Figure3.5.3 Terminals arrangement inside the RF section
the band marks attached to the power cable (1) and the communication cable (2).
Erroneous connection can cause a failure or an erroneous operation.
power cable (1) and communication cable (2). Using other cables can cause an erroneous
operation.
24
RF section
6 F 8 A 0 5 2 1
4. PART NAMES AND FUNCTIONS
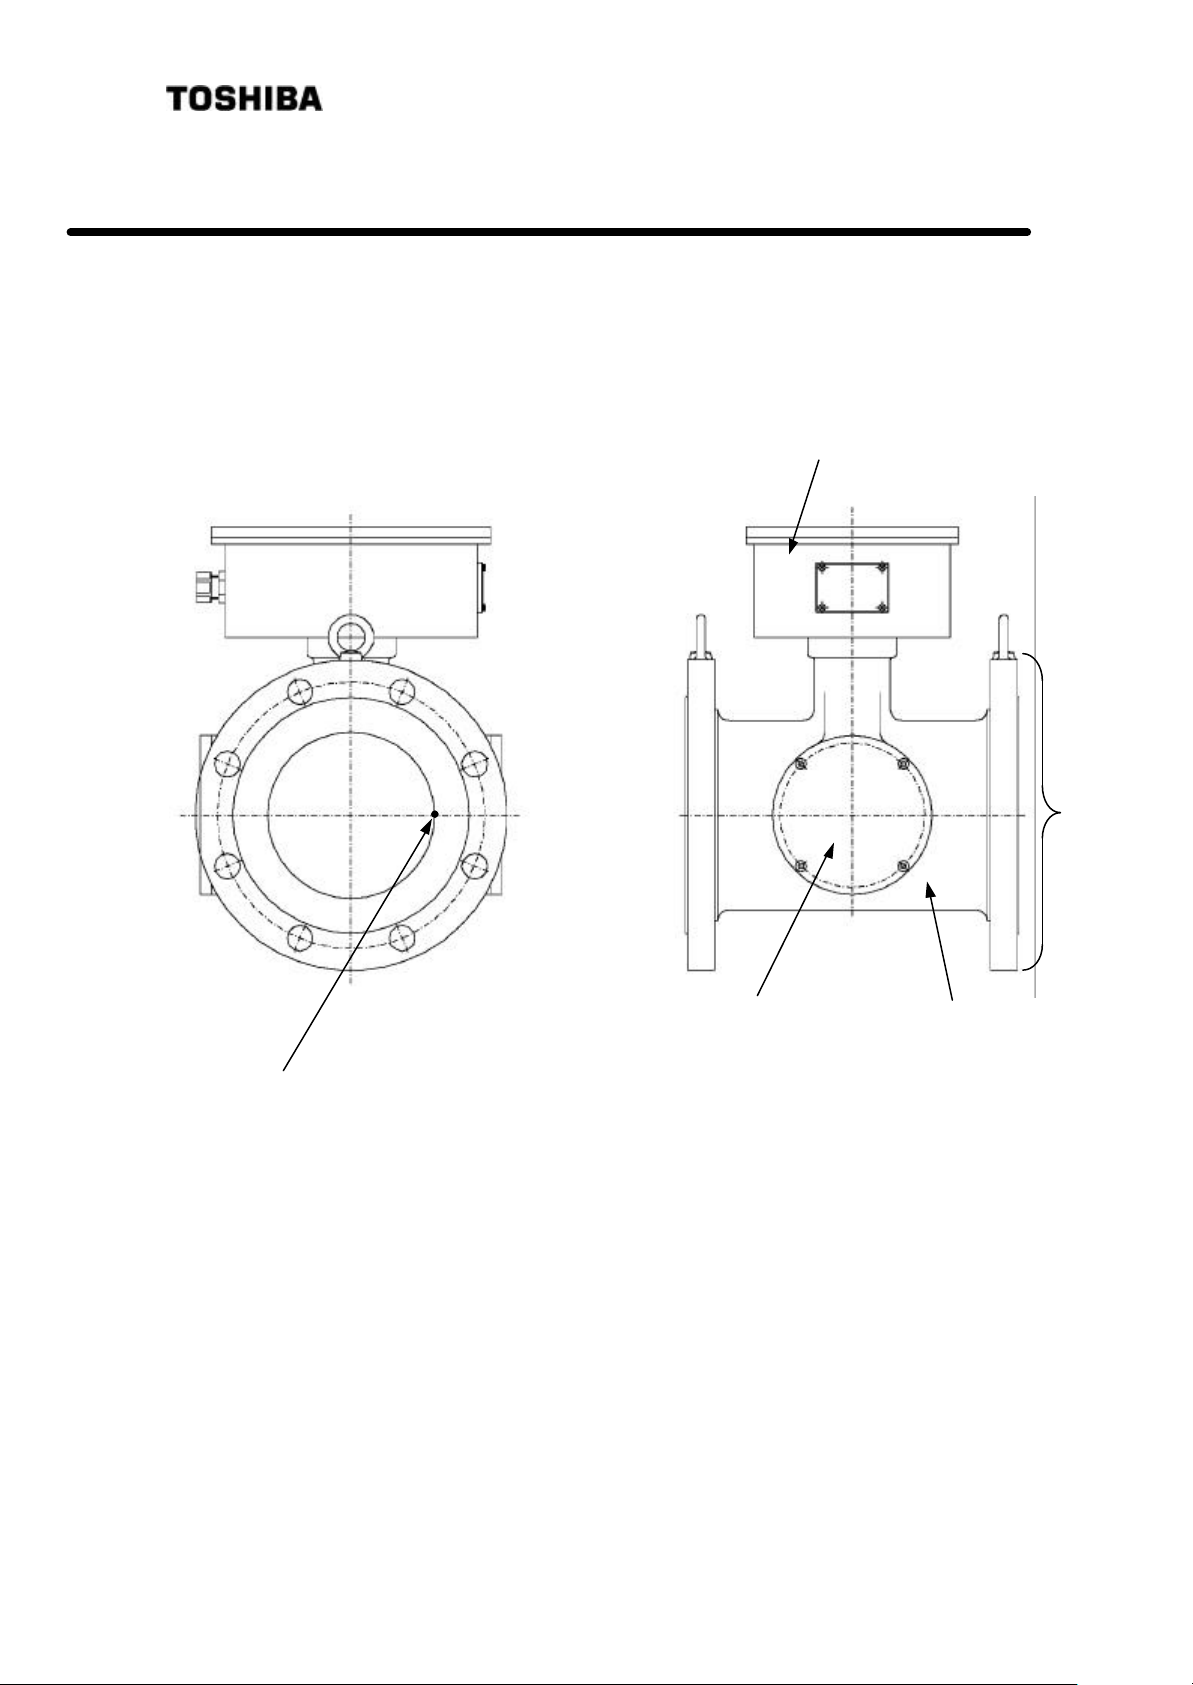
The detector is integrated with the converter in LQ500 Density mete r.
4.1 Detector
(3) Temperature detector
(2) Applicator section
Fig.4.1.1 Detector
Detector
(1) Mai n pipe
25

6 F 8 A 0 5 2 1
(1) Main pipe
Refers to the part connected to the pipe line of a measured object. FLANGE is JIS 10K or
equivalent. Contact Toshiba for connections other than this method (shown left).
(2) Applicator mount
The applicators (antenna) for transmitting and receiving microwaves are built inside. The
applicator on the front in Fig.4.1 is for transmitting and the rear is for receiving. Always keep
the lids closed and the screws of the lids secured.
(3) Temperature detector
The temperature detector (RTD) is for temperature correction. It measures temperature of the
fluid flowing through the main pipe.
(4) RF section
This is the section that generates and detects microwaves and also performs signal processing.
Do not open the case cover or loosen the bolts of the cover.
26
250V
4.2 Converter
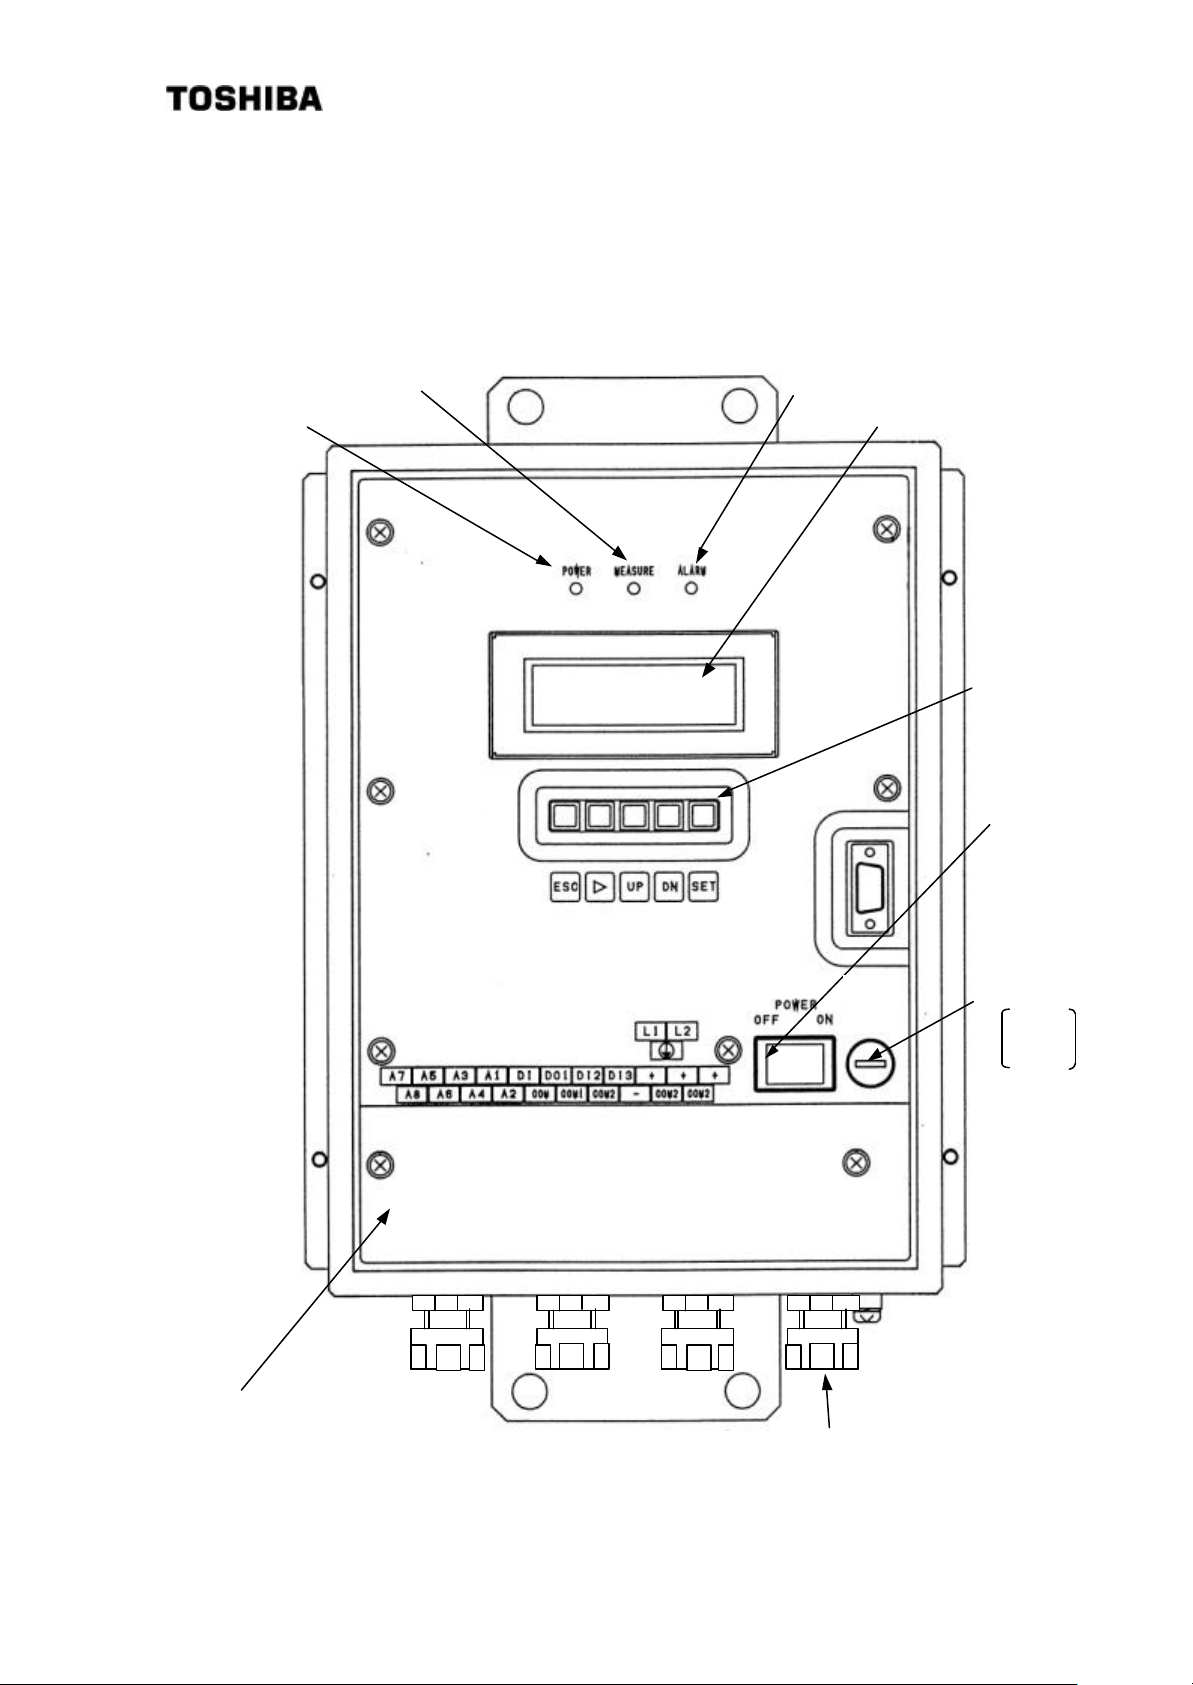
Figure 4.2 shows the converter with its door open.
(3) [POWER]
indicator
(4) [MEASURE]
indicator
6 F 8 A 0 5 2 1
(5) [ALARM]
indicator
(6) LCD indicator
FUSE
2A(T)
250V
(7) Setting keys
(1) Power switch
(2) Fuse
FUSE
2A(T )
(8) Terminal block
(9) Cable gland
27

6 F 8 A 0 5 2 1
[NOTE] Install the converter cover when operating the density meter. In addition, tighten securely
the screws of the co nverter cover. If screws are not tightened enough, moisture, dust or
other particles enters the converter and can cause a converter failure.
(1) [POWER] switch
The power switch for the density meter.
(2) [Fuse]
2A(T), 250V glass tube fuse is inside.
(3) [POWER] Indicator (Green LED)
Green LED lights when AC power turns on by the power switch.
(4) [MEASURE] Indicator (Green LED)
The indicator lights when measuring, and turns off when setting and when measuring stops at
externally synchronized operation.
(5) [ALARM] Indicator (Red LED)
Lights on error signal from the meter.
(6) LCD indicator
Displays measured values, set values and self -diagnosis data, etc. Being an indicator of 20
characters by 4 lines, it displays numerical values, alphanumeric characters and symbols in
accordance with needs.
(7) Setting keys
These keys are used for switching between display contents of the LCD indicator or setting
various set values. They include the [ESC] key, the [→] key, the [UP] key, [DN] key and the
[SET] key.
(8) Terminal block
Refers to the terminal block connecting cables for external connection.
(9) Cable glands
Six cable glands are available for introducing cables for external connection, such as power
supplies and output signals.
28
 Loading...