


HM196_EN.book Page 1 Tuesday, May 30, 2006 2:18 PM
Integrated High Definition
DLP™ Projection Television
HIGH-DEFINITION TELEVISION
62HM196
72HM196
IMPORTANT NOTE
Before connecting, operating, or adjusting this product, carefully read the Important Safety, Installation, Care, and Service information in the separate Installation Guide.
For an overview of steps for setting up your new TV, see page 7.
|
|
|
|
|
|
NSU |
|
|
|
|
|
|
|
|
|
|
|
|
|
O |
ME |
|
|
|
|
|
|
||
|
|
|
|
C |
|
|
R |
P |
|
|
|
|||
|
|
A |
|
|
|
|
|
|
|
|
||||
|
|
C |
|
|
|
|
|
|
|
R |
|
|
||
|
|
I |
|
|
|
|
|
|
|
|
|
|
||
|
|
R |
|
|
|
|
|
|
|
|
|
D |
||
|
M |
E |
|
|
|
|
|
|
|
|
O |
|
||
A |
|
|
|
|
|
|
|
|
|
|
U |
|||
|
|
|
|
|
|
|
|
|
|
|
|
T |
||
A |
|
|
|
|
|
|
|
|
|
|
|
|
|
C |
|
|
|
|
|
|
|
|
|
|
|
|
|
S |
|
B |
|
|
|
|
|
|
|
|
|
|
|
|
|
|
I |
|
|
|
|
|
|
|
|
|
|
|
|
|
, |
|
|
|
|
|
|
|
|
|
|
|
|
|
L |
|
H |
|
|
|
|
|
|
|
|
|
|
|
|
|
|
S |
|
|
|
|
|
|
|
|
|
|
|
|
|
. |
|
|
|
|
|
|
|
|
|
|
|
|
|
L |
|
O |
|
|
|
|
|
|
|
|
|
|
|
|
|
|
|
|
|
|
|
|
|
|
|
|
|
|
|
. |
|
|
|
|
|
|
|
|
|
|
|
|
|
|
|
C |
T |
|
|
|
|
|
|
|
|
|
|
|
|
. |
|
|
|
|
|
|
|
|
|
|
|
|
|
|
||
I |
|
|
|
|
|
|
|
|
|
|
|
5 |
||
S |
|
|
|
|
|
|
|
|
|
|
4 |
|||
|
|
O |
|
|
|
|
|
|
|
|
|
|
||
|
|
1 |
|
|
|
|
|
|
|
|
|
6 |
|
|
|
|
|
|
|
|
|
|
|
|
9 |
|
|
||
|
|
4 |
|
|
|
|
|
|
A |
|
|
|
||
|
|
|
0 |
1 |
|
|
|
. |
|
|
|
|
||
|
|
|
|
0 |
|
|
o |
|
|
|
|
|
||
|
|
|
|
|
|
|
FILEN |
|
|
|
|
|
|
|
Note: To display a High Definition picture, the TV must be receiving a High Definition signal (such as an over-the-air High Definition TV broadcast, a High Definition digital cable program, or a High Definition digital satellite program). For details, please contact your TV antenna installer, cable provider, or satellite provider.
Note: If the TV is powered off and then quickly on again when the lamp unit is hot, it may take several minutes for the picture to appear on-screen. This is a property of DLPTM TV lamp technology and is NOT a sign of malfunction. For details, see "IMPORTANT NOTICE ABOUT HOT LAMP RESTART" on page 2.
© 2006 TOSHIBA CORPORATION
All Rights Reserved
Owner’s Record
The model number and serial number are on the back of your TV. Record these numbers in the spaces below. Refer to these numbers whenever you communicate with your Toshiba dealer about this TV.
Model number:  Serial number:
YC/N VX1A00006700
HM196 (E/F) Web 213:276
HM196_EN.book Page 2 Tuesday, May 30, 2006 2:18 PM
CAUTION: This television is for use only with the Toshiba stand indicated below. Use with other carts or stands is capable of resulting in instability, causing possible injury.
Television |
Stand Model |
62HM196 |
ST 6286 |
72HM196 |
ST 7286 |
Important notes about your DLP™ projection TV
1)The light source for this TV is a projection lamp unit with a limited service life. When the lamp wears out, the picture
may become dark or black or the lamp may fail, at which time you must replace the lamp unit (- “Lamp unit replacement and care” on pages 81–83).
2)When the lamp mode is set to Low Power, every time the TV is powered on, the lamp will initially be in High Bright mode but will switch to Low Power mode after a short period of time. You may notice a change in screen brightness
when this happens. This is normal and is not a sign of malfunction (- page 55 for details).
3)Every time the TV is powered on, it may take several minutes for the picture to obtain full brightness (- “IMPORTANT NOTICE ABOUT HOT LAMP RESTART,” at right).
4)The TV’s display is manufactured using an extremely high level of precision technology; however, an occasional pixel (dot of light) may show constantly on the screen. This is a structural property of DLP™ (Digital Light Processing™) technology and is not a sign of malfunction. Such pixels are not visible when the picture is viewed from a normal viewing distance.
5)Always sit approximately 10–25 feet away from the TV and as directly in front of it as possible. The picture quality may be affected by your viewing position and length of viewing time. If you sit too closely to the TV for too long, you may suffer from eye fatigue. See item 29 under “Care” on page 4 of the separate Installation Guide.
6)Depending on the media you are viewing, it is possible, although unlikely, that a limited number of viewers may see a “rainbow effect” on the screen, which can, in rare instances, result in eye fatigue. This is a rare occurrence related to DLP technology and is not a sign of TV malfunction.
7)This TV contains several cooling fans to moderate
the internal temperature. You may be able to hear the fans for several minutes after the TV is turned
off. This is a function of the Quick Restart™ feature and is not a sign of TV malfunction. You can set the Quick Restart™ feature to stop the fans as soon as the TV is powered off. See “Setting the Quick Restart™ feature” (- page 30).
8)The yellow and blue LED lights at the bottom center of the
TV front indicate your TV’s current status. If either light flashes, see “LED indications” (- page 80).
9)Every time the TV power cord is plugged in, the yellow LED will blink until the TV enters standby mode (plugged in but not powered on). This is normal and is not a sign of malfunction.
“Voice announce” feature
When certain non-standard conditions occur, the LEDs on the TV will blink and the TV will play a recorded “voice announcement” describing the condition (see the
LED indication table on page 80 for the specific conditions that include a voice announcement).
To repeat the voice announcement and hear additional information, press the MENU button on the TV while the LEDs are blinking.
IMPORTANT NOTICE ABOUT HOT LAMP RESTART
When the TV has been powered on long enough for the lamp unit to get hot, it may take several minutes for the picture to appear in the following situations:
•When the Quick Restart™ feature is set to OFF and you turn the TV off and then on again within a few minutes; or
•If the TV is on when a short-term power failure, power surge, or other similar power failure occurs, such that
the TV loses and regains power within a few minutes.
This is a property of DLP™ technology and is NOT a sign of malfunction.
If this occurs, the yellow LED on the TV front panel will blink (and the blue LED will be lit solid) until the TV is finished restarting the lamp and the normal picture appears. If both LEDs are blinking, you will need to turn the TV off and then on again to restart the lamp.
2
HM196 (E/F) Web 213:276

HM196_EN.book Page 3 Tuesday, May 30, 2006 2:18 PM
Trademark Information
•This product incorporates copyright protection technology that is protected by U.S. patents and other intellectual property rights. Use of this copyright protection technology must be authorized by Macrovision, and is intended for home and other limited viewing uses only unless otherwise authorized by Macrovision. Reverse engineering or disassembly is prohibited.
•WOW, SRS and l symbol are trademarks of SRS Labs, Inc. WOW technology is incorporated under license from SRS Labs, Inc.
•Manufactured under license from Dolby Laboratories. Dolby, Pro Logic, and the double-D symbol are registered trademarks of Dolby Laboratories.
•CableCARD™ is a trademark of Cable Television Laboratories, Inc.
•HDMI, the HDMI logo and High-Definition Multimedia Interface are trademarks or registered trademarks of HDMI Licensing LLC.
•Digital Light Processing™, DLP™ and the DLP™ medallion are trademarks of Texas Instruments.
•In the United States, TV GUIDE and other related marks are registered marks of Gemstar-TV Guide International, Inc. and/or one of its affiliates. In Canada, TV GUIDE is a registered mark of Transcontinental Inc., and is used under license by Gemstar-TV Guide International, Inc. The TV Guide On Screen™ system is manufactured under license from Gemstar-TV Guide International, Inc. and/or one of its affiliates. The TV Guide On Screen™ system is protected by one or more of the following United States patents 4,908,713; 6,498,895; 6,850,693; 6,396,546; 5,940,073; 6,239,794 to Gemstar-TV Guide International, Inc. and/or its subsidiaries.
•GEMSTAR-TV GUIDE INTERNATIONAL INC. AND/OR ITS RELATED AFFILIATES ARE NOT IN ANY WAY LIABLE FOR THE ACCURACY OR AVAILABILITY OF THE PROGRAM SCHEDULE INFORMATION OR OTHER DATA IN THE TV GUIDE ON SCREEN SYSTEM AND CANNOT GUARANTEE SERVICE AVAILABILITY IN YOUR AREA. IN NO EVENT SHALL GEMSTAR-TV GUIDE INTERNATIONAL, INC. AND/OR ITS RELATED AFFILIATES BE LIABLE FOR ANY DAMAGES IN CONNECTION WITH THE ACCURACY OR AVAILABILITY OF THE PROGRAM SCHEDULE INFORMATION OR OTHER DATA IN THE TV GUIDE ON SCREEN SYSTEM.
3
HM196 (E/F) Web 213:276

HM196_EN.book Page 4 Tuesday, May 30, 2006 2:18 PM
Contents
Important notes about your DLP™ projection TV . . . . . . . . . . . 2 Trademark Information . . . . . . . . . . . . . . . . . . . . . . . . . . . . 3
Chapter 1: Introduction . . . . . . . . . . . . . . . . . . . . . . . . . . . . 6
Welcome to Toshiba . . . . . . . . . . . . . . . . . . . . . . . . . . . . . . . . 6 Features of your new TV . . . . . . . . . . . . . . . . . . . . . . . . . . . . 6 Overview of steps for installing, setting up, and
using your new TV. . . . . . . . . . . . . . . . . . . . . . . . . . . . . . 7 TV front and side panel controls and connections . . . . . . . . . 8 TV back panel connections. . . . . . . . . . . . . . . . . . . . . . . . . . . 9
Chapter 2: Using the remote control . . . . . . . . . . . . . . . . . . .11
Installing the remote control batteries . . . . . . . . . . . . . . . . . 11 Remote control effective range. . . . . . . . . . . . . . . . . . . . . . . 11 Learning about the remote control . . . . . . . . . . . . . . . . . . . . 12 Remote Control functional key chart . . . . . . . . . . . . . . . . . . 14 Using the remote control to operate your other devices . . . . 16 Programming the remote control to operate
your other devices . . . . . . . . . . . . . . . . . . . . . . . . . . . . . 16 Device code setup . . . . . . . . . . . . . . . . . . . . . . . . . . . . . 16 Searching and sampling the code of a device (8500). . . 17 Using the volume lock feature (8000) . . . . . . . . . . . . . . 17 Operational feature reset (8900). . . . . . . . . . . . . . . . . . . 17
Multi-brand remote control device codes . . . . . . . . . . . . . . . 18
Chapter 3: Menu layout and navigation . . . . . . . . . . . . . . . . .22
Main menu layout . . . . . . . . . . . . . . . . . . . . . . . . . . . . . . . . . 22 Setup/Installation menu layout . . . . . . . . . . . . . . . . . . . . . . . 23 THINC menu layout . . . . . . . . . . . . . . . . . . . . . . . . . . . . . . . 24 Navigating the menu system. . . . . . . . . . . . . . . . . . . . . . . . . 24
Chapter 4: Setting up your TV. . . . . . . . . . . . . . . . . . . . . . . .25
Selecting the menu language . . . . . . . . . . . . . . . . . . . . . . . . 25 Configuring the antenna input sources for the
ANT 1 and ANT 2 terminals . . . . . . . . . . . . . . . . . . . . . 25 Programming channels into the TV’s channel memory . . . . 26 Programming channels automatically . . . . . . . . . . . . . . 26
Manually adding and deleting channels in the channel memory . . . . . . . . . . . . . . . . . . . . . . . . . . . . . . . . . . 27
Setting the time and date. . . . . . . . . . . . . . . . . . . . . . . . . . . . 28 Setting the ColorStream® HD audio mode . . . . . . . . . . . . . . 28 Setting the HDMI™ audio mode . . . . . . . . . . . . . . . . . . . . . . 29 Viewing the CableCARD™ menu. . . . . . . . . . . . . . . . . . . . . 29 Setting the Quick Restart™ feature . . . . . . . . . . . . . . . . . . . . 30 Viewing the digital signal meter. . . . . . . . . . . . . . . . . . . . . . 30 Viewing the system status. . . . . . . . . . . . . . . . . . . . . . . . . . . 31
Chapter 5: Using the TV’s features . . . . . . . . . . . . . . . . . . . .32
Selecting the video input source to view . . . . . . . . . . . . . . . 32 Labeling the video input sources . . . . . . . . . . . . . . . . . . . . . 32 Tuning channels . . . . . . . . . . . . . . . . . . . . . . . . . . . . . . . . . . 33 Tuning channels using the Channel Browser™ . . . . . . . 33 Tuning to the next programmed channel . . . . . . . . . . . . 35
Tuning to a specific channel (programmed or unprogrammed) . . . . . . . . . . . . . . . . . . . . . . . . . . . . 35
Switching between two channels
using Channel Return . . . . . . . . . . . . . . . . . . . . . . . 36 Switching between two channels using SurfLock™. . . . 36 Selecting the picture size . . . . . . . . . . . . . . . . . . . . . . . . . . . 37
Scrolling the TheaterWide® picture
(TheaterWide 2 and 3 only) . . . . . . . . . . . . . . . . . . . . . . 38 Using the auto aspect ratio feature . . . . . . . . . . . . . . . . . . . . 39 Selecting the cinema mode (480i signals only) . . . . . . . . . . 39 Using the POP features . . . . . . . . . . . . . . . . . . . . . . . . . . . . . 40 Using the POP double-window feature . . . . . . . . . . . . . 40 Switching the speaker audio (left or right). . . . . . . . . . . 41 POP double-window aspect ratio . . . . . . . . . . . . . . . . . . 41
4
Using the FREEZE feature . . . . . . . . . . . . . . . . . . . . . . . . . . 41 Adjusting the picture. . . . . . . . . . . . . . . . . . . . . . . . . . . . . . . 42 Selecting the picture mode . . . . . . . . . . . . . . . . . . . . . . . 42 Adjusting the picture quality . . . . . . . . . . . . . . . . . . . . . 42 Using the closed caption mode . . . . . . . . . . . . . . . . . . . . . . . 43 Closed Caption Advanced . . . . . . . . . . . . . . . . . . . . . . . 43 Digital closed captions . . . . . . . . . . . . . . . . . . . . . . . . . . 44
Using the Closed Caption button on the
remote control . . . . . . . . . . . . . . . . . . . . . . . . . . . . . 44 Adjusting the audio. . . . . . . . . . . . . . . . . . . . . . . . . . . . . . . . 44 Muting the sound . . . . . . . . . . . . . . . . . . . . . . . . . . . . . . 44 Using the digital audio selector . . . . . . . . . . . . . . . . . . . 44 Selecting stereo/SAP broadcasts . . . . . . . . . . . . . . . . . . 45 Adjusting the audio quality . . . . . . . . . . . . . . . . . . . . . . 45 Using the StableSound® feature. . . . . . . . . . . . . . . . . . . 46 Turning off the built-in speakers . . . . . . . . . . . . . . . . . . 46 Selecting the optical audio output format . . . . . . . . . . . 46 Using the Locks menu . . . . . . . . . . . . . . . . . . . . . . . . . . . . . 47 Entering the PIN code . . . . . . . . . . . . . . . . . . . . . . . . . . 47 If you cannot remember your PIN code. . . . . . . . . . . . . 47 Changing your PIN code . . . . . . . . . . . . . . . . . . . . . . . . 47
Blocking TV programs and movies
by rating (V-Chip) . . . . . . . . . . . . . . . . . . . . . . . . . . 48 Downloading an additional rating system
for blocking TV programs and movies . . . . . . . . . . 48 Blocking channels . . . . . . . . . . . . . . . . . . . . . . . . . . . . . 49 Unlocking programs temporarily . . . . . . . . . . . . . . . . . . 50 Using the input lock feature . . . . . . . . . . . . . . . . . . . . . . 50 Using the GameTimer™ . . . . . . . . . . . . . . . . . . . . . . . . . 51 Using the control panel lock feature . . . . . . . . . . . . . . . 51
Setting the sleep timer. . . . . . . . . . . . . . . . . . . . . . . . . . . . . . 52 Setting the On/Off Timer . . . . . . . . . . . . . . . . . . . . . . . . . . . 52 Displaying TV status information using RECALL . . . . . . . 53 Understanding the auto power off feature . . . . . . . . . . . . . . 53 Understanding the last mode memory feature . . . . . . . . . . . 53
Chapter 6: Using the TV’s advanced features . . . . . . . . . . . . . 54
Using the advanced picture settings features . . . . . . . . . . . . 54 Using dynamic contrast . . . . . . . . . . . . . . . . . . . . . . . . . 54 Using CableClear® digital noise reduction . . . . . . . . . . 54 Using MPEG noise reduction. . . . . . . . . . . . . . . . . . . . . 55 Selecting the color temperature . . . . . . . . . . . . . . . . . . . 55 Selecting the lamp mode . . . . . . . . . . . . . . . . . . . . . . . . 55 Using the Game Mode feature . . . . . . . . . . . . . . . . . . . . 56
Using the advanced audio settings features . . . . . . . . . . . . . 56 Using the SRS WOW™ surround sound feature . . . . . . 56
HM196 (E/F) Web 213:276

HM196_EN.book Page 5 Tuesday, May 30, 2006 2:18 PM
Chapter 7: Using the THINC™ home network feature . . . . . . . .57
A. Connecting the TV to your home network . . . . . . . . . . . 57 B. Setting up the network address . . . . . . . . . . . . . . . . . . . . 57 Automatically setting up the network address . . . . . . . . 57 Manually setting up the network address. . . . . . . . . . . . 58 Resetting the network address . . . . . . . . . . . . . . . . . . . . 59 C. Setting up file sharing on your PC . . . . . . . . . . . . . . . . . . 59 Compatible operating systems . . . . . . . . . . . . . . . . . . . . 59
Setting up file sharing on a PC with Microsoft® Windows® XP Service Pack 1 or Service Pack 2 . . 59
Setting up file sharing on a PC with
Microsoft® Windows® 2000 . . . . . . . . . . . . . . . . . . 60 D. Setting up file sharing on the TV . . . . . . . . . . . . . . . . . . . 61 About the Software Upgrade feature . . . . . . . . . . . . . . . 62 E. Viewing/playing shared files on the TV. . . . . . . . . . . . . . 63 Media specifications. . . . . . . . . . . . . . . . . . . . . . . . . . . . 63 Using the Picture Viewer . . . . . . . . . . . . . . . . . . . . . . . . 64 Using the Audio Player . . . . . . . . . . . . . . . . . . . . . . . . . 66
F. Setting up e-mail scheduling . . . . . . . . . . . . . . . . . . . . . . 67 Required information and services. . . . . . . . . . . . . . . . . 67 Setting up e-mail scheduling . . . . . . . . . . . . . . . . . . . . . 67 Setting up SMTP authentication . . . . . . . . . . . . . . . . . . 69 Description of fields in the “E-mail Scheduling Setup”
window . . . . . . . . . . . . . . . . . . . . . . . . . . . . . . . . . . 71 G. Using e-mail scheduling . . . . . . . . . . . . . . . . . . . . . . . . . 73 E-mail parameters . . . . . . . . . . . . . . . . . . . . . . . . . . . . . 73 Sending a request e-mail to the TV . . . . . . . . . . . . . . . . 73 Formatting a request e-mail . . . . . . . . . . . . . . . . . . . . . . 73 Sample request e-mails . . . . . . . . . . . . . . . . . . . . . . . . . 74 Receiving an e-mail from the TV. . . . . . . . . . . . . . . . . . 75 Modifying an existing recording or reminder . . . . . . . . 75
Chapter 8: Troubleshooting . . . . . . . . . . . . . . . . . . . . . . . . .76
General troubleshooting . . . . . . . . . . . . . . . . . . . . . . . . . . . . 76
Home network troubleshooting . . . . . . . . . . . . . . . . . . . . . . 78
LED indications . . . . . . . . . . . . . . . . . . . . . . . . . . . . . . . . . . 80
Chapter 9: Appendix . . . . . . . . . . . . . . . . . . . . . . . . . . . . . .81
Lamp unit replacement and care. . . . . . . . . . . . . . . . . . . . . . 81 Replacing the lamp unit
(User-replaceable component). . . . . . . . . . . . . . . . . 81 When to replace the lamp unit . . . . . . . . . . . . . . . . . . . . 81 How to replace the lamp unit . . . . . . . . . . . . . . . . . . . . . 82 Disposing of the used lamp unit. . . . . . . . . . . . . . . . . . . 83 Specifications . . . . . . . . . . . . . . . . . . . . . . . . . . . . . . . . . . . . 84
Limited United States Warranty
for DLP™ Television Models . . . . . . . . . . . . . . . . . . . . . 85 Limited Canada Warranty
for DLP™ Television Models . . . . . . . . . . . . . . . . . . . . . 86
Index . . . . . . . . . . . . . . . . . . . . . . . . . . . . . . . . . . . . . . . .88
5
HM196 (E/F) Web 213:276
HM196_EN.book Page 6 Tuesday, May 30, 2006 2:18 PM
Chapter 1: Introduction
NOTICE OF POSSIBLE TV STAND INSTABILITY
DANGER: RISK OF SERIOUS PERSONAL INJURY OR DEATH! Use this TV only with
the TOSHIBA TV stand listed in the “Specifications” section of this manual. Use with other stands may result in instability, causing possible injury or death.
Welcome to Toshiba
Thank you for purchasing this Toshiba TV, one of the most innovative DLP™ projection TVs on the market.
This digital television is capable of receiving analog basic, digital basic, and digital premium cable television programming by direct connection to a cable system providing such programming. A security card provided by your cable operator is required to view encrypted digital programming. Certain advanced and interactive digital cable services (such as video-on-demand, a cable operator's enhanced program guide, or data-enhanced television services) may require the use of a set-top box. For more information, call your local cable operator.
We have provided three separate Guides to facilitate the installation and operation of your TV.
Please use the Guides in the order shown below to get the most enjoyment from your new TV.
1)The “Installation Guide” explains how to connect your TV to your antenna and equipment.
2)The “Operating Guide” provides step-by-step instructions for using your TV's many features.
3)The “TV Guide On Screen™ Interactive Program Guide” explains how to set up and navigate the TV Guide
On Screen™ system in your TV.
Note: The TV screen graphics in the Guides are for illustration purposes only and may be different from the screens displayed on your TV.
Features of your new TV
The following are just a few of the many exciting features of your new Toshiba widescreen, integrated HD, DLP™ projection TV:
•Integrated digital tuning (8VSB ATSC and QAM) eliminates the need for a separate digital converter set-top box (in most cases).
•TV Guide On Screen™ no-fee interactive program guide (- TV Guide On Screen™ Interactive Program Guide).
•Digital CableCARD™ slot for viewing encrypted digital Cable TV programs (- Installation Guide).
•Two HDMI™ digital, high-definition multimedia interfaces (- Installation Guide).
•Two sets of ColorStream® HD high-resolution component video inputs (- Installation Guide).
•Dolby Digital (- Installation Guide) and SRS WOW™
(- page 56) audio technologies.
•Digital Audio Out optical audio connection with Dolby® Digital optical output format (- page 46; also see
Installation Guide).
•CableClear® digital picture noise reduction (- page 54).
•Double-window POP feature (- page 40).
•Ethernet (RJ-45) (THINC™) port for connecting the TV to a home network to enable file sharing (JPEG, MP3) and e-mail scheduling of recordings and reminders
(- Chapter 7 and Installation Guide).
6
HM196 (E/F) Web 213:276

HM196_EN.book Page 7 Tuesday, May 30, 2006 2:18 PM
Chapter 1: Introduction
Overview of steps for installing, setting up, and using your new TV
Follow these steps to set up your TV and begin using its many exciting features.
1 Carefully read the important safety, installation, care, and service information in the separate Installation Guide. Keep this manual for future reference.
2 Observe the following when choosing a location for the TV:
•Read the separate Installation Guide.
•Read the separate TV Guide On Screen™ Interactive Program Guide.
•Read “Important notes about your DLP™ projection TV” (- page 2).
•Place the TV on the applicable optional TV stand listed in the “Specifications” section (if available for this TV model) or on a sturdy, level, stable surface that can safely support the size and weight of the unit.
•Place the TV in a location where light does not reflect on the screen.
•Place the TV far enough from walls and other objects to allow proper ventilation. Inadequate ventilation may cause overheating, which will damage the TV. THIS TYPE OF DAMAGE IS NOT COVERED UNDER THE TOSHIBA WARRANTY.
3 Do not plug in any power cords until AFTER you have connected all cables and devices to your TV.
4 BEFORE connecting cables or devices to the TV, learn the functions of the TV’s connections and controls (- pages 8–10).
5 Connect your other electronic device(s) to the TV (- Installation Guide).
6 Connect the supplied G-LINK™/IR blaster cable from your VCR and/or Cable box (if applicable) to the G-LINK™ terminal so you can use the TV Guide
On Screen™ features (applies to VCRs and cable boxes only) (- Installation Guide).
7 Install the batteries in the remote control (- page 11).
8 See “Learning about the remote control” (-page 12) for an overview of the buttons on the remote control.
9 Program the remote control to operate your other device(s) (- pages 16–21).
10 AFTER connecting all cables and devices, plug in the power cords for your TV and other devices.
11 After you plug in the TV power cord, the yellow LED
(on the TV front) will blink 3 times. Wait several seconds until the yellow LED stops blinking and then press pon the TV or remote control.
See “LED indications” (- page 80).
12 See “Menu layout and navigation” for a quick overview of the TV’s menu system (- page 22).
13 See the separate TV Guide On Screen™ Interactive Program Guide for details on setting up and using the TV Guide On Screen™ system (if available in your area).
14 Program channels into the TV’s channel memory (- page 26).
15 For details on using the TV’s features, see Chapters 5 and 6.
16 For details on connecting the TV to a home network to enable file sharing and e-mail scheduling of recordings, see Chapter 7.
17 For help, refer to the Troubleshooting Guide, Chapter 8.
18 For lamp unit replacement instructions, see Chapter 9.
19 For technical specifications and warranty information, see Chapter 9.
20 Enjoy your new TV!
7
HM196 (E/F) Web 213:276
HM196_EN.book Page 8 Tuesday, May 30, 2006 2:18 PM
Chapter 1: Introduction
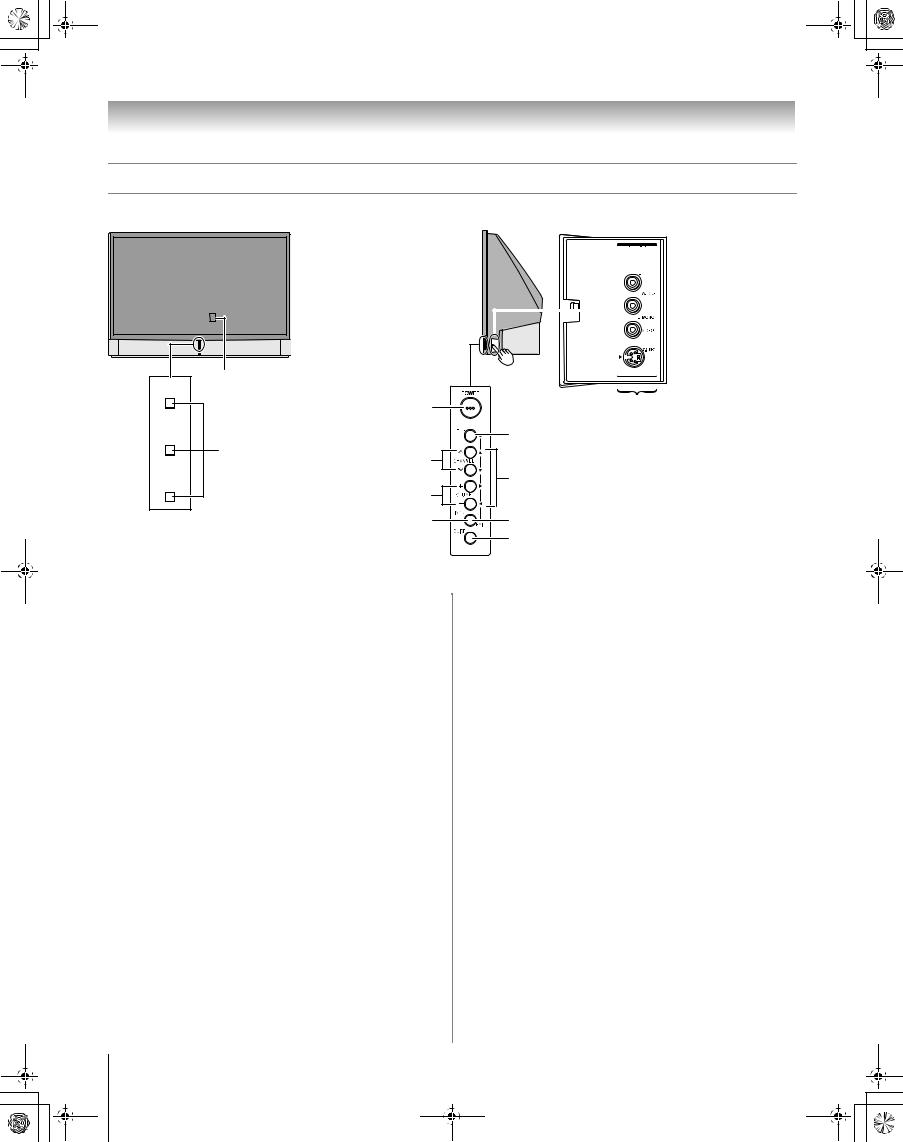
TV front and side panel controls and connections
|
TV front |
|
|
|
|
Side panel |
|
|
|
||||||||||
|
|
|
|
|
|
|
|
|
|
|
|
|
|
|
|
|
|
|
|
|
|
|
|
|
|
|
|
|
|
|
|
|
|
|
|
|
|
|
|
|
|
|
|
|
|
|
|
|
|
|
|
|
|
|
|
|
|
|
|
|
|
|
|
|
|
|
|
|
|
|
|
|
|
|
|
|
|
|
|
|
|
|
|
|
|
|
|
|
|
|
|
|
|
|
|
|
|
|
|
|
|
|
|
|
|
|
|
|
|
|
|
|
|
|
|
|
|
|
|
|
|
|
|
|
|
|
|
|
|
|
|
|
|
|
|
|
|
|
|
|
|
|
|
|
|
|
|
|
|
|
|
|
|
|
|
|
|
|
|
|
|
|
|
|
|
|
|
|
|
|
|
|
|
|
|
|
|
|
|
|
|
|
|
|
|
|
|
|
|
|
|
|
|
|
|
|
|
|
|
|
|
|
|
|
|
|
|
|
|
|
|
|
|
|
|
|
|
|
|
|
|
|
|
|
|
|
|
|
|
|
|
|
|
|
|
|
|
|
|
1
LAMP
3 |
11 |
POWER |
|
7* |
|
2 |
4 |
|
|
|
|
||
TIMER |
|
8 |
|
REC |
5 |
||
|
|||
|
|
||
|
6 |
9 |
|
|
|
10 |
Control panel
1Remote sensor (behind the screen) — Point the remote control toward this area of the TV screen (- “Remote control effective range” on page 11).
2Blue, Yellow and Green/Red LEDs
See “LED indications” on page 80 for additional information.
3POWER — Press to turn the TV on and off.
If the TV stops responding to the controls on the remote control or TV control panel and you cannot turn off the TV, press and hold the POWER button on the TV control panel for 5 or more seconds to reset the TV.
4CHANNEL U u — When no menu is on-screen, these buttons change the channel (programmed channels only; - page 26). When a menu is on-screen, these buttons function as up/down menu navigation buttons.
5VOLUME + – — When no menu is on-screen, these buttons adjust the volume level. When a menu is on-screen, these buttons function as left/right menu navigation buttons.
6INPUT — Repeatedly press to change the source you are viewing (ANT 1, VIDEO 1, VIDEO 2,
ColorStream HD-1, ColorStream HD-2, HDMI 1, HDMI 2, ANT 2).
7*MENU (ENTER) — Press to access the menu system (- pages 22–23). When a menu is on-screen, the MENU button on the TV’s side control panel functions as the ENTER button.
8ARROWS BbC c — When a menu is on-screen, these buttons function as up/down/left/right menu navigation buttons.
9EXIT — Press to instantly close an on-screen menu.
10GUIDE — Press to access the TV Guide On Screen™ program guide (- TV Guide On Screen™ Interactive Program Guide).
11VIDEO-2 IN — The side panel A/V connections are referred to as “VIDEO 2” and include standard A/V inputs plus an optional S-video input.
8
HM196 (E/F) Web 213:276
HM196_EN.book Page 9 Tuesday, May 30, 2006 2:18 PM
Chapter 1: Introduction
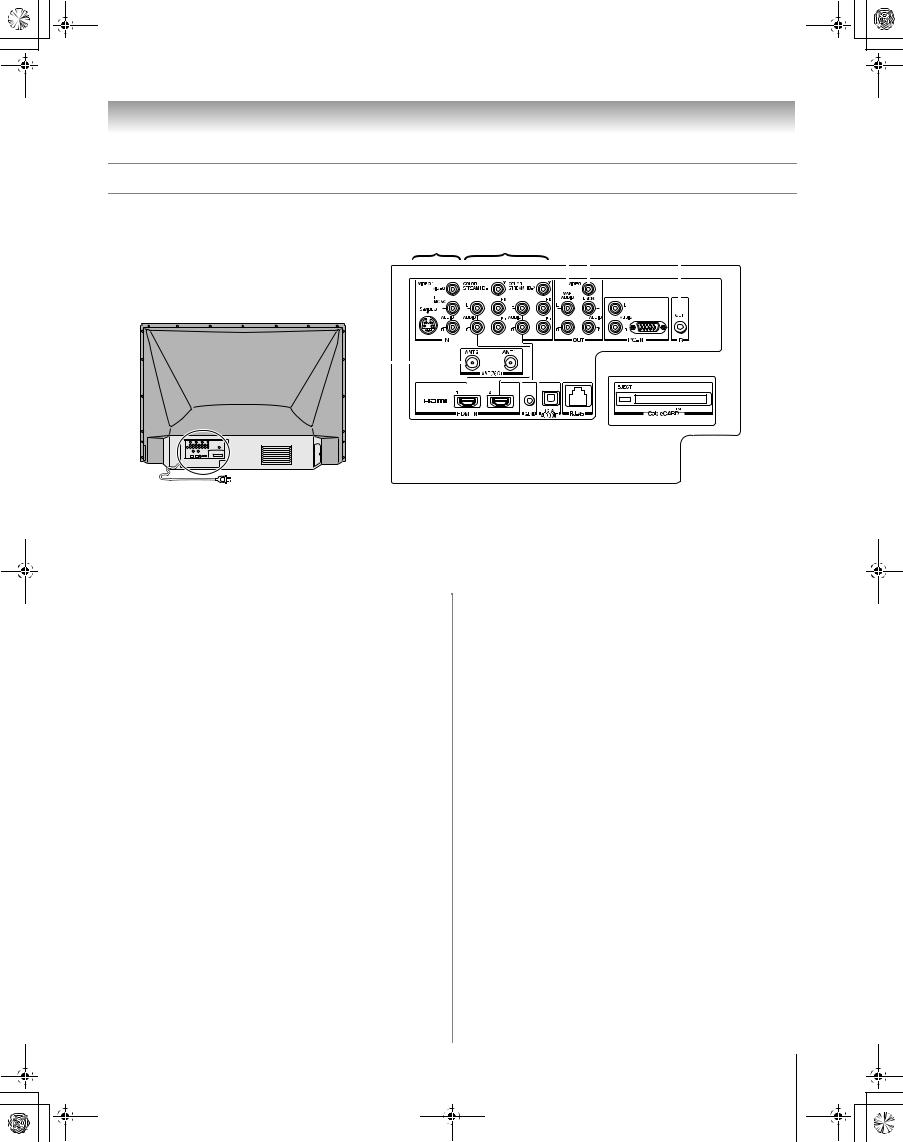
TV back panel connections
For an explanation of cable types and connections, see the Installation Guide.
|
|
|
1 |
|
|
|
2 |
|
|
|
3 |
4 |
|
5 |
||||||||||||||||||||||||||||||
|
|
|
|
|
|
|
|
|
|
|
|
|
|
|
|
|
|
|
|
|
|
|
|
|
|
|
|
|
|
|
|
|
|
|
|
|
|
|
|
|
|
|
|
|
|
|
|
|
|
|
|
|
|
|
|
|
|
|
|
|
|
|
|
|
|
|
|
|
|
|
|
|
|
|
|
|
|
|
|
|
|
|
|
|
|
|
|
|
|
|
|
|
|
|
|
|
|
|
|
|
|
|
|
|
|
|
|
|
|
|
|
|
|
|
|
|
|
|
|
|
|
|
|
|
|
|
|
|
|
|
|
|
|
|
|
|
|
|
|
|
|
|
|
|
|
|
|
|
|
|
|
|
|
|
|
|
|
|
|
|
|
|
|
|
|
|
|
|
|
|
|
|
|
|
|
|
|
|
|
|
|
|
|
|
|
|
|
|
|
|
|
|
|
|
|
|
|
|
|
|
|
|
|
|
|
|
|
|
|
|
|
|
|
|
|
|
|
|
|
|
|
|
|
|
|
|
|
|
|
|
|
|
|
|
|
|
|
|
|
|
|
|
|
|
|
|
|
|
|
|
|
|
|
|
|
|
|
|
|
|
|
|
|
|
|
|
|
|
|
|
|
|
|
|
|
|
|
|
|
|
|
|
|
|
|
|
|
|
|
|
|
|
|
|
|
|
|
|
|
|
|
|
|
|
|
|
|
|
|
|
|
|
|
|
|
|
|
|
|
|
|
|
|
|
|
|
|
|
|
|
|
|
|
|
|
|
|
|
|
|
|
|
|
|
|
|
|
|
|
|
|
|
|
|
|
|
|
|
|
|
|
|
|
|
|
|
|
|
|
|
|
|
|
|
|
|
|
|
|
|
|
|
|
|
|
|
|
|
|
|
|
|
|
|
|
|
|
|
|
|
|
|
|
|
|
|
|
|
|
|
|
|
|
|
|
|
|
|
|
|
|
|
|
|
|
|
|
|
|
|
|
|
|
|
|
|
|
|
|
|
|
|
|
|
|
|
|
|
|
|
|
|
|
|
|
|
|
|
|
|
|
|
|
|
|
|
|
|
|
|
|
|
|
|
|
|
|
|
|
|
|
|
|
|
|
|
|
|
|
|
|
|
|
|
|
|
|
|
|
|
|
|
|
|
|
|
|
|
|
|
|
|
|
|
|
|
|
|
|
|
|
|
|
|
|
|
|
|
|
|
|
|
|
|
|
|
|
|
|
|
|
|
|
|
|
|
|
|
|
|
|
|
|
|
|
|
|
|
|
|
|
|
|
|
|
|
|
|
|
|
|
|
|
|
|
|
|
|
|
|
|
|
|
|
|
|
|
|
|
|
|
|
|
|
|
|
|
|
|
|
|
|
|
|
|
|
|
|
|
|
|
|
|
|
|
|
|
|
|
|
|
|
|
|
|
|
|
|
|
|
|
|
|
|
|
|
|
|
|
|
|
|
|
|
|
|
|
|
|
|
|
|
|
|
|
|
|
|
|
|
|
|
|
|
|
|
|
|
|
|
|
|
|
|
|
|
|
|
|
|
|
|
|
|
|
|
|
|
|
|
|
|
|
|
|
|
|
|
|
|
|
|
|
|
|
|
|
|
|
|
|
|
|
|
|
|
|
|
|
|
|
|
|
|
|
|
|
|
|
|
|
|
|
|
|
|
|
|
|
|
|
|
|
|
|
|
|
|
|
|
|
|
|
|
|
|
|
|
|
|
|
|
|
|
|
|
|
|
|
|
|
|
|
|
|
|
|
|
|
|
|
|
|
|
|
|
|
|
|
|
|
|
|
|
|
|
|
|
|
|
|
|
|
|
|
|
|
|
|
6
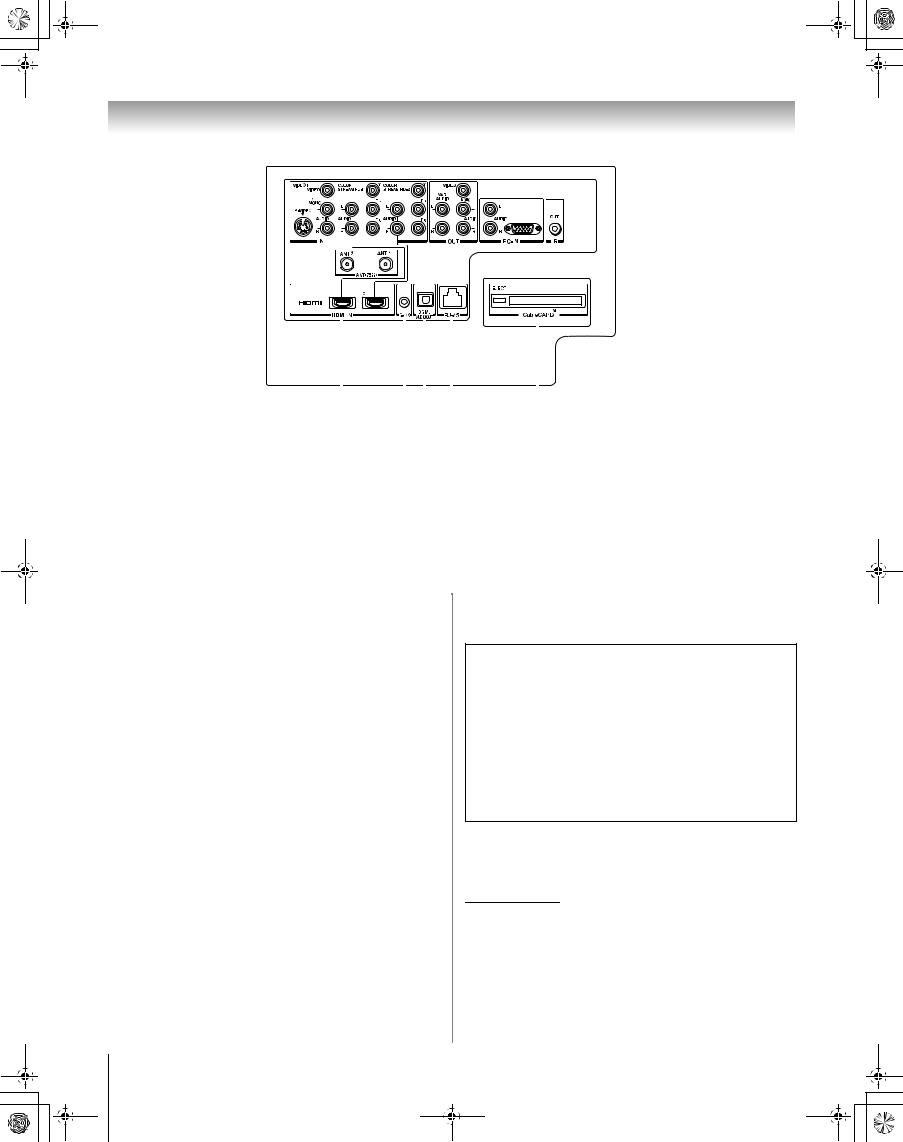
1VIDEO 1 IN — Composite video and analog audio inputs plus optional S-video inputs for connecting devices with composite video or S-video output.
Note: Composite video and S-video cables carry only video information; separate audio cables are required for a complete connection.
2ColorStream® HD-1 IN and ColorStream® HD-2 IN
— Two sets of ColorStream® high-definition component video inputs (with analog stereo audio inputs) for connecting devices with component video output, such as a Toshiba DVD player with ColorStream®.
Note:
•Component video cables carry only video information; separate audio cables are required for a complete connection.
•HDMI 1 (and 2) share analog audio inputs with ColorStream HD-1 (and HD-2). To specify the use of the audio inputs for a connected ColorStream (component video) device, see “Setting the ColorStream HD audio mode” on page 28.
3Variable Audio OUT — Standard analog audio outputs for connecting an analog amplifier with external speakers.
4A/V OUT — Standard composite video and analog audio outputs for connecting a VCR for editing and dubbing.
Note: The A/V OUT terminals will output AUDIO ONLY (no video) in the following instances:
•When the TV's INPUT mode is HDMI, or ColorStream (- “Selecting the video input source to view,” page 32).
•When the POP window is open (- page 40).
•When the MP3 Audio Player is active (- page 66).
5IR OUT — For controlling infrared remote-controlled devices through the TV. You can connect up to two devices with an IR blaster cable, and then control the devices using the TV’s IR pass-through features.
6ANT 1 and ANT 2 — Two inputs that support analog (NTSC) and digital (ATSC) off-air antenna signals and analog and digital Cable TV (QAM) signals.
Note: If you have an antenna only, connect it to ANT 1. If you have both cable TV and an antenna, connect the cable TV to ANT 1 and the antenna to ANT 2.
9
HM196 (E/F) Web 213:276
HM196_EN.book Page 10 Tuesday, May 30, 2006 2:18 PM
Chapter 1: Introduction
|
|
|
|
|
|
|
|
|
|
|
|
|
|
|
|
|
|
|
|
|
|
|
|
|
|
|
|
|
|
|
|
|
|
|
|
|
|
|
|
|
|
|
|
|
|
|
|
|
|
|
|
|
|
|
|
|
|
|
|
|
|
|
|
|
|
|
|
|
|
|
|
|
|
|
|
|
|
|
|
|
|
|
|
|
|
|
|
|
|
|
|
|
|
|
|
|
|
|
|
|
|
|
|
|
|
|
|
|
|
|
|
|
|
|
|
|
|
|
|
|
|
|
|
|
|
|
|
|
|
|
|
|
|
|
|
|
|
|
|
|
|
|
|
|
|
|
|
|
|
|
|
|
|
|
|
|
|
|
|
|
|
|
|
|
|
|
|
|
|
|
|
|
|
|
|
|
|
|
|
|
|
|
|
|
|
|
|
|
|
|
|
|
|
|
|
|
|
|
|
|
|
|
|
|
|
|
|
|
|
|
|
|
|
|
|
|
|
|
|
|
|
|
|
|
|
|
|
|
|
|
|
|
|
|
|
|
|
|
|
|
|
|
|
|
|
|
|
|
|
|
|
|
|
|
|
|
|
|
|
|
|
|
|
|
|
|
|
|
|
|
|
|
|
|
|
|
|
|
|
|
|
|
|
|
|
|
|
|
|
|
|
|
|
|
|
|
|
|
|
|
|
|
|
|
|
|
|
|
|
|
|
|
|
|
|
|
|
|
|
|
|
|
|
|
|
|
|
|
|
|
|
|
|
|
|
|
|
|
|
|
|
|
|
|
|
|
|
|
|
|
|
|
|
|
|
|
|
|
|
|
|
|
|
|
|
|
|
|
|
|
|
|
|
|
|
|
|
|
|
|
|
|
|
|
|
|
|
|
|
|
|
|
|
|
|
|
|
|
|
|
|
|
|
|
|
|
|
|
|
|
|
|
|
|
|
|
|
|
|
|
|
|
|
|
|
|
|
|
|
|
|
|
7 |
8 |
9 |
10 |
11 |
|
|
||||||||||||||||||||||||||||
7HDMI™ 1 IN and HDMI™ 2 IN — Two High-Definition Multimedia Interface inputs receive digital audio and uncompressed digital video from an HDMI device or uncompressed digital video from a DVI device.
Also see item 2.
Note: HDMI 1 (and 2) IN share analog audio inputs with ColorStream HD-1 (and HD-2) IN. To specify the use of the audio inputs for a connected HDMI (or DVI) device, see “Setting the HDMI audio mode” on page 29.
8G-LINK™ — For use with the enclosed IR blaster/ G-LINK™ cable to enable the TV Guide On Screen™ recording features (- Installation Guide).
9Digital Audio OUT — Optical audio output in Dolby* Digital or PCM (pulse-code modulation) format for connecting an external Dolby Digital decoder, amplifier, A/V receiver, or home theater system with optical audio input.
10RJ-45 (Ethernet) (THINC™ system**) — Allows you to connect the TV to your home network. See boxed note below.
**THINC™ system
(Toshiba Home Interactive Network Connection)
The RJ-45 (Ethernet) port allows your Toshiba TV to connect to your home network. You can use this revolutionary home entertainment networking system to access MP3 audio files and JPEG picture files that are stored on a networked PC (as shared files) and play/display them on your TV.
You also can play your shared MP3 audio files through a connected audio system.
See Installation Guide and Chapter 7 for details.
11CableCARD™ slot — For use with a digital security card and digital cable TV service (provided by your local cable operator) to view encrypted digital programming (- page 29).
HDMI, the HDMI logo and High-Definition Multimedia Interface are trademarks or registered trademarks of HDMI Licensing LLC. CableCARD is a trademark of Cable Television Laboratories, Inc.
*Manufactured under license from Dolby Laboratories. Dolby, Pro Logic, and the double-D symbol are registered trademarks of Dolby Laboratories.
10
HM196 (E/F) Web 213:276
HM196_EN.book Page 11 Tuesday, May 30, 2006 2:18 PM
Chapter 2: Using the remote control
Installing the remote control batteries
To install the remote control batteries:
1 Slide the battery cover off the back of the remote control.
2 Install two “AA” size alkaline batteries. Match the + and
– symbols on the batteries to the symbols on the battery compartment.
3 Slide the battery cover on to the remote control until the lock snaps.
Caution: Never throw batteries into a fire.
Note:
•Be sure to use AA size alkaline batteries.
•Dispose of batteries in a designated disposal area.
•Batteries should always be disposed of with the environment in mind. Always dispose of batteries in accordance with applicable laws and regulations.
•If the remote control does not operate correctly, or if the operating range becomes reduced, replace batteries with new ones.
•When necessary to replace batteries in the remote control, always replace both batteries with new ones. Never mix battery types or use new and used batteries in combination.
•Always remove the batteries from the remote control if they are dead or if the remote control is not to be used for an extended period of time. This will prevent battery acid from leaking into the battery compartment.
Remote control effective range
For optimum performance, aim the remote control directly at the TV remote sensor. Make sure there are no obstructions between the remote control and the TV.
Point remote control toward remote sensor on front of TV.
16.4 ft (5m)
11
HM196 (E/F) Web 213:276
HM196_EN.book Page 12 Tuesday, May 30, 2006 2:18 PM
Chapter 2: Using the remote control
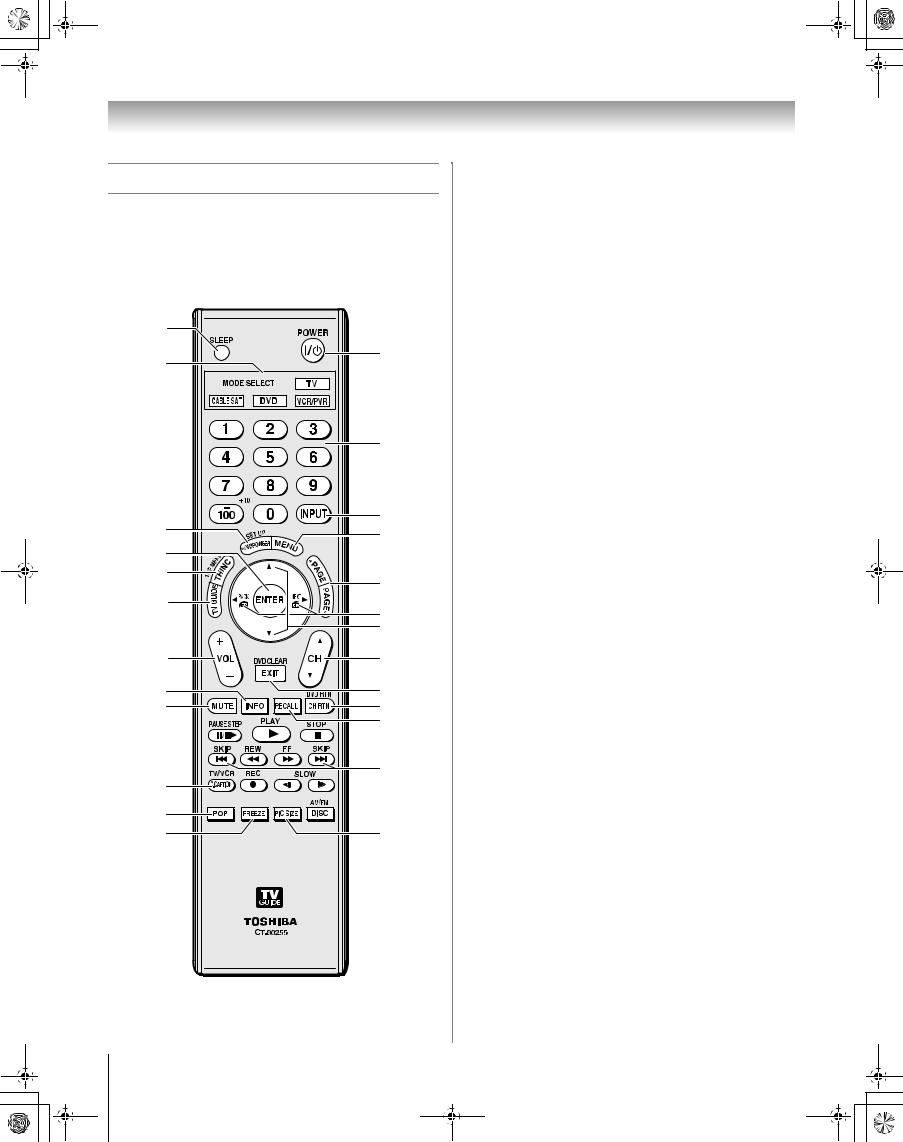
Learning about the remote control
The buttons used for operating the TV only are described here. For a complete list of the remote control’s functions, see the remote control functional key chart (- pages 14–15).
For a list of the buttons that operate the TV Guide On Screen™ system, see the separate TV Guide On Screen™ Interactive Program Guide.
1 |
|
3 |
2 |
|
4
6 |
5 |
|
7 |
||
8 |
||
|
||
9 |
10 |
|
11 |
||
12 |
||
|
||
|
13 |
|
14 |
15 |
|
17 |
16 |
|
18 |
19 |
|
|
20 |
|
22 |
21 |
|
|
||
23 |
|
|
24 |
25 |
1SLEEP accesses the sleep timer (- page 52).
2POWER turns the TV on and off. When the TV is on, the blue LED indicator on the TV front will be illuminated.
Note: The Quick Restart™ setting will affect the amount of time it takes for the picture to appear when you turn on the TV (- page 30).
3MODE SELECT sets the four remote control device modes: TV, CABLE/SAT, DVD, and VCR/PVR. Press
TV until the keypad blinks 3 times to control the TV. The selected MODE key blinks each time any key is pressed. (- page 16).
4Channel Numbers (0–9, –/100) directly tune channels. The =button is used to tune digital channels (- page 35) or to edit the Favorite List (- page 33).
5INPUT selects the video input source (- page 32).
6FAV BROWSER accesses the Favorites List in the Channel Browser™ (- page 33).
7MENU accesses the main TV menu system (- pages 22 and 23) or opens a menu in the TV Guide On Screen™ system (- TV Guide On Screen™ Interactive Program Guide).
8ENTER activates highlighted items in the main menu system and the TV Guide On Screen™ system.
9THINC accesses the THINC menu (- page 24).
10PAGE + - When the TV Guide On Screen™ system is open, moves from one set of screen information to the next, when applicable.
11TV GUIDE opens the TV Guide On Screen™ system (- TV Guide On Screen™ Interactive Program Guide).
123 C / # c While watching TV, these buttons open the Channel Browser banner and tune to the previous/next channel in the channel history (- page 34). (Also see “Arrow buttons.”)
13Arrow buttons (BbC c) When a menu is on-screen, these buttons select or adjust programming menus. (Also see 3 C / # c.)
14VOL + - adjusts the volume level.
15CH Bb cycles through programmed channels when no menu is on-screen (- page 26), and functions as page up/ down when a menu is on-screen or when the TV Guide On Screen™ system is open (- TV Guide On Screen™ Interactive Program Guide).
Note: The error message “Not Available” may appear if you press a key for a function that is not available.
12
HM196 (E/F) Web 213:276

HM196_EN.book Page 13 Tuesday, May 30, 2006 2:18 PM
Chapter 2: Using the remote control
16EXIT closes on-screen menus and the TV Guide On Screen™ system.
17INFO provides detailed information on highlighted items in the TV Guide On Screen™ system (- TV Guide
On Screen™ Interactive Program Guide).
18MUTE reduces or turns off the sound (- page 44).
19CH RTN returns to the last viewed channel (- page 36), or stops the picture viewer slide show (- page 65). Also can be used to switch between the song select view and file select view in the Audio Player (- page 66).
20RECALL displays TV status information (- page 53).
21SKIP Z and z jump backward and forward one day at a time in the TV Guide On Screen™ listings (-TV Guide On Screen™ Interactive Program Guide).
22C.CAPTION (TV/VCR) opens the closed caption/audio selector screen. (For analog channels, the audio selector is not available.) (- pages 43–44.) Also can be used to select the TV mode to view one program while recording another.
23POP opens the POP double-window (- page 40) or locks/unlocks the TV Guide On Screen™ video window (- TV Guide On Screen™ Interactive Program Guide).
24FREEZE freezes the picture. Press again to restore the moving picture.
25PIC SIZE cycles through the five pictures sizes: Natural,
TheaterWide 1/2/3, and Full (- page 37).
13
HM196 (E/F) Web 213:276

HM196_EN.book Page 14 Tuesday, May 30, 2006 2:18 PM
Chapter 2: Using the remote control
Remote Control functional key chart
|
|
|
|
|
• DVD/VCR |
|
|
|
|
REMOTE |
Toshiba TV |
CABLE |
SAT |
VCR |
combo |
Receiver/ |
CD |
PVR |
|
CONTROL KEY |
(TV) |
(satellite) |
• DVD/ |
AMP |
(AUDIO) |
||||
|
|
|
|||||||
|
|
|
|
|
DVD-R |
|
|
|
|
MODE |
Remote control device mode selection |
|
|
|
|
|
|||
SELECT |
|
|
|
|
|
||||
|
|
|
|
|
|
|
|
||
SLEEP |
Sleep timer |
s TV |
s TV |
s TV |
s TV |
s TV |
s TV |
s TV |
|
POWER |
Power |
Power |
Power |
Power |
Power |
Power |
Power |
Power |
|
1 |
Digit 1 |
Digit 1 |
Digit 1 |
Digit 1 |
Digit 1 |
AV input 1 |
Digit 1 |
Digit 1 |
|
2 |
Digit 2 |
Digit 2 |
Digit 2 |
Digit 2 |
Digit 2 |
AV input 2 |
Digit 2 |
Digit 2 |
|
3 |
Digit 3 |
Digit 3 |
Digit 3 |
Digit 3 |
Digit 3 |
AV input 3 |
Digit 3 |
Digit 3 |
|
4 |
Digit 4 |
Digit 4 |
Digit 4 |
Digit 4 |
Digit 4 |
AV input 4 |
Digit 4 |
Digit 4 |
|
5 |
Digit 5 |
Digit 5 |
Digit 5 |
Digit 5 |
Digit 5 |
CD |
Digit 5 |
Digit 5 |
|
6 |
Digit 6 |
Digit 6 |
Digit 6 |
Digit 6 |
Digit 6 |
Tuner |
Digit 6 |
Digit 6 |
|
7 |
Digit 7 |
Digit 7 |
Digit 7 |
Digit 7 |
Digit 7 |
Phono |
Digit 7 |
Digit 7 |
|
8 |
Digit 8 |
Digit 8 |
Digit 8 |
Digit 8 |
Digit 8 |
Cassette |
Digit 8 |
Digit 8 |
|
9 |
Digit 9 |
Digit 9 |
Digit 9 |
Digit 9 |
Digit 9 |
Aux |
Digit 9 |
Digit 9 |
|
0 |
Digit 0 |
Digit 0 |
Digit 0 |
Digit 0 |
Digit 0 |
--- |
Digit 0, 10 |
Digit 0 |
|
|
– (digital |
|
–/--, |
|
–/--, |
|
|
|
|
100/–/+10 |
--- |
+10, |
+100 |
+10, |
--- |
--- |
--- |
||
separator) |
|||||||||
|
|
+100 |
|
+100 |
|
|
|
||
|
|
|
|
|
|
|
|||
INPUT |
TV/Video |
s TV |
s TV |
s TV |
s TV |
Input |
s TV |
s TV |
|
select |
|||||||||
|
|
|
|
|
|
|
|
||
PIC SIZE |
Selects the |
s TV |
s TV |
s TV |
s TV |
s TV |
s TV |
s TV |
|
image shape |
|||||||||
MENU |
Menu/Guide |
Menu |
Menu |
--- |
Menu |
Menu |
Menu |
Menu |
|
Menu |
|||||||||
|
|
|
|
|
|
|
|
||
FAV |
FAV |
|
|
|
|
|
|
|
|
BROWSER/ |
--- |
--- |
--- |
Setup |
--- |
--- |
--- |
||
BROWSER |
|||||||||
SET UP |
|
|
|
|
|
|
|
||
|
|
|
|
|
|
|
|
||
THINC/ |
THINC |
s TV |
s TV |
s TV |
Top menu |
s TV |
s TV |
s TV |
|
TOP MENU |
|||||||||
|
|
|
|
|
|
|
|
||
TV GUIDE |
TV Guide |
Guide |
Guide |
--- |
Guide |
--- |
--- |
Guide |
|
INFO |
Guide Info |
Info |
Info |
--- |
Display |
--- |
--- |
Info |
|
ENTER |
Enter |
Select |
Select |
--- |
Select |
--- |
--- |
Select |
|
B |
Menu select |
Cursor up |
Cursor up |
--- |
Cursor up |
--- |
--- |
Cursor up |
|
up |
|||||||||
|
|
|
|
|
|
|
|
||
b |
Menu select |
Cursor |
Cursor |
--- |
Cursor |
--- |
--- |
Cursor |
|
down |
down |
down |
down |
down |
|||||
|
|
|
|
||||||
|
Menu select |
|
|
|
|
|
|
|
|
C 3 # c |
left/right |
Cursor left/ |
Cursor left/ |
--- |
Cursor left/ |
--- |
--- |
Cursor |
|
|
|||||||||
3 Back |
right |
right |
right |
left/right |
|||||
|
|
|
|
||||||
|
|
|
|
|
|
|
|
||
|
# Next |
|
|
|
|
|
|
|
|
EXIT/ |
Exit |
Exit |
Exit |
--- |
DVD clear |
--- |
--- |
Exit |
|
DVD CLEAR |
|||||||||
|
|
|
|
|
|
|
|
||
PAGE +/– |
Page up/ |
Page up/ |
Page up/ |
--- |
Page up/ |
--- |
--- |
--- |
|
down |
down |
down |
down |
||||||
|
|
|
|
|
|||||
VOL +/– |
Volume up/ |
Volume up/ |
Volume up/ |
Volume up/ |
Volume up/ |
Volume up/ |
Volume |
Volume |
|
down*1 |
down*1 |
down*1 |
down*1 |
down*1 |
down*1 |
up/down*1 |
up/down*1 |
||
|
|||||||||
14
HM196 (E/F) Web 213:276

HM196_EN.book Page 15 Tuesday, May 30, 2006 2:18 PM
Chapter 2: Using the remote control
|
|
|
|
|
• DVD/VCR |
|
|
|
|
REMOTE |
Toshiba TV |
CABLE |
SAT |
VCR |
combo |
Receiver/ |
CD |
PVR |
|
CONTROL KEY |
(TV) |
(satellite) |
• DVD/ |
AMP |
(AUDIO) |
||||
|
|
|
|||||||
|
|
|
|
|
DVD-R |
|
|
|
|
CH RTN/ |
Previous |
Previous |
Previous |
--- |
DVD RTN |
--- |
--- |
--- |
|
DVD RTN |
channel |
channel |
channel |
||||||
|
|
|
|
|
|||||
RECALL |
On-screen |
s TV |
s TV |
s TV |
s TV |
s TV |
s TV |
s TV |
|
display |
|||||||||
|
|
|
|
|
|
|
|
||
MUTE |
Sound mute |
Sound |
Sound |
Sound |
Sound |
Sound |
Sound |
Sound |
|
mute*1 |
mute*1 |
mute*1 |
mute*1 |
mute*1 |
mute*1 |
mute*1 |
|||
|
|
||||||||
SLOW |
Slow FWD* |
--- |
--- |
Slow FWD |
Slow FWD |
--- |
--- |
SlowFWD |
|
Slow REW* |
Slow REW |
Slow REW |
Slow REW |
||||||
|
|
|
|
|
|||||
SKIP z |
DAY+ |
--- |
--- |
--- |
Skip FWD |
--- |
Skip FWD |
--- |
|
SKIP Z |
DAY– |
Skip REW |
Skip REW |
||||||
|
|
|
|
|
|||||
REW |
Rewind* |
Rewind |
Rewind |
Rewind |
Rewind |
--- |
Rewind |
Rewind |
|
PAUSE/STEP |
Pause* |
Pause |
Pause |
Pause |
Pause |
--- |
Pause |
Pause |
|
PLAY |
Play* |
Play |
Play |
Play |
Play |
--- |
Play |
Play |
|
FF |
Fast FWD* |
Fast FWD |
Fast FWD |
Fast FWD |
Fast FWD |
--- |
Fast FWD |
Fast FWD |
|
C.CAPTION |
C.Caption |
--- |
TV/SAT |
TV/VCR |
---*3 |
--- |
--- |
--- |
|
TV/VCR |
|||||||||
|
|
|
|
|
|
|
|
||
DISC/AM/FM |
--- |
--- |
--- |
--- |
---*4 |
AM/FM |
Disc SKIP |
Instant |
|
Disc select |
replay |
||||||||
|
|
|
|
|
|
|
|||
STOP |
Stop* |
Stop |
Stop |
Stop |
Stop |
--- |
Stop |
Stop |
|
|
REC Menu |
Record |
Record |
Record |
Record |
|
|
Record |
|
REC |
(Single |
(Double |
(Double |
(Double |
(Double |
--- |
--- |
(Double |
|
|
click) |
click) |
click) |
click) |
click)*2 |
|
|
click) |
|
CH B b |
Channel up/ |
Channel up/ |
Channel up/ |
Channel |
Channel |
Channel |
--- |
Channel |
|
down |
down |
down |
up/down |
up/down |
up/down |
up/down |
|||
|
|
||||||||
POP |
Split |
s TV |
s TV |
s TV |
s TV |
s TV |
s TV |
s TV |
|
FREEZE |
Freeze |
s TV |
s TV |
s TV |
s TV |
s TV |
s TV |
s TV |
|
|
|
|
|
|
|
|
|
|
Note:
•“---” = key does not send a signal in that remote control mode.
•“s TV” = key will affect the TV, even though the remote control is in another mode.
•* Not available for your TV.
*1 Volume will affect the TV by default. When the volume is unlocked, all the devices will have their own volume if their ID has volume data. The AUDIO modes (receiver, CD) will have their own volume if volume lock is set on TV, CABLE/SAT, VCR/PVR, or DVD mode. See “Using the volume lock feature” (- page 17).
*2 DVD/DVD-R : RECORD is only for DVD-R, no function is picked for DVD. *3 DVD/VCR combo : TV/VCR
*4 DVD/VCR combo : DVD/VCR
15
HM196 (E/F) Web 213:276
HM196_EN.book Page 16 Tuesday, May 30, 2006 2:18 PM
Chapter 2: Using the remote control
Using the remote control to operate your other devices
Your TV remote control has one dedicated TV mode and three programmable multi-brand modes: CABLE/SAT, DVD, and VCR/PVR. The default device modes and programmable device modes are listed below.
Note: The TV remote control is preprogrammed to operate most Toshiba devices. To operate a non-Toshiba device or a Toshiba device that the remote control is not preprogrammed to operate, you will need to program the remote control. See “Programming the remote control to operate your other devices” (at right).
MODE SELECT Default device mode control (before programming)
TV |
Toshiba TV |
|
|
CABLE/SAT |
Toshiba DST 3100 Satellite receiver |
|
|
DVD |
Orion DVD |
|
|
VCR/PVR |
Toshiba VCR |
|
|
|
|
MODE SELECT Device mode control after programming
TV |
Toshiba TV |
CABLE/SAT |
|
|
|
DVD |
Multi-brand video/audio devices |
|
|
VCR/PVR |
|
|
|
Note: Although your new TV’s remote control includes codes for many devices, it may not include codes for some or all of the features on certain devices you wish to control. If you are unable to program the TV’s remote control to operate your device or some of the features on that device, use the device’s remote control or the controls on the device.
Programming the remote control to operate your other devices
Device code setup
1 Find the code for your device brand in the remote control device code table on pages 18–21.
If more than one code is listed, try each one separately until you find one that works.
2 Press the applicable mode select button (CABLE/SAT, DVD, or VCR/PVR), until the device button LED blinks 3 times.
3 While holding down E, press the Number buttons to enter the device category code “0–5” shown below plus the four-digit code for your device.
Category |
Device code |
|
TV (Toshiba) |
0 |
|
|
|
|
Cable box |
|
|
Satellite receiver |
1 |
|
Cable/PVR combo |
||
|
||
DBS/PVR combo (1) |
|
|
|
|
|
DVD |
2 |
|
|
|
|
VCR |
|
|
PVR |
3 |
|
DBS/PVR combo (2) |
|
|
|
|
|
Audio Amp |
4 |
|
Audio Amp/Tuners |
||
|
||
|
|
|
CD player |
5 |
|
|
|
•If a valid code is entered, the device button LED will blink twice.
•If an invalid code is entered, the device button LED will blink one long blink.
4 Point the remote control at the device and press pto test the code.
•If the device responds to the remote control, you have entered the correct code.
•If the device does not respond to the remote control, repeat steps 3 and 4 using another code.
Note: After programming the remote control, make sure all necessary keys on the TV remote control (in addition to p) operate your device. If some keys are not operational, repeat the device code setup using another code (if other codes are listed for your device). If, after trying all listed codes, the necessary keys do not operate your device, use the device’s original remote control.
16
HM196 (E/F) Web 213:276

HM196_EN.book Page 17 Tuesday, May 30, 2006 2:18 PM
Chapter 2: Using the remote control
5 To control the TV, press the “TV” mode select button.
Note:
•Although the TV remote control includes codes for many devices, it may not include codes for some or all of the features on certain devices you want to control. If you are unable to program the TV remote control to operate your device or some of the features on that device, use the device’s original remote control (or the control buttons on the device).
•Every time you change the batteries you will need to reprogram the remote control.
•Some newer VCRs respond to either of two codes. These VCRs have a switch labeled “VCR1/VCR2.” If your VCR has this kind of switch and does not respond to the codes for your VCR brand, set the switch to the other position (“VCR1” or “VCR2”) and reprogram the remote control.
Searching and sampling the code of a device (8500)
If you do not know the device code for a particular device, you can cycle the remote control through the available codes for that device mode and sample the functions to find the code that operates the target device. The keys available to be sampled, provided they are applicable to that mode, are p, 1, z, <, and S. Invalid keys will be ignored while in program mode.
To cycle through each available device code and sample its functions:
1 Press device button to select the mode you want to set up.
2 While holding down E, press 8, 5, 0, 0. The remote control will enter program mode.
3 Point the remote control at the target device and press p (or other function buttons that are available to be sampled).
4 If the device responds to the remote control:
Press Eto store the device code. The device button LED will blink two times and the remote control will exit the program mode.
If the device does not respond to the remote control: Press B, and then press p. Repeat this step until the
device responds to the remote control, and then press
E.
Note: When a search cycle is completed, the device button LED will blink three times. The remote control will begin to cycle through the available codes again. If no key is pressed within 10 seconds during programming, the remote control will exit the program mode and return to the previous code.
Using the volume lock feature (8000)
By default (factory setting), the remote control’s volume keys (zZand W) are locked to the “TV” device mode.
The remote control will operate the TV’s volume, even when “TV” is not the current device mode.
If you unlock the remote control’s volume keys, each device mode will have its own volume (if the device ID has volume data). The remote control will operate the volume of the device associated with the current device mode.
If you lock the remote control’s volume keys to a specific device mode, the remote control will operate the volume of the device associated with the locked mode, even when the locked mode is not the current device mode.
See “Using the remote control to operate your other devices” on page 16.
To lock the remote control’s volume keys to a specific mode (CABLE/SAT in this example):
1 Press CABLE/SAT.
2 While holding down the Ebutton, press 8, 0, 0, 0.
3 Press z. The CABLE/SAT button LED will blink two times (locked).
The remote control’s volume keys will now operate the volume of the device associated with the CABLE/SAT mode, even when CABLE/SAT is not the current device mode.
To unlock the remote control’s volume keys:
1 While holding down E, press 8, 0, 0, 0.
2 Press Z. The CABLE/SAT button LED will blink four times (unlocked).
Operational feature reset (8900)
This feature clears all programmed remote control features not related to “Device code setup” and resets the volume lock to the “TV” device mode.
To reset the remote control:
While holding down E, press 8, 9, 0, 0. The Device button LED will respond with four blinks.
17
HM196 (E/F) Web 213:276

HM196_EN.book Page 18 Tuesday, May 30, 2006 2:18 PM
Multi-brand remote control device codes
TVs
Brand |
Code |
Toshiba |
1524 |
Cable boxes
Brand |
Code |
ABC |
0003, 0008 |
Americast |
0899 |
Bell South |
0899 |
Clearmaster |
0883 |
ClearMax |
0883 |
Coolmax |
0883 |
Digeo |
1187 |
Director |
0476 |
GoldStar |
0144 |
Hamlin |
0009, 0273 |
Memorex |
0000 |
Motorola/ |
|
General Instrument/ |
|
Jerrold |
0276, 0476, 0810 |
Motorola |
1187, 1376 |
General Instrument/ |
|
Jerrold |
0003 |
Multitech |
0883 |
Pace |
0008, 0237, 1877 |
Panasonic |
0000, 0107 |
Paragon |
0000 |
Philips |
0317, 1305 |
Pioneer |
0144, 0533, 0877, |
|
1877 |
Pulsar |
0000 |
Quasar |
0000 |
RadioShack |
0883 |
Regal |
0273, 0279 |
Runco |
0000 |
Samsung |
0144 |
Scientific Atlanta |
0008, 0477, 0877, |
|
1877 |
Sony |
1006 |
Starcom |
0003 |
Supercable |
0276 |
Supermax |
0883 |
Torx |
0003 |
Toshiba |
0000 |
Tristar |
0883 |
V2 |
0883 |
Viewmaster |
0883 |
Vision |
0883 |
Vortex View |
0883 |
Zenith |
0000, 0525, 0899 |
Satellite receivers
Brand |
Code |
AlphaStar |
0772 |
Chaparral |
0216 |
Crossdigital |
1109 |
18
Chapter 2: Using the remote control
DirecTV |
0099, 0247, 0392, |
|
0566, 0639, 0724, |
|
0749, 0819, |
|
1076, 1108, 1109, |
|
1142, 1377, 1392, |
|
1414, 1442, |
|
1443, 1444, 1609, |
|
1639, 1640, 1749, |
|
1856 |
Dish Network System |
0775, 1005, 1170, |
|
1505, 1775 |
Dishpro |
0775, 1005, 1505, |
|
1775 |
Echostar |
0775, 1005, 1170, |
|
1505, 1775 |
Expressvu |
0775, 1775 |
GE |
0392, 0566 |
GOI |
0775, 1775 |
Goodmans |
1246 |
Hisense |
1535 |
Hitachi |
0819, 1250 |
HTS |
0775, 1775 |
Hughes |
0749, 1442, 1749 |
Hughes Network |
|
Systems |
0749, 1142, 1442, |
|
1443, 1444, 1749 |
iLo |
1535 |
Janeil |
0152 |
JVC |
0775, 1170, 1775 |
LG |
1226, 1414 |
Magnavox |
0722, 0724 |
Memorex |
0724 |
Mitsubishi |
0749 |
Motorola/General |
|
Instrument/Jerrold |
0869 |
Motorola |
0856 |
NEC |
0102, 0178, 1270 |
Next Level |
0869 |
Panasonic |
0152, 0247, 0701 |
Paysat |
0724 |
Philips |
0099, 0722, 0724, |
|
0749, 0819, 1076, |
|
1142, 1442, |
|
1749 |
Pioneer |
1442 |
Proscan |
0392, 0566 |
Proton |
1535 |
RadioShack |
0869 |
RCA |
0143, 0392, 0566, |
|
0855, 1392 |
Samsung |
1108, 1109, 1142, |
|
1276, 1377, 1442, |
|
1609 |
Sanyo |
1219 |
Sony |
0639, 1639, 1640 |
Star Choice |
0869 |
Tivo |
1142, 1442, 1443, |
|
1444 |
Toshiba |
0082, 0749, 0790, |
|
0819, 1285, 1286, |
|
1287, 1289, 1749, |
|
1857, 1858 |
UltimateTV |
1392, 1640 |
Uniden |
0722, 0724 |
US Digital |
1535 |
USDTV |
1535 |
Voom |
0869 |
Zenith |
1856 |
DVDs
Brand |
Code |
Aiwa |
0641 |
Akai |
0695, 0770, 1089 |
Alco |
0790 |
Allegro |
0869 |
Amphion Media |
|
Works |
0872 |
AMW |
0872 |
Apex Digital |
0672, 0717, 0755, |
|
0794, 0796, 0797, |
|
1004, 1020, |
|
1056, 1061, 1100 |
Aspire Digital |
1168, 1407 |
Audiovox |
0790, 1041, 1072 |
Axion |
1072 |
B & K |
0655, 0662 |
Blaupunkt |
0717 |
Blue Parade |
0571 |
Broksonic |
0695 |
California Audio Labs |
0490 |
Cinea |
0831 |
CineVision |
0833, 0869, 0876 |
Citizen |
1277 |
Coby |
0778, 0852, 1086, |
|
1107, 1177, 1351 |
Craig |
0831 |
Curtis Mathes |
1087 |
CyberHome |
0816, 0874, 1023, |
|
1024, 1117, 1129 |
Daewoo |
0705, 0784, 0833, |
|
0869, 1169, 1172, |
|
1234, 1242 |
Daytek |
0872 |
Denon |
0490, 0634 |
Desay |
1407 |
Disney |
0675, 1270 |
Dual |
1068, 1085 |
Durabrand |
1127 |
DVD2000 |
0521 |
Emerson |
0591, 0675, 0821 |
Enterprise |
0591 |
Fisher |
0670 |
Funai |
0675, 1334 |
Gateway |
1073, 1077, 1158 |
GE |
0522, 0717, 0815 |
Go Video |
0715, 0741, 0744, |
|
0783, 0833, 0869, |
|
1044, 1075, |
|
1099, 1158, 1304, |
|
1730 |
GoVision |
1072 |
GoldStar |
0741 |
GPX |
0699, 0769 |
Gradiente |
0490 |
Greenhill |
0717 |
Grundig |
0539 |
Harman/Kardon |
0582, 0702 |
Hitachi |
0573, 0664 |
Hiteker |
0672 |
iLo |
1348 |
Initial |
0717 |
Integra |
0571, 0627 |
Jaton |
1078 |
HM196 (E/F) Web 213:276

HM196_EN.book Page 19 Tuesday, May 30, 2006 2:18 PM
JBL |
0702 |
JSI |
1423 |
JVC |
0558, 0623, 0867, |
|
1164 |
jWin |
1049, 1051 |
Kawasaki |
0790 |
Kenwood |
0490, 0534 |
KLH |
0717, 0790, 1020, |
|
1149 |
Konka |
0711 |
Koss |
0651, 1423 |
Landel |
0826 |
Lasonic |
0798, 1173 |
Lecson |
1533 |
Lenoxx |
1127 |
LG |
0591, 0741, 0801, |
|
0869 |
LiteOn |
1058, 1158, 1416, |
|
1440 |
Loewe |
0511 |
Magnavox |
0503, 0539, 0646, |
|
0675, 0821 |
Malata |
0782, 1159 |
Marantz |
0539 |
McIntosh |
1533 |
Memorex |
0695, 0831, 1270 |
Microsoft |
0522 |
Mintek |
0717, 0839 |
Mitsubishi |
0521, 1521 |
Momitsu |
1082 |
NAD |
0591, 0692, 0741 |
NEC |
0785 |
Nesa |
0717 |
Next Base |
0826 |
NexxTech |
1402 |
Norcent |
0872, 1003, 1107, |
|
1265 |
Onkyo |
0503, 0627, 0792 |
Oritron |
0651 |
Panasonic |
0490, 0503, 0703, |
|
1362, 1462, 1490, |
|
1762 |
Philips |
0503, 0539, 0646, |
|
0675, 1267, 1354 |
PianoDisc |
1024 |
Pioneer |
0525, 0571, 0631 |
Polaroid |
1020, 1061, 1086 |
Polk Audio |
0539 |
Portland |
0770 |
Presidian |
0675 |
Proceed |
0672 |
Proscan |
0522 |
ProVision |
0778 |
Qwestar |
0651 |
RCA |
0522, 0571, 0717, |
|
0790, 0822 |
Rio |
0869 |
RJTech |
1360 |
Rotel |
0623 |
Rowa |
0823 |
Sampo |
0698, 0752 |
Samsung |
0490, 0573, 0744, |
|
0820, 1044, 1075 |
Sansui |
0695 |
Sanyo |
0670, 0695, 0873 |
Sensory Science |
1158 |
Chapter 2: Using the remote control
Sharp |
0630, 0675, 0752, |
|
1256 |
Sharper Image |
1117 |
Sherwood |
0633, 0770, 1043, |
|
1077 |
Shinsonic |
0533, 0839 |
Sonic Blue |
0869, 1099 |
Sony |
0533, 0864, 1033, |
|
1431, 1533 |
Sungale |
1074 |
Superscan |
0821 |
SVA |
0860, 1105 |
Sylvania |
0675, 0821 |
Symphonic |
0675 |
Teac |
0790, 0809 |
Technics |
0490, 0703 |
Technosonic |
0730 |
Techwood |
0692 |
Theta Digita |
0571 |
Toshiba |
0503, 0695, 1154, |
|
1854 |
Tredex |
0800, 0803, 0804 |
Urban Concepts |
0503 |
US Logic |
0839 |
Venturer |
0790 |
Vizio |
1064, 1226 |
Xbox |
0522 |
Yamaha |
0490, 0539, 0545 |
Yamakawa |
0872 |
Zenith |
0503, 0591, 0741, |
|
0869 |
Zoece |
1265 |
VCRs
Brand |
Code |
ABS |
1972 |
Admiral |
0048, 0209, 0479 |
Adventura |
0000 |
Aiko |
0278 |
Aiwa |
0000, 0037, 0124 |
Akai |
0041, 0061, 0175 |
Alienware |
1972 |
America Action |
0278 |
American High |
0035 |
Asha |
0240 |
Audiovox |
0037, 0278 |
Beaumark |
0240 |
Bell & Howell |
0104 |
Broksonic |
0002, 0121, 0184, |
|
0209, 0479 |
Calix |
0037 |
Canon |
0035 |
Carver |
0081 |
CCE |
0072, 0278 |
Citizen |
0037, 0278 |
Colt |
0072 |
Craig |
0037, 0047, 0072, |
|
0240 |
Curtis Mathes |
0035, 0041, 0060, |
|
0162 |
Cybernex |
0240 |
CyberPower |
1972 |
Daewoo |
0045, 0278 |
Dell |
1972 |
Denon |
0042 |
DirecTV |
0739 |
Durabrand |
0038, 0039 |
Dynatech |
0000 |
Electrohome |
0037, 0043 |
Electrophonic |
0037 |
Emerex |
0032 |
Emerson |
0000, 0002, 0037, |
|
0043, 0061, 0121, |
|
0184, 0209, |
|
0212, 0278, 0479, |
|
0593, 1593 |
Fisher |
0047, 0104 |
Fuji |
0033, 0035 |
Funai |
0000, 0593, 1593 |
Garrard |
0000 |
Gateway |
1972 |
GE |
0035, 0060, 0065, |
|
0240, 0807 |
Go Video |
0240, 0432, 0526 |
GoldStar |
0037, 0038 |
Gradiente |
0000 |
Harley Davidson |
0000 |
Harman/Kardon |
0038, 0075, 0081 |
Harwood |
0072 |
Headquarter |
0046 |
Hewlett Packard |
1972 |
HI-Q |
0047 |
Hitachi |
0000, 0041, 0042, |
|
0065, 0089, 0105 |
Howard Computers |
1972 |
HP |
1972 |
Hughes Network |
0042, 0739 |
Systems |
|
Humax |
0739 |
Hush |
1972 |
iBUYPOWER |
1972 |
Jensen |
0041 |
JVC |
0008, 0041, 0067 |
KEC |
0037, 0278 |
Kenwood |
0038, 0041, 0067 |
KLH |
0072 |
Kodak |
0035, 0037 |
Linksys |
1972 |
Lloyd's |
0000 |
Logik |
0072 |
LXI |
0037 |
Magnasonic |
0593 |
Magnavox |
0000, 0035, 0039, |
|
0081, 0149, 0563, |
|
0593 |
Magnin |
0240 |
Marantz |
0035, 0081 |
Marta |
0037 |
Matsushita |
0035, 0162 |
Media Center PC |
1972 |
MEI |
0035 |
Memorex |
0000, 0035, 0037, |
|
0039, 0046, 0047, |
|
0048, 0104, |
|
0162, 0209, 0240, |
|
0479 |
MGA |
0043, 0061, 0240 |
MGN Technology |
0240 |
Microsoft |
1972 |
Mind |
1972 |
Minolta |
0042, 0105 |
(continued)
19
HM196 (E/F) Web 213:276
HM196_EN.book Page 20 Tuesday, May 30, 2006 2:18 PM
Mitsubishi |
0043, 0061, 0067, |
|
0075, 0173, 0807 |
Motorola |
0035, 0048 |
MTC |
0000, 0240 |
Multitech |
0000, 0072 |
NEC |
0038, 0040, 0041, |
|
0067, 0104 |
Nikko |
0037 |
Nikon |
0034 |
Niveus Media |
1972 |
Noblex |
0240 |
Northgate |
1972 |
Olympus |
0035, 0226 |
Onkyo |
0222 |
Optimus |
0037, 0048, 0104, |
|
0162, 0432, 0593, |
|
1062 |
Orion |
0002, 0184, 0209, |
|
0479 |
Panasonic |
0035, 0077, 0162, |
|
0225, 0226, 0616, |
|
1062 |
Penney |
0035, 0037, 0038, |
|
0040, 0042, 0240 |
Pentax |
0042, 0065, 0105 |
Philco |
0035 |
Philips |
0035, 0081, 0618, |
|
0739, 1081, 1181 |
Pilot |
0037 |
Pioneer |
0067 |
Polk Audio |
0081 |
Profitronic |
0240 |
Proscan |
0060 |
Protec |
0072 |
Pulsar |
0039 |
Quarter |
0046 |
Quartz |
0046 |
Quasar |
0035, 0077, 0162 |
RadioShack |
0000 |
Radix |
0037 |
Randex |
0037 |
RCA |
0042, 0060, 0065, |
|
0077, 0105, 0149, |
|
0240, 0807, |
|
0880 |
Realistic |
0000, 0035, 0037, |
|
0046, 0047, 0048, |
|
0104 |
ReplayTV |
0614, 0616 |
Ricavision |
1972 |
Ricoh |
0034 |
Runco |
0039 |
Salora |
0075 |
Samsung |
0045, 0240, 0739 |
Sanky |
0039, 0048 |
Sansui |
0000, 0041, 0067, |
|
0209, 0479 |
Sanyo |
0046, 0047, 0104, |
|
0159, 0240 |
Scott |
0043, 0045, 0121, |
|
0184, 0210, 0212 |
Sears |
0000, 0035, 0037, |
|
0042, 0046, 0047, |
|
0104, 0105 |
Sharp |
0048, 0807, 0848 |
Shintom |
0072 |
Shogun |
0240 |
20
Chapter 2: Using the remote control
Singer |
0072 |
Sonic Blue |
0614, 0616 |
Sony |
0000, 0032, 0033, |
|
0034, 0035, 0636, |
|
1032, 1972 |
Stack 9 |
1972 |
STS |
0042 |
Sylvania |
0000, 0035, 0043, |
|
0081, 0593, 1593 |
Symphonic |
0000, 0593, 1593 |
Systemax |
1972 |
Tagar Systems |
1972 |
Tatung |
0041 |
Teac |
0000, 0041 |
Technics |
0035, 0162 |
Teknika |
0000, 0035, 0037 |
Thomas |
0000 |
Tivo |
0618, 0636, 0739, |
|
1996 |
TMK |
0240 |
Toshiba |
0043, 0045, 0209, |
|
0210, 0212, 0366, |
|
0845, 1008, |
|
1145, 1972, 1996 |
Totevision |
0037, 0240 |
Touch |
1972 |
Unitech |
0240 |
Vector |
0045 |
Vector Research |
0038, 0040 |
Video Concepts |
0040, 0045, 0061 |
Videomagic |
0037 |
Videosonic |
0240 |
Viewsonic |
1972 |
Villain |
0000 |
Voodoo |
1972 |
Wards |
0000, 0035, 0042, |
|
0047, 0048, 0060, |
|
0072, 0081, |
|
0149, 0212, 0240 |
White Westinghouse |
0072, 0209 |
XR-1000 |
0000, 0035, 0072 |
Yamaha |
0038 |
Zenith |
0000, 0033, 0034, |
|
0039, 0209, 0479, |
|
1139 |
ZT Group |
1972 |
PVRs
Brand |
Code |
ABS |
1972 |
Alienware |
1972 |
CyberPower |
1972 |
Dell |
1972 |
Direc TV |
0739 |
Gateway |
1972 |
Hewlett Packard |
1972 |
Howard Computers |
1972 |
HP |
1972 |
Hughes Network |
|
Systems |
0739 |
Humax |
0739 |
Hush |
1972 |
iBUYPOWER |
1972 |
Linksys |
1972 |
Media Center PC |
1972 |
Microsoft |
1972 |
Mind |
1972 |
Niveus Media |
1972 |
Northgate |
1972 |
Panasonic |
0616 |
Philips |
0618, 0739 |
RCA |
0880 |
ReplayTV |
0614, 0616 |
Sonic Blue |
0614, 0616 |
Sony |
0636, 1972 |
Stack 9 |
1972 |
Systemax |
1972 |
Tagar Systems |
1972 |
Tivo |
0618, 0636, 0739 |
Toshiba |
1008, 1972 |
Touch |
1972 |
Viewsonic |
1972 |
Voodoo |
1972 |
ZT Group |
1972 |
Cable/PVR Combo
Brand |
Code |
Americast |
0899 |
Digeo |
1187 |
Motorola/ |
|
General Instrument/ |
|
Jerrold |
0476, 0810 |
Motorola |
1187, 1376 |
Pace |
0237, 1877 |
Pioneer |
0877, 1877 |
Scientific Atlanta |
0877, 1877 |
Sony |
1006 |
Supercable |
0276 |
Zenith |
0899 |
DBS/PVR Combo (1)
Brand |
Code |
DirecTV |
0099, 0392, 0639, |
|
1076, 1142, 1377, |
|
1392, 1442, |
|
1443, 1444, 1640 |
Dish Network System |
0775, 1505 |
Dishpro |
0775, 1505 |
Echostar |
0775, 1170, 1505 |
Expressvu |
0775 |
Hughes Network |
|
Systems |
1142, 1442, 1443, |
|
1444 |
JVC |
1170 |
Motorola |
0869 |
Philips |
1142, 1442 |
Proscan |
0392 |
RCA |
1392 |
Samsung |
1442 |
Sony |
0639, 1640 |
Star Choice |
0869 |
DBS/PVR Combo (2)
Brand |
Code |
Hughes Network |
|
Systems |
0739 |
Philips |
0739 |
Samsung |
0739 |
HM196 (E/F) Web 213:276
HM196_EN.book Page 21 Tuesday, May 30, 2006 2:18 PM
Audio Amp
Brand |
Code |
Adcom |
0577, 1100 |
Bose |
0674 |
Carver |
0892 |
Durabrand |
1561 |
Elan |
0647 |
GE |
0078 |
Harman/Kardon |
0892 |
JVC |
0331 |
LeftCoast |
0892 |
Lenoxx |
1561 |
Luxman |
0165 |
Marantz |
0321, 0892 |
McIntosh |
0251 |
Nakamichi |
0321 |
NEC |
0264 |
Optimus |
0395, 0823 |
Parasound |
0246 |
Philips |
0892 |
Pioneer |
0823 |
PolkAudio |
0892 |
RCA |
0823 |
Realistic |
0395 |
Sansui |
0321 |
Shure |
0264 |
Sony |
0689, 0815, 1126 |
Soundesign |
0078, 0211 |
Victor |
0331 |
Wards |
0078, 0211 |
Yamaha |
0133, 0143, 0354, |
|
0504 |
CD players
Brand |
Code |
Adcom |
0234 |
Aiwa |
0124, 0157 |
Akai |
0156 |
Arcam |
0157 |
Audio-Technica |
0170 |
Burmester |
0420 |
California Audio Labs |
0029, 0303 |
Carver |
0157, 0299 |
Denon |
0003, 0034 |
DKK |
0000 |
DMX Electronics |
0157 |
Garrard |
0393, 0420 |
Genexxa |
0032 |
Harman/Kardon |
0083, 0157, 0173 |
Hitachi |
0032, 0139 |
Integra |
0101 |
JVC |
0072, 0655, 1294 |
Kenwood |
0028, 0037, 0190, |
|
0626 |
Krell |
0157 |
Linn |
0157 |
Magnavox |
0038, 0157 |
Marantz |
0029, 0038, 0157, |
|
0180, 0435, 0626 |
MCS |
0029 |
MGA |
0083 |
Miro |
0000 |
Mission |
0157 |
Mitsubishi |
0083 |
Chapter 2: Using the remote control
MTC |
0420 |
NAD |
0019, 0299 |
NEC |
0234 |
Nikko |
0170 |
NSM |
0157 |
Onkyo |
0101, 0102, 0138, |
|
0381, 1327 |
Optimus |
0000, 0032, 0037, |
|
0087, 0420, 0468 |
Panasonic |
0029, 0303, 0388, |
|
0752 |
Parasound |
0420 |
Philips |
0157, 0274, 0626 |
Pioneer |
0032, 0468, 0551, |
|
1062, 1087 |
Polk Audio |
0157 |
Proceed |
0420 |
Proton |
0157 |
QED |
0157 |
Quad |
0157 |
Quasar |
0029 |
RCA |
0032, 0053, 0420, |
|
0468, 1062 |
Realistic |
0180, 0420 |
Rotel |
0157, 0420 |
SAE |
0157 |
Sansui |
0157 |
Sanyo |
0087 |
Sharp |
0037, 0180 |
Sherwood |
0180 |
Sonic Frontiers |
0157 |
Sony |
0000, 0100, 0185, |
|
0490, 0604, 0605, |
|
0673, 1364 |
Sugden |
0157 |
TAG McLaren |
0157 |
Tascam |
0420 |
Teac |
0180, 0378, 0393, |
|
0420 |
Technics |
0029, 0303 |
Toshiba |
0019, 0299 |
Victor |
0072 |
Wards |
0053, 0157 |
Yamaha |
0036, 0170, 0187, |
|
0490, 1292 |
Audio Amp/Tuners
Brand |
Code |
ADC |
0531 |
Aiwa |
0121, 0189, 1243, |
|
1388, 1405, 1641 |
Akai |
1255, 1512 |
Alco |
1390 |
AMC |
1077 |
Anam |
1074, 1609 |
Apex Digital |
1774 |
Arcam |
1189 |
Audiotronic |
1189 |
Audiovox |
1390 |
Bose |
0639, 1229, 1253, |
|
1933 |
Capetronic |
0531 |
Carver |
0121, 0189, 1189, |
|
1289 |
Delphi |
1414 |
Denon |
0121, 1142, 1360 |
Fisher |
1801 |
Harman/Kardon |
0110, 0189, 0891, |
|
1289, 1304, 1306 |
Hitachi |
1273, 1801 |
Integra |
0135, 1298, 1320 |
JBL |
0110, 1306 |
JVC |
1058, 1374, 1495, |
|
1811 |
Kenwood |
0186, 1313, 1569, |
|
1570 |
KLH |
1390, 1428 |
Linn |
0189 |
Magnavox |
0189, 0531, 1189, |
|
1269, 1514 |
Marantz |
0189, 1189, 1269, |
|
1289 |
McIntosh |
1289 |
Micromega |
1189 |
Mitsubishi |
1393 |
Myryad |
1189 |
Nakamichi |
1313 |
Onkyo |
0135, 0380, 0842, |
|
1298, 1320, 1531 |
Optimus |
0186, 0531, 1023, |
|
1074 |
Panasonic |
0309, 1288, 1308, |
|
1316, 1350, 1363, |
|
1518, 1548, |
|
1633, 1763, 1764 |
Philips |
0189, 1189, 1266, |
|
1269 |
Pioneer |
0014, 0150, 0531, |
|
0630, 1023, 1384 |
Polk Audio |
0189, 1289, 1414 |
Proscan |
1254 |
RCA |
0531, 1023, 1074, |
|
1254, 1390, 1511, |
|
1609 |
Samsung |
1295, 1304, 1500 |
Sansui |
0189, 1189 |
Sanyo |
1469, 1801 |
Sharp |
0186 |
Sherwood |
1077 |
Sirius |
1811 |
Sony |
0168, 1058, 1258, |
|
1406, 1441, 1558, |
|
1622, 1658, |
|
1758, 1759, 1858 |
Stereophonics |
1023 |
Sunfire |
1313 |
Teac |
1074, 1267, 1390, |
|
1528 |
Technics |
0309, 1308, 1518, |
|
1633 |
Thorens |
1189 |
Toshiba |
0135 |
Venturer |
1390 |
Wards |
0014, 0189 |
XM |
1406, 1414 |
Yamaha |
0176, 0186, 1176, |
|
1276, 1331, 1375 |
21
HM196 (E/F) Web 213:276
HM196_EN.book Page 22 Tuesday, May 30, 2006 2:18 PM
Chapter 3: Menu layout and navigation
Main menu layout
The tables below and on the next page provide a quick overview of your TV’s menu system.
To open the main menus (illustrated below), press Yon the remote control or TV control panel.
Icon |
Item |
Option |
|
Applications |
Picture Viewer |
S [Launches the JPEG Picture Viewer] |
|
|
|
||
|
|
Audio Player |
S [Launches the MP3 Audio Player] |
|
|
||
|
|
|
|
|
|
Channel Browser™ |
S [Launches the Channel Browser™] |
|
|
TV Guide On Screen™ |
S [Opens the TV Guide On Screen™ option] |
|
|
||
|
|
Digital CC/Audio Selector |
S [Launches the ATSC Digital CC Selector] (This option is not available |
|
|
if you are not on a digital channel). |
|
|
|
|
|
|
|
|
|
|
|
CableCARD™ |
S Dynamic list of items provided by Cable company. |
|
|
(This option is not available if a CableCARD™ is not inserted.) |
|
|
|
|
|
Video |
Picture Settings |
S [Opens the Picture Settings menu] |
|
|
|
||
|
|
Advanced Picture Settings |
S [Opens the Advanced Picture Settings menu] |
|
|
||
|
|
|
|
|
|
Theater Settings |
S [Opens the Theater Settings menu] |
|
|
|
|
|
|
|
|
Audio |
Audio Settings |
S [Opens the Audio Settings menu] |
|
|
|
||
|
|
Advanced Audio Settings |
S [Opens the advanced Audio Settings menu] |
|
|
||
|
|
|
|
|
|
Audio Setup |
S [Opens the Audio Setup menu] |
|
|
|
|
Preferences |
Closed Caption Mode |
S OFF/CC1/CC2/CC3/CC4/T1/T2/T3/T4 |
|
|
|
||
|
|
Closed Caption Advanced |
S [Opens the Closed Caption Advanced menu] |
|
|
||
|
|
|
|
|
|
Input Labeling |
S [Opens the Input Labeling menu] |
|
|
|
|
|
|
Menu Language |
S English/French/Spanish |
|
|
|
|
|
|
Channel Browser Setup |
S [Opens the Channel Browser Setup menu] |
|
|
|
|
Locks |
Enable Rating Blocking |
S Off/On |
|
|
|
||
|
|
Edit Rating Limits |
S [Opens the Edit Rating Limits menu] |
|
|
||
|
|
|
|
|
|
Channels Block |
S [Opens the Channels block menu] |
|
|
|
|
|
|
Input Lock |
S Off/Video/Video+ |
|
|
|
|
|
|
Front Panel Lock |
S Off/On |
|
|
|
|
|
|
GameTimer™ |
S Off/30 Min/60 Min/90 Min/120 Min |
|
|
New PIN Code |
S [Opens the New PIN Code entry screen] |
|
|
|
|
Setup |
Installation |
S [Opens the Installation menu (- page 23)] |
|
|
|
||
|
|
Sleep Timer |
S [Opens the Sleep Timer menu] |
|
|
||
|
|
|
|
|
|
On/Off Timer |
S [Opens the On/Off Timer menu] |
|
|
|
|
|
|
ColorStream HD1 Audio |
S No/Yes |
|
|
|
|
|
|
HDMI 1 Audio |
S Auto / Digital / Analog |
|
|
|
|
|
|
ColorStream HD2 Audio |
S No/Yes |
|
|
|
|
|
|
HDMI 2 Audio |
S Auto / Digital / Analog |
|
|
|
|
|
|
Slide Show Interval |
S 2 Sec/5 Sec/10 Sec/15 Sec/20 Sec |
|
|
|
|
|
|
Quick Restart™ |
S Off/On |
22
HM196 (E/F) Web 213:276
HM196_EN.book Page 23 Tuesday, May 30, 2006 2:18 PM
Chapter 3: Menu layout and navigation
Setup/Installation menu layout
The Installation menu contains the Terrestrial, Network, TV Guide On Screen™ Setup, Time and Date, and System Status menus.
To open the Installation menu (illustrated below), press Yon the remote control or TV control panel, open the Setup menu, select Installation, and press T.
|
Icon |
Item |
Option |
|
Press Y, |
Terrestrial |
Input Configuration |
S [Opens the Input Configuration menu] |
|
open the |
|
|
Channel Program |
S ANT1 S [Scans for new channels on ANT1] |
|
|
|||
Setup menu, |
|
|
||
|
|
S ANT2 S [Scans for new channels on ANT2] |
||
and then |
|
|
|
|
|
|
|
|
|
|
|
Channel Add/Delete |
S [Opens the Channel Add/Delete menu] |
|
open the |
|
|
||
|
|
|
|
|
|
|
Signal Meter |
S [Opens the Signal Meter menu] |
|
Installation |
|
|
||
sub-menu. |
Network |
Basic Network Setup |
S [Opens the Basic Network Setup menu] |
|
|
|
|
||
|
|
|
E-mail Scheduling Setup |
S [Opens the E-mail Scheduling Setup menu] |
|
|
|
||
|
|
|
|
|
|
|
|
Home File Server Setup |
S [Opens the Home File Server Setup menu] |
|
|
|
|
|
|
|
|
Software Upgrade |
S [Opens the Software Upgrade menu] |
|
|
|
|
|
|
TV Guide On Screen™ Setup |
|
S [Opens the TV Guide On Screen™ Setup |
|
|
|
|
Start |
|
|
|
|
||
|
|
|
menu] |
|
|
|
|
|
|
|
|
|
|
|
|
|
|
|
|
|
Time and Date |
|
|
|
|
|
|
Start Setup |
S [Opens the Time and Date Setup menu] |
|
|
|
||
|
|
|
|
|
|
|
|
|
|
|
System Status |
|
|
|
|
|
|
System Information |
S [Opens the System Information screen] |
|
|
|
||
|
|
|
|
|
|
|
|
|
|
23
HM196 (E/F) Web 213:276
HM196_EN.book Page 24 Tuesday, May 30, 2006 2:18 PM
Chapter 3: Menu layout and navigation
THINC menu layout
The THINC menu will not be part of the main menu, but will be viewable by pressing Con the remote control. It will contain a list of special features offered by the TV; Picture Viewer, Audio Player, Channel Browser, Favorites Browser, and TV Guide On Screen.
THINC Applications
Picture Viewer
Audio Player
Channel Browser
Favorites Browser
TV Guide On Screen
Navigating the menu system
You can use the buttons on the remote control or TV control panel to access and navigate your TV’s on-screen menu system.
•Press Yto open the menu system.
•When a menu is open, use the up/down/left/right arrow buttons (BbC c) on the remote control or TV control panel to move in the corresponding direction in the menu.
•Press Tto save your menu settings or select a highlighted item. (A highlighted menu item appears in a different color in the menu.)
•All menus close automatically if you do not make a selection within 60 seconds, except the signal meter menu, which closes automatically after about 5 minutes.
•To close a menu instantly, press O.
Note: The menu backgrounds may sometimes appear black, depending on the signal the TV is receiving. This is not a sign of malfunction.
Applications
Picture Viewer
Audio Player
Channel Browser
TV Guide On Screen
Digital CC/Audio Selector
CableCARD
 Navigate ENTER Select CH RTN Back EXIT Exit
24
HM196 (E/F) Web 213:276
HM196_EN.book Page 25 Tuesday, May 30, 2006 2:18 PM
Chapter 4: Setting up your TV
Selecting the menu language
You can choose from three different languages (English, French, and Spanish) for the on-screen display of menus and messages.
Note: The TV Guide On Screen™ menus are in English, regardless of the language selected in this menu.
To select the menu language:
1 |
Press Yand open the Preferences menu. |
||||||||||||||||||||
2 |
Highlight Menu Language and press c. |
||||||||||||||||||||
3 |
Press B or b to select your preferred menu language and |
||||||||||||||||||||
|
press T. |
|
|
|
|
|
|
|
|
|
|
|
|||||||||
|
|
|
|
|
|
|
|
|
|
|
|
|
|
|
|
|
|
|
|
|
|
|
|
|
|
|
|
|
|
|
|
|
|
|
|
|
|
|
|
|
|
|
|
|
|
|
|
|
|
|
|
|
|
|
|
|
|
|
|
|
|||||
|
|
|
|
Preferences |
|
|
|
|
|
|
|
|
|
|
|
||||||
|
|
|
|
Closed Caption Mode |
Off |
|
|
English |
|
|
|
|
|
|
|||||||
|
|
|
|
Closed Caption Advanced |
|
|
Français |
|
|
|
|
|
|
||||||||
|
|
|
|
Input Labeling |
|
|
Español |
|
|
|
|
|
|
||||||||
|
|
|
|
Menu Language English |
|
|
|
|
|
|
|
|
|
|
|
||||||
|
|
|
|
Channel Browser Setup |
|
|
|
|
|
|
|
|
|
|
|
||||||
|
|
|
|
|
|
|
|
||||||||||||||
|
|
|
|
Navigate ENTER Select |
CH RTN Back EXIT Exit |
|
|
||||||||||||||
|
|
|
|
|
|
|
|
|
|
|
|
|
|
|
|
|
|
|
|
|
|
4 Press Oto close the Preferences menu.
Configuring the antenna input sources for the ANT 1 and ANT 2 terminals
To configure the ANT 1 and ANT 2 input sources:
1 Press Yand open the Setup menu.
2 Highlight Installation and press T.
Setup
|
Installation |
|
|
|
|
|
|
|
|
|
Sleep Timer |
|
|
|
|
|
|
|
|
|
On/Off Timer |
|
|
|
|
|
|
|
|
|
ColorStream HD1 Audio |
No |
|
|
|
|
|
|
|
|
HDMI 1 Audio |
|
Auto |
|
|
|
|
|
|
|
ColorStream HD2 Audio |
No |
|
|
|
|
|
|
|
|
HDMI 2 Audio |
|
Auto |
|
|
|
|
|
|
|
Navigate ENTER Select |
CH RTN Back EXIT Exit |
||
|
|
|
|
|
3 (A new set of Installation menu icons will appear, as shown below.) Open the Terrestrial menu, highlight
Input Configuration, and press T.
Note: The Terrestrial menu may not be accessible (items will be “grayed out”) in some instances (for example, if a cable box is connected to the ANT 1 input or if one of the VIDEO modes is the current input during TV Guide
On Screen™ setup).
Terrestrial
Input Configuration
Channel Program
Channel Add/Delete
Signal Meter
 Navigate ENTER Select CH RTN Back EXIT Exit
4 Press B or b to highlight Antenna 1 In, and press C or c to select the input source (Cable or Antenna) for the ANT 1 input on the TV.
Note: If a cable box is connected to the ANT 1 input during TV Guide On Screen™ setup, the entire Terrestrial menu will not be accessible, including the input source for ANT 1, which will automatically display “Cable Box.”
5 Press b to highlight Antenna 2 In and then C or c to select the input source (Cable or Antenna) for the ANT 2 input on the TV, if applicable. If you have not connected anything to the ANT 2 input, skip this step.
Input Configuration
Antenna 1 In |
|
Cable |
||
Antenna 2 In |
|
Antenna |
||
|
|
|
|
|
|
Cancel |
|
Done |
|
6 To save your new settings, highlight Done and press T. To revert to your original settings, highlight Cancel and press T.
25
HM196 (E/F) Web 213:276
HM196_EN.book Page 26 Tuesday, May 30, 2006 2:18 PM
Chapter 4: Setting up your TV
Programming channels into the TV’s channel memory
When you press <or ,on the remote control or TV control panel, your TV will stop only on the channels you programmed into the TV’s channel memory.
Follow the steps below to program channels into the TV’s channel memory.
Programming channels automatically
Your TV can automatically detect all active channels in your area and store them in its memory. After the channels are programmed automatically, you can manually add or erase individual channels in the channel memory.
Note:
•You must configure the antenna input source before programming channels (- page 25).
•If the Antenna 1 input signal type is set to Cable, the automatic channel programming process erases channels that were previously programmed into the TV’s memory.
•If the Antenna 1 input signal type is set to Antenna, the automatic channel programming process adds newly found channels to the existing set of programmed channels (and does NOT erase channels that were previously programmed into the TV’s memory). To remove an antenna source channel from the memory, you must manually delete it.
•To tune the TV to a channel not programmed in the channel memory, you must use the Channel Number buttons on the remote control.
•Programming channels when the antenna input is configured for Cable will take substantially longer than when the antenna input is configured for Antenna. This is normal; however, once channel programming is finished, you should not have to repeat the programming process again unless your Cable TV service lineup changes significantly.
•If you have a CableCARD™ inserted, channel programming for the ANT 1 input is disabled because the CableCARD™ automatically loads the Cable channel list into the TV’s channel memory. See the Installation Guide for details on CableCARD™.
To program channels automatically:
1 |
Configure the antenna input sources, if you have not |
||||||||||||||
|
already done so. (- page 25). |
||||||||||||||
2 |
Press Yand open the Setup menu. |
||||||||||||||
3 |
Highlight Installation and press T. |
||||||||||||||
|
|
|
|
|
|
|
|
|
|
|
|
|
|
|
|
|
|
|
|
|
|
|
|
|
|
|
|
|
|
|
|
|
|
|
|
|
|
|
|
|
|
|
|
|
|
|
|
|
|
|
|
Setup |
|
|
|
|
|
|
|
||||
|
|
|
|
Installation |
|
|
|
|
|
|
|
||||
|
|
|
|
Sleep Timer |
|
|
|
|
|
|
|
||||
|
|
|
|
On/Off Timer |
|
|
|
|
|
|
|
||||
|
|
|
|
ColorStream HD1 Audio |
No |
|
|
|
|
|
|
||||
|
|
|
|
HDMI 1 Audio |
Auto |
|
|
|
|
|
|
||||
|
|
|
|
ColorStream HD2 Audio |
No |
|
|
|
|
|
|
||||
|
|
|
|
HDMI 2 Audio |
Auto |
|
|
|
|
|
|
||||
|
|
|
|
|
|
|
|
|
|||||||
|
|
|
|
Navigate ENTER Select |
CH RTN Back EXIT Exit |
|
|
||||||||
|
|
|
|
|
|
|
|
|
|
|
|
|
|
|
|
4 (A new set of Installation menu icons will appear, as shown below.) Open the Terrestrial menu, highlight
Channel Program, and press T.
Terrestrial
Input Configuration
Channel Program 
Channel Add/Delete
Signal Meter
 Navigate ENTER Select CH RTN Back EXIT Exit
5 Highlight ANT 1 or ANT 2, depending on which antenna input you want to program channels for, and then press T to start automatic channel programming.
ANT 1 Antenna
Scanning channels, please wait ...
52%
Abort
The TV will automatically cycle through all the antenna channels, and store all active channels in the channel memory. While the TV is cycling through the channels, the message “Scanning channels, please wait” appears (as shown above).
6 To cancel channel programming, either press Oor highlight Abort in the on-screen display and press T.
When channel programming is finished, press <or ,to view the programmed channels.
26
HM196 (E/F) Web 213:276
HM196_EN.book Page 27 Tuesday, May 30, 2006 2:18 PM
Chapter 4: Setting up your TV
Manually adding and deleting channels in the channel memory
After automatically programming channels into the channel memory, you can manually add or delete individual channels.
To add or delete channels in the channel memory:
1 |
Press Yand open the Setup menu. |
||||||||||||||
2 |
Highlight Installation and press T. |
||||||||||||||
3 |
(A new set of Installation menu icons will appear, as |
||||||||||||||
|
shown below.) Open the Terrestrial menu, highlight |
||||||||||||||
|
Channel Add/Delete, and then press T. |
||||||||||||||
|
|
|
|
|
|
|
|
|
|
|
|
|
|
|
|
|
|
|
|
|
|
|
|
|
|
|
|
|
|
|
|
|
|
|
|
|
|
|
|||||||||
|
|
|
Terrestrial |
|
|
||||||||||
|
|
|
Input Configuration |
|
|
|
|
|
|
|
|||||
|
|
|
Channel Program |
|
|
|
|
|
|
|
|||||
|
|
|
Channel Add/Delete |
|
|
|
|
|
|
|
|||||
|
|
|
Signal Meter |
|
|
|
|
|
|
|
|
||||
|
|
|
|
|
|||||||||||
|
|
|
Navigate ENTER Select CH RTN Back EXIT Exit |
|
|||||||||||
|
|
|
|
|
|
|
|
|
|
|
|
|
|
|
|
4 The illustration below left shows channels programmed for the ANT 1 antenna input. To view the list of channels programmed for the ANT 2 or Cable box antenna input, press Bb to highlight ANT 2 and press T.
Channel Add/Delete |
|
|
|
|
|
Channel Add/Delete |
|
|
|
|
||||||||
|
|
|
|
|
|
|
|
|
|
|
|
|
|
|
|
|
|
|
|
|
|
2 |
|
Analog |
|
ANT 1 |
|
|
|
|
|
1 |
|
Analog |
|
ANT 1 |
|
|
|
|
|
|
|
|
|
|
|
|
|
|||||||
|
|
|
|
|
|
|
|
|
|
|
|
|
|
|
|
|
|
|
|
|
|
2 - 1 |
|
Digital |
|
ANT 2 |
|
|
|
|
2 |
|
Analog |
|
ANT 2 |
|
|
|
|
|
|
|
|
|
|
|
|
|
|
|
|
|
|
|
|
|
|
|
|
2 - 2 |
|
Digital |
|
|
|
|
|
|
|
3 |
|
Analog |
|
|
|
|
|
|
|
|
|
|
|
|
|
|
|
|
|
|
|
|
|
|
|
|
|
3 |
|
Analog |
|
|
|
|
|
|
4 |
|
Analog |
|
|
|
|
|
|
|
|
|
|
|
|
|
|
|
|
|
|
|
|
|
|
|
|
|
|
4 |
|
Analog |
|
|
|
|
|
|
5 |
|
Analog |
|
|
|
|
|
|
|
|
|
|
|
|
|
|
|
|
|
|
|
|
|
|
|
|
|
|
5 |
|
Analog |
|
|
|
|
|
|
6 |
|
Analog |
|
|
|
|
|
|
|
|
|
|
|
|
|
|
|
|
|
|
|
|
|
|
|
|
|
|
|
|
|
|
|
|
|
|
|
|
|
|
|
|
|
|
6 |
Analog |
|
7 |
Analog |
|
7 |
Analog |
Reset |
8 |
Analog |
Reset |
7 - 1 |
Digital |
Cancel |
9 |
Analog |
Cancel |
8 |
Analog |
Done |
10 |
Analog |
Done |
To add a channel to the channel memory:
Highlight the unchecked box next to the channel number you want to add, and then press Tto check the box.
To manually add digital subchannels on a physical channel:
Use the Channel Numbers and the Dash (=) on the remote control to enter the channel number (for example, 56–1).
If the channel is found, the number will be added to the list and the box will be checked.
If the channel is not found, a message will appear.
To remove a channel from the channel memory:
Highlight the checked box next to the channel number you want to remove, and then press Tto uncheck the box.
To save your new settings:
Highlight Done and press T.
To revert to your original settings:
Highlight Cancel and press Tbefore saving.
To remove all channels from the channel memory:
Highlight Reset and press T, and then highlight Done and press T.
Channel Add/Delete
|
|
2 |
|
Analog |
|
ANT 1 |
|
|
|
|
|
|
|
|
|
|
|
|
|
|
|
|
2 - 1 |
|
Digital |
|
ANT 2 |
|
|
|
||||
|
|
|
|
|
|
|
|
|
|
|
|
|
|
|
|
2 - 2 |
|
Digital |
|
|
|
|
|
|
|||
|
|
|
|
|
|
|
|
|
|
|
|
|
|
|
|
3 |
|
Analog |
|
|
|
|
|
|
|||
|
|
|
|
|
|
|
|
|
|
|
|
|
|
|
|
4 |
|
Analog |
|
|
|
|
|
|
|||
|
|
|
|
|
|
|
|
|
|
|
|
|
|
|
|
5 |
|
Digital |
|
|
|
|
|
|
|||
|
|
|
|
|
|
|
|
|
|
|
|
|
|
|
|
6 |
|
Analog |
|
|
|
|
|
|
|||
|
|
|
|
|
|
|
|
|
|
|
|
|
|
|
|
7 |
|
Analog |
|
Reset |
|
|
|
||||
|
|
|
|
|
|
|
|
|
7 - 1 |
|
Digital |
|
Cancel |
|
|
|
||||
|
|
|
|
|
|
|
|
|
|
|
|
|
|
|
|
8 |
|
Analog |
|
Done |
|
|
|
||||
|
|
|
|
|
|
|
Note: This action applies to the current antenna input only. To delete/add channels on the other input, highlight the input you want (ANT1, or ANT 2) and press T.
27
HM196 (E/F) Web 213:276
HM196_EN.book Page 28 Tuesday, May 30, 2006 2:18 PM
Chapter 4: Setting up your TV
Setting the time and date
Note: If you already set up the TV Guide On Screen™ system, the time and date were set automatically and you can skip this step.
To set the time and date:
1 Press Yand open the Setup menu.
2 Highlight Installation and press T.
3 (A new set of Installation menu icons will appear, as shown below.) Open the Time And Date menu, highlight Start Setup, and press T.
Time And Date
Start Setup
 Navigate ENTER Select CH RTN Back EXIT Exit
If you have not set up the TV Guide On Screen™ system, the following screen will appear. To set the time, highlight TV Guide On Screen™ and press T. The TV Guide On Screen™ setup sequence will start, and the time and date will be set automatically.
Time And Date
Your TV Guide On Screen system can provide accurate time and date information.
It is recommended you set up TV Guide On Screen first and use it to obtain the time and date.
Manual |
|
TV Guide On Screen |
|
Cancel |
If you have already set up the TV Guide On Screen™ system, or if you have not set up the time, the Time and Date setting screen will appear and you will need to manually set the time and date.
Time And Date |
|
|
|
|
|
|
|
|
|
|
|
Date (MM/DD/YY) |
|
|
|
|
|
|
|||||
0 |
6 |
/ |
3 |
0 |
/ |
0 |
5 |
|
|
||
|
|
|
|
|
|
|
|
|
|
|
|
Time (HH:MM) |
1 |
1 |
: |
1 |
1 |
|
|
AM |
|
||
In the event that your TV Guide On Screen system has acquired time, the television will use network acquired time rather than manually enterred time.
Cancel Done
Note:
•If you highlight TV Guide On Screen™ (above) to set the time and date through the TV Guide On Screen™ system and a power outage occurs, the time and date will be updated automatically when the power is restored.
•If you highlight Manual (above) to set the time and date manually and a power outage occurs, you will lose the time and date settings when the power is restored.
•If you manually set the time and date and then perform TV Guide On Screen™ setup, the manual time and date settings will be overridden by the TV Guide On Screen™ settings.
Setting the ColorStream® HD audio mode
To set the ColorStream HD audio mode:
1 Press Yand open the Setup menu.
2 Highlight ColorStream HD1 Audio (or ColorStream HD 2 Audio) and press c.
3 Press B or b to select Yes or No and press Tto display the information.
Setup
|
Installation |
|
|
No |
|
|
|
Sleep Timer |
|
|
Yes |
|
|
|
On/Off Timer |
|
|
|
|
|
|
|
|
|
|
||
|
ColorStream HD1 Audio No |
|
||||
|
|
|
|
|
|
|
|
HDMI 1 Audio |
|
Auto |
|
|
|
|
|
|
|
|
|
|
|
ColorStream HD2 Audio |
No |
|
|
|
|
|
|
|
|
|
||
|
HDMI 2 Audio |
Auto |
|
|
|
|
|
|
|
||||
|
Navigate ENTER Select |
CH RTN Back EXIT Exit |
||||
|
|
|
|
|
|
|
Note: The analog audio terminals for the ColorStream HD and HDMI inputs are used in common. When the ColorStream HD 1 (or 2) audio mode is set to Yes, the HDMI 1 (or 2) audio mode is set to Digital and will be grayed out. When the ColorStream HD 1 (or 2) audio mode is set to No, the HDMI 1 (or 2) Audio changes to Auto.
28
HM196 (E/F) Web 213:276
 Loading...