Toshiba 62372311 User Manual

Operation Manual
For
The Insertion Type Density Meter
Type LQ300A00******
6 F 8 A 0 7 8 7
© TOSHIBA Corporation 2002
All Rights Reserved.


6 F 8 A 0 7 8 7
■ Notice
1. Do not copy or transcribe this manual in part or entirety without written permission from Toshiba.
2. The manual is subject to change without notice.
3. Although we tried hard to make this manual error free, if you find any errors or unclear passages, kindly let us know.
1

6 F 8 A 0 7 8 7
INTRODUCTION
Thank you very much for your purchase of the LQ300A00****** Density Meter.
This manual is prepared for people in charge of installation, operation or maintenance. The
manual describes the precautions in using the meter, and explains about installing, adjusting,
calibrating and maintaining the LQ300A00****** meter.
Carefully read this manual before using the meter for efficient and safe operation. Always keep
the manual in a place where you can easily access.
◆ About Safety Precautions
Carefully read the Safety Precautions that appear in the following pages before using the Meter.
The safety signs used in the Safety Precautions will appear again in the following sections for
your safety.
2
6 F 8 A 0 7 8 7
Safety Precautions
Important information is shown on the product itself and in the operation manual to protect users from
bodily injuries and property damages, and to enable them to use the product safely and correctly.
Please be sure to thoroughly understand the meanings of the following signs and symbols before reading
the sections that follow, and observe the instructions given herein. Keep the manual in a place you can
easily access to whenever you need it.
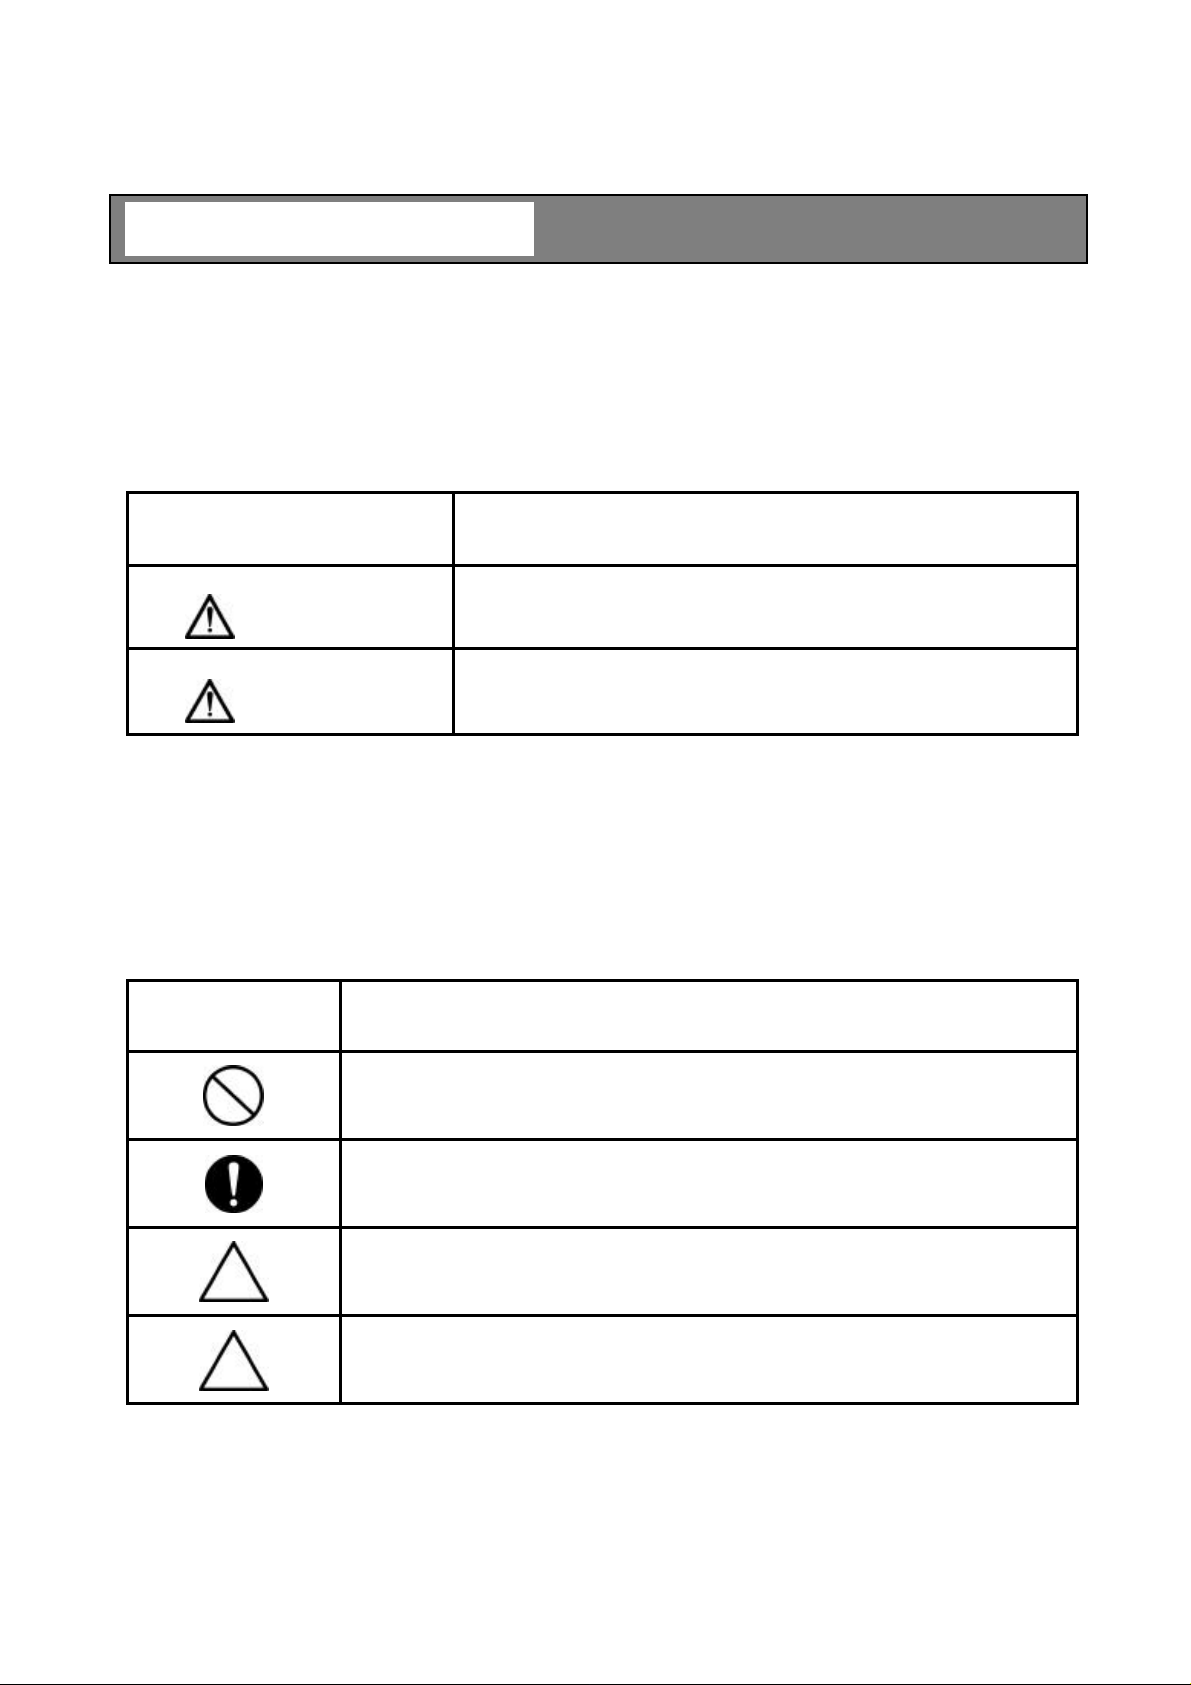
[ Explanation of Signs]
Sign Description
Indicates a potentially hazardous situation which could result in death or
WARNING
serious injury, if you do not follow the instructions in this manual.
Indicates a potentially hazardous situation which may result in minor or
Note 1: Serious injury refers to cases of loss of eyesight, wounds, burns (high or low temperature),
Note 2: Minor or moderate injury refers to cases of burns, electric shock, etc., which do not require
[ Explanation of the Symbols]
CAUTION
electric shock, broken bones, poisoning, etc., which leave after-effects or which require
hospitalization or a long period of outpatient treatment of cure.
hospitalization or a long period of outpatient treatment for cure; equipment damage refers to
cases of extensive damage involving damage to property or equipment.
Symbol Description
This sign indicates PROHIBITION (Do not). The content of prohibition is shown by a picture
or words beside the symbol.
This sign indicates MANDATORY ACTION (You are required to do). The content of action
is shown by a picture or words beside the symbol.
This shape or symbol indicates WARNING. The content of WARNING is shown by a picture
or words beside the symbol.
◆Color back : red, flame, picture and words : black
moderate injury, and/or equipment-only-damage, if you do not follow the
instruction in this manual.
This shape or symbol indicates CAUTION. The content of CAUTION is shown by a picture
or words beside the symbol.
◆Color back : yellow, flame, picture and words : black
3
6 F 8 A 0 7 8 7
Safety Precautions (Continued)
For a safe use of the LQ300A00****** Density Meter, take precautions described in this manual and
observe ordinances in making the installation and operation. Toshiba is not responsible for any accident
arising from the use that does not conform to above.
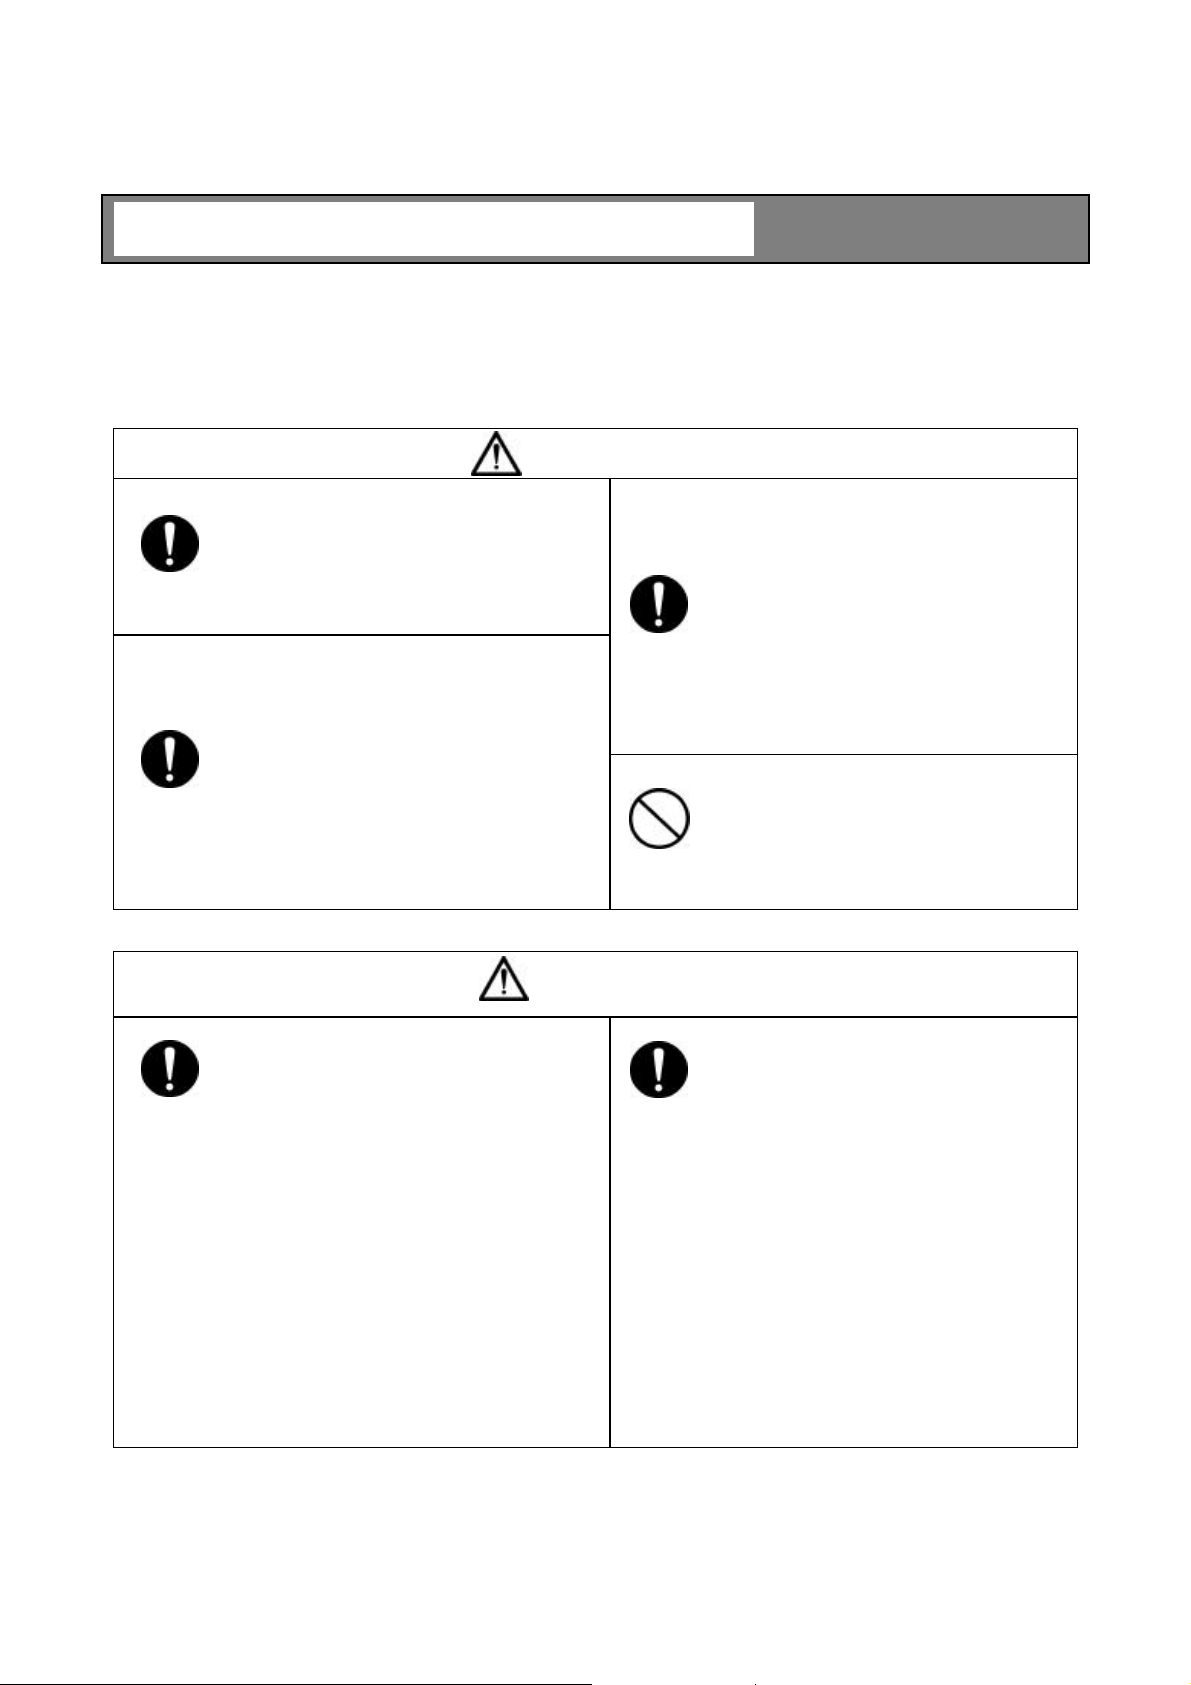
INSTALLATION PRECAUTIONS
WARNING
DO
DO
■ The meter is heavy. To move them or
relocate them may need a qualified operator
for handling a crane, a hoist or a truck for safe
operation.
■ When hoisting this unit, use the hoisting
bands.
In addition, when hoisting the unit with
hoisting bands, tighten the bands so that the
bands will not be loosened or slipped off.
Overturning or dropping can cause injuries or
equipment failure.
DO
DON’T
■ Electrical and mechanical constructions
are necessary for the meter.
Please consult your vender or Toshiba
sales representative.
Inadequate construction can cause electric
shock and fire.
■ Do not operate where there is a
possibility of leakage of flammable or
explosive gas.
A fire or explosion can occur.
DO
CAUTION
■ Avoid installing the meter in any of the
following places:
l Dusty place
l Place where corrosive gases (SO2, H2S)
or flammable gases may be generated.
l Place exposed to vibration or shock that
exceeds permissible level.
l Place exposed to condensation due to
abrupt change in temperature.
l Place too cold or hot for installation
l Place too humid for installation
l Near an apparatus that generates strong
radio waves or strong magnetic field.
Otherwise, a fire or equipment breakdown
or failure can occur.
DO
■ Install the meter in a place that is good
for operation, maintenance and inspection.
A stumble or an overturn can cause injuries.
4
Safety Precautions (Continued)
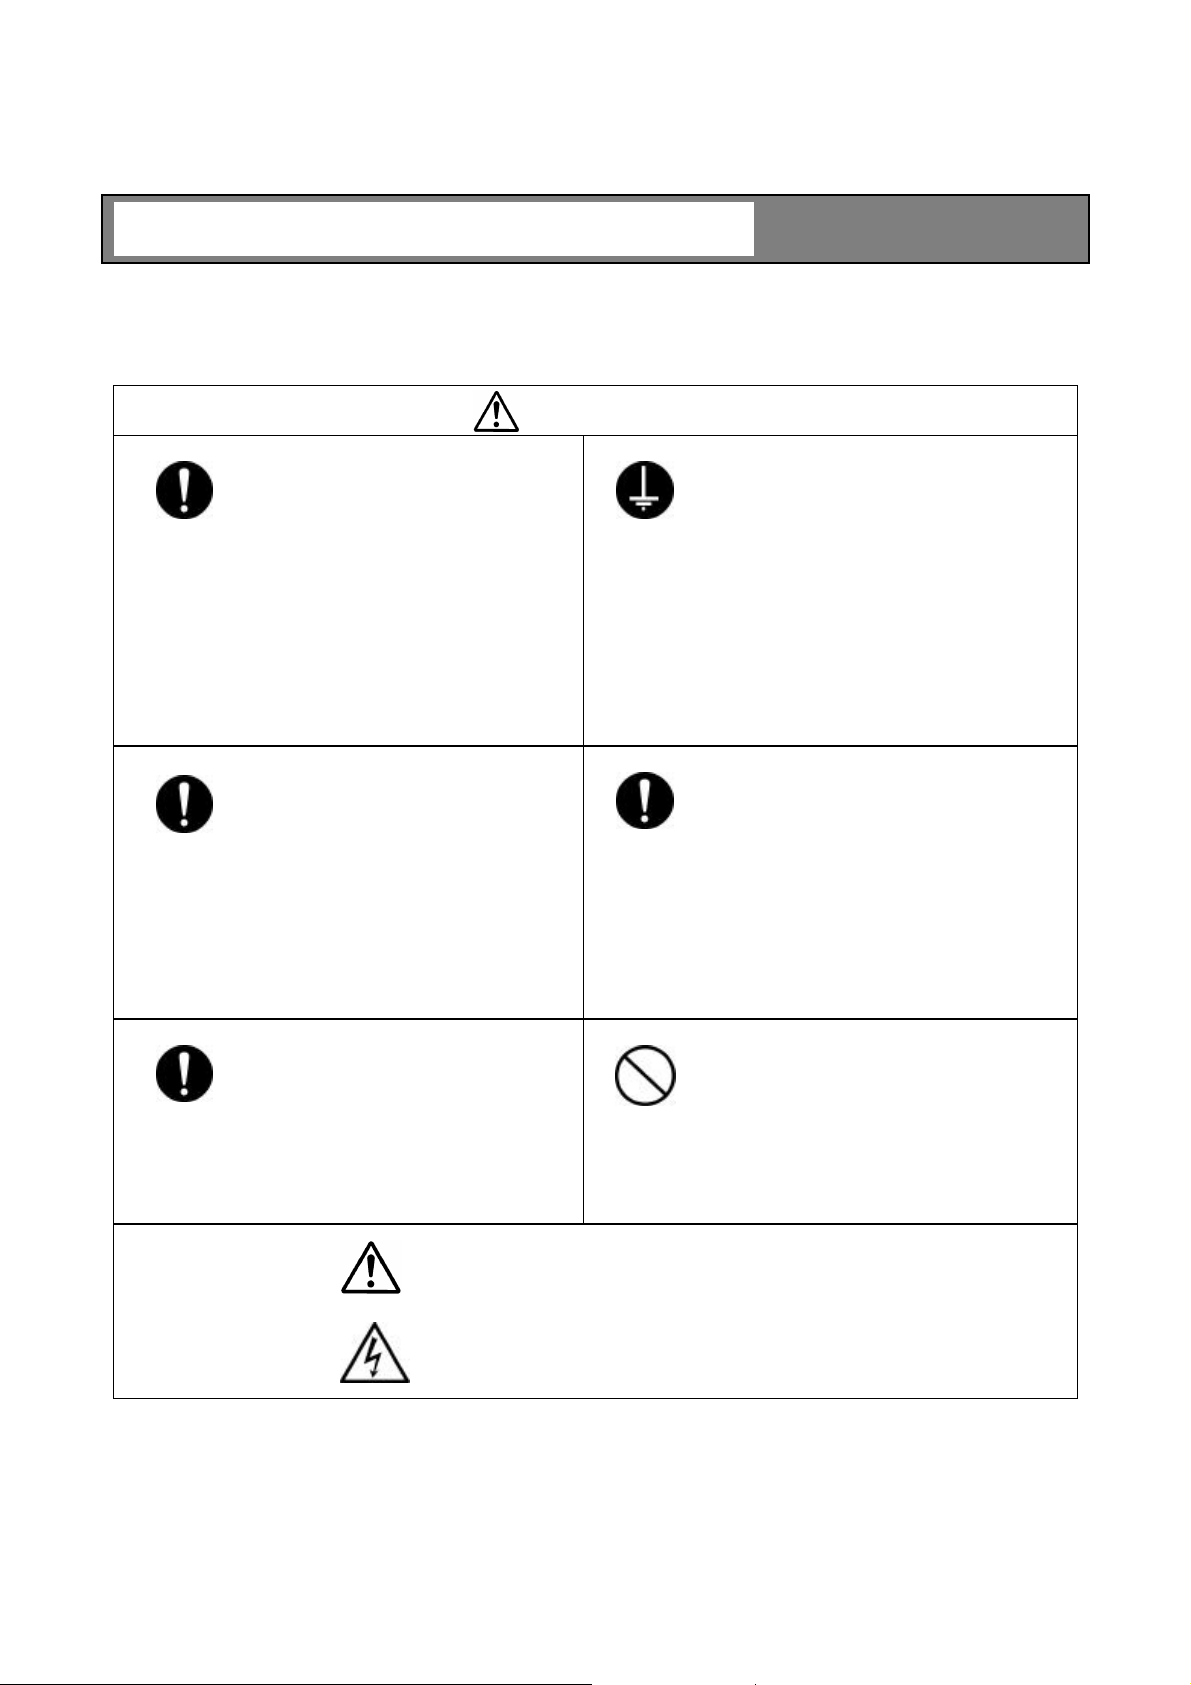
WIRING PRECAUTIONS
6 F 8 A 0 7 8 7
DO
DO
Yellow
■Be sure to install a fuse and a switch
to disconnect the equipment from the
power source.
Failure to observe this can cause
electric shock or equipment failure.
■Make sure that the main power line
is off before wiring or cabling.
Wiring or cabling without switching off
the main power line can cause electric
shock.
WARNING
DO
DO
■Be sure to ground the equipment using a
grounding wire separate from those used for
power tools.
(With 100 Ohms or less ground resistance)
Without grounding, electric shock,
malfunction, or equipment failure can be
caused by electric leakage.
■Use crimp terminals with insulation
sleeves for power line and grounding wire
terminals.
A disconnected cable or wire from the
terminal or a loose terminal can cause
electric shock or generate heat and cause a
fire or equipment failure.
DO
■Wiring and cabling should be done
as shown in the wiring and connection
diagrams.
Wrong wiring or cabling can cause
malfunctions, overheating, sparking, or
electric shock.
Yellow
The label shown left appears near a terminal block on the equipment to
which power is supplied. Take precautions to avoid electric shock.
Yellow
Do not wire or cable with wet hands.
A wet hand can cause electric shock.
DON’T
5
Safety Precautions (Continued)
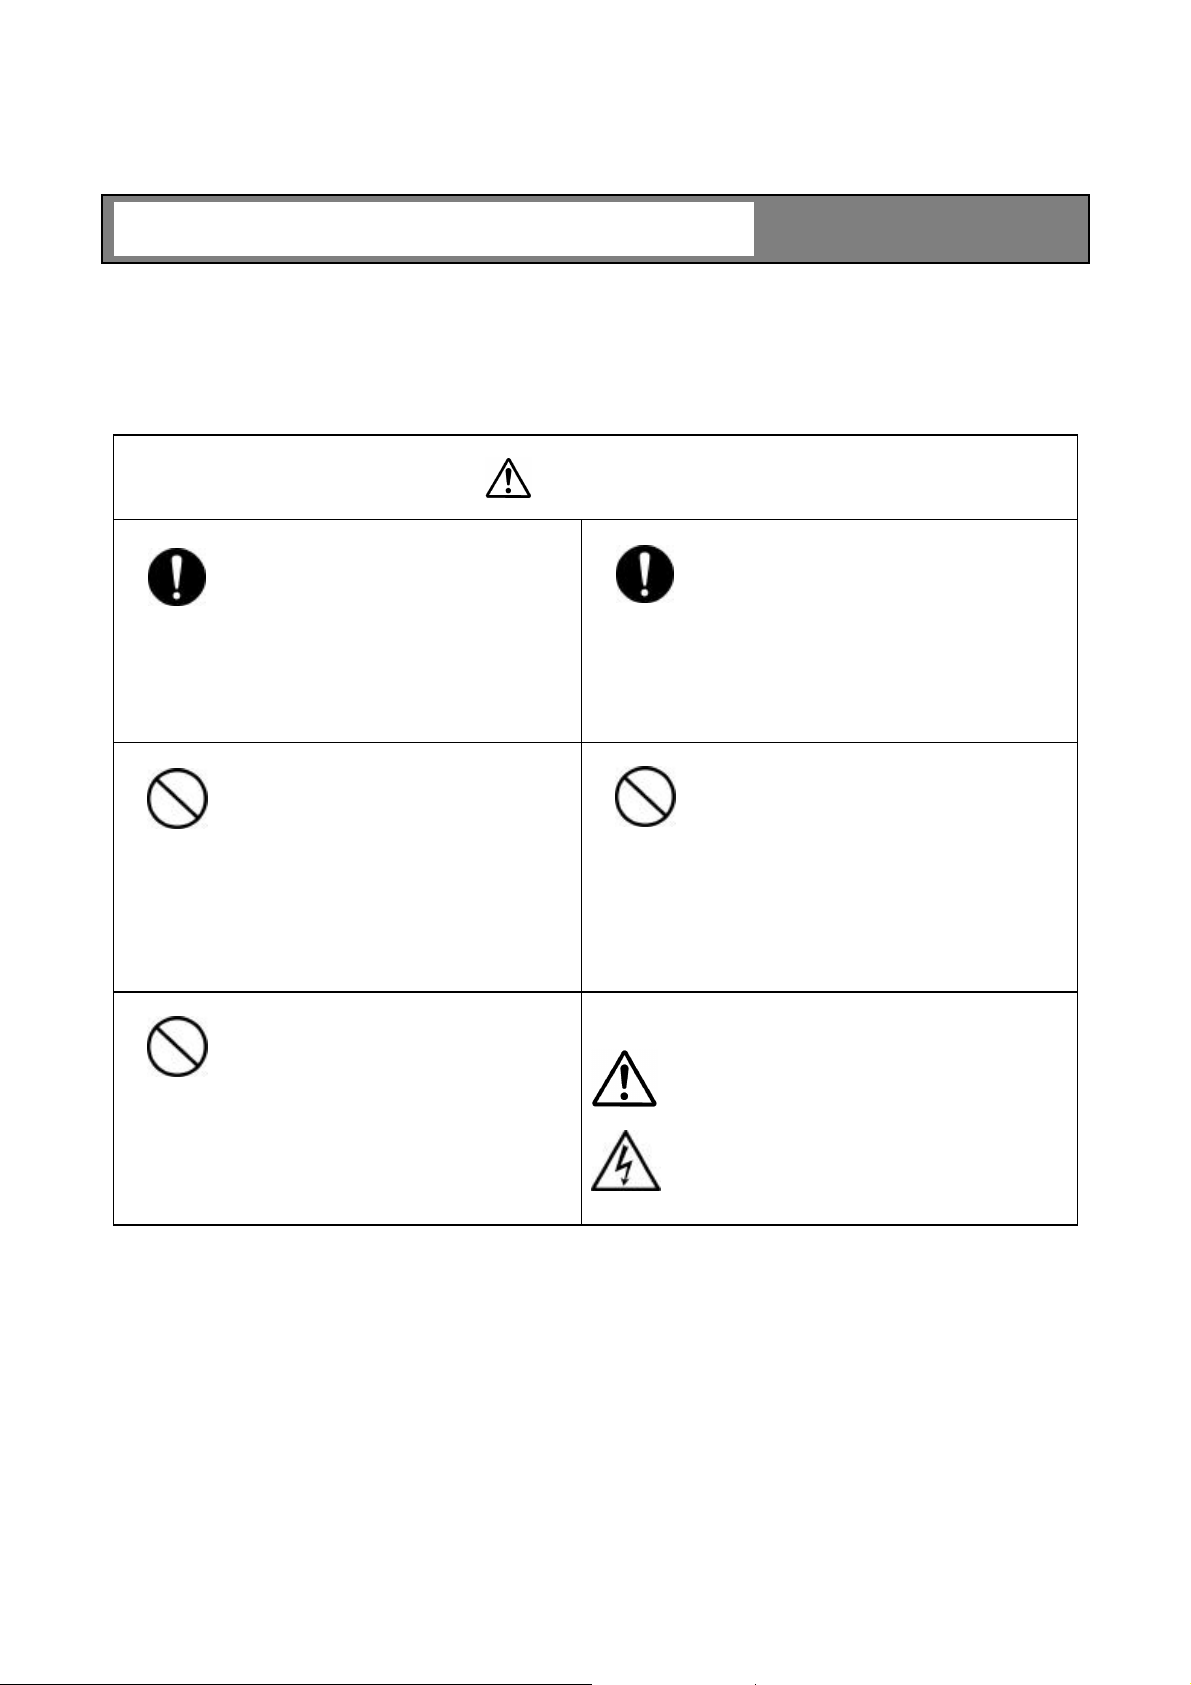
PRECAUTIONS REGARDING MAINTENANCE,
INSPECTION, AND PARTS REPLACEMENT
WARNING
6 F 8 A 0 7 8 7
DO
DON’T
DON’T
■ Be sure to set the power switch on
the equipment to the OFF position
before doing maintenance or inspection
inside the equipment or replacing its
parts.
Failure to observe this can cause
electric shock or equipment failure.
■ Do not touch the terminal block
during maintenance or inspection. If it is
necessary to touch the terminal block,
set the power switch on the equipment
to the OFF position in advance.
Failure to observe this can cause
electric shock.
■ Do not touch the detector main body
during measuring fluid density.
The temperature of the detector main
body rises with fluid temperature.
Touching the detector main body
causes burns.
DO
DON’T
■ Be sure to set the power switch on the
equipment to the OFF position before
replacing the fuse.
Failure to observe this can cause electric
shock.
■ Do not attempt disassemble or modify
the equipment.
Failure to observe this can cause electric
shock or equipment failure.
The label shown at left is placed near
each terminal block on the equipment
to which power is supplied. Be careful
of electric shock.
6

6 F 8 A 0 7 8 7
Safety Precautions (Continued)
Limited Applications of the product
This product is not designed or manufactured for the purpose of applying to the systems, such as shown
below, which require the level of safety that directly concerns with human life. When your use
includes potential applications in those systems, contact Toshiba for consultation.
• Main control system for atomic power generating plant/Safety protection system for nuclear
facilities/Other critical safety systems/medical control system for sustaining life
• This product is manufactured under strict quality control but components might fail and if this
product is likely to be applied to a system that concerns with human life or it is likely to be applied
to a facility that may have serious effects, please consider special efforts to make the system safe
regarding the operation, maintenance and management of the system.
Liability Exemptions
Toshiba assumes liability exemptions from the following examples.
• Damages caused by fire, earthquake, actions by third party, other accidents, abuse or faulty use
whether accidental or intentional by the user, or by other uses of abnormal conditions.
• Damages or losses that are incidental to the use of or disuse of the product (loss of business profit,
interruption of business operation, etc.)
7

6 F 8 A 0 7 8 7
[NOTE] Sign
In addition to the signs and symbols for safety precautions shown in the first several pages of the
manual, the following sign is also used.
♦
[NOTE] Sign
When an explanation is made in the text regarding the Safety Precautions, the [NOTE] sign shown
below appears in the left margin of a page. The [NOTE] gives you directions to follow in the following
instances.
• To use product correctly and effectively.
• To prevent abnormal or degrading performance of the product.
• To prevent faulty actions.
• To store the product when you do not use the product for a long time.
[Note]
8

6 F 8 A 0 7 8 7
Important Notes on Use of
The Insertion Type Density Meter LQ300A00******
Be sure to observe following instructions in order to maintain the original performance of the insertion
type density meter LQ300A00****** and safely use it over a long period of time.
♦ Toshiba is not held responsible for any fault or result caused by not observing the precautions
described in this manual or by not observing the laws or regulations in installing or using the
product.
[NOTE]
[NOTE]
[NOTE]
[NOTE]
[NOTE]
Do not install or store the product in the following places.
Otherwise, meter performance can deteriorate and malfunction, fault, or breakage can occur.
Place exposed to direct sunlight
Hot, humid place
Place exposed to severe vibration and shock
Place to be submerged under water except the liquid contacting area of the detector
Place of corrosive atmosphere
Use a separate wire for grounding the meter. Do not share the same grounding wire with other
devices.
Otherwise, malfunction, fault, or breakage can occur.
Lay the output signal cable through their own conduit away from the AC power cable and other
sources of noise.
Noise can interrupt correct measurement.
Perform periodic maintenance and inspection.
A long period of reliable measurement requires periodic span calibration. (e.g. once every 3 months)
Avoid using the density meter where fluid substances accumulate or entangle in the density meter
detector.
Be careful not to let water or moisture into the applicator mount of the detector, converter, or cable
ends.
Water or moisture can adversely affect performance and shorten parts service life.
Close the covers and doors securely, and make the cable outlets airtight.
[NOTE]
[NOTE]
Turn on the density meter only when the density meter is installed in a metal piping system.
Make sure to turn off the power when installing or removing the density meter.
Leakage of radio waves may cause interference to other equipment.
Do not step on any part of the density meter (temperature detector mount, applicator (antenna)
mount, converter for example) when you do piping work. Do not place any heavy object on it.
Otherwise, deformation or fault can occur.
9

6 F 8 A 0 7 8 7
Important Notes on Use of
The Insertion Type Density Meter LQ300A00******
[NOTE]
[NOTE]
[NOTE]
[NOTE]
[NOTE]
Do not use a transceiver, handy telephone, or other wireless device nearby.
Such a device can adversely affect correct measurement. In the event one must be used, observe the
following precautions.
(1) When using a transceiver, make sure that its output power is 5W or less.
(2) When using a transceiver or a handy telephone, keep the converter and signal cable at least
50cm away from the antenna.
(3) Do not use a transceiver or a portable telephone nearby while the density meter is in online
operation. This is important to protect if from being affected by a sudden output power change.
(4) Do not install the fixed antenna of a wireless device in the area around the converter and signal
cable.
Use a fuse of the specified rating.
A fuse other than that specified can cause density meter malfunction or breakage.
Do not modify or disassemble the density meter unnecessarily. Do not use parts other than specified.
Failure can cause malfunction and density meter fault.
When moving the meter elsewhere for installation, be careful not to drop, hit, or subject to strong
shock.
Otherwise, the density meter may be broken, resulting in malfunction or fault.
Before returning your density meter to Toshiba for repair, etc., make sure to inform us about the
measured matter remaining in the density meter pipe, including whether it is dangerous or not to
touch the material and then clean the meter so that no measured matter remains in its pipe.
Disposal
[NOTE]
[FCC notice]
This equipment has been tested and found to comply with the limits for a field disturbance sensor, pursuant to Part 15
of the FCC rules. These limits are designed to provide reasonable protection against harmful interference in a residential
installation. This equipment generates, uses and can radiate radio frequency energy and, if not installed and used in
accordance with the instructions, it may cause harmful interference to radio communications. However, there is no
guarantee that interference will not occur in a particular installation. If this equipment does cause harmful interference to
radio or television reception, which can be determined by turning the equipment off and on, the user is encouraged to try
to correct the interference by one or more of the following measures.
• Reorient the receiving antenna.
• Increase the separation between the equipment and receiver.
• Connect the equipment into an outlet on a circuit different fr6m' that to which the receiver is connected.
• Consult the dealer or an experienced radio,'1'V technician for help.
WARNING: This equipment has been certified to comply with the limits for a field disturbance sensor, pursuant to
Subpart C of part 15 FCC rules. Except AC power cable, shielded cables must be used between the external devices and
the terminals of the converter of the equipment.
Changes or modifications made to this equipment, not expressly approved by Toshiba or parties authorized by Toshiba
could void the user's authority to operate the equipment.
When disposing of this density meter, obey the rules and regulations of the local government.
10

6 F 8 A 0 7 8 7
Contents
Safety Precautions................................................................................................................................................................................3
[NOTE] Sign ...........................................................................................................................................................................................8
Important Notes on Use of The Insertion Type Density Meter LQ300A00******..............................................................................9
1 OVERVIEW .....................................................................................................................................................................................14
1.1 Principle of Measurement....................................................................................................................................................14
1.2 Features...............................................................................................................................................................................15
2 UNPACKING...................................................................................................................................................................................16
2.1 Standard Components.........................................................................................................................................................16
2.2 Standard Accessories..........................................................................................................................................................16
3 INSTALLATION..............................................................................................................................................................................17
3.1 Precautions for Installation...................................................................................................................................................17
3.2 Installation Location.............................................................................................................................................................19
3.3 Installation and Piping..........................................................................................................................................................21
3.4 Precautions for Wiring..........................................................................................................................................................25
3.5 Wiring...................................................................................................................................................................................26
4. Part Names and Functions...........................................................................................................................................................28
4.1 Detector................................................................................................................................................................................28
4.2 Conveter...............................................................................................................................................................................29
5. Operation Procedure.....................................................................................................................................................................31
5.1 Parameters and Set Values.................................................................................................................................................31
5.2 Menus and operations..........................................................................................................................................................33
5.2.1 main menu...................................................................................................................................................................33
5.2.2 Setting keys.................................................................................................................................................................34
5.2.3 Menu display...............................................................................................................................................................35
5.2.4 Monitoring menu display and operating procedures...................................................................................................38
5.2.5 Setting menu display and operating procedures....................................................................................................39
5.2.6 Measuring mode display and operating procedures...................................................................................................40
5.2.7 Reading of parameters display and operating procedures..........................................................................................40
5.2.8 Measured values display and operating procedures...................................................................................................44
5.2.9 Self-diagnosis data display operating procedures.......................................................................................................44
5.2.10 Parameter setting display and operating procedures..................................................................................................46
5.2.11 Zero calibration display and operating procedures.....................................................................................................49
5.2.12 Span calibration display and operating procedures....................................................................................................49
5.2.13 Phase angle rotation correction display and operating procedures............................................................................50
5.2.14 Linearize/conductity correction display and operating procedures..............................................................................51
5.2.15 Additives correction display and operating procedures...............................................................................................53
5.2.16 Other menus display and operating procedures.........................................................................................................56
6. Operations .....................................................................................................................................................................................57
6.1 Procedures for Preparing and Running................................................................................................................................57
6.2 Preparations before Turning on Power................................................................................................................................58
6.3 Power on and Preparations for Measuring...........................................................................................................................58
6.3.1 Turning power on........................................................................................................................................................58
11

6 F 8 A 0 7 8 7
6.3.2 Verifying and setting measurement conditions............................................................................................................59
6.4 Zero Calibration....................................................................................................................................................................60
6.5 Span Calibration...................................................................................................................................................................62
6.6 Operation.............................................................................................................................................................................64
6.7 External Synchronized Operation........................................................................................................................................65
6.7.1 Movement of the external synchronized operation......................................................................................................65
6.7.2 Setting the external synchronized operation...............................................................................................................66
6.8 Functions Related to Operation...........................................................................................................................................67
7 MAINTENANCE..............................................................................................................................................................................68
7.1 Precautions for Maintenance, Inspection, and Parts Replacement .....................................................................................68
7.2 Maintenance and Inspection Items......................................................................................................................................69
8 TROUBLESHOOTING....................................................................................................................................................................70
8.1 Troubleshooting...................................................................................................................................................................70
8.2 Error Indications and Recovery Operations.........................................................................................................................72
9 CORRECTIONS IN DENSITY CALCULATION..............................................................................................................................74
9.1 Density Calculation..............................................................................................................................................................74
9.2 Various Kinds of Corrections................................................................................................................................................75
9.2.1 Phase angle rotation correction...................................................................................................................................75
9.2.2 Liquid temperature correction......................................................................................................................................75
9.2.3 RF correction...............................................................................................................................................................76
9.2.4 Atmospheric temperature correction...........................................................................................................................76
9.3 Phase Angle Rotation Correction (Details) ..........................................................................................................................77
9.3.1 Care point concerning phase angle rotation................................................................................................................77
9.3.2 Phase angle rotation in external synchronized operation............................................................................................77
9.3.3 Outline of automatic adjustment function of phase angle rotations.............................................................................77
9.3.4 Judgement conditions and adjustments for automatic adjustment of phase angle rotations......................................77
9.3.5 Restrictions and invalidation in applying the automatic adjustment of phase angle rotations.....................................78
9.3.6 Invalidation by setting the automatic adjustment of phase angle rotations.................................................................78
9.3.7 Actions after invalidating the automatic adjustment of phase angle rotations.............................................................79
9.3.8 Return to the normal through manual input of the phase angle rotations...................................................................80
10 VARIOUS FUNCTIONS..................................................................................................................................................................81
10.1 Various Functions and their Outlines...................................................................................................................................81
10.2 Moving Average...................................................................................................................................................................82
10.2.1 Function of moving average........................................................................................................................................82
10.2.2 Setting of the moving average times...........................................................................................................................82
10.2.3 Cautions in using the moving average function...........................................................................................................82
10.3 Change-rata limit..................................................................................................................................................................83
10.3.1 Outline of change-rate limit function............................................................................................................................83
10.3.2 Examples of operating the change-rate limit function.................................................................................................83
10.3.3 Cautions in using the change-rate limit factor.............................................................................................................84
10.3.4 Setting the change-rate limit........................................................................................................................................85
10.4 Electric Conductivity Correction...........................................................................................................................................86
10.4.1 Standard conductivity correction factor.......................................................................................................................86
10.4.2 How to obtain and set a correction factor....................................................................................................................87
10.5 Additives Correction Factor..................................................................................................................................................90
10.5.1 Additive Correction Function.......................................................................................................................................90
10.5.2 Density calculation......................................................................................................................................................91
10.5.3 Procedures for using the additives correction function................................................................................................92
10.5.4 How to set the additives correction function................................................................................................................93
10.5.5 Simplified Correction on Additives...............................................................................................................................94
12

6 F 8 A 0 7 8 7
10.6 LINEARIZER SETTING........................................................................................................................................................95
10.6.1 Linearizer function.......................................................................................................................................................95
10.6.2 Linearizer setting.........................................................................................................................................................97
10.7 Density Multiplier Switching by External Signals..................................................................................................................98
10.7.1 Density multiplier switching function by external signals.............................................................................................98
10.7.2 Setting the density multiplier switching by external signals.........................................................................................99
11. Specifications..............................................................................................................................................................................100
11.1 General Specifications.......................................................................................................................................................100
11.2 Detector Specifications......................................................................................................................................................101
11.3 Converter Specifications....................................................................................................................................................102
11.4 Model Number Table..........................................................................................................................................................105
Appendix............................................................................................................................................................................................107
Attached Figure 1............................................................................................................................................................................107
13
6 F 8 A 0 7 8 7
Transmitted
Receivedmicrowaves
1 OVERVIEW
The LQ300A00****** Density Meter measures the density of a substance that flows in a tank and
through a pipe by means of a phase difference method using microwaves.
This method is little affected by the presence of contamination. It uses no moving mechanical parts or
mechanism that is often used in other measuring methods for cleaning, sampling, or defoaming. It
permits continuous measurement.
The density meter, which outputs measured density in electric current, is suitable for an application in a
process for monitoring and controlling.
1.1 Principle of Measurement
This insertion type density meter LQ300A00****** has adopted a new measuring method called
“Phase difference method by microwaves.” When microwaves go through a substance and comes out of
it, by measuring the phase lag of the waves, we get a certain physical property of the substance that is
proportional to the density.
The theory of density measurement based on the phase difference method is shown in Figure 1.1
The difference between the phase lagθ1 of the microwave received through water (density 0%) and the
phase lagθ2 of the microwave received through the object substance, that is,
Δθ = θ2 − θ
1
is determined, and since the differenceΔθis in direct proportion to the density, the density of the
object substance is measured.
Water
microwaves
Substancemeasured
Phasedifference△θ=θ2−θ
withphaselagθ
Phaselagθ
1
2
1
Fig. 1.1 Principle of phase angle difference
14

6 F 8 A 0 7 8 7
1.2 Features
The Insertion Type Density Meter has the following features compared to the flow-through type density
meter:
(1) Applicable to the larger size piping or tank of more than 300 mm in meter size
In this system the transmission and reception applicators (antenna) are installed at a fixed
distance in a pipe and then the pipe itself is inserted into a larger pipe or a tank thus the
installation of this density meter is not dependent on pipe size. The density meter can measure the
fluid density in a pipe or tank exceeding 300 mm in diameter.
(2) Fluid materials with its conductivity up to 15mS/cm can be measured
New applicators are developed so that the radiation power of microwaves are concentrated on the
area between the transmission and reception applicators (antenna) and its reception applicator
can prevent unwanted electromagnetic waves from outside and this made the density meter
applicable to higher conductivity fluid materials of up to 15 mS/cm. In the case of 250 mm or 300
mm pipe size, the flow-through type density meter may be difficult to measure fluid materials due
to conductivity problems but with this insertion type density meter the measurement may be
possible.
(3) Fluid materials with its density up to 50% TS can be measured
(4) Conformed to low-level radio-wave equipment
The output of microwaves is as low as 1 mW that this density meter is categorized as low-level
radio-wave equipment. Therefore the user is free to use this density meter without applying for
permission, registration, and licenses and so on to use this density meter.
Compared with the conventional method, this phase difference measurement method using microwaves,
in principle, has the following features.
(1) Not easily affected by contamination and bubbles.
This method is measuring the variation of the transmission time but not for measuring the
attenuation of the wave motion strength that has been transmitted into the measured matter.
Therefore, it is unnecessary for the window part for sending/receiving microwaves to be
transparent as the optical type.
(2) High liability and simple maintenance.
This reliability of this density meter is high because it has no moving parts like the rotary pulp
density meter does. In addition, it has no consumable parts such as bearings or pulleys and thus its
maintenance is easy.
(3) Not easily affected by the pulp material type or freeness.
Taking density measurements captivating the dielectric change following the density change in
the measured matter, the new method has the feature of not easily affected by the pulp material
type or freeness, etc.
(4) Capable of continuous measurement.
(5) Can easily change the measurement range.
(6) The operation is simple because complex processings such as density calculation and correction,
etc. are performed automatically by micro computers.
(7) Remote control is made possible by using the hand-held terminal AF100LQ3 type (optional),
which is a specialized terminal for communication.
<Supplementary Explanation>
Density meter LQ300A00****** is equipped with the display/operation consoles as
standard. Therefore, if the meter is installed on a location easy for maintenance, the
hand-held terminal is not always needed.
15
6 F 8 A 0 7 8 7
2 UNPACKING
Check items by the following list and table at unpacking.
2.1 Standard Components
(1) Density Meter : 1 unit
(2) Standard accessories : 1 unit
<Supplementary Explanation>
In the event of performing remote control through communications, you are required to have the handheld terminal AF100 type (type code: AF100LQ3AAA3), which is a specialized terminal for
communications. Therefore, please purchase one separately.
2.2 Standard Accessories
Accessory Specifications Qty
Fuse
Operation manual
1A(M),250V cartridge, glass tubular fuse,
5.2mm outer dia. x 20mm long
(The document you are reading.)
Table.2.1 Standard accessories
2
1
16
3 INSTALLATION
3.1 Precautions for Installation
WARNING
6 F 8 A 0 7 8 7
DO
DO
■ The meter is heavy. To move it for
relocation or installation, an qualified
operator qualified for safety should
handle it by using equipment such as a
crane or a sling.
Overturning or dropping can cause
human injuries or equipment failure.
Yellow
■ Avoid installing the meter in any of
the following places.
A fire or explosion can occur.
• Dusty place
• Place where corrosive gases (SO2,
H2S, etc.) or flammable gases may
be generated.
• Place exposed to vibration or shock
above permissible levels
• Place exposed to condensation due
to abrupt change in temperature.
• Place too cold or hot for installation
• Place too humid for installation
• Near an apparatus that generates
strong radio waves or a strong
magnetic field.
• Otherwise, a fire, equipment
breakdown or failure can occur.
CAUTION
■ Do not operate where there is a
possibility of leakage of flammable or
explosive gas.
DON’T
A fire or explosion can occur.
■ Install the meter in a place where it
is easy to operate, maintain, and
inspect.
DO
A stumble or a fall when working can
cause human injuries.
17
Hoisting the Density Meter Before Installation
吊りベルト装着位置
Center of
Hoisting position
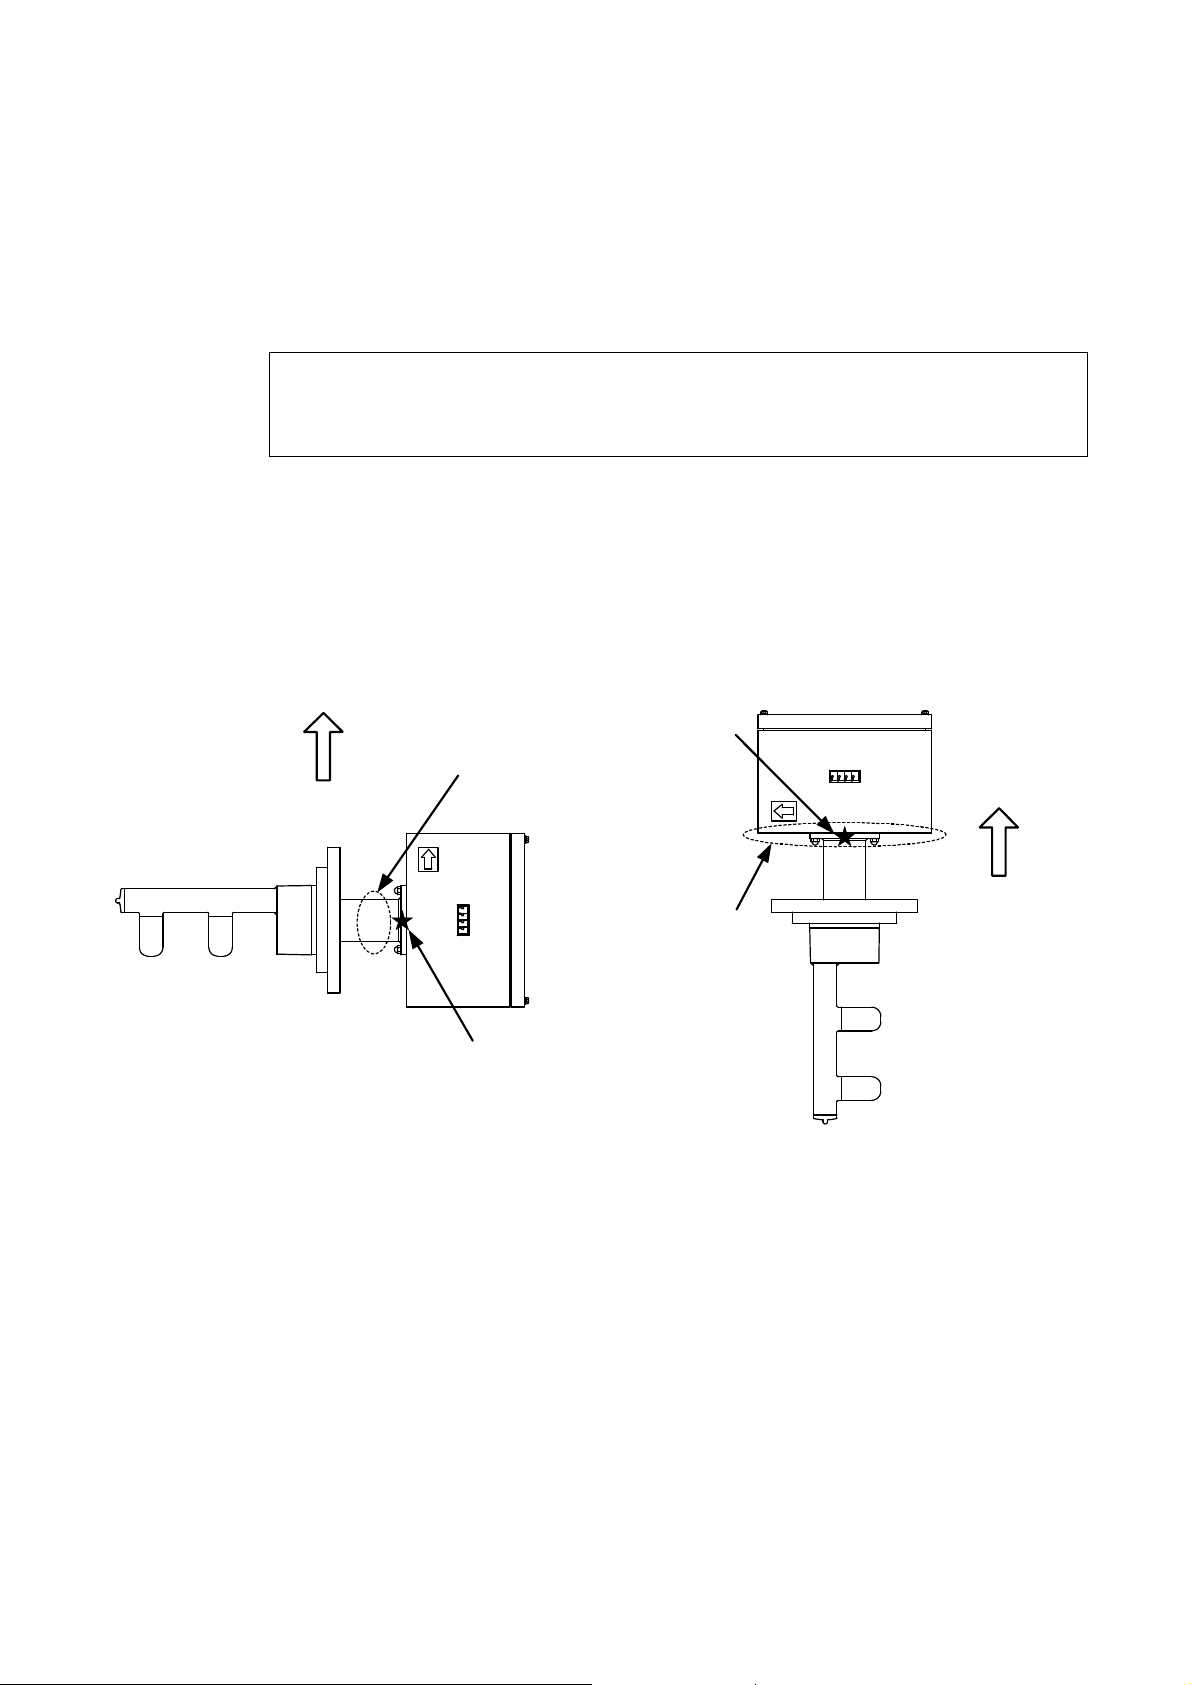
Make sure to hoist the density meter using the hoisting bands.
Hoisting it with incomplete position or condition can cause a fall or damage to the density meter.
6 F 8 A 0 7 8 7
[NOTE]
When you move or install the Insertion Type Density Meter, make sure to hoist the density meter
using the hoisting bands. In addition, care should be taken to put the cushioning material between the
hoisting band and the converter case. If the hoisting band touches the converter case directly it may
cause a scratch on the converter front panel.
Main unit mass: approx. 20 kg
Recommended hoisting bands: made of cloth, applicable band size 25 mm
Note: This unit is heavy. To move the unit or relocate it needs a qualified operator for handling a hand
truck, crane, hoist or other. In addition, when hoisting the unit with hoisting bands, tighten the
bands so that the bands will not be loosened or slipped off.
重心位置
gravity position
吊りベルト装着位置
Hoisting direction
吊り上げ方向
Hoisting direction
吊り上げ方向
Hoisting position with band
with band
Center of gravity position
重心位置
Fig. 3.1.1 Hoisting with Hoisting Bands (1) Fig. 3.1.1 Hoisting with Hoisting Bands (2)
18

3.2 Installation Location
6 F 8 A 0 7 8 7
[NOTE]
◆ Determine an indoor installation place in accordance with the following instructions.
(1) Choose a place that is free of vibrations and corrosive gasses, and has ample space for
maintenance.
(2) Secure maintenance space in front, rear and above the density meter. (Refer to fig. 3.2.1)
(3) In the case of outdoor installation, provide covering against sun.
(4) Do not install the meter in a place where there is a possibility of leakage of flammable or
explosive gas.
(5) Use a strength pipe, connected at both upstream and downstream sides, to securely
install the detector main body, or provide a supporting structure for the detector main
body. (Weight of this unit is shown in the external dimension list as attached.)
(6) When the density meter is used in an application where the process fluid contains plenty
of fur or fiber, these substances may accumulate or entangle in the density meter and thus
perform the maintenance operation periodically (clean the insertion probe area).
(7) The tank or pipe where this density meter is installed should be metal.
(8) Install the density meter in a place where the density distribution is even. If the density
distribution is not even, manual analysis data and the indication value of the density meter
may not be the same.
(9) Install this density meter in a piping system where bubbles are not found, and fluid does
not empty itself, and also sedimentation and accumulation of materials does not occur.
19
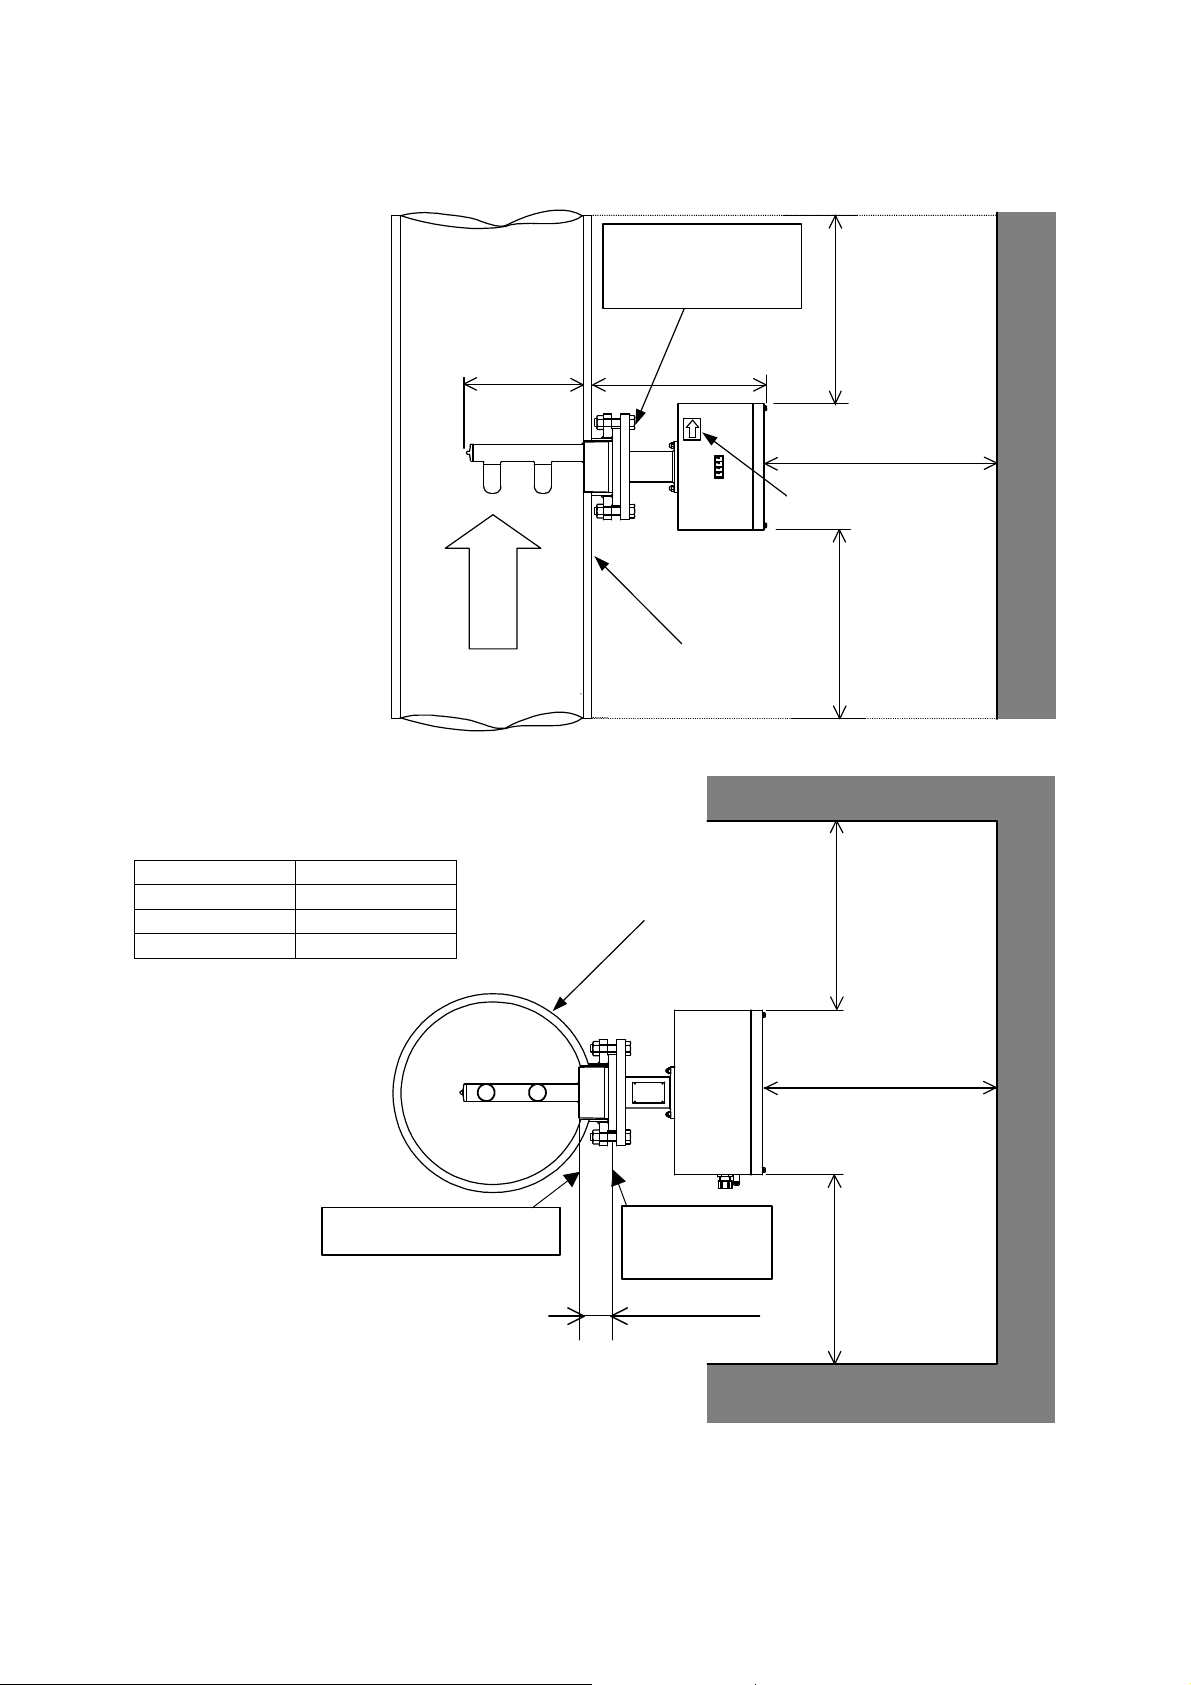
M8 screw tightening torque:
Figure 3.2.1 Maintenance Space
M8ネジ締め付けトルク:
10.0 to 13.5 N•m
10.0〜13.5N・m
(片締めとならないこと)
(Tighten the screws evenly.)
6 F 8 A 0 7 8 7
600
231(*1)
流
れ
方
向
Flow direction
Fluid to be measured
測定対象流体
Metal pipe or metal tank
Notes
*1 The length when Toshiba recommendation flange is used.
(Refer to 3H8A6579 and 3H8A6580 for details.)
*2 The length when *1 above and Sch40 standard stainless steel
pipe is used.
Diameter (mm) Length (mm)
300 347
350 346
400 345
金属製配管
Metal pipe or metal tank
L(*2)
金属製配管
t
変換器
Converter
600
shows flow direction
流れ方向を表示
600
600
測定対象流体
Fluid to be measured
Internal wall of tank or pipe
600
Mounting flange
surface
600
120mm or less
20

3.3 Installation and Piping
Installing the density meter is illustrated in Fig. 3.3.1 and Fig. 3.3.2, Fig.3.3.3, Fig.3.3.4.
6 F 8 A 0 7 8 7
[NOTE]
<Common Precautions>
(1) Install the density meter in a place where the distribution of density is even.
(2) Install the density meter in a location where the measured fluid flows in a tank or pipe in full and bubbles
do not stay. Insufficient fluid flowing or bubbles staying in the tube will cause measuring errors or
indicated-value fluctuations.
(3) Avoid installing the density meter where the material to be measured precipitates and accumulates at
the bottom of the tank or pipe.
(4) Avoid installing the density meter in a tank or pipe where bubbles are mixed in the fluid to be measured.
(5) The front side of the density meter's converter section is equipped with an LED density display section.
When installing the meter, choose a location and direction in which this density display section will be
easily visible. However, if it is difficult to look straight at the density value display area as a result of
installation layout, we recommend you order an optional external display unit.
(6) In the event that the tank or piping system (where the density meter is installed) may no longer be full of
the fluid while the pump is shut down or the density distribution in the density meter may become
uneven, make sure to take measurements only while the pump is operating by using the external
interlock function.
(7) Take necessary measures to prevent vibrations of the pump, etc. from travelling through the density
meter.
(8) Select the type and material of the gasket to use in the tank or pipe in accordance with the connection
method and the fluid material to measure.
(9) Make sure that the surface for the O-ring face and O-ring itself are clean without dirt or dust before
starting the installation work.
(10) We recommend the following tightening torque for bolts and nuts when mounting the flange for the
density meter. Tightening torque: 10.0 to 13.5 N•m for M8 bolts and nuts
(11) Perform the periodical inspection to make sure that the thin and long materials such as fur, fiber or
strings are not entangled in the applicators (antenna), or there are no scratches or cracks.
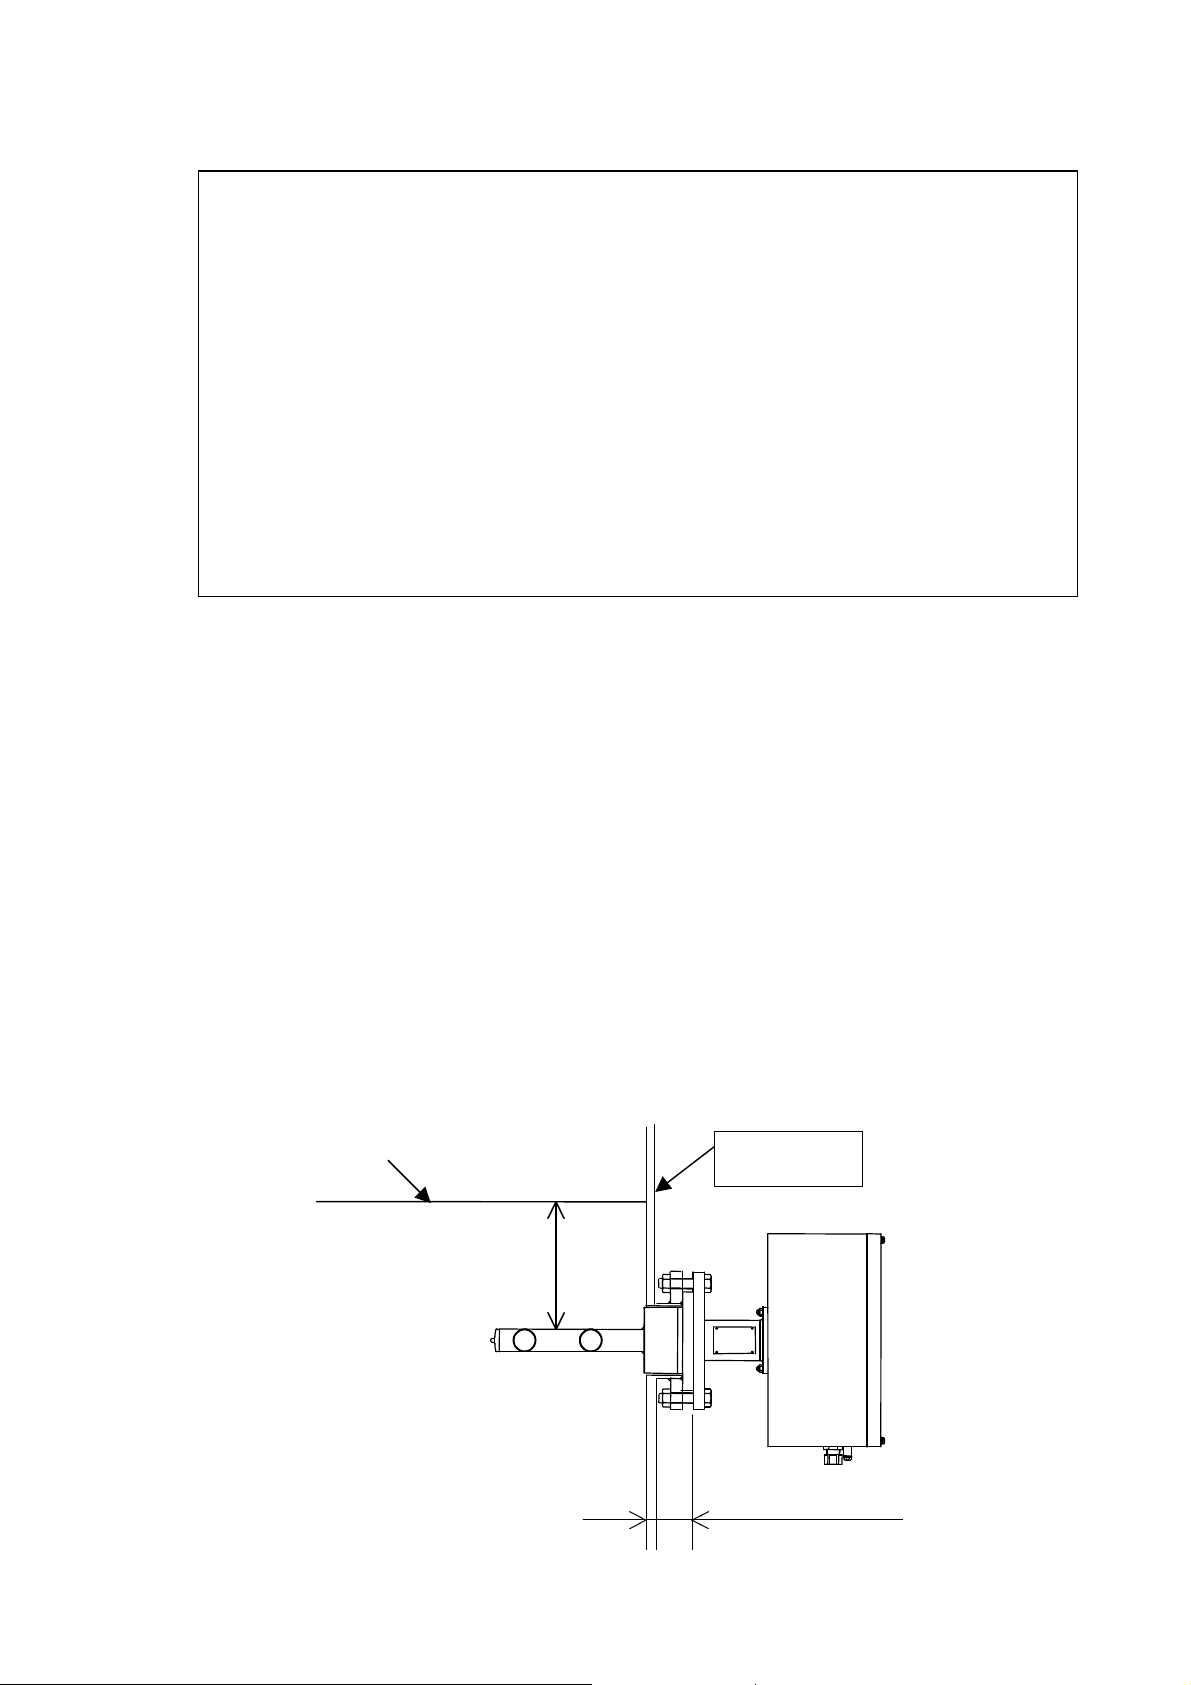
(12) Make sure that the applicator (antenna) is positioned more inside than the internal wall of the tank or
pipe. The distance from the mounting flange face of the insertion probe area to the internal wall should
be 120 mm or less.
<Piping Precautions>
(13) We recommend the installation should be made to a vertical piping system. The density meter can
operate the same performance even in a horizontal installation but only a vertical installation is allowed
for item (14).
(14) The installation should be made to a vertical piping system in the following cases:
a) Bubbles may remain in the piping.
b) The distribution of density in the piping may become uneven because the material to be
measured precipitates or floats unusually due to slow flow rate etc.
c) When main piping is enlarged and the density meter is installed to a larger piping system than the
main piping.
(15) We recommend that the converter section stay at the top when the density meter is installed to a
horizontal piping system because the maintenance is easy and its performance is assured.
(16) We recommend that the density meter should be installed at a point as far away as possible from a port
open to atmosphere and the water pressure is required a little to prevent bubbles from entering in the
fluid to be measured.
21
6 F 8 A 0 7 8 7
(17) On both the upstream and downstream sides of the density meter, install shutoff valves. Furthermore,
between these valves and the density meter, install the sampling port, the zero water supply port, the
air release port, the drain port with a shutoff valve attached respectively. In the event that the flow of the
pipe line cannot be stopped, provide a bypass pipe halfway with a shutoff valve attached. When
performing zero point calibration, these are needed to discharge the measured matter out of the density
meter through its drain port and fill up the meter with fresh water of zero density. (See Figures 3.3.2 and
3.3.3.)
(18) As to insertion orientation, install the density meter so that a pair of antennas face toward upstream.
<Precautions when installing the density meter in a tank>
(19) In a tank, install the density meter so that the applicators (antenna) are submerged 150 mm or more
under water from the surface. If the depth of water is less than 150 mm or the applicators surface stays
above the water level in cases like a pump operation, use the external synch signal and measure the
density only when the applicators surface remains more than 150 mm under water (see Figure 3.3.1.)
(20) Install the density meter far from such places as near the agitator in a tank where bubble are generated
and density disturbances occur and this affects the density measurement.
[NOTE]
♦ Sampling valve: Used to extract fluids for manual analysis. Install this valve to the side of the
pipe in the case of horizontal installation. It is recommended that a 1-inch
ball valve be installed to the side of the pipe.
♦ Zero point water valve: Used to supply drinking water (density or consistency 0%) to the detector
pipe for zero point adjustment. Install this valve at the top of the pipe in the
case of horizontal installation. It is recommended that a 1-inch ball valve be
installed in the top of the pipe and zero point water is supplied through this
inlet using a vinyl hose etc.
If valve water pipe is connected to this valve, air cannot be extracted.
Therefore, another valve (vent valve) is needed to extract air.
♦ Vent valve: Used to vent process fluids to open air when performing zero adjustment.
This helps the drinking water (density or consistency 0%) enter the detector
pipe easily. Install this valve in the top of the pipe in the case of horizontal
installation.
♦ Drain valve: Used to drain the fluids before supplying drinking water (density or
consistency 0%) to the detector pipe for zero adjustment. Install this valve at
the lowest point of the pipe. It is recommended that a 1-inch ball valve be
installed at the lowest point of the pipe.
Water surface
1500mm or more
Fluid to be measured
Metal tank
120mm or less
Figure 3.3.1 Precautions when installing the density meter in a tank
22
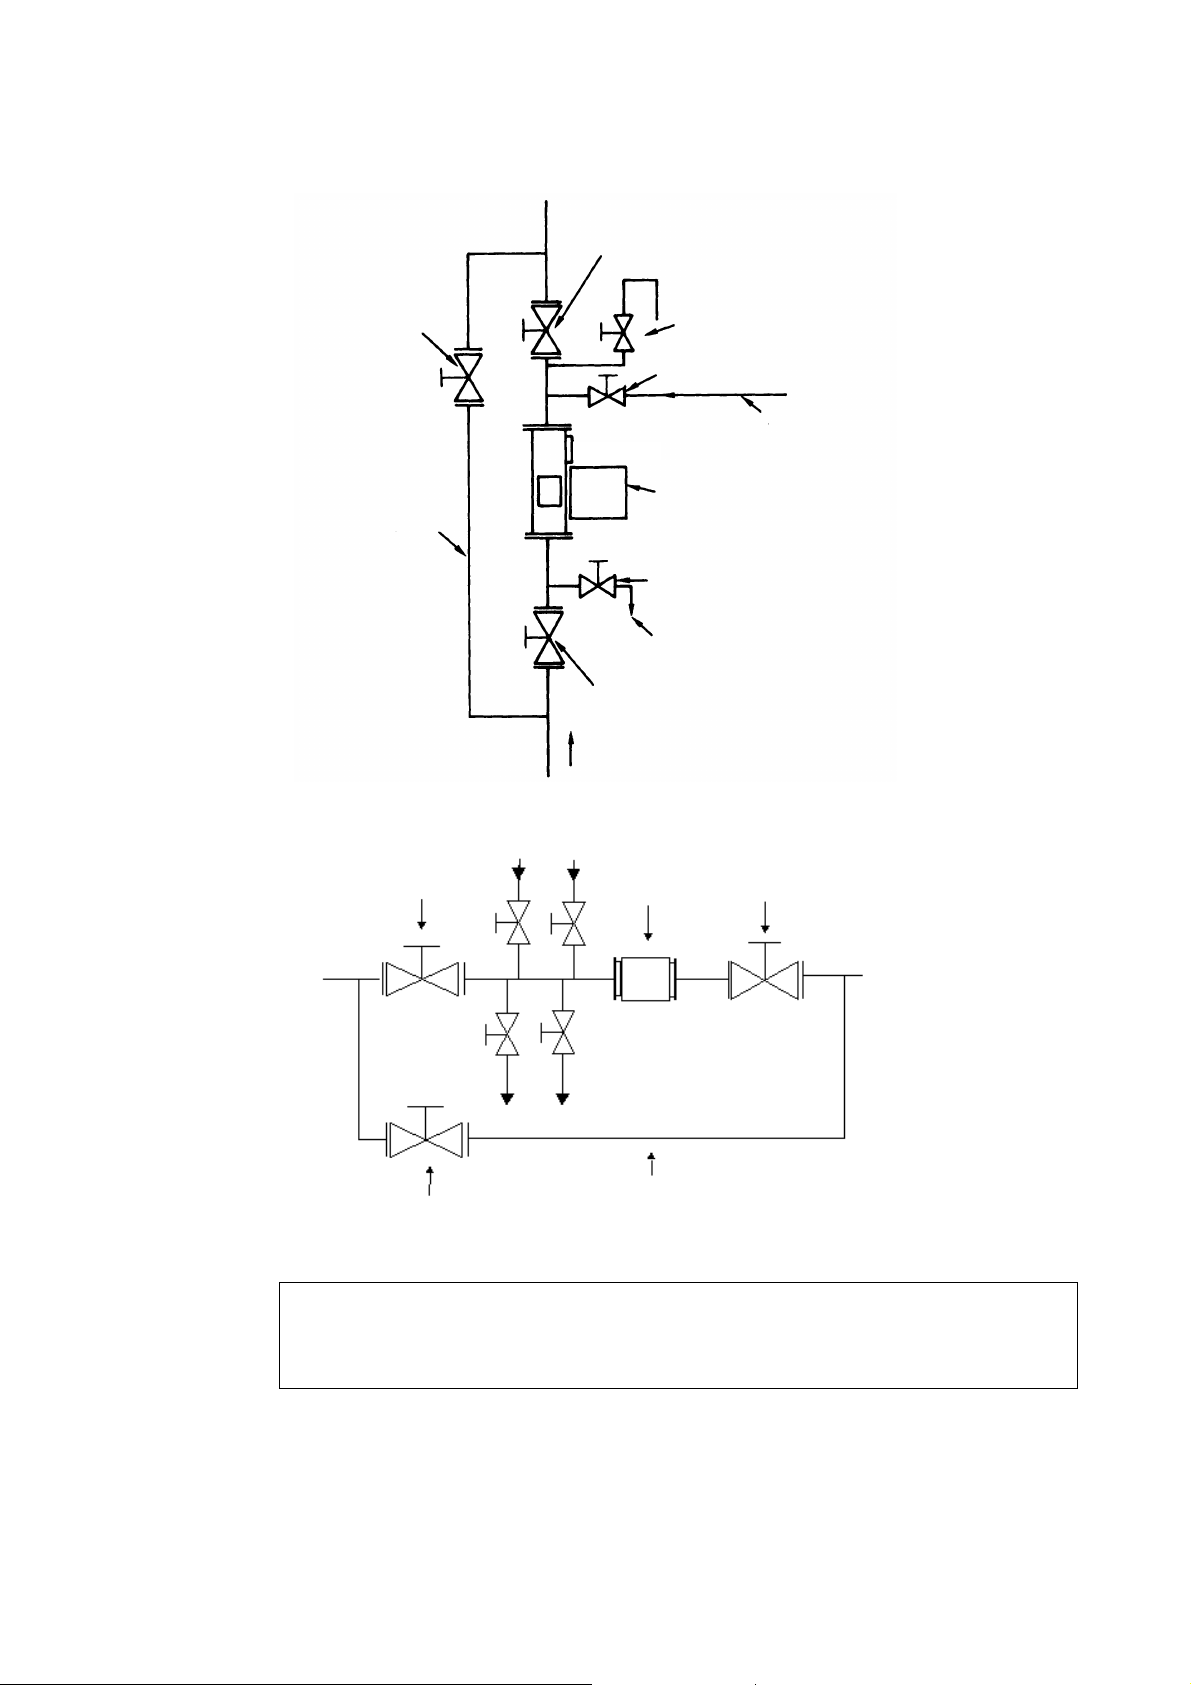
Shutoff valve
6 F 8 A 0 7 8 7
Shutoff valve
Bypass piping
Shutoff valve
Vent valve
Zero point water valve
Zero point water piping
Density meter
Drain valve
Drain piping
Shutoff valve
Direction of flow upward
Fig. 3.3.2 Meter mounted vertically
Vent valve Zero point water valve
Density meter
Shutoff valve
[NOTE]
Sampling valve
Shutoff valve
Drain valve
Bypass piping
Fig. 3.3.3 Meter mounted Horizontally (looking from above)
(1) Make sure that the surface for the O-ring face and O-ring itself are clean without dirt or dust
before starting the installation work.
(2) We recommend the following tightening torque for bolts and nuts when mounting the flange for
the density meter. Tightening torque: 10.0 to 13.5 N•m for M8 bolts and nuts
23
6 F 8 A 0 7 8 7
or the internal wall.
A
A
[NOTE]
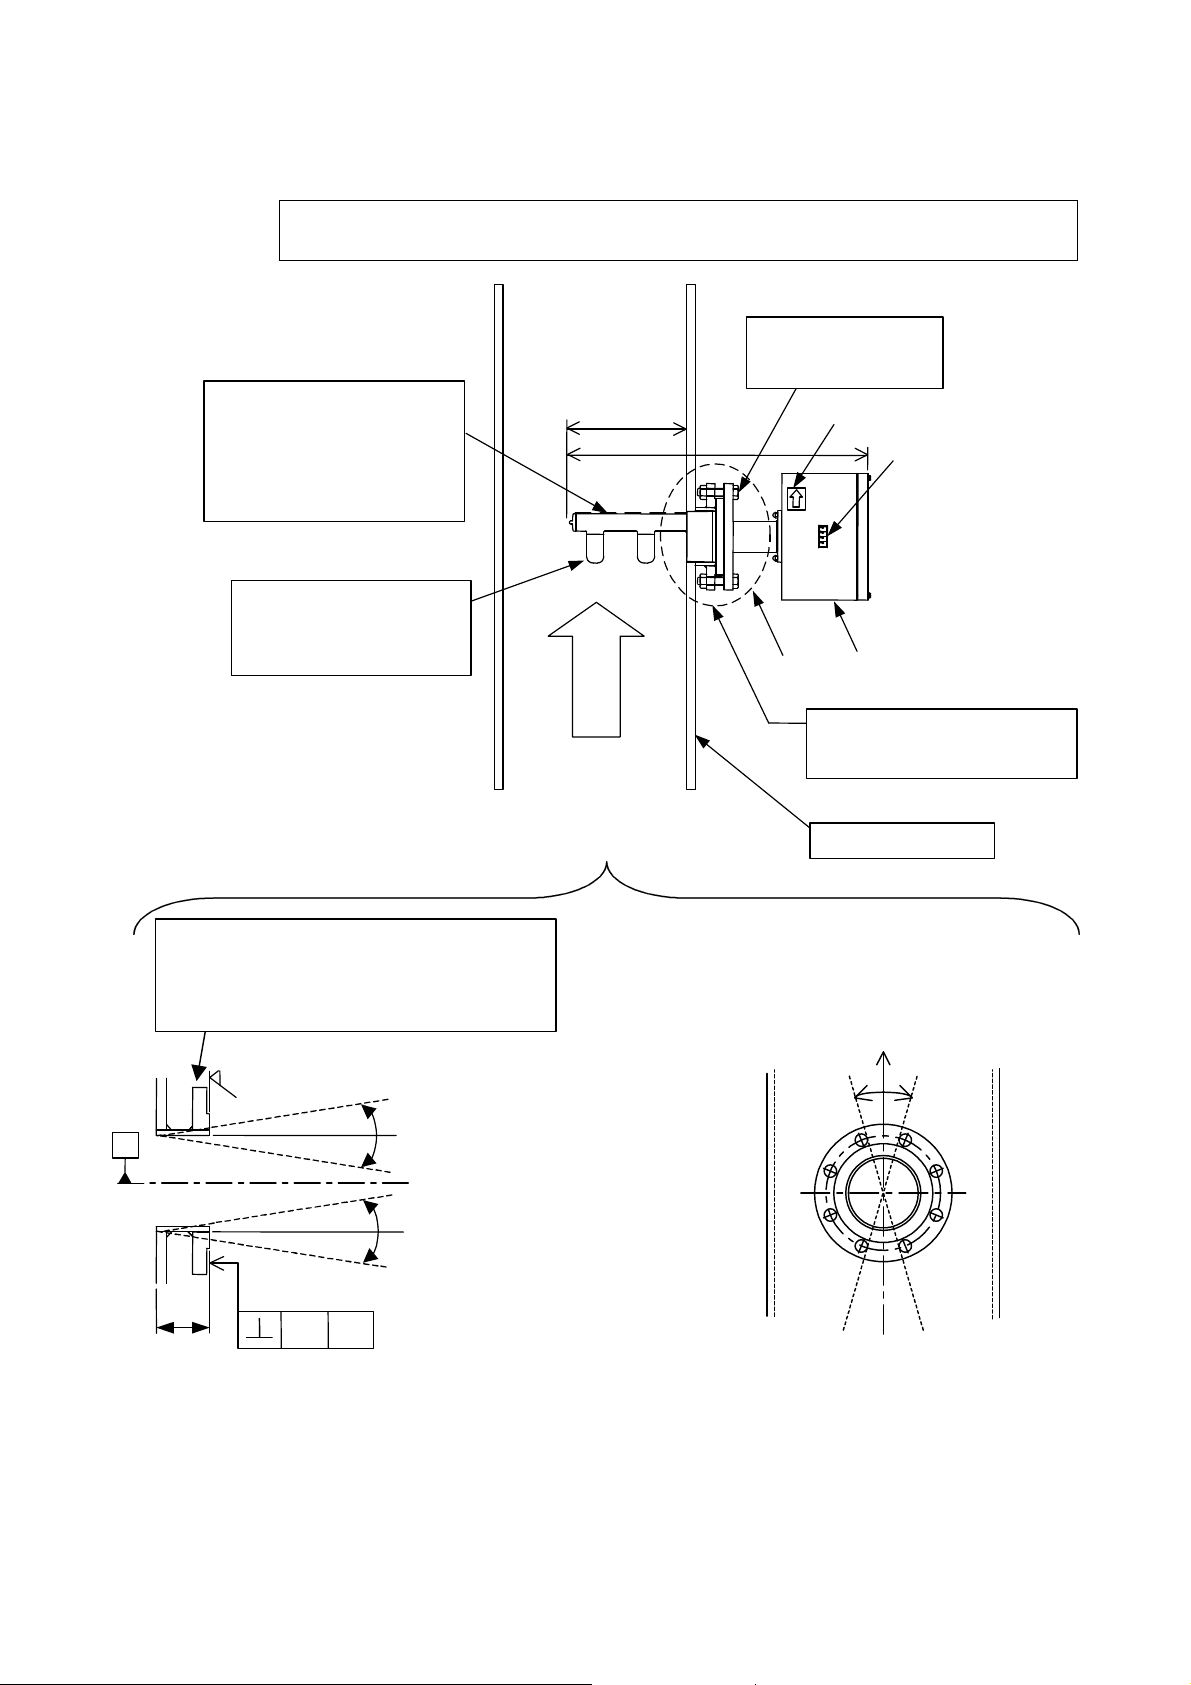
(1) When you install the density meter, see 3.3.4 Precautions When Installing the Density Meter.
(2) Install the density meter in a metal piping system.
When installing or removing the density
meter, insert or remove the applicator
mount section with its backside along the
mounting flange.
Extra care should be taken not to let the
applicators (antenna) hit against the flange
Make sure to mount the density meter
so that the applicators (antenna) face
upstream and in parallel with the
direction of the flow.
231
Flow direction
Fluid to be measured
M8 screw tightening torque:
10.0 to 13.5N•m
(Tighten the screws evenly.)
shows flow direction
589
Section A
Make sure that the O-ring groove and Oring itself are clean without dirt, dust or
cracks before installing the density meter.
Density value display
Converter
Flange standard: JIS10K
Diameter 100mm
Sch20
Refer to 3H8A6579 and 3H8A6580 for details.
3.2
Deviation from piping system in
perpendicular direction: ±1.5° or less
Surface roughness: Ra3.2 minimum
(56.6)
1.5
Fig 3.3.4 Installation Precaution
Section A expanded
Metal pipe or metal tank
Deviation of flange hole positions with respect to
the piping axial direction: ±2° or less
24
3.4 Precautions for Wiring
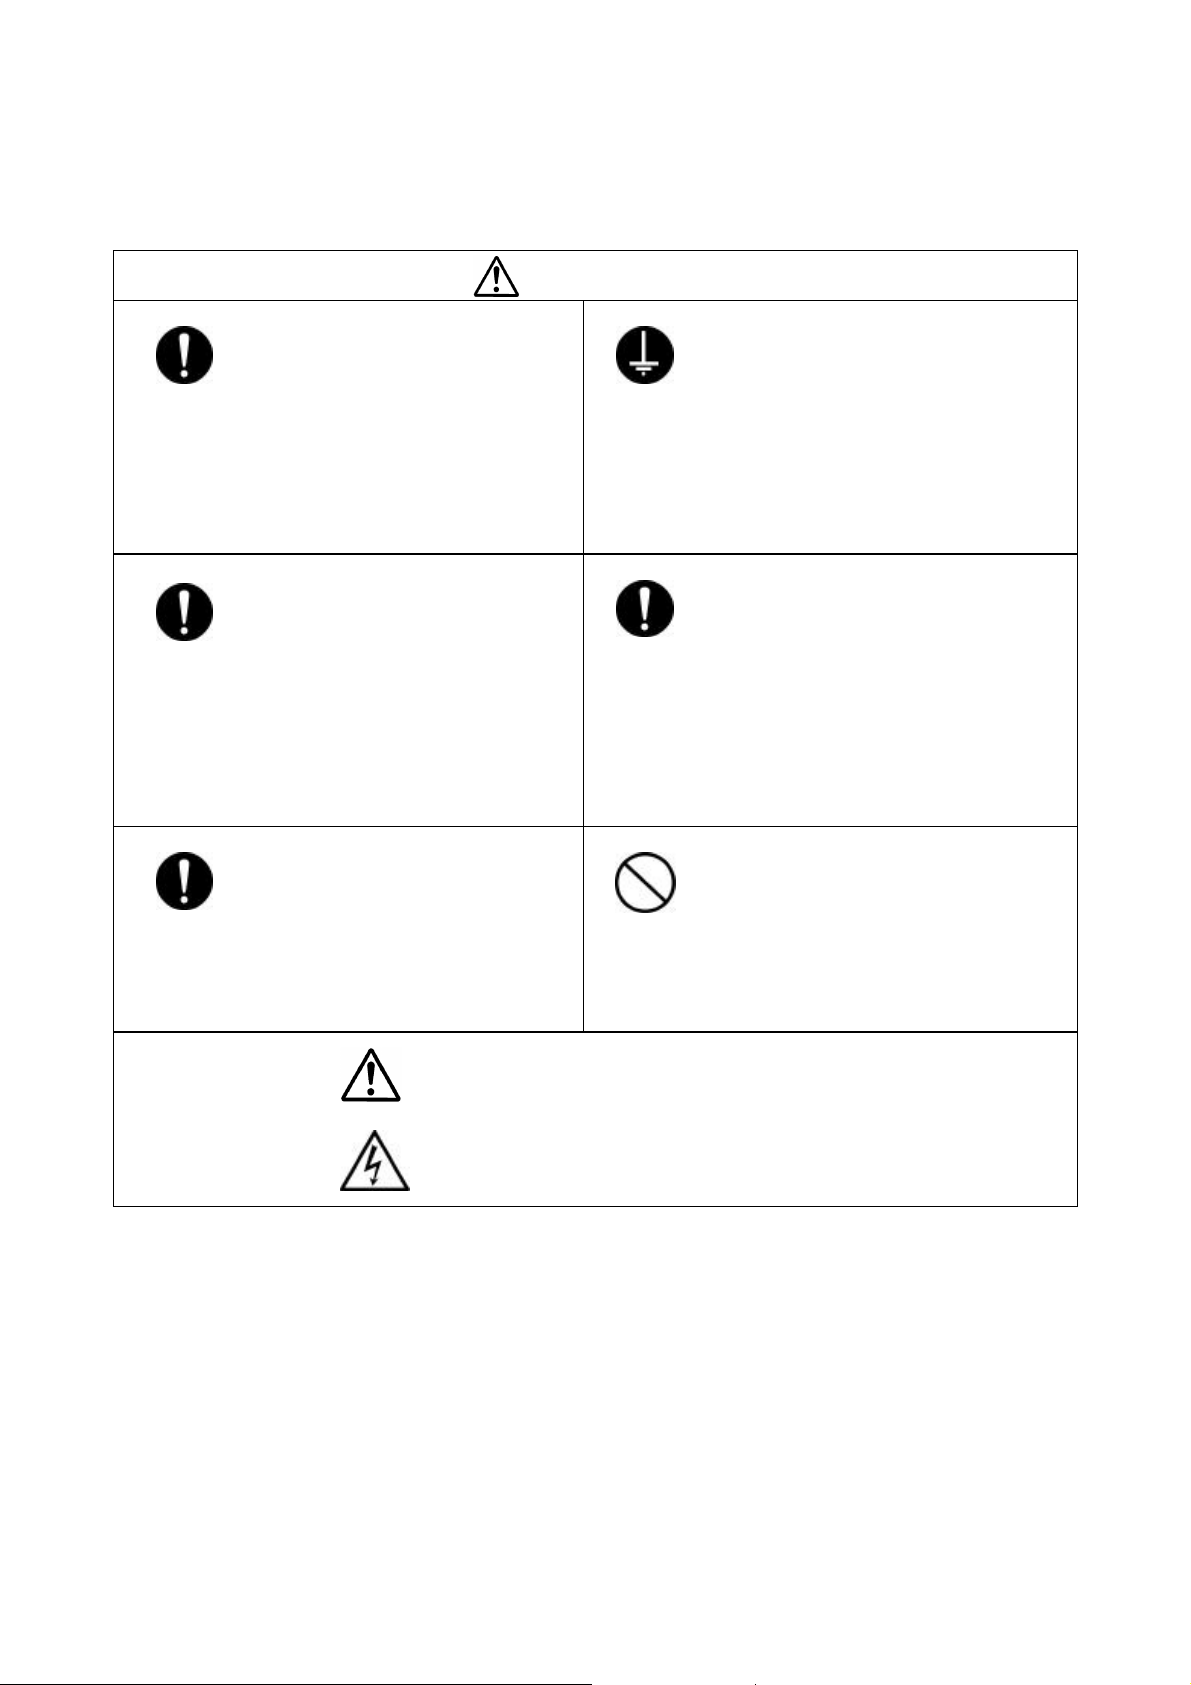
Yellow
■Be sure to install a fuse and a switch
to disconnect the equipment from the
power source.
DO
Failure to observe this can cause
electric shock or equipment failure.
WARNING
DO
6 F 8 A 0 7 8 7
■Be sure to ground the equipment using a
grounding wire separate from those used for
power tools.
(With 100 Ohms or less ground resistance)
Without grounding, electric shock,
malfunction, or equipment failure can be
caused by electric leakage.
DO
DO
■Make sure that the main power line
is off before wiring or cabling.
Wiring or cabling without switching off
the main power line can cause electric
shock.
■Wiring and cabling should be done
as shown in the wiring and connection
diagrams.
Wrong wiring or cabling can cause
malfunctions, overheating, sparking, or
electric shock.
Yellow
The label shown left appears near a terminal block on the equipment to
which power is supplied. Take precautions to avoid electric shock.
Yellow
■Use crimp terminals with insulation
sleeves for power line and grounding wire
terminals.
DO
A disconnected cable or wire from the
terminal or a loose terminal can cause
electric shock or generate heat and cause a
fire or equipment failure.
Do not wire or cable with wet hands.
A wet hand can cause electric shock.
DON’T
25

6 F 8 A 0 7 8 7
3.5 Wiring
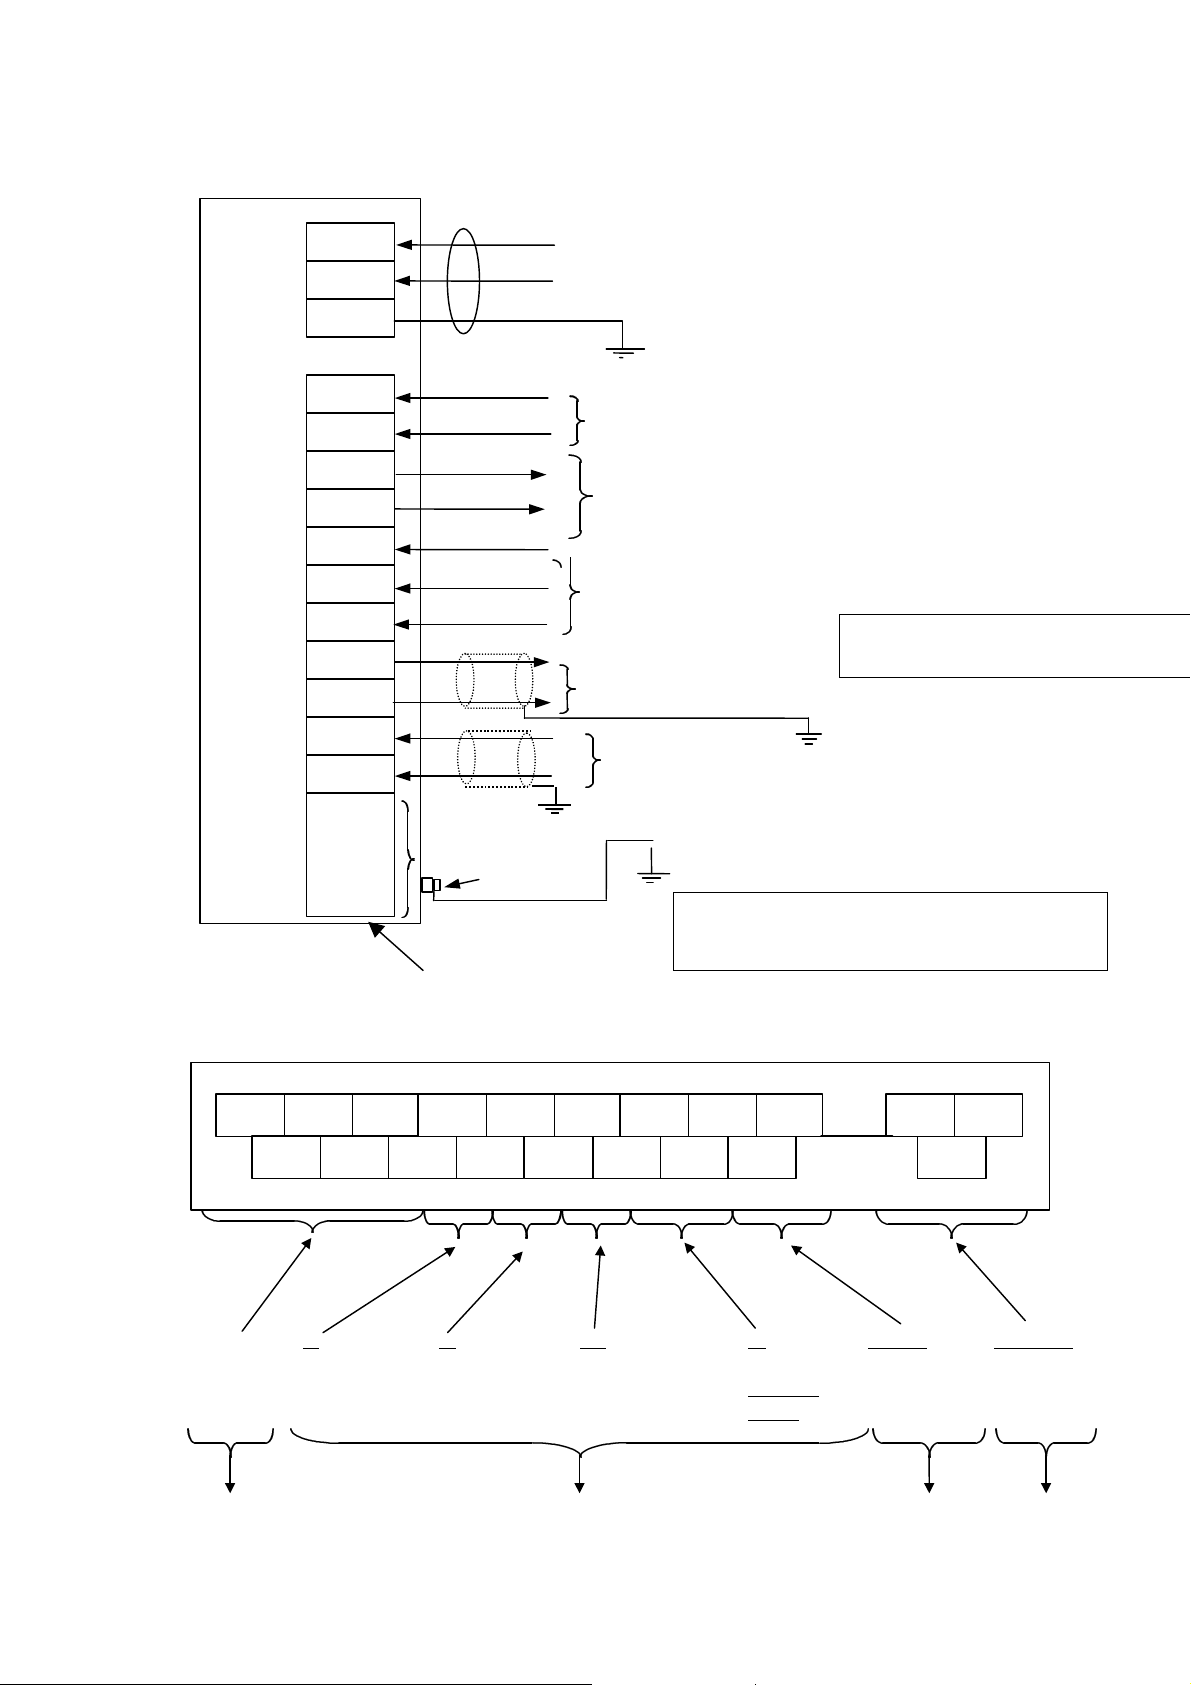
Figure 3.5.1 on the next page shows connections to the density meter and the external units. Figure 3.5.2
shows wiring assignment to a converter terminal. Refer to these figures for correct wiring.
[IMPORTANT]
(1) Provide a switch and a fuse to separate this unit from the mains power for ease of maintenance.
Power requirement of this unit is 50VA.
(2) Ground the LQ300A00****** with 100 Ohms or less ground resistance. Do not use a common ground
shared by other power equipment. The demands of the meter are 50VAs.
(3) Use a sheathed cable (CVV) with 2mm2 cross-sectional area for AC power cable and make sure the
voltage drop across the cable is less than 2 V. And use a M4 sized solderless contact for connection
cable with terminal.
(4) The cables should be free from vibration or sway. The cables should be placed in thick-walled steel
conduits.
(5) Wire the LQ300A00****** output in conduit separated from those of AC power cable, control signals,
alarm signal or other cables which could become the source of noise.
(6) Use a 2-wire shielded sheathed cable (CVVS) to wire the LQ300A00****** output (4 - 20mAdc). And
ground the shielded cable on the receiving instrument side.For performing the conductivity
compensation, use a 2-wire shielded sheathed cable (CVVS) to wire the LQ300A00****** conductivity
signal input (4-20mA). And ground the shielded cable on the receiving instrument side.
(7) As the cable port is made air-tight using a packing, tighten the cable gland securely when all the
wiring is completed. If the diameter of the cable is smaller than the inside diameter of the packing,
enlarge the cable diameter to the same size as the packing by wrapping valves around the cable. Its
suitable diameter is 11mm.
(8) Tighten the terminal screws securely. Appropriated torque to tighten the screws is 1.2 N・m .
(9) Do not turn on the power of the density meter when the applicators (antenna) are taken out of the
piping system. Leakage of radio waves may cause interference to external equipment.
26
6 F 8 A 0 7 8 7
A1,A2)
input DI, COM)
CW
L1
L2
COM
DI
COM1
DO1
COM2
DI2
DI3
+
-
A1
A2
A3 to A8
CW
Reserved
+
−
Ground
terminal (M6)
AC Power
100 to 240V 50/60Hz (50VA)
Ground (R<100 ohms)
(PE terminal)
External sync.
contact input (24VDC, 1A)
Density meter error or “in-maintenance”,
contact output (125Vac, 0.1A)
Measured Density Output (4-
Voltage input for selection of "density multiplier"
(H:20 to 30VDC,L:2VDC or less,Input resistance: Approx. 3k ohms)
The ground connection of the shielded wire of CVVS
should be made on the side of the receiving instrument.
Conductivity signal input
(4-20mA)
Ground resistance: 100 ohms or less
Note: Either the FG terminal of the terminal block inside the
converter or the ground terminal of the converter case
should be grounded.
Converter
Terminal block
No use
(for future)
Cable inlet
(PE terminal)
A3A5A7
AI
(Conductivity
signal input
A7
DI
(Extemal
sync.contat
(PE terminal)
DO1DIA1 L2L1
DI3DI2
COM2COM1A2 COMA4A6A8
DO
(Density meter error or “inmaintenance”, contact
output: O1,COM1)
+
−
DI
(Factor-select
DI2, DI3,
COM2)
AO(+,-)
4 to 20mA
(HART)
Cable inlet 3 Cable inlet 4Cable inlet 2
AC power
(L1,L2,PE)
27
6 F 8 A 0 7 8 7
4. Part Names and Functions
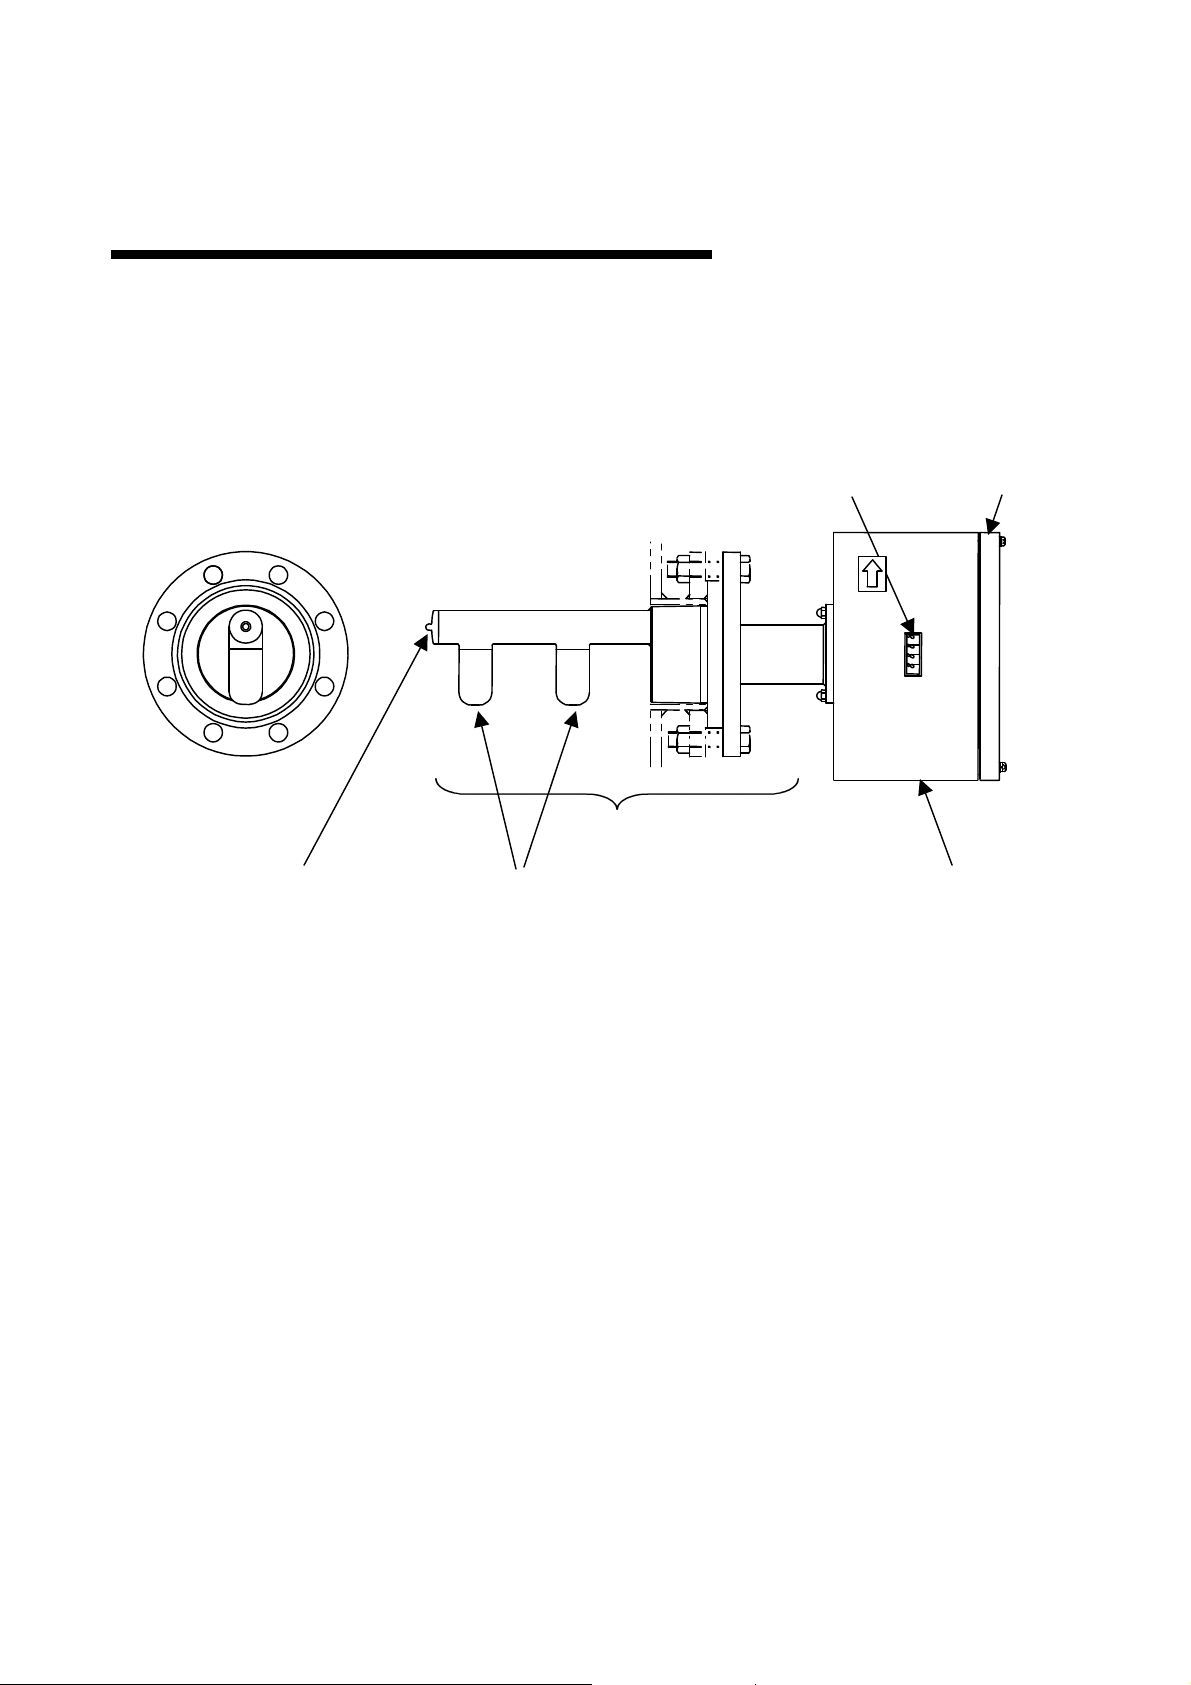
The detector is integrated with the converter in the Insertion Type Density Meter LQ300A00******.
4.1 Detector
(1) Temperature detector
(1) Temperature detector
This is a temperature detector (RTD) to correct the temperature difference. This detector
measures the temperature of the fluid to be measured (fluid temperature) flowing in the pipe
where the density meter is installed.
(4) Density value display
Detector
(2) Applicators (antenna)
Fig. 4.1 Insertion Type Density Meter LQ400A00
(5) Converter cover
(3) Converter
(2) Applicators
The applicators (antenna) for transmitting and receiving microwaves are built inside. The
applicator on the left in Fig.4.1 is for transmitting and the right is for receiving. Always keep the
lids closed and the screws of the lids secured.
(3) Converter
See Section 4.2
28
 Loading...