

Page 1

User Guide
Basic Copying
Toshiba America Business Solutions, Inc. © 2006
Training and Dealer Development
Page 2

Page 3
BASIC COPYING
Placing Originals on the Exposure Glass
Placing Originals in the Auto Document Feeder
Basic Copying Procedure
Copying From the Bypass Tray
Setting Thick Paper
Setting OHP Transparencies
Copying Onto Special Paper
Copying Onto Envelopes
Preset Reduction / Enlargement
Using the Zoom Function
Duplex Copying
Image Repeat
Color Adjustment
Color Balance
Job Programs
Page 1
Page 4
Placing Originals on the Exposure Glass
1. Lift the ADF.
IMPORTANT: Do not lift the ADF forcefully. Otherwise, the ADF cover might open or
be damaged.
NOTE: Be sure to lift the ADF more than 30°. Otherwise, the size of the original might not
be detected correctly.
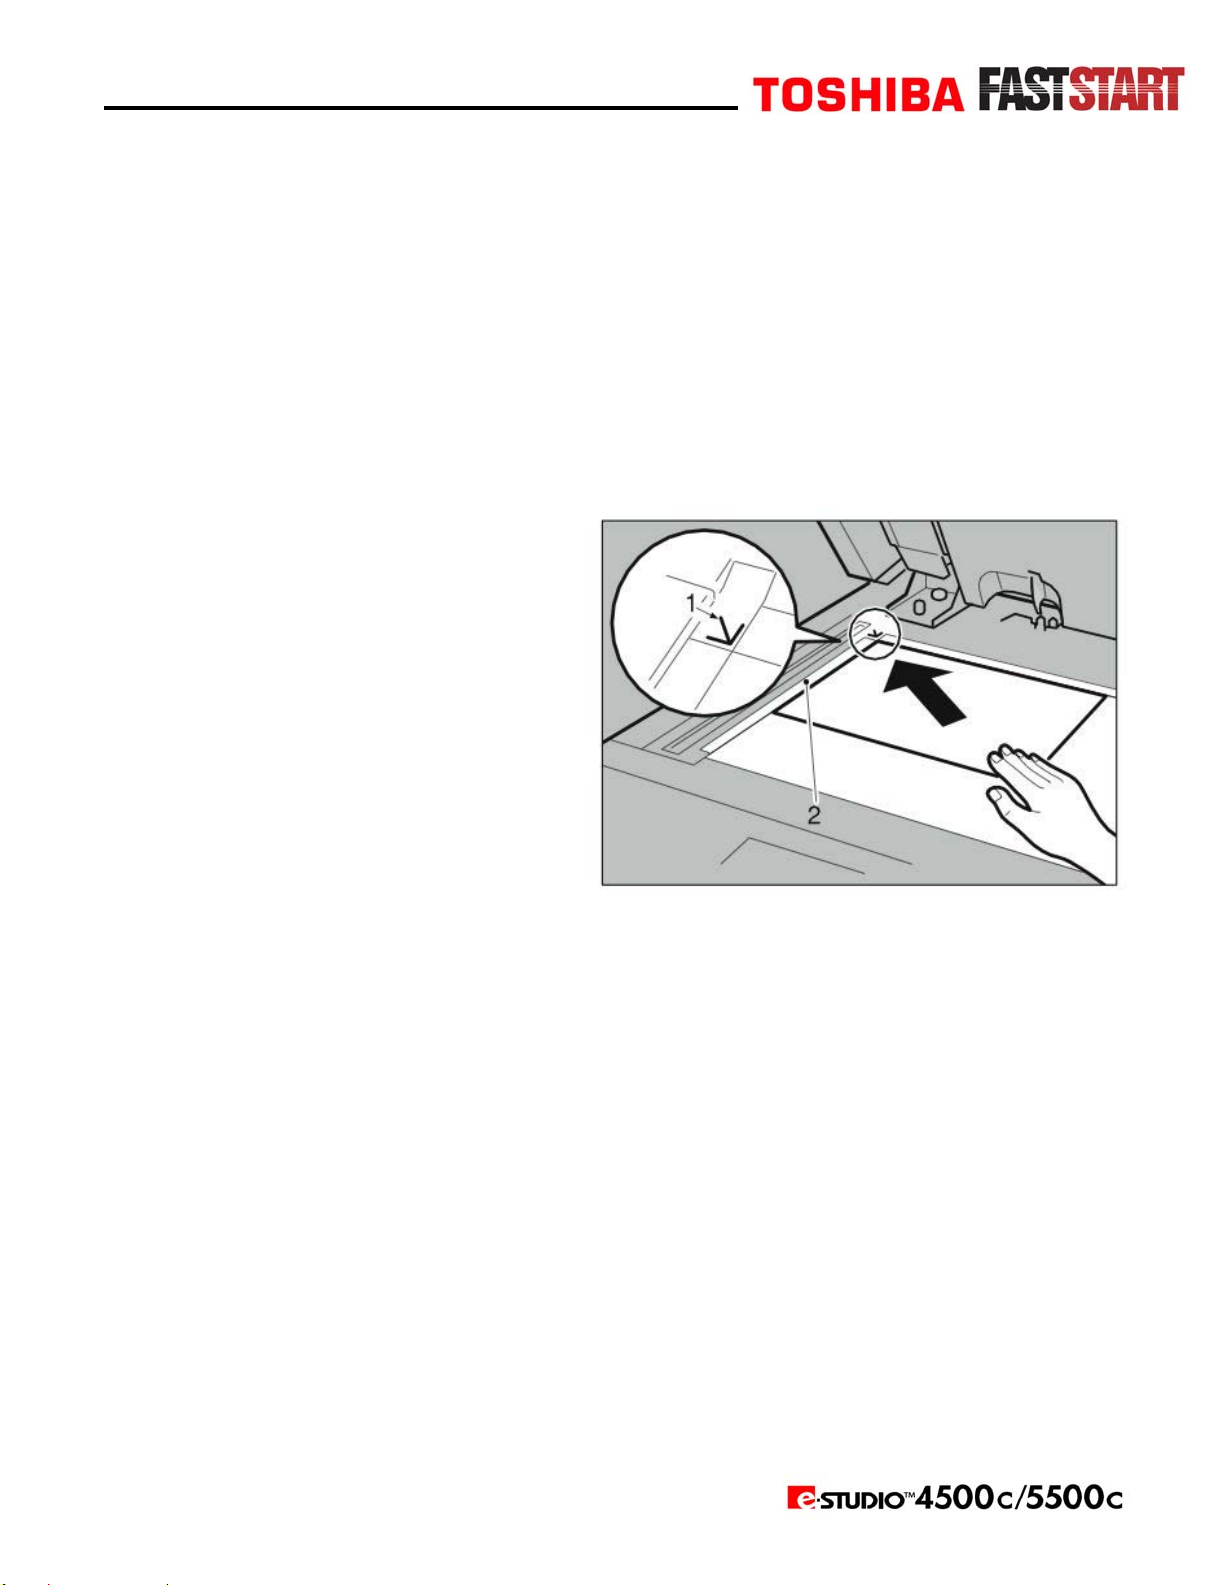
2. Place the original face down on the exposure glass. It should be aligned with the left scale.
y 1: Positioning mark
y 2: Left scale
NOTE: Start with the first page to be copied.
3. Lower the ADF.
Page 2
Page 5
Placing Originals in the Auto Document Feeder
NOTES:
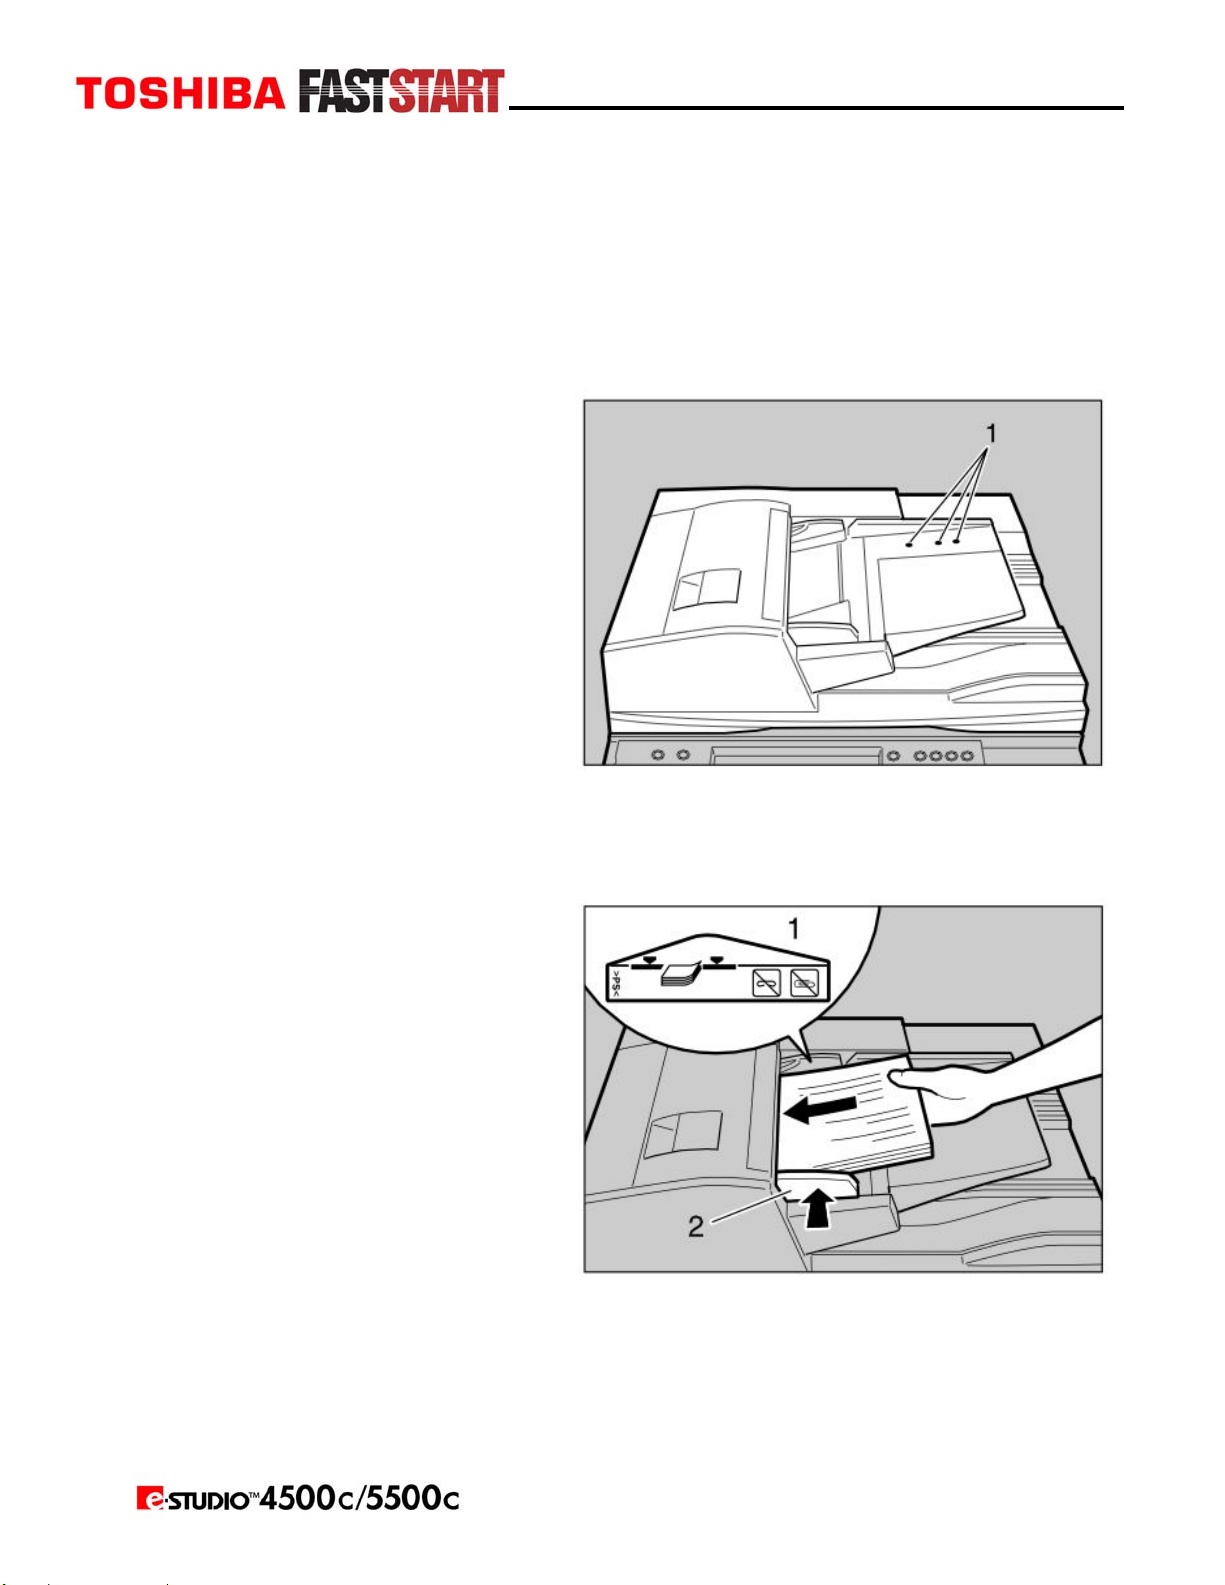
y Do not stack originals above the limit mark on the side guide of the ADF.
y The last page should be on the bottom.
y When you copy two-sided originals, both front and back sides of each original are
scanned at once.
y Do not place objects on the sensors or cover them with your hands, or the original size
may not be detected properly.
y 1: Sensors
1. Set the document guide to the original size.
2. Place the aligned originals face up into the ADF.
y 1: Limit mark
y 2: Document guide
NOTES:
y Straighten any curls in the originals before placing them in the ADF.
y To prevent multiple sheets from being fed at once, fan the originals before placing
them in the ADF.
y Place the originals squarely.
Page 3
Page 6
Placing Originals in the Auto Document Feeder (Cont’d.)
Batch Mode
The Batch mode enables you to copy originals of more than 100 pages as a single document,
even if you place the originals into the ADF in installments.
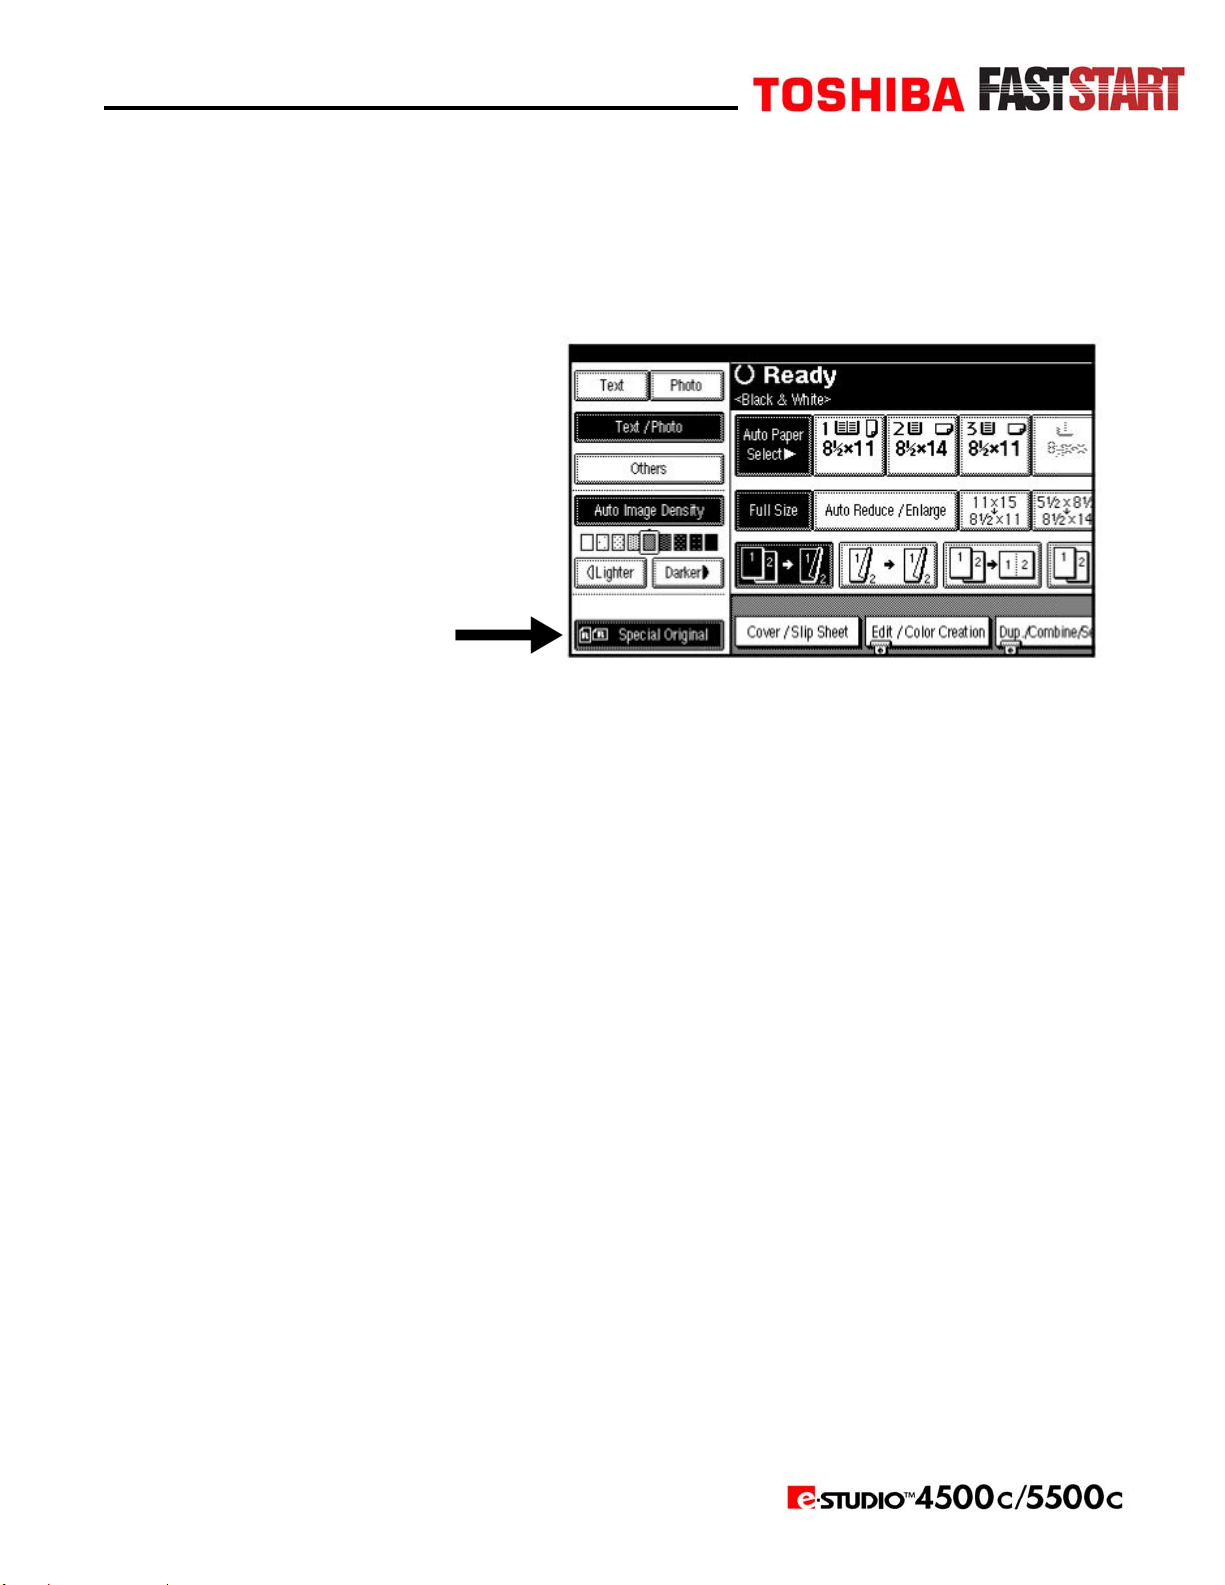
1. Press Special Original.
2. Press Batch, and then press OK.
3. Place the first installment of the originals, and press the Start key.
4. After the original has been fed, place the next installment.
5. Press the Start key.
Page 4
Page 7
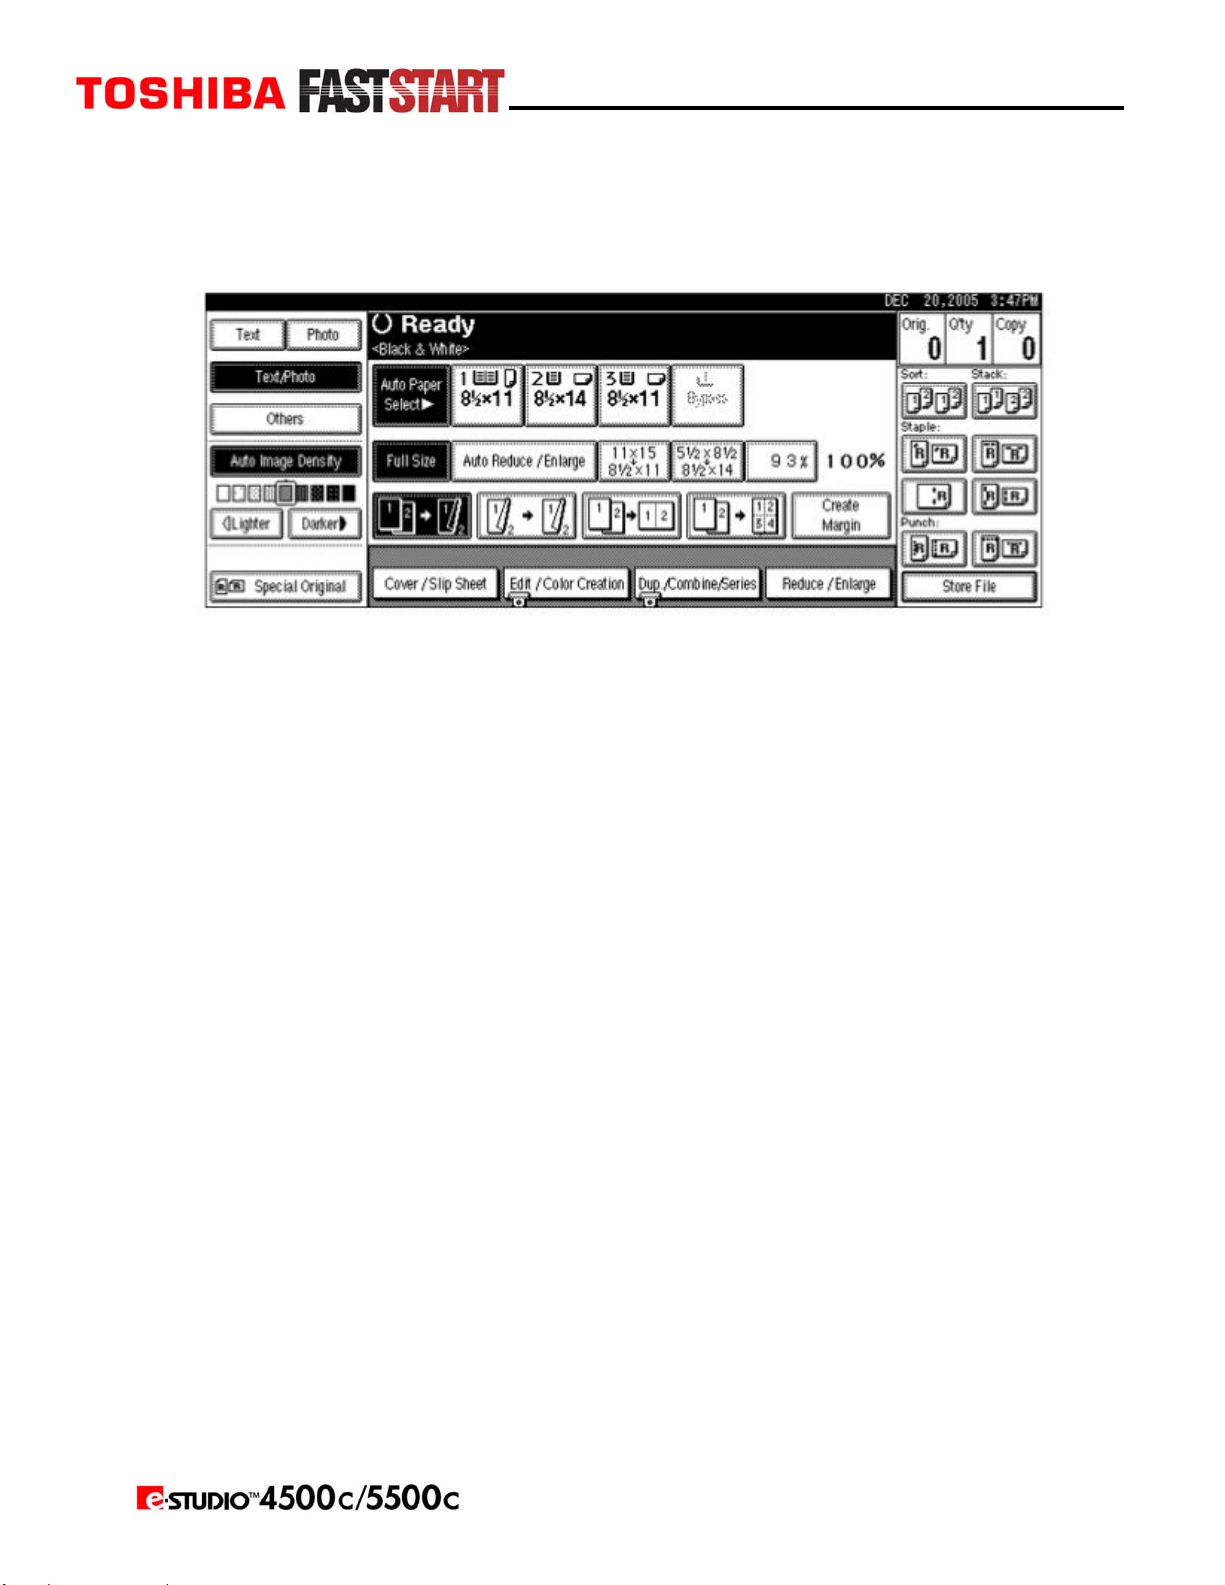
Basic Copying Procedure
1. Make sure Ready is shown on the display. If any other function is displayed, press the
Copy key.
y Initial copy display
2. Make sure no previous settings remain.
NOTE: When there are previous settings remaining, press the Clear Modes key before
entering your settings.
3. Place the originals.
4. Make the necessary settings.
5. Enter the required number of copies using the number keys.
NOTE: The maximum copy quantity that can be set is between 1 and 999.
6. Press the Start key.
NOTES:
y When placing originals on the exposure glass, press the
originals are scanned.
y Copies are delivered face down.
# (enter) key after all the
Page 5
Page 8
Copying From the Bypass Tray
This section gives instructions for setting paper on the bypass tray. Use the bypass tray to
print onto OHP transparencies, labels, thick paper, and envelopes that cannot be loaded in the
paper tray.
NOTES:
y When loading letterhead paper, pay attention to its orientation.
y Paper within the following dimensions can be set in the bypass tray:
y Vertical: 100 - 305 mm (3.9 - 12.0 in.)
y Horizontal: 148 - 457.2 mm (5.5 - 18.0 in.)
y Be sure to set the paper with the side you want to print facing down in the bypass tray.
y When loading OHP transparencies or thick paper in the bypass tray, make the paper
setting using the control panel or printer driver.
y The number of sheets that can be loaded in the bypass tray depends on the paper type.
y Paper sizes fed from the bypass tray are output first sheet down, print side-up.
LIMITATION: The following functions are disabled when printing from the bypass tray:
y Duplex printing
y Auto Tray Select
y Auto Tray Switching
y Rotating Collate
y Staple (when the optional unit is installed)
y Punch (when the optional unit is installed)
Page 6
Page 9

Copying From the Bypass Tray (Cont’d.)
1. Open the bypass tray.
2. Insert the paper with the side
you want to copy facing up, and
align the paper guide to the paper
size. Make sure the bypass tray
is selected (highlighted) on the
control panel.
y 1: Extender
IMPORTANT: If the guides are not flush against the copy paper, image skewing or misfeeds
might occur.
NOTES:
y Do not stack paper over the limit mark, otherwise image skewing or misfeeds
might occur.
y Swing out the extender to support paper sizes larger than A4 or 81/2" x 11".
y Fan paper to avoid multi-sheet feeds.
Page 7
Page 10

Copying From the Bypass Tray (Cont’d.)
3. Select the paper type and size.
y When Copying onto Standard Size Paper:
1. Press the # (enter) key. The “Bypass Tray Paper” screen is displayed.
2. Press Select Size.
3. Select the paper size.
4. Press OK twice.
y When Copying onto Custom Size Paper:
1. Press the # (enter) key.
2. Press Custom Size.
3. Enter the vertical size of the paper using the number keys, and then press
# (enter).
4. Enter the horizontal size of the paper using the number keys, and then press
NOTES:
y If Horiz is not highlighted, press Horiz.
5. Press OK.
Page 8
# (enter).
Page 11

Setting Thick Paper
NOTES:
y Paper settings can also be set using the printer driver. The following procedures are not
necessary when setting paper sizes using the printer driver.
y Paper size settings set using the printer driver have priority over those set using the
machine’s display panel.
y When the printer driver is not used, make settings using the display panel.
1. Press the User Tools/Counter key on the control panel.
2. Press System Settings.
3. Press the Tray Paper Settings tab.
4. Press Next to scroll through the list.
5. Press Paper Thickness Setting.
6. Select Thick1 or Thick2.
7. Press OK.
8. Press the User Tools/Counter key.
NOTE: The settings made will remain valid until they are reset again. After printing on thick
paper, make sure to clear settings for the next user.
Page 9
Page 12

Setting OHP Transparencies
1. Press the User Tools/Counter key on the control panel.
2. Press System Settings.
3. Press the Tray Paper Settings tab.
4. Press Next to scroll through the list.
5. Press Paper Type: Bypass Tray.
6. Select OHP or Translucent.
7. Press OK. The paper type selected is displayed.
8. Press the User Tools/Counter key.
NOTE: The settings made will remain valid until they are reset again. After printing on OHP
transparencies or thick paper, make sure to clear settings for the next user.
Page 10
Page 13

Copying Onto Special Paper
1. Put special paper in the bypass; make sure Bypass is the selected source on the control
panel. Press the # (enter) key.
2. Select paper type in “Special paper”.
3. Press OK.
4. Place the originals, and then press the Start key.
NOTE: When the Sort function is set, press the
5. When your copy job is finished, press the Clear Modes key to clear the settings.
# (enter) key af ter all origi nals hav e been sca nned.
Copying Onto Envelopes
NOTES:
y When placing an original on the exposure glass, place the original with the bottom line
aligned to the left scale.
y When placing originals in the ADF, place the originals with the bottom line inserted in
the ADF.
y When inserting envelopes, be sure
to unfold the flaps and position them
opposite to the paper feed direction.
1. Open the bypass tray, and insert the
envelopes with the side you want to
copy face up.
2. Align paper guide to envelope sides.
3. Press the
4. Press Custom Size.
5. Enter the vertical size of the envelope
using the number keys, and then press
# (enter) key.
# (enter).
6. When placing an original on the Enter the horizontal size of the envelope using the
number keys, and then press
NOTE: When entering the horizontal size for envelopes,
include the opened-out flap in the measurement.
y 1: Vertical
y 2: Horizontal
7. Select Thick Paper 2 for the paper type.
8. Press OK.
9. Place the originals, and then press the Start key.
10. When your copy job is finished, press the Clear Modes
key to clear the settings.
# (enter).
Page 11
Page 14

Preset Reduction / Enlargement
1. Press Reduce / Enlarge.
NOTE: To select a preset ratio on the initial display, press the shortcut Reduce / Enlarge key,
and then proceed to step 4.
2. Press Enlarge or Reduce.
3. Select a ratio, and then press OK.
4. Place originals, and then press the Start key.
Page 12
Page 15

Using the Zoom Function
You can change the reproduction ratio in increments of 1%.
NOTE: You can select a preset ratio close to the ratio using
Reduce or Enlarge, and then adjust it further, using
1. Press Reduce / Enlarge.
+ or - .
2. Enter the ratio.
y To Select the Ratio Using
1. Select a preset ratio close to the ratio using Reduce or Enlarge.
2. Adjust the ratio further, using
NOTES:
y Pressing
changes it in increments of 10%.
y If you have incorrectly entered the ratio, readjust it using
y To Enter the Ratio Using the Number Keys:
1. Press Mag. Ratio.
2. Enter the ratio using the number keys.
3. Press
4. Press OK.
3. Note Place the originals, and then press the Start key.
+ or - changes the ratio in increments of 1%. Pressing and holding down + or -
# (enter).
+ and - .
+ or - .
+ or - .
Page 13
Page 16

Duplex Copying
Duplex copying and orientation selection are done with the Dup./Combine/Series key.
There are two types of duplex copies:
y 1 Sided→2 Sided
Copies 2 one-sided pages onto a two-sided page.
2 Sided→2 Sided
y
Copies 1 two-sided page onto a two-sided page.
Page 14
Page 17

Duplex Copying (Cont’d.)
Originals and Copy Orientation
You can select the orientation:
y Top to Top
y Top to Bottom
1. Press Orientation, select the orientation (Original/Copy), and then press OK.
Page 15
Page 18

Image Repeat
The original image is copied repeatedly.
There are two types of designation methods for Image Repeat.
y Whole Area Repeat — Repeatedly copies the
entire image.
y Specified Area Repeat — Repeatedly copies a
specified portion of the image. Decide the base
point of the area, specify the length and the
width, and then specify the location of the area.
Whole Area Repeat
NOTE: The number of repeated images depends on the original and copy paper sizes, and the
reproduction ratio.
y Original: 8 1/2" x 5 1/2" vertical,
Copy paper: 8 1/2" x 11" vertical, OR
Original: 8 1/2" x 5 1/2" horizontal,
Copy paper: 81/2" x 11" horizontal.
y Original: 8 1/2" x 5 1/2" vertical,
Copy paper: 8 1/2" x 11" horizontal, OR
Original: 8 1/2" x 5 1/2" horizontal,
Copy paper: 81/2" x 11" vertical.
Page 16
Page 19

Image Repeat (Cont’d.)
1. Select the size of the copy paper and the reproduction ratio.
2. Press Edit / Color Creation.
3. Press Edit Image.
4. Press Image Repeat.
5. Make sure that Whole Area is selected, then press OK.
6. Press OK twice.
7. Place the original, and then press the Start key.
Page 17
Page 20

Color Adjustment
This function lets you alter up to three single colors by mixing them with adjacent colors in
the color circle.
NOTES:
y You can adjust up to 3 colors from yellow, red, magenta, blue, cyan, or green at the
same time.
y This function is only available in Full Color mode.
1. Press the Adjust/Program Color key.
2. Press Adjust Color.
y The color circle is displayed.
3. Select the colors you want to adjust.
y You can select up to 3 colors.
4. Adjust the color using ← or →.
NOTE: Refer to the color circle on the control panel.
5. Press OK.
NOTES:
y The indicator of the Adjust/Program Color key will light up when adjusting the color.
y The adjusted settings will be deleted and the initial values will be reset, when Auto Clear
has been performed, when the Clear Modes key has been pressed or when the power has
been turned off.
Page 18
Page 21

Color Balance
You can adjust the overall color tone when the overall copy is reddish or bluish.
1. Press the Adjust/Program Color key.
2. Make sure that Color Balance is selected.
3. Adjust by pressing Lighter or Darker.
4. Press OK.
NOTES:
y The indicator of the Adjust/Program Color key will light up when adjusting the
color balance.
y The adjusted settings will be deleted and the initial values will be reset when either Auto
Clear has been performed, when the Clear Modes key has been pressed or when the
power has been turned off.
Page 19
Page 22

Job Programs
You can store frequently used copy job settings in machine memory and recall them for future
use. Programs are not deleted by turning the power off or pressing the Clear Modes key. They
are canceled only when you delete or overwrite them with another program.
Storing a Program
1. Edit the copy settings so all functions you want to store in this program are selected.
2. Press the Program key.
3. Press Register.
4. Press the program number you want to store.
NOTE: Program numbers displayed with next to them already have settings.
Page 20
Page 23

Job Programs (Cont’d.)
5. Enter the program name using the letter keys on the display panel.
y You can enter up to 40 characters.
6. Press OK.
y When the settings are successfully stored, the indicator followed by the
program number and program name will be displayed. After a while, the screen reverts
back to the initial copy display.
Changing a Stored Program
1. Check the program settings.
2. Repeat steps 1 to 4.
3. Press Register. Repeat steps 5 and 6 of “Storing a Program”
NOTE: When overwritten, the previous program is deleted.
Page 21
Page 24

Job Programs (Cont’d.)
Deleting a Program
1. Press the Program key.
2. Press Delete.
3. Press the number of the program you want to delete.
4. Press Yes. The program is deleted, and the screen returns to the initial copy display.
Recalling a Program
1. Press the Program key.
2. Press Recall.
3. Press the number of the program you want to recall.
NOTE: Program numbers displayed with next to them already have settings.
4. Press the Program key. Place the originals, and then press the Start key.
Page 22
Page 25

Notes
Page 23
 Loading...