

Page 1

OWNER'S MANUAL
DLPTM Projection Television
44HM85
5
Owner's Record
The model number and serial number are on the back
of your TV. Record these numbers in the spaces below.
Refer to these numbers whenever you communicate
with your Toshiba dealer about this TV.
Model:
Serial No.:
Page 2
Lamp Unit Replacement
CAUTION: HOT SURFACE!
The temperature of the lamp
immediately after use
exceeds 392°F (200°C).
Touching the lamp before it has
cooled will result in severe burns. ALLOW THE LAMP TO
COOL FOR AT LEAST ONE (1) HOUR BEFORE REPLACING IT.
The exclamation mark in the triangle tells you that
important operating and maintenance instructions
follow this symbol.
The lightning symbol in the triangle tells you that
the voltage inside this product may be strong enough
to cause an electric shock. DO NOT TRY TO SERVICE
THIS PRODUCT YOURSELF.
The lamp in this product has a limited service life. The length
of service life varies depending on product use and user
settings. If you use the lamp beyond its service life:
• you may notice a reduction in the colors and/or brightness of
the picture, at which time you should replace the lamp unit;
and
• the strength of the quartz glass in the lamp will be reduced
and the lamp may rupture. If the lamp ruptures, the TV will
not operate until the lamp unit is replaced.
Note: The lamp unit is designed so broken lamp glass
remains securely inside the lamp unit.
See pages
46-48
.
• Dispose of the used lamp unit by the approved method for
your area.
NOTE TO CATV INSTALLERS
This is a reminder to call the CATV system installer’s attention
to Article 820-40 of the NEC, which provides guidelines for
proper grounding and, in particular, specifies that the cable
ground shall be connected to the grounding system of the
building, as close to the point of cable entry as practical. For
additional antenna grounding information, see items 27 and 28
on page 4.
Dear Customer,
Thank you for purchasing this Toshiba TV. This manual will
help you use the many exciting features of your new TV.
Before operating the TV, please read this manual completely,
and keep it nearby for future reference.
2500 Wilson Blvd.
Arlington, VA 22201 U.S.A.
Tel. 703-907-7600 Fax 703-907-7690
www.CE.org
CEA is the Sponsor, Producer and
Manager of the International CES
®
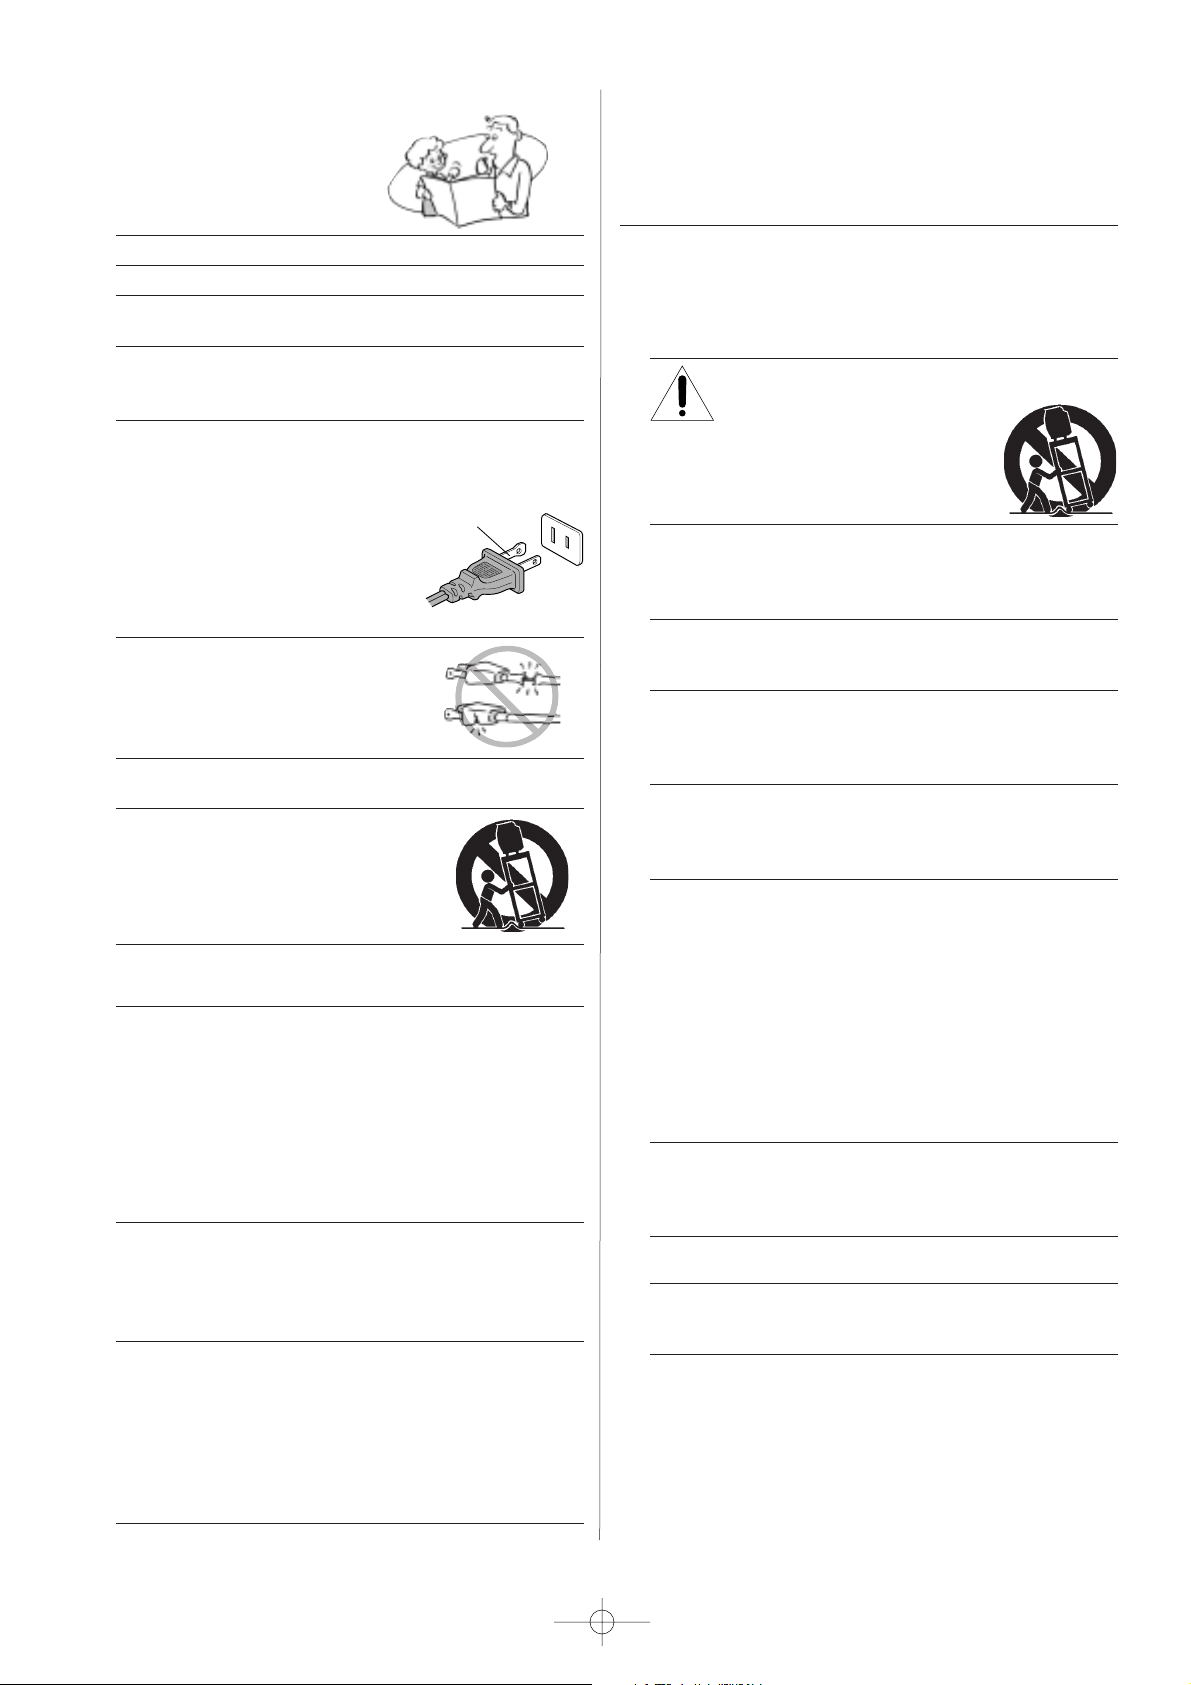
The Issue
W
If you are like most consumers, you have a TV in your
home. Many homes, in fact, have more than one TV.
W
The home theater entertainment experience is a growing
trend, and larger TVs are popular purchases; however, they are
not always supported on the proper TV stands.
W
Sometimes TVs are improperly secured or inappropriately
situated on dressers, bookcases, shelves, desks, audio
speakers, chests, or carts. As a result, TVs may fall over,
causing unnecessary injury.
Toshiba Cares!
W
The consumer electronics industry is
committed to making home
entertainment enjoyable and safe.
W
The Consumer Electronics
Association formed the Home
Entertainment Support Safety
Committee, comprised of TV and
consumer electronics furniture
manufacturers, to advocate
children’s safety and educate
consumers and their families about
television safety.
Tune Into Safety
One size does NOT fit all! Use appropriate
furniture large enough to support the weight of
your TV (and other electronic components).
Use appropriate angle braces, straps, and anchors to secure
your furniture to the wall (but never screw anything directly
into the TV).
Carefully read and understand the other enclosed
instructions for proper use of this product.
Do not allow children to climb on or play with furniture
and TVs.
Avoid placing any item on top of your TV (such as a VCR,
remote control, or toy) that a curious child may reach for.
Remember that children can become excited while watching
a program and can potentially push or pull a TV over.
W
Share our safety message about this hidden hazard of
the
home with your family and friends. Thank you!
W
W
W
W
W
W
It Makes A Difference
Where Your TV Stands
Congratulations on your purchase! As you enjoy
your new TV, keep these safety tips in mind:
Child Safety
Note: The lamp unit contains mercury. Disposal of mercury may
be regulated due to environmental considerations. For disposal or
recycling information, contact your local authorities or the
Electronics Industries Alliance (www.eiae.org).
PAGE 2
Safety Precautions
WARNING
TO REDUCE THE RISK OF FIRE OR ELECTRIC SHOCK, DO NOT
EXPOSE THIS APPLIANCE TO RAIN OR MOISTURE.
WARNING: TO REDUCE THE RISK OF ELECTRIC SHOCK, DO NOT
REMOVE COVER (OR BACK). NO USER-SERVICEABLE PARTS
INSIDE. REFER SERVICING TO QUALIFIED SERVICE PERSONNEL.
562C_2~5(2)_en 90/6/18 1:15 PM Page 2
Page 3
(continued on next page)
Installation, Care, and Service
Installation
Follow these recommendations and precautions and heed all
warnings when installing your TV:
17) Never modify this equipment. Changes or modifications may
void: a) the warranty, and b) the user’s authority to operate
this equipment under the rules of the Federal
Communications Commission.
18) DANGER: RISK OF SERIOUS PERSONAL
INJURY, DEATH, OR EQUIPMENT
DAMAGE! Never place the TV on
an unstable cart, stand, or table. The TV
may fall, causing serious personal injury,
death, or serious damage to the TV.
19) Never place or store the TV in direct sunlight; hot, humid
areas; areas subject to excessive dust or vibration; or
locations with temperatures at or below 41°F (5°C).
20) Always place the TV on the floor or a sturdy, level, stable
surface that can support the weight of the unit.
21) Never expose the apparatus to dripping or splashing or
place items such as vases, aquariums, any other item filled
with liquid, or candles on top of the TV.
22) Always place the back of the television at least one (1)
inch away from any vertical surface (such as a wall) to
allow proper ventilation.
23) Never block or cover the slots or openings in the TV cabinet
back, bottom, and sides. Never place the TV:
• on a bed, sofa, rug, or similar surface;
• too close to drapes, curtains, or walls; or
• in a confined space such as a bookcase, built-in cabinet,
or any other place with poor ventilation.
The slots and openings are provided to protect the TV from
overheating and to help maintain reliable operation of the
TV.
24) Never allow anything to rest on or roll over the power cord,
and never place the TV where the power cord is subject to
wear or abuse.
25) Never overload wall outlets and extension cords.
26) Always operate this equipment from a 120 VAC, 60 Hz
power source only.
Important Safety Instructions
1) Read these instructions.
2) Keep these instructions.
3) Heed all warnings.
4) Follow all instructions.
5) Do not use this apparatus near water.
6) Clean only with a dry cloth.
7) Do not block any ventilation openings. Install in
accordance with the manufacturer’s instructions.
8) Do not install near any heat sources such as radiators,
heat registers, stoves, or other apparatus (including
amplifiers) that produce heat.
9) Do not defeat the safety purpose of the polarized or
grounding type plug. A polarized plug has two blades
with one wider than the other. A grounding type plug has
two blades and a third grounding
prong. The wide blade or the third
prong are provided for your safety.
If the provided plug does not fit into
your outlet, consult an electrician
for replacement of the obsolete outlet.
10) Protect the power cord from being
walked on or pinched, particularly at
plugs, convenience receptacles, and
the point where it exits the apparatus.
11) Only use attachments/accessories specified by the
manufacturer.
12) Use only with the cart, stand, tripod,
bracket, or table specified by the
manufacturer, or sold with the
apparatus. When a cart is used, use
caution when moving the cart/apparatus
combination to avoid injury from tip-over.
13) Unplug this apparatus during lighting storms or when
unused for long periods of time.
14) Refer all servicing to qualified service personnel.
Servicing is required when the apparatus has been damaged
in any way, such as power-supply cord or plug is damaged,
liquid has been spilled or objects have fallen into the
apparatus, or the apparatus has been exposed to rain or
moisture, does not operate normally, or has been dropped.
This applies to all items except those specified on pages
46-48 of this manual.
15) CAUTION: To reduce the risk of electric shock, do not use
the polarized plug with an extension cord, receptacle, or
other outlet unless the blades can be inserted completely
to prevent blade exposure.
16) WARNING: This product contains a lamp to project the
picture, and requires special safety precautions:
• See pages 46-48 for instructions on lamp unit
replacement.
• DO NOT attempt to service this product except as
specified on pages 46-48. The only user-serviceable
item in this product is the lamp unit.
Wide plug
PAGE 3
562C_2~5(2)_en 90/6/18 1:15 PM Page 3
Page 4
Care
(cont. from previous column)
33) For added protection of your TV from lightning and power
surges, always unplug the power cord and disconnect the
antenna from the TV if you leave the TV unattended or
unused for long periods of time.
34
) During normal use, the TV may make occasional snapping or
popping sounds. This is normal, especially when the unit is
being turned on or off. If these sounds become frequent or
continuous, unplug the power cord
and contact a Toshiba Authorized Service Center.
35)
Special care for DLP
TM
(digital light processing) units:
•
Lamp—The lamp in this product has a limited service life.
The length of service life varies depending on product use
or user settings. If you use the lamp beyond its service
life:
- you may notice a reduction in the colors and/or
brightness of the picture, at which time you should
replace the lamp unit; and
- the strength of the quartz glass in the lamp will be
reduced and the lamp may rupture. If the lamp ruptures,
the TV will not operate until the lamp unit is replaced.
See pages 46-48.
Note:
• The lamp unit is designed so broken lamp glass remains
securely inside the lamp unit.
• The lamp unit contains mercury. Disposal of
mercury may be regulated due to environmental
considerations. For disposal or recycling information,
please contact your local authorities or the
Electronics Industries Alliance (www.eiae.org).
• Dispose of the used lamp unit by the approved method for
your area.
Service
36
) WARNING: RISK OF ELECTRIC SHOCK!
Never attempt to service the TV yourself,
except as specified on pages 45-47.
Opening and removing the covers may expose you to
dangerous voltage or other hazards. Failure to follow this
WARNING may result in death or serious injury. Refer all
servicing not specified in this manual to a Toshiba Authorized
Service Center.
37) If you have the TV serviced:
• Ask the service technician to use only replacement parts
specified by the manufacturer.
• Upon completion of service, ask the service technician to
perform routine safety checks to determine
that the TV is in safe operating condition.
38) When the TV reaches the end of its useful life, ask a
qualified service technician to properly dispose of the TV.
Note: The lamp unit contains mercury. Disposal of mercury may
be regulated due to environmental considerations. Dispose of the
used lamp unit by the approved method for your area.
For disposal or recycling information, please contact your local
authorities or the Electronics Industries Alliance (www.eiae.org).
Installation
(cont. from previous page)
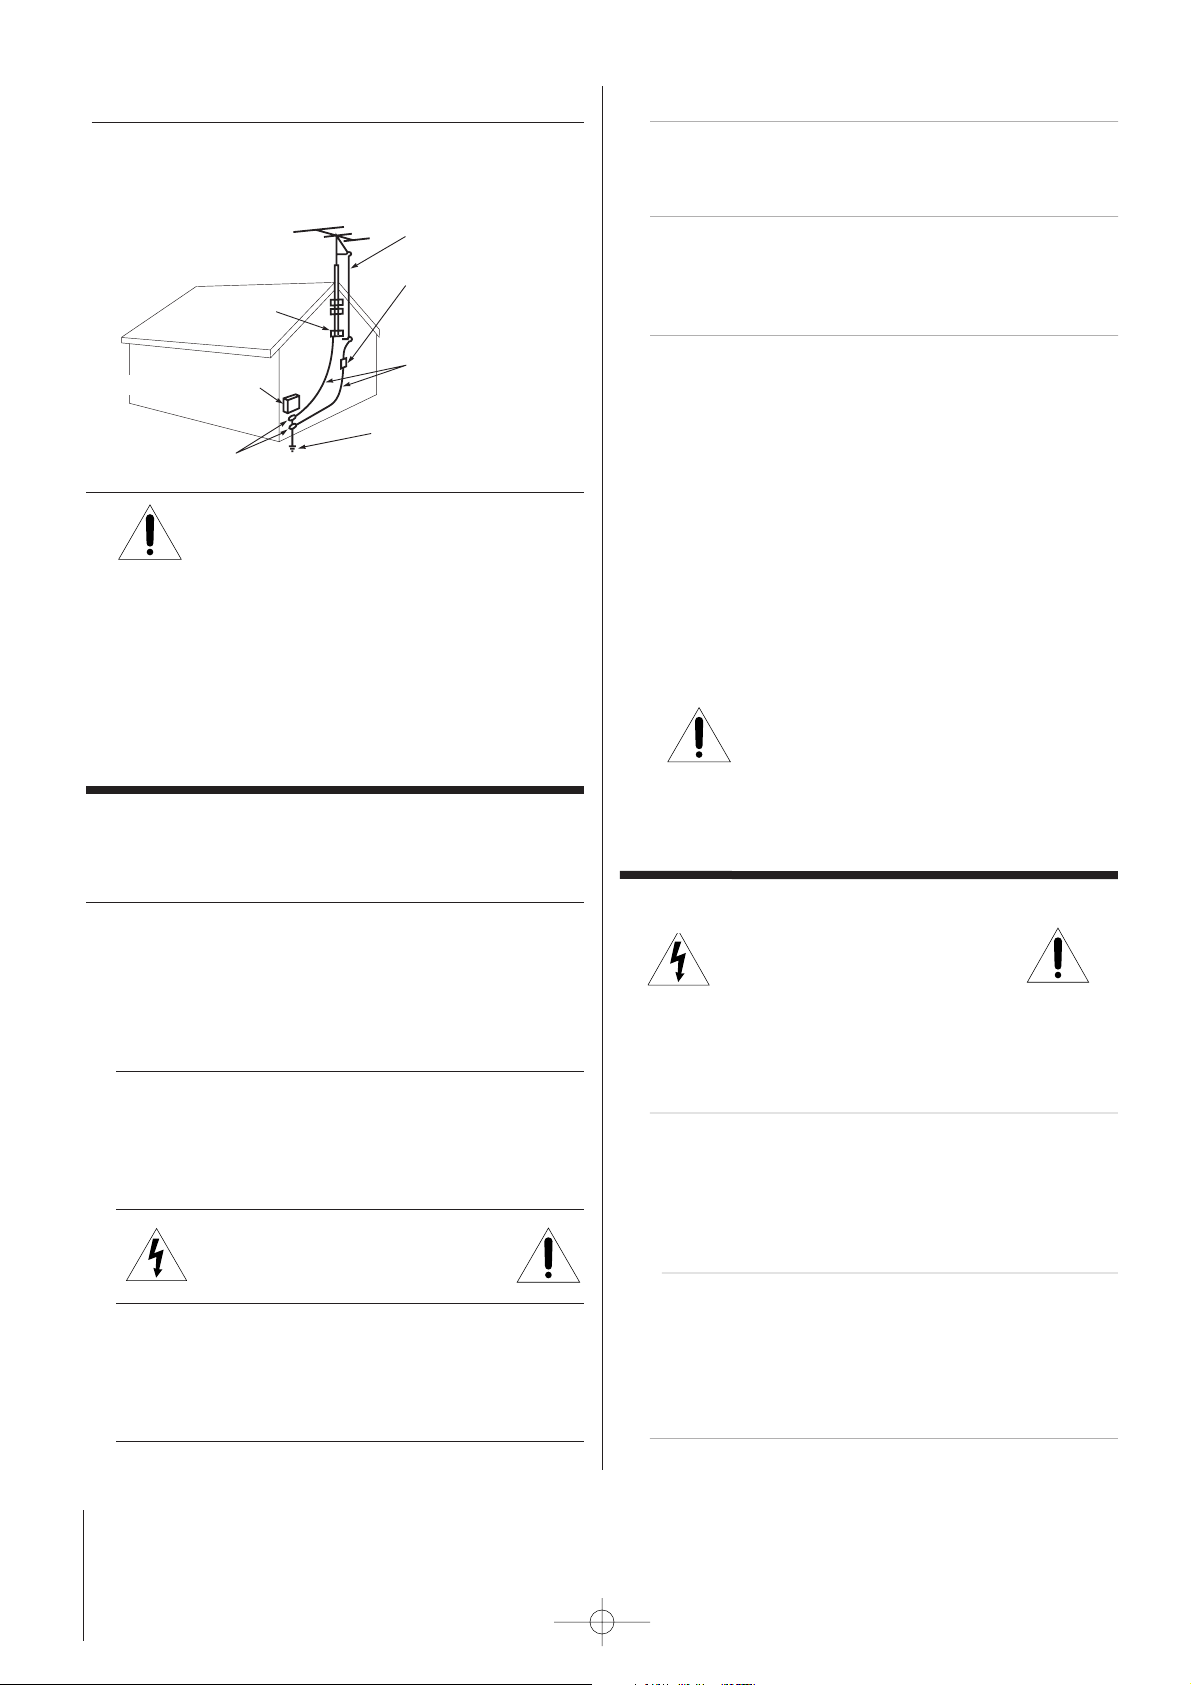
27) Always make sure the antenna system is properly grounded
to provide adequate protection against voltage surges and
built-up static charges (see Section 810 of the National
Electric Code).
28) DANGER: RISK OF SERIOUS PERSONAL
INJURY OR DEATH!
• Use extreme care to make sure you are never in
a position where your body (or any item you are in contact
with, such as a ladder or screwdriver) can accidentally
touch overhead power lines. Never locate the antenna near
overhead power lines or other electrical circuits.
• Never attempt to install any of the following during
lightning activity:
a) an antenna system; or b) cables, wires, or any home
theater component connected to an antenna or phone
system.
Care
For better performance and safer operation of your TOSHIBA TV,
follow these recommendations and precautions:
29) Always sit approximately 10–25 feet away from the TV and
as directly in front of it as possible. The picture can appear
dull if you sit too far to the left or right of the TV, or if
sunlight or room lights reflect on the screen. Turn the TV
off to check for reflections on the screen, and then remove
the source of reflections while viewing the TV.
30) Always unplug the TV before cleaning. Never use liquid or
aerosol cleaners. Clean only with a dry cloth.
Do not spray volatile compounds such as insecticide on the
cabinet. This may cause a discoloration or damage of the
cabinet.
31) WARNING: RISK OF ELECTRIC SHOCK!
Never spill liquids or push objects of any
kind into the TV cabinet slots.
32) If the air temperature rises suddenly (for example, when
the TV is first delivered), condensation may form on the
lenses. This can make the picture appear distorted or the
color appear faded. If this happens, turn off the TV for 6 to
7 hours to allow the condensation to evaporate.
Ground clamp
Antenna discharge unit
(NEC Section 810-20)
Grounding conductors
(NEC Section 810-21)
Power service grounding
electrode system (NEC Art 250 Part H)
Ground clamps
Antenna lead-in wire
Electric service equipment
PAGE 4
562C_2~5(2)_en 90/6/18 1:15 PM Page 4
Page 5

5) Always sit approximately 10–25 feet away from the TV and as
directly in front of it as possible. The picture quality may be
affected by your viewing position and length of viewing time.
If you sit too closely to the TV for too long, you may suffer
from eye fatigue. See item 29 on page 4.
6) This TV contains several cooling fans to moderate
the internal temperature. You may be able to hear
the fans noise during or after operation.
7) Always place the back of the television at least one (1) inch
away from any vertical surface (such as a wall) to allow
proper ventilation.
8) Review all safety and operating information in this owner’s
manual before you use your TV.
9) Interactive video games that involve shooting a “gun” type
of joystick at an on-screen target may not work on this TV.
1) The light source for this TV is a projection lamp unit with a
limited service life. When the lamp wears out, the picture
may become dark or black, or the lamp may fail, at which
time you must replace the lamp unit. See “Lamp unit
replacement” on pages 46-48.
2) Each time you turn on the TV, it may take up to several
seconds to go from no picture to full picture brightness.
3) The display on this TV is manufactured using an extremely
high level of precision technology; however, an occasional
pixel (dot of light) may show constantly on the screen. This
is a structural property of micro-display projection TV
technology, and is not a sign of malfunction. Such pixels are
not visible when the picture is viewed from a normal viewing
distance (see item 29 on page 4).
4) Depending on the media you are viewing, it is possible,
although unlikely, that a limited number of viewers may see
a “rainbow effect” on the screen, which can, in rare
instances, result in eye fatigue. This is a rare occurrence
related to technology of this type, and is not a sign of TV
malfunction.
Important notes about your DLPTM projection TV
FCC Compliance Statement
This equipment has been tested and found to comply with the limits for a Class B digital device, pursuant to part 15 of
the FCC Rules. These limits are designed to provide reasonable protection against harmful interference in a
residential installation. This equipment generates, uses and can radiate radio frequency energy and, if not installed
and used in accordance with the instructions, may cause harmful interference to radio communications. However,
there is no guarantee that interference will not occur in a particular installation. If this equipment does cause
harmful interference to radio or television reception, which can be determined by turning the equipment off and on,
the user is encouraged to try to correct the interference by one or more of the following measures:
- Reorient or relocate the receiving antenna.
- Increase the separation between the equipment and receiver.
- Connect the equipment into an outlet on a circuit different from that to which the receiver is connected.
- Consult the dealer or an experienced radio/TV technician for help.
PAGE 5
562C_2~5(2)_en 90/6/18 1:15 PM Page 5
Page 6

PAGE 6
Table of Contents
Setup Checklist
Important Safety Instructions . . . . . . . . . . . . . . . . .2-4
Important notes about your DLPTMprojection TV . . . . . . .5
Welcome to Toshiba . . . . . . . . . . . . . . . . . . . . . . . . .7
Function Status Indicators . . . . . . . . . . . . . . . . . . . . .7
Step 1. Hook Up TV
Rear Connections Panel . . . . . . . . . . . . . . . . . . . . . . .8
Front Connections Panel . . . . . . . . . . . . . . . . . . . . . .9
ANT/Cable Service Hookup . . . . . . . . . . . . . . . . . . . .10
Cable Box Connections . . . . . . . . . . . . . . . . . . . . . . .11
VCR Connections . . . . . . . . . . . . . . . . . . . . . . . . . . .12
DVD Player . . . . . . . . . . . . . . . . . . . . . . . . . . . . . .13
RGB-DTV/HDMI-DTV Input . . . . . . . . . . . . . . . . . . . .14
RGB-PC/HDMI-PC Input . . . . . . . . . . . . . . . . . . . . . .15
Monitor Out Setup . . . . . . . . . . . . . . . . . . . . . . . . .16
Remote Control Functions in TV Mode . . . . . . . . . . .17-18
On-Screen Displays . . . . . . . . . . . . . . . . . . . . . . . . .19
Front Panel Controls . . . . . . . . . . . . . . . . . . . . . . . .20
HDMI . . . . . . . . . . . . . . . . . . . . . . . . . . . . . . .21-22
Step 2. Customize your TV’s Features
CHANNEL Menu
Turning the TV On . . . . . . . . . . . . . . . . . . . . . . . . .23
Auto Program: Channel Search . . . . . . . . . . . . . . . . .23
Remote control effective range . . . . . . . . . . . . . . . .24
Manual Program
Adding/Delecting Channels
. . . . . . . . . . . . . . . . . . . .25
Fine Tuning Adjustment
. . . . . . . . . . . . . . . . . . . . .25
Surf list . . . . . . . . . . . . . . . . . . . . . . . . . . . . . .26
PICTURE Menu Options
Picture Mode . . . . . . . . . . . . . . . . . . . . . . . . . . . .27
Color Temperature Control . . . . . . . . . . . . . . . . . . . .28
ACM / Manual Picture Control . . . . . . . . . . . . . . . . . .29
AUDIO Menu Options
Sound mode / Stable sound
®
. . . . . . . . . . . . . . . . . . .30
Front surround / Manual Sound Control . . . . . . . . . . . .31
Stereo/SAP Broadasts Setup . . . . . . . . . . . . . . . . . .32
TIMER Menu Options
Clock Setup . . . . . . . . . . . . . . . . . . . . . . . . . . . . .33
On/Off Timer Setup . . . . . . . . . . . . . . . . . . . . . . . .34
Sleep Timer Setup / Auto Off . . . . . . . . . . . . . . . . .35
SPECIAL Menu Options
On-Screen Menu Languages / Key Lock . . . . . . . . . . . 36
Captions Setup . . . . . . . . . . . . . . . . . . . . . . . . . . .37
Caption/Text Mode Selection . . . . . . . . . . . . . . . . . .38
SCREEN Menu Options
Auto Adjustment / Manual Configure . . . . . . . . . . . . .39
Aspect ratio / Cinema Mode Setup . . . . . . . . . . . . . .40
NR / Initializing . . . . . . . . . . . . . . . . . . . . . . . . . .41
LOCK Menu Options
Parental Lock Setup . . . . . . . . . . . . . . . . . . . . . . . .42
Parental Lock . . . . . . . . . . . . . . . . . . . . . . . . . . . .43
PIP/Twin Picture Operation . . . . . . . . . . . . . . . .44-45
POP . . . . . . . . . . . . . . . . . . . . . . . . . . . . . . . . . . .45
Step 3. Miscellaneous
Lamp Unit Replacement . . . . . . . . . . . . . . . . . . . .46-48
Programming the Remote . . . . . . . . . . . . . . . . . . . . .49
Programming Codes . . . . . . . . . . . . . . . . . . . . . .50-53
Troubleshooting . . . . . . . . . . . . . . . . . . . . . . . . .54-55
Product Specifications . . . . . . . . . . . . . . . . . . . . . .56
Limited United States Warranty
Limited Canada Warranty
Step 1. Make all equipment and source connections.
See pages 10-16.
Step 2. Install batteries in remote control and do a channel search.
See page 23.
Step 3. Adjust TV features and options to your preference.
See contents above.
Note: Design and specifications are subject to change without prior notice.
Page 7
PAGE 7
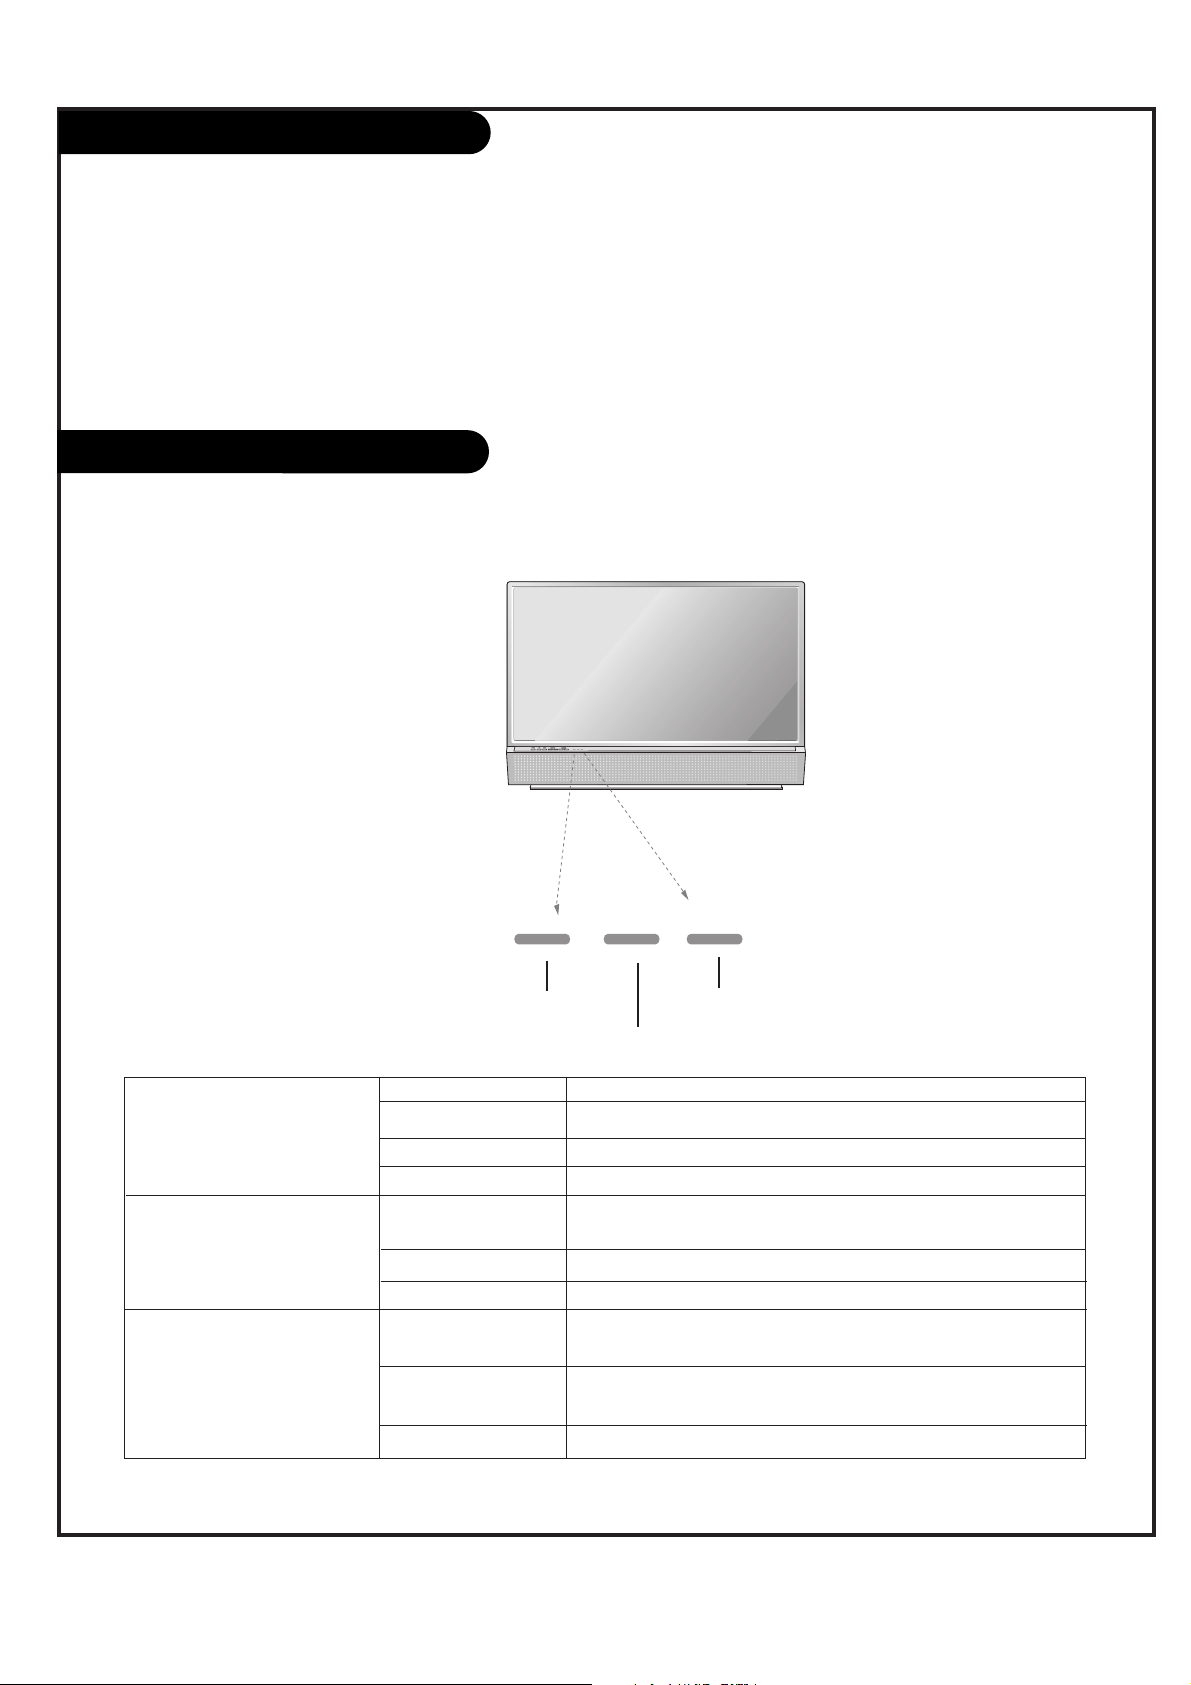
Function Status Indicators
Lamp indicator, operation indicator, and temperature indicator located below the front panel controls,
reveal the operating status of the DLP projection TV.
Operation Indicator
Lamp Indicator
Temperature Indicator
Off Power cord is not connected.
Red Power Cord is connected, unit is on standby mode.
Green TV turns on.
Orange (flashing) Preparing operation in standby mode.
Red (flashing) There is a problem with the lamp or around it. Contact an
authorized service center.
Red Lamp life over.
Green (flashing) The lamp cover is not closed.
Red The projection TV has shut down due to overheating.
After viewing the phrase “Thermal High Error”.
Red (flashing) The projection TV shut down due to the cooling fan trouble.
Contact an authorized service center.
Orange Thermal warning.
Operation Indicator
Lamp Indicator
Temperature Indicator
Welcome to Toshiba
Welcome to Toshiba
Congratulations! You have purchased one of the finest DLPTMprojection TVs on the market. The goal of this manual is to
guide you through setting up and operating your Toshiba TV as quickly as possible.
This manual applies to models 44HM85. The model and serial numbers are on the back of your TV. Write these numbers in
the space provided on the front cover of this manual for your records.
Instructions in this manual are based on using the remote control. You can also use the controls on the TV if they have
the same name as those on the remote control.
Please read all the safety and operating instructions carefully, and keep the manual for future reference.
Page 8
PAGE 8
S-VIDEO
VIDEO
AUDIO
(R)
(L)/
MONO
AV3
INPUT
HDMI INPUT
U
P
G
R
A
D
E
P
O
R
T
PC/DTV
(SXGA/
480p/
576p/
720p/
1080i)
(L)
AUDIO
(R)
RGB INPUT
DVI / RGB INPUT
MONITOR
OUT
A/V 2
INPUT
A/V 1
INPUT
VIDEO
(L)
AUDIO
(R)
S-VIDEO
MONO
COMPONENT
P
R
P
B
Y
(L)
AUDIO
(R)
480i/480p/
576i/576p/
720p/1080i
480i/480p/
576i/576p/
720p/1080i
INPUT 2
INPUT 1
HDMI INPUT
U
P
G
R
A
D
E
P
O
R
T
PC/DTV
(XGA/
480p/
720p/
1080i)
(L)
AUDIO
(R)
RGB INPUT
MONITOR
OUT
VIDEO 2
INPUT
VIDEO 1
INPUT
VIDEO
(L)
AUDIO
(R)
S-VIDEO
MONO
COLORSTREAM HD
P
R
P
B
Y
(L)
AUDIO
(R)
480i/480p/
720p/1080i
480i/480p/
720p/1080i
INPUT 1
INPUT 2
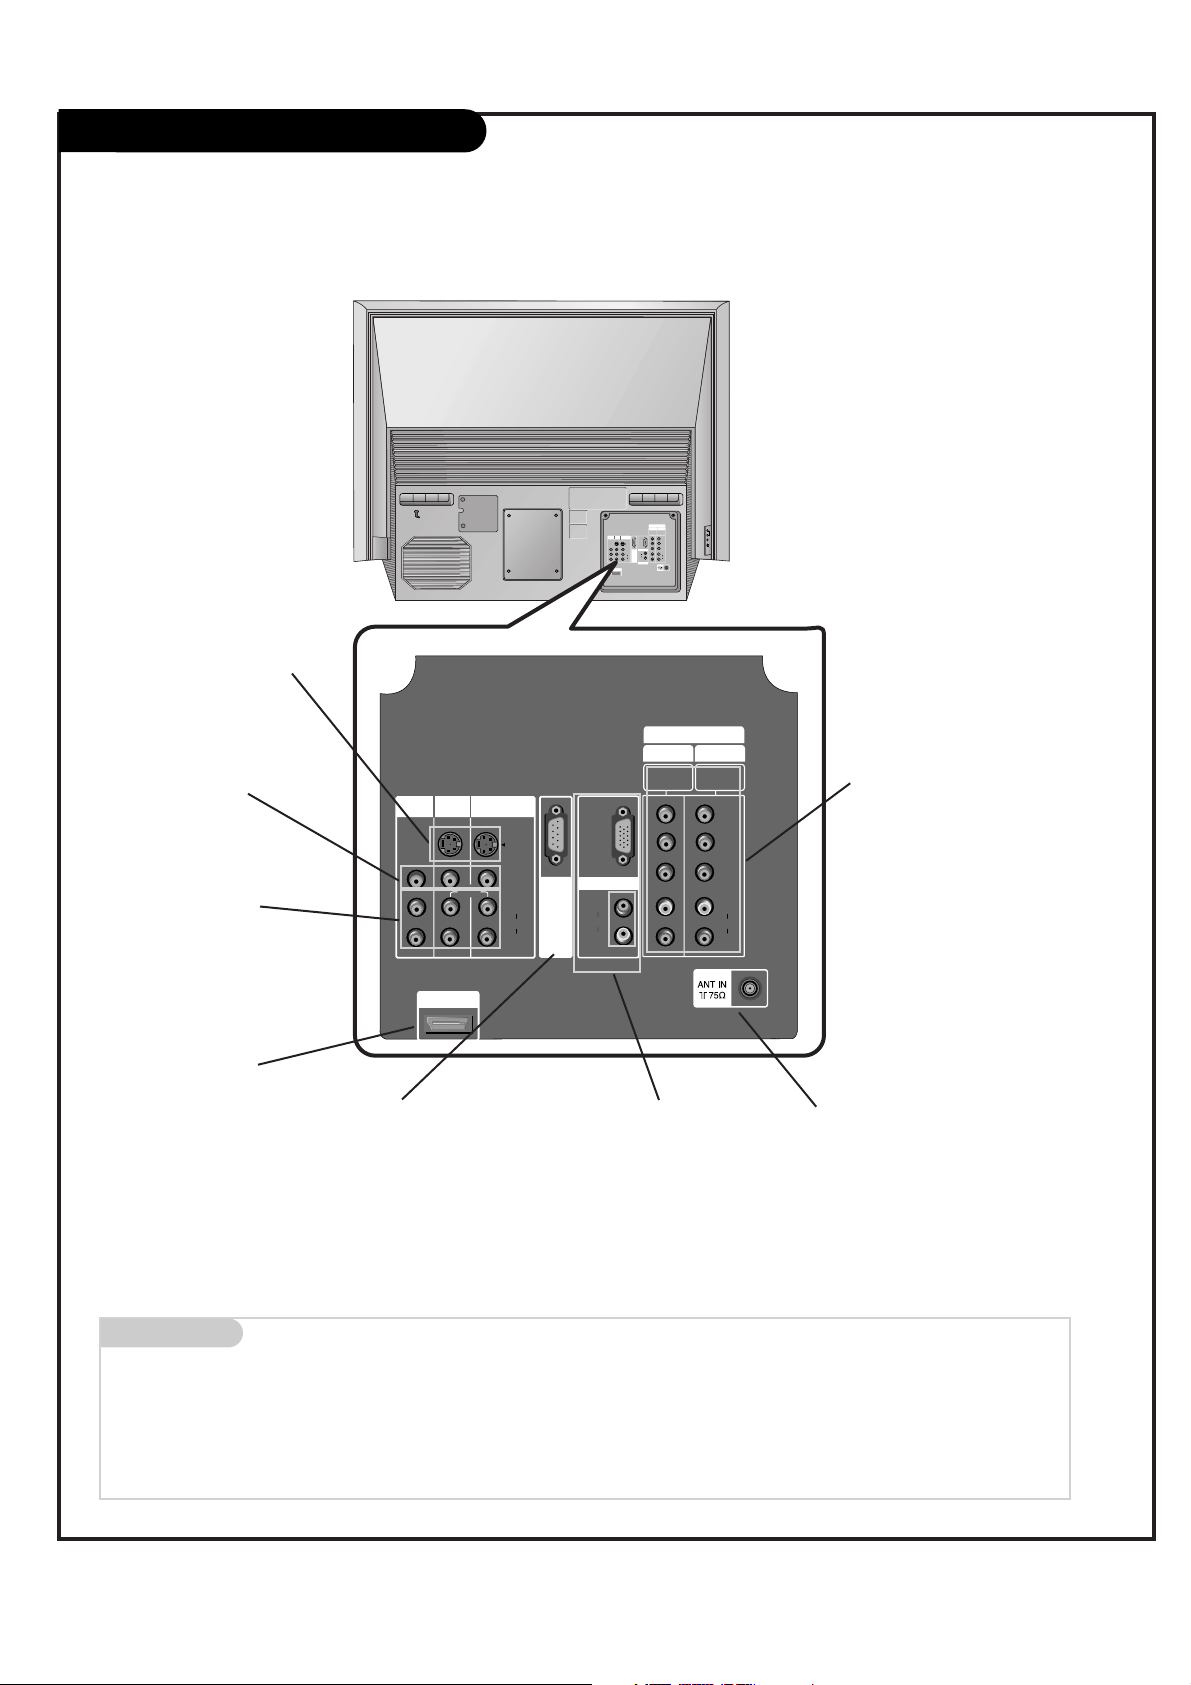
Rear Connections Panel
Mini glossary
JACK A connection on the back of a TV, VCR, or any other A/V device. This includes the RF jack and the Audio/Video jacks that are color-
coded.
SIGNAL Picture and sound traveling through cable, or over the air, to your television screen.
S-VIDEO In
A connection available with
some high-end equipment
that provides even better
picture quality for Video 2.
Video 1 or 2
Connects the video signals from various types of
equipment.
Connecting cables and external equipment to your TV.
Left/Right Audio
Used for stereo sound
from various types of
equipment.
UPGRADE PORT
This port is used to upgrade
the software version and debug
without changing the hardware.
Be careful not to use this port.
Just contact your dealer or service centre.
RGB Input
Connect the TV output con-
nector from a PC/DTV to the
appropriate input port.
RF Connector: Antenna
Used to connect analog
cable or antenna signals to
the television, either
directly or through your
cable box.
COLORSTREAM HD 1-2
Connect a ColorStream HD video/audio
device to these jacks. Refer to your DVD
manual for further information.
HDMI
connect a HDMI signal to
HDMI.
Page 9
PAGE 9
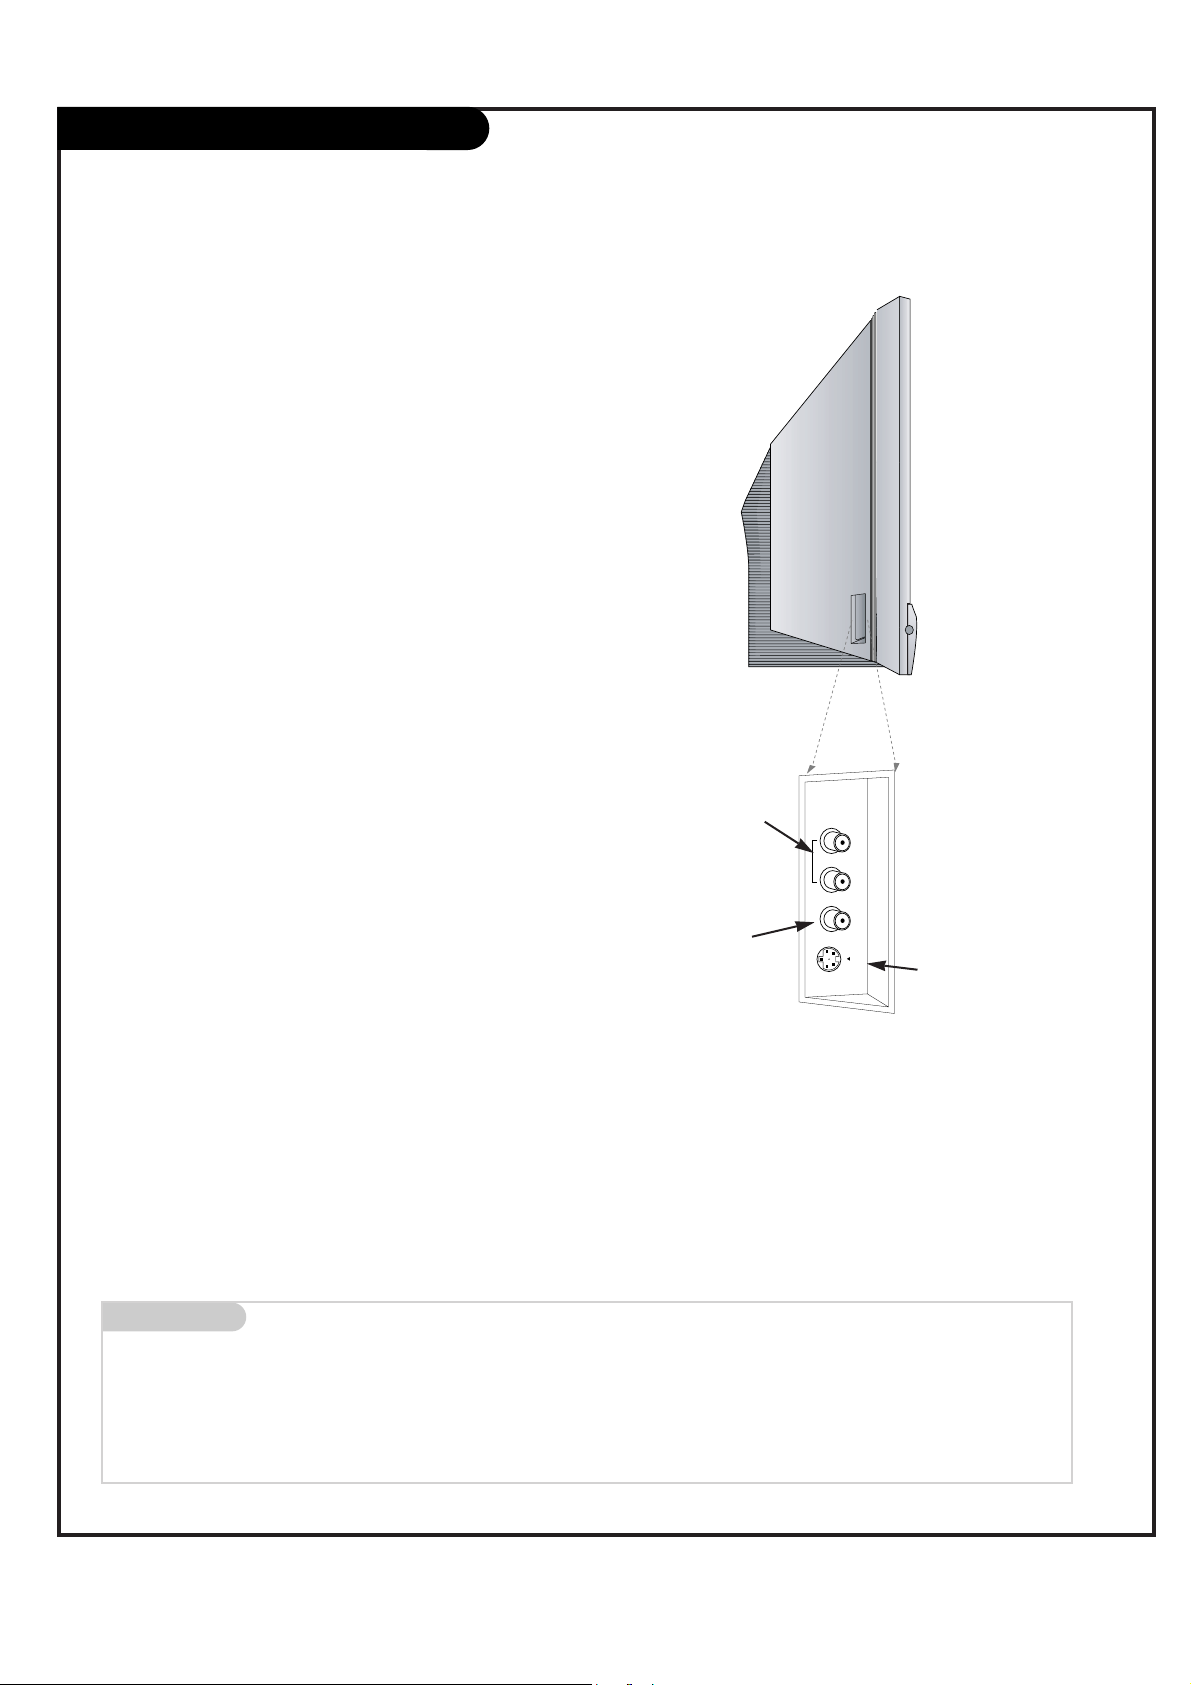
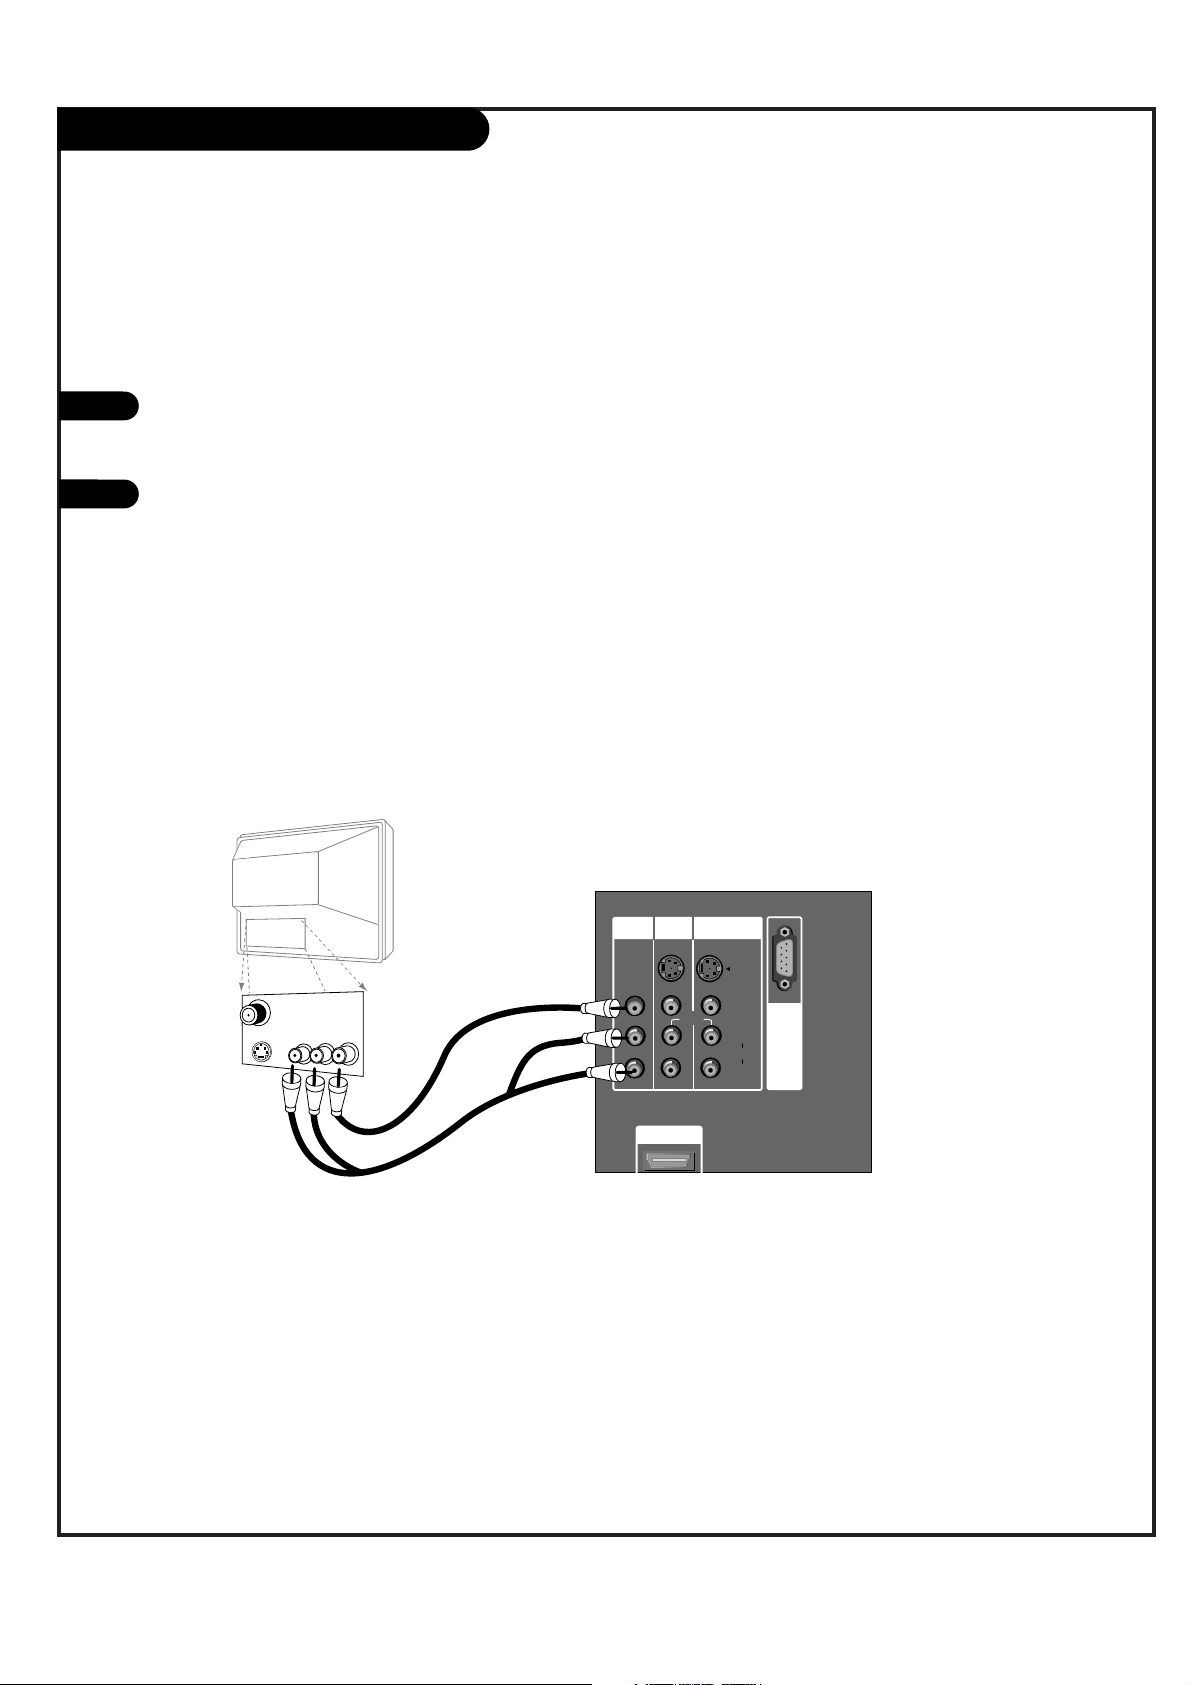
Front Connection Panel
There are four jacks on the left side on your projection TV that
make connecting Audio/Video devices like video games and camcorders very simple.
The jacks are like those found on the back jack connection panel.
This means that most equipment that connects to those types of
jacks on the rear jackpack, may be connected to the front connection panel.
To use the front jacks as the signal source, select them using
Main Input menu as described on page 44. They will be named
“Front Video” in the Main Input menu.
If you input both Front Video and SVideo, only the S-Video will work.
If you’re connecting a video game
device, make sure to change the
picture settings with the Picture Mode
option in the PICTURE menu (see
page 27).
Mini glossary
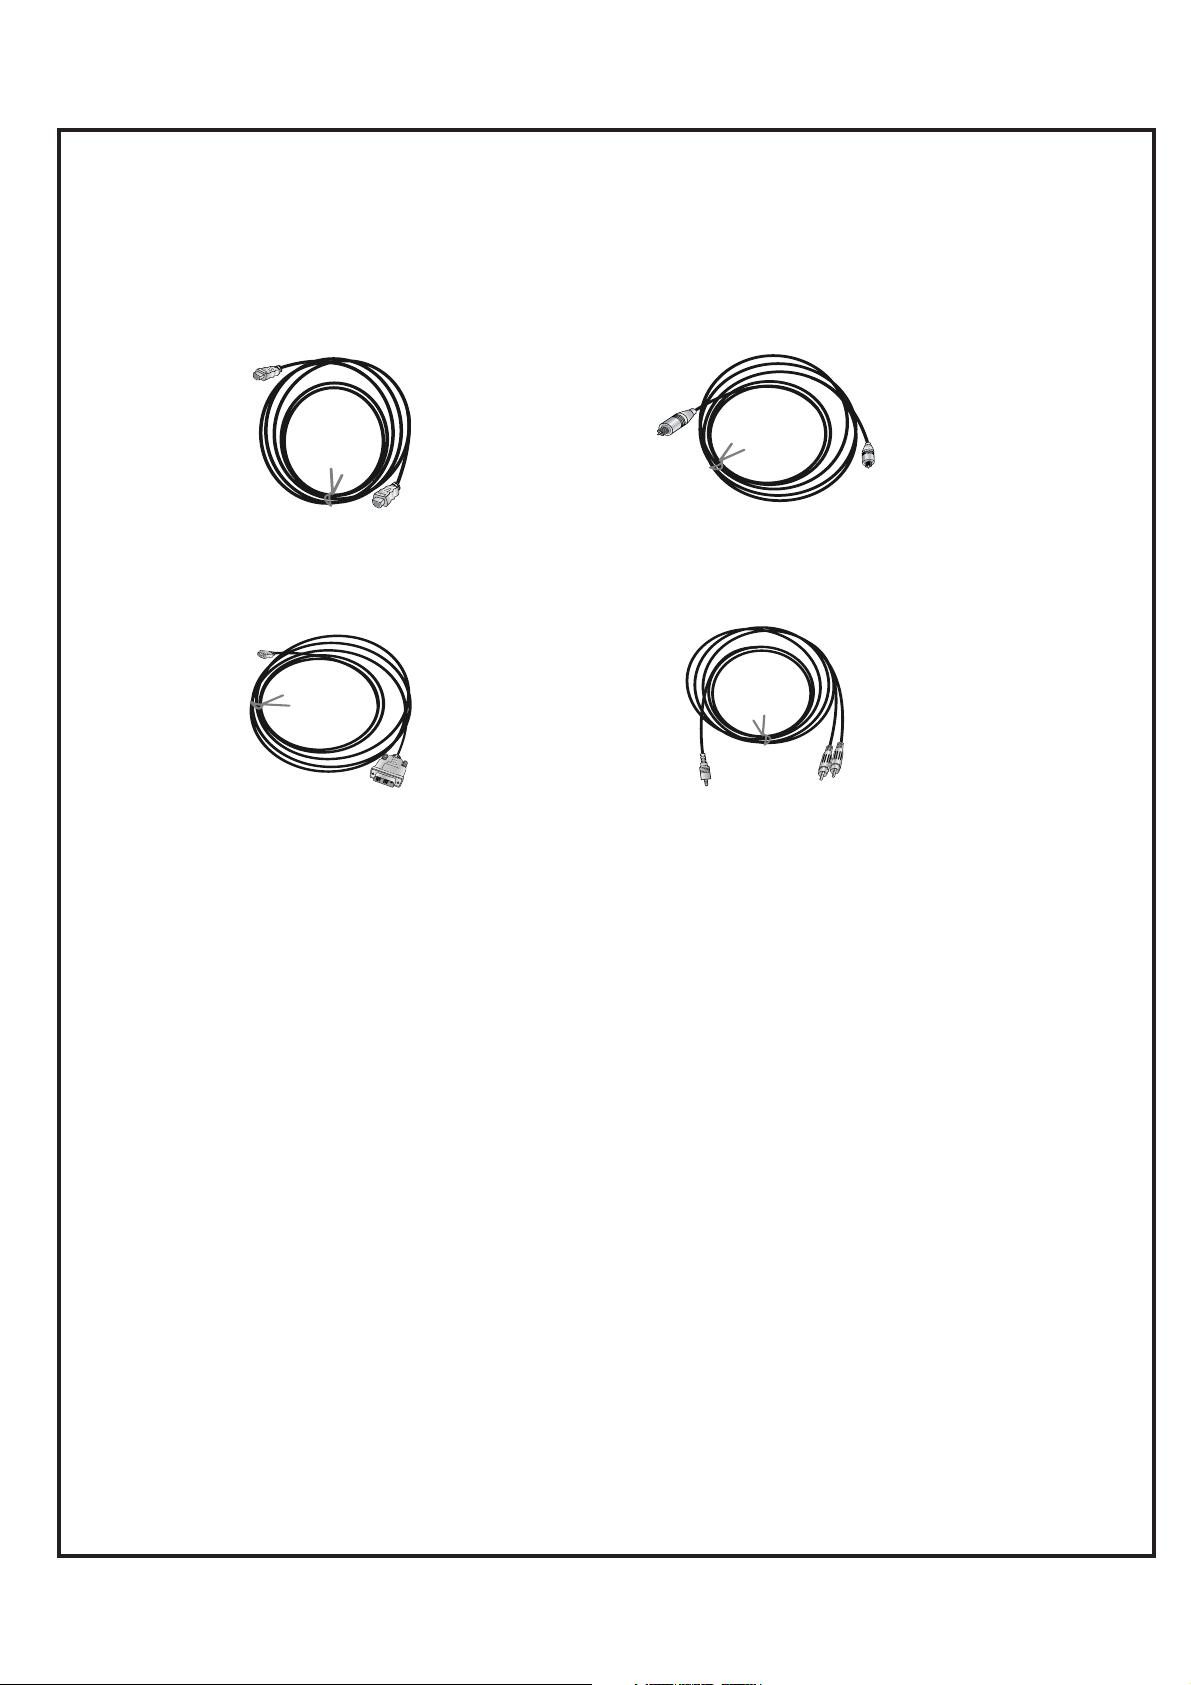
A/V CABLES Audio/Video cables. Three cable connector—Right audio (red), Left audio (white), and Video (yellow). A/V cables are used for stereo
playback of videocassettes and for higher quality picture and sound from other A/V devices.
A/V DEVICE Any device that produces video or sound (VCR, DVD, cable box, or television).
Left/Right Audio
Used for stereo sound
from various types of
equipment.
Video
Connects the video
signals from any
piece of equipment.
S-Video
A connection available on
some very high-end equipment
that provides better picture
quality than video input.
W
W
Front A/V Panel
AUDIO
VIDEO
S-VIDEO
FRONT A/V
)
R
(
/
)
L
(
O
N
O
M
Page 10
PAGE 10
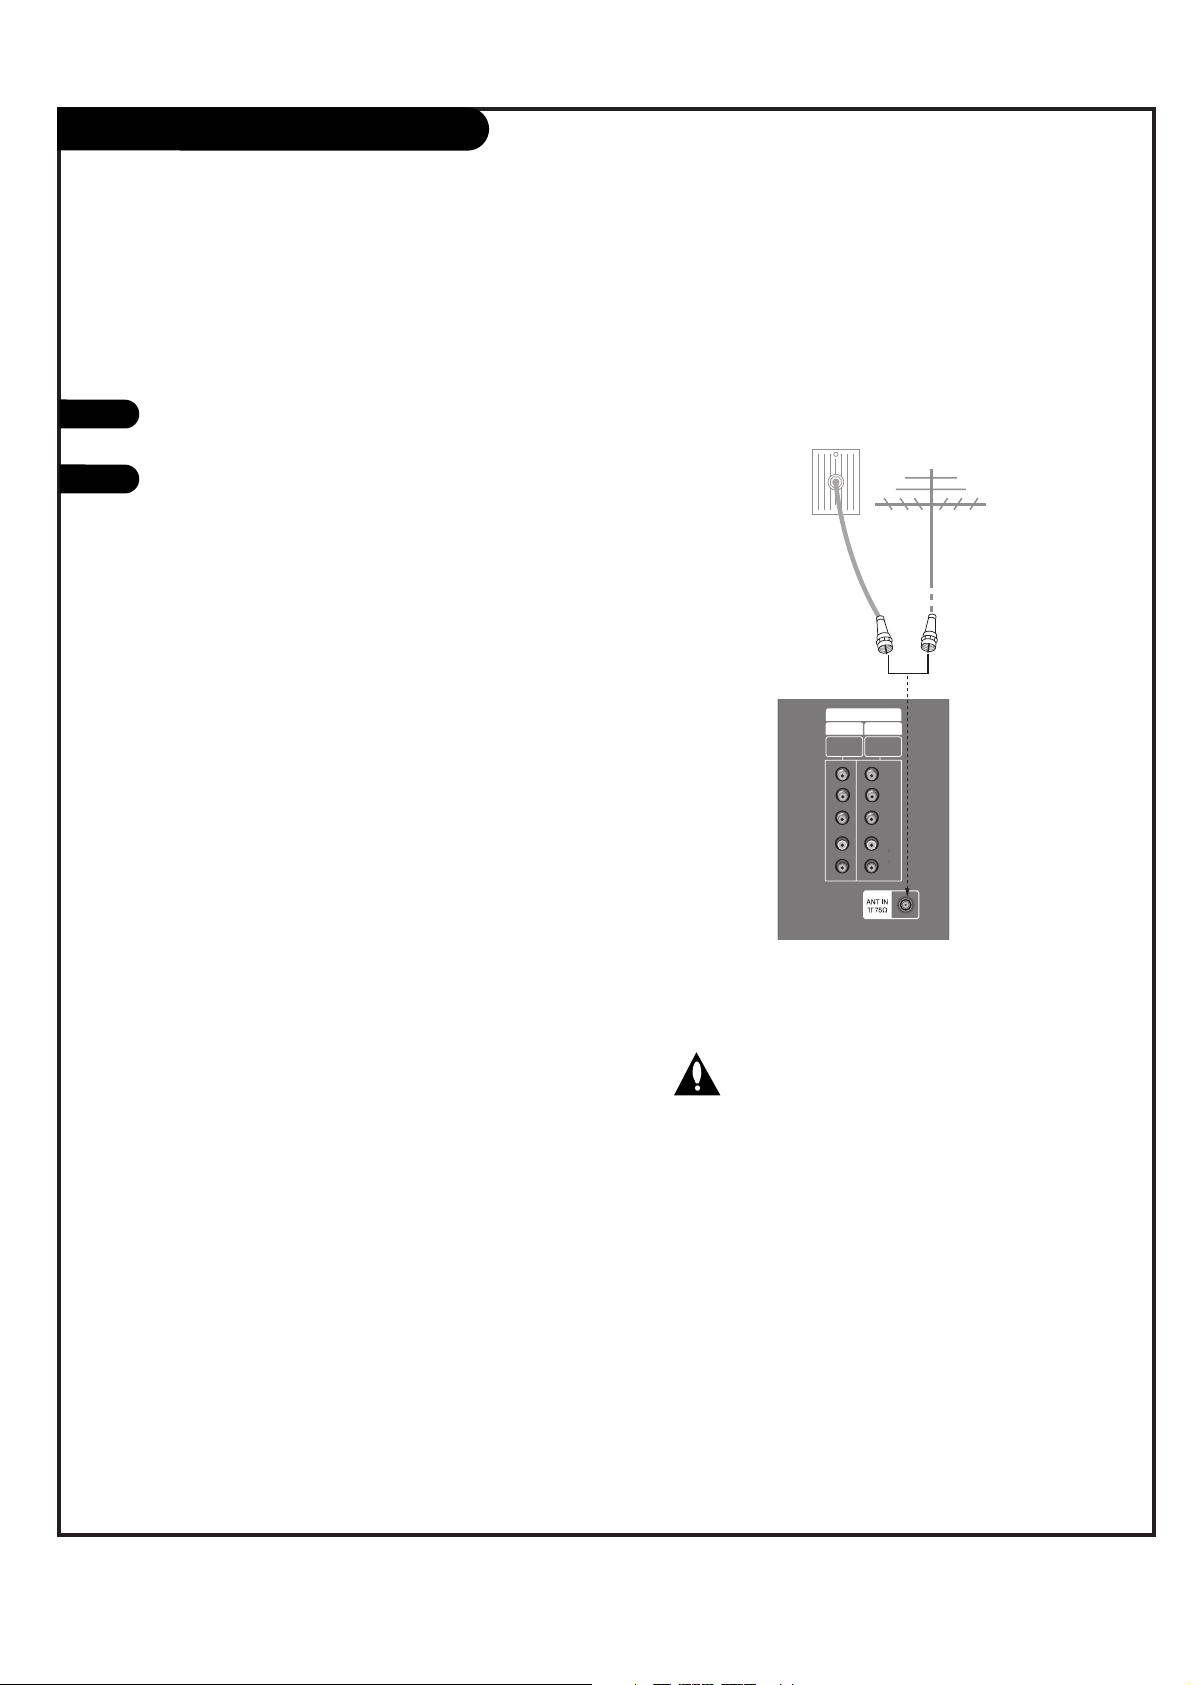
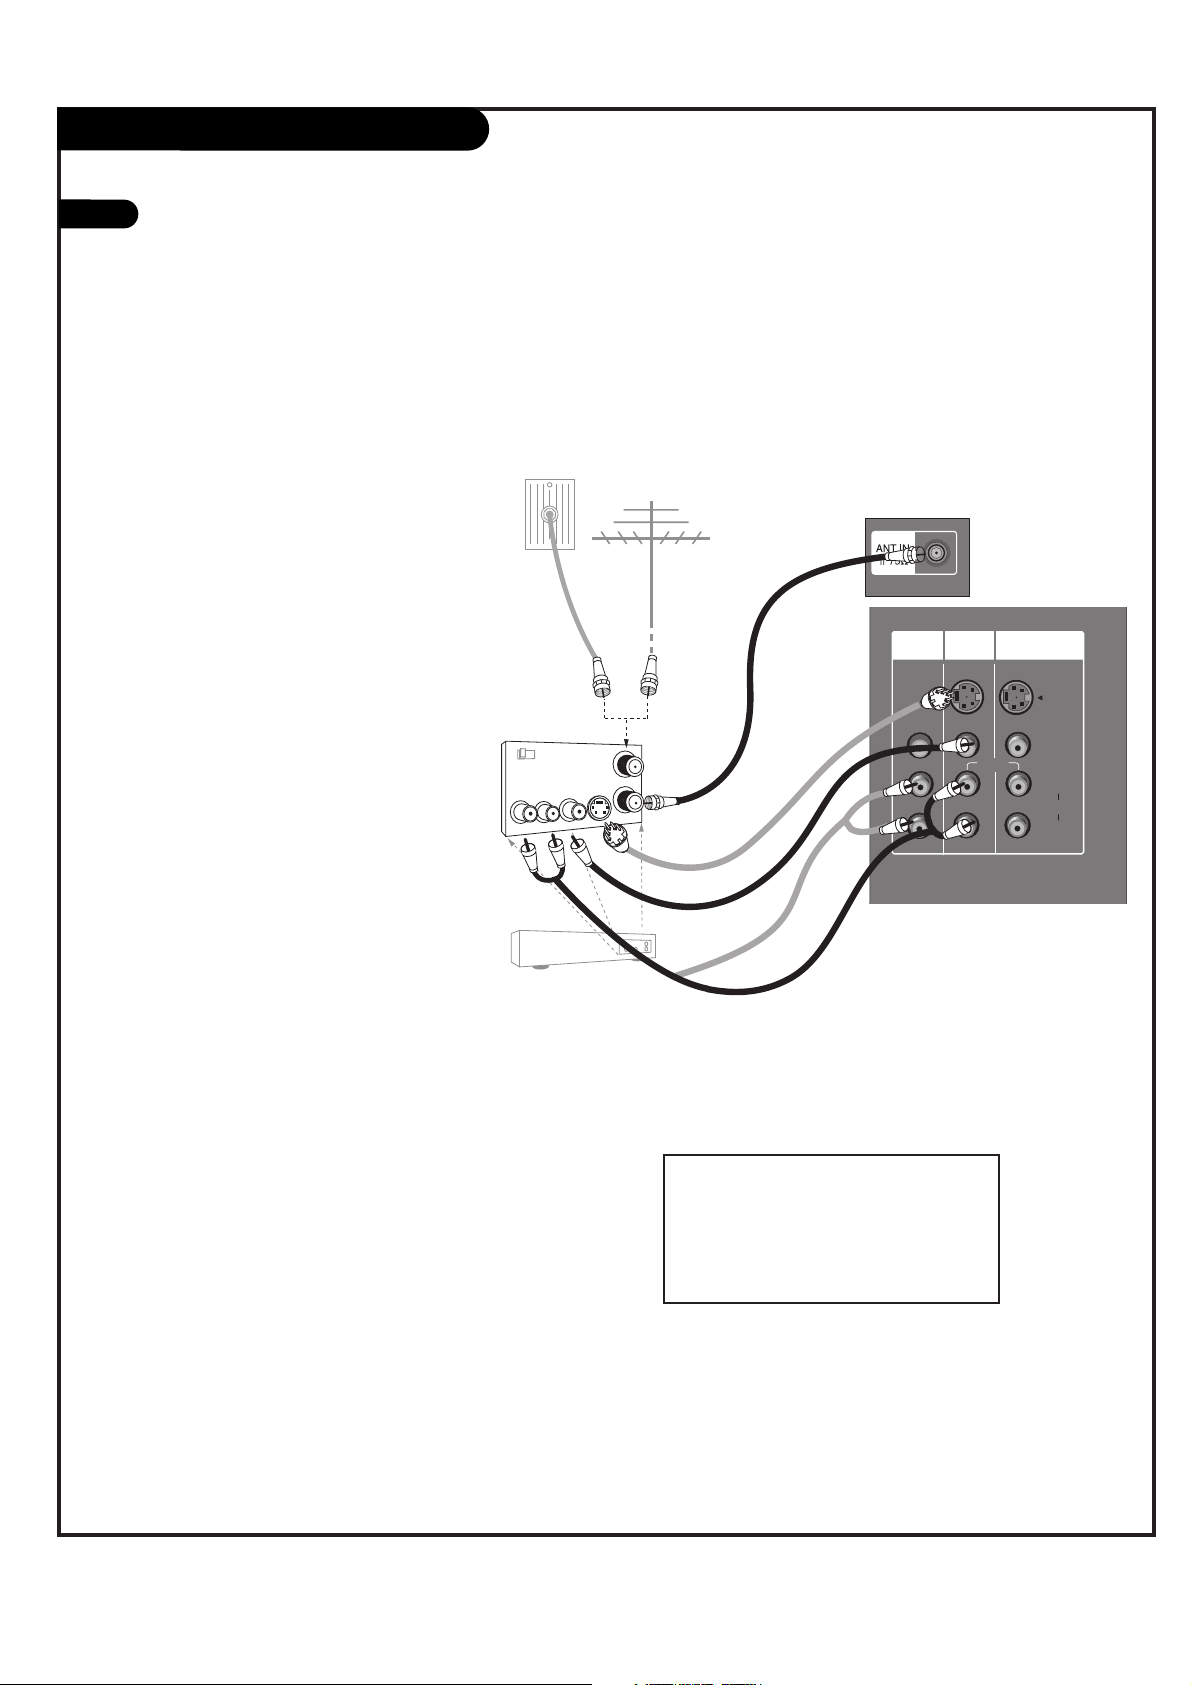
ANT / Cable Service Hookup
1
Connect an antenna or cable service to your
TV as shown.
Turn to page 23 to do a channel search
with Auto program for Ant/Cable connection(s).
For best signal reception, it is recommended to have your Antenna professionally adjusted.
2
If you receive your RF signal
through an antenna that is several
years old and connects with two
small prongs, you will need to purchase a 300 to 75 ohm adapter. It
should be available from your local
electronics dealer.
We recommend using a 75 ohm
cable for your antenna connections
in order to prevent
interference.
COLORSTREAM HD
P
R
P
B
Y
(L)
AUDIO
(R)
480i/480p/
720p/1080i
480i/480p/
720p/1080i
INPUT 1
INPUT 2
Antenna
Cable TV
Wall Jack Panel
RF Coaxial Wire
(75 ohm)
RF Coaxial Wire
(75 ohm)
W
W
Caution: RISK OF EQUIPMENT DAMAGE!
Never plug in any power cords until you have
finished connecting all equipment.
Page 11
PAGE 11
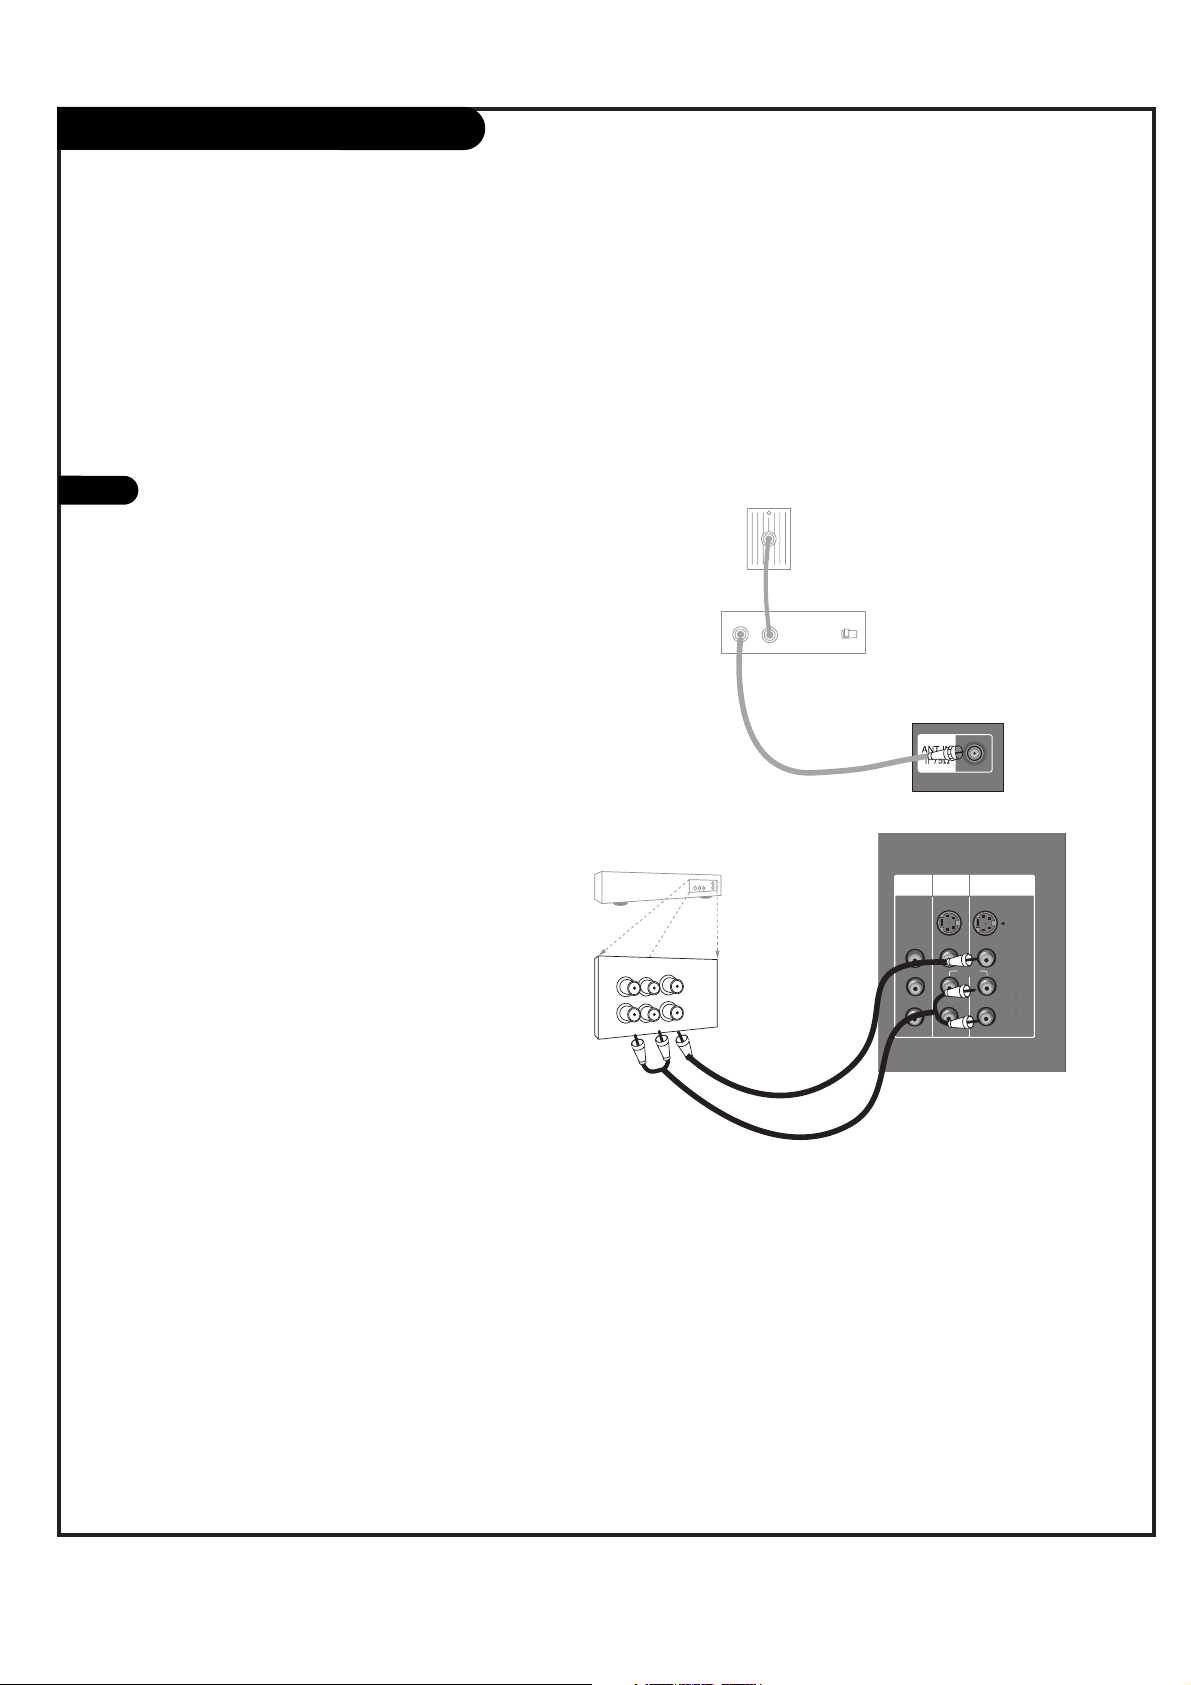
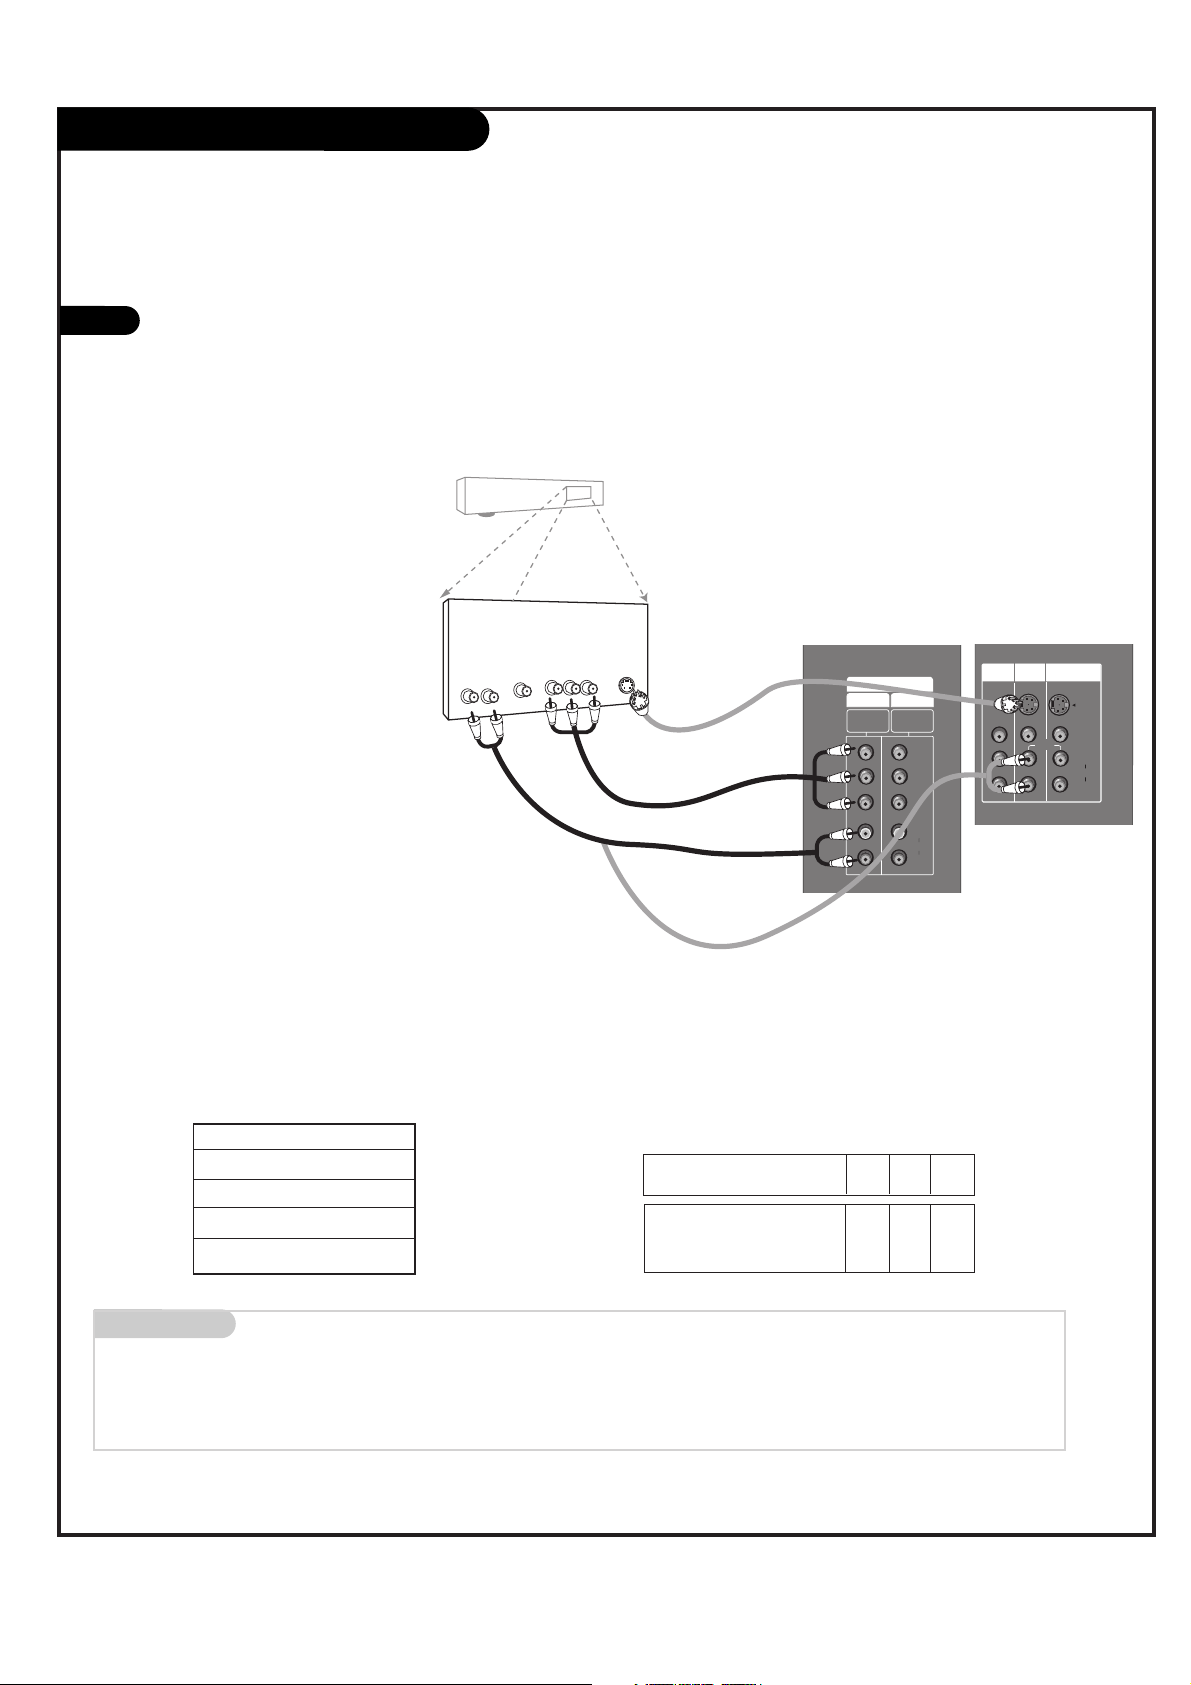
Cable Box Connections
Locate the output jack on the back of
your cable box. Connect this to the
Antenna jack on the back of your TV.
Or find the composite video and audio
jacks on the back of your cable box, and
connect them following the instructions
provided with your equipment.
This can be combined with any other
equipment you may want to hook up.
1
MONITOR
OUT
VIDEO 2
INPUT
VIDEO 1
INPUT
VIDEO
(L)
AUDIO
(R)
S-VIDEO
MONO
Audio
TV
VCR
L
R
Video
In
Output
Switch
Out
3 4
Cable TV
Wall Jack Panel
RF Coaxial Wire
(75 ohm)
Cable Box
If you’re using a cable box, leave the TV on
channel 3 or 4 and use your cable box to
change channels.
W
When you use a converter box with your TV, the
remote control will not operate some features,
such as programming your favorite channels,
labeling channels, and locking channels.
W
Page 12
PAGE 12
1
VCR Connections
Locate the Antenna jack on the
back of your TV. Connect this to
RF out jack on the back of your
VCR.
Or, find the composite video and
audio jacks on the back of your
VCR, and connect them following
the instructions provided with
your equipment.
You may connect either the composite video or the S-Video cables
to your TV. (Do not connect both
the composite and the S-Video
cables. In the event that you connect both composite and the SVideo cables, only the S-Video will
work.)
To hear stereo sound from cable or your VCR,
you will need to connect A/V cables as well as
the wire that runs from the VCR to your TV.
If you want to receive your signals on Channel
3 or 4, locate the Out to TV jack on your VCR.
Connect a cable from the Out to TV jack to the
Antenna In jack on the back of your TV.
MONITOR
OUT
VIDEO 2
INPUT
VIDEO 1
INPUT
VIDEO
(L)
AUDIO
(R)
S-VIDEO
MONO
In
Out
Audio
L
R
Video
3 4
S-Video
Output
Switch
Antenna
RF Coaxial Wire
(75 ohm)
Round Wire
(75 ohm)
A/V cables
not included
with TV
VCR
Back AV Panel
Cable TV
Wall Jack Panel
W
W
The unauthorized recording, use distribution,
or revision of television programs, videotapes,
DVDs, and other materials is prohibited under
the Copyright Laws of the United States and
other countries, and may subject you to civil
and criminal liability.
Page 13
PAGE 13
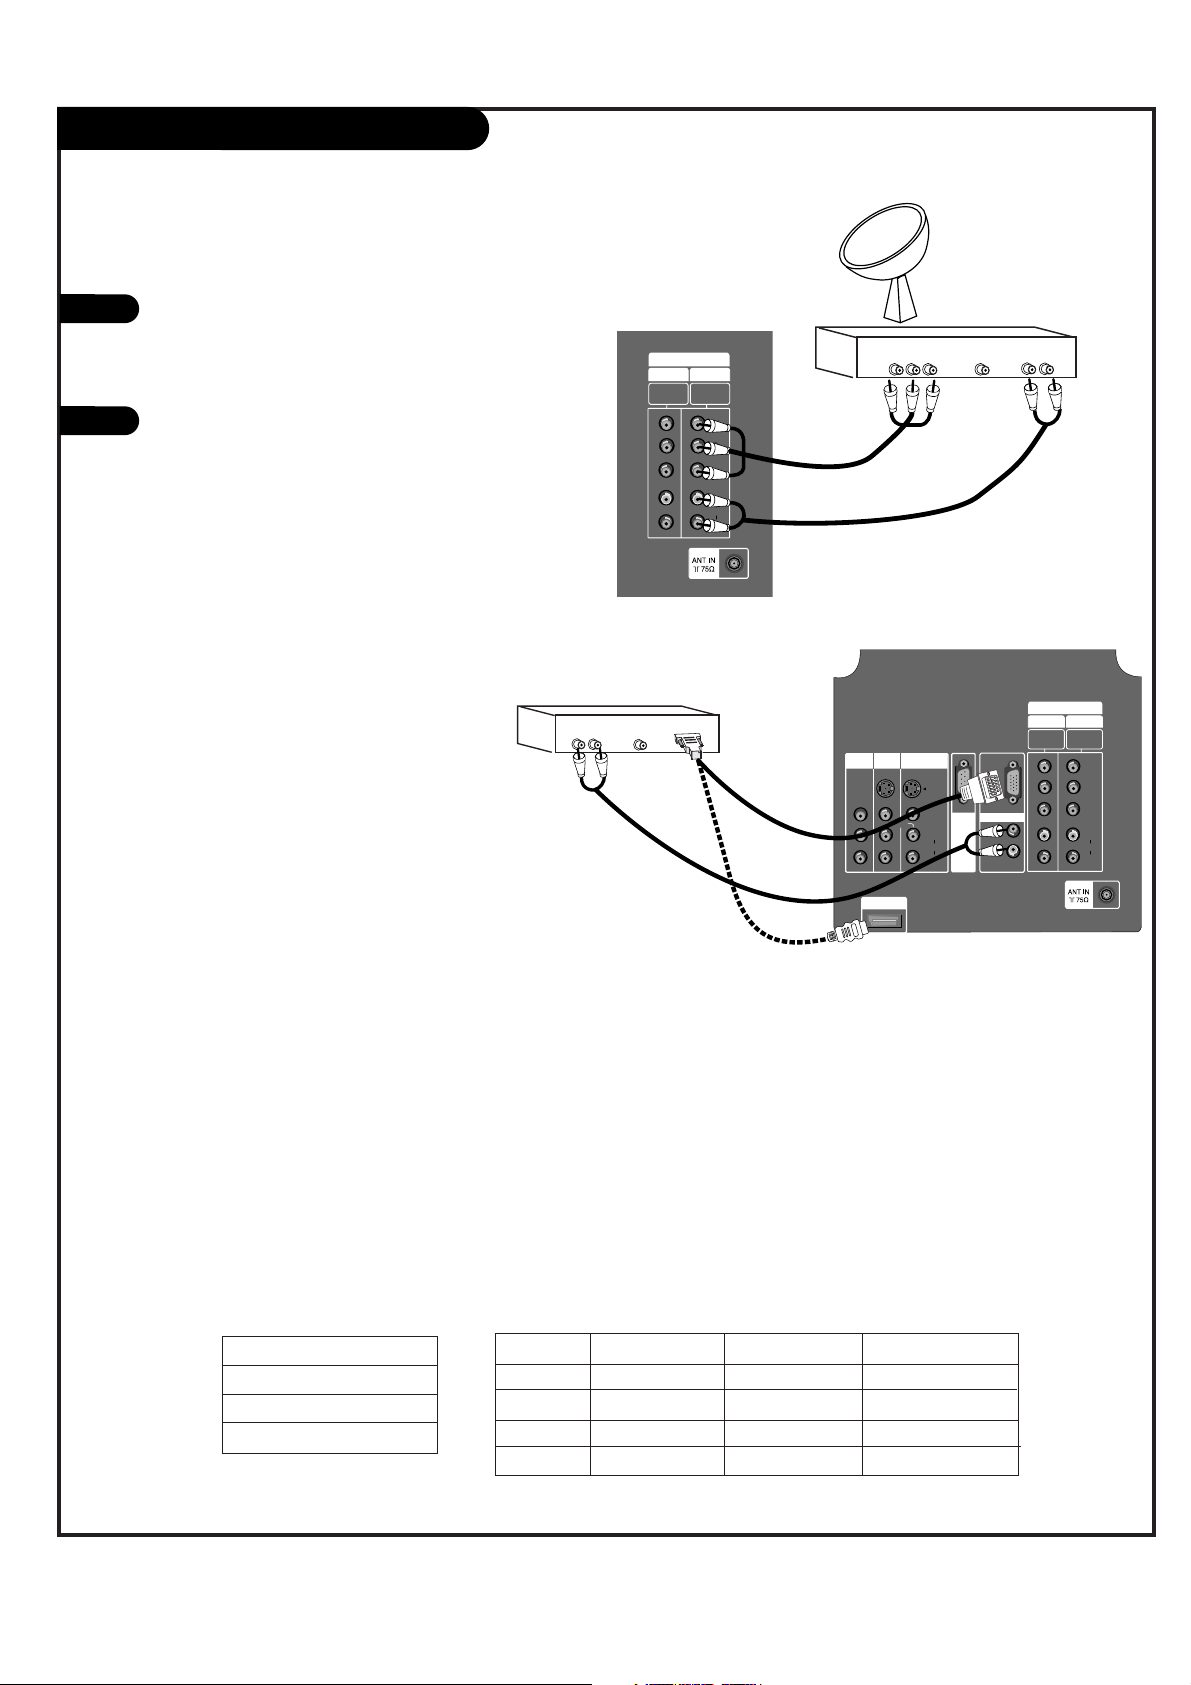
DVD Player
Mini glossary
ColorStream HD VIDEO Some video equipment uses three separate lines (Y, P
B, PR) to more precisely reproduce images. Your video equipment
manual will explain how this relates to your equipment.
Find the audio and ColorStream
HD or S-Video jacks on the back of
your DVD Player and connect them
following the instructions provided
with your equipment.
You may connect either the composite video or the S-Video cables
to your TV. Do not connect both
the composite and the S-Video.
1
COLORSTREAM HD 1 (or 2) Input
Y PB PR
1920X1080i
1280X720p
720X480p
720X480i
COLORSTREAM HD input jacks
on the Monitor
Y
P
B
PR
Video output jacks
on DVD player
Y
Y
Y
Y
Pb
B-Y
Cb
PB
Pr
R-Y
Cr
P
R
• COLORSTREAM HD
Input ports
Connect DVD player jacks to Monitor COLORSTREAM HD input jacks as indicated below.
A/V Cables
Not included
with TV
DVD Player
Back AV Panel
Some high-end DVD players use a
picture reproduction system
called “
COLORSTREAM HD Video.”
If your DVD player has COLORSTREAM HD output, use the
connectors marked
“COLORSTREAM HD 1/2” on the
jack panel. Please refer to your
DVD manual for proper installation.
Dolby Digital
Audio
Out
L R
Component Video
S-Video
COLORSTREAM HD
INPUT 2
480i/480p/
480i/480p/
720p/1080i
720p/1080i
INPUT 1
AUDIO
MONITOR
VIDEO 2
INPUT
MONO
VIDEO 1
INPUT
S-VIDEO
VIDEO
(L)
AUDIO
(R)
OUT
Y
PB
PR
(L)
(R)
Page 14
PAGE 14
RGB-DTV/HDMI-DTV Input
Find the audio and Y, PB, PR/RGB, HDMI
jacks on the back of your DBS receiver and
connect them following the instructions
provided with your equipment.
Connect these cables to your TV as shown.
1
2
The DTV shows the sharpest picture in 720p mode.
Select RGB-DTV/HDMI-DTV Source and press ENTER. Use UP/DOWN
arrows to select the desired options (H-Position/ V-Position) and then
use LEFT/RIGHT arrows to make appropriate adjustments.
COLORSTREAM HD
P
R
P
B
Y
(L)
AUDIO
(R)
480i/480p/
720p/1080i
480i/480p/
720p/1080i
INPUT 1
INPUT 2
Audio
L R
Component Out
Y Pb Pr
Dolby Digital
Out
Audio
L R
Dolby Digital
Out
HDMI INPUT
PC/DTV
(XGA/
480p/
720p/
1080i)
(L)
AUDIO
(R)
RGB INPUT
MONITOR
OUT
VIDEO 2
INPUT
VIDEO 1
INPUT
VIDEO
(L)
AUDIO
(R)
S-VIDEO
MONO
COLORSTREAM HD
P
R
P
B
Y
(L)
AUDIO
(R)
480i/480p/
720p/1080i
480i/480p/
720p/1080i
INPUT 1
INPUT 2
U
P
G
R
A
D
E
P
O
R
T
HD-SET TOP
1920x1080i
1280x720P
720x480P
RGB-DTV/HDMI-DTV
Signal
480i
480p
720p
1080i
COLORSTREAM HD1
Yes
Yes
Yes
Yes
COLORSTREAM HD2
Yes
Yes
Yes
Yes
RGB-DTV/HDMI-DTV
No
Yes
Yes
Yes
This TV supports HDCP (High-bandwidth Digital Content
Protection) protocol for HDMI-DTV (480p, 720p, 1080i) mode.
DBS Receiver
DBS Receiver
A/V Cables
Not included
with TV
A/V Cables
Not included
with TV
or
W
W
W
Page 15
PAGE 15
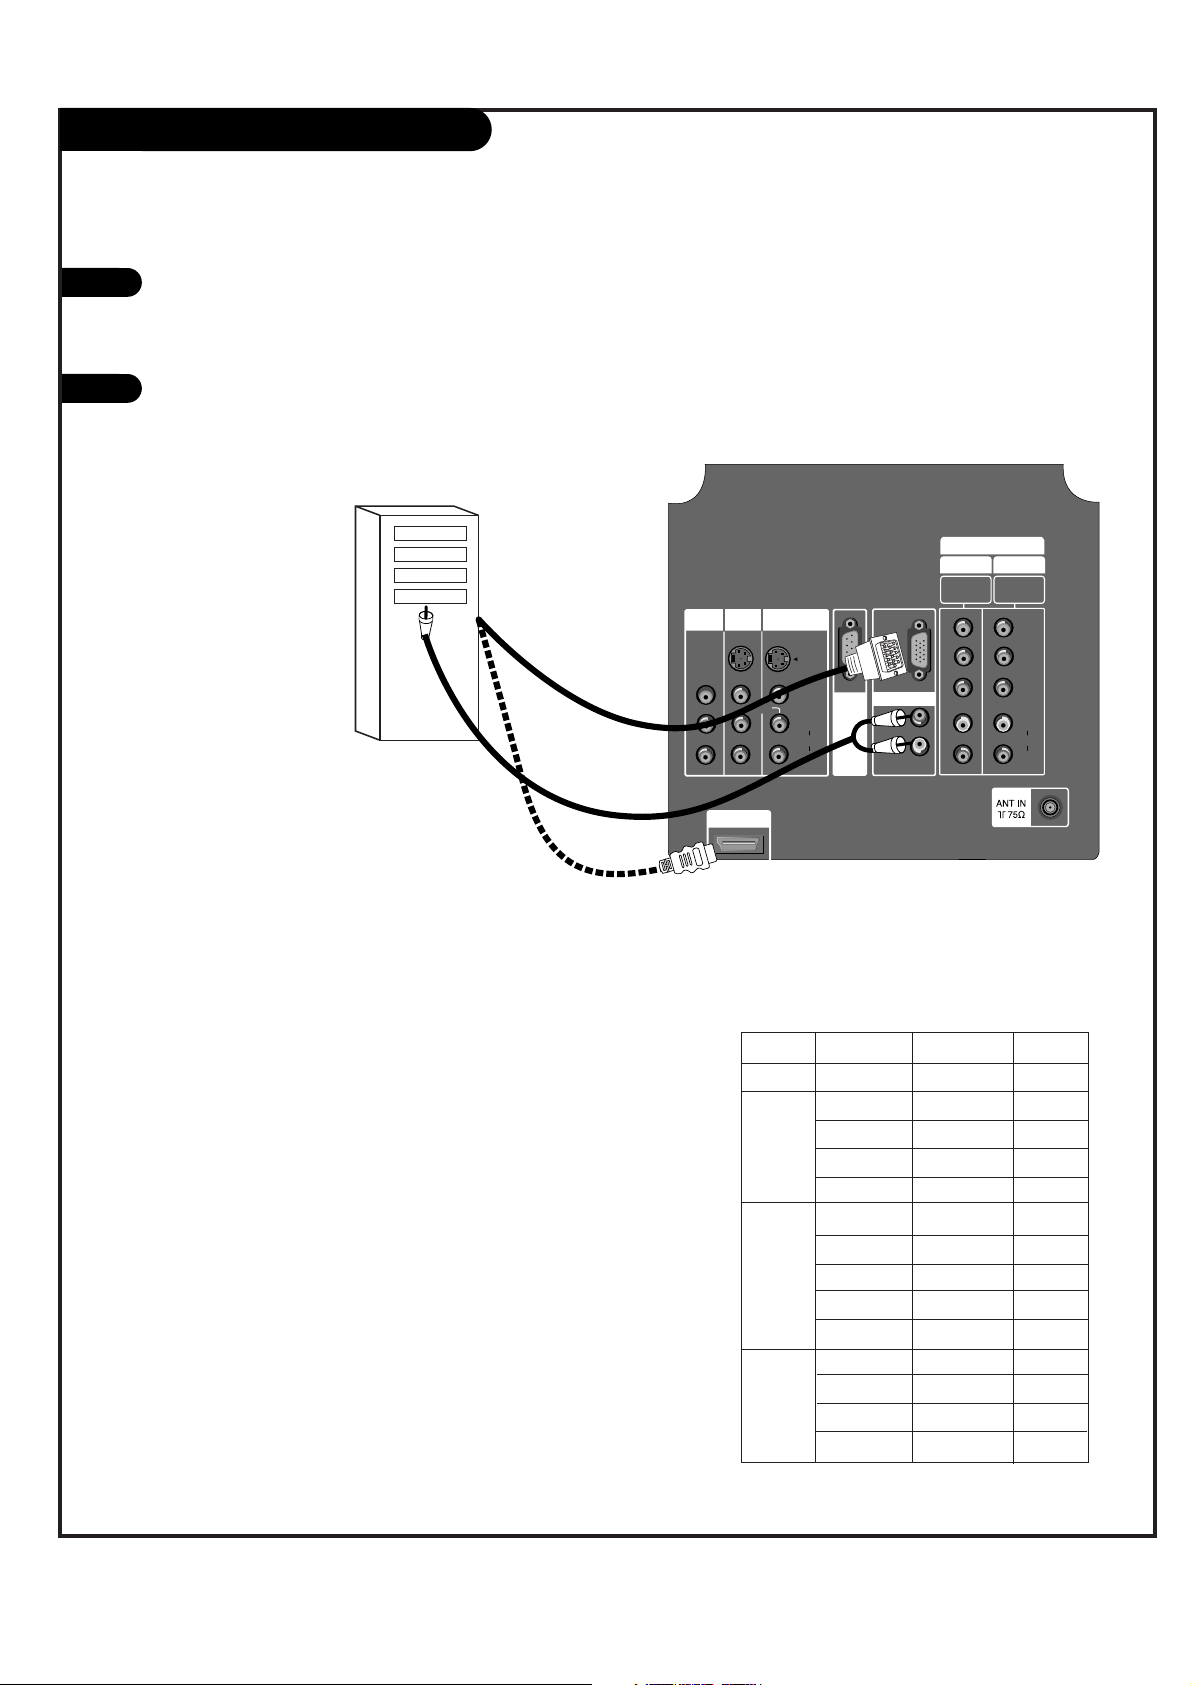
RGB-PC/HDMI-PC Input
Find the audio and RGB or DVI jacks on the
back of your PC and then connect them following the instructions provided with your
equipment.
Connect these cables to your TV as shown.
1
2
Synchronization input form: Signals are separate.
HDMI INPUT
PC/DTV
(XGA/
480p/
720p/
1080i)
(L)
AUDIO
(R)
RGB INPUT
MONITOR
OUT
VIDEO 2
INPUT
VIDEO 1
INPUT
VIDEO
(L)
AUDIO
(R)
S-VIDEO
MONO
COLORSTREAM HD
P
R
P
B
Y
(L)
AUDIO
(R)
480i/480p/
720p/1080i
480i/480p/
720p/1080i
INPUT 1
INPUT 2
U
P
G
R
A
D
E
P
O
R
T
MODE Resolution Horizontal Vertical
640x350 31.5KHz 70Hz
640x480 31.5KHz 60Hz
640x480 37.9KHz 72Hz
640x480 37.5KHz 75Hz
640x480 43.3KHz 85Hz
800x600 35.2KHz 56Hz
800x600 37.9KHz 60Hz
800x600 48.1KHz 72Hz
800x600 46.9KHz 75Hz
800x600 53.7KHz 85Hz
1024x768 48.4KHz 60Hz
1024x768 56.5KHz 70Hz
1024x768 60.0KHz 75Hz
1024x768 68.7KHz 85Hz
SVGA
VGA
Text
XGA
RGB-PC/HDMI-PC Input
Select RGB-PC Source and press ENTER. Use UP/DOWN arrows to
select the desired options (Phase/H Size/V Size/H Position/V
Position) and then use LEFT/RIGHT arrow to make appropriate
adjustments.
-
Horizontal size, Vertical size, Horizontal position and Vertical position: Based on the input mode (resolution), the adjustment
ranges may change.
-
PHASE: Removes any horizontal noise and clears up or sharpens
the character images. Adjustment range is 0~63.
Computer
W
W
Because HDMI is an evolving technology, some devices connected via
the HDMI/IN may not operate properly with the TV.
W
You need HDMI-to-DVI adapter cable to connect DVI device to this TV.
W
In HDMI-PC mode, H position, V pisition are only worked.
W
Page 16
PAGE 16
Monitor Out Setup
Your TV has a special signal output capability which allows you to hook up a second TV or monitor.
Just connect the second TV or monitor to
the MONITOR OUT Audio/Video jacks located on the back of your TV. See the
Operating Manual of the second TV or
monitor for further details regarding that
device’s input settings.
1
2
HDMI INPUT
MONITOR
OUT
VIDEO 2
INPUT
VIDEO 1
INPUT
VIDEO
(L)
AUDIO
(R)
S-VIDEO
MONO
Audio
Video
S-Video
U
P
G
R
A
D
E
P
O
R
T
COLORSTREAM HD1 1 - 2 and RGB-DTV/PC and
HDMI-DTV/PC input sources for main picture
cannot be used for Monitor Out.
A/V Cables
Not included
with TV
Second TV
W
Page 17
PAGE 17
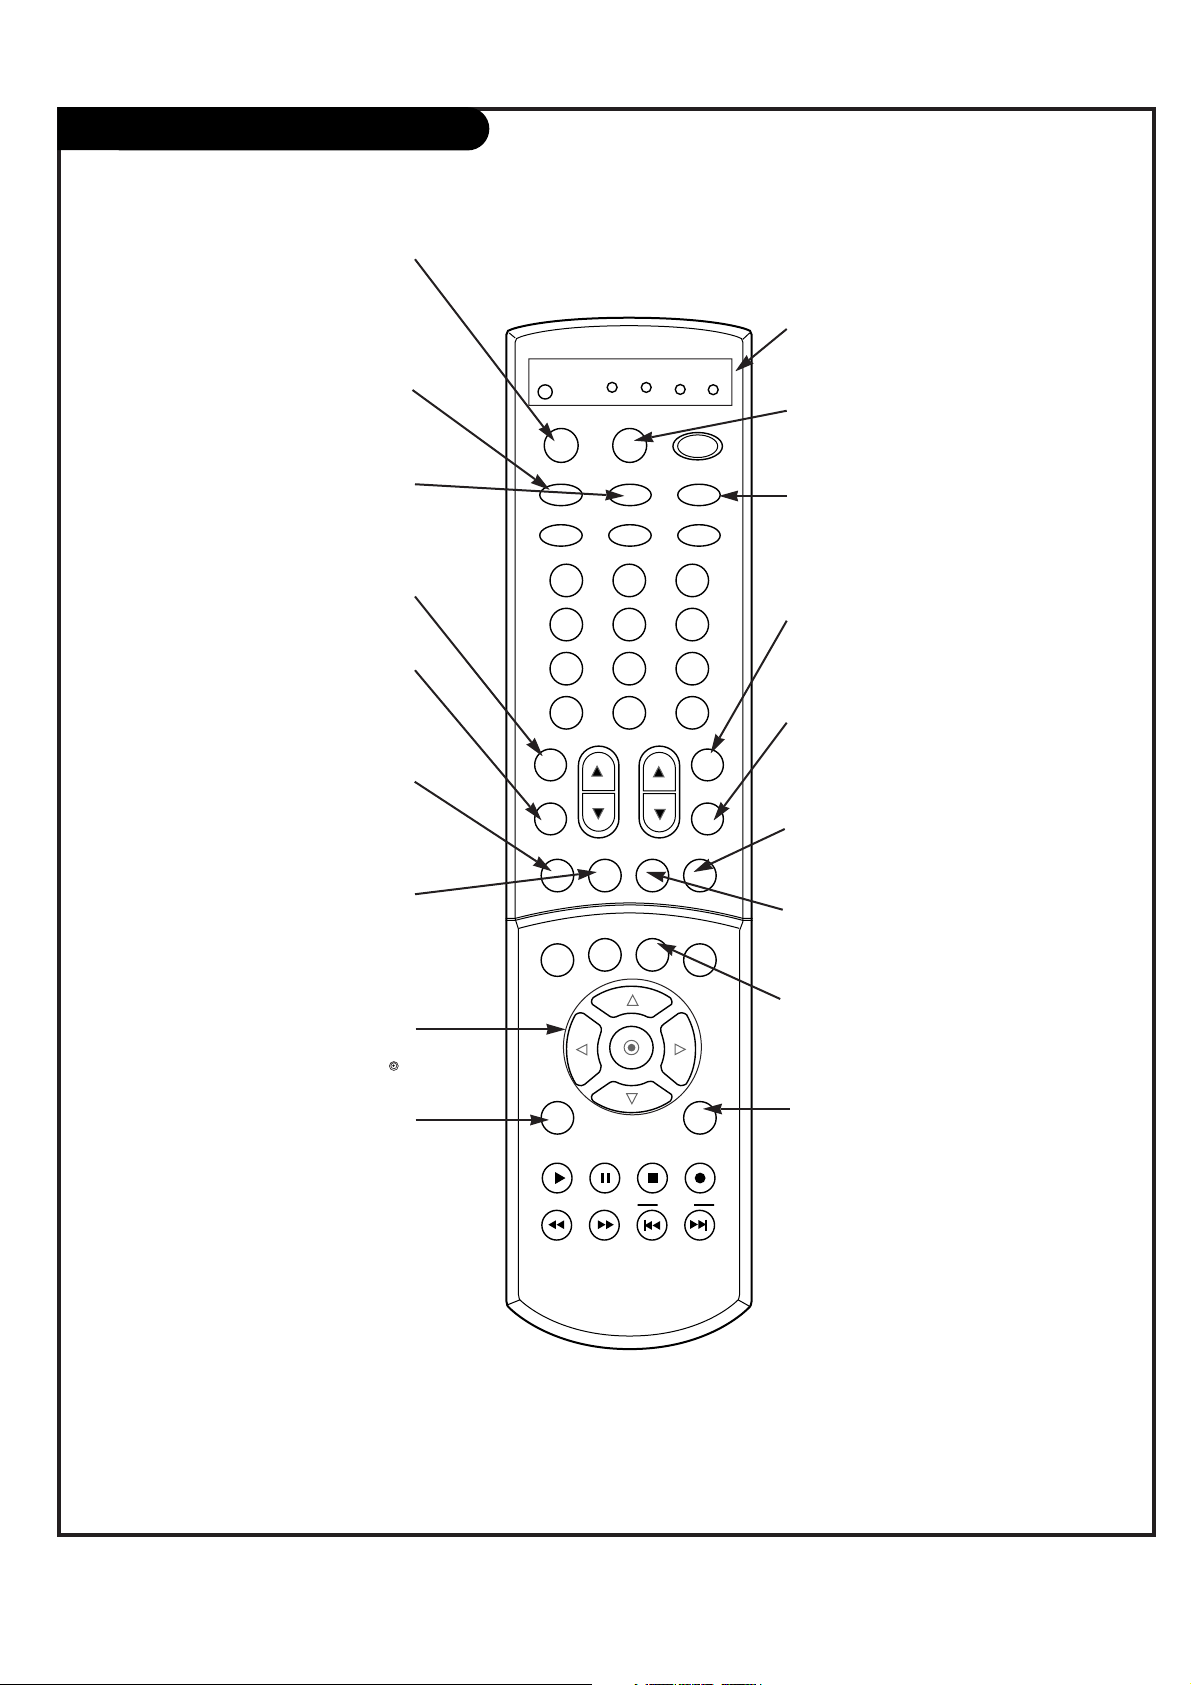
Remote Control Functions in TV Mode
1 2 3
4 5 6
7 8 9
0
TV
MODE
LIGHT
POWER
TV/VIDEO
HDMI
RGB
VCR
CABLE
DVD
SAT
MUTE
SWAPPIPCH- PIPCH+
PIP
PIC SIZE
REC
STOP
PAUSE
REW
PLAY
FF
MENU EXIT
CC FREEZE
PIP INPUT
VOL
CH
SURF
SAP
VIDEO
C/S HD2C/S HD1
FRONT
SKIP
ENTER
CH RTN
SURF
Scrolls the Surf channel list.
MENU
Brings up the main menu
to the screen.
EXIT
Clears all on-screen displays
and returns to TV viewing
from any menu.
FREEZE
Freezes the currently-viewed picture.
Sub picture is frozen in PIP/DW picture mode.
VIDEO
Adjusts the factory preset picture according to the room.
PIPCH+
Changes to next higher PIP
channel.
SWAP
Switches the picture from
PIP, POP, or twin picture to
the main screen.
MUTE
Switches the sound on or off
THUMBSTICK
Allows you to navigate the on-screen
menus and to adjust the system set-
tings and preferences, by moving to
an option with
F G
and selecting the
highlighted option with .
TV/VIDEO
Selects: Analog, Video1, Video2,
Front Video, Colorstream HD 1-2
and RGB and HDMI input sources
.
MODE
Selects the remote operating mode:
TV, VCR, Cable, DVD and Satellite.
Select other operating modes, for
the remote to control external
devices.
FRONT
Selects the front video signal if a
device, such as a camcorder or
game player, is connected to the
front video input jack.
HDMI
Selects: HDMI-DTV and HDMIPC input sources.
SAP
Selects: Mono, Stereo, and SAP.
PIPCH-
Changes to next lower
PIP channel
PIP
Toggles between PIP, POP
(Picture-outside-Picture) and
Twin picture mode.
LIGHT
Illuminates the remote control
keys.
INDICATOR LIGHTS
Show active remote mode
every time any button is
pressed.
D
E
Page 18
PAGE 18
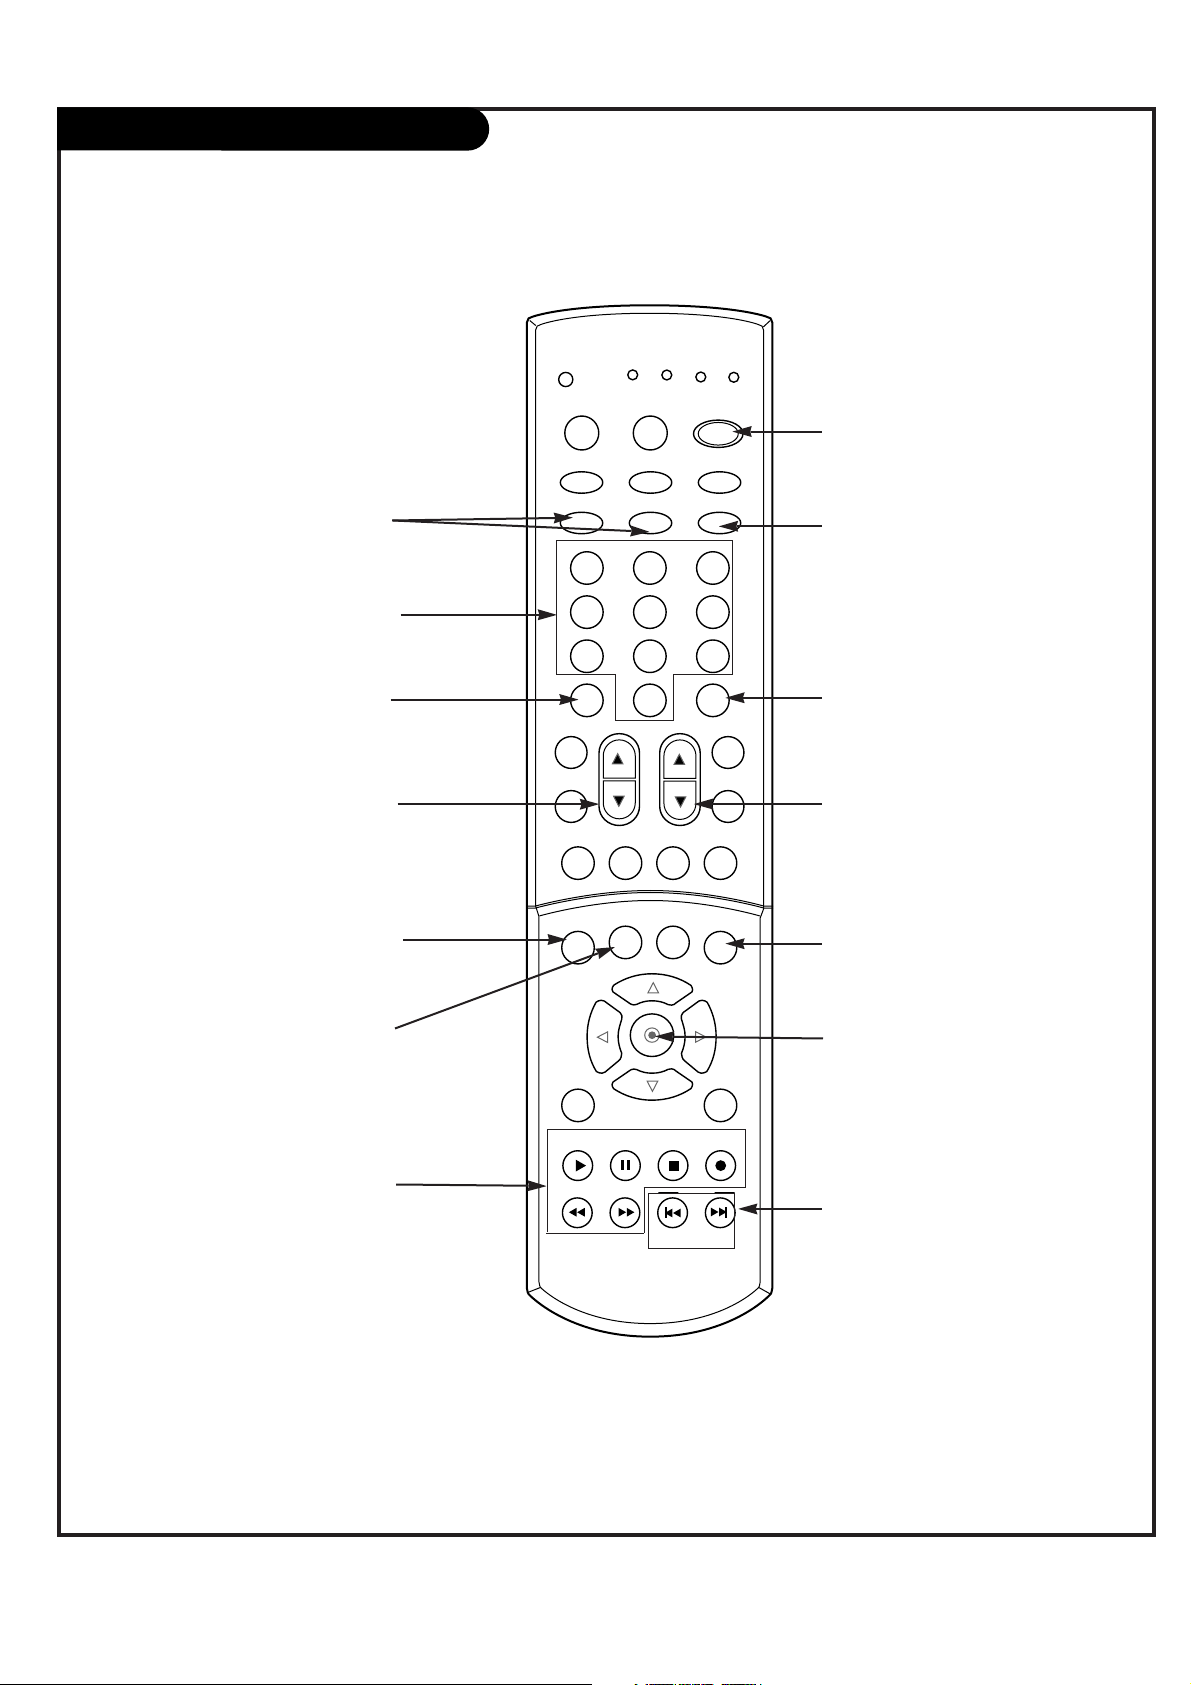
Remote Control Functions in TV Mode
1 2 3
4 5 6
7 8 9
0
TV
MODE
LIGHT
POWER
TV/VIDEO
HDMI
RGB
VCR
CABLE
DVD
SAT
MUTE
SWAPPIPCH- PIPCH+
PIP
PIC SIZE
REC
STOP
PAUSE
REW
PLAY
FF
MENU EXIT
CC FREEZE
PIP INPUT
VOL
CH
SURF
SAP
VIDEO
C/S HD2C/S HD1
FRONT
SKIP
ENTER
CH RTN
POWER
Turns your TV or any other
programmed equipment on or
off, depending on mode.
CHANNEL UP/DOWN
Scrolls through available channels in EZ Scan memory.
NUMBER KEYPAD
For direct channel selection and
programming functions.
ENTER
When in the menu system and
other on-screen displays,
selects highlighted options.
RECORD, PAUSE, REW, FFWD,
PLAY, STOP
Control the functions on your VCR.
VOLUME UP/DOWN
Increases/decreases the sound level.
PIC SIZE
Changes the screen format or
aspect ratio.
SKIP
Playing CDs: Selects songs.
Playing DVDs: Selects movie
chapters.
C/S HD1,HD2
Selects ColorStream HD signal
sources, such as DVD or HD receiver.
ENTER
When in the menu system and
other on-screen displays, selects
highlighted options.
CH RTN
Tunes to the last channel
viewed.
CC
Selects a closed caption mode for
displaying captioning information
if available on program.
PIP INPUT
Selects the input source for the
sub picture.
RGB
Selects: RGB-DTV and RGB-PC
input sources.
Page 19

PAGE 19
On-Screen Displays
This page describes your on-screen display and information banner options.
10
Mute
Main Channel Display
Displays current channel number.
PIP Display
This display
appears when PIP
is active.
Volume
Volume level is displayed while
adjusting the sound.
Mute
Appears when
sound is
muted.
TV 13
CATV 16
11:17 AM
Page 20
PAGE 20
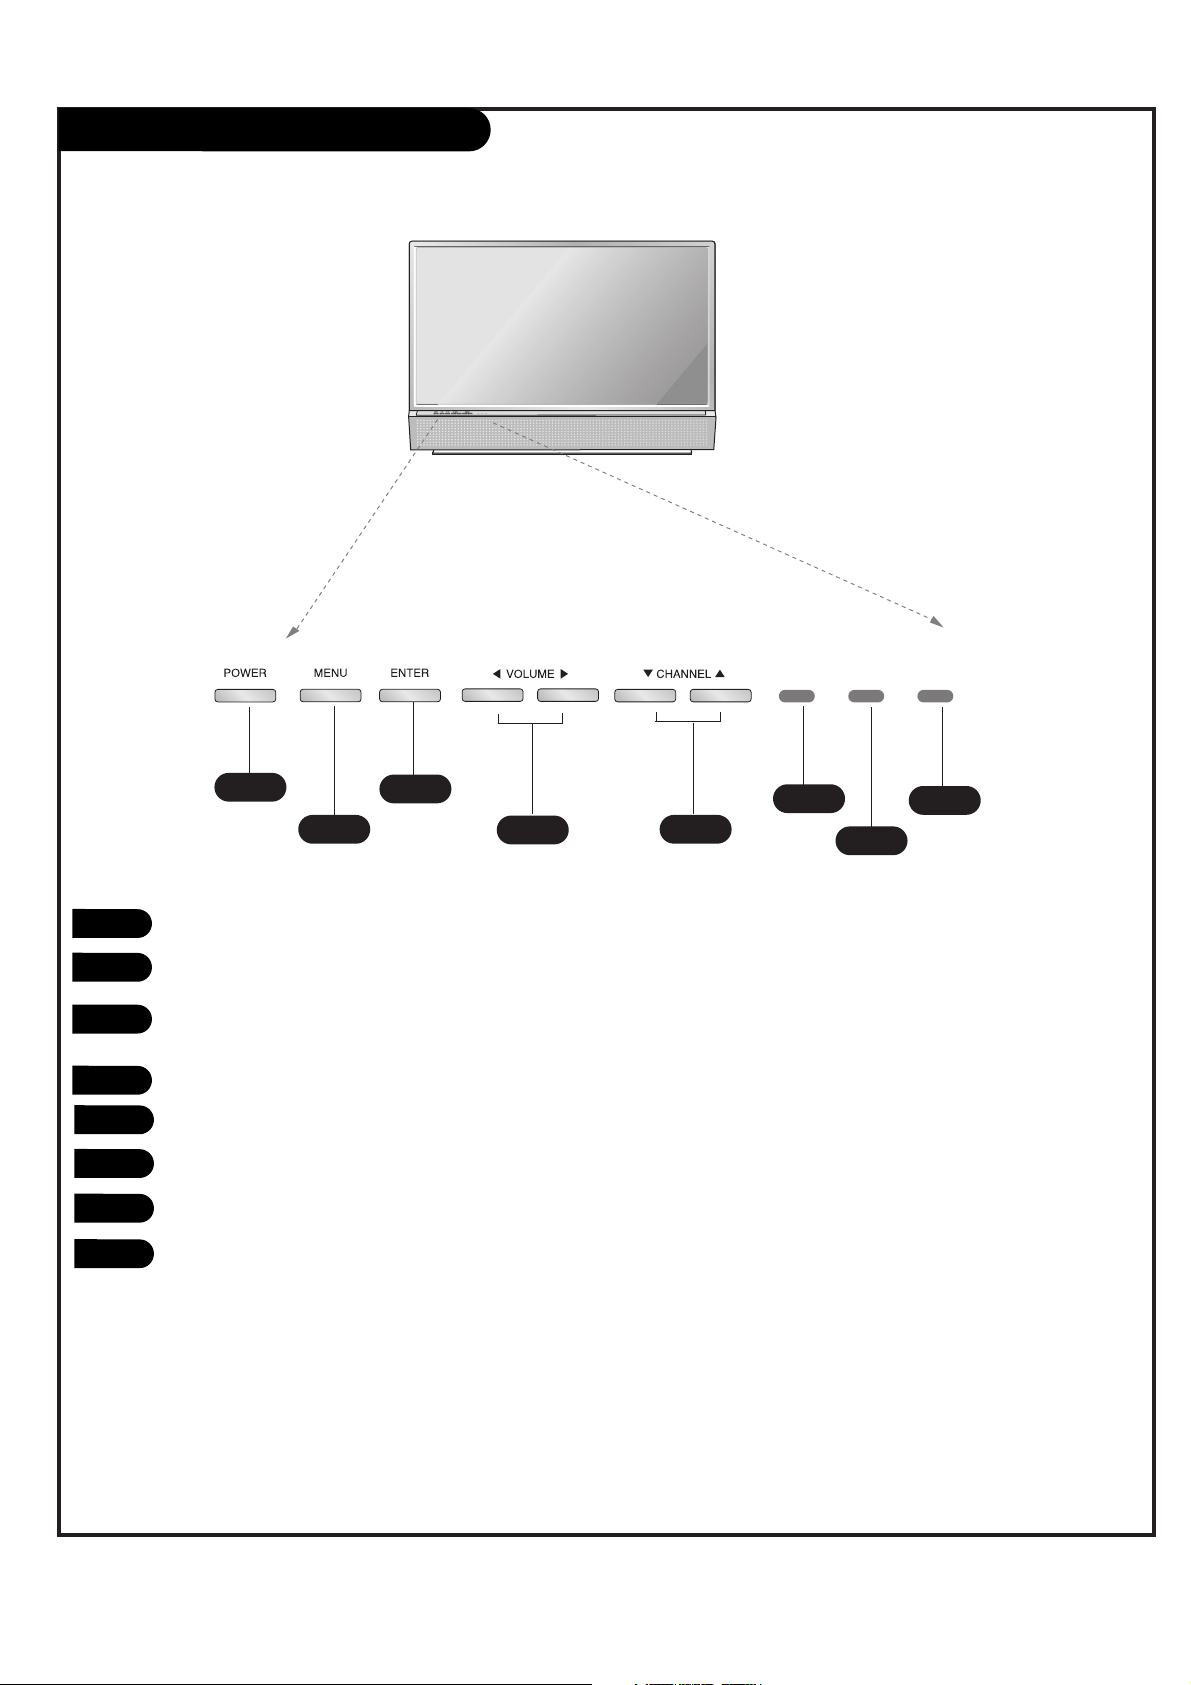
Front Panel Controls
1
2
4
3
6
7
8
5
POWER
MENU
ENTER (Same as ENTER button on your remote
control)
VOLUME UP / DOWN
CHANNEL UP / DOWN
Operation indicator. (See page 7).
Lamp indicator. (See page 7).
Temperature indicator. (See page 7).
1
2
3
4
5
6
7
8
See menu pages for instructions on using the onscreen menus.
The POWER, MENU, ENTER, VOLUME, and CHANNEL
buttons work just as they do on your remote control.
If TV is moved from cold to normal room temperature, condensation may form inside the TV, wait 6~7
hours for the TV to adjust to room temperature
before turning it on.
W
W
W
Page 21

PAGE 21
HDMI
- HDMITM, the HDMI logo and High-Definition Multimedia Interface are trademarks or registered trademarks of HDMI
Licensing.
- This set can receive the High-Definition Multimedia Interface (HDMI) or Input of Digital Visual Interface(DVI).
- This set supports HDCP (High-bandwidth Digital Contents Protection) Protocol for the set (480p, 720p, 1080i)
modes.
- When you Connect with HDMI Source Devices (DVD Player or Set Top Box or PC) supporting Auto HDMI function, automatically, support Plug & Play and then set the HDMI Source Devices (640 x 480p). After reading in
HDMI Source Devices using Display Data Channel(DDC) Protocol, EDID stored in the set is used. If HDMI Source
Devices not supported Auto HDMI is been, the Resolution is set, manually.
- To get the best picture quality, adjust the DVD Player or Set Top Box output resolution to 1280 x 720p.
- To get the best picture quality, adjust the PC graphics card to 1024 x 768, 60Hz.
- When Source Devices have DVI Output Connector, you must connect audio with separated cable.(Refer to <How
to connect>)
How to connect
1. When Source Devices (DVD Player or Set Top Box) support HDMI.
- If Source Devices have HDMI Output Connector, Source Devices connect to the set with HDMI Cable .(not supplied with the product).
- If Source Devices support Auto HDMI, automatically, Source Devices divert output resolution in 1280 x 720p. But
if the resolution has to be changed manually refer to the source devices owner manual.
- To get the best picture quality, adjust the DVD Player or Set Top Box output resolution to 1280 x 720p.
- Because HDMI sends Digital Video and Audio with one cable, need not especial Audio Cable for using HDMI Cable.
2. When Source Devices (DVD Player or Set Top Box) supports DVI.
- If Source Devices have DVI Output Connector, Source Devices connect to the set with HDMI to DVI Cable (not
supplied with the product).
- If Source Devices support Auto DVI, automatically, Source Devices divert output resolution in 1280 x 720p. But
if the resolution has to be changed manually refer to the source devices owner manual.
- To get the best picture quality, adjust the DVD Player or Set Top Box output resolution to 1280 x 720p.
- In this case, Audio use other cable. When Source Devices have Analog Audio Output Connector, RGB/DVI Audio
Input of the set connect to Audio Cable (not supplied with the product). And then you can listen to normal
Audio.
3. When PC supports DVI.
- If PC have DVI Output Connector, Source Devices connect to the set with HDMI to DVI Cable (not supplied with
the product).
- To get the best picture quality, adjust the PC graphics card to 1024 x 768, 60Hz.
- Use the the set’s HDMI (VIDEO) for video connections, depending on your PC connector.
- If the graphics card on the PC does not output analog RGB and DVI simultaneously, connect only one of either
RGB Input or HDMI Input to display the PC on the set.
- If he graphics card on the PC does output analog RGB and DVI simultaneously, change the input to either RGB
Input or HDMI Input; (the other mode is set to Plug and Play automatically by the set.)
- Then, make the corresponding audio connections. If using a sound card, adjust the PC sound as required.
- In this case, Audio use other cable. When PC (or sound card of PC) have Analog Audio Output Connector, RGB/DVI
Audio Input of the set connect to Analog Audio Cable (not supplied with the product). And then you can listen
to normal Audio.
Page 22
PAGE 22
How to use
1. Connect the HDMI Source Devices(DVD Player or Set Top Box or PC) and the set.
2. Turn on the display by pressing the POWER button on the set and HDMI Source Devices remote control.
3. Select HDMI Input source in Main Input option of PIP/DW menu.
4. Check the image on your set. There may be noise associated with the resolution, vertical pattern, contrast or
brightness in HDMI Source Devices. If noise is present, change the HDMI Source Devices to another resolution,
change the refresh rate or adjust the brightness and contrast on the menu until the picture is clear. If the refresh
rate of the PC graphics card can not changed, change the PC graphics card or consult the manufacturer of the PC
graphics card.
Notes:
- Depending on the graphics card, DOS mode may not work if you use a HDMI to DVI Cable.
- Avoid keeping a fixed image on the set screen for a long period of time. The fixed image may become permanently imprinted on the screen. Use the Orbiter screen saver when possible.
- When Source Devices connected HDMI Input, output PC Resolution(VGA, SVGA, XGA), Position, Size may not fit to
Screen. As shown the lower picture, press the MENU button to adjust the screen Position of the set and contact an
PC graphics card service center.
- When Source Devices connected HDMI Input output the set Resolution(480p, 720p, 1080i), the set Display fit
EIA/CEA-861-B Specification to Screen. If not, refer to the Manual of HDMI Source Devices or contact your service
center.
- In case HDMI Source Devices is not connected Cable or poor cable connection, "No Signal" OSD display in HDMI
Input. And In case of Video Resolution not supported the set output in HDMI Source Devices, "No Signal" OSD display. Refer to the Manual of HDMI Source Devices or contact your service center.
Reference
Cable sample
HDMI to DVI Cable
(not supplied with the product)
Analog Audio Cable (RCA type)
(not supplied with the product)
Analog Audio Cable (Stereo to RCA type)
(not supplied with the product)
HDMI Cable
(not supplied with the product)
Page 23
PAGE 23
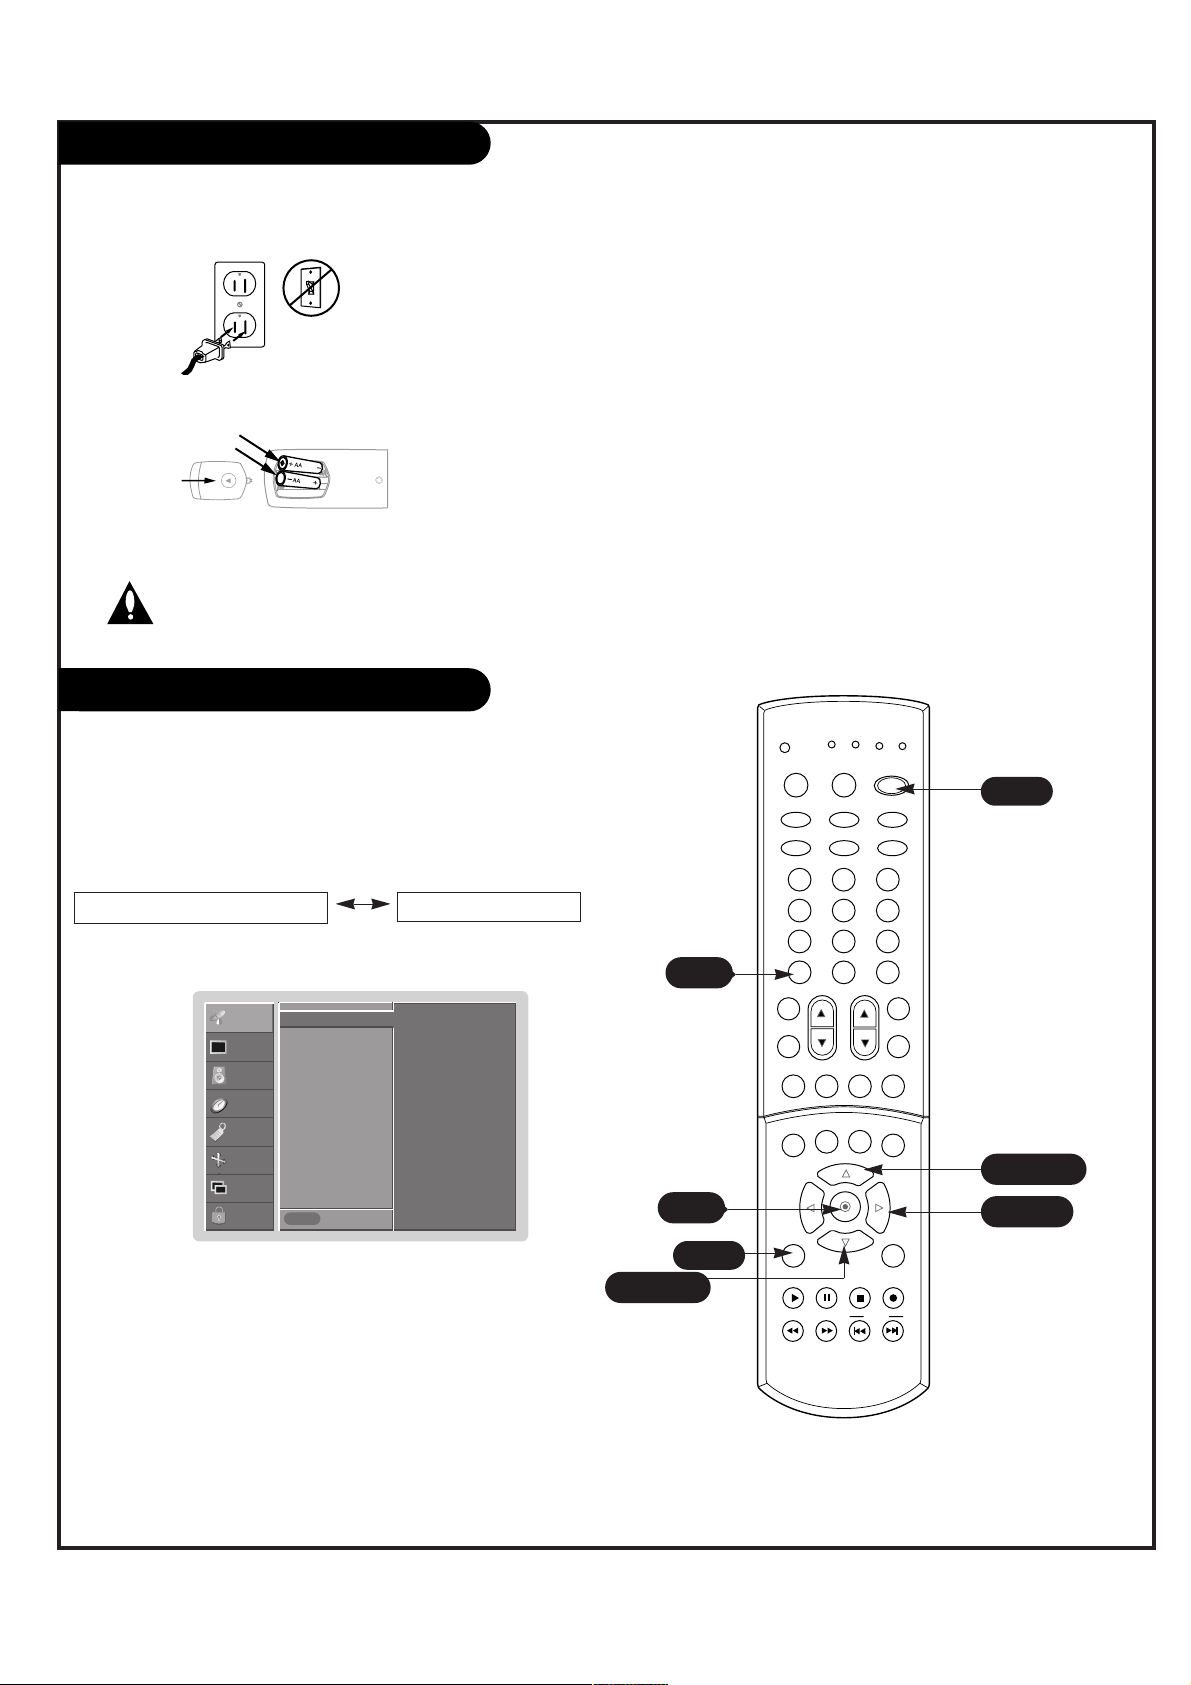
1. Refer to pages 10-16 to connect external equipment to your TV. If you have done so, plug
in your TV to a standard (non-switched) 120V 60Hz power outlet.
2. If you have done so, remove the back of the remote and install in two AA batteries. Make
sure batteries are properly installed (check the +/– symbols).
3. With the remote control in hand, press the POWER button to turn your TV on.
- Redo Auto Program if the DLP projection TV is ever moved to
another location.
- Auto Program will search for channels only through the ANT IN
jack.
- If channels numbers for broadcast over-the air TV and cable TV are
duplicated where different channels have the same number, press
the same number buttons again to toggle between:
(For example, press 17 to go to the channel, press 17 again to go
to the duplicated channel.)
back of
remote
CHANNEL
PICTURE
AUDIO
TIMER
SPECIAL
SCREEN
PIP/DW
LOCK
Prev.
Menu
To start
Auto program G
Manual program
Surf list
4. Press the MENU button and then use
D / E
button to select the
CHANNEL menu.
5. Press the
G button and then use
D / E
button to select Auto
program
.
6. Press ENTER or the
G button to start Auto program channel
search.
If you want to stop auto programming, press the ENTER but-
ton. Only the channels found up to at that time are memorized.
Broadcast TV Channels
Cable TV Channels
Turning the TV On
Caution: Never throw batteries into a fire.
1 2 3
4 5 6
7 8 9
0
TV
MODE
LIGHT
POWER
TV/VIDEO
HDMI
RGB
VCR
CABLE
DVD
SAT
MUTE
SWAPPIPCH- PIPCH+
PIP
PIC SIZE
REC
STOP
PAUSE
REW
PLAY
FF
MENU EXIT
CC FREEZE
PIP INPUT
VOL
CH
SURF
SAP
VIDEO
C/S HD2C/S HD1
FRONT
SKIP
ENTER
CH RTN
6
4/5/6
5/6
4/5/6
3
4
6
Auto Program: Channel Search
Page 24
PAGE 24
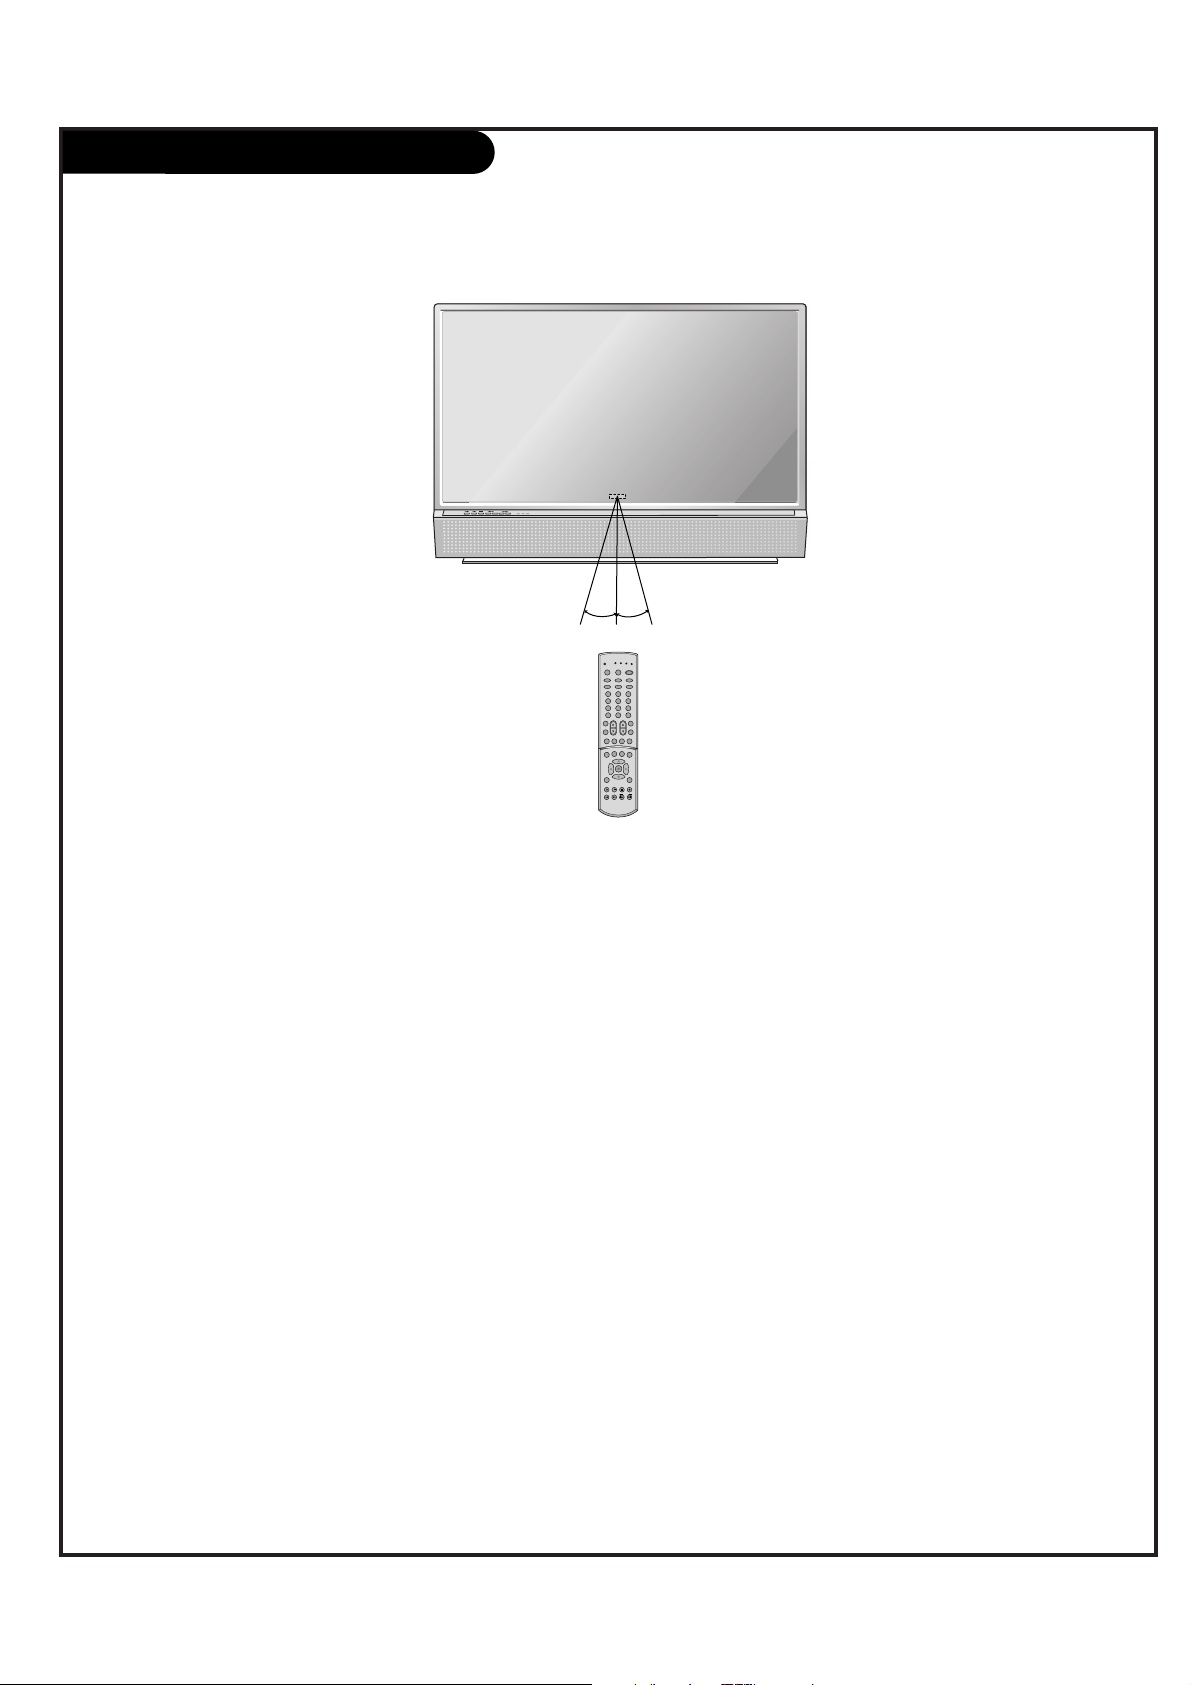
Remote control effective range
For optimum performance, aim the remote control directly at the TV and make sure there is no obstruction
between the remote control and the TV.
• If your Toshiba TV remote control does not operate all
the features of your other device, use the original
remote control for that device.
• Dispose of batteries in a designated disposal area.
• Attention should be drawn to the environmental
aspects of battery disposal.
• Do not mix battery types or combine used batteries
with new ones.
• If the remote control does not operate correctly, or if
the operating range becomes reduced, replace both
batteries with new ones.
• If the batteries are dead or if you will not use the
remote control for a long time, remote the batteries to
prevent battery acid from leaking into the battery
compartment.
W
1 2 3
4 5 6
7 8 9
0
TV
MODE
LIGHT
POWER
TV/VIDEO
DVI
RGB
VCR
CABLE
DVD
SAT
MUTE
SWAPPIPCH- PIPCH+
PIP
PIC SIZE
REC
STOP
PAUSE
REW
PLAY
FF
MENU EXIT
CC FREEZE
PIP INPUT
VOL
CH
SURF
SAP
VIDEO
C/S HD2C/S HD1
FRONT
SKIP
ENTER
CH RTN
12m
9m
30°
30°
Page 25
PAGE 25
Manual program
CHANNEL
PICTURE
AUDIO
TIMER
SPECIAL
SCREEN
PIP/DW
LOCK
Prev.
Menu
TV 2
Memory On
Fine 0
Auto program
Manual program G
Surf list
- You can add or delete channels from the channel scan manually.
1. Press the MENU button and then use
D / E
button to select the CHANNEL menu.
2. Press the
G button and then use
D / E
button to select Manual program.
3. Press the
G button and then use
D / E
button to select Memory.
4. Use the
F / G button to select On or Off.
5. Press the ENTER button to save.
AAdddin
din
g/Deletin
g/Deletin
g Chann
g Chann
els
els
- Use this function to correct the picture's instability and condition if it is poor.
Notes
• To remove fine tuning from a channel, reprogram the finely-tuned
channel with Auto program or Manual Program.
• If a finely-tuned channel is memorized, the color of the channel
number changes to yellow.
1. Press the MENU button and then use
D / E
button to select the CHANNEL
menu.
2. Press the
G button and then use
D / E
button to select Manual program.
3. Press the
G button and then use
D / E
button to select Fine.
4. Use the
F / G button to adjust the picture to your preference.
5. Press the ENTER button to save.
Fin
Fin
e T
e T
unin
unin
g A
g A
djustm
djustmenentt
0
MUTE
SWAPPIPCH- PIPCH+
PIP
PIC SIZE
REC
STOP
PAUSE
REW
PLAY
FF
MENU EXIT
CC FREEZE
PIP INPUT
VOL
CH
SURF
SAP
VIDEO
SKIP
ENTER
CH RTN
5
1/2/3
2/3/4
1/2/3
1
4
5
Page 26
PAGE 26
Surf list
- Surf Channels is a convenient feature that lets you quickly scan up to 8
channels of your choice without having to wait for the TV to scan through
all the in-between channels.
1. Press the MENU button and then use
D / E
button to select the CHANNEL
menu.
2. Press the
G button and then use
D / E
button to select Surf list.
3. Press the
G button and then use
D / E
button to select the first surf chan-
nel position.
4. Use the
F / G button to set the desired channel number for first surf chan-
nel.
5. Repeat steps 3 to 4 to memorize other surf channels.
6. Press the ENTER button to save.
• To tune to a surf channel, press the SURF button repeatedly. The eight
favorite channels appear on the screen in numerical order.
CHANNEL
PICTURE
AUDIO
TIMER
SPECIAL
SCREEN
PIP/DW
LOCK
Prev.
Menu
- - - - - - - -
- - - - - - - -
- - - - - - - -
- - - - - - - -
- - - - - - - -
- - - - - - - -
- - - - - - - -
- - - - - - - -
Auto program
Manual program
Surf list G
0
MUTE
SWAPPIPCH- PIPCH+
PIP
PIC SIZE
REC
STOP
PAUSE
REW
PLAY
FF
MENU EXIT
CC FREEZE
PIP INPUT
VOL
CH
SURF
SAP
VIDEO
SKIP
ENTER
CH RTN
6
1~4
2/3/4
1~4
1
4
6
Page 27
PAGE 27
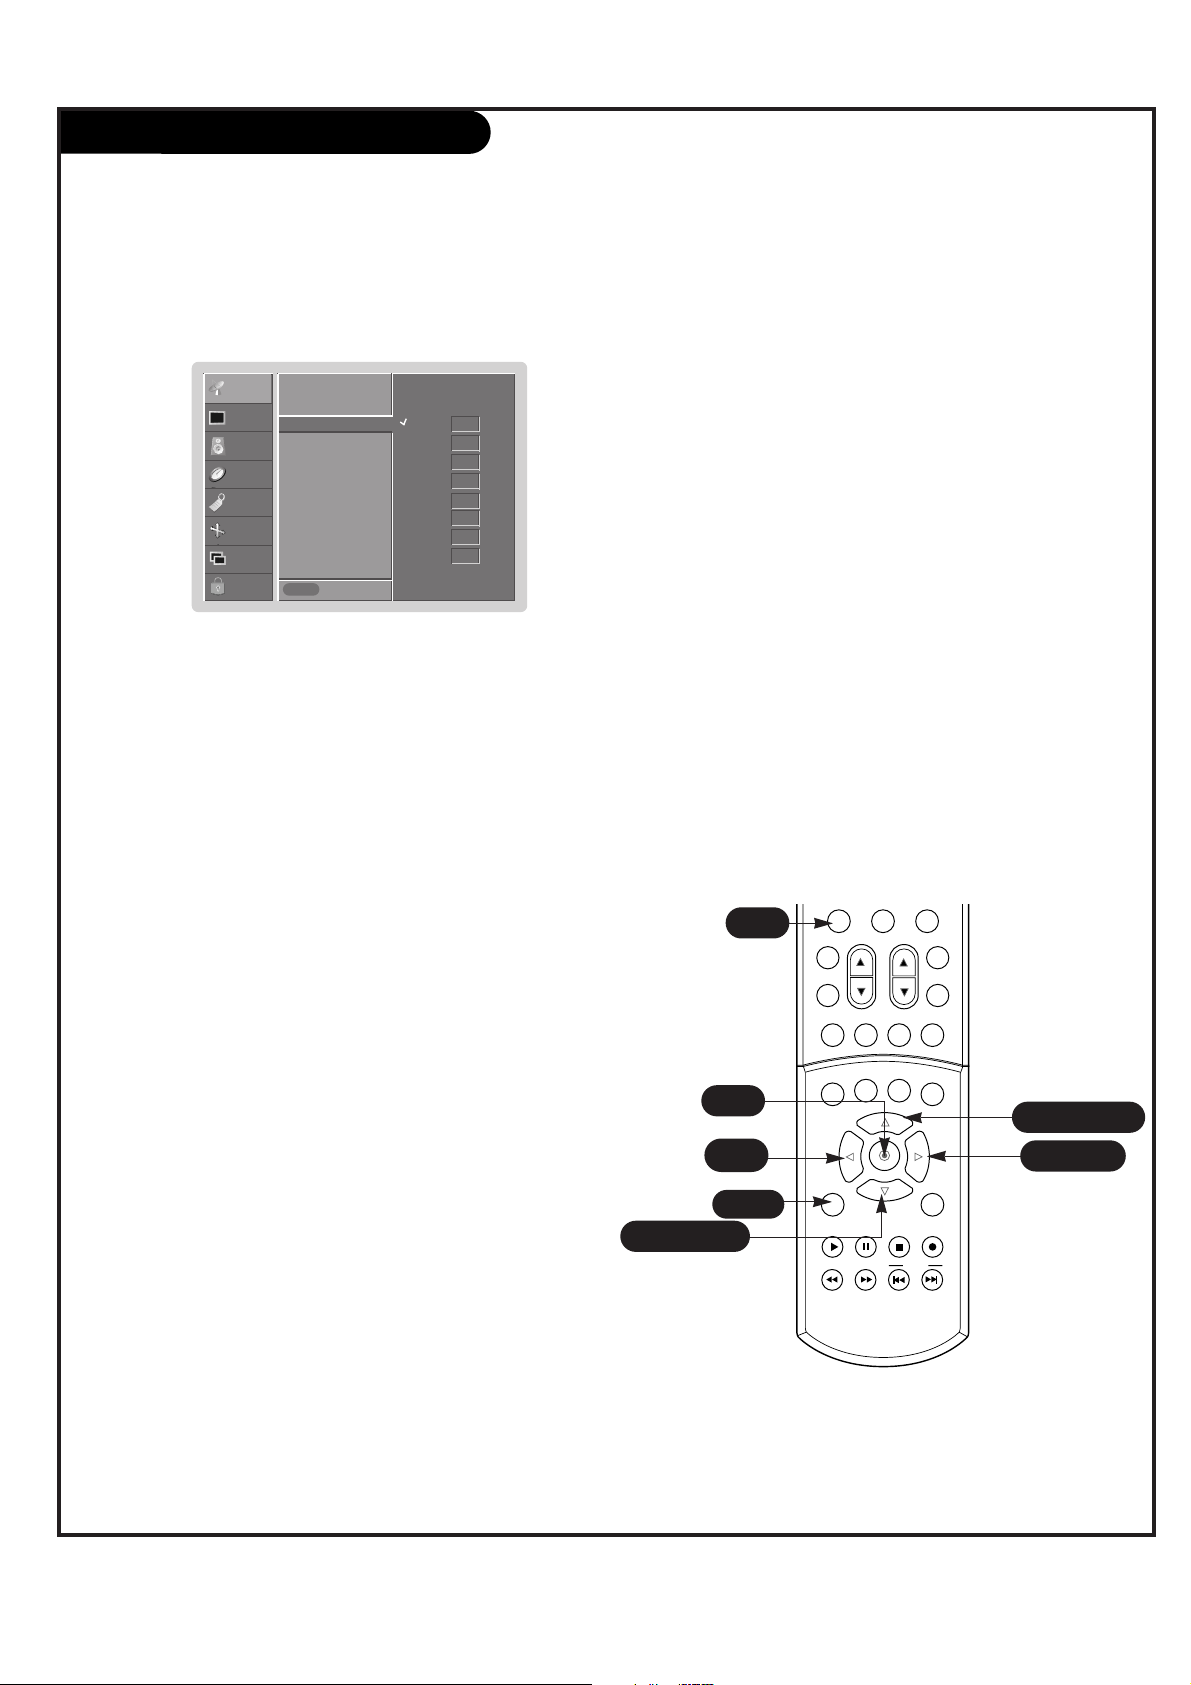
Picture Mode
Adjust the picture appearance to suit your preference and viewing situations.
- You can manually adjust the levels for the picture quality settings, such as Contrast, Brightness, Color, etc.
- You can also select a preset value from the Picture Mode menu based on the category of the program.
1.
Press the MENU button and then use
D / E
button to select the PICTURE
menu.
2.
Press the
G button and then use
D / E
button to select Picture Mode.
3.
Press the
G button and then use
D / E
button to set Daylight, Standard,
Night time, Movie, Video game and Sports settings are preset for good
picture quality at the factory and cannot be changed.
4. Press the ENTER button to save.
CHANNEL
PICTURE
AUDIO
TIMER
SPECIAL
SCREEN
PIP/DW
LOCK
Prev.
Menu
Daylight
Standard
Night time
Movie
Video game
Sports
Off
Picture Mode G
Color temporature
ACM
Contrast 100
Brightness 55
Color 55
Sharpness 60
Tint 0
0
MUTE
SWAPPIPCH- PIPCH+
PIP
PIC SIZE
REC
STOP
PAUSE
REW
PLAY
FF
MENU EXIT
CC FREEZE
PIP INPUT
VOL
CH
SURF
SAP
VIDEO
SKIP
ENTER
CH RTN
4
1/2/3
2/3
1/2/3
1
• Daylight Increases the levels of all picture settings to fit daylight
conditions.
Standard Restores the picture levels to their original settings.
Night Time Decreases the levels of all picture settings to fit Night
Time conditions.
Movie Adjusts Video settings to enhance Movie viewing. Contrast and
Sharpness levels are lowered so that the picture looks warm and soft.
Video Game Sets the picture settings to the levels that are more suitable to enjoy games. Color, Contrast, and Sharpness levels are lowered
to reduce the amount of glare.
Sports Sets the picture settings to the levels that are more suitable to
view sporting events. Contrast and Color levels are raised so that an
action scene appears clear and brilliant.
Off Lets you adjust the picture manually to your preferences.
4
Page 28

PAGE 28
Auto Color Temperature Control
- To initialize values (reset to default settings), select the Normal option.
1. Press the MENU button and then use
D / E
button to select the PICTURE
menu.
2. Press the
G button and then use
D / E
button to select Color temporature.
3. Press the
G button and then use
D / E
button to select either: Cool
(Preset), Normal (Default), or Warm (Preset).
4. Press the ENTER button to save.
CHANNEL
PICTURE
AUDIO
TIMER
SPECIAL
SCREEN
PIP/DW
LOCK
Prev.
Menu
Cool
Normal
Warm
Off
Red 0
Green 0
Blue 0
Picture Mode
Color temporature G
ACM
Contrast 100
Brightness 55
Color 55
Sharpness 60
Tint 0
Manual Color Temperature Control
(Color temporature set to Off option)
- You can adjust red, green, or blue to any color temperature you prefer.
1. Press the MENU button and then use
D / E
button to select the PICTURE
menu.
2. Press the
G button and then use
D / E
button to select Color temporature.
3. Press the G button and then use
D / E
button to select Off.
4.
Press the G button and then use
D / E
button to select Red, Green or
Blue.
5.
Use the F / G button to make appropriate adjustments.
• The adjustment range of Red, Green, and Blue is -30 ~ +30.
6. Press the ENTER button to save.
Color Temporature Control
0
MUTE
SWAPPIPCH- PIPCH+
PIP
PIC SIZE
REC
STOP
PAUSE
REW
PLAY
FF
MENU EXIT
CC FREEZE
PIP INPUT
VOL
CH
SURF
SAP
VIDEO
SKIP
ENTER
CH RTN
1/2/3
1/2/3
1
2/3
4
0
MUTE
SWAPPIPCH- PIPCH+
PIP
PIC SIZE
REC
STOP
PAUSE
REW
PLAY
FF
MENU EXIT
CC FREEZE
PIP INPUT
VOL
CH
SURF
SAP
VIDEO
SKIP
ENTER
CH RTN
1~4
1~4
1
2~5
6
5
4
6
Page 29
PAGE 29
AACM (A
CM (A
ctive Color M
ctive Color Mananagagememenent)t)
- You can adjust picture contrast, brightness, color, sharpness, and tint
options to the levels you prefer.
1. Press the MENU button and then use
D / E
button to select the PICTURE
menu.
2. Press the G button and then use
D / E
button to select the desired picture
option (Contrast, Brightness, Color, Sharpness, Tint).
3. Press the G button and then use F / G button to make appropriate adjustments.
4. Press the ENTER button to save.
- Adjust the ACM to select the desired skin colour option.
- This function works in the following mode:
TV, Video 1-2, Front Video Colorstream HD 1-2, RGB-DTV, HDMI-DTV.
1. Press the MENU button and then use
D / E
button to select the PICTURE
menu.
2. Press the
G button and then use
D / E
button to select ACM.
3.
Press the
G button and then use F / G button to make appropriate
adjustments.
4. Press the ENTER button to save.
CHANNEL
PICTURE
AUDIO
TIMER
SPECIAL
SCREEN
PIP/DW
LOCK
Prev.
Menu
Fleshtone 0
Greentone 0
Bluetone 0
Picture Mode
Color temporature
ACM G
Contrast 100
Brightness 55
Color 55
Sharpness 60
CHANNEL
PICTURE
AUDIO
TIMER
SPECIAL
SCREEN
PIP/DW
LOCK
Prev.
Menu
Picture Mode
Color temporature
ACM
Contrast 100 G
Brightness 55
Color 55
Sharpness 60
Tint 0
0
MUTE
SWAPPIPCH- PIPCH+
PIP
PIC SIZE
REC
STOP
PAUSE
REW
PLAY
FF
MENU EXIT
CC FREEZE
PIP INPUT
VOL
CH
SURF
SAP
VIDEO
SKIP
ENTER
CH RTN
4
1/2
2/3
1/2
1
3
4
MMananuual Pi
al Pi
ctur
ctur
e Con
e Contrtr
ol (
ol (Picture Mode
set to
set to off
opti
opti
on)
on)
Page 30
PAGE 30
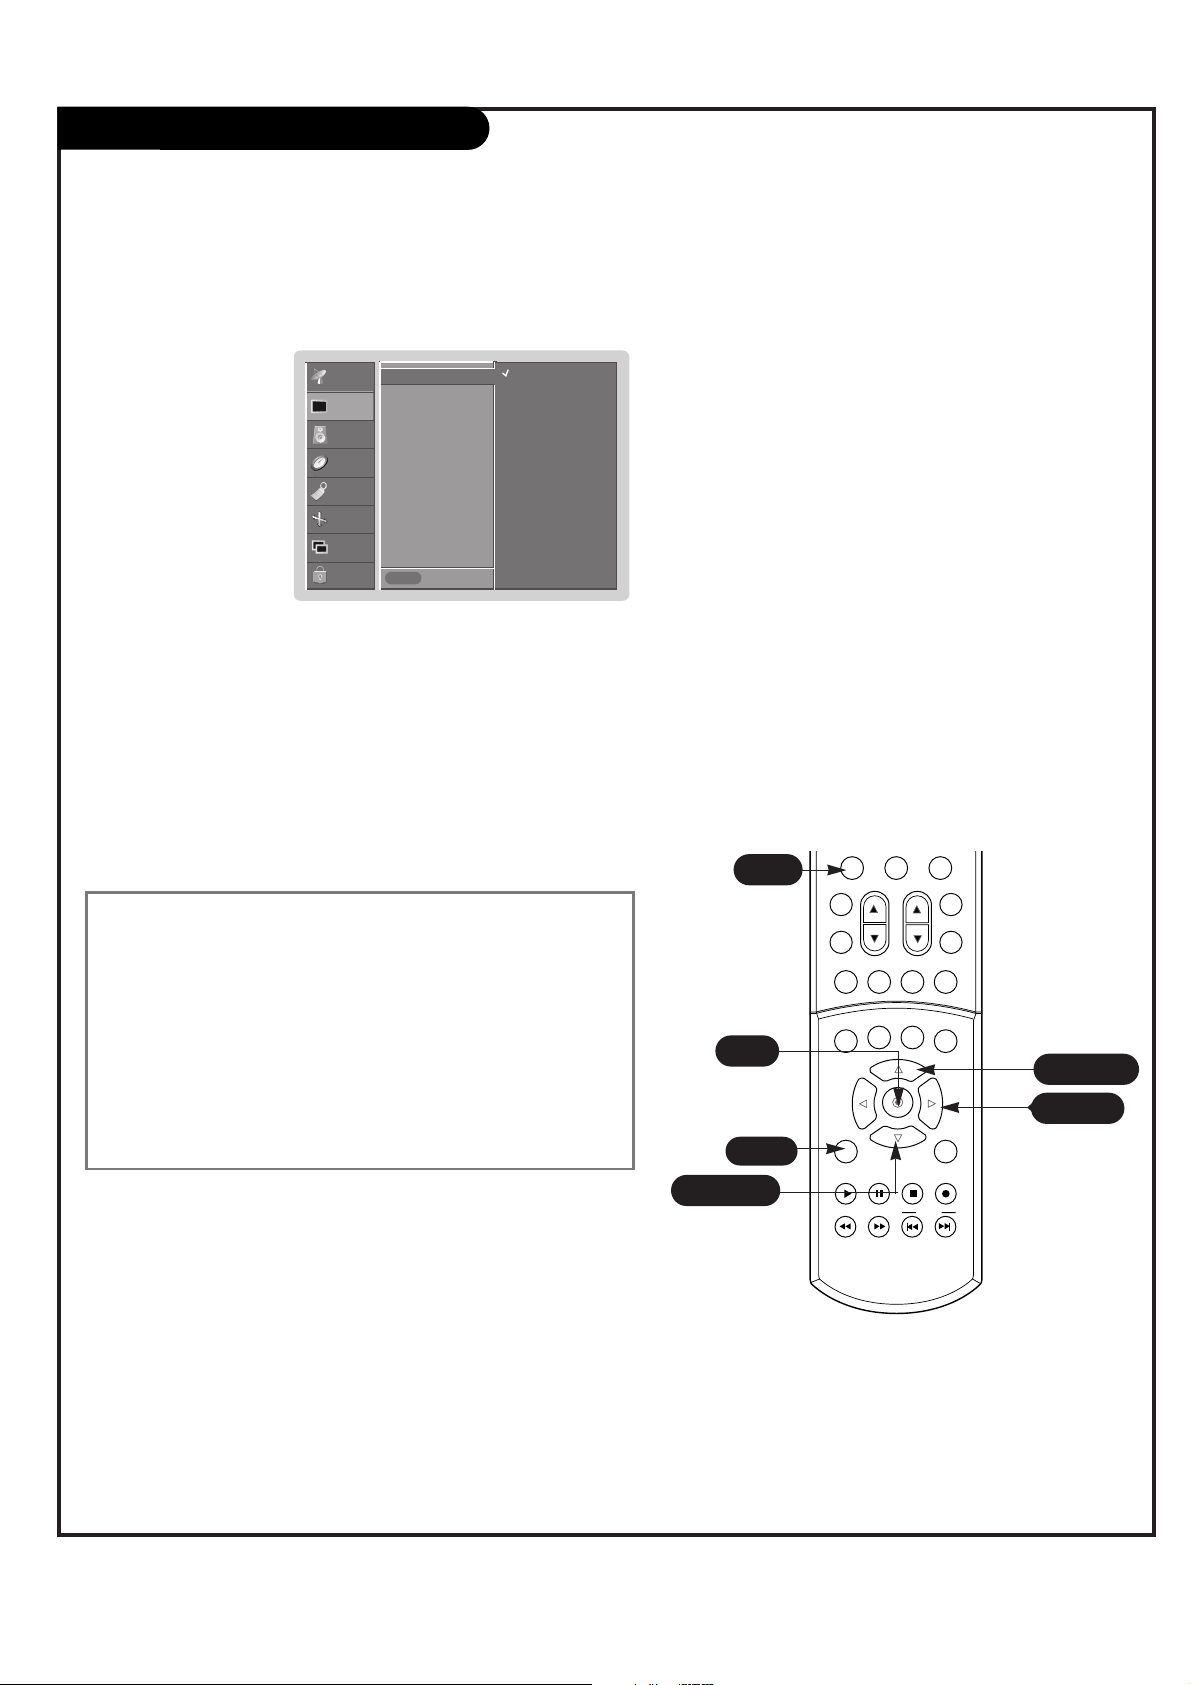
Sound mode
- Chooes the sound options manually.
- Scans for changes in the sound level during commercials, then adjusts the
sound to match
the current audio level of the TV program you are watching.
1. Press the MENU button and then use
D / E
button to select the AUDIO menu.
2. Press the
G button and then use
D / E
button to select Stable sound.
3. Press the G button and then use
D / E
button to select On or Off.
4. Press the ENTER button to save.
CHANNEL
PICTURE
AUDIO
TIMER
SPECIAL
SCREEN
PIP/DW
LOCK
Prev.
Menu
Normal
Stadium
News
Music
Theater
Off
Sound mode
G
Stable sound
Front surround
Balance 0
Treble 50
Bass 50
CHANNEL
PICTURE
AUDIO
TIMER
SPECIAL
SCREEN
PIP/DW
LOCK
Prev.
Menu
On
Off
Sound mode
Stable sound G
Front surround
Balance 0
Treble 50
Bass 50
1. Press the MENU button and then use
D / E
button to select the AUDIO menu.
2. Press the
G button and then use
D / E
button to select Sound mode.
3. Press the G button and then use
D / E
button to select appropriate sound setup.
4. Press the ENTER button to save.
• Normal Restores the sound levels to their original settings.
Stadium Stresses high frequency sounds and front surround sound to create
the sensation you would experience in a stadium.
News Increases high frequency sounds to emphasize the human voice.
Music Increases both high and low frequency sounds to stress the sounds of
musical instruments.
Theater Stresses both high and low frequency sounds, in addition to the front
surround sound, to create the sensation you would experience in a theater.
Off Lets you adjust the Audio menu sound options manually.
4
1/2/3
2/3
1/2/3
1
3
4
Stable sound
®
0
CH
CC FREEZE
STOP
FF
SKIP
CH RTN
SURF
VIDEO
SWAPPIPCH- PIPCH+
PIP INPUT
REC
ENTER
VOL
MUTE
SAP
PIP
PIC SIZE
MENU EXIT
PLAY
PAUSE
REW
Page 31

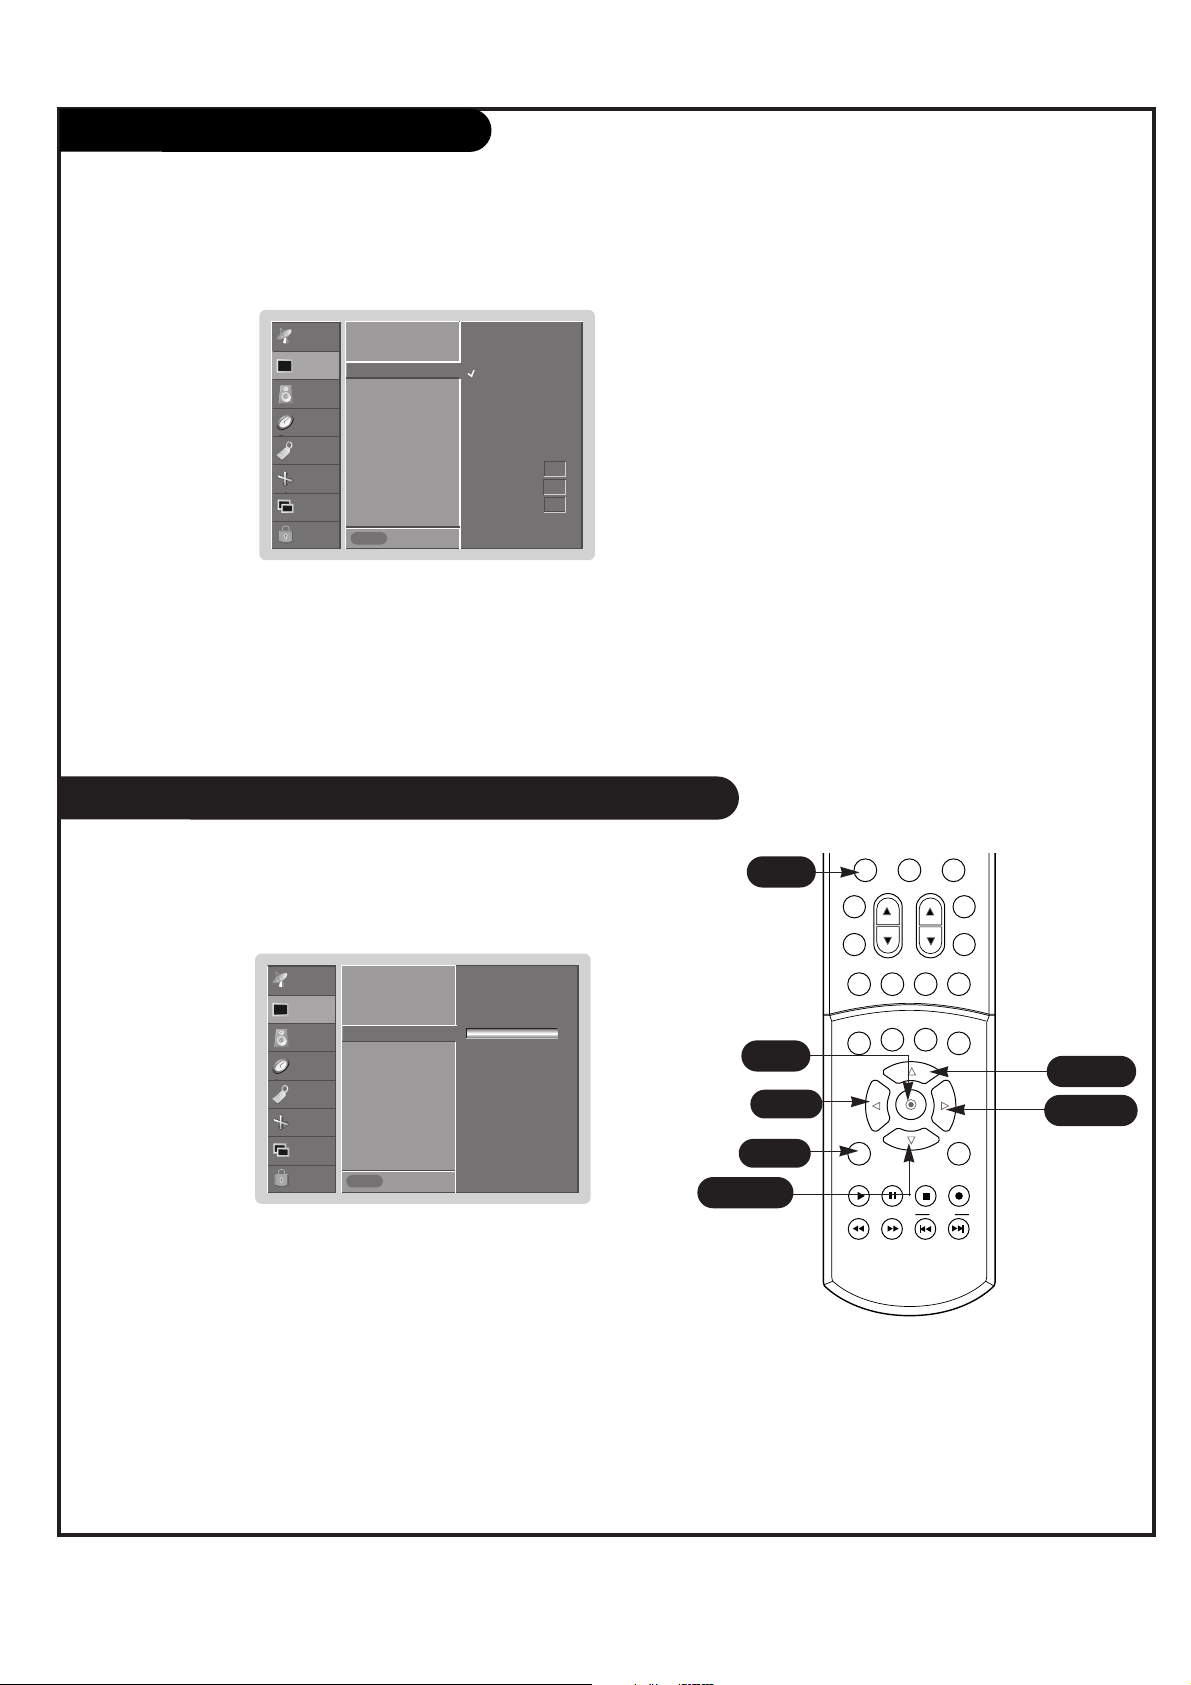
PAGE 31
Front surround
CHANNEL
PICTURE
AUDIO
TIMER
SPECIAL
SCREEN
PIP/DW
LOCK
Prev.
Menu
Sound mode
Stable sound
Front surround
Balance 0
Treble 50
Bass 50
L R
1. Press the MENU button and then use
D / E
button to select the AUDIO
menu.
2. Press the
G button and then use
D / E
button to select the desired sound
option (Balance, Treble, Bass).
3. Press the G button and then use F / G button to make appropriate
adjustments.
4. Press the ENTER button to save.
CHANNEL
PICTURE
AUDIO
TIMER
SPECIAL
SCREEN
PIP/DW
LOCK
Prev.
Menu
SRS TSXT
3D Echo system
Off
Sound mode
Stable sound
Front surround G
Balance 0
Treble 50
Bass 50
1. Press the MENU button and then use
D / E
button to select the AUDIO menu.
2. Press the
G button and then use
D / E
button to select Front surround.
3. Press the
G button and then use
D / E
button to select SRS TSXT or 3D Echo
system
.
4. Press the ENTER button to save.
- Increases the front surround sound to create more open and expanded sound.
• Balance Adjusts the left to right balance of the TV speakers.
Treble Increases or decreases the higher frequency sounds from the TV speak-
ers. Increases in treble, for example, make voice or string sounds stand out.
Bass Increases or decreases the lower frequency sounds from the TV speakers.
4
1/2/3
2/3
1/2/3
1
3
4
Manual Sound Control
- You can adjust sound options Balance, Treble, and Ba to the levels you prefer.
ENTER
VOL
MUTE
SAP
PIP
CC FREEZE
PIC SIZE
MENU EXIT
PLAY
PAUSE
REW
FF
CH RTN
0
CH
SURF
VIDEO
SWAPPIPCH- PIPCH+
PIP INPUT
REC
STOP
SKIP
Page 32

PAGE 32
Stereo/SAP Broadcasts Setup
MUTE
SWAPPIPCH- PIPCH+
PIP
PIC SIZE
MENU EXIT
CC FREEZE
PIP INPUT
VOL
CH
SURF
SAP
VIDEO
SAP
1. Press the SAP button repeatedly.
• Select mono sound mode if the signal is not clear or in poor signal
reception areas.
• Stereo, SAP modes are available only if included on the broadcast
signal.
Mono Stereo
SAP
- The TV can receive MTS (Multichannel Television Sound) stereo programs and any SAP (Secondary Audio
Program) that accompanies the stereo program; if the broadcaster transmits one additional sound signal in
addition to the original one.
- Mono: The primary language is heard from left and right speakers. Signal mode is mono.
- Stereo: The primary language is heard from left and right speakers. Signal mode is stereo.
- SAP: The secondary language is heard from left and right speakers in mono sound.
Page 33

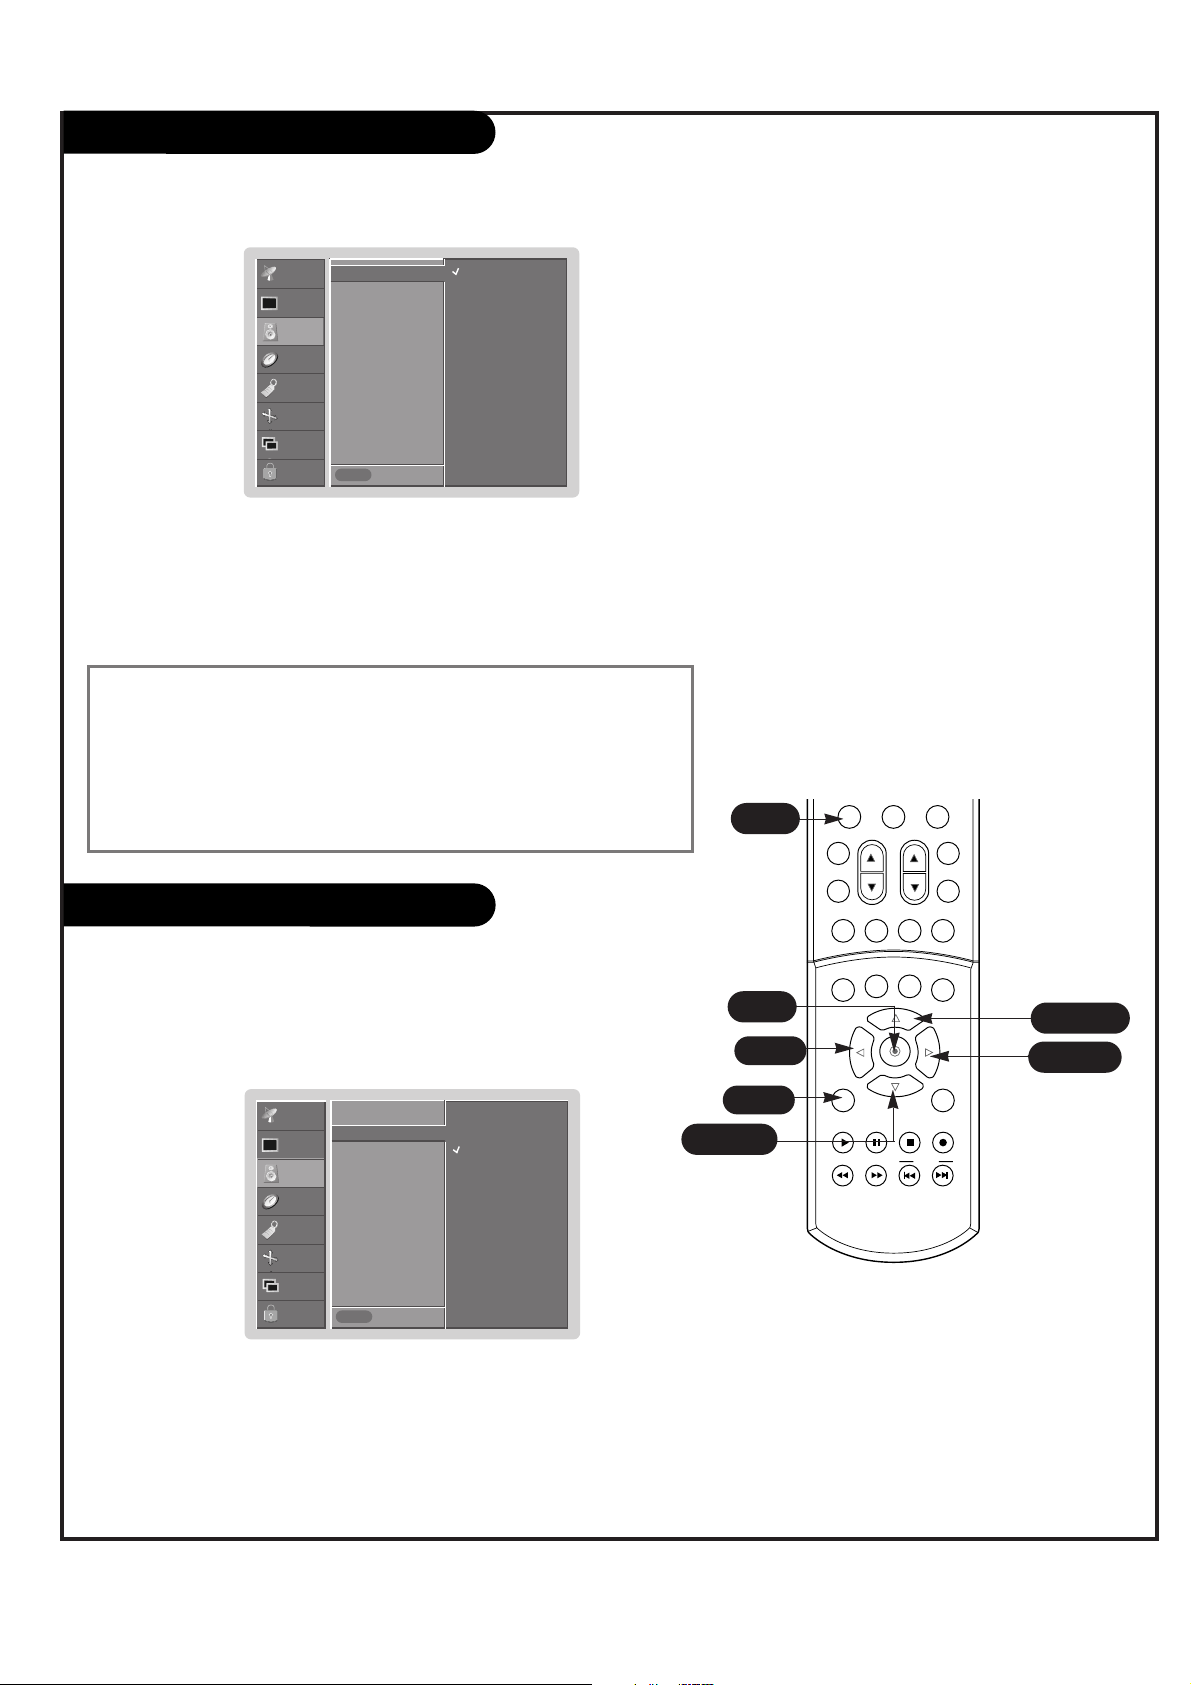
PAGE 33
Clock Setup
CHANNEL
PICTURE
AUDIO
TIMER
SPECIAL
SCREEN
PIP/DW
LOCK
Prev.
Menu
Clock G
Off timer
On timer
Sleep timer
Auto off
- Setting the time can be done automatically through the PBS broadcast signal.
- The PBS setup signal includes information for the current time.
- Set the clock manually, if the current time is set incorrectly programed by the auto
clock function.
0
MUTE
SWAPPIPCH- PIPCH+
PIP
PIC SIZE
REC
STOP
PAUSE
REW
PLAY
FF
MENU EXIT
CC FREEZE
PIP INPUT
VOL
CH
SURF
SAP
VIDEO
SKIP
ENTER
CH RTN
7
1~6
2~6
1~6
1
Auto
Manual
Time zone
Auto
PBS Channel
TV 2
Daylight Saving
Auto
1. Press the MENU button and then use
D / E
button to select the TIMER menu.
2. Press the
G button and then use
D / E
button to select Clock.
3. Press the
G button and then use
D / E
button to select Auto.
4. Press the G button and then use
D / E
button to select the time zone for
your viewing area. Your choices are: Auto, Nfld (New Foundland), Atlantic,
E.S.T. (Eastern Standard Time), C.S.T. (Central Standard Time), M.S.T.
(Mountain Standard Time) and P.S.T. (Pacific Standard Time).
5. Press the
G button and then use
D / E
button to set PBS Channel.
6. Press the G button and then use
D / E
button to set Daylight Saving Time
Auto, On or Off, depending on whether or not your viewing area observes
Daylight Saving Time.
7. Press the ENTER button to save.
7
Page 34

PAGE 34
On / Off Timer Setup
CHANNEL
PICTURE
AUDIO
TIMER
SPECIAL
SCREEN
PIP/DW
LOCK
Prev.
Menu
On
Off
6 : 30 AM
Volume 17
Ch. TV 2
Clock
Off timer
On timer G
Sleep timer
Auto off
- Time function operates only if current time has been set.
- Off-Timer function overrides On-Timer function if they are set both set to the
same time.
- The TV must be in standby mode for the On-Timer to work.
- If you do not press any button within 2 hours after the TV turns on with the On
Timer function, the TV will automatically revert to standby mode.
1. Press the MENU button and then use
D / E
button to select the TIMER
menu.
2. Press the
G button and then use
D / E
button to select Off timer or On
timer.
3. Press the G button and then use
D / E
button to select On.
• To cancel
On/Off timer function, select Off.
4. Press the
G button and then use
D / E
button to set the hour.
5. Press the
G button and then use
D / E
button to set the minutes.
6. For only
On timer function
Press the
G button and then use
D / E
button to set the sound level at turnon.
Press the
G button and then use
D / E
button to select the channel at turn-
on.
7. Press the ENTER button to save.
0
MUTE
SWAPPIPCH- PIPCH+
PIP
PIC SIZE
REC
STOP
PAUSE
REW
PLAY
FF
MENU EXIT
CC FREEZE
PIP INPUT
VOL
CH
SURF
SAP
VIDEO
SKIP
ENTER
CH RTN
7
1~6
2~6
1~6
1
7
Page 35

PAGE 35
Sleeep Timer Setup
CHANNEL
PICTURE
AUDIO
TIMER
SPECIAL
SCREEN
PIP/DW
LOCK
Prev.
Menu
On
Off
Clock
Off timer
On timer
Sleep timer
Auto off G
- If set to on and there is no input signal, the TV turns off automatically after
10 minutes.
1. Press the MENU button and then use
D / E
button to select the
TIMER menu.
2. Press the
G button and then use
D / E
button to select Auto off.
3. Press the G button and then use
D / E
button to select On or Off.
4.
Press the ENTER button to save.
- The Sleep Timer turns the TV off at the preset time. Note that this setting
is cleared when the TV is turned off.
1. Press the MENU button and then use
D / E
button to select the TIMER
menu.
2. Press the
G button and then use
D / E
button to select Sleep timer.
3. Press the G button and then use
D / E
button to choose a preset turn off time.
4.
Press the ENTER button to save.
CHANNEL
PICTURE
AUDIO
TIMER
SPECIAL
SCREEN
PIP/DW
LOCK
Prev.
Menu
10 min
20 min
30 min
60 min
90 min
120 min
180 min
240 min
Off
Clock
Off timer
On timer
Sleep timer G
Auto off
0
MUTE
SWAPPIPCH- PIPCH+
PIP
PIC SIZE
REC
STOP
PAUSE
REW
PLAY
FF
MENU EXIT
CC FREEZE
PIP INPUT
VOL
CH
SURF
SAP
VIDEO
SKIP
ENTER
CH RTN
4
1/2/3
2/3
1/2/3
1
4
Auto Off
Page 36

PAGE 36
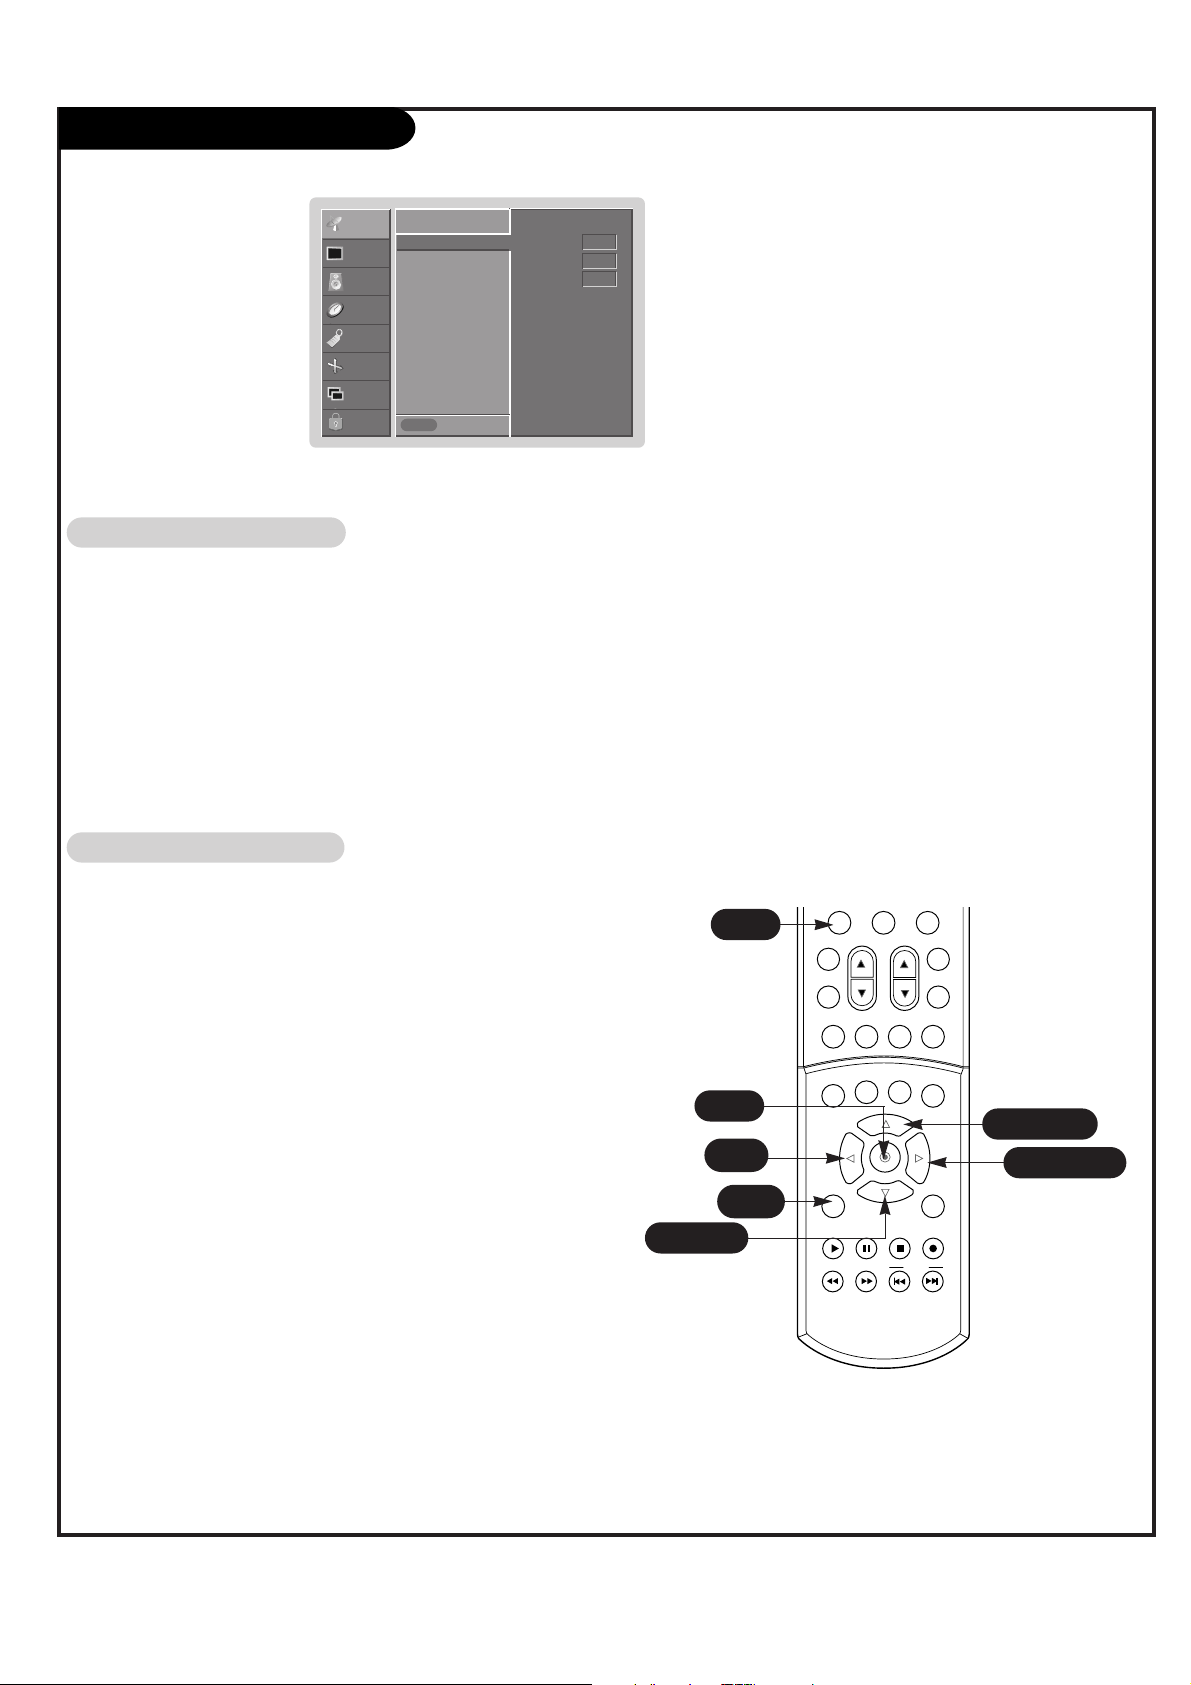
On-Screen Menu languages
- The TV can be set up so that it can only be used with the remote control.
- This feature can be used to prevent unauthorized viewing by locking out the
front panel controls.
- This TV is programmed to remember which option it was last set to even if
you turn the TV off.
1. Press the MENU button and then use
D / E
button to select the SPECIAL menu.
2. Press the G button and then use
D / E
button to select Key lock.
3. Press the G button and then use
D / E
button to select On or Off.
4. Press the ENTER button to save.
CHANNEL
PICTURE
AUDIO
TIMER
SPECIAL
SCREEN
PIP/DW
LOCK
Prev.
Menu
On
Off
Language
Key lock G
Captions
Caption / Text
- Select your preferred language for the menus : Englisg, Spanish, or French.
1. Press the MENU button and then use
D/ E
button to select the SPECIAL menu.
2. Press the G button and then use
D/ E
button to select Language.
3. Press the G button and then use
D/ E
button to select your desired language.
From this point on, the on-screen menus will be shown in the language of your choice.
4. Press the ENTER button to save.
CHANNEL
PICTURE
AUDIO
TIMER
SPECIAL
SCREEN
PIP/DW
LOCK
Prev.
Menu
English
Español
Français
Language G
Key lock
Captions
Caption / Text
0
MUTE
SWAPPIPCH- PIPCH+
PIP
PIC SIZE
REC
STOP
PAUSE
REW
PLAY
FF
MENU EXIT
CC FREEZE
PIP INPUT
VOL
CH
SURF
SAP
VIDEO
SKIP
ENTER
CH RTN
4
1/2/3
2/3
1/2/3
1
4
key Lock
Page 37

PAGE 37
Captions Setup
Closed Captions
Closed Captions
2. An old, bad, or illegally recorded tape is being played.
3. Strong, random signals from a car or airplane interfere with
the TV signal.
4. The signal from the antenna is weak.
5. The program wasn’t captioned when it was produced, transmitted, or taped.
Closed captioning is a process which converts the audio portion of a television program into written words which then
appear as subtitles on the television screen. Closed captions
allow viewers to read the dialogue and narration of television
programs.
Using Closed Captions
Captions are the subtitles of the dialogue and narration of
television programs. For prerecorded programs, program dialogue can be arranged into captions in advance. Its possible
to caption a live program by using a process called real-time
captioning, which creates captions instantly. Real-time captioning is normally done by professional reporters using a
machine shorthand system and computer for translation into
English.
Captioning is an effective system for the hearing-impaired,
and it can also aid in teaching
language skills.
• The picture at left shows a
typical caption.
Caption Tips
• Not all TV broadcasts include closed caption signals.
• Sometimes TV stations broadcast four different caption sig-
nals on the same channel. By selecting CC 1 to CC 2, you
can choose which signal you view.
CC 1 is usually the sig-
nal with the captions, while
Another mode might show
demonstration or programming information.
• Your TV might not receive caption signals normally in the
following situations.
• IGNITION:
Picture may flutter, drift, suffer from
black spots, or horizontal streaking.
Usually caused by interference from
automobile ignition systems, neon
lamps, electrical drills, and other electrical appliances.
• GHOSTS:
Ghosts are caused when the TV signal
splits and follows two paths. One is the
direct path and the other is reflected
off tall buildings, hills or other objects.
Changing the direction or position of
the antenna may improve reception.
• SNOW:
If your receiver is located at the weak,
fringe area of a TV signal, your picture
may be marred by small dots. It may be
necessary to install a special antenna
to improve the picture.
FOLLOW ME
1. Poor reception conditions are encountered:
1.
Use the CC button repeatedly to select Caption
Off or On.
2. Press the ENTER button to save.
• You can also adjust Captions in the PICTURE menu.
SWAPPIPCH- PIPCH+
PIP
PIC SIZE
MENU EXIT
CC FREEZE
PIP INPUT
CC
Using the CC button on the remote control
Page 38

PAGE 38
CHANNEL
PICTURE
AUDIO
TIMER
SPECIAL
SCREEN
PIP/DW
LOCK
Prev.
Menu
CC1
CC2
CC3
CC4
Text1
Text2
Text3
Text4
Language
Key lock
Captions
Caption / Text G
1. Press the MENU button and then use
D / E
button to select the SPECIAL
menu.
2.
Press the
G button and then use
D / E
button to select Caption / Text.
3.
Press the
G button and then use
D / E
button to select caption
:
CC1, CC2,
CC3, CC4, Text1, Text2, Text3, or Text4.
• CAPTION
The term for the words that scroll across the bottom of the TV screen; usually the
audio portion of the program provided for the hearing impaired.
• TEXT
The term for the words that appear in a large black frame and almost cover the
entire screen; usually messages provided by the broadcaster.
4. Press the ENTER button to save.
Caption/Text Mode Selection
0
MUTE
SWAPPIPCH- PIPCH+
PIP
PIC SIZE
REC
STOP
PAUSE
REW
PLAY
FF
MENU EXIT
CC FREEZE
PIP INPUT
VOL
CH
SURF
SAP
VIDEO
SKIP
ENTER
CH RTN
4
1/2/3
2/3
1/2/3
1
Select a closed caption mode for displaying captioning
information when provided on the program.
Captions displays information at any position on the
screen usually the program's dialog.
Text displays information, usually at the bottom position
and is used for a data service, generally not program
related.
4
Page 39

PAGE 39
Auto Adjustment
CHANNEL
PICTURE
AUDIO
TIMER
SPECIAL
SCREEN
PIP/DW
LOCK
Prev.
Menu
Auto config.
Manual config G
Aspect ratio
Cinema
NR
Reset
- If the image still isn’t clear after auto adjustment and especially if characters are still jittery,
adjust the picture Phase manually.
- H position or V position function only work for RGB-DTV/HDMI-DTV/HDMI-PC mode.
- To correct the screen size, adjust H Size, V Size, H Position, V Position.
1. Press the MENU button and then use
D / E
button to select the SCREEN menu.
2. Press the G button and then use
D / E
button to select Manual config..
3. Press the
G button and then use
D / E
button to to select Phase.
4. Use the
F / G button to make appropriate adjustments.
• The Phase adjustment range is 0 ~ 63.
5. Press the ENTER button to save.
Phase 0
H Size 0
V Size 0
H Position 0
V Position 0
- RGB (PC) mode only; This function doesn’t work for RGB-DTV mode.
- Automatically adjusts picture position and minimizes image shaking.
- After adjustment, if the image is still not correct, your TV is functioning properly but
needs further adjustment.
-The Auto config. is not active in HDMI mode.
1. Press the MENU button and then use
D / E
button to select the SCREEN menu.
2. Press the G button and then use
D / E
button to select Auto config..
3. Press the G button to run Auto configure.
• When Auto config. has finished, OK will be shown on screen.
• If the position of the image is still not correct, try Auto adjustment again.
4. In RGB (PC) mode, if the image needs to be adjusted more after using Auto config.,
you can make further adjustments with the Manual config. option.
CHANNEL
PICTURE
AUDIO
TIMER
SPECIAL
SCREEN
PIP/DW
LOCK
Prev.
Menu
To set
Auto config. G
Manual config
Aspect ratio
Cinema
NR
Reset
1/2
1/2
1
2/3
0
MUTE
SWAPPIPCH- PIPCH+
PIP
PIC SIZE
REC
STOP
PAUSE
REW
PLAY
FF
MENU EXIT
CC FREEZE
PIP INPUT
VOL
CH
SURF
SAP
VIDEO
SKIP
ENTER
CH RTN
1/2/3
1/2/3
1
2/3/4
5
4
5
Manual Configure
0
VOL
CC FREEZE
CH
CH RTN
SURF
VIDEO
SWAPPIPCH- PIPCH+
PIP INPUT
ENTER
MUTE
SAP
PIP
PIC SIZE
MENU EXIT
PLAY
PAUSE
REW
REC
STOP
FF
SKIP
Page 40

PAGE 40
Aspect ratio
CHANNEL
PICTURE
AUDIO
TIMER
SPECIAL
SCREEN
PIP/DW
LOCK
Prev.
Menu
On
Off
Auto config.
Manual config G
Aspect ratio
Cinema
NR
Reset
- Set up the TV for the best picture appearance for viewing movies.
- When you operate Cinema (3:2 Pull-Down Mode or Cinema Correction Mode), the TV will
adjust 24 fps video from movies to 30 fps video for display (This function is only available in Component 480i mode.)
1. Press the MENU button and then use
D / E
button to select the SCREEN menu.
2. Press the G button and then use
D / E
button to select Cinema.
3. Press the G button and then use
D / E
button to select On or Off.
4. Press the ENTER button to save.
- Caution: If a 4:3 fixed image is on the screen for a long time, it may remain visible.
- Set every aspect ratio for TV, Video, ColorStream HD 480i sources.
- Use 4:3, or 16:9 for other RGB-PC and HDMI-PC sources.
- Horizon is not available for ColorStream HD 1-2 (480p,720p,1080i), DTV
(480p,720p,1080i) sources.
1. Press the PIC SIZE button repeatedly to select the desired picture format. You can
also adjust Aspect ratio in the SCREEN menu.
• 4:3
Choose 4:3 when you want to view a picture with an original 4:3 aspect ratio, with
black bars appearing at both the left and right sides.
• 16:9
Choose 16:9 when you want to adjust the picture horizontally, in a linear proportion
to fill the entire screen.
• Theater wide 1
Choose Horizon when you want to adjust the picture in a non-linear proportion,
that is, more enlarged at both sides, to create a spectacular view.
• Theater wide 2
- Choose when you want to view the picture without any alteration. However, the top
and bottom portions of the picture will be cropped.
SWAPPIPCH- PIPCH+
PIP
PIC SIZE
MENU EXIT
CC FREEZE
PIP INPUT
PIC SIZE
0
MUTE
SWAPPIPCH- PIPCH+
PIP
PIC SIZE
REC
STOP
PAUSE
REW
PLAY
FF
MENU EXIT
CC FREEZE
PIP INPUT
VOL
CH
SURF
SAP
VIDEO
SKIP
ENTER
CH RTN
1/2/3
1/2/3
1
2/3
4
4
Cinema Mode Setup
• Video, S-Video and Colorstream HD 480i mode only.
Page 41

PAGE 41
CHANNEL
PICTURE
AUDIO
TIMER
SPECIAL
SCREEN
PIP/DW
LOCK
Prev.
Menu
To set
Screen adj.
ARC
Cinema
YNR
Reset
G
1. Press the MENU button and then use
D / E
button to select the SCREEN menu.
2. Press the Gbutton and then use
D / E
button to select Reset.
3. Press the G button.
•You can initialize Position, PIP Transparency, PIP position, PIP size and sub picture
size for double window.
- Reset is unique to each function: Manual config., Position, Split zoom, PIP position
and sub picture size for double window.
- Use the Reset option to initialize the adjusted settings.
NR
- You can select 3D NR or MPEG NR to reduce the picture noise which may appear
on the screen while watching the TV.
1. Press the MENU button and then use
D / E
button to select the SCREEN menu.
2. Press the
G button and then use
D / E
button to select NR.
3. Press the G button and then use
D / E
button to select 3D NR or MPEG NR.
4. Press the F / G button to make appropriate adjustments.
5. Press the ENTER button to save.
CHANNEL
PICTURE
AUDIO
TIMER
SPECIAL
SCREEN
PIP/DW
LOCK
Prev.
Menu
Auto config.
Manual config G
Aspect ratio
Cinema
NR
Reset
3D NR 0
MPGE NR 0
1/2/3
1/2/3
1
2/3/4
5
0
MUTE
SWAPPIPCH- PIPCH+
PIP
PIC SIZE
REC
STOP
PAUSE
REW
PLAY
FF
MENU EXIT
CC FREEZE
PIP INPUT
VOL
CH
SURF
SAP
VIDEO
SKIP
ENTER
CH RTN
1/2
1/2
1
2/3
4
5
Initi
Initi
alizin
alizin
g (Reset to ori
g (Reset to ori
gin
gin
al f
al f
actory value)
actory value)
0
VOL
CC FREEZE
CH
CH RTN
SURF
VIDEO
SWAPPIPCH- PIPCH+
PIP INPUT
ENTER
MUTE
SAP
PIP
PIC SIZE
MENU EXIT
PLAY
REW
PAUSE
REC
STOP
FF
SKIP
Page 42

PAGE 42
Parental Lock Setup
Parental Control can be used to block specific channels, ratings and other viewing sources.
The Parental Control Function (V-Chip) is used to block program viewing based on the ratings sent by the broadcasting station. The default setting is to allow all programs to be viewed. Viewing can be blocked by the type of program and by the
categories chosen to be blocked. It is also possible to block all program viewing for a time period. To use this function,
the following must be done :
1. Set ratings and categories to be blocked.
2. Specify a password
3. Enable the lock
V-Chip rating and categories
Rating guidelines are provided by broadcasting stations. Most television programs and television movies can be blocked by
TV Rating and/or Individual Categories. Movies that have been shown at the theaters or direct-to-video movies use the
Movie Rating System (MPAA) only.
Ratings for Movies previously shown in theaters:
Movie Ratings :
• Unblocked (Permits all programs)
• G & above (General audience)
• PG & above (Parental guidance suggested)s
• PG-13 & above (Parents strongly cautioned)
• R & above (Restricted)
• NC-17 & above (No one 17 and under admitted)
• X (Adult only)
If you set PG-13 : G and PG movies will be available , PG-13, R, NC-17 and X will be blocked.
Ratings for Television programs including made-for-TV movies :
General TV Ratings:
• Unblocked
• TV-G & above (general audience) (individual categories do not apply)
• TV-PG & aboves (parental guidance suggested)
• TV-14 & above (14 years and older)
• TV-MA (mature audience)
Children TV Ratings:
• Unblocked
• TV-Y
& above
(youth) (individual content categories do not apply)
• TV-Y7 (youth, 7 years and up)
Content Categories:
• Dialog - sexual dialogue (applies to TV-PG & above, TV-14)
• Language - adult language (applies to TV-PG & above, TV-14 & above, TV-MA)
• Sex scenes - sexual situations (applies to TV-PG
& above
, TV-14
& above
, TV-MA)
• Violence (applies to TV-PG & above, TV-14 & above, TV-MA)
• F Violence - fantasy violence (applies only to TV-Y7)
Aux. Block
• Video 1, 2/ Front Video (Blocked, Unblocked)
• ColorStream HD1, 2 (Blocked, Unblocked)
• RGB, HDMI (Blocked, Unblocked)
For Canadian English/French language rating system:
Canadian English language rating system:
• C & above (Children)
• C8+ (8 years and older)
• G & above (General programming. Suitable for all audiences.)
• PG & above (Parental guidance suggested)
• 14+ (Viewer 14 years and older)
• 18+ (Adult programming)
Canadian French language rating system:
• G & above (General)
• 8 ans+ (8 years and older)
• 13 ans+ (13 years and older)
• 16 ans+ (16 years and older)
• 18 ans+ (Adults only)
Page 43

PAGE 43
1. Press the MENU button and then use
D / E
button to select the LOCK menu.
Then, press the G button
• If Lock is already set, enter the password as requested.
• The TV is set up with the initial password “0-0-0-0”.
2. Use the
D / E
button to choose from the following LOCK Menu options. Once
the option is selected, change the settings to your preference.
• Lock on/off: Activates or disables the blocking scheme you set up pre-
viously.
• Set Password: Change the password by inputting a new password twice.
• MPAA (Movie Rating): Blocks movies according to the movie ratings
limits specified, so children cannot view certain movies. You can set
the ratings limit by blocking out all the movies with the ratings above
a specified level. Keep in mind that the movie ratings limit only applies
to movies shown on TV, not TV programs, such as soap operas.
• Age block
Children: Prevents children from watching certain children's TV pro-
grams, according to the ratings limit set. The children rating does not
apply to other TV programs. Unless you block certain TV programs
intended for mature audiences in the TV Rating - sub menu, your children can view those programs.
General: Based on the ratings, blocks certain TV programs that you
and your family do not want to view.
• Content block: According to the contents (Dialog, Language, Sex
scenes, Violence, F Violence), you can set the ratings limit.
• Aux. Block: Enables you to select a source to block from the external
source devices you have hooked up.
• Canadian
English: To prevent the children from looking at certain tele programs
for the programs intended for the children. This dimension does not
apply to the other tele programs. Unless locking certain programs
intended for the older spectators with the general menu; tele dimension, the children can look at these emissions.
French: To lock certain tele programs which one does not want to look
according to the dimensions.
- Lets you set up blocking schemes to block specific channels, ratings, and external
viewing sources.
- A password is required to gain access to this menu if the Lock System is turned on
CHANNEL
PICTURE
AUDIO
TIMER
SPECIAL
SCREEN
PIP/DW
LOCK
Prev.
Menu
On
Off
Lock on/off G
Set password
MPAA
Age block
Content block
Aux. block
Canadian
3. Press the ENTER button to save.
Note
• If you ever forget your password, key in ‘7’, ‘7’, ‘7’, ‘7’ on the remote control.
- PIP/DW, DW or PIP function doesn’t work if the Key Lock System is turned
on.
Parental Lock
0
MUTE
SWAPPIPCH- PIPCH+
PIP
PIC SIZE
REC
STOP
PAUSE
REW
PLAY
FF
MENU EXIT
CC FREEZE
PIP INPUT
VOL
CH
SURF
SAP
VIDEO
SKIP
ENTER
CH RTN
3
1
1/2
1
1/2
3
Page 44

PAGE 44
PIP (Picture-in-Picture) / Twin Picture Operation
Press the MENU button on the remote control,
then use the
D / E
button to select the
PIP/DW menu.
Press ENTER or the
G arrow button to access
the PIP/DW menu.
Use the
D / E
to select the Input option.
Press ENTER or the
G to access the Input
menu, then use the
D / E
button to select the
source. Your choices are: Ant/Cable, Video 1,
Video 2, Front Video, Colorstream HD1,
Colorstream HD2, RGB, HDMI.
Press EXIT to save and return to TV viewing
or press the
F to save and return to the pre-
vious Menu.
1
1
2
3
4
5
Changes the picture source for the Sub Picture image so
you can watch your TV, cable TV, VCR, or any other
devices that are connected to your TV.
Press the PIP button to show the sub picture.
Each press of PIP changes the PIP options as shown below.
PIP lets you view 2 different inputs (sources) on your monitor screen at the same time. One source will be large, and the other
source (PIP) will show a smaller inset image.
Twin Picture splits the screen into 2, allowing 2 pictures to be shown on the TV screen at the same time. Each source is given half
the screen.
Use the PIP INPUT button to select the input source
for the sub picture.
Each time you press PIP INPUT button, you toggle
between Ant/Cable, Video 1, Video 2, Front Video,
Colorstream HD1, Colorstream HD2, RGB, HDMI.
Using the menu
Using the PIP INPUT button on the remote control
PIP Mode
POP Mode
DW1
Watching PIP
PIP / Twin Picture Source Selection
Do not display a fixed image on the screen for long
periods of time. Doing so may cause image burn-in.
Not all sources are available for PIP.
Prev.
Menu
Ant/Cable
Video1
Video2
Front Video
Colorstream HD1
Colorstream HD2
RGB
HDMI
W
W
CHANNEL
PICTURE
AUDIO
TIMER
SPECIAL
SCREEN
PIP/DW
LOCK
Input
DW
PIP
PIP Input
Win.size
Win.position
PIP Transparency
MUTE
SWAPPIPCH- PIPCH+
PIP
PIC SIZE
CC FREEZE
PIP INPUT
VOL
CH
SURF
SAP
VIDEO
PIP INPUT
DW2
Page 45

PAGE 45
PIP (Picture-in-Picture) / Twin Picture Operation
Press PIP button on the remote control
with the POP image on the screen to activate POP (Picture-outside-Picture) mode.
The pictures of all the programmed channels are searched with the 3 POP screen, as
shown to the right.
• Press SWAP, to enlarge the selected
channel being searched on the POP
screen to view it on the Main screen.
(It’s possible to use this function in
Ant/Cable input source for Main and Sub
picture.)
Press the EXIT button to exit POP mode.
1
2
POP (Picture-outside-Picture)
1
2
Use POP to search the pictures of all the programmed channels one-by-one on the 3 POP screen display, while the main
screen remains the current channel.
Press the SWAP button.
Each time you press the SWAP button, you switch the Main and Sub pictures.
In the
PIP/DW menu, select the Win.position and then each press of the UP/DOWN/LEFT/RIGHT arrow buttons will
move the sub picture to a different position on the screen.
Press the PIP button on the remote control to select PIP or Twin picture mode.
Select the Ant/Cable source with the PIP INPUT button.
Use the PIPCH-/PIPCH+ button to select a channel for the sub picture.
Main Picture Sub Picture
Run Auto Program channel search before using POP mode.
Selecting PIP / Twin Picture Channels
Swapping Pictures
Moving the Sub Picture (PIP mode only)
Main Picture Sub Picture
W
Page 46

PAGE 46
Lamp Unit Replacement
• To obtain a replacement lamp unit:
• In Canada, contact a Toshiba parts distributor by directing your web browser to www.toshiba.ca Click
"Home Entertainment," and then click "Support."
Use the replacement lamp unit model listed below only. Using any other lamp may cause damage to the TV
and/or lamp. Model name is D85-LMP.
You must replace the lamp when:
• The image gets darker or starts to deteriorate.
• Follow the instructions to replace the lamp, as shown below.
1. Turn off the TV and unplug the power cable.
2. STOP! Allow the lamp to cool for at least one (1) hour before replacing it.
3. Remove the 2 retaining screws on the lamp cover with a Phillips type screwdriver. Remove the lamp door
completely from the TV.
4. Remove the two retaining screws on the lamp case with using Phillips type screwdriver.
5. Lift up the fixed wire handle of the lamp.
CAUTION: Always replace with same type lamp unit: Model No.
[D85-LMP]
CAUTION: HOT SURFACE!
The temperature of the lamp immediately after use exceeds
392°F (200°C). Touching the lamp before it has cooled
will result in severe burns. ALLOW THE LAMP TO COOL FOR
AT LEAST ONE (1) HOUR BEFORE REPLACING IT.
WARNING: RISK OFF ELECTRIC SHOCK!
The lamp unit door is provided with an interlock to reduce the
risk of electric shock and excessive ultraviolet radiation. Never
defeat its purpose or attempt to service without removing the
lamp unit door completely. Failure to follow this WARNING may result in death or serious injury.
Page 47

PAGE 47
Lamp Unit Replacement(Contd.)
6. Pull out the handle slowly and remove the lamp case.
7. Insert the new lamp gently into the correct position. Make sure it is inserted correctly.
Note:
• Never subject the lamp unit to excessive shock.
• Never touch the lamp unit glass or otherwise get it dirty.
Doing so may affect the image quality and reduce the service life of the lamp. See “ Cleaning the
lamp unit glass” at below.
8. Using a manual Phillips screwdriver (Do Not use an electric screwdiver), tighten the screws you removed in
step 3.
9. Replace the lamp cover and tighten the cover screws.
10. Plug in the power cord and turn on the TV. After the initial warmup period (which may take up to several
seconds for full picture brightness), the TV should operate normally. If any of the following conditions exist,
turn off the TV, unplug the power cord, and repeat steps 1–9 to ensure that the lamp unit and lamp unit
door are installed correctly:
• The lamp indicator flashes green.
• No picture
• Dark picture
• TV will not turn on
If, after repeating steps 1–10, the problem still exists:
• In Canada, locate the nearest Toshiba authorized service depot by directing your web browser to
www.toshiba.ca; click "Home Entertainment," and then click "Support."
CAUTION: NEVER clean a hot lamp with any type of flammable liquid or
aerosol cleaning agent. Many ordinary cleaning agents (such as glass
cleaners) contain chemicals that may be flammable at certain temperatures. If the lamp unit is not allowed to cool for at least one (1) hour,
such chemicals may lgnite.
Cleaning the lamp unit glass
If you accidentally touch the lamp unit glass or otherwise get it dirty, wipe it with a lint-free
lens cleaning cloth (such as a cloth for cleaning camera lenses or eyeglasses).
NOTE: Make sure the lamp unit and door are installed securely; otherwise, the
TV may not turn on.
Page 48

PAGE 48
Lamp Unit Replacement(Contd.)
Lamp unit disposal
• Place the used lamp unit in the empty box from the new lamp unit.
• Keep the lamp unit out of reach of children and pets.
• Dispose of the used lamp unit by the approved method for your area.
CAUTION: Always handle the lamp unit with care.
The lamp unit in this TV was designed for safe replacement by consumers;
however, if the lamp unit is subjected to intentional or accidental abuse
(such as excessive mechanical abuse or handling by children or pets), the
unit may break, exposing sharp edges or pinch points.
NOTE:
The lamp unit contains mercury, the disposal of which may be regulated due to environmental considerations. For disposal or recycling information,
contact your local authorities or the Electronics Industries Alliance
(www.eiae. org).
Page 49

PAGE 49
Programming the Remote
Test your remote control.
To find out whether your remote control can
operate the device without programming,
turn on the device such as a the VCR and
press the corresponding mode button (VCR)
on the remote control while pointing at the
device. Test the POWER and CH
D / E
buttons
to see if the device responds properly. If
not, the remote requires programming to
operate the device.
Turn on the device to be programmed. Then
press the corresponding mode button on the
remote control.
Press the POWER button and the MUTE button simultaneously. Now the remote control
is ready to program the code for the corresponding device.
There are two ways to find the right code for
the device.
A. If you press the CH
D / E
buttons repeatedly, the codes will change one at a time.
Press the POWER button after each code
change. If the right code is found, the
device will turn off.
B. Enter a code number using the number
buttons on the remote. The right code numbers for the corresponding component can
be found on the following pages.
Again, if the code is correct, the device will
turn off.
Press the EXIT button to store the program.
Test the remote control functions to see if
the device responds properly. If not, repeat
from step 2.
1
1 2 3
4 5 6
7 8 9
0
TV
MODE
LIGHT
POWER
TV/VIDEO
HDMI
RGB
VCR
CABLE
DVD
SAT
MUTE
SWAPPIPCH- PIPCH+
PIP
PIC SIZE
REC
STOP
PAUSE
REW
PLAY
FF
MENU EXIT
CC FREEZE
PIP INPUT
VOL
CH
SURF
SAP
VIDEO
C/S HD2C/S HD1
FRONT
SKIP
ENTER
CH RTN
2 3
4
5
3
2
3
4
5
6
4
The remote control for your HD receiver is a
multi-brand or universal remote control that can
be programmed to operate most remote-controllable devices of other manufacturers.
Note: The remote control may not be able to control all models of other brands.
Page 50

PAGE 50
Programming Codes: TVs
TVs
Brand Codes
A MARK 112 143
ADMIRAL 072 081 161
AKAI 006 146
AMPRO 073 167
AMSTRAD 052
ANAM 043 054 056
080 104 108
112 115 118
121 131
AOC 004 006 058
112
BLAUPUNKT 088
CANDLE 002 003 004
006
CAPEHART 058
CETRONIC 043
CITIZEN 002 003 004
006 043 101
103 143
CLASSIC 043
CONCERTO 004
CONTEC 039 043 050
051
CORONADO 143
CRAIG 043 054
CROWN 043 143
CURTIS MATHES 004 006 101
116 143
CXC 043
DAEWOO 004 016 017
043 044 055
071 076 103
107 111 114
117 120 123
125 127 128
136 143
DAYTRON 004 116 143
DYNASTY 043
DYNATECH 062
ELECTROHOME 024 077 143
EMERSON 004 005 006
028 043 047
048 050 051
096 116 143
151 153 154
155
FISHER 007 057
FUNAI 028 043
FUTURETECH 043
GE 004 006 008
009 034 056
073 074 091
116 130 144
155 160 161
165
Brand Codes
GOLDSTAR 004 102 106
110 112 113
116 119 122
127 137 143
HALL MARK 004 116
HITACHI 004 006 009
010 011 012
023 041 075
143 158 163
166
INFINITY 164
INKEL 129
JBL 164
JCPENNY 004 006 008
009 024 030
065 101 143
156 160
JENSEN 013
JVC 034 038 070
083 145
KEC 043
KENWOOD 006 070
KLOSS 002 059
KMC 143
KTV 006 043 143
154
LG 255
LODGENET 072
LOGIK 072
LUXMAN 004
LXI 007 015 052
081 160 164
166
MAGNAVOX 003 004 006
022 059 060
061 063 064
127 143 160
164
MARANTZ 006 077 164
MATSUI 164
MEMOREX 004 007 072
116
METZ 088
MGA 004 006 024
028 042 049
077 116
MINERVA 088
MITSUBISHI 004 006 024
028 040 042
109 116 124
146
MTC 004 006 062
101
NAD 015 025
NEC 006 007 016
Brand Codes
019 024 040
056 130 132
134
NIKEI 043
ONKING 043
ONWA 043
OPTONICA 019 081
PANASONIC 034 056 080
092 164
PHILCO 003 004 006
024 043 056
059 060 063
064 127 143
164
PHILIPS 003 004 005
006 038 059
070 093 143
160 164
PIONEER 006 018 023
025 027 116
135 176
PORTLAND 004 143
PROSCAN 144 160 161
165 167
PROTON 004 058 116
131 143 171
173
QUASAR 034 056 092
RADIO SHACK 019 043 047
116 127 143
RCA 004 006 023
024 056 065
074 144 152
156 160 161
165
REALISTIC 007 019 043
047
ROCTEC 186
RUNCO 168 169
SAMPO 004 006 058
116
SAMSUNG 004 050 089
101 105 113
116 127 133
137 143 160
SANYO 007 020 021
033 039 053
057 082 166
SCOTT 004 028 043
048 116 143
SEARS 004 007 015
028 030 057
082 094 101
116 143 160
Brand Codes
Sharp 004 014 019
022 028 029
081 143 170
175
SIEMENS 088
SIGNATURE 072
SONY 041 070 079
085 126 139
147 185
SOUNDESIGN 003 004 028
043 116
SPECTRICON 112
SSS 004 043
SUPRE MACY 002
SYLVANIA 003 004 006
044 059 060
063 064 116
127 140 160
164
TANDY 081
TATUNG 056 062
TECHNICS 034 080 084
TECHWOOD 004
TEKNIKA 002 003 004
006 024 028
031 043 072
077 101 103
143
TELEFUNKEN 037 046 086
087
TELERENT 072
TERA 172
TMK 004 116
TOSHIBA 007 015 030
040 051 062
101 138
TOTEVISION 143
UNIVERSAL 008 009
VIDEO CONCEPTS 146
VIDIKRON 174
VIDTECH 004 116
WARDS 004 008 009
019 028 060
061 063 064
072 074 116
143 164
YAMAHA 004 006
YORK 004 116
YUPITERU 043
ZENITH 001 072 073
095 103 157
ZONDA 112
Page 51

PAGE 51
Programming Codes: VCRs
VCRs
Brand Codes
AIWA 034
AKAI 016 043 046
124 125 146
AMPRO 072
ANAM 031 033 103
AUDIO DYNAMICS 012 023 039
043
BROKSONIC 035 037 129
CANON 028 031 033
CAPEHART 108
CRAIG 003 040 135
CURTIS MATHES 031 033 041
DAEWOO 005 007 010
064 065 108
110 111 112
116 117 119
DAYTRON 108
DBX 012 023 039
043
DYNATECH 034 053
ELECTROHOME 059
EMERSON 006 017 025
027 029 031
034 035 036
037 046 101
129 131 138
153
FISHER 003 008 009
010
FUNAI 034
GE 031 033 063
072 107 109
144 147
GO VIDEO 132 136
GOLDSTAR 012 013 020
101 106 114
123
HARMAN KARDON 012 045
HITACHI 004 018 026
034 043 063
137 150
INSTANTREPLAY 031 033
JCL 031 033
JCPENNY 012 013 015
033 040 066
101
JENSEN 043
JVC 012 031 033
043 048 050
Brand Codes
055 060 130
150 152
KENWOOD 014 034 039
043 047 048
LG 255
LLOYD 034
LXI 003 009 013
014 017 034
101 106
MAGIN 040
MAGNAVOX 031 033 034
041 067 068
MARANTZ 012 031 033
067 069
MARTA 101
MATSUI 027 030
MEI 031 033
MEMOREX 003 010 014
031 033 034
053 072 101
102 134 139
MGA 045 046 059
MINOLTA 013 020
MITSUBISHI 013 020 045
046 049 051
059 061 151
MTC 034 040
MULTITECH 024 034
NEC 012 023 039
043 048
NORDMENDE 043
OPTONICA 053 054
PANASONIC 066 070 074
083 133 140
145
PENTAX 013 020 031
033 063
PHILCO 031 034 067
PHILIPS 031 033 034
054 067 071
101
PILOT 101
PIONEER 013 021 048
PORTLAND 108
PULSAR 072
QUARTZ 011 014
QUASAR 033 066 075
145
RCA 013 020 033
Brand Codes
034 040 041
062 063 107
109 140 144
145 147
REALISTIC 003 008 010
014 031 033
034 040 053
054 101
RICO 058
RUNCO 148
SALORA 014
SAMSUNG 032 040 102
104 105 107
109 112 113
115 120 122
125
SANSUI 022 043 048
135
SANYO 003 007 010
014 102 134
SCOTT 017 037 112
129 131
SEARS 003 008 009
010 013 014
017 020 031
042 073 081
101
SHARP 031 054 149
SHINTOM 024
SONY 003 009 031
052 056 057
058 076 077
078 149
SOUNDESIGN 034
STS 013
SYLVANIA 031 033 034
059 067
SYMPHONIC 034
TANDY 010 034
TATUNG 039 043
TEAC 034 039 043
TECHNICS 031 033 070
TEKNIKA 019 031 033
034 101
THOMAS 034
TMK 006
TOSHIBA 008 013 042
047 059 082
112 131
Brands Codes
TOTEVISION 040 101
UNITECH 040
VECTOR RESEARCH 012
VICTOR 048
VIDEO CONCEPTS 012 034 046
VIDEOSONIC 040
WARDS 003 013 017
024 031 033
034 040 053
054 131
YAMAHA 012 034 039
043
ZENITH 001 034 048
056 058 072
080 101
Page 52

PAGE 52
Programming Codes: SAT/DVDs
SAT
DVD
Brand Codes
ALPHASTAR DSR 123
AMPLICA 050
BIRDVIEW 051 126 129
BSR 053
CAPETRONICS 053
CHANNEL MASTER 013 014 015
018 036 055
CHAPARRAL 008 009 012
077
CITOH 054
CURTIS MATHES 050 145
DRAKE 005 006 007
010 011 052
112 116 141
DX ANTENNA 024 046 056
076
ECHOSTAR 038 040 057
058 093 094
095 096 097
098 099 100
122
ELECTRO HOME 089
EUROPLUS 114
FUJITSU 017 021 022
Brand Codes
027 133 134
GENERAL INSTRUMENT 003 004 016
029 031 059
101
HITACHI 139 140
HOUSTON TRACKER 033 037 039
051 057 104
HUGHES 068
HYTEK 053
JANIEL 060 147
JERROLD 061
KATHREIN 108
LEGEND 057
LG 255
LUTRON 132
LUXOR 062 144
MACOM 010 059 063
064 065
MEMOREX 057
NEXTWAVE 028 124 125
NORSAT 069 070
PACE SKY SATELLITE 143
PANASONIC 060 142
PANSAT 121
Brand Codes
PERSONAL CABLE 117
PHILIPS 071
PICO 105
PRESIDENT 019 102
PRIMESTAR 030 110 111
PROSAT 072
RCA 066 106
REALISTIC 043 074
SAMSUNG 123
SATELLITE SERVICE CO 028 035 047
057 085
SCIENTIFIC ATLANTA 032 138
SONY 103
STARCAST 041
SUPER GUIDE 020 124 125
TEECOM 023 026 075
087 088 090
107 130 137
TOSHIBA 002 127
UNIDEN 016 025 042
043 044 045
048 049 078
079 080 086
101 135 136
Brand Codes
VIEWSTAR 115
WINEGARD 128 146
ZENITH 001 081 082
083 084 091
120
Brand Codes
APEX DIGITAL 022
DENON 020 014
GE 005 006
GOLDSTAR 010 016 025
HARMAN KARDON 027
JVC 012
LG 001 010 016
Brand Codes
025
MAGNAVOX 013
MARANTZ 024
MITSUBISHI 002
NAD 023
ONKYO 008 017
PANASONIC 003 009
Brand Codes
PHILIPS 013
PIONEER 004 026
PROCEED 021
PROSCAN 005 006
RCA 005 006
SAMSUNG 011 015
SONY 007
Brand Codes
THOMPSON 005 006
TOSHIBA 019 008
YAMAHA 009 018
ZENITH 010 016 025
Page 53

PAGE 53
Programming Codes: Cable Boxes
CATV
Brand Codes
ABC 003 004 039
042 046 052
053
ANTRONIK 014
ARCHER 005 007 014
024
CABLE STAR 026
CENTURION 092
CENTURY 007
CITIZEN 007
COLOUR VOICE 065 090
COMBANO 080 081
COMTRONICS 019 030
DIAMOND 023
EAGLE 020 030 040
EASTERN 057 062 066
ELECTRICORD 032
GE 072
GEMINI 008 022 025
054
GI 052 074
GOLDEN CHANNEL 030
HAMLIN 049 050 055
HITACHI 052 055
HOSPITALITY 070 077
JERROLD 002 003 004
Brand Codes
008 009 010
052 069 074
LG 255
M-NET 037
MACOM 033
MAGNAVOX 010 012 064
079
MEMOREX 001
MOVIE TIME 028 032
NSC 015 028 038
071 073
OAK 016 031 037
053
PANASONIC 044 047
PARAGON 001
PHILIPS 006 012 013
020 065 085
090
PIONEER 034 051 052
063 076
POST NEWS WEEK 016
PRUCER 059
PTS 011 048 071
072 073 074
PULSAR 001
RCA 047
Brand Codes
REGAL 049 050
REGENCY 057
REMBRANT 025
RK 091
SAMSUNG 030 068
SCIENTIFIC ATLANTA 003 011 041
042 043 045
046
SHERITECH 022
SIGNAL 030
SIGNATURE 052
SL MARX 030
SPRUCER 047 078
STARCOM 002 004 008
009
STARGATE 008 030
SYLVANIA 067
TADIRAN 030
TANDY 017
TEXSCAN 029 067
TOCOM 039 040 056
TOSHIBA 001
UNIKA 007 014 024
UNITED CABLE 004 053
UNIVERSAL 005 007 014
024 026 027
Brand Codes
032 035
VIEWSTAR 012 015 018
086 087 088
089
ZENITH 001 060 093
Page 54

PAGE 54
Troubleshooting
SYMPTOMS
Snowy picture and unclear sound.
Multiple images or ‘ghost shadows.’
Interference: Sharp lines across
the screen and unclear sound.
Normal picture but no sound.
No picture and unclear sound.
No picture and no sound.
No color, but the sound is O.K.
Picture has a big black box
on it, but the sound is O.K.
Picture has two horizontal
black bars, one on top and
one on bottom.
Missing Secret code
Some quick and easy tips to fixing problems yourself.
POSSIBLE SOLUTIONS
• Check your antenna connection or location.
• Check your cable input.
• Check to see if the TV/VCR button on your VCR has the TV selected.
• Check your antenna direction and/or location.
• Check your cable input.
• Make sure the cable from your antenna to your TV is
properly connected.
The following may cause image problems or distortion:
Electrical appliances, powerful lights, cars, trucks; computers or
portable phones; medical equipment
• If possible increase the distance between your TV and the offending appliance.
Or shut one of them off.
• Check sound level.
• Make sure the TV sound is not muted.
• Try another channel. The problem may be the broadcast, not your TV.
• Are the Audio cables properly installed?
• Are the wires for external speakers (if you have external speakers)
properly installed?
• Make sure your speakers are turned on in the Audio menu.
• If your audio mode is set to SAP, that channel may not have a SAP program.
• Are you in TV or cable tuning mode, and should be in the other?
• Make sure output channels on all A/V equipment are on the same channel (3 or 4).
• Check that all connections are tight.
• Is the AC power cord plugged in?
• Check that your AC power outlet works. (Test it by plugging in something
else or try another outlet.)
• Make sure your brightness and audio controls are set properly.
• Try another channel. The problem may be with the broadcast.
• Check the color settings in the Video menu.
• Try another channel. The problem may be with the broadcast.
• The Caption option may be in Text mode. Select CC 1 in the Caption/Text menu
or Off in the Caption menu.
• Your program is in letterbox. This means that the shape of your TV is a
square, but the program is a rectangle. Think of the bars as empty space the
program doesn’t fill; not picture that’s blocked out. Because this format is a
direct representation of film as you see it in the movies, you are actually seeing
MORE of the program when you see those bars.
• If you forget the secret code, press the remote control Button ‘7’, ‘7’, ‘7’ and ‘7’
when the display asks you to enter the secret code.
Page 55

PAGE 55
Remote control doesn’t work.
Menu options can’t be
changed or selected.
No picture or sound
when any non-cable source
is selected.
Weak or no Stereo Sound
when using a stereo VCR.
The PIP inset is black or
lacks contrast.
The PIP inset is “snow” when
the source is Antenna.
Time is incorrect.
Picture Interference
Troubleshooting (Contd.)
• Make sure the batteries are fresh and installed properly.
• Try unplugging your TV for a few minutes,
then plug it back in.
• Check to see if the source equipment has been turned on.
• Make sure that the connections are secure on the back of your TV and on the
source equipment.
• Check to see if all the connections are secure.
• Look in the Audio mode menu to see if all the settings are correct.
• You are using channel 3 or 4 to view your VCR. No stereo sound is present
under that decision.
• Check to be sure that the PIP source is turned on.
• You might want to adjust the PIP picture settings under the PIP menu.
• Check that all the wires are connected properly.
• Check to see if your input source for PIP is set correctly.
• Look to see if the TV/VCR button on your VCR has the TV selected or change
the PIP to another source.
• Reset clock manually.
• Even though you may be getting cable service, the signal may be weak, which
means the quality of your picture may suffer due to other factors. If there are
problems with the image on your TV, consult the Troubleshooting guide on the
following pages. You may also want to contact your cable service provider to
determine if the problem is from the cable service.
Page 56

PAGE 56
Product Specifications
Model
44HM85 Horizontal Size (Inches) 40
Height (Inches) 29.2
Depth (Inches) 14.4
Weight (lbs.) 50.7
Power Requirement AC 120V, 60Hz
Television System American TV Standard, NTSC, ATSC with STB
Television Channels VHF: 2 - 13
UHF: 14 - 69
CATV: 1 - 125
Power Consumption (W) 230W
Antenna 75 ohm External Terminal for VHF/UHF
Audio Output (W) 15W x 2
External Input/Output Ports A/V input (3 set)
Monitor out (1 set)
S-Video input (3)
COLORSTREAM HD input (2 set)
RGB input (1)
HDMI input (1)
RGB audio input (1 set)
UPGRADE port (1)
RF input (1)
• This model complies with the specifications listed below.
• Designs and specifications are subject to change without notice.
• This model may not be compatible with features and/or specifications that may be
added in the future.
Page 57

Limited United States Warranty
for DLPTMTelevision Models
(1) You must provide your bill of sale or other proof of purchase.
(2) All warranty servicing of this DLP television must be performed
by an Authorized TACP Service Station.
(3) These warranties from TACP are effective only if the DLP
television is purchased and operated in the U.S.A. or Puerto
Rico.
(4) Labor charges for installation, setup, adjustment of customer
controls, and installation or repair of antenna systems are not
covered by these warranties. Reception problems caused by
inadequate antenna systems are your responsibility.
(5) Warranties extend only to defects in materials or workmanship
as limited above, and do not extend to any DLP television or
parts that have been lost or discarded by you or to damage to
the DLP television or parts caused by fires, misuse, accident,
Acts of God (such as lightning or fluctuations in electric
power), improper installation, improper maintenance, or use in
violation of instructions furnished by TACP; use or malfunction
through simultaneous use of this product and connected
equipment; or to units that have been modified or had the
serial number removed, altered, defaced, or rendered illegible.
How to Obtain Warranty Services
If, after following all of the operating instructions in this manual
and checking the “Troubleshooting” section, you find that service is
needed:
(1) To find the nearest TACP Authorized Service Station, visit TACP’s
web site at www.tacp.toshiba.com/service or call toll free 1800-631-3811.
(2) Present your bill of sale or other proof of purchase to the
Authorized Service Station.
For additional information, visit TACP’s web site:
www.tacp.toshiba.com
ALL WARRANTIES IMPLIED BY THE LAW OF ANY STATE OF THE U.S.A.,
INCLUDING THE IMPLIED WARRANTIES OF MERCHANTABILITY AND
FITNESS FOR A PARTICULAR PURPOSE, ARE EXPRESSLY LIMITED TO
THE DURATION OF THE LIMITED WARRANTIES SET FORTH ABOVE.
WITH THE EXCEPTION OF ANY WARRANTIES IMPLIED BY THE LAW OF
ANY STATE OF THE U.S.A. AS HEREBY LIMITED, THE FOREGOING
WARRANTY IS EXCLUSIVE AND IN LIEU OF ALL OTHER WARRANTIES,
GUARANTEES, AGREEMENTS, AND SIMILAR OBLIGATIONS OF TACP
WITH RESPECT TO THE REPAIR OR REPLACEMENT OF ANY PARTS. IN
NO EVENT SHALL TACP BE LIABLE FOR CONSEQUENTIAL OR
INCIDENTAL DAMAGES (INCLUDING, BUT NOT LIMITED TO, LOST
PROFITS, BUSINESS INTERRUPTION, OR MODIFICATION OR ERASURE
OF RECORDED DATA CAUSED BY USE, MISUSE, OR INABILITY TO USE
THIS PRODUCT).
No person, agent, distributor, dealer, or company is authorized to
change, modify, or extend the terms of these warranties in any
manner whatsoever. The time within which action must be
commenced to enforce any obligation of TACP arising under this
warranty or under any law of the United States or of any state
thereof is hereby limited to 90 days from the date you discover, or
should have discovered, the defect. This limitation does not apply
to implied warranties arising under the law of any state of the
U.S.A.
THIS WARRANTY GIVES YOU SPECIFIC LEGAL RIGHTS, AND YOU MAY
ALSO HAVE OTHER RIGHTS, WHICH MAY VARY FROM STATE TO STATE
IN THE U.S.A. SOME STATES OF THE U.S.A. DO NOT ALLOW
LIMITATIONS ON THE DURATION OF AN IMPLIED WARRANTY,
LIMITATIONS ON THE TIME WITHIN WHICH AN ACTION MAY BE
BROUGHT, OR THE EXCLUSION OR LIMITATION OF INCIDENTAL OR
CONSEQUENTIAL DAMAGES; THEREFORE, THE ABOVE LIMITATIONS OR
EXCLUSIONS MAY NOT APPLY TO YOU UNDER SUCH CIRCUMSTANCES.
Toshiba America Consumer Products, L.L.C. (“TACP”) makes the
following limited warranties to original consumers in the United
States.
THESE LIMITED WARRANTIES EXTEND TO THE ORIGINAL CONSUMER
PURCHASER OR ANY PERSON RECEIVING THIS DLP TELEVISION AS A
GIFT FROM THE ORIGINAL
CONSUMER PURCHASER AND TO NO OTHER PURCHASER OR
TRANSFEREE.
PRODUCTS PURCHASED IN THE U.S.A. AND USED IN CANADA ARE
NOT COVERED BY THESE WARRANTIES.
PRODUCTS PURCHASED IN CANADA AND USED IN THE U.S.A. ARE
NOT COVERED BY THESE WARRANTIES.
Limited One (1) Year Warranty on Parts and Labor*
TACP warrants this DLP television and its parts against defects in
materials or workmanship for a period of one (1) year after the
date of original retail purchase. DURING THIS PERIOD, TACP WILL,
AT TACP’S OPTION, REPAIR OR REPLACE A DEFECTIVE PART WITH A
NEW OR REFURBISHED PART WITHOUT CHARGE TO YOU FOR PARTS
OR LABOR. TACP Authorized Service Station personnel will come to
your home when warranty service is required. Depending on the
type of repair required, either the service will be performed in your
home or the set will be taken to the TACP Authorized Service
Station for repair and returned to your home at no cost to you.
Limited One (1) Year Warranty on Lamp Unit*
TACP warrants the lamp unit in this DLP television against defects
in materials or workmanship for a period of one (1) year after the
date of original retail purchase. DURING THIS PERIOD, TACP WILL,
AT TACP’S OPTION, EXCHANGE A DEFECTIVE LAMP UNIT WITH A NEW
OR REFURBISHED LAMP UNIT WITHOUT CHARGE TO YOU. LABOR
CHARGES FOR LAMP UNIT REPLACEMENT ARE NOT COVERED UNDER
WARRANTY. The lamp unit is a user-replaceable component.
Rental Units
The warranty for rental units, including the lamp units contained
therein, begins with the date of first rental or thirty (30) days from
the date of shipment to the rental firm, whichever comes first.
*Limited Warranty for Commercial Units
TACP warrants DLP televisions, including the lamp units contained
therein, sold and used for commercial purposes as follows: all parts
are warranted against defects in materials or workmanship for a
period of ninety (90) days after the date of original purchase.
DURING THIS PERIOD, TACP WILL, AT TACP’S OPTION, REPAIR OR
REPLACE A DEFECTIVE PART WITH A NEW OR REFURBISHED PART
WITHOUT CHARGE TO YOU.
Owner’s Manual and Product Registration
Read this owner’s manual thoroughly before operating this DLP TV.
Complete and mail the enclosed product registration card or
register your product on-line at
www
.tacp.toshiba.com/service
as
soon as possible. By registering your product you will enable TACP
to bring you new products specifically designed to meet your needs
and help us to contact you in the unlikely event a safety
notification is required under the Consumer Product safety Act.
Failure to complete and return the product registration card does
not diminish your warranty rights.
Your Responsibility
THE ABOVE WARRANTIES ARE SUBJECT TO THE FOLLOWING
CONDITIONS:
562C_p.57~58(4)_en 90/6/18 1:16 PM Page 1
Page 58

Features your TV Remote Control your TV
Limited Canada Warranty
for DLPTMTelevision Models
(1) You must provide your bill of sale or other proof of purchase.
(2) All warranty servicing of this DLP television must be performed
by an Authorized TCL Service Depot.
(3) These warranties from TCL are effective only if the DLP
television is purchased in Canada from an authorized TCL dealer
and operated in Canada.
(4) Labor charges for installation, setup, adjustment of customer
controls, and installation or repair of antenna systems are not
covered by these warranties. Reception problems caused by
inadequate antenna systems are your responsibility.
(5) Warranties extend only to defects in materials or workmanship
as limited above, and do not extend to any DLP television or
parts that have been lost or discarded by you or to damage to
the television or parts caused by fires, misuse, accident, Acts
of God (such as lightning or fluctuations in electric power),
improper installation, improper maintenance, or use in
violation of instructions furnished by TCL; use or malfunction
through simultaneous use of this product and connected
equipment; or to units that have been modified or had the
serial number removed, altered, defaced, or rendered illegible.
How to Obtain Warranty Services
If, after following all of the operating instructions in this manual
and checking the “Troubleshooting” section, you find that service is
needed:
(1) To find the nearest TCL Authorized Service Depot, visit TCL’s
web site at www.toshiba.ca.
(2) Present your bill of sale or other proof of purchase to the
Authorized Service Depot.
For additional information, visit TCL’s web site:
www.toshiba.ca
ALL WARRANTIES IMPLIED BY THE LAW OF ANY PROVINCE OF
CANADA, INCLUDING THE IMPLIED WARRANTIES OF
MERCHANTABILITY AND FITNESS FOR A PARTICULAR PURPOSE, ARE
EXPRESSLY LIMITED TO THE DURATION OF THE LIMITED WARRANTIES
SET FORTH ABOVE. WITH THE EXCEPTION OF ANY WARRANTIES
IMPLIED BY THE LAW OF ANY PROVINCE OF CANADA AS HEREBY
LIMITED, THE FOREGOING WARRANTY IS EXCLUSIVE AND IN LIEU OF
ALL OTHER WARRANTIES, GUARANTEES, AGREEMENTS, AND SIMILAR
OBLIGATIONS OF TCL WITH RESPECT TO THE REPAIR OR
REPLACEMENT OF ANY PARTS. IN NO EVENT SHALL TCL BE LIABLE
FOR CONSEQUENTIAL OR INCIDENTAL DAMAGES (INCLUDING, BUT
NOT LIMITED TO, LOST PROFITS,
BUSINESS INTERRUPTION, OR MODIFICATION OR ERASURE OF
RECORDED DATA CAUSED BY USE, MISUSE, OR INABILITY TO USE
THIS PRODUCT).
No person, agent, distributor, dealer, or company is authorized to
change, modify, or extend the terms of these warranties in any
manner whatsoever. The time within which action must be
commenced to enforce any obligation of TCL arising under this
warranty or under any law of Canada or of any province thereof is
hereby limited to 90 days from the date you discover, or should
have discovered, the defect. This limitation does not apply to
implied warranties arising under the law of any province of Canada.
THIS WARRANTY GIVES YOU SPECIFIC LEGAL RIGHTS, AND YOU MAY
ALSO HAVE OTHER RIGHTS, WHICH MAY VARY FROM PROVINCE TO
PROVINCE IN CANADA. SOME PROVINCES OF CANADA DO NOT ALLOW
LIMITATIONS ON THE DURATION OF AN IMPLIED WARRANTY,
LIMITATIONS ON THE TIME WITHIN WHICH AN ACTION MAY BE
BROUGHT, OR THE EXCLUSION OR LIMITATION OF INCIDENTAL OR
CONSEQUENTIAL DAMAGES; THEREFORE, THE ABOVE LIMITATIONS OR
EXCLUSIONS MAY NOT APPLY TO YOU UNDER SUCH CIRCUMSTANCES.
Toshiba of Canada Limited (“TCL”) makes the following limited
warranties to original consumers in Canada.
THESE LIMITED WARRANTIES EXTEND TO THE ORIGINAL CONSUMER
PURCHASER OR ANY PERSON RECEIVING THIS DLP TELEVISION AS A
GIFT FROM THE ORIGINAL CONSUMER PURCHASER AND TO NO OTHER
PURCHASER OR TRANSFEREE.
PRODUCTS PURCHASED IN THE U.S.A. AND USED IN CANADA ARE
NOT COVERED BY THESE WARRANTIES.
PRODUCTS PURCHASED IN CANADA AND USED IN THE U.S.A. ARE
NOT COVERED BY THESE WARRANTIES.
Limited One (1) Year Warranty on Parts and Labor*
TCL warrants this DLP television television and its parts against
defects in materials or workmanship for a period of one (1) year
after the date of original retail purchase. DURING THIS PERIOD, TCL
WILL, AT TCL’S OPTION, REPAIR OR REPLACE A DEFECTIVE PART WITH
A NEW OR REFURBISHED PART WITHOUT CHARGE TO YOU FOR PARTS
OR LABOR. TCL Authorized Service Depot personnel will come to
your home when warranty service is required. Depending on the
type of repair required, either the service will be performed in your
home or the set will be taken to the TCL Authorized Service Depot
for repair and returned to your home at no cost to you. IN-HOME
SERVICE ONLY APPLIES WITHIN 100 KILOMETERS OF AN AUTHORIZED
TCL SERVICE DEPOT.
Limited One (1) Year Warranty on Lamp Unit*
TCL warrants the lamp unit in this DLP television against defects in
materials or workmanship for a period of one (1) year after the
date of original retail purchase. DURING THIS PERIOD, TCL WILL, AT
TCL’S OPTION, EXCHANGE A DEFECTIVE LAMP UNIT WITH A NEW OR
REFURBISHED LAMP UNIT WITHOUT CHARGE TO YOU. LABOR
CHARGES FOR LAMP UNIT REPLACEMENT ARE NOT COVERED UNDER
WARRANTY. The lamp unit is a user-replaceable component.
Rental Units
The warranty for rental units, including the lamp units contained
therein, begins with the date of first rental or thirty (30) days from
the date of shipment to the rental firm, whichever comes first.
*Limited Warranty for Commercial Units
TCL warrants DLP televisions, including the lamp units contained
therein, sold and used for commercial purposes as follows: all parts
are warranted against defects in materials or workmanship for a
period of ninety (90) days after the date of original purchase.
DURING THIS PERIOD, TCL WILL, AT TCL’S OPTION, REPAIR OR
REPLACE A DEFECTIVE PART WITH A NEW OR REFURBISHED PART
WITHOUT CHARGE TO YOU. ON-SITE SERVICE ONLY APPLIES WITHIN
100 KILOMETERS OF AN AUTHORIZED TCL SERVICE DEPOT.
Owner’s Manual and Product Registration
Read this owner’s manual thoroughly before operating this DLP
television.
Register your product online at www.toshiba.ca as soon as
possible. By registering your product you will enable TCL to provide
you with better customer service and improved product support.
Failure to register your product does not diminish your rights under
this warranty.
Your Responsibility
THE ABOVE WARRANTIES ARE SUBJECT TO THE FOLLOWING
CONDITIONS:
562C_p.57~58(4)_en 90/6/18 1:16 PM Page 2
Page 59

Notes
Page 60

ColorStream, StableSound, and TheaterWide are registered trademarks of Toshiba America Consumer Products, L.L.C.
The DLP logo and DLP medallion are trademarks of Texas Instruments.
Dolby is a registered trademark of Dolby Laboratories.
HEAD OFFICE: 191 McNABB STREET, MARKHAM, ONTARIO, L3R 8H2, CANADA – TEL: (905) 470-5400
SERVICE CENTERS:
TORONTO: 191 McNABB STREET, MARKHAM, ONTARIO L3R 8H2, CANADA – TEL: (905) 470-5400
MONTREAL: 18050 TRANS CANADA, KIRKLAND, QUEBEC, H9J 4A1, CANADA – TEL: (514) 390-7766
VANCOUVER: 22171 FRASERWOOD WAY, RICHMOND, B.C., V6W 1J5, CANADA – TEL: (604) 303-2500
PRINTED IN MEXICO
Page 61

Guide d’utilisation
mc
Téléprojecteur DLP
44HM85
5
Tous droits réservés
Dossier du propriétaire
Les numéros de modèle et de série sont inscrits à l’arrière
du téléviseur. Veuillez inscrire ces numéros dans l’espace
réservé à cette fin ci-dessous. Référez à ces numéros
chaque fois que vous communiquez avec votre
concessionnaire Toshiba au sujet de ce téléviseur.
Numéro de modéle:
Numéro de série :
Page 62

Mesures de sécurité
AVERTISSEMENT
POUR RÉDUIRE LES RISQUES D’INCENDIES OU DE CHOCS
ÉLECTRIQUES, NE PAS EXPOSER CET APPAREIL À LA PLUIE
NI À L’HUMIDITÉ.
REMPLACEMENT DU MODULE D'AMPOULE
ATTENTION : SURFACE BRÛLANTE!
La température de cette lampe
après usage dépasse les 392 °F
(200 °C). Pour éviter toute
brûlure grave, ne pas la toucher
avant qu’elle ne se soit
refroidie. LAISSEZ REFROIDIR L'AMPOULE PENDANT AU MOINS
UNE (1) HEURE AVANT DE LA REMPLACER.
Le point d’exclamation dans le triangle signale la
présence d’importantes directives d’exploitation et
d’entretien
Le symbole de l’éclair dans un triangle vous indique
que la tension à l’intérieur de ce produit peut être
assez forte pour provoquer un choc électrique. NE
TENTEZ PAS DE LE RÉPARER VOUS-MÊME.
L'ampoule de ce produit est d’une durée utile limitée, laquelle
varie en fonction de l’utilisation du produit et des paramètres de
l’utilisateur. Si vous l’utilisez au-delà de sa durée de service, il
se peut que :
• la couleur et la luminance de l’image en soient réduites. Il
faudra alors remplacer l'ampoule;
• le verre quartzeux de l'ampoule perde de la puissance,
pouvant en occasionner la rupture. Si l'ampoule se rompt, le
téléviseur ne fonctionnera pas jusqu’au remplacement de celleci.
Remarque : Cette ampoule est conçue de manière à ce que
le verre qui la compose demeure renfermé à l’intérieur en
cas de bris.
Voir l’annexe, pages 46 à 48.
•Jetez l'ampoule selon la méthode prescrite dans votre région.
AVIS AUX INSTALLATEURS DU CABLE
Veuillez rappeler à l’installateur de systèmes de
câblodistribution l’article 820-40 du CNE, lequel présente des
directives sur la bonne mise à la terre et préconise en
particulier que la mise à la terre du câble doit être reliée au
système de mise à la terre du bâtiment, le plus près possible du
point d’entrée du câble. Pour de l’information supplémentaire
sur la mise à la terre de l’antenne, consultez les articles 27 et
28 de la page 4.
À l’attention du client ,
Merci d’avoir acheté ce téléviseur Toshiba. Ce guide a pour
but de vous aider à utiliser les nombreuses fonctions
emballantes que vous procure ce nouveau téléviseur. Avant
de le mettre sous tension, veuillez lire entièrement ce guide
et le ranger à portée de la main aux fins de consultation
ultérieure.
2500 Wilson Blvd.
Arlington, VA 22201 U.S.A.
Tel. 703-907-7600 Fax 703-907-7690
www.CE.org
CEA is the Sponsor, Producer and
Manager of the International CES
®
La question
W
Comme la plupart des consommateurs, vous possédez sans
doute un téléviseur. En fait, plusieurs foyers en possèdent plus
d’un.
W
L’expérience du cinéma maison est de plus en plus en vogue et
il se vend actuellement un nombre grandissant de téléviseurs de
plus grands formats. Malheureusement, ces téléviseurs ne sont pas
toujours installés sur des meubles adaptés.
W
Il arrive parfois que les téléviseurs soient mal fixés ou qu’ils
soient placés sur une commode, dans une bibliothèque, sur une
étagère, sur un bureau, sur des haut-parleurs, sur un coffre ou un
chariot, pouvant en occasionner la chute et causer des
blessures.
TOSHIBA S'EN PRÉOCCUPE!
W
L’industrie de l’électronique grand public
s’est engagée à faire en sorte que les
consommateurs puissent jouir de leurs
systèmes de divertissements au foyer
de façon sécuritaire.
W
Avec la participation de fabricants
de meubles pour téléviseurs et de
produits électroniques grand public,
la Consumer Electronics Association
a fondé la Home Entertainment
Support Safety Committee (comité
de soutien de la sécurité des produits
de divertissement au foyer) afin de
promouvoir la sécurité des enfants et
d’éduquer les consommateurs et leurs
familles sur la sécurité en matière de
téléviseurs.
Être à l’écoute de la sécurité
Les meubles tout usage NE suffisent PAS! Il faut
des meubles assez grands pour soutenir le poids du téléviseur
(et de tout autre composant électronique).
Utilisez les bons aisseliers, dispositifs d’ancrage et les courroies
appropriées pour fixer vos meubles au mur (sans toutefois visser
quoi que ce soit directement dans le téléviseur).
Lisez attentivement toutes les directives ci-jointes sur la bonne
utilisation de ce produit et assurez-vous de bien les comprendre.
Lisez attentivement toutes les directives ci-jointes sur la bonne
utilisation de ce produit et assurez-vous de bien les comprendre.
Lisez attentivement toutes les directives ci-jointes sur la bonne
utilisation de ce produit et assurez-vous de bien les comprendre.
Souvenez-vous que les enfants s’excitent en regardant la
télévision et qu’ils peuvent pousser ou tirer sur le téléviseur et le
renverser.
W
Partagez les messages de sécurité traitant des dangers cachés
au foyer avec vos amis et les membres de votre famille. Merci!
W
W
W
W
W
W
L’emplacement du
téléviseur est important
Félicitations pour votre achat! Pour mieux jouir de
votre nouveau téléviseur, n'oubliez pas les conseils
de sécurité suivants :
Protégez vos
enfants
REMARQUE : Cette ampoule contient du mercure.
Pour des raisons de respect de l’environnement,
l’élimination du mercure pourrait être soumise à certains
règlements. Disposez de toutes ampoules usées selon la
méthode approuvée dans votre région. Pour obtenir de
l’information sur l’élimination ou le recyclage du mercure, veuillez
consulter les autorités de votre localité ou la Electronics
Industries Alliance (www.eiae.org).
PAGE 2
AVERTISSEMENT : POUR ÉVITER LES RISQUES DE CHOCS
ÉLECTRIQUES, NE PAS ENLEVER LE BOÎTIER (NI LA PARTIE
ARRIÈRE). AUCUNE PIÈCE FONCTIONNELLE À L’INTÉRIEUR.
ADRESSER TOUTE DEMANDE DE SERVICE À DU PERSONNEL DE
SERVICE QUALIFIÉ.
562C-2~5(2)_fr 90/6/18 12:26 PM Page 2
Page 63

(Suite à la page suivante)
Installation, entretien et service
Installation
Au moment d’installer le téléviseur, veuillez suivre les
recommandations, adopter les mesures préventives et tenir
compte des avertissements ci-après :
17) Ne modifiez jamais cet équipement. Conformément aux
règlements de la Commission fédérale des communications,
tous changements ou toutes modifications à cet appareil
peuvent engendrer a) l’annulation de la garantie et b)
l’autorisation dont jouit l’utilisateur d’exploiter cet équipement.
18) DANGER : RISQUES DE BLESSURES GRAVES, DE
MORT OU DE DOMMAGES À L’ÉQUIPEMENT! Ne
jamais
poser le téléviseur sur un chariot, un
meuble ou une table instable, car
celui-ci pourrait tomber et engendrer
des blessures graves, voire même
la mort, et endommager le téléviseur.
19) Ne placez ni n’entreposez jamais le téléviseur directement
au soleil, dans des endroits chauds, humides ou exposés à
la poussière excessive, aux vibrations ou à des températures
inférieures à 5 °C (41 °F).
20) Placez toujours le téléviseur sur un plancher ou une surface
solide, unie et stable, pouvant en soutenir le poids.
21) N’exposez jamais le téléviseur à des objets pouvant couler
ou éclabousser. N’y déposez ni vases, ni aquarium, ni
chandelles ou autres articles remplis de liquide.
22) Pour assurer une aération adéquate, placez toujours le
téléviseur à une distance d’au moins un (1) pouce de toute
surface verticale (un mur, par ex.).
23) Ne bloquez jamais les fentes et les orifices du boîtier
arrière, inférieur ou latéral du téléviseur et ne les recouvrez
pas. Ne le posez jamais
• sur un lit, un divan, un tapis ou quelque autre surface du genre;
•trop près des tentures, des rideaux ou des murs;
•dans des espaces restreints tels qu’une bibliothèque, une
armoire encastrée et tout autre endroit mal aéré.
Les fentes et orifices du téléviseur servent à le protéger contre
les excès de chaleur et à en assurer l’exploitation fiable.
24) Ne laissez jamais reposer ni rouler d’objets sur le cordon
d’alimentation. Ne posez jamais le téléviseur à un endroit
où le cordon d’alimentation risque de s’user ou d’être utilisé
de manière abusive.
25) Ne surchargez jamais les prises de courant murales ni les
cordons prolongateurs.
26) Exploitez toujours cet équipement à partir d’une source
d’alimentation de 120VAC, 60 Hz.
Consignes de sécurité importantes
1) Veuillez lire ces consignes.
2) Veuillez les conserver.
3) Tenez compte de tous les avertissements.
4) Suivez toutes les directives.
5) N’utilisez pas cet appareil près de l’eau.
6) Ne le nettoyez qu’avec un chiffon sec.
7) Ne bloquez pas les bouches d’aération. Installer cet
appareil en suivant les directives du fabricant.
8) N’installez pas cet appareil près des sources de chaleur
radiateurs, bouches à air chaud, cuisinières ou autres
appareils émettant de la chaleur (y compris les
amplificateurs).
9) N’allez pas à l’encontre des mesures de sécurité des
fiches polarisées ou de type mise à la terre. Une fiche
polarisée est dotée de deux lames, dont une est plus large
que l’autre. Une fiche de type mise à la
terre est dotée de deux lames et d’un
contact de mise à la terre. La lame la
plus large ou le contact de mise à la
terre sont là pour vous protéger.
Si la fiche fournie n’entre pas dans la prise de courant,
demandez à un électricien de remplacer la prise de courant
désuète.
10) Protégez le cordon d’alimentation faites en
sorte qu’on ne puisse marcher dessus et
ne le pincez pas, surtout près de la fiche,
de la prise de courant et du point d’où il
sort de l’appareil.
11) N’utilisez que les accessoires précisés par le fabricant.
12) Utilisez uniquement le chariot,
le meuble, le trépied, le support ou la table
précisés par le fabricant ou vendus avec
l’appareil. Si vous devez déplacer l’appareil
à même le chariot, attention aux blessures
pouvant résulter de la chute de l’appareil.
13) Débranchez cet appareil pendant les orages ou si vous
ne comptez pas l’utiliser pendant de longues périodes.
14) Confiez toutes réparations à du personnel qualifié. Il
faut faire appel à un technicien dans les cas suivants :
dommages au cordon d’alimentation ou à la fiche;
écoulement de liquide ou chute d’un objet dans l’appareil;
exposition de l’appareil à la pluie ou à l’humidité
engendrant la moisissure; lorsque l’appareil ne fonctionne
pas normalement ou qu’il a été échappé. Cette consigne
s’applique à tous les articles, à l’exception de ceux qui
sont précisés aux pages
46 à 48
de ce guide.
15) ATTENTION : Pour éviter les risques de chocs électriques,
n’utilisez jamais la prise polarisée avec un cordon prolongateur,
une prise de courant ou quelque autre prise du genre à moins
que les lames puissent y être entièrement enfouies.
16) ATTENTION : Ce produit contient une ampoule servant à
projeter l’image et fait l’objet de mesures de sécurité
particulières :
• Consultez les pages
46 à 48
pour les directives de
remplacement de l'ampoule.
• NE tentez PAS de réparer ce produit sauf de la manière
précisée dans les pages
46 à 48
. Le seul produit pouvant
être échangé dans cet appareil est l'ampoule.
Prise large
PAGE 3
562C-2~5(2)_fr 90/6/18 12:26 PM Page 3
Page 64

Entretien
(Suite de la page colonne)
33) Pour protéger davantage le téléviseur contre la foudre et les
surtensions, débranchez toujours le cordon d’alimentation et
l’antenne du téléviseur lorsque celui-ci n’est pas utilisé ou si
vous vous comptez vous absenter pendant un certain temps.
34
) En cours d’usage normal, le téléviseur peut émettre des bruits
secs ou des claquements. Ceci est normal surtout lorsqu’on
allume ou qu’on éteint l’unité. Si ces bruits persistent ou se
produisent trop souvent, débranchez le cordon d’alimentation
et communiquez avec un Centre de service autorisé Toshiba.
35)
Entretien particulier des unités DLP
M
C
(Digital Light
Processing ou bloque optique numérique:
•
L'ampoule—la durée utile de l'ampoule que contient ce
produit est limitée. Cette durée varie selon l’utilisation ou
les réglages mis en place par l’utilisateur du produit. Si
vous utilisez l'ampoule au-delà de sa durée utile :
- vous remarquerez une diminution des couleurs et / ou de
la luminance et il vous faudra alors remplacer l'ampoule;
- la puissance du verre quartzeux de l'ampoule sera réduite
et l'ampoule pourra alors se rompre. Dans le cas là, le
téléviseur ne fonctionnera pas jusqu’à ce que l'ampoule
soit remplacée.
Consultez les pages
46 à 48
.
Remarque :
• Cette ampoule est conçue de manière à ce que le verre brisé
demeure à l’intérieur de celle-ci.
•Cette ampoule contient du mercure. Pour des
raisons de respect de l’environnement,
l’élimination du mercure pourrait être soumise à
certains règlements. Disposez de toutes
ampoules usées selon la méthode approuvée dans votre
région. Pour obtenir de l’information sur l’élimination ou le
recyclage du mercure, veuillez consulter les autorités de votre
localité ou la Electronics Industries Alliance (www.eiae.org).
• Disposez de toutes ampoules usées selon la méthode
prescrite dans votre région.
Service
36
) AVERTISSEMENT : RISQUES DE
CHOCS ÉLECTRIQUES!
Ne tentez jamais de réparer vousmême le téléviseur sauf de la manière
prescrite aux pages
46 à 48
. En ouvrant ou en enlevant le
boîtier, vous vous exposez à de la haute tension et à d’autres
dangers. Tout défaut de suivre cet AVERTISSEMENT peut
engendrer de graves blessures, voire même la mort! Confiez
toutes les réparations non mentionnées dans ce guide à un
Centre de service autorisé Toshiba.
37) Si vous vous faites réparer ce téléviseur :
•Demandez au technicien du service de n’utiliser que des
pièces de rechange précisées par le fabricant.
•Une fois les réparations effectuées, demandez au technicien
du service d’exécuter des contrôles de sécurité afin de
s’assurer que le téléviseur fonctionne de façon sécuritaire.
38) Lorsque le téléviseur atteint sa durée utile, demandez à un
technicien du service qualifié d’en disposer comme il se doit.
Remarque: Cette ampoule contient du mercure. Pour des raisons
de respect de l’environnement, l’élimination du mercure pourrait
être soumise à certains règlements. Disposez de toutes ampoules
usées selon la méthode approuvée dans votre région. Pour
obtenir de l’information sur l’élimination ou le recyclage du
mercure, veuillez consulter les autorités de votre localité ou la
Electronics Industries Alliance (www.eiae.org).
Installation
(Suite de la page précédente)
27) Assurez-vous toujours que l’antenne soit correctement mise
à la terre afin de protéger celle-ci adéquatement contre les
surtensions et les accumulations de charges électrostatiques
(voir l’article 810 du NEC).
28) DANGER : RISQUES DE BLESSURES GRAVES OU DE
MORT!
• Prenez les précautions nécessaires pour éviter que
vous et tout objet que vous touchiez (tels une échelle ou un
tournevis) n’entre en contact par mégarde avec les circuits
électriques aériens ou tous autres circuits électriques.
•Ne tentez jamais de raccorder les objets suivants pendant
un orage :
a) un système d’antenne ou b) des câbles, des fils ou
quelque composante du cinéma maison que ce soit à une
antenne ou un système téléphonique.
Entretien
Pour obtenir un meilleur rendement du téléviseur TOSHIBA et
pour une exploitation plus sécuritaire, veuillez suivre les
directives et prendre les précautions suivantes :
29) Asseyez-vous toujours à environ 10 à 25 pieds de distance du
téléviseur et, autant que possible, en ligne droite. Si vous
êtes assis trop loin vers la droite ou la gauche du téléviseur,
ou si la lumière du soleil ou d’ampoules électriques est
projetée à l’écran, l’image semblera faible. Pour vérifier s’il y
a des reflets à l’écran du téléviseur, éteignez-le. Enlevez
ensuite la source du reflet pour regarder la télévision.
30) Débranchez toujours le téléviseur avant de le nettoyer.
N’utilisez jamais de liquides ni de nettoyants en aérosol.
Nettoyez-le uniquement avec un chiffon sec. Ne vaporisez
jamais de composés volatiles tels des insecticides sur le
boîtier, car ceci peut le décolorer ou l’endommager.
31) ATTENTION : RISQUES DE CHOCS ÉLECTRIQUES!
Ne renversez jamais de liquides dans les
fentes du boîtier du téléviseur et n’y
laissez jamais tomber d’objets.
32) Si la température ambiante monte subitement (le jour
même de la livraison, par ex.), il peut s’accumuler de la
vapeur sur la lentille et l’image peut paraître déformée ou
décolorée. Le cas échéant, éteignez le téléviseur pendant 6
à 7 heures et laissez s’évaporer la vapeur.
Matériel de service électrique
Prise de terre
Conducteur de terre
(Article 810 du NEC)
Prise de terre
Système de prise de terre du
service d’alimentation
(Article 810 du NEC)
Entrée de courant de
l’antenne
Unité de décharge de
l’antenne (Article 810 du
NEC)
PAGE 4
562C-2~5(2)_fr 90/6/18 12:26 PM Page 4
Page 65

5) Gardez toujours une distance d’environ 10 à 25 pieds du
téléviseur et, autant que possible, asseyez-vous droit devant.
Votre emplacement et le temps passé à regarder la télévision
peuvent affecter votre perception de la qualité de l’image. Le
fait de s’asseoir trop près du téléviseur pendant de longues
périodes risque de vous fatiguer les yeux. Voir l’article 29 de
la page 4.
6) Ce téléviseur est doté de plusieurs ventilateurs
servant à en diminuer la température interne,
lesquels peuvent se faire entendre pendant et après
l’emploi du téléviseur.
7) Pour assurer une aération adéquate, placez toujours le
téléviseur à une distance d’au moins un (1) pouce de toute
surface verticale (un mur, par ex.).
8) Passez en revue l’ensemble des renseignements relatifs à la
sécurité et à l’exploitation de ce téléviseur que contient ce
guide.
9) Les jeux vidéo dotés d’une manette de jeu simulant le tir
d’un « fusil » sur une cible à l’écran pourraient ne pas
fonctionner.
1) La source lumineuse de ce téléviseur est constituée d’une
ampoule de projection dont la durée utile est limitée.
Lorsque celle-ci s’use, l’image devient foncée ou noire, et si
l'ampoule tombe en panne, il faut la remplacer. Voir «
Remplacement de l'ampoule », pages 50 à 52.
2) Chaque fois que vous mettez le téléviseur sous tension, il
peut se passer plusieurs secondes avant que l’image passe du
blanc à la luminance intégrale.
3) L’afficheur de ce téléviseur est conçu selon une technologie
de très grande précision; il se peut cependant qu’à l’occasion,
un pixel (un point de lumière) s’affiche en permanence à
l’écran. Il s’agit là d’une propriété structurelle de la
projection par micro-affichage, propre à cette technologie de
téléprojection, plutôt que d’un indice de mauvais
fonctionnement. Ces pixels ne sont pas visibles lorsque le
visionnement de la télévision est à une distance raisonnable.
(voir l’article 29 de la page 4).
4) Selon le moyen de diffusion employé, certains
téléspectateurs pourraient apercevoir un « arc-en-ciel » à
l’écran (bien que cela soit peu probable) et les yeux peuvent
s’en trouver irrités (dans de rares cas). Ceci se produit
rarement avec ce type de technologie et n’indique nullement
dire un problème de fonctionnement du téléviseur.
Commentaires importants sur le téléprojecteur DLP
MC
Énoncé de conformité aux normes de la FCC
Conformément à la Partie 15 des règlements de la FCC, cet équipement a été testé et jugé conforme aux limites
prescrites pour les appareils numériques de classe B. Ces limites ont pour but d’offrir une protection raisonnable
contre le brouillage nuisible dans les installations résidentielles. Cet équipement génère, utilise et peut répandre des
fréquences radio et, s’il n’est pas installé et utilisé selon les directives, il peut nuire aux communications radio. Par
ailleurs, aucune installation ne saurait garantir l’absence totale de brouillage. Dans l’éventualité où cet appareil
brouillerait, de façon nuisible, les fréquences radio ou télévision (identifiable par la mise sous tension et hors
tension du téléviseur), nous invitons l’utilisateur à corriger l’interférence de l’une ou l’autre des façons suivantes :
- Réorienter ou déplacer l’antenne de réception.
- Augmenter la distance entre l’équipement et le récepteur.
- Brancher l’équipement dans une prise de courant dont le circuit diffère de celui où est raccordé le récepteur.
- Obtenir de l’aide du concessionnaire ou d’un technicien en radio/télévision compétent.
PAGE 5
562C-2~5(2)_fr 90/6/18 12:26 PM Page 5
Page 66

PAGE 6
Table des matières
Liste de contrôle de l’installation
Consignes de sécurité importantes . . . . . . . . . . . . . .2-4
Commentaires importants sur votre téléprojecteur DLPmc . .5
Toshiba vous souhaite la bienvenue . . . . . . . . . . . . . . .7
Indicateurs de l’état des fonctions . . . . . . . . . . . . . . . .7
Étape 1. Raccordement du téléviseur
Panneau de raccordement arrière . . . . . . . . . . . . . . . . .8
Panneau de raccordement avant . . . . . . . . . . . . . . . . .9
Branchement de l’antenne / de la télévision par câble . .10
Raccordement à un convertisseur de câble . . . . . . . . . .11
Raccordement à un magnétoscope . . . . . . . . . . . . . . .12
Lecteur DVD . . . . . . . . . . . . . . . . . . . . . . . . . . . . .13
Entrée RBV-DTV/HDMI-DTV . . . . . . . . . . . . . . . . . . . .14
Entrée RGB-PC/HDMI-PC . . . . . . . . . . . . . . . . . . . . . .15
Installation de la sortie Écran . . . . . . . . . . . . . . . . . .16
Fonctions de la télécommande en mode TV . . . . . . .17-18
Affichages à l’écran . . . . . . . . . . . . . . . . . . . . . . . . .19
Commandes du panneau avant . . . . . . . . . . . . . . . . . .20
HDMI . . . . . . . . . . . . . . . . . . . . . . . . . . . . . . .21-22
Étape 2. Personnalisation des fonctions du
téléviseur Options du menu RÉGLAGE
Options du menu canal
Mise en circuit du téléviseur . . . . . . . . . . . . . . . . . .23
Repérage de canal . . . . . . . . . . . . . . . . . . . . . . . . .23
Portée utile de la télécommande . . . . . . . . . . . . . . .24
Mise en Mise en mémoire
suppression du canal en cours . . . . . . . . . . . . . . . . . .25
Réglage de l’accord préci
s
s . . . . . . . . . . . . . . . . . . .25
Surf list . . . . . . . . . . . . . . . . . . . . . . . . . . . . . .26
Options du menu Image
Mode image . . . . . . . . . . . . . . . . . . . . . . . . . . . . .27
Contrôle de température de couleur . . . . . . . . . . . . .28
ACM / Contrôle manuel de l’image . . . . . . . . . . . . . . .29
Options du menu Audio
Mode sonore / Son stable . . . . . . . . . . . . . . . . . . . . .30
Ambiophonie / Contrôle sonore manuel . . . . . . . . . . . .31
Sélection des signaux bilingues . . . . . . . . . . . . . . . .32
Options du menu heure
Réglage de la pendule . . . . . . . . . . . . . . . . . . . . . .33
Réglage de la minuterie marche-arrêt . . . . . . . . . . . .34
Réglage de la minuterie / Arrêt automatique . . . . . . .35
Options du menu SPÉCIAL
Langue des menus à l’écran / Verrouillage . . . . . . . . . 36
Réglage des sous-titres . . . . . . . . . . . . . . . . . . . . .37
Sélection du mode Sous-titre / Texte . . . . . . . . . . . .38
Options du menu Ecran
Réglage automatique / Configuration manuelle . . . . . .39
Rapport hauteur / largeur / Réglage du mode Cinéma .40
NR / Initializing . . . . . . . . . . . . . . . . . . . . . . . . . .41
Options du menu Verrouillage
Réglage du verrouillage parental . . . . . . . . . . . . . . .42
Verrouillage parental . . . . . . . . . . . . . . . . . . . . . .43
Exploitation en mode d’image (I.D.I.) et Images doubles 44-45
Syntoniseur à images hors images(POP) . . . . . . . . . .45
Étape 3. Divers
Remplacement de l'ampoule . . . . . . . . . . . . . . . . .46-48
Programmation de la télécommande . . . . . . . . . . . . . .49
Codes de programmation . . . . . . . . . . . . . . . . . . .50-53
Dépannage . . . . . . . . . . . . . . . . . . . . . . . . . . . .54-55
Fiche technique du produit . . . . . . . . . . . . . . . . . . . .56
Garantie limitée au Canada
Garantie limitée aux États-Unis
Étape 1. Raccorder tous les équipements et les sources
Voir la pages 10 à 16.
Étape 2. Installer les piles de la télécommande et effectuer une recherche de chaîne
Voir la pages 23.
Étape 3. Régler les fonctions et options du téléviseur selon vos préférences. Voir le contenu ci-dessus.
Remarque : La conception et les spécifications peuvent être modifiées sans préavis.
Page 67

PAGE 7
Indicateurs de l’état des fonctions
Les témoins lumineux correspondant à l'ampoule, à l’exploitation et la température, situés en dessous des
commandes du panneau avant, vous révèlent l’état d’exploitation du téléprojecteur.
Témoin d’exploitation
Témoin de l'ampoule
Témoin de température
Éteint Cordon d’alimentation débranché.
Rouge Cordon d’alimentation branché; en mode veille.
Vert Mise sous tension du téléviseur.
Orange (clignotant) Préparation à l’exploitation en mode veille.
Rouge (clignotant) There is a problem with the lamp or around it. Communiquer
avec un centre de service autorisé.
Rouge Lamp life over.
Vert (clignotant) Le couvercle de l'ampoule n’est pas fermé.
Rouge Le téléprojecteur a surchauffé et s’est éteint.
After viewing the phrase “Thermal High Error”.
Rouge (clignotant) Le téléprojecteur s’est éteint suite à une panne du ventilateur.
Communiquer avec un centre de service autorisé.
Orange Thermal warning.
Témoin d’exploitation
Témoin de l'ampoule
Témoin de température
Toshiba vous souhaite la bienvenue
Toshiba vous souhaite la bienvenue
Félicitations! Vous venez de faire l’acquisition de l’un des meilleurs téléprojecteurs DLPMC qui soient sur le marché. Ce guide a pour
mission de vous guider parmi les étapes d’installation et d’exploitation de ce téléviseur Toshiba pour que vous puissiez en jouir le
plus tôt possible.
Ce guide est destiné au modèle 44NHM84. Les numéros de modèle et de série sont inscrits à l'arrière du téléviseur. Veuillez les
inscrire dans les espaces réservés à cette fin, sur la page couverture de ce guide.
Les directives fournies dans ce guide présument l’utilisation d’une télécommande. Vous pouvez également utiliser les commandes
du téléviseur à condition que celles-ci soient identiques à celles de la télécommande.
Veuillez lire attentivement toutes les consignes de sécurité et les directives d’exploitation et ranger ce guide aux fins de référence
ultérieure.
Page 68

PAGE 8
S-VIDEO
VIDEO
AUDIO
(R)
(L)/
MONO
AV3
INPUT
HDMI INPUT
U
P
G
R
A
D
E
P
O
R
T
PC/DTV
(SXGA/
480p/
576p/
720p/
1080i)
(L)
AUDIO
(R)
RGB INPUT
DVI / RGB INPUT
MONITOR
OUT
A/V 2
INPUT
A/V 1
INPUT
VIDEO
(L)
AUDIO
(R)
S-VIDEO
MONO
COMPONENT
P
R
P
B
Y
(L)
AUDIO
(R)
480i/480p/
576i/576p/
720p/1080i
480i/480p/
576i/576p/
720p/1080i
INPUT 2
INPUT 1
HDMI INPUT
U
P
G
R
A
D
E
P
O
R
T
PC/DTV
(XGA/
480p/
720p/
1080i)
(L)
AUDIO
(R)
RGB INPUT
MONITOR
OUT
VIDEO 2
INPUT
VIDEO 1
INPUT
VIDEO
(L)
AUDIO
(R)
S-VIDEO
MONO
COLORSTREAM HD
P
R
P
B
Y
(L)
AUDIO
(R)
480i/480p/
720p/1080i
480i/480p/
720p/1080i
INPUT 1
INPUT 2
Panneau de raccordement arrière
Glossaire
PRISE Raccordement à l’arrière d’un téléviseur, d’un magnétoscope ou de tout autre appareil audio/vidéo. Les prises HF et audio/vidéo à codes
couleur s’inscrivent dans cette description.
SIGNAL Effet de l’image et du son circulant dans un câble, en liaison radio et à l’écran du téléviseur.
(S-VIDEO In)
Entrée S-Vidéo
Raccordement installé dans
certains appareils de haut de
gamme offrant une qualité
d’image supérieure avec
Vidéo 2.
(VIDEO 1-2)Vidéo 1 et 2
Raccordement des signaux vidéo provenant de
divers types
d’équipements.
Raccordement des câbles et des équipements externes sur votre téléviseur.
(AUDIO L/R)
Audio gauche / droite)
Sert à la transmission
stéréophonique d’autres
appareils.
UPGRADE PORT
This port is used to upgrade
the software version and debug
without changing the hardware.
Be careful not to use this port.
Just contact your dealer or service centre.
(RVB INPUT)
Entrée RVB
Raccorder le connecteur de
sortie d’un PC/d’une télé
numérique au port d’entrée
approprié.
Connecteur RF : Antenne
Sert au raccordement d’un câble
analogique ou de signaux d’antenne directement dans le
téléviseur ou au moyen du convertisseur de câbles.
COLOURSTREAM HD
Raccordez un appareil vidéo/audio
ColorStream HD dans ces prises. Pour
obtenir de plus amples renseignements,
consultez le guide du DVD
HDMI
connect a HDMI signal to
HDMI.
Page 69

PAGE 9
Panneau de raccordement avant
Du côté gauche de la face avant du téléprojecteur se trouvent
quatre prises servant à simplifier le raccordement d’appareils
vidéo et audio tels des jeux vidéo et des caméscopes.
Ces prises sont identiques à celles que l’on retrouve à l’arrière de
l’unité, sur le panneau de raccordement des prises. Ainsi, la plupart des appareils raccordés à ce type de prises à cet endroit
peuvent également se raccorder au panneau avant.
Pour utiliser les prises avant à titre de source sonore, il faut les
sélectionner au moyen du menu « Main Input » (Entrée principale) tel que décrit à la page 44. Elles se nomment « Front Video
» (Vidéo d’avant) au menu « Main Input » (Entrée principale).
Si vous branchez à la fois Front Video
(Vidéo d’avant) et S-Video, seul SVideo fonctionnera
Si vous raccordez un appareil de jeux
vidéo, assurez-vous de modifier les
réglages de l’image au moyen de l’option « Picture Mode » (Mode Image)
au menu « Vidéo». Voir la page 27.
Glossaire
CBLES A/V Câbles audio / vidéo et trois raccords de câbles dont le raccord audio de droite (rouge), audio de gauche (blanc) et vidéo (jaune).
Les câbles A/V servent à la lecture stéréophonique de vidéocassettes et à procurer une image et un son d’une qualité supérieure à
celle d’autres appareils A/V.
APPAREIL A/V Tout appareil produisant des images vidéo ou des sons (magnétocassette, lecteur DVD, convertisseur du câble ou téléviseur).
(Left/Right Audio)
Audio gauche/droite
Sert à obtenir la stéréo-
phonie avec divers types
d’appareils.
(Video) Vidéo
Raccordement des sig-
naux vidéo de tous
types d’appareils.
S-Video
Raccordement offert sur certains appareils de haut de
gamme pour offrir une qualité
d’image meilleure que celle
d’une simple sortie vidéo.
W
W
Front A/V Panel
AUDIO
VIDEO
S-VIDEO
FRONT A/V
)
R
(
/
)
L
(
O
N
O
M
Page 70

PAGE 10
Branchement de l’antenne / de la télévision par Câble
1
Branchez l’antenne ou le câble dans le
téléviseur tel qu’indiqué ci-contre.
Consultez la page 23 pour effectuer une
recherche des canaux avec le balayage des
canaux pour connexion d'antenne/câble.
Pour une meilleure réception, nous vous conseillons de demander à un technicien professionnel
de régler l’antenne.
2
Si le signal RF provient d’une
antenne ancienne de plusieurs
années, raccordée au moyen de
deux petites broches, il vous faudra vous procurer un adaptateur
pour 300 à 75 ohm. Votre fournisseur de produits électroniques
local devrait en avoir.
Pour prévenir le brouillage, nous
vous conseillons d’utiliser un câble
de 75 ohm pour raccorder l’antenne.
COLORSTREAM HD
P
R
P
B
Y
(L)
AUDIO
(R)
480i/480p/
720p/1080i
480i/480p/
720p/1080i
INPUT 1
INPUT 2
Antenna
Prise murale du
câble
Câble coaxial RF
(75 ohm)
Câble coaxial RF
(75 ohm)
W
W
Attention: RISQUES DE DOMMAGES À
L’ÉQUIPEMENT!
Ne jamais brancher de cordons d’alimentation
avant d’avoir raccordé tous les équipements.
Page 71

PAGE 11
Raccordement à un convertisseur de câble
Repérez la prise de sortie à l’arrière du
convertisseur . Raccordez-la à la prise de
l’antenne à l’arrière du téléviseur.
Vous pouvez également repérer les prises
vidéo et audio à l’arrière du convertisseur,
puis raccorder celles-ci selon les directives fournies avec votre équipement.
Vous pouvez jumeler ceci au branchement
de tout autre équipement désiré.
1
MONITOR
OUT
VIDEO 2
INPUT
VIDEO 1
INPUT
VIDEO
(L)
AUDIO
(R)
S-VIDEO
MONO
Audio
TV
VCR
L
R
Video
In
Output
Switch
Out
3 4
Tableau de connexion murale de la
télévision par câble
Câble coaxial RF
(75 ohm)
Boîte de jonction
Si vous utilisez un convertisseur, laissez le
téléviseur syntonisé à la chaîne 3 ou 4, puis
changez de chaîne à l’aide du convertisseur.
W
Si vous utilisez une boîte de conversion, certaines fonctions dont la programmation, l'affichage et le verrouillage de vos canaux
préférées ne seront pas accessibles au moyen
de la télécommande.
W
Page 72

PAGE 12
1
Raccordement à un magnétophone
Repérez la prise d’antenne à l’arrière du téléviseur. Raccordez-la à
la prise de sortie RF derrière le
magnétoscope.
Ou, repérez les prises vidéo et
audio composites à l’arrière du
magnétoscope, puis raccordez-les
selon les directives fournies avec
l’équipement.
Vous pouvez raccorder les câbles
vidéo composite ou S-Video au
téléviseur. (Vous ne pouvez
cependant pas raccorder à la fois
les câbles vidéo composite et SVideo, car seul S-Video fonctionnera.
Pour obtenir la stéréophonie en mode télévision
par câble ou à partir du magnétoscope, vous
devez raccorder les câbles A/V ainsi que le
câble qui passe du magnétoscope au téléviseur.
Si vous désirez que les signaux vous parviennent sur la chaîne 3 ou 4, repérez la prise de
sortie du téléviseur sur le magnétoscope.
Raccordez-y un câble jusqu’à la prise d’entrée
de l’antenne à l’arrière du téléviseur.
MONITOR
OUT
VIDEO 2
INPUT
VIDEO 1
INPUT
VIDEO
(L)
AUDIO
(R)
S-VIDEO
MONO
In
Out
Audio
L
R
Video
3 4
S-Video
Output
Switch
Antenna
Câble coaxial RF
(75 ohm)
Fil rond de 75
ohm
Câbles A/V non fournis
avec le téléviseur
Magnétoscope
Panneau A/V arrière
Tableau de connexion murale de la
télévision par câble
W
W
Les lois sur le droit d’auteur aux États-Unis et
dans d’autres pays interdisent tout enregistrement, utilisation de listes de distribution
ou révisions non autorisées de tout programme télévisé, enregistré sur vidéocassette,
sur DVD ou par tout autre moyen. Le cas
échéant, la responsabilité civile ou criminelle
pourrait vous incomber.
Page 73

PAGE 13
Lecteur DVD
Glossaire
ColorStream HD VIDEO Certains équipements vidéo utilisent trois lignes distinctes (
Y, P B, PR) pour reproduire plus précisément les images. Le
guide qui accompagne votre équipement vidéo fournit des explications sur la manière dont ceci se rapporte à votre
équipement.
Repérez les prises audio et
ColorStream HD ou S-Vidéo à l’ar-
rière du lecteur DVD, puis raccordez-les en suivant les directives
fournies avec l’équipement.
Vous pouvez raccorder les câbles
vidéo à composante ou S-Vidéo à
votre téléviseur. Ne raccordez pas
à la fois le câble pour vidéo à
composante et S-Vidéo.
1
Entrée COLORSTREAM HD 1 (ou 2)
Y PB PR
1920X1080i
1280X720p
720X480p
720X480i
Prises entrée COLORSTREAM
HD sur le téléviseur
Y
PB
PR
Prises sortie vidéo
du lecteur DVD
Y
Y
Y
Y
Pb
B-Y
Cb
PB
Pr
R-Y
Cr
P
R
• Ports d’entrée COLORSTREAM HD
Raccordez les prises du lecteur DVD aux prises
d’entrée COLORSTREAM HD tel qu’indiqué ciaprès.
Câbles A/V non
fournis avec le
téléviseur
téléviseur
Lecteur DVD
Panneau A/V arrière
Certains lecteurs DVD de haut de
gamme font appel à un système
de reproduction de l’image
nommé « COLORSTREAM HD
Video. » Si votre lecteur DVD est
doté d’une sortie « COLORSTREAM
HD », utilisez les connecteurs
marqués « COLORSTREAM HD 1/2
» au panneau de connexions.
Veuillez consulter le guide fourni
avec votre lecteur DVD pour des
directives sur la bonne manière
de l’installer.
Dolby Digital
Audio
L R
Component Video
Out
S-Video
COLORSTREAM HD
INPUT 2
480i/480p/
480i/480p/
720p/1080i
720p/1080i
INPUT 1
AUDIO
MONITOR
VIDEO 2
INPUT
MONO
VIDEO 1
INPUT
S-VIDEO
VIDEO
(L)
AUDIO
(R)
OUT
Y
PB
PR
(L)
(R)
Page 74

PAGE 14
Entrée RBV-DTV/HDMI-DTV
Repérez les prises audio et Y, PB,
PR/RVB/HDMI (Y, P
B, PR/RVB/DVI) à l’ar-
rière du récepteur DBS (de radiodiffusion
par satellite), puis raccordez-les selon les
directives fournies avec votre équipement.
Raccordez ces câbles au téléviseur de la
manière indiquée ci-contre.
1
2
La télé numérique (DTV) présente une image optimale en mode 720p.
Sélectionnez RVB-DTV Source (source Rouge-Vert-Bleu- télé
numérique) et appuyez sur la touche ENTER de la télécommande.
Sélectionnez les options désirées (H-Position/Phase) au moyen des
flèches vers le HAUT et le BAS, puis utilisez les flèches vers la GAUCHE
et la DROITE pour effectuer les réglages requis.
COLORSTREAM HD
P
R
P
B
Y
(L)
AUDIO
(R)
480i/480p/
720p/1080i
480i/480p/
720p/1080i
INPUT 1
INPUT 2
Audio
L R
Component Out
Y Pb Pr
Dolby Digital
Out
Audio
L R
Dolby Digital
Out
HDMI INPUT
PC/DTV
(XGA/
480p/
720p/
1080i)
(L)
AUDIO
(R)
RGB INPUT
MONITOR
OUT
VIDEO 2
INPUT
VIDEO 1
INPUT
VIDEO
(L)
AUDIO
(R)
S-VIDEO
MONO
COLORSTREAM HD
P
R
P
B
Y
(L)
AUDIO
(R)
480i/480p/
720p/1080i
480i/480p/
720p/1080i
INPUT 1
INPUT 2
U
P
G
R
A
D
E
P
O
R
T
HD-SET TOP
1920x1080i
1280x720P
720x480P
RVB-DTV/HDMI-DTV
Signal
480i
480p
720p
1080i
COLORSTREAM HD1
Oui
Oui
Oui
Oui
COLORSTREAM HD2
Oui
Oui
Oui
Oui
RVB-DTV/HDMI-DTV
Non
Oui
Oui
Oui
Ce téléviseur prend en charge le protocole de protection du contenu
numérisé sur large bande (HDCP) en mode DVI-DTV (480p, 720p, 1080i).
Récepteur DBS
Récepteur DBS
Câbles A/V non
fournis avec le
téléviseur
Câbles A/V non
fournis avec le
téléviseur
au
W
W
W
Page 75

PAGE 15
Entrée RVB-PC/HDMI-PC
Repérez les prises audio et RVB ou DVI à
l’arrière de votre PC puis raccordez-les en
suivant les directives fournies avec votre
équipement.
Raccordez ces câbles au téléviseur, tel
qu’indiqué.
1
2
Format d’entrée de la synchronisation : signaux distincts
HDMI INPUT
PC/DTV
(XGA/
480p/
720p/
1080i)
(L)
AUDIO
(R)
RGB INPUT
MONITOR
OUT
VIDEO 2
INPUT
VIDEO 1
INPUT
VIDEO
(L)
AUDIO
(R)
S-VIDEO
MONO
COLORSTREAM HD
P
R
P
B
Y
(L)
AUDIO
(R)
480i/480p/
720p/1080i
480i/480p/
720p/1080i
INPUT 1
INPUT 2
U
P
G
R
A
D
E
P
O
R
T
MODE Résolution Horizontal Vertical
640x350 31.5KHz 70Hz
640x480 31.5KHz 60Hz
640x480 37.9KHz 72Hz
640x480 37.5KHz 75Hz
640x480 43.3KHz 85Hz
800x600 35.2KHz 56Hz
800x600 37.9KHz 60Hz
800x600 48.1KHz 72Hz
800x600 46.9KHz 75Hz
800x600 53.7KHz 85Hz
1024x768 48.4KHz 60Hz
1024x768 56.5KHz 70Hz
1024x768 60.0KHz 75Hz
1024x768 68.7KHz 85Hz
SVGA
VGA
Text
XGA
Entrée RVB-PC/HDMI-PC
Sélectionnez RVB-PC Source et appuyez sur ENTER. Sélectionnez
les options désirées (H-Position/V-Position/H-Size/V-Size/Phase)
à l’aide des flèches vers le HAUT et le BAS puis utilisez les flèches
vers la GAUCHE et la DROITE pour effectuer les réglages requis.
-
Position horizontale et verticale, taille horizontale et verticale : la
plage de réglage peut varier en fonction du mode d’entrée (résolution).
-
PHASE: sert à supprimer les bruits horizontaux et à effacer les
caractères ou à les rendre plus nets. La plage de réglage varie
entre 0~63.
Ordinateur
W
W
Parce que la technologie HDMI est en évolution constante, il se
peut que certains appareils raccordés par l’entremise du HDMI /IN
ne fonctionnent pas correctement avec ce téléviseur.
W
You need HDMI-to-DVI adapter cable to connect DVI device to this TV.
W
In HDMI-PC mode, H position, V pisition are only worked.
W
Page 76

PAGE 16
Installation de la sortie Écran
Votre téléviseur est doté d’une fonction
particulière de sortie audio vous permettant d’y raccorder un deuxième téléviseur
ou un deuxième écran.
Il suffit de raccorder le deuxième
téléviseur ou écran aux prises Audio/Video
MONITOR OUT situées à l’arrière du
téléviseur. Consultez le guide d’utilisation
fourni avec le deuxième téléviseur ou
écran pour obtenir de plus amples détails
sur les réglages d’entrée de ces appareils.
1
2
HDMI INPUT
MONITOR
OUT
VIDEO 2
INPUT
VIDEO 1
INPUT
VIDEO
(L)
AUDIO
(R)
S-VIDEO
MONO
Audio
Video
S-Video
U
P
G
R
A
D
E
P
O
R
T
Les sources d’entrée COLORSTREAM HD1 – 2,
RVB-DTV/PC et HDMI-DTV/PC correspondant à
l’image principale ne peuvent être utilisées avec
les sorties d’écran (Monitor Out).
Câbles A/V non fournis
avec le téléviseur
Deuxième téléviseur
W
Page 77

PAGE 17
Fonctions de la télécommande en mode TV
1 2 3
4 5 6
7 8 9
0
TV
MODE
LIGHT
POWER
TV/VIDEO
HDMI
RGB
VCR
CABLE
DVD
SAT
MUTE
SWAPPIPCH- PIPCH+
PIP
PIC SIZE
REC
STOP
PAUSE
REW
PLAY
FF
MENU EXIT
CC FREEZE
PIP INPUT
VOL
CH
SURF
SAP
VIDEO
C/S HD2C/S HD1
FRONT
SKIP
ENTER
CH RTN
SURF (NAVIGATION)
Permet de parcourir la liste
des canaux.
MENU
Affiche le menu principal
à l’écran.
EXIT (SORTIE)
Sert à effacer tout affichage à
l’écran et à revenir au mode
d’écoute de la télévision à
partir de n’importe quel
menu.
FREEZE (ARRÊT SUR IMAGE)
Sert à saisir l’image principale en
cours et à l’arrêter. Sub picture is
frozen in PIP/DW picture mode.
VIDEO (VIDÉO)
Sert à ajuster les réglages
prédéfinis en usine de l’image
en fonction de la pièce.
PIPCH+ (CANAUX PIP +)
Permet de passer à une chaîne
PIP supérieure.
SWAP (ÉCHANGE)
Sert à faire commuter l’image
à PIP, POP ou Twin à l’écran
principal.
MUTE (ASSOURDIR)
Permet d’activer et de désactiver le
son.
THUMBSTICK (MOLETTE)
Permet de naviguer les menus à
l’écran pour ajuster les réglages et les
préférences du système. Il suffit d’ac-
céder à une fonction à l’aide des
touche
F G
et de choisir l’option en
surbrillance accompagnée d’un .
TV/VIDEO (TÉLÉ / VIDÉO)
Choix de sources d’entrées dont :
Analog, Video 1, Video 2, Front
video, ColorStream HD1-2, RVB et
HDMI (RVB et HDMI).
MODE
Sert à choisir le mode d’exploita-
tion à distance : TV, VCR, Cable,
DVD et Satellite. Sélectionnez
d’autres modes d’exploitation pour
contrôler d’autres appareils au
moyen de la télécommande.
FRONT (AVANT)
Sélection du signal vidéo avant
lorsqu’un appareil tel un camés-
cope ou un appareil de jeu est
raccordé à la prise d’entrée vidéo
avant.
HDMI
Permet de choisir les sources
d’entrée HDMI-DTV et HDMIPC.
SAP (SPA – SECONDE
PISTE AUDIO)
Sélection Mono, Stéréo et SAP.
PIPCH-(CANAUX PIP)
Permet de passer à une
chaîne PIP inférieure.
PIP (I.D.I. - IMAGE DANS
L’IMAGE)
Permet de basculer entre les modes
I.D.I., POP (S.I. – Surimpression
d’images) et Twin (Images doubles).
ÉCLAIRAGE
Illumine les touches de télécommande.
TÉMOINS
Indique l’état d’activité de la
télécommande chaque fois
qu’on enfonce une touche.
D
E
Page 78

PAGE 18
Fonctions de la télécommande en mode TV
1 2 3
4 5 6
7 8 9
0
TV
MODE
LIGHT
POWER
TV/VIDEO
HDMI
RGB
VCR
CABLE
DVD
SAT
MUTE
SWAPPIPCH- PIPCH+
PIP
PIC SIZE
REC
STOP
PAUSE
REW
PLAY
FF
MENU EXIT
CC FREEZE
PIP INPUT
VOL
CH
SURF
SAP
VIDEO
C/S HD2C/S HD1
FRONT
SKIP
ENTER
CH RTN
POWER (MARCHE/ARRÊT)
Mise sous tension et hors tension
du téléviseur et de tout autre
appareil, selon le mode en cours.
CHANNEL UP/DOWN
(CHAÎNE PRÉCÉDENTE /
SUIVANTE)
Scrolls through available channels in EZ Scan memory.
CLAVIER NUMÉRIQUE
Sert à la sélection directe de canaux
et de fonctions de programmation.
ENTER (ENTRÉE)
Sert à sélectionner les
options en surbrillance dans
les menus et autres affichages
à l’écran.
REC, PAUSE, REW, FFWD,
PLAY, STOP (ENREG-
ISTREMENT, PAUSE, REBOBI-
NAGE, AVANCE RAPIDE,
ÉCOUTE, ARRÊT)
Sert au contrôle des fonctions du
téléviseur.
RÉGLAGE DU VOLUME
Permet de régler le volume du son .
PIC SIZE (TAILLE DE L’IM-
AGE)
Sert à modifier le format de l’im-
age ou le rapport hauteur/largeur.
SKIP (SAUT)
Lecture de CD : sélection des
chansons. Lecture DVD :
sélection des chapitres des
films.
C/S HD1,HD2
Sert à sélectionner des signaux
ColorStream HD provenant de sources
telles qu’un lecteur DVD ou un écran
HD.
ENTER (ENTRÉE)
Sert à choisir les options en sur-
brillance à partir des menus et
autres affichages à l’écran.
CH RTN (RETOUR DE
CHAÎNE)
Permet de revenir à la chaîne
précédente.
CC (SOUS-TITRES CODÉS)
Sert à choisir le mode sous-titres
codés aux fins d’affichage de l’in-
formation (à condition que l’émis-
sion le prenne en charge).
PIP INPUT (ENTRÉE I.D.I.)
Sert à sélectionner la source d’entrée des sous-images.
RVB (RVB – ROUGE,
VERT, BLEU)
Sélection des sources d’entrée RVB-DTV et RVB-PC.
D
E
Page 79

PAGE 19
Affichages à l’écran
Cette page décrit les options d’affichages et de bannières d’informations à l’écran.
10
Mute
Affichage du canal principal
Affiche le numéro de la chaîne
présentement écoutée.
Affichage I.D.I.
Données affichées
lorsque la fonction
I.D.I. est activée.
Volume
Affichage du niveau de l’audio pendant le réglage du son.
Assourdir
S’affiche
lorsque le son
est assourdi.
TV 13
CATV 16
11:17 AM
Page 80

PAGE 20
Commandes du panneau avant
1
2
4
3
6
7
8
5
POWER
MENU
ENTER (ENTRÉE – identique à la touche ENTER de
la télécommande)
VOLUME FORT / FAIBLE
CHAÎNE PRÉCÉDENTE / SUIVANTE
Témoin d’exploitation (Voir la page 7).
Témoin de l'ampoule (Voir la page 7).
Témoin de température (Voir la page 7).
1
2
3
4
5
6
7
8
Consulter les pages du menu pour des directives sur
la manière d’utiliser les menus à l’écran.
Les touches POWER, MENU, ENTER, VOLUME et CHANNEL fonctionnent de la même manière que celles de
la télécommande.
Si vous déplacez le téléviseur d’une pièce froide à
une pièce à température normale, il peut se faire de
la condensation dans le téléviseur. Attendre 6 à 7
heures avant de le mettre en marche pour qu’il s’ajuste à la température ambiante.
W
W
W
Page 81

PAGE 21
HDMI
- HDMITM, the HDMI logo and High-Definition Multimedia Interface are trademarks or registered trademarks of HDMI
Licensing.
- This set can receive the High-Definition Multimedia Interface (HDMI) or Input of Digital Visual Interface(DVI).
- This set supports HDCP (High-bandwidth Digital Contents Protection) Protocol for the set (480p, 720p, 1080i)
modes.
- When you Connect with HDMI Source Devices (DVD Player or Set Top Box or PC) supporting Auto HDMI function, automatically, support Plug & Play and then set the HDMI Source Devices (640 x 480p). After reading in
HDMI Source Devices using Display Data Channel(DDC) Protocol, EDID stored in the set is used. If HDMI Source
Devices not supported Auto HDMI is been, the Resolution is set, manually.
- To get the best picture quality, adjust the DVD Player or Set Top Box output resolution to 1280 x 720p.
- To get the best picture quality, adjust the PC graphics card to 1024 x 768, 60Hz.
- When Source Devices have DVI Output Connector, you must connect audio with separated cable.(Refer to <How
to connect>)
How to connect
1. When Source Devices (DVD Player or Set Top Box) support HDMI.
- If Source Devices have HDMI Output Connector, Source Devices connect to the set with HDMI Cable .(not supplied with the product).
- If Source Devices support Auto HDMI, automatically, Source Devices divert output resolution in 1280 x 720p. But
if the resolution has to be changed manually refer to the source devices owner manual.
- To get the best picture quality, adjust the DVD Player or Set Top Box output resolution to 1280 x 720p.
- Because HDMI sends Digital Video and Audio with one cable, need not especial Audio Cable for using HDMI Cable.
2. When Source Devices (DVD Player or Set Top Box) supports DVI.
- If Source Devices have DVI Output Connector, Source Devices connect to the set with HDMI to DVI Cable (not
supplied with the product).
- If Source Devices support Auto DVI, automatically, Source Devices divert output resolution in 1280 x 720p. But
if the resolution has to be changed manually refer to the source devices owner manual.
- To get the best picture quality, adjust the DVD Player or Set Top Box output resolution to 1280 x 720p.
- In this case, Audio use other cable. When Source Devices have Analog Audio Output Connector, RVB/DVI Audio
Input of the set connect to Audio Cable (not supplied with the product). And then you can listen to normal
Audio.
3. When PC supports DVI.
- If PC have DVI Output Connector, Source Devices connect to the set with HDMI to DVI Cable (not supplied with
the product).
- To get the best picture quality, adjust the PC graphics card to 1024 x 768, 60Hz.
- Use the the set’s HDMI (VIDEO) for video connections, depending on your PC connector.
- If the graphics card on the PC does not output analog RVB and DVI simultaneously, connect only one of either
RVB Input or HDMI Input to display the PC on the set.
- If he graphics card on the PC does output analog RVB and DVI simultaneously, change the input to either RVB
Input or HDMI Input; (the other mode is set to Plug and Play automatically by the set.)
- Then, make the corresponding audio connections. If using a sound card, adjust the PC sound as required.
- In this case, Audio use other cable. When PC (or sound card of PC) have Analog Audio Output Connector, RVB/DVI
Audio Input of the set connect to Analog Audio Cable (not supplied with the product). And then you can listen
to normal Audio.
Page 82

PAGE 22
How to use
1. Connect the HDMI Source Devices(DVD Player or Set Top Box or PC) and the set.
2. Turn on the display by pressing the POWER button on the set and HDMI Source Devices remote control.
3. Select HDMI Input source in Main Input option of PIP/DW menu.
4. Check the image on your set. There may be noise associated with the resolution, vertical pattern, contrast or
brightness in HDMI Source Devices. If noise is present, change the HDMI Source Devices to another resolution,
change the refresh rate or adjust the brightness and contrast on the menu until the picture is clear. If the refresh
rate of the PC graphics card can not changed, change the PC graphics card or consult the manufacturer of the PC
graphics card.
Notes:
- Depending on the graphics card, DOS mode may not work if you use a HDMI to DVI Cable.
- Avoid keeping a fixed image on the set screen for a long period of time. The fixed image may become permanently imprinted on the screen. Use the Orbiter screen saver when possible.
- When Source Devices connected HDMI Input, output PC Resolution(VGA, SVGA, XGA), Position, Size may not fit to
Screen. As shown the lower picture, press the MENU button to adjust the screen Position of the set and contact an
PC graphics card service center.
- When Source Devices connected HDMI Input output the set Resolution(480p, 720p, 1080i), the set Display fit
EIA/CEA-861-B Specification to Screen. If not, refer to the Manual of HDMI Source Devices or contact your service
center.
- In case HDMI Source Devices is not connected Cable or poor cable connection, "No Signal" OSD display in HDMI
Input. And In case of Video Resolution not supported the set output in HDMI Source Devices, "No Signal" OSD display. Refer to the Manual of HDMI Source Devices or contact your service center.
Référence
Échantillon de câble
Câble HDMI à DVI
(non fourni)
Câble audio analogique
(type RCA) (non fourni)
Câble audio analogique (stéréo à type RCA)
(non fourni)
Câble HDMI
(non fourni)
Page 83

PAGE 23
1.Consultez les pages 10 à 16 pour raccorder des équipements externes au téléviseur. Si c’est
déjà fait, branchez le téléviseur à une prise de courant standard de 120V, 60 Hz, non commutée
2. Si c’est déjà fait, enlevez la partie arrière de la télécommande pour y installer des piles
AA. Faites en sorte d’installer les piles correctement (vérifiez les symboles +/-).
3. Avec la télécommande en main, appuyez sur la touche POWER (de mise sous tension) pour
mettre le téléviseur en marche.
- Refaire la programmation automatique si l’affichage plasma est
déplacé dans un autre endroit.
- La programmation automatique fonctionne seulement avec ANT.
branché.
- Si l’indicatif du canal pour la diffusion hors antenne et télédistrib-
ution est doublé où différents canaux ont le même indicatif, presser les mêmes touches de nou-veau pour alterner entre eux.
: (par exemple, presser 17 pour aller au canal, presser 17 de nouveau pour aller à l’autre canal).
back of
remote
CHANNEL
PICTURE
AUDIO
TIMER
SPECIAL
SCREEN
PIP/DW
LOCK
Préc.
Menu
Démarrez
Déchiffrage G
Manuelle
Surf list
4. Presser la touche MENU puis la touche
D / E
pour sélectionner
menu CHANNEL.
5. Presser la touche
G puis la touche
D / E
pour sélectionner
A.PROG.
6. Press the ENTER button or the
G button to start Auto program
channel search.
Si l’on désire arrêter la programmation automatique, presser
ENTER. Seuls les canaux trouvés jusqu’à ce point seront mis
en mémoire.
télé générale sans fil
télédistribution
Mise en circuit du téléviseur
Attention: ne jamais jeter de piles dans les
flammes.
1 2 3
4 5 6
7 8 9
0
TV
MODE
LIGHT
POWER
TV/VIDEO
HDMI
RGB
VCR
CABLE
DVD
SAT
MUTE
SWAPPIPCH- PIPCH+
PIP
PIC SIZE
REC
STOP
PAUSE
REW
PLAY
FF
MENU EXIT
CC FREEZE
PIP INPUT
VOL
CH
SURF
SAP
VIDEO
C/S HD2C/S HD1
FRONT
SKIP
ENTER
CH RTN
6
4/5/6
5/6
4/5/6
3
4
6
Repérage de canal
Page 84

PAGE 24
Portée utile de la télécommande
Pour un rendement optimal, pointez la télécommande en ligne droite sur le téléviseur et assurez-vous qu’il
n’y ait aucun objet entre la télécommande et le téléviseur.
• Si la télécommande du téléviseur Toshiba ne vous per-
met pas d’exploiter toutes les fonctions des autres
appareils, utilisez alors de la télécommande correspondant à ces appareils.
• Jetez les piles dans des endroits désignés à cette fin.
• En disposant des piles, prêtez attention aux divers
aspects environnementaux.
• Ne pas mêler divers types de piles ni utiliser des piles
neuves avec des piles usées.
• Si la télécommande cesse de fonctionner correcte-
ment, ou si la portée utile diminue, remplacer les
deux piles par des piles neuves.
• Si les piles sont mortes ou que vous n’utilisez pas la
télécommande pendant longtemps, enlevez les piles
afin d’empêcher l’écoulement de l’acide dans le compartiment à piles.
W
1 2 3
4 5 6
7 8 9
0
TV
MODE
LIGHT
POWER
TV/VIDEO
DVI
RGB
VCR
CABLE
DVD
SAT
MUTE
SWAPPIPCH- PIPCH+
PIP
PIC SIZE
REC
STOP
PAUSE
REW
PLAY
FF
MENU EXIT
CC FREEZE
PIP INPUT
VOL
CH
SURF
SAP
VIDEO
C/S HD2C/S HD1
FRONT
SKIP
ENTER
CH RTN
12m
9m
30°
30°
Page 85

PAGE 25
Mise en Mise en mémoire
CHANNEL
PICTURE
AUDIO
TIMER
SPECIAL
SCREEN
PIP/DW
LOCK
Préc.
Menu
TV 2
Mémoire Marche
Synto 0
Déchiffrage
Manuelle G
Surf list
-L’on peut ajouter ou effacer des canaux de la mémoire.
1. Presser la touche MENU puis la touche
D / E
pour sélectionner menu CANAL.
2. Presser la touche
G , puis la touche
D / E
pour sélectionner Manuelle.
3. Presser la touche
G , puis la touche
D / E
pour sélectionner Mémoire.
4. Presser la touche
F / G pour sélectionner Marche ou Arrêt.
5. Presser ENTER pour sauvegarder.
suppr
suppr
essi
essi
on d
on d
u can
u can
al en cours
al en cours
- Cette fonction règle l’image en position stable lorsqu’elle est faible.
Remarques
• Pour annuler la mise en mémoire de l’accord précis, programmer de
nouveau le canal syntonisé par la Déchiffrage ou Manuelle.
• Si le canal réglé est mis en mémoire, la couleur de l’indicatif du
canal passe au jaune.
1. Presser la touche MENU puis la touche
D / E
pour sélectionner menu CANAL.
2. Presser la touche
G , puis la touche
D / E
pour sélectionner Manuelle.
3. Presser la touche
G , puis la touche
D / E
pour sélectionner Fine.
4. Presser la touch
F / G pour régler l’apparence de l’image selon ses préférences.
5. Presser ENTER pour sauvegarder.
Réglag
Réglag
e d
e d
e l’accor
e l’accor
d précis
d précis
0
MUTE
SWAPPIPCH- PIPCH+
PIP
PIC SIZE
REC
STOP
PAUSE
REW
PLAY
FF
MENU EXIT
CC FREEZE
PIP INPUT
VOL
CH
SURF
SAP
VIDEO
SKIP
ENTER
CH RTN
5
1/2/3
2/3/4
1/2/3
1
4
5
Page 86

PAGE 26
Surf list
- Les Surf Channels une fonction pratique permettant de balayer jusqu’à 8
canaux sans avoir à passer par tous les canaux entre les canaux.
1. Presser la touche MENU puis la touche
D / E
pour sélectionner menu CHAN-
NEL
.
2. Presser la touche
G , puis la touche
D / E
pour sélectionner Surf list.
3. Press the
G button and then use
D / E
button to select the first surf chan-
nel position.
4. Use the
F / G button to set the desired channel number for first surf chan-
nel.
5. Repeat steps 3 to 4 to memorize other surf channels.
6. Presser ENTER pour sauvegarder.
• Pour sélectionner le canal préféré, presser de façon répétitive la touche
SURF. 8 surf channels figurent à l’écran un par un.
CHANNEL
PICTURE
AUDIO
TIMER
SPECIAL
SCREEN
PIP/DW
LOCK
Préc.
Menu
- - - - - - - -
- - - - - - - -
- - - - - - - -
- - - - - - - -
- - - - - - - -
- - - - - - - -
- - - - - - - -
- - - - - - - -
Déchiffrage
Manuelle
Surf list G
0
MUTE
SWAPPIPCH- PIPCH+
PIP
PIC SIZE
REC
STOP
PAUSE
REW
PLAY
FF
MENU EXIT
CC FREEZE
PIP INPUT
VOL
CH
SURF
SAP
VIDEO
SKIP
ENTER
CH RTN
6
1~4
2/3/4
1~4
1
4
6
Page 87

PAGE 27
Mode image
Réglez l’image en fonction de vos préférences et de votre manière de visionner.
- Vous pouvez régler l’image manuellement (contraste, Brillance, couleur, etc.).
- Vous pouvez également prédéterminer une valeur à partir du menu Mode Image en fonction de la catégorie de programme.
1. Presser la touche MENU puis la touche
D / E
pour sélectionner menu PICTURE.
2. Presser la touche G , puis la touche
D / E
pour sélectionner Mode image.
3.
Presser la touche G , puis la touche
D / E
pour sélectionner Heure,
Standard, Soirée, Film, Jeu vidéo ou Sports sont préréglées et program-
mées pour une bonne qualité d’image à ‘usine et ne peuvent être modifiées.
4. Presser ENTER pour sauvegarder.
CHANNEL
PICTURE
AUDIO
TIMER
SPECIAL
SCREEN
PIP/DW
LOCK
Préc.
Menu
Heure
Standard
Soirée
Film
Jeu vidéo
Sports
Arrêt
Mode image G
Température couleur
ACM
Contraste 100
Brillance 55
Couleur 55
Netteté 60
Teinte 0
0
MUTE
SWAPPIPCH- PIPCH+
PIP
PIC SIZE
REC
STOP
PAUSE
REW
PLAY
FF
MENU EXIT
CC FREEZE
PIP INPUT
VOL
CH
SURF
SAP
VIDEO
SKIP
ENTER
CH RTN
4
1/2/3
2/3
1/2/3
1
• Heure (Lumière du jour) Sert à augmenter les niveaux des réglages
de l’image en fonction des conditions d’éclairage.
Standard (Éclairage normal) Sert à remettre les niveaux de réglage
de l’image à l’état initial.
Soirée (Nuit) Sert à réduire les niveaux de réglage de l’image en
fonction de l’éclairage le soir et la nuit.
Film Sert à ajuster les réglages vidéo en fonction de l’écoute d’un
film. Les niveaux de contraste et de définition sont réduits pour que
les couleurs de l’image soient chaudes et adoucies.
Jeu vidéo Sert à fixer les réglages à des niveaux appropriés pour les
jeux. Les niveaux de contraste et de couleur sont réduits afin d’élimin-
er les reflets.
Sports Sert à fixer les réglages à des niveaux appropriés pour les
événements sportifs. Les niveaux de contraste et de couleur sont aug-
mentés pour que les scènes de jeu apparaissent claires et brillantes.
Arrêt Permet de régler l’image en fonction de ses préférences.
4
Page 88

PAGE 28
Réglage de contrôle automatique de couleur
-Pour initialiser la valeur réglée, sélectionner Normal.
1. Presser la touche MENU puis la touche
D / E
pour sélectionner menu PICTURE.
2. Presser la touche G , puis la touche
D / E
pour sélectionner Température
couleur
.
3. Presser la touche
G , puis la touche
D / E
pour sélectionner Froide ,
Normal
ou Chaude.
4. Presser ENTER pour sauvegarder.
CHANNEL
PICTURE
AUDIO
TIMER
SPECIAL
SCREEN
PIP/DW
LOCK
Préc.
Menu
Froide
Normal
Chaude
Personnel
Rouge 0
Vert 0
Bleu 0
Mode image
Température couleur G
ACM
Contraste 100
Brillance 55
Couleur 55
Netteté 60
Teinte 0
Contrôle de température de couleur manuel
(option Personnel )
-L’on peut régler le rouge, le vert et le bleu à toute température de couleur désirée.
1.
Presser la touche MENU puis la touche
D / E
pour sélectionner menu PICTURE.
2. Presser la touche G , puis la touche
D / E
pour sélectionner Température
couleur
.
3. Presser la touche G , puis la touche
D / E
pour sélectionner Arrêt .
4. Presser la touche G , puis la touche
D / E
pour sélectionner Rouge , Vert ou
Bleu .
5. Presser la touche F / G pour effectuer le réglage.
• La gamme de réglage du Rouge , Vert ou Bleu va de -30 à +30.
6. Presser ENTER pour sauvegarder.
Contrôle de température de couleur
0
MUTE
SWAPPIPCH- PIPCH+
PIP
PIC SIZE
REC
STOP
PAUSE
REW
PLAY
FF
MENU EXIT
CC FREEZE
PIP INPUT
VOL
CH
SURF
SAP
VIDEO
SKIP
ENTER
CH RTN
1/2/3
1/2/3
1
2/3
4
0
MUTE
SWAPPIPCH- PIPCH+
PIP
PIC SIZE
REC
STOP
PAUSE
REW
PLAY
FF
MENU EXIT
CC FREEZE
PIP INPUT
VOL
CH
SURF
SAP
VIDEO
SKIP
ENTER
CH RTN
1~4
1~4
1
2~5
6
5
4
6
Page 89

PAGE 29
AACM (A
CM (A
ctive Color M
ctive Color Mananagagememenent)t)
- L’on peut régler le contraste, la brillance, la couleur, la netteté et la teinte
selon ses préférences.
1. Presser la touche MENU puis la touche
D / E
pour sélectionner menu PICTURE.
2.
Presser la touche
G , puis la touche
D / E
pour sélectionner l’option image
désirée. (Contraste , Brillance , Couleur , Netteté , Teinte ).
3. Presser la touche G , puis la touche F / G pour effectuer le réglage.
4. Presser ENTER pour sauvegarder.
- Adjust the ACM to select the desired skin colour option.
- This function works in the following mode:
TV, Video 1-2, Front Video Colorstream HD 1-2, RVB-DTV, HDMI-DTV.
1. Presser la touche MENU puis la touche
D / E
pour sélectionner menu PICTURE.
2.
Presser la touche
G , puis la touche
D / E
pour sélectionner ACM.
3.
Presser la touche G , puis la touche F / G pour effectuer le réglage.
4. Presser ENTER pour sauvegarder.
CHANNEL
PICTURE
AUDIO
TIMER
SPECIAL
SCREEN
PIP/DW
LOCK
Préc.
Menu
Ton de chair 0
Tons verts 0
Tons bleus 0
Mode image
Température couleur
ACM G
Contraste 100
Brillance 55
Couleur 55
Netteté 60
CHANNEL
PICTURE
AUDIO
TIMER
SPECIAL
SCREEN
PIP/DW
LOCK
Préc.
Menu
Mode image
Température couleur
ACM
Contraste 100 G
Brillance 55
Couleur 55
Netteté 60
Teinte 0
0
MUTE
SWAPPIPCH- PIPCH+
PIP
PIC SIZE
REC
STOP
PAUSE
REW
PLAY
FF
MENU EXIT
CC FREEZE
PIP INPUT
VOL
CH
SURF
SAP
VIDEO
SKIP
ENTER
CH RTN
4
1/2
2/3
1/2
1
3
4
Con
Con
trôle m
trôle manan
uel d
uel d
e l’im
e l’imagag
e (
e ( option Arret ))
Page 90

PAGE 30
Mode Sonore
- Sert à choisir les options manuellement.
- Sert à parcourir les modifications au niveau sonore pendant les messages publicitaires, puis à ajuster le son en fonction du niveau sonore du programme
télévisé en cours.
1. Presser la touche MENU puis la touche
D / E
pour sélectionner menu AUDIO.
2. Presser la touche G , puis la touche
D / E
pour sélectionner Son stable.
3.
Presser la touche G , puis la touche
D / E
pour sélectionner Marche ou Arrêt.
4. Presser ENTER pour sauvegarder.
CHANNEL
PICTURE
AUDIO
TIMER
SPECIAL
SCREEN
PIP/DW
LOCK
Préc.
Menu
Normal
Stade
Nouvelles
Musique
Théâtre
Arrêt
Mode sonore
G
Son stable
Ambiophonie
Équilibre 0
Aiguës 50
Graves 50
CHANNEL
PICTURE
AUDIO
TIMER
SPECIAL
SCREEN
PIP/DW
LOCK
Préc.
Menu
Marche
Arrêt
Mode sonore
Son stable G
Ambiophonie
Équilibre 0
Aiguës 50
Graves 50
1. Presser la touche MENU puis la touche
D / E
pour sélectionner menu AUDIO.
2. Presser la touche G , puis la touche
D / E
pour sélectionner Mode sonore.
3. Presser la touche G , puis la touche
D / E
pour sélectionner l’option réglage de l’apparence
de l’image
.
4. Presser ENTER pour sauvegarder.
• Normal Sert à remettre les niveaux sonores à l’état initial.
Stade Sert à accentuer les sons à fréquence élevée et les sont ambio-
phoniques avant pour recréer l’ambiance d’un stade.
Nouvelles Sert à augmenter les sons à fréquence élevée pour accentuer la
voix.
Musique Sert à augmenter les sons de haute et de basse fréquence afin d’ac-
centuer le son des instruments de musique.
Théâtre (Cinéma) Sert à accentuer les sons de haute et de basse fréquence
ainsi que les sons ambiophoniques avant afin de créer la sensation d’être au
cinéma.
Arrêt Sert à régler les options sonores au menu Audio manuellement.
4
1/2/3
2/3
1/2/3
1
3
4
Son stable
ENTER
VOL
MUTE
SAP
PIP
CC FREEZE
PIC SIZE
MENU EXIT
PLAY
PAUSE
REW
CH RTN
0
CH
SURF
VIDEO
SWAPPIPCH- PIPCH+
PIP INPUT
REC
STOP
FF
SKIP
Page 91

PAGE 31
Ambiophonie (Tonalité ambiophonique avant)
CHANNEL
PICTURE
AUDIO
TIMER
SPECIAL
SCREEN
PIP/DW
LOCK
Préc.
Menu
Mode sonore
Son stable
Ambiophonie
Équilibre 0
Aiguës 50
Graves 50
L R
1. Presser la touche MENU puis la touche
D / E
pour sélectionner menu AUDIO.
2. Presser la touche G , puis la touche
D / E
pour sélectionner l’option son
désirée (Équilibre , Aiguës , Graves).
3. Presser la touche G , puis la touche F / G pour effectuer le réglage.
4. Presser ENTER pour sauvegarder.
CHANNEL
PICTURE
AUDIO
TIMER
SPECIAL
SCREEN
PIP/DW
LOCK
Préc.
Menu
SRS TSXT
3D Echo system
Arrêt
Mode sonore
Son stable
Ambiophonie G
Équilibre 0
Aiguës 50
Graves 50
1. Presser la touche MENU puis la touche
D / E
pour sélectionner menu AUDIO.
2.
Presser la touche
G , puis la touche
D / E
pour sélectionner Ambiophonie.
3. Presser la touche
G , puis la touche
D / E
pour sélectionner SRS TSXT ou 3D
Echo system
.
4. Presser ENTER pour sauvegarder.
- Sert à augmenter les sons ambiophoniques avant afin de créer des sons plus ouverts et étendus.
• Brillance (Luminance) Sert à ajuster les niveaux de blanc et de lumière de l’im-
age.
• Couleur Sert à ajuster l’intensité des couleurs.
• Netteté (Définition) Sert à ajuster le degré de netteté des bords entre les
zones pâles et foncées de l’image. Plus le degré est faible, plus l’image est
adoucie.
4
1/2/3
2/3
1/2/3
1
3
4
Contrôle sonore manuel
-L’on peut régler les aiguës, basses et équilibre aux niveaux désirés.
ENTER
VOL
MUTE
SAP
PIP
CC FREEZE
PIC SIZE
MENU EXIT
PLAY
PAUSE
REW
FF
CH RTN
0
CH
SURF
VIDEO
SWAPPIPCH- PIPCH+
PIP INPUT
REC
STOP
SKIP
Page 92

PAGE 32
Sélection des signaux
MUTE
SWAPPIPCH- PIPCH+
PIP
PIC SIZE
MENU EXIT
CC FREEZE
PIP INPUT
VOL
CH
SURF
SAP
VIDEO
SAP
1. Presser l’a touche SAP de façon répétitive.
•Sélectionner le mode audio monophonique si le signal n’est pas clair
ou si les signaux de réception sont faibles.
• Les modes Stéréo et SAP sont disponibles seulement si compris dans
le signal de diffusion.
Mono Stéréo
SAP
- Le téléviseur peut recevoir les programmes stéréo multi-audio et SAP (2 versions) accompagnant le programme stéréo, si le diffuseur transmet un signal sonore additionnel en plus du signal d’origine.
- Mono: la langue primaire sort des haut-parleurs gauche et droit. Le mode est monophonique.
-Stéréo: la langue primaire sort des haut-parleurs gauche et droit. Le mode est stéréophonique.
- SAP: la langue seconde sort des haut-parleurs gauche et droit.
Page 93

PAGE 33
Réglage de la pendule
CHANNEL
PICTURE
AUDIO
TIMER
SPECIAL
SCREEN
PIP/DW
LOCK
Préc.
Menu
Pendule G
Heure arrêt
Heure marche
Minuterie
Arrêt auto
- Pour régler automatiquement l’heure par l’entremise du signal de diffusion PBS.
- Le signal de canal PBS comprend des informations sur l’heure appropriée.
-Régler la pendule manuellement, si l’heure en cours est incorrecte par la fonction
automatique.
0
MUTE
SWAPPIPCH- PIPCH+
PIP
PIC SIZE
REC
STOP
PAUSE
REW
PLAY
FF
MENU EXIT
CC FREEZE
PIP INPUT
VOL
CH
SURF
SAP
VIDEO
SKIP
ENTER
CH RTN
7
1~6
2~6
1~6
1
Auto
Manuelle
Fuseau
Auto
Chaîne PBS
TV 2
Heure avancée
Auto
1. Presser la touche MENU puis la touche
D / E
pour sélectionner menu TIMER.
2. Presser la touche G , puis la touche
D / E
pour sélectionner Pendule .
3. Presser la touche G , puis la touche
D / E
pour sélectionner Auto.
4. Presser la touche G , puis la touche
D / E
pour sélectionner la zone horaire
dans la région. Les options sont: Auto, Nfld (New Foundland), Atlantic,
E.S.T.(Eastern Standard Time: heure de l’Est), C.S.T. (Central Standard Time:
heure centrale),
M.S.T. (Mountain Standard Time: : heure des Rocheuses) et
P.S.T. (Pacific Standard Time: heure du Pacifique).
5. Presser la touche
G , puis la touche
D / E
pour régler le Chaîne PBS.
6. Presser la touche G , puis la touche
D / E
pour régler le Heure avancée
Auto, Arrêt ou Marche, selon si la région observe le changement horaire.
7. Presser ENTER pour sauvegarder.
7
Page 94

PAGE 34
Réglage de la minuterie marche-arrêt
CHANNEL
PICTURE
AUDIO
TIMER
SPECIAL
SCREEN
PIP/DW
LOCK
Préc.
Menu
Arrêt
Marche
6 : 30 AM
Volume 17
Ca. TV 2
Pendule
Heure arrêt
Heure marche G
Minuterie
Arrêt auto
- La fonction minuterie ne peut être actionnée que si l’heure a été réglée.
- La fonction minuterie arrêt est avant la fonction minuterie marche si elles sont réglées
ensemble.
- Le téléviseur doit être en mode attente pour que la heure marche fonctionne.
- À moins qu’une touche ne soit pressée dans un délai de 2 heures après avoir actionné la
fonction heure marche, l’appareil se met automatiquement hors circuit.
1.
Presser la touche MENU puis la touche
D / E
pour sélectionner menu HEURE.
2.
Presser la touche
G , puis la touche
D / E
pour sélectionner Heure arrêt ou
Heure marche.
3. Presser la touche G , puis la touche
D / E
pour sélectionner Défile.
• Pour annuler la fonction
Heure marche / arrêt , sélectionner Pause.
4. Presser la touche
G , puis la touche
D / E
pour sélectionner l’heure en cours.
5. Presser la touche
G , puis la touche
D / E
pour sélectionner le minutes.
6. Pour seulement fonction
Heure marche :
Press the
G button and then use
D / E
pour sélectionner le volume désiré.
Press the
G button and then use
D / E
pour sélectionner le canal pour la mise
en circuit.
7. Presser ENTER pour sauvegarder.
0
MUTE
SWAPPIPCH- PIPCH+
PIP
PIC SIZE
REC
STOP
PAUSE
REW
PLAY
FF
MENU EXIT
CC FREEZE
PIP INPUT
VOL
CH
SURF
SAP
VIDEO
SKIP
ENTER
CH RTN
7
1~6
2~6
1~6
1
7
Page 95

PAGE 35
Réglage de la minuterie de mise en veille
CHANNEL
PICTURE
AUDIO
TIMER
SPECIAL
SCREEN
PIP/DW
LOCK
Prev.
Menu
Marche
Arrêt
Pendule
Heure arrêt
Heure marche
Minuterie
Arrêt auto G
- Cette fonction permet une mise hors circuit automatique du TV dans un délai
d’environ 10 minutes s’il n’ a pas de signal d’entée.
1. Presser la touche MENU puis la touche
D / E
pour sélectionner menu TIMER.
2. Presser la touche G , puis la touche
D / E
pour sélectionner Arrêt auto.
3. Presser la touche G , puis la touche
D / E
pour sélectionner Marche o Arrêt.
4.
Presser ENTER pour sauvegarder.
- Cette fonction met automatiquement l’appareil hors circuit après une
durée réglée.
1. Presser la touche MENU puis la touche
D / E
pour sélectionner menu TIMER.
2. Presser la touche G , puis la touche
D / E
pour sélectionner Minuterie.
3. Press the G button and then use
D / E
button to choose a preset turn off time.
4.
Presser ENTER pour sauvegarder.
CHANNEL
PICTURE
AUDIO
TIMER
SPECIAL
SCREEN
PIP/DW
LOCK
Préc.
Menu
10 min
20 min
30 min
60 min
90 min
120 min
180 min
240 min
Arrêt
Pendule
Heure arrêt
Heure marche
Minuterie G
Arrêt auto
0
MUTE
SWAPPIPCH- PIPCH+
PIP
PIC SIZE
REC
STOP
PAUSE
REW
PLAY
FF
MENU EXIT
CC FREEZE
PIP INPUT
VOL
CH
SURF
SAP
VIDEO
SKIP
ENTER
CH RTN
4
1/2/3
2/3
1/2/3
1
4
Arrêt Automatique
Page 96

PAGE 36
Langue des menus à l’écran
- Le téléviseur peut être programmé pour être utilisé uniquement avec la télé
commande.
1. Presser la touche MENU puis la touche
D / E
pour sélectionner menu SPECIAL.
2. Presser la touche G puis la touche
D / E
pour sélectionner Verrouillage.
3. Presser la touche G puis la touche
D / E
pour sélectionner Marche ou Arrêt.
4.
Presser ENTER pour sauvegarder.
CHANNEL
PICTURE
AUDIO
TIMER
SPECIAL
SCREEN
PIP/DW
LOCK
Préc.
Menu
Marche
Arrêt
Langage(Language)
Verrouillage G
Sous-Titres
Sous-Titr/TX
Sélectionnez la langue des menus à l’écran : English, Español et Français.
1. Presser la touche MENU puis la touche
D / E
pour sélectionner menu SPECIAL.
2. Presser la touche G puis la touche
D / E
pour sélectionner Langage.
3. Presser la touche G button and then use
D/ E
pour sélectionner la langue désirée.
Depuis ce point, l’affichage à l’écran figurera dans la langue choisie.
4. Presser ENTER pour sauvegarder.
CHANNEL
PICTURE
AUDIO
TIMER
SPECIAL
SCREEN
PIP/DW
LOCK
Préc.
Menu
English
Español
Français
Langage(Language) G
Verrouillage
Sous-Titres
Sous-Titr/TX
0
MUTE
SWAPPIPCH- PIPCH+
PIP
PIC SIZE
REC
STOP
PAUSE
REW
PLAY
FF
MENU EXIT
CC FREEZE
PIP INPUT
VOL
CH
SURF
SAP
VIDEO
SKIP
ENTER
CH RTN
4
1/2/3
2/3
1/2/3
1
4
Verrouillage
- La fonction de verrouillage sert à désactiver les commandes du panneau avant
afin d’empêcher le visionnement non autorisé.
- Le téléviseur est programmé de manière à se rappeler la dernière option réglée
même si vous l’éteignez.
Page 97

PAGE 37
Réglage des sous-titres
Utilisation des sous-titr
Utilisation des sous-titr
es
es
2. Lecture d’une cassette usée, ou illégale.
3. Les signaux aléatoires et forts des voitures ou des avions
peu-vent causer une interférence avec le signal télé.
4. Le signal depuis l’antenne est faible.
5. Le programme n’est pas doté de sous-titres lorsqu’il a été
pro-duit, transmis ou enregistré.
La fonction de sous-titres est un procédé qui convertit la por-
tion audio d’un programme télé en mots écrits qui figurent à
l’écran. Ils permettent au spectateur de lire les dialogues à
l’écran.
Utilisation des sous-titres
Les sous-titres donnent les dialogues et les narrations des
pro-grammes télé. Pour les programmes préenregistrés, le dia-
logue peut être arrangé à l’avance en sous-titres. Il est possible de faire des sous-titres pour les programmes en direct en
utilisant un processus appelé sous-titres en temps réel, lequel
créé des sous-titres instantanément. Ceci est habituellement
fait par des professionnels qui utilisent un système de sténo-
graphie et un ordinateur pour traduire en anglais.
Les sous-titres sont un système efficace pour les malentendants et peuvent aussi
aider à apprendre une langue.
• L’illustration à droite montre
un sous-titres.
Conseils
• Les programmes ne sont pas tous diffusés avec les signaux
de sous-titres.
• Les stations télé diffusent parfois quatre signaux de soustitres différents pour le même canal. En sélectionnantg CC
1 à CC 2,
l’on peut choisir le signal désiré.
CC 1 est
habituellement le signal doté de sous-titres, tandis que
autre mode peut don-ner une démonstration ou de l’infor-
mation.
• Le téléviseur peut ne pas capter les signaux sous-titres dans
les cas suivants.
• ALLUMAGE:
L’image peut vaciller, avoir des points
noirs ou des traits horizontaux.
Habituellement causés par une interférence des systèmes d’allumage des
voitures, les éclairages au néon, des
perceuses électriques et autres
appareils électriques.
• IMAGE-FANTÔME:
Elles sont créées lorsque le signal télé
se sépare et suit deux chemins ; un
étant un chemin direct et l’autre est
réfléchi sur les édifices élevés, les montagnes ou d’autres objets. Modifier la
direction ou la position de l’antenne
peut améliorer la réception.
• NEIGE:
Si le récepteur est situé dans des
endroits où le signal est faible, l’image
peut présen-ter de petits points. Il peut
être nécessaire d’installer une antenne
spéciale pour améliorer l’image.
FOLLOW ME
1. Mauvaises conditions de réception :
1.
Presser CC pour sélectionner sous-titres:
Off ou On.
2. Presser ENTER pour sauvegarder.
• You can also adjust Captions in the PICTURE menu.
SWAPPIPCH- PIPCH+
PIP
PIC SIZE
MENU EXIT
CC FREEZE
PIP INPUT
CC
Utilisation de la touche CC (Sous-Titres / Texte)
Page 98

PAGE 38
CHANNEL
PICTURE
AUDIO
TIMER
SPECIAL
SCREEN
PIP/DW
LOCK
Préc.
Menu
CC1
CC2
CC3
CC4
Texte1
Texte2
Texte3
Texte4
Langage(Language)
Verrouillage
Sous-Titres
Sous-Titr/TX G
1. Presser la touche MENU puis la touche
D / E
pour sélectionner menu SPECIAL.
2. Presser la touche G puis la touche
D / E
pour sélectionner Sous-Titr /TX.
3. Presser la touche
G puis la touche
D / E
pour sélectionner caption: CC1 , CC2 , CC3
, CC4
, Texte1 , Texte2 , Texte3 ou Texte4 .
• Sous-titre
Terme utilisé pour les mots qui défilent à l'écran du téléviseur; habituellement
par partie son du programme, offerte comme service pour les malentendants.
• Texte
Terme utilisé pour les mots apparaissant dans un grand cadre noir et couvrant
la majorité de l'écran; habituellement des messages diffusés par le télédiffuseur.
4. Presser ENTER pour sauvegarder.
Sélection du mode Sous-titre / Texte
0
MUTE
SWAPPIPCH- PIPCH+
PIP
PIC SIZE
REC
STOP
PAUSE
REW
PLAY
FF
MENU EXIT
CC FREEZE
PIP INPUT
VOL
CH
SURF
SAP
VIDEO
SKIP
ENTER
CH RTN
4
1/2/3
2/3
1/2/3
1
Sélectionnez le mode d’affichage des sous-titres lorsque la
programmation le prend en charge.
Le mode Sous-titre affiche l’information à peu près n’importe où à l’écran. Il sert généralement à afficher les
dialogues correspondant à la programmation.
Le mode Texte affiche généralement l’information au bas
de l’écran. Il sert à des services de données, non reliés à
la programmation.
4
Page 99

PAGE 39
Réglage automatique
CHANNEL
PICTURE
AUDIO
TIMER
SPECIAL
SCREEN
PIP/DW
LOCK
Préc.
Menu
Config. auto
Config. manuelle G
Allongement
Cinema
NR
Réajuste
- Si l’image n’est pas claire après le réglage automatique et surtout si les carac-tères vibrent, régler
la Phase manuellement.
- H position or V position function only work for RVB-DTV/HDMI-DTV/HDMI-PC mode.
- To correct the screen size, adjust H Size, V Size, H Position, V Position.
1. Presser la touche MENU puis la touche
D / E
pour sélectionner menu SCREEN.
2. Presser la touche G puis la touche
D / E
pour sélectionner Config.manuelle.
3. Presser la touche G puis la touche
D / E
pour sélectionner Phase.
4. Presser la touche F / G pour effectuer le réglage.
• La gamme de Phase varie de 0 à 63.
5. Presser ENTER pour sauvegarder.
Phase 0
H Size 0
V Size 0
H Position 0
V Position 0
- Mode RVB (PC) seulenent.
- Pour régler automatiquement la position de l’image et élimine toute vibration de l’image.
- Si l’image n’est pas encore correcte, le téléviseur fonctionne correctement, mais doit être
encore réglé.
- Config.auto ne sont pas actives en mode HDMI.
1. Presser la touche MENU puis la touche
D / E
pour sélectionner menu SCREEN.
2. Presser la touche G puis la touche
D / E
pour sélectionner Config.auto.
3. Presser la touche G pour activer la configuration automatique.
• Lorsque Auto config. a terminé, OK figure à l’écran.
• La position de l’image est automatiquement réglée.
4. Si l’image doit être réglée après le réglage automatique en RVB (PC), l’on peut régler
la Config.manuelle.
CHANNEL
PICTURE
AUDIO
TIMER
SPECIAL
SCREEN
PIP/DW
LOCK
Préc.
Menu
Régler
Config. auto G
Config. manuelle
Allongement
Cinema
NR
Réajuste
1/2
1/2
1
2/3
0
MUTE
SWAPPIPCH- PIPCH+
PIP
PIC SIZE
REC
STOP
PAUSE
REW
PLAY
FF
MENU EXIT
CC FREEZE
PIP INPUT
VOL
CH
SURF
SAP
VIDEO
SKIP
ENTER
CH RTN
1/2/3
1/2/3
1
2/3/4
5
4
5
Configuration manuelle
0
VOL
CC FREEZE
CH
CH RTN
SURF
VIDEO
SWAPPIPCH- PIPCH+
PIP INPUT
ENTER
MUTE
SAP
PIP
PIC SIZE
MENU EXIT
PLAY
PAUSE
REW
REC
STOP
FF
SKIP
Page 100

PAGE 40
Allongement
CHANNEL
PICTURE
AUDIO
TIMER
SPECIAL
SCREEN
PIP/DW
LOCK
Préc.
Menu
Marche
Arrêt
Config. auto
Config. manuelle G
Allongement
Cinema
NR
Réajuste
- Réglez téléviseur de manière à obtenir une image optimale pendant le visionnement d’un film.
- En mode Cinema «étirement 3-2 » (1) ou en mode Cinéma « correction », le téléviseur ajuste
les 24 cadres du film à 30 cadres en vidéo aux fins d’affichage (fonction offerte uniquement en
mode Composant 480i).
1. Presser la touche MENU puis la touche
D / E
pour sélectionner menu SCREEN.
2. Presser la touche G puis la touche
D / E
pour sélectionner Cinema.
3. Presser la touche G puis la touche
D / E
pour sélectionner Marche ou Arrêt.
4. Presser ENTER pour sauvegarder.
- Si 4 :3 demeure à l’écran pendant une longue période, une image fixe peut demeurer.
-Régler chaque ratio aspect pour les sources TV, Video, ColorStream HD 480i.
- Utiliser 4:3 ou 16:9 pour d’autres sources RVB-PC et HDMI-PC.
- Horizon n’est pas disponible pour ColorStream HD 1-2 (480p,720p,1080i), DTV
(480p,720p,1080i).
1. Presser la touche PIC SIZE de façon répétitive pour sélectionner le format d’image
désiré. L’on peut aussi régle PIC SIZE au menu ECRAN.
•
4:3
Pour choisir lorsque l’on veut voir une image dans son rapport de 4:3, avec des barres figurant de chaque côté.
• 16:9
Pour choisir lorsque l’on veut régler l’image horizontalement, en proportion linéaire
pour remplir tout l’écran.
• Theater wide 1
lorsque vous désirez ajuster l’image en sens non linéaire. L’image en est
plus élargie aux extrémités de gauche et de droite afin de créer une vue
spectaculaire.
• Theater wide 2
- lorsque vous désirez visionner l’image sans altérations. Les parties
supérieure et inférieure de l’écran en seront cependant rognées.
SWAPPIPCH- PIPCH+
PIP
PIC SIZE
MENU EXIT
CC FREEZE
PIP INPUT
PIC SIZE
0
MUTE
SWAPPIPCH- PIPCH+
PIP
PIC SIZE
REC
STOP
PAUSE
REW
PLAY
FF
MENU EXIT
CC FREEZE
PIP INPUT
VOL
CH
SURF
SAP
VIDEO
SKIP
ENTER
CH RTN
1/2/3
1/2/3
1
2/3
4
4
Réglage du mode Cinéma
• Cette caractéristique fonctionne seulement en mode Vidéo, S-Vidéo
et Colorstream HD 480i.
 Loading...