

Toshiba 36HFX73, 32HFX73 Owner’s Manual
[
Dear Customer,
Thank you for purchashtg this Toshiba TV.This manual will
help you use the many exciting features of your new TV.
Before operating the TV, please read this manual
completely, and keep it nearby for future reference.
JtMakesADifference
WhereYourTVStands
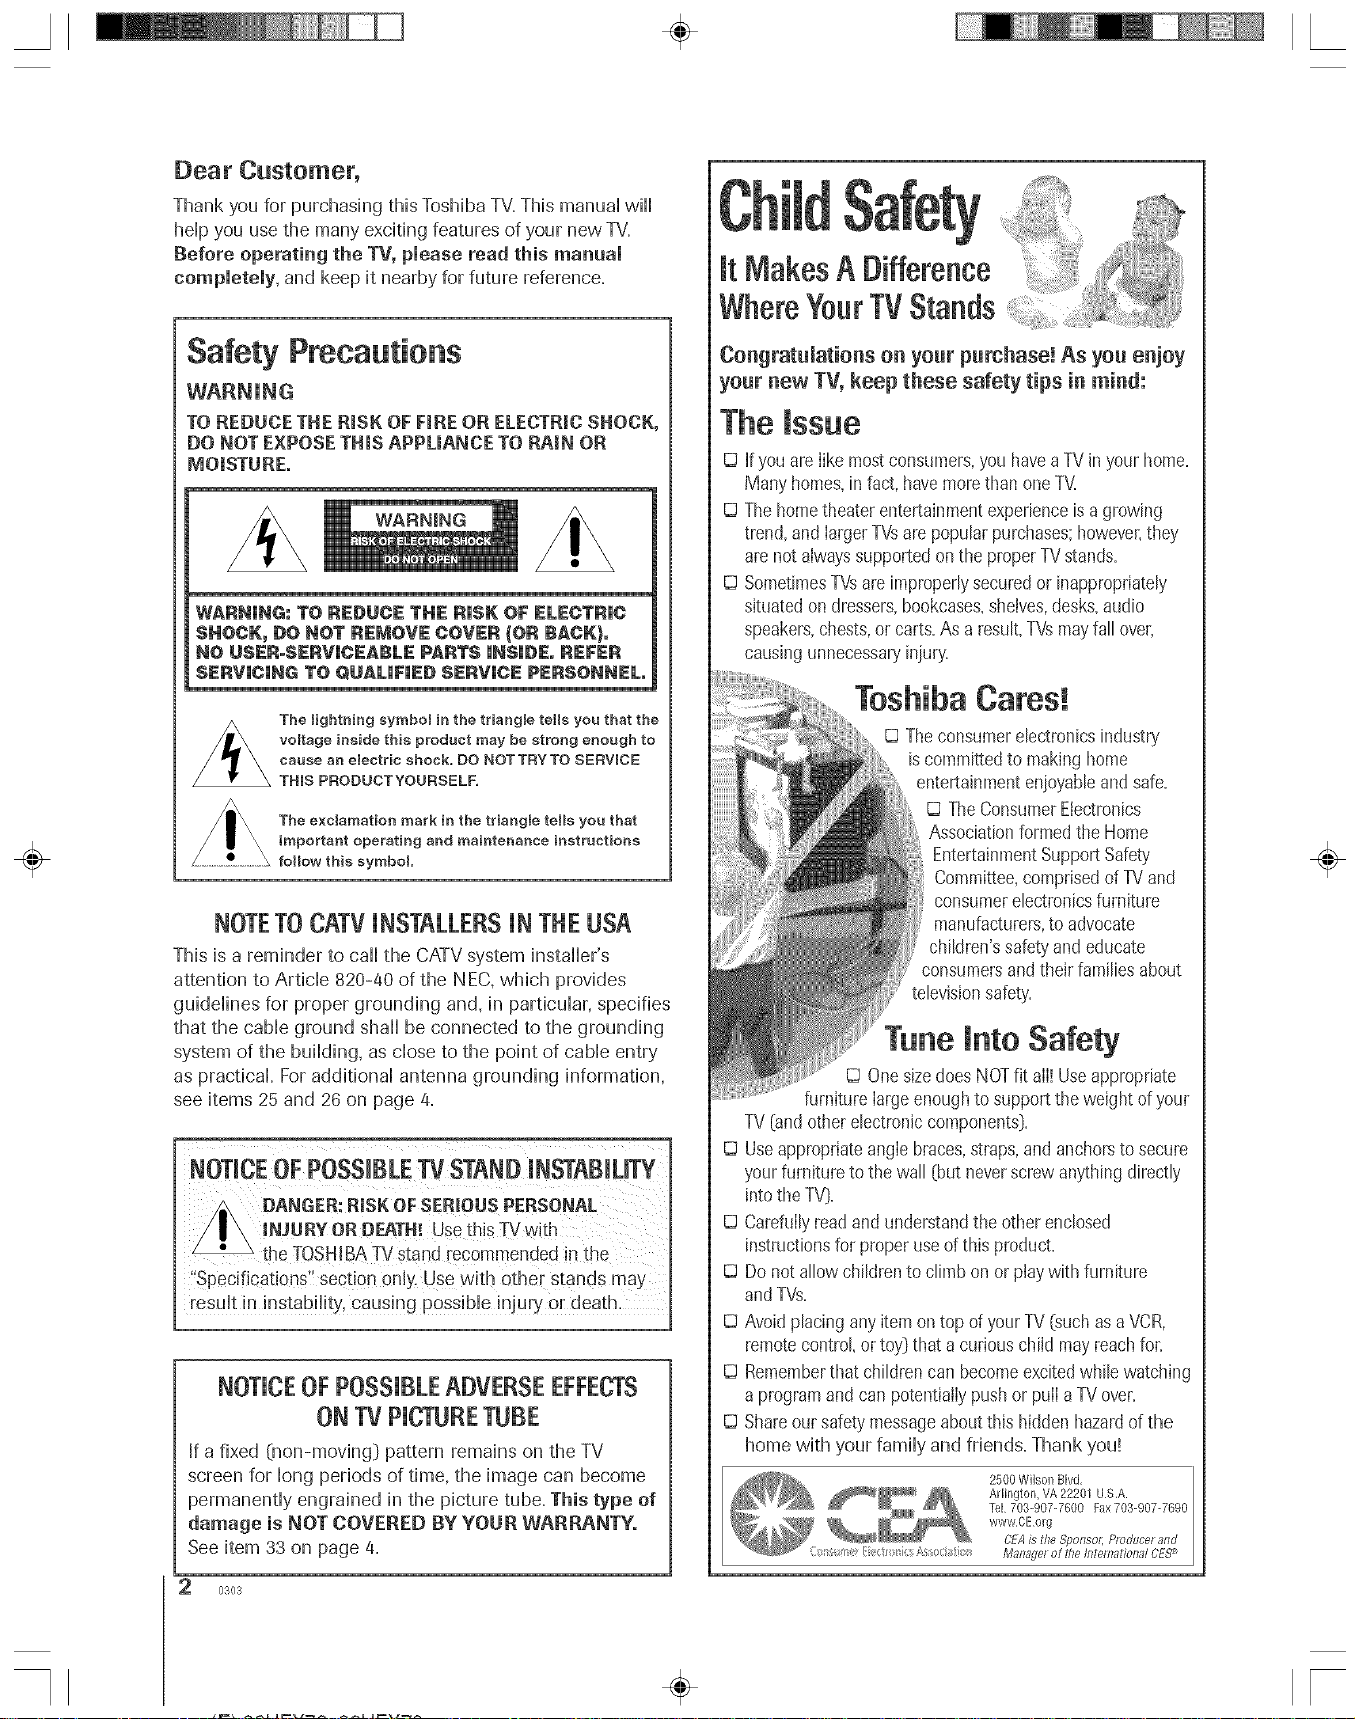
Safety Precautions
WARNUNG
TO REDUCE THE RiSK OF FmBEOR ELECTRIC SHOCK,
DO NOT EXPOSE THiS APPUANCE TO PAiN OB
MOISTURE°
/_ WANNING
voltage inside this product may be strong enough to
cause an eJectric shock. O0 NOTTRY TO SERVICE
The lightning symbol in the triangle tells yea that the
THIS PRODUCTYOURSELF,
The e×cJamation mark in the triangle toils yea that
important operating and maintenance instractions
follow this symbol
NOTETO CATV UNSTALLERSUNTHE USA
Thisisa remindertocalltheCATV systeminstafler's
attention to Article 820-40 of the NEC,which provides
guidelines for proper grounding and, in particular, specifies
that the cable ground shall be connected to the grounding
system of the building, as close to the point of cable entry
as practical. Foradditional antenna grounding information,
see items 25 and 26 on page 4.
NOTUCEOFPOSSIBLETVSTANDJNSTABIUTY
DANGER:RiSK OF SERmOUSPERSONAL
iNJURY OR DEATR_.Usethis TVwith
the TOSHIBATVstand recommended in the
"Specifications" section onl}: Use with other stands may
result in instability, causing possible injury or death.
NOTUCEOFP0SSUBLEADVERSEEFFECTS
ONTVPUCTURETUBE
If a fixed (non-moving} pattern remains on the TV
scremt for long periods of time, the image cart become
permanently engrained in the picture tube, This type of
damage is HOT COVEBED BY YOBB WABBAHTYo
See item 33 on page 4.
'_ 0303
CongratuJationson your purchase! As you enjoy
your new TV,keep these safety tips ill mind:
The mssue
D If you areIikemostconsumers,you haveaTV in yourhome.
Manyhomes,infact,havemorethan oneTV.
IJ Thehometheaterentertainmentexperienceisa growing
trend,andIargerTVsarepopularpurchases;however,they
are notalwayssupportedon theproperTVstands.
IJ SometimesTVsareimprope@securedorinappropriately
situatedondressers,bookcases,shelves,desks,audio
speakers,chests,or carts.Asa result,TVsmayfall over,
causingunnecessaryiniury.
Toshiba Cares!
D Theconsumerebctronicsindustry
iscommittedto makinghome
entertainmentenioyableandsafe.
TheConsumerElectronics
Associationformedthe Home
EntertainmentSupportSafety
Committee,comprisedofTV and
consumerebctmnicsfurniture
manufacturers,to advocate
children'ssafety'and educate
consumersand their familbsabout
televisionsafety.
into Safety
IJ OnesizedoesNOTfit aII!Useappropriate
furnitureIargeenoughto supporttheweight of your
TV[and otherebctronic components[.
UseappropriateangIebraces,straps,andanchorsto secure
yourfurnitureto thewall [but neverscrewanythingdirectly
intothe TV}.
D
Carefullyreadandunderstandthe otherenclosed
instructionsfor properuseof this product.
D
Donot allowchildrento climbon or playwith furniture
andTVs.
D
Avoidplacing anyitemon top of}'ourTV(suchasaVCR,
remotecontrol,or toy}that a curiouschild mayreachfor.
D
Rememberthatchildrencan becomeexcitedwhilewatching
a programandcan potentiallypushor pulla TVover.
D
Shareoursafetymessageaboutthis hiddenhazardofthe
home with your family and friends. Thank you!
2500WiBon Bird,
Arlington, VA 22201 USA.
]el 703-907-7600 Fax 703-907-7690
wwwCE orb
CEAis theSponsoL Prorl#cerand
tvlm_,_gel of the Intem;dion;ll CE.__
÷
÷ r
5} Do not use this apparatus near
water,
installation, Care, arid Service
mnstallation
Follow these recommendations and precautions and heed all
warnings when installing your TV:
16) Never modify this equipment. Changes or modifications
may void: a} the warranty, and b) the user's authority to
operate this equipment under the rules of the Federal
Communications Commission.
6} Clean only with a dry cloth.
iii//i_J_" _i_iiiii_ -
7} Do not block any ventmiatmon _ _ ,_"__
openings. Install in accnrdance with _
the manufacturer's instructions.
8) Do not instaH near any beat i ......
sources such as radiators,
heat registers, stoves, or other
apparatus (including amplifiers)
that produce heat.
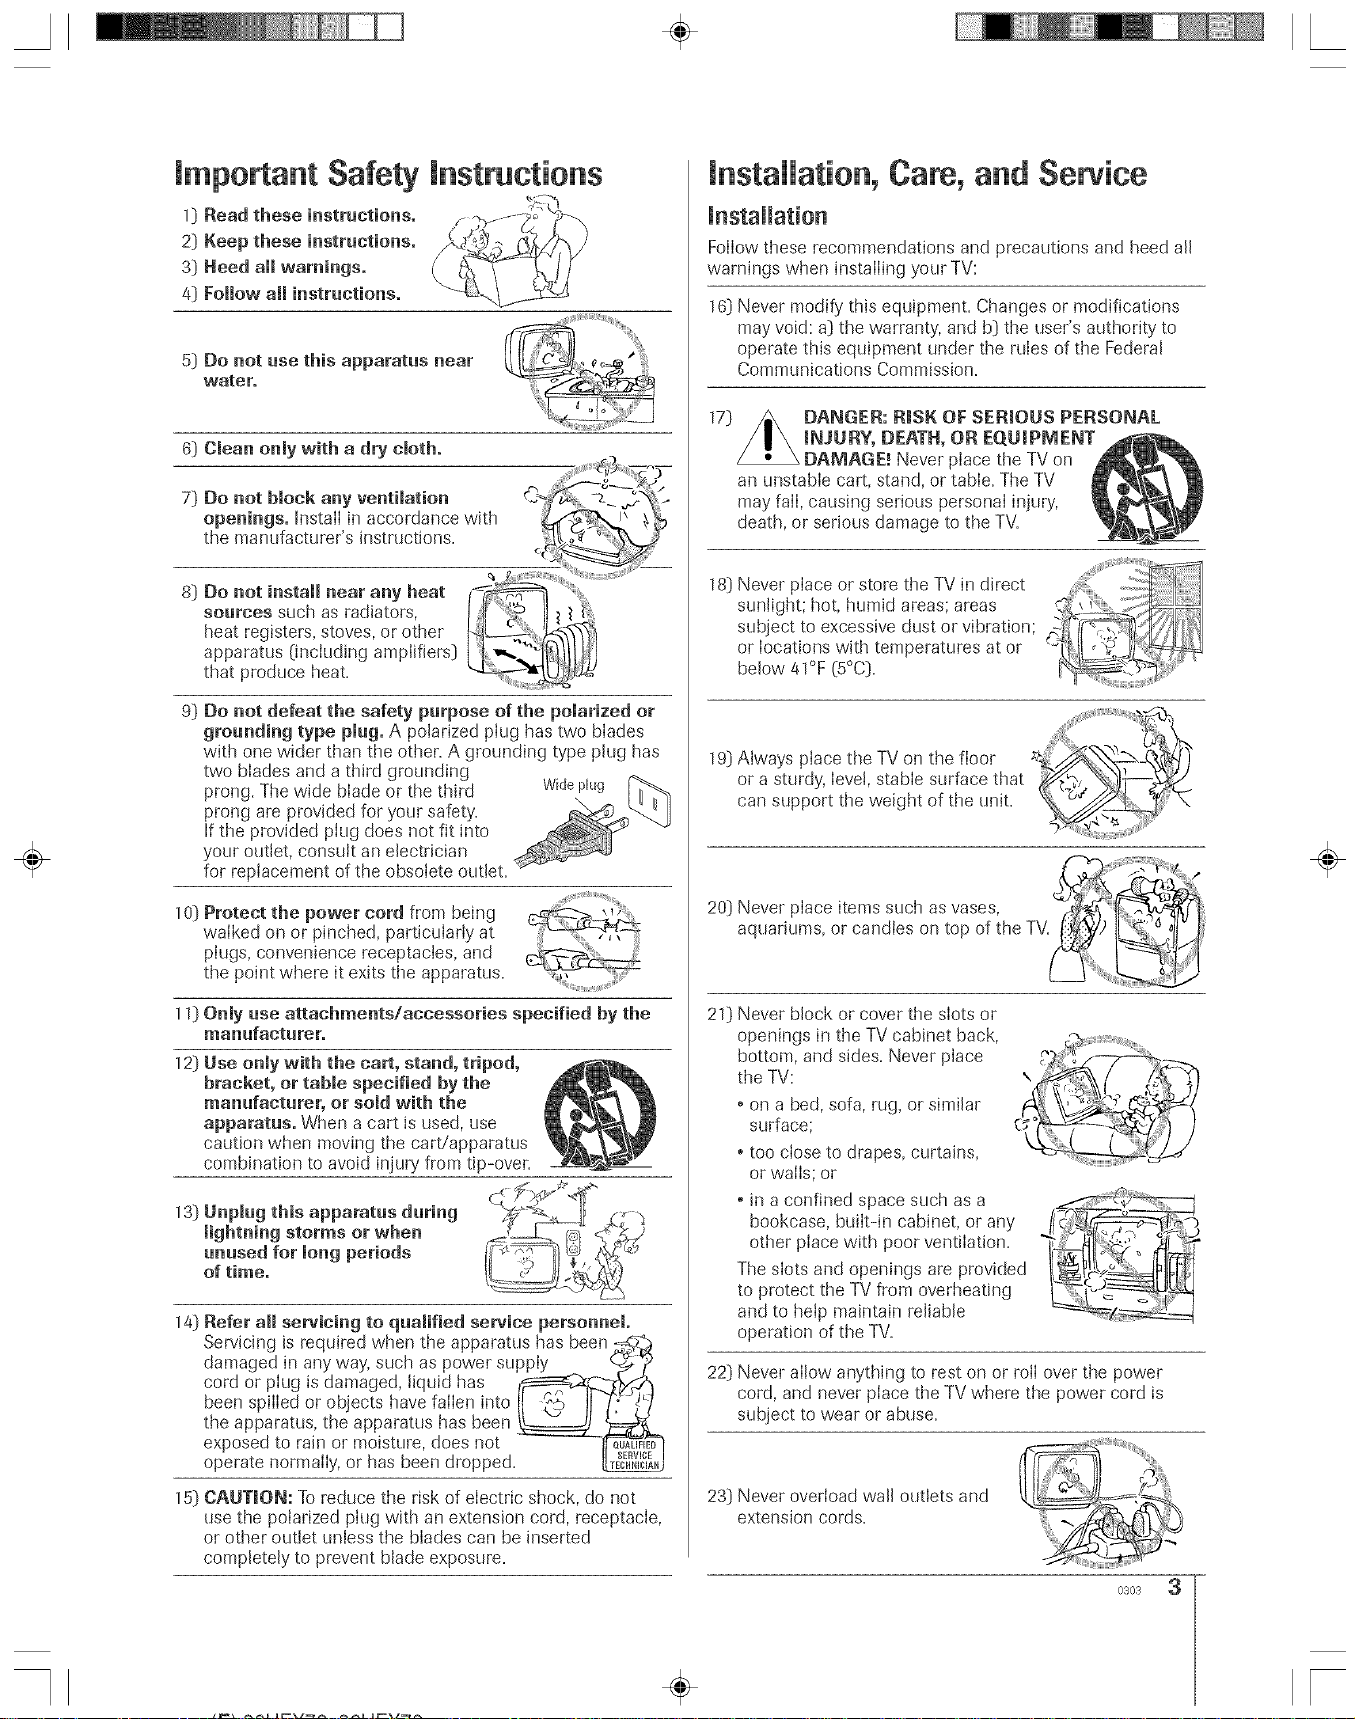
9)
Do [lot defeat the safety purpose of the polarized or
grounding type pmug.A polarized plug has two blades
with one wider than the other. A grounding type pk_g has
two blades and a third grounding
prong. The wide blade or the third widepk_g
prong are provided for your safety.
If the provided plug does not fit into
your outlet, consult an electrician
for replacement of the obsolete outbL
Protect the power cord from being
walked on or pinched, particularly at
plugs, convenience receptacles, and
the point where it exits tile apparatus.
o
o j
17)
an unstable cart, stand, or table. The TV
may fail, causing serious personal injury,
death, or sedous damage to the TV.
Never place or store the TV in direct _........
sunlight; hot, humid areas; areas _.L ....
subject to excessive dust or vibration; - -
or locations with temperatures at or -"
below 41°F (5°C). t_ ....
19} Always place tile TV on the floor
or a sturdy, Ievei, stable surface that
can support the weight of the unk.
Never place items such as vases, _ _:_fT"flS_f
20}
aquariums, or candies on top of the TV. II_)
DANGER: RiSK OF SERIOUS PERSONAL
raNJURY, DEATH, OR EQUmP_,_ENT
DAMAGE, _Never pIace tile TV on
÷
Only use attachments/accessories specified by the
manufacturer.
12)
Use only with the cart, stand, tripod,
bracket, or table specified by the
manufacturer, or sold with the
apparatus. When a cart is used, use
caution when moving the cart/apparatus
combination to avoid injury from tip-over.
Unplug this apparatus during
lightning storms or when
unused for long periods
of time°
Refer all servicing to quamified service personnel.
Servicing is required when the apparatus has been -_
damaged in any way, such as power supply _
cord or plug is damaged, liquid has t_'-_
been spilled or objects have failen into II _._, II _}"]_/
the apparatus, the apparatus has been _
exposed to rain or moisture, does not __,F_
operate normally, or has been dropped._
_5)
CAUTmON: To reduce the risk of electric shock, do not
use the polarized ping with an extension cord, receptacle,
or other outlet unbss the blades can be inserted
completely to prevent blade exposure.
Never block or cover the slots or
21)
openings in the TV cabinet back,
bottom, and sides. Never place
the TV:
* on a bed, sofa, rug, or similar
surface;
otoo close to drapes, curtains,
or wails; or
* in a confined space such as a
bookcase, built-in cabinet, or any
other pIace with poor ventilation.
The slots and openings are provided
to protect the TV from overheating
and to heip maintain reliable
operation of the TV.
22) Never alIow anything to rest on or rolI over the power
cord, and never piace the TV where the power cord is
subject to wear or abuse.
23) Never overload wall outlets and
extension cords.
0303 3
÷ r
24} Always operate this equipment from
a 120 VAC, 60 Hz power source only.
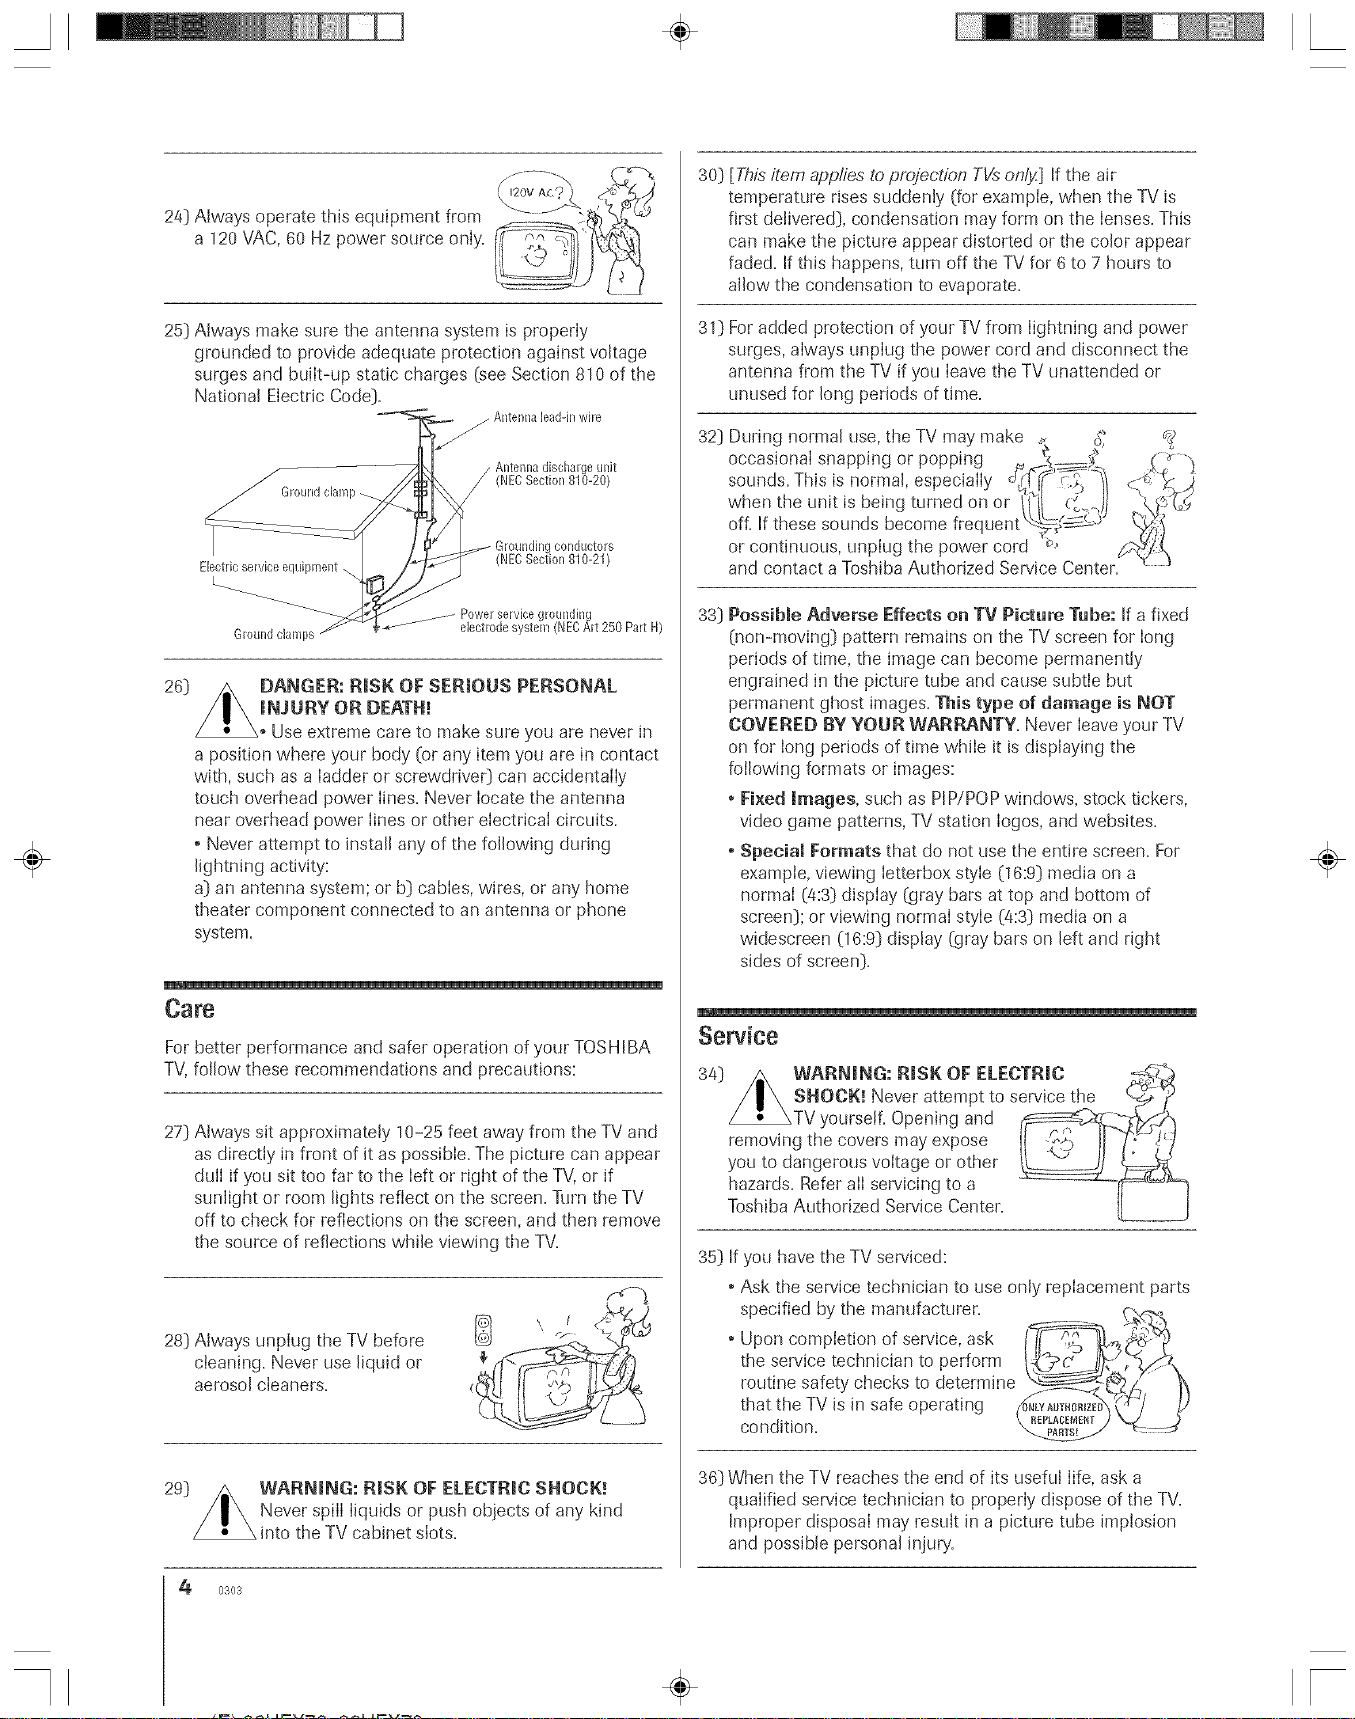
25} Always make sure the antenna system is properly
grounded to provide adequate protection against voltage
surges and built-up static charges (see Section 810 of the
National Electric Code}.
26}
a position where your body (or any item you are in contact
with, such as a ladder or screwdrive0 can accidentaily
touch overhead power lines. Never locate the antenna
near overhead power lines or other electricai circuits.
oNever attempt to install any of the following during
lightning activity:
a} an antenna system; or b} cables, wires, or any home
theater component connected to an antenna or phone
system.
m
DANGER: RiSK OF SERmOUS PERSONAL
raNJURY OR DEATH!
Use extreme care to make sure you are never in
Antermalead-il_wire
//
conductors
Care
For better performance and safer operation of your TOSH IBA
TV,follow these recommendations and precautions:
27} Always sit approximately 10-25 feet away from the TV and
as directiy in front of it as possible. The picture can appear
dull if you sit too far to the left or right of the TV, or if
sunlight or room lights reflect on the screen. Turn the TV
off to check for reflections on the screen, and then remove
the source of reflections while viewing the TV.
28} Always unplug the TV before
cleaning. Never use liquid or
aerosol cleaners,
3o}
[2Tis item applies to projection TVsonl}_] If the air
temperature rises suddenly (for exampIe, when the TV is
first delivered}, condensation may form on the lenses. This
can make the picture appear distorted or the color appear
faded. If this happens, turn off the TV for 6 to 7 hours to
allow the condensation to evaporate.
30
For added protection of your TV from lightning and power
surges, always unplug the power cord and disconnect the
antenna from the TV if you leave the TV unattended or
unused for long periods of time.
32}
During normal use, the TV may make _ _£
occasional
ndsThssnormaespeeay
off. If these sounds become frequent tU_-,¢_ _,_
or continuous, unplug the power cord r_,
and contact a Toshiba Authorized Service Center.
PossiMe Adverse Effects on TV Picture Tube: If a fixed
33}
(non-moving} pattern remains on the TV screen for long
periods of time, the image can become permanently
engrained in the picture tube and cause subtIe but
permanent ghost images• This type of damage is NOT
COVERED BY YOUR WARRANTY. Never leave your TV
on for long periods of time while it is dispBying the
folIowing formats or images:
• Fixed hnages, such as PIP/POP windows, stock tickers,
video game patterns, TV station Iogos, and websites.
oSpecial Formats that do not use the entire screen. For
example, viewing Ietterbox style (16:9} media on a
normal (4:3} display (gray bars at top and bottom of
screen}; or viewing normal style (4:3} media on a
widescreen (16:9} display (gray bars on left and right
sides of screen}.
snapping or popping _ _.__,_:_
zsbeing on or _/ {o.--!j
'turned 1._/_ ""when the unit
Service
34} /_ WARNmNG: RmSK OF ELECTRIC :,:_,_
/I_. SHOCK! Never attempt to service the _ [_
_TVyourself. Opening and l
removing the covers may expose _vJi_)
you to dangerous voltage or other
hazards. Refer all servicing to a ..... _
Toshiba Authorized Service Center. IL__.....
35} If you have the TV serviced:
• Ask the service technician to use only replacement parts
specified by the manufacturer. _\,-_
the service technician to perform l-_V*£c" Jl_, _CKg,
• . <- [y•
routine safety checks to determine "_
that the TV is in safe operating _'Au,.o._ _?__'/ ]/I
_,, \ _[PLAC[_I[NT / __ ?
,-Ti¥_,
÷
Z
29}
4 0303
WARNmN@ RmSKOF ELECTRIC SHOCK!
Never spill liquids or push objects of any kind
into the TV cabinet slots.
36} When the TV reaches the end of its useful life, ask a
qualified service technician to properly dispose of the TV.
Improper disposal may result in a picture tube implosion
and possible personal injury.
÷ r
Important Safety Information ............................. 2=4
introduction ......................................... 6
\Velconrc _o7\_shiba .............................................. 6
Explorh_g yore_new TV ................................................... 6
Note regarding Quick Connect Guide ........................ 6
Connecting your TV .................................................. 7
Conne_ti*g a VCR ............................................... 7
Connecting a cable box .......................................... 8
Connecting a cane bo× and VCR .................................... 8
Connecting a DVD player or satellite receiver and a VCR 9
(_onne_ting a DVD player with component video
and aVCR ........................................................ l0
Connecting a DTV rccdver/set-top box with
component vi&o and a VCR ......................................... 11
Conne_ tilg two VCRs ................................................... 12
Connecting a cameo*tier. ............................................... 12
Connecting a &vice to the DVI/HDCP input .............. 13
Connel.ting _in _inc[io s!,_stenl .......................................... 14
Connecting an A/V receiver ................................... 14
Using the remote eontrom ...................................... 15
Preparing the remote control t'or use .............................. 15
Installing the rmno_e toner4 batteries ............................ 15
Remote Contr4 f_mcdonal key &art ...................... 16
Progrmnming the remote control f'oruse with
)_ur audk_/vi&o devices ........................................ 18
Device co& setup ......................................... 18
Sear&ingandsamplingthecodeofa devke (85(.}(I)....18
Using d_evohln]e lock fbature (8000) ..................... 19
Operational fbaturc reset (8900) ............................. 19
Device code rune ............................................ 20-21
L<_rning about the remote toner4 .......................... 22
Setting up your TV .................................................. 2a
Leanring about the menu svstenr ................................... 23
Using the Quick Connect Guide ................................... 24
Changing the on-screen disphy hnguage ....................... 24
Selecting the antenna input ............................................ 25
Adding channds m the TV's memo U ............................ 25
Progranrnring &annals automatically ...................... 25
Adding and era_ing drannds nranually .................... 26
Changing &annals ........................................................ 27
Changing &annals ushrg SpeedSurf. .................. 27
Adjusting the tilt correction tbature .......................... 27
Using the TV's features ......................................... 28
Adjusting the d_annel settings ........................................ 28
Switdfing between two &annals using
Channel Return ............................................ 28
Swit_hing between twod_anne]s using Surf]Lod<j_l .... 28
Programming ymlr f:avorffe&annals ....................... 28
Labeling &annals ................................................... 30
Viewing the wide-screen pkture f'ormats ........................ 31
Sde¢tilg d_e image shape ........................................ 31
Using the aura aspect fbatme .................................. 33
Sdecting tire dnmna mode .................................... 33
Using the POP douNe-window fbature .......................... 34
Switdring dre main and POP pkmres ..................... 35
Deczing dre POP picture ................................ 35
Adiusting the size ofdre douNe-window. ................ 35
Donble-Win&w aspec_ ratio .................................. 36
Using the programmed channd sear& timcdon ...... 36
Using the fhvorire channd seardl fhncdon ............ 37
About tire aura f_rvoritefeature ........................... 37
Using the LOCKS nrenu ....................................... 38
Entea'hg Ore PIN co& .................................... 38
If you cannot remenlber your PIN code ............... 38
Using the V.CHIP menu ....................................... 39
ENABLE BLOCKING ................................... 39
TV RATING (Independent l>uing system t'or
Doa&asters) ........................................................... 39
lvlPAA RATING (independent rating s)vstemfbr
movies) ....................................................... 40
BLOCKING OPTION .......................................... 40
Unk)ddng progranrs temponu'ily .............. 41
Locking channds ................................................. 41
Loddng video hrputs ............................................ 42
Using tire game timer. ........................................... 43
Using the flont pand lo& feature ............................ 43
Changing the HN code ............................................ 43
Adinsting the picture ............................................ 44
.%leering the picture mode .................. 44
AdjHsting the pkture quality ................................... 44
Saving new pref'erence ............................................. 45
Using the flesh tone f_:ature................................... 45
Using d_eCaNeCbar Iv DNR feature ................... 45
Sde_ting the _olor tenrperature ............................... 46
Rese_ting pK_ure adjustments ............................... 46
Sd&ting the Scan Veloci_!:Moddation (SVbl) ...... 47
Sde_ting the display form= (for 480p signals only) 47
Selecting the video input som'ce ............................... 48
Labeling the vi&o input sources .................................... 48
Using d_edosed _aption t'cature ..................................... 49
Setting the ON-timer ........................................... 50
Setting the sleep timer... ........................ 50
Setting the dock ................................................. 51
Selecting the backg*ound of the menH display ............. 51
Adius_hrg the sound ............................................. 52
Muting tire sound ........................................... 52
Sde_ting stereo/SAP broadcasts ......................... 52
Enjoying d_e D4bv Virtual sound tbature ............... 53
rising d_eWO\ff rM surround sound [bature ........... 54
Adjusting the s_.lnd qu:di w .................................... 54
Resetthlg your audio adjustments ........................... 55
Using the CYCLONE "_snb-woolC_:rsvsteln ........... 55
Turning o[)'the btdlt-in speakers ............................ 56
Selecting tt_eAudio OUT sound ............................. 56
Using the SmNeSound °__bature ............................ 57
Displayhlg on-sc*ecn intbrnr=ion ................................. 57
Viewing d_e denro mode ............................................ 58
Undcrstan&ng tire aura powerolC}'fcature................ 58
Unders<nr&ng dre hst mode memo* v t'eaure .............. 58
Appendix ................................................................... 59
Spedtkations ..................................................... 59
_]oubleshooting .................................................. 60
Limited United .%_tes_rrantv ..................................... 61
Limited Canada _<_rrantv .............................................. 62
index .................................................. 83
5

Welcome to Toshiba
Congratulation!! You have purchased one of"the finest TVs on the
market. The goal of"this manual is to guide you through setdng up
and operating your Toshiba TV as quickly as possible.
This manual applies to modds 32HFX73 and 36HFX73. Befbre you
start reading, check your model number by looking at the rear of"the
TV.
Instructions in this manual are based on using the remote control.
You can also use the controls on the TV if"they have the same name as
those on the remote control.
Please read all the safety and operating instructions careffdly, and keep
the manual for ftuture ref'erence.
F_xploring your new TV
You can operate your TV by using the buttons on die fl"ont panel or
the remote control. The back panel and fFont panel (behind the door)
provide all the terminal connections you will need to connect other
equipment to your TV. See _Connecting your TV" on page 7.
Illustrations represent 36HFX73.
MENU
TV front
Video/audio inputs
(Video 3)
Behind the door
i
Noteregarding
O,nick ConnectGnide
The Quick Com, eet Guide
auLomalfca//y appears or>screen
ff_efif_t time the TV is turned on
This feature provides or>screen
/_stl_Jctiof_s to guide you thml(qh
inflfal setup of your T_/
To slop the Quicfg Cemlect
Guide, ei_hef press EX/T of turn off
ffTe TIZ
See page 24 for details.
POWER
Remote sensor
Power indicator
ANTOUT
ANT-1IN ANT-2IN
TV rear
DVI/HDCP IN
i
U
VIDEO 1/2 Video/
Audio OUT
ColorStream Co!orStream
HDq HD=2
Audio Center Channel IN
Variable Audio OUT
6

A ÷ L
Connecting your TV
Note: Cablesale not supplied wilh your TtZ
e Coaxial cable [s the cable that comes in from )_mr antenna, cable IV
service, or cable converter box. (oaxinl cable uses "F" connectors.
® Staudard AJV (audlo/vldeo) cables usually come in sets of three, and
are typically cdor-coded according to use: ydlow fbr vide(), red f_)r
stere() right audio, aud white fi._rstereo lef'_(ur munu) audio.
Ou your TV's back pand, t}_estandard A/V inputs are cdur-cuded in
the same manner as the cables_
o S-Video cable is for use with video equipment _nithS-Video output
o Compouent video cables come in sets of three, (cdor-cuded red,
green and blue) and are f_r use with vide() equipment: with component:
vide() uutputs. Cu[orStream ") is Tushiba's brand uf compuneut vide().
® DVI-D digital single-link cable is f_)r use wid_ vide() equipment wid_
DVI-D output (see page 13).
NOTE REGARDING PICTURE QUAUTY
Wheu cunnecdng videu equipment tu yum" 7bshiba TV:
e For GOOD picture quality: Use a standard yd[uw vide() cabM
o For BETTER picture qm_'_iity: Ifyuur equipment has an S-qdeo
input, use an S-qdeo cable insl_,ad ({F:_standard ydIow video cabM
(You sdll must connect the standard red and white audio cables for f'ull
q_scem connection, but go not connect *l_esslfnd)frd ye[/ow uid_,ocab/e at
*,/*eslfrnetime, or the picture per_)rmauce will be unacceptable.)
e For BEST picture qodlty: If"your equipment has component rid eo (or
DVI) inpucs, use either component video cables (or a DVI cable) insr('ad
uf a standard video or S-video cable. (You still must com_ect the standard
red and white audio cables t_>rfi*IIsystem cormection, bur do not connect
the sta_dm'd j_g'/l(,wvideo ('_,lh/_.or gm5LVJd_.o_vlh/_.gstskes_m_etime.)
431D
Coaxial(anten,a} cable
_ ,=IZD=
@4:1
StandardAN gables{red/whiteiyeHew}
@
Componentvideocables(red,green,bl_e
DVbgdigitatsingle=linkgable
CAUTION."
Do not plug in any power co/Us unl/I you have
finished connect/hg all equ/pmen£
iiiiiiiiiiiiiiiiiiiiiiiiiiiiiiiiiiiiiiiiiiiiiiiiiiiiiiiiiiiL
Connecting a VCR
This connection allows you to watch local channels and video
programs, play or record on the VCR while watching TM and record
from one channel while watching another channel.
You will need:
, two coaxial cables
* one set of'standard A!V cables
From Cable Box or Antenna
Stereo VCR
TV
Note:
ff you have a mona VCR, (;onnect L/Mona ta
VCR Audio OUTus//w only one auc//o cable
ff yau have a VCR with S-videa, use an
S-video cable (plus audio cab/esJ instead of
#_estancJa/d video (;able for be/l_r p/c;lum
pelfamTatT(;e.
Do not connect a stan&mJ video cable and
an S-video (;abb ta VIDEO 1 (or VIDEO 2] at
#_esame time or the pict_Jfepeffofa_Taet.e will
be unac;c;eplab/e
The unauthorizedrecording, use,
distribution, or revisionof television
programs,videotapes, DVDs,andother
materialsis prohibited under the
Copyright Lawsofthe United Statesand
other countries,and maysubject you to
civilandcriminal liability.
7
÷ r
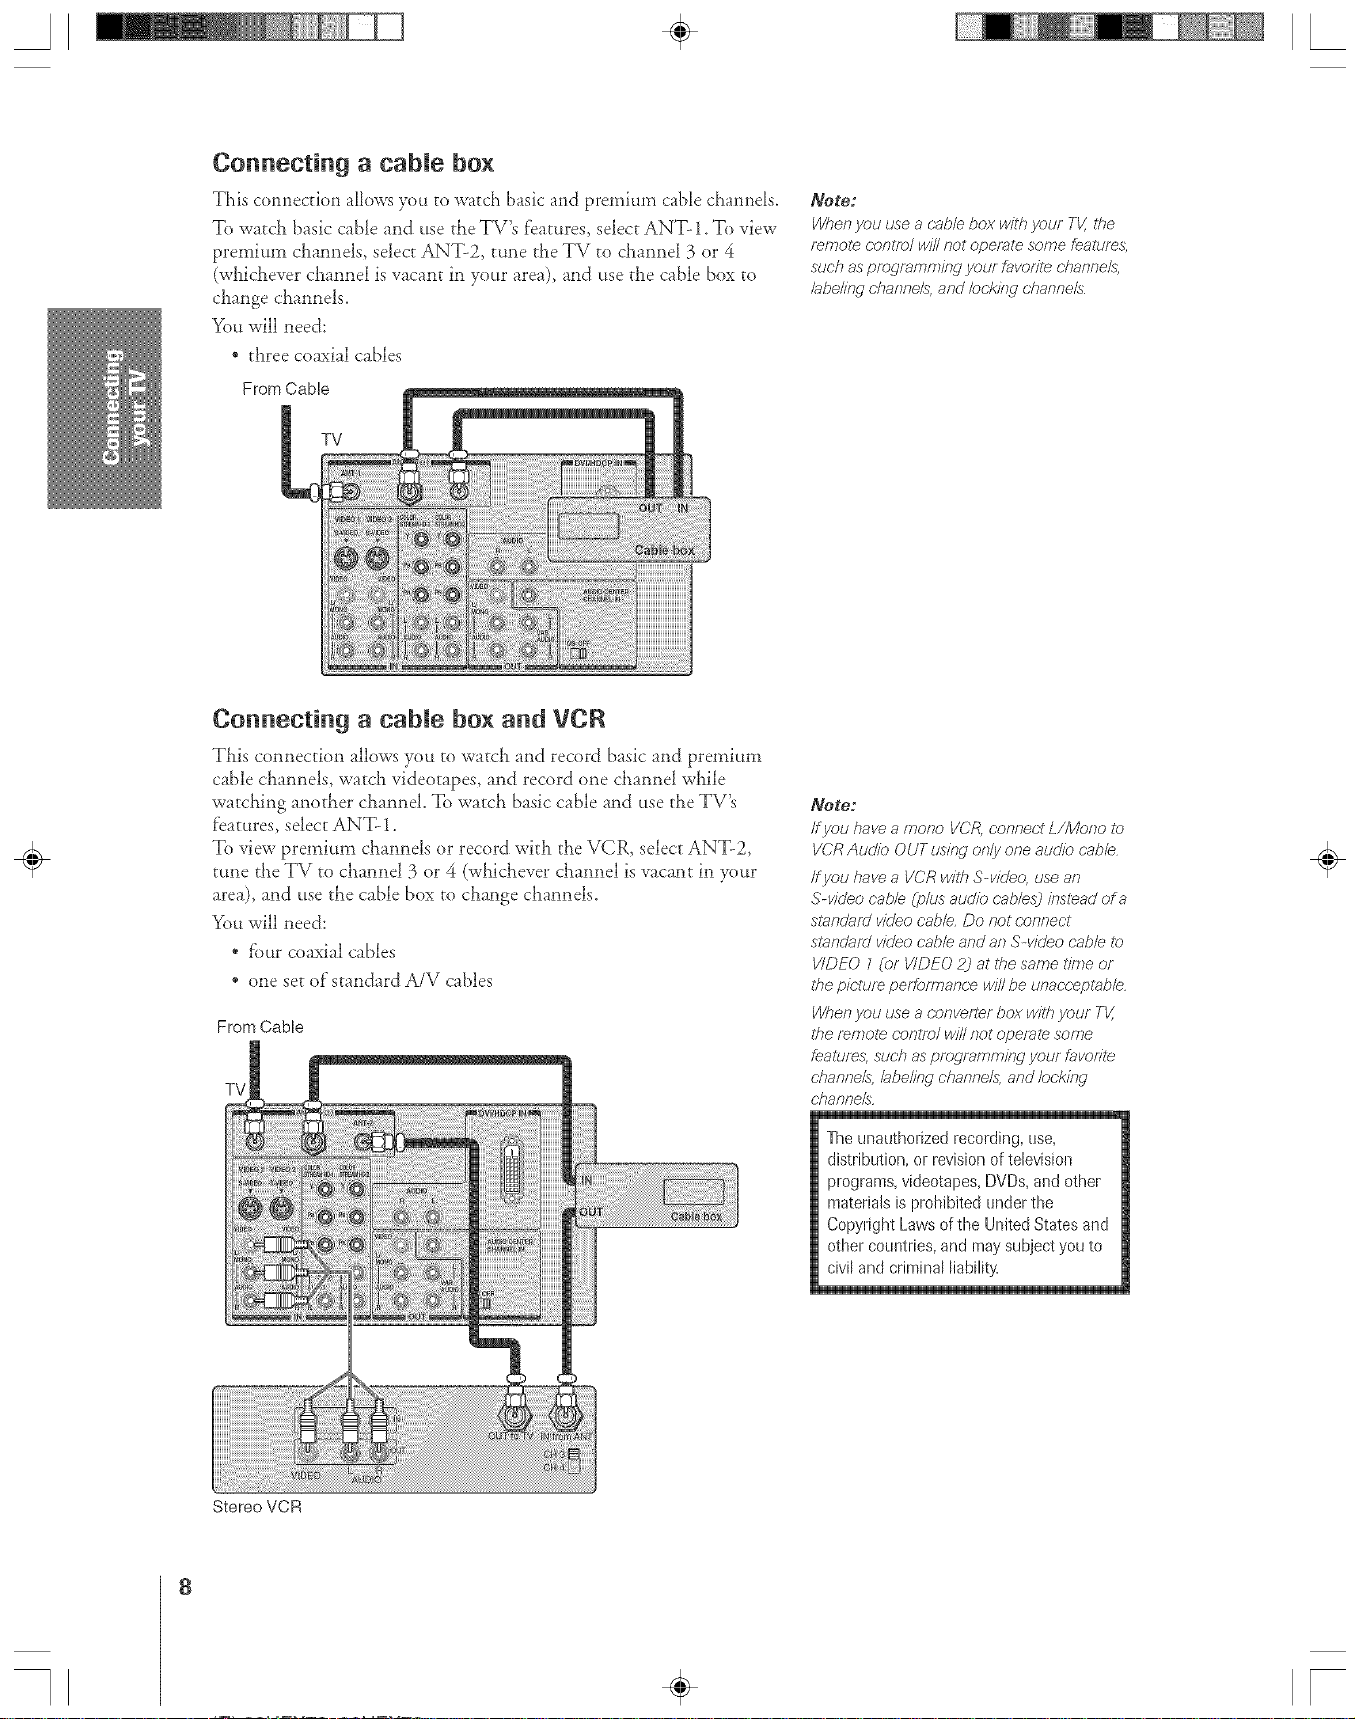
Connecting a cabme box
This connection allows }_u to watch basic and premium cable channels.
To warcll basic cable and use the TV's fearures, select ANT-1. To view
premium channels_ select ANT-2, tune rhe TV to cllannel 3 or 4
(whichever channel is vacant in your area), and use d_e cable box to
change channels.
You will need:
* three coaxial cables
From Cable
Pg_::::(@}I
Connecting a cabme box and VCR
This connection allows you to watch and record basic and premium
cable channels, watch videotapes, and record one channel while
watching another channel. To watch basic cable and use the TV's
Datures, select ANT- 1.
To view premium channels or record with the VCR, select ANT-2,
tune the TV to channel 3 or 4 (whichever channel is vacant in your
area), and use the cable box to change channels.
You will need:
, fbur coaxial cables
* one set of'standard A/V cables
From Cable
TV
Note:
Wher_yau use a c_,b/e box v,iitb your TV,#re
remote cot_tr_)/ will not operate some feaftJr_,g
such as programming your favor#e channels,
labe//tW ohar_oe,/s,and ©c'_?W oharvTe/s
Note:
/fyau have a morro VCR, connect L/Mono to
VCR Au&b OUT us/bg or_/yor_eau@b cab/l÷
If you have a VCR w/fit S-video, use an
S-video cable (plus audio cables) instead of a
standard video cable, Do not connect
slan&_,ru' video cable, and an S-video cable to
V/DEO Z (at V/DEO 2) at the same time or
Zflepk;ture performance w#1be ur_acceplable,
When you use a converter box w#b your TV,
the remote contTo/ will not operat_ some
fealures, such as programm#Tg your favont_
channels, bbelit_g char_ne/s,arTd locking
chanr_e/s,
÷
8
The unauthorized recording, use,
distribution, or revision of television
programs, videotapes, DVDs, and other
materials is prohibited under the
Copyright Laws of the United States and
other countries, and may subject you to
civil and criminal liability.
Stereo VCR
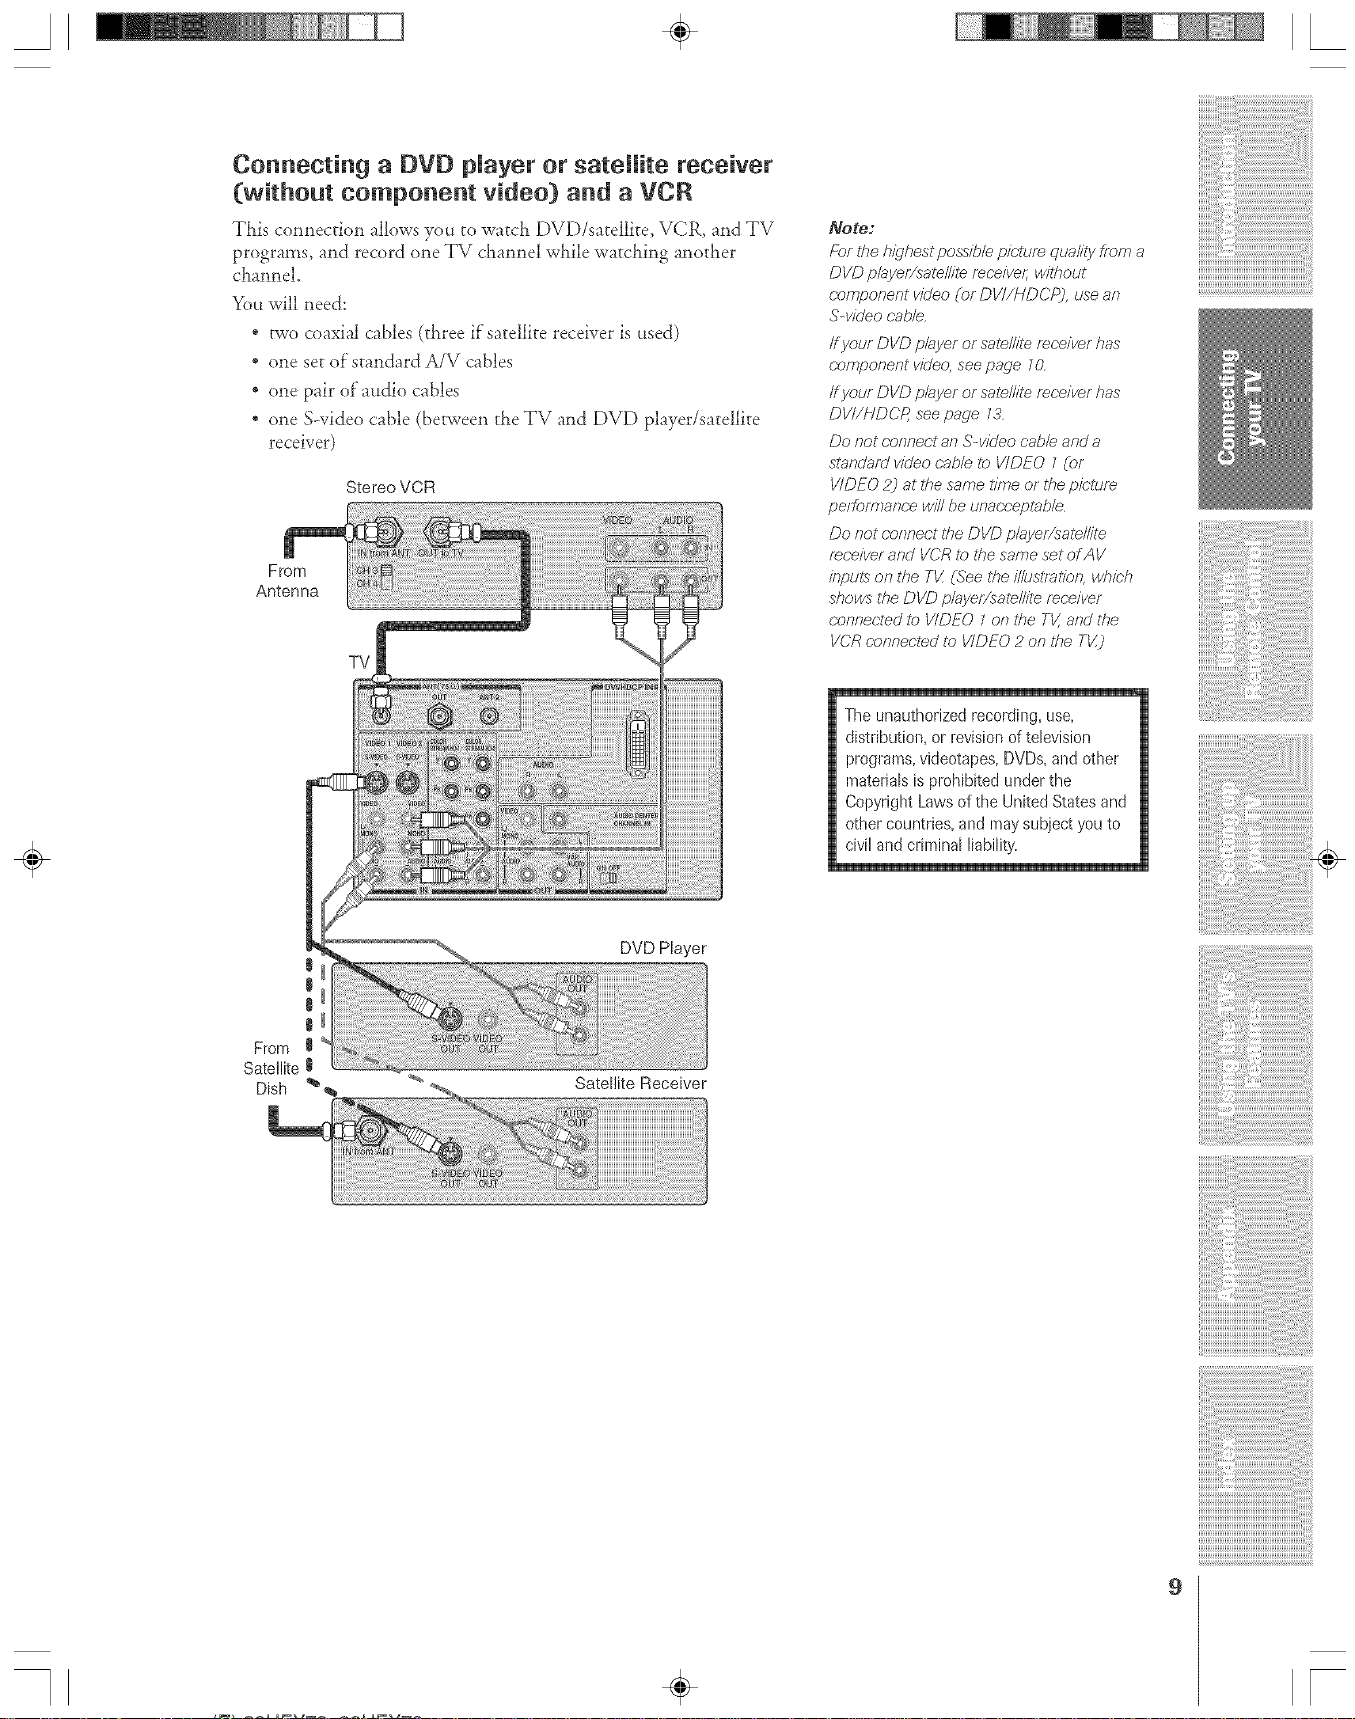
Connecting a DVD pJayer or satellite receiver
(without component video) and a VCR
This comlection allows y(m to watch DVD/.,;atellite> VCR_ and TV
program._;_ and record one TV chamlel while watching another
chmmel.
You will need:
o two coaxial cables (three if'._;atellite receiver is used)
one set of'standard A/V cables
one pair of audio cables
one S-video cable (between the TV aild DVD player/sateJlke
receiver)
Stereo VCR
From
Antenna
TV
/Vote:
For ffTeh/:ghesl possible picture quality from a
DVD p/ayer/satel/ite mr'eivel; wlffzout
component video (or DVI/HDCPj, use an
Swideo Pable,
ff your DVD pl_yer or sate//il_ receiver has
component video, see page l&
ff your DVD player or sal_//ite mr'eiver has
DVI/HDCR see page 73
Do not connect an S-vkleo cable and a
standard vk/eo cable io VIDEO 1 (or
VIDEO 2j at the same time or the pir;'tum
performar_r;e will he unaccepkJb/e
Do Rot eofvTect UTeDVD p/ayer/salR/lit_
receiver and VCR l_) lfm same set of AV
inpuis on the T_ (See the///UStTalfon, whir'h
shows the DVD p/ayer/sate/Id_ receiver
<onner;ted to VIDEO 1 on the TV, and the
VCR r'onnectRd t_) VIDEO 2 on ff_e Tt/)
The unauthorized recording, use,
distribution, or revision of television
programs, videotapes, DVDs, and other
materials is prohibited under the
Copyright Laws of the United States and
other countries, and may subject you to
civil and criminal liability.
iiiiiiiiiiiiiiiiiiiiiiiiiiiiiiiiiiiiiiiiiiiiiiiiiiiiiiiiiiL
From 1
Sate!lite|
Dish %
!
DVD Player
I
I
I
Satellite Receiver
÷
9
A ÷ L
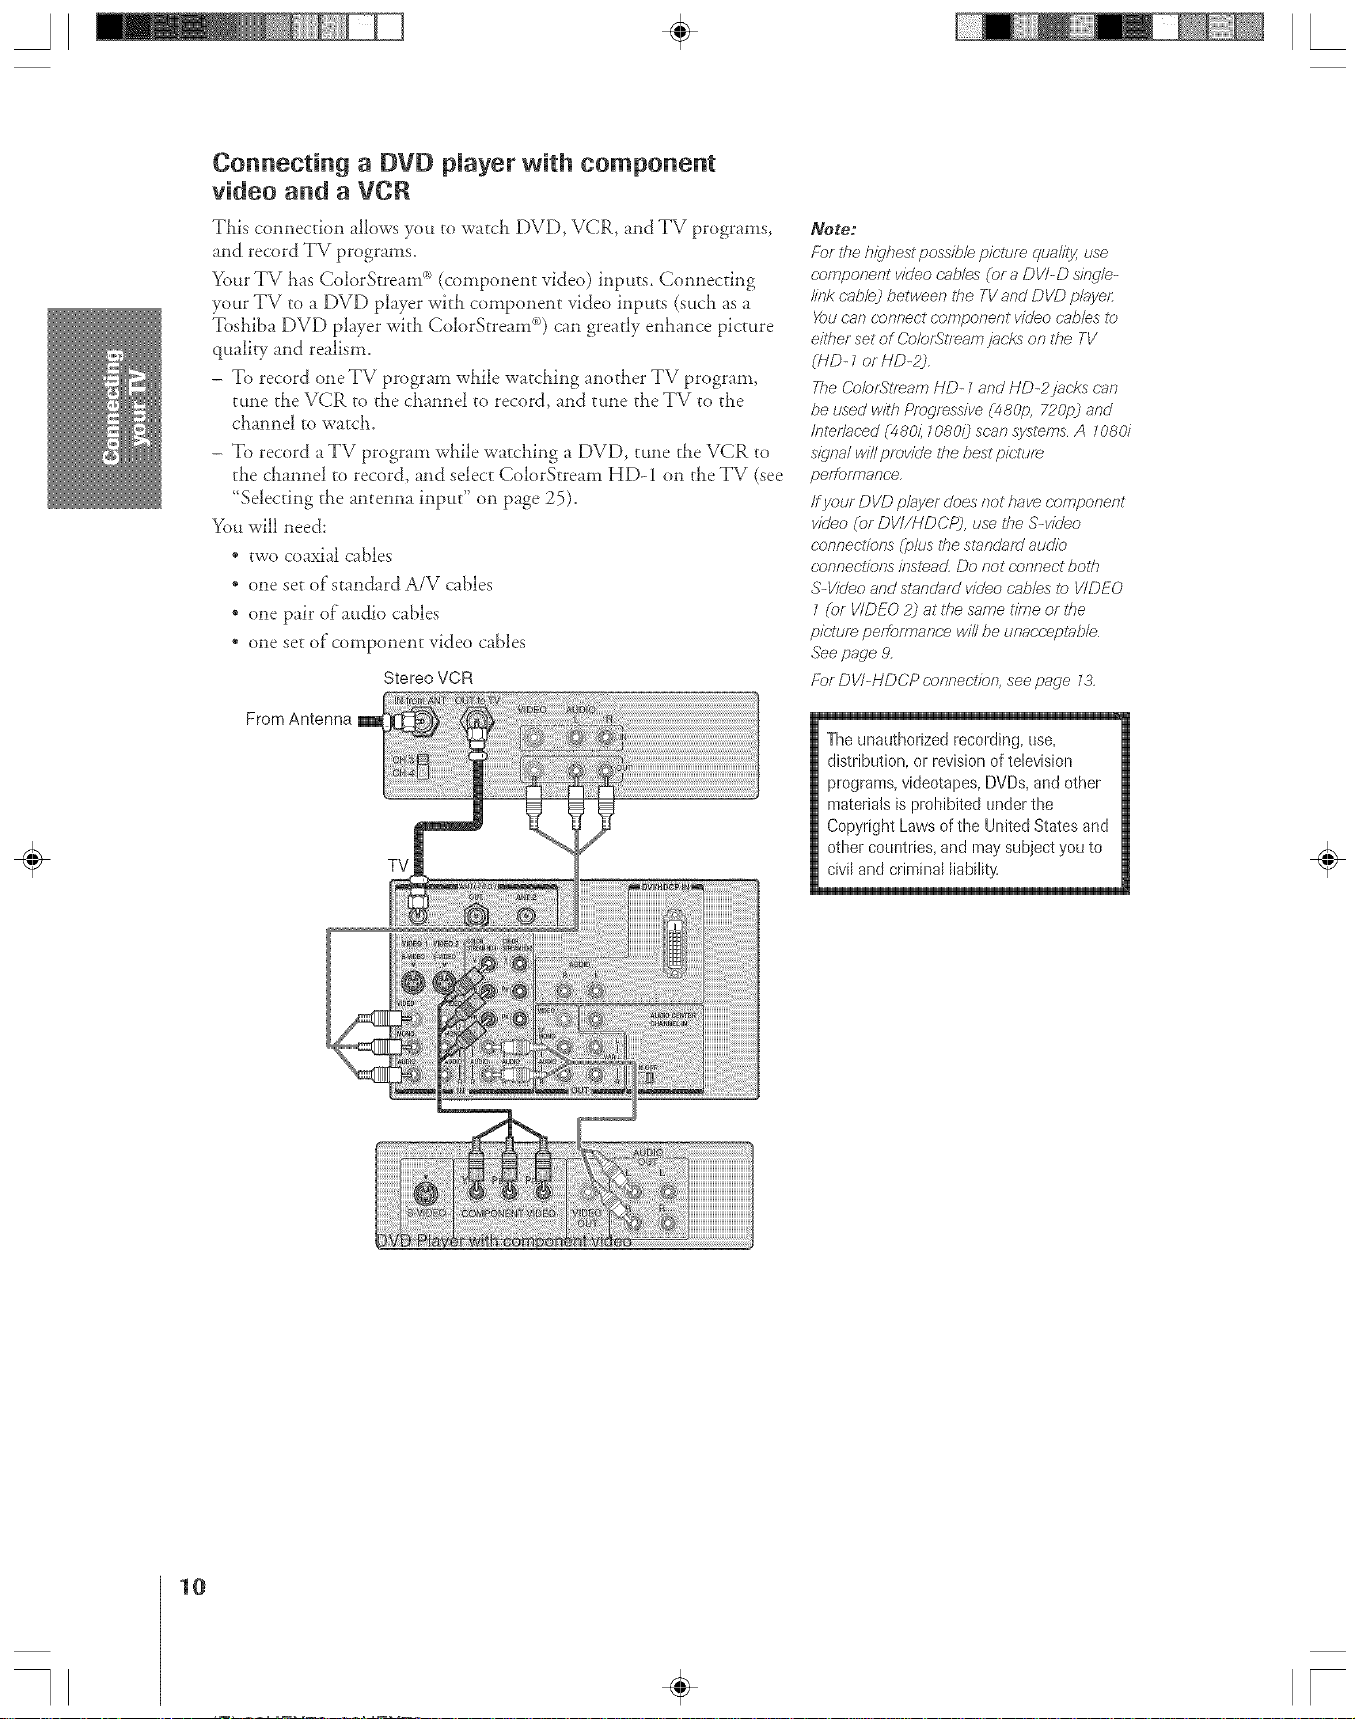
Connecting a DVD player with component
video and a VCR
This connection allows you to watch DVD, VCR, and TV programs,
and record TV programs.
Your TV has ColorStream c'_(component video) inputs. Connecting
your TV to a DVD player with component video inputs (such as a
Toshiba DVD player with ColorStream u_)can greatly enhance picture
quality and realism.
- To record one TV program while watching another TV program,
tune the VCR to the channel to record, and tktl_lethe TV to the
channel to watch.
- To record a TV program willie watching a DVD, tmle the VCR to
the channel to record, and select ColorStream HD-1 on the TV (see
"Selecting the antenna input" on page 25).
You will need:
. two coaxial cables
. one set of'standard A/V cables
" one pair of attdio cables
* one set of component video cables
Stereo VCR
From Antenna
TV
Note="
Fbf the/ugbest possible pidure Clua/ity,use
eompor_ent video cables (or a DVI-D single-
link cable) between the TVand DVD p/ayel:
You can nor_nect eamponent video cables ta
either set of Color:Stream jacks on the TV
(hiD- 1 or HD-2j.
The Co/of_S'/feamh/D- 1 and HD-2jac.ks can
be used with Progressive (480p, 720p) and
/rTter/aced (4801110801} scar_ systems A 108d
signal will pmw?/e the best p/c'tu/_
per[ofTTTaRce,
If your DVD player does not have c.omportertt
wVeo (or DVI/HDCP), use the S-video
eonneciions (plus the standgsid audio
c;orTnectior}silTsleac{ [Jo Rot c_oRrTeotbotfl
S-Vir/eo and standarU video cables ta VIDEO
I (or V/DEO Pj at the same time or the
pk;tum perfoff_TarTcevii//be unacceptable
.lee page 9.
Fbr DVI-HDCP c.ar)rlectfoe, see page 73.
The unauthorized recording, use,
distribution, or revision of television
programs, videotapes, DVDs, and other
materiaJs is prohibited tinder the
Copyright Laws of the United States and
other countries, and may subject you to
civil and criminal liability,
÷
10
A ÷ L
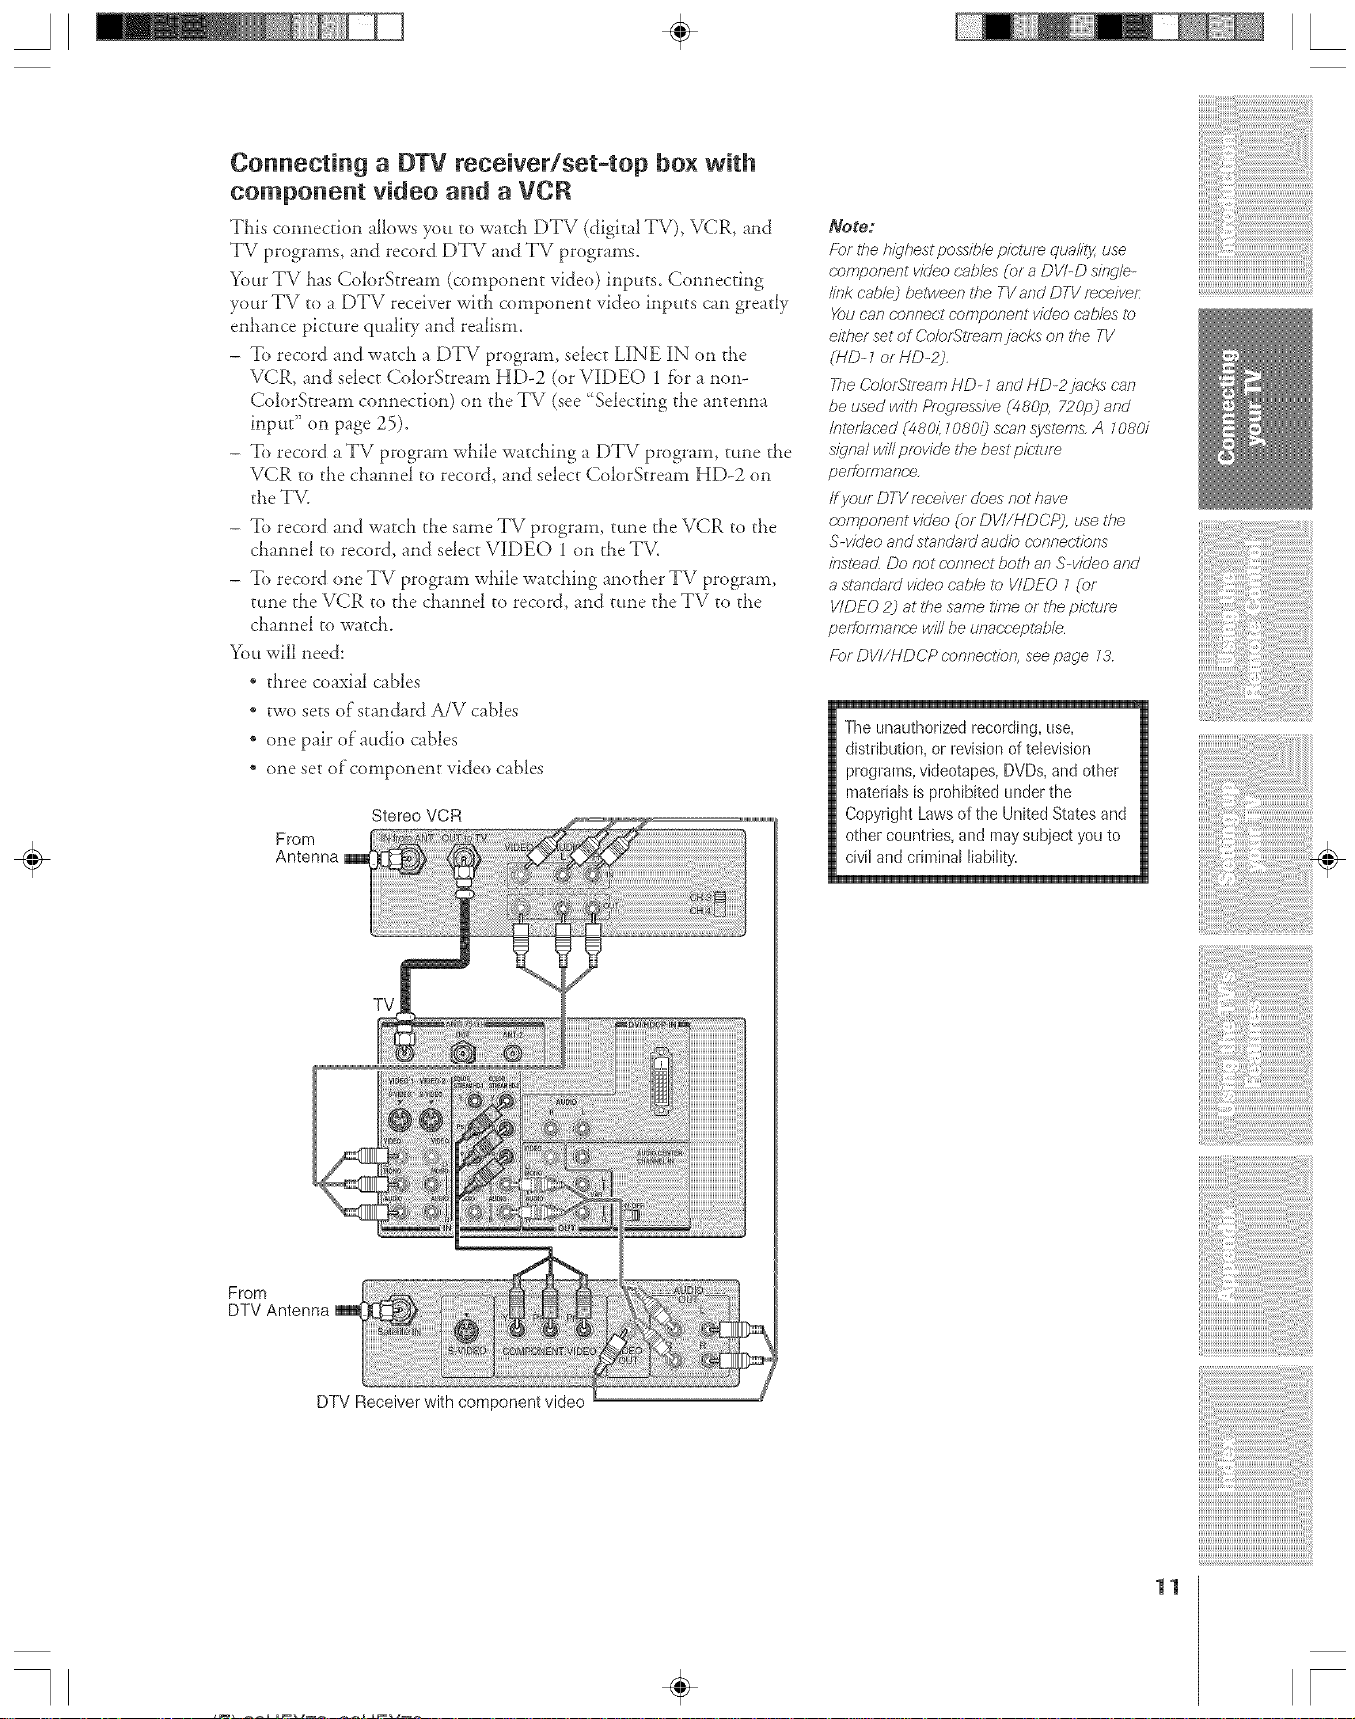
Connecting a DTV receiver/set-top box with
component video and a VCR
TLis connection allows you to watd_ DTV (digital TV), VCR, and
TV programs, and record DTV and TV programs.
Your TV Las Cole)Stream (component vide<)) inputs. Connecting
your TV to a DTV receiver witl_ component video inputs can greatly
enhance picture quality and realism.
- To record and watcl_ a DTV program, select LINE IN on the
VCR, and select Cole)Stream HD-2 (or VIDEO 1 fbr a non-
Cole)Stream connection) on the TV (see 'Selecting the antenna
input" on page 25).
- To record a TV program while watcLing a DTV program, tune tl_e
VCR to the channel to record, and select Cole)Stream HD-2 on
the TM
To record and watcll the same TV program, ttme the VCR to the
cLannel to record, and select VIDEO 1 on the TM
To record one TV program while watci_ing anot_er TV program,
tune the VCR to the cJ_annel to record, and tune the TV to the
cJlannel to watcL.
You will need:
* ti_ree coaxial cables
* two sets of standard A/V cables
" one pair of audio cables
* one set of component vide<) cables
Stereo VCR
From
Antenna
Note:
Fbr the highest possible pielure_ qua/ity, use
cmTlponent video c'abbs (era DV/-D single-
/ink cablej beivveen the TVand DTV receiver:
Pou can c.oqneot component video cab/es to
eitf_er set of Co/or:ltream jacks or7ff_e TV
(HD-l orHD-2),
TheCo/or:_tT_,amHD-Z8RdHD-2 jacks ('an
beusedwiff_PmfJressive 1480p, 720p) and
Inter/aced (48011ZO8Oij scan syslems A 10801
s_qna/win provide thebestpin/am
peffofmarT(;e,
ff your DTV mr;eiver does not have
component v/dee (or DVI/HDCP), use the
Swideo and star?dafd audio c;cmnec.tfons
insteac._Do not (:arTTlectboth an S-vHeo arid
a standard video cabb to V/DEO / (or
V/DEO 2) at the same tittle or tt_epk;lum
performar_ce w/I/be unacceptab/e
For DVI/HDCP (-onr_ectiog see page 13
The unauthorized recording, use,
distribution, or revision of television
programs, videotapes, DVDs, and other
materials is prohibited under the
Copyright Laws of the United States and
other countries, and may subject you to
civil and criminal liability.
iiiiiiiiiiiiiiiiiiiiiiiiiiiiiiiiiiiiiiiiiiiiiiiiiiiiiiiiiiiii_
From
DTV Antenna
TV
DTV Receiver with component video
÷
11
A ÷ [
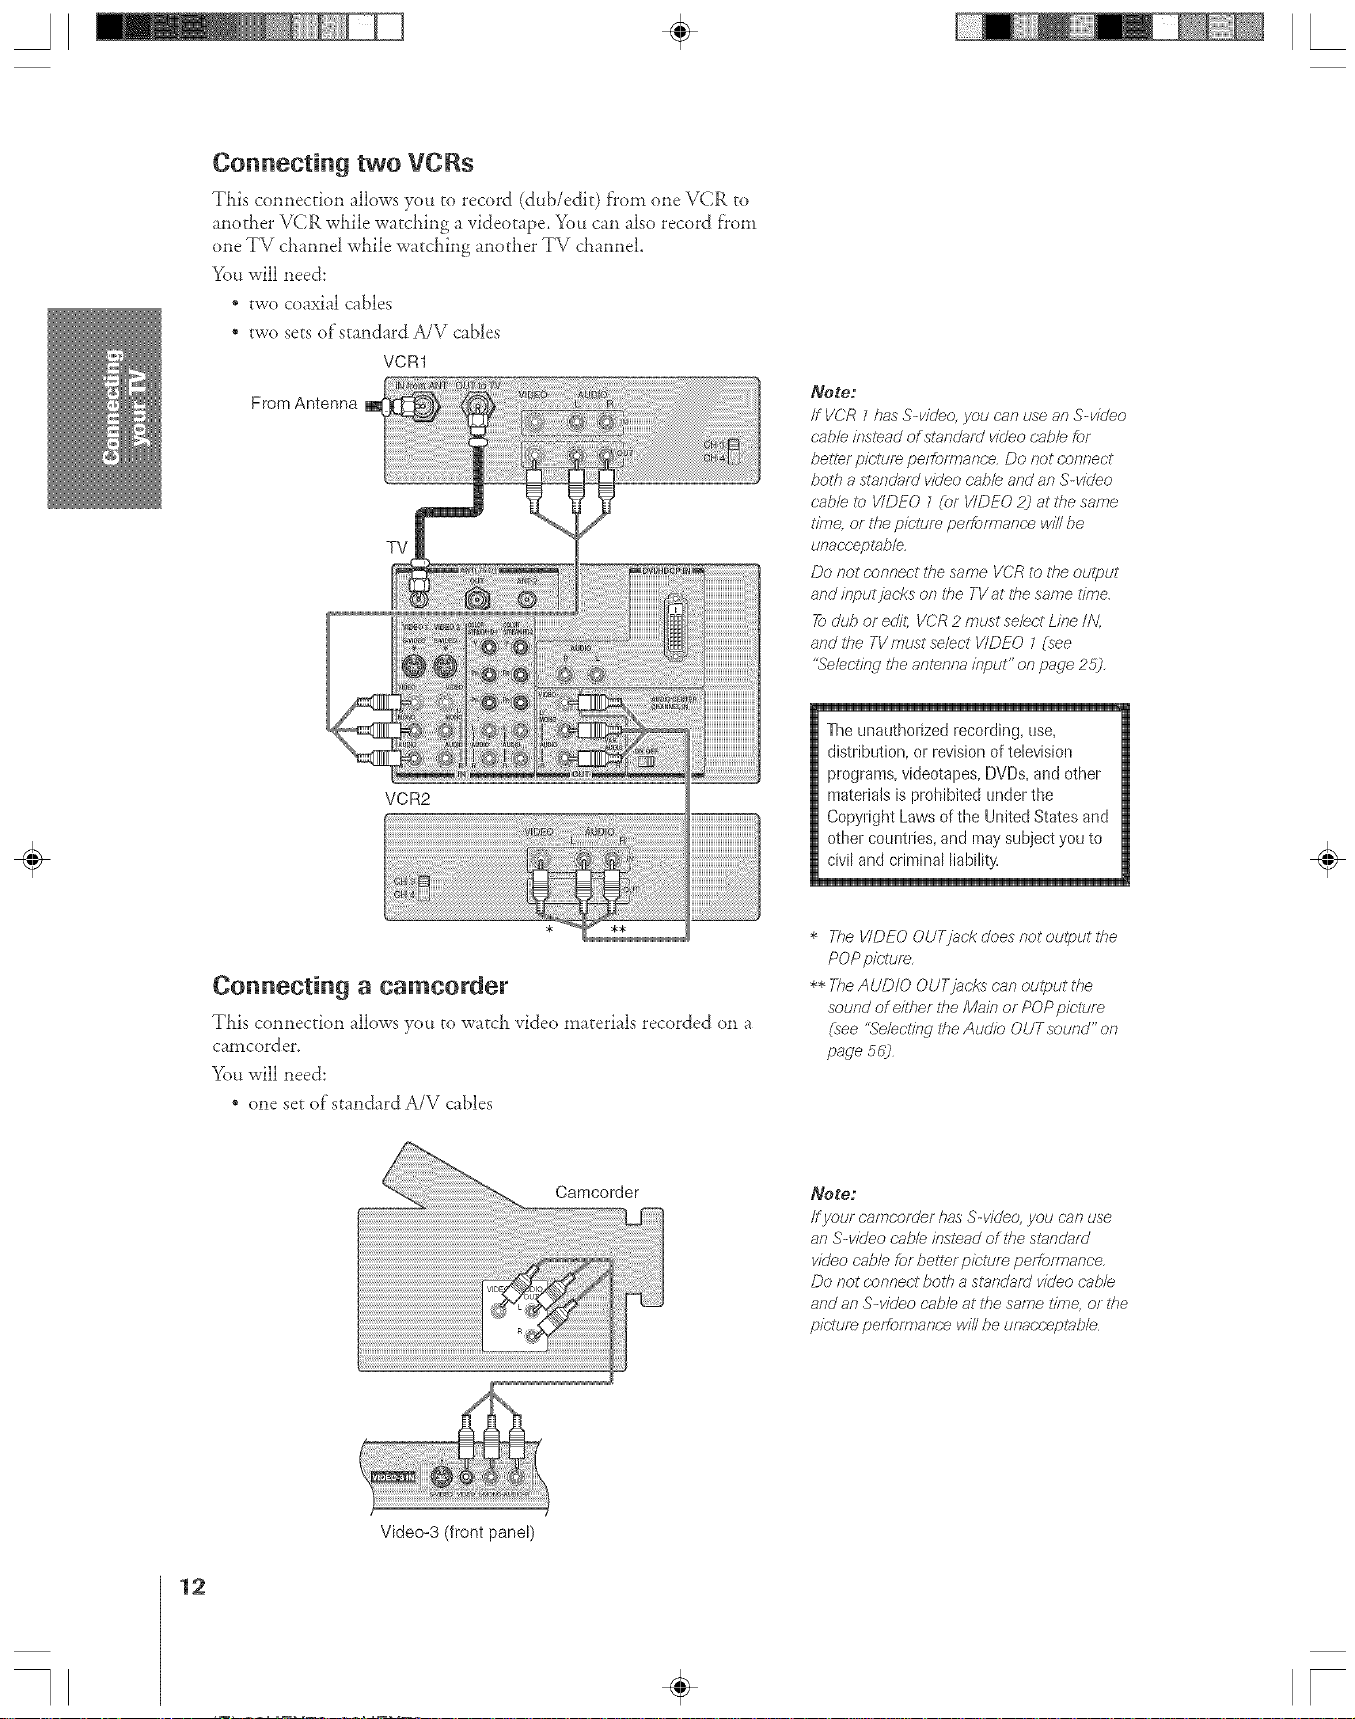
Connecting two VCRs
This connection ;dlows you to record (dub/edir) f'rom one VCR to
another VCR while watching a videotape. You can also record from
one TV ciaannel while watching another TV channel.
You will need:
* two coaxial cables
* two sets of standard A/V cables
VCR1
From Antenna
TV
Note."
/f VCR 1 has S-video, you can use an S-video
table/tTs/ead of standald virleo cable far
better p/ctors peffoffr_ance. Do not c'annect
both a standard video cable and an S-video
r'able to VIDEO 1 (or VIDEO 2] at the same
dme. or the p/ctur_ pefformarTce will be
urTaccep/_bb.
Do not conrTect ff_esame VCR to the ou{out
and inputjacks on #_eTVat the same time.
7bdub or edit, VCR 2 must sebc.t Line/IV,
and #Te TVmust select VIDEO I (see
"Se/ect/rlg l#e arTtenrTainput" on page 2,52.
VCR2
Connecting a camcorder
This connection allows you to watch video materials recorded on a
caincord er.
YOUwill need:
* one sd- of'standard A/V cables
Camcorder
The unauthorized recording,use,
distribution, or revisionof television
programs,videotapes,DVDs,andother
materialsis prohibited tinder the
Copyright Lawsofthe United Statesand
other countries,and maysubject you to
civilandcriminal liability.
* The VIDEO OUT jack does not output the
POP picture.
** The AUDIO OUTjacks can output the
sound of either ff_e Main or POP pit:lure
(see "Selec///W ire Audio OUTsound" on
page 56)
Note."
If yeur camcorder has S-videa, you can use
an S-video cable kTslsad of the s/an&e_/
wUeo cable for bettsr picture performance.
Do not connect both a standard video cable
and an S-video r;ab/e at the same time, or/be
p/c'tur_ perfomTarTce will be unacceptable
÷
12
Video=3 (front panel)

A ÷ L
Connecting a device to the DVi/HDCP input
The DVI/HDCP _input on your TV is designed to accept HDCP
program material in digital form from HA/CEA-861-compliant 2
consumer electronic device:% such as a set-top box or DVD player
eq_tipped with a DV][-D digital single-link output connection. 3
TLe DV_/HDCP input is designed fbr best perf'ormance witll 1080i
lligh-de£nition vide<)signals. The DVUHDCP input also will accept
and display 480p, 480i, and 720p picture signals.
Note: This TV is not intended for connection to
and should not he _sed with a PC (personal
con_puteO°
You will need:
" one coaxial cable
* one pair of'standard audio cables
* one DV][-D digital single-link cable
Note:/:brpfopef operation, the DVI-D cable length
shou/d r_ot exceed 3m (,98 fl? The mcommer_ded
/e,/_Wtf7 /S 2171 (0 6 fl_
DVI/HDCP device
(for example, set-top box or DVD player)
Note:
DVI/NDCP- Diui£_/ Visual lnteffac'e/
Nigh-bandwidth Didita/ Cor_tm_t Pn)teclJar_
2 EIA/CEA-861 comp/iance navels the
transmission of unc;ompmssed d/_i£i
w?/eowilt_ h/gh-bar_dwidth dcjital #enter_t
pml_ction, v,/hM_is being standan/iTed for
mceplion of h/gh-c/eb_ition video signals,
s Cansultyeur consumer electfonins dealer
far avai/abilit3z
Caution:
Toensure that ti_eDI!I/HDCP dev£'e £ reset
pfepe//y, it is f_cammended that you fo//ow
fftese pmc,,edufes,
, W/TeRtUfT_/lW oRyauF e/_OtlO/?ic
components, turn on tlae gg first,
and t/lef_ fire DV//NDCP device,
o When tumi/W offyour electnnTic
componemX tl_m off the DVI/NDCP
device first, afro/fften the TX
iiiiiiiiiiiiiiiiiiiiiiiiiiiiiiiiiiiiiiiiiiiiiiiiiiiiiiiiiiiiL
From
antenna
or cable
TV
÷
13
A ÷ L
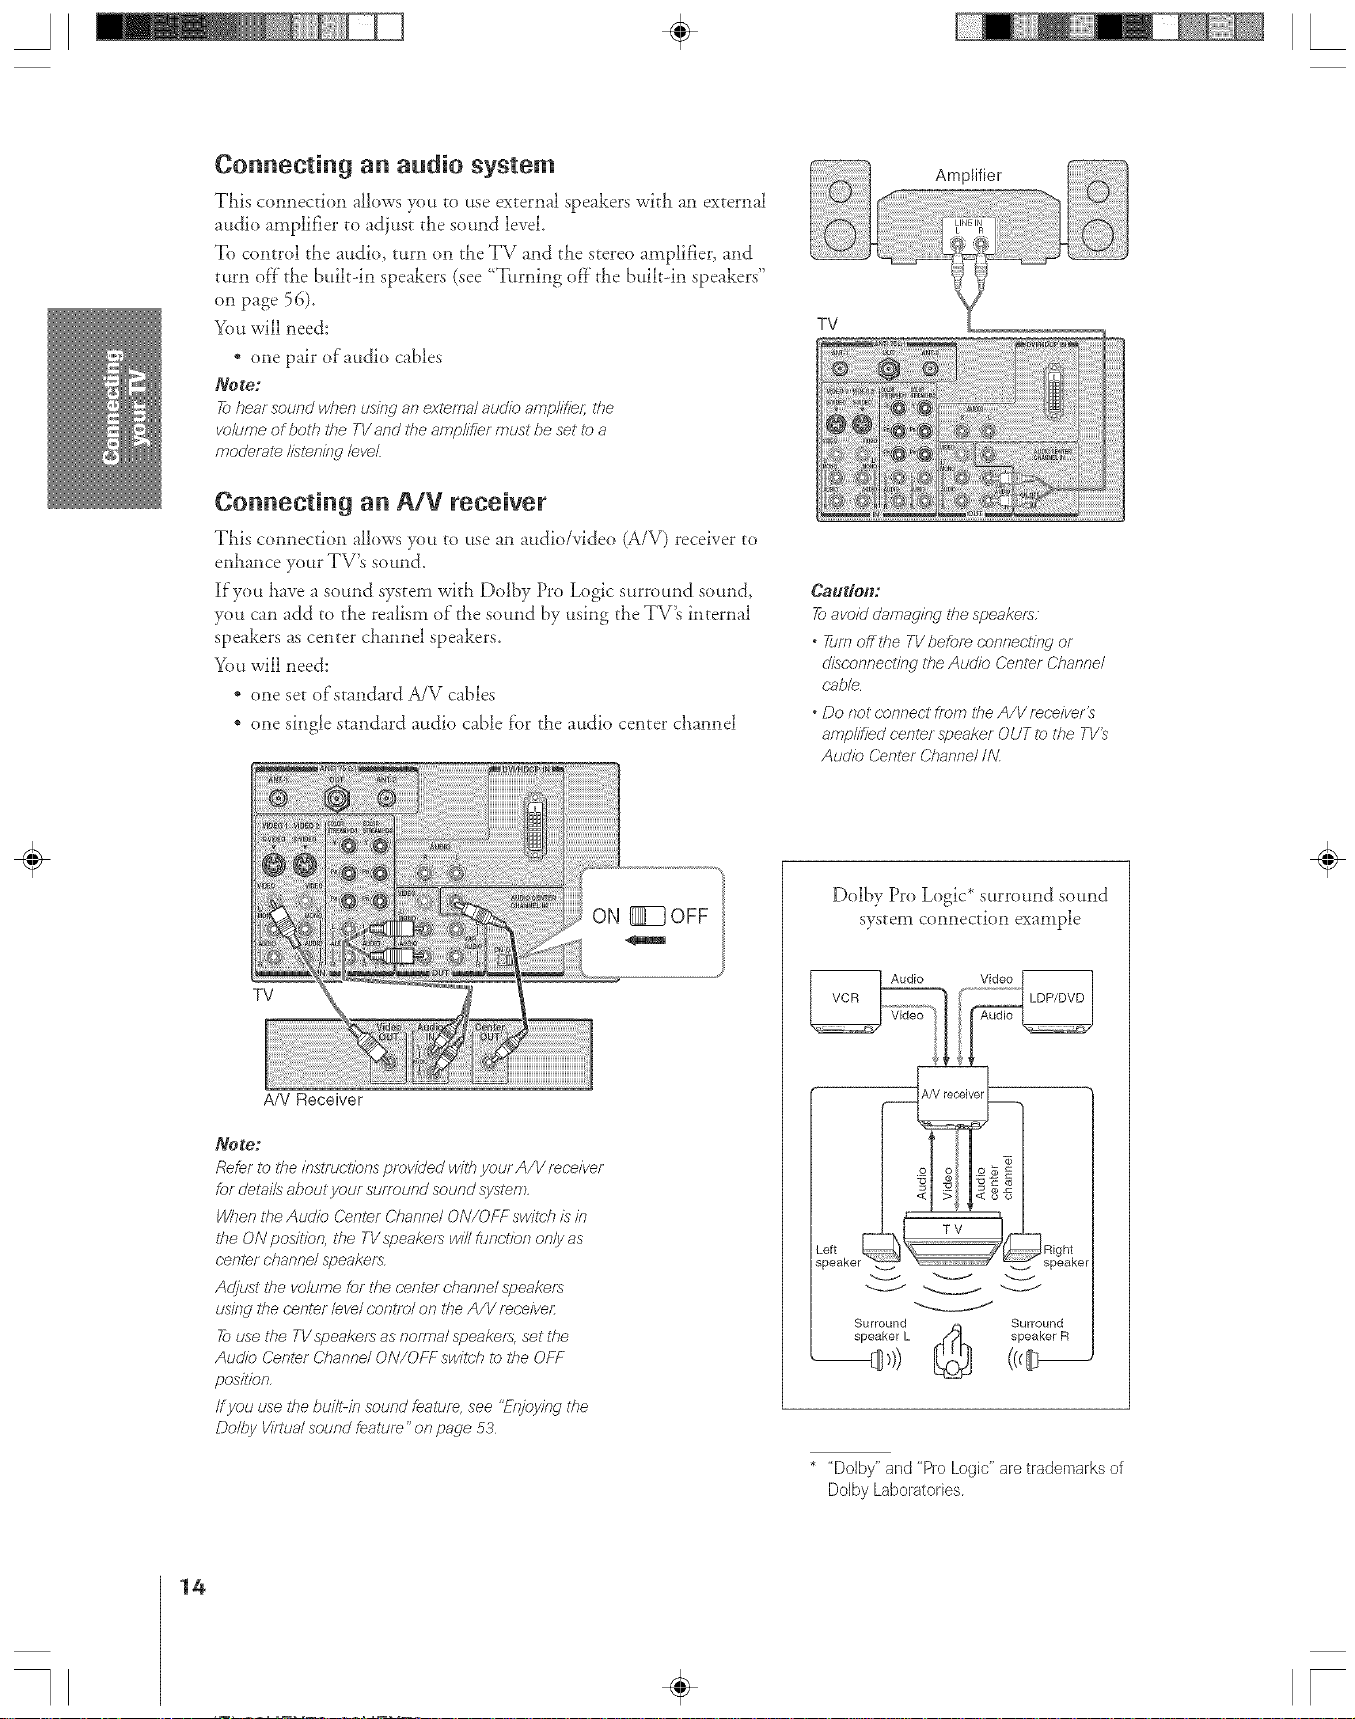
Connecting an audio system
TLis connection allows you to use external speakers wkh an external
attdio amplif;er to adiust tt_e sound level.
To control the audio, turn on the TV and the stere() amplifier, and
turn off t_e built-in speakers (see {T[trning of_"the built-in speakers"
on page 56).
You will need:
* one pair of audio cables
Note:
2_ hear sound when using an externa/ audio amplifier; the
volume of both the TV and ffTeamplifier rzTustbe set to a
moc/emle lislen#w /eveL
Connecting an A/V receiver
This connection allows you to use an attdio/video (A/V) receiver to
enhance your TV's sound.
]If'you have a sound system with Dolby Pro Logic surround sound,
you can add to the realism of"d_e sound by using the TV's internal
speakers as center channel speakers.
You will need:
* one set of standard A/V cables
* one si*lgle standard a_*dio cable f'or tM audio center channel
Amplifier
TV
Caution:
2_avoid damaging the speakers:
• Turn off the TV before connecting or
c/isconnecti_W the AIA//b Center Channel
cab/e
• Do not connect ffem #_eA/V receiver
amp/if)ed cenler speaker OUT to tl_e TV2
Audio Cenl_r Channel IAL
TV
AN Receiver
Note:
Refer te the inslr_Jr;lions provided with your A/V mc:eiver
for c/eta/Tsabout j/OUr SUfTOUnd soulTd Sj/sten?,
When the AL!dio Center Channe/ ON/OFF switc,h is k7
tile ON position, lfle TV speakers win function only as
c;enter channe/ speakers
At/just lf_e volume for tfle center channel speakers
usi/W the center/eve/r;ontm/on the A/V mr;eivef:
2_ use lf_e TV speakers as nofTTT8/speakers, set the
AucJio Cenier Channe/ ON/OFF swii_2_to lfle O/z-/Z"
position,
/f you use t/_ebuilt-in sound fealuf_, see "Enjoyit W tf_e
Do/by Virt_Ja/sound feature" on page 53
Dolby Pro Logic* surround sound
system connection example
Surround m Surround
speaker L z'_h speaker R
--@))
U
÷
14
* "Dolby" and "Pro Logic" are trademarks of
Dolby Laboratories
A ÷ L
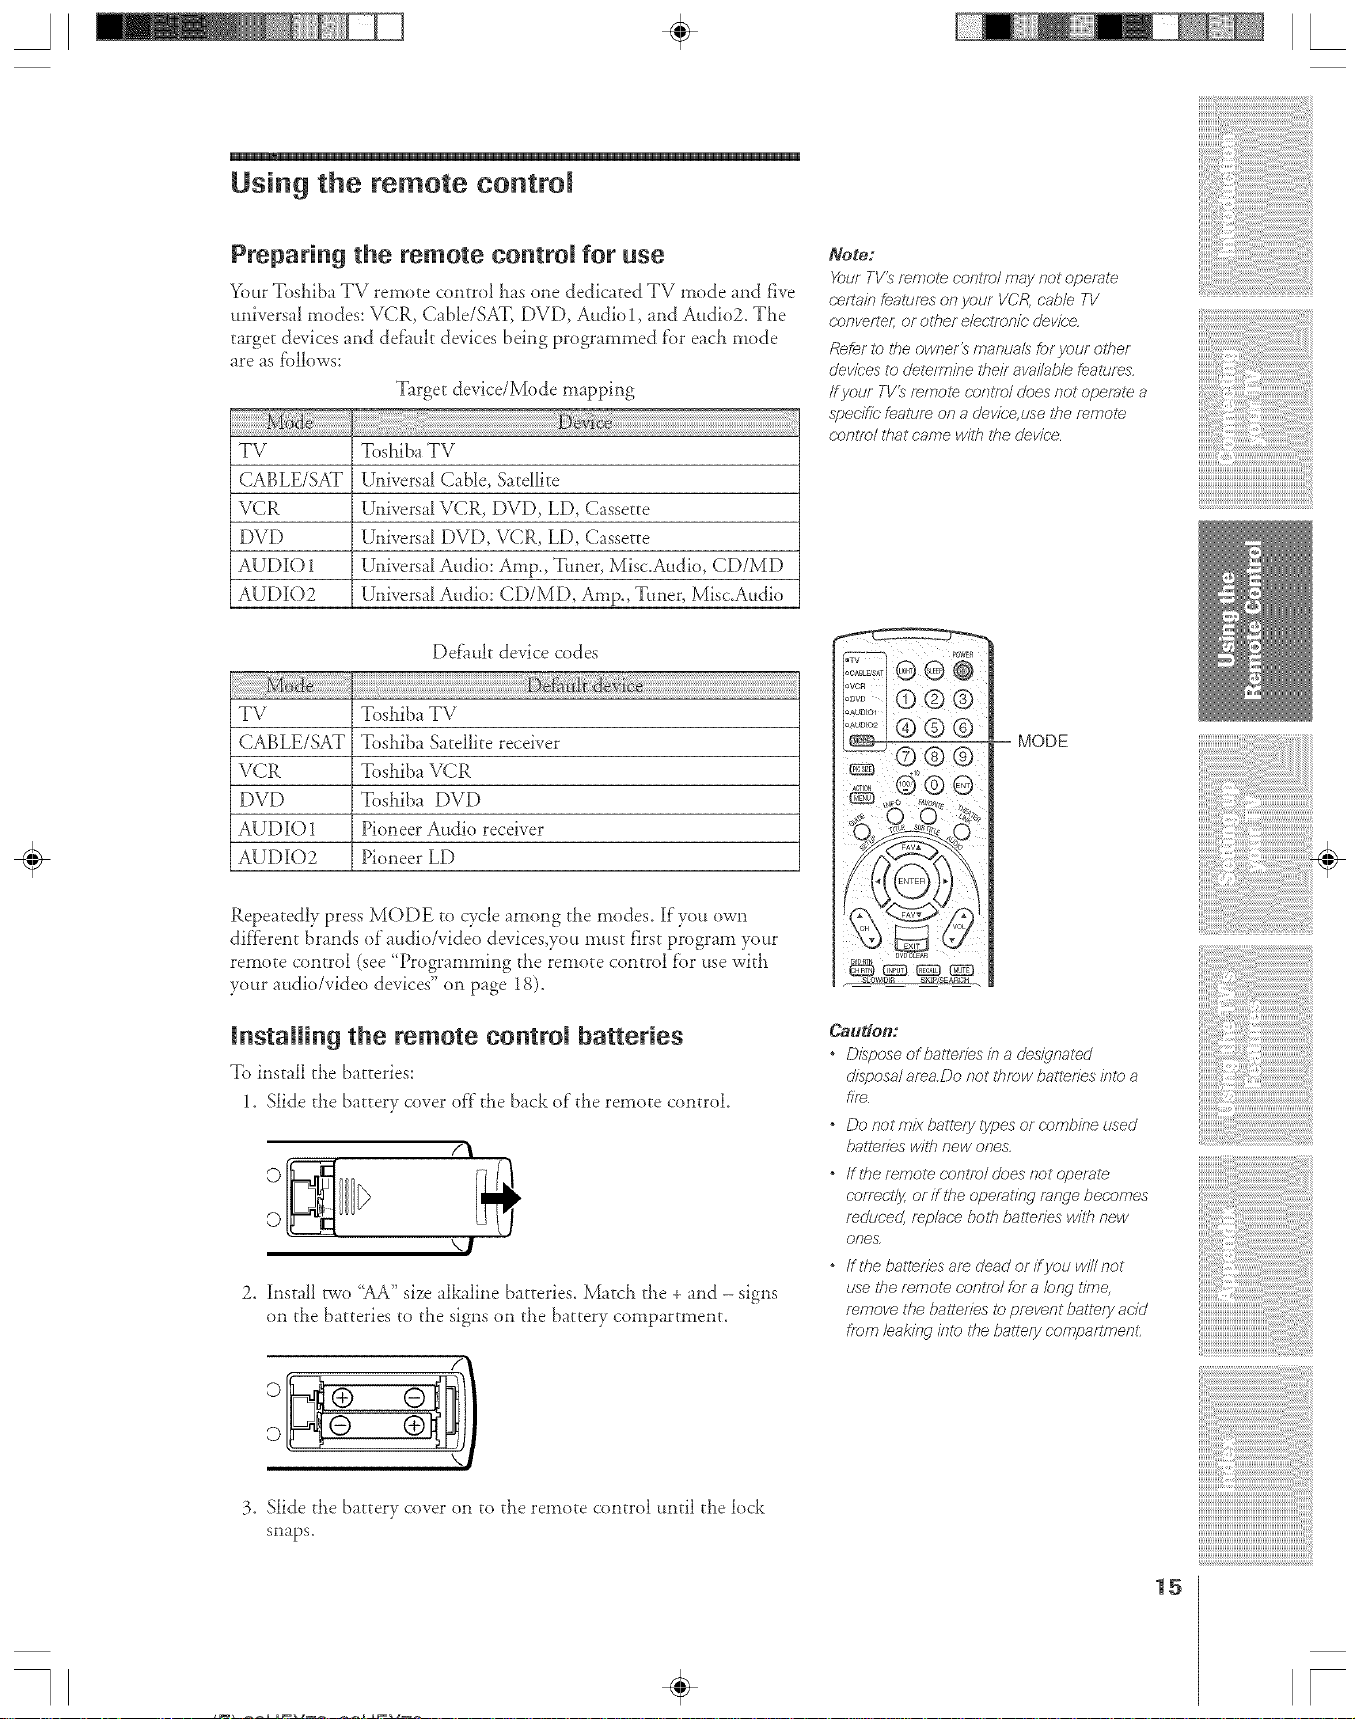
Using the remote controJ
Preparing the remote controJ for use
Your TosSiba TV remote control 5as one dedicated TV mode and five
universal modes: VCR, Cable/S_g, DVD, Audio 1, and Audio2. The
target devices and def'auJt devices being programmed f'or each mode
are as fbllows:
Target device/Mode mapping
iiiiiiiiiiiiiiiiiiiiiiiiiiiiiiiiiiiiiiiil_i_i_;ii_ii_ii_ii_ii_ii_ii_ii_ii_ii_ii_ii_ii_ii_ii_ii_ii_ii_ii_il¸I_:
Tv
CABLE/S2iF
VCR
DVD
AUDIO 1
AUDIO2
TV
CABLE/SAT
VCR
DVD
AUDIO 1
AUDIO2
Toshiba TV
U,liversa[ Cable, Satellite
U,liversal VCR, DVD, LD, Cassette
U,liversal DVD, VCR, LD, Cassette
U,fiversal Audio: Amp., Ttmer, Misc.Audio, CD/MD
U,dversal Audio: CD/MD, Amp., Ttmer, Misc.Audio
Default device codes
TosSiba TV
TosSiba Satellite receiver
Toshiba VCR
Toshiba DVD
Pioneer Audio receiver
Pioneer LD
Note:
Your TV2 remole contm/ may not operate
cefIain features on your VCR, cab/e TV
ccmvert_r; or other e/ec,tmnic device
Refer to the owner_ manuals for your other
dewces to determine their avai/ab/e features.
ff your TV_ r_mote cc_ntT_/does not opeiate a
specific feature on a device, use t?_emmot_
contTe/ fflat came with the device
MODE
Repeatedly press MODE to cycle among tSe modes. If you own
different brands of audio/video devices,you must first program your
remote control (see "Programming tSe remote control f'or use with
your audio/video devices" on page 18).
JnstaRing the remote eontrom batteries
To insta|{ the batteries:
1. Slide dae battery cover off the back of"the remote control.
/'\
'-I
2. install two "AA" size alkaline batteries. Marc5 tSe +and - signs
on the batteries to the signs on the battery compartment.
Camden:
o Dispose of batteries k7a des{qnated
disposa/ area.Do r_ottf_mw batl_des ink> a
fire
, Donotmixbatterytypesorc'ombmeused
batteries with new or_es.
, fftberemotec;orTtT_)ldoesrTotoperate
COfTe(;Uy,Orff fife c_pemtind range becomes
reduced, rwp/ac,,ebotTi ballerfes witf_ c)ew
orTe&
If the batteries are dead or if you win not
use the remote c,,OlltT2;Ufor a/orTg time,
remove the bailerTes to prevent batte/y acid
from/eakind kTt_the battery compaftmerTL
3. Slide the battery cover on to the remote control until the lock
snaps.
÷
15
A ÷ [
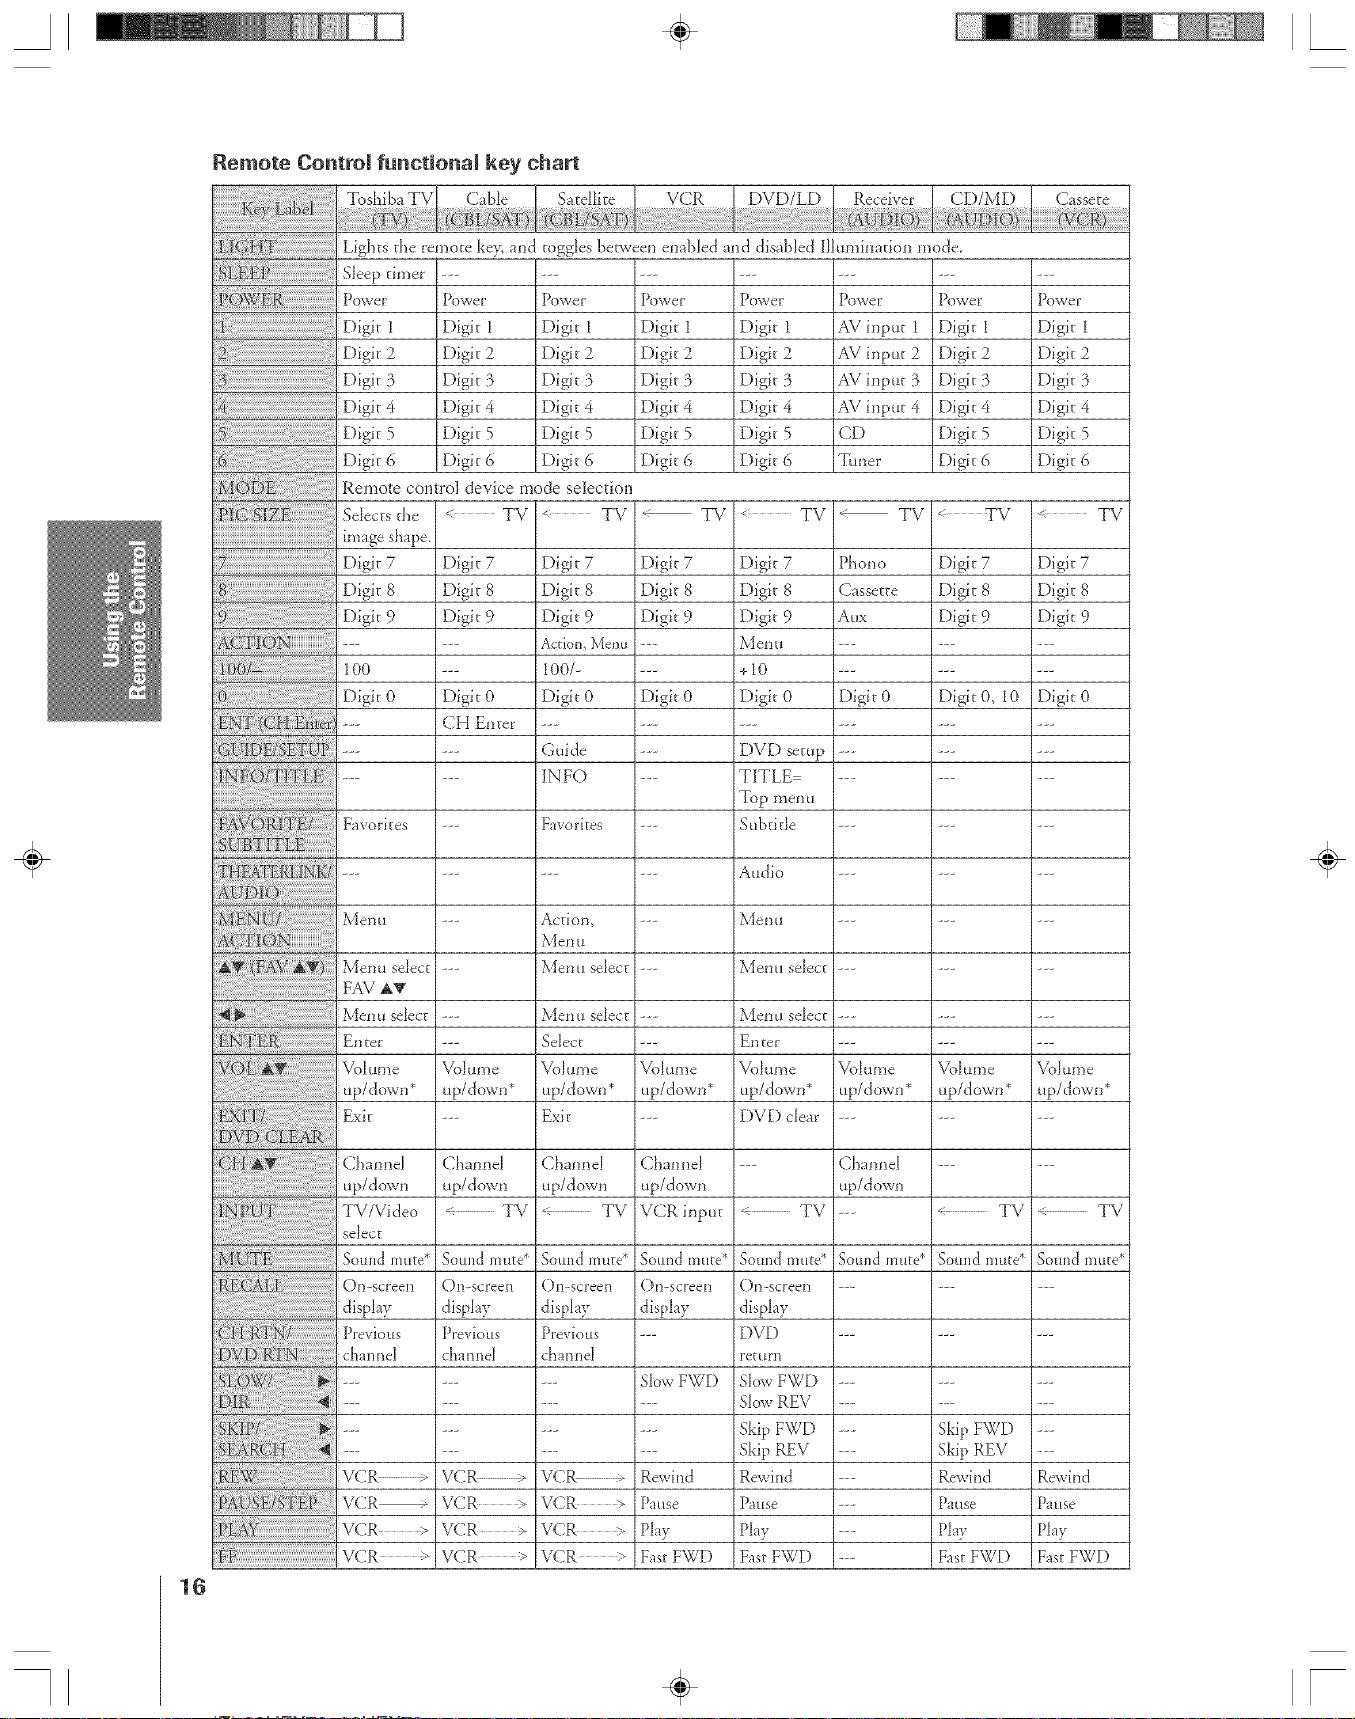
Remote Control functional key chart
=
iLights the remote ks)', md toggles beLweenenabDd md disabDd Ilhm_inadon mode
Sleep thner ---
Pi( ;
power_ I}owet _
Digit i Digit i
Digit 2 Digit 2
Digit 3 Digit 3
Digit 4 Digit 4
Digit 5 Digit 5
Digit 6 Digit 6
Remote control device mode selection
Se]_ectsthe TV TV
PovJe_"
Digit 1
Digit 2
Digit 3
Digit 4
Digit 5
Digit 6
P{3VJeE
Digit 1
Digit 2
Digit 3
Digit 4
Digit 5
Digit 6
" 71/
Powe__
Digit 1
Digit 2
Digit 3
Digit 4
Digit 5
Digit 6
; TV
Po%ve[
AV input 1
AV input 2
AV input 3
AV input 4
CD
Wtli_e_ _
TV
POVJeE
Digit I
Digit 2
Digit 3
Digit 4
Digit 5
Digit 6
< TV
P{3VJeE
Digit I
Digit 2
Digit 3
Digit 4
Digit 5
Digit 6
TV
Digit7
Digit 8
Digit 9
100
iDigito
:: Favo,: tes
N:N:--
Menu
Men u sebct
FAV _
Men u select
EDEeE
iVolume
iup/down*
Exit
Digit 7
Digit 8
Digit 9
Digit 0
Digit 7
Digit 8
Digit 9
Action, Menu
100/-
Digit 0
Digit 7
Digit 8
Digit 9
Digit 0
Digit 7
Digit 8
Digit 9
Menu
+lO
Digit 0
Phono
Cassette
kux
Digit 0
CH Enter
Guide
INFO
E)VE) setup
TITLE
Top menu
--- Favorites .........
Sub d tie
......... Audio ......
--- Action, --- Menu ......
l\_eI] 11
--- Men u select --- Menu select ......
Volume
up/down*
MeD tl select
Select
Voiume
up/down*
Exi t
Vol ume
up/down*
Menu select
EI]ter
Voiume
up/down*
E)VE) clear
Voiume
up/down*
Digit 7
Digit- 8
Digit- 9
Digit O, I0
Volume
up/down*
Digit 7
Digit 8
Digit 9
Digit 0
÷
Volume
up/down*
16
Channel
up/down
TV/Video
select
Sound mute*
On-screen
di@ay
Previous
channel
VCR .-
VCR_
VCR >
VCR >
Channel
up/down
<_" TV
S0ulld Ii] rite _
On-screen
display
Previous
channel
VCR --
VCR >
VCR >
VCR >
ChanneI
up/down
TV
Souild ii1 uEe*
()n-screen
display
Previous
channel
VCR ,
VCR
VCR >
VCR >
Channel
up/down
VCR input
Sotmd mute*
()n-screen
di@ay
Slow FWD
Rewind
Pause
Play
Fast FWD
TV
Sound mute*
()n-screen
display
DVD
FetllrI]
Sbw FWD
Slow REV
Skip FWD
Skip REV
Rewind
Pause
Play
Fast FWD
ChanneI
up/down
Sotuld Iilttte*
TV
Sound mute*
Skip FWD
Skip REV
Rewind
Patlse
Play
Fast FWD
< TV
Sound mute*
Rewind
Pause
Phy
Fast FWD
A ÷ L
VCR_ --
VCR - VCR >
VCR -; VCR
POP dmnnel -2 TV
up/down
POP Split _ -IV
POP Direc_ch < TV
POP Freeze < TV
POP Swap < TV
POP Ch scan _ TV
POP Source < TV
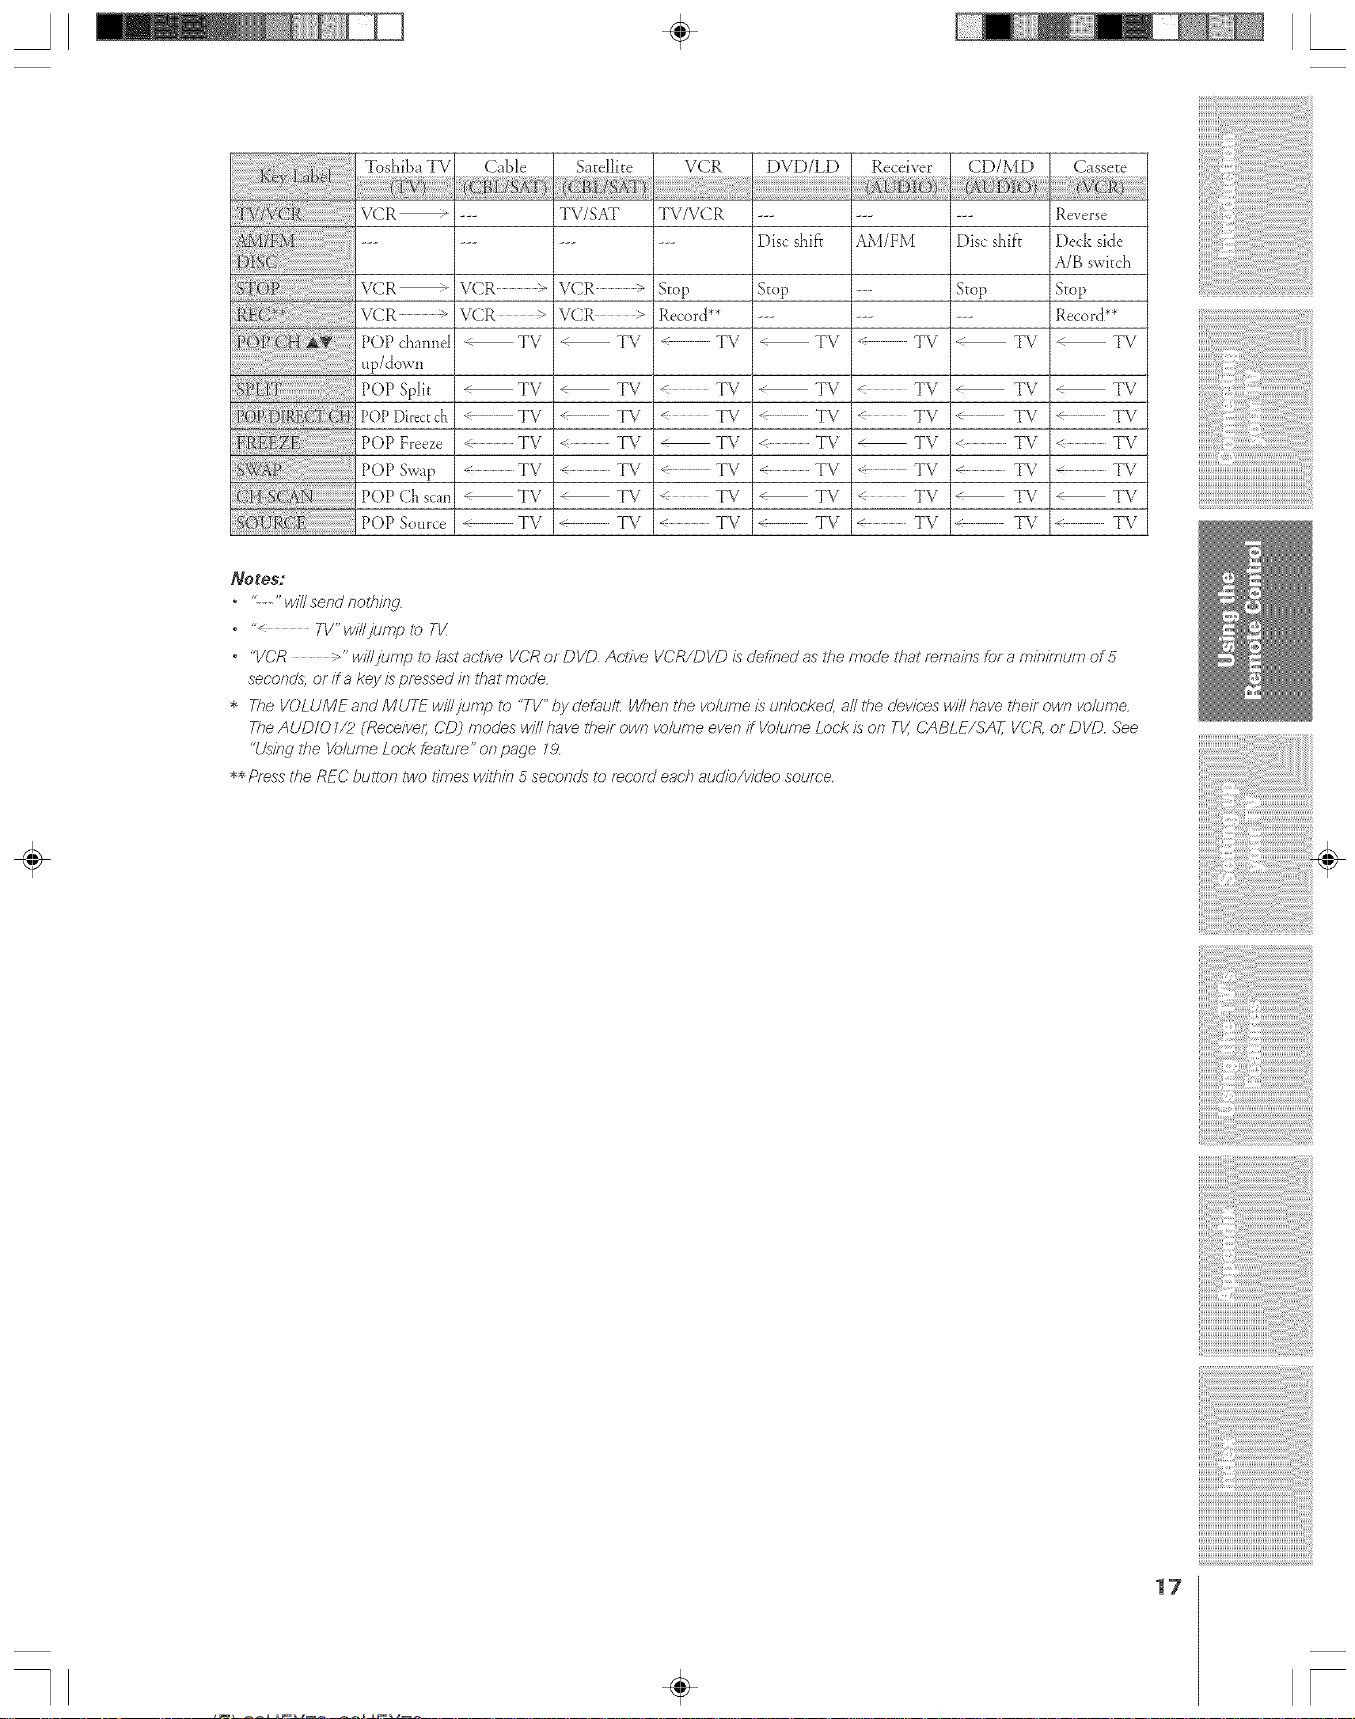
• <-" wi//se_d no/hk_£
• " TV"wi//]ump to TV
• "VCR >" wi//jump to/ast aclfve VCR or DVD Ac't/ve VCR/DVD is defined as the mode treatf_mains for a mJlTkzTun_of 5
seconds, or if a key is pressed in that tootle
• The VOLUME and MUTE w/I/jump to "TV" by default: WheR t¢_eVO/tJfT_eISL/R/ocked,a//the devJeP.swI//have ff_eif own w_lume.
The AUDIO f/2 (Rec;P.ivef;CD) modes wi// have ff_eif own w_lume even if Volume Lock is on TV, CABLE/SA_ VCR, or DVD See
"L/sitw the Vo/ume Look fealum" o_ page _,9
• *Pf_.ss tf_e REC bulton two t/riTes w/ltTin 5 seconds to f_c;of_] each atMio/vkJeo soume.
T\,_S/.AT
VCR
VCR >
TV
TV
_" TV
TV
< TV
TV
TV
TV/VC R
Stop
Record**
< TV
TV
TV
TV
_" TV
< TV
< TV
Discshift
Stop
TV
TV
TV
TV
TV
< TV
TV
AM/FM
_- TV
TV
°_ TV
TV
TV
< TV
TV
Discshift
Stop
TV
TV
< TV
< TV
TV
TV
, TV
Reverse
Deck side
A/B swkch
Stop
Record**
TV
< TV
-: TV
< TV
_ TV
< TV
TV
÷
17
Programming the remote controJ for use with
your audio/video devices
Device code setup
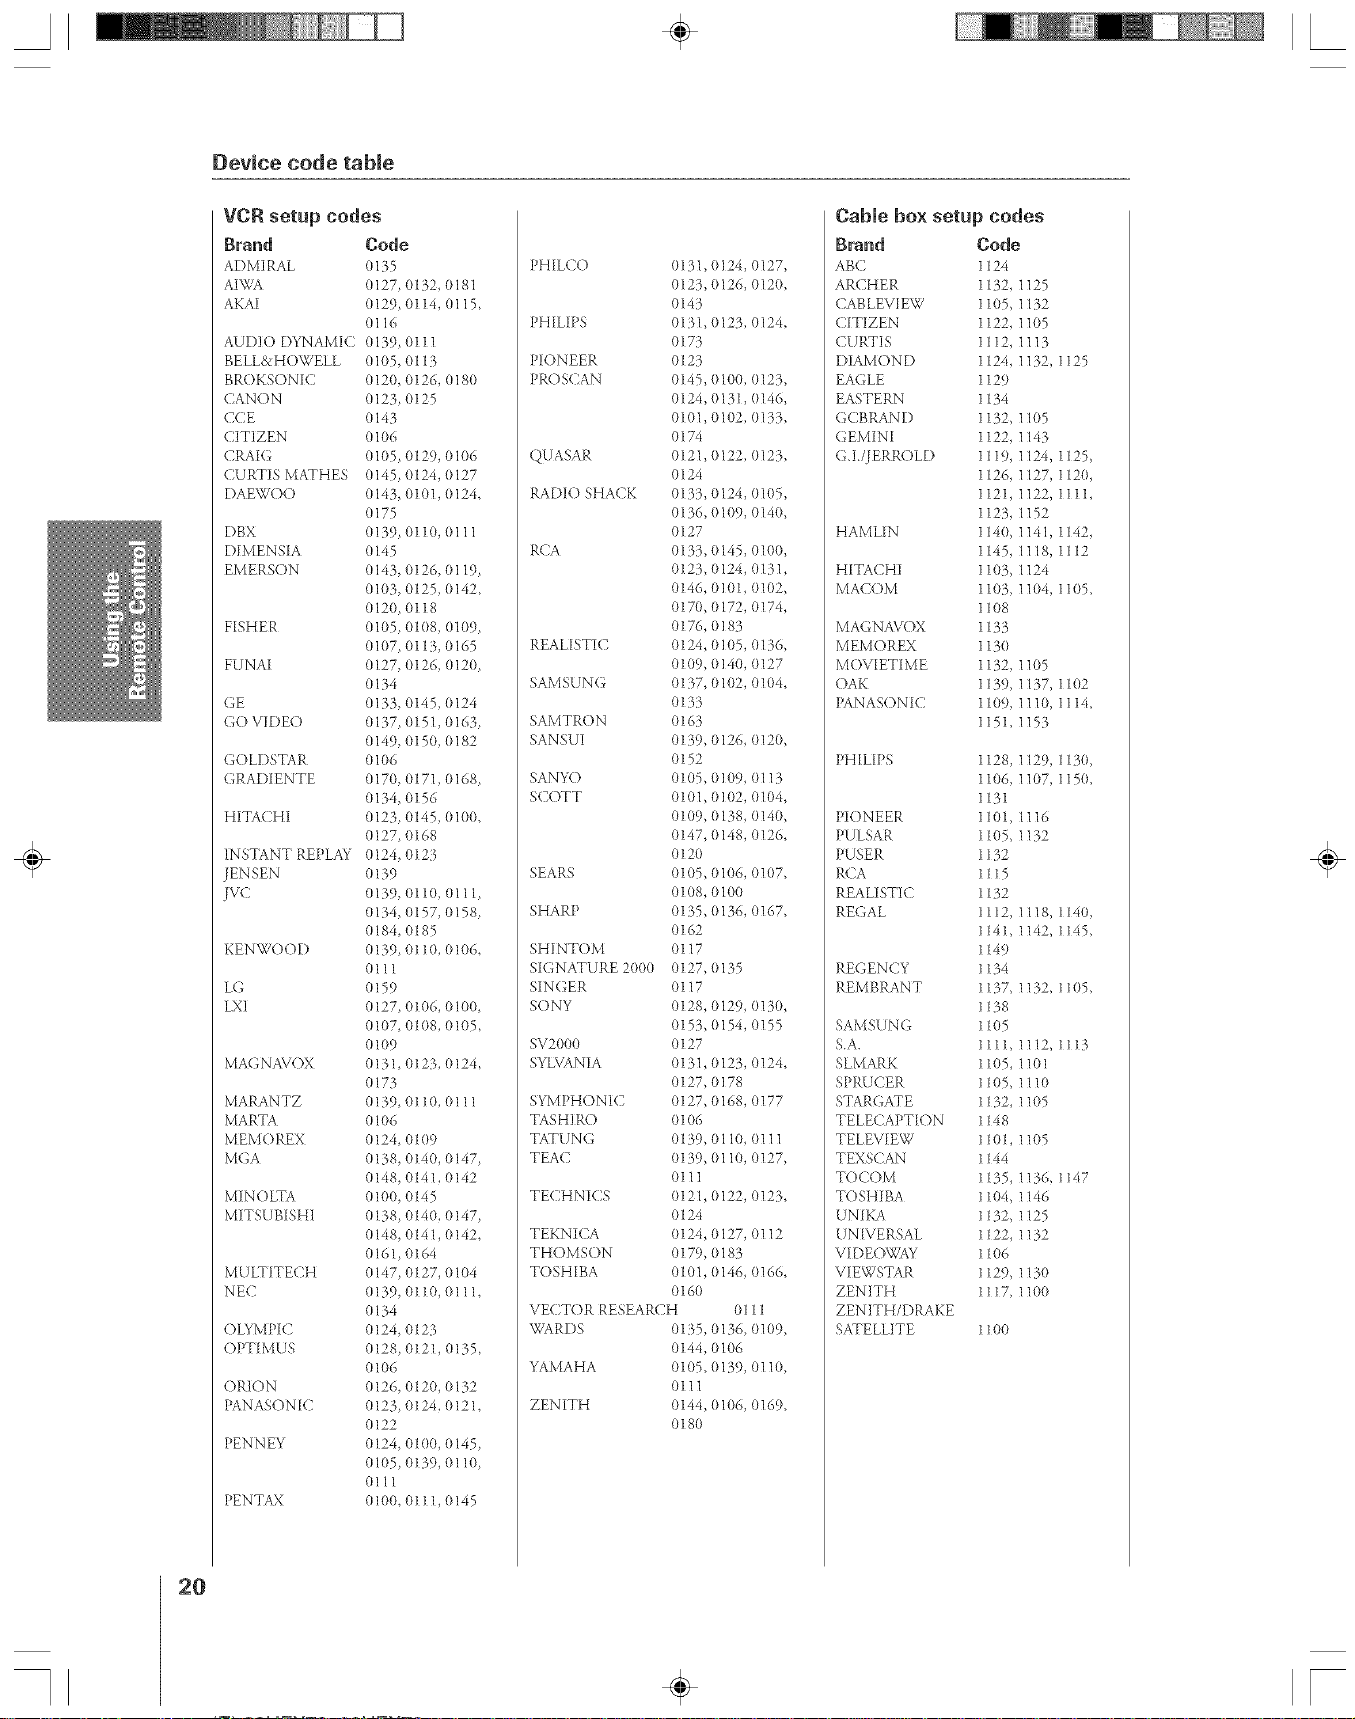
1. Refer to the Device code table on pages 20-21 to find the code
f'or tlle brand of your device.
If more tiaan one mmlber is listed, try each one separately until
you find the one that works.
2. Press MODE until tlae Mode indicator of the device ((;ABLE/
SAT, VCR, DVD, AUDIO 1, AUDIO2) lights _tp.
3. Wlaile holding down the RECALL button, press the Claannel
Number buttons to enter the four-digit code of your brand of"
device, if"a valid code is entered, tlle mode indicator will blink
twice. If"an invalid code is entered, the mode indicator will blink
one long blink.
4, Point tlae remote control at the device and press POWER to test
the code.
l[fdie device turns on, you have entered the correct code.
l[f"the device does not respond to tlae remote control, you may
Lave entered the wrong code. Repeat steps 3 and 4 using another
code,
Note: in additfon to POWFR, confifyrl that a// ne#essafy keys on the TV
re.mole contf_)/ operal_ your devic.e, ff some keys am not operational, f_epeat
the devic.e (;erie setup using ar_otfler c'o(/(_(if olher c.odes am listed for your
dev/(;ej /( after I/yi/w a// listed code& the c_ecessafykeys do not opeml_
your clew?;< use the deVl?;'e2 oiigityal mmot_ c.ot?imL
Press MODE to select the TV mode to control the T\4
5_
Note:
• Every _fme you f_p/ace the batteries, you
must f_feT)fjrsm tile fef77ote cotytfeL
• Some newer VCRs are (-s,pab/e ofwerking
on either of 1weremote codes These VCRs
/?avea swilr;h bbeled "VCR 1/VCR2" /f
your VCR /?as this kind of switch and does
not respond to any of the (;odes for your
VCR brar?g set ff_eswitch to the olher
position (VCR1 or VCR2j ar?dfW)mgram
ff_e remol_ eel?If e/
• A/though the mmole contm/foryournew
TVk?d;hJdesc;ocJesfor many clevic.,e&it may
r?otinclude codes for some or a// of the
f_atufes or?certain devices yeu want to
toni/eL ff you are unable to program the
TV_remote(;ot?m;_/toopemt_yourcJevice
orsomeof ff?efealumsonif?atc/evic,¢ use
/hedevk:'e_ remoteece?gyelorthe(-onlyo/s
o_?thedevice,
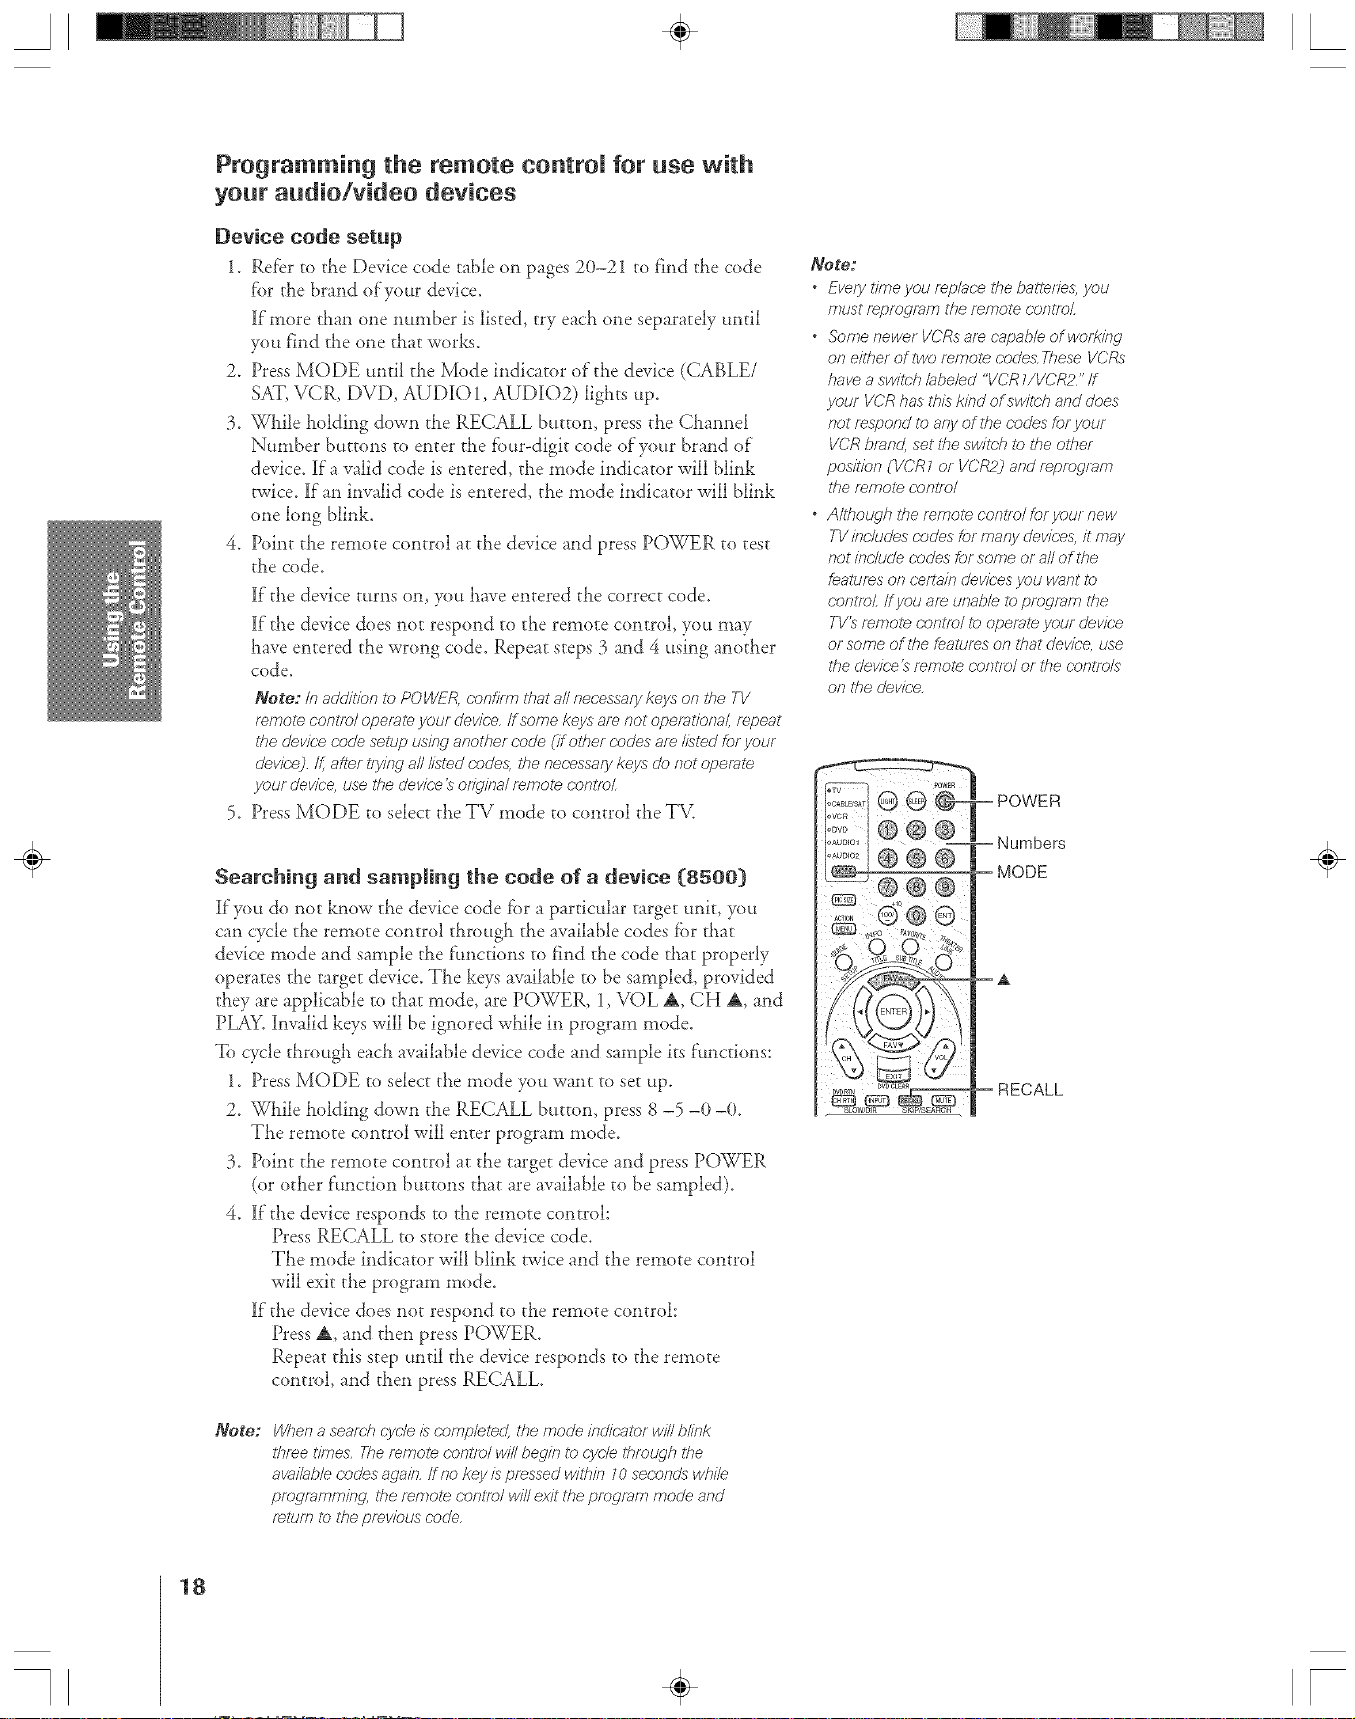
Searching and sampling the code of a device (8500)
]Ifyott do nor know the device code for a partic_dar target unit, you
can cycle the remote control tlarough tlae available codes for tlaar
device mode and sample the ftmctions to find tlae code that properly
operates tlae target device. The keys available to be sampled, provided
they are applicable to that mode, are POWER, 1, VOL A, CH A, and
PLAY. Invalid keys will be ignored while in program mode.
To cycle ttarough each available device code and sample its ft_tnctions:
1. Press MODE to select the mode you want to set up.
2. \Vtaile holding down the RECALL button, press 8 -5 -0 -0.
TLe remote control will enter program mode.
3. Point the remote control at the target device and press POWER
(or other function buttons that are available to be sampled).
4. if"the device responds to the remote control:
Press RECALL to store tlae device code.
TLe mode indicator will blink twice and the remote control
will exit the program mode.
if"the device does not respond to the remote control:
Press A, and then press POWER.
Repeat tiffs step until the device responds to the remote
control, and then press RECALL.
Note:
When a seam/? cyc-/eis complel_÷d, the mode mo'/c_tor wi// blink
ffyree dmes. The mmol_ c.onl/el will begin to cycle thmt4qh frye
aw:,i/ab/e codes again. If no key is pressed within 10seconds while
programming tke mmole con17_)/will exit the ping,ram merle and
return to the pmwbus code.
÷
RECALL
18
A ÷ [
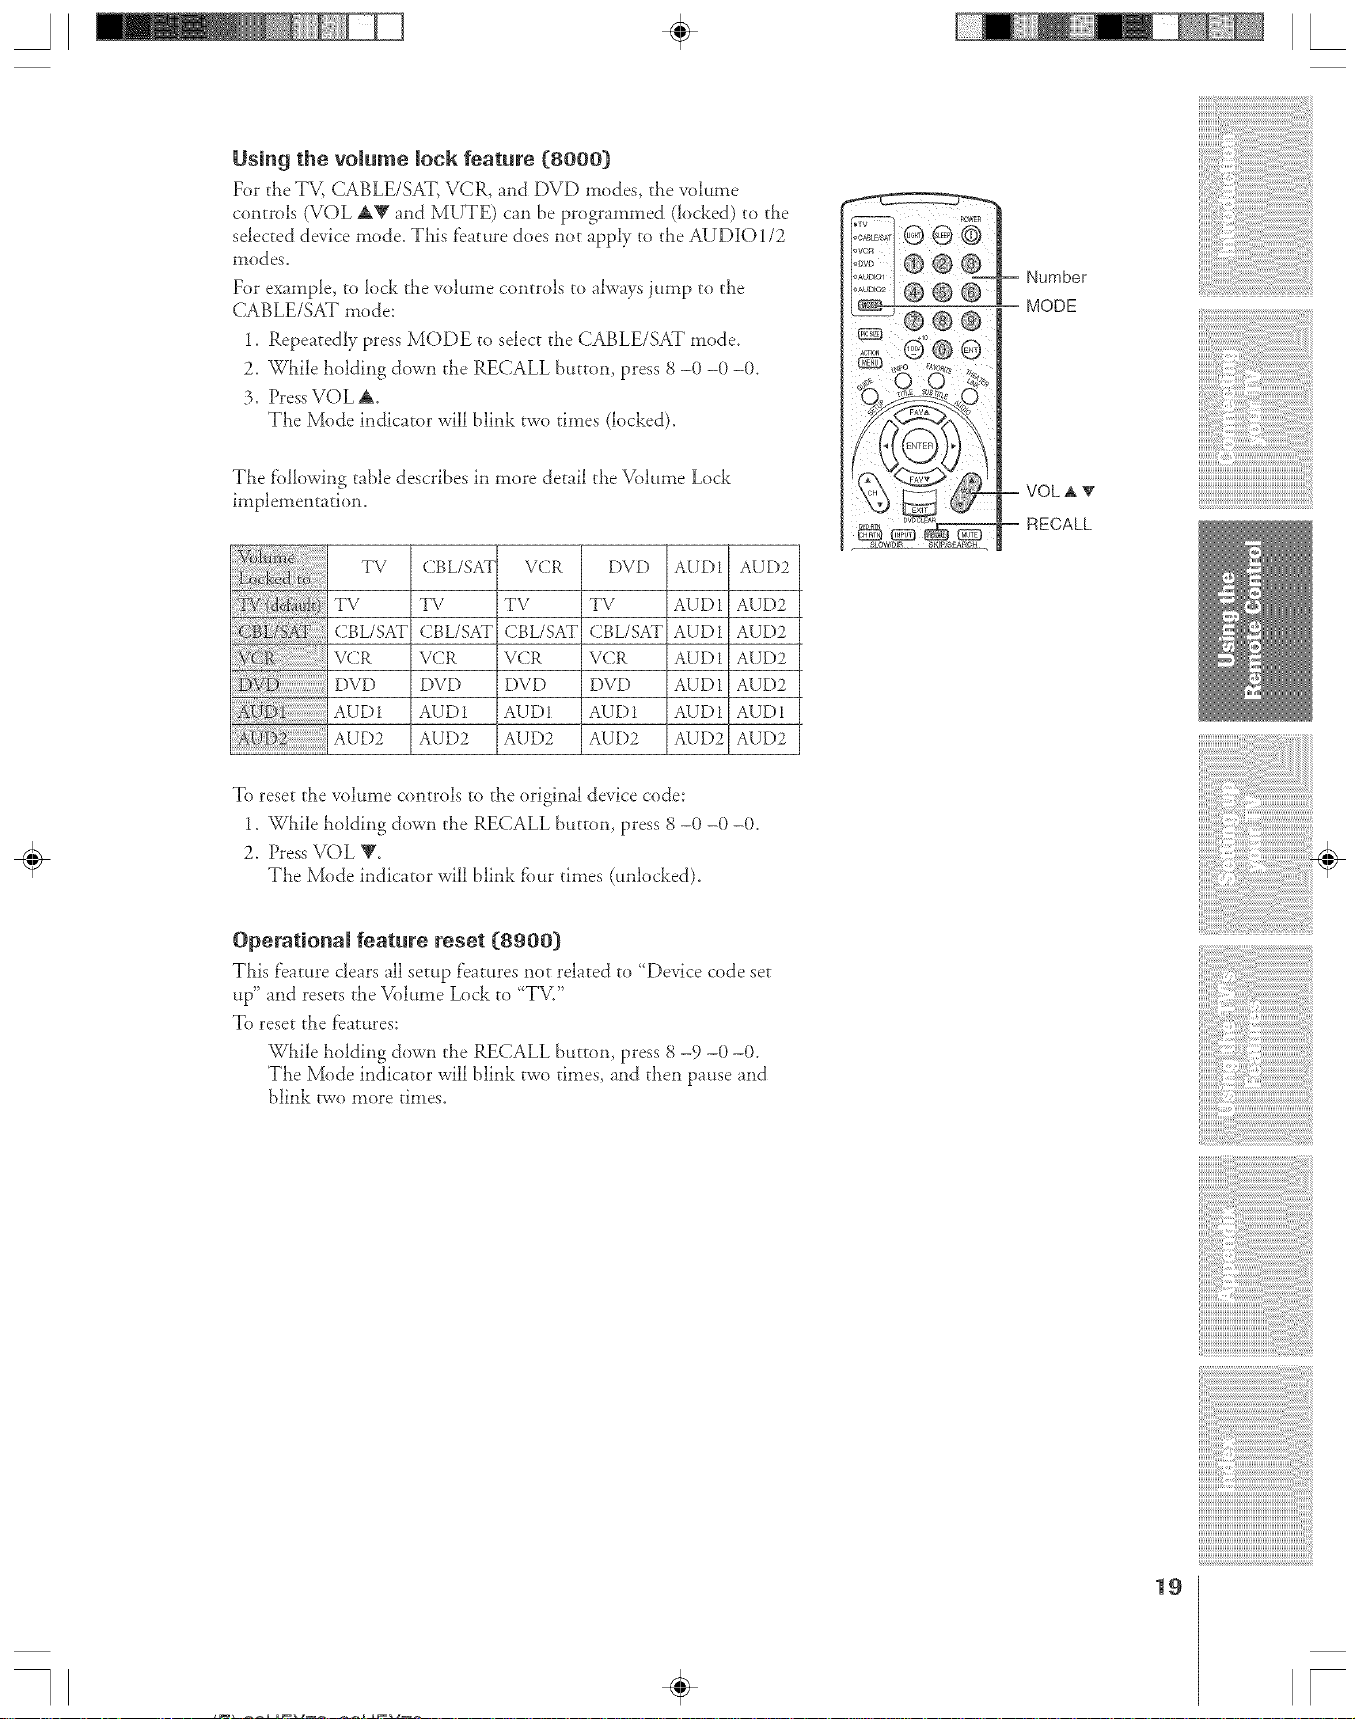
Using the volume IoeR feature {8000)
For the TV, CABLE/SAT, VCR, and DVD modes, the volume
controls (VOL AV and MUTE) can be programmed (locked) to the
selected device mode. This feature does not apply to the AUDIO1/2
i_lod es,
For example, to lock the volume controls to always jump to tile
CABLE/SAT mode:
1. Repeatedly press MODE to select tile CABLE/SAT mode.
2. While holding down the RECALL button, press 8 -0 -0 -0.
3. Press VOL A.
The Mode indicator will blink two times (locked).
The following table describes in more detail the Volume Lock
implementation.
TV
TV
CBL/SAT
VCR
DVD
AUD I
AUD2
To reset the volume controls to the original device code:
1. _gghileholding down tile RECALL button, press 8 -0 -0 -0.
2. Press VOL V.
The Mode indicator will blink fbur times (unlocked).
Operational feature reset {8900)
This [eature clears all setup [eatures not related to "Device code set
up" and resets the Volume Lock to 'TV/'
To reset the features:
While holding down tile RECALL button, press 8 -9 -0 -0.
The Mode indicator will blink two times, and then pause and
blink two more times.
CBL/SAT
72/
CBL/SAT
VCR
DVD
AUD I
AUD2
VCR
TV
CBL/SAT
VCR
DVD
AUD1
AUD2
DVD AUDI AUD2
TV AUD1 AUD2
CBL/SAT AUDI AUD2
VCR AUDI AUD2
DVD AUD1 AUD2
AUD1 AUD1 AUD1
AUD2 AUD2 AUD2
÷
19
[
A ÷ L
Device code table
VCR setup codes
Brand
ADMIR/\L
AKAI
AUDIO DYNAMIC
BELL&HI)WELL
BROKSONIC
CANON
CCE
CITIZEN
C'RAIG
CURTIS MATHES
DAEWOO
DBX
DIMENSIA
EMERSON
FISHER
FUNA[
GE
GO VIDE()
GOLDSTAR
GRADIENTE
HITACHI
INSTANT REPLAY
JENSEN
Iv(2
KENWOOD
LG
LX]
MAGNAVOX
MARANTZ
MARTA
MEMOREX
MGA
MINOLTA
MITSUBISHI
MU LTITECH
NEC
OLYMPIC
OPTIMUS
ORION
PANASON[C
PENN EY
PENTAX
Code
0135
0127 0132, 0181
0129,0114,0115,
0116
0139, 0111
0105, O113
012(i, (1126, 018(i
0123 0125
0143
0106
0105, (1129, 01(16
0145 0124, 0127
0143, 0101,111124,
0175
0139, 0110,111111
0145
0143, (1126, 0119,
01(13, 0125, 0142,
0120, 0118
0105, 0108, 01(19,
01(17, 011}, 0165
0127, 0126, 012(i,
0134
0133, 0145, 0124
0137, (1151,0163,
014% 11150,0182
0106
0170, 0171, (1168,
0134, (1156
0123 0145, 0100,
0127, {i}168
0124, 012}
0139
0139, 0110, 011 I,
0134, (1157, 0158
0184, 0185
0139 0110, 0106,
0111
0159
0127, (1106, 0100,
0107, 0108, (11(15,
0109
0131, I1123, (1124,
0173
0139, 0110, 0111
0106
0124, 0109
0138, (1140, 0147
0148, 0141, (1142
0100, 0145
0138 0140, (1147,
0148, 0141, (1142,
0161 0164
0147, (1127, 0104
0139, 0110,111111,
0134
0124, 0123
0128, (1121,0135,
0106
0126, (1120, 0132
0123 111124,(1121,
0122
0124, 0100, 0145,
0105, 01 }9, 0110
0111
0100, 0111, (1145
PH [LCO 0131, 0124, 0127,
0123, 0126, 0120,
0143
PH[LI PS 0111 0123, 0124,
0173
PIONEER 0123
PROS(AN 0145, 0100, 0123,
0124, (1131, [/146,
0101, 0102, 0133,
0174
QUASAR 0121, 0122, 0123,
0124
RADIO SHACK 0133, 0124, 0105,
0136, (11(19,014(}
0127
RCA 0133, 0145, 0100,
0123, (1124, 0131,
0146, 0101, 01(12,
0170, 0172, 0174,
0176,0183
REALISTIC 0124, 01(15,0136
01(/9 0140, 0127
SAM SUNG 0137, 01(}2,0104,
0133
SAMTRON 0163
SANSUI 0139 0126, 012(1,
0152
SANYO 0105 0109, 0113
SCOTT 0101, (11(12,0104,
01(/9 0138, 0140,
0147, (1148, 0126,
o 12{[}
SEARS 0105, 0106, 0107,
01(/8, 0100
SHARP 0135, 0136, 0167,
0162
SH/NTOM 0117
SIGNATURE 2000 0127, 0135
SINGER 0117
SONY 0128, 0129, 0130,
0153, (1154, 0155
SV2000 0127
SYLVANIA 0131, o12}, 0124,
01270178
SYMPHONIC 0127, 0168, 0177
TASHI R( ) 0106
TATUNG 0139 0110, 0111
TEA(-.' 0139, 0110,0127
0111
TECHN ICS 012 I, 0122, 0123,
0124
TEKNICA 0124, 0127, 0112
THOMSON 0179 0183
TOSHIBA 010 I, 0146, 0166,
0160
VECTOR RESEAR(_H 0111
WARDS 01 }5, 0136, 01(}9,
0144, 0106
YAMAHA 0105, 01 }9, 01 lll}
0111
ZENITH 0144, 01(}6,0169,
o 180
Cable box setup cedes
Brand Code
AB( 1124
ARCHER 1132, 1125
CAB LEVIEW 1105,
CITIZEN 1122,
CURTIS 1112,
DIAMOND 1124,
EAGLE 1129
EASTEKN 1134
(-;CBRAN D 1132,
GEMINI 1122,
(}.L/JERROED 1119,
HAMLIN
HITACHI
MACOM
MAGNAVOX
MEMOREX
MOV[ET[ME
OAK
PANASONIC
PH[LIPS
PION EER
PULSAR
PUSER
RCA
REALISTIC
REGAL
REGENCY
REMBRANT
SAMSUNG
&A.
SLMARK
SPRUCER
STARGATE
TELECAPTION
TELEVIEW
TEXSCAN
TOCOM
TOSHIBA
UNIKA
UNIVERSAL
VIDE( )WAY
VIEWSTAR
ZENITH
ZENITH/DRAKE
SATELLITE
1132
1105
1113
1132,1125
1105
1143
1124,1125,
1126,
1127,1120,
1121,1122,1111,
1123,1152
114(/,1141,1142,
1145,1118,1112
1103,1124
1103,11ti14,1105,
1108
1133
1130
1132,1105
1139,1137,1102
1109,1110,1114,
1151,1153
1128,1129,113(I,
1106,1107,1150,
1131
1101,1116
1105,1132
1132
1115
1132
1112,1118,1140,
1141,1142,1145,
1149
1134
11117,1132,1105,
1138
1105
1111,1112,1113
1105,1101
1105,1110
11112,1105
1148
1101, 11(15
1144
1135,1136,1147
1104,1146
1132,1125
1122,1132
1106
1129,1130
1117,11ti}(}
1100
÷
20
 Loading...