

Toshiba 36AFX62, 32AFX62 Owner’s Manual

Dear Customer,
Thank you for purchasing this Toshiba TV.This manual will
help you use the many exciting features of your new TV.
Before operating the TV, please read this manual
completely, and keep it nearby for future reference.
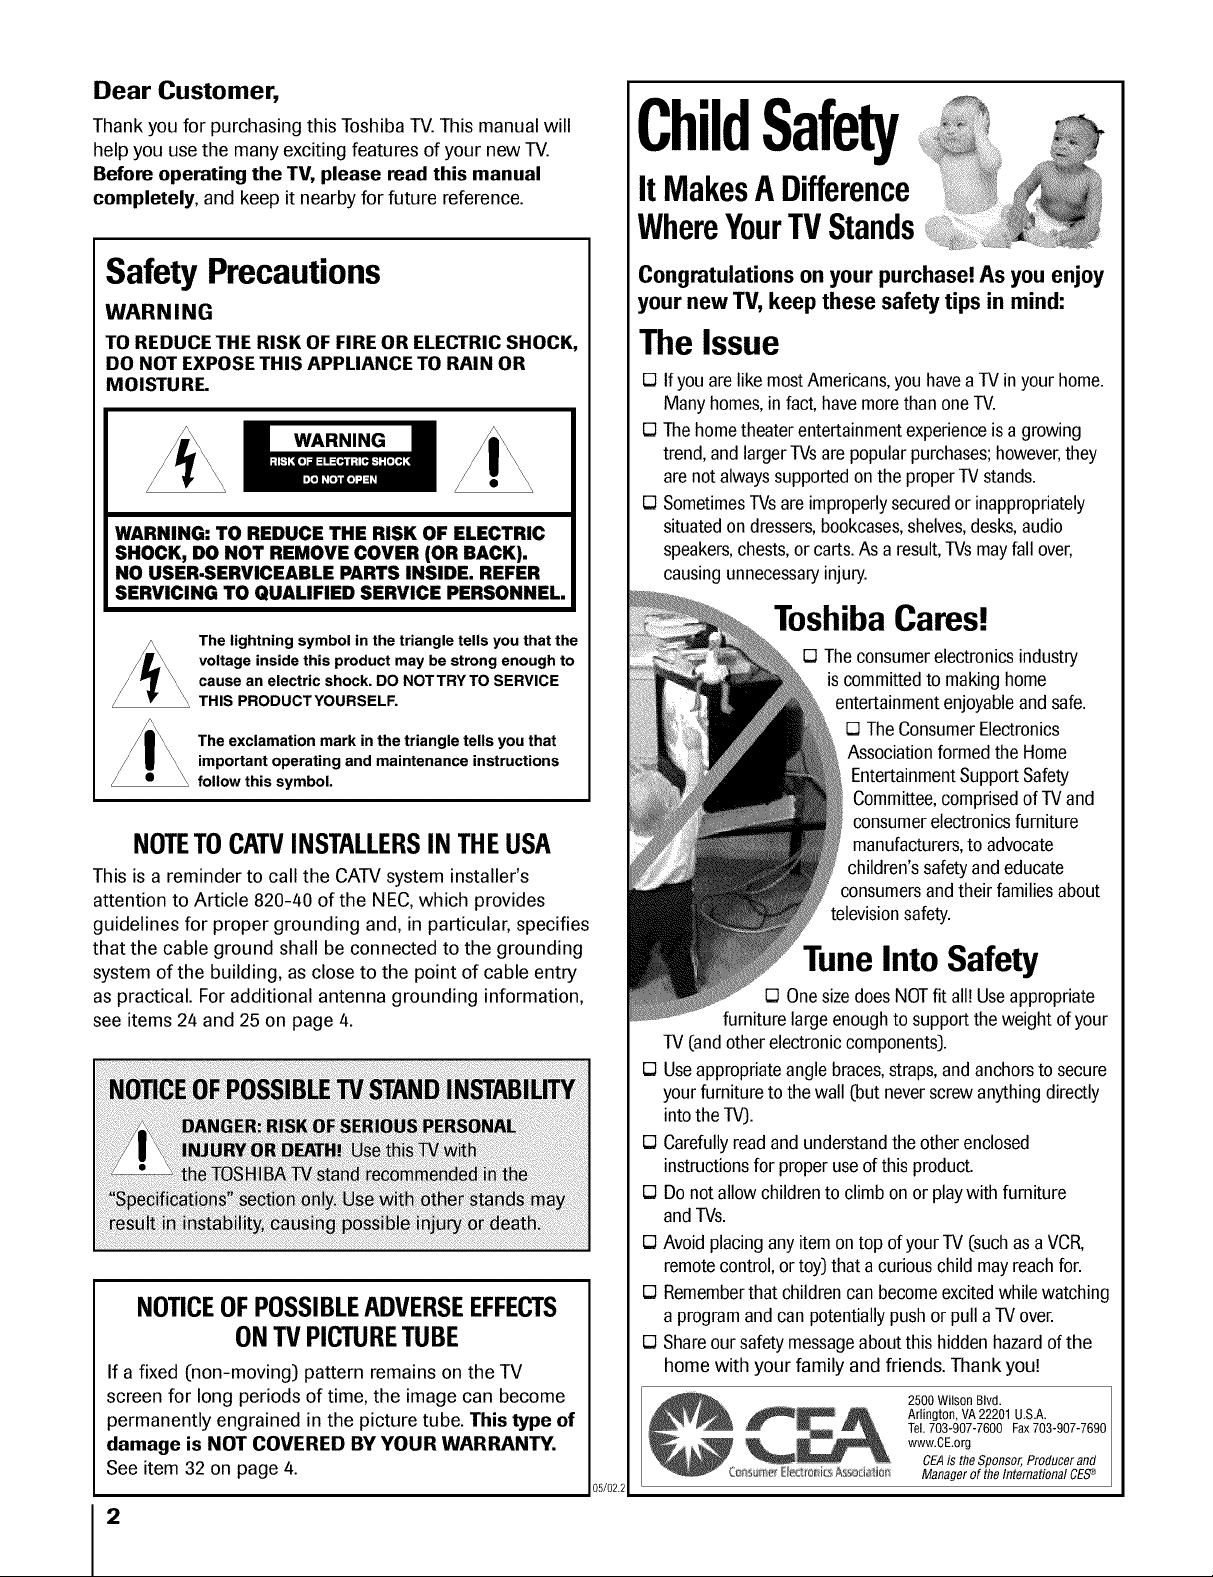
ChildSafety
It MakesA Difference
WhereYourTVStands
SafetyPrecautions
WARNING
TO REDUCE THE RISK OF FIRE OR ELECTRIC SHOCK,
DO NOT EXPOSE THIS APPLIANCE TO RAIN OR
MOISTURE.
WARNING: TO REDUCE THE RISK OF ELECTRIC
SHOCK, DO NOT REMOVE COVER (OR BACK).
NO USER-SERVICEABLE PARTS INSIDE. REFER
SERVICING TO QUALIFIED SERVICE PERSONNEL.
The lightning symbol in the triangle tells you that the
voltage inside this product may be strong enough to
cause an electric shock. DO NOTTRY TO SERVICE
THIS PRODUCTYOURSELF.
The exclamation mark in the triangle tells you that
important operating and maintenance instructions
follow this symbol.
NOTETOCAW INSTALLERSINTHEUSA
Thisis a reminder to call the CATVsystem installer's
attention to Article 820-40 of the NEC,which provides
guidelines for proper grounding and, in particular, specifies
that the cable ground shall be connected to the grounding
system of the building, as close to the point of cable entry
as practical. For additional antenna grounding information,
see items 24 and 25 on page 4.
NOTICEOFPOSSIBLEADVERSEEFFECTS
ONTVPICTURETUBE
If a fixed (non-moving) pattern remains on the TV
screen for long periods of time, the image can become
permanently engrained in the picture tube. This type of
damage is NOT COVERED BY YOUR WARRANTY.
See item 32 on page 4.
2
Congratulations on your purchase! Asyou enjoy
your new TV, keep these safety tips in mind:
The Issue
D Ifyou arelike mostAmericans,youhaveaTVinyour home.
Manyhomes,infact,havemorethan oneTV.
D The hometheaterentertainmentexperienceisa growing
trend,and largerTVsarepopularpurchases;however,they
arenotalwayssupportedonthe properTV stands.
D SometimesTVsareimproperlysecuredor inappropriately
situatedondressers,bookcases,shelves,desks,audio
speakers,chests,orcarts.As a result,TVsmayfall over,
causingunnecessaryinjury.
ToshibaCares!
D Theconsumerelectronicsindustry
iscommittedto makinghome
entertainmentenjoyableandsafe.
D TheConsumerElectronics
Associationformedthe Home
EntertainmentSupportSafety
Committee,comprisedof TVand
consumerelectronicsfurniture
manufacturers,toadvocate
children'ssafetyandeducate
consumersandtheirfamiliesabout
televisionsafety.
TuneInto Safety
D Onesizedoes NOTfit all!Useappropriate
furniture largeenoughto supportthe weightofyour
TV(andotherelectroniccomponents).
D Useappropriateanglebraces,straps,andanchorsto secure
yourfurnitureto thewall (butneverscrewanythingdirectly
intothe TV).
D Carefullyreadand understandtheother enclosed
instructionsfor properuseof thisproduct.
D Do notallowchildrento climbon or playwith furniture
andTVs.
D Avoid placingany itemontop of yourTV (suchasa VCR,
remotecontrol,ortoy)that a curiouschild mayreachfor.
D Rememberthat childrencan becomeexcitedwhilewatching
a programandcan potentiallypushor pull a TVover.
D Shareoursafetymessageaboutthis hiddenhazardofthe
home with your family and friends. Thank you!
2500 Wilson Blvd.
Tel.703-907-7600 Fax703-907-7690
www.CEorg
CEAis theSponsor,Produeerand
05/02.2
C_A Arlington, VA22201 U.S.A.
:ms met E_edro_i_sAsSQb_i_ Managerof theInternationalCES_
Important Safety Instructions
Installation,Care,and Service
1) Read these instructions.
2) Keep these instructions.
3) Heed all warnings.
4) Follow all instructions.
5) Do not use this apparatus near
water.
6) Clean only with a dry cloth.
7) Do not block any ventilation
openings. Install in accordance with
the manufacturer's instructions.
8) Do not install near any heat
sources such as radiators,
heat registers, stoves, or other
apparatus (including amplifiers)
that produce heat.
9) Do not defeat the safety purpose of the polarized or
grounding type plug. A polarized plug has two blades
with one wider than the other. A grounding type plug has
two blades and a third grounding
prong. The wide blade or the third Wideplug
prong are provided for your safety.
If the provided plug does not fit into
your outlet, consult an electrician
for replacement of the obsolete outlet.
CAUTION: To reduce the risk of electric shock, do not
use the polarized plug with an extension cord, receptacle,
or other outlet unless the blades can be inserted
completely to prevent blade exposure.
Installation
Follow these recommendations and precautions and heed all
warnings when installing your TV:
15) Never modify this equipment. Changes or modifications
may void: a) the warranty, and b] the user's authority to
operate this equipment under the rules of the Federal
Communications Commission.
16)
an unstable cart, stand, or table. The TV
may fall, causing serious personal injury,
death, or serious damage to the TV.
17)
Never place or store the TV in direct
sunlight; hot, humid areas; areas
subject to excessive dust or vibration;
or locations with temperatures at or
below 41°F (5°C).
18] Always place the TV on the floor
or a sturdy, level, stable surface that
can support the weight of the unit.
19) Never place items such as vases,
aquariums, or candles on top of the TV
DANGER: RISK OF SERIOUS PERSONAL
INJURY, DEATH, OR EQUIPMENT ,dl_-"m_
DAMAGE! Never place the TV on
6)
10) Protect the power cord from being
walked on or pinched, particularly at
plugs, convenience receptacles, and
the point where it exits the apparatus.
11) Only use attachmentslaccessories specified by the
manufacturer.
12) Use only with the cart, stand, tripod,
bracket, or table specified by the
manufacturer, or sold with the
apparatus. When a cart is used, use
caution when moving the cart/apparatus
combination to avoid injury from tip-over.
13) Unplug this apparatus during C4_,__._./
lightning storms or when __
unused for long periods /_1 _ _
of time.
14) Refer all servicing to qualified service personnel.
Servicing is required when the apparatus has been
damaged in any way, such as power supply _ (./___/_
cord or plug is damaged, liquid has !_r_,r2,1
been spilled or objects have fallen into !{ _._ )J _i_ 22) Never overload wall outlets and
the apparatus, the apparatus has been _._ extension cords.
exposed to rain or moisture, does not -_o'?-)
operate normally, or has been dropped. _ 05/02.2
20) Never block or cover the slots or
openings in the TV cabinet back,
bottom, and sides. Never place
the TV:
• on a bed, sofa, rug, or similar
surface;
• too close to drapes, curtains,
or walls; or
• in a confined space such as a
bookcase, built-in cabinet, or any
other place with poor ventilation.
The slots and openings are provided
to protect the TV from overheating
and to help maintain reliable
operation of the TV.
21] Never allow anything to rest on or roll over the power
cord, and never place the TV where the power cord is
subject to wear or abuse.
3
23) Always operate this equipment from
a 120 VAC, 60 Hz power source only.
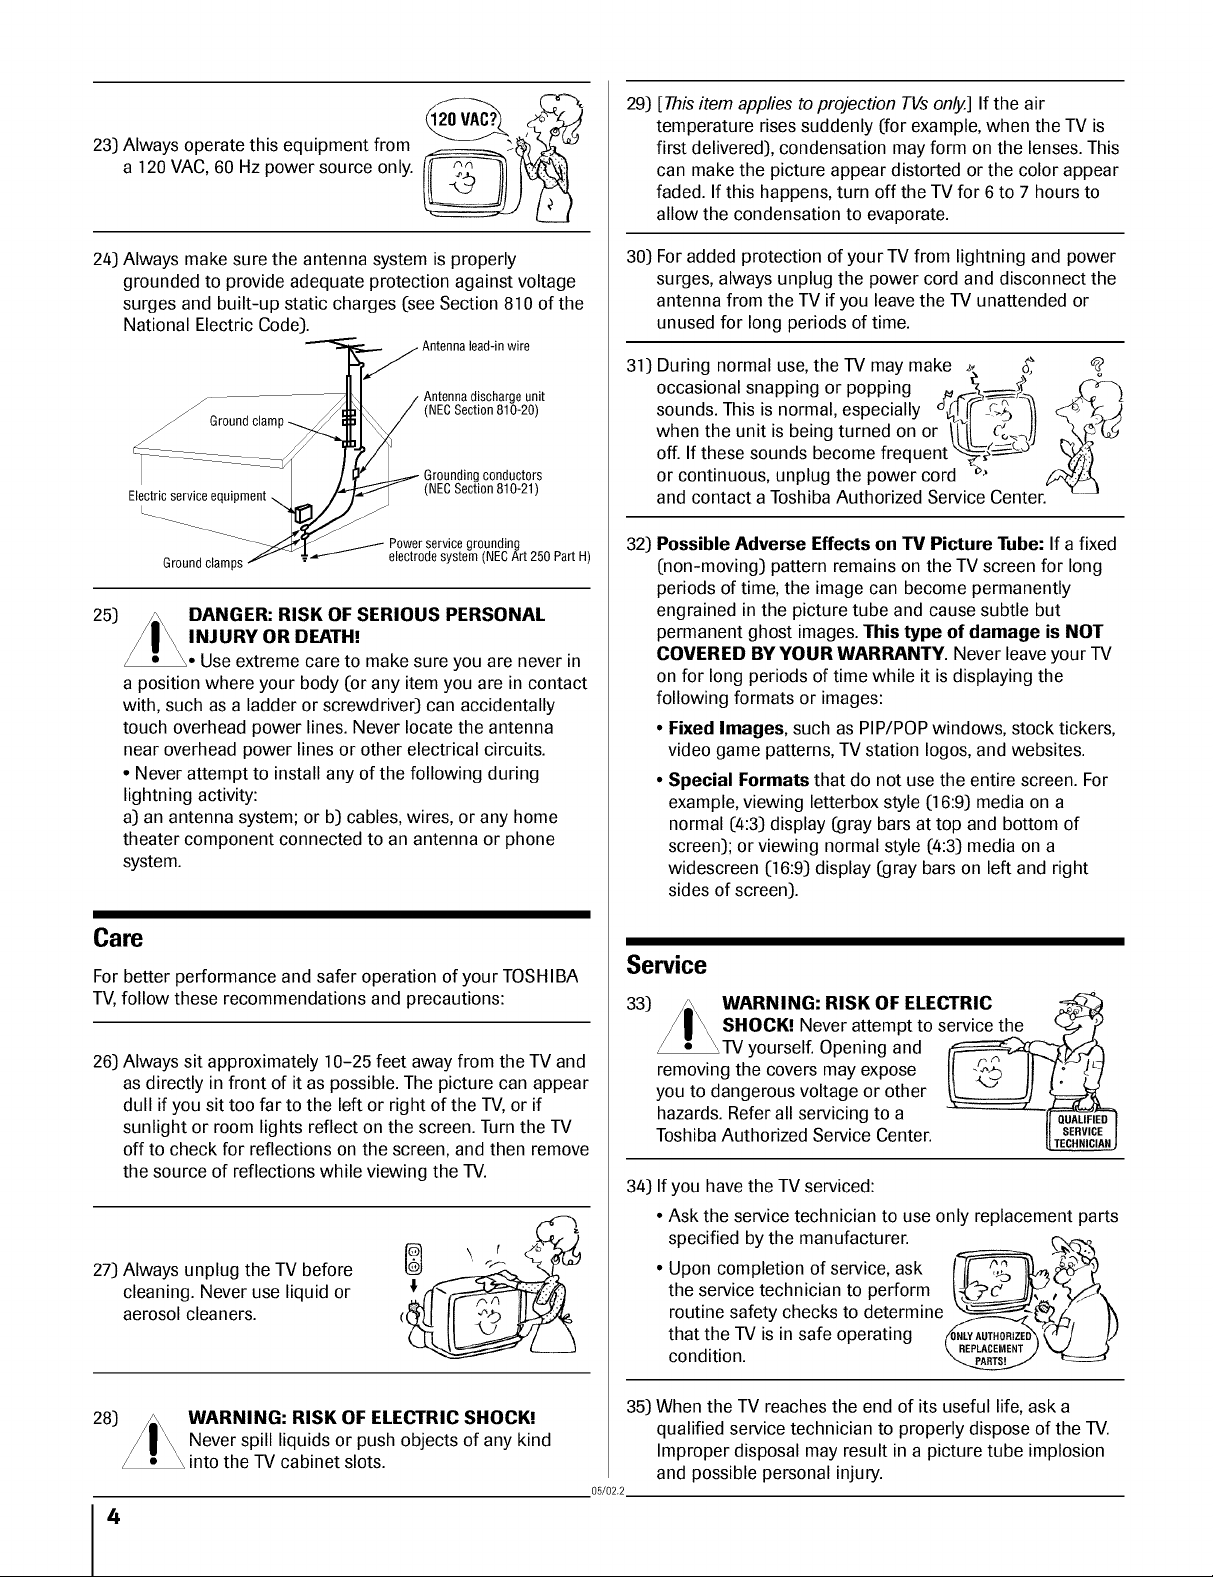
24) Always make sure the antenna system is properly
grounded to provide adequate protection against voltage
surges and built-up static charges (see Section 810 of the
National Electric Code)•
Antennalead-in wire
Antennadischarge unit
_Ground clamp
Electric service
L___
Groundclamps
25)
DANGER: RISK OF SERIOUS PERSONAL
(NECSection 810-20)
conductors
Powerservicegrounding
electrode system (NECArt 250 PartH)
INJURY OR DEATH!
Use extreme care to make sure you are never in
a position where your body (or any item you are in contact
with, such as a ladder or screwdriver) can accidentally
touch overhead power lines• Never locate the antenna
near overhead power lines or other electrical circuits•
• Never attempt to install any of the following during
lightning activity:
a) an antenna system; or b) cables, wires, or any home
theater component connected to an antenna or phone
system•
29)
[This item applies to projection TVs only.] If the air
temperature rises suddenly (for example, when the TV is
first delivered), condensation may form on the lenses• This
can make the picture appear distorted or the color appear
faded• If this happens, turn off the TV for 6 to 7 hours to
allow the condensation to evaporate•
30)
For added protection of your TV from lightning and power
surges, always unplug the power cord and disconnect the
antenna from the TV if you leave the TV unattended or
unused for long periods of time.
31)
During normal use, the TV may make _, _
occasional snapping or popping . _---_._ _
sounds• This is normal, especially _-¢ _-_
when the unit is being turned on or /1/_ o_",)l
off. If these sounds become frequent _(__a
)
or continuous, unplug the power cord _
and contact a Toshiba Authorized Service Center•
Possible Adverse Effects on TV Picture Tube: If a fixed
32)
(non-moving) pattern remains on the TV screen for long
periods of time, the image can become permanently
engrained in the picture tube and cause subtle but
permanent ghost images. This type of damage is NOT
COVERED BY YOUR WARRANTY. Never leave your TV
on for long periods of time while it is displaying the
following formats or images:
• Fixed Images, such as PIP/POP windows, stock tickers,
video game patterns, TV station Iogos, and websites.
• Special Formats that do not use the entire screen• For
example, viewing letterbox style (16:9) media on a
normal (4:3) display (gray bars at top and bottom of
screen); or viewing normal style (4:3) media on a
widescreen (16:9)display (gray bars on left and right
sides of screen)•
Care
For better performance and safer operation of your TOSHIBA
TV,follow these recommendations and precautions:
26) Always sit approximately 10-25 feet away from the TV and
as directly in front of it as possible• The picture can appear
dull if you sit too far to the left or right of the TV, or if
sunlight or room lights reflect on the screen• Turn the TV
off to check for reflections on the screen, and then remove
the source of reflections while viewing the TV.
27) Always unplug the TV before
cleaning• Never use liquid or
aerosol cleaners•
28)
WARNING: RISK OF ELECTRIC SHOCK!
Never spill liquids or push objects of any kind
into the TV cabinet slots•
4
Service
33) /=\ WARNING: RISK OF ELECTRIC
/ | _ SHOCK! Never attempt to service th.e
_TV yourself• Opening and
removing the covers may expose II IIT.
you tOdangerous voltage or other !______ _j
hazards. Refer all servicing to a -- "
Toshiba Authorized Service Center !1SERVI(
34) If you have the TV serviced:
• Ask the service technician to use only replacement parts
• Upon completion of service, ask g_
specified by the manufacturer. ___ _,
the service technician to perform
routine safety checks to determine I_--.._.4_Z/_, i)
that the TV is in safe operating
condition.
When the TV reaches the end of its useful life, ask a
35)
qualified service technician to properly dispose of the TV.
Improper disposal may result in a picture tube implosion
05/02.2
and possible personal injury.
• _ TECHNIC

Important Safety Information ............................. 2-4
Introduction ................................................................ 6
Welcome to Toshiba ......................................................... 6
Exploring your new TV ................................................... 6
Connecting your TV .................................................. 7
Note regarding picture quality ......................................... 7
Connecting a VCR .......................................................... 7
Connecting a cable converter box .................................... 8
Connecting a cable converter box and VCR ..................... 8
Connecting a DVD player or satellite receiver
and a VCR ....................................................................... 9
Connecting a DVD player with ColorStream ®
(component video) and a VCR ........................................ 9
Connecting two VCRs ................................................... 10
Connecting a camcorder ................................................ 11
Connecting an audio system .......................................... 11
Connecting an A/V receiver ........................................... 12
Using the remote control ...................................... 13
Preparing the remote control for use .............................. 13
Installing the remote control batteries ............................ 13
Remote Control functional key chart ...................... 14
Programming the remote control for use with your
audio/video devices ........................................................ 16
Device code setup ................................................... 16
Searching and sampling the code of a device (8500) .. 16
Using the Volume Lock feature (8000) ................... 17
Operational feature Reset (8900) ............................ 17
Device code table .................................................... 18
Learning about the remote control ................................. 20
Setting up your TV .................................................. 21
Learning about the menu system ................................... 21
Changing the on-screen display language ....................... 22
Selecting the antenna input ............................................ 22
Using the TV/VIDEO button to select
the antenna input ................................................... 22
Adding channels to the TV's memory ............................ 23
Programming channels automatically ...................... 23
Adding and erasing channels manually .................... 24
Adjusting the tilt correction feature ................................ 24
Changing channels ........................................................ 24
Using the TV's features .......................................... 25
Adjusting the channel settings ........................................ 25
Switching between two channels ............................. 25
Programming your favorite channels ....................... 25
Labeling channels ................................................... 26
Watching picture-in-picture (PIP) .................................. 28
Switching the main and small pictures .................... 29
Changing the position of the small picture .............. 29
Freezing the small picture ....................................... 29
Using the Multi-Window feature ................................... 29
Using the INFO (channel preview) function ........... 30
Using the FAVORITE function .............................. 30
Using the MULTI (strobe) function ........................ 30
Using the LOCKS menu ............................................... 31
Entering the PIN code ............................................ 31
If you cannot remember your PIN code .................. 31
Using the V-CHIP menu ............................................... 32
ENABLE BLOCKING .......................................... 32
TV RATING (Independent rating system for
broadcasters) ........................................................... 32
MPAA RATING (Independent rating system for
movies) ................................................................... 33
BLOCKING OPTION .......................................... 33
Unlocking programs temporarily ............................ 34
Locking channels ........................................................... 34
Locking video inputs ..................................................... 35
Changing the PIN code ................................................. 35
Adjusting the picture ..................................................... 36
Selecting the picture mode ...................................... 36
Adjusting the picture quality ................................... 36
Saving your new preferences ................................... 37
Using the flesh tone feature ..................................... 37
Using the noise reduction feature ............................ 37
Selecting the color temperature ............................... 38
Resetting your picture adjustments ......................... 38
Watching video input .................................................... 39
Labeling the video input sources .................................... 39
Using the closed caption feature ..................................... 40
Setting the sleep timer .................................................... 41
Setting the clock ............................................................ 41
Adjusting the sound ....................................................... 42
Muting the sound ................................................... 42
Selecting stereo/SAP broadcasts .............................. 42
Using the surround sound feature ........................... 43
Adjusting the sound quality .................................... 43
Resetting your audio adjustments ........................... 44
Using the CYCLONE ®sub-woofer system ............. 44
Turning off the built-in speakers ............................. 45
Selecting the Audio Out sound ............................... 45
Using the StableSound ®feature .............................. 46
Selecting the menu display background ......................... 46
Displaying on-screen information .................................. 46
Viewing the demonstration mode .................................. 47
Understanding the auto power off feature ...................... 47
Understanding the last mode memory feature ................ 47
Appendix ................................................................... 48
Specifications ................................................................. 48
Troubleshooting ............................................................. 49
Limited United States Warranty ..................................... 50
Limited Canada Warranty .............................................. 51
Index .......................................................................... 52
5
Introduction
Welcome to Toshiba
Congratulations! You have purchased one of the finest TVs on the
market. The goal of this manual is to guide you through setting up
and operating your Toshiba TV as quickly as possible.
This manual applies to models 32AFX62 and 36AFX62. Before you
start reading, check your model number by looking at the rear of
the TV.
Instructions in this manual are based on using the remote control.
You can also use the controls on the TV if they have the same name as
those on the remote control.
Please read all the safety and operating instructions carefully, and keep
the manual for future reference.
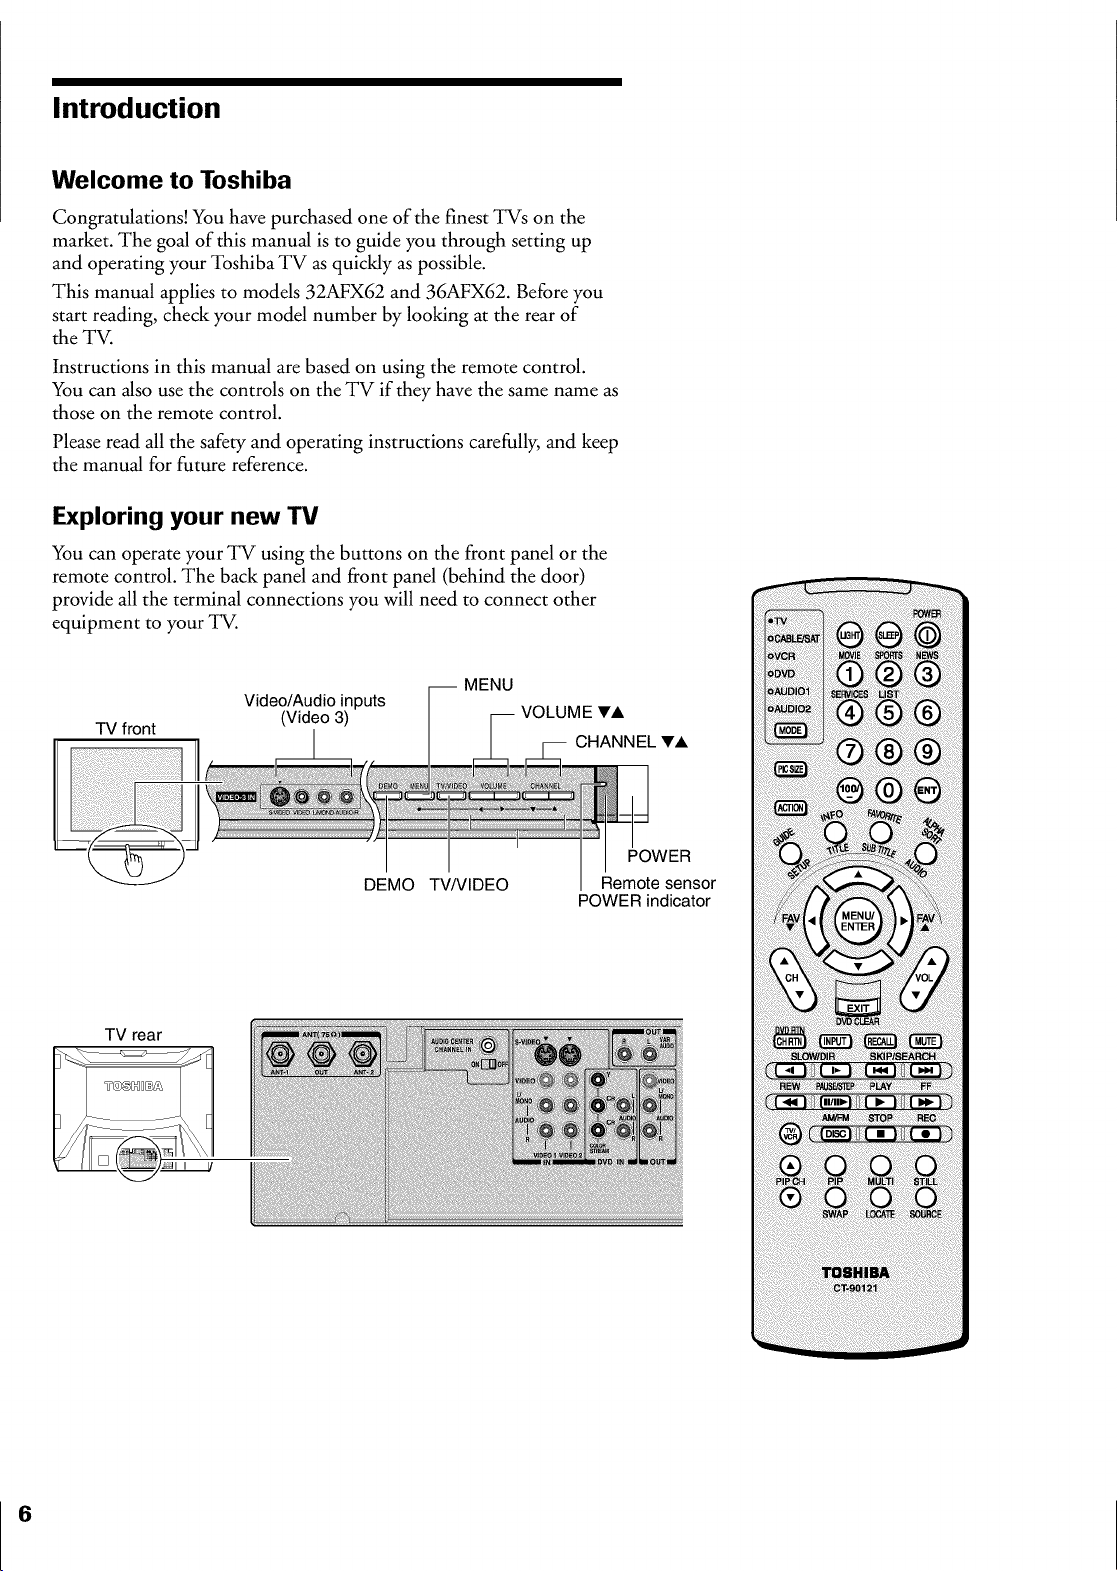
Exploring your new TV
You can operate your TV using the buttons on the front panel or the
remote control. The back panel and front panel (behind the door)
provide all the terminal connections you will need to connect other
equipment to your TV.
TV front
TV rear
Video/Audio inputs [-- MENU
(Video 3) / VOLUME VACHANNEL V,k
DEMO TWVlDEO
POWER indicator
POWER
Remote sensor
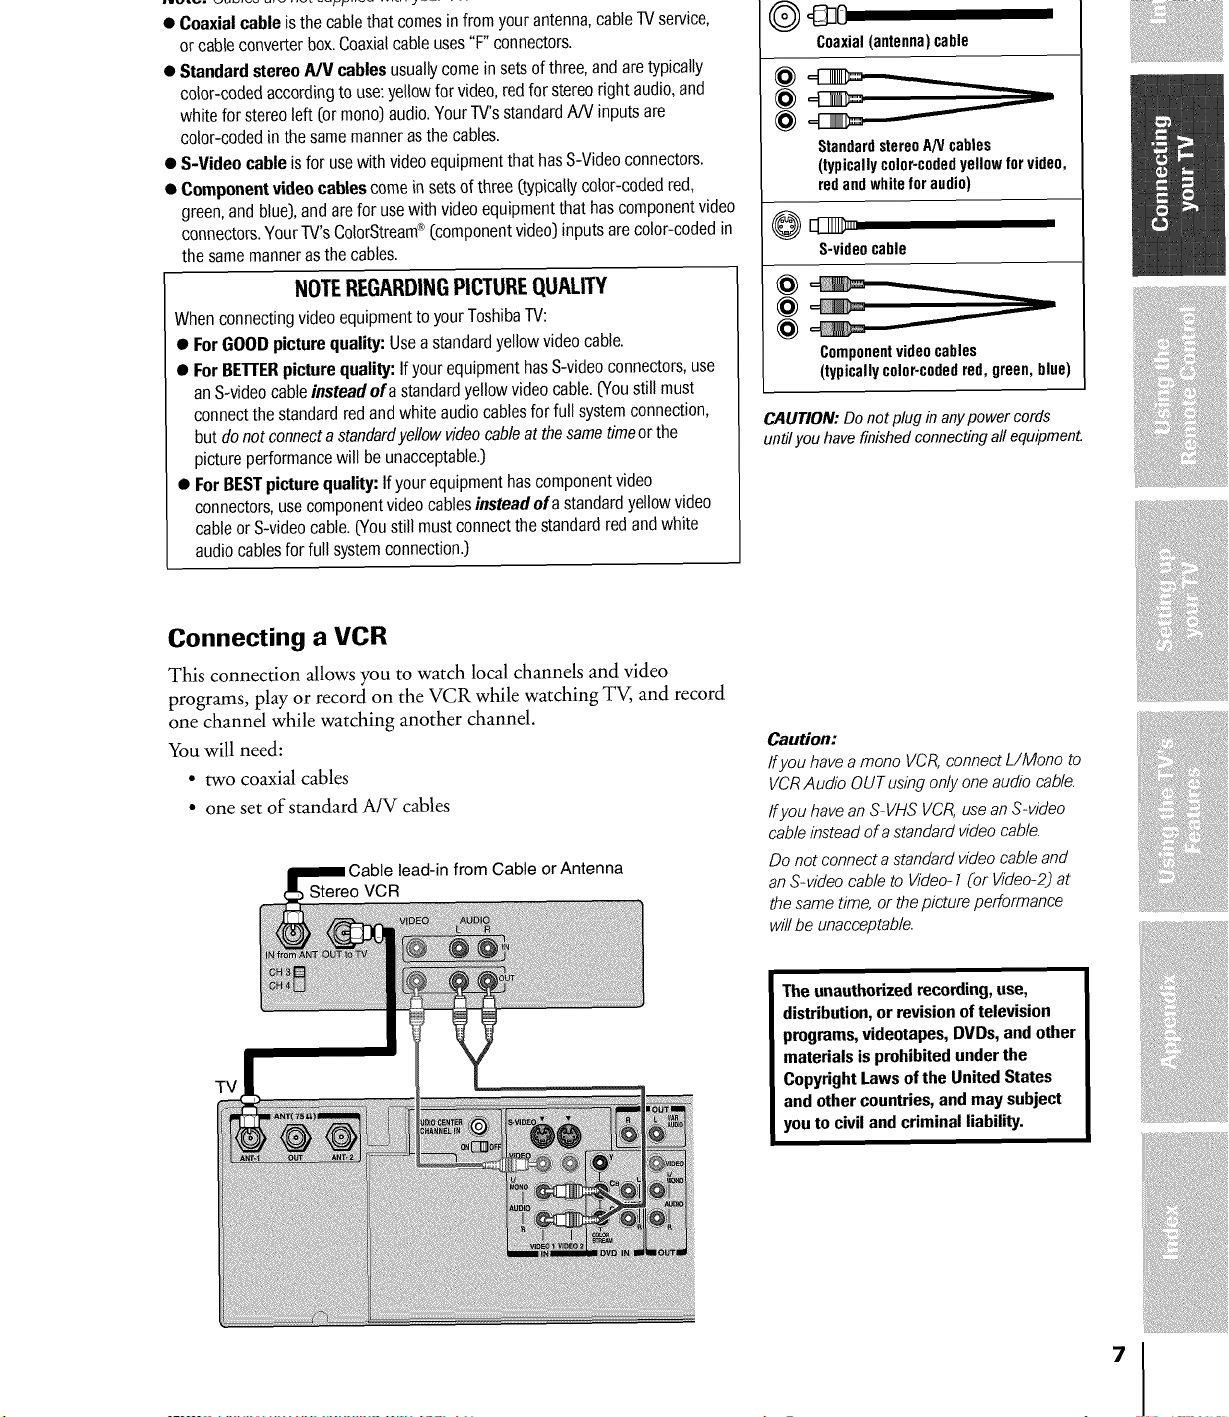
• Coaxialcable is the cablethat comesin from yourantenna,cableTVservice,
or cableconverterbox.Coaxialcable uses"F' connectors.
• Standard stereoPJV cables usuallycomein setsof three,and aretypically
color-codedaccordingto use:yellowfor video, redfor stereoright audio,and
white for stereoleft (or mono)audio.Your TV'sstandardA/V inputs are
color-codedin the samemannerasthe cables.
• S-Video cable isfor usewith videoequipmentthat hasS-Videoconnectors.
• Componentvideo cablescomeinsets of three (typicallycolor-codedred,
green,and blue),andare for usewithvideo equipmentthat hascomponentvideo
connectors.YourfV's ColorStream®(componentvideo)inputs arecolor-codedin
the samemanneras thecables.
O 433O
Coaxial(antenna)cable
StandardstereoAN cables
(typicallycolor-codedyellowforvideo,
redandwhiteforaudio)
S-videocable
NOTEREGARDINGPICTUREQUALITY
When connectingvideo equipmentto your ToshibaTV:
• For GOOD picturequality: Useastandardyellow videocable.
• For BETTERpicture quality: Ifyour equipmenthasS-videoconnectors,use
anSwideo cableinsteadofa standardyellow videocable. (Youstill must
connectthe standardredand white audiocablesfor full systemconnection,
but donot connecta standardyellow videocableatthe sametimeor the
picture performancewill beunacceptable.)
• For BESTpicture quality: Ifyour equipmenthascomponent video
connectors,use componentvideocablesinsteadofa standardyellowvideo
cableor S-videocable. (Youstill mustconnect the standardred andwhite
audiocablesfor full systemconnection.)
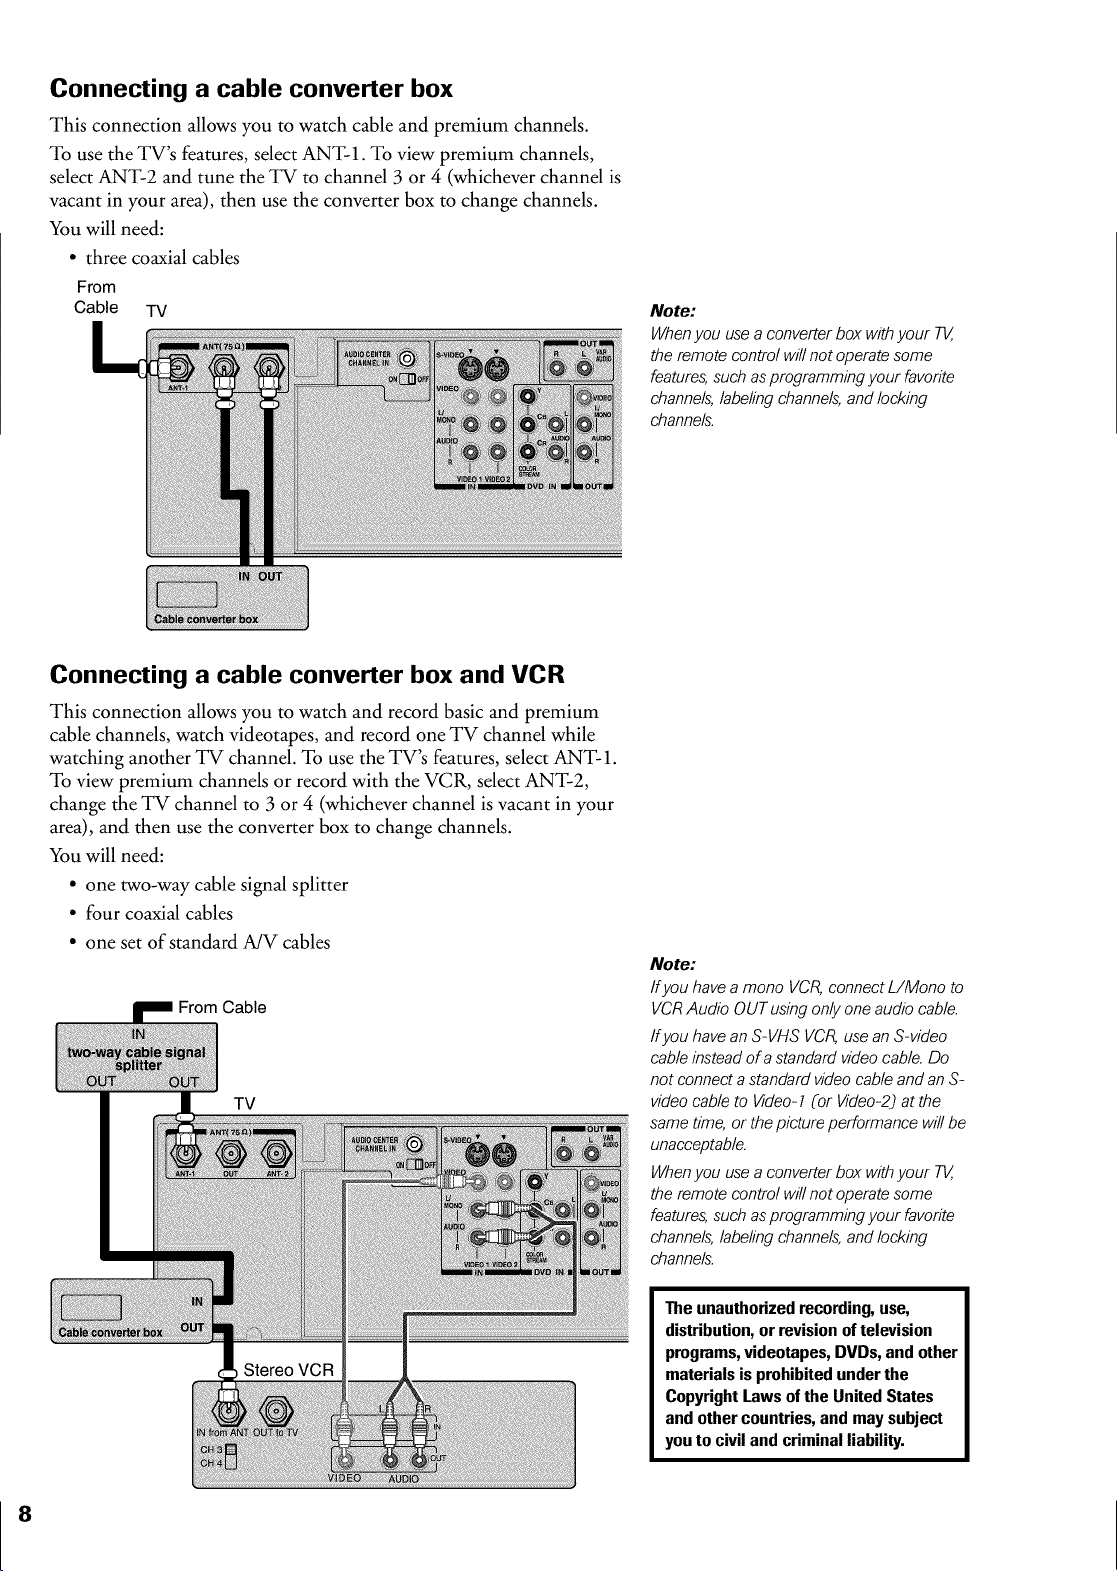
Connecting a VCR
This connection allows you to watch local channels and video
programs, play or record on the VCR while watching TV, and record
one channel while watching another channel.
You will need:
• two coaxial cables
• one set of standard A/V cables
Cable lead-in from Cable or Antenna
Stereo VCR
@
Componentvideocables
(typicallycolor-codedred,green,blue)
CAUTION: Do not plug in anypower cords
un#?you have finished connecting all equipment
Caution:
Ifyou have amono VCR,connect L/Mono to
VCRAudio OUTusing onlyoneaudio cable.
ffyou havean S-VHS VCR,usean S-video
cable insteadofa standard video cable.
Do notconnect a standard video cableand
anS-video cableto V/dee-f (or V/deo-2Jat
the same time or thepicture performance
wi//be unacceptab/e.
TV
The unauthorized recording,use,
distribution,or revisionoftelevision
programs,videotapes,DVDs, and other
materials is prohibitedunderthe
CopyrightLawsof the United States
and other countries,and may subject
you to civil and criminal liability.
7
Connecting a cable converter box
This connection allows you to watch cable and premium channels.
To use the TV's features, select ANT-1. To view premium channels,
select ANT-2 and tune the TV to channel 3 or 4 (whichever channel is
vacant in your area), then use the converter box to change channels.
You will need:
• three coaxial cables
From
Cable TV Note:
Whenyou usea converterbox withyour T_,
the remote control will not operatesome
features,such asprogramming your favorite
channels,labelingchannels,andlocking
channels.
Connecting a cable converter box and VCR
This connection allows you to watch and record basic and premium
cable channels, watch videotapes, and record one TV channel while
watching another TV channel. To use the TV's features, select ANT-1.
To view premium channels or record with the VCR, select ANT-2,
change the TV channel to 3 or 4 (whichever channel is vacant in your
area), and then use the converter box to change channels.
You will need:
• one two-way cable signal splitter
• four coaxial cables
• one set of standard A/V cables
From Cable
TV
Note:
Ifyou have a mono VCR,connect L/Mono to
VCRAudio OUTusingonly oneaudio cable.
ffyou have an S=VHSVCR,usean S=video
cable insteadof a standard videocable.Do
not connectastandard video cableand anS=
video cable to Video-1(or Video-2)at the
sametime, or the picture performance will be
unacceptable.
Whenyou usea converterbox withyour T_,
the remote control will not operatesome
features,such asprogramming your favorite
channels,labelingchannels,andlocking
channels.
The unauthorizedrecording,use,
distribution,or revisionoftelevision
programs,videotapes, DVDs,and other
materials isprohibitedunder the
CopyrightLaws of the UnitedStates
and other countries,and may subject
you to civil and criminal liability.
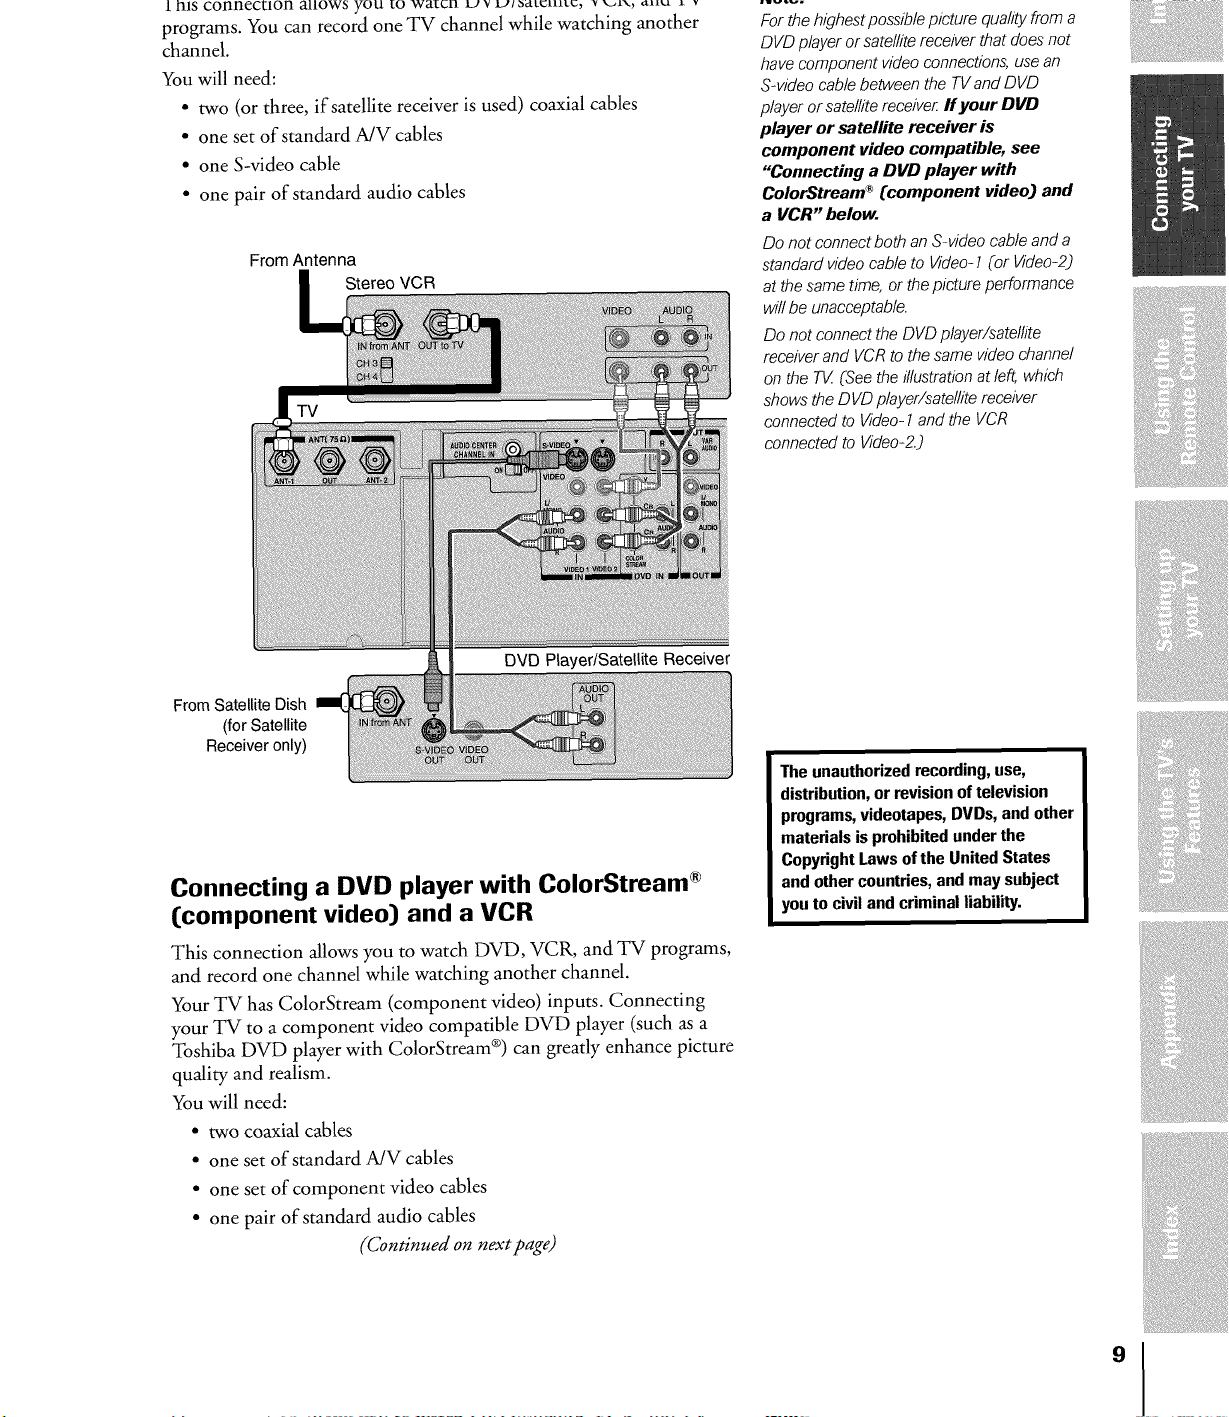
I his connection allOWSyou to wlitl.ll u v U/bdtCllltc, v val\, allti i v
programs. You can record one TV channel while watching another
channel.
You will need:
• two (or three, if satellite receiver is used) coaxial cables
• one set of standard A/V cables
• one S-video cable
• one pair of standard audio cables
From Antenna
Stereo VCR
.lv_v.
Forthehighestpossiblepicturequalityfroma
DVDplayer or satellitereceiverthatdoes not
havecomponentvideoconnections,usean
Swideocablebetweenthe TV and DVD
playerorsatellitereceive_If your DVD
player or satellite receiver is
component video compatible,see
"Connecting a DVD playerwith
ColorStream _ Ccomponent videoJ and
a VCR"below.
Donot connectbothanS-videocableanda
standardvideocabletoVideo-1(or Video-Z}
at the same time, or the picture performance
willbeunacceptable.
Donot connecttheDVDplayer/satellite
receiverandVCRtothe samevideochannel
ontheT_ (See the illustration at left, which
showsthe DVDplayer/satellitereceiver
connected to Video- 1andthe VCR
connected to Video-Z.}
DVD Player/Satellite Receiver
From Satellite Dish
(for Satellite
Receiver only)
Connecting a DVD player with ColorStream ®
(component video) and a VCR
This connection allows you to watch DVD, VCR, and TV programs,
and record one channel while watching another channel.
Your TV has ColorStream (component video) inputs. Connecting
your TV to a component video compatible DVD player (such as a
Toshiba DVD player with ColorStream ®)can greatly enhance picture
quality and realism.
You will need:
• two coaxial cables
• one set of standard A/V cables
• one set of component video cables
• one pair of standard audio cables
(Continued on next page)
The unauthorizedrecording,use,
distribution,or revisionof television
programs,videotapes,DVDs, and other
materials is prohibitedunder the
CopyrightLaws of the United States
and other countries,and may subject
you tocivil and criminal liability.
9

(Continued )%m previous page)
From Antenna
Stereo VCR
DVD player with component video
Connecting two VCRs
This connection allows you to record (dub/edit) from one VCR to
another VCR while watching a videotape. You can also record from
one TV channel while watching another channel.
You will need:
• two coaxial cables
• two sets of standard A/V cables
Note:
For the highestpossiblepicture quali_ use
component video cablesbetween the TVand
DVD playe_ Connect thecomponent video
cables from the DVD player to the TV's
ColorStreaminputs.
TheColorStreaminputs on the TVare for use
with DVDplayers that offer 480iinterlaced
scanningONLY If you have a 480p
progressive scan DVD player, you
must switch the DVD player to 480i
interlaced mode first and then connectit
to the TV'sCo/orStreaminputs.Failure to do
this willcause unacceptablepicture
performance.
Youcan connect ahigh-definition set-top
receiveronly if the output is switchedto the
480i interlacedmode first.This TV will
not accept or display 480p or 720p
progressive scan signals or I080i
interlaced high-definition signals.
Ifyour DVD playeris not compatible with
component video, useanS-video cable (plus
the standard audiocablesj insteadof
component video cables.
Do notconnect both S-video andstandard
video cablesbetweenthe TVand DVDplayer
at the sametime, or the picture performance
will be unacceptable.
The unauthorizedrecording,use,
distribution,or revisionoftelevision
programs,videotapes, DVDs,and other
materials isprohibitedunder the
CopyrightLaws of the UnitedStates
and other countries,and may subject
you to civil and criminal liability.
10
From Antenna
VCR 1
Note:
Do notconnect the same VCRto the output
andinputjacks on the TVat the sametime.
ffyou have S-VHS VCRs,useS-video cables
insteadofa standard videocable.Do not
connect both a standard videocableand an
S-video cable to Video-l (or Video-2)at the
sametime, or the picture performance will be
unacceptable.
Todub or edit, VCR2 mustse/ect Line iN,
andthe TVmust select Video-1.
* TheAudio OUTjacks can output thesound
ofeither the Main or PIPpicture (see
"SelectingtheAudio OUTsound" onpage
45).
** TheVideoOUTjack doesnot output the
PIPpicture.
You will need:
• one set of standard MV cables
TV
Camcorder
Note:
Ifyou havean S-VHS camcorder, thepicture
quality will increaseifyou use anS-video
cable insteadof a standardvideo cable.
Do not connectboth astandard video cable
andan S-videocable at the sametime, or the
picture performance will be unacceptable.
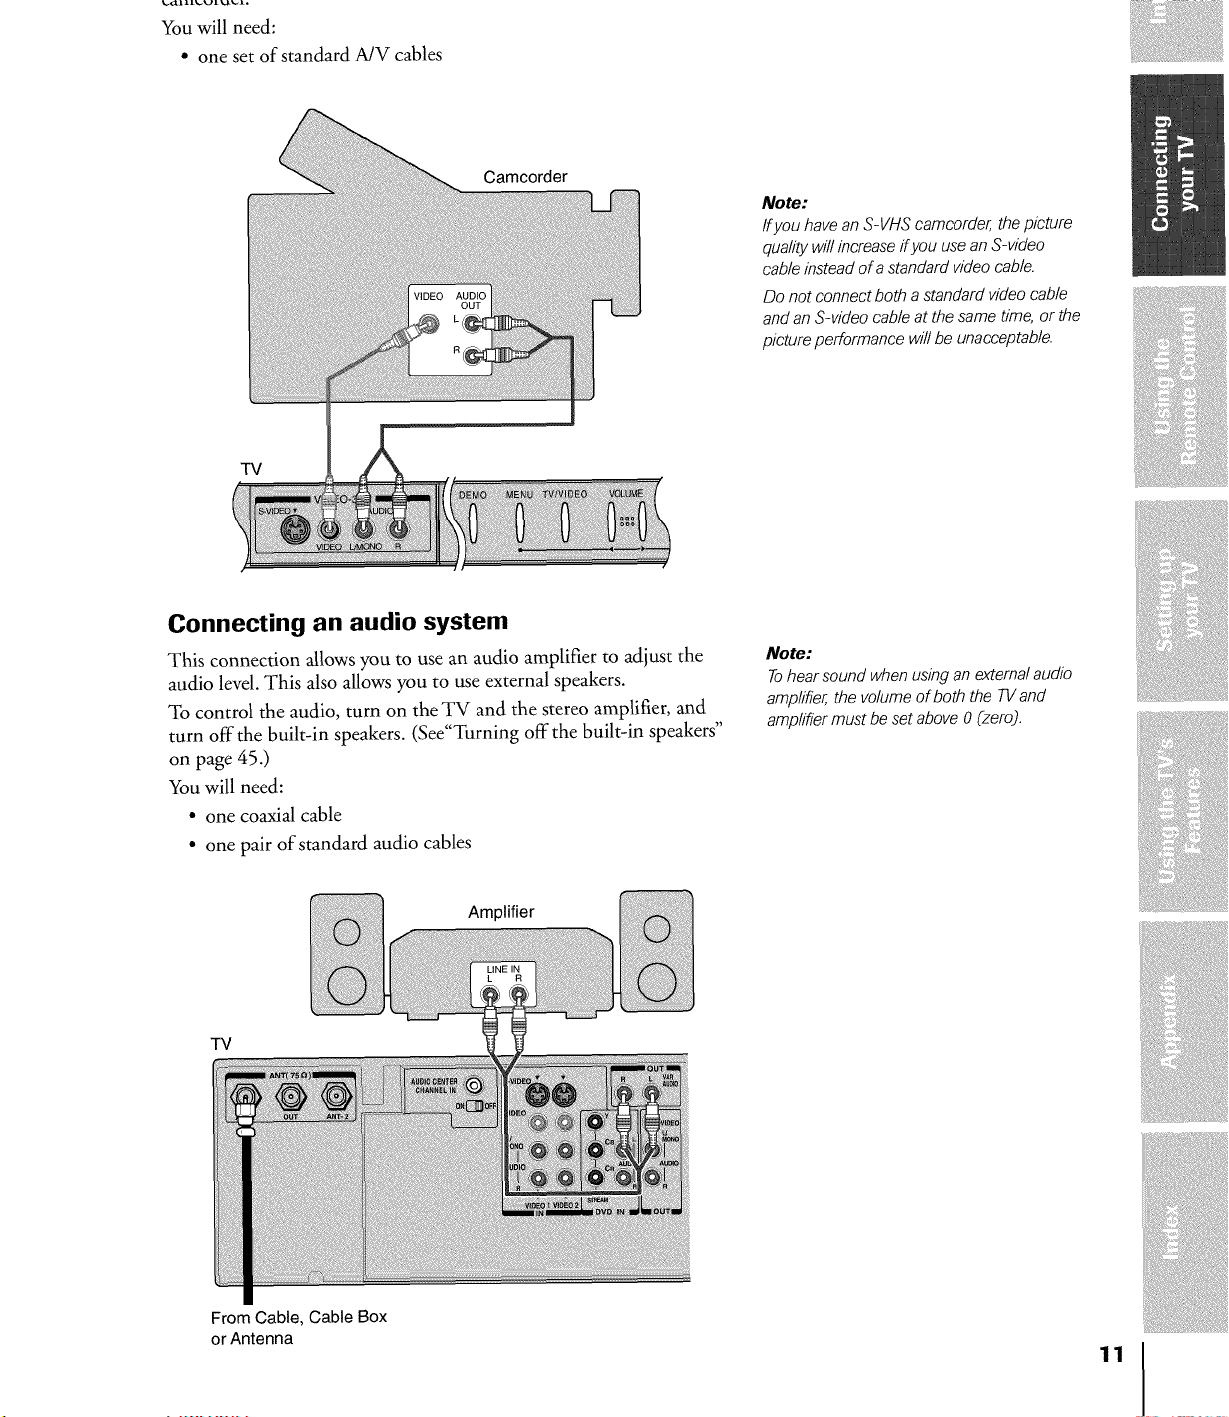
Connecting an audio system
This connection allows you to use an audio amplifier to adjust the
audio level. This also allows you to use external speakers.
To control the audio, turn on the TV and the stereo amplifier, and
turn off the built-in speakers. (See"Turning off the built-in speakers"
on page 45.)
You will need:
• one coaxial cable
• one pair of standard audio cables
Amplifier
TV
Note:
Tohearsound when usingan externalaudio
amplifier,the volume of both the TVand
amplifier must beset above0 (zero).
From Cable, Cable Box
or Antenna
11
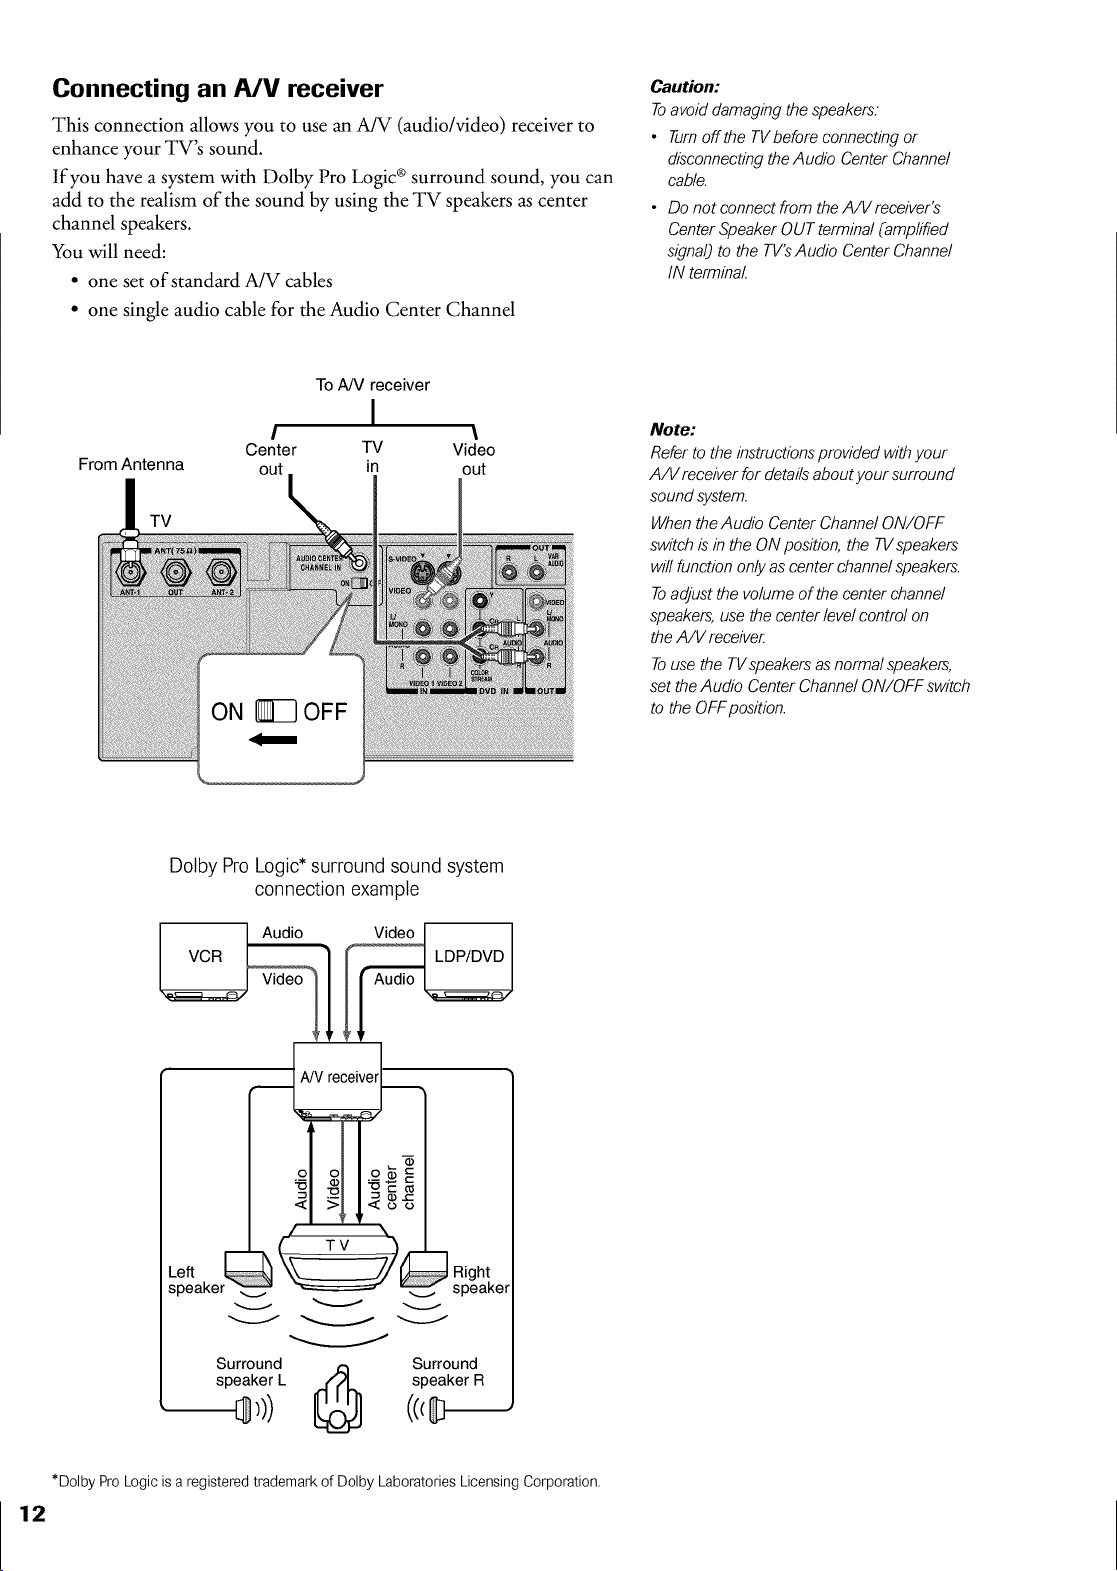
Connecting an PJV receiver
This connection allows you to use an A/V (audio/video) receiver to
enhance your TV's sound.
If you have a system with Dolby Pro Logic ®surround sound, you can
add to the realism of the sound by using the TV speakers as center
channel speakers.
You will need:
• one set of standard A/V cables
• one single audio cable for the Audio Center Channel
ToA/V receiver
I
I \
From Antenna
TV
Center TV Video
out in out
ON _ OFF
Caution:
Toavoiddamaging the speakers.
• Turnoffthe TVbefore connecting or
disconnectingtheAudio Center Channel
cable.
• Do not connect from the A/Vreceiver's
CenterSpeakerOUT terminal (amplified
signal) to the TV'sAudio Center Channel
IN terminal
Note:
Referto theinstructionsprovided withyour
A/V receiverfor detailsabout your surround
soundsystem.
WhentheAudio Center Channel ON/OFF
switch isin theON position,the TVspeakers
will function onlyas centerchannelspeakers.
Toadjustthe volumeof thecenter channel
speakers,use the center levelcontrol on
the A/V receive_
Touse the TVspeakers asnormal speakers,
setthe Audio Center ChannelON/OFF switch
to the OFFposition.
Dotby Pro Logic* surround sound system
connection example
Audio Video
VCR LDP/DVD
A/V receiver
TV
Right
speakel
Surround
speaker L _
Surround
speaker R
((cD--
*DolbyProLogicisaregisteredtrademarkofDolbyLaboratoriesLicensingCorporation.
12
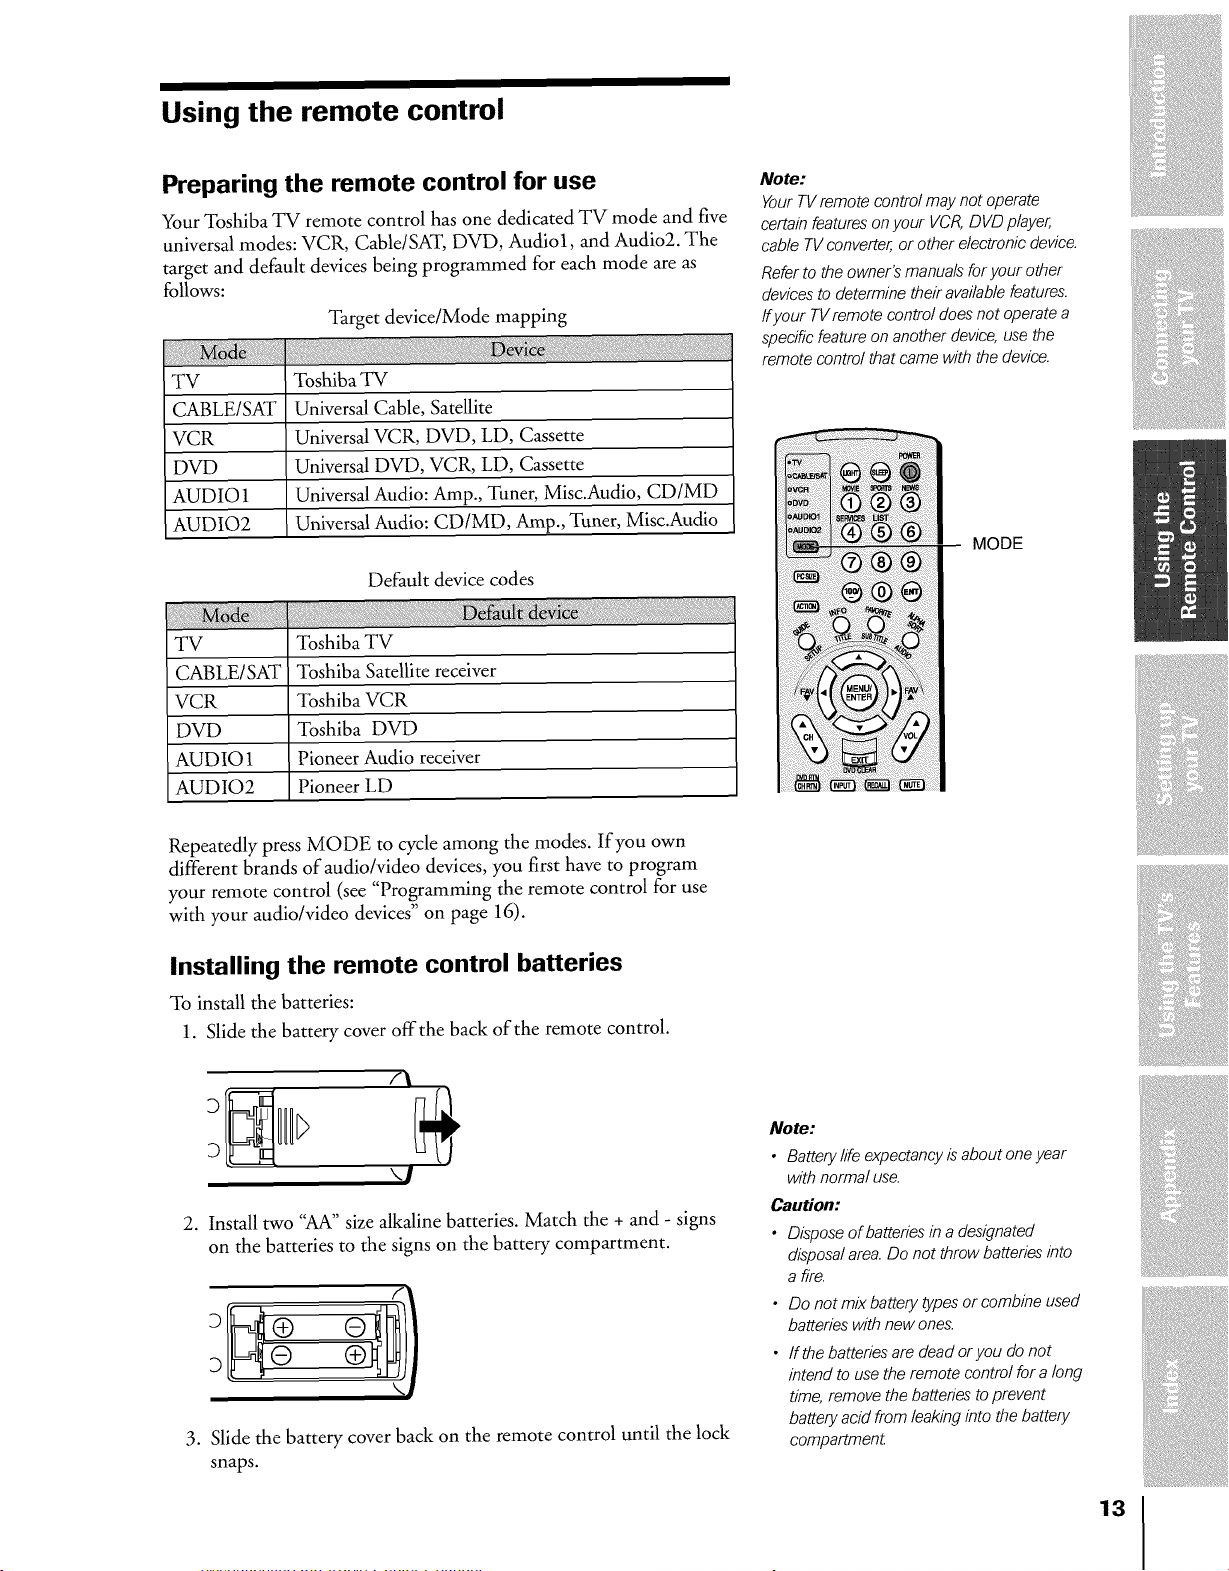
Using the remote control
Preparing the remote control for use
Your Toshiba TV remote control has one dedicated TV mode and five
universal modes: VCR, Cable/SAT, DVD, Audio1, and Audio2. The
target and default devices being programmed for each mode are as
follows:
Target device/Mode mapping
_!;!iill{ iiii!:;i!:iiiiiiiiiiii_{iil
TV
CABLE/SAT
VCR
DVD
AUDIO 1
AUDIO2
TV
CABLE/SAT
VCR
DVD
AUDIO1
AUDIO2
Toshiba TV
Universal Cable, Satellite
Universal VCR, DVD, LD, Cassette
Universal DVD, VCR, LD, Cassette
Universal Audio: Amp., Tuner, Misc.Audio, CD/MD
Universal Audio: CD/MD, Amp., Tuner, Misc.Audio
Default device codes
Toshiba TV
Toshiba Satellite receiver
Toshiba VCR
Toshiba DVD
Pioneer Audio receiver
Pioneer LD
Note:
YourTVremote control may not operate
certainfeaturesonyour VCR,DVD player,
cable TVconverter,or other electronicdevice.
Referto theowner's manualsfor your other
devicesto determinetheir availablefeatures.
ffyour TVremote control doesnot operatea
specific featureon another device, usethe
remote control that came with the device.
MODE
Repeatedly press MODE to cycle among the modes. If you own
different brands of audio/video devices, you first have to program
your remote control (see "Programming the remote control for use
with your audio/video devices" on page 16).
Installing the remote control batteries
To install the batteries:
1. Slide the battery cover offthe back of the remote control.
'4
2. Install two "AA" size alkaline batteries. Match the + and - signs
on the batteries to the signs on the battery compartment.
3. Slide the battery cover back on the remote control until the lock
snaps.
Note:
• Battery lifeexpectancyisabout oneyear
with normaluse.
Caution:
• Disposeof batteries in adesignated
disposalarea. Do not throw batteries into
a fire.
• Do not mixbattery typesor combineused
batterieswith new ones.
• ffthe batteries aredead oryou do not
intend to usethe remote control for a long
time, remove the batteriestoprevent
batteryacid from leakinginto the battery
compartment
iiiiiii
iiiiiiiiii
13
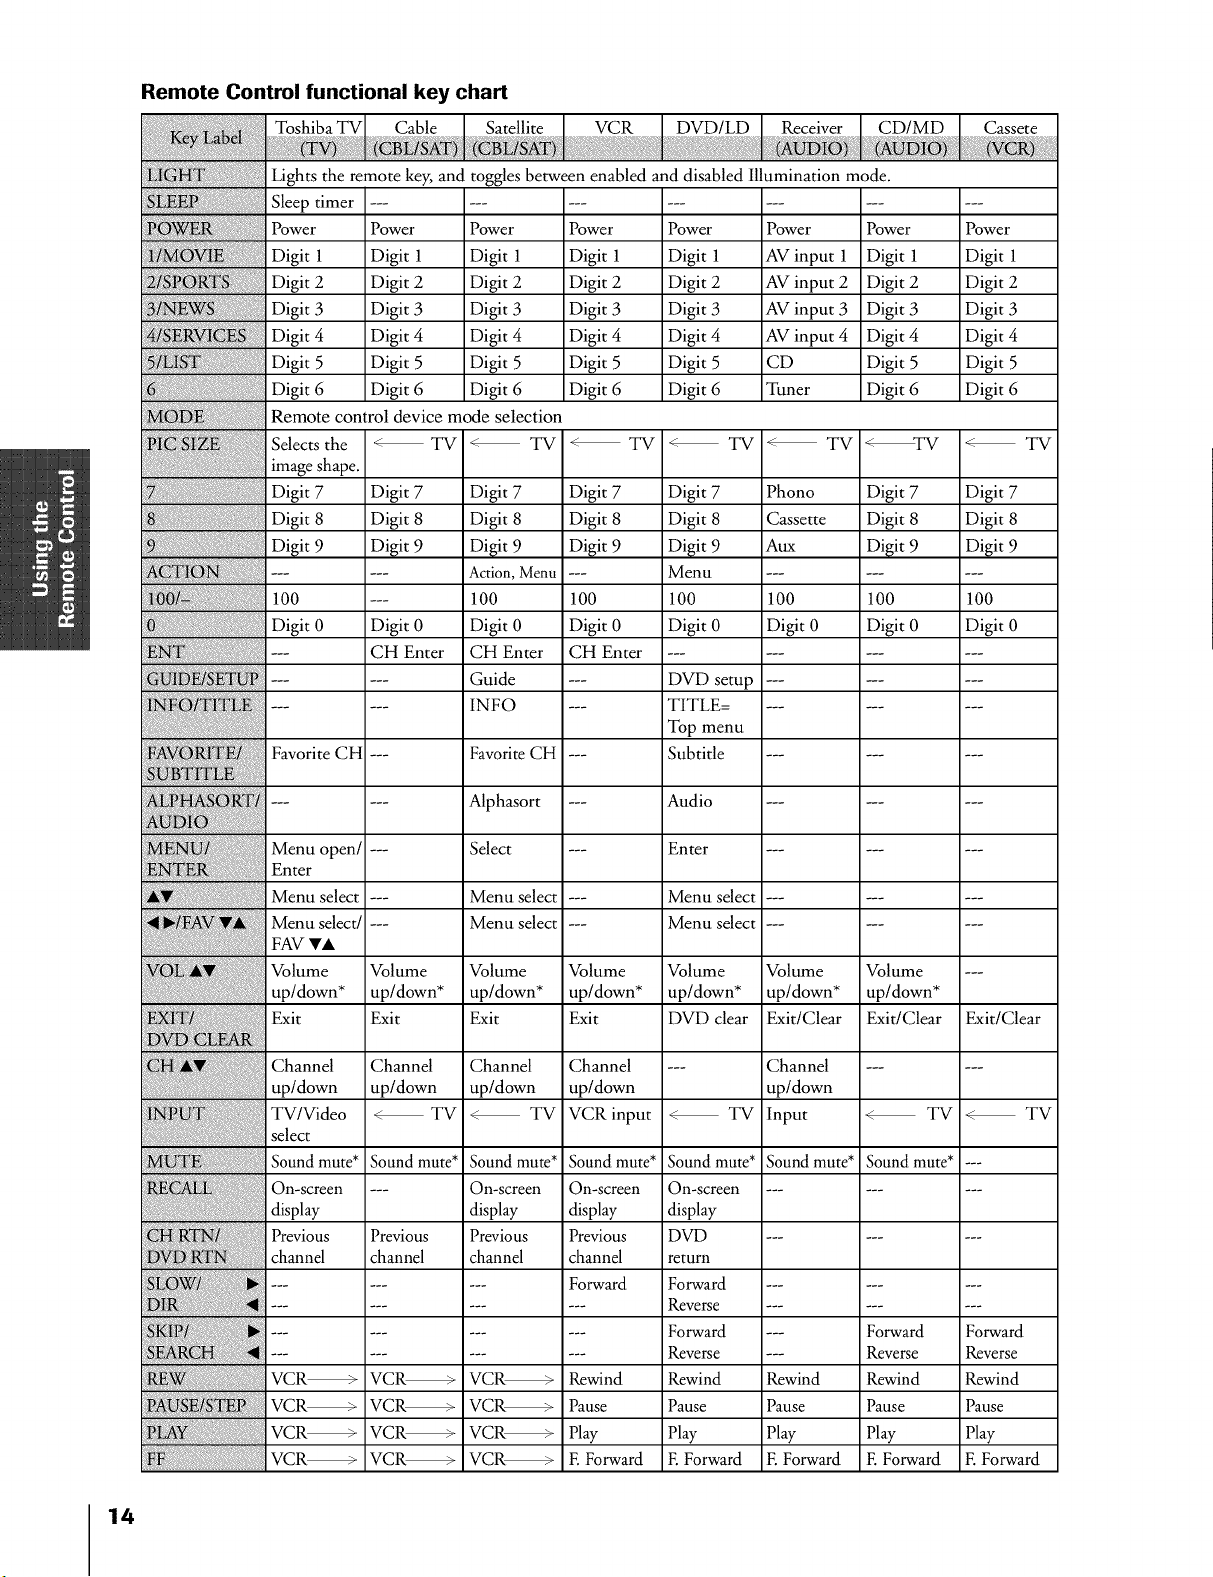
Remote Control functional key chart
Toshiba TV VCR DVD/LD Receiver CD/MD
Lights the remote key, and toggles between enabled and disabled Illumination mode.
Sleep timer .....................
Power Power Power Power Power Power Power Power
Digit 1 Digit 1 Digit 1 Digit 1 Digit 1 AV input 1 Digit 1 Digit 1
Digit 2 Digit 2 Digit 2 Digit 2 Digit 2 AV input 2 Digit 2 Digit 2
Digit 3 Digit 3 Digit 3 Digit 3 Digit 3 AV input 3 Digit 3 Digit 3
Digit 4 Digit 4 Digit 4 Digit 4 Digit 4 AV input 4 Digit 4 Digit 4
Digit 5 Digit 5 Digit 5 Digit 5 Digit 5 CD Digit 5 Digit 5
Digit 6 Digit 6 Digit 6 Digit 6 Digit 6 Tuner Digit 6 Digit 6
Remote control device mode selection
Selects the _TV _ TV _ TV _ TV _ TV _TV _ TV
image shape.
Digit 7 Digit 7 Digit 7 Digit 7 Digit 7 Phono Digit 7 Digit 7
Digit 8 Digit 8 Digit 8 Digit 8 Digit 8 Cassette Digit 8 Digit 8
Digit 9 Digit 9 Digit 9 Digit 9 Digit 9 Aux Digit 9 Digit 9
..... Action,Menu --- Menu .........
100 --- 100 100 100 100 100 100
Digit 0 Digit 0 Digit 0 Digit 0 Digit 0 Digit 0 Digit 0 Digit 0
--- CH Enter CH Enter CH Enter ............
_ /S U ...... Guide --- DVDsetup .........
...... INFO --- TITLE ..........
Top menu
Favorite CH --- Favorite CH --- Subtitle .........
...... Alphasort --- Audio .........
Menu open/ --- Select --- Enter .........
Enter
Menu select --- Menu select --- Menu select .........
Menu select/ --- Menu select --- Menu select .........
FAV VA
Volume Volume Volume Volume Volume Volume Volume ---
up/down* up/down* up/down* up/down* up/down* up/down* up/down*
Exit Exit Exit Exit DVD clear Exit/Clear Exit/Clear Exit/Clear
Channel Channel Channel Channel --- Channel ......
up/down up/down up/down up/down up/down
TV/Video _ TV _ TV VCRinput _ TV Input _ TV _ TV
select
Sound mute* Sound mute* Sound mute* Sound mute* Sound mute* Sound mute* Sound mute* ---
On-screen --- On-screen On-screen On-screen .........
display display display display
Previous Previous Previous Previous DVD .........
channel channel channel channel return
...... Forward Forward .........
......... Reverse .........
......... Forward --- Forward Forward
......... Reverse --- Reverse Reverse
VCR_ VCR_ VCR_ Rewind Rewind Rewind Rewind Rewind
VCR_ VCR_ VCR_ Pause Pause Pause Pause Pause
VCR_ VCR_ VCR_ Play Play Play Play Play
{{ { VCR_ VCR_ VCR_ F.Forward F.Forward F. Forward F. Forward F. Forward
14
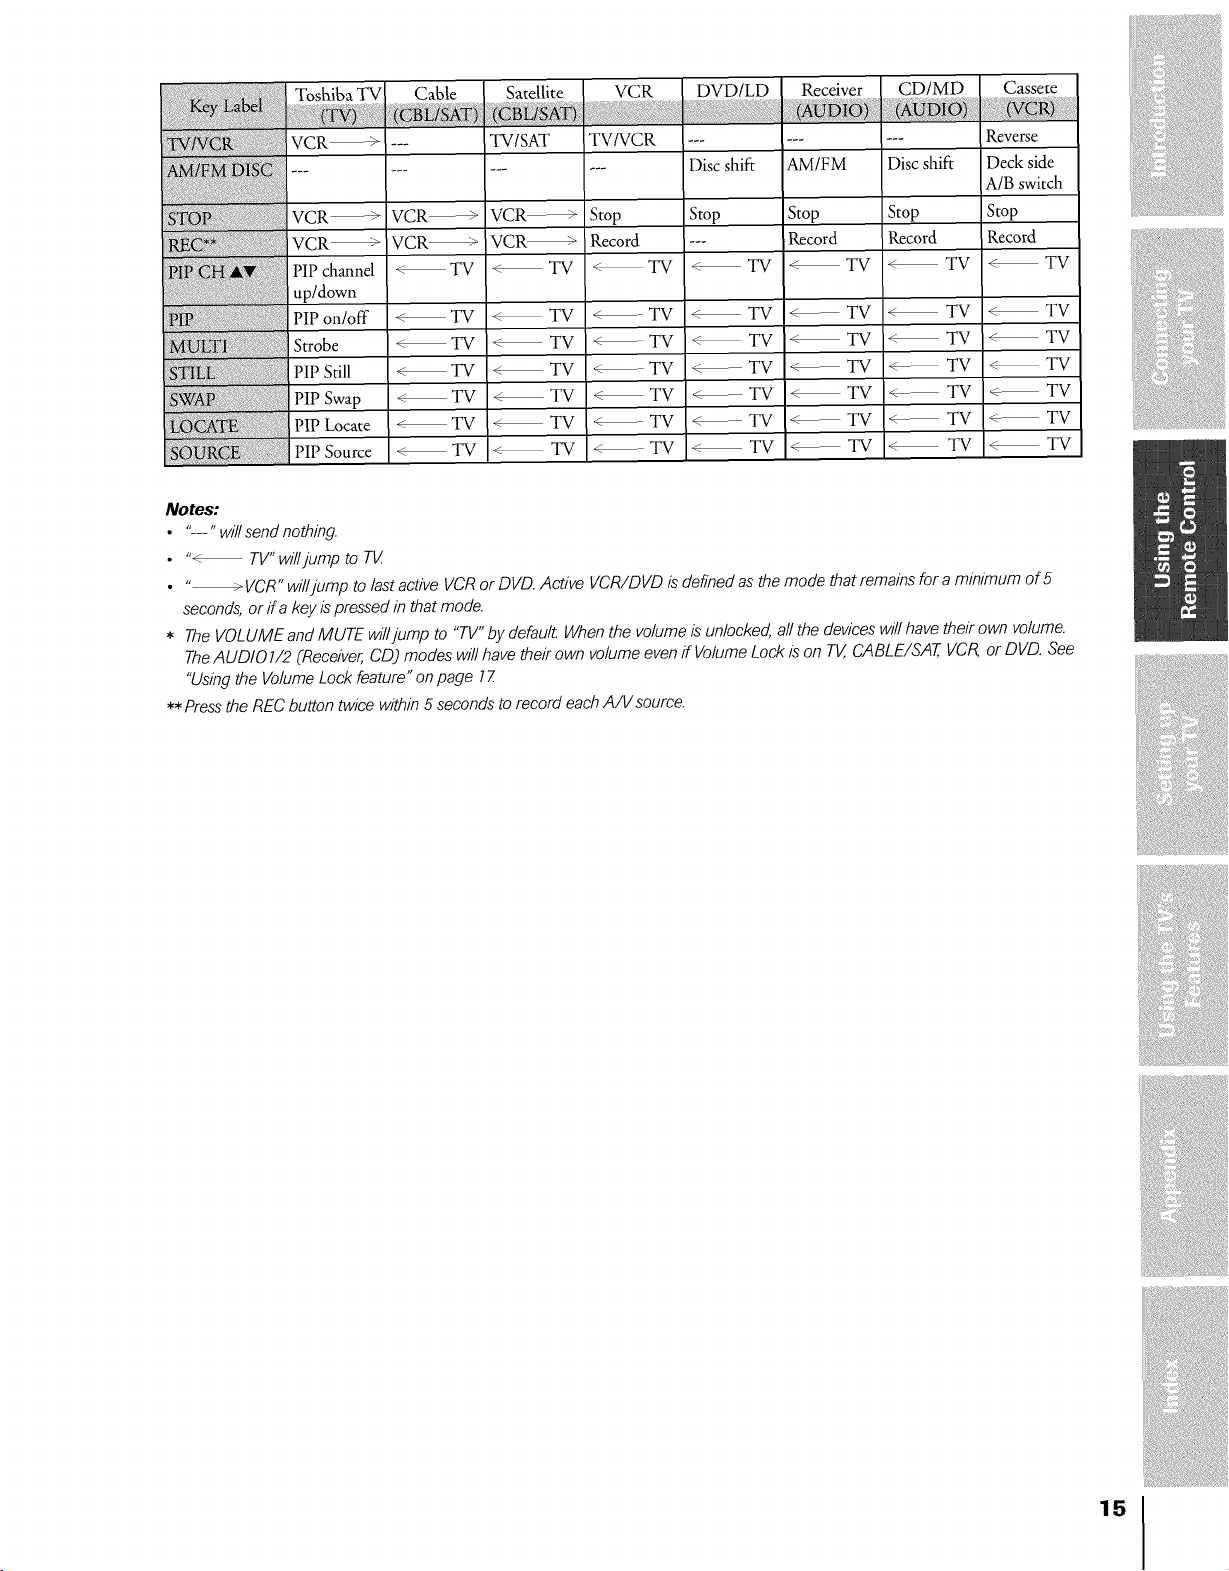
ToshibaTV Cable Satellite VCR DVD/LD
' I
Receiver CD/MD
VCR_ --- TV/SAT TV/VCR ---
............ Disc shift
VCR_ VCR_ VCR_
VCR_VCR--_ VCR_
PIP channel <_TV <-_TV <_TV <_TV <--TV <_TV <_TV
Stop Stop Stop Stop Stop
Record --- Record Record Record
AM/FM Disc shift
Casse_e
_N
Reverse
Deck side
A/B switch
up/down
PIP on/off <_TV <_TV <_TV <_TV < --TV <_TV <_TV
Strobe <_TV <_TV <-_TV '<_TV < --TV <_ TV <_TV
rip Still <_ TV <_ TV <_ TV <_ TV _-- TV <_ TV <_
rip Swap <_ TV _ TV +_ TV <_ TV _--- TV <_ TV <_ TV
PIP Locate <_TV <_ TV <_TV <_ TV <- TV <_ TV <_ TV
PIP Source <-_TV <_TV <_TV <_TV _TV <_ TV <_TV
Notes:
• "---" will send nothing.
• "<_ TV" willjurnp to Tg
• --_ VCR" wi//jump to/ast active VCR or DVD. Active VCR/DVD is defined as the mode that remains for a minimum of 5
seconds, or ira key is pressed in that mode.
* The VOLUME and MUTE wi//jurnp to "TV" by default When the vo/ume is un/ocked, a//the devices wi//have their own vo/urne.
The AUDIO1/2 (Receiver, CO) modes will have their own volume even if Volurne Lock is on TV, CABLE/SAT, VCR or DVD. See
"Using the Volume Lock feature" on page 1Z
**Press the REC button twice within 5 seconds to record each A/V source.
TV
iiiiiiiiii
15
Programming the remote control for use with
your audio/video devices
Device code setup
1. Refer to the device code table on pages 18-19 to find the code for
the brand of your device.
If more than one code is listed, try each one separately until you
find one that works.
2. Repeatedly press MODE until the device mode indicator
(CABLE/SAT, VCR, DVD, AUDIO 1, AUDIO2) lights up.
3. While holding down the RECALL button, press the Channel
Number buttons to enter the four-digit code for your device.
Ifa valid code is entered, the mode indicator will blink two times.
If an invalid code is entered, the mode indicator will blink one
long blink.
4. Point the remote control at the device and press POWER to test
the code.
If the device responds to the remote control, you have entered the
correct code.
If the device does not respond to the remote control, you may
have entered the wrong code. Repeat steps 3 and 4 using another
code.
.
To control the TV, repeatedly press MODE until the TV mode
indicator lights up.
Searching and sampling the code of a device (8500[
If you do not know the device code for a particular target unit, you
can cycle the remote through the available codes for that device mode
and sample functions in order to find the code that properly operates
the target device. The keys available to be sampled, provided they are
applicable to that mode, are 0, 1, 2, 3, POWER, VOL A, CH A,
PLAY and STOP. Invalid keys will be ignored while in program mode.
To cycle through each available device code and sample its functions:
1. Press MODE to select the mode you want to set up.
2. While holding down RECALL, press 8-5-0-0.
The remote control will enter program mode.
3. Point the remote control at the target device and press POWER
(or other function buttons that are available to be sampled).
4. If the device responds to the remote control:
Press RECALL to store the device code.
The mode indicator will blink two times and the remote
control will exit program mode.
If the device does not respond to the remote control:
Press A, and then press POWER.
Repeat this step until the device responds to the remote
control, and then press RECALL.
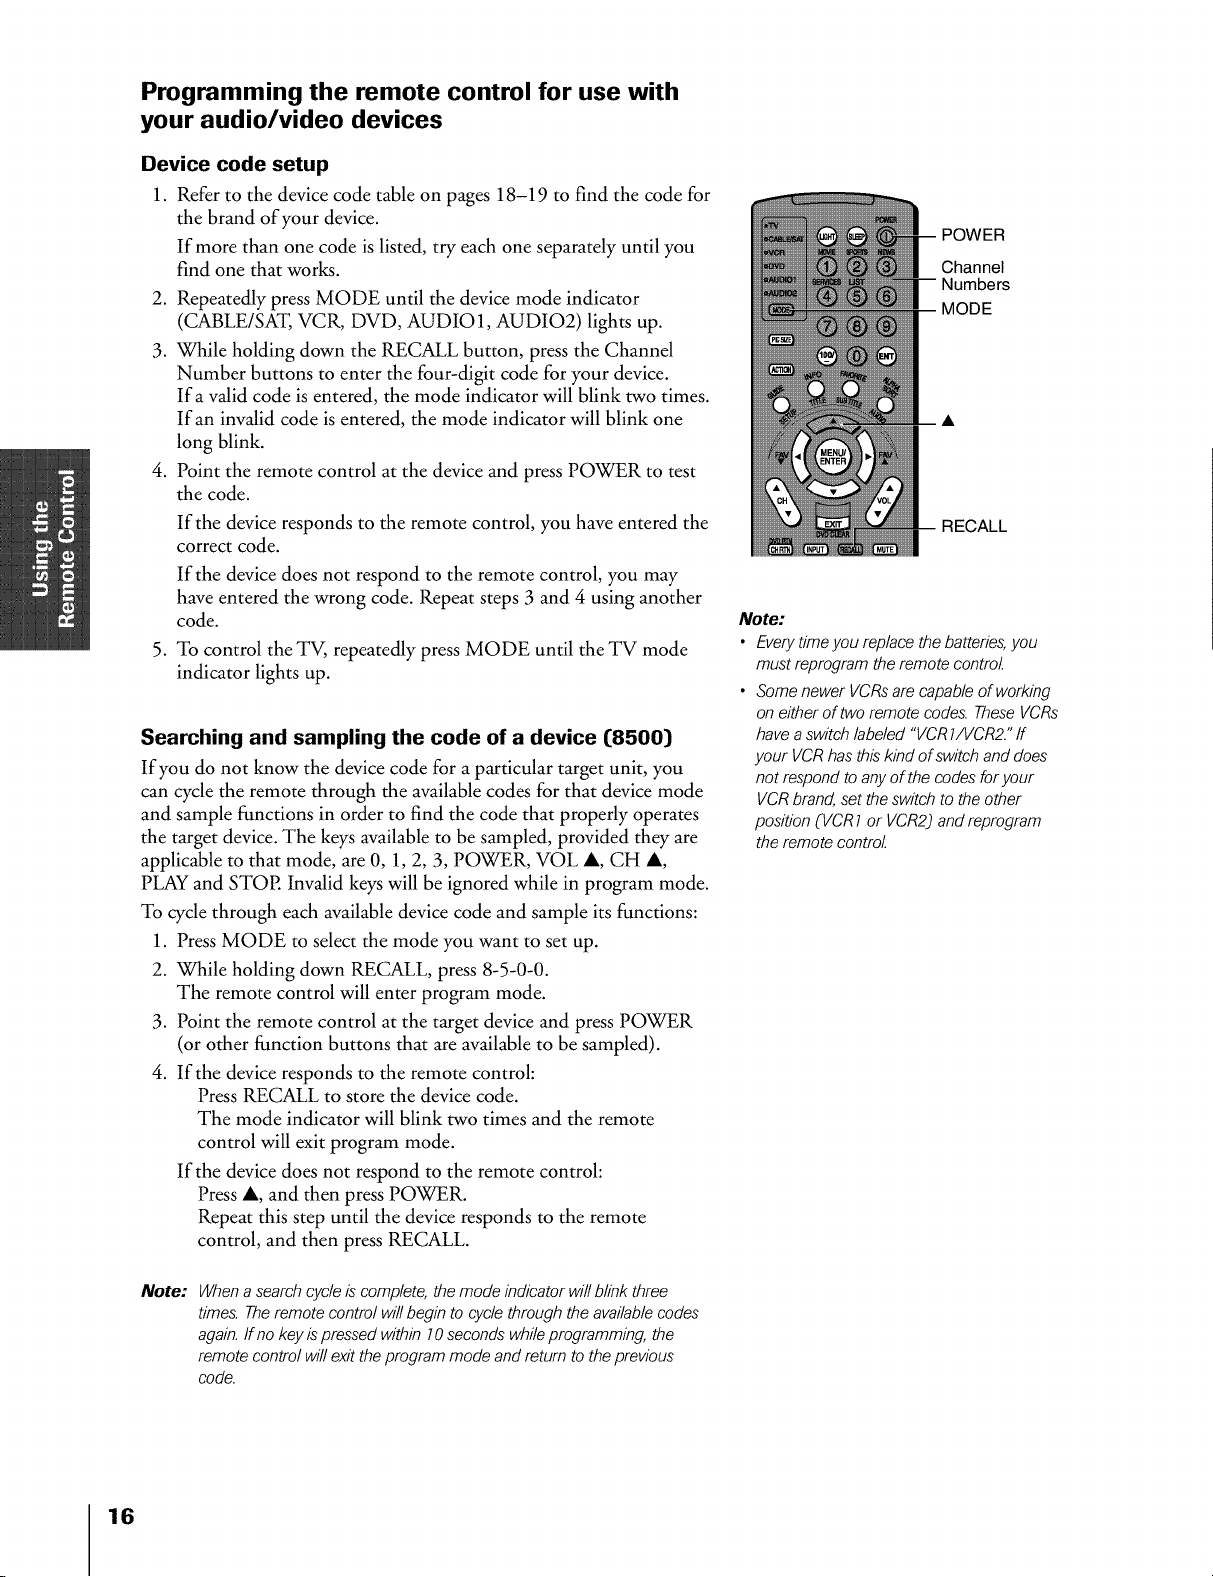
POWER
Channel
Numbers
MODE
RECALL
Note:
• Everytimeyou replacethe batteries,you
mustreprogram theremote control
• Some newer VCRsare capableof working
on either of two remote codes.TheseVCRs
havea switch labeled "VCR1/VCR2."ff
your VCRhasthis kind of switchand does
not respond to anyof thecodes for your
VCRbrand,set theswitch to theother
position (VCR1or VCR2)andreprogram
the remote control
16
Note:
Whenasearch cycleis complete, the mode indicatorwill blink three
times. Theremote control willbegin to cycle through the availablecodes
again,ff no keyispressed within 10seconds whileprogramming, the
remote control will exitthe program mode and return to theprevious
code.
 Loading...