

Page 1

TOSHIBA
WLG66/67
Series
Owner's manual
Manuel de l'utilisateur
Bedienungsanleitung
Page 2

Contents
English
SETTING UP
Safety precautions – Some do’s and don’ts for you to be aware of 3
Installation and important information 4
The remote control – an at-a-glance guide 5
Connecting external equipment – a guide to connecting external equipment to the back of the television 6
Connecting a computer – connecting a computer to the back of the television 7
Controls and input connections – switching on the television, standby, using the controls on the television,
headphone socket, connecting equipment to the side input sockets 8
TUNING THE TELEVISION
DIGITAL – tuning the television for the first time 9
DIGITAL – auto tuning 10
DIGITAL – programme sorting, manual tuning 11
ANALOGUE – tuning analogue mode for the first time, language, country 12
ANALOGUE – manual tune, broadcast system 13
ANALOGUE – auto tune 14
ANALOGUE – programme skip, sorting programme positions 15
CONTROLS AND FEATURES
General controls – changing programme position 16
Stereo and bilingual transmissions – stereo/mono or dual language broadcasts 16
Time display (analogue only) 16
Sound controls – volume, sound mute, bass/treble/balance 16
Sound controls – bass boost, dual (analogue only), stable sound
SRS WOW™ sound effects – SRS 3D, FOCUS and TruBass 17
Widescreen viewing 18
Picture controls – picture position (analogue only), back light 20
Picture controls – picture preferences (contrast, brightness, colour, tint, sharpness), black stretch,
MPEG noise reduction (MPEG NR), digital noise reduction (DNR), colour temperature 21
Picture controls – 3D colour management, base colour adjustment, cinema mode, antenna amplifier 22
Picture controls – automatic format (widescreen), blue screen, side panel adjustment,
picture still 23
Panel lock – disabling the buttons on the television 23
DIGITAL – programme timer 24
Sleep timer 24
DIGITAL – on-screen information and programme guide 25
DIGITAL settings – parental controls (setting the PIN, mode) 26
DIGITAL settings – favourite programmes, locked programmes, encrypted programmes 27
DIGITAL settings – audio languages, subtitles, reset TV, common interface 28
DIGITAL settings – software upgrade (version, auto upgrade, searching for new software) 29
PC settings – picture position, clock phase, sampling clock, reset 30
Input selection and AV connections – input and output sockets for connected equipment,
analogue switch off 31
TEXT SERVICES
ANALOGUE text – setting up, general information, Auto. and LIST modes 33
ANALOGUE text – control buttons 34
PROBLEM SOLVING
Questions and Answers – answers to some of the more common queries including
manual fine tuning and colour system 35
INFORMATION
Specifications and Accessories – technical information about the television, supplied accessories 38
®
17
2
Page 3

Safety Precautions
This equipment has been designed and manufactured to meet international safety standards but, like any
electrical equipment, care must be taken to obtain the best results and for safety to be assured. Please read
the points below for your own safety. They are of a general nature, intended to help with all electronic
consumer products and some points may not apply to the goods you have just purchased.
English
Air Circulation
Leave at least 10cm clearance around the television
to allow adequate ventilation. This will prevent
overheating and possible damage to the television.
Dusty places should also be avoided.
Heat Damage
Damage may occur if the television is left in direct
sunlight or near a heater. Avoid places subject to
extremely high temperatures or humidity. Place in a
location where the temperature remains between
5°C (41°F) min. and 35°C (94°F) max.
Mains Supply
The mains supply required for this equipment is
220-240v AC 50/60Hz. Never connect to a DC
supply or any other power source. DO ensure that
the television is not standing on the mains lead.
DO NOT cut off the mains plug from this
equipment, this incorporates a special Radio
Interference Filter, the removal of which will impair
its performance.
IF IN DOUBT PLEASE CONSULT A COMPETENT
ELECTRICIAN.
Do
DO read the operating instructions before you
attempt to use the equipment.
DO ensure that all electrical connections
(including the mains plug, extension leads and
inter-connections between pieces of equipment)
are properly made and in accordance with the
manufacturers’ instructions. Switch off and
withdraw the mains plug before making or
changing connections.
DO consult your dealer if you are ever in doubt
about the installation, operation or safety of your
equipment.
DO be careful with glass panels or doors on
equipment.
DO NOT REMOVE ANY FIXED COVERS AS THIS
WILL EXPOSE DANGEROUS AND 'LIVE' PARTS.
THE MAINS PLUG IS USED AS A
DISCONNECTING DEVICE AND THEREFORE
SHOULD BE READILY OPERABLE.
Do not
DO NOT obstruct the ventilation openings of the
equipment with items such as newspapers,
tablecloths, curtains, etc. Overheating will cause
damage and shorten the life of the equipment.
DO NOT allow electrical equipment to be exposed
to dripping or splashing or objects filled with liquids,
such as vases, to be placed on the equipment.
DO NOT place hot objects or naked flame sources,
such as lighted candles or nightlights on, or close to
equipment. High temperatures can melt plastic and
lead to fires.
DO NOT use makeshift stands and NEVER fix legs
with wood screws. To ensure complete safety,
always fit the manufacturers’ approved stand,
bracket or legs with the fixings provided according
to the instructions.
DO NOT listen to headphones at high volume, as
such use can permanently damage your hearing.
DO NOT leave equipment switched on when it is
unattended, unless it is specifically stated that it is
designed for unattended operation or has a
standby mode. Switch off by withdrawing the plug,
make sure your family know how to do this. Special
arrangements may need to be made for people
with disabilities.
DO NOT continue to operate the equipment if you
are in any doubt about it working normally, or it is
damaged in any way – switch off, withdraw the
mains plug and consult your dealer.
ABOVE ALL – NEVER let anyone, especially
children, push or hit the screen, push
anything into holes, slots or any other
openings in the case.
NEVER guess or take chances with electrical
equipment of any kind – it is better to be safe
than sorry.
3
Page 4
Installation and important information
English
Where to install
Locate the television away from direct sunlight and strong
lights, soft, indirect lighting is recommended for comfortable
viewing. Use curtains or blinds to prevent direct sunlight
falling on the screen.
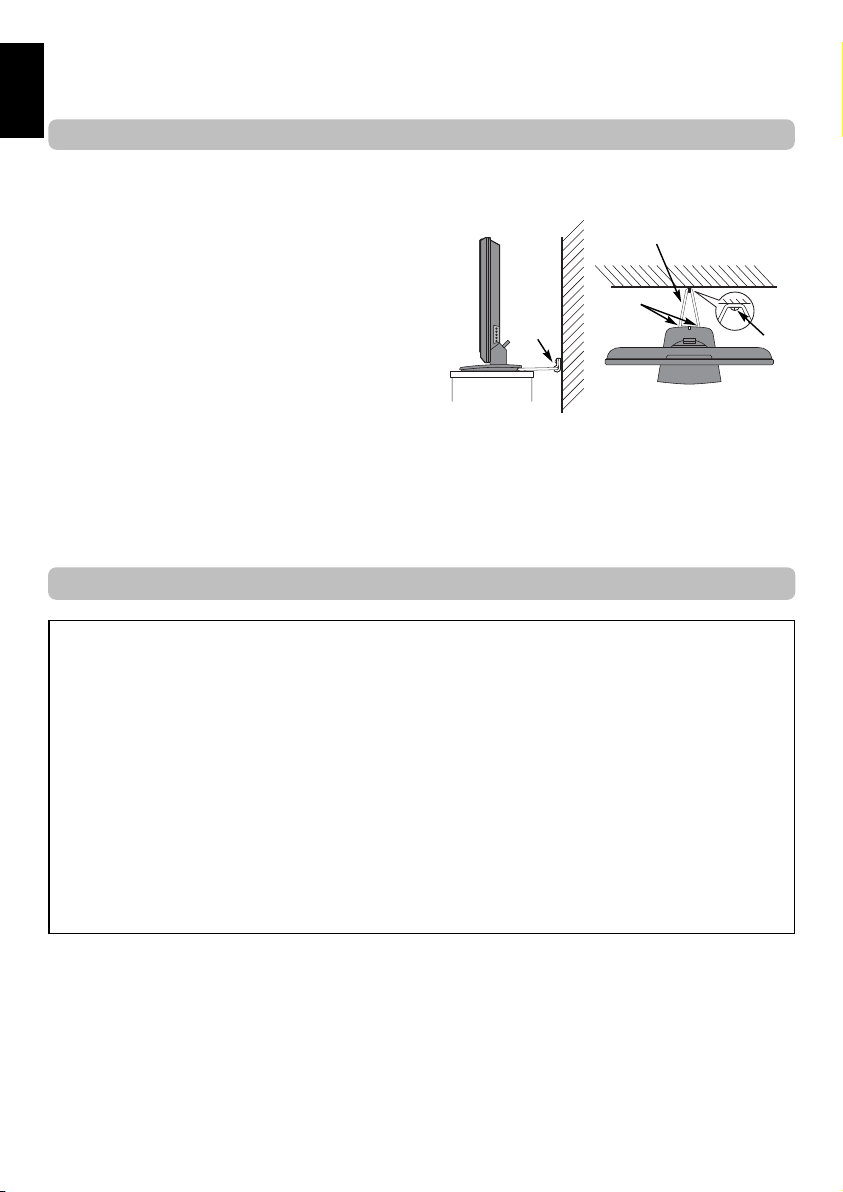
Place on a sturdy platform, the mounting surface should be
flat and steady. It should then be secured to the wall with a
sturdy tie using the clip on the back of the stand, or secured
to the platform using the fixing strap located underneath the
table top stand, this will prevent it from falling over.
The LCD display panels are manufactured using an
extremely high level of precision technology, however
sometimes some parts of the screen may be missing picture
elements or have luminous spots. This is not a sign of a
malfunction.
Make sure the television is located in a position where it cannot be pushed or hit by objects, as pressure will break or
damage the screen, and that small items cannot be inserted into slots or openings in the case.
Side View Top View
Clip
Please take note
EXCLUSION CLAUSE
Sturdy tie
(as short as possible)
Clip
Clip
Toshiba shall under no circumstances be liable for loss and/or damage to the product caused by:
i) fire;
ii) earthquake;
iii) accidental damage;
iv) intentional misuse of the product;
v) use of the product in improper conditions;
vi) loss and/or damage caused to the product whilst in the possession of a third party;
vii) any damage or loss caused as a result of the owner’s failure and/or neglect to follow the instructions set out in the owner’s
manual;
viii) any loss or damage caused directly as a result of misuse or malfunction of the product when used simultaneously with
associated equipment;
Furthermore, under no circumstances shall Toshiba be liable for any consequential loss and/or damage including but not limited
to the following, loss of profit, interruption of business, the loss of recorded data whether caused during normal operation or
misuse of the product.
If stationary images generated by text services, channel identification logos, computer displays, video games, on screen menus, etc.
are left on the television screen for any length of time they could become conspicuous, it is always advisable to reduce both the
brightness and contrast settings.
4
Page 5

The remote control
Simple at-a-glance reference of your remote control.
UP
English
To mute the sound
Number buttons
To return to the previous programme
To display the digital on-screen
To change programme positions and
When using a TOSHIBA VCR or DVD:
press
/
ll
r
m
press
to PLAY
r
press
q
press
s
press
to EJECT
w
press
to STOP
p
press
l
q
press
l
s
Programme Guide
On-screen Menus
text pages
To select mode
Selectable picture preferences
Widescreen viewing
to PAUSE/STEP
to REWIND
to FAST FORWARD
to SKIP-REWIND
to SKIP-FORWARD
For On/Standby mode
To select input from external sources
To switch between TV, Radio and Favourite
programmes when in digital mode
To exit Menus
When using menus the arrows move the
cursor on the screen up, down, left or
right. OK to confirm your selection
To alter the volume
To display digital on-screen information
To call up text services in analogue mode
When in TV mode:
u Still picture
OI/II
Stereo/bilingual transmissions
SUBTITLE Digital Subtitles
Time display
8/9
When using the Programme Guide:
– 24 hours
l
q
+ 24 hours
l
s
Text
Inserting batteries and effective range of the remote
Remove the back cover to reveal the battery compartment and make sure the batteries are inserted
the right way round. Suitable battery types for this remote are AAA, IEC R03 1.5V.
Do not combine a used, old battery with a new one or mix battery types. Remove dead batteries
immediately to prevent acid from leaking into the battery compartment. Do not expose to excessive
heat such as sunshine, fire or similar. Dispose of them in a designated disposal area.
The performance of the remote control will deteriorate beyond a distance of five metres or outside an
angle of 30 degrees from the centre of the television. If the operating range becomes reduced the
batteries may need replacing.
5
Page 6

Connecting external equipment
English
Before connecting any external equipment, turn off all main power switches. If there is no switch
remove the mains plug from the wall socket.
COMPONENT
SCART 2 (EXT2)
SCART 1 (EXT1)
VIDEO (EXT3)
CABLE HOLDER
a decoder could
*
be Digital Satellite
or any other
compatible decoder.
decoder*
media recorder
Aerial cables:
Connect the aerial to the socket on the rear of the
television. If you use a decoder* and/or a media recorder
it is essential that the aerial cable is connected through
the decoder and/or through the media recorder to the
television.
SCART leads:
Connect the video recorder IN/OUT socket to the
television. Connect the decoder TV socket to the
television. Connect the media recorder SAT socket to the
decoder MEDIA REC. socket.
Before running Auto tuning put your decoder and media
recorder to Standby.
The phono sockets alongside the COMPONENT VIDEO
INPUT sockets will accept L and R audio signals.
In addition there is a fixed/variable external audio ouput
which enables the connection of a suitable Hi-Fi unit.
Make sure the Speaker option in the Sound menu is set
to Off. The variable option is altered by using the sound
controls.
HDMI™ (High-Definition Multimedia Interface) is for use
with a DVD, decoder or electrical equipment with digital
audio and video output.
MEDIA REC.
TV
IN/OUT
SAT
FIXING STRAP
HDMI™ INPUT SOCKETS COMMON INTERFACE
It is designed for best performance with 1080i highdefinition video signals but will also accept and display
480i, 480p, 576i, 576p and 720p signals.
PLEASE NOTE: Although this television is able to
connect to HDMI equipment it is possible that some
equipment may not operate correctly.
A wide variety of external equipment can be
connected to the back of the television, therefore
the relevant owners manuals for all additional
equipment must be referred to.
We recommend SCART 1 for a decoder and SCART 2 for
a media recorder.
If connecting S-VIDEO equipment, set the INPUT for
EXT2. See page 31.
If the television automatically switches over to monitor
external equipment, return to normal television by
pressing the desired programme position button. To
recall external equipment, press
DTV, EXT1, EXT2, EXT3(C), HDMI1, HDMI2, PC,
or ATV.
The cable holder can be used for aerial, media recorder
and audio cables. Do not use the cable holder as a
handle and make sure all cables are removed before
moving the television.
HDMI, the HDMI logo, and High-Definition Multimedia Interface are
trademarks or registered trademarks of HDMI Licensing, LLC.
The Common Interface is
for a Conditional Access
Module (CAM). There is
access for two CAMs.
Contact a service provider.
to select between
B
6
Page 7

Connecting a computer
Before connecting any external equipment, turn off all main power switches. If there is no switch
remove the mains plug from the wall socket.
the back of your television
Audio cable for PC to
television connection
(not supplied)
Computer
Mini D-sub
15 pin connector
RGB PC cable
(not supplied)
Conversion adaptor if required (not supplied)
English
Connect the PC cable from the computer to the PC
terminal on the back of the television.
Connect the audio cable to the PC/HDMI1 Audio
socket on the back of the television. Select PC from the
PC/HDMI1 audio options in the AV connection
menu located in the SET UP menu.
Press the Bto select PC mode.
The following signals can be displayed:
VGA: 640 x 480/60 Hz (VESA)
SVGA: 800 x 600/60 Hz (VESA)
XGA: 1024 x 768/60 Hz (VESA)
SXGA: 1280 x 1024/60 Hz (VESA)
IMPORTANT NOTE: SXGA will display but it will
not be to VESA standard.
PLEASE NOTE:
Some PC models cannot be connected to this
television.
An adaptor is not needed for computers with a DOS/V
compatible mini D-sub 15 pin terminal.
A band may appear at the edges of the screen or parts
of the picture may be obscured. This is due to scaling
of the picture by the set, it is not a malfunction.
When PC input mode is selected some of the
television’s features will be unavailable e.g. Manual
setting in the SET UP menu, Colour, Tint, DNR and
Black Stretch in the Picture settings menu.
Signal information for Mini D-sub 15 pin connector
Pin assignment
for RGB/PC
terminal
Pin. No. Signal name Pin No. Signal name
1R9NC
2G10 Ground
3B11NC
4 NC (not connected) 12 NC
5NC13H-sync
6 Ground 14 V-sync
7 Ground 15 NC
8 Ground
7
Page 8

Controls and input connections
English
A wide variety of external equipment can be connected to the input sockets on the side of the television.
Whilst all the necessary adjustments and controls for the television are made using the remote control, the
buttons on the television may be used for some functions.
INPUT 3
GREEN LED – Active standby
RED LED – Power on
Input 3
(side) will take
Standby
priority over
EXT3 (back) if
both connections
are used at the
same time.
(EXT3)
Switching on
If the RED LED is unlit check that the mains plug is
connected to the power supply. If the picture does not
appear press ion the remote control, it may take a few
moments.
To put the television into Standby press ion the remote
control, the GREEN active standby LED will appear
(see ‘Software Upgrade’ section) next to the RED for a few
moments then disappear. To view the television press
again. The picture may take a few seconds to appear.
i
Using the remote control
Press the MENU button on the remote control to see
the menus.
In digital mode the menu bar at the top of the screens
will show three different topics shown in symbols. As each
symbol is selected by pressing the Sor Rbutton on the
remote control, its respective options will appear below.
In analogue mode the menu appears as a list of five
topics. As each symbol is selected by pressing the Sor
button on the remote control, its respective options will
R
appear below.
To use the options press the Pand Q button on the
remote control to move up and down through them and
OK, Sor Rto select the required choice. Follow the on
screen instructions. The functions of each menu are
described in detail throughout the manual.
Using the controls and connections
To alter the volume press — j+.
To alter the programme position press
Press MENU and S,R, Q or P to control the sound
and picture options.
Press MENU twice to finish.
When connecting sound equipment to EXT3, connect
the audio output of the equipment to the phono sockets
on the television.
To select the Input, press Buntil the display shows
EXT3 as described on page 31. The television will
automatically sense the type of signal.
Please always refer to the owner’s manual of the
equipment to be connected for full details.
Please note: Inserting the headphone plug will mute the
sound from all speakers.
8
eeFff
.
Page 9

Tuning the television for the first time
Before switching on the television put your decoder and media recorder to Standby if they are connected
and ensure the aerial is connected. To set up the television use the buttons on the remote control as detailed
on page 5.
English
Press the power-on button, the LOCAL OPTIONS
1
screen will appear. This screen will appear the
first time that the television is switched on and
each time the television is reset.
Country FRANCE
Language ENGLISH
Audio Language ENGLISH
Subtitles OFF
Local Time Settings 0
Press Q to highlight Country and SorRto
2
select. The television will now tune the stations for
LOCAL OPTIONS
Continue
your country.
Using Q highlight Language, then SorRto
3
select.
Press OK to start tuning.
4
The AUTO TUNING screen will appear and the
television will start to search for available stations.
The progress bar will move along the line.
You must allow the television to complete
the search.
When the search is complete the television will
automatically select programme one.
The AUTO TUNING screen will display the total
number of services found.
AUTO TUNING
86 programmes found
55 TV 24 Radio
Press OK to watch programme
Prog. Name Type U/VHF Quality
1 BBC ONE 34 GOOD
Different
Channel
numbers
may be
displayed
5
2 BBC TWO 34 GOOD
3 ITV1 31 GOOD
4 Channel 4 31 POOR
5 five 48 GOOD
6 ITV2 31 POOR
Change Watch
Page Up Page Down Sort
Use Q orPto move through the list to select a
programme then press OK to view.
NOTE: The time will be set automatically by
transmission but can be advanced or decreased
by up to 2 hours using Local Time Settings.
AUTO TUNING
Progress
Prog. Name Type U/VHF Quality
70 CBBC Channel 34 GOOD
87 Community 21 POOR
EXIT
Cancel
9
Page 10

Digital – auto tuning
English
NOTE: As new services are broadcast it will be necessary to re-tune the television in order to view them.
Auto tuning
Auto tuning will completely re-tune
the television and can be used to up date the channel list.
It is recommended that Auto tuning is run
periodically to ensure that all new services are
added. All current programmes and settings, i.e.
favourites and locked programmes, will be lost.
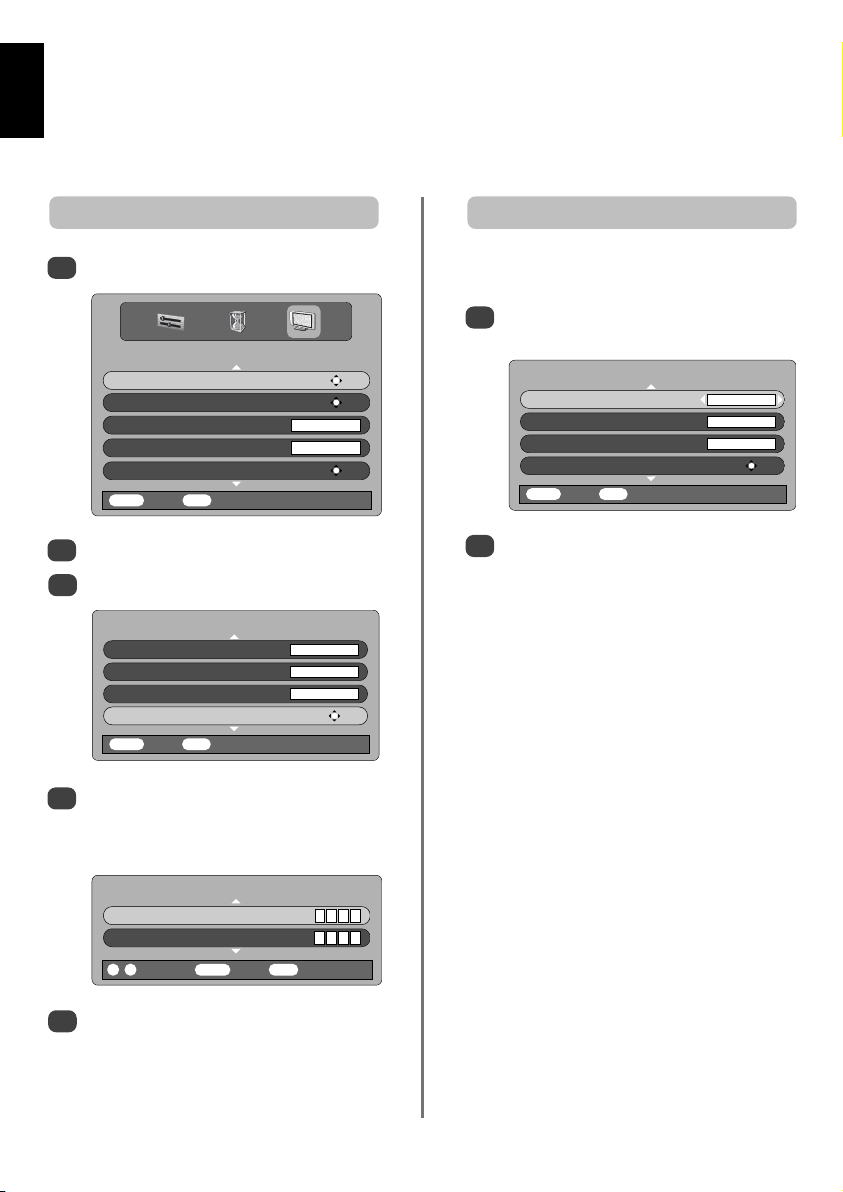
Press MENU, the SETUP MENU will appear.
1
Use Q to highlight Auto tuning. Press OK.
A screen will appear warning that previous
2
digital programmes and settings will be deleted.
Press OK to continue with the Auto tuning.
WARNING
! All previous digital programmes and
settings will be deleted.
Continue?
Yes
MENU
Select
The television will start to search for all available
stations.
Progress
Prog. Name Type U/VHF Quality
70 CBBC Channel 34 GOOD
87 Community 21 POOR
Cancel
AUTO TUNING
You must allow the television to complete
the search.
When the search is complete the AUTO
TUNING screen will display the total number of
services found.
AUTO TUNING
86 programmes found
55 TV 24 Radio
Press OK to watch programme
Prog. Name Type U/VHF Quality
1 BBC ONE 34 GOOD
2 BBC TWO 34 GOOD
3 ITV1 31 GOOD
4 Channel 4 31 POOR
5 five 48 GOOD
6 ITV2 31 POOR
Change Watch
Page Up Page Down Sort
Use Q orPto move through the list to select a
3
programme then press OK to view.
At any time by pressing and holding Ba list
will appear on screen showing modes and all
stored external equipment. Use Pand Q to
highlight and OK to select.
3C
B
2
B
1
B
DTV
ATV
PC
HDMI2
EXIT
Cancel
10
When DTV mode is selected pressing
repeatedly will scroll through all connected
equipment and the last channel being viewed in
DTV mode.
B
Page 11

Digital – programme sorting,
manual tuning
NOTE: When the television is switched off the mode being viewed at the time will automatically be selected
when the television is switched back on.
Use Q orPto move through the list to your
Programme sorting
The station order may be changed to suit personal
Press MENU, the SETUP MENU will appear on
1
screen.
Use Q to move down through the list and
2
highlight Programmes. Press OK.
preference.
4
preferred position. As you do so the other
stations will move to make room.
Press Sto store your move. Repeat as necessary,
5
then press EXIT.
Manual tuning
This feature is available for service engineers or can be
used for direct channel entry if the multiplex channel
is known.
English
SETUP MENU
TV Setup OK
Languages OK
Auto tuning OK
Manual tuning OK
Programmes OK
MENU
Back
EXIT
Watch TV
With the list of stations now showing use
3
Q orPto highlight the station you want to
move and press R.
The selected station will be moved to the right of
the screen.
Prog. Name
1 BBC ONE
2 BBC TWO
3 ITV1
4 Channel 4
5 five
6 ITV2
Page Up Page Down
PROGRAMMES
Sort Store
MENU
Back
EXIT
Watch TV
Select Manual tuning from the SETUP MENU
1
and press OK.
Enter the multiplex number using the number
2
buttons and then press OK. The television will
automatically search for that multiplex.
When the multiplex is found any channels not
currently on the programme list will be added
and the programme information at the top of
the screen will be updated.
Repeat as necessary. Press EXIT to finish.
3
11
Page 12

Tuning Analogue mode for the first time
English
The Quick Setup feature will tune all analogue channels currently available in the area. To put the
television into ATV mode press and hold
Select ATV mode. The Quick Setup screen will
1
appear.
Quick Setup
Select your language.
Language English
EXIT
Watch TV
Using SorRselect your Language, then press
2
OK.
Then press SorRto select your Country.
3
To start Auto tuning press OK.
4
Searching
Channel : C22 Station : BBC1
EXIT
Stop
The search will begin for all available stations.
5
The slide bar will move along the line as the
search progresses.
Auto tuning
OK
Next
then use Por Q to highlight ATV. Press OK to select.
B
Use Q orPto move through the list to select a
6
programme then press EXIT to view.
The station order may be changed using the
Manual tuning screen (see the analogue
‘Sorting programme positions’ section).
At any time by pressing and holding
will appear on screen showing modes and all
stored external equipment. Use Pand Q to
highlight and OK to select.
2
B
1
B
DTV
ATV
PC
HDMI2
HDMI1
When ATV mode is selected pressing
repeatedly will scroll through all connected
equipment and the last channel being viewed in
ATV mode.
B
B
a list
You must allow the television to complete
When the search is complete the television will
automatically select programme position 1 and
the Manual tuning screen will appear.
Prog. Channel Station
1 C22 BBC1
2 C28 BBC2
3 C25 ITV
4 C32 CH4
5 C69
6 C69
OK
Select Sort
MENU
Back
the search.
Manual tuning
EXIT
Watch TV
12
Page 13

Analogue – manual tune
The television can be tuned-in manually using Manual tuning. For example: if the television cannot be
connected to a media recorder/decoder with a SCART lead or to tune-in a station on another System.
Use SandRto move across the screen and select any of these Manual Tune options.
English
Programme System
Colour
system
Programme
skip
Channel Search
Manual fine
tuning
Station
Programme: The number to be pressed on the remote control.
System: Specific to certain areas.
Colour system: Factory set to Auto, should only be changed if problems are experienced, i.e. NTSC input from
external source.
Programme skip: means nothing has been stored or the facility to skip the channel is ON. See page 15.
Channel: The channel number on which a station is being broadcast.
Search: Search up and down for a signal.
Manual fine tuning: Only used if interference/weak signal is experienced. See page 35.
Station: Station identification. Use the Por Q and SorRbuttons to enter up to seven characters.
To allocate a programme position on the television for a decoder and media recorder: turn the decoder on,
insert a pre-recorded film in the media recorder and press PLAY, then manually tune.
Press MENU and using Sor Rselect the SET UP
1
menu, with Q highlight Manual tuning, press
OK to select.
Language English
Country UK
Auto tuning
Manual tuning
Antenna Amplifier On
AV connection
MENU
Back
Use Por Q to highlight the programme
2
position required e.g. we suggest Prog. 0 for
SET UP
EXIT
Watch TV
a media recorder.
Prog. Channel Station
OK
MENU
Manual tuning
0 C60
1 C22 BBC1
2 C28 BBC2
3 C25 ITV
4 C32 CH4
5 C69
Select Sort
Back
EXIT
Watch TV
1/2
OK
OK
OK
Different
Channel
numbers
may be
displayed
Press OK to select. If the programme is skipped,
3
Programme skip must be removed before
storing.
Manual tuning
0 I A C 60 0
OK
Store
MENU
Back
Press Rto select System and use Por Q to
4
change if required.
Then press Rto select Search.
5
Press Por Q to begin the search. The search
6
symbol will flash.
0 I A C 60 0
OK
Store
MENU
Back
Each signal will show on the television, if it is not
7
your media recorder, press Por Q again to
System
EXIT
Watc h TV
Manual tuning
Search: Up
EXIT
Watc h TV
restart the search.
13
Page 14

Analogue – manual tune continued,
English
When your media recorder signal is found, press
8
to move along to Station. With P, Q, Sand
R
put in the required characters, e.g. VCR.
R
Manual tuning
EXIT
Manual setting
Back
Station
Watch TV
Label
EXIT
Watch TV
0 I A C 60 0 V C R
OK
Store
MENU
Back
Press OK to store.
9
Repeat for each programme position you want
10
to tune or, press MENU to return to the list of
channels and select the next number to tune.
Press EXIT when you have finished.
11
To name external equipment, e.g. DVD on EXT2,
12
press Bto select EXT2, then select Manual
setting from the SET UP menu.
Press Rto select Label then using P, Q, Sand
13
put in the required characters. Press OK.
R
EXT2 A D V D
OK
Store
MENU
PLEASE
This television has direct channel entry
NOTE
if the channel numbers are known.
Select the Manual tuning screen in Step 3. Enter the
Programme number, the System, then C for
standard (terrestrial) channels or S for cable channels
and the Channel number. Press OK to store.
Auto tune
Using Auto tuning
To set up the television using Auto tuning, press
1
MENU and use SorRto select the SET UP menu.
Language English
Country UK
Auto tuning
Manual tuning
Antenna Amplifier On
AV connection
MENU
Back
Press Q to highlight Language and SorRto
2
select.
Using Q highlight Country, then SorRto select.
3
The television will now tune the stations for your
country.
Press Q to highlight Auto tuning, then press OK.
4
!
Previous settings will be lost !
Press EXIT for no change.
Press OK to start Auto tune.
MENU
Back
To start Auto tuning press OK.
5
SET UP
EXIT
Watch TV
Auto tuning
EXIT
Watch TV
1/2
OK
OK
OK
14
You must allow the television to complete the search.
When the search is complete the television will
automatically select programme position 1. This may not
be a clear picture, so the station order can be changed
(see 'Sorting programme positions' section).
Page 15

Analogue – programme skip,
sorting programme positions
English
Programme skip
To prevent certain programmes from being viewed, the
programme position can be skipped. The remote control
must be removed as the channels will still be available using
the number buttons
normal using the controls on the television, but the television
will not show the skipped programme position.
Select Manual tuning from the SET UP menu.
1
Use Por Q to highlight the programme position
2
to be skipped and press OK to select.
Press Rto select Programme skip.
3
Use Por Q to turn Programme skip on.
4
Press OK.
programme position.
OK
MENU
. Programmes can then be watched as
Prog. Channel Station
OK
Select Sort
MENU
Manual tuning
0 C60 VCR
1 C22 BBC1
2 C28 BBC2
3 C25 ITV
4 C32 CH4
5 C69
Back
EXIT
Watch TV
on the screen indicates a skipped
Manual tuning
1 I A C 22 0 B B C 1
Store
Back
Programme skip : On
EXIT
Watch TV
Sorting programme positions
Channels may be moved and stored on the programme
1
2
3
4
position of your choice.
Select Manual tuning from the SET UP menu.
With the list of stations now showing use Q or
to highlight the station you want to move and
press R.
The selected station will be moved to the right of
the screen.
Prog. Channel Station
Store
MENU
Manual tuning
1 C22 BBC1
2 C28 BBC2
3 C25 ITV
4 C32 CH4
5 C69
6 C69
Back
EXIT
Watch TV
Use Q orPto move through the list to your
preferred position. As you do so the other stations
will move to make room.
Press Sto store your move.
Repeat as necessary, then press EXIT.
P
Press MENU and repeat from Step 2 or press
5
EXIT.
Each programme position has to be individually
selected. To turn Programme skip off, repeat the
procedure for each position.
Skipped programme positions cannot be selected
by Pfand Peor by the controls on the
television, but can still be accessed by the number
buttons on the remote control.
15
Page 16

General controls, stereo/bilingual
transmissions, time display, sound controls
English
Selecting programme positions
To select a programme position use the numbered
buttons on the remote control.
Programme positions can also be selected using P
Pe.
To revert to the previous programme position press ^^.
To display on-screen information i.e. programme position,
channels or stereo/mono signal, press . Press again
to cancel.
+
i
and
f
Stereo and Bilingual transmissions
If stereo or dual language broadcasts are transmitted the
word Stereo or Dual will appear on the screen each time
programme positions are changed, disappearing after a
few seconds. If the broadcast is not in stereo the word
Stereo… Press
Bilingual… Bilingual transmissions are rare. If they are
transmitted the word Dual will display. Choose the
required programme number and if the word Dual
appears press OI/II to select Dual 1, Dual 2 or Mono.
Mono will appear.
OI/II to select Stereo or Mono.
The Time Display – analogue only
The time display facility allows the current (text service)
time to be seen on the television screen.
Bass, Treble and Balance
The sound controls are accessible in digital and
analogue modes, as are most of the televisions features.
In digital mode, press MENU and using
1
highlight TV setup then press OK.
Use SorRto select SOUND.
2
In analogue mode, press MENU and SorRto
3
select SOUND.
Dual Dual 1
Bass 0
Treble 0
Balance 0
WOW
Stable sound On
MENU
Back
Press Qto highlight Bass, Treble or Balance
4
and SorRto change the setting.
When connecting to a Hi-fi unit, set the Speaker
option to Off. Then select Fixed or Variable for
the Monitor (Audio) in the AV connection
menu. (See 'Input selection and AV connections'
section).
SOUND
EXIT
Watch TV
Q
1/2
OK
Press
broadcast to see a time display from the broadcaster. It
will remain on screen for about 5 seconds.
whilst watching a normal television
8/9
Sound controls
Volume
Press j— or
Sound Mute
Press konce to turn the sound off and again to cancel.
j
+ to adjust the volume.
16
Speaker Off
Bass boost On
Bass boost level 70
MENU
Back
SOUND
EXIT
Watch TV
2/2
Page 17

Sound controls continued, SRS WOW™ sound
effects, dual, stable sound
Bass boost
Bass boost enhances the depth of the sound. The
difference will only be noticeable on sound with a
In the SOUND menu press Q to highlight Bass
1
boost. Use SorRto select On.
Then press Q to highlight Bass boost level and
2
using SorRadjust to suit your preference.
strong bass.
Press Q to highlight SRS 3D and using
3
4
5
select between On or Off.
SorR
Then press Q to highlight FOCUS and press
to select between On or Off.
SorR
Highlight TruBass and use SorRto select Off,
Low or High to suit your preference.
NOTE: This feature is not available through
headphones.
Dual – analogue only
®
English
Speaker On
Bass boost On
Bass boost level 70
MENU
Back
SOUND
EXIT
Watch TV
2/2
SRS WOW™sound effects
SRS WOW™ is a suite of audio effects which use the
stereo signals being broadcast to produce enhanced sound
from the television’s speakers. If mono sound is broadcast
concentrates the sound and gives the effect of it coming
from the centre of the television, TruBass enhances the
1
2
only TruBass will be available.
SRS 3D gives a rich sound experience, FOCUS
lower bass frequencies.
Press MENU and select the SOUND menu.
Use Por Q to highlight WOW then press OK.
WOW
SRS 3D Off
FOCUS Off
TruBass Off
MENU
Back
EXIT
Watch TV
If a programme or film is being broadcast with a
soundtrack in more than one language, the DUAL feature
1
2
The Stable Sound feature limits high volume levels and
prevents the extreme changes in volume that can occur
when channels are changed or a programme switches to
1
2
allows selection between them.
Select the SOUND menu.
Use Q to highlight Dual then press SorRto
choose between Dual 1 or Dual 2.
Stable sound
a commercial.
Select the SOUND menu.
Use Q to highlight Stable Sound then press
to select On or Off.
SorR
Dual Dual 1
Bass 0
Treble 0
Balance 0
WOW
Stable sound On
MENU
Back
EXIT
®
SOUND
OK
Watch TV
1/2
WOW, SRS and •symbol are trademarks of SRS Labs, Inc.
WOW technology is incorporated under license from SRS Labs, Inc.
17
Page 18

Widescreen viewing
English
Depending on the type of broadcast being transmitted, programmes can be viewed in a number of formats.
Press the
Super Live 1, Cinema 1, Subtitle and 14:9.
SUPER LIVE 1
SUPER LIVE 2
CINEMA 1
button repeatedly to select between Exact Scan, Wide, Super Live 2, Cinema 2, 4:3,
{
This setting will enlarge a 4:3 image to
fit the screen by stretching the image
horizontally and vertically, holding the
correct proportions at the centre of the
image. Some distortion may occur.
If a ‘side panel format’ signal is being
received this setting will enlarge the
image to fit the screen by stretching
the image horizontally and vertically,
holding the correct proportions at the
centre of the image. Some distortion
When watching ‘letterbox format’
eliminate or reduce the black bars at
the top and bottom of the screen by
zooming in and selecting the image
may occur.
films/video tapes, this setting will
without distortion.
CINEMA 2
SUBTITLE
When watching ‘all sides panel format’
films/video tapes, this setting will
eliminate or reduce the black bars at all
sides of the screen by zooming in and
selecting the image without distortion.
When subtitles are included on a
letterbox format broadcast, this setting
will raise the picture to ensure that all
the text is displayed.
SUBTITLE
18
Page 19

Widescreen viewing continued
English
14:9
WIDE
4:3
1080i MODELS
EXACT SCAN
Use this setting when watching a 14:9
Use this setting when watching a
widescreen DVD, widescreen video
(when available). Due to the range of
20:9 etc.) black bars may be visible
on the top and bottom of the screen.
Use this setting to view a true 4:3
Use this setting when watching a
1080i source, it will display the image
as transmitted without scaling or
broadcast.
tape or a 16:9 broadcast
widescreen formats (16:9, 14:9,
broadcast.
This option is only
available when watching
a 1080i source.
cropping the picture.
Press and hold the {button and a list of all the widescreen formats will appear on
screen. Use Pand Q to highlight the required format and OK to select.
Using the special functions to change the size of the displayed image (i.e. changing the height/width ratio) for the purposes of public display or
commercial gain may infringe on copyright laws.
Exact Scan
Wide
Super Live 2
Cinema 2
4:3
Super Live 1
Cinema 1
Subtitle
14:9
19
Page 20

Picture controls
English
Most of the picture controls and functions are available in both digital and analogue modes. To access the
the required menus when in digital mode: press MENU and using Q select TV setup, press OK then Sor
to select the desired menu. PLEASE NOTE: features not available in digital mode will be greyed out. To access
the required menus when in analogue mode: press MENU and use Sor Rto select the desired menu.
R
Picture position – analogue only
The picture position may be adjusted to suit personal
preference and can be particularly useful for
In the SET UP menu press Quntil
1
Picture position is highlighted.
Picture position
Quick Setup
MENU
Press OK to view the options available for the
2
picture format that has been selected.
Press Pand Q to select an option, then Sor
3
to adjust the settings.
The options alter depending on the widescreen
format chosen and when viewing connected
equipment.
In Cinema 2:
Horizontal position 0
Vertical position 0
Reset
Back
external inputs.
SET UP
EXIT
Watch TV
Picture position
OK
OK
OK
2/2
R
Back light
Adjusting the Back light can improve the clarity of the
1
2
3
screen when viewing.
In the PICTURE menu press Qto select
Picture settings, then press OK.
Picture settings
3D Colour management
Base colour adjustment
Cinema mode
MENU
Back
PICTURE
EXIT
OK
Off
On
Watch TV
In the Picture settings menu press Qto select
Back light.
Press SorRto adjust.
Picture settings
Back light 100
Contrast 100
Brightness 50
Colour 50
Tint 0
Sharpness 0
MENU
Back
EXIT
Watch TV
1/2
MENU
Back
EXIT
Watch TV
To return to the original factory settings select Reset
in the Picture position menu and press OK.
20
Page 21

Picture controls continued
English
Picture preferences
This television offers the choice of personalising the picture
style. Press mto view the different styles available:
Picture mode-1 to 3 are preset options and
Picture mode-M stores your own settings:
Select Picture settings from the PICTURE menu.
1
Picture settings
Back light 100
Contrast 100
Brightness 50
Colour 50
Tint 0
Sharpness 0
MENU
Back
Use SorRto adjust the Contrast, Brightness,
2
Colour, Tint and Sharpness.
EXIT
Watch TV
1/2
Black stretch
Black Stretch increases the strength of dark areas of the
picture which improves the definition.
In the Picture settings menu press Quntil Black
1
Stretch is highlighted.
MPEG NR – Noise Reduction
When watching a DVD the compression may cause some
words or picture elements to become distorted or pixelated.
Using the MPEG NR feature reduces this effect by
smoothing out the edges.
Select MPEG NR from the Picture settings
1
menu. Use SorRto select a setting to suit your
preference.
DNR – Digital Noise Reduction
DNR enables you to ‘soften’ thescreen representation of a
weak signal to reduce the noise effect.
Select DNR from the Picture settings menu. Use
1
to adjust. The differences may not always
SorR
be noticeable (for the best result use lower
settings as picture quality can be lost if the setting
is too high).
Colour temperature
Colour Temperature increases the ‘warmth’ or ‘coolness’
of a picture by increasing the red or blue tint.
In the Picture settings menu press Quntil
1
Colour Temperature is highlighted.
Picture settings
Black stretch On
MPEG NR Low
DNR Auto.
Colour Temperature Normal
MENU
Back
Press SorRto select between On and Off. The
2
effect depends on the broadcast and is most
EXIT
Watch TV
noticeable on dark colours.
2/2
21
Picture settings
Black stretch On
MPEG NR Low
DNR Auto.
Colour Temperature Normal
MENU
Back
Press SorRto select between Normal, Warm
2
and Cool to suit your preference.
EXIT
Watch TV
2/2
Page 22

English
Picture controls continued
3D Colour management
When 3D Colour management is selected it allows the
‘Base colour adjustment’ feature to become available.
In the PICTURE menu press Qto select 3D Colour
1
management.
Picture settings
3D Colour management
Base colour adjustment
Cinema mode
MENU
Back
Press SorRto select On or Off.
2
PICTURE
EXIT
OK
On
OK
On
Watch TV
Base colour adjustment
The Base colour adjustment feature allows the
adjustment of individual colours to suit personal
preference. This can be useful when using an
In the PICTURE menu press Qto select
1
Base colour adjustment, then press OK.
external source.
Base colour adjustment
Red +2 +6 +4
Green 0 0 0
Blue 0 0 0
Yellow 0 0 0
Magenta 0 0 0
Cyan 0 0 0
Reset
MENU
Back
Hue Saturation Brightness
EXIT
Watch TV
OK
To return to the original factory settings select
Reset and press OK.
Cinema mode
If there are lines or jagged edges in the film or programme
being viewed, selecting Cinema mode can help correct
this by smoothing out the picture.
In the PICTURE menu press Qto select Cinema
1
mode.
Press SorRto select On or Off.
2
Antenna amplifier
If the signal being received by the television is too strong,
this may result in picture interference and/or a buzzing
sound. Setting Antenna Amplifier to Off reduces the
signal strength, and can help to remove the interference.
Picture settings
3D Colour management
Base colour adjustment
Cinema mode
MENU
Back
Press Pand Q to select an option, then Rto
2
adjust the settings.
PICTURE
EXIT
Watch TV
In the SET UP menu press Quntil Antenna
1
Amplifier is highlighted.
OK
On
OK
On
With Sor Rselect either On or Off.
2
Language English
Country UK
Auto tuning
Manual tuning
Antenna Amplifier On
AV connection
MENU
Back
SET UP
EXIT
Watch TV
1/2
OK
OK
OK
22
Page 23

Picture controls continued,
panel lock
English
Automatic format (Widescreen)
When this television receives a true Widescreen picture and
Auto format is On, it will automatically be displayed in
Widescreen format, irrespective of the
television’s previous setting.
Press MENU and SorRto select the
1
FUNCTION menu.
Tel etext Auto.
Panel lock Off
Auto format On
Blue screen On
Side Panel 1
MENU
Back
Press Q to highlight Auto format, then Sor
2
to select On or Off.
FUNCTION
EXIT
Watc h TV
R
Blue screen
When Blue screen is selected the screen will turn blue and
the sound will be muted when no signal is received.
Side panel adjustment
The Side Panel feature lightens or darkens the band each
side of the screen when in 4:3 or 14:9 format. This helps
prevent image retention of the band and can also make
viewing in bright or dark conditions more comfortable.
In the FUNCTION menu press Quntil Side
1
Panel is highlighted.
Press SorRto adjust.
2
Picture still
This feature is used to hold a still image on the screen.
Press
1
uto hold an image on the screen, press u
again to cancel.
Panel lock
Panel lock disables the buttons on the television. All
buttons on the remote control can still be used.
From the FUNCTION menu select Panel lock
1
and choose On or Off usingSorR.
In the FUNCTION menu press Q to highlight
1
Blue screen.
Tel etext Auto.
Panel lock Off
Auto format On
Blue screen On
Side Panel 1
MENU
Back
Press SorRto select On or Off.
2
FUNCTION
EXIT
Watch TV
23
Tel etext Auto.
Panel lock On
Auto format On
Blue screen On
Side Panel 1
MENU
Back
When Panel lock is On, a reminder will appear when
the buttons on the television are pressed. If the standby
button is pressed the television will switch off and
can only be brought out of standby by using the
remote control.
FUNCTION
EXIT
Watch TV
Page 24

English
Programme timer – digital only
The timers
When all the details have been entered press OK
5
to save the timer.
This feature will set the television to go to a specific
channel at a certain time. It can be used to view a
particular programme, or by setting the mode to daily or
weekly, can be used to view a series of programmes.
Press MENU and SorRto select the TIMER
1
MENU.
TIMER MENU
Programme timers OK
MENU
Back
EXIT
Watch TV
Press Qto select Programme timers, then press
2
OK to select.
Press Qto select the first programme to be
3
timed, then press OK. The SET TIMER menu will
now appear on screen.
Press Pand Q to go through the list adding the
4
details of the programme to be timed by using
the number buttons and Sand Rto make
selections.
12:18 Fri, 13 Jan.
SET TIMER
Programme BBC ONE 1
Date Fri, 13 Jan. 2006 13/01
Start Time 13.00
End Time 13.15
Repeat ONCE
Auto-start VCR NO
Subtitles NONE
Audio Language ENGLISH
0 - 9 Enter Number Save Timer MENU Cancel
Auto-start VCR: If your Toshiba media recorder is AV link
compatible setting this feature to YES will auto start/stop
a recording.
PLEASE NOTE: When a timed programme is about to
start, an information screen will appear offering the option
of watching or cancelling the programme. The menus and
other channels will not be available during the timed
programme unless the programme timer is cancelled.
Sleep timer
The television can be set to turn itself off after a
Press MENU and SorRto select the TIMER
1
menu.
Sleep timer 01:30
MENU
Press Qto select the Sleep timer. Use the
2
number buttons to set the required time. For
example, to switch the television off in one and a
half hours enter 01:30, or press SorRto
increase/decrease in steps of 10 minutes.
Press EXIT to finish.
3
Back
certain time.
TIMER
EXIT
Watch TV
24
Page 25

Digital on-screen information and
Programme Guide
When viewing in digital mode, the on-screen information and programme guide give access to programme
details for all available channels.
English
Information
Select information by pressing , the
1
information screen will appear giving details of the
channel and programme currently being viewed.
ALL PROGS
BBC ONE
BBC TWO
ITV1
Channel 4
five
Showing also Bobinogs starting in 5 minutes on CBeebies…
Tune EXIT Watch TV TV/FAV Change progs
Page Up Page Down Showing also Languages
2
11:30 Bargain Hunt x12:15 Cash in the Attic
1 minute left
A bargain bought at Peterborough Fair makes double
its money at auction. [S] Then BBC News and Weather.
To see details of any of the other channels currently
available, press Pand Q to scroll up and down the
channel list. As the channel is selected details of the
programme currently being broadcast will appear.
Pressing the YELLOW button will activate Showing
3
also, giving details of programmes which have
started on other channels.
To record the following programme, with the
4
information guide showing, press R. The Tune
option in the bottom section of the screen will
change to Record, press OK. The SET TIMER
screen will appear.
BBC News
001 BBC ONE 13:00-13:28 Fri, 13 Jan.
SET TIMER
Start Time 01:25
End Time 02:55
Repeat ONCE
Auto-start VCR NO
Subtitles NONE
Audio Language ENGLISH
0 - 9 Enter Number Save Timer MENU Cancel
+
i
12:14 Fri, 13 Jan.
…
I/II
ENTERTAINMENT
12:18 Fri, 13 Jan.
Guide
Select the on-screen guide by pressing GUIDE, the
1
guide screen will appear highlighting details of the
channel and programme currently being viewed.
This may take a few moments to appear.
Bargain Hunt
ALL PROGS
BBC ONE
BBC TWO
ITV1
Channel 4
five
ITV2
BBC THREE
8
BBC FOUR
ITV3
Sky Travel
UKTV History
Record More info EXIT Watch TV TV/FAV Change progs
Page Up Page Down Timers
2
3
12:00 12:30 13:00 13:30
Barga Cash in the Attic BBC Ne Spotli Neig
The Daily Po Working Lunch World Prof
This Mornin ITV News We It Today Wit
News at No Whats in Cheers The Way
Home and A Brainteaser Born to S
Judge Judy The Jeremy Kyle Show Airline
This is BBC THREE
This is BBC FOUR
Kojak Quincy Quin
Canaries on Douglas Che Floyd Around Beauty Sch
What the St What the Vi Fred Dibnah' Fred Dibna
+
i
Press SorRfor information of other programmes
scheduled for the channel selected.
For details of other channels currently available,
press Pand Q to scroll up and down the
channel list. As the channel is selected details of
the programme currently being broadcast will
appear, then press SorR.
For information on a highlighted programme
4
+
press . To set the timer for that programme
i
press the BLUE button to bring up the
PROGRAMME TIMERS menu.
NOTE: Recording can be set from both the
information screen and guide. In order for the
recording operation to work the media recorder
must be AV link compatible.
12.18 Fri, 13 Jan.
Friday
The details of the programme will have been
5
added to the screen. Press OK to save.
25
Page 26
Digital settings – parental control
English
In order to prevent viewing of unsuitable films and programmes, channels and menus can be locked. These
can then only be accessed with a security code PIN when in digital mode.
Setting the PIN
Press MENU and Rto select the FEATURE MENU.
1
FEATURE MENU
Parental Control OK
Favourite and Locked Programmes OK
Favourites ALL PROGS
Common Interface Slots
Software Upgrade OK
MENU
Back
EXIT
Watch TV
Use Q to select Parental Control then press OK.
2
Press Q to highlight Change Pin then press OK.
3
PARENTAL CONTROL
Mode ON
Parental Rating NONE
Censor if no data? OFF
Change Pin OK
MENU
Back
EXIT
Watch TV
Using the number buttons enter a four digit
4
number, when these have been entered the screen
will ask you to confirm them by entering them
again.
NO MODULE
Mode
This feature locks various menus to prevent the television
being retuned or the settings being overridden.
In the PARENTAL CONTROL menu press Q to
1
select Mode.
PARENTAL CONTROL
Mode ON
Parental Rating NONE
Censor if no data? OFF
Change Pin OK
MENU
Back
EXIT
Watch TV
Use Sor Rto choose between ON, OFF, LOCK
2
MENU and LOCK INSTALL.
When menus that have been locked are now
selected they will only become available when the
PIN is entered.
CHANGE PIN
New PIN
Confirm PIN – – – –
0 - 9 Enter PIN
Press MENU to go back to the Parental Control
5
screen. The PIN number is now set.
MENU
Back
EXIT
* * * *
Watch TV
PLEASE NOTE:
Parental Rating – Use Sor Rto choose
between PG, 12, 16, 18, TOTAL and NONE.
26
Page 27

Digital settings – favourite programmes,
locked programmes, encrypted programmes
English
Selecting favourite programmes
Favourite Programmes creates a list of the digital
channels that are watched most. Four lists can be created,
these can be a mixture of television, text and radio channels.
From the FEATURE MENU press Q to select
1
Favourite and Locked Programmes .
FAVOURITE AND LOCKED PROGRAMMES
1 BBC ONE
2 BBC TWO
7 BBC THREE
10 BBC FOUR
30 CBBC Channel
31 CBeebies
Select MENU Back
Page Up Page Down Select all Deselect all
Use Pand Q to go through the list of channels
2
pressing OK to select the ones required, a tick will
appear in the box.
Press Rto select List 2. Follow the same
3
procedure to make the selection. When all
favourites have been selected press MENU to
return to the FEATURE menu.
Use Q to highlight Favourites and Sor Rto
4
select between ALL, TV, RADIO, FAV-1 and
FAV-2. The number of favourites available
depends on how many lists have been created.
Favourite List 1: No
Locking programmes
Locked Programmes stops the viewing of digital
channels, they can only be accessed by entering the PIN.
From the FEATURE MENU press Q to select
1
Favourite and Locked Programmes.
Press Rrepeatedly to select the Locked
2
Programme list.
Use Pand Q to go through the list of channels
3
pressing OK to select the ones required, a
padlock will appear in the box.
FAVOURITE AND LOCKED PROGRAMMES
1 BBC ONE
2 BBC TWO
7 BBC THREE
10 BBC FOUR
30 CBBC Channel
31 CBeebies
Deselect MENU Back
Page Up Page Down Lock all Unlock all
Press EXIT to finish.
4
When any of the channels in the Locked
5
Programme list are now selected the PIN must
be entered before they can be accessed.
Locked Programme: Yes
Encrypted programmes
FEATURE MENU
Parental Control OK
Favourite and Locked Programmes OK
Favourites FAV-1
Common Interface Slots
Software Upgrade OK
MENU
Back
EXIT
Watch TV
Press EXIT.
2
5
Using thefPebuttons will now only access
those channels in Favourite List 1 when FAV-1 is
selected.
NO MODULE
27
Selecting Encrypted Programmes allows all encrypted
programmes to be shown in the programme list even if
1
2
they are not available to select.
In the FEATURE MENU press Por Q to select
Encrypted Programmes.
Use Sor Rto select ON or OFF.
NOTE: CAMs (Conditional Access Modules) are
available from service providers (see 'Common
Interface' section).
Page 28

Digital settings – audio languages, subtitles,
English
reset tv, common interface
Audio languages
This feature allows a programme or film to be viewed with
a choice of soundtrack language, provided they are
1
2
3
currently being broadcast.
From the SETUP MENU press Q to select Local
options.
SETUP MENU
TV Setup OK
Local options OK
Auto tuning OK
Manual tuning OK
Programmes OK
MENU
Back
EXIT
Watch TV
Press OK, then press Por Q to highlight Audio
Language.
Use Sor Rto select an option.
LOCAL OPTIONS
Country FRANCE
Language ENGLISH
Audio Language ENGLISH
Subtitles OFF
Local Time Settings 11.19
MENU
Back
EXIT
Watch TV
NOTE: If more than one soundtrack is available,
use
OI/II to select between them.
Subtitles
This feature will show subtitles on the bottom of the
screen in the selected language provided they are being
From the LOCAL OPTIONS menu press Q to
1
select Subtitles.
Use Sor Rto select an option.
2
broadcast.
Reset TV
Selecting Reset TV will delete all stored digital channels
and settings. The television will return to factory settings
Press MENU and then press Q until Reset TV is
1
highlighted.
Press OK to select. A screen will appear warning
2
that all digital settings will be lost, press OK to
continue.
The LOCAL OPTIONS screen will appear, press
OK to continue, the television will then auto tune.
and then auto tune.
Common interface
The Common Interface Slot, situated on the back of the
television, enables the insertion of a CAM (Conditional
Access Module) and card. These are purchased from a
service provider and allow additional subscription
broadcasts to be viewed. For information see a
Insert the CAM and card into the Common
1
Interface Slot, following the instructions provided
with the CAM. A box will appear on screen to
confirm that the CAM is loaded.
From the FEATURE MENU press Por Q to
2
select Common Interface Slots.
Parental Control OK
Favourite and Locked Programmes OK
Favourites ALL PROGS
Common Interface Slots
Software Upgrade OK
MENU
Details of the CAM should now be available. Use
3
OK to select it. If two CAMs are inserted use
or Rto select between the two.
S
service provider.
FEATURE MENU
Back
EXIT
NO MODULE
Watch TV
28
Page 29

Digital settings – software upgrade
English
Version
This feature can be used to check the version of software
From the FEATURE MENU press Por Q to
1
select Software upgrade. Press OK.
Press Por Q to select Version. Use Sor Rto
2
select. When the software has been updated there
will be a choice of two versions available.
currently installed.
FEATURE MENU
Favourite and Locked Programmes OK
Favourites ALL PROGS
Common Interface Slots
Software Upgrade OK
Encrypted Programmes OFF
MENU
Back
EXIT
Watch TV
SOFTWARE UPGRADE
Version 2.4
Auto upgrade ON
Search for New Software OK
0
Continue
MENU
Back
EXIT
NO MODULE
Watch TV
Auto Upgrade
If Auto upgrade is selected the software will
automatically update as each version becomes available,
provided the television is on or in standby. If the television
is on, a screen prompt will appear showing the software
1
download taking place.
In the SOFTWARE UPGRADE menu press Por
Q to select Auto upgrade.
Searching for new software
If preferred, software upgrades can be searched for
manually using Search for New Software.
In the SOFTWARE UPGRADE menu press Por
1
Q to select Search for New Software.
SOFTWARE UPGRADE
Version 2.4
Auto upgrade OFF
Search for New Software OK
MENU
Back
EXIT
Watch TV
Press OK. The television will automatically start
2
searching for a software upgrade, the progress bar
will move along the line.
SEARCHING FOR NEW SOFTWARE
Searching for a new software upgrade for
this TV.
Searching
EXIT
Stop
If an upgrade is found the television will
automatically start downloading, if not a screen
will appear stating that an upgrade is unavailable.
NO UPGRADE AVAILABLE
! There is no upgrade available
at this time.
Continue
Use Sor Rto select ON or OFF.
2
29
Page 30

PC settings – picture position, clock phase,
English
sampling clock, reset
Connect the PC (as shown in the ‘Connecting a PC’
section) and ensure that a picture is showing on the
television screen. The picture position may now be
adjusted to suit personal preference.
Press
to select PC, then select PC Setting
1
2
B
from the SET UP menu.
Language English
Country UK
AV connection
PC Setting
MENU
Back
SET UP
EXIT
Watch TV
Press OK. Press Pand Q to select an option,
then Sor Rto adjust the settings.
Horizontal position 0
Horizontal width –5
Vertical position 0
Vertical height –5
Clock phase 0
Sampling clock 0
MENU
Back
EXIT
Watch TV
Sampling clockPicture position
Adjusting the Sampling clock alters the number of pulses
per scan, this will clear vertical lines on the screen.
In the SET UP menu press Quntil PC Setting is
1
highlighted.
Press OK to select, then Q to highlight Sampling
2
clock.
1/2PC Settings
Horizontal position 0
Horizontal width –5
Vertical position 0
OK
OK
Vertical height –5
Clock phase 0
Sampling clock 0
MENU
Back
Use SorRto adjust until the picture clears.
3
EXIT
Watch TV
Reset
1/2PC Settings
To return to the original factory settings.
In the SET UP menu press Quntil PC Setting is
1
highlighted.
Press OK to select, then Q to highlight Reset.
2
PC Settings
Reset OK
2/2
Clock phase
The Clock phase matches the PC signal with the LCD
display. Adjusting this can clear horizontal stripes and
In the SET UP menu press Quntil PC Setting is
1
highlighted.
Press OK to select, then Q to highlight Clock
2
phase.
Use SorRto adjust until the picture clears.
3
picture blur.
30
3
MENU
Back
Press OK.
EXIT
Watch TV
Page 31

Input selection and
AV connections
Defining the INPUT and OUTPUT sockets so that the television recognises connected equipment. See page 6
for a clear view of the back connection recommendations.
English
Most media recorders and decoders send a signal
through the SCART lead to switch the television to the
correct Input socket.
Alternatively press the external source selection button
until the picture from connected equipment is shown.
B
This button must be used to view equipment connected
using the COMPONENT VIDEO INPUT (EXT3C).
An S in the display e.g.B2S (EXT 2S), indicates the
input is set for an S-Video signal.
Input selection
Use the Input Selection if the television does not switch
Press Bto select B1, B2, B3(C) (EXT1-3),
1
HDMI1, HDMI2 or PC.
HDMI™ displays equipment connected to Input
HDMI on the back of the television. It is designed
for best performance with 1080i high definition
signals.
PC displays a computer connected to Input
RGB/PC on the back of the television.
To return to television mode press and hold
2
and then select DTV or ATV .
over automatically.
B
Analogue switch-off
This is a digital television which is integrated to allow the
use of both digital and analogue services. However,
during the lifetime of this set it is very likely that
analogue services will be switched off to allow for more
new digital services.
INPUT signal selection
This specifies the type of signal going into SCART 2 (EXT2)
on the back of the television. Please refer to the
manufacturers instructions for the connected equipment.
In the SET UP menu press Quntil
1
AV connection is highlighted, then press OK.
Language English
Country UK
Auto tuning
Manual tuning
Antenna Amplifier On
AV connection
MENU
Back
With Sor Rselect either AV or S-VIDEO as the
2
required input for EXT2.
PC/HDMI1 audio PC
HDMI1 audio Digital
EXT1 output DTV
EXT2 input AV
EXT2 output DTV
Monitor (Audio) Fixed
MENU
Back
If the colour is missing try the alternative setting.
SET UP
EXIT
Watch TV
AV connection
EXIT
Watch TV
1/2
OK
OK
OK
This ‘switch-off’ will happen in a number of phases,
which will be advertised in your area well in advance.
It is recommended that at each phase the television is
re-tuned to ensure that existing and new digital
services can be viewed without disruption
(see the 'Auto tuning' section).
31
Page 32

Input selection and
English
AV connections
PC audio
In order to receive sound from a connected PC, plug the
audio cable into the back of the television (as shown in
‘Connecting a computer’ section), then use the
PC/HDMI1 audio settings.
In the SET UP menu press Quntil
1
AV connection is highlighted, then press OK.
Language English
Country UK
Auto tuning
Manual tuning
Antenna Amplifier On
AV connection
MENU
Back
Highlight PC/HDMI1 audio then use to Rselect
2
the PC option.
SET UP
EXIT
Watch TV
OK
OK
OK
1/2
continued
HDMI1 audio
If the connected HDMI source does not support digital
audio, plug the audio cable into PC/HDMI1 audio on the
back of the television (as shown in the ‘Connecting a
computer’ section), then use the HDMI1 audio settings.
In the SET UP menu press Quntil
1
AV connection is highlighted, then press OK.
Language English
Country UK
Auto tuning
Manual tuning
Antenna Amplifier On
AV connection
MENU
Back
In the AV connection menu press Qto highlight
2
PC/HDMI1 audio and using Rselect HDMI1.
SET UP
EXIT
Watch TV
1/2
OK
OK
OK
AV connection
PC/HDMI1 audio PC
HDMI1 audio Digital
EXT1 output DTV
EXT2 input AV
EXT2 output DTV
Monitor (Audio) Fixed
MENU
Back
EXIT
Watch TV
NOTE: Selecting the PC option will force HDMI
into digital audio.
32
Then highlight HDMI1 audio and using Sor
3
select Auto., Digital or Analogue.
AV connection
PC/HDMI1 audio HDMI1
HDMI1 audio Auto.
EXT1 output DTV
EXT2 input AV
EXT2 output DTV
Monitor (Audio) Fixed
MENU
Back
EXIT
Watch TV
If the sound is missing select an alternative
setting.
NOTE: HDMI1 supports digital and analogue
sound, HDMI2 is digital sound only.
HDMI, the HDMI logo, and High-Definition Multimedia
Interface are trademarks or registered trademarks of HDMI
Licensing, LLC.
R
Page 33

Analogue text services – setting up,
general information, Auto and LIST modes
This television has a multi-page text memory, which takes a few moments to load. It offers two Modes of
viewing text – Auto will display Fastext, if available. LIST will store your four favourite pages.
English
Selecting modes
The text character set will be automatically chosen by the
language setting in the SET UP menu.
Select Teletext from the FUNCTION menu.
1
With Sor Rchoose Auto. or LIST then press EXIT.
2
Tel etext Auto.
Panel lock Off
Auto format On
Blue screen On
Side Panel 1
MENU
Back
FUNCTION
EXIT
Watch TV
Text information
/ /
The
6
To view text services press
superimpose the text over a normal broadcast picture and
again to return to normal viewing. Programmes cannot
be changed until text is cancelled.
The first text page shown will be the initial page.
Any text page can be accessed by entering the 3 digit
page number using the numbered buttons, pressing the
coloured buttons or pressing Pfto advance to the next
page and P eto go back to the previous page.
Sub-pages
If there are sub-pages they will automatically load into
memory without changing the page on screen.
To access the sub-pages press Xthen use Pfand P
to view them. A bar with numbers will appear on the side
of the screen.
7
button:
/ /
6
. Press again to
7
e
The sub-page you are viewing will be highlighted and, as
the television loads any additional sub-pages the colour
of the numbers will change, indicating that these pages
have been loaded.
These sub-pages will remain available to view until
another page is chosen or, in normal TV mode, the
channel is changed.
Navigating pages using Auto.
If Fastext is available four coloured titles will appear at
the base of the screen.
To access one of the four given subjects, press the
relevant coloured button on the remote control.
For further information on your particular text system(s),
see the broadcast text index page or, consult your local
Toshiba dealer.
Navigating pages using LIST
The four coloured choices at the bottom of the screen are
numbers – 100, 200, 300 and 400, which have been
programmed into the television’s memory. To view these
pages press the relevant coloured buttons.
To change these stored pages press the relevant coloured
button and enter the 3 digit number. This number will
change in the top left of the screen and in the coloured
highlight.
Press OK to store. The bars at the bottom of the screen
will flash white. Whenever OK is pressed all four
page numbers showing at the bottom will be stored
and the previous ones will be lost.
If OK is not pressed the selection will be forgotten when
text is cancelled.
Other pages may be viewed by entering the 3 digit page
number – but DO NOT press OK or these pages will be
stored.
33
Page 34

Analogue text services – control buttons
English
Below is a guide to the functions of the remote control text buttons.
T
Press Tto access the index/initial page. The one
displayed is dependant on the broadcaster.
6
Press
superimpose text over a normal broadcast picture. Press
again to return to normal television viewing. Programmes
cannot be changed until this has been done.
X
For use with Pfand P eto view sub-pages when
available.
r
To discover the solutions on quiz and joke pages press the
r
q
At times it is convenient to hold a page of text. Press
and qwill appear in the top left of the screen. The
page will be held on screen until the button is pressed
again.
To display the index/initial page:
/ /
6
button.
To display a page of text:
7
/ /
to display text. Press again to
7
To access sub-pages:
To reveal concealed text:
To hold a wanted page:
q
8/9
Enter the page number then press
picture will be displayed. The television will indicate when
the page is present by displaying the page number at the
top of the screen. Press
To display news flashes:
Select the news flash page for the chosen text service
(see the index page of text service). Press
news flashes will be displayed as and when they are
broadcast. Press
The news flash page must be cancelled before
changing programmes.
To select a page whilst viewing a
normal picture:
, a normal
8/9
/ /
6
to view the page.
7
8/9
again to cancel the display.
8/9
Remember to cancel text before
changing channels – press the
/
6
/
7
button twice.
. The
s
Press sonce to enlarge the top half of the page, press
again to enlarge the bottom half of the page. Press again
to revert to normal size.
To enlarge the text display size:
34
Page 35

Questions and Answers
Below are the answers to some of the most common queries.
For more information go to www.toshiba.co.uk
English
Why is there no sound or picture?
Q
Check the mains switch is on and check all mains
A
connections.
Check the television is not in standby mode.
There is a picture, but why is there little or no
Q
colour?
When using an external source, for instance, a
A
poor quality video tape, if there is little or no
colour, improvements may sometimes be achieved. The
colour is factory set to Auto. to automatically display the
best colour system.
To check that you have the best colour:
With the external source playing, select Manual
1
setting from the SET UP menu.
Manual setting
Colour system: Auto.
EXT2 A V C R
OK
Store
MENU
Back
With Por Q choose between Auto., PAL,
2
SECAM, NTSC 4. 43 or 3. 58.
EXIT
Watch TV
Why is the VCR/DVD picture in black and
Q
white?
Check the correct input has been chosen,
A
S-VIDEO or AV. See AV connections page.
Why is there picture and sound interference on
Q
all digital and analogue channels?
The signal strength may be too strong. Set the
A
Antenna Amplifier option in the SET UP menu
to Off.
What else can cause a poor analogue picture?
Q
Interference or a weak signal. Try a different
A
television station. Manual fine tuning may help.
Select the Manual tuning menu. Highlight the
1
station and press OK, then press Rto select
Manual fine tuning
Using Por Q adjust to get the best picture and
2
sound. Press OK and then EXIT.
1 I A C 22 +2 B B C 1
OK
Store
MENU
Back
.
Manual tuning
Manual fine tuning
EXIT
Watch TV
Why doesn’t the video/DVD being played show
Q
on screen?
Make sure the VCR or DVD player is connected to
A
the television as shown on page 6, then select the
correct input by pressing B.
Why is there a good video picture but no sound?
Q
Check all lead connections.
A
Why is there a picture but no sound?
Q
Check the volume has not been turned down or
A
that sound mute has not been selected.
35
Why don’t the controls on the television work?
Q
Check that Panel lock is not ON.
A
Why doesn’t the remote control work?
Q
Check the side switch on the remote control is in
A
TV mode.
Check the batteries aren’t dead or inserted incorrectly.
Why is there a message permanently on the
Q
screen?
Remove it by pressing .
A
+
i
Page 36

English
Questions and Answers continued
Why is the DTV main menu unavailable?
Q
Analogue mode is selected. Press and hold Bto
A
select DTV.
Why are some of the menus locked?
Q
LOCK MENU has been enabled (see 'Parental
A
Controls' page).
Why is the digital channel locked?
Q
The channel has been selected in Locked
A
Programmes (see 'Digital settings' section).
Why can only certain digital channels be
Q
viewed?
A Favourite list has been selected (see 'Favourite
A
Programmes' section), set the feature to ALL
PROGS or change channels by using the number buttons.
Why are some of the digital subscription
Q
channels unavailable?
Your subscription needs upgrading. Contact your
A
service provider.
Why is the soundtrack in English when a
Q
different audio language has been selected?
The programme is currently being broadcast with
A
an English soundtrack only.
What can be done if the PIN number has been
Q
forgotten?
Use the Master PIN code of 1276, then change to
A
a number of your choice. Ensure that no-one else
can use the Master PIN by removing the Owner’s Manual.
Why is there no sound from my connected
Q
sound equipment?
Check the Speaker option in the Sound menu is
A
set to Off.
Why are there vertical stripes on the screen
Q
when in PC mode?
The Sampling clock may need adjustment. Select
A
PC Setting from the SET UP menu, highlight
Sampling clock and adjust until the lines clear.
Why are there horizontal stripes and/or blurred
Q
images on the screen when in PC mode?
The Clock phase may need adjustment. Select
A
PC Setting from the SET UP menu, highlight
Clock phase and adjust until the picture clears.
Why when digital subtitles have been selected
Q
are they not showing on screen?
Subtitles are not currently being transmitted by the
A
broadcaster.
Why is there no digital text service?
Q
The digital programme being viewed is not
A
broadcasting digital text. Try another digital
programme.
Why are there problems with analogue text?
Q
Good performance of text depends on a good
A
strong broadcast signal. This normally requires a
roof or loft aerial. If the text is unreadable or garbled,
check the aerial. Go to the main index page of the text
service and look for the User Guide. This will explain the
basic operation of text in some detail. If further
information is needed on how to use text see the
text section.
36
Page 37

Questions and Answers continued
English
Why are there no analogue text sub-pages?
Q
There are none broadcast or they have not yet
A
loaded. Press the Xbutton to access.
(See text section).
Why are the four coloured text numbers visible
Q
but no text?
Text has been selected whilst viewing an external
source i.e. DVD or VCR. No text will appear on
A
screen or a box may appear stating no information is
available. Select a broadcasting channel and press
/ /
6
Q
A
channels for upgrades, provided Auto upgrade is On.
The time it takes to do this may vary.
to access.
7
Why does the GREEN Active Standby LED
sometimes take longer to go out?
When put into standby the television’s active
standby will automatically search all available
Why are the colours wrong when an NTSC
Q
source is played?
Connect the source via a SCART lead and play.
A
Select Manual setting from the SET UP menu.
Manual setting
Colour system: Auto.
EXT2 A V C R
OK
Store
MENU
Back
Set the Colour to Auto. and exit.
1
Go to the Picture settings menu and adjust
2
the tint.
EXIT
Watch TV
Cleaning the screen and cabinet…
Turn off the power, clean the screen and cabinet with a soft, dry cloth. We recommend that you do not use any proprietary polishes or
solvents on the screen or cabinet as this may cause damage.
Disposal…
The following information is only for EU-member states:
The use of the symbol indicates that this product may not be treated as household waste. By ensuring this product is
disposed of correctly, you will help prevent potential negative consequences for the environment and human health,
which could otherwise be caused by inappropriate waste handling of this product. For more detailed information about
recycling of this product, please contact your local city office, your household waste disposal service or the shop where
you purchased the product.
37
Page 38

Specifications and accessories
English
Broadcast systems/channels
PAL-I UHF UK21-UK69
PAL-B/G UHF E21-E69
SECAM-L UHF F21-F69
SECAM-D/K UHF R21-R69
Video Input PAL, SECAM, NTSC 3.58/4.43
External connections
EXT1 Input/Output 21-pin SCART RGB, A/V
EXT2 Input/Output 21-pin SCART A/V, S-video
EXT3 Input Phono jacks Y, P
EXT3 Input (Side) Phono jack Video
HDMI 1/2 Input HDMI connector
PC Input Mini D-sub 15-pin Analog RGB signal
PC/HDMI1 Audio Phono jacks Audio L + R
Audio Ouput Fixed/Variable Phono jacks Audio L + R
VHF E2-E12, S1-S41
VHF F1-F10, B-Q
VHF R1-R12
Phono jacks A/V
Phono jacks Audio L + R
Selectable output
Selectable output
, PR/C
B/CB
Stereo Nicam
Visible Screen Size Model 26 66cm
(approx.) 32 80cm
Display 16:9
Sound output (at 10% distortion) Main 10W + 10W
Power consumption Model 26 135W
as specified in 32 159W
EN60107-1 : 1997 37 188W
Standby (approx.) Model 26 <1W
Dimensions Model 26 56cm (H) 66cm (W) 28cm (D)
(approx.) 32 61cm (H) 80cm (W) 30cm (D)
R
Weight (approx.) Model 26 15kg
Headphone socket 3.5mm stereo
Accessories Remote control
2 carrier system
37 94cm
32 <1W
37 <1W
37 69cm (H) 92cm (W) 30cm (D)
(Height dimension includes foot stand)
32 20kg
37 25kg
2 batteries
(AAA, IEC R03 1.5V)
Printed on recycled paper. 100% Chlorine free.
© Toshiba Information Systems (U.K.) Limited
Reproduction in whole or part without written permission is strictly prohibited.
38
Toshiba Information Systems (U.K.) Limited
Specification is subject to change without notice.
Originated by Zushi Illustration & Visualisation, Bristol, UK.
Consumer Products Division,
Admiralty Way, Camberley,
All rights reserved.
European Service Centre,
Surrey, GU15 3DT, UK
Page 39

Page 40

Sommaire
MISE EN ROUTE
Consignes de sécurité – Quelques conseils de sécurité à connaître et autres mesures à respecter 41
Installation et informations importantes 42
La télécommande – guide en image 43
Connexion d'un équipement externe – guide pour la connexion d’un équipement externe à
l’arrière du téléviseur 44
Connexion d'un ordinateur – connexion d'un ordinateur à l'arrière du téléviseur 45
Commandes et connexions d'entrée – mise en marche du téléviseur, mode de veille,
utilisation des commandes, prise pour casque d’écoute, connexion d’un équipement aux
prises d’entrée latérales 46
REGLAGE DU TELEVISEUR
NUMERIQUE – réglage du téléviseur pour la première fois 47
NUMERIQUE – recherche automatique 48
NUMERIQUE – attribution de programmes, réglage manuelle 49
ANALOGIQUE – réglage du mode analogique pour la première fois, langue, pays 50
ANALOGIQUE – réglage manuelle, système de diffusion 51
ANALOGIQUE – recherche automatique 52
ANALOGIQUE – saut de chaîne, tri des positions de programme 53
COMMANDES ET FONCTIONS
Commandes générales – changement de position de programme 54
Transmissions stéréo et bilingues – diffusions stéréo/mono ou en deux langues 54
Affichage de l'heure (analogique seulement) 54
Commandes du son – volume, son coupé, graves/aigus/balance 54
Commandes du son – super basses, bilingue (analogique seulement), egalisation du son
Effet sonore SRS WOW™ – SRS 3D, FOCUS et TruBass 55
Grand écran 56
Commandes de l'image – position de l'image (analogique seulement), rétroéclairage 58
Commandes de l'image – préférences d'image (contraste, lumière, couleur, teinte, définition),
Français
SERVICES TEXTE
RESOLUTION DES PROBLEMES
INFORMATIONS
étirage du noir, réduction du bruit MPEG (MPEG NR), réduction numérique du bruit (DNR),
température des couleurs 59
Commandes de l'image – gestion de la couleur 3D, réglage des couleurs de base, mode cinéma,
amplificateur d’antenne 60
Commandes de l'image – format automatique (grand écran), écran bleu,
ajustement du panneau latéral, arrêt sur image 61
Verrouillage panneau – désactiver les touches sur le téléviseur 61
NUMERIQUE – programmateur 62
Minuteur de mise en veille 62
NUMERIQUE – informations à l’écran et guide des programmes 63
Réglages NUMERIQUES – contrôle parental (définition du code PIN, mode) 64
Réglages NUMERIQUES – programmes favoris, bloqués, cryptés 65
Réglages NUMERIQUES – langage audio, sous-titrage, mise à jour TV, interface commune 66
Réglages NUMERIQUES – mise à niveau du logiciel (version, mise à jour automatique,
recherche de nouveau logiciel) 67
Réglages de l'ordinateur – position de l'image, phase de l'horloge, horloge d'échantillonnage, raz 68
Sélection d'entrée et connexions AV – prises d'entrée et de sortie pour les équipements connectés,
arrêt analogique 69
Texte ANALOGIQUE – configuration, informations d'ordre général, modes Auto. et LISTE 71
Texte ANALOGIQUE – touches de commande 72
Questions et réponses – réponses à certaines des questions les plus courantes y compris
accord fin manuel et système de couleur 73
Spécifications et accessoires – informations techniques concernant le téléviseur et les
accessoires fournis 76
®
55
40
Page 41

Consignes de Sécurité
Cet appareil a été conçu et fabriqué conformément aux normes internationales de sécurité. Toutefois, comme
tout appareil électrique, il convient de respecter certaines consignes afin d’assurer un fonctionnement optimal
en toute sécurité. Veuillez lire attentivement ce qui suit pour votre propre sécurité. Il s’agit de remarques
d’ordre général s’appliquant à tous les appareils électroniques grand public : il est donc possible que
certaines ne concernent pas le produit que vous venez d’acquérir.
Ventilation
Prévoyez un espace d’au moins 10 cm tout autour du
téléviseur pour permettre une ventilation adéquate et
éviter ainsi toute surchauffe susceptible d’endommager
l’appareil. Evitez également les endroits poussiéreux.
Chaleur excessive
Votre téléviseur risque d’être endommagé par la lumière
directe du soleil ou par la chaleur d’un radiateur. Evitez
les endroits trop chauds ou humides. Placez-le dans une
pièce dont la température ne descend pas en dessous de
5°C et ne dépasse pas 35°C.
Alimentation secteur
L'alimentation secteur requise pour cet appareil est
220-240 v CA 50/60Hz. Ne le raccordez jamais à une
source de courant continu ou toute autre source
d’alimentation électrique. ASSUREZ-VOUS que le cordon
d’alimentation n’est pas coincé sous l’appareil. NE
COUPEZ PAS la fiche secteur : elle contient un filtre
antiparasites spécial dont le retrait affectera le
fonctionnement du téléviseur.
EN CAS DE DOUTE, CONSULTEZ UN ELECTRICIEN
QUALIFIE.
Conseils
LISEZ le mode d’emploi avant de mettre l’appareil en
marche.
ASSUREZ-VOUS que tous les branchements électriques,
y compris la fiche secteur, les rallonges et les
interconnexions entre les différents appareils sont corrects
et conformes aux instructions du fabricant. Eteignez et
débranchez l’appareil avant de faire ou de modifier un
branchement.
CONSULTEZ votre revendeur en cas de doute sur
l’installation, le fonctionnement ou la sécurité de votre
appareil.
FAITES ATTENTION aux panneaux ou aux portes en
verre de l’appareil.
N’ENLEVEZ AUCUN CACHE FIXE SOUS PEINE
D’ELECTROCUTION.
LA PRISE DE SECTEUR EST UTILISÉE COMME
DISPOSITIF DE DÉCONNEXION ET DEVRAIT
PAR CONSÉQUENT ÊTRE FACILE À MANIER.
Mises en garde
N’OBSTRUEZ PAS les ouvertures de ventilation de
l’appareil, par exemple par des journaux, nappes,
rideaux, etc. Une surchauffe endommagera
l’équipement et réduira sa durée de vie.
NE LAISSEZ PAS l’appareil exposé à des gouttes ou
éclaboussures et n’y placez pas de récipients remplis de
liquides, comme des vases.
NE PLACEZ PAS d’objets chauds ou de sources de
flammes nues, comme des bougies ou des veilleuses, sur
l’appareil ou à proximité immédiate. Les températures
élevées peuvent faire fondre le plastique et provoquer
des incendies.
N’UTILISEZ PAS de supports de fortune et ne fixez
JAMAIS de pieds avec des vis à bois. Pour garantir une
sécurité totale, utilisez toujours le support, les consoles
ou les pieds agréés par le fabricant, avec les fixations
fournies conformément aux instructions.
N’ECOUTEZ PAS avec un casque à volume élevé, sous
peine d’entraîner une détérioration permanente de
l’ouïe.
NE LAISSEZ PAS votre appareil branché sans
surveillance à moins qu'il ne soit spécialement conçu
pour un fonctionnement sans surveillance ou qu'il
dispose d'un mode de veille. Débranchez l'appareil à la
prise de courant et assurez-vous que tous les membres
de votre famille savent le faire. Des mesures particulières
seront éventuellement nécessaires pour les personnes
handicapées.
N’UTILISEZ PAS votre équipement si vous avez le
moindre doute quant à son bon fonctionnement, ou s’il
présente un dommage quelconque. Eteignez-le,
débranchez-le et consultez votre revendeur.
NE LAISSEZ PERSONNE, surtout des enfants,
pousser ou frapper l'écran, enfoncer des objets
dans les trous, les fentes ou tout orifice du boîtier.
NE CHERCHEZ JAMAIS à deviner quoi que ce soit et
ne prenez aucun risque avec des appareils
électriques – prudence est mère de sûreté.
Français
41
Page 42

Installation et informations importantes
Où l'installer
Placez le téléviseur à l'abri de la lumière directe du soleil et des
éclairages puissants. Un éclairage doux et indirect est
recommandé pour un meilleur confort de visualisation. Utilisez
des rideaux ou des stores pour empêcher que la lumière du soleil
n'éclaire directement l'écran.
Placez le téléviseur sur une base solide ; la surface de support doit
être plane et stable. Il faut ensuite fixer le téléviseur au mur au
moyen d'une attache solide en utilisant le crochet à l'arrière du
support, ou le fixer à la base en utilisant la sangle de fixation
située en dessous du support de dessus de table, ce qui
l'empêchera de basculer vers l'avant.
Les écrans d'affichage à cristaux liquides sont fabriqués au moyen
d'une technologie de précision extrêmement avancée. Toutefois, il
peut arriver que certaines parties de l'écran soient dépourvues
d'éléments d'image ou présentent des points lumineux. Ceci ne
doit pas être considéré comme un signe de mauvais fonctionnement.
Assurez-vous que le téléviseur soit placé dans une position dans laquelle il ne peut pas être poussé ou heurté par des objets, car la
pression risquerait de casser ou d'endommager l'écran, et que de petits objets ne peuvent pas être insérés dans les fentes ou les
ouvertures de l'enceinte.
Vue de côté Vue de dessus
Clip
Veuillez prendre note
Français
Attache solide
(aussi courte que possible)
Clip
Clip
CLAUSE D’EXCLUSION
Toshiba ne pourra en aucun cas être tenu responsable de toute perte et/ou tout dommage du produit causés par :
i) un incendie ;
ii) un tremblement de terre ;
iii) un dommage accidentel ;
iv) une mauvaise utilisation délibérée ;
v) une utilisation du produit dans des conditions anormales ;
vi) une perte et/ou un dommage causés au produit alors qu’il était en possession d’un tiers ;
vii) tout dommage ou toute perte résultant du non-respect et/ou de la mauvaise application des instructions figurant dans le
manuel de l’utilisateur ;
viii) toute perte ou tout dommage résultant directement de la mauvaise utilisation ou d’un défaut de fonctionnement du produit
lorsqu’il est utilisé simultanément avec un appareil associé.
Par ailleurs, Toshiba ne pourra en aucun cas être tenu responsable de toute perte et/ou tout dommage consécutifs, notamment
mais non limitativement, les pertes de profit, les interruptions d’activité, la perte de données enregistrées, résultant du
fonctionnement normal ou d’une mauvaise utilisation du produit.
Si des images stationnaires produites par le télétexte, des logos d'identification de chaîne, des affichages informatiques, des jeux
vidéos, des menus à l'écran, etc., sont affichés sur l'écran de télévision pendant un certain temps, il est vivement conseillé de réduire
les réglages de luminosité et de contraste.
42
Page 43

La Télécommande
Votre télécommande d’un coup d’oeil
UP
Pour couper le son
Touches numériques
Pour revenir au programme précédent
Pour afficher le Guide des programmes
Sélection des préférences d’affichage
Si vous utilisez un magnétoscope
ou lecteur de DVD Toshiba :
appuyez sur
appuyez sur
appuyez sur
appuyez sur
appuyez sur
appuyez sur
appuyez sur
appuyez sur
numériques à l’écran
Menus à l’écran
Pour modifier les positions de
programme el les pages texte
Pour sélectionner le mode
Représentation grand écran
pour PAUSE
m
pour EJECTION
w
pour SAUT ARRIERE
l
q
pour SAUT AVANT
l
s
pour LECTURE
r
pour ARRET
p
pour RETOUR RAPIDE
q
pour AVANCE RAPIDE
s
Mode marche/veille
Pour sélectionner une entrée parmi des
sources externes
Pour passer entre TV, Radio et Programmes
favoris en mode numérique
Pour quitter les Menus
Dans les menus, les flèches déplacent le
curseur en haut, en bas, à gauche ou à
droite de l’écran. OK pour confirmer
votre sélection
Pour modifier le volume
Pour afficher des informations
numériques à l’écran
Pour appeler les services de texte en mode
analogique
En mode TV:
u Arrêt sur image
OI/II
Réception stéréo/bilingue
SUBTITLE Sous-titres numériques
Affichage de l’heure
8/9
Quand vous utilisez le Guide des
programmes :
– 24 heures
l
q
+ 24 heures
l
s
Touches de commande de texte
Français
Insertion des piles et portée de la télécommande
Retirez le cache arrière pour ouvrir le compartiment des piles et assurez-vous de bien respecter les polarités.
Des types de piles appropriés pour cette télécommande sont AAA, IEC R03 1,5 V.
N'associez pas une pile usée ancienne avec une nouvelle pile et ne mélangez pas des types de piles différents.
Retirez les piles déchargées immédiatement pour éviter que de l'acide ne s'écoule dans le compartiment des
piles. N’exposez pas cet appareil à une température excessive provoquée, par exemple, par les rayons du
soleil, un feu ou un élément similaire. Jetez les piles dans une zone de mise au rebut prévue à cet effet.
La performance de la télécommande se détériorera au-delà d'une distance de 5 m ou hors d'un angle de 30
degrés par rapport au centre du téléviseur. Si la plage de fonctionnement se réduit, il peut être nécessaire de
remplacer les piles.
43
Page 44

Connexion de l’équipement externe
Avant de connecter un équipement externe, débranchez toutes les connexions au secteur. S'il n'y a
pas d’interrupteur, débranchez les fiches des prises murales.
PERITEL 2 (EXT2)
SCART 1 (EXT1)
Un décodeur peut
*
être un décodeur
satellite numérique ou
tout autre décodeur
compatible.
ENTREE VIDEO COMPOSANT (EXT3)
PORTE-CABLES
SANGLE DE FIXATION
décodeur
*
enregistreur média
Français
Câbles d’antenne :
Raccordez l’antenne à la prise située à l’arrière du téléviseur.
Si vous utilisez un décodeur* et/ou un enregistreur média, il
est nécessaire de raccorder le câble d’antenne d’abord au
décodeur et/ou à l’enregistreur média, puis au téléviseur.
Câbles péritel :
Raccordez la prise IN/OUT de l’enregistreur média au
téléviseur. Raccordez la prise TV du décodeur au téléviseur.
Raccordez la prise SAT de l’enregistreur média à la prise
MEDIA REC. du décodeur.
Avant de démarrer la Recherche automatique,
mettez votre décodeur et votre enregistreur média en mode
Veille.
Les prises phono à côté des prises ENTRÉE VIDEO
COMPOSANT accepteront des signaux audio L et R.
Une sortie audio externa fixe/variable est également prévue
pour raccorder une chaîne Hi-Fi appropriée ; assurez-vous
que l'option Haut-parleurs dans le menu Son est sur
Arrêt. Modifiez la sortie variable à l’aide des touches de
réglage du son.
HDMI™ (Interface Multimédia Haute Définition) est destinée
à être utilisée avec un lecteur de DVD, un décodeur ou un
équipement électrique avec une sortie numérique audio et
vidéo. Elle est conçue pour fonctionner au mieux avec des
signaux vidéo haute définition 1080i, mais accepte et affiche
également des signaux 480i, 480p, 576i, 576p et 720p.
TV
IN/OUT
MEDIA REC.
SAT
PRISES D'ENTREE HDMI™
REMARQUE : Bien que ce téléviseur puisse être connecté à
un équipement HDMI, il peut arriver que certains
équipements ne fonctionnent pas correctement.
Vous pouvez connecter un grand nombre d’appareils
à l’arrière du téléviseur. Reportez-vous toujours au
manuel d’utilisation correspondant à chaque
appareil.
Nous vous recommandons d’utiliser Péritel 1 pour un
décodeur et Péritel 2 pour un enregistreur média.
Si vous branchez un appareil S-VIDEO, sélectionnez
l’entrée correspondante pour EXT2. Voir page 69.
Si le téléviseur commute automatiquement sur la
chaîne de l’appareil externe, appuyez sur la touche de
position de programme souhaitée pour repasser en
affichage normal. Pour repasser à la chaîne de l’appareil
externe, appuyez sur
EXT2, EXT3(C), HDMI1, HDMI2, PC ou ATV.
Le porte-câble peut être utilisé pour des câbles d'antenne,
des câbles enregistreur média et audio. N'utilisez pas le
porte-câble comme une poignée et assurez-vous que tous
les câbles sont retirés avant de déplacer le téléviseur.
HDMI, le logo HDMI et High-Definition Multimedia Interface sont des
marques de fabrique ou des marques déposées de HDMI Licensing, LLC.
pour sélectionner DTV, EXT1,
B
INTERFACE COMMUNE
Une Interface commune est prévue
pour les modules d’accès conditionnel
(Conditional Access Module ou CAM).
Il est possible de connecter deux CAM.
Contactez un fournisseur de services.
44
Page 45

Connexion d'un ordinateur
Avant de connecter un équipement externe, débranchez toutes les connexions au secteur. S'il n'y a
pas d’interrupteur, débranchez les fiches des prises murales.
l'arrière de votre téléviseur
Câble audio pour la
connexion de l'ordinateur au
téléviseur (non fourni)
ordinateur
Connecteur Mini
D-sub 15 broches
Adaptateur de conversion le cas échéant (non fourni)
Connectez le câble d'ordinateur de l'ordinateur à la
borne PC à l'arrière du téléviseur.
Connectez le câble audio à la prise PC/HDMI1 Audio à
l’arrière du téléviseur. Sélectionnez PC dans les options
PC/HDMI1 audio du menu Connexions AV dans le
menu RÉGLAGES.
Appuyez sur la touche
Les signaux suivants pourront s'afficher :
VGA: 640 x 480/60 Hz (VESA)
SVGA: 800 x 600/60 Hz (VESA)
XGA: 1024 x 768/60 Hz (VESA)
SXGA: 1280 x 1024/60 Hz (VESA)
IMPORTANT : SXGA s’affichera à l’écran. Ce format
n’est pas conforme à la norme VESA.
REMARQUE :
Certains types d'ordinateurs ne peuvent pas être
connectés à ce téléviseur.
Un adaptateur n'est pas nécessaire pour les ordinateurs
pourvus d'une borne mini D-sub à 15 broches
compatible DOS/V.
Il est possible qu’une bande apparaisse aux bords de
l’écran ou qu’une partie de l’image soit obscurcie du fait
de la mise à l’échelle effectuée par le téléviseur. Ceci est
tout à fait normal.
pour sélectionner le mode PC.
B
Câble RGB PC
(non fourni)
Un fois le mode Entrée PC sélectionné certaines des
fonctions du téléviseur ne seront plus disponsibles, par
example Rég. Manuel dans le menu des RÉGLAGES
et Couleur, Te in te, DNR et Profondeur de noir dans
le menu Réglage image.
Information de signal pour le connecteur Mini D-sub à 15
broches
Affectation des broches
pour la borne
RGB/PC
N° de Nom du signal N° de Nom du signal
broche broche
1R9NC
2G10 Terre
3B11NC
4 NC (non connectée) 12 NC
5NC13H-sync
6Terre 14 V-sync
7Terre 15 NC
8Terre
Français
45
Page 46

Commandes et connexions d'entrée
Il est possible de connecter un grand nombre d'équipements externes différents aux prises d'entrée sur le
côté du téléviseur.
Tous les réglages nécessaires du téléviseur se font par la télécommande. Les touches à l’avant de l’appareil
peuvent toutefois être utilisées pour certaines fonctions.
ENTRÉE 3
(EXT 3)
VERT – Veille active
ROUGE – Alimentation
Entrée 3 (sur
le côté) a la
Vielle
priorité sur EXT3
(à l’arrière) en
cas d’utilisation
simultanée des
deux connexions.
Français
Si le voyant rouge ne s’allume pas, vérifiez que la prise
de courant du téléviseur est bien branchée sur le secteur.
Si vous n’obtenez pas d’image, appuyez sur la touche
de la télécommande et patientez quelques instants.
Pour mettre le téléviseur en mode veille, appuyez sur la
touche ide la télécommande. L’indicateur VERT de
veille active s’allumera (voir la section ‘Mise à niveau du
logiciel’) à côté de l’indicateur ROUGE pendant quelques
instants avant de s’éteindre. Pour regarder la télévision
appuyez à nouveau sur i. L’image peut prendre
quelques instants avant de s’afficher.
Mise en marche
i
Utilisation de la télécommande
Appuyez sur la touche MENU de la télécommande pour
afficher les menus.
En mode numérique, la barre de menu située en haut des
écrans contient trois sujets différents distingués par des
symboles. Quand un symbole est sélectionné à l’aide de la
touche Sou Rde la télécommande, les options
correspondantes sont affichées en dessous.
En mode analogique, le menu apparaît sous la forme
d’une liste de cinq sujets. Quand un symbole est sélectionné
à l’aide de la touche Sou Rde la télécommande, les
options correspondantes s’affichent en dessous.
46
Pour accéder aux options, appuyez sur les touches Pet
Q de la télécommande pour descendre dans la liste, et
appuyez sur OK, Sou Rpour sélectionner votre choix.
Suivez les instructions à l'écran. Les fonctions de chaque
menu sont décrites en détail dans ce manuel.
Utilisation des commandes et
des connexions
Pour modifier le volume, appuyez sur — j+
Pour modifier la position de programme, appuyez sur
eeFff
.
Appuyez sur MENU et S,R, Q ou P pour accéder aux
options du son et de l’image.
Appuyez deux fois sur MENU pour valider et sortir.
Lors du branchement d’un équipement audio sur EXT3,
raccordez sa sortie aux prises phono du téléviseur.
Pour sélectionner l'Entrée, appuyez sur
le symbole EXT3 apparaisse, comme décrit page 69. Le
téléviseur détectera automatiquement le type de signal.
Pour plus de détails, référez-vous toujours au mode
d’emploi de l’appareil à brancher.
Veuillez noter : l’insertion de la fiche du casque d’écoute
coupera le son des haut-parleurs.
jusqu'à ce que
B
.
Page 47

Réglage du téléviseur pour la première fois
Avant d’allumer le téléviseur, mettez votre décodeur et votre enregistreur média en mode veille s’ils sont
connectés et vérifiez que l’antenne est branchée. Pour configurer le téléviseur, utilisez les touches de la
télécommande comme indiqué à la page 43.
Appuyez sur la touche de mise en marche.
1
L’écran LOCAL OPTIONS s’affiche. Cet écran
s’affiche la première fois que le téléviseur est
allumé et à chaque fois qu’il est réinitialisé.
Country FRANCE
Language ENGLISH
Audio Language ENGLISH
Subtitles OFF
Local Time Settings 0
A l'aide de la touche Q, mettez Country, en
2
surbrillance, puis utilisez SouRpour sélectionner.
LOCAL OPTIONS
Continue
Le téléviseur cherchera maintenant les chaînes
pour votre pays.
Appuyez sur Q pour mettre Language en
3
surbrillance, puis Sou Rpour sélectionner.
Appuyez sur OK pour commencer à faire les
4
réglages.
L’écran RECHERCHE AUTOMATIQUE s’affiche et
le téléviseur commence à rechercher toutes les
chaînes disponibles. La barre de progression se
déplace le long de la ligne.
Une fois la recherche terminée, le téléviseur
sélectionnera automatiquement la position de
programme 1.
L’écran RECHERCHE AUTOMATIQUE affiche le
nombre total de services détectés.
RECHERCHE AUTOMATIQUE
86 chaînes trouvées
55 TV 24 Radio
Appuyer sur OK pour regarder le programme
Prog. Nom Type U/VHF Qualité
1TF1 34 BONNE
Différents
numéros
de Canal
peuvent
s’afficher
5
2 France 2 34 BONNE
3 France 3 31 BONNE
4 CANAL+ 31 FAIBLE
5 France 5 48 BONNE
6 M6 31 FAIBLE
Varier Regarder
Page – Page + T rier
Utilisez Q ou Ppour vous déplacer dans la
liste afin de sélectionner un programme puis
appuyez sur OK pour le visualiser.
REMARQUE : L'heure va être automatiquement
programmée par la transmission mais vous
pouvez l'avancer ou la retarder d'un maximum de
2 heures en utilisant la fonction de Réglage
heure locale.
Français
Vous devez laisser le téléviseur mener la
recherche jusqu’à son terme.
RECHERCHE AUTOMATIQUE
Progrès
Prog. Nom Type U/VHF Qualité
70 TMC 34 BONNE
87 NT1 21 FAIBLE
EXIT
Annuler
47
Page 48

Numérique – recherche automatique
REMARQUE : Quand de nouveaux services sont diffusés, il est nécessaire de régler à nouveau le téléviseur
pour pouvoir y accéder.
Recherche automatique
La Recherche automatique effectue à nouveau les
réglages du téléviseur et peut être utilisée pour mettre à
jour la liste des chaînes. Il est conseiller d’exécuter
régulièrement une Recherche automatique pour
s’assurer que tous les nouveaux services sont
ajoutés. Tous les programmes et réglages courants, i.e.
les programmes favoris et bloqués, seront alors perdus.
Appuyez sur MENU. Le MENU REGLAGE
1
s’affiche. Sélectionnez Recherche automatique
à l’aide de la touche Q. Appuyez sur OK.
Un écran s’affiche pour vous prévenir que les
2
programmes et réglages numériques existants
vont être effacés. Appuyez sur OK pour
continuer la Recherche automatique.
ATTENTION
Français
! Tout les programmes et réglages
numériques précédents seront effacés.
Voulez-vous continuer?
Oui
MENU
Choisir
La recherche commencera pour toutes les
chaînes disponibles.
Annuler
Vous devez laisser le téléviseur mener la
recherche jusqu’à son terme.
Quand la recherche est terminée, l’écran
RECHERCHE AUTOMATIQUE indique le
nombre total de services détectés.
RECHERCHE AUTOMATIQUE
86 chaînes trouvées
55 TV 24 Radio
Appuyer sur OK pour regarder le programme
Prog. Nom Type U/VHF Qualité
1TF1 34 BONNE
2 France 2 34 BONNE
3 France 3 31 BONNE
4 CANAL+ 31 FAIBLE
5 France 5 48 BONNE
6 M6 31 FAIBLE
Varier Regarder
Page – Page + T rier
Utilisez Q ou Ppour vous déplacer dans la liste
3
afin de sélectionner un programme puis
appuyez sur OK pour le visualiser.
Si, à tout moment, vous appuyez sur la touche
en la maintenant enfoncée, une liste
B
s’affichera à l’écran avec les modes et tous les
équipement externes mémorisés. Faites votre
sélection à l’aide des touches Pet Q puis
appuyez sur la touche OK.
RECHERCHE AUTOMATIQUE
Progrès
Prog. Nom Type U/VHF Qualité
70 TMC 34 BONNE
87 NT1 21 FAIBLE
EXIT
Annuler
48
3C
B
2
B
1
B
DTV
ATV
PC
HDMI2
Quand le mode DTV est sélectionné, appuyer à
plusieurs reprises sur Bpermet de faire défiler
tous les équipements connectés et la dernière
chaîne visualisée en mode DTV.
Page 49

Numérique – attribution de programmes,
recherche manuelle
REMARQUE : Quand le téléviseur est éteint, le mode utilisé est automatiquement sélectionné quand le
téléviseur est remis en marche.
Utilisez les touches Q ou Ppour vous déplacer
Attribution de programmes
L’ordre des chaînes peut être modifié en fonction des
1
2
3
préférences personnelles.
Appuyez sur MENU pour afficher le MENU
REGLAGE.
Descendez dans la liste à l'aide de la touche
Q puis sélectionnez Programmes. Appuyez
sur OK.
MENU REGLAGE
Réglage TV OK
Options locales OK
Recherche automatique OK
Recherche manuelle OK
Programmes OK
MENU
Retour
EXIT
Sortie
La liste des chaînes étant indiquée, utilisez
Q ou Ppour mettre en surbrillance la chaîne
que vous souhaitez déplacer, et appuyez sur R.
La chaîne sélectionnée sera déplacée vers la
droite de l'écran.
4
dans la liste jusqu'à votre position préférée. Les
autres chaînes se déplaceront en conséquence
pour faire de la place.
Appuyez sur Spour mémoriser votre
5
changement. Répétez cette opération si
nécessaire, puis appuyez sur EXIT.
Recherche manuelle
Cette fonction est destinée aux techniciens ou vous
pouvez l’utiliser pour saisir directement des chaînes si vous
1
2
3
connaissez le canal multiplex.
Sélectionnez Recherche manuelle dans le
MENU REGLAGE puis appuyez sur OK.
Entrez le numéro multiplex à l’aide des touches
numériques puis appuyez sur OK. Le téléviseur
effectue ensuite une recherche automatique de
ce multiplex.
Une fois le multiplex trouvé, tous les canaux ne
figurant pas dans la liste des programmes sont
ajoutés et les informations de programme en
haut de l’écran sont mises à jour.
Répétez en fonction des besoins. Appuyez sur
EXIT pour terminer.
Français
Nom de prog.
PROGRAMMES
1 TF1
2 France 2
3 France 3
4 CANAL+
5France 5
6 M6
Trier Mémoriser MENU Retour EXIT Sortie
Page – Page +
49
Page 50

Réglage du mode analogique pour la
première fois
La fonction Réglage rapide permet de régler tous les canaux analogiques actuellement disponibles dans
la région. Pour mettre le téléviseur en mode ATV, appuyez sur la touche
et maintenez-la enfoncée pour
B
mettre ATV en surbrillance à l’aide de la touche Pou Q to highlight ATV. Appuyez ensuite sur OK.
1
2
3
4
Français
5
Sélectionnez le mode ATV. L’écran Rég. Rapide
s’affiche.
Rég. Rapide
Selectionner le langage
Langage Français
EXIT
Retour TV
Sélectionnez votre Langage à l'aide des touches
ou R, puis appuyez sur OK.
S
Ensuite, appuyez sur Sou Rpour sélectionner
votre Pays, puis sur OK.
Pour lancer le Recherche automatique,
appuyez sur OK.
Recherche
Canal : C22 Chaîne : TF1
EXIT
La recherche commencera pour toutes les
chaînes disponibles. Le point se déplace le long
de la ligne pour indiquer la progression de la
recherche.
Recherche automatique
Arrêt
OK
Suivant
Utilisez Q ou Ppour vous déplacer dans la liste
6
afin de sélectionner un programme puis appuyez
sur EXIT pour le visualiser.
L’ordre des chaînes peut être modifié à l’aide de
l’écran Recherche manuelle (voir la section
analogique ‘Tri des positions de programme’).
Si, à tout moment, vous appuyez sur la touche
en la maintenant enfoncée, une liste
B
s’affichera à l’écran avec les modes et tous les
équipement externes mémorisés. Faites votre
sélection à l’aide des touches Pet Q puis
appuyez sur la touche OK.
2
B
1
B
DTV
ATV
PC
HDMI2
HDMI1
Quand le mode ATV est sélectionné, appuyer à
plusieurs reprises sur Bpermet de faire défiler
tous les équipements connectés et la dernière
chaîne visualisée en mode ATV.
Vous devez laisser le téléviseur mener la
recherche jusqu’à son terme.
Une fois la recherche terminée, le téléviseur
sélectionne automatiquement la position de
programme 1 et l’écran Recherche manuelle
s’affiche.
Recherche manuelle
Prog. Canal Chaîne
1 C22 TF1
2 C28 FR2
3 C25 FR3
4 C32 TV5
5 C69
6 C69
OK
Valider Trier
MENU
Retour
EXIT
Retour TV
50
Page 51

Analogique – recherche manuelle
Le téléviseur peut être réglé manuellement à l'aide de la Recherche manuelle, quand par exemple il est
impossible de raccorder un enregistreur média/décodeur à l’aide d’un câble Péritel, ou pour régler une
chaîne sur un autre Système.
Utilisez SetRpour naviguer sur l’écran et sélectionner l’une des options relatives à la Recherche manuelle.
Programme Système Système
couleur
Saut de
chaîne
Canal Recherche
Accord fin
manuel
Chaîne
Programme: La touche numérique à enfoncer sur la télécommande.
Système: Spécifique à certaines zones.
Système couleur: Réglée en usine sur Auto, et ne devrait être modifiée que si vous avez des problèmes, c'est-à-dire
entrée NTSC depuis la source externe.
Saut de chaîne: signifie que la mémoire est vide ou que la fonction de saut de chaîne est activée. Voir page 53.
Canal: Le numéro du canal sur lequel une chaîne est diffusée.
Recherche: Recherche d’un signal par balayage.
Accord fin manuel: Utilisé uniquement en cas de parasites/signal faible. Voir page 73.
Chaîne: Identification de la chaîne. Utilisez les touches
P
ou Qet SouRpour entrer jusqu’à sept caractères.
Pour affecter une position de programme du téléviseur à un décodeur et un enregistreur média : mettez le décodeur sous tension, insérez
une cassette préenregistrée dans l’enregistreur média et appuyez sur la touche LECTURE avant de procéder à une recherche manuelle.
Appuyez sur la touche MENU et sélectionnez le
1
menu RÉGLAGES à l'aide des touches Sou R. En
utilisant Q, mettez Recherche manuelle en
Appuyez sur OK pour sélectionner. Si le
3
programme est bloqué, il vous faudra annuler
Saut de chaîne avant de mémoriser.
surbrillance et appuyez sur OK pour valider.
Recherche manuelle
Système
EXIT
Retour TV
Recherche manuelle
Recherche : Augmenter
EXIT
Retour TV
Langage Français
Pays France
Recherche automatique
Recherche manuelle
Amplificateur de signal Marche
Connexions AV
MENU
Retour
Utilisez Pou Q pour mettre en surbrillance la
2
position de programme requise (suggestion :
RÉGLAGES
EXIT
Retour TV
utilisez 0 pour un enregistreur média).
Recherche manuelle
Prog. Canal Chaîne
0 C60
1 C22 TF1
2 C28 FR2
3 C25 FR3
4 C32 TV5
5 C69
OK
Valider Trier
MENU
Retour
EXIT
Retour TV
0 L A C 60 0
OK
1/2
OK
OK
OK
Différents
numéros
de Canal
peuvent
s’afficher
Mémo
MENU
Retour
Appuyez sur Rpour sélectionner Système et
4
utilisez Pou Q pour faire les modifications
nécessaires.
Appuyez ensuite sur Rpour sélectionner
5
Recherche.
UtilisezPou Q pour lancer la recherche. Le
6
symbole de recherche clignotera.
0 L A C 60 0
OK
Mémo
MENU
Retour
Chaque signal apparaîtra à l’écran. S’il ne s’agit
7
pas de votre enregistreur média, appuyez à
nouveau sur Pou Q pour relancer la
recherche.
Français
51
Page 52

Analogique – recherche manuelle suite,
recherche automatique
Lorsque le signal de votre enregistreur média est
8
localisé, appuyez sur Rpour sélectionner
Chaîne. A l’aide des touches P, Q, Set R,
entrez les caractères requis, par ex. MAG.
Recherche manuelle
EXIT
Retour
Chaîne
Retour TV
Rég. Manuel
Etiquette
EXIT
Retour TV
0 L A C 60 0 M A G
OK
Mémo
MENU
Retour
Appuyez sur OK pour mémoriser.
9
Répétez l’opération pour chaque position de
10
programme que vous souhaitez régler, ou
appuyez sur MENU pour retourner à la liste de
canaux et sélectionner le numéro suivant.
Appuyez sur EXIT pour sortir.
11
Pour identifier un équipement extérieur par son
12
nom, par exemple DVD sur EXT2, appuyez sur
pour sélectionner EXT2, puis sélectionnez
B
Rég. Manuel dans le menu des RÉGLAGES.
Appuyez sur Rpour sélectionner Etiquette, puis
13
Français
à l'aide des touches P, Q, Set R, tapez les
caractères requis.
EXT2 A D V D
OK
Mémo
MENU
V
EUILLEZ NOTER
Ce téléviseur est équipé d’une
fonction de mémorisation directe de
chaînes lorsque le numéro de chaîne est connu.
Sélectionnez l’écran Recherche manuelle à l’Etape 3.
Entrez le Numéro du programme, le Système, puis
C pour les chaînes standard (terrestres) ou S pour les
chaînes câblées et le numéro de Canal. Appuyez sur
OK pour sauvegarder.
Utilisation de la recherche automatique
Pour régler le téléviseur à l'aide de la Recherche
1
automatique, appuyez sur MENU et, avec les
touches Sou R, sélectionnez le menu RÉGLAGES.
Langage Français
Pays France
Recherche automatique
Recherche manuelle
Amplificateur de signal Marche
Connexions AV
MENU
Retour
Appuyez sur Q pour mettre Langage en
2
surbrillance, puis Sou Rpour sélectionner.
A l'aide de la touche Q, mettez Pays, en
3
surbrillance, puis utilisez SouRpour sélectionner.
RÉGLAGES
EXIT
Retour TV
Le téléviseur cherchera maintenant les chaînes
pour votre pays.
Appuyez sur Q pour mettre Recherche
4
automatique en surbrillance, puis appuyez sur
OK.
Recherche automatique
!
Les réglages actuels seront effacés !!
Appuyer sur EXIT pour ne rien changer.
Appuyer sur OK pour commencer
MENU
Retour
Pour lancer le Recherche automatique,
5
appuyez sur OK.
EXIT
Retour TV
Vous devez laisser le téléviseur mener la recherche
jusqu’à son terme.
1/2
OK
OK
OK
52
A l’issue de la recherche, le téléviseur repassera
automatiquement à la position de programme 1.
Si l'image n'est pas suffisamment nette, vous pouvez
modifier l’ordre des chaînes (voir la section ‘Tri des
positions de programme’).
Page 53
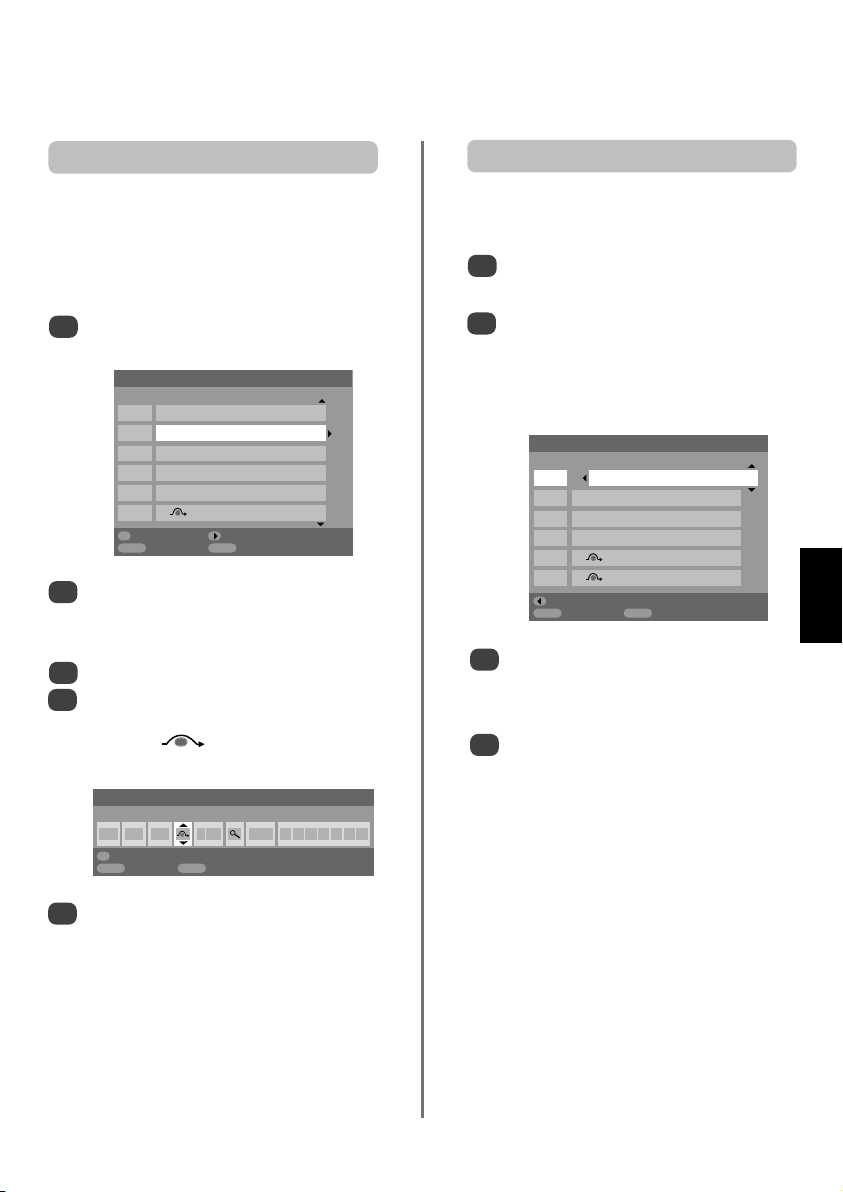
Analogique – saut de chaîne,
tri des positions de programme
Saut de chaîne
Pour empêcher la visualisation de certains programmes, vous
pouvez effacer la position de programme. Prenez soin de
dissimuler la télécommande car les chaînes bloquées
continuent d'être accessibles par les touches numériques. Les
programmes continueront d’être accessibles par les touches
du téléviseur, à l’exception des chaînes bloquées.
Sélectionnez Recherche manuelle dans le menu
1
RÉGLAGES.
Recherche manuelle
Prog. Canal Chaîne
0 C60 MAG
1 C22 TF1
2 C28 FR2
3 C25 FR3
4 C32 TV5
5 C69
OK
Valider Trier
MENU
Retour
Utilisez les touches Pou Q pour mettre en
2
surbrillance la position de programme que vous
souhaitez bloquer et appuyez sur OK pour
sélectionner.
Appuyez sur Rpour sélectionner Saut de chaîne.
3
Utilisez Pou Q pour mettre en marche
4
Saut de chaîne. Appuyer sur OK.
Le symbole affiché à l’écran indique que
la position de programme est bloquée.
1 L A C 22 0 T F 1
OK
Mémo
MENU
Retour
EXIT
Retour TV
Recherche manuelle
Saut de chaîne : Marche
EXIT
Retour TV
Tri des positions de programme
Il est possible de déplacer et de mémoriser les chaînes aux
positions de programme de votre choix.
Sélectionnez Recherche manuelle dans le menu
1
RÉGLAGES.
La liste des chaînes étant indiquée, utilisez
2
Q ou Ppour mettre en surbrillance la chaîne
que vous souhaitez déplacer, et appuyez sur R.
La chaîne sélectionnée sera déplacée vers la
droite de l'écran.
Recherche manuelle
Prog. Canal Chaîne
1 C22 TF1
2 C28 FR2
3 C25 FR3
4 C32 TV5
5 C69
6 C69
Mémo
MENU
Retour
Utilisez les touches Q ou Ppour vous déplacer
3
dans la liste jusqu'à votre position préférée. Les
autres chaînes se déplaceront en conséquence
pour faire de la place.
Appuyez sur Spour mémoriser votre
4
changement.
Répétez cette opération si nécessaire, puis
appuyez sur EXIT.
EXIT
Retour TV
Français
Appuyez sur MENU et répétez depuis l’Etape 2
5
ou appuyez su EXIT pour sortir.
Chaque position de programme doit être
selectionée séparément. Pour désactiver le
Saut de chaîne, répétez la procédure pour
chaque position.
Les chaînes bloquées ne peuvent pas être
sélectionnées à l’aide des touches P
Peou par les touches du téléviseur, mais sont
toujours accessibles par les touches numériques
de la télécommande.
et
f
53
Page 54

Réglages généraux, transmissions
stéréo/bilingues, affichage de l'heure,
réglages du son
Sélection d’une position de programme
Pour sélectionner une position de programme, utilisez les
touches numériques de la télécommande.
Vous pouvez également sélectionner une position de
programme à l’aide des touches P
Pour revenir à la position de programme précédente,
appuyez sur ^^.
Pour afficher des informations à l’écran comme la
position du programme, les chaînes ou le signal
stéréo/mono, appuyez sur . Appuyez à nouveau
pour annuler.
et Pe.
f
+
i
Transmissions stéréo et bilingues
Chaque fois que vous changez de chaîne, les mots Stéréo
ou Db. Langage s’afficheront à l’écran pendant quelques
secondes en cas de transmission d’émissions stéréo ou
bilingues. Si l’émission n’est pas en stéréo, le mot
Stéréo… Appuyez sur
Français
ou Mono.
Bilingue… Les transmissions bilingues sont rares. Le cas
échéant, les mots Db. Langage s’afficheront à l’écran.
Choisissez le numéro de programme requis et, si les mots
Db. Langage apparaissent, appuyez alors sur
pour sélectionner Langue 1, Langue 2 ou Mono.
Mono apparaîtra.
OI/II pour sélectionner Stéréo
OI/II
Affichage de l’heure –
analogique seulement
La fonction d'affichage de l'heure permet de voir l'heure
actuelle (le service texte) sur l'écran de télévision.
Lorsque vous regardez une émission, appuyez sur
pour faire apparaître l’heure (diffusée par la chaîne de
télévision). L’heure restera affichée pendant 5 secondes.
8/9
Réglages du son
Volume
Appuyez sur les touches
le volume.
Son coupé
Appuyez sur la touche kpour couper le son. Appuyez
une seconde fois pour remettre le son.
j
—
ou j+ pour régler
Réglages graves, aigus, balance
Les commandes de son sont accessibles en mode numérique
et analogique, comme la plupart des fonctions du téléviseur.
En mode numérique, appuyez sur MENU et, à
1
l’aide de la touche Q, mettez Réglage TV en
surbrillance avant d’appuyer sur OK.
Utilisez Sou Rpour sélectionner SON.
2
En mode analogique, appuyez sur MENU et sur
3
ou Rpour sélectionner SON.
S
Db. Langage Langue 1
Graves 0
Aigus 0
Balance 0
WOW
Egalisation du son Marche
MENU
Retour
Appuyez sur la touche Qpour mettre en
4
surbrillance Graves, Aigus ou Balance et sur les
touches Sou Rpour modifier la position de
réglage.
Lors de la connexion à une chaîne Hi-Fi, réglez
l'option Haut-parleurs sur Arrêt. Ensuite,
sélectionnez Fixe ou Variable pour la
Moniteur(Audio) dans le menu des
Connexions AV. (Reportez-vous au chapitre
‘Sélection d’entrée et Connexions AV’).
Haut-parleurs Arrêt
Super basses Marche
Niveau Super basses 70
MENU
Retour
SON
EXIT
Retour TV
SON
EXIT
Retour TV
1/2
OK
2/2
54
Page 55

Réglages du son suite, effet sonore
SRS WOW™, bilingue, egalisation du son
Appuyez sur Q pour mettre SRS 3D en
Super basses
Super basses améliore la profondeur du son. La
différence ne sera perceptible que sur un son très grave.
Dans le menu SON, appuyez sur Q pour mettre en
1
surbrillance Super basses. Utilisez SorRpour
sélectionner Marche.
Appuyez ensuite sur Q pour mettre en surbrillance
2
Niveau Super basses et utilisez SorRpour régler
le niveau à votre convenance.
Haut-parleurs Marche
Super basses Marche
Niveau Super basses 70
MENU
Retour
SON
EXIT
Retour TV
Effet sonore SRS WOW
SRS WOW™ est une palette d’effets sonores qui utilisent les
signaux stéréo diffusés pour améliorer la qualité acoustique
des haut-parleurs du téléviseur. Lors de la réception d’un
son mono, seule la fonction Trubass est disponible.
SRS 3D produit un son très riche, FOCUS concentre le
son et donne l’impression qu’il est émis du centre du
téléviseur, TruBass amplifie la plage de fréquences
1
2
inférieure des graves.
Appuyez sur MENU puis sélectionnez le menu
SON.
Avec les touches Pou Q, mettez en
surbrillance WOW puis appuyez sur OK.
2/2
™
3
surbrillance puis sur Sou Rpour sélectionner
Marche ou Arrêt.
Appuyez ensuite sur Q pour mettre FOCUS en
4
surbrillance puis sur Sou Rpour sélectionner
Marche ou Arrêt.
Mettez TruBass en surbrillance puis utilisez
5
pour sélectionner Arrêt, Faible ou Fort
SouR
en fonction de vos préférences.
A NOTER : Ces effets ne sont pas rendus si vous
utilisez un casque d’écoute.
Bilingue – analogique seulement
Si une émission ou un film est transmis avec une piste
sonore dans plusieurs langues, la fonction Db. Langage
permet de passer d’une langue à l’autre.
Appuyez sur la touche MENU et sélectionnez le
1
menu SON.
Utilisez la touche Q pour mettre Db. Langage
2
en surbrillance puis appuyez sur Sou Rpour
choisir Langue 1 ou Langue 2.
Egalisation du son
La fonction Egalisation du son limite les niveaux de haut
volume et empêche les changements de volume extrêmes
qui peuvent se produire lors d'un changement de chaîne
ou pendant un intervalle publicitaire.
Appuyez sur MENU puis sélectionnez le menu
1
SON menu.
Utilisez les touches Pou Q pour mettre en
2
surbrillance Egalisation du son puis appuyez sur
ou Rpour sélectionner Marche ou Arrêt.
S
®
Français
®
WOW
SRS 3D Arrêt
FOCUS Arrêt
TruBass Arrêt
MENU
Retour
EXIT
Retour TV
55
WOW, SRS and •symbol are trademarks of SRS Labs, Inc.
WOW technology is incorporated under license from SRS Labs, Inc.
Page 56

Représentation grand écran
En fonction du type d'émission diffusé, les programmes peuvent être affichés en plusieurs formats. Appuyez
sur la touche
à plusieurs reprises pour choisir entre Format réel, Plein écran, Cinéma2, Zoom2, 4:3,
{
Cinéma1, Zoom1, Sous-titre et 14:9.
CINÉMA1
Ce format étire horizontalement et
verticalement une image 4:3 pour
remplir l’écran. Bien que les
proportions correctes soient
maintenues au centre de l’écran, des
déformations peuvent se produire.
CINÉMA2
Lors de la réception d’un signal à
bandes latérales noires, ce format
étire horizontalement et verticalement
l’image pour remplir l’écran. Bien
que les proportions correctes soient
maintenues au centre de l’écran, des
déformations peuvent se produire.
ZOOM1
Français
Lorsque vous regardez des
films/cassettes vidéo en format "boîte
aux lettres", ce réglage éliminera ou
réduira les bandes noires en haut et en
bas de l'écran en agrandissant et en
sélectionnant l'image sans la déformer.
ZOOM2
SOUS-TITRE
Avec les films ou vidéocassettes
produisant un encadrement noir, ce
format supprime ou réduit les bandes
sur tous les côtés de l’écran en
effectuant un zoom avant centré sur
l’image, sans créer de déformation.
Lorsque des sous-titrages sont inclus
dans une émission diffusée en format
boîte aux lettres, ce réglage fera
monter l'image pour garantir que tout
le texte est affiché.
SOUS-TITRE
56
Page 57

14:9
PLEIN ÉCRAN
Représentation grand écran suite
Utilisez ce réglage lorsque vous
regardez une émission en
format 14:9.
Utilisez ce réglage lorsque vous
regardez une émission d'un lecteur de
disque numérique vidéo grand écran,
une cassette vidéo grand écran ou
une émission 16:9 (lorsqu'elles sont
disponibles). En raison de la gamme
de formats grand écran (16:9, 14:9,
20:9 etc.) vous verrez peut-être
apparaître des bandes noires en haut
et en bas de l'écran.
4:3
MODÈLE 1080i
FORMAT RÉEL
Appuyez sur la touche {et maintenez-la enfoncée pour faire apparaître la liste de
tous les formats grand écran. Utilisez Pou Q bas pour mettre en surbrillance le
format souhaité et appuyez sur OK pour valider votre choix.
Utilisez ce réglage pour voir une
émission en format 4:3 véritable.
Cette option est uniquement
disponible lors de la réception
d’une source 1080i
Utilisez ce réglage lors de la
réception d’une source 1080i :
l’image diffusée s’affichera sans mise
à l’échelle ni troncature.
Français
Format réel
Plein écran
Cinéma2
Zoom2
4:3
Cinéma1
Zoom1
Sous-titre
14:9
L’ utilisation des fonctions spéciales visant à modifier la dimension de l’image affichée (notamment le rapport hauteur/largeur) en vue d’une diffusion
publique ou à des fins commerciales peut constituer une infraction aux droits d’auteur.
57
Page 58

Réglages de l’image
La plupart des commandes et des réglages d’image sont disponibles en mode numérique et analogique.
Pour accéder aux menus souhaités en mode numérique : appuyez sur MENU puis, à l’aide de la touche Q,
sélectionnez Réglage TV. Appuyez sur OK puis sur Sou Rpour sélectionner le menu souhaité.
REMARQUE : les réglages non disponibles en mode numérique apparaîtront en grisé. Pour accéder aux menus
souhaités en mode analogique, appuyez sur MENU et utilisez Sou Rpour sélectionner le menu souhaité.
Position d'image –
analogique seulement
La position de l’image peut être ajustée en fonction de
vos préférences personelles ; cette fonction peut être
particulièrement utile pour les entrées externes.
Dans le menu RÉGLAGES, appuyez sur la touche
1
Q
jusqu'à ce que la fonction Position d'image
soit en surbrillance.
RÉGLAGES
EXIT
Retour TV
Position d'image
Français
2
3
Position d'image
Rég. Rapide
MENU
Retour
Appuyez sur OK pour voir les options disponsibles
pour le format d’image sélectionné.
Appuyez sur Pet Q pour sélectionner une
option, puis sur SouRpour ajuster les réglages.
Les options varient en fonction du format grand
écran choisi et de l’equipement éventuellement
raccordé.
En format Zoom2 :
Pos. H.
Pos. V.
Raz
Rétroéclairage
L'ajustement du Profondeur de noir peut améliorer la
Dans le menu IMAGE, appuyez sur la touche
1
pour mettre Réglage image en surbrillance puis
appuyez sur OK.
2/2
OK
OK
0
0
OK
Réglage image
Gestion de la couleur 3D
Réglage des couleurs de base
Mode Cinema
MENU
Dans le menu Réglage image, appuyez sur
2
pour sélectionner Profondeur de noir.
Appuyez sur Sou Rpour ajuster.
3
Profondeur de noir 100
Contraste 100
Lumière 50
Couleur 50
Teinte 0
Définition 0
MENU
clarté de l'écran.
Retour
Retour
IMAGE
EXIT
Retour TV
Réglage image
EXIT
Retour TV
Q
OK
Arrêt
Marche
Q
1/2
MENU
Retour
EXIT
Retour TV
Pour revenir aux préréglages en usine, sélectionnez
Raz dans le menu Position d’image et appuyez
sur OK.
58
Page 59

Réglages de l’image
suite
Préférences d’affichage
Ce téléviseur vous permet de personnaliser le style de
l’image. Appuyez sur la touche mpour afficher les
différents styles disponibles.
Image 1 à 3 pour les options préréglées, et
Image M pour mémoriser vos propres réglages :
Sélectionnez Réglage image dans le menu
1
IMAGE.
Réglage image
Profondeur de noir 100
Contraste 100
Lumière 50
Couleur 50
Teinte 0
Définition 0
MENU
Retour
Utilisez les touches SouRpour régler le
2
Contraste, la Lumière, la Couleur, la Tei nte et
EXIT
Retour TV
la Définition.
Etirage du noir
Profondeur du noir accentue l'intensité des zones
foncées de l'image, ce qui améliore la définition.
Dans le menu Réglage image, appuyez sur la
1
touche Qjusqu'à ce que la fonction Profondeur
du noir soit en surbrillance.
Réglage image
Profondeur du noir Marche
Réduction du bruit MPEG Faible
DNR Auto.
Tempér. couleur Normale
1/2
2/2
MPEG NR – Réduction du bruit
Quand vous regardez un DVD, la compression peut
parfois entraîner la distorsion ou la pixelisation de certains
mots ou composants de l’image. La fonction Réduction
du bruit MPEG permet de réduire cet effet en
"adoucissant" les bords.
Sélectionnez Réduction du bruit MPEG dans le
1
menu Réglage image puis Sou Rpour choisir
le réglage vous convenant.
DNR – Réduction numérique du bruit
La fonction DNR vous permet "d’adoucir" la représentation
à l'écran d'un signal faible afin de réduire l'effet de bruit.
Sélectionnez DNR dans le menu Réglage image.
1
Ajustez avec les touches SouR. Vous ne
remarquerez pas toujours de différences
(pour obtenir les meilleurs résultats, utilisez des
réglages inférieurs car la qualité de l'image
pourrait être affectée si le réglage est trop fort).
Température des couleurs
L’option Tempér. couleur permet d’augmenter le
caractère "chaud" ou "froid" d’une image en renforçant la
1
teinte rouge ou la teinte bleue.
Dans le menu Réglage image, appuyez sur la
touche Qjusqu'à ce que la fonction Tempér.
couleur soit en surbrillance.
Réglage image
Profondeur du noir Marche
Réduction du bruit MPEG Faible
DNR Auto.
Tempér. couleur Normale
2/2
Français
MENU
Retour
Appuyez sur Sou Rpour sélectionner Marche ou
2
Arrêt. L'effet dépendra de la diffusion et se
EXIT
Retour TV
remarquera davantage sur les couleurs foncées.
59
MENU
Retour
Appuyez sur SorRpour choisir Normale,
2
Chaude ou Froide selon vos préférences.
EXIT
Retour TV
Page 60

Réglages de l’image suite
Gestion de la couleur 3D
La sélection de la Gestion de la couleur 3D rend
disponible la fonction de "Réglage des couleurs de base".
Dans le menu IMAGE, appuyez sur la touche
1
pour sélectionner Gestion de a couleur 3D.
Réglage image
Gestion de la couleur 3D
Réglage des couleurs de base
Mode Cinema
MENU
Retour
Appuyez sur Sou Rpour sélectionnez Marche ou
2
Arrêt.
Réglage des couleurs de base
Français
La fonction de Réglage des couleurs de base permet
le réglage des couleurs individuelles selon vos
préférences. Elle peut s’avérer utile en cas d’utilisation
Dans le menu Réglage image, appuyez sur
1
pour sélectionner Réglage des couleurs de
base puis appuyez sur OK.
IMAGE
EXIT
Retour TV
d’une source externe.
OK
Marche
OK
Marche
Réglage des couleurs de base
Rouge +2 +6 +4
Vert 0 0 0
Bleu 0 0 0
Jaune 0 0 0
Q
Magenta 0 0 0
Cyan 0 0 0
Raz
MENU
Retour
Nuance Saturation Lumière
EXIT
Retour TV
OK
Pour revenir aux préréglages en usine,
sélectionnez Raz et appuyez sur OK.
Mode cinéma
Si le film ou l’émission diffusés présente des lignes ou des
bords irréguliers, la fonction Mode Cinema peut aider à
corriger le problème en lissant l’image.
Dans le menu IMAGE, appuyez sur la touche
1
pour sélectionner Mode Cinema.
Appuyez sur Sou Rpour sélectionnez Marche ou
2
Arrêt.
Q
Amplificateur d’antenne
Si le signal reçu par le téléviseur est trop fort, il peut
Q
entraîner des parasites sur l’image et/ou un
bourdonnement. Régler l’Amplificateur de signal sur
Arrêt a pour effet de réduire l'intensité du signal et peut
contribuer à éliminer les parasites.
EXIT
IMAGE
Retour TV
Réglage image
Gestion de la couleur 3D
Réglage des couleurs de base
Mode Cinema
MENU
Retour
Appuyez sur Pet Q pour sélectionner une
2
option, puis sur SouRpour ajuster les réglages.
OK
Marche
OK
Marche
60
Dans le menu RÉGLAGES, appuyez sur la touche
1
Q
jusqu'à ce que la fonction Amplificateur de
signal soit en surbrillance.
Appuyez sur Sou Rpour sélectionnez Marche
2
ou Arrêt.
Page 61

Réglages de l’image suite,
blocage du clavier
Format automatique (Grand écran)
Si ce téléviseur reçoit une image en format grand écran
véritable, et que la fonction Format auto. est activée,
l'émission sera automatiquement affichée en format
grand écran, indépendamment des réglages précédents
Appuyez sur MENU et sur Sou Rpour
1
sélectionner le menu FONCTION.
Télétexte Auto.
Bloc. clavier Arrêt
Format auto. Marche
Ecran bleu Marche
côte de l'écran 1
MENU
Appuyez sur Q pour mettre Format auto en
2
surbrillance puis sur Sou Rpour sélectionner
Marche ou Arret.
Retour
du téléviseur.
FONCTION
EXIT
Retour TV
Ecran bleu
Lorsque vous sélectionnez Écran bleu, l'écran deviendra
bleu et le son sera coupé si aucun signal n'est reçu.
Dans le menu FONCTION, appuyez sur
1
jusqu'à ce que Écran bleu latéral soit mis en
surbrillance.
Télétexte Auto.
Bloc. clavier Arrêt
Format auto. Marche
Ecran bleu Marche
côte de l'écran 1
MENU
Retour
Appuyez sur Sou Rpour sélectionner Marche ou
2
Arrêt.
FONCTION
EXIT
Retour TV
Q
Ajustement du panneau latéral
La fonction de côte de l’écran latéral éclaircit ou fonce la
bande de chaque côté de l'écran en format 4:3 ou 14:9.
Ceci permettra d'éviter une image rémanente de la bande
et peut également rendre plus confortables les conditions
de visualisation dans des conditions de lumière vive ou
Dans le menu FONCTION, appuyez sur
1
jusqu'à ce que côte de l’écran latéral soit mis en
surbrillance.
Appuyez sur Sou Rpour ajuster.
2
très sombre.
Q
Arrêt sur image
Cette fonction permet d’immobiliser une image à l’écran.
Appuyez sur
1
Appuyez à nouveau sur upour annuler.
upour faire un arrêt sur image.
Blocage du clavier
La fonction Blocage clavier vous permet de désactiver les
touches du téléviseur. Toutes les touches de la
télécommande continueront de fonctionner normalement.
Dans le menu FONCTION, sélectionnez
1
Bloc. clavier et choisissez Arrêt ou Marche à
l’aide des touches Sou R.
Télétexte Auto.
Bloc. clavier Marche
Format auto. Marche
Ecran bleu Marche
côte de l'écran 1
MENU
Retour
Lorsque le Blocage clavier est en marche, un rappel
apparaîtra à l’écran si vous tentez d’utiliser les touches
du téléviseur. Si vous appuyez sur la touche de veille,
le téléviseur s'éteindra et ne pourra être rallumé
qu'en utilisant la télécommande.
FONCTION
EXIT
Retour TV
Français
61
Page 62

Minuteries
Programmateur –
numérique uniquement
Cette fonction permet de programmer le téléviseur pour
qu’il se règle sur une chaîne spécifique à une heure
choisie. Elle peut être utilisée pour visualiser une émission
donnée ou pour visualiser une série en réglant le mode
sur "quotidien" ou "hebdomadaire".
Appuyez sur MENU et sur Sou Rpour
1
sélectionner le MENU PROGRAMMATION.
Une fois tous les détails saisis, appuyez sur OK
5
pour mémoriser la programmation.
VCR Auto-démarrage : Si votre enregistreur média
Toshiba est compatible avec une connexion AV, le réglage
de cette option à OUI a pour effet de démarrer/arrêter
automatiquement l’enregistrement.
REMARQUE : Quand une émission programmée est sur
le point de commencer, un écran d’information s’affiche
pour vous donner la possibilité de visualiser ou d’annuler
l’émission. Les menus et les autres chaînes ne seront pas
disponibles pendant l’émission programmée, sauf si le
programmateur est annulé.
Français
2
3
4
MENU PROGRAMMATION
Programmations OK
MENU
Retour
EXIT
Sortie
Utilisez Qpour sélectionner Programmations
puis appuyez sur OK.
Appuyez sur Qpour sélectionner la première
émission à programmer, puis sur OK. Le menu
REGLER LA PROGRAMMATION s’affiche alors
à l’écran.
Appuyez sur Pet Q pour parcourir la liste et
ajoutez les détails de l’émission à programmer à
l’aide des touches Set R.
12:18 Ven, 13 Jan.
REGLER LA PROGRAMMATION
Programme TF1 1
Date Ven, 13 Jan. 2006 13/01
Début 13.00
Fin 13.15
Répéter NON
VCR Auto-démarrage NON
Sous-titres SANS
Langage audio ANGLAIS
0 - 9
Saiser Code Valider MENU Annuler
Minuterie de mise en veille
Le téléviseur peut être réglé pour s’éteindre
automatiquement après un certain temps.
Appuyez sur la touche MENU puis Sou Rpour
1
sélectionner le menu MINUTERIE.
Minuterie arrêt 01:30
MENU
Retour
Appuyez sur Qpour sélectionner la Minuterie
2
arrêt. Utilisez les touches numériques pour taper
l'heure souhaitée. Par exemple, pour éteindre le
téléviseur dans une heure et demie, tapez 01:30,
ou appuyez sur Sou Rpour augmenter/diminuer
l'heure en incréments de 10 minutes.
Appuyez sur EXIT pour terminer.
3
MINUTERIE
EXIT
Retour TV
62
Page 63

Numérique – informations à l’écran et
guide des programmes
En mode numérique, les informations à l’écran et le guide des programmes donnent accès aux détails des
émissions pour toutes les chaînes disponibles.
Informations
La touche permet d’afficher les informations.
1
L’écran d’information apparaît avec les détails de
la chaîne et de l’émission visualisée.
TOUS PROG.
TF1
France 2
France 3
CANAL+
France 5
Voir aussi Journal commencé 5 depuis minutes sur CBeebies…
Regarder EXIT Sortie TV/FAV changer progs
Page – Page + Voir aussi Langages
Pour consulter les détails d’une autre chaîne
2
disponible, appuyez sur Pou Q pour parcourir la
liste des chaînes. Quand la chaîne est sélectionnée,
les détails de l’émission en cours s’affichent.
La touche JAUNE permet d'activer "En cours", qui
3
affiche les détails des émissions commencées sur
les autres chaînes.
Pour enregistrer l’émission suivante, le guide
4
d’information étant affiché à l’écran, appuyez
sur R. L’option Regarder en bas de l’écran devient
Enregistrer. Appuyez sur OK. L’écran REGLER LA
PROGRAMMATION s’affiche ensuite à l’écran.
+
i
13:30 Jt 13h x13:30 Météo
1 minute
13:29 Ven, 13 Jan.
…
I/II
DIVERTISSEMENT
12:18 Ven, 13 Jan.
Météo
001 TF1 13:30-14:00 Ven, 13 Jan.
REGLER LA PROGRAMMATION
Début 01:25
Fin 02:55
Répéter NON
VCR Auto-démarrage NON
Sous-titres SANS
Langage audio FRANÇAIS
0 - 9
Varier Valider MENU Annuler
Guide
La touche GUIDE permet d’afficher le guide à
1
l’écran, avec les détails de la chaîne et de
l’émission visualisée en surbrillance. Il peut
prendre quelques instants pour s’afficher.
Jt 13h
TOUS PROG.
TF1
France 2
France 3
CANAL+
France 5
M6
ARTE
Direct 8
W9
TMC
NT1
NRJ12
Enregistrer + d’infos EXIT Sortie TV/FAV Changer progs
Page – Page + Programmations
2
13:00 13:30 14:00 14:30
Jt 13h Météo
Journal
Inspecteur Derrick K
Z Ça Cartoon La gran Danny the Dog
Midi les zouzous Le magazine de la santé
MALCOLM LE GRAND AMOUR
Le pays des bouddhas Arte Europa
Le journal d Bien-être
Le brigade Le retour de Sherlock Holmes
Les filles Les choix d’une mère
S
+
i
Appuyez sur Sou Rpour afficher des
informations sur d’autres émissions listées pour la
chaîne sélectionnée.
Pour consulter les détails des autres chaînes
3
disponibles, appuyez sur Pet Q pour parcourir
la liste des chaînes. Quand la chaîne est
sélectionnée, les détails de l’émission en cours de
diffusion s’affichent. Appuyez ensuite sur Sou R.
Pour obtenir des informations sur une émission en
4
surbrillance, appuyez sur . Pour régler le
programmateur pour cette émission, appuyez sur
la touche BLEUE pour afficher le menu
PROGRAMMATIONS.
REMARQUE : L’enregistrement peut être défini
à partir de l’écran d’information ou du guide.
Pour que l’enregistrement soit possible,
l'enregistreur média doit être compatible avec les
connexions AV.
Ven dredi
+
i
12.18 Ven, 13 Jan.
Français
Les détails de l’émission ont été ajoutés à l’écran.
5
Appuyez sur OK.
63
Page 64

Réglages numériques – contrôle parental
Pour empêcher la visualisation de films ou d’émissions inappropriés, il est possible de bloquer des chaînes ou
des menus. Une fois bloqués, ils peuvent seulement être accédés en tapant un code PIN en mode numérique.
1
2
Français
3
Définition du code PIN
Appuyez sur MENU et Rpour sélectionner
AUTRE MENU.
AUTRE MENU
Contrôle parental OK
Programmes favoris et verrouillés OK
Favoris TOUS PROG.
Slots interface commune
Mise à jour logiciel OK
MENU
Retour
EXIT
Sortie
Appuyez sur Q pour sélectionner Contrôle
parental puis appuyez sur OK.
Appuyez sur Q pour mettre Changer code PIN
en surbrillance puis appuyez sur OK.
CONTRÔLE PARENTAL
Mode MARCHE
Verrouillage parental SANS
Censurer si pas de données ? ARRÊT
Changer code Pin OK
MENU
Retour
EXIT
Sortie
AUCUN
Mode
Cette option permet de bloquer divers menus afin
d’empêcher les réglages du téléviseur d’être changés
Dans le menu CONTRÔLE PARENTAL, appuyez
1
sur Q pour sélectionner Mode.
Mode MARCHE
Verrouillage parental SANS
Censurer si pas de données ? ARRÊT
Changer code Pin OK
MENU
A l’aide des touches Set R, choisissez MARCHE,
2
ARRÊT, VERROU MENU ou VERROU INST.
Quand des menus bloqués sont sélectionnés, ils
deviennent seulement disponibles après la saisie
du code PIN.
ou effacés.
CONTRÔLE PARENTAL
Retour
EXIT
Sortie
A l’aide des touches numériques, entrez un
4
nombre à quatre chiffres. L’écran vous demande
ensuite de confirmer le code PIN en entrant à
nouveau les chiffres.
CHANGER CODE PIN
Nouveau code PIN
Confirmer code PIN – – – –
0 - 9
Saiser code PIN
Appuyez sur MENU pour revenir à l’écran
5
Contrôle parental. Le code PIN est maintenant
MENU
Retour EXIT Sortie
défini.
* * * *
64
REMARQUE :
Verrouillage parental – A l’aide des touches
et R, choisissez ACCORD P., 12, 16, 18, TOTAL
S
et SANS.
Page 65

Réglages numériques – programmes
favoris, bloqués, cryptés
Sélection des programmes favoris
L’ o p t i ons Programmes favoris permet de créer une liste
des chaînes numériques le plus souvent regardées. Il est
possible de créer quatre listes, qui peuvent chacune contenir
un assortiment de chaînes de télévision, texte et radio.
Dans AUTRE MENU, appuyez sur Q pour
1
sélectionner Programmes favoris et verrouillés.
PROGRAMMES FAVORIS ET VERROUILLES
1 TF1
2 France 2
7 France 3
10 CANAL+
30 France 5
31 M6
Choisir MENU Retour
Page – Page + Tout valider Tout annuler
Parcourez la liste des chaînes à l’aide des touches
2
P
et Q puis appuyez sur OK pour sélectionner
les chaînes souhaitées. Les cases correspondantes
sont alors cochées.
Appuyez sur Rpour sélectionner la Liste 2. Suivez
3
la même procédure pour faire votre sélection.
Une fois tous les programmes favoris sélectionnés,
appuyez sur MENU pour revenir à AUTRE
MENU.
Utilisez Q pour mettre en surbrillance Favoris et
4
ou Rpour choisir TOUS PROG., TV, RADIO,
S
FAV-1 ou FAV-2. Le nombre de favoris
disponibles dépend du nombre de listes créées.
Favori liste 1: Non
Blocage de programmes
La fonction de Verrouillé Programme empêche la
visualisation de certaines chaînes numériques, qui
peuvent ensuite être accédées en entrant le code PIN.
Dans AUTRE MENU, appuyez sur Q pour
1
sélectionner Programmes favoris et verrouillés.
Appuyez sur Rà plusieurs reprises pour
2
sélectionner la liste Verrouillé Programme.
Parcourez la liste des chaînes à l’aide des touches
3
P
et Q et appuyez sur OK pour sélectionner les
chaînes souhaitées. Un cadenas apparaît alors
dans les cases correspondantes.
PROGRAMMES FAVORIS ET VERROUILLES
Verrouillé Programme: Oui
1 TF1
2 France 2
7 France 3
10 CANAL+
30 France 5
31 M6
Choisir MENU Retour
Page – Page + Tout fermer Tout ouvrir
Appuyez sur EXIT pour terminer.
4
A présent, si l’une des chaînes de la liste
5
Verrouillé Programme est sélectionnée, le code
PIN doit être saisi avant de pouvoir la regarder.
Programmes cryptés
Français
AUTRE MENU
Contrôle parental OK
Programmes favoris et verouillés OK
Favoris FAV-1
Slots interface commune
Mise á jour logiciel OK
MENU
Retour
EXIT
Sortie
Appuyez sur EXIT. Les touchesfPelimiteront
2
5
maintenant l’accès aux chaînes de la Favori liste 1
quand FAV-1 est sélectionné.
AUCUN
65
Sélectionner Programmes cryptés permet de lister toutes
les émissions cryptées dans la liste des programmes, même
si elles ne peuvent pas être sélectionnées.
Dans AUTRE MENU, appuyez sur Pou Q pour
1
sélectionner Programmes cryptés.
Utilisez Sou Rpour sélectionner MARCHE ou
2
ARRÊT.
REMARQUE : Les CAM (modules d’accès
conditionnel) sont disponibles auprès de
fournisseurs de service (voir la section ‘Interface
commune’).
Page 66

Réglages numériques – langage audio,
sous-titres, mise à jour TV, interface commune
Langages audio
Cette fonction permet de regarder une émission ou un film
avec des langues au choix pour la bande sonore, sous
1
2
3
Français
réserve qu’elles soient diffusées.
Dans le MENU REGLAGE, appuyez sur Q pour
sélectionner Options locales.
MENU RÉGLAGE
Réglage TV OK
Options locales OK
Recherche automatique OK
Recherche manuelle OK
Programmes OK
MENU
Retour
EXIT
Sortie
Appuyez sur OK puis sur Pou Q pour mettre
Langage audio en surbrillance.
Utilisez Sou Rpour sélectionner une option.
OPTIONS LOCALES
Pays FRANCE
Langage FRANÇAIS
Langage audio FRANÇAIS
Sous-titres ARRÊT
Réglage heure locale 11.19
MENU
Retour
EXIT
Sortie
Mise à jour TV
La fonction Mise à jour TV permet d’effacer toutes les
chaînes et réglages numerique mémorisés. Le téléviseur
reprend ses paramètres définis en usine puis procède à un
Appuyez sur MENU puis sur Q jusqu’à ce que
1
Mise à jour TV apparaisse en surbrillance.
Appuyez sur OK. Un écran s’affiche pour vous
2
prévenir que tous les réglages numériques vont
être perdus. Appuyez sur OK pour continuer.
L’écran de LOCAL OPTIONS s’affiche. Appuyez
sur OK pour continuer. Le téléviseur commence
alors son réglage automatique.
réglage automatique.
Interface commune
Le connecteur d’interface commune, situé à l’arrière du
téléviseur, permet de d’insérer un CAM (module d’accès
conditionnel) et une carte. Ceux-ci peuvent être obtenus
auprès d’un fournisseur de service et permettent de
visualiser des émissions disponibles avec un abonnement.
Pour obtenir des compléments d’information, veuillez
contacter un fournisseur de service.
Insérez le CAM et la carte dans le connecteur
1
d’interface commune en suivant les instructions
accompagnant le CAM. Un message s’affiche à
l’écran pour confirmer que le CAM est chargé.
Dans AUTRE MENU, appuyez sur Pou Q pour
2
sélectionner Slots interface commune.
REMARQUE : Si plusieurs bandes sonores sont
disponibles, utilisez
OI/II pour en choisir une.
Sous-titres
Cette fonction affiche les sous-titres en bas de l’écran dans
la langue sélectionnée, sous réserve qu’ils soient diffusés.
Dans le menu Options locales, appuyez sur Q
1
pour sélectionner Sous-titres.
Utilisez Sou Rpour sélectionner une option.
2
66
AUTRE MENU
Contrôle parental OK
Programmes favoris et verrouillés OK
Favoris TOUS PROG.
Slots interface commune
Mise à jour logiciel OK
MENU
Retour
EXIT
Sortie
Les détails du CAM devraient maintenant être
3
disponibles. Appuyez sur OK pour le sélectionner.
Si deux CAM sont insérés, utilisez Sou Rpour
sélectionner le CAM souhaité.
AUCUN
Page 67

Réglages numériques – mise à niveau
du logiciel
Version
Cette fonction permet de vérifier la version du
Dans AUTRE MENU, appuyez sur Pou Q pour
1
sélectionner Mise à jour logiciel. Appuyez sur
OK.
Programmes favoris et verrouillés OK
Favoris TOUS PROG.
Slots interface commune
Mise à jour logiciel OK
Programmes cryptés ARRÊT
MENU
Appuyez sur Pou Q pour sélectionner Version.
2
Utilisez Sou Rpour sélectionner la version. Une
fois le logiciel mis à jour, un choix de deux versions
est disponible.
Version 2.0
Mise à jour automatique MARCHE
Recherche nouveau logiciel OK
0
logiciel installé.
AUTRE MENU
Retour
EXIT
MISE A JOUR LOGICIEL
Continuer
MENU
Sortie
Retour
EXIT
Sortie
AUCUN
Recherche de nouveau logiciel
Les mises à niveau logicielles peuvent éventuellement être
recherchées manuellement à l’aide de la fonction
Recherche nouveau logiciel.
Dans le menu MISE À JOUR LOGICIEL, appuyez
1
sur Pou Q pour sélectionner Recherche
nouveau logiciel.
MISE A JOUR LOGICIEL
Version 2.0
Mise à jour automatique ARRÊT
Recherche nouveau logiciel OK
MENU
Retour
EXIT
Sortie
Appuyez sur OK. Le téléviseur commence
2
automatiquement à rechercher une mise à niveau
logicielle. Le barre de progression se déplace le
long de la ligne.
EN COURS DE RECHERCHE NOUVEAU LOGICIEL
Recherche en cours d’un nouvelle mise à jour
logicielle pour ce TV
Progrès
EXIT
Stop
Si une mise à niveau est trouvée, le téléviseur
commence automatiquement à la télécharger.
Sinon, un écran s’affiche pour indiquer qu’il n’y a
pas de mise à niveau disponible.
Français
Mise à jour automatique
Si l’option Mise à jour automatique est sélectionnée, le
logiciel est automatiquement mis à jour quand une
nouvelle version est disponible, sous réserve que le
téléviseur soit allumé ou en veille. Si le téléviseur est
allumé, un message s’affiche à l’écran pour indiquer que
le logiciel est en train d’être téléchargé.
Dans le menu MISE A JOUR LOGICIEL, appuyez
1
sur Pou Q pour sélectionner Mise à jour
automatique.
Utilisez Sou Rpour sélectionner MARCHE ou
2
ARRÊT.
67
AUCUNE MISE A JOUR DISPONIBLE
! Aucune mise à jour disponible
actuellement
Continuer
Page 68

Réglages de l'ordinateur – position d'image,
phase de l'horloge,
horloge d'échantillonnage, raz
Position d'image
Connectez le PC (conformément aux instructions de la
section ‘Connexion d’un ordinateur’) et assurez-vous
qu’une image s’affiche sur l’écran du téléviseur. Vous
pouvez alors régler sa position selon vos préférences.
1
2
Français
Appuyez sur
sélectionnez Réglage PC dans le menu des
RÉGLAGES.
Langage Français
Pays France
Connexions AV
Réglage PC
MENU
Appuyez sur OK. Appuyez sur Pet Q pour
sélectionner une option, puis sur SouRpour
ajuster les réglages.
Pos. H. 0
Larg. image – 5
Pos. V. 0
Hauteur d'image – 5
Réglage phase 0
horloge 0
MENU
pour sélectionner PC, puis
B
RÉGLAGES
Retour
Retour
EXIT
EXIT
Retour TV
Retour TV
Horloge d'échantillonnage
L'ajustement de horloge permet de modifier le nombre
d'impulsions par balayage, ce qui effacera les lignes
Dans le menu RÉGLAGES, appuyez sur
1
Q
surbrillance.
Appuyez sur OK pour sélectionner, puis sur
2
Q pour mettre en surbrillance horloge.
OK
OK
Utilisez les touches Sou Rpour ajuster jusqu'à ce
3
que l'image soit claire
1/2Réglage PC
Dans le menu RÉGLAGES, appuyez sur
1
Q
surbrillance.
Appuyez sur OK pour sélectionner, puis sur
2
Q pour mettre en surbrillance Raz.
verticales sur l'écran.
jusqu'à ce que Réglage PC soit mis en
Pos. H. 0
Larg. image – 5
Pos. V. 0
Hauteur d'image – 5
Réglage phase 0
horloge 0
MENU
Retour
EXIT
Retour TV
Raz
Pour revenir aux préréglages en usine.
jusqu'à ce que Réglage PC soit mis en
1/2Réglage PC
Phase de l'horloge
La Réglage phase adapte le signal de l'ordinateur à
l'affichage à cristaux liquides. Cet ajustement permet
d'effacer les bandes horizontales et le flou de l'image.
Dans le menu RÉGLAGES, appuyez sur
1
Q
jusqu'à ce que Réglage PC soit mis en
surbrillance.
Appuyez sur OK pour sélectionner, puis sur
2
Q pour mettre en surbrillance Réglage phase.
Utilisez les touches Sou Rpour ajuster jusqu'à
3
ce que l'image soit claire.
68
Appuyez sur OK.
3
Réglage PC
Raz OK
MENU
Retour
EXIT
2/2
Retour TV
Page 69

Sélection des entrées et
Connexions AV
Définition des prises ENTREE et SORTIE permettant au téléviseur de reconnaître les appareils qui lui sont
raccordés. Voir page 45 pour le schéma des connexions recommandées.
La plupart des enregistreur média et décodeurs envoient
un signal par le câble Péritel pour commuter le téléviseur
sur la prise d’Entrée correcte.
Vous pouvez également appuyer à plusieurs reprises sur
la touche B(sélection de la source externe) jusqu’à ce
que l’image provenant de l’appareil raccordé au
téléviseur apparaisse.
Cette touche doit obligatoirement être utilisée pour
tout appareil raccordé via l’ENTREE VIDEO
COMPOSANT (EXT3C).
Un S sur l'affichage, par exemple B2S (EXT 2S) indique
que l'entrée est prévue pour un signal S-Vidéo.
Sélection des entrées
Utilisez cette fonction si le téléviseur ne commute pas
Appuyez sur Bpour sélectionner B1, B2,
1
B
HDMI™ affiche un équipement connecté à
l'Entrée HDMI à l'arrière du téléviseur. Elle est
conçue pour fonctionner au mieux avec des
signaux haute définition 1080i.
PC illustre un ordinateur connecté à l'entrée
RGB/PC à l'arrière du téléviseur.
Pour repasser au mode télévision, appuyez sur la
2
touche Bet maintenez-la enfoncée pour
sélectionner DTV ou ATV.
automatiquement.
3(C) (EXT1-3), HDMI1, HDMI2 ou PC.
Arrêt analogique
Ce téléviseur est un appareil numérique conçu pour
permettre l'utilisation de services numériques et
analogiques. Cependant, pendant la durée de vie de ce
téléviseur, il est plus que probable que les services
analogiques seront suspendus pour permettre
davantage de services numériques.
Sélection du signal d’ENTREE
Elle spécifie le type de signal allant vers les prises Péritel 2
(EXT2) à l'arrière du téléviseur. Veuillez vous référer aux
instructions des fabricants pour les équipements raccordés.
Dans le menu RÉGLAGES, appuyez sur la touche
1
Q
jusqu'à ce que la fonction Connexions AV soit
en surbrillance, puis appuyez sur OK.
Langage Français
Pays France
Recherche automatique
Recherche manuelle
Amplificateur de signal Marche
Connexions AV
MENU
Retour
Avec Sou R, sélectionnez soit AV ou S-VIDEO
2
comme entrée requise pour EXT2.
PC/HDMI1 audio PC
HDMI1 Audio Numérique
Sortie EXT1 DTV
Entrée EXT2 AV
Sortie EXT2 DTV
Moniteur(Audio) Fixe
MENU
Retour
Si vous obtenez une image en noir et blanc,
essayez l’autre position.
RÉGLAGES
EXIT
Retour TV
Connexions AV
EXIT
Retour TV
1/2
OK
OK
OK
Français
Cet arrêt se déroulera en plusieurs étapes, qui seront
annoncées dans votre région bien à l'avance. Il est
recommandé de régler à nouveau le téléviseur lors de
chaque étape pour s’assurer que les services numériques
nouveaux et existants puissent être visualisés sans
perturbation (voir aussi la section ‘Réglage automatique’).
69
Page 70

Sélection des entrées et
Connexions AV
Audio PC
Pour recevoir du son d’un PC connecté au téléviseur,
branchez le câble audio à l’arrière du téléviseur (reportez-
vous au chapitre ‘Connexion d’un ordinateur’), puis
utilisez les réglages PC/HDMI1 audio.
Dans le menu RÉGLAGES, appuyez sur la touche
1
Q
jusqu'à ce que la fonction Connexions AV soit
en surbrillance, puis appuyez sur OK.
RÉGLAGES
OK
OK
OK
EXIT
Retour TV
Connexions AV
EXIT
Retour TV
2
Français
Langage Français
Pays France
Recherche automatique
Recherche manuelle
Amplificateur de signal Marche
Connexions AV
MENU
Retour
Mettez en surbrillance PC/HDMI1 audio puis
appuyez sur Rpour sélectionner l’option PC.
PC/HDMI1 audio PC
HDMI1 Audio Numérique
Sortie EXT1 DTV
Entrée EXT2 AV
Sortie EXT2 DTV
Moniteur(Audio) Fixe
MENU
Retour
A NOTER : La sélection de l’option PC met
automatiquement HDMI sur ‘numérique’.
1/2
suite
Audio HDMI1
Si la source HDMI connectée n’est pas compatible avec
l’audio numérique, branchez le câble audio sur
PC/HDMI1 Audio à l’arrière du téléviseur (reportez-vous
au chapitre ‘Connexion d’un ordinateur’), puis utilisez les
1
2
3
réglages HDMI1 Audio.
Dans le menu RÉGLAGES, appuyez sur la touche
Q
jusqu'à ce que la fonction Connexions AV soit
en surbrillance, puis appuyez sur OK.
Langage Français
Pays France
Recherche automatique
Recherche manuelle
Amplificateur de signal Marche
Connexions AV
MENU
Retour
RÉGLAGES
EXIT
Retour TV
Dans le menu Connexions AV, appuyez sur
1/2
OK
OK
OK
Q
pour mettre en surbrillance PC/HDMI1 audio et
appuyez sur Rpour sélectionner HDMI1.
Mettez ensuite en surbrillance HDMI1 Audio et
appuyez sur Sou Rpour sélectionner Auto.,
Numérique ou Analogique.
Connexions AV
PC/HDMI1 audio HDMI1
HDMI1 Audio Auto.
Sortie EXT1 DTV
Entrée EXT2 AV
Sortie EXT2 DTV
Moniteur(Audio) Fixe
MENU
Retour
EXIT
Retour TV
HDMI, the HDMI logo, and High-Definition Multimedia
Interface are trademarks or registered trademarks of HDMI
Licensing, LLC.
En l’absence de son, sélectionnez l’autre réglage.
A NOTER : HDMI1 est compatible avec les
signaux audio numériques et analogiques,
HDMI2 est uniquement compatible avec les
signaux audio numériques.
70
Page 71

Texte analogique – configuration,
généralités, modes Auto. et LISTE
Ce téléviseur est équipé d’une mémoire texte multi-pages dont le chargement nécessite un certain temps. Il
offre deux modes de visualisation du texte – Auto affichera Fastext, si celui-ci est disponible. LISTE gardera
en mémoire vos quatre pages préférées.
Selection des Modes
Le réglage des caractères du télétexte sera sélectionné
automatiquement par la sélection de la langue dans le
Sélectionnez Télétexte dans le menu FONCTION.
1
A l’aide des touches Sou Rchoisissez Auto. ou
2
LISTE, puis appuyez sur EXIT.
menu RÉGLAGES.
Le numéro de la sous-page que vous visualisez
apparaîtra en surbrillance et, à mesure que le téléviseur
charge les sous-pages supplémentaires, les numéros
changeront de couleur pour indiquer que ces pages ont
bein été chargées.
Ces sous-pages resteront disponibles jusqu'à la sélection
d'une nouvelle page, ou en mode télévision normal,
jusqu'au prochain changement de chaîne.
Naviguer dans les pages en
mode Auto.
Télétexte Auto.
Bloc. clavier Arrêt
Format auto. Marche
Ecran bleu Marche
côté de l'écran 1
MENU
Retour
FONCTION
EXIT
Retour TV
Informations texte
La touche
Appuyez sur
texte. Appuyez une nouvelle fois sur cette touche pour
afficher texte en surimpression sur une émission de
télévision normale, et une troisième fois pour repasser à
l’écran normal. Vous ne pouvez pas changer de chaîne tant
que texte est actif.
La première page qui s’affiche est la page initiale.
Vous pouvez accéder à une page de texte quelconque en
tapant le numéro de page à 3 chiffres à l'aide des touches
numériques, en appuyant sur les touches de couleur ou en
appuyant sur Pfpour avancer à la page suivante et sur
Pepour revenir à la page précédente.
Sous-pages
Les sous-pages éventuelles seront automatiquement
chargées en mémoire sans changer la page affichée à
l’écran.
Pour accéder aux sous-pages, appuyez sur
les touches Pfet Pepour les visualiser. Une barre
contenant des chiffres apparaîtra sur le côté de l'écran.
6
6
/ /
/ /
:
7
pour faire apparaître l’écran
7
puis utilisez
X
Si Fastext est disponible, vous verrez apparaître quatre
titres en couleur au bas de l’écran.
Pour accéder à l’une des quatre rubriques indiquées,
appuyez sur la touche de couleur de la télécommande.
Pour de plus amples informations sur votre (vos)
système(s) de texte, consultez la page d’index texte de la
chaîne de télévision concernée ou demandez conseil à
votre revendeur Toshiba le plus proche.
Naviguer dans les pages en
mode LISTE
Les quatre choix de couleur au bas de l’écran sont les
numéros 100, 200, 300 et 400 (programmés dans la
mémoire du téléviseur). Pour visualiser ces pages,
appuyez sur la touche de couleur correspondante.
Pour modifier ces pages mémorisées, appuyez sur la
touche de couleur souhaitée et tapez le numéro à
3 chiffres. Ce numéro apparaîtra alors dans le coin
supérieur gauche de l’écran dans la case colorée.
Appuyez sur OK pour mémoriser. Les barres au bas de
l’écran clignoteront alors en blanc. Chaque fois que
vous appuierez sur OK, les quatre numéros de
page apparaissant au bas de l’écran seront
mémorisés et remplaceront les numéros
précédents.
Si vous n’appuyez pas sur OK, la sélection sera perdue
lorsque vous désactiverez texte.
Vous pouvez parfaitement visualiser d’autres pages en
tapant leurs numéros à 3 chiffres respectifs – mais
n’appuyez pas sur OK sous peine de mémoriser ces
pages.
Français
71
Page 72

Texte analogique – touches de commande
Vous trouverez ci-dessous un guide des fonctions des touches Télétexte de la télécommande.
T
Appuyez sur Tpour accéder à la page d'index ou la
première page. La page affichée dépendra du fournisseur
de services.
6
Appuyez sur
sur cette touche à nouveau pour superposer le texte sur
une image normale diffusée. Appuyez encore une fois
pour revenir à un écran de télévision normal. Les
programmes ne peuvent pas être modifiés tant que cela
n'aura pas été fait.
X
Utilisez les touches P
pages éventuelles.
Français
r
Appuyez sur la touche rpour découvrir les réponses
aux quiz jeux-concours et les pages de blagues.
q
Pour afficher la page d'index/première :
/ /
Pour afficher une page texte :
7
/ /
6
Pour accéder à des sous-pages :
Pour révéler du texte caché :
Pour figer une page utile :
pour afficher le texte. Appuyez
7
et Pepour visualiser les sous-
f
8/9
Tapez le numéro de la page puis appuyez sur
une image normale s’affichera. Le téléviseur indiquera
que la page a été localisée en affichant le numéro de la
page en haut de l’écran. Appuyez sur
visualiser cette page.
Pour afficher des flashs d’information :
Sélectionnez la page des flashs pour le service texte
particulier (consultez la page d’index du service texte).
Appuyez sur
mesure de leur transmission. Appuyez à nouveau sur
8/9
Vous devez désactiver la page des flashs avant de
changer de chaîne.
Pour sélectionner une page tout en
regardant un programme de télévision :
8/9
/ /
6
7
. Les flashs s’afficheront au fur et à
8/9
pour annuler les flashs.
Rappel : Vous devez désactiver le texte
pour pouvoir changer de chaîne – appuyez
deux fois sur la touche
6
/
/
7
.
:
pour
Il est parfois nécessaire de figer une page de texte.
Appuyez sur la touche qpour faire apparaître le
symbole qdans le coin supérieur gauche de l’écran.
La page reste figée tant que vous ne rappuyez pas sur
cette touche.
s
Appuyez sur la touche sune seule fois pour agrandir la
moitié supérieure de la page, appuyez une nouvelle fois
pour agrandir la moitié inférieure. Appuyez une troisième
fois pour repasser au format standard.
Pour agrandir la taille de l’affichage
texte :
72
Page 73

Questions-Réponses
Vous trouverez ci-dessous les réponses aux questions les plus fréquentes.
Pour plus de renseignements, veuillez visiter le site : www.toshiba.co.uk
Il n’y a pas d’image ni de son
Q
Vérifiez que le commutateur de prise de secteur
R
est sur marche et vérifiez toutes les connexions au
secteur.
Assurez-vous que le téléviseur n’est pas en mode Veille.
Il y a bien une image, mais il y a peu ou pas
Q
de couleur
Lorsque vous utilisez une source externe, par
R
exemple une cassette vidéo de mauvaise qualité, il
est parfois possible d’améliorer la reproduction des
couleurs. La couleur est réglée en usine sur Auto. de
façon à ce que le téléviseur affiche automatiquement le
meilleur système de couleurs.
Pour vérifier que le meilleur système de couleurs a été
sélectionné :
En laissant la source externe en lecture, sélectionnez
1
Rég. Manuel dans le menu RÉGLAGES.
Rég. Manuel
Système couleur : Auto.
EXT2 A M A G
OK
Mémo
MENU
Retour
A l’aide des touches Por Q, choisissez Auto.,
2
PAL, SECAM, NTSC 4.43 ou 3.58.
La cassette vidéo / le DVD n’apparaissent pas
Q
à l’écran
Assurez-vous que le magnétoscope ou le lecteur
R
DVD sont bien raccordés au téléviseur (voir
schéma des connexions page 45), puis sélectionnez
l’entrée correcte à l’aide de la touche B.
L’image vidéo est bonne, mais il n’y a pas de son
Q
EXIT
Retour TV
Pourquoi l'image du magnétoscope VCR/lecteur
Q
de DVD est-elle en noir et blanc ?
Vérifiez que vous avez sélectionné la bonne
R
entrée – S-VIDEO ou AV (voir la page
Connexions AV).
Pourquoi y a-t-il des parasites d’image et de son
sur toutes les chaînes numériques et
Q
analogiques ?
L’intensité du signal est peut-être trop forte. Réglez
R
l’option d’Amplificateur de signal dans le menu
RÉGLAGES sur Arrêt.
Quelles sont les autres causes de mauvaise image
Q
analogique ?
Les parasites ou un signal faible. Essayez une
R
autre chaîne. Un Accord fin manuel peut
améliorer la qualité de l’image.
Sélectionnez le menu Recherche manuelle.
1
Mettez la chaîne en surbrillance et appuyez sur
OK. Appuyez sur Rpour sélectionner Accord fin
manuel.
Utilisez les touches Pou Q pour clarifier l’image
2
et le son. Appuyez sur OK puis sur EXIT pour
sortir.
Recherche manuelle
1 L A C 22 +2 T F 1
OK
Mémo
MENU
Retour
Pourquoi les commandes du téléviseur ne
Q
fonctionnent-elles pas ?
Vérifiez que la fonction de Blocage du clavier
R
n’est pas activée.
Accord fin manuel
EXIT
Retour TV
Français
Vérifiez toutes les connexions des cables.
R
Il y a une image mais pas de son
Q
Vérifiez que le volume n’a pas été baissé ou que la
R
touche de coupure du son n’a pas été activée.
La télécommande ne fonctionne pas
Q
Vérifiez que le commutateur latéral de la
R
télécommande est dans la position TV.
Vérifiez que les piles sont chargées et correctement
insérées.
73
Page 74

Questions-Réponsessuite
Un message s’affiche en permanence à l’écran
Q
Appuyez sur la touche pour le faire
R
disparaître.
Pourquoi le menu principal DTV n’est-il pas
Q
disponible ?
Le mode analogique est sélectionné. Appuyez sur
R
la touche Bet maintenez-la enfoncée pour
sélectionner DTV.
Pourquoi certains menus sont-ils bloqués ?
Q
VERROUILLAGE MENU a été activé (voir la page
R
‘Contrôle parental’).
Pourquoi la chaîne numérique est-elle bloquée ?
Q
La chaîne a été sélectionnée dans Verrouillé
R
Programme (voir la section ‘Réglages numériques’).
Français
Pourquoi seulement certaines chaînes
Q
numériques peuvent-elles être regardées ?
Une liste de Programmes favoris a été
R
sélectionnée (voir la section ‘Programmes favoris’).
Réglez cette option sur TOUS PROG. ou changez les
chaînes à l’aide des touches numériques.
Pourquoi certaines chaînes numériques avec
Q
abonnement ne sont-elles pas disponibles ?
Votre abonnement doit être renouvelé. Veuillez
R
contacter votre fournisseur de service.
Pourquoi la bande sonore est-elle en français
alors qu’une autre langue audio a été
Q
sélectionnée ?
L’émission est seulement diffusée avec une bande
R
sonore en français.
+
i
Pourquoi n'y a-t-il pas de son en provenance de
Q
ma sono connectée ?
Vérifiez que l'option Haut-parleurs dans le menu
R
Son est bien réglée sur Arrêt.
Pourquoi y a-t-il des bandes verticales sur
Q
l'écran en mode PC ?
L'horloge peut nécessiter un ajustement.
R
Sélectionnez Réglage PC à partir du menu
RÉGLAGES, mettez en surbrillance horloge et ajustez
jusqu'à la disparition des lignes.
Pourquoi y a-t-il des bandes horizontales et/ou
Q
des images floues sur l'écran en mode PC ?
La Réglage phase peut nécessiter un ajustement.
R
Sélectionnez Réglage PC à partir du menu
RÉGLAGES, mettez en surbrillance Réglage phase et
ajustez jusqu'à ce que l'image soit claire.
Pourquoi les sous-titres numériques ne
s’affichent-ils pas à l’écran alors qu’ils ont été
Q
sélectionnés ?
Les sous-titres ne sont pas actuellement diffusés
R
par l’organisme de radiodiffusion.
Pourquoi n’y a-t-il pas de service de texte
Q
numérique ?
L’émission numérique regardée ne diffuse pas de
R
texte numérique. Essayez une autre émission.
Le texte analogique ne fonctionne pas
Q
correctement
Le texte nécessite un signal de diffusion puissant,
R
normalement obtenu par une antenne sur le toit
ou dans le grenier. Vérifiez l’antenne si le texte est illisible
ou brouillé. Consultez la page d’index principal du service
texte et sélectionnez le Guide de l’utilisateur. Vous y
trouverez une description plus ou moins détaillée des
principes de fonctionnement du texte. Pour de plus
amples renseignements concernant l’utilisation du texte,
reportez-vous au chapitre consacré au texte.
Que peut-on faire quand on a oublié le code
Q
PIN ?
Utilisez le code PIN passe-partout 1276 puis
R
changez-le en un code de votre choix. Assurezvous que personne d’autre ne peut utiliser le PIN passepartout en rangeant le Manuel utilisateur.
Pourquoi n’y a-t-il pas de sous-pages de texte
Q
analogiques ?
Le service sélectionné n’en diffuse pas, ou elles
R
n’ont pas encore été chargées. Appuyez sur la
touche Xpour y accéder. (Voir le chapitre consacré au
texte).
74
Page 75

Questions-Réponsessuite
Pourquoi les quatre numéros en couleur sont-ils
Q
visibles mais pas le texte ?
La fonction texte a été sélectionnée pendant la
R
visualisation d’une source extérieure comme un
DVD ou une vidéo. Aucun texte ne s’affichera à l’écran ou
une boîte peut apparaître pour indiquer qu’aucune
information n’est disponible. Sélectionnez un canal de
diffusion et appuyez sur
Pourquoi l’indicateur VERT de veille active
Q
met-il parfois plus longtemps à s’éteindre ?
En mode veille, la veille active du téléviseur
R
recherche automatiquement toutes les chaînes
pouvant être téléchargées, sous réserve que le Auto
upgrade soit MARCHE. Le temps nécessaire peut varier.
6
/ /
pour y accéder.
7
Il y a un problème avec la couleur lors de la
Q
lecture d’une source NTSC
Connectez la source par le biais d'une prise péritel,
R
et mettez en lecture. Sélectionnez Reg. Manuel
dans le menu RÉGLAGES.
Rég. Manuel
Système couleur : Auto.
EXT2 A M A G
OK
Mémo
MENU
Retour
Réglez la Couleur sur Auto. et quittez le menu.
1
Sélectionnez le menu Réglage image et réglez
2
la teinte.
EXIT
Retour TV
Français
Nettoyage de l'écran et du boîtier…
Après avoir débranché l'appareil, nettoyez l'écran et le boîtier à l'aide d'un chiffon sec et doux. Nous recommandons de ne pas utiliser
de produits d'entretien pour meubles ou de solvants de marque déposée sur l'écran ou le boîtier, cela pouvant endommager l'appareil.
Mise au rebut…
Les informations suivantes concernent uniquement les États membres de l’Union européene :
Ce symbole indique que ce produit ne peut pas être traité comme une simple ordure ménagère. En s’assurant que ce
produit est correctement éliminé, vous contribuerez à éviter des conséquences potentielles nuisibles pour l’environnement
et la santé, qui pourraient être autrement causées par une évacuation inappropriée de ce produit. Pour obtenir des
compléments d’information sur le recyclage de ce produit, veuillez contacter votre bureau municipal, votre service local
d’élimination des ordures ménagères ou le magasin où vous avez acheté le produit.
75
Page 76

Spécifications et accessoires
Systèmes de diffusion/canaux
PAL-I UHF UK21-UK69
PAL-B/G UHF E21-E69
SECAM-L UHF F21-F69
SECAM-D/K UHF R21-R69
Entrée vidéo PA L, SECAM, NTSC 3.58/4.43
Connexions externes
EXT1 Entrée/Sortie Péritel 21 broches RGB, A/V
EXT2 Entrée/Sortie Péritel 21 broches A/V, S-Vidéo
EXT3 Entrée Jacks audio Y, P
EXT3 Entrée (latérale) Jack audio Vidéo
HDMI 1/2 Entrée Connecteur HDMI
Français
PC Entrée Mini D-sub 15 broches Signal analogue RGB
PC/HDMI1 Audio Jacks audio Audio L + R
Sortie audio Fixe/Variable Jacks audio Audio L + R
VHF E2-E12, S1-S41
VHF F1-F10, B-Q
VHF R1-R12
Jacks audio A/V
Jacks audio Audio L + R
sortie sélectionnable
sortie sélectionnable
, PR/C
B/CB
Stéréo Nicam
Taille visible écran Modèle 26 66 cm
(approx.) 32 80 cm
Format 16 : 9
Sortie son (distorsion de 10%) Principale 10 W + 10 W
Consommation Modèle 26 135 W
conformément à 32 159 W
EN60107-1 : 1997 37 188 W
Vielle (approx.) Modèle 26 <1 W
Dimensions Modèle 26 56 cm (H) 66 cm (L) 28 cm (p)
(approx.) 32 61 cm (H) 80 cm (L) 30 cm (p)
R
Poids (approx.) Modèle 26 15 kg
Prise casque 3,5 mm stéréo
Accessoires 1 télécommande
37 69 cm (H) 92 cm (L) 30 cm (p)
(La dimension en hauteur inclut le support)
Système à 2 porteuses
37 94 cm
32 <1 W
37 <1 W
32 20 kg
37 25 kg
2 piles
(AAA, IEC R03 – 1,5 V)
76
Imprimè sur du papier recyclè. 100 % sans chlore.
© Toshiba Information Systems (U.K.) Limited
Toute reproduction, même partielle, strictement interdite sans
Toshiba Information Systems (U.K.) Limited
Caractéristiques techniques susceptibles de modifications sans préavis.
Conception : Zushi Illustration & Visualisation, Bristol, Royaume-Uni.
Tous droits réservés.
autorisation écrite préalable.
Consumer Products Division,
European Service Centre,
Admiralty Way, Camberley,
Surrey, GU15 3DT, Royaume-Uni
Page 77

Page 78

Inhalt
VORBEREITUNG ZUR INBETRIEBNAHME
Sicherheitshinweise – einige Hinweise und Regeln zur Beachtung 79
Installation und wichtige Informationen 80
Die Fernbedienung – Übersicht auf einen Blick 81
Anschließen externer Geräte – Anleitung zum Anschluss externer Geräte an die rückseitigen
Anschlüsse des Fernsehers 82
Anschließen eines Computers – Anschließen eines Computers an die rückseitige
Anschlussbuchse des Fernsehers 83
Bedienelemente und Eingangsanschlüsse – Einschalten des Fernsehers, Standby-Betrieb, Verwendung
der Bedienelemente, Kopfhörerbuchse, Anschluss von Geräten an die seitlichen Eingangsbuchsen 84
SENDEREINSTELLUNG AM FERNSEHGERÄT
DIGITAL – erstmalige Sendereinstellung am Fernsehgerät 85
DIGITAL – Automatischer Sendersuchlauf 86
DIGITAL – Sortieren von Programmplätzen, Manuelle Sendereinstellung 87
ANALOG – erstmalige Sendereinstellung im analogen Modus, Sprache, Land 88
ANALOG – Manuelle Sendereinstellung, Sendesystem 89
ANALOG – Automatischer Sendersuchlauf 90
ANALOG – Überspringen von Programmplätzen, Sortieren von Programmplätzen 91
BEDIENELEMENTE UND FUNKTIONEN
Allgemeine Bedienelemente – Wechseln von Programmplätzen 92
Übertragungen in Stereo und Zweikanalton – Stereo-/Mono- und
Zweikanaltonsendungen 92
Uhrzeitanzeige (nur analog) 92
Klangregelung – Lautstärke, Stummschaltung, Bass/Höhen/Balance 92
Klangregelung – Bassverstärkung, Zweikanalton (nur analog), Automatischer Lautstärkeanpassung
SRS WOW™ Soundeffekt – SRS 3D, FOCUS und TruBass 93
Anzeige im Breitbildformat 94
Bildeinstellung – Bildposition (nur analog), Hintergrundbeleuchtung 96
Bildeinstellung – Bildvoreinstellungen (Kontrast, Helligkeit, Farbe, Farbton, Schärfe), Schwarzwert,
MPEG-Rauschunterdrückung (MPEG NR), Digitale Rauschunterdrückung (DNR), Farbtemperatur 97
Bildeinstellung – 3D Colour Management, Farbinstellungen, Kinomodus, Antennenverstärker 98
Bildeinstellung – automatische Formatierung (Breitbild), Blaues Bild, Einstellung der Funktion "Side Panel",
Standbild 99
Tastensperre – Sperren der Tasten an des Fernsehers 99
DIGITAL – Programm-Timer 100
Aus-Timer 100
DIGITAL – Bildschirminformationen und elektronischer Programmführer 101
DIGITALE Einstellungen – Kindersicherung (Einstellen des PIN-Codes und des Modus) 102
DIGITALE Einstellungen – Lieblingsprogramme, gesperrte Programme, verschlüsselte Programme 103
DIGITALE Einstellungen – Audiosprachen, Untertitel, TV-Einstellungen zurücksetzen, allgemeine Schnittstelle 104
DIGITALE Einstellungen – Aktualisierung der Software (Version, Automatische Update,
Suche nach neuer Software) 105
PC-Einstellungen – Bildposition, Taktphase, Abtasttakt, Zurücksetzen 106
Auswahl von Eingängen und AV-Anschlüsse – Eingangs- und Ausgangsanschlüsse für
angeschlossene Geräte, Abschaltung analoger Übertragungen 107
VIDEOTEXT
ANALOGER Text – Einrichtung, allgemeine Informationen, auto- und Normaltext-Modus 109
ANALOGER Text – Steuertasten für Videotext 110
PROBLEMLÖSUNG
Fragen und Antworten – Antworten auf häufig gestellte Fragen, beispielsweise zur manuellen
Feinabstimmung und zum Farbsystem 111
INFORMATIONEN
Notizen – für Ihre eigenen Notizen 114
Spezifikationen und Zubehör – technische Daten des Fernsehgerätes und Angaben zum
mitgelieferten Zubehör 116
Deutsch
®
93
78
Page 79

Sicherheitshinweise
Dieses Gerät wurde in Übereinstimmung mit internationalen Sicherheitsstandards entwickelt und hergestellt.
Wie bei jedem anderen Elektrogerät müssen Sie jedoch die gebührende Vorsicht walten lassen, um eine
optimale Funktionsweise und Sicherheit zu gewährleisten. Bitte lesen Sie zu Ihrer eigenen Sicherheit die
nachfolgenden Hinweise sorgfältig durch. Die Hinweise sind allgemeiner Natur und bieten Unterstützung bei
der Handhabung aller elektronischen Geräte, wobei einige Punkte unter Umständen auf das gerade von
Ihnen erworbene Produkt nicht zutreffen.
Luftzirkulation
Lassen Sie im Umkreis des Fernsehgerätes mindestens
10 cm Abstand, um eine ausreichende Belüftung zu
ermöglichen, die Ihren Fernseher vor Überhitzung und
den daraus erwachsenden möglichen Schäden bewahrt.
Räume mit großer Staubentwicklung sollten als Standorte
ebenfalls gemieden werden.
Beschädigung durch Hitze
Wenn Sie das Fernsehgerät der direkten
Sonneneinstrahlung aussetzen oder in der Nähe eines
Heizkörpers aufstellen, kann es unter Umständen
beschädigt werden. Vermeiden Sie Standorte, an denen
extrem hohe Temperaturen oder eine hohe Luftfeuchtigkeit
vorherrschen. Am gewählten Gerätestandort darf die
Temperatur nicht unter 5 °C und nicht über 35 °C liegen.
Stromversorgung
Die für dieses Gerät erforderliche Netzspannung beträgt
220 – 240 V bei 50/60 Hz Wechselstrom. Schließen Sie
das Gerät niemals an Gleichstrom oder eine andere
Stromquelle an. Beachten Sie stets, dass das
Fernsehgerät nicht auf dem Netzkabel stehen darf.
Trennen Sie den Netzstecker NICHT vom Kabel, da im
Stecker ein spezieller Funkentstörfilter integriert ist,
dessen Funktion anderenfalls beeinträchtigt wäre.
WENDEN SIE SICH IM ZWEIFELSFALL AN EINEN
FACHKUNDIGEN ELEKTRIKER.
Empfehlungen
Lesen Sie die Bedienungsanleitung, bevor Sie das Gerät
in Betrieb nehmen.
Überprüfen Sie, ob alle elektrischen Kabel, einschließlich
des Netzkabels, der Verlängerungskabel und der
internen Verbindungen zwischen den einzelnen
Gerätekomponenten ordnungsgemäß und entsprechend
den Richtlinien des Herstellers angeschlossen wurden.
Schalten Sie das Gerät aus, und ziehen Sie den
Netzstecker, bevor Sie neue oder zusätzliche
Komponenten anschließen.
Wenden Sie sich an Ihren Fachhändler, falls Sie Zweifel
an der korrekten Installation, Funktionsweise oder
Sicherheit des Gerätes haben.
Besondere Vorsicht ist angebracht, wenn sich Glasplatten
oder Türen in der Nähe des Gerätes befinden.
ENTFERNEN SIE KEINE FEST ANGEBAUTEN
GEHÄUSETEILE, DA ANSONSTEN GEFÄHRLICHE
SPANNUNGEN FREIGESETZT UND STROMFÜHRENDE
TEILE OFFEN GELEGT WERDEN KÖNNEN.
DER NETZSTECKER DIENT ALS TRENNVORRICHTUNG
UND SOLLTE DAHER GUT ZUGÄNGLICH SEIN.
Warnhinweise
Die Belüftungsschlitze des Geräts dürfen NICHT mit Zeitungen,
Tischdecken, Vorhängen oder ähnlichen Stoffen abgedeckt
werden. Durch Überhitzung können Schäden verursacht und
die Lebensdauer des Gerätes verkürzt werden.
Elektrische Geräte dürfen NICHT mit Tropf- oder Spritzwasser
in Berührung kommen. Achten Sie darauf, dass keine Behälter
mit Flüssigkeiten, beispielsweise Blumenvasen, auf dem Gerät
abgestellt werden.
Stellen Sie KEINE heißen Gegenstände oder offene Flammen,
wie zum Beispiel brennende Kerzen oder Nachtlampen, auf
dem Gerät oder in seiner Nähe ab. Hohe Temperaturen
können zum Schmelzen von Kunststoff führen und Brände
auslösen.
Verwenden Sie KEINEN behelfsmäßigen Fernsehtisch, und
befestigen Sie die Tischbeine NIEMALS mit Holzschrauben.
Verwenden Sie aus Sicherheitsgründen nur vom Hersteller
freigegebene und entsprechend den Anweisungen montierte
Ständer, Halterungen oder Stative und die mitgelieferten
Befestigungsmaterialien.
Achten Sie bei Verwendung der Kopfhörer auf eine
angemessene und NICHT zu hohe Lautstärke, da anderenfalls
Ihr Hörvermögen auf Dauer beeinträchtigt werden kann.
Lassen Sie das Gerät NICHT eingeschaltet, wenn Sie längere
Zeit nicht anwesend sind, es sei denn, es ist ausdrücklich für
den unbeaufsichtigten Betrieb gekennzeichnet oder verfügt
über einen Standby-Modus. Schalten Sie den Fernseher aus,
und ziehen Sie den Netzstecker. Erklären Sie ebenfalls Ihren
Familienmitgliedern, wie das Gerät auszuschalten ist. Für
Personen mit Behinderungen müssen unter Umständen
spezielle Vorkehrungen getroffen werden.
Benutzen Sie das Gerät NICHT weiter, wenn Sie Zweifel an
der korrekten Funktionsweise haben oder das Gerät in
irgendeiner Weise beschädigt ist. Schalten Sie es ab, ziehen Sie
den Netzstecker, und wenden Sie sich an einen Fachhändler.
Achten Sie VOR ALLEM darauf, besonders bei Kindern,
dass NIEMALS der Bildschirm Schlägen oder Stößen
ausgesetzt wird oder Gegenstände in Löcher, Schlitze
oder andere Gehäuseöffnungen gesteckt werden.
Gehen Sie NIEMALS leichtfertig mit elektrischen Geräten
jeglicher Art um – Vorsicht ist besser als Nachsicht!
Deutsch
79
Page 80

Installation und wichtige Informationen
Wahl des Standorts
Stellen Sie das Fernsehgerät an einem Platz auf, der möglichst
nicht der direkten Sonneneinstrahlung ausgesetzt ist und sich nicht
in der Nähe starker Lichtquellen befindet. Um ein optimales
Fernseherlebnis zu gewährleisten, wird ein Ort mit weichem
indirektem Licht empfohlen. Ziehen Sie gegebenenfalls die
Vorhänge zu, oder schließen Sie die Jalousien, damit die Sonne
nicht direkt auf den Bildschirm scheint.
Stellen Sie das Gerät auf einen robusten Unterbau, der eben und
fest ist. Der Fernseher sollte außerdem mit der Halterung an der
Rückseite des Standfußes über eine feste Verankerung an der
Wand gesichert oder mit dem unter dem Standfuß angebrachten
Befestigungsband auf der Abstellfläche fixiert werden, damit das
Gerät nicht herunterfallen kann.
LCD-Bildschirme werden unter Verwendung von
Hochpräzisionstechnologie hergestellt, trotzdem können in einigen
Bildschirmbereichen zuweilen fehlende Bildpunkte oder
Leuchtflecken vorkommen. Dies ist jedoch kein Zeichen einer Fehlfunktion.
Stellen Sie sicher, dass das Fernsehgerät an einem Ort steht, an dem es keinen Stößen ausgesetzt und nicht von anderen
Gegenständen getroffen werden kann, da der Bildschirm durch übermäßige Druckeinwirkung zersplittern oder beschädigt werden
kann. Weiterhin muss gewährleistet sein, dass keine fremden Gegenstände in Schlitze oder andere Gehäuseöffnungen des Gerätes
eindringen können.
Halterung
Seitenansicht Ansicht von oben
Bitte beachten!
Stabiler Haken
(so kurz wie möglich)
Halterung
Halterung
HAFTUNGSAUSSCHLUSSKLAUSEL
Toshiba haftet unter keinen Umständen für Verluste und/oder Schäden am Produkt, die durch folgende Ereignisse hervorgerufen
werden:
i) Brand;
ii) Erdbeben;
iii) Unfallschaden;
iv) absichtliche Zweckentfremdung bzw. falsche Verwendung des Produkts;
v) Nutzung des Produkts unter ungeeigneten Bedingungen;
vi) Verlust und/oder Schäden am Produkt, die auftreten, während sich das Produkt im Besitz eines Dritten befindet;
vii) jegliche Schäden oder Verluste, die durch Bedienfehler oder die Nichtbeachtung von Anweisungen aus der
Bedienungsanleitung durch den Eigentümer verursacht werden;
viii) jegliche Verluste oder Schäden, die direkt auf die missbräuchliche Verwendung oder Fehlfunktion des Produkts bei
gleichzeitiger Nutzung mit angeschlossenen Geräten zurückzuführen sind;
Weiterhin haftet Toshiba unter keinen Umständen für mittelbare Verluste und/oder Folgeschäden, einschließlich, jedoch nicht
beschränkt auf folgende Schäden: Gewinnverlust, Geschäftsunterbrechung und Verlust gespeicherter Daten, unabhängig davon,
ob dieser Datenverlust während des normalen Betriebs oder bei missbräuchlicher Nutzung des Produkts entstanden ist.
Wenn stehende Bilder wie Videotext, Senderkennungen, Computeranzeigen, Videospiele, Bildschirmmenüs o.ä. über eine längere
Zeit angezeigt werden, ist es empfehlenswert Kontrast und Helligkeit zu verringern.
Deutsch
80
Page 81

Die Fernbedienung
UP
Eine übersichtliche Darstellung mit einer Erläuterung der einzelnen Tasten Ihrer Fernbedienung
Stummschaltun
Zifferntasten
Umschalten zum vorherigen Programm
Zum Anzeigen des digitalen
Programmführers auf dem Bildschirm
Bildschirmmenüs
Ta sten für Programmwahl und Wechsel
Wählbare Bildvoreinstellungen
Bei Verwendung eines TOSHIBA
Videorecorders oder DVD-Players:
Drücken Sie
m
Drücken Sie
w
Drücken Sie
Drücken Sie
s
Drücken Sie
r
Drücken Sie
p
Drücken Sie
Drücken Sie
s
der Videotextseiten
Zur Moduswahl
Anzeige im Breitbildformat
für PAUSE
für AUSWERFEN
für ÜBERSPRINGEN –
l
q
SCHNELLER RÜCKLAUF
für ÜBERSPRINGEN –
l
SCHNELLER VORLAUF
für WIEDERGABE
für STOPP
für SCHNELLER RÜCKLAUF
q
für SCHNELLER VORLAUF
Ein/Standby
Wahl des Eingangs für externe Quelle
Zum Umschalten zwischen TV, Radio und
Lieblingsprogrammen im digitalen Modus
Verlassen der Menüs
Verwenden Sie die Pfeiltasten zum
Verschieben des Cursors in den
Bildschirmmenüs nach oben, unten, links
oder rechts. Bestätigen Sie Ihre Auswahl
mit OK
Tasten zur Lautstärkeeinstellung
Zum Anzeigen der digitalen
Bildschirminformationen
Zum Aufrufen von Videotextdiensten im
analogen Modus
Im TV-Modus:
u Standbild
OI/II Stereo-/Zweikanaltonempfang
SUBTITLE Digitale Untertitel
Uhrzeitanzeig
8/9
Bei Verwendung des elektronischen
Programmführers:
– 24 Stunden
l
q
+ 24 Stunden
l
s
Steuerungstasten für Videotext
Einlegen der Batterien und wirksame Reichweite der Fernbedienung
Nehmen Sie die Batterieabdeckung ab, so dass das Batteriefach sichtbar wird, und legen Sie die Batterien mit
der richtigen Polarität ein. Geeignete Batterietypen für diese Fernbedienung sind AAA, IEC R03 mit jeweils 1,5 V.
In der Fernbedienung dürfen nicht gleichzeitig entladene und neue Batterien oder unterschiedliche Batterietypen
verwendet werden. Wechseln Sie verbrauchte Batterien sofort aus, anderenfalls könnte das Batteriefach durch
auslaufende Säure beschädigt werden. Setzen Sie das Gerät keiner übermäßigen Hitze durch direkte
Sonneneinstrahlung, Feuer usw. aus. Geben Sie Altbatterien an einem dafür gekennzeichneten
Entsorgungsplatz ab.
Die Leistung der Fernbedienung verschlechtert sich ab einer Entfernung von 5 m bzw. außerhalb eines Winkels
von 30° zum Mittelpunkt des Fernsehgerätes.
81
Deutsch
Page 82

Anschließen externer Geräte
Schalten Sie alle Netzschalter aus, bevor Sie externe Geräte anschließen. Falls das betreffende
Gerät über keinen Netzschalter verfügt, ziehen Sie den Netzstecker aus der Steckdose.
EINGANG FÜR VIDEOKOMPONENTEN
SCART 2 (EXT2)
(EXT3)
SCART 1 (EXT1)
Als Decoder
*
gelten beispielsweise
ein digitaler
Satellitenempfänger
oder andere
kompatible Decoder.
decoder*
Medienrecorder
Antennenkabel:
Schließen Sie das Antennenkabel an die Antennenbuchse an der
Rückseite des Fernsehgerätes an. Bei Verwendung eines
Decoders* und/oder eines Medienrecorders ist zu beachten, dass
das Antennenkabel über den Decoder und/oder den
Medienrecorder mit dem Fernsehgerät verbunden werden muss.
SCART-Kabel:
Verbinden Sie die Buchse IN/OUT des Medienrecorders über
ein Scart-Kabel mit dem Fernseher. Verbinden Sie die Buchse
TV des Decoders mit dem Fernseher. Verbinden Sie die Buchse
SAT des Medienrecorders mit der Buchse MEDIA REC. am
Decoder.
Schalten Sie vor dem Start des Autom. Sendersuche den
Decoder und Medienrecorder in den Standby-Modus.
Über die Phono-Anschlüsse neben den Buchsen COMPONENT
VIDEO INPUT (Komponenten Videoeingang) können L- und RAudiosignale eingespeist werden.
Ein zusätzlicher fester/variabler Audioausgang ermöglicht den
Anschluss einer passenden HiFi Anlage. Dazu muss die Option
Lautsprecher im To n-Menü auf Aus gestellt werden.
Option für den variablen Audioausgang wird über die
Klangregelung eingestellt.
HDMI™ (High-Definition Multimedia Interface) ist eine Schnittstelle
für DVD-Player, Decoder oder Elektrogeräte mit digitalem Audiound Videoausgang. HDMI ist für hochauflösende 1080iVideosignale optimiert, kann jedoch auch 480i-, 480p-, 576i-,
576p- und 720p-Signale verarbeiten und anzeigen.
Deutsch
TV
IN/OUT
Die
MEDIA REC.
SAT
KABELHALTER
BEFESTIGUNGSBAND
HDMI™-EINGANGSBUCHSEN
ALLGEMEINE SCHNITTSTELLE
Die allgemeine Schnittstelle (Common Interface) ist zum
Anschluss eines CA-Moduls (Conditional Access Module;
dient zum Entschlüsseln kodierter Daten) bestimmt. Es
können zwei CA-Module angeschlossen werden. Wenden
Sie sich hierzu an den entsprechenden Dienstanbieter.
BITTE BEACHTEN: Dieses Fernsehgerät kann zwar an
HDMI-Geräte angeschlossen werden, aber es ist möglich,
dass manche Geräte nicht richtig funktionieren.
An der Rückseite des Fernsehgerätes können die
unterschiedlichsten Geräte angeschlossen werden. Lesen
Sie daher unbedingt für alle Zusatzgeräte vorher die
Bedienungsanleitungen der jeweiligen Hersteller.
Wir empfehlen Ihnen, für einen Decoder den Anschluss SCART 1
und für den Medienrecorder ggf. den Anschluss SCART 2 zu
verwenden.
Beim Anschluss von S-VIDEO-Geräten muss die Einstellung
INPUT für EXT2 entsprechend festgelegt werden. Siehe Seite 107.
Wenn Ihr Fernsehgerät automatisch zur Anzeige der
angeschlossenen Zusatzgeräte umgeschaltet wird, können Sie in
den normalen TV-Modus zurückkehren, indem Sie die Taste mit
der gewünschten Programmnummer drücken.
Um das jeweilige externe Gerät wieder aufzurufen, drücken Sie
die Taste
EXT2, EXT3(C), HDMI1, HDM2, PC oder ATV umschalten.
Der Kabelhalter kann für Antennen-, Scart- und Audiokabel
verwendet werden. Der Kabelhalter ist kein Tragegriff!
Vergewissern Sie sich vor dem Transport des Fernsehers stets,
dass alle Kabel entfernt wurden.
HDMI, das HDMI Logo und High-Definition Multimedia Interface sind
Marken oder eingetragene Marken von HDMI Licensing, LLC.
. Mit dieser Taste können Sie zwischen DTV, EXT1,
B
82
Page 83

Anschließen eines Computers
Schalten Sie alle Netzschalter aus, bevor Sie externe Geräte anschließen. Falls das betreffende
Gerät über keinen Netzschalter verfügt, ziehen Sie den Netzstecker aus der Steckdose.
Rückseite Ihres Fernsehgerätes
Audiokabel für
PC-TV-Verbindung
(nicht mitgeliefert)
Computer
Mini-D-Sub-
Stecker, 15-polig
RGB-PC-Kabel
(nicht mitgeliefert)
Übergangsstecker, sofern ein Adapter erforderlich ist (nicht mitgeliefert)
Verbinden Sie das PC-Kabel des Computers mit dem PCAnschluss an der Rückseite des Fernsehgerätes.
Schließen Sie das Audiokabel an die PC/HDMI1Audiobuchse an der Rückseite des Fernsehgerätes an.
Wählen Sie im Menü EINSTELLUNG das Untermenü
AV-Anschluss aus. Wählen Sie dann in den Optionen
PC/HDMI1 Ton die Einstellung PC aus.
Drücken Sie die Taste
auszuwählen.
Folgende Signale können auf dem Bildschirm angezeigt
werden:
VGA: 640 x 480/60 Hz (VESA)
SVGA: 800 x 600/60 Hz (VESA)
XGA: 1024 x 768/60 Hz (VESA)
SXGA: 1280 x 1024/60 Hz (VESA)
WICHTIGER HINWEIS: SXGA-Signale werden zwar
angezeigt, jedoch entspricht die Anzeige nicht
dem VESA-Standard.
HINWEIS:
Einige PC-Modelle können nicht an dieses Fernsehgerät
angeschlossen werden.
Für Computer mit einem DOS/V-kompatiblen 15-poligen
Mini-D-Sub-Anschluss wird kein Steckadapter benötigt.
An den Bildschirmrändern können unter Umständen
Streifen erscheinen, oder Teile des Bildes können unscharf
sein. Dieser Effekt ist auf die Skalierung des Bildes durch
das Gerät zurückzuführen und stellt keine Fehlfunktion dar.
, um den PC-Modus
B
Bei ausgewähltern Eingang PC-Modus sind einige
funktionen am Fernsehgerät nicht verfügbar, z.B. aus
dem Menü EINSTELLUNG die option Manuelle
Einstellung und aus dem Menü Bildeinstellung die
option Farbe, Farbton, DNR und Schwarzanp.
Signaldaten für 15-poligen Mini-D-Sub-Stecker
Pinbelegung für RGB/PCAnschlussklemme
Pin-Nr. Signalname Pin-Nr. Signalname
1R9NA
2G10 Masse
3B11NA
4 NA (
nicht angeschlossen
5NA13H-Sync
6Masse 14 V-Sync
7Masse 15 NA
8Masse
)12 NA
Deutsch
83
Page 84

Bedienelemente und Eingangsanschlüsse
Über die Eingangsbuchsen an der Seite des Fernsehgerätes lassen sich verschiedenste externe Geräte
anschließen.
Obwohl sich alle erforderlichen Anpassungen und Einstellungen an Ihrem Fernsehgerät mit der Fernbedienung
vornehmen lassen, können Sie einige Funktionen auch direkt über die am Fernseher angebrachten Tasten
steuern.
EINGANG 3
(EXT 3)
GRÜNE – Aktive Standby
ROT – Netzbetrieb
Eingang 3 (an der
Seite) hat Vorrang vor
Standby
EXT3 (an der
Rückseite), falls beide
Anschlüsse gleichzeitig
belegt sind.
Einschalten
Wenn die ROTE LED-Anzeige nicht leuchtet, überprüfen Sie,
ob der Netzstecker an die Stromversorgung angeschlossen
ist. Wenn kein Bild erscheint, drücken Sie die Taste
der Fernbedienung, und warten Sie einige Sekunden.
Drücken Sie auf der Fernbedienung die Taste
Fernsehgerät in den Standby-Modus zu schalten. Daraufhin
leuchtet die GRÜNE LED-Anzeige, die sich neben der ROTEN
LED-Anzeige befindet, kurz auf und erlischt dann. Drücken
Sie erneut die Taste
normalen Anzeigemodus zu schalten. Unter Umständen
dauert es einige Sekunden, bis das Bild erscheint.
, um den Fernseher wieder in den
i
, um das
i
i
Benutzung der Fernbedienung
Drücken Sie die Taste MENU auf der Fernbedienung, um
die Menüs anzuzeigen.
Im digitalen Modus werden in der Menüleiste am oberen
Bildschirmrand drei verschiedene Symbole für die einzelnen
Funktionsmenüs angezeigt. Wenn Sie mit Hilfe der Tasten
oder Reines dieser Symbole auswählen, werden jeweils
S
die entsprechenden Optionen unterhalb der Menüleiste
angezeigt.
Im analogen Modus enthält diese Menüleiste fünf
Funktionssymbole. Wenn Sie mit Hilfe der Tasten Soder
eines dieser Symbole auswählen, werden jeweils die
entsprechenden Optionen unterhalb der Menüleiste
angezeigt.
Deutsch
auf
Drücken Sie auf der Fernbedienung die Taste Q, um nach
unten durch die Menüoptionen zu blättern. Mit den Tasten
OK, Soder Rkönnen Sie anschließend die gewünschte
Option auswählen. Befolgen Sie die Bildschirmanweisungen.
Die Funktionen der einzelnen Menüs sind in dieser
Bedienungsanleitung detailliert beschrieben.
Verwenden der Bedienelemente
und Anschlüsse
Drücken Sie die Taste
einzustellen.
Drücken Sie die Tasten
wechseln.
Drücken Sie die Taste MENU auf der Fernbedienung und
anschließend S
Bildeinstellungen anzupassen.
Drücken Sie dazu zweimal MENU, um das Menü zu
verlassen.
Beim Anschließen von Audiogeräten an den Anschluss EXT3
muss der Audioausgang des jeweiligen Gerätes mit den
Phono-Anschlussbuchsen am Fernseher verbunden werden.
Drücken Sie zur Auswahl des Eingangs die Taste
gemäß der Beschreibung auf Seite 107 die Einstellung EXT3
angezeigt wird. Der Signaltyp wird vom Fernsehgerät
automatisch erkannt.
R
Genauere Informationen entnehmen Sie bitte der
Bedienungsanleitung des anzuschließenden Gerätes.
Hinweis: Wenn Sie Kopfhörer anschließen, werden alle
Lautsprecher stummgeschaltet.
— j +
, um die Lautstärke
eeFff
,Rbzw.
P oder Q, um die Ton- und
, um das Programm zu
-, bis
B
84
Page 85

Erstmalige Sendereinstellung am Fernsehgerät
Schalten Sie vor dem Einschalten des Fernsehgerätes Ihren Decoder und Medienrecorder in den Standby-
Modus, sofern solche Geräte angeschlossen sind. Vergewissern Sie sich außerdem, dass die Antenne
angeschlossen ist. Nehmen Sie die Einstellung des Fernsehgerätes mit den Tasten der Fernbedienung vor, die
in der Abbildung auf Seite 81 erläutert sind.
Drücken Sie die Netztaste, um den LOCAL
1
OPTIONS aufzurufen. Dieses Bildschirmfenster
wird beim erstmaligen Einschalten des
Fernsehgerätes und bei jedem Zurücksetzen der
Einstellungen des Geräts angezeigt.
Country FRANCE
Language ENGLISH
Audio Language ENGLISH
Subtitles OFF
Local Time Settings 0
Drücken Sie die Taste Q um die Menüoption
2
Country zu markieren. Wählen Sie dann mit den
Tasten SoderReine Ländereinstellung aus.
Drücken Sie die Taste Q, um die Menüoption
3
Language zu markieren. Zur Auswahl verwenden
Sie die Taste SoderR.
Drücken Sie die Taste OK, um die Sendersuche
4
zu starten.
LOCAL OPTIONS
Continue
Der Bildschirm AUTOMATISCHE ABSTIMMUNG
wird angezeigt. Bei diesem Vorgang wird nach
allen Sendern gesucht, deren Signale empfangen
werden. In der Statusleiste wird der Fortschritt des
Suchlaufs dynamisch angezeigt.
Sie müssen erst warten, bis das Fernsehgerät
den Suchlauf abgeschlossen hat.
Die Nummern
Ihrer Kanäle
können sich
von den hier
dargestellten
Nummern
unterscheiden.
AUTOMATICHE ABSTIMMUNG
Fortschritt
Progr. Name Typ U/VHF Qualität
70 RTL2 34 GUT
87 VOX 21
EXIT
Abbr.
SCHLECHT
Nach Abschluss der Suche schaltet das
Fernsehgerät automatisch auf den ersten
Programmplatz um.
Im Bildschirmfenster des AUTOMATISCHE
ABSTIMMUNG werden alle gefundenen Sender
in einer Übersicht angezeigt.
AUTOMATISCHE ABSTIMMUNG
86 Programme gefunden
55 TV 24 Radio
Zum TV sehen OK drücken
Progr. Name Typ U/VHF Qualität
1 Das Erste 34 GUT
2 ZDF 34 GUT
3 WDR Düsseldorf * 31 GUT
4 Phoenix 31
5 arte 48 GUT
6 RTL Television 31
Wechs. Betrachten
Seite – Seite + Sortieren
SCHLECHT
SCHLECHT
85
Mit der Taste Q oderPkönnen Sie durch die
5
Liste blättern und bei Bedarf einen Sender
auswählen. Drücken Sie dann OK, um den
ausgewählten Sender anzuzeigen.
HINWEIS: Die Zeit wird mittels Übertragung
automatisch gestellt, kann aber mit Hilfe der
Ortszeiteinstellung bis zu zwei Stunden
vor- oder nachgestellt werden.
Deutsch
Page 86

Digital – Automatische Sendersuchlauf
HINWEIS: Für den Empfang neuer Sender, die den Sendebetrieb erst aufgenommen haben, muss die
Sendereinstellung jeweils erneut ausgeführt werden.
Automatische Sendersuchlauf
Mit dem Automatische Abstimmung wird eine komplett
neue Sendereinstellung am Fernsehgerät durchgeführt, so
dass auf diese Weise die Senderliste aktualisiert werden kann.
Es wird empfohlen, den automatischen Abstimmungen
in regelmäßigen Abständen erneut auszuführen, um
zu gewährleisten, dass alle neuen Sender in die
Senderliste übernommen werden.
Alle aktuellen Programme und Einstellungen, z. B.
Lieblingsprogramme und gesperrte Programme, werden
jedoch bei einem neuen Suchlauf gelöscht.
Drücken Sie die Taste MENU, um das
1
EINSTELLUNGEN MENÜ aufzurufen. Drücken Sie
Q, um die Option Automatische Abstimmung
zu markieren. Drücken Sie die Taste OK.
Eine Bildschirmmeldung wird angezeigt, in der Sie
2
darauf hingewiesen werden, dass alle bisher
gespeicherten digitalen Programme und
Einstellungen gelöscht werden. Drücken Sie OK,
um den Vorgang fortzusetzen und den
Automatische Abstimmung zu starten.
WARNUNG
! Alle voreingestellten digitalen
Programme werden gelöscht. Ausführen?
Ja
MENU
Ausw.
Jetzt wird nach allen Sendern gesucht, deren
Signale empfangen werden.
AUTOMATICHE ABSTIMMUNG
Fortschritt
Progr. Name Typ U/VHF Qualität
70 RTL2 34 GUT
87 VOX 21
Abbr.
SCHLECHT
Sie müssen erst warten, bis das Fernsehgerät
den Suchlauf abgeschlossen hat.
Nach Abschluss der Suche werden im
Bildschirmfenster des AUTOMATISCHE
ABSTIMMUNG alle gefundenen Sender in einer
Übersicht angezeigt.
AUTOMATISCHE ABSTIMMUNG
86 Programme gefunden
55 TV 24 Radio
Zum TV sehen OK drücken
Progr. Name Typ U/VHF Qualität
1 Das Erste 34 GUT
2 ZDF 34 GUT
3 WDR Düsseldorf * 31 GUT
4 Phoenix 31
5 arte 48 GUT
6 RTL Television 31
Wechs. Betrachten
Seite – Seite + Sortieren
Mit der Taste Q oderPkönnen Sie durch die Liste
3
blättern und bei Bedarf einen Sender auswählen.
Drücken Sie dann OK, um den ausgewählten
Sender anzuzeigen.
Durch anhaltendes Drücken der Taste
auf dem Bildschirm jederzeit eine Liste mit den
Betriebsmodi des Fernsehers und allen
gespeicherten extern angeschlossenen Geräten
angezeigt werden. Mit den TastenPund Q
können Sie eine gewünschte Position markieren.
Drücken Sie dann zur Auswahl die Taste OK.
3C
B
2
B
1
B
DTV
ATV
PC
HDMI2
Bei ausgewähltem DTV-Modus können Sie durch
wiederholtes Drücken der Taste
allen angeschlossenen Geräten und dem letzten im
DTV-Modus angezeigten Kanal durchblättern.
B
SCHLECHT
SCHLECHT
kann
B
eine Liste mit
Deutsch
EXIT
Abbr.
86
Page 87

Digital – Sortieren von Programmplätzen,
Manuelle Sendereinstellung
HINWEIS: Beim Ausschalten des Fernsehers wird der zu diesem Zeitpunkt jeweils eingestellte Modus
gespeichert und automatisch ausgewählt, wenn das Fernsehgerät wieder eingeschaltet wird.
Sortieren von Programmplätzen
Die Reihenfolge der Sender lässt sich nach Belieben
Drücken Sie die Taste MENU, um das
1
EINSTELLUNGEN MENÜ auf dem Bildschirm
aufzurufen.
2
Blättern Sie durch Drücken der Taste Q durch
die Menüoptionen, und markieren Sie
Programme. Drücken Sie die Taste OK.
TV Einstellungen OK
Lokale Optionen OK
Automatische Abstimmung OK
Manuelle Abstimmung OK
Programme OK
MENU
Die Senderliste wird jetzt angezeigt. Markieren
3
Sie mit Hilfe der Taste Q oderPden Sender,
den Sie verschieben möchten, und drücken Sie
die Taste R.
Der ausgewählte Sender erscheint jetzt auf der
rechten Seite des Bildschirms.
Progr. Name
1 Dae Erste
2 ZDF
3 WDR Düsseldorf *
4 Phoenix
6 RTL Television
verändern.
EINSTELLUNGEN MENÜ
Zurück
EXIT
TV
PROGRAMME
5 arte
Sortieren Sp. MENU Zurück EXIT TV
Seite – Seite +
Blättern Sie wieder mit den Tasten Q oder
4
durch die Liste, bis Sie die gewünschte
Programmposition erreichen. Bei diesem
Vorgang werden die übrigen Sender
entsprechend verschoben.
Drücken Sie Szum Speichern ihres
5
Programmplatzes. Wiederholen Sie den Vorgang
bei Bedarf, und drücken Sie anschließend EXIT.
P
Manuelle Sendereinstellung
Diese Funktion steht für Servicetechniker zur Verfügung
oder kann zur direkten Kanaleingabe genutzt werden,
falls der Multiplexkanal bekannt ist.
Wählen Sie im EINSTELLUNGEN MENÜ die
1
Option Manuelle Abstimmung aus, und
drücken Sie dann OK.
Geben Sie die Multiplexnummer mit den
2
Zifferntasten der Fernbedienung ein, und
drücken Sie dann OK. Der Fernseher sucht
daraufhin automatisch nach dem
entsprechenden Multiplexkanal.
Sobald der Multiplexkanal gefunden wurde,
werden alle derzeit noch nicht in der
Programmliste enthaltenen Kanäle hinzugefügt
und die Programminformationen am oberen
Bildschirmrand aktualisiert.
Wiederholen Sie den Vorgang bei Bedarf.
3
Drücken Sie EXIT, um den Vorgang
abzuschließen.
Deutsch
87
Page 88

Erstmalige Sendereinstellung im
analogen Modus
Mit der Funktion Quick Setup (Automatische Installation) können alle in Ihrem Empfangsbereich derzeit
verfügbaren analogen Kanäle eingestellt werden. Um das Fernsehgerät in den ATV-Modus zu schalten,
müssen Sie die Taste
dann OK, um den Modus auszuwählen.
gedrückt halten und dann mit Poder Q die Option ATV markieren. Drücken Sie
B
Wählen Sie den ATV-Modus aus. Der Bildschirm
1
Automatische Installation wird angezeigt.
Automatische Installation
Bitte wählen Sie Ihre Sprache.
Sprache Deutsch
EXIT
Beenden
Wählen Sie Ihre Language mit den Tasten
2
oderRaus, und drücken Sie anschließend die
S
Taste OK.
Wählen Sie dann mit den Tasten SoderRIhr
3
Land aus.
Drücken Sie die Taste OK, um die Funktion
4
Autom. Einstellung zur Autom. Sendersuche
zu starten.
suchen
Kanal : C22 Sender : BBC1
EXIT
Jetzt wird nach allen Sendern gesucht, deren
5
Signale empfangen werden. Durch einen
Statusbalken wird der Fortschritt des Suchlaufs
dynamisch angezeigt.
Sie müssen erst warten, bis das Fernsehgerät
Nach Abschluss der Suche wählt das
Fernsehgerät automatisch den ersten
Programmplatz aus und ruft das Bildschirmfenster
Manuelle Sendersuche auf.
Autom. Sendersuche
stop
den Suchlauf abgeschlossen hat.
OK
weiter
Manuelle Sendersuche
Prog. Kanal Sender
1 C22 BBC1
2 C28 BBC2
3 C25 ITV
4 C32 CH4
5 C69
6 C69
OK
Auswahl ordnen
MENU
zurück
Mit der Taste Q oderPkönnen Sie durch die
6
Liste blättern und bei Bedarf einen Sender
auswählen. Drücken Sie dann EXIT, um den
ausgewählten Sender anzuzeigen.
Die Senderreihenfolge kann im Bildschirmfenster
Manuelle Sendersuche verändert werden
(siehe Abschnitt zum ‘Sortieren von
Programmplätzen’ im analogen Modus).
Durch anhaltendes Drücken der Taste Bkann
auf dem Bildschirm jederzeit eine Liste mit den
Betriebsmodi des Fernsehers und allen
gespeicherten extern angeschlossenen Geräten
angezeigt werden. Mit den TastenPund Q
können Sie eine gewünschte Position markieren.
Drücken Sie dann zur Auswahl die Taste OK.
B
B
DTV
ATV
PC
HDMI2
HDMI1
Bei ausgewähltem ATV-Modus können Sie durch
wiederholtes Drücken der Taste
allen angeschlossenen Geräten und dem letzten im
ATV- Modus angezeigten Kanal durchblättern.
EXIT
Beenden
2
1
eine Liste mit
B
Deutsch
88
Page 89

Analog – Manuelle Sendereinstellung
Für Ihr Fernsehgerät besteht auch die Möglichkeit einer manuellen Sendereinstellung mit Manuelle Sendersuche.
Beispiel: Das Fernsehgerät kann nicht per Scart-Kabel an einen Medienrecorder/Decoder angeschlossen werden,
oder Sie möchten einen Sender in einem anderen System einstellen.
Benutzen Sie die Tasten SundR, um sich innerhalb des Bildschirmmenüs zu bewegen und die entsprechende Option für die manuelle
Einstellung auszuwählen.
OK
OK
OK
Progr.
überspr.
P
1/2
Die Nummern
Ihrer Kanäle
können sich
von den hier
dargestellten
Nummern
unterscheiden.
89
Kanal Suchen
Feineinstellung
Sender
oder Qund SoderRzur Eingabe einer Senderbezeichnung,
Drücken Sie OK, zur Auswahl. Wenn es sich um
3
ein zu überspringendes Programm handelt, muss
die Option Programme ordnen vor dem
Speichern zurückgesetzt werden.
Manuelle Sendersuche
EXIT
System
Beenden
0 B/G A C 60 0
OK
speichern
MENU
zurück
Drücken Sie die Taste R, um System auszuwählen.
4
Mit Poder Q können Sie die Einstellung
gegebenenfalls ändern.
Drücken Sie anschließend die Taste R, um die
5
Option Suchen auszuwählen.
Drücken Sie die Taste Poder Q, um den
6
Suchlauf zu starten. Das Suchsymbol blinkt
während des Suchlaufs.
Manuelle Sendersuche
0 B/G A C 60 0
OK
speichern
MENU
zurück
Jedes Signal wird auf dem Fernsehbildschirm
7
angezeigt. Wenn nicht das Signal vom
Suchen : nach oben
EXIT
Beenden
Medienrecorder angezeigt wird, drücken Sie
erneut die Taste Poder Q, um den Suchlauf
wieder zu starten.
Programm System
Farbsystem
Programm: Die Nummer, die auf der Fernbedienung gedrückt werden muss.
System: Betrifft nur bestimmte Regionen.
Farbsystem: Fabrikeinstellung ist Auto; diese sollte nur geändert werden, wenn Probleme zu erwarten sind, wie z.B. ein
Progr. überspr.: Bedeutet, dass kein Sender gespeichert wurde oder die Funktion zum Überspringen des Kanals
NTSC-Eingang von einem externen Gerät.
aktiviert wurde. Siehe Seite 91.
Kanal: Die Nummer des Kanals, auf dem ein Sender übertragen wird.
Suchen: Suche nach einem Signal im Frequenzbereich.
Feineinstellung: Wird nur verwendet, wenn Störungen auftreten bzw. das Empfangssignal zu schwach ist. Siehe Seite 111.
Sender: Sendername. Verwenden Sie die Tasten
die aus bis zu sieben Zeichen bestehen kann.
Gehen Sie folgendermaßen vor, um einem Decoder bzw. Medienrecorder eine Programmposition im Fernsehgerät zuzuweisen: Schalten Sie
den Decoder ein, legen Sie einen Datenträger mit einem aufgezeichneten Film in den Medienrecorder ein, und drücken Sie PLAY
Drücken Sie die Taste MENU, und wählen Sie mit
1
den Tasten Soder Rdas Menü EINSTELLUNG
(Wiedergabe). Nehmen Sie dann die manuelle Feineinstellung vor.
aus. Markieren Sie dann mit Hilfe der Taste Q die
Option Manuelle Sendersuche, und drücken Sie
zur Auswahl die Taste OK.
Sprache Deutsch
Land Deutschland
Autom. Sendersuche
Manuelle Sendersuche
Antennenverstärker ein
AV-Anschluss
MENU
zurück
Drücken Sie Poder Q, um den gewünschten
2
Programmplatz zu markieren. Empfohlen wird
EINSTELLUNG
EXIT
Beenden
beispielsweise Prog. 0 für einen Medienrecorder.
Manuelle Sendersuche
Prog. Kanal Sender
0 C60
1 C22 ARD
2 C28 ZDF
3 C25 RTL
4 C32 SAT 1
5 C69
OK
Auswahl ordnen
MENU
zurück
EXIT
Beenden
Deutsch
Page 90

Analog – Manuelle Sendereinstellung Fortsetzung
Automatischer Sendersuchlauf
Wenn das Signal des Medienrecorders gefunden
8
wurde, drücken Sie die Taste R, um den Cursor in
das Feld Sender zu setzen. Geben Sie mithilfe
der Tasten P, Q, Soder Rdie gewünschten
Zeichen ein, z. B. VCR.
Manuelle Sendersuche
EXIT
Sender
Beenden
0 B/G A C 60 0 V C R
OK
speichern
MENU
zurück
Verwenden des autom. Sendersuche
Um die Sendereinstellung am Fernsehgerät mit
1
der Funktion Autom. Sendersuche
vorzunehmen, drücken Sie die Taste MENU und
wählen Sie dann mit SoderRdas Menü
EINSTELLUNG aus.
Drücken Sie zum Speichern die Taste OK.
9
Wiederholen Sie den Vorgang für jede
10
Programmposition, die Sie einstellen möchten,
oder drücken Sie die Taste MENU, um zur Liste
der Kanäle zu wechseln, und wählen Sie die
nächste einzustellende Nummer.
Drücken Sie nach Abschluss des Vorgangs die
11
Taste EXIT.
Um einen Namen für ein extern angeschlossenes
12
Gerät festzulegen, z. B. DVD an EXT2, drücken
Sie zur Auswahl von EXT2 die Taste -B.
Wählen Sie dann aus dem Menü EINSTELLUNG
die Option Manuelle Einstellung.
Drücken Sie R, um die Option Sendername
13
auszuwählen, und geben Sie dann mit Hilfe der
Tasten P, Q, Sund Rdie gewünschten
Zeichen ein.
Manuelle Einstellung
Sendername
EXT2 A D V D
OK
speichern
MENU
Dieses Fernsehgerät hat für den Fall, dass die
HINWEIS
Kanalnummern bekannt sind, einen direkten
Kanaleingang. Wählen Sie in Schritt 3 den Bildschirm
Manuelle Sendersuche. Geben Sie die
Programmnummer sowie das System an, geben Sie
danach C für die (terrestrischen) Standardkanäle oder S für
Kabelkanäle ein, gefolgt von der Nummer des Kanals.
Drücken Sie auf OK, um die Eingabe zu speichern.
zurück
EXIT
Beenden
Deutsch
Sprache Deutsch
Land Deutschland
Autom. Sendersuche
Manuelle Sendersuche
Antennenverstärker ein
AV-Anschluss
MENU
zurück
Drücken Sie die Taste Q, um die Menüoption
2
Sprache zu markieren. Zur Auswahl verwenden
EINSTELLUNG
EXIT
Beenden
1/2
OK
OK
OK
Sie die Taste SoderR.
Drücken Sie die Taste Q um die Menüoption
3
Land zu markieren. Wählen Sie dann mit den
Tasten SoderReine Ländereinstellung aus.
Drücken Sie die Taste Q , um die Funktion
4
Autom. Sendersuche zu markieren. Drücken Sie
jetzt OK.
Autom. Sendersuche
Achtung : Bisherige Einstellungen werden gelöscht!
!
Beenden um alle Einstellungen beizubehalten.
Zum Starten OK drucken
MENU
zurück
Drücken Sie die Taste OK, um die Funktion
5
Autom. Einstellung zur Autom. Sendersuche
EXIT
Beenden
zu starten.
Sie müssen erst warten, bis das Fernsehgerät den
Nach Abschluss der Suche schaltet das Fernsehgerät
automatisch auf den ersten Programmplatz um. Unter
Umständen empfangen Sie von bestimmten Sendern jedoch
nur ein schwaches Bildsignal. Sie können daher die
Reihenfolge der Sender ändern.
Suchlauf abgeschlossen hat.
90
Page 91

Analog – Überspringen von Programmen,
Sortieren von Programmplätzen
Überspringen von Programmen
Um bestimmte Programme für die Anzeige zu sperren,
können Sie die entsprechenden Programmplätze sperren.
Die Fernbedienung muss ebenfalls unter Verschluss
gehalten werden, da die Kanäle trotzdem noch mit den
Zifferntasten aufgerufen werden können. Sie können die
Programme dann mit den am Fernsehgerät angebrachten
Bedienfeldtasten wie gewohnt auswählen und anschauen,
die gesperrten Programmplätze werden dabei jedoch
übersprungen und können nicht angezeigt werden.
Wählen Sie aus dem Menü EINSTELLUNG die
1
Option Manuelle Sendersuche.
Manuelle Sendersuche
Prog. Kanal Sender
0 C60 VCR
1 C22 ARD
2 C28 ZDF
3 C25 RTL
4 C32 SAT 1
5 C69
OK
Auswahl ordnen
MENU
zurück
Markieren Sie mit Hilfe der Taste Q oderPdie
2
zu sperrende Programmposition, und drücken Sie
zur Auswahl die Taste OK.
Drücken Sie die Taste R, um die Option Progr.
3
überspr. auszuwählen.
Mit der P- oder der Q -Taste wird
4
Progr. überspr. eingeschaltet. Drücken Sie OK.
Eine gesperrte Programmposition wird auf
dem Bildschirm durch das Symbol gekennzeichnet.
1 B/G A C 22 0 A R D
OK
speichern
MENU
zurück
Drücken Sie die Taste MENU, und wiederholen
5
Sie Schritt 2, oder drücken Sie die Taste EXIT.
EXIT
Beenden
Manuelle Sendersuche
Progr. überspr. : ein
EXIT
Beenden
Gesperrte Programme können nicht mehr mit
und Peoder über die Tasten am
P
f
Fernsehgerät angewählt werden. Der Zugriff über
die Zifferntasten der Fernbedienung ist jedoch
trotzdem noch möglich.
Sortieren von Programmplätzen
Kanäle lassen sich verschieben und auf beliebigen
Programmplätzen speichern.
Wählen Sie aus dem Menü EINSTELLUNG die
1
Option Manuelle Sendersuche.
Die Senderliste wird jetzt angezeigt. Markieren Sie
2
mit Hilfe der Taste Q oderPden Sender, den
Sie verschieben möchten, und drücken Sie die
Taste R.
Der ausgewählte Sender erscheint jetzt auf der
rechten Seite des Bildschirms.
Manual tuning
Manuelle Sendersuche
Prog. Channel Station
Prog. Kanal Sender
1 C22 BBC1
1C22 ARD
2 C28 BBC2
2 C28 ZDF
3 C25 ITV
3 C25 RTL
4 C32 CH4
4 C32 SAT 1
5 C69
5 C69
6 C69
6 C69
Store
speichern
MENU
MENU
Back
zurück
Blättern Sie wieder mit den Tasten Q oder
3
durch die Liste, bis Sie die gewünschte
Programmposition erreichen. Bei diesem Vorgang
werden die übrigen Sender entsprechend
verschoben.
Drücken Sie Szum Speichern ihres
4
Programmplatzes.
Wiederholen Sie den Vorgang bei Bedarf, und
drücken Sie anschließend EXIT.
EXIT
EXIT
Watch TV
Beenden
P
Jeder Programmplatz muss einzeln ausgewählt
werden. Wiederholen Sie Progr. überspr. aus,
für jeden gewünschten Programmplatz.
Deutsch
91
Page 92
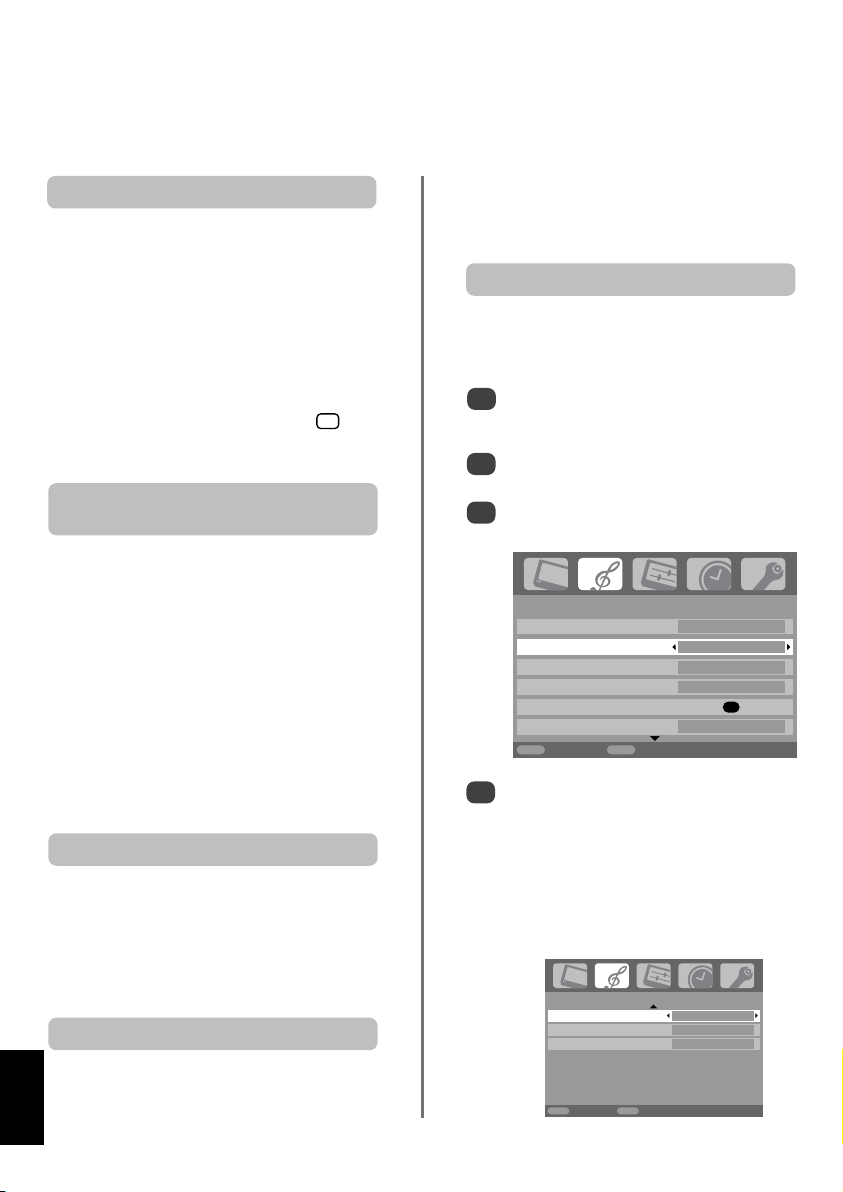
Allgemeine Bedienelemente, Stereo- und
Zweikanaltonsendungen, Uhrzeitanzeige,
Toneinstellung
Auswahl von Programmplätzen
Verwenden Sie zur Auswahl eines Programmplatzes die
Zifferntasten auf der Fernbedienung.
Programme können ebenfalls mit Hilfe der Tasten
gewählt werden.
e
Um wieder zum vorherigen Programm umzuschalten,
drücken Sie die Taste
Wenn Sie Bildschirminformationen anzeigen möchten,
beispielsweise den Programmplatz, Kanäle oder den
Stereo/Mono-Signalmodus, drücken Sie die Taste
Drücken Sie die Taste erneut, um den Vorgang
abzubrechen.
^^
.
Pf
i
+
und P
.
Übertragungen in Stereo und
Zweikanalton
Wenn Sendungen in Stereo oder mit Zweikanalton
übertragen werden, wird für einige Sekunden die Anzeige
Stereo oder 2-Kanalton am Bildschirm eingeblendet. Diese
Anzeige erscheint kurzzeitig nach jedem Umschalten der
Programme. Falls kein Stereo-Ton gesendet wird, wird statt
dessen das Wort Mono eingeblendet.
Stereo… Drücken Sie
oder Mono.
Zweisprachig… Zweisprachige Sendungen (Zweikanalton)
sind relativ selten. Bei einer solchen Sendung wird die
Anzeige 2-Kanalton eingeblendet. Wählen Sie die
gewünschte Programmnummer. Wenn die Anzeige
2-Kanalton eingeblendet wird, können Sie mit der Taste
OI/II
zwischen Sprache 1, Sprache 2 oder Mono wählen.
OI/II
zur Auswahl von Stereo
Die Uhrzeitanzeige – nur analog
Die Option Uhrzeitanzeige ermöglicht die Anzeige der
aktuellen (Videotext) Uhrzeit auf dem Bildschirm.
Wenn Sie während einer Fernsehsendung die Tasten
auf der Fernbedienung drücken, wird die genaue
8/9
vom Sender übertragene Uhrzeit eingeblendet. Diese
Anzeige wird nach etwa 5 Sekunden wieder ausgeblendet.
Toneinstellung
Stummschaltung
Drücken Sie die Stummschaltungstaste keinmal, um den
Ton auszuschalten und ein zweites Mal, um den Ton wieder
einzuschalten.
Bass-, Höhen- und Balance-Regelung
Die Bedienelemente zur Klangregelung wie auch die meisten
TV-Funktionen sind sowohl im digitalen als auch im
1
2
3
4
analogen Modus verfügbar.
Drücken Sie im digitalen Modus die Taste MENU,
und markieren Sie mit der Taste Qdie Option
TV Einstellungen. Drücken Sie dann OK.
Wählen Sie mit der Taste SoderRdie Option TON
aus.
Drücken Sie im analogen Modus die Taste MENU,
und wählen Sie mit SoderRdie Option TON aus.
2-Kanalton Sprache 1
Bass 0
Höhen 0
Balance 0
WOW
Aut. Lautstärkeanpassung ein
MENU
zurück
Drücken Sie zur Auswahl der Option Bass, Höhen
oder Balance die Taste Q. Drücken Sie dann zur
Übernahme der Einstellung die Taste SoderR.
Wenn Sie ein HiFi-Gerät anschließen, müssen Sie
die Option Lautsprecher auf aus stellen.
Anschließend wählen Sie im Menü AV-Anschluss
für den Monitor(Ton) die Option fest oder
variabel. (Weitere Informationen finden Sie im
Abschnitt "Eingangsauswahl und AV-Anschlüsse").
Lautsprecher aus
Bassverstär.Int. ein
Bassverst. Lautst. 70
TON
EXIT
Beenden
TON
OK
2/2
Lautstärke
Drücken Sie die Taste
Lautstärke anzupassen.
Deutsch
j
–
oder
j
+
, um die
92
MENU
zurück
EXIT
Beenden
Page 93

Toneinstellung Fortsetzung, SRS WOW™ Soundeffekt,
Zweikanalton, Aut. Lautstärkeanpassung
Drücken Sie Q, um SRS 3D zu markieren, und
Bassverstärker
Mit dem Bassverstär.Int. können tiefe Töne verstärkt
werden. Ein hörbarer Unterschied ergibt sich jedoch nur
1
2
bei Sound mit starken Bässen.
Blättern Sie im Menü TON drücken Sie Q, um die
Option Bassverstär.Int. zu markieren. Wählen
Sie mit der SoderRdie Einstellung ein aus.
Drücken Sie dann Q, um die Option Bassverst.
Lautst. zu markieren, und wählen Sie mit der
Taste SoderRdie gewünschte Einstellung aus.
3
wählen Sie mit SoderRdie Einstellung ein
oder aus.
Drücken Sie anschließend Q, um FOCUS zu
4
markieren, und wählen Sie mit SoderRdie
Einstellung ein oder aus.
Markieren Sie die Option TruBass, und wählen
5
Sie mit SoderRje nach Bedarf die Einstellung
aus, niedrig oder hoch.
HINWEIS: Diese Effekte sind über Kopfhörer
nicht verfügbar.
Zweikanalton – nur analog
®
Lautsprecher ein
Bassverstär.Int. ein
Bassverst. Lautst. 70
MENU
zurück
TON
EXIT
Beenden
2/2
SRS WOW™Soundeffekt
SRS WOW™ bietet verschiedenste Audioeffekte, mit denen
sich die Qualität der gesendeten Stereosignale für die
Ausgabe über die Fernsehlautsprecher optimieren lässt. Bei
Sendungen, die mono übertragen werden, steht nur die
Mit der Option SRS 3D kann ein vollerer Sound eingestellt
werden. Die Option FOCUS bietet einen Klangeffekt, bei
dem der Ton gleichsam aus der Mitte des Fernsehers zu
1
2
Funktion TrueBass zur verfügung.
kommen scheint. Mit TruBass werden die tieferen
Bassfrequenzen verstärkt.
Drücken Sie die Taste MENU, und wählen Sie
das Menü TON aus.
Drücken Sie Poder Q, bis die Option
WOW markiert ist. Drücken Sie OK.
WOW
SRS 3D aus
FOCUS aus
TruBass aus
MENU
zurück
EXIT
Beenden
Wenn eine Sendung oder ein Film mit einer mehrsprachigen
Tonspur übertragen wird, können Sie mit der Funktion
Zweikanalton zwischen diesen Sprachen umschalten.
Drücken Sie die Taste MENU, und wählen Sie
1
das Menü TON aus.
Drücken Sie Q, um die Option 2-Kanalton
2
auszuwählen. Drücken Sie dann SoderR, um
Sprache 1 oder Sprache 2 einzustellen.
Automatische Lautstärkeanpassung
Mit der Funktion Aut. Lautstärkeanpassung werden
hohe Lautstärkepegel begrenzt und extreme
Lautstärkeschwankungen verhindert, die beim Umschalten
des Kanals oder beim Einblenden eines Werbeblocks
während einer Sendung auftreten können.
Drücken Sie die Taste MENU, und wählen Sie
1
das Menü TON aus.
Drücken Sie Poder Q, bis die Option Aut.
2
Lautstärkeanpassung markiert ist. Drücken Sie
dann SoderR, um ein oder aus einzustellen.
WOW, SRS und das •Symbol sind Warenzeichen von
SRS Labs, Inc.
WOW Technologie wird unter Lizenz von SRS Labs, Inc. mit
eingeschlossen.
®
Deutsch
93
Page 94

Anzeige im Breitbildformat
In Abhängigkeit von der Art der jeweiligen Fernsehübertragung können Sie sich Sendungen in verschiedenen
Bildformaten anschauen. Drücken Sie bei Bedarf jeweils die Taste
, um zwischen den Bildformaten
{
True Scan, Breitbild, Super Live2, Kino2, 4:3, Super Live1, Kino1, Untertitel und 14:9 umzuschalten.
SUPER LIVE1
Mit dieser Einstellung kann ein
Fernsehbild im 4:3-Format an die
Bildschirmgröße angepasst werden,
indem es horizontal und vertikal
gestreckt wird. In der Bildmitte werden
dabei die realen Größenverhältnisse
beibehalten. Es können jedoch gewisse
Verzerrungen auftreten.
SUPER LIVE2
Bei Empfang eines Signals im
"Seitenwandformat" kann das
Fernsehbild mit dieser Einstellung
vergrößert und an die Bildschirmgröße
angepasst werden, indem es horizontal
und vertikal gestreckt wird. In der
Bildmitte werden dabei die realen
Größenverhältnisse beibehalten. Es
können jedoch gewisse
Verzerrungen auftreten.
KINO1
Wenn Sie sich Filme bzw. Videos im
Breitbildformat anschauen und schwarze
Balken am unteren und oberen Bildrand
angezeigt werden, können Sie mit Hilfe
dieser Einstellung diese Balken verkleinern
oder entfernen, indem Sie das Bild
auswählen und vergrößern, ohne dass die
Darstellung verzerrt wird.
KINO2
UNTERTITEL
Deutsch
Wenn Sie sich Filme bzw. Videos in einem
Ausschnittformat anschauen, bei dem
schwarze Balken an allen Bildrändern
angezeigt werden, können Sie mit Hilfe
dieser Einstellung diese Balken verkleinern
oder entfernen, indem Sie das Bild
auswählen und vergrößern, ohne dass die
Darstellung verzerrt wird.
Wenn bei einem Film im Breitbildformat
Untertitel angezeigt werden, können Sie
mit dieser Einstellung das Bild nach
oben verschieben, um zu gewährleisten,
dass der gesamte Untertiteltext auf den
Bildschirm passt.
94
UNTERTITEL
Page 95

Anzeige im Breitbildformat Fortsetzung
14:9
BREITBILD
4:3
1080i MODELL
TRUE SCAN
Verwenden Sie diese Einstellung für
Sendungen im 14:9-Format.
Verwenden Sie diese Einstellung für
Breitwand-DVDs, Breitwand-Videos oder
gegebenenfalls bei Sendungen im 16:9-
Format. Aufgrund der verschiedenen
Breitwandformate (16:9, 14:9, 20:9
usw.) werden unter Umständen
schwarze Balken am oberen und
unteren Rand des Bildschirms angezeigt.
Verwenden Sie diese Einstellung bei
Sendungen, die im 4:3-Format
ausgestrahlt werden.
Diese Option steht nur
bei einer Quelle m
1080i-Form
Verwenden Sie diese Einstellung, wenn
Sie im "1080i-Format" schauen wollen.
Das Bild wird originalgetreu ohne
Skalierung oder abgeschnittene
Bildränder angezeigt.
it
at zur Verfügung
Halten Sie die Taste {gedrückt, um eine Liste mit allen verfügbaren
Breitbildformaten auf dem Bildschirm anzuzeigen. Drücken Sie den Pbzw. Q, um
das gewünschte Format zu markieren. Drücken Sie zur Auswahl die Taste OK.
Der Einsatz der speziellen Funktionen zur Veränderung der Größe des angezeigten Bildes (d. h. Ändern des Verhältnisses der Bildhöhe zur
Bildbreite) zum Zweck einer öffentlichen Vorführung oder zur Erzielung eines kommerziellen Gewinns kann eine Verletzung von
Urheberrechtsgesetzen darstellen.
True Scan
Breitbild
Super Live2
Kino2
4:3
Super Live1
Kino1
Untertitel
14:9
95
Deutsch
Page 96

Bildeinstellung
Die meisten Bedienelemente und Funktionen zur Bildeinstellung stehen im digitalen und analogen Modus
zur Verfügung. Gehen Sie folgendermaßen vor, um die benötigten Menüs im digitalen Modus aufzurufen:
Drücken Sie die Taste MENU, und wählen Sie mit Q die Option TV Einstellung aus. Drücken Sie dann OK,
und wählen Sie mit der Taste Soder Rdas gewünschte Menü aus. HINWEIS: Funktionen, die im digitalen
Modus nicht zur Verfügung stehen, sind grau hinterlegt. Gehen Sie folgendermaßen vor, um die benötigten
Menüs im analogen Modus aufzurufen: Drücken Sie MENU, und wählen Sie dann das gewünschte Menü
mit Soder Raus.
Bildposition – nur analog
Die Bildposition kann individuell angepasst werden.
Teilweise ist dies bei externen Quellen hilfreich.
Wählen Sie das Menü EINSTELLUNG, und
1
drücken Sie die Taste Q, bis die Einstellung
Bildlage markiert ist.
Bildlage
Automatische Installation
EINSTELLUNG
OK
OK
2/2
Um das Gerät auf die werkseitigen
Standardeinstellungen zurückzusetzen, wählen Sie
im Menü Bildlage die Option zurücksetzen, und
drücken Sie dann die Taste OK.
Hintergrundbeleuchtung
Die Anzeigequalität kann sich verbessern, wenn die
Panelhelligkeit im Betrieb nachgestellt wird.
Drücken Sie im Menü BILD die Taste Q, so dass
1
die Einstellung Bildeinstellung ausgewählt ist.
Drücken Sie dann die Taste OK.
2
3
Deutsch
MENU
zurück
EXIT
Beenden
Drücken Sie OK, um die verfügbaren Optionen
für das ausgewählte Bildformat anzuzeigen.
Wählen Sie die gewünschte Option durch
Drucken der Tasten Pund Q aus, und nehmen
Sie die Einstellung jeweils mit Hilfe der Tasten
und Rvor.
S
Die angezeigten Optionen ändern sich in
Abhängigkeit vorn gewählten Breitbildformat
sowie bei der Bildanzeige über angeschlossene
Geräte.
Im Modus Kino2:
Bildlage
Horizontale Lage 0
Vertikale Lage 0
Zurücksetzen
MENU
zurück
EXIT
Beenden
OK
96
EXIT
BILD
Beenden
Bildeinstellung
3D Colour Management
Farbeinstellungen
Kino Modus
MENU
zurück
Drücken Sie im Menü Bildeinstellung die Taste
2
Q
, bis die Einstellung Panelhelligkeit
ausgewählt ist.
Drücken Sie die Taste SoderR, um die
3
Feineinstellung vorzunehmen.
Bildeinstellung
Panelhelligkeit 100
Kontrast 100
Helligkeit 50
Farbe 50
Farbton 0
Schärfe 0
MENU
zurück
EXIT
Beenden
OK
aus
ein
1/2
Page 97

Bildeinstellung Fortsetzung
Bildvoreinstellungen
Dieses Fernsehgerät bietet die Möglichkeit, individuelle
Bildeinstellungen zu speichern. Drücken Sie m, um die
verfügbaren Bildmodi anzuzeigen:
Tag , Abend und Nacht sind voreingestellte Optionen.
Unter eigene Einstellung können Ihre eigenen
Einstellungen gespeichert werden:
Wählen Sie im Menü BILD die Einstellung
1
Bildeinstellung aus.
Bildeinstellung
Panelhelligkeit 100
Kontrast 100
Helligkeit 50
Farbe 50
Farbton 0
Schärfe 0
MENU
zurück
Verwenden Sie zur Einstellung von Kontrast,
2
Helligkeit, Farbe, Farbton und Shärfe die Taste
oderR.
S
EXIT
Beenden
1/2
Schwarzwert
Mit der Einstellung Schwarzanp. erfolgt eine
Verstärkung von dunklen Bereichen des Bildes, was die
Wählen Sie das Menü Bildeinstellung, und
1
drücken Sie die Taste Q, bis die Einstellung
Schwarzanp. markiert ist.
Bildschärfe verbessert.
Bildeinstellung
Schwarzanp. ein
MPEG Rauschreduz. niedrig
DNR auto.
Farbtemperatur normal
2/2
MPEG NR – Rauschunterdrückung
Beim Abspielen von DVDs kann es – bedingt durch die
Komprimierung – vorkommen, dass einige Wörter oder
Bildelemente in der Anzeige verzerrt oder "verpixelt" sind.
Mithilfe der Funktion MPEG Rauschreduz. kann dieser
Effekt durch eine so genannte Kantenglättung
vermindert werden.
Wählen Sie aus dem Menü Bildeinstellung die
1
Option MPEG Rauschreduz. aus. Wählen Sie mit
oderRdie gewünschte Einstellung aus.
S
Digitale Rauschunterdrückung (DNR)
DNR führt zu einer "weicheren" Bilddarstellung bei einem
schwachen Signal zur Reduzierung störender Effekte.
Wählen Sie DNR aus dem Menü Bildeinstellung
1
und nehmen Sie mit den Tasten Sbzw.Rdie
Einstellung vor. Die Unterschiede sind nicht immer
wahrnehmbar (die besten Ergebnisse erzielen Sie
bei niedrigen Einstellungen. Bei zu hohen
Einstellungen kann sich die Bildqualität
verschlechtern).
Farbtemperatur
Durch die Einstellung Farbtemperatur kann ein Bild
"wärmer" oder "kühler" dargestellt werden, indem jeweils der
rote oder blaue Farbanteil des Bildes erhöht wird.
Wählen Sie das Menü Bildeinstellung, und
1
drücken Sie die Taste Q, bis die Einstellung
Farbtemperatur
Schwarzanp. ein
MPEG Rauschreduz. niedrig
DNR auto.
Farbtemperatur normal
markiert ist.
Bildeinstellung
2/2
MENU
zurück
Drücken Sie die Tasten SoderR, um die
2
Einstellung ein oder aus auszuwählen Die Stärke
EXIT
Beenden
dieses Effekts ist von der jeweiligen Sendung
abhängig und am besten bei dunklen Farben
sichtbar.
97
MENU
zurück
Wählen Sie mit Hilfe der Tasten SundRje nach
2
Bedarf die Einstellung normal, warm oder kalt.
EXIT
Beenden
Deutsch
Page 98

Bildeinstellung Fortsetzung
3D Colour Management
Wenn 3D Colour Management ausgewählt ist,
können Sie die Funktion zum ‘Farbeinstellungen’
verfügbar schalten.
Drücken Sie im Menü BILD mehrmals die Taste Q,
1
bis die Einstellung 3D Colour Management
ausgewählt ist.
EXIT
BILD
OK
ein
OK
ein
Beenden
Bildeinstellung
3D Colour Management
Farbeinstellungen
Kino Modus
MENU
zurück
Drücken Sie die Taste SoderR, um die
2
Einstellung ein oder aus auszuwählen.
Farbeinstellungen
Die Funktion Farbeinstellungen ermöglicht die
Einstellung der einzelnen Farbwerte entsprechend Ihren
persönlichen Vorlieben. Das kann sinnvoll sein, wenn Sie
1
eine externe Quelle verwenden.
Drücken Sie im Menü BILD die Taste Q, so dass
die Einstellung Bildeinstellung ausgewählt ist.
Drücken Sie dann die Taste OK.
Bildeinstellung
3D Colour Management
Farbeinstellungen
Kino Modus
BILD
OK
ein
OK
ein
Farbeinstellungen
Rot +2 +6 +4
Grün 0 0 0
Blau 0 0 0
Gelb 0 0 0
Magenta 0 0 0
Cyan 0 0 0
Zurücksetzen
MENU
zurück
Farbton Sättigung Helligkeit
EXIT
Beenden
OK
Um das Gerät auf die werkseitigen
Standardeinstellungen zurückzusetzen, wählen
Sie die Option Zurücksetzen, und drücken Sie
dann die Taste OK.
Kinomodus
Falls in einem Film oder einer Sendung unerwünschte
Linien oder gezackte Ränder sichtbar sind, können Sie
durch Auswahl des Kino Modus das Bild glätten und
dieses Problem somit beheben.
Drücken Sie im Menü BILD mehrmals die
1
Taste Q, bis die Einstellung Kino Modus
ausgewählt ist.
Drücken Sie die Taste SoderR, um die
2
Einstellung ein oder aus auszuwählen.
Antennenverstärker
Falls das vom Fernsehgerät empfangene Signal zu stark
sein sollte, können Bildstörungen auftreten und/oder ein
Brummton zu hören sein. Durch das Ausschalten des
Antennenverstärkers wird die Signalstärke verringert.
Möglicherweise werden die Störungen dadurch beseitigt.
Wählen Sie das Menü EINSTELLUNG, und
1
drücken Sie die Taste Q, bis die Einstellung
Antennenverstärker markiert ist.
Drücken Sie die Taste SoderR, um die
2
Einstellung ein oder aus auszuwählen.
2
Deutsch
MENU
zurück
EXIT
Beenden
Wählen Sie die gewünschte Option durch
Drucken der Tasten Pund Q aus, und nehmen
Sie die Einstellung jeweils mit Hilfe der Tasten
und Rvor.
S
98
Page 99

Bildeinstellung Fortsetzung,
Tastensperre
Automatische Formatierung (Breitbild)
Wenn dieses Fernsehgerät ein Signal in einem echten
Breitbildformat empfängt und die Einstellung Auto-Format
aktiviert ist ein, wird die Sendung unabhängig von der
aktuellen Bildformateinstellung des Fernsehers automatisch
1
2
im Breitbildformat angezeigt.
Drücken Sie die Taste MENU, und wählen Sie mit
der Taste SoderRdas Menü FUNKTION aus.
Videotext auto.
Bedienfeldsperre aus
Auto-Format ein
Blaues Bild ein
Zoom Balken 1
MENU
zurück
Drücken Sie die Taste Q, so dass die Einstellung
Auto-Format markiert ist. Drücken Sie dann die
Taste SoderR, um die Einstellung ein oder aus
auszuwählen.
FUNKTION
EXIT
Beenden
Blaues Bild
Bei Auswahl der Einstellung Blaues Bild wird bei einem
fehlenden Empfangssignal ein blauer Bildschirm angezeigt
1
und der Ton abgeschaltet.
Drücken Sie im Menü FUNKTION die Taste Q,
um die Option Blaues Bild auszuwählen.
FUNKTION
Videotext auto.
Bedienfeldsperre aus
Auto-Format ein
Blaues Bild ein
Zoom Balken 1
Einstellung Seitenrand
Mit der Funktion Zoom Balken können die im Format
4:3 oder 14:9 jeweils an den Bildschirmrändern sichtbaren
Streifen heller oder dunkler eingestellt werden. Dadurch
wird ein Nachleuchten des Streifenbildes vermieden und
ein entspannteres und angenehmeres Fernseherlebnis
ermöglicht, da Sie das Bild an helle oder dunkle
Lichtbedingungen anpassen können.
Drücken Sie im Menü FUNKTION die Taste Q,
1
um die Option Zoom Balken auszuwählen.
Drücken Sie die Taste SoderR, um die
2
Feineinstellung vorzunehmen.
Standbild
Mit dieser Funktion lässt sich ein Standbild auf dem
Drücken Sie
1
Standbild anzuzeigen. Drücken Sie die uerneut,
um den Vorgang abzubrechen.
Bildschirm anzeigen.
u, um auf dem Bildschirm ein
Tastensperre
Mit der Bedienfeldsperre können die Tasten am
Fernsehgerät deaktiviert werden. Alle Tasten der
Fernbedienung sind jedoch weiterhin nutzbar.
Wählen Sie aus FUNKTION die Option
1
Bedienfeldsperre und anschließend mit Hilfe
der Taste SoderRdie Einstellung ein oder aus.
Bei aktivierter Bedienfeldsperre wird eine
entsprechende Erinnerungsmeldung angezeigt,
sobald eine Taste am Fernseher gedrückt wird.
Das Fernsehgerät wird durch Drücken der
Standby-Taste ausgeschaltet und kann dann
nur mit der Fernbedienung wieder aus dem
Standby-Betrieb heraus eingeschaltet
werden.
MENU
zurück
Drücken Sie dann die Taste SoderR, um die
2
Funktion ein oder aus zu schalten.
EXIT
Beenden
Deutsch
99
Page 100

Die Timer
Programm-Timer – nur digital
Mit dieser Funktion lässt sich das Fernsehgerät so
einstellen, dass es zu einem bestimmten Zeitpunkt auf
einen bestimmten Kanal umschaltet. Mit Hilfe des Timers
kann eine bestimmte Sendung oder, durch Auswahl des
täglichen oder wöchentlichen Modus, auch eine Serie bzw.
1
2
3
Sendereihe angeschaut werden.
Drücken Sie die Taste MENU und SoderR, um
das TIMER MENÜ auszuwählen.
TIMER MENÜ
Timer Programme OK
MENU
Zurück
EXIT
TV
Drücken Sie die Taste Q, Timer Programme
auszuwählen. Drücken Sie dann OK, um die
Auswahl zu bestätigen.
Drücken Sie Q, um das erste Programm
auszuwählen, für das eine Zeiteinstellung
festgelegt werden soll. Drücken Sie dann OK.
Das Menü TIMER EINSTELLEN wird jetzt
aufgerufen.
Drücken Sie nach erfolgter Eingabe aller Daten
5
die Taste OK, um die Einstellung des Timers zu
speichern.
Videorekorder automatisch starten: Wenn der von
Ihnen verwendete Toshiba-Medienrecorder mit AVVerbindungen kompatibel ist, kann durch Aktivierung
dieser Funktion eine Aufzeichnung automatisch
gestartet/beendet werden.
HINWEIS: Kurz vor Beginn einer mit dem Timer
programmierten Sendung wird eine Bildschirmmeldung
angezeigt, in der ausgewählt werden kann, ob die
Sendung angezeigt oder ignoriert werden soll. Die Menüs
und anderen Kanäle sind für die Dauer der
programmierten Sendung nicht verfügbar, sofern der
Programm-Timer nicht deaktiviert wird.
Aus-Timer
Das Fernsehgerät kann so eingestellt werden, dass es sich
nach einer bestimmten Zeit automatisch ausschaltet.
Drücken Sie die Taste MENU und SoderR, um
1
das Menü TIMER auszuwählen.
Aus-Timer 01:30
TIMER
4
Deutsch
Drücken Sie die Tasten Pund Q, um die Liste
durchzublättern. Geben Sie die entsprechenden
Zeitangaben für das gewünschte Programm mit
den Zifferntasten ein. Mit den Tasten Sund
wird die jeweilige Auswahl vorgenommen.
12:18 Fre, 13 Jan.
TIMER EINSTELLEN
Programm Das Erste 1
Datum Fre, 13 Jan. 2006 13/01
Startzeit 13.00
Endzeit 13.15
Wiederholen EINM.
Videorekorder automatisch starten NEIN
Untertitel KEINE
Audio Sprache ENGLISCH
0 - 9
Nummer eingeben Timer sp. MENU Abbr.
R
100
MENU
zurück
Drücken Sie die Taste Q, um die Option Aus-
2
Timer auszuwählen. Stellen Sie die gewünschte
Zeit mit den Nummerntasten ein. Um
beispielsweise den Timer so einzustellen, dass das
Fernsehgerät in anderthalb Stunden ausgeschaltet
wird, geben Sie 01:30 ein, oder stellen Sie die Zeit
in Intervallen van je 10 Minuten mit der Taste
oderRein.
S
Drücken Sie nach Abschluss des Vorgangs die
3
Taste EXIT.
EXIT
Beenden
 Loading...