

Page 1

SERVICE MANUAL
LCD Color Television
32W153xDx
FILE NO. 050-2015003
32L153xDx
40L153xDx
32W154xDx
32L154xDx
40L154xDx
(System Information)
Page 2

CONTENTS
1. IMPORTANT NOTICE
2. GREEN PRODUCT PROCUREMENT
3. LEAD-FREE SOLDER
4. SAFETY INSTRUCTION
5. FIRMWARE UPDATING
6. HOTEL MODE / HOTEL CLONE
7. BLOCK DIAGRAM
8. SCHEMATIC DIAGRAM
9. TROUBLESHOOTING
1
Page 3
IMPORTANT NOTICE
WARNING:
You are requested that you shall not modify or alter the information or data provided
herein without prior written consent by Toshiba. Toshiba shall not be liable to
anybody for any damages, losses, expenses or costs, if any, incurred in connection
with or as a result of such modification or alteration.
THE INFORMATION OR DATA HEREIN SHALL BE PROVIDED "AS IS" WITHOUT ANY
WARRANTY OF ANY KIND, EITHER EXPRESS OR IMPLIED WARRANTY OF
MERCHANTABILITY AND FITNESS FOR A PARTICULAR PURPOSE.
Toshiba shall not be liable for any damages, losses, expenses or costs, if any,
incurred in connection with or as a result of use of any information or data provided
herein.
Page 4
GREEN PRODUCT PROCUREMENT
The EC is actively promoting the WEEE & RoHS Directives that define standards for
recycling and reuse of Waste Electrical and Electronic Equipment and for the Restriction of
the use of certain Hazardous Substances. From July 1, 2006, the RoHS Directive will
prohibit any marketing of new products containing the restricted substances.
Increasing attention is given to issues related to the global environmental. Toshiba
Corporation recognizes environmental protection as a key management tasks, and is doing
its utmost to enhance and improve the quality and scope of its environmental activities. In
line with this, Toshiba proactively promotes Green Procurement, and seeks to purchase
and use products, parts and materials that have low environmental impacts.
Green procurement of parts is not only confined to manufacture. The same green parts
used in manufacture must also be used as replacement parts.
LEAD-FREE SOLDER
This product is manufactured using lead-free solder as a part of a movement within the
consumer products industry at large to be environmentally responsible. Lead-free solder
must be used in the servicing and repair of this product.
WARNING: This product is manufactured using lead free solder.
DO NOT USE LEAD BASED SOLDER TO REPAIR THIS PRODUCT!
The melting temperature of lead-free solder is higher than that of leaded solder by 30ºC to
40ºC (54ºF to 72ºF). Use of a soldering iron designed for lead-based solders to repair
product made with lead-free solder may result in damage to the component and or PCB
being soldered. Great care should be made to ensure high-quality soldering when servicing
this product especially when soldering large components, through-hole pins, and on PCBs
as the level of heat required to melt lead-free solder is high.
Page 5
(1 / 3)
SAFETY INSTRUCTION
WARNING: BEFORE SERVICING THIS CHASSIS, READ THE "SAFETY PRECAUTION" AND "PRODUCT
SAFETY NOTICE" INSTRUCTIONS BELOW.
Safety Precaution
WARNING: SERVICING SHOULD NOT BE ATTEMPTED BY ANYONE UNFAMILIAR WITH THE
NECESSARY PRECAUTIONS ON THIS RECEIVER. THE FOLLOWING ARE THE NECESSARY
PRECAUTIONS TO BE OBSERVED BEFORE SERVICING THIS CHASSIS.
1. An isolation transformer should be connected in the power line between the receiver
and the AC line before any service is performed on the receiver.
2. Always disconnect the power plug before any disassembling of the product. It may
result in electrical shock.
3. When replacing a chassis in the cabinet, always be certain that all the protective
devices are put back in place, such as nonmetallic control knobs, insulating covers,
shields, isolation resistor-capacitor network, etc.
4. Always keep tools, components of the product, etc away from the children, These
items may cause injury to children.
5. Depending on the model, use an isolation transformer or wear suitable gloves when
servicing with the power on, and disconnect the power plug to avoid electrical shock
when replacing parts. In some cases, alternating current is also impressed in the
chassis, so electrical shock is possible if the chassis is contacted with the power on.
6. Always use the replacement parts specified for the particular model when making
repairs. The parts used in products require special safety characteristics such as
inflammability, voltage resistance, etc. therefore, use only replacement parts that have
these same characteristics. Use only the specified parts when the mark is indicated
in the circuit diagram or parts list.
7. Parts mounting and routing dressing of wirings should be the same as that used
originally. For safety purposes, insulating materials such as isolation tube or tape are
sometimes used and printed circuit boards are sometimes mounted floating. Also
make sure that wirings is routed and clamped to avoid parts that generate heat and
which use high voltage. Always follow the manufactured wiring routes / dressings.
Page 6
8. Always ensure that all internal wirings are in accordance before re-assembling the
external casing after a repairing completed. Do not allow internal wiring to be pinched
by cabinets, panels, etc. Any error in reassembly or wiring can result in electrical
leakage, flame, etc., and may be hazardous.
9. NEVER remodel the product in any way. Remodeling can result in improper operation,
malfunction, or electrical leakage and flame, which may be hazardous.
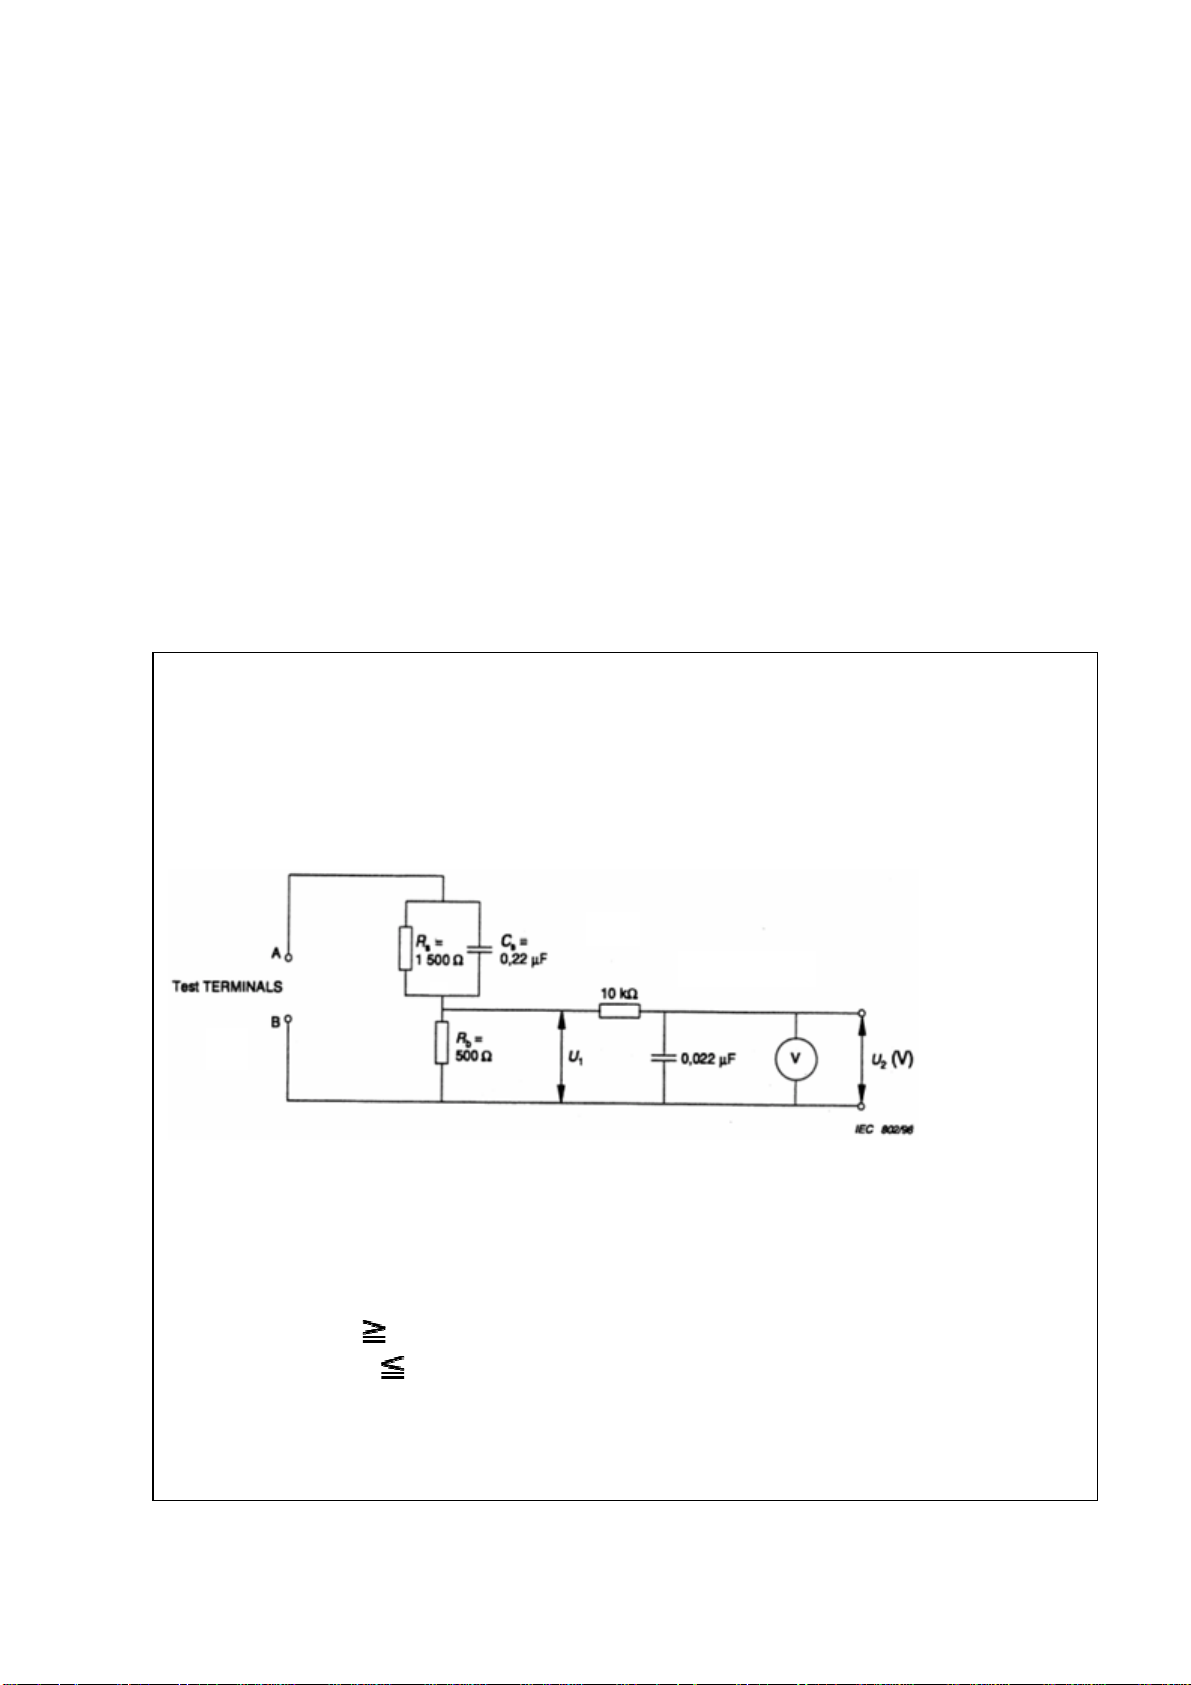
10. Touch current check. (After completing the work, measure touch current to prevent an
electric shock.)
Plug the AC cord directly into the AC outlet. Do NOT use an isolation transformer for
this check.
Connect a measuring network for touch currents between each exposed metallic part
on the set and a good earth ground such as a water pipe.
(2 / 3)
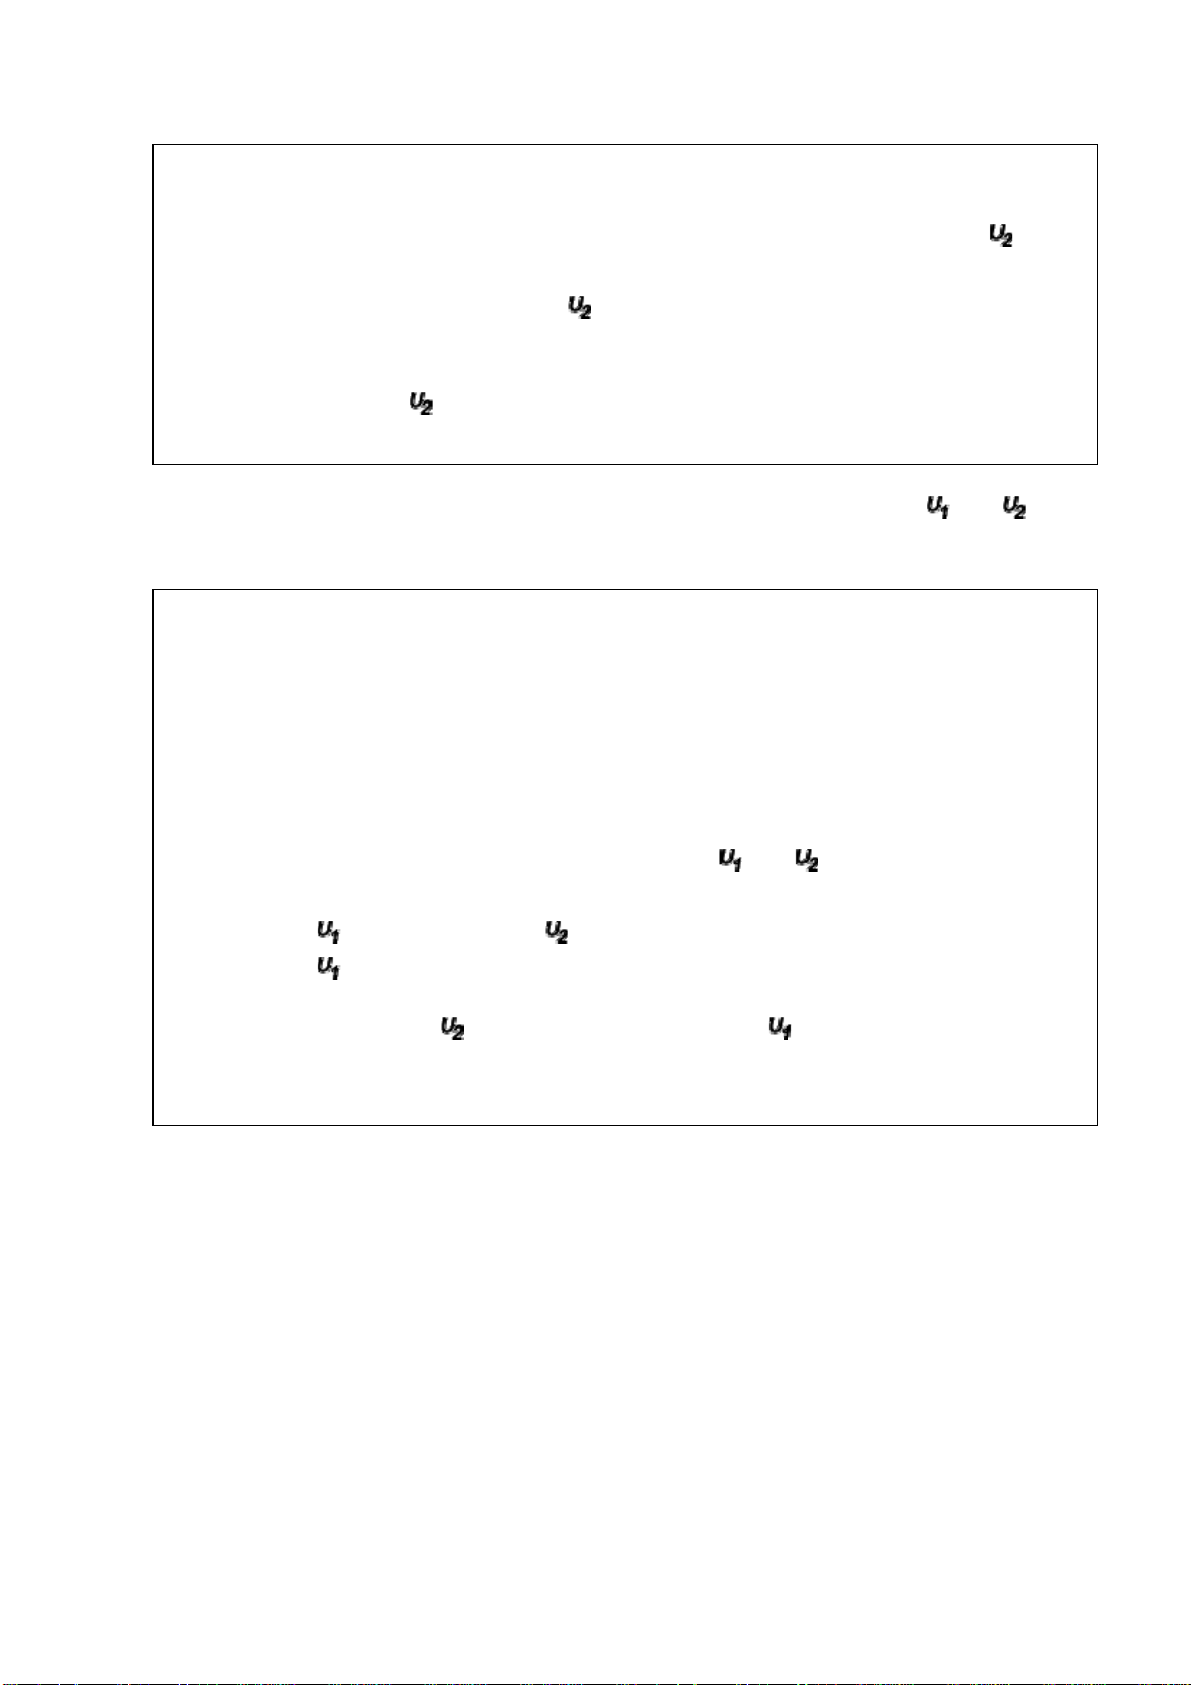
Measuring network for TOUCH CURRENTS
Resistance values in orms (Ω).
V: Voltmeter or oscilloscope
(r.m.s. or peak reading)
Annex D
(normative)
Input resistance : 1 MΩ
Input capacitance : 200 pF
Frequency range : 15 Hz to 1 MHz and d.c. respectively
Note: Appropriate measures should be taken to obtain the correct value in case of non
Page 7
(3 / 3)
sinusoidal waveforms.
The measuring instrument is calibrated by comparing the frequency factor of with
the solid line in figure F.2 of IEC 60990 at various frequencies. A calibration curve is
constructed showing the deviation of from the ideal curve as a function of
frequency.
TOUCH CURRENT = / 500 (peak value).
The potential at any point (TOUCH CURRENT) expressed as voltage and does
not exceed the following value:
The part or contact of a TERMINAL is not HAZARDOUS LIVE if:
a) The open-circuit voltage should not exceed 35 V (peak) a.c. or 60 V d.c. or, if a) is
not met.
b) The measurement of the TOUCH CURRENT shall be carried out in accordance
with IEC 60990, with the measuring network described in Annex D of this standard.
The TOUCH CURRENT expressed as voltages and , does not exceed the
following values:
- for a.c. : = 35 V (peak) and = 0.35 V (peak);
- for d.c. : = 1.0 V
Note: The limit values of = 0.35 V (peak) for a.c. and = 1.0 V for d.c. correspond
to the values 0.7 mA (peak) a.c. and 2.0 mA d.c.
Page 8

FIRMWARE UPDATING PROCEDURE
SW update via USB
17MB8X Core Software Update
1. Please copy the file to USB device. There is no need to use any specific folder.
• upgrade_loader.pkg
2. Turn power to OFF by mechanical switch or removing AC plug and plug the USB to TV.
3. Keep pressing and holding “OK” key from Toshiba remote controller and at the same time turn power to
ON by mechanical SW and hold OK pressed until the standby led blinks very rapidly.
4. SW update starts automatically when the led starts blinking.
5. SW update is completed after led blink is done.
* After core update, user/profile settings and panel files do not change.
* After Core update, bootloader/mboot version will be updated.
* SW version can be controlled from other settings or service menu.
Page 9
HOTEL MODE/HOTEL CLONE
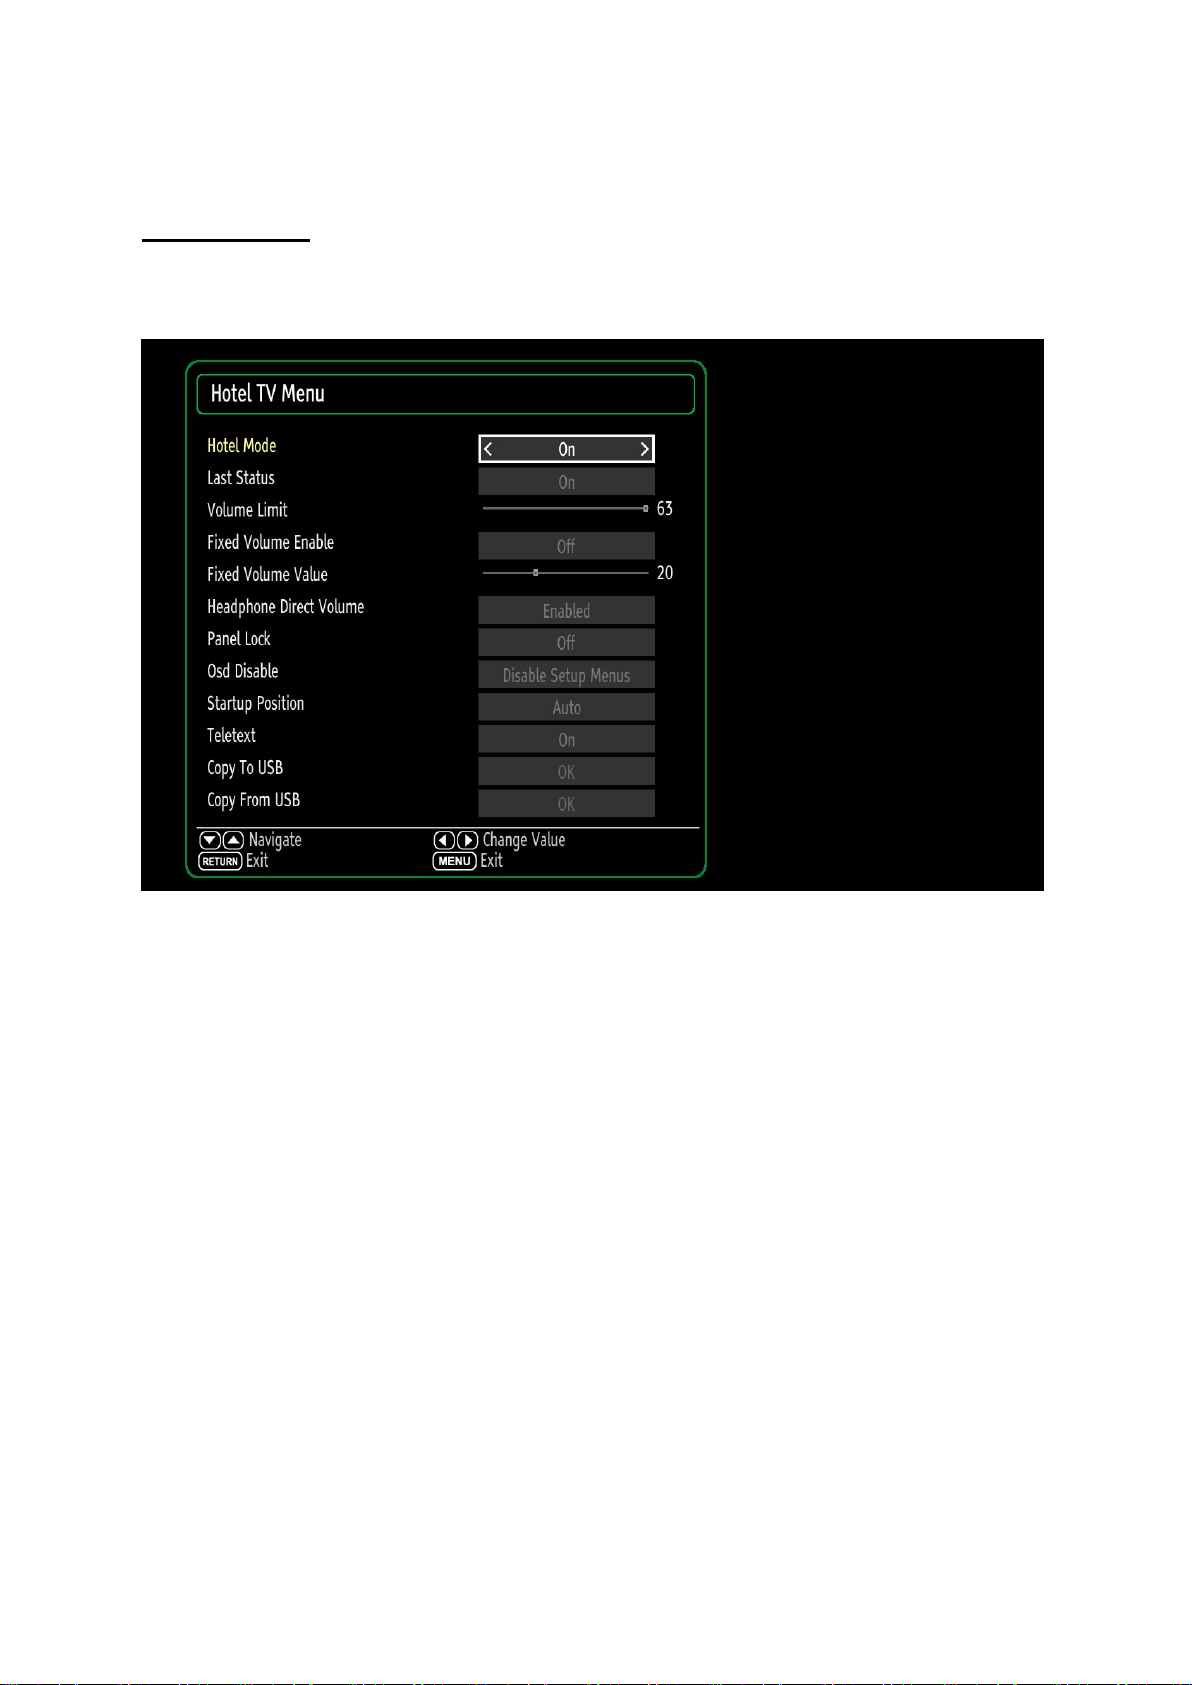
HOTEL TV MENU:
To enter hotel menu, please open main menu by pressing MENU(M) button. When you code following
password “7935”, hidden hotel TV menu appears.
Figure 1 Hotel TV Menu
Page 10
Hotel Mode
Setting “Hotel Mode” item 'On' activates hotel mode. In other words user can do only what he/she is
allowed to do. Restriction level can be determined by using other items on menu namely Volume Limit,
Panel Button, OSD Disable. In hotel mode, users can not reach channel table and install menu so they
could not change any program information.
Last Status
Setting “Last Status” item to 'On' enable TV open with the closing status. Otherwise, if “Last
Status” item is set 'Off' TV opens with standby status.
Panel Lock
Enables (Panel Lock = Off) or prohibits (Panel Lock = On) the use of front panel buttons.
RCU Inhibit
If OFF is selected TV will go on normal operation. If It is ON RCU will not function in
anymenu(including nomenu) except this menu. To turn this option OFF later, “hotel tv menu shortcut”
(MENU(M)-7-9-3-5) can be used to pop up this menu. RCU will function in Stand-By mode regardless
of the state of this option.
Startup Position
Specifies the starting channel when TV is switched ON. May take one of following values:
AUTO
o TV is opened using standby key or digit keys: Last channel or last external source when
TV is turned off
TV
o TV is opened using standby key or digits keys: TV channel number that is specified on
field Startup Channel
Other external sources (EXT1, HDMI2, PC, FAV, SVHS etc.)
o TV is opened using standby key or digit keys: Specified external source
Startup Channel
Specifies the starting TV channel’s ID which will be tuned when startup position is TV.
Page 11
Volume Limit
Sets the maximum value the volume can have. “Volume Limit” can take values between 0-63.
Fixed Volume Enable
Enables (Fixed Volume Enable = On) or prohibits (Fixed Volume Enable = Off) the use of fixed volume
value which is set by menu item “Fixed Volume Value”. If Fixed Volume Enable is ON, volume cannot
be set to a value other than the Fixed Volume Value.
Fixed Volume Value
Sets the fixed value the volume can have. If Fixed Volume Limit is ON, volume is set with the value
here.
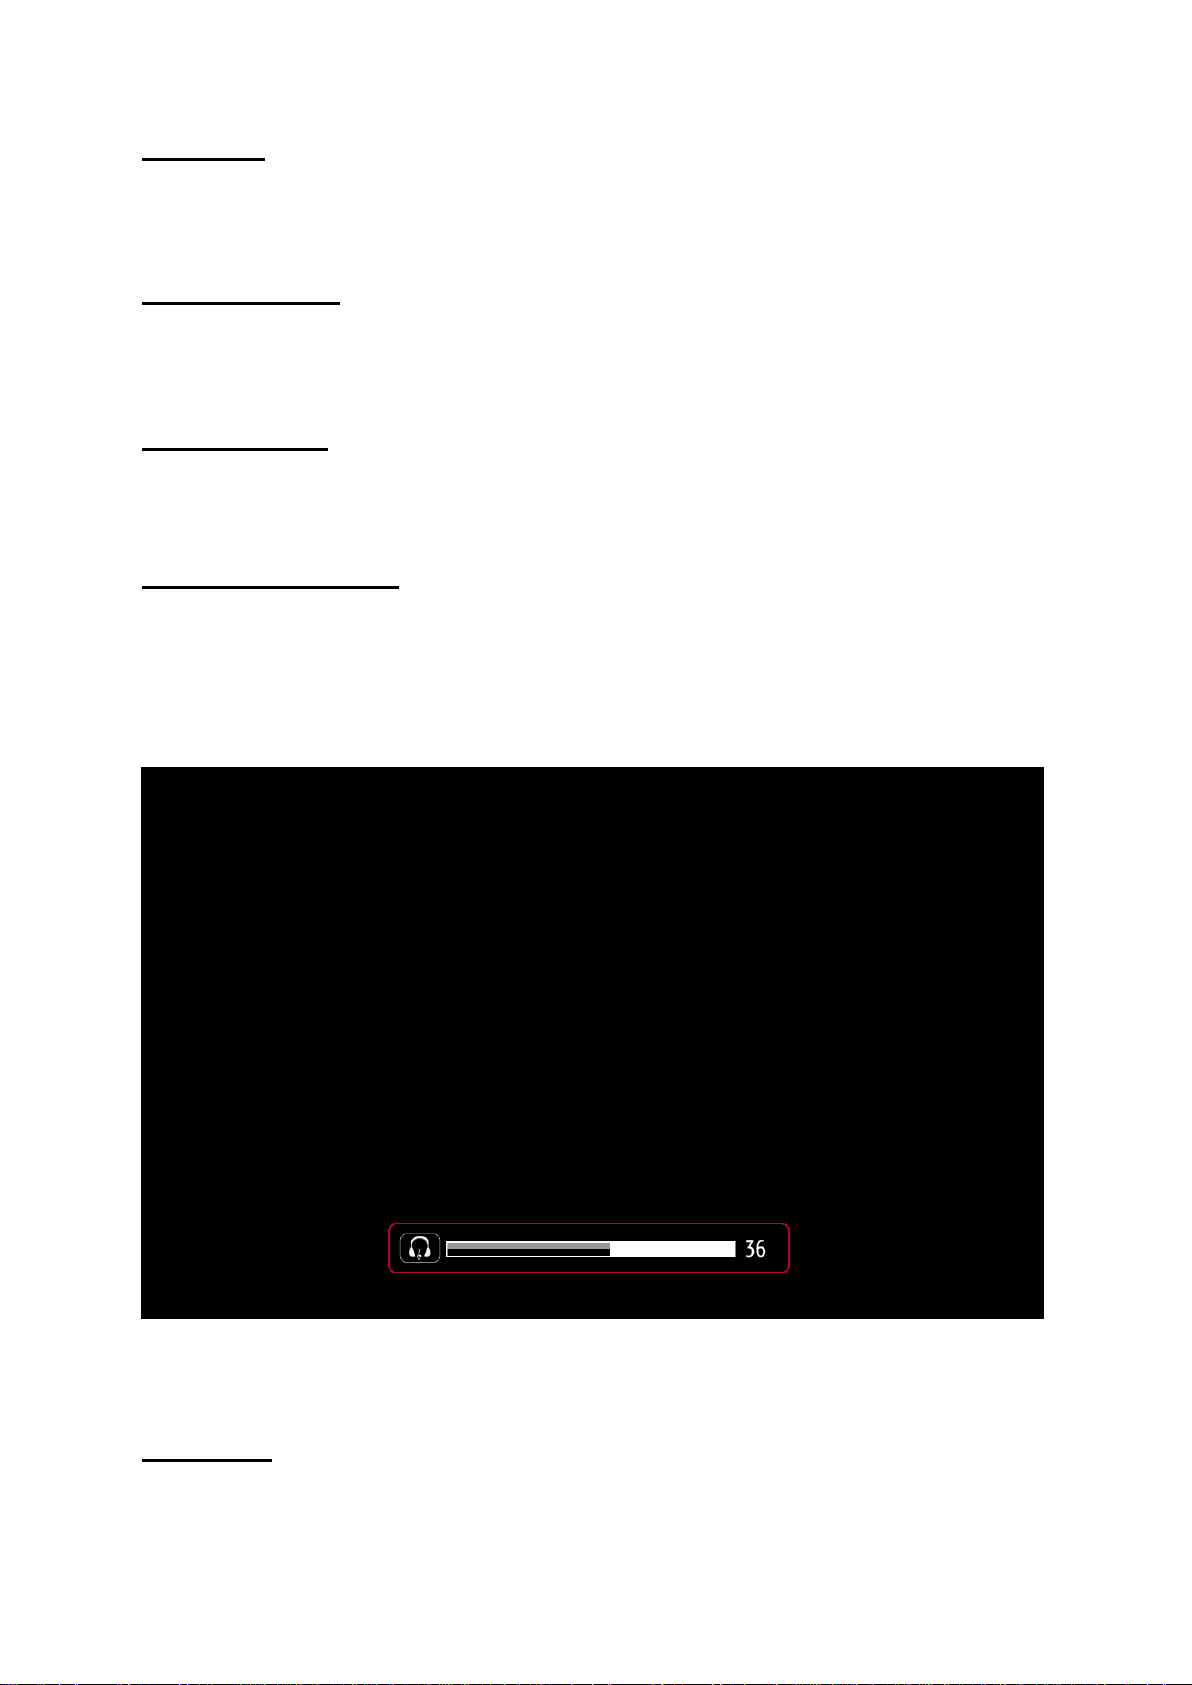
Headphone Direct Volume
Enables the remote controller volume +/- buttons to change the headphone volume directly. When this
feauters is active, volume +/- buttons changes only headphone value,and to change the tv main sound
it can be control from sound osd dialog only.
Figure 2 Headphone volume slider dialog
OSD Disable
Disables either only INSTALL menu or all menus, both in analog and digital (IDTV) mode.
Page 12

All Menus : All menus (MAIN, SOUND, PICTURE, SETTINGS, INSTALLATION) are invisible.
OSD Disable = Disable Setup Menus : Only SETUP menus are invisible.
Invisible Setup Menus are:
Main menu: Installation, Channel list
Settings menu: Parental, Sources, Other settings
Teletext
Enables (Teletext = On) or prohibits (Teletext = Off) the use of teletext (or MHEG if available)
WakeUp Time Channel
Wakeup time alarm is activated if the time of last played service is same to selected time but if this
entry is chosen an available service then only that service’s time information will be used. If default
behaviour (first one) is requested then keep the value as “0”.
Wakeup Time Volume
To modify the volume of tv wake up volume ( It cant be set higher volume than volume limit).
Copy To USB
There are two steps and both are independent from each other.
For welcome image downloading to USB, there should be DownloadWelcomeScreen.mb82 file in USB
ROOT.
Copy the updated welcome image to USB in directory “welcome_image” as “hotel_wel.png”
Copy NVRAM data (service list, preferences, etc.) to USB device. On Phonix platform, all nvram data
is stored in 8x32KB Flash files named as “nvblock_ ... .bin”. When Copy to USB is called, those files
are copied from TV to USB. Then they can be used for various purposes testing on another TV or
testing/debugging on observatory etc. Note that USB should be plugged before this operation.
A new folder will be created in the USB with every operation of “Copy To USB”. Folder names will
automatically increase like CLONE00001, CLONE00002, etc. (up to 99999)
Copy From USB
Firstly, you will see the directory list of your USB if it is connected. All operations will start after you
select one of this folders. The selected folder could also be the root folder. For Copy-From-USB
operation, there are two steps and both are independent from each other.
If there is file named “hotel_wel.png” in the folder “welcome_image” in the USB directory you selected,
it is copied to tv to use as welcome image. The selected directory can be the root or the one created
by user in the USB.
Page 13
Copy from USB device data to NVRAM: Just the reverse operation done by copy to USB call.
RC key
System Code
1
1 2
Previously copied nvram files (“nvblock_ ... .bin”) are copied into TV. If there is no flash file or some of
them are available on USB, the available ones are copied. If no USB is connected, nothing happens.
The files could be in a folder in the USB or it could be just in the root.
TV will autamtically reset after the files are copied from USB to TV. It is required because of existing
power-off requirement.
•
Note : For Clone function USB stick (Copy to USB – Copy from USB) must be formatted to
FAT32. If USB is not formatted to FAT32 the other TVs will not accept cloned data and
performance issues will result
USB Option
If this option is set as “ON”, TV will go on normal operation.
If it is set as “5V”, TV can not use USB and MediaBrowser but USB port will have a voltage of 5 Volts
and any device plugged can be charged. HOTEL MODE should be enabled for “5V” feature.
It is set as “OFF”, then USB ports will be disabled and power will be cut on USB ports. To be able to
use this feature,
-
“USBPowerOff” option has to be set as enabled from profile (hwprofile >
USBPorts/USBPowerOff).
OR
-
HOTEL MODE should be enabled.
Fixed Pic. Mode
If OFF is selected TV will go on normal operation. If It is ON Main menu/Picture quick menu/mode and
quick menu/picture zoom will be inaccessible.
Digital Tuner
If ON is selected TV will go on normal operation. If It is OFF TV will display “no signal” message
when tuned to digital channels existing in active channel list, and digital channels will not be detected
in auto or manual searches.
Multiple RC Support
If OFF is selected TV will go on normal operation. If It is ON RCU type (system code) that is chosen in
“RCU program menu” will be used. “RCU program menu” can be opened by RETURN-1-2-3-4
shortcut. The multiple RC support works on RC5 type of remote controllers. To active this feature, the
hotel mode should be active and from the hotel mode configuration menu, Multiple RC support should
be set as ON. A stand by cycle is necessary after programming the RCU, in order for this feature to
work correctly.
Page 14
0
3 2 4
3
Welcome message
Welcome message option is only visible at the hotel configuration menu when it is enabled from
the
profile option. If this option is unactivated, no welcome message does do occurs at the tv-
power on
term.
When the welcome message option is visible, it provides disables or enables the message screen
according to customer desire.
As default behaviour a welcome message image will be displayed (if hotel mode is enabled). The
image will stay on screen until user presses a key.
On the bottom side of image there is an message (osd message) displaying “press any
key”.This
Sharp, or if the
message is only visible when the customer sets via profile manager as Toshiba or
softwares which uses Toshiba UI. For the other customers and ui options that
warning is invisble.
Welcome image can be changed through USB (described in “copy from USB” section). A default
welcome image is available.
Welcome images must be PNG files with 960x540 resolution and 16 bit color depth.
Welcome image file sizes must not exceed 150KB (153600 Bytes) for 8+2MB TVs
Welcome image file sizes must not exceed 1000 KB (1024000 Bytes) for 8+4MB TVs. If 1000 KB limit
is wanted to be active, then profile option EnhancedLogo should be enabled or Satellite should be
enabled.
Copy service list to USB
This button is only visible at the hotel configuration menu if it was enabled from the profile option.
When this button is pressed all the services tuning informations (program number, name,
frequency...)
Meanwhile a “Please
are written to an xml file. Then this file (service_list.xml) is copied to root of usb.
wait” dialog is displayed. The file cen be edited by supplied
“AutoChannelConfigurator” tool.
Copy service list from USB
This button is only visible at the hotel configuration menu if it was enabled from the profile option.
When this button is pressed the TV will look for a service_list.xml file in the to root of usb. If the file is
available the services in the file will be added. Meanwhile a “Please wait” dialog is displayed.
P.S. Help about “AutoChannelConfigurator” tool is available in it.
Signal Lost (no signal) message
As default behaviour, if there is no signal the same welcome image is displayed. This time osd
message is “no signal”.
Page 15
Internal Clock
If hotel mode is active a new function (add wake up timer) will be available in Settings/Timers menu.
That function will open a new menu to set wake up time. After timer is saved tv can wake up
automatically on desired time.
If alarm option was selected as “on” after wake up tv will show welcome image and an alarm will be
heared. Then any key will stop alarm and welcome image.
If alarm option was selected as “off” after wake up tv will not show welcome image and the alarm will
not be activated.
There is a “wakeup time channel” option in hotel mode menu, Its used to set the channel, whose time
information to be used for wakeup timer. If this option is “0” time information of the channel which is
being watched when timer menu is opened, will be used. Otherwise a “please wait” message will be
displayed before the menu is open and during “please wait” time information of the channel will be get.
(This can take up to 30s). The “wakeup time channel” should be a digital service.
Pin8
If ON is selected Pin8 will go on normal operation , and it is going to switch between sources
automatically. If It is OFF ,Pin8 ignored , and the automatic source switching would be enabled. This
functions DISABLED/ENABLED value does not effect the profile Pin8Standby option (which can be
disabled or enabled via profile manager).
Attention: It has no connection by the profile Pin8Standby option whose function is automatic standby
waking up. Also profile Pin8 DISABLED/ENABLED value does not effect this option.
EPG Enable/Disable
If hotel mode is active and this item is set as “Enabled” EPG button will work to access EPG menus. If
it is set to “Disabled”, EPG menus will not be accessible.
NIT Update
This option enables or disables NIT update mechanism of the TV if Hotel Mode is enabled in the Hotel
Menu Dialog.
Furthermore, if TerrestrialCableCombinedSearch is selected as ENABLED and CustomChannelList is
selected as Single List in the profile, then the user will be able to see the following selection before
starting auto search:
Aerial & Cable Search
If the user performs an auto search with Aerial & Cable Search selection, then TV will not update NIT.
If the user performs an auto search with other selections, then TV will update NIT just like a regular
DVB TV.
Page 16

GeneralBlockDiagram
Page 17
A
513x_pin109
B
CI_A2
C
D
E
F
M_CI_INCLK
M_CI_INDATA6
CI_A12
M_CI_INDATA7
CI_A7
M_CI_OUTCLK
CI_A6
CI_RESET
CI_A5
CI_WAIT#
CI_A4
CI_A3
5135_DV33
513x_pin112
5135_DV10
M_CI_OUTVALID
CI_A1
M_CI_OUTSYNC
CI_A0
M_CI_OUTDATA0
CI_D0
M_CI_OUTDATA1
CI_D1
M_CI_OUTDATA2
CI_D2
CI_CD2#
CI_INT
5135_DV33
F85
1k
NC
F86
1k
C577
C118
10u
100n
10V
6V3
3V3_AVCC
F81
1k
F82
1k
F83
1k
F84
1k
F87
1k
C134
C582
100n
10u
10V
6V3
1 2 3 4 5 6 7 8
CLK_5135
M_CI_INVALID
CI_IREQ#
M_CI_INDATA3
M_CI_INDATA4
M_CI_INDATA5
96959493929190898887868584838281807978777675747372717069686766
97
A15
98
A24
99
A12
100
A25
101
A7
102
VS2_
103
A6
104
PCMCIA_RESET
105
A5
106
WAIT_
107
A4
108
A3
109
GPIO1
110
DVDD33_6
111
REG_
112
GPIO2
113
DVDD11_7
114
A2
115
BVD2
116
A1
117
BVD1
118
A0
119
D8
120
D0
121
D9
122
D1
123
D10
124
D2
125
CD2_
126
CI_INT
127
EFUSE
128
DVDD33_7
A22
A16
A23
SPI_CLK
SPI_DATA
SPI_CLE
READY
PVR_TS_DATA1
123456789
R2094
8
SPI_CLE
SPI_DATA
SPI_CLK
1
R1
7
2
R2
6
3
R3
54
R4
33R
CI_PWR_EN
PVR_TS_DATA0
DEMOD_RST PVR_TS_DATA0
S313
C12
DEMOD_TSVAL
DEMOD_TSDATA0
DEMOD_TSSYNC
DEMOD_TSVAL
DEMOD_TSCLK
3V3_VCC
C488
10p 50V
3V3_AVCC
C119
C120
C121
100n
10V
100n 100n
10V
10V
C122
100n
10V
AVDD33_1
C578
C124
100n
10u
10V
6V3
AVDD33_2
C579
C125
10u
100n
6V3
10V
AVDD33_3
C580
C126
10u
100n
6V3
10V
AVDD33_4
C1207
C127
100n
100n
10V
10V
1V2_AVCC
5135_AV12
C133
100n
10V
5135_DV33
1V2_513x
CI_WE#
M_CI_INDATA2
CI_A14
A20
WE_
A21
DVDD33_5
DVDD11_6
CI_TS_DATA0
PVR_TS_CLK
PVR_TS_VAL
PVR_TS_SYNC
PVR_TS_DATA0
1011121314151617181920212223242526272829303132
nc
50V10p
R26
1
R1
2
R2
3
R3
R4
33R
47R
R49
C1163
C123
10u
100n
10V
6V3
5V_VCC
5V_VCC
5135_DV10
M_CI_INDATA1
CI_A13
M_CI_INDATA0
A18
A13
A19
A14
DVDD11_5
MT5136
DVDD33
DVDD11
CI_TS_CLK
CI_TS_VAL
CI_TS_SYNC
1V2_513x
5135_DV33
8
7
6
54
5135_DV33
5135_DV10
5135_AV12
5135_DV33
R2010
4k7
513x_pin82
CI_A8
M_CI_INSYNC
CI_A9
CI_IOWR#
A9
A8
A17
IOWR_
DVDD33_4
U15
MT5135_RST_B
DEMOD_TS_CLK
DEMOD_TS_VAL
DEMOD_TS_SYNC
DEMOD_TS_DATA0
DEMOD_RST
5135_AV12
5135
5136
5135
5136-->NC
5135
5136
ACT_ANT
1
IN
U40
2
GND
TPS2553-1
21
3
EN
CI_A11
CI_IORD#
CI_OE#
A11
IORD_
NC
DVDD11_1
5135_DV10
513x_pin21
S325
S326
S327
S328
S329
ILIM
FAULT
5135_DV33
1V2_513x
CI_A10
CI_VS1#
A10
OE_
VS1_
DVDD11_4
TN
AVSS33_RSSI
ADIN0
AVDD33_RSSI
1M
R737
AVDD33_1
1V2_AVCC
513x_pin21
513x_pin39
C714
10u
16V
6
OUT
5
4
M_CI_OUTDATA7
CI_D7
M_CI_OUTDATA6
CI_CE1#
D7
D15
CE1_
DVDD33_3
XTALI
AVSS33_DEMOD
AVDD33_DEMOD
TP
XTALI
AVDD33_2
F11
21
330R
1V2_513x
5135_DV33
1
TP200
680R
R2008
680R
R2009
M_CI_OUTDATA5
CI_D6
65
D6
D13
D14
S2_TS_DATA7
S2_TS_DATA6
S2_TS_DATA5
S2_TS_DATA4
S2_TS_DATA3
S2_TS_DATA2
S2_TS_DATA1
S2_TS_DATA0
S2_TS_SYNC
TUNER_DATA
AVDD33_IFPGA
AVDD12_DEMOD
AVSS12_DEMOD
EXT_CLKSEL
AVDD33_XTAL
XTALO
AVSS33_XTAL
XTALO
AVDD33_3
R2199
8
1
R1
7
2
R2
6
3
R3
54
R4
33R
sat bypass option
F2
1k
C583
10u
6V3
5135
S330
5136
S331
5135
S332
5135
S333
C712
C713
100n
16V
100p
50V
D12
D11
CD1_
CHIP_CTRL
DVDD33_2
DVDD11_3
S2_TS_VAL
S2_TS_CLK
RF_AGC
IF_AGC
TUNER_CLK
DVDD11_2
DVDD33_1
IFPGA_INP
IFPGA_INN
D5
D4
D3
M_CI_OUTDATA4
63
CI_D4
62
M_CI_OUTDATA3
61
CI_D3
60
CI_CD1#
59
58
57
56
55
54
53
52
51
50
49
48
47
46
45
RF_AGC_5135 CI_D2
44
43
42
41
40
39
38
37
36
35
34
33
CI_D5
64
AVDD33_1
10k
R2118
S2_TS_DATA_0
S2_TS_SYNC
S2_TS_ VAL
S2_TS_CLK
1V2_MT5820
C128
C132
100n
100n
10V
10V
513x_pin82
513x_pin109
513x_pin112
ANTENNA INPUT
ACTIVE ANTENNA
R2201
47R
S2_TS_DATA_7
S2_TS_DATA_6
S2_TS_DATA_5
S2_TS_DATA_4
S2_TS_DATA_3
S2_TS_DATA_2
S2_TS_DATA_1
33R
33R
R758
R2234
R2130
R2129
4k7
4k7
5135_DV33
S2_TS_DATA_0
S2_TS_ VAL
S2_TS_SYNC
S2_TS_CLK
5135_DV10
513x_pin39
AVDD33_4
5135_AV12
5135_IF_P
5135_IF_N
3V3_AVCC
C1116
100n
10V
1V2_513x
NC
1: Differential
0: Single End
C129
100n
10V
USB_ENABLE
R2101
XTALI
XTALO
XTALI
R759
4k7
CI girisi ust-altta konacak
R209
10k
MXL601_SCL
MXL601_SDA
LED&VFD
R73
21
10k
LED2
5135_DV10
5V_STBY
5V_VCC
21
CN28
4
3
2
1
R426
R2096
10k
TP110
TP107
3V3_VCC 4k7
10k
R50
C179
27p
C180
27p
2
M_CI_OUTCLK
21
21
C490
10p
50V
X5
41
27MHz
3
XTALO
M_CI_INCLK
C492
10p
50V
47R
R51
47R
CI_OUTCLK
close to mt5135
M_CI_OUTDATA4
TP198
TP199
M_CI_OUTDATA5
M_CI_OUTDATA6
M_CI_OUTDATA7
6
7
8
R2005
R208
10k
TP120
TP119
3
2
1
CN18
21
S17
3
2
1
Q5
BC848B
21
10k
R74
2
BC858B
F189
LBS
1k
FC pin5 NC, pin6 current limit, R from VCC to pin6 NC
TI pin5 current limit, pin4 fault, R from pin4 to GND NC
1
IN
U44
2
GND
3
1
TP210
TPS2553-1
3
EN
Q222
BC848B
USB1_DP
21
2
21
TP121
4
21
220R
3
1
21
220R
ILIM
FAULT
C358
47n
16V
C1
27p
50V
R474
Q40
Q39
R473
OUT
TP122
5
21
6
5
4
IF_AGC
F60
1k
21
220R
R471
3
1
BC858B
21
R472
220R
R643
2 1
10R
21
10k
R72
2
USB1_VCC
R428
2 1
4k7
BC848B
LBS
R2069
560R
R2070
560R
TP209
F96
21
USB1_VCC
C623
10u
16V
330R
USB1_VCC
R4
45
R3
3
R2
2
R1
1
22R
LBS
21
10k
R70
3
Q4
1
TI OPT.
FC OPT.
5V_VCC
TI OPT.
1
IO1
U45
2
GND
AZ099-04S
IO2 IO3
R644
10R
CI_OUTDATA4
CI_OUTDATA5
CI_OUTDATA6
CI_OUTDATA7
2
21
C491
10p
50V
close to pcmcia
CI_INCLK
C489
10p
50V
5V_VCC
D8
R71
21
10k
LED1
6
IO4
5
VDD
USB1_VCC
43
USB1_DM
R2001
22R
8
M_CI_INVALID
M_CI_INSYNC
M_CI_INDATA0
M_CI_INDATA1
M_CI_INDATA2
M_CI_INDATA3
M_CI_INDATA4
M_CI_INDATA5
M_CI_INDATA6
M_CI_INDATA7
M_CI_OUTVALID
M_CI_OUTSYNC
M_CI_OUTDATA3
M_CI_OUTDATA0
M_CI_OUTDATA1
M_CI_OUTDATA2
1
R1
2
R2
3
R3
R4
R2002
22R
8
R1
7
R2
6
R3
R4
R2003
22R
8
R1
7
R2
6
R3
R4
R2140
10k
R4
R3
6
R2
7
R1
8
22R
R2004
CI_INVALID
7
CI_INSYNC
6
CI_INDATA0
54
CI_INDATA1
CI_INDATA2
1
2
CI_INDATA3
CI_INDATA4
3
CI_INDATA5
45
1
CI_INDATA6
2
CI_INDATA7
3
CI_OUTVALID
45
CI_OUTSYNC
CI_OUTDATA3
45
CI_OUTDATA0
3
CI_OUTDATA1
2
CI_OUTDATA2
1
VCC_PCMCIA
VCC_PCMCIA
CI_D3
CI_D4
CI_D5
CI_D6
CI_D7
CI_CE1#
CI_A10
CI_OE#
CI_A11
CI_A9
CI_A8
CI_A13
CI_A14
CI_WE#
CI_IREQ#
CI_INVALID
CI_INCLK
CI_A12
CI_A7
CI_A6
CI_A5
CI_A4
CI_A3
CI_A1
CI_A0
CI_D0
CI_D1
10k
R207
CI INTERFACE
VCC_PCMCIA
S311
USB1_VCC
5135_DV33
10k
R204
CI_CD1#
C131
100n
IR_IN
21
C5V6
5V_VCC
Q227
F186
60R
10V
BSH103
3V3_VCC
S336
C1397
10u
10V
3V3_VCC
R2242
2 1
4k7
R2241
2 1
4k7
2 1
S335
nc
nc
12V_VCC
1
POK
2
EN
APL5910
3
VIN
VCNTL NC
R2243
47R
U65
R2260
GND
VOUT
47k
Q226
BC848B
FB
8
7
6
54
R2259
47k
1
2
5135_DV10
R2245
22k
R2244
12k
C1395
10u
10V
10V
100n
C1434
C1396
10u
10V
DVB-T2
17mb82s-r4
SCH NAME :
DRAWN BY :
DEMOD
<YOUR NAME HERE>
CN6
1
2
3
4
5
6
7
8
9
10
11
12
13
14
15
16
17
18
19
20
21
22
23
24
25
26
27
28
29
30
31
32
33
34
10k
R203
C107
100n
10V
R2258
35
CI_CD1#
36
CI_OUTDATA3
37
CI_OUTDATA4
38
CI_OUTDATA5
39
CI_OUTDATA6
40
CI_OUTDATA7
41
CI_CE2#
42
CI_VS1#
43
CI_IORD#
44
CI_IOWR#
45
CI_INSYNC
46
CI_INDATA0
47
CI_INDATA1
48
CI_INDATA2
49
CI_INDATA3
50
51
52
CI_INDATA4
53
CI_INDATA5
54
CI_INDATA6
55
CI_INDATA7
56
CI_OUTCLK
57
CI_RESET
58
CI_WAIT#
59
60
CI_REG#CI_REG# CI_A2
61
CI_OUTVALID
62
CI_OUTSYNC
63
CI_OUTDATA0
64
CI_OUTDATA1
65
CI_OUTDATA2
66
CI_CD2#
67
68
R196
R197
R198
R201
R206
R205
R199
R200
R202
CI_CD2#
C130
100n
10V
C108
100n
10V
R2257
33k
33k
CI_PWR_EN
R2246
1k
C1399
100n
09-04-2014_15:22
87654321
10k
10k
10k
10k
10k
10k
10k
10k
10k
VCC_PCMCIA
CI_WAIT#
CI_OUTCLK
CI_IREQ#
CI_CE2#
CI_WE#
CI_OE#
CI_IORD#
CI_IOWR#
CI_VS1#
VCC_PCMCIA
C1398
10u
10V
5135_DV10
T. SHT:
A
B
C
D
E
F
A3
9
AX M
Page 18
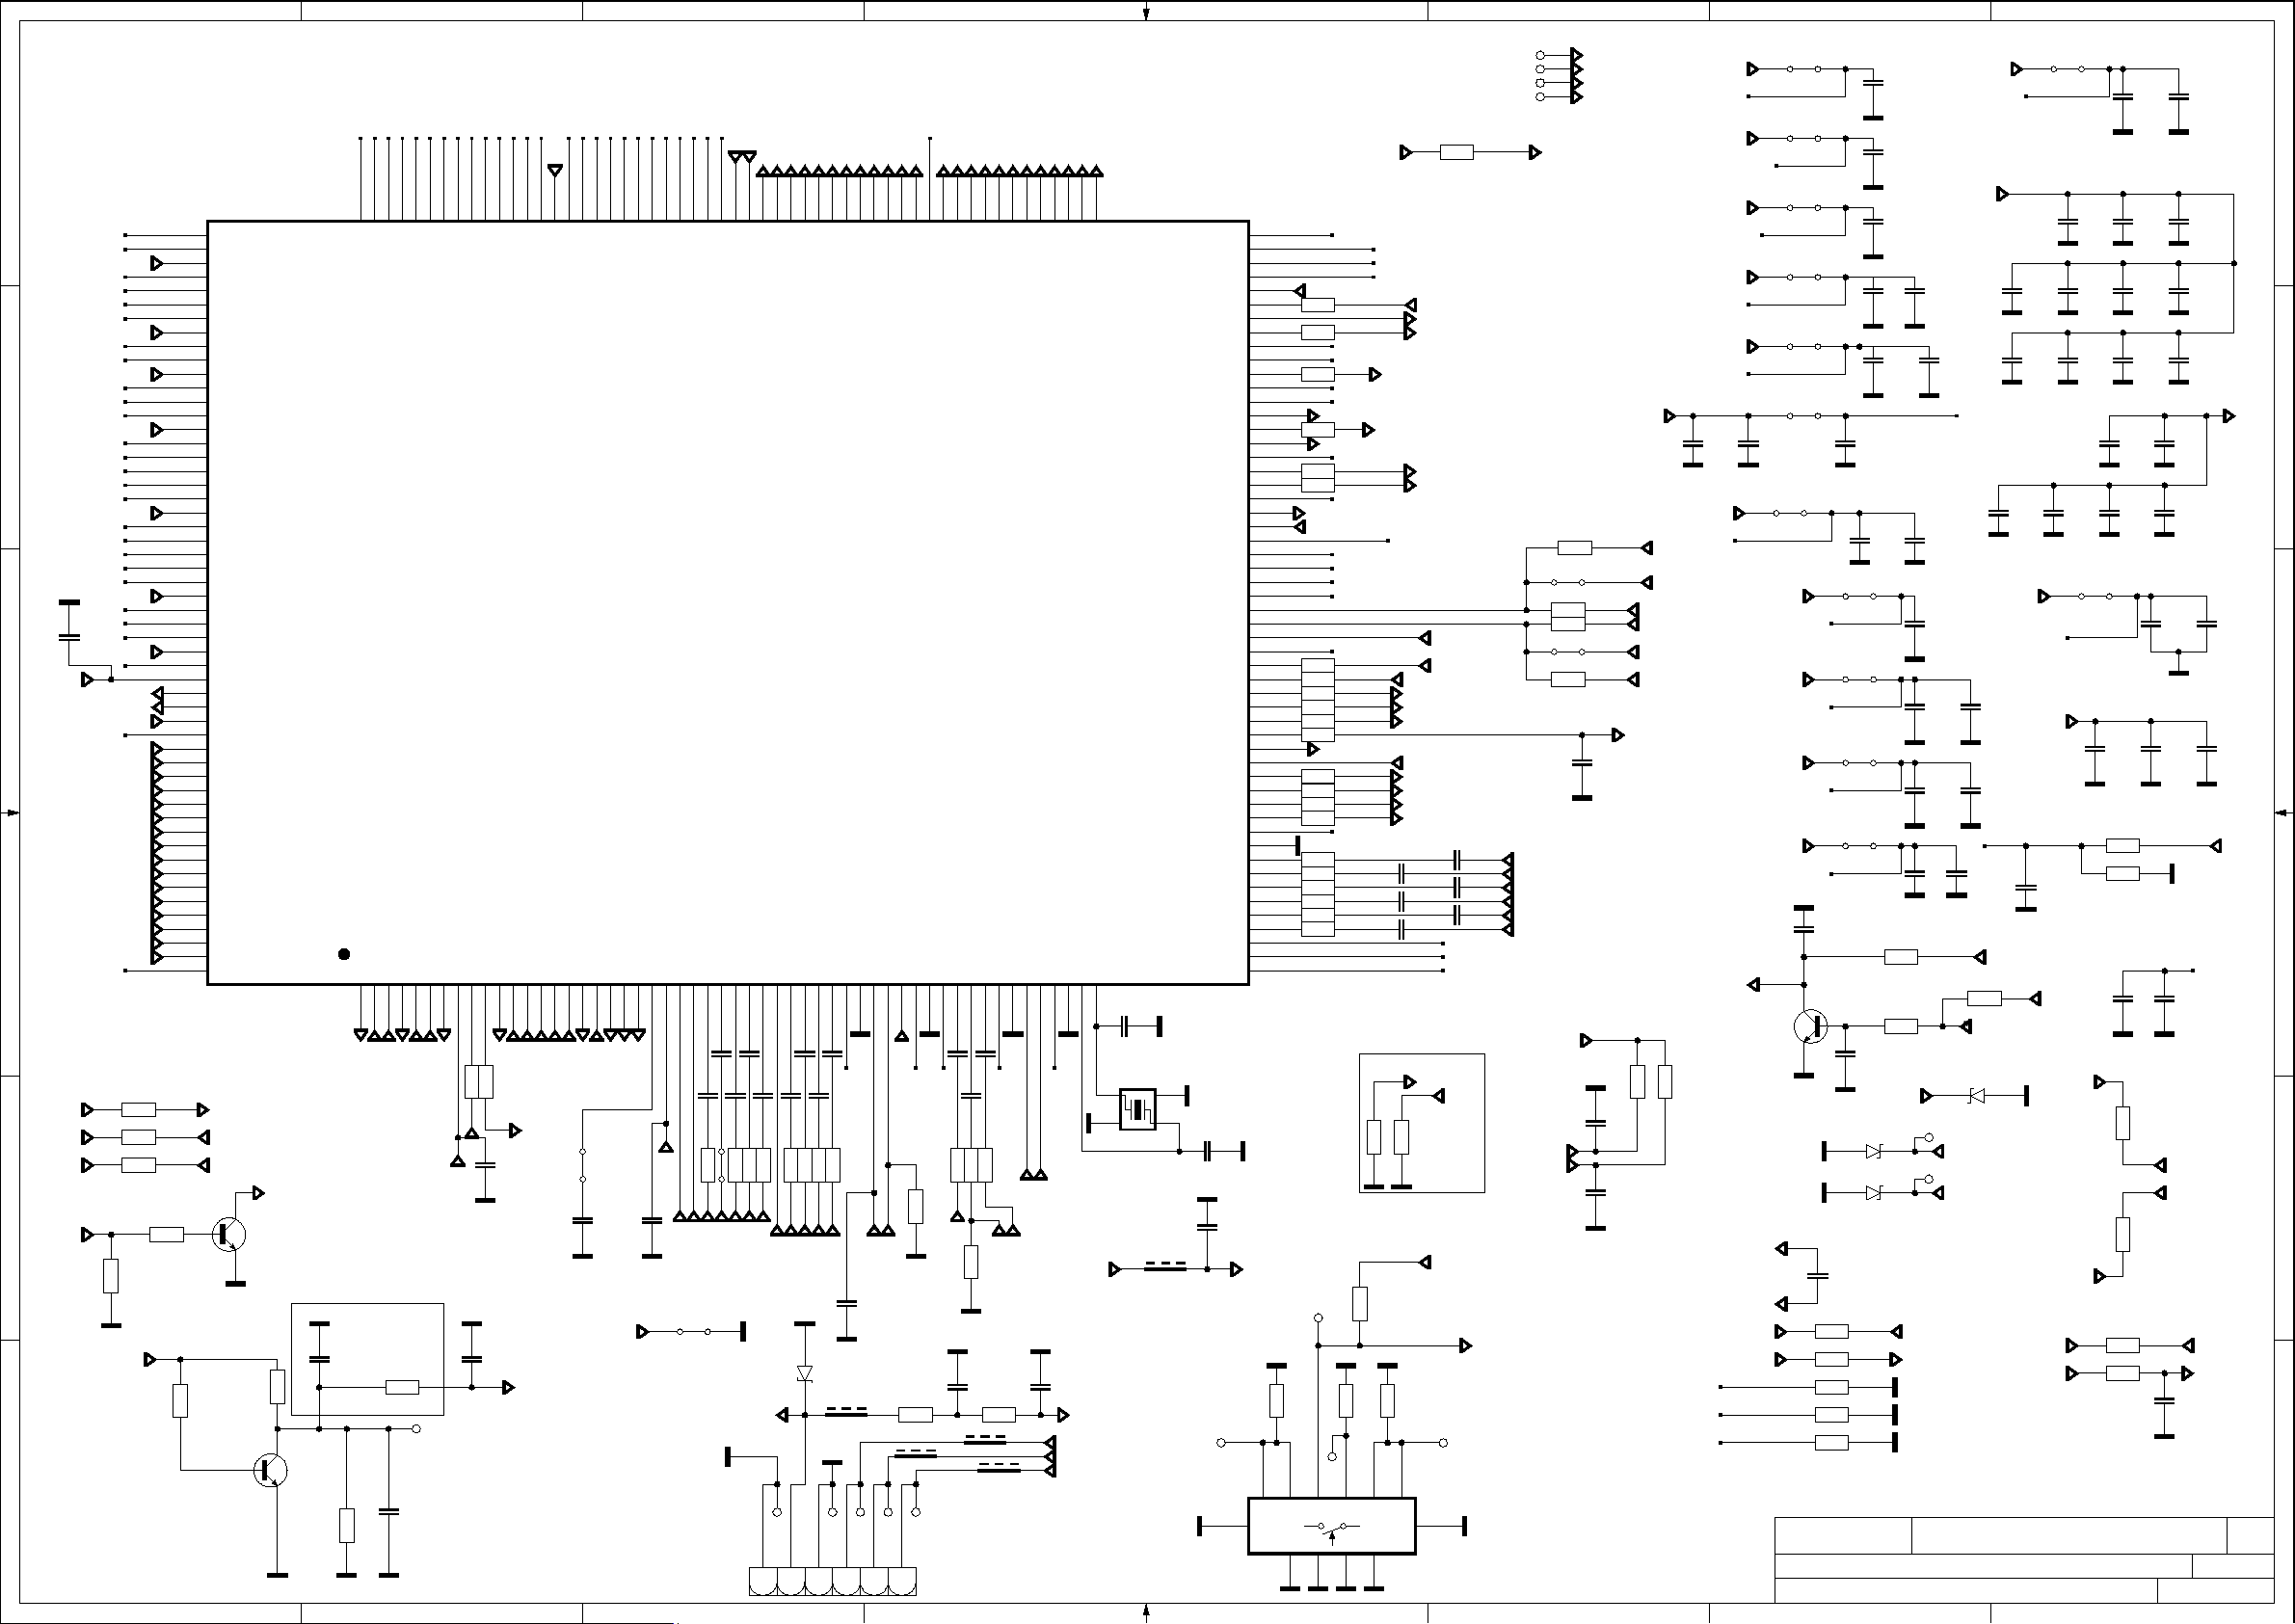
A
1V2_MT5820
B
RDQS0_
RCLK0_
RDQS1_
10V
1
100n
2
C1107
C
AVDD33_HDMI_1_RX
D
AVDD12_HDMI_1_RX
3V3_AVCC
1V2_MT5820
1V2_MT5820
HDMI0_CLKN
HDMI0_CLKP
HDMI0_RX0N
HDMI0_RX0P
HDMI0_RX1N
HDMI0_RX1P
HDMI0_RX2N
HDMI0_RX2P
HDMI1_CLKN
HDMI1_CLKP
HDMI1_RX0N
HDMI1_RX0P
HDMI1_RX1N
HDMI1_RX1P
HDMI1_RX2N
HDMI1_RX2P
3V3_STBY
LED1
LED2
E
OPWRSB
3V3_STBY
F
RDQ6
RDQ2
RDQ0
RDQ11
RDQ9
RDQ13
RDQ15
RDQM1
RVREF
RDQS0
RCLK0
RDQM0
RDQS1
RDQ12
RDQ14
RDQ10
RDQ8
RDQ1
RDQ3
RDQ7
RDQ5
REXT
USB1_DM
USB1_DP
1 2 3 4 5 6 7 8
AOSDATA0
1
10k
DDRV
DDRV
DDRV
DDRV
DDRV
10k
10k
10k
R2091
R176
R2092
R2093
R2090
10k
163
RDQ6
164
RDQ2
165
VCC2IO1
166
RDQ0
167
RDQ11
168
RDQ9
169
RDQ13
170
VCC2IO2
171
RDQ15
172
RDQM1
173
VCCK6
174
RVREF
175
RDQS0
176
RDQS0_
177
VCC2IO3
178
RCLK0_
179
RCLK0
180
RDQM0
181
RDQS1
182
RDQS1_
183
VCC2IO4
184
RDQ12
185
RDQ14
186
RDQ10
187
RDQ8
188
RDQ1
189
VCC2IO5
190
RDQ3
191
RDQ7
192
RDQ5
193
VCCK7
194
REXT
195
AVDD33_USB
196
USB_DM
197
USB_DP
198
VCCK8
199
AVDD33_HDMI_1_RX
200
HDMI_0_RX_CB
201
HDMI_0_RX_C
202
HDMI_0_RX_0B
203
HDMI_0_RX_0
204
HDMI_0_RX_1B
205
HDMI_0_RX_1
206
HDMI_0_RX_2B
207
HDMI_0_RX_2
208
HDMI_1_RX_CB
209
HDMI_1_RX_C
210
HDMI_1_RX_0B
211
HDMI_1_RX_0
212
HDMI_1_RX_1B
213
HDMI_1_RX_1
214
HDMI_1_RX_2B
215
HDMI_1_RX_2
216
AVDD12_HDMI_1_RX
AMP_MUTE
3V3_STBY
3V3_STBY
2
10k
R128
3
1
Q221
BC848B
2
STBY_ON/OFF
CLOSE TO MT5820
12k
R807
3
Q16
BC848B
1
RBA0
RCS_
RODT
RDQ4
162
161
160
159
RBA0
RCS_
RODT
RDQ4
HDMI_1_HPD
HDMI_1_SDA
HDMI_1_SCL
GPIO4
123456789
LED1
HDMI_1_SCL
HDMI_1_SDA
HDMI1_HPDIN
C1109
100n
R2095
1k
NC
C285
10u
10V
18k
R2087
RBA2
RA5
RA3
RA2
158
157
156
155
RA2
RA5
RA3
RBA2
VCC3IO_STB
HDMI_0_HPD
HDMI_0_SDA
HDMI_0_SCL
HDMI_0_SCL
HDMI_0_SDA
HDMI0_HPDIN
3V3_STBY
TP47
RRESET_
RA7
154
153
RA7
RRESET_
RA9
152
RA9
RA13
151
RA13
RA0
150
RA0
149
RWE_
148
RRAS_
DDRV
147
146
RRAS_
RCAS_
VCC2IO0
RA12
145
RA12
RA11
144
RA11
RA8
143
RA8
RA6
142
RA6
RA1
141
RA1
RA4
140
RA4
RBA1
139
RBA1
RA10
AVDD33_MEMPLL
RCKE
138
137
136
135
RCKE
RA10
VCCK5
AVDD33_MEMPLL
1V2_MT5820
1V2_MT5820
5820_TX_B_0_P
5820_TX_B_0_N
134
133
132
131
AO0P
AO0N
VCCK4
5820_TX_B_CLK_P
5820_TX_B_CLK_N
5820_TX_B_2_P
5820_TX_B_2_N
5820_TX_B_1_P
5820_TX_B_1_N
130
129
128
127
126
AO2P
AO2N
AO1P
AO1N
AOCKP
AOCKN
AVDD33_LVDSA
5820_TX_B_3_P
5820_TX_B_3_N
5820_TX_B_4_N
5820_TX_B_4_P
125
124
123
122
121
AO4P
AO4N
AO3P
AO3N
AVDD33_LVDSA
5820_TX_A_2_N
5820_TX_A_1_P
5820_TX_A_1_N
5820_TX_A_0_P
5820_TX_A_0_N
120
119
118
117
116
AE2N
AE1P
AE1N
AE0P
AE0N
5820_TX_A_3_N
5820_TX_A_2_P
5820_TX_A_CLK_N
5820_TX_A_CLK_P
115
114
113
112
AE3N
AE2P
AECKP
AECKN
RCAS_
RWE_
U14
MT5820L
AVDD33_DEMOD
ADCINN_DEMOD
ADCINP_DEMOD
AVSS12_DEMOD
AVDD12_DEMOD
CVBS0P
SY
SC
AVDD33_CVBS
AVSS33_CVBS
AVDD33_PLLGP
VCCK1
VDACX_OUT
AVDD33_VDAC
AVSS12_RGB
AVDD12_RGB
PRP
PBP
COM1
YP
SOY
RP
COM0
GP
SOG
BP
HSYNC
VSYNC
AVDD33_VGA_STB
AVDD10_LDO
ORESET_
ADIN0_SRV
ADIN1_SRV
VCCK0
OPWRSB
OIRI
U0TX
U0RX
VGA_SDA
VGA_SCL
OPCTRL2
OPCTRL1
OPCTRL0
101112131415161718192021222324252627282930313233343536373839404142434445464748495051525354
LED2
R2123
R2133
PC_SCL
100R
100R
C1104
2
100n
1
10V
DVD_WAKEUP
C1173
100n
mainreset
PC_SDA
UART-RX
UART-TX
OPCTRL1
C1327
4u7
6V3
C233
IR_IN
OPWRSB
KEYBOARD
1V2_MT5820
S312
30062301-->DP
C1106
100n
10V
SC_PIN8
mainreset
2
1
C207
R163
3V3_STBY
10n
S4
100R
VGA_B
VGA_HSNC
VGA_VSNC
COM_SC
S294
keyboard
KEYBOARD_ONBOARD
30067087
1n5
C206
10n
21
R162
100R
VGA_G
VGA_G
SC_FB
C199
10n
C200
10n
R160
R161
100R
100R
VGA_R
SC_FB
VGA_G_COM
TP115
1
CN11
C202
10n
R159
100R
SC_B
C1105
100n
C5V6
2
C203
10n
C204
R156
R158
100R
100R
SC_G
COM_SC
10V
D6
2 1
3
C201
10n
10n
AVDD12_RGB
R157
100R
SC_R
2
1
F187
1k
TP201
4
3V3_AVCC
TP202
5
1V2_MT5820
AVDD33_PLLGP
75R
R123
CVBS0_OUT
R30
47R
1k
TP118
TP117
6
C110
C111
47n
47n
C112
47n
AVDD33_CVBS
R154
R153
R155
62R
100R
100R
39R
R2097
SAV_CVBS
C31
2
100n
1
10V
R271
21
47R
F59
1k
F24
1k
AVDD33_DEMOD
AVDD12_DEMOD
5820_IF_P
5820_IF_N
OPCTRL1
SC_CVBS-IN
DVD_CVBS_IN
C142
2
100n
1
10V
21
3V3_STBY
SYS_SCL
SYS_SDA
5820_TX_A_3_P
5820_TX_A_4_N
5820_TX_A_4_P
111
110
109
AE4P
AE4N
AE3P
XTALO
XTALI
AVSS33_DEMOD
C171
21
27p
X4
2
KEYBOARD
AVDD12_LVDSA
GPIO2
GPIO1
GPIO0
VCC3IO1
POWE_
PAALE
PACLE
POCE0_
POOE_
PARB_
PDD7
PDD6
PDD5
PDD4
PDD3
PDD2
PDD1
PDD0
POCE1_
GPIO3
VCCK3
FSRC_WR
DEMOD_TSDATA0
DEMOD_TSSYNC
DEMOD_TSVAL
DEMOD_TSCLK
SCL_SYSTEM
SDA_SYSTEM
VCC3IO0
DEMOD_RST
RF_AGC
IF_AGC
AOSDATA0
AOBCK
AOLRCK
AOMCLK
ASPDIFO0
VCCK2
AR1_ADAC
AR0_ADAC
AL1_ADAC
AL0_ADAC
AVDD33_DAC
AVSS33_DAC
AIN2_L_AADC
AIN2_R_AADC
AIN1_L_AADC
AIN0_L_AADC
AIN1_R_AADC
AIN0_R_AADC
AVDD33_AADC
VMID_AADC
AVDD33_XTAL_STB
nc
41
27MHz
3
C172
21
27p
C1277
22p
50V
F198
1k
TP204
nc
CLK_5135
E2
108
107
106
105
104
103
102
101
100
99
98
97
96
95
94
93
92
91
90
89
88
87
86
85
84
83
82
81
80
79
78
77
76
75
74
73
72
71
70
69
68
67
66
65
64
63
62
61
60
59
58
57
56
55
R76
4
10k
3V3_STBY
AVDD12_LVDSA
SPI_CLE
SPI_DATA
SPI_CLK
3V3_VCC
R2136
100R
R2135
100R
POCE0_
POOE_
R134
33R
PDD7
PDD6
HP_AMP_MUTE
R2134
33R
AMP_MUTE
CI_INT
R2138
100R
R2137
100R
POCE1_
MT_DIMMING
1V2_MT5820
DEMOD_TSDATA0
DEMOD_TSSYNC
DEMOD_TSVAL
DEMOD_TSCLK
DEMOD_RST
R2139
100R
R62
33R
R133
33R
R132
33R
R131
33R
R130
33R
SPDIF_OUT
R278
20k
R279
20k
R280
20k
R281
20k
AVDD33_DAC
R152
30k
R151
30k
R150
30k
R149
30k
R148
30k
R147
30k
close to 5820
21
TP196
10k
2k
R742
+
C
SW1
G3
T
TP205
G2
SOURCE
3
G4
10k
PROTECT
USB_ENABLE
PANEL_VCC_ON/OFF
AMP_RST
DVD_SENSE
MT_BACKLIGHT_ON/OFF
HP_DETECT
internal gpio21
FSRC_WR
3V3_VCC
DVD_SPDIF
DVD_IR_ON/OFF
AOSDATA0
AOBCK
AOLRCK
1V2_MT5820
MAIN_DAC_R
SC_DAC_R
MAIN_DAC_L
SC_DAC_L
1u
1u
C74
1u
1u
C73
1u
1u
C72
AVDD33_XTAL_STB
STRAPPING
PANEL_VCC_ON/OFF
OPCTRL1
21
21
10k
R47
10k
R48
3V3_STBY
R46
R731
470R
-
2
1
E1
G1
TP59
TP60
TP75
TP58
R1984
C68
C69
C71
DVD_L_AUD
DVD_R_AUD
SAV_AUD_L_IN
SCART_AUD_L_IN
SAV_AUD_R_IN
SCART_AUD_R_IN
AVDD33_AADC
VMID_AADC
SYS_SCL
SYS_SDA
KEYBOARD_ONBOARD
TP203F25
1
1
1
HP_AMP_MUTE
33R
S31
33R
33R
S30
R2172
33R
3V3_VCC
C17
22p
50V
C18
22p
50V
AOBCK
AOLRCK
AOMCLK
R2171
R129
R127
3V3_AVCC
C375
22p
50V
3V3_AVCC
AVDD33_MEMPLL
3V3_AVCC
AVDD33_HDMI_1_RX
3V3_AVCC
AVDD33_CVBS
3V3_AVCC
3V3_AVCC
AVDD33_DEMOD
Close to MT5820
C1102
100n
3V3_AVCC
AVDD33_DAC
SAT_SCL
MXL601_SCL
SYS_SCL
SYS_SDA
MXL601_SDA
SAT_SDA
AOMCLK
BACKLIGHT_ON/OFF
4k7
4k7
R102
R103
2 1
2 1
CLOSE TO MTK IC
AVDD12_HDMI_1_RX
USB1_DM
USB1_DP
3V3_STBY
3V3_VCC
S19
S18
S16
S14
AVDD33_LVDSA
S13
S12
C1103
4u7
10V
S10
1V2_AVCC
1V2_AVCC
AVDD12_RGB
1V2_AVCC
AVDD12_DEMOD
1V2_AVCC
AVDD12_LVDSA
C55
BACKLIGHT_ON/OFF
Q30
BC848B
REXT
DEMOD_RST
FSRC_WR
SCH NAME :
DRAWN BY :
C56
100n
C54
100n
C53
100n
C51
100n
C50
100n
AVDD33_AADC
C49
100n
C48
100n
S15
S9
S8
S7
10V
C33
10V
100n
R440
4k7
R439
4k7
100n
3V3_STBY
D62
C12V
D63
C12V
C331
1p
R45
10k
R44
10k
R170
22k
R41
10k
R283
4k7
MAIN
<YOUR NAME HERE>
3V3_AVCC
AVDD33_PLLGP
1V2_MT5820
C1180
1u
6V3
C1158
1u
6V3
C82
4u7
10V
3V3_STBY
C52
100n
AVDD33_XTAL_STB
C47
100n
C46
100n
C1181
C45
1u
100n
6V3
21
R192
4k7
MT_BACKLIGHT_ON/OFF
21
C12V
D180
TP188
UART-TX
TP189
UART-RX
DVD_WAKEUP
PROTECT
C39
100n
C35
100n
C256
100n
C1183
1u
6V3
3V3_VCC
C1157
1u
6V3
5V_VCC
21
DVD_SENSE
MT_DIMMING
C23
100n
16V
3V3_STBY_1
3V3_STBY
3V3_STBY
S6
C44
100n
C43
C81
100n
4u7
10V
C42
C41
100n
100n
C38
C37
100n
100n
C80
4u7
10V
C26
C27
100n
100n
S23
C255
1u
16V
RVREF
R264
1k
R263
1k
R190
R191
R43
10k
33R
4k7
4k7
C258
1u
16V
NC
R282
17mb82s-r4
87654321
C209
10n
16V
near IC
C257
1u
16V
C40
100n
C36
100n
DDRV
C57
100n
C352
10u
10V
C28
100n
C25
100n
GND1
C24
C32
100n
100n
DDRV
VMID_AADC
C208
10n
16V
UART-TX
UART-RX
3V3_VCC
BACKLIGHT_DIM
C194
100n
2 1
16V
A3
T. SHT:
9
07-04-2014_11:30
A
B
C
D
E
F
AX M
Page 19

1 2 3 4 5 6 7 8
W/B2B
CN32
A
12 11
10 9
8 7
6 5
4 3
2 1
W/B2CABLE
B
TP230
TP229
C
power_pin3
power_pin9
D
1
1
CN33
2 1
4 3
6 5
8 7
10 9
12 11
nc
12V_STBY
12V_VCC
S211
S212
S304
5V_STBY
SW2
STBY_ON/OFF_NOT
E
W_ADAPTER
F
JK7
ADAPTER SOCKET
12V_STBY
power_pin9
DIMMING
BACKLIGHT_ON/OFF
power_pin3
power_pin1
12V_STBY
power_pin9
DIMMING
BACKLIGHT_ON/OFF
power_pin3
S303
S300
power_pin1
1
TP228
STBY_ON/OFF
STBY_ON/OFF_NOT
PW05_IPS60_IPS70_Adaptor
5V_STBY
R2124
2 1
33k
R296
2 1
33k
R119
2 1
10k
TP72
5
4
3
2
1
TP22
TP73
TP74
12V_VCC
24V_VCC_AU
PW03_PW04_PW07
PW06_IPS19
6
Q225
NTGS3446
1
NC
R109
47R
1k
R338
Q46
BC848B
Q219
Q220
FDC642P
FDC642P
R2175
R2176
5
2
21
100n
16V
6
1
6
1
10k
10k
TP29
43
C1153
NC
S301
S27
5
2
5
2
21
21
STP1
C1144
C1178
220n
10u
16V
25V
12V_STBY
STP2
2 1
TPS_CNTRL
R2065
5V_VCC
43
R2177
10k
43
R2178
21
21
10k
30049469 1.13k
C197
F1
60R
21
C353
220n
25V
10n
16V
2
1
C215
10u
16V
S314
1
VBST
2
VIN
3
SW
4
GND
U17
TPS54329E
COMMON
C1146
R2126
3n3
100n
C1152
16V
10k
VFB
C807
1u
16V
C811
PW03_PW04_PW07
3R3
50V
C810
S299
10u
16V
R2064
10k
1
EN
U46
2
VFB
VBST
TPS54528
3
VREG5
4
VSS
50V
8n2
PW06_IPS19
S262
21
VIN
SSW
GND
100n
16V
8
7
6
5
L18
10u
L35
1u2
C1205
C803
100n
100n
16V
16V
C1206
R2127
4u7 6x6 olacak ÜA
L34
10u
SK24
D168
3R3
5V_STBY
PW05_IPS60_IPS70_Adaptor
3V3_VCC
1k
C805
220n
10V
COMMON
21
5V_VCC
C1172
10u
10V
CCFL INVERTER SOCKET
CN4
1
2
3
4
5
6
R461
R465
22k
1k2
R462
R468
22k
2k2
5V_STBY
12V_INV
TP225
TP227
DIMMING
BACKLIGHT_ON/OFF
TP226
TP224
R122
21
10k
Q11
BC848B
R340
R35
10k
R34
10k
VREG5
VFB
C1148
10u
10V
C809
10u
16V
10u L27
C808
10u
C1147
3n3
50V
S64
S305
S306
Q12
BC848B
SS
EN
10V
21
21
R319
8
7
6
5
470R
C216
10u
10V
22u 6V3
3V3_AVCC
S29
S28
43
43
C136
21
100n
10V
C357
470n
6V3
C689
10u
10V
R2074
120k
5V_VCC
5
2
5
2
R315
33p
C1190
5V_CTRL
D2
C804
6
1
6
1
S302
12k1
nc
TP2
1
C5V6
FDC642P
FDC642P
R2066
100n
Q60
Q59
R165
22k
TP1
1
C1110
10u
10V
4k7
C1151
16V
5V_VCC 10k
3V3_STBY_1
STBY_ON/OFF
STBY_ON/OFF
STBY_ON/OFF_NOT
TP25
!
FS4
7A/32VDC
FS3
7A/32VDC
12V_STBY
C1349
F201
60R
F208
1k
F206
1k
F205
1k
F207
1k
VFB
R2073
22k
S273
S138
S2
10u
10V
1V3_SAT_VCC
1V2_MT5820
100n
C1150
D3
16V
R23
2 1
R24
2 1
10k
12V_STBY
12V_VCC
21
R39
C20
C5V6
VDD_AUDIO
5V_STBY
C1170
10u
10V
MOSFET_CONTROL
R37
R42
2 1
10k
R60
10k
10k
R61
21
10k
21
16V
100n
S5
S1
NC
10k
2 1
!
12V_INV
1V2_MT5820
C1179
2u2
6V3
12V_STBY
SW1
Q6
BC848B
21
3
2
Q2
BC848B
1
MOSFET_CONTROL
1V2_MT5820
21
C148
220n
R118
2 1
10k
Q13
BC848B
C3
10u
10V
STBY_ON/OFF_NOT
12V_VCC
25V
33k
R288
2 1
R108
21
47R
33k
R287
2 1
TPS_CNTRL
PW06_IPS19
PW05_IPS60_IPS70_Adaptor
Q24
BC848B
S215
S214
43
C1377
10u
16V
C1343
220n
25V
6
5
Q61
FDC642P
2
1
F200
21
60R
C1344
3n3
50V
FS2
7A/32VDC
4A
C1342
220n
25V
C1371
10n
16V
R2222
3R3
12V_VCC
3V3_VCC
2
1
C1376
10u
16V
S315
U63
TPS54329E
1
VBST
2
VIN
3
SW
4
GND
COMMON
L36
10u
5V_STBY
F199
60R
SCH NAME :
DRAWN BY :
R2219
21
10k
R2220
21
10k
8
SS
7
VREG5
VFB
C1348
10u
10V
C1303
10u
6V3
EN
C1375
6
5
470n
6V3
10R
R2238
F204
330R
C1345
10u
10V
R99
2 1
4k7
U58
LM1117
3 2
3 2
GND
1
U57
LM1117
GND
1
OUTIN
VOUT
4
OUTIN
VOUT
4
COMMON
POWER
<YOUR NAME HERE>
C1355
21
100n
10V
COMMON
S316
4k7
R2233
R2232
1k8
3V3_VCC
C1346
C1347
10u
10u
10V
NC
1
IN
OUT
U59
2
GND
TLV0033
EN N/C
S63
Q3 BC848B
3
1
2
Q1 BC848B
3
1
2
R169
U1
TL431SAMF2
R2173
100n
C1435
16V
D181
10V
5
43
COMMON
R321
2k7
22k
75K
R320
TP223
1V5_AVCC
1
N.C.
100R
R2174
100R
0R
17mb82s-r4
3V3_VCC
3V3_VCC
1
TP222
C5V6
3V3_STBY_1
F190
1k
C362
47u
16V
C1304
100n
10u
16V
6V3
R2261
100R
87654321
C1149
10u
10V
3V3_STBY
D5
C5V6
1V5_VCC
C1305
C1278
10u
6V3
1
1
1
1
1
1
1
1
5V_STBY
3V3_STBY
12V_VCC
VDD_Lineout
5V_VCC
3V3_AVCC
1V5_VCC
1V2_AVCC
TP3
TP4
TP12
TP24
TP13
TP15
TP18
TP21
BOARD VOLTAGES
T. SHT:
08-04-2014_17:33
A
B
C
D
E
F
A3
9
AX M
Page 20
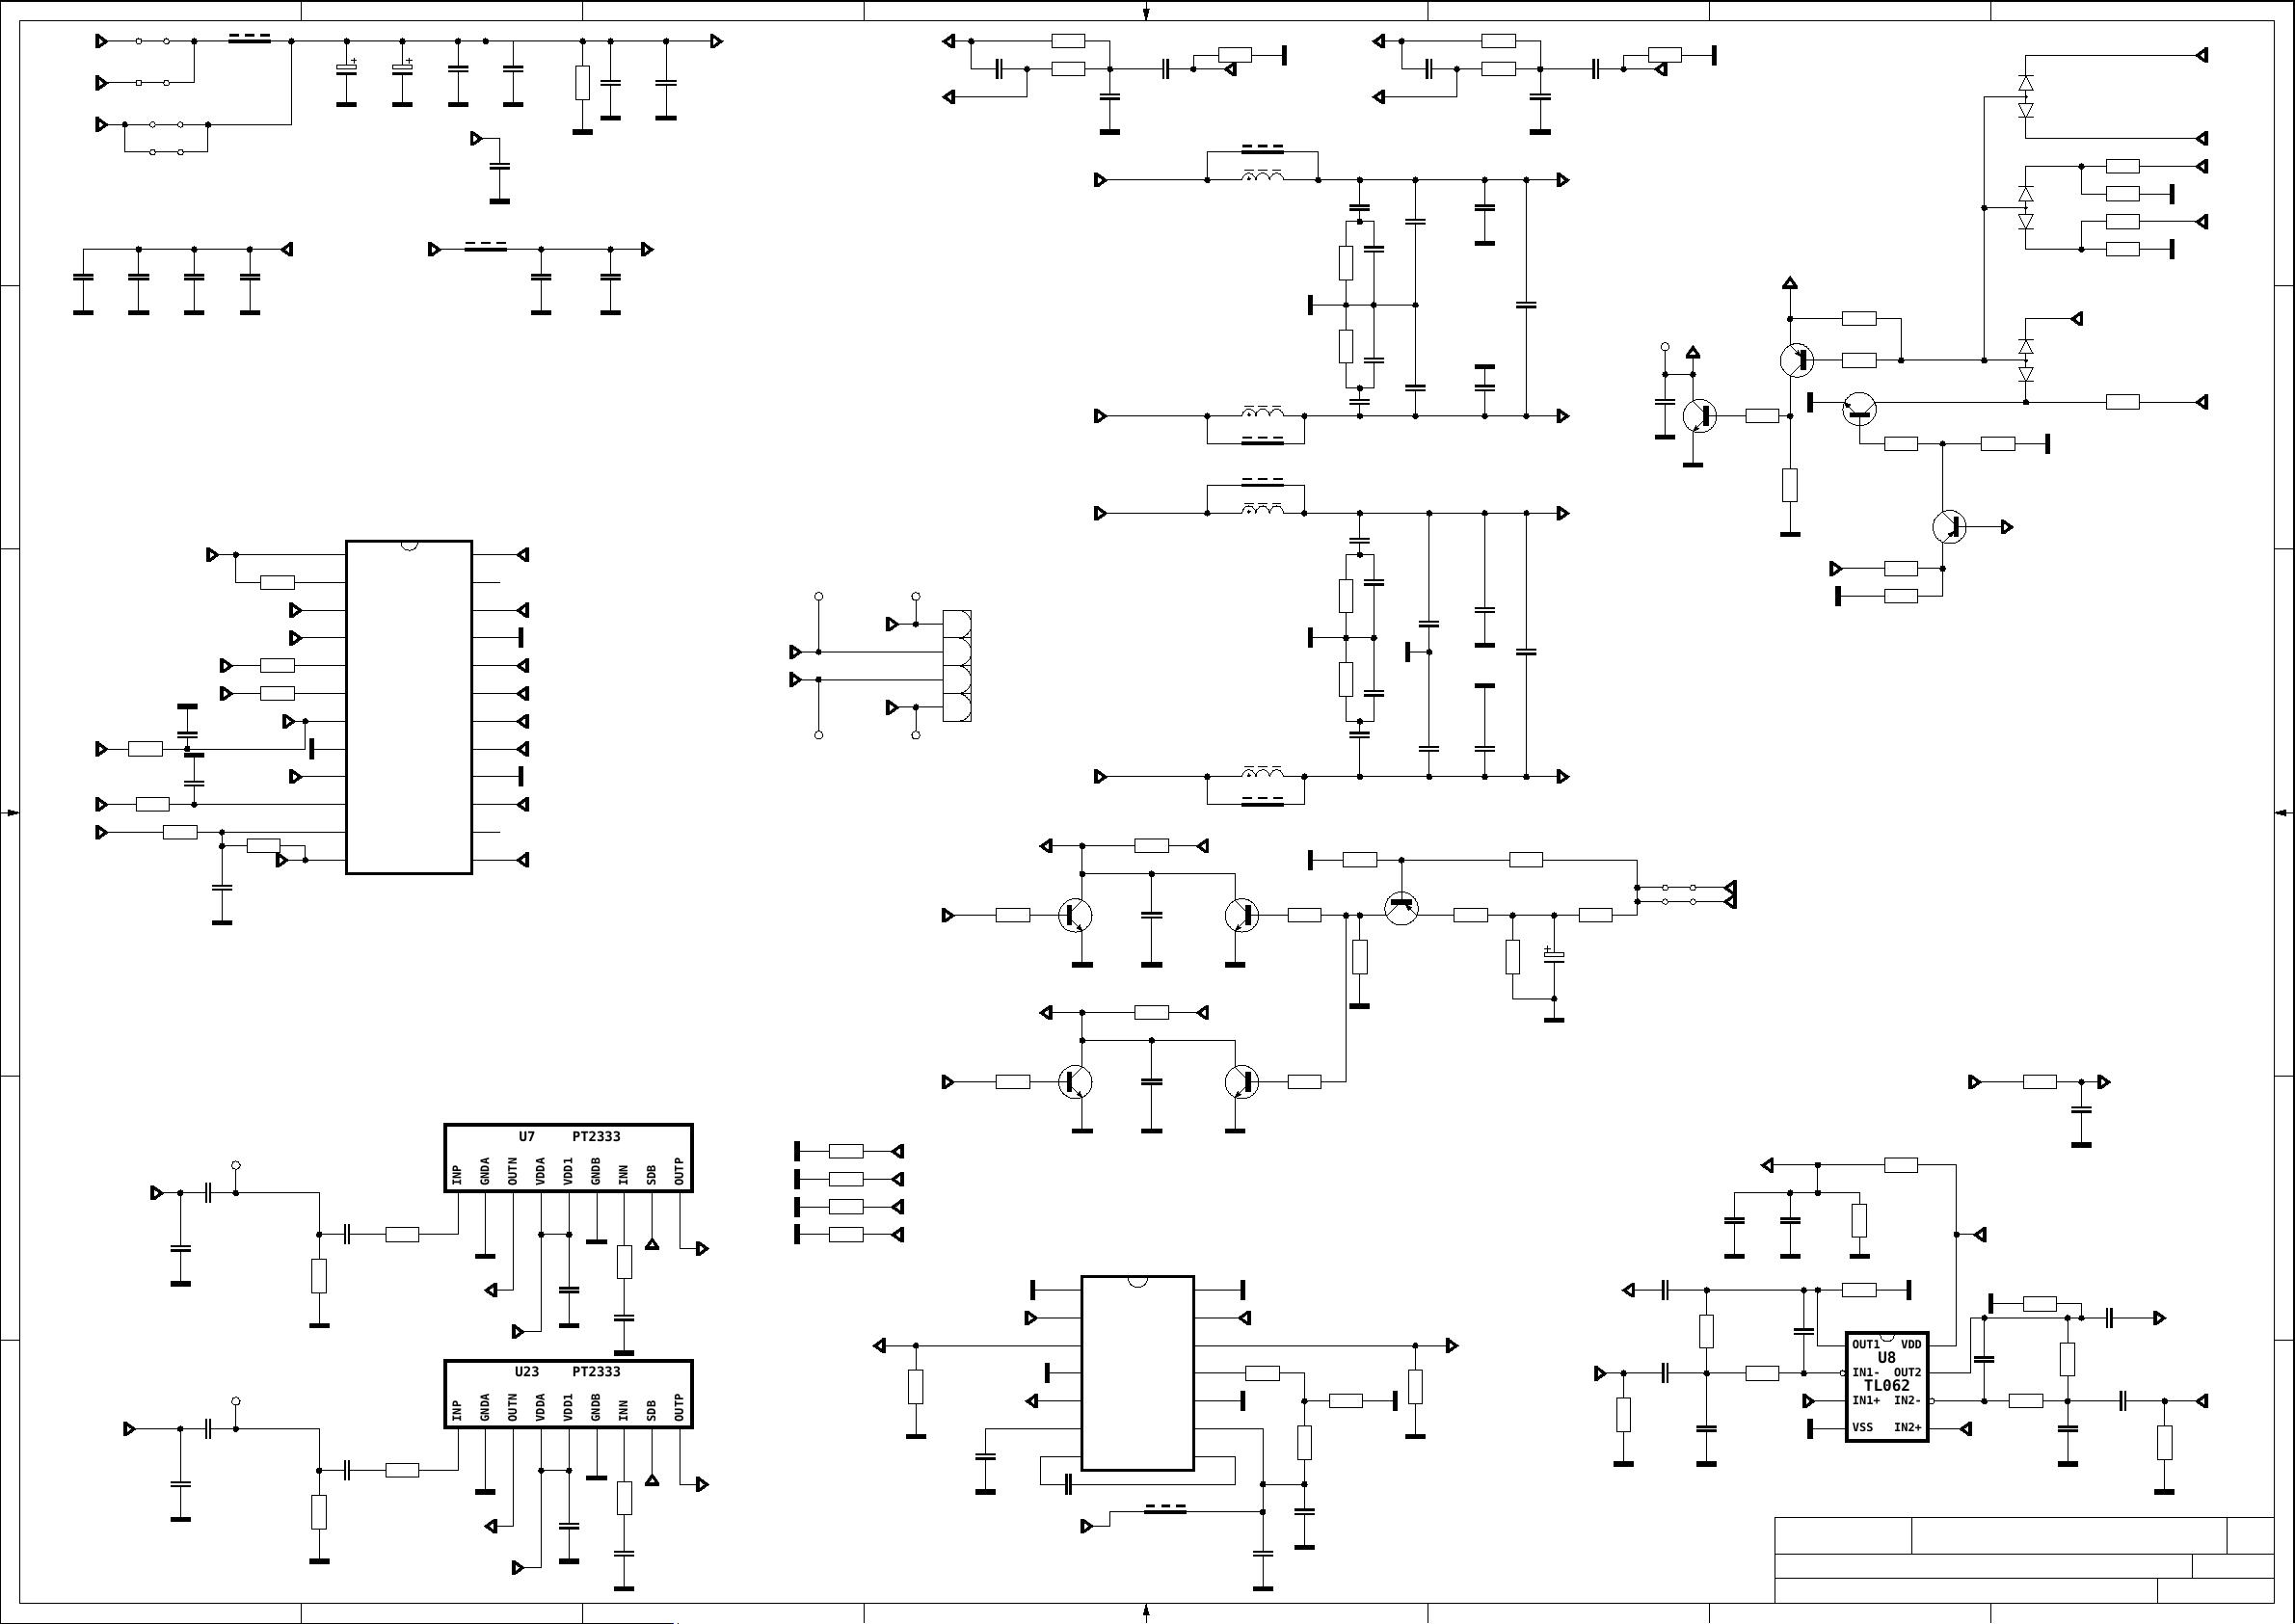
24V_VCC_AU
A
B
C
D
12V_VCC
5V_VCC
C1330
3V3_AMP
3V3_AMP
AOMCLK
100n
AOMCLK
1 2 3 4 5 6 7 8
S116
S200
S93
S141
C1331
100n
AMP_EN
SYS_SDA
SYS_SCL
R2223
4k7
R2214
4k7
R2210
100R
C1332
100n
C1350
100n
16V
C1328
100n
16V
F172
50R
C1333
R2213
100R
AOSDATA0
AOLRCK
R2211
100R
R2212
100R
AMP_RST
3V3_AMP
R2209
100R
AOBCK
C1329
12p
50V
100n
8W 30067972
2w5 30069845
VDD_AUDIO
1
2
3
4
5
6
7
8
9
10
11
12
C795
220u
10V
3V3_VCC
PD
ERROR
SDATA
LRCIN
SDA
SCL
AD82587D
RESET
DGND
DVDD
SA0
MCLK
BCLK
C143
100u
35V
24V_VCC_AU
VDDLA
N.C.2
LA
GNDL
LB
U62
VDDLB
VDDRB
RB
GNDR
RA
N.C.1
VDDRA
C674
10u
10V
F7
60R
24
23
22
21
20
19
18
17
16
15
14
13
C675
10u
10V
NC
C1176
10u
25V
VDD_AUDIO
A_OUT1A
A_OUT1B
VDD_AUDIO
VDD_AUDIO
A_OUT2B
A_OUT2A
VDD_AUDIO
R647
C245
100n
16V
10k
3V3_AMP
C1195
C1196
10u 10u
16V
16V
3V3_AMP
C704
10u
16V
VDD_AUDIO
NC
R_OUT_N
L_OUT_P
TP192
1
R_OUT_P
L_OUT_N
1
TP195
MAIN_R
HP_NEG_RIGHT
TP193
1
1
TP194
AMP_MUTE
C196
33p
CN13
1
2
3
4
AMP_EN
HP_AMP_EN
R78
10k
R224
27k
R238
47k
A_OUT1A
A_OUT1B
A_OUT2A
A_OUT2B
21
2
3
1
C242
A_OUT1A
A_OUT1B
A_OUT2A
A_OUT2B
BC848B
Q8
270p
R824
4k7
R100
4k7
C253
1u
C146
100n
16V
NC
R189
100k
MAIN_DAC_R
15u
F22 220R
F18 220R
3V3_AMP
3
Q7
1
BC848B
3V3_AMP
L4
10u
L5
10u
L2
10u
L3
10u
2
HP_NEG_LEFT
220RF23
15u
15u
15u
220RF9
R489
33k
MAIN_L
C1334
18R
R2215
GND1
18R
R2216
C1335
C1337
18R
R2217
GND1
18R
R2218
C1336
R692
100k
R691
21
100k
100n
C1338
220n
50V
C1339
220n
50V
100n
100n
C1341
220n
50V
C1340
220n
50V
100n
21
3
C190
33p
2
1
Q41
BC858B
C312
220n
50V
C313
220n
50V
C311
220n
50V
C307
220n
50V
R219
27k
R237
47k
30068742
30068742
10k
R79
C286
1u
50V
C287
1u
50V
C288
1u
50V
C302
1u
50V
21
10k
R80
21
10k
C238
C698
220n
50V
C699
220n
50V
C620
R1983
21
2 1
C252
270p
L_OUT_P
L_OUT_N
R_OUT_P
R_OUT_N
100u
1u
10k
R93
16V
C34
100n
10V
21
NC
R182
100k
MAIN_DAC_L
SHORT CCT PROTECTION
3V3_STBY_1
R85
2 1
TP26
1
2
1
S22
2 1
S21
2 1
PROTECT
Q9
3
2
1
BC848B
Q42
BC858B
R83
21
10k
R82
3V3_VCC
VDD_AUDIO
12V_VCC
21
1
3
10k
2
10k
R84
10k
Q10
1
BC848B
2
21
3
R322
100R
BC858B
R804
6k8
10k
2 1
R88
Q43
21
3
D41
BAW56
21
3
D40
BAW56
21
3
D39
BAW56
R657
47k
3
2
1V2_MT5820
1
R490
2 1
33k
R81
5k1
R494
10k
R86
3k9
3V3_AVCC
R92
10k
3V3_VCC
5V_VCC
24V_VCC_AU
A
12V_VCC
21
3V3_VCC
B
C
D
Q17
14
13
12
11
10
9
8
3
2
1
BC848B
HP_NEG_LEFT
R381
47k
100n
16V
C420
R247
33k
R464
10u
3k3
C1154
R467
1k5
21
56k
C1286
10u
16V
C280
R258
C294
150p
50V
10u
C281
VDD_Lineout
SC_AUD_L_OUT
1u
6V3
100k
R183
E
SC_DAC_L
12V_VCC
21
33k
R243
2 1
33k
1
OUT1
2
IN1-
TL062
3
IN1+
VSS IN2+
R245
R246
U8
33k
OUT2
IN2-
VDD
21
8
7
6
54
VDD_AUDIO/2
C99
C139
10u
100n
16V
10V
R188
100k
C284
C283
1u
6V3
10u
56k
R255
VDD_AUDIO/2
C293
150p
50V
R260
68k
C268
12p
50V
SC_AUD_R_OUT
MAIN_L
21
R308
33k
SC_DAC_R
NC
47R
R2098
VDD_Lineout
R244
33k
C265
12p
50V
R259
68k
VDD_AUDIO/2
F
A3
T. SHT:
9
AX M
SCH NAME :
DRAWN BY :
AUDIO AMP
<YOUR NAME HERE>
17mb82s-r4
03-04-2014_10:27
87654321
AUDIO AMP for 16" to 24"
HP_AMP_MUTE
TP207
C250
MAIN_L
1
E
1u
C140
100n
10V
NC
R64
C193
220n
100R
10V
R66
4k7
INP
A1
A_OUT1B
A2
GNDA
OUTN
A3
VDDA
B1
C152
100n
10V
B2
VDD_AUDIO
VDD1
2
1
GNDB
B3
R68
C306
INN
C1
4k7
220n
SDB
C2
AMP_EN
10V
LEFT
OUTP
C3
A_OUT1A
PT2333U23
PT2333U7
TP11
C251
MAIN_R
1
1u
F
C141
100n
10V
NC
C191
220n
R1
100R
10V
R65
4k7
INP
A1
A_OUT2B
A2
GNDA
OUTN
A3
VDDA
B1
C29
10V
100n
B2
VDD_AUDIO
VDD1
2
1
GNDB
B3
R67
C205
INN
C1
4k7
220n
SDB
C2
AMP_EN
10V
RIGHT
OUTP
C3
A_OUT2A
R2119
10k
R2120
10k
R2121
10k
R2122
10k
MAIN_R
21
21
21
21
AOSDATA0
AOBCK
AOLRCK
AOMCLK
HP_NEG_RIGHT
21
33k
R500
R40
10k
HP_AMP_EN
1u
C534
6V3
3V3_AMP
3
21
BC848B
2
Q14
1
C21
100n
16V
HEADPHONE AMP
1
2
3
4
5
6
7
C533
1u
INR_P
INR_N
OUTR
GND
MUTE
VSS
CN
U2
DRV632
INL_P
INL_N
OUTL
UVP
GND1
VDD
CP
F191
1k
Page 21
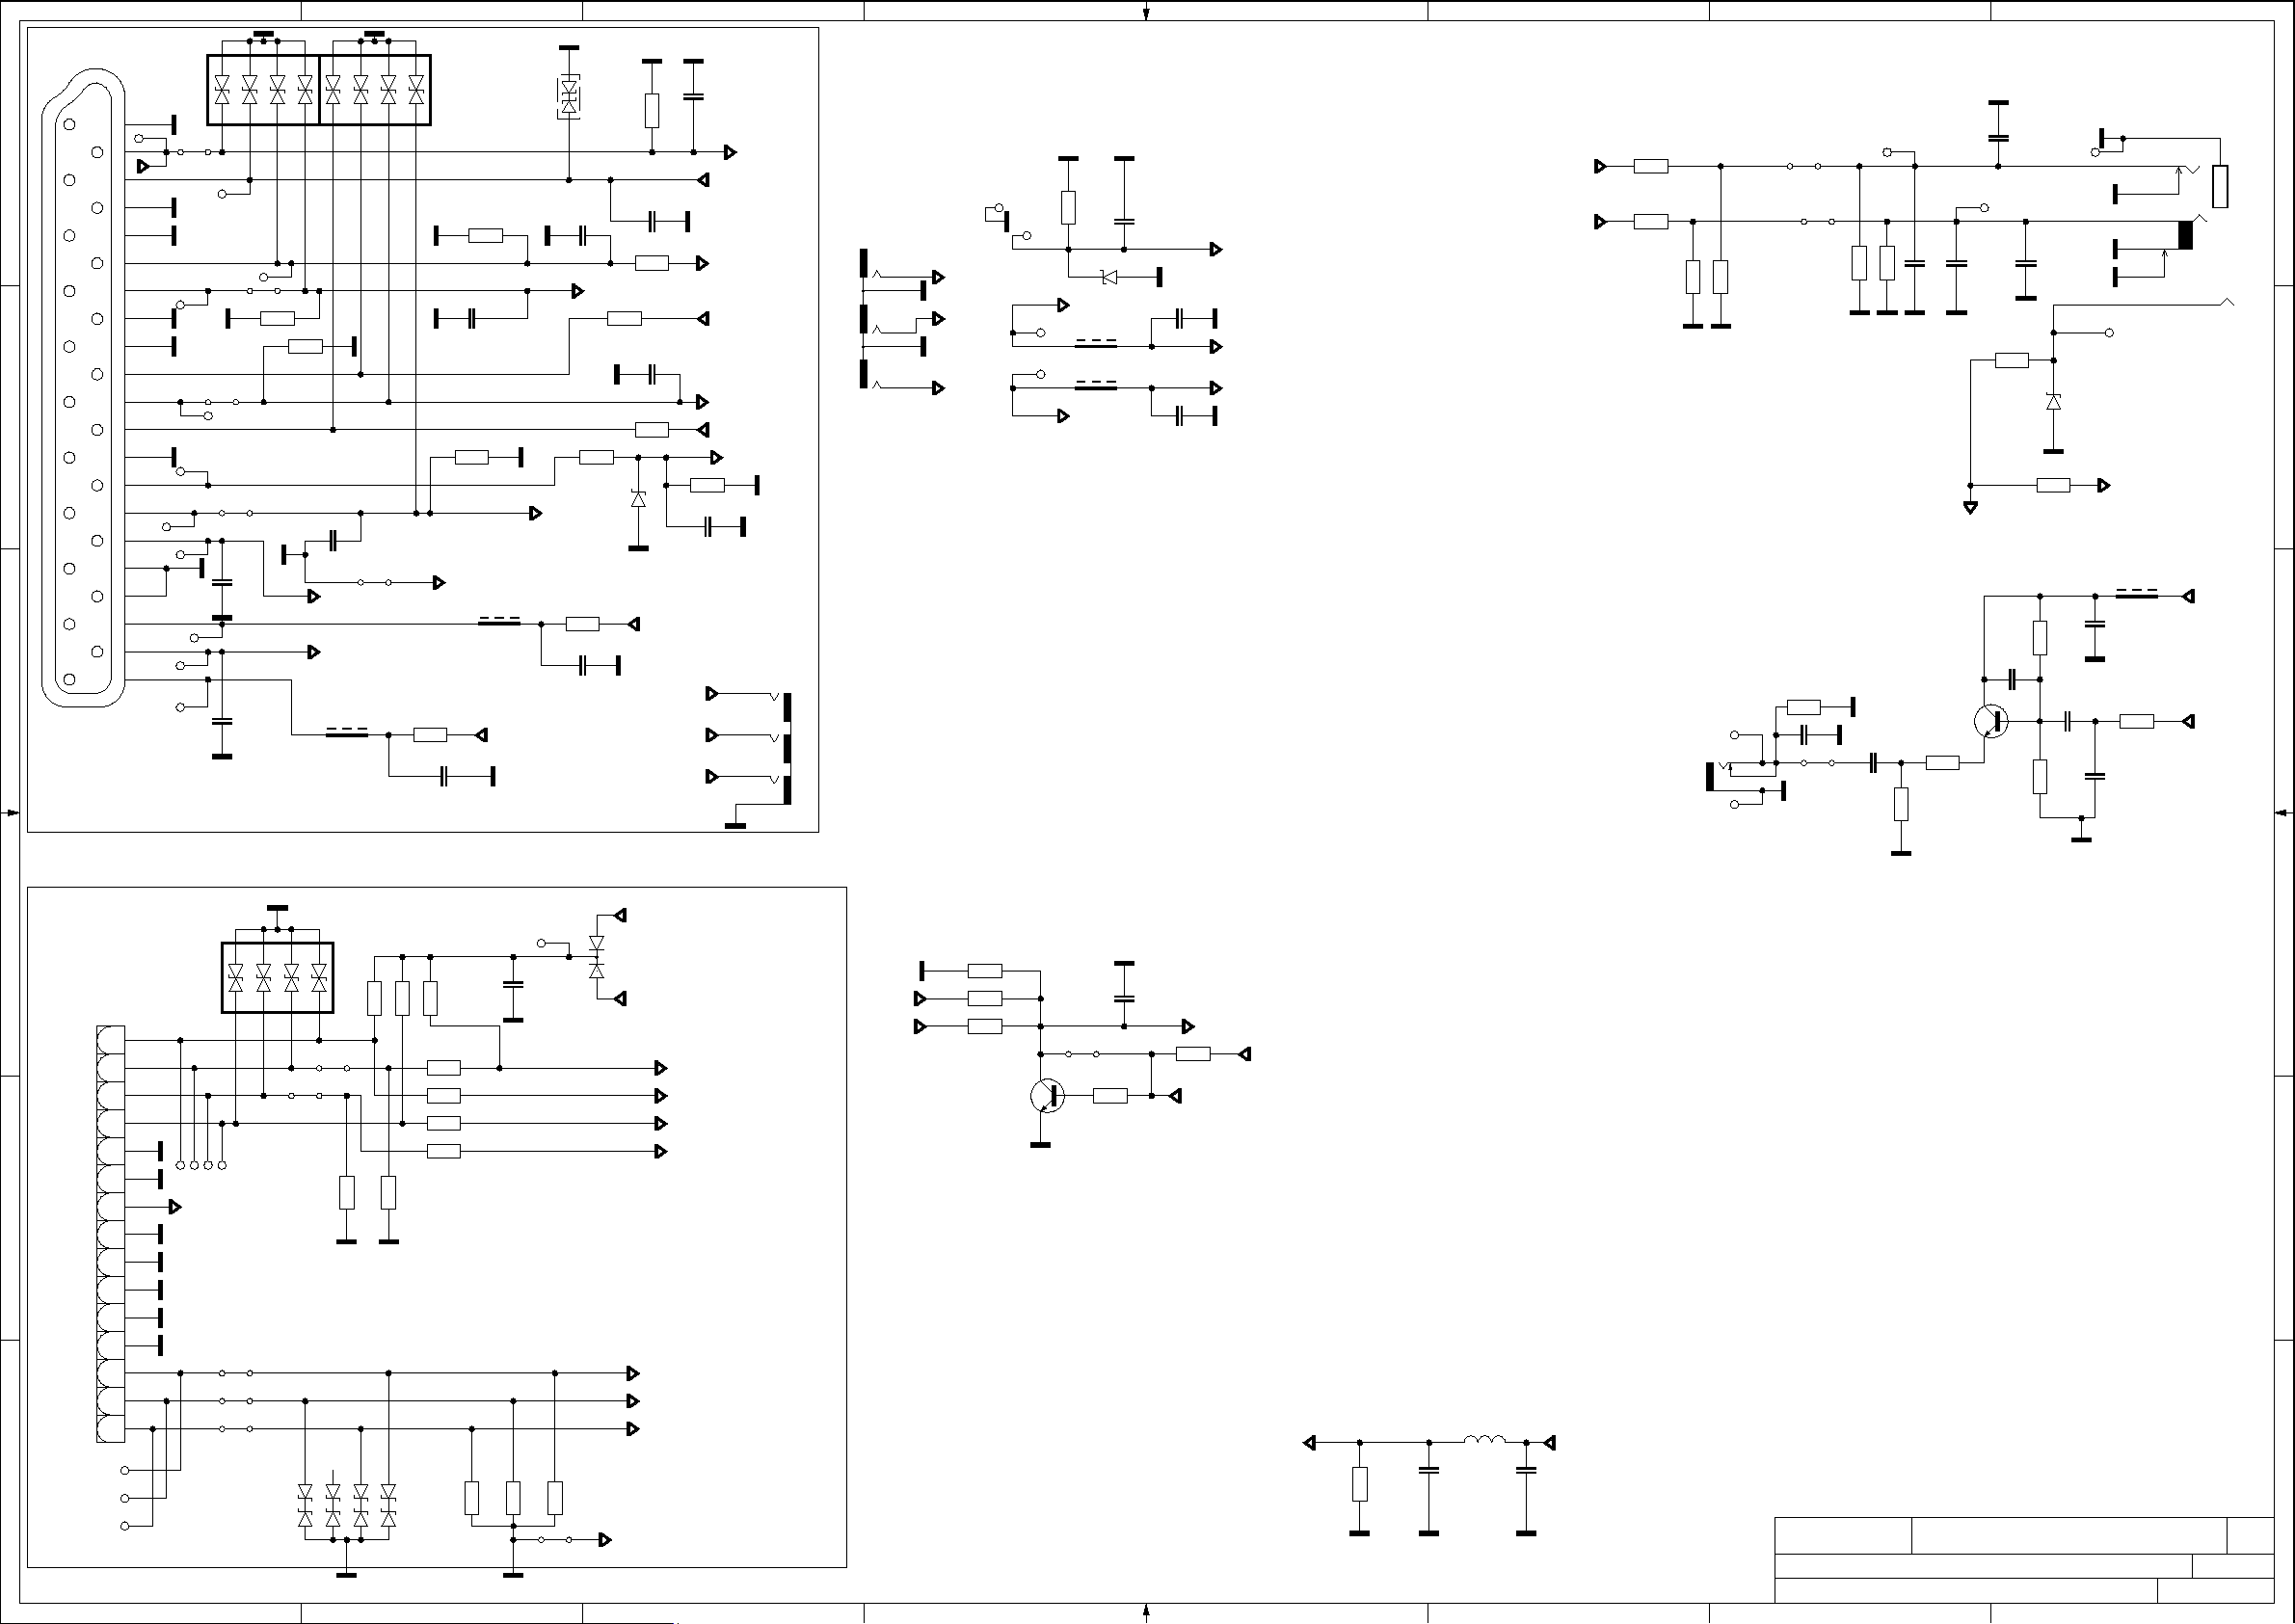
A
SC_CVBS-IN_pin20
SC1
B
C
21
TP79
20
19
18
17
16
15
TP187
14
13
12
11
SCART LT1
10
9
TP186
8
7
TP83
6
TP185
5
4
3
2
1
1 2 3 4 5 6 7 8
8
7
6
2
S86
3
54
CDA4C16GTH
2 1
COM_SC
R352
100R
C520
4n7 50V
D34
75R
2 1
R305
50V
33p
C455
75R
R300
21
D170
SC_B
F72
1k
SC_AUD_R_OUT
21
AZ5125-01J
50V
33p
C451
2 1
SC_R
75R
R304
R2185
5k1
21
D17
R353
21
100R
C519
4n7
SC_CVBS-IN_pin20
50V
SCART_AUD_L_IN
SCART_AUD_R_IN
C454
33p
50V
75R
R303
2 1
SC_CVBS-IN
50V
33p
SC_CVBS_OUT
C452
47R
R38
SC_FB
UART-TX
50V
33p
C453
R306
75R
C15V
R144
10k
C78
2 1
100n
10V
SC_G
UART-RX
SC_PIN8
SC_AUD_L_OUT
INDIA OPTION
4
YEL
3
JK5
WHT
2
RED
1
JK13
YEL
WHT
RED
SAV Slim INPUT
21
TP67
75R
TP66
1
SAV_CVBS
2
3
SAV_L
SAV_L
TP65
4
5
SAV_R
SAV_R
TP56
R317
SAV_L
F76
1k
F77
1k
SAV_R
D12
C5V6
C335
21
50V
220p
C267
3n3
C266
3n3
50V
50V
SAV_CVBS
SAV_AUD_L_IN
SAV_AUD_R_IN
MAIN_L
MAIN_R
SLIM HEADPHONE OUTPUT
21
R125
47R
R126
47R
R261
47R
R262
NCNC
47R
S230
S231
TP32
21
R167
10k
21
R168
10k
C90
10n
16V
C91
10n
16V
C1185
TP33
R33
100R
220p
21
C1184
50V
TP30
50V
220p
3V6 lik zener kullanilmali
D7
C5V6
4k7
1
R1149
HP_DETECT
C440
22p
50V
4k7
R441
2 1
Q31
C676
100n
10V
100n
R442
2 1
C87
10V
4k7
SPDIF OUT
R1986
220R
22p
C442
1
JK4
TP97
TP98
2
3
1
1
50V
S117
C88
10V
100n
R481
220R
BC848B
220R
R482
TP85
TP86
TP84
S84
TP80
D35
S81
TP81
8
1
TP82
S82
7
2
S83
C262
330p
50V
C261
330p
50V
6
3
75R
R302
2 1
54
1
21
75R
R301
50V
33p
C456
SCART_AUD_L_IN
SCART_AUD_R_IN
F73
1k
1
2
6
3
4
5
7
TP31
3V3_TUNER
F80
1k
R363
100R
C441
22p
50V
A
JK6
B
5V_VCC
C
SPDIF_OUT
D
VGA CONNECTOR
E
F
15
14
13
12
11
10
9
8
7
6
5
4
3
2
1
CN17
TP69
TP70
TP71
8
D33
1
1
1
TP68
TP621TP631TP64
VGA_DDC_5V
S75
S76
S77
5V_VCC
7
6
54
21
21
21
CDA4C16GTH
S79
321
R143
21
21
2k2
R799
2 1
4
3
2
S80
21
21
21
10k
5
R142
2k2
2 1
10k
R798
R141
nc
R351
R350
R349
R348
10k
100R
100R
100R
100R
D32
NUP4004M5
21
21
21
21
R295
2 1
75R
TP61
2
1
R294
2 1
75R
C77
100n
10V
1
R293
2 1
S78
75R
3
21
21
D60
VGA_G_COM
BAV70
VGA_DDC_5V
VGA_VSNC
PC_SCL
PC_SDA
VGA_HSNC
VGA_B
VGA_G
VGA_R
VGA INPUT
5V_VCC
3V3_VCC
R447
2 1
4k7
R445
2 1
4k7
R448
2 1
4k7
BC848B
Q32
D
C239
100n
16V
S139
3
1
nc
2
4k7
21
R101
3D_EN
4k7
21
R446
3D_ENABLE
3V3_VCC
E
30071260 kullanilacak
jumper
SC_CVBS_OUT
R496
33k
C457
33p
50V
L1
1u8
CVBS0_OUT
C458
33p
50V
SCH NAME :
DRAWN BY :
PERIPHERAL
<YOUR NAME HERE>
17mb82s-r4
03-04-2014_10:27
87654321
A3
T. SHT:
F
9
AX M
Page 22

1 2 3 4 5 6 7 8
CN12
21
20
1
2
3
4
5
6
7
8
9
10
11
12
13
14
15
16
17
18
19
CN8
21
20
1
2
3
4
5
6
7
8
9
10
11
12
13
14
15
16
17
18
19
A
B
C
D
Q27
F218
R292
100R
100R
R291
BC848B
F219
R289
100R
100R
R290
BC848B
HDMI0
F220
90R
90R
4
1
FR1
4
1
FR1
32
FR2
32
FR2
2
2
22R
R324
Q35
HDMI1
F221
90R
90R
4
1
FR1
4
1
FR1
32
FR2
32
FR2
2
2
22R
R325
Q28
R194
R193
100k
100k
R21
R20
1k
CEC
21
21
1k
47k
47k
R241
R242
CEC
21
21
47k
47k
R239
R240
DDRV
C291
10u
10V
A
C395
100n
16V
DDRV
C64
100n
16V
C320
50V
C63
100n 330p
16V
C321
330p
50V
B2D9G7K2K8N1N9R1R9A1A8C1C9D2E9F1H2
B_RA0
B_RA1
B_RA2
B_RA3
B_RA4
B_RA5
B_RA6
B_RA7
B_RA8
B_RA9
B_RA10
B_RA11
B_RA12
B_RA13
B
B_RBA0
B_RBA1
B_RBA2
CLK0
CLK#0
B_RCKE CLK0
B_RCS_
C
B_RAS_
B_RCAS_
B_RWE_
B_RESET
240R
R276
N3
A0
P7
A1
P3
A2
N2
A3
P8
A4
P2
A5
R8
A6
R2
A7
T8
A8
R3
A9
L7
A10/AP
R7
A11
N7
A12/BC
T3
A13
J1
NC1
L1
NC2
M7
NC3
L9
NC4
T7
NC5
J9
NC6
M2
BA0
N8
BA1
M3
BA2
J7
CK_0
K7
CK_1
K9
CKE
L2
CS
J3
RAS
K3
CAS
L3
WE
T2
RESET
L8
ZQ
VDD_4
VDD_3
VDD_2
VDD_1
H5TQ2G63BFR-PB
VSS_3
VSS_2
VSS_1
VDD_6
VDD_5
VSS_5
VSS_4
VDD_8
VDD_7
VSS_7
VSS_6
VDD_9
U16
VSS_9
VSS_8
VDDQ_2
VDDQ_1
VSS_11
VSS_10
VDDQ_3
VSS_12
A9B3E1G8J2J8M1M9P1P9T1T9B1B9D1D8E2E8F9G1G9
1V5_VCC DDRV
F10
60R
C289
10u
10V
C290
10u
10V
D
Near to pin 165 of MT5820
C1115
C62
100n
1u
16V
6V3
DDRV
H9
VDDQ_9
VDDQ_8
VDDQ_7
VDDQ_6
VDDQ_5
VDDQ_4
VREF_DQ
VREF_CA
DQL0
DQL1
DQL2
DQL3
DQL4
DQL5
DQL6
DQL7
DQU0
DQU1
DQU2
DQU3
DQU4
DQU5
DQU6
DQU7
DQSL_0
DQSL_1
DQSU_1
DQSU_0
VSSQ_7
VSSQ_6
VSSQ_5
VSSQ_4
VSSQ_3
VSSQ_2
VSSQ_1
DML
DMU
ODT
VSSQ_9
VSSQ_8
C59
100n
16V
H1
M8
E3
F7
F2
F8
H3
H8
G2
H7
D7
C3
C8
C2
A7
A2
B8
A3
F3
G3
B7
C7
E7
D3
K1
RDQ0
RDQ1
RDQ2
RDQ3
RDQ4
RDQ5
RDQ6
RDQ7
RDQ8
RDQ9
RDQ10
RDQ11
RDQ12
RDQ13
RDQ14
RDQ15
RDQS0
RDQS0_
RDQS1_
RDQS1
RDQM0
RDQM1
B_RODT
R265
1k
R266
1k
R268
1k
R267
1k
C58
100n
16V
DDRV
DDRV
RRESET_
RCLK0
RCLK0_
RWE_
RCAS_
RRAS_
RA12
RODT
RCS_
RBA0
RBA2
RA9
RA13
RA0
RA3
RA5
RA2
RA7
RA4
RBA1
RA10
RCKE
RA11
RA8
RA6
RA1
R4
5 4
R3
6
R2
7
R1
8
33R
R311
R312
33R
1
R1
2
R2
3
R3
R4
R4
5 4
R3
6
R2
7
R1
8
33R
R310
R4
5 4
R3
6
R2
7
R1
8
33R
R309
R4
5 4
R3
6
R2
7
R1
8
33R
R299
R4
5 4
R3
6
R2
7
R1
8
33R
R298
S25
S24
3
2
1
8
7
6
54
3
2
1
3
2
1
3
2
1
3
2
1
R2
B_RWE_
B_RCAS_
B_RAS_
B_RA12
B_RODT
B_RCS_
B_RBA0
B_RBA2
B_RESET
B_RA9
B_RA13
B_RA0
B_RA3
B_RA5
B_RA2
B_RA7
B_RA4
B_RBA1
B_RA10
B_RCKE
B_RA11
B_RA8
B_RA6
B_RA1
21
CLOSE DRAMCLOSE MT
100R
CLK#0
D166
1
8
D167
HDMI0_RX2P
HDMI0_RX2N
HDMI0_RX1P
HDMI0_RX1N
HDMI0_RX0P
HDMI0_RX0N
HDMI0_CLKP
HDMI0_CLKN
HDMI_0_SCL
HDMI_0_SDA
3
2
7
6
5 4
5V_STBY
R52
10k
HDMI0_HPDIN
R53
10k
BC848B
HDMI1_RX2P
HDMI1_RX2N
HDMI1_RX1P
HDMI1_RX1N
HDMI1_RX0P
HDMI1_RX0N
HDMI1_CLKP
HDMI1_CLKN
HDMI_1_SCL
HDMI_1_SDA
R54
HDMI1_HPDIN
10k
R55
10k
Q29
3
2
1
8
7
6
5 4
5V_STBY
UA 100R OLMALI
BC848B
PL1
PL2
PL3
PL4
E
F
DVD_L_AUD
DVD_R_AUD
DVD_SENSE
R2067
4k7
R2068
4k7
10V
DVD_CVBS_IN
21
21
21
C76
100n
4k7
2 1
R344
100R
R418
R2071
180R
R2072
180R
21
1
D54
SH2
C11
NC
21
27p
50V
21
S268
TP78
TP90
TP93
21
TP206
C15V
2
50V
220p
C1160
R3
100R
50V
220p
C339
DVD_SPDIF
TP76
CN20
21
43
65
87
109
21
50V
27p
DVD CONNECTION
IR_IN
DVD_IR_ON/OFF
TP91
S53
C13
C567
10u
25V
R2132
21
1k
TP57
1
DVD_WAKEUP
DVD_IR
TP92
BC848B
1
Q19
21
R679
2
47k
DVD_Power
D53
C18V
2 1
3
21
N.C.
S54
R420
DVD_IR
R419
2 1
4k7
3V3_VCC
R1357
R9
POCE0_
PDD7
Flash_WP R4
100R
100R
2
2
R8
3V3_VCC4k7
!
FS1
12V_VCC
C1423
10u
Close to FS1
25V
21
4A/24VDC
DVD_Power
SERIAL FLASH
TP99
TP1001TP101
4k7
1
1
1
2
3
U12
MX25L512
CS#
SO
HOLD#
WP#
SCLK
GND SI
4k7
R106
R107
Flash_WP
C145
2
100n
1
10V
VCC
4k7
8
7
6
54
3V3_VCC
POOE_
Flash_WP
R110
1
TP96
4k7
TP102
1
100R
R10
2
1
C147
100n
10V
R11
100R
21
D165
1N5819
21
POOE_
PDD6
3V3_VCC
POCE1_
PDD7
Flash_WP
3V3_VCC
R6
100R
100R
SERIAL FLASH
TP89
4k7
R105
1
1
2
2
R7
SCH NAME :
DRAWN BY :
TP88
MX25L512
1
CS#
2
SO
3
WP#
GND SI
U10
VCC
HOLD#
SCLK
MEMORY/HDMI
<YOUR NAME HERE>
TP77
S26
C1108
100n
10V
21
POOE_
PDD6
21
3V3_VCC
E
1
2
TP87
100R
1
100R
R5
21
4k7
R104
8
7
6
54
1
1
TP95
F
17mb82s-r4
09-04-2014_15:43
87654321
A3
T. SHT:
9
AX M
Page 23
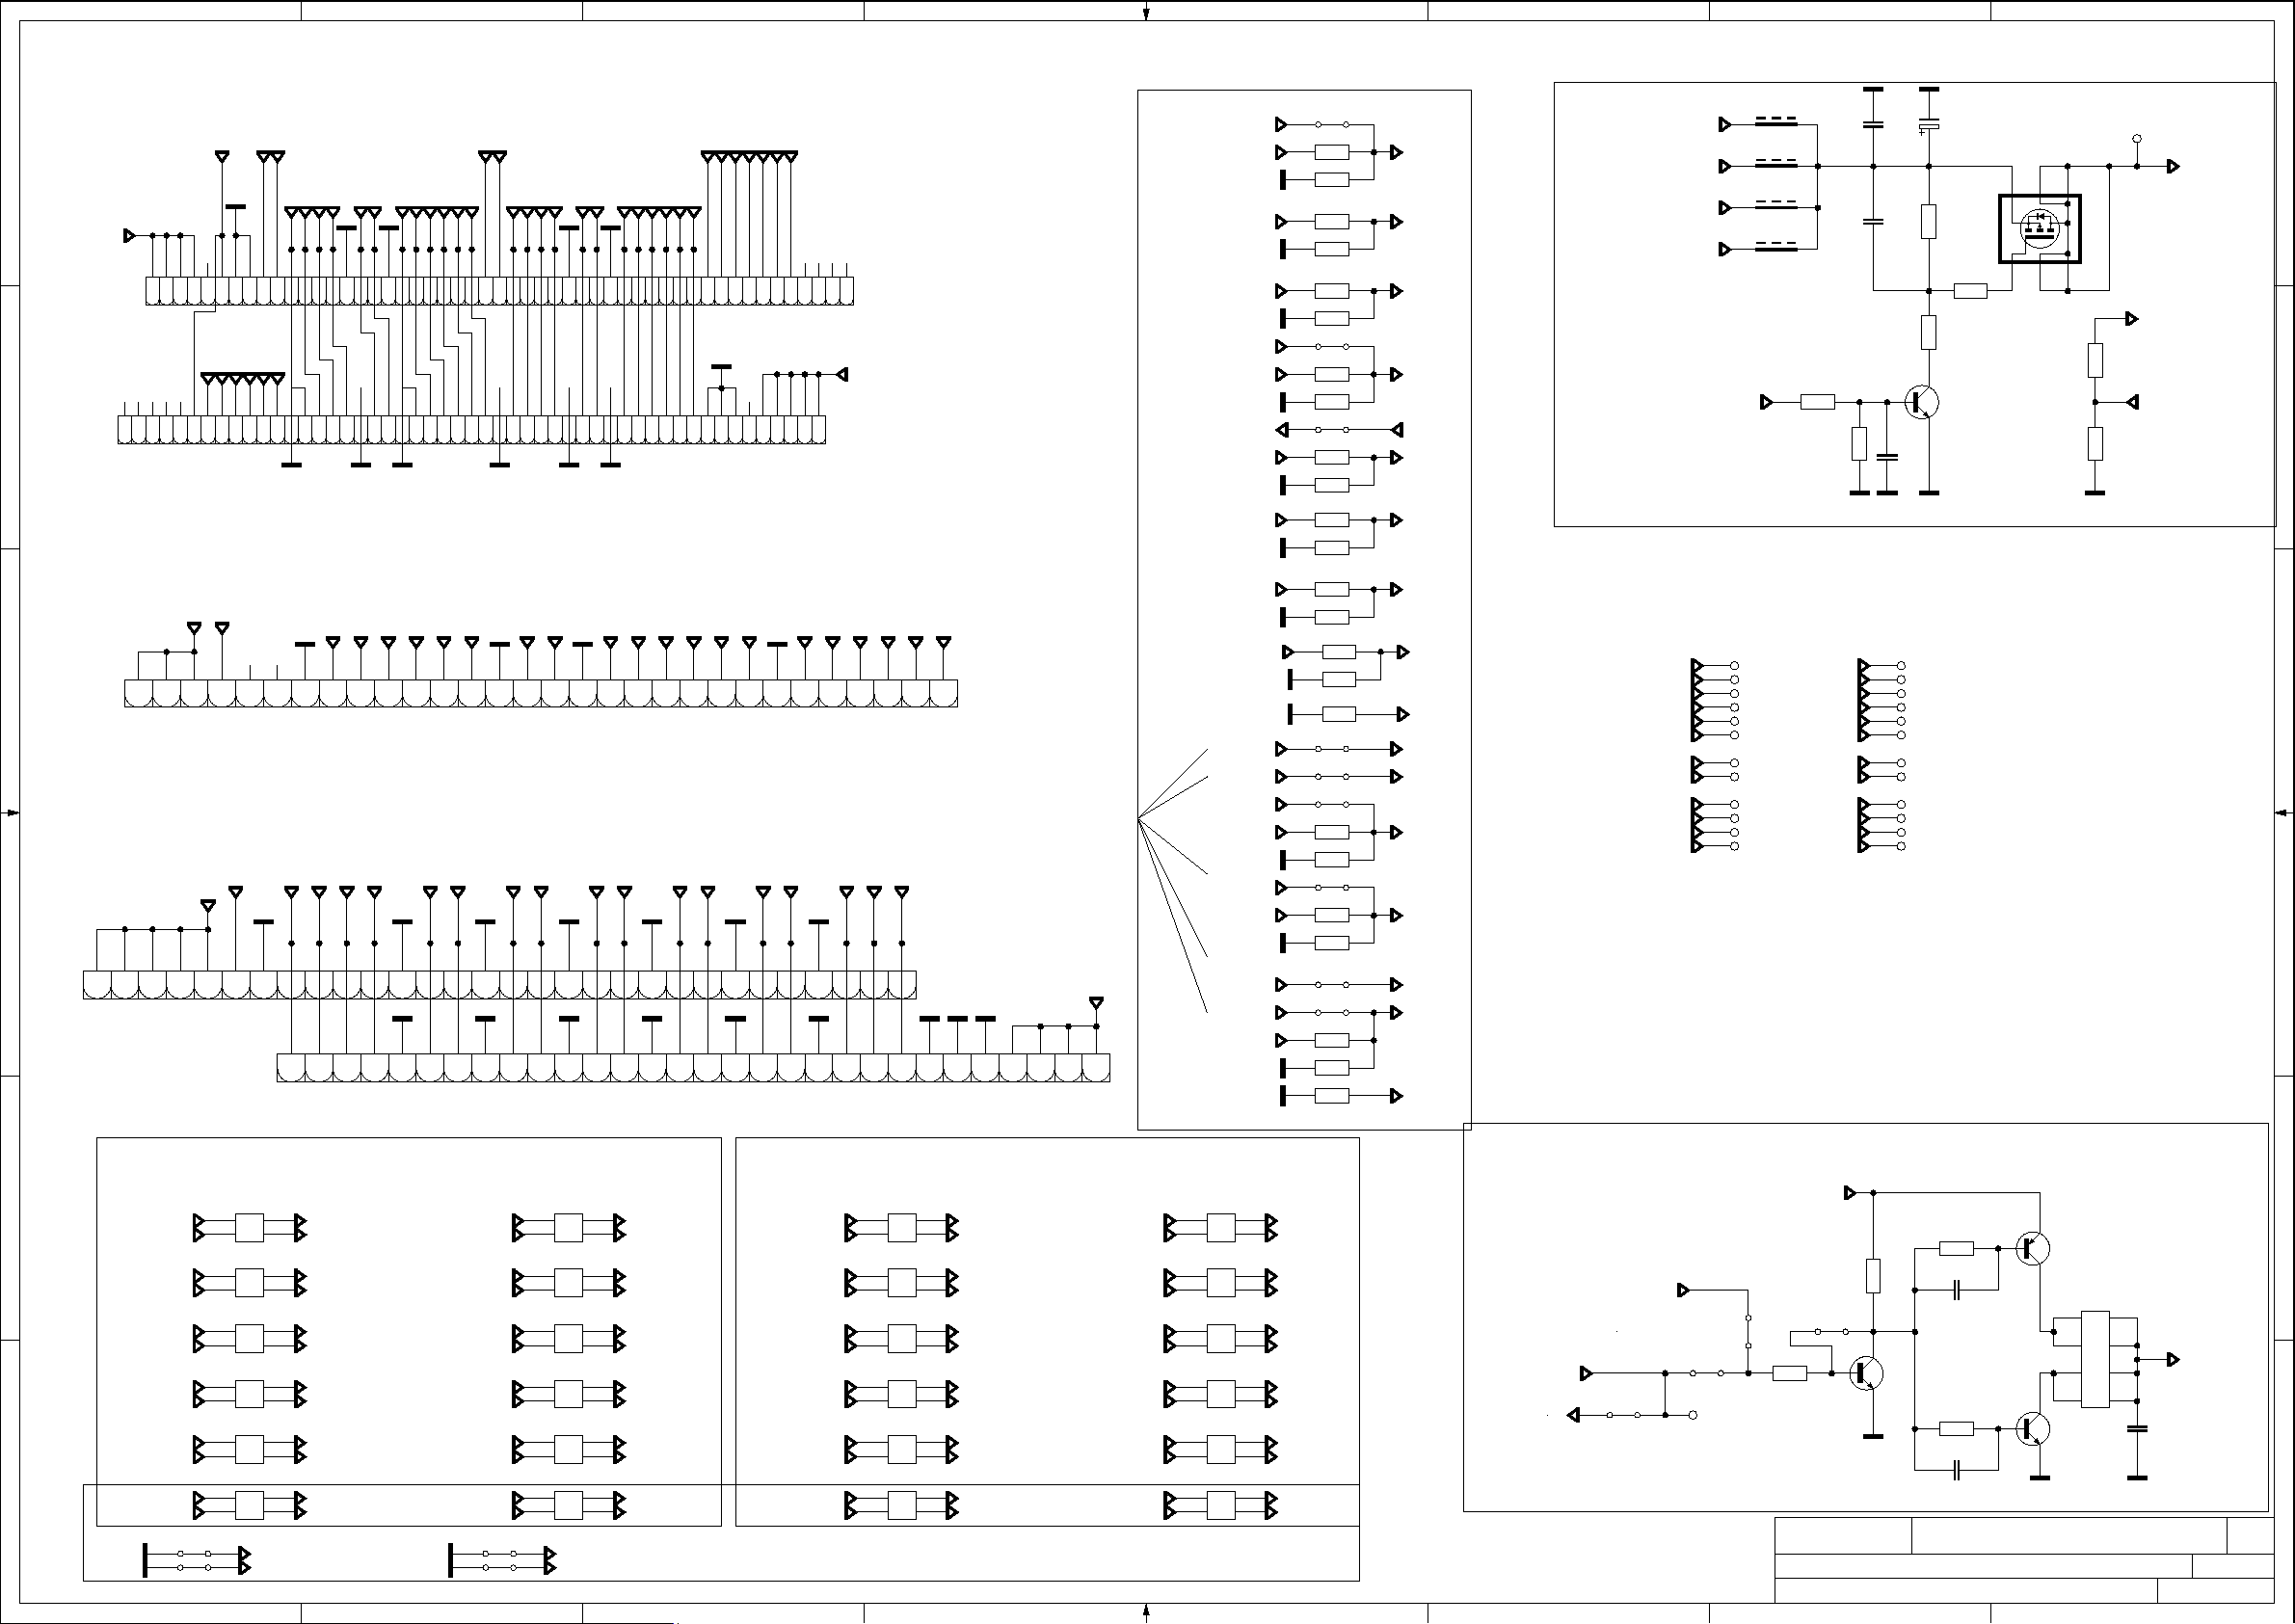
1 2 3 4 5 6 7 8
FHD 50Hz 3D FFC
OP_PIN46
OP_PIN43
OP_PIN43
OP_PIN41
OP_PIN42
OP_PIN42
TX_2_3_P
TX_2_4_P
TX_2_4_N
OP_PIN40
TX_2_3_N
TX_2_CLK_P
TX_2_2_N
TX_2_2_P
TX_2_CLK_N
TX_2_1_P
A
PANEL_VCC
LVDS
5150494847464544434241403938373635343332313029282726252423222120191817161514131211
OP_PIN44
OP_PIN45
B
LVDS
5150494847464544434241403938373635343332313029282726252423222120191817161514131211
19" TO 22" DOUBLE LVDS FFC OPTIONS
OP_PIN9
PANEL_VCC
C
CN16
1
4
3
2
7
6
5
TX_2_3_N
TX_2_3_P
9
8
TX_2_CLK_P
TX_2_CLK_N
11
10
TX_2_2_P
WXGA FFC
OP_PIN7
OP_PIN27
OP_PIN8
OP_PIN9
SAM
OP_PIN11
PANEL_VCC
D
9
8
7
6
5
4
3
2
1
CN15
LG
CN14
10
3
2
1
TX_1_3_P
13
12
11
6
5
4
TX_2_0_N
TX_2_0_P
TX_2_1_N
TX_2_2_N
13
12
TX_1_3_N
14
7
OP_PIN26
OP_PIN27
TX_1_4_P
14
TX_1_CLK_P
16
15
9
8
TX_1_3_P
TX_1_3_N
TX_1_4_N
TX_2_1_N
TX_2_1_P
16
15
TX_1_CLK_N
17
10
TX_1_CLK_P
TX_1_CLK_N
17
TX_1_2_P
19
18
12
11
TX_1_2_P
TX_1_2_N
TX_2_0_P
TX_2_0_N
19
18
TX_1_2_N
20
13
TX_1_1_P
TX_1_1_N
TX_1_0_P
TX_1_3_P
20
TX_1_1_P
22
21
15
14
TX_1_0_N
10
TX_1_3_N
21
OP_PIN7
OP_PIN8
OP_PIN9
OP_PIN11
OP_PIN10
10
987654321
TX_1_CLK_P
22
TX_1_1_N
23
16
OP_PIN5
OP_PIN6
987654321
TX_1_2_P
TX_1_CLK_N
25
24
23
TX_1_0_P
TX_1_0_N
26
25
24
19
18
17
LG BASED 30070519
CN9
PANEL_VCC
SAM BASED 30070519
CN10
TX_1_0_N
TX_1_0_P
TX_1_1_N
TX_1_1_P
TX_1_2_N
30
29
28
27
26
OP_PIN6
OP_PIN10
OP_PIN5
30
29
28
27
27
26
25
24
23
22
21
20
28
15.6"
PANEL_VCC
30
29
OPTIONS TABLE
S183
3D_EN
PANEL_VCC
PANEL_VCC
MEGA_DCR_IN
PANEL_VCC
MEGA_DCR_OUT
PANEL_VCC
PANEL_VCC
PANEL_VCC
PANEL_VCC
12V_VCC
12V_VCC
3D_EN
PANEL_VCC
12V_VCC
BACKLIGHT_ON/OFF
DIMMING
PANEL_VCC
2 1
R514
33k
R226
10k
R515
33k
R227
10k
R516
33k
R228
10k
S186
R517
33k
R229
10k
S185
2 1
R518
33k
R230
10k
R519
33k
R231
10k
R1962
33k
R1961
10k
R513
33k
R225
10k
R2240
10k
S123
S142
S188
2 1
R521
33k
R233
10k
S122
R522
33k
R234
10k
S164
S71
R124
33k
R90
10k
R2239
10k
OP_PIN5PANEL_VCC
21
OP_PIN6
21
OP_PIN7
21
21
OP_PIN8
21
OP_PIN9
OP_PIN9
21
OP_PIN10
21
OP_PIN11
21
OP_PIN27
21
21
OP_PIN26
21
OP_PIN40
21
OP_PIN41
OP_PIN42
21
21
OP_PIN43PANEL_VCC
21
21
OP_PIN44
21
OP_PIN45
21
21
OP_PIN46
PANEL SUPPLY SWITCH
TP43
TP44
TP45
TP46
TP48
TP49
TP42
TP50
TP51
TP52
TP53
TP54
F6
60R
F5
60R
F4
60R
F3
60R
2 1
TX_2_0_N
TX_2_0_P
TX_2_1_N
TX_2_1_P
TX_2_2_N
TX_2_2_P
TX_2_CLK_N
TX_2_CLK_P
TX_2_3_N
TX_2_3_P
TX_2_4_N
TX_2_4_P
R222
10k
3V3_VCC
12V_VCC
PANEL_VCC_ON/OFF
TX_1_0_N
TX_1_0_P
TX_1_1_N
TX_1_1_P
TX_1_2_N
TX_1_2_P
TX_1_CLK_N
TX_1_CLK_P
TX_1_3_N
TX_1_3_P
TX_1_4_N
TX_1_4_P
5V_VCC
5V_VCC
C248
C605
R223
2 1
10k
21
16V
100n
25V
220n
C616
1n
50V
TP16
TP17
TP27
TP28
TP34
TP35
TP36
TP37
TP38
TP39
TP40
TP41
33k
R511
2 1
C94
100u
16V
21
R512
33k
Q21
BC848B
R58
47R
TP55
PANEL_VCC
6
5
43
Q48
FDC642P
2
21
1
33k
R2147
2 1
PANEL_VCC
BACKLIGHT_ON/OFF
A
B
10k
R2146
2 1
C
D
JUMPER
E
F
5820_TX_A_0_N
5820_TX_A_0_P
5820_TX_A_1_N
5820_TX_A_1_P
5820_TX_A_2_N
5820_TX_A_2_P
5820_TX_A_CLK_N
5820_TX_A_CLK_P
5820_TX_A_3_N
5820_TX_A_3_P
5820_TX_A_4_N
5820_TX_A_4_P
S235
S234
4
90R
F26
4
90R
F43
4
90R
F42
4
90R
F41
4
90R
F39
3 2
4
90R
F40
21
21
FR2
23
FR1
1
FR2
23
FR1
1
FR2
23
FR1
1
FR2
23
FR1
1
FR2
23
FR1
1
FR2
FR1
1
TX_1_4_N
TX_1_4_P
TX_1_0_N
TX_1_0_P
TX_1_1_N
TX_1_1_P
TX_1_2_N
TX_1_2_P
TX_1_CLK_N
TX_1_CLK_P
TX_1_3_N
TX_1_3_P
TX_1_4_N
TX_1_4_P
5820_TX_B_0_N
5820_TX_B_0_P
5820_TX_B_1_N
5820_TX_B_1_P
5820_TX_B_2_N
5820_TX_B_2_P
5820_TX_B_CLK_N
5820_TX_B_CLK_P
5820_TX_B_3_N
5820_TX_B_3_P
5820_TX_B_4_N
5820_TX_B_4_P
S232
1
S233
1
2
2
FR2
FR1
4
90R
F38
FR2
FR1
4
90R
F31
FR2
FR1
4
90R
F30
FR2
FR1
4
90R
F29
FR2
FR1
4
90R
F27
FR2
FR1
4
90R
F28
TX_2_4_N
TX_2_4_P
TX_2_0_N
23
TX_2_0_P
1
TX_2_1_N
23
TX_2_1_P
1
TX_2_2_N
23
TX_2_2_P
1
TX_2_CLK_N
23
TX_2_CLK_P
1
TX_2_3_N
23
TX_2_3_P
1
TX_2_4_N
23
TX_2_4_P
1
10_BIT PANEL
5820_TX_A_0_N
5820_TX_A_0_P
5820_TX_A_1_N
5820_TX_A_1_P
5820_TX_A_2_N
5820_TX_A_2_P
5820_TX_A_CLK_N
5820_TX_A_CLK_P
5820_TX_A_3_N
5820_TX_A_3_P
5820_TX_A_4_N
5820_TX_A_4_P
R2
3 2
R1
4
0R
R232
R2
3 2
R1
4
0R
R235
R2
3 2
R1
4
0R
R520
R2
3 2
R1
4
0R
R457
R2
3 2
R1
4
0R
R456
1
R1
2 3
R2
0R
R534
1
1
1
1
1
4
TX_1_0_N
TX_1_0_P
TX_1_1_N
TX_1_1_P
TX_1_2_N
TX_1_2_P
TX_1_CLK_N
TX_1_CLK_P
TX_1_3_N
TX_1_3_P
TX_1_4_N
TX_1_4_P
5820_TX_B_0_N
5820_TX_B_0_P
5820_TX_B_1_N
5820_TX_B_1_P
5820_TX_B_2_N
5820_TX_B_2_P
5820_TX_B_CLK_N
5820_TX_B_CLK_P
5820_TX_B_3_N
5820_TX_B_3_P
5820_TX_B_4_N
5820_TX_B_4_P
R2
3 2
R1
4
0R
R569
R2
3 2
R1
4
0R
R568
R2
3 2
R1
4
0R
R567
R2
3 2
R1
4
0R
R564
R2
3 2
R1
4
0R
R563
R2
3 2
R1
4
0R
R535
1
1
1
1
1
1
TX_2_0_N
TX_2_0_P
TX_2_1_N
TX_2_1_P
TX_2_2_N
TX_2_2_P
TX_2_CLK_N
TX_2_CLK_P
TX_2_3_N
TX_2_3_P
TX_2_4_N
TX_2_4_P
BACKLIGHT_DIM
MEGA_DCR_IN
DIMMINGFERRITE
MEGA_DCR_OUT
S167
S168
TP231
S169
3V3_VCC
S20
R454
21
4k7
SCH NAME :
DRAWN BY :
R453
21
21
R714
1k
Q26
BC848B
4k7
C343
21
220p
50V
R455
4k7
C345
21
220p 50V
21
LVDS CON
<YOUR NAME HERE>
BC858B
Q38
R172
100R
8
1
R1
7
2
R2
6
3
R3
5 4
Q22
BC848B
R4
C625
10u
16V
17mb82s-r4
07-04-2014_09:47
87654321
DIMMING
T. SHT:
E
F
A3
9
AX M
Page 24
A
B
C
D
GND1
JK12
L20
270n
10V
100n
3V3_TUNER
MXL601_SDA
MXL601_SCL
DIGITAL_IF_N
DIGITAL_IF_P
ANALOG_IF_N
ANALOG_IF_P
IF FILTERS
1 2 3 4 5 6 7 8
NC
C150
AZ5425-01F
L6
12n
1M
R269
D171
1n
C322
10V
100n
MXL601_SDA
MXL601_SCL
21
4k7
R111
C1186
47p
50V
C1187
47p
50V
C1188
47p
50V
C1189
47p
50V
21
50V
12n
D_IF_AGC
21
4k7
R112
C264
C263
C259
1u
C260
1u
L38
D1
C153
1u
1u
4 3
ACT_ANT
C1161
F32
1k
F33
1k
21
22p
50V
F34
1k
F35
1k
L9
ESD0P8RFL
C89
47n
R22
10k
C1162
22p
50V
C319
47p
50V
C316
47p
50V
L10
390n
C135
82p
50V
220n
220nH
C109
180p
50V
16V
DEMOD_RST
C318
47p
50V
C317
47p
50V
C1401
100p
50V
390nH
0.7pF
IF_AGC
R16
100R
R15
100R
CLOSE TO DEMOD
R13
100R
R12
100R
CLOSE TO DEMOD
C1113
27p
50V
VDD_1V8
R135
33R
S317
4
F47
1
2
10nF
C1159
1u
6V3
R14
360R
5820_IF_P
R173
360R
5820_IF_N
2 3
X3
C104
2n2
50V
C269
100n
10k
5135_IF_N
5135_IF_P
5820_IF_P
5820_IF_N
1k
180R
R2099
MXL601_SCL
MXL601_SDA
41
27MHz
3
16V
NC
R2128
R56
10k
S318
S319
19
20
21
22
23
24
560nH
C270
12p
XTAL_N
XTAL_P
GND_XTAL
VDD_1P8_2
RESET_N
AS
C86
100n
16V
C1164
10u
6V3
R784
22R
22R
R785
NC
L13
3n9
C271
18
17
SDA
CLK_OUT
MXL601
LNA_INP
VDD_3P3_0
1
2
RF_IN_N
3V3_TUNER
GS5
CI ALTINA
1n
C323
1n
C324
16
SCL
U4
LNA_INN
3
RF_IN_P
50V
50V
12p
15
14
VDD_IO
VDD_1P8_0
4
5
C85
100n
16V
RF_IN_P
RF_IN_N
16V
100n
C1112
3V3_TUNER
13
VDD_1P2
GND_DIG
AGC_1
AGC_2
6
F188
1k
Flash_WP
3V3_VCC
C105
2n2
1.8nF
50V
VDD_1P8_1
VDD_3P3_1
IF_OUTN_1
IF_OUTP_1
IF_OUTN_2
IF_OUTP_2
D_IF_AGC
VDD_1V8
VDD_1V8
12
11
10
DIGITAL_IF_N
9
DIGITAL_IF_P
8
ANALOG_IF_N
7
ANALOG_IF_P
S32
NC NC
R57
10k
ONLY ANALOG
6V3
1u
C1194
C1174
10u
6V3
C79
1u
6V3
NC
C75
1u
6V3
C92
16V
100n
3V3_TUNER
3D_ENABLE
R59
10k
CI_INT
A
B
C
D
S41
3V3_AVCC
E
F
3V3_TUNER
SCH NAME :
DRAWN BY :
TUNER
<YOUR NAME HERE>
17mb82s-r4
03-04-2014_10:27
87654321
A3
T. SHT:
E
F
9
AX M
Page 25
1 2 3 4 5 6 7 8
SAT_SDA
SAT_SCL
4k7
100R
R2252
9
SCL/VADJ
AGND
4
C1433
1u
16V
2 1
2 1
R2251
FAULT
EN/ADDR
ISEL
TCAP
R2255
4k7
R2256
8
7
6
5
A
F217
1k
C1429
10u
25V
100n
10V
C1363
100n
NC
F216
1k
10V
1V3_SAT_VCC
C1391
10p
S2_TS_CLK
S2_TS_SYNC
S2_TS_ VAL
1V3_SAT_VCC
38
VSEL
DISEQC
VCC4
GNDD4
M_ERR
M_CLK
M_SYNC
GNDD3
VCC3
M_DATA5
23
37
24
LNB_OUT
C1430
10u
25V
36
35
34
33
32
31
30
29
28
27
26
25
C1431
10u
25V
R2230
33R
R2229
33R
R2228
33R
DISEQC_OUT
C1362
LNB_OUT
B
3 2
GND1
NC
1n
C1379
1
50V
1n
50V
C1380
GND1
CN34
657498
C
3V3_VCC10k
C1392
2p2F
3p3
50V
1n
50V
C1382
1n
50V
C1383
S320
2 1
LNB_OUT
1n
50V
C1381
LNB_OUT
50V
0p5 C1393
2pF
50V
27p
C1354
50V
100p
C1351
3V3_SAT_VDDA
50V
27p
C1353
27MHz
C1356
100n
10V
41
3
X6
2
3V3_SAT_VDDA
1V3_SAT_VCC
D
R2221
R2231
33R
PVR_TS_DATA0
100pF
C1358
10V
C1365
10nF
C1357
10V
100n
10V
100n
C1352
100p
50V
C1384
100n
C1359
C1367
1n 50V
100n
10V
10V
C1366
100n
10
11
12
1
2
3
4
5
6
7
8
9
10V
100n
LNA_IP
LNA_IN
TEST0
CAP
VDDA1
XTAL_OUT
XTAL_IN
CLK_OUT
VDDA2
GNDD1
VCC1
RESETN
48
VDDA5
SDA
13
3V3_SAT_VDDA
47
46
VDDA3
VDDA4
GNDD2
SCL
14
15
45
TEST2
VCC2
16
10V
1V3_SAT_VCC
C1364
100n
44
43
42
VCC5
GNDD5
TEST3
U64
M88RS6000
M_DATA0
TEST1
VDDD
17
18
19
2 1
41
40
IT_LOCK
ADDR_SEL1
M_DATA2
M_DATA1
20
21
S323
39
OLF
LNB_EN
DISEQC_IN
M_VALID
M_DATA7
M_DATA6
M_DATA4
M_DATA3
22
12V_VCC
C1428
10u
25V
D193
C1427
10u
25V
S339
C22V
NC
C1426
10u
25V
S340
D192
1N5819
C1424
10u
25V
C1425
10u
25V
L39
10u
D191
1N5819
25V
D190
2u2
C1420
12V_VCC
1N5819
NC
D189
100nF
100n
D188
1N5819
C1421
10u
16V
DISEQC_OUT
50V
220n
C1432
13
C1417
14
10V
15
16
1N5819
F215
1k
C1419
100n
10V
VLNB
VCP
BOOST
PGND
C1422
10u
16V
10k
R2253
12
EXTM
11
VCTRL
100R
10
SDA
U67
TPS65233
VCC
VIN
LX
1
2
3
C1416
100n
16V
130k
C1418
100n
22nF
R2254
100k
10V
3V3_VCC
A
B
C
D
4k7
4k7
C1389
10p
50V
20pF 20pF
S2DEMOD_RESET
21
21
C1390
10p
50V
33R
R2227
SAT_SDA
33R
R2226
SAT_SCL
C1360
100n
10V
1V3_SAT_VCC
3V3_SAT_VDD
C1361
100n
10V
321
R4R3R2
33R
5 4
S2_TS_DATA_2
S2_TS_DATA_1
S2_TS_DATA_0
R1
33R
R2236
R2237
876
S2_TS_DATA_3
321
R4R3R2
R1
876
5 4
S2_TS_DATA_4
S2_TS_DATA_5
S2_TS_DATA_6
S2_TS_DATA_7
SCH NAME :
DRAWN BY :
SAT_1
<YOUR NAME HERE>
17mb82s-r4
07-04-2014_09:46
87654321
A3
T. SHT:
E
F
9
AX M
3V3_SAT_VDD
S2DEMOD_RESET
E
3V3_VCC
3V3_VCC
F
F202
60R
S324
C1372
10u
6V3
C1369
100n
10V
C1370
100n
10V
C1368
100n
10V
3V3_SAT_VDDA
3V3_SAT_VDD
1V3_SAT_VCC
R2225
R2224
Page 26
C14
1n
CN1
S12
4kV
C13
1n
4kV
R32
10R
2
1
3.15A/250V
R46
10R
V_2
C43
56n
275V
AUX
A
S13
P1
P2
B
C
D
OUTPUT DIODES HEATSINKS
HS3
E
HS2
HS1
100k
F
SMPS MOSFET HEATSINK
1 2 3 4 5 6 7 8
12V RCD SNUBBER OPTION
XCAPS
ROCKER SWITCH
CN2
P3
S4
FS2
S9
FS1
3.15A/250V
C12
1n
4kV
C11
1n
4kV
C41
100n
275V
V_1
R280
10k
10R
FB C225
R253
PL4
PL3
R302
C307
1n
S301
4kV
C304
1n
4kV
PL2
PL1
V_5
2
1
S11
S10
510V
R281
10k
V1
R297
1n
50V
P4
SP5
TH3
10R
10R
275V
WITHDRAWAL RESISTORS
R119
1M
R118
1M
V_5 V_1
V_6
10R
CS
R309
10R
R33
10R 10R
10R
10R
TH4
C317
56n
275V
R117
1M
1M
LINE FILTER OPTION
LF3
32
SMPS CONVERTER BLOCK
C299
10p
50V
1
DET
2
FB
3
CS
4
GND
PRIMARY to SECONDARY Ycap
C9
1n
4kV
4M7
+400V
C4
100n
275V
V_6
S8
S2
TH2
TH1
C305
56n
4
1
U202
FAN6300
C303
1n
4kV
R1
C311
1n
4kV
C308
100n
275V
V_2
VDD
GATE
C10
1n
4kV
HV
NC
C7
56n
275V
R114
1M
R115R116
1M
V_5
8
7
6
5
V_6
R310
10R
R34
1
4
V_2
C1
100n
275V
C8
56n
275V
V_1
V_1
S22
S14
LF2
3 2
S23
S15
V_2
V_4V_3
R289
10R
R290
10R10R
R291
GATE
D298
C18V
FB
C61
1n
50V
SOFT_START
C296
1u
50V
C2
100n
275V
LF1
3 2
C86
220n
275V
V_3
1
4
+400V
R47
10R
D37
C12V
1k
C85
470n
275V
V_4
S16
C302
1u
50V
+12VCC
R20
1N4148
C52
1u
50V
C5
56n
275V
C6
C3
100n
56n
275V
275V
R45
VCC
FEEDBACK BLOCK
4
3 2
D18
V_2
V_1
R307
10R
10R
V_50
C15
1n
4kV
C16
1n
4kV
U4
4
3 2
K10104
U2
TCET1102G
C60
1n
1k
R300
50V
ST_BY
RL207
UF5402
UF5402
RL207
S6
F13
800R
C312
50V
100k
100k
100k
100k
100k
GATE
U1
TL431SAMF2
S5
C17
1n
4kV
D31
D30
D41
D33
C313
1u
50V
1u
C25
4n7
630V
R97
R98
R99
R100
100k
R96
1N4148
D19
R77
10R
10R
R76
R26
1k
C34
1n 50V
1k
R21 C59
1k
1k
C18
1n
4kV
RL207
D40
UF5402
D42
UF5402
D34
RL207
100k
100k
100k
100k
R24
R23
D32
V_10
BC858B
CS
+12VCC
1n
50V
1k
R25
F24
800R
140R
F22
F23
V_10
140R
2kV
47p
C38
D17HER207
HER207D16
D6 BA159
D5 BA159
Q15
FQPF8N60C
Q13
C62
1n
50V
+12VCC
R308
10R
R44
10R
F14
800R
S7
V_50
R92
+400V
R93
R94
R95
R91
1
1
R22
1k
R4
1k
D1
C6V8
Q7
BC848B
R305
1k
R306
1k
R56
10R
R55
10R
R53
10R
R54
10R
12V_AC
C21
C19
C306
47p
R85
2kV
10k
R75
10R
39u
39u
450V
450V
24V RCD SNUBBER OPTION
50R F26
F16
140R
F15
140R
C39
47p
2kV
R101
120R
ST_BY
R82
56k
F21
800R
D8
BA159
F18
70R
F17
70R
C20
39u
450V
24V_AC
R51
10R
R50
10R
R49
10R
R52
10R
R303
1k
R304
1k
F2550R
12V_AC
AUX
D4
D3
24V_DC
R80
39K
BL_ON-OFF
+400V
BA159
BA159
C35
D38
SBR10U150
47p 2kV C37
D25
SB5100
D24
SB5100
D23
SB5100
D26
SB5100
D22
SB5100
F19
70R
F20
70R
D7
BA159
+400V
1 6
DRAIN
N1 N2
14
2
N3 N4
13
F1
50R
R301
10R
R2
100k
Q8
BC848B
1n
50V
R79
33k
12V_DC
D13
UF5402
D12
UF5402
D11
UF5402
D14
UF5402
D15
UF5402
D9
SF10L60U
D10
SF10L60U
TR2
L3
10u
D20
RS1008FL
DUMMY LOAD CIRCIUT
1n
50V
C36
D39
SBR10U150
C70
560u
35V
24V_DC
1k
R31
Q10
BC848B
SP1
SP2
Q5
FDS4685
12V_AC
24V_AC
PIN_9
12V_AC
PIN_912V_DC
C28
10u 10u
10V
SP3 SP4
V_50
S24
C5V1
D301
81
7
6
5
AUDIO_REG
Q2
BC848B
+12VCC
+5V_STBY
C29
10V
C309 C310
56n
C68
22u
ST_BY
BL_ON-OFF
PWM_DIM
+5V_STBY
S30
+24VCC_SW
1u
L4
C71
560u
35V
C30
1m5
35V
R15ST_BY
1k
R8
1k
24V_AC
12V_AC
C73
47u
50V
PIN_9
9
5
87
10
C64
1n
50V
S41
C27
C31
35V
1m5
VCC
C33
1m
16V
R81
Q9
BC848B
2m2
1u
L5
C55
DRAIN
200k
35V
R9
1n
50V
+400V
AUX
R83
1k
56k
S42
Q3
BC848B
+12Vdc OUTPUT
F11
26R
C26
560u
AUDIO_REG
F10
35V
26R
R12
1k
Q4
BC848B
TRANSFORMATOR OPTION
+24VCC
1k
C69
22u
16V
R14
1n
50V
C57
1k
+12VCC
C56
TR1
1
N1
16
2
N6
15
PIN_9 12V_AC
+12VCC
12V to 5V LDO OPTION
N3
N2
N4
N5
OUTPUT SELECTION
S17
S25
S26
R27
1k
R28
1k
1n R13
50V
5
12
6
11
7
10
S1
S3
BC337
D2
S33
C5V1
D300
2
3
4
Q1
C6V8
PROJECT NAME :
SCH NAME :
D
RAWN BY :
1
<YOUR NAME HERE>
PINGOOD OPTIONS
C315
1m
16V
C314
1m
16V
C32
560u
D3616V
35V
C12V
R7
R6
1k
C63
1n
50V
PIN_1
PIN_3
1k
R5
1k
1k
2X6 PINLI MB SOKET OPS.
BL_ON-OFF
PWM_DIM
+5V_STBY
56n
275V
S40
D35
C12V
R29
CN4
21
43
65
87
109
1211
S28
ST_BY
PIN_3
+12VCC
17ips71-r3
C316
1m
16V275V
V_10
+24Vdc OUTPUT
26R
F12
+12VCC
S29
+24VCC_SW
+12VCC
26R
F9
PIN_4
2X10 PINLI MB SOKET OPS.
PIN_1
CN3
21
43
65
87
109
1211
1413
1615
1817
9
201
16-05-2014_11:20
87654321
+12VCC
PIN_4
+12VCC
T. SHT:
A
B
C
D
E
F
3
A
2
AXM
Page 27
1 2 3 4 5 6 7 8
A
C300
C24
10u
10u
16V
L1
13u
16V
C23
10u
16V
47u
C22
50V
L8
3 4
17u
2 1
L6
150u
GATE_LED
C301
10u
16V
L2
13u
R86
CON_AC
R78
10R
D21
1N4148
10k
BC858B
SB5100
Tapped Coil Option
+24VCC
+24VCC_SW
2u2
C78
2u2
10V
BOOST INPUT VOLTAGE
S20
S19
GATE_LED
CS_LED
OVP_LED
+24
+24
B
C75
25V 470n
BL_ON-OFF
PWM_DIM
330n 16V
C
330n
D
25V
S54
S55
C74
C76
270R
R90
R88
10R
C77
470n
16V
R3
100k
LED4
R89
270R
R111
330k
R113
6k8
+12VCC
LED DRIVER
C79
2u2
10V
1
COMP
2
EN
3
DBRT
4
GND
5
OSC
6
ISET
7
BOSC
8
LED4
LED DRIVER VCC CONNECTION
U3
MP3394
S46
VCC
VIN
GATE
ISENSE
OVP
LED1
LED2
LED3
C51
1u
25V
16
VCC_LED
15
14
LED1
LED2
LED3
C80 10V
VCC_LED
C83C84
10u
50V
R112
330k
13
12
11
10
9
10u
50V
C49
1u
25V
+24
Vp
CON_AC
Vp
D29
V_LED+
F2
50R
F3 50R
F6 F7
50R
50R
Q20
FQPF9N50C
Q17
FQD7N10L
Q14
VCC_LED
E
R70
10R
S302
R69
10R
V_SW
OUTPUT DIODE RC SNUBBER CIRCUIT
S21
R71
R73
10R
10R
R72
R74
10R
10R
F8
50R
F5
50R
R68
10R
10R
R299
100R
C45
47p
2kV
R298
50R
R65
R66R67
10R
10R
Q19
FQD7N10L
10k
CS_LED
LED DRIVER SINK MOSFET OPTION
1u
C50 V_LED+
25V
V_SW
V_SW
LED4_S
LED4
D28
SB5100
D27
SB5100
2kV
VCC_LED
POWER BOARD to LED BARS CONNECTION
Vp
35V
35V
C88
C87
F4
Vp
C4447p
Q18
FQD7N10L
R110
100R
R87
10k
2m2
2m2
R60
10R
R63
10R
R64
LED2_S
LED2
C90
47u
200V
10R
R58
R59
10R
10R
R61
R62
10R
10R
CHANNEL OPTIONS
LED1
LED2
LED3
LED4
LED1
LED3
LED3
LED1_S LED2_S
S53
S52
S51
S50
S49
S48
S47
S45
BOOSTED OUTPUT
C65
1n
50V
R104
100R
LED1_S
LED2_S
LED3_S
LED4_S
LED2
LED4
LED2
100R 100R
100R
V_LED+
R107
R106
R105
OVP_LED
LED2_S
V_LED+
V_LED+
LED1_S
LED2_S
S43
S18
LED3_S
LED4_S
BL_ON-OFF
PWM_DIM
+24
CN6
1
2
3
4
5
6
7
CN7
1
2
3
4
5
6
7
8
A
B
C
D
E
LED3_S LED4_S
F
S44
SCH NAME :
D
RAWN BY :
PROJECT NAME :
2
<YOUR NAME HERE>
17ips71-r3
87654321
A
T. SHT:
2
03-04-2014_11:17
F
3
AXM
Page 28
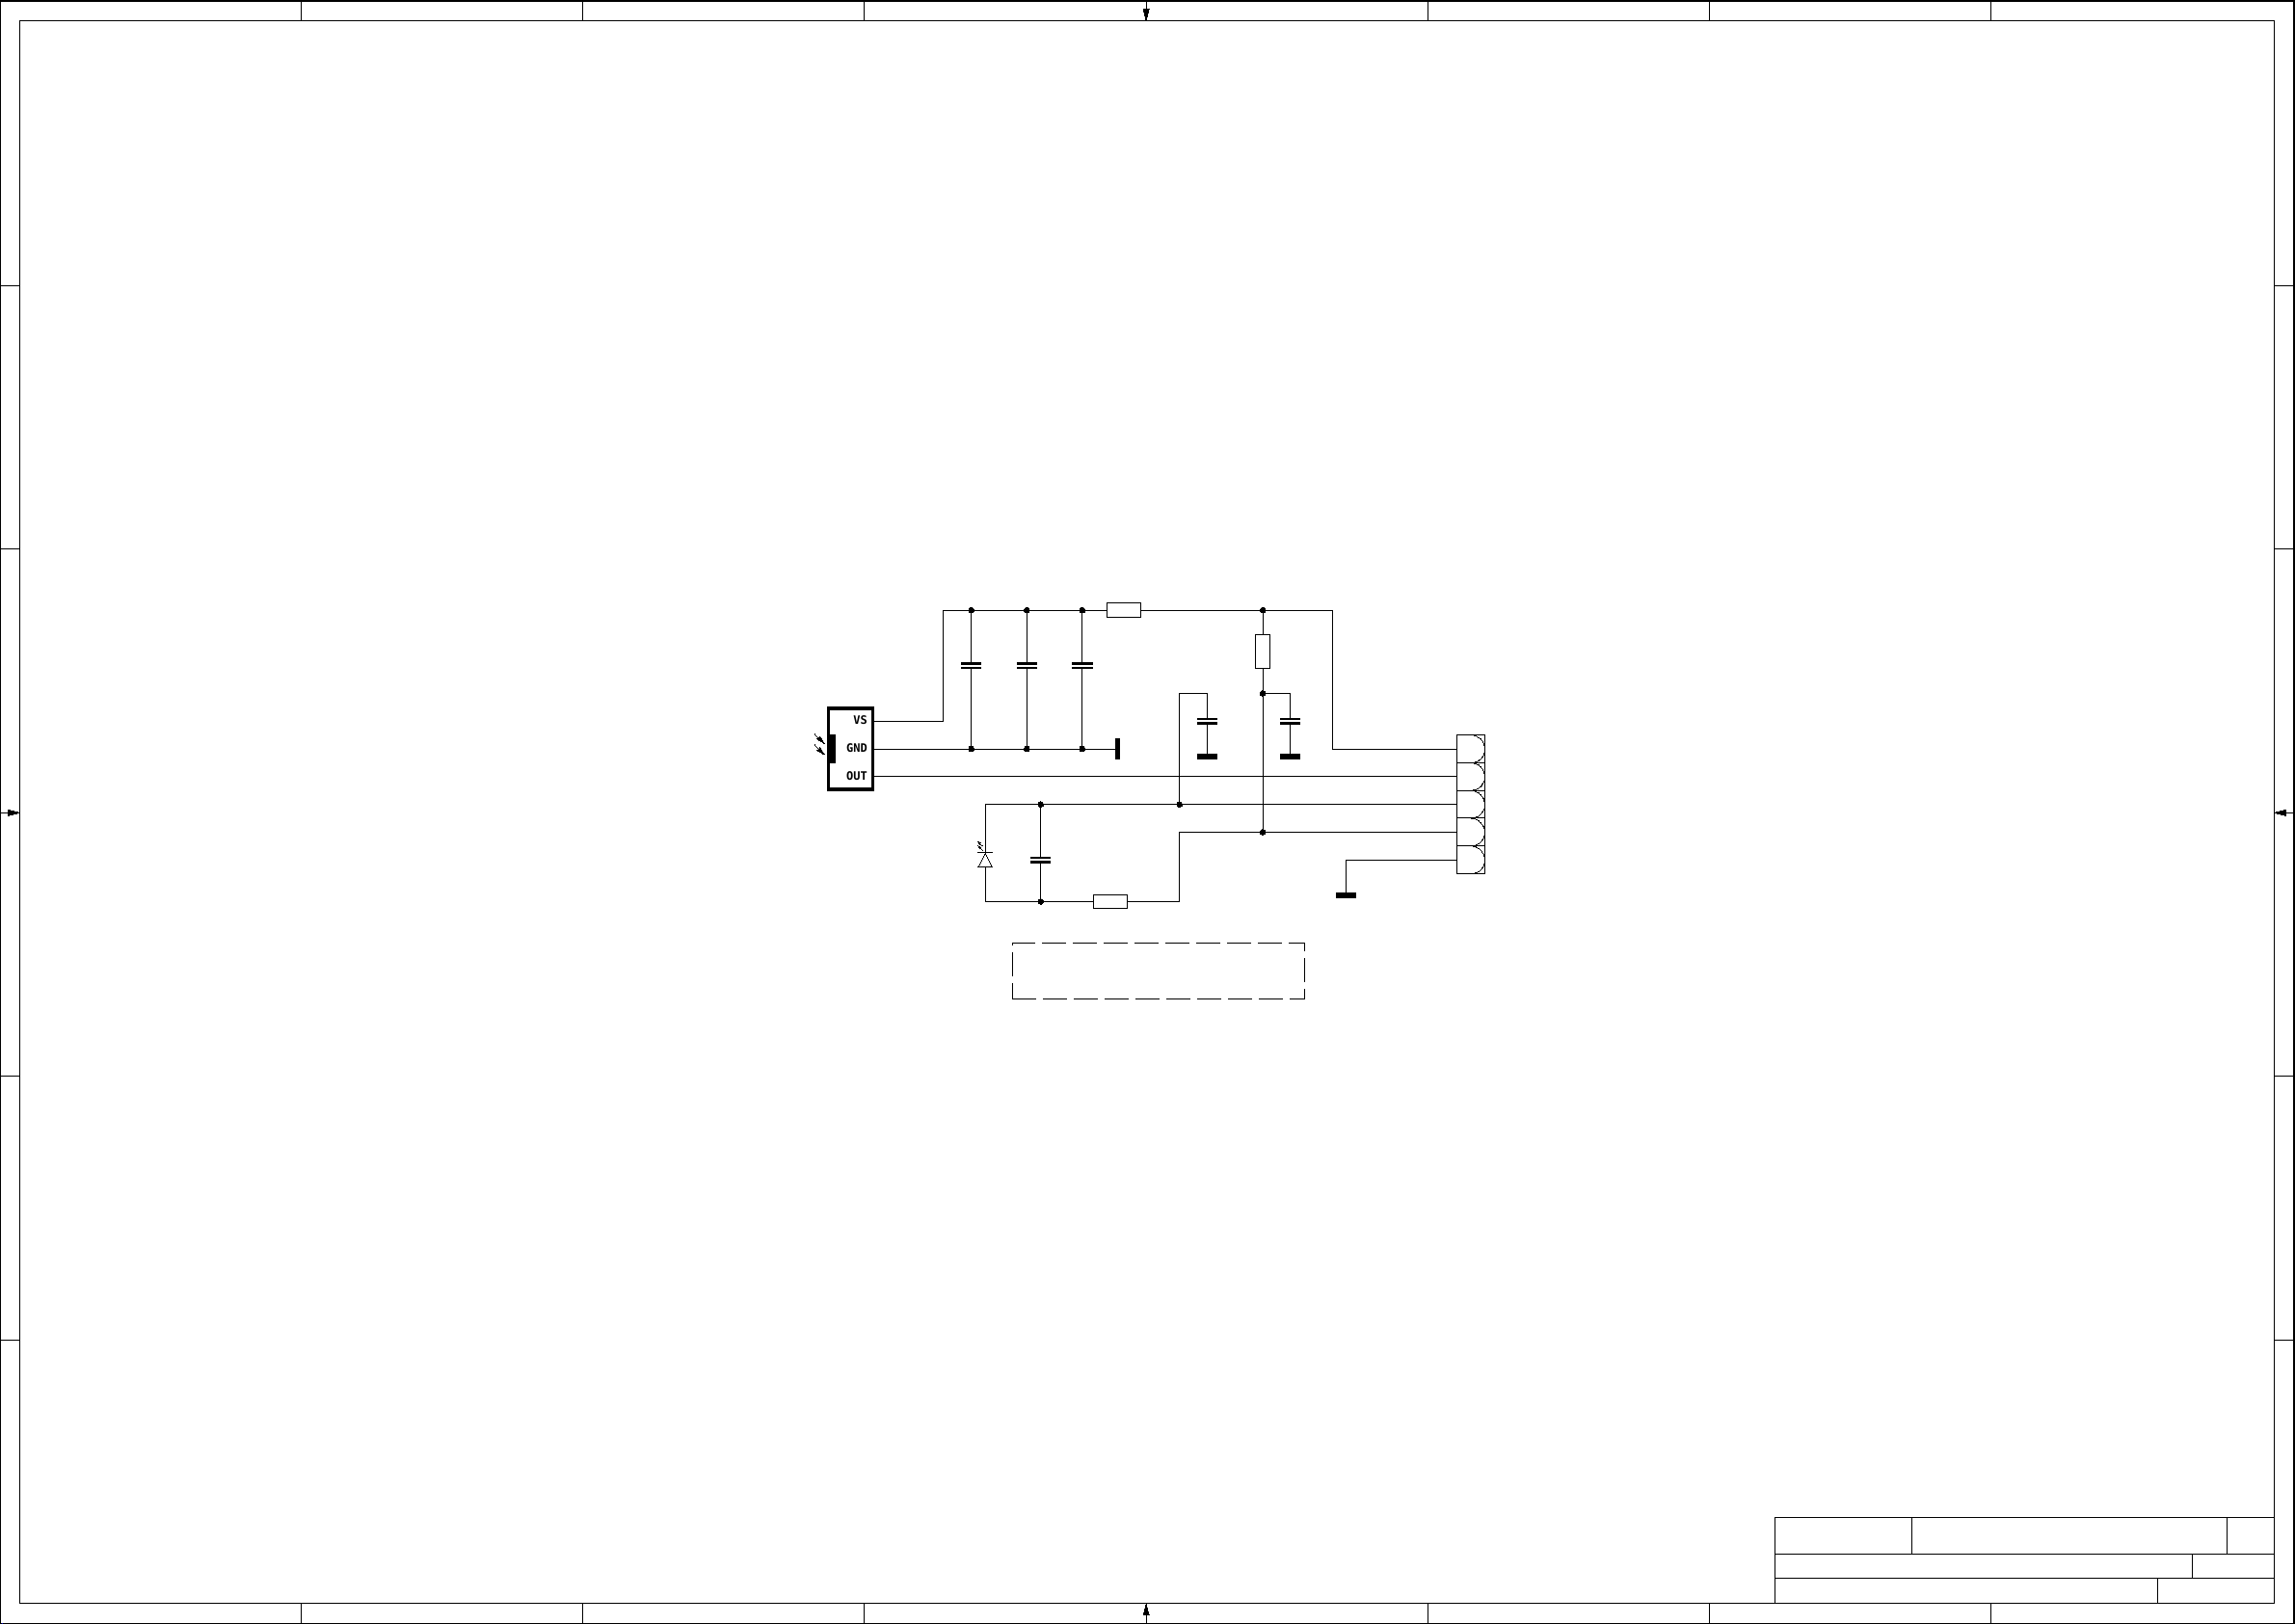
1 2 3 4 5 6 7 8
A
B
R1
100R
C2
1u
50V
C4
100n
50V
C3
1u
50V
22R
R3
220R
C5
100n
50V
R2
C6
100n
50V
5
4
3
2
1
CN1
C1
1u
C
VS
3
GND
OUT
2
1
IR1
50V
D1
VBC30034
A
B
C
D
xx335 LED BMS TOSHIBA
E
F
D
E
F
SCH NAME :
DRAWN BY :
1
<YOUR NAME HERE>
17ld171-r6
11-11-2014_10:33
87654321
A3
T. SHT:
1
AX M
Page 29
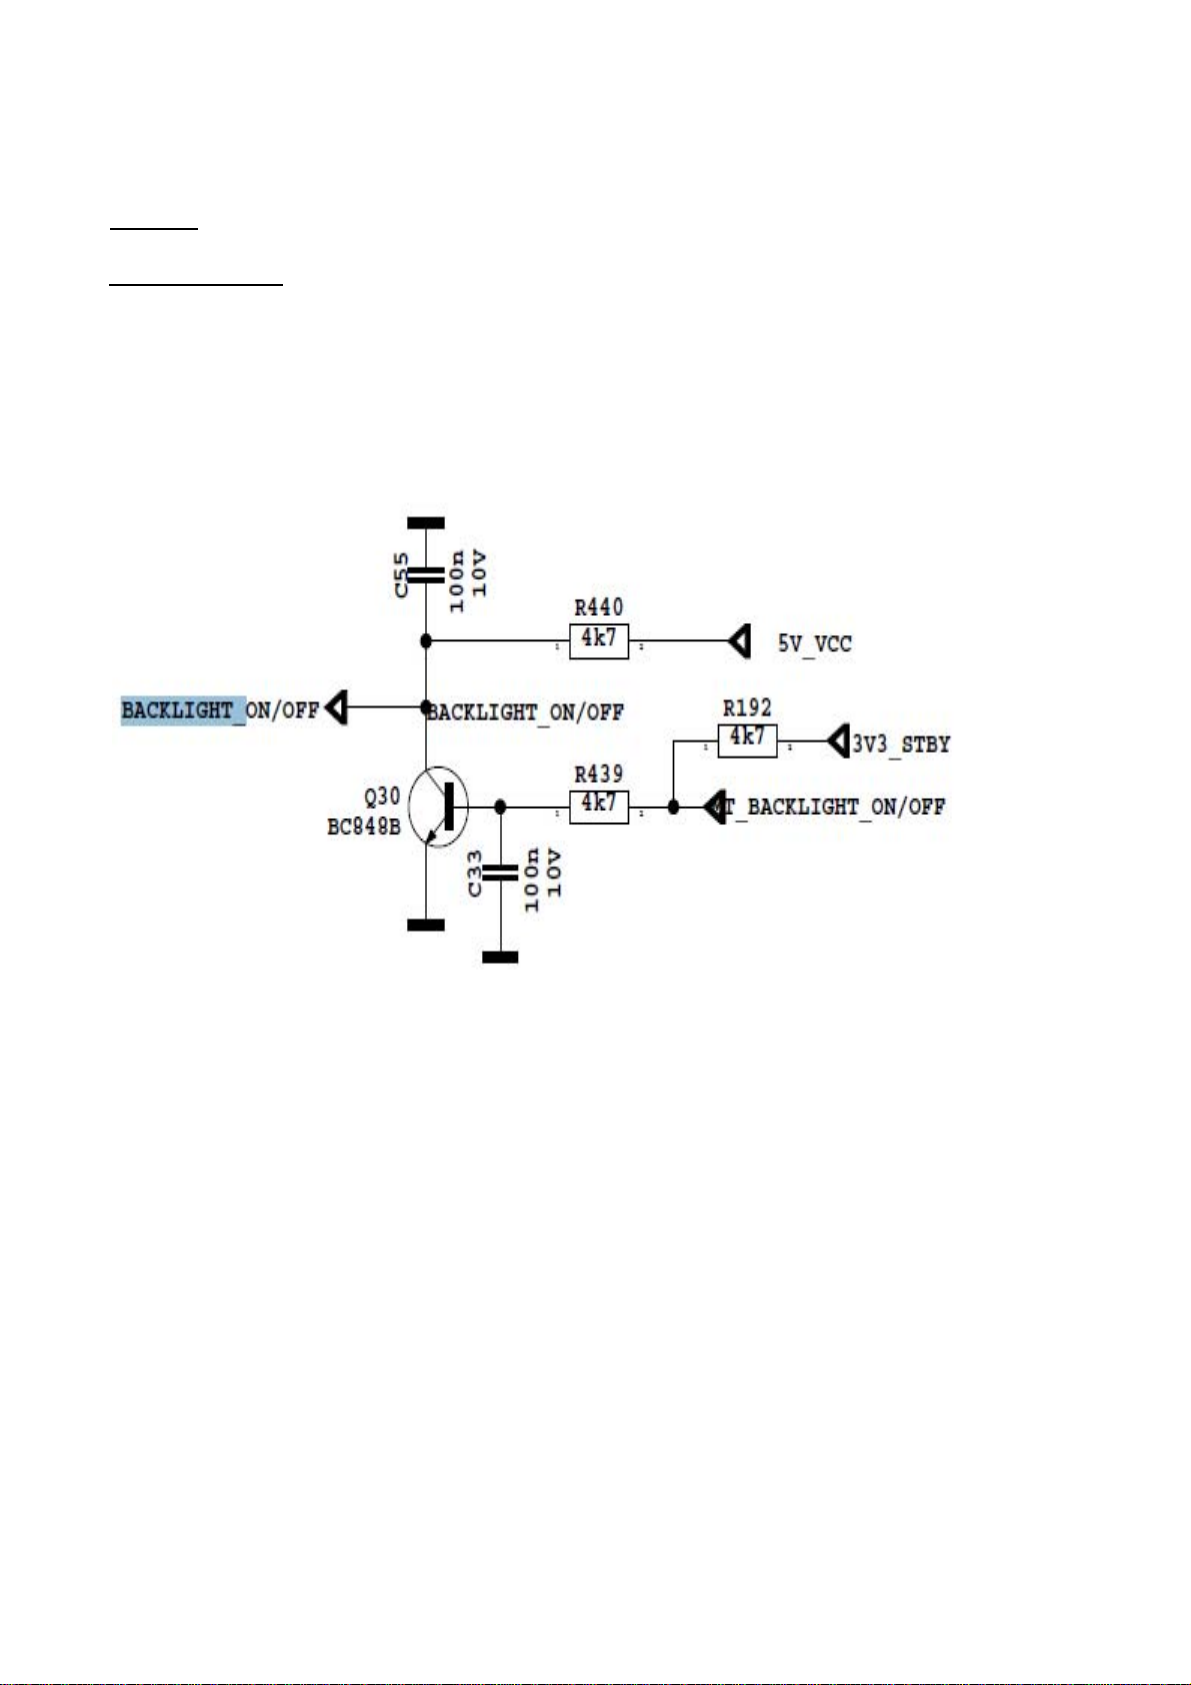
TROUBLESHOOTING (17MB82S)
1. NoBacklightProblem
Problem: If TV is working, led is normal and there is no picture and backlight on the panel.
Possible couses
Backlight pin should be high in open position. If it is low, please check Q30 and panel
cables.
: Backlight pin, dimming pin, backlight supply, stby on/off pin
1/10
Page 30
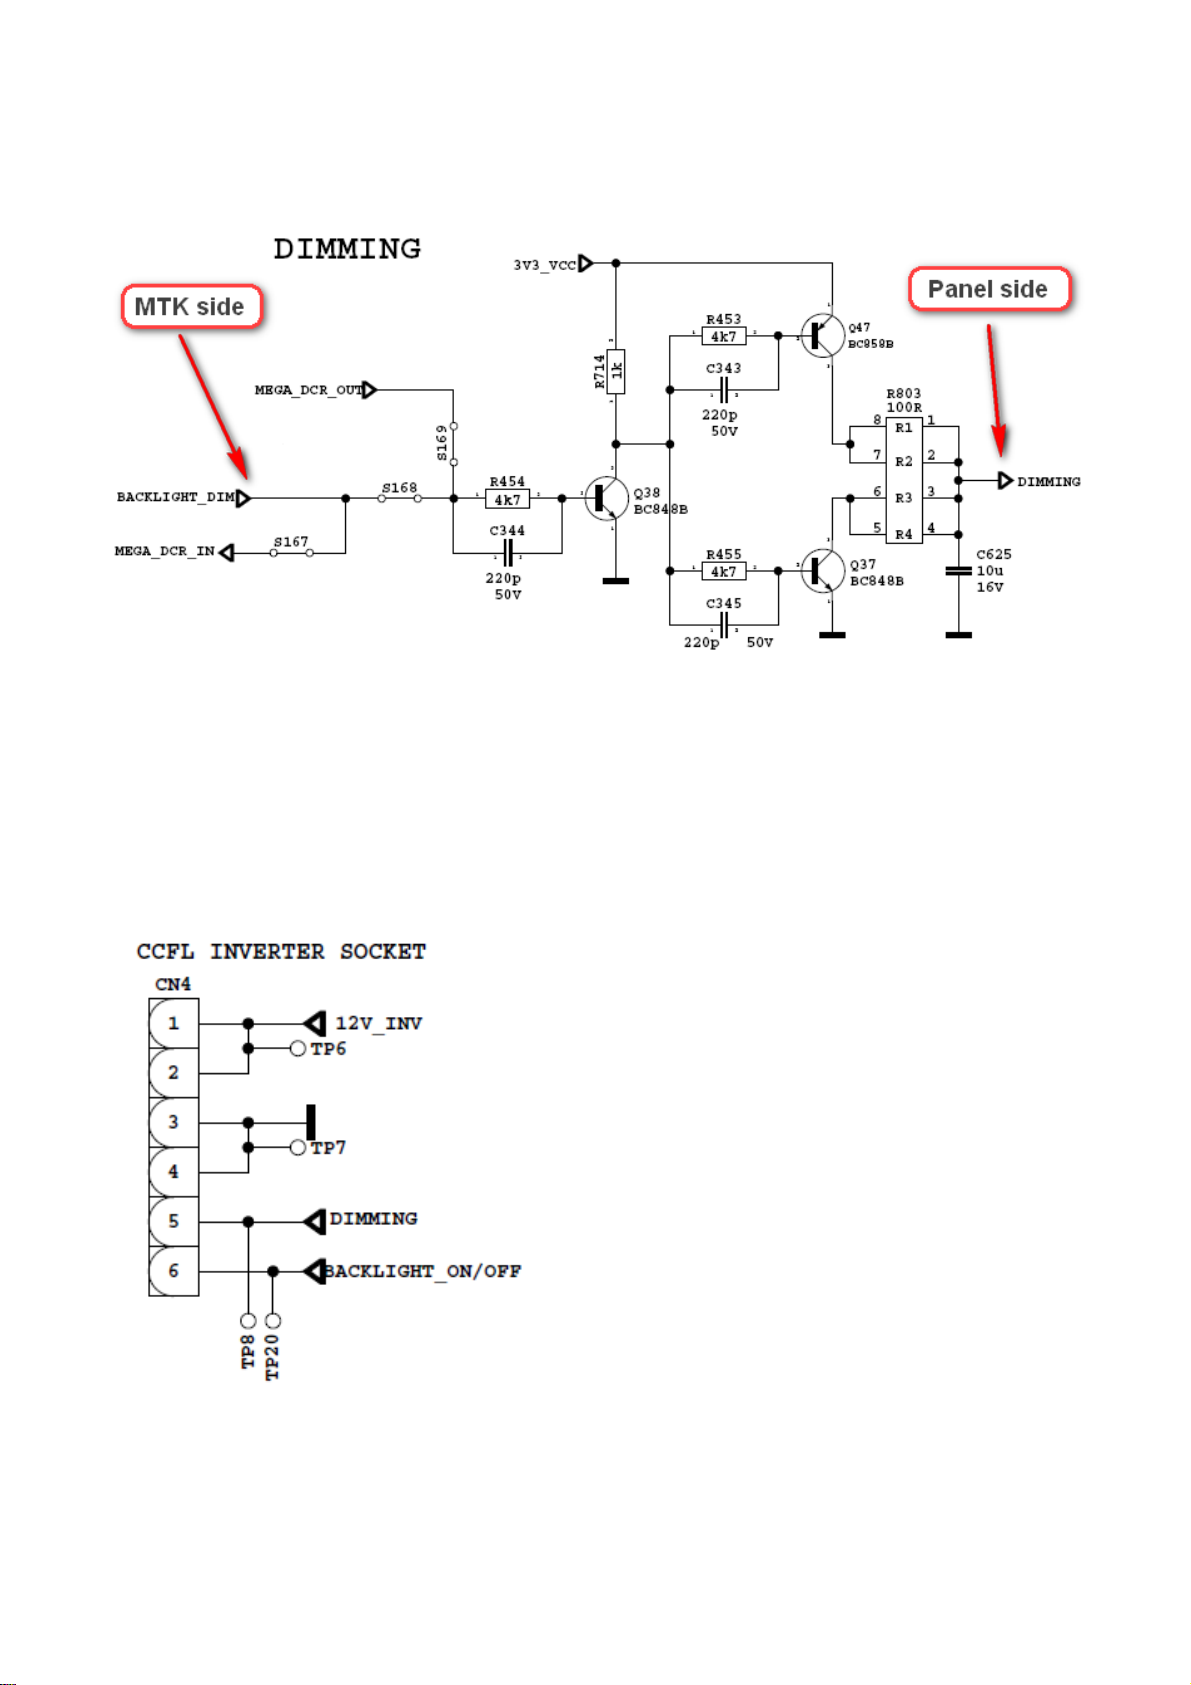
Dimming pin should be high or square wave in open position. If it is low, please check S16
for Mstar side and panel or power cables, connectors.
Backlight power supply should be in panel specs. Please check CN4 for MB82, related
connectors for power supply cards.
2/10
Page 31
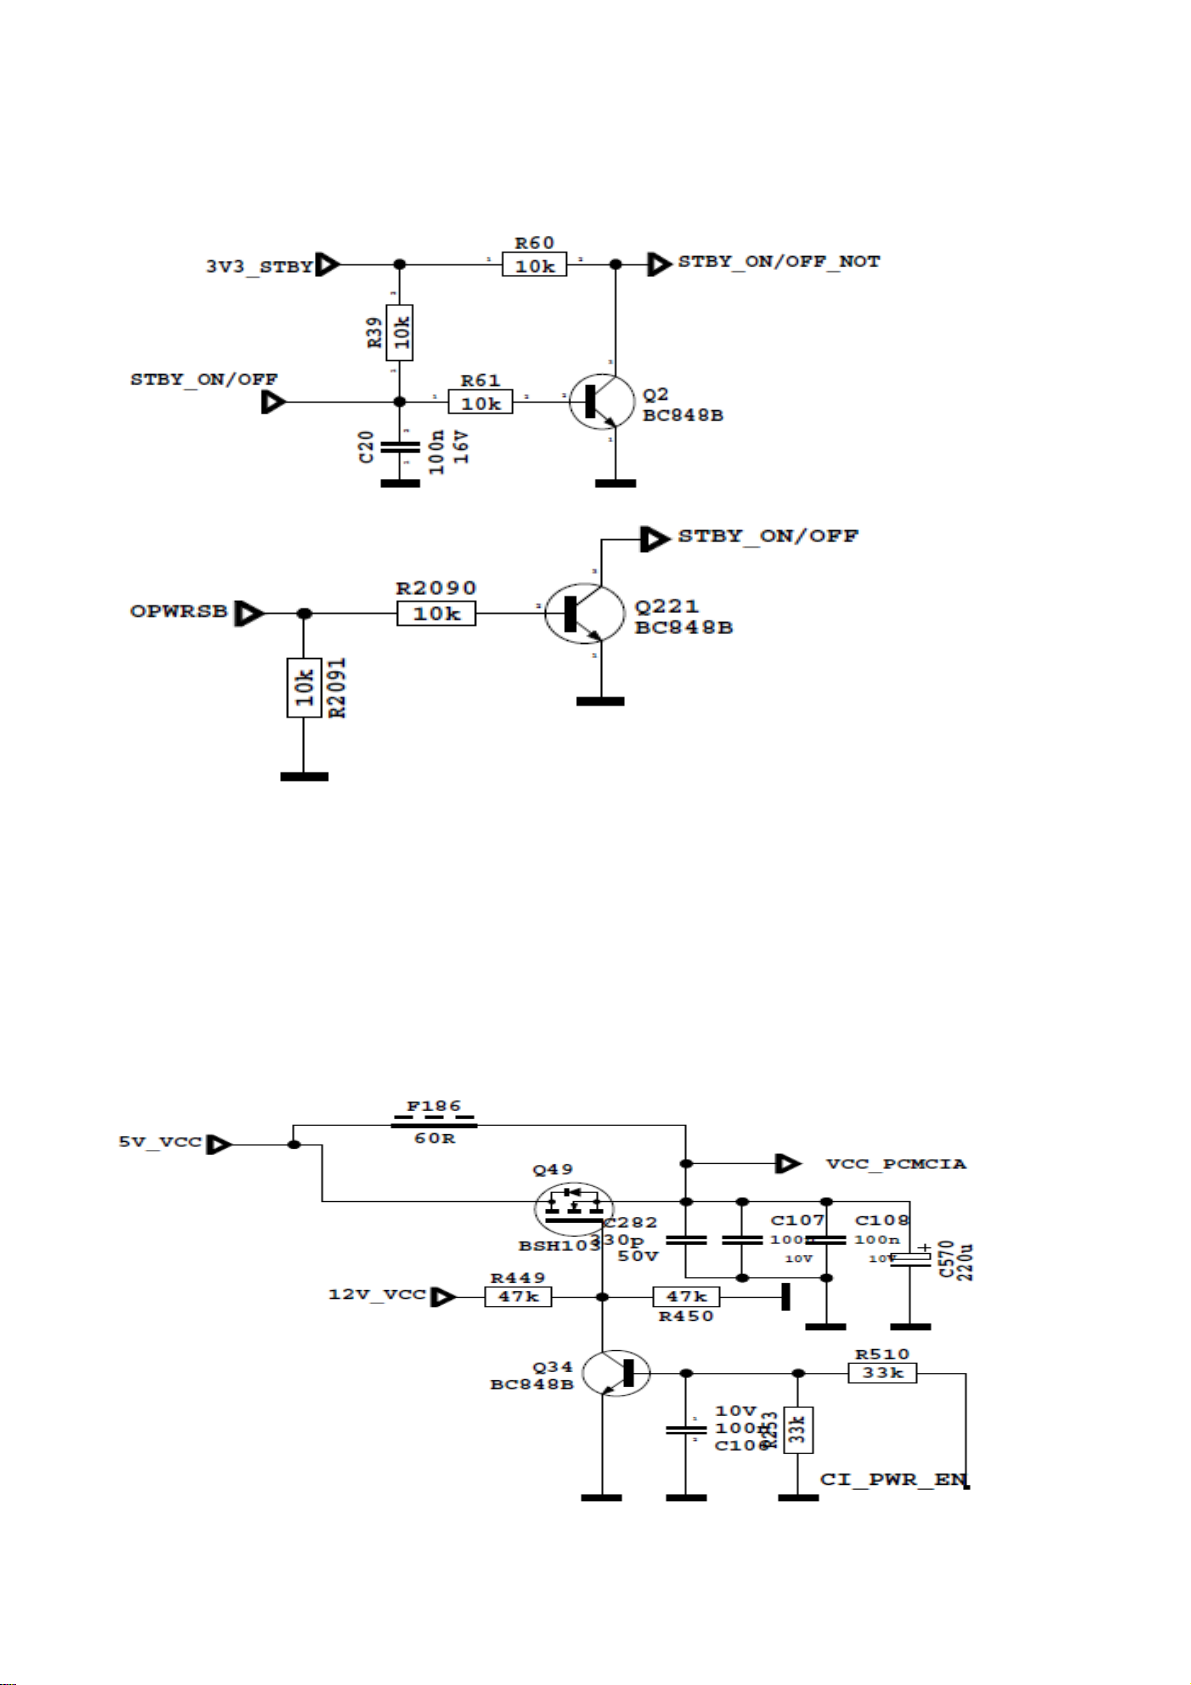
STBY_ON/OFF should be low for standby on condition, please check R2090.
2.CIModuleProblem
Problem: CI is not working when CI module inserted.
Possible couses: Supply, suply control pin, detect pins, mechanical positions of pins
CI supply shoul be 5V when CI module inserted. If it is not 5V please check
CI_POWER_CTRL, this pin should be low.
3/10
Page 32
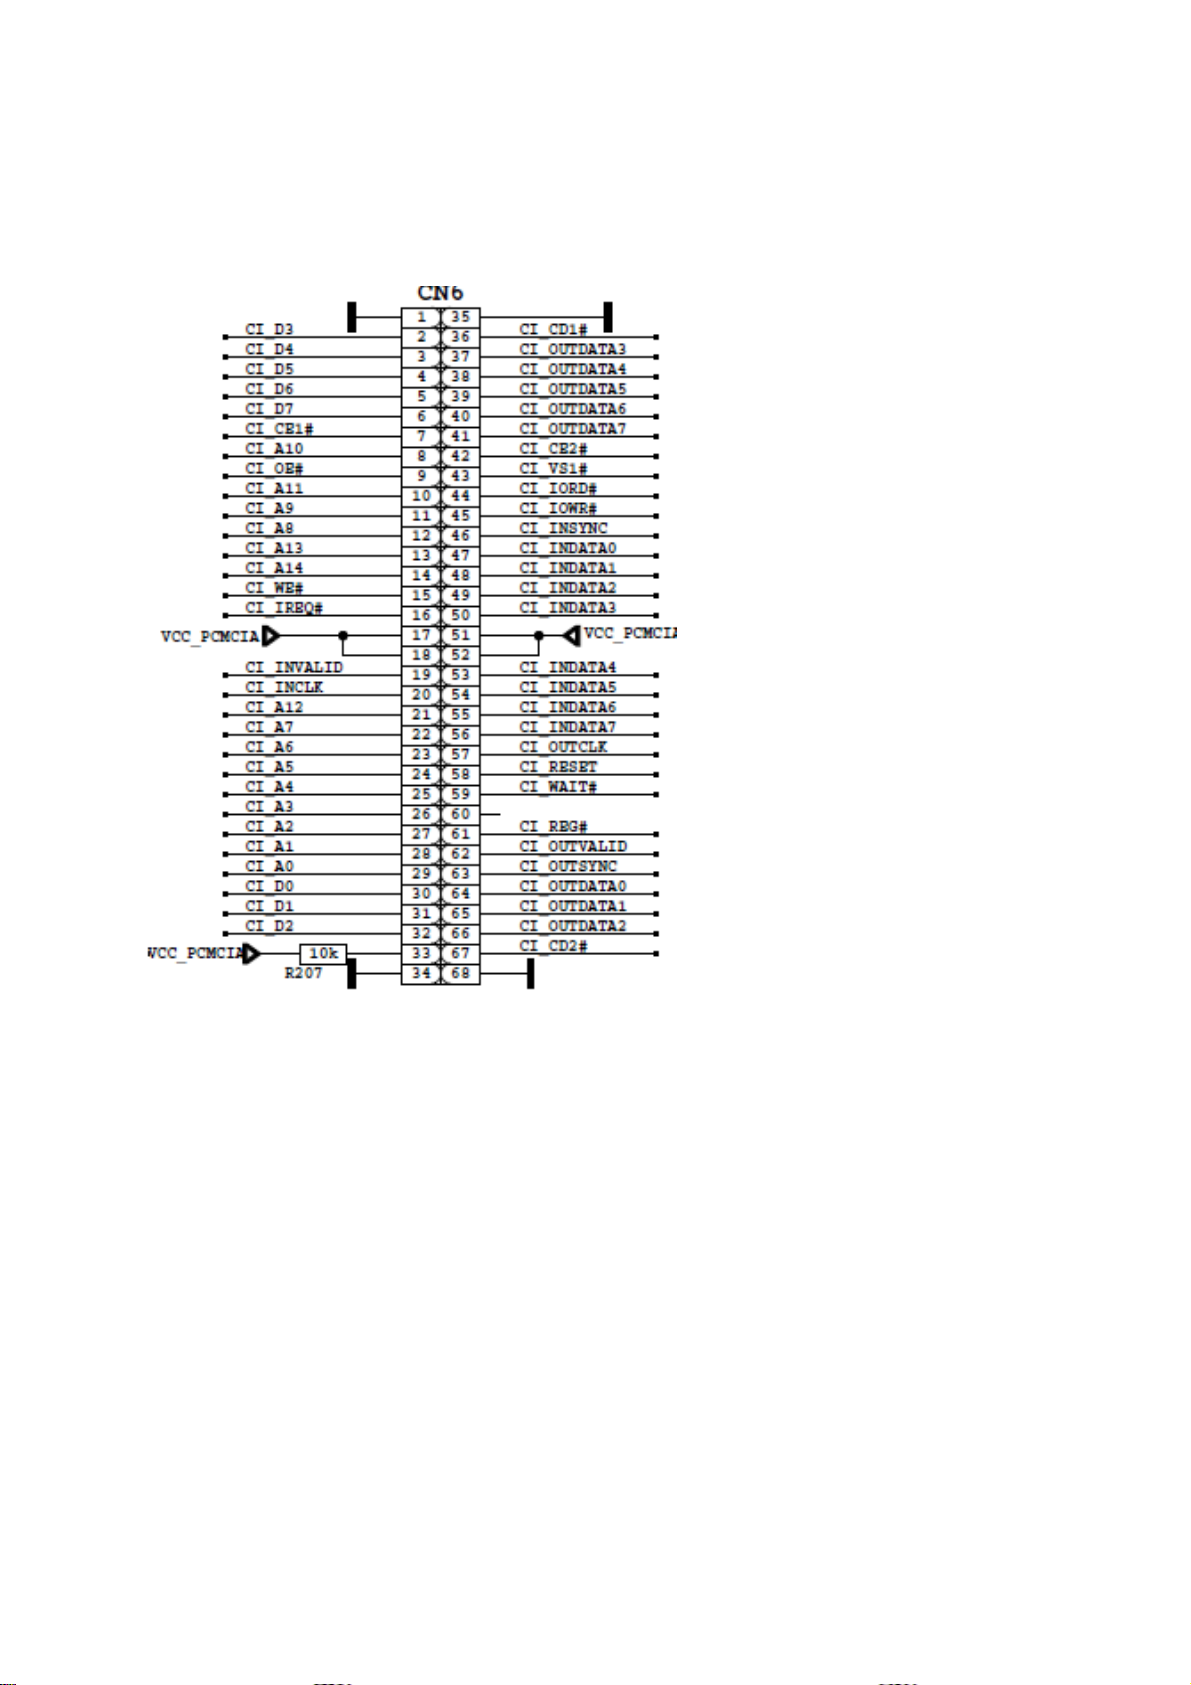
Please check mechanical positions of CI module.
Detect ports should be low. If it is not low please check CI connector pins, CI module pins
and 3V3_VCC on MB82.
4/10
Page 33
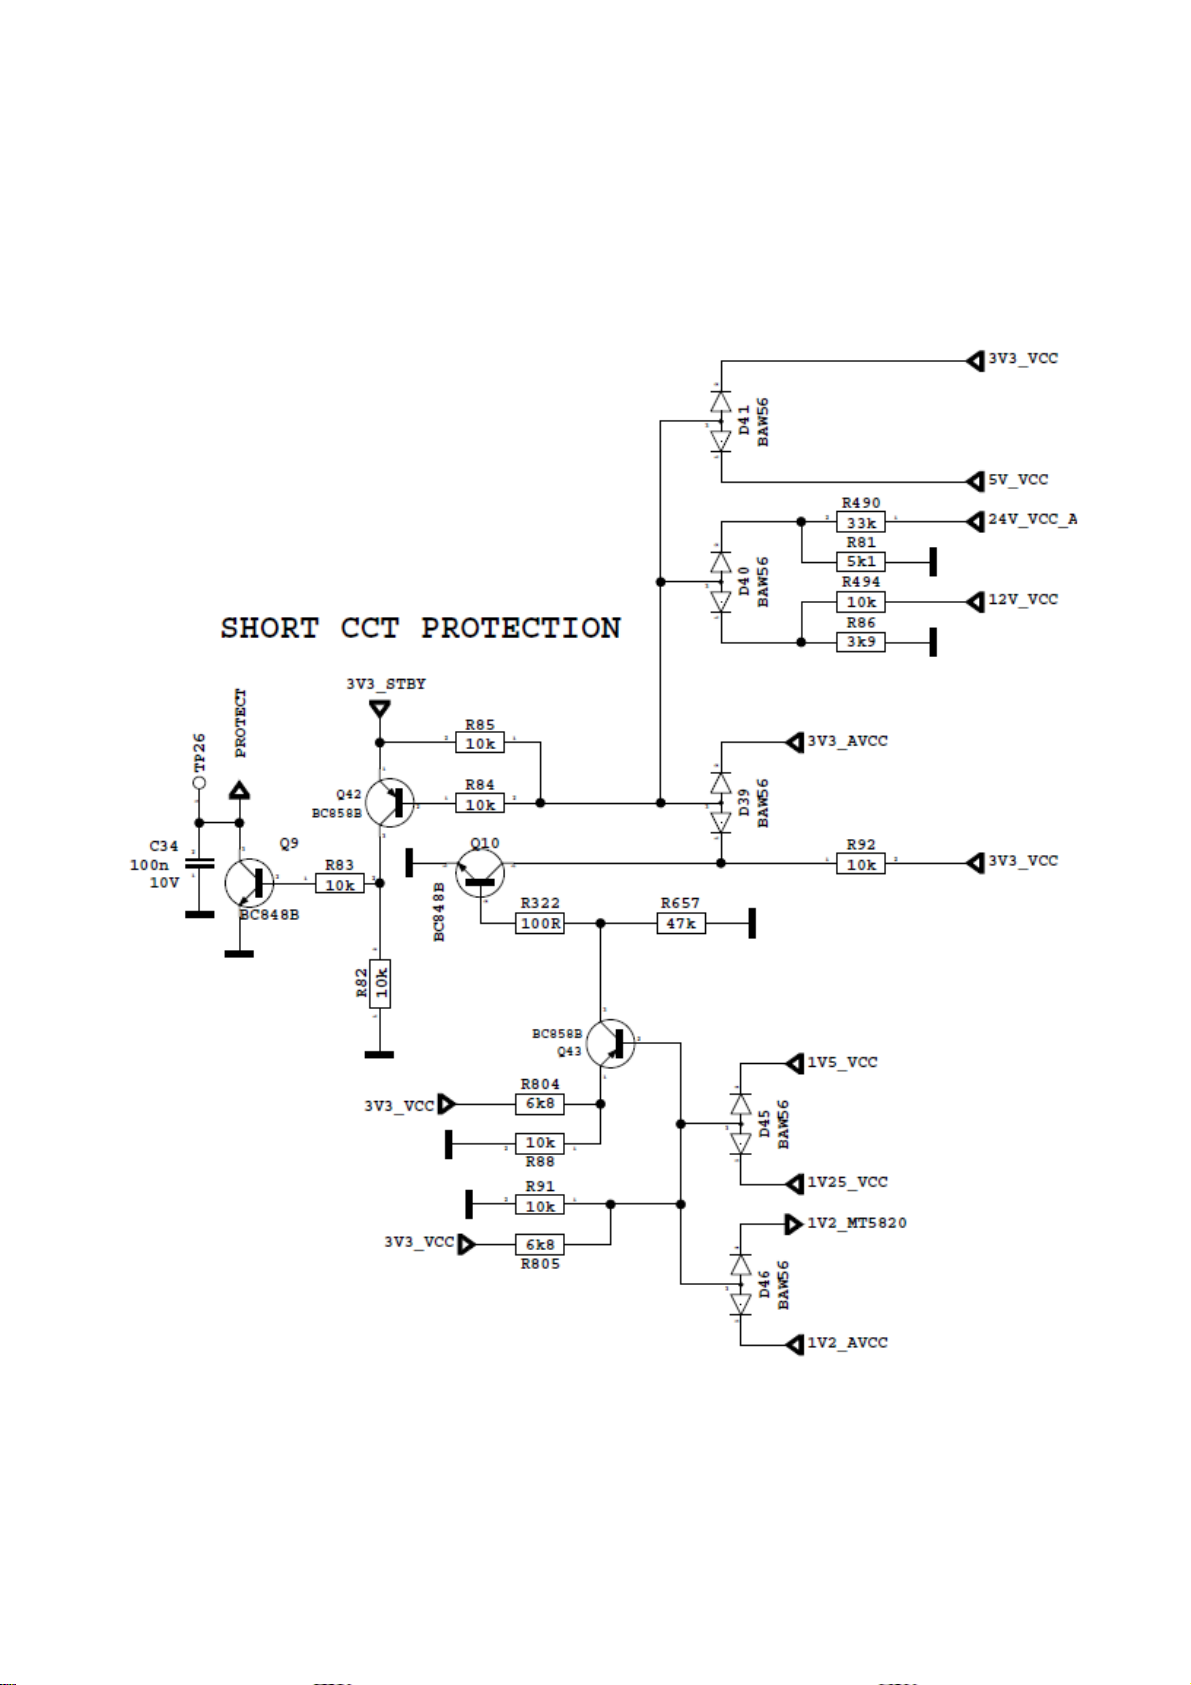
3. Led Blinking Problem
Problem: LED blinking, no other operation
This problem indicates a short on Vcc voltages. Protect pin should be logic high while
normal operation. When there is a short circuit protect pin will be logic low. If you detect
logic low on protect pin, unplug the TV set and control voltage points with a multimeter to
find the shorted voltage to ground.
5/10
Page 34
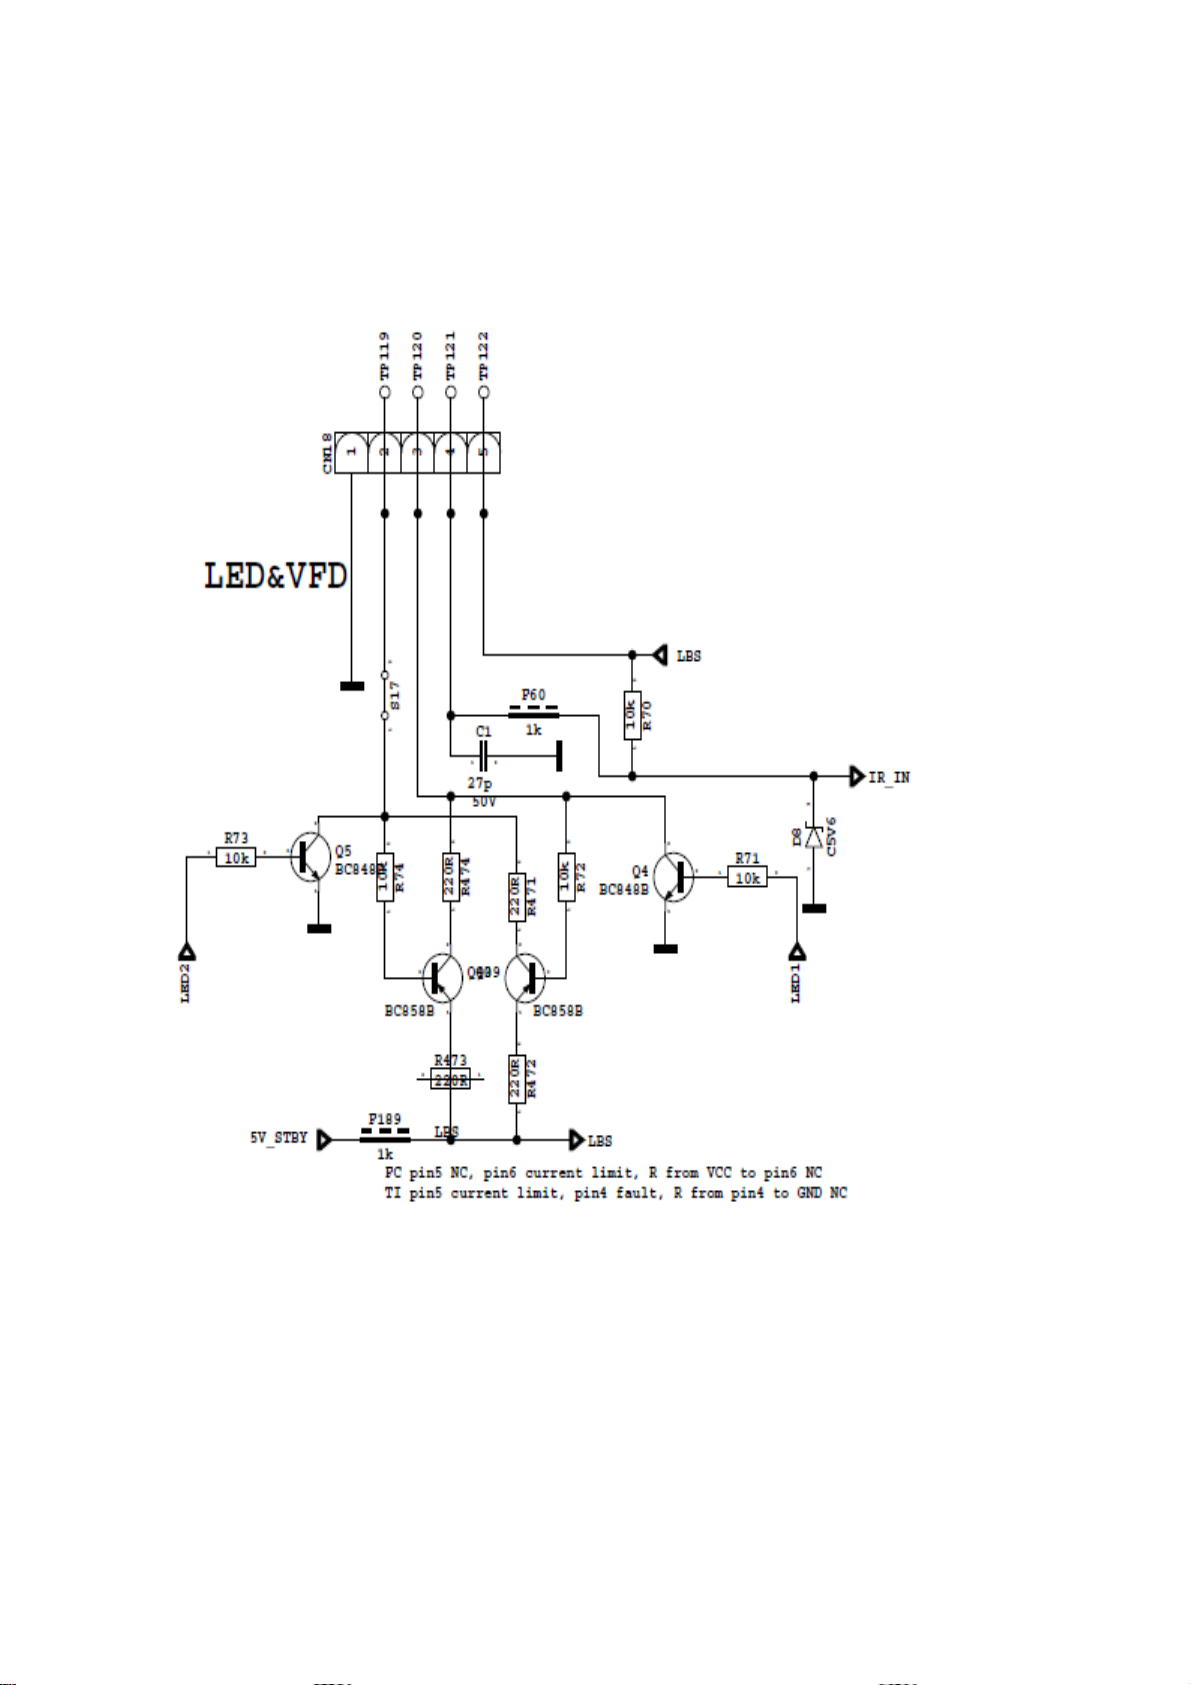
4. IR Problem
Problem: LED or IR not working
Check LED card supply on MB82 chasis.
6/10
Page 35
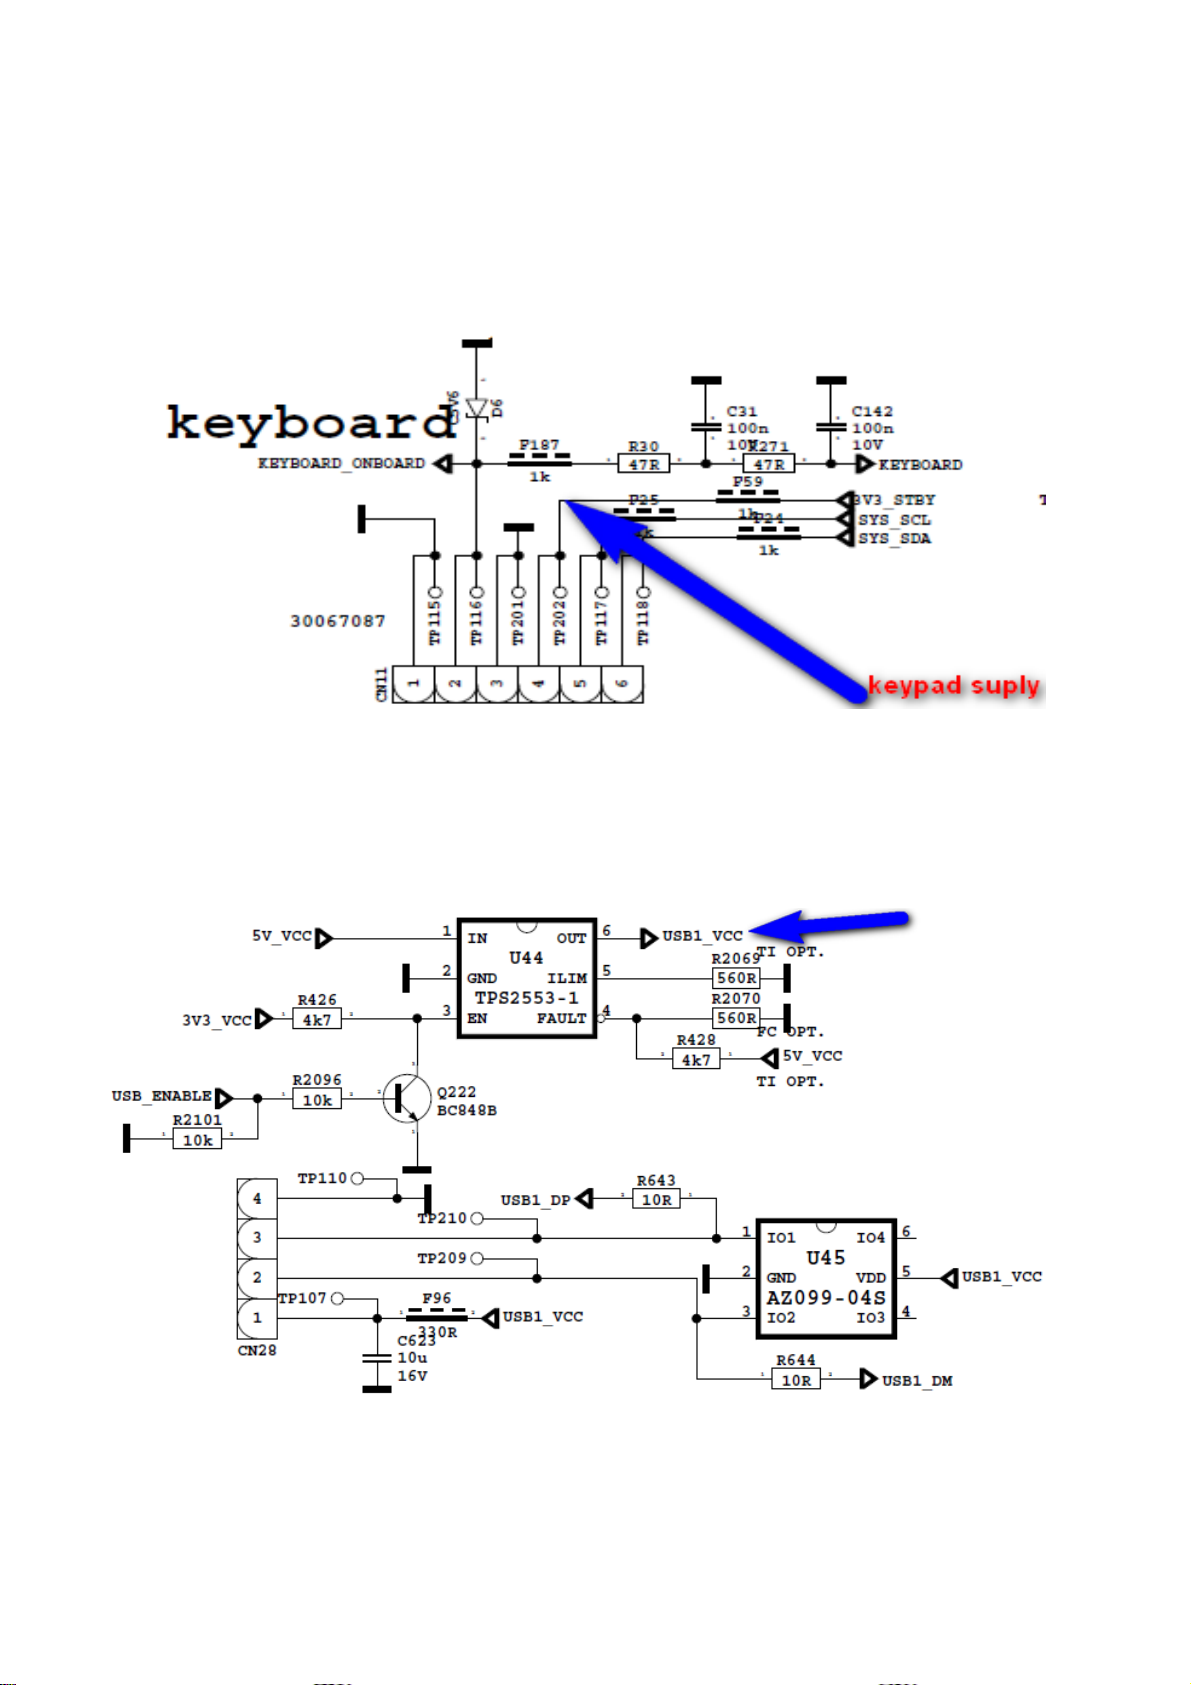
5. Keypad Touchpad Problems
Problem: Keypad or Touchpad is not working
Check keypad supply and KEYBOARD pin on MB82
6. USB Problems
Problem: USB is not working or no USB Detection.
Check USB Supply, It should be nearly 5V.
7/10
Page 36
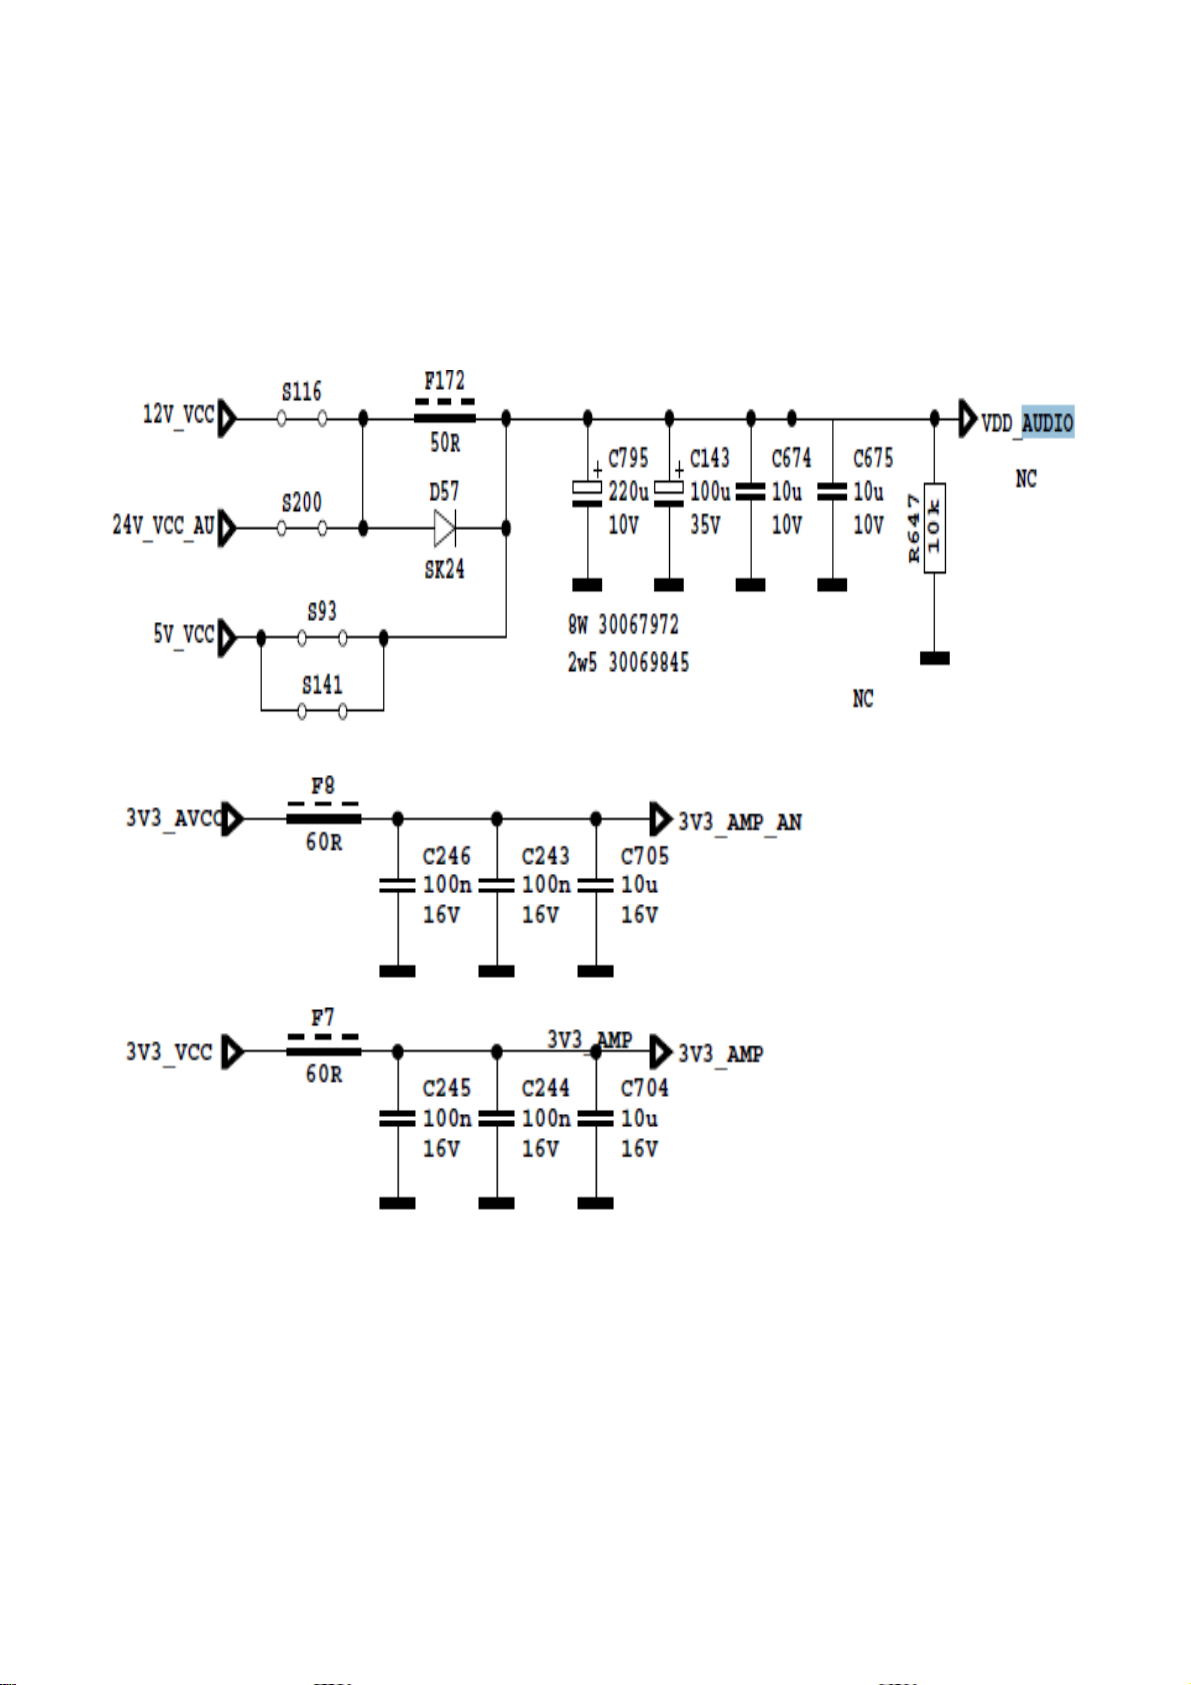
7. No Sound Problem
Problem: No audio at main TV speaker outputs.
Check supply voltages of VDD_AUDIO, 5V_VCC or 12V_VCC with a voltage-meter.
There may be a problem in headphone connector or headphone detect circuit (when
headphone is connected, speakers are automatically muted). Measure voltage at
HP_DETECT pin, it should be 3.3v.
8/10
Page 37
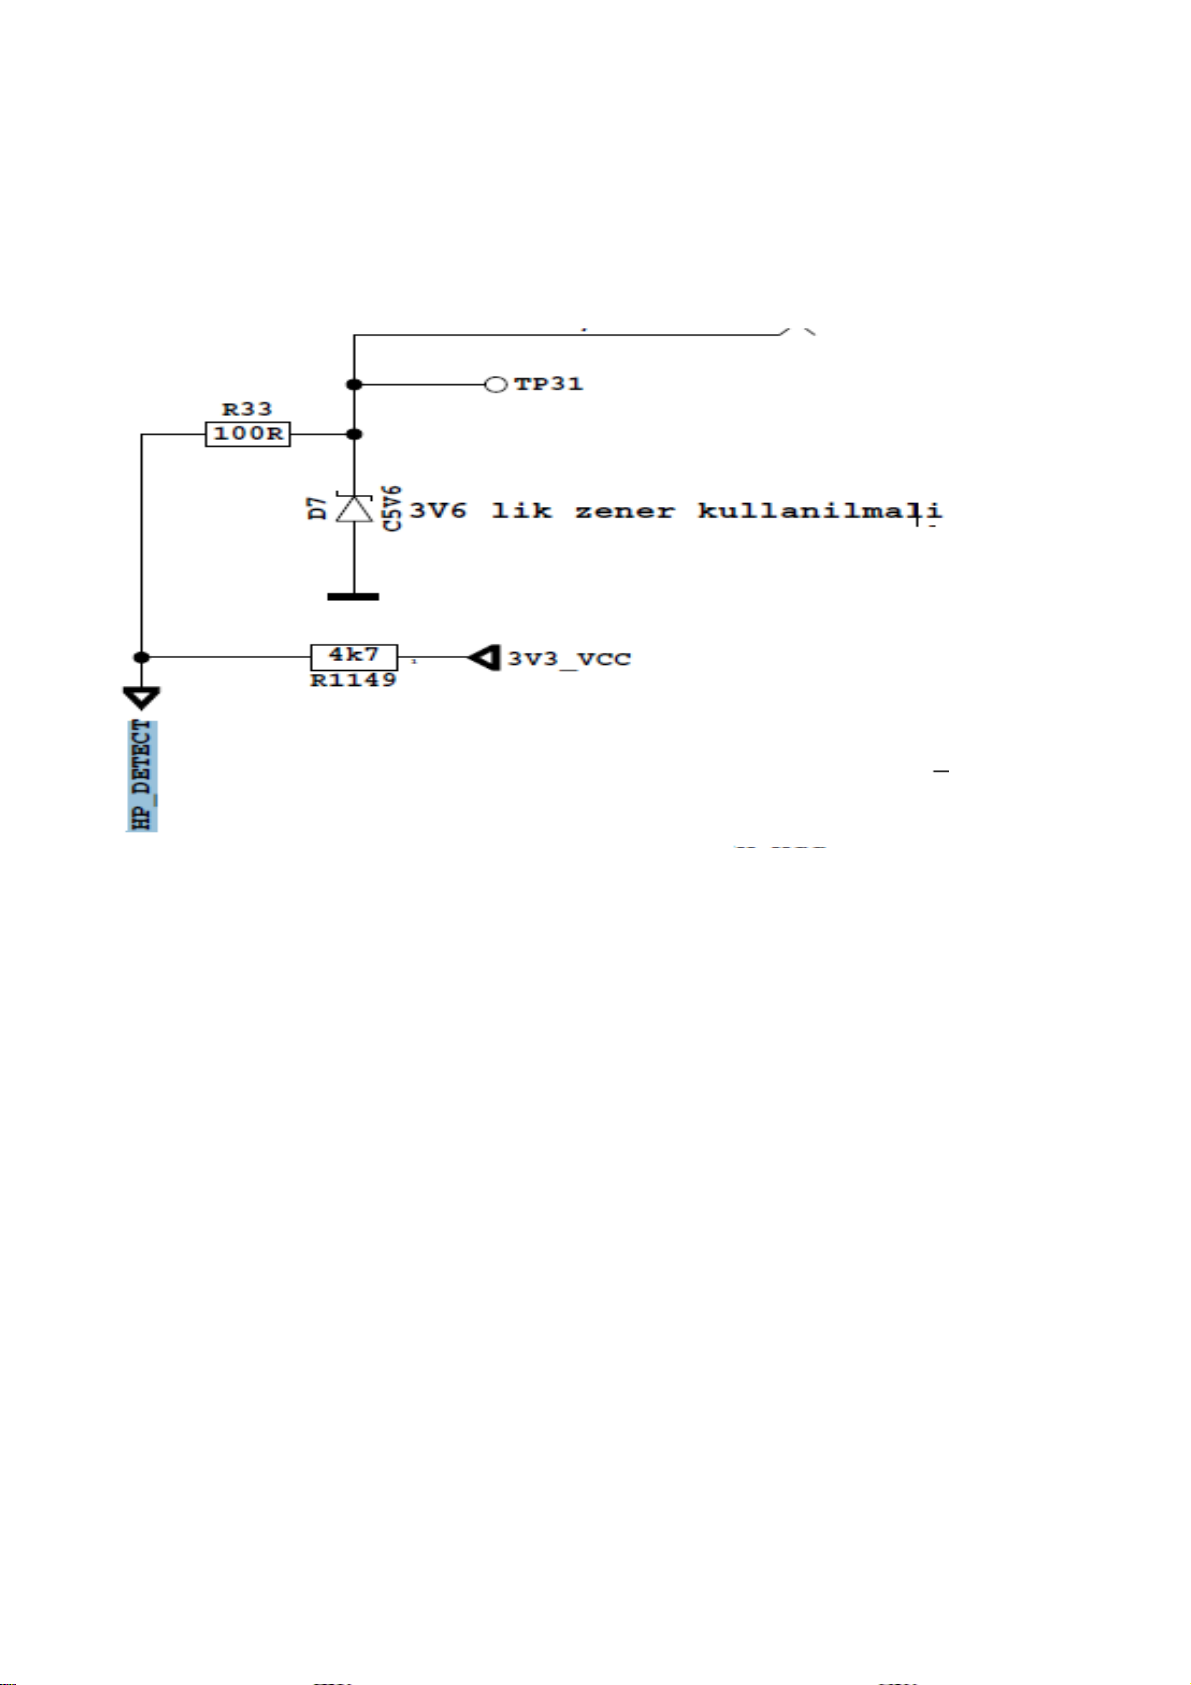
8. No Sound Problem at Headphone
Problem: No audio at headphone output.
Check HP detect pin, when headphone is. Check 5V_VCC and 3V3_VCC with a voltagemeter.
9. Standby On/Off Problem
Problem:
Device cannot boot, TV hangs in standby mode.
There may be a problem about power supply. Check 12V_VCC, 5V_VCC and 3V3_VCC
with a voltage-meter. Also there may be a problem about SW. Try to update TV with latest
SW. Additionally it is goood to check SW printouts via hyper-terminal (or Teraterm). These
printouts may give a clue about the problem.
9/10
Page 38
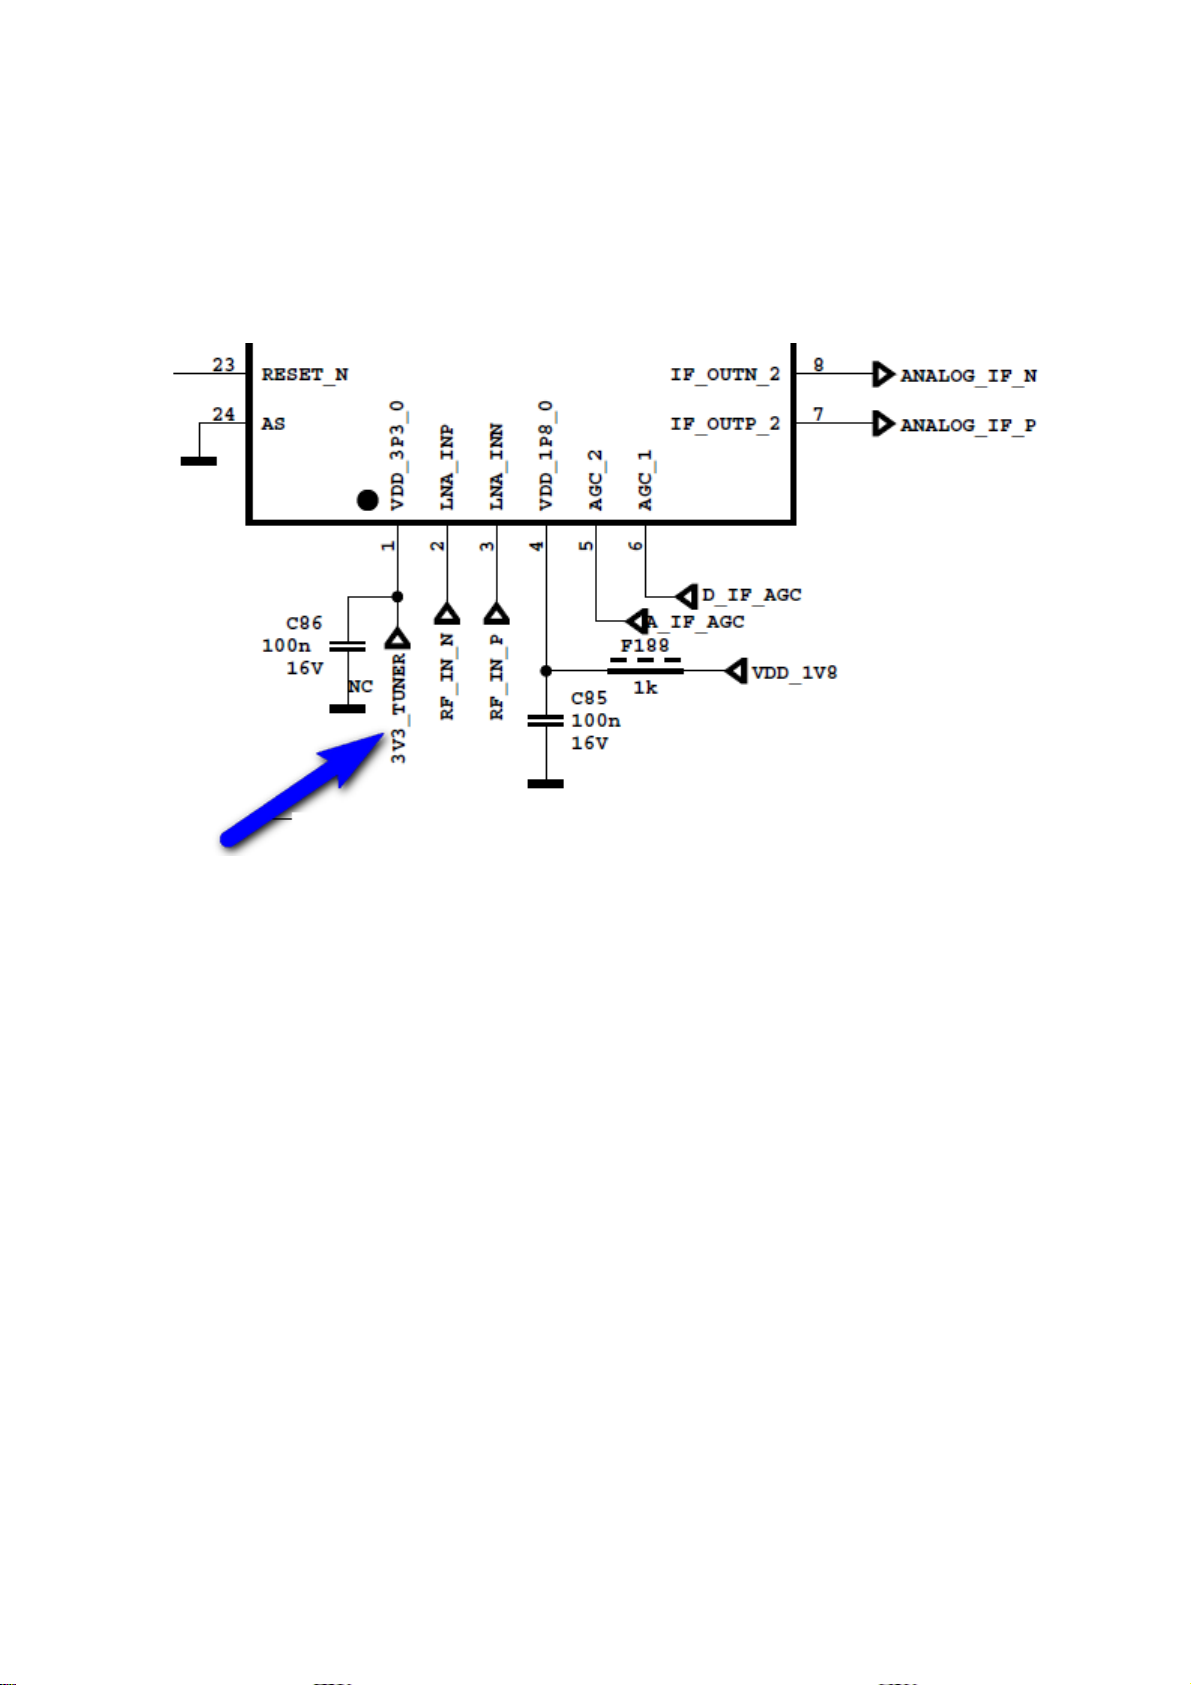
10. No Signal Problem
Problem: No signal in TV mode.
Check tuner supply voltage; 3V3_TUN. Check tuner options are correctly set in Service
menu. Check AGC voltage at IF_AGC pin of tuner.
10/10
Page 39

TOSHIBA LIFESTYLE PRODUCTS & SERVICES CORPORATION
2-9, Suehiro-Cho, Ome-Shi, Tokyo 198-8710, Japan
REV. 00
Feb/18/2015
 Loading...