

Page 1

EUROPEAN UNION ECOLABEL
Awarded to goods or services which meet the environmental
requirements of the EU ecolabelling scheme
SL83* Digital
Series
Page 2

Contents
English
INSTALLING YOUR TV
Safety Precautions ............................................................................. 4
Installation and important information ..................................... 5
The remote control ........................................................................... 6
Inserting batteries and effective range ............................ 6
CONNECTING YOUR TV
Connecting external equipment .................................................. 7
Connecting an HDMI® or DVI device to the HDMI input .....8
To connect an HDMI device ................................................. 8
To connect a DVI device ........................................................ 8
HDMI’s ARC (Audio Return Channel) feature ................. 8
REGZA-LINK connection .................................................................. 9
Connecting a computer ................................................................10
To connect a PC to the RGB/PC terminal .......................10
To connect a PC to the HDMI terminal ...........................10
Connecting a home network ......................................................11
To connect the TV to a home network - Wired ...........11
To connect the TV to a home network with an
internet connection - Wireless ......................................11
Controls and input connections .................................................12
Switching on ............................................................................12
Using the remote control ....................................................12
Using the TV controls and connections .........................12
MENU structure ................................................................................13
SETTING UP YOUR TV
Startup Application .........................................................................14
Quick Setup ..............................................................................14
Ant/Cable In (if available) ....................................................15
Auto Tuning .............................................................................16
ATV Manual Tuning .........................................................................17
Tuning ........................................................................................ 17
Skip ..............................................................................................18
Sorting positions ....................................................................18
DTV Manual Tuning ........................................................................19
Manual Tuning ........................................................................19
Manual Tuning for DVB-C ...................................................19
DTV Settings ......................................................................................19
Channels ...................................................................................19
Standby Channel Update ....................................................20
DVB Character Set ..................................................................20
Dynamic Scan ..........................................................................20
Location setting ......................................................................20
Analogue switch-off ............................................................20
CONTROLS AND FEATURES
General controls ............................................................................... 21
Quick Menu ..............................................................................21
Selecting positions ................................................................ 21
The Time Display – analogue only .................................21
Stereo and Bilingual transmissions .................................21
Sound controls .................................................................................22
Volume controls and sound mute ...................................22
Dual .............................................................................................22
Balance ......................................................................................22
Sound Navi ............................................................................... 22
Surround Settings .................................................................. 22
Dolby Volume® .......................................................................22
Dynamic Range Control ......................................................23
Audio Level Offset .................................................................23
Headphone Settings .............................................................23
Audio Description .................................................................23
Widescreen viewing ....................................................................... 24
Picture controls ................................................................................ 26
Picture Mode ...........................................................................26
Picture preferences ...............................................................26
Reset ...........................................................................................26
ColourMaster ...........................................................................26
Base Colour Adjustment .....................................................27
Colour Temperature .............................................................27
Auto Brightness Sensor Settings ......................................27
Active Backlight Control ...................................................... 27
Black/White Level ..................................................................28
Static Gamma .......................................................................... 28
MPEG NR – Noise Reduction ..............................................28
DNR – Digital Noise Reduction .........................................28
Resolution+ .............................................................................. 28
Active Vision M100 ................................................................28
Motion Detection Range ..................................................... 28
Resetting the advanced picture settings ......................29
Expert Picture Settings ........................................................29
Control Visualization ............................................................ 30
Automatic Format (Widescreen) ......................................30
4:3 Stretch ................................................................................ 30
Blue Screen .............................................................................. 30
Picture Position ...................................................................... 31
Picture still ................................................................................ 31
HDMI Information Display ..................................................31
Using your home network ........................................................... 32
Setting up the Network ................................................................. 33
Wireless Setup ........................................................................ 33
Advanced Network Setup .................................................. 35
DNS Setup ................................................................................36
Network Connection Test ................................................... 37
Using the software keyboard ......................................................37
Network Device Setup ................................................................... 38
External Control Setup ......................................................... 38
Media Renderer Setup .........................................................38
Device Name Setup .............................................................. 39
2
Page 3

Using Toshiba Places ......................................................................39
Using YouTube™ ..............................................................................39
Using the Function Menu ...................................................40
Using Hybrid TV Standard (if available) ...................................42
Using the Media Player ..................................................................42
Basic operation .......................................................................43
Viewing photo files
(on a DLNA CERTIFIED™ Server or USB device) .......44
Viewing movie files
(on a DLNA CERTIFIED™ Server or USB device) .......46
Playing music files
(on a DLNA CERTIFIED™ Server or USB device) .......48
Using the Photo Frame feature ..................................................50
To open Photo Frame ...........................................................50
Setting the features ...............................................................50
Other features ................................................................................... 52
Panel Lock .................................................................................52
The timers ...........................................................................................52
Programme Timers – digital only ................................... 52
On Timer ....................................................................................53
Sleep Timer .............................................................................. 53
Energy Saving Settings ..................................................................54
Automatic Power Down ......................................................54
No Signal Power Down ........................................................54
Digital on-screen information and Programme Guide ......54
Information .............................................................................. 54
Guide .......................................................................................... 55
Genre selection/searching .................................................. 56
Digital settings – parental control ............................................56
Parental PIN Setup .................................................................56
Parental Setup .........................................................................57
Network Lock ..........................................................................57
Digital settings – Channel Options ..........................................57
Selecting favorite channels ................................................57
Favorite Channel Lists ..........................................................57
Skip channels ...........................................................................58
Locking channels ...................................................................58
Digital settings – other settings ................................................58
Subtitles .....................................................................................58
Audio languages ....................................................................58
Common Interface ................................................................59
Software Upgrade and Licences ................................................59
Auto Upgrade ..........................................................................59
Searching for New Software ..............................................59
Network Upgrade ..................................................................60
Software Licences ..................................................................60
System Information and Reset TV ..............................................60
System Information ...............................................................60
Reset TV .....................................................................................60
PC Settings .........................................................................................61
Horizontal and Vertical Position .......................................61
Clock Phase ..............................................................................61
Sampling Clock .......................................................................61
Reset ...........................................................................................61
Input selection and AV connections ........................................ 62
Input selection ........................................................................ 62
External input skip .................................................................62
Labeling video input sources ............................................63
PC Audio ................................................................................... 63
HDMI 3 Audio ..........................................................................63
HDMI Settings .........................................................................64
Digital Audio Output ............................................................64
Using Personal TV Mode ...............................................................65
Using REGZA-LINK ........................................................................... 66
Enable REGZA-LINK ............................................................... 66
TV Auto Power ........................................................................66
Auto Standby ..........................................................................66
Amplifier Control ................................................................... 66
Initial Speaker Setting ..........................................................66
Position Key Pass Through .................................................66
REGZA-LINK input source selection ................................67
REGZA-LINK Device Control ...............................................67
REGZA-LINK one touch play .............................................. 67
REGZA-LINK system standby .............................................67
REGZA-LINK system audio control .................................. 68
Toshiba PC compatible with REGZA-LINK ....................68
TEXT SERVICES
Text services ......................................................................................69
Selecting modes .................................................................... 69
Text information ....................................................................69
Navigating pages using Auto ............................................69
Navigating pages using LIST .............................................69
Control buttons ......................................................................70
PROBLEM SOLVING
Questions and Answers ............................................................... 71
INFORMATION
License Information ........................................................................ 74
Information ........................................................................................ 76
Specifications and accessories ................................................... 79
English
3
Page 4

INSTALLING YOUR TV
Safety Precautions
English
This equipment has been designed and
manufactured to meet international safety standards
but, like any electrical equipment, care must be taken
to obtain the best results and for safety to be assured.
Please read the points below for your own safety.
They are of a general nature, intended to help with all
electronic consumer products, and some points may
not apply to the goods you have just purchased.
Air Circulation
Leave more than 10cm clearance around the
television to allow adequate ventilation. This will
prevent overheating and possible damage to the
television. Dusty places should also be avoided.
Heat Damage
Damage may occur if the television is left in direct
sunlight or near a heater. Avoid places subject to
extremely high temperatures or humidity. Place in a
location where the temperature remains between 5°C
(41°F) min. and 35°C (94°F) max.
Mains Supply
The mains supply required for this equipment is 220240v AC 50/60Hz. Never connect to a DC supply or any
other power source. DO ensure that the television is
not standing on the mains lead. Use only the supplied
lead.
DO NOT cut off the mains plug from this equipment,
this incorporates a special Radio Interference Filter,
the removal of which will impair its performance.
IF IN DOUBT, PLEASE CONSULT A COMPETENT
ELECTRICIAN.
Do
DO read the operating instructions before you
attempt to use the equipment.
DO ensure that all electrical connections (including
the mains plug, extension leads and interconnections between pieces of equipment) are
properly made and in accordance with the
manufacturers’ instructions. Switch off and withdraw
the mains plug before making or changing
connections.
DO consult your dealer if you are ever in doubt about
the installation, operation or safety of your
equipment.
WARNING: To prevent injury, this apparatus must be
securely attached to the floor/wall in accordance with
the installation instructions. See page 5.
DO be careful with glass panels or doors on
equipment.
DO NOT REMOVE ANY FIXED COVERS AS THIS WILL
EXPOSE DANGEROUS AND ‘LIVE’ PARTS.
THE MAINS PLUG IS USED AS A DISCONNECTING DEVICE
AND THEREFORE SHOULD BE READILY OPERABLE.
Do not
DO NOT obstruct the ventilation openings of the
equipment with items such as newspapers,
tablecloths, curtains, etc. Overheating will cause
damage and shorten the life of the equipment.
DO NOT allow electrical equipment to be exposed to
dripping or splashing or objects filled with liquids,
such as vases, to be placed on the equipment.
DO NOT place hot objects or naked flame sources,
such as lighted candles or nightlights on, or close to
equipment. High temperatures can melt plastic and
lead to fires.
WARNING: To prevent the spread of
fire, keep candles or other open
flames away from this product at all
times.
DO NOT use makeshift stands and NEVER fix legs with
wood screws. To ensure complete safety, always fit
the manufacturer’s approved stand, bracket or legs
with the fixings provided according to the
instructions.
DO NOT leave equipment switched on when it is
unattended, unless it is specifically stated that it is
designed for unattended operation or has a standby
mode. Switch off by withdrawing the plug, and make
sure your family knows how to do this. Special
arrangements may need to be made for people with
disabilities.
DO NOT continue to operate the equipment if you
are in any doubt about it working normally, or it is
damaged in any way – switch off, withdraw the mains
plug and consult your dealer.
WARNING – excessive sound pressure from
earphones or headphones can cause hearing loss.
ABOVE ALL – NEVER let anyone, especially
children, push or hit the screen, or push anything
into holes, slots or any other openings in the case.
NEVER guess or take chances with electrical
equipment of any kind – it is better to be safe than
sorry.
4
Page 5

Installation and important information
Remove four screws.
(Do not reuse these screws for
attaching a wall bracket.)
Stand style is dependent on model
Where to install
Locate the television away from direct sunlight and
strong lights. Soft, indirect lighting is recommended
for comfortable viewing. Use curtains or blinds to
prevent direct sunlight falling on the screen.
Place the TV on a stable, level surface that can
support the weight of the TV. In order to prevent
injury and maintain stability of this apparatus,
secure the TV to the level surface using the strap if
fitted, or to a wall using a sturdy tie to the P clips
provided. Otherwise secure the TV on the level
surface using the supplied mounting screw.
The LCD display panels are manufactured using an
extremely high level of precision technology;
however, sometimes some parts of the screen may be
missing picture elements or have luminous spots.
This is not a sign of a malfunction.
Make sure the television is located in a position where
it cannot be p ushed or hit b y objects, as pressure wil l
break or damage the screen. Also, please be certain
that small items cannot be inserted into slots or
openings in the case.
When using a Wall Bracket
Always use the screws recommended by the wall
mount manufacturer.
‘P’ Clip
INSTALLING YOUR TV
English
Fixing strap
Fixing strap
Sturdy tie (as short as possible)
Stand clip
Screw
(supplied)
Please take note
The digital reception function of this television is only effective in the countries listed in the “Country” section of
the “Setup/System Setup” menu. Depending on country/area, some of this television’s functions may not be
available. Reception of future additional or modified services can not be guaranteed with this television.
If stationary images generated by 4:3 broadcasts, text services, channel identification logos, computer displays,
video games, on-screen menus, etc. are left on the television screen for any length of time, they could become
conspicuous. It is always advisable to reduce both the brightness and contrast settings.
Very long, continuous use of the 4:3 pictu re on a 16:9 screen may result in some retention of the image at the 4:3
outlines. This is not a defect of the LCD TV and is not covered under the manufacturer’s warranty. Regular use of
other size modes (eg: Super Live) will prevent permanent retention.
EXCLUSION CLAUSE
Toshiba shall under no circumstances be liable for loss and/or damage to the product caused by:
i) Fire;
ii) Earthquake;
iii) Accidental damage;
iv) Intentional misuse of the product;
v) Use of the product in improper conditions;
vi) Loss and/or damage caused to the product whilst in the possession of a third party;
vii) Any damage or loss caused as a result of the owner’s failure and/or neglect to follow the instructions set out in the owner’s manual;
viii) Any loss or damage caused directly as a result of misuse or malfunction of the product when used simultaneously with
associated equipment;
Furthermore, under no circumstances shall Toshiba be liable for any consequential loss and/or damage including but not
limited to the following: loss of profit, interruption of business, the loss of recorded data whether caused during normal
operation or misuse of the product.
5
Page 6

INSTALLING YOUR TV
1
2
5
4
8
9
20
17
16
22
11
24
27
26
25
23
21
18
14
19
15
13
12
10
3
6
7
The remote control
English
Simple at-a-glance reference of your remote control.
16 To access “TOSHIBA PLACES” Top Page
When network is not connected, an error message will be
displayed.
17 To access Media Player Menu
18 To call up text services
19 To access the analogue or digital Channel List
20 On-screen Menus
21 To display the digital on-screen Programme Guide
22 To page up, down, left or right
23 When using menus, the arrows move the cursor on the screen
up, down, left or right. Press OK to confirm your selection
24 To return to previous Menu
25 To exit menus
26 When in TV mode:
r Picture still
D Analogue time
display
When using Programme
Guide:
Z –24 hours
z +24 hours
CC –1 page
cc +1 page
27 Colour buttons: Text and interactive service control buttons
When in Text mode:
A To reveal concealed
text
B To hold a wanted
page
C To enlarge text
display size
D To select a page
while viewing a
normal picture
During Playback:
c
To PLAY
v To STOP
W/w To PAUSE/STEP
Z To SKIP-BACK
CC To REWIND
cc To FAST FORWARD
z To SKIP-FORWARD
1 For On/Standby mode
2 To select external input sources
3 To select TV Mode
4 Selectable Picture preferences
5 Widescreen viewing
s Stereo/bilingual transmissions
6
7 Digital Subtitles or Analogue TEXT Subtitle pages if available
8 Number buttons
9 Switch the Audio Description On/Off
10 To return to previous programme position
11 To alter the TV volume
12 To display on-screen information
To access the index page in Text mode
13 To mute the TV sound
14 To access Quick Menu
15 To change programme positions
To change TEXT pages
Inserting batteries and effective range
Remove the back cover to
reveal the battery
compartment and make sure
the batteries are inserted the
proper way. Suitable battery
types for this remote are AA,
IEC R6 1.5V.
Do not combine a used, old
battery types. Remove dead batteries immediately to preven t
acid from leaking into the battery compartment. Dispose of
them in accordance with instructions on page 75 of this
manual.
Warning: Batteries must not be exposed to excessive heat
such as sunshine, fire or the like.
The performance of the remote control will deteriorate
beyond a distance of five metres or outside an angle of 30
degrees from the centre of the television. If the operating
range becomes reduced, the batteries may need replacing.
battery with a new one or mix
6
Page 7

CONNECTING YOUR TV
LAN port
SCART (EXT 1)
DIGITAL AUDIO OUT PUT
(OPTICAL)
PC/HDMI 3 AUDIO INPUT
(shared)
HDMI 4 INPUT
HEADPHONE jack
VIDEO/AUDIO INPUT
(EXT 3)
HDMI 1/2/3 INPUTS
COMPONENT VIDEO INPUT
(EXT 2)
RGB/PC INPUT
Media Recorder
Aerial Cable
Power cord
ILLUSTRATION SHOWS 42SL833.
Connecting external equipment
Before connecting any external equipment, turn off all main power switches. If there is no switch,
remove the mains plug from the wall socket.
English
Aerial cables: . . . . . . . . . . . . . . . . . . . . . . . . . . . . . . . . . .
Connect the aerial to the socket on the rear of the television.
If you use a decoder and/or a media recorder, it is essential
that the aerial cable is connected through the decoder and/ or
through the media recorder to the television.
SCART leads: . . . . . . . . . . . . . . . . . . . . . . . . . . . . . . . . . .
Connect the media recorder IN/OUT socket to the television.
Connect the decoder TV socket to the television.
Before running Auto Tuning, put your decoder and media
recorder to Standby.
The phono sockets alongside the COMPONENT VIDEO
INPUT sockets will accept L and R audio signals.
The Digital Audio Output socket enables the connection of a
suitable surround sound system.
NOTE: This output is always active.
HDMI® (High-Definition Multimedia Interface) is for use with a
DVD decoder or electrical equipment with digital audio and
video output. For acceptable video or PC signal formats
through the HDMI terminals, see page 77.
NOTE: Although this television is able to connect to HDMI
equipment, it is possible that some equipment may not
operate correctly.
LAN port is used to connect the TV to your home network.
This TV can play digital content stored on a DLNA CERTIFIED™
product with server function.
A wide variety of external equipment can be connected to
the back of the television; therefore, the relevant owner’s
manuals for all additional equipment must be referred to
for exact instructions.
If the television automatically switches over to monitor
external equipment, return to normal television by pressing
the desired programme position button. To recall external
equipment, press
EXT 3, HDMI 1, HDMI 2, HDMI 3, HDMI 4, PC or ATV.
When the external input mode is s elected while viewing DTV
mode, the SCART socket does not output video/audio signals.
o to select between DTV, EXT 1, EXT 2,
7
Page 8

CONNECTING YOUR TV
HDMI cable
HDMI device
the back of your television
Audio cable for HDMI to television
connection (not supplied)
HDMI-to- DVI adaptor Cable
DVI device
the back of your television
AV amplier that supports ARC
HDMI cable
the back of your television
Connecting an HDMI® or DVI
English
device to the HDMI input
The HDMI input on your television receives digital
audio and uncompressed digital video from an
HDMI source device or uncompressed digital
video from a DVI (Digital Visual Interface) source
device.
This input is designed to accept HDCP (High-Bandwidth
Digital-Content Protection) programme material in digital
form from EIA/CEA-861-D–compliant
devices (such as a set-top box or DVD player with HDMI or DVI
output). For acceptable video signal formats, see page 77.
NOTE:
• Some early HDMI equipment may not work properly with
your latest HDMI TV, due to the adoption of a new standard.
Please unplug your HDMI cable first and then try setting the
INSTAPORT™ and Enable Content Type options to “Off”.
Your early HDMI source should operate properly with your
television. See page 64.
• Supported Audio format: Linear PCM, Dolby Digital (AC-3),
sampling rate 32/44.1/48kHz.
[1]
consumer electronic
To connect an HDMI device
Connect an HDMI cable (type A connector) to the HDMI
terminal.
For proper operation, it is recommended that you use an
HDMI cable with the HDMI Logo ( ).
• If your HDMI connection is capable of 1080p and/or your
television is capable of refresh rates greater than 50Hz, you
will need a Category 2 cable. Conventional HDMI/DVI cable
may not work properly with this model.
• HDMI cable transfers both video and audio. Separate
analogue audio cables are not required (see illustration).
• See “HDMI 3 Audio” on page 63.
To connect a DVI device
Connect an HDMI-to-DVI adaptor cable (HDMI type A
connector) to the HDMI 3 terminal and audio cables to the PC/
HDMI 3 (AUDIO) socket (see illustration).
• The recommended HDMI-to-DVI adaptor cable length is
6.6 ft (2m).
• An HDMI-to-DVI adaptor cable transfers video only.
Separate analogue audio cables are required.
• See “HDMI 3 Audio” on page 63.
NOTE:
To ensure that the HDMI or DVI device is reset properly, it is
recommended that you follow these procedures:
• When turning on your electronic components, turn on the
television first, and then the HDMI or DVI device.
• When turning off your electronic components, turn off the
HDMI or DVI device first, and then the television.
HDMI’s ARC (Audio Return Channel)
feature
This feature enables the audio signal of the TV to be sent to
the AV amplifier via the HDMI cable. It will not be necessary to
connect a cable from the audio output of the TV to the audio
input of the AV amplifier to reproduce the audio received
from the tuner of the TV through the AV amplifier.
To view the HDMI device video, press the
HDMI 1, HDMI 2, HDMI 3 or HDMI 4 mode.
o button to select
8
Page 9

CONNECTING YOUR TV
AV amplier Playback device
Playback device
the back of your television
REGZA-LINK connection
You can control the basic functions of connected audio/video devices using the television’s remote
control if you connect a REGZA-LINK compatible AV amplifier or playback device. For an explanation of
setup and operations, see pages 66–68.
English
For the setup shown above, you will need three HDMI cables.
NOTE:
• If several devices are connected, the REGZA-LINK feature
may not operate properly.
• For proper operation, it is recommended that you u se HDMI
cables with the HDMI Logo ( ).
• This function is available when one PC and one AV amplifier
are connected separately. However, it may not operate
properly if the PC is connected via the AV amplifier.
Before controlling the device(s):
• After completing the above connections, set the REGZALINK Setup menu as you desire (see page 66).
• The connected devices must also be set. For details, see the
operation manual for each device.
• The REGZA-LINK feature uses CEC technology as regulated
by the HDMI standard.
• This feature is limited to models incorporating Toshiba’s
REGZA-LINK. However, Toshiba is not liable for those
operations. Refer to individual instruction manuals for
compatibility information.
9
Page 10

CONNECTING YOUR TV
the back of your television
Audio cable for PC to television
connection (not supplied)
Conversion adaptor
if required
(not supplied)
Computer
RGB PC cable (not
supplied)
Mini D-sub
15 pin connector
Audio cable for PC to television
connection (not supplied)
HDMI-to-DVI
adaptor cable
the back of your television
Computer
Connecting a computer
English
With either an RGB/PC or an HDMI connection, you
can watch your computer’s display on the
television and hear the sound from the television’s
speakers.
To connect a PC to the RGB/PC terminal
When connecting a PC to the RGB/PC terminal on the
television, use an analogue RGB (15-pin) computer cable and
a PC audio cable for the PC/HDMI 3 (AUDIO) socket. Select PC
from the PC/HDMI 3 Audio options in the AV Connection
menu located in the Preferences menu.
To connect a PC to the HDMI terminal
When connecting a PC to the HDMI terminal on th e television,
use an HDMI-to-DVI adaptor cable and an analogue audio
cable.
If connecting a PC with an HDMI terminal, use an HDMI cable
(type A connector). A separate analogue cable is not
necessary.
For acceptable PC and video signal formats, see page 77.
NOTE:
• The edges of the images may be hidden.
• If connecting a certain PC model with a unique PC signal,
the PC signal may not be detected correctly.
To use a PC, set the monitor output resolution on the PC
before connecting it to the television. For acceptable PC
signal formats, see page 76.
To display the optimum picture, use the PC setting feature
(see page 61).
NOTE:
• The PC audio input terminal on the television is shared with
the HDMI 3 analogue audio input terminal (see page 63).
• Some PC models cannot be connected to this television.
• An adaptor is not needed for computers with a compatible
mini D-sub15-pin terminal.
• Depending on the DVD’s title and the specifications of the
PC on which you are playing the DVD-Video, some scenes
may be skipped or you may not be able to pause during
multi-angle scenes.
• A ba nd m ay app ea r at the ed ges of t he scr een or par ts o f t he
picture may be obscured. This is due to scaling of the
picture by the set, it is not a malfunction.
• When PC input mode is selected, some of the television’s
features will be unavailable e.g. Colour System in the
Setup/System Setup menu.
• Some PC models may output unique signals that the
television may be unable to detect (see page 76).
10
Page 11
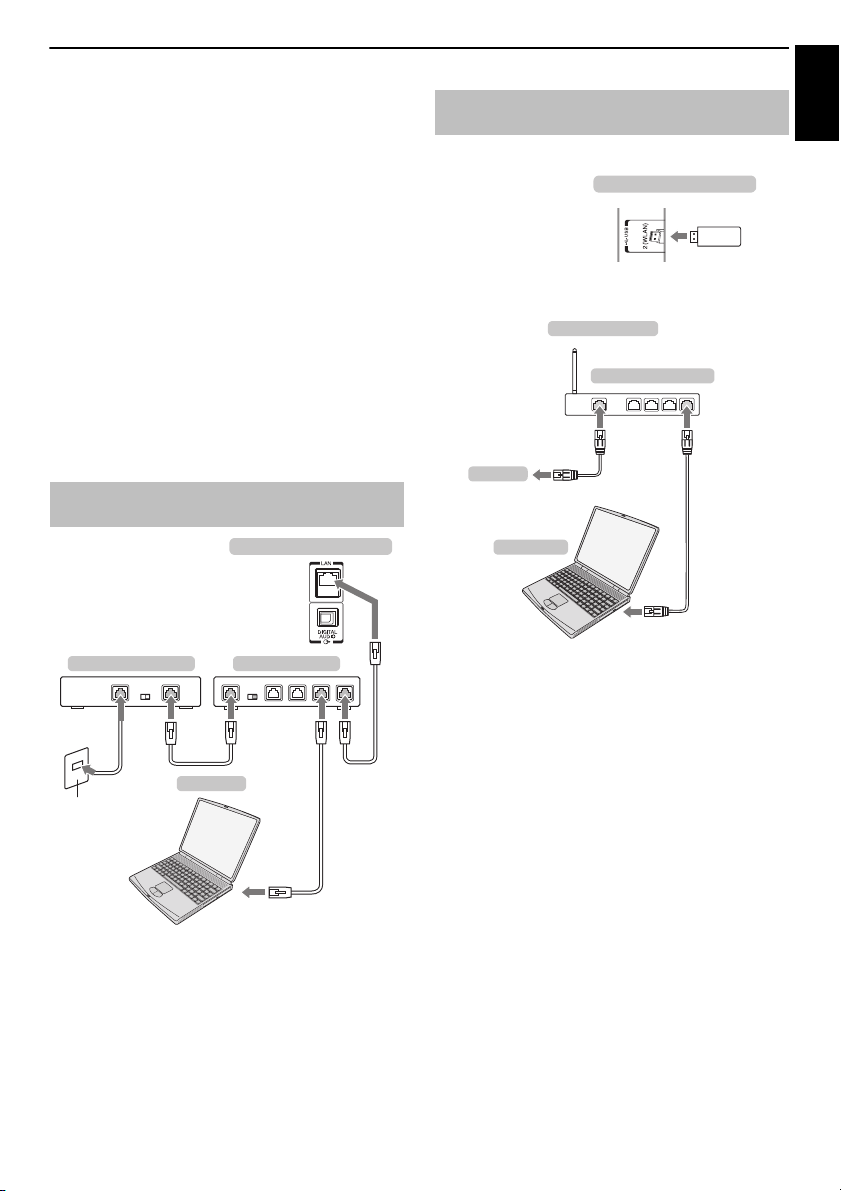
CONNECTING YOUR TV
Modem (if available)
Server PC
Router with Hub
the back of your television
Cable or Phone jack
[1] [2]
[2]
[3][2]
Access point (AP)
Wireless LAN router
Modem
TOSHIBA
Dual Band
WLAN
adaptor
the back of your television
Computer
English
Connecting a home network
The LAN port allows your Toshiba TV to connect to
your home network. You can use this revolutionary
home entertainment networking system to access
photo, video and audio files that are stored on a
DL NA C ER TIF IED ™ s erv er a nd pla y/d is pla y th em on
your TV.
NOTE:
• If you connect to a shared network outside your home, it is
advisable to use a router. Always use DLNA CERTIFIED™
products in private network environments.
• If you use a hub or switch to connect the TV to your home
network, you may not be able to use the automatic setup
and will have to manually set up the network address. See
page 36.
• If you use a router with built-in DHCP functionality, use the
automatic setup. Manual setup may not work.
• If you connect the TV and PC directly, use a crossover LAN
cable.
To connect the TV to a home network -
Wired
To connect the TV to a home network
with an internet connection - Wireless
Please refer to “Wireless Setup” section on page 33.
[1] Coaxial or telephone cable (depending on your modem typ e)
[2] Standard LAN cable
[3] Do NOT connect a phone jack directly to the TV’s LAN port.
11
Page 12

CONNECTING YOUR TV
ILLUSTRATION SHOWS 42SL833.
COMMON INTERFACE
The Common Interface is for a Conditional Access
Module (CAM).
Contact a service provider.
The software updating of CI Plus CAM may be
automatically executed. At this time, your
Recording/Reminder programming will be canceled.
Ambient
Light Sensor
RED LED – Standby
GREEN LED – Power on
ORANGE LED – Programme
timer set (digital only)
RED LED – Programme timer
Active (digital only)
USB 1 port
Media Player
USB 2 port
Media Player/Wireless LAN adaptor ready for a
home network
Control panel (touch sensor)
Controls and input connections
English
A wide variety of external equipment can be connected to the input sockets on the side of the television.
While all the necessary adjustments and controls for the television are made using the remote control, the
buttons on the television may be used for some functions.
Switching on
If the RED LED is not lit, check that the mains plug is
connected to the power supply and press
control; it may take a few moments. The GREEN LED will be lit.
To put the television into Standby, press
control. To view the television, press
take a few seconds to appear.
For energy saving:
We recommend that you use the television with the factory
settings. The factory settings are for energy saving.
Unplugging the mains plug will cut energy use to zero for
all televisions. This is recommended when the television is
not being used for a long time, e.g. when on holiday.
Reducing the brightness of the screen will reduce energy use.
Energy efficiency cuts energy consumption and thus saves
money by reducing electricity bills.
NOTE: Putting the television into standby mode will reduce
energy consumption, but will still draw some power.
Press MENU on the remote control to display the menu.
The menu appears as a list of five topics. As each symbol is
selected by pressing
respective options will appear below.
NOTE: The same menu is displayed in DTV (Digital TV) and
ATV (Analogue TV) modes; however, where some items are
not available in a mode, they will appear greyed out.
Using the remote control
C or c on the remote control, its
1 on the remote
1 again. The picture may
1 on the remote
To use the option, press
move up and down and press
setting. Follow the on-screen instructions. The functions of
each menu are described in detail throughout the manual.
B and b on the remote control to
C or c to select your desired
Using the TV controls and connections
To alter the volume gently touch –
To alter the programme position touch
Touch MENU and
picture options.
Touch MENU to finish.
The Media Player feature provides access to photo, movie and
music files stored on a USB storage device that is connected
via the USB 1 or USB 2 port or on a network device.
NOTE: The USB socket has limited functionality and Toshiba
can take no responsibility for damage to other connected
equipment.
The USB 2 socket has to be used with the “TOSHIBA Dual Band
WLAN Adaptor WLM-10U2” in order to access a wireless network.
You must use the TOSHIBA Wireless LAN device to ensure
correct operation of this feature. This feature is available only
when the “TOSHIBA Dual Band WLAN Adaptor“ is used.
To select an external input, touch
input source is selected.
Please always refer to the owner’s manual of the equipment to be
connected for full details.
NOTE: Interactive video games that involve shooting a “gun”
at an on-screen target may not work with this TV.
12
b p B, – 2 + to control the sound and
2 +.
b p B.
o until the appropriate
Page 13

CONNECTING YOUR TV
TV Programmes
Media Player
Connected TV
Setup
Function
Genre Search
Guide
Programme
Timers
MENU structure
To ope n th e mai n me nu ( ill ust rati on b elo w) , pre ss MENU on the remote control or on the TV control panel.
1st Layer 2nd Layer 3rd Layer
Press MENU. Press
TV Programmes
C c / B. Press C c.Press OK. Press BbC c.
English
Media Player
Connected TV
Function
Setup
Guide
Genre Search
Programme Timers
Photo
Movie
Music
Media Player Setup
Toshiba Places
YouTube
Photo Frame
On Timer
Sleep Timer
Picture
Sound
Preferences
System Setup
Jump to Programme Guide (EPG)
Jump to Genre Search
Jump to Programme Timers
Device Select or Photo Viewer
Device Select or Movie Viewer
Device Select or Music Viewer
Media Player Setup Menu
Jump to Toshiba Places
Jump to YouTube
Jump to Photo Frame
On Timer Menu
Sleep Timer Menu
Picture Menu
Sound Menu
Preferences Menu
System Setup Menu
13
Page 14

SETTING UP YOUR TV
Quick Setup
Country
Germany
Primary Subtitle Language
German
English
English
English
Secondary Subtitle Language
Primary Audio Language
Secondary Audio Language
Location
Home
To use the TV for displaying in a store showroom, please
select [Store]. [Home] mode is recommended for normal
use.
TV Mounting
Stand
If you are mounting the TV on a wall, please select [Wall].
[Stand] is recommended for other uses.
This setting may be modified later under Sound Navi in the
SOUND menu.
AutoView
No
AutoView mode automatically adjusts picture settings
to suit ambient light conditions.
Do you wish to enable AutoView mode?
Auto Tuning
Progress Found
ATV Tune Waiting...
Channel: C7
DTV Tune 3% 2
Startup Application
English
Before switching on the television, put your
decoder and media recorder, if applicable, to
Standby. To set up the television, use the buttons
on the remote control as detailed on page 6.
Quick Setup
a Press the 1 button. The Menu Language screen will
appear. This screen will appear the first time that the
television is switched on and each time Reset TV is
selected.
b Press BbC c to select the menu language, and then
press OK.
c Highlight Country and press C or c to select. The
television is now set to tune the stations for your
country.
NOTE:
• The following display menus will differ slightly
according to the country you selected.
• If there is not a country that you want to select in the
list, select Others.
d Press OK, and the Location screen will appear.
g Press OK, and the AutoView screen will appear, press
C or c to select Yes or No.
h Press OK. If the Antenna/Cable In screen appears,
press
B or b to select Antenna or Cable, and then
press OK to check ( ).
Antenna/Cable In
Antenna
Cable
Next
i Select Next and press OK. The Auto Tuning start up
screen will appear with the option to select between
DTV and ATV, DTV or ATV if available. Use
select the appropriate mode.
C or c to
j Press b or B to highlight Start Scan, and then press
OK.
The television will start to search for available DTV
and/or ATV channels. The progress bar will indicate
the scan status.
You must allow the television to complete the
search.
e Press C or c to select Home or Store. For normal
home use, select Home.
f Press OK, and the TV Mounting screen will appear,
press
C or c to select Stand or Wall.
When the search is complete, the television will
automatically select position one.
The Auto Tuning screen will display the total number
of services found.
NOTE: If there are multiple channels with the same
channel number, a confirmation window will appear.
C or c to select the one you prefer.
Press
k Press C or c to view the DTV (digital channel) or ATV
(analogue channel) lists.
14
Page 15

l Use b or B to move through the list to select a
PLEASE NOTE
Auto Tuning
DTV and ATVTuning Mode
DTV
Quick ScanScan Type
AutoStart Frequency
AutoEnd Frequency
AutoModulation
AutoSymbol Rate
AutoNetwork ID
Start Scan
channel, and then press OK to view.
In ATV mode, some areas may receive duplicate
stations. There may not be a clear picture or the signal
may be weak, so the station order can be changed
using ATV Manual Tuning.
REMEMBER: Press TV at any time to select between
ATV and DTV (DTV TV/DTV Radio/DTV Text if
available) modes.
NOTE: The time will be set automatically by
transmission but can be advanced or decreased by
using Local Time Setting in the DTV Settings screen.
The Quick Setup menu can als o be ac cessed at any
time from the Setup/System Setup menu.
Ant/Cable In (if available)
From this menu, you can set the R F input configuration to cable.
a Press MENU / C c to highlight Setup icon.
b Press B / C c to highlight System Setup icon.
c Press OK to display System Setup menu.
d Use b to highlight Ant/Cable In and use C or c to
select Antenna or Cable.
NOTE: When you attempt to change the Ant/
Cable In setting, a warning message will appear
followed by PIN entry (if PIN has been set) and a
prompt for Auto Tuning.
SETTING UP YOUR TV
With the exception of DTV Scan Type and DTV Modulation
items, all of the following items will have 2 operating modes.
The first is Auto where the values for each item are preset by
the system. The second is an Input mode where you will be
able to enter a single value in place of the pre-set value. If no
channel is currently tuned and the Input state is chosen, a
system default value will be shown. However, if a channel is
currently tuned when the item is accessed, the value of the
current channel will be displayed.
DTV Scan Type:
This item determines whether a Quick Scan or a Full Scan will
be executed.
The Quick Scan is a simplified version of the Full Scan that is
designed to complete in less time.
DTV Start Frequency:
This sets the frequency from which the scan will begin.
DTV End Frequency:
This sets the frequency at which the scan will end.
DTV Modulation:
You can choose from five QAM modulation settings.
DTV Symbol Rate:
This is the baud rate (KS/s) of the scan.
DTV Network ID:
This is the Network ID to be utilized for the scan. This item is
greyed out when DTV Scan Type is set to “Full Scan”.
English
e When Ant/Cable In is set to Cable, the following
setting options will be provided in the Auto Tuning
screen.
B or b to sel ect an ite m, and the n press C or c
Press
to select your desired option.
15
Page 16

SETTING UP YOUR TV
System Setup
Setup
Connected TV
Media Player
TV Programmes
Function
Picture
Sound
Preferences
System Setup
Menu Language
English
Country
Ant/Cable
ATV Manual Tuning
DTV Manual Tuning
Quick Setup
DTV Settings
Auto Tuning
Germany
Antenna
English
Auto Tuning
NOTE: As new services are broadcast, it will be necessary to
re-tune the television in order to view them.
Auto Tuning will completely re-tune the television and can be
used to update the channel list. It is recommended that Auto
Tuning is run periodically to ensure that all new services are
added. All current channels and settings, i.e. locked channels,
will be lost.
a Press MENU / C c to highlight Setup icon.
b Press B / C c to highlight System Setup icon.
c Press OK to display System Setup menu.
d Press b to highlight Auto Tuning, then press OK.
e A screen will appear warning that previous
programmes and settings will be deleted.
Auto Tuning
Previous settings will be lost!
Press EXIT for no change.
DTV and ATVTuning Mode
Start Scan
Use
C or c to select DTV and ATV, DTV or ATV, if
available, then highlight Start Scan and press OK to
continue with the Auto Tuning.
NOTE: If you have selected “Others” for the Country
field in the Setup menu, and selected a tuning mode
other than “DTV” , choose the optimum ATV
broadcasting system (B/G, I, D/K or L).
The television will start to search for all available DTV
and/or ATV services.
You must allow the television to complete the
search.
When the search is complete, the Auto Tuning screen
will display the services found.
f Use b or B to move through the list to select a
channel, and then press OK to view.
16
Page 17

SETTING UP YOUR TV
ATV Manual Tuning
System
1 A C 2 0 V C R
I
123 4 65 7 8 9
Pos. Channel Station
ATV Manual Tuning
1
2
3
4
6
7
8
C2
C7
S10
S40
C22
5
C25
C28
C30
ATV Manual Tuning
System
1 A C 2 0
I
ATV Manual Tuning
Search
1 C 2 0 IA
English
ATV Manual Tuning
Tuning
The television can be tuned-in manually using ATV Manual
Tuning. For example, you might use the feature if the television
cannot be connected to a media recorder/decoder with a SCART
lead or when you want to tune-in a station on another System.
Use
C and c to move across the screen and select any of the
ATV Manual Tuning options. Then use
settings.
1 Position
The number to be pressed on the remote control to tune
the channel.
2 System
Specific to certain areas.
3 Colour System
Factory set to Auto, should only be changed if problems
are experienced, i.e. NTSC input from external source.
4 Skip
Set Skip to On (
8) or Off (() for the selected channel.
See page 18.
5 Signal Class
The channel classification.
6 Channel
The channel number on which a station is being
broadcast.
7 Search
Search up and down for a signal.
8 Manual Fine Tuning
Only used if interference/weak signal is experienced. See
page 71.
9 Station
Station identification. Use the
to enter up to seven characters.
To allocate a position on the television for a decoder and
media recorder: turn the decoder on, insert a pre-recorded
film in the media recorder, press PLAY, and then manually
tune.
B or b to adjust the
B or b and C or c buttons
a In the System Setup menu, press b to highlight ATV
Manual Tuning and press OK.
System Setup
Menu Language
Country
Ant/Cable
Auto Tuning
ATV Manual Tuning
DTV Manual Tuning
DTV Settings
Quick Setup
English
Germany
Antenna
b Use B or b to highlight the desired position. We
suggest Pos. 0 for a media recorder.
Different Channel numbers may be displayed.
c Press OK to select. If the channel chosen for the media
recorder is set to skip, Skip should be removed before
storing.
d Press c to select System and use B or b to ch ange i f
required.
e Then press c to select Search.
f Press B or b to begin the search. The search symbol
will flash.
17
Page 18

SETTING UP YOUR TV
PLEASE NOTE
ATV Manual Tuning
Station
1 A C 2 0 V C R I
Pos. Channel Station
ATV Manual Tuning
1
2
3
4
6
7
8
C2
C7
S10
S40 ABC1
ABC1C22
5
C25
C28
C30
ATV Manual Tuning
Skip: On
1 A C 2 0 I
g Each signal will show on the television. If it is not your
English
media recorder, press
search.
B or b again to restart the
h When your media rec order si gnal is fo und, pre ss c to
move along to Station. Use
the required characters, e.g. VCR.
B, b, C and c to put in
i Press OK to save.
j Repeat for each position you want to tune, or press
BACK to return to the list of channels and select the
next number to tune.
k Press EXIT when you have finished.
This television has direct channel entry if the
channel numbers are known.
Select the ATV Manual Tuning screen in Step 3.
Enter the Position number, the System, then C for
standard (terrestrial) channels or S for cable
channels and the Channel number. Press OK to
save.
Skip
To prevent certain channels from being viewed, positions can be
skipped.
a Select ATV Manual Tuning from the System Setup
menu.
b Use B or b to highlight the position to be skipped
and press OK to select.
d Use B or b to turn Skip on.
Press OK.
8 on the screen indicates a skipped position.
e Press BACK and repeat from Step 2 or press EXIT.
Each position has to be individually selected. To turn
Skip off, repeat the procedure for each position.
Skipped positions cannot be selected by P
or by the controls on the television but can still be
accessed by the number buttons on the remote
control.
U and Pu
Sorting positions
Channels may be moved and saved to the position of your
choice.
a Select ATV Manual Tuning from the System Setup
menu.
b With the list of channels showing, use B or b to
highlight the channel you want to move and press
ATV Manual Tuning
Pos. Channel Station
2
S10
3
C7
4
C40
5
C22
1
C2
6
C25
7
C28
8
C30
ABC1
ABC1
c Use B or b to move through the list to your preferred
position. As you do so, the other channels will move
to make room.
c.
c Press c to select Skip.
d Press C to save your move.
Repeat as necessary, and then press EXIT.
18
Page 19

SETTING UP YOUR TV
DTV Manual Tuning
WEAK
Signal Strength
Quality
Channel
GOOD
Start Scan
STRONGAVERAGE
13
Pos.New TypeName
ABC ONE
0 New Channels - Total 6
ABC TWO
ABC THREE
ABC NEWS 24
DTV Manual Tuning
2
1
7
40
ABCi
51
DTV Settings
Channels
Parental PIN Setup
Subtitle and Audio
Parental Control
Local Time Setting
DVB Character Set
Dynamic Scan
Standby Channel Update
Standard
Off
On
Channels
Line No. 1/10
Sort : A-Z Sort
TV
1ABC ONE
2 ABC TWO
Pos. Name
7 ABC THREE
30 CABC Channel
40 ABC NEWS 24
51 ABCi
822 AA
823 AC
English
DTV Manual Tuning
NOTE: This feature varies depending on the Ant/Cable In
setting.
Manual Tuning
This feature is available for service engineers or can be used for
direct channel entry if the multiplex channel is known.
a Select DTV Manual Tuning from the System Setup
menu and press OK.
b Enter the multiplex number using the number
buttons or use
down.
c Highlight Start Scan, and then press OK. The
television will automatically search for that multiplex.
C or c to adjust the number up or
DTV Settings
Channels
The channel order may be changed to suit your personal
a Select DTV Settings from the System Setup menu
and press OK.
b Select Channels and press OK.
c For your convenience, you can jump to specific places
in the list by one of two methods.
preference.
When the multiplex is found, any channels that are
not currently in the channel list will be added and the
channel information at the top of the screen will be
updated.
d Repeat as necessary. Press EXIT to finish.
Manual Tuning for DVB-C
When Ant/Cable In is set to Cable, DTV Manual Tuning
items are as follows:
Frequency – input a specific frequency to be scanned
Modulation – choose from one of five QAM modulation
options
Symbol Rate – input a specific baud rate (KS/s) to be used for
the manual scan
19
Line Number Jump —Use the number buttons
(0-9) to input the line number you want t o select, and
then press OK.
Name Jump — Press CC or cc to jump to the
next station name with a different initial letter.
It is also possible to change the Position number of a
particular channel.
Renumber —Press the RED button to renumber
the highlighted channel. Edit the channel number
using the number buttons and press OK. If the
position number you input already exists, a
confirmation window will appear.
Pos.
----
Name
ABC ONE
Page 20

SETTING UP YOUR TV
Channels
Line No. 1/10
TV
1 ABC ONE
Pos. Name
822 AA
823 AC
2 ABC TWO
7 ABC THREE
30 CABC Channel
40 ABC NEWS 24
51 ABCi
Sort : A-Z Sort
Sort
Your existing channel order will be lost. Do you wish to
continue?
Yes
Sorting Type Number
Sort
Sort
English
Move feature. Use the
channel you wish to move and press OK to check.
If you wish to move multiple channels at once, select
another channel and check in the same way. Repeat
as necessary.
Once all desired channels have been checked, use the
B or b buttons to select the
This feature allows you to manually select the character set
(Standard = Table 0, West = Table 5 or Latin alphabet 9) to be
a Select DTV Settings from the System Setup menu
B or b buttons to place the focus at the position to
Move — Press the GREEN button to activate the
which you wish to move the channels. The channels
will be inserted above the highlighted channel. Press
the GREEN button to execute the move.
b Press b to select DVB Character Set and use C or c
DVB Character Set
used for DVB-C or DVB-T channels.
and press OK.
to select Standard, West or Latin alphabet 9.
Dynamic Scan
If the broadcast information has changed in your DVB-T
receiving area, the TV screen will display the message
“Broadcast information has changed. Would you like to
rescan now?”. Please follow the message. If you do not wish for
the TV to detect changes and prompt you to rescan, you should
set this feature to “Off”.
a Select DTV Settings from the System Setup menu
and press OK.
Sort — Press the YELLOW button. A confirmation
window will appear. Press
press OK.
The Sorting Type selection window will appear.
C or c to select Yes and
b Press b to select Dynamic Scan and use C or c to
select On.
Location setting
You can select either Home or Store mode. Home is
recommended for normal home use. Select Store when using the
television for displaying in a shop, etc.
a Select Location from the System Setup menu.
C or c to set the sorting type.
Press
A-Z Sort Station name order (A to Z)
Number Position No. order (numerical sequence)
Press
b to highlight Sort and press OK.
Standby Channel Update
If the Standby Channel Update is set to On, when the TV is in
standby mode, Digital Tuning is automatically executed and any
a Select DTV Settings from the System Setup menu
and press OK.
b Press b to select Standby Channel Update and use
C or c to select On.
new channels are saved.
b Press C or c to select Home or Store.
Analogue switch-off
This is a digital tel evisi on whic h is int egrat ed to al low th e use
of both digital and analogue services. However, during the
lifetime of this set it is very likely that analogue services will
be switched off to allow for more new digital services.
This ‘switch-off’ will happen in a number of phases, which will
be adve rti sed in y our a rea wel l in adva nce . It is r ecom men ded
that at each phase the television is re-tuned to ensure that
existing and new digital services can be viewed without
disruption.
20
Page 21

CONTROLS AND FEATURES
English
General controls
Quick Menu
Quick Menu helps you access some options quickly, such as
Picture Mode, Picture Size, More Information, Sleep Timer
etc.
Press QUICK to display the Quick Menu and use
select the option.
Quick Menu
Picture Mode AutoView
Picture Size
Personal Mode
More Information
Channel Options
Sleep Timer
REGZA-LINK Device Control
Speakers
Headphone Level
Wireless Information
NOTE: Quick Menu items are different depending on the
current mode.
Super Live
00:00
TV Speakers
50
Quick menu item example
Mode Quick menu item Description
When viewing a TV
programme or
pictures from the
external input
When using EPG Genre Colour See page 56.
Media Player
(Photo Multi View,
List View)
Photo Frame
(Full Screen)
Picture Mode See page 26.
Picture Size See page 24.
Personal Mode See page 65.
More Information See page 55.
Channel Options See page 57.
Sleep Timer See page 53.
REGZA-LINK Device
Control
Speakers See page 66.
Headphone Level See page 23.
Wireless Information See page 35.
EPG Update/
Cancel EPG Update
Sort See page 45.
Interval Time See page 45.
Repeat See page 45.
Shuffle See page 49.
Device Information See page 45.
Wireless Information See page 35.
Picture See page 26.
Picture Size See page 24.
Personal Mode See page 65.
B or b to
See page 67.
See page 55.
Selecting positions
To select a position, use the numbered buttons on the remote
control.
Positions can also be selected using P
To display on-screen information such as position, input
mode or stereo/mono signal, press . Press again to
cancel.
U and Pu.
The Time Display – analogue only
The time display facility allows the current (text service) time to
Press
to see the time display from the broadcaster. It will remain on
screen for about 5 seconds.
NOTE: This display may not be available in some cases.
be seen on the television screen.
D whilst watching a normal television broadcast
Stereo and Bilingual transmissions
For ATV programmes
If stereo or dual language broadcasts are transmitted, the word
Stereo or Dual will appear on the screen each time positions are
changed, disappearing after a few seconds. If the broadcast is
not in stereo, the word Mono will appear.
Stereo… Press
Bilingual… Bilingual transmissions are rare. If they are
transmitted, the word Dual will be displayed. Choose the
required programme number, and if the word Dual appears,
press
For DTV programmes
For ste reo or d ual m ono bro adc asts , pr ess s and use C or
c to select settings.
Stereo Stereo S Left S Right
Mono –
Multichannel –
For multi-audio track broadcasts, press
change the audio language (see “Audio languages” on
page 58).
s to select Stereo or Mono.
s to select Dual 1, Dual 2 or Mono.
Mode Display Pressing c
Dual mono Dual 1
S Dual 2 S Dual
s repeatedly to
21
Page 22

CONTROLS AND FEATURES
Sound
Dual
Balance
Advanced Sound Settings
Audio Level Offset
Headphone Settings
Audio Description
0
Dual 1
Dolby Volume Low
Dynamic Range Control Off
Surround Off
Voice Enhancement
Sound Navi
On
Advanced Sound Settings
Surround Off
Voice Enhancement
Sound Navi
On
Advanced Sound Settings
Sound controls
English
Volume controls and sound mute
Volume
Press
y or Y to adjust the volume.
Sound Mute
Press once to turn the sound off and again to cancel.
Dual
If a programme or film is being broadcast with a soundtrack in
more than one language, the Dual feature allows selection
between them.
a Press MENU / C c to highlight Setup icon.
b Press B / C c to highlight Sound icon and press OK.
c Press B or b to select Dual and press C or c to
choose between Dual 1 or Dual 2.
Balance
c Press C or c to select either Stand or Wall depending
on how your TV is installed, and then press the RED
button.
d Press C or c to select the frequency range you want
to adjust from the equalizer window, and then press
B or b to adjust the level.
Sound Navi
TV Mounting Stand
+20
0
-20
Equalizer
100 330 1K 3.3K 10K [Hz]
21012[Level]
e Repeat step 4 for other frequencies.
Surround Settings
Surround and Voice Enhancement help to create an
enhanced surround sound experience with deep, rich bass from
stereo sound sources. Your TV’s audio will sound fuller, richer,
and wider.
a In the Sound menu, press B or b to select Advanced
Sound Settings and press OK.
b Press B or b to select Surround and press C or c to
select Off, Spatial or Cinema.
a In the Sound menu, press B or b to select Balance,
and then press
speaker balance.
You can customize current sound mode settings. Select the
appropriate mode in accordance with the installation location of
the TV (Stand or Wall) and adjust the equalizer on-screen as
C or c to emphasize left or right
Sound Navi
desired.
a In the Sound menu, press B or b to select Advanced
Sound Settings and press OK.
b Press B or b to select Sound Navi and press OK.
Dolby Volume®
This feature provides a consistent sound volume regardless of
programmes, channels or input sources.
a In the Sound menu, press B or b to select Dolby
Volume.
b Press C or c to select Low, High or Off.
NOTE:
•The Dolby Volume setting influences the Dynamic Range
Control and Digital Audio Output settings.
• This feature will automatically switch Off when Dynamic
Range Control is set to On or Digital Audio Output is set
to Auto.
22
Page 23

CONTROLS AND FEATURES
0
0
-5
Audio Level Offset
ATV
DTV 2ch
External Input
English
Dynamic Range Control
This feature allows control of audio compression for some digital
TV programmes (MPEG-1 and MPEG-2 audio programmes are
not supported).
a In the Sound menu, press B or b to select Dynamic
Range Control.
b Press C or c to select On or Off.
NOTE: This feature will automatically switch Off when Dolby
Volume is set to Low or High.
Audio Level Offset
Sometimes there can be large changes in volume when
switching from a DTV 5.1ch to a DTV 2ch, an ATV channel, or an
external input. Using the Audio Level Offset feature reduces
these volume differences.
a Set the volume level usually used when watching a
DTV 5.1ch programme.
b Tune to a channel which is DTV 2ch, ATV or an
external input.
c In the Sound menu, press B or b to select Audio
Level Offset and press OK.
d Press B or b to select an option, and then use C or c
to adjust the volume level.
NOTE:
• The available item changes de pending on the current input
source. For example, while watching a DTV 2ch programme,
only DTV 2ch is available and the other two items are
greyed out in the menu. This allows you to easily adjust
according to each condition.
• When watching a DTV 5.1ch programme, this feature is not
available.
Headphone Settings
This setting is used to set the sound output when headphones are
Speaker
Link
On Sound is output
Off Sound is output
connected.
Headphone Speakers
2 – + is available.)
(
(Headphone level
menu is available.)
No sound
Sound is output
2 – + is available.)
(
a In the Sound menu, press B or b to select
Headphone Settings and press OK.
b Press B or b to select Speaker Link and use C or c
to select On or Off.
c If you select Off, then highlight Headphone Level
and use
C or c to adjust the headphone sound.
Headphone Settings
Speaker Link
Headphone Level
Off
50
Audio Description
Audio Description is an additional narrative sound track for
visually impaired individuals to understand and enjoy the story
line more fully. The letters AD will be displayed in the channel
banner when programmes contain AD content.
a In the Sound menu, select Audio Description and
press OK.
b Press B or b to select Audio Description, and then
press
C or c to select On.
Audio Description
Audio Description
Mixing Level
The AD button on the Remote can also be used to
toggle the Audio Description feature between On
and Off.
On
50
c To adjust the level of the audio description sound to
the main sound, highlight Mixing Level and use
c.
23
C or
Page 24

CONTROLS AND FEATURES
SUBTITLE
SUBTITLE
SUPER LIVE
This setting will enlarge a 4:3 image
to fit the screen by stretching the
image horizontally and vertically,
holding better proportions at the
centre of the image. Some distortion
may occur.
When subtitles are included on a
letterbox format broadcast, this
setting will raise the pictu re to ensure
that all the text is displayed.
CINEMA
When watching ‘all sides panel
format’ films/video tapes, this setting
will eliminate or reduce the black
bars at all sides of the screen by
zooming in and selecting the image
without distortion.
Use this setting when watching a
widescreen DVD, widescreen video
tape or a 16:9 broadcast (when
available). Due to the range of
widescreen formats (16:9, 14:9, 20:9
etc.) black bars may be visible on the
top and bottom of the screen.
Use this setting to view a true 4:3
broadcast.
Use this setting when watching a
14:9 broadcast.
Widescreen viewing
English
Depending on the type of broadcast being transmitted, programmes can be viewed in a number of
formats.
WIDE
4:3
14:9
24
Page 25

CONTROLS AND FEATURES
Dot by Dot
PC NORMAL
This setting will show the picture
without overscan, i.e. W YSIWYG.
This option is only available when
watching a PC signal source via
HDMI or PC terminal.
PC WIDE
This setting will show the picture
without overscan or side panels.
This option is only available when
watching a PC signal source via
HDMI or PC terminal.
“Dot by Dot” is a non-scaling display.
Depending on the input signal format,
the picture is displayed with side panels
and/or bars at the top and bottom (e.g.
VGA input source).
NATIVE
This setting will show the picture
without overscan, i.e. WYSIWYG.
Picture Size
4:3
Super Live
Wide
Native
Cinema
14:9
Subtitle
AV format PC format
English
Press the button on the Remote to display the list of available widescreen formats.
Press the button repeatedly to highlight the required format.
The Quick Menu feature can also be used to select Picture Size.
Using the special functions to change the size of the displayed image (i.e. changing the height/width ratio) for the purposes of public
display or commercial gain may infringe on copyright laws.
Picture Size
Dot by Dot
PC Normal
PC Wide
25
Page 26

CONTROLS AND FEATURES
Picture
Picture Mode
Reset
Backlight
Colour
Tint
Sharpness
100
100
0
0
0
0
Dynamic
Contrast
Brightness
Advanced Picture Settings
ColourMaster
Base Colour Adjustment
Colour Temperature
Black/White Level
Static Gamma
Noise Reduction
10
10
0
Off
On
Auto Brightness Sensor Settings
Active Backlight Control
Picture controls
English
Most of the picture controls and functions are
available in both digital and analogue modes.
PLEASE NOTE: Features not available will be greyed
out.
Picture Mode
This television offers the choice of personalising the picture style.
AutoView, Dynamic, Standard, Hollywood Night,
Hollywood Day, Hollywood Pro, Store, Game and PC are
preset options and affect many features/settings within the
NOTE:
• Because th e AutoView mode automatically adjusts picture
settings based on ambient light conditions and input signal
content, the Auto Brightness Sensor and Expert Mode
menus are greyed out when it is selected.
• Store mode is only available when Location is set to Store.
• Game mode is available in external input mode (other than
aerial input). When you select Game mode, suitable
widescreen formats will be selected.
• PC mode is available in RGB/PC input mode or HDMI input
mode.
television.
a Press MENU / C c to highlight Setup icon.
b Press B / C c to highlight Picture icon and press OK
to display Picture menu.
c Press B or b to select Picture Mode.
Picture preferences
You can customize current picture mode settings as desired. For
example, while selecting “Dynamic”, i f y ou c ha ng e th e f oll ow in g
items, such as Backlight, Contrast, Brightness, Colour, Tint,
Sharpness and the Advanced Picture Settings items, your
new settings are saved for “Dynamic” picture mode.
a In the Picture menu press b to select either
Backlight, Contrast, Brightness, Colour, Tint or
Sharpness and press OK.
b Press C or c to adjust the settings.
Reset
This feature resets all picture settings to the factory settings
except Picture Mode.
a In the Picture menu, press B or b to select Reset and
press OK.
b A confirmation message will appear. Press C or c to
select Yes and press OK.
ColourMaster
When ColourMaster is set to On, it allows the ‘Base Colour
Adjustment’ feature to become available.
a In the Picture menu, press B or b to select
Advanced Picture Settings and press OK.
b Press b to select ColourMaster.
d Press C or c to select the picture mode you prefer
and press OK.
NOTE: The picture mode you select affects the current input
only. You can select a different picture mode for each input.
c Press C or c to select On or Off, and then press OK.
26
Page 27

CONTROLS AND FEATURES
Hue
Saturation
Reset
Brightness
0Red
Green
Blue
Yellow
Magenta
Cyan
00
000
000
000
000
000
Base Colour Adjustment
Hue Saturation Brightness
0Red 0 -1
100
0
Backlight Adjustment Pro
Backlight Control Level
Control
Level
Ambient Light
48
Cancel
Reset
English
Base Colour Adjustment
The Base Colour Adjustment feature allows the adjustment of
individual colours to suit personal preference. This can be useful
when using an external source.
a In the Advanced Picture Settings menu, press B or
b to select Base Colour Adjustment and press OK.
b Press B or b to select an option, and then press c to
move to the adjustment window.
c Press C or c to select Hue, Saturation or Brightness,
and then press
required.
B or b to adjust the settings as
d Press BACK to return to the previous menu.
To return to the factory settings, select Reset and
press OK.
Auto Brightness Sensor Settings
When the Auto Brightness Sensor is activated, it will
automatically optimise the backlighting levels to suit ambient
light conditions.
a In the Advanced Picture Settings menu, press B or
b to select Auto Brightness Sensor Settings and
press OK.
b Press C or c to select On and press OK.
Auto Brightness Sensor Settings
Auto Brightness Sensor
Backlight Adjustment Pro
On
c Press B or b to select Backlight Adjustment Pro
and press OK.
d The Backlight Adjustment Pro window will appear.
Press OK again to display the adjustment window.
e Press C or c to select a point and press B or b to
adjust the level.
Colour Temperature
Colour Temperature increases the ‘warmth’ or ‘coolness’ of the
picture by increasing the red or blue tint.
a In the Advanced Picture Settings menu, press B or
b to select Colour Temperature and press OK.
b Press C or c to adjust the level.
The adjustment range is 0 (warm) to 10 (cool).
NOTE: If Picture Mode is set to AutoView, the adjustment
range is -5 to +5.
f Press OK to fix the adjustment.
To cancel the adjustment when selecting a point,
select Cancel and press OK.
To return the adjustments of all points to the factory
defaults, select Reset and press OK.
Active Backlight Control
When Active Backlight Control is activated, it will
automatically optimize the backlighting le vels for dark scenes.
a In the Advanced Picture Settings menu, press B or
b to select Active Backlight Control.
b Press C or c to select On or Off.
27
Page 28

CONTROLS AND FEATURES
Noise Reduction
DNR
MPEG NR
Low
Auto
English
Black/White Level increases the strength of dark areas of the
Black/White Level
picture to improve the definition.
a In the Advanced Picture Settings menu, press B or
b to select Black/White Level.
b Press C or c to adjust the level. The effect depends on
the broadcast and is most noticeable on dark colours.
Static Gamma
The static gamma feature allows you to adjust the levels of black
in the picture.
a In the Advanced Picture Settings menu, press B or
b to select Static Gamma.
b Press C or c to adjust the level.
MPEG NR – Noise Reduction
When watching a DVD, the compression may cause some words
or picture elements to become distorted or pixelated.
Using the MPEG NR feature reduces this effect by smoothing out
the edges.
a In the Advanced Picture Settings menu, press B or
b to select Noise Reduction and press OK.
b Press b to select MPEG NR.
Resolution+
The Resolution+ feature allows you to adjust the clarity levels
for your desired picture settings.
a In the Advanced Picture Settings menu, press B or
b to select Resolution+ and press OK.
b In the Resolution+ field, select Auto.
Resolution+
Resolution+
Level
Auto
3
c Press B or b to highlight Level, and then press C or
c to adjust the level.
NOTE:
• This feature may not work properly depending on the
content.
• Adjustable range varies according to the Picture Mode you
set.
• Noise may appear in the picture depending on the device
connected to the TV (e.g. a device with a specific enhancer
function).
Active Vision M100
This feature will reduce picture blur without decreasing image
brightness or adding flicker.
a In the Advanced Picture Settings menu, press B or
b to select Active Vision M100.
c Press C or c to select Low, Middle, High or Off to suit
your preference.
DNR – Digital Noise Reduction
DNR allows you to ‘soften’ the screen representation of a weak
signal to reduce the noise effect.
a Select DNR from the Noise Reduction menu.
b Use C or c to select Low, Middle, High, Auto or Off.
The differences may not always be noticeable (for the
best result use lower settings as picture quality can be
lost if the setting is too high).
b Press C or c to select Smooth, Standard or Off.
NOTE: When Picture Mode is set to Game, this feature will be
grayed out and automatically set to Off.
Motion Detection Range
This feature is to set the range of the adjustment of movement in
the double-scan processing. If you feel uncomfortable in motion
picture, select Standard.
a In the Advanced Picture Settings menu, press B or
b to select Motion Detection Range.
b Press C or c to select Wide or Standard.
Wide — Double-scan effect for higher-speed motion
picture
Standard — Stabilized double-scan effect
NOTE: When Active Vision M100 is set to Off, this feature will
be grayed out.
28
Page 29

Resetting the advanced picture settings
This feature allows you to reset the current Advanced Picture
Settings to the default values.
a In the Advanced Picture Settings menu, press B or
b to select Reset.
b Press OK.
Expert Picture Settings
This feature is available when the Picture Mode option is
Standard, Hollywood Day, Hollywood Night, and
Test Pattern
When the test pattern is on screen, you can navigate in the
Picture submenus and adjust picture settings without
removing the image.
When you move to a non-Picture menu, or close the menus,
regular video will be restored.
Hollywood Pro.
a In the Picture menu, press B or b to select Expert
Picture Settings and press OK to display Expert
Picture Settings menu.
b Press B or b to select Test Pattern.
c Press C or c to select On.
d Press EXIT to close.
RGB Filter
This feature individually enables or disables the red, green,
and blue components of the picture to allow for more
accurate adjustment of each colour.
a In the Expert Picture Settings menu, press B or b to
select RGB Filter, and then press OK.
b Press B or b to select Red, Green or Blue to adjust.
c Press C or c to select On.
d Press B or b to select Colour or Tint, and then press
C or c to adjust.
e Press EXIT.
NOTE: It is not possible to turn off all three colours
simultaneously.
CONTROLS AND FEATURES
Colour Decoding
If you view DVDs with this TV, the Colour Decoding option
may be set to ensure the colourimetry reproduction.
NOTE: The modes excluding Auto (BT601 and BT709) are to
convert an irregular signal output from the DVD etc. with
incorrect colour to the optimum state. If BT601 or BT709 is
selected with a normal signal received, the colour may not be
correctly displayed. This feature should normally be set to
Auto.
a In the Expert Picture Settings menu, press B or b to
select Colour Decoding.
b Press C or c to select Auto, BT601 or BT709.
White Balance-Window Display
This feature displays a special Window Pattern to be used
when adjusting white balance with a measuring device.
a In the Expert Picture Settings menu, press B or b to
select White Balance and press OK.
b Press B or b to select Window Display and press C
or
c to select On.
c Press EXIT to close.
White Balance-Setting Type
You can choose from two types of White Balance adjustment.
a In the Expert Picture Settings menu, press B or b
to select White Balance and press OK.
b Press B or b to select Setting Type and press C or c
to select 2P or 10P.
White Balance-2P White Balance
a Press b to select 2P White Balance.
b Press B or b to select Red-Offset, Green-Offset,
Blue-Offset, Red-Gain, Green-Gain, or Blue-Gain.
c Press C or c to adjust.
White Balance-10P White Balance
a Press b to select 10P White Balance.
b Press B or b to select IRE, Red, Green, or Blue.
c Press C or c to adjust.
NOTE: The adjustments made for Red / Green / Blue are
stored separately for each IRE setting. (There are ten IRE
settings from 10 to 100.)
English
29
Page 30

CONTROLS AND FEATURES
Brightness
Number
Of
Pixels
Output
Control Visualization
Distribution
Input
Control Curve
Auto Format On
4:3 Stretch Off
Picture Position
Display Settings
Resetting to the factory defaults
English
a In the Expert Picture Settings menu, press B or b to
select Reset and press OK.
A confirmation screen appears.
b Select Yes and press OK.
Control Visualization
This feature displays the brightness histogram and control curve
of the current video signal.
a In the Picture menu, press B or b to select Control
Visualization and press OK. The histogram window
will appear.
Automatic Format (Widescreen)
When this television receives a true Widescreen picture and Auto
format is On, it will automatically be displayed in Widescreen
format irrespective of the television’s previous setting.
a Press MENU / C c to highlight Setup icon.
b Press B / C c to highlight Preferences icon and
press OK.
c Press b to select Display Settings and press OK.
d Press B or b to select Auto Format and press C or c
to select On or Off.
4:3 Stretch
When 4:3 Stretch is activated, the size switching system
changes 4:3 programmes into full screen picture.
a In the Preferences menu, press B or b to select
Display Settings and press OK.
b Press B or b to select 4:3 Stretch and press C or c to
select On or Off.
b Press BACK to return to the previous menu.
Blue Screen
When Blue Screen is selected, the screen will turn blue and the
sound will be muted on analogue channels and external input
NOTE: Some external input sounds may not be muted.
modes when no signal is received.
a In the Preferences menu, press B or b to select Blue
Screen.
b Press C or c to select On or Off.
30
Page 31

CONTROLS AND FEATURES
Auto Format On
4:3 Stretch Off
Picture Position
PC Settings
Display Settings
0
0
Picture Position
Horizontal Position
Reset
Vertical Position
English
Picture Position
The picture position may be adjusted to suit personal preference
and can be particularly useful for external inputs.
a In the Preferences menu, press B or b to select
Display Settings and press OK.
b In the Display Settings menu, press B or b to select
Picture Position.
c Press OK to view the options available for the picture
format that has been selected.
d Press B or b to select an option, and then C or c to
adjust the settings.
The options differ depending on the currently
selected widescreen format and the input signal.
To return to the original factory settings, select Reset
in the Picture Position menu and press OK.
HDMI Information Display
When the HDMI Information Display feature is On and you are
watching an HDMI input source, pressing the button
displays the HDMI signal information banner.
a In the Preferences menu, press B or b to select
HDMI Information Display.
b Press C or c to select On.
HDMI signal information is as follows:
Resolution, Scan Type, Frame Rate*, Aspect, Bit Dep th,
Colour Space, RGB/YUV, Chroma Format, and Content
Type (if available).
* If the HDMI input source is interlaced, “Field Rate”
will be displayed instead of “Frame Rate”.
Picture still
This feature is used to hold a still image on the screen.
a Press r to hold an image on the screen, and press
r again to cancel.
31
Page 32

CONTROLS AND FEATURES
Using your home network
English
This TV is a DLNA CERTIFIED™ Player and Renderer.
This TV can play digital content stored on a DLNA
CERTIFIED™ product with server function.
If you want to use this TV as a DLNA CERTIFIED™
Player or Renderer, you will have to configure the
network on your TV (see page 11).
If you want to use your home network, you will
have to configure the network on your TV. (see
page 11)
Change the network settings if necessary (see
“Setting up the Network” on page 33).
When using a wireless home network:
Wireless Interoperability
The TOSHIBA Dual Band WLAN Adaptor is designed to be
interoperable with any wireless LAN product that is based on
Direct Sequence Spread Spectrum (DSSS)/Orthogonal
Frequency Division Multiplexing (OFDM) radio technology,
and is compliant to:
• The IEEE 802.11 Standard on Wireless LANs (Revision a/b/g/
n), as defined and approved by the Institute of Electrical and
Electronics Engineers.
• The TOSHIBA Dual Band WLAN Adaptor is intended for use
with the SL83 series LCD TV’s and should not be used with
any other devices.
Use of the WLAN Adaptor in other USB products may result
in damage to the WLAN Adaptor and or the equipment.
Such use will void any warranty that may otherwise apply,
and TOSHIBA will have no liability for any damage that may
result from such use.
CAUTION
Bluetooth™ and Wireless LAN devices operate within
the same radio frequency range and may interfere
with one another. If you use Bluetooth™ and Wireless
LAN devices simultaneously, you may occasionally
experience a less than optimal network performance
or even lose your network connection.
If you should experience any such problem,
immediately turn off either your Bluetooth™ or
Wireless LAN device.
Actual performance can vary, including lower wireless
network capacity, data throughput rate, range and
coverage.
Performance depends on many factors, conditions
and variables, including distance from the access
point, volume of network traffic, building materials
and construction, operating system used, mix of
wireless products used, interference and other
adverse conditions.
Wireless LAN and your Health
Wireless LAN products, like other radio devices, emit radio
frequency electromagnetic energy. The level of energy
emitted by Wireless LAN devices, however, is far less than the
electromagnetic energy emitted by wireless devices such as
mobile phones.
Because Wireless LAN products operate with in the guidelines
found in radio frequency safety standards and
recommendations, TOSHIBA believes Wireless LAN is safe for
use by consumers. These standards and recommendations
reflect the consensus of the scientific community and result
from deliberations of panels and committees of scientists
who continually review and interpret the extensive research
literature.
In some situations or environments, the use of Wireless LAN
may be restricted by the proprietor of the building or
responsible representatives of the organization. Such
restrictions may apply in environments where the risk of
interference to other devices or services is perceived or
identified as harmful.
If you are uncertain of the policy that applies to the use of
wireless devices in a specific organization or environment,
you are encouraged to ask for authorization to use the
Wireless LAN device prior to turning on the equipment.
This Dual Band Wireless LAN Adaptor may be operated in the
following countries:
AT Austria IS Iceland
BE Belgium LI Liechtenstein
CH Switzerland LT Lithuania
CY Cyprus LU Luxembourg
CZ Czech Republic LV Latvia
DE Germany MT Malta
DK Denmark NL Netherlands
ES Spain NO Norway
FI Finland PL Poland
FR France PT Portugal
GB United Kingdom SE Sweden
GR Greece SI Slovenia
EE Estonia SK Slovakia
HU Hungary BG Bulgaria
IT Italy RO Romania
IE Ireland TR Turkey
How to use this Dual Band Wireless LAN Adaptor
• If this device is goi ng to be operated in the frequency range
of 5.15 GHz to 5.35 GHz, it is restricted to indoor use.
• If this device is going to be operated for 802.11 b/g/n
function in the frequency range of 2.454 GHz to 2.4835 GHz
in France, it is restricted to indoor use.
• A general authorization is required for using this device
outdoors or in public places in Italy.
• This device is NOT ALLOWED to be used in th e geographical
area within a ra dius of 20km fro m the centre of Ny-Alesu nd
in Norway.
32
Page 33

Setting up the Network
Preferences
Network Setup
Network Device Setup
Personal TV Setup
Network Lock
Photo Frame Setup
REGZA-LINK Setup
Teletext Auto
Panel Lock Off
Network Type Wired
Network Connection Test
Advanced Network Setup
Network Setup
Wireless Setup
Easy Setup On
Enhanced 11n Off
Manual Setup
Wireless Setup
Assisted Setup
You can select the Network Type.
a Press MENU / C c to highlight Setup icon.
b Press B / C c to highlight Preferences icon and
press OK.
c Press B or b to select Network Setup and press OK.
CONTROLS AND FEATURES
Network Name, Authentication, and Encryption are decided
based on information from the AP. You will manually set the
Security Key.
Manual Setup (manual input of all settings)
Easy Setup using PBC (Push Button Configuration)
a In the Preferences menu, press B or b to select
Network Setup and press OK.
b Press B or b to select Wireless Setup and press OK.
c Press B or b to select Easy Setup and press OK.
English
d Press B or b to select Network Type, and then press
C or c to select Wired or Wireless.
NOTE: If the Dual Band WLAN Adaptor is not
connected, Wireless cannot be selected.
e If you selected Wired, see “Advanced Network Setup”
on page 35.
Wireless Setup
NOTE:
• This feature is grayed out when the Dual Band WLAN
Adaptor is not connected or Network Type is set to Wired.
• When you insert or remove the wireless LAN adaptor, you
must turn off your TV and unplug the power cord, and then
plug and turn on again.
• Conti nued connection of AP (Access Point) is not guaranteed.
The connection may be disconnected while watching TV.
• Do not remove the Dual Band WLAN Adaptor when
Network Type is set to Wireless or wireless
communication is active.
There are 3 methods for Wireless Setup:
Easy Setup (WPS)
If the AP supports WPS, this method can be used.
• WPS is an industry standard designed to make connection
of wireless LAN equipment and security setup easy. WPS
will automatically configure all wireless settings.
Assisted Setup (setup by using the AP’s notification
information)
d Press C or c to select PBC.
e Press b to highlight Start Scan and press OK.
f Following the on-screen instructions, push the
appropriate button on your AP.
g When a window reporting that the setup is complete
appears, press OK.
To cancel searching for the AP:
Press BACK while searching for the AP. A message will
appear, and then press C or c to select Yes and press
OK.
Easy Setup using PIN (Personal Identification
Number)
a In the Preferences menu, press B or b to select
Network Setup and press OK.
b Press B or b to select Wireless Setup and press OK.
c Press B or b to select Easy Setup and press OK.
d Press C or c to select PIN.
e Press b to select Start Scan and press OK.
f Press B or b to select the desired AP and press OK.
NOTE: Check the Network Name and/or MAC address
on the label of the AP or in the manual, and select
your AP.
g When the PIN code window appears, enter the
displayed PIN into your AP, and then press Next to
continue the PIN Setup. When a message displays to
report that the setup is complete, press OK.
33
Page 34

CONTROLS AND FEATURES
To cancel searching for the AP:
English
Press BACK while searching for the AP. A message will
appear; then, press C or c to select Yes and press
Assisted Setup
a In the Preferences menu, press B or b to select
Network Setup and press OK.
b Press B or b to select Wireless Setup and press OK.
c Press B or b to select Assisted Setup and press OK.
d Press B or b to select the desired AP and press OK.
NOTE: Check the MAC address on the label of the AP
or in the manual, and select your AP.
e Highlight Security Key and press OK. The Software
Keyboard window will appear.
f Input the Security Key by using the Software
Keyboard (see page 37). To save your setting, press
the BLUE button.
NOTE:
• The Security Key must adhere to these conditions:
- TKIP/AES: 8-63 ASCII or 64 Hex characters
- WEP: 5 or 13 ASCII or 10 or 26 Hex characters
• There is only one key ID to set for WEP encryption.
g Highlight Done and press OK.
NOTE: If Network Name is not displayed, see step 4
and 5 in Manual Setup below to set Network Name
before pressing Done.
NOTE: Settings are not saved if BACK is pressed before Done
is selected.
Manual Setup
a In the Preferences menu, press B or b to select
Network Setup and press OK.
b Press B or b to select Wireless Setup and press OK.
c Press B or b to select Manual Setup and press OK.
f Press B or b to select Authentication, and then
press
C or c to select Open System, Shared Key,
OK.
WPA-PSK or WPA2-PSK.
g Press B or b to select Encryption, and then press C
or
c to select None, WEP, TKIP or AES.
NOTE:
• Certain encryption types are only compatible with
specific authentication types.
- When Authentication is Open System, only WEP
or None is compatible.
- When Authentication is Shared Key, only WEP is
compatible.
- When Authentication is WPA-PSK or WPA2-PSK,
only TKIP or AES is compatible.
• When incompatible Authentication/Encryption
pairings are detected, a warning message will be
displayed, and no connection attempt will be made
until the incompatibility is resolved.
• There is only one key ID to set for WEP encryption.
h Press B or b to select Security Key and press OK.
i Input the Security Key by using the Software
Keyboard (see page 37). To save your setting, press
the BLUE button.
NOTE: This item is grayed out when Encryption is
None.
j Highlight Done, and then press OK.
NOTE: When Encryption is None, a message will
appear. Press
NOTE: Settings are not saved if BACK is pressed before Done
is selected.
Enhanced 11n
When Enhanced 11n is set to On, the Dual Channel (40MHz)
feature is available.
NOTE: In addition, some other optional 11n features will be
enabled.
C or c to select Yes and press OK.
a In the Preferences menu, press B or b to select
Network Setup and press OK. Highlight Wireless
Setup and press OK.
d Press B or b to select Network Name and press OK.
The Software Keyboard window will appear.
e Input the Network Name by using the Software
Keyboard (see page 37). To save your setting, press
the BLUE button.
b Press B or b to select Enhanced 11n, and then press
C or c to select On.
34
Page 35

Wireless Information
50
Quick Menu
Picture Size
Picture Mode AutoView
Super Live
More Information
Personal Mode
Sleep Timer
Channel Options
TV Speakers
Headphone Level
REGZA-LINK Device Control
Wireless Information
Speakers
00:00
The settings configured in Wireless Setup can be confirmed.
a Press QUICK to open the Quick Menu.
b Press B or b to select Wireless Information and
press OK.
c When the Network Type is Wireless, a Wireless
Information window will appear.
NOTE: Press the RED button to scan for all APs.
Item Description
Status Connected is displayed when the TV is
Signal Connection signal strength with AP
Speed Link with AP
Mode Working mode (11a, 11b, 11g, 11n)
Channel Channel in use (1-165)
Network Name SSID set
Authentication Authentication set
Encryption Encryption set
Security Key Security Key set
AP MAC
Address
TV MAC
Address
DHCP Enabled is displayed when using DHCP.
IP Address The TV’s IP address
Subnet Mask Value of the Subnet Mask
Default
Gateway
DNS Address of the DNS
connected with the AP.
Disconnected is displayed when the TV is
not connected with the AP.
(STRONG/MEDIUM/WEAK)
The AP’s MAC address is displayed when
the TV is connected with the AP.
The MAC address of the USB (Dual Band
WLAN Adaptor) is displayed.
Disabled is displayed when not using
DHCP.
Address of the Default GATEWAY
CONTROLS AND FEATURES
NOTE: Even if an AP for IEEE 802.11n is used when Encryption
is set to WEP or TKIP, the Speed value might be low. It is
recommended that Encryption be changed to AES (see
“Manual Setup” on page 34).
Notes on wireless LAN environment:
• The function of all IEEE802.11 is not supported.
• The ad-hoc mode is not supported.
• It is recommended to use IEEE 802.11a or IEEE 802.11n on
5 GHz for audio and SD video streaming.
• It is recommended to use IEEE 802.11n on 5 GHz for HD
video streaming.
• It is recommended that the encoding rate for streaming
video content is 20 Mbps or less.
• It is not recommended to use 2.4 GHz for audio and video
streaming.
• Content playback may be interrupted by various
surrounding interference.
Advanced Network Setup
NOTE:
• When the DHCP function of the router connected with this
TV is On, you can set Auto Setup to On or Off.
(This should usually be set to On.)
• When the D HCP function of the router is Off, set Auto Setup
to Off, and set the IP Address manually.
IP Address Setup
Auto Setup:
a In the Preferences menu, press B or b to select
Network Setup and press OK.
b Press B or b to select Advanced Network Setup
and press OK.
Network Setup
Network Type Wired
Wireless Setup
Advanced Network Setup
c Press B or b to select IP Address Setup and press
OK.
Advanced Network Setup
IP Address Setup Wired
DNS Setup
MAC Address
35
English
Page 36

CONTROLS AND FEATURES
Auto Setup On
Subnet Mask
IP Address Setup
IP Address
XXX . XXX . XXX . XXX
255 . 255 . 255 . 0
Default Gateway
. . .
Auto Setup Off
Subnet Mask
IP Address Setup
IP Address
XXX . XXX . XXX . XXX
255 . 255 . 255 . 0
Default Gateway
. . .
Auto Setup Off
Subnet Mask
IP Address Setup
IP Address
XXX . XXX . XXX . XXX
255 . 255 . 255 . 0
Default Gateway
. . .
d Highlight Auto Setup, and then press C or c to select
English
On.
NOTE: Other items will be grayed out when Auto Setup is set
to On.
Manual Setup:
a In the Preferences menu, press B or b to select
Network Setup and press OK.
b Press B or b to select Advanced Network Setup and
press OK.
c Press B or b to select IP Address Setup and press
OK.
d Highlight Auto Setup, and then press C or c to select
Off.
e Press B or b to select IP Address.
f Press C or c to highlight the field you want to
change, and then use the number buttons to input
the IP address. To save the setting, press OK.
NOTE: IP address field numbers must be between 0
and 255. After each field number has been set, press
OK to store the entire address. If the e ntire IP Address
is invalid, a warning message will appear after OK is
pressed.
DNS Setup
NOTE: When the DHCP function of the router connected to
this TV is Off, set Auto Setup to Off, and manually set the DNS
address(es). Your internet service provider should have
provided these to you.
Auto setup:
a In the Preferences menu, press B or b to select
Network Setup and press OK.
b Press B or b to select Advanced Network Setup and
press OK.
c Press B or b to select DNS Setup and press OK.
d Press B or b to highlight Auto Setup, and then press
C or c to select On.
NOTE: Other items will be grayed out when Auto Setup is s et
to On.
Manual setup:
a In the Preferences menu, press B or b to select
Network Setup and press OK.
b Press B or b to select Advanced Network Setup and
press OK.
c Press B or b to select DNS Setup and press OK.
d Press B or b to select Auto Setup, and then press C
or
c to select Off.
DNS Setup
Auto Setup Off
Primary DNS Address
Secondary DNS Address
XXX . XXX . XXX . XXX
255 . 255 . 255 . 0
e Press B or b to select Primary DNS Address.
g Press B or b to select Subnet Mask, and edit in the
same way as IP Address.
h Press B or b to select Default Gateway, and edit in
the same way as IP Address.
NOTE: If you manually set the IP address, you must not use
the same IP address for any other device. The IP address you
use should be a private address.
f Press C or c to highlight the field you want to
change, and then use the number buttons to input
the Primary DNS Address. To save the setting, press
OK.
NOTE: DNS address field numbers must be between 0
and 255. If you input an incompatible number and
press OK, the field number will reset to the previous
value.
g Press B or b to select Secondary DNS Address, and
edit in the same way as Primary DNS Address.
36
Page 37

MAC Address
You can view the fixed MAC address for the TV and for the Dual
Band WLAN Adaptor, if one is installed.
a In the Preferences menu, press B or b to select
Network Setup and press OK.
b Press B or b to select Advanced Network Setup and
press OK.
c Press B or b to select MAC Address and press OK.
CONTROLS AND FEATURES
Using the software keyboard
You can enter text by using the Software Keyboard.
The Software Keyboard window will appear when
you press
To enter text using the software keyboard:
a Highlight the desired character on the on-screen
b Press OK.
OK on a field that accepts character input.
software keyboard.
English
Network Connection Test
This function checks the Internet connectivity.
a In the Preferences menu, press B or b to select
Network Setup and press OK.
b Press B or b to select Network Connection Test and
press OK.
A message will appear to indicate if the connection
was successful or if it could not be completed.
NOTE: The result of Network Connection Test does
not always guarantee the connection. Depending on
the situation, YouTube may not be able to be used.
To cancel the Network Connection Test:
a Press BACK while searching for the Internet
connection.
c Repeat steps 1 and 2 until you have entered all
desired text.
d Press the BLUE button to close the software keyboard
and return to the previous screen.
NOTE: If BACK is pressed, changes are not saved and
the software keyboard window is closed. The text will
remain as it was before starting the keyboard.
A a1@
AAA|
A BCDE FG
HIJKLMN
OPQRSTU
VWXY Z
Input operation on the remote control:
Button Description
OK Inputs the selected character.
0-9 Inputs the number directly.
B b C c Moves the character highlight.
CC cc Moves the cursor.
Z
z
RED Deletes 1 character to the left of
GREEN Cycles through upper case, lower
YELLOW Chooses an accented version of
BLUE Saves changes and closes the
BACK Closes the Software Keyboard
Moves the cursor to the head of a
character string.
Moves the cursor to the end of a
character string.
the cursor.
case, numbers, and symbols, if
available.
the current letter, if applicable.
Software Keyboard window.
window without saving changes.
37
Page 38

CONTROLS AND FEATURES
Preferences
REGZA-LINK Setup
Network Setup
Network Device Setup
Personal TV Setup
Photo Frame Setup
Auto
Network Lock
Off
Teletext
Panel Lock
Network Device Setup
English
External Control Setup
This setup allows you to operate a home network-connected
Media Controller Setup
your TV from an external device.
a In the Preferences menu, press B or b to select
Network Device Setup and press OK.
b Press B or b to select External Control Setup and
press OK.
c Press B or b to select an option and press OK.
The Software Keyboard window will appear.
User Name — Input the User Name (to control the TV
from the iPhone etc.) by using the on-screen software
keyboard (see page 37). The maximum number of
characters is 16.
Password — Input the Password (to control the TV
from the iPhone etc.) by using the on-screen software
keyboard (see page 37). The maximum number of
characters is 16.
NOTE: Toshiba does not guarantee normal operation with all
connected devices.
Media Renderer Setup
Terminology:
DMS: DLNA CERTIFIED™ Server
DMR: DLNA CERTIFIED™ Renderer
DMC: DLNA CERTIFIED™ Controller
The TV can be configured as a DMR. When
operating as a DMR, the TV displays content
provided by a DMS. The selection of the media is
done by the DMC - the TV does not select the input.
The TV can play photo, movie, or audio files when
operating as a DMR.
Media Renderer
a In the Preferences menu, press B or b to select
Network Device Setup and press OK.
b Press B or b to select Media Renderer Setup and
press OK.
c Press B or b to select Media Renderer, and then
press
C or c to select On or Off.
Media Controller Setup
You can limit which DMC can control this TV.
If Access Control is enabled, only thos e DMCs with a check will
be allowed to control the TV.
a In the Media Renderer Setu p menu, press B or b to
select Media Controller Setup and press OK.
b Press B or b to select Access Control, and then press
C or c to select On.
c Press B or b to select Select Media Controller and
press OK.
d Press B or b to highlight the item you want t o select
and press OK. A check will appear in the box.
To remove the check, press OK again.
e Press c to highlight Done and press OK.
NOTE:
• You can select up to 8 DMC devices.
• If you would no t like to limit the DMCs for this TV, set Access
Control to Off.
• Devices other than DMCs may be displayed in the list.
Confirm the MAC address of the DMC and set it.
Maximum Volume Setup
This feature allows you to set the maximum volume of the TV
when it receives volume operation commands from a DMC.
a In the Media Renderer Setu p menu, press B or b to
select Maximum Volume Setup, and press
adjust to the desired volume.
NOTE:
• The TV’s remote control can set volume regardless of the
value of Maximum Volume Setup.
• When DMR playback ends, the TV volume will return to the
value in effect when DMR playback was started.
38
C or c to
Page 39

CONTROLS AND FEATURES
English
Device Name Setup
The TV’s DMR device name can be changed. The device name can
be confirmed from the DMC.
a In the Network Device Setup menu, press B or b to
select Device Name Setup and press OK.
b Highlight the Device Name field and press OK. The
Software Keyboard window will appear.
c Input the Device Name by using the Software
Keyboard (see page 37). Press the BLUE button.
NOTE: The Device Name can be up to 15 characters
long.
d Highlight Done and press OK to save your setting.
Using Toshiba Places
A new cloud based service, where content
(movies, photos, etc.) can be viewed and shared
across the web through a simple user interface
called “Toshiba Places”.
NOTE: You need to configure a home network before using
this feature (see page 11).
a Press on the remote control, or press MENU / B /
Cc to highlight Connected TV/Toshiba Places
icons and press OK.
b Press BbC c to select the desired place and press
OK.
NOTE:
• Some features require an always-on broadband internet
connection, firmware update and/or additional bandwidth
dedicated to this product. Third party inte rnet services may
change or be discontinued or restricted at any time. Toshiba
makes no warranties, representations, or assurances about
the content, availability or functionality of third-party
content or services. Use of third party internet services may
require registration by a computer and/or payment of
charges and membership. Not all services or content may
be available on this product, in your country or with your
language. In order to experience the full capabilities of this
product, fully compatible devices may be required. For
more information, visit
http://www.toshibaplaces.com/about
• This service may be forcibly blocked according to the
situation of CSP service.
.
Using YouTube™
YouTube is a video-sharing service managed by
YouTube, LLC.
This TV allows you to view YouTube content.
NOTE:
• You need to configure a home network before using this
feature (see page 11).
•If Network Lock is set to On, it will be necessary to enter
your four-digit PIN code in order to access network features
(see page 56).
a Press MENU / B / Cc to highlight Connected TV/
YouTube icons and press OK.
The YouTube top page will appear.
b Press BbC c to select the file you want to view, and
press OK.
To close YouTube:
a Press EXIT.
NOTE:
• This TV may not be able to perform all of the same
operations as a computer.
• Depending on the network environment and use case, you
may experience difficulty viewing content.
• Though the same volume value, actual volume might be
greatly different depending on contents.
• It may take time for the TV to load and begin playing back
content.
• Service content and the look and feel of the interface may
be changed at any time without prior notice.
39
Page 40

CONTROLS AND FEATURES
English
The Function Menu provides easy access to functions that are
Using the Function Menu
commonly used.
a Press the BLUE button while displaying YouTube.
The Function menu window will appear.
Back
Forward
Reload
http://www.youtube.com/xl
Home
Pointer
b Press C or c to select the desired icon and press OK.
Item Description
Back Returns to the previous page.
Forward Moves to the forward page.
Reload/
Abort
Home Returns to the top page of YouTube.
Pointer Switches the pointer On/Off or drag mode.
Menu Switches the frame or sets various settings.
Updates the displayed page.
Aborts update
( is displayed while reading, and is
displayed in other case.)
Switching the pointer
The tool that operates the screen can be changed to pointer
or drag mode.
a From the Function menu, press C or c to select
Pointer, and then press OK.
b If you select , see “To use the Pointer: ON” on this
page. If you select , see “To use the Drag Mode” on
this page.
To use the Pointer: ON:
a Press B or b to select Pointer: ON and press OK.
• will appear.
b Press BbC c to the place where changes to ,
and then press OK.
NOTE: When Pointer: OFF is se le cte d a nd
the highlight moves to linked areas.
BbC c is pressed,
Menu
To use the Drag Mode:
a Press B or b to select Pointer: ON and press OK.
b Press the BLUE button.
c From the Function menu, press C or c to select
Pointer, and then press OK.
d Press B or b to select Drag Mode and press OK.
• will appear.
e Press OK, and then changes to .
f Press BbC c to move the selected item in the
desired place.
Switching the frame
a From the Function menu, press C or c to select
Menu, and then press OK.
b Press C or c to select Page Tasks.
c Highlight Switch Frames and press OK.
Setting the view feature
a From the Function menu, press C or c to select
Menu, and then press OK.
b Press C or c to select View.
c Press B or b to select the desired item, and press OK.
d Press B or b to select the desired setting, and press
OK.
Item Settings
Display
Mode
Text Size Changes the font size of the screen. Select
Advanced
Settings
Page
Information
Server
Certificates
Normal: Displays YouTube page with the
size as it is.
Just-Fit Renderin g: Displays YouTube page
at a size that has been adjusted to precisely
fit the width of your TV.
from Largest, Large, Medium, Small or
Smallest.
NOTE: This font size is effective only for the
page.
See the next column.
Displays the information of the page you are
viewing.
Displays the server certification.
40
Page 41

If you select Advanced Settings:
a Press BbC c to select the setting items, and press
OK. A check will appear in the box. To remove the
check, press OK again.
b Press BbC c to select OK field, and press OK.
Item Description
Image Sets display/non-display of images.
Table Sets effect/non-effect of tables.
CSS Sets effect/non-effect of CSS.
Pop-up
window
Animation Sets display/non-display of animations.
JavaScript Sets effect/non-effect of JavaScript.
Word wrap Sets effe ct/non-effect of Word Wrap. If Word
RapidRender
Sets effect/non-effect of pop-up windows.
Wrap is enabled, a word not finished at the
end of a line is shifted to the next line.
Sets effect/non-effect of Rapid-Render. If
Rapid-Render is enabled, texts and links are
displayed first, and the images and the
tables, etc. are displayed afterward. The
highlight can be moved with the text and
the link displayed.
Setting other features
a From the Function menu, press C or c to select
Menu, and then press OK.
b Press C or c to select Settings.
c Press B or b to select the desired item, and press OK.
d Press B or b to select the desired setting, and press
OK.
CONTROLS AND FEATURES
Item Settings
Security When jumping from a protected page to an
Cookies Accept all: Cookie is received, and it records
Delete
Cookies
Cache Use cache: When the check is applied to
Browser
Information
NOTE:
• Cookie is the technical information that a website leaves in
this TV so that the website will recognize you when you use
it again.
• Cache is a system used to shorten the display time by
checking the past data preserved in this television when a
page that you viewed before is seen again.
unprotected page, the message is displayed
when the check is applied to Notify of
secure/non-secure page changes.
Apply the check to select SSL version from
SSL Version to use (SSL2.0, SSL3.0,
TSL1.0).
A content confirmation of the certification
and a setting effect/non-effect can be done
in Root Certificates and CA Certificates
shown below.
in this TV.
Reject all: Cookie is not received.
Prompt before accepting: When Cookie is
received, a message window will be
displayed.
Deletes all recorded Cookies.
this, cache is used.
Delete All Cache Data: Deletes all the cache
data preserved in the television.
Displays the information on a browser.
To confirm Root Certificates or CA Certificates:
a Press B or b to select Security in step3 in Setting
other features.
b Press BbC c to select Root Certificates or CA
Certificates, and press OK.
English
c Press B or b to select the desired certificate.
• When OK is pressed, a detailed informatio n window
will appear.
• When the BLUE button is pressed, Disable or
Enable bar will appear. It changes whenever BLUE
button is pressed.
d Press BACK.
41
Page 42

CONTROLS AND FEATURES
Using Hybrid TV Standard
English
(if available)
Hybrid TV Standard enables the TV to receive
HbbTV services. TV services which support this
feature often show “press RED” on the screen.
NOTE: You need to configure a home network before using
this feature (see page 11).
a Press MENU / Cc / B / Cc to highlight Setup /
Preferences icons and press OK.
b Press b to select Hybrid TV Standard.
c Press C or c to change from Disabled to Enabled.
When changing from Disabled to Enabled, a
Network Connection Test is performed. If the result
is OK, then the setting changes to Enabled. If not, the
setting remains Disabled.
When “press RED” is indicated on the screen, press
the RED button to access HbbTV service site, and then
B b C c to select the desired contents.
press
NOTE:
• This service is not available outside Germany.
• The HbbTV service indication or required key operations
may not be possible depending on the service contents. In
this case, set the Hybrid TV Standard setting to Disabled.
• Toshiba makes no warranties, representations, or
assurances about the content.
Using the Media Player
This TV allows you to enjoy movie, music and
photo files stored on a USB device connected to
the USB port.
Moreover, you can also play photos, movies or
music files from your PC by connecting the TV to
your home network.
Terminology:
DMP: DLNA CERTIFIED™ Player
DMS: DLNA CERTIFIED™ Server
DMR: DLNA CERTIFIED™ Renderer
DMC: DLNA CERTIFIED™ Controller
• DMP: The TV can control and play content from a DMS.
- A D MS is a de vice that can func tion as a s erver for DMP or
DMR.
• DMR: The TV can play content from a DMS. Playback is
controlled by a DMC.
- A DMC is a device that can instruct the TV to display
content.
NOTE:
• Do not insert/remove USB device while in use.
• MENU is not available during playback.
• When you want to use your TV as a DMR, set Media Rende rer
to On (see “Media Renderer” on page 38).
Media Player Specifications
Device
USB device
Interface version: USB2.0 HS
USB Mass Storage Class devices (MSC)
NOTE:
• Connectivity is not guaranteed for all devices.
• A USB hub can not be used.
File system: FAT16 and FAT32
Maximum memory size: Unlimited
DLNA CERTIFIED™ Server: Your PC (for example)
You must obtain any required permission from
copyright owners to download or use copyrighted
content. TOSHIBA cannot and does not grant such
permission.
42
Page 43

Basic operation
USB Auto Start On
Media Player Setup
DivX
®
VOD
Media Server Setup
Using Media Player with USB
When Auto Start is enabled, you will be asked if you
want to start the Media Player whenever a USB device
is inserted. If Auto Start is disabled (or if you want to
connect to a DMS on the network), you must manually
start the Media Player from the menu.
To change the Auto Start setting:
a Press MENU / Cc / B / Cc to highlight Media
Player/Media Player Setup icons and press OK.
b Press B or b to select USB Auto Start, and then press
C or c to select On or Off.
CONTROLS AND FEATURES
English
Manual Start:
a Insert USB device into the USB socket on the left side
of the TV.
b Press MENU / Cc to highlight Media Player icon.
c Press B / Cc to highlight Photo, Movie or Music
icon and press OK. The contents list will appear.
To select a file in the list of contents:
a Press Bb (C c) to select a file or folder.
b Press OK to move to the next layer, or press BACK to
return to the previous layer.
To close the Media Player:
a Press EXIT.
Auto Start:
a Insert USB device into the USB socket on the left side
of the TV. A prompt will appear.
b Press C or c to select Yes, and then press OK.
c Press B or b to select Photo, Movie, or Music and
press OK.
NOTE: If Auto Start is set to Off, you can start the Media
Player manually.
Using the Media Player with a DLNA CERTIFIED™
Server
You need to configure a home network before using
this feature (see page 11).
a Press MENU / Cc to highlight Media Player icon.
b Press B / Cc to highlight Photo, Movie, or Music
icon and press OK. The thumbnail (for Photo) or list of
files (for Movie and Music) will appear.
NOTE: If there is more than one media server on the
network, a list of all media servers will be displayed.
Highlight the server you want to use, and press OK.
c Press B or b to select a DMS if the selection window
is displayed.
43
Page 44

CONTROLS AND FEATURES
Photo list example
To select a file in the list of contents:
English
a Press B or b to select a file or folder.
b Press OK to move to the next layer, or press BACK to
return to the previous layer.
To close the Media Player:
a Press EXIT.
To display the device information:
a Press QUICK to open the Quick Menu in list mode or
Multi View mode.
b Press B or b to select Device Information.
Setting DLNA CERTIFIED™ Server waking up:
You only need to complete the Media Server Setup if
you wish to use the “Wake-on-LAN” feature.
a Press MENU / Cc / B / Cc to highlight Media
Player/Media Player Setup icons and press OK.
b Press B or b to select Media Server Setup and press
OK. A list of currently available DMSs will appear.
c Press B or b to select the desired device, and press
OK. A check will appear in the box. To remove the
check, press OK again.
d Press c to highlight Done, and then press OK to save.
NOTE:
• Up to 8 DMSs can be selected.
• Even if the device checked is powered off, it will be
displayed but grayed out in the Select Device window.
When OK is pressed on a highlighted grayed out item, a
confirmation of Wake-on-LAN is displayed. The TV tries to
wake up the DMS if Yes is pressed. The Server will start if it
supports Wake-on-LAN feature.
• When some DMSs are connected, it may take time until the
list is displayed. The list may be refreshed by the following
operation.
- The device selection window is closed once and it is
displayed again.
-The RED button is pressed.
Viewing photo files (on a DLNA
CERTIFIED™ Server or USB device)
There are three types of viewing modes.
Multi View
This view allows you to search for photos in a grid format.
The pictures are displayed using thumbnail data in each
image file.
PHOTO
/Folder Sort: Title
1/54
XXXXXXXXXXX.jpg
The initial highlighted position will be on the top left
thumbnail in the Multi View.
QUICK
FeaturesPlay
10:00 Fri, 21 Feb 2010
1920x1080
PageOK P
a Press B b C c to move the highlight in one window.
If all of the photos will not fit in one screen, when
pressing
C at the top left thumbnail, the screen will
move to the previous page. Conversely, when
pressing
c at the bottom right thumbnail, the screen
will move to the next page.
U Pu buttons can be used to page up/down the
P
photo list when there are more photos than will fit
onto one screen. When the P
pressed, the highlight shall be on the photo at the top
left of Previous/Next list.
U Pu buttons are
b When you select a folder, press OK to move to the
next layer. Press BACK to move back to the previous
layer.
c Press OK to view the selected photo in Single View
mode.
NOTE: When the TV is used as a DMR, this feature is not
available.
Single View
In this mode, only files located in the selected directory will be
displayed. This view allows you to change the photo content
manually. When moving from Multi View to Single View, the
currently selected photo will be displayed.
44
Page 45

a Press c to view the next photo. Press C to view the
previous photo.
b Press B to rotate the image 90° clockwise. Press b to
rotate the image 90° counterclockwise.
c Press to display file status information (file
number, photo title, date and time taken, resolution
etc.).
NOTE: The information may not be correctly displayed
depending on the content, DMC or DMS.
Slide Show
This view allows you to watch a slide show of your photos. In
this mode, only files located in the selected directory will be
played.
a To start slideshow, press OK in the Single View mode.
b Press C or c to view the previous/next photo.
CONTROLS AND FEATURES
To zoom in/out photos
During the Single View mode or Slide Show mode, the zoom
function can be used.
RED button: x1
GREEN button: x16
BACK button: Normal playback
B b C c buttons: Vertical or Horizontal scrolling
To set the shuffle mode (USB only):
S x2 S x4 S x8 S x16 zoom
S x8 S x4 S x2 S x1 zoom
a Press QUICK to open the Quick Menu in list mode.
b Press B or b to select Shuffle.
c Press C or c to select On or Off.
To sort the folders and files
a Press QUICK to open the Quick Menu from Multi
View mode.
English
c Press B or b to rotate the photo.
d Press to display file status information.
To set Interval Time and Repeat settings:
a Press QUICK to open the Quick Menu while in the
Single View mode or Slide Show mode.
b Press B or b to sel ect ei the r Interval Time or Repeat.
c Press C or c to adjust the setting and press OK.
To set Background Music
a Press QUICK to open the Quick Menu while in the
Slide Show mode.
b Press B or b to select Background Music and press
OK.
c Press B or b to select Background Music and press
C or c to select On.
d Press b to select Select Music and press OK.
e Select a music file.
NOTE:
• The music must be selected from the same media (USB)
device or DMS from which the picture files will be played.
• This feature is not available when there is no music that can
be selected.
b Press B or b to select Sort.
c Press C or c to select Title/File Name, New or Old to
set the sorting rule.
Item Description
Title (DMS) File sorting rules:
File Name
(USB)
New From new to old according to the date and
Old From old to new according to the date and
NOTE: Sorting may not be supported by some DMSs.
To display the device information
1. Unicode priority
2. (0, 1, ..., 9), capital alphabet (A, B, ..., Z),
small alphabet (a, b, ..., z)
3. Increasing order
File sorting rules:
1. Unicode priority
2. (0, 1, ..., 9), capital alphabet (A, B, ..., Z),
small alphabet (a, b, ..., z)
3. Increasing order
time when the picture was taken.
time when the picture was taken.
a Press QUICK to open the Quick Menu from Multi
View mode.
b Press B or b to select Device Information and press
OK.
NOTE: When the photos on the USB device are used, or t he TV
is used as a DMR, this feature is not available.
45
Page 46

CONTROLS AND FEATURES
Movie list example
/Folder
Sort
:
File Name
1/9
PageOK P
QUICK
FeaturesPlay
movie
MOVIE
Unprotected
WWWWWWWWWWWWW.mp4
WWWWWWWWWWWWW.mp4
WWWWWWWWWWWWW.mp4
WWWWWWWWWWWWW.mp4
WWWWWWWWWWWWW.mp4
WWWWWWWWWWWWW.mp4
WWWWWWWWWWWWW.mp4
WWWWWWWWWWWWW.mp4
00:00:20 / 00:04:00
To close the Photo Viewer
English
a Press EXIT. The television will return to the last viewed
channel or external input.
File Compatibility
See page 78.
Viewing movie files (on a DLNA
CERTIFIED™ Server or USB device)
You can select movies from a list of available files.
a Press B b to select a file or folder. PU Pu buttons
can be used to page up/down the movie list when
there are more files than will fit onto one screen.
b When you select a folder, press OK to move to the
next layer. Press BACK to move back to the previous
layer.
c With the desired file selected, press OK or
start playback.
NOTE:
• On preview screen, if you highlight the file without
pressing OK, the content is played on a preview
screen. When OK is pressed, it is played in full screen
mode.
• Dependi ng on the file size, it may take some time to
start playback.
d Press v to stop playback.
NOTE:
• If playback finishes before
return to the list.
• Depending on the file size, it may take some time for
playback to begin.
v is pressed, the screen will
c
(play) to
During playback:
•Press W/w to pause.
You can move to the desired replay position by pressing
or
c during PAUSE.
PAUSE or operations during PAUSE may not be available
depending on the contents, DMC or DMS.
c
• To resume normal playback, press
(play).
• To play in fast reverse or fast forward directions, press
cc during playback. Each time you press the CC or cc,
or
the playback speed will change.
• To locate a specific file, press
Z or z repeatedly.
• Press to display the file status information (content
number, movie title, progress time etc.).
NOTE:
• The information may not be correctly displayed
depending on the contents, DMC or DMS.
• During playback, you can adjust the Picture, Picture Size
and Sound menu functions from the Quick Menu.
To select subtitle and audio languages
•Press SUBTITLE repeatedly to select your preferred subtitle
language.
s repeatedly to select your preferred audio
•Press
language.
NOTE: This feature may not be available depending on the
contents.
To set the repeat mode
a Press QUICK to open the Quick Menu.
b Press C or c to select Off, All or 1.
Mode Description
Off The file is played back only once.
All Files in the same folder are repeatedly
played back.
1 The same file is repeatedly played back.
c Press BACK.
NOTE: When the TV is used as a DMR, this feature is not
available.
46
C
CC
Page 47

To sort the folders and files
a Press QUICK to open the Quick Menu in list mode.
b Press B or b to select Sort.
c Press C or c to select Title/File Name, New or Old to
set the sorting rule.
Item Description
Title (DMS) File sorting rules:
File Name
(USB)
New From new to old according to the date and
Old From old to new according to the date and
1. Unicode priority
2. (0, 1, ..., 9), capital alphabet (A, B, ...,Z),
small alphabet (a, b, ..., z)
3. Increasing order
File sorting rules:
1. Unicode priority
2. (0, 1, ..., 9), alphabet (A, B, ...,Z)
3. Increasing order
time when the contents were updated.
time when the contents were updated.
CONTROLS AND FEATURES
To register your TV to a DivX® account
This TV allows you to play back files purchased or rented from
®
DivX
Video-On Demand (VOD) services. When you purchase
®
or rent DivX
enter a registration code.
a In the Media Player Setup menu, press B or b to
b Press B or b to highlight DivX
c The DivX
VOD files on the internet, you will be asked to
select DivX
and then press OK.
DivX
the registration code. For details on registration,
please visit the DivX
®
VOD and press OK.
®
VOD Registration,
®
VOD
DivX® VOD Registration
®
DivX
VOD Deactivation
®
VOD window will appear and you will see
®
website at
http://vod.divx.com
d Copy the activation file to a memory device and play
it on the TV.
English
NOTE: Sorting may not be supported by some DMSs.
To display the device information
a Press QUICK to open the Quick Menu in list mode.
b Press B or b to select Device Information and press
OK.
NOTE: When movies on a USB device are used, or the TV is
used as a DMR, this feature is not available.
To close the Movie Viewer
a Press EXIT.
File Compatibility
See page 78.
To deactivate your device
a In step 2 above, highlight DivX
and then press OK.
®
VOD Deactivation,
b A confirmation message will appear. Select Yes, and
then press OK.
c The DivX
ABOUT DIVX VIDEO: DivX® is a digital video format created by
DivX, Inc. This is an official DivX Certified® device that plays
DivX video. Visit divx.com
tools to convert your files into DivX video.
ABOUT DIVX VIDEO-ON-DEMAND: This DivX Cert ified® device
must be registered in order to play purchased DivX Video-onDemand (VOD) movies. To obtain your registration code,
locate the DivX VOD section in your device setup menu. Go to
vod.divx.com
registration.
DivX Certified® to play DivX® and DivX Plus™ HD (H.264/MKV)
video up to 1080p HD including premium content.
®
VOD window will appear and you will see
the deactivation code. For details on registration,
please visit the DivX
for more information on how to complete your
®
website at
http://vod.divx.com
for more information and software
47
Page 48

CONTROLS AND FEATURES
Music list example
Title
WWWWWWWWW
:
Artist
WWWWWWWWW
:
00:00:34 / 00:05:19
/Folder
Sort
:
File Name
1 / 10
music
Unprotected
WWWWWWW.mp3
WWWWWWW.mp3
WWWWWWW.mp3
WWWWWWW.mp3
WWWWWWW.mp3
WWWWWWW.mp3
WWWWWWW.mp3
WWWWWWW.mp3
Page Full screenOK P
QUICK
FeaturesPlay
MUSIC
To playback DivX Plus HD content:
English
• To play in fast reverse or fast forward directions, press CC
or
cc during playback. Each time you press the CC or cc,
the playback speed will change.
• This TV gene rates original chapter point in 10% increments
for 10 chapters in total, that are accessible by using the
Number buttons on the remote control.
During playback, press
chapter. When
two times of above. If
playback will skip to the beginning of the next content.
Z to skip to the beginning of the current chapter.
Press
When
Z is pressed twice in succession, it will skip to the
beginning of the previous chapter. If
succession at the first chapter, stop playing the current
content and skip to the beginning of the previous content.
z to skip to the beginning of the next
z is pressed twice in succession, it wi ll repeat
z is pressed at the last chapter,
Z is pressed twice in
The Number button is used for direct jump. If the 3 button is
pressed, playback will jump to the beginning of 3rd chapter.
Even if the playback content have authored chapters, the
Number button is used to jump directly to Auto Generated
Chapter.
If the content has Authored Chapters,
Authored Chapters.
Z / z are using for
NOTE: Depending on the content data will not be operated.
Using Multi Title and Alternative Timelines Multi
Title
DivX Plus HD files may contain up to 100 titles.
You can change the title (It contains same video file) by
pressing the RED button.
When the RED button is pressed, it will display the title
change window at the bottom on the screen (same as Subtitle
or Audio change window).
The title is changed cyclically each time the RED button is
pressed. Playback will start from start time of selected title
each time you press
NOTE: Depending on the content data will not be operated.
B or b.
Playing music files (on a DLNA
CERTIFIED™ Server or USB device)
You can listen to music from a list of available files.
a Press B b to select a file or folder. PU Pu buttons
can be used to page up/down the music list when
there are more files than will fit onto one screen.
b When you select a folder, press OK to move to the
next layer. Press BACK to move back to the previous
layer.
c With the desired file selected, press OK or
start playback.
NOTE: OK takes to you full s creen playback. Playback
in preview start without pressing OK.
Moving cursor up/down plays music.
d Press v to stop playback.
NOTE:
• Depending on the file size, it may take some time for
playback to begin.
• During playback, you can adju st the Sound menu functions
from the QUICK Menu.
During playback:
•Press W/w to pause.
• To resume normal playback, press
• You can move to the desired replay position by pressing
c during PAUSE.
or
• PAUSE or operations during PAUSE may not be available
depending on the content, DMC or DMS.
• To play in fast reverse or fast forward directions, press
cc. Each time you press CC or cc, the playback speed
or
will change.
c
(play).
48
c
(play) to
C
CC
Page 49

To set the repeat mode:
a Press QUICK to open the Quick Menu in list mode.
CONTROLS AND FEATURES
English
To display the device information
a Press QUICK to open the Quick Menu in list mode.
b Press B or b to select Repeat.
c Press C or c to select Off, All or 1.
Mode Description
Off Files in the same folder are played back
All Files in the same folder are repeatedly
1 The same file is repeatedly played back.
once.
played back.
d Press BACK.
NOTE: When the TV is used as a DMR, this feature is not
available.
To set the shuffle mode:
a Press QUICK to open the Quick Menu in list mode.
b Press B or b to select Shuffle.
c Press C or c to select On or Off.
To sort the folders and files
a Press QUICK to open the Quick Menu in list mode.
b Press B or b to select Sort.
c Press C or c to select Title/File Name, New or Old to
set the sorting rule.
Item Description
Title (DMS) File sorting rules:
File Name
(USB)
New From new to old according to the date and
Old From old to new according to the date and
1. Unicode priority
2. (0, 1, ..., 9), alphabet (A, B, ...,Z)
3. Increasing order
File sorting rules:
1. Unicode priority
2. (0, 1, ..., 9), alphabet (A, B, ...,Z)
3. Increasing order
time when the contents were updated.
time when the contents were updated.
b Press B or b to select Device Information and press
OK.
NOTE: When music files on a USB device are used, or the TV is
used as a DMR, this feature is not available.
To display the file status information
a Press during playback. The information will be
displayed on the bottom of the screen.
b Press again to remove the information.
NOTE: The information may not be correctly displayed
depending on the content, DMC or DMS.
To close the Music Player:
a Press EXIT.
File Compatibility
See page 78.
NOTE: Sorting may not be supported by some DMSs.
49
Page 50

CONTROLS AND FEATURES
Preferences
REGZA-LINK Setup
Network Setup
Teletext
Network Lock
Network Device Setup
Personal TV Setup
Photo Frame Setup
Auto
Off
Panel Lock
Photo Frame Setup
Photo Select
Photo Edit
Settings
Start
ReturnEnterOK BACK
Photo Frame Setup
Photo Select
Photo Edit
Settings
Start
ReturnEnterOK BACK
Using the Photo Frame feature
English
You can use the TV screen as a digital photo fr ame. One image
(pre-installed or user-installed) can be displayed. Date info
can also be superimposed, if desired.
You can overwrite the photo file with a file from a USB storage
device or DLNA CERTIFIED™ Server.
To open Photo Frame
a Press MENU / Cc / B / Cc to highlight Setup/
Preferences icons and press OK.
b Press B or b to select Photo Frame Setup and press
OK.
The preview screen will appear.
c Press c to select Start and press OK to open Photo
Frame.
To open from the Quick Menu
a Press QUICK to open the Quick Menu.
b Press B or b to select Photo Frame and press OK to
open Photo Frame.
To close Photo Frame:
a Press EXIT.
Setting the features
In the preview screen, you can set various settings for Photo
Photo Select
Frame.
a In the Photo Frame Setup menu, press B or b to
select Photo Select and press OK.
b If the device selection screen appears, press B or b to
select the appropriate device and press OK.
50
Page 51

c Press B b C c to select the photo you want to copy
/Folder Sort: Title
1/54
XXXXXXXXXXX.jpg
10:00 Fri, 21 Feb 2010
1920x1080
PageOK P
QUICK
FeaturesPlay
PHOTO
OK BACK
Photo Edit
Rotate
Delete
ReturnEnter
OK BACK
Settings
Clock Off
Left
Off
Position
Auto Power Off
ReturnEnter
--/-- (---)
-- 10:10
from the USB storage device or DLNA CERTIFIED™
server to the TV’s flash memory, and then press OK.
Photo Edit
a Press B or b to select Photo Edit and press OK.
b Press B or b to select Rotate or Delete.
CONTROLS AND FEATURES
Settings
a Press B or b to select Settings, and then press OK.
b Press B or b to select Clock, Position or Auto Power
Off.
c Set the following items as required.
• Clock — Press
Analogue Clock or Analogue + Digital.
• Position — Press
• Auto Power Off — Press
00:30, 01:00, 02:00, 04:00, 06:00 or 12:00.
If the Photo Frame window is left open, the TV will
automatically turn off after the set length of time
(maximum 12 hours).
C or c to select Off, Digital Clock,
C or c to select Left or Right.
C or c to select Off,
English
c Set the following items as required.
• Rotate — Press OK to rotate the image
90°clockwise.
• Delete — Press OK. A confirmation window will
appear. Press
C or c to select Yes, and then press
OK.
d Press BACK.
d Press BACK.
e Select Start and press OK.
Apr/26 (Tue)
AM 10:53
NOTE:
• The clock display will only appear when time from a digital
broadcast is available.
• The photo and clock displays are moved by 4 dots every 5
minutes to minimize the risk of screen burn-in.
• The pre-installed photo file is stored in the TV’s flash
memory before shipment.
• Picture Size selection (Normal/ Dot by Dot) is available by
pressing the QUICK button. However when the resolution is
1920 x 1080 or above, the Picture Size selection menu will
be grayed out.
51
Page 52

CONTROLS AND FEATURES
Preferences
Network Setup
Network Device Setup
Personal TV Setup
Network Lock
Photo Frame Setup
REGZA-LINK Setup
Teletext Auto
Panel Lock Off
Set Timer
10:50 Tue, 26 Apr
Timer Type
Date
Channel
Start Time
End Time
30 CABC Channel
Reminder
10:49
11:49
Subtitle
Repeat
Once
Off
Tue, 26 Apr 2011
Input
Return
Edit
Set Timer Delete Timer
50
0-9
BACK
Other features
English
Panel Lock
Panel Lock disables the buttons on the television. All buttons on
the remote control can still be used.
a Press MENU / Cc / B / Cc to highlight Setup/
Preferences icons and press OK.
When Panel Lock is On, a reminder will appear when the
buttons on the television are pressed. If th e standby button
is pressed, the television will switch off and can only be
brought out of standby by using the remote control.
The timers
Programme Timers – digital only
This feature will set the television to go to a specific channel at a
certain time. It can be used to view a particular programme, or by
setting the mode to daily or weekly, can be used to view a series
a Press MENU / Cc / B / Cc to highlight TV
Programmes/Programme Timers icons and press
OK.
b Press b to select Programme Timers, and then press
OK.
c Press b if necessary to select an open timer position,
then press OK. The Set Timer menu will now appear
on screen.
d Press B and b to go through the list adding the
details of the programme by using the number
buttons and
of programmes.
C and c to make selections.
e When all of the details have been entered, highlight
Set Timer and press OK to save the timer.
The ORANGE/RED programme timer indicator on the
front of the television will be lit (see page 73 for details).
PLEASE NOTE: When a timed programme is about to start, an
information screen will appear offering the option of
watching or cancelling the programme. The menus and other
channels will not be available during the timed programme
unless the programme timer is cancelled.
It wil l only be p ossible t o create or edit pr ogramme t imers for
the currently tuned DTV input.
52
Page 53

CONTROLS AND FEATURES
On Timer
Enable On Timer
Enable DTV Clock
Volume
Time Until Power On
20
00:00
Done
Channel
12 ABC
Repeat
Once
Input
DTV
Power On Time
00:00
On
On
English
On Timer
The feature allows you to set the television to turn on
automatically to a preset channel at a certain time of day or after
a certain length of time.
a Press MENU / Cc / B / Cc to highlight Function/
On Timer icons and press OK.
b Press B or b to select Enable On Timer and press C
or
c to select On.
c Press b to select Enable DTV Clock, and then press C
or
c to select On or Off.
d Press B or b to go through the list adding the details
of the On Timer by using the number buttons and
and
c to make selections.
Power On Time (only for DTV Clock On mode): Set
the time you prefer with the number buttons.
Repeat (only for DTV Clock On mode): Select the
desired On Timer operation (Once, Every Day, Mon-
Fri, Mon-Sat, Sat-Sun).
Input: Select a video input source (ATV, DTV, EXT 1,
EXT 2, EXT 3, HDMI 1, HDMI 2, HDMI 3, HDMI 4 or PC).
Channel: Set the channel that will be tune d when the
television turns on.
NOTE: When an external input is selected in the Input
field, a channel cannot be selected.
Volume: Set the volume that will be applied when
the television turns on.
Time until Power On (only for DTV Clock Off mode):
Set the amount of time from now until the TV turns o n
using the number buttons (maximum of 12 hours).
C
Sleep Timer
The television can be set to turn itself Off after a certain length of
time.
a Press MENU / Cc / B / Cc to highlight Function/
Sleep Timer icons and press OK.
b Use the number buttons to set the desired time. For
example, to switch the television off in one and a half
hours enter 01:30, or press
in steps of 10 minutes. (Maximum time setting is 12
hours)
c / C to increase/decrease
c Press EXIT to finish.
d To cancel the Sleep Timer, enter all zeros for the
above setting.
e Press B or b to highlight Done and press OK.
To cancel the On Timer
a In the On Timer menu, select Enable On Timer
b Press C or c to select Off.
53
Page 54

CONTROLS AND FEATURES
D
+
Change
6:00 Thu, 11 Oct
4
CHANNEL Z
Now
MLB Young’s two-run triple leads AL over NL
MLB Young’s two-run triple leads AL over NL
15 min left
News
8:00- 9:00
6:00- 8:00
Next
Also
HD
AD 18
16:9
AD English
World News and Sports
(Personal Name)
Return
Edit
Set Timer Delete Timer
BACK
Set Timer 10:50 Tue, 26 Apr
Tue, 26 Apr 11:00
30 CABC Channel
Seven Wonder4
End Time
Start Time
10:49
11:49
Repeat
Subtitle
Once
Off
Timer Type
Reminder
50
Energy Saving Settings
English
Automatic Power Down
The TV will automatically turn itself off (standby) after 4 hours, if
you do not operate the TV either from the remote control or the
TV control panel.
a Press MENU / Cc / B / Cc to highlight Setup/
Preferences icons and press OK.
b Press B or b to select Energy Saving Settings and
press OK.
c Press B or b to select Automatic Power Down.
d Press C or c to select On or Off, and press OK.
NOTE:
• This feature is set to On when Location is set to Home.
•1 minute before switching to standby, a Warning message
will appear.
• When the following features are set, the feature that is set
for the nearest time will function.
- Automatic Power Down
-Sleep Timer
- Photo Frame/Auto Power Off
- Auto shutdown after 1 hour of inactivity (after power on
by On Timer)
- No signal auto power off (after 15 minute of no signal)
No Signal Power Down
The TV will automatically turn itself off after 15 minutes when no
signal is detected. You can change the setting to Off for the
• Low signal strength of analog channel (no signal detection)
• Only Audio L/R is connected to external input to listen to
music through the TV speakers.
following purposes:
a In the Energy Saving Settings menu, highlight No
Signal Power Down, and press OK.
Digital on-screen information and Programme Guide
When viewing in digital mode, the on-screen
information and programme guide provide access
to programme details for all available channels.
Information
a Press , the information screen will appear giving
details of the channel and programme currently
being viewed.
b Press B or b to select the “Now”, “Next” or “Also”
information guide.
c To record the next scheduled programme, select
“Next” and press OK. The Set Timer screen will
appear.
b Press B or b to highlight the item you want to
change, and press
NOTE:
• Default setting is all On.
• A warning message will ap pear 1 minute before turning off.
C or c to select On or Off.
d The details of the programme will already have been
added to the timer. Highlight Set Timer and press OK
to save.
To indicate that a Recording Timer has been set, a
clock icon will be displayed in the Next and Also fields
of the information screen. A check mark will appear if
the timer is a Reminder Timer.
e Press b to select Also. Details of programmes that
have started on other channels will be provided. Use
C or c to change the display contents.
54
Page 55

To display More Information
D
6 M6
11 NT1
806 ITV1
807 ITV3
808 ITV2
809 ITV4
34 AB1
804 Codec 4:3
31 PARIS PREMIERE
800 FlowerGd 6Mbs
801 FlowerGd 4Mbs
802 FlowerGd 2Mbs
9 W9
10:50 Tue, 6 Apr
Thu
6
TV
18:00 18:30 19:00 19:30 20:00
Evamag
00
MA SORCIE...
06
Nicky La...
SUMMERLAND
08
Street fight...32Dragon B...59Dragon B...24K 2000
48
10
LES SIM...
44
SUMMERLAND
53
LES SIM...
09
TOP MODEL
06
LES SIM...
33
HAPPY DAYS39HAPPY DAYS
39
21 jump street27Jerry Springer Show14City guys54L...
17
LES SIMPSON
09
a Press QUICK to open the Quick Menu.
b Press b to highlight More Information and press OK.
On-screen Information icons
Icon Description
Service info Service type
Audio info Mono
+
D
HE-AAC Audio Coding
AD Audio Description
Audio/Subtitle
info
Personal Mode
info
Event info HD, SD Video format (HD, SD)
16:9, 4:3 Video Aspect
Subtitle (Single, Multi)
0, 4 – 18 Parental rating
Timer info Recording
(TV, Radio, Text)
Skip
Stereo
Dual mono
Multichannel
Dolby Digital
Dolby Digital+
For Hard of Hearing
Personal Mode
(Personal Name)
Teletext
Multi-audio track
Encrypted
Reminder
CONTROLS AND FEATURES
Guide
a Select the on-screen guide by pressing GUIDE, and
the guide screen will appear highlighting details of
the channel and programme currently being viewed.
This may take a few moments to appear.
You can switch the time scale to 1.25 or 2.5 hours by
pressing the GREEN button.
NOTE: Channels are displayed in groups by service
type (TV, Radio, Text). Pressing the TV button will
switch the service type.
b Press C or c for information on other programmes
scheduled for the channel selected. To highlight the
first programme in the genre grid, press the RED
button.
c For details of other programmes currently available,
press
B and b to scroll up and down the channel list.
As channels are selected, details of the programme
currently being broadcast will appear. Press
view information for future programmes.
C or c to
English
d For information on a highlighted programme, press
.
e To set the timer for that programme, press the BLUE
button to bring up the Programme Timers menu.
NOTE: In order for the recording operation to work
properly, the media recorder must be set to the same
time as the TV. Regarding the process for recording,
please refer to the owner’s manual of the recording
equipment.
f Press Pu to advance to the next page, or press PU to
go back to the previous page.
55
Page 56

CONTROLS AND FEATURES
BACK
Genre Colour Setup
Movies
Colour Setup
Return
34 AB1
11 NT1
9 W9
34 AB1
11 NT1
31 PARIS PREMIERE
9 W9
11 NT1
31 PARIS PREMIERE
11 NT1
11 NT1
34 AB
31 PARIS PREMIERE
Indiana Jones and the Temple of Doom
Red Corner
The Lawnmower Man
A Vow to Kill
Parenthood
Body and Soul
The Nun’s Story
Red Corner
The Real Blonde
Critters
The jackal
Coup De Ville
Hard Rain
Wed,27 Apr 22:15- 23:55
Wed,27 Apr 0:15- 1:45
Thu,28 Apr 1:20- 3:00
Fri,29 Apr 1:30- 3:00
Sat,30 Apr 0:45- 2:40
Sat,30 Apr 1:15- 3:00
Sat,30 Apr 15:00- 17:30
Sat,30 Apr 23:20- 1:15
Sun,1 May 0:40- 2:00
Sun,1 May 0:40- 2:20
Sun,1 May 21:10- 23:20
Sun,1 May 23:20- 1:15
Mon,1 May 1:10- 3:00
Genre Search
10:50 Tue, 6 Apr
Movies
System Setup
Menu Language English
Country
Ant/Cable In
ATV Manual Tuning
DTV Manual Tuning
Quick Setup
DTV Settings
Germany
Antenna
Auto Tuning
* * * *
New PIN:
Confirm PIN:
Parental PIN Setup
English
Genre selection/searching
From the guide screen, you can use the genre selection and
search features.
a Press the QUICK button from the guide screen.
b Press B or b to highlight Genre Colour in the Quick
Menu and press OK.
c With the focus on a particular genre, press the desired
colour key to assign. Four colours will be available to
set. Press BACK to go back to the guide screen.
d Press the YELLOW button to access the Genre
Search screen.
Digital settings – parental control
In order to prevent viewing of unsuitable films and
programmes, channels and menus can be locked
in digital mode. These can then only be accessed
with a security code PIN.
Parental PIN Setup
a Press MENU / Cc / B / Cc to highlight Setup/
System Setup icons and press OK.
b Press B or b to select DTV Settings and press OK.
c Press B or b to highlight Parental PIN Setup and
press OK.
DTV Settings
Channels
Subtitle and Audio
Parental PIN Setup
Parental Control
Local Time Setting
Standby Channel Update
DVB Character Set
Dynamic Scan
Off
Standard
On
e Press C or c to select the genre. Programmes listed
will change for the new genre. Press
highlight a particular programme.
f When a current programme is selected, pressing OK
will tune to that programme. When a future
programme is selected, pressing OK will open the
Edit Timer menu.
g For information on a highlighted programme, press
h To exit the Genre Search and go back to the guide
.
screen, press the YELLOW button.
d Using the number buttons enter a four digit number.
Once entered you will be prompted to confirm by
entering again.
B or b to
The PIN number is now set.
If the PIN code has been set, when Auto Tuning and
Reset TV are executed, entering the PIN will be
necessary.
56
Page 57

CONTROLS AND FEATURES
Parental Setup None
Parental Control
Preferences
REGZA-LINK Setup
Network Setup
Teletext
Network Lock
Network Device Setup
Personal TV Setup
Photo Frame Setup
Auto
Panel Lock Off
Channel List
Favourites 1
6 M6
9 W9
11 NT1
31 PARIS PREMIERE
34 AB1
51 ITV1
English
Parental Setup
The Parental Control feature allows you to block programmes
according to their rating levels. If a PIN has been set, you will need
to enter it before adjusting the level.
a In the DTV Settings menu, press B or b to select
Parental Control and press OK.
b Use C or c to choose an option (None or an age
setting (4-17 or 4-18 depending on the Country
setting)).
To view blocked programmes, enter the PIN. To
reactivate the Parental Control, turn the TV off and
then on again.
Network Lock
You can use the Network Lock feature to prevent the Web
browser from launching. When this feature is set to On, PIN input
will be necessary to use YouTube.
This feature will be grayed out until a PIN is set.
a Press MENU / Cc / B / Cc to highlight Setup/
Preferences icons and press OK.
b Press B or bto select Network Lock and press OK.
Digital settings – Channel Options
Selecting favorite channels
Favorite Channels creates a list of the digital channels that are
watched most. Four lists can be created, they can be a mixture of
a Select a channel you want to add to your favorite list.
b Press QUICK to open the Quick Menu.
c Press b to select Channel Options and press OK.
d Press c repeatedly to select the favorite list (Fav.1-4).
e Press OK to select the ones required. A tick will appear
f Repeat steps 1 through 5 for other channels.
g When all favorites have been selected, press EXIT.
television, radio and text channels.
Channel Options
Fav.
1234
in the box as they are selected.
Favorite Channel Lists
c Enter your four-digit PIN code.
d Press C or c to select On, and then press OK.
To unlock the Network:
a Select Off in step 4 above.
a Press LIST to display Channel List.
b Press C or c to select Favourites 1-4. The number of
favourites available depends on how many lists have
been created.
c Press B or b to highlight a channel and press OK to
watch.
57
Page 58

CONTROLS AND FEATURES
Subtitle and Audio
Subtitle Type
Secondary Subtitle Language
Primary Subtitle Language
Audio Type
Primary Audio Language
Secondary Audio Language
English
English
English
Normal
English
Normal
Subtitle Display
Off
English
This feature allows you to set channels that will be skipped when
Skip channels
u or PU are used to tune.
P
a Select the channel you want to skip in your channel
list.
b From the Quick Menu, press b to select Channel
Options and press OK.
c Press c repeatedly to highlight the skip (8) box.
d Press OK to select. A tick will appear in the box.
e Repeat steps 1 through 4 for other channels.
f Press EXIT.
NOTE: Skipped channels cannot b e se lec ted by P
U but still be accessed by direct number entry
P
(when tuned a
banner to indicate as a skipped channel).
8 icon will be displayed in the
Locking channels
Locking Channels stops the viewing of digital channels, and
they can only be accessed by entering the PIN.
a Select the channel you want to lock in your channel
list.
b From the Quick Menu, press b to select Channel
Options and press OK.
c Press c repeatedly to highlight the lock ( ) box.
d Press OK to select. A tick will appear in the box.
If a PIN has already been set, PIN entry will be required
to set the locked channels.
e Repeat steps 1 through 4 for other channels.
f Press EXIT.
g From this point on, when any of the channels in the
Locked Channel list are selected, the PIN must be
entered before they can be accessed.
Digital settings – other settings
Subtitles
In digital mode, this feature will show subtitles on the screen in
the selected language provided they are being broadcast.
a In the DTV Settings menu, press B or b to select
Subtitle and Audio and press OK.
b Press b to select Subtitle Display and use C or c to
select On or Off.
u or
c Press B or b to select Primary Subtitle Language or
Secondary Subtitle Language and press
select an option.
The SUBTITLE button can be used to select subtitle on or off
for the current channel only and to select the subtitle
language if more than one subtitle is available.
Audio languages
This feature allows a programme or film to be viewed with a
choice of soundtrack language, provided multiple language
a In the Subtitle and Audio menu, press B or b to
b Press B or b to select Primary Audio Language or
tracks are being b roadcast.
select Audio Type and press
or For Hard of Hearing.
Secondary Audio Language and press
select an option.
If more than one soundtrack is available, use the s
button to select between them.
C or c to select Normal
C or c to
C or c to
58
Page 59

CONTROLS AND FEATURES
SEARCHING FOR NEW SOFTWARE
Searching for a new software upgrade for this TV.
Searching
English
Common Interface
The Common Interface Slot, situated on the side of the television,
enables the insertion of a CAM (Conditional Access Module) and
card. These are purchased from a service provider and allow
additional subscription broadcasts to be viewed. For
information, see a service provider.
a Insert the CAM and card into the Common Interface
Slot, following the instructions provided with the
CAM. A box will appear on screen to confirm that the
CAM has been inserted.
b Press MENU / Cc / B / Cc to highlight Setup/
System Setup icons and press OK.
c Press B or b to select DTV Settings and press OK.
d Press B or b to select Common Interface and press
OK.
e Details of the CAM should now be available.
NOTE:
• Software update of a CI Plus CAM may occur automatically
if instigated by the broadcaster. This could cause the
cancellation of any Reminders/Recordings during this
process.
• Some CI or CI+ CAM may not be supported.
• CI+ operation is not guaranteed except for Canal Ready DTT
services on suffix FC models.
Software Upgrade and Licences
Auto Upgrade
When Auto Upgrade is set to On, the television will
automatically upgrade while in standby if new software is
a In the System Setup menu, press B or b to select
Software Upgrade and press OK.
b Press B or b to select Over-the-air Upgrade and
press OK.
c Press B or b to select Auto Upgrade.
d Use C or c to select On or Off.
Searching for New Software
If preferred, software upgrades can be searched for manually
using Search for New Software.
a In the System Setup menu, press B or b to select
Software Upgrade and press OK.
b Press B or b to select Over-the-air Upgrade and
press OK.
c Press B or b to select Search for New Software.
d Press OK. The television will automatically start
searching for a software upgrade, the progress bar
will move along the line.
available.
If an upgrade is found, the television will
automatically start downloading. If not, a screen will
appear stating that an upgrade is unavailable.
59
Page 60

CONTROLS AND FEATURES
English
TOSHIBA may offer upgrades for the TV’s software in the future.
Before downloading software;
Configure your TV to connect to the Internet.
NOTE: While the upgrade is being performed, you will not be
able to watch the TV.
Network Upgrade
The TV’s software is upgraded via the Network.
a In the System Setup menu, press B or b to select
Software Upgrade and press OK.
b Press B or b to select Network Upgrade and press
OK.
NOTE: If the network is not available, a warning
message will appear.
c The TV software upgrade will start when download
succeeds.
Software Licences
The licences for the software used in this television are available
for viewing.
a In the System Setup menu, press B or b to select
Software Licences and press OK.
A screen will appear displaying all the licensing
information required for the televisions software.
System Information and Reset TV
System Information
This feature can be used to check the version of software
currently installed. When in DTV mode, it includes additional
diagnostic information such as signal strength, signal quality,
a In the System Setup menu, press B or b to select
b Press OK to display the System Information .
c For information about the signal quality of a particular
d Press OK for a screen showing detailed technical
Selecting Reset TV will reset all TV settings, including saved
a In the System Setup menu, press B or b to select
centre frequency, modulation, etc.
System Information.
System Information
2.1.26.0 Feb 19 2011 - 15:56:50 FW:13
WEAK
Ch25
multiplex, press
information about the selected multiplex.
TOSHIBA
2011
AVERAGE STRONG
B or b to select that multiplex.
Reset TV
channels, to their original factory values.
Reset TV.
Good
b Press OK to select. A screen will appear warning that
all settings will be lost. Press OK to continue.
When the set powers back on, the Quick Setup
screen will appear. Press OK to advance the setup and
perform an auto tune. (See “Quick Setup” section on
page 14.)
60
Page 61

CONTROLS AND FEATURES
Auto Format On
4:3 Stretch Off
Picture Position
PC Settings
Display Settings
0
0
0
0
PC Settings
Horizontal Position
Reset
Sampling Clock
Vertical Position
Clock Phase
English
PC Settings
Horizontal and Vertical Position
Connect the PC (as shown in the ‘Connecting a computer’
section) and ensure that a picture is showing on the television
screen. The picture position may now be adjusted to suit
a Press MENU / Cc / B / Cc to highlight Setup/
Preferences icons and press OK.
b Press B or b to select Display Settings and press OK.
c Press B or b to select PC Settings.
d Press OK. Press B and b to select an option, then C
or
c to adjust the settings.
personal preference.
Sampling Clock
Adjusting the Sampling Clock alters the number of pulses per
scan, this will clear vertical lines on the screen.
a In the Display Settings menu, press B or b to select
PC Settings and press OK.
b Press B or b to select Sampling Clock.
c Press C or c to adjust until the picture clears.
Reset
Use Reset to return all items to the original factory settings.
a In the Display Settings menu, press B or b to select
PC Settings and press OK.
b Press B or b to select Reset and press OK.
NOTE: When a PC is connected using HDMI, none of these
functions will be available.
The screen is disrupted momentarily when adjusting PC
Settings. This is not a sign of malfunction.
The default settings and adjustment ranges may vary
depending on the input signal format.
Clock Phase
The Clock Phase matches the PC signal with the LCD display.
Adjusting this can clear horizontal stripes and picture blur.
a In the Display Settings menu, press B or b to select
PC Settings and press OK.
b Press B or b to select Clock Phase.
c Press C or c to adjust until the picture clears.
61
Page 62

CONTROLS AND FEATURES
Inputs
TV
1
2
3
HDMI 2
HDMI 1
PC
HDMI 3
HDMI 4
Inputs
DTV TV *
DTV Radio *
DTV Text *
1
2
3
HDMI 3
HDMI 2
ATV
HDMI 4
PC
HDMI 1
Pressing o on the
remote control
Pressing o on the TV
* If radio or text channels
are currently available
for DTV.
Input Label
--
--
--
--
--
--
--
--
Input Labeling
EXT 1
EXT 2
EXT 3
HDMI 1
HDMI 2
HDMI 3
HDMI 4
PC
Input selection and AV
English
connections
See page 7 for a detailed image showing
recommended connections.
Most media recorders and decoders send a signal through the
SCART lead to switch the television to th e correct Input socket.
Alternatively, press the external source selection button
until the picture from connected equipment is shown.
Input selection
Use the Input Selection window if the television does not switch
over automatically.
a By pressing o on the remote control or TV, a list will
appear on screen showing all inputs and external
equipment.
External input skip
This feature is designed to make input selection more conveni ent
by allowing you to skip unused inputs.
a Press MENU / Cc / B / Cc to highlight Setup/
Preferences icons and press OK.
b Press B or b to select AV Connection.
o
Preferences
Network Setup
Network Device Setup
Photo Frame Setup
Teletext Auto
Network Lock
Panel Lock Off
Display Settings
AV Connection
c Press OK to display the AV Connection menu.
d Press B or b to highlight Input Labeling and press
OK.
AV Connection
Input Labeling
PC/HDMI 3 Audio
HDMI 3 Audio
HDMI Settings
Digital Audio Output
PC
Digital
Auto
HDMI® displays equipment connected to Input HDMI
on the back or side of the television.
PC disp lay s a c ompu ter con nec ted t o Input RGB/PC on
the back of the television.
e Press B or b to select the input you want to skip, and
then press the RED button to turn on the skip.
f To turn off the skip, press the RED button again.
The input set to Skip is grayed out in the Input
Selection window and is skipped over when you press
o on the remote control.
62
Page 63

CONTROLS AND FEATURES
Input Label
--
--
--
--
--
--
--
--
Input Labeling
EXT 1
EXT 2
EXT 3
HDMI 1
HDMI 2
HDMI 3
HDMI 4
PC
AV Connection
Input Labeling
PC/HDMI 3 Audio
PC
HDMI 3 Audio
Auto
HDMI Settings
Digital Audio Output
Auto
English
Labeling video input sources
These input labels are shown in the input selector. You can label
video inputs according to the devices you have connected to the
TV.
a Press MENU / Cc / B / Cc to highlight Setup/
Preferences icons and press OK.
b Press B or b to select AV Connection and press OK.
c Press B or b to select Input Labeling and press OK.
d Press B or b to highlight the item you want to label,
and then press
DVD, Game, PC, Recorder, Satellite or VCR, or press
the GREEN button to select User Input.
NOTE: When User Input is selected by pressing the
GREEN button, the Software Keyboard window will
appear. Input the desired characters (10 characters or
less) by using the Software Keyboard (see page 37)
or using the number buttons for a number input. To
save your settings, press the BLUE button.
C or c to select --, Amplifier, Cable,
e Repeat step 4 for other video inputs.
PC Audio
In order to receive sound from a connected PC, plug the audio
cable into the back of the television (as shown in the ‘Connecting
a computer’ section), and then use the PC/HDMI 3 Audio
setting.
a In the Preferences menu, press B or b to select AV
Connection and press OK.
b Press B or b to highlight PC/HDMI 3 Audio, and
then press
NOTE: Selecting the PC option will force HDMI 3
Audio to Digital mode.
If the connected HDMI source does not support digital audio,
plug the audio cable into PC/HDMI 3 (AUDIO) on the back of
the television (as shown in the ‘Connecting an HDMI® or DVI
device to the HDMI input’ section), th en use the HDMI 3 Audio
C or c to select the PC option.
HDMI 3 Audio
setting.
a In the Preferences menu, press B or b to select AV
Connection and press OK.
b Press B or b to select HDMI 3 Audio, and then press
C or c to select Auto or Analogue.
If the sound is absent, try selecting a different setting.
NOTE: HDMI 3 supports digital and analogue sound,
HDMI 1, HDMI 2 and HDMI 4 are digital sound only.
Certain DVD disk formats may not output from this TV
(32/44.1/48kHz and 16/20/24 bits are acceptable).
63
Page 64

CONTROLS AND FEATURES
HDMI Settings
Enable Content Type
INSTAPORT
TM
On
On
RGB Range
Auto
AV Connection
Input Labeling
PC/HDMI 3 Audio
PC
HDMI 3 Audio
Auto
HDMI Settings
Digital Audio Output
Auto
English
Some early HDMI equipment may not work properly with your
HDMI TV. Please try setting the Enable Content Type and
INSTAPORT™ options to Off. Adjusting these settings shoul d
allow your early HDMI source to operate properly with your
HDMI Settings
television.
a In the Preferences menu, press B or b to select AV
Connection and press OK.
b Press B or b to select HDMI Settings and press OK.
NOTE: HDMI Settings is grayed out on non-HDMI
inputs.
c Press B or b to sel ect an ite m, and the n press C or c
to select a setting.
• Enable Content Type: On
When set to On, the TV will automatically adjust
settings according to the content type data sent
from the connected HDMI device.
• INSTAPORT™: On
This feature reduces the lag time when switching
HDMI sources.
•RGB Range: Auto
This feature adjusts RGB full range signal
automatically. When Limited is selected, RGB signal
is output in the range from 16 to 235. When Full is
selected, RGB signal is output in the range from 0 to
255.
NOTE:
• If your HDMI connection is capable of 1080p and/or your
television is capable of refresh rates greater than 50Hz or
supports Deep Colour, you will need a Category 2 cable.
Conventional HDMI/DVI cables may not work properly with
this mode.
• All of the above HDMI settings need proper HDMI source
devices.
If the HDMI source products do not support these features,
the television may not work properly by activating these
features.
Digital Audio Output
When connecting a surround sound amplifier to the digital audio
output (Sony/Philips Digital Interface Format [S/PDIF]), the
following options can be selected or adjusted.
a In the Preferences menu, press B or b to select AV
Connection and press OK.
b Press B or b to select Digital Audio Output.
c Press OK to display Digital Audio Output menu and
press
B or b to select an option.
Audio Format:
C or c to select PCM or Auto.
Press
PCM: This mode outputs PCM format to the digital
audio output socket.
Auto: This mode outputs Dolby Digital (if available)
or PCM to the digital audio output socket.
Dolby Digital
Dolby Digital Plus
MPEG
HE-AAC
Audio Delay:
Press
C or c to select Auto or Manual.
Auto: This mode automatically adjusts the audio
timing to meet the video timing.
NOTE: The time lag might be large between
the image and sound depending on the
connected equipment (amplifier etc.). In that
case, select Manual.
Manual:You can manually adjust the audio signal
timing to meet the video signal timing.
Delay Adjustment:
C or c to adjust the audio signal timing
Press
(0 – 250ms) to meet the video signal timing.
NOTE:
• This feature is grayed out when Audio Delay is in
Auto.
• A time lag will occur when the video signal or audio
signal is changed. Adjust the timing accordingly.
• When adjusting the timing, turn down the volume
of the AV equipment used as far as possible.
Depending on the equipment, noise etc. may occur
when the signal is changed.
• Depending on the connected equipment (amplifier,
etc.), adjustment may not be possible.
• When th e optical digital output setting (Auto
is changed, it may be necessary to adjust the timing
again.
• Do not use other than for audio output from the AV
amplifier, etc. (Malfunction may occur)
S Dolby Digital
S PCM
S Dolby Digital
S Dolby Digital
tPCM)
64
Page 65

CONTROLS AND FEATURES
Normal
Personal Mode B
Personal Mode C
Personal Mode D
Personal Mode A
Personal Mode
Personal Mode B
Personal Mode C
Personal Mode D
Personal Mode A
Personal TV Setup
Personal TV Setup
Personal Mode A
Edit name
Personal PIN Setup
Preset Volume
Preset
50
Volume Type
English
Using Personal TV Mode
You can customize some TV functions as desired
and those settings can be saved in one of 4
Personal Modes (A to D). The Personal Mode can
be selected from the Quick Menu.
To select the Personal Mode
a Press QUICK to open the Quick Menu.
b Press B or b to select Personal Mode and press OK.
c Press Bb or corresponding coloured button to select
individual Personal Mode from Normal, Personal
Mode A, Personal Mode B, Personal Mode C and
Personal Mode D. The mode will default to Normal
every the TV is turned off and on.
NOTE: If the Personal PIN has been set, the Lock icon
will be displayed. If the Personal PIN entry screen is
displayed, enter the correct Personal PIN.
Personal Mode TV Setup
a Press MENU / C c / B / C c to highlight Setup/
Preferences icons and press OK.
c Press B or b (or corresponding coloured button) to
select the individual Personal Mode and press OK.
Edit Name
You can edit the name of your Personal Mode.
Press B or b to select Edit Name and press OK.
Edit the desired name by using the software
keyboard. (See page 37) The maximum number of
characters is 25.
Personal PIN Setup
B or b to select Personal PIN Setup and press
Press
OK.
Enter your personal PIN in same manner as “Parental
PIN Setup” on page 56.
Volume Type
B or b to select Volume Type and press C or c
Press
to select Preset or Last.
Last — Volume level just before you turn off the TV.
Preset — Your personal volume level you set.
Preset Volume
B or b to select Preset Volume and press B or
Press
b to adjust your desired volume level. When the
Volume Type is set to Last, this feature will be grayed
out.
b Press B or b to select Personal TV Setup and press
OK.
Behavior in Personal Mode
• Personal Favourite Channel List (Fav5 -Fav8):
Normal Mode: Fav1 / Fav2 / Fav3 / Fav4
Personal Mode A:Fav5
Personal Mode B:Fav6
Personal Mode C:Fav7
Personal Mode D:Fav8
Press the LIST button to display Channel List and press
c to select All or your Personal Mode (Fav5 – Fav8)
• Personal Picture Mode:
The Picture Mode you selected is stored in your Personal
Mode.
65
C or
Page 66

CONTROLS AND FEATURES
REGZA-LINK Setup
Enable REGZA-LINK
On
TV Auto Power
Position Key Pass Through
On
Auto Standby On
Initial Speaker Setting
TV Speakers
Amplifier Control
On
Using REGZA-LINK
English
This is a new feature that uses CEC technology and
allows you to control Toshiba REGZA-LINK
compatible devices from the television remote
control via HDMI connection (page 9).
When the Enable REGZA-LINK item in the REGZA-LINK
Setup menu is set to On, individual functions also set to On
will be activated.
Enable REGZA-LINK
a Press MENU / Cc / B / Cc to highlight Setup/
Preferences icons and press OK.
b Press B or b to select REGZA-LINK Setup and press
OK.
c Press b to highlight Enable REGZA-LINK, and then
press
C or c to select On.
NOTE: If you set Enable REGZA-LINK to Off, all other
items will be grayed out.
Auto Standby
When Auto Standby is enabled, the television, when switched
off, will automatically switch off (standby mode) all connected
REGZA-LINK equipment.
a In the REGZA-LINK Setup menu, press b to highlight
Auto Standby.
b Press C or c to select On or Off.
Amplifier Control
When Amplifier Control is set to On, it allows the “Speaker
Preference” feature to become available.
a In the REGZA-LINK Setup menu, press b to highlight
Amplifier Control.
b Press C or c to select On or Off.
Initial Speaker Setting
This feature allows the audio output preference to be set to the
TV speakers or AV amplifier speakers. The AV Amplifier option lets
the television’s remote control adjust or mute the volume of the
audio.
a In the REGZA-LINK Setup menu, press b to highlight
Initial Speaker Setting.
b Press C or c to select TV Speakers or Amplifier.
TV Auto Power
The TV Auto Power setting allows the television to be
automatically switched on if a REGZA-LINK device is turned on.
a In the REGZA-LINK Setup menu, press b to highlight
TV Auto Power.
b Press C or c to select On or Off.
Position Key Pass Through
When Position Key Pass Through for the selected HDMI input
mode is set to On, the P
remote control will pass through. When in Off, those operate as
U Pu and number (0-9) keys on the
TV programme selection keys.
a In the REGZA-LINK Setup menu, press b to highlight
Position Key Pass Through and press OK.
b Press B or b to select the appropriate HDMI mode.
c Press C or c to select On.
66
Page 67

CONTROLS AND FEATURES
Inputs
TV
1
2
3
HDMI 2
HDMI 1
PC
HDMI 3
HDMI 4
1 DVD
2 VCR/DVR
3 CBL/SAT
4 GAME/TV
5 AUX
REGZA-LINK
Root Menu
Recorder
REGAZA
-
LINK Device Control
Eject
Power
Contents Menu
Setup Menu
Top Menu
DVD Menu
Audio
English
REGZA-LINK input source selection
If a REGZA-LINK device with HDMI switching capability (e.g. AV
amplifier) is connected to the HDMI input, you can select another
REGZA-LINK device that is connected to the master HDMI device
on the input source list.
a Press o and a list will appear on screen showing
available input sources.
b Press b to select the desired input source with
REGZA-LINK icon.
c Press c and a second selection screen will appear
showing all connected REGZA-LINK equipment.
d Press B or b to select the desired input source, and
then press OK.
NOTE:
• These functions depend on the device connected.
• If you select the REGZA-LINK input source from the popup
window, some REGZA-LINK devices may automatically turn
on.
• When th e television is switched on it will take a few minutes
for the REGZA-LINK icon to appear in the list. When an HDMI
cable is removed, it will take a few minutes for the icon to
disappear.
• If the HDMI cable from connected equipment is changed,
Enable REGZA-LINK in the REGZA-LINK Setup menu may
need to be reset to On.
• If you change the HDMI lead to a connected device or
change an HDMI device setting, reset the Enable REGZA-
LINK item on the REGZA-LINK Setup menu from Off to On.
REGZA-LINK Device Control
With the REGZA-LINK mode on your television’s remote
control, you can control the connected REGZA-LINK device
you are watching.
To control the REGZA-LINK input source first select the
equipment by REGZA-LINK input source selection.
a Press QUICK to open the Quick Menu.
b Press B or b to select REGZA-LINK Device Control
and press OK.
c Press B or b to select a control option and press OK.
NOTE: The available functions depend on the equipment
connected. Please refer to the operation manual for each
piece of equipment connected.
REGZA-LINK one touch play
When connected equipment is switched on, REGZA-LINK will
automatically detect the television through the input
selection. If the television is in standby, it will be switched on
automatically.
These functions can be enabled or disabled from the REGZALINK Setup (see page 66).
NOTE:
• Even if the equipment is showing a menu, the television
may automatically show the input source.
• This feature depends on the connected equipment and
television state.
REGZA-LINK system standby
If the television is turned off (standby mode), the television
will send a message to turn off (standby mode) all of the
REGZA-LINK devices connected to the television.
These functions can be enabled or disabled from the REGZALINK Setup (see page 66).
NOTE: This feature depends on the connected equipment
and television state.
67
Page 68

CONTROLS AND FEATURES
REGZA-LINK system audio control
English
With your television’s remote control, you can adjust or mute the
sound volume of the speakers connected to the television via an
AV amplifier.
a Set the Initial Speaker Setting to Amplifier in the
REGZA-LINK Setup menu.
b Confirm that a connected REGZA-LINK device (such as
a DVD player, etc) is selected for the AV amplifier input
source.
NOTE:
• These functions depend on the device connected.
• When you turn on the AV amplifier, change its input source,
or adjust the sound volume, the sound will be output from
the AV amplifier’s speakers even if TV Speakers has been
selected. Turn the television off and on again to output the
sound from the TV Speakers.
• This feature may not work if the AV amplifier is operated.
Toshiba PC compatible with REGZA-LINK
This feature automatically adjusts the suitable widescreen
formats and picture preferences when connected to a
Toshiba PC compatible with REGZA-LINK.
NOTE: This feature depends on the connected equipment
state.
68
Page 69

TEXT SERVICES
Preferences
REGZA-LINK Setup
Network Setup
Teletext
Network Device Setup
Personal TV Setup
Photo Frame Setup
Network Lock
Panel Lock Off
Teletext Auto
English
Text services
This television has a multi-page text memory,
which takes a few moments to load. It offers two
Modes of viewing text – Auto will display Fastext,
if available. List will save your four favorite pages.
Selecting modes
The text character set will be automatica lly chosen by the
language setting in the Setup menu.
a Press MENU / Cc / B / Cc to highlight Setup/
Preferences icons and press OK.
b Press B or b to select Teletext, and then press C or
c to select Auto or List.
Text information
The TEXT button:
To view text services press TEXT. Press again to superimpose
the text over a normal broadcast picture and again to return
to normal viewing. Channels cannot be changed until text is
cancelled.
The first text page shown will be the initial page.
Any text page can be accessed by entering the 3 digit page
number using the numbered buttons, pressing the coloured
buttons or pressing P
to go back to the previous page.
Sub-pages
The pages on the screen will dynamically update as subpages are received.
If you open a page containing sub-pages, the sub-pages are
automatically displayed in sequence. To quit automatic subpage change, press
Once selected, the sub-page you are viewing will be
highlighted and, as the television loads any additional subpages, t he colour of the numbers will change, indicating that
these pages have been loaded.
These sub-pages will remain available to view until another
page is chosen or, in normal TV mode, the channel is changed.
U to advance to the next page and Pu
C or c.
Navigating pages using Auto
If Fastext is available, four coloured titles will appear at the
base of the screen.
To access one of the four given subjects, press the relevant
coloured button on the remote control.
For further information on your particular text system(s), see
the broadcast text index page or consult your local Toshiba
dealer.
Navigating pages using LIST
The four coloured choices at the bottom of the screen are
numbers – 100, 200, 300 and 400, which have been
programmed into the television’s memory. To view these
pages, press the relevant coloured buttons.
To change these saved pages, press the relevant coloured
button and enter the 3 digit number. This number will change
in the top left of the screen and in the coloured highlight.
Press OK to save. Whenever OK is pressed, all four page
numbers showing at the bottom will be saved and the
previous ones will be lost.
If OK is not pressed, the selection will be forgotten when the
channel is changed.
Other pages may be viewed by entering the 3 digit page
number – but DO NOT press OK or these pages will be saved.
69
Page 70

TEXT SERVICES
English
Below is a guide to the functions of the remote control text
buttons.
Control buttons
k To display the index/initial page:
Press k to access the index/initial page. The one displayed is
dependant on the broadcaster.
TEXT To display a page of text:
Press TEXT to display text. Press again to superimpose text
over a normal picture. Press again to return to normal
te levi sio n vi ewin g. C han nel s can not be c han ged u nti l th is ha s
been done.
A To reveal concealed text:
To discover the solutions on quiz and joke pages press the A
button.
B To hold a wanted page:
At times it is convenient to hold a page of text. Press B and
B will appear in the top left of the screen. The page will be
held on screen until the button is pressed again.
C To enlarge the text display size:
Press C once to enlarge the top half of the page, press again
to enlarge the bottom half of the page. Press again to revert
to normal size.
D To select a page whilst viewing normal
picture:
Enter the page number then press D, normal picture
will be displayed. The television will indicate when the page is
ready by changing the colour of the page number at the top
of the screen. Press TEXT to view the page.
To display news flashes:
Select the news flash page for the chosen text service (see the
index page of text service). The news flashes will be displayed
as and when they are broadcast.
Remember to cancel text before
changing channels - press the TEXT
button twice.
70
Page 71

PROBLEM SOLVING
System Setup
Country Germany
Colour System
Auto
Menu Language English
ATV Manual Tuning
Manual Fine Tuning
1 A C 9
0 I
English
Questions and Answers
Below are the answers to some of the most
common queries.
Why is there no sound or picture?
Q
Check the television is not in standby mode. Check
the mains plug and all mains connections.
A
There is a picture, but why is there little or no
Q
colour?
When using an external source, for instance, a poor
quality video tape, if there is little or no colour,
A
improvements may sometimes be achieved. The
colour is factory set to Auto to automatically displa y
the best colour system.
To check that you have the best colour:
a With the external source playing, select Colour
System from the System Setup menu.
b With C or c choose between Auto, PAL, SECAM,
NTSC 4.43 or NTSC 3.58.
Why doesn’t the video/DVD being played show
Q
on screen?
Make sure the media recorder or DVD player is
connected to the television as shown on page 7, and
A
then select the correct input by pressing
Why is there a picture but no sound?
Q
Check all lead connections.
No sound or unacceptable format sound may be
A
received.
Check the volume has not been turned down or that
sound mute has not been selected.
Check shared audio settings.
o.
What else can cause a poor picture?
Q
Interference or a weak signal. Try a different
television station. Manual Fine Tuning may help.
A
a Select the ATV Manual Tuning menu. Highlight the
station and press OK. Then press
Fine Tuning.
c to select Manual
b Using B or b adjust to get the best picture and
sound. Press OK and then EXIT.
Why don’t the controls of the television work?
Q
Check that Panel Lock is not On.
A
Why doesn’t the remote control work?
Q
Check that the batteries aren’t dead or inserted
incorrectly.
A
Why is the digital channel locked?
Q
The channel has been locked in Channel Options
(see “Digital settings – Channel Options” section).
A
Why are some of the digital subscription channels
Q
unavailable?
Your subscription needs upgrading. Contact your
service provider.
A
Why is the soundtrack in English when a different
Q
audio language has been selected?
The programme is currently being broadcast with an
English soundtrack only.
A
Why is there incorrect or no sound when in DTV
Q
mode?
Press s to ensure the hard of hearing option has
not been selected.
A
71
Page 72

PROBLEM SOLVING
What is DVB-T?
English
Q
Digital Video Broadcast via an aerial/antenna.
A
What is DVB-C?
Q
Digital Video Broadcast via a cable connection.
A
How are radio channels selected?
Q
Press TV on the remote control and select DTV
Radio. Alternatively select from the GUIDE.
A
What can be done if the PIN number has been
Q
forgotten?
Use the Master PIN code of 1276, then change to a
number of your choice. Select Parental PIN Setup
A
from the DTV Settings menu to enter PIN. Ensure
that no-one else can use the Master PIN by removing
the Owner’s Manual.
Why are there vertical stripes on the screen when
Q
in PC mode?
The Sampling Clock may need adjustment. Select PC
Settings from the Display Settings menu, highlight
A
Sampling Clock and adjust until the lines clear.
Why are there horizontal stripes and/or blurred
Q
images on the screen when in PC mode?
The Clock Phase may need adjustment. Select PC
Settings from the Display Settings menu, highlight
A
Clock Phase and adjust until the picture clears.
Why when digital subtitles have been selected are
Q
they not showing on screen?
Subtitles are not currently being transmitted by the
broadcaster.
A
Why are there problems with analogue text?
Q
Good performance of text depends on a good strong
broadcast signal. This normally requires a roof or loft
A
aerial. If the text is unreadable or garbled, check the
aerial. Go to the main index page of the text service
and look for the User Guide. This will explain the basic
operation of text in some detail. If further information
is needed on how to use text see the text section.
Why is a page number visible at the top of the
Q
screen but no text?
Text has been selected but Teletext information is
currently unavailable on the current source.
A
Why are the colours wrong when an NTSC source
Q
is played?
Connect the source via a SCART lead and play.
Select Colour System from the System Setup menu.
A
a Set the Colour to Auto and exit.
b Go to the Picture menu and adjust the tint.
Why don’t the devices connected via HDMI
Q
operate properly?
Make sure to use cables with the HDMI logo
A
Some early HDMI equipment may not work properly
with the latest HDMI TV products, due to new
standard adoption. Try switching the HDMI settings
(Enable Content Type and INSTAPORT™) to Off.
Why don’t the REGZA-LINK devices work?
Q
When the connected REGZA-LINK device does not
work correctly after you have changed the settings of
A
the device, turn off your television and unplug the
power cord, and then plug and turn on again.
Unplug the HDMI cable of the REGZA-LINK device
and lead again.
Why is the REGZA-LINK logo still showing when
Q
the equipment has been disconnected?
If the REGZA-LINK device is disconnected, the logo
will disappear after approximately one minute.
A
Why don’t the networked devices work?
Q
The LAN cables are not connected properly or at all.
Connect all cables (see page 11).
A
Make sure your network address is set up correctly
(see page 35).
Why doesn’t the wireless network work?
Q
Make sure the TOSHIBA Dual Band WLAN Adaptor is
used (see page 11).
A
Check that the AP is powered on.
(see page 8).
72
Page 73

Why doesn’t the Media Player feature operate?
Q
Make sure that devices are connected correctly.
Incorrect behavior may occur with a USB Hub
A
connection.
Check your network setup if us ing DLNA CERTIFIED™
Server.
What do the LEDs on the front of the television
Q
indicate?
Check the table below.
A
PROBLEM SOLVING
English
LED 2LED 1
LED indication
LED-1 LED-2
Green Orange Power ON
Green Red Power ON
Green OFF Power ON
Red Orange Power OFF (Standby)
Red Red Power OFF (Standby)
Red OFF Power OFF (Standby)
Condition Solution
Programme Timer is set
Both Programme Timer
(Recording) and Recording are
NOT working
Programme Timer (Recording)
or Recording is working
Programme Timer is NOT set
Both Programme Timer
(Recording) and Recording are
NOT working
Programme Timer is set
Both Programme Timer
(Recording) and Recording are
NOT working
Programme Timer (Recording)
or Recording is working
Programme Timer is NOT set
Both Programme Timer
(Recording) and Recording are
NOT working
LED indication
LED-1 LED-2
OFF Green
–
–
–
–
–
–
(Blinks)
Red
OFF Abnormal operation of WDT.
(Blinks)
Green
OFF Fan stopped.
(Blinks)
Orange Green For Service
Red OFF For Service
Green OFF For Service
Condition Soluti on
Abnormal operation of BUS
line.
(if applicable)
SW Upgrade in Progress
SW Upgrade Failed
SW Upgrade Successful
Turn OFF the TV
and unplug the
power cord. Plug
the power cord in
again and turn ON
the TV.
–
–
–
73
Page 74

INFORMATION
License Information
English
• This product achieved the European Eco label
• Manufactured under license from Dolby
• HDMI, the HDMI logo, and High-Definition
• INSTAPORT™ and INSTAPORT logo are trademarks of Silicon
Image, Inc. in the United States and other countries.
• YouTube and the YouTube Logo are trademarks of Google Inc.
• This product contains NetFront Browser of ACCESS CO., LTD.
• ACCESS, the ACCESS logo and NetFront are
• Opera® Browser from Opera Software ASA.
• This product contains Adobe® Flash® Player software under
license from Adobe Systems Incorporated.
Copyright © 1995-2009 Adobe Systems Incorporated. All rights
reserved. Adobe and Flash are trademarks of Adobe Systems
Incorporated.
• DivX®, DivX Certified®, DivX Plus™ HD and
• DVB is a registered trademark of the DVB Project.
award issued by the European Commission.
You can get more information in following link:
http://ec.europa.eu/environment/ecolabel/
Laboratories.
Dolby and the double-D symbol are trademarks
of Dolby Laboratories.
Multimedia Interface are trademarks or
registered trademarks of HDMI Licensing, LLC.
trademarks or registered trademarks of ACCESS
CO., LTD. in the United States, Japan and other
countries.
© 2010 ACCESS CO., LTD. All rights reserved.
This software is based in part on the work of the
Independent JPEG Group.
Copyright 1995-2010 Opera Software ASA.
All rights reserved.
For further information, please see
http://www.opera.com
associated logos are trademarks of DivX, Inc. and
are used under license.
Covered by one or more of the following U.S.
patents:
7,295,673; 7,460,668; 7,515,710; 7,519 ,274
• DLNA®, DLNA® Certification Logo and DLNA CERTIFIED™ are
registered trademarks, service marks, or certification marks of
the Digital Living Network Alliance.
• THIS PRODUCT IS LICENSED U NDER THE AVC PATENT
PORTFOLIO LICENSE FOR THE PERSONAL AND
NONCOMMERCIAL USE OF A CONSUMER TO (i) ENCODE VIDEO
IN COMPLIANCE WITH THE AVC STANDARD (AVC VIDEO) AND/
OR (ii) DECODE AVC VIDEO THAT WAS ENCODED BY A
CONSUMER ENGAGED IN A PERSONAL AND
NONCOMMERCIAL ACTIVITY AND/OR WAS OBTAINED FROM A
VIDEO PROVIDER LICENSED TO PROVIDE AVC VIDEO. NO
LICENSE IS GRANTED OR SHALL BE IMPLIED FOR ANY OTHER
USE. ADDITIONAL INFORMATION MAY BE OBTAINED FROM
MPEG LA, L.L.C.
•THIS PRODUCT IS LICENSED UNDER THE MPEG-4 VISUAL
PATENT PORTFOLIO LICENSE FOR THE PERSONAL AND NONCOMMERCIAL USE OF A CONSUMER FOR (i) ENCODING VIDEO
IN COMPLIANCE WITH THE MPEG-4 VISUAL STANDARD
(“MPEG-4 VIDEO”) AND/OR (ii) DECODING MPEG-4 VIDEO
THAT WAS ENCODED BY A CONSUMER ENGAGED IN A
PERSONAL AND NON-COMMERCIAL ACTIVITY AND/OR WAS
OBTAINED FROM A VIDEO PROVIDER LICENSED BY MPEG LA
TO PROVIDE MPEG-4 VIDEO. NO LICENSE IS GRANTED OR
SHALL BE IMPLIED FOR ANY OTHER USE. ADDITIONAL
INFORMATION INCLUDING THAT RELATING TO
PROMOTIONAL, INTERNAL AND COMMERCIAL USES AND
LICENSING MAY BE OBTAINED FROM MPEG LA,L.L.C.
• MPEG Layer-3 audio coding technology licensed from
Fraunhofer IIS and Thomson.
• Audyssey EQ te chnology
• Manufactured under license from Audyssey Laboratories. U.S.
and foreign patents pending. Audyssey EQ is a registered
trademark of Audyssey Laboratories.
Audyssey EQ is based on the same core technology as Audyssey
MultEQ that is used for automatic correction of room
acoustics. Audyssey EQ uses time-domain filters to correct
problems that arise from speaker drivers and enclosures and is
calibrated to account for the ac oustical problems in a typical
listening environment.
SEE HTTP://WWW.MPEGLA.COM
SEE HTTP://WWW.MPEGLA.COM
74
Page 75

INFORMATION
Cleaning the screen and cabinet…
Turn off the power, and clean the screen and cabinet with a soft, dry cloth. We recommend that you do not use any proprietary
polishes or solvents on the screen or cabinet as this may cause damage.
Disposal…
The following information is only for EU-member states:
Disposal of products
The crossed out wheeled dust bin symbol indicates that products must be collected and disposed of separately
from household waste. Integrated batteries and accumulators can be disposed of with the product. They will be
separated at the recycling centres.
The black bar indicates that the product was placed on the market after August 13, 2005.
By participating in separate collection of products and batteries, you will help to assure the proper disposal of
products and batteries and thus help to prevent potential negative consequences for the environment and human
health.
For more detailed information about the collection and recycling programmes available in your country, please
contact your local city office or the shop where you purchased the product.
Disposal of batteries and/or accumulators
The crossed out wheeled dust bin symbol indicates that batteries and/or accumulators must be collected and
disposed of separately from household waste.
If the battery or accumulator contains more than the specified values of lead (Pb), mercury (Hg), and/or cadmium
(Cd) defined in the Battery Directive (2006/66/EC), then the chemical symbols for lead (Pb), mercury (Hg) and/or
cadmium (Cd) will appear below the crossed out wheeled dust bin symbol.
By participating in sep arate collection of batteries, you will help to assure the proper disposal of products and
batteries and thus help to prevent potential negative consequences for the environment and human health.
For more detailed information about the collection and recycling programmes available in your country, please
contact your local city office or the shop where you purchased the product.
English
75
Page 76

INFORMATION
Information
English
Before connecting any external equipment, turn off all main power switches. If there is no switch,
remove the mains plug from the wall socket.
Signal information for Mini D-sub 15 pin connector
Pin No. Signal name Pin No. Signal name Pin No. Signal name
1 R 6 Ground 11 NC
2 G 7 Ground 12 NC
3 B 8 Ground 13 H-sync
4NC*9 NC14V-sync
5 Ground 10 Ground 15 NC
* NC = not connected
Acceptable PC signals through the PC terminal
The PC input on this TV only accepts signal formats which are compliant with VESA-DMT as shown in the
table below. Since some PCs input signals which are different from the resolution and frequency described
in the table below, the following phenomenon may occur; incorrect display, false format detection, picture
position failure, blur, or judder. In this case, set the monitor output format on your PC to conform to a
signal in the table below.
Format Resolution V. Frequency H. Frequency Pixel Clock Frequency VESA Standard (DMT)
VGA 640 × 480 59.940Hz 31.469kHz 25.175MHz
72.809Hz 37.861kHz 31.500MHz
75.000Hz 37.500kHz 31.500MHz
SVGA 800 × 600 56.250Hz 35.156kHz 36.000MHz
60.317Hz 37.879kHz 40.000MHz
72.188Hz 48.077kHz 50.000MHz
75.000Hz 46.875kHz 49.500MHz
XGA 1024 × 768 60.004Hz 48.363kHz 65.000MHz
70.069Hz 56.476kHz 75.000MHz
75.029Hz 60.023kHz 78.750MHz
WXGA 1280 × 768 59.995Hz 47.396kHz 68.250MHz
59.870Hz 47.776kHz 79.500MHz
74.893Hz 60.289kHz 102.250MHz
1360 × 768 60.015Hz 47.712kHz 85.500MHz
SXGA 1280 × 1024 60.020Hz 63.981kHz 108.000MHz
75.025Hz 79.976kHz 135.000MHz
76
Page 77

INFORMATION
Acceptable video or PC signals through the HDMI terminals
The HDMI inputs on this TV only accept VGA, SVGA, XGA, WXGA, and SXGA signal formats which are
compliant with VESA as shown in the table below. Since some PCs and HDMI or DVI devices input signals
which are different from the resolution and frequency described in the table below, the following
phenomenon may occur; incorrect display, false format detection, picture position failure, blur, or judder.
In this case, set the monitor output format on your PC, HDMI or DVI device to conform to a signal in the
table below.
English
Format Resolution V. Frequency H. Frequency Pixel Clock Frequency VESA
480i 720 × 480i 59.940/60.000Hz 15.734/15.750kHz 27.000/27.027MHz
576i 720 × 576i 50.000Hz 15.625kHz 27.000MHz
480p 720 × 480p 59.940/60.000Hz 31.469/31.500kHz 27.000/27.027MHz
576p 720 × 576p 50.000Hz 31.250kHz 27.000MHz
1080i 1920 × 1080i 59.940/60.000Hz 33.716/33.750kHz 74.176/74.250MHz
1080i 1920 × 1080i 50.000Hz 28.125kHz 74.250MHz
720p 1280 × 720p 59.940/60.000Hz 44.955/45.000kHz 74.176/74.250MHz
720p 1280 × 720p 50.000Hz 37.500kHz 74.250MHz
1080p 1920 × 1080p 59.940/60.000Hz 67.433/67.500kHz 148.352/148.500MHz
1080p 1920 × 1080p 50.000Hz 56.250kHz 148.500MHz
1080p 1920 × 1080p 24.000Hz 27.000kHz 74.250MHz
VGA 640 × 480 59.940/60.000Hz 31.469/31.500kHz 25.175/25.200MHz
72.809Hz 37.861kHz 31.500MHz
75.000Hz 37.500kHz 31.500MHz
SVGA 800 × 600 56.250Hz 35.156kHz 36.000MHz
60.317Hz 37.879kHz 40.000MHz
72.188Hz 48.077kHz 50.000MHz
75.000Hz 46.875kHz 49.500MHz
XGA 1024 × 768 60.004Hz 48.363kHz 65.000MHz
70.069Hz 56.476kHz 75.000MHz
75.029Hz 60.023kHz 78.750MHz
WXGA 1280 × 768 59.995Hz 47.396kHz 68.250MHz
59.870Hz 47.776kHz 79.500MHz
74.893Hz 60.289kHz 102.250MHz
1360 × 768 60.015Hz 47.712kHz 85.500MHz
SXGA 1280 × 1024 60.020Hz 63.981kHz 108.000MHz
75.025Hz 79.976kHz 135.000MHz
Standard
77
Page 78

INFORMATION
Media Player Supported Format
English
Media
Player
Photo JPEG .jpg
Movie MPEG-2 PS
Music MP3 .mp3 Audio) MPEG-1 Audio Layer-3
Media
Format
MPEG-2 TS
MP4 .mp4
AVI
DivX
DivX Plus HD
MKV
DivX Plus HD
AVCHD .mts
MP4 .mp4
L-PCM Audio) L-PCM
File
Extension
.jpeg
.mpg
.mpeg
.ts
.m4v
.avi
.divx
.div
.mkv Video) H.264 Yes
.m2ts
.m4a
Video/Audio codec USB DMS Note
JPEG Yes Yes <USB>
Video) MPEG-1 Video Yes
Video) MPEG-2 Video
H.264(MPEG-4 AVC)
Audio) MPEG-1 Layer1
MPEG-1 Layer2
MPEG-2 Layer2
Dolby Digital (AC-3)
L-PCM (MPEG-2 PS only)
Audio) Dolby Digital Plus
AAC
HE AAC
Video) H.264(MPEG-4 AVC) Yes Yes
Audio) AAC Yes Yes
Audio) HE AAC
Dolby Digital (AC-3)
Dolby Digital Plus
Video) DivX (3,4,5,6) Yes
Audio) Dolby Digital (AC-3)
MPEG-1 Layer2
MPEG-1 Layer3
Audio) AAC
HE AAC
Dolby Digital (AC-3)
MPEG-1 Layer 3
Video) H.264(MPEG-4 AVC) Yes Yes
Audio) Dolby Digital (AC-3) Yes Yes
MPEG-2 Audio Layer-3
MPEG-2.5 Audio Layer-3
Audio) AAC Yes
Audio) HE AAC Yes
Data compatibility: JPEG Exif ver 2.2
Maximum viewable resolution:
4096 x 4096 (HW decode)
16384 x 16384 (SW decode)
Maximum photo size: 9MB
Maximum number of files: 2000 / folder
<DMS>
Data compatibility: JPEG EXIF Ver.1.x or
later, JFIF 1.02a
Maximum photo resolution: 4096 x 4096
Maximum photo size: 6 MB
Maximum number of files: 2000 / folder
No <USB>
Yes Yes
Yes Yes
Yes
Yes
Yes
Yes
Yes Yes <USB>
No Yes
Maximum number of files: 2000 / folder
<DMS>
Maximum number of files: 2000 / folder
*)Some files may not be played.
*)Normal playing and trick playing may
not be available depending on the
contents.
*)DivX external subtitles are not
No
supported.
No
No
No
No
No
Maximum number of files: 2000 / folder
<DMS>
Maximum number of files: 2000 / folder
No
No
*)Some files may not be played.
78
Page 79

Specifications and accessories
Specification is subject to change without notice.
Receiving systems
DVB-T Broadcast systems/channels
UK UHF 21-68 PAL-I UHF UK21-UK69
France VHF 05-10 (VHF 01-05)
Germany VHF 05-12
Austria VHF 05-12
Switzerland VHF 05-12
Italy VHF 05-12 (D,E,F,G,H,H1,H2)
Spain UHF 21-69
Nederlands VHF 0 5-12
Greece VHF 05-12
DVB-C Broadcast systems
Video Input PAL, SECAM, NTSC 3.58/4.43
External connections
EXT 1 Input/Output 21-pin SCART RGB, A/V input
EXT 2 Input Phono jacks
EXT 3 Input Phono jacks Video/Audio L + R
HDMI 1/2/3/4 Input HDMI® compliant
PC Input Analog RGB
PC/HDMI 3 Audio input 3.5mm mini jack Audi o
Digital Audio Output (S/PDIF) Optical
LAN port RJ-45
USB 1/USB 2 port Media Player
USB 2 port Wireless LAN adaptor ready for a home
Headphone socket 3.5mm stereo
UHF 21-69
UHF 21-69
UHF 21-69
UHF 21-69
UHF 21-69
UHF 21-69
UHF 21-69
Broadcast systems/channels
PAL-B/G UHF E21-E69
SECAM-L UHF F21-F 69
SECAM-D/K UHF R21-R69
Phono jacks
HDCP compliant
(Enable Content Type, INSTAPORT™,
RGB Range, supported)
Interface version: USB 2.0
USB class: Mass Storage
File system: FAT16 and FAT32
network, IEEE802.11a/b/g/n
compatible
VHF E2-E12, S1-S41
VHF F1-F10, B-Q
VHF R1-R12
AV out, TV out
Y, PB/CB, PR/C
Audio L + R
R
INFORMATION
Stereo A2, Nicam
Visible Screen Size
(approx.)
Display 16:9
Sound output
(at 10% distortion)
Power consumption
(approx.)
Annual power
consumption*
(approx.)
On mode power
consumption**
(approx.)
Standby power
consumption
(approx.)
* Operating 4 hours a day and 365 days a year.
** Tested in accordance with IEC 62087-BD Ed. 2.0:2008.
Dimensions
(approx.)
Weight (approx.) 32SL
Operating condition Temperature 5°C - 35°C (41°F - 94°F)
Supplied accessories • Remote control
Optional accessories TOSHIBA Dual Band WLAN Adaptor
2 carrier system
Model 32
32SL
37SL
42SL
46SL
(Height dimension includes foot stand)
37SL
42SL
46SL
Humidity 20 - 80% (non-condensing)
• 2 batteries (AA, IEC R6 1.5V)
• ‘P’ Clip/Screw (for TV mounting)
WLM-10U2
80cm
37
94cm
42
107cm
46
117cm
10W + 10W
32SL 93W
37SL 97W
42SL 125W
46SL 137W
32SL 94.8kWh
37SL 100.9kWh
42SL 131.4kWh
46SL 142.4kWh
32SL 64.9W
37SL 69.1W
42SL 90.0W
46SL 97.5W
32SL/37SL 0.3W
42SL/46SL 0.2W
53cm (H) 75cm (W) 26cm (D)
59cm (H) 87cm (W) 26cm (D)
68cm (H) 99cm (W) 29cm (D)
73cm (H) 108cm (W) 29cm (D )
13.0kg
15.0kg
20.5kg
22.5kg
See page 5.
English
79
Page 80

EU Ecolabel : PL/22/002
For those products that have been awarded the
European Eco Label, TOSHIBA gives a minimum of
2 years guarantee for this LCD TV and 7 years
availability for replacement of electronic parts.
For warranty repairs, please contact the retailer where
you purchased the product.
Please see the Toshiba website or European Eco Label
website (www.ecolabel.eu) for details of those
products.
© TOSHIBA Television Central Europe Sp. z o.o.
Reproduction in whole or part without written permission is strictly prohibited.
TOSHIBA Television Central Europe Sp. z o.o.
ul. Pokoju 1, Biskupice Podgórne, 55-040 Kobierzyce, Poland
All rights reserved.
T 2
 Loading...