

Toshiba 32S255 Series, 40S255 Series Owner's Manual

LED TV
32S255* Series
40S255* Series
display
OWNER'S MANUAL
TMF0803005
TOSHIBA GULF FZE
TOSHIBA EL ARABY VISUAL & APPLIANCES
MARKETING COMPANY
© 2015 All Rights Reserved
Owner's Record
- 2 -
Screws
(4 x M4*10)
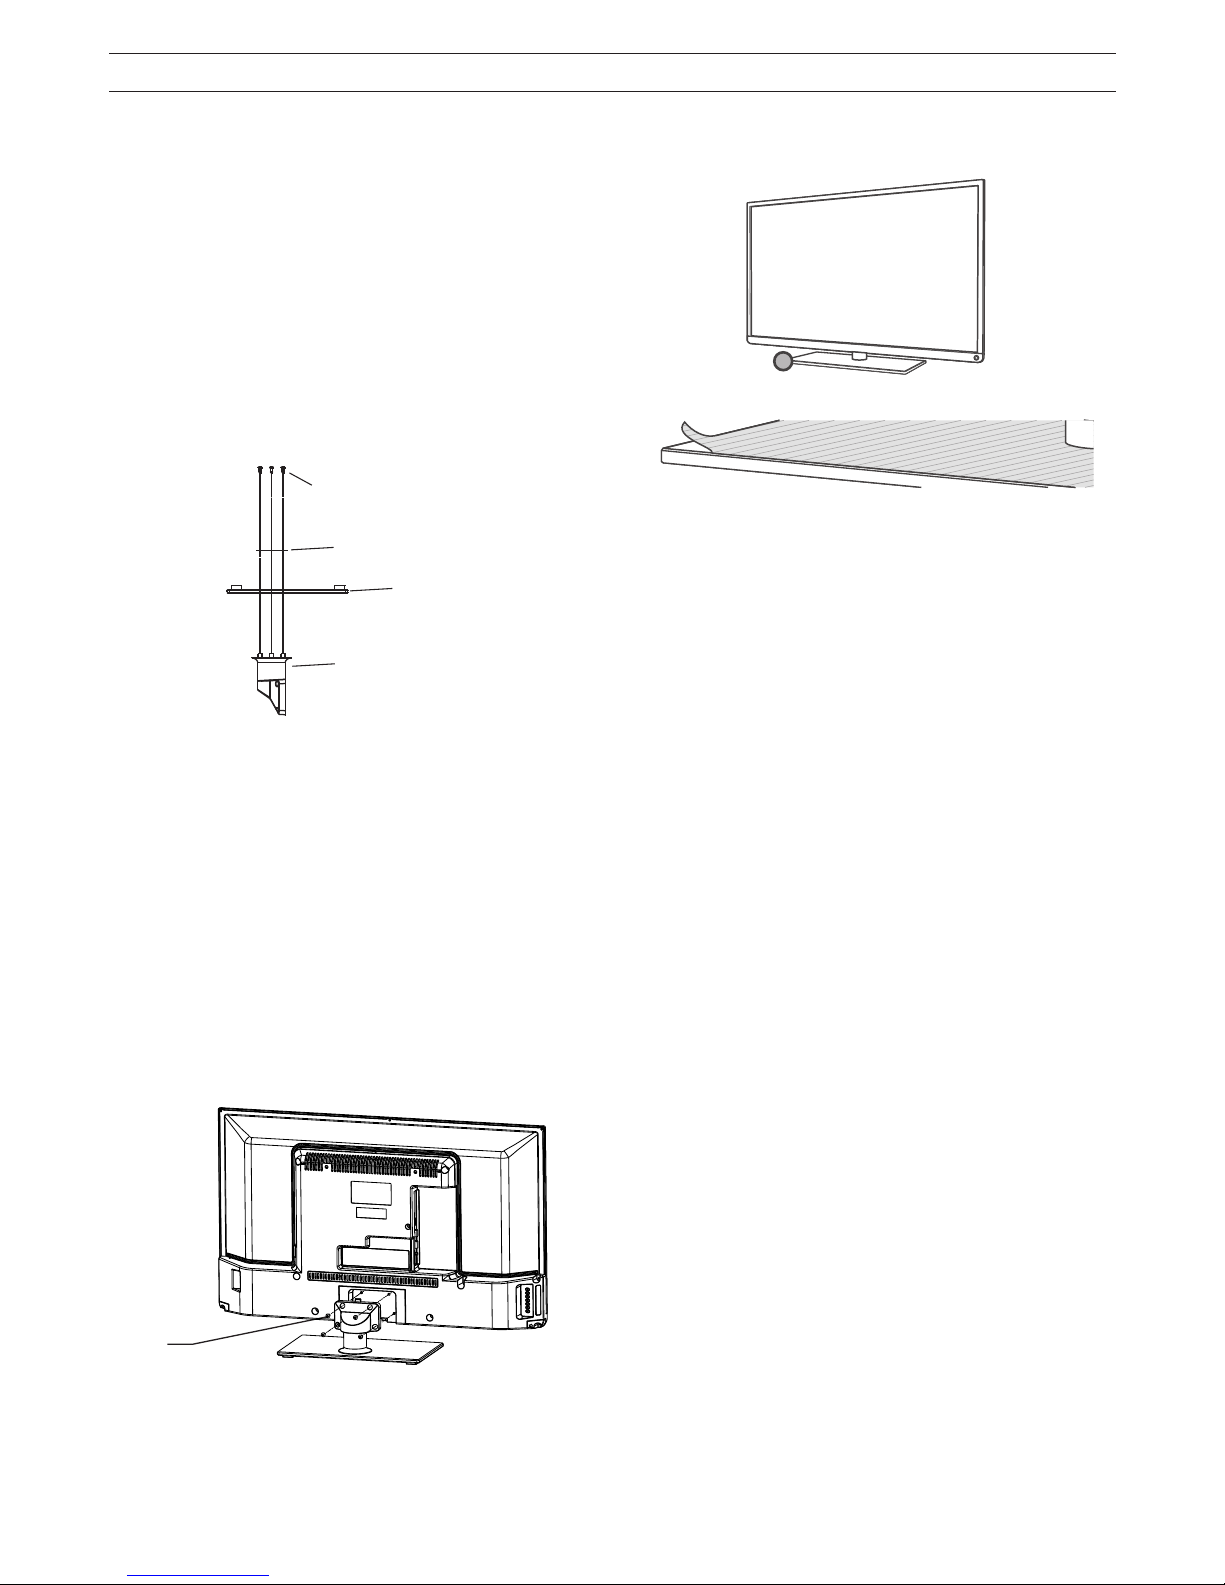
Follow the procedures below in order to assemble
the LED TV base
1. Before you begin to assemble the base, carefully
support the LED TV, with the front facing down,
on a flat and soft surface, such as a towel or
blanket. Allow for the lower part of the unit
to project outwards from the support and
assemble the base as follows.
Notes:
• Be
careful when attaching the base to avoid
damage to the LED panel.
• Only use the screws provided with the
accessories.
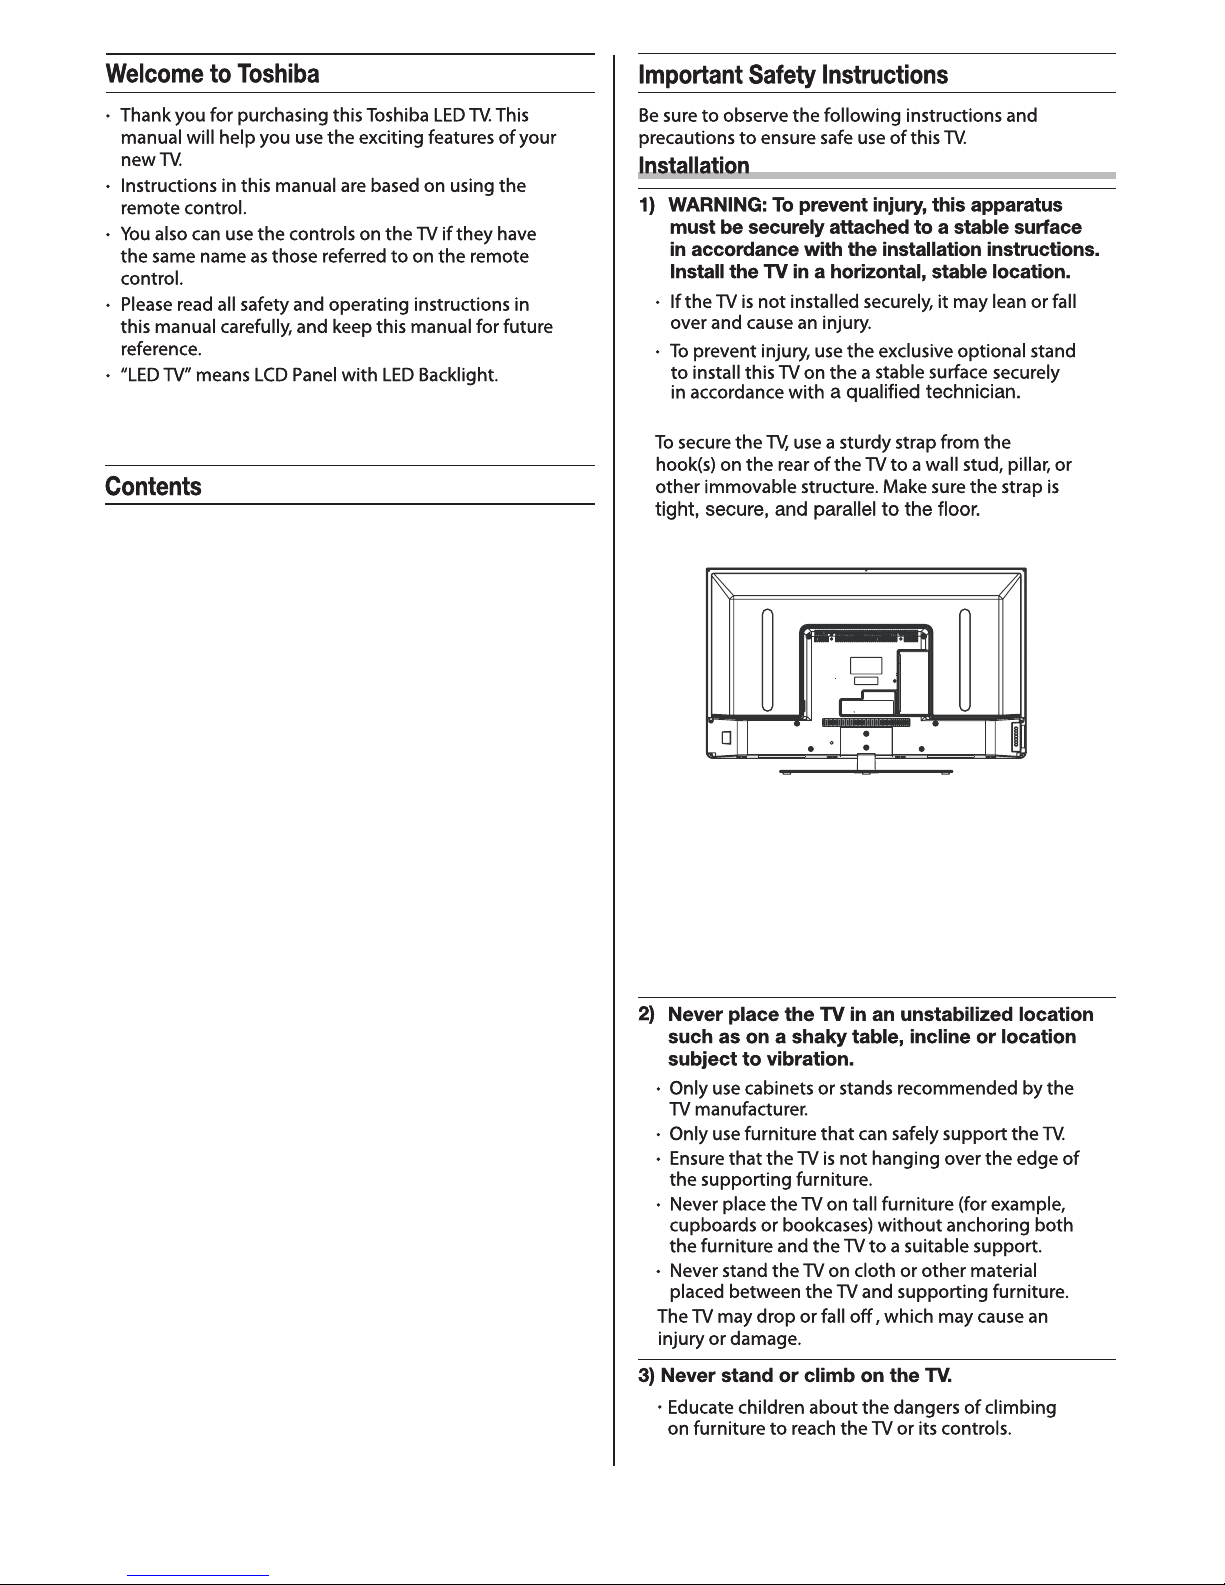
2. Correctly screw the base to the TV, according to
the illustration.
Note:
In order to protect the TV, use the fastener to
mount the stand to the wall or any other fixed
structure.
3. Insert the stand into the TV. Use the mounting
screws to firmly attach the stand.
4.
After the stand is mounted to the TV, remove
the stand’s protective film.
Warning: Make sure that the power cable is not
caught or pinched when you attach the base,
because this can damage the cable and cause
electric shock.
Base assembly
Screws
Transition board
Stand
Bracket
Protective film in detail
- 3 -
3
6
6
7
8
8
9
9
9
9
10
17
18
20
21
21
Important Safety Instructions.......................................
Exploring your new TV.................................................
TV panel controls.........................................................
Learning about the remote control...............................
TV back panel connections..........................................
Connecting HDMI or DVI devices.................................
Connecting an aerial.....................................................
Turning the TV on ........................................................
Select Input Source......................................................
Turning the TV for the first time....................................
Main Menu Operation...................................................
PC.................................................................................
Media Operation............................................................
Media Player Supported Formats.................................
Troubleshooting............................................................
Specfications................................................................
- 4 -
VOL
REC
INFO
ENTER
EPG
LIST
Q.MENU
MENU
BACK
EXIT
PICTURE ZOOM
SLEEP
AUDIO
PgUp
SUBTITLE
TEXT
PgDn
CH
NICAM
CT-32F1
- 6 -
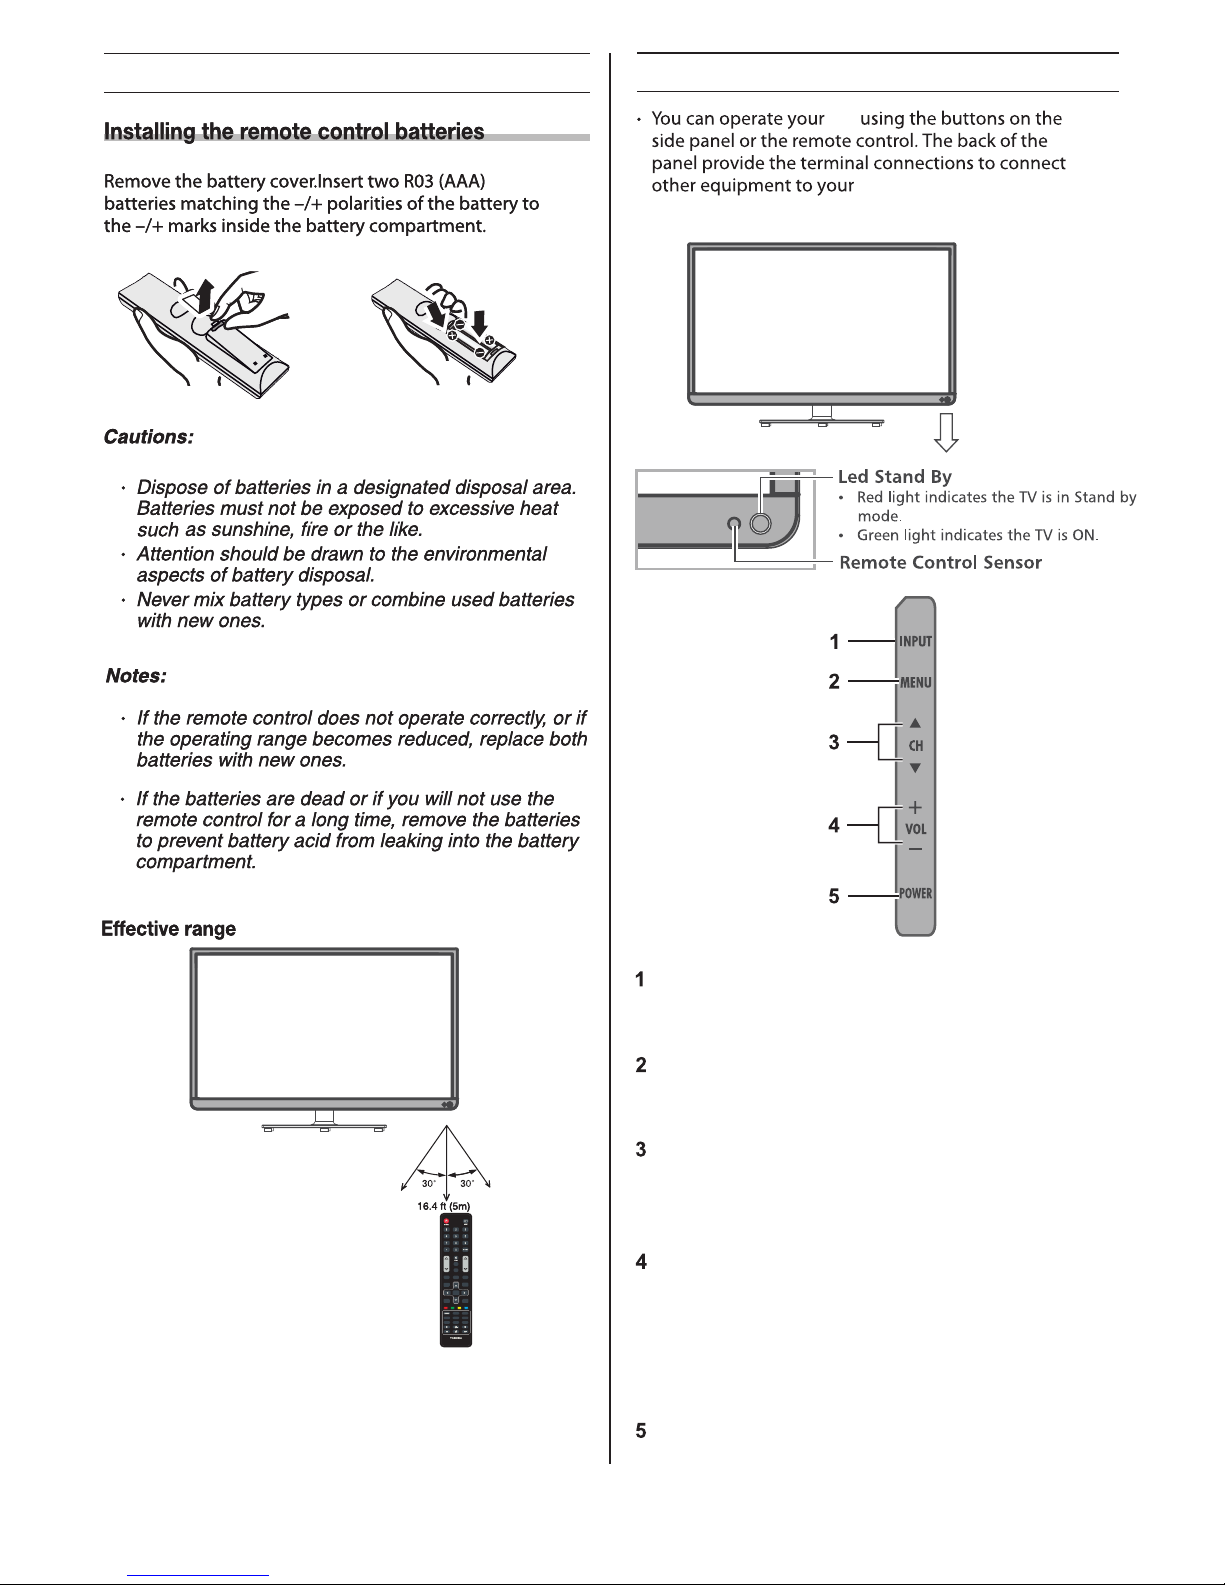
Exploring your new TV
TV panel controls
TV front view
TV
TV.
Left side view
INPUT (on-screen information or input source)
–This button switches to the on-screen information
or the input source selection.
MENU Press to select the main menu.
When selectable on-screen information is displayed,
it can be selected by pushing
CH ▼/▲
Press to change programs.
In the on-screen menu, use the CH buttons ▼/▲
as up/down arrow buttons.
“VOL-” or “VOL+” key – These buttons adjust the
volume level.
These buttons also can be used such as “Right” or
“Left” key when Menu is displayed or Media Player
mode. And “Volume Up” key can be used such as
“ENTER” when selectable on-screen information is
displayed.
POWER (power on/standby) – Press to turn the
TV on/standby.
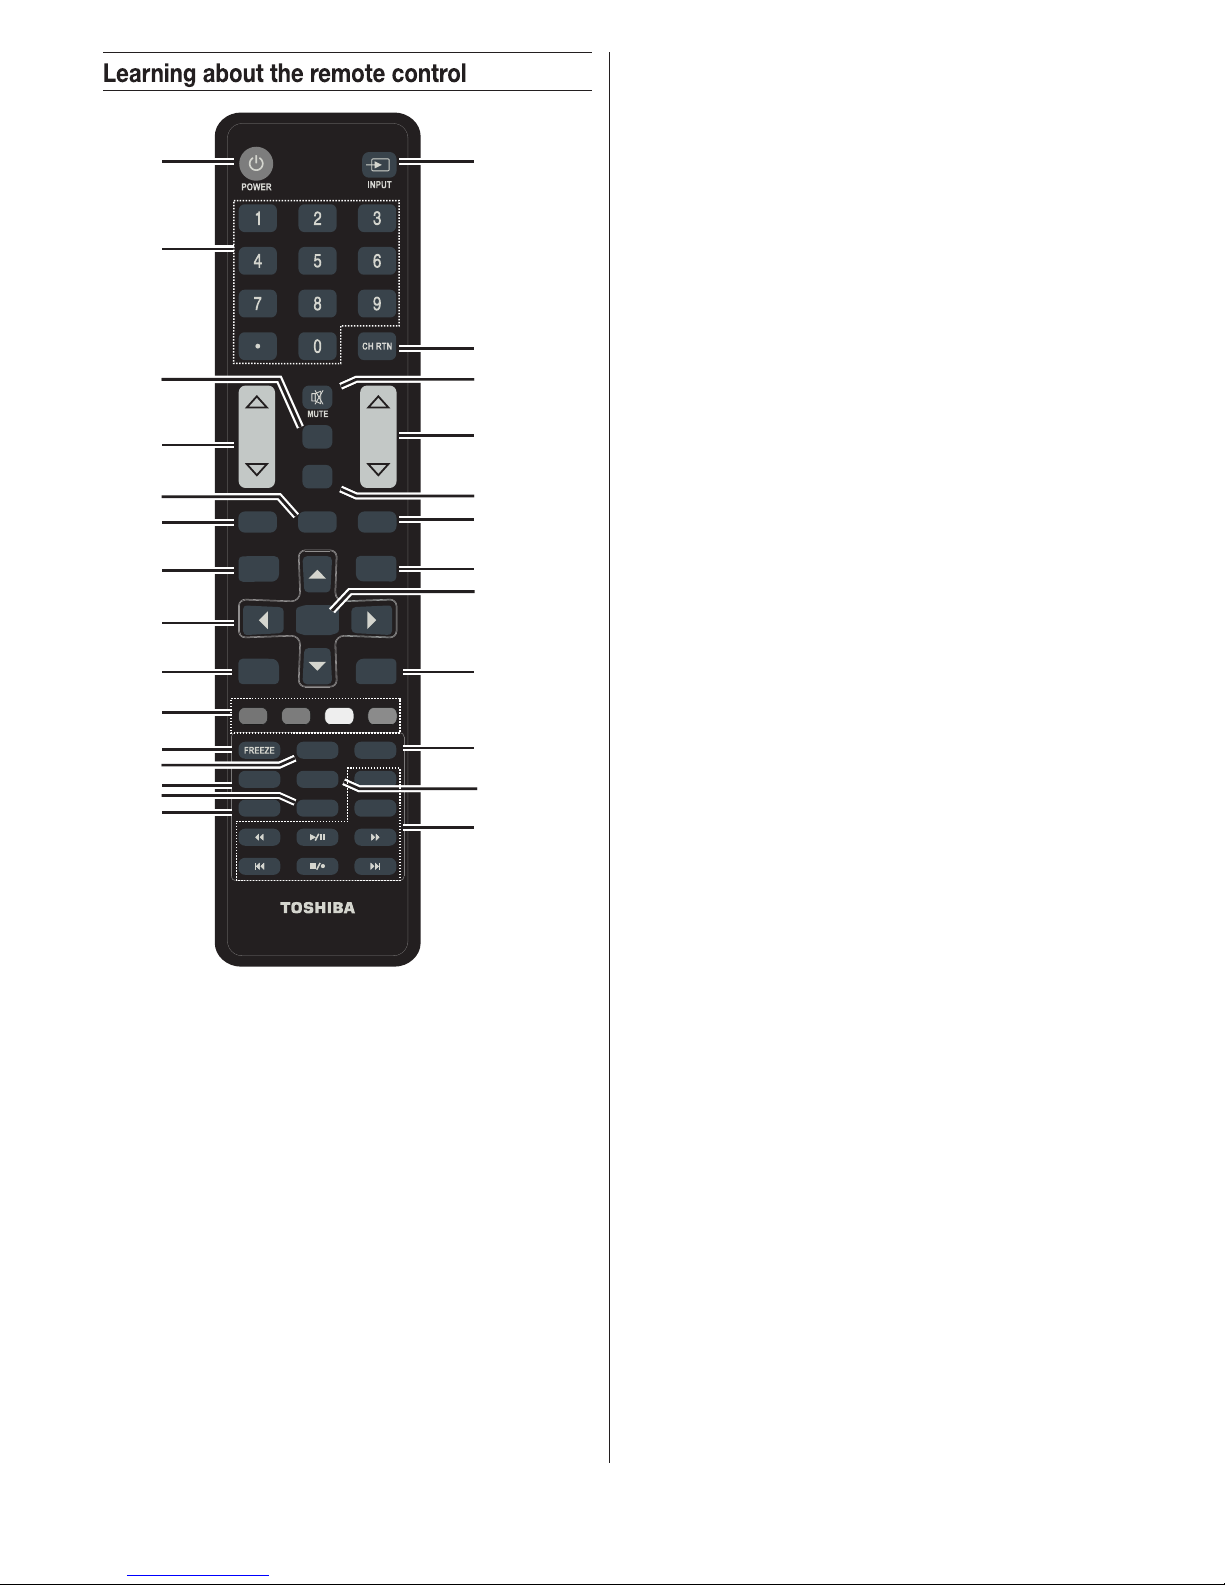
1. POWER: Turn the TV on and off.
2. INPUT: This button is used to switch among different
sources, Select a source and press ENTER button to
confirm.
3. Digital Buttons(0-9,-): Directly select channel with
digital buttons.
4. CH RTN: Switch to the previous program.
5. MUTE: Press this button to cut off the sound of the TV
set temporarily, press again to resume.
6. EPG: Select electronic program guide, in DTV mode,
it will display all the information of program in a week
when pressing this button.
7. VOL : Press these buttons to adjust the volume./
8. CH : / Press these buttons to change channel
upward or downward.
VOL
REC
INFO
ENTER
EPG
LIST
Q.MENU
MENU
BACK
EXIT
PICTURE ZOOM
SLEEP AUDIO
PgUp
SUBTITLE
TEXT
PgDn
CH
NICAM
CT-32F1
1 2
3
4
5
6
7
10
12
17
16
19
20
21
23
24
22
8
9
11
13
14
15
18
27
25
26
- 7 -
LIST: Press it to show channel list on screen.9.
10. NICAM: NICAM button.
11. REC: Press to start recording. (Only in the DTV mode.)
12. Q.MENU: Press this key to go to quick menu.
13. INFO: Display the program information.
14. MENU: Display the main menu or exit the current
menu.
15. Arrow button : Use to select on-screen s
menu items and change menu values.
16. ENTER: Validation key. In the ATV and DTV mode,
press this key to open the list.
17. BACK: Return.
18. EXIT: Exit the menu.
19. COLOR The red button can help you BUTTONS:
delete program and the green button is used to edit.
You can press yellow button to move and press blue
button to skin program.
20. FREEZE: Press this button to freeze the image.
Note: Some formats do not support the freeze
function.
21. PICTURE: Press this button to select among dynamic,
standard, mild, personal.
22. ZOOM: Press this button to switch the screen mode.
SLEEP: TV will be turn off automatically at preset 23.
sleep time if you have set sleep timer.
Press this button to select sleep time among 15min,
30min, 45min, 60min, 90min, 120min, 240min and off.
24. AUDIO: Press to switch audio mode, press this button
to switch audio track when movie is playing.
25. SUBTITLE: In USB and DTV mode, press this button
to switch subtitles when movie is playing.
26. TEXT: Press this button to enter or exit teletext mode.
27. DIGITAL MEDIA PLAYER CONTROL BUTTON:
Include play/pause, stop, previous, next, page up,
page down, backward, forward is used in USB mode .

- 8 -
TV back panel connections
TV back view
HDMI1
HDMI2
PC AUDIO
display
HDMI1
HDMI2
PC AUDIO
Connecting HDMI or DVI devices
- 9 -
TV may not display small text properly.
Switching off the TV
TV
TV,
TV
TV,
TV
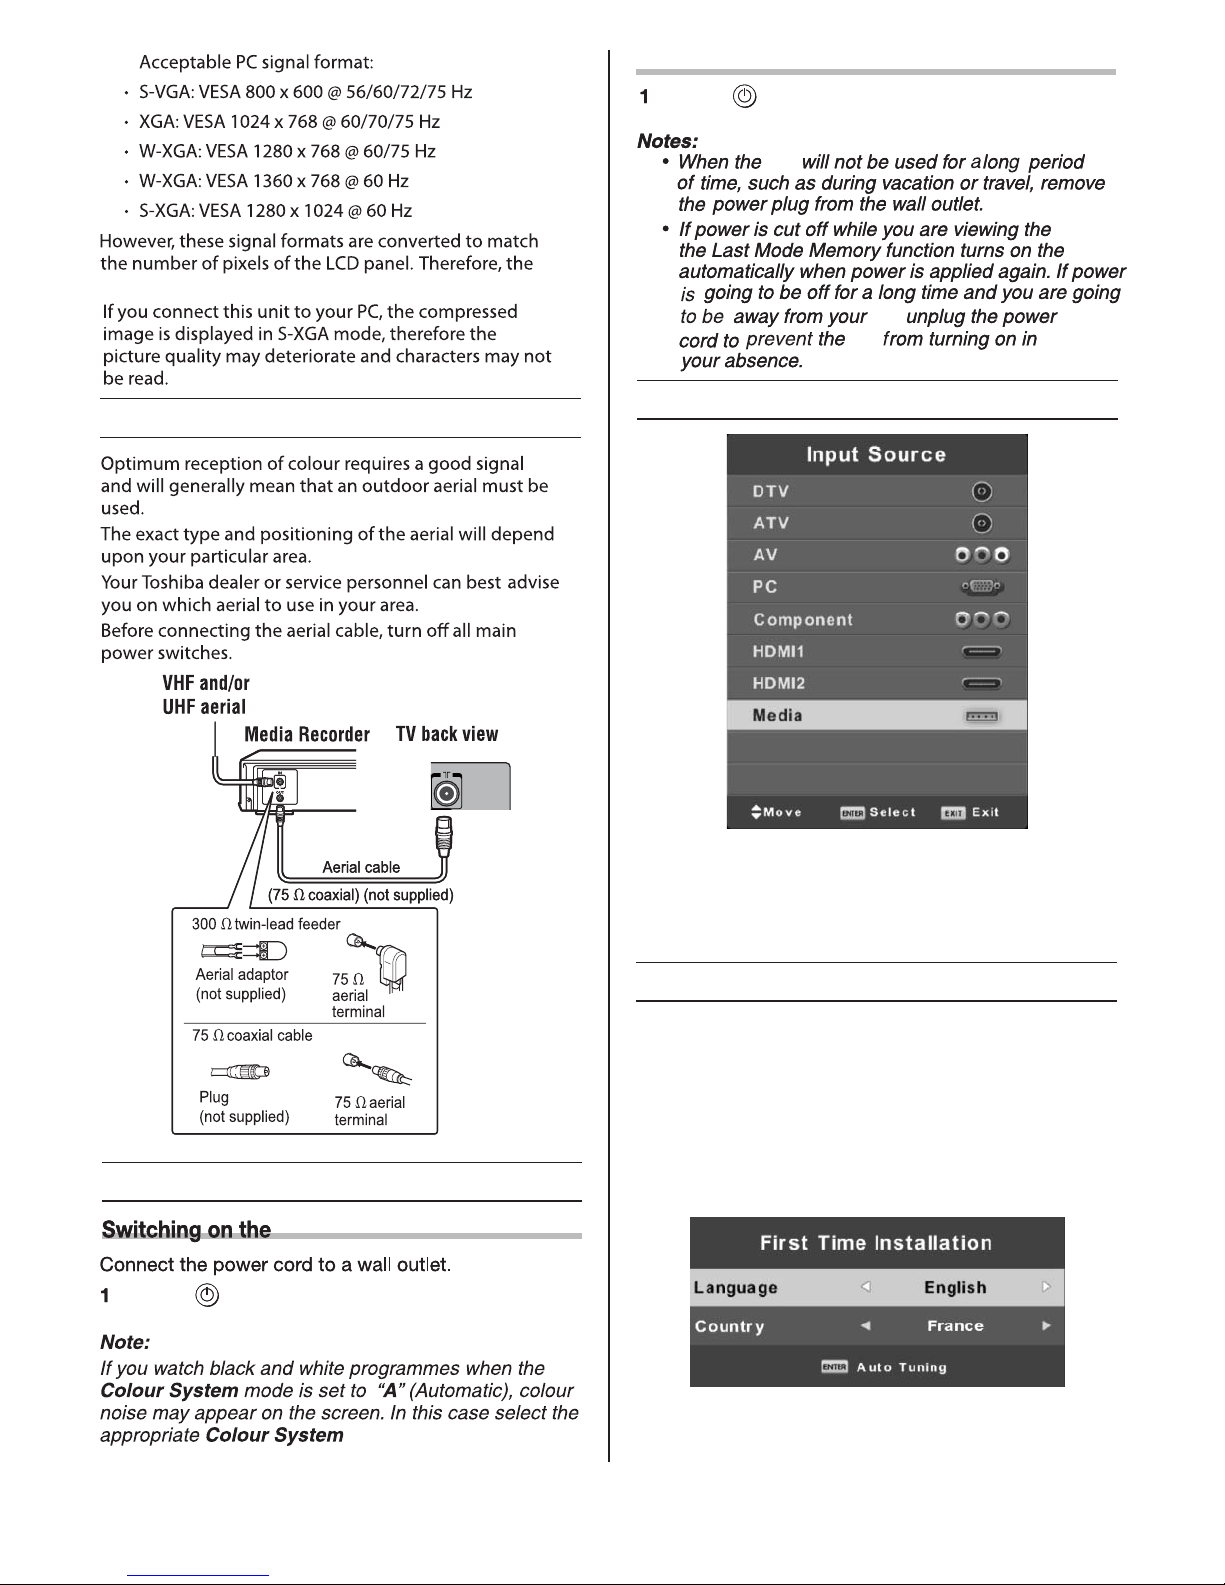
Select Input Source
Turning the TV for the first time
Connect an RF cable from the TV’s input called “RF-In”
and to your TV Aerial socket.
Select Language
Press ◄/► button to select the language to be used for
menus and message.
Select Country
Press ▼/▲ button to highlight country menu.
Press ◄/► button to select the country you want to.
Press INPUT button to display the input source list
Press ▼/▲ or OK button to select the input source you
want to.
Press OK button to enter the input source.
Press EXIT button to quit.
Press on the remote control or POWER on the
TV left side panel to switch to the standby mode.
Connecting an aerial
Turning the TV on
TV
Press on the remote control or POWER on the
TV left side panel.
- 10 -
1. Press ▼/▲ button to select the option that you want
to adjust in the CHANNEL menu.
2. Press Enter button to adjust.
3. After finishing your adjustment, Press Enter button to
save and return to the previous menu.
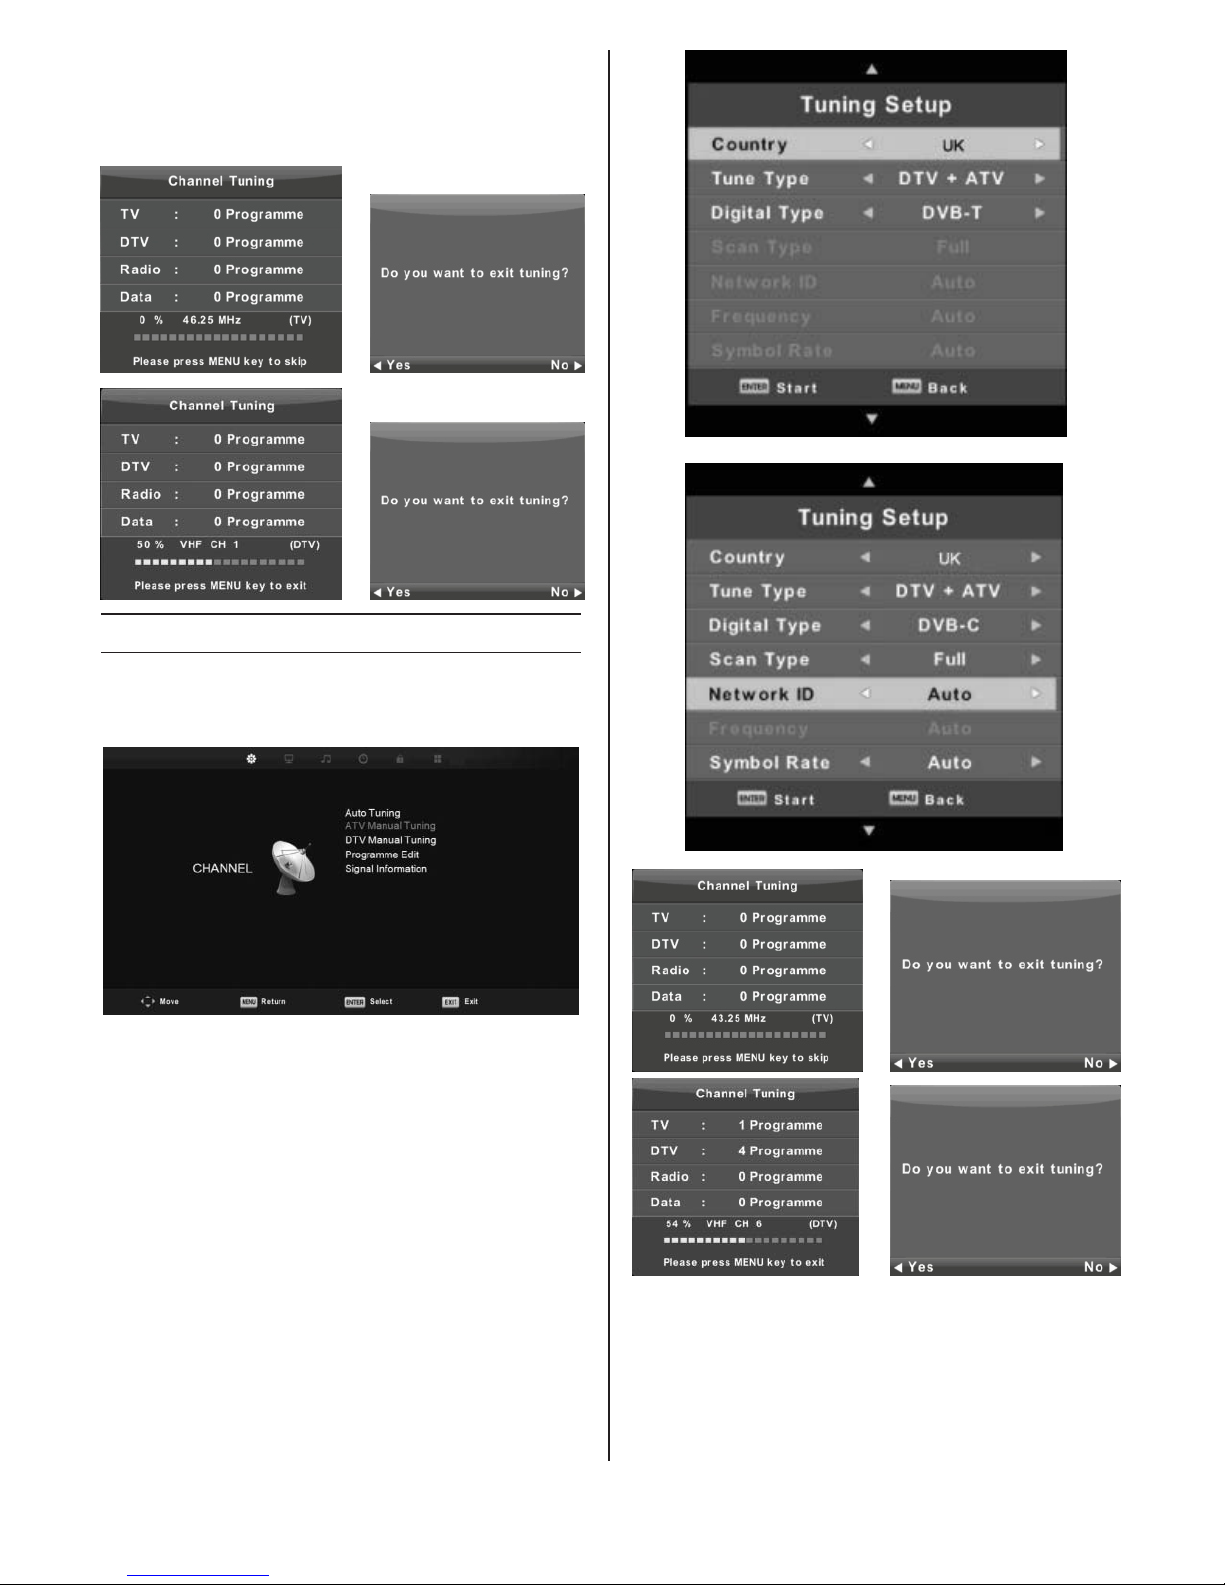
Auto Tuning
Press ▼/▲ button to select Auto Tuning, then press
Enter/► button to enter.
Auto Tuning
First tuning ATV, press Menu and left arrow button to
skip ATV tuning,
Second tuning DTV, press Menu and left arrow button
to skip DTV tuning.
Main Menu Operation
Channel Menu
Press MENU button to display the main menu.
Press ◄/► button to select CHANNEL in the main menu.
- 11 -
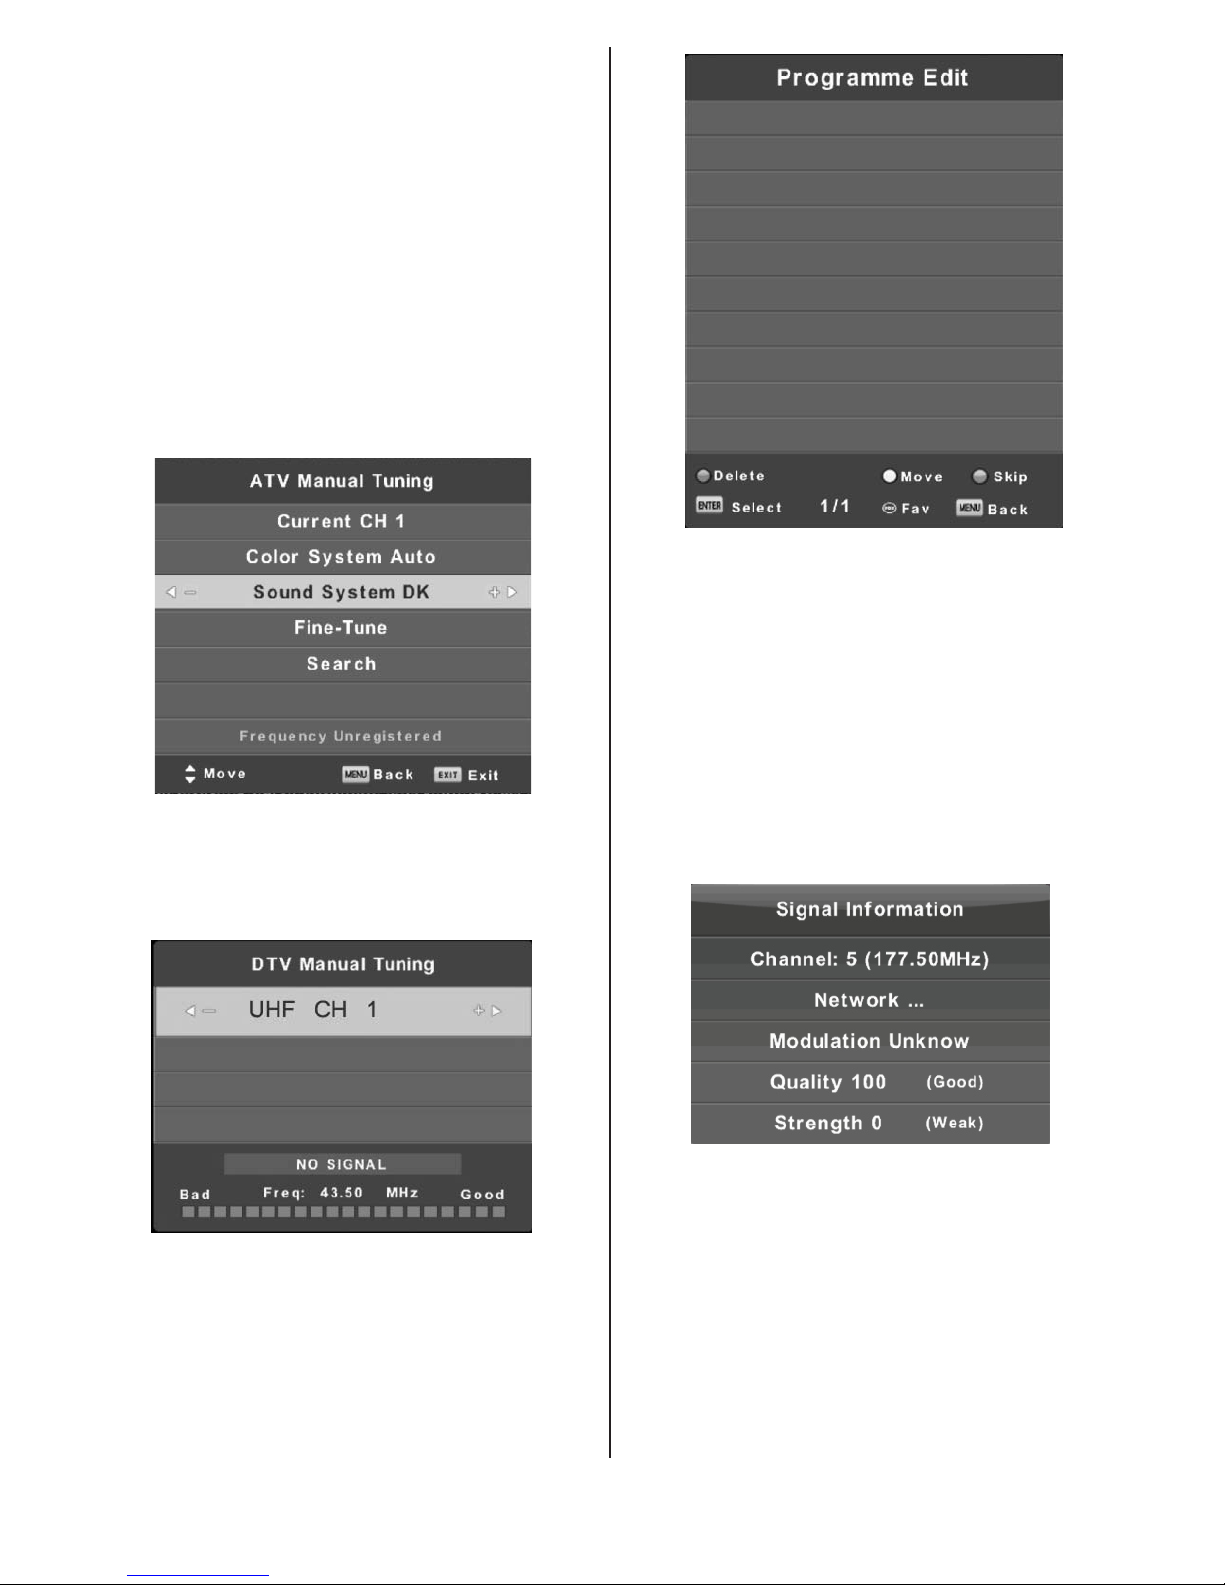
Signal Information
Press ▼/▲ button to select Signal Information, press
the Enter button to see the detail information about the
signal. Only available when there is signal in DTV.
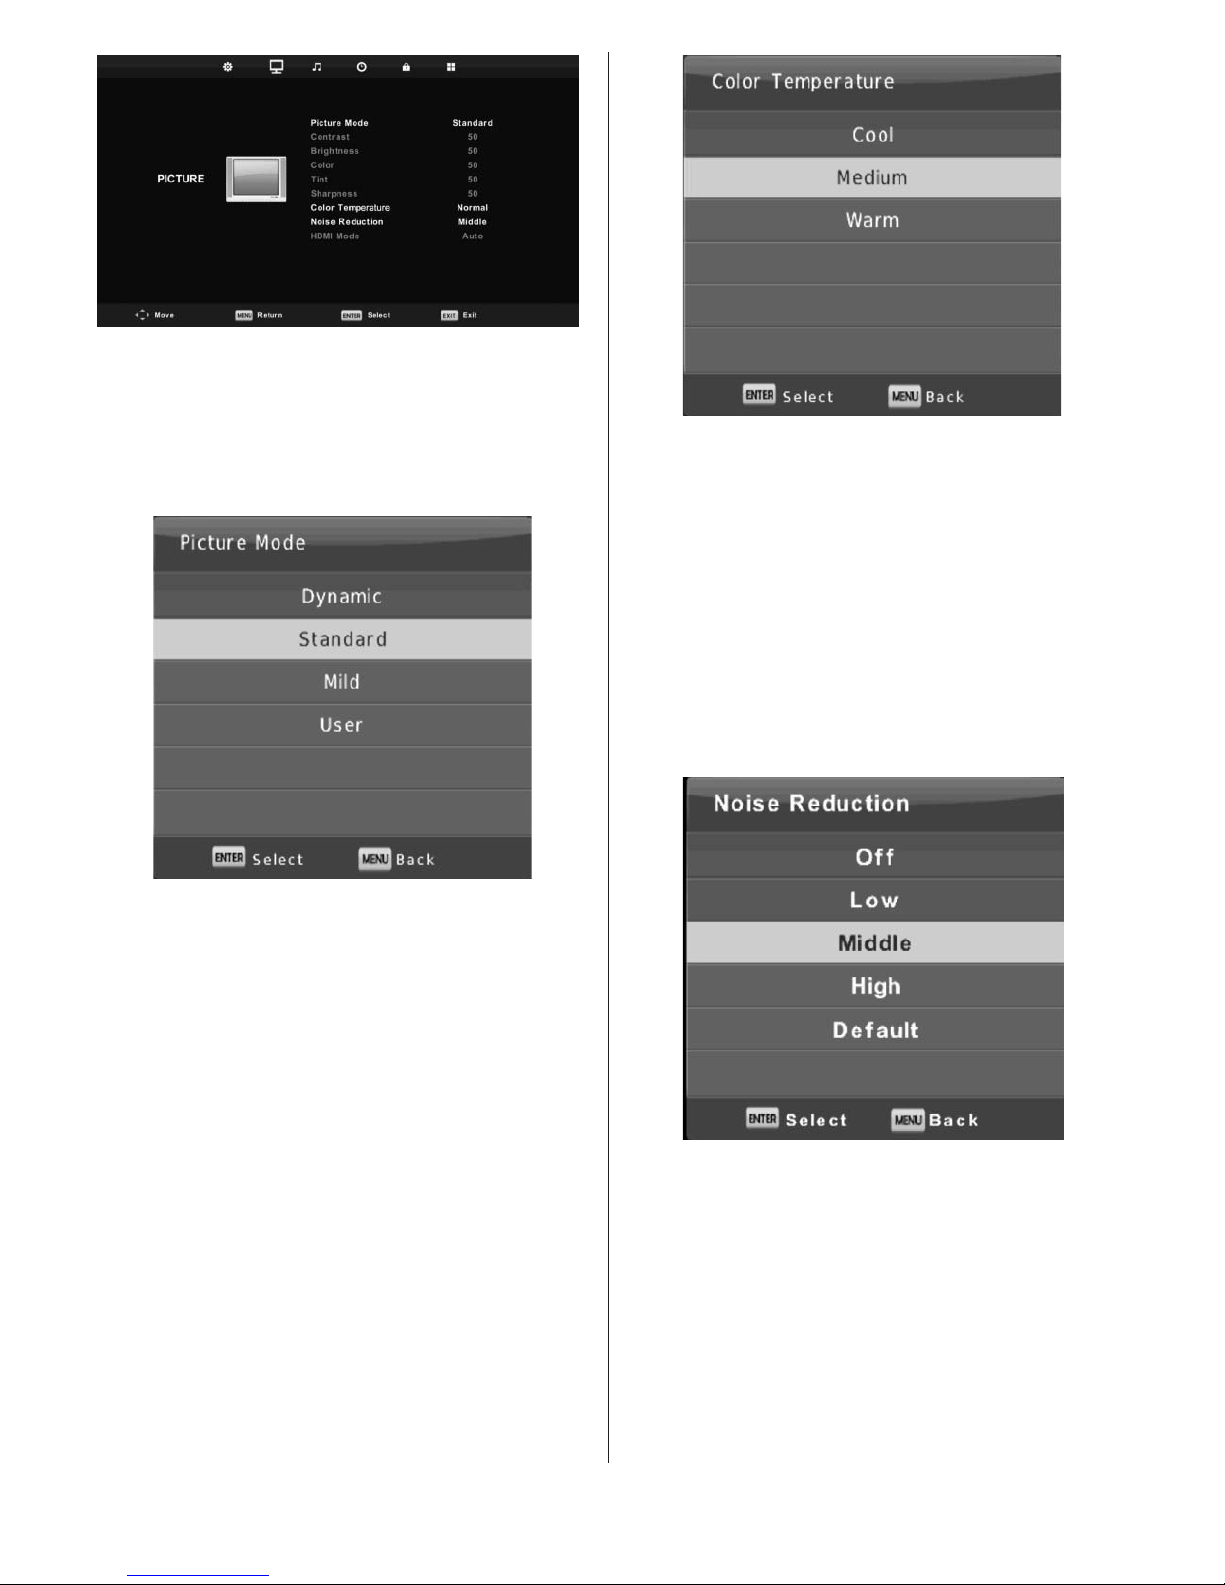
Picture Menu
Press MENU button to display the main menu.
Press ◄/► button to select PICTURE in the main menu.
1. Press ▼/▲ button to select the option that you want
to adjust in the PICTURE menu.
2. Press OK button to adjust.
3. After finishing your adjustment, press MENU button to
save and return back to the previous menu.
The three colored key is the shortcut key for programming
the channel. First press ▼/▲ to highlight the channel you
want to select, then:
Press the Red button to delete the program in the list.
Press the Yellow button to move the channel in favorite
list.
Press the Blue button to skip the selected channel.
Press FAV button to add or remote the channel to your
favorite list. (Your TV set will skip the channel
automatically when using CH+/- to view the channels.)
Program Edit
Press ▼/▲ button to select Program Edit, then press
Enter button to enter sub-menu.
ATV Manual Tuning
Current CH
Set the channel number.
Color System
Select the color system
(Available System: AUTO, PAL, SECAM )
Sound System
Select the Sound system
Fine-Tune
Adjust the frequency of the channel finely.
Search
After setting the channel number and frequency, you can
choose “search” option and press ENTER button.
DTV Manual Tuning
Press ▼/▲ button to select DTV Manual Tuning, then
press Enter button to enter sub-menu.
Press ◄/► button to select channel, then press Enter
button to search program.
- 12 -
Cool: Increase the blue tone for the white.
Medium: Increase the sex-linked colors for the white.
Warm: Increase the red color for the white.
Noise Reduction
To filter out and reduces the image noise and improve
picture quality.
Press ▼/▲ button to select Noise Reduction, then press
OK button to enter sub-menu.
Off: Select to turn off video noise detection.
Low: Detect and reduce low video noise.
Middle: Detect and reduce moderate video noise.
High: Detect and reduce enhanced video noise.
Default: Set as Default.
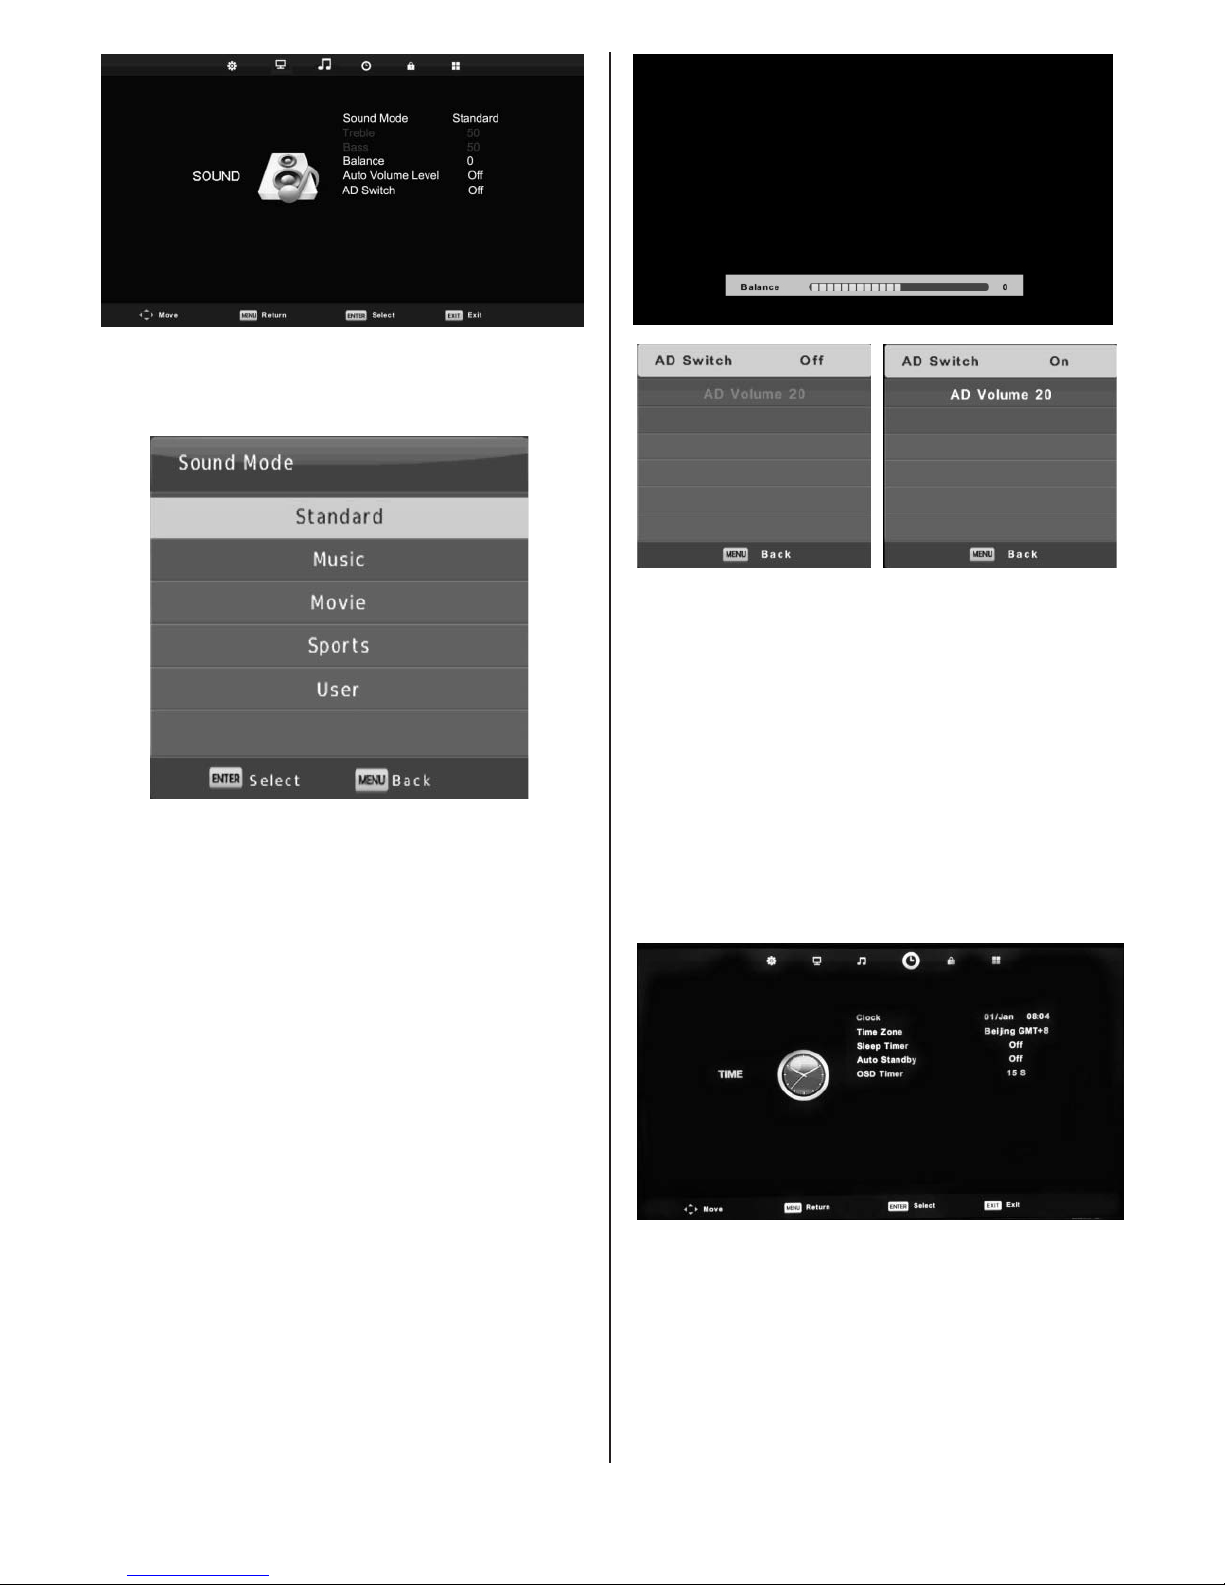
Sound Menu
Press MENU button to display the main menu.
Press ◄/► button to select SOUND in the main menu.
1. Press ▼/▲ button to select the option that you want
to adjust in the SOUND menu.
2. Press Enter button to adjust.
3. After finishing your adjustment, press Enter button to
save and return to the previous menu.
Picture Mode
Press ▼/▲ button to select Picture Mode, then press OK
button to enter sub-menu.
You can change the value of contrast, brightness, color,
sharpness and tint when the picture is in User mode.
TIPS: You can press picture button to change the Picture
Mode directly.
Contrast/ Brightness/ Color/ Tint / Sharpness
Press ▼/▲ button to select option, then press◄/►
button to adjust.
Contrast: Adjust the highlight intensity of the picture,
but the shadow of the picture is invariable.
Brightness: Adjust the optical fiber output of the entire
picture, it will effect the dark region of the
picture.
Color: Adjust the saturation of the color based on your
own like.
Tint: Use in compensating color changed with the
transmission in the NTSC code.
Sharpness: Adjust the peaking in the detail of the picture.
Color Temperature
Change the overall color cast of the picture.
Press ▼/▲ button to select Color Temperature, then
press OK button to enter sub-menu.
Press ◄/►button to select.
(Available mode: Cool, Medium, Warm).
You can change the value of red, green and blue when
the color temperature is in User mode.
- 13 -
Sound Mode
Press ▼/▲ button to select Sound Mode, then press
Enter button to enter sub-menu.
Press▼/▲ button to select.
You can change the value of Treble and Bass when the
sound is in Personal mode.
TIPS: You can press audio button on the remote
control to change the Sound Mode directly.
Standard: Produces a balanced sound in all environments.
Music: Preserves the original sound.
Good for musical programs.
Movie: Enhances treble and bass for a rich sound
experience.
Sports: Enhances vocals for sports.
User: Select to customize picture settings.
Note: The treble and bass are only available in User
mode, you can adjust them as you like.
Balance
Press ▼/▲ button to select option, Press ◄/► button
to adjust.
Auto Volume level
Press ▼/▲ button to select Auto Volume Level, then
press ◄/► button to select On or Off.
AD Switch
Press ▼/▲ button to select AD Switch, then press ◄/►
button to select On or Off.
Amblyopia function for the blind, the tracks will be mixed
describe the current screen.
It need code stream to support.
NOTE:
Balance: This item can adjust the speaker’s output, it
enables you to listen to best at your position.
Auto Volume: This item is used for reducing the
difference between channel and program’s volume
automatically.
Time Menu
Press MENU button to display the main menu.
Press ◄/► button to select TIME in the main menu.
1. Press ▼/▲ button to select the option that you want
to adjust in the TIME menu.
2. Press Enter button l to adjust.
3. After finishing your adjustment, press Enter button to
save and return to the previous menu.
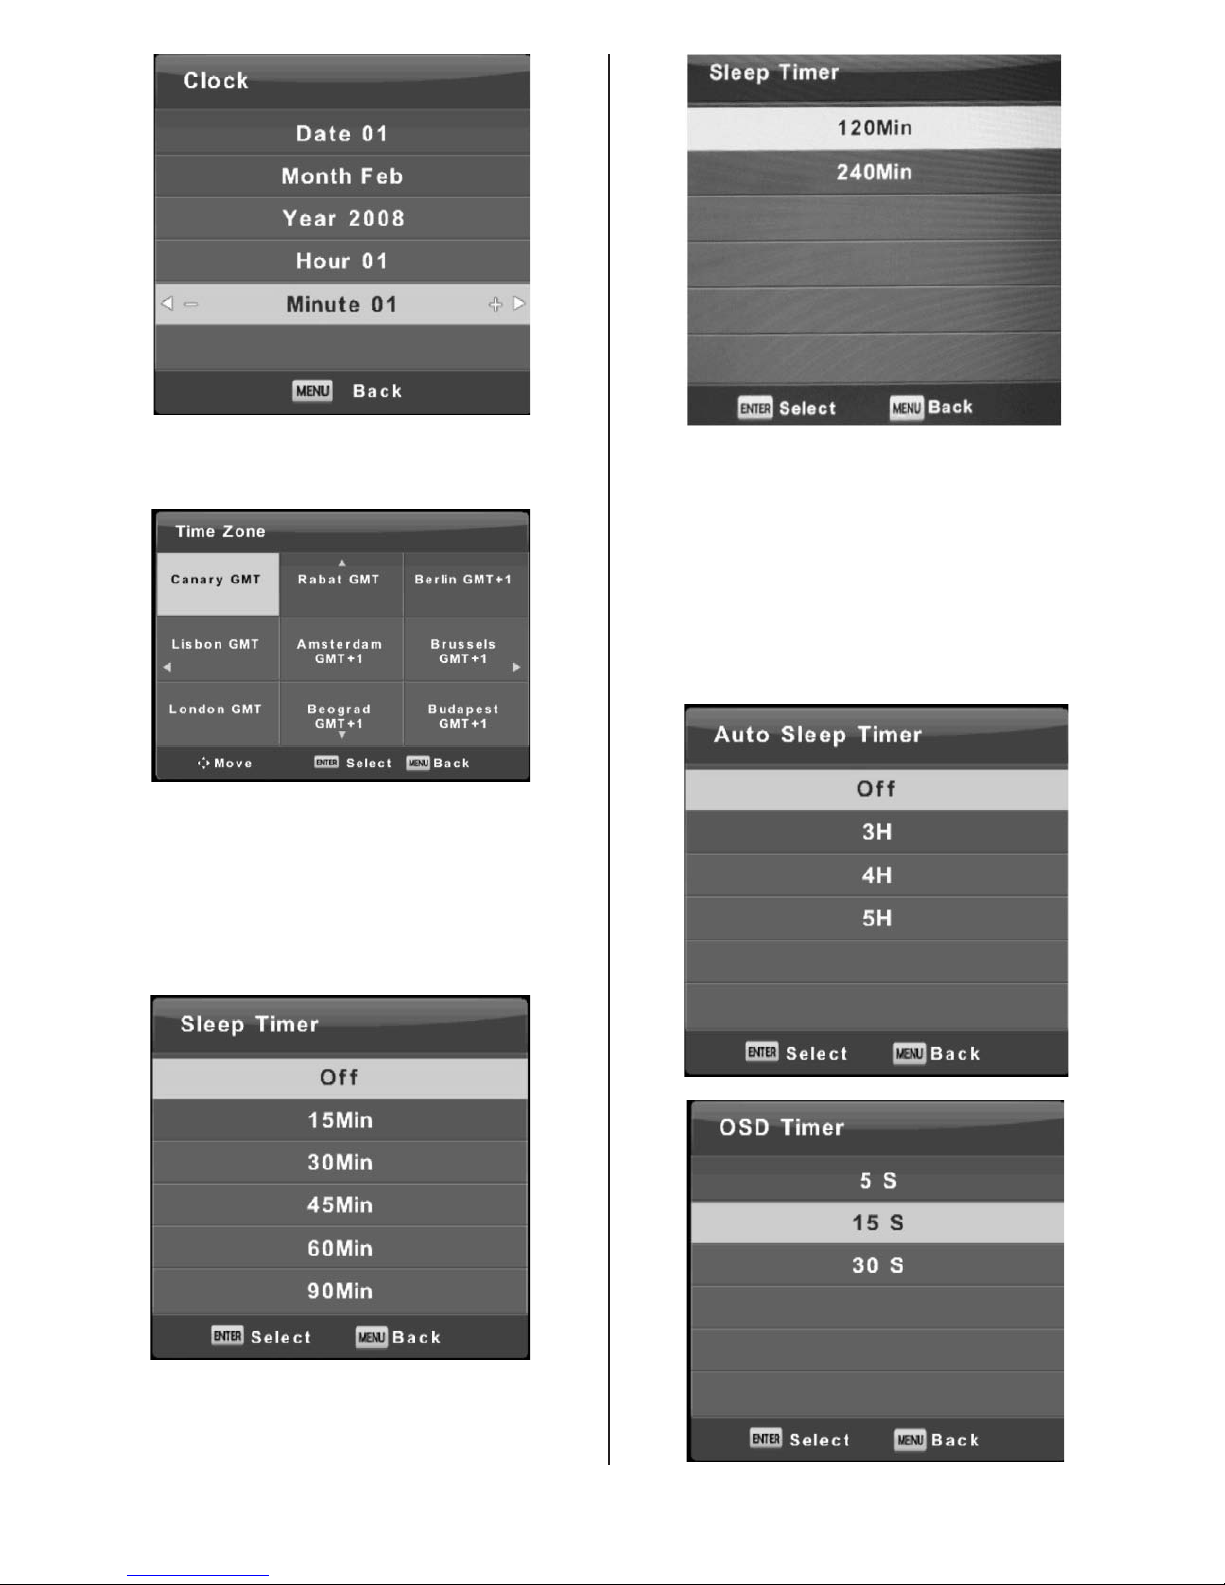
Clock
Press ▼/▲ button to select clock, then press Enter button
to enter sub-menu.
Press ▼/▲ button to select.
- 14 -
OSD Timer
Press ▼/▲ button to select OSD Timer, then press
Enter button to enter sub-menu.
Press ◄/► button to select.
Auto Standby
Press ▼/▲ button to select Auto Standby, then press
Enter button to enter sub-menu.
Press ▼/▲ button to select.
Tips: The remote control does not make any operation
in the hypothesis time, it will close down automatically.
If you do any operation, it will reset the time.
Sleep Timer
Press ▼/▲ button to select Sleep Timer, then press
Enter button to enter sub-menu.
Press ▼/▲ button to select.
(Available options are: Off, 15min, 30min, 45min, 60min,
90min, 120min, 240min).
Time Zone
Press ▼/▲ button to select Time Zone, then press
Enter button to enter sub-menu.
Press ▼/▲/◄/► button to select time zone.
 Loading...