

Toshiba 24L365 Series, 55L365 Series, 32L365 Series, 40L365 Series, 43L365 Series Owner's Manual
...
C
24L365* Series
32L365* Series
40L365* Series
43L365* Series
49L365* Series
55L365* Series
c
2016 TOSHIBA LIFESTYLE PRODUCTS & SERVICES CORPORATION
All Rights Reserved

WelcometoToshiba
Introduction / Getting started
Pedestal stand Assembling
(for 24L365* Series) .........................................3
(for 32L365* Series) .........................................4
(for 40/43/49/55L365* Series) .....................5
Important Safety Instructions ...........................6
Connecting an aerial ..........................................10
Exploring your new TV ......................................10
TV panel controls .................................................11
Learning about the remote control ..............15
Connecting the AC adapter to your TV
(for 24L365* Series) ............................................
Connecting the AC power cord to your TV
(for 32/40/43/49/55L365* Series) ..................
Turning the TVfortherst time ...................17
Selecting the external input source
to view .....................................................................17
1
1
Using the Tv’s features
Learning about the menu system .................18
Picture adjustment .............................................
Sound adjustment ..............................................22
Channel adjustment ..........................................
Time adjustment .................................................
Using the Option menu ....................................
Setting the Lock menu ......................................27
2
2
25
26
Connecting your TV
Back connections ................................................ 28
Connecting HDMI or DVI devices ..................28
Using the USB storage device Function ......29
Using the Media Player ......................................
Using the MHL TV Function ..............................34
31
Reference section
APPENDIX .............................................................. 35
6
6
0
3
Troubleshooting ................................................. 38
Broadcast system ................................................39
Specications ....................................................... 39
2

Int roduc tion / Ge tting s tart ed
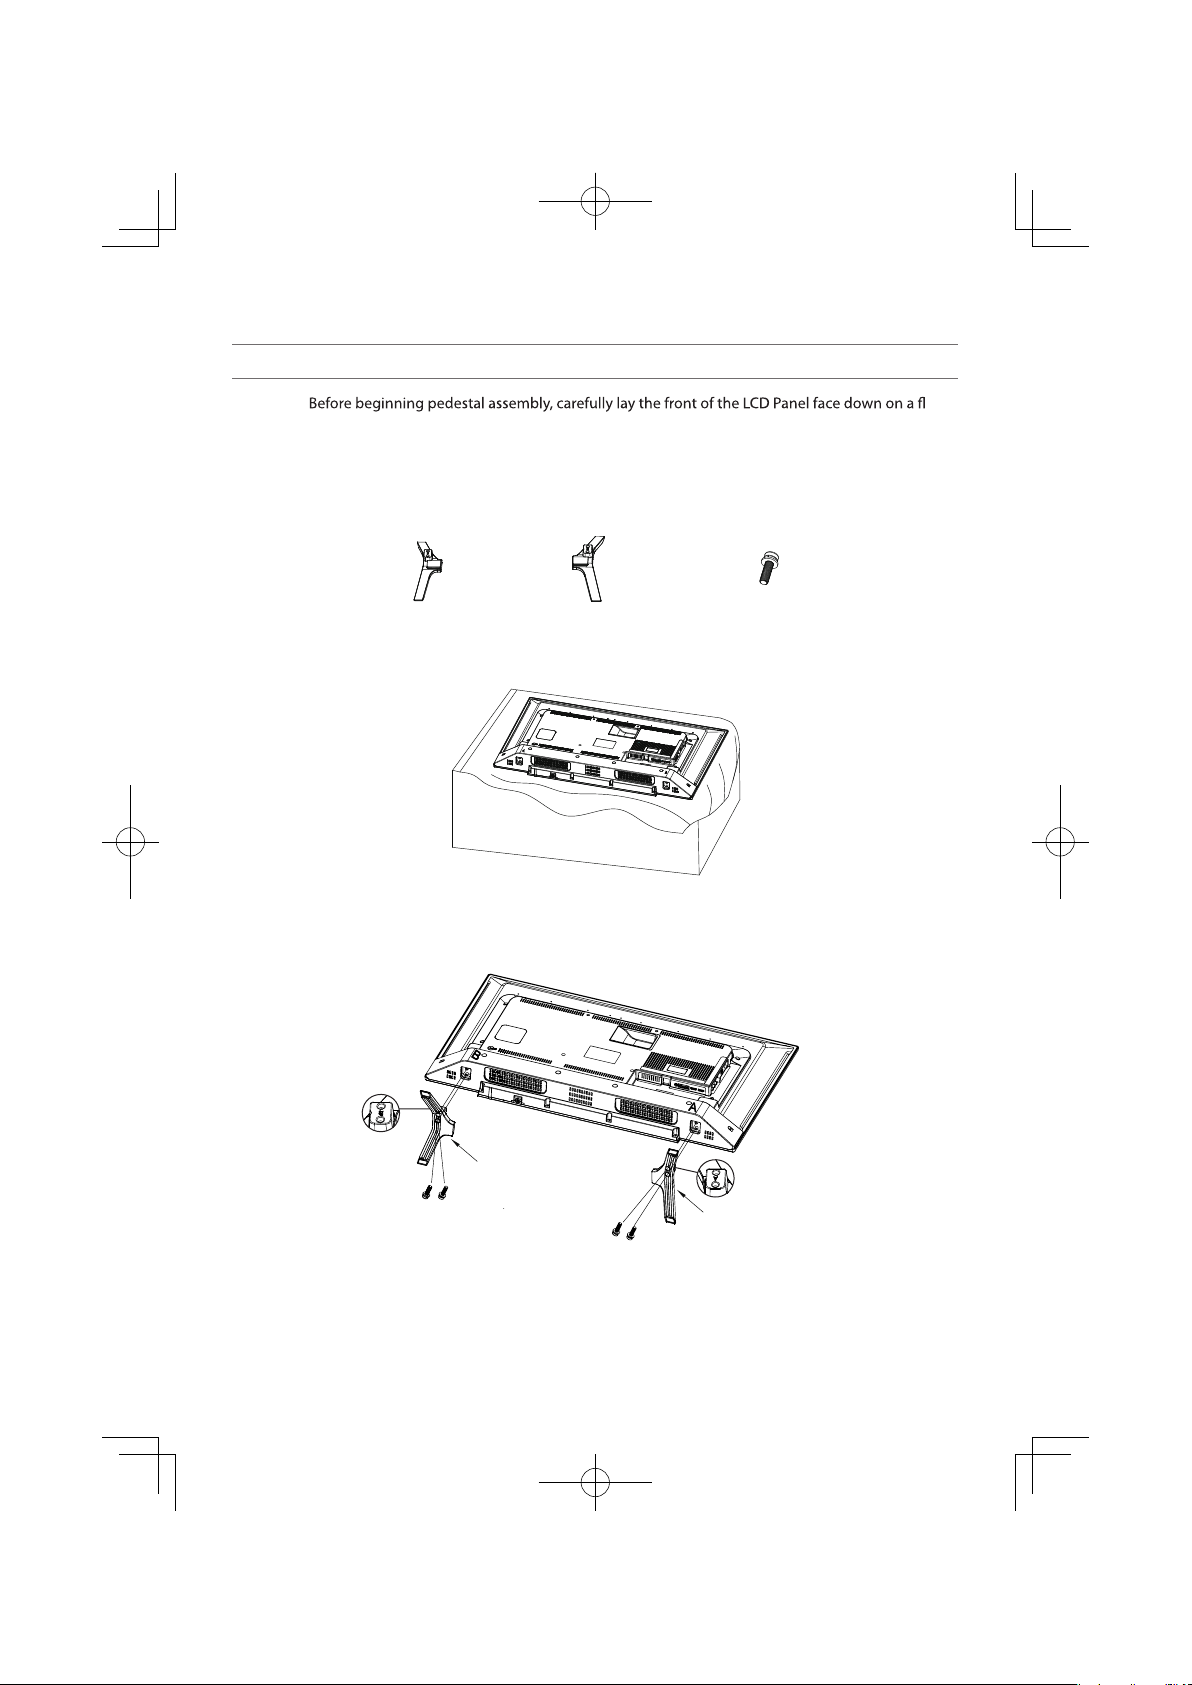
Pedestal stand Assembling (for 24L365 Series)
CAUTION:
cushioned surface such as a quilt or blanket. Leave the bottom of the unit protruding over the edge of the
surface and assemble as indicated.
NOTE:
Extreme care should always be used when attaching the pedestal stand to avoid damage to the LCD panel.
*
1
Base A 1PC Base B 1PC
BT 4X18 2 PCS
2
at,
Please tighten the base and TV set together with two BT 4×18 screws.
3
Base mark“B”Base mark“B”
Base B
Base mark“A”Base mark“A”
Base A
Warning: Ensure the power cable is not pinched when attaching the pedestal stand as this could
cause an electric shock.
3

Int roduc tion / Ge tting s tart ed
Pedestal stand Assembling (for 32L365 Series)
CAUTION:
cushioned surface such as a quilt or blanket. Leave the bottom of the unit protruding over the edge of the
surface and assemble as indicated.
NOTE:
Extreme care should always be used when attaching the pedestal stand to avoid damage to the LCD panel.
*
at,
1
Base A 1PC Base B 1PC
BT 4X16 4 PCS
2
Please tighten the base and TV set together with four BT 4×16 screws.
3
Base mark“B”
Base mark“B”
Base B
Base B
Base A
Base A
Warning: Ensure the power cable is not pinched when attaching the pedestal stand as this could
cause an electric shock.
4
Base mark“A”Base mark“A”
Int roduc tion / Ge tting s tart ed
Pedestal stand Assembling (for 40/43/49/55L365 Series)
CAUTION:
cushioned surface such as a quilt or blanket. Leave the bottom of the unit protruding over the edge of the
surface and assemble as indicated.
NOTE:
Extreme care should always be used when attaching the pedestal stand to avoid damage to the LCD panel.
*
at,
1
Base A 1PC Base B 1PC
PM4X14 4 PCS
2
Please tighten the base and TV set together with four PM4×14 screws.
3
Base mark“B”
Base B
Base A
Warning: Ensure the power cable is not pinched when attaching the pedestal stand as this could
cause an electric shock.
Base mark“A”Base mark“A”
5

Int roduc tion / Ge tting s tart ed
Important Safety Instructions
Be sure to observe the following instructions and
precautions to ensure safe use of this TV.
Installation
1) WARNING: To prevent injury, this apparatus
must be securely attached to a stable surface/
wall in accordance with the installation
instructions.
Install the TV in a horizontal, stable location.
• If the TV is not installed securely, it may lean or
fall over and cause an injury.
• To prevent injury, use the exclusive optional
stand or wall-hanging bracket to install this
TV on a stable surface or wall securely in
ed technician.
• To secure the TV, use a sturdy strap from the
hook(s) on the rear of the TV to a wall stud,
pillar, or other immovable structure. Make
sure the strap is tight, secure, and parallel
to the oor.
TV side
For 43/49/55L365*
2) Never place the TV in an unstabilized location
such as on a shaky table, incline or location
subject to vibration
• Only use cabinets or stands recommended by
the TV manufacturer.
• Only use furniture that can safely support the
TV.
• Ensure that the TV is not hanging over the
edge of the supporting furniture.
• Never place the TV on tall furniture (for
example, cupboards or bookcases) without
anchoring both the furniture and the TV to a
suitable support.
• Never stand the TV on cloth or other material
placed between the TV and supporting
furniture.
,which may cause an
injury or damage.
3) Never stand or climb on the TV.
• Educate children about the dangers of
climbing on furniture to reach the TV or its
controls.
Be especially careful in households with children
to prevent them through climbing on top of
the TV. It may move, fall over, break, become
damaged or cause an injury.
4) Always connect the power plug to an
appropriate electrical outlet equipped with
100-240V AC, 50/60Hz
ed voltage
re or an electric shock.
About the fuse
In a threee pin earthing-type, the fuse tted in
this plug is approved by ASTA or BSI to BS1362.
It should only be replaced by a correctly rated
and approved type and the fuse cover must be
retted.
About the use
• Make sure to insert the plugs rmly, when
plugging the AC power cord/AC adapter into
the TV set end and wall outlet end.
• Make sure to hold the plug, when unplugging
the AC power cord/AC adapter.
• Never use other cord except for supplied AC
power cord/AC adapter, and never use the
supplied AC power cord/AC adapter for any
other purpose.
• Use the AC power cord
(for 32/40/43/49/55L365*)
• Use the AC adapter (for 24L365*)
5) Never insert or remove the power plug with
wet hands.
This may cause an electric shock.
6) Never block or cover the slots and openings in
the cabinet.
• Never place the TV so that it is facing upward
or on its side.
• Never place the TV in a closet, bookcase or
other similar area where the ventilation is
poor.
• Never drape a newspaper, tablecloth or
curtain on the TV.
• When installing the TV against a wall, always
keep the TV at least 10 cm away from the wall.
• Never place the TV on a soft unstable surface,
such as a carpet, or a cushion.
The inside of this TV will overheat if the
ventilation holes are covered, blocked or sealed,
which may result in a re.
6
Int roduc tion / Ge tting s tart ed
7) Never place the TV near a heater or in direct
sunlight.
The surface of the cabinet or power cord may
melt and result in a re or an electric shock.
8) Never place the TV in an area exposed to high
humidity levels, such as in a bathroom or
closetoahumidier.
This may cause a re or an electric shock.
9) Never place the TV next to a stove where it
will be exposed to oil, smoke, or steam, or in
a location where there is a large quantity of
dust.
This may cause a re or an electric shock
10) Precautions for moving the TV
• When moving the TV, be sure to remove the
plug from the wall outlet and disconnect the
aerial cable and audio/video cables, any steady
ties and mounting screw. A re or an electric
shock may result if the power cord is damaged.
• When carrying the TV, at least two people are
needed. Be sure to carry it upright.
• Never carry the TV with the screen facing up or
down.
11) Precautions for installing on outdoor aerial
An outside aerial system should not be located
in the vicinity of overhead power lines, or other
electric light or power circuits.
If the aerial falls down or drops, it may cause an
injury or an electric shock.
Use
1) Never place hot objects or open ame sources,
such as lighted candles or nightlights, on or
close to the TV.
High temperatures can melt plastic and lead to
res.
2) The apparatus shall not be exposed to
dripping or splashing and that no objects
lled with liquids, such as vases, shall be
placed on the apparatus.
When liquids are spilled or small items are
dropped inside the TV, this may cause a re or an
electric shock.
If small objects drop inside the TV, turn off the
TV and remove the power plug from the outlet
immediately and contact a service technician.
3) Never insert objects (metal or paper) or pour
water inside the TV through ventilation holes
and other openings.
These items may cause a re or an electric shock.
If these objects are inserted inside the TV, turn
off the TV and remove the power plug from
the outlet immediately and contact a service
technician. Be especially careful that children do
not insert objects in the TV
4) When the TV will not be used for a long period
of time, such as during vacation or travel,
remove the power plug from the wall outlet
for safety.
• The TV is not completely disconnected from
the power supply line, as minute current is
consumed even when the ! Power switch is
turned off.
• The Mains plug or an appliance coupler is
used as the disconnect device, therefore
the disconnect device shall remain readily
operable.
5) Never pull on the power cord when removing
the plug from the wall outlet.
Always hold the plug rmly when removing it. If
the power cord is yanked, the cord may become
damaged and a re or an electric shock may
occur.
6) Never cut, break, modify, twist, bunch up
or bent the cord or apply excessive force or
tension to it.
Never place heavy objects on the cord or allow
it to overheat as this may cause damage, a re or
an electric shock. Contact a service technician if
the power cord is damaged.
7) If there is thunder or lightning, never touch
the aerial cable or other connected cables.
You may suffer an electric shock.
7

Int roduc tion / Ge tting s tart ed
Service
1) Never repair, modify or disassemble the TV by
yourself.
It may cause a re or an electric shock.
Consult a service technician for inspection and
repairs.
2) When a malfunction occurs, or if smoke or
an unusual odor comes from the TV, turn off
the TV and remove the power plug from the
outlet immediately.
Make sure that the smoke or smell has stopped,
then contact a service technician. If the TV is still
used in this condition, it may cause a re or an
electric shock.
3) If the TV is dropped or the cabinet is broken,
turn off the TV and remove the power plug
from the outlet immediately.
If the TV has power in this condition, it may cause
a re or an electric shock. If the cabinet is broken,
be careful when handling the TV to prevent an
injury.
Contact a service technician for inspection and
repair.
4) When the TV reaches the end of its useful life,
ask a qualied service technician to properly
dispose of the TV.
Cleaning
CAUTION: Avoid using chemicals (such as air
refreshers, cleaning agents, etc.) on or near
the TV pedestal. Studies indicate that plastics
may weaken and crack over time from the
combination effects of chemical agents and
mechanical stress (such as weight of TV). Failure
to follow these instructions could result in
serious injury and/or permanent damage to TV
and TV pedestal.
1) Remove the power plug before cleaning.
Never use solvents such as benzine or thinner to
clean the TV.
• These solvents may distort the cabinet or
damage its nish.
• If rubber or vinyl products remain in contact
with the TV for a long time, a stain may result.
If the cabinet becomes dirty, clean it with a soft,
dry cloth.
When cleaning the surface of the LCD display,
wipe the panel surface gently with a soft, dry
cloth.
2) Periodically disconnect the power plug from
the outlet and check it.
If dust has collected on the power plug
connectors, clean off the dust with a dry cloth.
This dust may cause a re due to reduced
insulation on the plug.
Important information
1) About LCD screen
• If you have the LCD screen facing to the sun,
the LCD screen will be damaged. Be aware of
locating the TV close to a window or outdoors.
• Never press the LCD screen strongly or scratch
it, and never put anything on it. These actions
will damage the LCD screen.
2) About cabinet and LCD screen
Never spray volatile compounds such as
insecticide on the cabinet and LCD screen.
This may cause a discoloration or damage the
cabinet and LCD screen.
3) About afterimage
If a still picture is displayed, an afterimage may
remain on the screen, however it will disappear.
This is not a sign of malfunction.
4) Some pixels of the screen do not light up
The LCD display panel is manufactured using an
extremely high level of precision technology,
however sometimes some pixels of the screen
may be missing picture elements or have
luminous spots. This is not sign of malfunction.
5) About Interference
The LCD display may cause interference in image,
sound, etc. of other electronic equipment that
receives electromagnetic waves (e.g. AM radios
and video equipment).
6) About using under the low temperature places
If you use the TV in the room of 0°C or less,
the picture brightness may vary until the
LCD monitor warms up. This is not a sign of
malfunction.
7) When disposing of or transferring ownership
of the TV
Before disposing of or transferring ownership
of the TV, perform "Resetting the TV".
8

Int roduc tion / Ge tting s tart ed
Recording using an USB storage device
• Be sure to select the correct country/region for
use.
Use of the recording function may not be possible
depending on the selected country/region.
Use with incorrect settings may violate certain
laws or other regulations, and may result in
criminal punishment.
In such cases, TOSHIBA LIFESTYLE PRODUCTS &
SERVICES CORPORATION and the Toshiba Group
shall bear no responsibility whatsoever.
• The recording function has been designed for
private use and entertainment in your home
environment.
Please note that any commercial use of the
recording function could lead to copyright
infringement of authors’rights. Toshiba asks you
to respect the intellectual property rights of third
parties.
• Before recording to a device connected to the TV,
make a test recording and check the recording
performance.
• Toshiba shall not be liable for compensation
or incidental damages of any kind whatsoever
resulting from content that was not properly
recorded on the recording device or that was
modied or lost.
• Toshiba shall not be liable for damages of any kind
whatsoever (breakdown of the recording device,
cation or loss of the recorded content, etc.)
resulting from malfunction, operating failure
or incorrect operation due to combining with
another connected device.
• Do not turn off the power supply to the USB
storage device or disconnect the connecting
cable while the USB storage device is operating.
Doing so may result in loss of the recorded data or
malfunction of the USB storage device.
• The recording function is not available in all
countries.
• Please note that recording on the USB storage
device is no longer playable after the TV’s main board is exchanged during service.
• If the time information is incorrect, programed
recording may not be performed properly.
Furthermore, if the time information differs
according to the currently viewed channel,
programed recording may not be performed
properly depending on tuning operations.
Exemptions
• Toshiba is not liable for any damage caused
by res, natural disaster (such as thunder,
earthquake, etc.), acts by third parties, accidents,
owner’s misuse, or uses in other improper
conditions.
• Toshiba is not liable for incidental damages
(such as prot loss or interruption in business,
modication or erasure of record data, etc.)
caused by use or inability to use of product.
• Toshiba is not liable for any damage caused
by neglect of the instructions described in the
owner’s manual.
• Toshiba is not liable for any damage caused by
misuse or malfunction through simultaneous use
of this product and the connected equipment.
9
Int roduc tion / Ge tting s tart ed
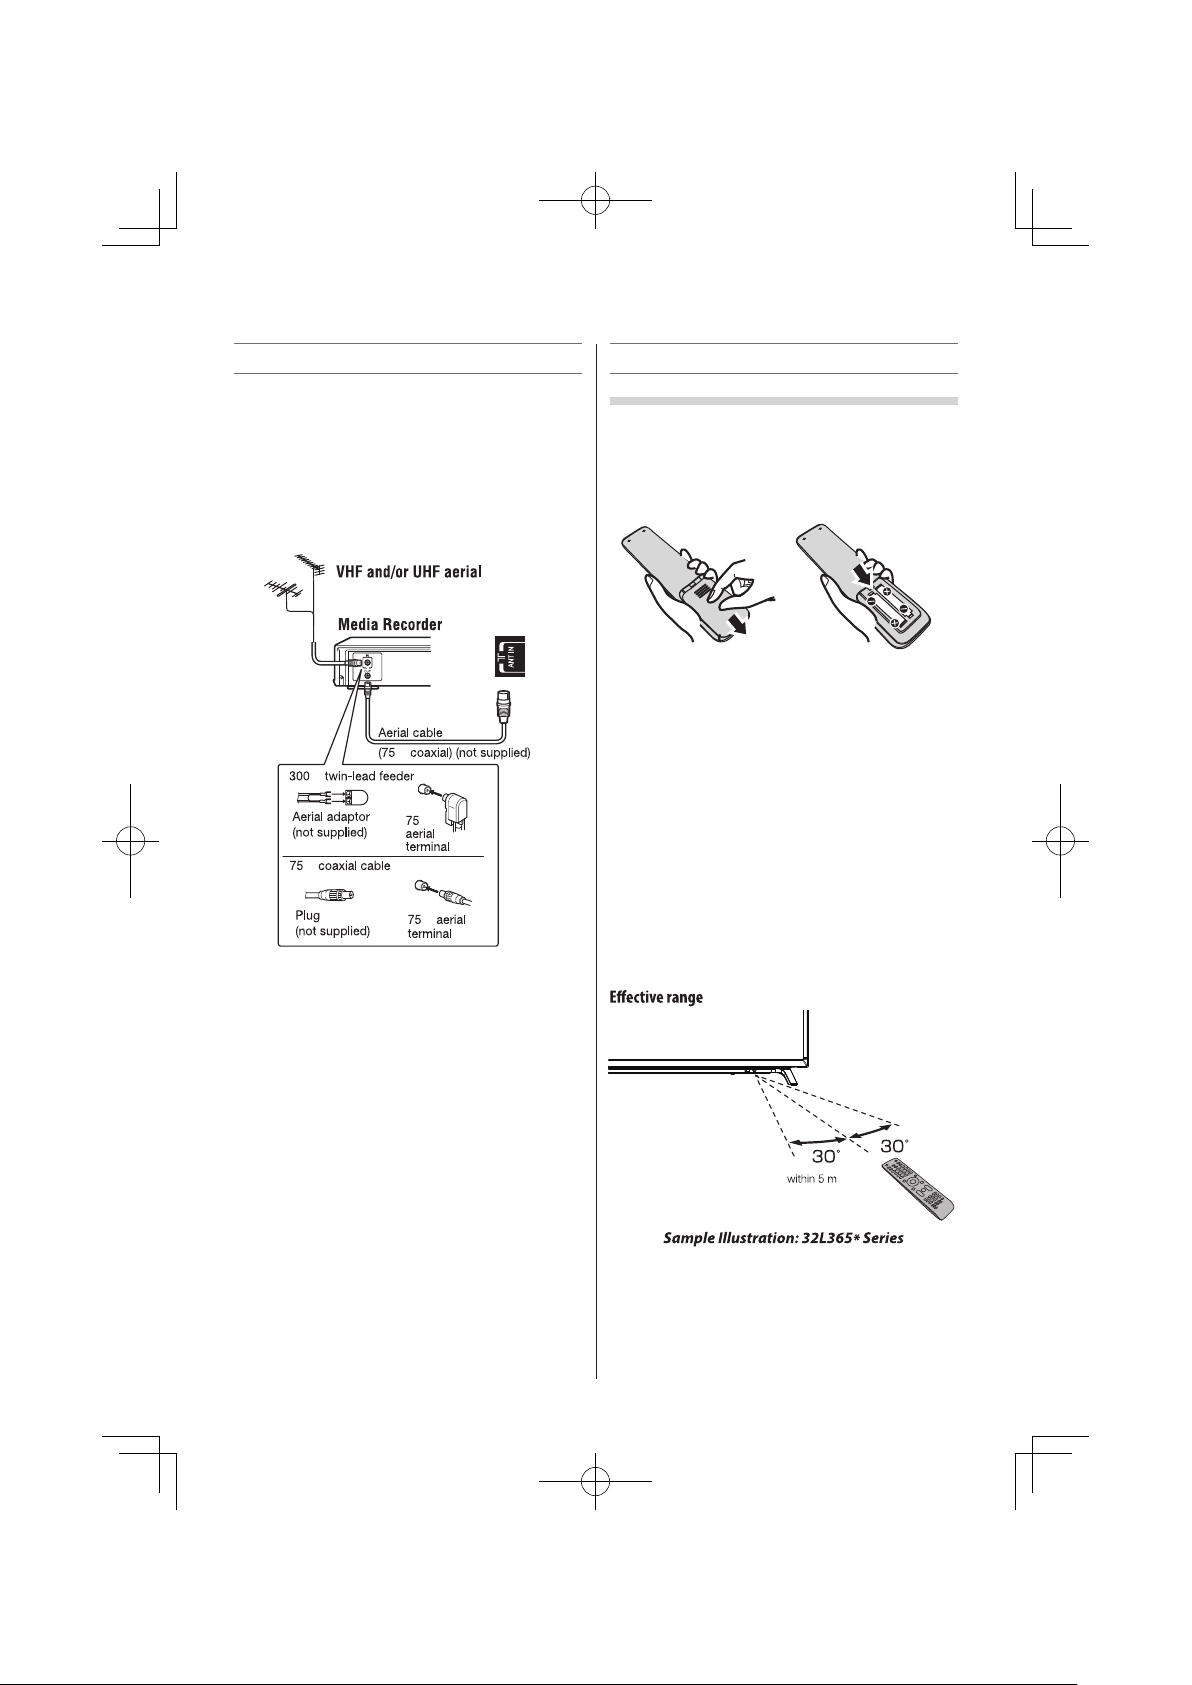
Connecting an aerial
Optimum reception of color requires a good signal
and will generally mean that an outdoor aerial must
be used.
The exact type and positioning of the aerial will
depend upon your particular area.
Your Toshiba dealer or service personnel can best
advise you on which aerial to use in your area.
Before connecting the aerial cable, turn off all main
power switches.
TV Antenna input
Ω
Ω
Ω
Ω
Ω
Exploring your new TV
Installing the remote control batteries
Remove the battery cover.
Insert two R03 (AAA) batteries matching the –/+
polarities of the battery to the –/+ marks inside the
battery compartment.
Cautions:
• Dispose of batteries in a designated disposal area.
Batteries must not be exposed to excessive heat such
as sunshine, re or the like.
• Attention should be drawn to the environmental
aspects of battery disposal.
• Never mix battery types or combine used batteries
with new ones.
NOTE:
• If the remote control does not operate correctly, or if
the operating range becomes reduced, replace both
batteries with new ones.
• If the batteries are dead or if you will not use the
remote control for a long time, remove the batteries
to prevent battery acid from leaking into the battery
compartment.
10
Int roduc tion / Ge tting s tart ed
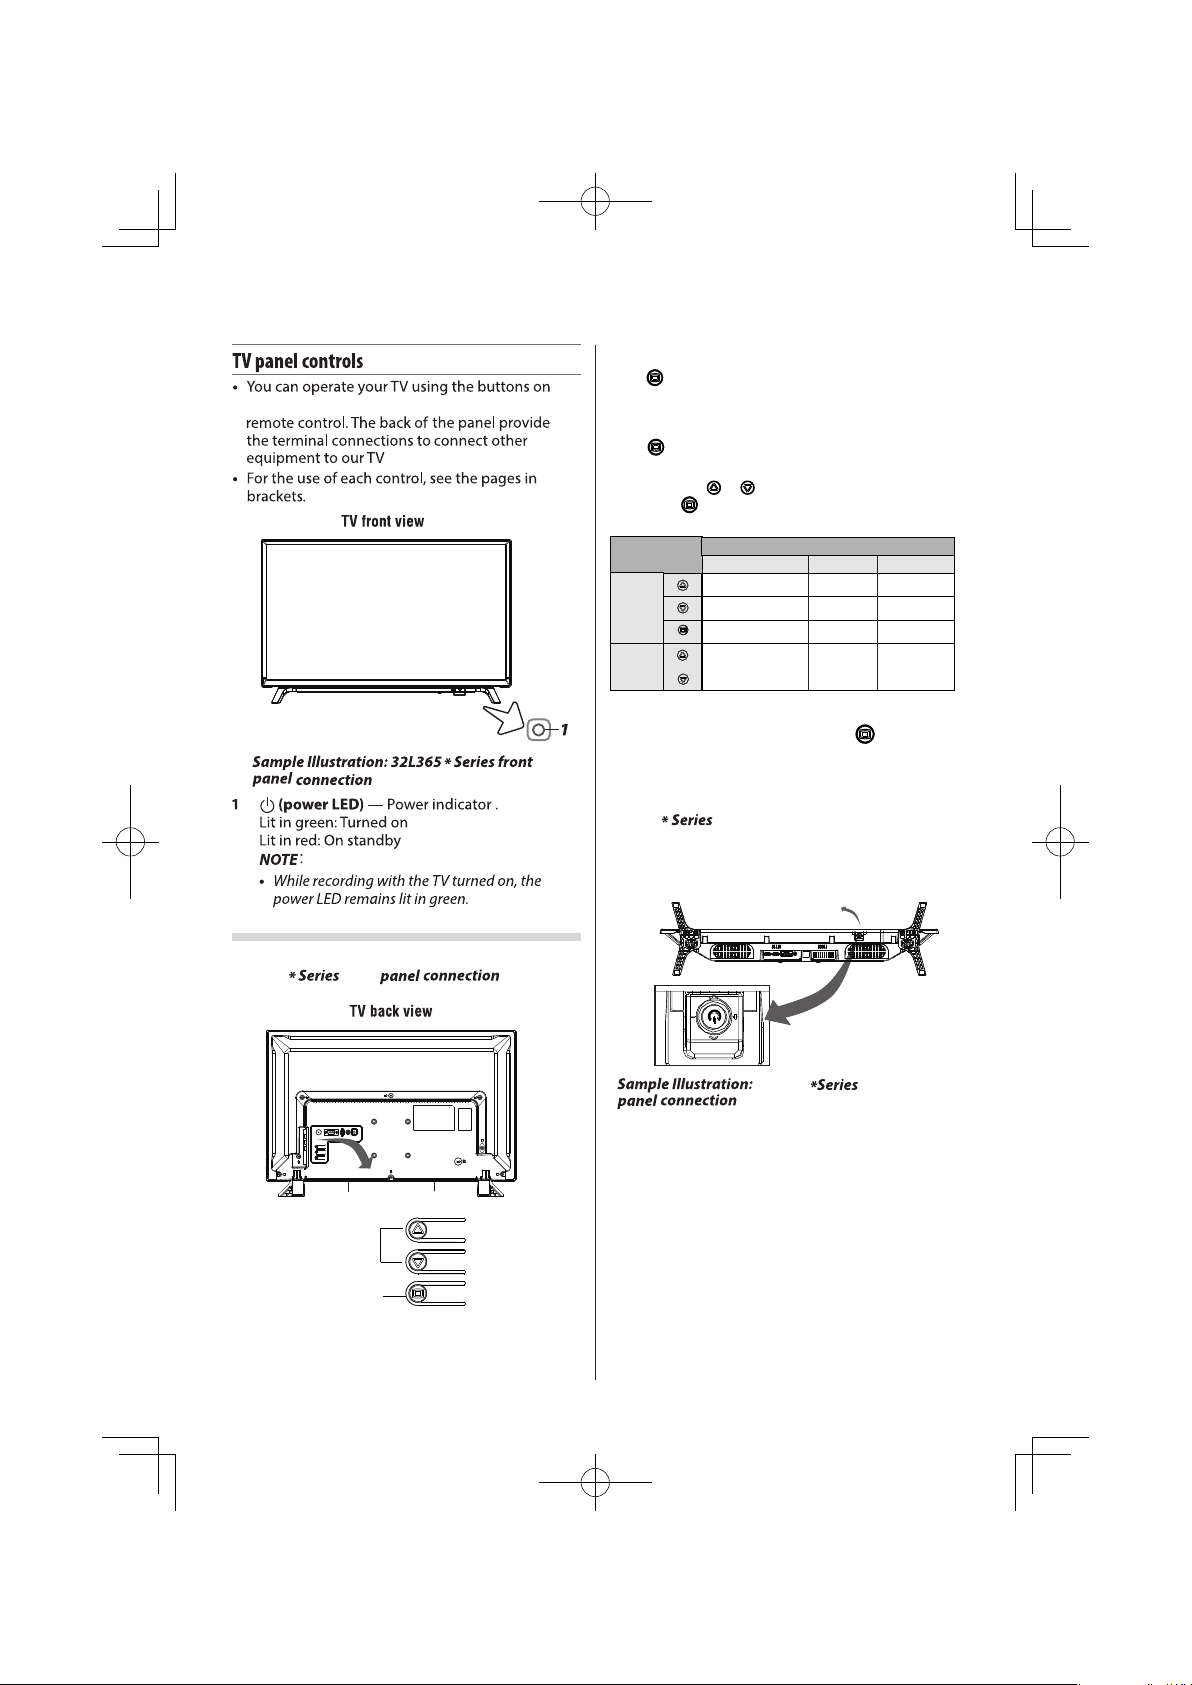
back panel or joystick control buttons or the
Turn on the TV
Press and wait for about 2 seconds, TV will
be turned on.
Menu select
Press to open the OSD, from left to right,
the icons are main menu, source and sound
volume. Press or button to select a menu
and press button to access it.
TV buttons
24L 365
bac k
BUTTON CONTROL
Pres s
Pres s
and h old
or
Move left or up
Move right or down
Select and confirm
setting a value.
MENU O PERATI ON
Mai n menu Sou rce menu
Enter/Back
Move up
Move down
Enter/Back
/ /
Volum e adjus t
Move left
Move right
/
Go to standby
Exit on-screen menu, press and hold button
for 2 seconds.
Joystick Control Buttons on the TV(32/40/43/49/
55L365 )
NOTE:
The graphics are for representation only.
Pow er Indi cator /
Rem ote Sen sor
TV bottom view
32L 365
bac k
Up or Do wn/
Left o r Right
Ente r/Bac k/
Turn On o r Off
Press middle button:
In standby mode, press it to turn on the TV;
Without OSD, short press it to access source
Spe akerSpe aker
menu; long press to turn the TV to standby;
With OSD, short press it to confirm a
selection; long press it to return or exit a
menu /submenu.
Push left: decrease volume or go to left.
Push right: increase volume or go to right.
Push forward: channel up or go to above.
Push backward: channel down or go to below.
11
Int roduc tion / Ge tting s tart ed
TV terminal
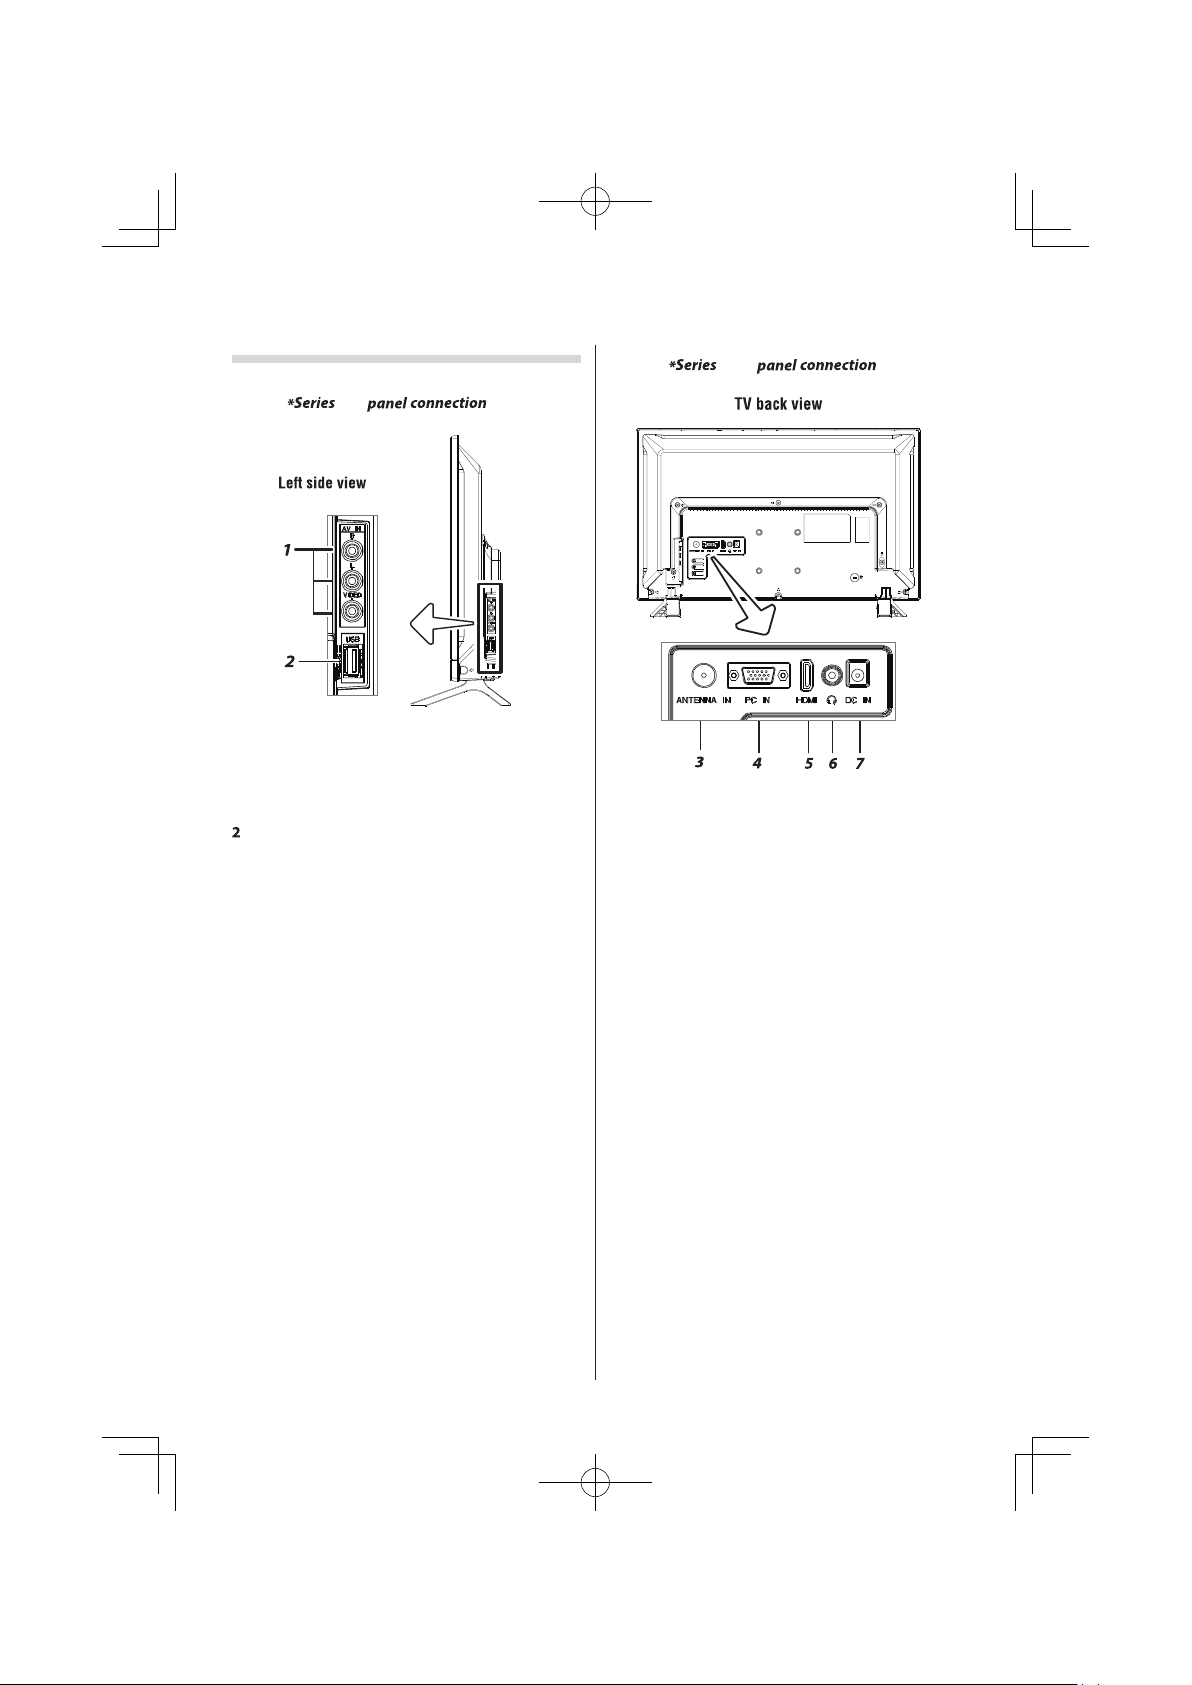
24L 365
AV IN (L/R/VEDIO): Connect video and
1
audio input signal from signal source
such as DVD.
USB: Connect your USB storage device
(photo,video and music) or a USB storage
device for recording and playback.
left
24L 365
3 ANTENNA IN: Connect a coaxial terminal with
cable to receive signal from the antenna.
4 PC IN: Connect a PC via a VGA cable.
5 HDMI: Connect HDMI input signal from signal
source such as DVD player,and also supports
MHL function.
6 EARPHONE/LINEOUT: Earphone terminal is
shared with Lineout terminal.
They can be selected by Sound Menu.
Earphone : Speakers will be muted when
earphone plugged.
Lineout : Speakers won't be muted, and
sound level is fixed.
back
12
7 DC IN: Connect the AC adapter.

TV terminal
Int roduc tion / Ge tting s tart ed
32/ 40/43 /49L3 65
1 DIGITAL AUDIO OUTPUT: Connect the
digital audio devices such as Digital Power
Amplifier to the TV. The supported format
is PCM and DD/DD+.
2 USB: Connect your USB storage device
(photo, video and music) or a USB storage
device for recording and playback.
3 ANT IN: Connect a coaxial terminal with cable
to receive signal from the antenna.
4 AUDIO (L/R)/VEDIO: Connect video and
audio input signal from signal source
such as DVD.
left
32/ 40/43 /49L3 65
5 EARPHONE/LINEOUT: Earphone terminal is
shared with Lineout terminal.
They can be selected by Sound Menu.
Earphone : Speakers will be muted when
earphone plugged.
Lineout : Speakers won't be muted, and
sound level is fixed.
back
6 RGB/PC: Connect a PC via a VGA cable.
7 HDMI1(MHL)/HDMI2: Connect HDMI
input signal from signal source such as
DVD player.
HDMI1 supports MHL function.
13

TV terminal
Int roduc tion / Ge tting s tart ed
55L 365
1
USB1/2: Connect your USB storage device
(photo,video and music) or a USB storage
device for recording and playback.
2 HDMI1(MHL)/HDMI2/HDMI3: Connect HDMI
input signal from signal source such as
DVD player.
HDMI1 supports MHL function.
3 AUDIO (L/R)/VEDIO: Connect video and
audio input signal from signal source
such as DVD.
left
55L 365
DIG ITAL AUDIO OUTPUT:
4
digital audio devices such as Digital Power
Amplifier to the TV. The supported format
isPCM and DD/DD+.
5 RGB/PC: Connect a PC via a VGA cable.
6 ANT IN: Connect a coaxial terminal with cable
to receive signal from the antenna.
7 EARPHONE/LINEOUT: Earphone terminal is
shared with Lineout terminal.
They can be selected by Sound Menu.
Earphone : Speakers will be muted when
earphone plugged.
Lineout : Speakers won't be muted, and
sound level is fixed.
back
5
Connect the
6
7
14

Int roduc tion / Ge tting s tart ed
Change Picture Optimizer
Change Sound Mode
Freeze the picture on the screen. (Not available in
USB mode and DTV receiving when resolution is
more than 1080i, also DTV 720p/H.264 format
may not be available, and it depends on the
broadcast program. )
Change aspect ratio
Press to view your assigned favorite channels.
Press Up/Down buttons to cycle through your
assigned favorite channels, press OK to
confirm.
program
channel
Program
Display the recording file list.
To start recorded le
Four color buttons : You can control Teletext
page (for example) or others function .
Switch between TV and radio
Select the sleep time
15
Int roduc tion / Ge tting s tart ed
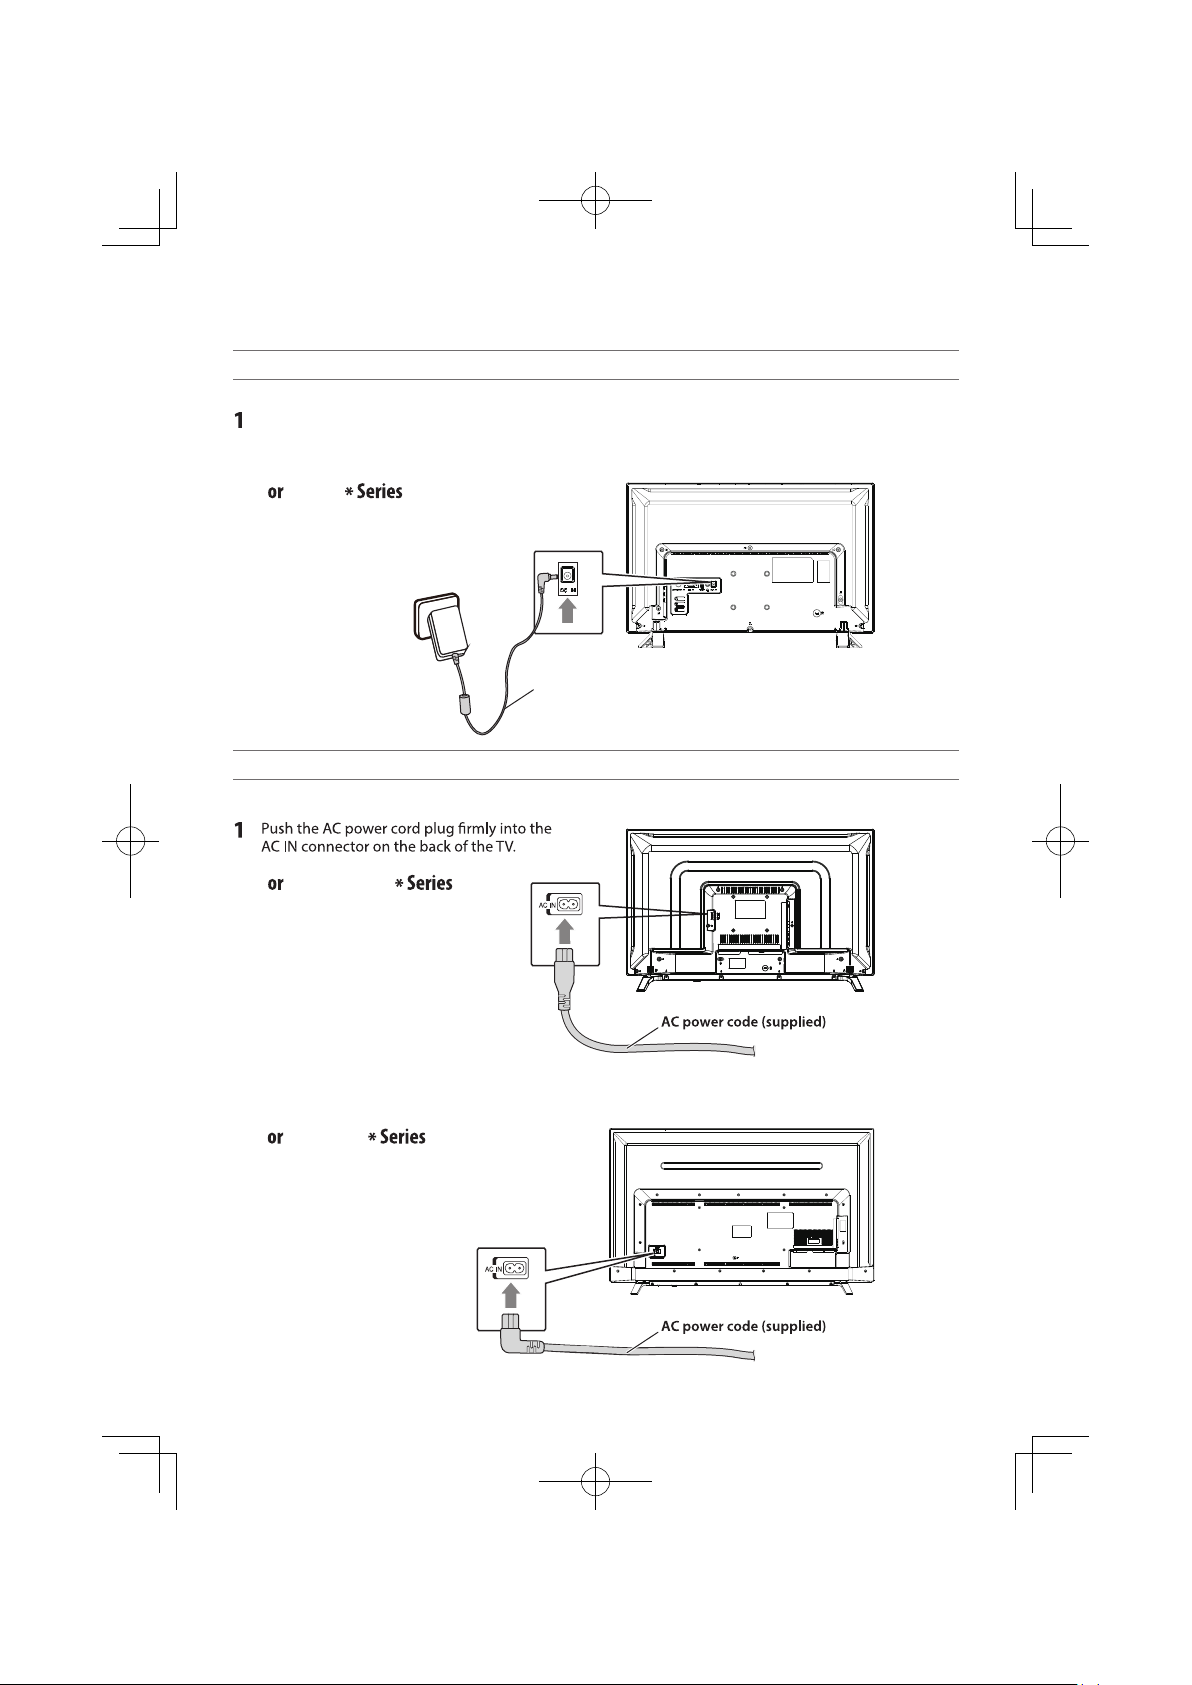
Connecting the AC adapter cord to your TV
Push the AC adapter cord plug rmly into the
DC IN connector on the back of the TV.
24L365
F
DC adapter cord (supplied)
Connecting the AC power cord to your TV
F
40/43/49L365
16
F
32/55L365
Sample for 55L365*

Int roduc tion / Ge tting s tart ed
Tuning the TV for the rst time
Before switching on the TV, put your decoder and
media recorder to standby, if they are connected,
and ensure that the aerial is connected. To setup
the TV, use the buttons on the remote control.
1 Press the button. The Please select an OSD
language screen will appear. This screen will
appear the rst time that the TV is switched
on.
2 Press , , or to select the OSD
language, and then press OK.
3 Display the Location menu.
Press or to select Store or Home.
You can select either Home or Store mode.
Home is recommended for normal home use.
Select Store when using a TV for displaying in
a shop, etc.
4 Press OK to display the DVB Select type.
Press or to select DVB-Tor DVB-C.
5 Press , , or to select the country and
press OK.
6 Input the EWS Local Postal Codes and start
the Channel Tuning.
The television will start to search for available
ATV/DTV or Radio channels. The progress
bar will indicate the scan status.
You must allow the television to complete
the search.
Selecting the external input source to view
1 Press on the remote control until the
external input mode list appears on the screen,
then press , or to select appropriate
input source.
Input Source
2 Press OK.
NOTE:
If the Inputs list is displayed by pressing and
or on the right side of the TV .The options as
follows.
• DTV/ATV/AV/HDMI/MHL/PC/USB.
(24L365*)
• DTV/ATV/AV/HDMI1/MHL/HDMI2/PC/USB.
(32/40/43/49L365*)
• DTV/ATV/AV/HDMI1/MHL/HDMI2/HDMI3/PC/
USB.(55L365*)
7 When the search is complete, it will switch to
the rst channel.
17

Learning about the menu system
We suggest you familiarize yourself with the display charts before using the menu system:
• Press MENU to display menu, then press or to select main menu headings.
• Press or to select an item.
• Press or to select or adjust setting.
• Press OK to display the next menu.
Displaying the menu chart
Picture Optimi zer
l
18
Audio Des cript ion

SW Update (OA D)
OAD Tuning
EWS Local Postal Codes
User Reset
Automa tic Power Dow n
NOTE:
• Auto Tuning, AT V Manual Tuning, DTV Manual Tuning are available when input source is DTV or ATV.
• If you do not make a selection for a while, the menu display disappears automatically.
• If you want to close the menu display instantly, press EXIT or MENU.
• To return to the previous menu, press MENU.
• When you use the color management function, you can select the Base Color Adjustment
menu.
19

Picture adjustment
Activating the Picture Optimizer
This TV offers the choice of personalising the picture
style.
Standard,Football/Cricket,Cinema,Game and
User are preset options and affect many features/
settings within the TV.
1 From the PICTURE menu, press or to
select Picture Optimizer.
Picture Optimizer
2 Press or to select Picture Optimizer.
NOTE:
The Picture Optimizer you select affects the
current input only. You can select a different
Picture Optimizer for each input.
Activating the picture preferences
You can customise current Picture Optimizer
settings as desired. Only when you selecting "User",
you can change the following items, such as
Brightness, Contrast , Color, Tint, Sharpness,
then press the Picture items, your new setting are
saved for "User" Picture Optimizer.
Adjusting the Color Temperature
Color Temperature increases the warmth or
coolness of the picture by setting the red, green or
blue tint.
1 From the PICTURE menu, press or to
select Color Temperature and press OK.
2 Press or to select Natural, Warm,
User, or Cool to suit your preference.
3 Only when you use User, can you Press
or to select Red Level, Green Level
or Blue Level. Then press or to
adjust the setting as required.
Selecting the Aspect Ratio
1 From the PICTURE menu, press or to
select Aspect Ratio.
2 Press or to select 16:9, 4:3, Auto,
Just Scan, Zoom1 or Zoom2, Super Live
to suit your preference.
NOTE:
• Using the special functions to change the size of
the displayed image (e.g. changing the height/
width ratio) for the purpose of public display or
commercial gain may infringe on copyright laws.
• If the aspect ratio of the selected format is different
from the one of the TV transmission or video
program, it can cause a difference in vision.
Change to the correct aspect ratio picture size.
• When using the PC connected via HDMI terminal,
the moving image quality may be deteriorated.
Activating the 4:3 Stretch
When 4:3 Stretch is activated, this function will
switch 4:3 format programs into a full screen
picture.
1 From the PICTURE menu, press or to
select 4:3 Stretch.
2 Press or to select On or Off.
NOTE:
This function is available when Aspect Ratio is AUTO.
20

Activating the Noise Reduction & MPEG NR
If the receiving signal of MPEG is a mosquito
(grained) noise depending on the compression and
conversion, the picture is weak and the picture is
blurry, the picture may be improved when using this
function.
1 From the PICTURE menu, press or to select
Noise Reduction or MPEG NR.
2 Select Noise Reduction or MPEG NR, and then
press or to select Low, Middle, High or Off.
Adjusting the 3D Color Management
You can adjust the picture color quality by
selecting from 6 base color adjustments : Red,
Green, Blue, Yellow, Magenta ,Cyan or Reset.
1 From the PICTURE menu, press or to
select 3D Color Management.
2 Press or to select On.
NOTE:
If you select 3D Color Management Off mode, this
mode is not available.
Resetting the Base Color Adjustment
The reset function adjusts the base color
adjustment to the factory settings.
1 From the Base Color Adjustment menu, press
or to select Reset.
2 Press OK.
3 A conrmation message will appear. Press or
to select Yes, and then press OK.
Setting the Dynamic Contrast
This feature enriches the picture contrast under
certain circumstances.
1 From the PICTURE menu, press or
to select Dynamic Contrast.
2 Press or to select On or Off.
Using the Film Mode
This feature will reduce picture blur without
decreasing image brightness or adding icker.
1 From the PICTURE menu, press or
to select Film Mode.
2 Press or to select On or Off.
3 Press or to select Base Color
Adjustment.
4 Press OK, then press or to select an item
you want to adjust.
5 Press , then press or to select Tint
Color or Brightness.
6 Press or to adjust the settings as required.
Magenta
Using the Auto View
This mode can adjust the brightness of the screen
image automatically according to indoor lighting
condition.
1 From the PICTURE menu, press or
to select Auto View.
2 Press or to select On or Off.
NOTE:
This feature is not available for 24inch TV .
Using the Active Backlight Control
In order to improve screen visibility, the Active
Backlight Control sets the screen brightness
automatically during dark scenes.
1 From the PICTURE menu, press or to
select Active Backlight Control.
2 Press or to select On or Off.
21

Adjusting the Backlight
When you select Active Backlight Control Off
mode, the Backlight mode is available.
1 From the PICTURE menu, press or to
select Backlight .
2 Press or to adjust the settings as required.
2 Press or to adjust the settings as desired.
NOTE:
This feature is available when the Sound Mode
is selected to User.
Using the Auto Volume
Automatically adjust the volume.
1 From the SOUND menu, press or to select
the Auto Volume.
2 Press or to select On or Off.
l
Sound adjustment
Using the Sound Mode
Choose your preferred Sound Mode(Standard,
Music, Movie, Sports, User).
1 From the SOUND menu, press or to select
the Sound Mode.
2 Press or to select Standard, Music,
Movie, Sports, User.
Adjusting the sound quality
You can adjust the basic sound quality.
1 From the SOUND menu, press or to select
the Bass, Treble, Balance.
Using the Surround Sound
Surround Sound help to create rich and wider
sound from stereo sound sources.
1 From the SOUND menu, press or
to select Surround Sound.
2 Press or to select On or Off.
Using the Audio Description
Supports Audio Description.
1 From the SOUND menu, press or to select
the Audio Description , and press OK.
2 In Audio Description menu, Press or to
select AD Switch press or to select On or
Off.
3
When you select AD switch On mode, the AD
Volume mode is available, then you can adjust
value of AD Volume to change the AD sound
level when the main audio track is mixed with
the AD track.
NOTE:
If sound would be only AD track, you need to press
VOL +/- to change the AD sound level. The condition
of mixed sound with main and AD depends on
broadcast program.
22
5

Using the Digital Audio Output
1 From the SOUND menu, press or to select
the Digital Audio Output.
2 Press or to select Auto or PCM.
NOTE:
This feature is not available for 24inch TV .
Using the Analog Audio Out
This feature is used for selection of Headphone
and Lineout.
Analog Audio Out can be used as both Headphone
and Lineout.
Channels adjustment
·The channel menu may be changed to suit your
personal preference.
Auto Tuning
1 From the CHANNEL menu, press or to
select Auto Tuning.
2 Press OK to display the DVB Select type.
Press or to select DVB-Tor DVB-C.
3 When you select DVB-T mode, press , ,
or to select the country and press OK.
Input the EWS Local Postal Codes and start
the Auto Tuning.
The television will start to search for available
DTV/Radio or ATV channels. The progress
bar will indicate the scan status.
4 When you select DVB-C mode, it will appear
the DVB-C-Scan Menu.
DVB-C Scan Menu
Scan type Full
Frequency(KHz)
Network ID
Symbol(ks/s)
You must allow the television to complete
the search.
When the search is complete, it will switch to
the rst channel.
Auto
Auto
Auto
ATV Manual Tuning
1 When you switch to ATV source, you can from
the CHANNEL menu, press or to select
ATV Manual Tuning.
2 Press OK to display the ATV Manual Tuning
menu.
Press or to select the program position
you want to arrange.
SW Update (OAD)
OAD Tuning
StorageTo 1
Sound System I
Color System AUTO
Current CH 1
Search
Fine-Tune
SAVE
DTV Manual Tuning
NOTE:
The content of this menu varies depending on the DTV
input that is currently selected.
This feature is available for service engineers or can
be used for direct channel entry if the multiplex
channel is known.
23

1 When you switch to DTV source, you can from
the CHANNEL menu, press or to select
DTV Manual Tuning and press OK.
2 Use or to change the settings.
• For DVB-T source, the number buttons can be
used to enter the RF number.
D
VHF CH 9
DTV 5
Radio 2
Data 0
Bad Normal Good
• While in DVB-C source,thenumber buttons
can be used to enter Frequency.
DTV
Symbol(ks/s)
QAM Type
Auto
Auto
Skip—Press the BLUE button to delete the
program.
Rename(ATV only)—Press the GREEN button to
rename the program.
SELECT—Add the favorite channel to the SELECT
list.
Signal Information
This feature is available for displaying the on-screen
information.
1 From the CHANNEL menu, press or to
select Signal Information and press OK.
2 Then the list of signal information will appear
as follows.
NOTE:
When the signal Quality isGood,information will
appear as bellow.
Channel 54
256QAM
(Good)
100
(Strong)
96
Bad Normal Good
3 Press OK to search for channels.
The channels will be searched and stored to the
channel list.
4 Press EXIT can exit the searching process.
Program Edit
1 From the CHANNEL menu, press or to
select Program Edit.
SELECT
Delete—Press the RED button to delete the
program.
Move—Press the YELLOW button to activate
the Move feature. Press the or buttons to
select the channel you wish to move and press
OK to check.
24
NOTE:
While the signal Quality ispoor,information as
follows.
This option is only available in DVB-T source,
select On to supply power for the TV’s
antenna; Select Off to turn off this function.
SWUpdate (OAD)
1 From the CHANNEL menu, press or to select
SWUpdate (OAD) and press or toselect
OnorOff.
2 Select On to allow the TV to update the system
software over the air. Select Off will turn off
this function.
NOTE:
This feature is onlyavailable for someregions.

OAD Tuning
When SW Update (OAD) is Off, this option is
disable. Select OAD scan mean that go to scan
channel to find the OAD update information.
Time adjustment
Setting the Time Zone
1 From the TIME menu, press or to select
Time Zone.
2 Press or to set.
Setting the Auto Sync
1 From the TIME menu, press or to select
Auto Sync.
2 Press or to select Auto or Manual.
Setting the Summer Time
1 From the TIME menu, press or to select
Summer Time.
2 Press or to select On or Off.
Setting the Sleep Timer
The Sleep Timer is especially useful if you want the
TV to turn itself off after a selected period of time.
1 From the TIME menu, press or to select
Sleep Timer.
2 Press or to select 10min, 20min, 30min,
60min, 90min, 120min, 180min, 240min,
or Off.
Using the Continuous Viewing Timer
To prevent watching TV continuously for long
periods of time, you can set a message to appear
that suggests that the viewer takes a break. This
is especially useful for stopping children from
watching TV for long periods of time.
1 From the TIME menu, press or
to select Continuous Viewing Timer.
2 Press or to select 60 min, 120 min, 180
min o r Off.
When the set time has passed, a message
suggesting the viewer takes a break appears.
Press OK or EXIT to clear the message.
NOTE :
• Bef ore the s et amou nt of tim e has pas sed, the
tim er is res et.
• If th e set amo unt of ti me is cha nged, t he time r is
res et.
Setting the On Timer
The feature allows you to set the TV to turn on
automatically to a preset input or volume.
1 From the TIME menu, press or to
select On Timer, and then press OK.
2 Press or to select the desired On Timer
operation (Once, Every Day, Mon.- Fri.,
Mon.-Sat., Sat.-Sun., Sunday, Off).
Automatic Power Down
1 From the TIME menu, press or to select
Automatic Power Down.
2 Press or to select 4Hours, 6Hours,
8Hours or Off.
25

3 Press or to go through the list adding the
details of the On Timer and press or to make
selections.
Hour: Select the hour from hour 00-hour 23.
Minute: Select the minute from 01-59.
Source: Select a video input source .
Channel: Select the channel that will be set
Volume: Select the volume that will be set
when the TV turns on.
4 When all the details have been entered, press
Menu to start the timer.
Using the OPTION menu
Selecting the OSD language
You can select a language for the on-screen display.
1 Press MENU, then press or to display
OPTION menu.
2 Press or to select OSD Language.
3 Press or to select the desired language.
Audio Languages
This feature allows a program or lm to be viewed
with a choice of sound track language, provided
multiple language tracks are being broadcast.
1 From the OPTION menu, press or to select
Primary Audio Language and press OK, then
press , , or to select an option.
Setting the Location
You can select either Home or Store mode. Home
is recommended for normal home use. Select Store
when using a TV for displaying in a shop, etc.
1 From the OPTION menu, press or to select
Location.
2 Press or to select Home or Store.
HDMI CEC
1 From the OPTION menu, press or to select
HDMI CEC and press OK ,then press or
select On or Off.
2 When you select HDMI CEC On, you can press
or to select Auto Standby then press or
select On or Off.
This function can turn the TV to standby
automatically.
3 When HDMI CEC is on, you can check the device
list of connecting to the TV.
PVR File System
1 From the OPTION menu, press or to select
PVR File System and press OK.
Subtitle Language
1 From the OPTION menu, press or
to select Subtitle Language and press OK, then
press , , or to select an option.
TTX Language
To select a language for Teletext:
1 From the OPTION menu, and then press
or to select TTX Language.
2 Press or to select the required language.
such as Cyrillic, Arabic, Frasi, Pan-Euro, Greek.
DigitalPOP
when using a TV for displaying in a shop and select
the Store mode location, then you can select the
Digital POP On to Show the product selling point.
1 From the OPTION menu, press or to select
Digital POP.
2 Press or to select On or Off.
26
Select Disk
Press OK to enter into the Select Dick page , and
thenpress or to select disk drive.
NOTE:
If connected device is not divided to some drives,
only C: is available.
Check PVR File System
Test whether the connected USB storage device
functions properly.
USB Disk
Indicate the status of the disk when checking PVR
le system.
Format
Format the connected USB storage device.
Speed
Storage speed.
Free Record Limit
Maximum recording time capacity.

How to format of USB-HDD
Insert the USB-HDD to the USB port of TV set,
then switch to DTV source.
1 Press MENU, then press or to display
OPTION menu and select PVR File System.
2 Press or to select the USB-HDD disk ,and
press or to select Format.
EWS Local Postal Codes
This function is for Indonesia. Inform people of early
warning information, especially about natural
disaster. Press number button and then set up the
“EWS Location Code”, when finished, once receiving
safety warning information, the TV will sound the
alarm according to the warning class.
For the lowest class, you can exit the message by
pressing MENU button; for higher classes, you can’t
exit the message and also it’s no use for any buttons.
2 From the OPTION menu, press or to select
SW Update(USB).
3 Press OK.
A screen will appear displaying all of the
licencing information required for the TV’s
software.
Setting the Lock menu
Lock System
1 Press MENU and press or to select
Lock System then press OK .
Password is required for opening Lock System.
Default password is 0000.
Ple as e Input local Postal codes
Use 0 -9 D igital key to input
Yes
No
User Reset
Reset TV will reset all TV settings, including stored
channels, to their original factory values.
1 From the OPTION menu, press or to
select User Reset.
2 Press OK to select.
A screen will appear warning that all settings
will be lost. Select Yes, and then press OK to
continue.
When the set power back on,the rst time
screen will appear. Press OKto continue,
and proceed to the Auto Tuning menu.
SW Update (USB)
Insert an USB device with upgrading software
to upgrade the TV system.
1 Connect USB storage device to USB input
terminal.
2 Switch to DTV or ATV source.
2 When Lock System is set to ON ,then you can
Set Password , set the Block Program and
set Parental Guidance.
3 You can change password to select
Set Password and press OK.
Old password is required for changing to new
password.
Password should be a four digit number.
4 Block Program can set special DTV program
as locked.
Select Block Program and press OK.
Program list appears, then you can set/reset
Lock by pressing green button.
Password is required to view blocked programs.
Parental Control
The Parental Control feature allows you to block
programs according to their rating levels.
1 From the LOCK menu, press or to select
Parental Guidance, and press OK.
2 Press or to adjust the settings.
Password is required to view blocked programs.
27

Back connections Connecting HDMI or DVI devices
Connection example
•Before connecting any external equipment, turn
off all main power switches.
• The unauthorized recording of T V programs,
DVDs, video tapes and other materials may
infringe upon the provisions of copyright law.
• Additional equipment and cables shown are not
supplied with this TV.
• (Sample for 32L365*)
Connecting an audio system
You can enjoy high quality dynamic sound by
connecting the TV to an audio system.
NOTE:
• Refer to the owner’s manual of the connected
equipment as well.
• When you connect the TV to other equipment, be
sure to turn off the power and unplug all of the
equipment from the wall outlet before making any
connections.
• The output sound of the TV has a wide dynamic
range. Be sure to adjust the audio ampli er’s volume
to a moderate listening level before turning on the
power. Otherwise, the speakers and your hearing
may be damaged by sudden high volume audio.
• Turn off the amplier before you connect or
disconnect the TV’s power cord. If you leave the
amplier power on, the speakers may be damaged.
•When turning on your electronic components,
turn on the TV rst, and then the HDMI and DVI
device.
• When turning off your electronic components,
turn off the HDMI and DVI device rst, and then
the TV.
• This TV may not be compatible with features and/
or specications that may be added in the future.
• This TV is only operable with L-PCM and Dolby
Digital on 32/44.1/48 kHz.
• This TV is able to connect with HDMI devices. But
it is possible that some HDMI devices may not
operate properly with this TV.
Connecting HDMI or DVI devices
The HDMI input on your TV receives digital audio
and uncompressed digital video from an HDMI and
uncompressed digital video from a DVI device.
This input is designed to accept HDCP program
material in digital from CEA-861-D compliant
consumer electronic devices (such as a set top box
and DVD player with HDMI and DVI output).
The HDMI input is designed for best performance
with 480i /480p/720p/1080i/(60Hz) (Video Format) ,
highdenition video signals, but will also accept
and display 576i /576p/720p/1080i (50Hz)(Video
Format)and 1080P 24Hz/25Hz/30Hz/50Hz/60Hz
(Video Format).
• HDMI: High-Denition Multimedia Interface
• HDCP: High-bandwidth Digital Content Protection
• CEA-861-D compliance covers the transmission of
uncompressed digital video with high-bandwidth
digital content protection, which is being
standardized for reception of high-denition
video signals. Because this is an evolving
technology, it is possible that some devices may
not operate properly with the TV.
• Acceptable PC signal format:
VGA (640 x 480) 60/75 Hz
S-VGA (800 x 600) 60/75 Hz
XGA (1024 x 768) 60/70/75 Hz
W-XGA (1280 x 768) 60/75 Hz
W-XGA (1360×768) 60 Hz
S-XGA (1280 x 1024) 60 Hz
However, these signal formats are converted to
match the number of pixels of the LCD panel.
Therefore, the TV may not display small text
properly.
If you connect this unit to your PC, the compressed
image is displayed in S-XGA mode, therefore the
picture quality may deteriorate and characters may
not be read.
• L-PCM: Linear-Pulse Code Modulation
• Supported Audio format: L-PCM, Dolby Digital
sample rate 32/44,1/48 kHz
28

For 24L365* For 32/40/43/49L365*
Left
For 55L365*
For 55L365*
Audio from DVI devices can be heared if audio
cable is connected to audio (red/white) terminal
of AV input.
For 24L365* For 32/40/43/49L365*
Left
For 55L365*
For 55L365*
Using the USB storage device Function
The USB storage device function can be used to
record and view digital broadcast programs.
Read the precautions below before recording or
viewing programs using the USB storage device
function.
NOTE:
• Be sure to select the correct country/region for use.
Use of the recording function may not be possible
depending on the selected country/region.
Use with incorrect settings may violate certain laws
or other regulations, and may result in criminal
punishment.
In such cases, TOSHIBA LIFESTYLE PRODUCTS &
SERVICES CORPORATION and the Toshiba Group
shall bear no responsibility whatsoever.
• Recorded programs saved on the USB storage
device can only be viewed on this TV. They cannot be
viewed when connected to another TV (including the
same model of TV), a PC, or other device.
• You cannot watch one channel while recording
another.
• If the recording time to the USB storage device is too
short, no data may be saved.
• You cannot record video input signals on the USB
storage device.
• Not all types of broadcast may be recordable.
• After programing the TV to record digital
broadcasting, do not disconnect the power plug
before recording starts.
• Should video or audio recording fail due to
malfunction of the TV or poor reception, no
compensation shall be paid.
• You can reserve up to a total of 64 programs for
recording and viewing.
• If there is a power failure or the power plug is
disconnected during programed recording,
recording will stop and will not resume when the
power returns or the plug is reconnected.
• Do not unplug the power supply during recording.
Doing so may damage the USB storage device.
• Any changes implemented by the broadcasting
station may affect program scheduling.
• Programed recording cannot take place if the
power plug is not connected.
• Disconnecting the power plug during recording may
result in failure to save the recorded program.
• Recording may not be possible depending on the
amount of space remaining on the USB storage
device.
• If the time is not set, the recording feature cannot
be used.
• Locked channel cannot record (One Touch
Recording, TimeShift Recording), even if you watch
the program.
29
This TV supports USB storage devices (or partitions)
of up to 2 TB.
Deletearecordedprogram
1 Press “PVR LIST” button to enter into PVR le
list.
2 Select the recorded videoyou want to delete.
3 Press RED button.
4 If OK is selected, then delete all selected les.
To schedule programed recording
Programed recording can be scheduled easily
using the Program Guide or by specifying the
date and time.
NOTE:
• When a timed program is about to start, an
information screen will appear. The menus and
other channels will not be available during the
timed program unless the program timer is
cancelled.
It will only be possible to create or edit program
timers for the currently tuned DTV input.
• If you have scheduled programed recording of
two consecutive time periods, the beginning of the
program in the later time period will be omitted.
• If the time information is incorrect, programed
recording may not be performed properly.
Furthermore, if the time information differs
according to the currently viewed channel,
programed recording may not be performed
properly depending on tuning operations.
NOTE:
• button can be used for hiding or displaying
PVR sub menu.
1 Press PVR LIST to enter into PVR le list.
2 Select the recorded video le and press OK
button to add checking mark.Long program is
divided into some les. In this case, add checking
mark to all les, and select the lowest le to
start from the rst recorded le.
3 Press to play a recorded program.
30
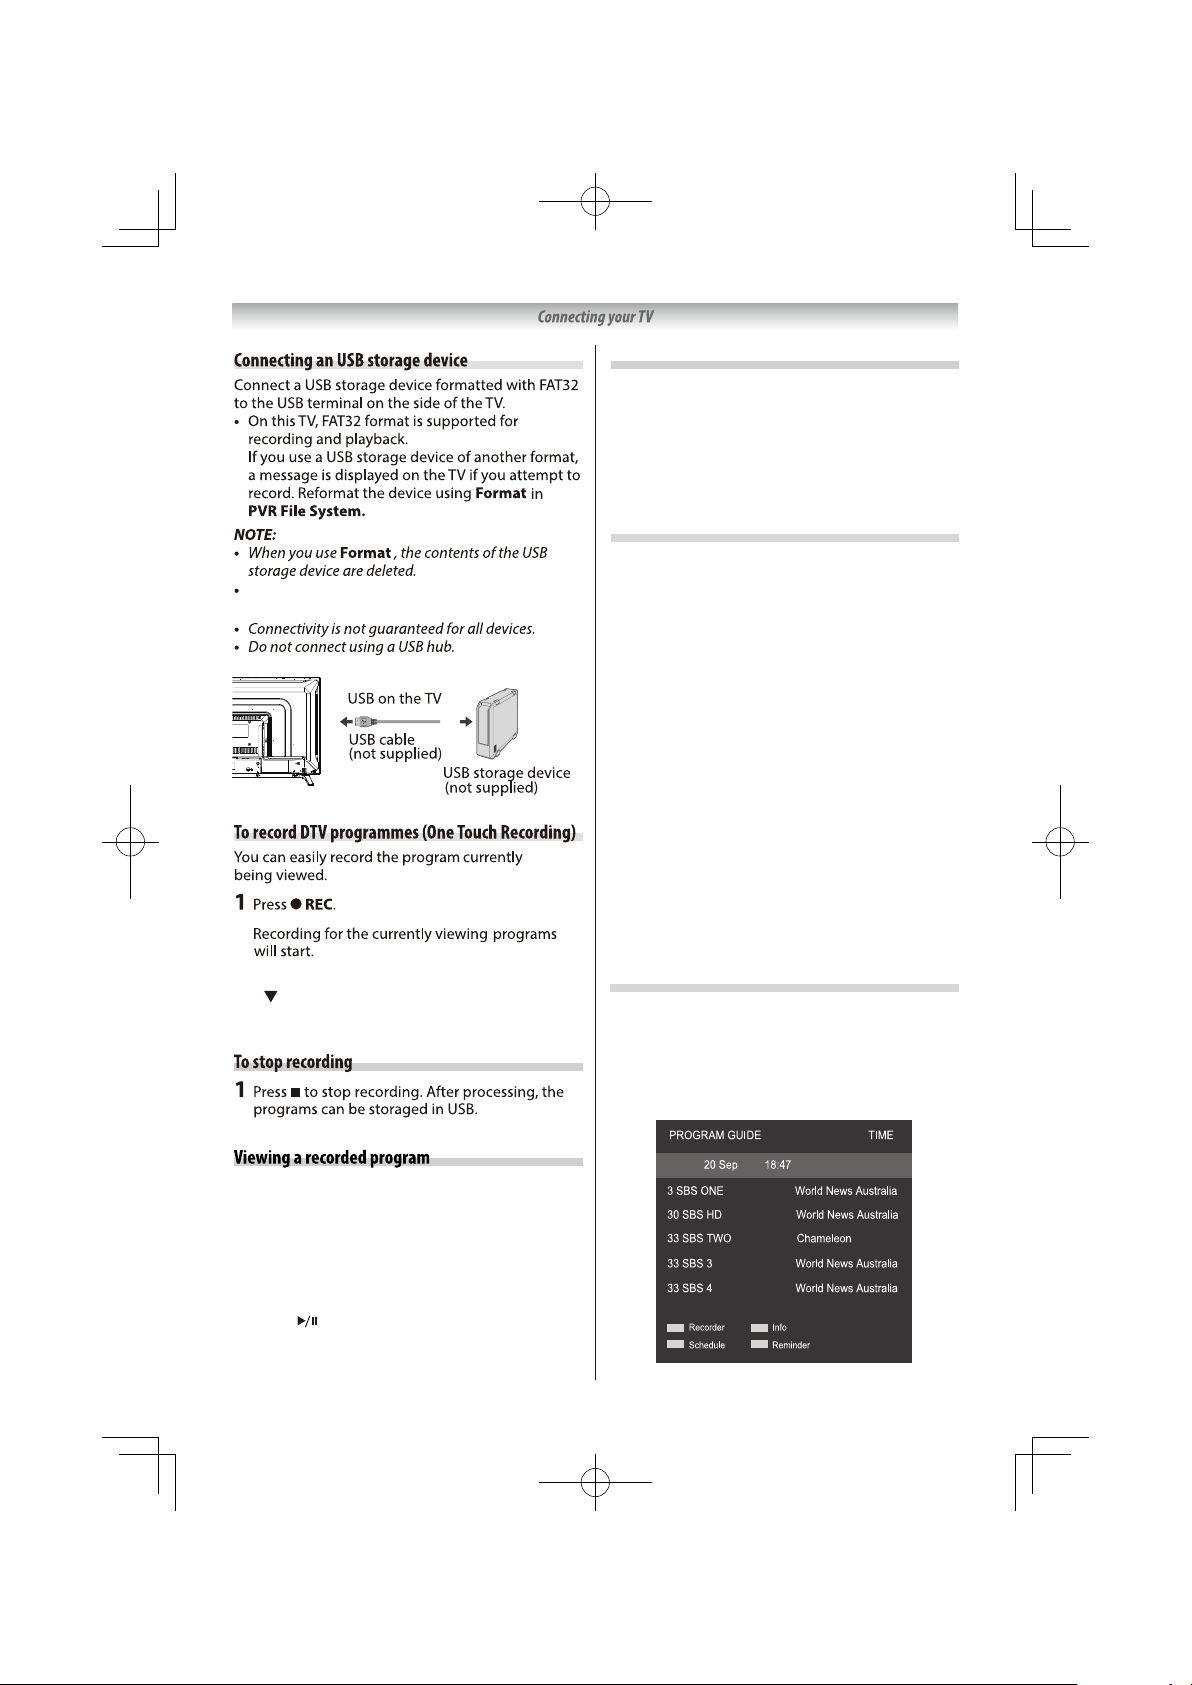
Program Guide
1 Press the GUIDE button to bring up the EPG
interface. The second bar from the top will
display the current date and the time. On the
list below, the channel you are currently
watching will be highlighted.

2 Before you can view any EPG information, you
have to activate every channel for which you
want to view program information. To do this,
use the or to select a channel, then press
OK to conrm.
3 To check programs to be broadcast on a future
date, scroll up to the date eld. Use to
select the date you want to check.
4 Press to scroll up to the top bar in the
display, then press to select Channel List.
The second bar will now display one of your
available channels.
5 Go to the channel and use or to select the
channel for which you want to view information.
After a brief moment, the program information
will appear.
6 Use or to scroll through the time slots.
7 Press MENU button to exit the EPG menu.
Recorder
Press the RED button to display the recorder
menu(right).
See detailed information about the different
ways of recording with the television onto a
USB device.
Info
Press the GREEN button to show information
about the selected program.
Schedule
Press the YELLOW button to display the
Schedule List. Press or to select an event,
press the RED button to delete an Event.
Remind
Press the BLUE button to display a reminder
menu.
Press or to select an item and or
to change the setting.
Press OK to add the reminder event to the
schedule list.
Using the Media Player
This TV allows you to enjoy video, music and photo
les stored on a USB device connected to the USB
port.
Terminology
The TV can control and play content from a USB
device.
NOTE:
• Do not insert/remove USB device while in use.
• MENU is not available during playback.
Media Player Specications
Device
USB device
Interface version: USB2.0
USB Mass Storage Class devices (MSC)
NOTE:
• Connectivity is not guaranteed for all devices.
• Do not connect using a USB hub.
• Turn off the TV before connecting a USB storage
device.
• The aspect ratio may not be correct in some cases.
File system: FAT32
You must obtain any required permission
from copyright owners to download or use
copyrighted content. TOSHIBA cannot and does
not grant such permission.
Basic operation
1 Insert USB device into the USB socket on the TV.
2 From the SOURCE menu, press or to select
USB and press OK.
3 Press or to select MOVIE, MUSIC or PHOTO
and press OK.
4 Press or to select a le or folder.
select a le and press OK to start playback.
Select a folder and press OK to move to the
next layer.
To return to the previous layer, press EXIT.
31

Playing Movies
Press to display below Menu Bar and press
EXIT button to exit it. Press USB control buttons on
the remote control to do relevant operations.
Movie Control Bar
Music Control Bar
Play & Pause/Stop/Prev. /Next
Press to play or pause the playing; press
to stop playing; press / to play the previous
or the next music. Or Press / to highlight the
corresponding icon on the control bar, and then
press OK , TV will response accordingly.
Play & Pause/Stop/Prev. /Next
Press to play or pause the playing; press
to stop playing; You also can press / to
highlight one of the four icons, and then press
OK , TV will response accordingly.
Fast Back/Fast Forward
Press / to activate Fast Back/Fast Forward.
Press FF/FR button again, then playing progress
changes as your desire, Press to start the
playing from the new position.
Play Mode
Highlight the corresponding icon and press OK
to switch to another play mode.
Information
Highlight the corresponding icon and press OK
to view the information of the playing video.
Go to time
Skip to specic point by input time. Highlight the
corresponding icon and press OK to open the Input
search time screen. Press / to move the cursor
and use the number buttons to insert the time.
Press OK , the TV will start playing from the set
time.
Aspect Ratio
Highlight the button and press OK to select the
display mode.
Fast Back/Fast Forward
Press and hold / or seconds to draw the
playing progress as your desire, then press
on the remote control to start the playing from the
new position.
Play Mode
Highlight the corresponding icon and press OK
to switch to another play mode.
Information
Highlight the corresponding icon and press OK
to check the information of the playing music.
NOTE:
-This menu only shows support les.
- Files with other le extensions are not displayed, even
if they are saved on the same USB storage device.
- An over-modulated mp3 le may cause some sound
distortion during playback.
- This TV supports lyrics display (English).Maximum
number of characters per line is 48.
- The le name of music and lyrics must be the same in
order to display lyrics while the music is playing.
- If you want to show the associated lyrics on the screen
with the music, you must store these associated lyrics
in the same folder using the same le name with “.lrc”
le extensions.
Playing Music
Press INFO/ to display/ exit from the below Menu
Bar. Press USB control buttons on the remote
control to do relevant operations.
32

Browse Photo
Press / to display/ exit from the below Menu
Bar. Press USB control buttons on the remote
control to do relevant operations.
Movie Control Bar
Play & Pause/Stop/Prev. /Next
Press to play or pause the playing; press
to stop playing; press to play the previous
or the next music. Or Press / to highlight the
corresponding icon on the control bar, and then
press OK , TV will response accordingly.
Play Mode
Highlight the icon and press OK to switch to
another play mode.
Background music
Highlight the icon and press OK to turn on the
background music.
Info.
Highlight the corresponding button and press OK
to check the information of the playing photo.
Rotate
Highlight the corresponding icon on the menu
bar and press OK to rotate the picture
90 degrees clockwise or counter clockwise.
Zoom In/Zoom Out
Highlight the corresponding icon on the menu
bar and press OK to zoom in/zoom out of the
image.
Move View
When the image is magnied, use this function
for convenient check. Highlight this icon, press
OK button, then press left/right/up/down button
to move the image.
FAST BACK
33

Using the MHL TV Function
• Interoperability with MHL devices of other
manufacturers is not guaranteed.
• Toshiba does not provide any guarantee, therefore,
against operational failure such as that described
below when an MHL source is connected to the TV.
-No picture or sound.
-Some of the functions do not work be remote
operation from the TV.
• If the MHL does not work properly, also contact the
manufacturer of the source device for advice on
its use.
• Do not disconnect the power plug when theTVis
active and the MHL device is being connected.
• Do not disconnect the power plug when theTVis
in standby mode and the MHL device is being
connected.
Using MHL TV Function
You can use the following function by connecting
between the TV HDMI1/MHL port and micro USB
port of mobile phones etc. with a MHL cable.
• Charge withmobilephonefromTV
• Video/Audio output from mobile phone
• Access mobile content through TV remote
controller
• Supports transfer of HD video resolution up
to 1080p
• MHL functions may not perform properly as
some mobile devices may not incorporate the
full MHL functionality
NOTE:
These functions may not be available depending on
the connected equipment.
When you connect an MHL-compatible device to the
HDMI1/MHL port on the TV with the MHL cable,
charging starts automatically.
NOTE:
Do not connect an MHL-compatible device to any port
other than the HDMI1/MHL port.
Operating an MHL-compatible Device
MHL is a new mobile audio video interface standard
for direct connection with MHL enabled mobile
devices to MHL enabled TVs, providing instant access
to a wealth of mobile content with ease of control
through the TV remote controller.
Remote Control
Not entry MHL Control (Remote Control)
Item
EXIT
Description
Exit
Up
Down
Left
Connecting an MHL-compatible Device
Connect the device to the HDMI1/MHL port on the
TV using an MHL cable (not supplied).
HDMI1/MHL
micro USB
MHL cable (not supplied)
34
OK
MENU
Right
Select
Root MENU

APPENDIX
Media Player Supported Formats
Video:
Container
Video Codec(le type)
File Extension Name
Sampling rate SPEC
Bit Rate
Prole
5
Motion JPEG
Motion JPEG
Sorenson H.263
H.263
Motion JPEG 640x480@30fps
Motion JPEG
640x480@30fps
640x480@30fps
640x480@30fps
640x480@30fps
10M bps
5
5
10M bps
10M bps
5
10M bps
5
Some les may not be played
35

Sorenson H.263
5
5
Motion JPEG
Sorenson H.263
Media Player Supported Formats
Audio:
Audio Codec(le type)
File Extension Name
640x480@30fps
10M bps
k
k
k k
k
k k
k
k
k
k
k
k
k
k
k
k
Bit Rate
k
k
k
k
k
k
k
5
Remark
k
k
k
k
k
k
k
k
k
36
k
k
k
k
k
k
k k
Some les may not be played

Media Player Supported Formats
Photo:
Cont ainer
File E xtens ion Nam e Pho to Re solut ion Rem ark
Some les may not be played
37

38
If the password for LOCK functions has been
forgotten:
Use the master password (code 8899), then
change to the new passwordby the procedure
described in Lock System item on page 27.
Ensure that no-one else can use the master
password by removing the Owner's Manual.

Power source
100V-240V AC, 50/60Hz
Power consumption
24": 40 W, <0.5W (standby)
32": 65 W, <0.5W (standby)
40": 74 W, <0.5W (standby)
43": 100 W, <0.5W(standby)
49": 120 W, <0.5W(standby)
55": 150 W, <0.5W(standby)
Dimensions
24" : 553 mm (W) 368 mm (H) 135 mm (D)
32" : 735mm (W) 482 mm (H) 193 mm (D)
40" : 907 mm (W) 578 mm (H) 245 mm (D)
43" : 977mm (W) 628 mm (H) 245 mm (D)
49" :1111mm (W)707 mm (H)251 mm (D)
55" :1250mm (W) 785 mm (H) 256mm (D)
Mass (Weight)
24" : 2.3 kg
32" : 4.5 kg
40" : 8.3 kg
43" : 9.4 kg
49" :12.1 kg
55" :15.3 kg
39

DVB-T,DVB-T2 and
DVB-C
24L365
3.5mm 3.5mm
adapter c ab le (a na lo g au di o ou tp ut R /W )(1),
AC adapter(1),
M 4X18 2 PCS
24" : 60cm
32" : 81cm
40" : 99cm
43" : 109cm
49" : 124cm
55" : 139cm
24", 32" :
40", 43", 49", 55" :
24":5W5W
32", 40", 43", 49", 55" : 10W10W
24" :Main 1333020 mm 2pcs.
32" : Main 1404134 mm 2pcs.
40" 43" : Main 1523750 mm 2pcs.
49" 55" : Main 1903243 mm 2pcs.
PC INPUT
AV
Digital Audio Output Coaxial
Headphone
/Lineout
(24 L3650 *)
,
(32 /40/4 3/49L 365*)
(55 L365* )
,
,
32L365
3.5mm
adapter c ab le (a na lo g au di o ou tp ut R /W )(1),
AC power cable (1),
BT 4X16 4 PCS
40/ 43/49 /55L3 65
3.5mm
adapter c ab le (a na lo g au di o ou tp ut R /W )(1),
AC power cable (1),
PM4X14 4 PCS
40
(55L365*have2 USBport).

Trademark Information
• The terms HDMI and HDMI High-Denition
Multimedia Interface, and the HDMI Logo are
trademarks or registered trademarks of HDMI
Licensing LLC in the United States and other
countries.
• Manufactured under license from Dolby
Laboratories.Dolby, Dolby Audio and the
double-D symbol are trademarks of Dolby
Laboratories.
• THIS PRODUCT IS LICENSED UNDER THE AVC
PATENT PORTFOLIO LICENSE FOR THE PERSONAL
AND NONCOMMERCIAL USE OF A CONSUMER
TO (i) ENCODE VIDEO IN COMPLIANCE WITH
THE AVC STANDARD (AVC VIDEO) AND/OR (ii)
DECODE AVC VIDEO THAT WAS ENCODED BY
A CONSUMER ENGAGED IN A PERSONAL AND
NONCOMMERCIAL ACTIVITY AND/OR WAS
OBTAINED FROM A VIDEO PROVIDER LICENSED
TO PROVIDE AVC VIDEO. NO LICENSE IS GRANTED
OR SHALL BE IMPLIED FOR ANY OTHER USE.
ADDITIONAL INFORMATION MAY BE OBTAINED
FROM MPEG LA, L.L.C.
SEE HTTP://WWW.MPEGLA.COM
• MPEG Layer-3 audio coding technology licensed
from Fraunhofer LLS and Thomson.
• MHL, Mobile High-Denition Link and the MHL
Logo are trademarks or registered trademarks
of the MHL, LLC.
• THIS PRODUCT IS LICENSED UNDER THE MPEG 4 VISUAL PATENT PORTFOLIO LICENSE FOR
THE PERSONAL AND NON COMMERCIAL USE
OF A CONSUMER FOR (i) ENCODING VIDEO
IN COMPLIANCE WITH THE MPEG-4 VISUAL
STANDARD (MPEG-4 VIDEO) AND/OR (ii)
DECODING MPEG-4 VIDEO THAT WAS ENCODED
BY A CONSUMER ENGAGED IN A PERSONAL
AND NON COMMERCIAL ACTIVITY AND/OR WAS
OBTAINED FROM A VIDEO PROVIDER LICENSED
BY MPEG LA TO PROVIDE MPEG-4 VIDEO. NO
LICENSE IS GRANTED OR SHALL BE IMPLIED FOR
ANY OTHER USE. ADDITIONAL INFORMATION
INCLUDING THAT RELATING TO PROMOTIONAL,
INTERNAL AND COMMERCIAL USES AND
LICENSING MAY BE OBTAINED FROM MPEG LA, L.
L. C.
SEE HTTP://WWW.MPEGLA.COM
• This product contains technology subject to
certain intellectual property rights of Microsoft.
Use or distribution of this technology outside of
this product is prohibited without the appropriate
license(s) from Microsoft.
• This product includes technology owned by
Microsoft Corporation and can not be used or
distributed without a license from Microsoft
Licensing, GP.
41
 Loading...