


ON-LINE MANUAL
48L344*DG
LED Backlight LCD Satellite TV
During the life of your TV rmware updates will be made available to
ensure that your TV maintains optimum performance.
You can download the latest version of rmware from
www.toshiba-om.net/rmware.php
Some features listed in this document are limited due to local legislation
and may not be available in all countries.
“Register your TV online at: www.toshiba-europe.com/registration”

English - 1 -
English
Contents
Safety Precautions ................................................. 3
Air Circulation
..................................................... 3
Heat Damage...................................................... 3
Mains Supply ...................................................... 3
Warning ............................................................. 3
Do ....................................................................... 3
Do not ................................................................. 3
Installation and Important Information
.................... 4
Exclusion Clause
................................................ 4
Important safety information
.................................. 5
The Remote Control
............................................... 7
Inserting Batteries and Effective Range of the
Remote Control................................................... 7
Connecting External Equipment
............................. 8
Connecting an HDMI
®
or DVI Device to the HDMI
Input........................................................................ 9
To Connect an HDMI Device
.............................. 9
To Connect a DVI Device.................................... 9
Connecting a Computer........................................ 10
To Connect a Computer
.................................... 10
Connecting a DVD Player..................................... 10
Connecting to a DVD Player via YPbPr
............ 10
Connecting a USB Memory
.................................. 10
To Connect a USB Flash Drive
......................... 10
Connecting a home network
..................................11
Environmental Information
............................... 12
Controlling the TV
................................................. 13
Switching on
..................................................... 13
Using the Remote Control ................................ 13
Using the Controls on the TV ............................ 13
Auto Tuning....................................................... 16
Digital Aerial Manual Search............................. 17
Digital Cable Manual Search ............................ 17
Analogue Manual Search ................................. 17
Digital Satellite Manual Search ......................... 17
Analogue Fine Tune.......................................... 18
Clear Service List (*)
......................................... 18
Stereo and Bilingual Transmissions.................. 19
Displaying Subtitles
.......................................... 19
Viewing Main Menu .......................................... 19
Controlling Volume and Muting Sound ............. 19
Selecting Programme Positions........................ 19
Standby Notications ........................................ 19
Viewing Channel List ........................................ 20
Moving a Channel ............................................. 20
Deleting a Channel ........................................... 20
Renaming a Channel
........................................ 20
Locking a Channel
............................................ 20
Viewing Info Banner .......................................... 21
Electronic Programme Guide............................ 21
Language Settings ............................................ 22
Viewing Parental Control Menu
........................ 23
Menu Lock
........................................................ 23
Maturity Lock (*)................................................ 23
Child Lock
......................................................... 23
Set PIN
............................................................. 23
Conguring Picture Settings
............................. 24
Mode
................................................................. 24
Contrast
............................................................ 24
Brightness ......................................................... 24
Sharpness......................................................... 24
Colour ............................................................... 24
Power Save Mode
............................................ 24
Backlight
........................................................... 24
Noise Reduction ............................................... 24
Reset ................................................................ 25
PC Picture Settings (*) ...................................... 27
PC Position
....................................................... 27
Autoposition
...................................................... 27
H Position ......................................................... 27
V Position.......................................................... 27
Dot Clock .......................................................... 27
Phase................................................................ 27
Conguring Sound Settings .............................. 28
Operating Sound Settings Menu Items ............. 28
Volume .............................................................. 28
Equalizer (Only for speaker) ............................. 28
Balance (Only for speaker)
............................... 28
Headphone
....................................................... 28
Sound Mode ..................................................... 28
AVL ................................................................... 28
Headphone/Lineout .......................................... 28
Dynamic Bass
................................................... 28
Surround Sound................................................ 28
Digital Out
......................................................... 28
Conguring Your TV’s Settings ......................... 29
Viewing Settings Menu ..................................... 29
Conditional Access
........................................... 29
Language
.......................................................... 29
Parental ............................................................ 29
Timers ............................................................... 29
Date/Time ......................................................... 29
Sources............................................................. 29
Network Settings............................................... 29
Satellite Settings .............................................. 29
Other Settings ................................................... 29
Using a Conditional Access Module ................. 29
Timers
............................................................... 30
Setting Sleep Timer
.......................................... 30
Setting Programme Timers ............................... 30
Conguring Date/Time Settings ........................ 30
Conguring Source Settings ............................. 31
Input Selection
.................................................. 31
Conguring Satellite Settings............................ 31
Conguring Other Settings - General
............... 32
Operation .......................................................... 32
Menu Timeout ................................................... 32
Scan Encrypted Channels
............................... 32
Blue Background
.............................................. 32

English - 2 -
English
Software Upgrade ............................................. 32
Application Version ........................................... 32
Hard of Hearing
................................................ 32
Audio Description.............................................. 32
Auto TV Off ....................................................... 33
Store Mode
....................................................... 33
MEDIA Renderer............................................... 33
Power Up Mode
................................................ 33
Bisskey
............................................................ 33
CEC .................................................................. 33
CEC Auto Power On ......................................... 33
Conguring Network Settings
........................... 34
First enter to Toshiba Portal .............................. 34
Using the Toshiba Portal
................................... 34
Using the Internet Browser ............................... 34
Using YouTube
TM
............................................. 35
Manual Start
..................................................... 36
Auto Start .......................................................... 36
Playing MP3 Files
............................................. 37
Viewing JPEG Files .......................................... 37
Slideshow Feature ............................................ 38
Video Playback
................................................. 38
Media Browser Settings .................................... 39
Using MENU button in Media Browser Mode
... 39
To Close the Media Player ................................ 39
Using Text Button -TEXT .................................. 40
Accessing Sub-pages
....................................... 40
Revealing Concealed Text ................................ 40
Holding a Page
................................................. 40
To display an initial page................................... 40
Appendix A: PC Input Typical Display Modes
....... 41
Appendix B: AV and HDMI Signal Compatibility
(Input Signal Types)
.............................................. 42
Appendix C: PIN Information
............................... 43
Specications and Accessories
............................ 45
License Information
.............................................. 46
Q & A Section
....................................................... 47

English - 3 -
English
Safety Precautions
This equipment has been designed and manufactured to meet international safety standards but, like any
electrical equipment, care must be taken to obtain the best results and for safety to be assured. Please read
the points below for your own safety. They are of a general nature, intended to help with all electronic consumer
products and some points may not apply to the goods you have just purchased.
Air Circulation
Leave more than 10cm around all edges when wall
mounting the television to allow adequate ventilation.
This will prevent overheating and possible damage to
the television. Dusty places should also be avoided.
Heat Damage
Damage may occur if the television is left in direct
sunlight or near a heater. Avoid places subject to
extremely high temperatures or humidity, or locations
where the temperature is likely to fall below 5°C
(41°F).
Mains Supply
The set should be operated only from a 220-240 V
AC 50 Hz outlet. DO ensure that the television is not
standing on the mains lead. DO NOT cut off the mains
plug from this equipment, this incorporates a special
Radio Interference Filter, the removal of which will
impair its performance. It should only be replaced by
a correctly rated and approved type. IF IN DOUBT
PLEASE CONSULT A COMPETENT ELECTRICIAN.
Warning
To prevent the spread of re, keep candles or other
open ames away from this product at all times.
Do
DO read these operating instructions before you
attempt to use the equipment.
DO ensure that all electrical connections (including
the mains plug, extension leads and inter connections
between pieces of equipment) are properly made and
in accordance with the manufacturers’ instructions.
Switch off and withdraw the mains plug before making
or changing connections.
DO consult your dealer if you are ever in doubt about
the installation, operation or safety of your equipment.
DO be careful with any glass panels or doors on
equipment.
Do not
DON’T remove any xed cover as this may expose
dangerous voltages.
DON’T obstruct the ventilation openings of the
equipment with items such as newspapers, tablecloths,
curtains, etc. Overheating will cause damage and
shorten the life of the equipment.
DON’T allow electrical equipment to be exposed to
dripping or splashing or objects lled with liquids, such
as vases, to be placed on the equipment.
DON’T place hot objects or naked ame sources,
such as lighted candles or nightlights on, or close to
equipment. High temperatures can melt plastic and
lead to res.
DON’T use makeshift stands and NEVER x with
wood screws. Use the stand manufacturers supplied
screws.
DON’T leave equipment switched on when it is
unattended, unless it is specically stated that it is
designed for unattended operation or has a standby
mode. Switch off by withdrawing the plug, make sure
your family know how to do this. Special arrangements
may need to be made for people with disabilities.
DON’T continue to operate the equipment if you are in
any doubt about it working normally, or it is damaged
in any way - switch off, withdraw the mains plug and
consult your dealer.
WARNING - excessive sound pressure from
earphones or headphones can cause hearing loss.
ABOVE ALL - NEVER let anyone, especially
children, push or hit the screen, push anything
into holes, slots or any other openings in the case.
NEVER guess or take chances with electrical
equipment of any kind - it is better to be safe
than sorry.
THE MAINS PLUG IS USED AS A DISCONNECTING
DEVICE AND THEREFORE SHOULD BE READILY
OPERABLE.
Note : Interactive video games that involve shooting
a “gun” type of joystick at the on-screen target may
not work with this TV.
English - 4 -
English
Locate the television away from direct sunlight and strong
lights. Soft, indirect lighting is recommended for comfortable
viewing. Use curtains or blinds to prevent direct sunlight
falling on the screen.
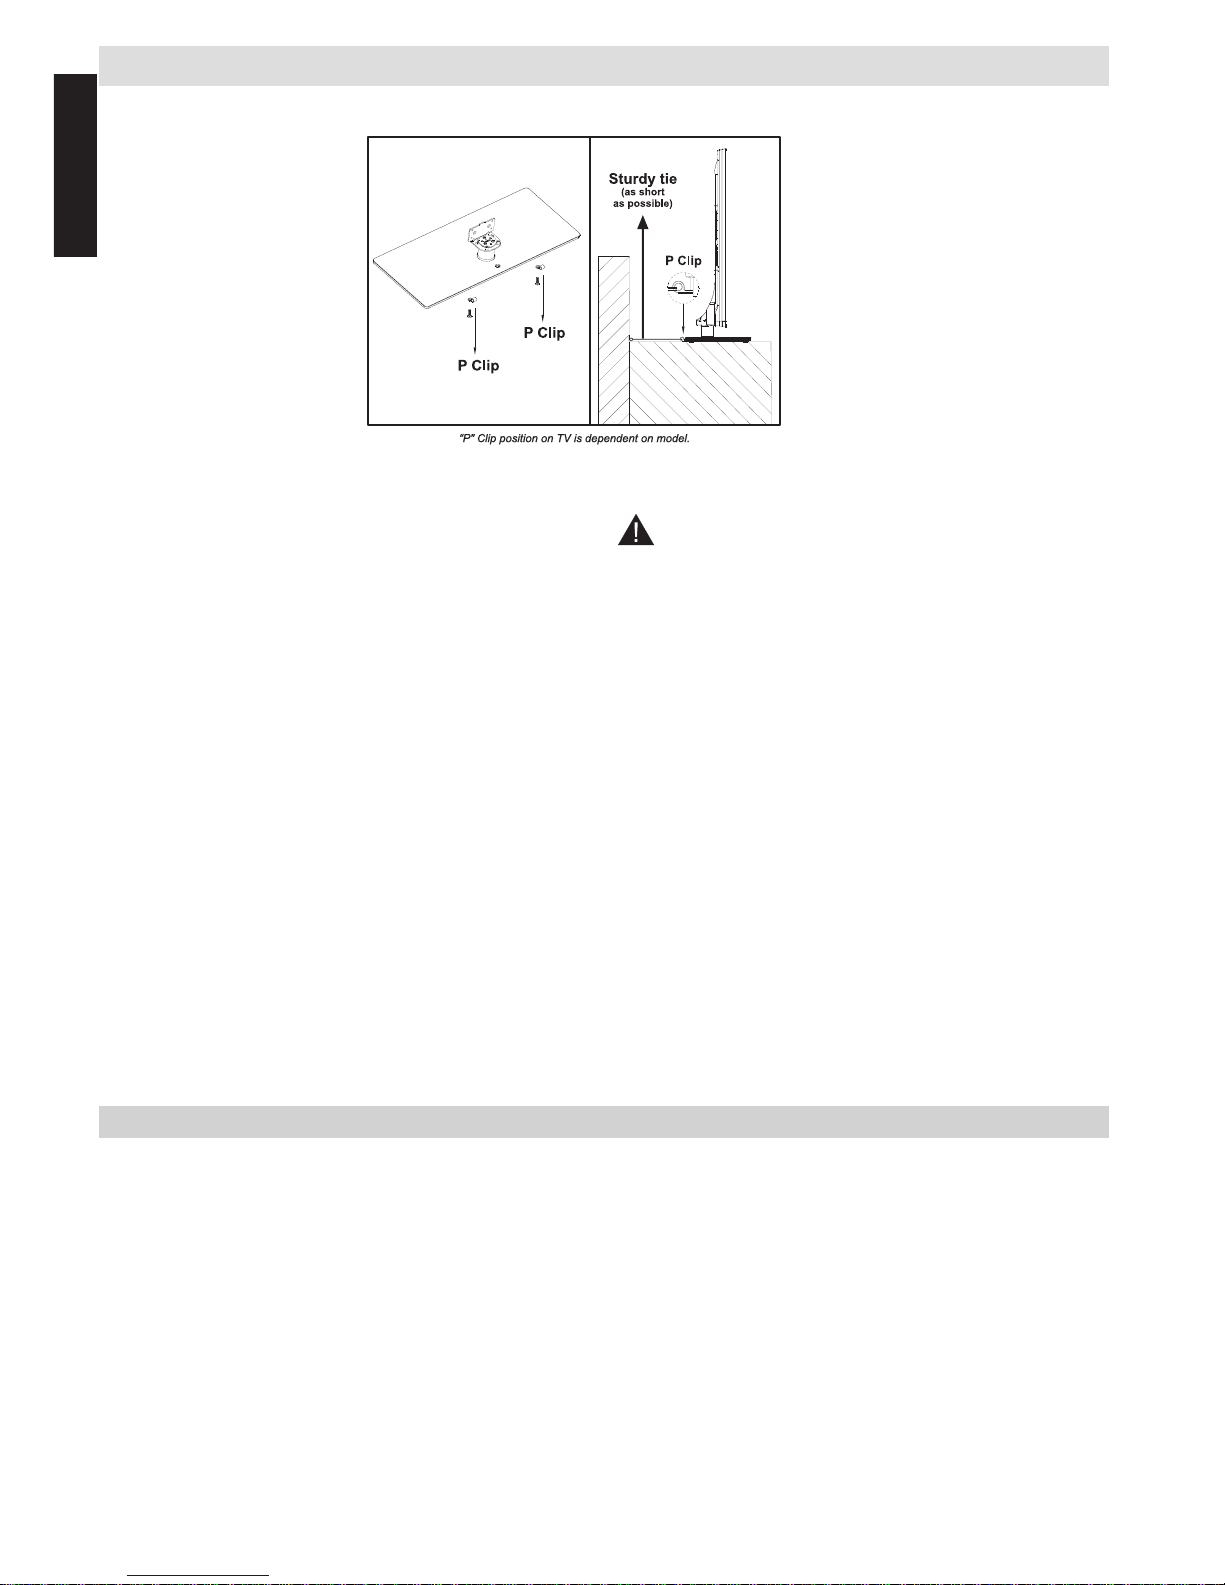
Place the TV on a stable, level surface that can support the
weight of the TV. In order to maintain stability and prevent
it falling over, it is recommended to secure the TV to a wall
using a sturdy tie on the back of the stand.
The LCD display panels are manufactured using an extremely
high level of precision technology; however, sometimes some
parts of the screen may be missing picture elements or have
luminous spots. This is not a sign of a malfunction.
Make sure the television is located in a position where it
cannot be pushed or hit by objects, as pressure will break
Please take note
The digital reception function of this television is only effective in the countries listed in the “Country” section
during the rst time installation menu. Depending on country/area, some of this television’s functions may not
be available. Reception of future additional or modied services cannot be guaranteed with this television.
If stationary images generated by 4:3 broadcasts, text services, channel identication logos, computer displays,
video games, on screen menus, etc. are left on the television screen for any length of time, they could become
conspicuous. It is always advisable to reduce both the brightness and contrast settings.
Very long, continuous use of the 4:3 picture on a 16:9 screen may result in some retention of the image at
the 4:3 outlines. This is not a defect of the LCD TV and is not covered under the manufacturer’s warranty.
Regular use of other size modes will prevent permanent retention.
Exclusion Clause
Toshiba shall under no circumstances be liable for loss and/or damage to the product caused by:
i) re;
ii) earthquake;
iii) accidental damage;
iv) intentional misuse of the product;
v) use of the product in improper conditions;
vi) loss and/or damage caused to the product whilst in the possession of a third party;
vii) any damage or loss caused as a result of the owner’s failure and/or neglect to follow the instructions set out in the
owner’s manual;
viii) any loss or damage caused directly as a result of misuse or malfunction of the product when used simultaneously with
associated equipment;
Furthermore, under no circumstances shall Toshiba be liable for any consequential loss and/or damage including but not
limited to the following, loss of prot, interruption of business, the loss of recorded data whether caused during normal
operation or misuse of the product.
Installation and Important Information
Where to install
or damage the screen. Also, please ensure that small items are
not inserted into slots or openings in the case.
Avoid using chemicals (such as air refreshers, cleaning
agents, etc.) on or near the TV pedestal. Studies
indicate that plastics may weaken and crack over time
from the combination effects of chemical agents and mechanical
stress (such as weight of TV). Failure to follow these instructions
could result in serious injury and/or permanent damage to TV
and TV pedestal.
Cleaning the screen and cabinet…
Turn off the power, and clean the screen and cabinet with a soft,
dry cloth. We recommend that you do not use any proprietary
polishes or solvents on the screen or cabinet as this may
cause damage.
* Button and stand style
is dependent on model.

English - 5 -
English
Important safety information
• Any function related to the digital television (with the DVB logo) is available only within the country or area
where such signals are transmitted. Verify with the salesperson if it is possible to receive a DVB - T/C/S
signal in the area where you live.
• Even if the television conforms to the required DVB - T/C/S specications, the compatibility with future digital
DVB - T/C/S transmissions is not guaranteed.
• Some digital television functions may not be available in certain countries.
• The DVB - T/C/S system present in this device, allows reception of both FTA (Free To Air) and Encrypted
channels.
Note; Encrypted channels require a specic encryption system to view, which may not be available in certain
countries.
• DVB is a registered trademark of the DVB Project. This logo indicates that the product is compliant with
European Digital Broadcasting.
IMPORTANT INFORMATION
TV Installation
• Do not stand the televisions on cloth or other materials placed between the television and supporting furniture.
• Educating children about the dangers of climbing on furniture to reach the television or its controls.
• Always hold the plug when disconnecting the unit from the socket outlet. Do not pull on ex. The ex can
become damaged and cause a short circuit.
• Use a soft, dry cloth to clean the unit.
• Set up unit so that no one will trip over the ex.
• If you intend to wall mount the unit, contact the shop where you purchased the unit for advice, and leave the
installation work to professionals. Improper installation can cause damage and/or injuries.
• To protect the unit during a thunder storm, unplug the AC power cord and disconnect the aerial, cable and
satellite decoder/systems etc.
Caution: Do not touch the aerial and or satellite connector.
• The unit becomes warm when in operation. Do not place any covers or blankets on the unit in order to
prevent overheating.
The ventilation holes should not be blocked. Do not set up near radiators. Do not place in direct sunshine.
• Moisture condensation occurs in the following situations:
- When you move the unit from a cold place to a warm place.
- When you use the unit in a room where the heater was just turned on.
- When you use the unit in an area where cold air from an air conditioner directly hits the unit.
- When you use the unit in a humid place.
• Never use the unit when moisture condensation could occur.
• Using the unit when moisture condensation exists may damage its own internal parts. After two or three
hours, the unit will warm up and moisture will be evaporated.
English - 6 -
English
Removing the pedestal stand
When using a Wall Bracket
Please use a wall bracket appropriate for the size and weight of the LCD TV
.
• Two people are required for installation.
• To install a wall-mount.
(1) Unplug and remove any cables and/or other component connectors from the rear of the TV
.
(2) Carefully lay the front of the unit face down on a at, cushioned surface such as a quilt or blanket.
(3) Follow the instructions provided with your wall bracket. Before proceeding, make sure the appropriate
bracket(s) are attached to the wall and the back of the TV as described in the instructions provided with the
wall bracket.
(4) Always use the screws supplied or recommended by the wall mount manufacturer.
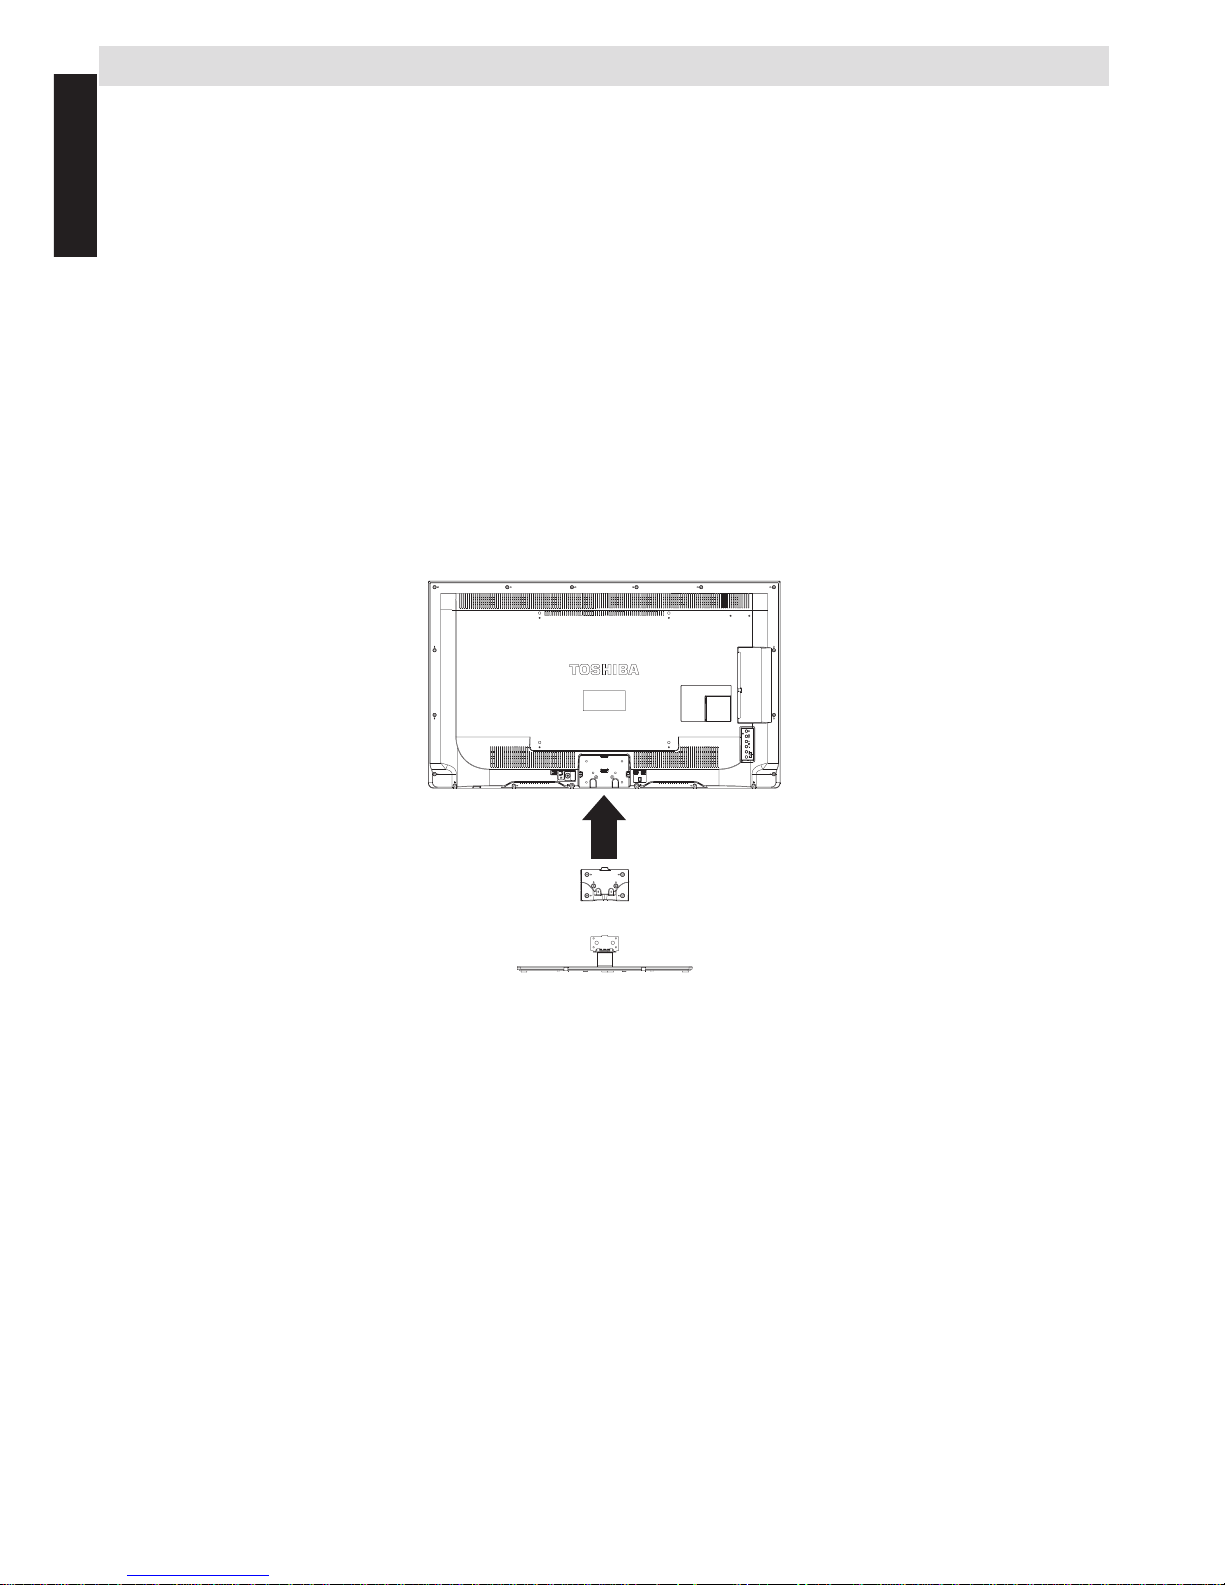
Removing the pedestal stand
(1) Carefully lay the front of the unit face down on a at, cushioned surface with the stand hanging over the edge.
(2) Remove the screws.
(3) After the screws are removed, hold the pedestal stand in place,then remove the pedestal stand and the
plastic moulding from the TV by removing away from the TV.
NOTE: Extreme care should always be used when removing the pedestal stand to avoid damage to the LCD
panel.
For 48L344*DG models
English - 7 -
English
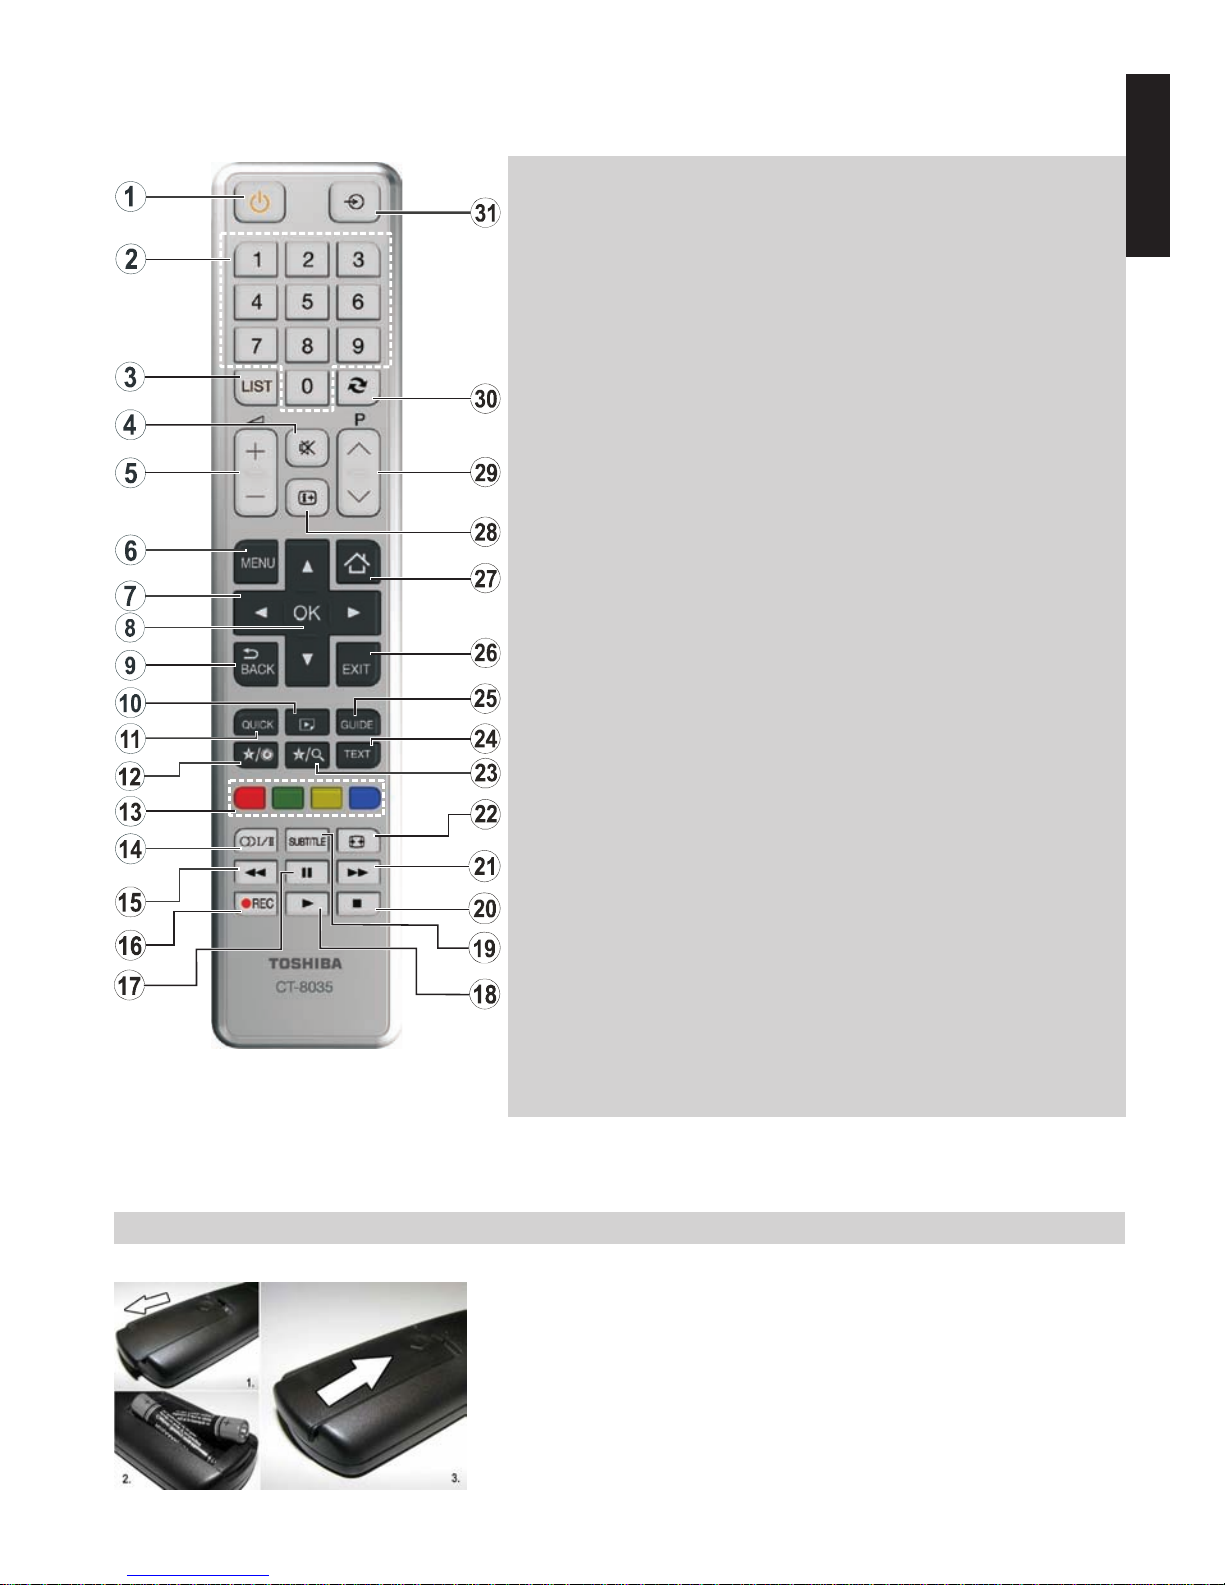
The Remote Control
Simple at-a-glance reference of your remote control.
Inserting Batteries and Effective Range of the Remote Control
Remove the back cover to reveal the battery compartment and make sure the
batteries are inserted the right way round. Suitable battery types for this remote
are AAA, IEC R03 1.5V.
Do not combine a used, old battery with a new one or mix battery types. Remove
exhausted batteries immediately to prevent acid from leaking into the battery
compartment. Dispose of them in a designated disposal area.
Warning: Batteries must not be exposed to excessive heat such as sunshine,
re or the like.
The performance of the remote control will deteriorate beyond a distance of ve
metres or outside an angle of 30 degrees from the IR receiver. If the operating
range becomes reduced the batteries may need replacing.
(*) MY BUTTON 1 & MY BUTTON 2
These buttons may have default functions depending on the model.
However you can set a special function to these buttons by pressing
on them for ve seconds when on a desired source, channel or link. A
conrmation message will be displayed on the screen. Now the selected
MY BUTTON is associated with the selected function.
Note that if you perform rst time installation, MY BUTTON 1&2 will return
to their default function.
1. Standby
2. Numeric buttons
3. TV-AV / Channel list /
Switches among broadcast
types
4. Mute
5. Volume Up / Down
6. Menu on-off
7. Navigation buttons
(Up/Down/Left/Right)
8. Okay (Conrm) / Hold (in
TXT mode) / Channel List
9. Return / Index page (in
TXT mode)
10. Media Browser
11. Quick Menu
12. My button 1 (*)
13. Coloured buttons
14. Mono/Stereo - Dual I-II /
Current Language
(in DVB channels)
15. Rapid reverse
16. No function
17. Pause
18. Play
19. Subtitle on-off (in Media
Browser mode and in DVB
channels)
20. Stop
21. Rapid advance
22. Image size
23. My button 2 (*)
24. Teletext / Mix (in TXT
mode)
25. Electronic programme
guide(in DVB channels)
26. Exit
27. Internet portal
28. Info / Reveal (in TXT
mode)
29. Programme Down /
Page up -
Programme Up / Page
down
30. Previous programme
31. AV / Source selection
English - 8 -
English
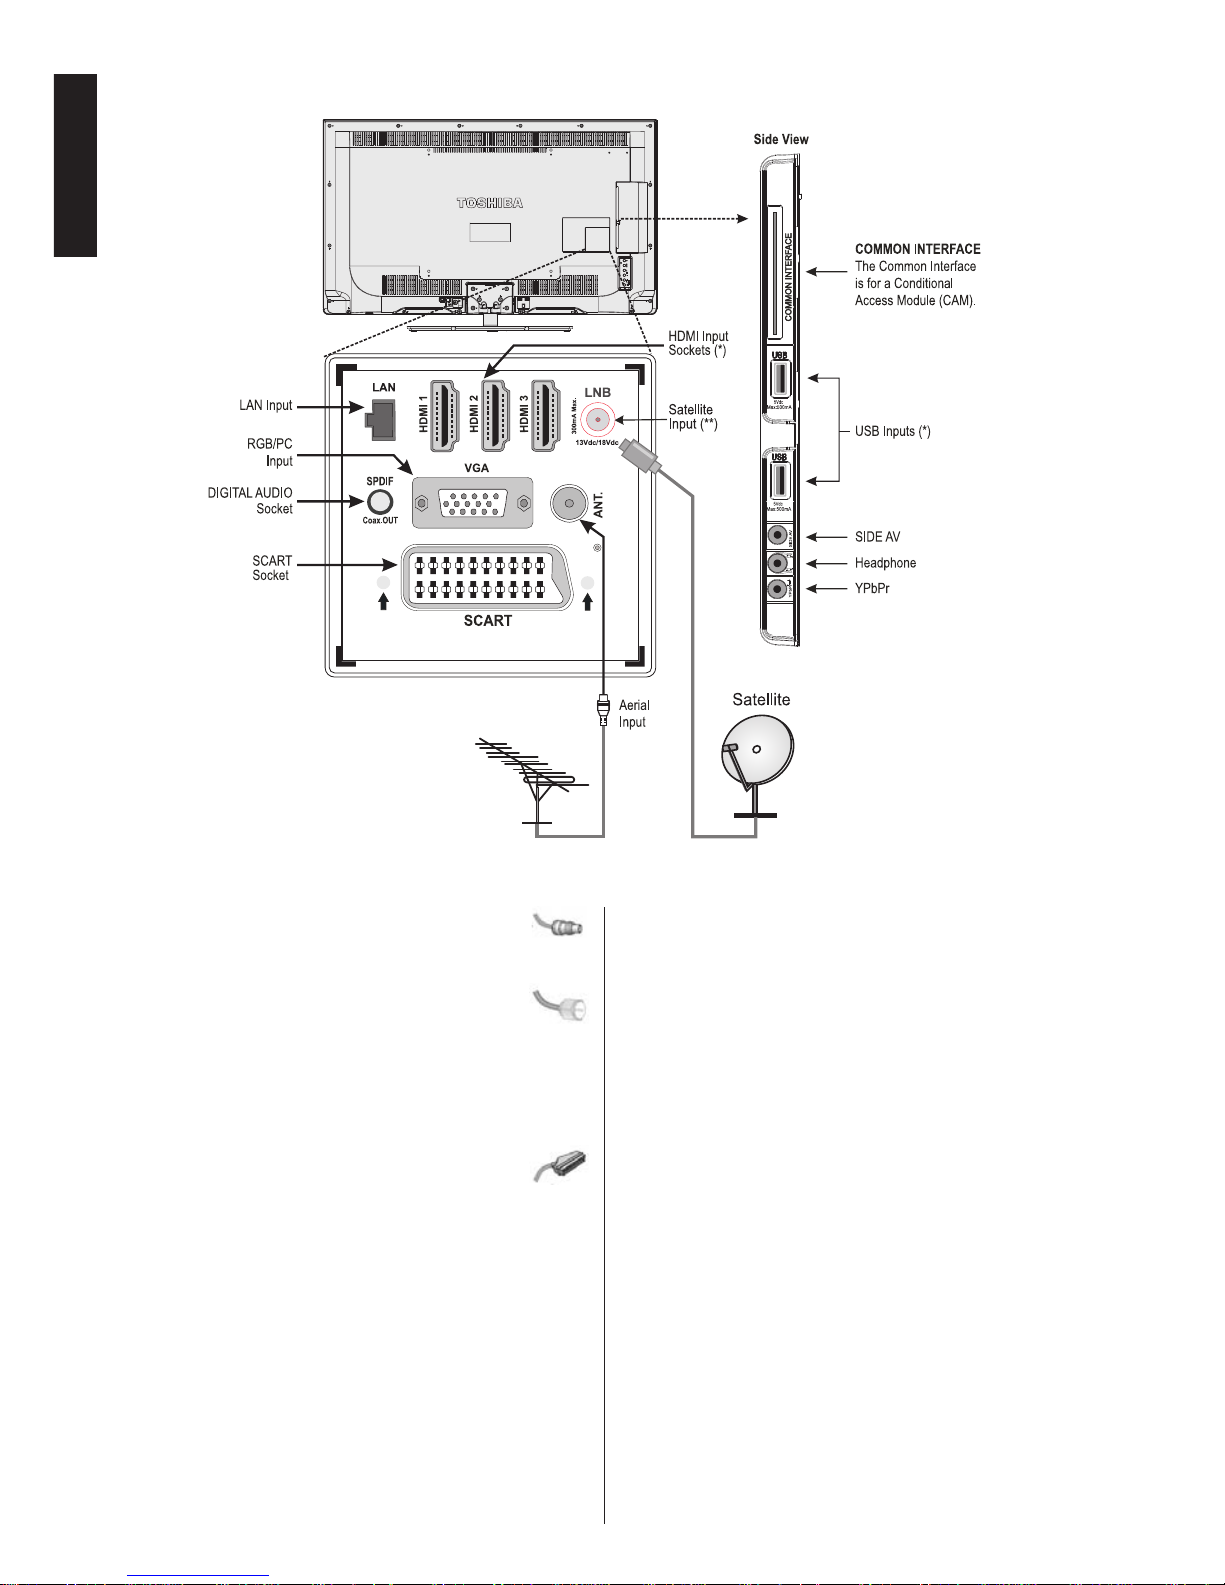
Connecting External Equipment
Before connecting any external equipment, remove the mains plug from the wall socket.
Aerial cable:.....................................................
Connect the aerial to the ANT. socket on the rear of
the TV.
Satellite cable:............................................(**)
Connect the LNB from the satellite dish to the Satellite
Antenna socket on the rear of the TV.
If your satellite connection is different, suitable
adaptors are available from most satellite equipment
retailers.
SCART lead:....................................................
If you use a decoder* or a media recorder, it is
essential that the scart cable is connected to the TV.
Before running rst time installation, any connected
devices need to be set to standby mode.
The DIGITAL AUDIO socket enables the connection
of a suitable surround sound system.
HDMI
®
(High-Denition Multimedia Interface) is for
using with a DVD decoder or other equipment with
digital audio and video output. It is designed for best
performance with 1080i and 1080p high-denition
video signals but will also accept and display VGA,
480i, 480p, 576i, 576p and 720p signals. PC format
signals will also be displayed.
NOTE: Although this TV is able to connect to HDMI
equipment, it is possible that some equipment may
not operate correctly.
When connecting a device via the Side AV input, you
must use the supplied connection cable to enable
connection.
When connecting a device via YPbPr input, you
must use the supplied connection cable to enable
connection.
LAN Input is used to connect the TV to your home
network.
A wide variety of external equipment can be connected
to the TV; therefore, the relevant owner’s manuals
for all additional equipment must be referred to for
exact instructions.
If the TV automatically switches over to monitor
external equipment, return to normal TV by pressing
the desired programme position button. To recall
external equipment, press SOURCE button repeatedly
to switch between sources.
Regardless of source’s property, audio output from the
DIGITAL AUDIO socket cannot be copied.
(*) Number of these inputs may change according to the model of your TV.
(**) Your TV may not be supported depending on the model.
English - 9 -
English
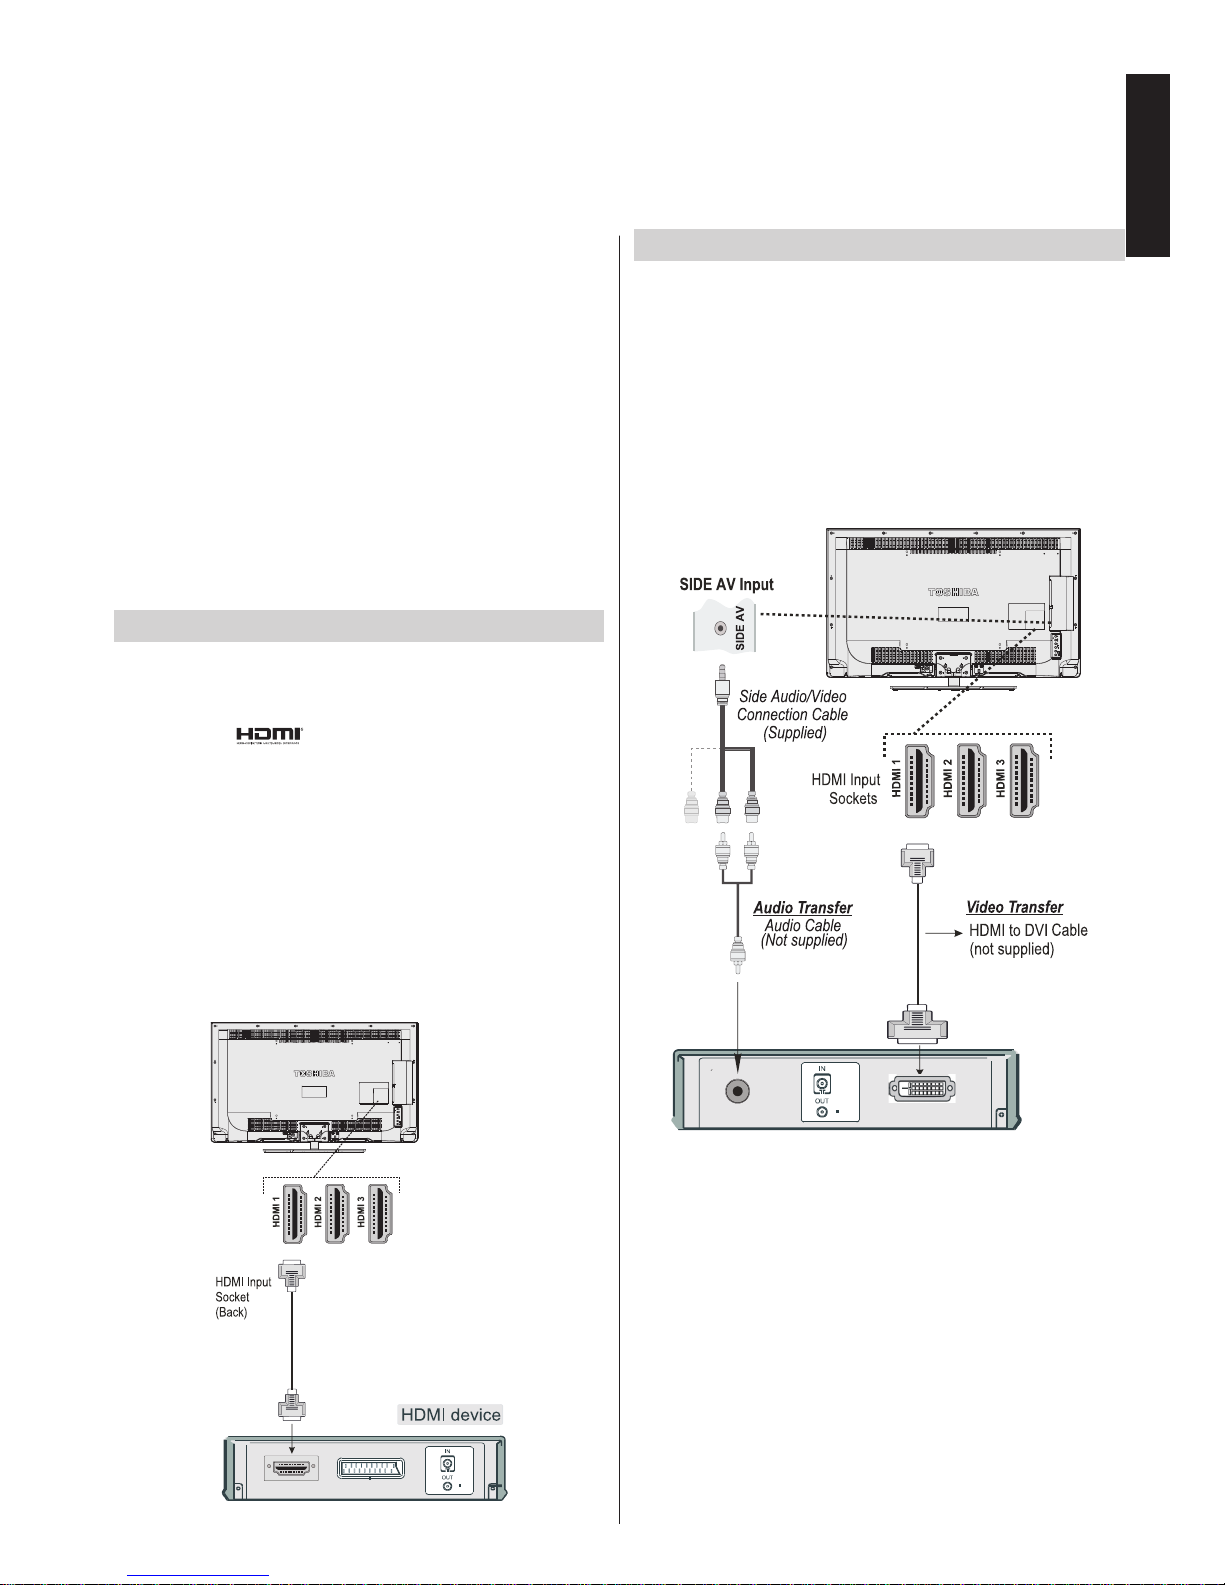
Connecting an HDMI® or DVI Device to the HDMI Input
The HDMI inputs on your TV receive digital audio and
uncompressed digital video from an HDMI source
device or uncompressed digital video from a DVI
(Digital Visual Interface) source device.
These inputs are designed to accept HDCP (HighBandwidth Digital-Content Protection) programme
material in digital form from EIA/CEA-861-D–
compliant [1] consumer electronic devices (such as a
set-top box or DVD player with HDMI or DVI output).
NOTE:
• Some early HDMI equipment may not work properly
with your latest HDMI TV.
• Supported Audio format: Linear PCM, sampling rate
32/44.1/48kHz.
To Connect an HDMI Device
Connect an HDMI cable (type A connector) to
the HDMI terminal. For proper operation, it is
recommended that you use an HDMI cable with the
HDMI Logo (
).
• If your HDMI connection is capable of 1080p and/or
your TV is capable of refresh rates greater
than 50Hz, you will need a Category 2 cable.
Conventional HDMI/DVI cable may not work properly
with this mode.
• HDMI cable transfers both video and audio. Separate
analogue audio cables are not required (see
illustration).
• To view the HDMI device video press SOURCE
button to select the appropriate HDMI input.
To Connect a DVI Device
Connect an HDMI-to-DVI cable (HDMI type A
connector) to the HDMI input socket and audio cables
to the RED and WHITE SIDE AV AUDIO inputs on
the Audio/Video connection cable supplied (see
illustration).
• The maximum recommended HDMI-to-DVI cable
length is 6.6 ft (2m).
• An HDMI-to-DVI cable transfers video only. Separate
analogue audio cables are required.
NOTE:
To ensure that the HDMI or DVI device is reset
properly, it is recommended that you follow these
procedures:
• When turning on your electronic components, turn
on the TV rst, and then the HDMI or DVI device.
• When turning off your electronic components, turn
off the HDMI or DVI device rst, and then the TV.
* Number of
these inputs
may change
according to
the model of
your TV.
* Number
of these
inputs
may
change
according
to the
model of
your TV.
English - 10 -
English
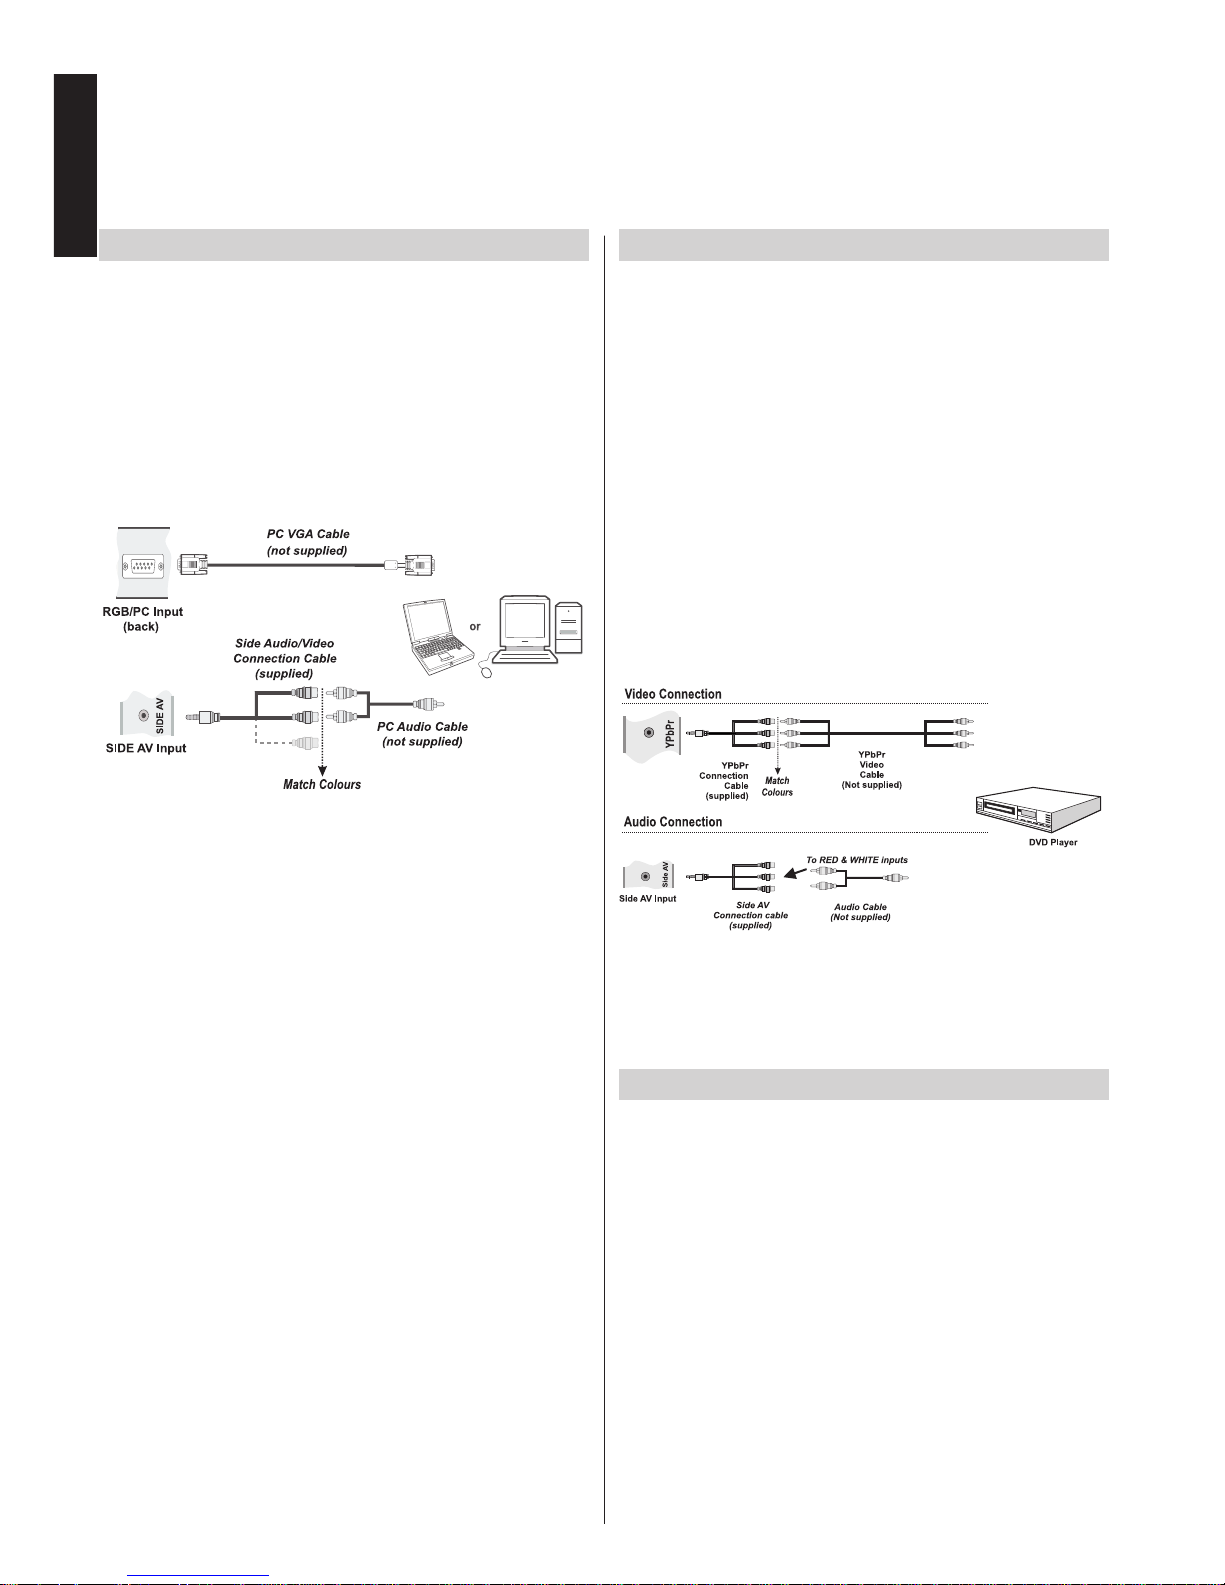
To Connect a Computer
With either an RGB/PC or an HDMI connection, you
can watch your computer’s display on the TV and hear
the sound from the TV’s speakers.
When connecting a PC to the RGB/PC input on TV,
use an analogue RGB (15-pin) computer cable and
use the SIDE AV socket with a PC audio cable (not
supplied) for audio connection, using the supplied
Side AV connection cable’s RED and WHITE inputs
(see illustration).
To use a PC, set the monitor output resolution on
the PC before connecting it to the TV. To display the
optimum picture, use the PC setting feature.
NOTE:
• Some PC models cannot be connected to this TV.
An adaptor is not needed for computers with a
compatible mini D-sub15-pin terminal.
• Depending on the DVD’s title and the specications
of the PC on which you are playing the DVD-Video,
some scenes may be skipped or you may not be
able to pause during multiangle scenes.
Connecting a Computer Connecting a DVD Player
Connecting to a DVD Player via YPbPr
Some DVD players are connected through
COMPONENT SOCKETS (YPbPr). In this case,
you must use the supplied Component YPbPr video
connection cable for enabling connection. First, plug
the single jack of the cable to the TV’s YPbPr socket
(side). Afterwards, insert your YPbPr cable’s (not
supplied) connectors into the plural part of the supplied
YPbPr video connection cable (see illustration below).
Colours of the connected jacks should match.
To enable audio connection, use the supplied Side AV
connection cable. First, plug single jack of the cable
to the Side AV Input of the TV. Afterwards, insert your
DVD player’s audio cable’s connectors into the plural
part of the supplied Side AV connection cable (see
illustration below). Colours of the connected jacks
should match.
Connecting a USB Memory
To Connect a USB Flash Drive
• You can connect a USB Flash Drive to your TV by
using the USB inputs on the TV. This feature allows
you to display/play music, photo or video les stored
in a USB stick.
• It is possible that certain types of USB devices (e.g.
MP3 Players) may not be compatible with this TV.
• You may back up your les before making any
connections to the TV set in order to avoid any
possible data loss. Note that manufacturer will not
be responsible for any le damage or data loss.
• Do not pull out USB module while playing a le.
CAUTION: Quickly plugging and unplugging USB
devices may cause damage to the USB device.
English - 11 -
English
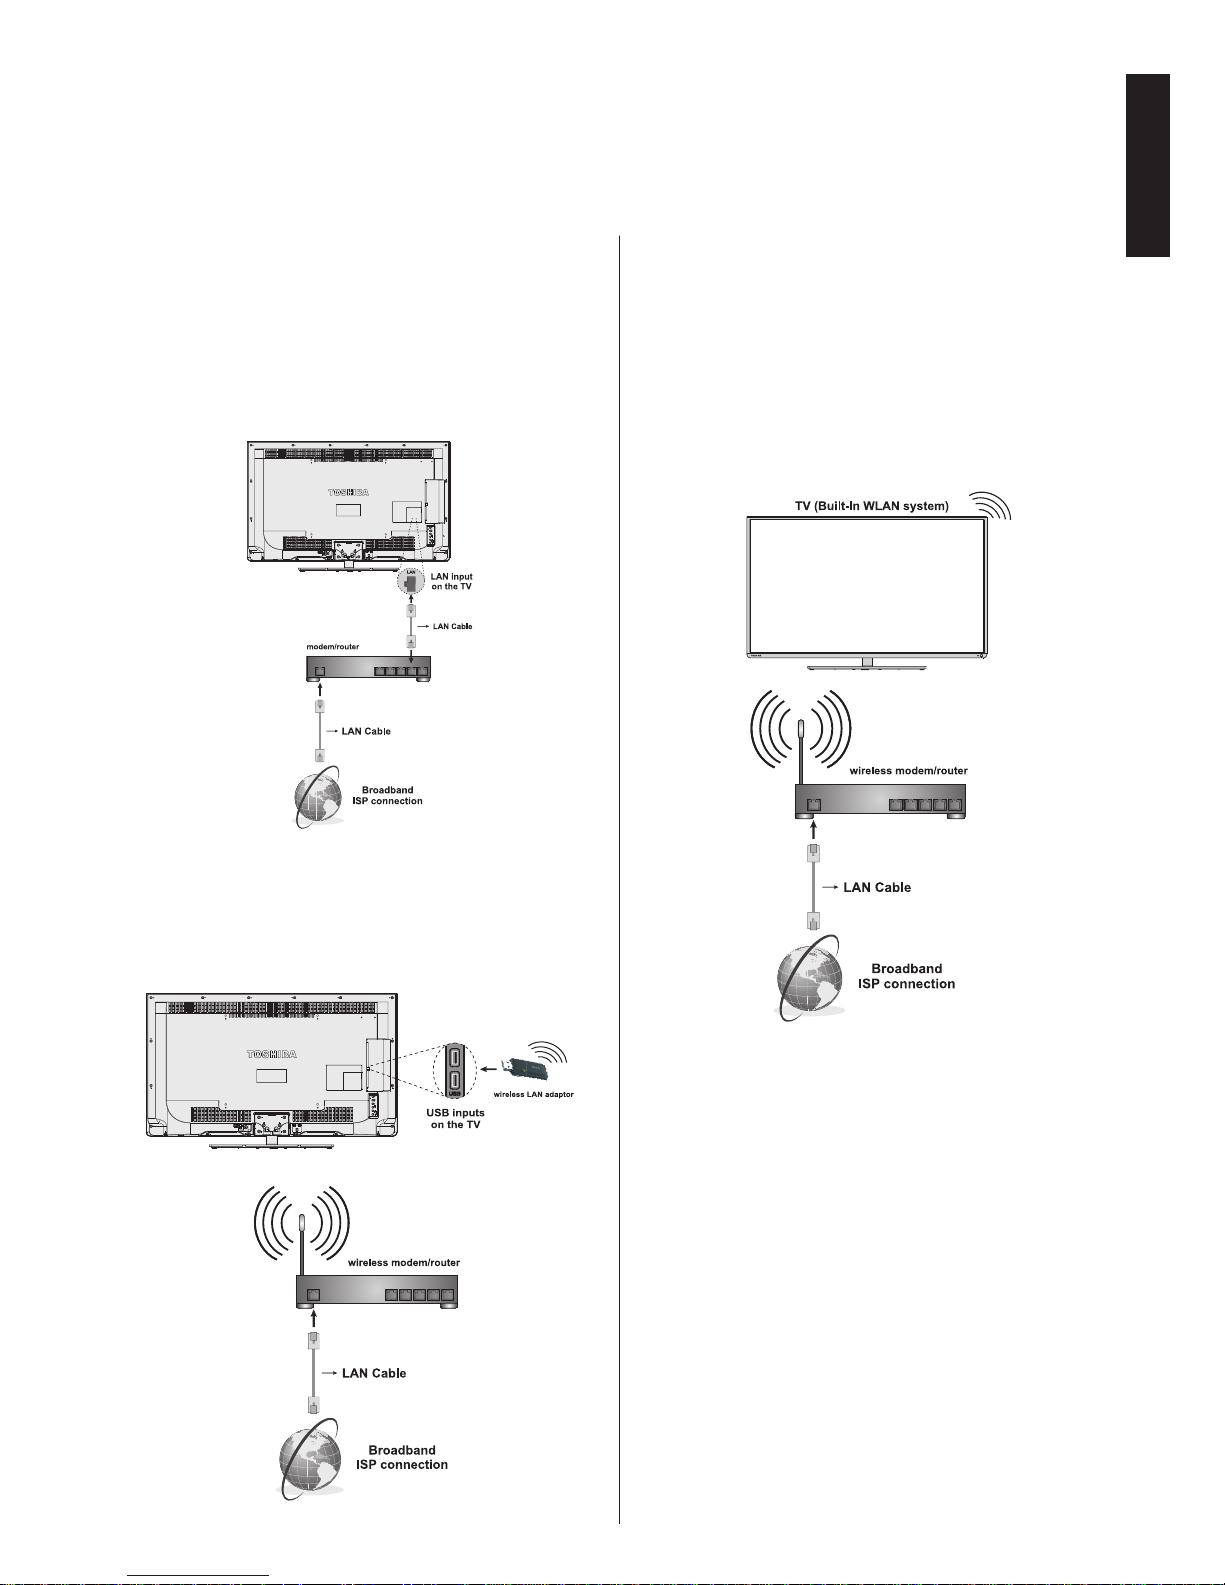
Connecting a home network
The LAN port allows your TV to connect to your
home network. You can use this networking system
to access photo, video and audio les that are stored
on a media server and play/display them on your TV.
Wired connection
You need a LAN cable (not supplied) to connect your
TV to your modem/router.
Wireless connection for models without integrated
WIFI
You need to connect a USB LAN adaptor (sold
separately) to one of the USB inputs on your TV to
connect to your network wirelessly.
Note: Wireless USB LAN adaptor can be purchased
from the retail outlet or Toshiba service company. You
can nd the phone numbers of the local services on
the back cover of this manual.
Wireless connection for models with integrated
WIFI
IF your TV has a built-in WLAN system, you don’t
need additional devices to connect to your network
wirelessly.
Note: Performance depends on many factors,
conditions and variables, including distance from
acces point (AP), volume of network trafc, building
materials and construction, operating system used,
mix of wireless products used, interference and other
adverse conditions.
After connections are done, network congurations of
the TV should be set. Please refer to network setting
section on page 34.
English - 12 -
English
Environmental Information
This television is designed to be environment friendly. You not only help to save the environment but also
you can save money by reducing electricity bills thanks to the energy efciency feauture of this TV. To reduce
energy consumption, you should take the following steps:
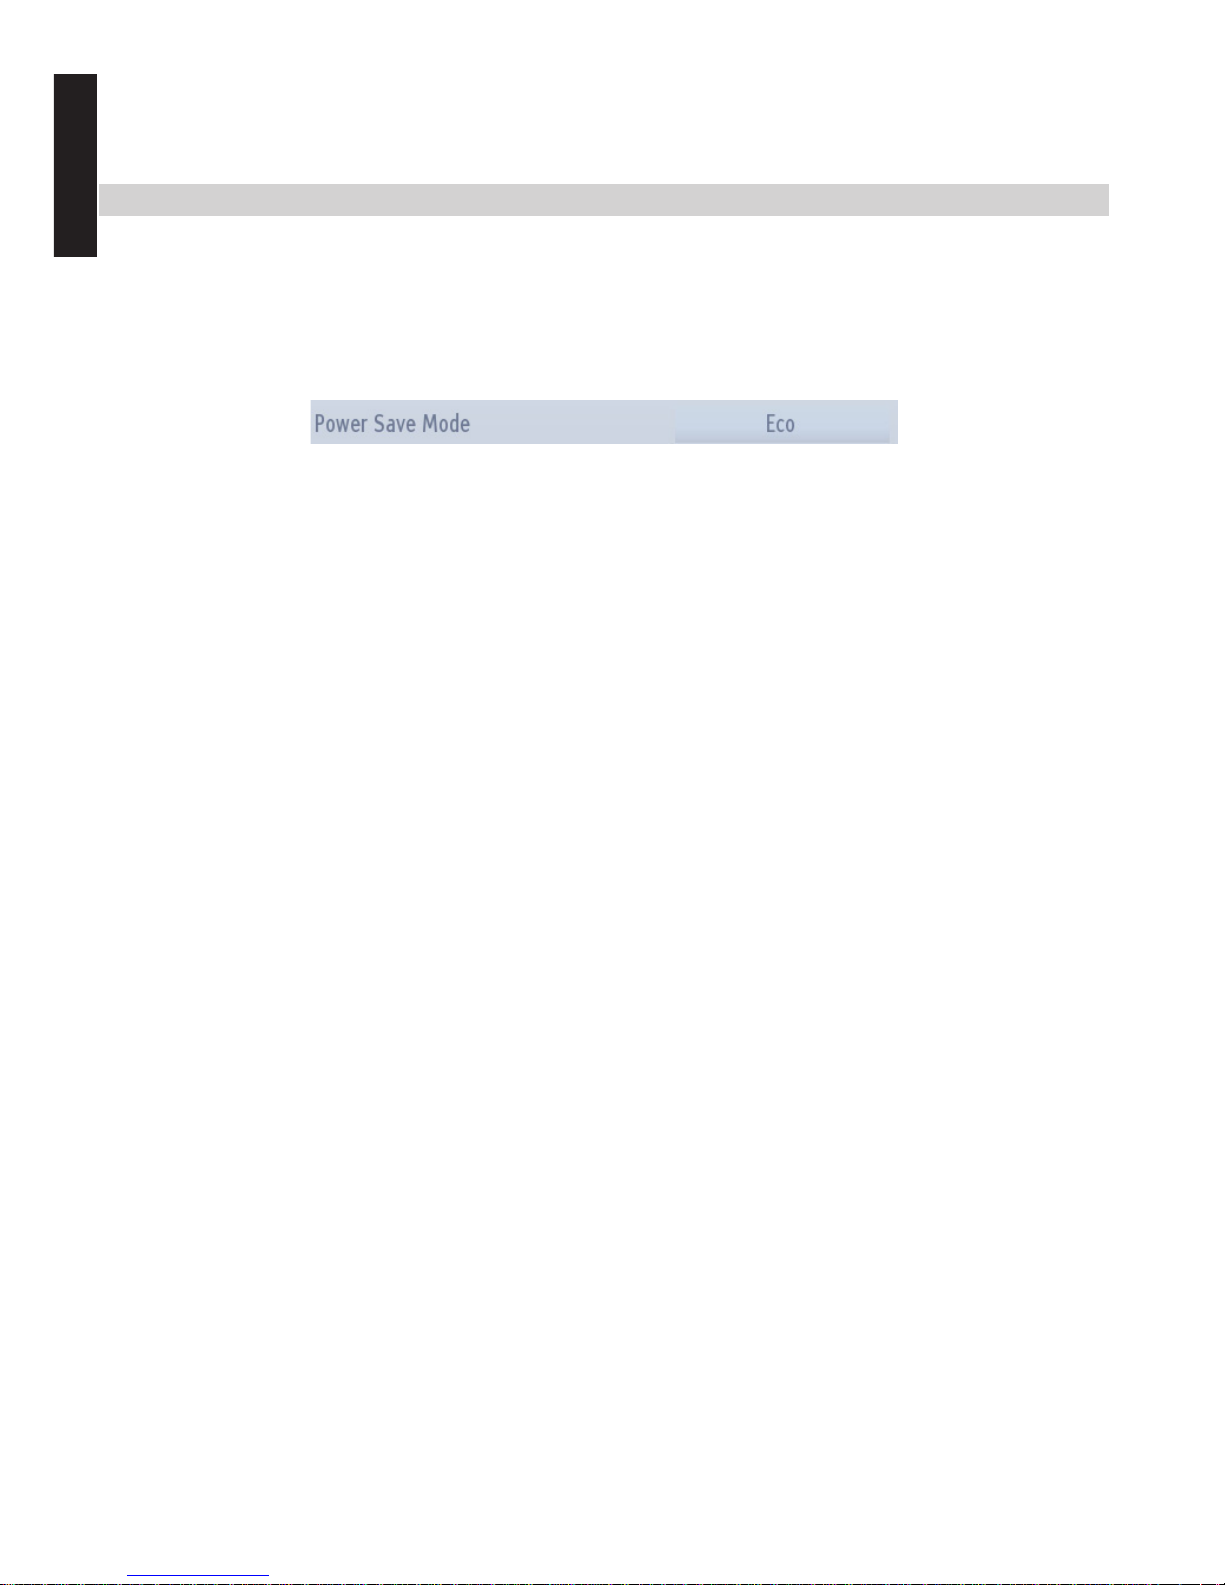
You can use Power Save Mode setting, located in the Picture Settings menu. If you set Power Save Mode as
Eco, the TV will switch to energy-saving mode and luminance level of TV set will be decreased to optimum
level. Note that some picture settings will be unavailable to be changed when the TV is in Power Save Mode.
If pressed Right button, “Screen will be off in 15 seconds.” message will be displayed on the screen. Select
Proceed and press OK to turn the screen off immediately. If you don’t press any button, the screen will be off
in 15 seconds. Press any button on the remote or on the TV to turn the screen on again. If you disable Power
Save Mode, picture mode will be automatically set to Dynamic.
It is highly recommended to activate Power Save Mode to reduce your annual power consumption. And also
it is recommended to disconnect the TV from the mains plug to save more energy when you are not going to
use it for a long period of time.
Repair Information
Please refer all servicing to qualied personnel. Only qualied personnel must repair the TV. Please contact
your local dealer, where you have purchased this TV for further information.
Power Save Mode
English - 13 -
English
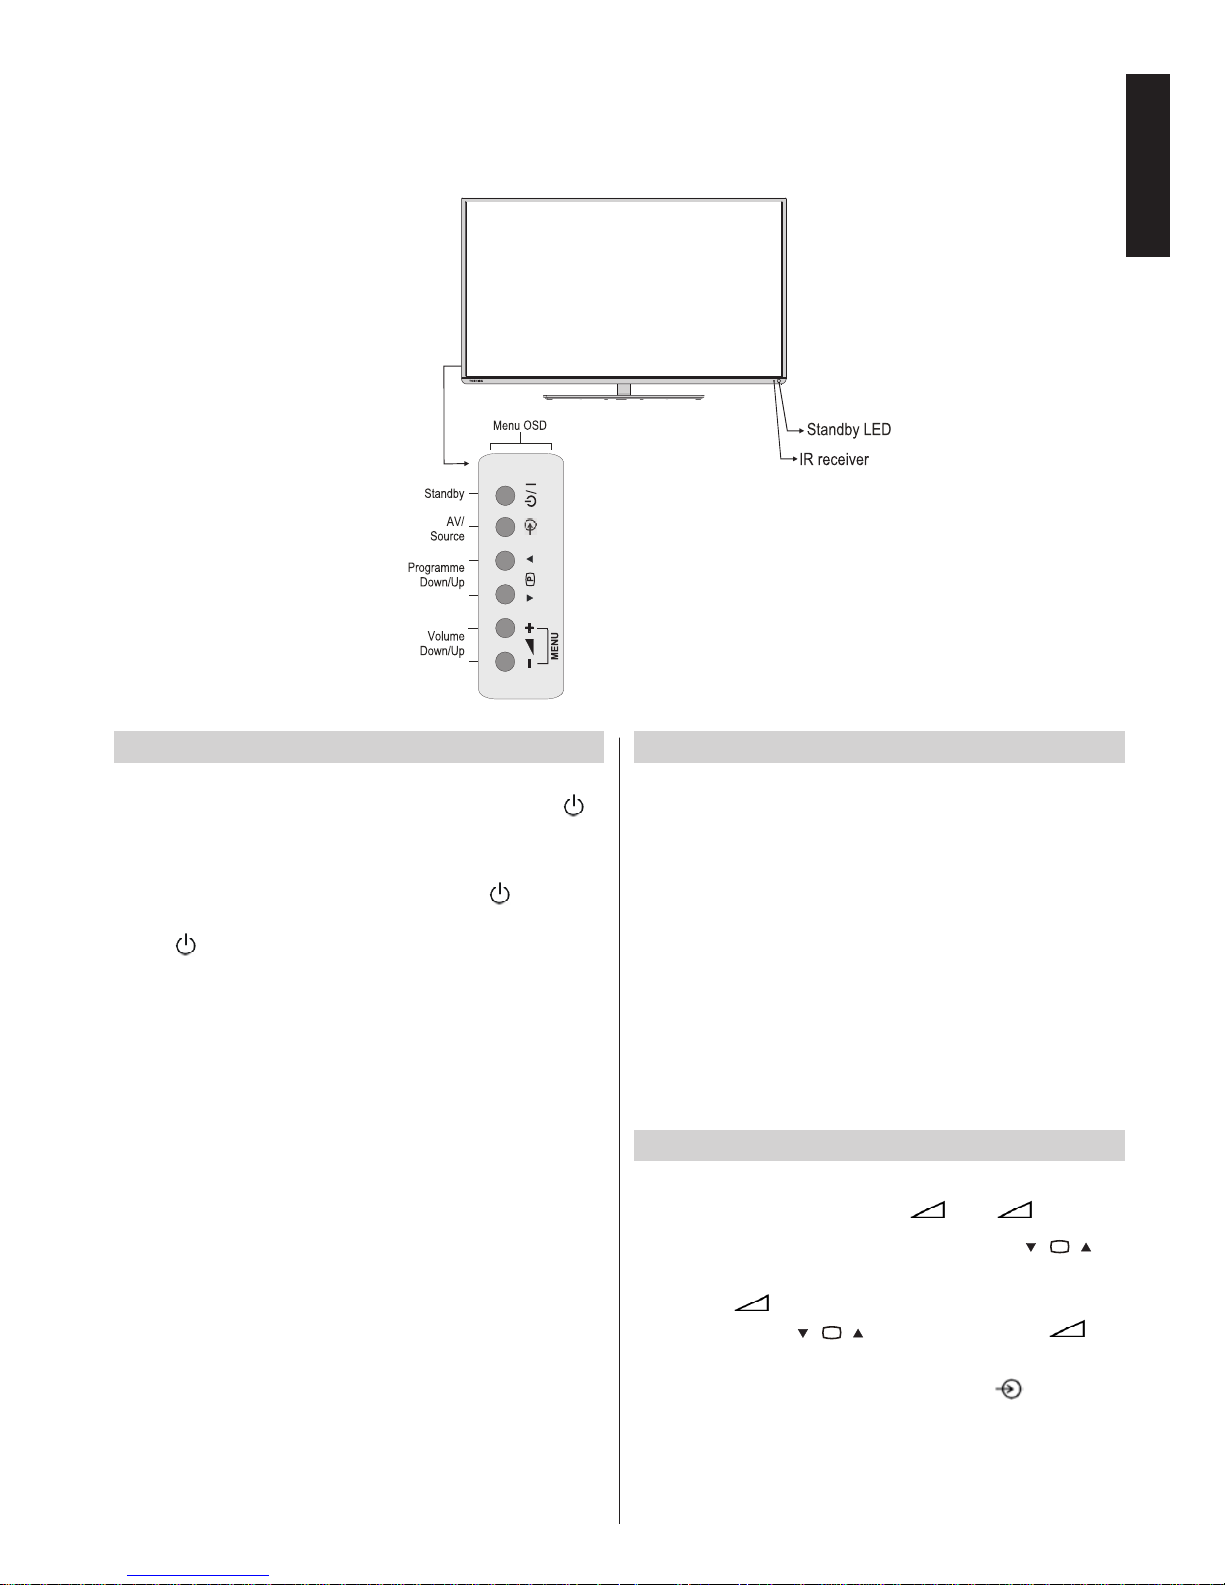
Controlling the TV
A wide variety of external equipment can be connected via the sockets located on the side and back of the
TV. Whilst all the necessary adjustments and controls for the TV are made using the remote control, the
buttons on the Back of the TV may be used for some functions.
Switching on
If the standby LED is unlit, check that the mains
plug is connected to the power and press the
/ I
button on the back side of the television to switch the
television on.
To put the television into Standby, press
button on
the remote control or on the TV. To view the television,
press button again. The picture may take a few
seconds to appear.
Note: The active Standby LED colour will turn to red in a few
moments when the TV is switched into Standby.
For energy saving:
Turning the TV off at its mains supply, or un-plugging
it, will cut energy use to nearly zero for all TV’s. This
is recommended when the TV is not being used for a
long time, e.g. when on holiday.
Reducing the brightness of the screen will reduce
energy use. Energy efciency cuts energy consumption
and thus saves money.
NOTE: Putting the TV into standby mode, will reduce energy
consumption, but will still draw some power.
Using the Remote Control
Press the MENU button on the remote control to see
the menus.
The main menu appears as a group of icons each
for a menu option. Press the Left or Right button to
select a topic.
In sub menu screen mode the menu appears as a
list. Press the Up or Down button to select a topic.
To use the options press the Up and Down buttons
on the remote control to move up and down through
them and OK, Left or Right buttons to select the
required choice. Follow the on screen instructions.
The functions of each menu are described in detail
throughout the manual.
Using the Controls on the TV
Using the control buttons on the Back of the TV:
• To alter the volume press +
or - .
• To alter the programme position press
P
on
the Back of the TV.
• Press +
- buttons at the same to view main
menu and use
P
to navigate and + - to
change value.
To select an external input, press
until the
appropriate input source is selected.
Please always refer to the owner’s manual of the
equipment to be connected for full details..
English - 14 -
English
Initial Installation
Before switching on the TV, put your decoder and media recorder to Standby if they are connected and
ensure the aerial/cable and/or Satellite dish is connected to your TV. To set up the TV, use the buttons on
the remote control as detailed on page 7.
IMPORTANT: Ensure that the aerial/cable and/or
Satellite dish is connected and a Common Interface
module is not inserted before switching on the TV for
the rst time installation.
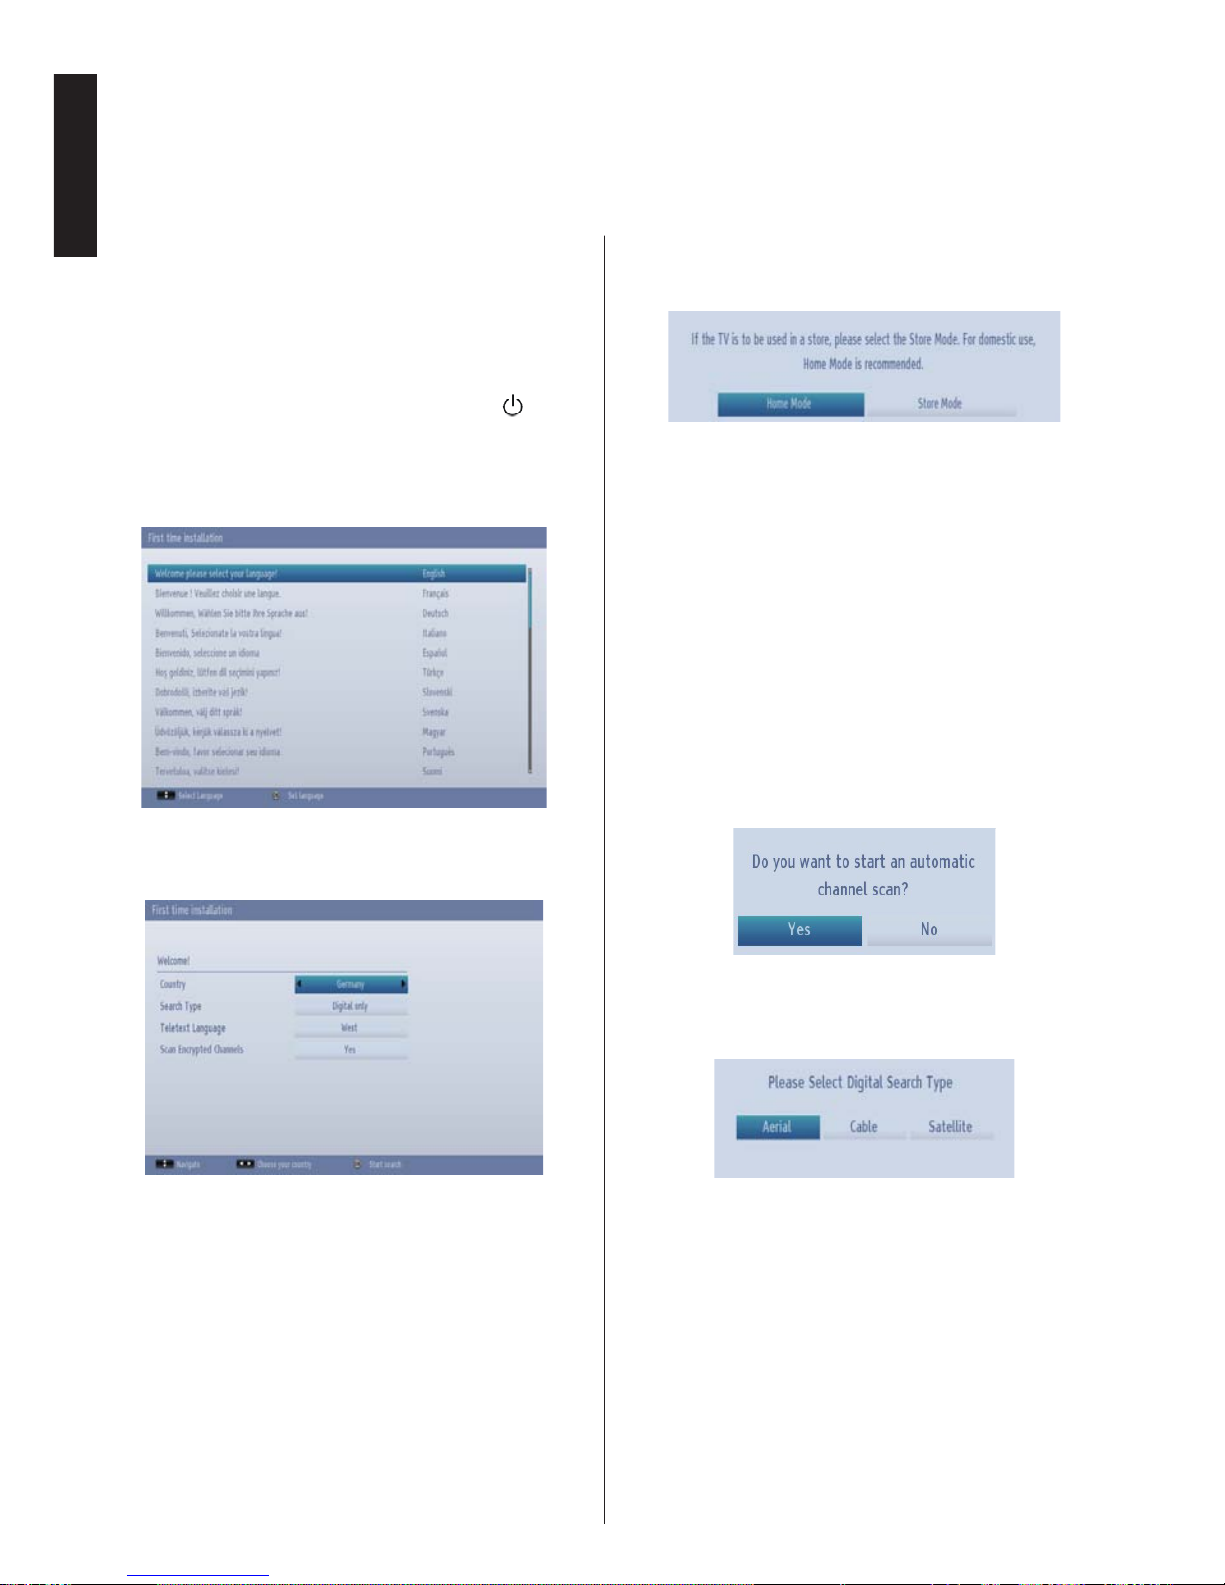
1. Connect the mains plug and switch the TV to on
on using the side control switch. If the TV does
not switch on, press any numbered or button
on the remote control, then the language selection
menu will be displayed. This screen will appear
the rst time that the TV is switched on and each
time the TV is reset.
2. By pressing Up or Down button, highlight the
language you want to set and press OK button.
The following message will be displayed next:
3. By pressing Left or Right button, select the
country you want to set and press Down button
to highlight the Search Type option. Use Left or
Right to set the desired search type. Available
search types are digital only, analog TV only
and full.
4. When set, Down button to select Teletext
Language. Use Left or Right button to select
desired Teletext Language.
5. Press OK button on the remote control to continue
and the following message will be displayed on
the screen:
Select Store mode if the TV will be placed in a
store to exhibit. This option will congure your
TV’s settings for best display quality and the
supported features of the TV will be displayed on
the top of the screen as a info banner. If Store
mode is selected, a conrmation screen will be
displayed. Select YES to proceed. This option will
be available in Other Settings menu and can be
turned off/on later.
If Home Mode is selected, Store Mode will not
be available after the First Time Installation. For
home use select Home Mode.
6. Press OK button on the remote control to continue
and the following message will be displayed on
the screen:
7. Select Yes button by using Left or Right button
and press OK button to continue. Afterwards, the
following OSD will be displayed on the screen:
8. If you select Cable option, a conrmation screen
will be displayed. Select YES to proceed. The
following screen will be displayed:
Note: Although this cable feature can be selected,
it is not fully supported in the UK. If cable signals
are input to this TV from a Cable Network Provider
some may be displayed.

English - 15 -
English
9. You can select Network, Frequency, Network ID
and Search Step from this screen. For highlighting
lines you see, use Up or Down button. You can
set Search Step as 8000 kHz or 1000 kHz. If
you select 1000 kHz, the TV will perform search
process in a detailed way. Searching duration will
thus increase accordingly. When nished, press
OK button to start automatic search.
10. If you select Aerial option from the Search Type
screen, the television will search for broadcasts.
11. The Auto tuning screen will appear and the
television will start to search for available stations.
The progress bar will move along the line. You
must allow the television to complete the search.
Note: You can press MENU button to cancel.
While the search continues a message will appear,
asking whether you want to sort channels according
to the LCN(*). Select Yes and press OK to conrm.
(*) LCN is the Logical Channel Number system that
organizes available broadcasts in accordance with a
recognizable channel sequence (if available).
After the available stations are stored, Edit Channel
List will be displayed on the screen.
Press OK button to quit channel list and watch TV.
Note: Do not turn off the TV while initializing rst time
installation.
12. If you select Satellite option from the Search Type
screen, Antenna Type menu will be displayed.
There are three types of antenna selection. You
can select Antenna type as Direct, Unicable
or DiSEqC.
Direct: If you have a single receiver and a direct
satellite dish, select this antenna type. After selecting
Direct, another menu screen will be displayed.
Select an available satellite and press OK to scan
for services.
Unicable: If you have multiple receivers and a
unicable system, select this antenna type. Press
OK to continue. Congure settings by following
instructions on the screen. Press OK to scan for
services.
DiSEqC switch: If you have multiple satellite
dishes and a DiSEqC switch, select this antenna
type. After selecting DiSEqC switch, another
menu screen will be displayed. You can set four
DiSEqC options (if available). Press GREEN
button to scan all satellites or press YELLOW
button to scan only the highlighted satellite. To
save and exit press OK button.
After the available stations are stored, Channel List
will be displayed on the screen. If you like the sort
channels, according to the LCN, please select Yes
and then press OK button (if available).
Initial Installation - continued

English - 16 -
English
Auto Tuning
As new services are broadcast, it will be necessary to
retune the television in order to view them.
• It is recommended to run Auto Tuning periodically
to ensure that all new services are added. Please
be aware that Auto Tuning will completely retune
the television and all current channels and settings
will be lost.
• Press MENU button on the remote control and select
Install and Retune by using Left or Right button.
Press OK button and the following menu screen
will be displayed.
• Select Automatic Channel Scan (Retune) by using
Up or Down button and press OK button. Automatic
Channel Scan options will be displayed. You can
select options by using Up or Down and OK buttons.
Auto Channel Scan Menu Operation
Digital Aerial: Searches and stores aerial DVB
stations.
Digital Cable: Searches and stores cable DVB
stations.
Analogue: Searches and stores analogue stations.
Digital Aerial & Analogue: Searches and stores
aerial DVB and analogue stations.
Digital Cable & Analogue: Searches and stores
cable DVB and analogue stations.
Satellite: Searches and stores satellite channels.
Note: Although this cable feature can be selected, it
is not fully supported in the UK. If cable signals are
input to this TV from a Cable Network Provider some
may be displayed.
• Whenever you select an automatic search type and
press OK button, a conrmation screen will appear
on the screen. To start installation process, select
Yes, to cancel select No by using Left or Right
and OK button.
• After auto channel scan type is set and selected
and conrmed, installation process will start and
Auto Tuning
progress bar will move along. The television will
search for all available stations. You must allow
the television to complete the search. Press MENU
button to cancel the process. In such a case, located
channels are not stored.

English - 17 -
English
Manual Tuning, Analogue Fine Tuning
The television can be tuned-in manually using Manual Search feature.
Digital Aerial Manual Search
The feature is available for service engineers or
can be used for direct channel entry if the multiplex
channel is known.
• Select Manual channel scan from the Install and
Retune menu and press OK.
After selecting search type as Digital Aerial, you
can enter the multiplex or frequency number using
the numeric buttons and press OK button to search.
• Enter the multiplex number using the numeric
buttons. The television will automatically search
for that multiplex. When the multiplex is found any
channels not currently on the programme list will be
added and the programme information at the top of
the screen will be updated.
• Repeat as necessary.
Digital Cable Manual Search
• In cable manual scan, you can enter frequency,
modulation, symbol rate and network channel scan
options. After selecting search type as Digital Cable,
you can set the desired options and press OK button
to search.
Analogue Manual Search
Only if an analogue signal or Service is available.
The television can be tuned-in manually. For example:
if the television cannot be connected to a media
recorder/decoder with a SCART lead or to tune-in a
station on another System.
To allocate a programme position on the television
for a decoder and media recorder: turn the decoder
on, insert a pre-recorded lm into the media recorder
and press PLAY, then manually tune.
After selecting search type as Analogue, you can
use Up or Down button to highlight an item and then
press Left or Right button to set an option.
Enter the channel number or frequency using the
numeric buttons. You can then press OK button
to search. When the channel is located, any new
channels that are not on the list will be stored.
Digital Satellite Manual Search
Note: If the Satellite installation is not completed by the
rst time installation (FTI), you are not able to run manual
satellite search. You will be directed with a warning
massage to do “Antenna Installation” rst, where you
can nd under the Satellite Settings in Settings menu.
•

English - 18 -
English
• After selecting search type as Satellite, you can set
the desired options and press OK button to search.
In satellite manual scan, you can enter frequency,
polarisation, symbol rate values and change network
channel scan and satellite options by using left/right
buttons or numeric buttons on the remote. You can
then press OK button to search. If you enter invalid
manual tune settings a warning massage is displayed
on the screen.
Note: Frequency, polarization and symbol rate may
change in accordance with the selected channels.
Analogue Fine Tune
Only if an analogue signal or Service is available.
• Select Analogue Fine Tune from the Install and
Retune menu by using Up or Down and OK
buttons. Analogue ne tune screen will be displayed.
Analogue Fine Tune feature will not be available if
there are no analogue channels stored.
• Use Left or Right button to set Fine Tune. When
nished, press OK button.
Clear Service List (*)
(*) This setting is visible only when the Country option
is set to Denmark, Sweden, Norway or Finland.
• Select Clear Service List from the Install and
Retune menu by using Up or Down and OK buttons.
A conrmation message will be displayed. If you
want to delete all channels, select Yes and press
OK. Use this setting to clear channels stored.
Manual Tuning, Analogue Fine Tuning - continued
The television can be tuned-in manually using Manual Search feature.

English - 19 -
English
General Operation
Stereo and Bilingual Transmissions
If stereo or dual language broadcasts are transmitted,
the word Stereo or Dual will appear on the screen
each time positions are changed, disappearing after
a few seconds. If the broadcast is not in stereo, the
word Mono will appear.
Stereo… Press “LANG -
” to select Stereo or
Mono.
Bilingual… Bilingual transmissions are rare. If they
are transmitted, the word Dual will be displayed.
Choose the required programme number, and if the
word Dual appears, press “LANG -
” to select
Dual I, Dual II or Mono.
For DTV broadcasts
To view current language and for changing to an
alternative language (if available), press
“LANG -
” button. Available options will be listed.
Displaying Subtitles
In digital broadcasts, this feature will show subtitles
on the screen in the selected language provided they
are being broadcast.
Press SUBTITLE button to turn the subtitles on. Press
SUBTITLE button again to turn the subtitles off.
Viewing Main Menu
Press + or - buttons on the TV at the same
time to view main menu.
Press MENU button on the remote control to view
main menu.
Controlling Volume and Muting Sound
Volume
Press + or - button on the remote control to
adjust the volume.
Sound Mute
Press “ ” button once to turn the sound off and
again to cancel.
Selecting Programme Positions
To select a programme position use the numeric
buttons on the remote control. Programme positions
can also be selected using P or P buttons.
Press “INFO - ” button to display the on-screen
information i.e. programme position, stereo/mono
signal and picture format.
Standby Notications
If the TV switches off while in No Signal mode, the
following on-screen message will be displayed on the
next switch-on:
When the Auto TV OFF timeout is reached, the
following message will be displayed on the screen.
Select Yes to shut down the TV. Select No to cancel.
The TV will switch off as well, if you do not make a
selection on this screen.
If the TV switches off owing to the auto power down
feature, the following on-screen message will be
displayed on the next switch-on:

English - 20 -
English
Channel List, Sorting Programmes, Programme Locking
You can view stored channels and sort them by using the Channel List feature.
Viewing Channel List
The channel order may be changed to suit your
personal preference.
• Select Channel List from the main menu and press
OK button. The following menu will be displayed:
• Select Edit Channel List to manage all stored
channels. Use Up or Down and OK buttons to select
Edit Channel List.
• Press Up or Down button for selecting a channel.
You can press P or P button to move page up
or page down.
• To watch a specic channel, highlight it by using
Up or Down button. Afterwards press OK button.
• Press BLUE button to view ltering options.
• Press MENU or EXIT button to exit.
Note: The channels listed are mixed at the channel
list. Channel types can be differentiated by the icons
next to them: DTV (digital tv), HD (HD TV) , ATV
(Analogue TV) ,TV (TV), Radio symbol (Radio),
encrypted, lock, and FAV symbols (for channels in
the favourite list). Listed channels can also be sorted
by using the active channel list lter.
Moving a Channel
• Highlight the desired channel by using Up or Down
button.
• Select Move option in the channel list by using Left
or Right button and press OK button.
• Edit Number screen will be displayed. Enter the
desired channel number by using the numeric
buttons on the remote control and press OK. If there
is a previously stored channel on that number, a
warning screen will be displayed. Select Yes if you
want to move the channel and press OK.
• Selected channel is now moved.
Deleting a Channel
You can press GREEN button to tag/untag all
channels; YELLOW button to tag/untag channel.
• Select the channel that you want to delete and select
Delete option by using Left or Right button. Press
OK button to continue.
• A warning screen will appear. Select Yes to delete,
select No to cancel. Press OK button to continue.
Renaming a Channel
• Select the channel that you want to rename and
select Edit Name option by using Left or Right
button. Press OK button to continue.
• Pressing Left or Right button moves to the previous/
next character. Pressing Up or Down button
changes the current character. Pressing the numeric
buttons ‘0...9’ replaces the highlighted character with
the characters printed above the button one by one
as the button is pressed.
• When nished, press OK button to save. Press
MENU or BACK to cancel.
Locking a Channel
You can press GREEN button to tag/untag all
channels; YELLOW button to tag/untag a single
channel.
• Select the channel that you want to lock by using
Up or Down button.
• Select Lock option by using Left or Right button.
Press OK button to continue.
• You will be asked to enter parental control PIN. Enter
the PIN number.
Note: Default PIN is set to 0000.
• Press OK button when the desired channel is
highlighted to lock/unlock the channel. Lock symbol
will be displayed next to the selected channel.

English - 21 -
English
Viewing Info Banner, Electronic Programme Guide
Viewing Info Banner
• Press“INFO - ” button. The information screen will
appear giving details of the channel and programme
currently being viewed.
• Whenever you change channel, the TV displays the
broadcast picture along with an information banner at
the bottom of the screen. This will remain on the screen
for a few seconds.
• If the selected channel is locked, you must enter the
correct four numeric code to view the channel. “Enter
PIN” will be displayed on the screen in such a case:
• Enter the 4-digit PIN number to continue.
Note: Factory set default PIN code is 0000.
Electronic Programme Guide
• Select the on-screen guide by pressing GUIDE
button, the guide screen will appear highlighting
details of the channel and programme currently
being viewed. This may take a few moments to
appear.
• For details of other programmes currently available,
press navigation buttons to scroll up and down or
scroll left/right through the list. As channels are
selected, details of the programme currently being
broadcast will appear.
• Press RED button to view the previous day.
• Press GREEN button to view the next day.
• Press YELLOW button for zooming to a programme.
• Press BLUE button to display ltering options.
• Press SUBTITLE button to sort channels by a genre.
• For information on a highlighted programme, press
i button.
• Use numeric buttons for quickly selecting a
broadcast.
• To set the timer for a selected programme, press
OK button to select Options menu.
• Press TEXT button to display searching options.
• Press “SWAP- ” button for displaying current
programmes.

English - 22 -
English
Language Selection
Language Settings
Using this menu you can adjust the preferred language
settings.
• Press MENU button and select Settings by using
Left or Right button.
• Select Language and press OK to view this menu.
Select the desired language by using Left or Right
button. Press the MENU button on the remote
control to exit.
Preferred
These settings will be used if available. Otherwise the
current settings will be used.
Audio: By pressing Left or Right button change the
audio language.
Subtitle: Alter the subtitle language with Left or Right
button. The chosen language will be seen in subtitles.
Teletext: Changes the preferred teletext language.
Guide: By pressing Left or Right button change the
guide language.
Current
Audio: If audio language is supported, change the
audio language by pressing Left or Right button.
Subtitle: If subtitle is supported, alter the subtitle
language with Left or Right button. The chosen
language will be seen in subtitles.

English - 23 -
English
Digital Settings - Parental Control, Menu Lock, Set PIN
You can view or set parental preferences of your TV.
Viewing Parental Control Menu
Press MENU button and select the Settings by using
Left or Right button. Press OK button to view Settings
menu. Use Up or Down button to highlight Parental
and press OK to continue:
• A dialogue box asking for the lock key will be
displayed. The default key is set to 0000. Enter
the PIN.
• If it is incorrect, “Wrong PIN” OSD will be displayed.
If it is correct, the Parental Control menu will be
displayed:
Note: Factory set default PIN code is 0000.
Menu Lock
In Menu lock you can set locking for All menus, or the
Installation menu to restrict access to these menus.
If the menu lock is disabled, there will be free access
to the menu system.
• Use Up or Down buttons to go to Menu Lock
option. Use Left or Right buttons to choose Menu
Lock Mode.
OFF : All menus are unlocked.
ALL MENUS : All Menus are accessible only with
the correct lock key. So the user cannot add, delete,
rename, channels or set timers.
INSTALLATION MENU: Installation menu is locked.
So the user can’t add channels.
Maturity Lock (*)
When set, this option gets the maturity information
from the broadcast and if this maturity level is disabled,
disables access to the broadcast.
(*) Not available for UK.
Child Lock
Child Lock disables the buttons on the television. All
buttons on the remote control can still be used.
Set PIN
• Use Up or Down buttons to select Set PIN option.
Press OK to display the Set PIN window.
• Use numeric buttons to enter new pin number. You
will need to input your new pin a second time for
verication purposes.
• After typing correct PIN numbers, PIN number will
be changed.
Note: If you change the pin number make sure you
write it down and keep it safe.

English - 24 -
English
Conguring Picture Settings
You can congure picture settings of your TV by using Picture Settings menu.
Conguring Picture Settings
You can use different picture settings in detail. You
can customize current picture mode settings as
desired. For example, you can change items such as,
Brightness, Contrast, Colour and Sharpness.
Press MENU button and select Picture by using Left
or Right button. Press OK button to view Picture
Settings menu.
Operating Picture Settings Menu Items
• Press Up or Down button to highlight a menu item.
• Use Left or Right button to set an item.
• Press MENU button to exit.
Mode
This TV offers the choice of personalising the picture
style. Natural, Cinema, Game, Sports and Dynamic
are preset options and affect settings within the TV.
Press Left or Right button to select the picture mode
you prefer.
Note: Some options may be inactive depending on
the selected mode.
Contrast
Sets the lightness and darkness values of the screen.
Press Left or Right button to adjust the contrast.
Brightness
Sets the brightness value for the screen. Press Left
or Right button to adjust the brightness.
Sharpness
Sets the sharpness value for the objects displayed
on the screen. Press Left or Right button to adjust
the sharpness.
Colour
Sets the colour value, adjusting the colours. Press
Left or Right button to adjust the colour.
Power Save Mode
Enables or disables the power save mode. Press
Left or Right button to set as Disabled, Eco or to
turn the screen off. See the section Environmental
Information in this manual for further information on
Power Save Mode.
Note: Picture mode will be set to Dynamic automatically
if the Power Save Mode is set to Disabled.
Backlight
This setting controls the backlight level and it can be
set to Auto, Low, Medium and High.
Note: The backlight function will be inactive if Power
Save Mode is set to Eco or picture mode is set to
Game.
Noise Reduction
Sometimes some words or picture elements may
become distorted or pixelated. Using the Noise
Reduction feature reduces this effect by smoothing
out the edges. Press Left or Right button to set noise
reduction level.
Advanced Settings
Some additional controls in the picture menu are
grouped under the title Advanced Settings. To view
or change, rst highlight Advance Settings and press
OK button to view. Advanced Settings menu controls
are as the following:
Dynamic Contrast: You can change contrast rate by
using dynamic contrast function. Dynamic contrast
can be set to one of these options: Low, Medium,
High or Off.
Colour Temp: Colour Temperature increases the
‘warmth’ or ‘coolness’ of the picture by increasing the
red or blue tint. Colour temperature can be set to one
of these options: Normal, Warm or Cool.
Picture Zoom: Sets the picture size to Auto, Full, 16:9,
Subtitle, 14:9, 14:9 Zoom, 4:3 or Cinema. Press Left
or Right button to change the setting.

English - 25 -
English
Film Mode (optional): Films are recorded at a
different number of frames per second to normal
television programmes. Press Left or Right button
to set this feature to Auto or Off. Turn this feature
to Auto when you are watching lms to see the fast
motion scenes clearly.
Skin Tone: Adjust the desired skin tone.
Colour Shift: Adjust the desired colour tone.
RGB Gain: Press OK button to edit RGB gain. You
can congure the colour temperature values using
the RGB Gain feature.
HDMI True Black (optional): While watching from
HDMI source, this feature will be visible in the
Advanced Settings menu.
You can use this feature to enhance blackness in the
picture. Set this feature to On to activate.
Note: HDMI True Black On/Off feature functions only
when the HDMI device output is set to RGB.
Reset
This feature allows you to reset the current Picture
Settings to the default values. Press MENU button and
select Picture by using Left or Right button. Press Up
or Down button to select Reset and press OK button.
Note: The reset function does not reset the settings
for Mode, Noise Reduction, Colour Temp, Picture
Zoom and HDMI True Black.
Conguring Picture Settings - continued

English - 26 -
English
Changing Picture Format
Press “SCREEN - ” button repeatedly to select between Auto(*), Full(**), 16:9, Subtitle, 14:9, 14:9 Zoom,
4:3 or Cinema.
Note: Using the special functions to change the size of the displayed image (i.e. changing the height/width
ratio) for the purposes of public display or commercial gain may infringe on copyright laws.
Note: You can shift to screen up or down by pressing “
”/“ ” buttons while picture zoom is selected as 14:9
Zoom, Cinema or Subtitle.
(*) When AUTO is selected, the aspect ratio of the screen is adjusted by the information provided by the
selected source (if available). The format being displayed in AUTO mode is completely independent of WSS
information which could be included in the broadcast signal or the signal from an external device.
Note: Auto mode will only be available in SCART, HDMI, YPbPr and DTV.
(**) Full mode is only available on HD channels.
16:9
Use this setting when watching a
widescreen DVD, widescreen video
tape or a 16:9 broadcast (when
available). Due to the range of
widescreen formats (16:9, 14:9 etc.)
black bars may be visible on the top
and bottom of the screen.
4:3
Use this setting to view a true 4:3
broadcast
.
14:9 Zoom
This option zooms to the 14:9 picture.
Subtitle
When subtitles are included on a
letterbox format broadcast, this
setting will raise the picture to ensure
that all the text is displayed.
14:9
This zooms up the wide picture (14:9
aspect ratio) to the upper and lower
limits of the screen
Cinema
This zooms up the wide picture
(16:9 aspect ratio) to the full
screen.

English - 27 -
English
Conguring PC Picture Settings
PC Picture Settings (*)
(*) While in VGA/PC mode, some sections in Picture
menu will be unavailable. Instead, VGA mode settings
will be added to the Picture Settings while in VGA/
PC mode.
PC Picture controls
Contrast, Brightness and Colour adjustments in
this menu are identical to adjustments dened in TV
picture menu.
Select Reset and press OK button to reset the
adjustments.
Note:
For switching to VGA/PC source, press “SOURCE -
” button on your remote control and select VGA/
PC input.
Note that VGA/PC mode menu settings are available
only while the TV is in PC source.
PC Position
Select this to display PC position menu sections.
Autoposition
If you shift the picture horizontally or vertically to an
unwanted position, use this section to put the picture
into correct place automatically.
Highlight Autoposition and then press the OK button.
H Position
H (Horizontal) Position shifts the image horizontally to
right hand side or left hand side of the screen.
Press Down button until H Position is highlighted.
Press Left or Right button to adjust the value.
V Position
V (Vertical) Position shifts the image vertically towards
the top or bottom of the screen.
Press Down button until V Position is highlighted.
Press Left or Right button to adjust the value.
Dot Clock
Dot Clock adjustment corrects the interference
that appear as vertical banding in dot intensive
presentations like spreadsheets or paragraphs or
text in smaller fonts.
Press Down button until Dot Clock is highlighted.
Press Left or Right button to adjust the value.
Phase
Depending on the resolution and scan frequency that
you input to the TV Set, you may see a hazy or noisy
picture on the screen. In such a case you can use this
item to get a clear picture by trial and error method.
Press Down button until Phase is highlighted.
Press Left or Right button to adjust the value.

English - 28 -
English
Conguring Sound Settings
You can congure sound settings of your TV by using Sound Settings menu.
Conguring Sound Settings
Sound settings can be congured according to your
personal preferences.
Press MENU button and select Sound by using Left
or Right button. Press OK button to view Sound
Settings menu.
Operating Sound Settings Menu Items
• Press Up or Down button to highlight a menu.
• Use Left or Right button to set.
• Press MENU button to exit.
Volume
Select Volume using Up or Down button and then use
Left or Right button to set volume level.
Equalizer (Only for speaker)
You can customize current sound mode settings. Select
the appropriate mode in accordance with the installation
location of the TV and adjust the equalizer on-screen as
desired. Press OK button to view equalizer submenu.
In equalizer menu, the preset can be changed to Music,
Movie, Speech, Flat, Classic and User. Press the
MENU button to return to the previous menu.
Note: Equalizer menu settings can be changed
manually only when the Equalizer Mode is in User.
Balance (Only for speaker)
This setting is used for emphasizing left or right speaker
balance.
• Press Left or Right button to change the level of the balance.
Balance level can be adjusted between -31 and +31.
Headphone
This setting is used to set the sound output when
headphones are connected.
• Press Up or Down button to select Headphone.
• Press Right button to increase headphone volume level.
Press Left button to decrease headphone volume level.
Headphone volume level can be adjusted between 0
and 63.
Sound Mode
This setting is used to set the Sound Mode. Higlight
Sound Mode by using Up or Down button. Press Left
or Right button to set.
You can select Mono, Stereo, Dual I or Dual II mode,
only if the selected channel supports that mode.
AVL
Sometimes there can be large changes in volume
when switching from a DTV 5.1ch to a DTV 2ch, an
ATV channel, or an external input. Using the AVL
feature reduces these volume differences.
• Press Up or Down to highlight AVL. Press Left or Right
button to set AVL as On or Off.
Headphone/Lineout
Set this option as Lineout, when an external amplier
is connected to the TV using the headphone jack. If
headphones are connected to the TV, set this option
as Headphone.
Dynamic Bass
Dynamic Bass is used to increase bass effect of the
TV set. Select Dynamic Bass using Up or Down
buttons and press Left or Right button to set.
Surround Sound
In the Sound menu, press Up or Down to highlight
Surround Sound. Press Left or Right button to set
Surround Sound as On or Off.
Digital Out
This setting enables you to set Digital Out preference
as Compressed or PCM. You should set this feature
in accordance with the received broadcast’s content.
Select Digital Out using Up or Down button and then
use Left or Right button to set.

English - 29 -
English
Settings Menu Operation, Conditional Access
Conguring Your TV’s Settings
Detailed settings can be configured to suit your
personal preferences.
Viewing Settings Menu
Press MENU button and select Settings by using Left
or Right button. Press OK button to view Settings
menu.
Operating Settings Menu Items
• Press Up or Down button to highlight a menu item.
• Press OK button to select an item.
• Press MENU button to exit.
Conditional Access
This setting controls conditional access modules
when available. Use Up or Down button to highlight
Conditional Access. Press OK button to continue.
Language
Congures language settings. See page 22.
Parental
Congures parental settings. See page 23.
Timers
Sets timers for selected programmes. See page 30.
Date/Time
You can congure date/time preferences by using this
menu screen. See page 30.
Sources
Enables or disables selected source options. See
page 31.
Network Settings
Congures network settings. See page 34.
Satellite Settings
Congures satellite settings. See page 31.
Other Settings
Displays other setting options of the TV set.
Using a Conditional Access Module
The Common Interface Slot, situated on the side of the
television, enables the insertion of a CAM (Conditional
Access Module) and card. These are purchased from
a service provider and allow additional subscription
broadcasts to be viewed. For more information, see
a service provider.
IMPORT ANT : Insert or remove the CAM only when
the TV is SWITCHED OFF.
• In order to watch certain digital channels, a
conditional access module (CAM) is necessary.
This module must be inserted in the CI slot of
your TV.
• Obtain the Conditional Access Module (CAM) and
the viewing card by subscribing to a pay channel
company, then insert those to the TV using the
following procedure.
• Insert the CAM and then the viewing card to the
slot that is located in the terminal cover at the rear
side of the TV.
• The CAM should be correctly inserted, it is
impossible to insert fully if reversed. The CAM or
the TV terminal may be damaged if the CAM is
forcefully inserted.
Connect the TV to the mains supply, switch on and
then wait for few moments until the card is activated.
• When no module is inserted, “No common
interface module detected.” message appears
on the screen.
• Refer to the module instruction manual for details
of the settings.
Viewing Conditional Access Menu (*)
(*) These menu settings may change depending on
the service provider.
Press MENU button and select Settings by using
Left or Right button. Press OK button to view
Settings menu. Use Up or Down button to highlight
Conditional Access and press OK to view menu
items.

English - 30 -
English
Setting Timers, Setting Date/Time
Timers
To view Timers menu, press MENU button and select
Settings by using Left or Right button. Press OK
button to view Settings menu. Use Up or Down
button to highlight Timers and press OK to continue:
Setting Sleep Timer
The television can be set to turn itself off after a certain
length of time.
• Highlight Sleep Timer by using Up or Down button.
• Use Left or Right button to set. The timer can be
programmed between Off and 2.00 hours (120
minutes) in steps of 30 minutes.
Setting Programme Timers
This feature will set the television to go to a specic
channel at a certain time. It can be used to view a
particular programme or can be used to view a series
of programmes by setting the Repeat option to Daily,
Weekly or Weekdays.
Press Down button to set timers on an event.
Programme timer function buttons will be displayed
on the screen.
Note: This feature will be available only when a timer
has been programmed.
Adding a Timer
Press YELLOW button on the remote control to add
a timer. The following menu appears on the screen:
Network Type: Set the network type to lter the
channels that will be listed in the Channel option.
Timer Type: This feature is unavailable to be set.
Channel: Changes channel by using Left or Right.
Record Type: This feature is unavailable to be set.
Date: Enter a date using the numeric buttons.
Start: Enter a starting time using the numeric buttons.
End: Enter an ending time using the numeric buttons.
Duration: Displays duration between the starting
and ending time.
Repeat: Sets a timer to be repeated as Once, Daily,
Weekly or Weekdays. Use Left or Right button to
select an option.
Change/Delete: Controls parental settings on timers.
Press OK button to save the timer. Press
button
to cancel.
Editing a Timer
• Select the timer you want to edit by pressing Up or
Down button.
• Press GREEN button to edit.
• When nished with editing, press OK button to save.
You can press RET/BACK button to cancel.
Deleting a Timer
• Select the timer you want to delete by pressing Up
or Down button.
• Press RED button.
• Select Yes by using Left or Right button and press
OK to delete the timer. Select No to cancel.
Conguring Date/Time Settings
You can congure date/time preferences by using
this menu screen.
• Select Date/Time in the Settings menu to congure
Date/Time settings. Press OK button.
Use Up or Down button to highlight the Time Settings
Mode. It can be set to Auto or Manual.
When Auto is selected, Date, Time and Time Zone
options will not be available to be set. If Manual option
is selected as the Time Zone can be altered:
Press Up or Down button to select Time Zone.
Use Left or Right button to change the Time Zone
between GMT-12 or GMT+12. Date/Time on the top
of the menu list will then change according to the
selected Time Zone.
Note: For countries without Digital channels, only the
Date and Time option will be displayed.

English - 31 -
English
Source Settings, Other Controls
Conguring Source Settings
You can enable or disable selected source options. The
TV will not switch to the disabled source options when the
“SOURCE -
” button is pressed.
• Select Sources in the Settings menu and press
OK button.
• Press Up or Down buttons to select a source.
• Use Left or Right button to enable or disable the
selected source. Changes are automatically stored.
Input Selection
Use the Input Selection window if the television does
not switch over to a connected source automatically.
Press
“SOURCE - ” button on your remote control for
directly changing sources. Use the Up or Down button
to highlight an input and press Right button to select.
Conguring Satellite Settings
Select Satellite settings in the Settings menu to
congure satellite settings. Press OK button.
Satellite List: To view the list of available satellites
select this option. You can add, delete or edit the
satellites in the list.
Antenna Installation: You can change antenna
settings and start a new satellite scan.
SatcoDX (optional): There are two options regarding
to satcodx feature.
You can download or upload satcoDX data. In order
to perform these functions a USB device must be
connected to the TV rst.
You can upload current services and related satellites
& transponders in TV, to a USB device (le extension
will be “sdx”).
In addition to the uploading feature you can download
one of the satcodx les stored in USB device, to the
TV.
When you select one of these satcodx files, all
services and related satellites and transponders in
the selected le will be stored in TV. If there are any
installed terrestrial, cable and/or analog services, they
will be kept and only satellite services will be removed.
Afterwards, check your antenna settings and make
changes if necessary. An error message stating “No
Signal” may be displayed if antenna settings are not
congured properly.

English - 32 -
English
Other Controls - continued
Conguring Other Settings - General
You can congure the settings of your TV. Select
Settings from main menu and press OK to view the
Settings menu. Press the MENU button on the remote
control to exit.
To view general conguration preferences, select
Other Settings in the Settings menu and press OK
button.
Operation
• Press Up or Down button to select an item.
• Use Left or Right button to set an option or press
OK button to view a sub-menu.
Menu Timeout
To set a specic display timeout for menu screens,
set a value for this option.
In the Other Settings menu, select Menu Timeout
and choose 15 sec, 30 sec, 60 sec or Off using Left
or Right button.
Scan Encrypted Channels
When this setting is set as Yes, search process will
locate the encrypted channels as well. If it is set as
No manually, encrypted channels will not be located
while in automatic search or manual search. Scan
Encrypted Channel feature will always be Yes after
performing rst time installation.
• In the Other Settings menu, use Up or Down button
to select Scan Encrypted.
• Press Left or Right button to set this function as
Yes or No.
Blue Background
If the signal is weak or absent, the TV can automatically
change to a blue screen. To enable this, set Blue
Background to On from.
• The Other Settings menu, Background and select
On or Off using Left or Right button.
Software Upgrade
This feature helps to keep your TV updated. It works
automatically and searches for new information when
available and selected.
You can enable or disable automatic upgrade by the
Automatic Scanning option.
You can manually start searching for new software by
selecting Scan for upgrade and pressing OK button.
You can select the satellite, which is used for updating
process by setting Edit Upgrade for Satellite option.
Press
or MENU button to cancel the process.
Application Version
Displays the current application version.
Hard of Hearing
If the broadcaster enables any special signal
concerning the audio, you can set this setting as On
to receive such signals.
• Use Up or Down button to select Hard of Hearing
and then press Left or Right button to set this setting
as On or Off.
Audio Description
Audio description refers to an additional narration
track for blind and visually impaired viewers of visual
media, including television and movies. The description
narrator talks through the presentation, describing
what is happening on the screen during the natural
pauses in the audio (and sometimes during dialogue,
if deemed necessary). You can use this feature, only if
the broadcaster supports that additional narration track.
• Highlight Audio Description by pressing Up or
Down button.
• Press OK button to enter Audio Description
submenu.
• Use Up or Down button to select Audio Description
setup and then press Left or Right button to set
this setting.

English - 33 -
English
Other Controls - continued
Auto TV Off
You can set the timeout value of auto off feature. After
the timeout value is reached and the TV is not operated
for selected time, the TV will go off. Press MENU button
and select Settings by using Left or Right button. Press
OK button to continue. Use Up or Down button to select
Other Settings and then press OK button. Select Auto
TV Off using Up or Down button.
Store Mode
If you set Store Mode to Enabled, your TV’s
features will be illustrated on the top of the screen. To
deactivate this feature, set to Disabled.
MEDIA Renderer
This feature allows to share/play les stored in a
MEDIA compatible smartphone, tablet pc or laptop on
the TV. Install an appropriate software on your device
and read instructions of the sharing software for more
information. Highlight MEDIA Renderer and press
Left or Right button to enable or disable.
Power Up Mode
This setting congures the power up mode preference.
Standby: The TV always powers up in Standby mode.
Last State: The TV always switches on with the last
selected channel/source.
Bisskey
Biss is a satellite signal scrambling system that is
used for some broadcasts. If you need to enter BISS
key on a broadcast, you can use Biss Key setting.
Highlight Biss Key and press OK to enter keys on the
desired broadcast.
CEC
This function allows to control the connected HDMICEC compatible devices with the remote control of
the TV.
Select the HDMI input of the connected device from
the source menu. The TV remote is automatically
able to control most functions of the device (navigate
menus, change channels, launch the disc etc.).
To disable this feature hold the “0-Zero” button on
the remote control for 3 seconds. It is also possible
to disable this feature in the conguration menu of
the connected HDMI device. Refer to the operating
instructions of the related device.
Press Left or Right button to enable or disable the
feature.
CEC operation is available if a CEC device is present.
The CEC osd menu is accessed through the “QUICK”
button on the remote. The CEC osd menu will only be
displayed if a CEC product is connected.
CEC Auto Power On
This function allows the connected HDMI-CEC
compatible device to turn on the TV and switch to its
input source automatically.
Press Left or Right button to enable or disable the
feature.

English - 34 -
English
Network Settings, Portal, Internet Browser and YouTube
Conguring Network Settings
Press the MENU button to open the main TV menu.
Highlight Settings by pressing Left or Right buttons
and press OK to enter. Highlight Network Settings
and press OK. While Network Type is highlighted,
press Left or Right buttons to select connection type.
Press OK to enable the connection.
If you are going to make a wireless connection for
the rst time, press YELLOW button to search for
available networks. If there is no presaved wireless
prole on the TV, the TV will also search for available
networks when pressed OK. Choose a network
from the list and press OK. You may have to enter
a password if the selected network is password-
protected. Enter the password and choose OK on the
virtual keyboard and press OK.
Wait a while and Conguration Status will change
to Connected. IP adreess and Network name will
appear, which means that the connection is done.
First enter to Toshiba Portal
At rst time the “ ” button is pressed, the TV
downloads and installs the latest version of the
portal if available. Then the introduction page of
the portal setup wizard will be displayed. Press
OK to proceed.
Next step is End User License Agreement(EULA).
The user have to scroll the whole text down to
the end and check the box next to Agree by
highlighting it and pressing the OK button. This
means that the user accepts the agreement.
Now, the user can highlight Next and proceed
by pressing OK.
The user can skip the rest and portal page will
be displayed. Account and profile settings can
be configured later from the Settings menu on
the portal.
Using the Toshiba Portal
You need to congure a home network before using
this feature.
Toshiba Portal is a service, where content (web sites,
applications, online services etc.) can be viewed
across the web through a simple user interface.
Press “
” button on the remote. Select the desired
application using the navigation buttons. Press OK to
launch the application or go to related link. This can
take uo to a minute or two to connect.
From the portal page, the user can also access
to the media les stored on USB storage devices
connected to the TV or on the MEDIA servers in the
same network.
NOTES:
• Some applications may require an always-on
broadband internet connection, rmware update
and/or additional bandwidth dedicated to this
product.
• Third party internet services may change, be
discontinued or restricted at any time.
• Use of third party internet services may require
registration by a computer and if needed payment
of charges and membership.
• Service content and the interface may be changed
at any time without prior notice.
Toshiba makes no warranties about the content,
availability or functionality of third-party content or
services.
Using the Internet Browser
To use the internet browser, enter the portal rst. Then
launch the Internet application on the portal.
Predened web sites and logos will be displayed on
the browser’s opening page to provide quick access.
The user can add desired websites to the quick access
page. To add a new quick access item, point the
cursor to “
” whilst on the website and press OK.
A submenu will be opened. Then point the cursor to
“
” and press OK. On the next window, point
the cursor to one of the quick access items and
press OK to replace it with the new one.
To visit a web site move the cursor to the adress
bar using the navigation buttons on the remote and
press OK. The virtual keyboard will be opened in a
new window.
Enter the URL in the adress bar. Point the cursor to “
” button and press OK.
To make a search on internet, enter a keyword in
the adress bar. Point the cursor to “
” button and
press OK.
Press the BACK button to close the virtual keyboard
or to go to previous page in the browser.
Press the “
” button to turn back to portal home
page.

English - 35 -
English
Network Settings, Portal, Internet Browser and YouTube -
continued
Press the EXIT button to close the portal and
watch TV again.
NOTES:
• The virtual keyboard or numeric buttons on the
remote, which are assosiated with the letters of the
alphabet, can be used for entries.
• The browser does not support multiple tabs.
• Some internet pages include ash content. These
are not supported by the browser.
• The TV does not support any download processes
from the web browser.
Using YouTubeTM
You need to congure a home network before using
this feature.
This TV allows you to view Youtube content.
Press “Mybutton1 -
” to connect YouTube directly.
You can also press “ ” button on the remote and
launch the YouTube application on the portal to access
YouTube.
NOTES:
• Depending on the network environment and use
case, you may experience difculty viewing the
content.
• It may take time for the TV to load and begin playing
back the content.
• Service content and the interface may be changed
at any time without prior notice.

English - 36 -
English
Manual Start
To display Media Browser window, press the “
” button on the remote control. The Media Browser
menu is also accessable from the main menu. Press
the MENU button on the remote. Select Media
Browser by pressing Left or Right button and press
OK.
Select the media type to be listed and press OK.
If there is more than one media source available, a list
of devices and servers will be displayed. Highlight the
device or server from the list and press OK.
Auto Start
When you plug a USB storage device, the following
menu will be displayed.
You can play or view music, video and picture les
from an USB storage device connected to the USB
port.
Moreover you can also play or view music, video
and picture les from a
MEDIA SERVER on the
same network.
To display the les with folders, select Settings tab
and change View Style to Folder. So the selected
type of les in the selected folder will be displayed.
Additionally the All tab will be added to the main
Media Browser menu. To list all available music,
video and picture les in the selected folder at once,
select All tab and press OK button.
If View Style is set to Flat, all selected type of les
will be listed. If for instance, Video is selected in the
main Media Browser menu, TV will search the source
for all video les and list them.
Note:
Some USB compliant devices may not be supported.
If the USB storage device is not recognized after
power off/on or First Time Installation, plug the USB
device out and power off/on the TV set. Then plug
it in again.
• Do not use a USB Hub.
• You must obtain any required permission from
copyright owners to use copyright content.
Toshiba cannot and does not grant such permission.
• Depending on the le size and amount in your USB
storage device or DMS, it may take some time for
loading to view. A message will be displayed on
the screen when loading les from the USB device
or DMS.
• Only limited types of USB devices are supported.
Therefore, it is suggested not to use USB for playing
Media Player.
• Non-supported characters will be replaced with a
square (□).
Using Media Browser
This TV allows you to enjoy photo, music or video les stored on a USB device or on a MEDIA SERVER.

English - 37 -
English
Viewing JPEG Files
To view photo les from a USB Memory or a DMS, you
can use this menu screen. When you select Photos
in the main Media Browser menu, available image
les will be ltered and listed on this screen.
• / : Navigate menu.
• Jump (Numeric buttons): Type the le number
using the numeric buttons on your remote to jump
to a le directly.
• OK: View the selected image in full-screen.
• Slideshow ( button): Start the slideshow to view
all the images automatically.
• Green button: View the images in thumbnails. Press
again to turn back to previous layout.
• Red button: Sort les by date.
• Yellow button: Change viewing style.
• Blue button: Change media type.
• Swap button: Open the Device Selection menu.
This option appears only when more than one media
source is detected.
Playing MP3 Files
To play mp3 les from a USB memory or a DMS, you
can use this menu screen.
• / : Navigate menu.
• Play ( button): Start to play all files listed
beginning with the selected one.
• Stop ( button): Stop the playback.
• Pause ( button): Pause/Resume the playback.
• Red button: Sort les by Title, Artist or Album.
Note: If the Viewing Style in Media Browser Settings
menu is set to Folder, the les will be displayed as
sorted and there is no need to sort les again by
pressing the RED button. In that case the RED button
will not function anyway.
• Loop/Shufe (Green button): Press once to enable
Loop. Press again to enable both Loop and Shufe.
Press once more to disable Loop. Press again to
disable Shufe. You can follow the disabled and
enabled functions with the change of the icons.
• Jump (Numeric buttons): Type the le number
using the numeric buttons on your remote to jump
to a le directly. The le with the typed number will
be only highlighted and will not be played.
• Play This (OK button): Play the selected le.
• Previous/Next (Left/Right buttons): Jump to
previous or next le and play.
• Yellow button: Change viewing style.
• Blue button: Change media type.
• Swap button: Open the Device Selection menu.
This option appears only when more than one media
source is detected.
Using Media Browser - continued
This TV allows you to enjoy photo, music or video les stored on a USB device or on a MEDIA SERVER.

English - 38 -
English
Slideshow Feature
You can use this feature to display all images
automatically on your USB Memory or a DMS.
• Pause ( button): Pause the slideshow.
• Continue ( button): Continue the slideshow.
• Loop/Shufe (Green button): Press once to enable
Loop. Press again to enable both Loop and Shufe.
Press once more to disable Loop. Press again to
disable Shufe. You can follow the disabled and
enabled functions with the change of the icons.
• Previous/Next (Left/Right buttons): Jumps to
previous or next le on slideshow. When pressed,
the slideshow pauses.
• Rotate (Up/Down buttons): Rotate the image using
up/down buttons. When pressed, the slideshow
pauses.
• Return/Back: Back to le list.
• Info button: Display info bar.
Video Playback
When you select Videos from Media Browser menu,
available video les will be ltered and listed on this
screen. You can use Up or Down button to select a
video le and press OK button to play a video.
Note: If you select a subtitle le and press OK button,
you can select or deselect that subtitle le.
Jump (Numeric buttons): Type the le number using
the numeric buttons on your remote to jump to a le
directly. The le with the typed number will be only
highlighted and will not be played.
Play This (OK button): Play the selected le.
/ : Navigate menu.
LANG - (Play Preview): Display selected le in
a small preview screen. Press again to stop preview.
Red button: Sort les by name.
Play (
button): Start to play all les listed beginning
with the selected one.
Yellow Button: Change viewing style.
Loop/Shufe (Green button): Press once to enable
Loop. Press again to enable both Loop and Shufe.
Press once more to disable Loop. Press again to
disable Shufe. You can follow the disabled and
enabled functions with the change of the icons.
Blue: Change media type.
Play ( button): Start the video playback.
Stop (
button): Stop the video playback.
Pause (
button): Pause the video playback.
Rewind (
button): Goes backward.
Forward (
button): Goes forward.
Previous/Next (Left/Right buttons): Plays the
previous/next le.
Subtitle/Audio (
LANG - button): Set Subtitle/
Audio.
Green: Jumps to the selected time.
Ret/Back: Back to le list.
Yellow: Open subtitle time correction menu.
Press OK to conm.
Press BLUE button to clear.
Press
button to switch back to previous menu.
Note:
You can set subtitles by using OK button before
starting the playback or by using
“LANG - ” button
during the playback. Selected subtitles may not be
displayed correctly in some cases.
In order to display movie subtitles correctly, you
should set a subtitle language. See the section,
Subtitle in Language Settings for selecting movie
subtitle language.
Using Media Browser - continued
This TV allows you to enjoy photo, music or video les stored on a USB device or on a MEDIA SERVER.

English - 39 -
English
Media Browser Settings
You can set your Media Browser preferences by using
the Settings dialogue. Press Up or Down button to
highlight an item and use Left or Right button to set.
View Style: Set default browsing mode. Set as Flat to
list all selected type of les stored in the USB device
or DMS. Set as Folder to list all selected type of les
in the selected folder.
Slideshow Interval: Set slide show interval time.
Show Subtitle: Set subtitle enabling preference.
Subtitle Language: Set supported subtitle language.
Subtitle Position: Set subtitle position as Up or
Down.
Subtitle Font Size: Set subtitle font size (max. 47pt).
Using MENU button in Media Browser Mode
Pressing MENU button while in Media Browser mode
displays the following menu screen:
You can access Picture, Sound and Settings menu
options using this screen. Press MENU again to exit
from this screen.
To Close the Media Player
• Press EXIT button on the remote control.
Using Media Browser - continued
This TV allows you to enjoy photo, music or video les stored on a USB device or on a MEDIA SERVER.

English - 40 -
English
Before using the text services, the required language
region must be chosen.
• Select Language from the Settings menu.
• Highlight Teletext in the Language Settings
menu and press Left or Right button to choose the
required language region.
After the Teletext language is selected, press MENU
button to exit.
Using Text Button -TEXT
• To view text services press TEXT. Press TEXT again
to superimpose text over a normal broadcast picture.
• Press TEXT again to return to normal viewing.
• Programmes cannot be changed until text is
cancelled.
• The rst text page shown will be the initial page.
• Any text page can be accessed by entering the 3
digit page number using the numbered buttons.
Press P / or Up/Down buttons to go to the next/
previous page.
• Four coloured titles will appear at the base of the
screen. To access one of the four given subjects,
press the relevant coloured button on the remote
control.
• For further information on your particular text
system(s), see the broadcast text index page or,
consult your local Toshiba dealer.
Below is a guide to the functions of the remote control
text buttons.
Accessing Sub-pages
If a text page has sub-pages, press Left/Right buttons
or enter the sub-page number 0001, 0002, 0003 etc.
to access.
Revealing Concealed Text
To discover the solutions on quiz and joke pages press
the “INFO - ” button.
Holding a Page
At times it is convenient to hold a page of text. Press
OK and “HOLD” will appear in the top left of the
screen. The page will be held on screen until the
button is pressed again.
To display an initial page
Press RET/BACK to access an initial page. The one
displayed is dependant on the broadcaster.
Analogue Only Text Services
This television has a multi-page text memory, which takes a few moments to load.
Only available if an analogue service is transmitted.

English - 41 -
English
Appendix A: PC Input Typical Display Modes
The following table is an illustration of some of the typical video display modes. Some, due to the display
native resolution, are scaled automatically to enable correct image to be displayed.
Your TV may not support different resolutions. Supported resolution modes are listed below.
If you switch your PC to an unsupported mode, a warning OSD will appear on the screen.
Index Resolution Frequency
1 640x400 70Hz
2 640x350 85Hz
3 640x400 85Hz
4 640x480 60Hz
5 640x480 66Hz
6 640x480 72Hz
7 640x480 75Hz
8 640x480 85Hz
9 800x600 56Hz
10 800x600 60Hz
11 800x600 70Hz
12 800x600 72Hz
13 800x600 75Hz
14 800x600 85Hz
15 832x624 75Hz
16 1024x768 60Hz
17 1024x768 66Hz
18 1024x768 70Hz
19 1024x768 72Hz
20 1024x768 75Hz
21 1024x768 85Hz
22 1152x864 60Hz
23 1152x864 70Hz
24 1152x864 75Hz
25 1152x864 85Hz
26 1152x870 75Hz
27 1280x768 60Hz
28 1360x768 60Hz
29 1280x768 75Hz
30 1280x768 85Hz
31 1280x960 60Hz
32 1280x960 75Hz
33 1280x960 85Hz
34 1280x1024 60Hz
35 1280x1024 75Hz
36 1280x1024 85Hz
37 1400x1050 60Hz
38 1400x1050 75Hz
39 1400x1050 85Hz
40 1440x900 60Hz
41 1440x900 75Hz
42 1600x1200 60Hz
43 1680x1050 60Hz
44 1920x1080 60Hz
45 1920x1200 60Hz

English - 42 -
English
Appendix B: AV and HDMI Signal Compatibility (Input Signal Types)
Source
Supported
Signals
Available
EXT-1
(SCART1)
PAL O
NTSC 60 O
RGB 50/60 O
SECAM O
EXT-1
(SCART2)
PAL O
NTSC 60 O
SECAM O
Side AV
PAL 50/60 O
NTSC 60 O
SECAM O
YPbPr
480I 60Hz O
480P 60Hz O
576I 50Hz O
576P 50Hz O
720P 50Hz O
720P 60Hz O
1080I 50Hz O
1080I 60Hz O
HDMI1
HDMI2
HDMI3
480I 60Hz O
480P 60Hz O
576I 50Hz O
576P 50Hz O
720P 50Hz O
720P 60Hz O
1080I 50Hz O
1080I 60Hz O
1080P
24Hz
25Hz
30Hz
50Hz
60Hz
O
Note: In some cases a signal on the LCD TV may not be displayed properly. The problem may be an
inconsistency with standards from the source equipment (DVD, Set-top box, etc.). If you do experience such
a problem please contact your dealer and also the manufacturer of the source equipment.

English - 43 -
English
Appendix C: PIN Information
Before connecting any external equipment, turn off all main power switches. If there is no switch, remove the
mains plug from the wall socket.
Signal information for Mini D-sub 15 pin connector
Pin No. Signal name Pin No. Signal name Pin No. Signal name
1 R 6 Ground 11 NC
2 G 7 Ground 12 NC
3 B 8 Ground 13 H-sync
4 NC* 9 NC 14 V-sync
5
NC 10 Ground 15 NC
* NC = not connected

English - 44 -
English
Appendix D: Supported File Formats for USB Mode
Media Extension Format Notes
Video Audio
Movie dat, mpg,
mpeg
Mpeg1,2 MPEG1/2 Layer 1/2/3, AAC/HEAAC,
AC3/EAC3, LPCM/ADPCM
1080P@ 30fps 50Mbit/
sec
dat, mpg,
mpeg
MPEG2 ,H.264, VC1, AVS,
MVC
MPEG1/2 Layer 1/2/3, AAC/HEAAC,
AC3/EAC3, LPCM/ADPCM
H.264:1080Px2@25fps
1080P@ 50fps MVC:
1080P@ 24fps Other:
1080P@ 30fps” 50Mbit/
sec
.vob MPEG2 MPEG1/2 Layer 1/2/3, AC3, LPCM 1080P@ 30fps 50Mbit/
sec
.mkv MPEG1,2,4, XviD,
H.264,
VC1,WMV3,
Motion JPEG
MPEG1/2 Layer 1/2/3, AAC/HEAAC,
AC3/EAC3, LPCM
H.264:1080Px2@25fps
1080P@ 50fps
Other:1080P@ 30fps
50Mbit/sec
.mp4 .mov MPEG1/2 Layer 3, AAC/HEAAC,
AC3/EAC3, LPCM/ADPCM
H.264:
1080Px2@25fps
1080P@ 50fps Other:
1080P@ 30fps 50Mbit/
sec
.avi MPEG1,2,4
Xvid
H.264,
VC1,WMV3,
Sorenson H.263
Motion JPEG
MPEG1/2 Layer 1/2/3, AAC/HEAAC,
AC3/EAC3, LPCM/ADPCM, WMA
H.264:
1080Px2@25fps
1080P@ 50fps Other:
1080P@ 30fps”
50Mbit/sec
v H.264,
Sorenson H.263
MPEG1/2 Layer 3, AAC/HEAAC,
LPCM/ADPCM
H.264: 1080Px2@25fps
1080P@ 50fps Other:
1080P@ 30fps” 50Mbit/
sec
3gp,3g2 MPEG4, H.264 1920x1080 @ 30P
20Mbit/sec
asf, wmv MPEG2,4, XviD, H.264,
VC1,WMV3
MPEG1/2 Layer 1/2/3, AAC/HEAAC,
AC3/EAC3, LPCM, WMA
1080P@ 30fps 50Mbit/
sec
Music .mp3
-
MPEG1 Layer 1/2/3 (MP3)
.wav LPCM
WMA/ASF WMA, WMA Pro
.m4a/ .aac AAC, HEAAC
Photo .jpg .jpeg Baseline JPEG MAX WxH =
14592x12288
Up to 8 MegaByte
.png Progressive JPEG
.bmp non-interlace
.png
interlace
Subtitle
sub - -
srt - -

English - 45 -
English
Specications and Accessories
Broadcast Systems/Channels
DVB-T MPEG2, DVB-T MPEG4 HD
DVB-C MPEG2, DVB-C MPEG4
DVB-S / S2 MPEG2, DVB-S / S2 MPEG4 HD
Video Input
PAL, SECAM, NTSC 4.43
Stereo Nicam
External Connections
1-SCART
1 Input 21-pin SCART RGB, A/V
2-SCART-S (via SCART 1) Input 21-pin SCART S-Video
3-YPbPr (via VGA) Input Mini D-Sub 15-Pin Analogue
4-SIDE A V Input Side AV Cable input Video + Audio L + R
5-HDMI 1/2 /3 Input Type A
6-PC Input Mini D-Sub 15-Pin Analogue RGB Signal
7-Digital Audio Output S/PDIF (Coaxial)
8-YPbPr Input YPbPr Connection Jack
9-LAN port RJ-45
USB Ports Media Browser Interface Version: USB 2.0
USB Class: Mass Storage
File System: FAT32
For sets with built in wireless unit
the Home network with a wireless
router must be compatible with;
IEEE 80211 a/b/g/n
Security Protocols WEP 64/128, WPA, WPA2, TKIP, AES, WAPi.
USB 2.0
Headphone Socket 3.5mm stereo
Operating Conditions Temperature 5°C - 35°C (41°F - 94°F)
Humidity 20 - 80% (non-condensing)
Supplied Accessories Remote Control
2 batteries (AAA,IEC R03 1.5V)
Four screws
Side AV cable
YPbPr Connection Cable
Stand xing cover
P Clip
Optional Accessories Wireless USB Adaptor - Toshiba WLM -30U2 and is available from the retail
outlet or Toshiba service company.
48” L
Energy Efciency Class
A ++
Visible Screen Size (approx.)
121 cm / 48”
On Mode Power Consumption (approx.) (*)
44 W
Annual Power Consumption (approx.) (**)
64 kWh
Standby Power Consumption (approx.)
< 0.50 W
Screen Resolution (pixels)
1920 x 1080
Display
16:9
Sound Output (at 10% distortion)
2 x 8
Power Consumption Model (approx.)
90 W
Weight TV with stand
18.0 kg
Gross weight
22.5 kg
TV without stand
15.5 kg
(*) Tested in accordance with IEC 62087-BD in default settings.
(**) Energy consumption 64 kWh per year, based on the power consumption of the television operating 4 hours per day for
365 days. The actual energy consumption will depend on how the television is used.
Specication is subject to change without notice.
A (mm) B (mm) C (mm) D (mm) E (mm) F (mm) G (mm)
48L344*DG 1092.2 643.5 250.1 105.4 697.7 400.0 400.0

English - 46 -
English
License Information
• HDMI, the HDMI logo, and High-Denition Multimedia Interface are trademarks or registered trademarks of
HDMI Licensing LLC in the United States and other countries.
• DVB is a registered trademark of the DVB Project.
• [1] EIA/CEA-861-D compliance covers the transmission of uncompressed digital video with high-bandwidth
digital content protection, which is being standardized for reception of high-denition video signals. Because
this is an evolving technology, it is possible that some devices may not operate properly with the television.
• YouTube and the YouTube logo are trademarks of Google Inc.
AVC licence letter
THIS PRODUCT IS LICENSED UNDER THE AVC PATENT PORTFORIO LICENSE FOR THE PERSONAL
AND NON-COMMERCIAL USE OF A CONSUMER TO (I)ENCODE VIDEO IN COMPLIANCE WITH THE AVC
STANDARD (“AVC VIDEO”) AND/OR (II)DECODE AVC VIDEO THAT WAS ENCODED BY A CONSUMER
ENGAGED IN A PERSONAL AND NON-COMMERCIAL ACTIVITY AND/OR WAS OBTAINED FROM A VIDEO
PROVIDER LICENSED TO PROVIDE AVC VIDEO. NO LICENSE IS GRANTED OR SHALL BE IMPLIED
FOR ANY OTHER USE. ADDITIONAL INFORMATION MAY BE OBTAINED FROM MPEG LA,L.L.C. SEE
HTTP://WWW.MPEGLA.COM
Licence Notication
Manufactured under license from Dolby Laboratories.
TRADEMARK ACKNOWLEDGMENT
“Dolby” and the double-D symbol are trademarks of Dolby Laboratories.
Disposal...
The following information is only for EU-member states:
Disposal of products
The crossed out wheeled dust bin symbol indicates that products must be collected and disposed of
separately from household waste. Integrated batteries and accumulators can be disposed of with the
product. They will be separated at the recycling centres. The black bar indicates that the product was
placed on the market after August 13, 2005. By participating in separate collection of products and
batteries, you will help to assure the proper disposal of products and batteries and thus help to prevent
potential negative consequences for the environment and human health.
For more detailed information about the collection and recycling programmes available in your country,
please visit our website (www.toshiba.eu/recycling) or contact your local city ofce or the shop where you
purchased the product.
Disposal of batteries and/or accumulators
The crossed out wheeled dust bin symbol indicates that batteries and/or accumulators must be collected
and disposed of separately from household waste. If the battery or accumulator contains more than
the specied values of lead (Pb), mercury (Hg), and/or cadmium (Cd) dened in the European Battery
Directive, then the chemical symbols for lead (Pb), mercury (Hg) and/or cadmium (Cd) will appear below
the crossed out wheeled dust bin symbol.
By participating in separate collection of batteries, you will help to assure the proper disposal of products
and batteries and thus help to prevent potential negative consequences for the environment and human
health.
For more detailed information about the collection and recycling programmes available in your country,
please visit our website (www.toshiba.eu/recycling) or contact your local city ofce or the shop where you
purchased the product.

English - 47 -
English
Q & A Section
Question
Answer
Sound
Why is there no sound or picture?
Check if the TV is not in standby mode
Check the mains plug and all mains connections
Why is there a picture but no sound?
Check if the volume has not been turned off or sound mute has
not been selected
Why does the sound come only from
one speaker when stereo sound is
selected?
Check the balance in the SOUND menu if it has been set to one
side or not
Why is the soundtrack in English
when a different audio language has
been selected?
The programme is currently being broadcast with an English
soundtrack only.
Picture
What can cause a poor picture? Interference or a weak signal. Try a different TV station
Why isn't the video / DVD being
played shown on screen?
Make sure the Blu-ray of DVD player is connected to the TV as
illustrated in the beginning chapters, then select the correct input
by pressing SOURCE.
Why is the Blu-ray / DVD player in
black and white?
Check if the correct input has been chosen or not.
Why are there horizontal stripes and
or blurred images on the screen
when in PC mode?
The phase may need adjusting. Select PC settings and highlight
Phase and adjust until the picture is clear.
General
Why doesn't the remote control
work?
Check if the batteries are exhausted or inserted incorrectly
Why doesn't the Media browser
feature operate?
Make sure the USB stick / HDD is connected correctly. Incorrect
operation may occur from a USB Hub connection.
Check your network setup if using media server.
Why digital subtitles are not shown
on screen when they are selected?
Subtitles are not currently being transmitted by the broadcaster
Why is the digital channel locked? Parental control is activated. Check parental settings
Why are some encrypted digital
channels unavailable?
Your subscription needs upgrading. Contact your service provider.
Why does the active standby LED
sometimes take longer to go out?
When in active standby, the TV's active standby will automatically
search all available channels for updates, provided automatic
update is enabled. The required time to do this may vary. Led
blinks red and green in this mode.
Why don’t the controls of the TV
work?
Check if CHILD LOCK is selected or not
What is DVB-T? Digital Video Broadcast via an aerial / antenna.
What is DVB-C? Digital Video Broadcast via a cable system.
What is DVB-S? Digital Video Broadcast via a Satellite dish.
How are radio channels selected? You can select them via Channel list
What can be done if the pin number
is forgotten?
You can reset the TV and perform the rst time installation again.
Ensure that no one else is aware of this procedure by securely
storing the Owner’s Manual.
Why don't the networked devices
work?
Check the LAN cables if they are connected properly or not.
If it is wireless connection, make sure the wireless USB dongle
(depending on the model) is plugged properly or/and the wireless
network settings are done accordingly.

English - 48 -
English
This equipment corresponds to requirements of the Technical Regulation on limitation of usage of
certain dangerous substances in electrical and electronic equipment.
REACH information
The European Union (EU) chemical regulation, REACH (Registration, Evaluation, Authorization and
Restriction of Chemicals), entered into force on 1 June 2007, with phased deadlines to 2018.
Toshiba will meet all REACH requirements and is committed to provide our customers with information
about the presence in our articles of substances included on the candidate list according to REACH
regulation.
Please consult the following website www.toshiba.eu/reach for information about the presence in our
articles of substances included on the candidate list according to REACH in a concentration above
0.1 % weight by weight.
Toshiba herby declares that this product with an integrated Wireless Function is in compliance with the
essential requirements and other relevant provisions of Directive 1999/5/EC..
EU Conformity Statement
This product is carrying the CE-Mark in accordance with the related European Directives.
Responsible for CE-Marking is TOSHIBA, 23 Davy Road, Plymouth, PL6 8BY UK.
This product is labeled with the CE Mark in accordance with the related European Directives, notably
Low Voltage Directive 2006/95/EC, Electromagnetic Compatibility Directive 2004/108/EC and RoHS
Directive 2011/65/EU. Furthermore the product complies with the Ecodesign Directive 2005/32/EC (EuP)
and 2009/125/EC (ErP) and its related implementing measures.
If this product has an integrated Wireless LAN feature, the Radio Equipment and Telecommunications
Terminal Equipment Directive 1999/5/EC is also applicable.
© TOSHIBA 23 Davy Road, Plymouth Devon PL6 8BY England
All rights reserved.
Reproduction in whole or part without written permission is strictly prohibited.

If you wish to view the advanced functions but do not have access to a computer or
the internet then please contact your nearest owner’s manual Helpline number from the
numbers shown below.
Country name locally Contact Number
Österreich 0810 - 144 122 (7,3 ct/min aus dem Festnetz der Telekom Austria, Mobil ggf. abweichend)
Belgique / Belgie 02 391 01 01
България 029421141
Hrvatska 01 653 9737
Κύπρος 22872111
Českárepublika 323204191
Danmark 80 88 93 38
EesVabariik 6997800
Suomen tasavalta 0800 77 35 03
France 09 69 32 64 84
Deutschland 02131 52 40 999 (Ortstarif, abweichender Mobilfunktarif möglich)
Gibralter 200 76334
Ελληνική 2109554298
MagyarKöztársaság 23428870
Ísland 00 45 80 88 93 38
Yisrā’el 039535900
Italia 039 609 9301
Latvijas 00 372 69 97 800
Lietuvos 00 372 69 97 800
Luxembourg 00 32 2 391 01 01
Moldova 00380 443 511 317
Nederlanden 00 32 2 391 01 01
Norge 800 573 57
Polska 0 71 796 95 05
Portugal 707 265 265
RepublicofIreland 012467780
România 021 3169 393
Россия 88001000505
Slovensko 0042 323 204191
España 902332234
Sverige 0201 70 16 00
Schweiz / Suisse 0900 57 58 58 (CHF 1.49 / Min.)
Türkiye 0 212 340 6080
U.K. 0871 495 0730
Україна 8(044)3511317
Please note the telephone number only applies to advanced owner’s manual enquiries
and not general operation of the TV.
 Loading...