

Toshiba 32L310U18, 55L510U18 Quick Setup Manual
START HERE
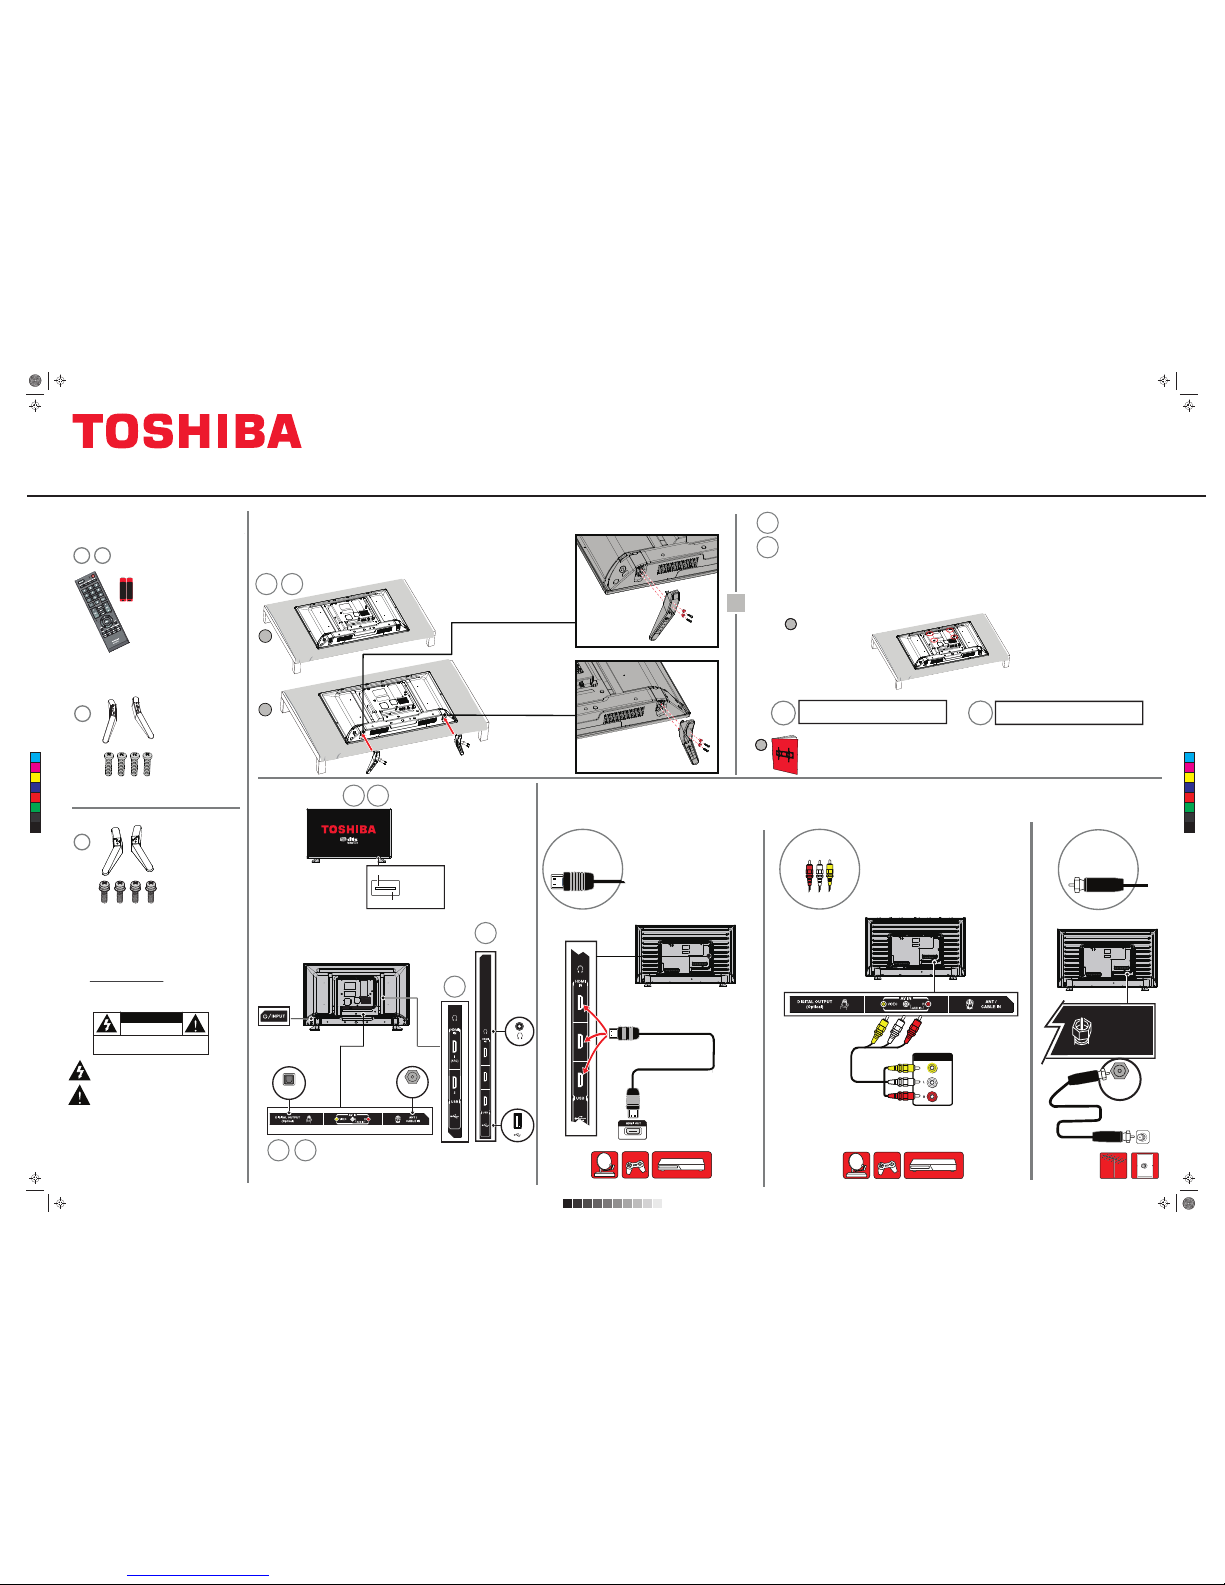
How do I attach the stand to my TV? (not for wall mounting)
You’ll need : Soft surface and a Phillips screwdriver.
A Carefully place your TV face-down on a cushioned, clean surface.
B Secure each TV stand leg to the back of your TV with two of the provided screws.
1
The lightning flash with arrowhead symbol within an equilateral
triangle is intended to alert the user to the presence of uninsulated
“hazardous voltage” within the product’s enclosure, which may be
of sufficient magnitude to induce a risk of electric shock to persons.
The exclamation mark inside an equilateral triangle is intended to
alert the user to the presence of important operating and
maintenance (servicing) instructions in the literature accompanying
the product.
CAUTION
RISK OF ELECTRIC SHOCK
DO NOT OPEN
CAUTION: TO REDUCE THE RISK OF ELECTRIC SHOCK, DO NOT
REMOVE COVER (OR BACK). NO USER-SERVICEABLE PARTS
INSIDE. REFER SERVICING TO QUALIFIED SERVICE PERSONNEL.
WARNING: To reduce the risk of fire or electric shock, do not
expose this apparatus to rain or moisture.
FIND YOUR USER GUIDE ONLINE!
Go to www.tv.toshiba.com and follow the
online instructions.
IMPORTANT: See the online User Guide before installing the
TV on a wall.
URL: www.tv.toshiba.com
Quick Setup Guide | 32L310U18/55L510U18
32" 720p, 60Hz, LED TV
55" 1080p, 60Hz, LED TV
Remote control and
two AAA batteries
M5 screws
(15 mm length)
(4 pcs.)
ST4 screws
(25 mm length)
(4 pcs.)
Your TV has four VESA mounting holes on the back. If you attach a wall-mount bracket to the back of your TV, the bracket must
be securely attached, using all four holes. If you do not use all four mounting holes, your TV may fall and cause property
damage or personal injury. See the documentation that came with your wall mount for complete mounting instructions.
WALL MOUNT
How do I prepare my TV for wall mounting? (not for use with a TV stand)
You’ll need: Soft surface and a Phillips screwdriver.
Before you mount your TV, make sure that:
• You remove the stand legs.
• The wall-mount bracket is listed by an independent laboratory (such as UL, CSA, or ETL).
• The bracket supports the weight of your TV.
A Carefully place your TV face-down on a cushioned, clean surface.
B
See the instructions that came with your wall mount for more information about how to
correctly mount your TV.
32"
55"
A
B
INCLUDED ACCESSORIES
(Sample Illustration)
32”model
32" 55"
(Sample Illustration)
55”model
MAKING CONNECTIONS
How do I watch TV (cable, satellite, or antenna) or connect a device such as a DVD or Blu-ray disc player or game console?
Features
Front
2
AAA+AAA
+
Coaxial
(GOOD)
AV (GOOD)
32" 55"
Stand legs
32"
AUDIO/VIDEO OUT
HDMI® (BEST)
Best video quality
2
1
(ARC)
3
Note: Connect an ARC-enabled home theater
receiver to HDMI 1.
Note: The 32" does not have an HDMI 3 jack.
VESA Mounting Pattern
VESA mount (mm): 200 × 100 – M4 type screws
VESA Mounting Pattern
55"
32"
(Sample Illustration)
32”model
Back
2
1
(ARC)
3
USB
32" 55"
32"
55"
32"
55"
(Sample Illustration)
32” model
1
8
Stand legs
55"
B
ANT/
CABLE IN
DIGITAL OUTPUT
(Optical)
A
55"
32"
ST4 type (25 mm) screws
M5 type (15 mm) screws
OR
(Sample Illustration)
55”model
(Sample Illustration)
55”model
Before using your new product, please read these instructions to prevent any damage.
Remote sensor
Power On/Standby LED
32” model shown
32” model shown
ANT /
CABLE IN
ANT /
CABLE IN
VESA mount (mm): 400 × 400 – M6 type screws
C
M
Y
CM
MY
CY
CMY
K
Toshiba_32L310U18_55L510U18_16-1115_QSG_V1_ENG_R2.ai 1 1/4/2017 2:38:15 PMToshiba_32L310U18_55L510U18_16-1115_QSG_V1_ENG_R2.ai 1 1/4/2017 2:38:15 PM
32"
55"
Access the online User Guide
Go to www.tv.toshiba.com and follow the online instructions.
Many questions regarding parts, service, and
warranties can be answered by visiting the
Customer Support Section of our website:
www.tv.toshiba.com
Contact Toshiba Customer Support Center
(855) 527-2411 From the United States and Canada
The terms HDMI and HDMI High-Definition Multimedia Interface,
and the HDMI Logo are trademarks or registered trademarks of
HDMI Licensing LLC in the United States and other countries.
All other brand and product names are trademarks or registered
trademarks of their respective companies.
Distributed and warranted by Best Buy Purchasing LLC
7601 Penn Avenue South, Richfield, MN 55423 USA
©2017 Best Buy China LTD. All rights reserved.
Toshiba is a registered trademark of Toshiba Corporation.
All other trademarks are property of their respective owners.
OR
SOUNDBAR
USING YOUR REMOTE CONTROL
PICTURE SIZE
4:3 - Displays content in a 4:3 aspect
ratio. You might see black bars if the
original content is not standard
definition (4:3).
Native Mode™- Use to watch the entire
picture as broadcasted without
over-scanning to reduce artifacts.
Only supported for HDMI and digital
antenna/cable inputs.
FULL Expands the image to fill the
screen. The left and right edges of
the image may be cropped.
THEATERWIDE™ 3 The same as
TheaterWide 2, but subtitles are
visible.
THEATERWIDE™ 1
Stretches the
image at the right and left edges,
but keeps a clear image in the
center.
THEATERWIDE™ 2
Expands the
image to fill the screen. The top and
bottom of the image may
be cropped.
ABCDEFG
NORMAL Original aspect ratio is
preserved. You might see black bars
if the original content is not
widescreen (16:9).
DOT BY DOT
Original aspect ratio is
preserved and is not scaled. You might
see black bars depending on the
signal type.
CONNECTING EXTERNAL SPEAKERS
How do I connect my TV to external speakers?
TURNING ON MY TV
When can I turn on my TV?
Using digital audio
Note: See the
instructions that
came with your
speakers for more
information.
3
4
Using analog audio
V1 ENGLISH 16-1115
1
AUDIO IN
I already have a universal remote control.
How do I make it control this TV?
If you already have a universal remote control that you would like to program to work with your TV and don’t want to use the included Toshiba remote control, see the
table below for common codes. If you do not see a code for your universal remote control or set-top box, see the documentation that came with your device.
AT&T
Cablevision
Charter
Comcast
Cox
DirecTV
Dish Network
RCA
Rogers
Time Warner
Verizon
UNIVERSAL REMOTE CONTROL CODES
1 Plug the power cord into a power outlet.
WHEN YOUR TV IS IN PLACE:
2 Remove the remote control cover and install the batteries.
3 Press (power) on your remote control.
4 Follow the on-screen instructions.
OPTICAL
AUDIO IN
DIGITAL OUTPUT
(Optical)
DIGITAL OUTPUT
(Optical)
(Sample Illustration)
55" model
1127, 1179, 1203, 1204, 1222, 1223, 1332, 1340, 1341, 1345, 1353, 1010, 1098, 1104, 1147, 1148, 1149, 1150, 1151, 1173, 1174, 1210, 1215, 1256, 1257, 1263, 1267, 1272, 1302, 1311, 1312, 1322, 1343, 1376, 1585, 1589, 1592, 11524, 12724,
10156, 11935, 11704, 11959, 10650, 11343, 11369, 10060
015, 101, 045, 030, 007, 040, 062, 142, 137, 382, 703
11524, 10822, 10845, 11656, 12006, 10154, 11256, 10156, 11265, 10060, 10650, 11156, 11356, 11704, 0154, 0156, 0060, 1256, 0832, 1704, 1936, 0650, 1156, 1656, 1935, 0845, 1356, 1918, 1945, 015, 030, 007, 040, 062, 101, 142, 045, 137, 138,
325, 258, 031, 038, 039, 423, 571
11656, 11156, 11256, 11704, 10845, 11356, 10060, 10650, 11265, 10154, 10765, 10767, 10178, 11314, 10700, 10702, 11935, 10832, 11959, 10036, 10149, 11343, 11369, 10781, 10003, 10250, 10156, 0060, 003, 0154, 0156
074, 168, 170, 822, 093, 991, 156, 060, 154, 093, 030, 031, 038, 039, 0170, 0074, 0168, 1270, 0060, 0154, 0156, 1256, 1265, 1945, 1704, 1656, 1635, 1356, 1343, 1325, 1306, 1156, 0845, 0832, 0650, 0149, 0036, 1369, 1042, 1060, 1061, 1062,
1087,
1091, 1097, 1098, 1130, 1131, 1183, 1524, 1935, 2006, 1959, 1936, 1164, 2724
10156, 11656, 11256, 11704, 11356, 10060, 10650, 10154, 10765, 10178, 10700, 10702
617, 631, 590, 618, 635, 680, 688, 750, 847, 800, 526, 851, 852, 595, 908, 757, 850, 802, 785, 743, 849, 622, 789, 771, 744, 243, 117
11524, 11656, 10156, 11156, 11256, 12006, 11265, 11704, 11945, 10845, 1356, 12724
1524
0156, 0060, 0154, 1042, 1060, 1061, 1062, 1087, 1091, 1097, 1098, 1130, 1131, 1172, 1173, 1183, 1286, 1317, 1325, 1327, 1334, 1345, 1346, 1355, 1364, 1365, 0016, 0017, 0090, 0096, 0117, 0118, 0129, 0131, 0180, 0206, 2001, 0011, 0021, 0041,
0051, 0061, 0081, 0101, 0111, 0171, 0191, 0211, 0471, 0701, 0411, 0501, 1301, 1351, 1441, 1781, 1951, 2021, 0341, 2341, 2481, 0861, 2351, 3671, 2801, 3821, 4151, 3921, 3931, 1256, 1265, 1945, 1935, 1704, 1656, 1635, 1356, 1343, 1306, 1156,
0845, 0832, 0650, 0149, 0036, 1190, 1014, 1015, 1127, 1007, 1252, 1246, 1219, 1212, 1168, 1163, 1018, 1114, 1028, 1071, 1300, 1338, 1353, 1369, 030, 007, 040, 062, 101, 142, 137, 045, 015, 062, 142, 137, 703, 138, 230, 258, 325
0087, 0181, 0183, 0677, 0859, 0872, 1172, 1183, 1283, 1292, 1383, 1683, 1731, 3015, 3022, 3023, 3051, 3052, 3053, 3055, 3059, 3062, 3066, 3072, 3074, 3078, 3080, 3087, 3089, 3093, 3147, 3167, 3168, 3169, 3171, 3173, 3182, 3187,
3188, 3207,
3214, 3220, 397
Picture
Sound
Installation
Get Help
Accessibility
Video Description
Voice Guide
TV Remote Tutorial
Closed Caption
Options
Timers
MENU
INPUT
Input Selection
0 ANT / CABLE
1 AV
2 HDMI 1
3 HDMI 2
4 HDMI 3
5 USB
Accessibility
On
On
Note: 32" model does not have the HDMI 3 option.
AAA
+
AAA
+
1
8
32"
55"
(Sample Illustration)
55" model
INPUT
Opens the Input Selection list.
SLEEP
Sets the sleep timer.
FREEZE
Freezes the picture.
Press again to
un-freeze the picture.
Numbers
Enter channel numbers.
Enters a digital sub-channel
number (for example 4.1).
MUTE
Mutes the sound.
Volume
Adjusts the volume.
Arrows
Navigate in on-screen menus
MENU
Opens the on-screen menu.
BACK
Returns to the previous menu
level.
INFO
Displays TV status information
as well as program details,
when available.
POWER
Turns your TV on and o.
When the TV is o, the power
indicator on the front lights red.
PIC SIZE
Changes how the picture is
displayed on the screen.
PIC MODE
Selects the picture mode.
FAV
Opens the favorites list.
SAP
Selects a secondary audio
program, if available
Channel
Changes the TV channels.
ACC
Opens the Accessibility menu
ENTER
Confirms selections or changes.
EXIT
Closes on-screen menus.
C. CAPTION
Accesses closed captioning.
CH RTN
Returns to the previous
channel or source.
CEC device controls
CEC devices—Control
CEC-compatible
devices connected to your TV.
C
M
Y
CM
MY
CY
CMY
K
Toshiba_32L310U18_55L510U18_16-1115_QSG_V1_ENG_R2.ai 2 1/4/2017 2:38:17 PMToshiba_32L310U18_55L510U18_16-1115_QSG_V1_ENG_R2.ai 2 1/4/2017 2:38:17 PM
 Loading...