

LCD TV/DVD COMBINATION
OWNER’S MANUAL
19DV713B
19DV714B
22DV713B
22DV714B
26DV713B
32DV713B
©2010 Toshiba Corporation
Before operating the unit, please read this manual thoroughly.
Owner’s Record
The model number and serial number
are on the back of your TV/DVD.
Record these numbers in the spaces
below. Refer to these numbers whenever
you communicate with your Toshiba
dealer about this TV/DVD.
Model number: _________________
Serial number: _________________

Precautions
CLASS 1
LASER PRODUCT
IMPORTANT INFORMATION
If a television is not positioned in a sufficiently stable location, it can be potentially hazardous due to falling. Many injuries,
particularly to children, can be avoided by taking simple precautions such as:
• Using stands recommended by the manufacturer of the television.
• Only using furniture that can safely support the television.
• Ensuring the television is not overhanging the edge of the supporting furniture.
• Not placing the television on tall furniture (for example, cupboards or bookcases) without anchoring both the furniture
and the television to a suitable support.
• Not standing the televisions on cloth or other materials placed between the television and supporting furniture.
• Educating children about the dangers of climbing on furniture to reach the television or its controls.
Place the TV on a stable, level surface that can support the weight of the TV. In order to maintain stability and prevent it
from falling over, secure the TV to a wall using a sturdy tie to the clip on the back of the table top stand.
Note: Unless otherwise indicated, the examples used throughout this manual are based on the 32DV713B model.
CAUTION:
THIS UNIT IS A CLASS 1 LASER PRODUCT. HOWEVER THIS UNIT USES A VISIBLE LASER BEAM WHICH COULD CAUSE
HAZARDOUS RADIATION EXPOSURE IF DIRECTED. BE SURE TO OPERATE THE PLAYER CORRECTLY AS
INSTRUCTED.
THE FOLLOWING CAUTION LABEL IS LOCATED ON THE REAR PANEL OF THE UNIT.
WHEN THIS UNIT IS PLUGGED INTO THE WALL OUTLET, DO NOT PLACE YOUR EYES CLOSE TO THE OPENINGS TO
LOOK INTO THE INSIDE OF THIS UNIT.
USE OF CONTROLS OR ADJUSTMENTS OR PERFORMANCE OF PROCEDURES OTHER THAN THOSE SPECIFIED
HEREIN MAY RESULT IN HAZARDOUS RADIATION EXPOSURE.
DO NOT OPEN COVERS AND DO NOT REPAIR YOURSELF. REFER SERVICING TO QUALIFIED PERSONNEL.
Headphone Warning
Loud music can damage your hearing irreversibly. Do not set the volume to a high level when listening through headphones,
particularly for extended listening periods.
Information for the DVB-T function
• Any function relative to the digital television (with the DVB logo) is available only within the country or area where such signals
are transmitted. Verify with the salesperson if it is possible to receive a DVB-T signal in the zone where you live.
• Even if the television conforms to the DVB-T specifications, the compatibility to future digital DVB-T transmissions is not
guaranteed.
• Some digital television functions may not be available in some countries.
• The DVB-T system present in this device is FTA (Free to air).
• The “HD ready” logo is a trademark of EICTA.
• DVB is a registered trademark of the DVB Project. This logo indicates that the product is compliant with European Digital
Broadcasting.
Possible Adverse Effects on LCD Screen
If a fixed (non-moving) pattern remains on the LCD screen for long periods of time, the image can become permanently retained
on the LCD TV panel and cause subtle but permanent ghost images. This type of damage is NOT COVERED BY YOUR
WARRANTY. Never leave your TV on for long periods of time while it is displaying the following formats or images:
• Fixed Images, such as stock tickers, video game patterns, TV station logos, and websites.
• Special Formats that do not use the entire screen. For example, viewing letterbox style (16:9) media on a normal (4:3) display
(Black bars at top and bottom of screen); or viewing normal style (4:3) media on a widescreen (16:9) display (Black bars on
left and right sides of screen).
2

Contents
Precautions ................................................................................................................................................................................ 2
Important safety information ........................................................................................................................................................ 5
Digital TV switchover ................................................................................................................................................................... 8
Location of controls ..................................................................................................................................................................... 9
Remote control .......................................................................................................................................................................... 10
I/O connections........................................................................................................................................................................... 12
Using the Auto Brightness Sensor.............................................................................................................................................. 13
Auto setup ................................................................................................................................................................................. 14
Quick guide for menu operation ................................................................................................................................................. 16
Selecting the video input source ................................................................................................................................................ 17
Automatic station presetting with the built-in tuner .................................................................................................................... 18
Changing the order of stored channels ..................................................................................................................................... 19
Manual TV station presetting ..................................................................................................................................................... 20
Basic operation .......................................................................................................................................................................... 21
Teletext ...................................................................................................................................................................................... 23
Stereo reception with the built-in analogue tuner ...................................................................................................................... 24
Picture format ............................................................................................................................................................................ 25
AV colour adjustment ................................................................................................................................................................ 26
Other convenience functions ..................................................................................................................................................... 27
Using REGZA-LINK® ................................................................................................................................................................ 29
Using the Media Player .............................................................................................................................................................. 33
Display setup/Timer setting (DTV mode only) ........................................................................................................................... 40
Password setup (Parental lock) (DTV mode only) ..................................................................................................................... 41
Version ...................................................................................................................................................................................... 42
Software upgrade (DTV mode only) .......................................................................................................................................... 43
Common interface (DTV mode only) ......................................................................................................................................... 44
Multi audio (DTV mode only) ..................................................................................................................................................... 45
DVB-Subtitle/Using the Digital Service (DTV mode only) .......................................................................................................... 46
EPG (Electronic Program Guide) (DTV mode only) .................................................................................................................. 47
EPG Timer (DTV mode only) ..................................................................................................................................................... 48
Disc ............................................................................................................................................................................................ 49
Basic playback ........................................................................................................................................................................... 50
Advanced playback ................................................................................................................................................................... 52
Zoom function/Scene navigation ............................................................................................................................................... 53
Scene bookmark ........................................................................................................................................................................ 54
Repeat playback/A-B repeat playback ...................................................................................................................................... 55
Scene angle/Title selection/DVD menu ..................................................................................................................................... 56
Soundtrack language/Audio channel/Subtitle ............................................................................................................................ 57
Playback information/VCD playback control (PBC) ................................................................................................................... 58
MP3/JPEG/DivX
About the file browser/Audio file playback ................................................................................................................................. 60
Playing an audio file .................................................................................................................................................................. 61
JPEG file operation ................................................................................................................................................................... 62
®
and DivX® VOD operation .............................................................................................................................................. 63
DivX
MP3/JPEG/DivX
Programme playback/Random playback ................................................................................................................................... 66
Customising disc playback ........................................................................................................................................................ 67
Temporary cancel the rating level by DVD disc ......................................................................................................................... 73
PC connection ........................................................................................................................................................................... 74
Connecting an HDMI or DVI device to the HDMI input .............................................................................................................. 75
REGZA-LINK
Connecting TV to other equipment ............................................................................................................................................ 77
®
and Audio CD operation ............................................................................................................................... 59
®
and Audio CD playback modes .................................................................................................................... 64
®
connection ........................................................................................................................................................ 76
3

Contents
Status message ......................................................................................................................................................................... 79
Troubleshooting table ................................................................................................................................................................ 80
Specifications ............................................................................................................................................................................. 82
The GNU General Public License (GPL) ................................................................................................................................... 83
The Libpng License Notices ...................................................................................................................................................... 86
The zlib License ......................................................................................................................................................................... 87
4

Important safety information
This unit has been produced according to all current safety regulations. The following safety tips should safeguard users against
careless use and the dangers related to such use.
• Although this unit has been carefully manufactured and rigorously checked prior to leaving the factory as with all electrical
appliances, it is possible for problems to develop. If you notice smoke, an excessive build-up of heat or any other unexpected
phenomena, you should disconnect the plug from the mains power socket immediately.
• Ensure that the unit is sufficiently ventilated! Never place it next to or underneath curtains!
• This set should only be connected to an AC 110-240V/50-60Hz mains power supply. Do not attempt to connect it to any other
type of supply.
• The socket outlet must be installed near the equipment and is easily accessible.
• Do not open this unit. An attempt to repair the unit by a non-expert could be dangerous and potentially cause a fire hazard.
All repairs must be carried out by qualified service personnel only.
• Keep away from rodents. Rodents (and also cockatiels) enjoy biting electric flexes. They can cause a short circuit (fire hazard!)
and receive a fatal electric shock.
• Always hold the plug when disconnecting the unit from the socket outlet. Do not pull on flex. The flex can become overloaded
and cause a short circuit.
• Use a damp---not wet---cloth to clean the unit.
• Set up unit so that no one will trip over the flex.
• This unit is recommended to be installed on shock-free benches in order to avoid any danger from falling.
• Take note that toddlers can pull the unit down from a table or cupboard by means of its flex. Children can hurt themselves
when doing this.
• Do not use the unit near heat sources. The casing and flex could be damaged by the intensity of the heat.
• The screen is made of glass and can break if damage is done to it. Be careful when collecting sharp edged glass splitters.
• If you intend to wall mount the unit, contact the shop where you purchased the unit for advice, and leave the installation work
to professionals. Improper installation can cause damage and/or injuries.
• When installing the set on a wall, allow at least 10 cm clearance between the rear of the set and the wall. Clearance of less
than 10 cm will obstruct the vents and cause overheating to the interior of the set, resulting in faults or damage to the set.
• Taking fall-prevention measures
- If these measures are not taken, the unit can fall and cause damage and/or injuries.
- Contact the shop where you purchased the unit to obtain full details of the measures.
• When a TV stand is used,
- Ensure the unit is fully on the stand and placed in the centre.
- Do not leave the stand doors open. You could be hurt as a result of the unit falling or breaking, or your fingers being caught
or jammed. Take extra precautions if you have children.
• Avoid placing the unit on any surfaces that may be subject to vibrations or shocks.
• To protect the unit during a thunder storm, unplug the AC power cord and disconnect the aerial.
Caution: Do not touch the aerial connector.
• When you leave your home for a long period of time, unplug the AC power cord for safety.
• The unit becomes warm when in operation. Do not place any covers or blankets on the unit in order to prevent overheating.
The ventilation holes should not be blocked. Do not set up near radiators. Do not place in direct sunshine.
• When placing on a shelf, allow at least 10 cm clearance space around the whole unit.
• The unit shall not be exposed to dripping or splashing, and no objects filled with liquids, such as vases, shall be placed on the
apparatus.
• Liquids spilled into the unit can cause serious damage. Switch the set off and disconnect the mains power supply, then consult
a qualified service person before attempting to use the unit again.
• Moisture condensation occurs, for example, when you pour a cold drink into a glass on a warm day and drops of water form
on the outside of the glass. In the same way, moisture may condense on this unit’s internal optical pick-up lens, one of the
most crucial internal parts of the unit.
• Moisture condensation occurs in the following situations:
- When you move the unit from a cold place to a warm place.
- When you use the unit in a room where the heater was just turned on.
- When you use the unit in an area where cold air from an air conditioner directly hits the unit.
- When you use the unit in a humid place.
• Never use the unit when moisture condensation may occur.
• Using the unit when moisture condensation exists may damage its own internal parts and discs. Connect the power cord of
the unit to the wall outlet, turn on the unit, remove the disc, and leave it for two or three hours. After two or three hours, the
unit will warm up and moisture will be evaporated. Leaving the TV connected to the wall outlet will help prevent moisture
condensation in the unit.
• Never place hot objects or open flame sources, such as lighted candles or night lights, on or close to the TV. High
temperatures can melt plastic and lead to fires.
5
Important safety information (continued)
Slide the lever to the left
Back side of the pedestal stand
Where to install
Locate the television away from direct sunlight and strong lights; soft and
indirect lighting is recommended for comfortable viewing. Use curtains
or blinds to prevent direct sunlight from falling on the screen.
Always place the TV on a sturdy, level, stable surface that can support
the weight of the TV. In order to maintain stability and prevent the TV
from falling over, secure the TV with a sturdy strap from the hook on the
rear of the TV to a wall stud, pillar, or other immovable structure. Make
sure the strap is tight, secure, and parallel to the floor.
The LCD display panels are manufactured with extremely high-precision
technology techniques. However some non-active pixels may appear on
the screen or luminous spots may occur occasionally - this is not a sign
of a malfunction.
Note: The hook is only applicable to 26DV713B and 32DV713B.
Make sure that the television is located in a position where it cannot be pushed or hit by objects, as pressure will break or damage
the screen, and that small items cannot be inserted into slots or openings of the case.
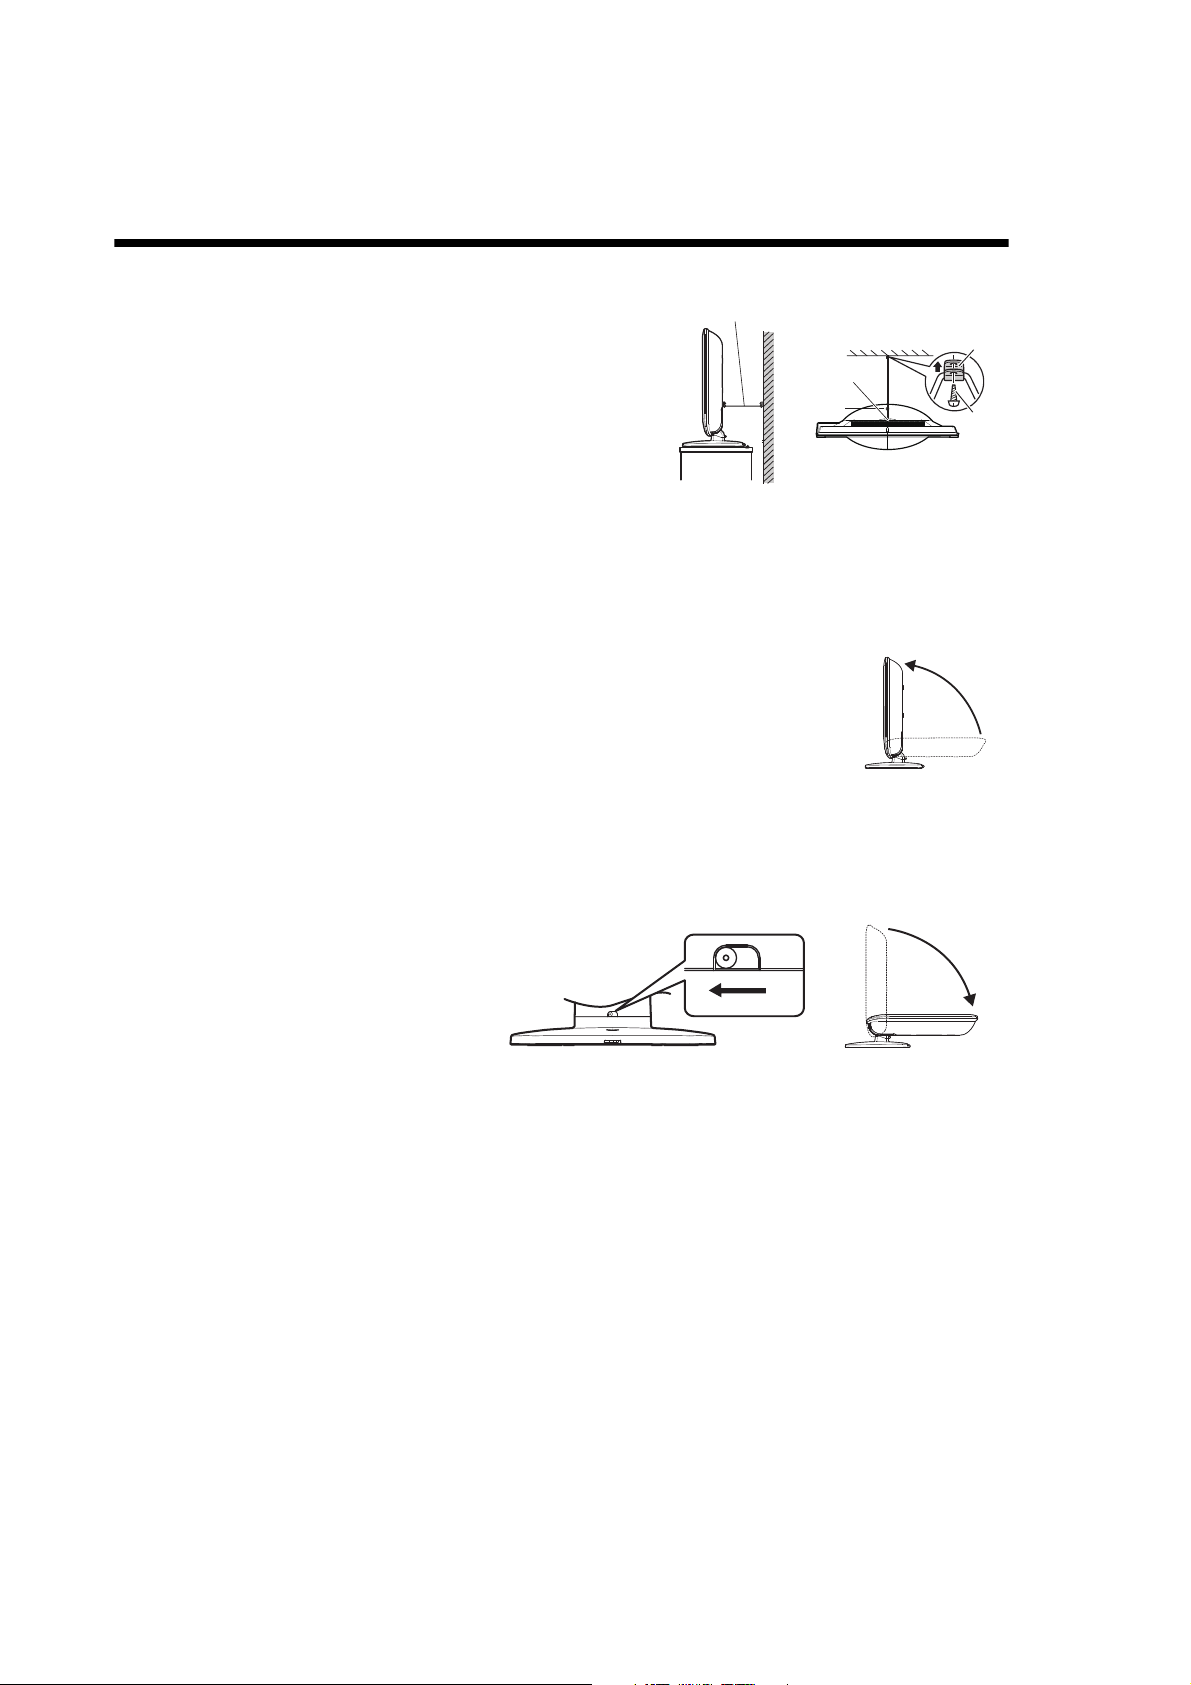
To display your LCD TV on the included pedestal stand
Observe the following safety precautions:
(1) Read and follow the pedestal assembly instructions included with the pedestal.
Caution: Before beginning pedestal assembly, carefully lay the front of the LCD Panel face down
on a flat, cushioned surfaces such as a quilt or blanket. Leave the bottom of the TV protruding over
the edge of the surface and assemble the pedestal as indicated below.
Note: Extreme care should always be taken when attaching the pedestal stand to avoid damage
to the LCD panel.
(2) Grab the pedestal stand and lift the display up. Confirm the pivot is locked.
(3) Place the TV on a sturdy, level surface that can support the weight of the TV.
(4) Be sure to secure the TV to a wall stud, pillar, surface, or other immovable structure. To secure the
TV in this manner: (1) attach a clip to an immovable structure, and then (2) pass a sturdy strap
through the clip and attach each end to the hooks located at the back of the TV. Be sure to leave at
least 10 cm between the TV and the wall or similar structure for ventilation.
Sturdy strap (as short as possible)
Hook
Screw
hole
Side View Top View
Clip
Screw
To fold the pedestal stand
(1) Slide the lever on the back side of the
pedestal stand to the left.
(2) Lay the display down.
Applicable to the following models:
19DV713B, 19DV714B, 22DV713B, and
22DV714B.
Note: Do not operate the LCD TV when the pedestal stand is folded. The pedestal stand should not be folded at any time
except for packing purposes.
To display your LCD TV using a wall bracket
If you decide to wall mount your LCD TV, always use a wall bracket appropriate for the size and weight of the LCD TV:
(1) Caution: Two people are required for installation.
(2) Unplug and remove any cables and/or other component connectors from the rear of the TV.
(3) Follow the instructions provided with your wall bracket. Before proceeding, make sure the appropriate bracket(s) are
attached to the wall and the back of the TV as described in the instructions provided with the wall bracket.
(4) IMPORTANT: Always use the screws supplied or recommended by the wall mount manufacturer.
(5) After attaching the appropriate bracket(s) to the wall and the back of the TV, remove the pedestal stand from the TV as
described below.
6
Important safety information (continued)
AC INPUT
Two screws
Three screws Hook
(Sturdy strap should be
as short as possible.)
AC INPUT
EXCLUSION CLAUSE
Toshiba shall under no circumstances be liable for loss and/or damage to this product caused by:
i) fire;
ii) earthquake;
iii) accidental damage;
iv) intentional misuse of the product;
v) use of the product in improper conditions;
vi) loss and/or damage caused to the product whilst in the possession of a third party;
vii) any damage or loss caused as a result of the owner’s failure and/or neglect to follow the instructions set out in the owner’s
manual;
viii) any loss or damage caused directly as a result of misuse or malfunction of the product when used simultaneously with
associated equipment;
Furthermore, under no circumstances shall Toshiba be liable for any consequential loss and/or damage including but not
limited to the following: loss of profit, interruption of business, and/or loss of recorded data whether caused during normal
operation or misuse of the product.
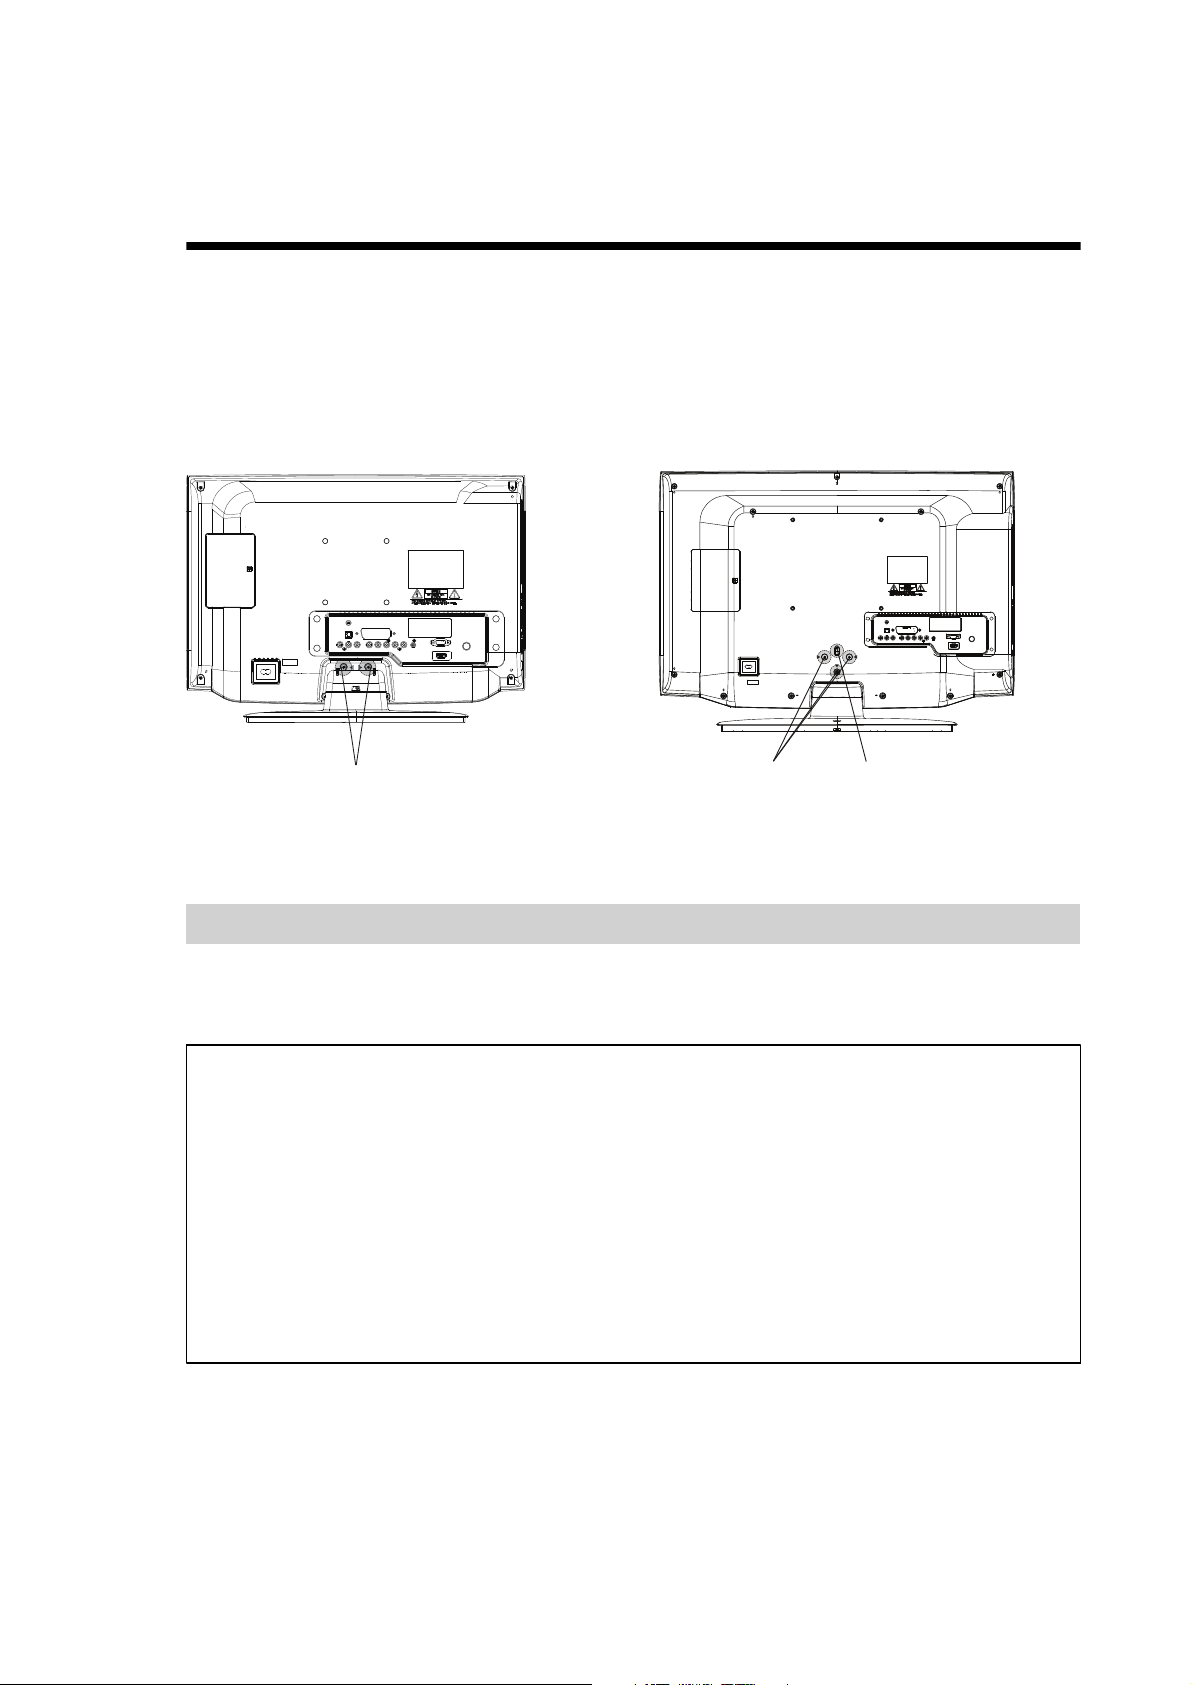
Removing the pedestal stand
(1) Carefully lay the front of the TV face down on a flat, cushioned surface such as a quilt or blanket. Leave the stand protruding
over the edge of the surface.
Note: Extreme care should always be taken when removing the pedestal stand to avoid damage to the LCD panel.
(2) Remove the screws shown in the diagram below. This will allow removal of the pedestal stand.
(3) Once you have removed all screws holding the pedestal stand in place, remove the pedestal stand from the TV by sliding
the pedestal stand away from the TV.
19DV713B/19DV714B/22DV713B/22DV714B 26DV713B/32DV713B
Note:
• 22DV713B, 22DV714B, and 32DV713B are used for illustration purposes.
• The hook is only applicable to 26DV713B and 32DV713B.
Please take note
If stationary images generated by text services, channel identification logos, computer displays, video games, on-screen menus,
etc. are left on the television screen for any length of time, they could leave an afterimage. It is always advisable to reduce both
the brightness and contrast settings.
7
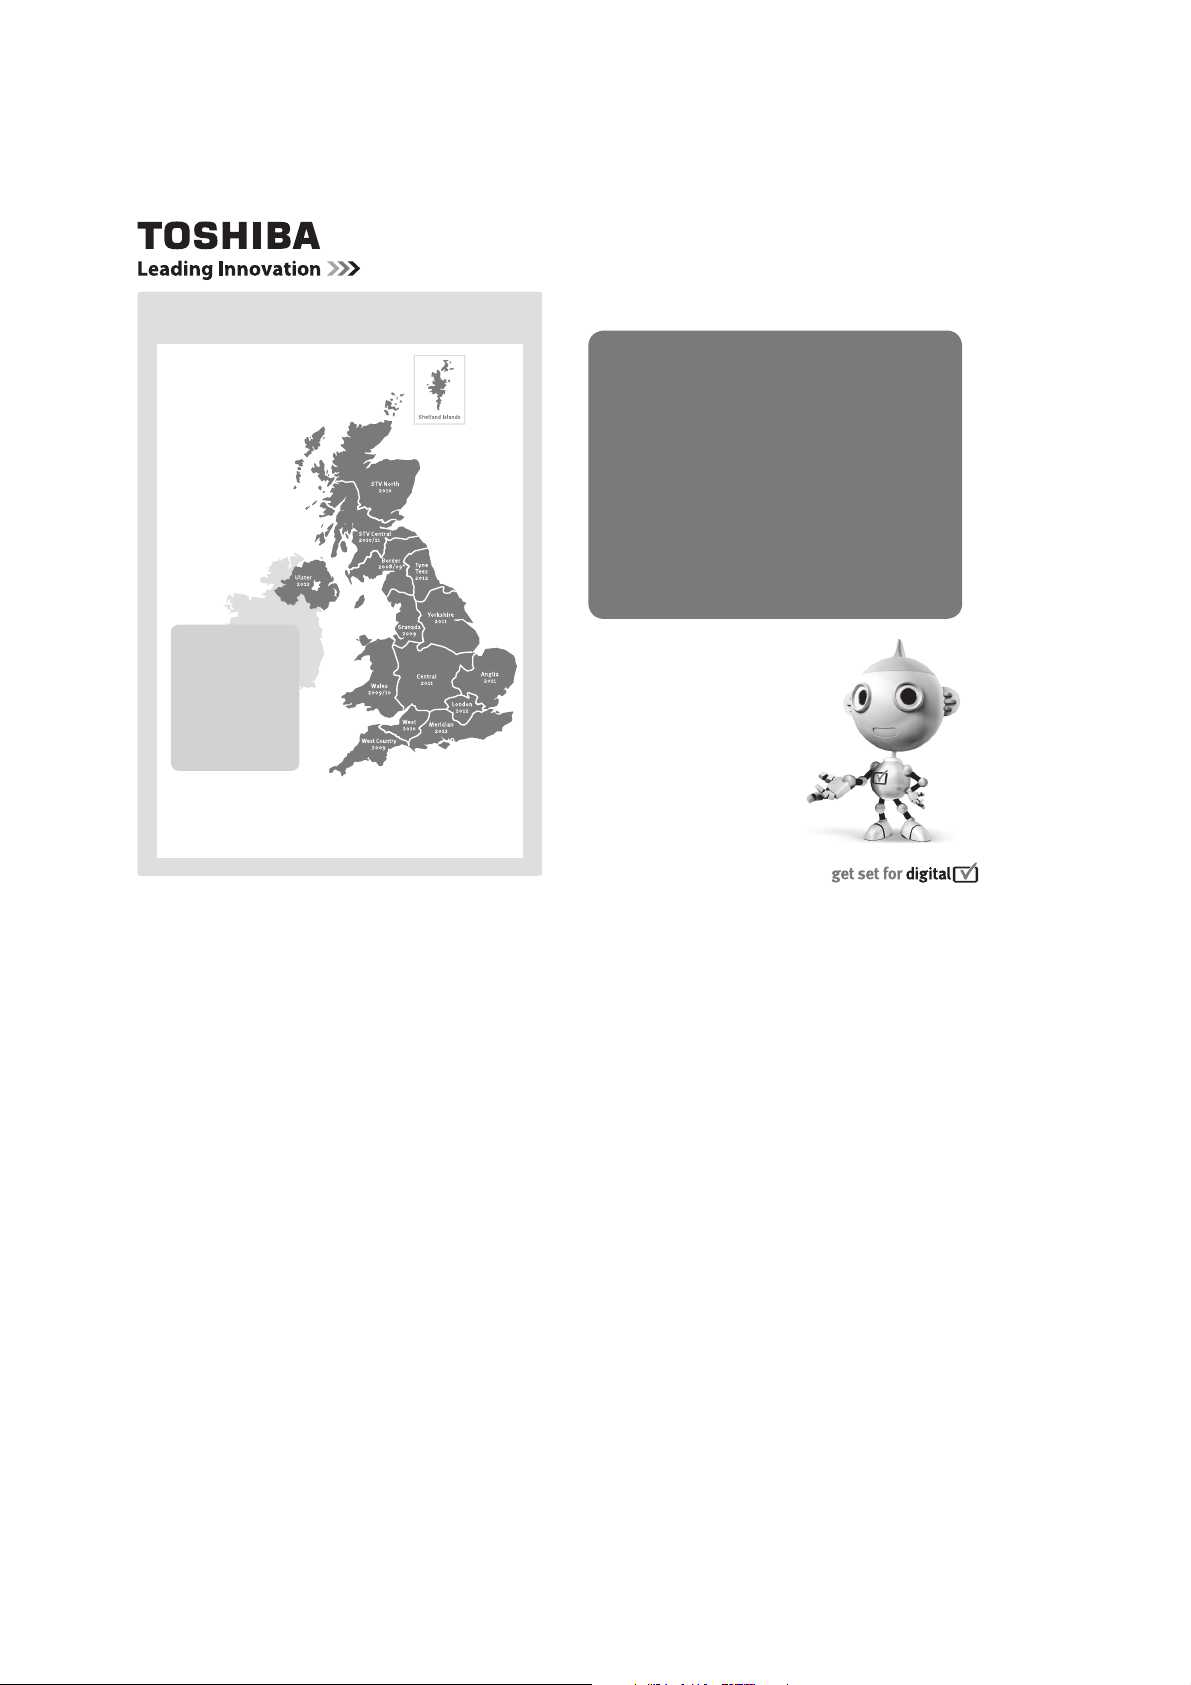
DIGITAL SWITCHOVER
Television in the UK is going digital, bringing us all more
choice and new services. Starting in late 2007 and ending in
2012, television services in the UK will go completely digital,
TV region by TV region.
Please see above to find out when your area switches to
digital.
Digital UK is the independent, non-profit organisation leading
the process of digital TV switchover in the UK. Digital UK
provides impartial information on what people need to do to
prepare for the move to digital, and when they need to do it.
How the switchover affects your TV equipment:
Your new TV has a digital tuner built in, which means it is ready
to receive the Freeview signal by simply plugging it into your
aerial socket (check if you can get digital TV through your
aerial now, or whether you’ll have to wait until switchover, at
www.digitaluk.co.uk).
When the TV switchover happens in your area, there are at
least two occasions when you will need to re-tune your TV in
order to continue receiving your existing TV channels, and also
to pick up new ones, Digital UK, the body leading the digital
TV switchover, will advise you when you need to re-tune during
the switchover.
If you choose to connect your TV to satellite or cable with a
digital box then it will not be affected by switchover, and you
won’t need to re-tune.
How to re-tune:
As new services are broadcast it will be necessary to re-tune
the television in order to view them.
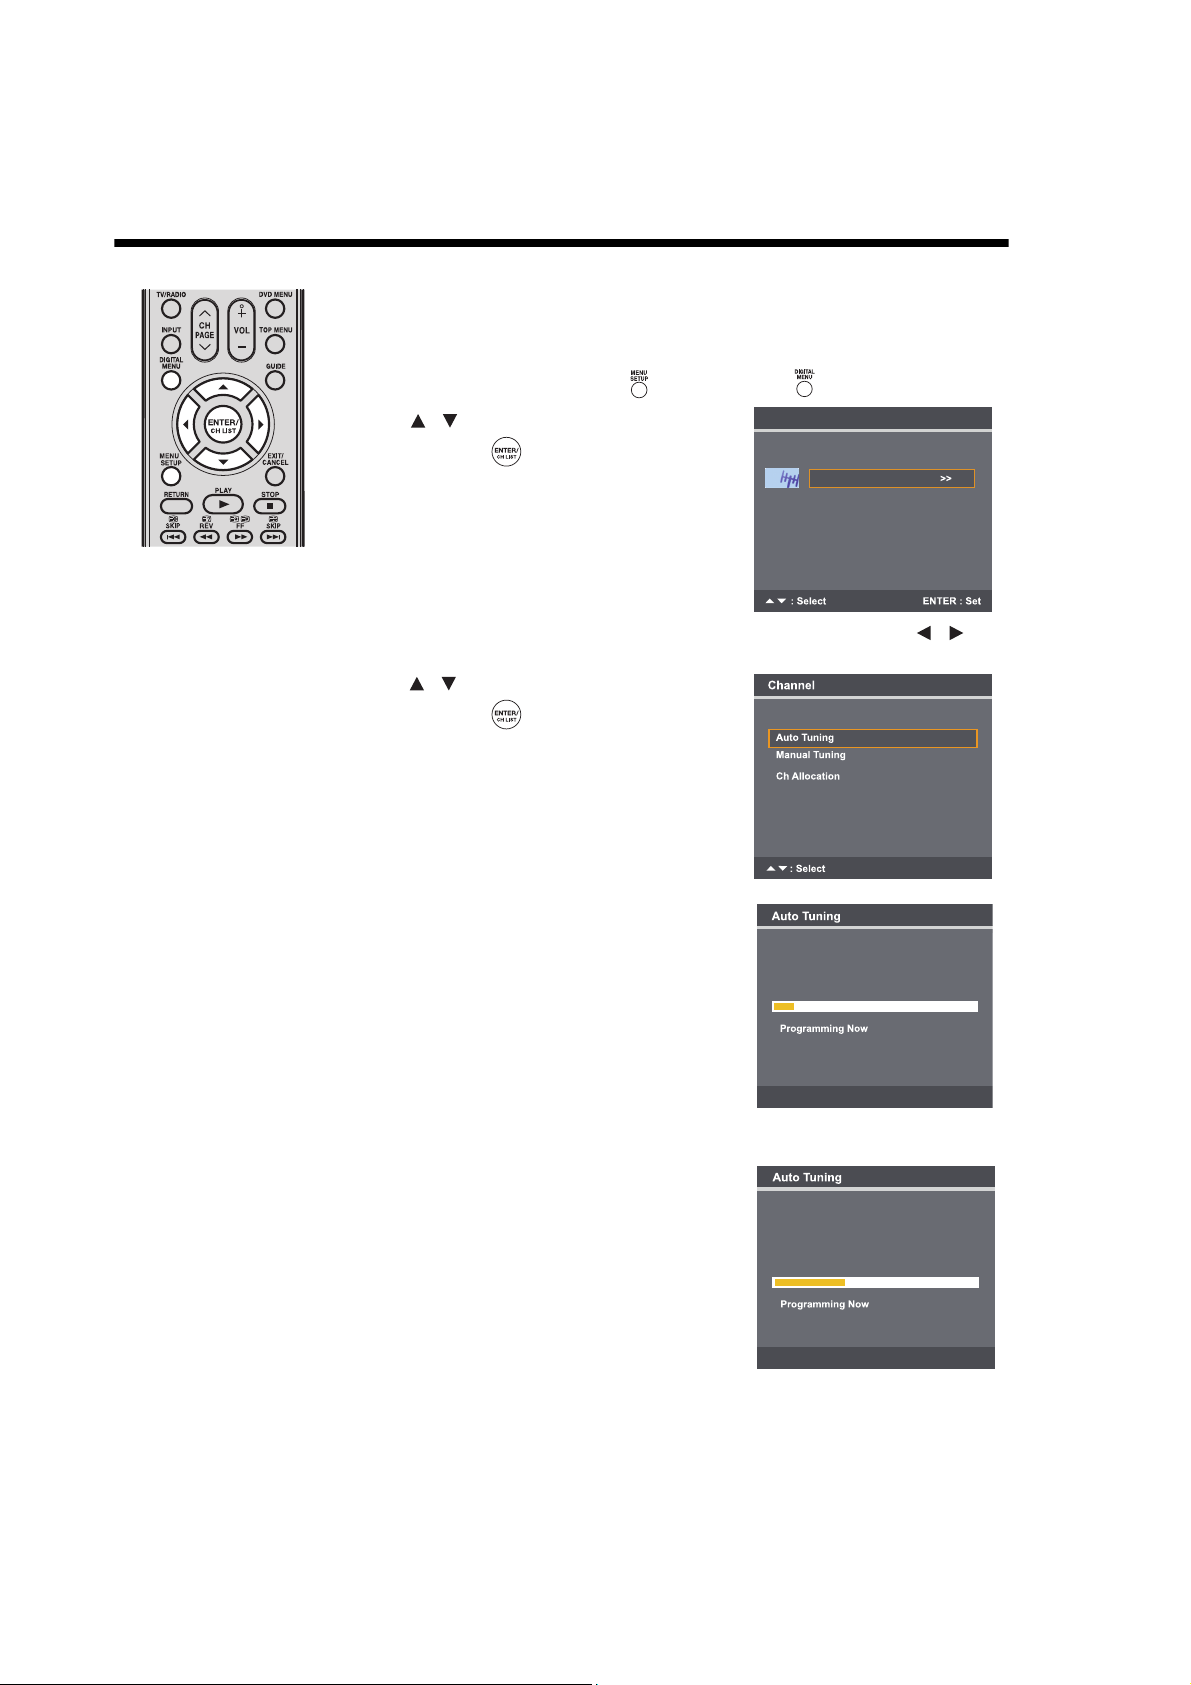
Auto Tuning
will
completely retune the television and can be used to update the
channel list.
1
Press
MENU button
on the remote control unit to display
the Channel menu, and then select
Auto Tuning.
2
A screen will appear warning that all previously stored
channels will be deleted.
You must allow the television to complete the search......
When the search is complete the Auto Tuning screen will
display the total number of service found.
NOTE:
For further detailed instructions on
Auto Tuning,
please refer to pages 16 and 18.
If you are missing channels, it may be that they are not
available in your area, or that your aerial needs upgrading.
If you have any further questions, please contact your
equipment supplier or call Digital UK on 08456 50 50 50
or
visit www.digitaluk.co.uk
When does switchover happen?
*Copeland switches on October 17, 2007
The exact date you
switch depends on the
transmitter you are
served by. To check
when you switch,
go to Digital UK’s
postcode checker on
www.digitaluk.co.uk
Keep this important
leaet about how to
re-tune your TV
during the
digital
TV switchover
8
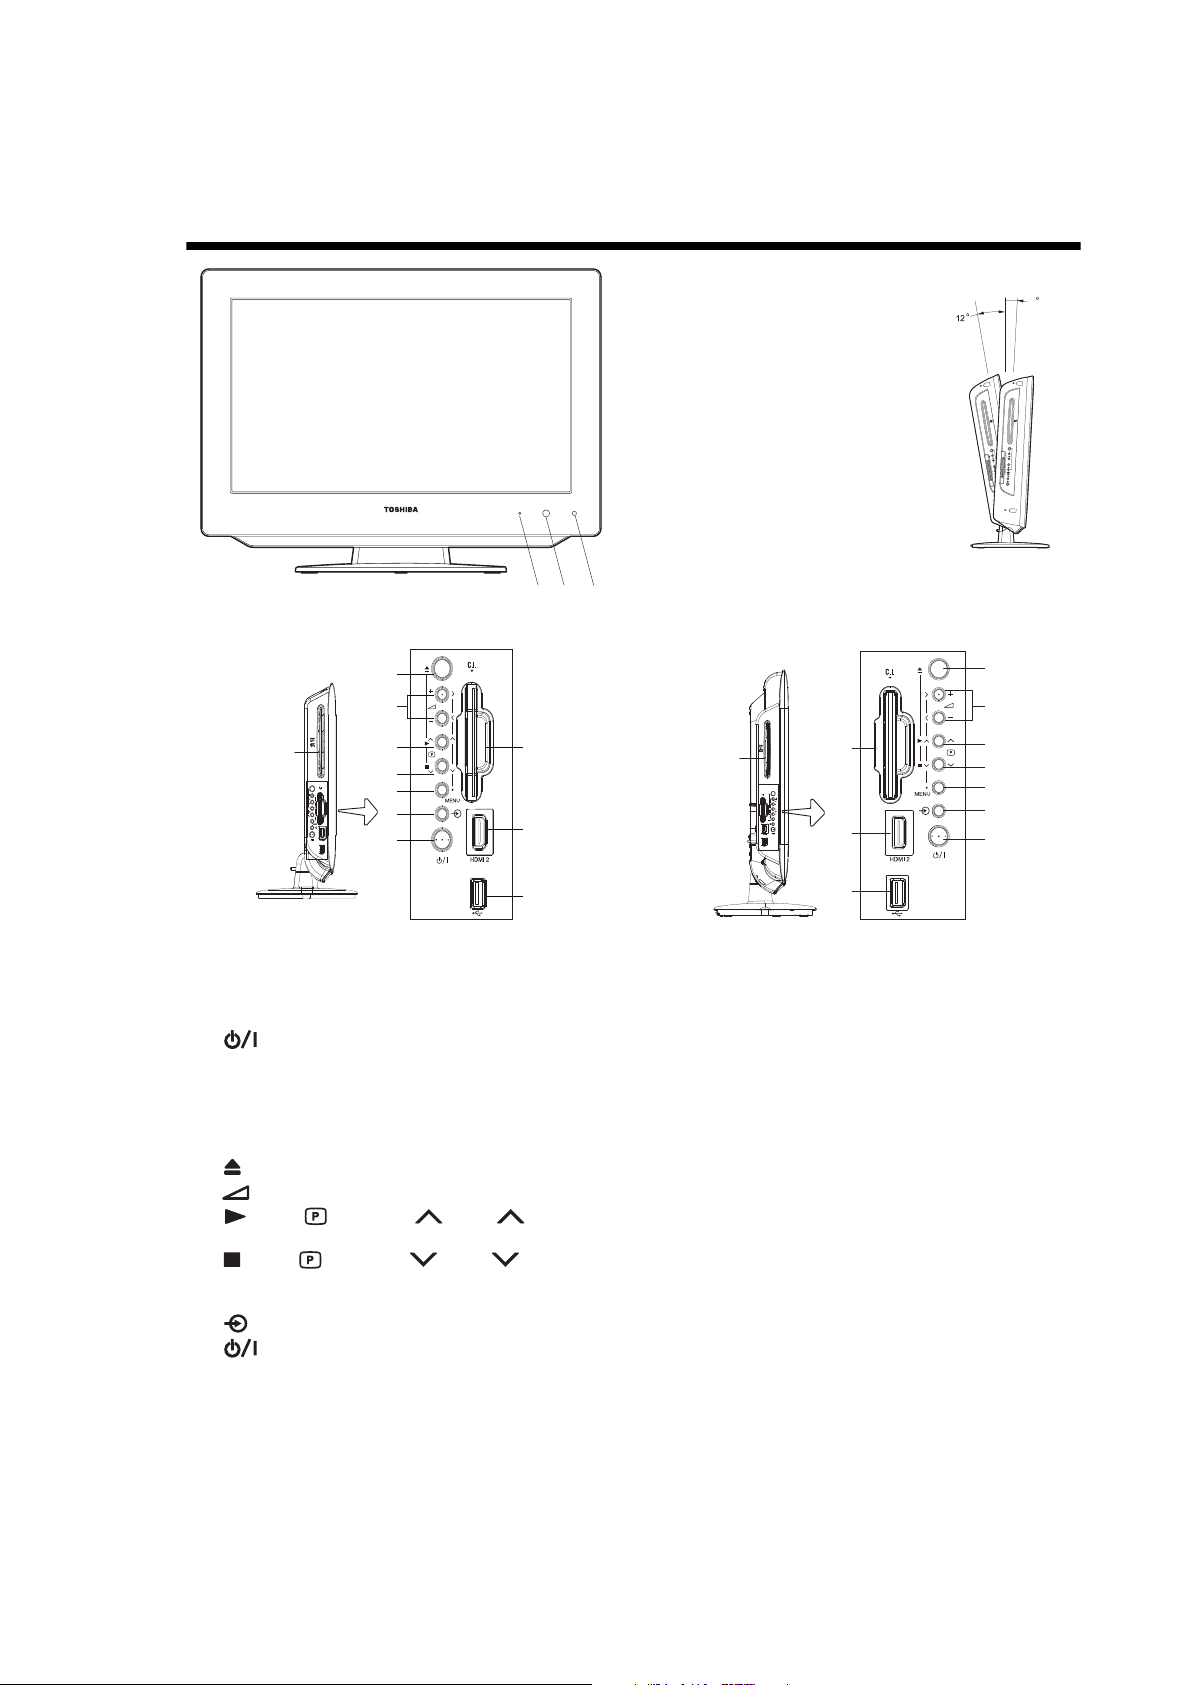
Location of controls
Adjusting the screen angle
You can adjust the angle of the TV
screen 3° forward or 12°backward from
a vertical angle. Hold the base of the TV
while adjusting the angle.
Applicable to the following models:
19DV713B, 19DV714B, 22DV713B,
22DV714B.
3
2
1
19DV713B/19DV714B/22DV713B/22DV714B
26DV713B/32DV713B
3
5
6
4
7
12
4
12
8
9
10
11
Note:
• The position of indicator labels on the keypad may be different depending on the model. 22DV713B, 22DV714B, and
32DV713B are used for illustration purposes.
13
14
13
14
5
6
7
8
9
10
11
Description of indicators and controls
1. POWER indicator: The Power indicator lights red in standby mode, orange in standby mode when the timer is
activated, and green when TV is powered on.
2. Remote sensor
3. Auto Brightness Sensor: This sensor will detect the ambient light conditions to optimise the backlighting level (see page
13).
4. Disc slot: Load the disc into the disc slot to view or listen.
5. EJECT: Press to eject a disc.
6. VOLUME +
7. PLAY
In DVD mode: Playback. In Menu: Functions as up menu navigation button. In Standby mode: Turn the TV on.
8. STOP
In DVD mode: Stop. In Menu: Functions as down menu navigation button. In Standby mode: Turn the TV on.
9. MENU: Press to access the menu system.
10. INPUT/ENTER: Select video input source. In Menu: Use as an ENTER button to confirm selection.
11. POWER button: Connect the supplied AC power cord to 110-240V/50-60Hz AC outlet, and then press the button to
turn the TV on and off.
12. C.I. slot: The Common Interface allows you to insert CAM (Conditional Access Module) and a suitable Smart Card to give
you access to additional Pay-TV services (see page 44). Before inserting the module, make sure to turn off the mains
power and then insert the module all the way into the slot until it is flushed with the side panel buttons.
13. HDMI 2 input: High-Definition Multimedia Interface (HDMI 2) input receives digital audio and uncompressed digital video
from an HDMI device or uncompressed digital video from a DVI device. HDMI connection is necessary to receive 1080p
signals (see pages 74-76).
14. USB terminal: For use when inserting a USB device.
/ -: Press to adjust the volume level. In Menu: Setting.
/ CHANNEL : Press to change to a higher numbered channel set into memory.
/ CHANNEL : Press to change to a lower numbered channel set into memory.
9
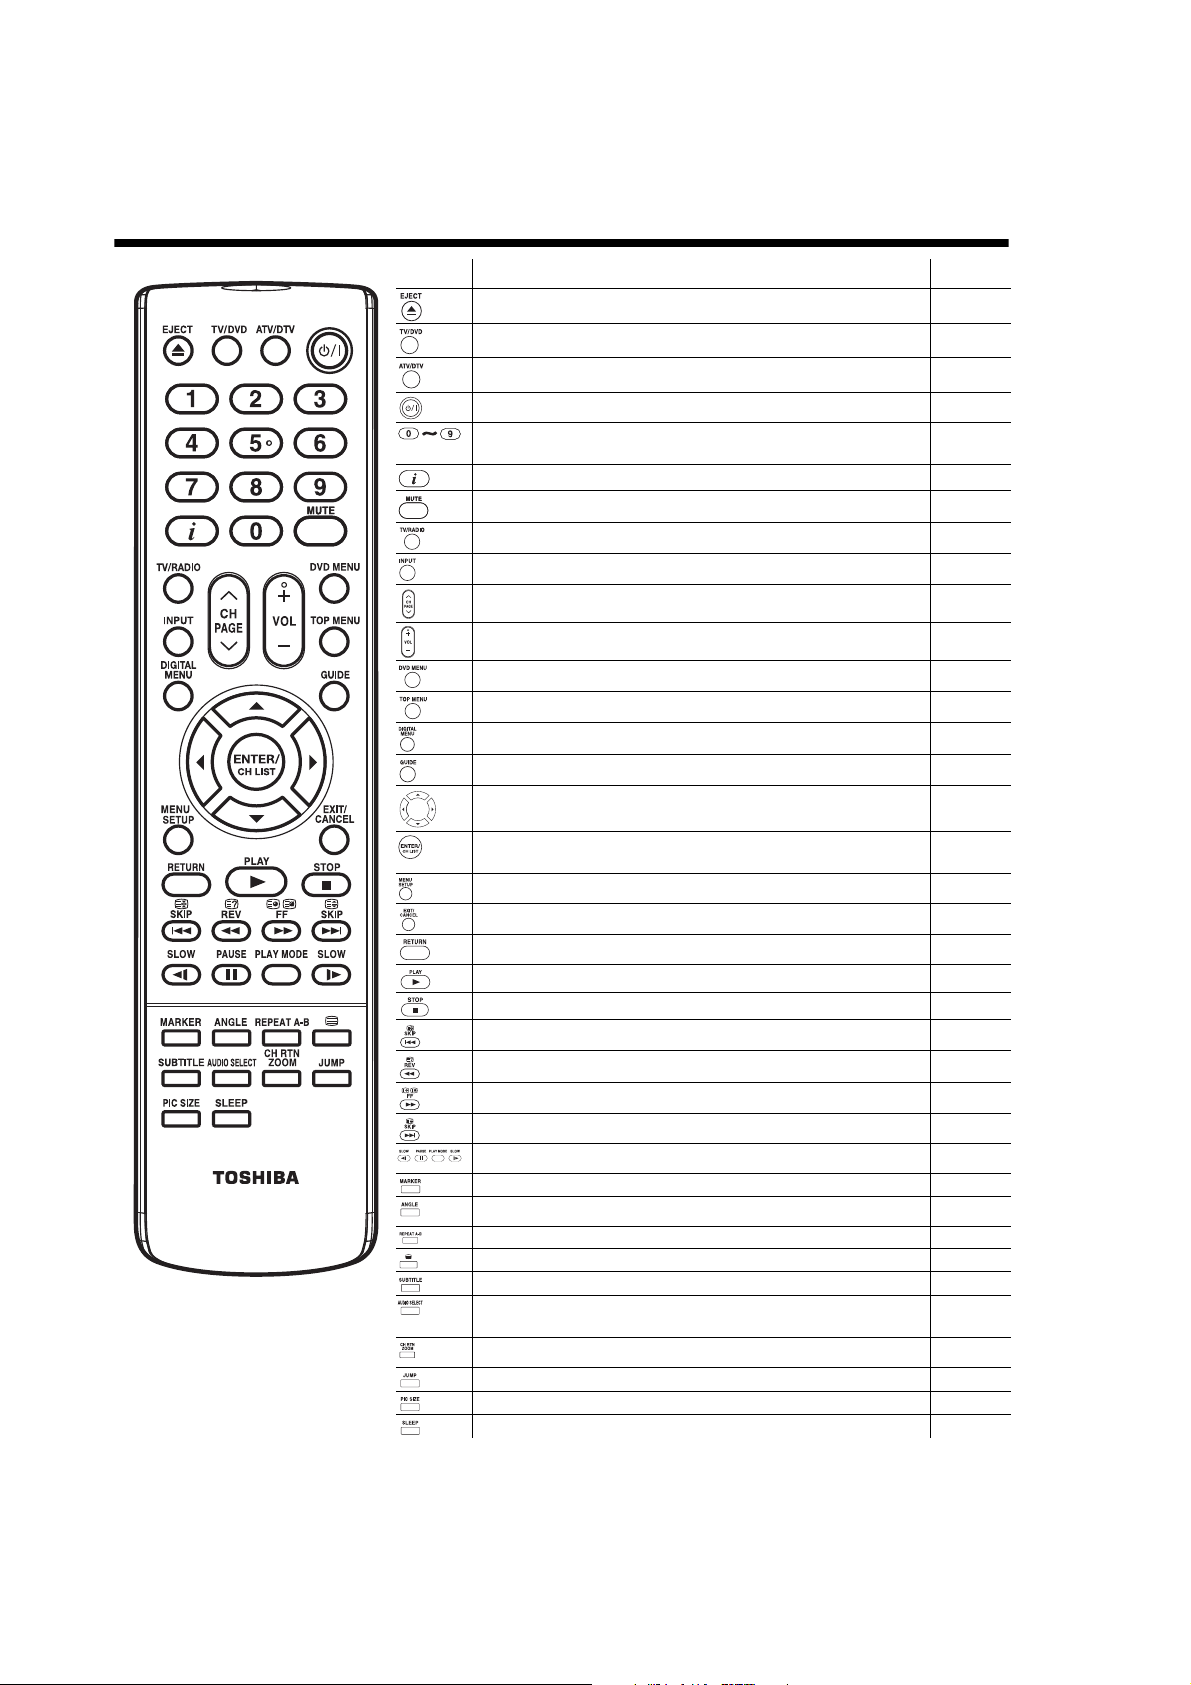
Remote control
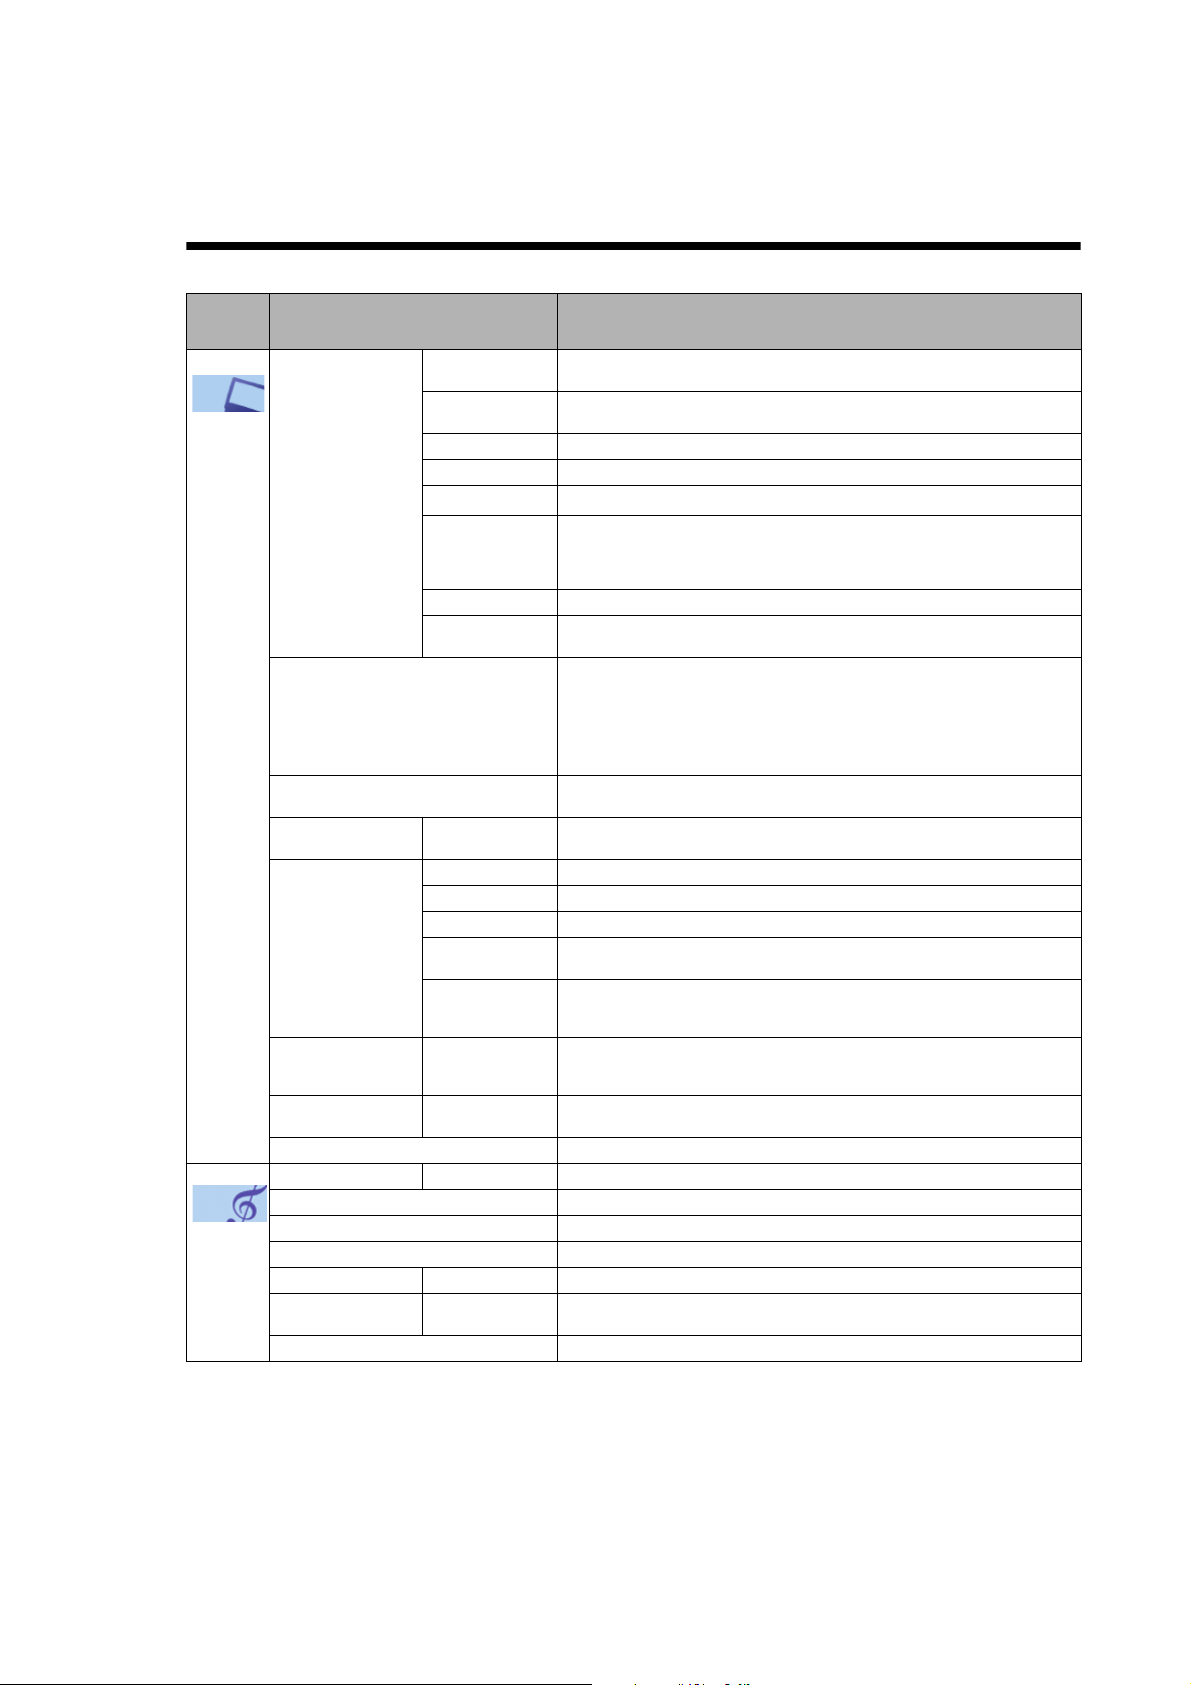
Function Page
Eject a disc from the disc slot 51
Toggle between TV and DVD mode 16, 50
Toggle between analogue TV and digital TV 16
Toggle between power on and standby mode 16
- Select a channel
- Select a teletext page
- Enter the password
Display source information 22, 47, 58
Tur n the sound on/off 21
Toggle between TV, Radio, and Data modes 21
Select an input source 17
- Change the TV channel or teletext page up or down
- In standby mode: turn on the power
Increase or decrease the volume 21
21
23
41, 73
21, 23
16
- In DVD mode, view the DVD menu screen
- In JPEG CD mode, display image thumbnails
- In DVD mode, select a DVD title
- In JPEG CD mode, view the image file browser
In DTV mode, display the Digital Main Menu 16
Display the EPG (Electronic Program Guide) 47
Cursor buttons to select or adjust programming menus when a menu is on-screen 14, 15
- When using the TV menu, enable a menu option or view a sub-menu screen
- In teletext mode, display teletext page 100
- When in TV mode, display the channel list
- In ATV mode, display the Analogue Main Menu
- In DVD mode, display the DVD Setup menu
- Exit the Analogue or Digital Main Menu screen
- Cancel marking
- Exit the DVD Setup Menu screen
- Return to previous directory from Media Player sub-folder or sub-menu
Start or resume di sc playback 50
Cancel disc playback 50
- Pause the teletext display to “hold” the current page in place
- Jump to the previous chapter/track
- In teletext mode, reveal the answers to quiz questions
- During playback, play in fast reverse direction
- In teletext mode, view a sub-page
- During playback, play in fast forward direction
- In teletext mode, toggle the display size
- During playback, jump to the next chapter/track
- Fastext/TOP text buttons
- DVD control buttons
Mark specific playback points in a DVD, VCD, or audio CD 54
- In DVD mode, change the scene angle
- In JPEG CD mode, rotate the image display
Repeat playback of a specific section between two set points (A-B) 55
Toggle the teletext display on or off 23
Set the subtitle of a multi-language DVD 46, 57
- In ATV mode, select between the available broadcast audio channels
- In DTV mode, display the Multi audio menu
- Change the soundtrack language of a multi-language DVD or VCD
- In TV mode, switch to the last channel selected prior to the current one
- In DVD mode, change the image viewing scale of a video or image file
Select the specific point where to start disc playback 53
In TV/DVD mode, change the display’s aspect ratio 25
Configure the Sleep Timer 22
56
60
56
60
16
23
21
16
67
16
54
67
35-37, 39
23
52
23
52
23
52
23
52
23
52, 55
56
62
24
45
57
21
53
10
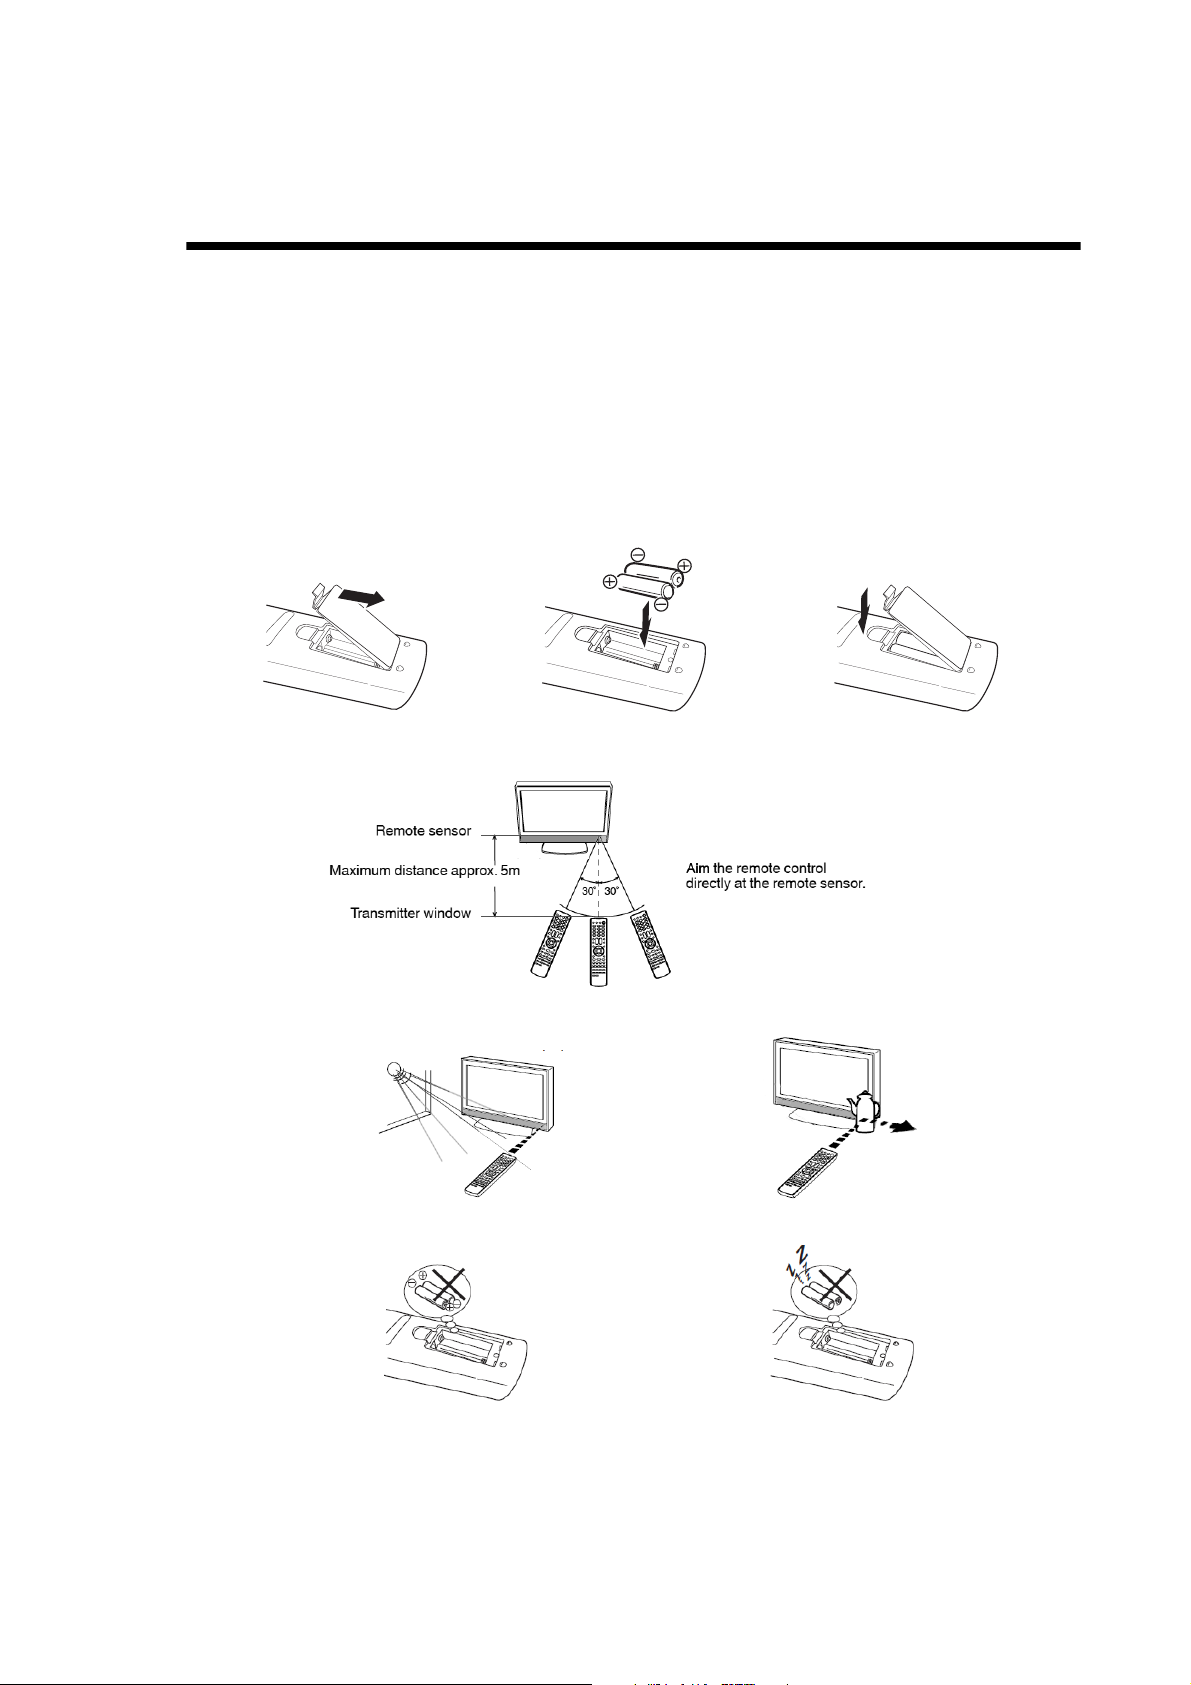
Remote control
1 Open the battery compartment cover
in the direction of the arrow.
2 Install the batteries as shown
below, ensuring the correct polarity.
3 Close the battery compartment.
If bright sunlight directly beams on the front of the TV.
If an obstacle is placed between the TV and the remote.
If the batteries are not installed according to their polarities.
If the batteries are weak.
Install the batteries
Use R03/AAA/UM4 batteries.
Note:
• Weak batteries can leak and severely damage the remote control transmitter. Always remove batteries if they become weak
or if the remote control is not to be used for an extended period of time.
• Do not use old or weak batteries. The remote control may not work properly with a weak voltage from such batteries. Replace
exhausted batteries with new ones. Never try to recharge normal batteries - this could cause an explosion.
• Dispose of batteries in a designated disposal area.
Warnings:
• Never throw batteries into a fire.
• Never expose batteries to excessive heat such as sunshine, fire or the like.
Distance of remote control operation
(continued)
The remote control will not work properly in the following cases:
11
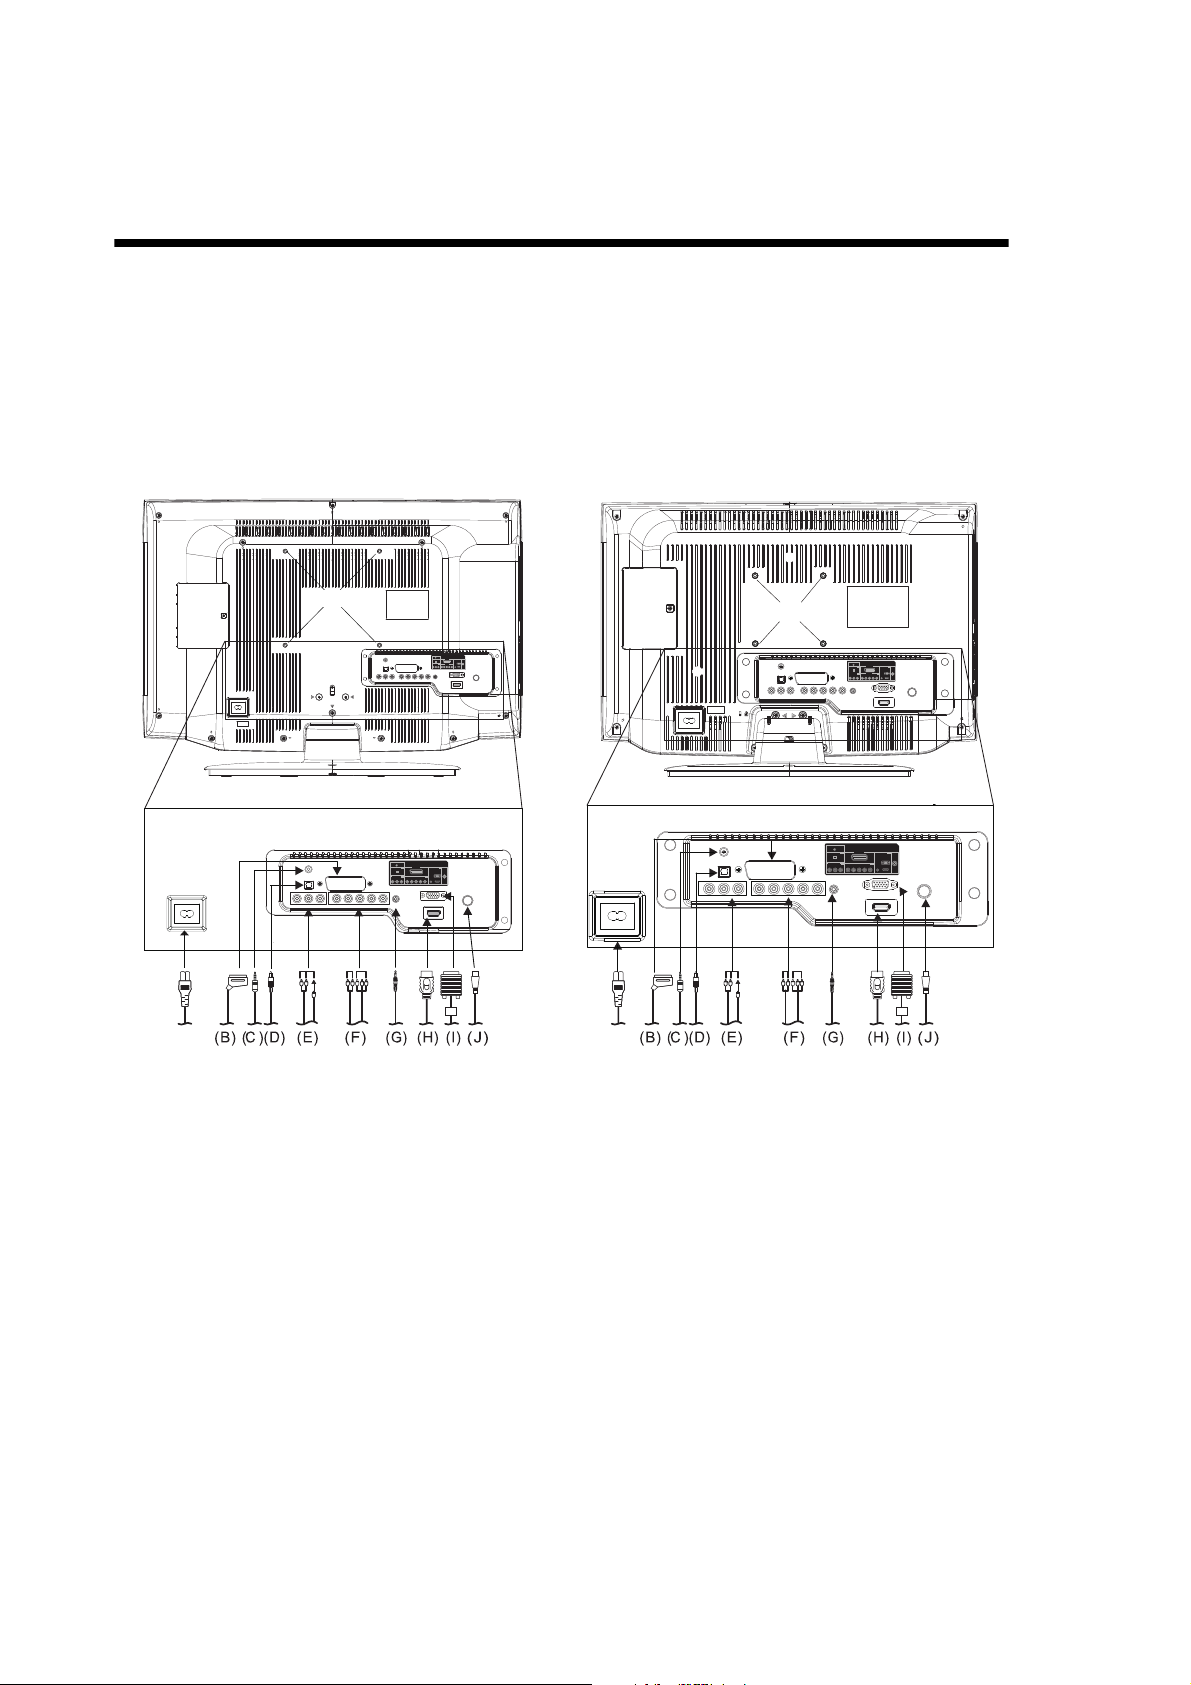
I/O connections
TUNER
HDMI 1
YPbPrLRLR
VIDEO
PC MONITOR
HEAD PHONE
PC/
HDMI 1
AUDIO
DIGITAL AUDIO
OPTICAL
INININ
OUT
SCART (AV1)
COMPONENTCOMPOSITE(AV2)
(K)
AC INPUT
TUNER
HDMI 1
YPbPrLRLR
VIDEO
PC MONITOR
HEAD PHONE
PC/
HDMI 1
AUDIO
DIGITAL AUDIO
OPTICAL
INININ
OUT
SCART (AV1)
COMPONENTCOMPOSITE(AV2)
TUNER
HDMI 1
YPbPrLRLR
VIDEO
PC MONITOR
HEAD PHONE
PC/
HDMI 1
AUDIO
DIGITAL AUDIO
OPTICAL
INININ
OUT
SCART (AV1)
COMPONENTCOMPOSITE(AV2)
AC INPUT
(K)
TUNER
HDMI 1
YPbPrLRLR
VIDEO
PC MONITOR
HEAD PHONE
PC/
HDMI 1
AUDIO
DIGITAL AUDIO
OPTICAL
INININ
OUT
SCART (AV1)
COMPONENTCOMPOSITE(AV2)
(A) (A)
Illustration of 26DV713B/32DV713B
Illustration of 19DV713B/19DV714B/ 22DV713B/
22DV714B
Note:
Before you connect other appliances:
• To avoid potentially damaging your TV, make sure all items are switched off and disconnected from the mains power when
you make the connections.
• Arrange the desired connection.
• When you have finished making the connections, reconnect the mains power to the TV and switch it back on.
Connect your aerial as shown below. Connections to other equipments is explained further on pages 74-78.
If you have problems with reception, consult a TV antenna installer.
Note:
• 22DV713B, 22DV714B, and 32DV713B are used for illustration purposes.
(A) AC input: Connect one end of the supplied AC power cord into the TV’s AC input jack, and the other end to an AC 110-
240V/50-60Hz power outlet to turn on and operate the TV.
(B) AV1 (SCART) socket: For the connection of SCART cable, see pages 77-78.
(C) HEADPHONE jack: For use when inserting a headphone with a mini plug (3.5 mm).
(D) OPTICAL DIGITAL AUDIO output: Optical audio output in Dolby Digital format for connecting an external Dolby Digital
decoder, amplifier, or home theatre system with optical audio input (see page 77).
(E) AV2 (VIDEO, Audio L/R) input: Standard (composite) video and standard audio inputs plus for connecting devices with
composite video (see pages 77-78).
Note: Standard (composite) video cables carry only video information; separate audio cables are required for a complete
connection.
(F) COMPONENT input: For use when connecting devices with component video output (see page 78).
Note: Component video cables carry only video information; separate audio cables are required for complete connection.
(G) PC/HDMI 1 AUDIO input: PC audio input terminal is shared with HDMI 1 analogue audio input terminal (see pages 74-75).
(H) HDMI 1 input: High-Definition Multimedia Interface (HDMI 1) input receives digital audio and uncompressed digital video
from an HDMI device or uncompressed digital video from a DVI device. Also see (G). HDMI connection is necessary to
receive 1080p signals (see pages 74-76).
(I) PC MONITOR input (PC): For use when connecting a personal computer (see page 74).
(J) Tuner: Connect the outdoor aerial to the aerial input socket (see page 77).
(K) Bracket holes: Fix a wall mounting bracket (not supplied) here.
12
Using the Auto Brightness Sensor
/
/
Picture
Auto Brightness Sensor Off
Reset
: Adjust
When the Auto Brightness Sensor feature is set to On, the TV will automatically optimise the backlighting levels to suit ambient
light conditions.
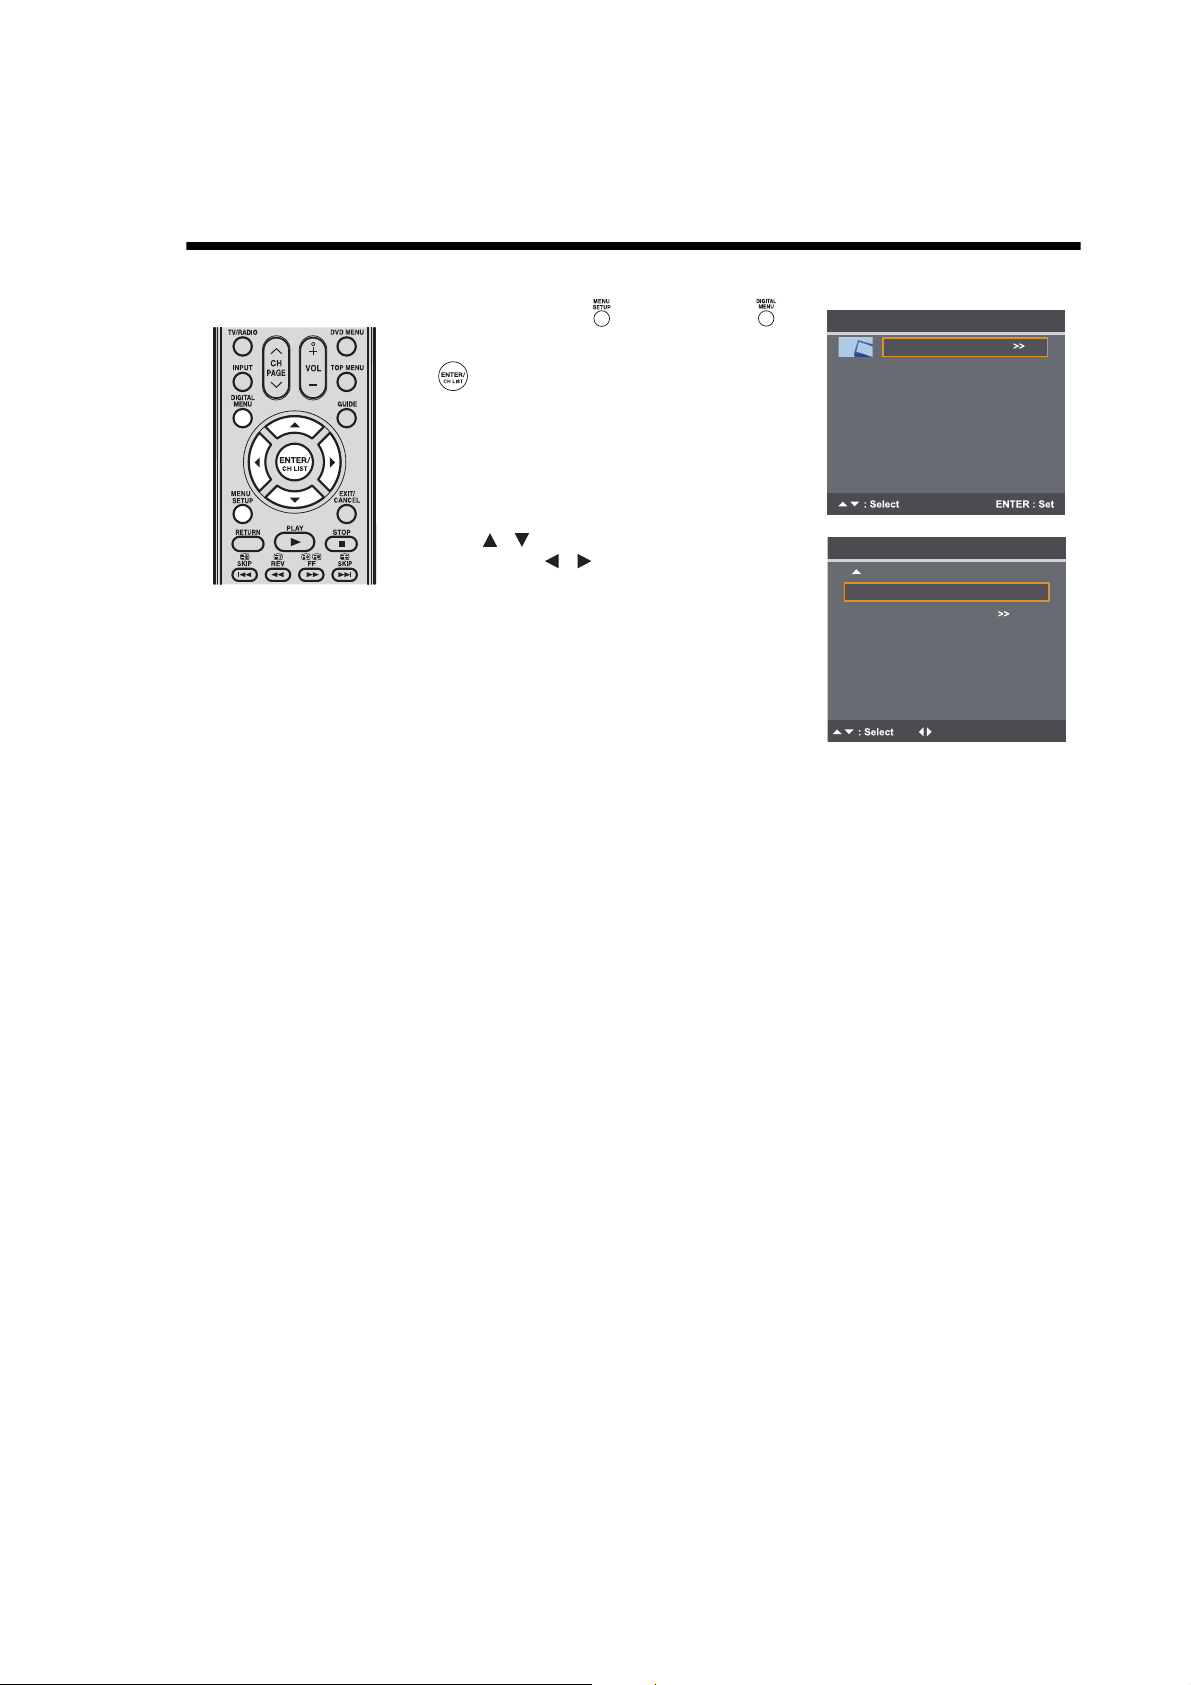
Press MENU SETUP or DIGITAL MENU to
1
display the Main Menu screen.
Select Picture, and then press ENTER/CH LIST
.
Press to select Auto Brightness Sensor,
2
and then press to select On or Off to confirm
your choice.
Main Menu
Picture
Sound
Channel
Setup
13
Auto setup
Auto Installation
: Adjust
Menu Language
English
Country UK
Auto Tuning
Energy Saving Mode Home
/
/
/
/
Auto Installation
: Adjust
Menu Language
English
Country UK
Auto Tuning
Energy Saving Mode Home
/
/
Auto Installation
Menu Language
English
Auto Tuning
: Adjust
Energy Saving Mode Home
Country UK
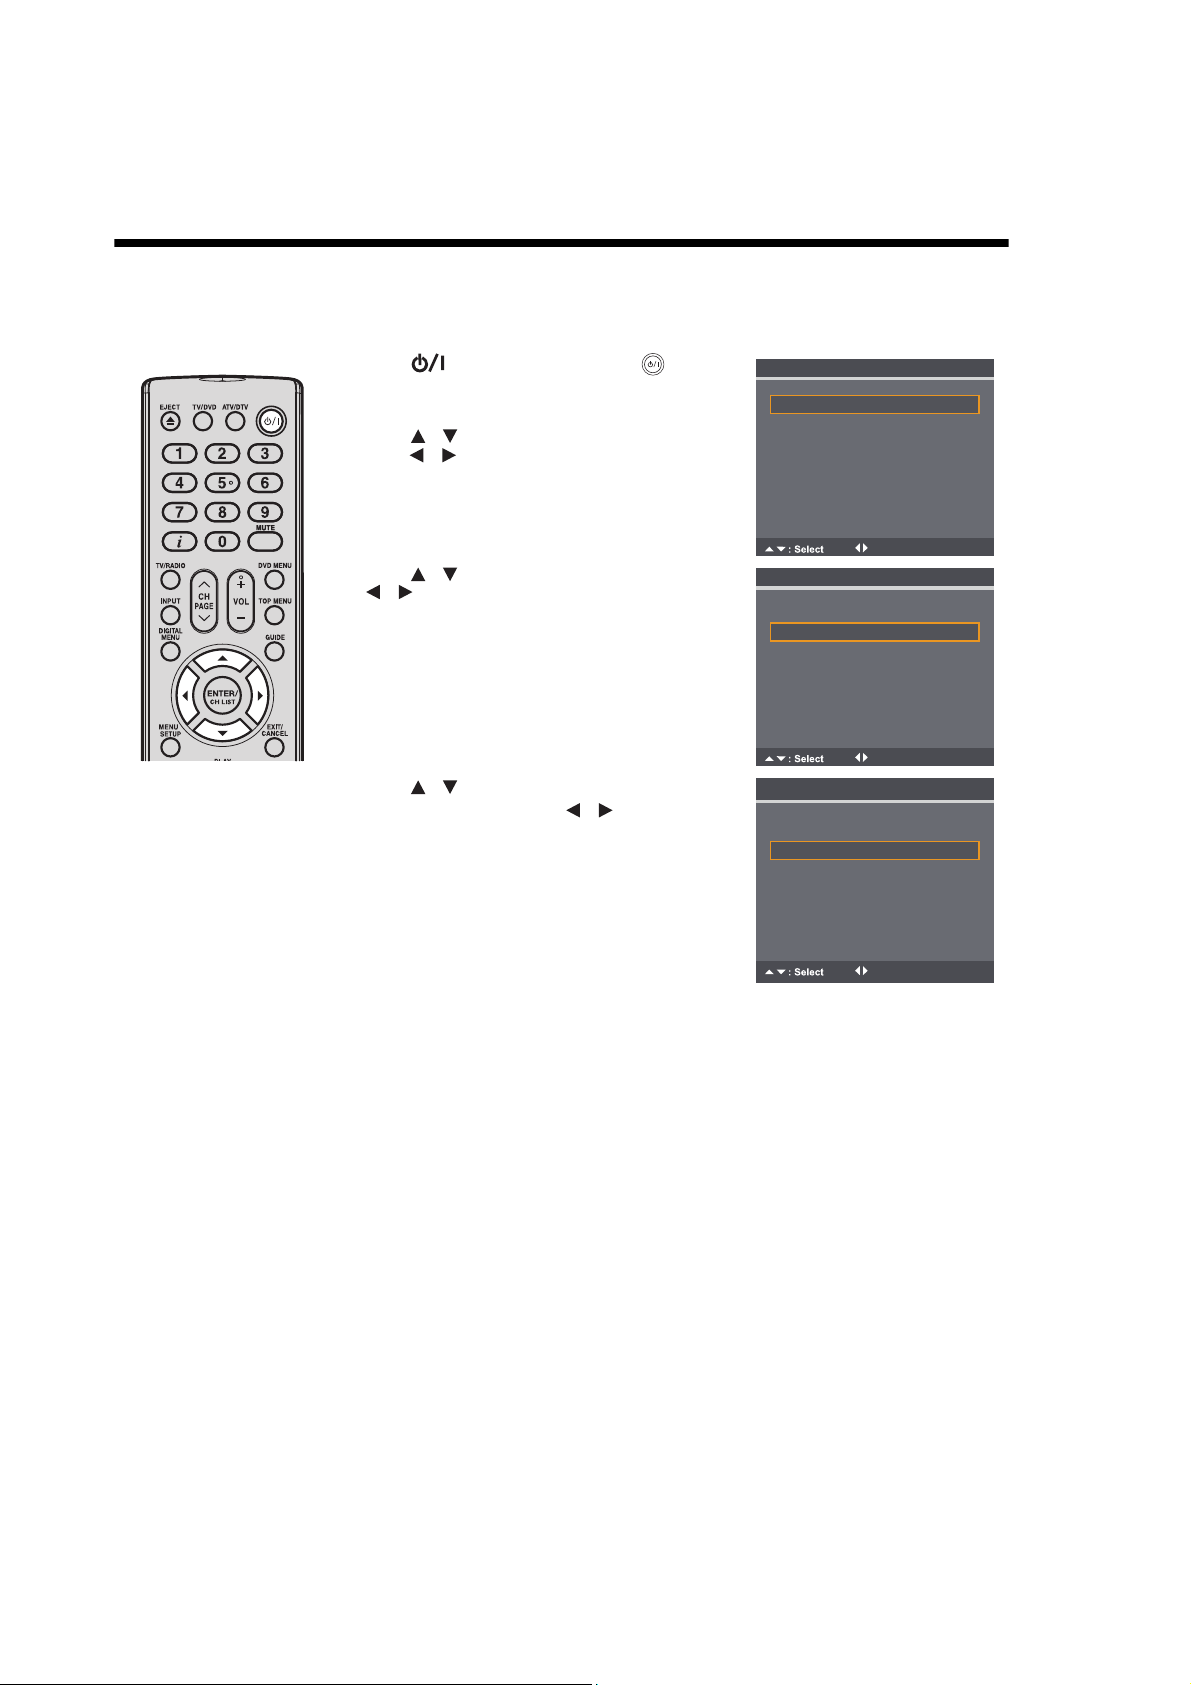
Your TV has an automatic installation routine which makes installation easy. When you turn on the TV for the first time, the
automatic installation routine is activated. This routine helps you select the on-screen language, country, energy saving mode,
and automatically search for and store all available analogue and digital (DVB) channels.
The automatic station presetting feature is for the TV’s built-in tuner only. If you have a device such as a digital decoder (e.g.
Satellite or Digital Terrestrial) connected (see page 77), you need to tune it in separately according to its own instructions.
Press on the TV control panel or on the
1
remote control.
The Auto Installation menu will appear.
Press to select Menu Language, and then
2
press to select your preferred language.
Press to select Country, and then press
3
4
to select your country.
Press to select Energy Saving Mode.
For normal home use, press to select Home.
14
Note:
• The factory default settings of this TV meet the Energy Saving requirements. Enabling or
changing certain features and functionality (e.g. Picture Setting) may increase energy
consumption, possibly beyond the limits required for Energy Saving qualification.
To ensure your TV is operating at optimal energy efficiency, select [Home] mode during
initial activation.
• The corresponding default setting of Picture Preference to [Home] mode is “Standard”,
and the corresponding default setting of Picture Preference to [Retail] mode is “Sports”.
The Energy Saving Mode will remain the same regardless of the changes made to the
setting of Picture Preference.
• If you want to change the current energy saving mode setting, perform the Reset
procedure (see page 28) and run the auto installation routine to select a different mode.
Note:
/
Connect aerial to TV then press ENTER to
start auto tuning
EXIT : End
(Analogue)
Auto Installation
Menu Language
English
Analogue Channel Found 16
Country UK
Auto Tuning
EXIT : Cancel
Energy Saving Mode Home
(Digital)
• The Auto Tuning process
will only start by itself the
first time you turn on the
TV/DVD. To enable Auto
Tuning in a later time, see
page 18.
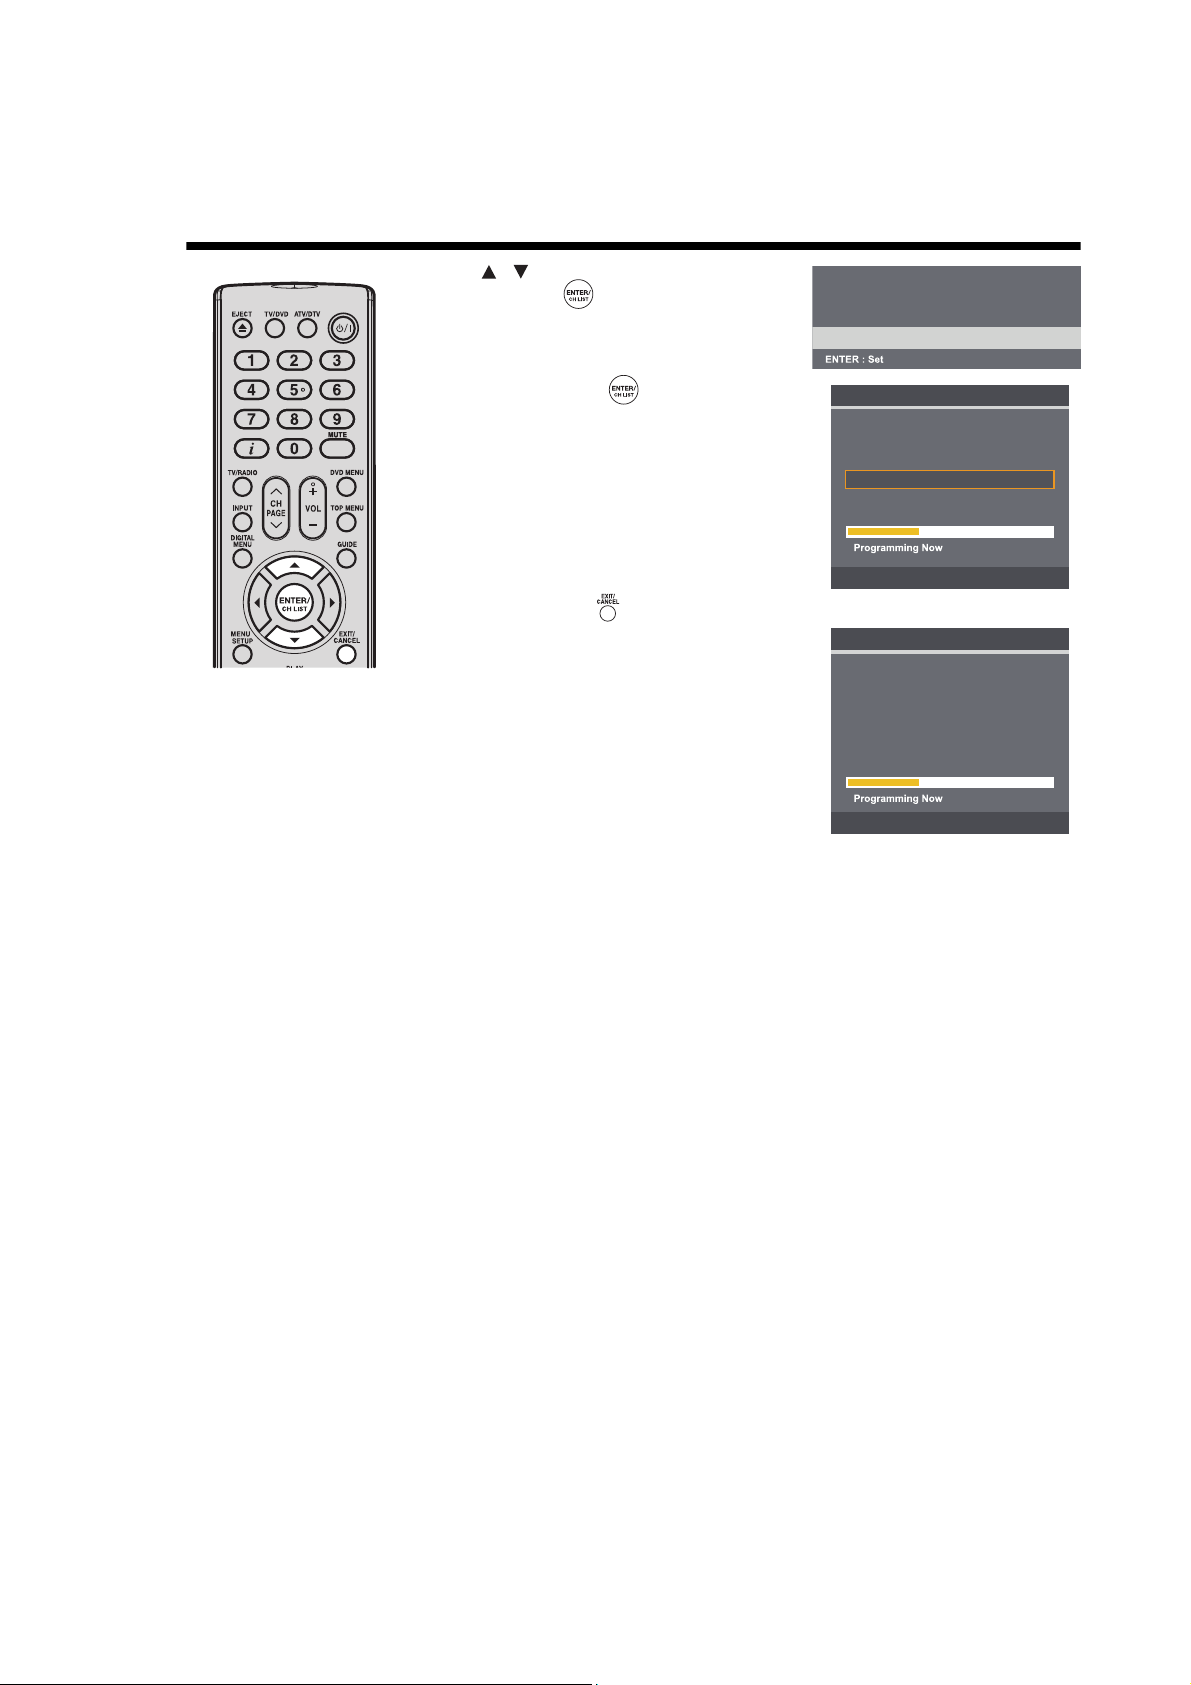
Press to select Auto Tuning, and then press
5
ENTER/CH LIST .
A message prompt will appear with option to
connect aerial to TV.
Press ENTER/CH LIST to start Auto Tuning.
6
Your TV will now automatically detect all available
channels in your area and store them in the TV’s
memory. Analogue channels will be scanned first,
and then digital channels.
When the Programming Now progress bar is
completely highlighted, the Auto Tuning process is
finished.
To cancel the Auto Tuning process:
Press EXIT/CANCEL .
Note:
• Please be patient. The Auto Tuning process can
take several minutes to complete.
Auto setup (continued)
Auto Installation
Menu Language
Country UK
Energy Saving Mode Home
Auto Tuning
DTV Channel Found 5
Radio Channel Found
English
3
EXIT : Cancel
15
Quick guide for menu operation
/
/
/
Main Menu
Picture
Sound
Channel
Setup
/
/
UK
Country
>>
>>
>>
: Adjust
/
: Adjust
Auto Tuning will delete all previously
stored channels -
Do you want to proceed?
Yes No
(Analogue)
DTV Channel Found
0
EXIT : Cancel
Radio Channel Found 0
Frequency(kHz) 642000
(Digital)
Preparations:
• Turn on the TV with the
button on its left
side.The power
indicator will light green.
To place the TV in standby
mode, press on the
remote control. Power
indicator will change from
green to red. To turn on
the TV from standby
mode, press on the
remote control again.
In standby mode, you can
also turn the TV on with
on the TV or
CH on the remote
control.
To turn off the TV, press
button on it; to
completely switch it off,
disconnect the mains
power supply.
•Press TV/DVD to
select TV mode.
•Press ATV/DTV to
toggle between analogue
TV and digital TV mode.
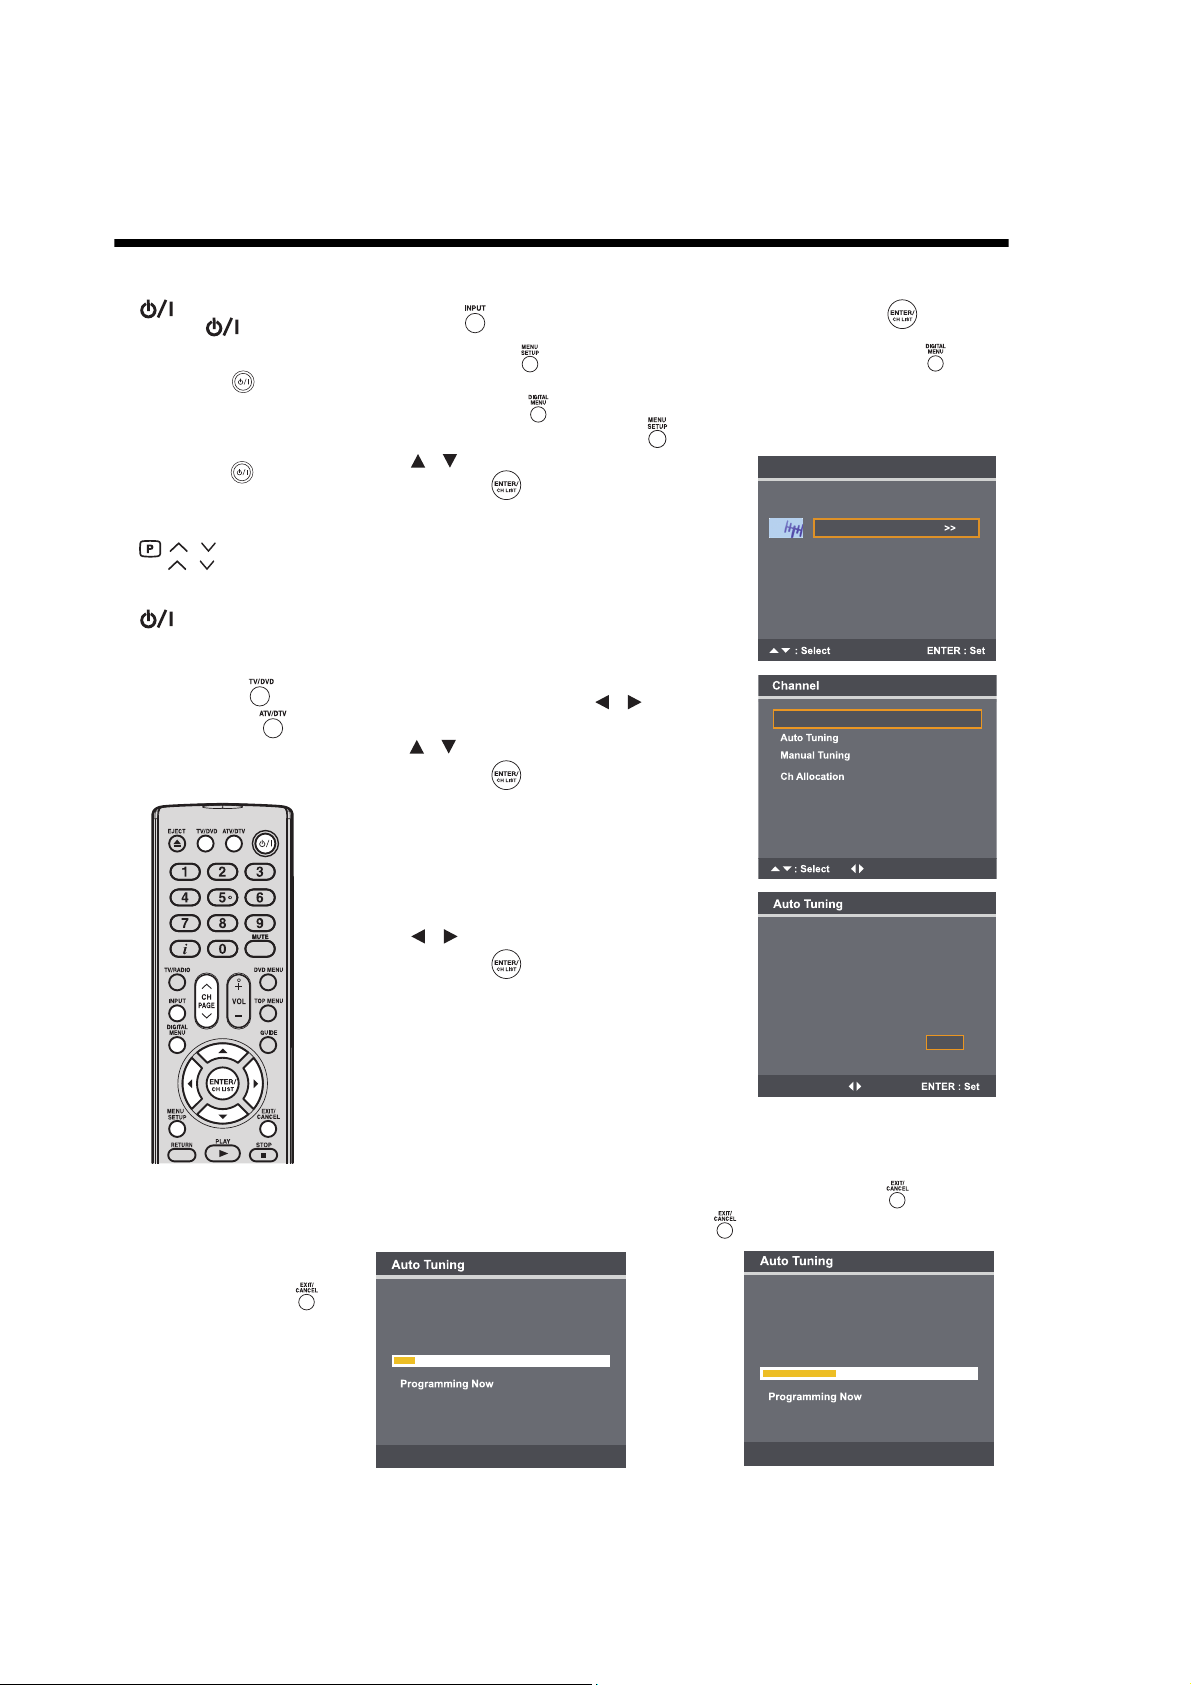
Quick guide for menu operation
Launch the Main Menu screen. For example: Select Auto Tuning.
Press INPUT to select ATV or DTV, and then press ENTER/CH LIST .
1
Press MENU SETUP in ATV (analogue TV) mode or press DIGITAL MENU in DTV
2
(digital TV) mode to display the Main Menu screen.
When DIGITAL MENU is pressed in ATV mode, it will automatically switch to DTV mode.
And it is possible to use MENU SETUP in DTV mode.
Press to select Channel, and then press
3
ENTER/CH LIST .
On the Channel menu, the Country option is
4
automatically highlighted. Press to select
your country.
Press to select Auto Tuning, and then press
ENTER/CH LIST .
Note:
• If no button is pressed
after approximately 60
seconds, the Main Menu
screen will disappear.
•Press EXIT/CANCEL
to exit the Main Menu
screen.
16
A message prompt will appear with option to delete
5
previously stored channels.
Press to select Yes or No, and then press
ENTER/CH LIST .
The auto scan process will now begin. A progress bar appears to indicate scanning
6
progress.
Note:
• All the channels will be deleted before the scanning process begins.
• You can cancel the scan process at any time by pressing EXIT/CANCEL . The carriers
and the services stored before EXIT/CANCEL is pressed will be stored.
Analogue Channel Found
0
EXIT : Cancel

Note:
/
ATV
DTV
AV1
AV2
Component
HDM1
HDM2
AV1
AV2
Component
HDM1
HDM2
7. PC
8. DVD
ENTER : Set
Select
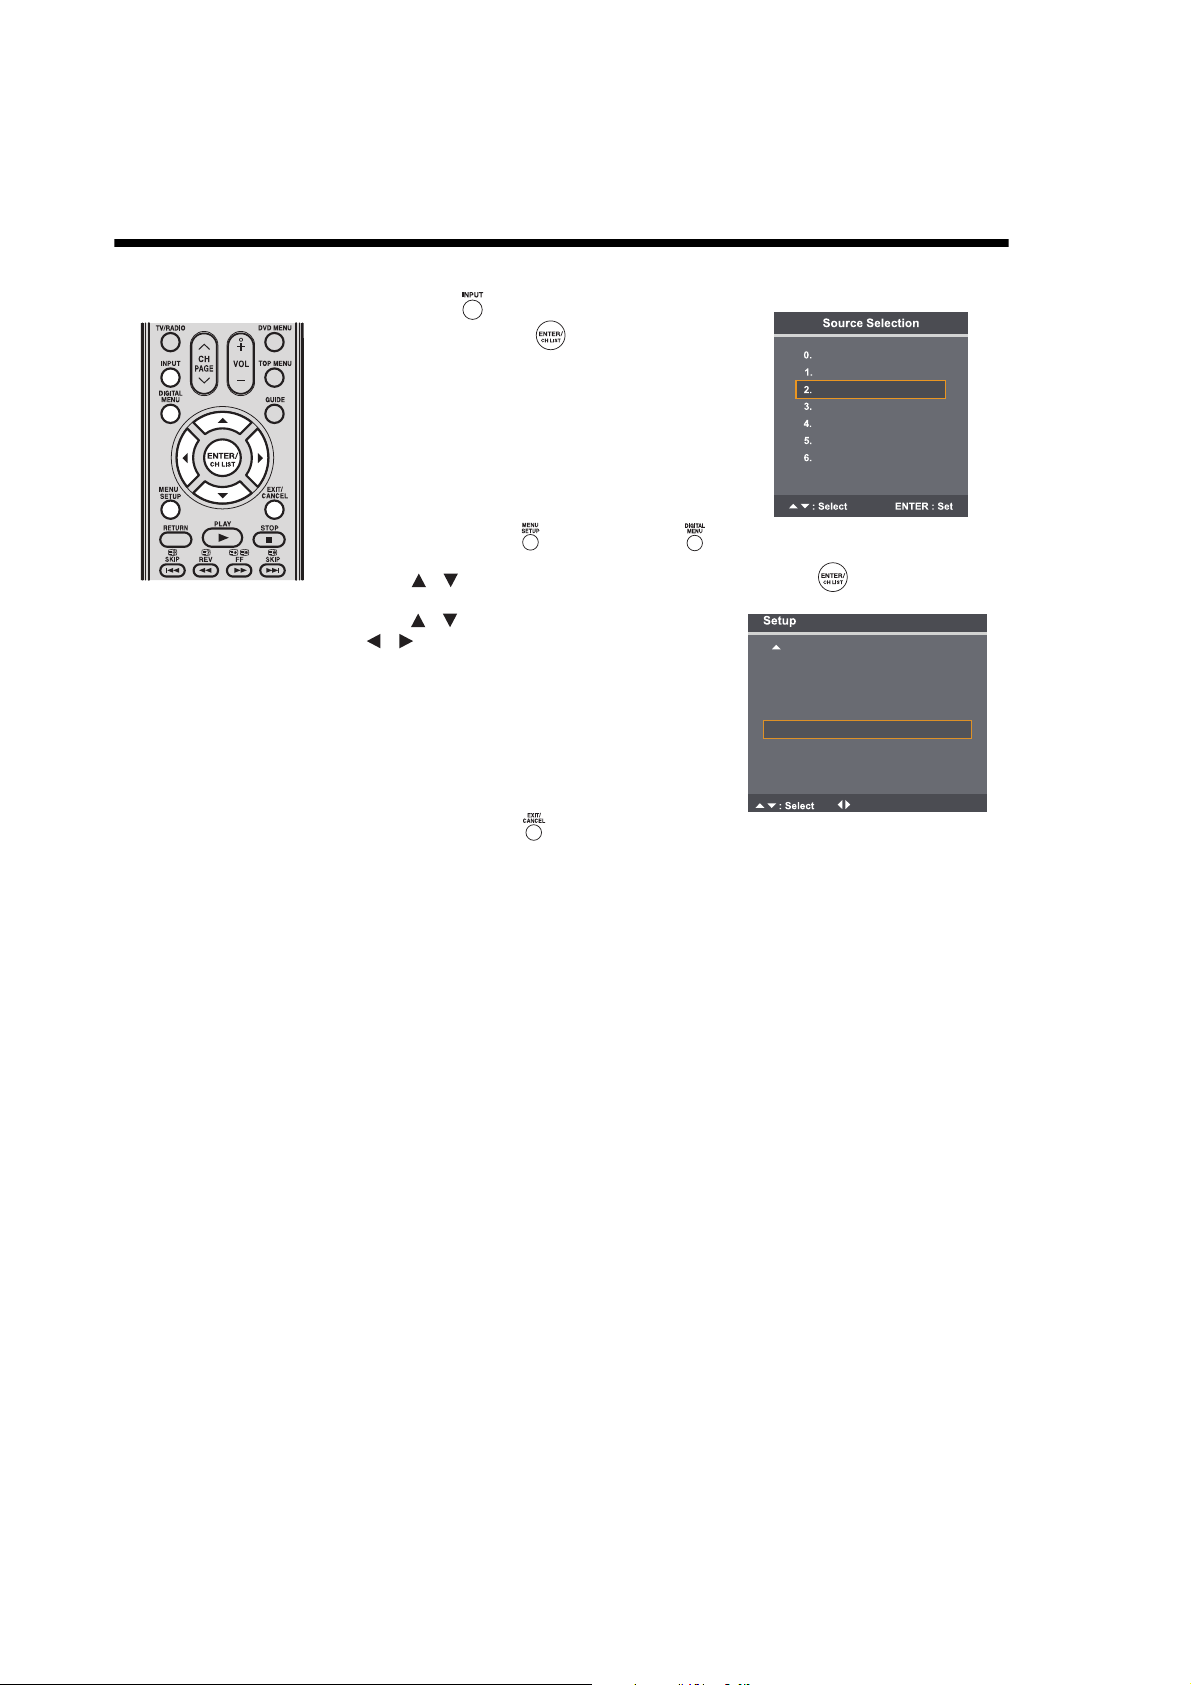
• If no button is pressed
after approximately 5
seconds, the Source
Selection menu screen
disappears.
Selecting the video input source
Selecting the video input source
Press INPUT to view a signal from the device connected to your TV, such as a VCR or
1
DVD player.
You can select each input source according to the devices you have connected to your TV.
Press or the corresponding number on the
2
screen to select a video input source, and then
press ENTER/CH LIST within 5 seconds.
17
Automatic station presetting with the built-in tuner
/
Main Menu
Picture
Sound
Channel
Setup
/
/
UK
Country
>>
>>
>>
ENTER : Set
EXIT : Cancel
Analogue Channel Found
0
(Digital)
(Analogue)
Automatic station presetting with the built-in tuner
Perform this feature to search for and store new analogue and digital TV programmes after the
Automatic Installation (see page 14).
Preparation:
Make sure your antenna is connected to the aerial input (see page 12). Select ATV or DTV (see
page 16), and then press MENU SETUP or DIGITAL MENU .
1 Press to select Channel, and then press
ENTER/CH LIST .
On the Channel menu, the Country option is automatically highlighted. Press to
2
select your country.
Press to select Auto Tuning, and then press
3
ENTER/CH LIST .
The automatic tuning will search for available
channels and store them in a correct order. During
the search the sound is muted. When all channels
have been stored, the normal TV screen will appear.
18
DTV Channel Found
Radio Channel Found 0
Frequency(kHz) 642000
0
EXIT : Cancel
Note:
Main Menu
Picture
Sound
Channel
Setup
/
UK
Country
>>
>>
ENTER : Set
/
Ch Allocation
Erase Programme
Skip
Ch Label
Lock
Sort
/
/
/
///
/
/
• When changing the
order of channels, it is
best to start with Ch1.
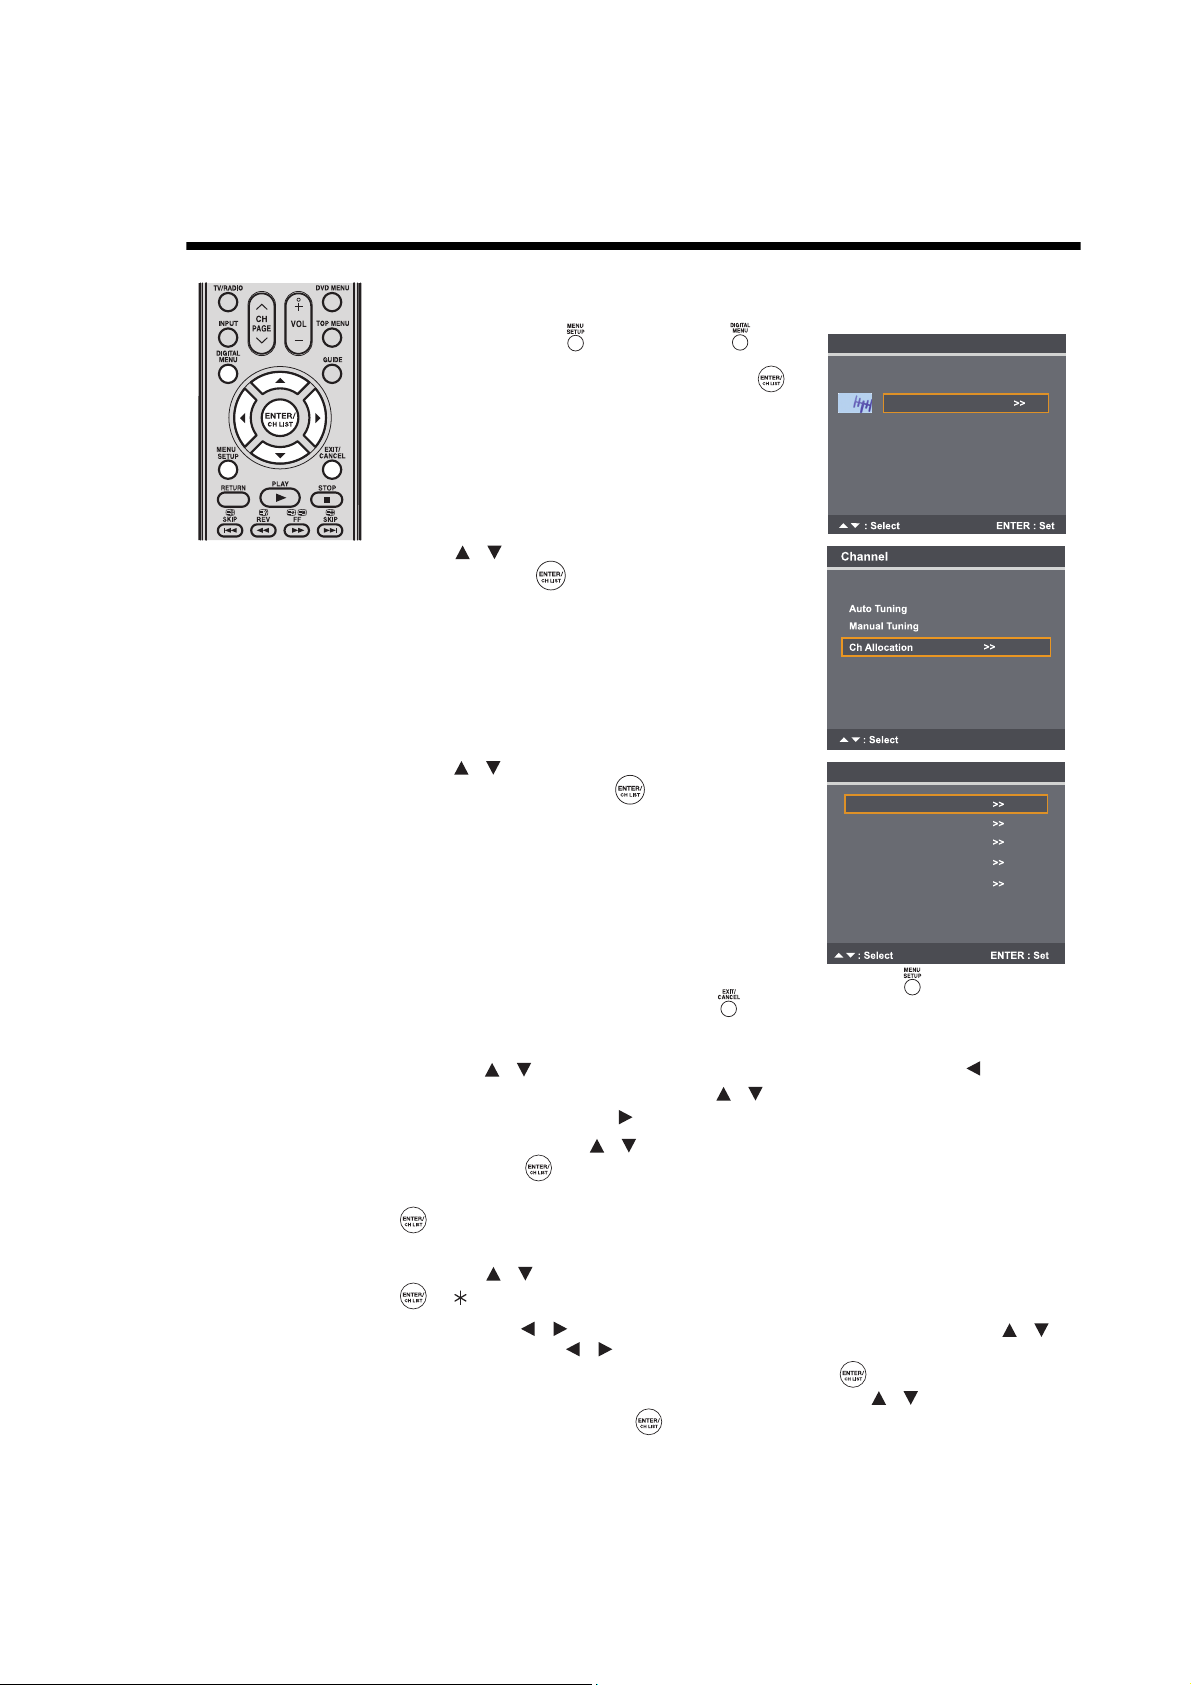
Changing the order of stored channels
Changing the order of stored channels
The Automatic station presetting stores channels in a specific order. However, this order can be
changed if you wish.
Press MENU SETUP or DIGITAL MENU to
1
display the Main Menu screen.
Select Channel, and then press ENTER/CH LIST .
Press to select Ch Allocation, and then press
2
ENTER/CH LIST .
Press to select a channel allocation option, and
3
then press ENTER/CH LIST .
After configuring the channel allocation options, press MENU SETUP to return to Ch
4
Allocation menu, or press EXIT/CANCEL to return to the normal screen.
There are several options to customise your channel allocation settings:
• Sort: Press to select the channel that you want to move, and then press to move the
channel label to the left side of the list. Press to select the position that you want to move
the channel to, and then press to confirm the move.
• Erase Programme: Press to select the channel that you want to erase, and then press
ENTER/CH LIST .
• Lock: This feature enables you to lock any channel you choose by pressing ENTER/CH LIST
, and then enter the parental lock password. If you have not set the parental lock password,
you can use the initial password “0000”.
• Skip: Press to select the channel that you want to skip, and then press ENTER/CH LIST
. A mark will appear.
• Ch Label: Press to select a channel that you want to rename, and then press to
select Ch Label. Press repeatedly until the character you want appears in the first place.
When the character you want appears, press ENTER/CH LIST . Repeat this step to enter the
rest of the characters. If you want to remove the channel label, press to select Label Clear,
and then press ENTER/CH LIST .
19
Manual TV station presetting
/
UK
Country
>>
>>
>>
ENTER : Set
/
/
/
/
Colour System Auto
Sound System Auto
: Adjust
Manual Tuning
48.25 MHz
48.25 MHz
Colour System PAL
Sound System D/K
: Adjust
Manual Tuning
48.25 MHz
48.25 MHz
/
/
/
Channel List
Ch-21
Frequency(kHz) 474000
: Adjust
Manual Tuning
DTV Channel Found 5
Radio Channel Found
3
Channel List
Ch-21
Frequency(kHz) 474000
Manual Tuning
Completed
EXIT : Cancel
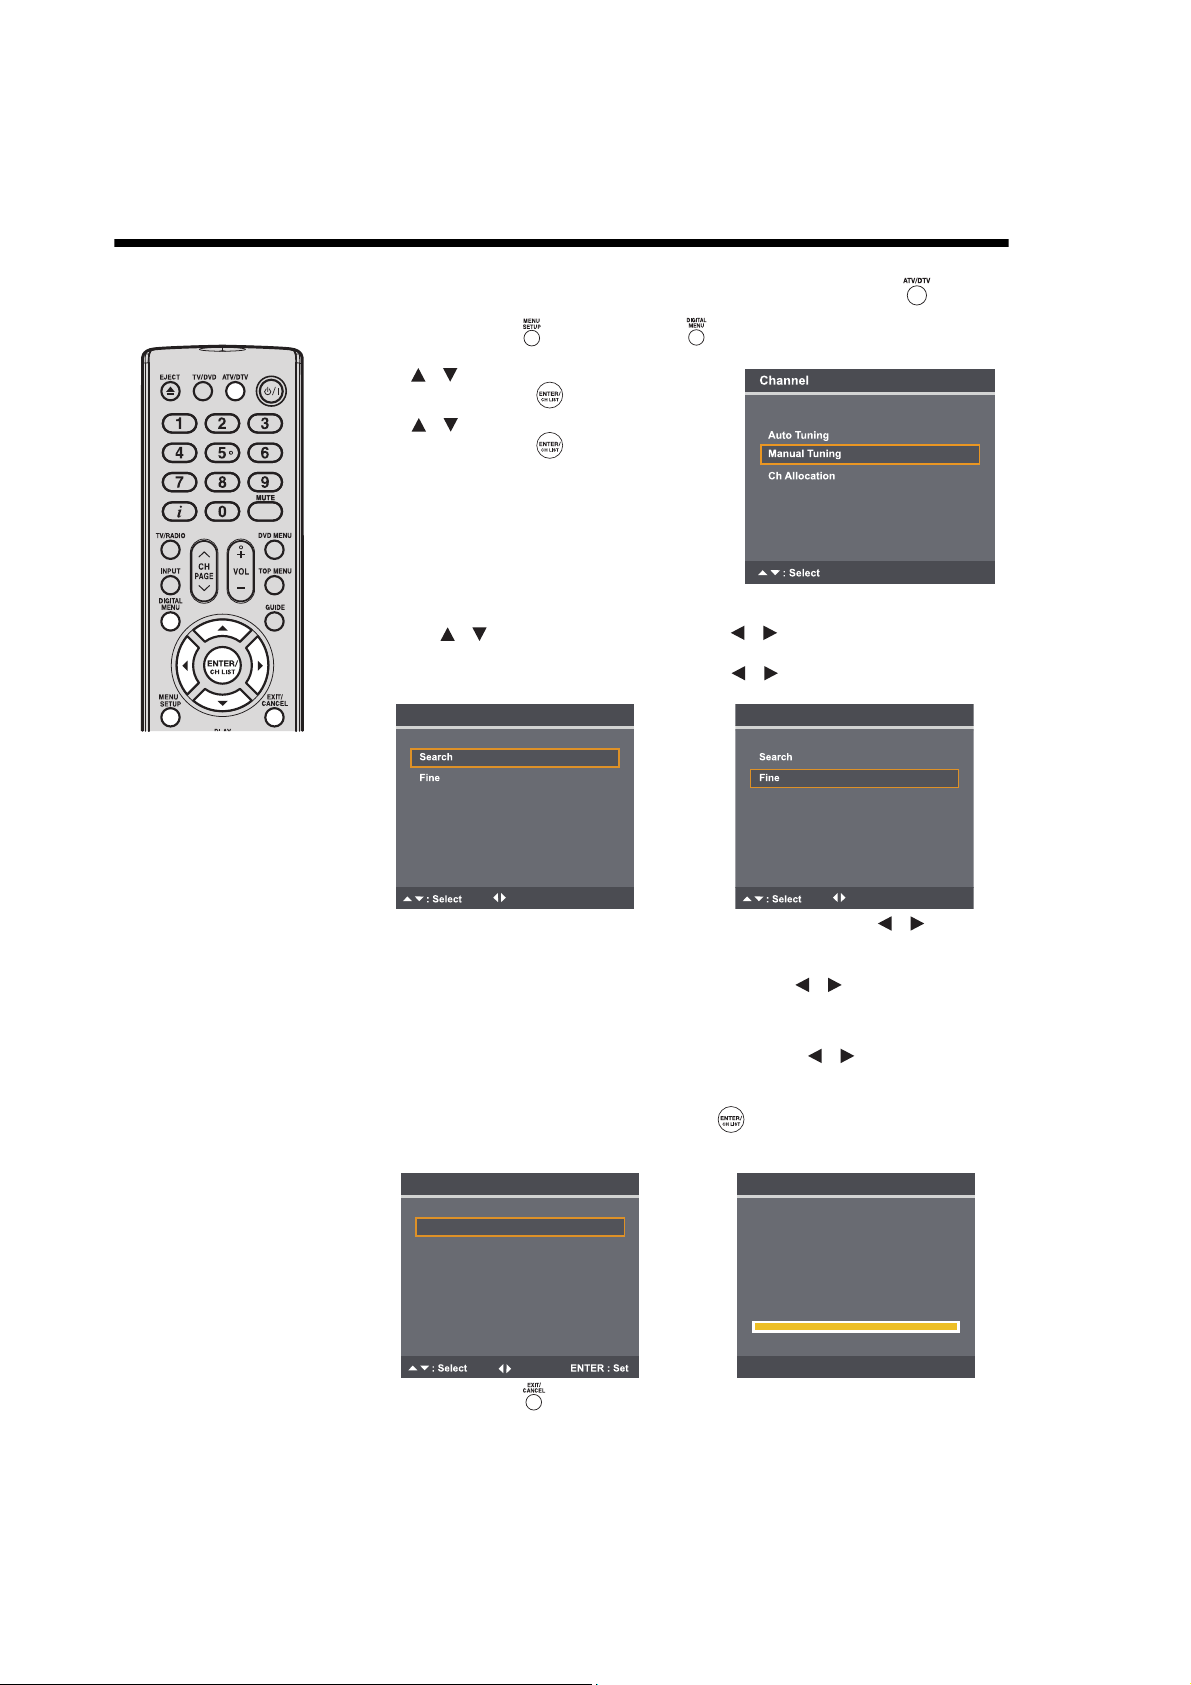
The Auto Tuning process stores all available stations in the reception area. However, some stations with weak or poor reception
may not be detected. If this is the case and you still want to store these stations in your TV, press the ATV /DTV button to
enter ATV or DTV mode, and then follow the steps below.
Press MENU SETUP or DIGITAL MENU to display the Main Menu screen.
1
Press to select the Channel menu, and then
2
press ENTER/CH LIST .
Press to select Manual Tuning, and then
3
press ENTER/CH LIST .
In ATV mode:
4
(1) Press to select Search, and then press to start tuning. It will stop at
each station that has good reception.
(2) If you like to use fine-tuning, select Fine. Press to fine tune until the station is
adjusted to the best position (see the note on the left of this page).
Note:
• Under a normal
receiving condition, the
station search will stop
automatically at the best
receiving position. That
picture will appear
without disturbance.
This receiving position
will be automatically
saved. You do not need
to fine tune it.
In the rare case of bad
reception, the station
search might not stop at
the best receiving
position. The picture
display in that station will
appear disturbed (e.g.
wavy lines). Only in this
case will you need to
manually fine tune the
station’s position.
(3) To select a colour system for your TV, select Colour System. Press to select
the TV system applicable to your area: Auto, PAL or SECAM. PA L should be selected
for use in the UK.
(4) To select a sound system, select Sound System. Press to select the sound
system applicable to your area: Auto, B/G, I, D/K or L/L’.
In DTV mode:
You can select a channel number for Channel List by pressing . The corresponding
tuning frequency for the channel will be set. Or you can enter a frequency value to start
tuning.
After setting the channel, press ENTER/CH LIST to start scanning for channels.
A progress bar will appear to indicate scanning progress, and a list of services collected
from the channel will be listed.
20
Press EXIT/CANCEL to return to the normal screen.
5
Note:
/
DTV Channel List
Analogue Channel List
/
• If the built-in tuner does
not receive anything (e.g.
if no antenna is
connected) during TV
operation, the TV will
change to standby mode
after approx. 15 minutes.
•Press TV/RADIO to
switch between the three
service categories: TV,
Radio, and Data.
Basic operation
Channel selection
Use the number buttons 0-9. For example:
• CH 2: Press 0 and within 2 seconds, press 2. The TV will switch to CH 2.
• CH 29: Press 2 and within 2 seconds, press 9. The TV will switch to CH 29.
(1) Press CH to select a channel. This takes approx. 2 seconds to switch from one
channel to another. Only channels saved in the TV and are active can be displayed.
Skipped channels will not appear (see page 19).
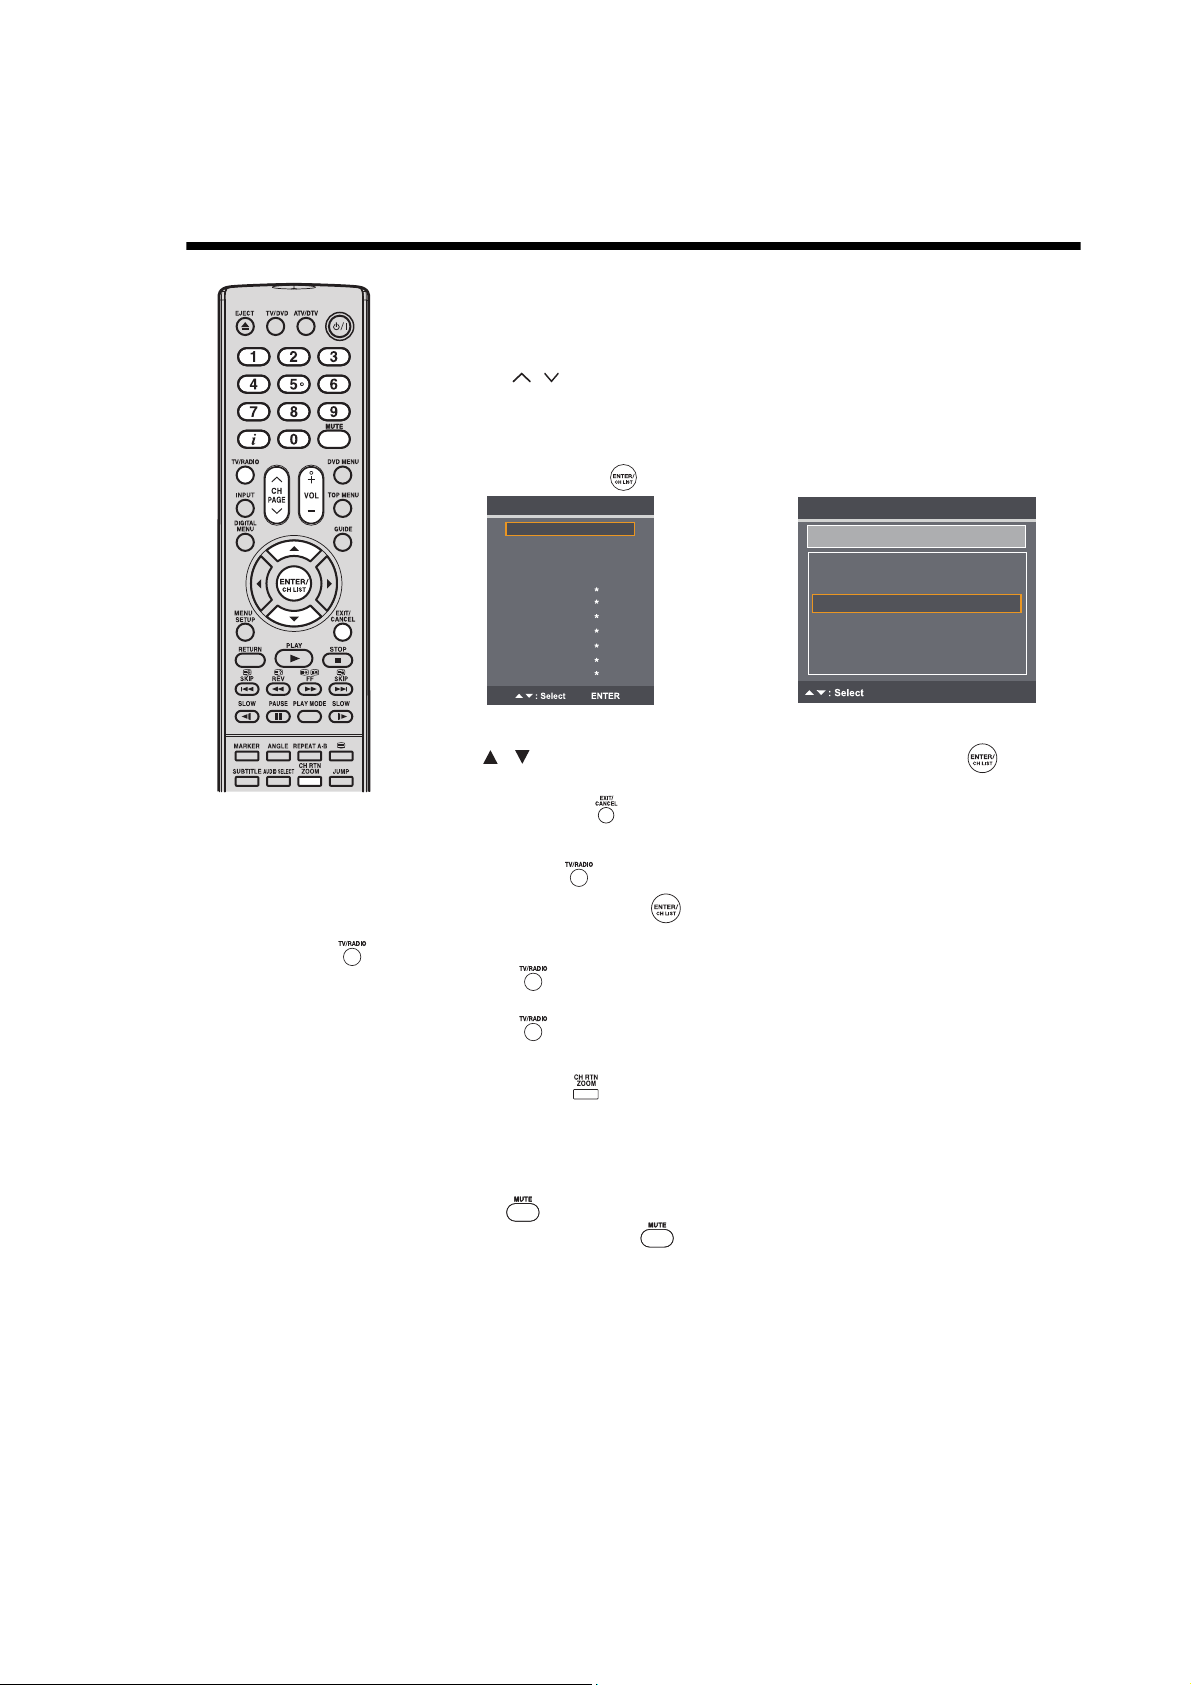
The Channel List shows a list of all receivable programmes. They are located in channels 1
to 99 for ATV mode and 1 to 999 for DTV mode.
(2) Press ENTER/CH LIST to display the Channel List.
Channel List - ATV
01. Channel
02. Channel
03. Channel
04. Channel
05.
06.
07.
08.
09.
10.
11.
(3) Press to select a desired channel, and then press ENTER/CH LIST to display
the selected channel.
(4) Press EXIT/CANCEL to exit.
Toggle between the list of TV, Radio, and Data services (DTV mode only)
(1) Press TV/RADIO to switch between the TV, Radio, and Data mode.
(2) If you press ENTER/CH LIST when you are in Radio mode, the Channel List menu
will display the list of Radio services.
If you wish to view the list of Data services without exiting the current menu, press
TV/RADIO once.
If you wish to view the list of TV services without exiting the current menu, press
TV/RADIO again.
Channel List Radio
S.No Service
007. SBS 6
008. SBS 7
009. SBS 8
010. SBS 9
011. SBS 10
012. SBS 11
ENTER TV/RADIO
QuickView
Press CH RTN ZOOM to go back to the last selected channel.
Volume adjustment
Press VOL +/– to adjust the volume. The volume level indicator shows the current volume, and
will disappear after 4 seconds of inactivity.
Mute
Press MUTE to turn off the sound. The TV/DVD’s sound will be turned off and Mute will
appear on-screen. Press MUTE again or VOL
+/– to turn the sound on.
21
Basic operation (continued)
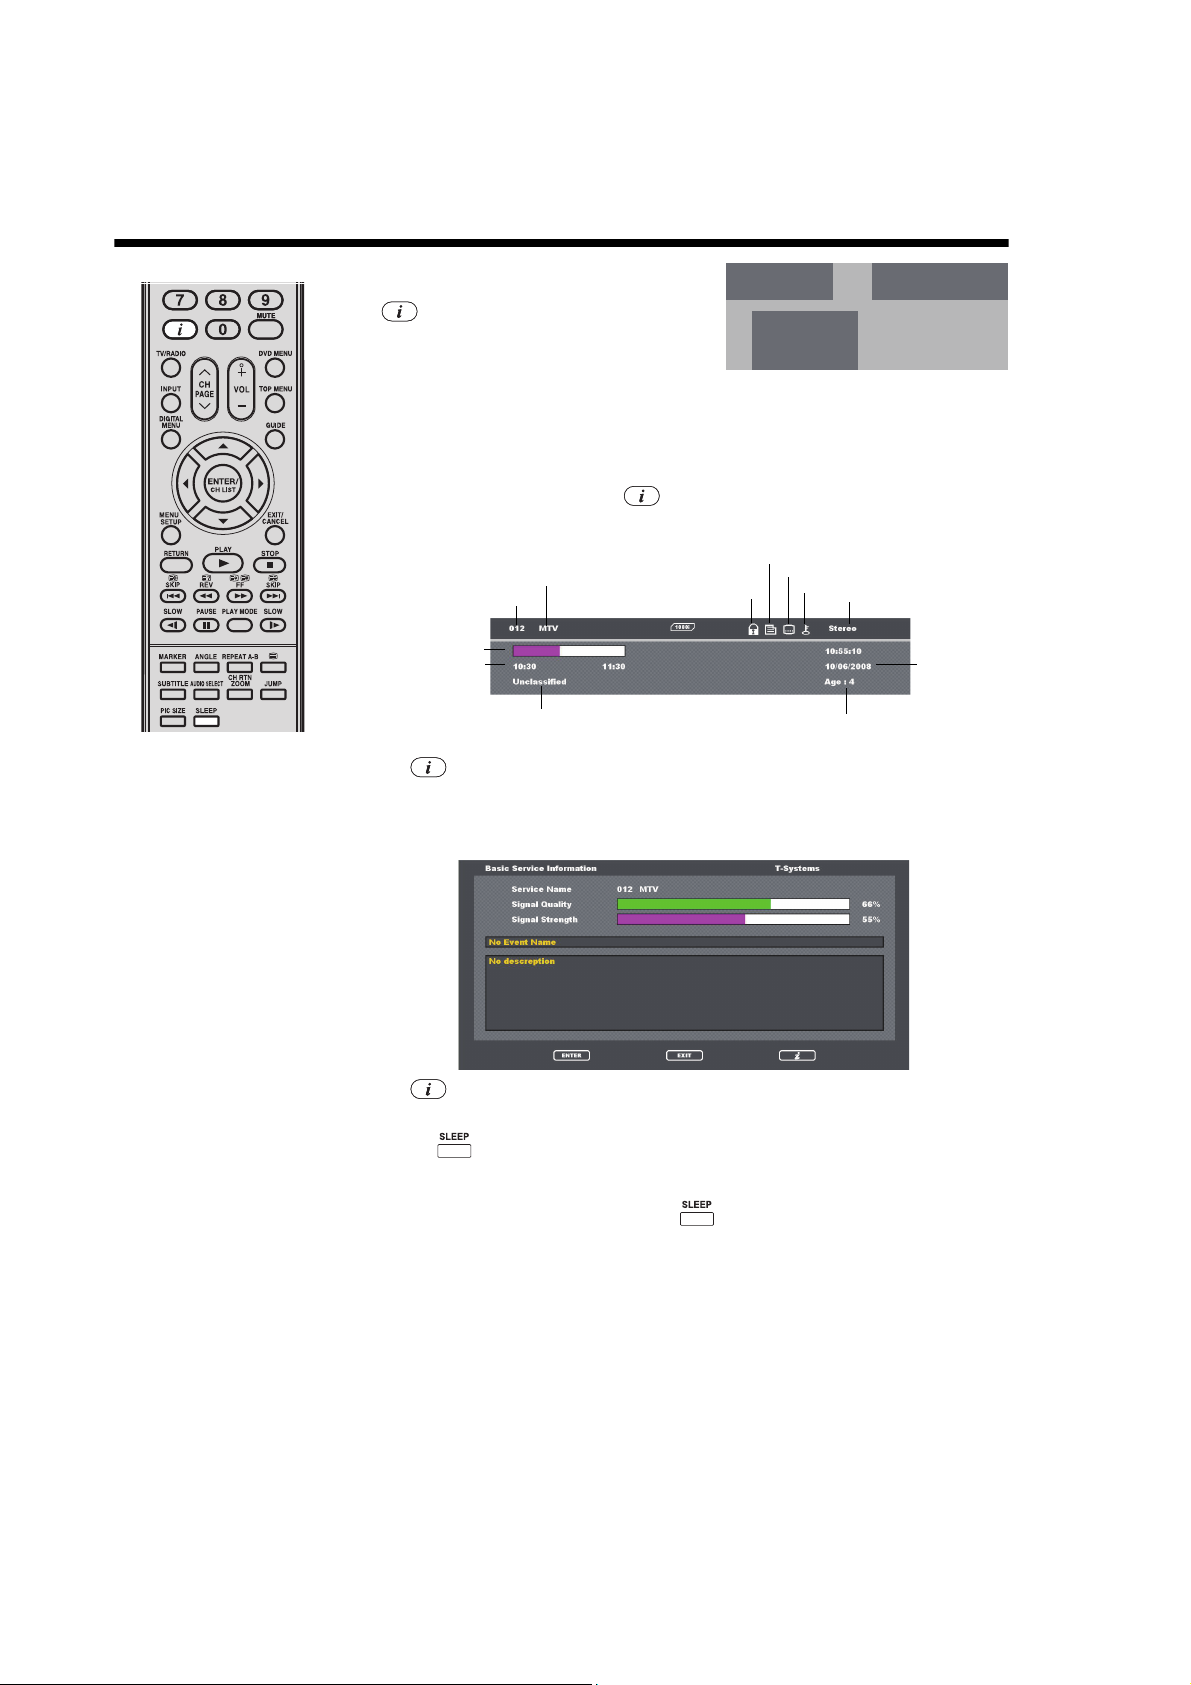
11
BBC1
Sleep Timer
1h 40m
NICAM ST
Auto
576i
Service no.
Service name
Duration bar
Genre
Time and
Date
Lock status
Starting/
Ending time of
current
Parental rating
DVB Teletext available
DVB Subtitle available
Pay TV
Audio mode
Information display
In ATV mode:
Press to display the channel number and sleep
timer settings information on the screen. Current
settings for the sound mode, picture size, and
resolution (if in use) are also displayed. The
information will appear for approx. 5 seconds.
In DTV mode:
When you switch channels, a channel banner is displayed for a few seconds. The channel
banner shows information such as current date and time, DTV channel number, station, and
messages from the DTV service providers, etc.
(1) While watching a programme, press to display the channel banner. The channel
banner will disappear after a set time. You can change how long the channel banner is
displayed (see page 40 for details).
Note:
• In the Basic Service
Information, the name of
channels and services
appears in full not in
abbreviation.
• Subtitles are displayed on
the channel banner, but
some broadcasts may not
provide this service.
(2) Press again to display the Basic Service Information screen.
You can verify the signal strength and quality of the selected service here. If necessary,
adjust the direction of antenna to obtain the maximum signal strength.
A short event description of an event can also be viewed here. For an extended description
of an event, you can view it in the EPG menu (see page 47).
22
(3) Press to remove the diaplay of the Basic Service Information.
Sleep timer
Press SLEEP to set the sleep timer to turn off your TV/DVD after a set length of time. Each
time you press the SLEEP button, the timer setting increases in 10 increments (Off, 0h 10m, 0h
20m, ..., 2h 0m). After the setting is programmed, the display will begin 30 seconds in advance
to remind you that the sleep timer is enabled.
To confirm the sleep timer setting, press SLEEP and the time remaining will appear for a
few seconds. To cancel the sleep timer, press the SLEEP button repeatedly until Off appears.
Teletext
TELETEXT
TELETEXT
/
/
A teletext service offers a range of text-based information, typically including news stories, sport articles, weather forecasts, and
TV schedules. Information is sent page by page. The TV can store up to 256 pages, but they can only be accessed once they
have been stored.
Fastext/TOPtext
The Fastext/TOPtext is teletext with a special directory.
On the lower part of the screen there are four different
coloured fields (red, green, yellow, and blue). These
fields lead directly to the pages shown within. The
coloured buttons on the remote control correspond to
the coloured fields. Press the appropriate coloured
button in order to activate the desired coloured field.
Switch Teletext on/off
Teletext is not available for all channels.
(1) Select a channel that shows teletext.
(2) Press . You will now see a teletext page.
(If “100” is shown without any text information, it may
mean that the current channel does not support teletext.)
(3) Press again to switch to split TV-teletext display
mode. You will now see both the teletext page and the TV
programme.
(4) Press once more to close the teletext screen.
(5) Press again in order to switch teletext on.
The last page which was stored is now shown.
Note:
• You cannot change channels when there is a teletext
display. Turn off the teletext if you want to switch to another
channel.
Select page
Press CH until the page you want appears. Or use the
number buttons 0-9 to enter the page number.
If you input the wrong page number, enter 3 random numbers
first, and then enter the number you want. Or press one of the
coloured teletext buttons, so the page from Fastext/TOPtext
will be shown.
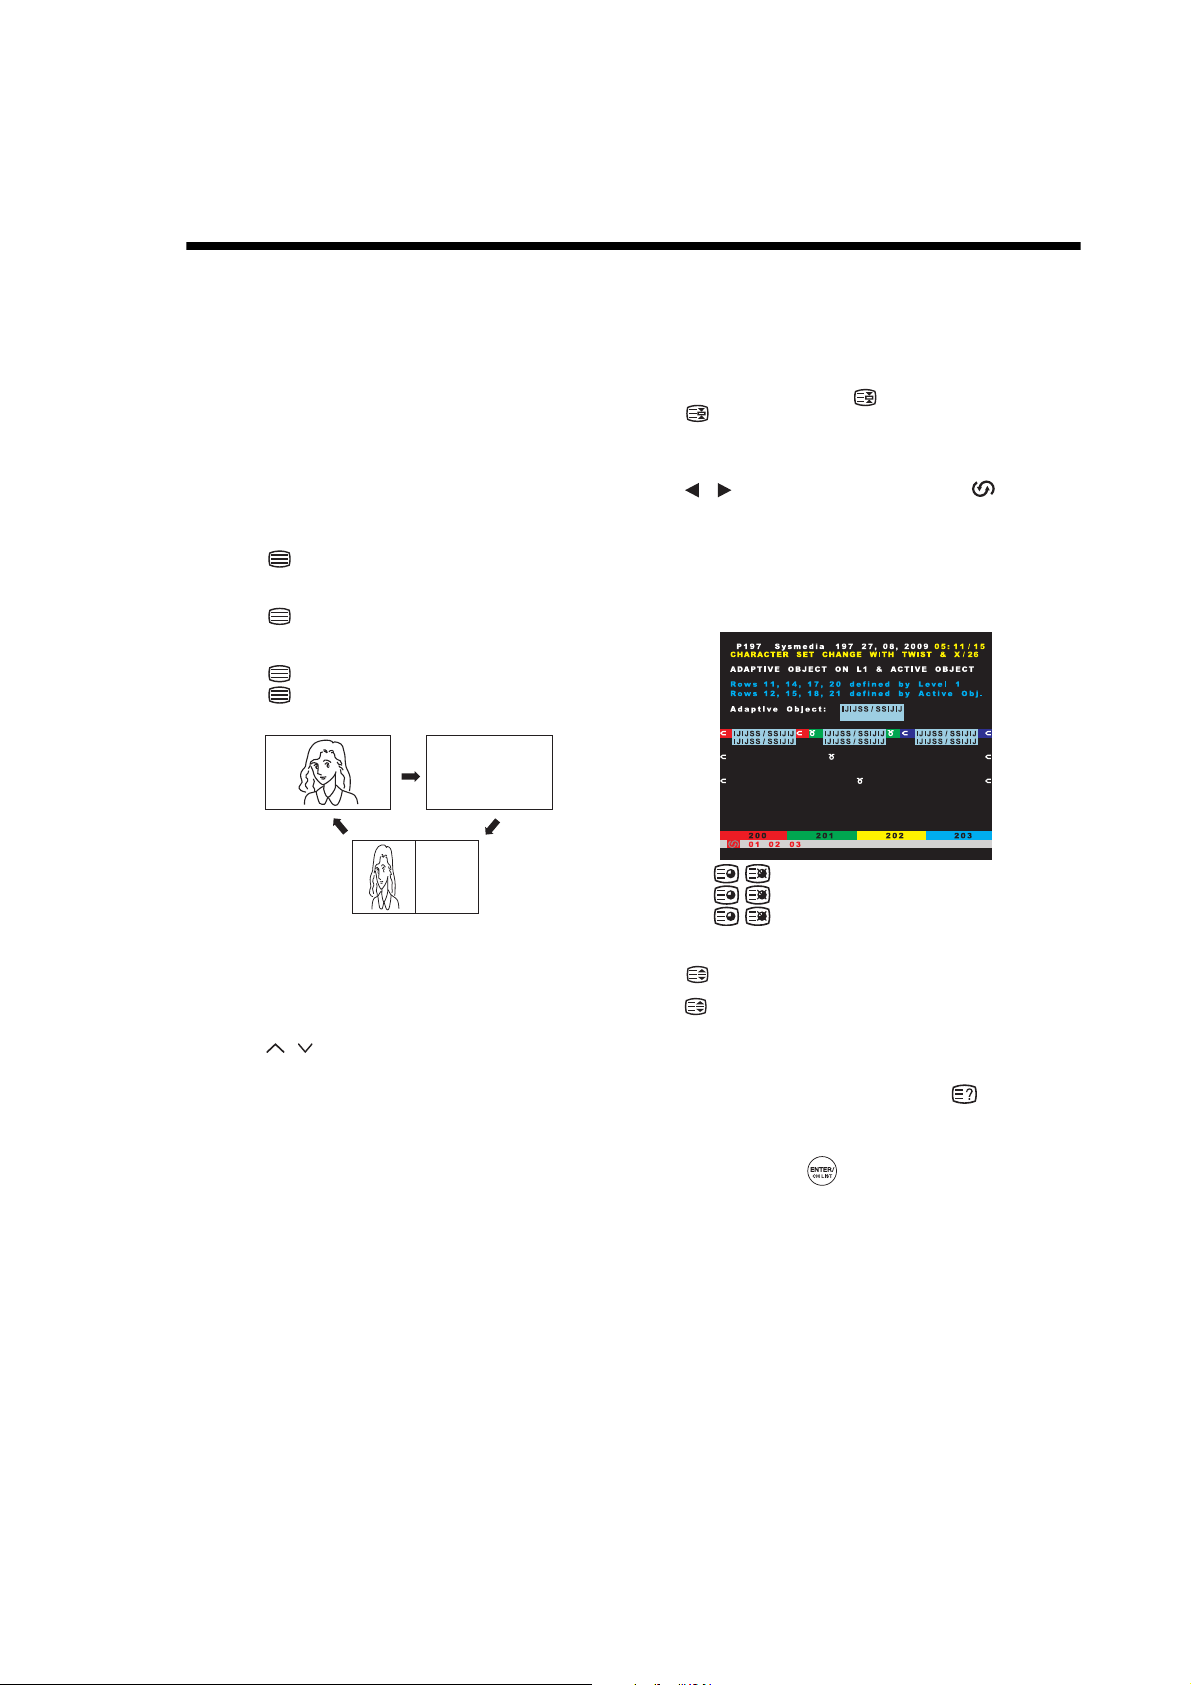
Hold page
Some pages are divided into sub-pages by channel. Subpages are automatically displayed when they are transmitted.
In order to hold a page, press .
Press again to display the next sub-page.
Directly select a sub-page
Sub-page numbers are displayed below the coloured bar.
Press to select a sub-page, or highlight to display
a sub-page when it is transmitted. You can directly select a
sub-page if required.
Example:
On the screen below, page 197 offers the sub-page service.
At the bottom of the screen, sub-pages (01/02/03) available for
page 197 are displayed.
To select a sub-page:
(1) Press in order to select 01 sub-page.
(2) Press again in order to switch to 02 sub-page.
(3) Press once more to switch to 03 sub-page.
Enlargement
Press to increase the size of teletext display - either the
upper or lower half of the screen is enlarged. Each time you
press , the display toggles between half-screen and fullscreen display mode.
Answering quiz questions
Some teletext pages contain quiz questions. Answers to these
questions are hidden within the page. Press to reveal the
answers.
Page 100
Press ENTER/CH LIST to show page 100 of a multi-page
teletext.
23
Stereo reception with the built-in analogue tuner
/
NICAM Auto
Bass 15
Treble 15
Balance
HDMI1 Audio HDMI
Digital Audio Output Bitstream
Reset
: Adjust
Sound
/
NICAM ST
NICAM M1
NICAM M1 / M2
NICAM Off
Sound Sound
Stereo
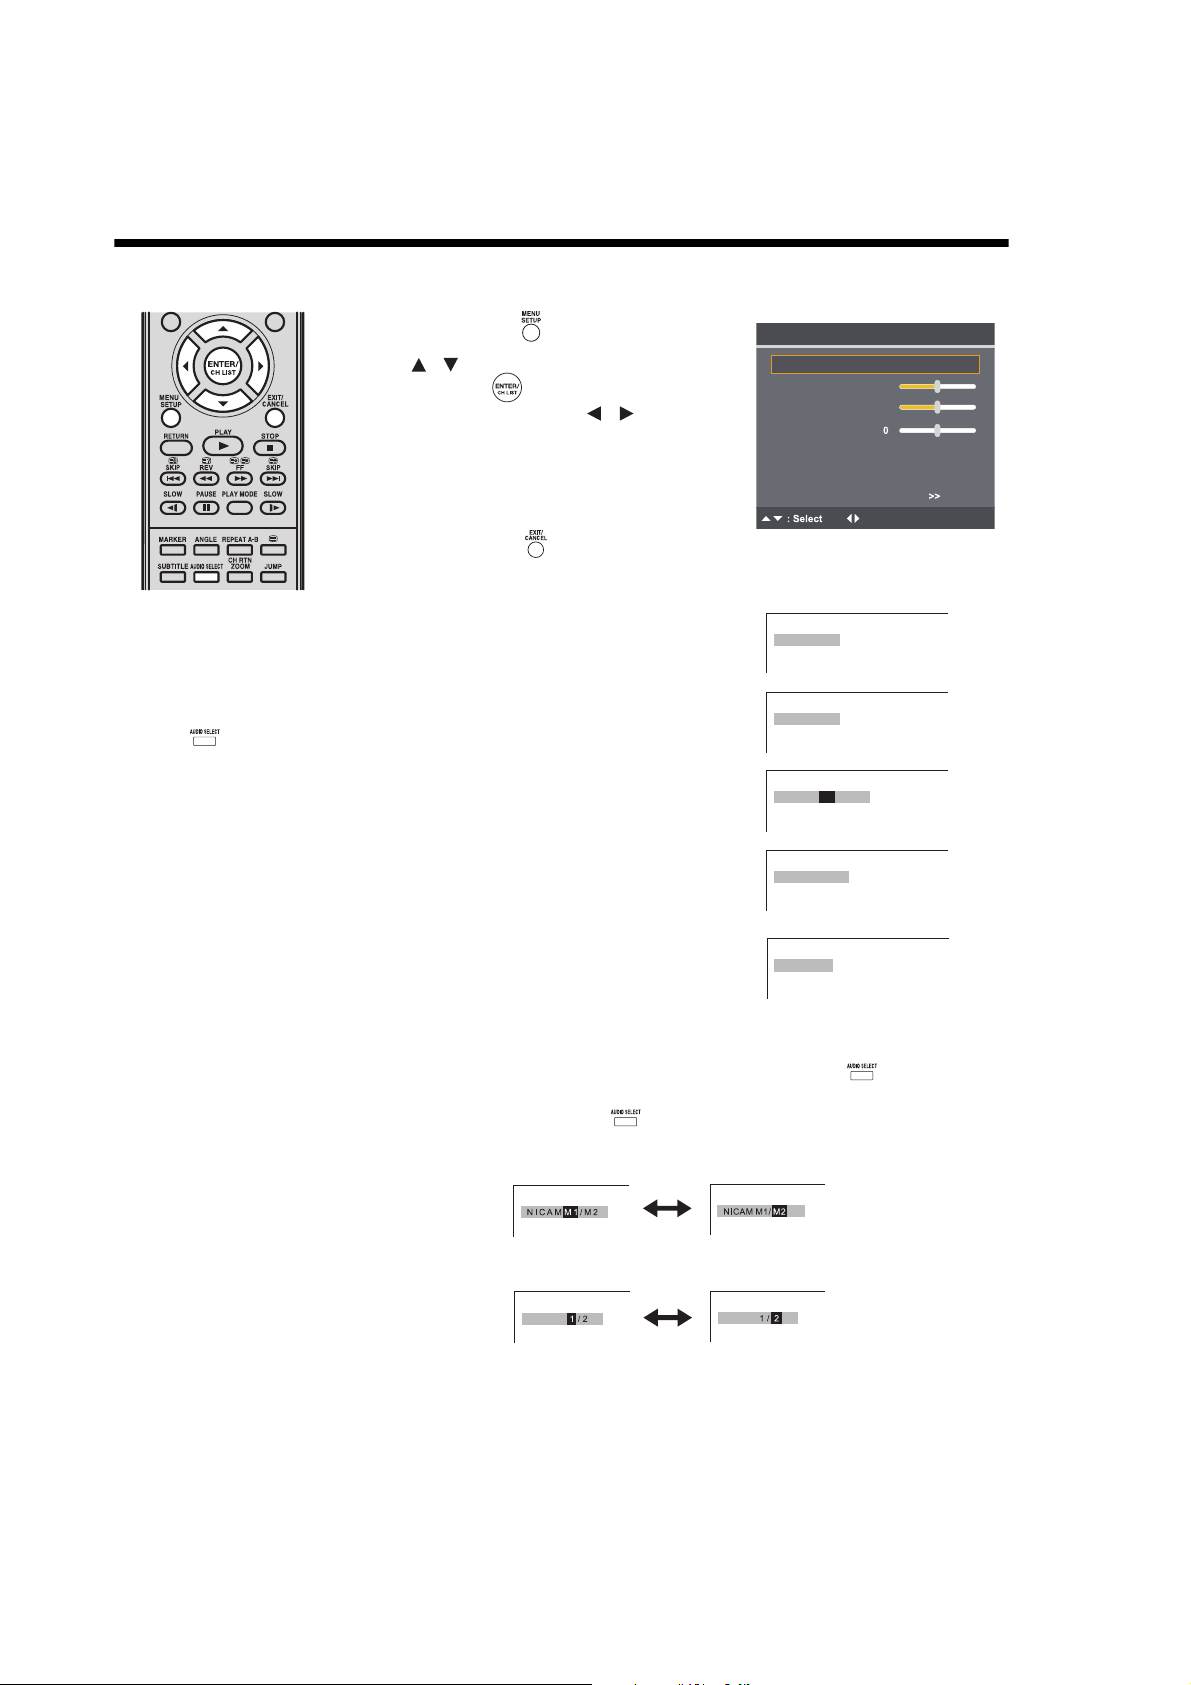
The TV’s built-in tuner can detect and receive NICAM stereo broadcasts automatically.
NICAM stereo sound reception
Press MENU SETUP to display the Main Menu
1
screen.
Press to select Sound, and then press
ENTER/CH LIST .
Select NICAM, and then press to select
2
Auto or Off.
Select Off if you do not want to receive NICAM
sound.
Press EXIT/CANCEL to return to the normal screen.
3
Note:
Bad reception can cause
disturbance to stereo sound.
In some cases, NICAM
stereo sound may not be
received correctly. In the
case of two-channel sound
reception, press AUDIO
SELECT to switch to a
sound channel with better
audio quality.
The following types of broadcast are possible with NICAM transmissions:
• NICAM ST: Illuminates for approx. 4 seconds when a
NICAM STEREO broadcast signal is received.
• NICAM M1: Illuminates for approx. 4 seconds when a
NICAM MONO A broadcast signal is received.
• NICAM M1/ M2: Illuminates for approx. 4 seconds
when a NICAM MONO A and MONO B broadcast
signals are received.
• NICAM OFF: Appears for approx. 4 seconds when a
NICAM signal is received and the NICAM Off option is
selected.
Stereo reception in Germany
STEREO illuminates for approx. 4 seconds when a
STEREO broadcast signal is received.
Two-channel sound reception
When two-channel sound reception is available, press AUDIO SELECT to select your
preferred audio channel.
Each time you press AUDIO SELECT , the sound channel will switch between the two
alternative channels available.
NICAM two-channel sound reception (not available in Germany)
Two-channel sound reception in Germany
24

Picture format
The broadcaster may transmit a widescreen signaling (WSS) signal which can determine the correct height/width of pictures
and have it set automatically when the setting Auto is selected. If you want to change this setting, you can select from the
formats listed below.
Note:
• When the picture size is set to Auto
mode, the aspect ratio will
automatically change according to
the WSS signal, if it is available.
This may either be transmitted by a
broadcasting TV channel, or via a
recording from a VCR, etc. Any
WSS signal received will only be
effective in Auto mode. However,
some DVD players/digital decoders
etc. will automatically switch the
aspect ratio via a SCART input (Pin
8 switching), even if Auto is not
selected.
In any case, if you want to change
an aspect ratio to the one selected
automatically, you can change it by
pressing PIC SIZE .
• In PC mode, the picture size
settings is available only for
16:9 or 4:3 format.
• In HDMI or Component mode, the
scanning rates are 720p and 1080i,
and the picture size settings is
available only for 16:9 or Real
(HDMI mode only) format.
• Using the PIC SIZE function to
change the format of the displayed
image (i.e. changing the height/
width ratio) for the purposes of
public display or commercial gain
may infringe on copyright laws.
Auto picture size
Press PIC SIZE repeatedly until Auto appears on the screen.
Picture format setting
Press PIC SIZE repeatedly to scroll through the following options.
4:3
This mode shows a picture in the standard 4:3 format with vertical black bands on the
left and right sides.
Real (HDMI mode only)
The picture is displayed in its original size.
16:9
This mode is used with 16:9 signals from a Digital decoder, DVD player or other
external source. This uniformly stretches a 4:3 picture horizontally to fill the screen.
(For example, DVDs often store a 16:9 image ‘‘anamorphically’’, which means that the
16:9 image is stored as a horizontally compressed 4:3 image. Select the 16:9 format
to restore the image to its proper 16:9 proportions.)
Cinema
This mode is used to zoom in, or expand pictures with a 4:3 ‘‘letterbox’’ format (with
black bars on the top and bottom of the picture) so that they fill more of the screen.
Note:
• Using this format will slightly cut off part of the picture due to the image expansion.
However, it is possible to scroll the picture up or down to view the cutoff section on
the top or bottom part of the picture (see Vertical Position on page 28).
14:9
This mode enlarges a standard 4:3 picture to the 14:9 format.
25
AV colour adjustment
ATV
DTV
AV1
AV2
Component
HDM1
HDM2
/
Display Setup
Auto 4:3 Default
4:3
Auto Shut Off
AV Colour Auto
: Adjust
>>
>>
Rec Screen Status On
Reset >>
/
/
Use the AV Colour menu option to adjust the picture colour settings in AV mode. These settings do not apply when the TV is
in any other mode.
Note:
• DVD players that play
NTSC DVDs (i.e. multiregion/region code-free)
can produce different
signals based on the
player model. Possible
signals include PAL,
SECAM, NTSC3.58,
NTSC4.43 and PAL60. If
you are using an external
DVD player, connect it to
the TV through the
component video jack.
Press INPUT to select AV 1 or AV2, and then
1
press ENTER/CH LIST .
Press MENU SETUP or DIGITAL MENU to display the Main Menu screen.
2
Press to select Setup, and then press ENTER/CH LIST .
3
Press to select AV Colo u r, and then press
4
to select the preferred colour system.
Options include PAL, SECAM, NTSC4.43,
NTSC3.58, and PAL6 0.
If you are not certain of the system used in your
area or if the setting you have selected causes
horizontal stripes to the picture display, select
Auto.
Press EXIT/CANCEL to return to the normal screen.
5
26
Other convenience functions
The TV Main Menu has several menu options you can configure to suit your viewing preferences.
Main
menu
Picture Picture Setting Brightness Adjust the black level. This aspect determines the point where grays become pure
Picture Preference Select one of the four preset picture modes.
Picture Size You can choose from six picture formats to adjust the height/width ratio of the
Blue Back On/Off You can set the TV to automatically switch the display to a blue screen and mute
PC Setting*
DNR*
Auto Brightness
Sensor
Reset Reset all Picture menu settings to their factory preset values.
Sound NICAM Auto/Off Enable or disable the reception of NICAM stereo broadcasts. See page 24.
Bass Adjust the low-pitched sounds.
Treble Adjust the high-pitched sounds.
Balance Adjust the sound balance between the left and right speakers.
HDMI1 Audio HDMI/DVI See pages 74-76.
Digital Audio Output Bitstream/PCM You can select “Bitstream” when AC3 format is available or select “PCM” for other
Reset Reset all Sound menu settings to their factory preset values.
*1 Adjust Tint if you use an NTSC3.58 MHz or NTSC4.43 MHz signal through one of the AV inputs, and NTSC or Auto has been selected for the AV Colour
option.
*2 The PC Setting option can be configured only when the TV tuner input is set to PC mode.
*3 In PC mode, the DNR option cannot be selected.
Selected items Setup hint
black.
Contrast Adjust the white level. This aspect determines how bright the brightest whites
Sharpness Adjust the sharpness or softness of the display.
Colour Adjust the colour intensity.
1
Tint*
Colour Temperature Adjust the level of white balance in the display. Available settings include:
Backlight Adjust the backlight level.
DynaLight This function automatically strengthens the black colouring of dark areas in the
2
3
Hor Position Adjust the image position horizontally.
Ver Position Adjust the image position vertically.
Clock Minimise any vertical bars or stripes visible on the screen background.
Phase Adjust this option if the computer’s display frequency has been set to 60 Hz. This
Auto Adjust When individual adjustment of PC settings results in rough edges or flickering in the
On/Off DNR (digital noise reduction) improves picture quality by filtering out unusable data
On/Off This sensor will detect the ambient light conditions to optimise the backlighting
should appear.
Adjust the balance of the red, green, and blue colours in the display.
• Cool - Picture appears with a bluish tint.
• Standard - Picture appears more white.
• Warm - Picture appears with a reddish tint.
video according to the level of darkness.
• Sports - High contrast display for clear-cut images.
• Standard - Picture is viewed in its original display mode.
• Movie - Picture quality is suited for viewing under dim lighting conditions to deliver
a “cinema” experience.
• Memory - When you adjust any of the items in the Picture Setting menu, this
mode is automatically applied.
display. See page 25.
the sound if the signal is weak or absent.
will optimise picture quality by eliminating flickering in the display.
picture display, select Auto Adjust to automatically adjust all settings to their ideal
position based on the current VGA signal.
(noise) from a faulty input signal (e.g. a video film in letterbox format or a noisy
analogue cable TV signal).
levels. See page 13.
audio format.
27

Other convenience functions (continued)
/
Main
menu
Channel Country Select a country in which you live.
Auto Tuning Perform an automatic channel search. See page 18.
Manual Tuning Perform a channel search for stations with weak or poor signal. See page 20.
Ch Allocation Customise the channels stored in the TV. See page 19.
Setup REGZA-LINK Setup Enable REGZA-LINK/
REGZA-LINK Player Power/
Media Player Photo/
Language Setup Menu Language Select a display language.
Audio Description AD Enable (On/Off) You can set to receive audio description service to have narration of selected
Timer Setting*
Password Setup*
Version View the software version information. See page 42.
Software Upgrade See page 43.
Common Interface See page 44.
Vertical Position When the picture format is set to Cinema mode (see page 25), you can adjust
Auto 4:3 Default*
Display Setup*
Auto Shut Off No Signal This option automatically shuts the TV off when no signal has been detected for
AV Colour*
Rec Screen Status On/Off This function is used in conjunction with the Timer function included as part of
Reset Reset all TV settings to their factory preset values. Once the TV reset process
*1 Timer Setting option can be configured only when the TV tuner input is set to DTV mode.
The Password Setup and Display Setup option can be configured only when the TV tuner input is set to DTV mode.
*2 In TV mode, Auto 4:3 Default is only available when the Picture Size is set to Auto.
In Component mode, Auto 4:3 Default is only available when there is a 480i/576i signal.
*3 PAL60 is the colour system used in Germany; NTSC3.58 is used in the U.S. If the picture shows horizontal stripes, set this option to Auto.
Selected items Setup hint
TV Auto Input Switch/
TV Auto Power On/
Device Auto Standby/
Speaker Preference
Root Menu/
Contents Menu/
Setup Menu/
Top Menu/
Menu
Music/
Auto Start
Pref. Audio Language Select an audio language (DTV mode only).
Pref. Subtitle Language Select a subtitle language (DTV mode only).
Pref. Digital Service
Language
AD Volume Adjust the audio description volume.
1
1
2
4:3/16:9 Select the default picture size for a 4:3 picture. This picture can either be
1
No Operation
3
Auto/
PA L/
SECAM/
NTSC4.43/
NTSC3.58/
PAL60
This is a new feature that uses CEC technology and allows you to control
Toshiba REGZA-LINK
connection. See pages 31-32.
See pages 29-30.
The TV allows you to enjoy photos and music stored on a USB device. See
pages 33-39.
Select a digital service language (DTV mode only).
programmes.
View the current date and time settings. See page 40.
Set password for TV programmes and movies. See page 41.
the vertical position of the display to view the top and bottom sections that have
been cut off due to the image expansion. Press to adjust the vertical
position of the picture by up to +10 and downwards by up to -10.
displayed in its original 4:3 format or expanded to 16:9 proportions.
See page 40.
15 minutes (not applicable to DVD mode), or no button has been pressed for 4
hours.
Select the colour system for the display when using signal from the audio/video
terminals. See page 26.
the Digital EPG. It determines whether the TV screen switches on or not when a
programmed Timer setting begins. See page 48 for further details.
has been completed, the TV will automatically turn off. Press
control to turn it back on.
®
compatible devices from the TV remote via HDMI
on the remote
28

Using REGZA-LINK
/
/
This is a new feature that uses CEC technology and allows you to control Toshiba REGZA-LINK® compatible devices from the
TV remote via HDMI connection (see page 76).
When the Enable REGZA-LINK in the REGZA-LINK Setup menu (see page 32) is set to On,
the following REGZA-LINK
®
functions will be enabled.
®
REGZA-LINK® playback device (DVD player, etc.) control
With your TV’s remote control, or using the REGZA-LINK Player menu, you can control the
connected REGZA-LINK
Available remote control key functions:
®
playback device you are watching.
PLAY
Begin playback.
STOP
Stop playback.
PAUSE
Pause the picture during play or record mode.
SKIP
Skip forward.
SKIP
Skip backward.
FF / REV
Fast-forward/Fast-reverse.
ENTER/CH LIST
Enter contents menu, etc.
Navigate contents menu, etc.
EXIT/CANCEL
Close the menu.
Note:
• These functions depend on the devices connected.
29

Using REGZA-LINK
/
/
REGZA-LINK Setup
REGZA-LINK Player
Language Setup
Audio Description
Media Player
>>
>>
>>
>>
>>
Timer Setting >>
/
REGZA-LINK® Player menu
Press MENU SETUP or DIGITAL MENU to display the Main Menu screen.
1
®
(continued)
Press to select Setup, and then press
2
ENTER/CH LIST .
Press to select REGZA-LINK Player, and
3
Main Menu
Picture
Sound
Channel
Setup
then press ENTER/CH LIST .
Press to select the item you want to control and then press ENTER/CH LIST .
4
REGZA-LINK® Player menu functions
Power
Turn the selected device on and off.
30
Root Menu
Access the root menu of a disc or the selected device.
Contents Menu
Access the contents list when you press ENTER/CH LIST . At this time, the REGZA-LINK
Player menu will appear.
Setup Menu
Access the setup menu of a DVD player.
Top Menu
Access the top menu of a disc during playback.
Menu
Access the menu of a disc during playback.
Note:
• These functions depend on the discs and the devices that are connected.
• The REGZA-LINK Player item will be disabled in the following conditions:
- A non-HDMI input is currently selected.
- The Enable REGZA-LINK item is set to Off.
- The connected CEC device is not a playback or recording device.

Using REGZA-LINK
®
(continued)
REGZA-LINK® input source selection
If a REGZA-LINK® device with HDMI switching capability (e.g. Audio Receiver) is connected to
the HDMI input, you can select another REGZA-LINK
HDMI device using INPUT on the remote control or INPUT/ENTER on the TV control
panel.
®
device that is connected to the master
VOLUME and MUTE controls of Audio Receiver
With your TV’s remote control, you can adjust or mute the sound volume of a REGZA-LINK
compatible Audio Receiver.
• adjusts the volume level.
• turns off the sound.
To use this function
Set Speaker Preference to Audio Receiver in the
1
REGZA-LINK Setup menu.
REGZA-LINK Setup
Enable REGZA-LINK
TV Auto Input Switch
TV Auto Power On
Device Auto Standby
On
On
Off
On
®
: Adjust
Confirm that a connected REGZA-LINK® device (such as a DVD player, etc.) is selected for
2
the Audio Receiver input source.
Note:
• You can also use this function when the audio receiver is connected to the TV’s DIGITAL
AUDIO OUT terminal (not HDMI connection). In this case, select a digital audio input mode
on the Audio Receiver.
• These functions depend on the device connected.
31

Using REGZA-LINK
/
REGZA-LINK Setup
REGZA-LINK Player
Language Setup
Audio Description
Media Player
>>
>>
>>
>>
>>
Timer Setting >>
/
/
/
/
Other REGZA-LINK® functions
When the Enable REGZA-LINK and each item in the REGZA-LINK Setup menu are set to On,
the following functions will be enabled.
TV Auto Input Switch
If a connected HDMI device starts playing video or audio, the TV will automatically switch to the
appropriate HDMI input.
®
(continued)
Note:
• When you turn on a
REGZA-LINK® compatible
audio receiver, change its
input source, or adjust the
sound volume, the sound
will be output from the
audio receiver’s speakers
even if TV Speakers has
been selected. Turn the
TV off and on again to
output the sound from the
TV speakers.
TV Auto Power On
If a device is turned on, the TV turns on automatically.
Device Auto Standby
If the TV is turned off, the TV will send a message to turn off all of the devices connected to the
TV.
Speaker Preference
From this item, you can set your audio output preference to the TV speakers or the audio
receiver speakers. When this item is set to Audio Receiver, the TV remote can be used to
adjust or mute the volume of the audio receiver. You will not be able to select this item unless a
REGZA-LINK
To set the REGZA-LINK® Setup
From the Setup menu, press to select
1
REGZA-LINK Setup and then press ENTER/CH
LIST .
Press to select Enable REGZA-LINK and
2
then press to select On.
Note:
• If you set Enable REGZA-LINK to Off, you will
®
compatible audio receiver is connected.
not be able to select the other items.
REGZA-LINK Setup
Enable REGZA-LINK
TV Auto Input Switch
TV Auto Power On
Device Auto Standby
On
On
Off
On
s
32
: Adjust
Press to select the REGZA-LINK Setup item you want to use, and then press
3
to select On or your desired mode to confirm your choice.
• TV Auto Input Switch: On/Off
• TV Auto Power On: On/Off
• Device Auto Standby: On/Off
• Speaker Preference: TV Speakers/Audio Receiver

Using the Media Player
The TV allows you to enjoy photos and music stored on a USB device.
Media Player information
Required device
USB device: USB Mass Storage Class devices (MSC)
Note:
• Connectivity is not guaranteed for all devices.
• Connect the USB device to the TV directly.
• Do not use a USB hub.
Media Player playback reminders
• The file systems supported by Media Player are FAT12, FAT16, and FAT32.
• The maximum number of files stored in each folder is 2000.
• It may take some time to open a file of large size.
• Do not remove the USB device while in use.
• Only limited types of U3 USB device are supported. Therefore, it is suggested not to use U3 USB for playing Media Player.
File name display reminders
• Most characters in European languages (both upper and lower case), numbers, and the underscore symbol (_) can be
displayed.
• Non-supported characters will be replaced with a hyphen (-).
Media Player encoding information
Music
- File format: MPEG-1Audio (MP3)
- Sampling frequency: 32, 44.1, 48 kHz
- Bit rate: 32, 48, 56, 64, 80, 96, 112, 128, 144, 160, 192, 224, 256 kbps
- ID3: ver.1, ver.2
- Supported file extension: .mp3
Photo
- File format: JPEG EXIF ver 2.2 (DCF ver 1.1)
- Maximum viewable resolution: 8192 x 8192 pixels
- Maximum photo size: 9MB
- Supported file extension: .jpg
IMPORTANT INFORMATION
You must obtain any required permission from copyright owners to download or use copyrighted content.
Toshiba cannot and does not grant such permission.
33

Using the Media Player (continued)
/
/
/
/
Media Player
Music
Auto Start On
Photo
: Adjust
/
/
/
/
/
Basic operation
Auto Start
Press MENU SETUP to display the Main Menu screen.
1
Press to select Setup, and then press
2
ENTER/CH LIST .
Press to select Media Player, and then
press ENTER/CH LIST .
Press to select Auto Start, and then press
3
to select On.
Note:
• If Auto Start is set to Off, you can start the Media
Player manually.
REGZA-LINK Setup
REGZA-LINK Player
Media Player
Language Setup
Audio Description
Timer Setting
>>
>>
>>
>>
>>
>>
34
To set Auto Start
Insert USB device into the USB terminal on the left side of the TV.
1
A prompt will appear. Press to select Yes,
2
and then press ENTER/CH LIST .
Press to select Photo or Music and then
3
press ENTER/CH LIST . The photo thumbnail
view or music list will appear.
Auto Start
USB device was connected to TV. Do
you want to open Media Player?
Yes
Media Player
Photo
Music
Auto Start On
No
To set manual Start
Insert USB device into the USB terminal on the left side of the TV.
1
Press MENU SETUP to display the Main Menu screen.
2
Press to select Setup, and then press ENTER/CH LIST .
3
Press to select Media Player, and then press ENTER/CH LIST .
Press to select Photo or Music and then press ENTER/CH LIST .
4
The photo thumbnail view or music list will appear.
To close the Media Player
Press EXIT/CANCEL . The TV will return to the last-viewed channel or video input.

Using the Media Player (continued)
/
/
/
/
/
/
/
Viewing JPEG files
Single View mode
Press MENU SETUP to display the Main Menu
1
screen.
Press to select Setup, then press to
2
select Media Player, and then press ENTER/CH
LIST .
REGZA-LINK Setup
REGZA-LINK Player
Media Player
Language Setup
Audio Description
Timer Setting
>>
>>
>>
>>
>>
>>
Press to select Photo, and then press
3
ENTER/CH LIST .
When the thumbnail view appears, press / to select a file or folder.
4
Media Player
Photo
Music
Auto Start On
Note:
• An incompatible JPEG file will be displayed with an icon.
Press ENTER/CH LIST to begin viewing the selected file in full screen or to open the
5
selected folder.
Note:
• When in sub-directory, press / to select the first folder named “..” on the
upper-left corner to return to the previous photo mode.
Press to view the next file, or press to view the previous file.
6
Slide Show mode
To switch to the Slide Show mode, press ENTER/CH LIST while in Single View mode.
1
To return to Single View mode, press ENTER/CH LIST again.
Press to view the next file, or press to view the previous file.
2
Rotating the image
When in Single View mode, press to rotate the image 90 degrees clockwise, or press to
rotate the image 90 degrees counterclockwise.
Returning to the thumbnail
Press RETURN while in Single View mode or Slide Show mode.
35

Using the Media Player (continued)
/
/
Using the photo Quick Menu
You can select your preferred photo viewing settings from the photo Quick Menu.
From the photo Single View, Slide Show or thumbnail mode, press MENU SETUP to
1
enter the Quick Menu.
Note:
• The Quick Menu items of thumbnail and Single View/Slide Show modes are different.
Press to select the item you want to adjust.
2
Note:
• The sleep timer setting in
the Media Player Quick
Menu or TV Setup Menu
will override the previous
setting of each other.
Press to select your preferred setting.
3
Press RETURN to return to the previous photo view mode, or press EXIT/CANCEL
4
to close the Quick Menu.
Quick Menu setting details
Sort
To set the file sorting preference in thumbnail view.
• Title: to sort the files by file name.
• New: to sort the files from new to old by file date.
• Old: to sort the files from old to new by file date.
Note:
• This Quick Menu item is only available for access from the thumbnail view mode.
Interval Time
To set a time interval to view photos at your preferred intervals: 3sec, 5sec, 10sec, 15sec, 30sec,
60sec, or 90sec.
Repeat
To display photos in the same folder repeatedly: On/Off.
Background Music Select
To select background music for the photo display from the music stored in the USB device (see
page 37).
Note:
• This Quick Menu item is only available for access from Single View/Slide Show modes.
36
Sleep Timer
To set the sleep timer to turn off the Media Player, as well as the TV (up to 120 minutes in 10minute increments).
Note:
• This Quick Menu item is only available for access from Single View/Slide Show modes.

Using the Media Player (continued)
/
/
Setting background music for photo mode
You can select music from the music list stored in the USB device to be played back in photo
mode.
From the photo Single View or Slide Show mode,
1
press MENU SETUP to enter the Quick Menu.
Quick Menu
Interval Time 5 sec
Repeat Off
Background Music Select >>
Sleep Timer Off
: Adjust
Press to select Background Music Select,
2
and then press ENTER/CH LIST .
Press to select your desired music, and then press ENTER/CH LIST to pl ay the
3
music.
Press RETURN repeatedly to return to the previous photo mode with the selected
4
music on.
To stop/pause music playback or select another music:
Go to the music list.
Note:
• The music will be played back in accordance with the repeat setting set in the music Quick
Menu (see page 39).
Quick Menu
Interval Time 5 sec
Background Music Select
Sleep Timer
37

Using the Media Player (continued)
/
/
Listening to MP3 files
Besides viewing JPEG files, you can also listen to the music files stored in the USB device.
From Media Player menu, press to select Music and then press ENTER/CH LIST
1
.
When the list appears, press to select a file or folder.
2
Press ENTER/CH LIST to begin playing the selected music file or to open the selected
3
folder.
Press RETURN or the first folder named “..” on the top of the list to return to the upper
4
folder.
Using the remote control button in music playback
You can use the remote control buttons listed below to control the music playback.
Note:
• If no button on the remote
control or TV control panel
is pressed for 60 seconds
after starting music
playback, the TV will enter
screen saver mode. Press
any button but to
return to music list mode.
PLAY / ENTER/CH LIST
Begin music playback.
STOP
Stop music playback.
PAUSE
Pause music playback.
SKIP
Skip to play next music file.
SKIP
Skip to play previous music file.
Press to move to the previous page, or press to move to the next page.
38

Using the Media Player (continued)
/
/
Using the music Quick Menu
You can select your preferred music playback settings from the music Quick Menu.
From the music list or music playback mode, press MENU SETUP to enter the Quick
1
Menu.
Note:
• The Quick Menu items of music list and music playback modes are different.
Press to select the item you want to adjust.
2
Note:
• The sleep timer setting in
the Media Player Quick
Menu or TV Setup Menu
will override the previous
setting of each other.
• If Enable REGZA-LINK in
the REGZA-LINK Setup
menu is set to Off or no
amplifier is detected, the
Speaker item will be
disabled.
Press to select your preferred setting.
3
Press RETURN to return to the previous menu or music mode, or press EXIT/
4
CANCEL to close the Quick Menu.
Quick Menu setting details
Sort
To set the file sorting preference in music list.
• Title: to sort the files by file name.
• New: to sort the files from new to old by file date.
• Old: to sort the files from old to new by file date.
Note:
• This Quick Menu item is only available for access from the music list.
Repeat
To set preferred music repeat mode.
• 1: to repeat the current playing music file.
• All: to repeat all the music files in the folder where the current playing file is.
• Off: to disable music repeat.
Sound
To adjust the audio quality: Bass/Treble/Balance.
Note:
• This Quick Menu item is only available for access from music playback mode.
Sleep Timer
To set the sleep timer to turn off the Media Player, as well as the TV (up to 120 minutes in 10minute increments).
Note:
• This Quick Menu item is only available for access from music playback mode.
Speaker
To select the audio output preference.
• TV Speakers: to output the music from the TV’s built-in speakers.
• Audio Receiver: to output the music from a connected REGZA-LINK
receiver. (For more information, please see page 32.)
Note:
• This Quick Menu item is only available for access from music playback mode or when a
REGZA-LINK® compatible audio receiver is connected.
®
compatible audio
39

Display setup/Timer setting (DTV mode only)
/
/
/
/
Banner
Timeout
1 sec, 2 sec...
7 sec.
Select how long the service banner
information appears on the screen.
Banner
Positio n
Top Select whether the service banner
information appears on the top or bottom
of the screen.
Bottom
/
/
: Adjust
Timer Setting
Current Time 23:59
Time Offset
Auto
/
Display Setup
Press MENU SETUP or DIGITAL MENU to display the Main Menu screen.
1
Press to select the Setup menu, and then press ENTER/CH LIST .
2
Press to select Display Setup, and then
3
press ENTER/CH LIST .
The Display Setup menu appears.
Press to select an item, and then press to change each setting.
4
After all the changes are made, press EXIT/CANCEL to return to the normal screen.
5
Display Setup
Banner Timeout
Banner Position Bottom
: Adjust
4 sec.
Timer Setting
If the time displayed on the Channel banner differs from the actual time, it can be corrected.
Press MENU SETUP or DIGITAL MENU to display the Main Menu screen.
1
Press to select the Setup menu, and then press ENTER/CH LIST .
2
Press to select Timer Setting, and then
3
press ENTER/CH LIST .
REGZA-LINK Setup
REGZA-LINK Player
Media Player
Language Setup
Audio Description
Timer Setting >>
>>
>>
>>
>>
>>
40
If the time displayed on the Channel banner differs
4
from the actual time, adjust Time Offset with the
button until the correct time is shown.
Note:
• Normally, this can be done by selecting Auto.
After all the changes are made, press EXIT/CANCEL to return to the normal screen.
5

Password setup (Parental lock) (DTV mode only)
/
/
/
/
/
IMPORTANT NOTE ON RESETTING THE PASSWORD
We suggest that you remove the following instructions from this owner’s
manual to prevent children from reading it.
If you forget your password, follow the instructions below
to reset the password.
Press 4 times within 5 seconds while the TV is in
password input mode. This allows you to reset your
password.
Password Setup (Parental lock)
This feature allows you to have parental control of services based on your viewing preferences.
Once a service is protected with a password, it cannot be viewed unless the correct password
is provided.
Press MENU SETUP or DIGITAL MENU to display the Main Menu screen.
1
Press to select the Setup menu, and then
2
press ENTER/CH LIST .
Note:
• There are 15 age-based
ratings, ranging from “4”
(years old) to “18” (years
old), “None” and “Block
All”. For example, if the
parental lock is set to “8”
(years old), only the
services with parental
rating of “8” (years old)
and under will be viewable
without entering the
password.
• You will be prompted to
enter the password when
you set a new parental
rating.
You can set the new
parental rating only when
you enter the password
correctly; otherwise the
old parental code will be
retained.
Press to select Password Setup, and then
press ENTER/CH LIST .
The Enter Password window will appear.
Use the number buttons (0–9) to key in “0000”. This is the factory default password.
3
Press to select Parental Lock, and then press to select a preferred parental
4
rating (see Note).
Press EXIT/CANCEL to return to the normal screen.
You can also change the password using the Change Password option.
5
Press to select Change Password, and then press ENTER/CH LIST to enter
a new password (0 to 9).
Make sure to remember this password.
Re-enter the same password again for confirmation.
Press EXIT/CANCEL to return to the normal screen.
While toggling between channels, if a service with parental rating is selected, you will be asked
to enter the password to view that channel. If the channel you are currently watching supports
a parental rating, the rating will also be displayed in the Channel banner menu (see page 22).
Password Setup
Version
Software Upgrade
Common Interface
Vertical Position 0
>>
>>
>>
>>
41

Version
/
/
Note:
• Version check also applies
to ATV mode.
Version
You can check the software version information.
Press MENU SETUP or DIGITAL MENU to display the Main Menu screen.
1
Press to select the Setup menu, and then press ENTER/CH LIST .
2
Press to select the Versi on menu, and
3
then press ENTER/CH LIST .
Password Setup
Vers ion
Software Upgrade
Common Interface
Vertical Position 0
The software version will be displayed.
Version
>>
>>
>>
>>
ENTER : Set
Note:
• The software version printed here in the manual
is used as an example only. Please refer to your
TV for the latest version.
Press EXIT/CANCEL to return to the normal screen.
4
V0.01.001P
EXIT : Cancel
42

Note:
/
/
Software Upgrade
Please Wait
Progress
Cancel
/
• Do not disconnect the AC
cord when the software
upgrade is in progress, as
this may cause the
upgrade to fail. At this time
you cannot use any of the
buttons.
• When the TV searches for
a software upgrade signal,
the message “Please
wait...” will appear.
Software upgrade (DTV mode only)
Software Upgrade
Software Upgrade allows you to download the latest software available for the channel.
Press MENU SETUP or DIGITAL MENU to display the Main Menu screen.
1
Press to select the Setup menu, and then press ENTER/CH LIST .
2
Press to select Software Upgrade, and
3
then press ENTER/CH LIST to select Start to
check if the TV has the Over Air Download service.
A progress bar appears to indicate scanning
progress.
Password Setup
Vers ion
Software Upgrade
Common Interface
Vertical Position 0
>>
>>
>>
>>
If software upgrade is available from the Over Air
4
Download (OAD), a message prompt with option to
upgrade software from OAD appears.
Press to select Yes, and then press
5
ENTER/CH LIST . The software upgrade is
initiated.
If you select No, the update will be cancelled. You
can return to watching your TV programmes.
Once the process is completed, press
6
ENTER/CH LIST to reboot the TV.
Software Upgrade
There is new Software! Do you want to
download the new Software?
Yes
Software Upgrade
Upgrading... don’t Power Off!
Progress 0%
Software Upgrade
Success, TV will reset!
No
Yes
43

Common interface (DTV mode only)
/
/
/
Common Interface
You can access the Common Interface module information from this menu option.
Preparations:
Insert CAM into the DVB Common Interface (C.I.) slot on the side of the TV (see page 9).
Press MENU SETUP or DIGITAL MENU to display the Main Menu screen.
1
Press to select the Setup menu, and then press ENTER/CH LIST .
2
Press to select Common Interface, and
3
then press ENTER/CH LIST .
Password Setup
Vers ion
Software Upgrade
Common Interface
Vertical Position 0
>>
>>
>>
>>
ENTER : Set
The conditional access module (CAM) name is
4
displayed.
Press ENTER/CH LIST to view more
information.
On the CI menu, options related to the CAM
5
module are displayed on the screen.
Press to select an option, and then press
ENTER/CH LIST to view details.
Press EXIT/CANCEL to return to the normal screen.
6
Cl Module
Module Name Viaccess
ENTER EXIT
Cl Menu
Viaccess Module
Consultations
Authorization
Module information
Select the item
44

Multi audio (DTV mode only)
/
/
Multi audio
The Multi audio menu enables you to choose your preferred audio mode and DVB (Digital Video
Broadcasting) subtitle languages available for the current broadcasting programmes.
Press AUDIO SELECT to display the Multi
1
audio menu.
The Audio mode and Language Code will be
displayed, if available.
Press to select Audio mode.
2
The Audio mode options include: Stereo, Left,
Right, and L + R.
Press to select a language code in the Language Code list.
3
When different audio tracks are being broadcast from the left and right channels, select Left
4
or Right in the Audio mode option.
Press EXIT/CANCEL to save audio preferences.
5
Multi audio
Audio mode Stereo
No. Language Code
001 English
: Adjust
Multi audio
Audio mode L+R
No. Language Code
001 English
: Adjust
45

DVB-Subtitle/Using the Digital Service (DTV mode only)
/
/
DVB-Subtitle
DVB-Subtitle is a feature supported by DVB (Digital Video Broadcasting) applications. It
provides on-screen text display in parallel with the corresponding audio services, and can be
enabled or disabled at any time.
Press SUBTITLE to display the Subtitle
1
menu.
Press to select your preferred subtitle language from the available languages.
2
Note:
• DVB-Subtitle can also be changed by pressing SUBTITLE repeatedly.
To disable DVB-Subtitle, press repeatedly
3
until Off appears on the Subtitle menu.
Press EXIT/CANCEL to save the subtitle language.
4
Using the Digital Service
Some services bring you programmes with the Digital Service, and let you experience DTV
interactively. When provided, the Digital Service will start when you press .
Subtitle
Language English
: Adjust
Subtitle
Language Off
: Adjust
Note:
• When the DVB-Subtitle default setting is set to On, the Digital Service cannot be selected
(e.g. MHEG). If you want to view the Digital Service screen, turn the DVB-Subtitle off.
• MHEG5 digital service is not available when the country selection is not set to UK (see pages
14 and 18).
46

EPG (Electronic Program Guide) (DTV mode only)
/
/
The Guide menu shows a list of available programmes for the next eight days only, including today. However, it will show “No
Event Name” for programmes which are more than eight days ahead, or for programmes within the eight days when no
programme information is available.
Press GUIDE to display the EPG menu.
1
Press TV/RADIO to toggle between three service modes -TV, Radio, and Data - to view
2
the EPG data accordingly. By default, the services listed on the screen is TV mode.
If you wish to view the list of Radio services without exiting the current menu, press
TV/RADIO once.
If you wish to view the list of Data services without exiting the current menu, press
TV/RADIO twice.
• Service List
Displays all the available services.
As you scroll through the service list by pressing , the Event List will be refreshed
accordingly, and you will see the programme information for the currently highlighted
programme(s).
To scroll through the service list from page to page, press the Red/SLOW or Green/
PAUSE button.
• Event List
Displays events in a grid of rows and columns.
Each row shows a list of events that are available for the corresponding service in the
service list. Within each row, you can press to navigate through the rest of the events.
You can easily move to the Previous day or Next day in the Event List by pressing the
Yellow/PLAY MODE or Blue/SLOW button (the date of the programme you are
currently viewing is shown on the top right corner).
The full event name will be displayed in the bar above. Event title will be displayed only
if available; otherwise “No Event Name” message will be displayed.
From the Guide menu, you can open the Description menu for the currently highlighted
3
programme(s) by pressing .
The Guide/Description menu shows extended descriptions of an event. You can scroll and
view the complete descriptions of the event using .
To return to the Guide menu, press .
To clear the menu screen, press EXIT/CANCEL .
47

EPG Timer (DTV mode only)
/
/
/
You can choose whether or not to switch on your TV screen when a timer event begins (see page 28: Rec Screen Status (LCD
Power on/off)). This is so that if you are using the timer to make a recording from your VCR or other device, the TV screen will
not turn on unless you want it to.
If you try to interrupt your event timer in any way, e.g. switching to another channel, while the timer event is in progress, the
following message will appear: “Warning: Changing the channel will interrupt your event timer. Are you sure you want to proceed?
Yes/No”. Select Yes or No according to your wishes.
Press GUIDE to display the EPG menu.
1
Press / to highlight the programme you want to set as a timer event, and then
2
press ENTER/CH LIST .
Note:
• To display the stored timer events, press GUIDE twice, and then the Event Timer
menu (see step 4 below) will appear. You can also delete or change the frequency (Once/
Daily/Weekly) of the stored timer events, but please note that you cannot edit the time
details that have been set from the EPG.
A confirmation banner will display on-screen.
3
Press to select Yes or No, and then press ENTER/CH LIST (the selected
option is shown in blue).
The Event Timer menu will appear.
4
Press the Red/SLOW button to set the
timer mode for a selected event.
48
The frequency of Timer wake-up specified by
5
the Timer mode can be set as Once, Daily or
Weekly.
Press ENTER/CH LIST to save the
selected timer mode.
Note:
To delete a timer event, select the specified
event and then press the Green/PAUSE
button.
To return to the EPG menu, press ENTER/CH LIST .
6
To clear the menu screen, press EXIT/CANCEL .
Note:
• When the EPG Timer starts, the message “Event Timer Start” will appear.
• If the EPG Timer starts when it is already switched on, it will start at the exact time that is set.
If it starts from the standby mode, it will begin 20 seconds ahead of the starting time.
• You cannot hasten the starting time from the original starting time of an Event.
• You cannot set the same date and time for another Event.
• Press the Yellow/PLAY MODE button to change the starting time of an event.
• Press the Blue/SLOW button to change the time duration of an event.
• When in power-off condition, EPG Timer cannot be activated.
• If the EPG Timer begins during standby mode without screen display, the Power indicator on
the TV will be lit in orange. This is to indicate that an EPG Timer event has begun in standby
mode. However, if it begins during the standby mode with screen display, the Power indicator
on the TV will light green.

Disc
2
Title 1
Chapter 1
Chapter 1
Chapter 2
Chapter 3
Title 2
Chapter 2
DVD DISC
Track 1
Track2
Track 3
Track 4
Track 5
Video CD/Audio CD
Playback side
DVD discs must be Region 2 or Region ALL type to play on this TV/DVD. If region numbers, which stand for their playable area,
are printed on your DVD and you do not find or , disc playback will not be allowed by the player. (In this case, the TV/DVD
will display a message on-screen). Some DVDs that have no region code label may still be subject to area restrictions and
therefore not playable.
Disc playback reminders
• The following disc formats are supported: DVD-Video, DVD-R/-RW (video format only), Audio CD, CD-R/CD-RW, and Video
CD. Some CD-R/RW discs may be incompatible.
• To prevent accidental erasure of pre-recorded material, do not play DVD-ROM, DVD-Audio, CD-G, Photo CD or SVCD.
• This unit can play an 8cm disc.
• Do not use a disc adapter or load any disc of irregular shape into the unit. This may interfere with the operation of the TV. You
may not be able to remove the disc.
• Please do not use aftermarket accessories, such as a ring protector. This may interfere with the operation of the unit.
Structure of disc contents
DVD
When two or more movies are recorded on a disc, the disc is
divided into two or more sections; each section is called a “title”.
The titles can be subdivided into many sections; each section is
called a “chapter”.
Video CD/Audio CD
A Video CD/Audio CD can contain several items. Each item is
called a “track”.
Removing disc from case
Be sure to hold the edge of a disc. Pick up the disc gently from
the case. Do not touch the surface of the disc.
• Do not scratch the disc.
• Do not get dirt on the surface of the disc.
• Do not stick a label or adhesive tape on the disc.
• Do not drop or bend the disc.
Storing disc
• Store the disc in a CD case to avoid scratches, dirt or damage.
• Do not leave the disc exposed to direct sunlight or in hot or
humid places.
Cleaning disc
Wipe the disc with a clean, dry cloth from the centre outwards.
• Do not wipe in circular direction.
• Do not use liquid or aerosol cleaners.
49

Basic playback
/
/
Reading
This section shows you how to play a disc.
Basic playback (DVD/VCD/Audio CD)
Press on the TV control panel or on the remote control to turn on the TV.
1
The power indicator on the front of the TV will change to green.
Press TV/DVD on the remote control to switch to DVD
2
mode.
The DVD startup screen will appear on-screen.
Hold the disc by its edges and load it in the disc slot with the label side facing forward.
3
(If the disc has a label.)
Note:
• Do not place a disc which is unplayable in this TV.
On the TV screen, the prompt will change from “Insert Disc” symbol to Reading, and
4
Note:
• When a disc is inserted
when the TV is not in DVD
mode, the TV will
automatically switch to
DVD mode.
• Do not move the TV during
playback. Doing so may
damage the disc.
then playback starts.
• If the disc has its own menu, it will be displayed on-screen. Press / to
navigate the disc menu, and then press ENTER/CH LIST to enable the selected
menu option.
To stop playback, press STOP .
5
• The TV supports playback resume function. If you stop the disc playback before it is
completed, the TV records the stop point. appears on the screen. Press PLAY to
resume playback on the stop point.
• If you press STOP twice in quick succession or unload the disc, the TV will clear the
stop point.
50

Basic playback (continued)
To start playback in stop mode
Press PLAY .
To pause playback (still mode)
Press PAUSE during playback.
To continue playback from still mode
Press PLAY .
To stop playback
Press STOP .
To remove a disc
Press EJECT on the TV control panel or on the remote control.
1
Wait for the disc drive to eject the disc, and then remove the disc from the slot.
2
Disc playback reminders
• If the TV does not operate properly, static electricity build-up may be the cause. Turn off the
TV, and then disconnect the power cord from the AC outlet. Reconnect the power cord, and
then press on the TV control panel or on the remote control to turn on the TV again.
• If an incompatible disc is loaded, one of the following messages will appear on-screen:
“Incorrect Disc”, “Disc region incorrect” or “Enter Password”, depending on the type of the
loaded disc. If this is the case, check your disc again (see pages 49 and 71).
• Some discs may take a minute or so to start playback.
• When you load a disc with the playback side facing forward, “Reading” appears on-screen
but it will be replaced by “Incorrect Disc”. Eject the disc and load it again, making sure the
playback side is now facing backward.
• The playback resume function may not work on some discs.
• Some DVDs may have fixed playback operations designed by the DVD manufacturer. Since
the TV follows this design, some playback features may not be available. You may refer to
the instructions accompanying the DVD.
• In many instances, a menu screen will appear after disc playback. Prolonged display of an
on-screen menu may damage your television set, permanently etching that menu image on
the screen. To avoid this, turn off the TV once disc playback is completed.
• There may be a slight delay between the button press and the function it activates.
• The prohibition symbol “X” appears on the upper right corner of the screen when you try to
employ a playback function that is not available on the disc, or that is not yet accessible at
this time. This does not indicate a problem with the TV.
51

Advanced playback
The TV supports several playback modes that allow you to play discs at various speeds.
Playing in fast reverse or fast forward direction (DVD/VCD/Audio CD)
Press REV / FF during playback.
1
• REV : Fast reverse playback
• FF : Fast forward playback
Each time you press REV / FF , the playback speed changes.
To resume normal playback, press PLAY .
2
Note:
• The sound is muted during reverse and forward scan.
• The playback speed may differ depending on the disc.
• You can use fast reverse/fast forward playback for MP3/DivX
Playing frame by frame (DVD/VCD)
Press PAUSE during playback.
1
Each time you press PAUSE , the picture advances one frame.
To resume normal playback, press PLAY .
2
Note:
• The sound is muted during frame by frame playback.
• You can use frame by frame playback for DivX
Playing in slow motion (DVD/VCD)
Press SLOW during playback.
1
• SLOW : Slow reverse playback
• SLOW : Slow forward playback
Each time you press SLOW /SLOW , the playback speed changes.
To resume normal playback, press PLAY .
2
Note:
• The sound is muted during slow motion playback.
• You can use slow forward playback for DivX
• Slow reverse playback is not available for DivX
Locating a chapter or track (DVD/VCD/Audio CD)
Press SKIP repeatedly to display the chapter or track number you want to play.
1
• SKIP : To locate succeeding chapters or tracks. Playback starts from the beginning
of the selected chapter or track.
• SKIP : Playback starts from the beginning of the current chapter or track. When you
press SKIP twice in quick succession, playback starts from the beginning of the
preceding chapter or track.
®
®
CD.
®
CD.
CD.
®
CDs.
52

Zoom function/Scene navigation
/
/
1
/
/
Jump
Title
Chapter
Time
Jump
Title
Chapter
Time
/
Jump
Title
Chapter
Time
Using the Zoom function (DVD/VCD)
You can change the viewing scale of a picture by using the Zoom function. Once the image has
been rescaled, use the arrow buttons / to pan the image.
Press CH RTN ZOOM during playback.
1
The view will zoom into the centre of the image.
Each press of the button will increase the scale value:
1(x 1.3), 2 (x 1.5), and 3 (x 2.0).
Press / to pan the scene and view different sections of the picture.
2
To return to normal view, press CH RTN ZOOM repeatedly until Off appears.
3
Note:
• You can use the Pause and Slow playback functions in Zoom mode.
• Zoom function may not apply to some discs.
• You can use the Zoom function for DivX
Locating a specific scene (DVD/VCD/Audio CD)
Scene navigation options differ depending on the kind of disc. DVDs use the title, chapter or
record time to locate the start point for playback; audio and video CDs use the record time or
track number. To view the disc’s title/track, chapter, and time list, press .
Press JUMP during playback, resume or stop
1
mode.
®
CDs.
Press to select a navigation option: Title/Track,
2
Chapter or Time.
Use the number buttons (0–9) to key in a value for the
3
navigation option you selected.
If you input a wrong number, press EXIT/CANCEL .
Refer to the disc package to check the correct number.
Press ENTER/CH LIST to start playback.
4
Note:
• When you use title navigation, playback starts from the first chapter of the selected title.
• Scene navigation may not apply to some discs.
• Scene navigation by record time is applicable only to DivX
• For audio and video CDs, you can locate a scene by track number or record time.
• For PBC-enabled VCDs, turn off the PBC function first before using the JUMP function (see
page 58 for instructions).
®
CDs.
53

Scene bookmark
Marker 1
Marker 2
Marker 3
Marker 1
Marker 2
Marker 3
/
Marker 1
Marker 2
Marker 3
Marker 1
Marker 2
Marker 3
/
Note:
• Bookmark function is not
applicable to JPEG CD/
®
DivX
CD.
Bookmarking a scene (DVD/VCD/Audio CD)
Scene bookmarks refer to specific points in the playback range that have been marked for later
access. You can create up to three markers per disc.
Note:
• The saved scene bookmarks are only accessible during the current session. Once you eject
the disc or turn off the TV, all bookmarks will be cleared.
During playback, press MARKER at the
1
scene where you would like to place the bookmark.
Press to select a blank marker, and then
2
press ENTER/CH LIST to bookmark the
selected scene.
Press MARKER to close the Bookmark window.
3
To save two more bookmarks, repeat steps 1-3.
4
Note:
• Bookmarking a scene may not apply to some discs.
• In some cases, subtitles for the marked scene may not appear.
Viewing a scene bookmark (DVD/VCD/Audio CD)
Press MARKER during playback or stop
1
mode.
Press to select the saved marker.
2
Press ENTER/CH LIST to start playback on the scene saved in the selected
3
bookmark.
To delete a scene bookmark:
Perform steps 1-2, and then press EXIT/CANCEL .
54

Repeat playback/A-B repeat playback
Repeat : Title
[DVD]
Play Mode
[Video CD]
Mode : Normal
Repeat : Off
Play Mode
/
A
AB
Enabling repeat playback (DVD/VCD)
You can choose to repeat DVD playback by title or chapter. For VCDs, you can repeat a single
track or the entire disc.
Press PLAY MODE during playback or stop mode.
1
DVD
2
Press ENTER/CH LIST repeatedly to select a
repeat mode. It can either be by Chapter or by Title.
The TV automatically starts repeat playback after
finishing the current title or chapter.
VCD
Press to select Repeat, and then press
ENTER/CH LIST repeatedly to select a repeat
mode. It can either be Single or All.
Note:
If you set the repeat mode during stop mode, press PLAY to start Repeat playback.
Press PLAY MODE again to close the Play Mode window.
3
To resume normal playback:
Select Off in step 2 above.
Note:
• The Repeat playback function may not apply to some discs.
• Chapter/Track function is cancelled when the SKIP or SKIP button is pressed.
• The Repeat playback function is not applicable to PBC-enabled VCDs.
Enabling A-B repeat playback (DVD/VCD/Audio CD)
The A-B repeat function lets you repeat a specific section between two set points.
During playback, press REPEAT A-B at the
1
point where you would like the playback loop to begin.
This sets your “A” point.
When the playback reaches the point where you would like the playback loop to stop, press
2
REPEAT A-B again. This sets your “B” point.
The section between points A and B will be played
repeatedly in a loop until you turn off the Repeat A-B
mode.
To resume normal playback:
Press REPEAT A-B until Off appears on the screen.
Note:
• In some cases, subtitles for the repeated scene may not display.
• The A-B repeat mode may not apply to some DVD scenes.
• The A-B repeat mode is not applicable to interactive DVDs and JPEG CDs.
55

Scene angle/Title selection/DVD menu
1/2
/
/
/
/
Changing the scene angle (DVD)
When playing back a DVD recorded with multi-angle scenes, you can select the scene angle
that you prefer.
Press ANGLE during playback.
1
The current angle will appear.
Press ANGLE repeatedly until the preferred scene angle is displayed.
2
Note:
• Depending on the DVD, you may not be able to change the scene angle even if multi-angle
data are recorded on the disc.
Selecting a DVD title (DVD)
Some DVDs contain two or more titles. If this is the case, you can select a particular title for
playback.
Press TOP MENU during playback to display the title menu. The title menu will appear
1
on the screen.
Press / to select the preferred title.
2
Press ENTER/CH LIST or PLAY to start playback.
3
Note:
• Title selection may not apply to some DVDs.
• The title menu may simply be referred to as “menu” or “title” in the instructions supplied with
the DVD.
DVD menu (DVD)
Some DVDs have an encoded menu that allows you to select a specific disc content, enable a
particular DVD feature (e.g. subtitle or soundtrack language), or choose a particular title (for
multi-title DVDs).
Press DVD MENU during playback. The DVD menu will appear on the screen.
1
Press / to select a DVD menu item, and then press ENTER/CH LIST .
2
Use the same keys to enable an option for the selected item.
Repeat this step to configure other menu options.
Press DVD MENU again to resume playback on the scene that was playing when you
3
pressed DVD MENU .
Note:
• Depending on the DVD, you may not be able to resume playback from the same scene that
was playing when you pressed DVD MENU .
56

Soundtrack language/Audio channel/Subtitle
2/2 D 5.1 Ch Eng
Stereo Left
Right
Mix
1/5 Eng
Off
Selecting a soundtrack language (DVD)
You can select the soundtrack language when you play a multilingual DVD.
During playback, press AUDIO SELECT repeatedly
until the preferred language is selected.
Selecting the audio channel (VCD)
During playback, press AUDIO SELECT repeatedly until the preferred audio channel is
heard. Options include Stereo, Left, Right, and Mix.
Note:
• If the preferred language is not heard after selecting it for several times, that language is not
recorded on the disc.
• The soundtrack language selected is only applicable for the current session. When you stop
playback and try to play the disc again, the default language track will be used.
• If you select the DTS option in DVDs with DTS feature, no sound will be heard from the TV
speakers. You need to connect an amplifier equipped with a DTS decoder to the optical digital
audio out jack.
Viewing subtitles (DVD)
When playing back a disc recorded with subtitles, you can select the subtitle language or turn
the subtitle off.
Press SUBTITLE repeatedly during playback until
1
the preferred language is selected.
To turn off the subtitle, press SUBTITLE until Off
2
appears. The on-screen display will disappear after a few
seconds.
Note:
• Not all DVDs have encoded subtitles.
• The subtitle selection may revert to the default language when you stop playback and try to
play the DVD again.
• In some cases, the selected subtitle language may not display immediately.
• Depending on the DVD, you may not be able to change subtitles, or to turn subtitles on or off.
57

Playback information/VCD playback control (PBC)
VCD2.0
Time DISC 00:00:19/00:16:12 Track 00:00:19/00:02:28
Track 1/8
Elapsed/remaining
time for disc
Elapsed/remaining time
for current track
Track no.
(if PBC is
enabled,
“PBC On”
will be
displayed)
DVD Video
Time TT 00:01:52/00:09:11 CH 00:01:41/00:00:01
Title 1/2
Chapter 2/5
Elapsed/remaining
time for current title
Title no.
Elapsed/remaining time
for current chapter
Chapter no.
Audio type Subtitle status (if on, will show language)
Bit rate
Scene angle
status
/
Viewing the playback information (DVD/VCD)
You can view the playback status and other disc information.
Press to display the status of the disc during playback.
To close the display panel, press again.
VCD mode
DVD mode
Press again.
1/5 2 Ch Eng
off
1/1
2.205Mbps Bitrate
On Video CDs
This TV/DVD supports Video CDs equipped with the Playback Control (PBC) function, version
2.0. You can enjoy two playback variations depending on types of discs.
• Video CD not equipped with the PBC function (Version 1.1)
Sound and movie can be played on this TV in the same way as an audio CD.
• Video CD equipped with the PBC function (Version 2.0)
In addition to operation of a Video CD not equipped with the PBC function, you can enjoy
playback of interactive software with search function by using the on-screen playback menu.
Some of the functions described in this owner’s manual may not work with some discs.
To turn off the PBC
(1) Press PLAY MODE during stop mode.
(2) Press to select Mode, and then press ENTER/CH LIST repeatedly until
Normal appears.
(3) Press PLAY MODE again to clear the screen.
To turn on the PBC
Follow the steps 1-2 above, and then press ENTER/CH LIST repeatedly until PBC
appears.
58

MP3/JPEG/DivX® and Audio CD operation
This TV can play MP3/JPEG/DivX® files recorded on CD-R and CD-RW discs. To create an MP3/JPEG/DivX® disc, you need a
Windows PC with a CD-RW drive and file encoding software (not supplied).
This TV requires discs/recordings that meet certain technical standards in order to achieve optimal playback quality. There are
many different types of recordable disc formats (including CD-R discs containing MP3 files). Not all recordable discs will produce
optimal playback quality. The technical criteria set forth in this owner’s manual are meant only as a guide. Use of CD-RW discs
for recording MP3 files is not recommended.
MP3/JPEG/DivX® /Audio CD information
MP3/JPEG/DivX
• Make sure the file name of MP3/JPEG/DivX
and “avi”) to make it compliant with the ISO 9660 standard.
• This unit can read 2000 files per disc. If a disc has more than 2000 files, it reads the first 2000 files, while the remaining files
will be omitted.
• To play the files in sequence based on the recorded order:
- Use MP3/JPEG/DivX
- Include a two- or three-digit number prefix on the file name, ex: “01” “02” or “001” “002”.
- Refrain from making too many sub-folders.
•MP3/JPEG/DivX
• It may take more than one minute for this unit to read MP3/JPEG/DivX
• Audio files recorded based on the Joliet Recording Specification can be played back.
• This unit does not support data disc burned using the Apple Mac OS (Hierarchical File System, HFS format).
File name display reminders
• The maximum number of characters for file name display is 15. Long file names will be condensed.
• Only the following characters will be displayed: A through Z (both upper and lower case), 0 through 9, and the underscore
symbol (_).
• Non-supported characters will be replaced with a hyphen (-).
®
playback reminders
®
files in a CD includes the 3-character file extension (“mp3”, “jpg”, “div”, “divx”,
®
-encoding software that records data alphabetically or numerically.
®
CDs cannot be used for recording purpose.
®
files depending on the disc structure.
MP3/JPEG/DivX® CD limitations
• Depending on the recording conditions, some MP3/JPEG/DivX® CDs cannot be played back in your TV.
• Only MP3/JPEG/DivX
®
files recorded in the CD-R or CD-RW disc can be played. Other files will not be read nor displayed.
MP3 and DivX® file encoding information
MP3
- File format: MPEG-1 Audio
- Sampling frequency: 32 kHz, 44.1 kHz, 48 kHz
- Bit rate: 32-320 kbps (constant bit rate or variable bit rate)
The recommended recording setting for high-quality sound is 44.1 kHz sampling frequency and 128 kbps constant bit rate.
®
DivX
- Version: DivX® 3, 4, 5, and 6 (specifically 3.1.1, 4.1.2, 5.0.2, 5.0.5, 5.1.1, 5.2.1, 6.0 at Home Theatre profile)
- File format: MPEG1 Layer2 (MP2) or MPEG1 Layer3 (MP3)
- Sampling frequency: 32 kHz, 44.1 kHz, 48 kHz
- Bit rate: 32-320 kbps
- Resolution: 720 x 576 at 25 fps (max), 720 x 480 at 30 fps (max)
Note:
•DivX®, DivX Certified® and associated logos are registered trademarks of DivX, Inc. and are used under license.
• MPEG Layer-3 audio coding technology licensed from Fraunhofer IIS and Thomson.
IMPORTANT INFORMATION
You must obtain any required permission from copyright owners to download or use copyrighted content.
Toshiba cannot and does not grant such permission.
59

About the file browser/Audio file playback
Select files
Operation status
Scroll bar
Filename of
selected item
File list
Selection highlight
Preview panel
Option
panel
Music Playing
/
/
/
/
About the file browser
File icons
Music file (MP3 or audio CD track)
Picture file (JPEG)
Movie file (DivX
If a CD contains a mixture of MP3, JPEG, and DivX
selecting a file, playback starts automatically from the first file in the list.
®
video)
®
files, and PLAY is pressed without
Setting the file type listing
You can choose the type of files listed in the file browser.
Press to move the selection highlight to the Option panel.
1
Press to highlight Select Files, and then press ENTER/CH LIST .
2
Press to select a file type from the list: Audio, Photo, or Video.
3
Press ENTER/CH LIST to add or remove the check mark next to each file type.
4
Checked file type will be displayed in the file browser.
Press twice to move the selection highlight back to the file list.
5
Note:
• Select Files is not applicable to audio CDs.
Viewing image files in thumbnail mode
You can change the browser’s view mode from list mode to thumbnail mode. This is convenient
when browsing for JPEG files.
Press DVD MENU .
1
Press / to select an image file.
2
To return the browser to list mode:
Press TOP MENU .
To view the previous or next thumbnail page:
Press SKIP or SKIP .
60

Playing an audio file
Select files
Folder- 1
Folder- 2
MP3- 1
MP3- 2
MP3- 3
WMA- 1
WMA- 2
WMA- 3
JPEG Preview
/
Select files
Folder- 1
Folder- 2
MP3- 1
MP3- 2
MP3- 3
WMA- 1
WMA- 2
WMA- 3
JPEG Preview
/
Load an MP3 or audio CD in the disc slot.
1
The file browser appears on-screen. The first audio
file in the list plays automatically (applicable only to
audio CD).
Press to select another audio file for
2
playback.
Press ENTER/CH LIST or PLAY to start playback.
3
To stop playback:
Press STOP .
The TV records the stop point. appears on-screen. Press PLAY to resume playback.
If you press STOP twice in quick succession or unload the disc, the TV will clear the stop
point.
Note:
• If the current directory has more than eight files, press to scroll the file list.
• To see folder contents, select a folder and then press ENTER/CH LIST .
• To return to the root directory, select Go Up ... and then press ENTER/CH LIST .
• The Repeat and Random/Programme playback modes can be enabled during audio
playback (see pages 64-65).
61
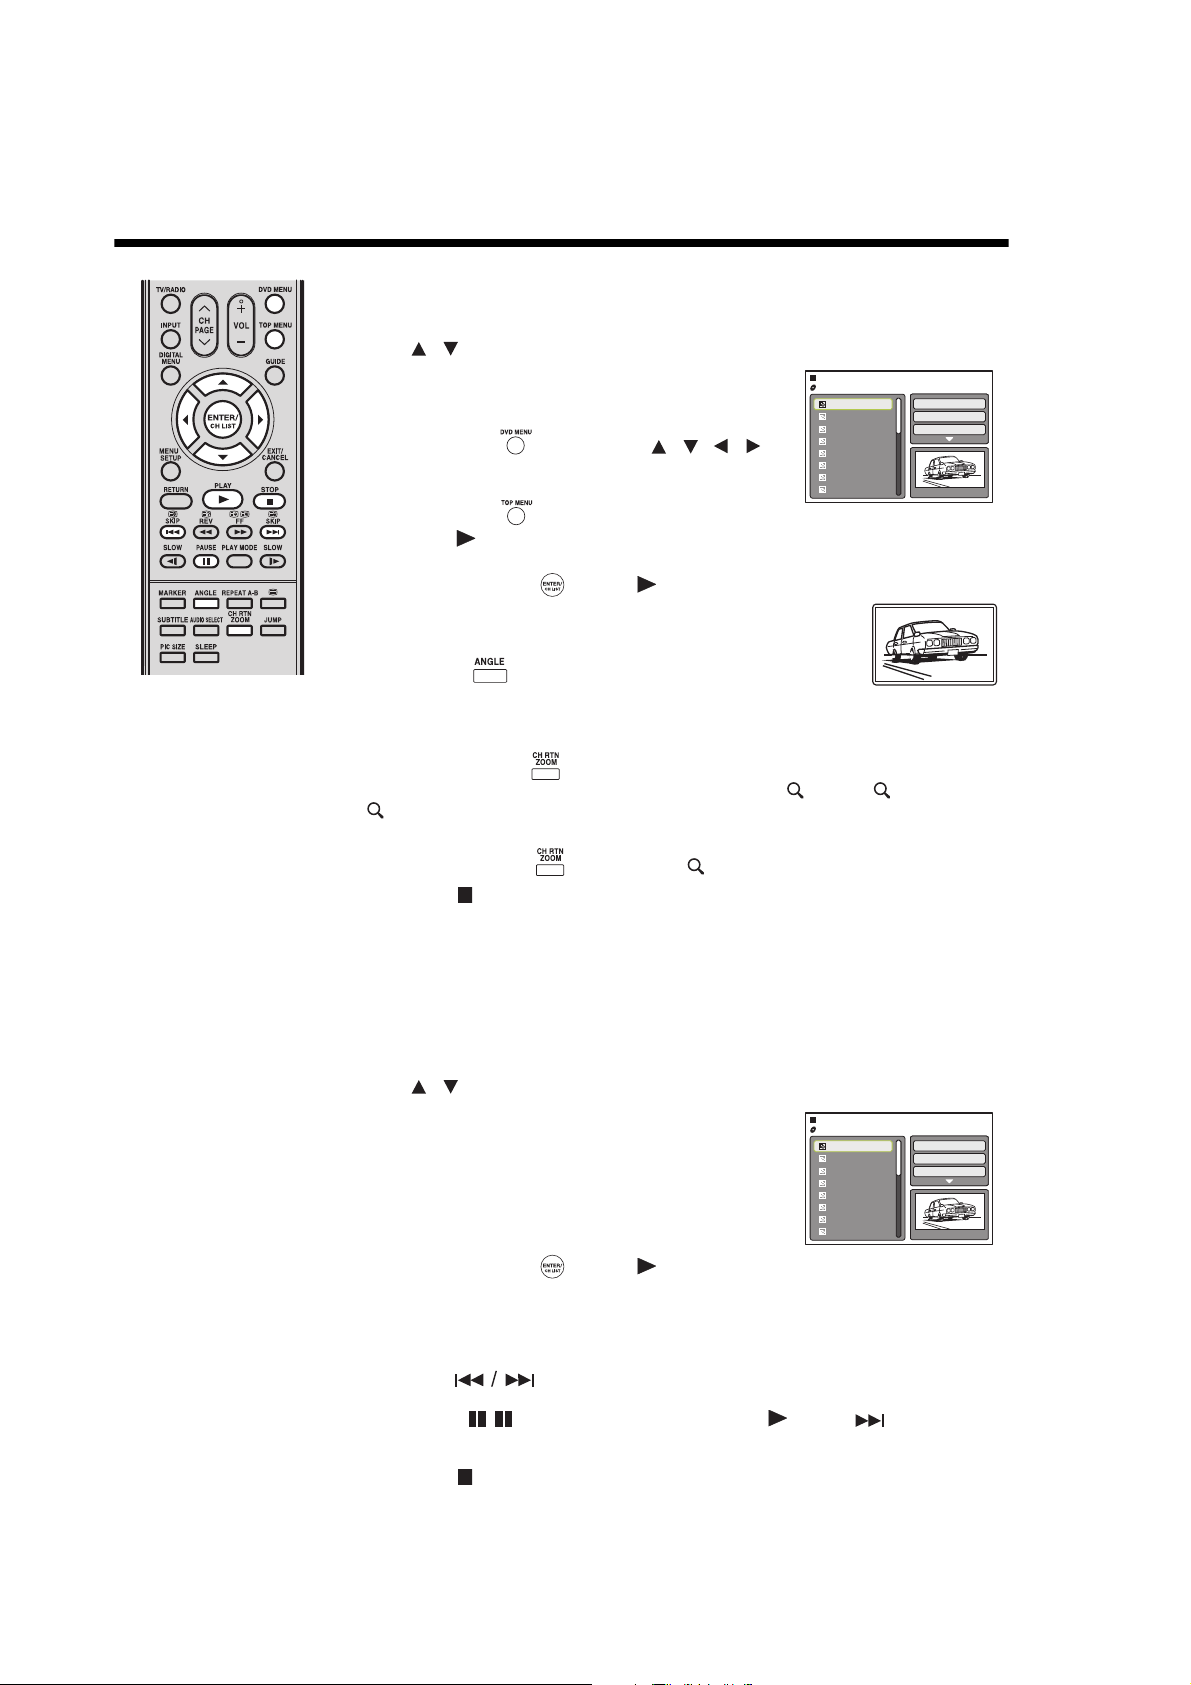
JPEG file operation
/
Picture-01
Picture-02
Picture-03
Picture-04
Picture-05
Picture-06
Picture-07
Picture-08
Select Files
Repeat :Off
Mode :Normal
/
/
/
Picture-01
Picture-02
Picture-03
Picture-04
Picture-05
Picture-06
Picture-07
Picture-08
Select Files
Repeat :Off
Mode :Normal
Note:
• The Jump and A-B Repeat
modes are not available
when viewing JPEG
images.
• When an image exceeds
5760 x 3840 pixels, the
image display can appear
cropped. This applies
when viewing the image in
the Preview panel of the
file browser, or when in the
thumbnail, full-screen, or
slide show modes.
• During a slide show, the
interval time between
images may increase if the
file size is too big.
Viewing a JPEG file
Load a disc containing JPEG files in the disc slot.
1
The file browser appears on-screen.
Press to select an image file for viewing.
2
A preview of the selected file is displayed in the Preview
panel.
/Picture-01.JPG
To display a thumbnail list:
Press DVD MENU , and then press /
select an image file.
To return to the file browser:
to
JPEG Preview
W: 2048 H: 1536
Press TOP MENU .
When PLAY is pressed without selecting a file, playback starts automatically from the
first file in the list.
Press ENTER/CH LIST or PLAY .
3
The selected image is displayed in full-screen mode.
To rotate an image:
Press ANGLE repeatedly until the preferred angle is
obtained.
The image angle is adjusted in 90° increments. The current
angle setting is shown on-screen: 90º, 180º, 270º or No rotation.
To magnify an image:
Press CH RTN ZOOM repeatedly until the image is displayed in the preferred scale.
The current zoom setting is indicated by the following icons: 1 (x 1.3), 2 (x 1.5), and 3
(x 2.0).
To return to normal view:
Press CH RTN ZOOM repeatedly until Off appears.
Press STOP to end playback.
4
The file browser appears on-screen.
Viewing a slide show
The slide show enables you to view multiple JPEG files one after another automatically.
Preparation:
Set JPEG Interval setting to 5 seconds, 10 seconds, or 15 seconds (see page 69).
Open the file folder containing the JPEG files you want to include in the slide show.
1
Press to select the file you want to be the starting image for the slide show.
2
A preview of the selected file is displayed in the Preview
panel.
/Picture-01.JPG
62
Press ENTER/CH LIST or PLAY to start slide show.
3
The selected image is displayed in full-screen mode.
When the slide show is completed, the file browser appears.
To view the previous or next image in the slide show:
Press SKIP .
To temporarily stop the slide show:
Press PAUSE . will appear on-screen. Press PLAY or SKIP to resume the
slide show.
To stop the slide show:
Press STOP . The file browser appears.
JPEG Preview
W: 2048 H: 1536

DivX® and DivX® VOD operation
/Movie-01.DIVX
Select Files
Repeat :Off
Mode :Normal
JPEG Preview
Movie-01
Movie-02
Movie-03
Movie-04
Movie-05
Movie-06
Movie-07
Movie-08
/
/
View DivX(R)VOD Rental
This rental has 5 views left.
Do you want to use one of
your 5 views now?
Yes
No
Note:
• Depending on the
recording conditions of
®
DivX
file, you may not be
able to use the Fast
Reverse, Fast Forward
playback, and Jump
functions (see pages 52-
53).
DivX® playback
Load a disc containing DivX® files in the disc slot.
1
The file browser appears.
Press to select a file for playback.
2
When PLAY is pressed without selecting a file, playback
starts automatically from the first file in the list.
Press ENTER/CH LIST or PLAY to start movie
3
playback.
To stop playback, press STOP .
4
The TV records the stop point. appears on-screen. Press PLAY to resume playback.
If you press STOP twice in quick succession or unload the disc, the TV will clear the stop
point.
Playing DivX® VOD content
DivX Certified® to play DivX® video, including premium content.
ABOUT DivX
DivX certified device that plays DivX video. Visit www.divx.com for more information and
software tools to convert your files into DivX video.
ABOUT DivX
to play DivX Video-On-Demand (VOD) content. To generate the registration code, locate the
DivX VOD section in the device setup menu. Go to vod.divx.com with this code to complete the
registration process and learn more about DivX VOD (see page 72).
If an incorrect DRM file is loaded, the message “Authorization Error This player is not authorized
to play this video.” appears on-screen. DivX
number of times. A message prompt will appear to show the allowable number of views. If you
intend to consume all your view options during the current session, press to select Yes,
and then press ENTER/CH LIST .
®
VIDEO: DivX® is a digital video format created by DivX, Inc. This is an official
®
VIDEO-ON-DEMAND: This DivX Certified® device must be registered in order
®
VOD content can only be played for a cer tain
If you attempt to play DivX
“Rental Expired” appears on-screen. In this case, you will not be able to play the file.
®
VOD content that has already reached its view limit, the message
63

MP3/JPEG/DivX® and Audio CD playback modes
Folder-1
Folder-2
MP3-1
Select Files
Repeat Off
/
Folder-1
Folder-2
MP3-1
Select Files
Repeat Track
/
Folder-1
Folder-2
MP3-1
Repeat Off
Shuffle
Edit Mode
/
Folder-1
Folder-2
MP3-1
Repeat Off
Music Intro
Edit Mode
Note:
• These playback modes
are only applicable during
the current session. Once
you eject the disc or turn
off the TV, these modes
will be disabled.
• For audio CD, the A-B
Repeat function can also
be used (see page 55).
Enabling repeat playback (Audio CD/MP3/JPEG/DivX®)
You can choose to repeat CD playback by track or the entire disc.
During stop mode, in the Option panel of the file browser,
1
press to select Repeat.
Press ENTER/CH LIST repeatedly to select a repeat
2
mode: Track or All.
Press PLAY .
3
The TV automatically starts repeat playback after finishing the current track.
To resume normal playback, select Off in step 2 above.
4
Enabling random playback (Audio CD/MP3/JPEG/DivX®)
You can set the TV to play files at random.
During stop mode, in the Option panel of the file browser, press to select Mode.
1
Press ENTER/CH LIST repeatedly to set the mode
2
to Shuffle.
Press PLAY .
3
The TV automatically applies the shuffle mode.
To resume normal playback, select Normal in step 2 above.
4
Enabling the Music Intro mode (Audio CD/MP3)
When the Music Intro mode is enabled, the first 10 seconds of an audio track is played. This is
useful if you are simply looking for a particular track in a list.
During stop mode, in the Option panel of the file browser,
1
press to select Mode.
Press ENTER/CH LIST repeatedly to set the mode
2
to Music Intro.
Press PLAY .
3
The TV starts to play the first 10 seconds of each track in the list.
To resume normal playback, select Normal in step 2 above.
4
64

MP3/JPEG/DivX® and Audio CD playback modes
Folder-1
Folder-2
MP3-1
Mode : Music Intro
Edit Mode
Program View
/
/
Folder-1
Folder-2
MP3-1
MP3 2
Edit Mode
Program View
Add To Program
/
/
/
Folder-1
Folder-2
MP3-1
MP3-2
MP3 3
MP3-1
MP3-2
MP3-5
MP3-3
MP3 6
Browser View
Clear Program
Edit Mode
Program View
Add To Program
Edit Mode
Browser View
Program View
/
/
/
/
/
Programming the playback sequence (Audio CD/MP3/JPEG/DivX®)
You can customise the file playback sequence.
In the Option panel of the file browser, press to
1
select Edit Mode, and then press ENTER/CH LIST .
Press to return to the file list and press to
2
Note:
• The programme playback
mode is only applicable
during the current session.
Once you eject the disc or
turn off the TV, this mode
will be disabled.
select a file, and then press ENTER/CH LIST to
mark it for inclusion in the programmed playlist.
A check mark will appear next to the file.
Repeat this step to mark any other files you want to add
in the programmed playlist.
In the Option panel, press to select Add To
3
Program, and then press ENTER/CH LIST to add
the marked files to the programmed playlist.
The maximum number of files/tracks can be added is 30.
Press to select Edit Mode, and then press ENTER/CH LIST to disable it.
4
Press to select Program View, and then press ENTER/CH LIST .
5
In Program View, only the files you added in step 3 are displayed.
MP3-1.MP3
Folder-1
Folder-2
MP3-1
(continued)
Mode : Music Intro
Edit Mode
Program View
In the programmed playlist, press to select a file, and then press PLAY to start
6
playback.
To remove a file from the programmed list:
Press STOP twice to stop playback.
1
In Program View, press / to select Edit Mode on the Option panel, and then
2
press ENTER/CH LIST to enable it.
Press to go to the programmed list.
3
Press to select the file you want to remove, and then press ENTER/CH LIST .
4
Repeat step 4 to mark any other files you want to remove from the list.
5
Press to go to the Option panel.
6
Press to select Clear Program, and then press ENTER/CH LIST .
7
65

Programme playback/Random playback
1–––
2–––
3–––
Mode :Normal
Program Playback
Play Mode
1–––
2–––
3–––
Mode :Program
Program Playback
Play Mode
/
1–––
2–––
3–––
Mode :Program
Program Playback
Play Mode
2
/
/
/
/
/
/
/
1–––
2–––
3–––
Mode :Shuffle
Program Playback
Play Mode
/
The TV enables you to arrange the playback order of tracks and files on the disc, and it can also select tracks and files at
random and playback them. These features can be applied for Video CD. For Audio CD and MP3/JPEG/DivX
“Enabling random playback (Audio CD/MP3/JPEG/DivX
MP3/JPEG/DivX
®
)” on page 65.
®
)” on page 64 and “Programming the playback sequence (Audio CD/
®
CD, please see
Enabling programme playback (VCD)
Press PLAY MODE during stop mode.
1
Press to select Mode, and then press
2
ENTER/CH LIST to select Program.
Press to select the programming position.
3
Use the number buttons (0–9) to input the track
numbers sequentially.
If you input a wrong number, press EXIT/CANCEL .
Press to return to the left column, then press to select Program Playback
4
and press ENTER/CH LIST . The programmes you selected will start to playback in
order.
Note:
• For Video CD with PBC, you cannot set program playback.
Note:
• The programme playback
mode is only applicable
during the current session.
Once you eject the disc or
turn off the unit, this mode
will be disabled.
To resume normal playback:
Select Normal in step 2.
To change programmes:
(1) Select Program in step 2, then press / to select the track number you want
to change, and press EXIT/CANCEL .
(2) Use the number buttons (0–9) to enter the new track number.
To clear programmes:
• To clear a single programme, select Program in step 2. Press / to select the
track number, and then press EXIT/CANCEL .
• To clear all programmes, select Clear Program, and then press ENTER/CH LIST .
Enabling random playback (VCD)
Press PLAY MODE during playback or stop mode.
1
Press to select Mode, and then press
2
ENTER/CH LIST to select Shuffle.
66
Press PLAY to start random playback.
3
• If you set Shuffle during playback mode, random playback will begin after the track
currently played has ended.
• To resume normal playback, select Normal in step 2.
Note:
• For Video CD with PBC, you cannot set random function during playback.

Customising disc playback
Parental : Off
Set Password
Output : Interlace
DivX(R) VOD
DRC : Off
QSound : On
E.B.L. : Off
TV Screen : 4:3
Display : On
Picture Mode : Auto
JPEG Interval : 5 Seconds
Screen Saver : On
Menu :English
Subtitle :English
DivX Subtitle :ASCII
Audio :English
OSD :English
Parental : O
Set Password
Output : Interlace
DivX(R) VOD
DRC : O
QSound : On
Menu : English
Subtitle : English
Audio : English
Display :On
Picture Mode :Auto
JPEG Interval :Off
/
Parental : O
Set Password
Output : Interlace
DivX(R) VOD
DRC : O
QSound : On
Menu : English
Subtitle : English
Audio : English
Display :On
Picture Mode :Auto
JPEG Interval :Off
/
Display
Picture Mode
JPEG Interval :Off
/
You can customise the disc playback settings to suit your preferences.
Configuring the disc playback settings (DVD/VCD/CD)
In DVD mode, press MENU SETUP during stop
1
mode.
Press to select a setup tab, and then press .
2
The first option will be highlighted.
3
Press to select the setup option you want to
customise.
Press ENTER/CH LIST or to display a list of
4
available option settings.
Press to select an option setting, and then press ENTER/CH LIST to apply and
5
save it.
Parental : O
DRC : O
Menu : English
Set Password
QSound : On
Subtitle : English
Output : Interlace
Audio : English
DivX(R) VOD
O
On
Go to pages 69-72 for a list of descriptions for each option setting.
To configure another option on the same setup tab, repeat steps 3-5.
6
To configure an option on another tab, go back to step 2 by pressing repeatedly.
To close the Setup screen, press MENU SETUP or RETURN .
7
67

Customising disc playback (continued)
Note: These setup settings are retained in the TV’s memory. It remains active even if the power
is turned off.
Section Option Details Page
Menu Select the language for the DVD menu display. 69
Subtitle Select the subtitle language for disc playback.
DivX Subtitle Select the subtitle encoding format for DivX
®
VOD playback.
Audio Select the audio language for disc playback.
OSD Select the language for the Setup screen display.
Display Choose whether to show a status display whenever a button
is pressed.
69
Picture Mode Select the DVD source content.
JPEG Interval Select the interval time between images in a slide show.
Night Mode Toggle the night mode on or off. 70
Digital Out Select the format for digital audio output corresponding to
your audio connection.
Parental Set the restriction level for allowable disc content. 71
Password Change the access password for the parental control
setting.
72
DivX (R) VOD Display the 10-character registration code for viewing DivX
®
VOD content.
DivX
Deregistration
Display the 8-character deregistration code.
Settings details
68

Customising disc playback (continued)
Parental : Off
Set Password
Output : Interlace
DivX(R) VOD
DRC : Off
QSound : On
E.B.L. : Off
TV Screen : 4:3
Display : On
Picture Mode : Auto
JPEG Interval : 5 Seconds
Screen Saver : On
Menu :English
Subtitle :English
DivX Subtitle :ASCII
Audio :English
OSD :English
Parental : O
Set Password
Output : Interlace
DivX(R) VOD
DRC : O
QSound : On
Menu : English
Subtitle : English
Audio : English
Display :On
Picture Mode :Auto
JPEG Interval :Off
Menu / OSD
Select the language for the DVD and Setup menu display. Options include: English,
French, Spanish, German, and Italian.
Subtitle / Audio
Select the language for the subtitle display and audio track output during disc
playback.
• English/French/Spanish/Italian/German: The selected language will be heard or
seen.
• Auto (Subtitle): The TV will display the subtitle in the disc’s default language.
• Off (Subtitle): There will be no subtitle display.
Note:
• If the selected language is not available, the default disc language will be used.
DivX Subtitle
Select the subtitle encoding format to use during DivX® content playback. Options
include: ASCII, Unicode, Turkish, Hebrew, and Arabic.
Display
Choose whether to show a status display whenever a button is pressed.
• Off: There will be no on-screen display when any button is pressed, except PLAY
MODE, MARKER, , and JUMP.
• On: There will be on-screen display when any button is pressed.
Picture Mode
The source content of a DVD can either be recorded in film format (images are
recorded at 24 frames per second) or video format (images are recorded at 30 frames
per second). Make this selection according to the type of content being viewed.
• Auto: The TV automatically detects the type of source content and converts that
signal in an appropriate method based on the current aspect ratio of the TV. This
option will normally suit most DVDs.
• Film: Suitable for playback of DVDs recorded in a film format.
• Video: Suitable for playback of DVDs recorded in a video format.
Note:
• If picture appears cut off or doubled, select Video.
JPEG Interval
Select the interval time between images during a JPEG slide show.
• Off: Slide show option is disabled.
• 5 seconds: Images will be displayed in a slide show at 5 second intervals.
• 10 seconds: Images will be displayed in a slide show at 10 second intervals.
• 15 seconds: Images will be displayed in a slide show in 15 second intervals.
69

Customising disc playback (continued)
Parental : O
Set Password
Output : Interlace
DivX(R) VOD
Menu : English
Subtitle : English
Audio : English
E.B.L. : O
TV Screen : 4:3
Display : On
Picture Mode : Auto
JPEG Interval : 5 Seconds
Screen Saver : On
Night Mode :Off
Digital Out :Bitstream
Night Mode
Select to toggle the Night Mode feature on or off. When enabled, this function allows
for automatic volume level adjustment for audio that may be too low (e.g. whispered
dialogues) or too high (e.g. a thunderstorm scene).
• Off: Audio retains its disc recording volume level.
• On: Volume level is automatically adjusted depending on the scene content.
Note:
• The Night Mode feature is only applicable to Dolby Digital-featured DVDs. The
adjusted sound level depends on the DVD encoding.
Digital Out
Select the sound format of the digital output depending on the enabled signal
connection.
• Off: Disable digital sound output. Select this option when there is no equipment
connected to the optical DIGITAL AUDIO OUT jack.
• PCM: Change Dolby Digital output to PCM. Select this option when using a twochannel digital stereo amplifier.
• Bitstream: Select this option to output the signal in its native format.
Note:
• MPEG audio will always be in PCM format regardless of the Digital Out setting.
70

Customising disc playback (continued)
DRC : Off
QSound : On
Menu : English
Subtitle : English
Audio : English
E.B.L. : Off
TV Screen : 4:3
Display : On
Picture Mode : Auto
JPEG Interval : 5 Seconds
Screen Saver : On
Parental :Off
Password :Change
DivX(R) VOD :Display
DivX Deregistration :Display
/
/
Parental
A DVD is usually encoded with a rating level to indicate the recommended audience
age. You have the option to select the content rating level allowed for playback in
your TV.
You will be prompted to key in the system password to access this setting option.
For initial access to this menu:
(1) Press to select Parental, and then press ENTER/CH LIST .
Enter Password screen will appear.
(2) Press “0000” using the number buttons (0–9). (Please note that this is the
factory default password.) Then press ENTER/CH LIST .
Press ENTER/CH LIST again to view the parental rating levels.
• Level 1 Kid Safe: Suitable for children
• Level 2 G: General audiences; recommended as acceptable for viewers of
all ages
• Level 3 PG: Parental guidance suggested
• Level 4 PG-13: Unsuitable for children under 13
• Level 5 PG-R: Parental guidance recommended
• Level 6 R: Restricted; parents or adult guardians are required to
accompany children under 17
• Level 7 NC-17: No one under 17 admitted
• Level 8 Adult: Virtually, DVD software of any grade (adult/general/
children) can be played back. Should be viewed only by adults due to
graphic sexual material, violence or language.
• Level Off: No playback restriction. All discs can be played regardless of
content rating.
(3) Press to select the allowable rating level, and then press ENTER/CH
LIST . The higher the level number, the more severe the content is.
(4) Press EJECT to activate Parental control setting.
To temporarily cancel the parental restriction:
(1) Load the restricted content DVD that you want to play.
(2) Use the number buttons (0-9) to input the system password after the Enter
Password message, and then press ENTER/CH LIST .
This suspension of the parental restriction setting applies until disc is ejected.
Note:
• If each setting (pages 69-72) has been completed, the TV can always work under
the same condition (especially with DVD discs). Each setting will be retained in
the memory even if you turn the power off.
• Some discs may not have their rating level encoded on the disc though it is
indicated on the disc jacket. Playback restriction will not apply to these discs so
make sure to restrict access to it manually.
• The password is required whenever you change the parental level.
• If you input a wrong number, press EXIT/CANCEL .
71

Customising disc playback (continued)
/
/
/
Password
Select this option to change the access password for the parental control setting.
(1) Press to select Password, and then press ENTER/CH LIST .
The Enter Current Password screen will appear.
(2) Use the number buttons (0–9) to input the current password, and then press
ENTER/CH LIST .
If the password has not been set yet, key in “0000”. This is the factory default
password.
(3) Press ENTER/CH LIST again, and then Enter New Password screen will
appear. Use the number buttons (0–9) to input the new password.
(4) Press ENTER/CH LIST . You will be prompted to confirm the new
password.
(5) Use the number buttons (0–9) to input the new password again, and then
press ENTER/CH LIST . Now your new password has been set. Be sure to
remember this number!
If you forget the password:
(1) Make sure there is no disc in the disc slot.
(2) Press and hold down 4 on the remote control, and then press VOLUME - on the
TV control panel. The Initializing message appears on-screen to indicate that
the password has been reset to its default factory setting “0000”. All DVD setup-
related settings will also be reset to their default factory values.
DivX(R) VOD
In order to play DivX® VOD (Video-On-Demand) content on this TV, you first need to
register the TV with your DivX
®
DivX
VOD registration code, which you will need to submit to your provider.
To generate this code:
(1) Press to select DivX(R) VOD, and then press ENTER/CH LIST .
Your 10-character registration code is displayed on-screen. Note down the code
as you will need it when you register with a DivX
ENTER/CH LIST to select Done.
®
VOD content provider. You do this by generating a
®
VOD provider. Then press
72
DivX Deregistration
In order to deregister this TV, you will be required to provide your TV’s deregistration
code.
To generate this code:
(1) Press to select DivX Deregistration, and then press ENTER/CH LIST
. Note down the 8-character deregistration code that is displayed on-
screen.
Note:
• In order to select Divx Deregistration, you will first need to register your TV at
http://www.divx.com/vod with the registration code provided (see DivX(R) VOD);
otherwise, this item is greyed out and cannot be selected.

Temporary cancel the rating level by DVD disc
Enter Password
Load a DVD disc.
1
If the DVD disc has been designed to temporarily cancel the rating level, the screen which
2
follows the Reading screen will change, depending on which disc is played. If you select
Yes and press ENTER/CH LIST , the password input screen will then appear.
Use the number buttons (0–9) to input the password, and
3
then press ENTER/CH LIST .
Playback will start if the entered password is correct.
4
Note:
• This temporary cancellation of rating level will be kept until the disc is ejected. When the disc
is ejected, the original rating level will be set again automatically.
73

PC connection
TV(Back side view)
To PC/HDMI 1
AUDIO input
Audio cable
To HDMI input
VGA cable
HDMI-to-DVI cable
To DVI output
PC
TUNER
HDMI 1
YPbPrLRLR
VIDEO
PC MONITOR
HEAD PHONE
PC/
HDMI 1
AUDIO
DIGITAL AUDIO
OPTICAL
INININ
OUT
SCART (AV1)
COMPONENTCOMPOSITE(AV2)
(All illustrated cables are not supplied.)
/
/
/
/
/
As PCs are sometimes supplied with a “conventional” CRT monitor, you may need to adjust the display settings of your PC’s
graphic card; otherwise the pictures may not appear correctly. Switch on your PC (still with your original monitor), select “1360 x
768” for the screen resolution, and select “60 Hz” for the on-screen refresh rate. Switch off your PC, and then connect it to your
TV while both items are switched off.
Monitor display modes
Mode Resolution V. Frequency H. Frequency Pixel Clock Frequency
VGA 640 x 480 59.940 Hz 31.469 kHz 25.175 MHz
SVGA 800 x 600 60.317 Hz 37.879 kHz 40.000 MHz
XGA 1024 x 768 60.004 Hz 48.363 kHz 65.000 MHz
WXGA 1280 x 720 60.000 Hz 45.000 kHz 74.250 MHz
WXGA 1280 x 768 59.870 Hz 47.776 kHz 79.500 MHz
WXGA 1360 x 768 60.015 Hz 47.712 kHz 85.500 MHz
(according to graphic card)
Select PC input
(1) Switch on the TV.
(2) Switch on the computer.
(3) Select the PC input mode on the TV
(see page 17). (When you use an
HDMI cable, select HDMI input
mode.)
Note:
• The PC audio input terminal on the TV
is shared with the HDMI 1 analogue
audio input terminal.
• If there is no video signal from the
computer when the TV is in PC mode,
No Signal will appear on the TV
screen.
• If a digital PC connection does show
a picture, proper working is not
guaranteed. Digital PC connection
is not granted for this TV.
Use a PC-VGA cable (not supplied) to connect the TV to your PC. You can also use
an HDMI cable to connect the TV to your PC. When the HDMI cable is used, the
audio cable is no longer required. If you use the HDMI-to-DVI cable, please connect
audio cable in the same way as VGA cable. Connect cables carefully. Do not bend
or break the connector pins.
To adjust the contrast:
During PC mode, press MENU SETUP to display the Main Menu screen.
1
Press to select Picture, and then press ENTER/CH LIST .
2
Press to select Picture Setting, and then press ENTER/CH LIST .
Select Contrast and then press ENTER/CH LIST .
Press to adjust the contrast.
Press EXIT/CANCEL to return to the normal screen.
3
After connecting a PC to your TV, you can now configure the display and audio settings.
To configure the display settings:
(1) Press MENU SETUP to display the Main Menu
screen.
(2) Press to select the Picture menu, and then press
ENTER/CH LIST .
(3) On the Picture menu, you can adjust various picture
properties such as brightness, contrast, sharpness,
colour, tint, colour temperature, backlight, and dynalight.
Note: Tint can be adjusted only when NTSC signal is
supported.
(4) For a list of available menu options in the Picture menu,
see page 27.
74
To configure the audio settings:
(1) Press MENU SETUP to display the Main Menu
screen.
(2) Press to select the Sound menu, and then press
ENTER/CH LIST .
(3) On the Sound menu, you can adjust the NICAM stereo
reception, and the bass, treble, balance, and sound
effects.
Note: NICAM is available only when the TV is set to ATV
mode.
(4) For a list of available menu options in the Sound menu,
see page 27.

To PC/HDMI 1
AUDIO input
Audio cable
HDMI-to-DVI adapter cable
To DVI output
HDMI
device
device
DVI
or
To HDMI output
To HDMI input
(HDMI type A connector)
(HDMI type A connector)
HDMI cable
TUNER
HDMI 1
YPbPrLRLR
VIDEO
PC MONITOR
HEAD PHONE
PC/
HDMI 1
AUDIO
DIGITAL AUDIO
OPTICAL
INININ
OUT
SCART (AV1)
COMPONENTCOMPOSITE(AV2)
TV(Back side view)
(All illustrated cables and type A connectors are not supplied.)
/
/
/
Connecting an HDMI or DVI device to the HDMI input
The HDMI input on your TV receives digital audio and uncompressed video from an HDMI-equipped device, or uncompressed
digital video from a DVI-equipped (Digital Visual Interface) device.
HDMI, the HDMI logo and
High-Definition Multimedia
Interface are trademarks or
registered trademarks of
HDMI Licensing LLC.
Note:
• All the models
(19DV713B/19DV714B/
22DV713B/22DV714B/
26DV713B/32DV713B)
have two HDMI IN jacks
(HDMI1 and HDMI2) and
only one audio input mode
(HDMI1). Please check
the I/O port label on the
rear side of TV to
determine the location of
the HDMI1 jack.
To connect an HDMI device:
One HDMI cable per HDMI device is necessary.
• For proper operation, it is recommended that you use an HDMI cable with the HDMI logo
().
• HDMI cable transfers both video and audio signals. Separate analogue audio cables are not
required (see illustration).
To connect a DVI device:
One HDMI-to-DVI adapter cable and one pair of standard analogue audio cable per DVI device
are necessary.
• For proper operation, the length of an HDMI-to-DVI adapter cable should not exceed 9.8 ft
(3m). The recommended length is 6.6 ft (2m).
• An HDMI-to-DVI adapter cable transfers video only. Make sure to connect this cable to the
HDMI1 input on the TV. Separate analogue audio cables are required (see illustration).
HDMI/DVI device setup reminders
• When turning on your electronic components, turn on the TV first and then the HDMI or DVI
device.
• When turning off your electronic components, turn off the HDMI or DVI device first and then
the TV.
Selecting HDMI input
After setting up the HDMI device, use the TV remote control to change the TV source input to
HDMI (see page 17).
Selecting the HDMI audio input source
You must choose an appropriate HDMI audio input for each connection, depending on whether
the source is equipped with an HDMI or DVI socket.
Press MENU SETUP to display the Main Menu screen.
1
Press to select Sound menu, and then press ENTER/CH LIST .
2
Press to select HDMI1 Audio, and then press ENTER/CH LIST .
3
Press to select HDMI or DVI.
Press EXIT/CANCEL to return to the normal screen.
4
Note:
• For specific connection instructions, refer to the manual supplied with your HDMI device.
• To set the video output for the HDMI device, refer to the manual supplied with your HDMI
device.
• If there is no picture available via HDMI connection, you can use a SCART cable to connect
to the TV. Use the HDMI-device’s remote control to launch the HDMI-device’s Setup menu
screen.
75

REGZA-LINK® connection
Audio receiver
Playback device
(REGZA-LINK DVD
player,etc.)
R
Playback device
(REGZA-LINK DVD
player,etc.)
R
To HDMI
input
To HDMI
input
To HDMI input
To HDMI
output
To HDMI
output
To HDMI
output
TUNER
HDMI 1
YPbPrLR
L
R
VIDEO
PC MONITOR
HEAD PHONE
PC/
HDMI 1
AUDIO
DIGITAL AUDIO
OPTICAL
INININ
OUT
SCART (AV1)
COMPONENTCOMPOSITE(AV2)
TV(Back side view)
TV left side panel
(All illustrated cables are not supplied.)
You can control the basic functions of connected audio/video devices using the TV’s remote control if you connect a REGZALINK® compatible audio receiver or playback device. For an explanation of setup and operations, see pages 29-32.
To connect an audio receiver and playback devices:
HDMI cables are necessary (see illustration).
Note:
• If several devices are connected, REGZA-LINK® feature may not operate properly.
• For proper operation, it is recommended that you use HDMI cables with the HDMI Logo ( ).
Before controlling the device(s):
• After completing the above connections, set the REGZA-LINK Setup menu as you desire (see page 32).
• The connected devices must also be set. For details, see the operation manual for each device.
• The REGZA-LINK
• This feature is limited to models incorporating Toshiba’s REGZA-LINK
Refer to the individual instruction manuals for compatibility information.
®
feature uses the CEC technology as regulated by the HDMI standard.
®
. However, Toshiba is not liable for those operations.
Note:
• This feature may not work properly depending on the devices that are connected.
76

Connecting TV to other equipment
To AV1 input
To Tun e r
Video recorder
DVD player
To AV 2
(Video, Audio L/R)
input
TV(Back side view)
TUNER
HDMI 1
YPbPrLRLR
VIDEO
PC MONITOR
HEAD PHONE
PC/
HDMI 1
AUDIO
DIGITAL AUDIO
OPTICAL
INININ
OUT
SCART (AV1)
COMPONENTCOMPOSITE(AV2)
Audio/video cable
Antenna
Satellite
antenna
Satellite receiver
Decoder
SCART cable
(All illustrated cables are not supplied.)
Optical digital lead
(not supplied)
To Optical Digital
Audio output
TV(Back side view)
Surround sound amplifier
TUNER
HDMI 1
YPbPrLRLR
VIDEO
PC MONITOR
HEAD PHONE
PC/
HDMI 1
AUDIO
DIGITAL AUDIO
OPTICAL
IN
IN
IN
OUT
SCART (AV1)
COMPONENTCOMPOSITE(AV2)
Connecting aerials and other devices to your TV
1
Connect the TV’s coaxial cable directly to the aerial input jack at the back of the TV.
Caution:
Before connecting:
• Make sure to disconnect the appliance from the power supply in order to avoid any potential damage from occurring.
• Make sure to establish the required connection.
• Make sure that connections are properly and correctly attached before connecting the appliance to the power supply.
Connecting an audio system
2
The TV’s digital audio out terminal outputs a Dolby Digital or two-channel down-mixed PCM (Pulse-Code Modulation)
signal for use with an external Dolby Digital decoder, surround sound amplifier, etc. with optical audio input. An optical
audio cable is required for the connection. Use an optical audio cable that has the larger “TosLink” connector and not the
smaller “mini-optical” connecter.
If you have a DTS decoder or processor, you can obtain the full benefit of 5.1 channel DTS encoded soundtracks on DVDs
and audio CDs.
Note:
• The digital audio out terminal may not output some digital audio sources because of copy restrictions.
• The Bass/Treble/Balance adjustments function only with the sound from the TV speakers.
• After connecting a Dolby Digital decoder, please select in the DVD menu the Dolby Digital (DD) sound track option.
• Several DVDs may be pre-recorded on both sides. However only one side contains the Dolby Digital sound track. Please
insert the correct DVD side.
• When a DTS sound track is played, the integrated loudspeakers are muted. The DTS sound can only be played digitally
using the digital outlet. DTS decoder is necessary for hearing.
• Digital audio output is active only when receiving DVB-T, not when receiving analogue cable TV broadcasting.
77

Connecting TV to other equipment (continued)
Connecting a DVD player
3
DVD player can be connected to the TV either
by a SCART cable or a standard audio cable
along with a component video cable (see 5 on
this page).
In this case, a SCART cable is required for the
connection. To play the DVD, select AV1 input
mode on the TV (see page 17).
DVD player
Connecting a video camera
4
A standard A/V cable is required for the connection. To view the video, select the AV2 input mode on the TV (see page 17).
TV(Back side view)
HEAD PHONE
SCART (AV1)
OUT
DIGITAL AUDIO
OPTICAL
IN
VIDEO
IN
TUNER
PC MONITOR
COMPONENTCOMPOSITE(AV2)
IN
PC/
HDMI 1
YPbPrLRLR
AUDIO
HDMI 1
SCART cable
(not supplied)
TV(Back side view)
To AV1 input
HEAD PHONE
SCART (AV1)
OUT
DIGITAL AUDIO
OPTICAL
COMPONENTCOMPOSITE(AV2)
IN
IN
VIDEO
YPbPrLRLR
IN
TUNER
PC MONITOR
PC/
HDMI 1
AUDIO
HDMI 1
To AV2(Video, Audio L/R)input
Video camera
Audio/video cable
(not supplied)
Note:
• To connect the video camera using other cables, refer to the video camera’s instruction manual for more information.
Connecting to a DVD player or other AV device with Component Video outputs
5
If your DVD player (or other devices) has
Component Video output jacks, use a suitable set
of leads (RCA/Phono) to connect these to the
Component Video inputs on this TV as shown - it
can greatly enhance the picture quality and
performance. Please remember that you will also
need to connect separate leads (RCA/Phono) for
the audio signals. Select the Component input
source on the TV (see page 17).
Note:
• The Component Video input of the TV is for
use with equipment which outputs interlaced
signals (PAL:576i/1080i or NTSC: 480i/1080i)
and progressive signals (PAL: 576p/720p or
NTSC: 480p/720p).
To Audio
input
AV output
TV(Back side view)
HEAD PHONE
SCART (AV1)
OUT
DIGITAL AUDIO
OPTICAL
VIDEO
Audio cable
TUNER
PC MONITOR
COMPONENTCOMPOSITE(AV2)
INININ
PC/
HDMI 1
PbPr
Y
LRLR
AUDIO
HDMI 1
To Component input
YPbPr
Component cable (not supplied)
(not supplied)
Audio
output
YPbPr
DVD player
Component
output
78

Status message
Information/Status message Cause
Invalid entry The channel does not exist (e.g. “000”).
No radio services Cannot change to Radio mode because there is no radio service in the channel list.
No TV services Cannot change to TV mode because there is no TV service in the channel list.
No data services Cannot change to Data mode because there is no data service in the channel list.
No services There are no services in the received signal.
No Teletext signal There is no Teletext in the channel.
Duplicate Timer When two event timers overlap.
No video No audio The signal does not contain audio or video.
Audio stream not available The Multi Audio Menu cannot be displayed because there is no sound.
Descrambling not possible The services for the selected channel are not available for this card.
CI card initialised CI card is initialising.
CAM module has been removed CAM module has been removed. (CAM is used for inserting the CI card).
No CAM Found CAM module is not found.
Database empty There are no services in the TV.
No signal There are no signal inputs.
Locked service The service is locked by the channel organiser.
Scrambled service The service is scrambled and unavailable.
Digital Service Not available.
Not Running Broadcasting has been suspended.
HD service This service is for HD.
New service added … A new service has been added.
Upgrading available service details Service information has been changed. The channel list is updating.
Duplicate carrier found The same signal has already been set.
Invalid Stream Contains a video format that is not supported by this TV.
Interactive services are disabled
while subtitles are on
The Digital Service cannot be viewed if DVB-Subtitle is activated.
79

Troubleshooting table
Refer to the following checklist to troubleshoot simple problems that may occur during TV operation. If the problem still exists
after you try out the possible solutions, consult your local dealer or service outlet for assistance. Check that all connections are
properly made when using the TV with another equipment.
Symptom Possible solution Page
TV
TV/DVD does not operate. • Make sure the power cord is plugged in, and then press POWER.
• Try another AC outlet.
• Unplug the power cord and then plug it back in.
• The remote control batteries may be dead. Replace the batteries or try the
control panel buttons.
TV broadcast reception
• Switch on the TV.
No picture, no sound.
No reception. • Have you tuned in the TV stations?
The TV switches off with
missing antenna input signal.
The Channel menu cannot be
accessed in the Main Menu
screen.
Wrong Colours. • Colour and Brightness errors can occur when the viewing angle/ambient air
There is sound but no picture
when viewing a DVB (digital)
channel.
Blocky image or image stops
intermittently.
Some digital channels cannot
be viewed.
“Database empty” message
appears on the screen.
TV shuts off. • The sleep timer has been activated.
Display is not shown in your
preferred language.
Disc playback
The playback picture has
occasional distortion.
Playback does not start. • No disc is inserted. Insert a disc.
• Check that the mains power outlet is properly connected.
• Select appropriate input mode.
• Unplug the TV for one minute, and then plug it back in.
• Connect the antenna.
• Make sure the TV is ON and not in standby mode.
• 15 minutes after the antenna signal have disappeared, the TV will change to
standby mode. This is normal.
• The TV is not set to ATV/DTV mode. 17
temperature (see technical specifications) are exceeded.
• Some channels offer audio content only. -
• Check all antenna connections.
• Move the antenna away from areas of possible interference.
• Try using an antenna booster.
• Contact the service provider to subscribe. -
• Check all antenna connections and try auto tuning again. 12
• There is power interruption.
• Set your preferred language. 14
• The disc is dirty. Eject the disc and clean it.
• Sometimes a small amount of picture distortion may appear. This is not a
malfunction.
• An unplayable disc is inserted. Insert a playable disc (Check the disc type and
colour system).
• Place the disc in the disc slot with the label side facing forward.
• The disc is dirty. Clean the disc.
• Cancel the parental lock function or change the parental lock level.
X appears on the screen. • The function is not applicable to the disc or to the current mode. 51
No picture. • The TV is not in DVD mode. 50
No sound. • The TV is in a special playback mode.
• If you are using an amplifier, check the optical digital audio out connection.
• If an external speaker is connected, check its volume control.
Picture is distorted during fast
reverse/forward playback.
• The picture will be distorted occasionally. This is normal. -
-
-
11
9
12
17
-
14, 17
12
9
21
-
12
-
-
22
-
49, 50
-
50
49
50
49
71, 73
52
77
-
80

Troubleshooting table (continued)
Stopping playback, slow motion
play, repeat, program, etc.
cannot be performed.
The keys on the TV control
panel or the remote control are
not functioning.
Playback does not start when
the title is selected.
The audio soundtrack and/or
subtitle language cannot be
changed.
No subtitle. • The disc has no subtitle encoded on it.
Scene angle cannot be
changed.
Remote control operation
The remote control does not
function.
REGZA-LINK
REGZA-LINK
function.
HDMI operation
HDMI does not function. • Make sure to use cables with the HDMI Logo ( ).
Media Player operation
Media Player does not function. • Make sure the devices are connected correctly.
The photo files cannot be
displayed.
The music files cannot be
displayed or played back.
®
operation
®
does not
• These playback features are not applicable to all discs. 52, 55,
• Turn off the TV and unplug and power cord for several minutes, and then
reconnect the power cord.
• The disc may not be compliant with the “Parental” setting. 71
• The disc has no multi-language option encoded on it. 57
• Subtitles are disabled. Press SUBTITLE.
• The disc has no multi-angle scenes. 56
• Aim the remote control at the remote sensor.
• Make sure you use the remote control within approximately five metres of the
TV or reduce the light in the room.
• Make sure there is no obstruction on the path of the beam.
• The batteries are no longer working. Replace the batteries.
• Make sure the batteries are properly positioned.
• The REGZA-LINK® feature is available for Toshiba REGZA-LINK® compatible
devices.
• Make sure to use cables with the HDMI Logo ( ).
• When the connected REGZA-LINK
have changed settings of the device, turn off your TV and unplug the power
cord, and then plug it back in and turn on the TV again.
• If several devices are connected, REGZA-LINK
properly.
• Read the operation manual supplied with the connected REGZA-LINK
• Some legacy HDMI sources may not work properly with the latest HDMI TV
products, due to new standard adoption.
• If you connect a USB device with a separate cable or through USB hub, the TV
does not recognise the USB device.
• Make sure you select “Photo” in the Media Player menu.
• Make sure the photo file format is supported.
• Make sure you select “Music” in the Media Player menu.
• Make sure the music file format is supported.
®
device does not work correctly after you
®
feature may not operate
®
device.
66
-
57
11
29
76
-
76
76
76
-
-
-
35
33
38
33
• This product incorporates copyright protection technology that is protected by U.S. patents and other intellectual property
rights. Use of this copyright protection technology must be authorised by Macrovision, and is intended for home and other
limited viewing uses only unless otherwise authorised by Macrovision. Reverse engineering or disassembly is prohibited.
• Portions of this software are copyright © <2007> The Free Type Project (www.freetype.org). All rights reserved.
• This software is based in part on the work of the Independent JPEG Group.
• MPEG Layer-3 audio coding technology licensed from Fraunhofer IIS and Thomson.
• Manufactured under license from Dolby Laboratories. Dolby and the double-D symbol are trademarks of Dolby Laboratories.
• is a trademark of DVD Format/Logo Licensing Corporation.
• Manufactured under license under U.S. Patent #: 5,451,942 & other U.S. and worldwide patents issued & pending. DTS and
the Symbol are registered trademarks and DTS Digital Out and the DTS logos are trademarks of DTS, Inc. Product includes
software. © DTS, Inc. All Rights Reserved.
• Unauthorised recording of copyrighted television programmes, films, video cassettes and other materials may infringe the
rights of copyright owners and be contrary to copyright laws.
®
•DivX
, DivX Certified® and associated logos are registered trademarks of DivX, Inc. and are used under license.
81

Specifications
Model 19DV713B / 19DV714B 22DV713B / 22DV714B 26DV713B 32DV713B
Television
LCD panel (approximate
screen size, diagonal)
System Analogue PAL UK, IR, CCIR, French System, B/G, D/K, I/I, L/L’
Video colour system PAL/SECAM/NTSC 3.58/NTSC 4.43/PAL 60
Preset channels Analogue channels (99) + Digital channels (Carrier 200/Service1000)
Frequency
range
LCD 470 mm visible* 548 mm visible* 661 mm visible* 801 mm visible*
Speaker
Audio output power Approx. 3 W (MAX) x 2 Approx. 5 W (MAX) x 2 Approx. 10 W (MAX) x 2
DVD
Signal system NTSC, PAL (Region 2)
Applicable disc DVD (12cm, 8cm), CD (12cm, 8cm)
Output Audio
Pickup CD Wavelength: 775 - 805 nm
Input/Output
HDMI input Two HDMI-compliant (type A connector)
Component video input
Video input
Audio input
PC input Monitor: 15-pin mini-D-sub x 1; audio: 3.5-mm stereo jack x 1
SCART terminal One 21-pin SCART connector
Optical digital audio output Optical type
Headphone 3.5-mm stereo mini jack × 1
General
Power source AC 110-240V, 50-60Hz
Power
consumption
Weight 5.1 kg 5.7 kg 8.5 kg 11 kg
Dimensions
(including
foot stand)
Operating temperature 0 °C - 35 °C (32 °F - 95 °F)
Accessories
Digital DVB-T (OFDM 2k/8k 16QAM/64QAM)
Analogue IRA-S6, S7-S37, S38-E69
Digital IRA-S6, S7-S37, S38-E69
Digital
audio
DVD Wavelength: 640 - 660 nm
Operation Approx. 40 W at 230 V,
Standby Approx. 0.5 W at 230 V,
Width 18.9 in. (480.9 mm) 21.7 in. (552.3 mm) 26.2 in. (666.0 mm) 31.7 in. (804.6 mm)
Height 14.4 in. (365.8 mm) 15.9 in. (404.5 mm) 19.3 in. (490.0 mm) 23.2 in. (590.0 mm)
Depth 8.5 in. (215.0 mm) 8.5 in. (215.0 mm) 10.2 in. (260.0 mm) 10.0 in. (255.0 mm)
19.0 inch 22.0 inch 26.0 inch 32.0 inch
TFT low-glass Active Matrix Colour LCD, 1366 x 768 Pixel
70x20x26 mm, 8 x 2 167x45x37 mm, 6 x 2
(RCA) –12.0 dBm, 1 k
3.3 Vp-p/100
Maximum output power: 0.5 mW
Maximum output power: 1.0 mW
HDCP compliant
Suggested scan rates: PAL: 576i/576p/720p/1080i/1080p
NTSC: 480i/480p/720p/1080i/1080p
PC Audio: 2-channel LPCM, 32/44.1/48 kHz sampling frequency
16/20/24 bits per sample
(Y) 1.0 V (p-p), 75 , pin jack x 1
(Pb, Pr) 0.7 V (p-p), 75 , pin jack x 2
1.0 V (p-p), 75 , pin jack x 1
–8dBm, 50 k , pin jack (L/R) x 2
Include audio/video input, RGB input, and TV audio/video output
Video input/output: 1.0 V (p-p), 75
RGB input: 0.7 V (p-p), 75
Audio input: 50k , 500m Vrms
Audio output: 1k , 500m Vrms
50 Hz
50 Hz
Remote control
2 batteries (AAA/R03/UM-4)
3 screws (for 26DV713B and 32DV713B only)
AC cord
Approx. 58 W at 230 V,
50 Hz
Approx. 0.5 W at 230 V,
50 Hz
Approx. 78 W at 230 V,
50 Hz
Approx. 0.5 W at 230 V,
50 Hz
Approx. 92 W at 230 V, 50
Hz
Approx. 0.5 W at 230 V,
50 Hz
*Visible screen size is approximate.
Note:
• All weight and dimensions are approximate values.
• We continually strive to improve our products. Designs and specifications are subject to change without notice.
82

The GNU General Public License (GPL)
Version 2, June 1991
Copyright (C) 1989, 1991 Free Software Foundation, Inc.
59 Temple Place, Suite 330, Boston, MA 02111-1307 USA
Everyone is permitted to copy and distribute verbatim copies of this license document, but changing it is not allowed.
Preamble
The licenses for most software are designed to take away your freedom to share and change it. By contrast, the GNU General
Public License is intended to guarantee your freedom to share and change free software--to make sure the software is free for
all its users. This General Public License applies to most of the Free Software Foundation's software and to any other program
whose authors commit to using it. (Some other Free Software Foundation software is covered by the GNU Library General Public
License instead.) You can apply it to your programs, too.
When we speak of free software, we are referring to freedom, not price. Our General Public Licenses are designed to make sure
that you have the freedom to distribute copies of free software (and charge for this service if you wish), that you receive source
code or can get it if you want it, that you can change the software or use pieces of it in new free programs; and that you know
you can do these things.
To protect your rights, we need to make restrictions that forbid anyone to deny you these rights or to ask you to surrender the
rights. These restrictions translate to certain responsibilities for you if you distribute copies of the software, or if you modify it.
For example, if you distribute copies of such a program, whether gratis or for a fee, you must give the recipients all the rights that
you have. You must make sure that they, too, receive or can get the source code. And you must show them these terms so they
know their rights.
We protect your rights with two steps: (1) copyright the software, and (2) offer you this license which gives you legal permission
to copy, distribute and/or modify the software.
Also, for each author's protection and ours, we want to make certain that everyone understands that there is no warranty for this
free software. If the software is modified by someone else and passed on, we want its recipients to know that what they have is
not the original, so that any problems introduced by others will not reflect on the original authors' reputations.
Finally, any free program is threatened constantly by software patents. We wish to avoid the danger that redistributors of a free
program will individually obtain patent licenses, in effect making the program proprietary. To prevent this, we have made it clear
that any patent must be licensed for everyone's free use or not licensed at all.
The precise terms and conditions for copying, distribution and modification follow.
TERMS AND CONDITIONS FOR COPYING, DISTRIBUTION AND MODIFICATION
This License applies to any program or other work which contains a notice placed by the copyright holder saying it may be
distributed under the terms of this General Public License. The "Program", below, refers to any such program or work, and a
"work based on the Program" means either the Program or any derivative work under copyright law: that is to say, a work
containing the Program or a portion of it, either verbatim or with modifications and/or translated into another language.
(Hereinafter, translation is included without limitation in the term "modification".) Each licensee is addressed as "you".
Activities other than copying, distribution and modification are not covered by this License; they are outside its scope. The act of
running the Program is not restricted, and the output from the Program is covered only if its contents constitute a work based on
the Program (independent of having been made by running the Program). Whether that is true depends on what the Program
does.
(1) You may copy and distribute verbatim copies of the Program's source code as you receive it, in any medium, provided that
you conspicuously and appropriately publish on each copy an appropriate copyright notice and disclaimer of warranty; keep
intact all the notices that refer to this License and to the absence of any warranty; and give any other recipients of the
Program a copy of this License along with the Program.
You may charge a fee for the physical act of transferring a copy, and you may at your option offer warranty protection in
exchange for a fee.
(2) You may modify your copy or copies of the Program or any portion of it, thus forming a work based on the Program, and
copy and distribute such modifications or work under the terms of Section 1 above, provided that you also meet all of these
conditions:
a) You must cause the modified files to carry prominent notices stating that you changed the files and the date of any
change.
b) You must cause any work that you distribute or publish, that in whole or in part contains or is derived from the Program
or any part thereof, to be licensed as a whole at no charge to all third parties under the terms of this License.
c) If the modified program normally reads commands interactively when run, you must cause it, when started running for
such interactive use in the most ordinary way, to print or display an announcement including an appropriate copyright
notice and a notice that there is no warranty (or else, saying that you provide a warranty) and that users may
redistribute the program under these conditions, and telling the user how to view a copy of this License. (Exception: if
the Program itself is interactive but does not normally print such an announcement, your work based on the Program
is not required to print an announcement.)
These requirements apply to the modified work as a whole. If identifiable sections of that work are not derived from the
Program, and can be reasonably considered independent and separate works in themselves, then this License, and its
terms, do not apply to those sections when you distribute them as separate works. But when you distribute the same
sections as part of a whole which is a work based on the Program, the distribution of the whole must be on the terms of this
License, whose permissions for other licensees extend to the entire whole, and thus to each and every part regardless of
who wrote it.
Thus, it is not the intent of this section to claim rights or contest your rights to work written entirely by you; rather, the intent
is to exercise the right to control the distribution of derivative or collective works based on the Program.
83

In addition, mere aggregation of another work not based on the Program with the Program (or with a work based on the
Program) on a volume of a storage or distribution medium does not bring the other work under the scope of this License.
(3) You may copy and distribute the Program (or a work based on it, under Section 2) in object code or executable form under
the terms of Sections 1 and 2 above provided that you also do one of the following:
a) Accompany it with the complete corresponding machine-readable source code, which must be distributed under the
terms of Sections 1 and 2 above on a medium customarily used for software interchange; or,
b) Accompany it with a written offer, valid for at least three years, to give any third party, for a charge no more than your
cost of physically performing source distribution, a complete machine-readable copy of the corresponding source
code, to be distributed under the terms of Sections 1 and 2 above on a medium customarily used for software
interchange; or,
c) Accompany it with the information you received as to the offer to distribute corresponding source code. (This
alternative is allowed only for noncommercial distribution and only if you received the program in object code or
executable form with such an offer, in accord with Subsection b above.)
The source code for a work means the preferred form of the work for making modifications to it. For an executable work,
complete source code means all the source code for all modules it contains, plus any associated interface definition files,
plus the scripts used to control compilation and installation of the executable. However, as a special exception, the source
code distributed need not include anything that is normally distributed (in either source or binary form) with the major
components (compiler, kernel, and so on) of the operating system on which the executable runs, unless that component
itself accompanies the executable.
If distribution of executable or object code is made by offering access to copy from a designated place, then offering
equivalent access to copy the source code from the same place counts as distribution of the source code, even though third
parties are not compelled to copy the source along with the object code.
(4) You may not copy, modify, sublicense, or distribute the Program except as expressly provided under this License. Any
attempt otherwise to copy, modify, sublicense or distribute the Program is void, and will automatically terminate your rights
under this License. However, parties who have received copies, or rights, from you under this License will not have their
licenses terminated so long as such parties remain in full compliance.
(5) You are not required to accept this License, since you have not signed it. However, nothing else grants you permission to
modify or distribute the Program or its derivative works. These actions are prohibited by law if you do not accept this
License. Therefore, by modifying or distributing the Program (or any work based on the Program), you indicate your
acceptance of this License to do so, and all its terms and conditions for copying, distributing or modifying the Program or
works based on it.
(6) Each time you redistribute the Program (or any work based on the Program), the recipient automatically receives a license
from the original licensor to copy, distribute or modify the Program subject to these terms and conditions. You may not
impose any further restrictions on the recipients' exercise of the rights granted herein. You are not responsible for enforcing
compliance by third parties to this License.
(7) If, as a consequence of a court judgment or allegation of patent infringement or for any other reason (not limited to patent
issues), conditions are imposed on you (whether by court order, agreement or otherwise) that contradict the conditions of
this License, they do not excuse you from the conditions of this License. If you cannot distribute so as to satisfy
simultaneously your obligations under this License and any other pertinent obligations, then as a consequence you may not
distribute the Program at all. For example, if a patent license would not permit royalty-free redistribution of the Program by
all those who receive copies directly or indirectly through you, then the only way you could satisfy both it and this License
would be to refrain entirely from distribution of the Program.
If any portion of this section is held invalid or unenforceable under any particular circumstance, the balance of the section is
intended to apply and the section as a whole is intended to apply in other circumstances.
It is not the purpose of this section to induce you to infringe any patents or other property right claims or to contest validity
of any such claims; this section has the sole purpose of protecting the integrity of the free software distribution system,
which is implemented by public license practices. Many people have made generous contributions to the wide range of
software distributed through that system in reliance on consistent application of that system; it is up to the author/donor to
decide if he or she is willing to distribute software through any other system and a licensee cannot impose that choice.
This section is intended to make thoroughly clear what is believed to be a consequence of the rest of this License.
(8) If the distribution and/or use of the Program is restricted in certain countries either by patents or by copyrighted interfaces,
the original copyright holder who places the Program under this License may add an explicit geographical distribution
limitation excluding those countries, so that distribution is permitted only in or among countries not thus excluded. In such
case, this License incorporates the limitation as if written in the body of this License.
(9) The Free Software Foundation may publish revised and/or new versions of the General Public License from time to time.
Such new versions will be similar in spirit to the present version, but may differ in detail to address new problems or
concerns.
Each version is given a distinguishing version number. If the Program specifies a version number of this License which
applies to it and "any later version", you have the option of following the terms and conditions either of that version or of any
later version published by the Free Software Foundation. If the Program does not specify a version number of this License,
you may choose any version ever published by the Free Software Foundation.
(10) If you wish to incorporate parts of the Program into other free programs whose distribution conditions are different, write to
the author to ask for permission. For software which is copyrighted by the Free Software Foundation, write to the Free
Software Foundation; we sometimes make exceptions for this. Our decision will be guided by the two goals of preserving
the free status of all derivatives of our free software and of promoting the sharing and reuse of software generally.
84

NO WARRANTY
(1) BECAUSE THE PROGRAM IS LICENSED FREE OF CHARGE, THERE IS NO WARRANTY FOR THE PROGRAM, TO
THE EXTENT PERMITTED BY APPLICABLE LAW. EXCEPT WHEN OTHERWISE STATED IN WRITING THE
COPYRIGHT HOLDERS AND/OR OTHER PARTIES PROVIDE THE PROGRAM "AS IS" WITHOUT WARRANTY OF ANY
KIND, EITHER EXPRESSED OR IMPLIED, INCLUDING, BUT NOT LIMITED TO, THE IMPLIED WARRANTIES OF
MERCHANTABILITY AND FITNESS FOR A PARTICULAR PURPOSE. THE ENTIRE RISK AS TO THE QUALITY AND
PERFORMANCE OF THE PROGRAM IS WITH YOU. SHOULD THE PROGRAM PROVE DEFECTIVE, YOU ASSUME
THE COST OF ALL NECESSARY SERVICING, REPAIR OR CORRECTION.
(2) IN NO EVENT UNLESS REQUIRED BY APPLICABLE LAW OR AGREED TO IN WRITING WILL ANY COPYRIGHT
HOLDER, OR ANY OTHER PARTY WHO MAY MODIFY AND/OR REDISTRIBUTE THE PROGRAM AS PERMITTED
ABOVE, BE LIABLE TO YOU FOR DAMAGES, INCLUDING ANY GENERAL, SPECIAL, INCIDENTAL OR
CONSEQUENTIAL DAMAGES ARISING OUT OF THE USE OR INABILITY TO USE THE PROGRAM (INCLUDING BUT
NOT LIMITED TO LOSS OF DATA OR DATA BEING RENDERED INACCURATE OR LOSSES SUSTAINED BY YOU OR
THIRD PARTIES OR A FAILURE OF THE PROGRAM TO OPERATE WITH ANY OTHER PROGRAMS), EVEN IF SUCH
HOLDER OR OTHER PARTY HAS BEEN ADVISED OF THE POSSIBILITY OF SUCH DAMAGES.
END OF TERMS AND CONDITIONS
How to Apply These Terms to Your New Programs
If you develop a new program, and you want it to be of the greatest possible use to the public, the best way to achieve this is to
make it free software which everyone can redistribute and change under these terms.
To do so, attach the following notices to the program. It is safest to attach them to the start of each source file to most effectively
convey the exclusion of warranty; and each file should have at least the "copyright" line and a pointer to where the full notice is
found.
One line to give the program's name and a brief idea of what it does.
Copyright (C) <year> <name of author>
This program is free software; you can redistribute it and/or modify it under the terms of the GNU General Public License as
published by the Free Software Foundation; either version 2 of the License, or (at your option) any later version.
This program is distributed in the hope that it will be useful, but WITHOUT ANY WARRANTY; without even the implied warranty
of MERCHANTABILITY or FITNESS FOR A PARTICULAR PURPOSE. See the GNU General Public License for more details.
You should have received a copy of the GNU General Public License along with this program; if not, write to the
Free Software Foundation, Inc., 59 Temple Place, Suite 330,
Boston, MA 02111-1307 USA
Also add information on how to contact you by electronic and paper mail.
If the program is interactive, make it output a short notice like this when it starts in an interactive mode:
Gnomovision version 69,
Copyright (C) year name of author Gnomovision comes with ABSOLUTELY NO WARRANTY; for details type `show w'. This is
free software, and you are welcome to redistribute it under certain conditions; type `show c' for details.
The hypothetical commands `show w' and `show c' should show the appropriate parts of the General Public License. Of course,
the commands you use may be called something other than `show w' and `show c'; they could even be mouse-clicks or menu
items--whatever suits your program.
You should also get your employer (if you work as a programmer) or your school, if any, to sign a "copyright disclaimer" for the
program, if necessary. Here is a sample; alter the names:
Yoyodyne, Inc., hereby disclaims all copyright interest in the program `Gnomovision' (which makes passes at compilers) written
by James Hacker.
signature of Ty Coon, 1 April 1989
Ty Coon, Vice President
This General Public License does not permit incorporating your program into proprietary programs. If your program is a
subroutine library, you may consider it more useful to permit linking proprietary applications with the library. If this is what you
want to do, use the GNU Library General Public License instead of this License.
85

The Libpng License Notices
This copy of the libpng notices is provided for your convenience. In case of any discrepancy between this copy and the notices
in the file png.h that is included in the libpng distribution, the latter shall prevail.
COPYRIGHT NOTICE, DISCLAIMER, and LICENSE:
If you modify libpng you may insert additional notices immediately following this sentence.
This code is released under the libpng license.
libpng versions 1.2.6, August 15, 2004, through 1.2.41, December 3, 2009, are Copyright (c) 2004, 2006-2009 Glenn RandersPehrson, and are distributed according to the same disclaimer and license as libpng-1.2.5 with the following individual added to
the list of Contributing Authors:
Cosmin Truta
libpng versions 1.0.7, July 1, 2000, through 1.2.5 - October 3, 2002, are Copyright (c) 2000-2002 Glenn Randers-Pehrson, and
are distributed according to the same disclaimer and license as libpng-1.0.6 with the following individuals added to the list of
Contributing Authors:
Simon-Pierre Cadieux
Eric S. Raymond
Gilles Vollant
and with the following additions to the disclaimer:
There is no warranty against interference with your enjoyment of the library or against infringement. There is no warranty that
our efforts or the library will fulfill any of your particular purposes or needs. This library is provided with all faults, and the
entire risk of satisfactory quality, performance, accuracy, and effort is with the user.
libpng versions 0.97, January 1998, through 1.0.6, March 20, 2000, are Copyright (c) 1998, 1999 Glenn Randers-Pehrson, and
are distributed according to the same disclaimer and license as libpng-0.96, with the following individuals added to the list of
Contributing Authors:
Tom Lane
Glenn Randers-Pehrson
Willem van Schaik
libpng versions 0.89, June 1996, through 0.96, May 1997, are Copyright (c) 1996, 1997 Andreas Dilger, and are distributed
according to the same disclaimer and license as libpng-0.88, with the following individuals added to the list of Contributing
Authors:
John Bowler
Kevin Brac ey
Sam Bushell
Magnus Holmgren
Greg Roelofs
Tom Tanner
libpng versions 0.5, May 1995, through 0.88, January 1996, are Copyright (c) 1995, 1996 Guy Eric Schalnat, Group 42, Inc.
For the purposes of this copyright and license, “Contributing Authors” is defined as the following set of individuals:
Andreas Dilger
Dave Martindale
Guy Eric Schalnat
Paul Schmidt
Tim Wegner
The PNG Reference Library is supplied “AS IS”. The Contributing Authors and Group 42, Inc. disclaim all warranties, expressed
or implied, including, without limitation, the warranties of merchantability and of fitness for any purpose. The Contributing
Authors and Group 42, Inc. assume no liability for direct, indirect, incidental, special, exemplary, or consequential damages,
which may result from the use of the PNG Reference Library, even if advised of the possibility of such damage.
Permission is hereby granted to use, copy, modify, and distribute this source code, or portions hereof, for any purpose, without
fee, subject to the following restrictions:
1. The origin of this source code must not be misrepresented.
2. Altered versions must be plainly marked as such and must not be misrepresented as being the original source.
3. This Copyright notice may not be removed or altered from any source or altered source distribution.
The Contributing Authors and Group 42, Inc. specifically permit, without fee, and encourage the use of this source code as a
component to supporting the PNG file format in commercial products. If you use this source code in a product, acknowledgment
is not required but would be appreciated.
A “png_get_copyright” function is available, for convenient use in “about” boxes and the like:
printf(“%s”,png_get_copyright(NULL));
Also, the PNG logo (in PNG format, of course) is supplied in the files “pngbar.png” and “pngbar.jpg” (88x31) and “pngnow.png”
(98x31).
86

Libpng is OSI Certified Open Source Software. OSI Certified Open Source is a cer tification mark of the Open Source Initiative.
Glenn Randers-Pehrson
glennrp at users.sourceforge.net
December 3, 2009
The zlib License
zlib.h -- interface of the “zlib” general purpose compression library
Version 1.2.3, July 18th, 2005
Copyright (C) 1995-2005 Jean-loup Gailly and Mark Adler
This software is provided “as-is”, without any express or implied warranty. In no event will the authors be held liable for any
damages arising from the use of this software.
Permission is granted to anyone to use this software for any purpose, including commercial applications, and to alter it and
redistribute it freely, subject to the following restrictions:
1. The origin of this software must not be misrepresented; you must not claim that you wrote the original software. If you use this
software in a product, an acknowledgment in the product documentation would be appreciated but is not required.
2. Altered source versions must be plainly marked as such, and must not be misrepresented as being the original software.
3. This notice may not be removed or altered from any source distribution.
Jean-loup Gailly jloup@gzip.org
Mark Adler madler@alumni.caltech.edu
87

Following information is only for EU-member states:
EU Conformity Statement
“This product is marked with “CE” and complies therefore with the applicable harmonized European standards listed
under the Low Voltage Directive 2006/95/EC and the EMC Directive 2004/108/EC.”
Responsible for CE-marking is TOSHIBA INFORMATION SYSTEMS (U.K.) LTD,
Toshiba Court, Weybridge Business Park, Addlestone Road, Weybridge,
Surrey, KT15 2UL, United Kingdom
The use of the symbol indicates that this product may not be treated as household waste. By ensuring this
product is disposed of correctly, you will help prevent potential negative consequences for the environment
and human health, which could otherwise be caused by inappropriate waste handling of this product. For more
detailed information about recycling of this product, please contact your local city office, your household waste
disposal service or the shop where you purchased the product.
Following information is only valid for EU-member States:
Disposal of batteries and/or accumulators
The crossed out wheeled dust bin symbol indicates that batteries and/or accumulators must be collected and
disposed of separately from household waste.
If the battery or accumulator contains more than the specified values of lead (Pb), mercury (Hg), and/or
cadmium (Cd) defined in the Battery Directive (2006/66/EC), then the chemical symbols for lead (Pb), mercury
(Hg) and/or cadmium (Cd) will appear below the crossed out wheeled dust bin symbol.
By participating in separate collection of batteries, you will help to assure the proper disposal of products and
batteries and thus help to prevent potential negative consequences for the environment and human health.
For more detailed information about the collection and recycling programmes available in your country, please
contact your local city office or the shop where you purchased the product.
In conformity with the EEE Regulation.
88

52G0101A P69-Back.indd 76 1/5/09 3:08:45 PM
Printed in China
 Loading...