

Page 1

MULTIFUNCTIONAL DIGITAL COLOR SYSTEMS
User Functions Guide
Page 2

TRADEMARKS AND COPYRIGHT
Trademarks
- The official name of Windows 98 is Microsoft Windows 98 Operating System.
- The official name of Windows Me is Microsoft Windows Me Operating System.
- The official name of Windows 2000 is Microsoft Windows 2000 Operating System.
- The official name of Windows XP is Microsoft Windows XP Operating System.
- The official name of Windows Server 2003 is Microsoft Windows Server 2003 Operating System.
- Microsoft, Windows, Windows NT, and the brand names and product names of other Microsoft products
are trademarks of Microsoft Corporation in the US and other countries.
- Apple, AppleTalk, Macintosh, Mac, TrueType, and LaserWriter are trademarks of Apple Computer, Inc. in
the US and other countries.
- Postscript is a trademark of Adobe Systems Incorporated.
- Netscape is a trademark of Netscape Communications Corporation.
- IBM, AT and AIX are trademarks of International Business Machines Corporation.
- NOVELL, NetWare, and NDS are trademarks of Novell, Inc.
- Other company names and product names in this manual are the trademarks of their respective
companies.
Copyright
© 2006 TOSHIBA TEC CORPORATION All rights reserved
Under the copyright laws, this manual cannot be reproduced in any form without prior written permission of
TTEC. No patent liability is assumed, however, with respect to the use of the information contained herein.
Page 3

TABLE OF CONTENTS
PREFACE ...................................................................................................... 5
Chapter 1 MANAGING ADDRESS BOOK (ADDRESS MENU)
MANAGING ADDRESS BOOK ...................................................................10
About Managing Contacts in Address Book ............................................10
Registering Contacts ............................................................................... 10
Editing Contacts ...................................................................................... 14
Deleting Contacts .................................................................................... 16
Searching Contacts ................................................................................. 18
MANAGING GROUPS ................................................................................. 22
About Managing Groups in Address Book .............................................. 22
Creating New Group................................................................................ 22
Editing Groups......................................................................................... 25
Deleting Groups.......................................................................................31
Searching Groups....................................................................................33
Confirming the Members of the Groups .................................................. 36
Chapter 2 MANAGING COUNTERS (COUNTER MENU)
TOTAL COUNTER....................................................................................... 40
Displaying Print Counter.......................................................................... 40
Displaying Scan Counter ......................................................................... 43
PRINT OUT TOTAL COUNTER .................................................................. 45
DEPARTMENT COUNTER.......................................................................... 46
Displaying Print Counter for Department Code ....................................... 46
Displaying Scan Counter for Department Code ......................................49
Displaying Fax Communication Counter for Department Code............... 51
MANAGING DEPARMENT CODE .............................................................. 53
Logging On As Administrator................................................................... 53
Printing Department Codes List............................................................... 55
Enabling Department Code ..................................................................... 55
Resetting All Department Counters .........................................................57
Deleting All Department Codes ...............................................................58
Registering a New Department Code......................................................59
Editing the Department Code ..................................................................63
Deleting the Department Code ................................................................ 67
Resetting the Counter of Each Department............................................. 69
Setting Output Limitations for All Departments........................................ 71
Setting No Limit Black .............................................................................73
CHECKING TONER AMOUNT ....................................................................74
TABLE OF CONTENTS 1
Page 4

Chapter 3 SETTING ITEMS (USER)
SETTING GENERAL FUNCTIONS ............................................................. 76
Setting the Auto Clear Mode ................................................................... 76
Changing the Display Language ............................................................. 78
Setting the Reversed Display Mode ........................................................ 79
Replacing the Toner Cartridge ................................................................ 81
Setting the Calibrations ...........................................................................83
Setting the Registration ...........................................................................85
SETTING COPY FUNCTIONS.....................................................................86
SETTING FAX FUNCTIONS........................................................................ 88
SETTING SCAN FUNCTIONS ..................................................................... 90
SETTING E-FILING FUNCTIONS................................................................ 93
PRINTING LISTS .........................................................................................94
Printing the Address Book List ................................................................ 94
Printing the Group Numbers List ............................................................. 96
Printing the Function List (User) .............................................................. 97
SETTING DRAWER..................................................................................... 98
CHECKING E-MAIL ................................................................................... 100
TURN OFF THE POWER (SHUT DOWN) .................................................101
SETTING BIP PRINTING........................................................................... 103
Chapter 4 SETTING ITEMS (ADMIN)
ENTERING TO ADMIN MENU...................................................................107
SETTING GENERAL FUNCTIONS ........................................................... 109
Setting the Device Information ..............................................................109
Setting the Notification........................................................................... 111
Changing the Administrator Password ..................................................113
Setting the Date and Time..................................................................... 115
Setting the Weekly Timer ......................................................................117
Setting the Auto Power Save Mode....................................................... 120
Setting the Sleep Mode .........................................................................122
Setting the Calibration and Registration Display Level..........................124
Setting the Copy Calibrations ................................................................ 126
Setting the Print Calibration...................................................................129
Setting the Registration .........................................................................132
Setting the Drawer Set Pop-Up and Paper Jam Recovery Pop-Up ......134
SETTING NETWORK FUNCTIONS .......................................................... 136
Setting the TCP/IP Protocol................................................................... 136
Setting the IPX/SPX Protocol ................................................................ 142
2 TABLE OF CONTENTS
Page 5

Setting the NetWare Settings ................................................................144
Setting the SMB Protocol ......................................................................146
Setting the AppleTalk Protocol .............................................................. 149
Setting the HTTP Network Service........................................................ 151
Setting the Ethernet Speed ................................................................... 153
Setting the LDAP and SNMP Network Service ..................................... 155
Setting the User Certificate.................................................................... 157
SETTING COPY FUNCTIONS...................................................................161
SETTING FAX FUNCTIONS...................................................................... 163
Setting the Terminal ID.......................................................................... 163
Setting the Fax Initial Setup................................................................... 166
Setting the Line-2 Mode ........................................................................ 168
Setting the RX Printing ..........................................................................171
Setting the Recovery Transmission....................................................... 177
SETTING FILE FUNCTIONS ..................................................................... 179
SETTING E-MAIL FUNCTIONS................................................................. 180
Setting the Scan to E-mail Message Properties .................................... 180
Setting the Scan to E-mail Fragmentation.............................................181
SETTING INTERNET FAX FUNCTIONS ...................................................182
Setting the Internet Fax Message Properties ........................................ 182
Setting the Internet Fax Fragmentation .................................................183
Setting the Internet Fax Body String Transmission ............................... 184
SETTING LIST/REPORT ...........................................................................185
Setting the Transmission / Reception Journal ....................................... 185
Setting the Communication Report........................................................ 187
Setting the Reception List...................................................................... 190
PRINTING LISTS .......................................................................................192
SETTING PRINTER/E-FILING FUNCTIONS ............................................. 193
WIRELESS SETTINGS AND Bluetooth SETTINGS ................................ 194
Chapter 5 APPENDIX
LIST PRINT FORMAT................................................................................ 196
Total Counter List .................................................................................. 196
Department Code List............................................................................ 197
Address Book List..................................................................................198
Group Numbers List ..............................................................................199
Function List (User) ............................................................................... 200
NIC Configuration Page......................................................................... 201
Function List (Administrator).................................................................. 202
PS3 Font List .........................................................................................217
PCL Font List.........................................................................................218
TABLE OF CONTENTS 3
Page 6

INDEX .......................................................................................................................................219
4 TABLE OF CONTENTS
Page 7
PREFACE
Thank you for purchasing the Toshiba Multifunctional Digital Color System e-STUDIO2500c/
3500c/3510c. This Operator’s Manual describes the following:
y How to set up the Multifunctional Digital Color System.
y How to operate the functions in the [USER FUNCTIONS] button.
Before using the Multifunctional Digital Color System, thoroughly read and understand this
Operator's Manual. To ensure that clean copies are made at all times and to keep your Multifunctional Digital Color System in optimum working order, this Operator’s Manual should be
readily available for future reference.
Lineup of Our Manuals
Thank you for purchasing the TOSHIBA multifunctional digital color systems e-STUDIO2500c/
3500c/3510c.
We have provided you with these manuals for the operation of this equipment. Select and read
the manual best suited to your needs.
Quick Start Guide
This Quick Start Guide describes the initial setup method of this equipment and accessories of this product such as operator’s manuals and
CD-ROMs.
Operator’s Manual Basic Functions
This Operator’s Manual Basic Functions describes how to use the basic
functions of this equipment mainly focusing on the copying function.
Also this manual contains safety precautions for users to be observed.
Be sure to read it first carefully.
User Functions Guide
This User Functions Guide describes the functions and settings under
the [USER FUNCTIONS] button on the control panel of this equipment.
Color Guide
This color Guide simply explains the functions such as “copy density
adjustment”, “color adjustment”, “copy editing”, "image editing” and
“image processing” in color. This guide also includes the basic knowledge of color.
PREFACE 5
Page 8
Other guides are provided by the User Documentation CD-ROM in PDF files:
TopAccess Guide
This TopAccess Guide explains how to operate and set up the network
functions such as the network scanning function and job management,
using the TopAccess (Web-based utility) from client computers.
Network Administration Guide
This Network Administration Guide explains the guidelines for setting up
network servers to provide various network services, and troubleshooting for network administrators.
Printing Guide
This Printing Guide explains how to install the client software for printing
from Microsoft Windows, Apple Mac OS, and UNIX computers, and print
to the equipment.
Scanning Guide
This Scanning Guide explains how to operate the scanning function of
this equipment.
e-Filing Guide
This e-Filing Guide explains how to operate the e-Filing function using
the TWAIN driver, File Downloader and e-Filing web utility.
6 PREFACE
Page 9
Network Fax Guide
This Network Fax Guide explains how to use the network fax function
that enable users to operate fax and internet fax sending from a client
computer via network.
User Management Guide
This User Management Guide describes how to manage this equipment
using the functions of “Department Management”, “User Management
Setting” and “User Authentication for Scan to E-mail”.
To read manuals in PDF (Portable Document Format) files
Viewing and printing this operator’s manual in PDF files require that you install Adobe Reader or
Adobe Acrobat Reader on your PC. If Adobe Reader or Adobe Acrobat Reader is not installed
on your PC, download and install it from the website of Adobe Systems Incorporated.
PREFACE 7
Page 10
Precautions in this manual
To ensure correct and safe use of this equipment, this operator’s manual describes safety precautions according to the three levels shown below.
You should fully understand the meaning and importance of these items before reading this
manual.
Indicates a potentially hazardous situation which, if not avoided, could result
in death, serious injury, or serious damage, or fire in the equipment or surrounding assets.
Indicates a potentially hazardous situation which, if not avoided, may result in
minor or moderate injury, partial damage of the equipment or surrounding
assets, or loss of data.
Indicates a procedure you should follow to ensure the optimal performance of
the equipment and problem-free copying.
Other than the above, this manual also describes information that may be useful for the operation of this equipment with the following signage:
Describes handy information that is useful to know when operating the equipment.
Pages describing items related to what you are currently doing. See these
pages as required.
8 PREFACE
Page 11

1.MANAGING ADDRESS BOOK
(ADDRESS MENU)
MANAGING ADDRESS BOOK................................................................................10
About Managing Contacts in Address Book......................................................................................10
Registering Contacts.........................................................................................................................10
Editing Contacts ................................................................................................................................14
Deleting Contacts..............................................................................................................................16
Searching Contacts...........................................................................................................................18
MANAGING GROUPS .............................................................................................22
About Managing Groups in Address Book ........................................................................................22
Creating New Group .........................................................................................................................22
Editing Groups ..................................................................................................................................25
Deleting Groups ................................................................................................................................31
Searching Groups .............................................................................................................................33
Page 12
1 MANAGING ADDRESS BOOK (ADDRESS MENU)
MANAGING ADDRESS BOOK
About Managing Contacts in Address Book
The Address Book contents are entered using the [ADDRESS] button. The Address Book contents are used for Facsimile and Scan to E-mail.
In Address Book, you can register up to 1000 contacts that can contain a fax number, an E-mail
address, or both in each contact. Also you can specify the option settings for the fax transmission in each contact, such as Transmission type, ECM, Quality transmission, Line select, and
subaddress settings.
In the Address Book button menu, you can perform following operations to manage contacts.
y P.10 “Registering Contacts”
y P.14 “Editing Contacts”
y P.16 “Deleting Contacts”
y P.18 “Searching Contacts”
Registering Contacts
The following procedure describes how to register new contact in the Address Book.
Press the [USER FUNCTIONS] button on the control panel to enter
1
the User Functions menu.
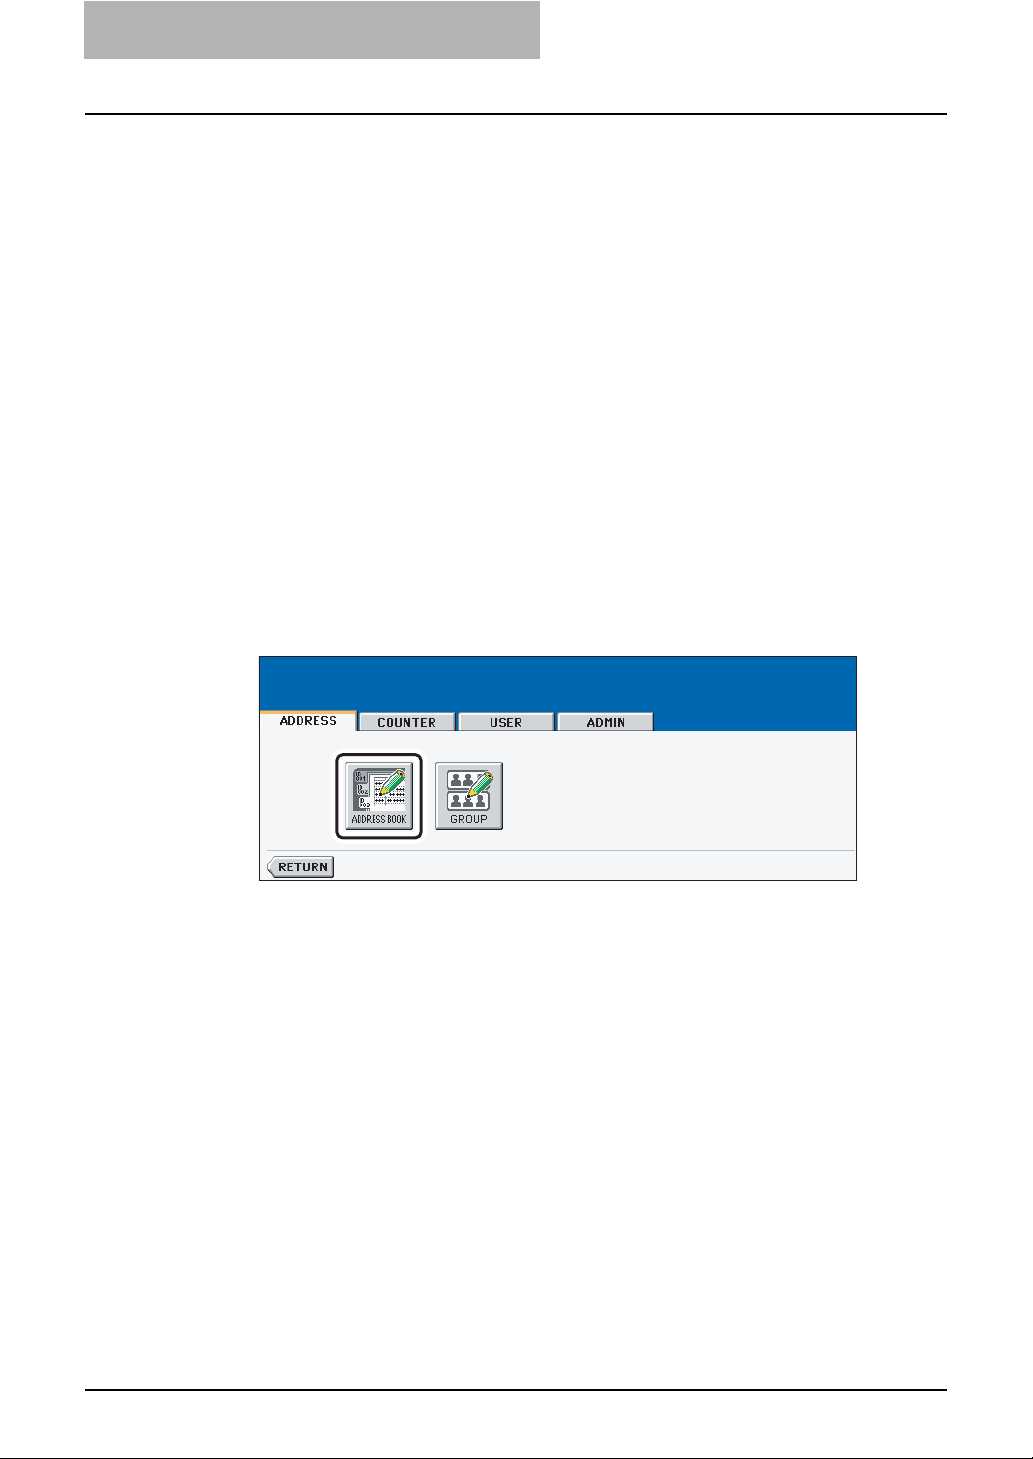
Press the [ADDRESS] button, and then press the [ADDRESS
2
BOOK] button on the touch panel.
y The ADDRESS BOOK screen is displayed.
10 MANAGING ADDRESS BOOK
Page 13

Press undefined button that you want to register new contact and
3
press the [ENTRY] button.
y The ADDRESS BOOK REGISTRATION screen is displayed.
If the touch panel does not display an undefined contact, press the [Next] button to display the next screen.
MANAGING ADDRESS BOOK 11
Page 14
1 MANAGING ADDRESS BOOK (ADDRESS MENU)
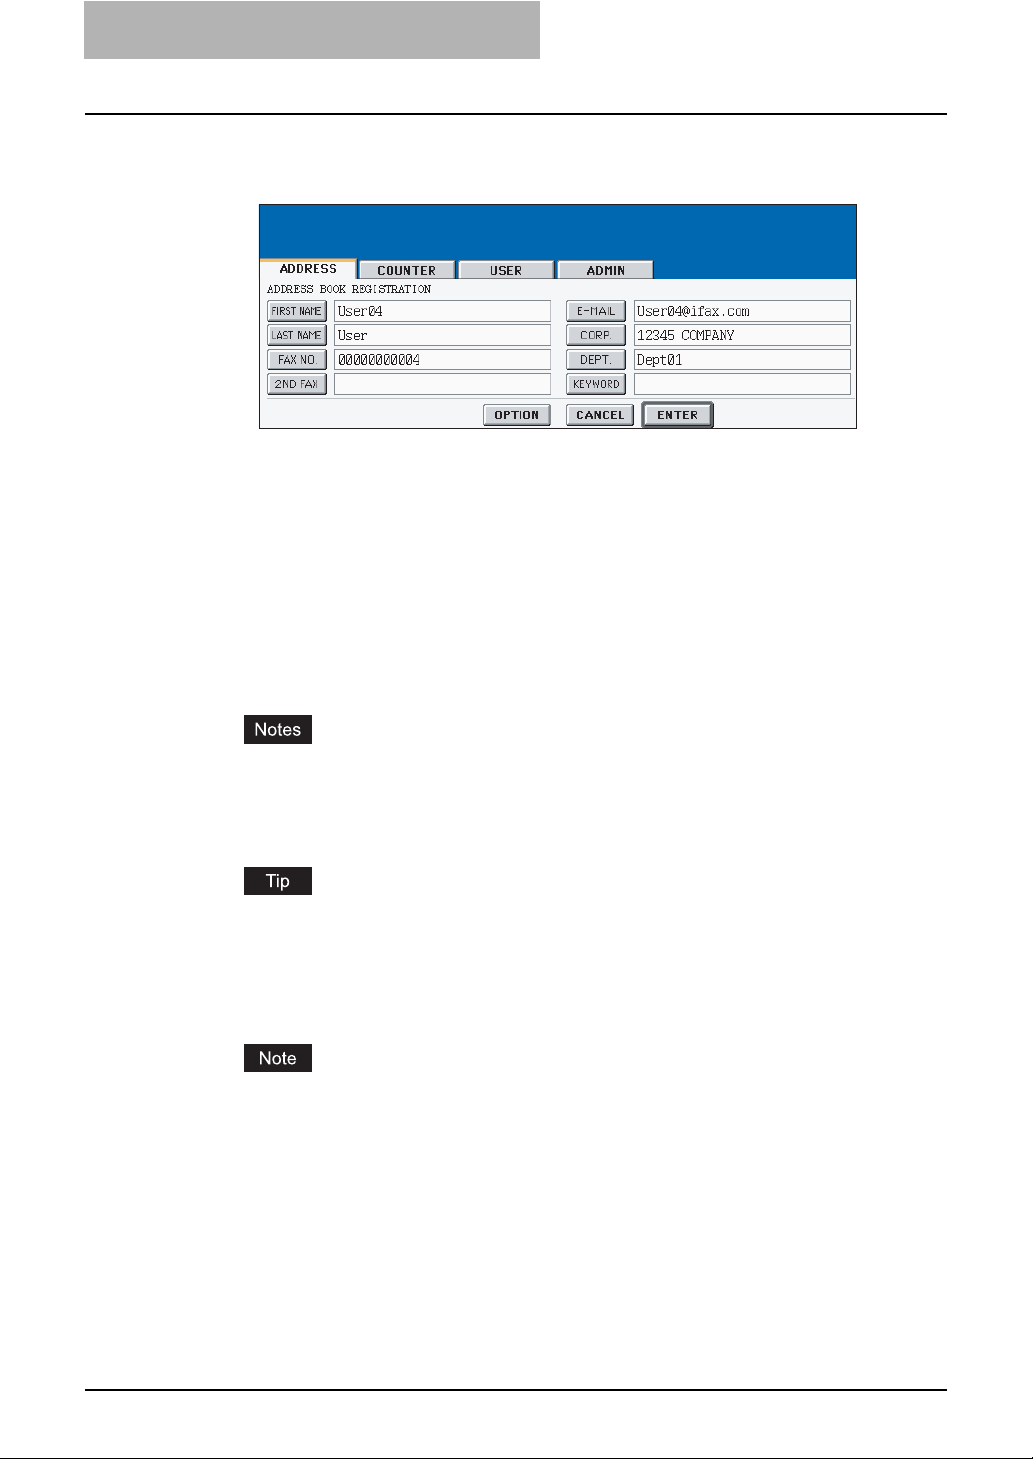
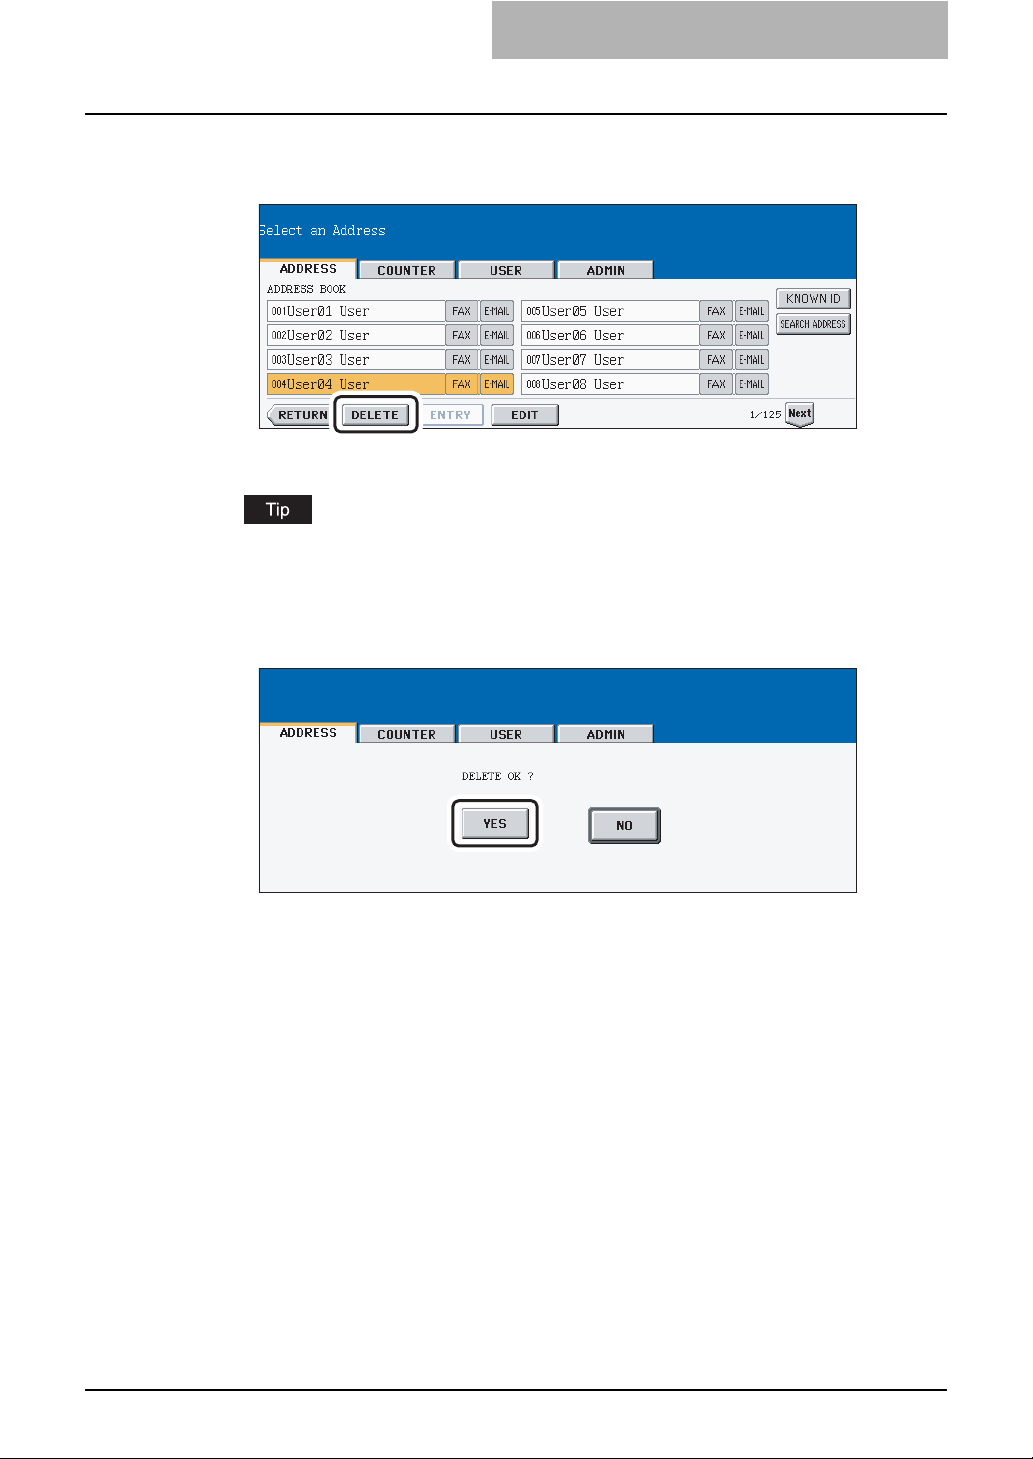
Press each button on the touch panel to enter following contact
4
information.
y [FIRST NAME] — Enter the first name of the contact. This name will appear in the
address book list on the touch panel.
y [LAST NAME] — Enter the last name of the contact. This name will appear in the
address book list on the touch panel.
y [FAX NO.] — Enter the fax number of the contact.
y [2ND FAX] — Enter the second fax number of the contact.
y [E-MAIL] — Enter the E-mail address of the contact.
y [CORP.] — Enter the company name of the contact.
y [DEPT.] — Enter the department name of the contact.
y [KEYWORD] — Enter the keyword of the contact. This keyword can be used to
search for this contact.
y You must at least enter either the [FIRST NAME] or [LAST NAME] button, and either
the [FAX NO.] or [E-MAIL] button to register the contact.
y If you enter “-” in the [FAX NO.] and [2ND FAX], three seconds pause is added for
dialing the fax number.
When you press each button, the input screen is displayed. Enter the value using the
keyboard and digital keys and press the [ENTER] button to set the entry.
Press the [OPTION] button to specify the default settings for a fax
5
transmission.
This is available only when the optional fax unit is installed.
12 MANAGING ADDRESS BOOK
Page 15

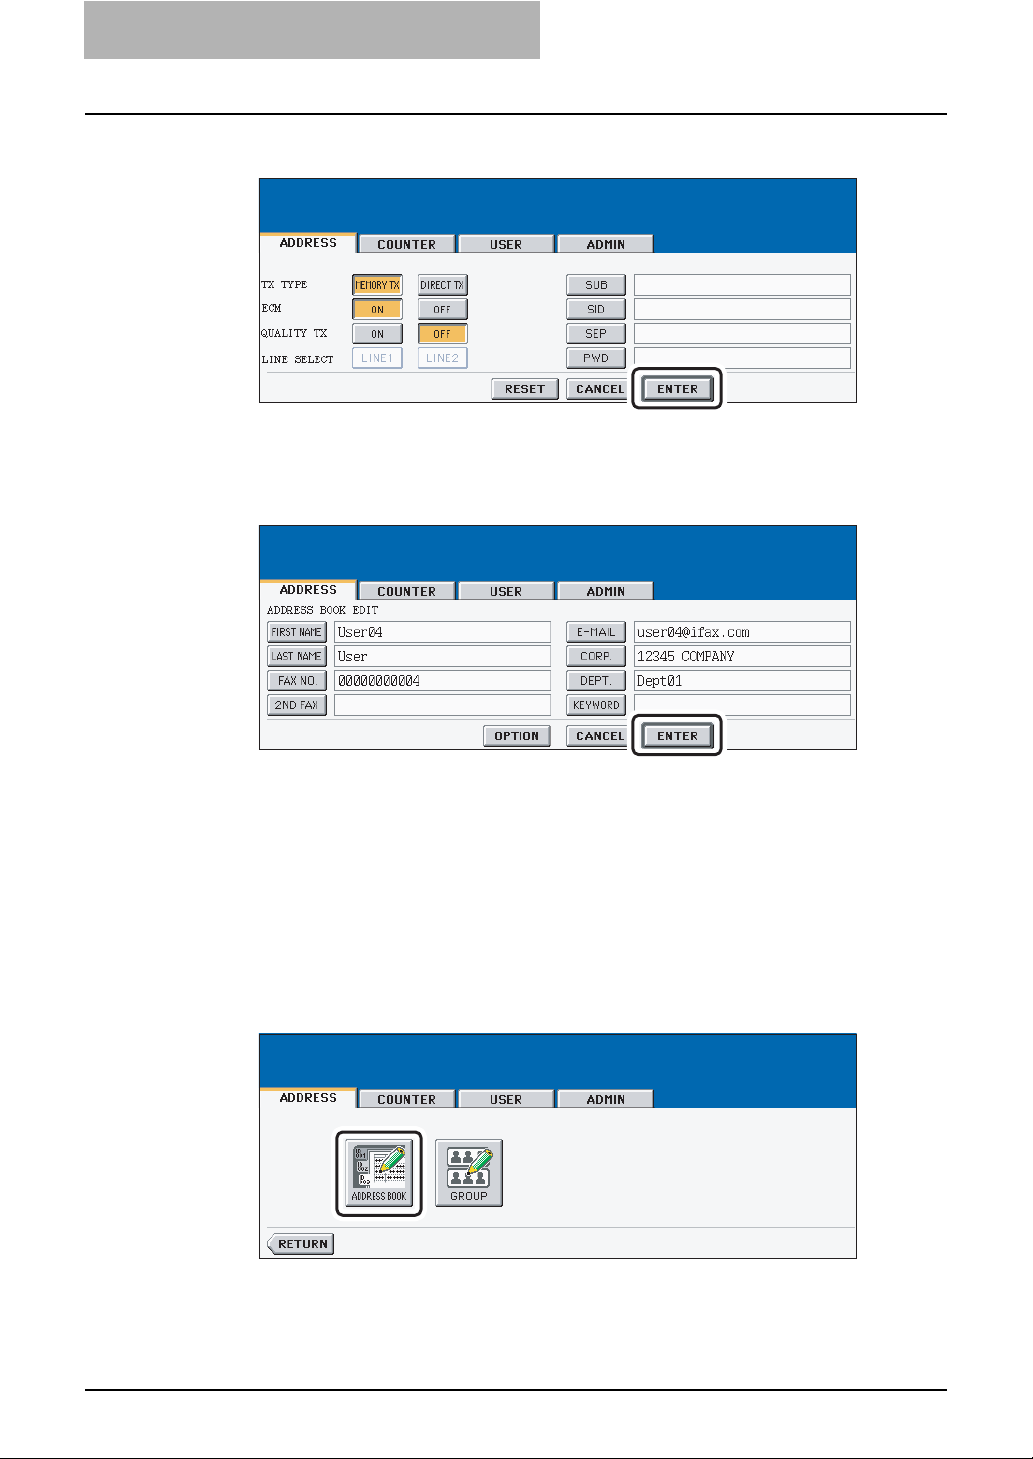
Specify following items as you required.
6
y TX TYPE — This sets the type of the fax transmission mode. Press the [MEMORY
TX] button to select the memory transmission mode or the [DIRECT TX] button to
select the direct transmission mode.
y ECM — Select whether enabling or disabling the ECM (Error Correction Mode) to
automatically resend any portion of the document affected by phone line noise or distortion. Press the [ON] button to enable the ECM, or the [OFF] button to disable the
ECM.
y QUALITY TX — Select whether a document is sent in the Quality TX mode. This fea-
ture allows to send a document at a slower speed than a normal so that the transmission will be less affected by line condition. Press the [ON] button to enable the
Quality TX, or [OFF] button to disable the Quality TX.
y LINE SELECT — Select the line to be used for the fax transmission. Press the
[LINE1] button to use the Line 1, or [LINE2] button to use Line 2. The [LINE2] button
can be selected only when the optional 2nd line board is installed.
y [SUB] — Enter the mailbox number if you want to send originals to the mailbox in the
remote fax.
y [SID] — Enter the password to input a document into the mailbox in the remote fac-
simile.
y [SEP] — Enter the mailbox number if you want to retrieve a document from the mail-
box in the remote fax.
y [PWD] — Enter the password to retrieve a document from the mailbox in the remote
facsimile.
When you press the [SUB], [SID], [SEP], and [PWD] buttons, the input screen is displayed. Enter the value using the keyboard and digital keys, and press the [ENTER] button to set the entry.
Press the [ENTER] button to save option settings.
7
MANAGING ADDRESS BOOK 13
Page 16
1 MANAGING ADDRESS BOOK (ADDRESS MENU)
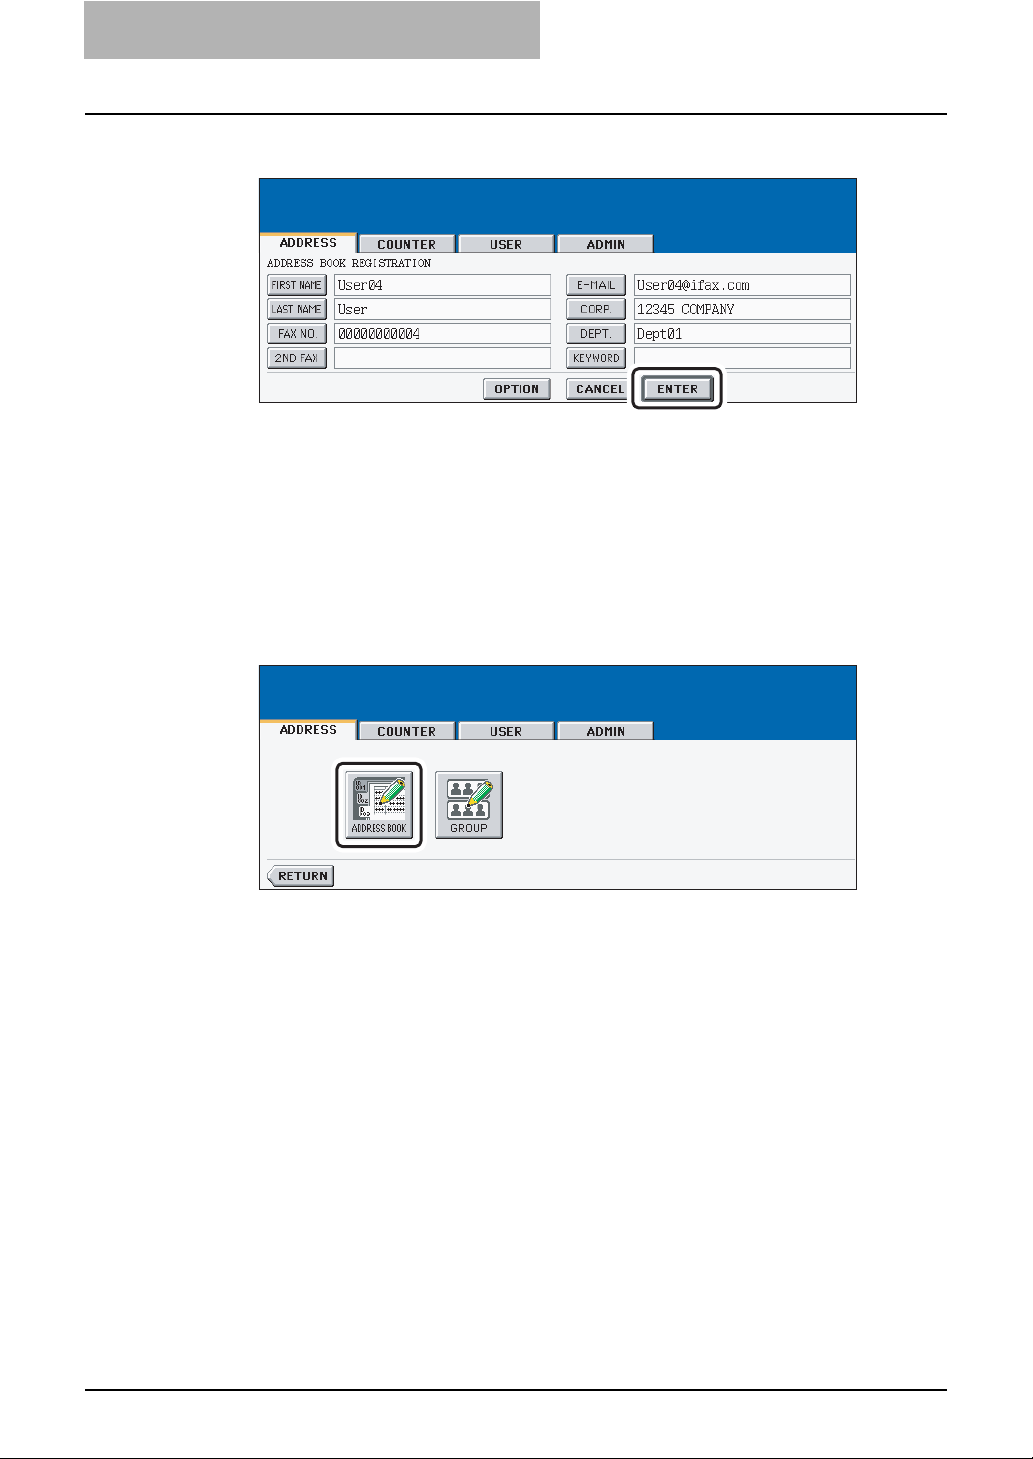
Press the [ENTER] button to register the contact.
8
Editing Contacts
The following procedure describes how to edit existing contacts in the Address Book.
Press the [USER FUNCTIONS] button on the control panel to enter
1
the User Functions menu.
Press the [ADDRESS] button, and then press the [ADDRESS
2
BOOK] button on the touch panel.
y The ADDRESS BOOK screen is displayed.
14 MANAGING ADDRESS BOOK
Page 17
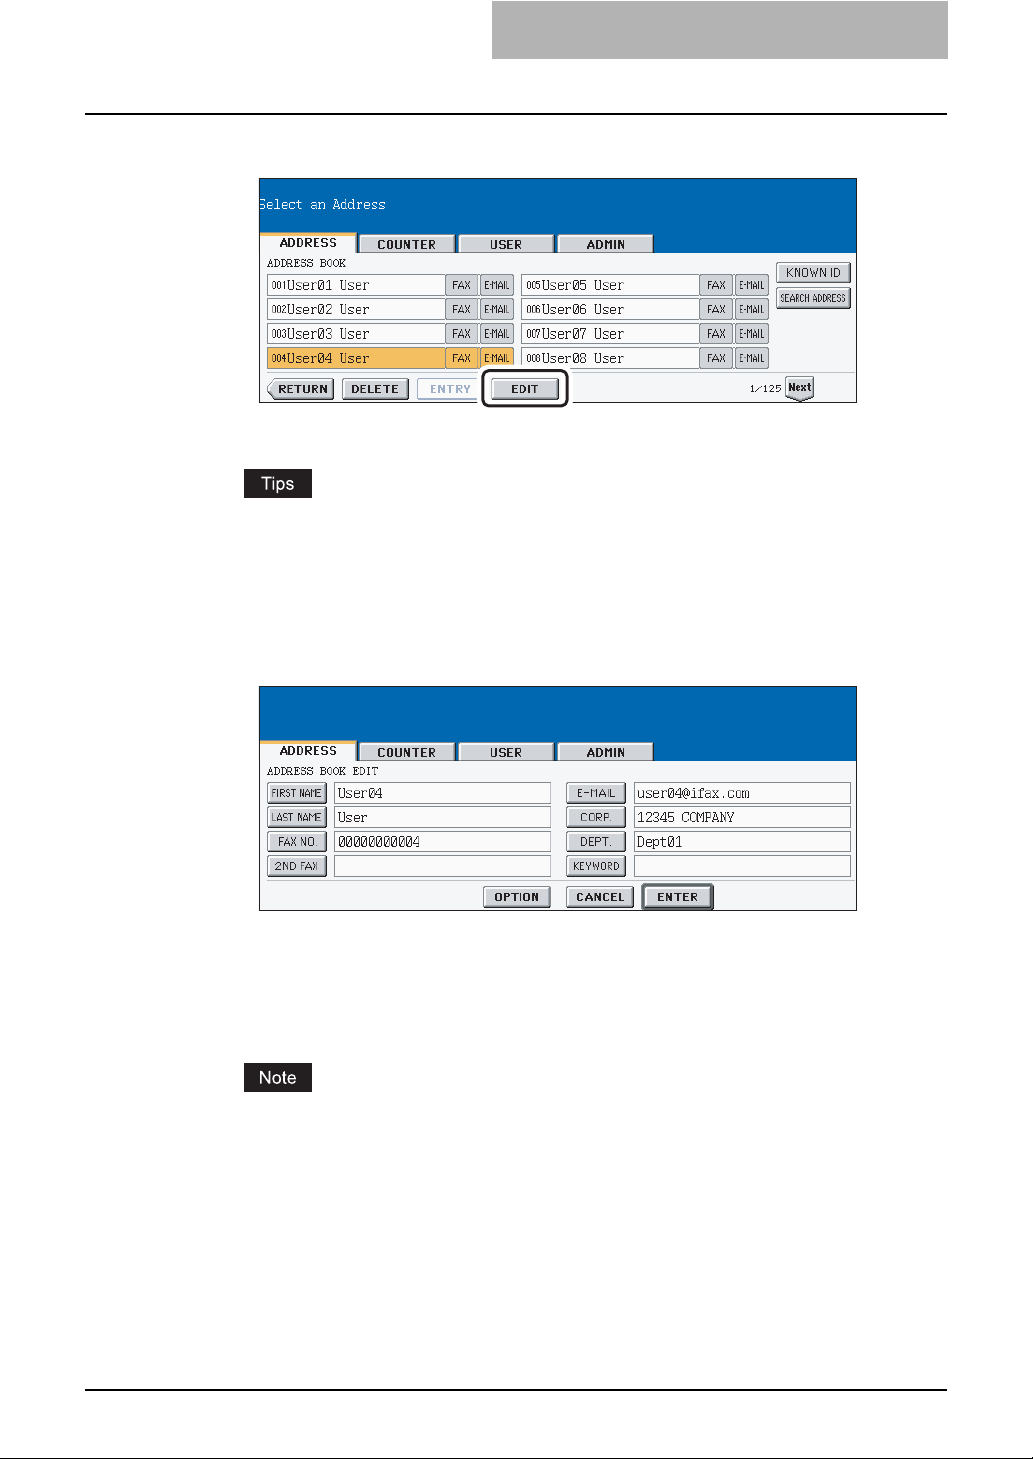
Press the contact that you want to edit and press the [EDIT] button.
3
y The ADDRESS BOOK EDIT screen is displayed.
y If the touch panel does not display the contact that you want to edit, press the [Next]
button to display the next screen.
y You can quickly search for the contact that you want to edit. To search for the con-
tact, see the "Searching Contacts". P. 1 8
Press each button on the touch panel to edit the contact informa-
4
tion.
y For the description of each item, see the Step 4 in the procedure of "Registering Con-
tacts" in the previous section.
Press the [OPTION] button to specify the default settings for a fax
5
transmission.
This is available only when the optional fax unit is installed.
MANAGING ADDRESS BOOK 15
Page 18
1 MANAGING ADDRESS BOOK (ADDRESS MENU)
Specify the items as you required and press the [ENTER] button.
6
y For the description of each item, see the Step 6 in the procedure of "Registering Con-
tacts" in the previous section.
Press the [ENTER] button to save the contact.
7
y The contact is edited.
Deleting Contacts
The following procedure describes how to delete existing contact in the Address Book.
Press the [USER FUNCTIONS] button on the control panel to enter
1
the User Functions menu.
Press the [ADDRESS] button, and then press the [ADDRESS
2
BOOK] button on the touch panel.
y The ADDRESS BOOK screen is displayed.
16 MANAGING ADDRESS BOOK
Page 19
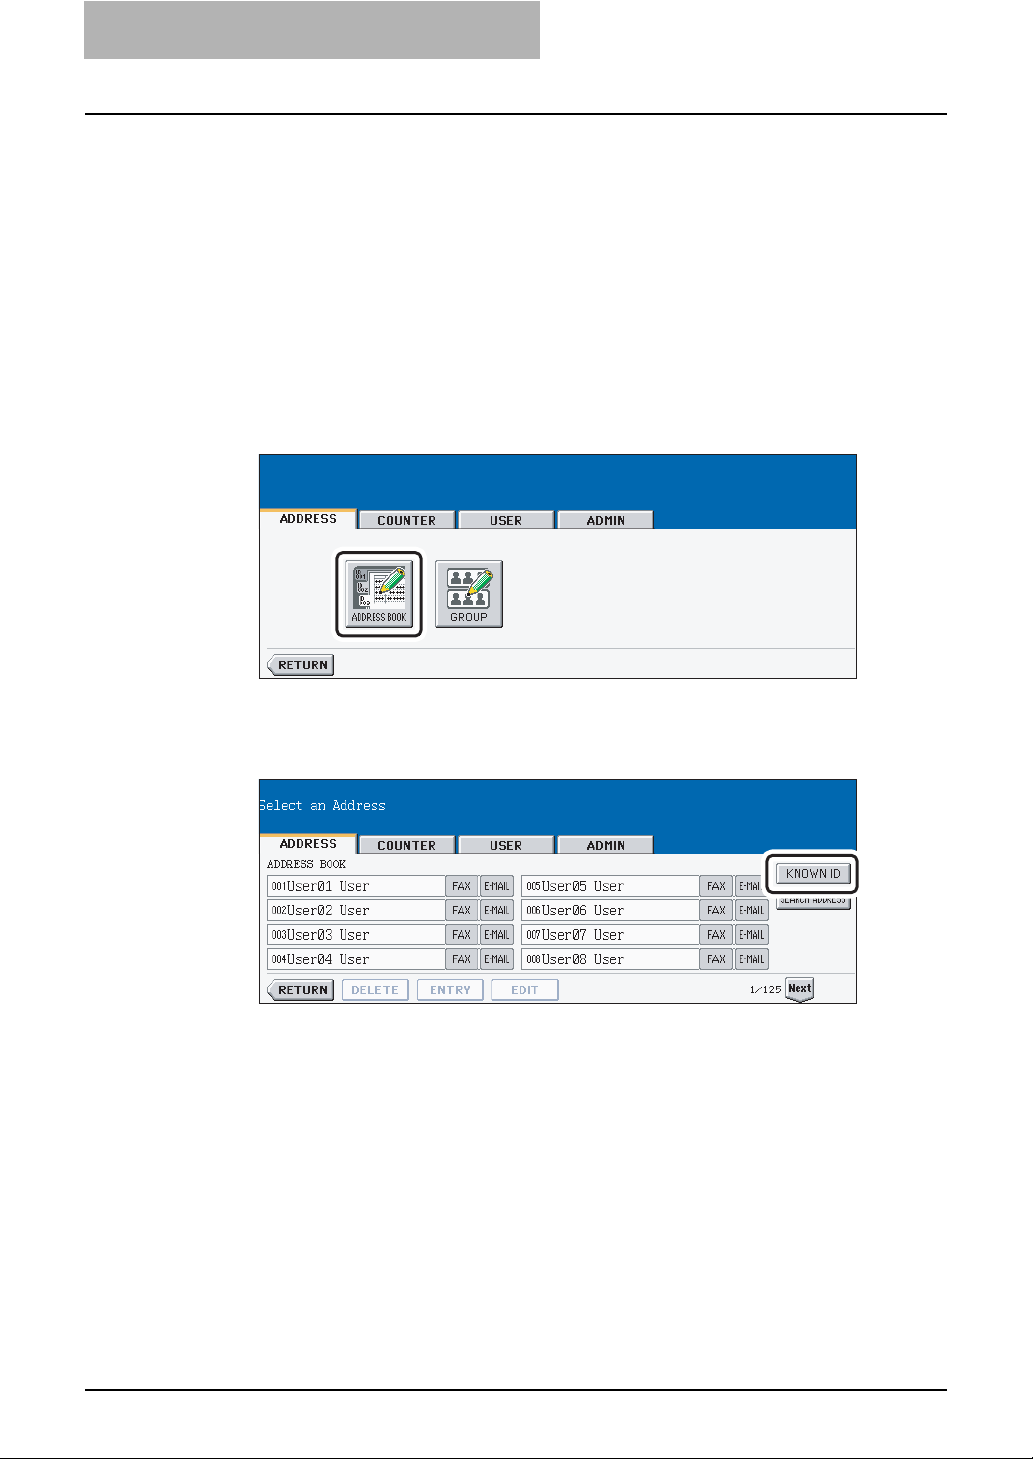
Press the contact that you want to delete and press the [DELETE]
3
button.
y The delete confirmation screen is displayed.
If the touch panel does not display the contact that you want to delete, press the [Next]
button to display the next screen.
Press the [YES] button to delete the contact, or the [NO] button to
4
cancel deleting.
y When you press the [YES] button, the selected contact is deleted.
MANAGING ADDRESS BOOK 17
Page 20
1 MANAGING ADDRESS BOOK (ADDRESS MENU)
Searching Contacts
The following procedure describes how to search for contacts in the Address Book. This function is useful to find the contact that you want to edit.
You can search for the contacts by entering an ID number or the search strings.
Searching a Contact by ID Number
Press the [USER FUNCTIONS] button on the control panel to enter
1
the User Functions menu.
Press the [ADDRESS] button, and then press the [ADDRESS
2
BOOK] button on the touch panel.
y The ADDRESS BOOK screen is displayed.
Press the [KNOWN ID] button.
3
y The KNOWN ID screen is displayed.
18 MANAGING ADDRESS BOOK
Page 21
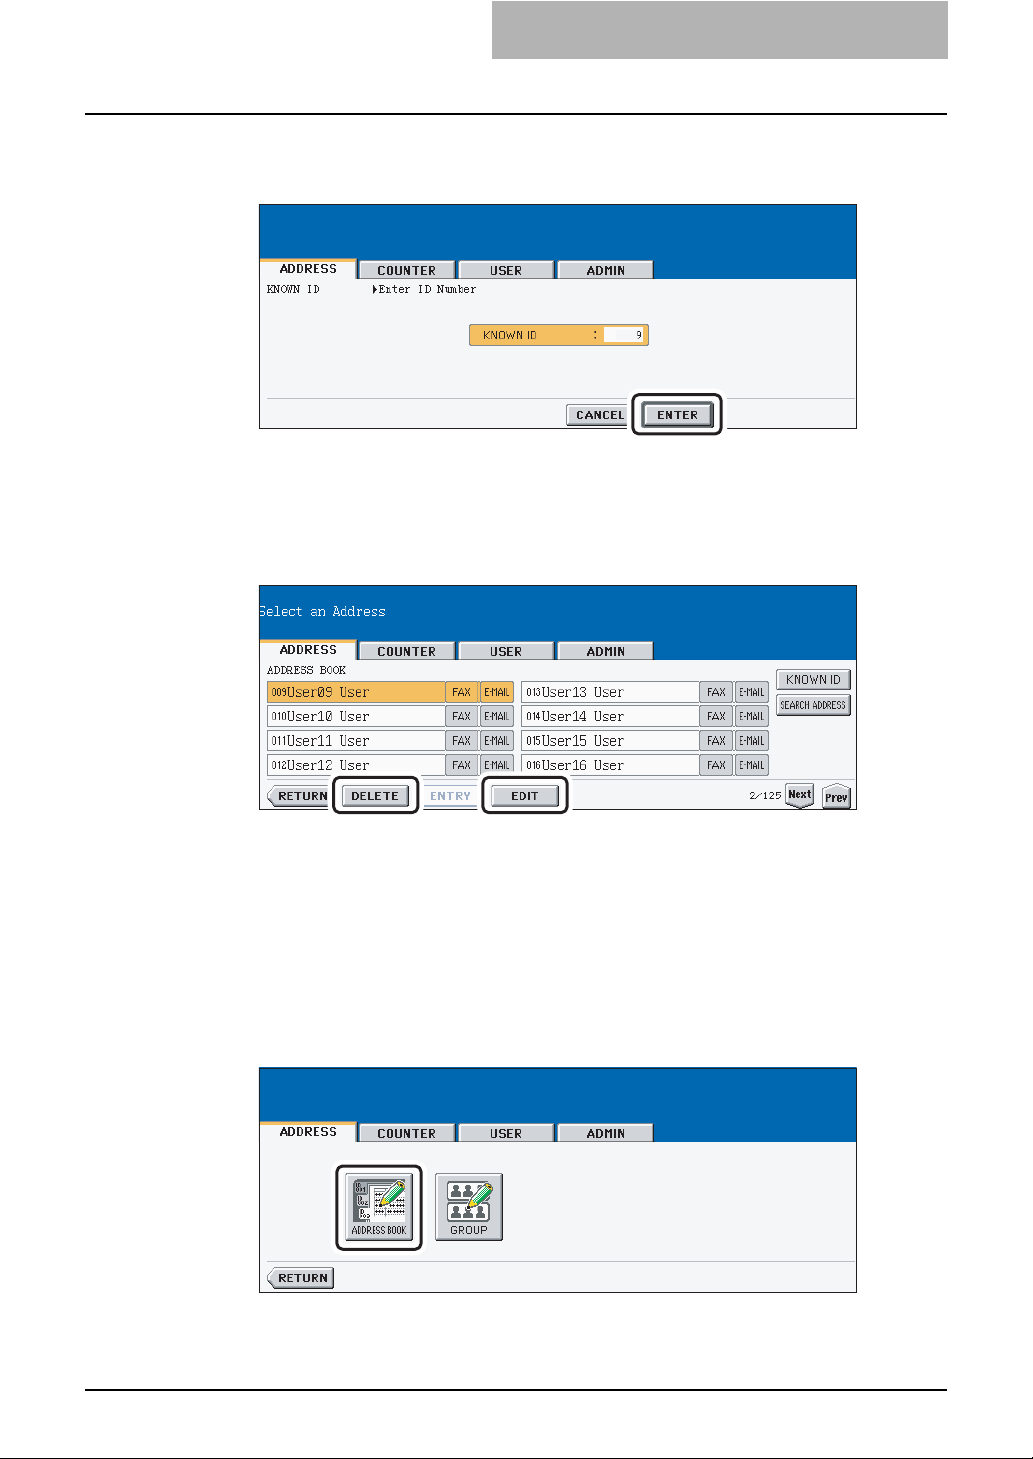
Enter the ID Number using the digital keys and press the [ENTER]
4
button.
The touch panel displays the screen that contains the searched
5
contact. Press the contact and press the [EDIT] button to edit the
contact information, or press the [DELETE] button to delete the
contact.
y See "Editing Contacts" for the instruction to edit the contact. P. 1 4
Searching Contacts by Entering Search String
Press the [USER FUNCTIONS] button on the control panel to enter
1
the User Functions menu.
Press the [ADDRESS] button, and then press the [ADDRESS
2
BOOK] button on the touch panel.
y The ADDRESS BOOK screen is displayed.
MANAGING ADDRESS BOOK 19
Page 22
1 MANAGING ADDRESS BOOK (ADDRESS MENU)
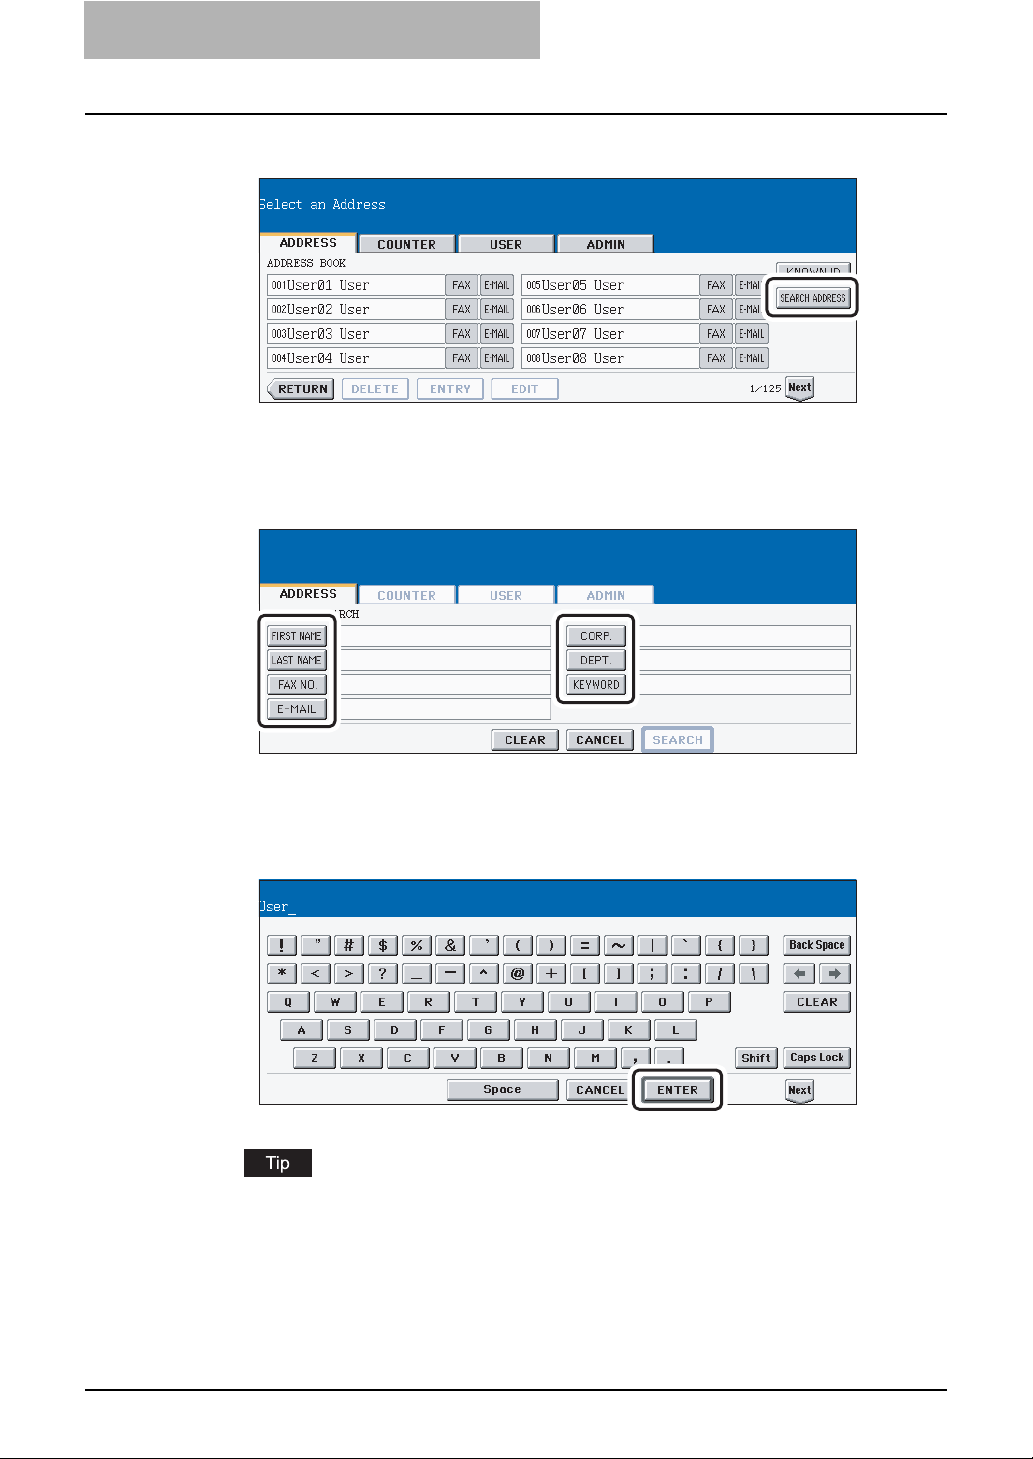
Press the [SEARCH ADDRESS] button.
3
y The SEARCH ADDRESS screen is displayed.
Press the button that is used for searching to specify the search
4
string.
y When you press each button, the input screen is displayed.
Enter the search string using the keyboard and digital keys, and
5
press the [ENTER] button.
It will search for the contacts that contain the search text in the specified items.
20 MANAGING ADDRESS BOOK
Page 23
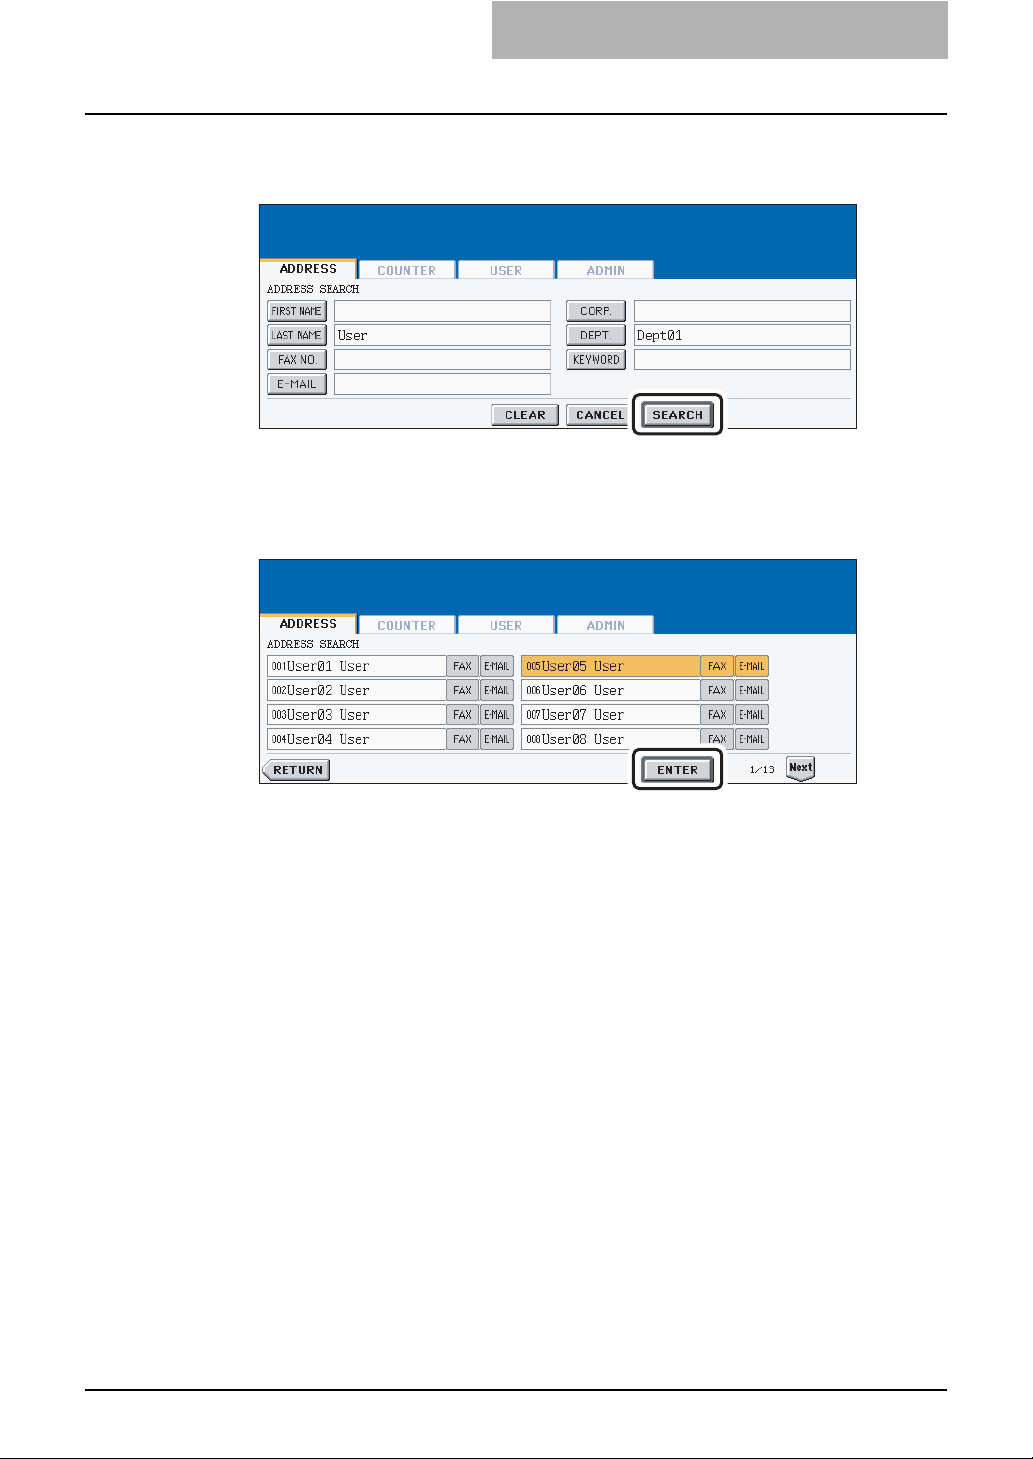
Specify the search string in the items that you require and press the
6
[SEARCH] button.
The touch panel displays the screen that contains the searched
7
contacts. Press the contact and press the [ENTER] button to edit
the contact information.
y See "Editing Contacts" for the instruction to edit the contact. P. 1 4
MANAGING ADDRESS BOOK 21
Page 24
1 MANAGING ADDRESS BOOK (ADDRESS MENU)
MANAGING GROUPS
About Managing Groups in Address Book
You can create groups that contain the multiple members of contacts. This enables you to specify the groups instead of specifying each recipient separately when operating Scan to E-mail, or
fax or Internet Fax transmission. You can also delete groups.
In Address Book, you can register up to 200 groups and each group can contain up to 1000
members.
y One fax number or one E-mail address is counted as one destination. If you select the con-
tact that contains both fax number and E-mail address, it results in two destinations in the
group.
y You can register the fax numbers in the Groups, however, you can use them to specify the
destinations for fax transmission only when the optional Fax unit is installed.
In the Group button menu, you can perform following operations to manage groups.
y P.22 “Creating New Group”
y P.25 “Editing Groups”
y P.31 “Deleting Groups”
y P.33 “Searching Groups”
Creating New Group
The following procedure describes how to create a new group in the Address Book.
Press the [USER FUNCTIONS] button on the control panel to enter
1
the User Functions menu.
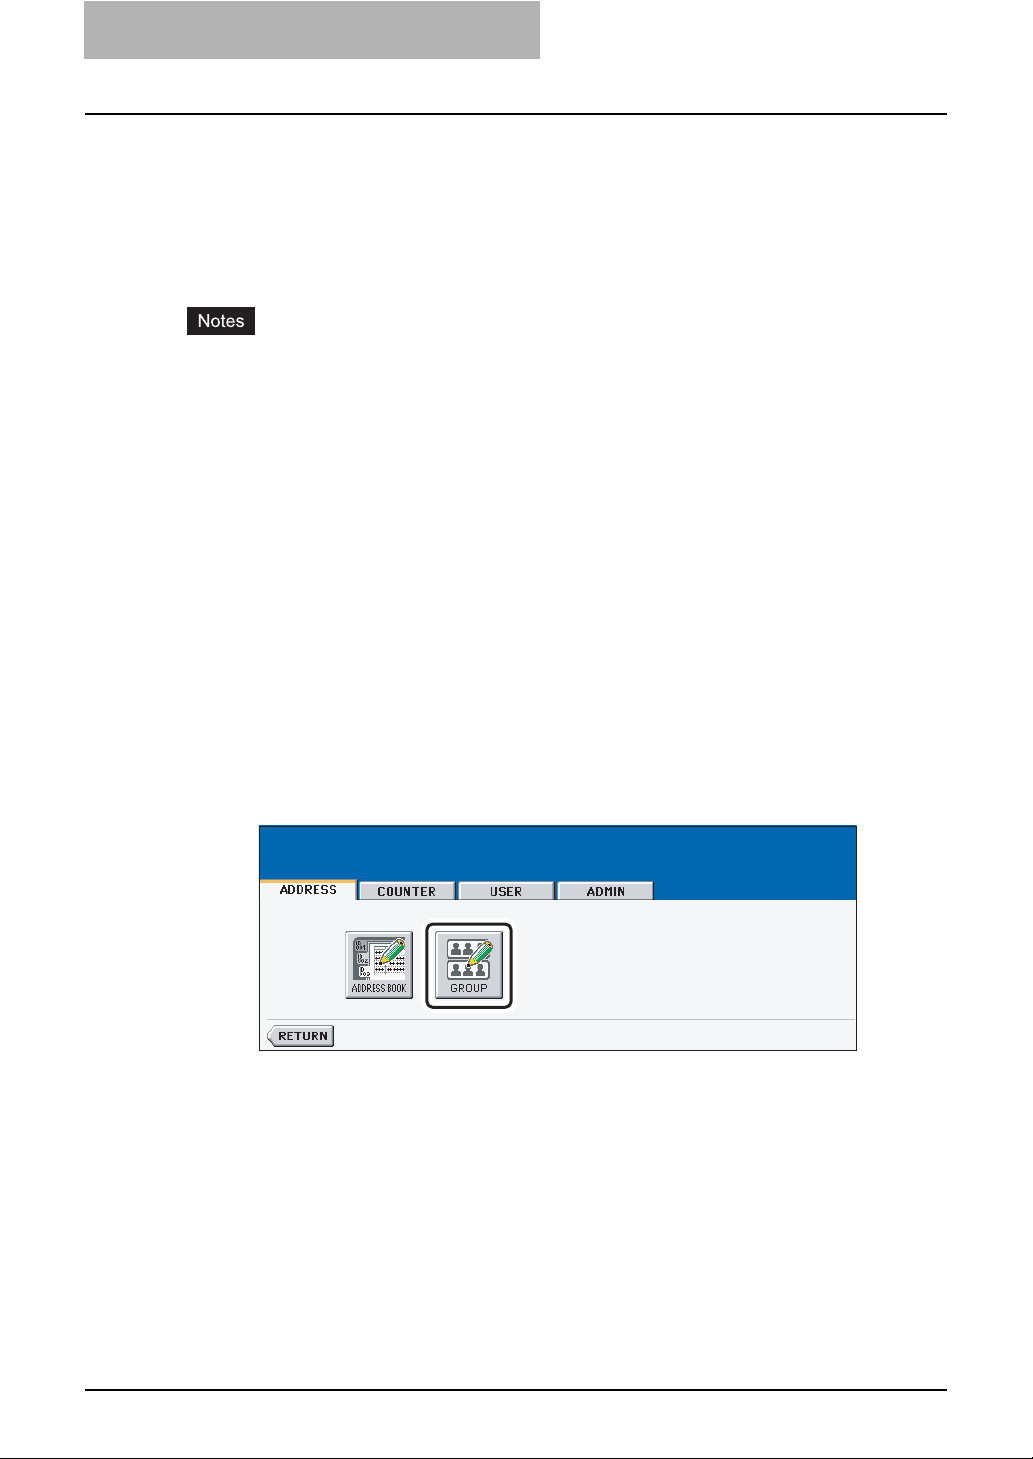
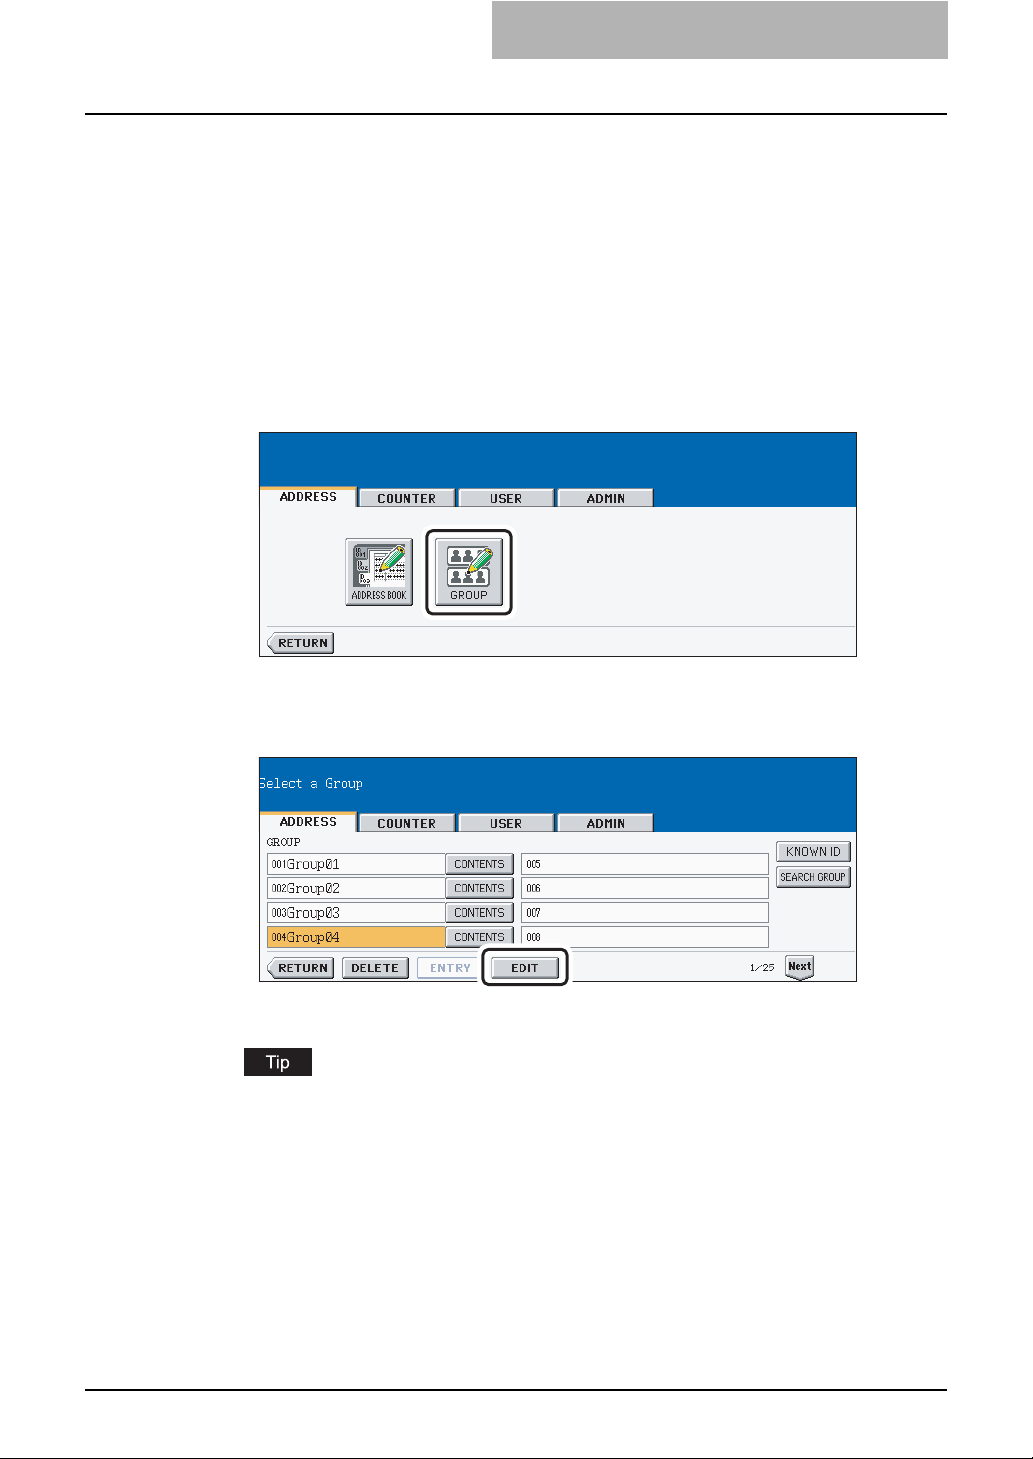
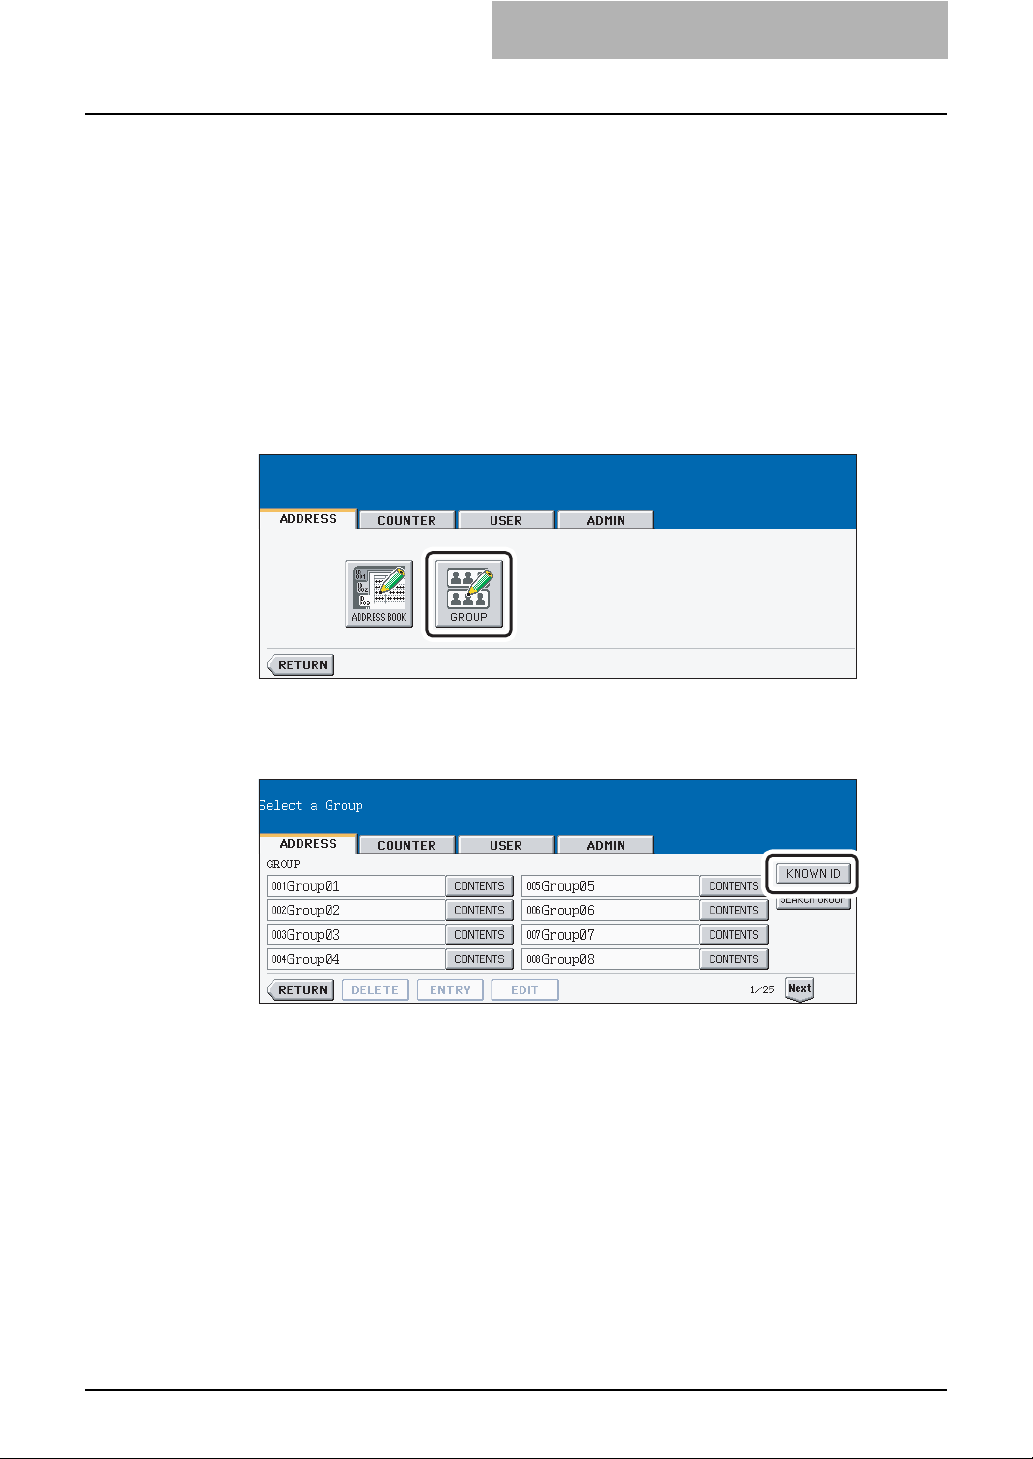
Press the [ADDRESS] button, and then press the [GROUP] button
2
on the touch panel.
y The GROUP screen is displayed.
22 MANAGING GROUPS
Page 25
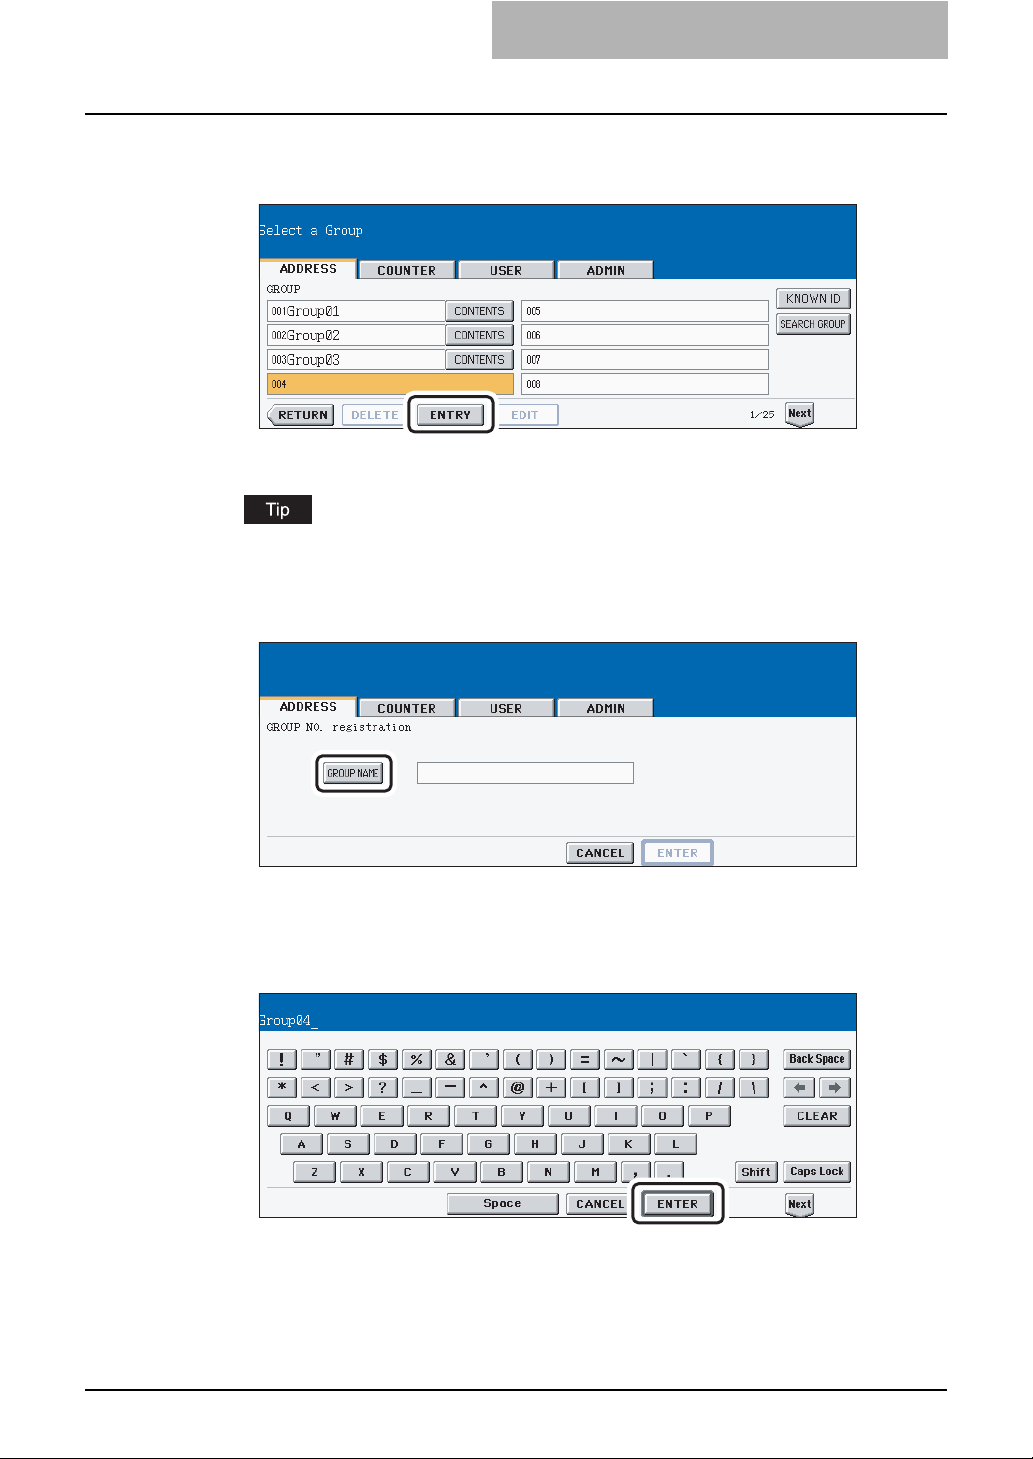
Press undefined button that you want to create a new group and
3
press the [ENTRY] button.
y The GROUP NO. REGISTRATION screen is displayed.
If the touch panel does not display an undefined group, press the [Next] button to display
the next screen.
Press the [GROUP NAME] button.
4
y The input screen is displayed.
Enter the group name using the keyboard and digital keys, and
5
press the [ENTER] button.
MANAGING GROUPS 23
Page 26
1 MANAGING ADDRESS BOOK (ADDRESS MENU)
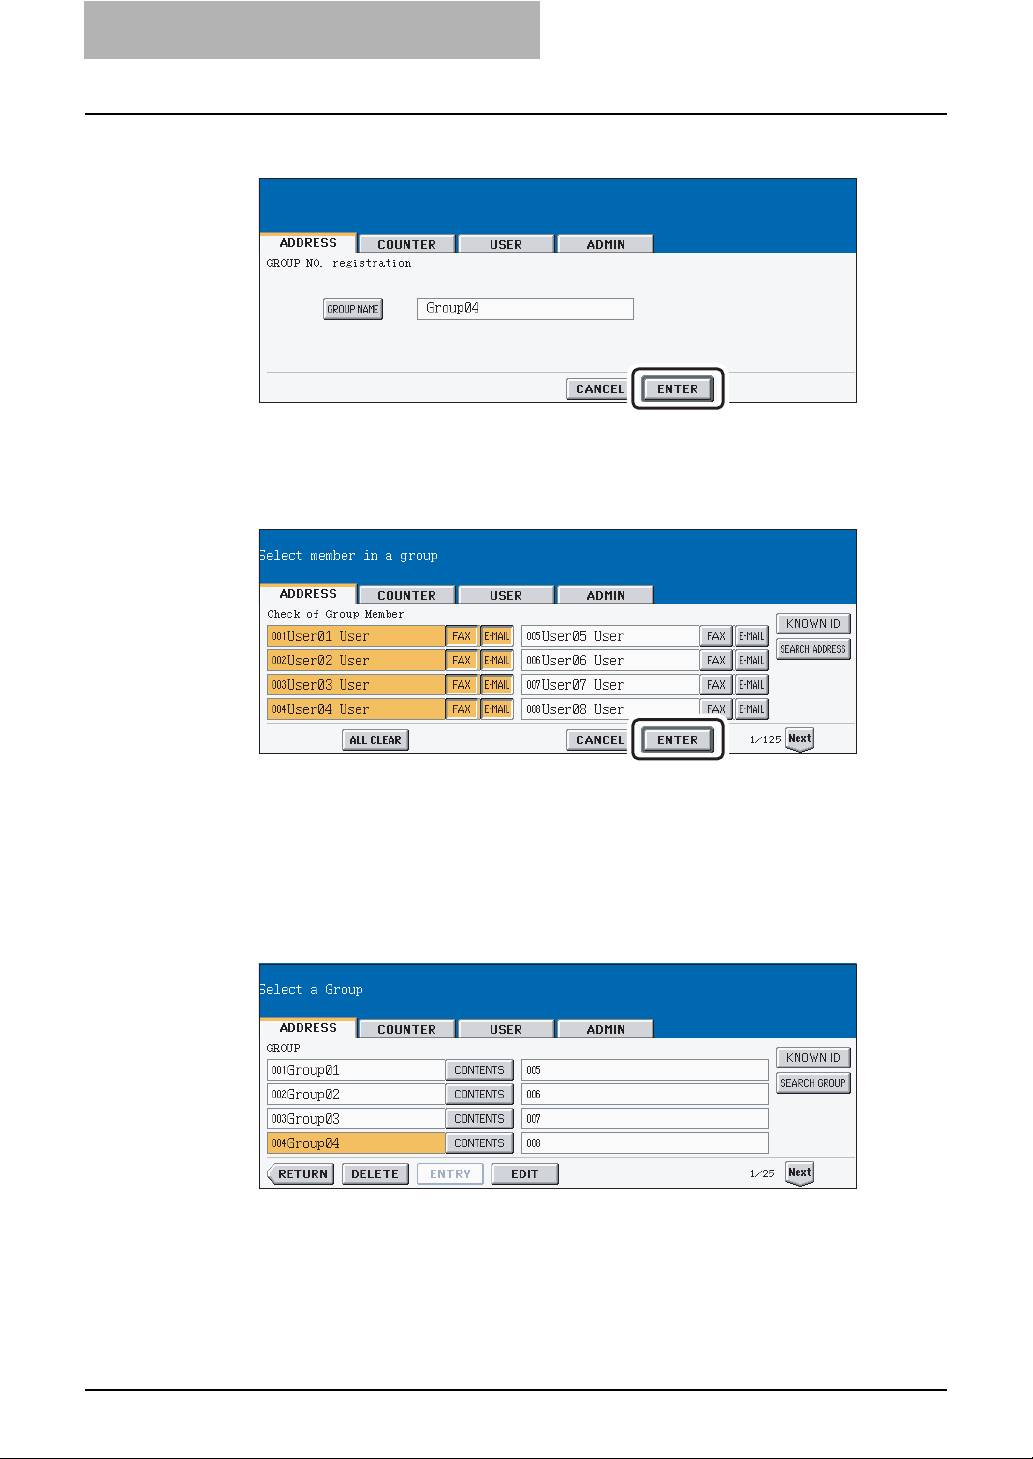
Press the [ENTER] button.
6
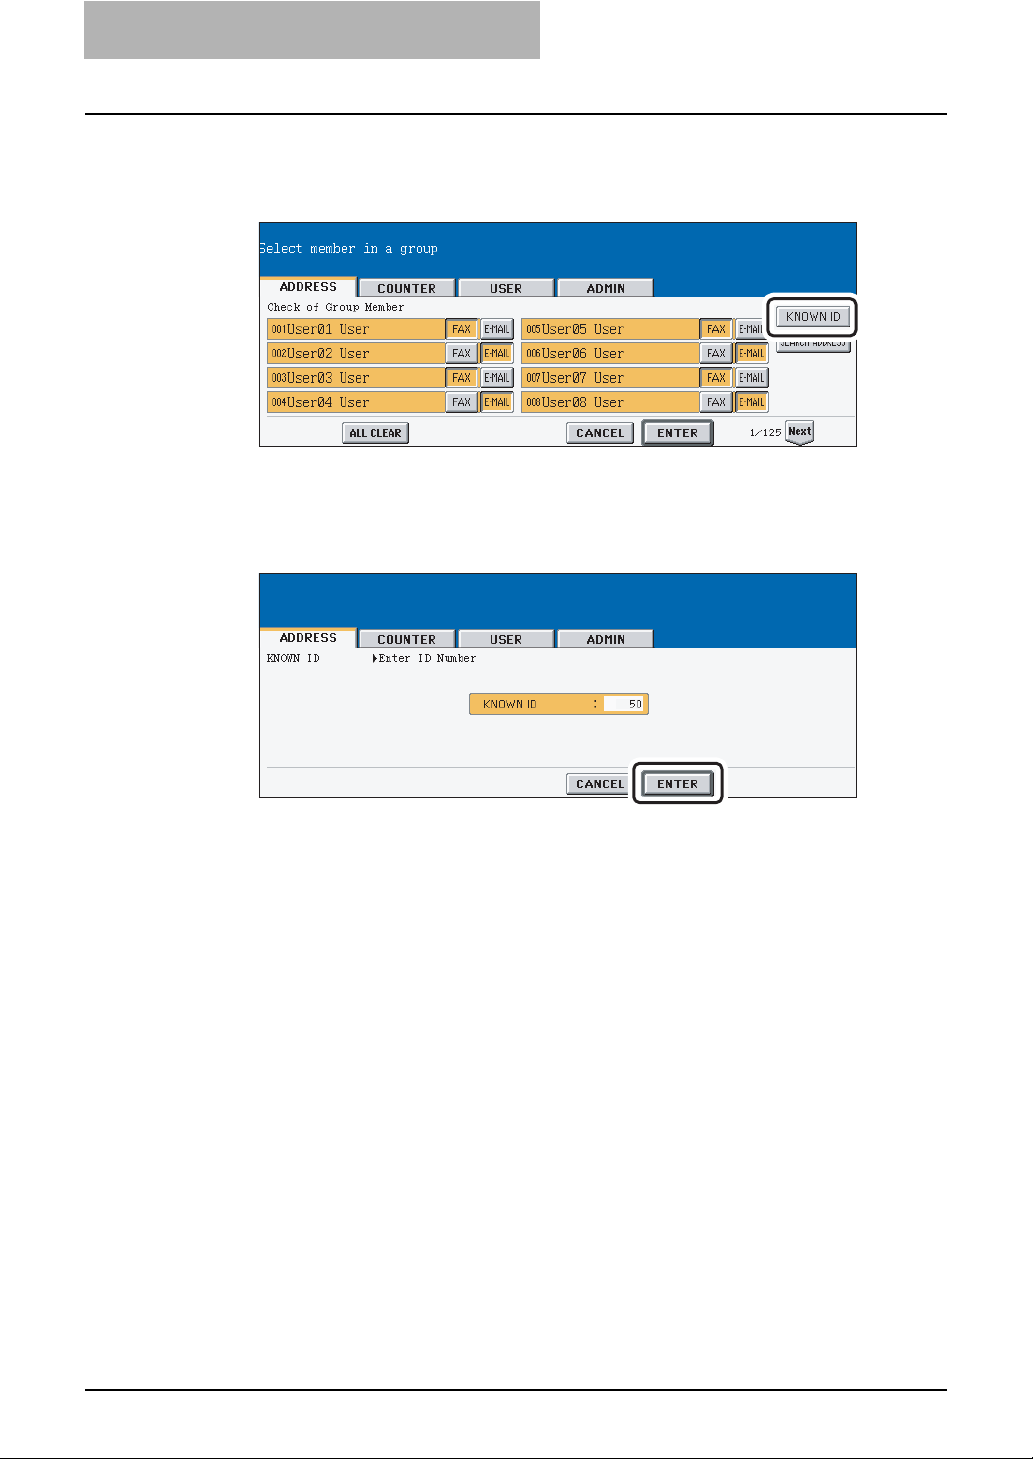
y The CHECK OF GROUP MEMBER screen is displayed.
Select the contacts that you want to add to the group, and then
7
press the [ENTER] button.
y To add or remove the contacts by selecting each contacts manually, see "Adding or
Removing Contacts". P. 2 7
y To add the contacts by searching them with the ID number, see "Adding Contacts by
Searching with ID Number". P. 2 8
y To add the contacts by searching them with search string, see "Adding Contacts by
Searching with Search String". P.2 9
New Group is created and appears on the touch panel.
8
24 MANAGING GROUPS
Page 27
Editing Groups
The following procedure describes how to edit the name of groups, add or remove the members
in groups.
Editing Group Name
Press the [USER FUNCTIONS] button on the control panel to enter
1
the User Functions menu.
Press the [ADDRESS] button, and then press the [GROUP] button
2
on the touch panel.
y The GROUP screen is displayed.
Press the group that you want to edit and press the [EDIT] button.
3
y The GROUP NO. EDIT screen is displayed.
If the touch panel does not display the group that you want to edit, press the [Next] button
to display the next screen.
MANAGING GROUPS 25
Page 28
1 MANAGING ADDRESS BOOK (ADDRESS MENU)
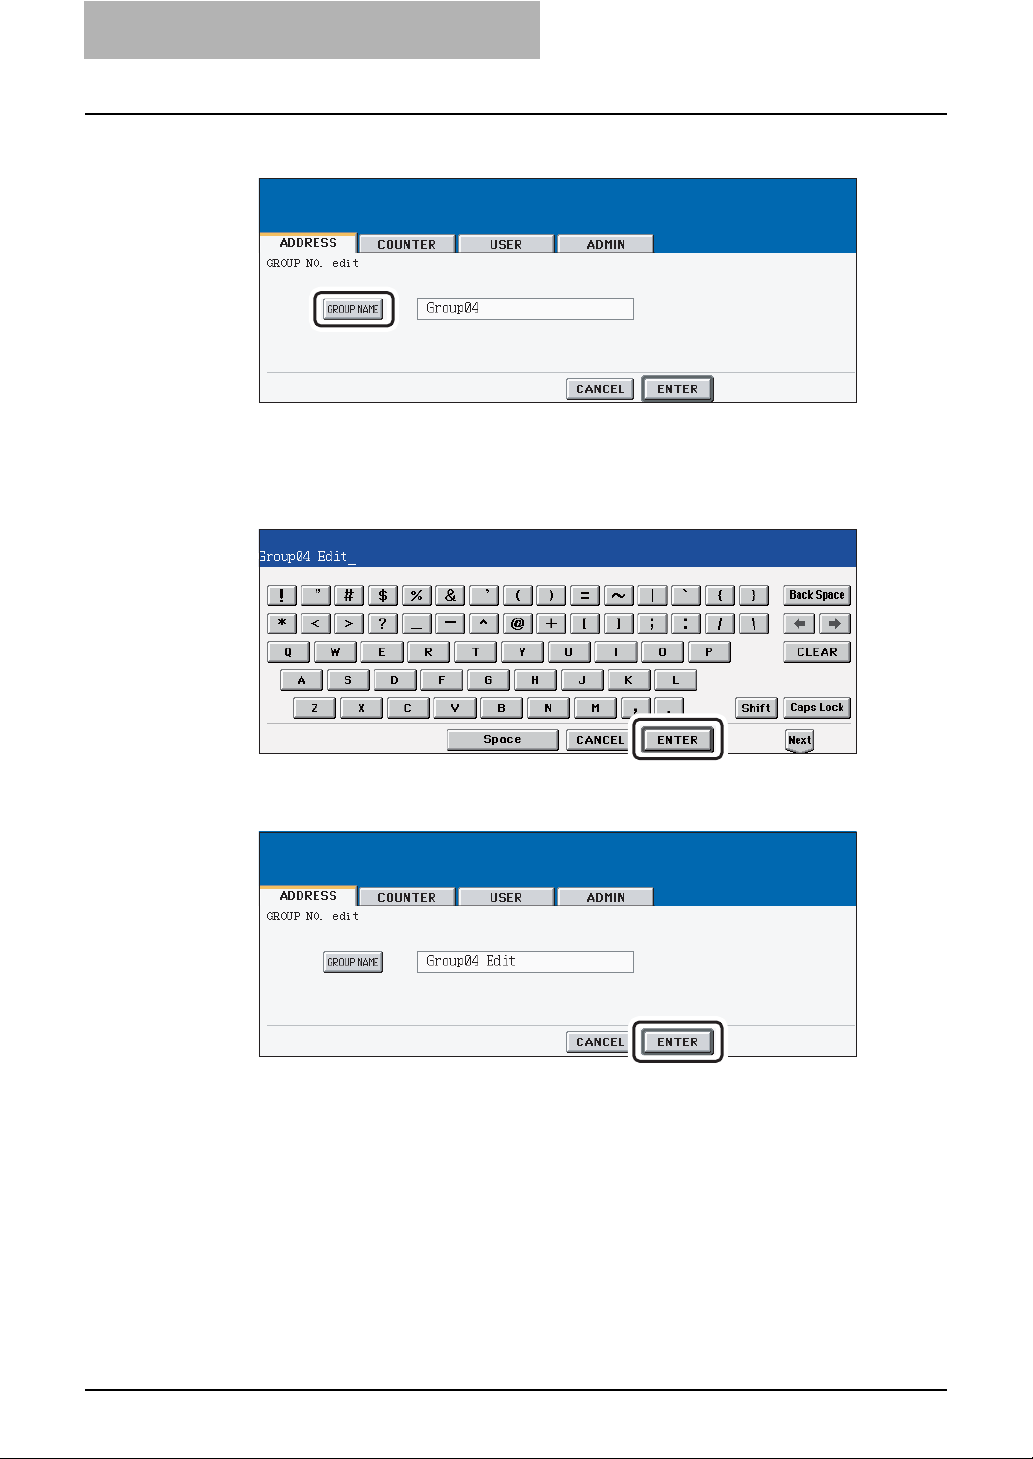
Press the [GROUP NAME] button to edit the group name.
4
y The input screen is displayed.
Enter the group name using the keyboard and digital keys, and
5
press the [ENTER] button.
Press the [ENTER] button.
6
y The CHECK OF GROUP MEMBER screen is displayed.
26 MANAGING GROUPS
Page 29
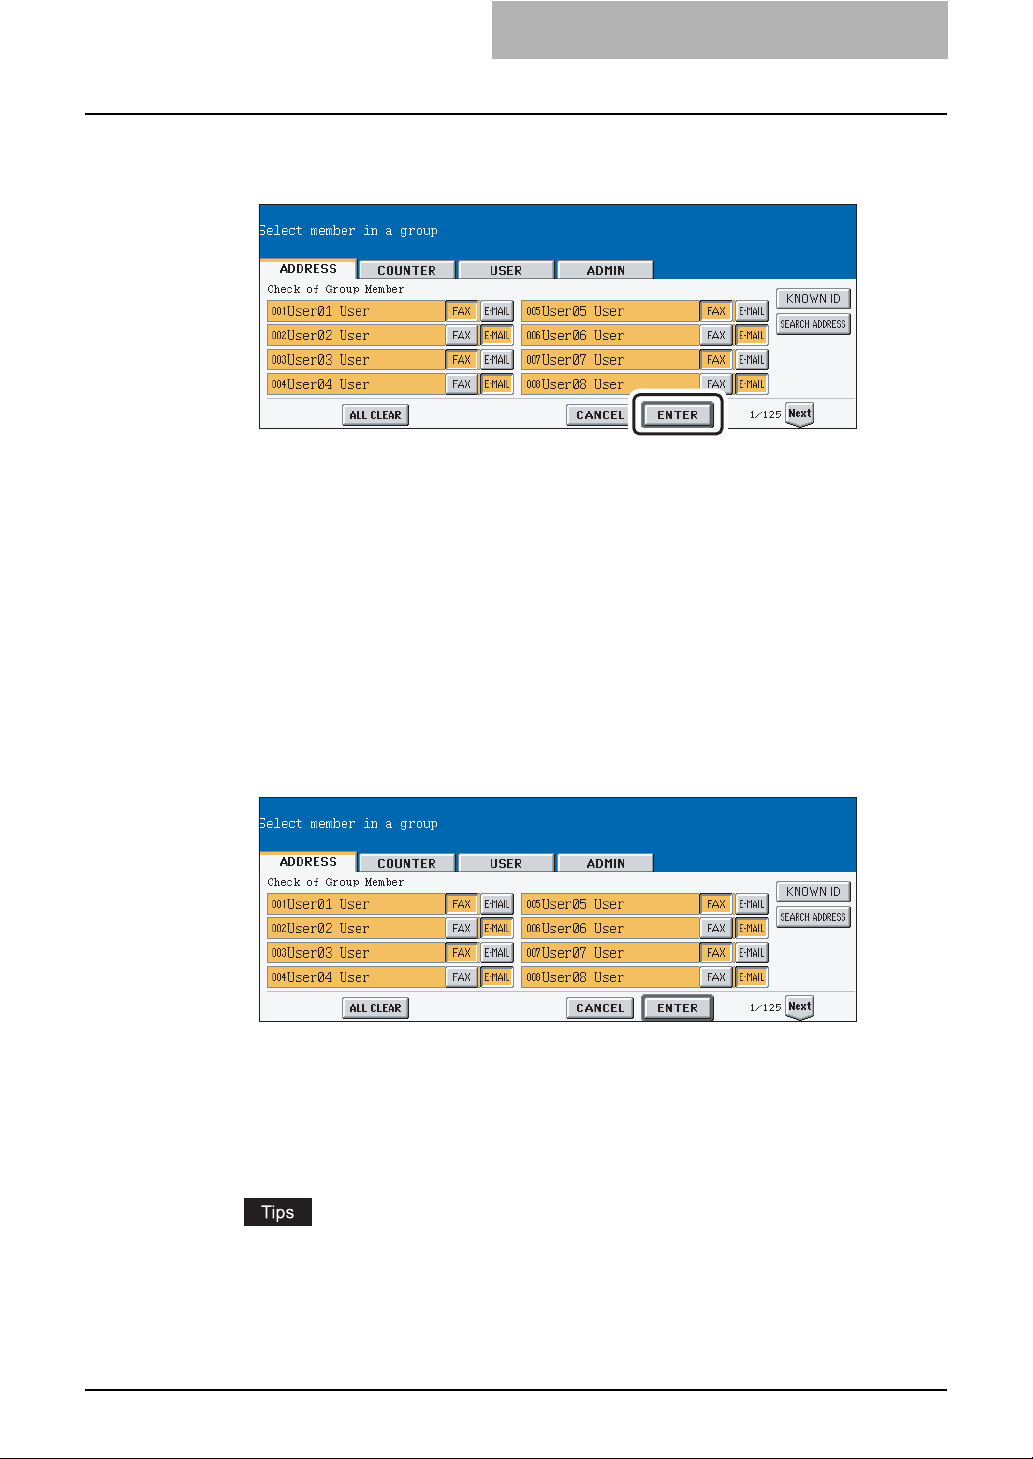
In the screen, the contacts that have been registered in the group
7
are highlighted.
y To add or remove the contacts by selecting each contacts manually, see "Adding or
Removing Contacts". P. 2 7
y To add the contacts by searching them with the ID number, see "Adding Contacts by
Searching with ID Number". P. 2 8
y To add the contacts by searching them with search string, see "Adding Contacts by
Searching with Search String". P.2 9
To finish editing the group, press the [ENTER] key to save the set-
8
tings.
Adding or Removing Contacts
Press the contacts that are not highlighted to add to the group, or
1
press the highlighted contacts to remove from the group.
y To add both the fax number and E-mail address of a contact to the group, press over
the contact name.
y To add only the fax number of a contact to the group, press the [FAX] button of the
contact.
y To add only the E-mail address of a contact to the group, press the [E-MAIL] button of
the contact.
y Press the [Prev] button or [Next] button to display the contacts in the different page.
y You can also clear the all highlighted contacts by pressing the [ALL CLEAR] button.
Press the [ENTER] button to save the group.
2
y The group is modified.
MANAGING GROUPS 27
Page 30
1 MANAGING ADDRESS BOOK (ADDRESS MENU)
Adding Contacts by Searching with ID Number
Press the [KNOWN ID] button.
1
y The KNOWN ID screen is displayed.
Enter the ID Number using the digital keys and press the [ENTER]
2
button.
28 MANAGING GROUPS
Page 31

The touch panel displays the screen that contains the searched
3
contact. Press the contact to be added to the group.
y To add both the fax number and E-mail address of a contact to the group, press over
the contact name.
y To add only the fax number of a contact to the group, press the [FAX] button of the
contact.
y To add only the E-mail address of a contact to the group, press the [E-MAIL] button of
the contact.
y Press the [Prev] button or [Next] button to display the contacts in the different page.
y You can also clear the all highlighted contacts by pressing the [ALL CLEAR] button.
Press the [ENTER] button to add to the group.
4
y The contacts in the group are modified.
Adding Contacts by Searching with Search String
Press the [SEARCH ADDRESS] button.
1
y The SEARCH ADDRESS screen is displayed.
MANAGING GROUPS 29
Page 32

1 MANAGING ADDRESS BOOK (ADDRESS MENU)
Press the button that is used for searching to specify the search
2
string.
y When you press each button, the input screen is displayed.
Enter the search string using the keyboard and digital keys, and
3
press the [ENTER] button.
It will search for the contacts that contain the search string in the specified items.
Specify the search string in the items that you require and press the
4
[SEARCH] button.
30 MANAGING GROUPS
Page 33

The touch panel displays the screen that contains the searched
5
contacts. Press the contacts that you want to add to the group.
y To add both the fax number and E-mail address of a contact to the group, press over
the contact name.
y To add only the fax number of a contact to the group, press the [FAX] button of the
contact.
y To add only the E-mail address of a contact to the group, press the [E-MAIL] button of
the contact.
Press the [Prev] button or [Next] button to display the contacts in the different page.
Press the [ENTER] button to save the group.
6
y The contacts in the group are modified.
Deleting Groups
The following procedure describes how to delete a group in the Address Book.
Press the [USER FUNCTIONS] button on the control panel to enter
1
the User Functions menu.
Press the [ADDRESS] button, and then press the [GROUP] button
2
on the touch panel.
y The GROUP screen is displayed.
MANAGING GROUPS 31
Page 34

1 MANAGING ADDRESS BOOK (ADDRESS MENU)
Press the group that you want to delete and press the [DELETE]
3
button.
y The delete confirmation screen is displayed.
If the touch panel does not display the group that you want to delete, press the [Next] button to display the next screen.
Press the [YES] button to delete the contact, or [NO] button to can-
4
cel deleting.
y When you press the [YES] button, the selected group is deleted.
32 MANAGING GROUPS
Page 35
Searching Groups
The following procedure describes how to search for groups in the Address Book. This function
is useful to find the contact that you want to edit.
You can search for the groups by entering the ID number or the search string.
Searching a Group by ID Number
Press the [USER FUNCTIONS] button on the control panel to enter
1
the User Functions menu.
Press the [ADDRESS] button, and then press the [GROUP] button
2
on the touch panel.
y The GROUP screen is displayed.
Press the [KNOWN ID] button.
3
y The KNOWN ID screen is displayed.
MANAGING GROUPS 33
Page 36

1 MANAGING ADDRESS BOOK (ADDRESS MENU)
Enter the ID Number using the digital keys and press the [ENTER]
4
button.
The touch panel displays the screen that contains the searched
5
group. Press the group and press the [EDIT] button to edit the
group information.
y See "Editing Groups" for the instruction to edit the group. P. 2 5
Searching Groups by Group Name
Press the [USER FUNCTIONS] button on the control panel to enter
1
the User Functions menu.
Press the [ADDRESS] button, and then press the [GROUP] button
2
on the touch panel.
y The GROUP screen is displayed.
34 MANAGING GROUPS
Page 37

Press the [SEARCH GROUP] button.
3
y The SEARCH GROUP screen is displayed.
Press the [GROUP NAME] button to specify the search string.
4
y The input screen is displayed.
Enter the search string using the keyboard and digital keys, and
5
press the [ENTER] button.
It will search for the groups that contain the search string in the group name field.
MANAGING GROUPS 35
Page 38

1 MANAGING ADDRESS BOOK (ADDRESS MENU)
Press the [SEARCH] button.
6
The touch panel displays the screen that contains the searched
7
groups. Press the group and press the [ENTER] button to edit the
group information.
y See "Editing Groups" for the instruction to edit the contact. P. 2 5
Confirming the Members of the Groups
The following procedure describes how to confirm the contacts that are added in the group.
Press the [USER FUNCTIONS] button on the control panel to enter
1
the User Functions menu.
Press the [ADDRESS] button, and then press the [GROUP] button
2
on the touch panel.
y The GROUP screen is displayed.
36 MANAGING GROUPS
Page 39

Press the [CONTENTS] button of the group that you want to con-
3
firm the members.
The contacts added to the group are displayed.
4
MANAGING GROUPS 37
Page 40

1 MANAGING ADDRESS BOOK (ADDRESS MENU)
38 MANAGING GROUPS
Page 41

2.
MANAGING COUNTERS (COUNTER MENU)
TOTAL COUNTER ...................................................................................................40
Displaying Print Counter ...................................................................................................................40
Displaying Scan Counter...................................................................................................................43
PRINT OUT TOTAL COUNTER ...............................................................................45
DEPARTMENT COUNTER ......................................................................................46
Displaying Print Counter for Department Code.................................................................................46
Displaying Scan Counter for Department Code ................................................................................49
Displaying Fax Communication Counter for Department Code ........................................................51
MANAGING DEPARMENT CODE ...........................................................................53
Logging On As Administrator ............................................................................................................53
Printing Department Codes List ........................................................................................................55
Enabling Department Code...............................................................................................................55
Resetting All Department Counters...................................................................................................57
Deleting All Department Codes.........................................................................................................58
Registering a New Department Code ...............................................................................................59
Editing the Department Code............................................................................................................63
Deleting the Department Code..........................................................................................................67
Resetting the Counter of Each Department ......................................................................................69
Setting Output Limitations for All Departments .................................................................................71
Setting No Limit Black.......................................................................................................................73
CHECKING TONER AMOUNT ................................................................................74
Page 42

2 MANAGING COUNTERS (COUNTER MENU)
TOTAL COUNTER
Displaying Print Counter
This feature allows you to display the Print Counter.
The print counter contains following counters:
y Copy Counter — indicates the number of sheets that have been printed by copy operations.
y Fax Counter — indicates the number of sheets that have been printed by fax receptions.
y Printer Counter — indicates the number of sheets that have been printed by print opera-
tions and E-mail receptions (Internet Fax receptions).
y List Counter — indicates the number of sheets that have been printed by system page print
operations.
Press the [USER FUNCTIONS] button on the control panel to enter
1
the User Functions menu.
Press the [COUNTER] button, and then press the [TOTAL
2
COUNTER] button on the touch panel.
y The TOTAL COUNTER menu is displayed.
Press the [PRINT COUNTER] button.
3
40 TOTAL COUNTER
Page 43
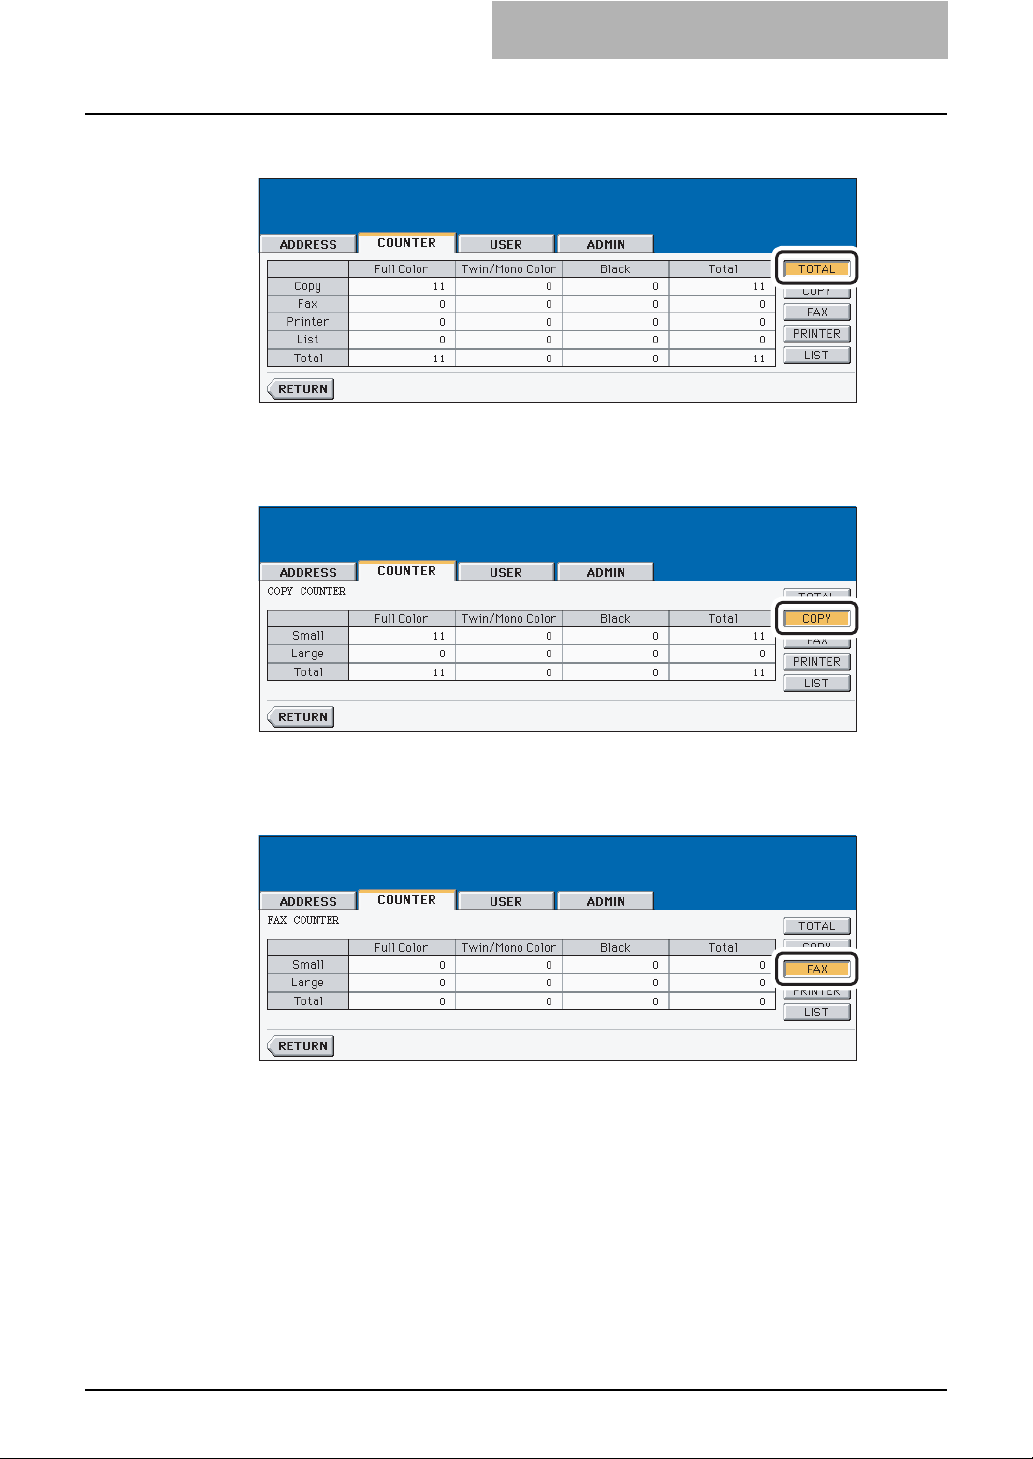
The Print Counter is displayed.
4
Press the [COPY] button to display the total number of copies clas-
5
sified by size group.
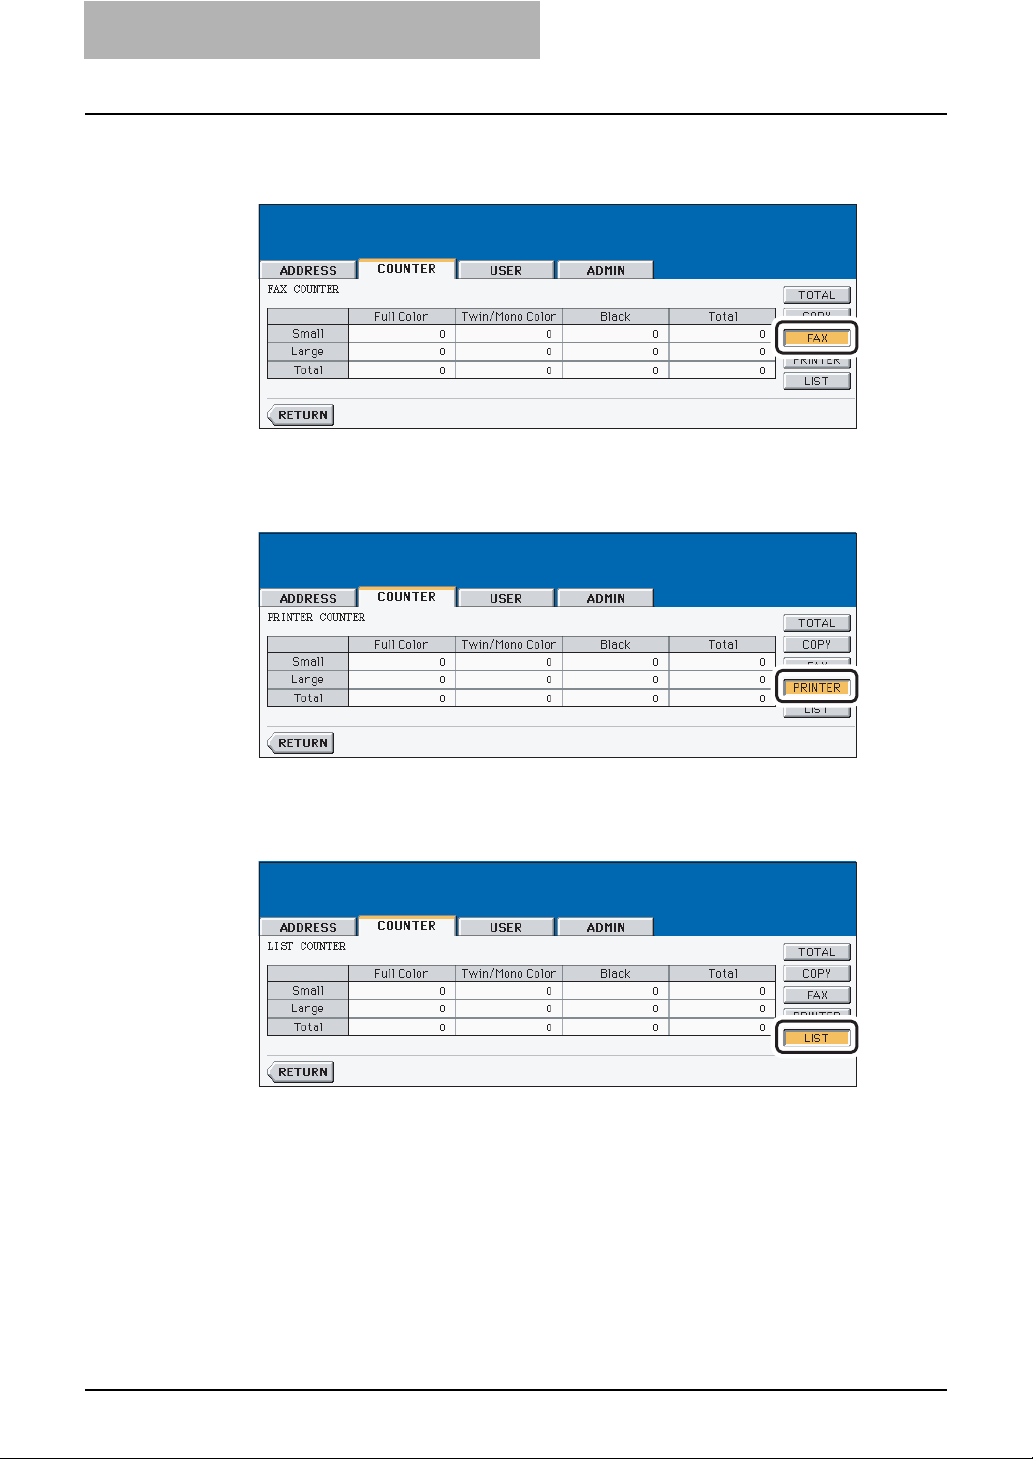
Press the [FAX] button to display the total number of faxes classi-
6
fied by size group.
TOTAL COUNTER 41
Page 44
2 MANAGING COUNTERS (COUNTER MENU)
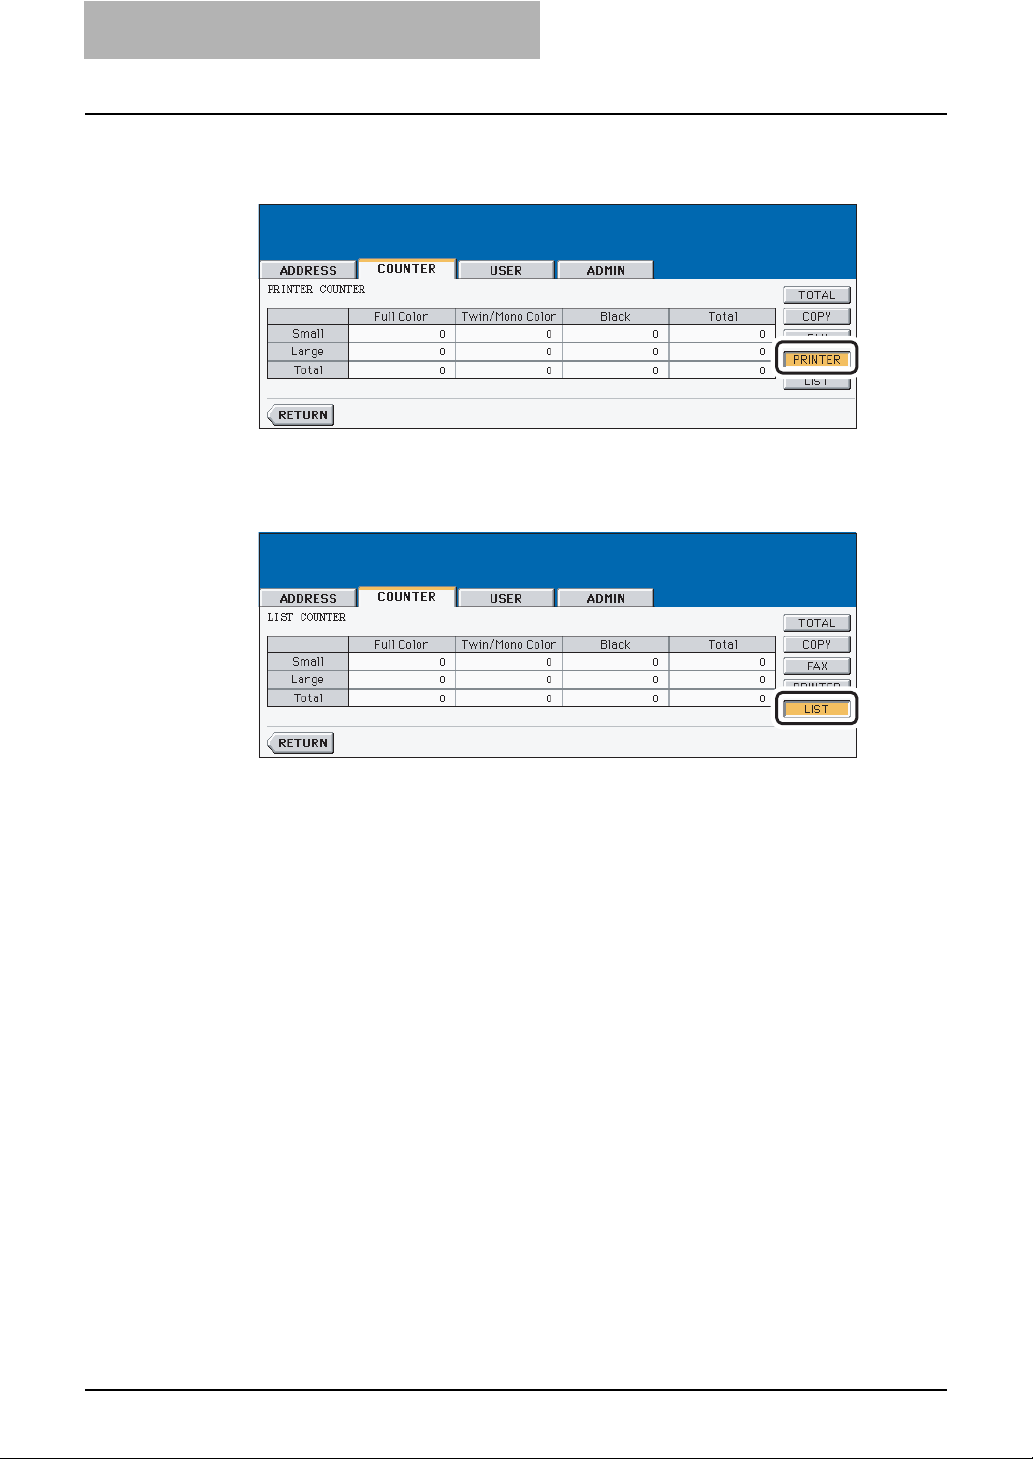
Press the [PRINTER] button to display the total number of prints
7
classified by size group.
Press the [LIST] button to display the total number of printed lists
8
classified by size group.
42 TOTAL COUNTER
Page 45

Displaying Scan Counter
This feature allows you to display the Scan Counter.
The scan counter contains following counters:
y Copy Counter — indicates the number of originals that have been scanned by copy opera-
tions.
y Fax Counter — indicates the number of originals that have been scanned by fax and Inter-
net Fax transmissions.
y Network Counter — indicates the number of originals that have been scanned by scan
operations.
Press the [USER FUNCTIONS] button on the control panel to enter
1
the User Functions menu.
Press the [COUNTER] button, and then press the [TOTAL
2
COUNTER] button on the touch panel.
y The TOTAL COUNTER menu is displayed.
Press the [SCAN COUNTER] button.
3
TOTAL COUNTER 43
Page 46

2 MANAGING COUNTERS (COUNTER MENU)
The Scan Counter is displayed.
4
44 TOTAL COUNTER
Page 47
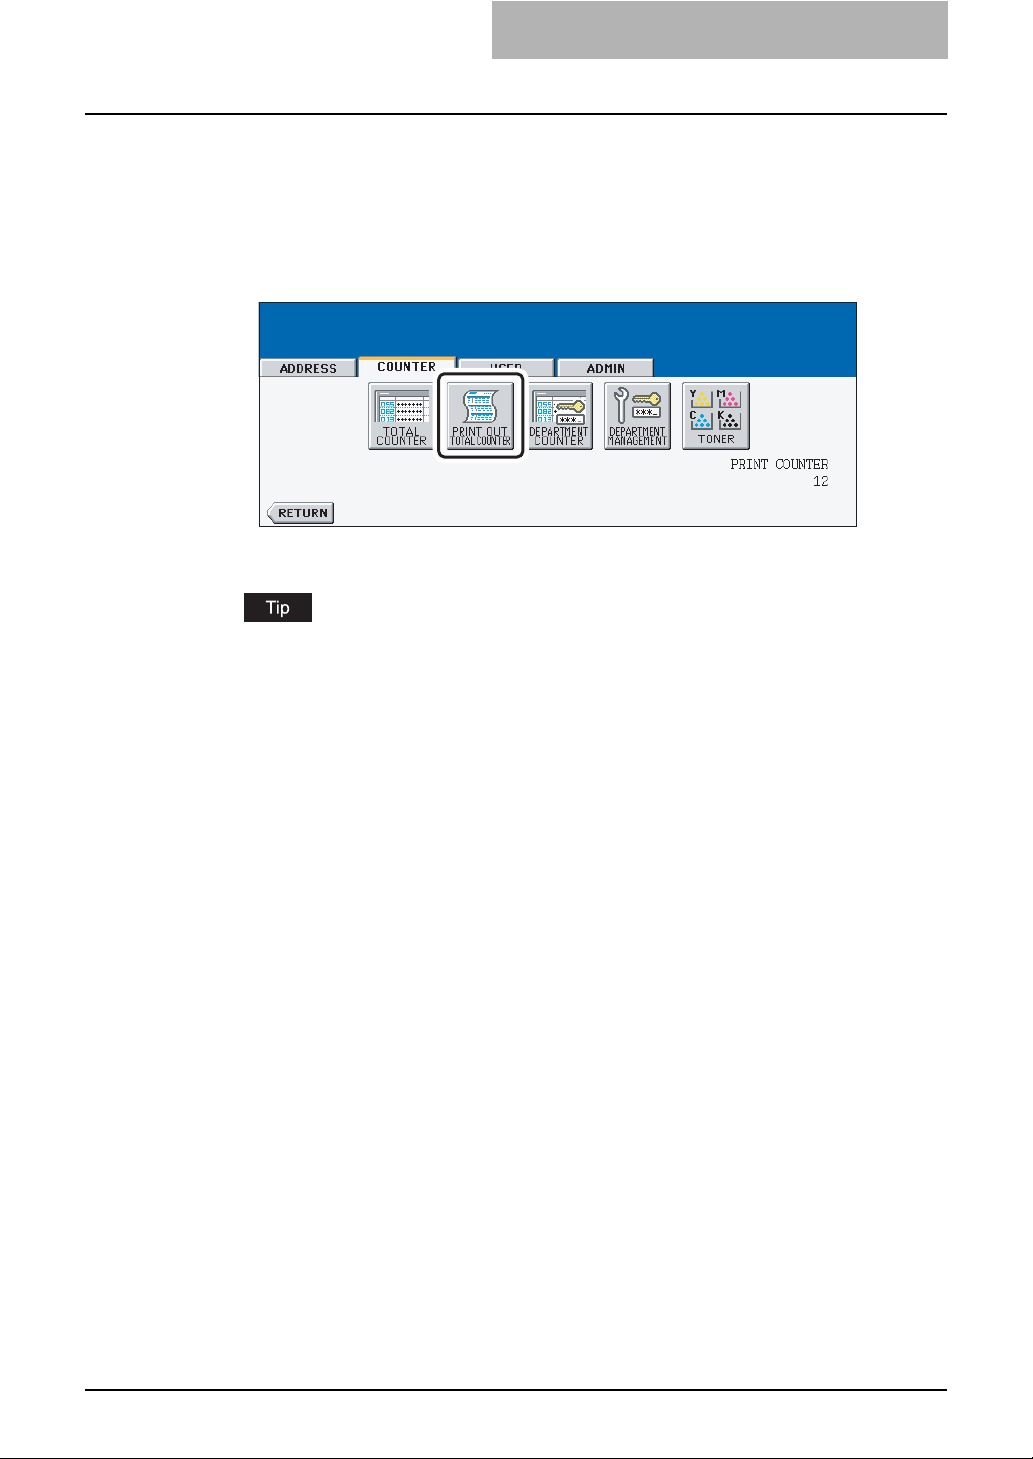
PRINT OUT TOTAL COUNTER
This feature allows you to print the total counter list.
Press the [USER FUNCTIONS] button on the control panel to enter
1
the User Functions menu.
Press the [COUNTER] button, and then press the [PRINT OUT
2
TOTAL COUNTER] button on the touch panel.
y The total counter list is printed.
For an output example of the total counter list, see "Total Counter List". P.196
PRINT OUT TOTAL COUNTER 45
Page 48

2 MANAGING COUNTERS (COUNTER MENU)
DEPARTMENT COUNTER
Displaying Print Counter for Department Code
This feature allows you to display the number of the print counter for each department code.
The department counter is available only when this equipment has been managed with the
department code. P.53 “MANAGING DEPARMENT CODE”
The print counter contains following counters:
y Copy Counter — indicates the number of sheets that have been printed by copy operations.
y Fax Counter — indicates the number of sheets that have been printed by polling operations.
y Printer Counter — indicates the number of sheets that have been printed by print opera-
tions.
y List Counter — indicates the number of sheets that have been printed by system page print
operations.
Press the [USER FUNCTIONS] button on the control panel to enter
1
the User Functions menu.
Press the [COUNTER] button, and then press the [DEPARTMENT
2
COUNTER] button on the touch panel.
y The DEPARTMENT CODE screen is displayed.
Enter the department number using the digital keys, and then press
3
the [ENTER] button.
46 DEPARTMENT COUNTER
Page 49

Press the [PRINT COUNTER] button.
4
The Print Counter for the specified department code is displayed.
5
Press the [COPY] button to display the total number of copies clas-
6
sified by size group.
DEPARTMENT COUNTER 47
Page 50
2 MANAGING COUNTERS (COUNTER MENU)
Press the [FAX] button to display the total number of faxes classi-
7
fied by size group.
Press the [PRINTER] button to display the total number of prints
8
classified by size group.
Press the [LIST] button to display the total number of printed lists
9
classified by size group.
48 DEPARTMENT COUNTER
Page 51

Displaying Scan Counter for Department Code
This feature allows you to display the number of the scan counter for each department code.
The department counter is available only when this equipment has been managed with the
department code. P.53 “MANAGING DEPARMENT CODE”
The scan counter contains following counters:
y Copy Counter — indicates the number of originals that have been scanned by copy opera-
tions.
y Fax Counter — indicates the number of originals that have been scanned by fax and Inter-
net Fax transmissions.
y Network Counter — indicates the number of originals that have been scanned by scan
operations.
Press the [USER FUNCTIONS] button on the control panel to enter
1
the User Functions menu.
Press the [COUNTER] button, and then press the [DEPARTMENT
2
COUNTER] button on the touch panel.
y The DEPARTMENT CODE screen is displayed.
Enter the department number using the digital keys, and then press
3
the [ENTER] button.
DEPARTMENT COUNTER 49
Page 52

2 MANAGING COUNTERS (COUNTER MENU)
Press the [SCAN COUNTER] button.
4
The Scan Counter for the specified department code is displayed.
5
50 DEPARTMENT COUNTER
Page 53

Displaying Fax Communication Counter for Department Code
This feature allows you to display the number of the Fax and Internet Fax Transmission and
Reception counter for each department code.
The department counter is available only when this equipment has been managed with the
department code. P.53 “MANAGING DEPARMENT CODE”
The fax communication counter contains following counters:
y Transmit — indicates the number of pages that are sent by Fax transmissions.
y Reception — indicates the number of pages that are received by polling operations.
Press the [USER FUNCTIONS] button on the control panel to enter
1
the User Functions menu.
Press the [COUNTER] button, and then press the [DEPARTMENT
2
COUNTER] button on the touch panel.
y The DEPARTMENT CODE screen is displayed.
Enter the department number using the digital keys, and then press
3
the [ENTER] button.
DEPARTMENT COUNTER 51
Page 54

2 MANAGING COUNTERS (COUNTER MENU)
Press the [FAX COMMUNICATION] button.
4
The Fax Communication Counter for the specified department code
5
is displayed.
52 DEPARTMENT COUNTER
Page 55

MANAGING DEPARMENT CODE
Logging On As Administrator
You can audit the copy quantity of copy, print, scan, and facsimile pages performed by setting a
department code. Up to 1000 department codes can be registered.
To manage the department code, you must know the administrator password for this equipment.
Therefore, it is recommended to be performed by an authorized administrator in your place.
If the User Management Setting is enabled and you login with the user name that has the
Account Manager privilege, you do not have to enter the administrator password to display the
DEPARTMENT MANAGEMENT menu.
Press the [USER FUNCTIONS] button on the control panel to enter
1
the User Functions menu.
Press the [COUNTER] button, and then press the [DEPARTMENT
2
MANAGEMENT] button on the touch panel.
y The ADMINISTRATOR PASSWORD screen is displayed.
Press the [PASSWORD] button.
3
y The input screen is displayed.
MANAGING DEPARMENT CODE 53
Page 56

2 MANAGING COUNTERS (COUNTER MENU)
Enter the administrator password and press the [ENTER] button.
4
y The DEPT. MANAGEMENT menu is displayed.
Continue the operation that you want.
5
y P.55 “Printing Department Codes List”
y P.55 “Enabling Department Code”
y P.57 “Resetting All Department Counters”
y P.58 “Deleting All Department Codes”
y P.59 “Registering a New Department Code”
y P.63 “Editing the Department Code”
y P.67 “Deleting the Department Code”
y P.69 “Resetting the Counter of Each Department”
y P.71 “Setting Output Limitations for All Departments”
y P.73 “Setting No Limit Black”
54 MANAGING DEPARMENT CODE
Page 57

Printing Department Codes List
You can print out the department codes list and counters for each department code.
In the DEPT. MANAGEMENT menu, press the [PRINT OUT DEPART-
1
MENT CODES] button.
y Printing begins.
y For the procedure to display the screen above, see "Logging On As Administrator".
P. 5 3
y For an output example of the department code list, see "Department Code List".
P.197
Enabling Department Code
In the initial setting, the department code feature is disabled. If you want to manage the counter
separately by the department codes, you must enable the department code. When the department management is enabled, the department code input screen will be displayed before entering the copy, scan, fax, and e-Filing operation screen to manage the operations for each
department code. Also the print jobs that are sent from computers can be managed for each
department code.
y The [DEPARTMENT MANAGEMENT] button will be available after registering a department
code. Before enabling the department code, register the required department code.
P.59 “Registering a New Department Code”
y Using TopAccess, you can also configure the Department Code Enforcement setting that
sets whether the invalid jobs, which a department code is not specified or invalid department
code is specified, will be printed or stored in the invalid job list when the department management is enabled. For instructions on how to set the Department Code Enforcement, see
TopAccess Guide.
y When the User Management Setting is enabled, the Department Code feature cannot be
disabled. If you want to disable the Department Code, you must disable the User Management Setting and then disable the Department Code.
y When the Department Management is disabled, the No Limit Black function is also disabled.
Therefore, the No Limit Black function is set as disabled every time you enable the Department Management. If you want to enable the No Limit Black function, you must enable it
after enabling the Department Management.
MANAGING DEPARMENT CODE 55
Page 58

2 MANAGING COUNTERS (COUNTER MENU)
In the DEPT. MANAGEMENT menu, press the [DEPARTMENT MAN-
1
AGEMENT] button.
y The DEPARTMENT MANAGEMENT screen is displayed.
For the procedure to display the screen above, see "Logging On As Administrator".
P. 5 3
Press the [ENABLE] button to enable the department code, or [DIS-
2
ABLE] button to disable the department code.
56 MANAGING DEPARMENT CODE
Page 59

Resetting All Department Counters
This function clears all department counters to “0”.
y This function is available only when the department code is enabled.
y This function clears only the department counters. You cannot clear the total counter.
In the DEPT. MANAGEMENT menu, press the [RESET ALL
1
COUNTERS] button.
y The clear confirmation screen is displayed.
For the procedure to display the screen above, see "Logging On As Administrator".
P. 5 3
Press the [YES] button to clear all department counters, or [NO]
2
button to cancel clearing.
MANAGING DEPARMENT CODE 57
Page 60

2 MANAGING COUNTERS (COUNTER MENU)
Deleting All Department Codes
This function deletes all department codes that have been registered.
The [DELETE ALL] button will be available after registering a department code.
P.59 “Registering a New Department Code”
In the DEPT. MANAGEMENT menu, press the [DELETE ALL] button.
1
y The delete confirmation screen is displayed.
For the procedure to display the screen above, see "Logging On As Administrator".
P. 5 3
Press the [YES] button to delete all department codes, or [NO] but-
2
ton to cancel deleting.
58 MANAGING DEPARMENT CODE
Page 61
Registering a New Department Code
The function allows you to register new department code.
After registering the department code(s), you must enable the Department Code function.
P.55 “Enabling Department Code”
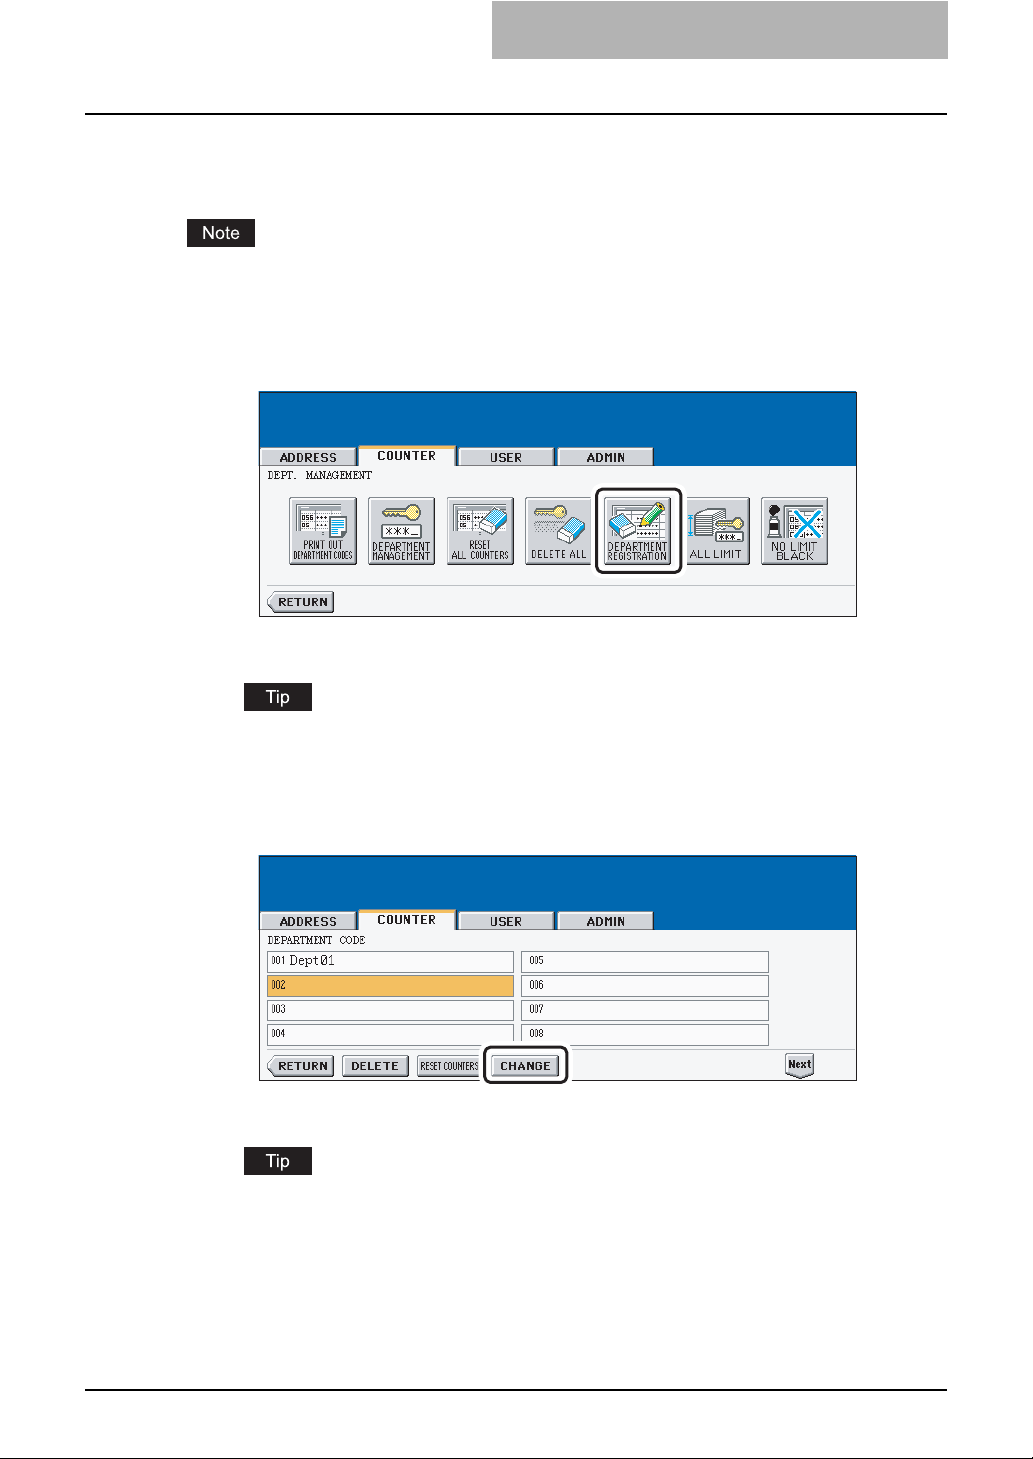
In the DEPT. MANAGEMENT menu, press the [DEPARTMENT REG-
1
ISTRATION] button.
y The DEPARTMENT CODE screen is displayed.
For the procedure to display the screen above, see "Logging On As Administrator".
P. 5 3
Press the undefined department code and press the [CHANGE] but-
2
ton.
y The input screen is displayed.
If the touch panel does not display an undefined department code, press the [Next] button to display the next screen.
MANAGING DEPARMENT CODE 59
Page 62

2 MANAGING COUNTERS (COUNTER MENU)
Enter the department name using the keyboard and digital keys,
3
and press the [ENTER] button.
y The REGISTRATION DEPARTMENT CODE screen is displayed.
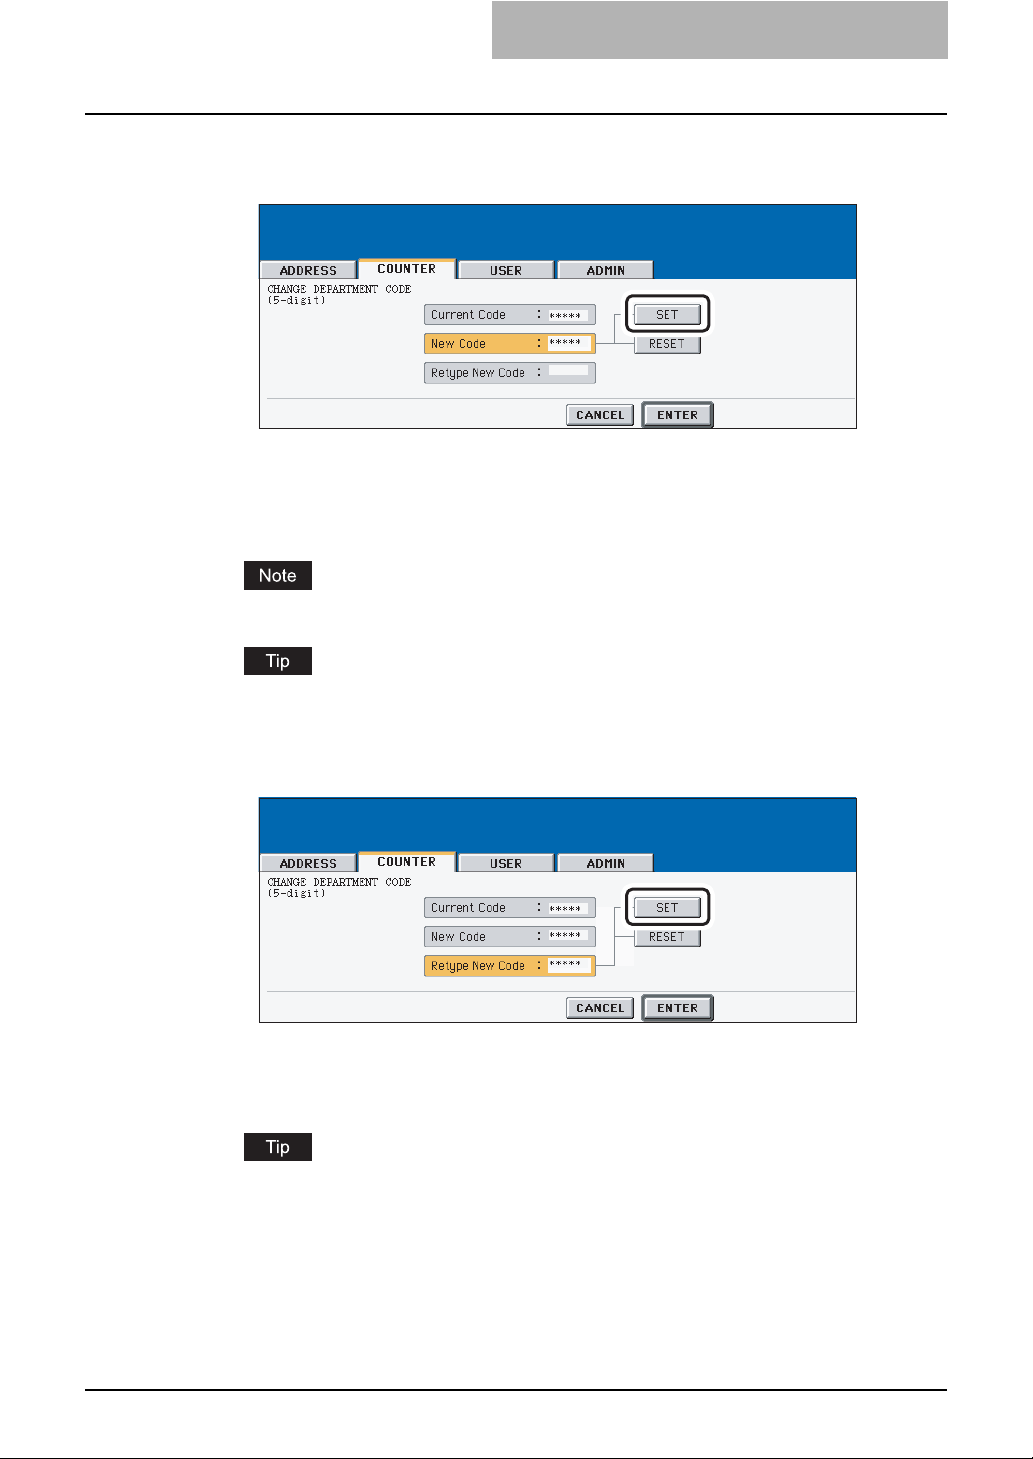
Enter the 5-digit code in the “New Code” field using the digital keys,
4
and then press the [SET] button to set the entry.
y If you enter the code, asterisks (*) appear in the “New Code” field.
y If you want to clear the code to retype it, press the [CLEAR] button on the Control
Panel.
y After pressing the [SET] button, the “Retype New Code” field is highlighted.
The department code must be the 5-digit code except “00000”.
60 MANAGING DEPARMENT CODE
Page 63

Enter the 5-digit code again in the “Retype New Code” field using
5
the digital keys, and then press the [SET] button to set the entry.
y If you enter the code, asterisks (*) appear in the “Retype New Code” field.
y If you want to clear the code to retype it, press the [CLEAR] button on the Control
Panel.
If you want to return to the “New Code” field to retype it, press the [RESET] button.
Press the [ENTER] button at the bottom of the touch panel.
6
y The LIMITATION screen is displayed.
MANAGING DEPARMENT CODE 61
Page 64

2 MANAGING COUNTERS (COUNTER MENU)
Set the limitation of this department code as required.
7
y COLOR — Press the [ON] button to enable the color output limitation for this depart-
ment code. When you select the [ON] button, press the “Limitation” field and enter the
maximum number of the color outputs for this department code using the digital keys.
You can enter up to “99999999”. If you do not set the output limitation for color outputs, press the [OFF] button.
y BLACK — Press the [ON] button to enable the black output limitation for this depart-
ment code. When you select the [ON] button, press the “Limitation” field and enter the
maximum number of the black outputs for this department code using the digital keys.
You can enter up to “9999999”. If you do not set the output limitation for black outputs,
press the [OFF] button.
y If you enter “0” for the limitation, it will disable printing any copies or prints using this
department code.
y When the No Limit Black function is enabled, you cannot set the limitation for black.
y When the number of outputs exceeds the limitation during the job is being printed,
few copies that exceeds the limitation are printed and counted because the equipment cannot stop the job immediately.
Press the [ENTER] button.
8
y New department code is registered.
62 MANAGING DEPARMENT CODE
Page 65

Editing the Department Code
The function allows you to edit the existing department code.
In the DEPT. MANAGEMENT menu, press the [DEPARTMENT REG-
1
ISTRATION] button.
y The DEPARTMENT CODE screen is displayed.
For the procedure to display the screen above, see "Logging On As Administrator".
P. 5 3
Press the department button that you want to edit and press the
2
[CHANGE] button.
y The message “This department code is already registered. Do you wish to replace
this code?” is displayed.
If the touch panel does not display the department code that you want to edit, press the
[Next] button to display the next screen.
MANAGING DEPARMENT CODE 63
Page 66

2 MANAGING COUNTERS (COUNTER MENU)
Press the [ENTER] button.
3
y The input screen is displayed.
Enter the department name using the keyboard and digital keys,
4
and press the [ENTER] button.
y The CHANGE DEPARTMENT CODE screen is displayed.
Enter current department code in the “Current Code” field using the
5
digital keys, and then press the [SET] button to set the entry.
y If you enter the code, asterisks (*) appear in the “Current Code” field.
y If you want to clear the code to retype it, press the [CLEAR] button on the Control
Panel.
y After pressing the [SET] button, the “New Code” field is highlighted.
64 MANAGING DEPARMENT CODE
Page 67
Enter new 5-digit code in the “New Code” field using the digital
6
keys, and then press the [SET] button to set the entry.
y If you enter the code, asterisks (*) appear in the “New Code” field.
y If you want to clear the code to retype it, press the [CLEAR] button on the Control
Panel.
y After pressing the [SET] button, the “Retype New Code” field is highlighted.
The department code must be the 5-digit code except “00000”.
If you want to return to the “Current Code” field to retype it, press the [RESET] button.
Enter new 5-digit code again in the “Retype New Code” field using
7
the digital keys, and then press the [SET] button to set the entry.
y If you enter the code, asterisks (*) appear in the “Retype New Code” field.
y If you want to clear the code to retype it, press the [CLEAR] button on the Control
Panel.
If you want to return to the “Current Code” field or “New Code” field to retype them, press
the [RESET] button.
Press the [ENTER] button at the bottom of the touch panel.
8
y The LIMITATION screen is displayed.
MANAGING DEPARMENT CODE 65
Page 68

2 MANAGING COUNTERS (COUNTER MENU)
Set the limitation of this department code as required.
9
y COLOR — Press the [ON] button to enable the color output limitation for this depart-
ment code. When you select the [ON] button, press the “Limitation” field and enter the
maximum number of the color outputs for this department code using the digital keys.
You can enter up to “99999999”. If you do not set the output limitation for color outputs, press the [OFF] button.
y BLACK — Press the [ON] button to enable the black output limitation for this depart-
ment code. When you select the [ON] button, press the “Limitation” field and enter the
maximum number of the black outputs for this department code using the digital keys.
You can enter up to “9999999”. If you do not set the output limitation for black outputs,
press the [OFF] button.
y If you enter “0” for the limitation, it will disable printing any copies or prints using this
department code.
y When the No Limit Black function is enabled, you cannot set the limitation for black.
y When the number of outputs exceeds the limitation during the job is being printed,
few copies that exceeds the limitation are printed and counted because the equipment cannot stop the job immediately.
Press the [ENTER] button.
10
y The department code is edited.
66 MANAGING DEPARMENT CODE
Page 69

Deleting the Department Code
The function allows you to delete the existing department code.
In the DEPT. MANAGEMENT menu, press the [DEPARTMENT REG-
1
ISTRATION] button.
y The DEPARTMENT CODE screen is displayed.
For the procedure to display the screen above, see "Logging On As Administrator".
P. 5 3
Press the department button that you want to delete and press the
2
[DELETE] button.
y The delete confirmation screen is displayed.
If the touch panel does not display the department code that you want to delete, press
the [Next] button to display the next screen.
MANAGING DEPARMENT CODE 67
Page 70

2 MANAGING COUNTERS (COUNTER MENU)
Press the [YES] button to delete the department code, or [NO] but-
3
ton to cancel deleting.
y When you press the [YES] button, the department code is deleted.
68 MANAGING DEPARMENT CODE
Page 71

Resetting the Counter of Each Department
The function allows you to reset the counter of specific department code only.
In the DEPT. MANAGEMENT menu, press the [DEPARTMENT REG-
1
ISTRATION] button.
y The DEPARTMENT CODE screen is displayed.
For the procedure to display the screen above, see "Logging On As Administrator".
P. 5 3
Press the department button that you want to reset the counter and
2
press the [RESET COUNTERS] button.
y The clear confirmation screen is displayed.
If the touch panel does not display the department code that you want to clear the
counter, press the [Next] button to display the next screen.
MANAGING DEPARMENT CODE 69
Page 72

2 MANAGING COUNTERS (COUNTER MENU)
Press the [YES] button to clear the counter of the department code,
3
or [NO] button to cancel clearing the counter.
y When you press the [YES] button, the counter of the department code is cleared.
70 MANAGING DEPARMENT CODE
Page 73

Setting Output Limitations for All Departments
This function allows you to set the output limitation for all departments by a single operation.
When you select [ON], the output will be disabled for all departments.
When you select [OFF], the infinite outputs will be allowed for all departments.
When you select [ON], the limitation setting for each department code will be set to [ON] and the
“Limitation” field will be set to “0”. If you want to change the limitation setting for each department code, change the limitation setting by editing a department code.
P.63 “Editing the Department Code”
In the DEPT. MANAGEMENT menu, press the [ALL LIMIT] button.
1
y The ALL LIMIT screen is displayed.
For the procedure to display the screen above, see "Logging On As Administrator".
P. 5 3
Specify following items as required.
2
y COLOR — Press the [ON] button to disable the color copies/prints for all depart-
ments, or [OFF] button to permit infinite color copies/prints for all departments.
y BLACK — Press the [ON] button to disable the black copies/prints for all depart-
ments, or [OFF] button to permit infinite black copies/prints for all departments.
The All Limit function for black cannot be set when the No Limit Black function is enabled.
MANAGING DEPARMENT CODE 71
Page 74

2 MANAGING COUNTERS (COUNTER MENU)
Press the [ENTER] button.
3
y The output limitation settings are saved. After pressing the [ENTER] button, the
“WAIT” message is displayed until the setting is applied. This may take a time
according to the amount of the registered department codes.
72 MANAGING DEPARMENT CODE
Page 75

Setting No Limit Black
When No Limit Black function is enabled, users can perform any numbers of the black copies/
prints on this equipment and it will not count the number of black copies/prints for each department code.
When the Department Management is disabled, the No Limit Black function is also disabled.
Therefore, the No Limit Black function is set as disabled every time you enable the Department
Management. If you want to enable the No Limit Black function, you must enable it after
enabling the Department Management.
In the DEPT. MANAGEMENT menu, press the [NO LIMIT BLACK]
1
button.
y The NO LIMIT BLACK COPY/PRINT screen is displayed.
For the procedure to display the screen above, see "Logging On As Administrator".
P. 5 3
Press the [ENABLE] button to enable the No Limit Black function,
2
or the [DISABLE] button to disable the No Limit Black function.
y THe No Limit Black setting is saved.
MANAGING DEPARMENT CODE 73
Page 76
2 MANAGING COUNTERS (COUNTER MENU)
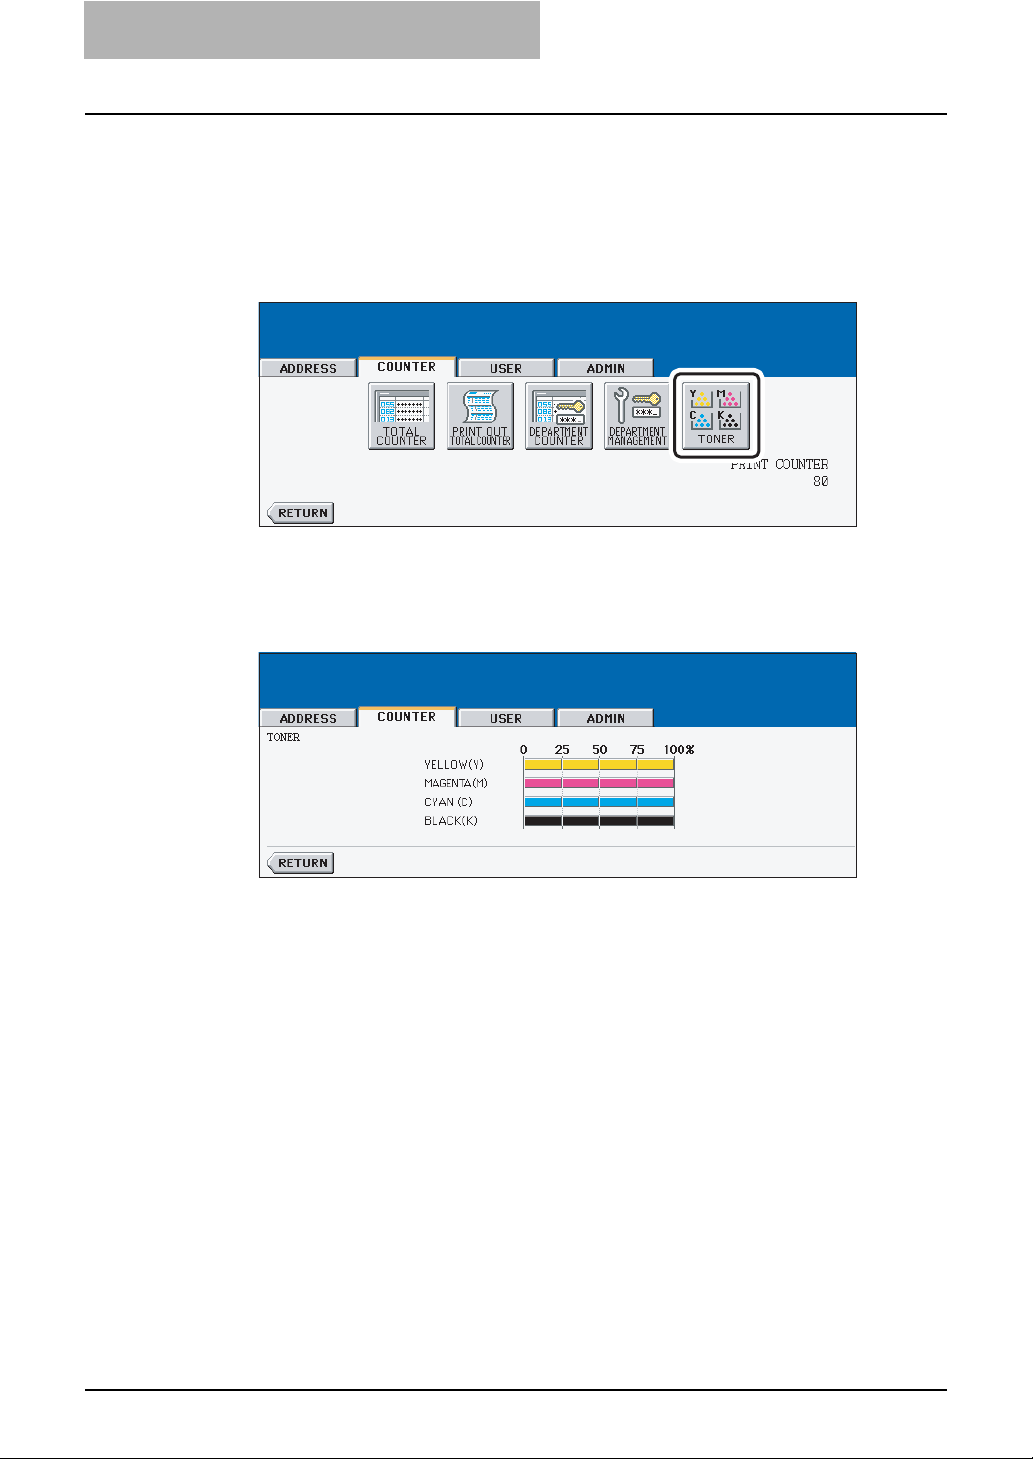
CHECKING TONER AMOUNT
This feature allows you to check the toner amount for each color.
Press the [USER FUNCTIONS] button on the control panel to enter
1
the User Functions menu.
Press the [COUNTER] button, and then press the [TONER] button
2
on the touch panel.
y The TONER screen is displayed.
You can check how much amount of toner is remained in each
3
toner cartridge.
74 CHECKING TONER AMOUNT
Page 77

3.SETTING ITEMS (USER)
SETTING GENERAL FUNCTIONS..........................................................................76
Setting the Auto Clear Mode.............................................................................................................76
Changing the Display Language.......................................................................................................78
Setting the Reversed Display Mode..................................................................................................79
Replacing the Toner Cartridge ..........................................................................................................81
Setting the Calibrations.....................................................................................................................83
Setting the Registration.....................................................................................................................85
SETTING COPY FUNCTIONS .................................................................................86
SETTING FAX FUNCTIONS ....................................................................................88
SETTING SCAN FUNCTIONS .................................................................................90
SETTING E-FILING FUNCTIONS ............................................................................93
PRINTING LISTS......................................................................................................94
Printing the Address Book List ..........................................................................................................94
Printing the Group Numbers List.......................................................................................................96
Printing the Function List (User)........................................................................................................97
SETTING DRAWER .................................................................................................98
CHECKING E-MAIL ...............................................................................................100
TURN OFF THE POWER (SHUT DOWN) .............................................................101
SETTING BIP PRINTING .......................................................................................103
Page 78

3 SETTING ITEMS (USER)
SETTING GENERAL FUNCTIONS
Setting the Auto Clear Mode
This function sets how long the machine waits before clearing the previous functions set on the
control panel.
Press the [USER FUNCTIONS] button on the control panel to enter
1
the User Functions menu.
Press the [USER] button, and then press the [GENERAL] button on
2
the touch panel.
y The GENERAL menu is displayed.
Press the [AUTO CLEAR] button.
3
y The AUTO CLEAR screen is displayed.
76 SETTING GENERAL FUNCTIONS
Page 79

Press the button that indicates the desired time in seconds.
4
y The Auto Clear mode has been set to selected time.
y If you want to disable the Auto Clear mode, press the [NO LIMIT] button.
y Even if the [NO LIMIT] button is selected, the screen will be cleared after 45 seconds
in case that users operate in the USER FUNCTION, JOB STATUS, or TEMPLATE
screen.
SETTING GENERAL FUNCTIONS 77
Page 80

3 SETTING ITEMS (USER)
Changing the Display Language
The language used on the touch panel can be changed to a different one.
Press the [USER FUNCTIONS] button on the control panel to enter
1
the User Functions menu.
Press the [USER] button, and then press the [GENERAL] button on
2
the touch panel.
y The GENERAL menu is displayed.
Press the [CHANGE LANGUAGE] button.
3
y The CHANGE LANGUAGE screen is displayed.
Press the desired language button.
4
y The touch panel is displayed in the selected language.
78 SETTING GENERAL FUNCTIONS
Page 81

Setting the Reversed Display Mode
You can change the touch panel to be displayed in the Reversed Display mode (which the white
portion will be black and the black portion will be white).
Changing to the Reversed Display mode helps you to display the touch panel more clearly
where it is too bright to see the touch panel.
Press the [USER FUNCTIONS] button on the control panel to enter
1
the User Functions menu.
Press the [USER] button, and then press the [GENERAL] button on
2
the touch panel.
y The GENERAL menu is displayed.
Press the [REVERSED DISPLAY] button.
3
y The REVERSED DISPLAY screen is displayed.
SETTING GENERAL FUNCTIONS 79
Page 82

3 SETTING ITEMS (USER)
Press the [ON] button to enable the Reversed Display, or [OFF] but-
4
ton to disable the Reversed Display.
y When you select the [ON] button, the touch panel is displayed in the Reversed Dis-
play mode.
80 SETTING GENERAL FUNCTIONS
Page 83
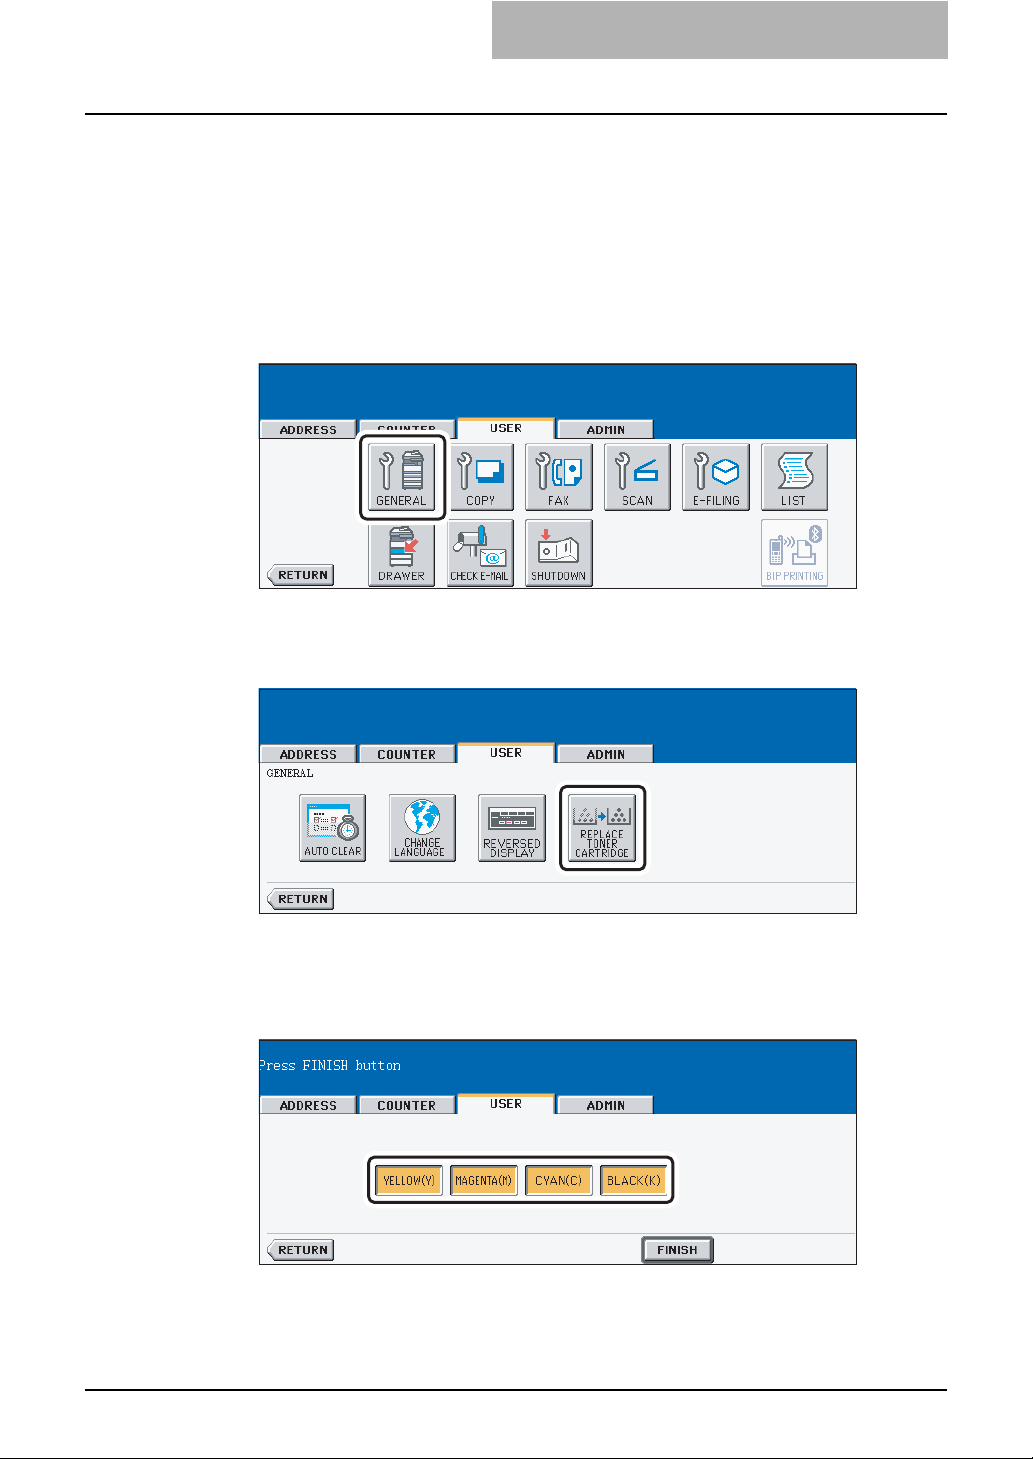
Replacing the Toner Cartridge
When you want to replace the toner cartridges before the Touch Panel Display indicates the
toner empty message, you can replace them by the following procedure.
Press the [USER FUNCTIONS] button on the control panel to enter
1
the User Functions menu.
Press the [USER] button, and then press the [GENERAL] button on
2
the touch panel.
y The GENERAL menu is displayed.
Press the [REPLACE TONER CARTRIDGE] button.
3
y The REPLACE TONER CARTRIDGE screen is displayed.
Press the button that indicates the toner cartridges you want to
4
replace.
SETTING GENERAL FUNCTIONS 81
Page 84

3 SETTING ITEMS (USER)
Replace the toner cartridges in the equipment.
5
For instructions on how to replace the toner cartridges, please see the Operator’s Manual for Basic Functions.
After replacing the toner cartridges, press the [FINISH] button.
6
Press the [YES] button.
7
82 SETTING GENERAL FUNCTIONS
Page 85

Setting the Calibrations
This equipment allows you to calibrate the color gradation for copy and print.
y The copy calibration setting in the [USER] menu can be configured only when an administra-
tor has set the Calibration Display Level to [USER].
P.124 “Setting the Calibration and Registration Display Level”
y When the private print jobs, schedule print jobs, or invalid jobs are stored in the job list, the
calibrations cannot be performed. In that case, delete the jobs in the job list.
This function allows the machine automatically to calibrate the color gradation for copy and printing jobs when the color cannot be adjusted well because the shading or the hue of the image
has deviated.
y Set the LT-sized or A4-sized paper (recommended paper) in the cassette before starting the
calibration. If any other paper is used, calibration may not be performed properly.
y If the color often deviates, call your service technician.
y If the glass is dirty or any foreign objects are stuck to the glass, the calibration may not be
carried out properly. Keep the glass clean.
y Never raise the original cover or the optional Automatic Document Feeder, or open the front
cover while the calibration is in progress. If this does happen, the calibration cannot be finished appropriately.
y Interrupt copying is not available during the calibration.
Place the LT-size or A4-size paper in the cassette.
1
Press the [USER FUNCTIONS] button on the control panel to enter
2
the User Functions menu.
Press the [USER] button, and then press the [GENERAL] button on
3
the touch panel.
y The GENERAL menu is displayed.
SETTING GENERAL FUNCTIONS 83
Page 86

3 SETTING ITEMS (USER)
Press the [CALIBRATION] button.
4
y The CALIBRATION menu is displayed.
Please refer to the Step 4 in the following procedures.
5
When you want to perform the copy calibration: P.126 “Setting the Copy Calibrations”
When you want to perform the print calibration: P.129 “Setting the Print Calibration”
The instructions on how to perform the copy and print calibration are same when they are
performed in the [ADMIN] menu.
84 SETTING GENERAL FUNCTIONS
Page 87

Setting the Registration
This equipment allows you to perform the registration to adjust the printing position manually.
The registration setting in the [USER] menu can be configured only when an administrator has
set the Registration Display Level to [USER].
P.124 “Setting the Calibration and Registration Display Level”
Press the [USER FUNCTIONS] button on the control panel to enter
1
the User Functions menu.
Press the [USER] button, and then press the [GENERAL] button on
2
the touch panel.
y The GENERAL menu is displayed.
Press the [REGISTRATION] button.
3
y The REGISTRATION menu is displayed.
Please refer to the Step 4 in the following procedures.
4
P.132 “Setting the Registration”
The instructions on how to perform the registration is same when it is performed in the
[ADMIN] menu.
SETTING GENERAL FUNCTIONS 85
Page 88

3 SETTING ITEMS (USER)
SETTING COPY FUNCTIONS
You can change the initial setting (default setting) of copy job.
Press the [USER FUNCTIONS] button on the control panel to enter
1
the User Functions menu.
Press the [USER] button, and then press the [COPY] button on the
2
touch panel.
y The COPY screen is displayed.
Specify the following items as you require.
3
y In the “EXPOSURE FOR COLOR” and “EXPOSURE FOR BLACK” options, press the
desired mode button.
y In the “COLOR MODE” option, press the desired mode button. Only [BLACK] can be
selected when the No Limit Black function is enabled.
y In the “IMAGE DIRECTION” option, press the desired mode button. For more
descriptions for the IMAGE DIRECTION option, please refer to the Operator’s Man-
ual For Basic Function.
Press the [Next] button to display the next screen.
4
86 SETTING COPY FUNCTIONS
Page 89

Press the desired media type button.
5
For more information about the paper type, please see the Operator’s Manual For Basic
Functions.
Press the [Next] button to display the next screen.
6
Press the desired mode button for “ORIGINAL MODE FOR COLOR”
7
and “ORIGIANL MODE FOR BLACK” option.
Press the [Next] button to display the next screen.
8
Press the desired mode button for “ORIGINAL MODE FOR AUTO
9
COLOR” option.
Press the [ENTER] button.
10
y The default settings for each mode are changed as you specified.
SETTING COPY FUNCTIONS 87
Page 90
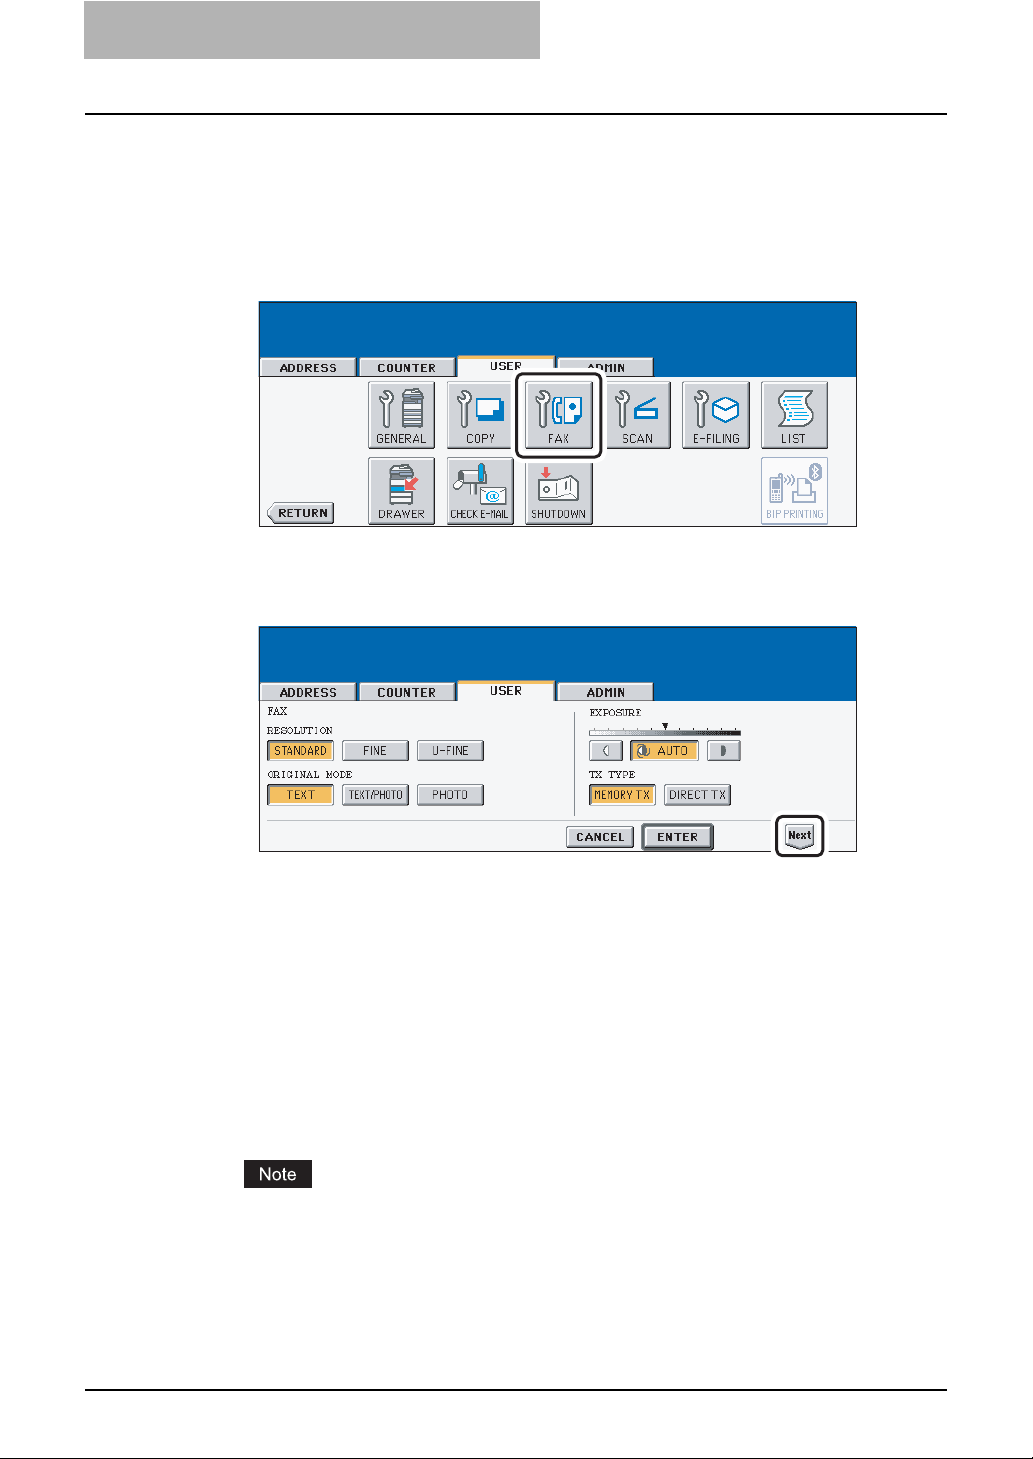
3 SETTING ITEMS (USER)
SETTING FAX FUNCTIONS
You can change the initial setting (default setting) of fax and Internet Fax features.
Press the [USER FUNCTIONS] button on the control panel to enter
1
the User Functions menu.
Press the [USER] button, and then press the [FAX] button on the
2
touch panel.
y The FAX screen is displayed.
Specify the following items as you require.
3
y In the “RESOLUTION” option, press the desired mode button.
y In the “ORIGINAL MODE” option, press the desired mode button.
y In the “EXPOSURE” option, press light or dark buttons to specify the default expo-
sure manually, or press the [AUTO] button to select auto mode for the default exposure mode.
y In the “TX TYPE” option, press the desired mode button.
[MEMORY TX] — Press this to set the Memory TX mode as default transmission
mode that will send after scanning and saving all originals in the memory. This mode
enables multi-address transmission.
[DIRECT TX] — Press this to set the Direct TX mode as default transmission mode
that will send originals page by page after every original has been scanned. This
mode disables multi-address transmission.
The “TX TYPE” option is available only when the optional Fax unit is installed.
Press the [Next] button to display the next screen.
4
88 SETTING FAX FUNCTIONS
Page 91

Specify the following items as you require.
5
y In the “RTI” option, specify whether the RTI is enabled or disabled as default setting.
[ON] — Press this to print a reception header (RTI) on received faxes to clearly identify the time, date, and page count of received faxes.
[OFF] — Press this not to print a reception header (RTI) on received faxes.
y In the “ECM” option, specify whether the ECM is enabled or disabled as default set-
ting.
[ON] — Press this to enable the ECM (Error Correction Mode) to automatically resend any portion of the document affected by phone line noise or distortion.
[OFF] — Press this to disable the ECM.
The “RTI” and “ECM” options are available only when the optional Fax unit is installed.
Press the [ENTER] button.
6
y The default settings for each mode are changed as you specified.
SETTING FAX FUNCTIONS 89
Page 92
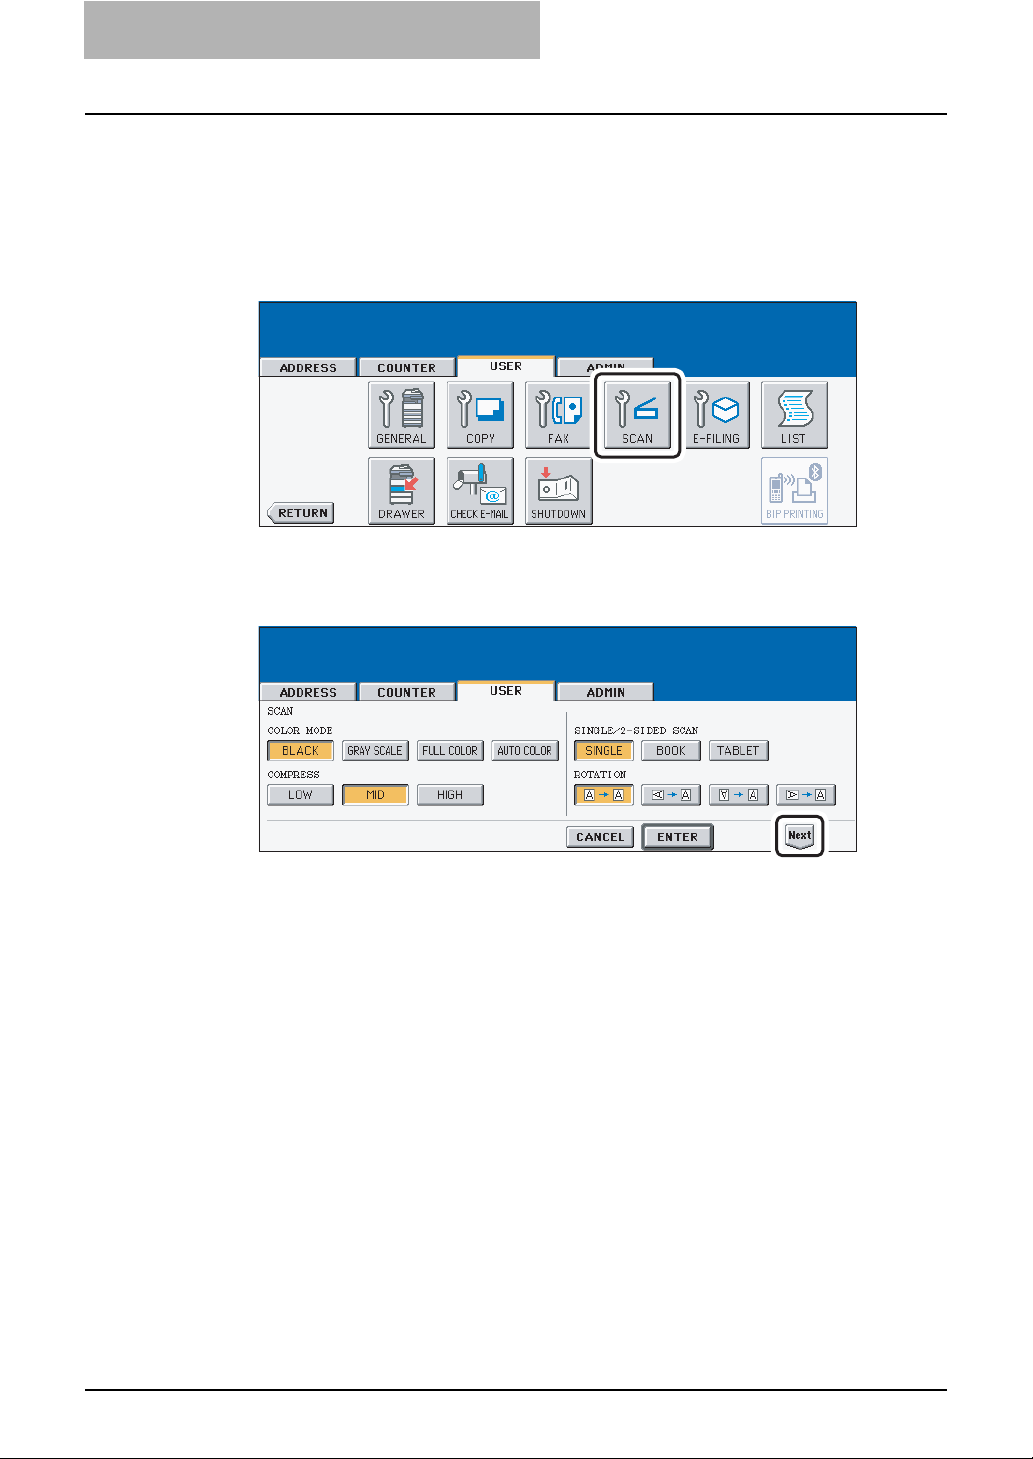
3 SETTING ITEMS (USER)
SETTING SCAN FUNCTIONS
You can change the initial setting (default setting) of scan job.
Press the [USER FUNCTIONS] button on the control panel to enter
1
the User Functions menu.
Press the [USER] button, and then press the [SCAN] button on the
2
touch panel.
y The SCAN screen is displayed.
Specify the following items as you require.
3
y In the “COLOR MODE” option, press the desired mode button.
y In the “COMPRESS” option, press the desired mode button that applies when scan-
ning in gray scale, full color, or auto color mode.
y In the “SINGLE/2-SIDE SCAN” option, press the desired mode button.
[SINGLE] — Press this to set single page scan as default scan mode.
[BOOK] — Press this to set book scan mode as default scan mode. This enables to
scan both side of originals in the same direction.
[TABLET] — Press this to set tablet scan mode as default scan mode. This enables
to scan front page in the general direction, and scan back page rotated 180 degree.
y In the “ROTATION” option, press the desired mode button.
Press the [Next] button to display the next screen.
4
90 SETTING SCAN FUNCTIONS
Page 93
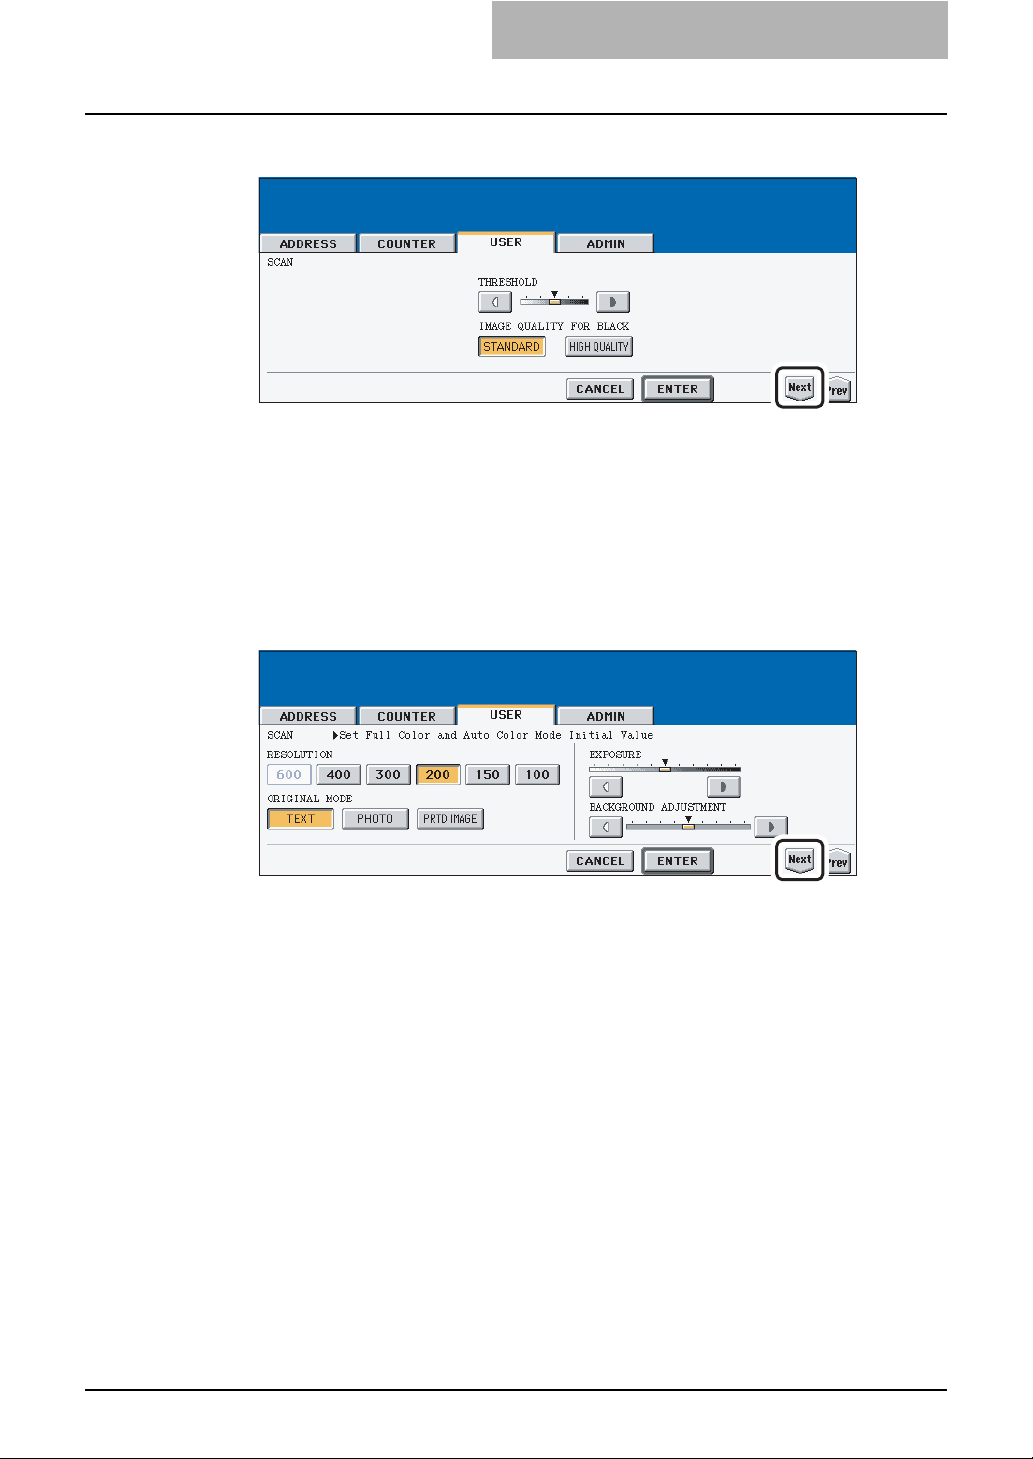
Specify the following items as you require.
5
y In the “THRESHOLD” option, press the light button or dark button to specify the expo-
sure that applies when scanning a black original in the auto color mode. If you move
to the left, the black and white in an original will be scanned lightly. If you move to the
right, the black and white in an original will be scanned deeply.
y In the “IMAGE QUALITY FOR BLACK” option, press the desired mode button that
applies when scanning a black original in the auto color mode.
Press the [Next] button to display the next screen.
6
Specify the following items as you require.
7
y In the “RESOLUTION” option, press the desired mode button applied for color scans.
[600] can be selected only when the optional expansion memory is installed.
y In the “ORIGINAL MODE” option, press the desired mode button applied for color
scans.
y In the “BACKGROUND ADJUSTMENT” option, press the light button or dark button
to specify the contrast for color scans. If you move to the left, the background color
will be lighter. If you move to the right, the background color will be darker.
y In the “EXPOSURE” option, press light or dark buttons to specify the default expo-
sure for color scans manually.
Press the [Next] button to display the next screen.
8
SETTING SCAN FUNCTIONS 91
Page 94
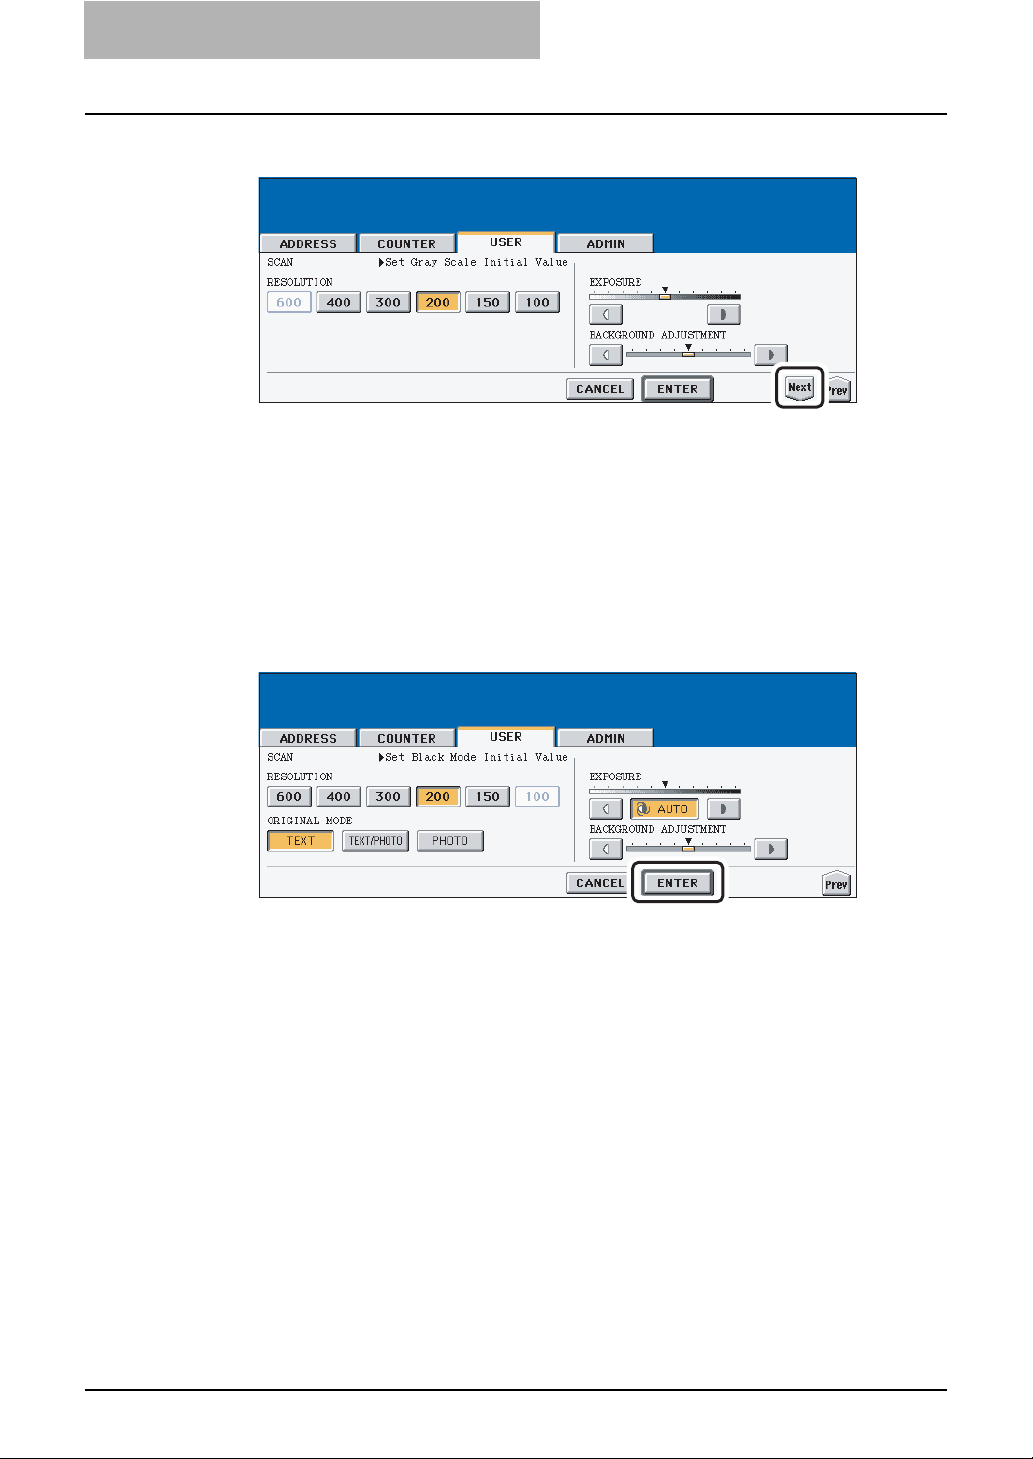
3 SETTING ITEMS (USER)
Specify the following items as you require.
9
y In the “RESOLUTION” option, press the desired mode button applied for gray scale
scans.[600] can be selected only when the optional expansion memory is installed.
y In the “EXPOSURE” option, press light or dark buttons to specify the default expo-
sure for gray scale scans manually.
y In the “BACKGROUND ADJUSTMENT” option, press the light button or dark button
to specify the contrast for gray scale scans. If you move to the left, the background
color will be lighter. If you move to the right, the background color will be darker.
Press the [Next] button to display the next screen.
10
Specify the following items as you require.
11
y In the “RESOLUTION” option, press the desired mode button applied for black scans.
y In the “ORIGINAL MODE” option, press the desired mode button applied for black
scans.
y In the “EXPOSURE” option, press light or dark buttons to specify the default expo-
sure for black scans manually, or press the [AUTO] button to select auto mode for the
default exposure mode for black scans.
y In the “BACKGROUND ADJUSTMENT” option, press the light button or dark button
to specify the contrast for black scans. If you move to the left, the background color
will be lighter. If you move to the right, the background color will be darker.
Press the [ENTER] button.
12
92 SETTING SCAN FUNCTIONS
y The default settings for each mode are changed as you specified.
Page 95

SETTING E-FILING FUNCTIONS
You can set the image quality type for printing color documents from e-Filing that are stored by
Scan to e-Filing.
Press the [USER FUNCTIONS] button on the control panel to enter
1
the User Functions menu.
Press the [USER] button, and then press the [E-FILING] button on
2
the touch panel.
y The E-FILING screen is displayed.
In the “PRINTING IMAGE MODE” option, press the desired mode
3
button.
y [GENERAL] — Press this to apply proper color quality for printing a general color
document.
y [PHOTOGRAPH] — Press this to apply proper color quality for printing photos.
y [PRESENTATION] — Press this to apply proper image quality for printing a vivid doc-
ument.
y [LINE ART] — Press this to apply proper image quality for printing a document con-
tains a lot of characters or line arts.
Press the [ENTER] button.
4
SETTING E-FILING FUNCTIONS 93
Page 96

3 SETTING ITEMS (USER)
PRINTING LISTS
Printing the Address Book List
You can print the address book list that shows all registered contacts and groups in this equipment.
Press the [USER FUNCTIONS] button on the control panel to enter
1
the User Functions menu.
Press the [USER] button, and then press the [LIST] button on the
2
touch panel.
y The LIST menu is displayed.
Press the [ADDRESS BOOK] button.
3
y The ADDRESS BOOK menu is displayed.
94 PRINTING LISTS
Page 97

Press the [ID SORT] button to print it as sorted by the ID number, or
4
[NAME SORT] button to print it as sorted by the last name.
y When the department management is disabled, the address book list is printed.
y When the department management is enabled, the screen to input the department
code is displayed. Enter the department code using the digital keys and press the
[ENTER] button to print the address book list.
y The list is printed on the paper that is fed from the drawer LT-R or A4-R paper is set
and exit to the inner tray.
y For an output example of the address book list, see "Address Book List". P. 1 9 8
PRINTING LISTS 95
Page 98
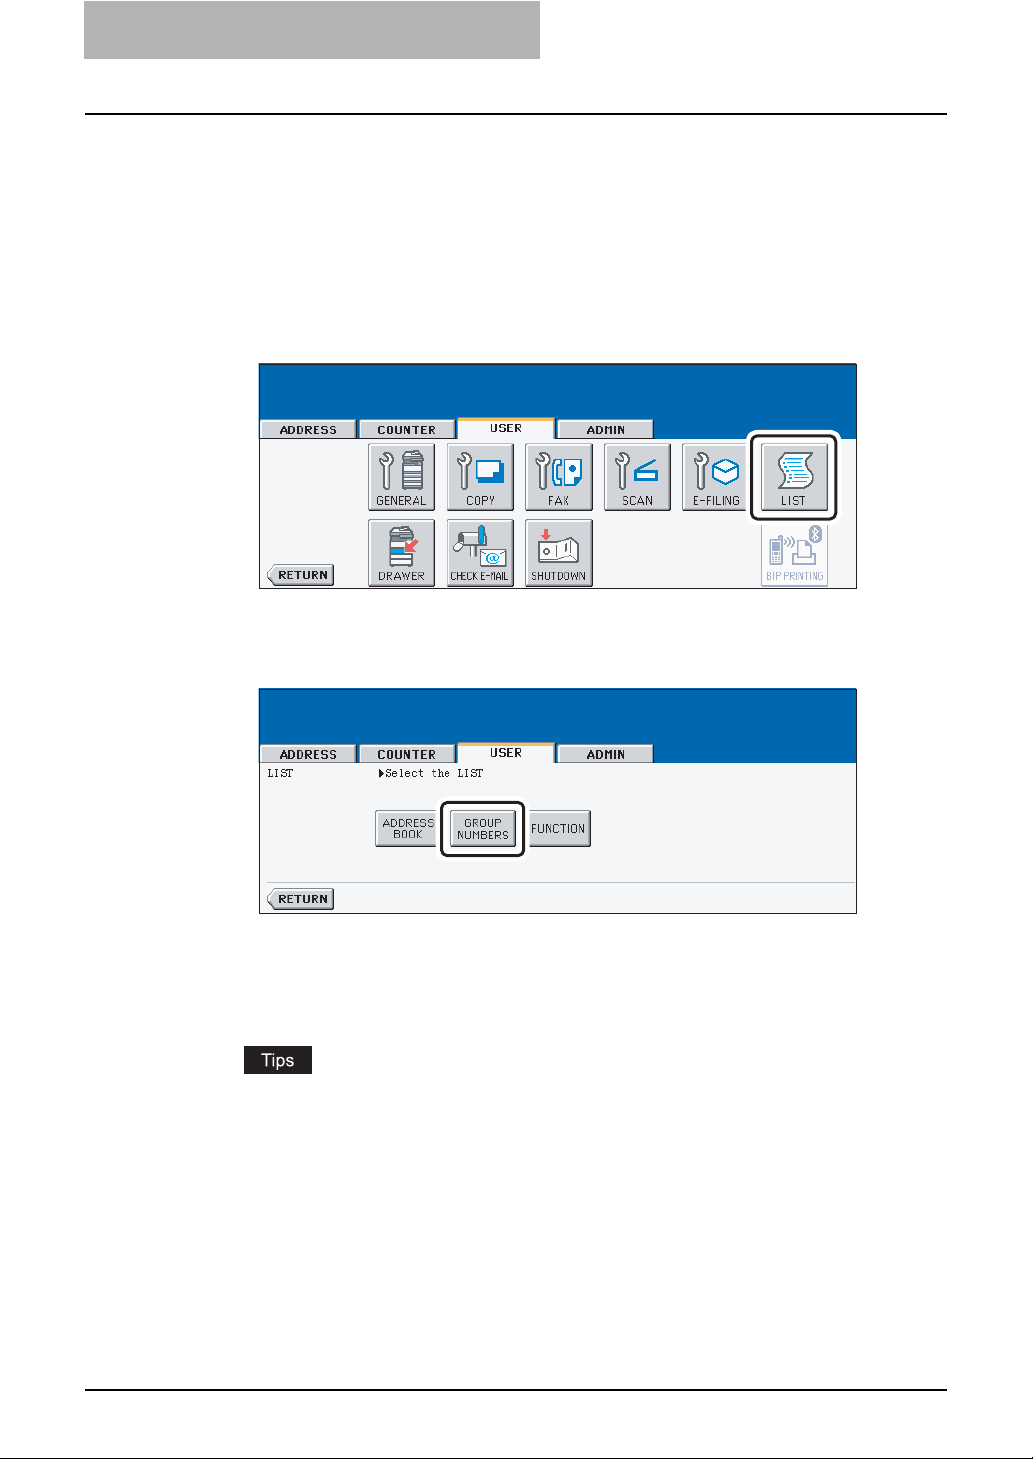
3 SETTING ITEMS (USER)
Printing the Group Numbers List
You can print the group numbers list that shows all registered groups and members in this equipment.
Press the [USER FUNCTIONS] button on the control panel to enter
1
the User Functions menu.
Press the [USER] button, and then press the [LIST] button on the
2
touch panel.
y The LIST menu is displayed.
Press the [GROUP NUMBERS] button.
3
y When the department management is disabled, the group numbers list is printed.
y When the department management is enabled, the screen to input the department
code is displayed. Enter the department code using the digital keys and press the
[ENTER] button to print the group numbers list.
y The list is printed on the paper that is fed from the drawer LT-R or A4-R paper is set
and exit to the inner tray.
y For an output example of the group numbers list, see "Group Numbers List".
P.199
96 PRINTING LISTS
Page 99
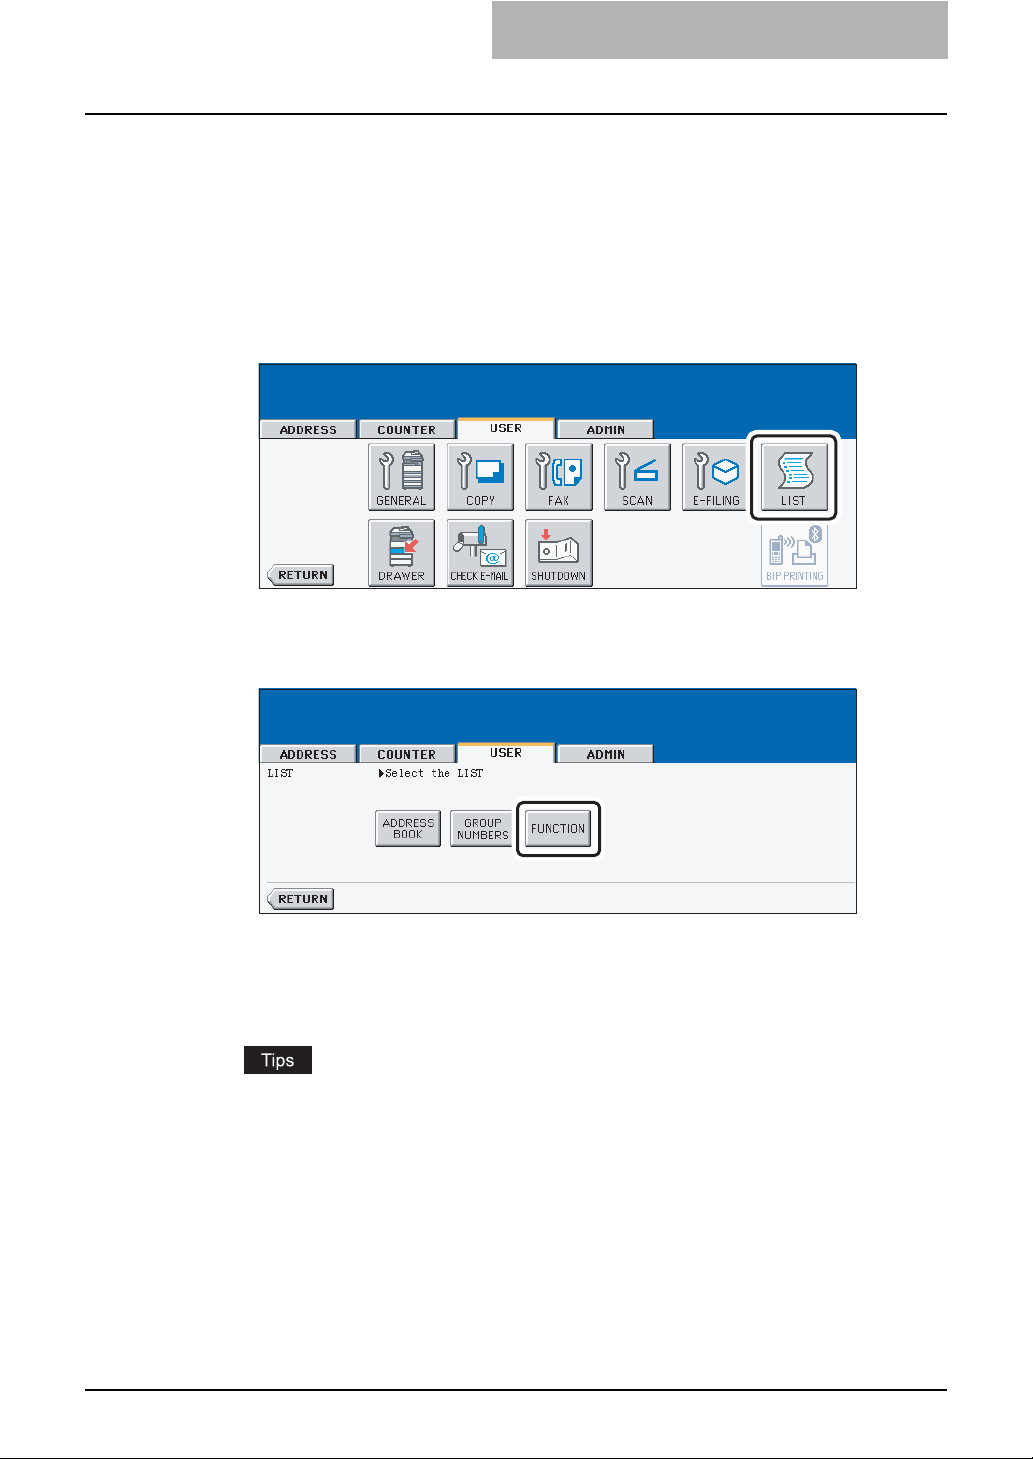
Printing the Function List (User)
You can print the function list that shows the function flow under the [USER] button of the User
Functions.
Press the [USER FUNCTIONS] button on the control panel to enter
1
the User Functions menu.
Press the [USER] button, and then press the [LIST] button on the
2
touch panel.
y The LIST menu is displayed.
Press the [FUNCTION] button.
3
y When the department management is disabled, the function list is printed.
y When the department management is enabled, the screen to input the department
code is displayed. Enter the department code using the digital keys and press the
[ENTER] button to print the function list.
y The list is printed on the paper that is fed from the drawer LT-R or A4-R paper is set
and exit to the inner tray.
y For an output example of the function list, see "Function List (User)". P. 2 0 0
PRINTING LISTS 97
Page 100

3 SETTING ITEMS (USER)
SETTING DRAWER
This function allows you to set the paper size and paper type of each drawer.
Press the [USER FUNCTIONS] button on the control panel to enter
1
the User Functions menu.
Press the [USER] button, and then press the [DRAWER] button on
2
the touch panel.
Press the drawer portion in the illustration to highlight the drawer
3
where you want to change the paper size, then press the desired
paper size button.
y When you press the paper size button, the selected paper size will be displayed in the
drawer in the illustration.
Press the [MEDIA TYPE] button.
4
98 SETTING DRAWER
 Loading...