

Page 1
AIR CONDITIONER (SPLIT TYPE)
For general public use
Indoor unit
RAS-H13, 18, 24S3KS-M
Outdoor unit
RAS-H13, 18, 24S3AS-M
OWNER’S MANUAL
1110655137
ENGLISH
BAHASA MELAYU
TSB 1110655137_cover.indd 1 12/18/57 BE 1:44 PM
Page 2
PRECAUTIONS FOR SAFETY
DANGER
• Do not install, repair, open or remove the cover. It may expose you to dangerous
voltages. Ask the dealership or the specialist to do this.
• Turning off the power supply will not prevent potential electric shock.
• The appliance shall be installed in accordance with national wiring regulation.
• Means for disconnection from the supply having a contact separation of at least
3 mm in all poles must be incorporated in the fixed wiring.
WARNING
• Do not expose your body directly to cool air for a long time.
• Do not insert your finger or any article into the air inlet/outlet.
• When an abnormality (burning smell, etc.) occurs, stop the air conditioner and
turn off the circuit breaker.
• Installation must be requested from the supplying retail dealership or
professional installation vendors. Installation requires special knowledge and
skill. If customers install on their own, it can be a cause of fire, electric shock,
injury or water leakage.
• Do not select a location for installation where flammable gas may leak. If there
is any gas leakage or accumulation around the unit, it can be a cause of fire.
• Do not turn ON/OFF the circuit breaker or operate buttons with a wet hand. It
may be a cause of electric shock.
• Do not disassemble, modify or relocate the unit by yourself. It may become the
cause of fire, electric shock, or water leakage. For repair or relocation, please
request service from the supplying retail dealership or a Toshiba dealership.
• Do not select a location for installation where there may be excessive water or
humidity, such as a bathroom. Deter ioration of insulation may be a cause of
electric shock or fire.
• When relocating or repairing the unit, please contact the supplying retail
dealership. When there is a kink in the wiring, it may be the cause of electric
shock or fire.
• During an error (such as a burning odor, not cooling, or not warming), stop
operating the unit and turn off the circuit breaker. Continuous operation may
be a cause of fire, or electric shock. Please request repair or service from the
supplying retail dealership or a Toshiba dealership.
• Earth work should be requested from the supplying retail dealership or
professional vendors. Insufficient grounding work may be the cause of electric
shock. Do not connect the earth wire to a gas pipe, water pipe, lightning
conductor, or telephone earth wire.
• If the indoor unit piping outlet is exposed due to relocation, close the opening.
Touching internal electrical parts may cause injury or electric shock.
• Do not insert any material (metal, paper, or water, etc) into the air outlet or
air intake opening. Fan may be rotating at high speed inside or there are high
voltage sections, which may cause an injury or electric shock.
• You must use a independent power outlet for the power supply. If a power outlet
other than the independent outlet is used, it may cause a fire.
• When the air-conditioning unit does not cool or warm, there may be a leakage of
refrigerant. Please consult the supplying retail dealership. The refrigerant used in
the air-conditioning unit is safe. It will not leak under normal operating conditions
but if it leaks into the room and contacts a heat source such as a heater, or stove,
it may cause a harmful reaction.
• When water or other foreign substances enter the internal parts, stop operating
the unit immediately and turn off the circuit breaker. Operating the unit
continuously may cause fire or electric shock. Please contact the supplying
retail dealership for repair.
• Do not clean the inside of the air-conditioning unit yourself. Please request
internal cleaning of the air-conditioning unit from the supplying retail dealership.
Incorrect cleaning may cause breakage of resin parts or insulation defects of
electrical parts, causing water leakage, electric shock or fire.
• Do not damage or modify the power cable. Do not connect the cable midway,
or use a multiple outlet extension cord that is shared by other devices. Failure
to do so may cause fire.
• Do not place heavy objects on the power cable, expose it to heat, or pull it. To
do so may cause electrical shock or fire.
• This appliance is not intended for use by persons (including children) with
reduced physical, sensory or mental capabilities, or lack of experience and
knowledge, unless they have been given supervision or instruction concerning
use of the appliance by a person responsible for their safety.
• Children should be supervised to ensure that they do not play with the
appliance.
• Do not use any refrigerant different from the one specified for complement or
replacement. Otherwise, abnormally high pressure may be generated in the
refrigeration cycle, which may result in a failure or explosion of the product or an
injury to your body.
CAUTION
• Check that the circuit breaker is installed correctly. If the circuit breaker is not
properly installed, it may cause an electric shock. To check the installation
method, please contact the supplying retail dealership or the professional
vendor who installed the unit.
• When using the unit in a closed room, or operating with other combustion
appliances, make sure to open a window occasionally for ventilation. Insufficient
ventilation may cause suffocation due to a lack of oxygen.
• Avoid operating for long periods in a high humidity environment (over 80%) such
as with the windows or doors open. There may be condensation on the indoor
unit and droplets may fall onto the furniture.
• When the unit won’t be used for a long time, turn off the main switch or the
circuit breaker.
• It is recommended that maintenance be performed by a specialist when the unit
has been operated for a long time.
• At least once a year check if the mounting table of the outdoor unit is damaged
or not. If a damaged state is ignored, the unit may fall or over-turn, causing an
injury.
• Stand on a sturdy ladder when attaching/detaching the front panel/air filter/air
cleaning filter. Failure to do so may cause a fall or injury.
• Do not stand on the outdoor unit or place anything on the unit. It may be the
cause of injury due to falling or over-turning. Any damage to the unit may cause
an electric shock or fire.
• Do not use combustion appliances in the direct flow of the air from the air-
conditioning unit. Poor combustion of a combustion appliance may cause
suffocation.
• Do not place anything around the outdoor unit or allow fallen leaves to
accumulate around it. If there are fallen leaves, small animals could enter and
contact internal electrical parts, causing a failure or fire.
• Do not place animals and plants in places where wind from the air-conditioning
unit flows directly. It may have a negative influence on the animal or plant.
• Ensure that drained water is discharged. When the discharging water process
is not sufficient, water may leak, causing water damage to furniture. To check
that the installation method used is correct, please contact the supplying retail
dealership or the professional vendor who installed the unit.
• Do not place any containers such as a vase containing fluid on the unit. It might
cause water to enter the unit and deteriorate the electrical insulation, causing
an electric shock.
• Do not use for special applications such as storage of food or animals, or to
display plants, precision devices, or art objects. Do not use on ships or in other
vehicles. It may cause a failure in the air-conditioning unit. In addition, it may
damage these items.
• Do not place other electrical appliances or furniture under the unit. Water
droplets might fall, causing damage or failure.
• When cleaning, you must stop operating the unit and turn off the circuit breaker.
Since the fan inside may be rotating at high speed, it may cause an injury.
• Do not wash the main air-conditioning unit with water. It may cause an electric
shock.
• After the front panel/air filter is cleaned, wipe away any water and allow to dry. If
water remains, it may cause an electric shock.
• Once the front panel is removed, do not touch the metal parts of the unit. It may
cause an injury.
• Do not touch the air intake section or the aluminum fins of the unit. It may cause
injury.
• When you hear thunder and there might be a lightning strike, stop operating the
unit and disconnect the circuit breaker. If lightning strikes, it may cause a failure.
• Batteries for remote control unit:
- Should be inserted with correct polarity (+) and (–).
- Should not be recharged.
-
Do not use batteries for which the “Recommended usage period” has expired.
- Do not keep used batteries inside the remote control unit.
- Do not mix different types of batteries, or mix new batteries with old ones.
- Do not directly solder the batteries.
- Do not short-circuit, disassemble, heat, or throw batteries into a fire. If
batteries are not disposed of correctly, they may burst or be the cause of fluid
leakage, resulting in burns or injuries. If touching the fluid, wash thoroughly
with water. If it touches devices, wipe off to avoid direct contact.
- Do not place within reach of small children. If a battery is swallowed, consult
a doctor immediately.
• The manufacturer shall not assume any liability for the damage caused by not
observing the description of this manual.
1
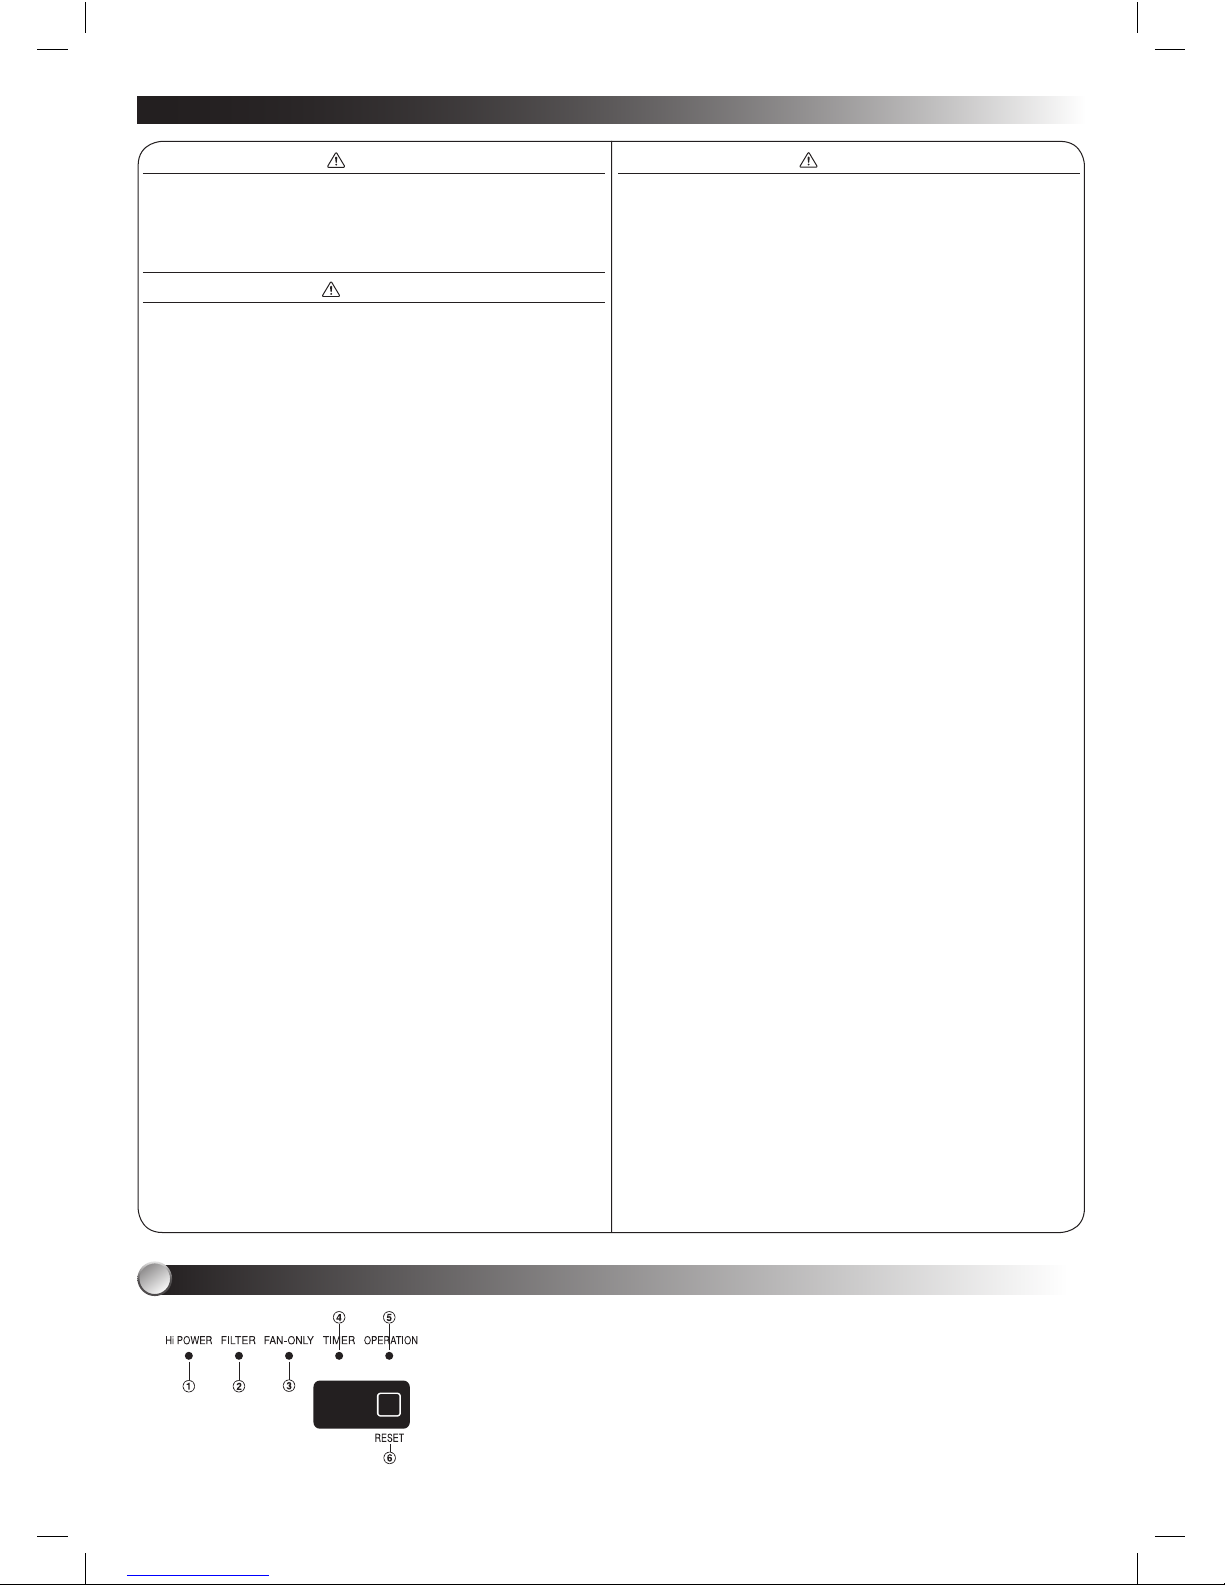
INDOOR UNIT DISPLAY
1 Hi POWER (Green)
2 FILTER (Orange)
3 FAN-ONLY (Orange)
4 TIMER (Yellow)
5 OPERATION (Green)
6 RESET button
TSB 1110655137_EN.indd 1 12/18/57 BE 1:42 PM
Page 3
EN
1
Press
FIX
: Move the louver in the
desired vertical direction.
2
Press
SWING
: Swing the air
automatically and press again to stop.
3
For horizontal direction, adjust manually.
Preparing Filters
1. Open the air inlet grille and remove the air filters.
2. Attach the filters. (see detail in the accessory sheet).
Loading Batteries (when use wireless operation.)
1. Remove the slide cover.
2. Insert 2 new batteries (AAA type)
following the (+) and (–) positions.
Clock Setup
1. Push
by tip of the pencil.
If timer indication is flashing, go to the next step 2.
2. Press
or : adjust the time.
3. Press
: Set the time.
Remote Control Reset
Push by tip of the pencil or
1. Remove the batteries.
2. Press
.
3. Insert the batteries.
Note:
• Donotmovethelouvermanuallybyothers.
• Thelouvermayautomationpositioningbysomeoperationmode.
Note:
• TheprovidedRemoteControllerisawirelesstype,whichalsocanbeusedas
a wire. Please see “How to Connect The Remote Controller for Wired
Operation”, located in installation instruction, in case of wired control is required.
• Inwireoperation,remotecontrollerwillreturntoinitialcondition(PRESET,
TIMER and CLOCK will return to initial condition) when user shutdown power
supply of Air conditioner.
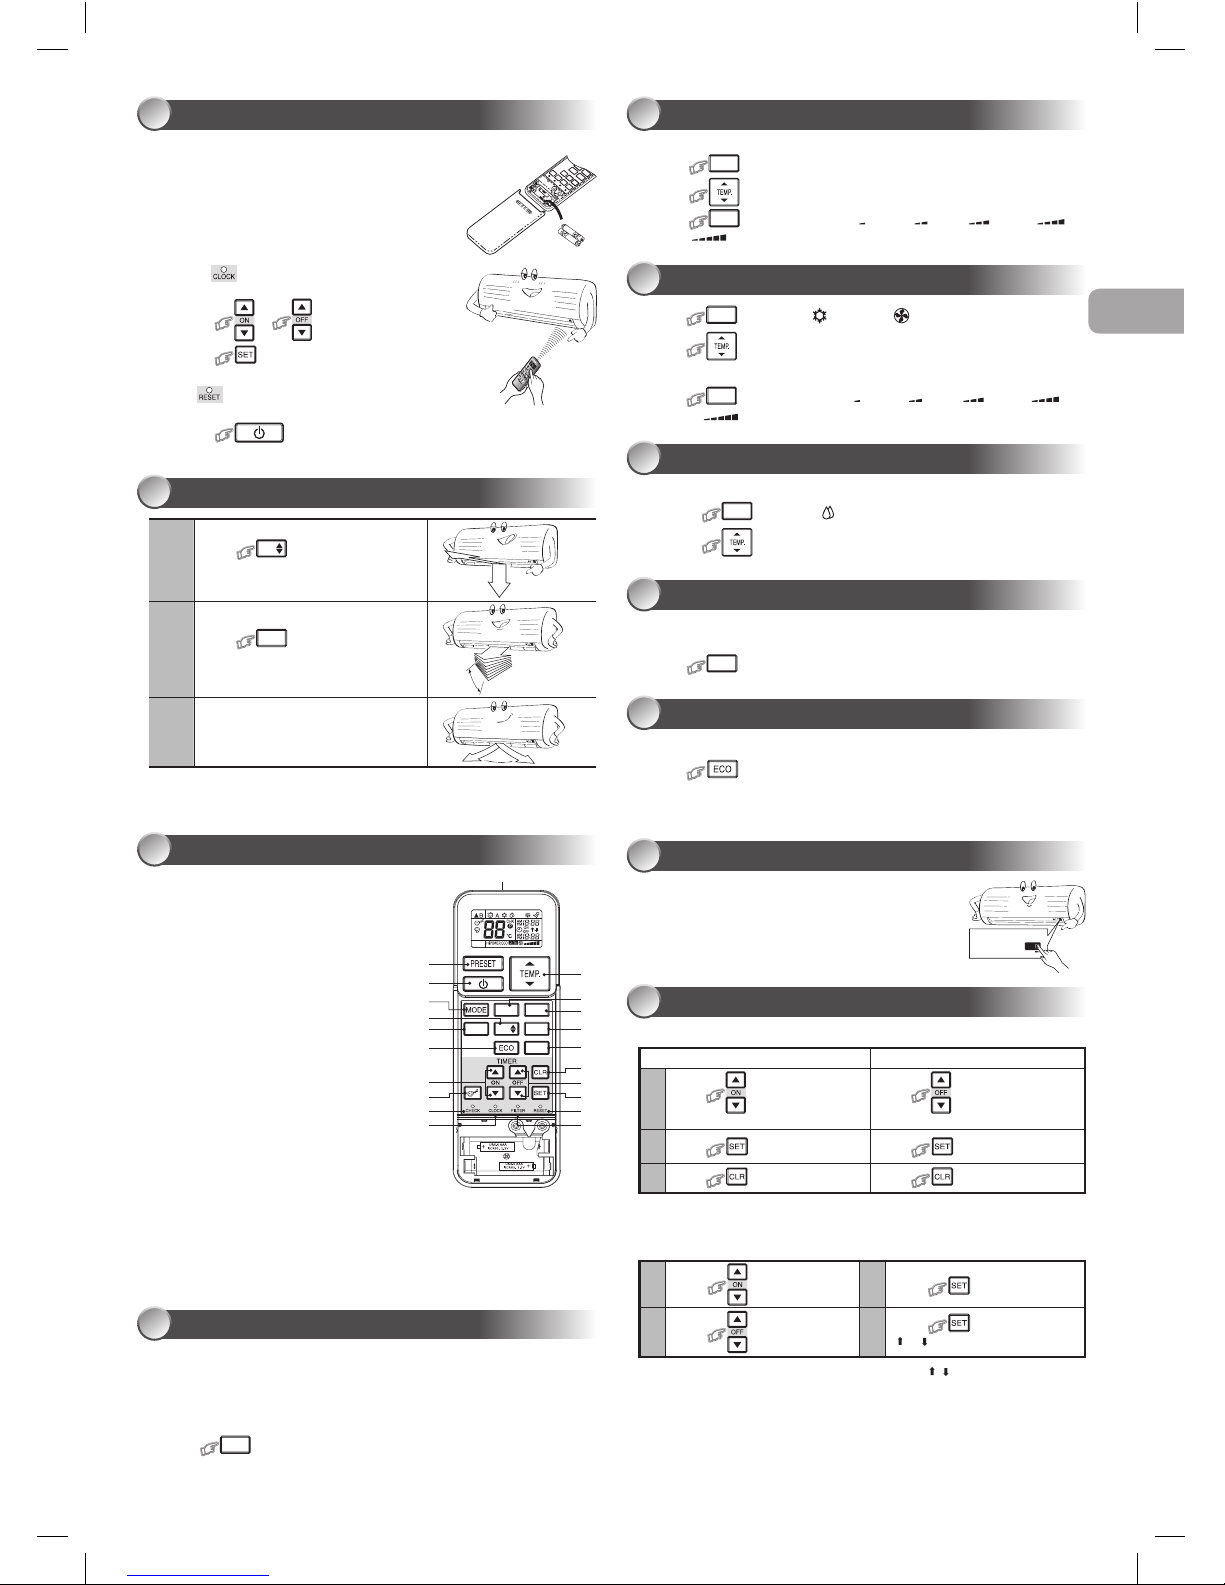
1 Infrared signal emitter
2 Start/Stop button
3 Mode select button (MODE)
4 Temperature button (TEMP)
5 Fan speed button (FAN)
6 Swing louver button (SWING)
7 Set louver button (FIX)
8 On timer button (ON)
9 Off timer button (OFF)
! Setup button (SET)
" Clear button (CLR)
# Memory and Preset button (PRESET)
$ One-Touch button (ONE-TOUCH)
% High power button (Hi-POWER)
& Economy button (ECO)
( Quiet button (QUIET)
) Comfort sleep button (COMFORT SLEEP)
~ Filter reset button (FILTER)
+ Set clock button (CLOCK)
, Check button (CHECK)
- Reset button (RESET)
Press the “ONE-TOUCH” button for fully automated operation that is customized
to the typical consumer preferences in your region of the world. The customized
settings control temperature air flow strength, air flow direction and other settings
to provide you alternate contact with “ONE-TOUCH” of the button. If you prefer
other settings you can select from the many other operating functions of your
Toshiba unit.
Press
ONE-TOUCH
: Start the operation.
To automatically select cooling or fan only operation
1. Press
MODE
: Select A.
2. Press
: Set the desired temperature.
3. Press
FAN
: Select AUTO, LOW , LOW+ , MED , MED+ , or
HIGH
.
1. Press
MODE
: Select Cool or Fan only .
2. Press
: Set the desired temperature.
Cooling: Min. 17°C, Fan Only: No temperature indication
3. Press
FAN
: Select AUTO, LOW , LOW+ , MED , MED+ ,
or HIGH .
For dehumidification, a moderate cooling performance is controlled automatically.
1. Press
MODE
: Select Dry .
2. Press
: Set the desired temperature.
To automatically control room temperature and airflow for faster cooling operation
(except in DRY and FAN ONLY mode)
Press
Hi POWER
: Start and stop the operation.
In case of the misplaced or discharged remote control
• PressingtheRESETbutton,theunitcanstartor
stop without using the remote control.
• OperationmodeissetonAUTOMATICoperation,
preset temperature is 24°C and fan operation is
automatic speed.
Set the timer when the air conditioner is operating.
Setting the ON Timer Setting the OFF Timer
1
Press : Set the desired
ON timer.
Press
: Set the desired OFF
timer.
2
Press : Set the timer. Press : Set the timer.
3
Press : Cancel the timer. Press : Cancel the timer.
Daily timer allows the user to set both the ON & OFF timers and will be
activated on a daily basis.
Setting Daily Timer
1
Press : Set the ON timer.
3
Press .
2
Press : Set the OFF timer.
4
Press : button during the
(
or ) mark flashing.
• Duringthedailytimerisactivating,botharrows(
, ) are indicated.
Note:
• Keeptheremotecontrolinaccessibletransmissiontotheindoorunit;
otherwise, the time lag of up to 15 minutes will occur.
• Thesettingwillbesavedforthenextsameoperation.
To automatically control room to save energy (except in DRY and FAN ONLY mode)
Press : Start and stop the operation.
Note:Coolingoperation;thesettemperaturewillincreaseautomatically1degree/
hour for 2 hours (maximum 2 degrees increase).
COOLING / FAN ONLY OPERATION
7
DRY OPERATION
8
Hi-POWER OPERATION
9
ECO OPERATION
10
TEMPORARY OPERATION
11
TIMER OPERATION
12
PREPARATION BEFORE USE
2
AIR FLOW DIRECTION
3
REMOTE CONTROL
4
ONE-TOUCH
5
AUTOMATIC OPERATION
6
SWING
FAN
FIX
QUIET
Hi POWER
ONE-TOUCH
COMFORT
SLEEP
4
5
!
-
"
%
(
8
1
2
$
)
,
&
#
3
+
7
6
~
9
ES
FR
IT
DE
PT
PL
CZ
RU
CR
HU
TR
NL
GR
SV
FI
NO
DK
RO
BG
EE
LV
SK
SI
TSB 1110655137_EN.indd 2 12/18/57 BE 1:42 PM
Page 4
Set your preferred operation for future use. The setting will be memorized by the
unit for future operation (except airflow direction).
1. Select your preferred operation.
2. Press and hold
for 3 seconds to memorize the setting.
The P mark displays.
3. Press
: Operate the preset operation.
This product is designed so that, after a power failure, it can restart automatically
in the same operating mode as before the power failure.
Information
The product was shipped with Auto Restart function in the ON position.
Turn it OFF if this function is not required.
How to cancel the Auto Restart
1. Press and hold the [RESET] button on the indoor unit for 3 seconds to
cancel the operation. (3 beeps will sound but OPERATION lamp does not
blink)
2. Press and hold the [RESET] button on the indoor unit for 3 seconds to set
the operation. (3 beeps will sound and OPERATION lamp blink 5 time/sec
for 5 seconds)
• DonotoperateONtimerandOFFtimer.
Note: Default setting of auto restart operation is ON.
To operate at super low fan speed for quiet operation (except in DRY mode)
Press
QUIET
: Start and stop the operation.
Note: Under certain conditions, QUIET operation may not provide adequate
cooling due to low sound features.
For comfortable sleep, automatically control air flow and automatically turn OFF.
Press
: Select 1, 3, 5 or 9 hrs for OFF timer operation.
Note: The cooling operation, the set temperature will increase automatically
1 degree/hour for 2 hours (maximum 2 degrees increase).
Firstly, turn off the circuit breaker.
Filter Reset (Some models only)
FILTERlamplightson;theltermustbecleaned.
To turn off the lamp, push the RESET button on the indoor unit or the FILTER
button on the remote control.
Indoor Unit and Remote Control
• Cleantheindoorunitandtheremotecontrolwithawetclothwhenneeded.
• Nobenzine,thinner,polishingpowderorchemically-treatedduster.
1. Three-minute protection feature: To prevent the unit from being activated
for 3 minutes when suddenly restarted or switched to ON.
2. Some minor cracking sound may occur when unit operating. This is normal
because the cracking sound may be caused by expansion/contraction of
plastic.
Air conditioner operating conditions
To protect bad smell caused by the humidity in the indoor unit.
1. If the
button is pressed once during “Cool” or “Dry” mode,
the fan will continue to run for other 20 minutes, then it will turn off
automatically. This will reduce the moisture in the indoor unit.
2. To stop the unit immediately, press the
more 2 times within
30 seconds.
Temp.
Operation
Outdoor Temperature Room Temperature
Cooling 21°C ~ 43°C 21°C ~ 32°C
Dry 19°C ~ 43°C 17°C ~ 32°C
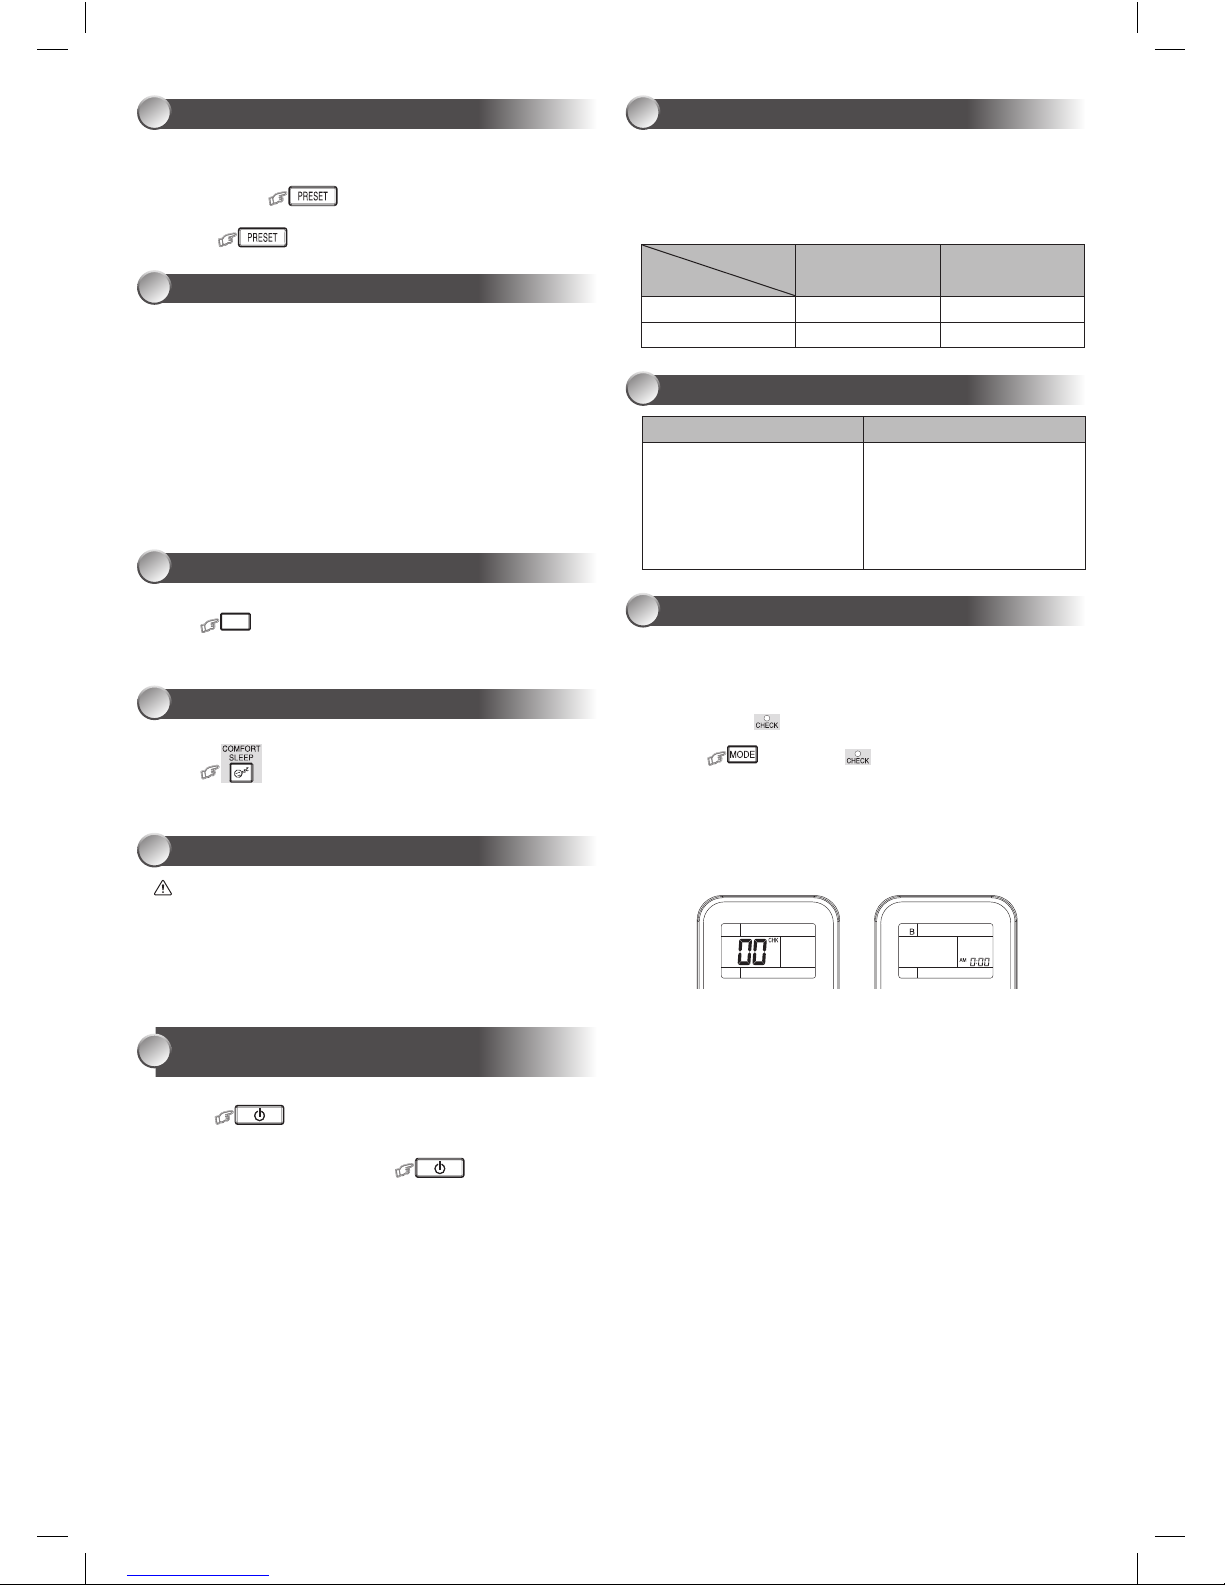
To separate using of remote control for each indoor unit in case of 2 air
conditioners are installed nearly.
Remote Control B Setup.
1. Press RESET button on the indoor unit to turn the air conditioner ON.
2. Point the remote control at the indoor unit.
3. Push and hold
button on the Remote Control by the tip of the pencil.
“00” will be shown on the display.
4. Press
during pushing . “B” will show on the display and “00”
will disappear and the air conditioner will turn OFF. The Remote Control B
is memorized.
Note: 1. Repeat above step to reset Remote Control to be A.
2. Remote Control A has not “A” display.
3. Default setting of Remote Control from
factory is A.
ba
The unit does not operate. Cooling is abnormally low.
• Thepowermainswitchisturned
off.
• Thecircuitbreakerisactivatedto
cut off the power supply.
• Stoppageofelectriccurrent.
• ONtimerisset.
• Theltersareblockedwithdust.
• Thetemperaturehasbeenset
improperly.
• Thewindowsordoorsareopened.
• Theairinletoroutletoftheoutdoor
unit is blocked.
• Thefanspeedistoolow.
• TheoperationmodeisFANorDRY.
OPERATION AND PERFORMANCE
19
TROUBLESHOOTING (CHECK POINT)
20
REMOTE CONTROL A-B SELECTION
21
PRESET OPERATION
13
AUTO RESTART OPERATION
14
QUIET OPERATION
15
COMFORT SLEEP OPERATION
16
MAINTENANCE
17
SELF CLEANING OPERATION (COOL AND
DRY OPERATION ONLY)
18
TSB 1110655137_EN.indd 3 12/18/57 BE 1:42 PM
Page 5

PAPARAN UNIT DALAMAN
PERINGATAN UNTUK KESELAMATAN
1 Hi POWER (Hijau)
2 FILTER (Oren)
3 KIPAS-SAHAJA (Oren)
4 TIMER (Kuning)
5 OPERATION (Hijau)
6 Butang RESET
BAH AYA
• Jangan pasang, baiki, buka atau tanggalkan penutupnya. Anda mungkin
terdedah kepada bahaya voltan yang tinggi. Minta wakil penjual atau kedai yang
mempunyai pakar untuk melakukannya.
• Walaupun bekalan kuasa ditutup, ini tidak bermakna kejutan elektrik tidak boleh
berlaku.
• Alat ini hendaklah dipasang menurut peraturan pendawaian negara.
• Alat-alat untuk memutuskan sambungan dari bekalan yang mempunyai
pemisahan sentuh sekurangkurangnya 3 mm pada semua kutub mestilah
dipasang dalam pendawaian tetap.
AMARAN
• Jangan biarkan tubuh anda terkena udara sejuk secara terus terlalu lama.
• Jangan masukkan jari anda atau sebarang benda ke dalam saluran masuk/
saluran keluar udara.
• Apabila berlaku keabnormalan (bau terbakar, dsb), hentikan penyaman udara
dan matikan pemutus litar.
• Pemasangan mesti diminta daripada wakil penjual yang membekal atau vendor
pemasangan profesional. Pemasangan memerlukan pengetahuan khusus
dan skil. Jika pelanggan memasangnya sendiri, ia boleh menjadi penyebab
kebakaran, kejutan elektrik, kecederaan atau kebocoran air.
• Jangan pilih tempat untuk pemasangan di mana gas mudah terbakar mungkin
bocor. Jika terdapat kebocoran gas atau pengumpulan di sekitar unit, ia boleh
menjadi penyebab api.
• Jangan HIDUPKAN/MATIKAN pemutus litar atau mengendalikan butang
dengan tangan yang basah. Ia boleh menjadi penyebab kejutan elektrik.
• Jangan nyahpasang, ubah suai atau menempatkan semula unit dengan sendiri.
Ia boleh menjadi penyebab api, kejutan elektrik, atau kebocoran air. Untuk
pembaikan atau penempatan semula, sila minta perkhidmatan daripada wakil
penjual runcit yang membekal atau wakil penjual Toshiba.
• Jangan pilih lokasi untuk pemasangan yang mungkin terdapat air atau
kelembapan berlebihan, seperti bilik mandi. Kemerosotan penebat mungkin
menjadi penyebab kejutan elektrik atau api.
• Apabila menempatkan semula atau membaiki unit, sila hubungi wakil penjual
yang membekal. Apabila terdapat pintalan pada pendawaian, ia boleh menjadi
penyebab kejutan elektrik atau api.
• Apabila berlaku ralat sebegitu (seper ti bau terbakar, tiada penyejukan, atau tiada
pemanasan), hentikan operasi unit dan matikan pemutus litar. Operasi berterusan
boleh menjadi penyebab api, atau kejutan elektrik. Sila minta perkhidmatan
daripada wakil penjual runcit yang membekal atau wakil penjual
Toshiba
.
• Kerja tanah seharusnya diminta daripada wakil penjual yang membekal atau
vendor pemasangan profesional. Kerja pembumian yang tidak lengkap boleh
menjadi penyebab kejutan elektrik. Jangan sambung dawai bumi ke paip gas,
paip air, konduktor kilat, atau dawai bumi telefon.
• Jika saluran keluar paip unit dalaman terdedah akibat penempatan semula,
tutup bukaan tersebut. Menyentuh bahagian elektrik boleh menyebabkan
kecederaan atau kejutan elektrik.
• Jangan masukkan sebarang bahan (logam, kertas, atau air, dsb) ke dalam
saluran keluar udara atau saluran masuk udara. Kipas mungkin berputar pada
kelajuan tinggi di dalam atau terdapat bahagian voltan tinggi, yang boleh
menyebabkan kecederaan atau kejutan elektrik.
• Anda mesti menggunakan saluran keluar kuasa tak bersandar untuk bekalan
kuasa. Jika saluran keluar kuasa lain daripada saluran keluar tak bersandar
digunakan, ia mungkin menyebabkan kebakaran.
• Apabila unit penyaman udara tidak menjadi sejuk atau panas, mungkin
terdapat kebocoran bahan penyejuk. Sila berunding dengan wakil penjual
yang membekal. Bahan penyejuk yang digunakan dalam unit penyaman udara
adalah selamat. Ia tidak akan bocor di bawah keadaan operasi biasa tetapi jika
ia bocor ke dalam bilik dan bersentuhan dengan sumber haba seperti pemanas,
atau dapur, ia mungkin menyebabkan tindak balas berbahaya.
• Apabila air atau bahan asing lain memasuki bahagian dalaman, hentikan
operasi unit dengan serta-merta dan matikan pemutus litar. Membiarkan unit
beroperasi dengan berterusan boleh menyebabkan api atau kejutan elektrik.
Sila hubungi wakil penjual runcit yang membekal untuk pembaikan.
• Jangan bersihkan bahagian dalaman unit penyaman udara dengan sendiri.
Sila minta pembersihan dalaman unit penyaman udara daripada wakil penjual
runcit yang membekal. Pembersihan tidak betul mungkin menyebabkan retakan
pada bahagian resin atau kerosakan penebat bahagian elektrik, menyebabkan
kebocoran air, kejutan elektrik atau api.
• Jangan rosakkan atau ubah suai kabel kuasa. Jangan sambung kabel di
bahagian pertengahan, atau gunakan kord pemanjangan yang dikongsi dengan
peranti lain. Kegagalan berbuat demikian mungkin menyebabkan api.
• Jangan letakkan objek berat pada kabel kuasa, dedahkannya kepada api, atau
menariknya. Berbuat demikian mungkin menyebabkan kejutan elektrik atau api.
• Perkakasan ini bukan untuk penggunaan orang (termasuk kanak-kanak)
dengan keupayaan zikal, deria atau mental yang berkurangan, atau
kekurangan pengalaman atau pengetahuan, melainkan mereka telah diberikan
penyeliaan atau arahan berkaitan dengan penggunaan perkakasan oleh orang
yang bertanggungjawab akan keselamatan mereka.
• Kanak-kanak mesti diselia untuk memastikan bahawa mereka tidak bermain
dengan perkakasan.
• Jangan gunakan apa-apa bahan penyejuk selain daripada yang telah ditentukan
sebagai pelengkap atau pengganti . Jika tidak, tekanan yang luar biasa tinggi
mungkin terhasil dalam kitaran penyejukan, yang boleh mengakibatkan
kegagalan atau letupan produk atau kecederaan kepada badan anda.
AWAS
• Periksa sama ada pemutus litar dipasang dengan betul. Jika pemutus litar
tidak dipasang dengan betul, ia mungkin menyebabkan kejutan elektrik.
Untuk memeriksa kaedah pemasangan, sila hubungi wakil penjual runcit yang
membekal atau vendor profesional yang telah memasang unit tersebut.
• Apabila menggunakan unit dalam bilik tertutup, atau beroperasi dengan
perkakas pembakaran lain, pastikan untuk membuka tingkap sekali-skala untuk
pengudaraan. Pengudaraan tidak mencukupi mungkin menyebabkan lemas
akibat kekurangan oksigen.
• Elakkan daripada beroperasi untuk jangka masa yang panjang dalam
persekitaran berkelembapan tinggi (lebih 80%) seperti dengan tingkap atau
pintu terbuka. Mungkin terdapat kondensasi pada unit dalaman dan titisan air
boleh jatuh ke atas perabot.
• Apabila unit tidak akan digunakan untuk jangka masa yang panjang, matikan
suis utama atau pemutus litar.
• Disyorkan bahawa penyenggaraan dilakukan oleh pakar apabila unit telah
beroperasi untuk masa yang panjang.
• Sekurang-kurangnya sekali setahun periksa jika meja pemegang unit luaran
rosak atau tidak. Jika keadaan rosak diabaikan, unit mungkin jatuh atau terbalik,
menyebabkan kecederaan.
• Berdiri di atas tangga yang kuat semasa memasang/membuka panel hadapan/
penapis udara/penapis pembersih udara. Kegagalan berbuat demikian boleh
menyebabkan kejatuhan atau kecederaan.
• Jangan berdiri pada unit luaran letakan apa-apa di atasnya. Ia boleh menjadi
penyebab kecederaan akibat jatuh atau terbalik. Sebarang kerosakan kepada
unit mungkin menyebabkan kejutan elektrik atau api.
• Jangan gunakan perkakas pembakaran dalam aliran terus dengan udara
daripada unit penyaman udara. Pembakaran tidak baik daripada perkakas
pembakaran mungkin menyebabkan kelemasan.
• Jangan letakkan apa-apa di sekitar unit luaran atau biarkan daun yang
jatuh untuk berkumpul di sekitarnya. Jika terdapat daun yang jatuh, haiwan
kecil boleh masuk dan bersentuhan dengan bahagian elektrik dalaman,
menyebabkan kegagalan atau api.
• Jangan letakan haiwan atau tumbuh-tumbuhan di tempat di mana udara
daripada unit penyaman udara mengalir secara terus. Ia mungkin menyebabkan
pengaruh negatif pada haiwan atau tumbuh-tumbuhan.
• Pastikan air yang disalirkan dibuang. Apabila proses pembuangan air tidak
mencukupi, air mungkin bocor, menyebabkan kerosakan air pada perabot.
Untuk memeriksa sama ada kaedah pemasangan yang digunakan adalah
betul, sila hubungi wakil penjual runcit yang membekal atau vendor profesional
yang telah memasang unit tersebut.
• Jangan letakkan sebarang bekas seperti pasu yang berisi air di atas unit. Ia
mungkin menyebabkan air memasuki unit tersebut dan merosakkan penebatan
elektrik, menyebabkan kejutan elektrik.
• Jangan gunakan untuk kegunaan khas seperti tempat simpanan untuk
makanan atau haiwan, atau untuk mempamerkan tumbuh-tumbuhan, peranti
kejituan, atau objek seni. Jangan gunakan di atas kapal atau kenderaan lain. Ia
mungkin menyebabkan kegagalan unit penyaman udara. Malahan, ia mungkin
merosakkan item ini.
• Jangan letakkan perkakas elektrik lain atau perabot di bawah unit. Titisan air
mungkin jatuh, menyebabkan kerosakan atau kegagalan.
• Apabila membersihkan, anda mesti hentikan operasi unit dan matikan pemutus
litar. Memandangkan kipas di dalam mungkin sedang berputar pada kelajuan
tinggi, ia boleh menyebabkan kecederaan.
• Jangan bersihkan unit penyaman udara dengan air. Ia mungkin menyebabkan
kejutan elektrik.
• Selepas panel hadapan/penapis udara dibersihkan, lapkan sebarang air dan
biarkannya untuk kering. Jika air kekal, ia mungkin menyebabkan kejutan
elektrik.
• Sebaik panel hadapan dibuka, jangan sentuh bahagian logam unit. Ia boleh
menyebabkan kecederaan.
• Jangan sentuh bahagian saluran masuk udara atau sirip aluminium unit. Ia
boleh menyebabkan kecederaan.
• Apabila anda mendengar guruh dan mungkin terdapat kilat, hentikan
operasi unit dan putuskan pemutus litar. Jika terdapat panahan kilat, ia boleh
menyebabkan kegagalan.
• Bateri untuk unit kawalan jauh:
- Patut dimasukkan dengan kekutuban yang betuk (+) dan (–).
- Tidak harus dicas semula.
- Jangan gunakan bateri dengan “Tempoh penggunaan yang disyorkan” telah
tamat.
- Jangan simpan bateri yang telah digunakan di dalam unit kawalan jauh.
- Jangan campur bateri berlainan jenis, atau campur bateri baru dengan yang lama.
- Jangan pateri terus ke bateri.
- Jangan litar pintas, nyahpasang, panaskan, atau buang bateri ke dalam api.
Jika bateri tidak dibuang dengan betul, ia mungkin meletus atau menjadi
penyebab kebocoran cecair, yang menyebabkan kebakaran dan kecederaan.
Jika menyentuh cecair tersebut, cuci dengan bersih dengan air. Jika ia
menyentuh peranti, lapkannya untuk mengelakkan sentuhan terus.
- Jangan letakkan berdekatan capaian kanak-kanak kecil. Jika tertelan bateri,
hubungi doktor dengan segera.
• Pengilang tidak akan bertanggungjawab terhadap kerosakan yang disebabkan
atas sebab tidak mematuhi penerangan dalam manual ini.
1
MA
MA
TSB 1110655137_MA.indd 5 12/18/57 BE 1:42 PM
Page 6

1
Tekan
FIX
: Menggerakkan ram
dalam arah menegak yang dikehendaki.
2
Tekan
SWING
: Mengayunkan udara
secara automatik dan tekan sekali lagi
untuk menghentikannya.
3
Untuk arah mendatar, laraskan secara
manual.
Menyediakan Penapis
1. Buka jeriji saluran masuk udara dan keluarkan penapis udara.
2. Pasangkan penapis. (lihat butiran dalam lembaran aksesori).
Memasukkan Bateri (apabila menggunakan operasi wayarles.)
1. Tanggalkan penutup gelangsar.
2. Masukkan 2 biji bateri baru (jenis AAA)
mengikut kedudukan (+) dan (–).
Mengeset Jam
1. Tekan
dengan mata pensel.
Jika penunjuk pemasa berkelip, pergi ke
langkah 2 seterusnya.
2. Tekan
atau : laraskan masa.
3. Tekan
: Setken pemasa.
Mengeset Semula Alat Kawalan Jauh
Tekan dengan mata pensel atau
1. Keluarkan bateri.
2. Tekan
.
3. Masukkan bateri.
Nota:
• Jangan gerakkan ram secara manual dengan cara lain.
• Ram mungkin diset secara automatik semasa mod pengendalian.
Nota:
• Alat Kawalan Jauh yang disediakan adalah daripada jenis wayarles, yang
turut boleh digunakan sebagai berwayar. Sila lihat “Cara Menyambung Alat
Kawalan Jauh untuk Operasi Berwayar”, yang boleh ditemui dalam arahan
pemasangan, jika kawalan berwayar diperlukan.
• Dalam operasi wayar, alat kawalan jauh akan kembali ke keadaan awal
(PRASET, PEMASA dan JAM akan kembali ke keadaan awal) apabila
pengguna menutup bekalan kuasa penyaman Udara.
1 Pemancar isyarat inframerah
2 Butang Mula/Berhenti
3 Butang pilih mod (MODE)
4 Butang suhu (TEMP)
5 Butang kelajuan kipas (FAN)
6 Butang ayun ram (SWING)
7 Butang mengeset ram (FIX)
8 Butang pasang pemasa (ON)
9 Butang padam pemasa (OFF)
! Butang seting (SET)
" Butang padam (CLR)
# Butang ingatan dan praset (PRESET)
$ Butang Satu-Sentuhan (ONE-TOUCH)
% Butang kuasa tinggi (Hi-POWER)
& Butang ekonomi (ECO)
( Butang senyap (QUIET)
) Butang tidur selesa (COMFORT SLEEP)
~ Butang mengeset semula penuras
(FILTER)
+ Butang mengeset jam (CLOCK)
, Butang periksa (CHECK)
- Butang mengeset semula (RESET)
Tekan butang “SATU-SENTUHAN” untuk operasi automatik sepenuhnya yang
telah disuaikan menurut keutamaan pengguna biasa di rantau anda. Tetapan yang
disuaikan mengawal suhu kekuatan aliran udara, arah aliran udara dan tetapan lain
untuk memberikan anda sentuhan gantian dengan butang “SATU-SENTUHAN”.
Jika anda mahukan tetapan lain, anda boleh memilih daripada pelbagai fungsi
operasi lain bagi unit Toshiba anda.
Tekan
ONE-TOUCH
: Memulakan operasi.
Untuk memilih operasi pendinginan atau kipas sahaja secara automatik
1. Tekan
MODE
: Pilih A.
2. Tekan
: Setkan suhu yang dikehendaki.
3. Tekan
FAN
: Pilih AUTO, LOW , LOW+ , MED , MED+ ,
atau HIGH .
1. Tekan
MODE
: Pilih Pendinginan atau Kipas sahaja .
2. Tekan
: Setkan suhu yang dikehendaki.
Pendinginan: Min. 17°C, Kipas Sahaja: Tiada penunjuk suhu.
3. Tekan
FAN
: Pilih AUTO, LOW , LOW+ , MED , MED+ ,
atau HIGH .
Untuk penyahlembapan, prestasi pendinginan yang sederhana dikawal secara
automatik.
1. Tekan
MODE
: Pilih Kering .
2. Tekan
: Setkan suhu yang dikehendaki.
Untuk mengawal suhu bilik dan aliran udara secara automatik bagi pendinginan
yang lebih pantas (kecuali dalam mod KERING dan KIPAS SAHAJA)
Tekan
Hi POWER
: Memulakan dan menghentikan operasi.
Sekiranya alat kawalan jauh tersalah letak atau baterinya
lemah
• Apabila butang RESET ditekan, alat penyaman
udara ini boleh bermula atau berhenti tanpa
menggunakan alat kawalan jauh.
•
Mod pengendalian diset pada kendalian AUTOMATIK,
suhu praset adalah 24°C dan kendalian kipas diset
pada kelajuan automatik.
Tetapkan pemasa apabila penyaman udara beroperasi.
Mengeset Pemasa ON Mengeset Pemasa OFF
1
Tekan : Setkan pemasa
ON yang diingini
Tekan : Setkan pemasa OFF
yang diingini
2
Tekan : Setkan pemasa. Tekan : Setkan pemasa.
3
Tekan : Membatalkan pemasa.
Tekan : Membatalkan
Setiap pemasa membolehkan pengguna mengeset pemasa ON & OFF dan
akan diaktifkan setiap hari.
Menetapkan Pemasa Harian
1
Tekan : Setkan pemasa
ON.
3
Tekan .
2
Tekan : Setkan pemasa
OFF.
4
Tekan butang : semasa
tanda ( atau ) berkelip.
• Semasa pemasa harian diaktifkan, kedua-dua anak panah (
, ) ditunjukkan.
Nota:
• Pastikan isyarat penghantaran alat kawalan jauh dapat sampai ke unit
dalaman; jika tidak masa lat sehingga 15 minit akan berlaku.
• Pengesetan ini akan disimpan untuk operasi yang sama berikutnya.
Untuk mengawal bilik secara automatik untuk menjimatkan tenaga (kecuali dalam
mod KERING dan KIPAS SAHAJA)
Tekan : Mula dan hentikan operasi.
Nota: Operasi menyejuk; suhu yang ditetapkan akan meningkat secara automatik
1 darjah/jam selama 2 jam (peningkatan 2 darjah maksimum)
OPERASI PENDINGINAN / KIPAS SAHAJA
7
OPERASI KERING (DRY)
8
OPERASI KUASA TINGGI (Hi-POWER)
9
OPERASI EKO
10
OPERASI TEMPORARY
11
OPERASI PEMASA (TIMER)
12
PERSEDIAAN SEBELUM PENGGUNAAN
2
ARAH ALIRAN UDARA
3
FUNGSI ALAT KAWALAN JAUH
4
SATU-SENTUHAN
5
OPERASI AUTOATIK
6
SWING
FAN
FIX
QUIET
Hi POWER
ONE-TOUCH
COMFORT
SLEEP
4
5
!
-
"
%
(
8
1
2
$
)
,
&
#
3
+
7
6
~
9
TSB 1110655137_MA.indd 6 12/18/57 BE 1:42 PM
Page 7

Setkan operasi pilihan anda untuk kegunaan masa akan datang. Pengesetan
akan diingati oleh alat penyaman udara ini untuk operasi akan datang (kecuali
arah aliran udara).
1. Pilih operasi pilihan anda.
2. Tekan dan tahan
selama 3 saat untuk mengingati pengesetan.
Tanda P akan dipaparkan.
3. Tekan
: Operasi yang telah dipraset akan beroperasi.
Produk ini direka agar, selepas kegagalan kuasa, ia boleh mula semula secara
automatik dalam mod operasi yang sama seperti sebelum kegagalan kuasa.
Maklumat
Produk telah dihantar dengan fungsi Mula Semula Auto dalam posisi ON.
OFF ia jika fungsi ini tidak diperlukan.
Bagaimana untuk membatalkan Mula Semula Auto
1. Tekan dan tahan butang [RESET] pada unit dalam selama 3 saat untuk
membatalkan operasi. (3 bip akan berbunyi tetapi lampu OPERASI tidak
berkelip)
2. Tekan dan tahan butang [RESET] pada unit dalam selama 3 saat untuk
menetapkan operasi. (3 bip akan berbunyi dan lampu OPERASI akan
berkelip 5 kali/saat selama 5 saat)
• Jangan kendalikan pemasa HIDUP dan pemasa MATI.
Nota: Tetapan lalai mula semula auto operasi ON.
Untuk beroperasi pada kelajuan kipas yang rendah bagi operasi senyap (kecuali
dalam mod KERING).
Tekan
QUIET
: Memulakan dan menghentikan operasi.
Nota: Di bawah keadaan tertentu, operasi SENYAP mungkin tidak
memberikan penyejukan yang mencukupi kerana ciri rendah bunyi itu.
Untuk tidur yang lebih selesa, kawal aliran udara secara automatik dan matikan
secara automatik.
Tekan
: Pilih 1, 3, 5 atau 9 jam untuk operasi pemasa OFF.
Nota: Semasa operasi penyejukan, suhu yang ditetapkan akan meningkat
secara automatik sebanyak 1 darjah/jam selama 2 jam (maksimum 2
darjah peningkatan).
Mula-mula sekali, matikan pemutus litar.
Set Semula Penuras (Sesetengah model sahaja)
Jika lampu PENURAS menyala; penuras harus dibersihkan.
Untuk mematikan lampu, tekan butang SET SEMULA pada unit dalam rumah
atau butang PENURAS pada alat kawalan jauh.
Unit Dalaman dan Alat Kawalan Jauh
• Bersihkan unit dalaman dan alat kawalan jauh dengan kain lembap apabila
perlu.
• Jangan gunakan benzin, pencair, serbuk penggilap atau pembuang debu
yang telah dirawat secara kimia.
1. Ciri perlindungan tiga minit: Untuk mencegah alat ini daripada diaktifkan
selama 3 minit apabila alat ini dengan tiba-tiba dimulakan semula atau
suisnya dihidupkan (ON).
2. Bunyi gemeresik yang kecil mungkin kedengaran semasa unit dikendalikan.
Ini adalah normal kerana bunyi gemeresik ini mungkin disebabkan oleh
pengembangan/pengecutan plastik.
Keadaan kendalian alat penyaman udara
Untuk mengelakkan bau yang tidak menyenangkan disebabkan oleh
kelembapan dalam unit dalaman.
1. Jika butang
ditekan sekali semasa dalam mod “Cool”
(dingin) atau “Dry” (kering), kipas akan terus berjalan selama 20 minit
lagi, kemudian ia akan mati secara automatik. Ini akan mengurangkan
lembapan dalam unit dalaman.
2. Untuk mematikan unit dengan serta-merta, tekan
sebanyak
2 kali dalam tempoh 30 saat.
Suhu.
Operasi
Suhu Bilik Suhu Luar
Pendinginan 21°C ~ 43°C 21°C ~ 32°C
Kering 19°C ~ 43°C 17°C ~ 32°C
Untuk menggunakan dua alat kawalan jauh secara berasingan sekiranya terdapat
2 unit penyaman udara yang dipasang berdekatan.
Mengeset Alat Kawalan Jauh B.
1. Tekan butang SET SEMULA pada unit di dalam rumah untuk menghidupkan
penyaman udara.
2. Halakan alat kawalan jauh pada unit dalam rumah.
3. Tekan dan tahan butang
pada Alat Kawalan Jauh dengan mata pensel.
“00” akan ditunjukkan pada paparan.
4. Tekan
semasa menekan . “B” akan dipaparkan pada paparan
dan “00” akan hilang dan penyaman udara akan mati. Kini Alat Kawalan
Jauh B telah disetkan memori.
Nota: 1. Ulangi langkah di atas untuk mengeset Alat Kawalan Jauh kepada A.
2. Alat Kawalan Jauh A tidak memaparkan “A”.
3. Seting lalai kilang bagi Alat Kawalan Jauh adalah A.
Alat penyaman udara tidak
beroperasi.
Pendinginan terlalu rendah.
• Suis kuasa utama tidak
dihidupkan.
• Pemutus litar diaktifkan untuk
memutuskan bekalan kuasa.
• Arus elektrik terhenti.
• Pemasa ON diset.
• Penapis dipenuhi habuk.
• Suhu tidak diset dengan betul.
• Tingkap dan pintu terbuka.
• Saluran masuk atau saluran keluar
udara pada unit luaran tersekat.
• Kelajuan kipas terlalu rendah.
• Mod operasi ialah FAN atau DRY.
OPERASI DAN PRESTASI
19
PEMILIHAN ALAT KAWALAN JAUH A-B
21
OPERASI PRASET (PRESET)
13
OPERASI MULA SEMULA AUTOMATIK
14
OPERASI SENYAP
15
OPERASI TIDUR SELESA
16
PENYENGGARAAN
17
OPERASI PEMBERSIHAN SENDIRI (OPERASI
DINGIN DAN KERING SAHAJA)
18
PENYELESAIAN MASALAH (PERKARAPERKARA YANG PERLU DIPERIKSA)
20
ba
MA
MA
TSB 1110655137_MA.indd 7 12/18/57 BE 1:42 PM
Page 8

⫭㱌び柝
⋕旍
• 孛≣⫭堩ɀὒ䍪ɀㆷㅺ㈪⋜䘺⪴Ɂ⎊ⅽ⍓偡Ṿ嬍「㌉奊↔⋕旍䒙⋯Ɂ孛丳摤⒪ㅺ
ᵷ⬚弿垰弽㐱ỀɁ
• 救䒙㷴ⷚᵱ偡忣₱⍓偡䗨奊䒙Ɂ
• 㚐堩仒䗨⫭堩ⷸ忙⼎♡⬚ⵧ丣夨⫾Ɂ
• ♞⫾ⵧ丣㕚濇壥ὁ嬥㔑䒙㷴㕚ㆤ㙭㛥䀝䗨奊䀝敘旸嵁䤟兗ᶞ 3 mmɁ
嫊⎮
• ᵱ壥嬍帏ặ擣㕚敘䙘㌉㘘暖⚌ℛ䧞㭸ᶑɁ
• ᵱ壥⭪ㆯ㉫ㅺṟẹ䇍␥㌶弿栲⍇/⅞栲⍇Ɂ
• ⺷⅞䌔濃䂊䰮⏗䪭濄㕚濇῀㫆䧞孧ⷚⅫ㔑㔑嵓◌Ɂ
• ⫭堩⼩柟孛晚⒒ỿ岋丳摤⒪ㅺᵷᵾ⫭堩ỿⷸ⒪弿垰Ɂ⫭堩晤壥ᵷᵾ䗨䝉嬪⏰
偡Ɂ⣦㜀⬆㆛兎垰⫭堩濇⍓偡Ṿ径ㅴ㿏㿢ɀ奊䒙ɀ⌻Ẉㅺ㹳㮘Ɂ
• ᵱ壥彭㉍⫭堩⚌⍓偡㙭㕷䄧⾋㭸ặ㰨㹳䗨ằ仒Ɂ⣦㜀㚐堩仒⏌♘㙭ṟẹ㭸ặ㰨㹳
ㅺ䥓侾濇⍓偡径ㅴ㿏㿢Ɂ
• Ⅻ≣䒌㷣ㆯ䒙嵓㔑嵓◌ㅺ㐱Ề㉭搒Ɂ⎊ⅽ⍓偡径ㅴ奊䒙Ɂ
• ᵱ壥兎垰㈪⋜ɀ㒝堩ㅺ弥䥟㚐堩仒Ɂ⎊ⅽ⍓偡径ㅴ㿏㿢ɀ奊䒙ㅺ㹳㮘Ɂ㙭乘ὒ
ㅺ弥䥟濇孛Ḳ晚⒒ỿ岋丳摤⒪ㅺᶀ刁丳摤⒪⡨䒗孛㙱∅Ɂ
• ᵱ壥彭㉍⫭堩⚌㳘⬈䪭⍓偡㙭弫⡾㮘ㅺ㻒㷣䗨ằ仒Ɂ乁乼≺⍓偡径ㅴ奊䒙ㅺ㿏
㿢Ɂ
• 弥䥟ㅺὒ䍪㚐堩仒㕚濇孛侸䱟晚⒒ỿ岋丳摤⒪Ɂ丣嵓㙭㇑丷㕚濇⍓偡径ㅴ奊䒙ㅺ
㿏㿢Ɂ
• ⅞䌔㒩昀濃ữ⣦䁋䂊⏗ɀᵱ↚ℛㅺᵱ↚䁑濄㕚濇῀㫆ợ䒌㚐堩仒ⷚⅫ㔑䒙嵓㔑嵓
◌Ɂ彂乑㐱Ề⍓偡径ㅴ㿏㿢ㅺ奊䒙Ɂ孛Ḳ晚⒒ỿ岋丳摤⒪ㅺᶀ刁丳摤⒪⡨䒗孛乘
ὒㅺ㙱∅Ɂ
• ⚃㔝ⵉ䥯⼩柟⍵晚⒒ỿ岋丳摤⒪ㅺᵷᵾ⫭堩ỿⷸ⒪䒗孛Ɂ㌉⚔ⵉỀᵱ₩Ⅺ⍓偡径
ㅴ奊䒙Ɂᵱ壥⭪⚔丣彂㌉↔䃈㭸䬅ɀ㮘䬅ɀ忣晛⭠ặㅺ䒙孁⚔丣Ɂ
• ⣦㜀䒕弥䥟濇暖⅞⬈堩仒䗨䬅德⅞⍇濇孛䘺ᵮ暖⅞䗨⅞⍇Ɂ奊㏜恌䒙㭸恌
Ṛ⍓偡径ㅴ⌻Ẉㅺ奊䒙Ɂ
• ᵱ壥⭪ṟẹ㚴㓽濃愵⯂ɀ东⺄ㅺ㮘䪭濄㌶⅞栲⍇ㅺ弿栲⍇Ɂ恌䗨栲ㆫ⍓偡⚌
樼徃㔯廐ㅺ⪼⚌樼䒙⋯丨Ṛ濇⍓偡Ṿ径ㅴ⌻Ẉㅺ奊䒙Ɂ
• ⼩柟ᶞ䒙㷴ợ䒌䉐䨯䗨䒙㷴㌶⸋Ɂ⣦㜀ợ䒌䗨ᵱ㖓䉐䨯䗨䒙㷴㌶⸋濇⍓偡径ㅴ㿏
㿢Ɂ
• ⺷䧞孧堩仒ᵱ偡↚ℛㅺ↚䁑㕚濇↚ℛ↦⍓偡㰨㹳Ɂ孛␌孆晚⒒ỿ岋丳摤⒪Ɂ䧞孧
堩仒ᶑợ䒌䗨↚ℛ↦㖓⫭䗨Ɂ⚌㫇ⵉỀ㛅Ṛᵯ↚ℛ↦ᵱṾ㰨㹳濇Ẫ⣦㜀↚ℛ
↦㰨㹳↔⬈ᵸ㌉奊↔∄䁑◌ㅺ㿏㿭䪭䁑㷴㕚濇⍓偡径ㅴ㙭⬗䗨⌱ⷸɁ
• ⺷㮘ㅺḺ䇍弿恌恌Ṛ㕚濇䨯⋗῀㫆ợ䒌㚐堩仒ⷚⅫ㔑䒙嵓㔑嵓◌Ɂ彂乑
㐱Ề㚐堩仒⍓偡径ㅴ㿏㿢ㅺ奊䒙Ɂ孛侸䱟晚⒒ỿ岋丳摤⒪弿垰ὒ䍪Ɂ
• ᵱ壥兎垰㵩㱥䧞孧堩仒恌Ɂ孛⍵晚⒒ỿ岋丳摤⒪䒗孛㵩㱥䧞孧堩仒恌Ɂᵱ㫇
䟒䗨㵩㱥⍓偡径ㅴ㝵偦恌Ṛ䞘㋃ㅺ䒙㭸恌Ṛ乁乼亞旛濇Ḳ佰径ㅴ㹳㮘ɀ奊䒙ㅺ㿏
㿢Ɂ
• ᵱ壥㋃⚳ㅺ㒝堩䒙㷴䒙乪Ɂᵱ壥⚌䒙乪ᶑ敘弿垰㎑㌉濇ᵱ壥ợ䒌ᵲḺ嬢⡫
䒌䗨⡾䒌㌶⸋⹚擣丣Ɂ⎊ⅽ⍓偡径ㅴ㿏㿢Ɂ
• ᵱ壥⭪愱䇍㒢⚌䒙㷴䒙乪ᵮ濇ᵱ壥嬍䒙㷴䒙乪㘘暖䁑㷴濇ᵱ壥㈭㉡䒙乪Ɂ⎊
ⅽ⍓偡Ṿ径ㅴ奊䒙ㅺ㿏㿢Ɂ
• 㚐堩仒ᵱ彦⍬䒕帏ặ㫯亞ɀゃ夦ㅺ䰢䣂ᵱ㫇濇ㅺ亞䙜丳槰ㅺ䝉嬪䗨Ḟ
濃≩㉐₣䩉濄ợ䒌濇旈曂弽Ḟ䒕岃岇⫭䗨ḺḞ䘵䛇ㅺ㉫⭠ợ䒌Ɂ
• ₣䩉ⷸ⌻䘵䛇濇䟒ὁᵱṾ䌍㚐堩仒Ɂ
• ᵱ壥ợ䒌ᵲ㉫⫾䗨埉₩ㅺ㙘㋆↚ℛ↦ᵱ⍰䗨ṟẹ↚ℛ↦Ɂ⎊ⅽ濇⚌↚ℛ⼎䌓⍓
偡ḋ䒃䗨樼⋯濇⍓偡径ㅴḋ␥㒩昀ㅺ䅪䀜濇ㅺ帏ặ⌻ẈɁ
ʓ Hi POWER濃乣凖濄
ʔ FILTER濃㦽凖濄
ʕ FAN-ONLY濃㦽凖濄
ʖ TIMER濃渨凖濄
ʗ OPERATION濃乣凖濄
ʘ RESET㉭搒
⭳⼧
• 㠤㝉䒙嵓㔑嵓◌㫇䟒⫭堩Ɂ⣦㜀䒙嵓㔑嵓◌⫭堩ᵱ㫇䟒濇⍓偡径ㅴ奊䒙Ɂ壥䟒嬈
⫭堩㔝㰹濇孛侸䱟⫭堩㚐堩仒䗨晚⒒ỿ岋丳摤⒪ㅺᵷᵾ䗨ỿⷸ⒪Ɂ
• ⚌⬪救䗨ㆣ敘ợ䒌㚐堩仒濇ㅺᵲḺ䄧䁋堩仒ᵤ峛ợ䒌㚐堩仒㕚濇䟒ὁᵱ⫾㚃
⚔ㆷ䧻㆛弿垰彾栲Ɂ彾栲ᵱ崗⍓偡径ㅴ♄亞㮋佰䧶⿓Ɂ
• 忣₱⚌敌䧻ㆷ䪭㷣⸊樼䗨䌓⟧濃樼 80%濄擣㕚敘ợ䒌㚐堩仒Ɂ⬈堩仒ᵮ
⍓偡㙭⅁丷濇䂚⍲㮘㹘⍓偡Ṿ厡↔⬚ᵮɁ
• ⺷擣㕚敘ᵱợ䒌㚐堩仒㕚濇孛救⾟ㅺ䒙嵓㔑嵓◌Ɂ
• 嬒⚌擣㕚敘ợ䒌㚐堩仒⍲濇䒕ᵷ⬚弿垰ὁɁ
• 㬳ⷘ兗㠤㝉ᵤ㪅⬈⡺堩仒䗨⫭堩⍔㖓⎊㋃⚳Ɂ⣦㜀⽡太㋃⚳䈚⽥濇㚐堩仒⍓偡
⛄厡ㅺᾢ壪濇径ㅴ⌻ẈɁ
• ⫭堩/㈪⋜↱曆㛣/䧞㭸弫㹈◌/䧞㭸㹈㵩◌㕚濇孛䨽⚌䦗♞䗨㠓⪴ᵮɁ⎊ⅽ⍓偡崰
ὶㅺ⌻ẈɁ
• ᵱ壥䨽⚌⬈⡺堩仒ᵮ濇ᵱ壥⚌ᵮ㒢仒ṟẹ䇍␥Ɂ⎊ⅽ⍓偡♄⛄厡ㅺᾢ壪佰径
ㅴ⌻ẈɁ⭝㚐堩仒䗨ṟẹ㋃⚳⚫⍓偡径ㅴ奊䒙ㅺ㿏㿢Ɂ
• ᵱ壥⚌䧞孧堩仒䗨䙘㌉㭸㲥ᶑợ䒌䄧䁋堩仒Ɂ䄧䁋堩仒䗨ᵱ⫰䄧䁋⍓偡径ㅴ䧶
⿓Ɂ
• ᵱ壥⚌⬈⡺堩仒⏌♘㒢仒ṟẹ䇍␥濇ᵱ壥嬍厡⍚❪䥓⚌⬈⡺堩仒⏌♘Ɂ⣦㜀㙭
厡⍚濇⭳∌䇍⍓偡Ṿ弿ⷚ㌉奊↔恌䒙㭸恌Ṛ濇径ㅴ㒩昀ㅺ㿏㿢Ɂ
• ᵱ壥⭪∌㡱䇍㒢⚌䧞孧堩仒㭸㲥䙘㌉⎝㈦䗨⚔㔝Ɂ弽㞛⍓偡⭝∌㡱䇍㙭岃曆⻕
Ɂ
• 䟒ὁ㋶㒢⅞㯅㮘Ɂ⺷㋶㒢㮘弫䥯ᵱ₩Ⅺ㕚濇⍓偡Ṿ㹳㮘濇⭝⬚径ㅴ㋃⚳Ɂ壥㠤
㝉ợ䒌䗨⫭堩㔝㰹㖓⎊㫇䟒濇孛侸䱟⫭堩㚐堩仒䗨晚⒒ỿ岋丳摤⒪ㅺᵷᵾ䗨ỿⷸ
⒪Ɂ
• ᵱ壥⭪堩㙭㴖ặ䗨刕䑚䪭ṟẹ⬝◌㒢↔㚐堩仒ᵮɁ⎊ⅽ⍓偡Ṿ嬍㮘弿㚐堩仒濇
≺䒙㭸乁乼濇径ㅴ奊䒙Ɂ
• ᵱ壥䒌桃␥唳ㅺ∌䇍⫭柣濇ㅺ䒌⮹䢞⋦⊞ɀ䰢⬪嬢⡫ㅺ凞㚓Ề␥䪭䇝㫮ⷸ
䒌⚞⍬Ɂᵱ壥⚌冝冚ㅺḺ廊廪ᵮợ䒌Ɂ⎊ⅽ䧞孧堩仒⍓偡⅞䌔㒩昀Ɂ⍊⡺弼⍓
偡㋃⚳弽䇍␥Ɂ
• ᵱ壥⚌㚐堩仒ᵯ㒢仒Ḻ䒙◌堩仒ㅺ⬚Ɂ㮘㹘⍓偡厡ᵯ濇径ㅴ㋃⚳ㅺ㒩昀Ɂ
• 㵩㱥㕚濇⼩柟῀㫆ợ䒌㚐堩仒ⷚⅫ㔑䒙嵓㔑嵓◌Ɂ♄ᶞ恌䗨栲ㆫ⍓偡㫇ṉ樼徃
㔯廐濇Ḳ佰⍓偡径ㅴ⌻ẈɁ
• ᵱ壥䒌㮘㱻㴈ᶟ䧞孧堩仒Ɂ⎊ⅽ⍓偡径ㅴ奊䒙Ɂ
• 㵩㱥↱曆㛣/䧞㭸弫㹈◌⍲濇孛㑊㋭ṟẹ㮘Ⅺ濇ợ⌼ⷖɁ⣦㜀㙭㮘㫯䒽濇⍓偡径
ㅴ奊䒙Ɂ
• ㈪ᵯ↱曆㛣⍲濇ᵱ壥奊㏜㚐堩仒䗨愵⯂恌ṚɁ⎊ⅽ⍓偡径ㅴ⌻ẈɁ
• ᵱ壥奊㏜㚐堩仒䗨弿栲⍇恌ằㅺ摁伩䆫Ɂ⎊ⅽ⍓偡径ㅴ⌻ẈɁ
• ⺷⎐↔晛⡔ᵸ⍓偡㙭晛⅟㕚濇孛῀㫆ợ䒌㚐堩仒ⷚ㔑䒙嵓㔑嵓◌Ɂ⣦㜀⅞䌔晛
⅟濇⍓偡径ㅴ㒩昀Ɂ
• 忉㌋◌堩仒䗨䒙㯄濕
- ⷸṉ㫇䟒䗨㛥⾋濃+濄⏰濃–濄㌶Ɂ
- ᵱ愱⡱₩䒙Ɂ
-
ᵱ壥ợ䒌ĥ嬒䗨ợ䒌㚃Ħⵖ↔㚃䗨䒙㯄Ɂ
- ᵱ壥⭪䒌弫䗨䒙㯄䒽⚌忉㌋◌堩仒Ɂ
- ᵱ壥㵛䒌ᵱ⍰䯟⛯䗨䒙㯄濇ᵱ壥㵛䒌㔔㕋䒙㯄Ɂ
- ᵱ壥䙘㌉䁮㌉䒙㯄Ɂ
- ᵱ壥嬍䒙㯄䝑嵓濇ᵱ壥㈪⋜ɀ∄䁑䒙㯄濇ᵱ壥⭪䒙㯄ㆸ↔㿏ᶑɁ⣦㜀䒙㯄㚎
㫇䟒仒濇⍓偡Ṿ䅪䀜ㅺ径ㅴ㴖ặ㰨㹳濇径ㅴ㿠Ẉㅺ⌻ẈɁ⣦㜀奊㏜↔㴖ặ濇
孛䒌㮘⻟ⷹ㵩㱻Ɂ⣦㜀㴖ặ奊䠔↔嬢⡫濇孛㑊旈ṉ忣₱䙘㌉㌉奊Ɂ
- ᵱ壥㒢⚌₣䩉⍓ṉ⢃↔䗨⚔㔝Ɂ⣦㜀⎂␡䒙㯄濇孛䨯⋗⮕⊟Ɂ
• ↚径⒪⭝♄ᵱ忙⫬㚐ㆯᶑ䗨存㕲佰径ㅴ䗨㋃⚳㣦ᵱ岃岇Ɂ
⬈堩仒㖢䢞
1
TSB 1110655125_(01_CS).indd 2 8/7/2014 6:14:05 PM
TSB 1110655137_(03_CS).indd 2 15/12/2014 08:58:42
Page 9

1
㉭ 濕㰣ㆤ晤䗨⛦䙘㔝⍵䥟∌䗢
⍚㭸䧻Ɂ
2
㉭ 濕嬍㭸㲥兎∌㎫㎪濇㉭ᵤ
ᵯⅽ῀㫆Ɂ
3
⭝㮘㔝⍵濇孛ㆯ∌孧処Ɂ
K⡫弫㹈◌
1. ㆷ弿栲⍇㞠㝩濇㈪ᵯ䧞㭸弫㹈◌Ɂ
2. ⫭堩弫㹈◌Ɂ濃⌦夥悱Ṛ埌ᶑ䗨孊个ὅ⿓濄Ɂ
堩廡䒙㯄濃⺷ợ䒌㕄丣㐱Ề㕚Ɂ濄
1. ㈪ᵯ㸵䘺Ɂ
2. ㉭䃋濃+濄⏰濃–濄ằ仒㌶ 2 処㔔䒙㯄濃AAA ⛯濄Ɂ
㕚搃嬢仒
1. 䒌搩䩸⭺㌌
Ɂ
⣦㜀⫾㕚◌㉫䢞敎䀥濇ⅽ廐↔㌉ᵯ㛉䗨㫉樈 2Ɂ
2. ㉭
ㅺ 濕孧処㕚敘Ɂ
3. ㉭ 濕嬢⫾㕚敘Ɂ
忉㌋◌愱仒
䒌搩䩸⭺㌌
ㅺ
1. ㈪ᵯ䒙㯄Ɂ
2. ㉭
Ɂ
3. ㌶䒙㯄Ɂ
㱌濕
• ᵱ壥嬍ḺḞㆯ∌䥟∌䗢⍚㭸䧻Ɂ
• ⚌㜴弴垰㦅ᵯ濇䗢⍚㭸䧻Ṿ兎∌⫾ằɁ
㱌濕
• ㌴ỿ䗨忉㌋◌㖓㕄丣䯟⛯濇⍓ṉ䒌Ề㙭丣㐱ỀɁ⣦㜀晤壥㙭丣䗨㌋↚濇孛
⌦敩⫭堩存㕲ᶑĥ⣦ẹ彂㌉忉㌋◌弿垰㙭丣㐱ỀĦɁ
• ⚌㙭丣㐱Ềᶑ濇⺷䒌㆛Ⅻ㔑䧞孧䗨䒙㷴㕚濇忉㌋◌⭪⿆⡱ᶞↁ⤯䈚ℙ
濃PRESETɀTIMER ⏰ CLOCK ⭪弸♂ↁ⤯䈚⽥濄Ɂ
ʓ 丆⡺ὅ⍛⌵⭨◌
ʔ ⎓∌/῀㫆㉭搒
ʕ 㦅彭㉍㉭搒濃MODE濄
ʖ 㶍⸊㉭搒濃TEMP濄
ʗ 栲ㆫ廐徃㉭搒濃FAN濄
ʘ 䗢⍚㭸䧻㎫㎪㉭搒濃SWING濄
ʙ ♞⫾䗢⍚㭸䧻㉭搒濃FIX濄
ʚ ⫾㕚◌㉭搒濃ON濄
ʛ ⫾㕚◌㉭搒濃OFF濄
ʜ 嬢仒㉭搒濃SET濄
ʝ 㵩旈㉭搒濃CLR濄
ʞ 嬔⼪⏰柨嬢㉭搒濃PRESET濄
ʟ ⊹奊㉭搒濃ONE-TOUCH濄
ʠ 樼∃䋫㉭搒濃Hi-POWER濄
ʡ
処偡㉭搒濃ECO濄
ʢ 暽杗㉭搒濃QUIET濄
ʣ
其彦䛅䚄㉭搒濃COMFORT SLEEP濄
ʤ 弫㹈◌愱仒㉭搒濃FILTER濄
ʥ 嬢⫾㕚搃㉭搒濃CLOCK濄
ʦ 㠤㝉㉭搒濃CHECK濄
ʧ 愱仒㉭搒濃RESET濄
㉭ĥONE-TOUCHĦ㉭搒⬂䌔兎∌弴垰濇弽㖓ᶞ䍧⍨⚔⊞⛯㳬岝佩䗨ᾳ⣡ㆤ
⫾↚䗨∃偡Ɂ⫾↚䗨嬢仒Ṿ㌋↚㶍⸊㭸㲥⺞⸊ɀ㭸㲥㔝⍵⏰Ḻ嬢仒濇ṉἣợ「⍓
ṉ彭㉍ợ䒌ĥONE-TOUCHĦ㉭搒Ɂ⣦㜀ᾳ⣡Ḻ嬢仒濇⍓ṉḲᶀ刁堩仒䗨嬜⡾
Ḻ㐱Ề∃偡ᶑ弿垰彭㉍Ɂ
㉭
濕⤯弴垰Ɂ
剉壥兎∌彭㉍↚ℛㅺḩ栲ㆫ弴垰
1. ㉭ 濕彭㉍ AɁ
2. ㉭ 濕嬢⫾ㆤ晤䗨㶍⸊Ɂ
3. ㉭ 濕彭㉍ AUTOɀLOW
ɀLOW+ ɀMED ɀMED+ ㅺ
HIGH
Ɂ
1. ㉭ 濕彭㉍↚ℛ
ㅺḩ栲ㆫ Ɂ
2. ㉭ 濕嬢⫾ㆤ晤䗨㶍⸊Ɂ
↚ℛ濕㙤Ẳ 17°C濇ḩ栲ㆫ濕㕄㶍⸊㉫䢞
3. ㉭ 濕彭㉍ AUTO ɀLOW
ɀLOW+ ɀMED ɀMED+ ㅺ
HIGH Ɂ
ᶞ旈㷣濇Ṿ兎∌㌋↚彦⸊䗨↚ℛ⾋偡Ɂ
1.㉭
濕彭㉍旈㷣
Ɂ
2.㉭ 濕嬢⫾ㆤ晤䗨㶍⸊Ɂ
兎∌㌋↚⬈㶍⏰㭸㲥ṉ∄⽏↚ℛ弴垰濃ᵱ≩㉐ DRY ⏰ FAN ONLY 㦅濄
㉭ 濕⤯⏰῀㫆弴垰Ɂ
⚌㇢ᵱ↔忉㌋◌ㅺ忉㌋◌㰅䒙䗨〩ℙᵯ
• ㉭ RESET ㉭搒濇㕄晤ợ䒌忉㌋◌⮕⍓ṉ⎓∌ㅺ῀
㫆㚐堩仒Ɂ
• 弴垰㦅嬢⫾ᶞ AUTOMATIC 弴垰濇柨嬢㶍⸊ᶞ
24°C ᵸ栲ㆫ弴垰ᶞ兎∌廐徃Ɂ
䧞孧弴垰㕚濇嬢⫾⫾㕚◌Ɂ
嬢⫾ ON ⫾㕚◌ 嬢⫾ OFF ⫾㕚◌
1
㉭ 濕 嬢⫾ㆤ晤䗨 ON ⫾㕚◌Ɂ
㉭ 濕 嬢⫾ㆤ晤䗨 OFF ⫾㕚◌Ɂ
2
㉭ 濕嬢⫾⫾㕚◌Ɂ ㉭ 濕嬢⫾⫾㕚◌Ɂ
3
㉭ 濕⌺㳬⫾㕚◌Ɂ ㉭ 濕⌺㳬⫾㕚◌Ɂ
㬳㕉⫾㕚◌₥嬜䒌㆛⍰㕚嬢⫾ ON ⏰ OFF ⫾㕚◌濇ᵸṾ㬳⢍㼤㲟Ɂ
嬢⫾㬳㕉⫾㕚◌
1
㉭ 濕嬢⫾ ON ⫾㕚◌Ɂ
3
㉭ Ɂ
2
㉭ 濕嬢⫾ OFF ⫾㕚◌Ɂ
4
⚌濃 ㅺ 濄㝫嬔敎䀥㚃敘㉭
㉭搒Ɂ
• 㼤㲟㬳⢍䗨⫾㕚◌㚃敘濇Ṿ㉫䢞ᶈᶎ䬑⢘濃 ɀ 濄Ɂ
㱌濕
• ὁ㉥忉㌋◌䗨ὅ⍛⍓Ẅ廷↔⬈堩仒濖⎊ⅽ濇Ṿ⅞䌔㙤擣 15 Ⅺ搃䗨⹚彃Ɂ
• ⭪ὁ⪼嬢仒䒌ᵯᵤ㪅䙜⍰䗨弴垰Ɂ
兎∌㌋↚ㆣ敘弿垰処偡濃ᵱ≩㉐ DRY ⏰ FAN ONLY 㦅濄
㉭ 濕⤯⏰῀㫆弴垰Ɂ
㱌濕 ↚ℛ弴垰濖嬢⫾䗨㶍⸊⭪⚌ 2 ⭳㕚兎∌⊫樼濇㬳⭳㕚⊫樼 1 ⸊濃㙤⡾⊫樼
2 ⸊濄Ɂ
↚ℛ/ḩ栲ㆫ弴垰
7
旈㷣弴垰
8
樼∃䋫弴垰
9
処偡弴垰
10
ᶘ㕚㐱Ề
11
⫾㕚◌㐱Ề
12
ợ䒌↱K⡫
2
㭸㲥㔝⍵
3
忉㌋◌
4
⊹奊
5
兎∌弴垰
6
CS
ES
IT
DE
PT
PL
CZ
RU
CR
HU
TR
NL
GR
SV
FI
NO
DK
RO
BG
EE
LV
SK
SI
TSB 1110655125_(01_CS).indd 3 8/7/2014 6:14:05 PM
FIX
SWING
ONE-TOUCH
MODE
FAN
MODE
FAN
MODE
Hi POWER
SWING
FAN
FIX
QUIET
Hi POWER
ONE-TOUCH
COMFORT
SLEEP
4
5
!
-
"
%
(
8
1
2
$
)
,
&
#
3
+
7
6
~
9
TSB 1110655137_(03_CS).indd 2 15/12/2014 08:58:42
Page 10

嬢⫾ᾳ⣡弴垰濇ỿṉ⍲ợ䒌Ɂ㚐堩仒Ṿ嬔⼪嬢仒濃ᵱ≩㉐㭸㲥㔝⍵濄濇ỿṉ⍲
ợ䒌Ɂ
1. 彭㉍ᾳ⣡䗨弴垰Ɂ
2. ㉭ẳ 3 䤶搃濇嬔ẳ嬢仒Ɂ
㖢䢞 P 㝫嬔Ɂ
3. ㉭ 濕ợ䒌柨嬢䗨弴垰Ɂ
ṉ峩Ẳ栲ㆫ廐徃弿垰暽杗弴垰濃ᵱ≩㉐ DRY 㦅濄
㉭
濕⤯⏰῀㫆弴垰Ɂ
㱌濕⚌㜴㛅Ṛᵯ濇䒕Ẳ柵杗䇝⾋濇QUIET 弴垰⍓偡㕄㰹㌴ỿ崗⢃䗨↚ℛɁ
ᶞ其彦䛅䚄濇兎∌㌋↚㭸㲥ⷚ兎∌㚞Ɂ
㉭
濕ᶞ OFF ⫾㕚◌弴垰彭㉍ 1ɀ3ɀ5 ㅺ 9 ⭳㕚Ɂ
㱌濕 ↚ℛ弴垰㕚濇嬢⫾䗨㶍⸊Ṿ⚌ 2 ⭳㕚兎∌⊫樼濇㬳⭳㕚⊫樼 1 ⸊濃㙤⡾
⊫樼 2 ⸊濄Ɂ
€Ⅻ㔑䒙嵓㔑嵓◌Ɂ
弫㹈◌愱仒濃ḩ㜴㚞⛯濄
FILTER ㉫䢞㿓䀝Ḓ濖⼩柟㵩㱥弫㹈◌Ɂ
壥救㉫䢞㿓濇㉭⬈堩仒ᵮ䗨 RESET ㉭搒ㅺ忉㌋◌ᵮ䗨 FILTER ㉭搒Ɂ
⬈堩仒⏰忉㌋◌
• ⼩壥㕚䒌㷣ⵧ㵩㱥⬈堩仒⏰忉㌋◌Ɂ
• ᵱ偡ợ䒌㯡㰝ɀ䥤愮↦ɀㇿ₭䯭ㅺ≺⫊⡨䍪䗨旈⭼◌Ɂ
1. ᵭⅪ搃ὁ㈈∃偡濕䧥䂚愱⎓ㅺⅫ㋆ᶞ ON 䗨 3 Ⅺ搃濇忣₱㼤㲟㚐堩仒Ɂ
2. ⺷㚐堩仒弴垰㕚濇⍓偡Ṿ⎐↔ᵤ廟⼒䗨⏸◷⡔Ɂ弽㖓㫇䗨濇♄ᶞ⏸◷⡔
⍓偡㖓➵㓽儌値/㒚亍峛䗨Ɂ
䧞孧ⵉỀ㛅Ṛ
忣₱⬈堩仒ᶑ䗨㷣㭸径ㅴ䗨兑⏗Ɂ
1. ⣦㜀⚌ĥ↚ℛĦㅺĥ旈㷣Ħ㦅ᶑ㉭ᵤ㪅
㉭搒濇栲ㆫ⭪之乑
弴垰 20 Ⅺ搃濇䂚⍲兎∌救Ɂ弽⭪ℳ⬈堩仒ᶑ䗨㷣㭸Ɂ
2. 壥䨯⋗῀㫆㚐堩仒濇⚌ 30 䤶㉭ 2 㪅 Ɂ
㶍⸊
弴垰
⬈⡺㶍⸊ ⬈㶍⸊
↚ℛ 21°C ~ 43°C 21°C ~ 32°C
旈㷣 19°C ~ 43°C 17°C ~ 32°C
⣦㜀㙭 2 ᶎ䧞孧⫭堩⚌䙜曄張䗨ằ仒濇ⅽ⊹䉐ợ䒌⍨ᶎ⬈堩仒䗨忉㌋◌Ɂ
忉㌋◌ B 嬢仒Ɂ
1. ㉭⬈堩仒ᵮ䗨 RESET ㉭搒濇ㆷ䧞孧Ɂ
2. ⭪忉㌋◌㉫⍵⬈堩仒Ɂ
3. 䒌搩䩸⭺柚ẳ忉㌋◌ᵮ䗨
㉭搒Ɂ㖢䢞⮳ᵮ⭪⅞䌔ĥ00ĦɁ
4. ⚌㌌ 䗨⍰㕚㉭ ɁĥBĦ⭪⅞䌔⚌㖢䢞⮳ᵮ濇ĥ00Ħ⭪㳬⢕濇佰
䧞孧⭪救Ɂ嬔⼪忉㌋◌ BɁ
㱌濕1. 愱⡱ᵮ彔㫉樈⭪忉㌋◌愱仒ᶞ AɁ
2. 忉㌋◌ A 㰅㙭ĥAĦ㖢䢞Ɂ
3. 忉㌋◌䗨⅞⋦渼嬈嬢仒㖓 AɁ
㚐堩仒ᵱⵉỀɁ ↚ℛẲɁ
• 䒙㷴⾟救Ɂ
• 䒙嵓㔑嵓◌堏㼤㲟濇Ⅻ㔑䒙㷴Ɂ
• 䒙㲥㔑嵓Ɂ
• 嬢⫾ ON ⫾㕚◌Ɂ
• 弫㹈◌堏㿔⭼➙⟂Ɂ
• 㶍⸊嬢⫾ᵱ㫇Ɂ
• 敌䧻ㆷɁ
• ⬈⡺堩仒䗨弿栲⍇ㅺ⅞栲⍇堏斟⟂Ɂ
• 栲ㆫ廐徃⢎ẲɁ
• 弴垰㦅ᶞ FAN ㅺ DRYɁ
弴垰⏰⾋偡
19
㒩昀㋶旈濃㠤㝉䀝濄
20
忉㌋◌ A-B 彭㉍
21
柨嬢弴垰
13
兎∌愱⎓弴垰
14
暽杗弴垰
15
其彦䛅䚄弴垰
16
ὁ
17
兎㵩㱥弴垰濃ḩ↚ℛ⏰旈㷣弴垰濄
18
QUIET
㚐ḋ␥嬢嬅ᶞ⍓⚌⌵䒃῀䒙⍲濇兎∌ṉᵲ῀䒙↱䙜⍰䗨㐱Ề㦅愱㔔⎓∌Ɂ
ὅ⿓
㚐ḋ␥⅞⋦㕚濇兎∌愱⎓∃偡⋗嬢⫾⚌ ON ằ仒Ɂ
⣦㜀ᵱ晤壥孉∃偡濇孛⭪嬢⫾ᶞ OFFɁ
⣦ẹ⌺㳬兎∌愱⎓
1. ㉭ẳ⬈㚞ᵮ䗨 [RESET] ㉭搒
3 䤶搃濇⌺㳬弴垰Ɂ
濃⭪⌵⅞
3 㪅㌴䢞杗濇Ẫ OPERATION ㉫䢞㿓ᵱ敎䀥濄
2. ㉭ẳ⬈㚞ᵮ䗨 [RESET] ㉭搒
3 䤶搃濇嬢⫾弴垰Ɂ濃⭪⌵⅞ 3 㪅㌴䢞杗濇
ᵸ OPERATION ㉫䢞㿓敎䀥
5 㪅/䤶濇㉥乑 5 䤶濄
• 孛≣㐱Ề ON ⫾㕚◌⏰ OFF ⫾㕚◌Ɂ
㱌濕兎∌愱⎓弴垰渼嬈嬢⫾ᶞ ONɁ
ba
TSB 1110655137_(03_CS).indd 2 15/12/2014 08:58:42
Page 11

TSB 1110655137_EN.indd 4 12/18/57 BE 1:42 PM
Page 12

1110655137
TSB 1110655137_cover.indd 2 12/18/57 BE 1:44 PM
 Loading...