

Page 1

QUICK START GUIDE
24D153*DG / 24W153*DG
LED Backlight LCD TV
This document is to provide you with an overview of your Toshiba TV.
It is expected that during the life of your TV rmware updates will
be made available to ensure that your TV maintains optimum
performance. You can download the latest version of rmware from
www.toshiba-om.net/rmware.php
Some features listed in this document are limited due to local
legislation and may not be available in all countries.
If you wish to view the advanced manual for this Toshiba TV, you can
do so by visiting
www.toshiba-om.net
“Register your TV online at: www.toshiba-europe.com/registration”
Toshiba estimates that the initiative of making the advanced functions available online
will save over 100.000 trees per year (6.5 Million kg Co2).
If you wish to view the advanced functions but do not have access to a computer or
the internet then please contact your local Helpline number whose Contact details are
shown at the back of this book.
Page 2

Contents
English - 1 -
English
Safety Precautions ................................................. 2
Air Circulation ..................................................... 2
Heat Damage...................................................... 2
Mains Supply ...................................................... 2
Warning .............................................................. 2
Do ....................................................................... 2
Do not ................................................................. 2
Installation and Important Information .................... 3
EXCLUSION CLAUSE........................................ 3
Important safety information ................................... 4
Fitting or Removing the stand................................. 5
The Remote Control (TV - DVD) ............................ 6
Inserting Batteries and Effective Range of the
Remote Control................................................... 6
Connecting External Equipment ............................. 7
Connecting an HDMI
®
or DVI Device to the HDMI
Input........................................................................ 8
To Connect an HDMI Device .............................. 8
To Connect a DVI Device.................................... 8
Connecting a Computer.......................................... 9
To Connect a Computer ...................................... 9
To Connect a USB Flash Drive ........................... 9
Controlling the TV ................................................. 10
Switching on ..................................................... 10
Using the Remote Control ................................ 10
Using the Controls on the TV ............................ 10
Initial Installation ....................................................11
DVD Mode ............................................................ 13
Handling Discs .................................................. 13
Cleaning Discs .................................................. 13
DVD - Features ................................................. 13
DVD - Control buttons on the TV ...................... 13
How to watch a DVD......................................... 14
Notes on DVD Playback ................................... 14
DVD Mode Conguration .................................. 15
Preferences ...................................................... 15
The DVD picture quality is poor ........................ 16
Appendix A: DVD Mode Supported le formats.... 17
Appendix B: Compatible disc types ...................... 17
Specications and Accessories ............................ 19
License Information .............................................. 20
Q & A Section ....................................................... 21
Page 3

English - 2 -
English
Safety Precautions
This equipment has been designed and manufactured to meet international safety standards but, like any electrical equipment,
care must be taken to obtain the best results and for safety to be assured. Please read the points below for your own safety.
They are of a general nature, intended to help with all electronic consumer products.
Air Circulation
Leave more than 10cm around all edges when wall mounting
the television to allow adequate ventilation. This will prevent
overheating and possible damage to the television. Dusty
places should also be avoided.
Heat Damage
Damage may occur if the television is left in direct sunlight
or near a heater. Avoid places subject to extremely high
temperatures or humidity, or locations where the temperature
is likely to fall below 5°C (41°F).
Mains Supply
The set should be operated only from a 220-240 V AC 50 Hz
outlet. Make sure the TV or its stand are not placed on the
power cord. DO NOT cut off the mains plug from this equipment, this incorporates a special Radio Interference Filter, the
removal of which will impair its performance. It should only
be replaced by a correctly rated and approved type. IF IN
DOUBT PLEASE CONSULT A COMPETENT ELECTRICIAN.
Warning
To prevent the spread of re, keep candles or other open
ames away from this product at all times.
Do
DO read these operating instructions before you attempt to
use the equipment.
DO ensure that all electrical connections (including the mains
plug, extension leads and inter connections between pieces
of equipment) are properly made and in accordance with the
manufacturers’ instructions. Switch off and withdraw the mains
plug before making or changing connections.
DO consult your dealer if you are ever in doubt about the
installation, operation or safety of your equipment.
DO be careful with any glass panels or doors on equipment.
Do not
DON’T remove any xed cover as this may expose danger-
ous voltages.
DON’T obstruct the ventilation openings of the equipment
with items such as newspapers, tablecloths, curtains, etc.
Overheating will cause damage.
DON’T allow electrical equipment to be exposed to dripping
or splashing or objects lled with liquids.
DON’T place hot objects or naked ame sources, such as
lighted candles or nightlights on, or close to equipment. High
temperatures can melt plastic and lead to res.
DON’T use makeshift stands and use the stand manufacturers
supplied screws.
DON’T leave equipment switched on when it is unattend-
ed, unless it is specically stated that it is designed for
unattended operation or has a standby mode. Switch off by
withdrawing the plug, make sure your family know how to do
this. Special arrangements may need to be made for people
with disabilities.
DON’T continue to operate the equipment if you are in any
doubt about it working normally, or it is damaged in any way
- switch off, withdraw the mains plug and consult your dealer.
WARNING - excessive sound pressure from earphones or
headphones can cause hearing loss.
ABOVE ALL - NEVER let anyone, especially children,
push or hit the screen, push anything into holes, slots
or any other openings in the case.
NEVER guess or take chances with electrical equipment
of any kind - it is better to be safe than sorry.
THE MAINS PLUG IS USED AS A DISCONNECTING
DEVICE AND THEREFORE SHOULD BE READILY OPERABLE.
Note: Interactive video games that involve shooting a “gun”
type of joystick at the on-screen target may not work with
this TV.
The illustrations and the OSD in this operation
manual are for explanation purposes and may vary
slightly from the actual operations.
Page 4
English - 3 -
English
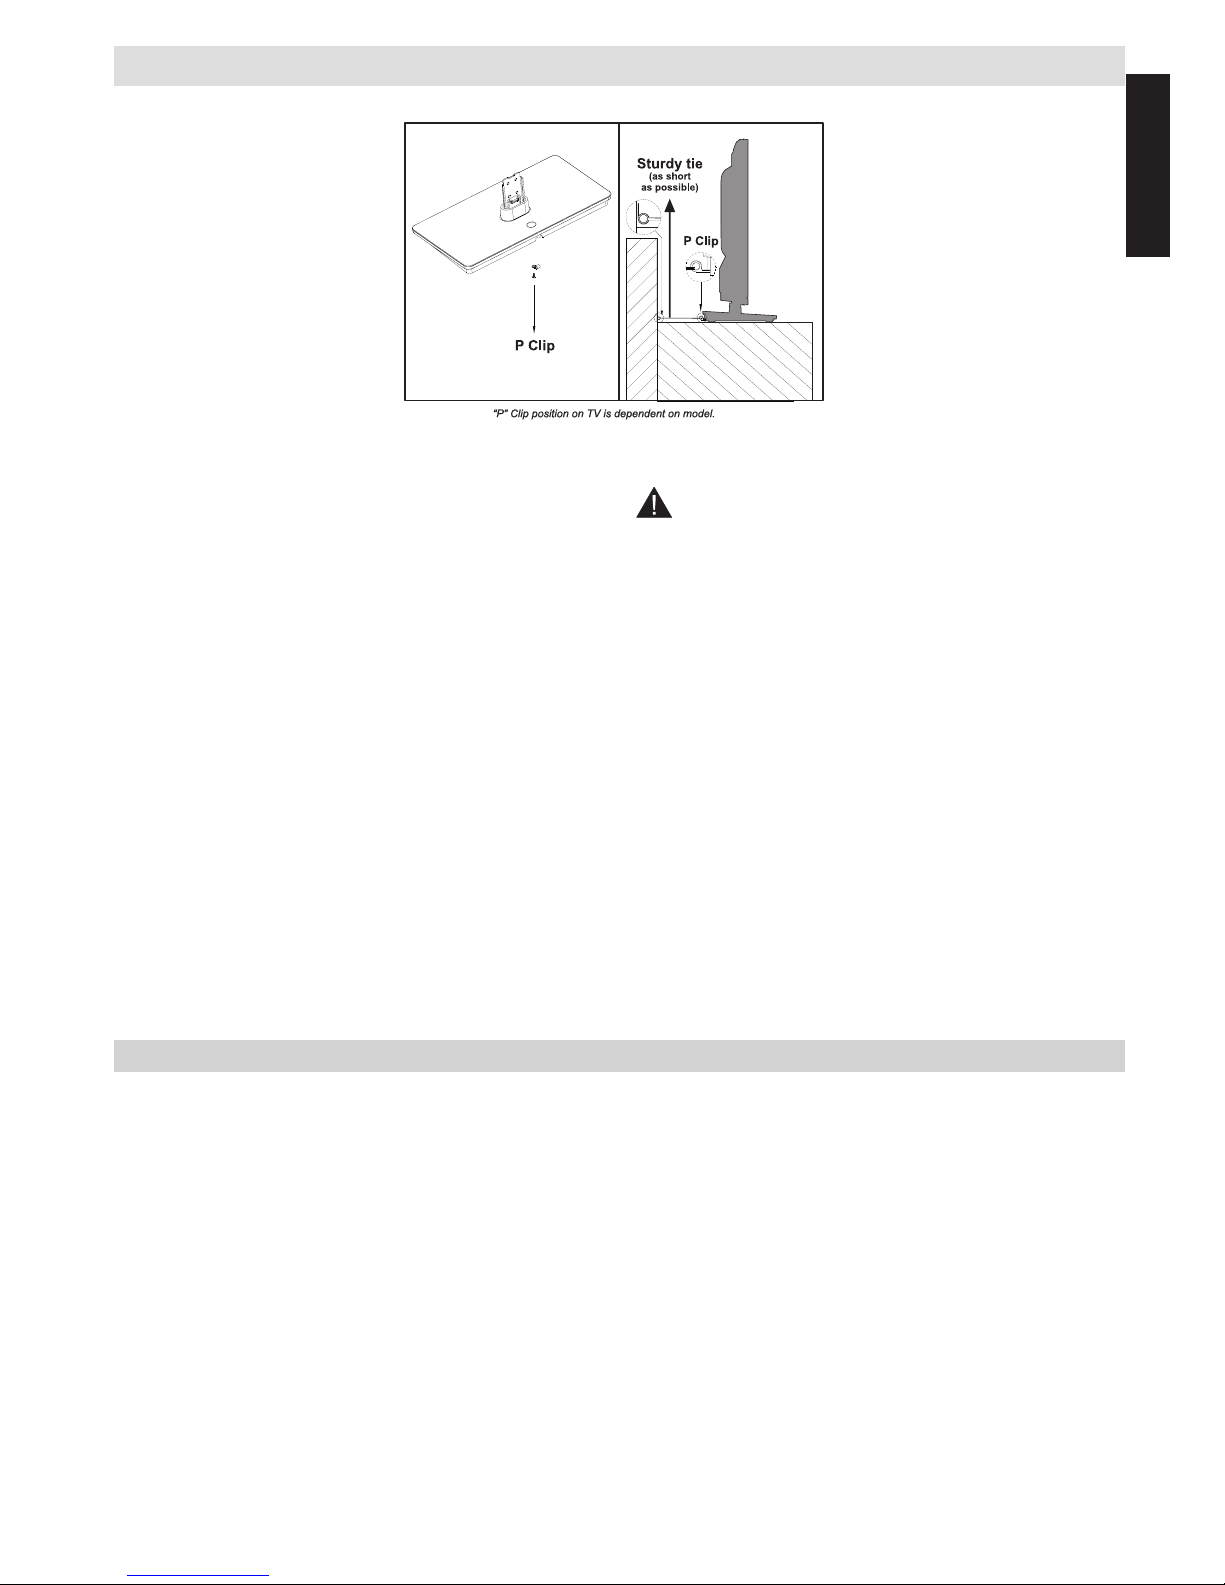
Installation and Important Information
Where to install
* Button and stand style
is dependent on model.
Locate the television away from direct sunlight and strong
lights. Soft, indirect lighting is recommended for comfortable
viewing. Use curtains or blinds to prevent direct sunlight falling
on the screen.
Always place the TV on a sturdy, level, stable surface that can
support the entire bottom surface of the stand and the weight
of the unit using the following method to secure the TV to a
wall using a sturdy tie on the back of the stand.
The LCD display panels are manufactured using an extremely
high level of precision technology; however, sometimes some
parts of the screen may be missing picture elements or have
luminous spots. This is not a sign of a malfunction.
Make sure the television is located in a position where it
cannot be pushed or hit by objects, as pressure will break or
damage the screen. Also, please ensure that small items are
not inserted into slots or openings in the case.
Avoid using chemicals (such as air refreshers,
cleaning agents, etc.) on or near the TV pedestal.
Studies indicate that plastics may weaken and crack
over time from the combination effects of chemical agents
and mechanical stress (such as weight of TV). Failure to
follow these instructions could result in serious injury and/or
permanent damage to TV and TV pedestal.
Cleaning the screen and cabinet…
Turn off the power, and clean the screen and cabinet with
a soft, dry cloth. We recommend that you do not use any
proprietary polishes or solvents on the screen or cabinet as
this may cause damage.
Please take note
The digital reception function of this television is only effective in the countries listed in the “Country” section
during the rst time installation menu. Depending on country/area, some of this television’s functions may not
be available. Reception of future additional or modied services cannot be guaranteed with this television.
If stationary images generated by 4:3 broadcasts, text services, channel identication logos, computer displays,
video games, on screen menus, etc. are left on the television screen for any length of time, they could become
conspicuous. It is always advisable to reduce both the brightness and contrast settings.
Very long, continuous use of the 4:3 picture on a 16:9 screen may result in some retention of the image at
the 4:3 outlines. This is not a defect of the LCD TV and is not covered under the manufacturer’s warranty.
Regular use of other size modes will prevent permanent retention.
EXCLUSION CLAUSE
Toshiba shall under no circumstances be liable for loss and/or damage to the product caused by:
i) re;
ii) earthquake;
iii) accidental damage;
iv) intentional misuse of the product;
v) use of the product in improper conditions;
vi) loss and/or damage caused to the product whilst in the possession of a third party;
vii) any damage or loss caused as a result of the owner’s failure and/or neglect to follow the instructions set out in the
owner’s manual;
viii) any loss or damage caused directly as a result of misuse or malfunction of the product when used simultaneously with
associated equipment;
Furthermore, under no circumstances shall Toshiba be liable for any consequential loss and/or damage including but not
limited to the following, loss of prot, interruption of business, the loss of recorded data whether caused during normal operation or misuse of the product.
Page 5

English - 4 -
English
Important safety information
• Any function related to the digital television (with the DVB logo) is available only within the country or area
where such signals are transmitted. Verify with the salesperson if it is possible to receive a DVB - T/C signal
in the area where you live.
• Even if the television conforms to the required DVB - T/C specications, the compatibility with future digital
DVB - T/C transmissions is not guaranteed.
• Some digital television functions may not be available in certain countries.
• The DVB - T/C system present in this device, allows reception of both FTA (Free To Air) and Encrypted
channels.
• Note; Encrypted channels require a specic encryption system to view, which may not be available in certain
countries.
• DVB is a registered trademark of the DVB Project. The DVB logo indicates that the product is compliant
with European Digital Broadcasting.
• DVB T is Digital Video Broadcast via an Aerial or antenna system.
• DVB C is Digital Video Broadcast via a Cable system.
IMPORTANT INFORMATION
TV Installation
• Do not stand the televisions on cloth or other materials placed between the television and supporting furniture.
• Educate children about the dangers of climbing on furniture to reach the television or its controls.
• Always hold the plug when disconnecting the unit from the socket outlet. Do not pull on ex. The ex can
become damaged and cause a short circuit.
• Use a soft, dry cloth to clean the unit.
• Set up unit so that no one will trip over the ex.
• If you intend to wall mount the unit, contact the shop where you purchased the unit for advice, and leave the
installation work to professionals. Improper installation can cause damage and/or injuries.
• To protect the unit during a thunder storm, unplug the AC power cord and disconnect the aerial, cable and
satellite decoder/systems etc.
Caution: Do not touch the aerial connector.
• The unit becomes warm when in operation. Do not place any covers or blankets on the unit in order to
prevent overheating.
• The ventilation holes should not be blocked. Do not set up near radiators. Do not place in direct sunshine.
• Moisture condensation occurs in the following situations:
- When you move the unit from a cold place to a warm place.
- When you use the unit in a room where the heater was just turned on.
- When you use the unit in an area where cold air from an air conditioner directly hits the unit.
- When you use the unit in a humid place.
• Never use the unit when moisture condensation could occur.
• Using the unit when moisture condensation exists may damage its own internal parts. Allow two or three
hours, the unit will warm up and moisture will be evaporated before switching on.
Page 6
English - 5 -
English
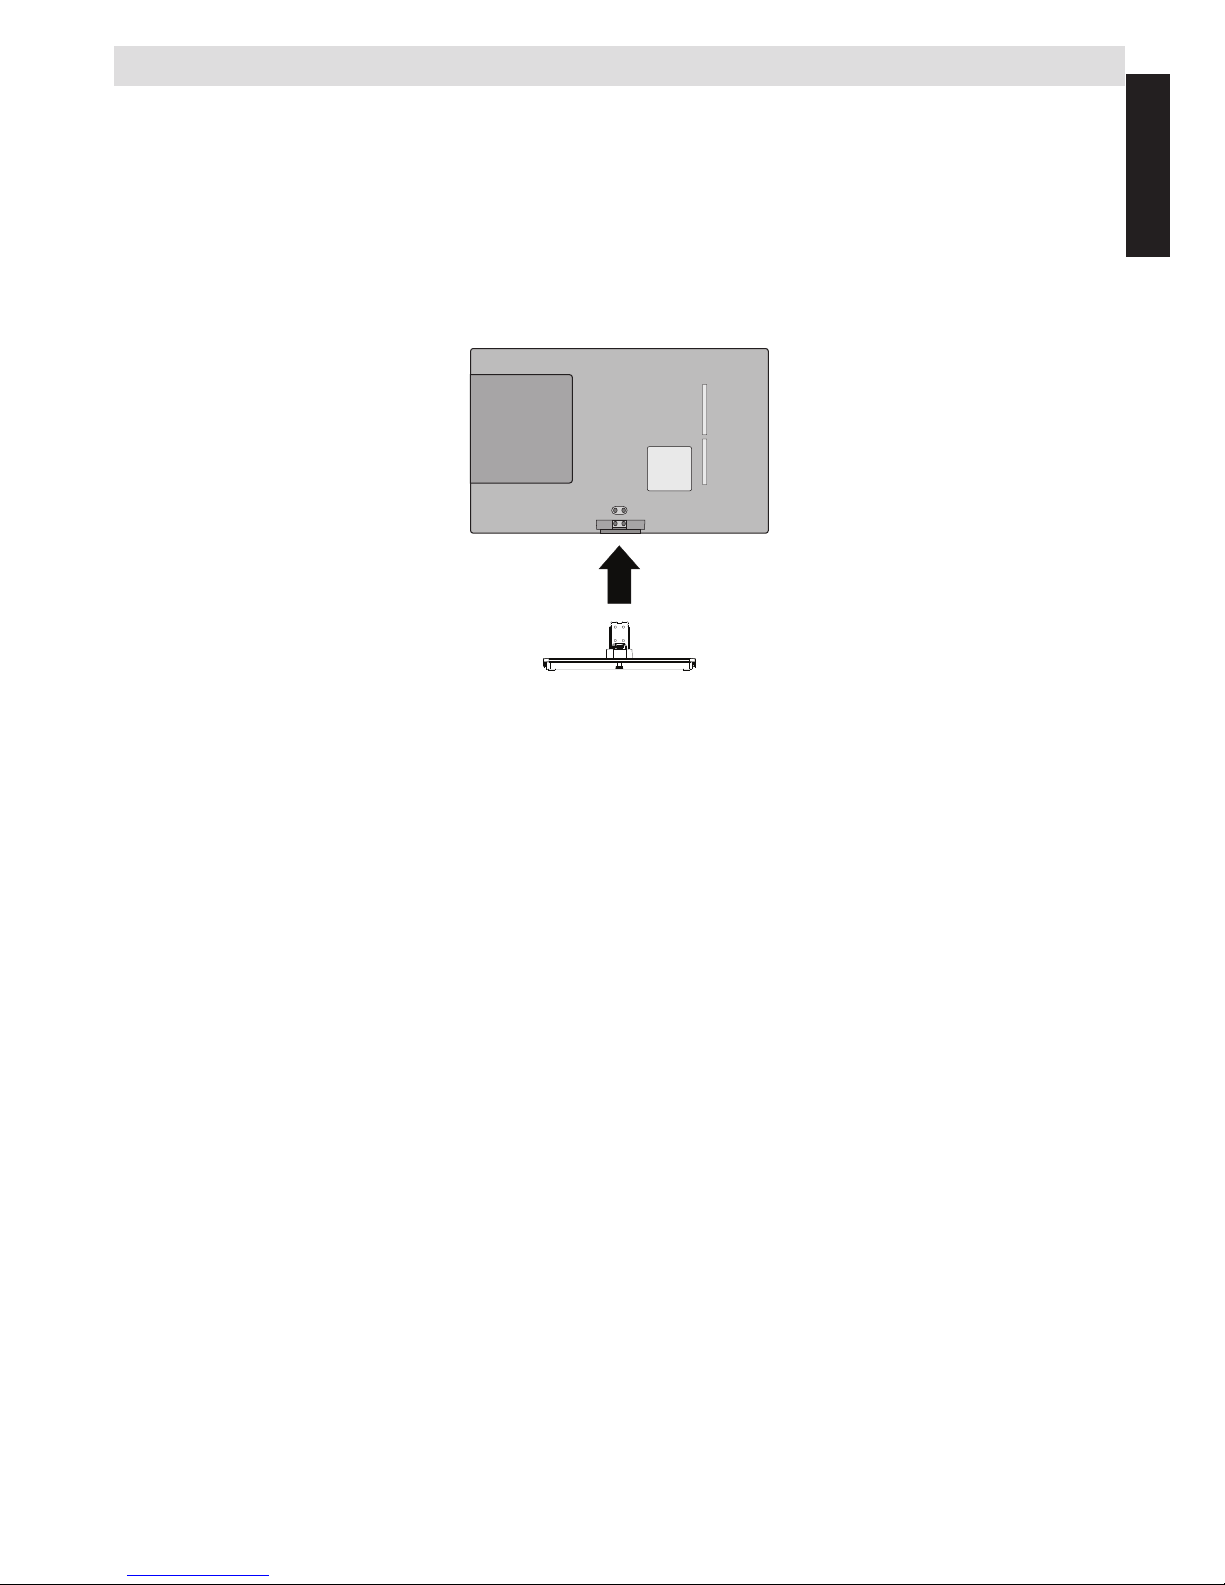
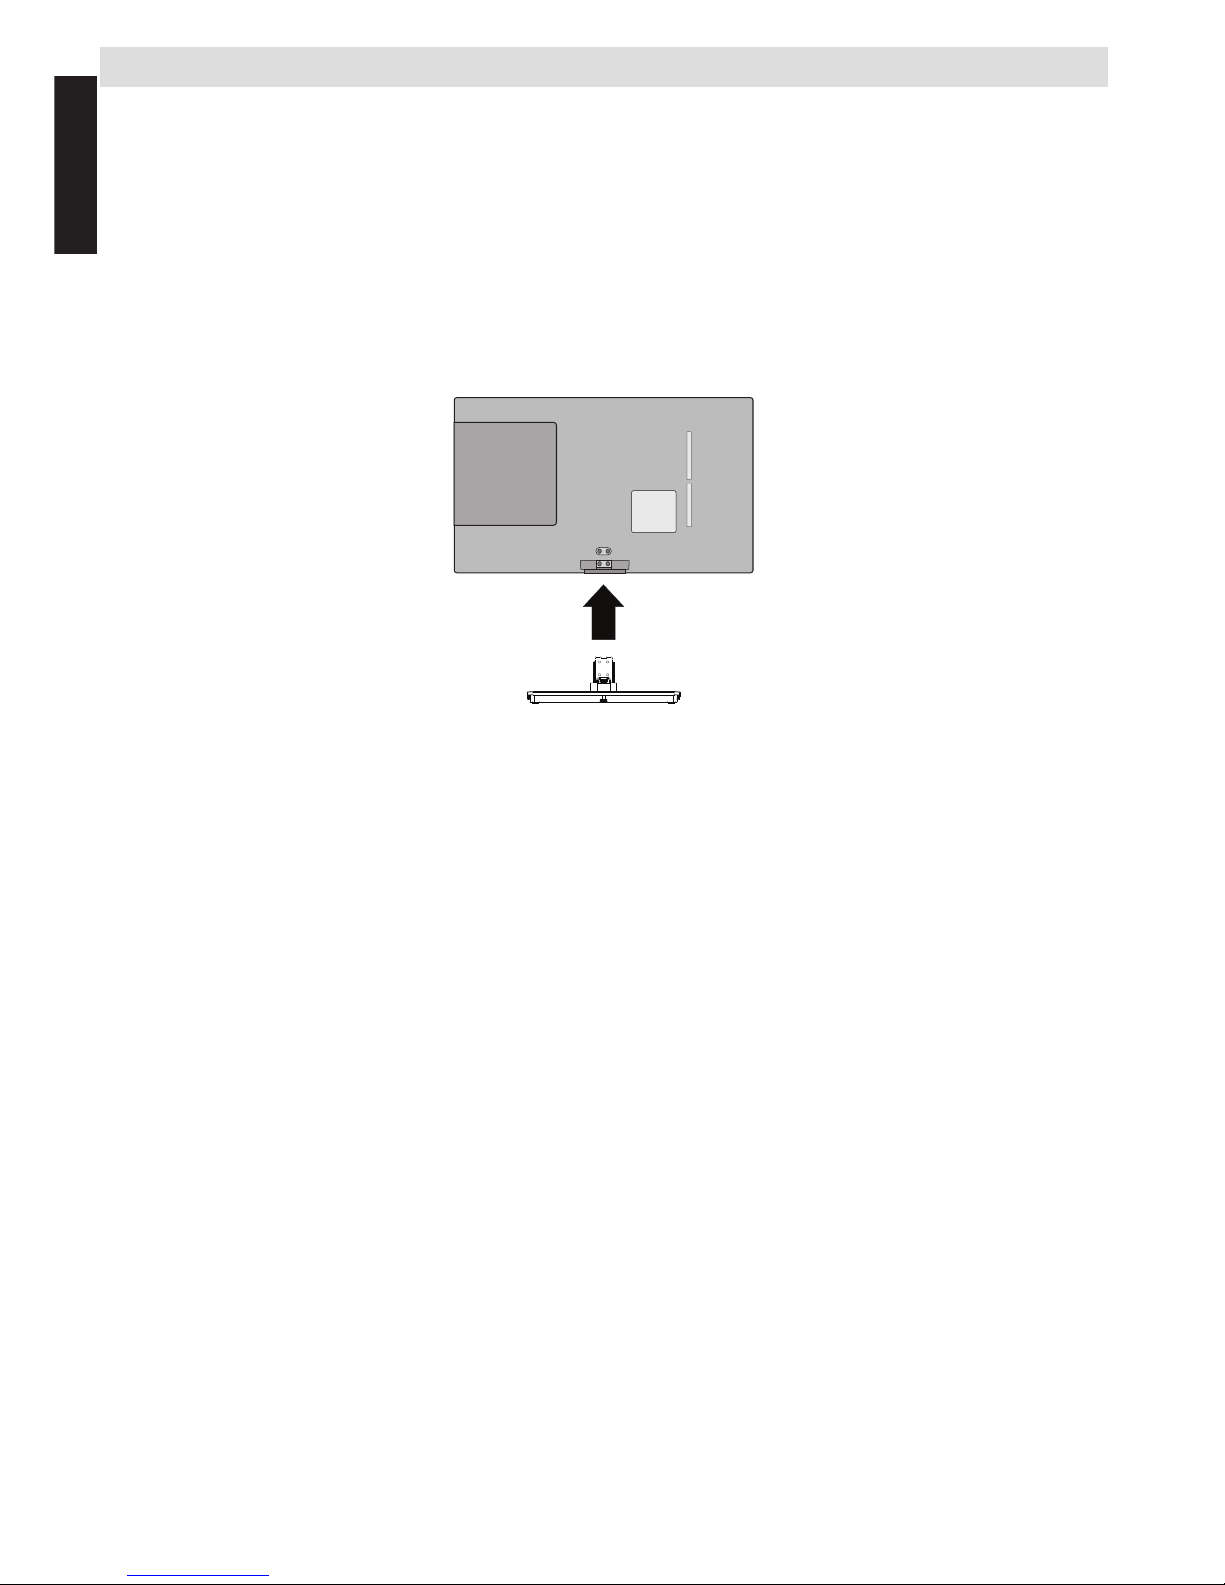
Fitting or Removing the stand
Fitting or Removing the stand
(1) Carefully lay the front of the unit face down on a at, cushioned surface with the stand hanging over the edge.
(2) To t the stand use the screws supplied.
or
(3) Remove the screws xing the stand
(4) After the screws are removed, hold the TV and pull out the stand by applying a rm outwards pull from
the TV to remove the stand.
Note: Extreme care should always be used when removing the stand to avoid damage to the LCD panel.
For 24D153*DG / 24W153*DG model
When using a Wall Bracket
Please use a wall bracket appropriate for the size and weight of the LCD TV and two people are required for
the installation.
(1) Unplug and remove any cables and/or other component connectors from the rear of the TV.
(2) Carefully lay the front of the unit face down on a at, cushioned surface such as a quilt or blanket.
(3) Follow the instructions provided with your wall bracket. Before proceeding, make sure the appropriate
bracket(s) are attached to the wall and the back of the TV as described in the instructions provided with the
wall bracket.
Page 7
English - 6 -
English
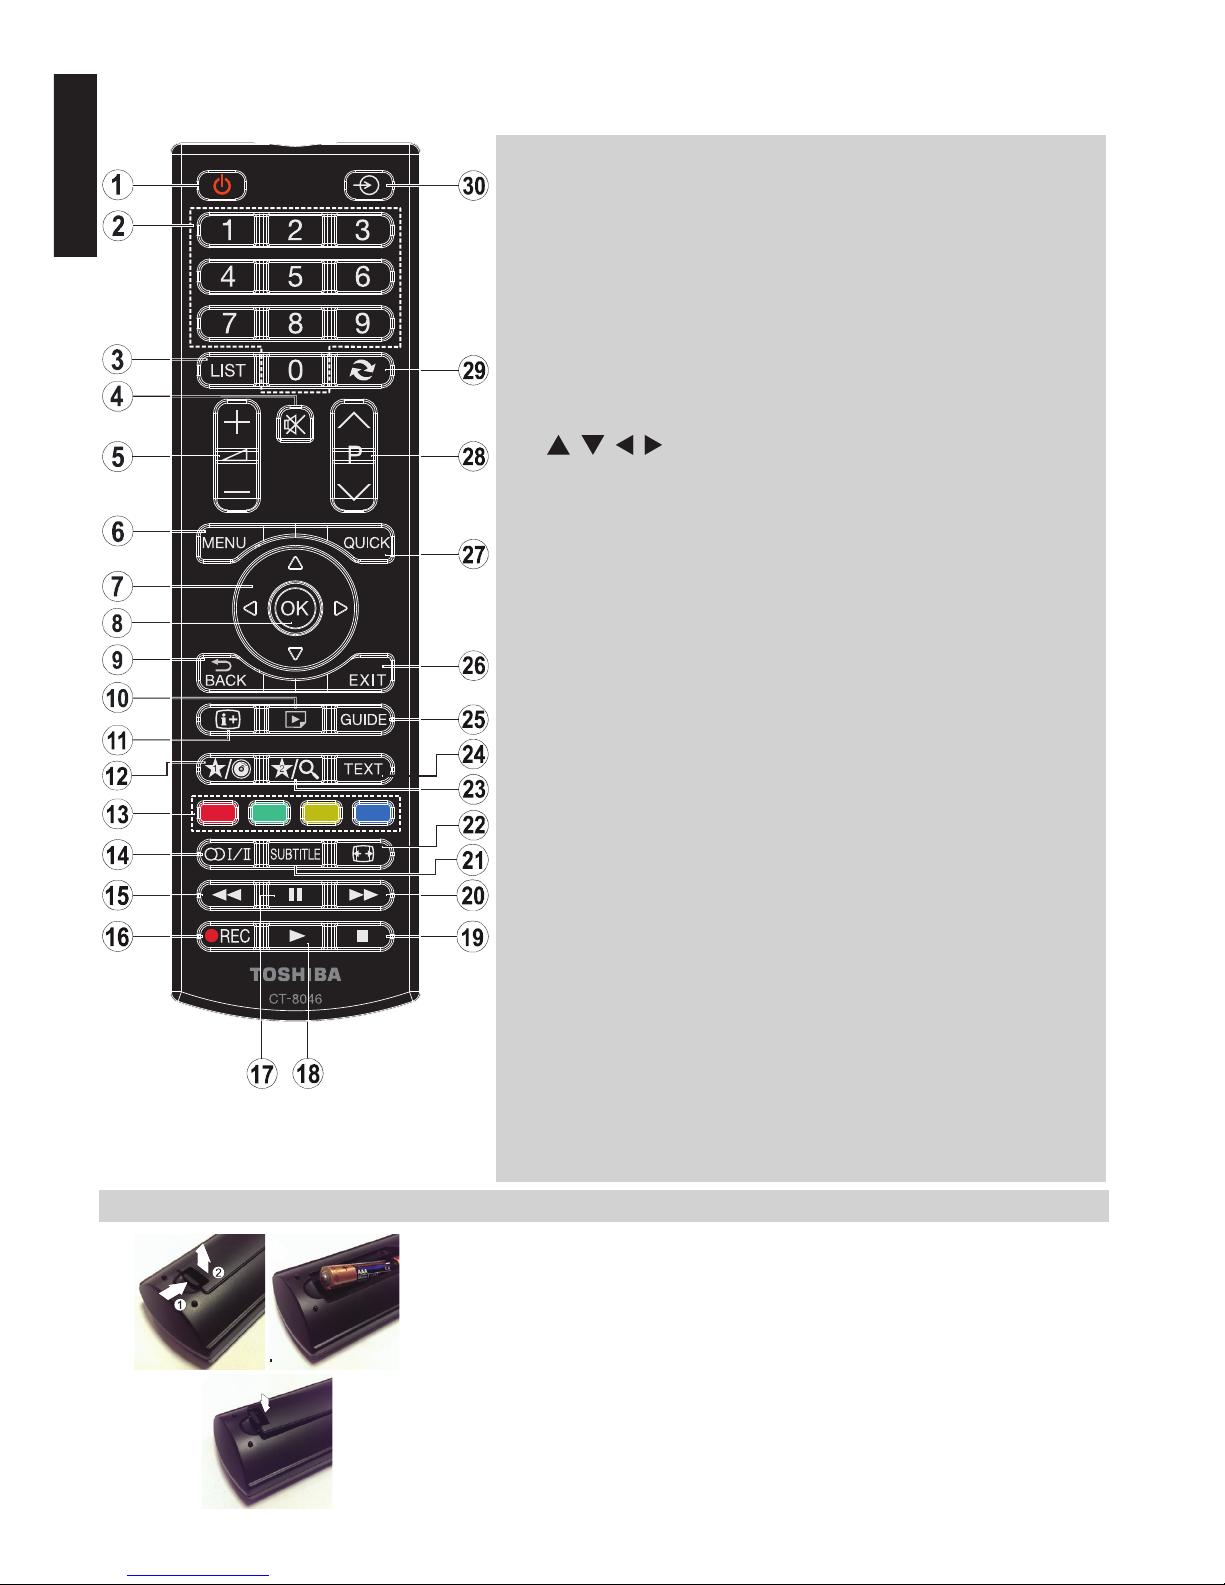
The Remote Control (TV - DVD)
Simple at-a-glance reference of the remote control.
(*) MY BUTTON 1 & MY BUTTON 2
These buttons may have default functions depending on the model.
However you can set a special function to these buttons by pressing on
them for ve seconds when on a desired source or channel. A conrmation
message will be displayed on the screen. Now the selected MY BUTTON
is associated with the selected function.
Note that if you perform rst time installation, MY BUTTON 1&2 will return
to their default function.
1. Standby
Standby
2. Numeric buttons
Numeric buttons
3. TV-AV / Channel list / Switches
among broadcast types
4. Mute
Mute
5. Volume Up / Down
Volume Up / Down
6. Menu on-off
Menu
7. Navigation buttons
(
, , , )
Navigation buttons
8. Okay (Conrm) / Channel List /
Hold (in TXT mode)
OK
9. Return / Index page (in TXT
mode)
10. Media Browser
Angle
11. Info / Reveal (in TXT mode)
Time
12. My button 1 (*)
Display time / DVD menu
13. Coloured buttons
Red button - Zoom
Green button - Repeat
Yellow button - Root
Blue button - Title
14. Mono/Stereo - Dual I-II /
Current Language
(in DVB channels)
Language selection
15. Rapid reverse
Rapid reverse
16. No function
17. Pause
Pause
18. Play
Play
19. Stop
Stop
20. Rapid advance
Rapid advance
21. Subtitle on-off (in Media
Browser mode and in DVB
channels)
Subtitle
22. Image size
Image size
23. My button 2 (*)
Search mode
24. Teletext / Mix (in TXT mode)
25. Electronic programme guide(in
DVB channels)
26. Exit
Exit
27. Quick Menu
28. Programme Down /
Page up -
Programme Up / Page down
29. Previous programme
30. AV / Source selection
Source selection
Note: The references in Bold
are for models with and in DVD
operation.
Inserting Batteries and Effective Range of the Remote Control
Remove the back cover to reveal the battery compartment and make sure
the batteries are inserted the right way round. Suitable battery types for this
remote are AAA, IEC R03 1.5V.
Do not combine a used, old battery with a new one or mix battery types.
Remove exhausted batteries immediately to prevent acid from leaking into
the battery compartment. Dispose of them in a designated disposal area.
Warning: Batteries must not be exposed to excessive heat such as sunshine,
re or the like.
The performance of the remote control will deteriorate beyond a distance
of ve metres or outside an angle of 30 degrees from the IR receiver. If the
operating range becomes reduced the batteries may need replacing.
1. 2.
3.
Page 8
English - 7 -
English
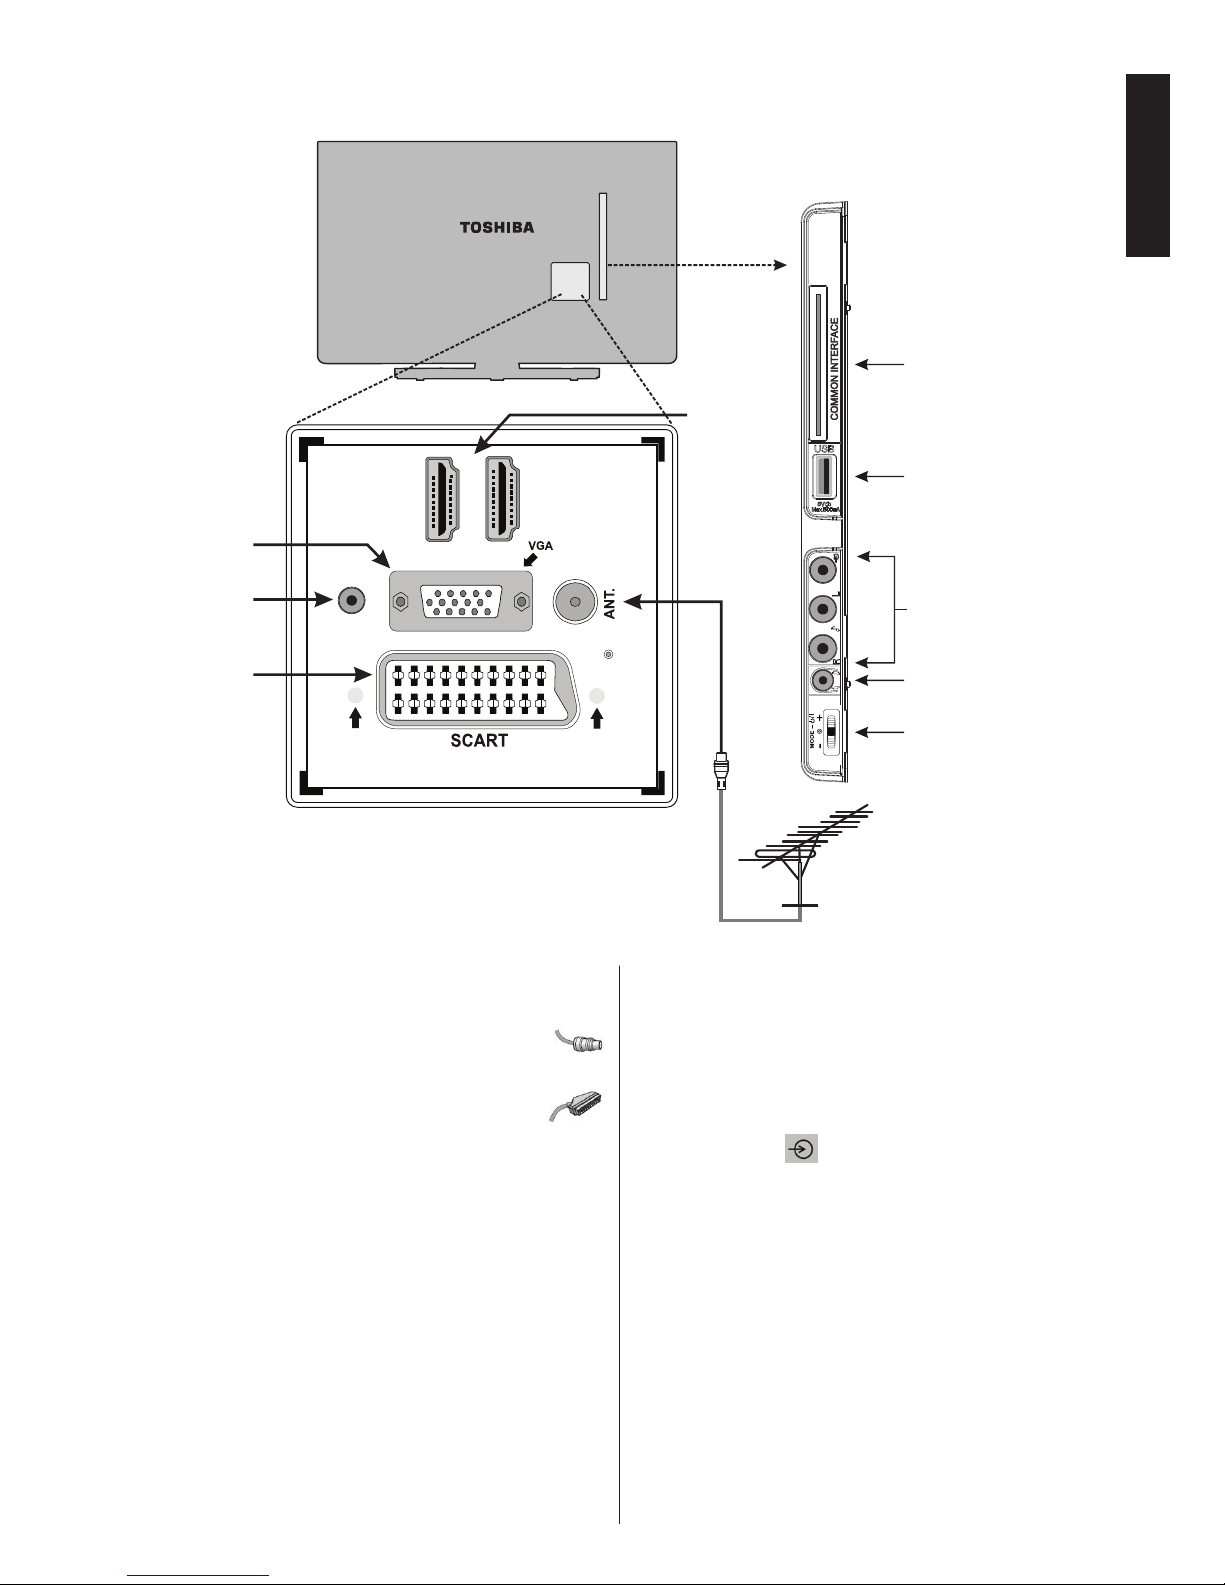
Connecting External Equipment
Before connecting any external equipment, remove the mains plug from the wall socket.
D IH M 1
D IH M 2
SIDE AV Inputs:
Video, Audio L+R
SPDIF
HDMI Input
Sockets (*)
RGB/PC
Input
SCART
Socket
DIGITAL AUDIO
Socket
Side View
COMMON INTERFACE
The Common Interface is
for a Conditional Access
Module (CAM).
Headphone
USB Input
Aerial
Input
Menu Wheel
(*) Number of these inputs may change according to the model of your TV.
Before running rst time installation, any connected devices
need to be set to standby mode.
Aerial cable:................................................................
Connect the aerial to the ANT. socket on the rear of the TV.
SCART lead:..............................................................
If you use a decoder* or a media recorder, it is essential
that the scart cable is connected to the TV.
The DIGITAL AUDIO socket enables the connection of a
suitable surround sound system.
HDMI
®
(High-Denition Multimedia Interface) is for using
with a DVD decoder or other equipment with digital audio and
video output. It is designed for best performance with 1080i
and 1080p high-denition video signals but will also accept
and display VGA, 480i, 480p, 576i, 576p and 720p signals.
PC format signals will also be displayed.
Note: Although this TV is able to connect to HDMI equipment,
it is possible that some equipment may not operate correctly.
You can use YPbPr to VGA cable (not supplied) to enable
YPbPr signal via VGA input.
Note: You cannot use VGA and YPbPr at the same time. A
wide variety of external equipment can be connected to the
TV; therefore, the relevant owner’s manuals for all additional
equipment must be referred to for exact instructions.
If the TV automatically switches over to monitor external
equipment, return to normal TV by pressing the desired
programme position button. To recall external equipment,
press “SOURCE -
” button repeatedly to switch between
sources.
Regardless of source’s property, audio output from the DIG-
ITAL AUDIO socket cannot be copied.
Page 9
English - 8 -
English
Connecting an HDMI® or DVI Device to the HDMI Input
The HDMI inputs on your TV receive digital audio and
uncompressed digital video from an HDMI source device
or uncompressed digital video from a DVI (Digital Visual
Interface) source device.
These inputs are designed to accept HDCP (High-Bandwidth
Digital-Content Protection) programme material in digital form
from EIA/CEA-861-D–compliant [1] consumer electronic
devices (such as a set-top box or DVD player with HDMI
or DVI output).
NOTE:
• Some early HDMI equipment may not work properly with
your latest HDMI TV.
• Supported Audio format: Linear PCM, sampling rate
32/44.1/48kHz.
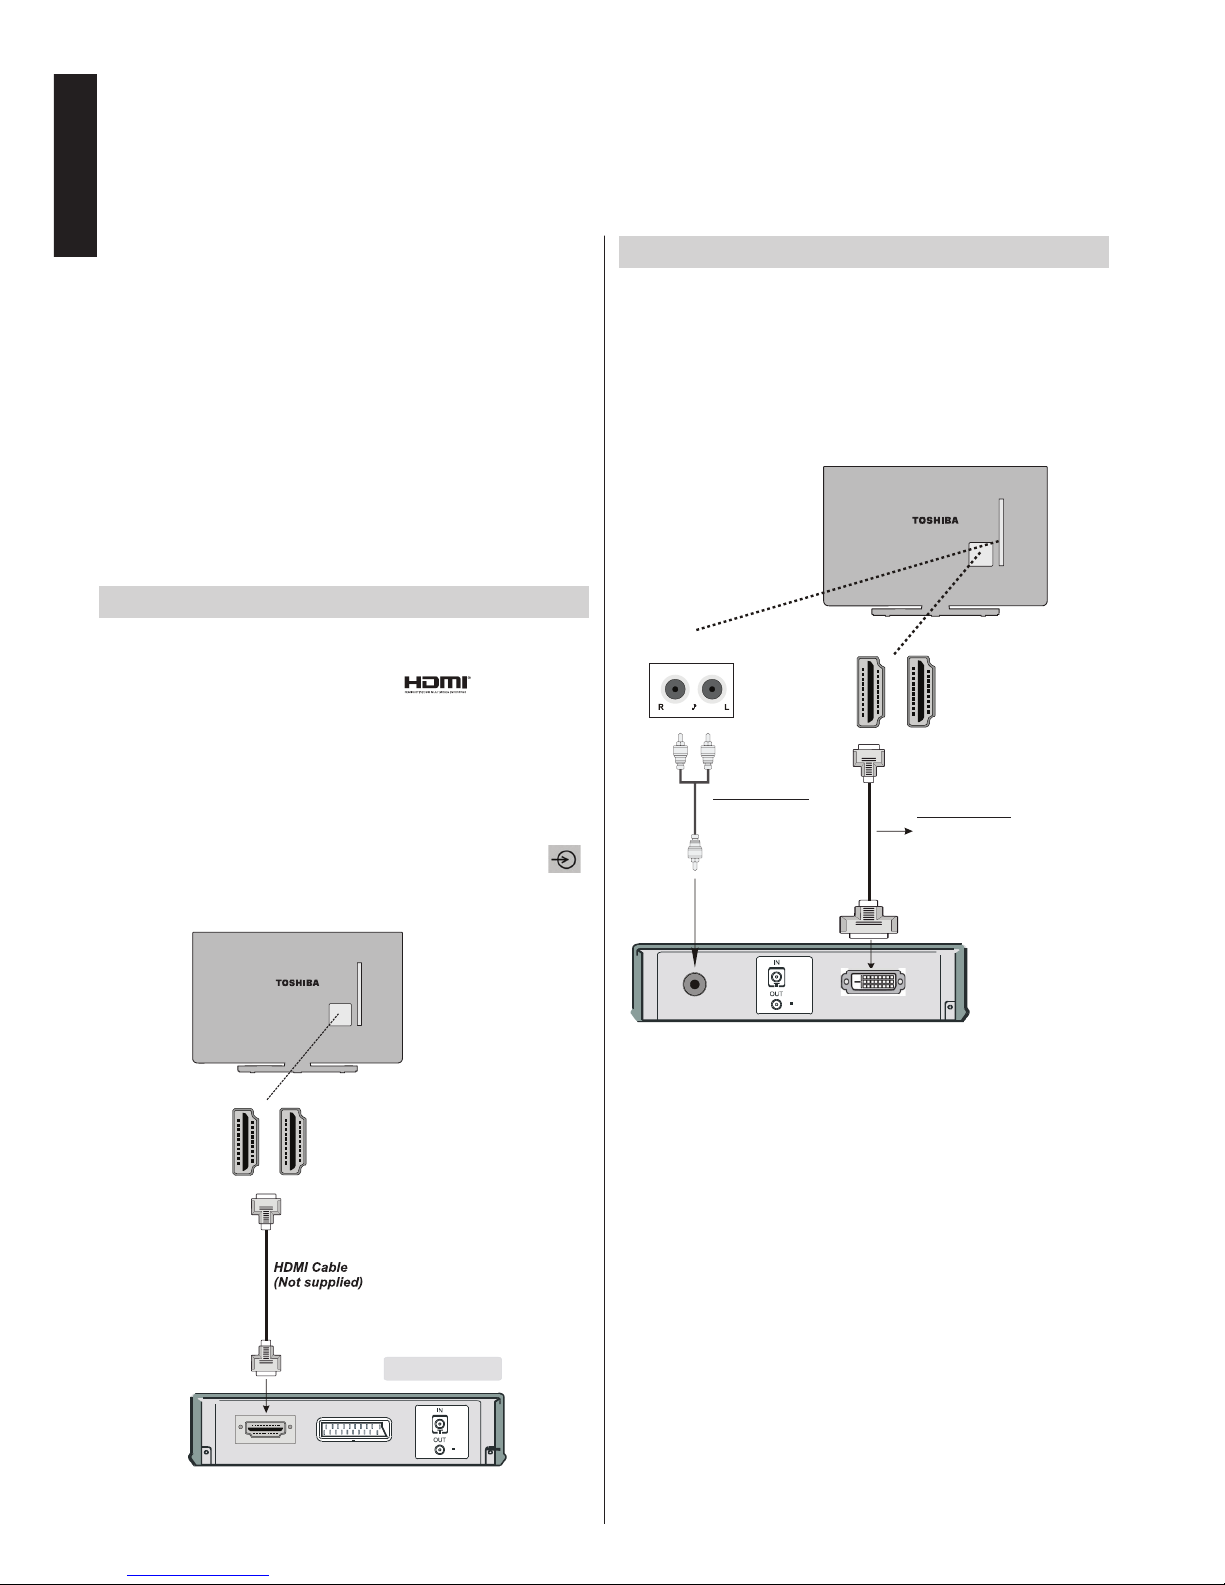
To Connect an HDMI Device
Connect an HDMI cable (type A connector) to the HDMI terminal. For proper operation, it is recommended that you use
an HDMI cable with the HDMI Logo ( ).
• If your HDMI connection is capable of 1080p and/or
your TV is capable of refresh rates greater than 50Hz, you
will need a Category 2 cable. Conventional HDMI/DVI cable
may not work properly with this mode.
• HDMI cable transfers both video and audio. Separate
analogue audio cables are not required (see illustration).
• To view the HDMI device video, press the “SOURCE -
”
button to select the appropriate HDMI input.
HDMI Input
Socket
(Back)
HDMI device
D IH M 1
D IH M 2
* Number of
these inputs
may change
according to
the model of
your TV.
To Connect a DVI Device
Connect an HDMI-to-DVI cable (HDMI type A connector) to
the HDMI input socket and audio cables to the AUDIO inputs
(side)(see illustration).
• The maximum recommended HDMI-to-DVI cable length
is 6.6 ft (2m).
• An HDMI-to-DVI cable transfers video only. Separate
analogue audio cables are required.
D IH M 1
D IH M 2
HDMI Input
Sockets
HDMI to DVI Cable
(not supplied)
Audio Cable
(not supplied)
Audio Inputs (side)
Audio Transfer
Video Transfer
* Number of
these inputs
may change
according to
the model of
your TV.
NOTE:
To ensure that the HDMI or DVI device is reset properly, it is
recommended that you follow these procedures:
• When turning on your electronic components, turn on the
TV rst, and then the HDMI or DVI device.
• When turning off your electronic components, turn off the
HDMI or DVI device rst, and then the TV.
Page 10
English - 9 -
English
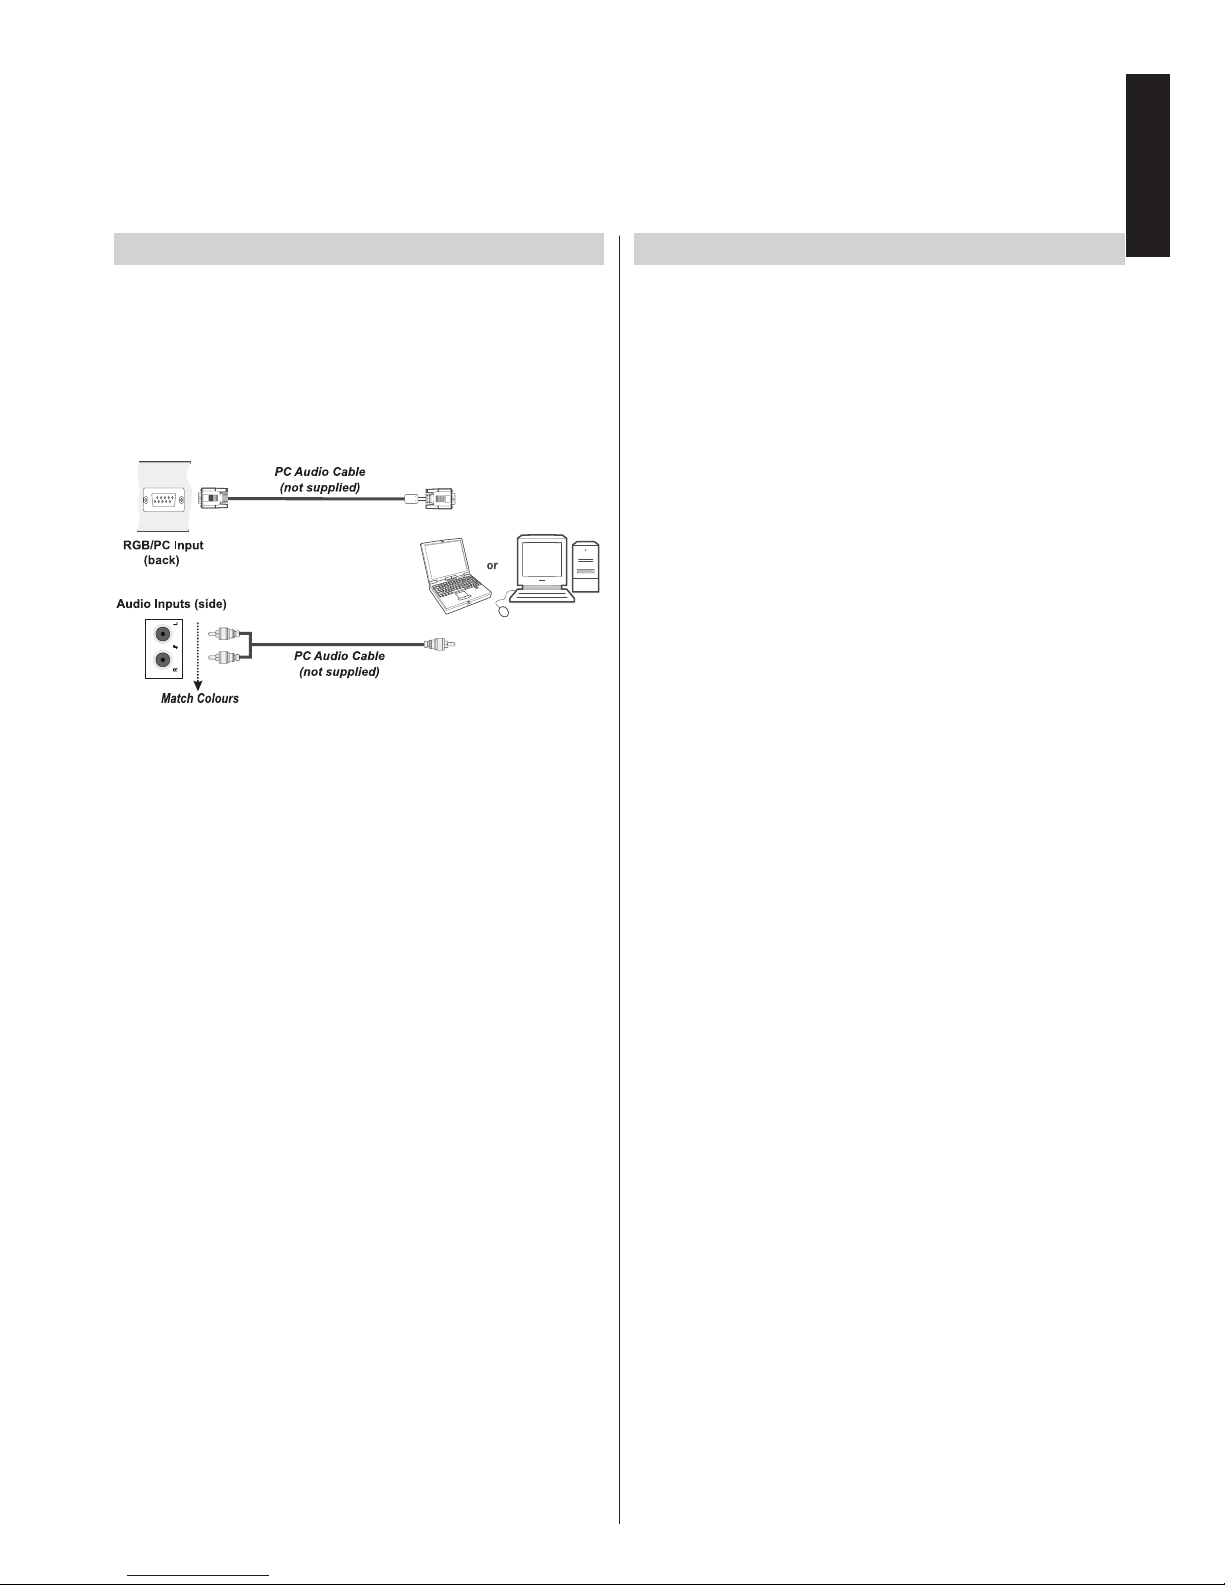
Connecting a Computer
To Connect a Computer
With either an RGB/PC or an HDMI connection, you can watch
your computer’s display on the TV and hear the sound from
the TV’s speakers.
When connecting a PC to the RGB/PC input on TV, use an
analogue RGB (15-pin) computer cable and use the AUDIO
INPUTS (side) with a PC audio cable (not supplied) for audio
connection (see illustration).
To use a PC, set the monitor output resolution on the PC
before connecting it to the TV. To display the optimum picture,
use the PC setting feature.
NOTE:
• Some PC models cannot be connected to this TV. An
adaptor is not needed for computers with a compatible mini
D-sub15-pin terminal.
• Depending on the DVD’s title and the specications of the
PC on which you are playing the DVD-Video, some scenes
may be skipped or you may not be able to pause during
multiangle scenes.
Connecting a USB Memory
To Connect a USB Flash Drive
• You can connect a USB Flash Drive to your TV by using
the USB input/inputs on the TV. This feature allows you to
display/play music, photo or video les stored in a USB stick.
• It is possible that certain types of USB devices (e.g. MP3
Players) may not be compatible with this TV.
• You may back up your les before making any connections
to the TV set in order to avoid any possible data loss.
Note that manufacturer will not be responsible for any le
damage or data loss.
• Do not pull out USB module while playing a le.
CAUTION: Quickly plugging and unplugging USB devices
may cause damage to the USB device.
Page 11
English - 10 -
English
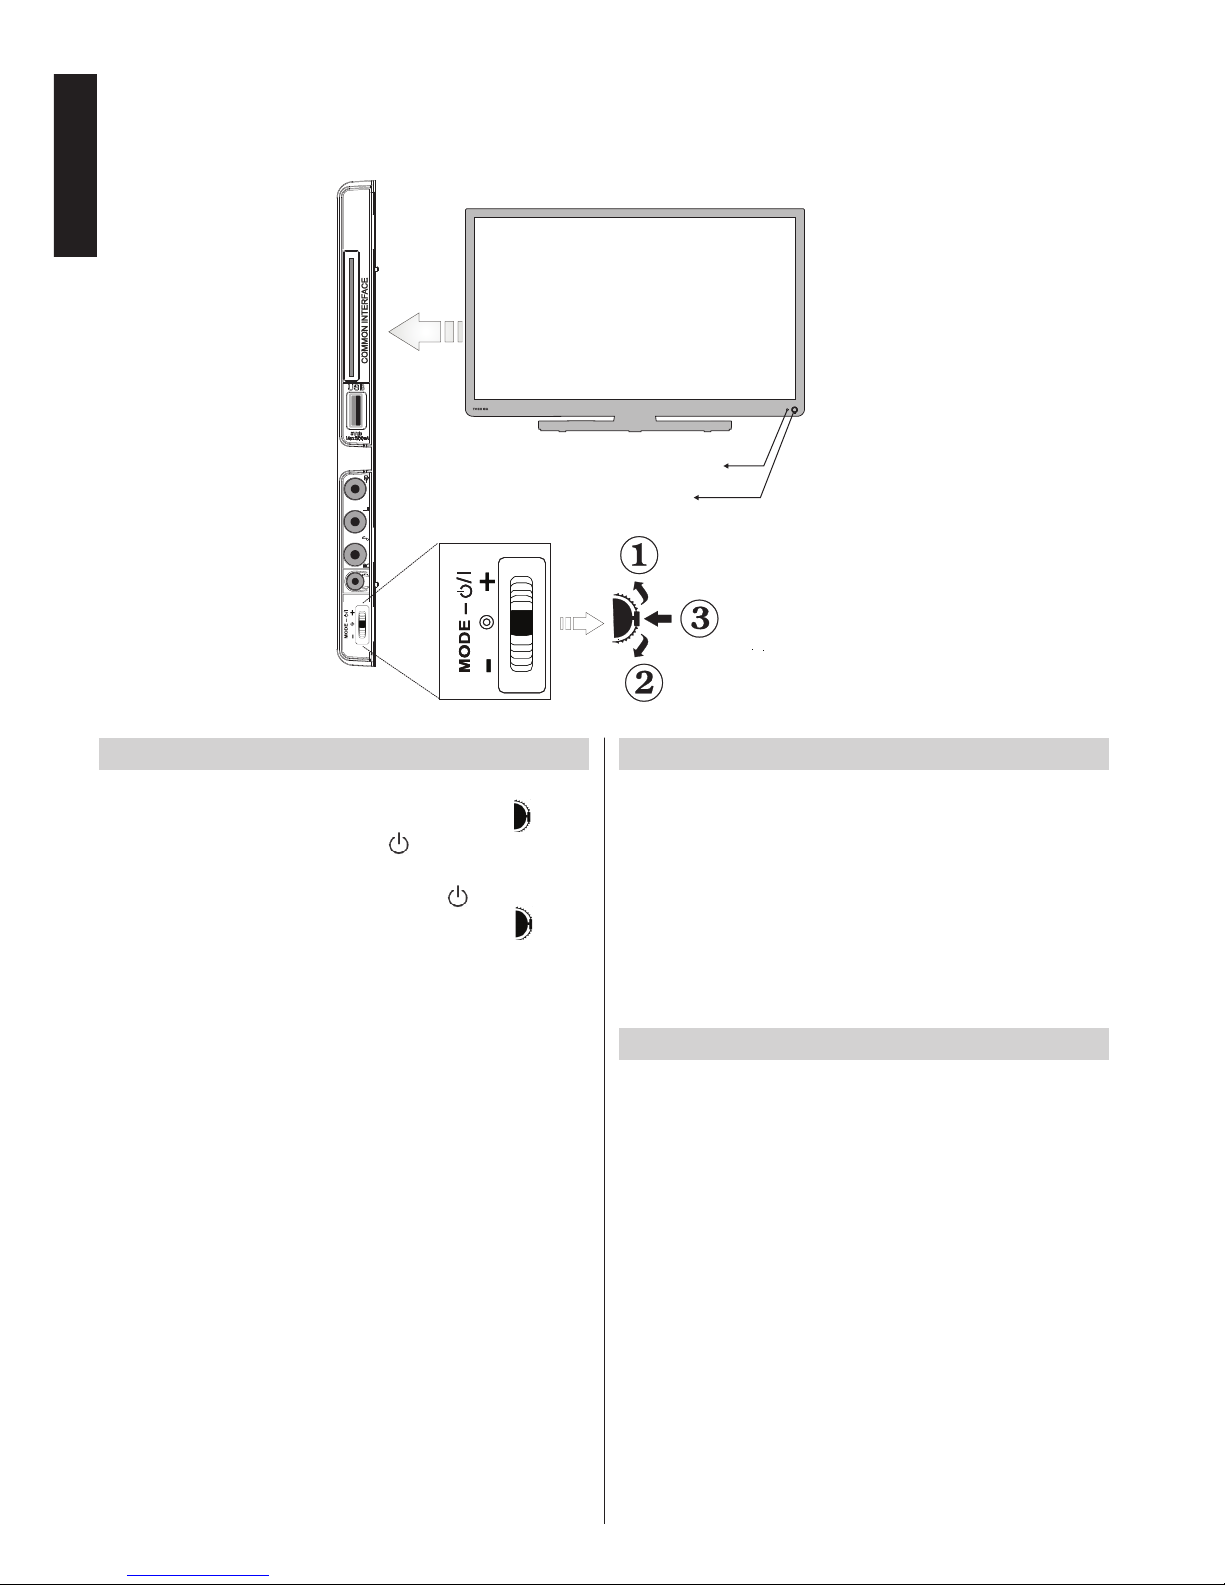
Controlling the TV
A wide variety of external equipment can be connected via the sockets located on the side and back of the
TV. Whilst all the necessary adjustments and controls for the TV are made using the remote control, the
menu wheel on the left side of the TV may be used for some functions.
Standby LED
Up Direction
Programme / V
olume /
IR receiver
Down Direction
AV / Standby-On
selection switch
Switching on
If the standby LED is unlit, check that the mains plug is connected to the power and press the middle of the
button
on the left side of the television or
button on the remote
control to switch the television on.
To put the television into Standby, press
button on the
remote control or press and hold the middle of the
button
on the left side of the TV. To view the television, press again.
The picture may take a few seconds to appear.
Note: The active Standby LED colour will turn to red in a few
moments when the TV is switched into Standby.
For energy saving:
Turning the TV off at its mains supply, or un-plugging it, will
cut energy use to nearly zero for all TV’s. This is recommended when the TV is not being used for a long time, e.g.
when on holiday.
Reducing the brightness of the screen will reduce energy use.
Note: Putting the TV into standby mode, will reduce energy
consumption, but will still draw some power.
Using the Remote Control
Press the MENU button on the remote control to see the
menus.
The main menu appears as a group of icons each for a menu
option. Press the Left or Right button to select a topic.
In sub menu screen mode the menu appears as a list. Press
the Up or Down button to select a topic.
To use the options press the Up and Down buttons on the
remote control to move up and down through them and OK,
Left or Right buttons to select the required choice. Follow the
on screen instructions.
Using the Controls on the TV
Using the menu wheel on the side of the TV:
To change volume: Press the middle button until the
volume level OSD appears. Increase the volume by
pushing the button up. Decrease the volume by pushing
the button down.
To change channel: Press the middle button until the
channel information banner appears. Scroll through the
stored channels by pushing the button up or down
To change source: Press the middle button until the
source list appears. Scroll through the available sources
by pushing the button up or down.
Please always refer to the owner’s manual of the equipment
to be connected for full details.
To turn the TV off: Press the middle of the button down
and hold it down for a few seconds, the TV will turn into
standby mode.
Page 12
English - 11 -
English
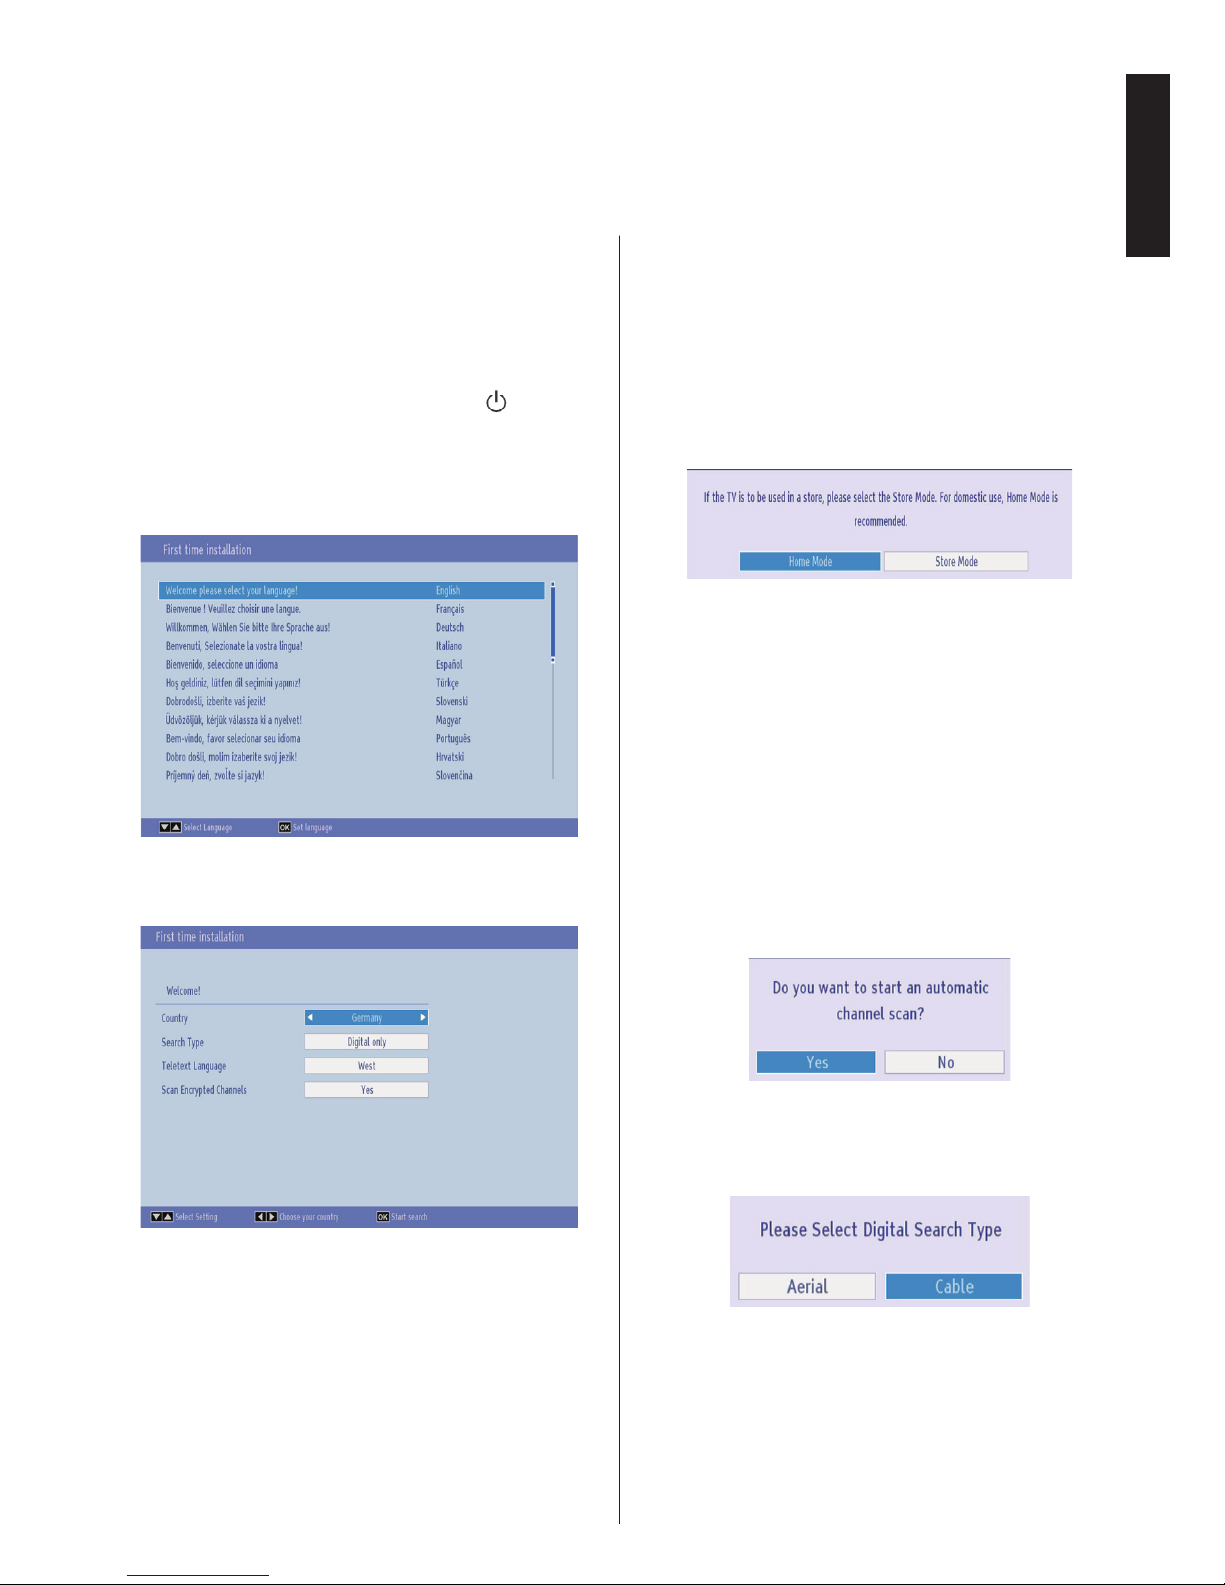
Initial Installation
Before switching on the TV, put your decoder and media recorder to Standby if they are connected and
ensure the aerial/cable is connected to your TV. To set up the TV, use the buttons on the remote control as
detailed on The Remote Control page.
IMPORTANT: Ensure that the aerial/cable is connected and
a Common Interface module is not inserted before switching
on the TV for the rst time installation.
1. Connect the mains plug, press and hold the
middle of the menu wheel on the left side of
the TV to switch the TV on. If the TV does not
switch on, press any numbered or
button on
the remote control, then the language selection
menu will be displayed. This screen will appear
the rst time that the TV is switched on and each
time the TV is reset.
2. By pressing Up or Down button, highlight the
language you want to set and press OK button.
The following screen will be displayed next:
3. By pressing Left or Right button, select the
country you want to set and press Down button
to highlight the Search Type option. Use Left or
Right to set the desired search type. Available
search types are Digital only, Analogue TV
only and Full.
4. When set, press Down button to highlight
Teletext Language. Use Left or Right button to
select desired language region. Highlight Scan
Encryted Channels and enable/disable this
option by using Left or Right buttons. Press OK
to continue.
Note: Depending on the Country selection you may be asked
to set and conrm a PIN at this point. The selected PIN cannot
be 0000. You have to enter it if you are asked to enter a PIN
for any menu operation later.
5. The following message will be displayed next on
the screen:
Select Store mode if the TV will be placed in a
store to exhibit. This option will congure your
TV’s settings for best display quality and the
supported features of the TV will be displayed on
the top of the screen as a info banner. If Store
mode is selected, a conrmation screen will be
displayed. Select YES to proceed. For home use
select Home Mode.
This option will be available in Other Settings
menu and can be turned off/on later.
6. Press OK button on the remote control to continue
and the following message will be displayed on
the screen:
7. Select Yes by using Left or Right button and
press OK button to continue. Afterwards, the
following OSD will be displayed on the screen:
8. If you select Cable option, a conrmation screen
will be displayed. If you want to search for
available networks, select YES to proceed. The
following screen will be displayed:
Page 13
English - 12 -
English
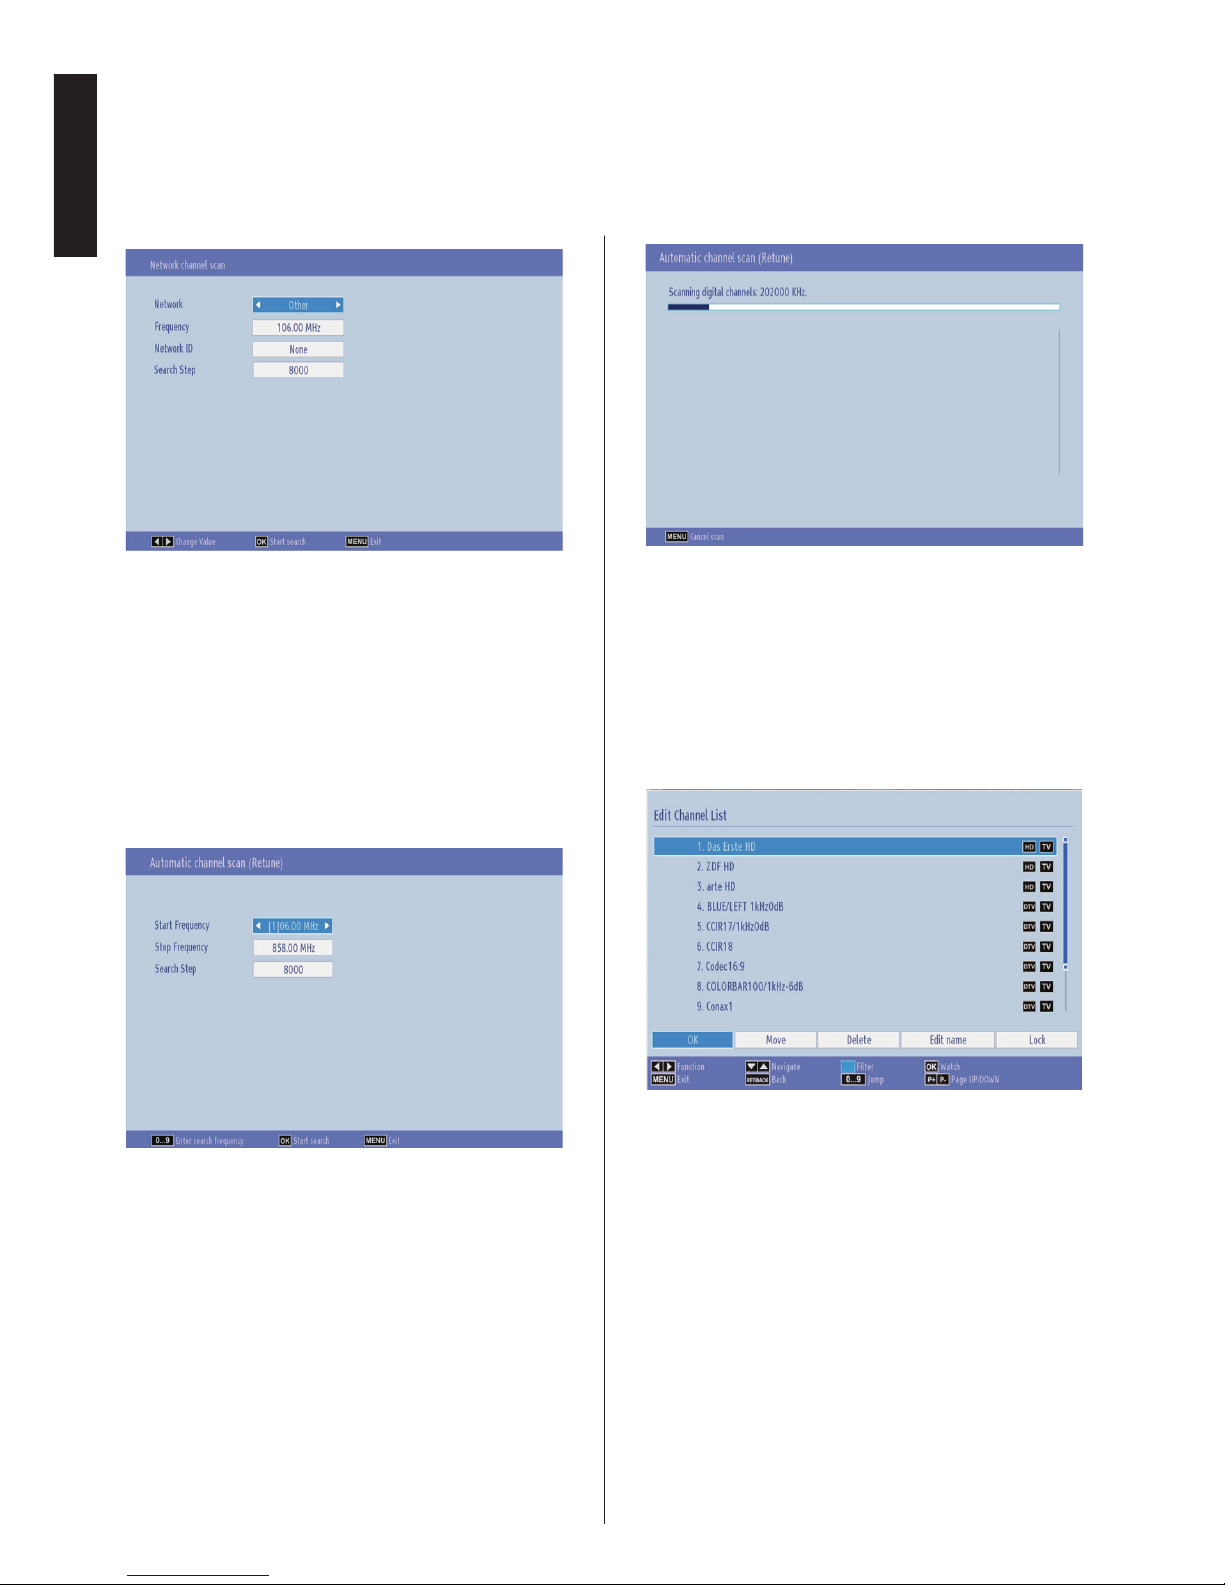
Initial Installation - continued
You can select Network, Frequency, Network
ID and Search Step from this screen. For
highlighting lines you see, use Up or Down button.
You can set Search Step as 8000 kHz or 1000
kHz. If you select 1000 kHz, the TV will perform
search process in a detailed way. Searching
duration will thus increase accordingly. When
finished, press OK button to start automatic
search.
If you select NO, the following screen will be
displayed:
You can set Start - Stop Frequencies and Search
Step as desired. When nished, press OK button
to start the search.
9. If you select Aerial option from the Search Type
screen, a conrmation message will be displayed.
If you want to continue with searching select Yes,
the television will search for available broadcasts.
Select No to exit.
10. The Auto tuning screen will appear and the
television will start to search for available stations.
The progress bar will move along the line. You
must allow the television to complete the search.
Note: You can press MENU button to cancel.
While the search continues a message will appear, asking
whether you want to sort channels according to the LCN(*).
Select Yes and press OK to conrm.
(*) LCN is the Logical Channel Number system that organizes
available broadcasts in accordance with a recognizable
channel sequence (if available).
After the available stations are stored, Edit Channel
List will be displayed on the screen.
Press MENU button to quit channel list and watch TV.
Note: Do not turn off the TV while initializing first time
installation.
Page 14

English - 13 -
English
DVD Mode
If your television has a built-in DVD module. The following instructions are for correct operation of the
integrated DVD unit.
• Warning: Risk of exposure to radiation from
class 1/class 3b visible and invisible laser beams.
Do not stare directly into beam.
CLASS 1
LASER PRODUCT
Handling Discs
• To keep the disc clean, only handle the disc by its
edge. Do not touch the surface.
• Do not stick paper or tape on the disc.
• If the disc is contaminated with any substance like
glue, remove before using it.
• Do not expose the disc to direct sunlight or heat
sources such as hot air ducts, or leave it in a car
parked in direct sunlight as the temperature can rise
quickly and damage the disc.
• After playing, store the disc in its case.
Cleaning Discs
• Before playing, clean the disc with a cleaning cloth.
Wipe the disc from the centre out.
• Do not use solvents such as benzine, thinner,
commercially available cleaners or anti-static spray
intended for vinyl LPs.
DVD - Features
• DVD / CD / CD-R / CD-RW / MP3 / JPEG / MPEG
playback.
• NTSC / PAL playback (according to disc content).
• LPCM audio via coaxial and optical digital audio
outputs (optional).
• Multi-Audio (up to 8) support (according to disc
content).
• Multi-Subtitle (up to 32) support (according to disc
content).
• Multi-Angle (up to 9) support (according to disc
content).
• 8 level parental control.
• Fast forward and rewind - 5 different speeds:
2x, 4x, 8x, 16x, 32x.
• Slow motion playback - 4 different speeds:
1/2x, 1/4x, 1/8x, 1/16x forward.
• Frame by frame forward playback.
• Search Mode.
• Repeat.
• Coaxial audio output (optional).
• Copied disks may be incompatible.
DVD - Control buttons on the TV
1. Disc loader
2. Play / Pause (
/ ) button
Plays / pauses the disc. When DVD menu (root
menu) is active, this button functions as “button
select” (selects the highlighted item in menu) if
this is not prohibited by the disc).
3. Stop / Eject (
/ ) button
Stops the disc playing / Ejects or Loads the
disc.
NOTE: You cannot eject the disc via the remote control. To
eject while playing a le; you should press the STOP button
(
/ ) (on the TV) three times.
Back of TV
3
1
2
Page 15
English - 14 -
English
DVD Mode
General Operation
How to watch a DVD
Note: DVD mode cannot be accessed unless a DVD is
inserted or a DVD control button is pressed.
If you switch to another source by pressing
“SOURCE -
”, “SWAP - ” or “P / ”
buttons on the remote control, DVD playback will
be paused automatically. You should press PLAY
and resume the playback manually when you switch
to DVD mode.
1. Switch on the TV.
2. Switch to DVD source using the “SOURCE -
” button on the remote control.
3. Insert a disc into the loader.
The labelled side of the disc MUST be facing you
when looking at the TV screen.
Most discs will be automatically loaded and play will
start automatically if the disc does not have any menus
recorded on it.
If play does not start automatically, press the play
button “
” on the remote control, or the play button
“
/ ” on the right side of the TV.
A menu may appear on the TV screen after a few
moments or the lm may start immediately after the
Film/TV Company introduction. This will depend on
the disc content and may differ on each disc.
Note: Steps 4 and 5 are only available when a menu is
recorded on the disc.
4. Press the navigation buttons “ ”, “ ”, “ ” or “ ”
or the number button/s to select the required title.
5. Press the OK button. The selected item starts to
play.
Notes on DVD Playback
a. No sound will be heard during Rapid advance or
Rapid reverse.
b. No sound will be heard during Slow motion play.
c. Reverse Slow motion play is not available.
d. In some cases, the subtitle language will not be
changed immediately to the selected one.
e. When the preferred language will not select, even
after pressing the button several times, it means
the language is not available on the disc.
f. When the DVD player is restarted or the disc is
changed, the subtitle selection is automatically
changed back to the initial settings.
g. If a language is selected that is not supported by
the disc, the subtitle language will automatically
be set to the disc’s priority (default) language.
h. Usually a ‘circulation’ will happen while switching
to another language, this means you can cancel
the subtitle by pressing the same button a number
of times until “Subtitle Off” appears on the screen.
i. When the power is turned on or the disc is
removed, the language heard will be the one
selected at the initial settings.
j. Some DVDs may not contain root and/or title
menus.
k. Reverse stepping is not available.
l. For reference: If you attempt to enter a number
greater than the total time of the current title, the
time search box disappears and “Input Invalid -
” message appears on top-left corner of screen.
m. The slide show is disabled when the ZOOM mode
is on.
Page 16
English - 15 -
English
DVD Mode
General Operation
DVD Mode Conguration
1. While in DVD source, press “MYBUTTON1 - ”
button to access DVD Setup menu. This is only
possible if there is no playback.
2. This menu is operated using “ ” or “ ” and “ ”
or “
” buttons.
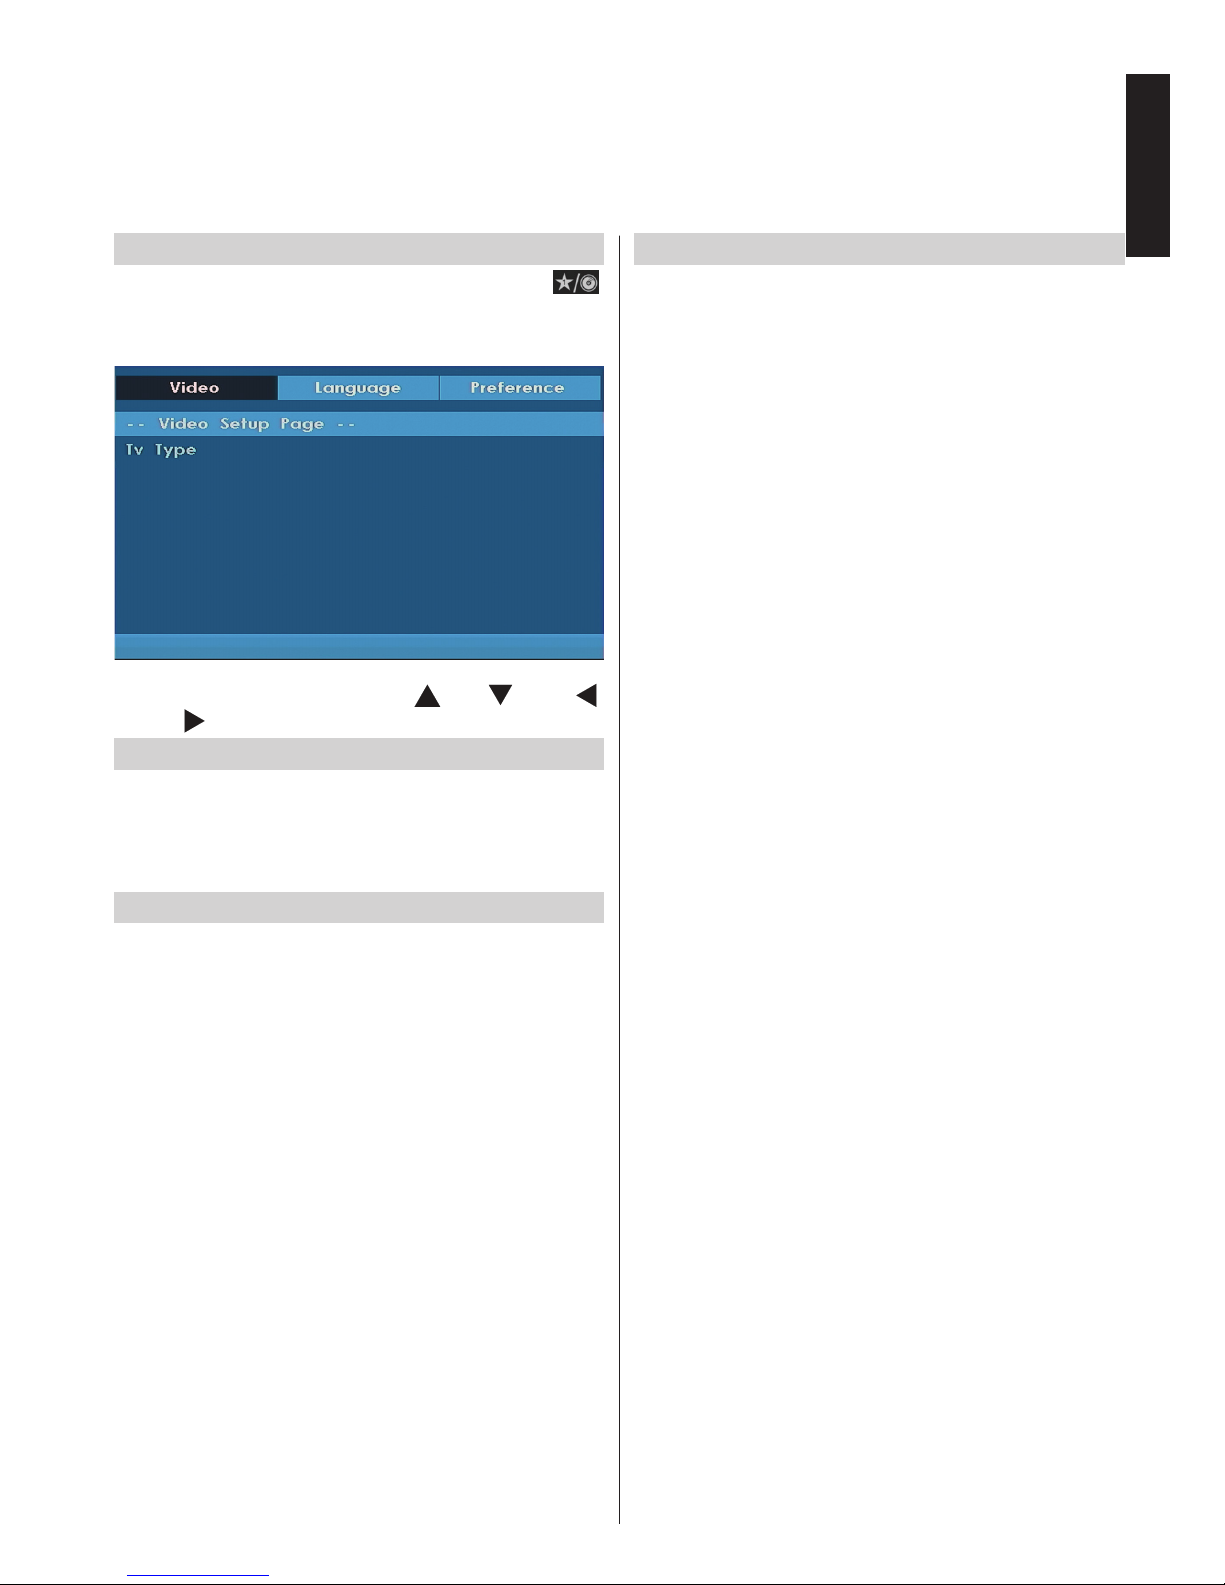
Video Setup
TV Type
TV Type is only available as ‘PAL’. The TV set also
supports NTSC signal; however, the signal will be
converted to PAL when it appears on the screen.
Language Setup
This menu is used for setting language preferences
in DVD mode. Language menu contents are detailed
below:
OSD Lang
You can select the default OSD language of the
player menus.
Audio
You can select the default audio language if supported
by the DVD disc.
Disc Menu
You can select the DVD’s disc menu language among
these languages. Disc menu appears in the selected
language, if supported by the DVD disc.
Subtitle
You can select the default subtitle language if
supported by the DVD disc.
Preferences
These are the DVD mode preferences. Menu contents
are detailed below:
Default
If you choose Reset and press OK, the factory-presets
are loaded. Parental level and parental password
does not change.
Downmix
This mode can be selected when the digital audio
output of the TV is used.
Surround: Surround sound output.
Stereo: Two channels stereo.
Parental
Playing some DVD’s can be limited depending on the
age of users. The “Parental Control” function allows
playback limitation level to be set by the parent.
Parental Level can be adjusted to one of the eight
levels. Level “8 Adult” adjustment lets you watch all of
the DVD titles ignoring the DVD disc’s parental level.
You can watch the DVD discs, which has the same
or lower parental level than the player’s level only.
Password
Using this item you can change the current password.
To change the password you will be prompted to enter
your old password. After you have entered your old
password, you can now enter and conrm the new
4-digit password. You can use C button to delete the
incorrect entry(if it’s available on your remote).
Note: Factory preset of the password is “0000”. You
have to enter XXXX digital password every time you
want to change the parental level. If you forget your
password please contact technical service.
SPDIF OUTPUT
You can set Spdif Output as PCM or RAW. If you
select PCM from SPDIF Output in DVD menu and
play DVD with Dolby audio, you can get audio output
with two channels via the speakers and the SPDIF
Out. If you select RAW from SPDIF Output in DVD
menu and play DVD with Dolby audio, speakers will
be muted and you can get 5+1 Dolby audio via the
SPDIF Out.
Page 17

English - 16 -
English
DVD Mode
Troubleshooting & Tips
The DVD picture quality is poor
1. Make sure the DVD disc surface is not damaged
(no scratches, ngerprints etc.).
2. Clean the DVD disc and try again. See instructions
in “Cleaning Discs” to clean your disc properly.
3. Ensure that the DVD disc is in the loader with the
label facing you when looking at the TV screen.
4. A damp DVD disc or condensation may effect the
equipment. Wait for 1 to 2 hours in Stand-by mode
before using the equipment.
The Disc does not play
1. No disc in the machine - Place a disc into the
loader.
2. Disc is incorrectly loaded - Ensure that the DVD
disc is in the loader with the label facing you when
looking at the TV screen.
3. Wrong type of disc. The DVD player cannot play
CD-ROMS with PC-Data etc.
4. The region code of the DVD disc must match
the player.
Wrong OSD language
1. Select the language in the setup menu.
2. The language for the sound or subtitles on a
DVD disc cannot be changed.
3. Multilingual sound and/or subtitles are not
recorded on the DVD disc.
4. Try to change the sound or subtitles using
DVD’s title menu. Some DVD’s do not allow
the user to change these settings without using
the disc’s menu.
Angle, Zoom etc. functions do not work
1. These functions are not available on the DVD.
2. Angle can only be changed when the angle
symbol is displayed.
If nothing works
If you have tried the above solutions and none seem
to work, try switching your TV-DVD off and on again.
If this does not work, contact your supplier or TV-DVD
repair technician.
Notice
This product incorporates copyright protection
technology that is protected by U.S. patents and
other intellectual property rights. Use of this copyright
protection technology must be authorized by Rovi
Corporation, and is intended for home and other
limited viewing uses only unless otherwise authorized
by Rovi Corporation. Reverse engineering and
disassembly are prohibited.
Page 18

English - 17 -
English
Appendix A: DVD Mode Supported le formats
Media
File
Extension
Format
Supported
(Maximum resolution/Bit rate etc.)
Video
Audio
Movie
.mpg/ .dat/
.vob
MPEG1
MPEG Layer
1/2/3
MPEG2 MPEG2
.avi
XviD/ 3ivx PCM/MP3 XviD Verson up to: 1.1.2
MPEG4 PCM/MP3
MS ISO
MPEG4
PCM/MP3 Support SP and ASP
Music
- - PCM Sample Rate: 8K ~ 48KHz
.mp3 -
MPEG 1/2
Layer 1/2/3
(MP3)
Sample Rate: 8K ~ 48KHz,
Bit Rate: 64K~320Kbps
Photo .jpg
Baseline JPEG
WxH = 8902 x 8902 up to 77 Mega-pixel
Support format: 444/440/422/420/ Grayscale
Progressive JPEG
Up to 4 Mega-pixel Support format: 444/440/422/420/
Grayscale
External
Subtitles
.srt
Support Text File Format, but do not support Picture
File Format
.smi
.sub
.ssa
.ass
Appendix B: Compatible disc types
Disc Types
(Logos)
Recording
Types
Disc
Size
Max. Playing
Time
Characteristics
Audio
+
Video
12cm Single sided;
240 min.
Double sided;
480 min.
DVD contains excellent sound and
video due to Dolby Digital and MPEG2 System. Various screen and audio
functions can be easily selected
through the on screen menu.
Audio 12cm 74 min. An LP is recorded as an analogue
signal with more distortion. CD is
recorded as a digital signal with better
audio quality, less distortion and less
deterioration of audio quality over time.
Audio
(xxxx.mp3)
12cm Depends on
MP3 quality
MP3 is recorded as a digital signal
with better audio quality, less distortion
and less deterioration of audio quality
over time.
Video
(still
picture)
12cm Depends on
JPG
quality
JPEG is recorded as a digital signal
with better picture quality over time.
For proper operation, only 12 cm discs must be used.
Page 19

English - 18 -
English
DVD Mode
You can operate DVD, movie CD, music or picture CD’s content by using the buttons on your remote
control. Below are the main functions of commonly used remote control buttons.
Buttons on
the Remote
Control
DVD
Playback
Movie
Playback
Picture
Playback
Music Playback
Play Play Play Play
Pause Pause Pause Pause
Stop Stop Stop Stop
/
Highlights a menu item /
Shifts the zoomed picture left or right (if available)
X
/
Highlights a menu item / Shifts the zoomed picture up or down (if available)
/
Rapid reverse / Rapid advance X
Rapid reverse /
Rapid advance
Views the
scene from
different angles
(if available)
X X X
Displays disc information / Displays DVD setup
menu during stop mode
X X
Displays disc information X X
Audio language X X X
MENU Displays main menu
OK Enter / View / Play
GREEN
BUTTON
Displays repeat options
RETURN Returns back to the previous menu (if available)
YELLOW
BUTTON
Goes back to the root folder (if available) X
JUMP (*) Direct selection of scenes, time or le (track) number
SUBTITLE
Subtitle on-off. Press repeatedly to switch between
subtitle options (if available)
X X
BLUE
BUTTON
Displays disc menu (if available) X X
RED BUTTON Zooms picture. Press repeatedly to switch between zoom options X
Other Functions – Button Combinations
(During playback)
+
Slow forward
[ + ] +
Sets slow forward speed
[ + ]
Sets slow reverse
+
Sets rapid advance speed
+
Sets rapid reverse speed
+
Conrms stop command
(*) You can switch to title by pressing numeric keys directly. You need to press 0 and then digit key to switch one digit titles (example:
to select 5, press 0 and 5).
Page 20
English - 19 -
English
Specications and Accessories
Broadcast Systems/Channels
DVB-T MPEG2, DVB-T MPEG4 HD
DVB-C MPEG2, DVB-C MPEG4
Video Input PAL, SECAM, NTSC 4.43
Stereo Nicam
External Connections
1-SCART 1 Input 21-pin SCART RGB, A/V
2-SCART-S (via SCART 1) Input 21-pin SCART S-Video
3-YPbPr (via VGA) Input Mini D-Sub 15-Pin Analogue
4-SIDE AV Input RCA Video + Audio L + R
5-HDMI 1/2 (*) Input Type A
(*) Number of these inputs may change according to the model of your TV.
6-VGA/PC Input Mini D-Sub 15-Pin Analogue RGB Signal
7-Digital Audio Output S/PDIF (Coaxial)
USB Port Media Browser Interface Version: USB 2.0
USB Class: Mass Storage
File System: FAT32
Headphone Socket 3.5mm stereo
Operating Conditions Temperature 5°C - 35°C (41°F - 94°F)
Humidity 20 - 80% (non-condensing)
Supplied Accessories Remote Control
2 batteries (AAA,IEC R03 1.5V)
4 screws
Stand xing cover
P Clip
24” D
24” W
Energy Efciency Class
A+ A+
Visible Screen Size (approx.)
61cm / 24” 61cm / 24”
On Mode Power Consumption (approx.) (*)
18 W 18 W
Annual Power Consumption (approx.) (**)
26 kWh 26 kWh
Standby Power Consumption (approx.)
< 0.50 W < 0.50 W
Screen Resolution (pixels)
1366 x 768 1366 x 768
Display
16:9 16:9
Sound Output (at 10% distortion)
2 x 2.5 2 x 2.5
Power Consumption Model (approx.)
45 W 45 W
Weight TV with stand
4.7 kg 4.2 kg
Gross weight
7.5 kg 7.0 kg
TV without stand
4.0 kg 3.5 kg
(*) Tested in accordance with IEC 62087-BD in default settings.
(**) Energy consumption 26 kWh per year, based on the power consumption of the television operating 4 hours per day for
365 days. The actual energy consumption will depend on how the television is used.
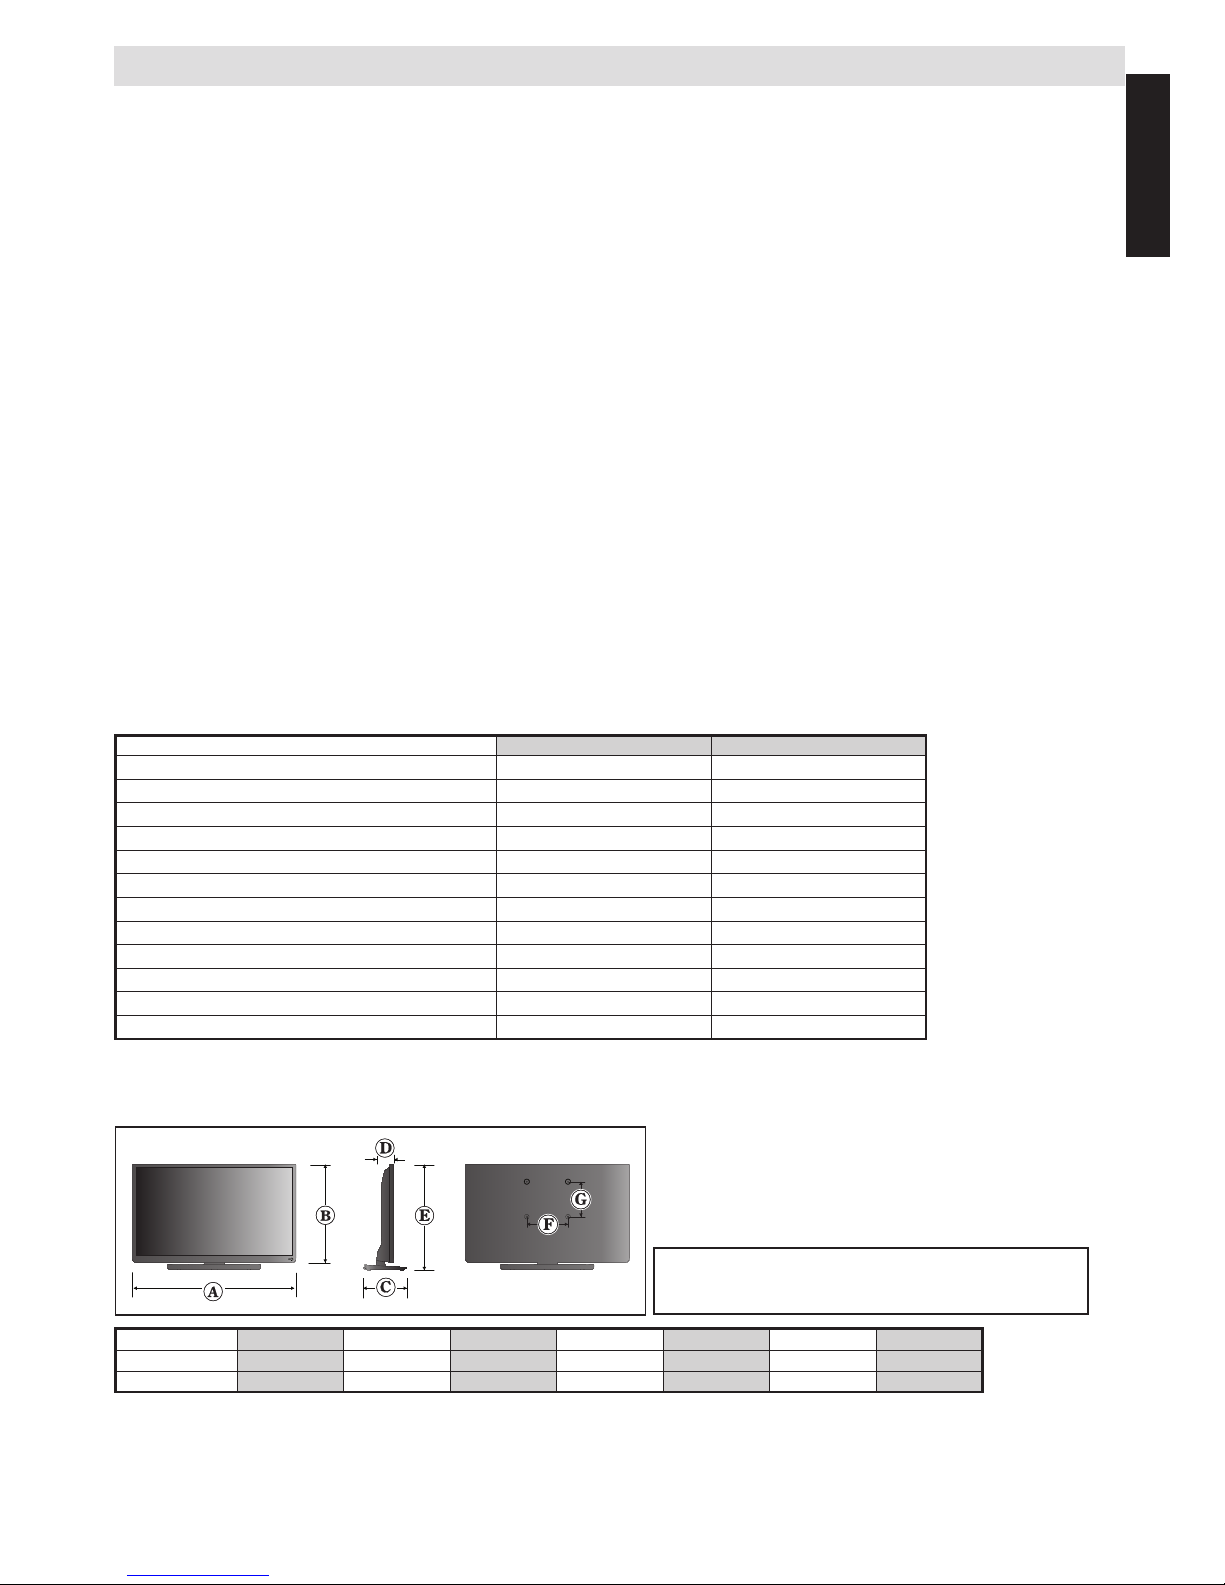
Unit Dimensions (Approximate)
Specication is subject to change without notice.
A (mm) B (mm) C (mm) D (mm) E (mm) F (mm) G (mm)
24D153*DG 554.0 345.0 163.0 61.3 379.0 75 75
24W153*DG
554.0 345.0 163.0 61.3 379.0 75 75
Page 21
English - 20 -
English
License Information
• The terms HDMI and High-Denition Multimedia Interface, and the HDMI Logo are trademarks or registered
trademarks of HDMI Licensing LLC in the United States and other countries.
• DVB is a registered trademark of the DVB Project.
• [1] EIA/CEA-861-D compliance covers the transmission of uncompressed digital video with high-bandwidth digital
content protection, which is being standardized for reception of high-denition video signals. Because this is an
evolving technology, it is possible that some devices may not operate properly with the television.
MP3 licence letter
MPEG Layer-3 audio coding technology licensed from Fraunhofer LLS and Thomson.
MP4 licence letter
THIS PRODUCT IS LICENSED UNDER THE MPEG-4 VISUAL PATENT PORTFOLIO LICENSE FOR THE
PERSONAL AND NON-COMMERCIAL USE OF A CONSUMER FOR (I) ENCODING VIDEO IN COMPLIANCE
WITH THE MPEG-4 VISUAL STANDARD (MPEG-4 VIDEO) AND/OR (II) DECODING MPEG-4 VIDEO THAT WAS
ENCODED BY A CONSUMER ENGAGED IN A PERSONAL AND NON-COMMERCIAL ACTIVITY AND/OR WAS
OBTAINED FROM A VIDEO PROVIDER LICENSED BY MPEG LA TO PROVIDE MPEG-4 VIDEO. NO LICENSE
IS GRANTED OR SHALL BE IMPLIED FOR ANY OTHER USE. ADDITIONAL INFORMATION INCLUDING THAT
RELATING TO PROMOTIONAL, INTERNAL AND COMMERCIAL USES AND LICENSING MAY BE OBTAINED
FROM MPEG LA,L.L.C. SEE HTTP://WWW.MPEGLA.COM
AVC licence letter
THIS PRODUCT IS LICENSED UNDER THE AVC PATENT PORTFOLIO LICENSE FOR THE PERSONAL AND
NON-COMMERCIAL USE OF A CONSUMER TO (I) ENCODE VIDEO IN COMPLIANCE WITH THE AVC STANDARD
(“AVC VIDEO”) AND/OR (II) DECODE AVC VIDEO THAT WAS ENCODED BY A CONSUMER ENGAGED IN
A PERSONAL AND NON-COMMERCIAL ACTIVITY AND/OR WAS OBTAINED FROM A VIDEO PROVIDER
LICENSED TO PROVIDE AVC VIDEO. NO LICENSE IS GRANTED OR SHALL BE IMPLIED FOR ANY OTHER
USE. ADDITIONAL INFORMATION MAY BE OBTAINED FROM MPEG LA,L.L.C. SEE HTTP://WWW.MPEGLA.COM
Licence Notication
TRADEMARK ACKNOWLEDGMENT
Manufactured under license from Dolby Laboratories. Dolby and the double-D symbol are trademarks of Dolby
Laboratories.
Disposal...
The following information is only for EU-member states:
Disposal of products
The crossed out wheeIed dust bin symbol indicates that products must be collected and disposed of separately
from household waste. Integrated batteries and accumulators can be disposed of with the product. They will be
separated at the recycling centres.
The black bar indicates that the product was placed on the market after August 13, 2005.
By participating in separate collection of products and batteries, you will help to assure the proper disposal of
products and batteries and thus help to prevent potential negative consequences for the environment and human
health.
For more detailed information about the collection and recycling programmes available in your country, please
visit our website (www.toshiba.eu/recycling) or contact your local city ofce or the shop where you purchased the
product.
Disposal of batteries and/or accumulators
The crossed out wheeled dust bin symboI indicates that batteries and/or accumulators must be collected and
disposed of separately from household waste.
If the battery or accumulator contains more than the specied values of lead (Pb), mercury (Hg), and/or cadmium
(Cd) dened in the European Battery Directive, then the chemical symbols for lead (Pb), mercury (Hg) and/or
cadmium (Cd) will appear below the crossed out wheeled dust bin symbol.
By participating in separate collection of batteries, you will help to assure the proper disposal of products and
batteries and thus help to prevent potential negative consequences for the environment and human health. For
more detailed information about the coIIection and recycling programmes available in your country, please visit our
website (www.toshiba.eu/recycling) or contact your local city ofce or the shop where you purchased the product.
Page 22
English - 21 -
English
Q & A Section
Question
Answer
Sound
Why is there no sound or picture?
Check if the TV is not in standby mode
Check the mains plug and all mains connections
Why is there a picture but no sound?
Check if the volume has not been turned off or sound mute has
not been selected
Why does the sound come only from
one speaker when stereo sound is
selected?
Check the balance in the SOUND menu if it has been set to one
side or not
Why is the soundtrack in English
when a different audio language has
been selected?
The programme is currently being broadcast with an English
soundtrack only
Picture
What can cause a poor picture? Interference or a weak signal. Try a different TV station
Why isn't the video / DVD being
played shown on screen?
Make sure the Blu-ray or DVD player is connected to the TV as
illustrated in the beginning chapters, then select the correct input
by pressing the SOURCE -
button on the remote.
Why is the Blu-ray / DVD player in
black and white?
Check if the correct input has been chosen or not
Why are there horizontal stripes and/
or blurred images on the screen
when in PC mode?
The phase may need adjusting. Select PC settings and highlight
Phase and adjust until the picture is clear
General
Why doesn't the remote control
work?
Check if the batteries are exhausted or inserted incorrectly
Why doesn't the Media browser
feature operate?
Make sure the USB stick / HDD is connected correctly. Incorrect
operation may occur from a USB Hub connection.
Why digital subtitles are not shown
on screen when they are selected?
Subtitles are not currently being transmitted by the broadcaster
Why is the digital channel locked? Parental control is activated. Check parental settings
Why are some encrypted digital
channels unavailable?
Your subscription needs upgrading. Contact your service provider
Why does the active standby LED
sometimes take longer to go out?
When in active standby, the TV's active standby will automatically
search all available channels for updates, provided automatic update
is enabled. The required time to do this may vary. Led blinks as red
and green in this mode
Why don’t the controls of the TV
work?
Check if CHILD LOCK is selected or not
What is DVB-T? Digital Video Broadcast via an aerial / antenna
What is DVB-C? Digital Video Broadcast via a cable system
How are radio channels selected? You can select them via Channel list
What can be done if the PIN is
forgotten?
You can reset the TV and perform the First Time Installation again.
Ensure that no one else is aware of this procedure by securely storing
the Owner’s Manual
If you are asked to enter a PIN to perform the First Time Installation
consult your authorized retailer
Page 23

English - 22 -
English
REACH information
The European Union (EU) chemical regulation, REACH (Registration, Evaluation, Authorization
and Restriction of Chemicals), entered into force on 1 June 2007, with phased deadlines to 2018.
Toshiba will meet all REACH requirements and is committed to provide our customers with
information about the presence in our articles of substances included on the candidate list according
to REACH regulation.
Please consult the following website www.toshiba.eu/reach for information about the presence in
our articles of substances included on the candidate list according to REACH in a concentration
above 0.1 % weight by weight.
EU Conformity Statement
This product is carrying the CE-Mark in accordance with the related European Directives.
Responsible for CE-Marking is TOSHIBA, 23 Davy Road, Plymouth, PL6 8BY UK.
This product is labeled with the CE Mark in accordance with the related European Directives, notably
Low Voltage Directive 2006/95/EC, Electromagnetic Compatibility Directive 2004/108/EC and RoHS
Directive 2011/65/EU. Furthermore the product complies with the Ecodesign Directive 2005/32/EC (EuP)
and 2009/125/EC (ErP) and its related implementing measures.
©TOSHIBA 2014
All rights reserved.
Reproduction in whole or part without written permission is strictly prohibited.
TOSHIBA
23 Davy Road, Plymouth Devon, PL6 8BY, England.
This equipment corresponds to requirements of the Technical Regulation on limitation of usage of certain
dangerous substances in electrical and electronic equipment.
Page 24

GUIDE DE DÉMARRAGE RAPIDE
24D153*DG / 24W153*DG
Téléviseur LCD À Retro Éclairage LED
Le présent document donne une vue d'ensemble de
votre téléviseur Toshiba.
Il est prévu qu'au cours de la durée de vie de votre téléviseur, des
mises à jour du rmware seront mises à disposition, de sorte à garantir
les performances optimales de votre appareil. Vous pouvez télécharger
la version la plus récente du rmware via l'adresse
www.toshiba-om.net/rmware.php
Certaines fonctionnalités présentées dans ce document sont
limitées du fait des lois locales et peuvent ne pas être
disponibles dans certains pays.
Si vous souhaitez consulter le manuel avancé de ce téléviseur Toshiba,
rendez-vous à l'adresse
www.toshiba-om.net
« Enregistrez votre téléviseur en ligne à l'adresse :
www.toshiba-europe.com/registration »
Toshiba estime que le fait de rendre les fonctionnalités avancées accessibles en ligne
préservera l'abattage d'environ 100.000 arbres chaque année
(soit 6.5 millions de kg de Co2).
Si vous souhaitez voir les fonctions avancées mais n’avez pas accès à un ordinateur ou
à Internet, veuillez contacter le service d'assistance de votre région via les coordonnées
inscrites en quatrième de couverture de ce document.
Page 25

Contenu
Français - 2 -
Français
Précautions de sécurité .......................................... 3
Circulation de l’air ............................................... 3
Dommages de chaleur........................................ 3
Alimentation secteur ........................................... 3
Avertissement ..................................................... 3
À faire ................................................................. 3
À ne pas faire...................................................... 3
Installation et renseignements importants .............. 4
CLAUSE D’EXCLUSION .................................... 4
Consignes de Sécurité Importantes ....................... 5
Montage ou Démontage du socle........................... 6
La télécommande ( TV - DVD ) .............................. 7
Insertion des piles dans la télécommande ......... 7
Brancher un équipement externe ........................... 8
Branchement d'un périphérique HDMI
®
ou DVI à
l’entrée HDMI.......................................................... 9
Connecter un appareil HDMI .............................. 9
Connecter un appareil DVI ................................. 9
Connexion d’un ordinateur ................................... 10
Connexion d’un ordinateur ............................... 10
Branchement d'un Lecteur ash USB ............... 10
Contrôle du téléviseur............................................11
Mise en marche .................................................11
Utilisation de la télécommande ..........................11
Utiliser les touches de commande sur le dessus
du téléviseur: .....................................................11
Installation initiale ................................................. 12
Mode DVD ............................................................ 14
Manipuler vos disques ...................................... 14
Nettoyez les disques......................................... 14
DVD - Fonctions ............................................... 14
DVD - boutons de commande de la TV ............ 14
Comment regarder un DVD .............................. 15
Remarques sur la lecture DVD ......................... 15
Conguration du mode DVD ............................. 16
Préférences ...................................................... 16
La qualité des images DVD est mauvaise ........ 17
Annexe A : les formats de chiers supportés en
mode DVD ............................................................ 18
Annexe B : Types de disques compatibles ........... 18
Spécications et accessoires ............................... 20
Informations de licence......................................... 21
Section Q & R ....................................................... 22
Page 26

Français - 3 -
Français
Précautions de sécurité
Cet appareil a été conçu et fabriqué conformément aux normes de sécurité internationales ; cependant, comme tout appareil
électrique, il nécessite la prise de certaines précautions pour pouvoir vous offrir une performance optimale en toute sécurité.
Pour votre propre sécurité, veuillez lire les consignes données ci-dessous. Elles sont générales et conçues pour vous aider
à mieux utiliser les produits électroniques.
Circulation de l’air
Laissez un espace de plus de 10 cm autour du téléviseur lors
du montage mural pour permettre une ventilation adéquate.
Ceci empêchera une surchauffe et des éventuels dommages
sur votre téléviseur. Les endroits très poussiéreux doivent
être évités.
Dommages de chaleur
Des dommages peuvent être provoqués si vous laissez le
téléviseur à la lumière directe du soleil ou près d'un radiateur.
Evitez les endroits sujets à des températures extrêmement
hautes ou humides, ou les endroits où les températures sont
susceptibles de tomber au-dessous de 5°C (41°F).
Alimentation secteur
Ce téléviseur ne doit être raccordé qu’à une prise de 220-240
V AC 50 Hz. S’assurer que ni le téléviseur, ni son support,
n’est posé sur le cordon d’alimentation. Cette prise NE DOIT
pas être retirée de l’équipement parce qu’elle contient un ltre
d’interférence radio spécial. Si vous le retirez, sa performance
sera affectée. Il doit être remplacé par un autre correctement évalué et approuvé. SI VOUS AVEZ DES DOUTES,
CONTACTEZ UN ÉLECTRICIEN SPÉCIALISÉ.
Avertissement
Pour éviter d’éventuels incendies, éloignez en permanence
les bougies et d’autres objets de nature similaire de cet
appareil.
À faire
VEUILLEZ lire la notice d’utilisation avant d’utiliser l’équi-
pement.
VEUILLEZ vous assurer que tous les branchements
électriques (prise d’alimentation, cordons prolongateurs et
interconnexions entre différentes unités d’équipement) ont
été réalisés correctement, conformément aux instructions du
fabriquant. Éteignez et retirez la prise d’alimentation avant
d’effectuer ou de modier les branchements.
VEUILLEZ consulter votre fournisseur si vous avez des
doutes sur l’installation, le fonctionnement ou la sécurité de
votre équipement.
VEUILLEZ faire attention aux panneaux ou aux ouvertures
de votre appareil qui sont en verre.
À ne pas faire
N’enlevez absolument jamais les pièces xes de votre appa-
reil sous peine de vous exposer à des tensions dangereuses.
NE PAS obstruer les aérations de votre appareil avec des
journaux, des nappes, des rideaux etc. Le surchauffage va
endommager l'appareil.
NE PAS exposer les appareils électriques dans des endroits
pleins d'eau ou avec des objets contenant du liquide.
Ne placez absolument jamais à proximité de l’appareil des
objets dégageant de la chaleur ou des sources de ammes
nues, tels que des bougies allumées ou des veilleuses. Des
températures élevées peuvent faire fondre les matières
plastiques et occasionner des incendies.
NE PAS utiliser des supports de fortune; utiliser les vis pour
support Télé fournies par le fabricant.
NE PAS laisser l’équipement allumé sans surveillance, à
moins qu’il soit spéciquement établi qu’il a été conçu pour
une utilisation non surveillée ou qu’il y ait un état de veille.
Éteignez le téléviseur en débranchant la che, et veillez à ce
que les autres membres de la famille sachent le faire également. Des arrangements spéciaux peuvent être à prévoir
pour les personnes inrmes ou invalides.
NE laissez absolument jamais fonctionner le matériel si
vous avez des doutes sur son bon fonctionnement, ou s’il
est endommagé d’une façon ou d’une autre – Mettez-le
hors tension, débranchez la che secteur et contactez votre
revendeur.
ATTENTION - Une pression excessive du son provenant des
écouteurs et haut-parleurs peut entraîner une perte de l’ouïe.
AVANT TOUTE CHOSE – NE JAMAIS laisser quiconque,
les enfants en particulier, pousser ou porter des coups
sur l’écran, insérer des objets dans les trous, les fentes
ou les autres ouvertures du boîtier.
NE FAITES RIEN d’irresponsable avec des équipements
électriques – il vaut mieux être sûr qu’avoir des regrets.
LA FICHE D’ALIMENTATION EST UTILISÉE COMME
APPAREIL DE SECTIONNEMENT, ET DOIT PAR CONSÉQUENT RESTER FACILE D’ACCÈS.
Remarque : Des jeux vidéo interactifs dans lesquels le joueur
tire un « fusil » semblable à une manette de jeu sur l’écran
cible peut ne pas fonctionner avec ce téléviseur.
Les illustrations et OSD contenues dans ce manuel
d'utilisateur sont uniquement pour une meilleure
compréhension et peuvent varier légèrment par
rapport aux fonctions actuelles.
Page 27
Français - 4 -
Français
Installation et renseignements importants
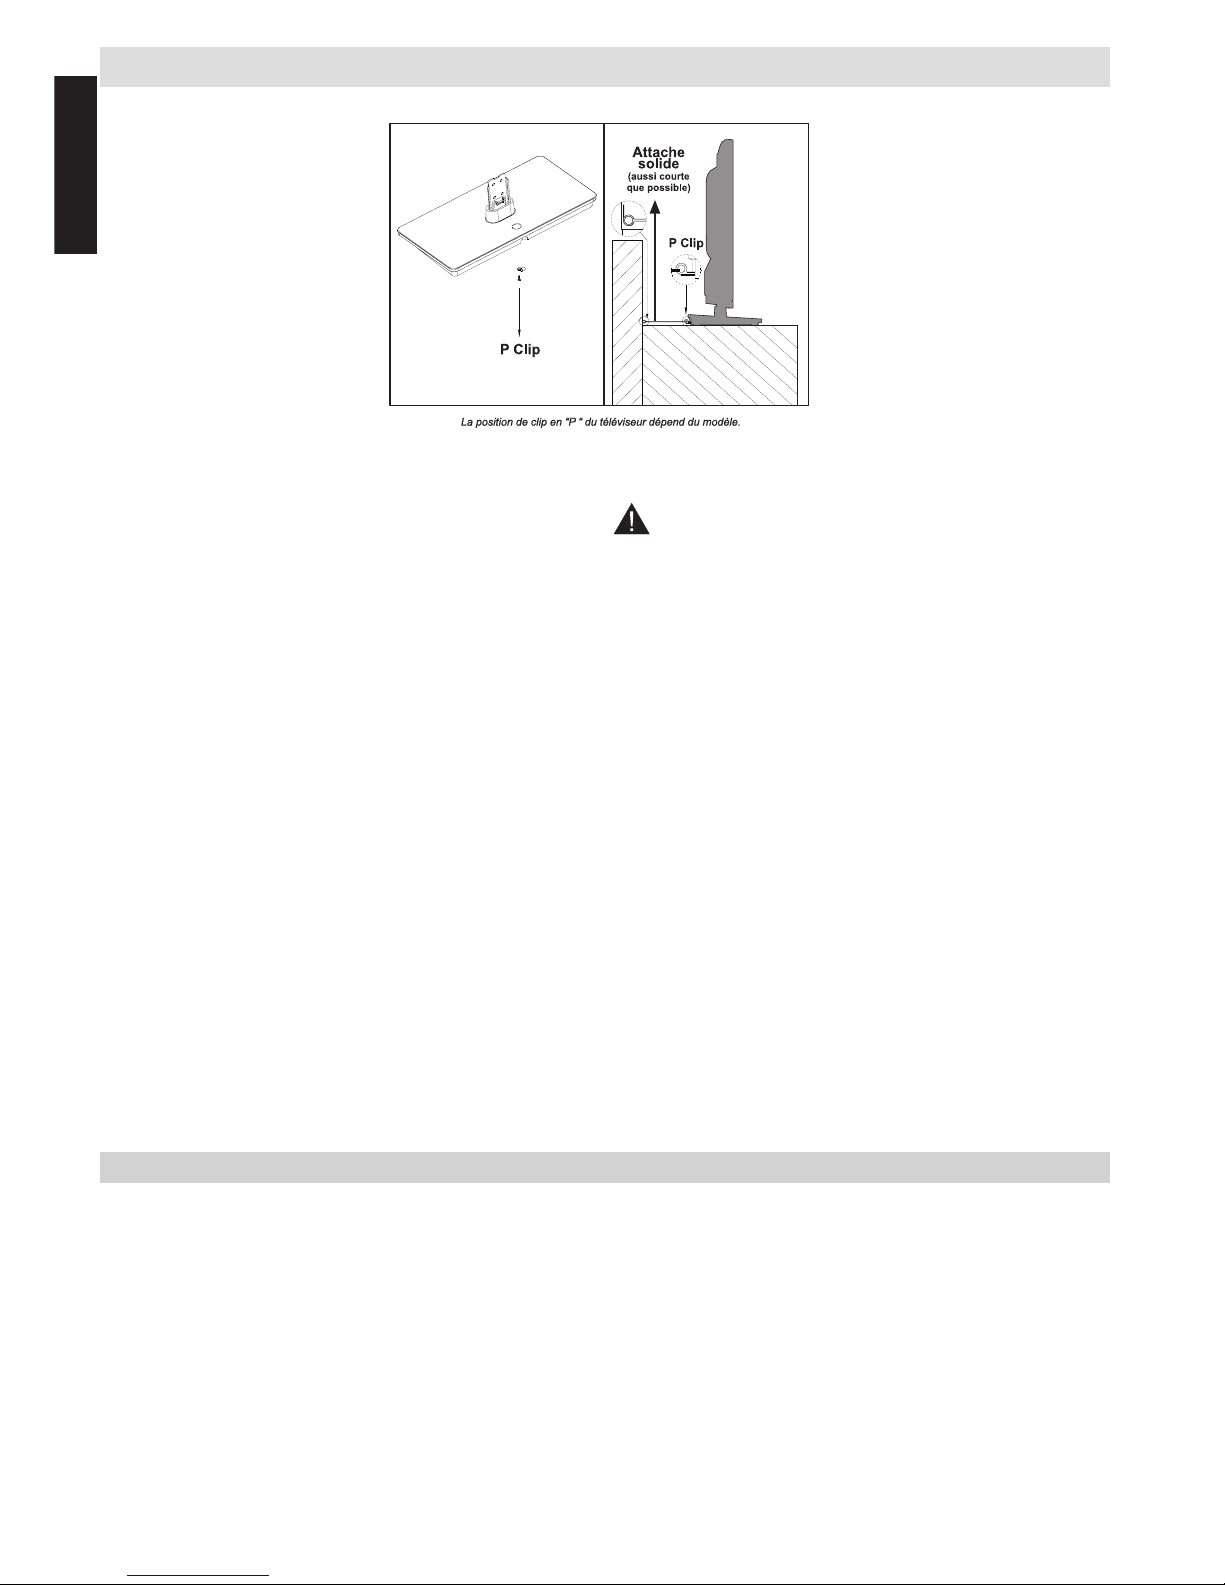
Emplacement
* Les boutons et types
de support sont fonction
du modèle.
Éloignez le téléviseur de la lumière directe du soleil et des
autres intempéries. Pour utiliser votre appareil dans des
conditions optimales, nous vous recommandons un éclairage
indirect. Utilisez des rideaux ou des stores pour empêcher que
les rayons de soleil atteignent l’écran.
Placez toujours placer le téléviseur sur une surface résistante
et stable pouvant supporter toute la partie inférieure du support
et le poids de l'unité à l'aide de la méthode suivante an de
sécuriser le téléviseur à un mur avec une attache solide à
l'arrière du support.
Les écrans LCD sont fabriqués en utilisant une technologie de
précision de pointe ; cependant il peut manquer des éléments
de l’image sur l’écran ou il peut y avoir des points lumineux.
Ce n’est pas un défaut.
Assurez-vous que le téléviseur est placé dans un endroit où
il ne peut pas être poussé ou atteint par des objets, car la
pression peut endommager l’écran. De même, veillez à ce
que de petits éléments ne puissent pas être insérés dans les
fentes ou les ouvertures du boîtier.
Évitez d’utiliser les produits chimiques (comme les
puricateurs d’air, les agents de nettoyage, etc.) ou à
proximité du piédestal du téléviseur. Selon des études,
les matières plastiques peuvent faiblir et lâcher avec le temps
sous les effets conjoints des agents chimiques et de l’usure
mécanique (à l’exemple du poids du téléviseur par exemple).
Le non respect de ces consignes pourrait amener le téléviseur
ou son piédestal à subir des dégâts graves et/ou permanents.
Nettoyer l’écran et son compartiment...
Débranchez le téléviseur, et nettoyez l’écran et le casier avec
un chiffon doux et sec. Nous vous recommandons de ne pas
utiliser de produits à polir ou de solvants sur l’écran ou le boîtier
puisque cela pourrait causer des dommages.
Nota bene
La fonction de réception numérique de ce téléviseur ne fonctionne que dans les pays énumérés dans la section
"Pays" pendant la première installation. Suivant le pays ou la région, certaines fonctions de ce téléviseur
peuvent ne pas être disponibles. La réception des services supplémentaires futurs ou modiés ne peut être
garantie avec cet appareil.
Si les images stationnaires générées par les diffusions au format 4 :3, les services de télétexte, les logos
d’identication de chaîne, les écrans d’ordinateur, les jeux vidéos, les menus à l’écran, etc. s’afchent à l’écran
pendant un certain temps, ils pourraient se faire remarquer. Il est toujours conseillé de réduire aussi bien la
luminosité que le contraste du téléviseur.
Une utilisation très longue et continue de l’image au format 4 :3 sur un écran prévu pour afcher une image au
format 16 :9 est susceptible de provoquer une certaine rétention de l’image au niveau du rapport d’aspect 4 :3.
Lorsque c’est le cas, il ne s’agit nullement d’une défaillance du téléviseur LCD qui ne saurait par conséquent
être couverte par la garantie du fabricant. L’utilisation régulière des autres formats d’image évitera de manière
permanente de tels problèmes.
CLAUSE D’EXCLUSION
Toshiba décline toute responsabilité pour les pertes et/ou dommages causés au produit en cas de :
i) incendie ;
ii) tremblement de terre ;
iii) dommages accidentels ;
iv) tout usage abusif intentionnel du produit ;
v) toute utilisation du produit dans de mauvaises conditions ;
vi) des pertes et/ou dommages du produit occasionnés en possession d’une tierce partie ;
vii) des dommages ou pertes causés par le défaut et/ou la négligence du propriétaire à suivre les instructions données
dans la notice d’utilisation ;
viii) des pertes ou dommages causés directement par la mauvaise utilisation ou le dysfonctionnement du produit lorsqu’il
est utilisé simultanément à un équipement associé ;
De plus, en aucun cas Toshiba n'est responsable des pertes et/ou dommages indirects, incluant, mais non limités, les cas
suivants, la perte de prot, l’interruption d’activité, la perte de données enregistrées occasionnés lors du fonctionnement
normal ou d’une mauvaise utilisation du produit.
Page 28

Français - 5 -
Français
Consignes de Sécurité Importantes
• Toute fonction se rapportant au téléviseur numérique (ayant le logo DVB) est disponible uniquement dans
le pays ou la région dans lequel / laquelle le signal en question est émis. Vériez auprès du vendeur s’il est
possible de recevoir un signal DVB - T/C dans votre localité.
• Même si le téléviseur est conforme aux spécications DVB - T/C, la compatibilité aux futures transmissions
numériques DVB-T/C n'est pas garantie.
• Certaines fonctions de télévision numérique peuvent ne pas être disponibles dans certains pays.
• Le système DVB-T/C dont dispose cet appareil permet la réception des chaînes FTA (Free To Air - ondes
libres) et cryptées.
• Remarque ; les chaînes cryptées nécessitent un système de cryptage spécique pour afcher, ce qui peut
ne pas être disponible dans certains pays.
• DVB est une marque déposée du projet DVB. Le logo DVB indique que le produit est conforme aux exigences
de la radiodiffusion numérique européenne.
• Le DVB T est une émission vidéo numérique par antenne.
• Le DVB C est une émission vidéo numérique par câble.
INFORMATIONS IMPORTANTES
Installation du téléviseur
• Évitez de mettre des tissus ou tout autre matériau entre le téléviseur et le meuble sur lequel il est placé.
• Sensibilisez les enfants sur les dangers qu’ils courent s’ils grimpent sur le meuble pour atteindre le téléviseur
ou ses commandes.
• Tenez toujours la prise lorsque vous débranchez l'appareil du secteur. Ne tirez pas le cordon. Le cordon
peut être endommagé et provoquer ainsi un court-circuit.
• Utilisez un chiffon doux et sec pour nettoyer l'appareil.
• Disposez l’appareil de sorte que personne ne puisse trébucher sur le cordon.
• Si vous avez l'intention de monter l’appareil sur le mur, contactez le magasin où vous l’avez acheté pour
obtenir des conseils, et laissez les professionnels faire le montage. Un mauvais montage peut causer des
dommages et / ou des blessures.
• Pour protéger l'appareil pendant un orage, débranchez le cordon d'alimentation CA et déconnectez le
décodeur ou les systèmes d'antenne, de câble et de satellite, etc.
Attention : Ne touchez pas la che de branchement de l’antenne.
• Le téléviseur chauffe lorsqu’il est en marche. Ne couvrez pas le téléviseur lorsqu’il est en marche an
d’éviter tout risque de surchauffe.
• Les trous de ventilation ne doivent pas être bloqués. Ne placez pas le poste à proximité d’un radiateur. Ne
le placez pas en contact direct avec la lumière du soleil.
• La condensation survient dans les situations suivantes :
- Lorsque vous déplacez l'appareil d'un endroit froid à un endroit chaud.
- Lorsque vous utilisez l'appareil dans une pièce dans laquelle on vient de mettre le chauffage en marche.
- Lorsque vous utilisez l'appareil dans un endroit où l'air froid d'un climatiseur atteint directement l'appareil.
- Lorsque vous utilisez l'appareil dans un endroit humide.
• N’utilisez jamais l'appareil lorsqu’il y a risque de condensation.
• L’utilisation de l'appareil lorsqu’il existe un risque de condensation peut endommager ses pièces internes.
Laisser passer deux ou trois heures, pour que l'appareil se réchauffe et la moisissure s'évapore avant de
l'allumer.
Page 29
Français - 6 -
Français
Montage ou Démontage du socle
Montage ou Démontage du socle
(1) Placer avec soin la face du téléviseur sur une surface plane et matelassée, en veillant à ce que le support
pende sur le côté.
(2) Pour monter le socle utiliser les vis fournies
ou,
(3) Retirer les vis utilisées pour assembler le socle.
(4) Après le retrait des vis, tenez le téléviseur et tirez le socle en exerçant une traction vers l'extérieur du
téléviseur pour retirer le socle.
Remarque:Touteslesprécautionsdoiventtoujoursêtreprisespendantledémontagedusocleand'éviterd'endommager
le panneau LCD.
Pour modèle 24D153*DG / 24W153*DG
En cas d’utilisation d’un support mural
Veuillez utiliser un support mural approprié pour la taille et le poids du téléviseur LCD et il faut deux personnes
pour l'installer.
(1) Débranchez et retirez les câbles et/ou autres connecteurs de composants à l'arrière du téléviseur.
(2) Placer avec soin la face de l’appareil sur une surface plane et matelassée, comme une courtepointe ou
une couverture.
(3) Suivez les instructions fournies avec le support mural. Avant de commencer, assurez-vous que les supports
appropriés sont xés au mur et à l'arrière du téléviseur comme décrit dans les instructions fournies avec le
support mural.
Page 30

Français - 7 -
Français
La télécommande ( TV - DVD )
Télécommande facile à utiliser au premier coup d'œil.
(*) MON BOUTON 1 ET MON BOUTON 2
Ces boutons sont dotés de fonctions par défaut, selon le modèle.
Cependant, vous pouvez personnaliser les fonctions de ces boutons en
les appuyant pendant cinq secondes après avoir sélectionné la source
ou la chaîne. Un message de conrmation va apparaître sur l'écran. La
fonction MON BOUTON est alors associée à la fonction sélectionnée.
Remarque : Si vous procédez à une première installation, les touches
MON BOUTON 1 et 2 retourneront à leurs fonctions par défaut
1. Veille
Veille
2. Touches numériques
Touches numériques
3. Afche la liste des
chaînes / Bascule entre les
types de diffusion
4. Coupez le sone
Coupez le son
5. Augmentez/réduisez le volume
Augmentez/réduisez le
volume
6. Menu activé/désactivé
Menu
7. Boutons de navigation
(
, , , )
Boutons de navigation
8. Okay (Conrmer) / Liste
des Chaînes / Maintenir
appuyé (en mode TXT)
OK
9. Retour / Page d’index (en
mode TXT)
10. Navigateur média
Angle
11. Info/Révéler (En mode TXT)
Temps
12. Mon bouton 1 (*)
Afcher l'heure / le menu
DVD
13. Bouton de couleur
Bouton rouge - Zoom
Bouton vert - Repeat
Bouton jaune - Root
Bouton bleu - Title
14. Mono/Stéréo - Dual
I - I I / L a n g u e e n c o u r s
(dans les chaînes DVB)
Sélection de la langue
15. Réaction rapide
Réaction rapide
16. Aucune fonction
17. Pause
Pause
18. Lecture
Lecture
19. Stop
Stop
20. Avance rapide
Avance rapide
21. Activer/désactiver sous-titre
(en mode Navigateur média et
avec des chaînes DVB)
Sous-titre
22. Taille de l'image
Taille de l'image
23. Mon bouton 2 (*)
Mode recherche
24. Télétexte /Mélanger (en mode
TXT)
25. Guide électronique de
programme (dans les chaînes
DVB)
26. Quitter
Quitter
27. Menu principal
28. Programme vers le bas /
Page précédente -
Programme vers le haut –
Page suivante
29. Programme précédent
30. Sélection de AV/Source
Sélection de la source
Remarque : Les références en
gras sont destinées aux modèles
avec fonctionnement DVD.
Insertion des piles dans la télécommande
Retirez le couvercle pour ouvrir le logement de piles et veillez à placer les piles dans le
bon sens. Les piles adéquates sont AAA, IEC R03 1.5V.
N'associez pas une pile usagée et une pile neuve et ne mélangez pas différents types
de pile. Retirer les piles mortes immédiatement pour éviter que l'acide ne se déverse
dans le compartiment à piles. Veuillez les jeter dans un lieu de collecte prévu à cet effet.
Avertissement: Les piles ne doivent pas être exposées à une chaleur excessive telle
que celle du soleil, du feu ou autre.
Les performances de la télécommande se détérioreront au-delà d’une distance de 5 mètres
ou à l’extérieur d’un angle de 30 degrés à partir du récepteur infra rouge. Si la plage de
fonctionnement commence à se réduire, les piles pourraient nécessiter un remplacement.
1. 2.
3.
Page 31

Français - 8 -
Français
Brancher un équipement externe
Avant de brancher un périphérique externe, débranchez la che de la prise murale.
(*) Le nombre de ces ports peut varier selon le modèle de téléviseur.
Avant d'exécuter la Première Installation , les périphériques
connectés doivent être mis en mode veille.
Câble d’antenne :......................................................
Branchez l’antenne sur la prise pour antenne au dos du
téléviseur.
Prise PÉRITEL:..........................................................
Si vous utilisez un décodeur* ou un enregistreur multimédia,
il est essentiel que le câble péritel soit connecté au téléviseur.
La prise DIGITAL AUDIO permet le branchement d’un
système de son d'ambiance.
HDMI
®
(Interface des médias multiples de haute
dénition) sert à utiliser un décodeur DVD ou tout autre
équipement avec des sorties audio et vidéo numériques.
Cette interface a été conçue pour une meilleure performance
avec les signaux vidéos haute dénition 1080i et 1080p.
Toutefois, elle peut également accepter et afcher les signaux
VGA, 480i, 480p, 576i, 576p et 720p Les signaux de format
de PC s’afcheront également.
Remarque : Bien que ce téléviseur puisse être branché à
un dispositif HDMI, il est possible que certains appareils ne
fonctionnent pas correctement.
Vous pouvez utiliser un câble YPbPr à VGA (non fourni) pour
activer le signal YPbPr via l’entrée du VGA.
Remarque : Vous ne saurez utilisez le VGA et le YPbPr de
manière interchangeable.
Vous pouvez brancher une grande variété d’appareils
externes au téléviseur; il faut par conséquent consulter les
consignes y afférentes dans les manuels d'utilisateurs de
ces appareils.
Si le téléviseur bascule automatiquement vers l’appareil
externe, vous pouvez retourner au mode télévision normal
en appuyant sur la touche correspondant à la chaîne de votre
choix. Pour revenir au périphérique externe, appuyez sur le
bouton « SOURCE -
» pour commuter entre les sources.
Quelles que soient les propriétés de la source, la sortie audio
de la prise DIGITAL AUDIO ne peut être copiée.
Page 32

Français - 9 -
Français
Branchement d'un périphérique HDMI® ou DVI à l’entrée HDMI
Les entrées HDMI de votre téléviseur reçoivent des chiers
audio numériques et vidéos numériques non compressés
depuis une source HDMI ou une vidéo numérique non
compressée à partir d’un DVI (Interface visuelle numérique).
Ces entrées sont conçues pour accepter des émissions HDCP
(protection des contenus numériques à haute dénition) sous
forme numérique d’un appareil électronique grand public
compatible EIA/CEA-861-D [1] (comme un décodeur ou un
lecteur DVD munie d’une sortie HDMI ou DVI).
REMARQUE :
• Certains équipements HDMI antérieurs peuvent ne pas
fonctionner correctement avec votre nouveau téléviseur
HDMI.
• Format audio pris en charge : PCM linéaire, fréquence
d’échantillonnage 32/44.1/48kHz.
Connecter un appareil HDMI
Brancher un périphérique HDMI (connecteur de type A) à la
prise HDMI Pour assurer un bon fonctionnement, il est recommandé d'utiliser un câble HDMI avec le logo HDMI ( ).
• Si votre connexion HDMI a une capacité de 1080 p ou si votre
téléviseur prend en charge des taux de rafraîchissement
supérieurs à 50Hz, vous devez vous procurer un câble de
catégorie 2. Un câble HDMI/DVI classique risque de ne pas
fonctionner correctement dans ce mode.
• Un câble HDMI transfère des signaux audio et vidéo. Il n’est
pas nécessaire d’avoir des câbles audio analogiques séparés
(voir illustration).
• Pour afcher l'appareil vidéo en HDMI, appuyer sur
le bouton “SOURCE -
” pour sélectionner le port
HDMI approprié.
* Le nombre
de ces ports
peut varier
selon le
modèle de
téléviseur.
Connecter un appareil DVI
Branchez un câble adaptateur HDMI-DVI (connecteur HDMI
de type A) à la prise d’entrée HDMI et les câbles audio aux
ENTRÉES AUDIO (LATÉRALES) (voir illustration).
• La longueur recommandée du câble adaptateur HDMI-à-
DVI est de 6.6 pi (2m).
• Le câble de l’adaptateur HDMI-DVI transfère uniquement
le signal vidéo. Des câbles audio analogiques séparés
sont nécessaires.
* Le nombre de
ces ports peut
varier selon
le modèle de
téléviseur.
REMARQUE :
Pour s'assurer d'une bonne réinitialisation des périphériques
HDMI ou DVI, il est recommandé de suivre les consignes
suivantes :
• Lorsque vous mettez sous tension vos composants
électroniques, mettez d’abord le téléviseur sous tension,
et ensuite l’appareil HDMI ou DVI.
• Lorsque vous mettez hors tension vos composants
électroniques, mettez d’abord l’appareil HDMI ou DVI hors
tension, et ensuite le téléviseur.
Page 33

Français - 10 -
Français
Connexion d’un ordinateur
Connexion d’un ordinateur
Une connexion RVB/PC ou HDMI vous permet de visionner
l’écran de votre ordinateur sur le téléviseur et d’écouter le
son via les haut-parleurs de ce dernier.
Lorsque vous voulez brancher un PC à l'entrée RVB/PC du
téléviseur, utilisez un câble d’ordinateur analogique RGB
(15-broches) et utiliser des ENTREES AUDIO (latéral) avec
un câble PC audio (non fourni) pour une connexion audio
(voir illustration).
Pour utiliser un PC, réglez la résolution de sortie du moniteur
de l’ordinateur avant de le raccorder au téléviseur. Pour
afcher une image optimale, utilisez la fonction Réglage PC.
REMARQUE :
• Certains modèles de PC ne peuvent pas être connectés
à ce téléviseur. Un adaptateur n’est pas nécessaire pour
les ordinateurs avec une borne mini D-sub à 15 broches
compatible.
• Selon le titre du DVD et les spécications de l'ordinateur
sur lequel vous jouez le DVD-Vidéo, certaines scènes
peuvent être sautées ou vous pouvez ne pas être en mesure
d’activer la touche pause pendant les scènes multi-angles.
Branchement d’une clé USB
Branchement d'un Lecteur ash USB
• Vous pouvez brancher une clé USB à mémoire ash à votre
téléviseur à l’aide de l’entrée USB du votre appareil. Cette
fonctionnalité vous donne la possibilité d’afcher/de lire les
chiers musicaux, photographiques ou vidéos enregistrés
sur un support USB.
• Il est possible que certains types de périphériques USB
(à l’exemple des lecteurs MP3) soient incompatibles avec
ce téléviseur.
• Vous pouvez sauvegarder vos chiers avant d’effectuer tout
branchement au téléviseur an d’éviter de probables pertes
de données. Veuillez remarquer que la responsabilité du
fabricant ne saurait être engagée en cas de dommage de
chier ou de perte de données.
• Ne jamais enlever un périphérique USB durant la lecture
d’un chier.
ATTENTION : Un branchement et un débranchement rapide
des supports USB peuvent les endommager.
Page 34

Français - 11 -
Français
Contrôle du téléviseur
Vous pouvez brancher une grande variété d’appareils externes sur les prises situées sur le côté et à
l’arrière du téléviseur. Les réglages et commandes réalisables à l’aide de la télécommande peuvent être
réalisés à partir de la barre du menu sur le côté gauche du téléviseur pour les mêmes fonctions.
Mise en marche
Si le voyant de veille LED n'est pas allumé, vériez que la
che secteur est branchée à l'alimentation puis appuyez sur
le milieu du bouton
sur le côté gauche de la télévision ou
le bouton
de la télécommande pour mettre le téléviseur
en marche.
Pour placer le téléviseur en mode Standby, appuyez sur le
bouton «
» sur la télécommande ou appuyez le milieu du
bouton «
» sur le côté gauche du téléviseur et mainte-
nez-le appuyez. Pour allumer la Télé appuyer sur ce bouton
une seconde fois. L'image peut prendre quelques secondes
pour s'afcher.
Remarque : La couleur LED du mode Veille actif change au
rouge en quelques secondes lorsque la Télé est en mode
veille.
À propos de l'économie d'énergie:
Le fait de mettre le téléviseur hors tension au niveau de
son alimentation secteur, ou de le débrancher, rendra sa
consommation électrique, ainsi que celle de tous les téléviseurs, pratiquement nulle. Ceci est recommandé lorsque le
téléviseur n'est pas utilisé pendant une longue période, par
exemple pendant les vacances.
La réduction de la luminosité de l’écran en réduira aussi
l’utilisation de l’énergie.
Remarque : En mettant le téléviseur en mode de veille, vous
en réduisez uniquement la consommation électrique car
l’appareil continue de consommer de l’énergie.
Utilisation de la télécommande
Appuyez sur la touche MENU de la télécommande pour voir
les menus.
Le menu principal apparaît comme un groupe de symboles
pour chaque option du menu. Appuyez sur la touche directionnelle gauche ou droite pour sélectionner une rubrique.
En mode sous menu d'écran le menu apparaît sous forme
d'une liste. Appuyez sur la touche de déplacement vers le
Haut ou celle de déplacement vers le Bas pour sélectionner
une rubrique.
Pour utiliser ces options, appuyer sur les boutons Haut et Bas
de la télécommande pour déler le menu puis appuyer sur OK
pour sélectionner. Les boutons Gauche et Droite servent à
sélectionner l'option choisit. Suivez les instructions à l’écran.
Utiliser les touches de commande sur le
dessus du téléviseur:
Utiliser les touches de commande sur le côté du téléviseur:
Pour régler le volume :
Appuyez sur la touche médiane
jusqu’à ce que l’OSD indiquant le niveau de volume
apparaisse. Augmentez le volume en appuyant sur le
bouton Haut. Diminuez le volume en appuyant sur le
bouton Bas.
Pour changer de chaîne : Appuyez sur la touche
médiane jusqu’à ce que le ruban d’informations de la
chaîne apparaisse. Parcourrez les chaînes mémorisées
en appuyant sur le bouton Haut ou Bas.
Pour régler la source : Appuyez sur la touche médiane
jusqu’à ce que la liste des sources apparaisse. Parcourrez
les sources disponibles en appuyant sur le bouton Haut
ou Bas.
Veuillez toujours vous référer au manuel d’utilisation des
appareils à brancher pour des détails complets.
Pour éteindre la Télé : Appuyez sur le centre du bouton
vers le bas et maintenez-le enfoncé pendant quelques
secondes, le téléviseur passe alors en mode veille.
Page 35

Français - 12 -
Français
Installation initiale
Avant d'allumer la Télé mettez votre décodeur et support d'enregistrement en mode Veille s'ils sont
connectés, puis assurez vous que l'antenne/le câble est branché à la Télé. Pour congurer le téléviseur,
utilisez les touches de la télécommande tel que décrit à la page consacrée à la Télécommande.
IMPORTANT : Assurez-vous que l'antenne/le câble est
branché et le module Interface Commune n'a pas été
inséré avant d'allumer la Télé pour effectuer la première
installation.
1. Connectez la che secteur , appuyez et maintenez
le milieu du bouton menu sur le côté gauche de
la Télé pour l’allumer. Si le téléviseur ne s’allume
pas, appuyez sur une touche numérotée sur
la télécommande ou sur la touche
de la
télécommande et le menu de sélection de la
langue s’affichera. Cette fenêtre apparaît la
première fois que le téléviseur est allumé et à
chaque fois que le téléviseur est réinitialisé.
2. Sélectionnez la langue de votre choix avec la
touche de déplacement vers le Haut ou celle de
déplacement vers le Bas, puis appuyez sur la
touche OK. Ensuite, l'écran ci-après s’afchera :
3. En appuyant sur le bouton directionnel Gauche
ou Droit, sélectionnez le pays de votre choix
et appuyez sur le bouton bas pour mettre en
surbrillance l’option Type de recherche. Utilisez
l'option Gauche ou Droit pour dénir le type de
recherche souhaité. Les types de recherches sont
uniquement Numérique, téléviseur analogique
uniquement et intégral.
4. Une fois définie, appuyez sur la touche
directionnelle Bas pour sélectionner l’option
Langue télétexte. Appuyez sur le bouton Gauche
ou Droit pour sélectionner la langue souhaitée.
Mettez l'option Recherche des chaînes cryptées
en surbrillance puis activez/désactivez cette
option la à l'aide des boutons Gauche ou Droite.
Appuyez sur OK pour continuer.
Remarque : Selon le pays,vouspouvezêtreinvitéàdéniret
valider un code PIN à ce niveau. Le code PIN sélectionné ne
saurait être 0000.Vousdevezlesaisirsil'onvousdemande
de le faire pour toute opération dans le menu plus tard.
5. Le message suivant s’afchera à l’écran :
Sélectionnez le mode Magasin si le téléviseur est
destiné à une exposition en magasin. Cette option
congurera les paramètres de votre téléviseur
pour un afchagede qualité et les fonctionnalités
du téléviseur pris en charge s'afcheront en haut
de l'écran en tant que bannière d'informations. Si
le Mode Magasin est sélectionné, un message
de conrmation s'afchera à l'écran. Sélectionnez
OUI pour continuer. Pour un usage domestique,
sélectionnez Mode . Domestique.
Cette option est disponible pour le menu Autres
réglages et peut être désactivée ou activée
ultérieurement.
6. Pressez le bouton OKsur la télécommande pour
continuer et le message suivant s’afchera à
l’écran :
7. Sélectionnez l'option Oui en appuyant sur les
touches Gauche et Droite et appuyez sur OK
pour continuer. Ensuite, l’OSD suivant s’afchera
à l’écran :
Page 36

Français - 13 -
Français
Première installation - suite
8. Si vous sélectionnez l’option Câble, l’écran ci-
après s’afchera : Si vous souhaitez rechercher
les réseaux disponibles, sélectionnez OUI
pour continuer. Le menu ci-après s’afchera :
Vous pouvez sélectionner Réseau, Fréquence ID
et Étape recherche à partir de cet écran. Pour
sélectionner les lignes qui s'afchent, utilisez les
boutons Haut ou Bas. Vous pouvez dénir Étape
de recherche à 8000 kHz ou 1000 kHz. Si vous
sélectionnez 1000 kHz, le téléviseur effectuera
une recherche détaillée. La durée de recherche
augmentera alors en conséquence. Une fois
terminé, appuyez sur le bouton OK pour lancer
la recherche automatique.
Si vous sélectionnez NON, le message suivant
s'afchera sur l'écran :
Vous pouvez régler les fréquences de début et de
n, ainsi que les niveaux de recherche désirés.
Une fois terminé, appuyez sur le bouton OK pour
lancer la recherche.
9. Si vous sélectionnez l'option Aérien de l'écran du
Type de recherche, un message de conrmation
s'afchera à l'écran. Si vous souhaitez continuer
la recherche, sélectionnez Oui, le téléviseur
recherchera les chaînes diffusées disponibles.
Sélectionnez Non pour quitter.
10. La fenêtre de réglage automatique apparaît et
le téléviseur démarre la recherche de stations
disponibles. La barre de progression s’afche.
Vous devez laisser le téléviseur terminer la
recherche.
Remarque : Vous pouvez appuyez sur la touche MENU
pour annuler.
Pendant la recherche, un message apparaît, vous demandant
si vous souhaitez trier les chaînes selon la LCN (*).
Sélectionnez Oui et appuyez sur OK pour conrmer.
(*)LeLCNc'estlesystèmedeNumérodeChaîneLogiquequi
répertorie les chaînes disponibles en fonction de la fréquence
de diffusion émise (si disponible).
Une fois toutes les stations disponibles enregistrées,
La Liste des Chaînes s’afchera à l’écran.
Appuyez sur le bouton MENU pour quitter la liste des
chaînes et regarder la télé.
Remarque : Évitez d’éteindre le téléviseur lors de l’initialisation
de la première installation.
Page 37

Français - 14 -
Français
Mode DVD
Si votre Téléviseur est équipé d'un module DVD intégré. La procédure suivante permet de faire fonctionner
l'unité DVD intégré correctement.
• Avertissement: Risque d'exposition a la
radiation de classe 1/classe 3b les rayons laser
visibles et invisibles. Ne Pas xer directement les
rayons.
PRODUIT LASER
DE CLASSE 1
Manipuler vos disques
• Pour garder le disque propre, tenez-le par ses bords.
Ne touchez pas la surface.
• Ne pas coller du papier ou de la bande adhésive
sur le disque.
• Si le disque est sali par n’importe quelle substance,
par ex. de la colle, enlevez-la avant de l’utiliser.
• Ne pas exposer le disque sous le soleil ou au contact
directe avec autres sources de chaleur comme des
tuyaux d'air chaud, ou le laisser dans une voiture
stationnée sous le soleil où la température peut
augmenter très rapidement et donc endommager
le disque.
• Après la lecture, rangez le disque dans son étui.
Nettoyez les disques
• Nettoyez le disque avec un tissu avant la lecture.
Frottez le disque du centre vers le bord.
• N’utilisez pas de solvants tel que le benzine ou les
diluants, ni les produits nettoyants disponibles dans
le commerce et les atomiseurs antistatiques prévus
pour les disques vinyle.
DVD - Fonctions
• Lecteur DVD / CD / CD-R / CD-RW / MP3 / JPEG
/ MPEG.
• Lecture NTSC/PAL (selon le contenu du disque).
• LPCM par sorties audio coaxiales et optiques
numériques (optionnelle).
• Prise en charge Multi-audio (jusqu’à 8) (selon le
contenu du disque)
• Support Multi-sous-titrage (jusqu’à 32) (selon le
contenu du disque)
• Support Multi-angle (jusqu’à 9) (selon le contenu
du disque).
• Contrôle parental à 8 niveaux.
• Lecture rapide avant et arrière dans 5 vitesses
différentes: 2x, 4x, 8x, 16x, 32x.
• Lecture au ralenti à 4 vitesses différentes :
1/2x, 1/4x, 1/8x, 1/16x avant.
• Lecture avant image par image
• Mode de recherche.
• Relecture
• Sortie audio coaxiale (en option)
• Les disques copiés peuvent être incompatibles.
DVD - boutons de commande de la TV
1. Chargeur de disques
2. Lecture / Pause (
/ ) bouton
Lit/ Pause le disque. Lorsque le menu
DVD (menu principal) est activé, ce bouton
fonctionne comme « bouton de sélection »
(Sélectionne la rubrique mise en surbrillance
dans le menu) si le disque prend en charge
cette fonctionnalité
3. Arrêt / Ejecter (
/ ) bouton
Arrête la lecture du disque / Ejecte ou charge
le disque.
REMARQUE : Vous ne pouvez pas éjecter le disque à partir
de la télécommande. Lors de la lecture d’un chier,vous
devez appuyer sur le bouton STOP (
/ ) (de la TV) trois
fois, pour pouvoir éjecter le disque.
Arrière du téléviseur
3
1
2
Page 38

Français - 15 -
Français
Mode DVD
Fonctionnement général
Comment regarder un DVD
Remarque : Le mode DVD ne peuvent pas être ouvert à
moinsqu'un DVDsoit inséré ou un bouton de commande
de DVD pressé.
Si vous changez de source en appuyant sur les
boutons “SOURCE -
”, “SWAP - ” ou “P
/ ” de la télécommande, le lecteur DVD va
s'arrêter automatiquement. Vous devez appuyer
sur PLAY et reprendre manuellement la lecture
lorsque vous repassez au mode DVD.
1. Allumer le téléviseur.
2. Passer en source DVD en utilisant le bouton
« SOURCE -
» de la télécommande.
3. Introduisez un disque dans le chargeur.
Le côté du disque doit être face à vous lorsque vous
regardez l'écran du téléviseur.
Le disque est chargé automatiquement et la lecture
commence si le disque ne comporte pas de menus.
Si lecture ne démarre pas automatiquement, appuyez
sur le bouton de lecture «
» de la télécommande
, ou le bouton lecture «
/ » sur le côté droit du
téléviseur.
Il est possible qu’un menu apparaisse sur l’écran du
téléviseur après quelques instants, ou que le lm
commence immédiatement après la présentation de
la compagnie cinématographique/TV. Cela dépendra
du contenu du disque et peut changer d’après chaque
disque.
Remarque : Les étapes 4 et 5 ne sont possibles que si le
disque comporte un menu.
4. Appuyer sur les boutons de navigation “ ”, “ ”,
“ ” ou “ ” , ou sur les boutons numériques pour
sélectionner le titre souhaité.
5. Pressez le bouton OK. L'élément sélectionné va
commencer à jouer.
Remarques sur la lecture DVD
a. Aucun son n'est émis lorsqu'on appuie sur les
fonctions Avance rapide ou relecture rapide.
b. Aucun son n'est émis en mode de lecture au ralenti.
c. La fonction relecture au ralenti n'est pas disponible.
d. Dans certains cas, la langue de sous-titrage
ne change pas immédiatement pour la langue
souhaitée.
e. Lorsque la langue souhaitée n'est pas sélectionnée,
même après avoir appuyé sur le bouton à plusieurs
reprises, cela signie que cette langue n'est pas
disponible sur le disque.
f. Lorsque le lecteur DVD est redémarré ou que le
disque est changé, le mode de sous-titrage rentre
automatiquement aux paramètres initiaux.
g. Si la langue sélectionnée n'est pas supportée
par le disque, la langue de sous-titrage va
automatiquement changé à la langue du disque
par défaut.
h. Une ‘circulation’ se produit souvent lorsqu'on
change de langue ; cela indique que vous pouvez
supprimer le sous-titrage en appuyant sur le
même bouton à plusieurs reprises jusqu'à ce que
le message "Subtitle Off apparaît sur l'écran.
i. Lorsque l'appareil est allumé et que le disque est
retiré, la langue écoutée est celle sélectionnée
dans les paramètres initiaux.
j. Certains DVD peuvent ne pas contenir des menus
racines et/ou des titres.
k. Le retour par étapes n'est pas disponible.
l. À titre de référence : Si vous essayez d'entrer un
chiffre plus grand que le temps total du titre qui
joue, la boîte de recherche du temps disparaît et
le message « Entrée invalide-
» apparaît sur
le haut de l'écran à gauche.
m. Le mode lecture en diaporama est désactivé
lorsque le mode ZOOM est activé.
Page 39

Français - 16 -
Français
Mode DVD
Fonctionnement général
Conguration du mode DVD
1. Pendant que l'appareil est en mode DVD, appuyer
sur le bouton “MON BOUTON 1 - ” pour entrer
dans le menu de paramétrage du DVD. Ceci n’est
possible que s’il n’y a aucune lecture.
2. Ce menu fonctionne à l'aide des boutons “ ” ou“
” et “ ” ou “ ” .
Réglage vidéo
Type TV
Le type de TV est uniquement disponible en tant que
« PAL ». Le poste de télévision prend le signal NTSC
en charge aussi; cependant le signal est convertit en
PAL lors qu’il apparaît sur l’écran.
Conguration de la langue
Ce menu s’utilise pour régler les préférences
linguistiques en mode DVD. Le contenu du menu
Langue sont données ci-dessous :
Langue OSD
Vous pouvez sélectionner la langue OSD par défaut
des menus du lecteur.
Audio
Vous pouvez choisir la langue audio par défaut si cette
fonction est permise par le disque DVD.
Menu de disque
Vous pouvez sélectionner la langue du menu du
disque DVD parmi ces langues. Le menu du disque
apparaît dans la langue sélectionnée, si acceptée
par le disque DVD.
Sous-titre
Vous pouvez sélectionner la langue du sous-titre par
défaut si acceptée par le disque DVD.
Préférences
Ceux-ci sont les préférences du mode DVD. Le
contenu du menu sont données ci-dessous :
Par défaut
Si vous sélectionnez le mode Remettre et vous
appuyez sur OK, les paramètres programmés en
usine sont chargés. Le niveau parental et le mot de
passe parental ne changent pas.
Basmix:
Ce mode peut être sélectionné quand la sortie audio
digitale de la TV est utilisée.
Surround: Sortie de son surround.
Stéréo: Deux chaînes stéréo.
Parental
La lecture de certains DVD peut être limitée selon
l’âge de l’utilisateur. La fonction « Contrôle Parental
» permet de régler le niveau limite de la lecture par
les parents. Le niveau parental peut être réglé entre
le niveau un et huit. Le niveau « 8 Adult » vous
permettent de voir tous les titres DVD en ignorant le
niveau de contrôle parental du disque DVD. Vous ne
pouvez visionner que les disques DVD ayant le même
niveau de contrôle parental ou un niveau inférieur à
celui du lecteur.
Motdepasse.
En utilisant cette rubrique vous pouvez changer le
mot de passe actuel. Pour changer le mot de passe
vous devez introduire l’ancien mot de passe. Après
avoir introduit l’ancien mot de passe, vous pouvez
introduire et conrmer le nouveau mot de passe de
4 caractères. Vous pouvez utiliser le bouton C pour
effacer une entrée erronée (si ce bouton est disponible
dans votre télécommande).
Remarque : « 0000 » est le réglage par défaut du
mot de passe. Vous devez entrer le mot de passe
numérique XXXX à chaque fois que vous voulez
changer le niveau de contrôle parental. Si vous
oubliez votre mot de passe, contactez un technicien
de service.
Sortie SPDIF
Vous pouvez régler la sortie Spdif en tant que PCM
ou RAW. Si vous sélectionnez l’option PCM à partir
de la sortie SPDIF dans le menu DVD et lisez l’option
DVD avec Dolby audio, vous pouvez obtenir la sortie
audio avec deux chaînes à travers les haut-parleurs
et la sortie SPDIF. Si vous sélectionnez l’option RAW
à partir de la sortie SPDIF dans le menu DVD et lisez
l’option DVD avec Dolby audio, les haut-parleurs
seront coupés et vous pouvez obtenir la sortie audio
5+1 Dolby avec deux chaînes à travers les hautparleurs et la sortie SPDIF.
Page 40

Français - 17 -
Français
Mode DVD
Résolution des problèmes et astuces
La qualité des images DVD est mauvaise
1. Assurez-vous que la surface du disque DVD n’est
pas endommagée (rayures, traces de doigts, etc.)
2. Nettoyer le disque DVD et recommencer.
Reportez-vous aux instructions dans « Nettoyer
les disques » pour nettoyer le disque
correctement.
3. Assurez-vous que le disque DVD est bien placé
dans le chargeur de disque avec l’étiquette face
à vous regardant l'écran du téléviseur.
4. A disque DVD humide ou en condensation va
endommager l'appareil. Attendez 1 ou 2 heures
en mode de veille, avant d'utiliser le matériel.
Le disque ne se met pas en marche
1. Aucun disque dans l'appareil - Mettre le disque
dans le lecteur.
2. Le disque est installé - se rassurer que le disque
DVD est dans le lecteur avec l'étiquette face à
vous lorsque vous regardez l'écran de Télé.
3. Ce n’est pas le bon type de disque. Le lecteur
ne peut pas lire les disques CD-ROM avec les
données PC etc.
4. Le code régional du DVD doit correspondre à
celui de lecteur.
Langue OSD erronée
1. Sélectionnez la langue dans le menu réglage.
2. La langue audio ou de sous-titre du DVD ne peut
être changée.
3. Le son et / ou le sous-titre multilingue n’ont pas
été enregistrés sur le DVD.
4. Essayer de changer le son ou le sous-titrage
dans le menu des titres du DVD. Certains DVD
ne permettent pas à l’utilisateur de modier ces
réglages sans utiliser le menu du disque.
Angle, Zoom, etc. fonctions ne
fonctionnent pas
1. Ces fonctions ne sont pas disponibles sur le DVD.
2. L’angle ne peut être modié que si le symbole
d’angle est afché.
Si ces actions ne marchent pas
Si vous avez essayé les solutions précédentes et
qu'aucune ne semble fonctionner, essayez d'éteindre
votre Téléviseur-DVD et le rallumer. Si cela ne marche
pas, contactez votre fournisseur ou le réparateur de
TV-DVD.
Remarque
Ce produit intègre la technologie de protection des
droits d'auteur protégée par les brevets américains
et autres droits de propriété intellectuelle. L'utilisation
de cette technologie déposée doit avoir été autorisée
par Rovi Corporation et est prévue uniquement pour
une utilisation résidentielle ou autrement similaire
sauf avec la permission de Rovi Corporation. Le
désossage ou le démontage est interdit.
Page 41

Français - 18 -
Français
Annexe A : les formats de chiers supportés en mode DVD
Média
Extension du
chier
Format
Support d’enregistrement
(Résolution maximale / Débit binaire, etc.)
Vidéo
Audio
Cinéma
.mpg/ .dat/
.vob
MPEG1
MPEG Layer
1/2/3
MPEG2 MPEG2
.avi
XviD/ 3ivx PCM/MP3 Version XviD jusqu'à: 1.1.2
MPEG4 PCM/MP3
MS ISO
MPEG4
PCM/MP3 Prend en charge SP et ASP
Musique
- - PCM Fréquence de test : 8K ~ 48KHz
.mp3 -
MPEG 1/2
Layer 1/2/3
(MP3)
Fréquence de test : 8K ~ 48KHz,
Débit binaire: 64K~320Kbps
Photo .jpg
Base JPEG
WxH = 8902 x 8902, jusqu’à 77 Mega-pixel
Format de support : 444/440/422/420/ Image
achromatique
JPEG progressif
Jusqu’à 4 méga pixels Format pris en charge :
444/440/422/420/ Image achromatique
Sous-titres
externes
.srt
Prend en charge le format du chier Texte, mais ne
prend pas en charge le format du chier Image
.smi
.sub
.ssa
.ass
Annexe B : Types de disques compatibles
Types de
disques
(Logos)
Types
d’enregistrements
Taille du
disque
Durée de
Lecture
Max.
Caractéristiques
Audio
+
Vidéo
12 cm)
Simple
face ;
240 min.
Double
face ;
480 min.
Un DVD contient des données audio
et vidéo d’excellente qualité grâce
aux systèmes Dolby Digital et MPEG-
2. Le menu afché à l’écran permet
de sélectionner facilement diverses
fonctions audio et options d’afchage.
Audio
12 cm)
74 min. Un disque LP s’enregistre sous la forme
d’un signal analogique avec davantage
de distorsion. Un CD est enregistré
sous la forme d’un signal numérique
offrant une meilleure qualité de son,
moins de distorsion et une meilleure
durabilité de la qualité audio.
Audio (xxxx.
mp3)
12 cm)
Dépend de
la qualité
des chiers
MP3
Un MP3 est enregistré sous la forme d’un
signal numérique offrant une meilleure
qualité de son, moins de distorsion et une
meilleure durabilité de la qualité audio.
Video (Image
xe)
12 cm)
Dépend de
la qualité des
chiers JPG
Les JPEG sont enregistrés sous la
forme d'un signal numérique offrant une
meilleure durabilité de la qualité d'image.
Pour un bon fonctionnement, seuls les disques de 12 cm, doivent être utilisés.
Page 42

Français - 19 -
Français
Mode DVD
Vous pouvez lire le contenu des DVD et CD de lm, musique ou image en vous servant des touches
appropriées qui se trouvent sur votre télécommande. Les fonctions principales ci-après sont celles des
touches de télécommande communément utilisées.
Touches de la
télécommande
Lecture du
DVD
Transmission
en différé
Cinéma
Transmission en différé
Lecture de
l’image
Lecture de la
musique
Lire Lire Lire Lire
Pause Pause Pause Pause
Stop Stop Stop Stop
/
Sélectionne la rubrique de menu/
Déplacez l’image zoomée vers le haut ou vers le bas (si disponible)
X
/
Sélectionne la rubrique de menu/Déplace l’image zoomée vers le haut ou vers le bas
(si disponible).
/
Lecture avant rapide / Lecture arrière rapide X
Lecture avant
rapide / Lecture
arrière rapide
Voir la scène
sous plusieurs
angles (si
disponible).
X X X
Afche des informations portant sur le disque/
afche le menu de conguration du DVD à l’arrêt
X X
Afche les informations sur le disque. X X
Langue audio X X X
MENU Afche le menu principal
OK Entrée / Afchage / Lecture
TOUCHE
VERTE
Afche les options de relecture
RETOUR Retourne au menu précédent (si disponible)
TOUCHE
JAUNE
Retourne au chier mère (si disponible) X
JUMP (*) Sélection directe des scènes, du temps ou du numéro du chier (piste)
SOUS-TITRE
Sous-titre Marche-Arrêt. Appuyez continuellement pour
passer d’une option de sous-titre à l’autre (le cas échéant).
X X
TOUCHE
BLEUE
Afche le menu du disque (si disponible) X X
TOUCHE
ROUGE
Zoom sur l'image Appuyer à plusieurs reprises pour changer les
options de zoom.
X
Autres fonctions - combinaison de boutons
(Pendant la lecture)
+
Ralenti avant
[ + ] +
Ralenti la vitesse avant
[ + ]
Règle le retour lent
+
Lecture accélérée en avant
+
Lecture accélérée en arrière
+
Conrmation de la touche Stop
(*) Vous pouvez passer au titre en appuyant directement sur les touches numériques. Pour cela, appuyez d'abord sur la
touche 0, puis sur la touche du chiffre pour changer les intitulés de chiffres (exemple : pour sélectionner 5, appuyez sur 0 et 5.
Page 43

Français - 20 -
Français
Spécications et accessoires
Systèmes d’émission/canaux
DVB-T MPEG2, DVB-T MPEG4 HD
DVB-C MPEG2, DVB-C MPEG4
Entrée vidéo PAL, SECAM, NTSC 4.43
Stéréo Nicam
Connexions externes
1-PÉRITEL 1 Entrée 21-broches PÉRITEL RVB, A/V
2-PÉRITEL-S (via PÉRITEL 1) Entrée 21-broches PÉRITEL S-Vidéo
3-YPbPr (via VGA) Entrée Analogue à 15 broches Mini D-Sub
4-CÔTÉ AV Entrée CÔTÉ AV Entrée du câble Vidéo + Audio G + D
5-HDMI 1/2 (*) Entrée Type A
(*) Le nombre de ces ports peut varier selon le modèle de téléviseur.
6-VGA/PC Entrée Analogue à 15 broches Mini D-Sub Signal RGB
7- Audio Numérique Sortie S/PDIF (Coaxiale)
Ports USB Navigateur multimédia Interface Version: USB 2.0
Classe USB : Stockage de masse
Système de chiers : FAT32
Prise pour casque audio 3,5mm stéréo
Conditions de fonctionnement Température 5°C - 35°C (41°F - 94°F)
Humidité 20 - 80% (ne condense pas)
Accessoires fournis Télécommande
2 batteries (AAA,IEC R03 1.5V)
4 vis
Couvercle de xation du support
P Clip
24” D
24” W
Energy Efciency Class
A+ A+
Visible Screen Size (approx.)
61cm / 24” 61cm / 24”
Consommation électrique en mode « marche »
(approx.) (*)
18 W 18 W
Consommation électrique annuelle (approx.) (**)
26 kWh 26 kWh
consommation d'énergie en mode veille
(approx.)
< 0.50 W < 0.50 W
Résolution écran (pixels)
1366 x 768 1366 x 768
Afchage
16:9 16:9
Effet de son (à 10 % distorsion)
2 x 2.5 2 x 2.5
Modèle de consommation d'énergie (approx.)
45 W 45 W
Poids Téléviseur avec socle
4.7 kg 4.2 kg
Poids brut
7.5 kg 7.0 kg
Téléviseur sans socle
4.0 kg 3.5 kg
(*) Testé selon la norme IEC 62087-BD dans les paramètres par défaut.
(**) Consommation d’énergie de 26 kWh par an, en fonction de la consommation en énergie de la Télé lorsqu’elle fonctionne
4 heures par jour pendant 365 jours. La consommation énergétique réelle dépendra de la façon dont le téléviseur est utilisé.
Dimensions (approximatives) de l'unité
Les spécications peuvent être modiées sans avis
préalable.
A (mm) B (mm) C (mm) D (mm) E (mm) F (mm) G (mm)
24D153*DG 554.0 345.0 163.0 61.3 379.0 75 75
24W153*DG
554.0 345.0 163.0 61.3 379.0 75 75
Page 44

Français - 21 -
Français
Informations de licence
• HDMI, l'interface multimédia de haute dénition ainsi que le logo de HDMI sont des marques déposées de HDMI Licensing
LLC aux États Unis d’Amérique et dans d’autres pays.
• DVB est une marque déposée du projet DVB.
• [1] La conformité à la norme EIA/CEA-861-D couvre la transmission de la vidéo numérique non compressée avec la
protection du contenu numérique à large bande passante, qui est en cours de normalisation pour la réception des signaux
vidéo haute dénition. Comme il s’agit d’une technologie en pleine évolution, il est possible que certains appareils ne
fonctionnent pas correctement avec le téléviseur.
Notication de licence MP3
Technologie de codage audio MPEG Layer-3 (MP3) sous licence de Fraunhofer LLS and Thomson.
Notication de licence MP4
CE PRODUIT EST UTILISE EN VERTU DE LA LICENCE DE PORTEFEUILLE DES BREVETS MPEG-4 VISUAL POUR
UTILISATION A DES FINS STRICTEMENT PERSONNELLES ET NON COMMERCIALES DU CLIENT POUR LES
BESOINS SUIVANTS: (I) CODAGE VIDEO EN CONFORMITE AVEC LA NORME MPEG-4 VISUAL (MPEG-4 VIDEO) ET
/ OU (II) DECODAGE VIDEO MPEG-4 AYANT ETE ENCODE PAR LE CLIENT POUR DES ACTIVITES STRICTEMENT
PERSONNELLES ET NON COMMERCIALES ET/OU AYANT ETE FOURNI PAR UN FOURNISSEUR DE VIDEO AUTORISE
PAR MPEG LA A FOURNIR DES VIDEOS MPEG-4. AUCUNE LICENCE NE SERA ACCORDEE OU UTILISEE A D'AUTRES
FINS. AUTRES INFORMATIONS LIEES NOTAMMENT A SON UTILISATION A DES FINS PROMOTIONNELLES, INTERNES
ET COMMERCIALES ET AUTRES LICENCES PEUVENT ETRE OBTENUES AUPRES DE MPEG LA L.L.C. RENDEZ-VOUS
SUR HTTP://WWW.MPEGLA.COM
Notication de licence AVC
CE PRODUIT EST UTILISE EN VERTU DE LA LICENCE DE PORTEFEUILLE DES BREVETS POUR UTILISATION A
DES FINS STRICTEMENT PERSONNELLES ET NON COMMERCIALES DU CLIENT POUR LES BESOINS SUIVANTS:
(I) CODAGE VIDEO EN CONFORMITE AVEC LA NORME AVC (AVC VIDEO) ET / OU (II) DECODAGE VIDEO AVC AYANT
ETE ENCODE PAR LE CLIENT POUR DES ACTIVITES STRICTEMENT PERSONNELLES ET NON COMMERCIALES
ET/OU AYANT ETE FOURNI PAR UN FOURNISSEUR DE VIDEO AUTORISE PAR MPEG LA A FOURNIR DES VIDEOS
AVC. AUCUNE LICENCE NE SERA ACCORDEE OU UTILISEE A D'AUTRES FINS. VOUS POUVEZ OBTENIR DES
INFORMATIONS COMPLEMENTAIRES AU LIEN DE MPEG LA, L.L.C. AlLLEZ SUR HTTP://WWW.MPEGLA.COM
Notication de licence
RECONNAISSANCE DE MARQUE COMMERCIALE
Fabriqué sous licence de Dolby Laboratories. « Dolby » et le symbole du double D sont des marques commerciales de
Dolby Laboratoires.
Mise au rebut...
Les renseignements suivants ne s'appliquent qu'aux pays membres de l’EU :
Mise au rebut des produits
Le symbole de la poubelle à roue barrée indique que les produits doivent être collectés et jetés séparément des ordures
ménagères. Les batteries intégrées et les accumulateurs peuvent être jetés avec le produit. Ils seront séparés au centre de
recyclage.
La barre noire indique que le produit a été mis sur le marché après le 13 août 2005.
En participant au tri des produits et des batteries, vous assurerez une mise au rebut appropriée des produits et des batteries,
et contribuerez à éviter les conséquences potentiellement néfastes sur l'environnement et la santé humaine.
Pour de plus amples informations sur les programmes de collecte et de recyclage disponibles dans votre pays, veuillez visiter
notre page web à l’adresse (www.toshiba.eu/recycling) ou veuillez contacter votre mairie ou le magasin où vous avez acheté
le produit.
Mise au rebut des batteries et / ou accumulateurs
Le symbole de la poubelle à roue barrée indique que les batteries et / ou accumulateurs doivent être collectés et jetés
séparément des ordures ménagères.
Si la batterie ou l'accumulateur contient des valeurs supérieures à celles indiquées du plomb (Pb), du mercure (Hg) et / ou du
cadmium (Cd) dénies dans la Directive, alors les symboles chimiques du plomb (Pb ), du mercure (Hg) et / ou du cadmium
(Cd) apparaissent sous le symbole de la poubelle à roue barrée.
En participant au tri des batteries, vous assurerez une mise au rebut appropriée des produits et des batteries, et contribuerez
à éviter les conséquences potentiellement néfastes sur l'environnement et la santé humaine. Pour de plus amples
informations sur les programmes de collecte et de recyclage disponibles dans votre pays, veuillez visiter notre page web à
l’adresse (www.toshiba.eu/recycling) ou veuillez visiter notre page web à l'adresse (www.toshiba.eu/recycling) ou veuillez
contacter notre mairie ou le magasin où vous avez acheté le produit.
Page 45

Français - 22 -
Français
Section Q & R
Question
Réponse
Son
Pourquoi n’y a-t-il pas de son ni
d’image ?
Vériez que le téléviseur est en mode veille.
Vériez la prise d'alimentation et tous les branchements au
secteur
Pourquoi y a-t-il une image, mais
pas de son ?
Vériez que le volume n’a pas été diminué ou coupé
Pourquoi le son ne sort-il que d’un
haut-parleur alors que le son stéréo
a été sélectionné ?
Vériez que le réglage des balances du menu SON n’est pas
réglé que d’un côté.
Pourquoi la piste sonore est-elle en
anglais alors qu'une autre langue
audio a été sélectionnée ?
La chaîne est actuellement émise avec une piste sonore en
anglais uniquement.
Image
Qu’est-ce qui provoque une
mauvaise image ?
Interférence ou signal faible. Essayez une autre chaîne TV
Pourquoi la vidéo/le DVD en marche
ne se voit-il pas à l’écran ?
Assurez-vous que le lecteur Blu-ray ou DVD est branché au téléviseur
tel qu'illustré dans les premiers chapitres, puis sélectionnez l’entrée
correspondante en appuyant sur la touche SOURCE -
de la
télécommande
Pourquoi le Blu-ray / le lecteur DVD
est-il en noir et blanc ?
Vériez si l'entrée appropriée a été sélectionnée ou pas.
Pourquoi y a –t-il des rayures
horizontales et / ou des images
oues sur l’écran lorsqu’on est en
mode PC ?
Il se peut que la phase ait besoin d'un réglage. Sélectionnez les
paramètres de l'ordinateur, allez à Phase et réglez jusqu’à ce que
l’image soit claire.
Généralités
Pourquoi la télécommande ne
fonctionne-t-elle pas ?
Vériez si les batteries sont à plat ou mal insérées
Pourquoi la fonction navigateur
multimédia ne fonctionne pas ?
Assurez-vous que le périphérique USB / HDD est correctement
branché. Un mauvais branchement du Hub USB peut poser des
problèmes de fonctionnement.
Pourquoi les sous-titres numériques
sélectionnés ne s’afchent-ils pas à
l’écran ?
Les sous-titres ne sont pas transmis par l’émetteur.
Pourquoi la chaîne numérique est-
elle verrouillée?
Le contrôle parental est activé. Vériez les paramètres du contrôle
parental
Pourquoi certaines chaînes
numériques cryptées ne sont-elles
pas disponibles ?
Votre abonnement doit être renouvelé. Contactez votre
fournisseur de services.
Pourquoi le voyant lumineux de
veille activé met-il parfois plus de
temps pour s’éteindre ?
En état de veille, la veille activée du téléviseur recherche
automatiquement un téléchargement parmi toutes les chaînes
disponibles si la fonction de téléchargement automatique a été
activée. La durée nécessaire peut varier. Dans ce mode, le voyant
clignote en rouge et vert.
Pourquoi les commandes du
téléviseur ne marchent pas ?
Vériez si la fonction SÉCURITÉ ENFANT a été activée ou pas
Qu'est ce que le DVB-T ? Diffusion vidéo numérique via une antenne.
Qu’est ce que le DVB-C ? Diffusion vidéo numérique via un système de câble.
Comment sélectionne-t-on les
chaînes radio ?
Vous pouvez les sélectionner à partir de la liste des chaînes
Que faire si j'ai oublié le mot de
passe ?
Vous pouvez réinitialiser le téléviseur et effectuer la première
installation une fois de plus. Assurez-vous que personne ne soit
informé de cette procédure, en mettant le Manuel de l'utilisateur
en sécurité.
Si l'on vous demande de saisir le code PIN pour effectuer la Première
installation, consultez votre fournisseur autorisé
Page 46

Français - 23 -
Français
Informations REACH
La réglementation de l'Union européenne (EU) sur les substances chimiques, REACH
(enregistrement, évaluation, autorisation et restriction des substances chimiques), est entrée en
vigueur le 1 juin 2007, avec des échéances échelonnées jusqu'en 2018.
Toshiba va répondre à toutes les exigences REACH et s'est engagé à fournir à ses clients des
informations sur la présence dans ses articles de substances incluses dans la liste des substances
candidates conformément à la réglementation REACH.
Bien vouloir consulter le site web suivant www.toshiba.eu/reach pour avoir des informations sur la
présence de nos produits de substances inclus dans la liste de candidature au REACH, avec un
pourcentage de concentration supérieur à 0.1 % poids par poids.
Déclaration de Conformité l'EU
Cet appareil porte la marque CE conformément aux directives européennes en la matière.
Responsable de l'apposition de la marque CE : TOSHIBA, 23 Davy Road, Plymouth, PL6 8BY UK.
Cet appareil porte la marque CE conformément aux directives européennes en la matière, notamment en
ce qui concerne la directive Basse Tension 2006/95/EC, la directive sur la compatibilité électromagnétique
2004/108/EC et la directive LdSD 2011/65/EU. En outre, ce produit est conforme avec la directive 2005/32/
EC (EuP) et 2009/125/EC (ErP) sur l'écoconception ainsi que les mesures d'implémentation y afférentes.
©TOSHIBA 2014
Tous droits réservés.
Toute reproduction entière ou partielle sans aucune permission écrite est strictement interdite.
TOSHIBA
23 Davy Road, Plymouth Devon PL6 8BY England
L’équipement correspond aux exigences de la réglementation technique en matière de limitation d’usage
de certaines substances dangereuses dans les appareils électriques et électroniques.
Page 47

KURZANLEITUNG
24D153*DG / 24W153*DG
LED-Hintergrundbeleuchtung LCD-TV-Gerät
Dieses Dokument soll Ihnen einen Überblick über Ihr Toshiba-Gerät
bieten.
Es wird erwartet, dass während der Laufzeit Ihres TV-Gerätes
Firmware-Updates zur Verfügung gestellt werden, um sicherzustellen,
dass Ihr TV-Gerät seine optimale Leistung hält. Sie können die neueste
Version der Firmware aus der folgenden Adresse herunterladen:
www.toshiba-om.net/rmware.php
Einige Funktionen, die in diesem Dokument aufgeführt sind,
beschränken sich aufgrund der örtlichen
Gesetzgebung und können nicht in allen Ländern verfügbar sein.
Wenn Sie die erweiterte Bedienungsanleitung für dieses Toshiba-TV-
Gerät sehen möchten, können Sie
dies tun, indem Sie die folgende Adresse besuchen:
www.toshiba-om.net
“Registrieren Sie Ihr TV-Gerät online unter:
www.toshiba-europe.com/registration”
Toshiba schätzt, dass die Initiative, die erweiterten Funktionen online zur Verfügung zu
stellen, über 100.000 Bäume pro Jahr (6.5 Millionen kg Co2) retten wird.
Wenn Sie die erweiterten Funktionen anzeigen möchten, aber keinen Zugang zu einem
Computer oder dem Internet haben, dann kontaktieren Sie bitte Ihre lokale Helpline-
Nummer. Die Kontaktdaten sind auf der Rückseite dieses Buches angezeigt.
Page 48

Inhalt
Deutsch - 1 -
Deutsch
Sicherheitsmaßnahmen.......................................... 2
Luftzirkulation...................................................... 2
Schaden durch Überhitzung ............................... 2
Netzspannung..................................................... 2
Warnung ............................................................. 2
Was Sie tun sollten ............................................. 2
Bitte vermeiden! .................................................. 2
Installation und wichtige Informationen .................. 3
AUSSCHLUSSKLAUSEL ................................... 3
Wichtige Sicherheitshinweise ................................. 4
Einsetzen oder Entfernen des Ständers ................. 5
Die Fernbedienung (TV - DVD) .............................. 6
Einlegen der Batterien und effektive Reichweite
der Fernbedienung ............................................. 6
Anschließen von externen Geräten ........................ 7
Anschließen eines HDMI
®
- oder DVI-Geräts an den
HDMI-Eingang ........................................................ 8
Anschluss eines HDMI-Gerätes.......................... 8
Um ein DVI-Gerät anzuschließen. ...................... 8
Anschluss eines Computers ................................... 9
Anschluss eines Computers ............................... 9
Anschluss eines USB-Gerät .............................. 9
Bedienung des TV-Geräts .................................... 10
Einschalten ....................................................... 10
Verwendung der Fernbedienung ...................... 10
Nutzung der Bedienelemente des TV-Gerätes . 10
Erstinstallation .......................................................11
DVD-Modus .......................................................... 13
Umgang mit Disc .............................................. 13
Reinigung von Disc ........................................... 13
DVD-Eigenschaften .......................................... 13
DVD-Bedientasten am Fernsehgerät................ 13
Abspielen der DVD ........................................... 14
Hinweise zur DVD-Wiedergabe ........................ 14
DVD-Modus-Konguration ................................ 15
Voreinstellungen ............................................... 15
Die DVD Bildqualität ist schlecht ...................... 16
Anhang A: DVD-Modus unterstützte Dateiformate 17
Anhang B: Kompatible Disc-Typen ....................... 17
Spezikationen und Zubehör ................................ 19
Lizenzinformationen ............................................. 20
Q & A Sektion ....................................................... 21
Page 49

Deutsch - 2 -
Deutsch
Sicherheitsmaßnahmen
Dieses Gerät wurde unter Berücksichtigung internationaler Sicherheitsstandards konzipiert und produziert. Sie müssen jedoch
wie bei jedem anderen Elektrogerät Vorsicht walten lassen, um beste Ergebnisse zu erzielen und größtmögliche Sicherheit zu
gewährleisten. Lesen Sie deshalb zu Ihrer eigenen Sicherheit die unten aufgeführten Hinweise. Sie sind allgemeiner Natur,
hilfreich bei allen elektronischen Geräten.
Luftzirkulation
Halten Sie mehr als 10 cm Abstand um das Fernsehgerät
ein, um ausreichende Luftzirkulation zu gewährleisten. Damit
wird vermieden, dass sich das Fernsehgerät überhitzt und
deshalb beschädigt wird. Staubige Standorte sollten ebenfalls
vermieden werden.
Schaden durch Überhitzung
Wenn Sie das Fernsehgerät direktem Sonnenlicht aussetzen
oder es in der Nähe eines Heizkörpers aufstellen, könnte das
Gerät beschädigt werden. Vermeiden Sie Standorte, die sehr
heiß oder feucht werden könnten, oder Standorte, bei denen
die Temperatur auf unter 5 °C (41 °F) absinken könnte.
Netzspannung
Das Gerät darf nur an einer Netzsteckdose mit 220-240 V
Wechselspannung und einer Frequenz von 50 Hz betrieben
werden. Achten Sie darauf, dass weder das Fernsehgerät
noch dessen Ständer auf dem Netzkabel stehen. Schneiden
Sie NIEMALS den Netzstecker von diesem Gerät ab. Er hat
einen speziellen Funkentstörlter, und wenn dieser entfernt
wird, könnte dies die Leistung des Geräts beeinträchtigen. Es
sollte nur von einem richtig bemessenen und genehmigten
Typ ersetzt werden. FALLS SIE ZWEIFEL HABEN ,FRAGEN
SIE BITTE EINEN SACHKUNDIGEN ELEKTRIKER.
Warnung
Um die Ausbreitung von Feuer zu verhindern, muss das Gerät von Kerzen und anderen offenen Feuerquellen getrennt
gehalten werden.
Was Sie tun sollten
LESEN Sie die Bedienungsanleitung vor der Inbetriebnahme
des Geräts.
VERGEWISSERN Sie sich, dass sämtliche elektrische
Verbindungen (einschließlich Netzkabel, Verlängerungskabel und die Verbindungen zwischen den Geräteteilen)
ordnungsgemäß und im Anklang mit den Anweisungen des
Herstellers angeschlossen sind. Ziehen Sie den Netzstecker
aus der Netzsteckdose, bevor Sie mit dem Herstellen oder
der Änderung von Anschlüssen beginnen.
LASSEN Sie sich von Ihrem Händler beraten, wenn Sie
Zweifel an der Installation, dem Betrieb oder der Sicherheit
des Geräts haben.
SEIEN Sie bei der Handhabung von Glasplatten oder Türen
an dem Gerät äußerst vorsichtig.
Bitte vermeiden!
Entfernen Sie NIEMALS fest angeschraubte Abdeckungen,
da Sie sonst gefährliche Spannungen ausgesetzt werden
könnten.
Die Ventilationsöffnungen des Geräts dürfen NICHT mit
Gegenständen wie Zeitungen, Tüchern, Gardinen usw.
blockiert werden.
Setzen Sie das Gerät NIEMALS Tropf- oder Spritzwasser
aus und stellen Sie keine mit Flüssigkeit gefüllten Behälter
auf das Gerät.
Stellen Sie NIEMALS Wärmequellen oder offene Flammen
wie brennende Kerzen oder Lampen auf das Gerät oder
in dessen Nähe. Hohe Temperaturen können Kunststoff
schmelzen und zu Bränden führen.
Verwenden Sie KEINE selbstgebauten Ständer und benut-
zen Sie die Schrauben des Herstellers am Gerät.
Lassen Sie NIEMALS Geräte ohne Aufsicht eingeschaltet,
es sei denn es wird ausdrücklich darauf hingewiesen, dass
diese für unbeaufsichtigten Betrieb konzipiert sind oder
über einen Standby-Betriebsmodus verfügen. Schalten Sie
die Geräte ab, indem Sie den Netzstecker ziehen. Stellen
Sie sicher, dass auch die anderen Familienangehörigen mit
dieser Vorgehensweise vertraut sind. Für Behinderte können
eventuell Sondereinrichtungen erforderlich sein.
SCHALTEN Sie das Gerät unbedingt ab, wenn Sie Zweifel
an der ordnungsgemäßen Funktion des Gerätes haben oder
das Gerät beschädigt ist. Schalten Sie gegebenenfalls das
Gerät aus, ziehen Sie den Netzstecker und wenden Sie sich
an Ihren Händler.
WARNUNG - Zu hoher Schalldruck oder zu hohe Lautstärken
von Kopf- oder Ohrhörern können zu Gehörschäden führen.
VOR ALLEM ABER lassen Sie NIEMALS zu, dass jemand,
insbesondere Kinder, gegen den Bildschirm drückt oder
dagegen schlägt oder irgendwelche Gegenstände in
Löcher, Schlitze oder andere Öffnungen in der Abdeckung steckt.
Gehen Sie im Umgang mit Elektrogeräten beliebiger Art
NIEMALS irgendwelche Risiken ein - Vorsicht ist besser
als Nachsicht!
DER NETZSTECKER WIRD FÜR DIE VÖLLIGE NETZTRENNUNG VERWENDET UND MUSS DAHER GUT ZUGÄNGLICH SEIN.
Hinweis: Interaktive Computerspiele, bei denen mit einem
pistolenartigen Joystick auf eine Zielscheibe auf dem
Bildschirm geschossen wird, funktionieren mit diesem TVGerät u. U. nicht.
Die Abbildungen und Menüdarstellungen in diesem
Handbuch dienen nur der Erklärung; sie können
leicht von den tatsächlichen Gegebenheiten Ihres
Geräts abweichen.
Page 50

Deutsch - 3 -
Deutsch
Installation und wichtige Informationen
Aufstellungsort
*Tasten und Standfußdesign variieren je
nach Modell
Stellen Sie das Gerät nicht in direktem Sonnenlicht und nicht in
der Nähe von starken Lampen auf. Für bequemes Fernsehen
wird eine weiche, indirekte Beleuchtung empfohlen. Verwenden Sie Vorhänge oder Jalousien, um den Einfall von direktem
Sonnenlicht auf den Bildschirm zu vermeiden.
Stellen Sie den Fernseher stets auf eine stabile, gerade Oberfläche, die ausreichend Platz für den Fuß des Ständers bietet
und das Gewicht des Gerätes trägt. Verfahren Sie auf folgende
Weise, um den Fernseher mit Hilfe der stabilen Halterung an
der Geräterückseite an einer Wand zu befestigen.
Die LCD-Anzeigen werden mit extrem hoher technischer
Präzision gefertigt. Dennoch können an einigen Stellen des
Bildschirms Bildelemente fehlen oder leuchtende Punkte
auftreten. Dies ist kein Hinweis auf eine Störung.
Stellen Sie sicher, dass das TV-Gerät an einer Stelle aufgestellt
wird, an der es nicht durch Gegenstände verschoben oder
gestoßen werden kann, da der Bildschirm durch Druck oder
Stöße beschädigt oder zerbrochen werden kann. Achten Sie
auch darauf, dass keine kleinen Gegenstände in die Schlitze
und Öffnungen des Gehäuses gelangen.
Vermeiden Sie die Verwendung von Chemikalien (z.B.
Lufterfrischer, Reinigungsmittel, usw.) auf oder neben
dem TV-Podest. Studien deuten darauf hin, dass
Kunststoffe im Laufe der Zeit von den Kombinationseffekten
chemischer Substanzen und mechanischer Beanspruchung
(z.B. Gewicht von TV-Gerät) geschwächt und gebrochen
werden können. Die Nichtbeachtung dieser Anweisungen kann
zu schweren Verletzungen und / oder dauerhaften Schäden
am Fernseher und TV-Podest führen.
Reinigung des Bildschirms und des Gehäuses ...
Schalten Sie das Gerät aus und reinigen Sie Bildschirm und
Gehäuse mit einem weichen, trockenen Tuch. Wir empfehlen,
keine Fertigpolituren oder -Lösungsmittel auf dem Bildschirm
oder dem Gehäuse zu verwenden, da dies zu Schäden
führen kann.
Bitte beachten Sie!
Der Digitalempfang mit diesem TV-Gerät ist nur in den Ländern möglich, die im Abschnitt "Land" im Menü
Erstinstallation angeführt sind. Je nach Land/Region sind einige Funktionen des TV-Gerätes u. U. nicht
verfügbar. Der Empfang zukünftiger oder zusätzlicher Dienste mit diesem TV-Gerät kann nicht garantiert
werden.
Wenn Standbilder von 4:3-Übertragungen, Textdiensten, Senderlogos, Computeranzeigen, Videospiele,
Bildschirmmenüs usw. über längere Zeit auf dem Bildschirm angezeigt werden, kann dies gefährlich werden.
Reduzieren Sie daher stets die Helligkeits- und Kontrasteinstellungen.
Sehr lange, ständige Verwendung der Bildeinstellung 4:3 auf 16:9-Bildschirmen kann zu dauerhaft bleibenden
Bildteilen an den 4:3-Rändern führen. Dies ist keine Fehlfunktion des LCD-TV-Gerätes und fällt daher nicht
unter die Herstellergarantie. Die regelmäßige Verwendung anderer Bildgrößen verhindert dies.
AUSSCHLUSSKLAUSEL
Toshiba ist unter keinen Umständen haftbar für Verluste und/oder Schäden am Produkt, die durch Folgendes verursacht werden:
i) Feuer;
ii) Erdbeben;
iii) Unbeabsichtigte Beschädigungen;
iv) Absichtlich unsachgemäße Verwendung des Produkts;
v) Verwendung des Produkts unter unsachgemäßen Bedingungen;
vi) Verluste und/oder Schäden, die am Produkt verursacht wurden, während es sich im Besitz Dritter befand;
vii) Jegliche Verluste oder Schäden, die aus einem Fehler der Besitzers und/oder seinem Versäumnis, den Anweisungen
im Benutzerhandbuch zu folgen, resultieren.
viii) Jegliche Verluste oder Schäden, die durch unsachgemäße Verwendung oder Fehlfunktionen des Produkts bei gleich-
zeitiger Verwendung von Zusatzgeräten entstehen.
Darüber hinaus haftet Toshiba nicht für mögliche Folgeschäden und/oder Verluste, einschließlich, aber nicht beschränkt auf
Folgendes: entgangene Gewinne, Betriebsunterbrechung, oder den Verlust aufgezeichneter Daten, egal ob sie während der
normalem Verwendung oder aufgrund falscher Bedienung verursacht wurden.
Page 51

Deutsch - 4 -
Deutsch
Wichtige Sicherheitshinweise
• Die Funktionen in Verbindung mit Digital-TV (mit dem DVB-Logo) ist nur in Ländern bzw. Gebieten verfügbar,
wo solche Signale übertragen werden. Überprüfen Sie beim Kauf des Gerätes, ob in Ihrem Gebiet ein DVBT/C-Signal empfangen werden kann.
• Das TV-Gerät erfüllt zwar die aktuellen DVB-T/C-Spezikationen, doch kann eine Kompatibilität mit
zukünftigen DVB-T/C-Übertragungen nicht garantiert werden.
• Einige Digital-TV-Funktionen sind unter Umständen nicht in allen Ländern verfügbar.
• Das DVB-T/C-System in diesem Gerät ermöglicht den Empfang von sowohl FTA (Free To Air - empfanf von
freiem) und verschlüsselten Kanälen.
• Hinweis; Verschlüsselte Kanäle erfordern ein spezisches Verschlüsselungssystem, um Sie anzusehen, die
möglicherweise nicht in bestimmten Ländern verfügbar sind.
• DVB ist ein eingetragenes Warenzeichen des DVB-Project. Das Logo zeigt an, dass das Produkt mit der
European Digital Broadcasting-Norm übereinstimmt.
• DVB-T ist die digitale Video-Übertragung über eine Antenne oder ein Antennensystem.
• DVB-C ist digitale Video-Übertragung über ein Kabel-System.
WICHTIGE INFORMATIONEN
Aufstellung des Fernsehgeräts
• Stellen Sie das TV-Gerät nicht auf Textilien oder andere Materialien zwischen dem TV-Gerät und dem
Möbelstück.
• Klären Sie Ihre Kinder darüber auf, dass es gefährlich ist, auf hohe Möbelstücke zu klettern, um das
Fernsehgerät oder die Fernbedienung zu erreichen.
• Halten Sie das Kabel stets direkt am Stecker, wenn Sie das Gerät von der Steckdose trennen wollen. Ziehen
Sie niemals am Kabel. Das Kabel kann beschädigt werden und einen Kurzschluss verursachen.
• Verwenden Sie zur Reinigung des Gerätes ein weiches, trockenes Tuch.
• Stellen Sie das Gerät so auf, dass niemand über das Kabel stolpern kann.
• Wenn Sie das Gerät an die Wand montieren, wenden Sie sich an den Händler, bei dem Sie das Gerät gekauft
haben. Überlassen Sie die Montage bitte stets Fachleuten. Unsachgemäße Montage kann zu Sachschäden
und/oder Verletzungen führen.
• Bei Gewittern sollten Sie das Gerät sicherheitshalber vom Netz und der Antenne und Satelliten Decoder/
System usw. trennen.
Vorsicht: Berühren Sie den Antennenstecker nicht.
• Während des Betriebs wird das Gerät heiß. Decken Sie das Gerät niemals ab, um einen Hitzestau im Gerät
zu vermeiden.
• Blockieren Sie niemals die Belüftungsöffnungen. Stellen Sie das Gerät nicht in der Nähe von Heizkörpern
auf. Stellen Sie es nicht in direkter Sonneneinstrahlung auf.
• Dies geschieht in folgenden Fällen:
- Wenn Sie das Gerät aus einer kalten in eine warme Umgebung bringen.
- Wenn Sie das Gerät in einem Raum verwenden, in dem gerade die Heizung eingeschaltet wurde.
- Wenn Sie das Gerät an einem Ort betreiben, wo Kaltluft aus einer Klimaanlage direkt auf das Gerät trifft.
- Wenn Sie das Gerät in einer feuchten Umgebung verwenden.
• Verwenden Sie das Gerät nicht, wenn die Gefahr von Kondensatbildung besteht.
• Die Verwendung des Gerätes bei Kondensatbildung kann zu Schäden an Bauteilen und an verwendeten
führen. Warten Sie zwei bis drei Stunden, bis sich die Gerätetemperatur angepasst hat und das
Kondenswasser wieder verdampft ist, bevor Sie es einschalten.
Page 52

Deutsch - 5 -
Deutsch
Einsetzen oder Entfernen des Ständers
Einsetzen oder Entfernen des Ständers
(1) Legen Sie das TV-Gerät vorsichtig mit dem Bildschirm nach unten auf eine ache, gut gepolsterte Fläche
mit dem Ständer über den Rand.
(2) Um den Ständer anzubauen, verwenden Sie die im Lieferumfang enthaltenen Schrauben.
oder
(3) Entfernen Sie die Schrauben, mit denen Ständer befestigt wurde
(4) Nachdem Sie die Schrauben zur Befestigung des Ständers gelöst haben, können Sie den Ständer
abnehmen, indem Sie diesen mit einem festen Griff vom Fernsehgerät abziehen.
Hinweis: Gehen Sie beim Abbau des Ständers mit größter Vorsicht vor, um eine Beschädigung des LCD-Panels zu vermeiden.
Für 24D153*DG / 24W153*DG-Modelle
Bei Verwendung einer Wandhalterung
Bitte verwenden Sie einen für die Größe und das Gewicht des LCD-Fernsehgeräts geeigneten Wandhalter.
Für die Ausführung der Montage sind zwei Personen erforderlich.
(1) Nehmen Sie alle Kabel und/oder andere Anschlüsse von der Rückseite des TV-Geräts ab.
(2) Legen Sie das TV-Gerät vorsichtig mit dem Bildschirm nach unten auf eine ache, gut gepolsterte Fläche
(ein Tuch oder eine Decke).
(3) Befolgen Sie die mit der Wandhalterung mitgelieferten Montagehinweise. Stellen Sie sicher, dass die
geeignete(n) Halterung(en) wie in den mitgelieferten Montagehinweisen beschrieben richtig an der Rückseite
des TV-Geräts und an der Wand befestigt sind.
Page 53

Deutsch - 6 -
Deutsch
Die Fernbedienung (TV - DVD)
Einfache Schnellanleitung für die Fernbedienung auf einen Blick.
(*) MEINE TASTE 1 & MEINE TASTE 2
Entsprechend dem jeweiligen Modell haben diese Tasten voreingestellte
Standardfunktionen. Allerdings können Sie diesen Tasten besondere
Funktionen zuweisen, in dem Sie auf einen dieser, während Sie sich auf
der gewünschten Quelle oder auf dem gewünschten Kanal benden, für
5 Sekunden lang gedrückt halten. Auf dem Bildschirm erscheint dann
eine Bestätigungsmeldung. Jetzt ist der ausgewählte MEINE TASTE mit
der gewählten Funktion belegt.
Beachten Sie, wenn Sie die Erstinstallation durchführen, dass MEINE
TASTE 1&2 auf seine Standard-Funktion zurückkehren wird..
1. Standby
Standby
2. Ziffertasten
Ziffertasten
3. TV-AV / Kanalliste / Schaltet
zwischen den Sendearten um
4. Stumm
Stumm
5. Lautstärke Auf / Ab
Lautstärke Auf / Ab
6. Menu Ein-Aus
Menü
7. Navigationstasten
( , , , )
Navigationstasten
8. OK (Bestätigen) / Kanalliste /
Halten (im TXT-Modus)
OK
9. Return / Indexseite (im TXT-
Modus)
10. Medienbrowser
Winkel
11. Info / Anzeige (im TXT-Modus)
Time
12. Meine Taste 1 (*)
Display Zeit / DVD-Menü
13. Farbtasten
Rote Taste - Zoom
Grüne Taste - Wiederholen
Gelbe Taste Stammverzeichnis
Blaue Taste - Titel
14. Mono/Stereo - Dual I-II / Aktuelle
Sprache
(in DVB Kanälen)
Sprachauswahl
15. Schneller Rücklauf
Schneller Rücklauf
16. Keine Funktion
17. Pause
Pause
18. Wiedergabe
Wiedergabe
19. Stopp
Stopp
20. Schneller Vorlauf
Schneller Vorlauf
21. Untertitel ein-aus (im Media-
Browser-Modus und bei DVBKanälen)
Untertitel
22. Bildgröße
Bildgröße
23. Meine Taste 2 (*)
Such-Modus
24. Teletext/ Mix(im TXT-Modus)
25. Elektronischer Programmführer
(bei DVB-Kanälen)
26. Exit
Exit
27. Schnell-Menü
28. Programm nach unten/
Seite nach oben -
Programm nach oben/ Seite nach
unten
29. Vorhergehendes Programm
30. AV / Quellenauswahl
Quellenauswahl
Hinweis: Die Verweise in
Fettschrift sind für Modelle mit
und im DVD-Betrieb.
Einlegen der Batterien und effektive Reichweite der Fernbedienung
Entfernen sie die hintere Abdeckung Ihrer Fernbedienung zum Öffnen des Batteriefachs und achten Sie beim Einlegen der Batterien auf deren richtige Polung.
Geeignete Batterien für diese Fernbedienung sind AAA, IEC R03 1.5V.
Verwenden Sie niemals alte, benutzte Batterien zusammen mit neuen und verwenden
Sie keine unterschiedlichen Batterietypen. Entfernen Sie leere Batterien sofort, um
zu verhindern, dass Säure ins Batteriefach ausläuft. Entsorgen Sie alte Batterien
bei gekennzeichneten Sammelstellen.
Warnung: Batterien dürfen nicht zu großer Hitze wie direkter Sonneneinstrahlung,
Feuer od. dgl. ausgesetzt werden.
Die Leistung Ihrer Fernbedienung wird beeinträchtigt, wenn das Gerät mehr als fünf
Meter oder außerhalb eines Winkels von 30 Grad von der Mitte Ihres Fernsehgeräts
entfernt ist. Wenn die Reichweite nachlässt, müssen möglicherweise die Batterien
ausgetauscht werden.
1. 2.
Page 54

Deutsch - 7 -
Deutsch
Anschließen von externen Geräten
Ziehen Sie den Netzstecker aus der Steckdose, bevor Sie irgendwelche Anschlüsse vornehmen.
(*) Die Anzahl dieser Eingänge kann sich je nach Modell Ihres TV-Gerätes ändern.
Schalten Sie alle angeschlossenen Geräte in den StandbyModus, bevor Sie die Erstinstallation durchführen.
Antennenkabel:...........................................................
Schließen Sie das Antennenkabel an die ANT.-Buchse an der
Rückseite des TV-Geräts an.
SCART-Kabel:..........................................................
Wenn Sie einen Decoder* oder Medienrecorder verwenden,
muss das Scart-Kabel an das TV-Gerät angeschlossen sein.
Die DIGITAL AUDIO-Buchse dient zum Anschluss eines
geeigneten Surround-Sound-Systems.
HDMI
®
(High-Denition Multimedia Interface) dient zum
Anschluss eines DVD-Geräts oder anderer Geräte mit
digitalem Audio- und Videoausgang. Die optimale Leistung
wird mit HD-Signalen mit den Auösungen 1080i und 1080p
erzielt; es können aber auch Signale mit VGA, 480i, 480p,
576i, 576p und 720p angezeigt werden. Auch PC-Signale
können angezeigt werden.
Hinweis: Obwohl dieses Gerät für den Anschluss von
HDMI-Komponenten geeignet ist, kann es vorkommen, dass
bestimmte Geräte nicht richtig funktionieren.
Sie können YPbPR an VGA-Kabel (nicht beigelegt) ver-
wenden um ein YPbPr-Signal über den VGA-Eingang zu
ermöglichen.
Hinweis: Sie können VGA und YPbPr nicht gleichzeitig
verwenden.
Es kann eine Reihe von Zusatzgeräten an das TVGerätangeschlossen werden. Lesen Sie dazu auch die
Bedienungsanleitung der entsprechenden Geräte.
Wenn das TV-Gerät automatisch auf das externe Gerät
schaltet, können Sie durch Drücken der entsprechenden
Programmtaste zum normalen Fernsehbetrieb zurückschalten. Um zum Zusatzgerät zurückzuschalten oder zwischen
Quellen zu wechseln, drücken Sie mehrmals die „SOURCE
“-Taste.
Unabhängig von den Eigenschaften der Quelle kann die
Audioausgabe von der DIGITAL-AUDIO-Buchse nicht kopiert
werden.
Page 55

Deutsch - 8 -
Deutsch
Anschließen eines HDMI®- oder DVI-Geräts an den HDMI-
Eingang
Der HDMI-Eingang Ihres TV-Geräts nimmt digitale Audio- und
unkomprimierte digitale Videosignale von einem HDMI-Gerät
bzw. unkomprimierte digitale Videosignale von einem DVIGerät auf (Digital Visual Interface).
Der Eingang kann Programme in HDCP (High-Bandwidth
Digital-Content Protection) in digitaler Form von EIA/CEA861-D–kompatiblen [1] Unterhaltungselektronikgeräten
aufnehmen (z. B. Set-Top-Box oder DVD-Player mit HDMIoder DVI-Ausgabe).
HINWEIS:
• Einige frühe HDMI-Geräte funktionieren mit Ihrem
modernen HDMI-TV-Gerät u. U. nicht.
• Unterstütztes Audioformat: Linear-PCM, Samplingrate
32/44.1/48 kHz.
Anschluss eines HDMI-Gerätes
Schließen Sie ein HDMI-Kabel (Anschluss Typ A) an die HDMI-Buchse an. Verwenden Sie ein HDMI-Kabel mit dem HDMI-Logo ( ), um die korrekte Funktion zu garantieren.
• Wenn Ihre HDMI-Verbindung die Au lösung 1080p unterstützt und/oder Ihr TV-Gerät eine Bildwiederholfrequenz
von mehr als 50 Hz unterstützt, benötigen Sie ein Kabel
der Kategorie 2. In diesem Modus funktioniert ein normale
HDMI-Kabel u. U. nicht.
• HDMI-Kabel transferieren beıdes Video und Audio. Separate
analoge Audiokabel sind nicht erforderlich (siehe Abbildung).
• Um das Video am HDMI Gerät zu sichten, drücken Sie
die „SOURCE“
-Taste um den entsprechenden HDMI-
Eingang auszuwählen.
* Die Anzahl
dieser Eingänge
kann sich je
nach Modell
Ihres TVGerätes ändern.
Um ein DVI-Gerät anzuschließen.
Schließen Sie ein HDMI-zu-DVI-Kabel (HDMI-Steckertyp A)
an den HDMI-Eingang und ein Audio-Kabel an die AUDIO-Eingänge (Seite) (siehe Abbildung) an.
• Die empfohlene Länge des HDMI-DVI-Adapterkabels
beträgt 6.6 ft (2m).
• Ein HDMI-zu-DVI-Kabel überträgt nur Videosignale. Sie
benötigen dazu noch analoge Audiokabel.
* Die Anzahl
dieser
Eingänge kann
sich je nach
Modell Ihres
TV-Gerätes
ändern.
HINWEIS:
Um sicherzustellen, dass Ihr HDMI- oder DVI-Gerät richtig
arbeitet, müssen Sie wie folgt vorgehen:
• Schalten Sie stets zuerst das TV-Gerät und dann erst das
HDMI- oder DVI-Gerät ein.
• Schalten Sie stets zuerst das HDMI- oder DVI-Gerät und
dann erst das TV-Gerät aus.
Page 56

Deutsch - 9 -
Deutsch
Anschluss eines Computers
Anschluss eines Computers
Sie können die Anzeige Ihres Computers entweder über
einen RGB/PC-Anschluss oder einen HDMI-Anschluss auf
dem TV-Gerät wiedergeben und dazu das Audiosignal über
die Lautsprecher des TV-Gerätes hören.
Wenn Sie einen PC an den RGB / PC-Eingang am TV-Gerät
anschließen, verwenden Sie ein analoges RGB (15-pin)
Computerkabel und an den AUDIO-EINGÄNGEN (Seite) mit
einem PC-Audiokabel (nicht mitgeliefert) für Audio-Anschlüsse (siehe Abbildung).
Stellen Sie zuerst die Ausgabeauösung am PC ein, bevor
Sie diesen an das TV-Gerät anschließen. Für ein optimales
Bild verwenden Sie bitte die Funktion PC-Einstellung.
HINWEIS:
• Einige PC-Modelle können nicht an dieses TV-Gerät
angeschlossen werden. Für Computer mit einem
kompatiblen Mini-D-Sub-Anschluss mit 15 Kontakten ist
kein Adapter erforderlich.
• Je nach der Ausstattung des DVD-Titels oder den
technischen Daten des PCs, auf denen Sie die DVD-Videos
wiedergeben, können einige Szenen übersprungen werden
oder Sie werden nicht in der Lage sein, während MultiangleSzenen zu pausieren.
Anschluss eines USB-
Speichers
Anschluss eines USB-Gerät
• Sie können über die USB-Eingänge am TV-Gerät ein USBLaufwerk an das TV-Gerät anschließen. Mit dieser Funktion
können Sie auf einem USB-Stick gespeicherte Musik-, Fotound Videodateien anzeigen bzw. wiedergeben.
• Unter Umständen sind bestimmte Arten von USB-Geräten
(z. B. MP3-Player) mit diesem TV-Gerät nicht kompatibel.
• Machen Sie gegebenenfalls Kopien von Ihren Dateien,
bevor Sie ein Gerät an das TV-Gerät anschließen, um
mögliche Datenverluste zu vermeiden. Beachten Sie, dass
der Hersteller keinerlei Haftung für beschädigte Dateien
oder Datenverluste übernimmt.
• Ziehen Sie niemals während des Aufnehmens oder
Abspielens ein USB Gerät aus dem Bildschirm.
VORSICHT: Schnelles Ein-und Ausstecken von USB-Geräten
kann zu Schäden an dem USB-Gerät führen
Page 57

Deutsch - 10 -
Deutsch
Bedienung des TV-Geräts
Eine Vielzahl von externen Geräten kann über die Buchsen an der Seite und Rückseite des TV-Geräts
angeschlossen werden. Während alle notwendigen Einstellungen und Steuerungen für das TV-Gerät über
die Fernbedienung erfolgen, können einige Funktionen über das Menü-Rad an der linken Seite des TV-
Gerätes eingestellt werden.
Einschalten
Wenn die Standby-LED nicht leuchtet, stellen Sie bitte sicher,
dass der Netzstecker eingesteckt ist. Drücken Sie die
Taste
an der hinteren Seite des TV-Gerätes
oder die Taste auf
der Fernbedienung, um es einzuschalten.
Um den Fernseher auf Standby zu stellen, drücken Sie die
-Taste auf der Fernbedienung bzw. drücken und halten Sie
die Mitte der
-Taste auf der linken Seite des Fernsehers.
Um fernzusehen, drücken Sie nochmals. Es kann einige
Sekunden dauern, bis das Bild erscheint.
Hinweis: Nachdem der Fernseher ausgeschaltet wurde,
wechselt die aktive Standby-LED-Farbe in wenigen Minuten
auf rot, während sich der Fernseher auf Standby stellt.
Um Energie zu sparen:
Durch Ausschalten oder Ausstecken des TV-Gerätes wird der
Energieverbrauch fast auf Null gesenkt. Wir empfehlen, dies
zu tun, wenn das TV für längere Zeit nicht verwendet wird, z.
B. wenn Sie auf Urlaub fahren.
Auch die Verringerung der Helligkeit kann den Energieverbrauch senken.
Hinweis: Auch wenn Sie das TV-Gerät in den Standby-Modus
schalten, wird der Energieverbrauch gesenkt. Ein gewisser
Stromverbrauch bleibt aber.
Verwendung der Fernbedienung
Drücken Sie die Taste MENU auf der Fernbedienung, um
die Menüs zu sehen.
Das Hauptmenü erscheint als Gruppe von Symbolen für
jede Option. Drücken Sie die Taste Links oder Rechts, um
ein Thema zu wählen.
Im Untermenü Bildschirmmodus wird das Menü als Liste
angezeigt. Drücken Sie die Taste Auf oder Ab, um eine
Option zu wählen.
Um die Optionen zu verwenden, drücken Sie die Tasten Auf
und Ab auf der Fernbedienung. Damit bewegen Sie sich in den
Optionen auf oder ab. Zum Auswählen der entsprechenden
Option drücken Sie OK, Links oder Rechts. Folgen Sie den
Anweisungen am Bildschirm.
Nutzung der Bedienelemente des TV-Gerätes
Verwendung des Menü-Wahlrads an der Seite des TV-Geräts
Um die Lautstärke zu ändern: Drücken Sie die mittlere
Taste, bis die Lautstärke OSD angezeigt wird. Erhöhen
Sie die Lautstärke durch Drücken der Taste nach oben.
Senken Sie die Lautstärke durch Drücken der Taste nach
unten.
Um den Kanal zu wechseln: Drücken Sie die mittlere
Taste, bis der Kanal Informationsfeld eingeblendet wird.
Nun können Sie durch das drehen des Rades nach oben
oder nach unten den Kanal wechseln
Um die Signalquelle zu ändern: Drücken Sie die mittlere
Taste, bis die Quellenliste angezeigt wird. Durch das
Hinauf- bzw. Hinunterdrehen des Rades können Sie nun
die Quelle ändern.
Bitte sehen Sie immer auch in der Bedienungsanleitung
des angeschlossenen Gerätes für weitere Details nach.
TV ausschalten: Halten Sie die Mitte des radförmigen
Knopfs für ein paar Sekunden nach unten gedrückt, bis
der Fernseher in den Standby-Modus versetzt wird.
Page 58

Deutsch - 11 -
Deutsch
Erstinstallation
Bevor Sie das TV-Gerät einschalten, müssen Sie eventuell angeschlossene Decoder und Aufnahmegeräte
in den Standby Modus schalten und sicherstellen, dass die Antenne an das Fernsehgerät angeschlossen
ist. Um das TV-Gerät einzurichten, verwenden Sie die Tasten auf der Fernbedienung, wie detailliert auf der
Seite Steuerung der Fernbedienung beschrieben.
WICHTIG: Stellen Sie sicher, dass die Antenne
angeschlossen und kein CI-Modul eingesteckt ist, bevor
Sie das TV-Gerät für die erste Installation einschalten.
1. Stecken Sie den Netzstecker ein, drücken und
halten Sie die Mitte des Menürades auf der
linken Seite des TVs um den TV anzuschalten.
Schaltet sich das TV-Gerät nicht ein, drücken Sie
eine Zifferntaste oder auf der Fernbedienung.
Es erscheint das Menü Sprachauswahl. Dieser
Bildschirm erscheint, wenn das TV-Gerät das
erste Mal eingeschaltet wird bzw. jedes Mal,
nachdem das Gerät zurückgesetzt wurde.
2. Markieren Sie mit der Auf oder Ab-Taste die
gewünschte Sprache und drücken Sie die
OK-Taste. Die folgende OSD-Meldung wird
eingeblendet:
3. Wählen Sie durch Drücken der Links- oder
Rechts-Taste die gewünschte Länderoption und
drücken Sie die Taste Ab, um die Suchart-Option
zu markieren. Stellen Sie den gewünschten
Suchtyp mit Links oder Rechts ein. Verfügbare
Suchtypen sind nur Digital, nur Analog-TV und
Voll.
4. Wenn Sie die Einstellung abgeschlossen
haben, drücken Sie die Ab-Taste, um die Option
Teletextsprache zu markieren. Wählen Sie die
gewünschte Teletextsprache mit den Tasten
Links oder Rechts aus. Markieren Sie Suche
nach verschlüsselten Kanälen und aktivieren/
deaktivieren Sie diese Option durch Benutzen der
Tasten Links oder Rechts. Drücken Sie die Taste
OK, um fortzusetzen.
Hinweis: Je eingestellter Länderauswahl, werden Sie
möglicherweise an dieser Stelle aufgefordert, eine PIN
einzurichten und zu bestätigen. Die ausgewählte PINNummer darf nicht 0000 lauten. Wenn Sie aufgefordert
werden, müssen Sie später eine PIN für jede Menübedienung
eingeben.
5. Auf dem Bildschirm erscheint die folgende
Meldung:
Wählen Sie Ladenmodus, wenn das TV-Gerät
in einem Geschäft ausgestellt wird. Diese
Option wird die Einstellungen Ihres TV-Gerätes
für die beste Anzeigequalität konfigurieren,
die unterstützten Funktionen des TV-Gerätes
werden am oberen Bildschirmrand als BannerInformation angezeigt. Wurde der Ladenmodus
ausgewählt, wird ein Bestätigungsbildschirm
angezeigt. Wählen Sie JA, um fortzufahren. Für
den Heimgebrauch wählen Sie Heimmodus.
Diese Option wird im Menü Andere Einstellungen
verfügbar sein und kann später aus- bzw.
eingeschaltet werden.
6. Drücken Sie die OK-Taste auf der Fernbedienung,
um fortzufahren. Die folgende Meldung wird auf
dem Bildschirm eingeblendet:
7. Wählen Sie Ja durch das Drücken der Tasten
Links oder Rechts und der Taste OK, um
fortzufahren. Anschließend erscheint auf dem
Bildschirm folgende OSD-Meldung:
Page 59

Deutsch - 12 -
Deutsch
Erstinstallation - Fortsetzung
8. Wenn Sie die Option Kabel wählen, wird ein
Bestätigungsbildschirm angezeigt. Wenn Sie
nach verfügbaren Netzwerken suchen möchten,
wählen Sie JA um fortzufahren. Die folgende
OSD-Meldung wird eingeblendet:
In diesem Bildschirm können Sie Netzwerk,
Frequenz, Netzwerk-ID und den Suchschritt
auswählen. Zum Markieren der Zeilen verwenden
Sie die Tasten Auf oder Ab. Sie können den
Suchschritt als 8000 kHz oder 1000 kHz
einstellen. Wenn Sie 1000 kHz auswählen, wird
das Fernsehgerät genauer suchen. Daher wird
sich die Suchzeit entsprechend verlängern. Wenn
Sie fertig sind, drücken Sie die OK-Taste, um die
automatische Suche zu starten.
Wenn Sie Option NEIN wählen, wird der folgende
Bildschirm angezeigt:
Sie können gewünschte Start-Stoppfrequenzen
und Suchschritte einstellen. Wenn Sie fertig sind,
drücken Sie OK, um die Suche zu starten.
9. Wenn Sie die Option Antennenempfang in der
Anzeigeäche Suchart ausgewählt haben, wird
eine Bestätigung auf dem Bildschirm angezeigt.
Wenn Sie mit der Suche fortfahren möchten,
wählen Sie Ja, das Fernsehgerät wird dann nach
verfügbaren Programmen suchen. Zum Beenden
wählen Sie Nein.
10. Der Autoprogrammbildschirm erscheint und das
Gerät sucht nach allen empfangbaren Sendern.
Dabei zeigt der Fortschrittsbalken den Status
an. Sie müssen die Suche vollständig ablaufen
lassen.
Hinweis: Sie können die Taste MENU drücken, um
abzubrechen.
Während die Suche andauert, erscheint eine Nachricht, die
Sie fragt, ob Sie Kanäle gemäß der LCN(*) sortieren möchten.
Wählen Sie Ja und drücken Sie OK um fortzufahren.
(*) LCN ist das logische Kanalnummer System, das die
zur Verfügung stehenden Sendungen in Übereinstimmung
mit einer erkennbaren Kanalreihenfolge (wenn verfügbar)
organisiert.
Wenn die verfügbaren Kanäle gespeichert sind, wird
Kanalliste Bearbeiten auf dem Bildschirm angezeigt.
Drücken Sie die MENU-Taste, um die Kanalliste zu
schließen und fernzusehen.
Hinweis: Schalten Sie das Gerät während der Ersteinstallation
nicht ab.
Page 60

Deutsch - 13 -
Deutsch
DVD-Modus
Wenn Ihr Fernsehgerät über ein eingebautes DVD-Modul verfügt. Die folgenden Anweisungen gelten für
den korrekten Betrieb des eingebauten DVD-Gerätes.
• Warnung: Ein durch Strahlung hervorgerufenes
Gefährdungsrisiko durch sichtbare und unsichtbare
Laserstrahlen der Klasse 1/Klasse 3b ist möglich.
Schauen Sie nicht direkt in den Strahl.
KLASSE 1
LASER-PRODUKT
Umgang mit Disc
• Berühren Sie die Disc nur an den Kanten, damit sie
sauber bleibt. Berühren Sie niemals die Oberäche.
• Kleben Sie weder Papier noch Klebelm auf die
Disc.
• Sollte die Disc mit Substanzen wie beispielwiese
Kleber verschmutzt, müssen Sie diese vor dem
Abspielen entfernen.
• Setzen Sie die Disc nicht direktem Sonnenlicht
oder Hitzequellen, wie Heißluftkanälen, aus, lassen
Sie diese auch nicht in einem Auto, dass in der
Sonne geparkt ist, da andernfalls die erhöhten
Temperaturen zu Schäden am Datenträger führen
könnten.
• Legen Sie die Disc nach dem Abspielen wieder in
die Hülle zurück.
Reinigung von Disc
• Reinigen Sie die Disc vor dem Abspielen mit einem
Reinigungstuch. Wischen Sie die Disc von der Mitte
nach außen ab.
• Verwenden Sie weder Lösungsmittel (z. B. Benzin,
Verdünner) noch Industriereiniger und auch keine
für Vinyl-LPs gedachte Antistatic-Sprays.
DVD-Eigenschaften
• DVD /CD / CD-R / CD-RW / MP3 / JPEG / MPEG
/ Wiedergabe.
• NTSC/PAL-Wiedergabe (je nach Inhalt der Disc).
• LPCM Audio über koaxialen & optischen
Digitalausgang (optional).
• Multi-Audio-Unterstützung (bis zu 8, jeweils
abhängig vom Inhalt der Disc).
• Unterstützung von Untertiteln in bis zu 32 Sprachen
(jeweils abhängig vom Inhalt der Disc).
• Unterstützung von bis zu 9 verschiedenen
Anzeigewinkeln (jeweils abhängig vom Inhalt der
Disc).
• Jugendschutzfunktion mit 8 verschiedenen Stufen
• Schneller Vorlauf und Rücklauf in 5 verschiedenen
Geschwindigkeiten: 2x, 4x, 8x, 16x, 32x.
• Zeitlupenwiedergabe in 4 verschiedenen
Geschwindigkeiten: 1/2x, 1/4x, 1/8x, 1/16x vorwärts.
• Einzelbild-Weiterschaltung.
• Such-Modus.
• Wiederholen.
• Koaxialer Audioausgang (optional).
• Kopierte Disc sind unter Umständen nicht
kompatibel.
DVD-Bedientasten am Fernsehgerät
1. Disc-Lade.
2. Wiedergabe / Pause (
/ ) Taste.
Wiedergabe/Pause der Disc. Wenn das DVDMenü aktiv ist (Wurzelmenü), funktioniert diese
Taste als “Auswahltaste” (wählt die markierte
Option des Menüs aus), sofern die Disc dies
zulässt.
3. Stopp / Auswurf (
/ ) Taste.
Stoppt die Wiedergabe der Disc / wirft die Disc
raus oder ladet sie.
HINWEIS: Sie können eine DVD nicht über die Fernbedienung
auswerfen. Zum Auswerfen während der Wiedergabe einer
Datei, müssen Sie dreimal die STOPP-Taste (
/ ) (am
Fernsehgerät) drücken.
Page 61

Deutsch - 14 -
Deutsch
DVD-Modus
Allgemeiner Betrieb
Rückseite des
Fernsehgeräts
3
1
2
Abspielen der DVD
Hinweis: Auf den DVD-Modus kann nur zugegriffen
werden, wenn eine DVD ist eingelegt ist oder eine DVDSteuerungstaste gedrückt wird.
Wenn Sie durch Drücken der „SOURCE- “,
„SWAP-
“ oder „P / “ Tasten auf der
Fernbedienung auf eine andere Quelle umschalten
möchten, wird die DVD-Wiedergabe automatisch
angehalten.Sie müssen die WIEDERGABE-Taste
drücken und die Wiedergabe manuell fortsetzen,
wenn Sie in den DVD-Modus umschalten.
1. Schalten Sie das Fernsehgerät ein.
2. Wechseln Sie zur DVD-Quelle mit der „SOURCE-
“Taste auf der Fernbedienung.
3. Legen Sie eine DVD in das Laufwerk ein.
Die beschriftete Seite der DVD MUSS in Ihre Richtung
zeigen, wenn Sie auf den Fernsehbildschirm schauen.
Die meisten Discs werden automatisch geladen und
wiedergegeben, sofern sie nicht über gespeicherte
Menüs verfügen.
Wenn die Wiedergabe nicht automatisch beginnt,
drücken Sie die Wiedergabetaste „
“ auf der
Fernbedienung oder die Taste „
/ “ an der rechten
Seite des Fernsehgeräts.
Nach einigen Sekunden erscheint entweder ein Menü
auf dem Bildschirm oder die Wiedergabe des Films
beginnt. Dies hängt von jeweiligen Inhalt ab und kann
sich bei jeder DVD verschieden sein.
Hinweis: Schritte 4 und 5 sind nur relevant, wenn die DVD
ein Menü enthält.
4. Drücken Sie die Navigationstasten „ “, „ “, „
“ oder „ “ oder die numerischen Tasten, um die
erforderlichen Titel auszuwählen.
5. Klicken Sie auf die OK-Taste. Die Wiedergabe
startet mit der gewählten Option.
Hinweise zur DVD-Wiedergabe
a. Während des schnellen Vor- oder Rücklaufs erfolgt
keine Tonwiedergabe.
b. Während der Zeitlupenwiedergabe erfolgt keine
Tonwiedergabe.
c. Die Zeitlupenwiedergabe rückwärts ist nicht
möglich.
d. In einigen Fällen ist kein direkter Wechsel zur
gewünschten Untertitelsprache möglich.
e. Wenn auch nach mehrmaligem Drücken der Taste
die bevorzugte Sprache nicht ausgewählt wird, ist
diese auf der CD nicht verfügbar.
f. Beim erneuten Einschalten des Players bzw. beim
erneuten Einlegen einer DVD wird die Auswahl
der Untertitelsprache automatisch wieder auf die
Ausgangseinstellung zurückgesetzt.
g. Wird eine Sprache ausgewählt, die auf der Disc
nicht verfügbar ist, wird als Untertitelsprache
automatisch die für die Disc vorgegebene
Standardsprache verwendet.
h. Die Untertitelsprachen wechseln in einer
festgelegten Reihenfolge. Deshalb können Sie
die Anzeige der Untertitel abbrechen, indem Sie
die UNTERTITEL-Taste mehrfach drücken, bis
„Untertitel Aus“ auf dem Bildschirm erscheint.
i. Beim erneuten Einschalten des Players bzw. beim
erneuten Einlegen einer Disc wird die Auswahl der
Wiedergabesprache automatisch wieder auf die
Ausgangseinstellung zurückgesetzt.
j. Einige Disc enthalten keine Haupt- und/oder
Titelmenüs.
k. Die Einzelbildweiterschaltung im Rücklauf ist nicht
möglich.
l. Als Referenz: Wenn Sie eine Zahl eingeben, die
Page 62

Deutsch - 15 -
Deutsch
DVD-Modus
Allgemeiner Betrieb
größer als die Gesamtlaufzeit des aktuellen Titels ist,
wird das Zeitsuchfeld ausgeblendet, und in der
oberen linken Ecke des Bildschirms erscheint die
Meldung „Eingabe ungültig
“.
m. Die Diaschau ist deaktiviert, wenn der ZOOM-
Modus eingeschaltet ist.
DVD-Modus-Konguration
1. Wenn die DVD-Quelle geöffnet ist, drücken Sie
„MEINE TASTE1 -
“ Taste, um das DVD-
Setup-Menü aufzurufen. Dies ist nur möglich,
solange keine Wiedergabe stattndet.
2. Dieses Menü wird mit der Benutzung der „ “
oder „
“ und „ “ oder „ “ Tasten bedient.
Videoeinstellungen
Fernsehnorm
Für die Option Fernsehnorm ist nur ‚PAL‘ verfügbar.
Das Fernsehgerät unterstützt auch das NTSC-Signal,
dieses wird jedoch vor der Anzeige auf dem Bildschirm
in PAL umgewandelt.
Sprachen-Setup
Dieses Menü dient zum Einstellen der Sprache im
DVD-Modus. Sprachmenü-Inhalte sind wie folgt
aufgeführt:
Sprache der Bildschirmanzeige
Wählen Sie die Sprache für die Bildschirmanzeige
der Player-Menüs aus.
Audio
Wählen Sie die gewünschte Standardsprache für
die Audio-Wiedergabe aus (sofern dies von der DVD
unterstützt wird).
Disc-Menü
Sie können eine Sprache für das DVD-Menü
auswählen. Das Disc-Menü wird in der ausgewählten
Sprache angezeigt, sofern die Sprache von der
jeweiligen DVD unterstützt wird.
Untertitel
Wählen Sie die gewünschte Standardsprache für die
Untertitel-Wiedergabe aus (sofern dies von der DVD
unterstützt wird).
Voreinstellungen
Dies sind die DVD-Modus Einstellungen. MenüInhalte sind unten detailliert aufgeführt:
Standard
Wenn Sie Reset auswählen und OK drücken, werden
die Werkeinstellungen geladen. Die Einstellungen
der Kindersicherungsstufe und des dazugehörigen
Passworts werden nicht geändert.
Downmix
Dieser Modus kann verwendet werden, wenn der
digitale Audioausgang des TV-Geräts verwendet wird.
Surround: Surroundausgabe.
Stereo: Stereo-Ausgabe zwei Kanäle
Elternkontrolle
Die Wiedergabe einiger DVDs kann je nach Alter des
Anwenders eingeschränkt werden. Die “Jugendschutz”Funktion erlaubt es Eltern, die Wiedergabe von
Programmen zu beschränken. Sie können zwischen
acht Kindersicherungsschutzstufen umschalten. Mit
der Einstellung Stufe „8 Erwachsene“ können Sie
sämtliche DVD-Titel unter Nichtberücksichtigung der
DVD-Kindersicherung abspielen. Sie können nur
DVD-Discs wiedergeben, bei denen dieselbe oder
eine niedrigere Kindersicherungsschutzstufe wie
diejenige Ihres Players eingestellt ist.
Passwort
Mit Hilfe dieser Option können Sie das aktuelle
Passwort ändern. Für die Änderung des Passworts
werden Sie zunächst zur Eingabe des bisherigen
Passworts aufgefordert. Nach der Eingabe des alten
Passworts können Sie das neue, aus vier Ziffern
bestehende Passwort eingeben und bestätigen. Mit
der C-Taste können falsch eingegebene Ziffern wieder
gelöscht werden (sofern diese auf der Fernbedienung
vorhanden ist).
Hinweis: Das werksseitig voreingestellte
Passwort ist “0000”. Sie müssen das digitale
Passwort XXXX jedes Mal eingeben, wenn Sie die
Kindersicherungsschutzstufe ändern möchten. Wenn
Page 63

Deutsch - 16 -
Deutsch
DVD-Modus
Fehlerbehebung & Tipps
Sie das Passwort vergessen haben, wenden Sie sich
an den technischen Kundendienst.
SPDIF-AUSGANG
Sie können die Option SPDIF-Ausgang auf RAW
oder PCM einstellen. Wenn Sie im DVD-Menü unter
SPDIF-Ausgang PCM auswählen und eine DVD
mit Dolby-Audiosignal abspielen, erhalten Sie die
Audioausgabe in zwei Kanälen über die Lautsprecher
und den SPDIF-Ausgang. Wenn Sie im DVD-Menü
unter SPDIF-Ausgang RAW auswählen und eine
DVD mit Dolby-Audiosignal abspielen, werden
die Lautsprecher deaktiviert und Sie erhalten die
Audioausgabe in 5+1-Kanal über den SPDIFAusgang.
Die DVD Bildqualität ist schlecht
1. Vergewissern Sie sich, dass die DVD-
Oberäche nicht beschädigt ist (Keine Kratzer,
Fingerabdrücke usw.)
2. Reinigen Sie die DVD und versuchen Sie es
erneut. Siehe die Anweisungen im Abschnitt
„Reinigung von Disc” zur richtigen Reinigung
Ihrer DVDs.
3. Stellen Sie sicher, dass beschriftete Seite der
DVD im Laufwerk in Ihre Richtung zeigt, wenn
Sie auf den Fernsehbildschirm schauen.
4. Feuchtigkeit oder Kondensation auf der Disc
können das Gerät negativ beeinussen. Warten
Sie ein bis zwei Stunden im Standby-Modus, bis
das Gerät trocken ist.
Die Disc wird nicht wiedergegeben
1. Keine DVD im Gerät - Legen Sie eine DVD in
das Laufwerk.
2. Die DVD ist falsch eingelegt - Stellen Sie
sicher, dass die DVD in das Laufwerk mit der
beschrifteten Seite nach oben eingelegt ist.
3. Falscher Datenträgertyp. Das Gerät kann keine
CD-ROMs mit Computerdaten usw. wiedergeben.
4. Der Regionalcode der DVD muss mit dem des
Players übereinstimmen.
Falsche OSD-Sprache
1. Wählen Sie die Sprache im Menü Setup aus.
2. Die Audio- oder Untertitelsprache der DVD lässt
sich nicht ändern.
3. Auf der DVD sind keine mehrsprachigen Audios
bzw. Untertitel aufgezeichnet.
4. Versuchen Sie, die Audiospur bzw. die Untertitel
im Titelmenü der Disc zu ändern. Manche
DVDs erlauben es dem Anwender nicht, die
Einstellungen ohne Verwendung des DVD-Menüs
zu ändern.
Funktionen wie Anzeigewinkel, Zoom usw.
arbeiten nicht
1. Diese Funktionen sind auf der DVD nicht
vorhanden.
2. Der Anzeigewinkel kann nur dann geändert
werden, wenn das Anzeigewinkel-Symbol
angezeigt wird.
Wenn nichts geholfen hat
Wenn Sie mit keinem der oben angeführten Hinweise
das Problem lösen konnten, sollten Sie das TV-DVDKombigerät abschalten und wieder einschalten.
Hilft auch das nicht weiter, wenden Sie sich bitte
an Ihren Händler oder an eine auf TV-DVD-Geräte
spezialisierte Reparaturwerkstatt.
Hinweis
Dieses Produkt enthält Kopierschutztechnologie, die
durch US-Patente und andere geistige Eigentumsrechte
geschützt ist. Die Kopierschutztechnologie darf nur
mit Genehmigung der Rovi Corporation verwendet
werden, sie darf ohne spezielle Genehmigung der
Rovi Corporation nur im Heimbereich und im nicht
öffentlichen Bereich verwendet werden. Nachbau oder
Demontage ist ausdrücklich verboten.
Page 64

Deutsch - 17 -
Deutsch
Anhang A: DVD-Modus unterstützte Dateiformate
Medium
Datei-
erweiterung
Format
Unterstützt
(Max. Auösung / Bitrate etc.)
Video
Audio
Film
.mpg/ .dat/
.vob
MPEG1
MPEG Layer
1/2/3
MPEG2 MPEG2
.avi
XviD/ 3ivx PCM/MP3 XviD-Version bis: 1.1.2
MPEG4 PCM/MP3
MS ISO
MPEG4
PCM/MP3 SP und ASP unterstützt
Musik
- - PCM Sample-Rate: 8K ~ 48KHz
.mp3 -
MPEG 1/2
Layer 1/2/3
(MP3)
Sample-Rate: 8K ~ 48KHz, Bitrate: 64K~320Kbps
Foto .jpg
Baseline JPEG
WxH = 8902 x 8902, Bis zu 77 Megapixel
Unterstützte Formate: 444/440/422/420/ Grayscale
Progressive JPEG
Bis zu 4 Mega-Pixel Format-Unterstützung:
444/440/422/420/ Grayscale
Ext.
Untertitel
.srt
Textdateiformat wird unterstützt, jedoch kein
Bilddateiformat
.smi
.sub
.ssa
.ass
Anhang B: Kompatible Disc-Typen
Disc Typen
(Logos)
Aufnahme-
Arten
Disc-
Größe
Maximale
Wiedergabezeit
Eigenschaften
Audio
+
Video
12 cm Einseitig; 240
min.
Doppelseitig;
480 min.
Dank des Dolby Digital und MPEG2-Systems verfügt eine DVD
über ausgezeichnete Ton- und
Bildqualität. Die verschiedenen
Bildschirm- und Audio-Funktionen
können problemlos über das
Bildschirmmenü gewählt werden.
Audio 12 cm 74 min. Eine analoge Langspielplatte (LP)
wird als Analogsignal mit größerer
Verzerrung aufgenommen. Auf einer
DVD wird ein digitales Signal mit
besserer Audioqualität, geringerer
Verzerrung und geringerem
Qualitätsverlust des Audiosignals
im Lauf der Zeit aufgezeichnet.
Audio
(xxxx.mp3)
12 cm Abhängig von
der MP3Qualität
Auf einer MP3 wird ein digitales
Signal mit besserer Audioqualität,
geringerer Verzerrung und
geringerem Qualitätsverlust des
Audiosignals im Lauf der Zeit
aufgezeichnet.
Video
(Standbild)
12 cm
Abhängig von
JPGQualität
JPEG wird als digitales Signal mit
besserem Erhalt der Bildqualität im
Lauf der Zeit aufgezeichnet.
Für einen ordnungsgemäßen Betrieb dürfen nur DVDs mit einem Durchmesser von 12 cm verwendet
werden.
Page 65

Deutsch - 18 -
Deutsch
DVD-Modus
Sie können DVD-, Fim-CD-, Musik- oder Bilder-Disks mit den geeigneten Tasten der Fernbedienung
steuern. Im Folgenden nden Sie die Hauptfunktionen der am häugsten benutzten Fernbedienungstasten
erklärt.
Tasten auf der
Fernbedienung
DVD
Wiedergabe
Film
Wiedergabe
Bildwiedergabe Musikwiedergabe
Wiedergabe Wiedergabe Wiedergabe Wiedergabe
Pause Pause Pause Pause
Stop Stop Stop Stop
/
Markiert einen Menüeintrag /
Verschiebt den vergrößerten Bildausschnitt nach links oben oder
unten (sofern verfügbar).
X
/
Markiert einen Menüeintrag/ Verschiebt den vergrößerten Bildausschnitt nach links oben oder
unten (sofern verfügbar).
/
Schneller Vorlauf / Schneller Rücklauf X
Schneller Vorlauf /
Schneller Rücklauf
Zum
Betrachten
einer
Szene aus
verschiedenen
Blickwinkeln
(sofern
verfügbar)
X X X
Zeigt DVD-Informationen an / Zeigt im
Stoppmodus das DVD-Setup-Menü an.
X X
Zeigt DVD-Informationen an X X
Audiosprache X X X
MENÜ Zeigt das Hauptmenü an
OK Eingeben / Ansehen / Wiedergeben
TASTE GRÜN Anzeigen der Wiederholoptionen.
RETURN Kehrt zum vorhergehenden Menü zurück (sofern verfügbar).
TASTE GELB Kehrt zum Stammverzeichnis zurück (sofern verfügbar). X
SPRINGEN (*) Direkte Wahl von Szenen, Zeitpunkten oder Dateien (Spur)-Nummer
UNTERTITEL
Untertitel Ein-Aus. Wiederholt drücken, um
zwischen den Modi umzuschalten (sofern
verfügbar).
X X
BLAUE TASTE Anzeige des DVD-Menüs (sofern verfügbar). X X
TASTE ROT
Zoomt das Bild. Wiederholt drücken, um zwischen den Zoom-
Optionen umzuschalten.
X
Weitere Funktionen - Tastenkombinationen
(während der Wiedergabe)
+
Langsamer Vorlauf
[ + ] +
Stellt die Geschwindigkeit für den langsamen Vorlauf ein
[ + ]
Startet den langsamen Rücklauf.
+
Stellt die Geschwindigkeit für den schnellen Vorlauf ein
+
Stellt die Geschwindigkeit für den schnellen Rücklauf ein
+
Bestätigt den Stop-Befehl
(*) Sie können durch Drücken der Zifferntasten direkt zum entsprechenden Titel wechseln. Um auf einstellige Titelnummern zu wechseln, müssen
Sie zuerst die 0 und dann die entsprechende Ziffer eindrücken (Beispiel: Um 5 zu wählen, drücken Sie 0 und 5.)
Page 66

Deutsch - 19 -
Deutsch
Spezikationen und Zubehör
Sendesysteme / Kanäle
DVB-T MPEG2, DVB-T MPEG4 HD
DVB-C MPEG2, DVB-C MPEG4
Video-Eingang PAL, SECAM, NTSC 4.43
Stereo Nicam
Externe Anschlüsse
1-SCART 1 Eingang 21-pin SCART RGB, A/V
2-SCART-S (via SCART 1) Eingang 21-pin SCART S-Video
3-YPbPr (via VGA) Eingang Mini D-Sub 15-Pin Analogue
4-SIDE AV Eingang RCA Video + Audio L + R
5-HDMI 1/2 (*) Eingang Type A
(*) Die Anzahl dieser Eingänge kann sich je nach Modell Ihres TV-Gerätes ändern.
6-VGA/PC Eingang Mini D-Sub 15-Pin Analogue RGB Signal
7-Digital Audio Ausgang S/PDIF (Koaxial)
USB Port Medienbrowser-Schnittstellenversion:
USB 2.0
USB-Klasse: Massenspeicher
Dateisystem: FAT32
Kopfhörerbuchse 3.5 mm Stereo
Betriebsbedingungen Temperatur 5°C - 35°C (41°F - 94°F)
Feuchtigkeit 20 - 80 % (nicht kondensierend)
Mitgeliefertes Zubehör Fernbedienung
2 Batterien (AAA,IEC R03 1.5V)
4 Schrauben
Stand Befestigungsabdeckung
P-Clip
24” D
24” W
Energieefzienzklasse
A+ A+
Sichtbare Bildschirmgröße (ca.)
61cm / 24” 61cm / 24”
Stromverbrauch im Modus eingeschaltet
(ca.) (*)
18 W 18 W
Jahresstromverbrauch (approx.) (**)
26 kWh 26 kWh
Standby-Stromverbrauch (ca.)
< 0.50 W < 0.50 W
Bildschirmauösung (Pixel)
1366 x 768 1366 x 768
Bildschirm
16:9 16:9
Klang-Ausgabe (bei 10% Verzerrung)
2 x 2.5 2 x 2.5
Leistungsaufnahme Modell (ca.)
45 W 45 W
Gewicht TV mit Standfuß
4.7 kg 4.2 kg
Bruttogewicht
7.5 kg 7.0 kg
TV ohne Standfuß
4.0 kg 3.5 kg
(*) Mit Standardeinstellungen gemäß IEC 62087-BD getestet.
(**) Energieverbrauch 26 kWh pro Jahr, basierend auf den Stromverbrauch des Fernsehers bei Betrieb für 4 Stunden pro Tag
in 365 Tagen. Der tatsächliche Energieverbrauch hängt davon ab, wie das Fernsehen verwendet wird.
Die Spezikationen können ohne vorherige
Ankündigung geändert werden.
A (mm) B (mm) C (mm) D (mm) E (mm) F (mm) G (mm)
24D153*DG 554.0 345.0 163.0 61.3 379.0 75 75
24W153*DG
554.0 345.0 163.0 61.3 379.0 75 75
Page 67

Deutsch - 20 -
Deutsch
Lizenzinformationen
• Die Bezeichnungen HDM und High-Denition Multimedia Interface, sowie das HDMI-Logo sind Markenzeichen
oder eingetragene Markenzeichen der HDMI Licensing LLC in den USA und anderen Ländern.
• DVB ist ein eingetragenes Warenzeichen des DVB-Project.
• [1] EIA/CEA-861-D bedeutet, dass die Übertragung von unkomprimiertem digitalen Video mit digitalem Inhaltsschutz
hoher Bandbreite erfolgt, standardisiert für die Aufnahme von HD-Videosignalen. Da es sich hierbei um eine in
Entwicklung bendliche Technologie handelt, funktionieren u. U. einige Geräte nicht mit diesem TV-Gerät.
MP3-Lizenzhinweis
Die MPEG Layer-3-Audiokodierungstechnologie ist von Fraunhofer LLS und Thomson lizenziert.
MP4-Lizenzhinweis
DIESES PRODUKT IST UNTER DER MPEG-4 VISUAL PATENT-PORTFORIO-LIZENZ FÜR DEN PERSÖNLICHEN
UND NICHT-GEWERBLICHEN GEBRAUCH EINES ENDVERBRAUCHERS LIZENZIERT FÜR (I) DIE KODIERUNG
VON VIDEOS IN ÜBEREINSTIMMUNG MIT DEM MPEG-STANDARD ("MPEG4-VIDEO") UND/ODER (II) DIE
DEKODIERUNG VON MPEG4-VIDEOS, DIE VON EINEM ENDVERBRAUCHER IN PERSÖNLICHER UND
NICHT-GEWERBLICHER AKTIVITÄT KODIERT UND/ODER VON EINEM VIDEOBEREITSTELLER MIT DER
ERFORDERLICHEN MPEG4-LIZENZ BEREITGESTELLT WURDEN. FÜR ALLE ANDEREN ZWECKE IST EINE
LIZENZ WEDER AUSDRÜCKLICH NOCH IMPLIZIT ERTEILT. ZUSÄTZLICHE INFORMATIONEN AUF FÜR
WERBE-, INTERNE UND KOMMERZIELLE NUTZUNG UND LIZENSIERUNG VON MPEG LA, L.L.C. SIEHE
HTTP://WWW.MPEGLA.COM
AVC-Lizenzhinweis
DIESES PRODUKT IST UNTER DER AVC-PATENT-PORTFOLIO-LIZENZ FÜR DEN PERSÖNLICHEN UND
NICHT-GEWERBLICHEN GEBRAUCH EINES ENDVERBRAUCHERS LIZENZIERT FÜR (I) DIE KODIERUNG VON
VIDEOS IN ÜBEREINSTIMMUNG MIT DEM AVC-STANDARD ("AVC-VIDEO") UND/ODER (II) DIE DEKODIERUNG
VON AVC-VIDEOS, DIE VON EINEM ENDVERBRAUCHER IN PERSÖNLICHER UND NICHT-GEWERBLICHER
AKTIVITÄT KODIERT UND/ODER VON EINEM VIDEOBEREITSTELLER MIT DER ERFORDERLICHEN
AVC-LIZENZ BEREITGESTELLT WURDEN.
FÜR ALLE ANDEREN ZWECKE IST EINE LIZENZ WEDER
AUSDRÜCKLICH NOCH IMPLIZIT ERTEILT. ZUSÄTZLICHE INFORMATIONEN ERHALTEN SIE VON MPEG LA,
L.L.C. SIEHE HTTP://WWW.MPEGLA.COM
Lizenzhinweise
MARKENZEICHEN
Hergestellt unter der Lizenz der Dolby Laboratories. Dolby und das Doppel-D-Symbol sind Warenzeichen der
Dolby Laboratories.
Entsorgung...
Die folgenden Informationen gelten nur für EU-Mitgliedsstaaten:
Entsorgung der Produkte
Das Symbol mit der durchgestrichenen Mülltonne zeigt an, dass dieses Produkt getrennt vom normalen
Haushaltsmüll gesammelt und entsorgt werden muss. Eingebaute Batterien und Akkus können gemeinsam mit
dem Produkt entsorgt werden. Sie werden dann in den Recyclingzentren getrennt.
Der schwarze Balken zeigt an, dass das Produktnach dem 13. August, 2005 auf den Markt gekommen ist.
Durch die getrennte Sammlung von Produkten und Batterien unterstützen Sie, die richtige Entsorgung von
Produkten und Batterien und helfen damit, mögliche negative Folgen für die Umwelt und die menschliche
Gesundheit zu vermeiden.
Für ausführlichere Informationen über die Sammlung und Recycling-Programme in Ihrem Land, besuchen Sie
bitte unsere Website (www.toshiba.eu/recycling) oder kontaktieren Sie Ihre örtlichen Behörden bzw. erkundigen
Sie sich in dem Geschäft, in dem Sie das Produkt gekauft haben.
Entsorgung von Batterien und Akkus
Das durchgestrichene Rad Symbol weist darauf hin, dass Batterien und/oder Akkumulatoren gesammelt und
separat vom Hausmüll entsorgt werden müssen.
Wenn die Batterie oder der Akku mehr als den festgelegten Wert an Blei (Pb), Quecksilber (Hg) und / oder
Cadmium (Cd) beinhaltet als in dereuropäischen Batterierichtlinie deniert ist, werden die chemischen Symbole
für Blei (Pb), Quecksilber (Hg) und / oder Cadmium (Cd) unter dem durchgestrichenen Mülltonnensymbol
angezeigt.Durch Unterstützung der separaten Sammlung von Batterien helfen Sie bei der richtigen Entsorgung
und tragen damit dazu bei, mögliche schädliche Auswirkungen auf Umwelt und Gesundheit zu vermeiden. Für
ausführlichere Informationen über die Sammlung und Recycling-Programme in Ihrem Land, besuchen Sie bitte
unsere Website (www.toshiba.eu/recycling) oder kontaktieren Sie Ihre örtlichen Behörden bzw. erkundigen Sie
sich in dem Geschäft, in dem Sie das Produkt gekauft haben.
Page 68

Deutsch - 21 -
Deutsch
Q & A Sektion
Frage
Antwort
Ton
Warum habe ich kein Bild und
keinen Ton?
Überprüfen Sie, ob das TV-Gerät nicht im Standby-Modus ist.
Überprüfen Sie den Netzstecker und alle Netzverbindungen.
Warum habe ich ein Bild, aber
keinen Ton?
Stellen Sie sicher, dass der Ton nicht heruntergeregelt oder
stummgeschaltet ist.
Warum kommt der Ton nur aus
einem Lautsprecher, wenn Stereoton
ausgewählt ist?
Überprüfen Sie, ob die Option Balance im Menü TON ganz auf
eine Seite geregelt wurde.
Warum ist der Audioton in Englisch,
wenn eine andere Audiosprache
ausgewählt ist?
Dieses Programm wird derzeit nur in Englisch gesendet.
Bild
Was ist schuld an einem schlechten
Bild?
Störungen oder ein schwaches Signal. Versuchen Sie, einen
anderen TV-Sender einzustellen.
Warum wird die Video/DVDWiedergabe nicht am Bildschirm
angezeigt?
Stellen Sie sicher, dass der BLU-ray- oder DVD-Player, wie in den
ersten Kapiteln gezeigt, an das TV-Gerät angeschlossen ist und
wWählen Sie dann den richtigen Eingang durch Drücken von der
Taste SOURCE -
auf der Fernbedienung.
Warum ist das Blu-ray / DVD-Spieler
schwarzweiß?
Stellen Sie sicher, ob der richtige Eingang ausgewält wurde oder
nicht.
Warum sind im PC-Modus
horizontale Streifen und/oder
verschwommene Bilder zu sehen?
Die Phasenlage muss vielleicht eingestellt werden. Wählen Sie
PC-Einstellungen und markieren Sie Phasenlage. Stellen Sie
diese ein, bis das Bild deutlicher wird.
Allgemein
Warum funktioniert die
Fernbedienung nicht?
Prüfen Sie, ob die Batterien leer oder falsch eingelegt sind.
Wieso funktioniert der
Medienbrowser nicht?
Stellen Sie sicher, dass der USB-Stick / HDD korrekt
angeschlossen ist. Bei Verwendung eines USB-Hubs kann es zu
Problemen kommen.
Warum werden keine digitalen
Untertitel angezeigt, obwhl diese
ausgewählt wurden?
Derzeit werden zu diesem Programm keine Untertitel gesendet.
Warum ist der digitale Kanal
gesperrt?
Die Kindersicherung ist aktiviert. Überprüfen Sie die
Jugendschutzeinstellungen.
Warum sind einige verschlüsselte
digitale Kanäle nicht verfügbar?
Sie müssen Ihr Programmabo erneuern. Wenden Sie sich an den
Programmanbieter.
Warum braucht die grüne AktivStandby-LED manchmal länger, bis
sie erlischt?
Wenn das TV-Gerät in den Aktiv-Standby-Modus geschaltet wird,
sucht es automatisch alle verfügbaren Kanäle nach Downloads
ab, wenn die Option Automatischer Download aktiviert wurde. Die
Zeit, die dafür nötig ist, kann variieren. Led blinkt rot als auch grün
in diesem Modus.
Warum funktionieren die Tasten am
TV-Gerät nicht?
Stellen Sie sicher, ob die TASTENSPERRE aktiviert ist oder nicht.
Was ist DVB-T? Digital-Video-Übertragung über eine Antenne.
Was ist DVB-C? Digitale Videoausstrahlung über ein Kabelsystem.
Wie kann ich Radiokanäle
auswählen?
Sie können diese über die Kanalliste auswählen.
Was kann ich tun, wenn ich den PIN
vergessen habe?
Sie können das TV-Gerät zurücksetzen und die Erstinstallation
nochmals Durchführen.Stellen Sie sicher, dass niemandem sonst
dieser Vorgang bewusst ist, bei der sicheren Speicherung der
Bedienungsanleitung.
Wenn Sie aufgefordert werden, zur Durchführung der Erstinstallation
die PIN einzugeben, wenden Sie sich an Ihren Fachhändler
Page 69

Deutsch - 22 -
Deutsch
REACH-Informationen
Die Europäische Union (EU) Chemikalienverordnung, REACH (Registrierung, Auswertung,
Zulassung und Beschränkung von Chemikalien), am 1. Juni 2007 in Kraft getreten, mit gestaffelten
Fristen bis 2018.
Toshiba wird alle REACH-Anforderungen erfüllen und ist gemäß der REACH-Verordnung
verpichtet, unseren Kunden Informationen über die Präsenz von Stoffen in unseren Artikeln auf
der Kandidatenliste, zu liefern.
Bitte konsultieren Sie die folgende Website www.toshiba.eu/reach für Informationen über die
Präsenz von Substanzen in unseren Artikeln auf der Kandidatenliste, in einer Konzentration von
mehr als 0.1 % Gewicht, gemäß REACH.
EU-Konformitätserklärung
Dieses Produkt trägt das CE-Kennzeichen in Übereinstimmung mit den entsprechenden europäischen
Richtlinien.
Verantwortlich für die CE-Kennzeichnung ist TOSHIBA, 23 Davy Road, Plymouth, PL6 8BY UK.
Dieses Produkt ist mit dem CE-Kennzeichen in Übereinstimmung mit den entsprechenden europäischen
Richtlinien, insbesondere Niederspannungsrichtlinie 2006/95/EC, Richtlinie zur elektromagnetischen
Verträglichkeit 2004/108/EC und RoHS-Richtlinie 2011/65/EU beschriftet. Darüber hinaus entspricht das
Produkt der Ökodesign-Richtlinie 2005/32/EC (EuP) und 2009/125/EC (ErP) und die damit verbundenen
Umsetzungsmaßnahmen.
©TOSHIBA 2014
Alle Rechte vorbehalten.
Eine Vervielfältigung im Ganzen oder teilweise ohne schriftliche Genehmigung ist strengstens
untersagt.
TOSHIBA
23 Davy Road, Plymouth Devon, PL6 8BY, England.
Dieses Gerät entspricht den Anforderungen der Technischen Verordnung über die Beschränkung der
Verwendung bestimmter gefährlicher Stoffe in Elektro-und Elektronikgeräten.
Page 70

GUÍA DE INICIO RÁPIDO
24D153*DG / 24W153*DG
Televisor LCD con retroiluminación LED
Este documento pretende ofrecerle una descripción general de su
televisor Toshiba.
A lo largo de la vida útil del televisor habrá disponibilidad de una serie
de actualizaciones que garantizan un funcionamiento óptimo del
mismo. Podrá descargar la última versión del rmware desde
www.toshiba-om.net/rmware.php
Algunas de las funciones descritas en este documento pueden verse
limitadas por la legislación local, y podrían no estar disponibles en
todos los países.
Si desea ver el manual de uso avanzado del televisor Toshiba,
encontrarlo visitando:
www.toshiba-om.net
“Registre su televisor en línea en: www.toshiba-europe.com/registration”
En Toshiba creemos que la iniciativa de poner las funciones avanzadas a disposición
del usuario a través de la web ayuda a salvar más de 100.000 árboles al año
(6.5 Millones de kg de Co2).
Si desea ver las funciones avanzadas, pero no tiene acceso a un ordenador ni a
Internet, le rogamos que nos contacte al teléfono del servicio directo más cercano (de
los que se muestran al final de este manual).
Page 71

Contenido
Español
Contenido
Español - 2 -
Español
Precauciones de seguridad .................................... 3
Circulación del aire ............................................. 3
Daños por sobrecalentamiento ........................... 3
Fuentes de alimentación..................................... 3
Advertencia ......................................................... 3
Debe ................................................................... 3
No Debe.............................................................. 3
Instalación e información importante ...................... 4
CLAUSULA DE EXCLUSION ............................. 4
Información importante sobre la seguridad ............ 5
Fijación o extracción del soporte ............................ 6
El mando a distancia (TV - DVD) ........................... 7
Colación de las pilas y rango de funcionamiento
del mando a distancia ......................................... 7
Conexión de un equipo externo.............................. 8
Conexión de un dispositivo HDMI
®
o DVI a la
Entrada HDMI ......................................................... 9
Conexión a un dispositivo HDMI......................... 9
Conexión a un dispositivo DVI ............................ 9
Conexión a un ordenador ..................................... 10
Conexión a un ordenador ................................. 10
Para conectar una memoria Flash USB ........... 10
Control del TV ........................................................11
Puesta en marcha..............................................11
Uso del mando a distancia ................................11
Uso de los controles y conexiones del televisor 11
Instalación Inicial .................................................. 12
Modo DVD ............................................................ 14
Manejo de los Discos........................................ 14
Limpieza de los discos...................................... 14
DVD - Funciones .............................................. 14
DVD - Botones de control en el televisor .......... 14
Cómo Ver un DVD ............................................ 15
Notas sobre la Reproducción de DVD .............. 15
Conguración del Modo DVD ........................... 16
Preferencias...................................................... 16
La calidad de imagen DVD es mala ................. 17
Apéndice A: Formatos de Ficheros Admitidos en
Modo DVD ............................................................ 18
Apéndice B: Tipos de disco compatibles .............. 18
Características técnicas y Accesorios .................. 20
Información sobre Licencias ................................. 21
Preguntas y Respuestas ...................................... 22
Page 72

Español - 3 -
Español
Precauciones de seguridad
Este equipo se ha diseñado y fabricado cumpliendo las normas de seguridad internacionales pero, como en cualquier
equipo eléctrico, se debe tener el cuidado para garantizar un funcionamiento seguro y la obtención del mejor resultado. Lea
detenidamente los puntos que se indican a continuación para su seguridad. Son puntos generales, redactados para brindar
asistencia con todos los productos electrónicos de consumo.
Circulación del aire
Le recomendamos que deje un espacio libre de más de 10 cm
alrededor del televisor para una correcta ventilación. Con ello
evitará el sobrecalentamiento del televisor y posibles daños
al mismo. También deberá evitar los sitios con mucho polvo.
Daños por sobrecalentamiento
Si deja el televisor expuesto a la luz directa del sol o cerca
de fuentes de calor pueden dañarlo. Evite los sitios expues-
tos a altas temperaturas o humedad, o lugares donde la
temperatura pueda descender por debajo de los 5°C (41°F).
Fuentes de alimentación
Utilice el receptor solo con tomas de energía de CA a 220240 V de, 50 Hz. Asegúrese de que el televisor o su soporte
no estén situados sobre el cable de alimentación. NO CORTE NUNCA el cable de corriente del aparato, puesto que
incorpora un ltro especial de radio interferencias que, de
eliminarse, impediría su funcionamiento correcto. Solo debe
sustituirse por uno del tipo correcto y homologado. SI LE
SURGE ALGUNA DUDA, PÓNGASE EN CONTACTO CON
UN TÉCNICO ELECTRICISTA COMPETENTE.
Advertencia
Para evitar la propagación de fuego, mantenga siempre lejos
de este producto velas u otro tipo de llamas
Debe
DEBE leer detenidamente el manual de instrucciones antes
de poner en marcha el aparato.
DEBE asegurarse de que las conexiones eléctricas (cable
de alimentación, alargadores e interconexiones entre las
piezas del equipo incluidas) estén correctamente realizadas
siguiendo las instrucciones de los fabricantes. Antes de
proceder a la modicación de cualquier conexión, apague
el televisor y desenchúfelo de la corriente.
DEBE Contactar con su distribuidor si le surge alguna duda
sobre la instalación, el funcionamiento o la seguridad del
aparato.
DEBE tener cuidado con los paneles de cristal o las puertas
situados cerca del aparato.
No Debe
NO DEBE retirar ninguna cubierta ja ya que se podría
exponer a voltajes peligrosos.
NO DEBE obstruir las aberturas de ventilación del equipo
con objetos como periódicos, manteles, cortinas, etc. El
sobrecalentamiento dañará el aparato.
NO DEBE permitir que los equipos eléctricos se expongan a
gotas o salpicaduras u objetos llenos de líquidos.
NO DEBE situar objetos calientes o fuentes de llama viva,
como por ejemplo velas encendidas o lamparillas, encima o
cerca del aparato. Las altas temperaturas pueden fundir el
plástico y provocar un incendio.
NO UTILICE soportes inestables y utilice los tornillos de la
base suministrados por el fabricante.
NO DEBE dejar el aparato encendido cuando no esté cerca
de él, a menos que se indique de forma especíca que está
diseñado para su funcionamiento sin vigilancia o disponga
de un sistema de modo en espera. Apague el televisor
desenchufando el cable de alimentación y asegúrese de
que los miembros de su familia sepan hacerlo. Debe tomar
precauciones especiales para las personas discapacitadas
o enfermas.
NO DEBE seguir usando el aparato si le surge alguna duda
de su funcionamiento correcto o si sospecha que pueda
tener alguna avería, apáguelo, desenchúfelo y póngase en
contacto con su distribuidor.
ATENCIÓN Un volumen excesivo en los auriculares podrían
provocar problemas de pérdida de audición.
MUY IMPORTANTE - NO DEBE dejar que nadie, especialmente los niños, introduzcan ningún objeto por los agujeros, las ranuras o por cualquier apertura de la carcasa.
NUNCA se la juegue o corra riesgos con equipos eléctricos de ningún tipo. Es mejor prevenir que lamentar.
EL CABLE DE ALIMENTACIÓN SE UTILIZA PARA DESENCHUFAR COMPLETAMENTE EL TELEVISOR Y, POR
LO TANTO, DEBE TENER UN ACCESO FÁCIL.
Nota: Es posible que aquellos vídeojuegos que puedan
suponer el uso de un mando de tipo “pistola” para objetivos
en la pantalla no funcionen correctamente en este televisor.
Las ilustraciones y menús en pantalla de este
manual sólo tienen fines explicativos; pueden
variar ligeramente con respecto a las funciones
reales.
Page 73

Español - 4 -
Español
Instalación e información importante
Dónde instalar el televisor
* El tipo y la base del
soporte dependen del
modelo.
Coloque el televisor lejos de la luz solar directa y de luces
fuertes. Para una visión más cómoda, se recomienda una luz
suave e indirecta. Utilice cortinas o persianas para evitar el
contacto directo de la pantalla con la luz solar.
Siempre coloque el televisor sobre una supercie robusta,
nivelada y estable que pueda soportar toda la supercie
inferior del soporte y el peso de la unidad mediante el siguiente método para jar el televisor a una pared con un nudo
resistente en la parte posterior del soporte.
Los paneles de visualización LCD se fabrican utilizando una
tecnología de precisión de nivel extremadamente alto. No
obstante, puede ocurrir que ciertas piezas del televisor pierdan
elementos de imagen o se vean afectadas por caracteres
luminosos. Esto no es un signo de funcionamiento erróneo.
Asegúrese de que el televisor esté colocado de manera tal
que no pueda ser empujado o golpeado por objetos ya que
la presión podría ocasionar el rompimiento o daño de la
pantalla. Asegúrese también de que ningún objeto pequeño
se pueda insertar por las ranuras o aberturas de la carcasa.
Evite utilizar productos químicos, como ambientadores
o limpiadores u otros, en o cerca del soporte
del televisor. Estudios indican que los plásticos
pueden debilitarse y agrietarse con el tiempo, debido a la
combinación de dichos químicos con la presión mecánica
como por ejemplo, el peso del propio televisor. El no seguir
estas instrucciones podría causar heridas graves y/o daños
permanentes al televisor y su soporte.
Limpieza de la pantalla y la carcasa del televisor...
Apague el equipo y limpie la pantalla y la carcasa con un paño
seco y suave. Le recomendamos que no utilice pulimentos
ni disolventes para la limpieza de la pantalla y de la carcasa,
puesto que podría dañarlos.
Tenga en cuenta lo siguiente
La función de recepción de televisión digital de este televisor sólo funciona en aquellos países que guran en
el apartado "País" del menú de la instalación inicial. Dependiendo del país o zona, algunas de las funciones
de este televisor pueden no estar disponibles. Recepción de servicios futuros adicionales o modicados que
no se pueden garantizar con este televisor.
Si las imágenes jas generadas por emisiones 4:3, servicios de texto, logotipos de canales, pantallas de
ordenador, juegos de vídeo, menús en pantalla, etc., se dejan a la izquierda de la pantalla del televisor por
mucho tiempo, podría llegar a ser visibles. Siempre es recomendable reducir tanto el brillo como el contraste.
El uso continuo y prolongado de la imagen 4:3 en una pantalla 16:9 puede dar lugar a cierta retención de la
imagen en los contornos 4:3. Esto no representa ningún defecto del TV LCD, ni está cubierto por la garantía
del fabricante. El uso habitual de otros tamaños de imagen evitará esta retención permanente.
CLAUSULA DE EXCLUSION
Toshiba declina toda responsabilidad por pérdida y/o daños al aparato producidos bajo las siguientes circunstancias:
i) incendio;
ii) terremoto;
iii) daños fortuitos;
iv) mal uso intencionado del producto;
v) uso del producto en condiciones indebidas;
vi) daños y/o perjuicios provocados al producto cuando éste se encuentre en posesión de terceros
vii) cualquier daño o perjuicio provocado por el propietario del aparato y/o el no cumplimiento de las instrucciones detalladas
en este manual;
viii) cualquier daño o pérdida provocados directamente como resultado de un mal uso o mal funcionamiento del producto
si se utiliza simultáneamente con otros equipos,
Además, Toshiba declina toda responsabilidad por cualquier perjuicio y/o daño que se produjera como consecuencia de los
casos siguientes, que incluyen, pero que no se limitan a: pérdida de benecios, interrupción del negocio, pérdida de datos
almacenados ya sean provocados durante el funcionamiento normal como durante un mal uso del producto.
Page 74

Español - 5 -
Español
Información importante sobre la seguridad
• Cualquier otra función relativa a la televisión digital (con el logotipo DVB) solo está disponible en el país
o área donde se emita la señal. Compruebe con el personal de ventas si es posible recibir señal digital
DVB - T/C en el área donde vive.
• La compatibilidad para el futuro de las transmisiones digitales DVB - T/C no está garantizada, aun cuando
el televisor se ajuste a las especicaciones de DVB - T/C.
• Algunas funciones de televisión digital podrían no estar disponibles en algunos países.
• El sistema DVB - T/C actual de este dispositivo permite tanto los canales FTA (Free To Air - analógico)
como canales de paga.
• Nota; los canales codicados requieren un sistema de codicación especíco para ver, lo que puede no
estar disponible en algunos países.
• DVB es una marca registrada del proyecto DVB. El logotipo DVB indica que el aparato cumple con las
Emisiones Digitales Europeas.
• DVB T es Digital Video Broadcast (Transmisión de Video Digital) a través de un sistema de antena aérea
o por aire.
• DVB C es Digital Video Broadcast (Transmisión de Video Digital) a través de un sistema de cable.
INFORMACIÓN IMPORTANTE
Instalación del televisor
• No coloque el televisor sobre manteles o paños, o cualquier otro material entre el televisor y el mueble.
• Enseñe a los niños los peligros de subirse al mueble para tocar el televisor y sus controles.
• Cuando desenchufe el aparato, agarre siempre la clavija del enchufe. No lo haga tirando del cable. El cable
podría dañarse y provocar un cortocircuito.
• Use un paño suave y seco para limpiar el aparato.
• Coloque el aparato de tal forma que nadie tropiece con el cable.
• En caso de querer instalar el aparato en la pared, contacte con el establecimiento donde lo adquirió para
obtener ayuda; deje la instalación en manos de profesionales. Una instalación incorrecta puede provocar
daños y/o lesiones.
• Para proteger la unidad durante una tormenta eléctrica, desconecte el cable de alimentación de CA y
desconecte la antena aérea, sistemas/decodicadores de cable, satélite, etc.
Precaución: No toque la conexión de la antena.
• El aparato se calienta durante su funcionamiento. No coloque ninguna cubierta ni mantel sobre el aparato;
así evitará cualquier sobrecalentamiento.
• No debe bloquear las ranuras de ventilación. No coloque el aparato cerca de ningún radiador. No lo exponga
a la luz solar directa.
• La condensación de humedad se produce en las situaciones siguientes:
- Cuando se mueve el aparato desde un lugar frío a uno cálido.
- Cuando el aparato se utiliza en una habitación donde se acaba de encender la calefacción.
- Cuando el aparato se utiliza en una zona donde le llegue directamente el aire frío de un acondicionador de aire.
- Cuando el aparato se utiliza en un entorno húmedo.
• No utilice el aparato nunca, en caso de que pueda darse condensación de humedad.
• El uso del aparato cuando hay condensación de humedad puede dañar sus propias partes y discos internos.
Espere dos o tres horas, a que el aparato se caliente y se evapore la humedad antes de encenderlo.
Page 75

Español - 6 -
Español
Fijación o extracción del soporte
Fijación o extracción del soporte
(1) Coloque con cuidado la parte frontal del televisor boca abajo sobre una supercie plana y acolchada, con
el soporte sobresaliendo.
(2) Utilice los tornillos suministrados para jar el pie.
o
(3) Extraiga los tornillos que sujetan el soporte.
(4) Después de retirar los tornillos, mantenga el televisor y extraiga el soporte aplicando presión hacia el
exterior y tire de la TV para quitar el soporte.
Nota: Tenga mucho cuidado cuando saque el pie de soporte, con el n de evitar cualquier daño al panel LCD.
Para el modelo 24D153*DG / 24W153*DG
Cuando se utilice un soporte de pared
Utilice siempre un soporte de pared adecuado al tamaño y al peso del televisor LCD. La instalación deberán
real izarla entre dos personas.
(1) Desconecte y retire todos los cables y/ú otros componentes conectores de la parte trasera del televisor.
(2) Coloque con cuidado la parte frontal del televisor boca abajo sobre una supercie plana y acolchada,
como por ejemplo un edredón o una manta.
(3) Siga las instrucciones incluidas con el soporte de pared. Antes de continuar, asegúrese de haber montado
el soporte adecuado en la pared y en la parte trasera del televisor, tal como se describe en las instrucciones
incluidas con el soporte de pared.
Page 76

Español - 7 -
Español
El mando a distancia (TV - DVD)
Un rápido vistazo al mando a distancia.
(*) MI BOTÓN 1 y MI BOTÓN 2:
En función del modelo, estos botones tendrán funciones predenidas. Sin
embargo, podría jar una función especial para los mismos, pulsándolos
durante 5 segundos cuando esté en una fuente o canal determinados. Se
mostrará la siguiente información en pantalla. Esto conrma que el botón
seleccionado como MI BOTÓN estaría asociado a la función elegida.
Tenga en cuenta que MI BOTÓN 1&2 volverá a su función predeterminada
si realiza de nuevo la instalación inicial.
1. Modo en espera
Modo en espera
2. Teclas numéricas
Teclas numéricas
3. TV-AV / Lista de canales / Alterna
entre los diversos tipos de señal
4. Silencio
Silencio
5. Volumen arriba/abajo
Volumen arriba/abajo
6. Menu
Encendido-apagado del Menú
7. Teclas de desplazamiento
( , , , )
Teclas de desplazamiento
8. Ok (Conrmar) / Lista de Canales
/ Detener Avance (en modo TXT)
OK
9. Volver / Página Índice (en modo
TXT)
10. Explorador multimedia
Ángulo
11. Información / Mostrar (en modo
TXT)
Hora
12. Mi Botón 1(*)
Muestra tiempo / menú de DVD
13. Botones de colores
Botón rojo - Acercamiento
Botón verde - Repetir
Botón amarillo - Menú raíz
Botón azul - Título
14. Mono/Estéreo - Dual I-II/Idioma
Actual
(en canales DVB)
Selección de idioma
15. Reversa rápida
Reversa rápida
16. Sin función
17. Pausa
Pausa
18. Reproducir
Reproducir
19. Detener
Detener
20. Avance rápido
Avance rápido
21. Subtítulos
Subtítulos activadosdesactivados (en el modo
de Explorador multimedia y
canales DVB)
22. Tamaño de la imagen
Tamaño de la imagen
23. Mi Botón 2 (*)
Modo de búsqueda
24. Teletexto / Mezclar (en modo
TXT)
25. Guía de Programación
Electrónica (en canales DVB)
26. Salir
Salir
27. Menú rápido
28. Canal abajo /
RePág -
Canal arriba / AvPág
29. Canal anterior
30. AV / Selección de fuente
Selección de fuente
Nota: Las referencias en negrita
son para los modelos con DVD.
Colación de las pilas y rango de funcionamiento del mando a distancia
Abra la tapa del compartimiento para pilas situado en la parte trasera del
mando a distancia y asegúrese de introducir las pilas respetando las polaridades. Las pilas adecuadas para este mando a distancia son las siguientes:
IEC R03, AAA de 1.5 V.
Nunca combine pilas nuevas con pilas usadas, ni mezcle tipos de pilas. Quite
las pilas usadas inmediatamente para evitar la salida de ácido dentro del
compartimiento para pilas. Deséchelas en un punto de recogida selectiva
de residuos.
Advertencia: Nunca exponga las pilas a una fuente de calor excesiva como
por ejemplo la luz solar, el fuego o similares.
El funcionamiento del mando a distancia perderá ecacia a partir de una
distancia de 5 metros o fuera de un ángulo de 30 grados desde el receptor
de infrarrojos. Si el mando pierde ecacia, deberá sustituir las pilas.
1.
2.
3.
Page 77

Español - 8 -
Español
Conexión de un equipo externo
Desenchufe el aparato de la corriente antes de conectar ningún dispositivo externo.
(*) El número de entradas podrá variar en función del modelo de su televisor.
Ponga todos los dispositivos conectados en el modo de
espera antes de realizar la instalación inicial.
Cable de antena:...........................................................
Conecte el cable de antena a la toma situada en la parte
trasera del televisor.
Cable de Euroconector:.............................................
Es esencial que conecte un cable euroconector al televisor,
en caso de que esté utilizando un decodicador* o un
grabador multimedia.
La toma de SONIDO DIGITAL permite la conexión de un
adecuado sistema de sonido envolvente.
HDMI
®
(Interfaz Multimedia de Alta Definición) Sirve
para usar con un decodicador DVD u otro equipo con
salida de audio/vídeo digital. Está diseñado para un mejor
funcionamiento con señales 1080i o 1080p, también admite
VGA, 480i, 480p, 576i, 576p y 720p. También muestra señal
de PC.
Nota: A pesar de que el televisor admite la conexión de
equipos HDMI, es posible que algunos equipos no funcionen
correctamente.
Si desea habilitar la señal YPbPr en la entrada VGA, utilice
un cable YPbPr a VGA (no incluido).
Nota: No podrá utilizar a la vez las opciones YPbPr y VGA.
Se puede conectar una amplia variedad de equipos externos
al TV; por tanto, se debe consultar el manual del usuario
correspondiente a todos los equipos adicionales para obtener
las instrucciones exactas.
Si el TVcambia automáticamente al equipo externo, podrá
regresar a la visualización de la televisiónpulsando el botón
del canal que desee ver. Para recuperar un equipo externo,
pulse el botón “SOURCE -
” repetidamente para cambiar
entre las fuentes.
Independientemente de las propiedades de la fuente, no se
podrá copiar la señal de sonido desde la toma de SONIDO
DIGITAL.
Page 78

Español - 9 -
Español
Conexión de un dispositivo HDMI® o DVI a la Entrada HDMI
La entrada HDMI del televisor recibe señales de sonido y
vídeo digital sin comprimir desde un dispositivo de fuente
HDMI, o de vídeo digital sin comprimir desde un dispositivo de
fuente DVI (Digital Visual Interface, o Interfaz Visual Digital).
Estas entrada están diseñadas para admitir señales HDCP
(High-Bandwidth Digital Content Protection, o de Protección
de Contenidos Digitales de Banda Ancha) en formato digital
dispositivos de electrónicos que cumplen con la norma EIA/
CEA-861-D, como por ejemplo receptores o reproductores
de DVD con salida HDMI o DVI.
NOTA:
• Algunos de los primeros equipos HDMI podría no funcionar
correctamente con su televisor HDMI más actualizado.
• Formatos de Audio admitidos: PCM lineal, tasa de muestreo
32/44.1/48kHz.
Conexión a un dispositivo HDMI
Conecte un cable HDMI (conector tipo A) al puerto correspondiente HDMI. Para un funcionamiento correcto, recomendamos que utilice un cable HDMI que tenga el correspondiente
logotipo ( ).
• Si su conexión HDMI es capaz de 1080p y/o su televisor es
capaz de velocidades de actualización superiores a 50 Hz,
necesita un cable de Categoría 2. En este modo, un cable
HDMI/DVI convencional podría no funcionar correctamente.
• El cable HDMI transmite tanto vídeo como sonido. No se
necesitan cables de audio analógicos por separado (Ver
ilustración).
• Para ver el vídeo del dispositivo HDMI, pulse el
botón
“SOURCE - ” para seleccionar la entrada
HDMI apropiada.
(*) El número de
entradas podría
variar en función
del modelo.
Conexión a un dispositivo DVI
Conecte un cable de HDMI a DVI (conector HDMI tipo A) a la
toma de entrada HDMI y con el cable de audio a las entradas
de audio (lateral) (vea la ilustración).
• La longitud máxima recomendada para el cable es de 6.6
ft (2 metros).
• Un HDMI-a-DVI solo transmite señales de vídeo. Se
necesitan cables de audio analógicos por separado.
(*) El número
de entradas
podría variar
en función del
modelo.
NOTA:
Para garantizar que el dispositivo HDMI o DVI se reinicien
correctamente, se recomienda que siga estos pasos:
• Al encender los aparatos electrónicos, encienda primero el
televisor, y después el dispositivo HDMI o DVI.
• Al apagar los componentes electrónicos, apague éstos en
primer lugar y después el televisor.
Page 79

Español - 10 -
Español
Conexión a un ordenador
Conexión a un ordenador
Podrá ver la pantalla de su ordenador y escuchar el sonido
del mismo por los altavoces del televisor, gracias a un cable
de conexión RGB/PC o HDMI.
Al conectar un PC a la entrada RGB / PC en el televisor, utilice
un cable RGB analógico (15-pin) computadora y utilice las
ENTRADAS DE AUDIO (lateral) con un cable de audio PC
(no incluido) para la conexión de audio (vea la ilustración).
Para utilizar un PC, ajuste la resolución de salida del monitor del PC antes de conectarlo al televisor. Para mostrar la
imagen óptima, utilice la función de ajuste de imagen PC.
NOTA:
• Algunos modelos de PC no se pueden conectar a este
televisor. No es necesario un adaptador para equipos con
un terminal compatible con mini D-Sub15-pin.
• Según el título del DVD y las especicaciones del PC en
el que se reproduce el DVD-Vídeo, algunas escenas se
pueden omitir o puede no ser capaz de hacer una pausa
durante las escenas multiángulo.
Conexión de una memoria
USB
Para conectar una memoria Flash USB
• Mediante las entradas USB del televisor podrá conectar
un disco de memoria ash a su televisor. Esta función le
permite visualizar/reproducir cheros de música, fotografía
o vídeo almacenados en una memoria USB.
• Es posible que algunos dispositivos USB (reproductores
MP3, por ejemplo) no sean compatibles con el televisor.
• A n de evitar cualquier pérdida de información o datos,
puede realizar una copia de seguridad de los cheros antes
de realizar cualquier conexión con el televisor. Tenga en
cuenta que el fabricante no se hace responsable de los
daños o pérdidas de cheros, archivos, datos o información.
• No extraiga el dispositivo USB mientras esté reproduciendo
un archivo.
Precaución: El dispositivo USB se puede averiar si lo conecta
y desconecta rápidamente.
Page 80

Español - 11 -
Español
Control del TV
A través de las tomas de la parte trasera y de los laterales del televisor, podrá conectar una amplia gama
de equipos externos. Aunque todos los ajustes necesarios y el control del funcionamiento del televisor se
realicen mediante la rueda del menú del mando a distancia los botones situados en la parte izquierda del
televisor también pueden utilizarse para realizar algunas funciones.
Puesta en marcha
Si el LED del modo de espera está apagado, verique que
el enchufe está conectado a la red eléctrica
/ I y pulse
el botón en el lado izquierdo del televisor o en el mando a
distancia para encenderlo.
Para poner el televisor en el modo de espera, pulse
en el
mando a distancia o pulse y sostenga el centro del botón
en el lado izquierdo del televisor. Para ver la televisión, pulse
de nuevo. La imagen puede tardar unos minutos en aparecer.
Nota: El LED activo del modo de espera se encenderá en
color rojo en unos instantes al poner el televisor en modo
de espera.
Para el modo de Ahorro energético:
El apagado total del televisor, o si lo desenchufa, reducirá el
consumo prácticamente a cero en todos los televisores. Esto
es recomendable cuando no se utilice el aparato por periodos
largos de tiempo, por ejemplo, durante unas vacaciones.
Reduciendo el brillo de la pantalla disminuirá el consumo
energético.
Nota: Poner el televisor en modo de espera reducirá el
consumo, aunque aún se gastará algo de energía.
Uso del mando a distancia
Para acceder a los menús, pulse el botón MENU del mando
a distancia.
El menú principal se mostrará con grupos de iconos, un grupo
para cada opción del menú. Pulse el botón de dirección hacia
la Derecha o hacia la Izquierda para seleccionar el tema.
En pantalla, el submenú aparecerá en forma de lista de
opciones. Pulse el botón de dirección hacia Arriba o Abajo
para seleccionar el tema.
Para utilizar las opciones, pulse los botones de Arriba y Abajo
del mando a distancia para desplazarse hacia arriba y hacia
abajo a través de ellos y OK y los botones a la Izquierda
o Derecha para seleccionar la opción requerida. Siga las
instrucciones que le aparecerán en pantalla.
Uso de los controles y conexiones del
televisor
Uso de los botones laterales del televisor:
Para cambiar el volumen:
Pulse el botón central hasta
visualizar el menú de volumen. Aumente el volumen
pulsando el botón arriba. Baje el volumen pulsando el
botón abajo.
Para cambiar el canal: Pulse el botón central hasta
visualizar la barra de información del canal. Desplácese
por los canales almacenados pulsando el botón arriba o
abajo.
Para cambiar de fuente: Pulse el botón central hasta
visualizar la lista de fuentes. Desplácese por las fuentes
disponibles pulsando el botón arriba o abajo.
Para obtener más detalles, consulte siempre el manual de
instrucciones del equipo que quiera conectar.
Apagado del Televisor: Si aprieta en el centro del botón
abajo y lo mantiene pulsado unos segundos, el televisor
pasará al modo de espera.
Page 81

Español - 12 -
Español
Instalación Inicial
Antes de encender el televisor, coloque el decodicador y el grabador de medios en modo de Espera si están
conectados, y asegúrese de que la antena/cable esté bien conectada al televisor. Para congurar el televisor,
utilice los botones del mando a distancia tal y como se describe en la página El mando a distancia.
IMPORTANTE: Asegúrese de que la antena/cable esté
conectado y que no haya ningún módulo de Interfaz
Común insertado antes de encender el televisor para la
instalación inicial.
1. Conecte el enchufe de alimentación, mantenga
pulsado el centro de la rueda del menú en la parte
izquierda de la TV para encender el televisor. Si
el televisor no se enciende, pulse cualquier tecla
numérica o
botón en el mando a distancia; a
continuación aparecerá en la pantalla el menú de
selección de idioma. Esta ventana le aparecerá
la primera vez que ponga en marcha el televisor
y cada vez que reinicie el televisor.
2. Con los botones Arriba o Abajo, marque el
idioma que desea y pulse OK. En la pantalla se
mostrará lo siguiente:
3. Pulse los botones Derecho o Izquierdo para
eligir el país que desee; pulse el botón Abajo
para marcar la opción de Tipo de Búsqueda.
Utilice las teclas Izq. o Der. para ajustar el modo
de búsqueda que preera. Los tipos de búsqueda
disponibles son Solo Digital, Solo Televisión
Analógica y completa.
4. Una vez seleccionado pulse el botón, Abajo
para seleccionar la opción de Idioma del
Teletexto. Pulse el botón Izquierdo o Derecho
para seleccionar la región deseada del idioma.
Seleccione Escanear Canales Codicados y
active/desactive esta opción usando los botones
Izquierdo o Derecho. Pulse OK para continuar.
Nota: En función del País seleccionado, se le pedirá un PIN
que deberá conrmar en este punto. Dicho PIN no podrá
ser 0000. Lo deberá introducir más tarde, en caso de que
se le solicite para realizar cualquier operación en los menús.
5. Se mostrará la siguiente información en pantalla:
Seleccione el modo Tienda si el televisor
se coloca en una tienda para exhibir. Esta
opción congurará los ajustes de su TV para la
mejor calidad de pantalla y las características
compatibles de la TV se mostrarán en la
parte superior de la pantalla como una barra
de información. Se mostrará una pantalla de
conrmación en caso de seleccionar el Modo
Tienda. Seleccione Sí para seguir. Para el uso
en el hogar seleccione el modo Hogar.
Esta opción estará disponible en el menú Otros
ajustes y se puede apagar o encender después.
6. Pulse OK en el mando a distancia para seguir, y
se mostrará el siguiente mensaje:
7. Seleccione Si, con los botones Izq. o dch. Y
pulse OK para continuar. Después, se mostrará
la siguiente información en pantalla:
8. Si selecciona la opción Cable se mostrará
una pantalla de conrmación. Si desea buscar
las cadenas disponibles, seleccione Sí para
continuar. La siguiente pantalla mostrará lo
siguiente:
Page 82

Español - 13 -
Español
Instalación Inicial-continuación
Puede seleccionar Red, Frecuencia, ID de
red y Paso de búsqueda desde esta pantalla.
Para marcar las líneas que quiera, utilice los
botones Arriba o Abajo. Puede seleccionar
Paso de búsqueda como 8000 kHz o 1000
kHz. Si selecciona la opción de incrementos de
1000 Khz., el proceso de búsqueda que llevará
a cabo el televisor será más detallado. El tiempo
de búsqueda se alargará correspondientemente.
Una vez terminado, pulse OK para iniciar la
búsqueda automática.
Si selecciona NO, se mostrará la imagen
siguiente:
Puede establecer Frecuencias de Inicio-Fin
y de Paso de búsqueda si lo desea. Una vez
terminado, pulse OK para iniciar la búsqueda.
9. Si selecciona la opción Aérea desde la pantalla
Tipo de búsqueda, se mostrará un mensaje de
conrmación. Si desea continuar con la búsqueda
seleccione Sí, el televisor buscará emisiones
disponibles. Seleccione No para salir.
10. Aparecerá la ventana de sintonización automática
y el televisor empezará a buscar todos los canales
disponibles. La barra de progreso se desplazará
por la línea. Deberá esperar a que el televisor
termine la búsqueda.
Nota: Puede pulsar el botón MENU para cancelar la
operación.
Se mostrará un mensaje, durante la búsqueda, preguntándole
si desea ordenar los canales según el LCN(*). Seleccione la
opción Sí y pulse OK para conrmar.
(*) LCN es el Número de canal lógico que organiza
transmisiones disponibles de acuerdo con una secuencia
de canales reconocibles (si está disponible).
Después de las estaciones disponibles se almacenan,
Editar lista de canales se mostrará en la pantalla.
Pulse MENU para salir de la lista de canales y ver
la televisión.
Nota: No apague el televisor mientras realice la instalación
inicial.
Page 83

Español - 14 -
Español
Modo DVD
Si el televisor tiene DVD integrado. Las instrucciones siguientes son para aprender el manejo correcto del
DVD integrado.
• Advertencia: Riesgo de exposición a
radiaciones de láser visibles e invisibles clase 1 y
clase 3b. No vea hacia el haz de luz.
PRODUCTO
LÁSER CLASE 1
Manejo de los Discos
• Sujete los discos por los bordes con el fin de
mantenerlos limpios. No toque la supercie.
• No pegue papel ni cintas o etiquetas adhesivas
sobre los discos.
• Retire cualquier resto de suciedad del disco
(pegamento, etc.) antes de utilizarlo.
• No exponga el disco a la luz solar o fuentes directas
de calor, como conductos de aire caliente, ni lo deje
en un automóvil estacionado en el sol, ya que la
temperatura puede elevarse rápidamente y dañar
el disco.
• Guarde los discos en los estuches protectores
después de utilizarlos.
Limpieza de los discos
• Antes de reproducir los discos, límpielos con un
paño limpio. Limpie los discos en línea recta desde
el centro hacia los bordes.
• No utilice disolventes como bencina, disolventes
de limpieza disponibles en el mercado ni aerosoles
antiestáticos para discos de vinilo.
DVD - Funciones
• Reproducción de DVD/CD/CD-R/CD-RW/MP3/
JPEG/MPEG.
• Reproducción en NTSC/PAL (según el contenido
del disco)
• Salidas de sonido LPCM por vía coaxial y óptica
digital (opcional).
• Múltiples formatos (hasta 8) (según el contenido
del disco).
• Subtítulos Múltiples (hasta 32) (según el contenido
del disco).
• Múltiples ángulos (hasta 9) (según tipo de disco).
• Control paterno en 8 niveles.
• Avance y retroceso rápido en 5 diferentes velocidades:
2x, 4x, 8x, 16x, 32x.
• Reproducción a cámara lenta en 4 diferentes
velocidades. 1/2x, 1/4x, 1/8x, 1/16x de avance.
• Avance cuadro por cuadro.
• Modo Buscar.
• Repetir.
• Salida coaxial de sonido (opcional)
• Los discos copiados pueden ser incompatibles.
DVD - Botones de control en el televisor
1. Cargador de Discos.
2. Reproducir / Pausa (
/ ) botón
Reproduce o pausa la reproducción del disco.
Con el menú raíz del DVD (DVD root menu) en
pantalla, este botón se utiliza como “botón de
selección” si el disco lo admite (selecciona el
elemento resaltado en el menú).
3. Detener / Sacar (
/ ) botón
Detiene la reproducción del disco / Expulsa o
carga el disco.
NOTA: No se puede expulsar el disco con el mando a
distancia. Para expulsar el disco durante la reproducción,
deberá pulsar la tecla DETENER “
/ ” (del televisor)
tres veces.
Parte trasera del televisor
3
1
2
Page 84

Español - 15 -
Español
Modo DVD
Funcionamiento General
Cómo Ver un DVD
Nota: No podrá acceder al modo DVD a menos que
introduzca un DVD (disco) o que pulse una tecla de control
del DVD.
Si cambia a otra fuente pulsando “SOURCE -
”, “INTERCAMBIAR - ” o “P / ” en
el mando a distancia, la reproducción de DVD se
detendrá automáticamente. Usted debe pulsar
REPRODUCIR y reanudar la reproducción de
forma manual al cambiar al modo DVD.
1. Encendido del televisor.
2. Pase a la fuente DVD con la tecla "SOURCE -
” del mando a distancia.
3. Coloque un disco en la bandeja.
El disco DEBE estar de cara a usted cuando mire a
la pantalla del TV.
La mayoría de los discos se cargarán y reproducirán
automáticamente si el disco no tiene ningún menú
grabado.
Si la reproducción no comienza automáticamente,
pulse el botón correspondiente “
” en el mando a
distancia, o el botón de reproducción “
/ ” del
lateral derecho del televisor.
Tras unos instantes, aparecerá en la pantalla un
menú o bien la película comenzará inmediatamente
después de la presentación de la productora TV/
cinematográca. Esto dependerá del contenido del
disco, pudiendo variar entre unos y otros discos.
Nota: Los pasos 4 y 5 están disponibles únicamente cuando
el disco disponga de un menú.
4. Pulse los botones de navegación “ ”, “ ”,
“
” o “ ” o el botón numérico para seleccionar
el título deseado.
5. Pulse el botón OK. El elemento seleccionado
empezará a reproducirse.
Notas sobre la Reproducción de DVD
a. No se oirá sonido durante el avance Rápido o
retroceso rápido.
b. No se oirá sonido durante la reproducción a
cámara lenta.
c. La reproducción a cámara lenta hacia atrás no
está disponible.
d. En algunos casos, el idioma de los subtítulos no
se cambiará inmediatamente a la seleccionada.
e. Cuando el idioma preferido no se selecciona,
incluso después de pulsar el botón varias veces,
signica que el idioma no está disponible en el
disco.
f. Cuando el reproductor de DVD se reinicia o se
cambia de disco, la selección de subtítulos se
cambia automáticamente a la conguración inicial.
g. Si se selecciona un idioma que no es soportado
por el disco, el idioma de los subtítulos se ajustará
automáticamente a la prioridad (por defecto) el
idioma del disco.
h. Por lo general, una “circulación” sucederá al
cambiar a otro idioma, esto signica que usted
puede cancelar los subtítulos pulsando el mismo
botón varias veces hasta que aparezca "Subtítulos
apagados" aparece en la pantalla.
i. Cuando la alimentación se activa o se extrae el
disco, el idioma oído será el seleccionado en la
conguración inicial.
j. Puede que algunos DVD no contengan ni menú
raíz ni menú de títulos.
k. No es posible realizar esta operación hacia atrás
en la reproducción.
l. Para referencia: Si intenta introducir un número
mayor que el tiempo total del título actual, el cuadro
de búsqueda de tiempo desaparece y el mensaje
"Entrada inválida
” aparecerá en la esquina
superior izquierda de la pantalla.
m. La presentación de diapositivas se desactiva
cuando el modo ZOOM está encendido.
Page 85

Español - 16 -
Español
Modo DVD
Funcionamiento General
Conguración del Modo DVD
1. Mientras está en la fuente DVD, presione
“MI BOTÓN1 - ” para acceder al menú de
conguración del DVD. Esto sólo será posible si
no hay ninguna reproducción en curso.
2. Este menú se maneja con “ ” o “ ” y “ ” o “ ”.
Conguración de la imagen
Tipo de TV
Solo estará disponible la opción de TV ‘PAL’. El
televisor también admite señal NTSC; sin embarbo,
la misma puede convertirse a PAL al mostrarse en
la pantalla.
Conguración del Idioma
Este menú sirve para fijar las preferencias de
idioma del modo DVD. A continuación se muestra el
contenido del menú de idioma:
Idioma de los mensajes en pantalla
Podrá seleccionar el idioma del menú en pantalla por
defecto (OSD menu) de los menús del reproductor.
Audio
Podrá elegir el idioma de subtitulado que aparezca
por defecto en el disco DVD.
Menú de Disco
Podrá elegir uno de los idiomas dados para el menú
de disco del DVD (DVD disc menu). El menú del
disco apa recerá en el idioma seleccionado si el DVD
admite esta opción.
Subtítulos
Podrá elegir el idioma de subtitulado si el DVD lo
admite.
Preferencias
Estas son las preferencias del modo DVD A
continuación se muestra el contenido del menú:
Predeterminadas
Al seleccionar Reiniciar y pulsar OK, se restauran
las conguraciones de fábrica. Sin embargo, dichos
ajustes por defecto no cambiarán el nivel paternal ni
la contraseña.
Remezclado
Si utiliza la función de salida digital de audio, puede
seleccionar este modo.
Surround: Salida de sonido envolvente.
Stereo: Estéreo bi-canal.
Control parental
La reproducción de algunos DVD puede limitarse en
función de la edad de los usuarios. La función “Control
Parental” permite a los padres establecer un nivel de
limitación para la reproducción. El Nivel de Control
Parental puede establecerse dentro de una escala de
ocho grados diferentes. El nivel “8 Adulto” le permite
ver todos los títulos de los DVD sin tener en cuenta el
nivel de control paterno del disco. Únicamente podrá
ver DVDs que tengan el mismo nivel, o inferior, con
respecto al del reproductor.
Contraseña
Esta función le permitirá cambiar la contraseña actual.
Antes de poder cambiar su palabra clave se le pedirá
que introduzca la palabra clave actual. Tras introducir
su contraseña actual, podrá introducir la nueva de
4 dígitos. Puede utilizar la tecla C para eliminar la
entrada incorrecta (si está disponible en su mando
a distancia).
Nota: La palabra clave por defecto es “0000”. Cada
vez que desee cambiar el nivel de control paternal
deberá introducir la contraseña digital XXXX. Si olvida
su contraseña, por favor contacte con el servicio
técnico.
SALIDA SPDIF
En esta opción podrá elegir entre PCM y RAW. Dentro
del menú del DVD, si para la salida Spdif selecciona
la opción PCM, y reproduce un DVD con sonido Dolby,
podrá obtener la señal de sonido bicanal a través de
los altavoces y la salida SPDIF. Si selecciona RAW
de la salida SPDIF en el menú del DVD y reproduce
el DVD con sonido Dolby, los altavoces quedarán
silenciados y podrá obtener la señal de sonido Dobly
5+1 a través de la salida Spdif.
Page 86

Español - 17 -
Español
Modo DVD
Solución de problemas y Consejos
La calidad de imagen DVD es mala
1. Asegúrese de que la supercie del disco DVD no
esté dañada (arañazos, huellas, etc.).
2. Limpie el disco e inténtelo de nuevo. Consulte
las instrucciones en "Limpiar los Discos" para
limpiar el disco correctamente
3. Asegúrese de que el disco DVD esté en la
bandeja con la etiqueta hacia usted cuando mire
hacia el televisor.
4. Un disco DVD húmedo o la condensación pueden
afectar el equipo. Espere 1 o 2 horas en modo en
espera para secar el equipo.
El disco no se reproduce
1. No hay ningún disco en la máquina - Coloque un
disco en el cargador.
2. El disco está cargado incorrectamente - Asegúrese
de que el disco DVD esté en el cargador con la
etiqueta hacia usted cuando mire en la pantalla
del televisor.
3. Tipo de disco equivocado. El reproductor de DVD
no puede reproducir discos CD-ROM con datos
para PC, etc.
4. El código de región del DVD debe coincidir con
el del reproductor.
Idioma erróneo del menú en pantalla (OSD)
1. Seleccione el idioma en el menú de conguración.
2. El idioma para el sonido o los subtítulos de un
disco DVD no se puede cambiar.
3. El DVD no dispone de sonido y/o subtítulos
multilingües.
4. Trate de modicar la conguración del sonido o
los subtítulos utilizando el menú de título del DVD.
Algunos DVD no permiten al usuario modicar
estos ajustes sin utilizar el menú del disco.
Funciones de ángulo, zoom, etc. no
funcionan
1. Estas funciones no están disponibles en el DVD.
2. El ángulo sólo se puede cambiar cuando se
muestra el símbolo del mismo.
Si no funciona nada.
Si ha probado las soluciones expuestas más arriba
y no parece que nada funcione, intente apagar y
encender de nuevo su TV-DVD. Si esto tampoco
funcionara, póngase en contacto con su proveedor
o técnico de reparación del DVD.
Aviso
Este producto incorpora tecnología de protección de
copyright que está protegida por patentes de U.S y
otros derechos de propiedad intelectual. El uso de
esta tecnología de protección de derechos de autor
debe autorizarse por parte de Rovi Corporation,
y está diseñada para uso exclusivo en el hogar y
otras proyecciones limitadas, a menos que exista
autorización expresa por parte de Rovi Corporation.
Se prohíbe la realización de ingeniería inversa o el
desmontaje del aparato.
Page 87

Español - 18 -
Español
Apéndice A: Formatos de Ficheros Admitidos en Modo DVD
Multimedia
Extensión de
Archivos
Formato
Admitida
(Resolución máxima/Velocidad de bits, etc.)
Vídeo
Audio
Película
.mpg/ .dat/
.vob
MPEG1
MPEG Layer
1/2/3
MPEG2 MPEG2
.avi
XviD/ 3ivx PCM/MP3 Versión XviD hasta: 1.1.2
MPEG4 PCM/MP3
MS ISO
MPEG4
PCM/MP3 Admite SP y ASP
Música
- - PCM Tasa de Muestreo: 8K ~ 48KHz
.mp3 -
MPEG 1/2
Layer 1/
2/3(MP3)
Tasa de Muestreo: 8K ~ 48KHz,
Velocidad de bits: 64K~320Kbps
Foto .jpg
Baseline JPEG
WxH = 8902 x 8902, Hasta 77 Megapíxeles
Formato admitido: 444/440/422/420/ escala de
grises
JPEG Progresivo
Hasta 4 Megapíxeles Formato Admitido:
444/440/422/420/ escala de grises
Subtítulos
Externos
.srt
Admite Formatos de Ficheros de Texto, no así con el
Formato de Archivos de Imagen
.smi
.sub
.ssa
.ass
Apéndice B: Tipos de disco compatibles
Formatos
de Disco
(Logos)
Tipos de
Grabación
Tamaño
del Disco
Tiempo
Máximo de
Reproducción
Características
Audio
+
Video
12cm Una cara; 240
min.
Doble cara; 480
min.
El DVD contiene sonido e
imagen de gran calidad gracias
a los sistemas Dolby Digital y
MPEG-2. Gracias al menú en
pantalla, puede elegirse entre
una variedad de opciones de
pantalla y de sonido, de forma
fácil y cómoda.
Audio 12cm 74 min. Un LP se graba como una señal
analógica con más distorsión.
Un CD se graba como una
señal digital con mejor calidad
de sonido, pero con menos
interferencias y un menor
deterioro de la calidad del
sonido con el paso del tiempo.
Audio
(xxxx.mp3)
12cm En función de la
calidad del MP3
Un MP3 se graba como una
señal digital con mejor calidad
de sonido, menos interferencias
y menos deterioro de la calidad
de sonido con el tiempo.
Vídeo
(imágenes
jas)
12cm En función de
la calidad del
chero JPG
JPEG se graba como una señal
digital con una mejor calidad de
imagen a lo largo del tiempo.
Para un funcionamiento correcto, sólo se deben utilizar discos de 12 cm.
Page 88

Español - 19 -
Español
Modo DVD
Podrá reproducir contenidos de DVD, CD's de películas, música e imágenes, mediante los botones del
mando a distancia. A continuación se describen las principales funciones de los botones más utilizados del
mando a distancia.
Botones del
mando a
distancia
DVD
Reproducción
Película
Reproducción
Reproducción
de Fotos
Reproducción de Música
Reproducir Reproducir Reproducir Reproducir
Pausa Pausa Pausa Pausa
Detener Detener Detener Detener
/
Resalta una opción de menú / Cambia la imagen con zoom hacia la
izquierda o hacia la derecha (si está disponible)
X
/
Resalta una opción de menú / Desplaza la imagen ampliada arriba o hacia abajo (si estuviera
disponible)
/
Avance rápido / Retroceso rápido X
Avance rápido / Retroceso
rápido
Vistas de la
escena desde
diferentes
ángulos (si está
disponible)
X X X
Muestra la información del disco / Muestra el menú
de conguración de DVD en el modo de detención.
X X
Muestra la información del disco. X X
Idioma de Sonido X X X
MENU Muestra el menú principal.
OK Entrar / Ver / Reproducir
TECLA VERDE Muestra las opciones de repetición.
RETURN Regresa a los valores anteriores (si se dispone de ellos).
TECLA
AMARILLA
Regresar a la carpeta raíz (si se dispone de ellos). X
JUMP (*) Para la selección directa de escenas, punto temporal o número de chero (pista).
SUBTITLE
Activar/desactivar subtítulos. Pulsar repetidamente
para alternar entre las diversas opciones de
subtítulos (si la opción estuviera disponible).
X X
TECLA AZUL Muestra el menú del disco (si está disponible). X X
TECLA ROJA
Amplía la imagen. Pulsar repetidamente para alternar entre las
diversas opciones de zoom.
X
Otras Funciones – Combinaciones de Teclas
(Durante la reproducción)
+
Avance lento
[ + ] +
Para jar la velocidad de avance lento
[ + ]
Para elegir el retroceso lento.
+
Para jar la velocidad de avance rápido
+
Para jar la velocidad de retroceso rápido
+
Conrma la orden de parar
(*) Puede cambiar al titulo seleccionado pulsando directamente las teclas numéricas. Para los títulos de un solo dígito es necesario pulsar
el 0 en primer lugar, y luego el dígito correspondiente. (por ejemplo: para seleccionar 5, presione 0 y 5)
Page 89

Español - 20 -
Español
Características técnicas y Accesorios
Emisoras y Canales de Emisión
DVB-T MPEG2, DVB-T MPEG4 HD
DVB-C MPEG2, DVB-C MPEG4
Entrada de vídeo PAL, SECAM, NTSC 4.43
Estéreo Nicam
Conexiones externas
1-Euroconector 1 Entrada 21-pines Euroconector RGB, A/V
2-EUROCONECTOR-S (via EUROCONECTOR 1) Entrada 21-pines Euroconector S-Vídeo
3-YPbPr (vía VGA) Entrada Mini D-Sub 15-Pines analógicos
4-Entrada de Audio Entrada RCA Audio I + D
5-HDMI 1/2 (*) Entrada Tipo A
(*) El número de entradas podrá variar en función del modelo de su televisor.
6-VGA/PC Entrada Mini D-Sub 15-Pines analógicos Señal RGB
7-Audio digital Salida S/PDIF (Coaxial)
Puerto USB Versión de la interfaz del Explorador Multimedia: USB 2.0
Clase USB: Almacenamiento masivo
Sistema de Ficheros: FAT32
Toma de auriculares 3.5mm estéreo
Condiciones de Funcionamiento Temperatura 5°C - 35°C (41°F - 94°F)
Humedad 20 - 80% (sin condensación)
Accesorios Incluidos Mando a Distancia
2 pilas (AAA, IEC R03 1.5V)
4 tornillos
Tapa del soporte
Clip P
24” D
24” W
Clase Energética
A+ A+
Tamaño de pantalla visible (aprox.)
61cm / 24” 61cm / 24”
Consumo energético en funcionamiento (aprox.) (*)
18 W 18 W
Consumo energético anual (aprox.) (**)
26 kWh 26 kWh
Consumo energético en modo de espera (aprox.)
< 0.50 W < 0.50 W
Resolución de la Pantalla en píxeles
1366 x 768 1366 x 768
Pantalla
16:9 16:9
Salida de audio (10% distorsión)
2 x 2.5 2 x 2.5
Modelo de consumo energético (aprox.)
45 W 45 W
Peso Televisor con soporte
4.7 kg 4.2 kg
Peso Bruto
7.5 kg 7.0 kg
Televisor sin soporte
4.0 kg 3.5 kg
(*) Probado de acuerdo con la norma IEC 62087-BD en la conguración predeterminada.
(**) Consumo eléctrico 26 kWh por año, basado en el consumo del televisor funcionando 4 horas diarias durante 365 días.
El consumo real dependerá del uso del televisor.
Las especicaciones están sujetas a cambios sin
previo aviso.
A (mm) B (mm) C (mm) D (mm) E (mm) F (mm) G (mm)
24D153*DG 554.0 345.0 163.0 61.3 379.0 75 75
24W153*DG
554.0 345.0 163.0 61.3 379.0 75 75
Page 90

Español - 21 -
Español
Información sobre Licencias
• Los términos HDMI y High-Denition Multimedia Interface y el logotipo de HDMI son marcas comerciales o
registradas de HDMI Licensing LLC en los Estados Unidos y en otros países.
• DVB es una marca registrada del proyecto DVB.
• [1] EIA/CEA-861-D su cumplimiento cubre la transmisión de vídeo digital sin comprimir con la protección de alto
ancho de banda de los contenidos digitales, que está siendo normalizado para la recepción de señales de vídeo
de alta denición. Como se trata de una tecnología en evolución, es posible que algunos dispositivos podrían no
funcionar correctamente con el televisor.
Noticación de Licencia del MP3
La tecnología de codicación de sonido MPEG Layer-3 es bajo licencia de Fraunhoffer LLS y Thomson.
Noticación de Licencia de MP4
ESTE PRODUCTO SE LICENCIA DE CONFORMIDAD CON LA LICENCIA DE LA CARTERA DE PATENTES
VISUALES MPEG-4 PARA EL USO PERSONAL Y NO COMERCIAL POR PARTE DE UN CONSUMIDOR PARA
(I) CODIFICAR VIDEO DE CONFORMIDAD CON EL ESTÁNDAR VISUAL DE MPEG-4 ("VÍDEO MPEG-4") Y / O
(II) DECODIFICAR VIDEO CON FORMATO MPEG-4 CODIFICADO POR UN CONSUMIDOR EN UNA ACTIVIDAD
PERSONAL Y NO COMERCIAL Y / U OBTENIDO DE UN PROVEEDOR DE VÍDEO CON LICENCIA DE MPEG-4
PARA SUMINISTRAR VÍDEO CON FORMATO MPEG-4. NO SE OTORGA NI SE OTORGARÁ LICENCIA ALGUNA
PARA CUALQUIER OTRO USO. COMUNÍQUESE CON CON MPEG LA,L.L.C. PARA OBTENER INFORMACIÓN
ADICIONAL, INCLUYENDO INFORMACIÓN RELACIONADA CON LOS USOS PROMOCIONALES, INTERNOS
Y COMERCIALES Y LA OBTENCIÓN DE LICENCIAS. VISITE EL SITIO HTTP://WWW.MPEGLA.COM
Noticación de Licencia de AVC
ESTE PRODUCTO SE CONCEDE BAJO LAS PATENTES AVC PORTAFOLIO DE LICENCIA PARA EL USO
PERSONAL
Y NO COMERCIAL DE UN CONSUMIDOR PARA (I) CODIFICAR VÍDEO DE CONFORMIDAD
CON LA NORMA AVC ("VÍDEO AVC") Y / O (II) DECODE AVC QUE HAYA SIDO CODIFICADO POR UN
CONSUMIDOR EN EJERCICIO DE UNA ACTIVIDAD PERSONAL Y NO COMERCIAL Y / U OBTENIDO DE
UN PROVEEDOR DE VÍDEO CON LICENCIA PARA PROPORCIONAR VÍDEO AVC. NO SE OTORGA NI
SE OTORGARÁ LICENCIA ALGUNA PARA CUALQUIER OTRO USO. SE PUEDE OBTENER INFORMACIÓN
ADICIONAL EN LA WEB DE MPEG LA, L.L.C. HTTP//WWW.MPEGLA.COM VISITE EL SITIO HTTP://WWW.
MPEGLA.COM
Aviso sobre la Licencia
RECONOCIMIENTO DE LA MARCA COMERCIAL
Fabricado con la autorización de Dolby Laboratories. Dolby y el logotipo de la doble D son marcas registradas de
Dolby Laboratories.
Desecho...
La siguiente información está destinada solo a países de la EU:
Desecho de aparatos
El símbolo tachado del cubo de basura indica que los productos deben recogerse y desecharse aparte de la basura
doméstica. Las pilas y acumuladores integrados pueden desecharse junto al aparato. Una vez en el centro de
reciclaje, se les clasicará y separará.
La barra negra indica que el producto se ha comercializado en el mercado después del 13 de Agosto de 2005.
Al participar en la recogida selectiva de aparatos y baterías, estará ayudando a garantizar el desecho correcto
de los aparatos y las pilas; de esta forma contribuirá a evitar posibles consecuencias negativas para el medio
ambiente y la salud humana.
Para obtener más información detallada acerca de los programas de recogida selectiva y reciclaje disponibles en
su país, visite nuestro sitio web (www.toshiba.eu/recycling) o contacte con su ayuntamiento o con la tienda donde
adquirió el aparato.
Desecho de pilas y acumuladores
El símbolo tachado del cubo de basura indica que las baterías y acumuladores deben ser recogidos y desechados
de forma separada de los residuos domésticos.
Si la batería o acumulador contiene valores más altos de los indicados para plomo (Pb), mercurio (Hg), y/o
cadmio (Cd) tal como se dene en la DirectivaEuropea de Baterías, los símbolos químicos del plomo (Pb),
mercurio (Hg) y / o cadmio (Cd) aparecerán debajo del símbolo de cubo de basura con ruedas tachado.
Al participar en la recogida selectiva de pilas, estará ayudando a garantizar el adecuado desecho de los
productos y las pilas, contribuyendo así a evitar posibles consecuencias negativas para el medio ambiente y la
salud humana. Para obtener más información detallada acerca de los programas de recogida selectiva y reciclaje
disponibles en su país, visite nuestro sitio web (www.toshiba.eu/recycling) o contacte con su ayuntamiento o con
la tienda donde adquirió el aparato.
Page 91

Español - 22 -
Español
Preguntas y Respuestas
Pregunta
Respuesta
Sonido
¿Por qué no hay sonido ni imagen?
Compruebe si el televisor está en modo de espera. Revise todas
las conexiones y el enchufe
¿Por qué hay imagen pero no hay
sonido?
Compruebe que no haya apagado el volumen o que no esté
seleccionada la opción “mute” de silencio.
¿Por qué sólo se oye sonido de un
altavoz si la emisión es en estéreo?
Compruebe que el balance en el menú SONIDO no se haya jado
para un solo lado.
¿Por qué la banda sonora está en
inglés si he seleccionado otro idioma
de sonido?
El programa que se está emitiendo solo lo hace en idioma inglés.
Imagen
¿Qué puede provocar una mala
imagen?
Existen interferencias o la señal es débil. Pruebe otro canal.
¿Por qué el vídeo o el DVD que se
está reproduciendo no se ven en la
pantalla?
Asegúrese que el reproductor Blu-RAy o DVD está conectado al
televisor, tal como se ilustra en los primeros capítulos, a continuación,
seleccione la entrada correcta pulsando SOURCE -
en el
mando a distancia
¿Por qué la imagen del Blu-Ray/
DVD está en blanco y negro?
Verique que haya elegido la entrada correcta.
¿Por qué hay rayas horizontales y /
o imágenes borrosas en la pantalla
cuando está en modo PC?
Puede que necesite ajustar la Fase. Seleccione Conguración de
PC y seleccione Fase y ajuste hasta que la imagen sea clara.
General
¿Por qué no funciona el mando a
distancia?
Compruebe si se han agotado las pilas o si están mal colocadas.
¿Por qué no funciona el Explorador
Multimedia?
Asegúrese de haber conectado el USB o Disco Duro
correctamente. La operación incorrecta se puede producir con
una conexión USB Hub.
¿Por qué no se muestran los
subtítulos digitales en pantalla a
pesar de que se han seleccionado?
La emisión no incluye subtítulos.
¿Por qué está bloqueado el canal
digital?
El control paterno está activado. Verique las opciones de control
paterno.
¿Por qué no pueden verse algunos
canales digitales codicados?
Deberá renovar su suscripción. Contacte con el proveedor del
servicio
¿Por qué el LED de modo en
espera tarda más en apagarse con
frecuencia?
Cuando pone el televisor en modo en espera, se iniciará la búsqueda
automática de descargas, siempre que ésta esté activada. El tiempo
que el televisor tardará en realizar esta función puede variar. El
indicador, en este modo, parpadeará en rojo y verde.
¿Por qué no funcionan los botones
de control del televisor?
Compruebe que el BLOQUEO INFANTIL no esté activado.
¿Qué es la DVB-T? Emisión de Vídeo Digital a través de una antena.
¿Qué es la DVB-C? Emisión de Vídeo Digital a través de un sistema de cable.
¿Cómo se seleccionan los canales
de radio?
Puede seleccionarlos a través de la Lista de Canales.
¿Qué puedo hacer si he olvidado el
número PIN?
Puede reiniciar el televisor y ejecutar la Instalación Inicial. Asegúrese
de que no hay nadie más consciente de este procedimiento mediante
guardar de forma segura el Manual del Usuario.
Si se le pide que introduzca un PIN para realizar la Instalación
Inicial consulte a su distribuidor autorizado
Page 92

Español - 23 -
Español
Información REACH
La Norma REACH (Registro, Evaluación, Autorización y Restricción de Sustancias y Preparados
Químicos), de la UE en materia de química, entró en vigor el 1 de junio de 2007, con plazos
escalonados para 2018.
Toshiba cumplirá todos los requisitos de REACH y se ha comprometido a proporcionar a nuestros
clientes información acerca de la presencia en nuestros artículos de sustancias incluidas en la
lista del reglamento REACH.
Consulte el sitio web www.toshiba.eu/reach para obtener información sobre la presencia en
nuestros artículos de sustancias incluidas en la lista REACH en una concentración superior al
0.1% en peso por peso.
Declaración de Conformidad UE
Este producto lleva la marca CE de conformidad con las Directivas Europeas aplicables.
El responsable de la marca CE es TOSHIBA, 23 Davy Road, Plymouth, PL6 8BY UK.
El producto está etiquetado con la marca CE de acuerdo con las Directivas Europeas aplicables, en la
Directiva 2006/95/EC notable de baja tensión, y la Directiva 2004/108/EC y RoHS Directiva 2011/65/EU
de compatibilidad electromagnética. Además, el producto cumple con la Directiva 2005/32/EC (EuP)
sobre diseño ecológico y 2009/125/EC (ErP) y lo relacionado con las medidas de ejecución.
©TOSHIBA 2014
Todos los derechos reservados.
Queda prohibida la reproducción total o parcial sin permiso escrito.
TOSHIBA
23 Davy Road, Plymouth Devon, PL6 8BY, England.
Este aparato cumple los requisitos de la normativa técnica de límites de uso de ciertas sustancias en
equipos eléctricos y electrónicos.
Page 93

GUIDA RAPIDA
24D153*DG / 24W153*DG
TV LCD retroilluminata LED
Questo documento è stato pensato per fornirvi una panoramica della
TV Toshiba.
Durante la durata di vita della TV si prevede che verranno resi
disponibili degli aggiornamenti firmware in modo da garantire che la
TV continui a garantire prestazioni ottimali. Sarà possibile scaricare
l'ultimissima versione del firmware da
www.toshiba-om.net/firmware.php
Alcune delle funzioni elencate nel presente documento sono limitate
a causa della legislazione locale e potrebbero non essere disponibili in
tutti i paesi.
Per visualizzare il manuale avanzato della TV Toshiba sarà possibile
visitare il sito
www.toshiba-om.net
“Registrate la vostra TV online su:
www.toshiba-europe.com/registration”
Toshiba ritiene che l'iniziativa di rendere le funzioni avanzate disponibili online
consentirà di salvare più di 100.000 alberi l'anno (6.5 milioni di Co2).
Qualora desideriate visualizzare le funzioni avanzate ma non abbiate accesso a un
computer o a internet, vi invitiamo a contattare il vostro numero di assistenza locale, i
cui dettagli sono indicati sul retro di questo manuale.
Page 94

Indicazioni
Italiano
Indicazioni
Italiano - 1 -
Italiano
Misure di sicurezza ................................................. 2
Circolazione dell’aria........................................... 2
Danni causati dal calore ..................................... 2
Alimentazione elettrica........................................ 2
Avvertenza .......................................................... 2
Cose da fare ....................................................... 2
Non ..................................................................... 2
Installazione e informazioni importanti ................... 3
CLAUSOLA DI ESCLUSIONE ............................ 3
Importanti informazioni di sicurezza ....................... 4
Inserimento o rimozione del supporto .................... 5
Il telecomando (TV - DVD) ..................................... 6
Inserimento delle batterie e raggio di azione del
telecomando ....................................................... 6
Collegamento di apparecchiature esterne .............. 7
Collegamento di un dispositivo HDMI
®
o DVI
all’ingresso HDMI ................................................... 8
Collegamento di un dispositivo HDMI ................. 8
Collegamento di un dispositivo DVI .................... 8
Collegamento di un computer................................. 9
Collegamento di un computer ............................. 9
Per collegare una chiavetta USB ash ............... 9
Controllo della TV ................................................. 10
Accensione ....................................................... 10
Utilizzo del telecomando ................................... 10
Uso dei controlli sulla TV .................................. 10
Installazione iniziale...............................................11
Modalità DVD ....................................................... 13
Gestione dei dischi ........................................... 13
Pulizia dei dischi ............................................... 13
DVD - Caratteristiche ........................................ 13
DVD - Tasti di comando sulla TV ...................... 13
Come guardare un DVD ................................... 14
Note sulla Riproduzione DVD ........................... 14
Congurazione modalità DVD .......................... 15
Preferenze ........................................................ 15
La qualità dell'immagine è scadente (DVD) ...... 16
Appendice A: Modalità DVD Formati le
supportati .............................................................. 17
Appendice B: Tipi di disco compatibili .................. 17
Speciche tecniche e accessori ........................... 19
Informazioni di licenza .......................................... 20
Sezione Domande & Risposte.............................. 21
Page 95

Italiano - 2 -
Italiano
Misure di sicurezza
Questo apparecchio è stato progettato e prodotto per rispettare gli standard di sicurezza internazionali ma, come ogni apparecchiatura elettrica, deve essere fatta attenzione per ottenere i risultati migliori e garantire la sicurezza. Per la propria sicurezza, leggere i punti riportati di seguito. Sono di natura generale, e offrono un aiuto con tutti i prodotti elettronici di consumo.
Circolazione dell’aria
Lasciare più di 10 cm di distanza ai bordi in fase di installazione a parete per consentire un'adeguata ventilazione. Questo
impedirà il surriscaldamento e possibili danni alla televisione.
Evitare anche i posti polverosi.
Danni causati dal calore
Se la televisione viene lasciata esposta alla luce solare diretta
o vicino ad un calorifero, possono esserci danni. Evitare luoghi
soggetti a temperature estremamente alte o a umidità o in cui
la temperatura potrebbe scendere al di sotto di 5°C (41°F).
Alimentazione elettrica
Il ricevitore dovrebbe essere usato solo da una presa da 220-
240 V AC 50 Hz. Vericare che la TV o il supporto non siano
collocati sul cavo di alimentazione. NON tagliare la spina
dall’apparecchio; essa contiene un ltro speciale contro le
interferenze radio, la rimozione del quale avrebbe come conseguenza una prestazione imperfetta. Deve essere sostituito
solo con un tipo con il corretto valore nominale e approvato
e deve essere riposizionato il coprifusibile. NEL CASO DI
DUBBI, CONSULTARE UN ELETTRICISTA COMPETENTE.
Avvertenza
Per evitare eventuali incendi, tenere sempre le candele o
altre amme aperte lontane dal prodotto.
Cose da fare
LEGGERE le istruzioni di funzionamento prima di tentare ad
usare l'apparecchio.
ASSICURARSI che tutti i collegamenti elettrici (compresi la
presa dell’alimentazione centrale, i cavi di estensione e le
interconnessioni tra le parti dell’apparecchio) siano fatti correttamente e secondo le istruzioni del produttore. Spegnere
e ritirare la presa dell’alimentatore centrale prima di stabilire
o di modicare le connessioni.
CONSULTARE il negoziante bel caso di dubbi sull’installazione, la funzionalità o la sicurezza della vostra attrezzatura.
FARE attenzione a pannelli o porte di vetro dell’apparecchio.
Non
NON rimuovere alcuna copertura ssa perché questo potreb-
be esporre a tensioni pericolose.
NON ostruire i fori di ventilazione dell’apparecchio con oggetti come giornali, tovaglie, tende, ecc. Il surriscaldamento
provocherà dei danni.
NON lasciare che l'attrezzatura elettrica sia esposta a gocciolio o versamento di liquido o che oggetti pieni di liquidi.
NON collocare oggetti molto caldi o fonti di amme libere
come candele accese o lampade da notte, su o nei pressi
dell'apparecchio. Le alte temperature possono sciogliere la
plastica e provocare incendi.
NON usare supporti di fortuna e usare le viti fornite in dotazione dal produttore.
NON lasciare l’apparecchio acceso quando non è custodito a
meno che non sia indicato specicatamente che è destinato
a funzionare senza sorveglianza o abbia la modalità standby. Spegnere staccando la spina e assicurarsi che la vostra
famiglia sappia come farlo. Può essere necessario prendere
delle misure particolari per i disabili.
NON continuare a far funzionare il dispositivo se si ha qualche
dubbio sul funzionamento normale o se è danneggiato in qualche modo – spegnere, staccare l’interruttore dell’alimentatore
centrale e consultare il negoziante.
AVVERTENZA - Il volume audio in eccesso da auricolari e
cufe può causare la perdita dell’udito.
SOPRATTUTTO – MAI lasciare che alcuno, soprattutto
bambini, spingano o colpiscano lo schermo, inseriscano
oggetti nei fori, nelle tacche o in altre parti dell'involucro.
MAI tirare a indovinare o fare delle modiche a caso
ad apparecchi elettrici – è meglio essere sicuri che
dispiaciuti!
LA SPINA ELETTRICA SI UTILIZZA COME DISPOSITIVO
PER SCOLLEGARE E DEVE QUINDI ESSERE FACILMENTE RAGGIUNGIBILE.
Nota: I videogiochi interattivi che prevedono un joystick simile
a una pistola e hanno un bersaglio a video potrebbero non
funzionare con questa TV.
Le illustrazioni e l’OSD in questo manuale
d’istruzioni sono unicamente a scopo esplicativo
e potrebbero leggermente differire rispetto ai
comandi reali.
Page 96

Italiano - 3 -
Italiano
Installazione e informazioni importanti
Dove installare
* Lo stile del tasto e del
supporto dipendono dal
modello.
Posizionare la TV lontano dalla luce solare diretta e dalle luci
forti. Consigliamo un’illuminazione morbida e indiretta per una
comoda visualizzazione. Usare tende o persiane per impedire
che la luce solare diretta cada sullo schermo.
Posizionare sempre la TV su una supercie solida e in piano,
in grado di sostenere tutta la supercie inferiore del supporto
e il peso dell'unità, servendosi del seguente metodo per
ssarla a parete usando una fascetta resistente sulla parte
posteriore del supporto.
I pannelli del display LCD sono prodotti usando un livello
estremamente alto di tecnologia di precisione; a volte, però
in alcune parti dello schermo possono mancare elementi di
immagine o avere macchie luminose. Non si tratta di un’anomalia di funzionamento.
Assicurarsi che la televisione sia in una posizione in cui non
possa essere spinta o colpita da piccoli oggetti perché la
pressione romperebbe o danneggerebbe lo schermo. Veri-
care inoltre che alcuni piccoli oggetti non possano essere
inseriti negli alloggiamenti o nelle aperture del case.
Evitare di usare sostanze chimiche (quali ad esempio
dispositivi di rinfrescamento dell'aria, agenti pulenti,
ecc.) su o vicino al piedistallo della TV. Gli studi
indicano che gli elementi in plastica si potrebbero indebolire
e rompersi col tempo come effetto della combinazione di
sostanze chimiche e stress meccanico (ad esempio il peso
della TV). Il mancato rispetto di queste istruzioni potrebbero
provocare gravi lesioni e/o danni permamenti alla TV e al
piedistallo della TV.
Pulizia dello schermo e del mobile...
Spegnere l'apparecchio, pulire lo schermo e il mobile con
una panno morbido, asciutto. Consigliamo di non usare
lucidanti o solventi per lo schermo o il mobile perch possono
causare danni.
Nota
La funzione di ricezione digitale di questa TV funziona solo nei paesi elencati nella sezione Paese durante
il menu di prima installazione. A seconda del paese/area, alcune delle funzioni di questa TV potrebbero non
essere disponibili. La ricezione di servizi futuri aggiuntivi o modicati non può essere garantita con questa
televisione.
Se le immagini stazionarie generate da servizi di testo, loghi di identicazione del canale, monitor di computer,
videogiochi, menu a schermo, in modalità 4:3 ecc. vengono lasciate sullo schermo televisivo per un certo
tempo, possono diventare evidenti. E sempre consigliabile ridurre le impostazioni di luminosità e contrasto.
Un uso lungo e continuo dell'immagine 4:3 su uno schermo 16:9 potrebbe provocare dei segni di permanenza
dell'immagine in 4:3. Non si tratta di un difetto della TV LCD e non coperto dalla garanzia del produttore. Un
uso regolare di altre modalità di dimensioni evita una conservazione permanente.
CLAUSOLA DI ESCLUSIONE
La Toshiba non può in nessun caso essere ritenuta responsabile per perdite e/o danni al prodotto causate da:
i) fuoco;
ii) terremoto;
iii) danni accidentali;
iv) uso scorretto intenzionale del prodotto;
v) uso del prodotto in condizioni improprie;
vi) perdite e/o danni causati al prodotto mentre questo è¨ in possesso di terzi;
vii) qualsiasi danno o perdita causata in conseguenza del mancato e/o scorretto rispetto delle istruzioni indicate nel manuale
del proprietario;
viii) qualsiasi perdita o danno causato direttamente in conseguenza di uso scorretto o malfunzionamento del prodotto usato
contemporaneamente ad altro impianto ad esso associato;
Inoltre, in nessun caso la Toshiba sarà responsabile per danni e/o perdite consequenziali compreso, mo non solo, quanto
segue: perdita di protti, interruzione di attività perdita di dati registrati sia essa causata durante il normale funzionamento
o per cattivo uso del prodotto.
Page 97

Italiano - 4 -
Italiano
Importanti informazioni di sicurezza
• Qualsiasi funzione relativa alla televisione digitale (col logo DVB) è disponibile solo nel paese o nell'area
in cui vengono trasmessi questi segnali. Vericare col rivenditore se è possibile ricevere un segnale DVB
- T/C nella zona in cui si vive.
• Anche se la televisione è conforme alle speciche DVB - T/C la compatibilità con future trasmissioni digitali
DVB - T/C non è garantita.
• Alcune funzioni delle televisioni digitali potrebbero non essere disponibili in alcuni paesi.
• Il sistema DVB - T/C presente in questo dispositivo consente la ricezione sia di canali FTA (Free To Air -
Canali in chiaro) di canali criptati.
• Nota: i canali criptati richiedono un sistema di cifratura specico per essere visualizzati, che potrebbe non
essere disponibile in alcuni paesi.
• DVB è un marchio commerciale registrato del progetto DVB. Il logo DVB indica che il prodotto è conforme
con le Trasmissioni Digitali Europee.
• DVB T è l'acronimo di Trasmissione Video Digitale (Digital Video Broadcast) tramite sistema antenna.
• DVB C è l'acronimo di Trasmissione Video Digitale (Digital Video Broadcast) mediante sistema via cavo.
INFORMAZIONI IMPORTANTI
Installazione della TV
• Non appoggiare la TV su indumenti o altri materiali che si interpongano fra la TV stessa e il mobilio di sostegno.
• Informare i bambini dei possibili pericoli che salire sui mobili per raggiungere la TV comporta.
• Tenere sempre la presa mentre si scollega l'unità alla spina. Non tirare il cavo. Il cavo potrebbe sovraccaricarsi
e provocare un corto circuito.
• Usare un panno morbido e asciutto per pulire l’unità.
• Impostare l’unità di modo che nessuno inciampi sul lo.
• Nel caso in cui si intenda installare l'unità a parete, contattare il negozio presso cui è stata acquistata l'unità
per ricevere consulenza e lasciare il lavoro di installazione a dei professionisti. Un’installazione non corretta
può provocare danni e/o lesioni.
• Per proteggere l'unità durante un temporale, scollegare il cavo di alimentazione CA e scollegare l'antenna.
Attenzione: Non toccare il connettore dell’antenna.
• L'unità si surriscalda mentre in funzione. Non posizionare coperchi o lenzuola sull’unità per evitare il
surriscaldamento.
• I fori di ventilazione non dovrebbero essere ostruiti. Non posizionare vicino a radiatori. Non posizionare alla
luce solare diretta.
• La condensa dell’umidità si verica nelle seguenti situazioni:
- Quando si s sposta l’unità da un luogo freddo a un luogo caldo.
- Quando si usa l’unità in un stanza in cui appena stato acceso il riscaldamento.
- Quando si usa l’unità in un’area in cui l’aria fredda dal condizionatore dell’aria colpisce direttamente l’unità.
- Quando si usa l’unità in un luogo umido.
• Non usare mai l'unità quando si potrebbe vericare condensa da umidità.
• Usare l’unità quando si verica condensa da umidità che potrebbe danneggiare le componenti e i dischi
interni. Lasciar passare due o tre ore, l'unità si scalderà e l'umidità evaporerà.
Page 98

Italiano - 5 -
Italiano
Inserimento o rimozione del supporto
Inserimento o rimozione del supporto
(1) Appoggiare facendo attenzione il lato anteriore della TV su una supercie piatta e morbida, con il supporto
che sporge alle estremità
(2) Per inserire il piedistallo servirsi delle viti fornite in dotazione.
o
(3) Rimuovere le viti che tengono ssato il supporto.
(4) Dopo aver tolto le viti, tenere la TV ed estrarre il supporto tirando saldamente verso l'esterno dalla TV
no a rimuovere il supporto.
Nota: Fare molta attenzione in fase di rimozione del supporto per evitare di danneggiare il pannello LCD.
Per il modello 24D153*DG / 24W153*DG
Quando viene usata una staffa a parete
Servirsi di una staffa a parete adeguata alle dimensioni e al peso della TV LCD. Sono necessarie due persone
per eseguire l'installazione.
(1) Staccare e rimuovere tutti i cavi e/o i connettori di altri componenti dalla parte posteriore della TV.
(2) Appoggiare delicatamente la TV con lo schermo rivolto verso il basso su una supercie morbida come ad
esempio una coperta o un piumino.
(3) Seguire le istruzioni fornite con il supporto per il montaggio a parete. Prima di procedere, vericare di
avere agganciato gli appositi supporti alla parete e la parte posteriore della TV come descritto nelle istruzioni
fornite con il supporto per il montaggio a parete.
Page 99

Italiano - 6 -
Italiano
Il telecomando (TV - DVD)
Guida rapida e semplice al telecomando.
(*) PULSANTE PERSONALE 1 & PULSANTE PERSONALE 2
Questi pulsanti potrebbero avere funzioni predenite a seconda del
modello. Sarà tuttavia possibile impostare una funzione speciale per
questi pulsanti premendoli per cinque secondi quando ci si trova sulla
sorgente o sul canale. Sullo schermo si visualizzerà un messaggio. Ora
il pulsante selezionato PULSANTE PERSONALE viene associato con
la funzione selezionata.
Si prega di notare che quando viene eseguita la prima installazione,
PULSANTE PERSONALE 1&2 torna alla funzione predenita.
1. Standby
Standby
2. Pulsanti numerici
Pulsanti numerici
3. TV-AV / Visualizza elenco
canali / Si sposta fra i vari tipi di
trasmissione
4. Muto
Muto
5. Volume Su / Giù
Volume Su / Giù
6. Menu on-off
Menu
7. Pulsanti di navigazione
( , , , )
Pulsanti di navigazione
8. Okay (Conferma) / Elenco canali
/ Hold (in modalità TXT)
OK
9. Torna / Pagina Indice (in modalità
TXT)
10. Browser multimediale
Angolazione
11. Info / Mostra (in modalità TXT)
Ora
12. Pulsante personale 1 (*)
Visualizza menu ora / DVD
13. Pulsanti colorati
Pulsante rosso - Zoom
Pulsante verde - Ripeti
Pulsante giallo - Root
Pulsante blu - Titolo
14. Mono/Stereo - Dual I-II/ Lingua
Corrente
(in canali DVB)
Selezione lingua
15. Riavvolgimento rapido
Riavvolgimento rapido
16. Nessuna funzione
17. Pausa
Pausa
18. Play
Play
19. Stop
Stop
20. Avanzamento rapido
Avanzamento rapido
21. Sottotitoli On-off (in modalità
Media Browser e nei canali DVB)
Sottititoli
22. Dimensioni immagine
Dimensioni immagine
23. Pulsante personale 2 (*)
Modalità Ricerca
24. Televideo / Mix / (in modalità
TXT)
25. Guida programmi elettronici (in
canali DVB)
26. Esci
Esci
27. Menu Rapido
28. Programma Giù /
Pagina su -
Programma Su / Pagina giù
29. Programma precedente
30. AV / Selezione sorgente
Selezione sorgente
Nota: I riferimenti in grassetto
sono per i modelli con DVD e con
funzionamento.
Inserimento delle batterie e raggio di azione del telecomando
Rimuovere il coperchio posteriore del vano batterie e assicurarsi che essere
siano inserite nella giusta direzione. Le batterie adatte per questo telecomando sono AAA, IEC R03 1.5V.
Non combinare batterie usate con altre nuove e non mescolare batterie
di tipologia diversa. Rimuovere immediatamente le batterie esaurite per
impedire il versamento di acido nel vano batterie. Smaltirle nelle apposite
aree di smaltimento.
Avvertenza: le batterie non devono essere esposte a calore eccessivo, come
luce solare, fuoco o simili.
Il funzionamento del telecomando diminuisce ad una distanza superiore ai cinque metri o ad una angolazione di più di 30 gradi dal centro della televisione.
Se il raggio di azione si riduce può essere necessario sostituire le batterie.
1. 2.
3.
Page 100

Italiano - 7 -
Italiano
Collegamento di apparecchiature esterne
Prima di collegare una qualsiasi strumentazione esterna, scollegare il dispositivo dalla presa di corrente.
(*) Il numero di questi ingressi può variare a seconda del modello della TV.
Prima della prima installazione, sarà necessario impostare
gli eventuali dispositivi collegati in modalità standby.
Cavo antenna:...............................................................
Collegare l'antenna alla presa ANT sul retro della televisione.
Cavo SCART:..............................................................
Nel caso in cui si usi un decoder* o un media recorder sarà
essenziale che il cavo scart sia collegato alla televisione.
La presa AUDIO DIGITALE consente il collegamento di un
adeguato sistema di surround.
HDMI® (interfaccia multimediale ad alta denizione) va
usata con un decoder DVD o altra strumentazione con uscita
audio e video digitale. La sua resa è ottimale con segnali video
ad alta denizione 1080i e 1080p, ma accetta e visualizza
anche segnali VGA, 480i, 480p, 576i, 576p e 720p. Verranno
visualizzati anche i segnali formato PC.
Nota: sebbene questa televisione sia in grado di collegarsi
ai dispositivi HDMI, è possibile che alcuni dispositivi non
funzionino correttamente.
Sarà possibile usare un cavo da YPbPr a VGA (non in dotazione) per attivare il segnale YPbPr tramite ingresso VGA.
Nota: Non è possibile utilizzare VGA e YPbPr contempo-
raneamente.
Sul retro della TV può essere collegata una vasta gamma di
dispositivi esterni; vedere i relativi manuali di tutti i dispositivi
aggiuntivi per istruzioni dettagliate in merito.
Se la televisione passa automaticamente al monitor del dispositivo esterno, tornare a quello della televisione normale premendo il tasto della posizione del programma desiderato. Per
richiamare la strumentazione esterna premere ripetutamente
il tasto “SOURCE -
” per spostarsi fra le diverse sorgenti.
A prescindere dalla proprietà della sorgente, l'uscita audio
della presa AUDIO DIGITALE non può essere copiata.
 Loading...