

Page 1

MULTIFUNCTIONAL DIGITAL SYSTEMS
Operator’s Manual for
TOSHIBA Viewer
Page 2

LICENSE AGREEMENT
Wordcraft International Limited
Unimessage Pro Software Licence Agreement
CONDITIONS OF PURCHASE
Software is licensed subject to the limitations on permitted use. No refund will be given after the purchaser
has installed the software. This Licence shall continue for as long as the Product is in use. Failure to comply
with the terms and conditions detailed below will result in termination of the licence. All copies of the software must be destroyed on termination of the licence.
PERMITTED USES
The original purchaser may use the software on a computer system owned or used by the original purchaser
for the purpose of any business or profession. The original purchaser may store the software on a hard disk
system for use only by the permitted number of users and connected only to the permitted number of communication devices as specified in the system configuration file contained within the software product at the
time of purchase, plus the number of users and devices added by obtaining a valid licensed upgrade from
Wordcraft International Limited or an authorised agent of Wordcraft International Limited.
USES NOT PERMITTED
1. Downloading of the software from a computer service or bulletin board or use in a multi-site arrangement except in respect of users licensed by Wordcraft International Limited to do so.
2. Use of the software in a computer service business, network, time-sharing, interactive cable television or
multiple CPU arrangement except in respect of users licensed by Wordcraft International Limited to do
so.
3. The use of a single user version on a second or subsequent computer or network workstation. Details of
multi-user packs are available from authorised dealers or authorised distributors of Wordcraft International Limited or direct from Wordcraft International Limited.
4. The use of a network version on a second or subsequent network.
5. The making of alterations and modifications to the software, merging all or any part of the software with
another program, reverse engineering, decamping, or disassembling of the software.
6. Obscuring any areas of the software responsible for company branding, image, help system, contacting
Wordcraft International Ltd, identifying Wordcraft International Ltd as the copyright and trademark
owner, or any such related areas. Exemptions to this clause will only be granted in exceptional circumstances at the discretion of Wordcraft International Ltd Applications must be made in writing to Wordcraft
International Ltd.
7. The right to rent, assign, lease, transfer or grant sub-licences or other rights to others.
8. The making of copies of any documentation belonging to Wordcraft International Limited.
9. The selling or transferring of software marked ‘Not for Resale’ or ‘Evaluation’ or ‘Demonstration’ or
‘Training’.
10. Any other uses not included in “Permitted Uses” above, which would require a licence to use the copyright in the software.
The license contained in this agreement will terminate automatically and without notice from Wordcraft International Limited if any provision in this agreement is not complied with.
GOVERNING LAW
This agreement shall be governed by the laws of the United Kingdom of Great Britain and Northern Ireland.
2 LICENSE AGREEMENT
Page 3

LIMITED WARRANTY
Wordcraft International Limited make no representations or warranties, express or implied, of any kind with
respect to the contents of this package and specifically disclaim any express or implied warranty of merchantability or fitness for any particular purpose. Wordcraft International Limited’s liability shall be limited to
replacing any faulty product with alternative product or a cash refund up to but not exceeding the value of
the monies paid for the product when originally purchased. In no event shall Wordcraft International Limited
or their suppliers be liable for any special, incidental, indirect or consequential damages whatsoever (including, without limitation, damages for loss of revenue or profits, business interruption, lost or damaged data, or
any other loss arising out of the installation of, use of or inability to use this software product). Wordcraft
International Limited shall not be responsible for any claims arising from the use of software marked ‘Not for
Resale’ or ‘Evaluation’ or ‘Demonstration’ or ‘Training’.
Wordcraft International Limited shall not be responsible for any claims arising from the use of software other
than the use for which it was specifically sold.
Wordcraft International Limited shall not be responsible for any claims by a third party.
No oral or written information or advice given to Wordcraft International Limited, or given by Wordcraft International Limited, or an authorised representative shall create a warranty or in any way increase the scope of
this warranty.
COPYRIGHT
Software and documentation produced by Wordcraft International Limited is protected by International
Copyright Conventions.
TRADEMARKS
Wordcraft is a trademark of Wordcraft International Limited.
All other trademarks are acknowledged.
Following installation the package will be automatically registered.
This is a legally binding agreement with Wordcraft International Limited.
If you feel you cannot accept the conditions defined above please return the complete
software package unopened to your supplier.
© 2005 Wordcraft International Limited
LICENSE AGREEMENT 3
Page 4

4 LICENSE AGREEMENT
Page 5
Notice to Users
USE OF RECYCLED PAPER IN THE COPIER
As with all copiers and reproduction devices, the use of the appropriate paper ensures the best image
quality of the copies and the machine’s performance and reliability.
Because of the extreme variances in composition and quality of paper from various manufacturers, consumers should ensure the recycled paper they use is suitable for the copier. In accordance with the EPA
Energy Star Program guidelines, TOSHIBA recommends the following recycled paper for use in the
copier-
Great White MultiUse 20 paper
If you have any questions regarding the use of recycled paper in your copier, contact your authorized
service technician.
FCC NOTICE
This equipment has been tested and found to comply with the limits for a Class A digital device, pursuant to Part 15 of the FCC Rules. These limits are designed to provide reasonable protection against
harmful interference when the equipment is operated in a commercial environment. This equipment
generates, uses and can radiate radio frequency energy and, if not installed and used in accordance
with the instruction manual, may cause harmful interference to radio communications. Operation of this
equipment in a residential area is likely to cause harmful interference in which case the user will be
required to correct the interference at his own expense.
WARNING
Changes or modification made to this equipment, not expressly approved by TOSHIBA TEC or parties
authorized by TOSHIBA TEC, could void the user’s authority to operate the equipment.
This Class A digital apparatus complies with Canadian ICES-003.
Cet appareil numérique de la classe A est conforme à la norme NMB-003 du Canada.
Notice to Users 5
Page 6
Lineup of Our Manuals
Thank you for purchasing the TOSHIBA multifunctional digital systems e-STUDIO163/203/165/
205.
We have provided you with these manuals for the operation of this equipment. Select and read
the manual best suited to your needs.
Operator’s Manual for Copying Functions
e-STUDIO163/203
This manual describes the basic operations, mainly copying
functions, of this equipment. It also describes safety precautions to ensure correct and safe use of this equipment. Be
sure to read this before you use the equipment.
Operator’s Manual for Copying Functions
e-STUDIO165/205
This manual describes the basic operations, mainly copying
functions, of this equipment. It also describes safety precautions to ensure correct and safe use of this equipment. Be
sure to read this before you use the equipment.
Operator’s Manual for TOSHIBA Viewer (PDF)
This manual describes how to use the co-packed application
software TOSHIBA Viewer, and how to print data from other
Windows applications to this equipment.
To read manuals in PDF (Portable Document Format) files
Viewing and printing this operator’s manual in PDF files require that you install Adobe Reader or
Adobe Acrobat Reader on your PC. If Adobe Reader or Adobe Acrobat Reader is not installed
on your PC, download and install it from the website of Adobe Systems Incorporated.
6 Lineup of Our Manuals
Page 7

Before Reading This Manual
This operator’s manual describes the following:
y How to use this equipment
y How to inspect and carry out maintenance on this equipment
y How to remedy mechanical and copying problems
Precautions in this manual
To ensure correct and safe use of this equipment, this operator’s manual describes safety precautions according to the three levels shown below.
You should fully understand the meaning and importance of these items before reading this
manual.
Indicates a potentially hazardous situation which, if not avoided, could result
in death, serious injury, or serious damage, or fire in the equipment or surrounding assets.
Indicates a potentially hazardous situation which, if not avoided, may result in
minor or moderate injury, partial damage of the equipment or surrounding
assets, or loss of data.
Indicates a procedure you should follow to ensure the optimal performance of
the equipment and problem-free copying.
Other than the above, this manual also describes information that may be useful for the operation of this equipment with the following signage:
Trademarks
y Microsoft and Windows are the trademarks of Microsoft Corporation in the US and other
y Adobe, Adobe Acrobat, Adobe Reader and Adobe Acrobat Reader are the trademarks of
y Other company or product names shown in this manual may be a brand name or a trade-
©2005 TOSHIBA TEC CORPORATION All rights reserved
Under the copyright laws, this manual cannot be reproduced in any form without prior written
permission of TOSHIBA TEC CORPORATION. No patent liability is assumed, however, with
respect to the use of the information contained herein.
Describes handy information that is useful to know when operating the equipment.
Pages describing items related to what you are currently doing. See these
pages as required.
countries.
Adobe Systems Incorporated.
mark of each company.
Before Reading This Manual 7
Page 8

8 Before Reading This Manual
Page 9

CONTENTS
Operator’s Manual for TOSHIBA Viewer
LICENSE AGREEMENT ................................................................................2
Notice to Users .............................................................................................5
Lineup of Our Manuals................................................................................. 6
Before Reading This Manual ....................................................................... 7
Chapter 1 INTRODUCTION
Introduction................................................................................................. 12
Chapter 2 INSTALLATION
About Installation ....................................................................................... 14
Before Installing the Softwares................................................................ 14
Installing the USB Driver ........................................................................... 17
From the Plug-and-Play Prompt..............................................................17
Installing the Printer Driver to the Local Client ....................................... 33
Before installing the Printer Driver...........................................................33
From the Add Printer Wizard ................................................................... 34
Installing the TOSHIBA Viewer..................................................................66
Before installing the TOSHIBA Viewer .................................................... 66
Installation ............................................................................................... 66
Device Setup ........................................................................................... 71
To utilize TOSHIBA Viewer when logging on as different user
who also has Admin rights....................................................................... 78
Uninstalling the TOSHIBA Viewer............................................................. 82
Before uninstalling the TOSHIBA Viewer ................................................ 82
Removing the e-STUDIO163/203/165/205 COM Port ...............................86
Before removing the e-STUDIO163/203/165/205 COM port................... 86
Installing the Printer Driver to the Network Client .................................. 90
Before installing the Printer Driver...........................................................90
Supplement ...............................................................................................113
Cancelling print jobs ..............................................................................113
Chapter 3 DESCRIPTION OF THE FUNCTIONS
Description of the Main Welcome Menu.................................................116
Summary of each menu ........................................................................116
Browse Folders......................................................................................... 118
How to operate "Browse Folders" and each function ............................118
Copy...........................................................................................................142
CONTENTS 9
Page 10

How to operate "Copy" and each function............................................. 142
File Scan.................................................................................................... 143
How to operate "File Scan" and each function ......................................143
Email Scan ................................................................................................146
How to operate "Email Scan" and each function ................................... 146
Setup..........................................................................................................148
How to operate "Setup" and each function............................................ 148
TOSHIBA Viewer GDI Printer...................................................................154
How to print a document using TOSHIBA Viewer GDI Printer .............. 154
INDEX .......................................................................................................................................159
Operator’s Manual for TOSHIBA Viewer
10 CONTENTS
Page 11

1.INTRODUCTION
This section describes the overview of TOSHIBA Viewer.
Introduction.............................................................................................................12
Page 12

1 INTRODUCTION
Introduction
“TOSHIBA Viewer” has been specially designed for use with the Toshiba Multifunctional Digital
Systems e-STUDIO163/203/165/205 and TWAIN compatible scanning devices.
Available features of TOSHIBA Viewer include:
y Using your e-STUDIO163/203/165/205 as a printer.
y Using your e-STUDIO163/203/165/205 as a scanner.
y Configuring your e-STUDIO163/203/165/205 from the PC.
y Scanning hard copy documents using your TWAIN scanner.
y Creating graphics files in the TOSHIBA Viewer.
y Storing properties of files in the Unimessage Pro folders to be used with TOSHIBA Viewer’s
sophisticated search engine.
y Routing of scanned images using TOSHIBA Viewer’s simple wizard style Routing Rules.
y Create or edit the Phone/Fax numbers stored in your e-STUDIO165/205 from the PC.
(only for the e-STUDIO165/205 with the fax option installed)
y Creating contacts in your TOSHIBA Viewer Phonebooks for frequently used fax numbers
and E-mail addresses.
(only for the e-STUDIO165/205 with the fax option installed)
y The Fax functions are only available for the e-STUDIO165/205 with the fax option installed.
y The functions of TOSHIBA Viewer are not available for the e-STUDIO165/205 with the
optional Network Printer Kit installed.
This manual gives instructions on how to install the GDI printer driver, TWAIN scanner driver
and TOSHIBA Viewer and basic information about some of the other functions listed above.
12 Introduction
Page 13

2.INSTALLATION
This section describes the instructions on how to install the printer/scanner driver and TOSHIBA Viewer on
your PC.
About Installation....................................................................................................14
Before Installing the Softwares .........................................................................................................14
Installing the USB Driver........................................................................................17
From the Plug-and-Play Prompt........................................................................................................17
Installing the Printer Driver to the Local Client....................................................33
Before installing the Printer Driver ....................................................................................................33
From the Add Printer Wizard.............................................................................................................34
Installing the TOSHIBA Viewer ..............................................................................66
Before installing the TOSHIBA Viewer..............................................................................................66
Installation.........................................................................................................................................66
Device Setup.....................................................................................................................................71
To utilize TOSHIBA Viewer when logging on as different user who also has Admin rights...............78
Uninstalling the TOSHIBA Viewer .........................................................................82
Before uninstalling the TOSHIBA Viewer..........................................................................................82
Removing the e-STUDIO163/203/165/205 COM Port............................................86
Before removing the e-STUDIO163/203/165/205 COM port ............................................................86
Installing the Printer Driver to the Network Client...............................................90
Before installing the Printer Driver ....................................................................................................90
Supplement ...........................................................................................................113
Cancelling print jobs........................................................................................................................ 113
Page 14

2INSTALLATION
About Installation
Before installing the printer/scanner driver and TOSHIBA Viewer, please read this section to
ensure the requirements for the installation, and understand the various ways of the installation
that you are provided.
Before Installing the Softwares
Computer Requirements
The Requirements indicated here are minimums.
As with most Windows applications, TOSHIBA Viewer will run faster when used on a PC with a
faster processor or with more RAM.
If you are using other applications on your PC at the same time as TOSHIBA Viewer, a faster
processor and additional RAM are highly recommended.
The TOSHIBA Viewer system is compatible with Microsoft Windows 98 Second Edition,
Microsoft Windows Me, Microsoft Windows 2000, Microsoft Windows XP or Microsoft Windows
Server 2003.
Make sure that your computer meets the following criteria.
The TOSHIBA Viewer system is not applicable to a 64-bit OS.
PC: PC/AT 100% compatible; Pentium 120 MHz or higher for
Windows 98 Second Edition
PC/AT 100% compatible; Pentium 150 MHz or higher for
Windows Me or Windows 2000 Professional
PC/AT 100% compatible; Pentium 300 MHz or higher for
Windows XP Home or Professional, or Windows 2000
Server
PC/AT 100% compatible; Pentium 400 MHz or higher for
Windows Server 2003
Operating system: Microsoft Windows 98 Second Edition
Microsoft Windows Me
Microsoft Windows 2000 Professional or Server
Microsoft Windows XP Home or Professional
Microsoft Windows Server 2003
PC memory: 32M Bytes RAM for Windows 98 Second Edition
64M Bytes RAM (128MB recommended) for Windows Me or
Windows 2000 Professional
128M Bytes RAM for Windows XP Home or Professional
256M Bytes RAM for Windows 2000 Server
512M Bytes RAM for Windows Server 2003
Display: A 24 bit color video card and driver is recommended
14 About Installation
Page 15

Configuration of the TOSHIBA Viewer CD-ROM
The configuration of the TOSHIBA Viewer CD-ROM and the purposes for each folder are as
described below.
y \Toshiba Viewer
Includes the Setup.exe to install the TOSHIBA Viewer, printer driver and TWAIN driver.
y \Driv_USB\e-ST163,203,165,205\Win98SE
Includes the USB driver for Windows 98 SE
y \Driv_USB\e-ST163,203,165,205\WinMe
Includes the USB driver for Windows Me
y \Driv_USB\e-ST163,203,165,205\Win2k
Includes the USB driver for Windows 2000
y \Driv_USB\e-ST163,203,165,205\WinXP
Includes the USB driver for Windows XP
y \Driv_USB\e-ST163,203,165,205\Win2003
Includes the USB driver for Windows Server 2003
y \Driv9xMe\Local
Includes the printer driver and TWAIN driver for ADD Printer function in Windows 98 SE/Me
that e-STUDIO163/203/165/205 is connected in local.
y \Driv9xMe\Network
Includes the printer driver for the network client computers of Windows 98 SE/Me
y \Driv2kXp\Local
Includes the printer driver and TWAIN driver for ADD Printer function in Windows 2000/XP/
Server 2003 that e-STUDIO163/203/165/205 is connected in local.
y \Driv2kXp\Network
Includes the printer driver for the network client computers of Windows 2000/XP/Server 2003
About Installation 15
Page 16

2INSTALLATION
Navigating your Installation
There are many different ways of installing the e-STUDIO163/203/165/205 softwares according
to the environments or your requirements.
Please carefully read the instruction below and find out what you should do for installing the softwares.
y P.17 “Installing the USB Driver”
First of all, it is recommended to install the USB driver when connecting the e-STUDIO163/
203/165/205 to your PC via the USB cable.
y P.33 “Installing the Printer Driver to the Local Client”
After you install the USB driver, you can install the GDI printer driver when connecting the eSTUDIO163/203 to your PC in local. For Windows 2000, XP, Server 2003, the printer driver
can be installed automatically when you install the USB driver.
This driver allows you to print the document with e-STUDIO163/203.
y P.66 “Installing the TOSHIBA Viewer”
After you install the GDI printer driver, you can install the TOSHIBA Viewer if you want use
this utility.
This utility allows you to control your e-STUDIO163/203/165/205 from your PC, such as
scanning, copying, and configuring the device settings. For further details of the TOSHIBA
Viewer, see the following page.
P.116 “Description of the Main Welcome Menu”
y P.90 “Installing the Printer Driver to the Network Client”
You can also install the GDI printer driver to the network clients.
This allows printing from the network clients with e-STUDIO163/203/165/205.
Screens used in the installation procedures of the above softwares are captured in system environment with the e-STUDIO163 connected.
16 About Installation
Page 17
Installing the USB Driver
Never turn the power off of the equipment or pull out the USB cable while you are installing the
e-STUDIO163/203/165/205 software and data communication is being performed between the
equipment and your PC.
From the Plug-and-Play Prompt
When using the e-STUDIO163/203/165/205 is connected to your PC via the USB cable and
powered on Windows will prompt to install drivers for the new hardware.
Drivers are provided on the CD in the "Driv_USB" folder, select to install drivers from this specific location.
These drivers will install an additional COM port, in Windows through which the Toshiba Viewer
will then communicate with the e-STUDIO163/203/165/205. There are various ways of installation according to the Windows version running on your PC.
P.17 “Windows 98 SE/Me”
P.23 “Windows 2000”
P.28 “Windows XP/Server 2003”
Windows 98 SE/Me
The following describes an installation on Windows 98 Second Edition.
The procedure is almost the same when Windows Me is used.
Make sure you understand the following information.
An additional COM port can only be installed on your PC by your executing USB driver installation two times. Even if you finish the installation by clicking the [Finish] button on the “Add New
Hardware Wizard”, the communication port will not be installed. When the “Add New Hardware
Wizard” appears again after clicking the [Finish] button, follow the procedure in the manual to
execute the USB driver installation once again.
Connect the e-STUDIO163/203/165/205 to the computer by a USB
1
cable, make sure it is turned on and start Windows.
Installing the USB Driver 17
Page 18

2INSTALLATION
When Windows detects the device, the Plug-and-Play screen is dis-
2
played.
Windows 98 SE
Click [Next].
Windows Me
Proceed to step 3.
18 Installing the USB Driver
Page 19
Select what you want Windows to do.
3
Windows 98 SE
Select [Search for the best driver for your device (Recommended)] and click [Next].
Windows Me
Select [Specify the location of the driver (Advanced)] and click [Next].
Installing the USB Driver 19
Page 20
2INSTALLATION
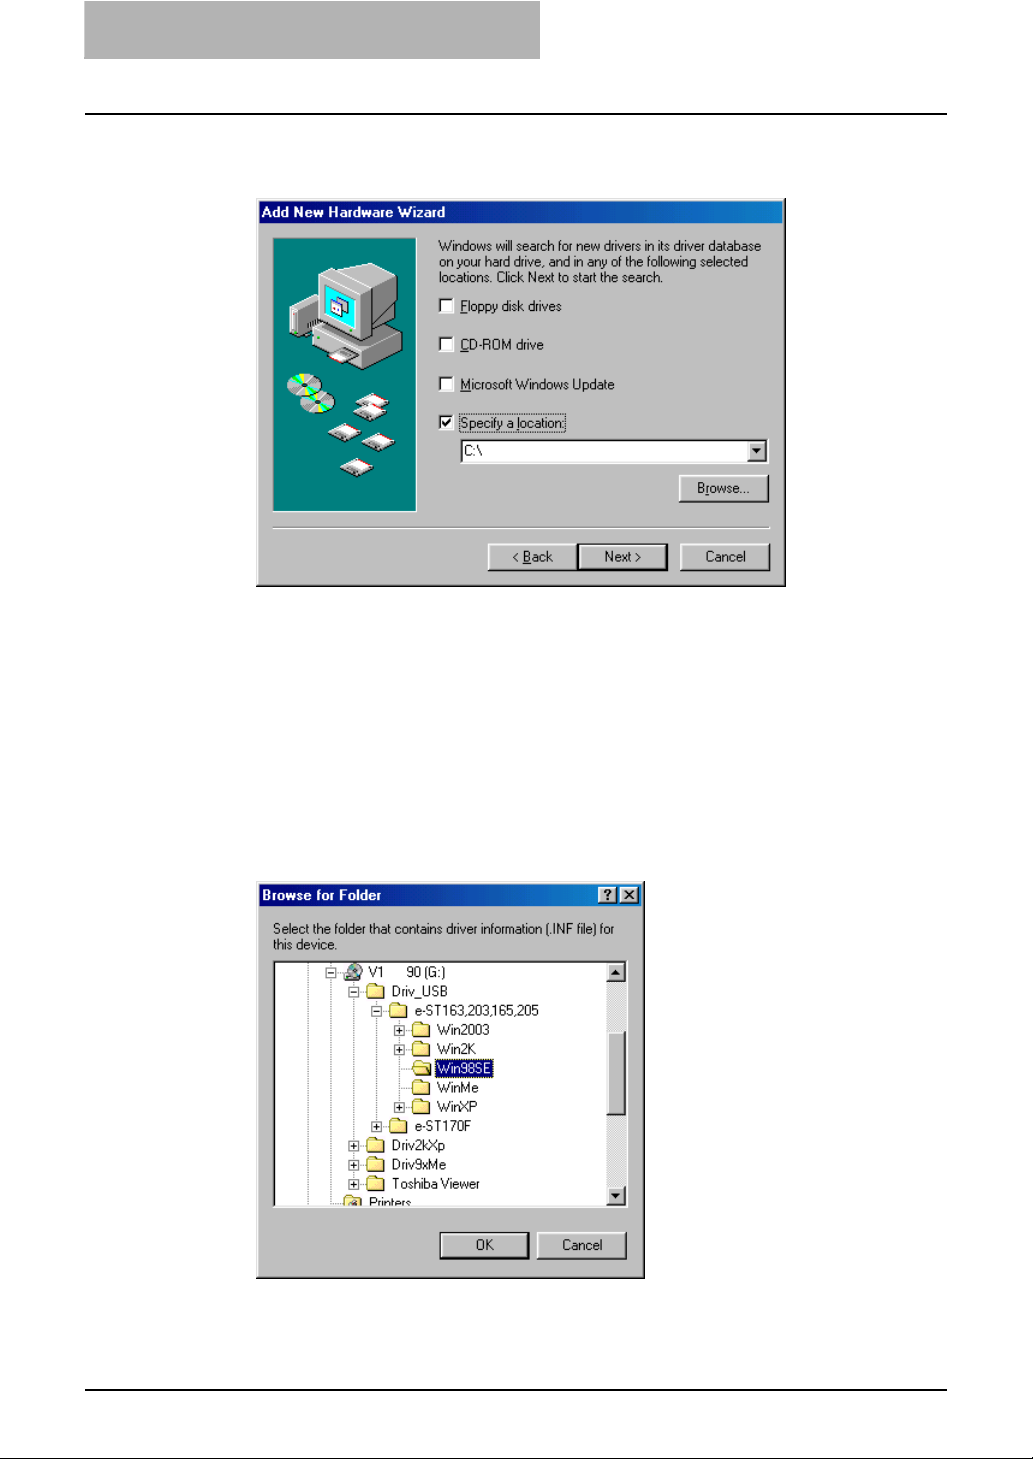
Select the search location.
4
Select [Specify a location] and click [Browse].
Insert the TOSHIBA Viewer CD-ROM in to the CD-ROM drive.
5
Browse to the USB driver folder.
6
Windows 98 SE
To install the USB driver, locate “[CD-ROM drive]:\Driv_USB\e-ST163,203,165,205\
Win98SE”.
Windows Me
To install the USB driver, locate “[CD-ROM drive]:\Driv_USB\e-ST163,203,165,205\
WinMe”.
Select the folder and click [OK].
20 Installing the USB Driver
Page 21
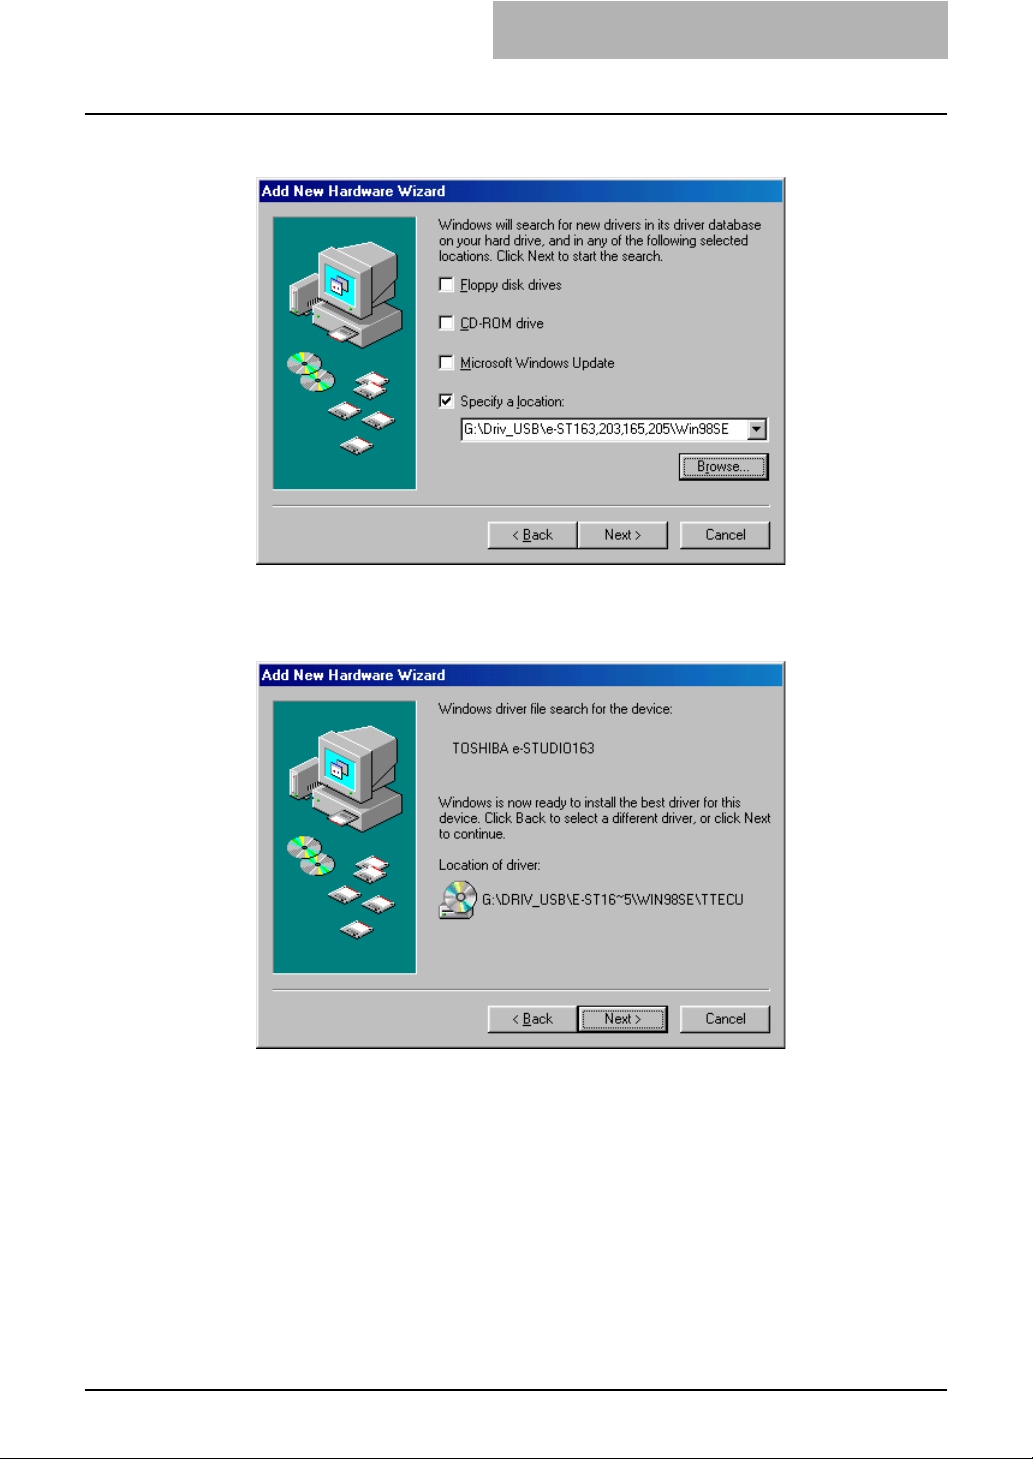
Click [Next].
7
Click [Next].
8
It starts copying file.
Installing the USB Driver 21
Page 22
2INSTALLATION
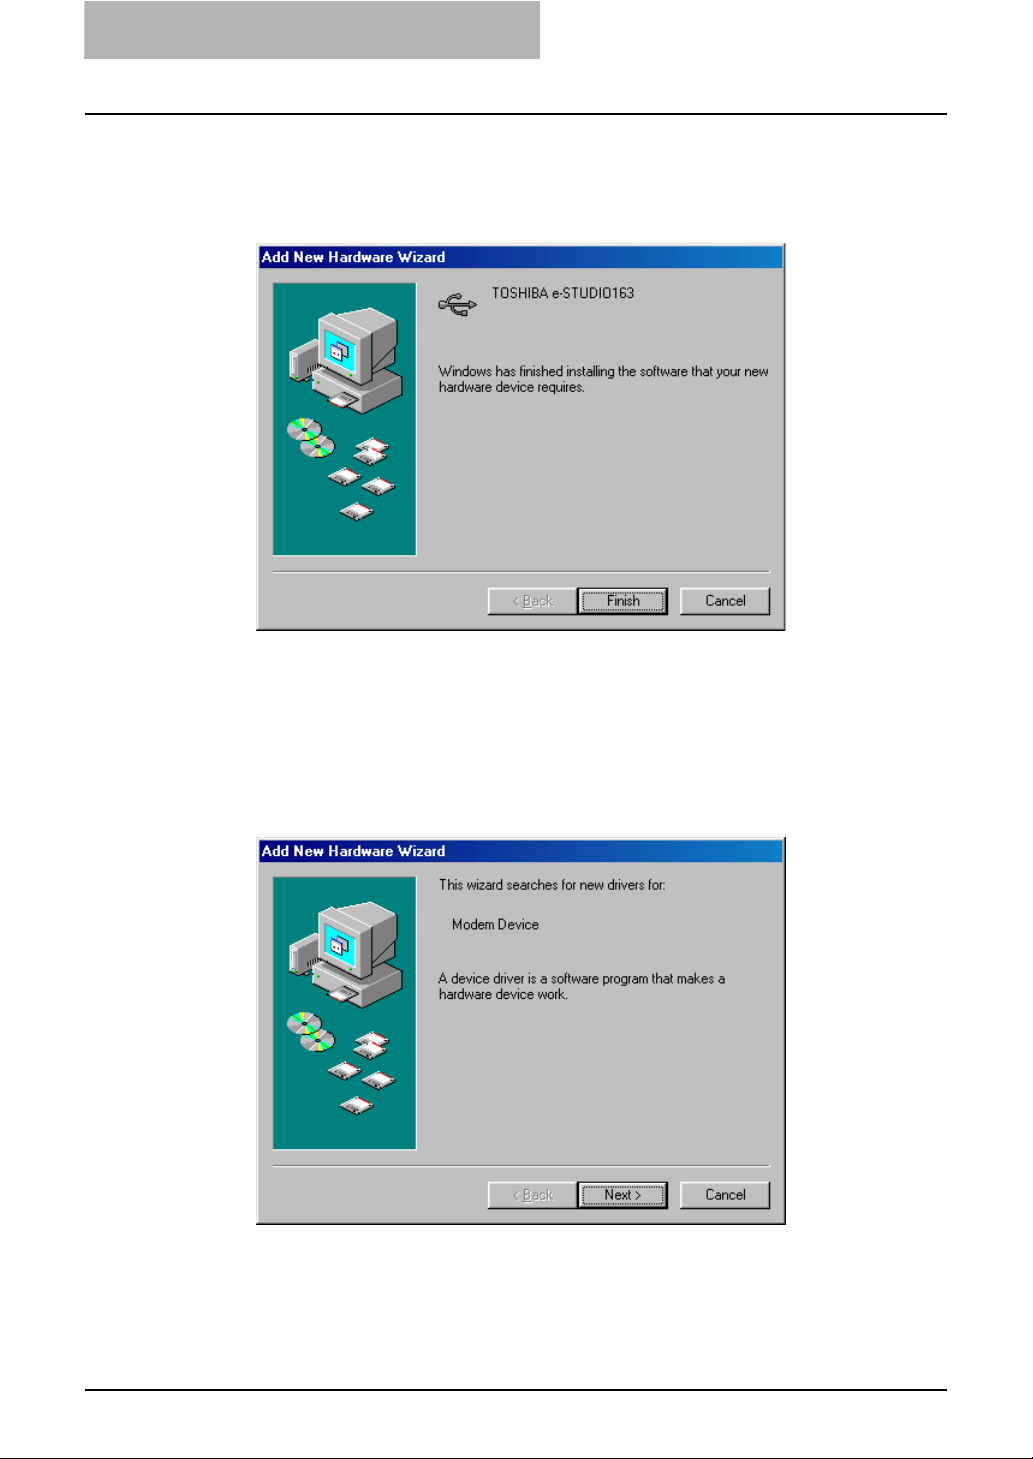
Click [Finish] to complete the installation.
9
Proceed to step 10.
An additional COM port is installed on your PC by your executing USB driver installation
two times.
The “Add New Hardware Wizard” appears again.
10
Follow steps 2 to 9 to execute the USB driver installation once again.
This will install an additional COM port, e. g. COM3 if the PC already has COM1 and
COM2, through which the device driver will communicate with the e-STUDIO163/203/
165/205 device.
Proceed to step 11.
22 Installing the USB Driver
Page 23
After the USB driver is installed, “Add Printer Wizard” appears.
11
Follow steps 4 and after in the section “From the Add Printer Wizard” to install the printer
driver for the e-STUDIO163/203/165/205.
P.34 “From the Add Printer Wizard”
If “Add Printer Wizard” does not appear, or you clicked the [Cancel] button on “Add
Printer Wizard”, go to the following page to install the printer driver for the e-STUDIO163/
203/165/205.
P.34 “From the Add Printer Wizard”
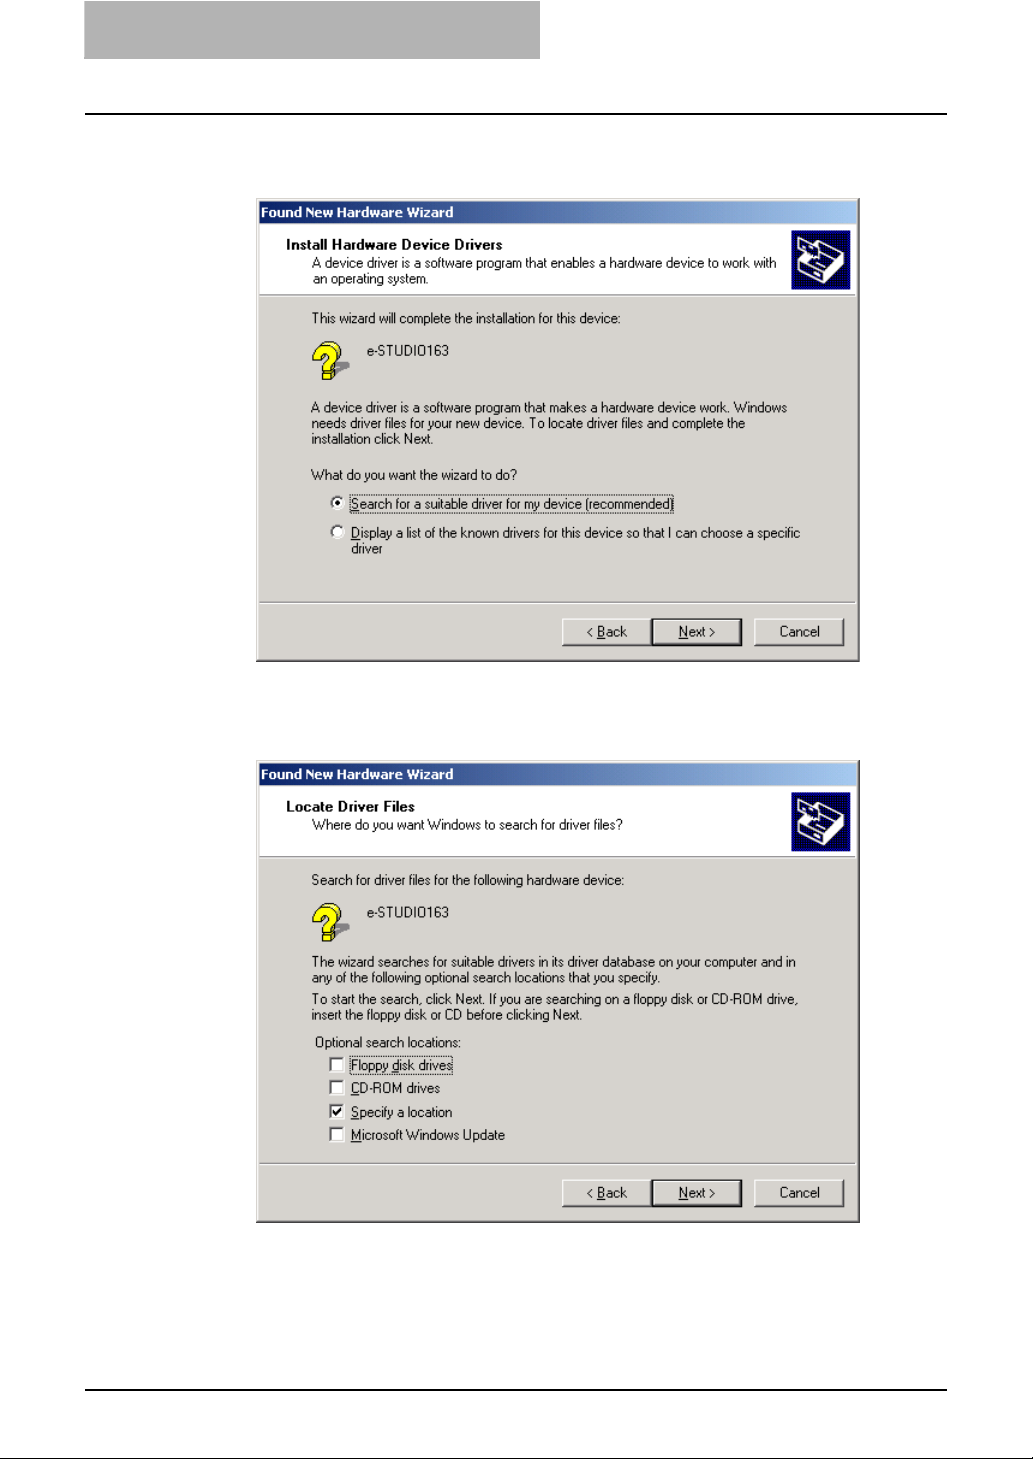
Windows 2000
Please make sure that you have Administrator access right.
Connect the e-STUDIO163/203/165/205 to the computer by a USB
1
cable, make sure it is turned on and start Windows.
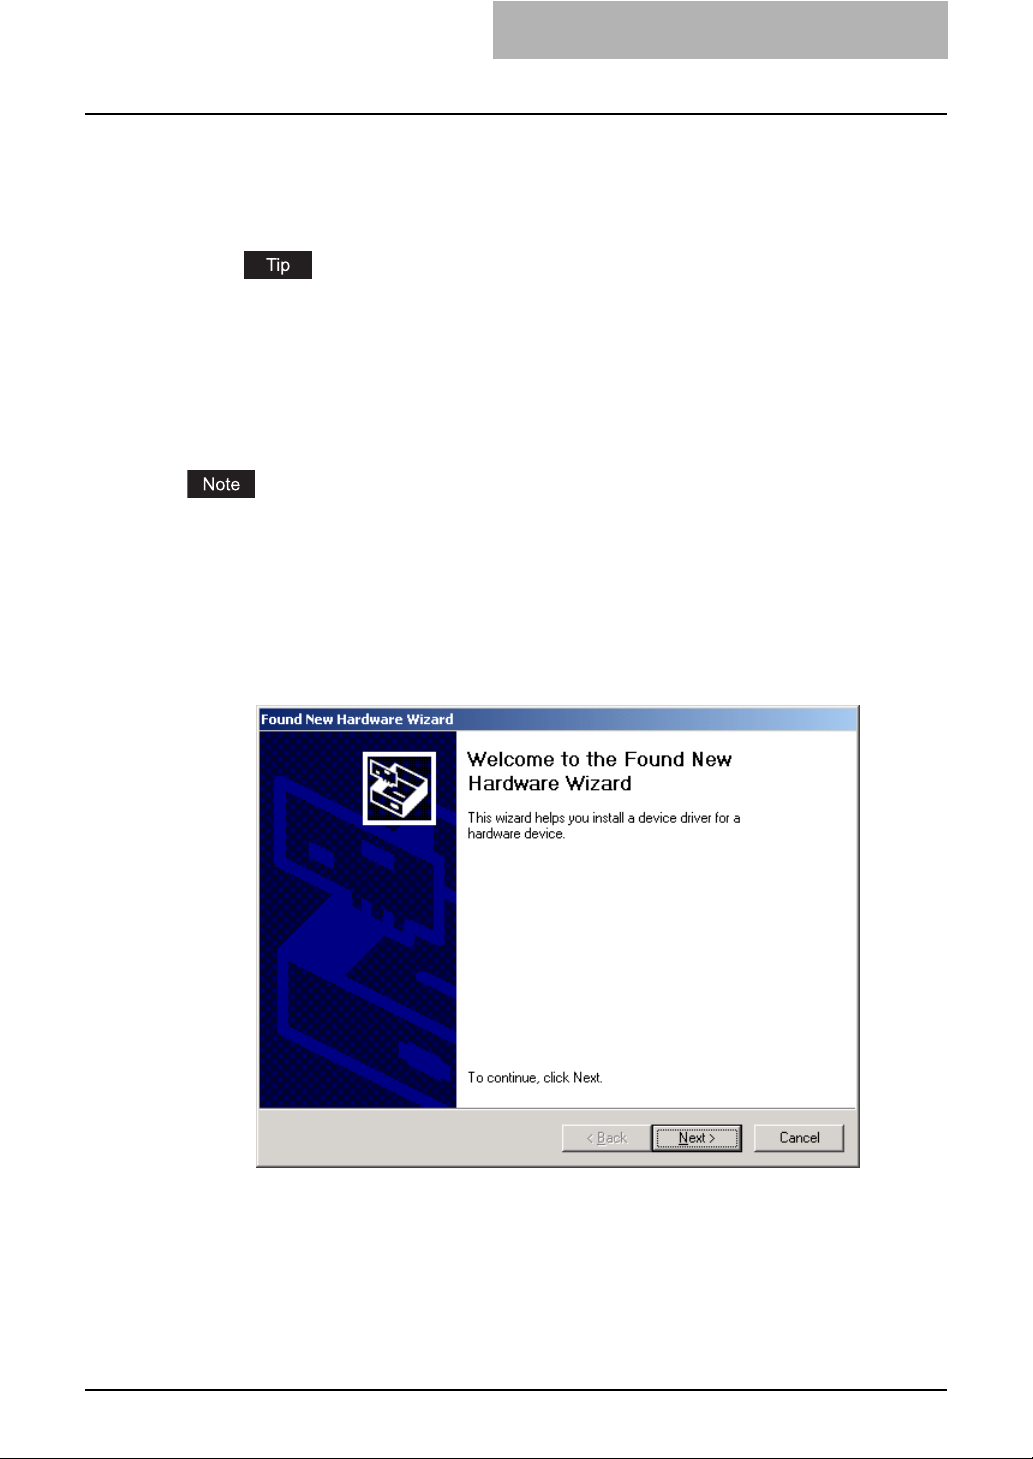
When Windows detects the device, the Plug-and-Play screen is dis-
2
played.
Click [Next].
Installing the USB Driver 23
Page 24
2INSTALLATION
Select what you want Windows to do.
3
Select [Search for a suitable driver for my device (recommended)] and click [Next].
Select the search location.
4
Select [Specify a location] and click [Next].
24 Installing the USB Driver
Page 25
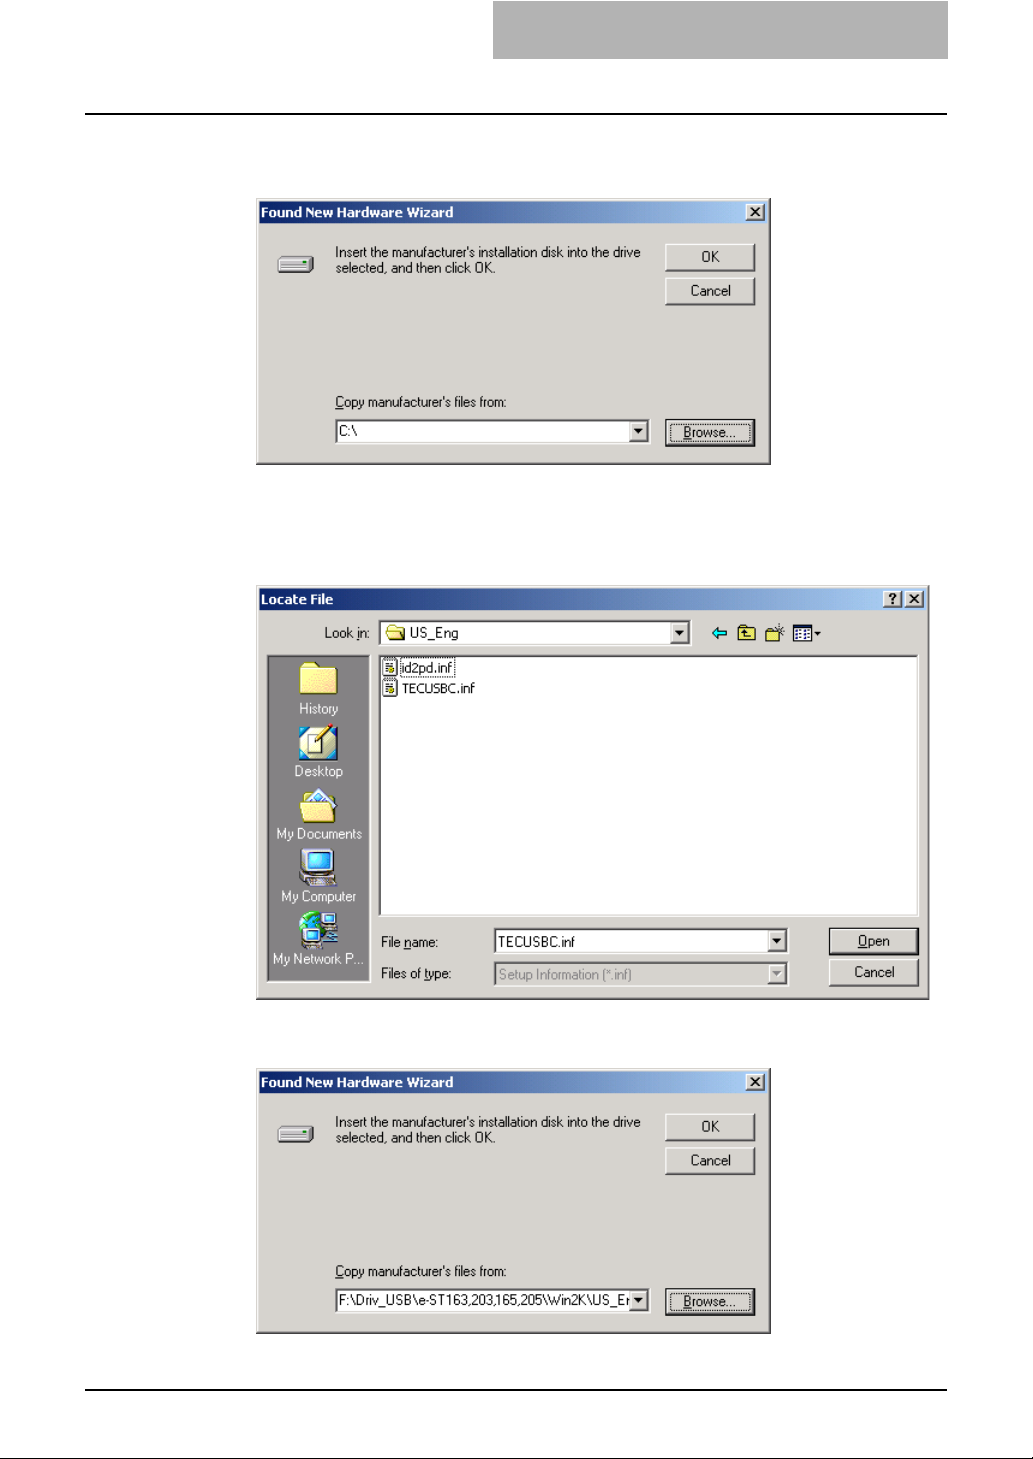
Insert the TOSHIBA Viewer CD-ROM to the CD-ROM drive.
5
Click [Browse].
Browse to the USB driver folder.
6
To install the USB driver, locate “[CD-ROM drive]:\Driv_USB\e-ST163,203,165,205\
Win2k” then specify the language sub-folder you want to install and click [Open].
Click [OK].
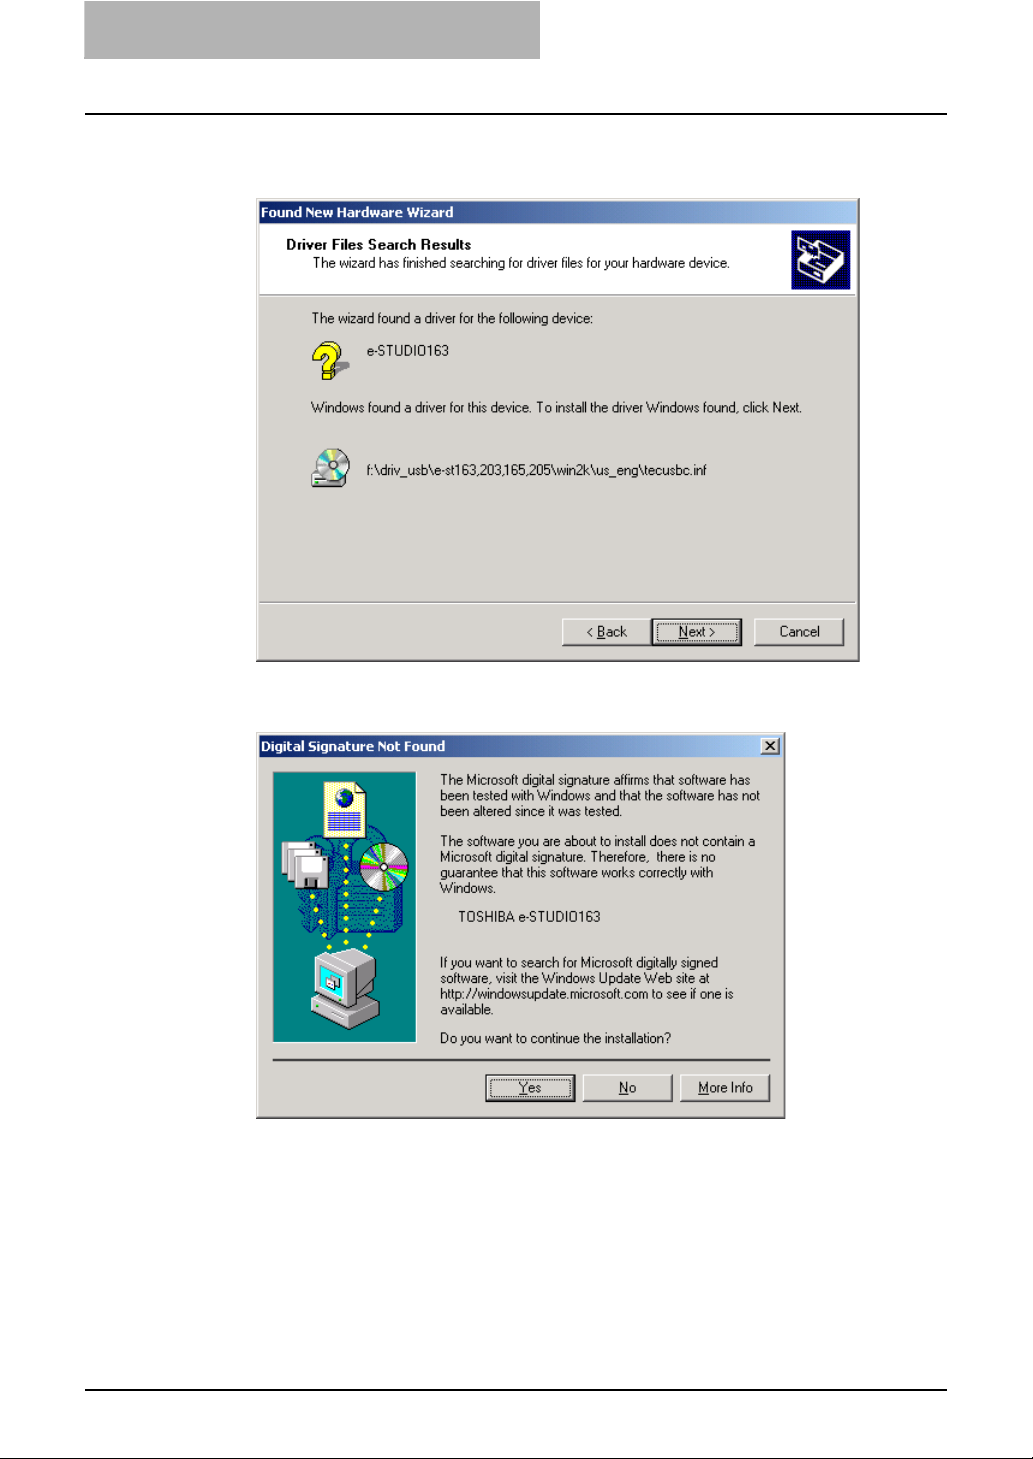
7
Installing the USB Driver 25
Page 26
2INSTALLATION
Click [Next].
8
It starts copying file.
Click [Yes].
9
26 Installing the USB Driver
Page 27
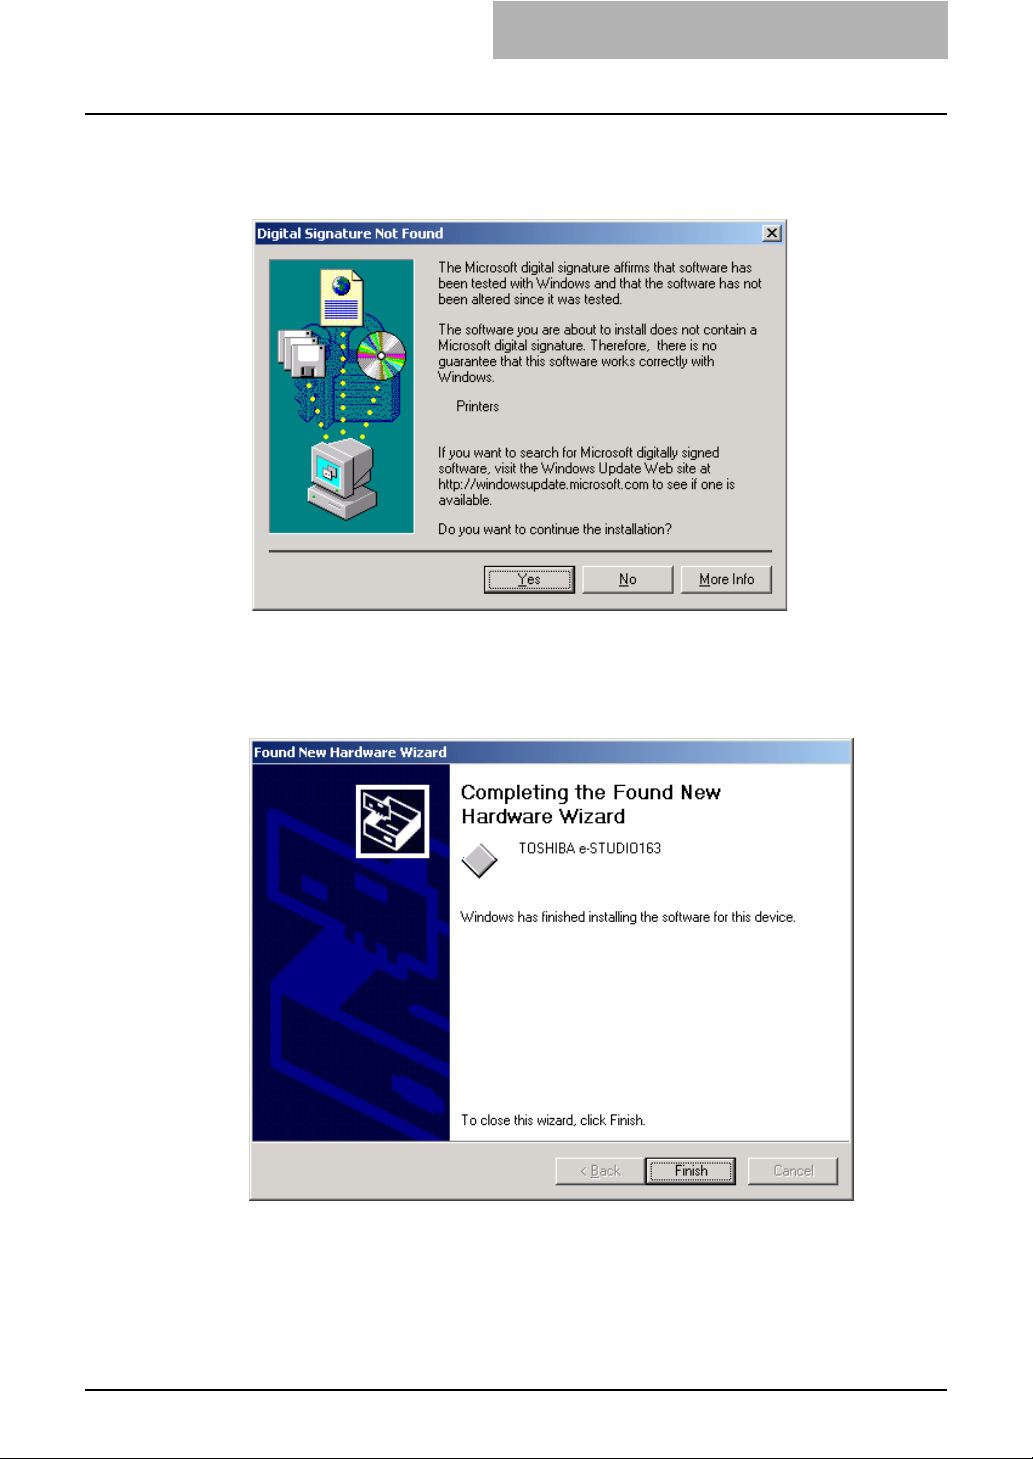
After the USB driver is installed, installation of the printer driver for
10
the e-STUDIO163/203/165/205 automatically begins.
Click [Yes].
Click [Finish] to complete the installation.
11
This will install an additional COM port, e. g. COM3 if the PC already has COM1 and
COM2, through which the device driver will communicate with the e-STUDIO163/203/
165/205 device.
Installing the USB Driver 27
Page 28

2INSTALLATION
Windows XP/Server 2003
The following describes an installation on Windows XP.
The procedure is almost the same when Windows Server 2003 is used.
Please make sure that you have Administrator access right.
Connect the e-STUDIO163/203/165/205 to the computer by a USB
1
cable, make sure it is turned on and start Windows.
The Found New Hardware Wizard dialog box appears.
Select whether or not Windows connects to Windows Update to
2
search for software.
Select [No, not this time] and click [Next].
This screen is not displayed with versions prior to SP2.
28 Installing the USB Driver
Page 29

Select what you want Windows to do.
3
Select [Install from a list or specific location (Advanced)] and click [Next].
Select the search location.
4
Select [Search for the best driver in these locations] and [Include this location in
the search]. Click [Browse].
Insert the Toshiba Viewer CD-ROM in to the CD-ROM drive.
5
Installing the USB Driver 29
Page 30

2INSTALLATION
Browse to the USB driver folder.
6
Windows XP
To install the USB driver, locate "[CD-ROM drive]:\Driv_USB\e-ST163,203,165,205\
WinXP", then specify the language sub-folder you want to install.
Windows Server 2003
To install the USB driver, locate "[CD-ROM drive]:\Driv_USB\e-ST163,203,165,205\
Win2003", then specify the language sub-folder you want to install.
Select the folder and click [OK].
Click [Next].
7
It starts copying files.
30 Installing the USB Driver
Page 31

Click [Continue Anyway].
8
After the USB driver is installed, installation of the printer driver for
9
the e-STUDIO163/203/165/205 automatically begins.
Click [Continue Anyway].
Installing the USB Driver 31
Page 32

2INSTALLATION
Click [Finish] to complete the installation.
10
This will install an additional COM port, e.g. COM3 if the PC already has COM1 and
COM2, through which the device driver will communicate with the e-STUDIO163/203/
165/205 device.
32 Installing the USB Driver
Page 33

Installing the Printer Driver to the Local Client
Before installing the Printer Driver
Before installing the printer driver, please follow the
instruction described here.
When you have already installed the previous version of the Printer Driver on
your PC...
Please delete the printer driver from the Printers folder as soon as you start the Windows.
(The printer driver cannot be deleted properly when the printer driver had been used before
deleting.)
Installing the Printer Driver to the Local Client 33
Page 34

2INSTALLATION
From the Add Printer Wizard
Upon connecting the e-STUDIO163/203/165/205 to your PC as a local (COM) device, you can
install the printer driver for this e-STUDIO163/203/165/205 using this procedure.
There are various ways of installation according to the Windows version running on your PC.
P.34 “Windows 98 SE/Me”
P.42 “Windows 2000”
P.54 “Windows XP/Server 2003”
Windows 98 SE/Me
The printer drivers in the languages listed below are on the CD-ROM supplied with your
machine.
Please select the language sub-folder by following the language of the Windows you are using.
\Bra_Por
\CaFrench
\Chinese
\Danish
\Dutch
\Finnish
\French
\German
\Italian
\Mex_Span
\Norwe
\Portu
\Spanish
\Swedish
\UK_Eng
\US_Eng
The following describes an installation on Windows 98 Second Edition.
The procedure is almost the same when Windows Me is used.
: Portuguese [Brazilian]
: French [Canadian]
: Chinese
: Danish
: Dutch
: Finnish
: French
: German
: Italian
: Spanish [Mexican]
: Norwegian
: Portuguese
: Spanish
: Swedish
: English [UK]
: English [US]
Please make sure that following terms are satisfied.
y Close all applications that are running to avoid any conflicts during installation.
y The TOSHIBA e-STUDIO163/203/165/205 is connected to your PC and powered on.
y The USB driver has been already installed on your PC.
34 Installing the Printer Driver to the Local Client
Page 35

Open the [Printers] folder.
1
Click [Start] and select [Settings/Printers].
Double click on [Add Printer] icon.
2
Installing the Printer Driver to the Local Client 35
Page 36

2INSTALLATION
Click [Next].
3
Select [Local printer].
4
Click [Next].
36 Installing the Printer Driver to the Local Client
Page 37

Windows presents a list of printers it knows about.
5
Click [Have Disk].
Insert the TOSHIBA Viewer CD-ROM in to the CD-ROM drive.
6
Click [Browse].
Browse to the printer driver folder.
7
Browse to the appropriate language sub-folder of the “Local” folder in the “Driv9xMe”
folder. Highlight “oemsetup.inf” and click [OK].
Installing the Printer Driver to the Local Client 37
Page 38

2INSTALLATION
Click [OK].
8
Select the appropriate printer from the list.
9
Click [Next].
38 Installing the Printer Driver to the Local Client
Page 39

Select whether or not you use the existing printer driver.
10
Select [Keep existing driver (recommended)] and click [Next].
This screen appears when the e-STUDIO163/203/165/205 printer driver has been
already installed on your PC.
Installing the Printer Driver to the Local Client 39
Page 40

2INSTALLATION
Select the port to which your printer is connected.
11
Select [COM port] and click [Next].
y Specify the COM port which is set when installing the USB driver to your PC.
P.17 “Installing the USB Driver”
Example: COM3
y The new COM port will appear in the [Ports] section of Windows' [Device Manager],
you can open Device Manager to check what port number has been assigned as follows:
Windows 98 SE/Me: Click [Start], [Control Panel], [System], select the [Device
Manager] tab, expand the [Ports] branch.
Type the printer name and select whether or not you use e-STUDIO
12
163/203/165/205 as the default printer.
Rename the printer name if required. Click [Finish]. Files will be copied and installed.
40 Installing the Printer Driver to the Local Client
Page 41

Insert the disk labeled “Windows 98 Second Edition CD-ROM” to
13
the CD-ROM drive and click [OK].
Complete the installation.
14
Your e-STUDIO163/203/165/205 printer driver is now installed and ready to use.
If you wish you can print a test page from [Control Panel]/[Printers], by double clicking
on the printer icon and selecting [Print Test Page] on the [General] tab of the printer’s
properties.
y To remove your printer, driver simply open [Control Panel]/[Printers], highlight the
printer and press the [Delete] key on your keyboard.
y When you want to use the TOSHIBA Viewer, go to the following page and install the
TOSHIBA Viewer.
P.66 “Installing the TOSHIBA Viewer”
Installing the Printer Driver to the Local Client 41
Page 42

2INSTALLATION
Windows 2000
The printer drivers in the languages listed below are on the CD-ROM supplied with your
machine.
Please select the language sub-folder by following the language of the Windows you are using.
\Bra_Por
\CaFrench
\Chinese
\Danish
\Dutch
\Finnish
\French
\German
\Italian
\Mex_Span
\Norwe
\Portu
\Spanish
\Swedish
\UK_Eng
\US_Eng
Please make sure that following terms are satisfied.
y Close all applications that are running to avoid any conflicts during installation.
y The TOSHIBA e-STUDIO163/203/165/205 is connected to your PC and powered on.
y The USB driver has been already installed on your PC.
y Make sure you have Administrator access rights.
: Portuguese [Brazilian]
: French [Canadian]
: Chinese
: Danish
: Dutch
: Finnish
: French
: German
: Italian
: Spanish [Mexican]
: Norwegian
: Portuguese
: Spanish
: Swedish
: English [UK]
: English [US]
42 Installing the Printer Driver to the Local Client
Page 43

Open the [Printers] folder.
1
Click [Start] and select [Settings/Printers].
Double click on [Add Printer] icon.
2
Installing the Printer Driver to the Local Client 43
Page 44

2INSTALLATION
Click [Next].
3
Select [Local printer].
4
Uncheck [Automatically detect and install my Plug and Play printer] and click [Next].
44 Installing the Printer Driver to the Local Client
Page 45

Select the port to which your printer is connected.
5
Select [COM port] and click [Next].
y Specify the COM port which is set when installing the USB driver to your PC.
P.17 “Installing the USB Driver”
Example: COM3
y The new COM port will appear in the [Ports] section of Windows' [Device Manager],
you can open Device Manager to check what port number has been assigned as follows:
Windows 2000: Click [Start], [Settings], [Control Panel], [System], select the
[Hardware] tab, click the [Device Manager] button, expand the [Ports] branch.
Installing the Printer Driver to the Local Client 45
Page 46

2INSTALLATION
Windows presents a list of printers it knows about.
6
Click [Have Disk].
Insert the TOSHIBA Viewer CD-ROM in to the CD-ROM drive.
7
Click [Browse].
46 Installing the Printer Driver to the Local Client
Page 47

Browse to the printer driver folder.
8
Browse to the appropriate language sub-folder of the “Local” folder in the “Driv2kXp”
folder.
Highlight “oemsetup.inf” and click [Open].
Click [OK].
9
Installing the Printer Driver to the Local Client 47
Page 48

2INSTALLATION
Select the appropriate printer from the list.
10
Click [Next].
Select whether or not you use the existing printer driver.
11
Select [Keep existing driver (recommended)] and click [Next].
This screen appears when the e-STUDIO163/203/165/205 printer driver has been
already installed on your PC.
48 Installing the Printer Driver to the Local Client
Page 49

Type the printer name and select whether or not you use e-STUDIO
12
163/203/165/205 as the default printer.
Rename the printer name if required and click [Next].
Select the printer is shared with network clients or not.
13
(1) If you want this printer to be used by only the local client, select [Do not share this
printer]. If you want this printer to be shared with network clients, select [Shared as]
and enter the shared printer name.
(2) Click [Next].
Installing the Printer Driver to the Local Client 49
Page 50

2INSTALLATION
Select whether printing the test page or not.
14
(1) If you want to print a test page, select [Yes]. If you do not want to print a test page,
(2) Click [Next].
select [No].
Click [Finish] to complete the Add Printer Wizard.
15
Your e-STUDIO163/203/165/205 Series printer driver is now installed.
50 Installing the Printer Driver to the Local Client
Page 51

Click [Yes].
16
The installation is continued and your e-STUDIO163/203/165/205 Series printer driver
becomes ready to use.
When you want to use the TOSHIBA Viewer, go to the following page and install the
TOSHIBA Viewer. P.66 “Installing the TOSHIBA Viewer”
Installing the Printer Driver to the Local Client 51
Page 52

2INSTALLATION
Make sure a test page is successfully printed when you request
17
printing a test page.
If a test page is successfully printed, click [OK] to complete the installation.
If a test page is not successfully printed, click [Troubleshoot].
To remove your printer driver, follow the steps below:
1. Open [Control Panel]/[Printers], highlight the TOSHIBA e-STUDIO163/203/165/205
and press the [Delete] key on your keyboard to remove the printer icon.
2. Select Server Properties from the [File] menu.
52 Installing the Printer Driver to the Local Client
Page 53

3. Open the drivers tab and highlight the TOSHIBA e-STUDIO163/203/165/205 driver.
4. Click [Remove].
Installing the Printer Driver to the Local Client 53
Page 54

2INSTALLATION
Windows XP/Server 2003
The printer drivers in the languages listed below are on the CD-ROM supplied with your
machine.
Please select the language sub-folder by following the language of the Windows you are using.
\Bra_Por
\CaFrench
\Chinese
\Danish
\Dutch
\Finnish
\French
\German
\Italian
\Mex_Span
\Norwe
\Portu
\Spanish
\Swedish
\UK_Eng
\US_Eng
The following describes an installation on Windows XP.
The procedure is almost the same when Windows Server 2003 is used.
: Portuguese [Brazilian]
: French [Canadian]
: Chinese
: Danish
: Dutch
: Finnish
: French
: German
: Italian
: Spanish [Mexican]
: Norwegian
: Portuguese
: Spanish
: Swedish
: English [UK]
: English [US]
Please make sure that following terms are satisfied.
y Close all applications that are running to avoid any conflicts during installation.
y The TOSHIBA e-STUDIO163/203/165/205 is connected to your PC and powered on.
y The USB driver has been already installed on your PC.
y Make sure you have Administrator access rights.
54 Installing the Printer Driver to the Local Client
Page 55

Open the [Printers and Faxes] folder.
1
Click [Start] and select [Printers and Faxes].
Select [Add a printer].
2
Installing the Printer Driver to the Local Client 55
Page 56

2INSTALLATION
Click [Next].
3
Select [Local printer attached to this computer].
4
Uncheck [Automatically detect and install my Plug and Play printer] and click [Next].
56 Installing the Printer Driver to the Local Client
Page 57

Select the port to which your printer is connected.
5
Select [COM port] and click [Next].
y Specify the COM port which is set when installing the USB driver to your PC.
P.17 “Installing the USB Driver”
Example: COM3
y The new COM port will appear in the [Ports] section of Windows' [Device Manager],
you can open Device Manager to check what port number has been assigned as follows:
Windows XP: Click [Start], [Control Panel], [Performance] and [Maintenance],
[System], select the [Hardware] tab, click the [Device Manager] button, expand the
[Ports] branch.
Installing the Printer Driver to the Local Client 57
Page 58

2INSTALLATION
Windows presents a list of printers it knows about.
6
Click [Have Disk].
Insert the TOSHIBA Viewer CD-ROM in to the CD-ROM drive.
7
Click [Browse].
58 Installing the Printer Driver to the Local Client
Page 59

Browse to the printer driver folder.
8
Browse to the appropriate language sub-folder of the “Local” folder in the “Driv2KXP”
folder. Highlight “oemsetup.inf” and click [Open].
Click [OK].
9
Installing the Printer Driver to the Local Client 59
Page 60

2INSTALLATION
Select the appropriate printer from the list.
10
Click [Next].
Select whether or not you use the existing printer driver.
11
Select [Keep existing driver (recommended)] and click [Next].
This screen appears when the e-STUDIO163/203/165/205 printer driver has been
already installed on your PC.
60 Installing the Printer Driver to the Local Client
Page 61

Type the printer name.
12
(1) Rename the printer name if required.
(2) Select whether or not you use e-STUDIO163/203/165/205 as the default printer.
(3) Click [Next].
Select the printer is shared with network clients or not.
13
(1) If you want this printer to be used by only the local client, select [Do not share this
printer]. If you want this printer to be shared with network clients, select [Share
name] and enter the shared printer name.
(2) Click [Next].
Installing the Printer Driver to the Local Client 61
Page 62

2INSTALLATION
Select whether printing the test page or not.
14
(1) If you want to print a test page, select [Yes]. If you do not want to print a test page,
(2) Click [Next].
select [No].
Click [Finish] to complete the Add Printer Wizard.
15
Your e-STUDIO163/203/165/205 Series printer driver is now installed.
62 Installing the Printer Driver to the Local Client
Page 63

Click [Continue Anyway].
16
The installation is continued and your e-STUDIO163/203/165/205 Series printer driver
becomes ready to use.
When you want to use the TOSHIBA Viewer, go to the following page and install the
TOSHIBA Viewer. P.66 “Installing the TOSHIBA Viewer”
Installing the Printer Driver to the Local Client 63
Page 64

2INSTALLATION
Make sure a test page is successfully printed when you request
17
printing a test page.
If a test page is successfully printed, click [OK] to complete the installation.
If a test page is not successfully printed, click [Troubleshoot].
To remove your printer driver, follow the steps below:
1. Open [Printers and Faxes], highlight the TOSHIBA e-STUDIO163/203/165/205 and
press the [Delete] key on your keyboard to remove the printer icon.
2. Select Server Properties from the [File] menu.
64 Installing the Printer Driver to the Local Client
Page 65

3. Open the drivers tab and highlight the TOSHIBA e-STUDIO163/203/165/205 driver.
4. Click [Remove].
Installing the Printer Driver to the Local Client 65
Page 66

2INSTALLATION
Installing the TOSHIBA Viewer
Before installing the TOSHIBA Viewer
Before installing TOSHIBA Viewer, your TOSHIBA e-STUDIO163/203/165/205 must be connected to your PC via a USB cable suitable for bi-directional communications.
Please make sure that following terms are satisfied.
y When using Windows 2000/XP/Server 2003, make sure you have Administrator access
rights.
y Close all applications that are running to avoid any conflicts during installation.
y The TOSHIBA e-STUDIO163/203/165/205 connected to your PC is powered on.
When the Plug-and-Play prompt is displayed...
When the Plug-and-Play prompt is displayed as soon as Windows is started, install the USB
driver before installing the TOSHIBA Viewer.
About the instructions for installing the driver, see the following page.
P.17 “Installing the USB Driver”
Installation
Prompts may vary depending on your PC configuration. The screens show examples of Windows XP.
Insert the TOSHIBA Viewer CD-ROM in to the CD-ROM drive.
1
Click [Start] and select [Run].
66 Installing the TOSHIBA Viewer
Page 67

Type “F:\Toshiba Viewer\Setup.exe”.
2
Click [OK].
Type “F:\Toshiba Viewer\Setup.exe” where F is your CD-ROM drive.
Select Language.
3
Click [OK].
Installing the TOSHIBA Viewer 67
Page 68

2INSTALLATION
Start the Installation.
4
Click [Next].
Read the [Software License Agreement].
5
If you agree the License Agreement, click [Yes]. If you click [No], exit the Installation.
The Installation is not completed.
68 Installing the TOSHIBA Viewer
Page 69

Choose the Destination Location.
6
Click [Next].
Enter [Program Folder] Name or Select the [Program Folder].
7
Click [Next].
Installing the TOSHIBA Viewer 69
Page 70

2INSTALLATION
Start the Copy.
8
Wait until file copying files is completed. The Setup Complete screen automatically
appears.
If the GDI printer driver was installed prior to the installation of TOSHIBA Viewer, the wizard will issue a series of prompts indicating that several files already exist.
Simply instruct the wizard to overwrite the existing files.
Exit the Installation Window.
9
Select [Yes, I want to restart my computer now.], and click [Finish].
You have to restart the computer before using the TOSHIBA Viewer.
After restarting the computer, the Unimessage Pro device wizard automatically runs.
70 Installing the TOSHIBA Viewer
Page 71

Device Setup
After restarting the computer, the [Unimessage Pro device wizard] automatically appears.
This device setup wizard can be operated by running the [Unimessage Pro Startup Wizard] in
[Program Folder] as well.
When multiple TOSHIBA devices are connected to your PC, you can operate the device setups
for each device.
Every time you operate the device setup, a new TOSHIBA Viewer utility is created.
1
Unimessage Pro device wizard appears.
Enter the details for each entry field. After all required entries are completed, click [Next].
At least [Name], [Address], [Location], [Telephone number], and [Fax number] must
be entered.
The [Address] entry must be more than 10 letters.
The [Name] entry must be more than 2 letters.
The [Telephone number] and [Fax number] entries must be more than 8 numbers.
Installing the TOSHIBA Viewer 71
Page 72

2INSTALLATION
Select the device driver installation type.
2
Select [Yes, look for devices connected to this computer and configure
Unimessage Pro to use them], and click [Next].
Message to start scanning the system for network devices is dis-
3
played.
Click [Next].
72 Installing the TOSHIBA Viewer
Page 73

Scanning for network devices starts.
4
After scanning for network devices is completed, select one device from the list and click
[Next].
Enter [System Device Name] and [Descriptive Device Name].
5
Default [System Device Name] and [Descriptive Device Name] are already entered.
Rename them if required.
Installing the TOSHIBA Viewer 73
Page 74

2INSTALLATION
Select [Custom] for the type of Setup.
6
Click [Next].
Select [Yes, install TWAIN components].
7
(1) TOSHIBA Viewer will ask if the TWAIN resource should be installed as you configure
the device.
(2) Click [Next].
74 Installing the TOSHIBA Viewer
Page 75

Select [Yes, create a printer].
8
(1) TOSHIBA Viewer will ask if a printer driver for the e-STUDIO163/203/165/205 should
be created or not.
If you choose to create this printer, it will be named after the e-STUDIO163/203/165/
205 but you can edit this name if you prefer.
(2) Click [Next].
Even if you choose not to create the printer driver during the definition of the device or it
is deleted, you can create the printer driver for the e-STUDIO163/203/165/205 later.
To do this, open the Devices folder, right click on the appropriate device and select
[Create printer].
For further details, see the [Help] for [Create printer].
Installing the TOSHIBA Viewer 75
Page 76

2INSTALLATION
Select whether to create a shortcut and the location.
9
Click [Next].
Complete the device setup.
10
Click [Finish].
76 Installing the TOSHIBA Viewer
Page 77

TOSHIBA Viewer starts.
11
Installing the TOSHIBA Viewer 77
Page 78

2INSTALLATION
To utilize TOSHIBA Viewer when logging on as different user who also has Admin rights
When a user who has not installed TOSHIBA Viewer wants to utilize TOSHIBA Viewer utility, follow the steps below to prepare the registry for the user.
This operation is applied to Windows 2000/XP/Server 2003.
The screens show examples of Windows XP.
Click [Start] – [All Programs] – [Unimessage Pro] – [Prepare Regis-
1
try for Unimessage Pro].
78 Installing the TOSHIBA Viewer
Page 79

Browse for Folder dialog box appears.
2
Select the folder where Unimessage Pro has been installed and click [OK].
Select [Yes, run the front-end], the desired user and language, then
3
click [Next].
Select the user name who has Administrator access rights.
Installing the TOSHIBA Viewer 79
Page 80

2INSTALLATION
Select the device you use.
4
(1) When you use the device that has been already created, select [No, use devices
(2) Click [Next].
connected to other computers.]. When you create a new device, select [Yes, look
for devices connected to this computer and configure Unimessage Pro to use
them.].
Select whether to create a shortcut and the location and click
5
[Next].
80 Installing the TOSHIBA Viewer
Page 81

Click [Finish].
6
TOSHIBA Viewer starts.
7
Installing the TOSHIBA Viewer 81
Page 82

2INSTALLATION
Uninstalling the TOSHIBA Viewer
Before uninstalling the TOSHIBA Viewer
When the following icon is displayed in the system tray (called task tray which is displayed at the
very right on the Windows task bar), ensure to close the device driver before uninstalling the
TOSHIBA Viewer.
Right click on the icon and select [Close].
Prompts may very depending on your PC configuration.
The screens show examples of Windows XP.
Select [Start], [Control Panel].
1
Double click [Add or Remove Programs].
82 Uninstalling the TOSHIBA Viewer
Page 83

Select [Unimessage Pro].
2
Click [Change/Remove].
Confirm File Deletion dialog appears.
3
Click [Yes].
TOSHIBA Viewer alert dialog appears.
4
Exit all applications running on your machine because uninstallation causes to lose the
unsaved data of which is running during the uninstallation, and click [OK].
Uninstalling the TOSHIBA Viewer 83
Page 84

2INSTALLATION
Uninstallation starts.
5
During the uninstallation, the confirmation dialogs for removing the shared files appear.
y Click [Yes to All] to delete all shared files in the TOSHIBA Viewer program folder.
y Click [No to All], if you intend to retain GDI printer driver installed separately.
After removing files is completed, click [OK].
84 Uninstalling the TOSHIBA Viewer
Page 85

Confirm File Deletion dialog appears.
6
The confirmation dialog appears for removing files which are created after the
installation. Click [YES] to delete the files.
Click [OK].
7
After removing files is completed, click [OK].
Restart your computer.
8
Restart your computer to complete the uninstallation.
Some files are deleted after restarting the computer.
Uninstalling the TOSHIBA Viewer 85
Page 86

2INSTALLATION
Removing the e-STUDIO163/203/165/205 COM Port
Before removing the e-STUDIO163/203/165/205 COM port
When the following icon is displayed in the system tray (called task tray which is displayed at the
very right on the Windows task bar), ensure to close the device driver before removing the eSTUDIO163/203/165/205 COM port.
Right click on the icon and select [Close].
Make sure that e-STUDIO163/203/165/205 is connected to your PC using the USB cable and
powered on.
The screens show examples of Windows XP.
Click [Start] and select [Control Panel].
1
86 Removing the e-STUDIO163/203/165/205 COM Port
Page 87

Open system properties.
2
Click [Performance and Maintenance] and click [System].
Open device manager.
3
Select the [Hardware] tab and click [Device Manager].
Removing the e-STUDIO163/203/165/205 COM Port 87
Page 88

2INSTALLATION
Select the e-STUDIO163/203/165/205 COM port.
4
Expand the [Ports] branch and highlight the e-STUDIO163/203/165/205 COM port.
Remove the e-STUDIO163/203/165/205 COM port.
5
Select [Uninstall] from the [Action] menu or right click on the e-STUDIO163/203/
165/205 COM port icon and select [Uninstall].
88 Removing the e-STUDIO163/203/165/205 COM Port
Page 89

“Confirm Device Removal” dialog box appears.
6
Click [OK].
Removing the e-STUDIO163/203/165/205 COM Port 89
Page 90

2INSTALLATION
Installing the Printer Driver to the Network Client
Before installing the Printer Driver
This section describes how to install the printer driver to the network clients computer.
This allows the network clients to print to e-STUDIO163/203/165/205, which is connected to a
remote computer by a USB cable, through a network.
TOSHIBA Viewer GDI printer driver does not support Point and Print. Therefore, when installing
the printer driver to the network client, follow the steps described here.
Before installing the printer driver, please make sure that following terms are satisfied.
y The TOSHIBA e-STUDIO163/203/165/205 is connected to the remote computer by USB
cable and powered on, and the USB driver is installed.
y The printer driver is already correctly installed on the remote computer and shared.
y You have access rights to the remote computer and printer. (only when required)]
There are various ways of installation according to the Windows version running on your PC.
P.90 “Windows 98 SE/Me”
P.95 “Windows 2000”
P.103 “Windows XP/Server 2003”
Windows 98 SE/Me
The printer drivers in the languages listed below are on the CD-ROM supplied with your
machine.
Please select the language sub-folder by following the language of the Windows you are using.
\Bra_Por
\CaFrench
\Chinese
\Danish
\Dutch
\Finnish
\French
\German
\Italian
\Mex_Span
\Norwe
\Portu
\Spanish
\Swedish
\UK_Eng
\US_Eng
: Portuguese [Brazilian]
: French [Canadian]
: Chinese
: Danish
: Dutch
: Finnish
: French
: German
: Italian
: Spanish [Mexican]
: Norwegian
: Portuguese
: Spanish
: Swedish
: English [UK]
: English [US]
90 Installing the Printer Driver to the Network Client
Page 91

The following describes an installation on Windows 98 Second Edition.
The procedure is almost the same when Windows Me is used.
Please make sure that following terms are satisfied.
y Close all applications that are running to avoid any conflicts during installation.
y The TOSHIBA e-STUDIO163/203/165/205 is connected to your PC and powered on.
Browse to the network printer.
1
(1) Using Explorer, browse to the workstation or server that contains the shared printer
that you want to install.
(2) Double click on the printer.
Click [Yes] to install.
2
Installing the Printer Driver to the Network Client 91
Page 92

2INSTALLATION
Select [No] because there is no MS-DOS printer driver for the
3
e-STUDIO163/203/165/205 and click [Next].
If the operating system of the remote computer is the Windows 98 SE/Me, skip the
procedure to step 10.
If the operating system of the remote computer is not the Windows 98 SE/Me, continue to
next step.
Windows presents a list of printers it knows about.
4
Click [Have Disk].
92 Installing the Printer Driver to the Network Client
Page 93

Insert the TOSHIBA Viewer CD-ROM in to the CD-ROM drive.
5
Click [Browse].
Browse to the printer driver folder.
6
Browse to the appropriate language sub-folder of the “Network” folder in the “Driv9xMe”
folder.
Highlight “oemsetup.inf” and click [OK].
Click [OK].
7
Installing the Printer Driver to the Network Client 93
Page 94

2INSTALLATION
Select the appropriate printer from the list.
8
Click [Next].
Type the printer name.
9
(1) Rename the printer name if required.
(2) Click [Finish]. Files will be copied and installed. Your e-STUDIO163/203/165/205
Series printer driver is now installed and ready to use.
To remove your printer driver, simply open [Control Panel]/[Printers], highlight the printer
and press the [Delete] key on your keyboard.
94 Installing the Printer Driver to the Network Client
Page 95

Windows 2000
The printer drivers in the languages listed below are on the CD-ROM supplied with your
machine.
Please select the language sub-folder by following the language of the Windows you are using.
\Bra_Por
\CaFrench
\Chinese
\Danish
\Dutch
\Finnish
\French
\German
\Italian
\Mex_Span
\Norwe
\Portu
\Spanish
\Swedish
\UK_Eng
\US_Eng
Please make sure that following terms are satisfied.
y Close all applications that are running to avoid any conflicts during installation.
y Make sure you have Administrator access rights.
Open the [Printers] folder.
1
Click [Start] and select [Settings]/[Printers].
: Portuguese [Brazilian]
: French [Canadian]
: Chinese
: Danish
: Dutch
: Finnish
: French
: German
: Italian
: Spanish [Mexican]
: Norwegian
: Portuguese
: Spanish
: Swedish
: English [UK]
: English [US]
Installing the Printer Driver to the Network Client 95
Page 96

2INSTALLATION
Double click on [Add Printer] icon.
2
Click [Next].
3
96 Installing the Printer Driver to the Network Client
Page 97

Select [Network printer].
4
Click [Next].
Click [Next] to browse for the printer you want to use.
5
Installing the Printer Driver to the Network Client 97
Page 98

2INSTALLATION
Browse and select the network printer you want install and click
6
[Next].
If the operating system of the remote computer is the Windows 2000/XP/Server
2003
skip the procedure to step 14.
If the operating system of the remote computer is not the Windows 2000/XP/Server
2003
continue to next step.
Click [OK].
7
98 Installing the Printer Driver to the Network Client
Page 99

Windows presents a list of printers it knows about.
8
Click [Have Disk].
Insert the TOSHIBA Viewer CD-ROM in to the CD-ROM drive.
9
Click [Browse].
Installing the Printer Driver to the Network Client 99
Page 100

2INSTALLATION
Browse to the printer driver folder.
10
Browse to the appropriate language sub-folder of the “Network” folder in the “Driv2kXP”
folder.
Highlight “oemsetup.inf” and click [Open].
Click [OK].
11
Select the appropriate printer from the list.
12
Click [Next].
100 Installing the Printer Driver to the Network Client
 Loading...