

Toshiba 15LV505-T, 15LV506-T Owner's Manual
15-inch* class LCD TV/DVD
COMBINATION
15LV505-T
15LV506-T
Introduction
Connections
Basic setup
TV operation
Basic playback
Advanced playback
Function setup
Others
OWNER’S MANUAL
© 2009 Toshiba Corporation
Before operating the unit, please read this manual thoroughly.
*Screen size is approximate.
Owner’s Record
The model and serial numbers are on
the back of your TV/DVD.
Record these numbers in the spaces
below. Refer to these numbers
whenever you communicate with your
Toshiba dealer about this TV/DVD.
Model number:_________________
Serial number: _________________
2
14
21
26
44
47
59
64
Introduction
2
Dear Customer,
Thank you for purchasing this Toshiba LCD TV or TV/DVD
Combination television.
This manual will help you use the many exciting features of
your new LCD TV. Before operating your LCD TV or TV/DVD
Combination, please read this manual completely, and keep it
nearby for future reference.
The examples used throughout this manual are based on the
15LV505-T model.
Safety Precautions
WARNING: TO REDUCE THE RISK OF FIRE OR
ELECTRIC SHOCK, DO NOT EXPOSE THIS
APPLIANCE TO RAIN OR MOISTURE.
TO PREVENT THE SPREAD OF FIRE, KEEP CANDLES
OR OPEN FLAMES AWAY FROM THIS PRODUCT AT
TIMES.
CAUTION
RISK OF ELECTRIC SHOCK
DO NOT OPEN
WARNING: TO REDUCE THE RISK OF ELECTRIC
SHOCK, DO NOT REMOVE COVER (OR BACK).
NO USER-SERVICEABLE PARTS INSIDE. REFER
SERVICING TO QUALIFIED SERVICE PERSONNEL .
CAUTION: To reduce the risk of electric shock, do
not use the polarized plug with an extension cord,
receptacle, or other outlet unless the blades can
be inserted completely to prevent blade exposure.
The lightning flash with arrowhead symbol, within an
equilateral triangle, is intended to alert the user to
the presence of uninsulated dangerous voltage
within the product’s enclosure that may be of
sufficient magnitude to constitute a risk of electric
shock to persons.
The exclamation point within an equilateral triangle,
is intended to alert the user to the presence of
important operating and maintenance (servicing)
instructions in the literature accompanying the
appliance.
ENERGY STAR
®
qualified TV. Products that earn
the ENERGY STAR prevent greenhouse gas
emissions by meeting strict energy efficiency
guidelines set by the U.S. Environmental
Protection Agency and the U.S. Department of
Energy. ENERGY STAR and the ENERGY STAR
mark are registered U.S. marks.
NOTE TO CATV INSTALLERS
This is a reminder to call the CATV system ins taller’s atte ntion to
Article 820-40 of the NEC, which provides guidelines for proper
grounding and, in particular, specifies that the cable ground shall be
connected to grounding system of the building, as close to the point of
cable entry as practical. For additional antenna grounding information,
see item 29 on page 5.
WARNING:
Handling the cord on this product or cords associated
with accessories sold with this product will exp ose yo u to lead , a
chemical known to the State of California to cause birth defects or
other reproductive harm.
Wash hands after handling.
CHILD SAFETY:
It Makes A Difference How and Where You Use Your
Flat Panel Display
Congratulations on your purchase! As you enjoy your new
product, please keep these safety tips in mind:
The Issue
The home theater entertainment experience is a growing trend
and larger flat panel displays are popular purchases. However, flat
panel displays are not always supported on the proper stands or
installed according to the manufacturer’s
recommendations.
Flat panel displays that are
inappropriately situated on
dressers, bookcases, shelves,
desks, speakers, chests or carts
may fall over and cause injury.
TOSHIBA Cares!
The consumer electronics industry is committed to making home
entertainment enjoyable and safe.
Tune Into Safety
• One size does NOT fit all. Follow the manufacturer’s recommendations
for the safe installation and use of
your flat panel display.
• Carefully read and understand all
enclosed instructions for proper
use of this product.
• Don’t allow children to climb on or
play with furniture and television
sets.
• Don’t place flat panel displays on
furniture that can easily be used as
steps, such as a chest of drawers.
• Remember that children can become excited while watching a
program, especially on a “larger than life” flat panel display. Care
should be taken to place or install the display where it cannot be
pushed, pulled over, or knocked down.
• Care should be taken to route all cords and cables connected to
the flat panel display so that they cannot be pulled or grabbed by
curious children.
Introduction
3
FCC Compliance Information
CAUTION: TO PREVENT ELECTRIC SHOCK DO NOT USE THIS POLARIZED PLUG WITH AN EXTENSION CORD, RECEPTACLE
OR OTHER OUTLET UNLESS THE BLADES CAN BE FULLY INSERTED TO PREVENT BLADE EXPOSURE.
TO PREVENT THE SPREAD OF FIRE, KEEP CANDLES OR OPEN FLAMES AW AY FROM THIS PRODUCT AT ALL
TIMES.
FCC Declaration of Conformity Compliance Statement (Part 15):
The Toshiba 15LV505-T and 15LV506-T LCD TV/DVD Combinations complies with Part 15 of the FCC rules. Operation is
subject to the following two conditions: (1) this devi ce may not cau se harmful in terfere nce, and (2) th is device mus t accept any
interference received, including interf erence that may cause undesired operation.
The party responsible for compliance to these rules is:
Toshiba America Consumer Products, L.L.C.
82 Totowa Rd. Wayne, NJ07470.
Ph: (800) 631-3811 or visit TACP’s website at www.tacp.Toshiba.com
FCC NOTICE: This equipment has been tested and found to comply with the limits for a Class B digital device, pursuant to Part
15 of the FCC rules. These limits are designed to provide reasonable protection against harmful interference in
a residential installation. This equipment generates, uses, and can radiate radio frequency energy and, if not
installed and used in accordance with the instructions, may cause harmful interference to radio
communications. However, there is no guarantee that interference will not occur in a particular installation. If
this equipment does cause harmful interference to radio or television reception, which can be determined by
removing and applying power to the equipment, the user is encouraged to try to correct the interference by one
or more of the following measures:
- Reorient or relocate the receiving antenna.
- Increase the separation between the equipment and the receiver.
- Connect the equipment into an ou tlet on a circuit different from that to which the receiver is connected.
- Consult the dealer or an experienced radio/TV technician for help.
WARNING:
Changes or modifications to this equipment not expressly approved by Toshiba co uld void the user's authority to operate thi s
equipment.
CAUTIONS:
J qefp=afdfq^i=sfabl=mi^vbo=bjmilvp=^=i^pbo=
pvpqbjK=
J ql=bkprob=molmbo=rpb=lc=qefp=molar`qI=mib^pb=
ob^a=qefp=ltkboDp=j^kr^i=`^obcriiv=^ka=
obq^fk=fq=clo=crqrob=obcbobk`bK
J pelria=qeb=rkfq=obnrfob=j^fkqbk^k`bI=
`lkq^`q=^k=^rqelofwba=pbosf`b=il`^qflkK=
J rpb=lc=`lkqolipI=^agrpqjbkqp=lo=qeb=
mbocloj^k`b=lc=mol`barobp=lqebo=qe^k=
qelpb=pmb`fcfba=ebobfk=j^v=obpriq=fk=
e^w^oalrp=o^af^qflk=bumlprobK=
J ql=mobsbkq=afob`q=bumlprob=ql=i^pbo=_b^jI=
kbsbo=lmbk=qeb=bk`ilprobK=sfpf_ib=i^pbo=
o^af^qflk=j^v=_b=mobpbkq=tebk=qeb=bk`ilprob=
fp=lmbkbaK=kbsbo=pq^ob=fkql=qeb=_b^jK
CLASS 1
LASER PRODUCT
Location of the required Marking
The rating sheet and the safety caution are on the rear of the unit.
CERTIFICATION: COMPLIES WITH FDA PERFORMANCE
STANDARDS FOR LASER PRODUCTS EXCEPT FOR
DEVIATIONS PURSUANT TO LASER NOTICE NO.50,
DATED JUNE 24, 2007.
SAFETY: LAMP DISPOSAL
The lamp(s) inside this product contain mercury. Disposal may be regulated due to environmental considerations.
For disposal or recycling information, contact your local authorities or the Electronic Industries Alliance
(www.eia.org).
Introduction
4
Installation, Care, and Service
Installation
Follow these recommendations and precautions and heed
all warnings when installing your TV:
16) To avoid damage to this product, never place or store
the TV in direct sunlight; hot, humid areas; or areas
subject to excessive dust or vibration.
17) ALWAYS plug the product into an outlet that is located
in such a manner that it can be easily unplugged in
case the product requires service.
18) NEVER route the product’s power cord inside a wall or
similar enclosed area.
19) Never modify this equipment. Changes or modifications
may void: (a) the warranty, and (b) the user’s authority
to operate this equipment under the rules of the
Federal Communications Commission.
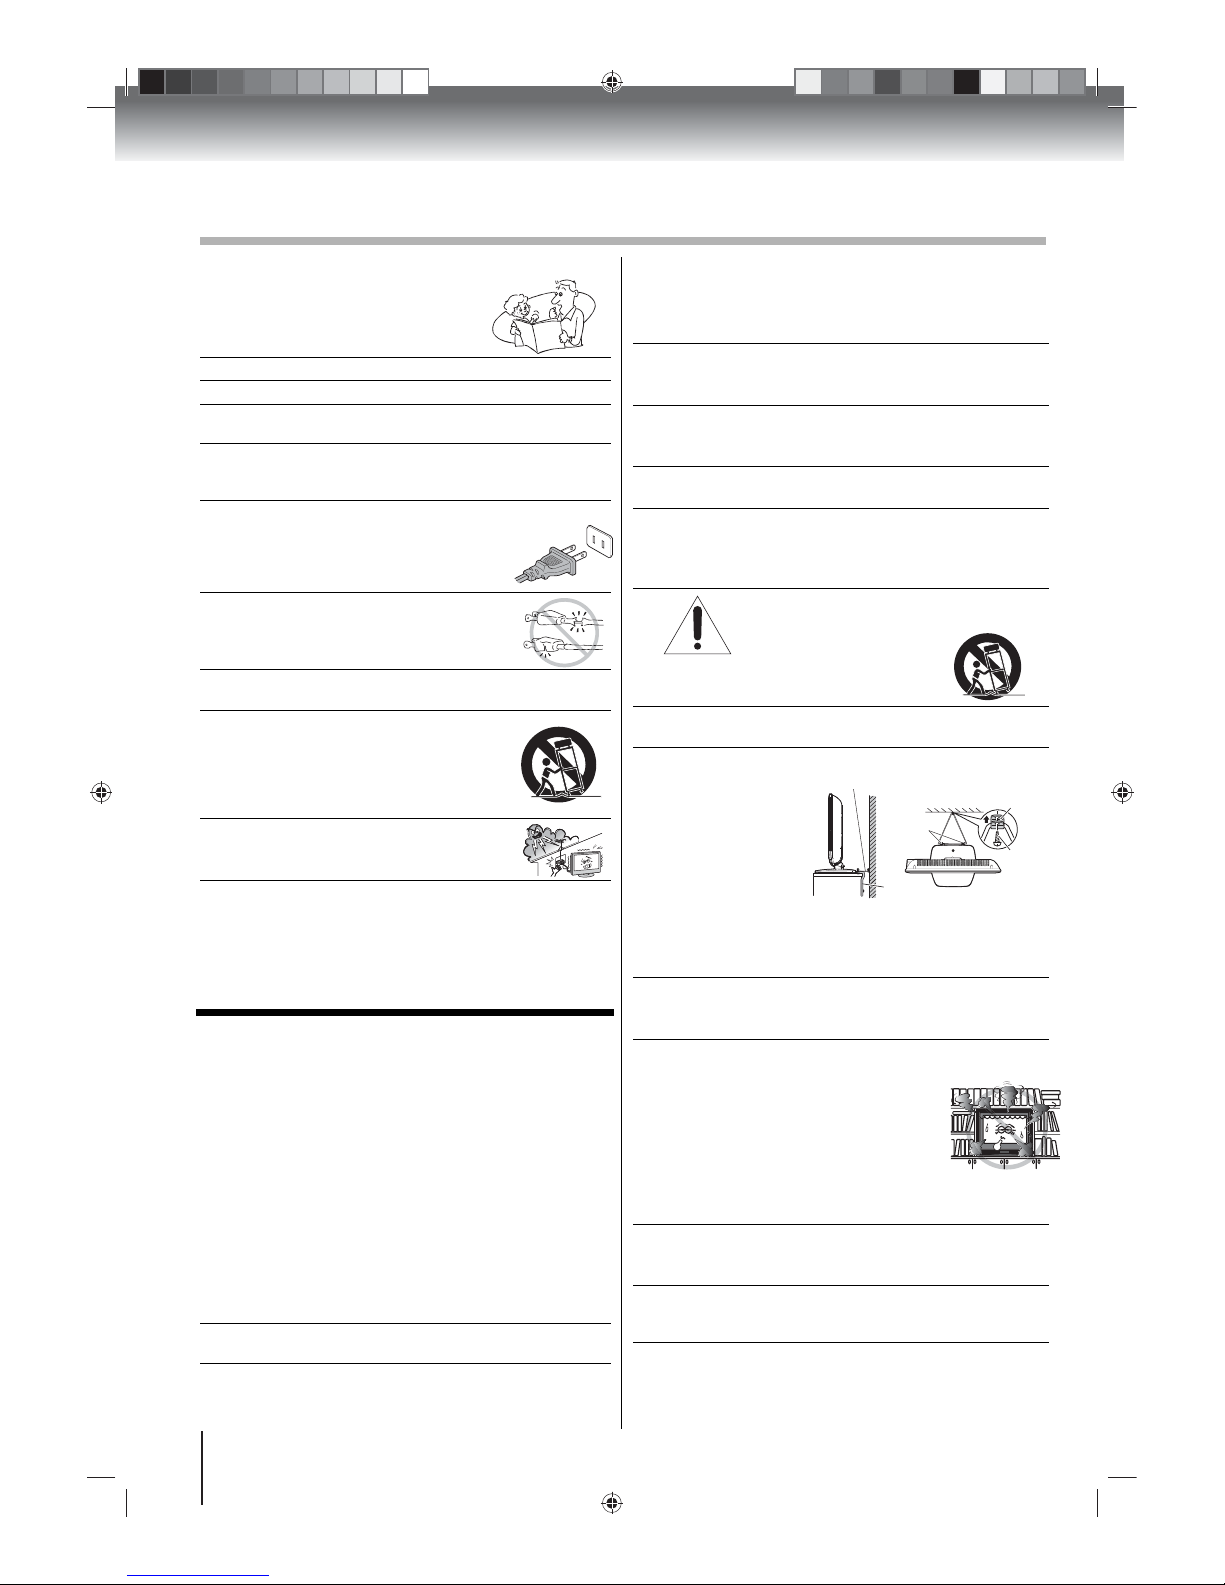
20)
DANGER: RISK OF SERIOUS PERSONAL
INJURY, DEATH, OR EQUIPMENT DAMAGE
Never place the TV on an
unstable cart, stand, or table.
The TV may fall, causing serious personal
injury, death, or serious damage to the TV.
21) Never place items such as vases, aquariums, or candles
on top of the TV.
22)
WARNING:
Always place the TV on the floor or on a
sturdy, level, stable
surface that can
support the weight
of the unit. To secure
the TV, use a sturdy
strap from the hooks
on the rear of the TV
pedestal to a wall
stud, pillar or other
immovable structure. Make sure the strap is tight, secure,
and parallel to the floor.
23) Never e xpose the apparatus to dripping or splashing liquid
or place items such as vases, aquariums, or any other
item filled with liquid, or candles on top of the TV.
24) Never block or cover the slots or openings in the TV
cabinet back, bottom, and sides. Nev er place the TV:
• on a bed, sofa, rug, or similar surface;
• too close to drapes, curtains, or
walls; or
• in a confined space such as
a bookcase, built-in cabinet,
or any other place with poor ventilation.
The slots and openings are provided to protect the TV from
overheating and to help maintain reliable operation of the
TV. Leave a space of at least four (4) inches around the TV .
25) Always place the back of the television at least four (4) inches
away from an y v ertical surface (such as a w all) to allow
proper ventilation.
26) Never allow anything to rest on or roll ov er the po w er cord,
and never place the TV where the power cord is subject to
wear or abuse.
Important Safety Instructions
1) Read these instructions.
2) Keep these instructions.
3) Heed all warnings.
4) Follow all instructions.
5) Do not use this apparatus near water.
6) Clean only with dry cloth.
7) Do not block any ventilation openings.
Install in accordance with the manufacturer’s instructions.
8) Do not install near any heat sources such as
radiators, heat registers, stoves, or other apparatus
(including amplifiers) that produce heat.
9)
The TV uses a non-polarized, two-pronged plug.
This kind of plug can be used in polarized
outlets. It can fit into a wall socket in either
direction. It does not provide protection
from shock.
10)
Protect the power cord
from being walked
on or pinched, particularly at plugs,
convenience receptacles, and the point
where they exit from the apparatus.
11)
Only use attachments/accessories specified b y the
manufacturer.
12)
Use only with the cart, stand, tripod,
bracket, or table specified by the
manufacturer, or sold with the
apparatus.
When a cart is used, use
caution when moving the cart/apparatus
combination to avoid tip-ov er injuries.
13)
Unplug this apparatus during lightning
storms or when unused for long periods
of time.
14)
Refer all servicing to qualified service personnel.
Servicing is required when the apparatus has been damaged
in any way, such as when the power supply cord or plug is
damaged, liquid has been spilled or objects have fallen
into the apparatus, the apparatus has been expose d to
rain or moisture, does not operate normally , or has been
dropped.
Additional Safety Precautions
14a)CAUTION: If the TV is dropped and the cabinet or
enclosure surface has been damaged or the TV doe s
not operate normally, take the following precautions:
• ALWAYS turn off the TV and unplug the power cord to
avoid possible electric shock or fire.
• NEVER allow your body to come in contact with any
broken glass or liquid from the damaged television.
The LCD panel inside the TV contains glass an d a toxi c
liqui d . I f th e l i quid comes in c o nt a c t with your mouth or
eyes, or your skin is cut by broken glass, rinse the
affected area thoroughly with water and consult your
doctor.
• ALWAYS contact a service technician to inspect the
TV any time it has been damaged or dropped.
14b)WARNING: To prevent the spread of fire, keep
candles or other open flames away from this product
at all times.
15) WARNING: NEVER expose batteries to excessive
heat such as sunshine, fire, or the like.
SAFETY INSTRUCTIONS
Sturdy tie (as short as possible; min. 4 in.)
Band
TV side
TV top
Clip
Screw
Hooks
Introduction
5
Care (continued from previous column)
33) While it is thundering, do not touch the connecting
cables or apparatus.
34) For added protection of your TV from lightning and
power surges, always unplug the power cord and
disconnect the antenna from the TV if you leave the
TV unattended or unused for long periods of time.
35) ALWAYS unplug the TV to completely disconnect
from mains power. When the TV is turned off using
the on/off switch, it is not comp letely disconnected
from power and a minute amount of current is st ill
consumed.
36) During normal use, the TV may make occasional
snapping or popping sounds. This is normal, especially
when the unit is being turned on or off. If these sounds
become frequent or continuous, unplug the po wer cord
and contact a Toshiba Authorized Service Center.
37) Keep your fingers well clear of the disc slot as it is
closing. Failure to do so may cause serious personal
injury.
38) When you use headphones, keep the volume at a
moderate level. Using headphones continuously at a
high volume may cause hearing damage.
39) NEVER look directly into the disc slot or ventilation
slots at the source of the laser beam. Doing so may
cause sight damage.
40) NEVER use a cracked, deformed, or repaired disc.
Such discs are easily broken and may cause serious
personal injury or product damage. SUCH DAMAGE
IS NOT COVERED UNDER YOUR WARRANTY.
41) WARNING: RISK OF SERIOUS PERSONAL INJURY
OR EQUIPMENT DAMAGE!
• Never strike the screen with a sharp or heavy object.
• Never touch, press, or place anything on the LCD
screen. These actions will damage the LCD screen
if you need to clean the LCD screen, follow the
instructions in item 31 on this page.
Service
QOF
WARNING: RISK OF ELECTRIC SHOCK!
Never attempt to service the TV yourself.
Opening and removing the covers may
expose you to dangerous voltage or other
hazards. Failure to follow this WARNING may result in
death or serious injury. Refer all servicing to a Toshiba
Authorized Service Center.
43) If you have the TV serviced:
• Ask the service technician to use only replacement
parts specified by the manufacturer.
• Upon completion of service, ask the service
technician to perform routine safety checks to
determine that the TV is in safe operating condition.
44) When the TV reaches the end of its useful life, ask a
qualified service technician to properly dispose of the
TV.
Installation (continued from previous page)
27) Never overload wall outlets and extension cords.
28) Always operate the TV with a 120 V AC, 60 Hz power
source only.
29) Always make sure the antenna system is properly
grounded to provide adequate protection against
voltage surges and built-up static charges (see
Section 810 of the National Electric Code.)
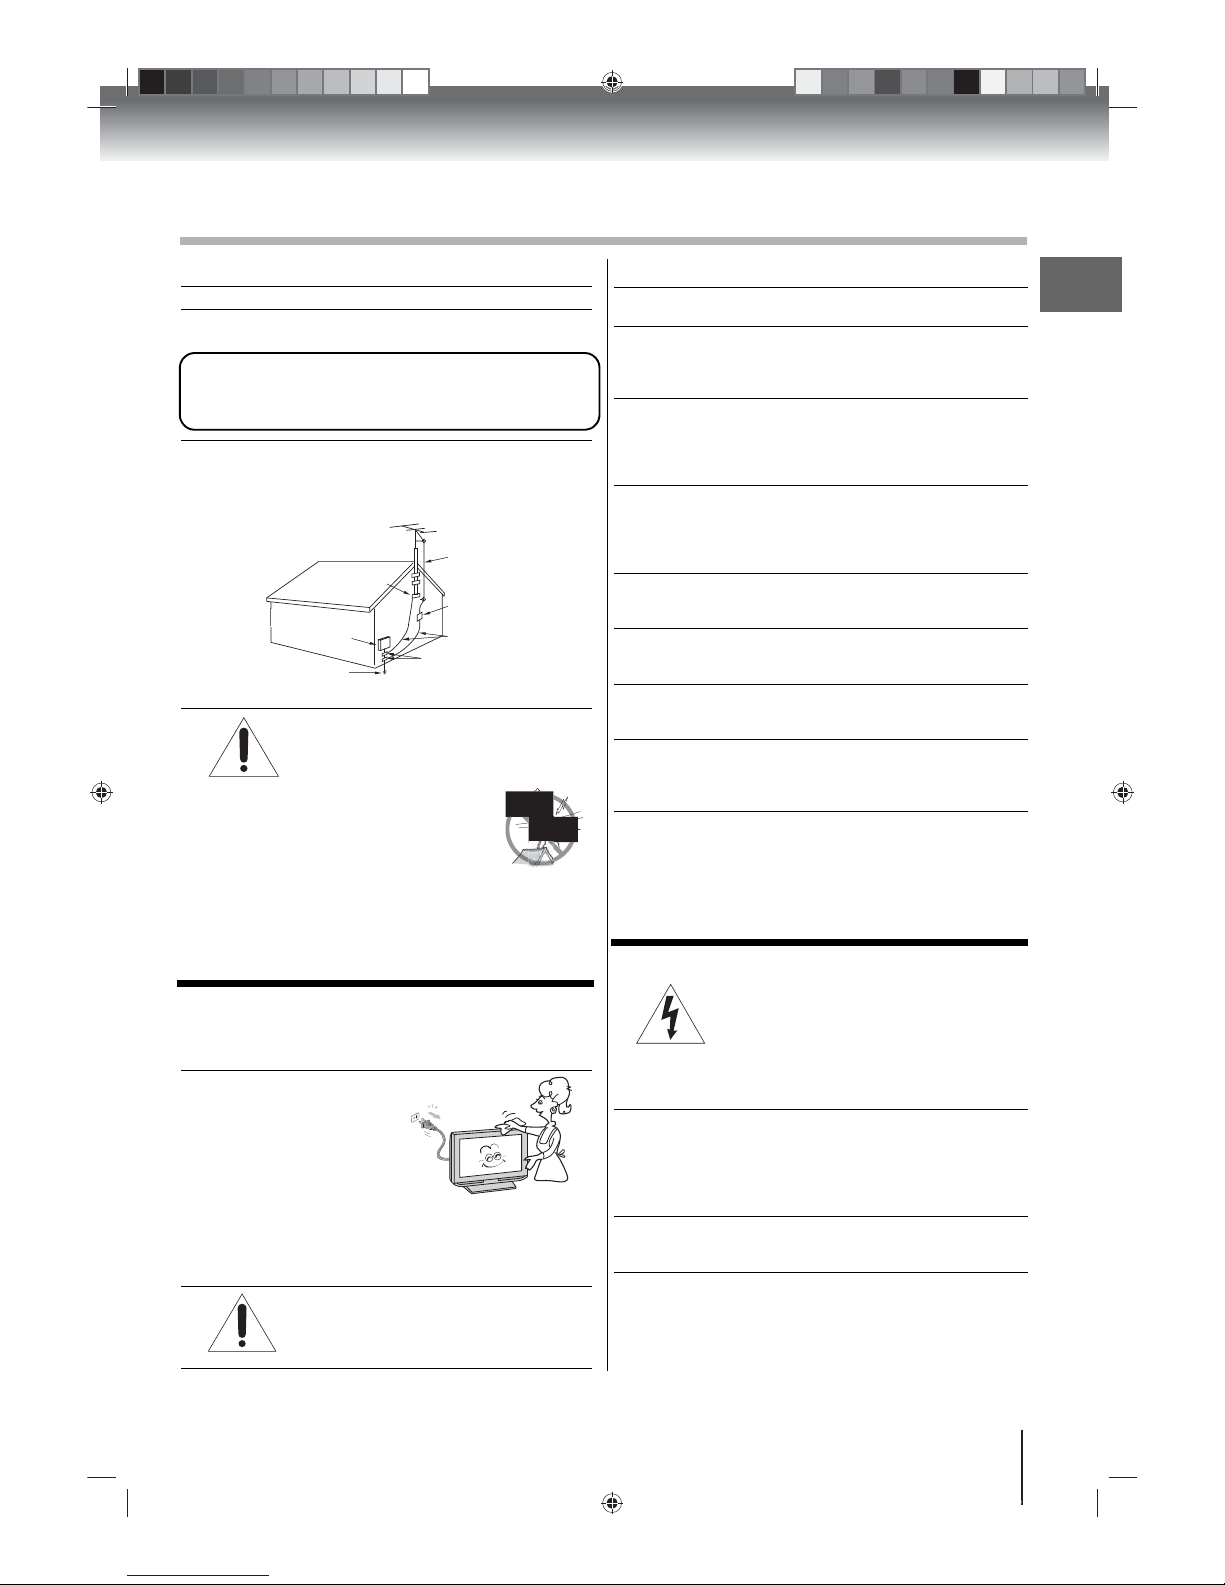
30)
DANGER: RISK OF SERIOUS
PERSONAL INJURY OR DEATH!
• Use extreme care to make sure you are
never in a position where your body
(or any item you are in contact with,
such as a ladder or screwdriver) can
accidentally touch overhead power lines.
Never locate the antenna near overhead power lines
or other electrical circuits.
• Never attempt to install any of the following during
lightning activity: (a) an antenna system; or (b) cables,
wires, or any home theater component connected to
an antenna or phone system.
Care
For better performance and safer operation of your
TOSHIBA TV, follow these recommendations and
precautions:
31) Always unplug the TV before
cleaning. Wipe the display
panel surface gently using
only a soft cloth (supplied.)
A hard cloth may damage
the surface of the panel.
Avoid contact with alcohol,
thinner, benzene, acidic or
and alkaline solvent cleaners, abrasive cleaners , or
chemical cloths, which may damage the surface.
Never spra y volatile co mpounds such as insecticide on
the cabinet. Such products may damage or discolor
the cabinet.
POF
t^okfkdW=ofph=lc=bib`qof`=pel`h>
Never spill liquids or push objects of any
kind into the TV cabinet slots.
SAFETY INSTRUCTIONS
(continued)
Ground clamp
CAUTION: To reduce the risk of electric shock, do not use the
polarized plug with an extension cord, receptacle, or other outlet
unless the blades can be inserted completely with three-wire
grounding type to prevent blade ex posure.
Antenna lead-in wire
Antenna discharge unit
(NEC Section 810-20)
Grounding conductors
(NEC Section 810-21)
Ground clamps
Electric service
equipment
Power service grounding
electrode system
(NEC Article 250 Part H)
Introduction
6
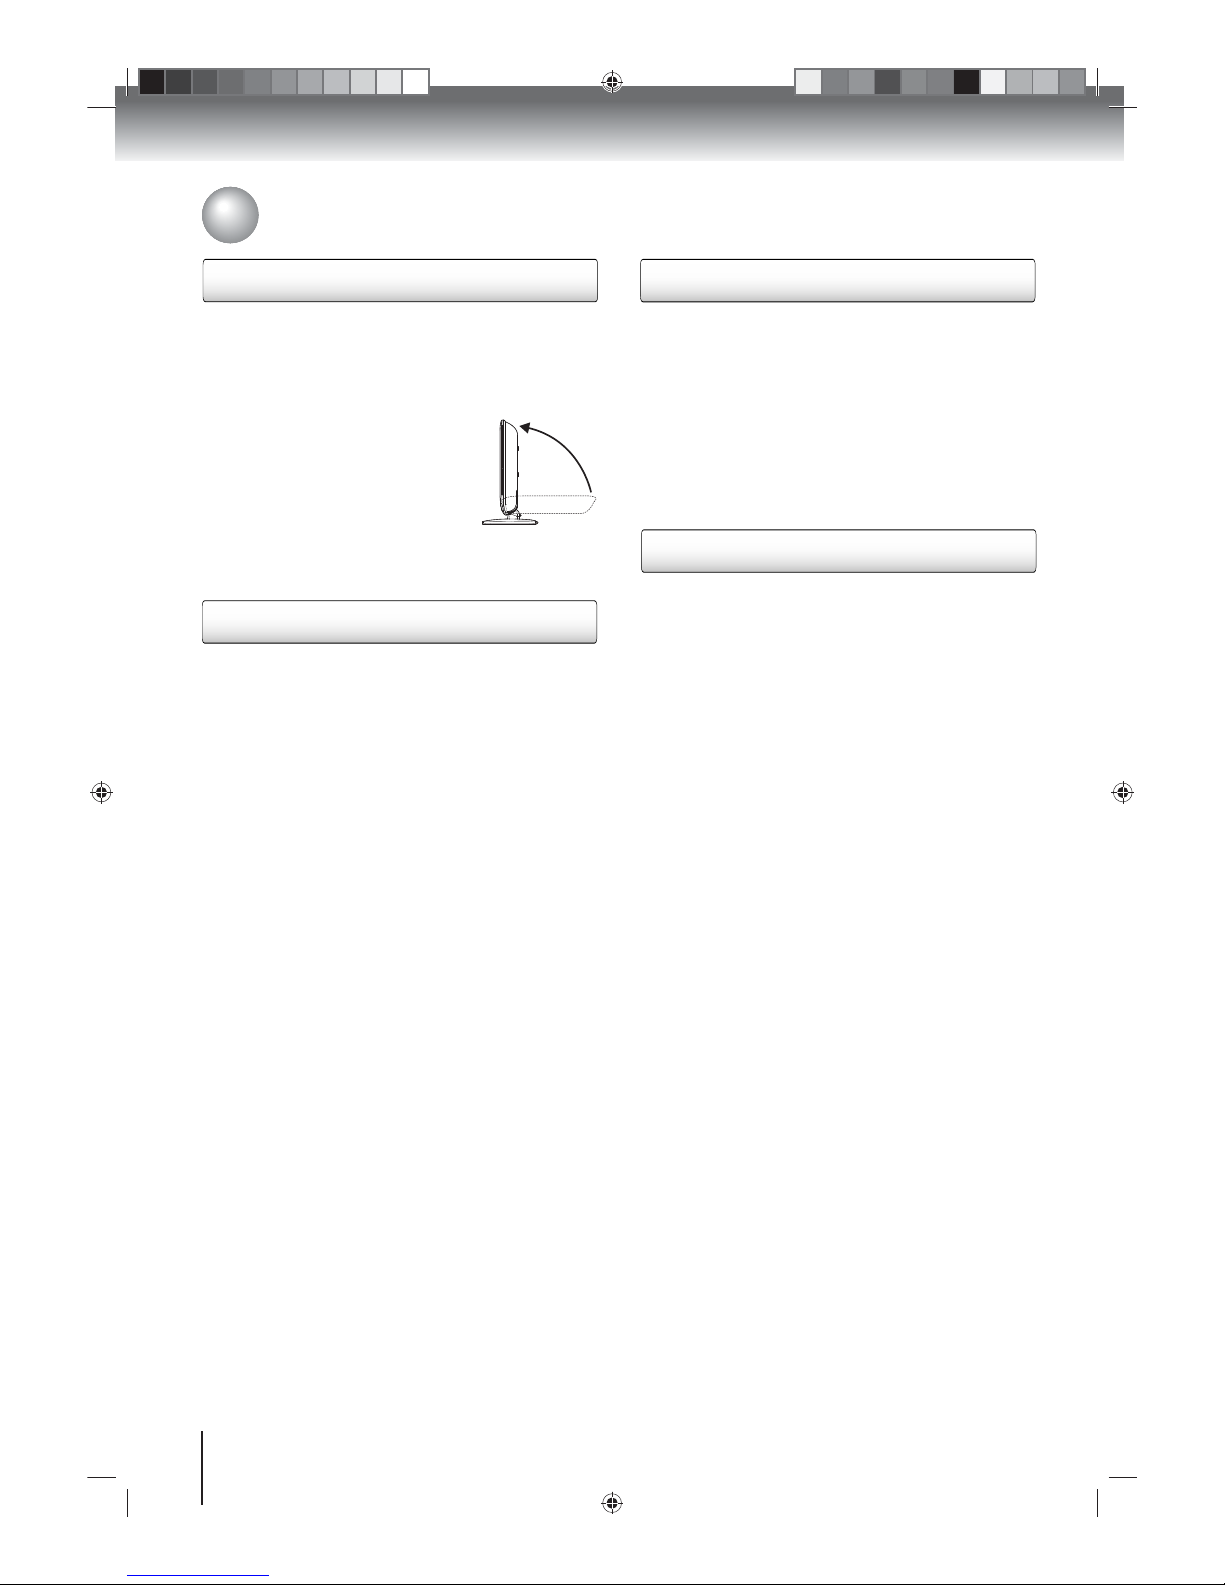
• Retractable pedestal stand and positioning the LCD TV
Observe the following safety precautions:
1. Ensure that the unpacking and transfer of the unit is carried out
by two or more people.
2. Put the LCD TV on a large level area in a recumbent posture.
3. Grab the pedestal stand and lift the display up.
4. Place the TV on a sturdy, level surf ace that
can support the weight of the TV.
5. Be sure to secure the TV to a wall stud,
pillar, surface, or other immovable
structure. To secure the TV in this manner:
(1) attach a clip to an immovabl e structure,
then (2) pass a sturdy strap through the clip
and attach each end to the hooks located
at the back of the TV. Be sure to leave at least four inches
between the TV and the wall or similar structure for ventilation.
See item 22 on page 4 for additional details.
Precautions
Choosing a location for your LCD TV
Important notes about your LCD TV
The following symptoms are technical limitations of LCD
technology and are not an indication of malfunction; therefore,
Toshiba is not responsible for perceived defects resulting from
these symptoms.
1. An afterimage (ghost) may appear on-screen if a fixed,
non-moving image is displayed for a long period of time. This
afterimage is not permanent and will disappear in a short period of
time.
2. The LCD panel contained in this TV is manufactured using an
extremely high le vel of precision technology; howev er, there may
be an occasional pixel (dot of li ght) that does not operate prope rly
(does not light, remains constantly lit, etc.). This is a structural
property of LCD technology. It is not a sign of malfunction, and is
not covered under your warranty . Such pix els are not visible when
the picture is viewed from a normal viewi ng dist an ce.
Notes on handling the unit
• Do not subject the LCD panel to physical shock, such as
dropping it. It may cause unit damage and malfunction.
• When shipping the unit, the original shipping carton and packing
materials may come in handy. For full protection, repack the unit
as it was originally packed at the factory.
• Do not use volatile liquids, such as insecticide, near the unit.
• Do not leave rubber or plastic products in contact with the unit
for prolonged periods of time. Doing so will leave marks on the
finish.
• The top and rear panels of the unit may become warm after a
long period of use. This is not a malfunction.
• When the unit is not in use, always remove the disc and turn off
the power.
Notes on positioning the unit
• When you place this unit near a TV, radio, or VCR, the playback
picture may become poor and the sound may be distorted. In
this case, place the unit away from the TV, radio, or VCR.
• To avoid damage to this product, never place or store the un it in
direct sunlight; hot, humid areas; or areas subject to excessive
dust or vibration.
• The socket outlet must be installed near the unit and is easily
accessible.
Introduction
7
• Do not touch the playback side of the disc. Handle the disc as
shown in the figure below.
Playback side
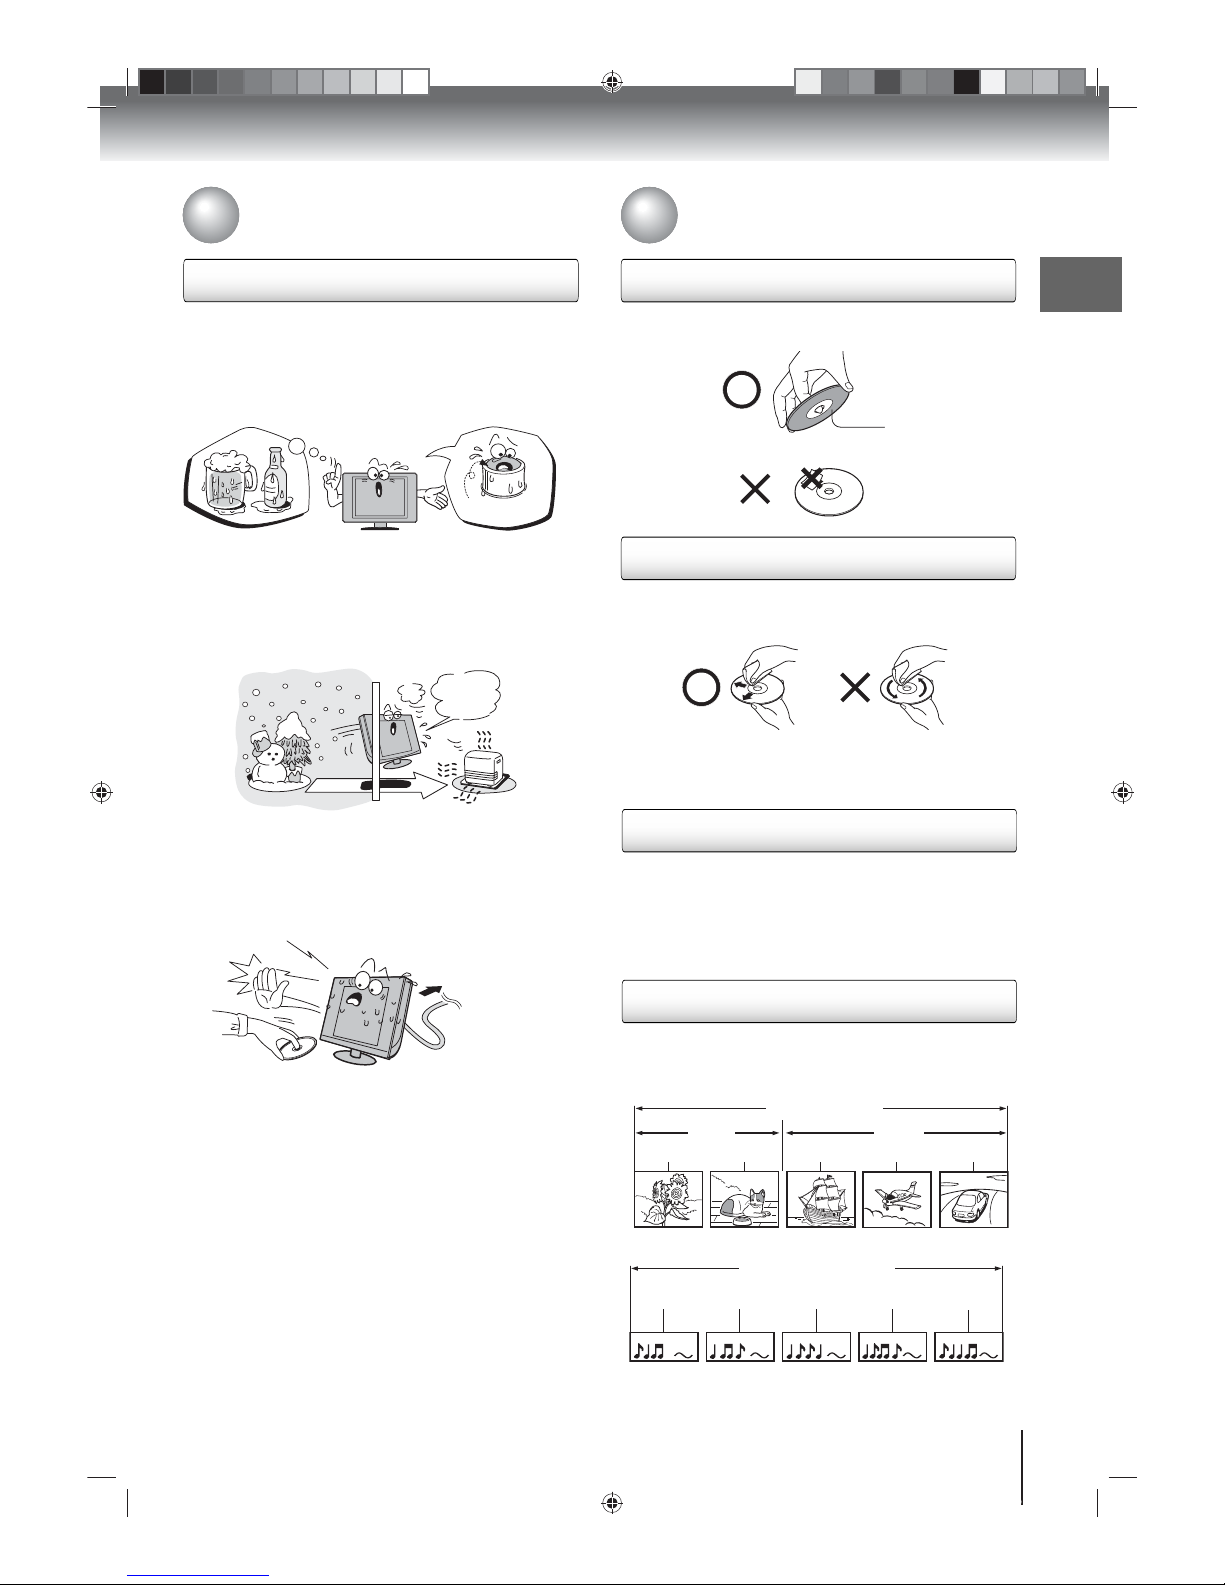
Moisture condensation damages the unit. Please read the
following carefully.
Moisture condensation occurs, for example, when you pour a cold
drink into a glass on a warm day and drops of water form on the
outside of the glass. In the same way, moisture may condense on
this unit’s internal optical pick-up lens, one of the most crucial
internal parts of the unit.
Moisture condensation may occur in the following situations:
• When you move the unit from a cold area to a warm area.
• When you use the unit in a room in which the heat was just
turned on.
• When you use the unit in an area where cold air from an air
conditioner directly hits the unit.
• When you use the unit in a humid area.
Never use the unit when moisture condensation may occur.
Using the unit when moisture condensation exists may damage
discs and internal parts. Connect the power cord of the unit to the
wall outlet, turn on the unit, remove the disc, and leave it for two or
three hours. After two or three hours, the unit will have warmed up
and evaporated any moisture. Leaving the TV connected to the wall
outlet will help prevent moisture condensation in the unit.
Example of moisture
condensation!
Normally, DVD video discs are divided into titles, and the titles are
sub-divided into chapters. Video CDs and Audio CDs are divided into
tracks.
DVD
Video CD/Audio CD
Each title, chapter or track is assigned a number, which is called “title
number”, “chapter number” or “track number” respectively. There
may be discs that do not have these numbers.
Precautions (continued)
Notes on moisture condensation
On handling discs
On cleaning discs
On storing discs
Optical pickup
lens
I
t
’
s
t
o
o
w
a
rm
!
Wall outlet
W
a
i
t
!
• Do not attach paper or tape to discs.
• Fingerprints and dust on the disc cause picture and sound
deterioration. Wipe the disc from the center outwards with a soft
cloth. Always keep the disc clean.
• Do not use any type of solvent such as thinner, benzine,
commercially available cleaners or antistatic spray for vinyl LPs.
It may damage the disc.
• Do not store discs in a place subject to direct sunlight or near
heat sources.
• Do not store discs in places subject to moisture and dust such as
a bathroom or near a humidifier.
• Store discs vertically in a case. Stacking or placing objects on
discs outside of their case may cause warping.
Structure of disc contents
DVD
Title 1
Title 2
Chapter 1
Chapter 2
Chapter 1
Chapter 3
Video CD/Audio CD
Track 1
Track 2
Track 3
Track 4
Track 5
Chapter 3
Notes on discs
Introduction
8
Notes on discs (continued)
Notes on copyright
The unauthorized recording, use, distribution, or revision of
copyrighted materials including, without limitation, television
programs, videotapes, and DVDs, is prohibited under the Copyright
Laws of the United States and other countries, and may subject you
to civil and criminal liability.
Playable discs
About this owner’s manual
Notes on region numbers
On Video CDs
This unit supports Video CDs equipped with the Playback Control
(PBC) function, version 2.0.You can enjoy two playback variations
depending on types of discs.
•
Video CD not equipped with PBC function (Version 1.1)
Sound and movie can be played on this unit in the same way as
a DVD.
•
Video CD equipped with PBC function (Version 2.0)
In addition to operation of a Video CD not equipped with the
PBC function, you can enjoy playback of interactive software
with search function by using the on-screen playback menu.
Some of the functions described in this owner’s manual may not
work with some discs.
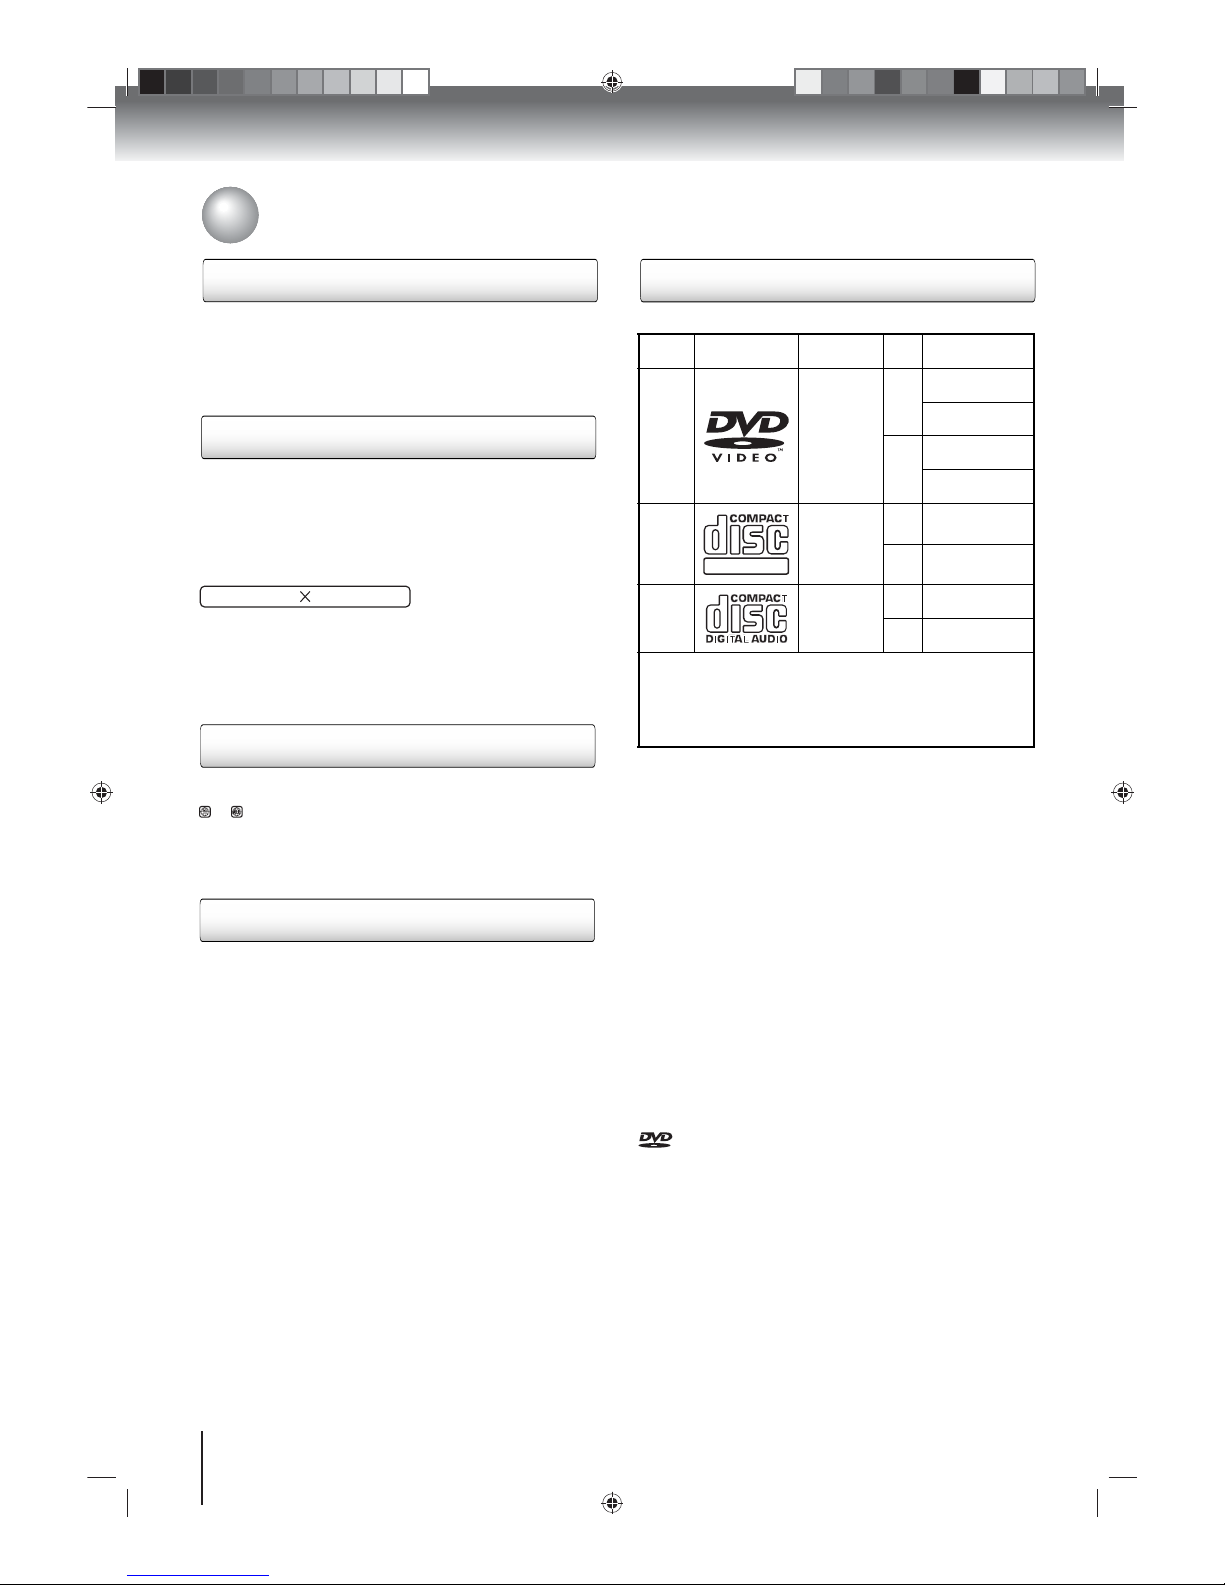
This unit can play the following discs.
• You cannot play discs other than those listed above.
• You cannot play discs of DVD-RAM, DVD-ROM, CD- ROM,
Photo CD, etc., or non-standardized discs even if they may be
labeled as above.
• Some CD-R/RWs cannot be played back depending on the
recording conditions.
• This unit uses the NTSC color system, and cannot play DVD
video discs recorded in any other color system (PAL, SECAM,
etc.).
• This unit can play an 8 cm disc. Please do not use a disc
adapter. It may cause trouble.
• Please do not insert any disc of an irregular shape into the unit,
as it may interfere with the function of the unit. You may not be
able to remove it.
• Please do not use after market accessories, such as a ring
protector, as this may cause trouble with the operation of the
unit.
Because of problems and errors that can occur during the creation
of DVD and CD software and/or the manufacture of DVD and CD
discs, Toshiba cannot assure that the DVD player contained in this
TV will successfully play every disc bearing the DVD and CD logos.
If you happen to experience any difficulty playing a DVD or CD on
the DVD player contained in this TV, please contact Toshiba
Customer Service.
is a trademark of DVD Format/Logo Licensing Corporation.
Disc mark Contents
Disc
size
Maximum
playback time
DVD
Video
disc
Audio
+
Video
(moving
pictures)
12 cm
Approx. 4 hours
(single sided disc)
Approx. 8 hours
(double sided disc)
8 cm
Approx. 80 minutes
(single sided disc)
Approx. 160 minutes
(double sided disc)
Video
CD
Audio
+
Video
(moving
pictures)
12 cm
Approx. 74 minutes
(single sided disc)
8 cm
Approx. 20 minutes
(single sided disc)
Audio
CD
Audio
12 cm
Approx. 74 minutes
(single sided disc)
8 cm
Approx. 20 minutes
(single sided disc)
The following discs are also supported.
• DVD-R/RW discs containing files of DVD video format
• CD-R/CD-RW discs containing files in CD-DA, Video CD, MP3,
WMA, or JPEG formats.
• Kodak Picture CD and FUJICOLOR CD
Some of these discs may be incompatible.
DIGITAL VIDEO
This owner’s manual explains the basic instructions of this unit.
Some DVD video discs are produced in a manner that allows
specific or limited operation during playback. As such, the unit may
not respond to all operating command. This is not a defect of the
unit. Refer to the instruction notes of discs.
The following symbol may appear on the TV screen during
operation.
It means that the operation is not permitted by the TV/DVD or the
disc. For example, sometimes it is unable to stop the playback of
copyright message of the disc when the Stop button is pressed.
Alternatively, this symbol may also indicate that the feature is not
available for the disc.
The region number of this unit is 1. If region numbers, which stand
for their playable area, are printed on your DVD and you do not find
or , disc playback will not be allowed by the player. (In this
case, the unit will display a message on-screen.). Some DVDs that
have no region code label may still be subject to area restrictions
and therefore not playable.

Introduction
9
Introduction
SAFETY INSTRUCTIONS...............................4
Precautions......................................................6
Notes on discs.................................................7
Contents..........................................................9
Identification of controls.................................10
Connections
Antenna connections................................. ....14
Cable TV connections ...................................15
Optional equipment connections ...................16
Basic setup
Auto Setup.....................................................21
Language setup.............................................22
Channel memory ...........................................23
TV operation
TV operations ................................................26
Channel labels...............................................28
Video input labels ..........................................29
V-Chip setup..................................................30
Closed captioning...................................... ....34
Advanced closed captioning..........................35
Picture preference and settings.....................36
Picture formats .............................................. 37
Film Mode......................................................38
Digital Noise Reduction .................................38
Sound quality adjustment ..............................39
Sound stream selection.................................39
Digital audio language selection....................40
Aspect feature ...............................................40
DTV signal strength.......................................41
Power indicator..............................................42
Auto Shut Off.................................................42
Settings reset.................................................43
Contents
Basic playback
Disc playback................................................ 44
Playback navigation...................................... 46
Advanced playback
Zoom function............................................... 47
Scene navigation................. ... ... ................... 47
Scene bookmark............................... ............ 48
Repeat playback........................................... 49
A-B repeat..................................................... 49
Programmed playback.................................. 50
Random playback......................................... 50
Scene angle...................................... ... ......... 51
Title selection................................................ 51
DVD menu.................................................... 51
Soundtrack language.................................... 52
Audio channel............................................... 52
Subtitle.......................................................... 52
Playback information .................................... 53
VCD playback control ................................... 53
MP3, WMA, JPEG, and
Audio CD operation ...................................... 54
MP3, WMA, JPEG, and
Audio CD playback modes ........................... 57
Function setup
Customizing disc playback ........................... 59
Others
Power Return feature.................................... 64
Troubleshooting............................................ 64
Reception disturbances ................................ 66
Care and maintenance ................................. 66
Specifications................................................ 67
Limited United States Warranty.................... 68
Introduction
10
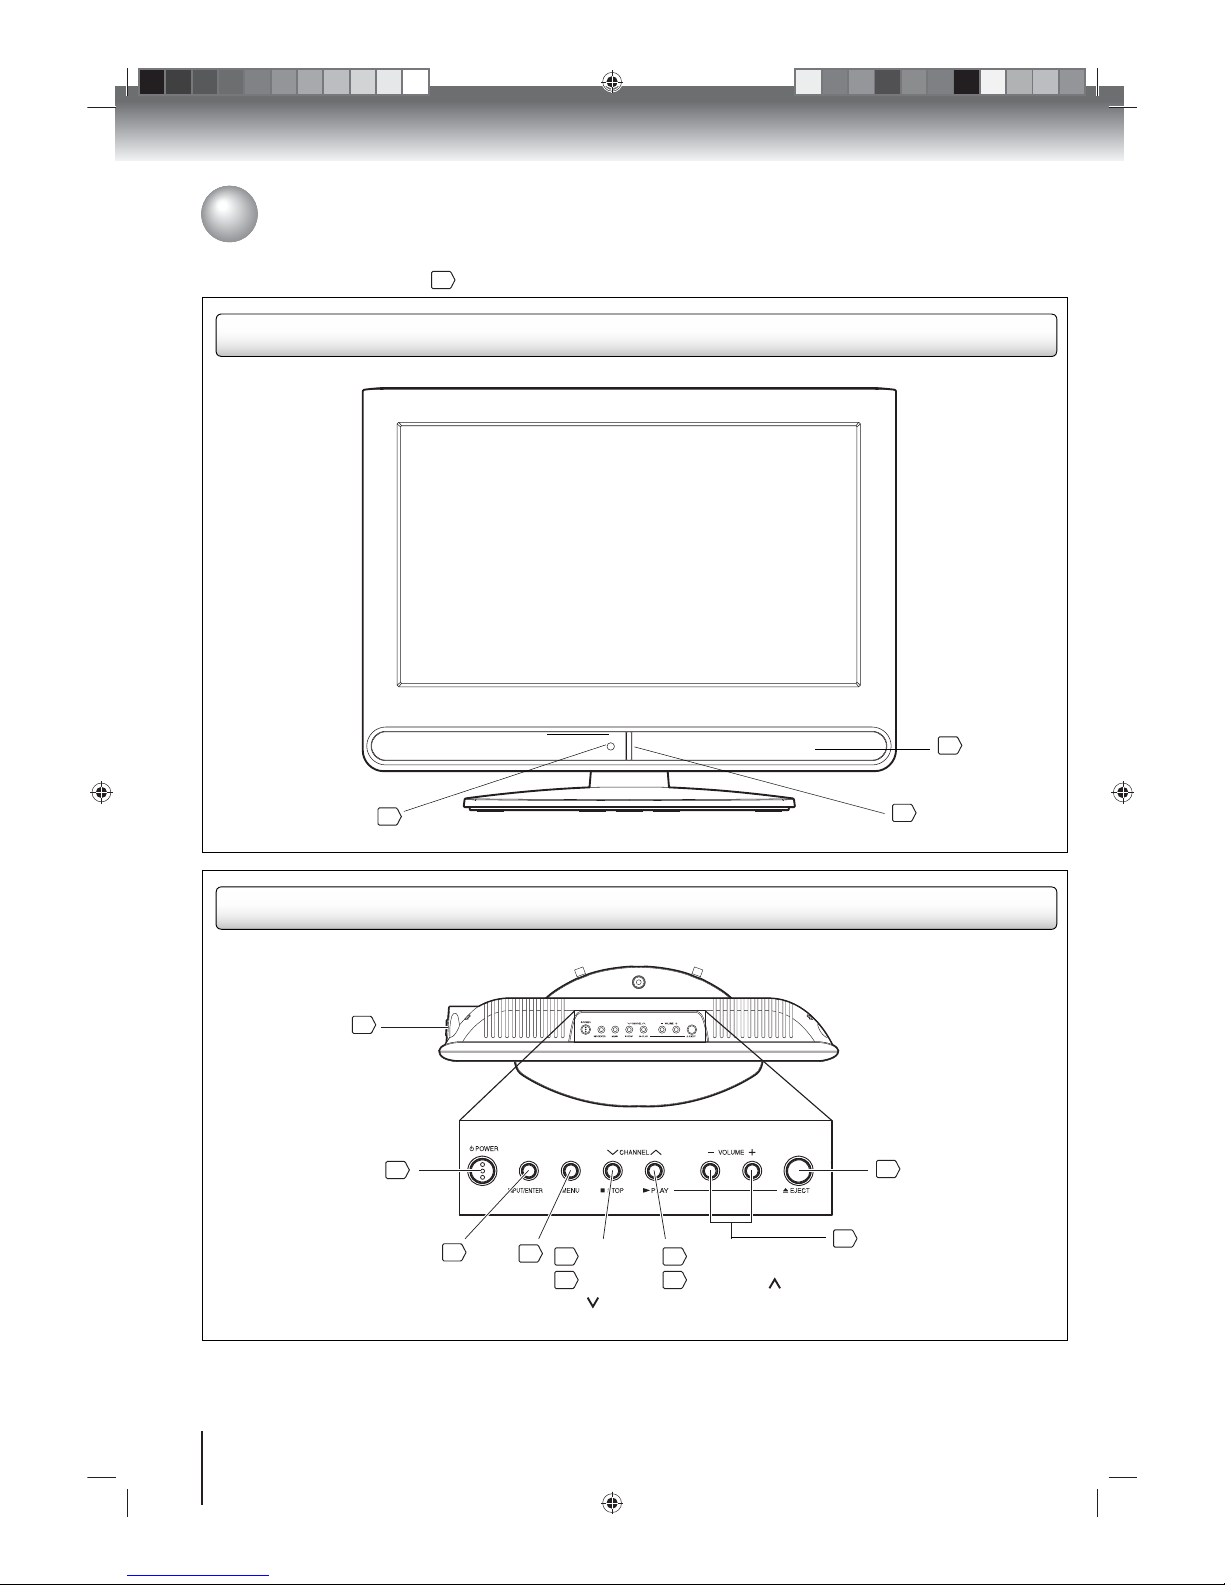
Front Panel
Remote sensor
13
Speaker
39
Top Side
Identification of controls
See the page number enclosed in for details. Unless otherwise indicated, figures are based on the 15LV505-T model.
POWER indicator
21
POWER button
26
INPUT/ENTER button
16
STOP /
CHANNEL
button
44
26
PLAY /
CHANNEL button
44
26
EJECT button
45
VOLUME (+/–) buttons
26
Disc slot
44
MENU
button
22
Introduction
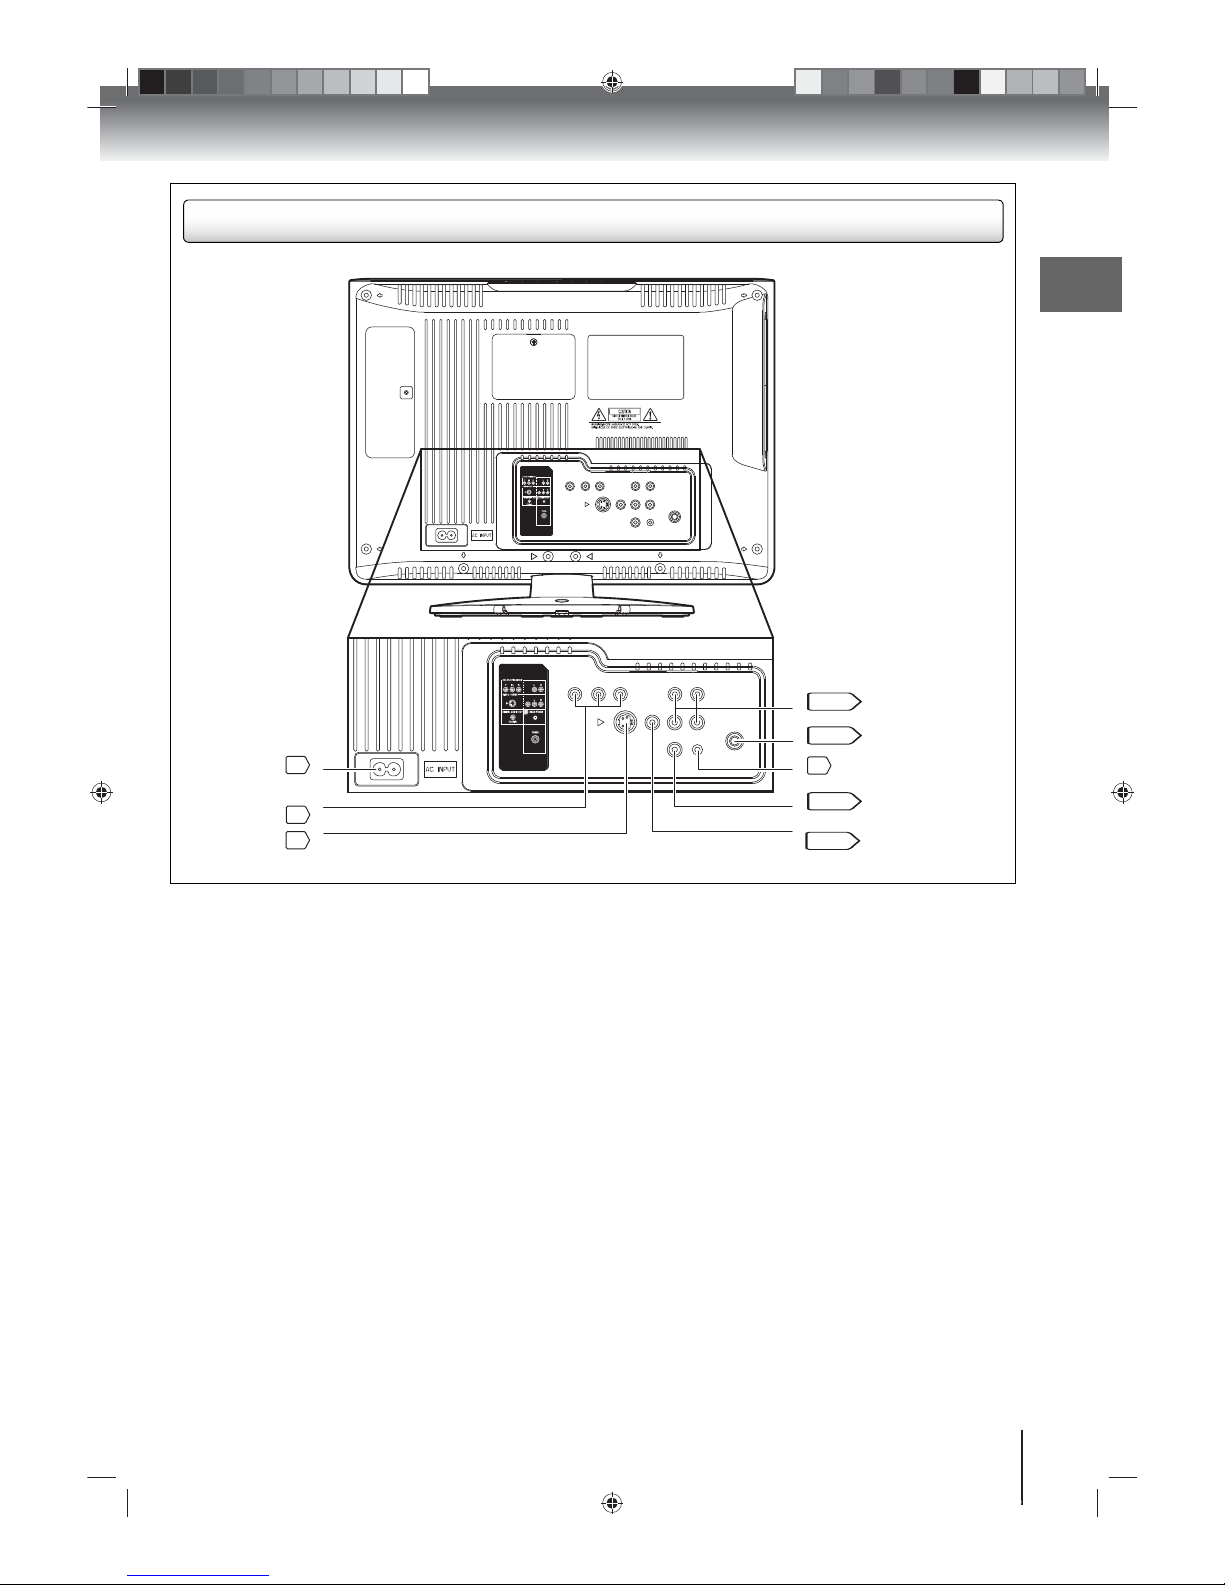
11
Rear Side
AUDIO IN L/R jacks
Antenna jack
HEADPHONE jack
COAXIAL DIGITAL
AUDIO OUT jack
VIDEO IN / GAME jack
16, 17
14–152718–19
16–17
AC INPUT jack
COLORSTREAM
HD IN jacks
S-VIDEO
/ GAME jack
201717
Introduction
12
Identification of controls
(continued)
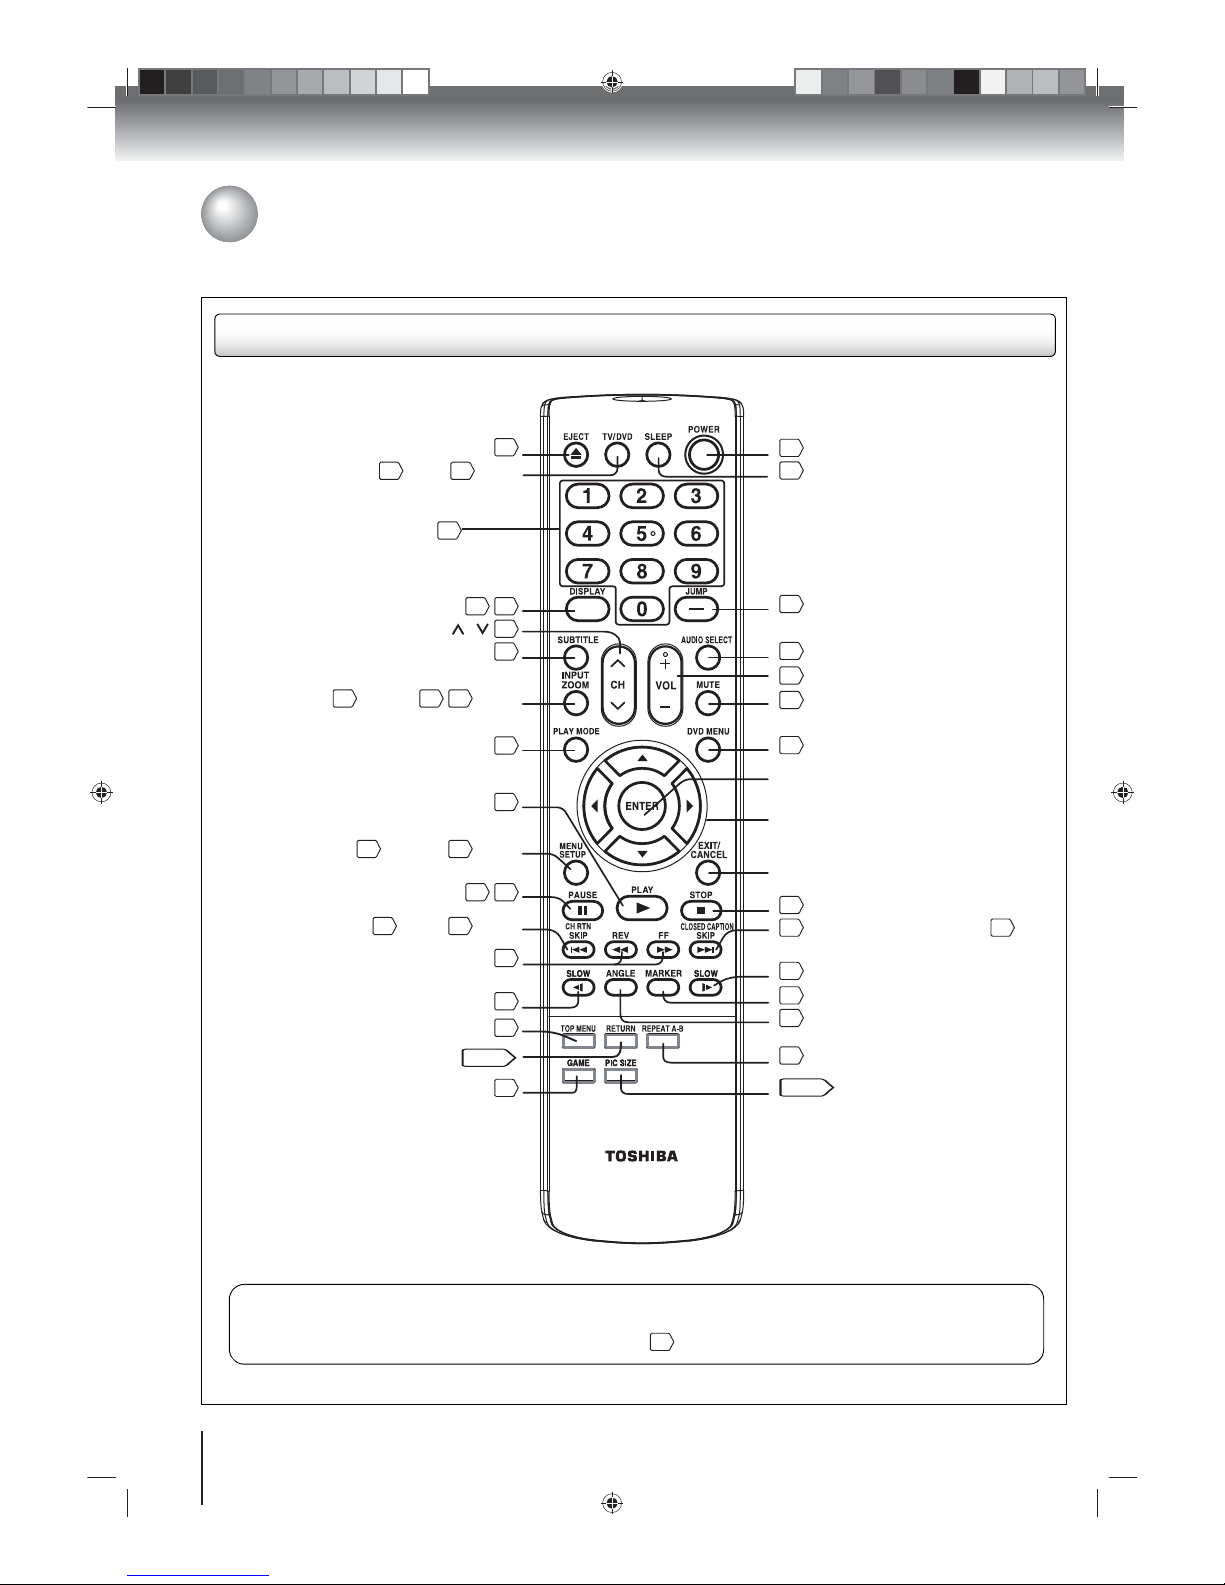
Remote control
* DVD MENU button
Use the DVD MENU button to display the menu included on many DVD Video disc. To operate a menu, refer
to the instructions in the “DVD menu” section on page .
51
EJECT button
TV / DVD button
DISPLAY button
Channel
SUBTITLE button
INPUT / ZOOM button
PLAY MODE button
PLAY button
MENU / SETUP button
PAUSE button
Channel Return / SKIP button
REWIND and FAST FORWARD buttons
SLOW button
TOP MENU button
RETURN button
GAME button
45
26
44
27
53
/
26
52
164756
4944225944
46
27
46
46
46
51
55, 59
17
Direct channel selection /
Number buttons (0-9)
26
POWER button
SLEEP button
JUMP button
AUDIO SELECT button
VOL +/– button
MUTE button
DVD MENU button *
ENTER button
Direction buttons
EXIT / CANCEL button
STOP button
CLOSED CAPTION / SKIP button
SLOW button
MARKER button
ANGLE button
REPEAT A-B button
PIC SIZE button
262747
52
26
265144
34
464648
51
49
37, 55
Introduction
13
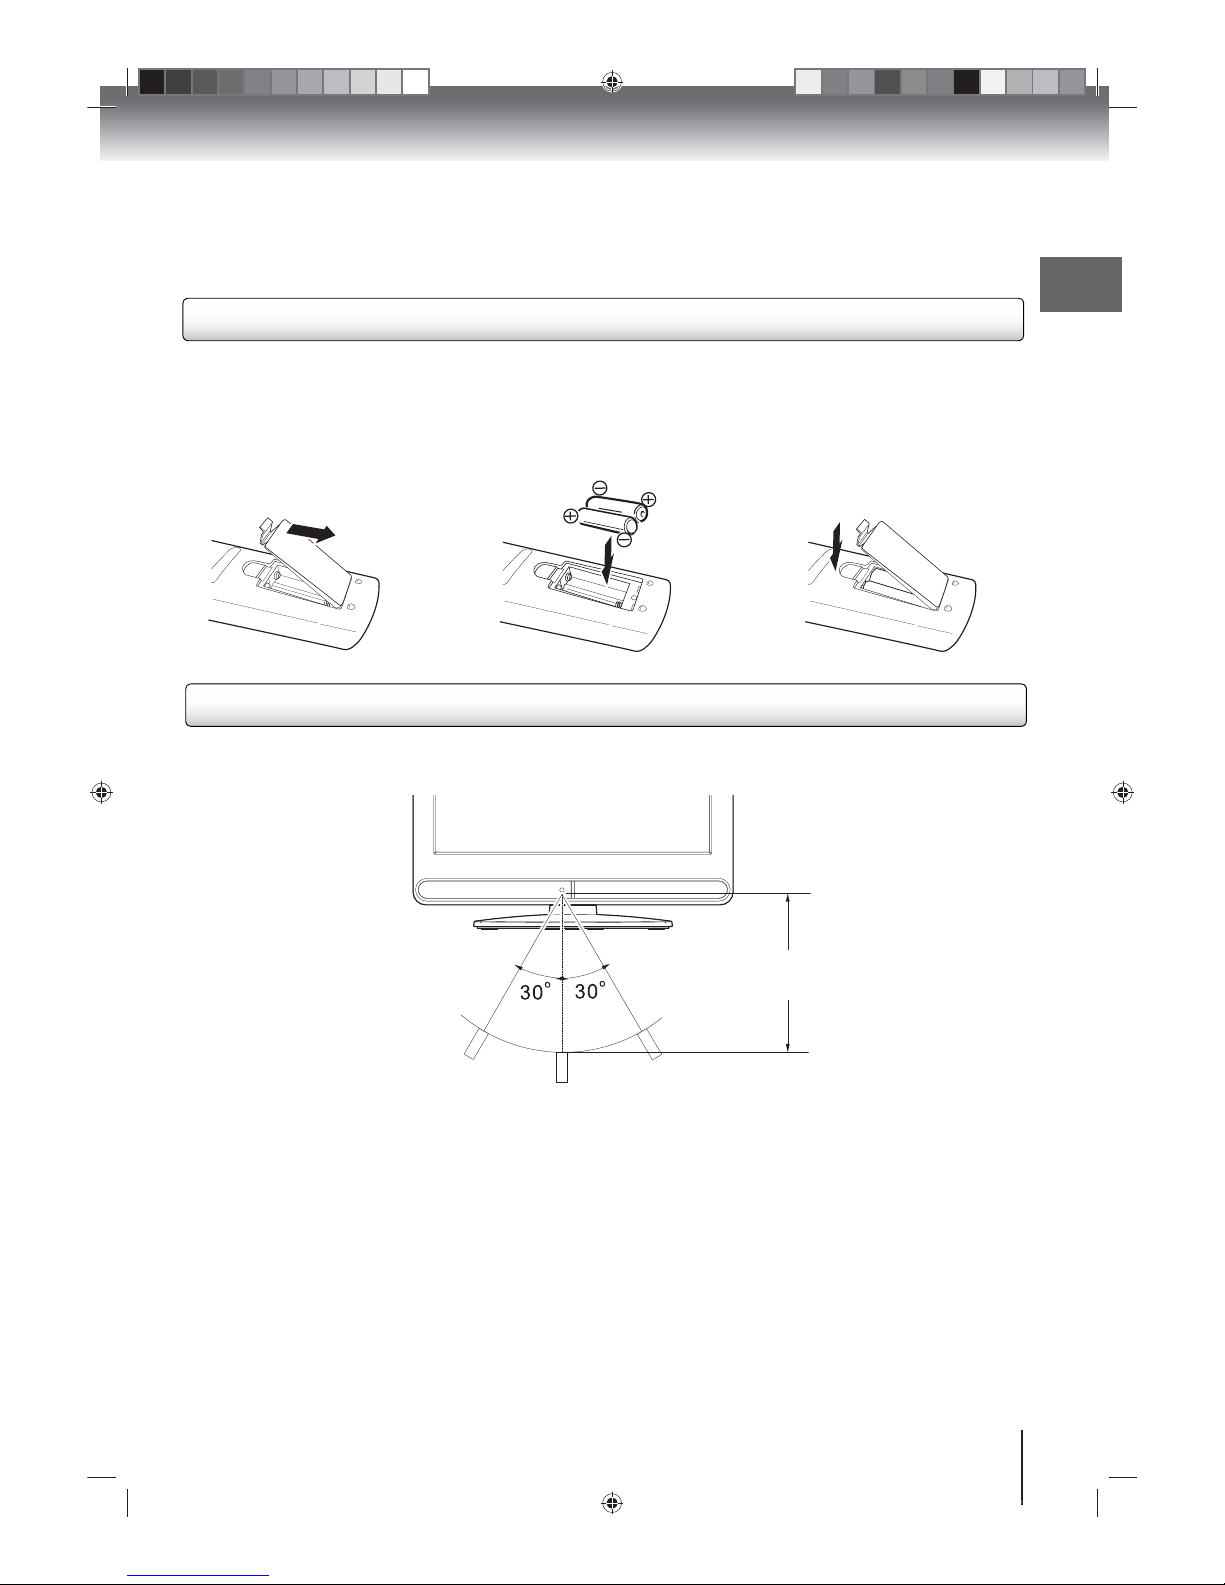
Inserting batteries
Aim the remote control at the remote sensor and press the control buttons to operate. Make sure the remote control
is within approximately five meters and 30° angle (on either side) of the remote sensor.
Caution:
Never throw batteries into a fire.
Notes:
• Be sure to use AAA size batteries.
• Dispose of batteries in a designated disposal area.
• Batteries should always be disposed of with the environment in mind. Always dispose of batteries in accordance with
applicable laws and regulations.
• If the remote control does not operate correctly, or if the operating range becomes reduced, replace batteries with new
ones.
• When replacing the remote control batteries, always replace both batteries with new ones. Never mix battery types or
use new and used batteries in combination.
• Always remove batteries from remote control if they are already drained or if the remote control is not to be use for an
extended period of time. This will prevent battery acid from leaking into the battery compartment.
Approximately
5 meters
N
Open the battery compartment
cover in the direction of the
arrow.
O
Install two “R03/AAA” batteries
(supplied), paying attention to
the polarity indicated in the
battery compartment.
P
Replace the compartment cover.
Operation
Connections
14
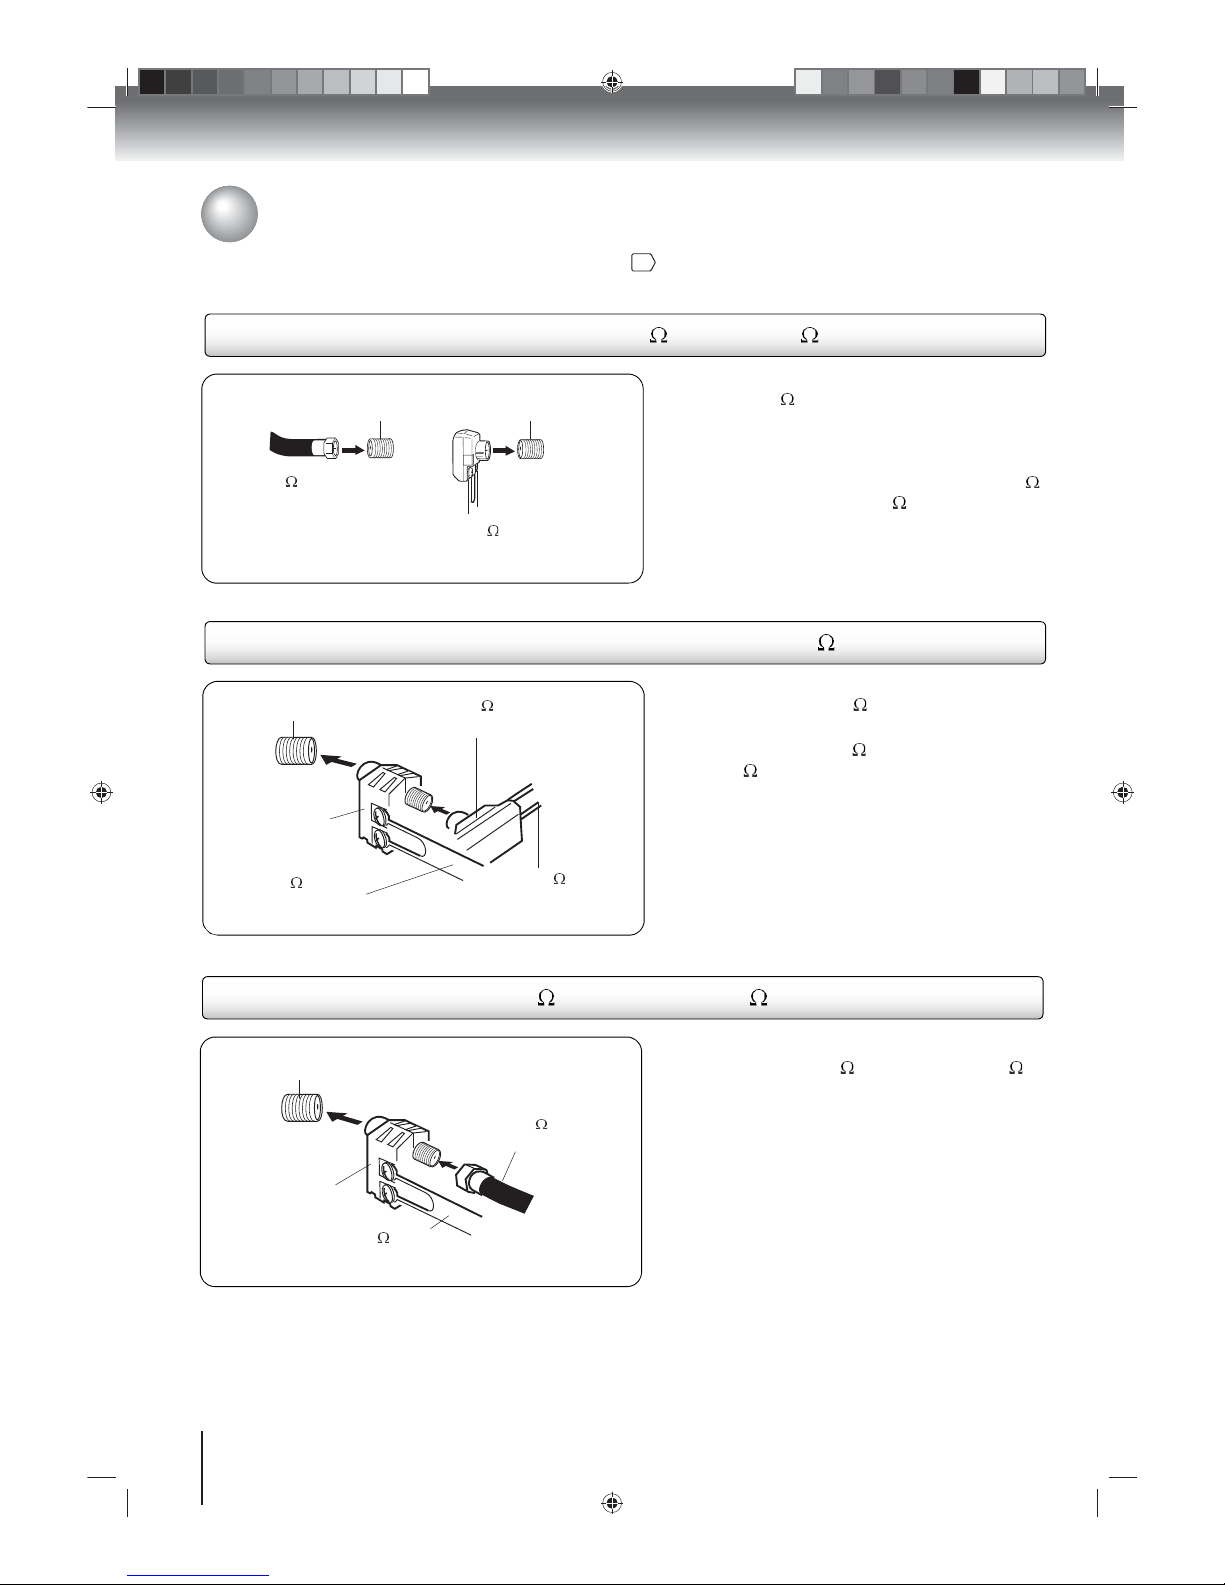
Connect the 75 cable from the combination VHF/
UHF antenna to the antenna jack on the back of the
TV/DVD.
If your combination VHF/UHF antenna has a 300
twin-lead wire, use the 300-75 matching
transformer (not supplied).
Antenna jack
75 coaxial cable
(not supplied)
Combination VHF/UHF antenna (Single 75 cable or 300 twin-lead wire)
Antenna jack
300-75 matching
transformer (not supplied)
Combination VHF/UHF antenna (Separate VHF and UHF 300
twin-lead wires)
1. Connect the UHF 300 twin-lead wire to the
combiner (not supplied).
2. Connect the VHF 300 twin-lead wire to the
300-75 matching transformer (not supplied).
3. Attach the transformer to the combiner, then
attach the combiner to the antenna jack on the
back of the TV/DVD.
Antenna jack
UHF 300 twin-lead
wire (not supplied)
300-75 matching
transformer (not supplied)
VHF 300 twin-lead
wire (not supplied)
Combiner
(not supplied)
Separate VHF/UHF antennas (75
VHF cable and 300
UHF twin-lead wires)
1. Connect the VHF 75 cable and UHF 300
twin-lead wire to the combiner (not supplied).
2. Attach the combiner to the antenna jack on the
back of the TV/DVD.
Antenna jack
UHF 300 twin-lead
wire (not supplied)
VHF 75 cable
(not supplied)
Combiner
(not supplied)
Connections
Antenna connections
If you are using an indoor or outdoor antenna, follow the instructions below that correspond to your antenna system.
If you are using a cable TV service (CABLE), go to page for related connections.
15
Connections
15
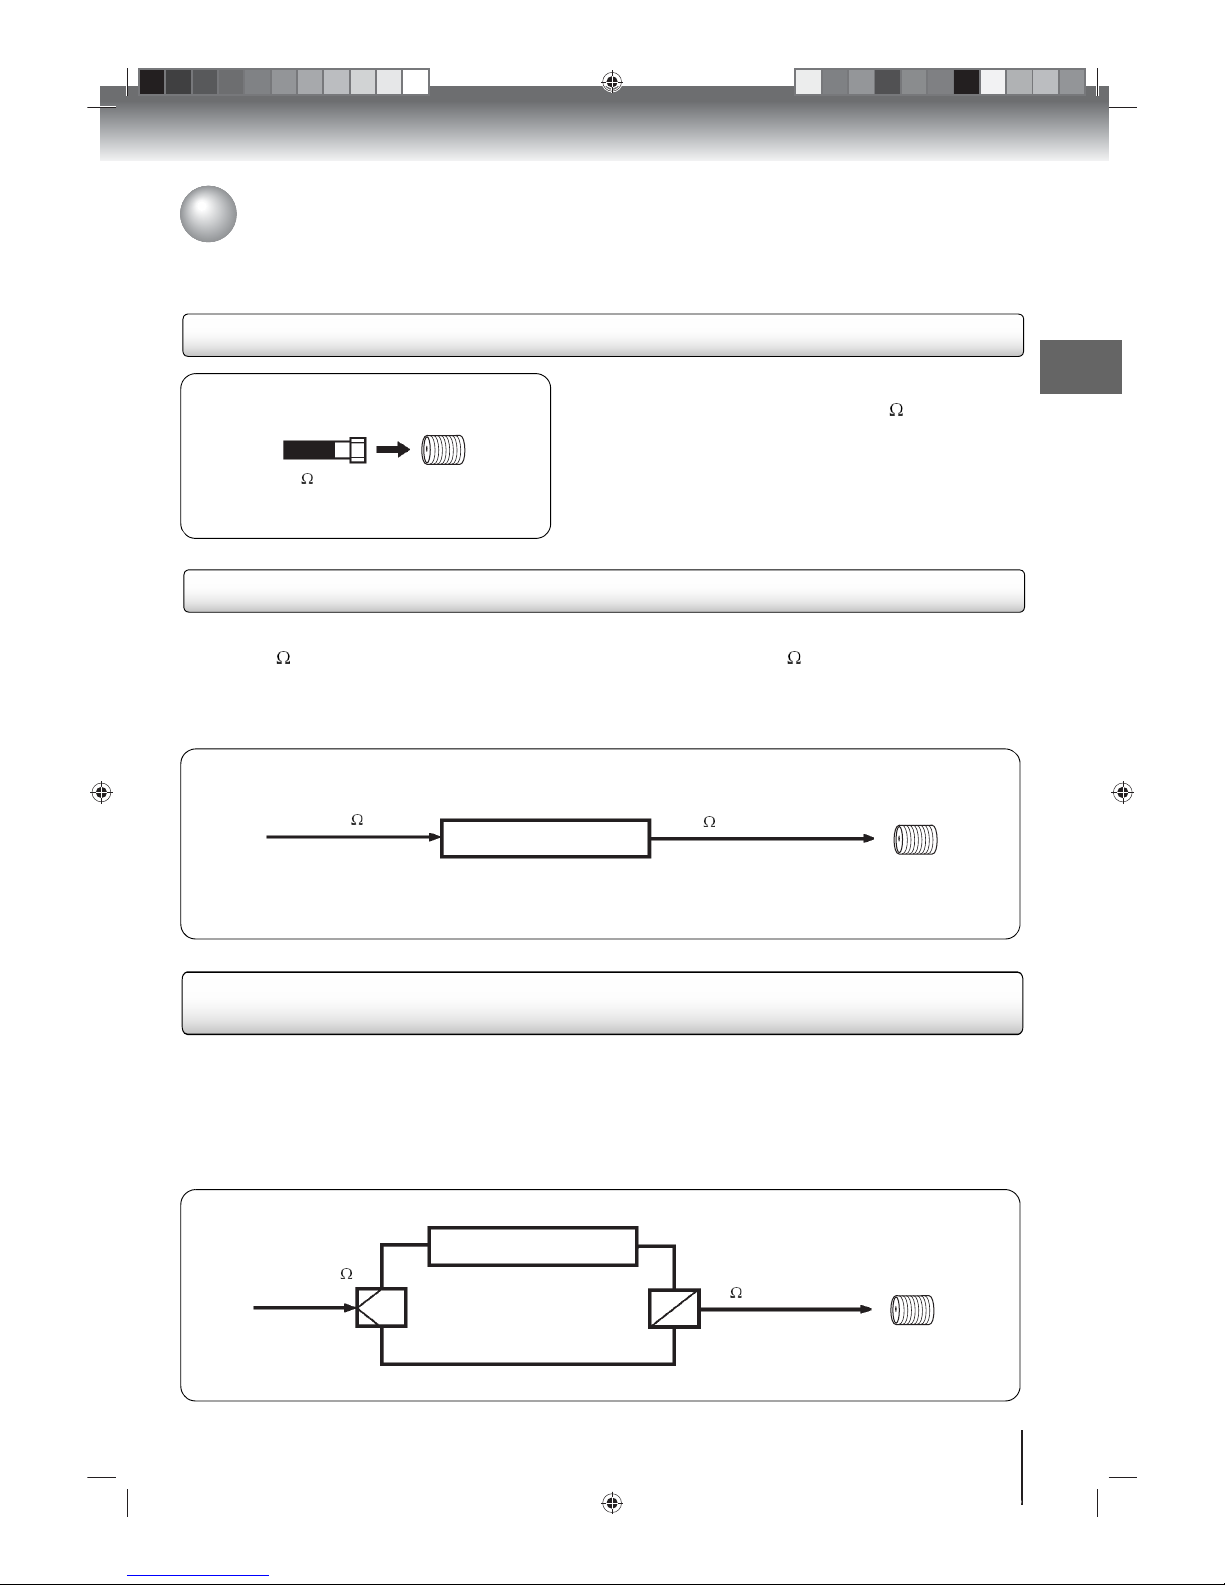
Cable TV connections
This TV/DVD has an extended tuning range and can tune most cable channels without using a cable TV converter box.
Some cable companies offer “premium pay channels” in which the signal is scrambled. Descrambling these signals for
normal viewing requires the use of a descrambler device which is generally provided by the cable company.
For subscribers to basic cable TV service
For basic cable service not requiring a converter/
descrambler box, connect the cable TV 75 coaxial cable
directly to the antenna jack on the back of the TV/DVD.
Antenna
jack
75
coaxial cable
For subscribers to scrambled cable TV service
If you subscribe to a cable TV service which requires the use of a converter/descrambler box, connect the
incoming 75 coaxial cable to the converter/descrambler box. Using another 75 coaxial cable, connect the
output jack of the converter/descrambler box to the antenna jack on the TV/DVD. Follow the connections shown
below. Set the TV/DVD to the output channel of the converter/descrambler box (usually channel 3 or 4) and use
the converter/descrambler box to select channels.
Incoming 75 cable TV
Converter/descrambler
75 cable to TV/DVD
Antenna
jack
For subscribers to unscrambled basic cable TV service with
scrambled premium channels
If you subscribe to a cable TV service in which basic channels are unscrambled and premium channels require
the use of a converter/descrambler box, you may wish to use a signal splitter and an A/B switch box (available
from the cable company or an electronics supply store). Follow the connections shown below. With the switch in
the “B” position, you can directly tune any unscrambled channels on your TV/DVD. With the switch in the “A”
position, tune your TV/DVD to the output of the converter/descrambler box (usually channel 3 or 4) and use the
converter/descrambler box to tune scrambled channels.
Incoming 75
cable TV
Converter/descrambler
75 cable to TV/DVD
Splitter
A/B switch
A
B
Antenna
jack

Connections
16
Optional equipment connections
You can enjoy VCR, camcorder or TV games with connection to an external input.
Important: Read the optional equipment’s owner's manual for related connection
instructions and reminders before connecting the device to your TV/DVD.
Using the audio/video inputs
0-3
INPUT
GAME
Press INPUT to view a signal from anot her device connected to your TV/DVD, such as a VCR player. You can select TV,
Video, or ColorStream HD depending on which input jacks you used to connect your devices. When the built-in disc
player is used, select “DVD”.
Press INPUT on the remote cont rol to display the current sig nal so urce. To change the input source, press INPUT again
or press the Numb er buttons (0-3).
Optional equipment connections reminders:
• All input terminals are located on the rear side of the TV.
• When you connect an equipment to your TV, be sure to turn off the power and unplug the equipment from the wall
outlet before making any connections.
• Placing the TV near a tuner or radio can distort the radio broadcast sound. If this is the case, move th e unit away from
the tuner and radio.
• The arrow direction in the succeeding figures indicates the signal flow.
Connecting to a VCR
Connect the VCR to the TV/DVD as shown. Select “Video” by pressing INPUT repeatedly.
To Audio/Video OUT
Audio/Video cable (not supp lie d)
To Audio/Video IN
yellow, white, red
Connecting to a camcorder
Connect the camcorder to the TV/DVD as shown. Select “Video” by pressing INPUT repeatedly.
To Audio/Video OUT
Audio/Video cable (not supp lie d)
To Audio/Video IN
yellow, white, red
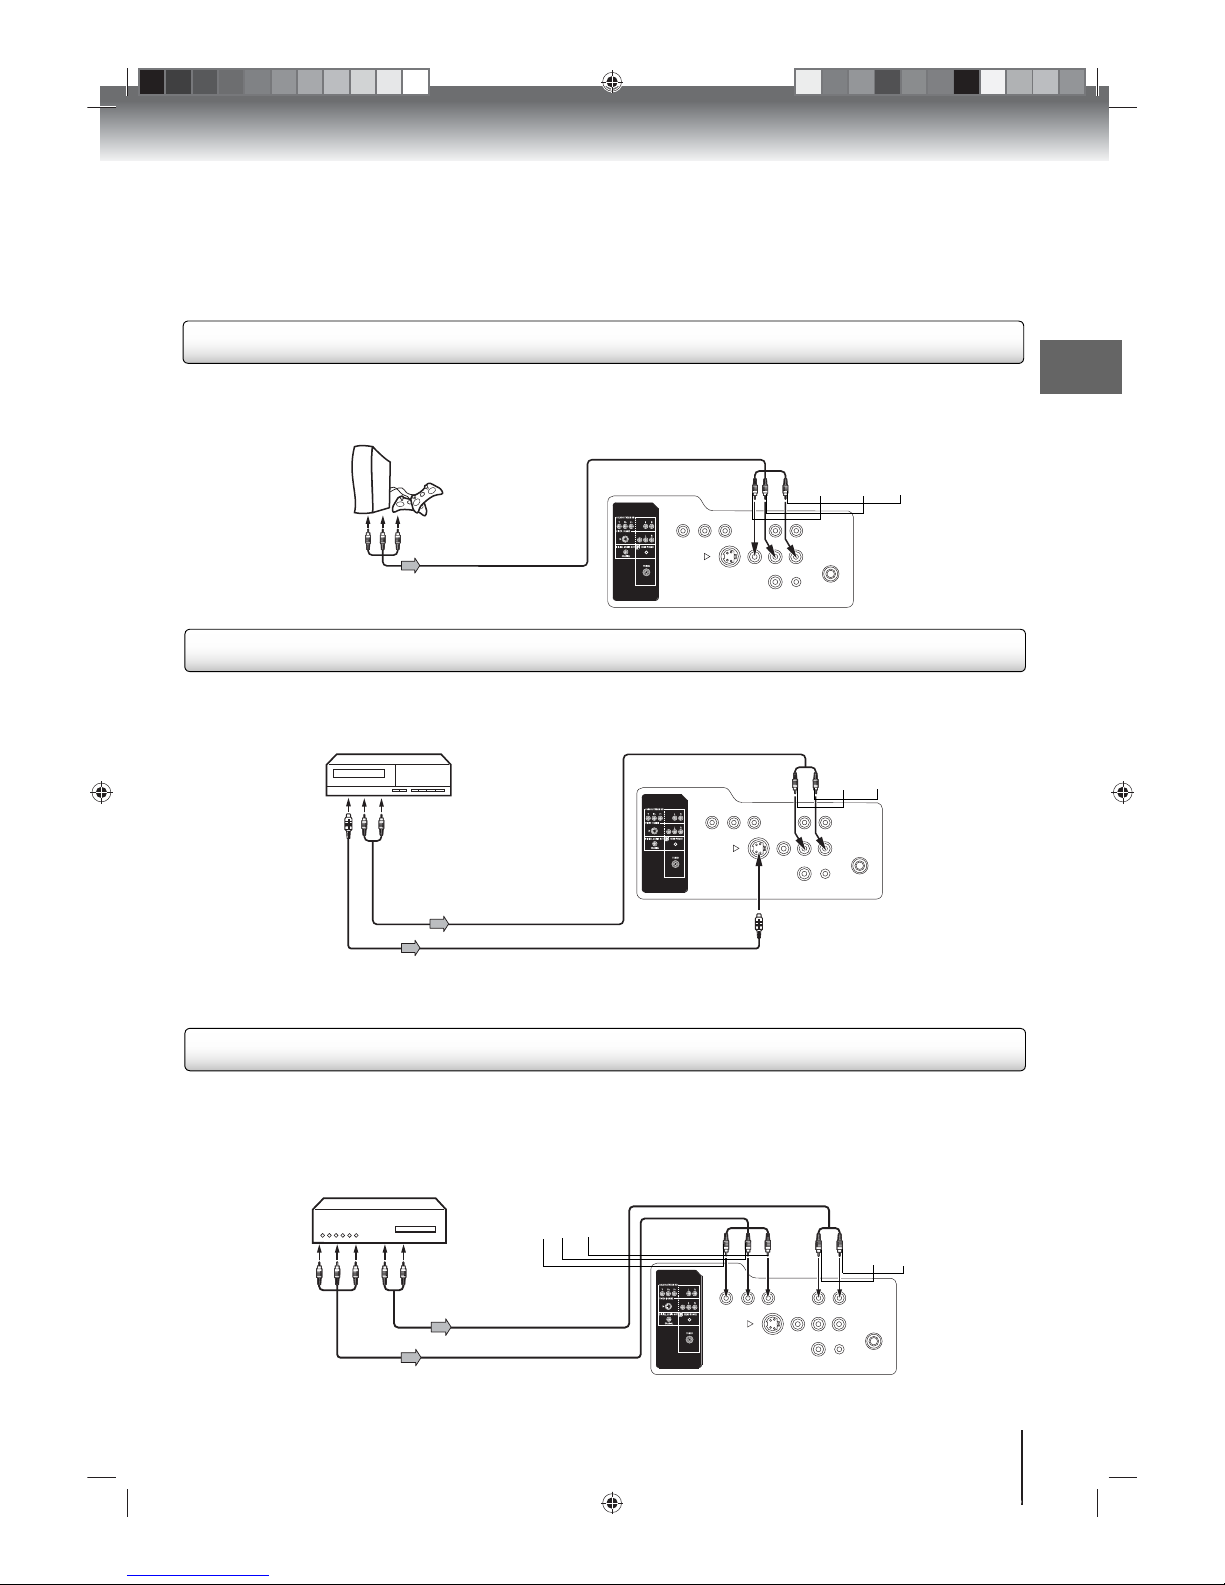
Connections
17
If you connect a device with an S-Video cable to the TV’s S-VIDEO IN jack, you must also connect the audio cables to
the AUDIO IN jacks as shown below. The S-Video cable only carries the video signal. The audio signal is separated.
Select “Video” (“Video 1”) by pressing INPUT repeatedly.
Note: When the S-Video cable and the standard video cable are connected at the same time, the S-Video cable takes
precedence.
Audio cable (not supplied)
To Audio L/R OUT
To S-Video OUT
S-Video cable (not supplied)
To S-Video IN
To Audio L/R IN
white, red
Connecting to a game console
You can use your TV as a display device for many video game consoles. Hook-up instructions for game consoles vary
so you need to consult your device’s user manual for applicable instructions. This section shows an AUDIO/VIDEO IN
connection. Once connected, press GAME to display the Game mode screen.
To Audio/Video OUT
Audio/Video cable (not supp lie d)
To Audio/Video IN
yellow, white, red
Connecting to an optional equipment with S-Video output
Your TV/DVD supports ColorStream® (component video) connection. When using a component video cable, you must
also connect the audio cables to the COLORSTREAM HD AUDIO IN jacks as shown below. Select “ColorStream HD”
by pressing INPUT repeatedly.
Note: The ColorStream
®
inputs on this unit are compatible with devices that output 480i, 1080i interlaced signals and
480p, 720p progressive signals.
To Audio L/R OUT
Audio cable (not supplied)
To Component
Video OUT
Component video cable (not supplied)
To ColorStream HD
(Y, Pb, Pr) IN
To ColorStream
HD Audio L/R IN
white, red
Connecting to an optional equipment with ColorStream® (Component video) output
Connections
18
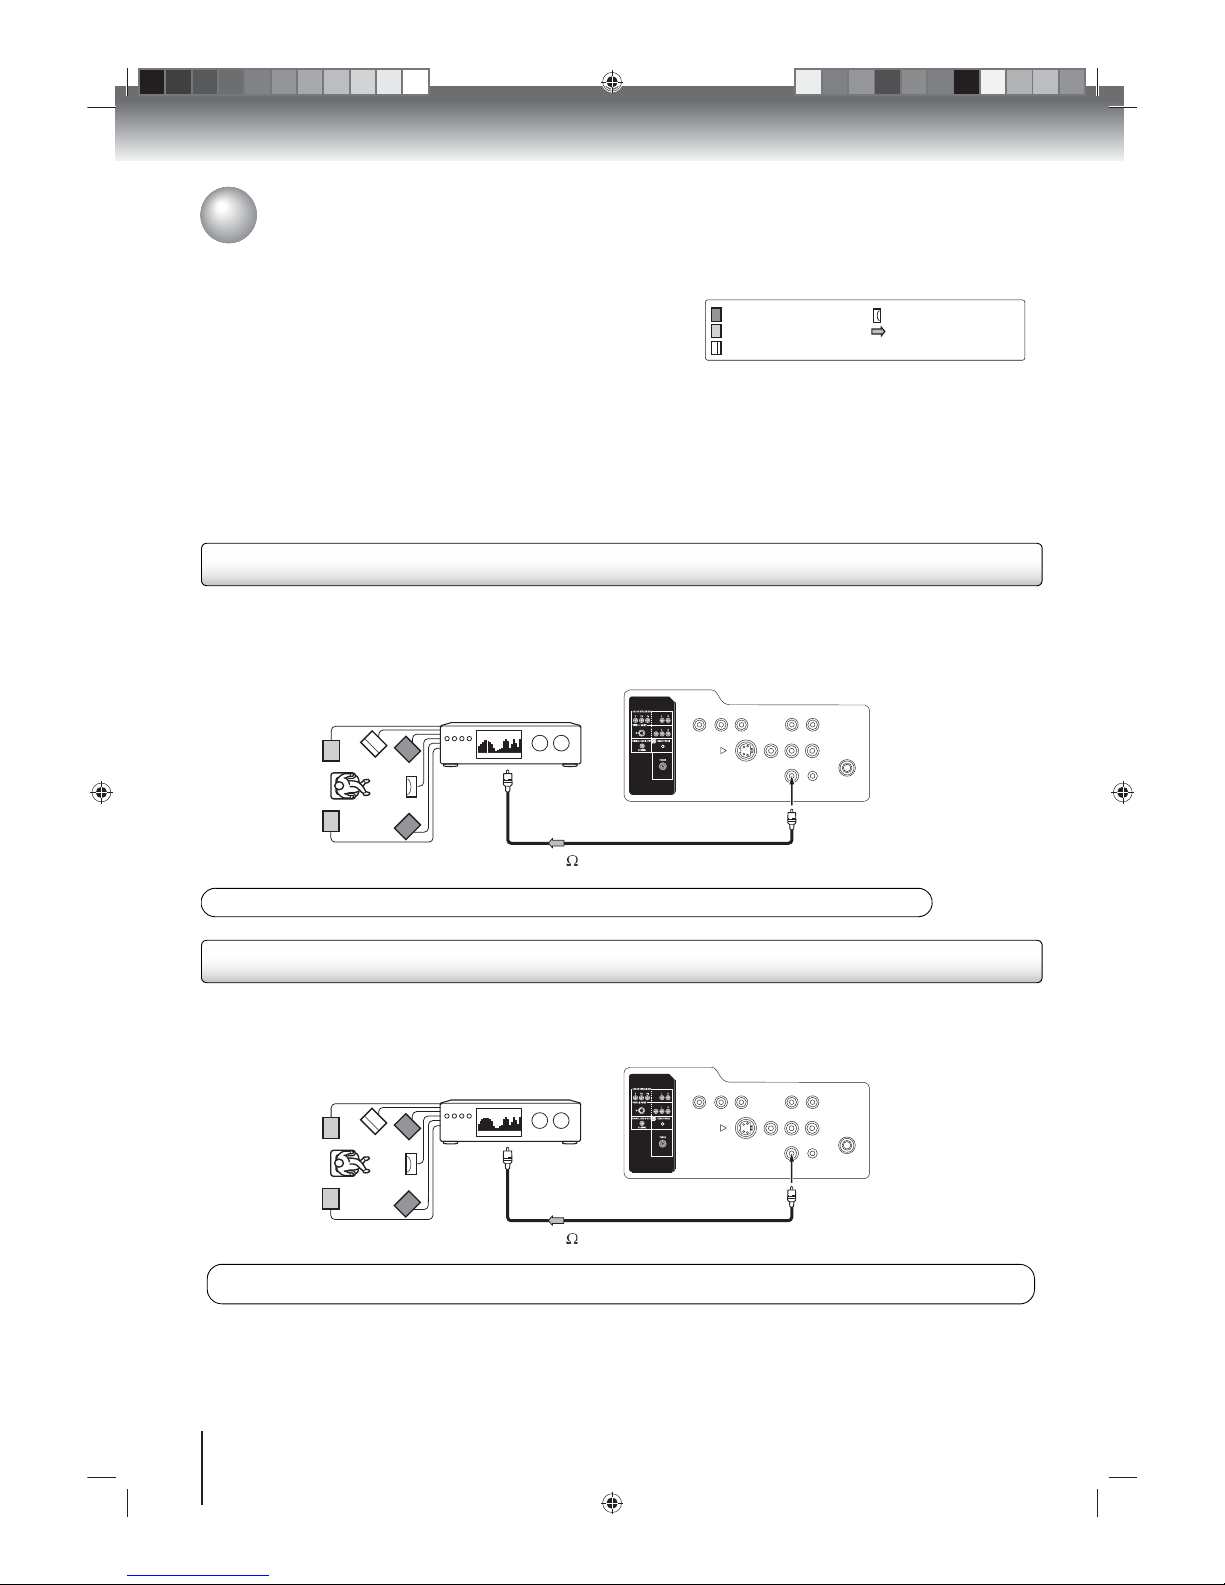
Connecting to an amplifier equipped with a Dolby® Digital decoder
Dolby Digital
Dolby Digital is the surround sound technology used in movie theaters. Thi s technology is now readily ava ilable for home
entertainment. You can enjoy motion picture and live concert DVD encoded via the Dolby Digital recording system by
connecting your TV to a 6-channel amplifier equipped with a Dolby Digital decoder or a Dolby Digital processor.
To Coaxial Type
Digital Audio IN
To Coaxial Digital Audio OUT
75 coaxial cable (not supplied)
Manufactured under license from Dolby Laboratories. Dolby and the double-D symbol are trademarks of Dolby Laboratories.
Optional equipment connections
(continued)
You can enjoy high quality dynamic sounds by connecting the TV to an optional audio equipment.
Optional audio equipment connection reminders
• DO NOT connect the Coaxial Digital Audio OUT jack of the TV to the RF input of a Dolby Digital receiver. This input
on your receiver is reserved for Laserdisc use only and is incompatible wit h the Coaxial Digital Audio OUT ja ck on the
TV.
• Your TV has a wide dynamic range output sound. Be sure to adju st the receiver’s volume t o a moderate listening le vel
to prevent damaging the speakers and harming your hearing from sudden high volume sound.
• When using an external audio amplifier, make sure the volume on both t he TV and the amplifier is set to a reaso nable
listening level.
: Front speaker
: Rear speaker
: Subwoofer
: Center speaker
: Signal flow
The succeeding sections use the following reference marks.
Connecting to an amplifier equipped with a DTS® decoder
Digital Theater Systems (DTS)
DTS is a high quality surround technology used in theaters. If you have a DTS decoder or processor, you can obt ain
the full benefit of 5.1 channel DTS encoded soundtracks on DVDs and audio CDs.
To Coaxial Type
Digital Audio IN
To Coaxial Digital Audio OUT
75 coaxial cable (not supplied)
Manufactured under license under U.S. Patent #: 5,451,942 & other U.S. and worldwide patents issued & pending. DTS and DTS Digital
Out are registered trademarks and the DTS logos and Symbol are trademarks of DTS, Inc. © 1996-2008 DTS, I nc. All Rights Reserved.
Connections
19
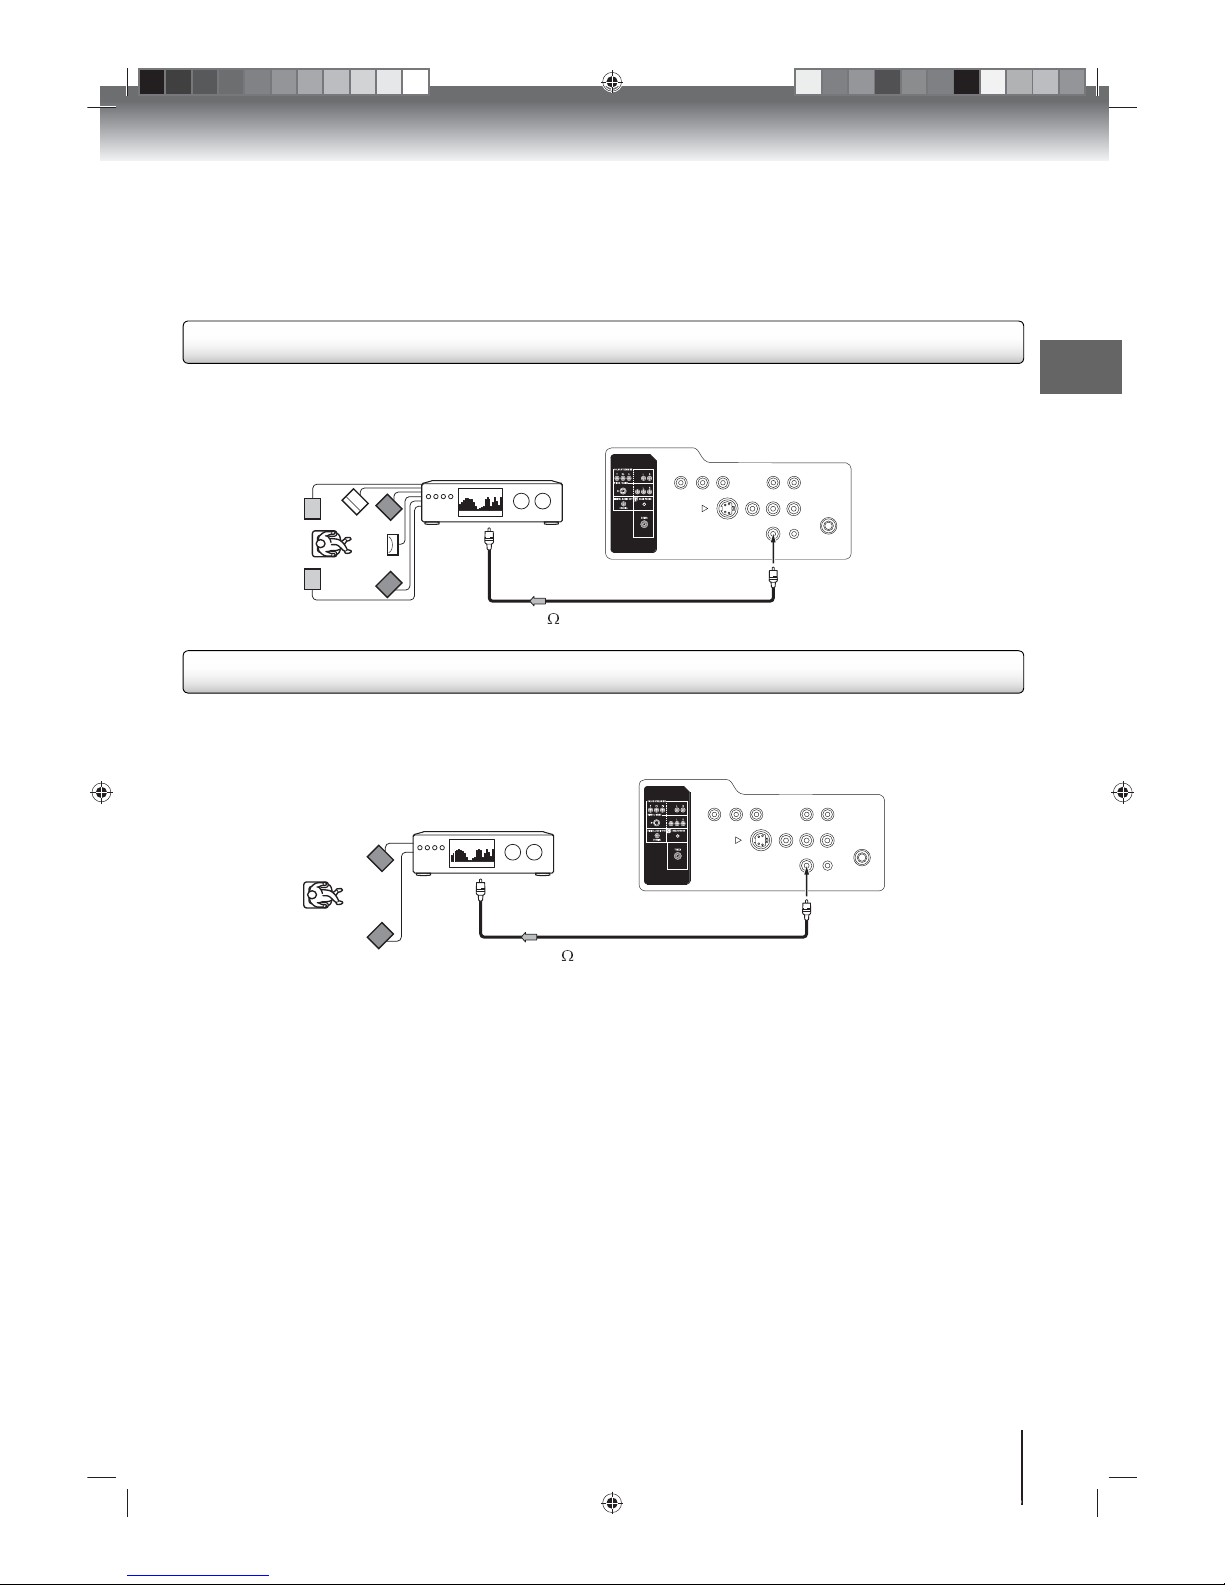
Connecting to an amplifier equipped with an MPEG audio decoder
MPEG2 sound
You can watch motion picture and live concert DVDs encoded via the MPEG2 recording syst em. Enjoy dynamic realistic
sound by connecting an amplifier equipped with an MPEG2 audio decoder or MPEG2 audio processor.
To Coaxial Type
Digital Audio IN
To Coaxial Digital Audio OUT
75 coaxial cable (not supplied)
Connecting to an amplifier equipped with a digital audio input
2-channel digital stereo
You can enjoy the dynamic sound of 2-channel digital stereo by connect ing an amplifier equipped with a digital audio
input and speaker system (right and left front speakers). Note that PCM audio is limited to DVD and CD playback.
To Coaxial Type
Digital Audio IN
To Coaxial Digital Audio OUT
75 coaxial cable (not supplied)
Connections
20
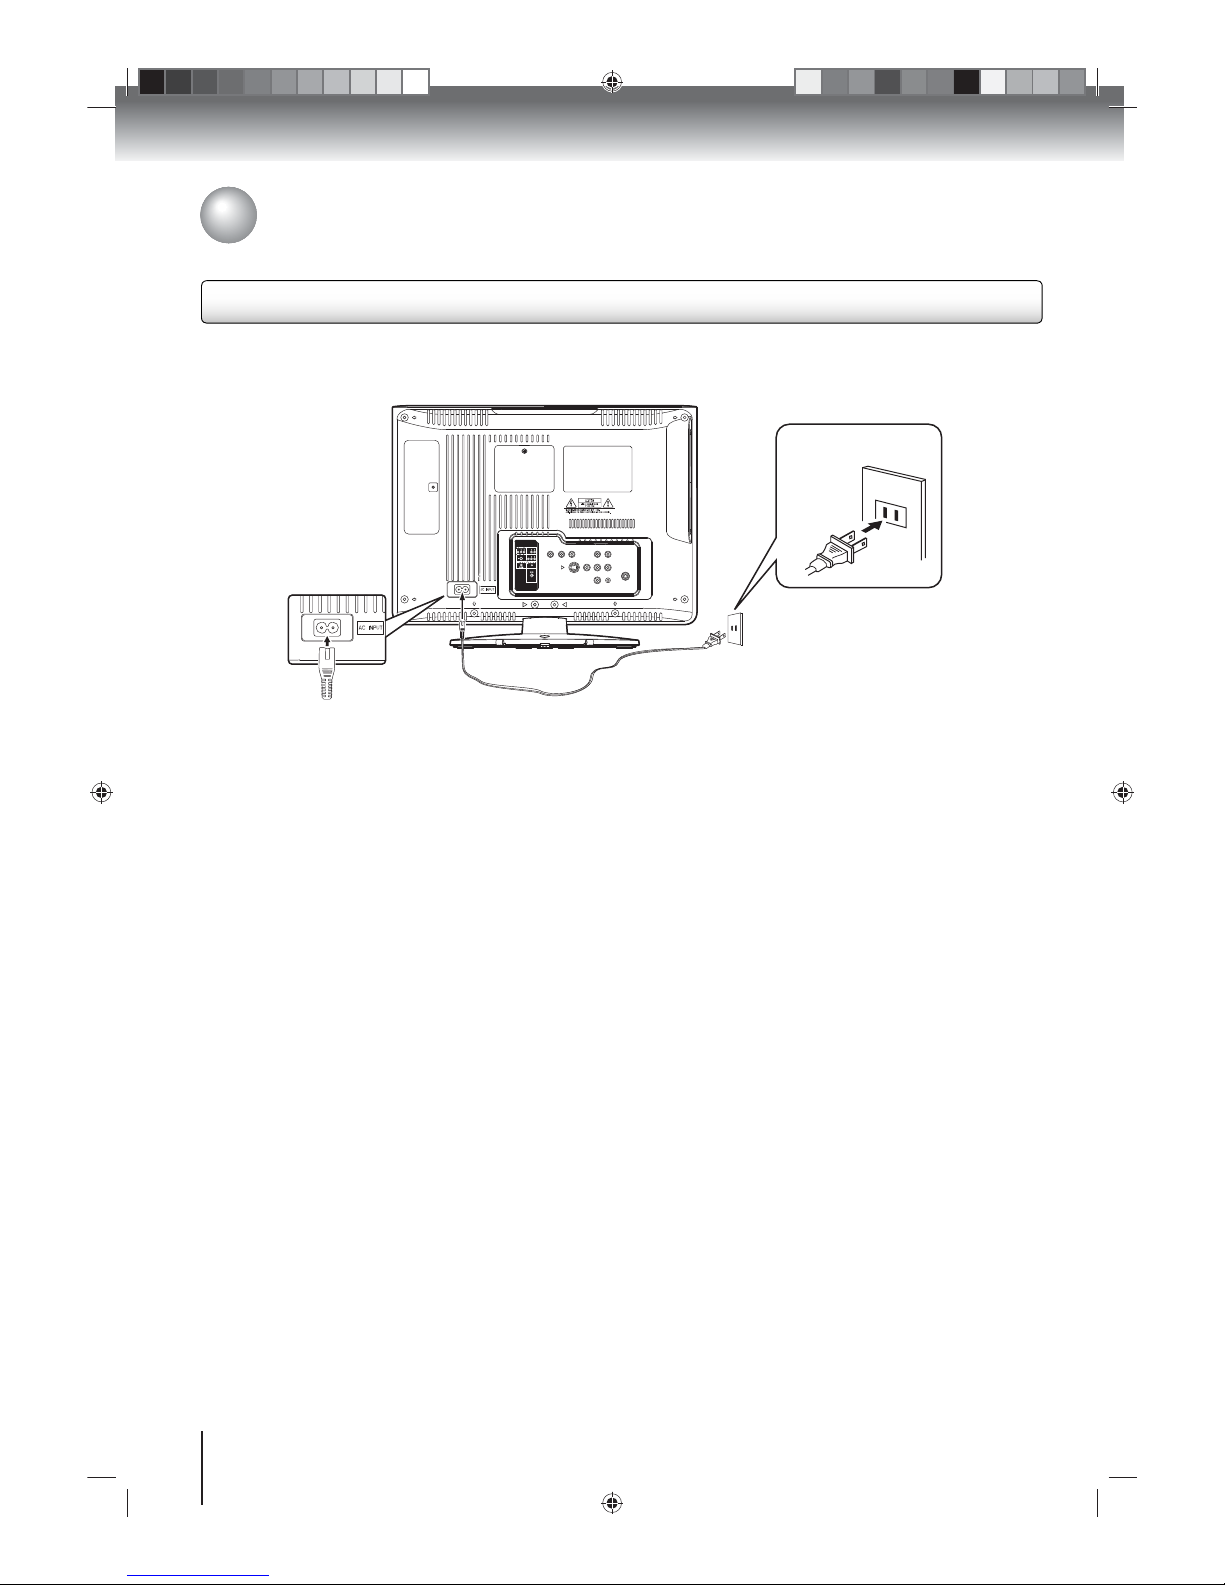
AC power connection
Connecting to a power source
To connect AC power:
1. Connect the AC cord plug into the TV/DVD’s AC INPUT jack.
2. Connect the AC cord into an AC outlet.
Notes:
• Never connect the AC cord plug to other than the specified voltage (120 V, 60 Hz). Use the supplied power cord only.
• If you cause a static discharge when touching the unit and the unit fails to function, simply unplug the unit from the AC outlet
and plug it back in. The unit should return to normal operation.
• If the AC cord plug is plugged in for the first time, wait for approximately five (5) seconds before pressing POWER.
120 V, 60 Hz AC outlet
AC cord (supplied)
AC input jack
Basic setup
21
Air – VHF/UHF channels
Cable – Cable TV channels
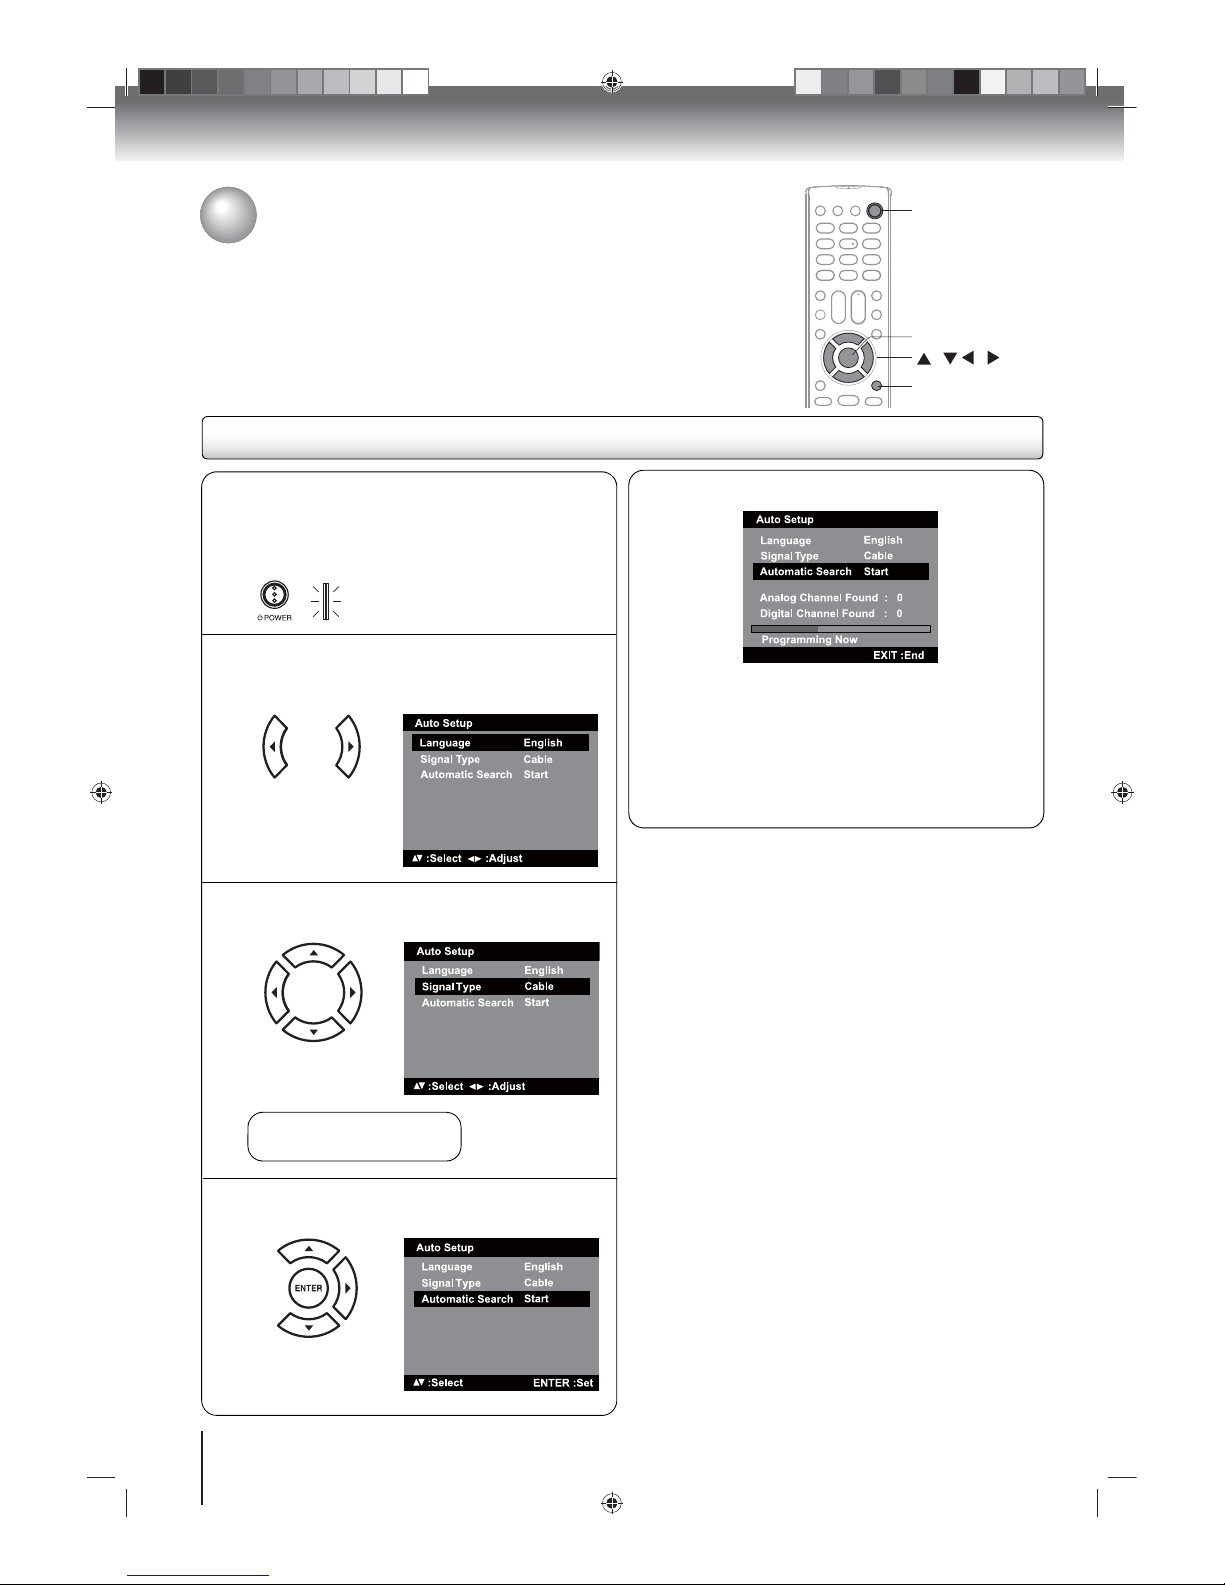
Auto Setup
The Auto Setup function helps to configure your TV/DVD for initial
operation. It lets you select the system language, the TV signal type,
and perform an automatic channel search.
Important: Make sure that the antenna or cable TV system connection
is made.
Auto Setup
/ / /
POWER
ENTER
EXIT/CANCEL
N
Press POWER on the unit or on the remote
control.
The POWER indicator on the front of the unit
changes to blue. It may take approximately
10 seconds for a picture to appear on-screen.
P
Press or to select “Signal Type”, then
press
or to select “Air” or “Cable”.
Q
Press or to select “Automatic Search”,
then press
or ENTER.
O
The Auto Setup menu appears on screen.
“Language” is automatically highlig hted. Press
or to select your preferred language.
R
The automatic channel search starts.
The TV/DVD will begin memorizing all the channels
available in your area.
If you want to stop the Automatic Search, press
EXIT/CANCEL. Only channels detected before the
cancellation will be stored.
After the Automatic Search is completed, the first
TV channel detected appears on the screen.
Notes:
• The Auto Setup function is only availabl e the first time
you turn on the TV/DVD.
• The Automatic Search process may take 15 to 30
minutes to complete, depending on your regional
cable service.
 Loading...