

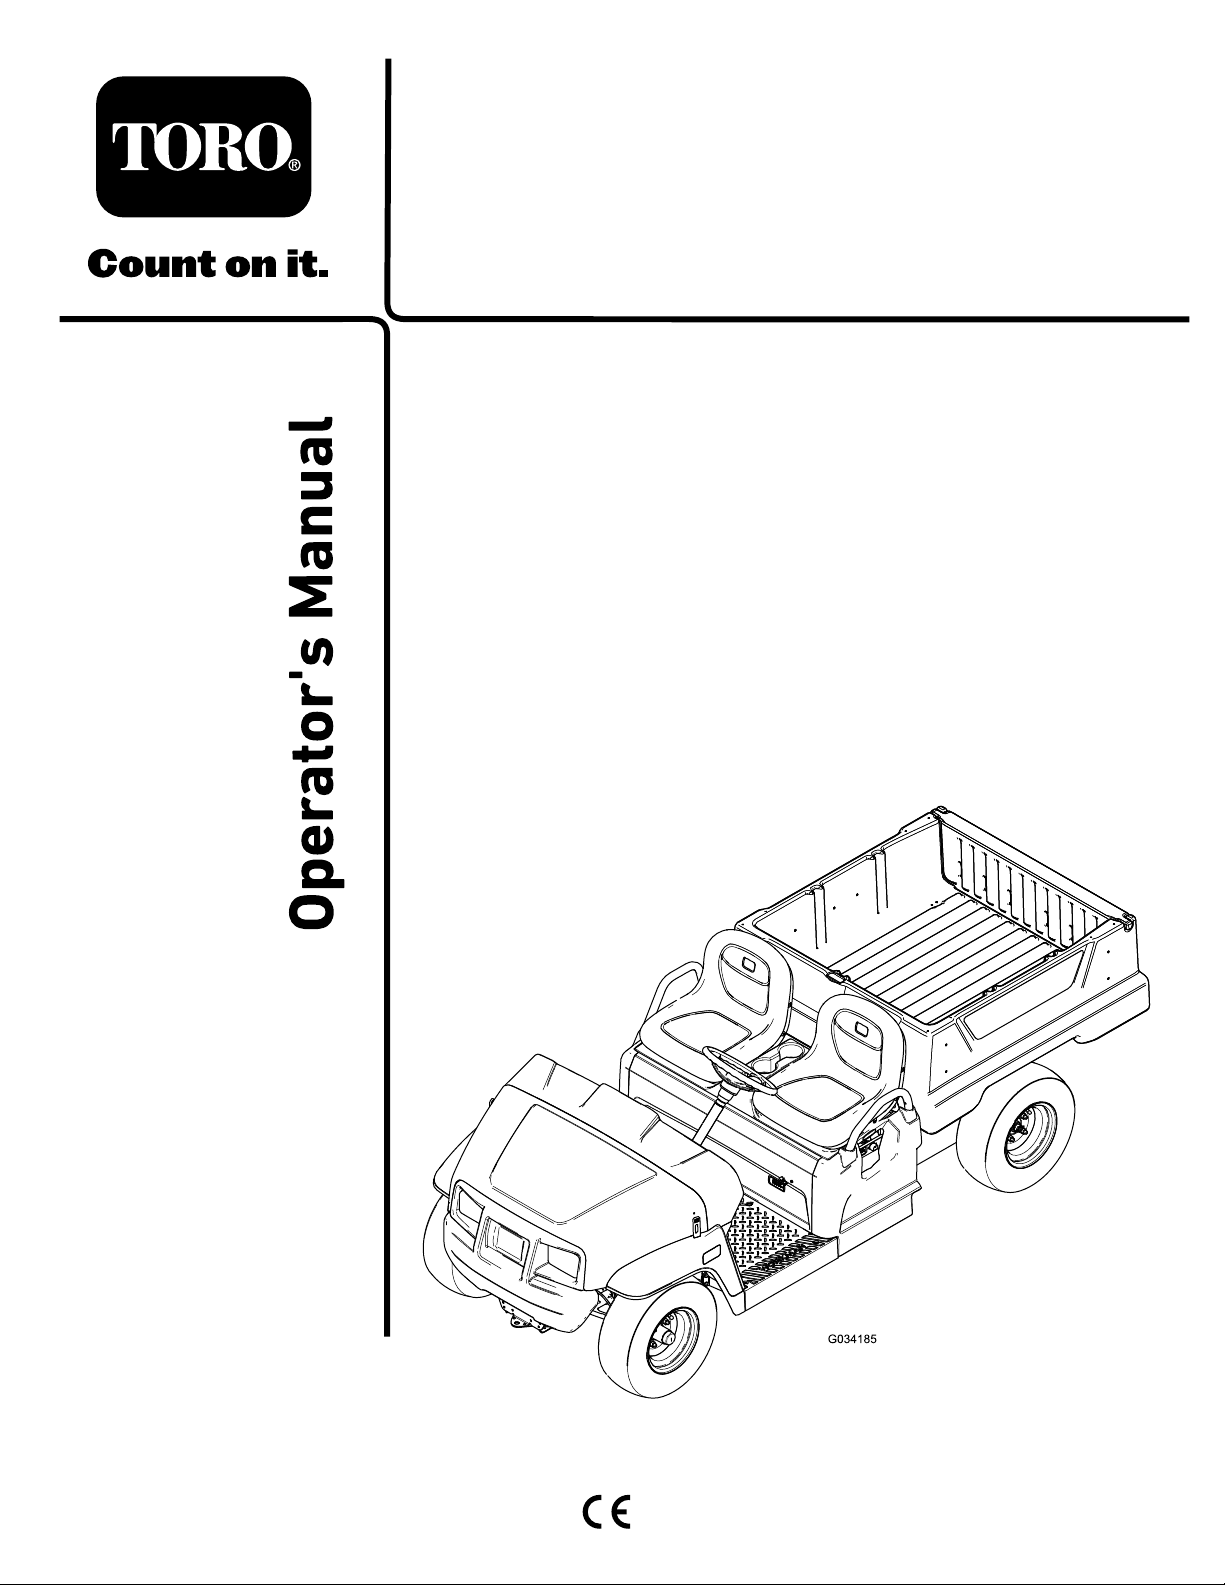
Toro WORKMAN GTX 07131, WORKMAN GTX 07131TC, WORKMAN GTX 07137, WORKMAN GTX 07139TC, WORKMAN GTX 07137TC Operator's Manual
...Page 1
FormNo.3407-523RevB
Workman
®
GTXElectricUtility
Vehicle
ModelNo.07131—SerialNo.316000001andUp
ModelNo.07131TC—SerialNo.316000001andUp
ModelNo.07137—SerialNo.316000001andUp
ModelNo.07137TC—SerialNo.316000001andUp
ModelNo.07139—SerialNo.316000001andUp
ModelNo.07139TC—SerialNo.316000001andUp
Registeratwww.T oro.com.
OriginalInstructions(EN)
*3407-523*B
Page 2
ThisproductcomplieswithallrelevantEuropeandirectives;
fordetails,pleaseseetheseparateproductspecicDeclaration
ofConformity(DOC)sheet.
WARNING
CALIFORNIA
Proposition65Warning
Thisproductcontainsachemicalorchemicals
knowntotheStateofCaliforniatocausecancer,
birthdefects,orreproductiveharm.
Introduction
Readthisinformationcarefullytolearnhowtooperateand
maintainyourproductproperlyandtoavoidinjuryand
productdamage.Youareresponsibleforoperatingthe
productproperlyandsafely.
YoumaycontactTorodirectlyatwww .Toro.comforproduct
andaccessoryinformation,helpndingadealer,ortoregister
yourproduct.
Thismanualidentiespotentialhazardsandhassafety
messagesidentiedbythesafety-alertsymbol(Figure2),
whichsignalsahazardthatmaycauseseriousinjuryordeath
ifyoudonotfollowtherecommendedprecautions.
Figure2
1.Safety-alertsymbol
Thismanualuses2wordstohighlightinformation.
Importantcallsattentiontospecialmechanicalinformation
andNoteemphasizesgeneralinformationworthyofspecial
attention.
Wheneveryouneedservice,genuineT oroparts,oradditional
information,contactanAuthorizedServiceDealerorToro
CustomerServiceandhavethemodelandserialnumbersof
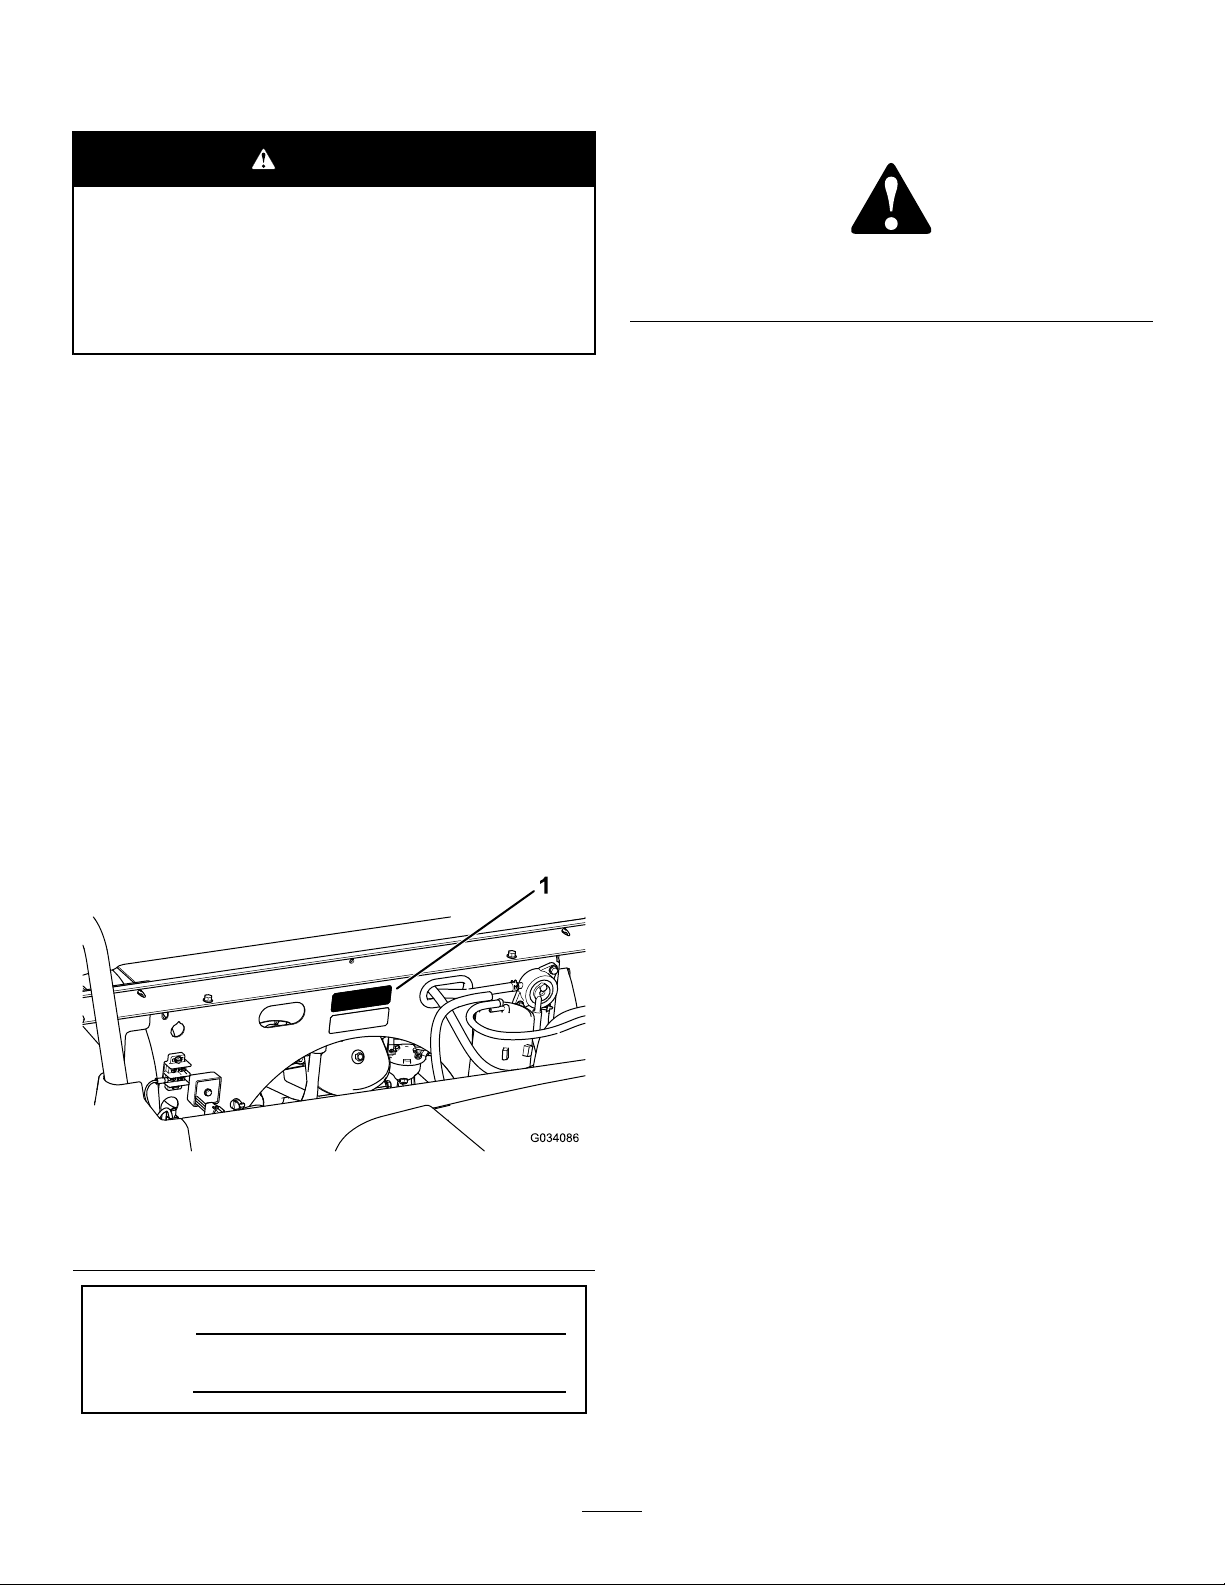
yourproductready.Figure1identiesthelocationofthe
modelandserialnumbersontheproduct.Writethenumbers
inthespaceprovided.
Figure1
BottomofSeatAssemblyShown
1.Modelandserial-numberlocation
ModelNo.
SerialNo.
©2016—TheToro®Company
8111LyndaleAvenueSouth
Bloomington,MN55420
Contactusatwww.Toro.com.
2
PrintedintheUSA
AllRightsReserved
Page 3

Contents
Safety...........................................................................4
SafeOperatingPractices...........................................4
Supervisor’sResponsibilities.....................................4
BeforeOperating....................................................4
Operation...............................................................4
HandlingandServicingBatteries...............................7
Maintenance...........................................................7
SafetyandInstructionalDecals.................................8
Setup...........................................................................11
1InstallingtheSteeringWheel..................................11
2CheckingtheFluidLevelsandTirePressure.............11
3ReadingtheManualandViewingtheSafety
TrainingMaterial................................................12
ProductOverview.........................................................13
Controls...............................................................14
Specications........................................................17
Attachments/Accessories........................................17
Operation....................................................................18
ThinkSafetyFirst...................................................18
OperatingtheCargoBox.........................................18
UsingtheRearCargo-Box-AccessoryMount..............20
PerformingPre-StartingChecks...............................21
CheckingtheTirePressure......................................21
UnderstandingandUsingtheBatterySystem..............21
StoppingtheMachine.............................................23
ParkingtheMachine...............................................23
BreakinginaNewMachine......................................23
LoadingtheCargoBox...........................................23
TransportingtheMachine........................................24
TowingtheMachine...............................................24
TowingaTrailer.....................................................25
Maintenance.................................................................26
RecommendedMaintenanceSchedule(s)......................26
DailyMaintenanceChecklist....................................27
PremaintenanceProcedures........................................27
MaintainingtheMachineunderSpecialOperating
Conditions.........................................................27
PreparingtoMaintaintheMachine............................28
LiftingtheMachine................................................28
AccessingtheHood................................................29
RemovingtheSeatAssembly....................................29
InstallingtheSeatAssembly.....................................29
Lubrication...............................................................30
GreasingtheMachine.............................................30
GreasingtheFrontWheelBearings...........................30
ElectricalSystemMaintenance....................................33
MaintainingtheBatteries.........................................33
ReplacingtheFuses................................................36
MaintainingtheHeadlights......................................37
DriveSystemMaintenance.........................................39
MaintainingtheTires..............................................39
AdjustingtheFrontWheelToe-in.............................39
CheckingtheTransaxle-FluidLevel...........................40
ChangingtheTransaxleFluid...................................40
BrakeMaintenance....................................................41
CheckingtheParkingBrake.....................................41
AdjustingtheParkingBrake.....................................41
CheckingtheBrake-FluidLevel................................41
InspectingtheBrakes..............................................42
ReplacingtheServiceandParking-Brake
Pads..................................................................42
ChangingtheBrakeFluid........................................42
ChassisMaintenance..................................................42
AdjustingtheCargo-BoxLatches..............................42
Cleaning...................................................................43
WashingtheMachine..............................................43
Storage........................................................................43
BatteryStorage......................................................43
Troubleshooting...........................................................44
3
Page 4

Safety
Improperuseormaintenancebytheoperatororownercan
resultininjury.Toreducethepotentialforinjury,comply
withthesesafetyinstructionsandalwayspayattentionto
thesafety-alertsymbol,whichmeansCaution,Warning,or
Danger—personalsafetyinstruction.Failuretocomplywith
theinstructionmayresultinpersonalinjuryordeath.
ThemachinemeetstherequirementsofSAEJ2258.
Important:ForCErequiredregulatorydata,refertothe
DeclarationofConformitysuppliedwiththemachine.
SafeOperatingPractices
Important:Thismachineisdesignedprimarilyasan
off-roadmachineandisnotintendedforextensiveuse
onpublicroads.
Whenusingthemachineonpublicroads,followall
trafcregulationsanduseanyadditionalaccessories
thatmayberequiredbylaw,suchaslights,turn
signals,slow-movingvehicle(SMV)signs,andothers
asrequired.
Thismachinewasdesignedandtestedtooffersafeservice
whenoperatedandmaintainedproperly.Althoughhazard
controlandaccidentpreventionaredependentuponthe
designandcongurationofthemachine,thesefactorsare
alsodependentupontheawareness,concern,andproper
trainingoftheoperator,maintenance,andstorageofthe
machine.Improperuseormaintenanceofthemachinecan
resultininjuryordeath.
Thismachinehasadifferentfeelthanwhatdriversexperience
withpassengercarsortrucks.Sotaketimetobecomefamiliar
withyourmachine.
Notalloftheattachmentsthatadapttothemachine
arecoveredinthismanual.SeethespecicOperator’s
Manualprovidedwitheachattachmentforadditionalsafety
instructions.
Toreducethepotentialforinjuryordeath,complywith
thefollowingsafetyinstructions:
Supervisor’sResponsibilities
Makesurethattheoperatorsarethoroughlytrainedand
familiarwiththeOperator’ sManualandalllabelsonthe
machine.
BeforeOperating
•Thismachineisdesignedtocarryonlyyou,theoperator,
and1passengerintheseatprovidedbythemanufacturer.
Nevercarryanyotherpassengersonthemachine.
•Becomefamiliarwiththecontrolsandknowhowtostop
themachinequickly.
•Neveroperatethemachinewhentired,ill,orunderthe
inuenceofdrugsoralcohol.
•Wearsubstantial,slip-resistantshoes.Donotwear
loose-ttingclothing,tiebacklonghair,anddonotwear
jewelry.
•Wearingsafetyglasses,safetyshoes,andlongpantsare
requiredbysomelocalregulations.
•Neverallowchildrentooperatethemachine.Never
allowadultstooperateitwithoutproperinstructions.
Onlytrainedandauthorizedpersonsshouldoperatethis
machine.
•Alwaysbeawareofwherebystandersare.
•Keepallshields,safetydevicesanddecalsinplace.Ifa
shield,safetydeviceordecalismalfunctioning,illegible,
ordamaged,repairorreplaceitbeforeoperatingthe
machine.
•Avoiddrivingwhenitisdark,especiallyinunfamiliar
areas.Ifyoumustdrivewhenitisdark,usetheheadlights.
•Beforeoperatingthemachine,alwayscheckallpartsof
themachineandanyattachments.Ifsomethingiswrong,
stopusingmachine.Makesurethattheproblemis
correctedbeforemachineorattachmentisoperatedagain.
•Operatethemachineonlyoutdoorsorinawell-ventilated
area.
Operation
•Theoperatorandpassengershouldremainseated
wheneverthemachineisinmotion.Theoperator
shouldkeepbothhandsonthesteeringwheel,whenever
possible,andthepassengershouldusethehandholds
provided.Keeparmsandlegswithinthemachinebody
atalltimes.
•Driveslowerandturnlesssharplywhenyouarecarrying
apassenger.Rememberyourpassengermaynotbe
expectingyoutobrakeorturnandmaynotbeready.
Nevercarrypassengersintheboxoronattachments.
•Neveroverloadthemachine.Thenameplate(located
undertheseatassemblyontherearpanel)showstheload
limitsforthemachine.Neveroverllattachmentsor
exceedthemaximumgrossvehicleweight(GVW).
•Failuretooperatemachinesafelymayresultinan
accident,tipoverofthemachine,andseriousinjuryor
death.Drivecarefully.Topreventtippingorlossof
control,takethefollowingprecautions:
–Useextremecaution,reducespeed,andmaintain
asafedistancearoundsandtraps,ditches,creeks,
ramps,anyunfamiliarareas,orotherhazards.
4
Page 5

–Watchforholesorotherhiddenhazards.
–Donotoperatethemachineonaslopethatexceeds
18°or32.5%gradient.Usecautionwhenoperating
themachineonaslope.Normally,travelstraightup
anddownslopes.Reducespeedwhenmakingsharp
turnsorwhenturningonhillsides.Avoidturningon
hillsideswheneverpossible.
–Useextracautionwhenoperatingthemachineon
wetsurfaces,athigherspeeds,orwithafullload.
Stoppingtimeincreaseswithafullload.
–Avoidsuddenstopsandstarts.
–Donotattemptsharpturnsorabruptmaneuversor
otherunsafedrivingactionsthatmaycausealossof
controlofthemachine.
–Whendumping,donotletanyonestandbehind
machineanddonotdumptheloadonanyone’sfeet.
–Keepallbystandersaway .Beforebackingup,lookto
therearandensurethatnooneisbehindthemachine.
Backupslowly.
–Watchoutfortrafcwhennearorcrossingroads.
Alwaysyieldtherightofwaytopedestriansandother
machines.Alwayssignalyourturnsorstopearly
enoughsootherpersonsknowwhatyouplantodo.
Obeyalltrafcrulesandregulations.
–Neveroperatethemachineinornearanareawhere
thereisdustorfumesintheairwhichareexplosive.
Theelectricalandexhaustsystemsofthemachinecan
producesparkscapableofignitingexplosivematerials.
–Alwayswatchoutforandavoidlowoverhangssuch
astreelimbs,doorjambs,overheadwalkways,etc.
Makesurethereisenoughroomoverheadtoeasily
clearthemachineandyourhead.
–Ifyouareeverunsureaboutthesafeoperationofthe
machine,stopyourworkandaskyoursupervisor.
•Beforegettingofftheseat:
–Stopthemovementofthemachine.
–Lowerthebed.
SpecialOperationwiththe
Multi-PassengerKitInstalled
•Withthemulti-passengerkitinstalled,youmustaccount
fortheextrapassengerscontributingtotheoverallgross
vehicleweight(GVW)ofthemachine.
•Ifyouhavealoadinthecargobox,ensurethatyoudo
notexceedthecapacityofthemachinebyhavingtoo
manypassengers.
•Passengersshouldsitinthedesignatedseatingpositions
only.Donotallowpassengerstositinthecargobox.
•Theoperatorandpassengersshouldremainseated
wheneverthemachineisinmotion.
•Additionalmachinelengthresultsinalargerturnradius,
soallowmorespacetomaneuver.
Braking
•Slowdownthemachinebeforeyouapproachanobstacle.
Thisgivesyouextratimetostoporturnaway .Hittingan
obstaclecaninjureyouandyourpassenger.Inaddition,it
candamagethemachineanditscontents.
•Grossvehicleweight(GVW)hasamajorimpactonyour
abilitytostopand/orturn.Heavyloadsandattachments
makethemachinehardertostoporturn.Theheavierthe
load,thelongerittakestostop.
•Decreasethespeedofthemachineifthecargoboxhas
beenremovedandthereisnoattachmentinstalledon
themachine.Thebrakingcharacteristicschangeandfast
stopsmaycausetherearwheelstolockup,whichaffects
thecontrolofthemachine.
•Turfandpavementaremuchmoreslipperywhentheyare
wet.Itcantake2to4timeslongertostopthemachine
onwetsurfacesasondrysurfaces.Ifyoudrivethrough
deep-standingwaterandgetthebrakeswet,theywillnot
workwelluntiltheyaredry.Afterdrivingthroughwater,
youshouldtestthebrakestomakesurethattheywork
properly.Iftheydonot,driveslowlyonalevelground
whileputtinglightpressureonthebrakepedal.Thisdries
outthebrakes.
–Engagetheparkingbrake.
–Removethekey.
•Ifthemachineevervibratesabnormally,stopthemachine
immediately,andwaitforallmotiontostopandinspect
fordamage.Repairalldamagebeforeresumingoperation.
•Lightningcancausesevereinjuryordeath.Iflightning
isseenorthunderisheardinthearea,donotoperate
themachine;seekshelter.
5
Page 6

OperatingonHills
WARNING
WARNING
Operatingthemachineonahillmaycausetipping
orrollingofthemachine,orthebatteriesmayrun
lowandyoucouldloseheadwayonthehill.This
couldresultinpersonalinjury.
•Donotoperatethemachineonexcessivelysteep
slopes.
•Donotacceleratequicklyorslamthebrakes
whenbackingdownahill,especiallywithaload.
•Ifthebatteriesrunloworyoubegintolose
headwaywhileclimbingahill,graduallyapply
thebrakesandslowlybackstraightdownthe
hill.
•Operatethemachineslowlyonahillanduse
caution.
•Avoidturningonahill.
•Reduceyourloadandthespeedofthemachine.
•Avoidstoppingonhills,especiallywithaload.
Taketheseprecautionswhenoperatingthemachineonahill:
•Slowthemachinedownbeforestartingupordownahill.
•Ifthebatteriesrunloworyoubegintolosemomentum
whileclimbingahill,graduallyapplythebrakesandslowly
backthemachinestraightdownthehill.
•Turningwhiletravelingupordownhillscanbedangerous.
Ifyouhavetoturnwhileonahill,doitslowlyand
cautiously.Nevermakesharporfastturns.
Suddenchangesinterrainmaycauseabrupt
steeringwheelmovement,possiblyresultingin
handandarminjuries.
•Reduceyourspeedwhenoperatingonrough
terrainandnearcurbs.
•Gripthesteeringwheellooselyaroundthe
perimeter,keepingthumbsupandoutofthe
wayofthesteeringwheelspokes.
LoadingandDumping
•Donotexceedtheratedweightcapacityofthemachine
whenoperatingitwithaloadinthecargobox,when
towingatrailer,orboth;refertoSpecications(page17).
•Usecautionwhenoperatingthemachineonahillsideor
onroughterrain,particularlywithaloadinthecargobox
orwhentowingatrailerorboth.
•Beawarethatthestabilityandcontrolofthemachine
arereducedwhentheloadinthecargoboxispoorly
distributed.
•Carryingoversizedloadsinthecargoboxchangesthe
stabilityofthemachine.
•Thesteering,braking,andstabilityofthemachineare
affectedwhencarryingaloadwheretheweightofthe
materialcannotbeboundtothemachine,suchasthe
liquidinalargetank.
WARNING
Theweightoftheboxmaybeheavy.Handsor
otherbodypartscouldbecrushed.
•Heavyloadsaffectstability.Reducetheweightofthe
loadandyourgroundspeedwhenoperatingonhillsorif
theloadhasahighcenterofgravity.Securetheloadto
thecargoboxofthemachinetopreventtheloadfrom
shifting.Takeextracarewhenhaulingloadsthatshift
easily(liquid,rock,sand,etc.).
•Avoidstoppingonhills,especiallywithaload.Stopping
whilegoingdownahilltakeslongerthanstoppingon
levelground.Ifyoumuststopthemachine,avoidsudden
speedchanges,whichmayinitiatetippingorrollingof
themachine.Donotslamonthebrakeswhenrolling
backward,asthismaycausethemachinetooverturn.
OperatingonRoughTerrain
Reducethegroundspeedofthemachineandloadcarriedin
themachinewhenoperatingonroughterrain,unevenground,
andnearcurbs,holes,andothersuddenchangesinterrain.
Loadsmayshift,causingthemachinetobecomeunstable.
–Keepyourhandsandotherbodypartsaway
whenloweringthebox.
–Donotdumpmaterialsonbystanders.
•Neverdumpaloadedcargoboxwhilethemachineis
sidewaysonahill.Thechangeinweightdistributionmay
causethemachinetooverturn.
•Whenoperatingwithaheavyloadinthecargobox,
reduceyourspeedandallowforsufcientbraking
distance.Donotsuddenlyapplythebrakes.Useextra
cautiononslopes.
•Beawarethatheavyloadsincreaseyourstoppingdistance
andreduceyourabilitytoturnquicklywithouttipping
over.
•Therearcargospaceisintendedforloadcarrying
purposesonly,notforpassengers.
6
Page 7

HandlingandServicing Batteries
•Toreducethepotentialforre,keepthebatteriesand
motorareafreeofexcessivegrease,grass,leaves,and
accumulationofdirt.
•Alwaysdisconnectthebatterycablesbeforeservicing
anyelectricalcomponents;refertoDisconnectingthe
Batteries(page35).
Note:Disconnectingallofthebatterycablesisolates
powerfromtheelectricalsystem.
•Batteryelectrolytecontainssulfuricacid.Sulfuricacid
produceshydrogengas,which,intherightproportions,
isexplosive.
–Alwaysservice,store,andchargethemachineina
well-ventilatedarea.
–Keepsparksandopenamesawayfromthebatteries.
–Donotsmokenearthebatteries.
–Neveruseanopenametocheckthelevelorleakage
ofbatteryelectrolyte.
•Usecautionwhenhandlingandworkingaround
electrolyte.Thesulfuricacidinelectrolytecanburnskin
anddamageclothing.Furthermore,itcanbeemittedasa
gasthatcandamageyourlungs.
–Wearpropereye,hand,andfaceprotection.
•Donotallowmetaltoolstoshortbetweenthebattery
terminalsandmetalpartsofthemachine.Removeall
jewelryandwatchesbeforeservicingthebatteries.
•Donotcheckabatterychargebyplacingametalobject
acrosstheposts.Thiscausessparks,whichcancausean
explosion.
•Alwayskeepthebatteryretainersinplacetoprotectand
securethebatteries.
•Readandunderstandthecharginginstructionsbefore
chargingthebatteries;refertoChargingtheBatteries
(page33).Also,takethefollowingprecautionsand
actionswhenchargingthebatteries:
–TurnthemachinekeyswitchtoOFFbefore
connectingthechargertoapowersource.
–Useonlythebatterychargersuppliedwiththe
machinetochargethebatteries.
–Donotchargeadamagedorfrozenbattery.
–AlwaysunplugtheACpowercordfromthepower
outletbeforeunpluggingitfromthemachinecharging
receptacletoavoidsparks.
–Ifabatterygetshotwhilecharging,beginsemitting
largeamountsofgases,orspewselectrolyte,
immediatelydisconnectthechargerpowercordfrom
thepoweroutlet.Havethemachineservicedbyan
AuthorizedServiceDealerbeforeusingitagain.
–Donotleanoverthebatteriesatanytime.
–Avoidbreathinginbatteryfumes.
–Fillthebatterieswherecleanwaterisalwaysavailable
forushingtheskin.
–Ifyougetelectrolyteonyourskinoreyes,ush
theaffectedareafor20minuteswithcleanwater.
Removeacid-soakedclothing.Seekmedicalattention
immediately.
–Keepchildrenandpetsawayfromthebatteriesand
electrolyte.
•Electrolyteisverypoisonous.
–Donotdrinktheelectrolyte.
–Ifelectrolytehasbeenswallowed,andthepersonis
conscious,havethemdrinklargequantitiesofwater
immediatelytodilutetheelectrolyte.
–Donotattempttomakethemvomit.
–CallPoisonControlandgetmedicalattention
immediately.
•Whennotllingthebatteries,keepthebatteryventcaps
tightonthebatteries.Neveroperatethemachineifany
oftheventcapsaremissingordamaged.
•Whenremovingorinstallingthebatteries,donotallow
thebatteryterminalstotouchanymetalpartsofthe
machine.
Maintenance
•Beforeservicingormakingadjustmentstothemachine,
shutoffthemachine,engagetheparkingbrake,and
removethekeyfromthekeyswitchtopreventaccidental
startingofthemachine.
•Neverworkunderaraisedbedwithoutensuringthatthe
proprodisfullyseatedinthedetentslot.
•Tomakesurethattheentiremachineisingoodcondition,
keepallnuts,bolts,andscrewsproperlytightened.
•Ifthemachinemustberunningtoperformamaintenance
adjustment,keephands,feet,clothing,andanypartsof
thebodyawayfromthebatteriesandanymovingparts.
Keepeveryoneaway.
•Ifmajorrepairsareeverneededorassistanceisrequired,
contactanAuthorizedToroDistributor.
•Tobesureofoptimumperformanceandsafety,always
purchasegenuineTororeplacementpartsandaccessories.
Replacementpartsandaccessoriesmadebyother
manufacturerscouldbedangerous.Alteringthismachine
inanymannermayaffecttheoperationofthemachine,
performance,durabilityoritsusemayresultininjuryor
death.SuchusecouldvoidtheproductwarrantyofThe
Toro®Company.
7
Page 8
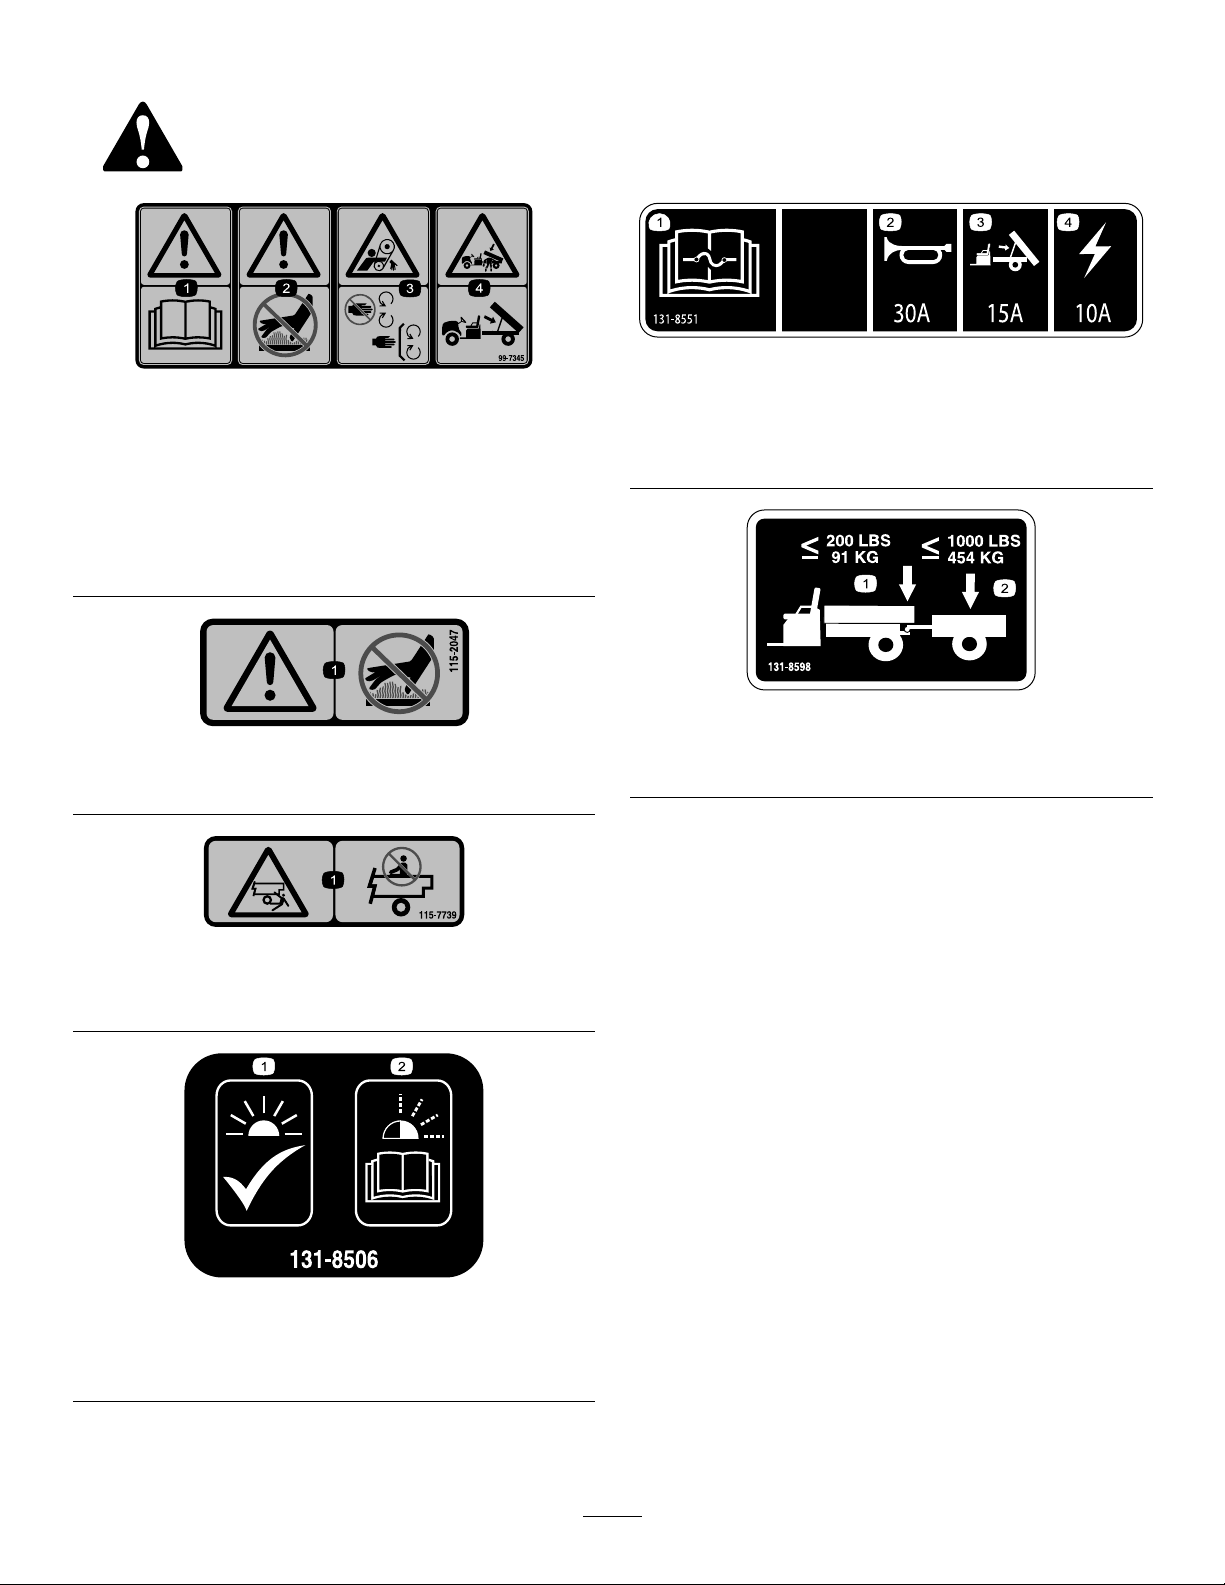
SafetyandInstructionalDecals
Safetydecalsandinstructionsareeasilyvisibletotheoperatorandarelocatednearanyareaofpotential
danger.Replaceanydecalthatisdamagedormissing.
99-7345
1.Warning—readtheOperator'sManual.
2.Hotsurface/burnhazard—stayasafedistancefromthe
hotsurface.
3.Entanglementhazard,belt—stayawayfrommovingparts;
keepallguardsinplace.
4.Crushinghazard,cargobox—usetheproprodtosupport
thecargobed
131-8551
1.ReadtheOperator’s
Manualforfuse
information.
2.Horn—30A4.Mainpower—10A
3.Optionalliftkit—15A
115-2047
1.Warning—donottouchthehotsurface.
115-7739
1.Falling,crushinghazard,bystanders—noriderson
machine.
1.Maximumbedweight91
kg(200lb)
131-8598
2.Maximumtrailerweight
454kg(1,000lb)
1.Solidlight—unitis
preparedforoperation.
131-8506
2.Flashinglight—refertothe
chargermanualforthe
faultcodes.
8
Page 9
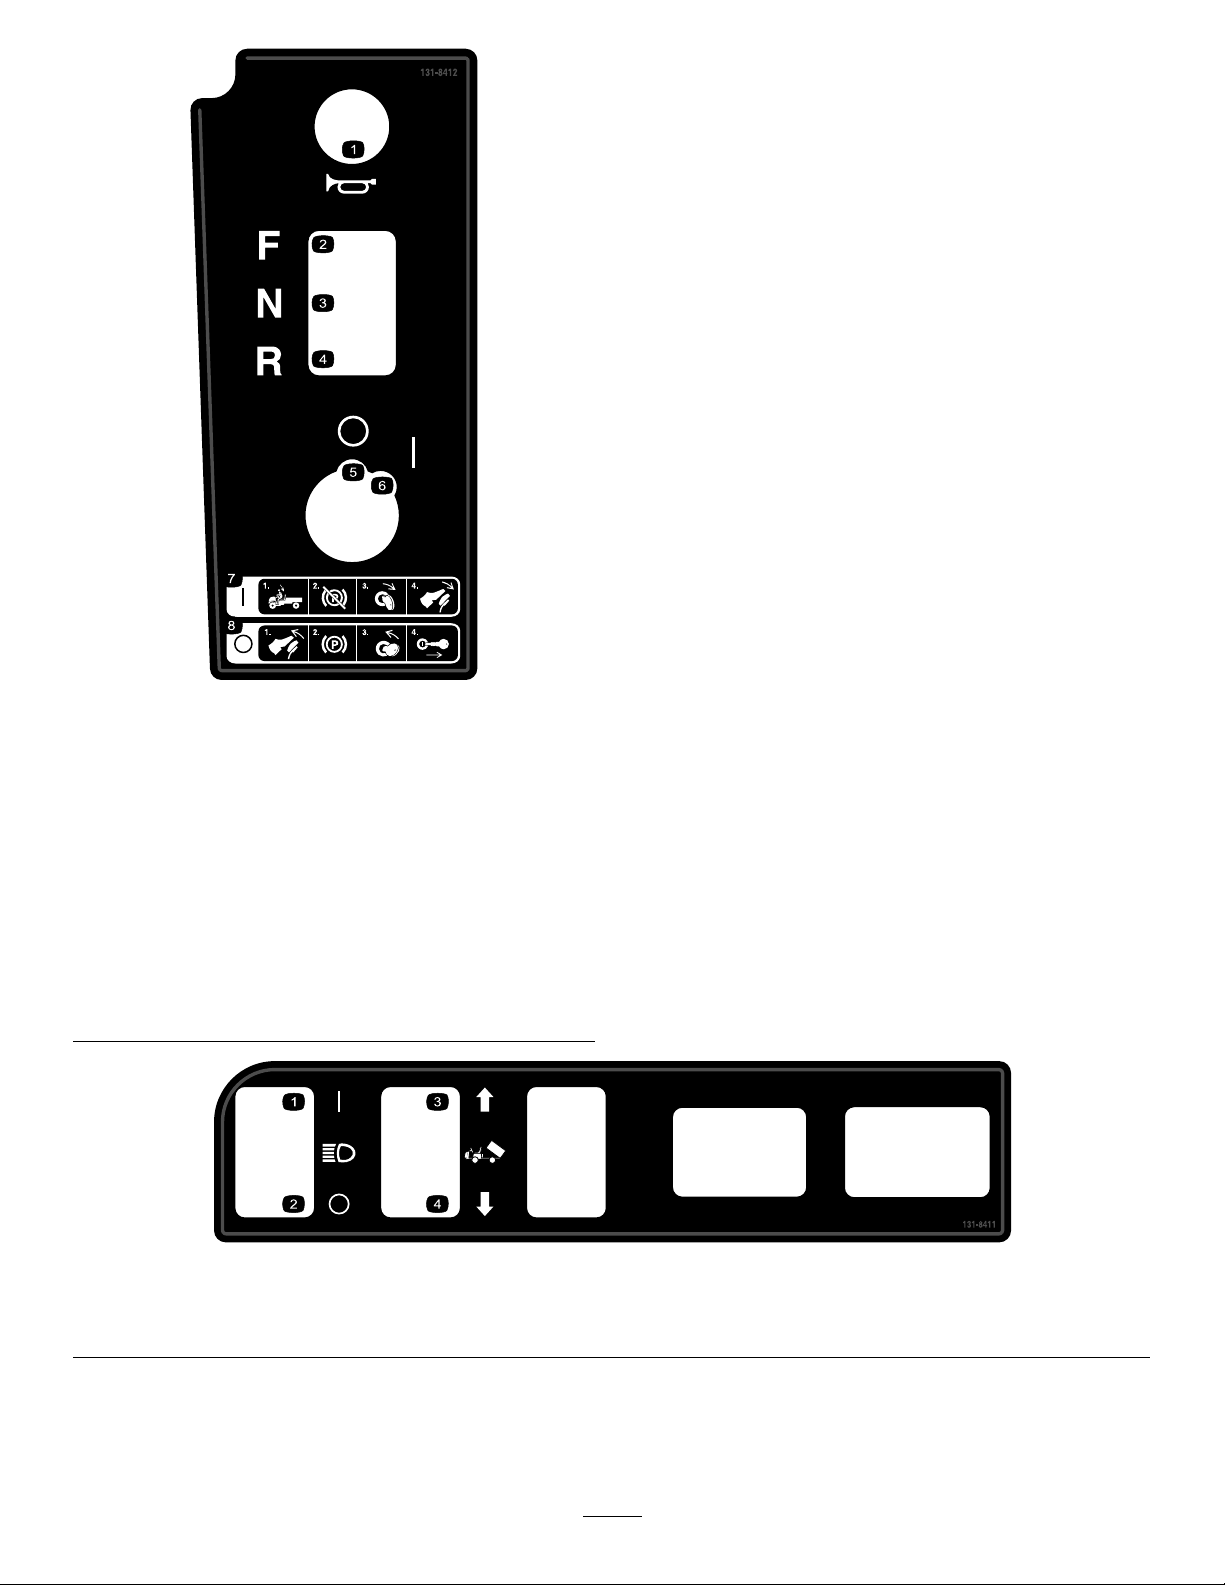
131-8412
1.Horn
2.Forward
3.Neutral
4.Reverse
5.Off
6.On
7.Turningon—1)Sitinthe
driver'sseat;2)Disengage
theparkingbrake;3)Turn
thekeyswitchtothestart
position;4)Pushdownon
thepedal.
8.Turningoff—1)Release
thepedal;2)Engagethe
parkingbrake;3)Turn
thekeyswitchtothestop
position;4)Removethe
keyfromthekeyswitch.
131-8411
1.Headlight—on3.Raisethebed.
2.Headlight—off
4.Lowerthebed.
9
Page 10
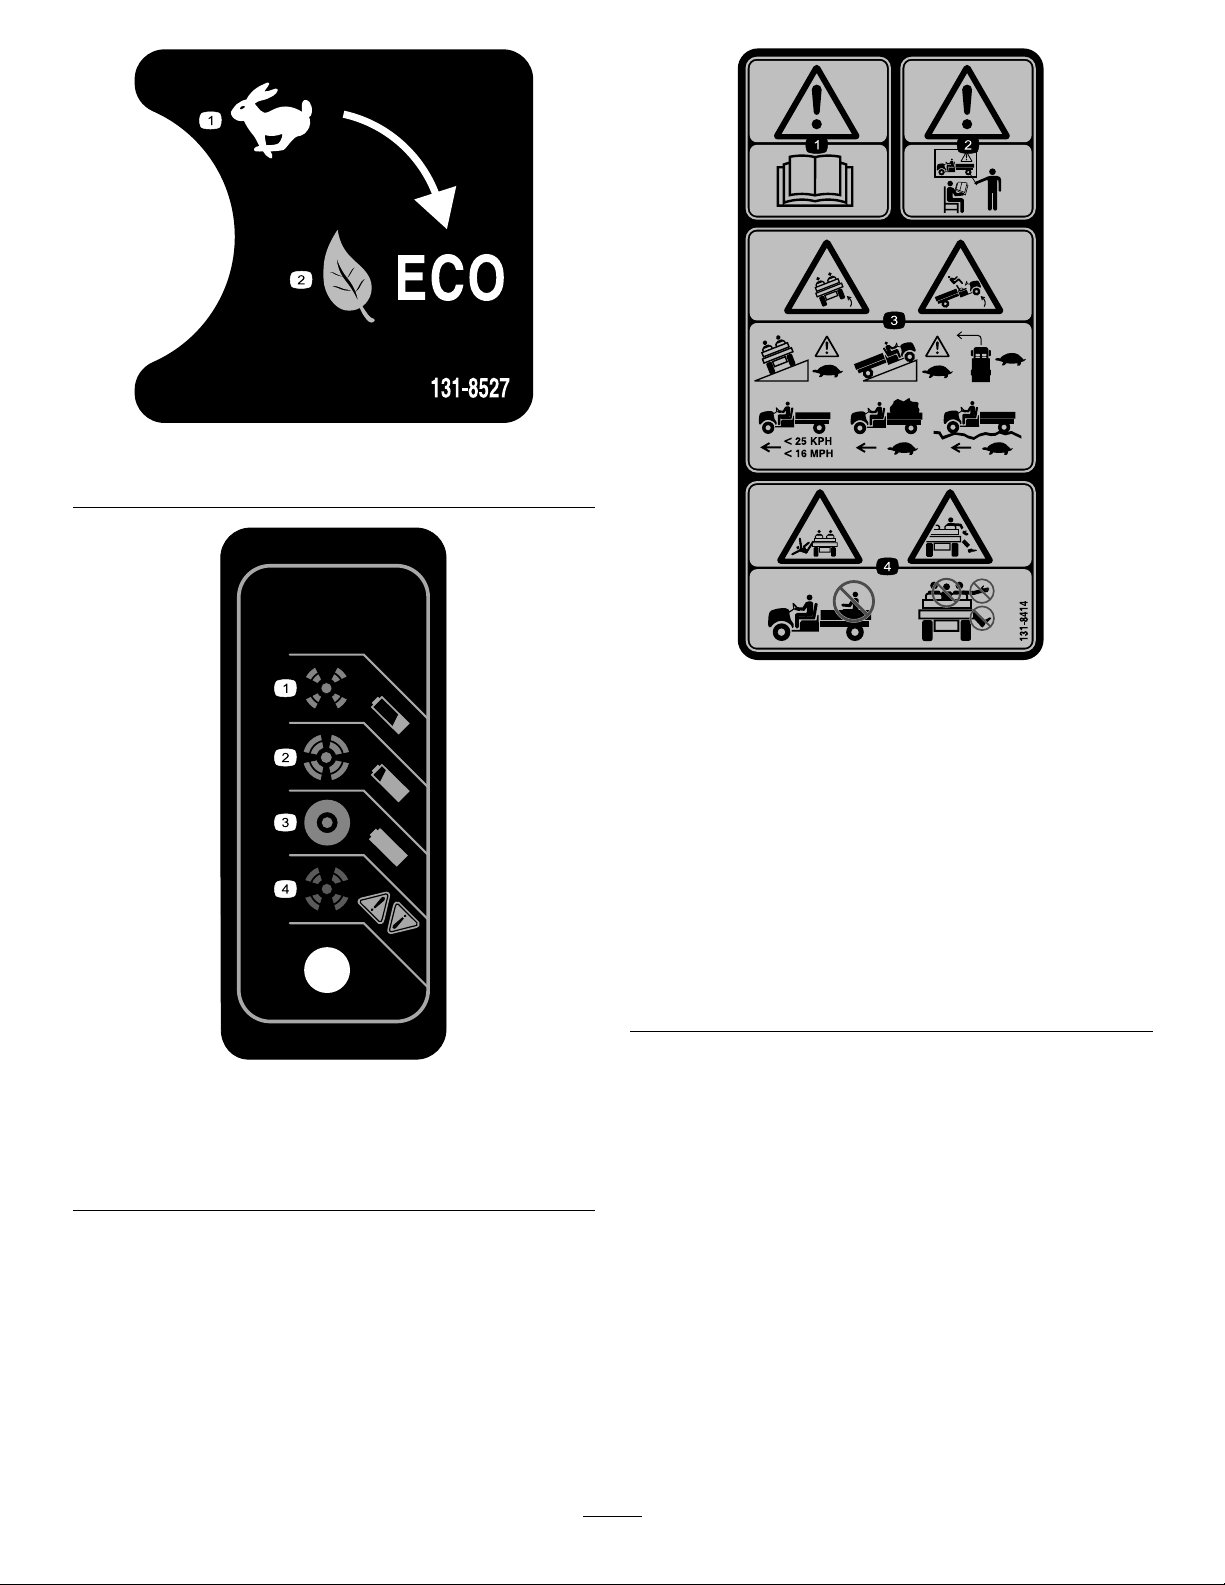
131-8527
1.Performancemode
2.Ecomode
1.Warning—readthe
Operator'sManual.
2.Warning—receiveproper
trainingbeforeoperating
themachine.
131-8414
3.Tippinghazard—drive
slowlyacrossorupslopes;
taketurnsslowly;donot
exceedspeedsof25kph
(16mph);driveslowly
whenhaulingcargo;drive
slowlyonuneventerrain.
4.Fallinghazard;severing
hazardoflimbs—donot
carrypassengersinthe
bed;donotcarryextra
passengersinbetween
theseats;donotputyour
armsorlegsoutsideofthe
machinewhileoperating.
131-8495
1.Thebatteryisempty .3.Thebatteryischarged.
2.Thebatteryisalmost
charged.
4.Chargerfault;refertothe
chargermanualforthe
faultcodes.
10
Page 11
Setup
LooseParts
Usethechartbelowtoverifythatallpartshavebeenshipped.
ProcedureDescription
Steeringwheel
1
2
3
Note:Determinetheleftandrightsidesofthemachine
fromthenormaloperatingposition.
Cover
Washer(1/2inch)
Nopartsrequired
Operator'sManual
PartsCatalog
Safetytrainingmaterial
RegistrationCard
PredeliveryInspectionForm1
CerticateofQuality
Key2
Chargercord
1
Qty.
Use
1
1
1
–
1
1
1
1
1
1
Installthesteeringwheel(TCModels
only).
Checktheuidlevelsandtirepressure.
ReadtheOperator'sManualandview
thetrainingmaterialbeforeoperating
themachine.
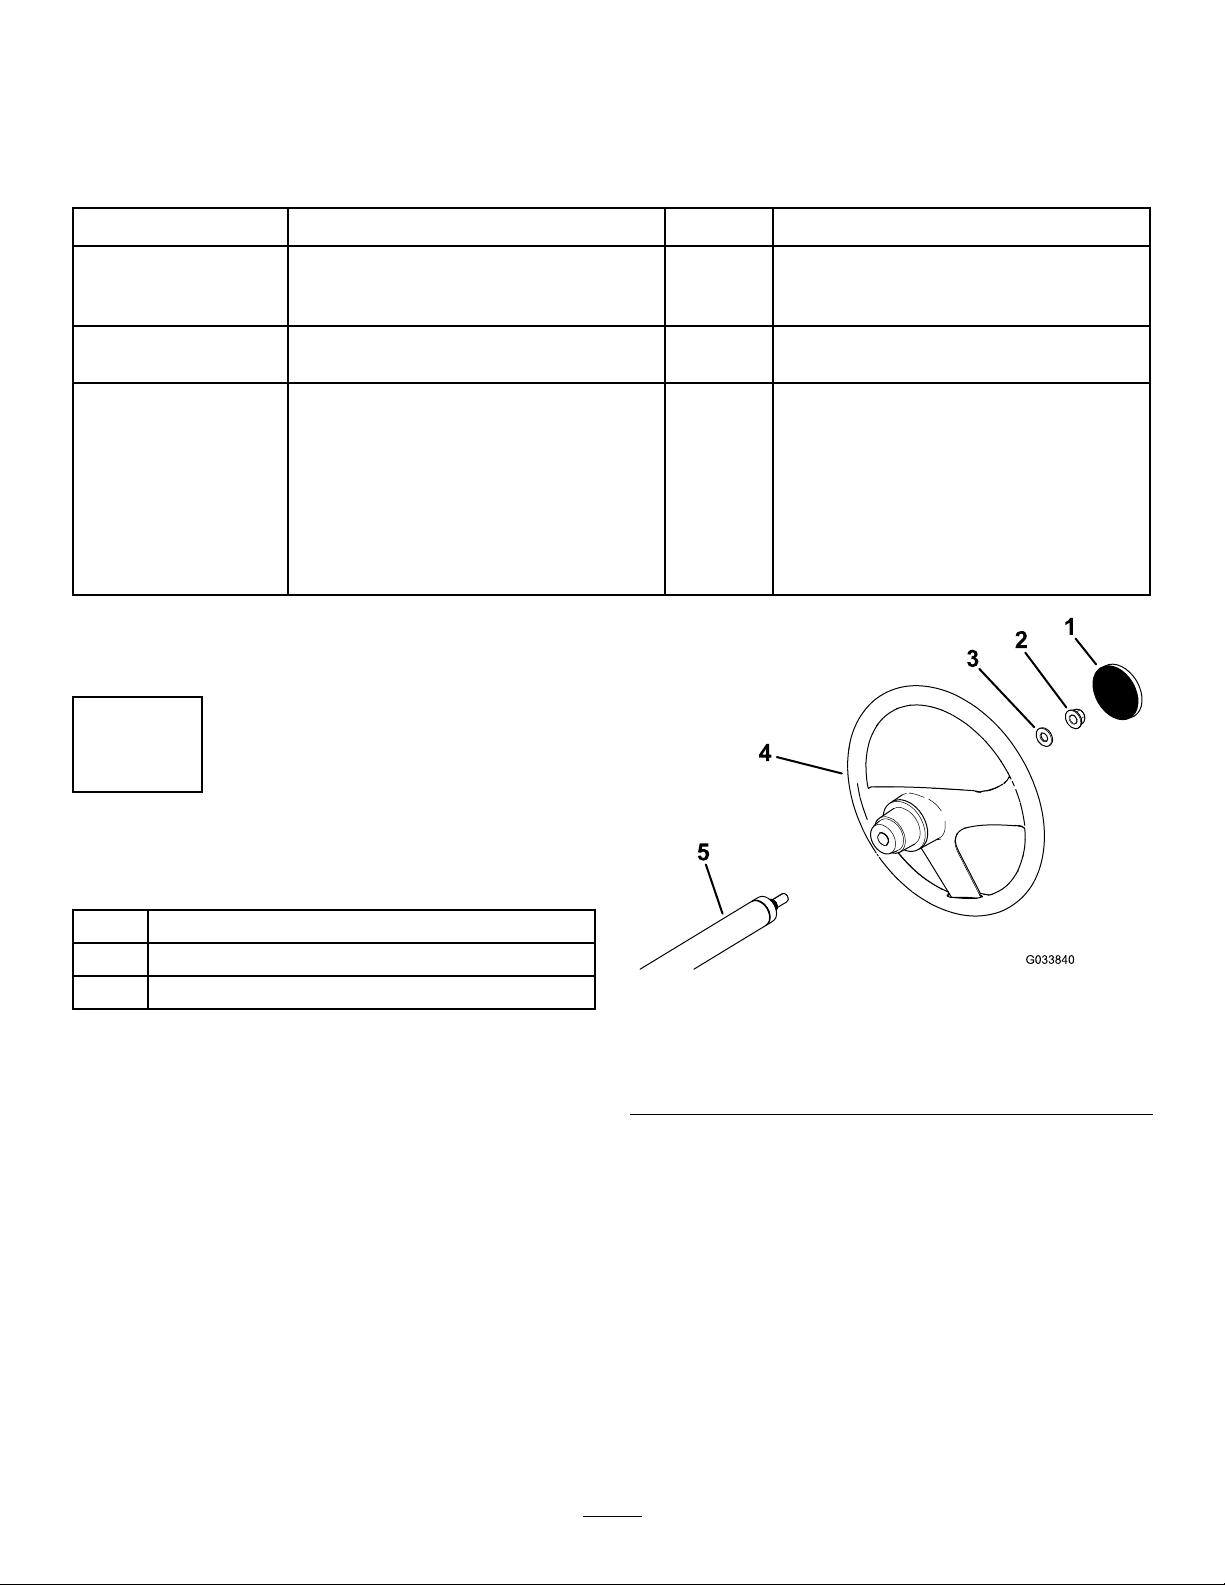
InstallingtheSteeringWheel
Partsneededforthisprocedure:
1
Steeringwheel
1
Cover
1
Washer(1/2inch)
Procedure
1.Ifthecoverisinstalled,removeitfromthehubofthe
steeringwheel(Figure3).
2.Removethelocknut(1/2inch)fromthesteeringshaft
(Figure3).
3.Slidethesteeringwheelandwasher(1/2inch)ontothe
steeringshaft(Figure3).
4.Securethesteeringwheeltotheshaftwiththelocknut
(1/2inch)andtightenitto27to34N·m(20to25
ft-lb).
5.Installthecoveronthesteeringwheel(Figure3).
Figure3
1.Cover4.Steeringwheel
2.Locknut(1/2inch)5.Steeringshaft
3.Washer(1/2inch)
11
Page 12

2
3
CheckingtheFluidLevelsand
TirePressure
NoPartsRequired
Procedure
1.Checkthewaterlevelinthebatteriesbeforeoperating
themachine;refertoCheckingtheWaterLevelofthe
Batteries(page34).
2.Ensurethatthebatteriesarecharged;refertoCharging
theBatteries(page33).
3.Checkthebrake-uidlevelbeforethemachineisrst
operated;refertoCheckingtheBrake-FluidLevel
(page41).
4.Checkthetransaxle-uidlevelbeforethemachineis
rstoperated;refertoCheckingtheTransaxle-Fluid
Level(page40).
5.Checktheairpressureinthetires;refertoChecking
theTirePressure(page21).
ReadingtheManualand ViewingtheSafetyTraining Material
Partsneededforthisprocedure:
1
Operator'sManual
1
PartsCatalog
1
Safetytrainingmaterial
1
RegistrationCard
1PredeliveryInspectionForm
1
CerticateofQuality
2Key
1
Chargercord
Procedure
•ReadtheOperator'sManual.
•Viewthesafetytrainingmaterial.
•Fillouttheregistrationcard.
•CompletethePredeliveryInspectionForm.
•ReviewtheCerticateofQuality.
12
Page 13
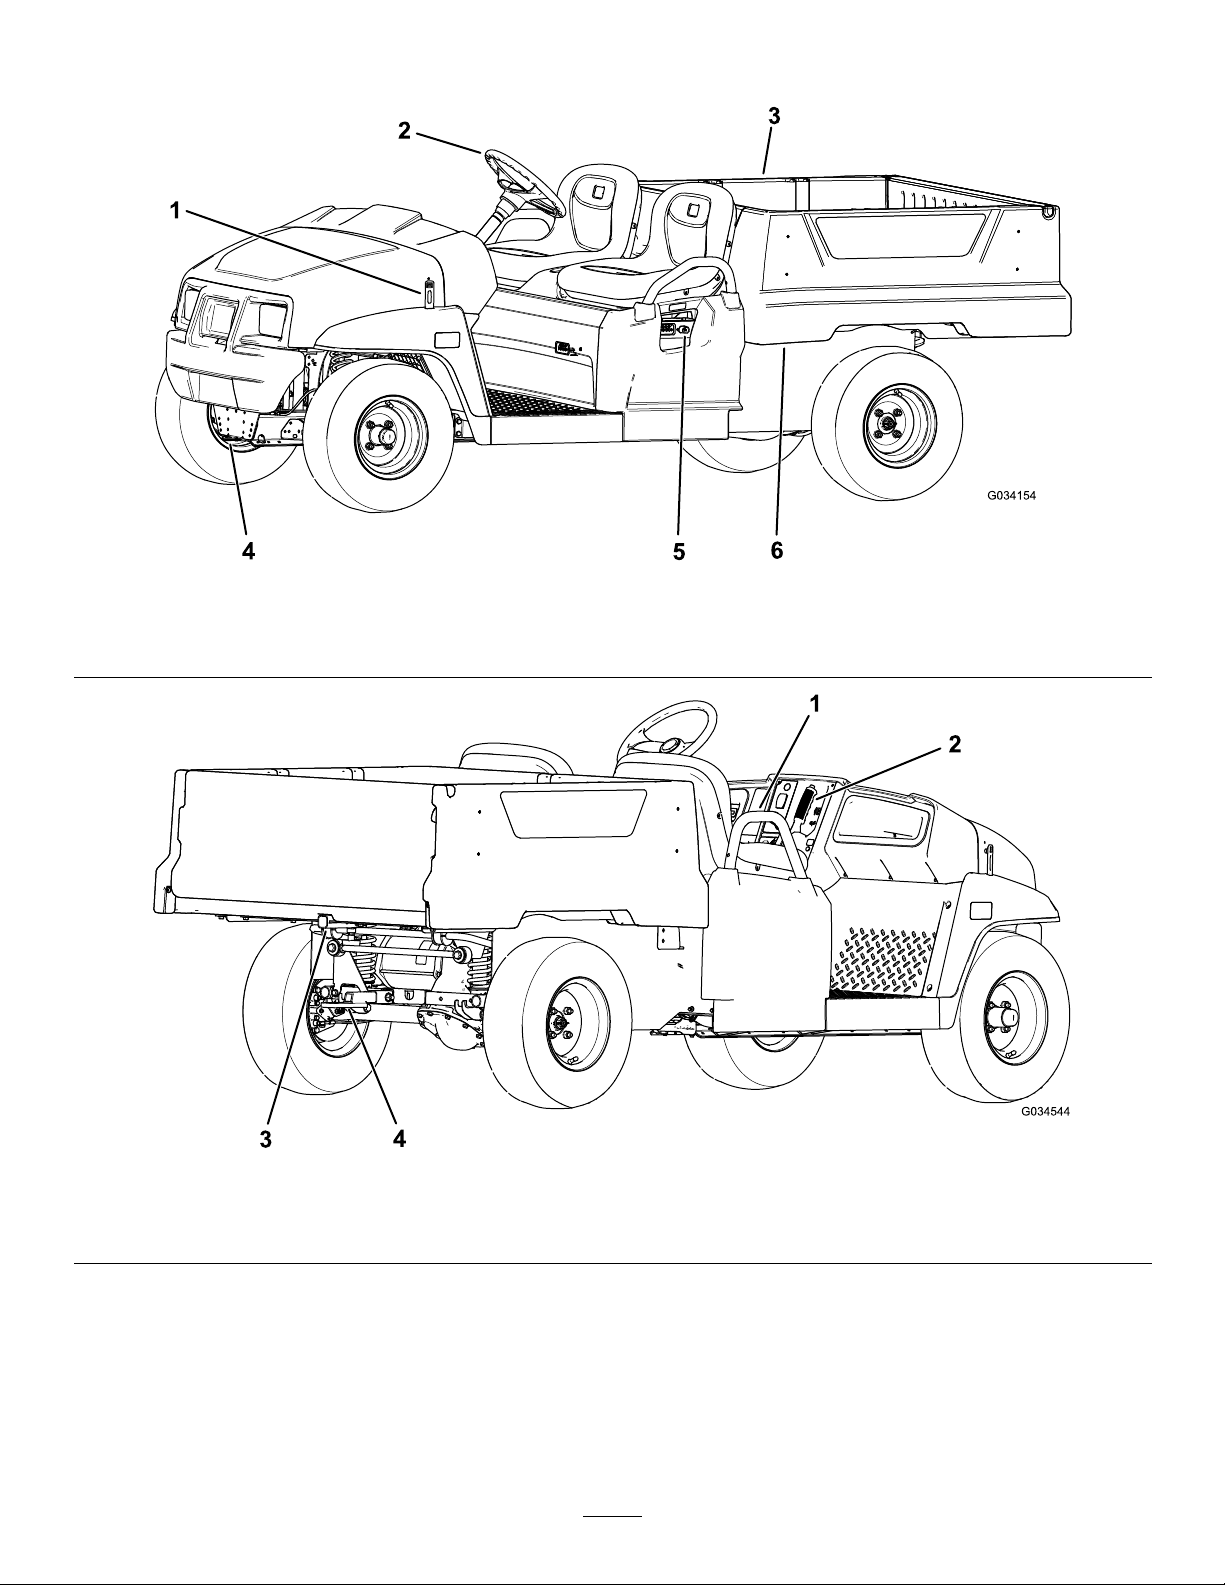
ProductOverview
Figure4
1.Hoodlatch
2.Steeringwheel
3.Cargobox
4.Towingtongue
5.Batterycharger
6.Cargo-boxlever
Figure5
1.Passengerhandhold3.Rearcargo-box-accessorymount
2.Parking-brakelever4.Trailerhitch
13
Page 14
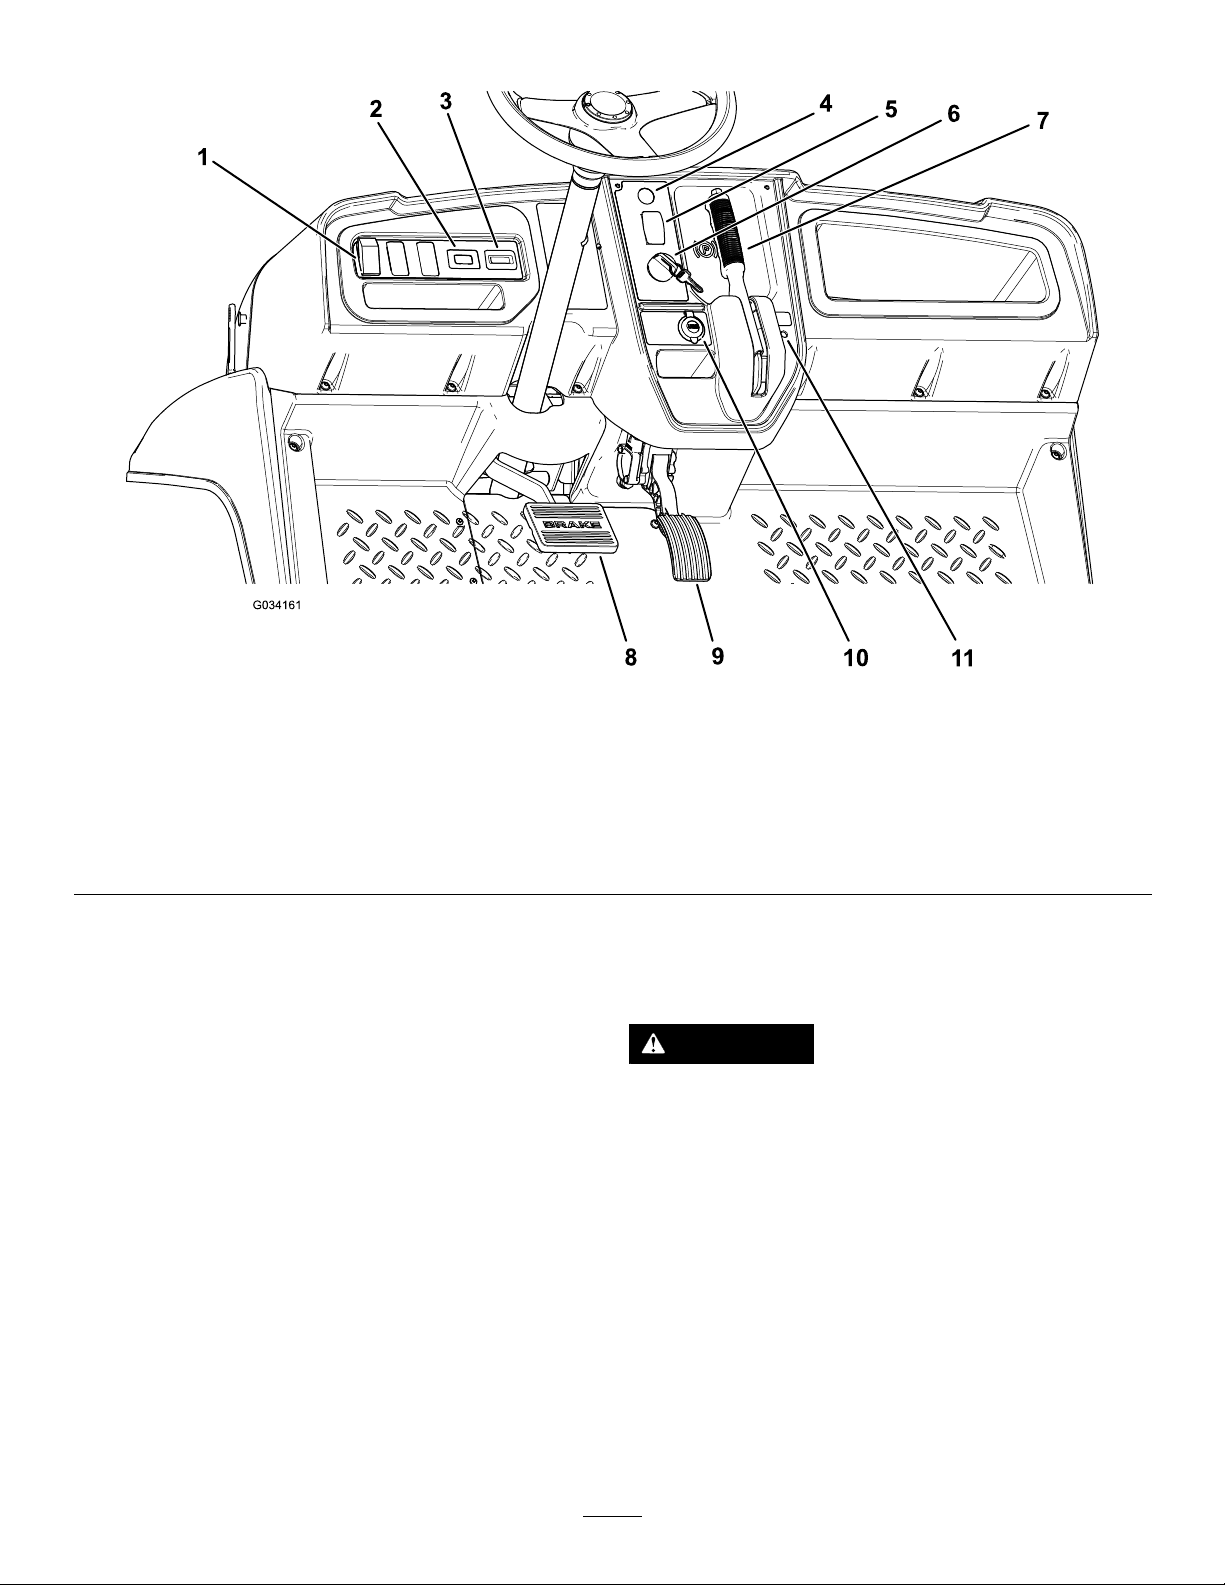
Controls
Figure6
1.Lightswitch7.Parking-brakelever
2.Hourmeter8.Brakepedal
3.Battery-dischargeindicator9.Acceleratorpedal
4.Hornbutton(TCmodelsonly)10.USBpowerpoint
5.Gear-shiftselector11.Status-indicatorlight
6.Keyswitch
AcceleratorPedal
Usetheacceleratorpedal(Figure6)tovarygroundspeedof
themachine.Pressingdowntheacceleratorpedalstartsthe
machine.Pressingthepedalfartherincreasesgroundspeed.
Releasingthepedalslowsthemachine,andthemachineshuts
off.
BrakePedal
Usethebrakepedaltostoporslowthemachine(Figure6).
CAUTION
Operatingamachinewithwornorincorrectly
adjustedbrakescanmayresultinpersonalinjury.
Themaximumforwardspeedinperformancemodeis
26km/h(16mph)asshowninFigure9.
Themaximumforwardspeedineconomymodeis19km/h
(12mph)asshowninFigure9.
Ifbrakepedaltravelstowithin25mm(1inch)of
themachineoorboard,adjustorrepairthebrakes.
14
Page 15
Parking-BrakeLever
Theparking-brakeleverislocatedonthecontrolpanel
(Figure6).
Wheneveryoushutoffthemachine,engagetheparking
braketopreventthemachinefromaccidentalmoving.If
themachineisparkedonasteepgrade,makesurethatyou
engagetheparkingbrake.
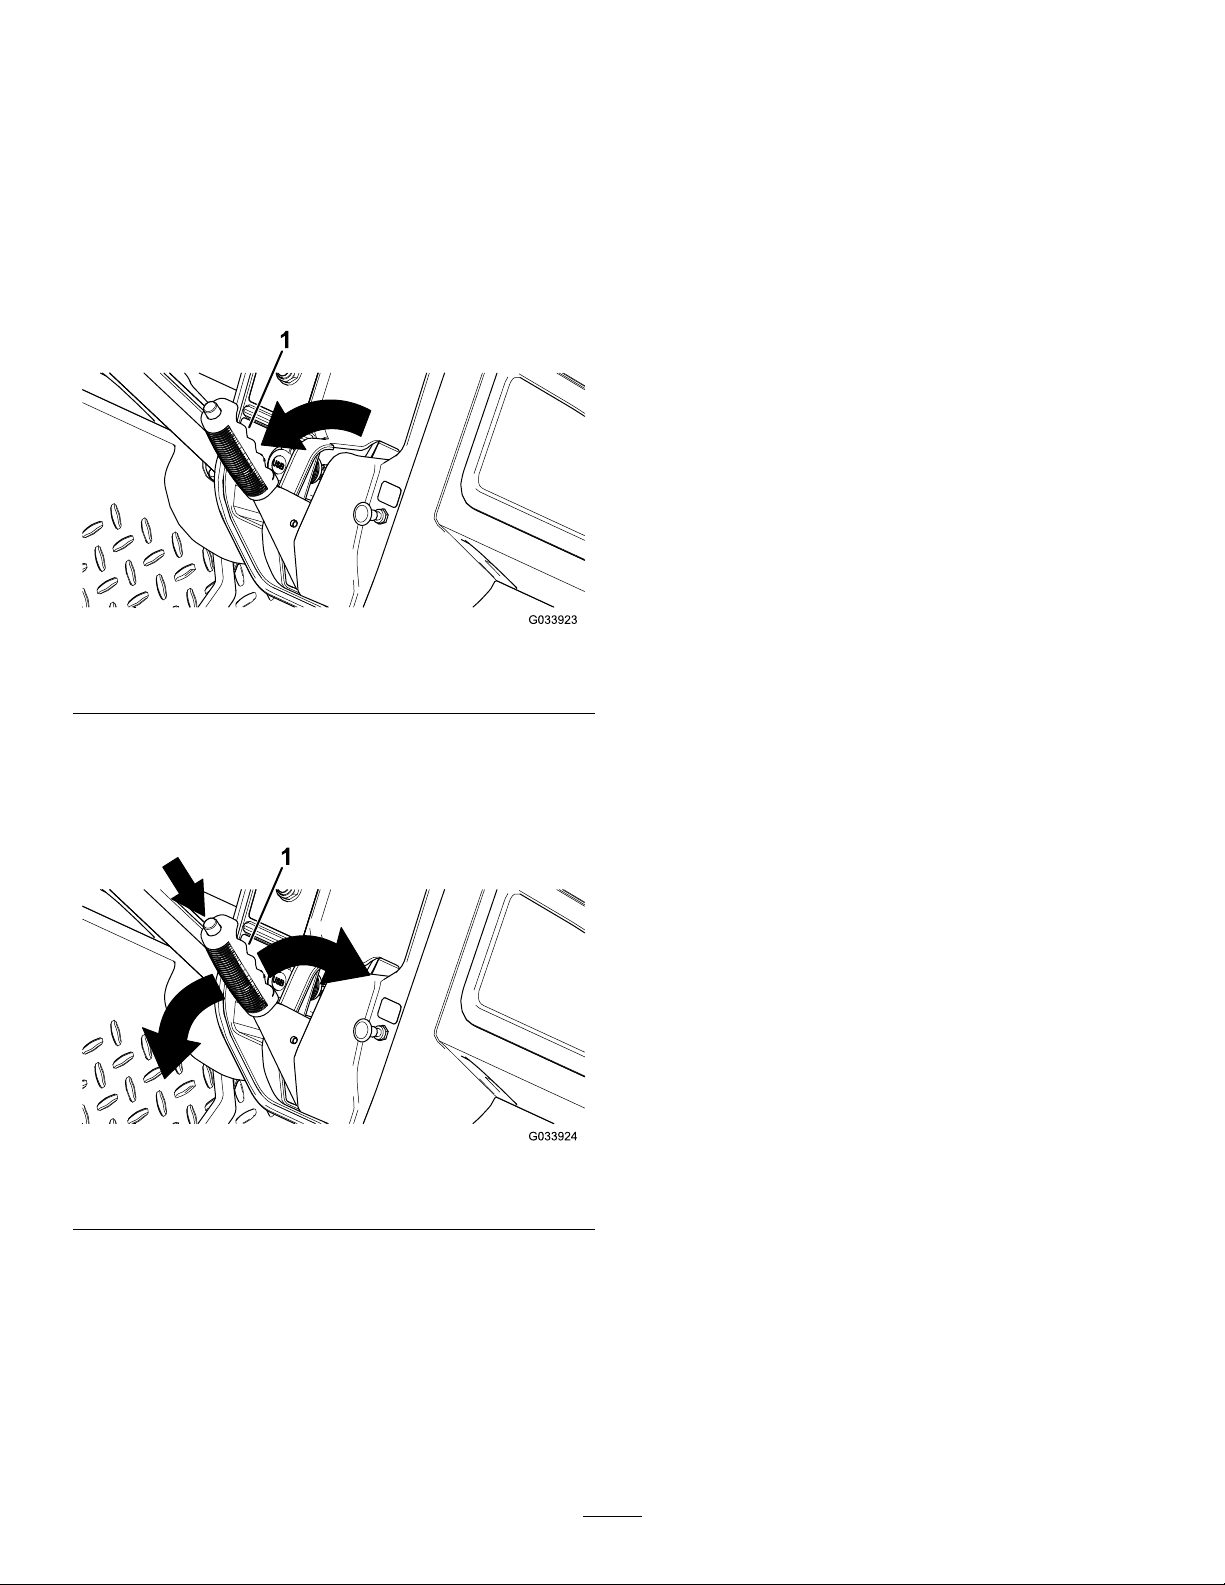
Toengagetheparkingbrake,pulltheparking-brakelever
towardyou(Figure7).
Figure7
1.Parking-brakelever
Important:Alwaysstopthemachinebeforechanging
direction.
HornButton
TCModelsOnly
Thehornbuttonislocatedonthecontrolpanel(Figure6).
Pressthehornbuttontosoundthehorn.
LightSwitch
Thelightswitchislocatedtotheleftofthesteeringcolumn
(Figure6).Usethelightswitchtoilluminatetheheadlights.
Pushthelightswitchupwardtoturnontheheadlightsor
pushdownwardtoturnoffthelights.
Battery-DischargeIndicator
Thebattery-dischargeindicatorislocatedtotheleftofthe
steeringcolumn(Figure6).Thebattery-dischargeindicator
indicatestheremainingchargeinthebatteries.Whenthe
machinebatteriesarefullycharged,tenindicatorbarsextend
fromthe0tothe1position.Asthechargeisused,the
indicatorbarsdisappearstartingattherightsideofthe
meter.Fordetailedinformationonthebatterymeter,referto
UnderstandingandUsingtheBatterySystem(page21).
Todisengagetheparkingbrake,pushdownthebuttonontop
oftheparkingbrakelever,pulltheparking-brakelevertoward
youtoreleasepressure,andthenpushtheparking-brakelever
forward(Figure8).
Figure8
1.Parking-brakeleverandbutton
DirectionSelector
Thedirectionselectorislocatedtotheleftofthe
parking-brakelever.Thedirectionselectorhas3positions:
FORWARD,REVERSE,andNEUTRAL(Figure6).
Note:Themachinecanbeoninanyofthe3positions,but
onlymovesintheFORWARDandREVERSEpositions.
HourMeter
Thehourmeterislocatedtotherightofthelightswitch
(Figure6).Usethehourmetertondoutthetotalnumberof
operatinghours.Thehourmeterstartstofunctionwhenever
youturnthekeyswitchtotheONpositionorifthemachine
isrunning.
Note:Whenthemachineisrunning,thehourmeterblinks
continuously,recordingusage.
USBPowerPoint
TheUSBpowerpointislocatedtotheleftofthe
parking-brakelever(Figure6).Usethepowerpointtopower
mobiledevices.
Important:WhennotusingtheUSBpowerpoint,insert
therubberplugtopreventdamagetothepowerpoint.
KeySwitch
Thekeyswitch(Figure6),isusedtorunandshutoffthe
machine,andhas2positions:ONandOFF.Rotatethekey
clockwisetotheONpositiontooperatethemachine.When
themachineisstopped,rotatethekeycounterclockwiseto
theOFFpositiontoshutoffthemachine.Removethekey
fromthekeyswitchwheneveryouleavethemachine.
15
Page 16
SupervisorSpeed-LimitSwitch
PassengerHandholds
Thesupervisorspeed-limitswitch,locatedundertheseat
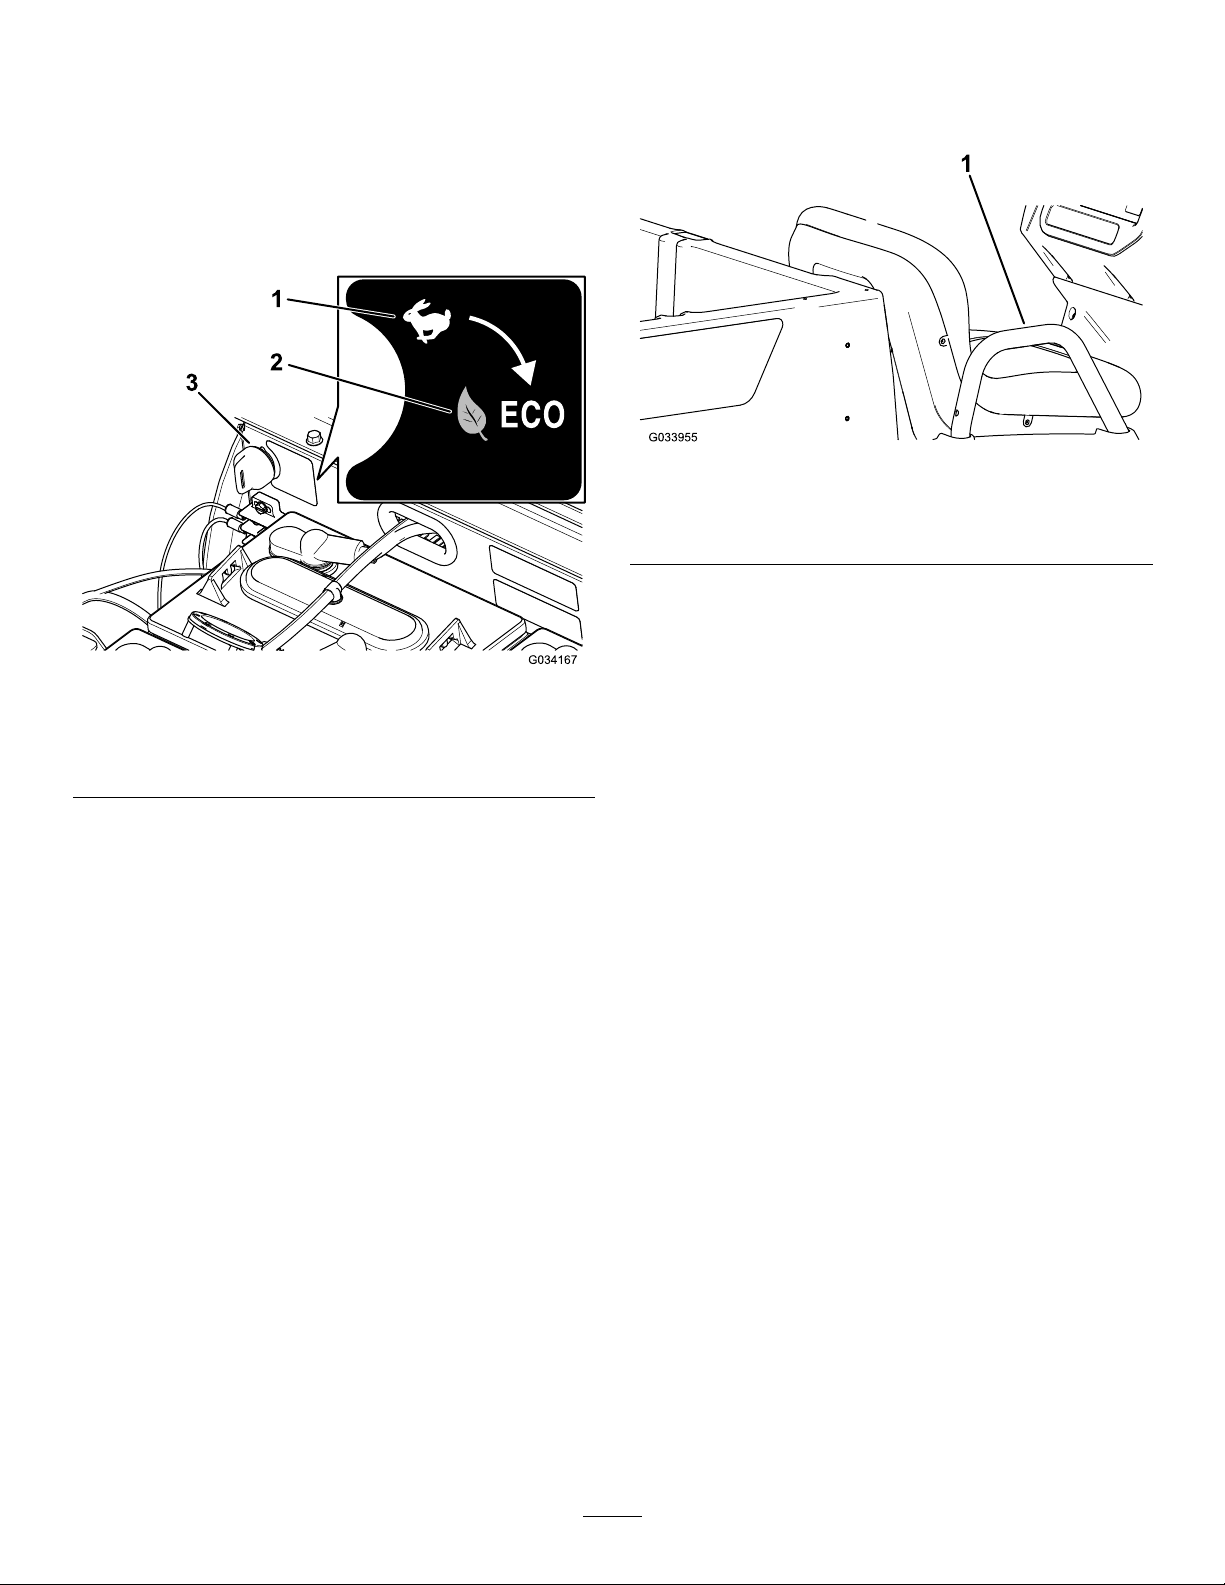
assembly,has2positions:PERFORMANCEandECONOMY.
RotatetheswitchclockwisetotheECONOMYpositionto
limitthemaximummachinespeedto19km/h(12mph).
RotatetheswitchcounterclockwisetothePERFORMANCE
positiontorestorethemaximumspeedofthemachineto
26km/h(16mph)asshowninFigure9.
Figure9
Thepassengerhandholdsarelocatedontheoutsideofeach
seat(Figure10).
Figure10
PassengerSideShown
1.Passengerhandhold
1.Performanceposition3.Supervisorspeed-limit
2.Economyposition
switch
Status-IndicatorLight
Thestatus-indicatorlightislocatedtotherightofthe
parking-brakeleveronthecontrolpanel(Figure6).
Whenthemachineisturnedon,thegreenstatus-indicator
lightilluminateseithersolidorblinking.
Ifthelightissolid,thisindicatesthatthemachineisreadyfor
normaloperation.Ifthelightisblinking,thereisanissuethat
needstoberesolvedbeforecontinuingwithnormaloperation
ofthemachine.
Ifthestatus-indicatorlightblinks2times,thisindicates
thattheparkingbrakeisengagedwhileintheFORWARDor
REVERSEpositiononthedirectionselector.Disengagethe
parkingbraketoshutoffthestatus-indicatorlight.
RefertoTroubleshooting(page44)ifthestatus-indicator
lightblinksmorethan2times.
16
Page 17

Specications
Note:Specicationsanddesignaresubjecttochangewithoutnotice.
Baseweight
Ratedcapacity(onlevelground)544kg(1,200lb)total,including90.7kg(200lb)operatorand
Maximumgrossvehicleweight(GVW)(onlevelground)1177kg(2,595lb)total,includingalloftheweightslistedabove
Maximumcargocapacity(onlevelground)363kg(800lb)total,includingrear-mountedaccessories
Maximumrearcargo-box-accessorymountcapacity
Towcapacity
Overallwidth119cm(47inches)
Overalllength302cm(119inches)
Overallheight127.5cm(50.2inches)
Groundclearance21.6cm(8.5inches)atthefrontwithnoloadoroperator,14cm
Wheelbase
Wheeltread(centerlinetocenterline)119cm(47inches)inthefront,119cm(47inches)intherear
Cargoboxlength102cm(40inches)inside,1 14.3cm(45inches)outside
Cargoboxwidth98cm(38.5inches)inside,107.3cm(42.3inches)atoutsideof
Cargoboxheight28cm(11inches)inside
Dry633kg(1,395lb)
91kg(200lb)passenger,load,accessories,andattachments
45kg(100lb)total
Tongueweight91kg(200lb)Maximumtrailerweight454kg
(1,000lb)
(5.5inch)attherearwithnoloadoroperator
220cm(86.6inches)
themoldedfenders
*SpecicationslistedarewithTrojanT-125batteries.**Installingnon-standardbatteriesmayreducethecargo-box
capacity.
Attachments/Accessories
AselectionofToroapprovedattachmentsandaccessoriesisavailableforusewiththemachinetoenhanceandexpand
itscapabilities.ContactyourAuthorizedServiceDealerorDistributororgotowww.Toro.comforalistofallapproved
attachmentsandaccessories.
17
Page 18
Operation
Note:Determinetheleftandrightsidesofthemachine
fromthenormaloperatingposition.
ThinkSafetyFirst
Carefullyreadallsafetyinstructionsandsymbolsinthe
safetysection.Knowingthisinformationcouldhelpyouor
bystandersavoidinjury.
DANGER
CAUTION
Ifaloadisconcentratednearthebackofthecargo
boxwhenyoureleasethelatches,theboxmay
unexpectedlytipopen,injuringyouorbystanders.
•Centerloadsinthecargobox,ifpossible.
•Holdthecargoboxdownandensurethatno
oneisleaningovertheboxorstandingbehindit
whenreleasingthelatches.
•Removeallcargofromtheboxbeforeliftingthe
boxuptoservicethemachine.
Operatingonwetgrassorsteepslopescancause
slidingandlossofcontrol.
Wheelsdroppingoveredgescancauserollovers,
whichmayresultinseriousinjury,death,or
drowning.
Toavoidlossofcontrolandpossibilityofrollover:
•Donotoperateneardropoffsornearwater.
•Reducespeedanduseextremecautionon
slopes.
•Avoidsuddenturnsorrapidspeedchanges.
OperatingtheCargoBox
RaisingtheCargoBoxtotheDump
Position
WARNING
Araisedboxcouldfallandinjurepersonsthatare
workingbeneathit.
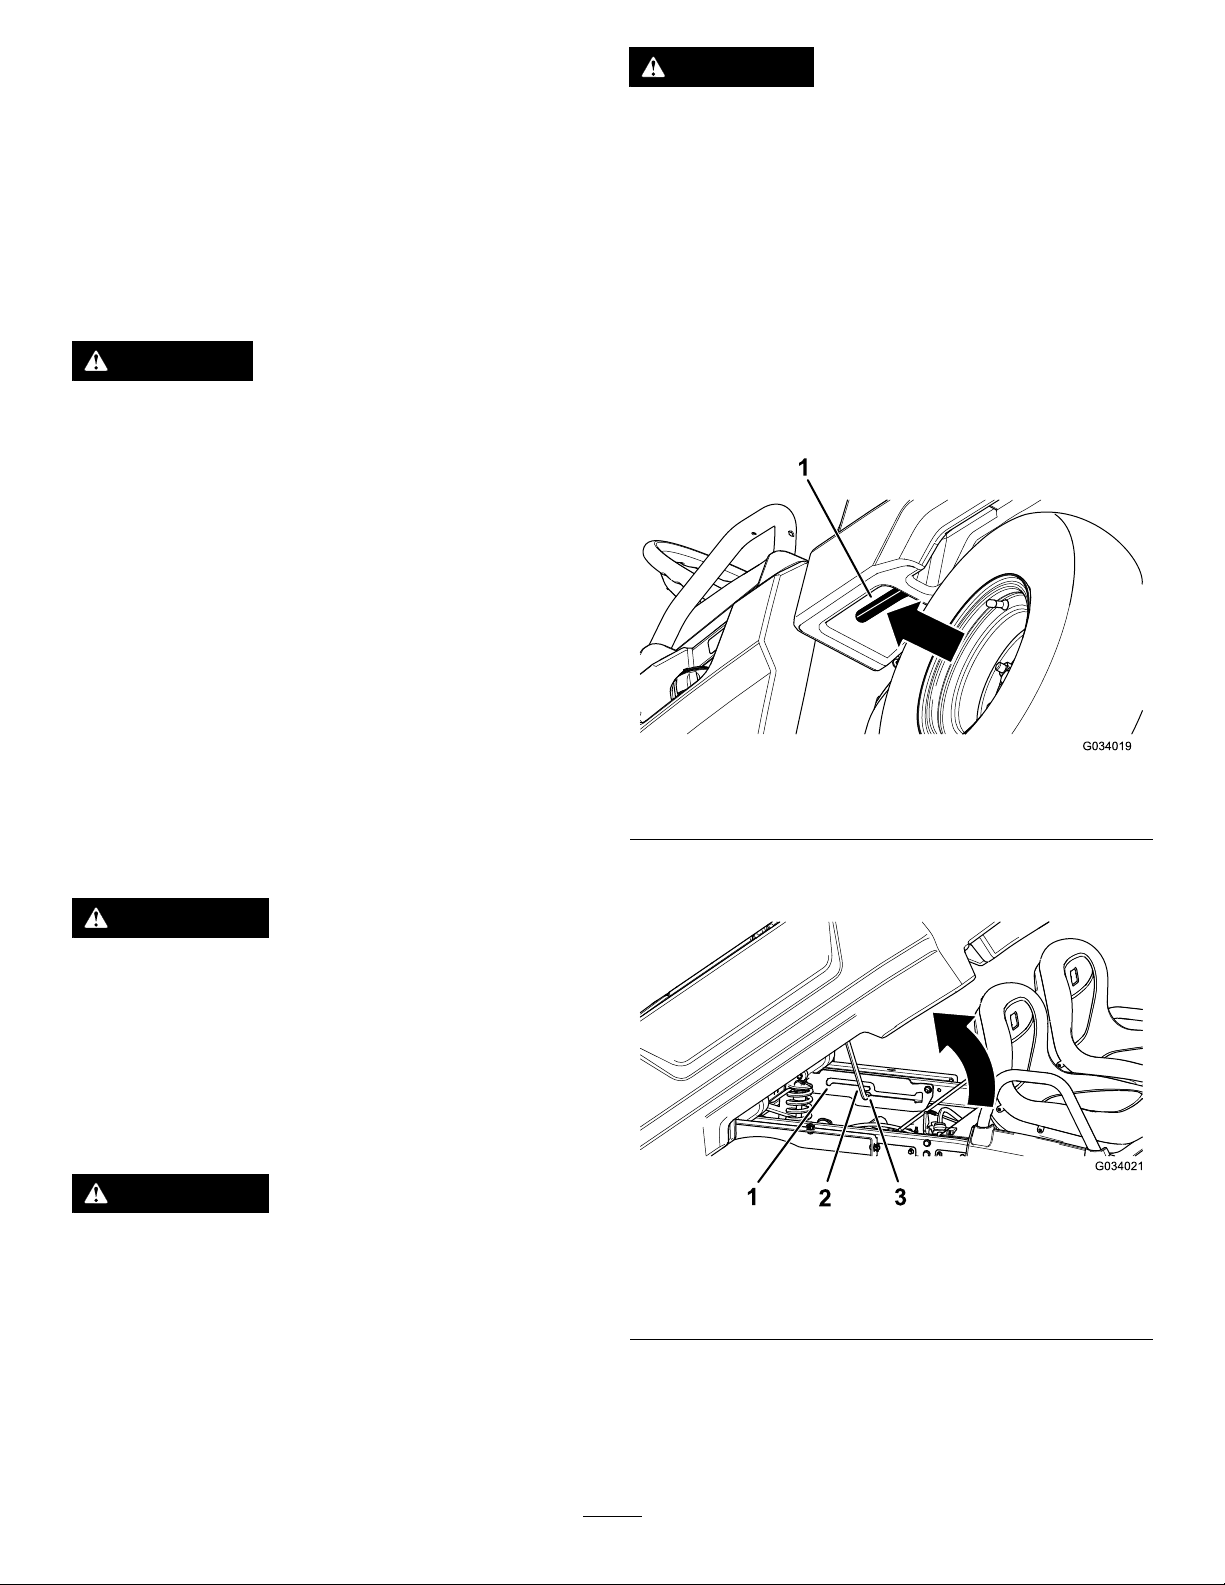
1.Pulltheleveronleft,insideofthecargoboxtoward
youandliftthecargoboxup(Figure11).
Figure11
1.Cargo-boxlever
2.Pulltheproprodintothedumppositiondetentslot,
securingtheboxfordumping(Figure12).
•Alwaysusetheproprodtoholdtheboxup
beforeworkingunderthebox.
•Removeanyloadmaterialfromtheboxbefore
raisingit.
WARNING
Drivingthemachinewiththecargoboxraisedmay
causethemachinetotiporrolleasier.Thebox
structuremaybecomedamagedifyouoperatethe
machinewiththeboxraised.
•Operatethemachineonlywhenthecargobox
isdown.
•Afteremptyingthecargobox,lowerit.
1.Servicepositiondetent
2.Proprod
18
Figure12
3.Dumppositiondetentslot
slot
Page 19

RaisingtheCargoBoxtotheService
Position
1.Pulltheleveronleft,insideofthecargoboxtoward
youandliftthecargoboxup(Figure11).
2.Pullproprodintotheservicepositiondetentslot,
securingtheboxformaintenance(Figure12).
LoweringtheCargoBox
WARNING
Theweightoftheboxmaybeheavy.Handsor
otherbodypartscouldbecrushed.
Keephandsandotherbodypartsclearwhen
loweringthebox.
1.Raisethecargoboxslightlybyliftinguponthelatch
lever(Figure11).
2.Pulltheproprodoutofthedetentslot(Figure12).
3.Lowertheboxuntilitlatchessecurely .
OpeningtheTailgate
1.Ensurethatthecargoboxisdownandlatched.
2.Usingbothhands,raisethetailgateusingtheridgenear
thetopofthetailgate(Figure13).
3.Lowerthetailgateuntilitisushwiththebottomof
thecargobox(Figure13).
Figure13
19
Page 20
ClosingtheTailgate
UsingtheRear
Ifyouunloadedloosematerialsuchassand,landscapingrock,
orwoodchipsfromthecargoboxofthemachine,some
ofthematerialthatyouunloadedmayhavelodgedinthe
hingeareaofthetailgate.Performthefollowingstepsbefore
closingthetailgate.
1.Removeasmuchofthematerialfromthehingearea
aspossible.
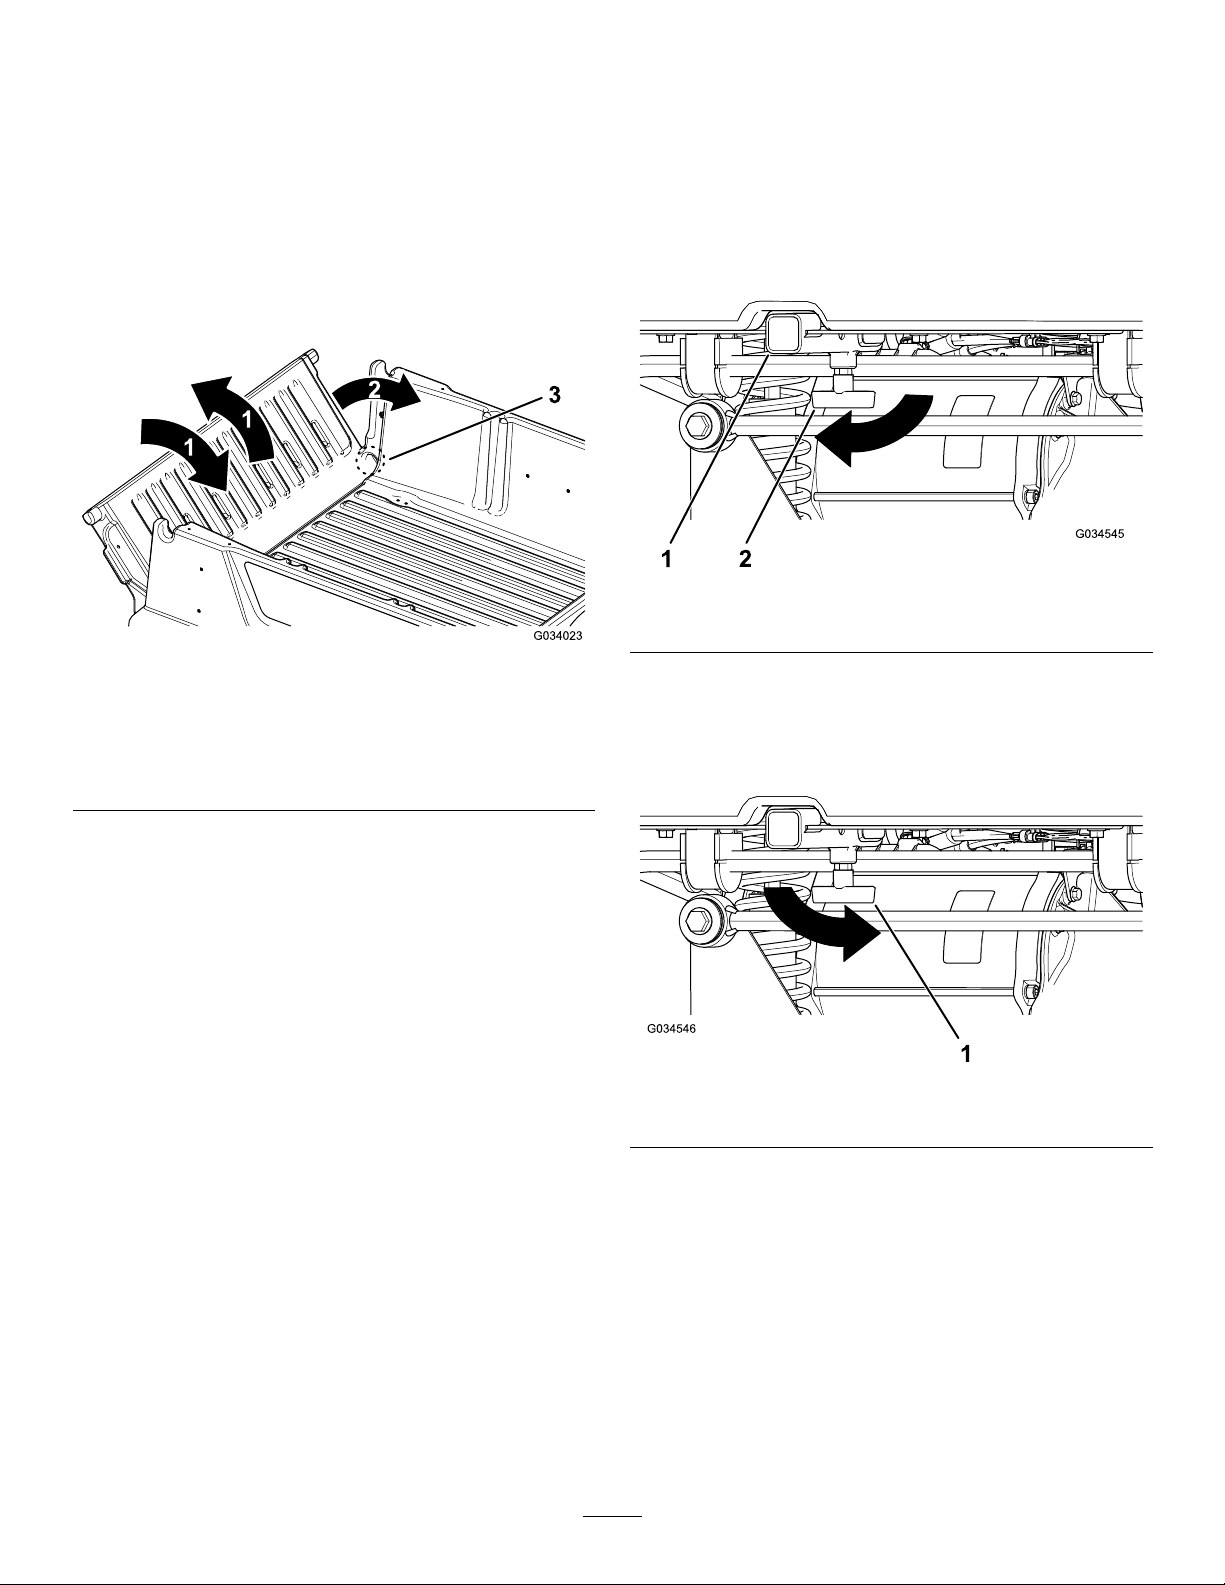
2.Rotatethetailgatetoapproximatelythe45°position
(Figure14).
Figure14
1.Rotatethetailgateback
andforthseveraltimes.
2.Rotatethetailgateto
approximatelythe45°
position.
3.Hingearea
Cargo-Box-AccessoryMount
Usetherearcargo-box-accessorymounttoattachaccessories
totherearofthemachine.
Capacity:45kg(100lb)
1.Loosenthe‘T’handlebyrotatingitclockwise(Figure
15).
Figure15
1.Receiver
2.Insertyouraccessoryintothereceiveruntilthe
accessoryreachestheendofthereceiver(Figure15).
3.Tightenthe‘T’handlebyrotatingitcounterclockwise
(Figure16).
2.‘T’handle
3.Useashort,shakingmotiontorotatethetailgateback
andforthseveraltimes(Figure14).
Note:Thisactionhelpsmovematerialawayfrom
thehingearea.
4.Lowerthetailgateandcheckformaterialremainingin
thehingearea.
5.Repeatsteps1through4untilthematerialisremoved
fromthehingearea.
6.Rotatethetailgateupandliftthetailgateintothe
notchesinthecargobox.
Figure16
1.‘T’handle
20
Page 21
PerformingPre-Starting
UnderstandingandUsingthe
Checks
ServiceInterval:BeforeeachuseordailyCheckthe
followingitemseachtimeyoubegin
usingthemachinefortheday:
•Ensurethatthebatteriesarechargedbeforeusingthe
machine;ChargingtheBatteries(page33).
•Checkthewaterlevelinthebatteries;CheckingtheWater
LeveloftheBatteries(page34).
•Checkbrake-uidlevel,andaddthespeciedbrakeuids
asneeded;refertoCheckingtheBrake-FluidLevel(page
41).
•Checktheairpressureinthetires;refertoCheckingthe
TirePressure(page21).
•Checkthetransaxle-uidlevel;refertoCheckingthe
Transaxle-FluidLevel(page40).
•Checkthebrakepedaloperation.
•Checktoseethatthelightsareworking.
•Turnthesteeringwheeltotheleftandrighttocheck
steeringresponse.
•Checkforloosepartsandanyothernoticeable
malfunctions.
Note:Shutoffthemachineandallowallmovingparts
tostopbeforecheckingforloosepartsandotherwear
anddamage.
Ifanyoftheaboveitemsarenotcorrect,notifyyour
mechanicorcheckwithyoursupervisorbeforetakingthe
machineoutfortheday.Yoursupervisormaywantyouto
checkotheritemsonadailybasis,soaskhimorherabout
additionaloperator’ sresponsibilities.
BatterySystem
UnderstandingDeep-CycleBatteries
Themachinecontains8deep-cycle,lead-acidbatteriesthat
supplypowertothemotorandaccessories.Adeep-cycle
batteryisnotthesameasanautomobilebattery.An
automobilebatteryisdesignedtoprovideasurgeofpowerto
startthemachineandmoderatepowertorunthelightsand
accessorieswhenthemotorifofforidling.Thealternator
thencontinuouslychargesastheautomobileruns.Assuch,
anautomobilebatteryseldomdropsbelow90%ofthe
maximumchargelevel.
Adeep-cyclebatteryisdesignedtobeaprimarypower
sourcetoprovideasustainedoutput.Deep-cyclebatteriesare
typicallydischargedaslowas20to30%ofthemaximum
chargelevel.Adischargethislowisconsideredadeep
discharge.
Important:Repeateddeep-dischargecyclesreduces
thebatterylife.
Lead-acidbatteriesproduceelectricitythroughachemical
reactionbetweenleadplatesandsulfuricacid.Charginga
batteryreversesthechemicalreaction,allowingthebatteryto
onceagainproduceelectricity.
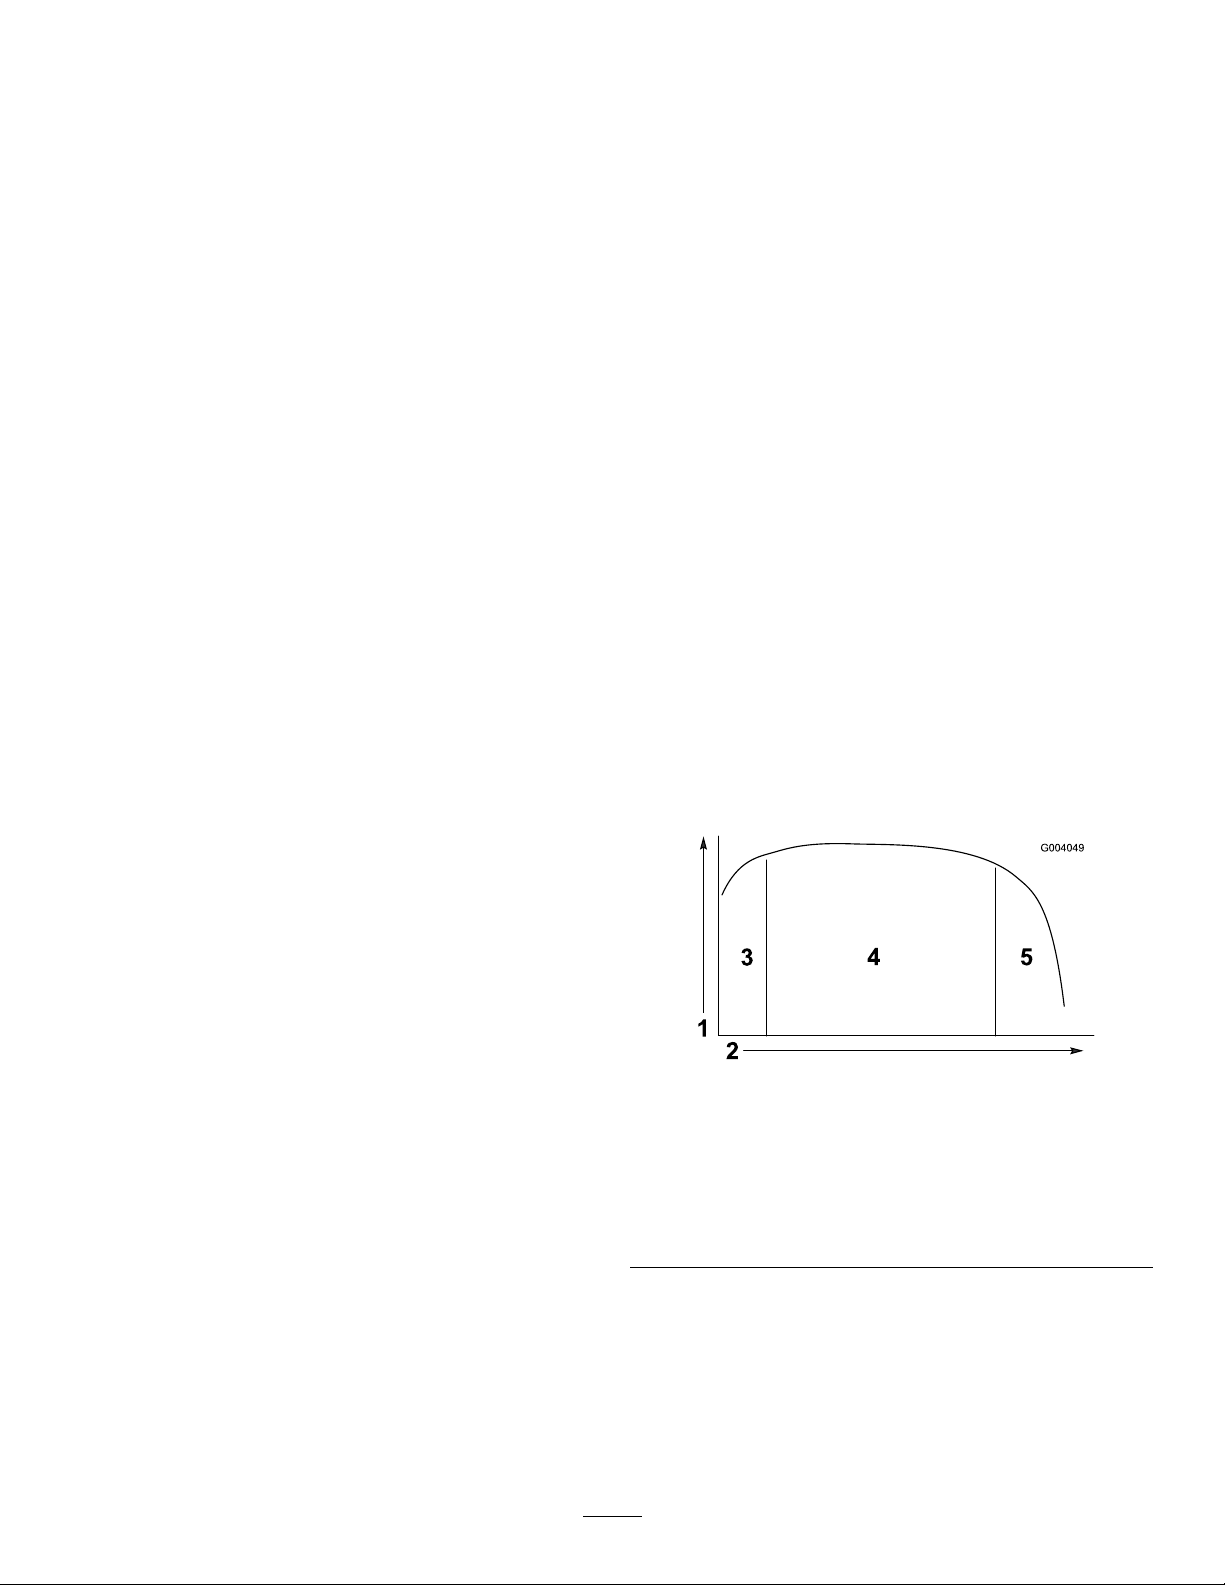
Abatteryisaperishableitemthathasalimitedlifetime
(Figure17).Whenabatteryisnew ,itrequiresabreak-in
periodtoestablishefcientelectricalproduction.Thisbreak
inperiodusuallyrequires100to150discharge/chargecycles.
CheckingtheTirePressure
ServiceInterval:Beforeeachuseordaily
TireAirPressureRange:165to207kPa(24to30psi)
Important:Donotexceedthemaximumairpressure
indicatedonthesidewallofthetire.
Note:Theairpressureneededinthetiresisdeterminedby
thepayloadthatyouintendtocarry.
1.Checktheairpressureinthetires.
Note:Theairpressurerangeinthefrontandreartires
is165to207kPa(24to30psi).
•Uselowerairpressureinthetiresforlighter
payloads,forlessthesoilcompaction,fora
smoothertheride,andtominimizetiremarksin
theground.
•Usehigherairpressureinthetiresforcarrying
heavierpayloadsathigherspeeds.
2.Ifneeded,adjusttheairpressureinthetiresbyadding
orremovingairinthetires.
Figure17
Battery-LifetimeT able
1.Batterycapacity
2.Discharge/chargecycles5.Endofthebatterylife
3.Break-inperiod(100to
150cycles)
Afterthebreak-inperiod,thebatterymaintainsahigh
capacityformanycycles.Thenumberofcyclesthatabattery
performsdependsonthefollowing:
4.Primebatterylife
•Batterymaintenance—impropermaintenanceseverely
reducesthelifeofthebatteries.
•Depthofdischargebetweenchargecycles—thedeeper
thebatteriesaredischargedonaregularbasis
21
Page 22
betweencharges,theshortertheservicelifethe
batterieswillhave.
•Chargefrequency—fullychargethebatterieswhenever
possible.
Important:Fullydischargingthebatteriesdamages
themandreducestheirlife.
•Lowwaterlevels—iftheleadplatesbecomeexposed,
itmaypermanentlydamagethebatteries.Perform
thefollowingtomaintaintheelectrolytelevel:
Afterfullychargingthebatteries,llthebatterieswith
distilledordeionizedwater;refertoCheckingtheWater
LeveloftheBatteries(page34)andAddingDistilledor
DeionizedW atertotheBatteries(page35).
Important:Fullychargethebatteriesbeforeadding
thewatertothebatteries.Whilecharging,the
electrolyteincreasesinvolume,andllingalow
batterybeforefullychargingthebatteriescancause
theelectrolytetooverowandleakoutofthevent.
Attheendofthebatterylife,thebatteriesgraduallylose
electriccapacity.
UsingtheBatterySystem
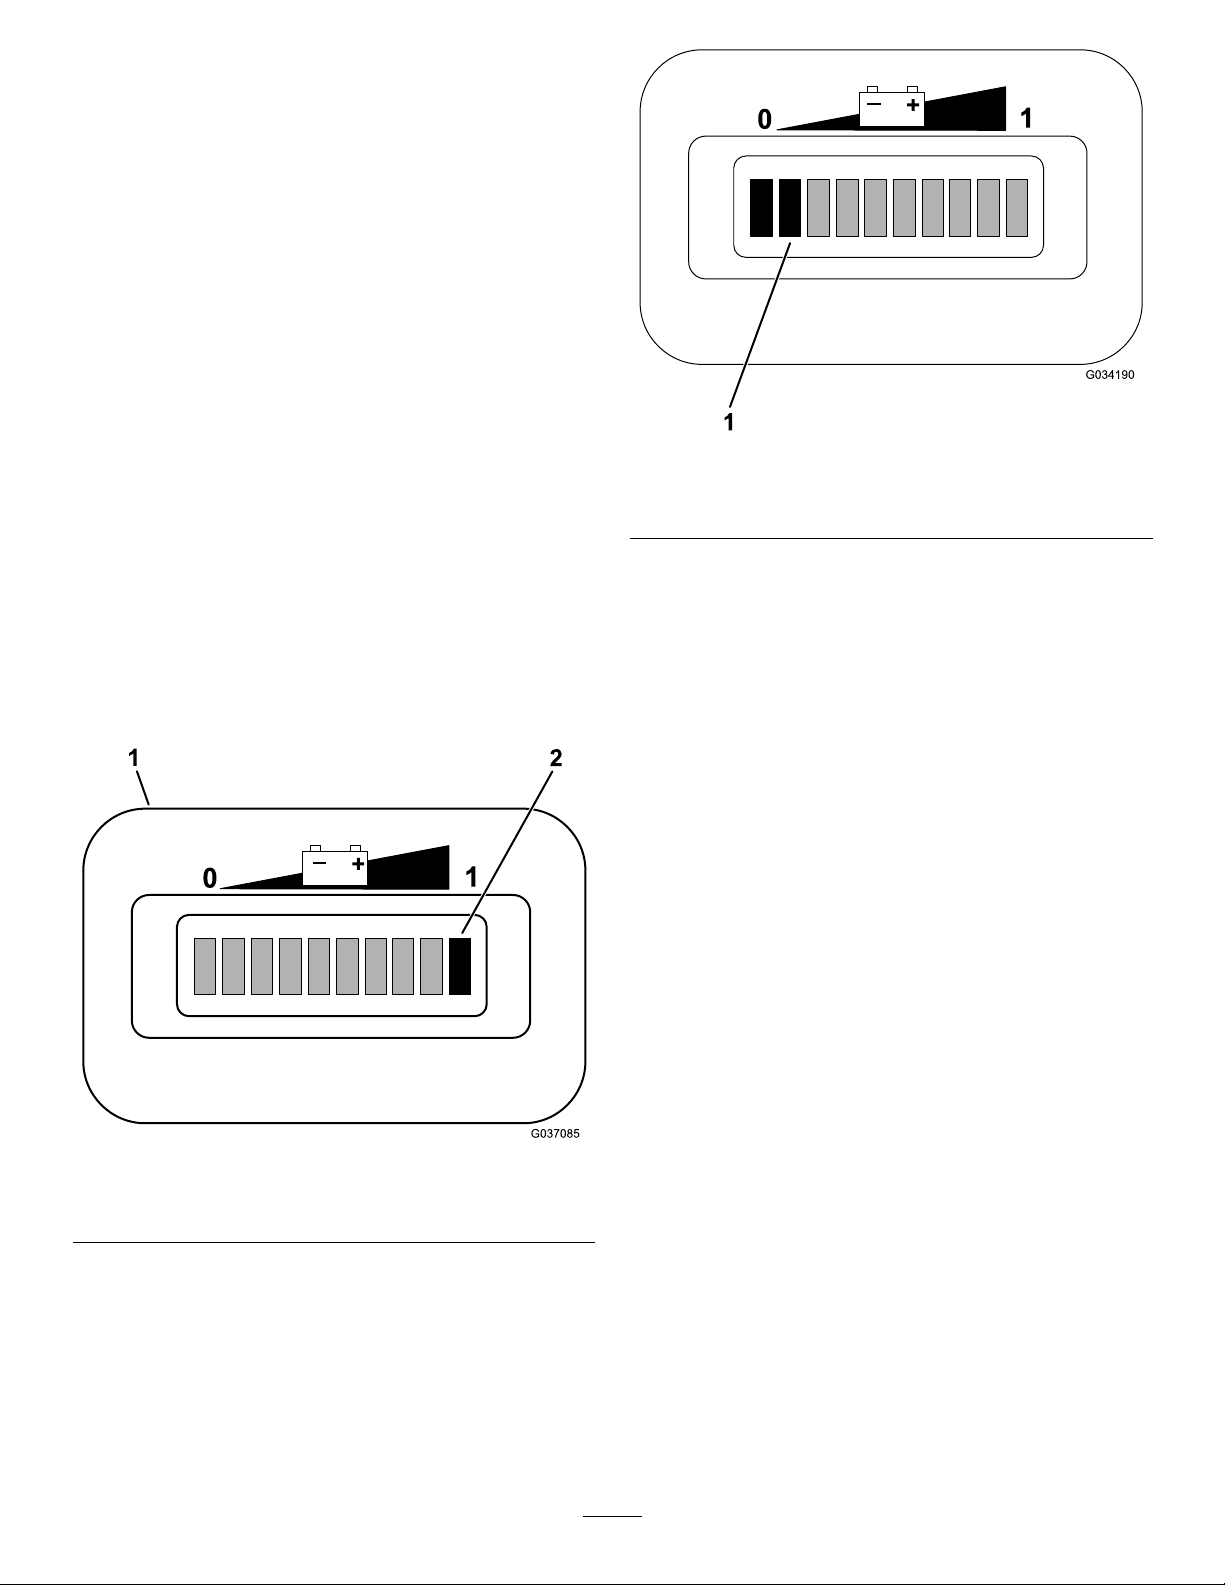
Whenyourbatteriesarefullycharged,thetenthbar(farright)
illuminatesonthebattery-dischargeindicator(Figure18).
Figure19
1.The2leftbarscontinuouslyblinkuntilyouchargethe
battery.
Ifyoucontinuetousethemachinewithonly2barsremaining,
bars1and2alternatelyash.
Important:Whenonly2barsremainonthe
battery-dischargeindicator,themachinemayenter
areduced-speedmode;thismodeaidsinprotecting
thebatteries,butprolongedoperationinthismode
candamagethebatteriesand/orthemachine.Avoid
drainingyourbatteriesdownto2barsremainingto
preventthisissue.Chargethebatteriesimmediately.
Ifthebatteriesbecomefullydischarged,themachine
shutsdown.
Do not allo w the batteries to become full y
discharged.
Important:Toobtainmaximumbatterylife,always
chargethebatterieswhenthereare2ormorebarsvisible
onthescreen.Regularlydepletingthebatteriestolower
than2barsreducesthelifeofthebatteries.
Figure18
1.Battery-discharge
indicator
2.Charge-indicatorbars
Asyouusethemachine,thebarsdisappearastheelectrical
capacityofthebatteriesisused.
Whenonly2barsremainonthebattery-dischargeindicator;
thisisagoodtimetocharge.The2remainingredbarsonthe
leftcontinuouslyblinkuntilyouchargethebatteries(Figure
19).Thisindicatesthatthebatterycapacityisnearlydrained
andyoushouldchargethebatteriesassoonaspossibleto
preventbatterydamage.
22
Page 23

StoppingtheMachine
LoadingtheCargoBox
Important:Whenstoppingthemachineonanincline,
usetheservicebrakestostopthemachineandengage
theparkingbraketoholdthemachineinplace.Using
theacceleratortostallthemachineonthehillcan
overheatthemotorordrainthebatteries.
1.Removeyourfootfromtheacceleratorpedal.
2.Slowlypressthebrakepedaltoapplytheservicebrakes
untilthemachinecomestoacompletestop.
Note:Thestoppingdistancemayvarydependingon
themachineloadandspeed.
ParkingtheMachine
1.Stopthemachineusingtheservicebrakesbypressing
andholdingthebrakepedal.
2.Engagetheparkingbrakebypullingtheparking-brake
levertowardyou.
3.RotatethekeycounterclockwisetotheOFFposition.
4.Removethekey.
BreakinginaNewMachine
Usethefollowingguidelineswhenloadingthecargoboxand
operatingthemachine:
•Observetheweightcapacityofthemachineandlimit
theweightoftheloadthatyoucarryinthecargoboxas
describedinSpecications(page17)andonthegross
vehicleweighttagofthemachine.
Note:Theloadratingisspeciedformachineoperation
onalevelsurfaceonly.
•Reducetheweightoftheloadthatyoucarryinthecargo
boxwhenoperatingthemachineonhillsandrough
terrain.
•Reducetheweightoftheloadthatyoucarrywhenthe
materialsaretall(andhaveahighcenterofgravity),such
asastackofbricks,landscapingtimbers,orfertilizerbags.
Distributetheloadaslowaspossible,makingsurethat
theloaddoesnotreduceyourabilitytoseebehindthe
machinewhenoperatingit.
•Keeploadscenteredbyloadingthecargoboxasfollows:
–Evenlypositiontheweightinthecargoboxfrom
sidetoside.
Important:Tippingoverismorelikelytooccur
ifthecargoboxisloadedto1side.
ServiceInterval:Aftertherst100hours—Performthe
breakinginanewmachineguidelines.
Performthebreakinginanewmachineguidelinestoprovide
properperformanceandlonglifeforthemachine.
•Checkthebrakeuid,transaxleuid,andthewaterlevel
inthebatteriesregularly.
•Avoidhardbrakingsituationsfortherstseveralhoursof
newmachinebreak-inoperation.Newbrakeliningsmay
notbeatoptimumperformanceuntilseveralhoursofuse
hascausedthebrakestobecomeburnished(broken-in).
•RefertoMaintenance(page26)foranyspeciallowhour
checks.
•Checkthefrontsuspensionpositioningandadjustitif
necessary.
–Evenlypositiontheweightinthecargoboxfrom
fronttoback.
Important:Lossofsteeringcontrolorthe
machinemaytipoverifyoupositiontheload
behindtherearaxleandthetractiononthefront
tiresisreduced.
•Useextracautionwhentransportingoversizedloadsin
thecargobox,particularlywhenyoucannotcenterthe
wightoftheoversizeloadtothecargobox.
•Wheneverpossible,securetheloadbybindingittothe
cargoboxsoitdoesnotshift.
•Whentransportingliquidinalargetank(suchasasprayer
tank),usecautionwhendrivingthemachineuphillor
downhill,whensuddenlychangingspeedorstopping,or
whendrivingovertoughsurfaces.
Thecapacityofthecargoboxis0.28m
(volume)ofmaterialthatyoucanplaceintheboxwithout
exceedingtheloadratingsofthemachinecanvarygreatly
dependingonthedensityofthematerial.
3
(10ft3).Theamount
23
Page 24

Seethefollowingtableforloadvolumelimitswithvarious
materials:
MaterialDensity
Gravel,dry1522kg/m
Gravel,wet1922kg/m
Sand,dry1442kg/m
Sand,wet1922kg/m
Wood
Bark
Earth,packed
721kg/m
3
(95
3
lb/ft
)
3
(120
3
lb/ft
)
3
(90
3
lb/ft
)
3
(120
3
lb/ft
)
3
(45lb/ft
<721kg/m
1602kg/m
3
(<45
3
lb/ft
)
3
(100
3
lb/ft
)
MaximumCargo
BoxCapacity
(onlevelground)
Full
3/4Full
Full
3/4full
3
)
Full
Full
3/4Full
(approximately)
TransportingtheMachine
Useatrailerwithfull-widthrampstomovethemachinea
longdistance.Makesurethatthemachineissecurelybound
tothetrailer.RefertoFigure20andFigure21forthelocation
ofthetie-downpointsonthemachine.
CAUTION
Looseseatsmayfalloffthemachineandtrailer
whentransportingthemachine,andtheseatsmay
landonanothermachineorobstructtheroadway.
Removetheseatsormakesurethattheseatsare
securelyfastenedtothecouplingintheseatshroud.
Figure21
1.Reartie-downpoints
TowingtheMachine
Incaseofanemergency ,themachinecanbetowedfora
shortdistance.However,wedonotrecommendthisasa
standardoperatingprocedure.
WARNING
Towingatexcessivespeedscouldcausealossof
steeringcontrol,resultinginpersonalinjury.
Nevertowthemachinefasterthan8km/h(5mph).
Towingthemachineisa2-personjob.Ifthemachinemust
bemovedaconsiderabledistance,transportitonatruckor
trailer;refertoTransportingtheMachine(page24).
1.Turnoffthemachineandremovethekeyfromthe
keyswitch.
Figure20
1.Towingtongueandtie-downpoint(frontofthemachine)
Important:Ifyoutowthemachinewiththekey
intheONposition,theelectricalsystemmaybe
damaged.
2.Afxatowlinetothetongueatthefrontofthe
machine’sframe(Figure20).
3.Disengagetheparkingbrake.
24
Page 25

TowingaTrailer
Themachineiscapableofpullingtrailers.
Whenhaulingcargoortowingatrailer,donotoverloadyour
machineortrailer.Overloadingeitherthemachineorthe
trailercancausepoorperformanceordamagetothebrakes,
axle,motor,transaxle,steering,suspension,bodystructure,or
tires.Alwaysloadatrailerwith60%ofthecargoweightin
thefrontofthetrailer.Thisplacesapproximately10%ofthe
grosstrailerweight(GTW)onthetowhitchofthemachine.
Themaximumcargoloadshallnotexceed454kg(1,000lb),
includingtheGTW .Forexample,iftheGTW=181.5kg
(400lb)thenthemaximumcargoload=544kg(1,200lb)
includingoperator(s).
Toprovideadequatebrakingandtraction,alwaysloadthe
cargoboxwhentrailering.DonotexceedtheGTWorGVW
limits.
Avoidparkingamachinewithatraileronahill.Ifyoumust
parkonahill,engagetheparkingbrakeandblockthetires
ofthetrailer.
25
Page 26

Maintenance
Note:Downloadacopyoftheelectricalschematicbyvisitingwww .T oro.comandsearchingforyourmachinefromthe
Manualslink.
Note:Determinetheleftandrightsidesofthemachinefromthenormaloperatingposition.
RecommendedMaintenanceSchedule(s)
MaintenanceService
Interval
Aftertherst100hours
Beforeeachuseordaily
Every25hours
Every100hours
Every300hours
Every400hours
Every800hours
MaintenanceProcedure
•Performthebreakinginanewmachineguidelines.
•Performthepre-startingchecks.Checkthefollowingitemseachtimeyoubegin
usingthemachinefortheday:
•Checkthetirepressure.
•Chargethebatteries.
•Checkthewaterlevelofthebatteries.
•Checkthebrake-uidlevel.
•Cleanthebatteries.
•Checkthewaterlevelofthebatteriesandadddistilledordeionizedwatertothe
batteries(ifnecessary).
•Greasethebearingsandbushings.
•Checktheconditionofthetiresandrims.
•T orquethewheel-lugnuts.
•Checkthefrontwheeltoe-in.
•Checkthetransaxle-uidlevel.
•Inspectthebrakes.
•Greasethefrontwheelbearings.
•Replacetheserviceandparking-brakepads.
•Changethetransaxleuid.
Every1,000hours
•Changethebrakeuid.
26
Page 27

DailyMaintenanceChecklist
Duplicatethispageforroutineuse.
Fortheweekof: MaintenanceCheckItem
MondayTuesdayWednesdayThursdayFriday
Checkbrakeandparking
brakeoperation.
Checkgearshift/neutral
operation.
Checkthewaterlevelof
thebatteries.
Checktransaxle-uid
level.
Checkbrake-uidlevel.
Checkunusualoperating
noises.
Checktirepressure.
Checkuidleaks.
Checkinstrument
operation.
Checkaccelerator
operation.
Lubricateallgrease
ttings.
Touchupdamagedpaint.
SaturdaySunday
WARNING
Araisedcargoboxcanfallandinjurepersonsthatareunderneathit.
Youmustraisethecargoboxtoperformsomeroutinemaintenance.
•Alwaysusetheproprodtoholdthecargoboxupbeforeworkingunderit.
•Removeanyloadmaterialfromthecargoboxbeforeworkingunderit.
CAUTION
Ifyouleavethekeyinthekeyswitch,someonecouldaccidentlystartthemachineandseriouslyinjure
youorotherbystanders.
Removethekeyfromthekeyswitchanddisconnectabatterycablebeforeyoudoanymaintenance.
Premaintenance
Procedures
MaintainingtheMachineunder SpecialOperatingConditions
Ifthemachineissubjectedtoanyoftheconditionslisted
below,maintenanceshouldbeperformedtwiceasfrequently.
•Desertoperation
•Coldclimateoperation—below10°C(50°F)
•Trailertowing
•Frequentoperationindustyconditions
•Constructionwork
•Afterextendedoperationinmud,sand,water,orsimilar
dirtyconditions,haveyourbrakesinspectedandcleaned
assoonaspossible.Thispreventsanyabrasivematerial
fromcausingexcessivewear.
27
Page 28
PreparingtoMaintainthe Machine
1.Parkthemachineonalevelsurface.
2.Engagetheparkingbrake,rotatethekeyswitchtothe
OFFposition,andremovethekey.
LiftingtheMachine
Figure23
DANGER
Themachinemaybeunstablewhenusingajack.It
couldslipoffthejack,injuringanyonebeneathit.
•Donotstartthemachinewhilethemachineis
onajack.
•Alwaysremovethekeyfromthekeyswitch
beforegettingoffthemachine.
•Blockthetireswhenthemachineissupported
byliftingequipment.
•Usejackstandstosupportthemachineonce
youhaveliftedtheit.
Important:Wheneverthemachineisranforroutine
maintenanceand/ordiagnostics,therearwheelsofthe
machineshouldbe25mm(1inch)offtheground,with
therearaxlesupportedonjackstands.
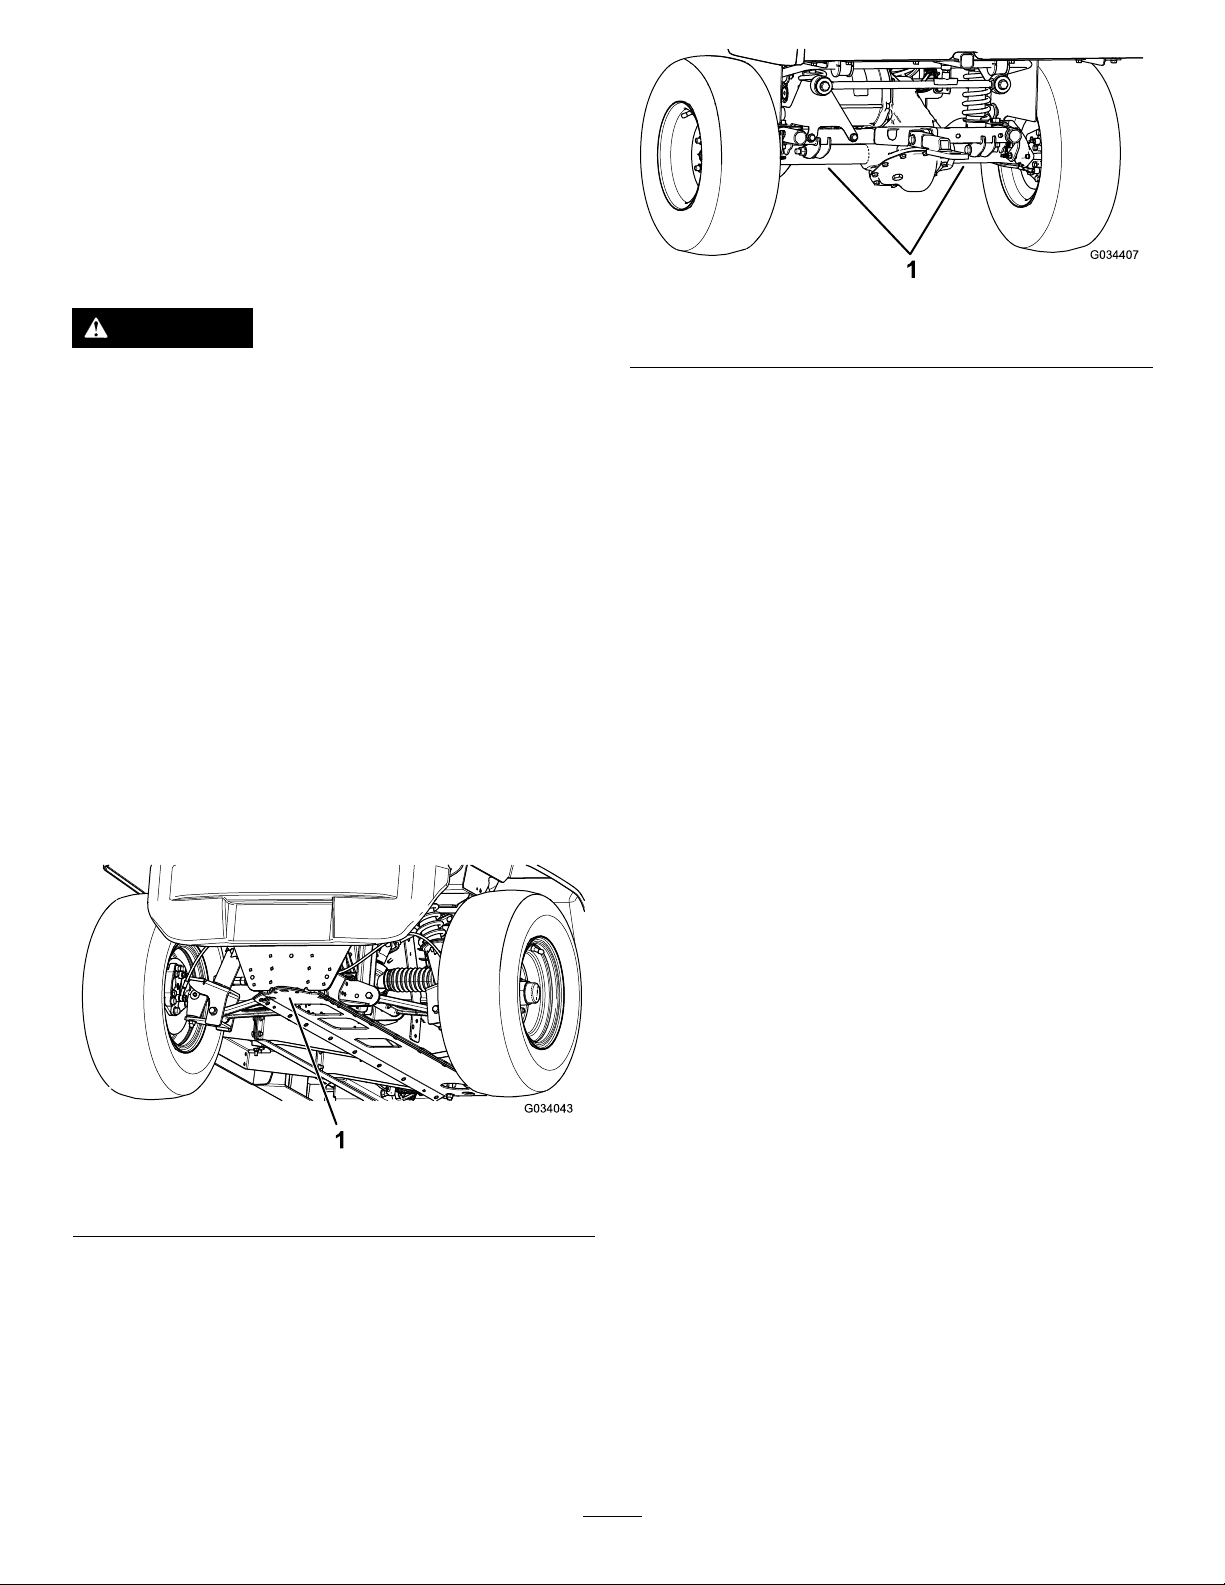
•Theliftingpointatthefrontofthemachineisatthefront
oftheframebehindthetowingtongue(Figure22).
1.Rearliftingpoints
Figure22
1.Frontliftingpoint
•Theliftingpointattherearofthemachineisunderthe
axletubes(Figure23).
28
Page 29
AccessingtheHood
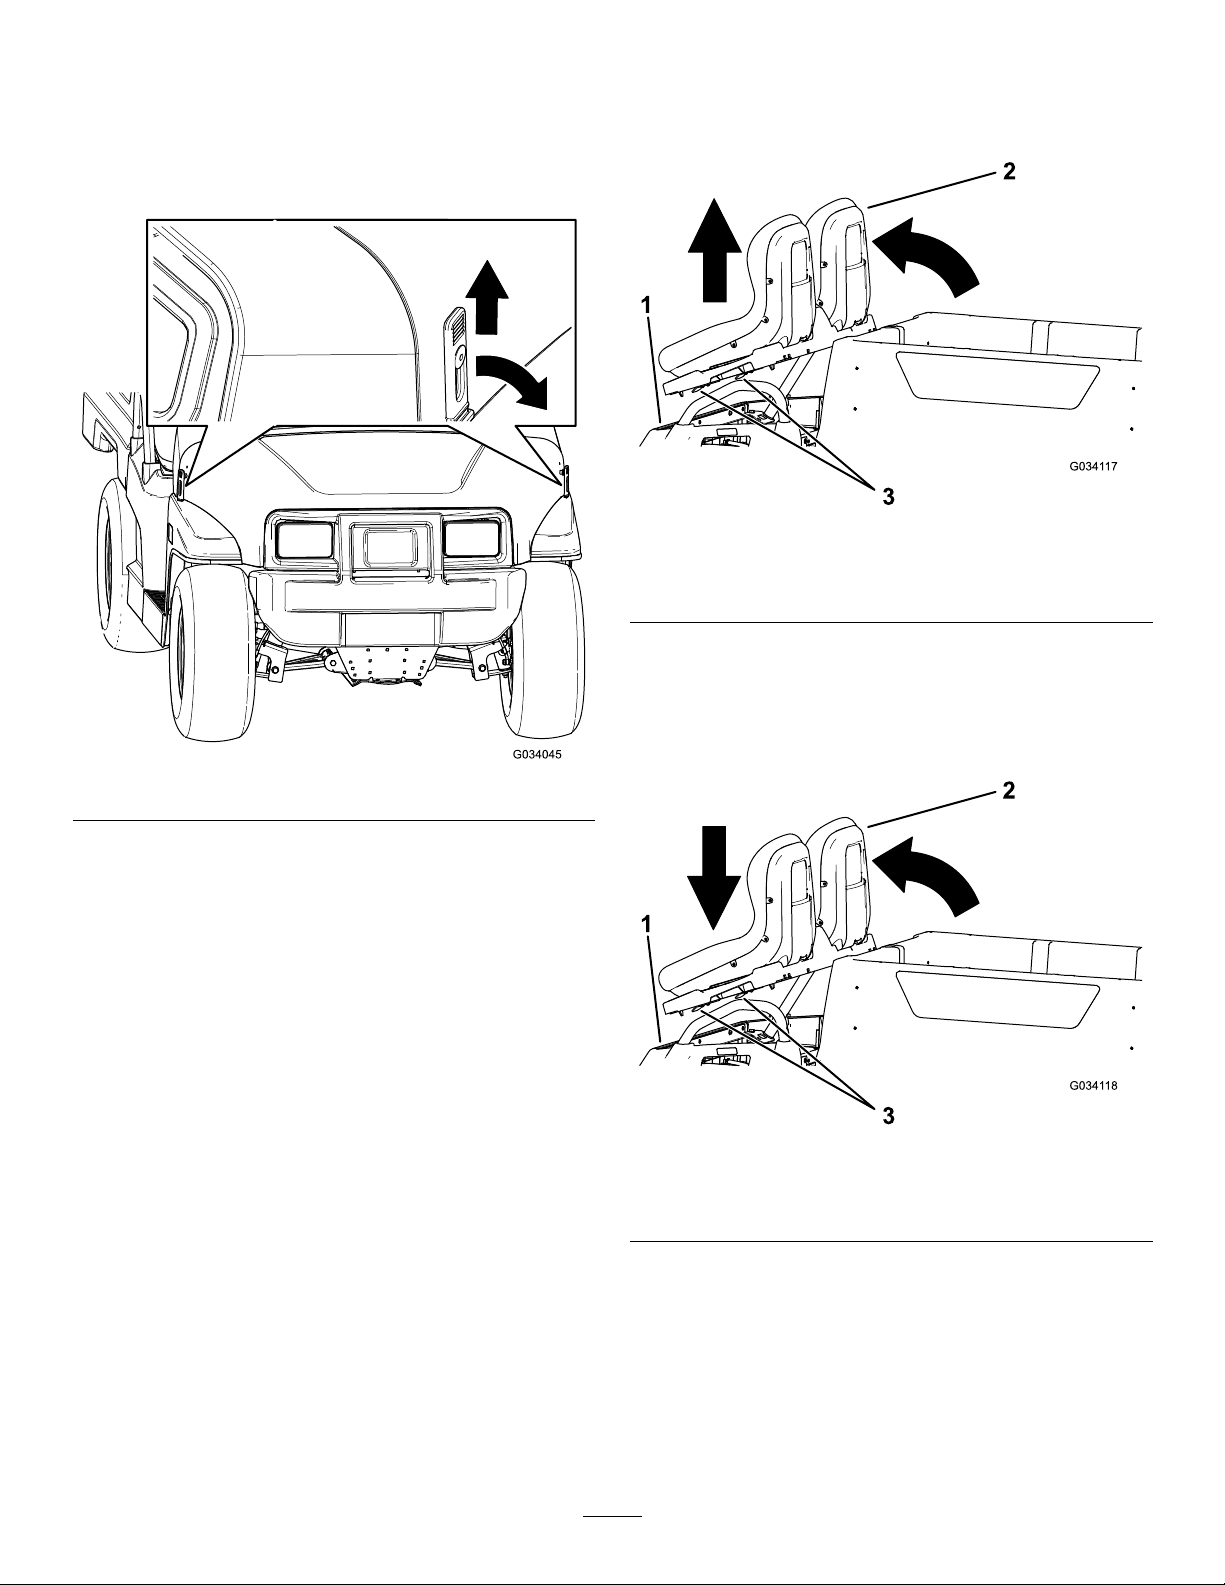
Raisingthehood
1.Liftupthehandleoftherubberlatchesateachside
ofthehood(Figure24).
RemovingtheSeatAssembly
Pushtheseatassemblyforwardandlifttheassemblyupward
untiltheretainerbracketscleartheseat-basepanel(Figure25).
Figure25
Figure24
2.Raisethehood.
ClosingtheHood
1.Gentlylowerthehoodontothechassis.
2.Securethehoodbyaligningtherubberlatchesontothe
latchanchorsateachsideofthehood(Figure24).
1.Seat-basepanel
2.Seatassembly
3.Retainerbrackets
InstallingtheSeatAssembly
Lowertheseatassemblyandensurethattheretainerbrackets
latchintotheseat-basepanel(Figure26).
29
1.Seat-basepanel
2.Seatassembly
Figure26
3.Retainerbrackets
Page 30
Lubrication
GreasingtheFrontWheel Bearings
GreasingtheMachine
ServiceInterval:Every100hours/Yearly(whichevercomes
rst)—Greasethebearingsandbushings.
Greasethemachinemorefrequently
whenusingitforheavy-dutyoperations.
GreaseType:No.2lithiumgrease
1.Usearagtowipethegreasettingcleansothatforeign
mattercannotbeforcedintothebearingorbushing.
2.Withagreasegun,apply1or2pumpsofgreaseinto
thegreasettingsonthemachine.
3.Wipetheexcessgreaseoffthemachine.
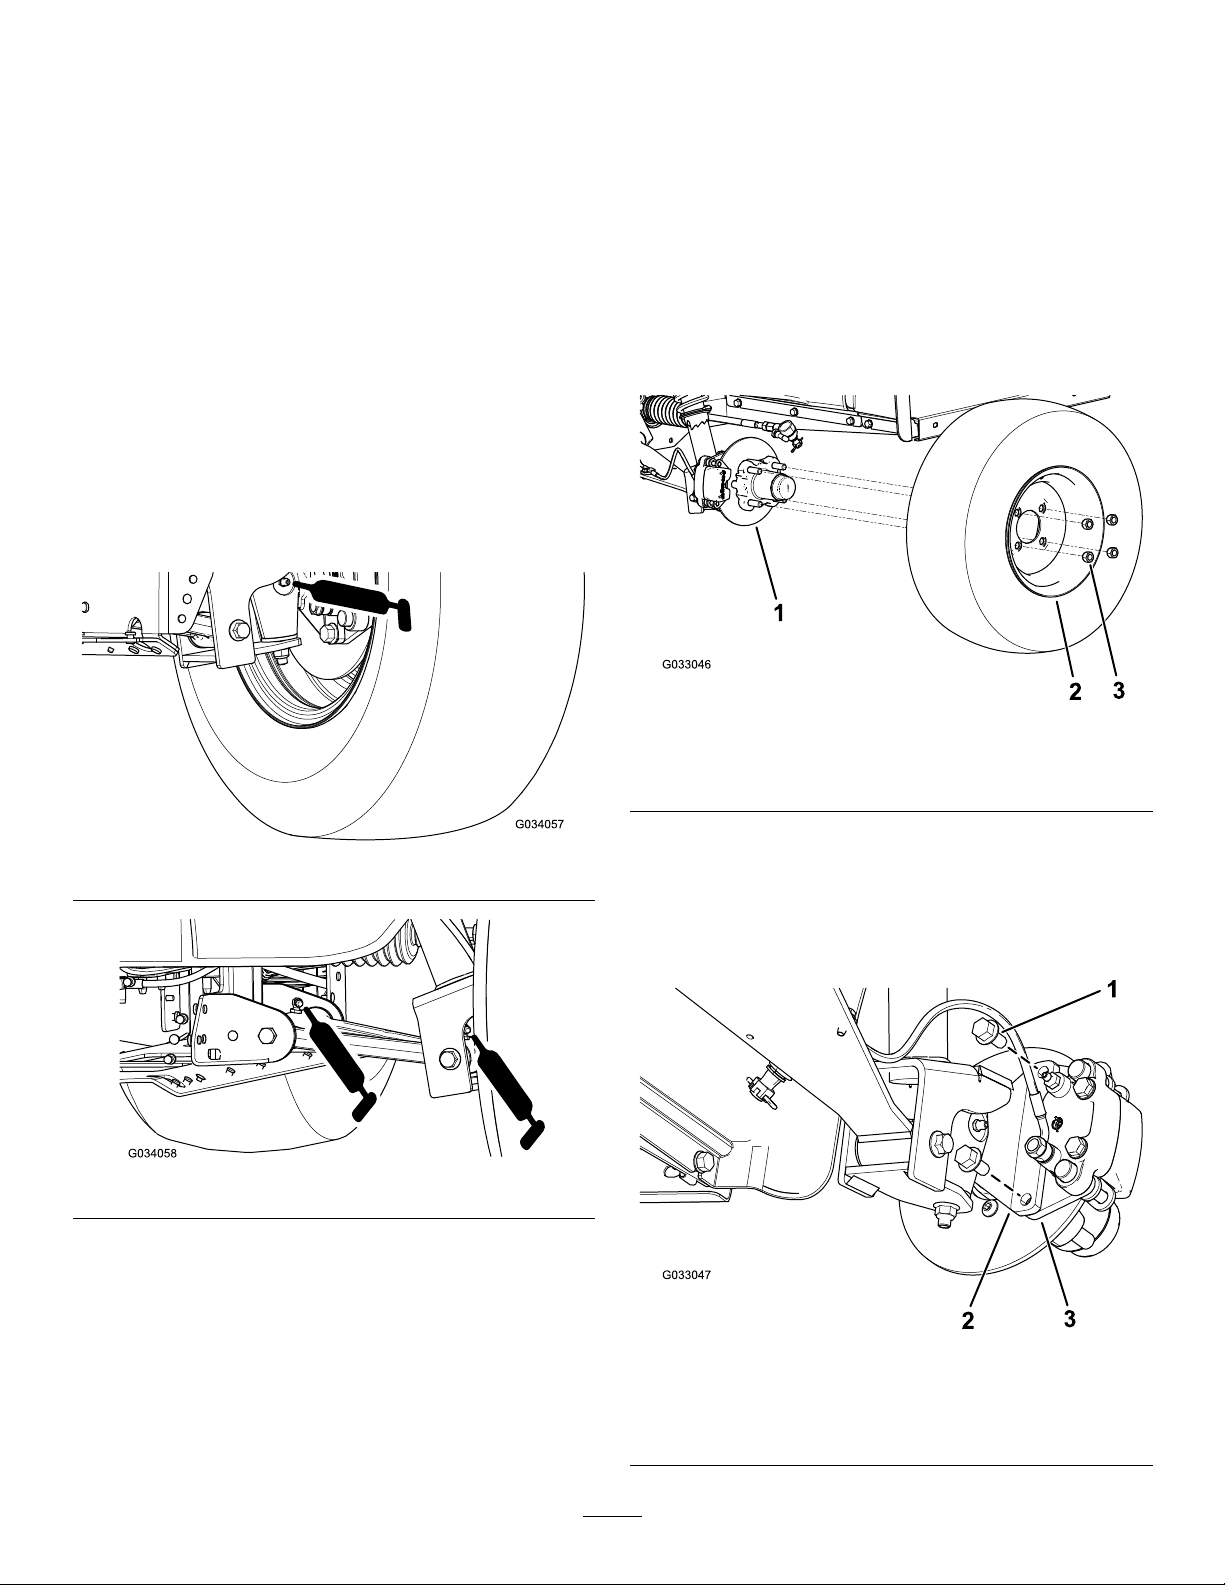
Thegreasettingsarelocatedattheinnerendofthecontrol
arms,thetie-rodballjoint,andtheouterendofthecontrol
arms(Figure27andFigure28).
ServiceInterval:Every300hours
Greasespecication:MobilgreaseXHP™-222
RemovingtheHubandRotor
1.Liftthefrontofthemachineandsupportitwithjack
stands.
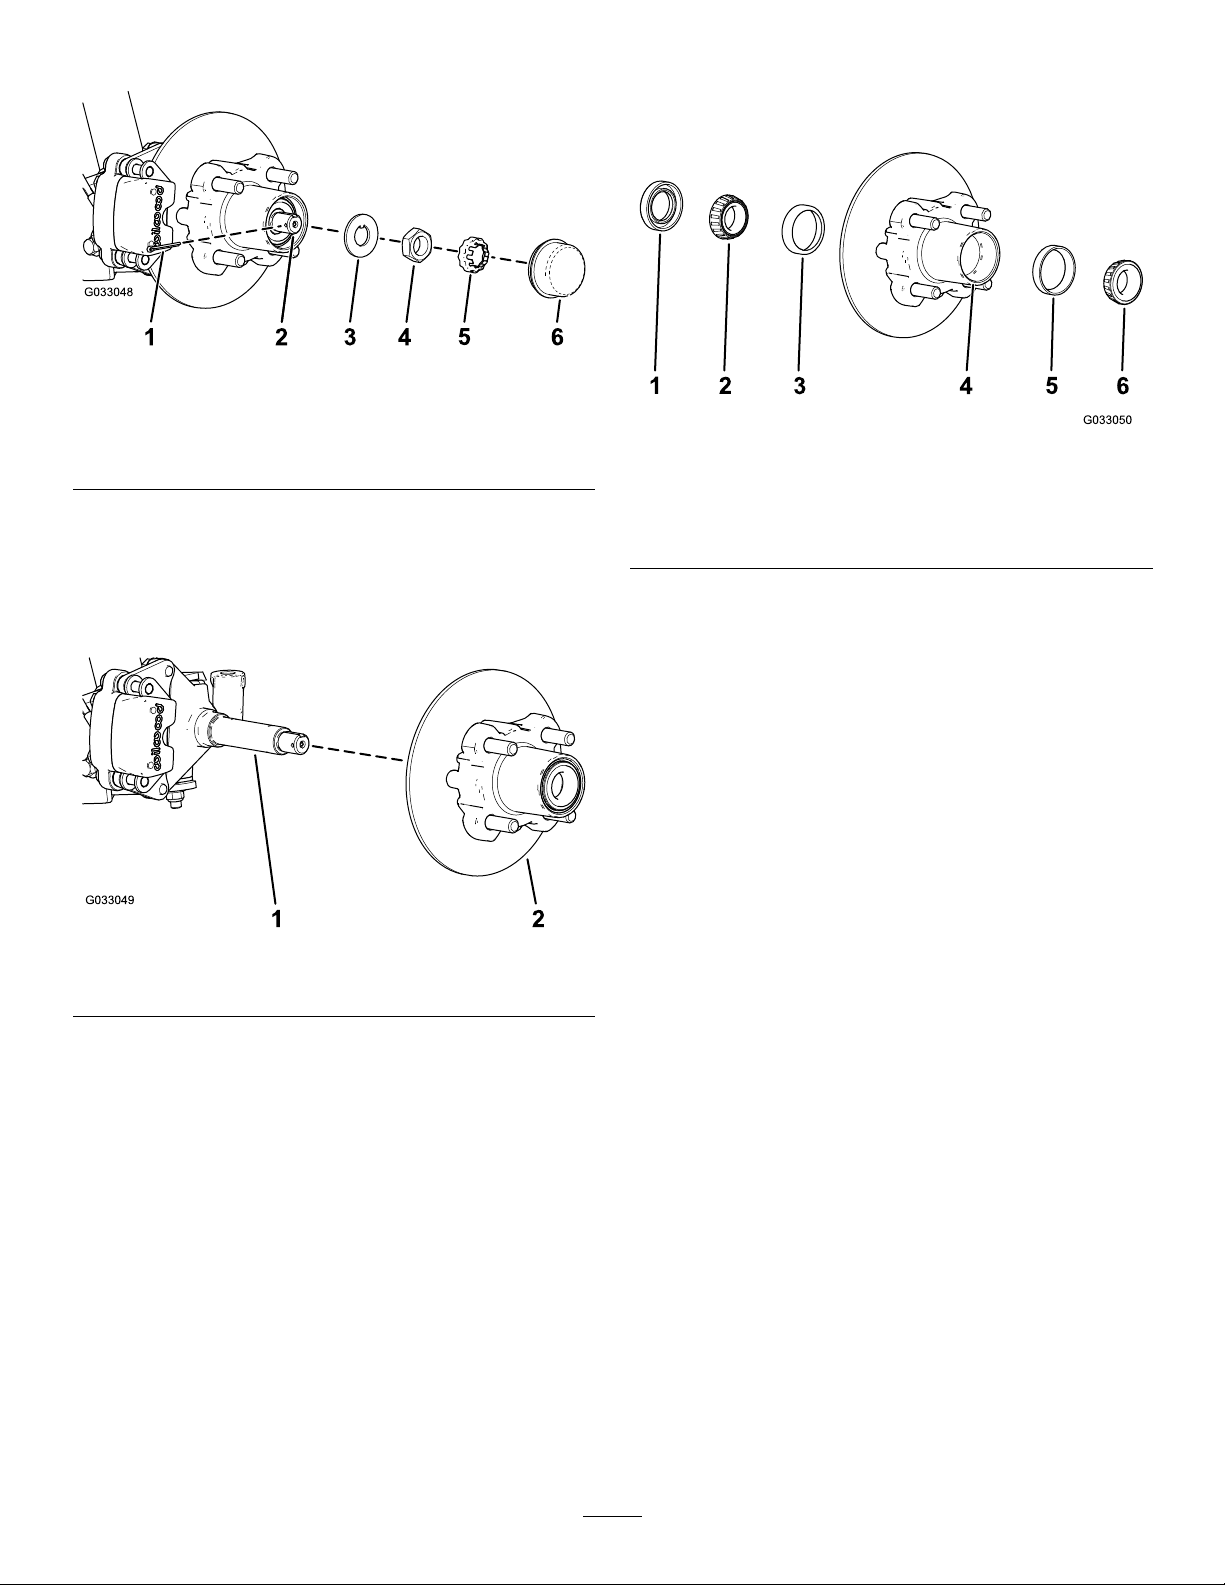
2.Removethe4lugnutsthatsecurethewheeltothehub
(Figure29).
Figure29
Figure27
Figure28
1.Hub3.Lugnut
2.Wheel
3.Removetheange-headbolts(3/8x3/4inch)that
securethebracketforthebrakeassemblytothespindle
andseparatethebrakefromthespindle(Figure30).
Note:Supportthebrakeassemblybeforeproceeding
tothenextstep.
1.Flange-headbolts(3/8x
3/4inch)
2.Spindle
30
Figure30
3.Caliperbracket(brake
assembly)
Page 31
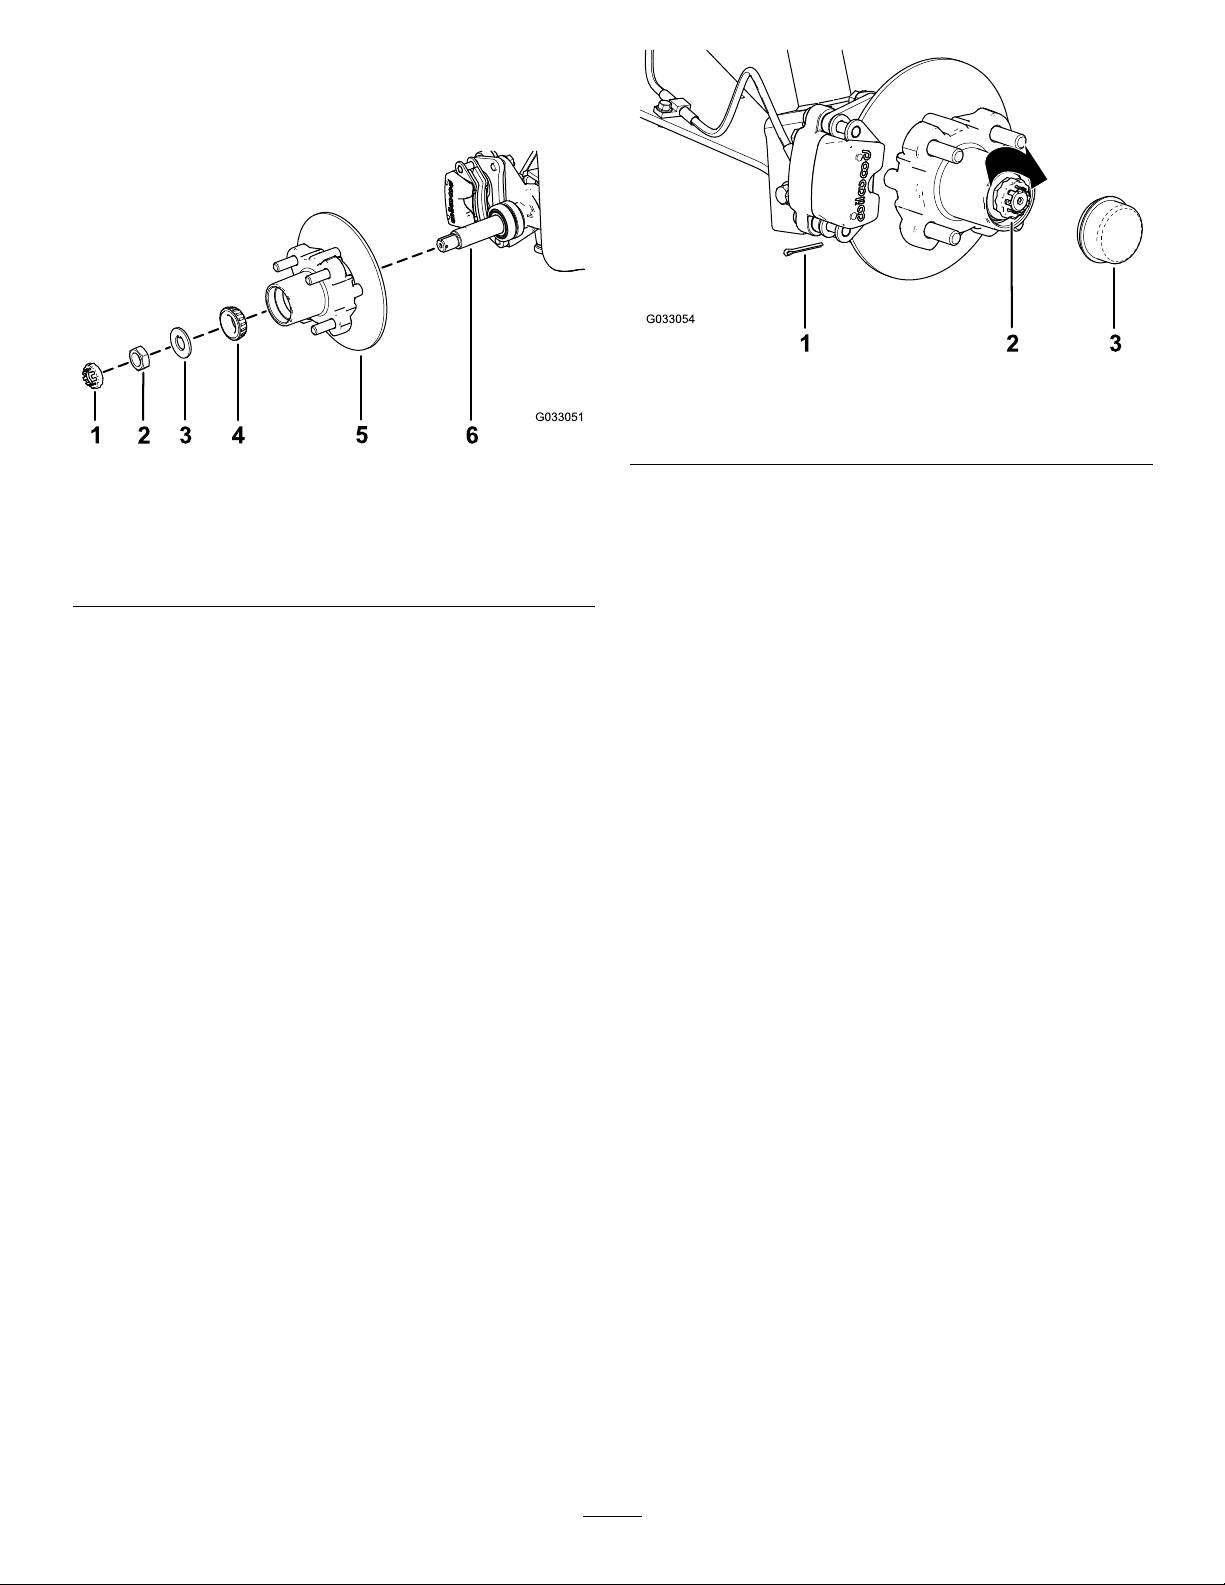
4.Removethedustcapfromthehub(Figure31).
Figure31
1.Cotterpin4.Spindlenut
2.Spindle
3.Tabwasher6.Dustcap
5.Nutretainer
5.Removethecotterpinandnutretainerfromthe
spindleandspindlenut(Figure31).
GreasingtheWheelBearings
1.Removetheoutboardbearingandbearingracefrom
thehub(Figure33).
Figure33
1.Seal4.Bearingcavity(hub)
2.Inboardbearing
3.Inboard-bearingrace
5.Outboard-bearingrace
6.Outboardbearing
6.Removethespindlenutfromthespindle,andseparate
thehubandrotorassemblyfromthespindle(Figure
31andFigure32).
Figure32
1.Spindle
2.Hubandrotorassembly
7.Wipecleanthespindlewitharag.
8.Repeatsteps1through7tothehubandrotoratthe
othersideofthemachine.
2.Removetheseal,inboardbearingfromthehub(Figure
33).
3.Wipecleanthesealandcheckforwearanddamage.
Note:Donotusecleaningsolventtocleantheseal.
Replacethesealifitiswornordamaged.
4.Cleanthebearingsandraces,andcheckthesepartsfor
wearanddamage.
Note:Replaceallwornordamagedparts.Ensurethat
thebearingsandracesarecleananddry.
5.Cleanthecavityofthehubofallgrease,dirt,anddebris
(Figure33).
6.Packthebearingswiththespeciedgrease.
7.Fillthecavityofhub50to80%fullofthespecied
grease(Figure33).
8.Assembletheinboardbearingontotheraceatthe
inboardsideofthehubandinstalltheseal(Figure33).
9.Repeatsteps1through8tothebearingsfortheother
hub.
31
Page 32
InstallingtheHubandRotor
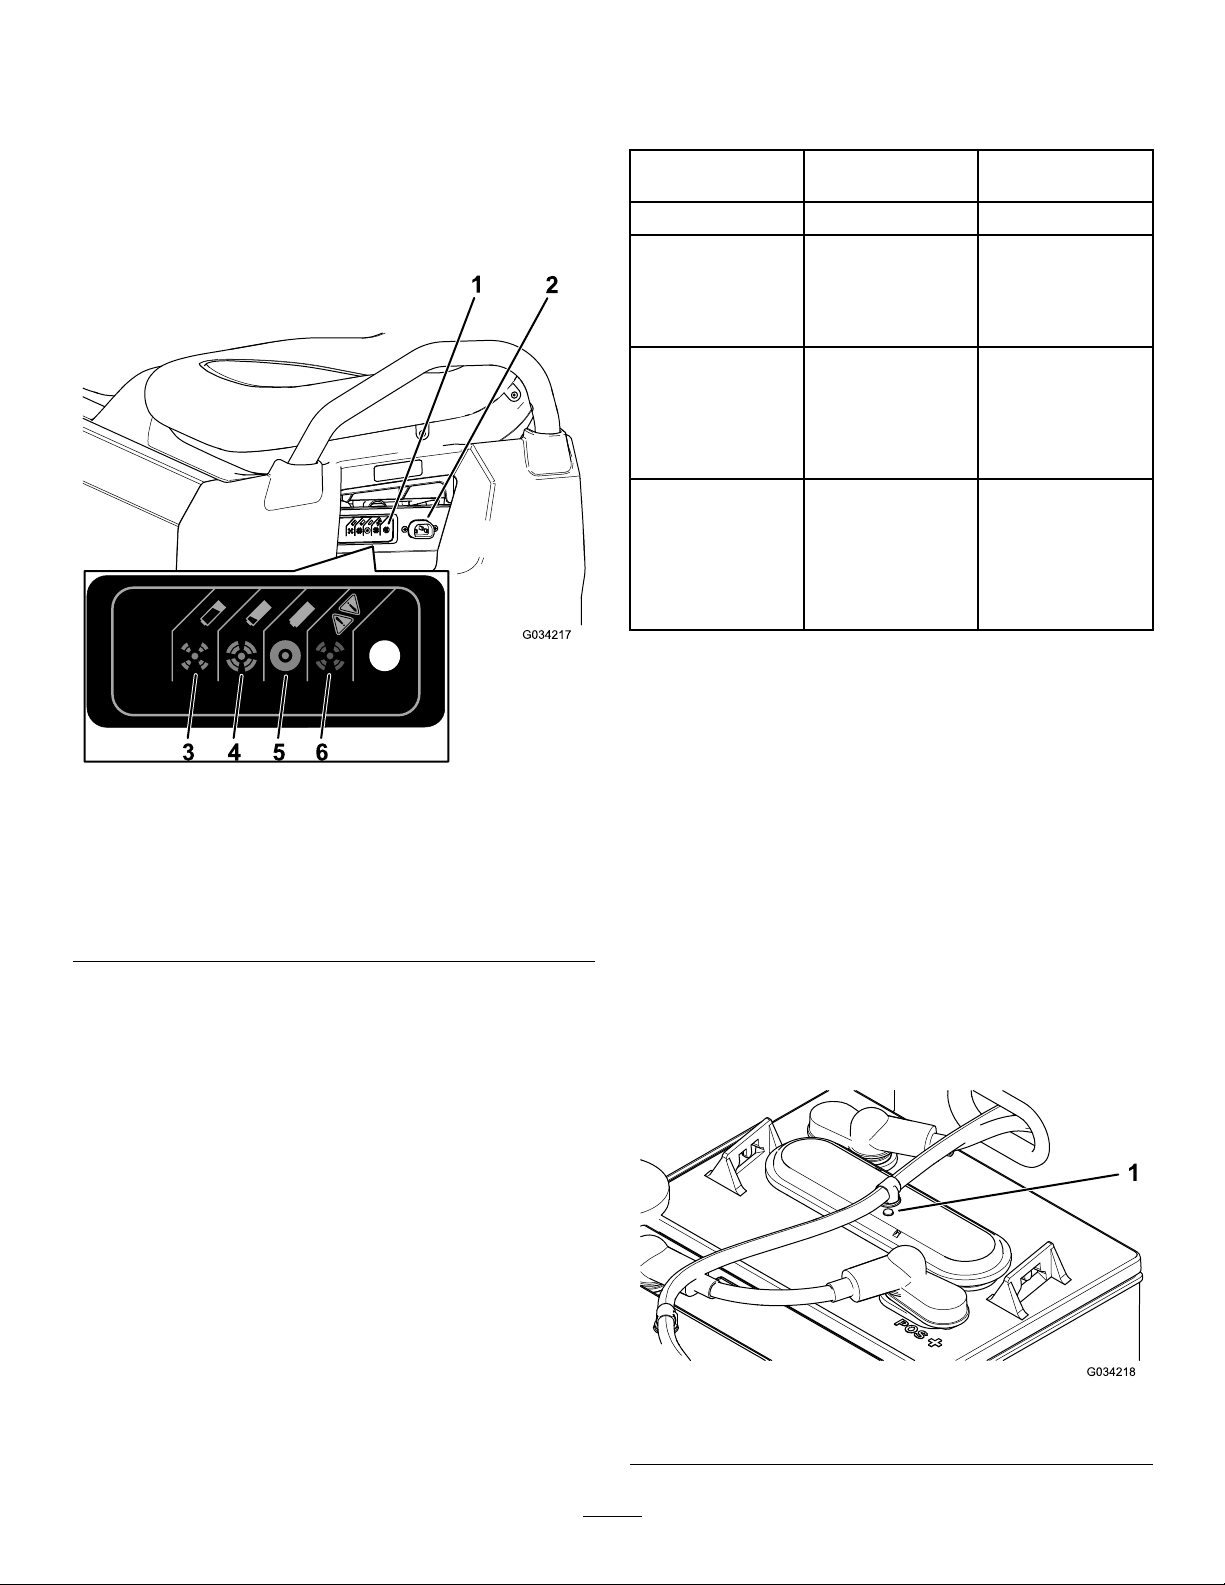
1.Applyalightcoatofthespeciedgreasetothespindle
(Figure34).
Figure35
Figure34
1.Nutretainer
2.Spindlenut
3.Tabwasher
4.Outerbearing
5.Hub,rotor,innerbearing,
race,andseal
6.Spindle
2.Assemblethehubandrotorontothespindlewiththe
rotorinboard(Figure34).
3.Assembletheoutboardbearingontothespindleand
seatthebearingtotheoutboardrace(Figure34).
4.Assemblethetabwasherontothespindle(Figure34).
5.Threadthespindlenutontothespindleandtightenthe
nutwhilerotatingthehub(Figure34).
Note:Tightenthenutandrotatethespindleuntilthe
bearingsarefullyseatedandthehubhasnolinear-end
movement.
6.Loosenthespindlenutuntilthehubrotatesfreely.
7.Torquethespindlenutto170N∙cm(15in-lb)while
rotatingthehub.
8.Installtheretaineroverthenutandcheckthealignment
oftheslotintheretainerandtheholeinthespindlefor
thecotterpin(Figure35).
Note:Iftheslotintheretainerandtheholeinthe
spindlearenotaligned,tightenthespindlenuttoalign
theslotandholetoamaximumtorqueof226N∙cm
(20in-lb)onthenut.
1.Cotterpin
2.Nutretainer
3.Dustcap
9.Installthecotterpinandbendeachlegsaroundthe
retainer(Figure35).
10.Installthedustcapontothehub(Figure35).
11.Repeatsteps1through10forthehubandrotoratthe
othersideofthemachine.
InstallingtheBrakesandWheels
1.Cleanthe2ange-headbolts(3/8x3/4inch)and
applyacoatforanti-seizecompoundtothethreads
ofthebolts.
2.Alignthebrakepadstoeithersideoftherotor(Figure
30)andtheholesinthecaliperbracketwiththeholes
inthebrakemountofthespindleframe(Figure34).
3.Assemblecaliperbrackettothespindleframe(Figure
30)withthe2ange-headbolts(3/8x3/4inch),and
torquethebolts47to54N∙cm(35to40ft-lb).
4.Aligntheholesinthewheeltothestudsofthehub
andassemblethewheeltothehubwiththevalvestem
outward(Figure29).
Note:Ensurethatthemountingsurfaceofthewheel
isushwiththehub.
5.Securethewheeltothehubwiththelugnuts(Figure
29),andtorquethenutsto108to122N∙m(80to90
ft-lb).
6.Repeatsteps1through5forthebrakeandwheelatthe
othersideofthemachine.
32
Page 33

ElectricalSystem
Maintenance
MaintainingtheBatteries
Removetheseatassemblyandraisethecargoboxbefore
maintainingthebatteries;refertoRemovingtheSeat
Assembly(page29)andRaisingtheCargoBoxtotheService
Position(page19).
WARNING
CALIFORNIA
Proposition65Warning
Batteryposts,terminals,andrelated
accessoriescontainleadandleadcompounds,
chemicalsknowntotheStateofCalifornia
tocausecancerandreproductiveharm.
Washhandsafterhandling.
WARNING
Batteryterminalsormetaltoolscouldshortagainst
metalcomponentscausingsparks.Sparkscan
causethebatterygasestoexplode,resultingin
personalinjury.
•Whenremovingorinstallingthebattery,donot
allowthebatteryterminalstotouchanymetal
partsofthemachine.
•Donotallowmetaltoolstoshortbetween
thebatteryterminalsandmetalpartsofthe
machine.
•Usenon-conductivetoolswhenmaintainingthe
batteries.
CleaningtheBatteries
ServiceInterval:Every25hours
1.Ensurethatallofthebatterycapsaretight.
2.Useapapertoweltocleanthebatteries.
3.Ifthebatteryterminalsarecorroded,cleanthemwith
asolutionof4partswaterand1partbakingsoda.
Also,cleanthepostsandcableclampswithapostand
clampcleaner.
Note:Thepostsandclampsshouldhaveabright,
metallicshine.
4.ApplyalightcoatingofTorobattery-terminal
protector.
ChargingtheBatteries
ServiceInterval:Beforeeachuseordaily
Thechargerforthismachineislocatedinsidethemachine
undertheoperator’sseat.Formaximumbatterylife,charge
thebatterieswheneveryouarenotusingthemachine.
Dependingonhowdischargedthebatteriesareandthe
ambienttemperatureofthebatteries,itmaytakeupto16
hourstochargethebatteriestofullcapacity.
Note:Normalchargetimeisapproximately8to10hours.
Important:Lead-acidbatteriesdonotdevelopa
chargememoryanddonotneedtobefullydischarged
beforechargingthem.
may dama ge them.
machineisnotinuse.
Full y discharging the batteries
Chargethebatteriesanytimethe
WARNING
Chargingthebatteryproducesgasesthatcan
explode.
Neversmokenearthebatteriesandkeepsparks
andamesawayfromthem.
•Alwayskeepthebatteryretainersinplaceto
protectandsecurethebatteries.
DANGER
Donottouchanyelectricalcomponentsorcontacts
onthemotor.
Touchinganyofthesecomponentsorcontacts
couldseriouslyinjureyouorcausedeath.
1.Positionthemachineinawell-ventilatedareaneara
suitablepoweroutlet.
2.Checktheelectrolytelevelofthebatteries.
Note:Afterfullychargingthebatteries,llthe
batterieswithdistilledordeionizedwater;referto
AddingDistilledorDeionizedWatertotheBatteries
(page35).
Important:Fullychargethebatteriesbefore
addingthewatertothebatteries.Whilecharging,
theelectrolyteincreasesinvolume,andllinga
lowbatterybeforefullychargingthebatteriescan
causetheelectrolytetooverowandleakoutof
thevent.
3.Connecta16gauge(orlargerdiameter),2.5m(8.2
ft)orshorterchargercordtothechargingreceptacle
onthemachine(Figure36).
33
Page 34
Note:Ensurethatthecharger-voltagesettingmatches
thevoltageatthepoweroutletbeingused.
RefertothefollowingtableandFigure36forinformationon
themeaningsofthevaryingcolorsofthecharger-statuslight.
Note:Inhigh-ambienttemperatureenvironments,
removetheseatassemblyforoptimalchargingtime;
refertoRemovingtheSeatAssembly(page29).Ifthe
batterychargeristoohot,itmaynotchargeproperly.
Incoldtemperatures,itmaytakealongerforthe
batteriestocharge.
Charger-StatusLightTable
Charger-Status
LightColor
GreenSolidChargingcomplete
Green
AmberFlashingReduced-power
RedFlashing
Solid/Flashing
Flashing
CheckingtheWaterLevelofthe
Batteries
Meaning
Shortash—less
than80%charge
Long
ash—greaterthan
80%charge
mode—lowAC
voltageorhigh
internalcharger
temperature;
chargeimmediately
Charger
error—resetthe
chargerpower
Ifthiserrorpersists,
refertotheblink
codesinthe
chargermanual
Figure36
1.Charger-statuslight
2.Chargingreceptacle
3.Thebatteryisnearempty.
4.Thebatteryisalmost
charged.
5.Thebatteryischarged.
6.Chargerfault;refertothe
chargermanualforthe
faultcodes.
4.Plugthechargerpowercordintothepoweroutlet.
Note:Whilethebatteriesarecharging,thegreenlight
onthechargerblinksonandoff.Whenthebatteries
arefullycharged,thegreenlightstopsblinkingand
stayson.
5.Disconnectthecordfromthepoweroutlet.
6.Disconnectthechargerfromthemachine.
ServiceInterval:Beforeeachuseordaily
1.Parkthemachineonalevelsurface,shutoffthe
machine,removethekeyfromthekeyswitch,and
raisecargobox;RaisingtheCargoBoxtotheService
Position(page19).
2.Removetheseatassemblytoaccessthebatteries;refer
toRemovingtheSeatAssembly(page29).
3.Checktheeyeletsoneachofthebatteriestoseeifthey
areeitherblackorwhite(Figure37).
Note:Blackeyeletsindicatethatthebatteriesarefull
ofwater.Whiteeyeletsindicatethatwaterisneeded
forthebatteries.
Figure37
1.Batteryeyelet
34
Page 35
4.Iftheeyeletsarewhite,youmustadddistilledor
+
-
+
-
+ + +
-
-
-
+
-
+
-
+
-
+
-
G034412
deionizedwatertothebatteries;refertoAdding
DistilledorDeionizedWatertotheBatteries(page35).
AddingDistilledorDeionizedWaterto
theBatteries
ServiceInterval:Every25hours/Every2weeks(whichever
comesrst)
Important:Fullychargethebatteriesbeforeaddingthe
watertothebatteries.Whilecharging,theelectrolyte
increasesinvolume,andllingalowbatterybefore
fullychargingthebatteriescancausetheelectrolyteto
overowandleakoutofthevent.
Important:Useonlyclean,distilledordeionizedwater
tollthebatteries.Usingtapwatermaydamageand
reducethelifeofthebatteries.
1.Parkthemachineonalevelsurface,shutoffthe
machine,removethekeyfromthekeyswitch,and
raisecargobox;RaisingtheCargoBoxtotheService
Position(page19).
2.Chargethebatteriesuntilafullchargeisachieved;refer
toChargingtheBatteries(page33).
3.Removetheseatassemblytoaccessthebatteries;refer
toRemovingtheSeatAssembly(page29).
Important:Donotoverllthebattery.Electrolyte
willoverowontootherpartsofthemachineand
severecorrosionanddeteriorationmayresult.
Also,overllingthebatterymayreducethelifeof
thebattery.
ChangingtheBatteries
Whenthemachinebeginstoloseoperatingrangeorwhen
thelengthoftimetodischargeorchargethebatteryis
signicantlyreduced,thebatteriesareprobablywearingand
losingtheirabilitytoholdacharge.Takethemachinetoan
AuthorizedServiceDealerandhavethemtestthebatteries
todeterminewhetherthebatteriesneedtobereplaced.The
dealercanthenreplacethebatteriesforyou.Ifyouwishto
replacethebatteriesyourself,usethefollowingprocedures:
DisconnectingtheBatteries
1.Raisethecargobed,turnthekeyswitchtotheOFF
position,andremovethekey.
2.Disconnectthemainnegative-batterycable(black)that
connectsthebankofbatteriestothegroundpointof
themachine(Figure39).
Note:Themainbatterycablesarelongwhen
comparedtobattery-interconnectcables.
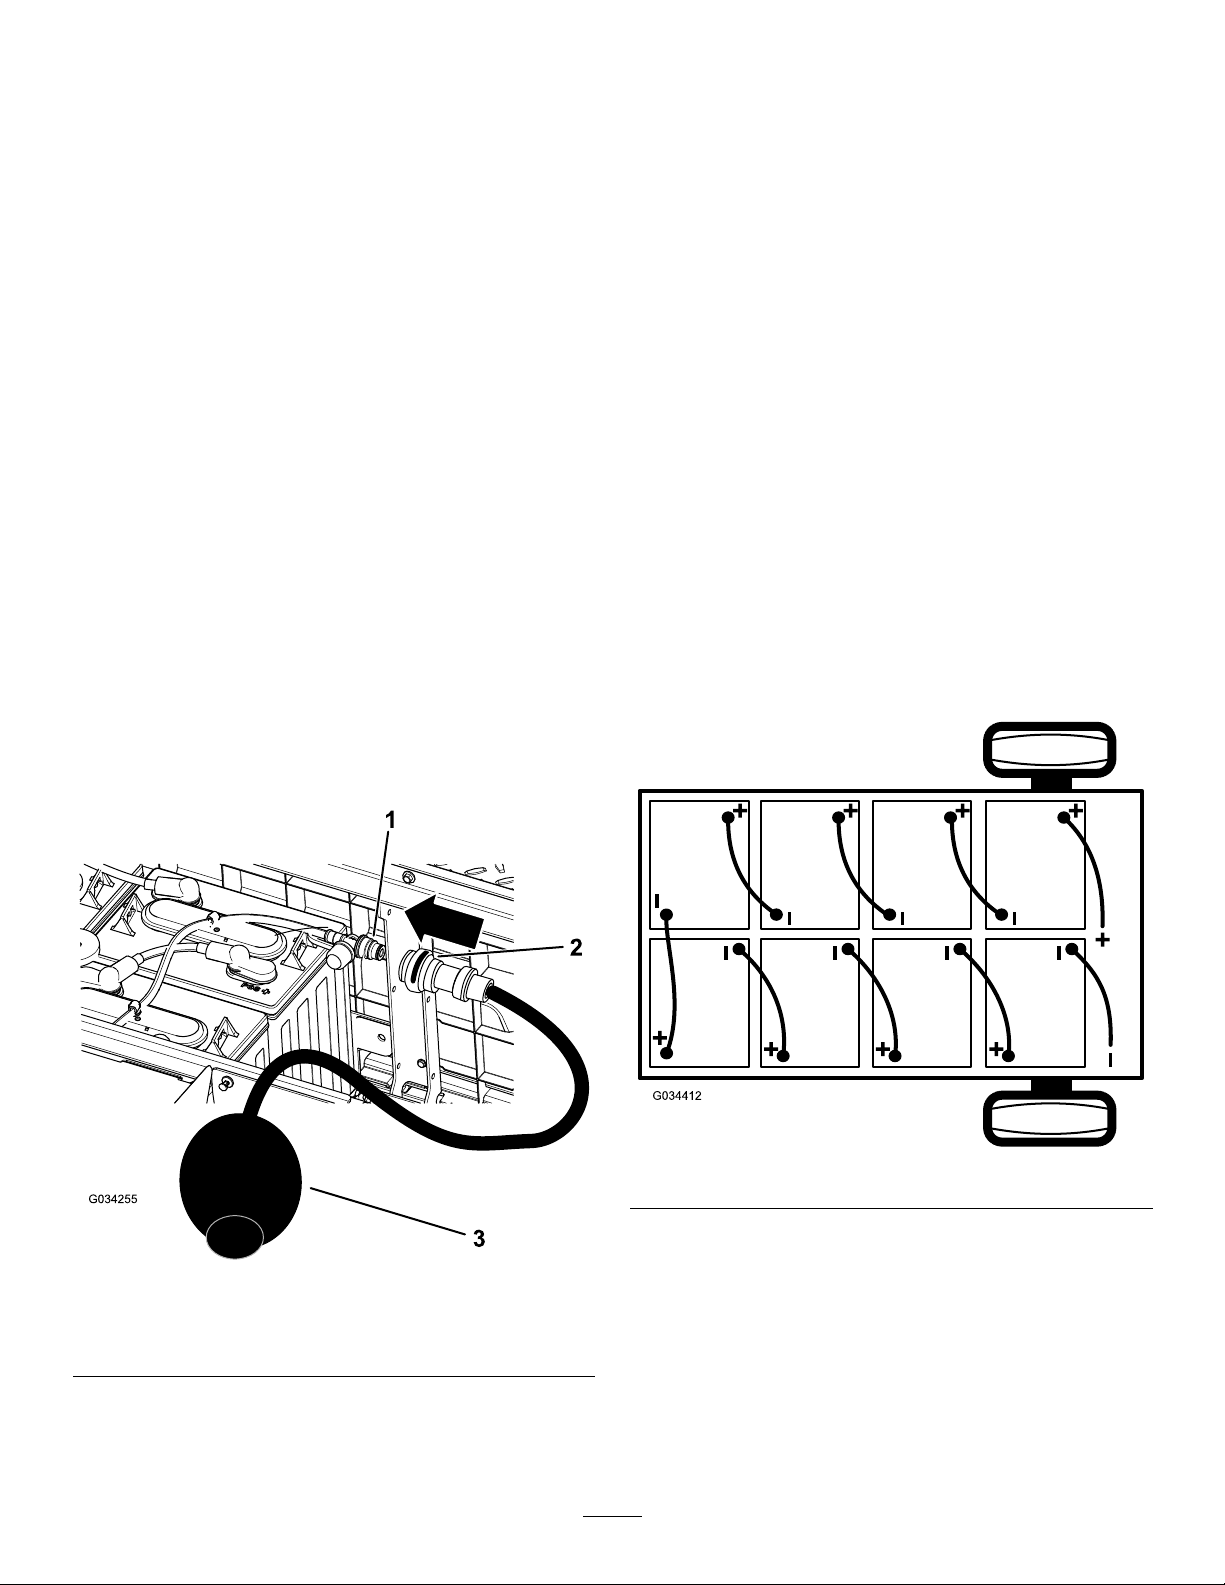
4.ConnectyourTorowaterhandpumptothewater-ll
port(Figure38).
1.Water-llport
2.Hand-pumpconnector
5.Pumpwaterintothewaterintobatteriesuntilallofthe
eyeletsontopofthebatteriesareblack,indicatingthat
theyarelledwithwater.
Figure38
3.Waterhandpump
Figure39
3.Disconnectthemainpositive-batterycable(red)that
connectsthebankofbatteriestothemaincontactorof
themachine(Figure39).
35
Page 36
ReplacingtheBatteries
1.Removeallofthebattery-interconnectcablesfromthe
batteries.
2.Removethebatteryretainerslocatedbetweenthe
batteries.
3.Removeallofthebatteriesandrecyclethemaccording
toyourlocalcodes.
4.Assemblenewbatteriesintothemachineatthe
locationsfromwhereyouremovedbatteriesinstep3.
Note:Payattentiontothebatterypolaritywhen
installingthenewbatteries(Figure39).
5.Installthebatteryretainersandtightenthenutsuntil
theretainersecurelygripsthebatteries.
6.ConnectthebatteriestogetherasshowninFigure39
withthebattery-interconnectcablesthatyouremoved
instep1.
ConnectingtheBatteries
1.Ensurethatthebatteryterminalsarecleanandfree
ofoxidation.
ReplacingtheFuses
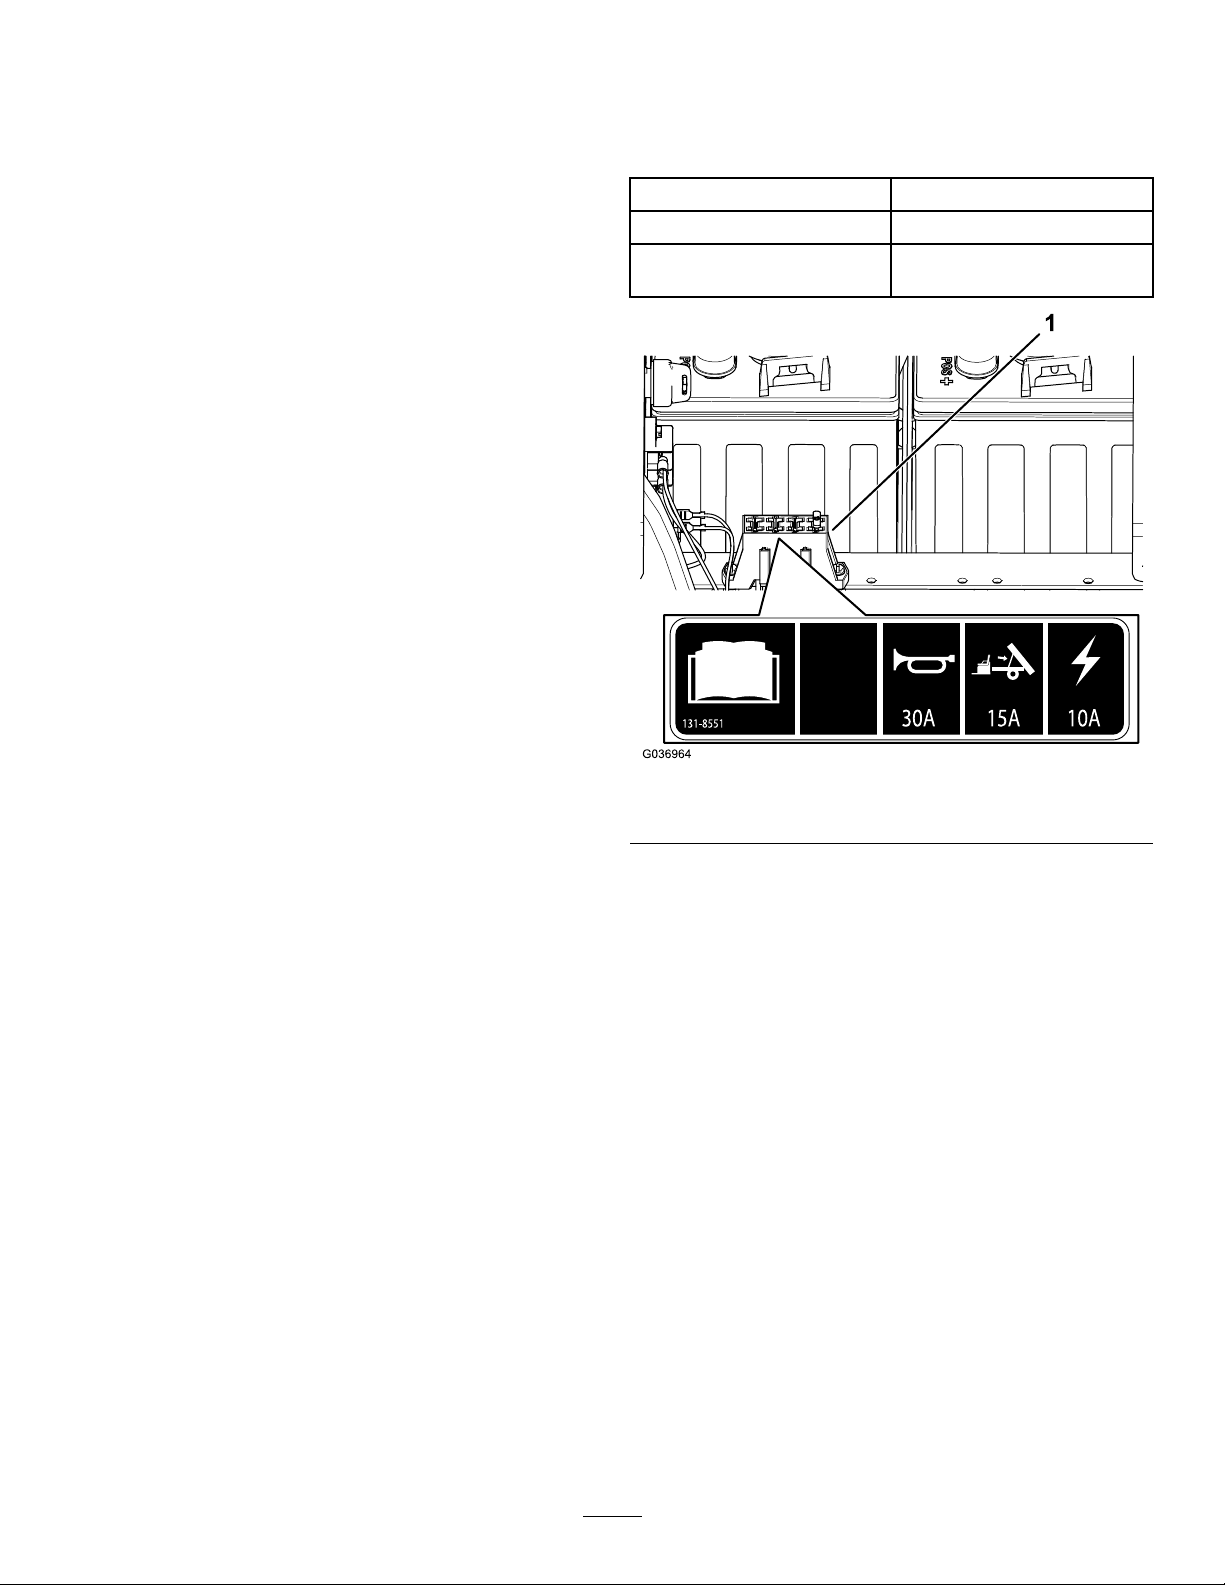
Thereis1fuseintheelectricalsystem;theotherslotsare
openforoptions.Theyarelocatedundertheseatassembly
behindabatteryontherightsideofthemachine(Figure40).
Optionalliftkit—open
Mainpower10A
Horn—optional(standardon
TCmodelsonly)
15A
30A
2.Connectthemainpositive-batterycable(red)between
thebankofbatteriesandthemachine(Figure39).
3.Connectthemainnegative-batterycable(black)
betweenthebankofbatteriesandthemachine(Figure
39).
4.Torquethenutssecuringallofthebatterycablesuntil
theretainersecurelygripsthebattery.
5.CoatthebatteryterminalswithTorobattery-terminal
protector.
6.Ensurethattherubberbootsoneachbatterycableare
securelyseatedoverthebatteryterminals.
7.Insertthekeyintothekeyswitchandrotatetheswitch
totheONposition.
8.Lowerthecargobox,rotatethekeyswitchtotheOFF
position,andremovethekey.
StoringtheBatteries
Chargethebatteriesfullybeforeplacingthemachineinto
storage.Plugthechargerintoawalloutletwhilethemachine
andbatteriesareinstorage.Leavethechargerpluggedintoa
walloutletandchargingreceptacleduringstoragetoensure
thatthebatteriesstaychargedanddonotfreeze;otherwise,
chargethebatteriesatleastonceamonth.
Figure40
1.Fuseblock
Important:Ifthemachinecannotbepluggedinduring
storage,fullychargethebatteriesatleastonceamonth.
Thebatteriesself-dischargeoverlongperiodsoftime,
whichmaydamagethebatteriestothepointofbeing
unusable,evenifthebatteriesarenew.
36
Page 37
MaintainingtheHeadlights
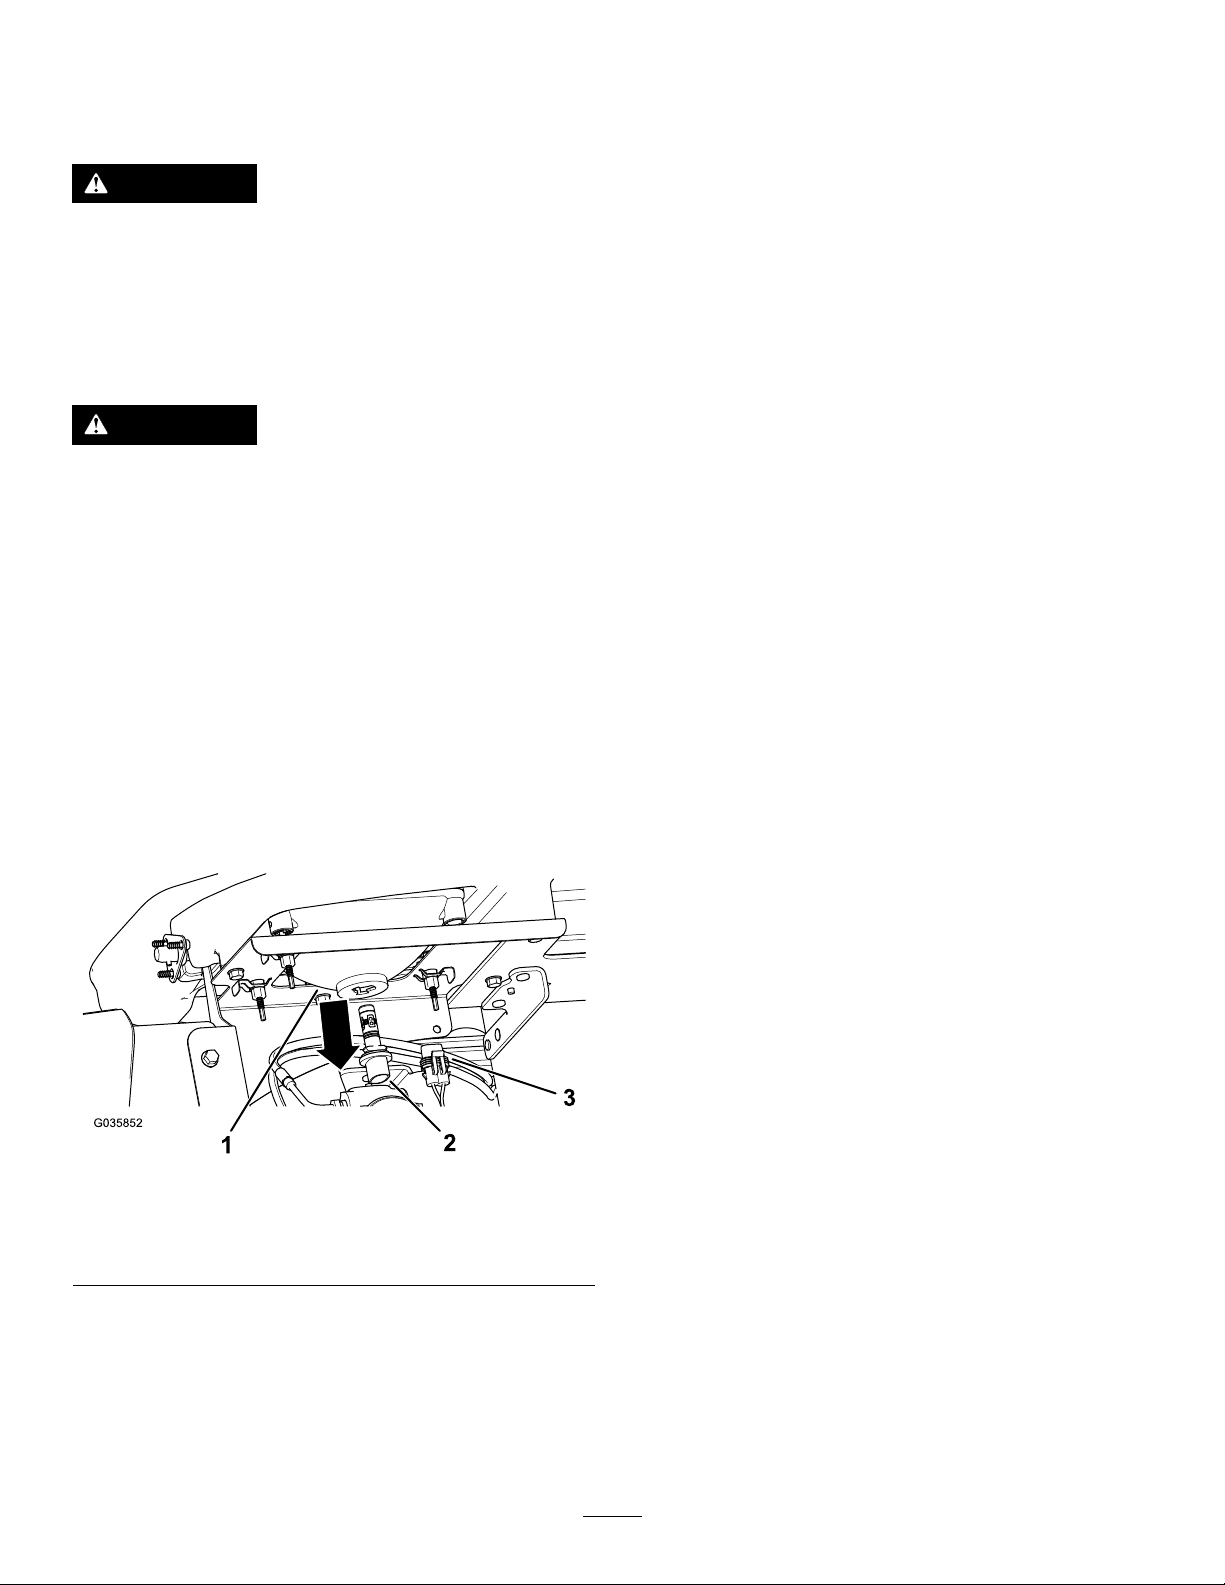
6.Securelampassemblybyturningit1/4turnclockwise
(Figure41).
ReplacingtheBulbs
CAUTION
Ifyouinstallahigherwattagebulbthanthesystem
isdesignedfor,youmaydamagethe12Vpower
supply,orataminimum,blowthefuse.
AlwaysusethespeciedToroLEDbulbtoprevent
thisissue.
CAUTION
Thebulbsbecomeextremelyhotwheninoperation.
Handlingahotbulbcancausesevereburnsand
personalinjury.
Alwaysallenoughtimetoforthebulbstocool
beforereplacingthem.Usecarewheneverhandling
thebulb.
Specication:SeeyourPartsCatalog.
1.Disconnectthebatteries;refertoDisconnectingthe
Batteries(page35).
7.Connecttheelectricalconnectorfortheharnesstothe
connectorofthenewlampassembly(Figure41).
8.Connectthebatteriesandclosethehood;referto
ConnectingtheBatteries(page36).
2.Openthehood;refertoAccessingtheHood(page29).
3.Disconnecttheelectricalconnectorfortheharness
fromtheconnectorofthelampassemblyattheback
oftheheadlighthousing(Figure41).
Figure41
1.Headlighthousing3.Harness-electrical
2.Lampassembly
4.Rotatethelampassembly1/4turncounterclockwise
andmovingitrearward,outoftheheadlighthousing
(Figure41).
connector
5.Insertthenewlampassemblyandheadlighthousing
andalignthetabsinthelampassemblywiththeslots
intheheadlighthousing(Figure41).
37
Page 38
ReplacingtheHeadlight
AdjustingtheHeadlights
1.Disconnectthebatteries;refertoDisconnectingthe
Batteries(page35).
2.Openthehood;refertoAccessingtheHood(page29).
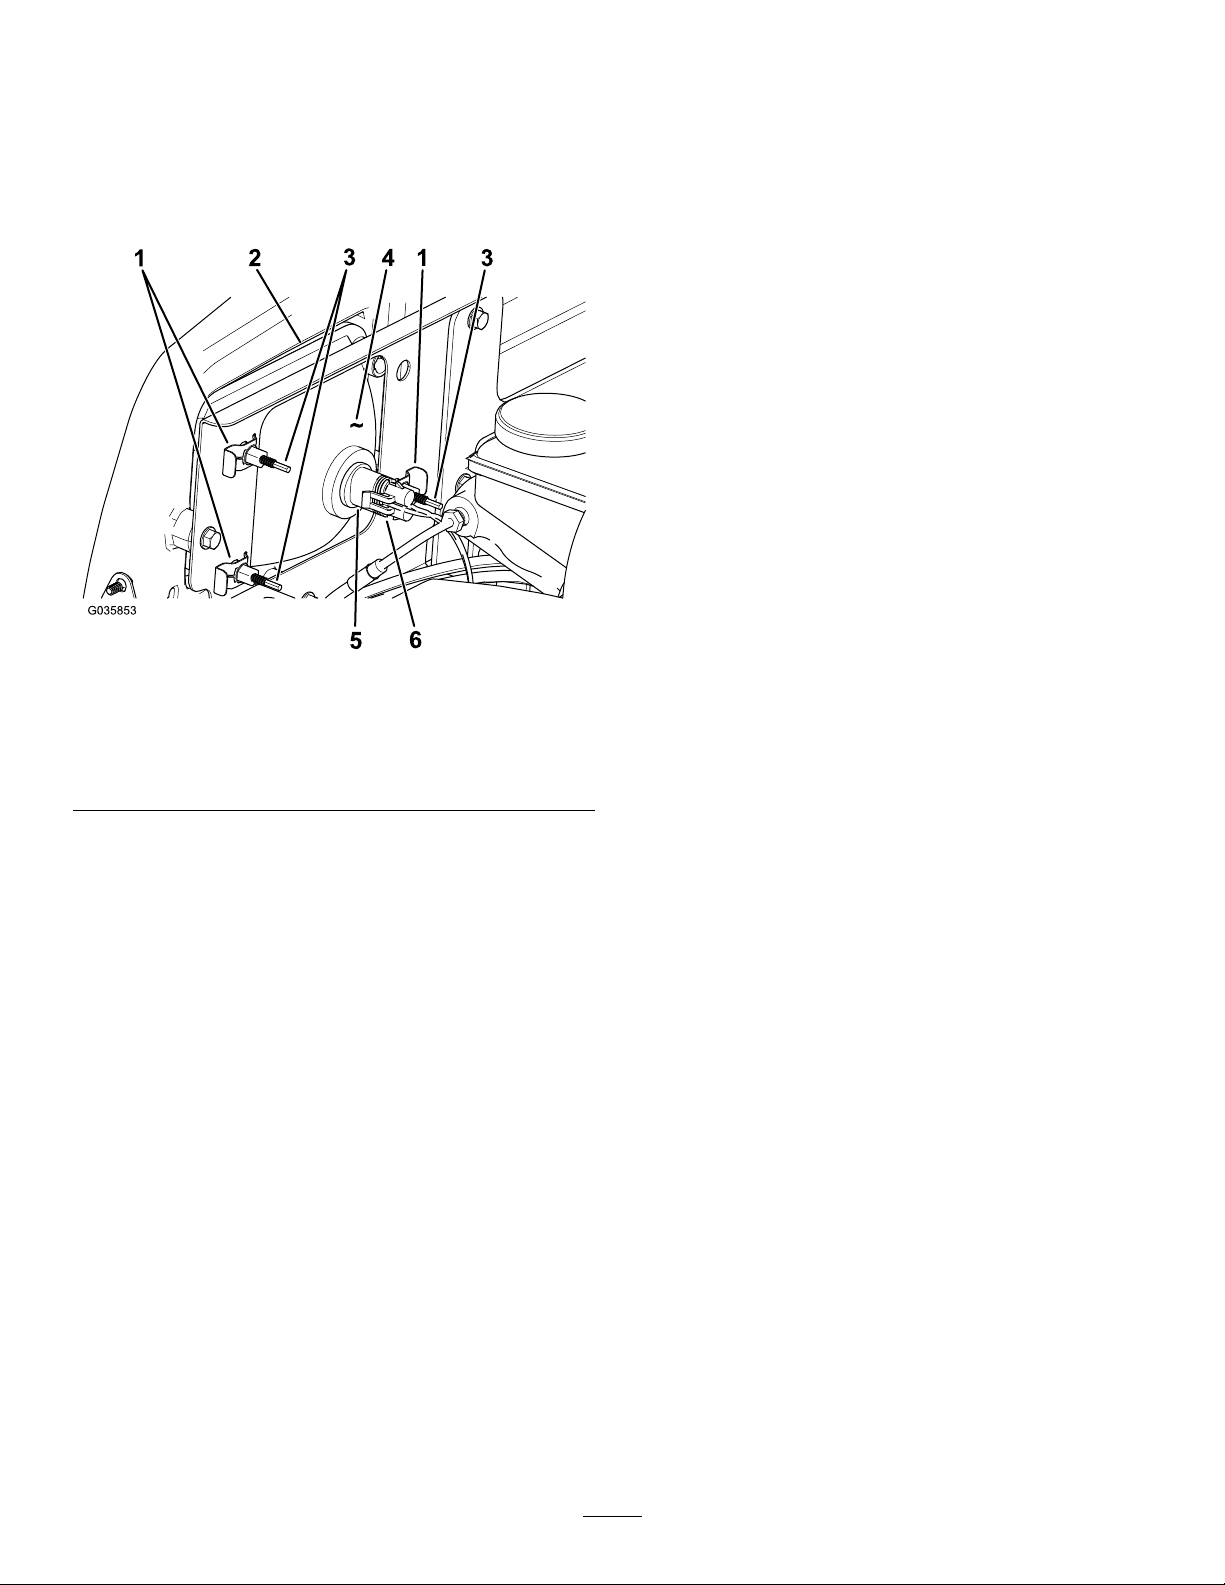
3.Disconnecttheelectricalconnectorfortheharness
fromtheconnectorofthelampassembly(Figure42).
Figure42
Usethefollowingproceduretoadjusttheheadlightbeam
positionwheneveraheadlightassemblyisreplacedor
removed.
1.TurnthekeyswitchtotheONposition,andturnon
theheadlights.
2.Atthebackoftheheadlightassembly,rotateadjustment
screws(Figure42)topivottheheadlightassemblyand
alignthepositionofthecastbeam.
3.Connectthebatteryandclosethehood;referto
ConnectingtheBatteries(page36).
1.Speedclip
2.Openinginthebumper
3.Adjustmentscrew6.Harness-electrical
4.Headlight
5.Lampassembly
connector
4.Removethespeedclipsthatsecuretheheadlighttothe
headlightbracket(Figure42).
Note:Retainallpartsforinstallationofthenew
headlight.
5.Removetheheadlightassemblybymovingitforward
throughtheopeninginthefrontbumper(Figure42).
6.Installthenewheadlightthroughtheopeninginthe
bumper(Figure42).
Note:Ensuretheadjustmentpostsarelinedupwith
theholesinthemountingbracketbehindthebumper.
7.Securetheheadlightassemblywiththespeedclipsthat
youremovedinstep4.
8.Connecttheelectricalconnectorfortheharnesstothe
connectorofthelampassembly(Figure42).
9.Adjusttheheadlightstodirectthebeamstothedesired
position,refertoAdjustingtheHeadlights(page38).
38
Page 39
DriveSystem
G009235
1
2
3
Maintenance
MaintainingtheTires
ServiceInterval:Every100hours—Checktheconditionof
thetiresandrims.
Every100hours—Torquethewheel-lugnuts.
1.Inspectthetiresanrimsforsignsofwearanddamage.
Note:Operatingaccidents,suchashittingcurbs,can
damageatireorrimandalsodisruptwheelalignment,
soinspecttireconditionafteranaccident.
2.Torquethewheel-lugnutsto108to122N∙m(80to
90ft-lb).
AdjustingtheFrontWheel Toe-in
ServiceInterval:Every100hours/Yearly(whichevercomes
rst)—Checkthefrontwheeltoe-in.
Important:YouneedT oroT oolNo.6010fromyour
ToroDistributortoperformthisprocedure.
Thetoe-inshouldbe0+/–3mm(0+/–1/8inch).
•Checkthetirepressuretoensurethatthefronttiresare
inatedto165to207kPa(24to30psi).
•Either,addweighttothedriver'sseatequaltotheaverage
operatorwhowillrunthemachine,orhaveanoperator
sitontheseat.Theweightoroperatormustremainon
theseatforthedurationoftheprocedure.
•Onalevelsurface,rollthemachinestraightback2to3
m(6to10ft)andthenstraightforwardtotheoriginal
startingposition.Thisallowsthesuspensiontosettleinto
theoperatingposition.
•Measurethetoe-inwiththewheelsfacingstraightahead.
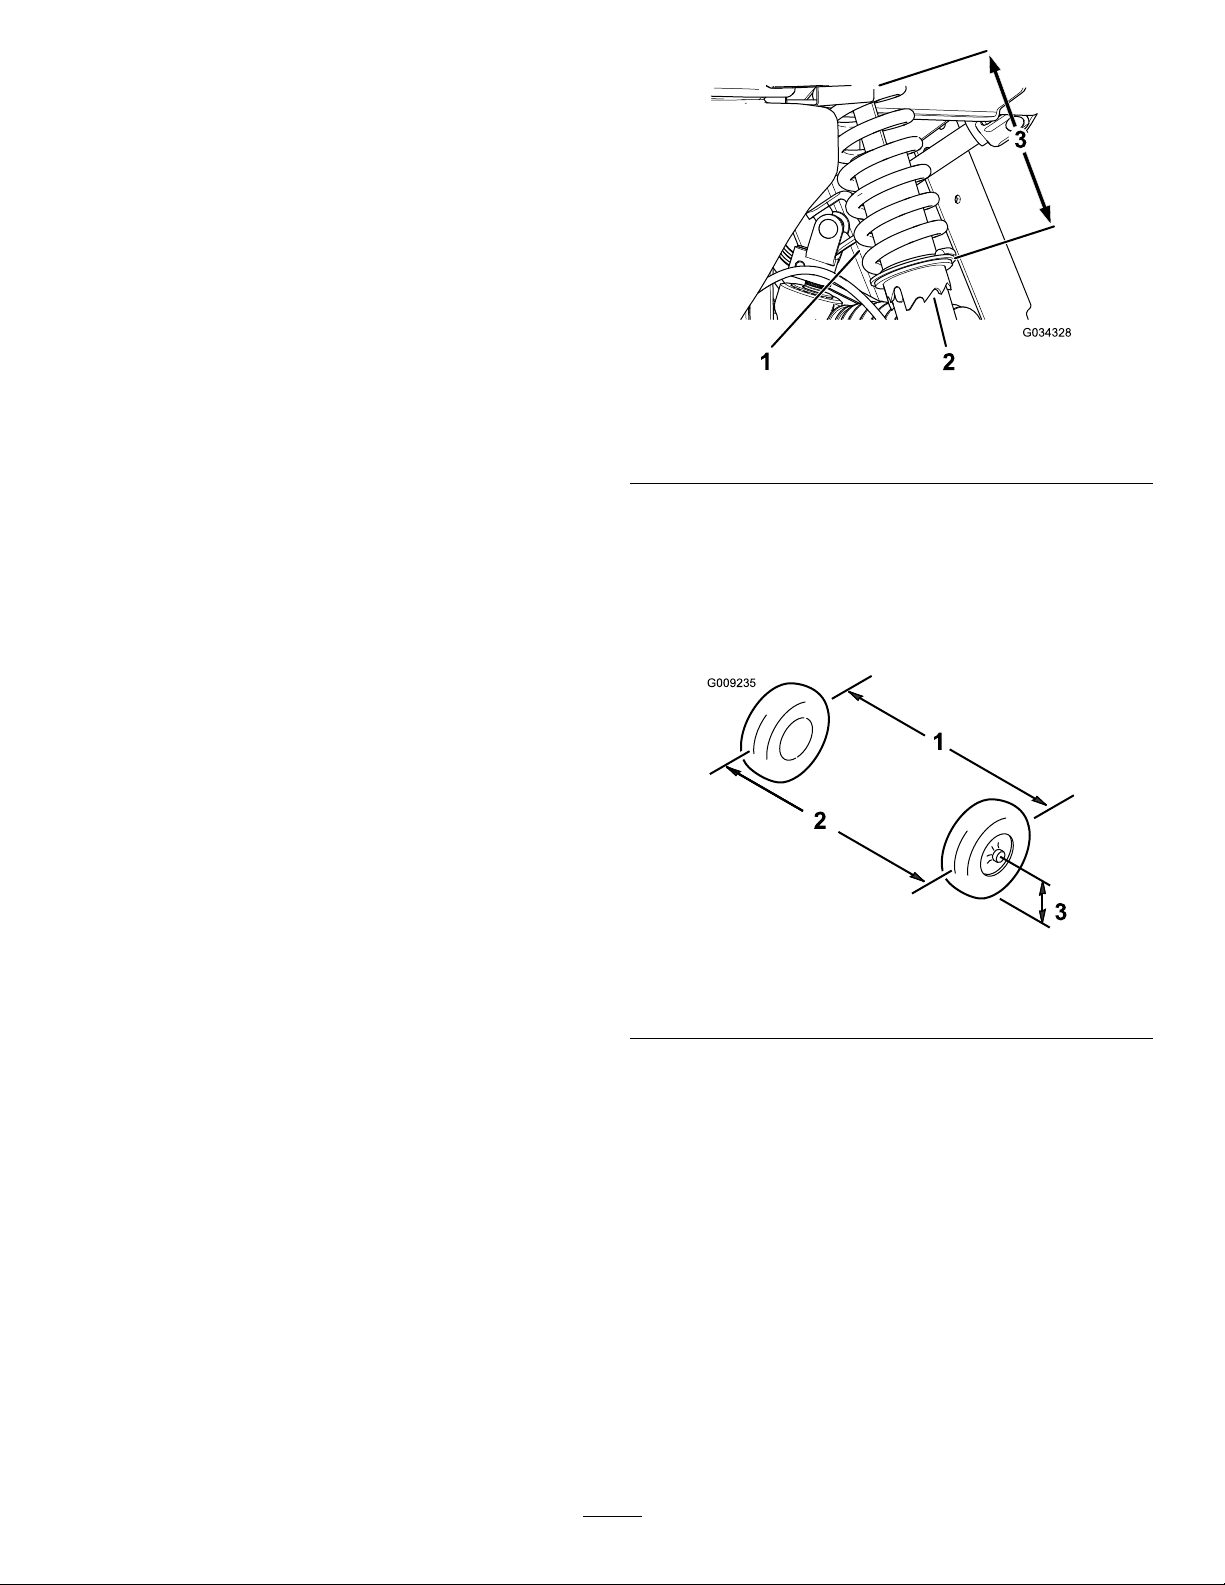
Adjusttheridingheighttothedesiredpositionbyperforming
thefollowingprocedure:
Figure43
1.Shock-absorberspring3.Springlength
2.Collar
2.Onalevelsurface,rollthemachinestraightback2to3
m(6to10ft)andthenstraightforwardtotheoriginal
startingposition.
3.Measurethedistancebetweenbothofthefronttiresat
theaxleheightatboththefrontandrearofthefront
tires(Figure44).
Figure44
1.Tirecenterline—back3.Axlecenterline
2.Tirecenterline—front
4.Ifthemeasurementdoesnotfallwithin0+/–3mm
(0+/–1/8inch),loosenthejamnutsattheouterend
ofthetierods(Figure45).
1.UsingToroToolNo.6010,rotatethecollaronthe
shockabsorbertochangethelengthofthespring
(Figure43).
39
Page 40
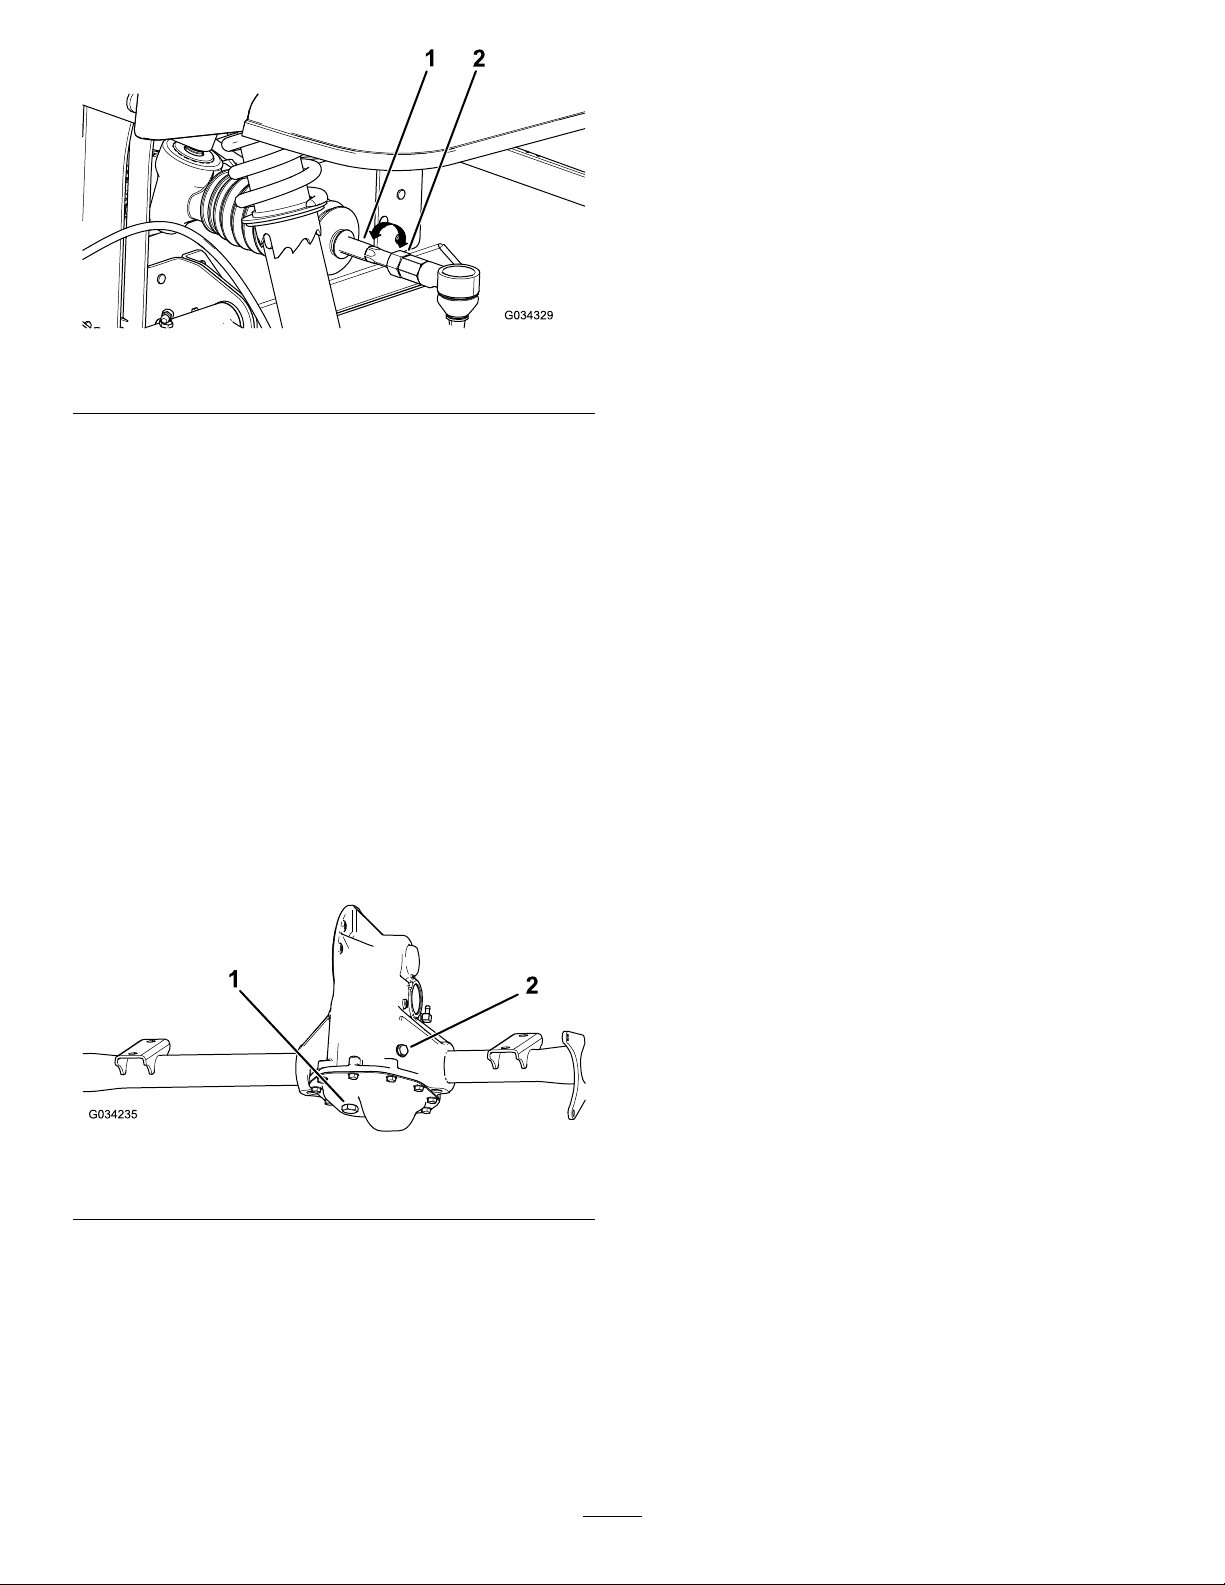
Figure45
1.Tierod2.Jamnut
ChangingtheTransaxleFluid
ServiceInterval:Every800hours/Yearly(whichevercomes
rst)
FluidType:SAE10W-30(APIserviceSJorhigher)
FluidCapacity:1.4L(1.5USqt)
1.Alignadrainpanunderthedrainplug(Figure46).
2.Removethellplugandtheseal(Figure46).
Note:Retainthellplugandsealforinstallationin
step6.
3.Removethedrainplugandtheseal,andallowtheuid
todraincompletely(Figure46).
5.Rotatebothtierodstomovethefrontofthetire
inwardoroutward.
6.Tightenthetierodjamnutswhentheadjustmentis
correct.
7.Ensurethatthereisfulltravelofthesteeringwheelin
bothdirections.
CheckingtheTransaxle-Fluid Level
ServiceInterval:Every100hours
FluidType:SAE10W-30(APIserviceSJorhigher)
1.Movethemachinetoalevelsurface,shutoffthe
machine,engagetheparkingbrake,andremovethekey .
2.Removethellplugonthetransaxle(Figure46).
Note:Retainthedrainplugandsealforinstallation
instep4.
4.Installthedrainplugandseal,andtorqueitto20to27
N∙m(15to20ft-lb).
5.Fillthetransaxlewiththespecieduiduntilitruns
outofthellhole.
6.Installthellplugandseal,andtorqueitto20to27
N∙m(15to20ft-lb).
Figure46
1.Drainplug2.Fillplug
3.Iftheuidlevelislow ,removethellplugandaddthe
specieduiduntilitrunsoutofthehole(Figure46).
4.Replacethellplugandtorqueitto20to27N∙m(15
to20ft-lb).
40
Page 41
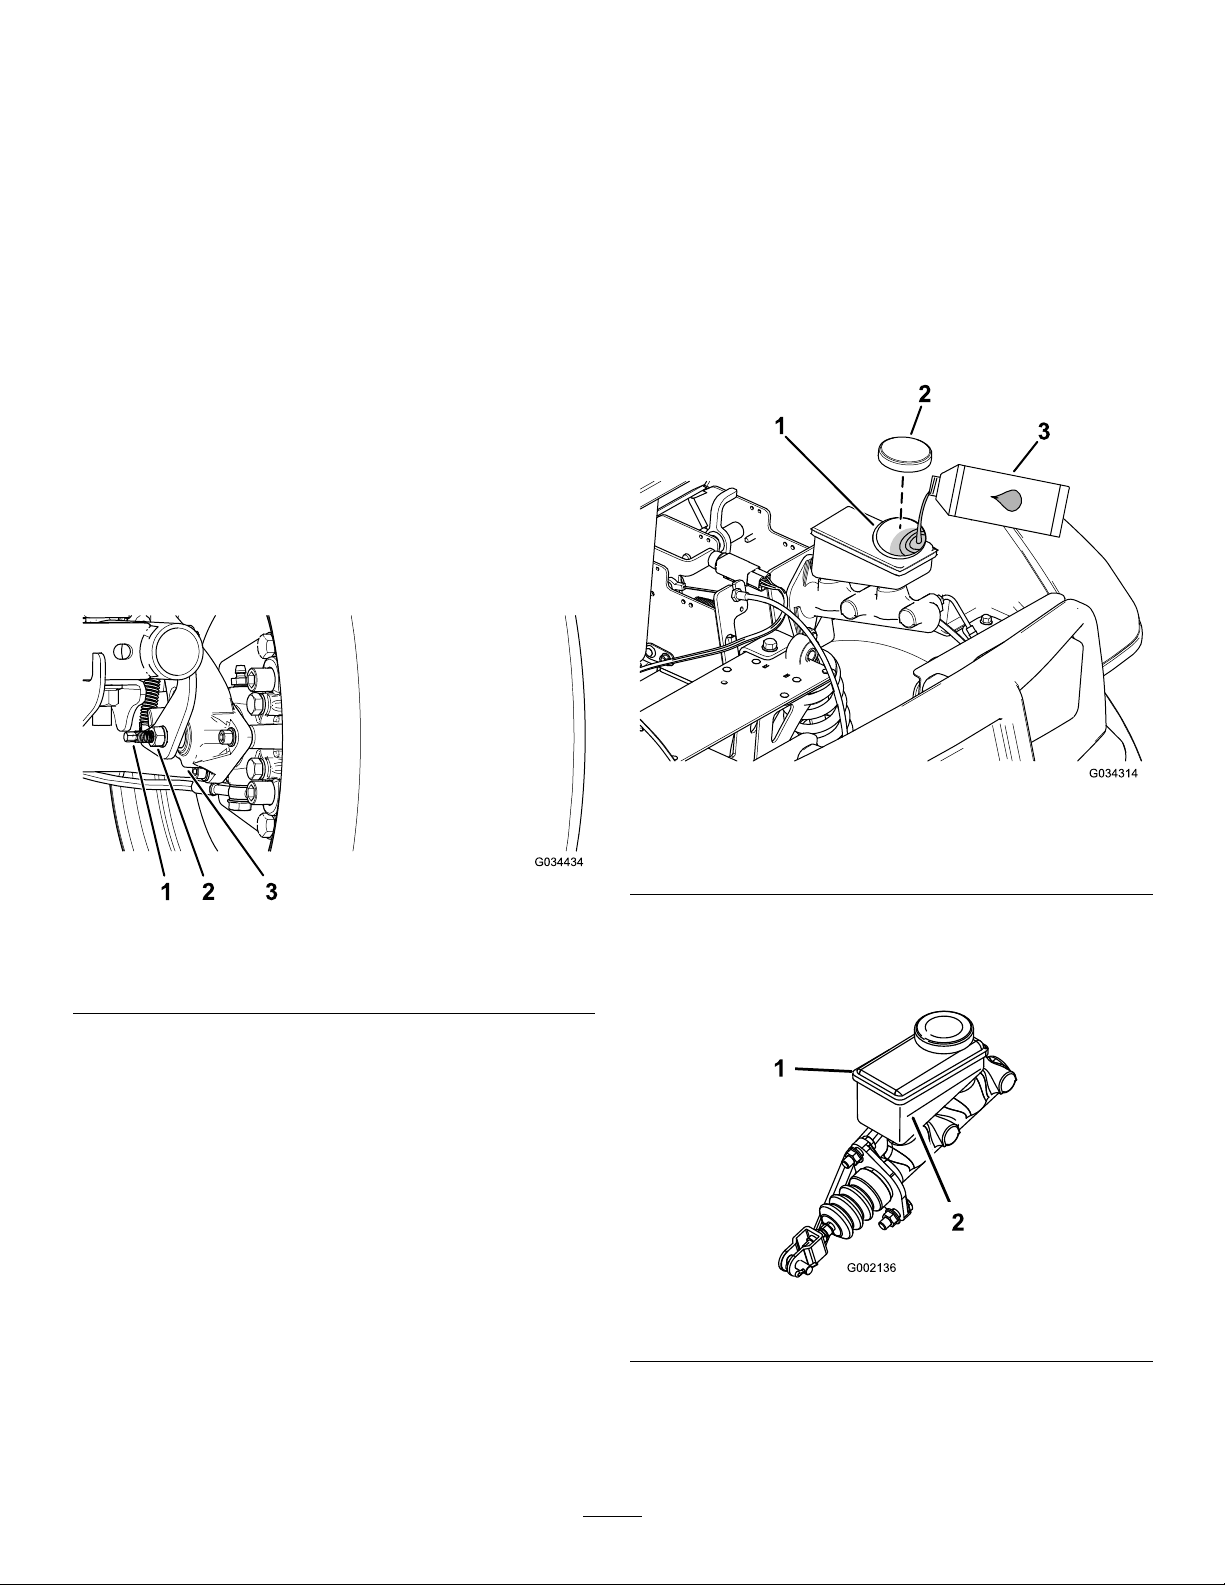
BrakeMaintenance
CheckingtheBrake-Fluid Level
CheckingtheParkingBrake
1.Engagetheparkingbrakebypullingtheparking-brake
levertowardyou,untilyoufeeltension.
2.Ifyoudonotfeeltensionwhenpullingthe
parking-braketowardyouwithin11.4to16.5cm
(4-1/2to6-1/2inches)fromthe‘P’symbolonthe
dash,thenyouneedtoadjusttheparkingbrake;refer
toAdjustingtheParkingBrake(page41).
AdjustingtheParkingBrake
1.Ensurethattheparkingbrakeisdisengaged.
2.Usingjackstands,lifttherearofthemachine;referto
LiftingtheMachine(page28).
3.Using2wrenches,holdtheadjustingpostonthe
caliperinplacewith1wrench,andloosenthejamnut
1/4turnwiththeotherwrench(Figure47).
ServiceInterval:BeforeeachuseordailyCheckthe
brake-uidlevelbeforethemotorisrst
used.
BrakeFluidType:DOT3
1.Parkthemachineonalevelsurface,engagetheparking
brake,andremovethekey.
2.Raisethehoodtogainaccesstothemaster-brake
cylinderandreservoir(Figure48).
Figure47
1.Adjustingpost
2.Jamnut
4.Whileholdingtheadjustingpostandthejamnutin
place,turntheadjustingpostintotighten(Figure47).
Note:Performthisstepuntilyoufeeldragonthe
wheel.
5.Whileholdingtheadjustingpostandthejamnutin
place,backoff1/4turn(Figure47).
6.Whileholdingtheadjustingpostandthejamnutin
place,tightenthejamnut(Figure47).
7.Performsteps1through6totheotherside.
8.Verifythattheparkingbrakeisadjustedtotheproper
tension;refertoCheckingtheParkingBrake(page41).
3.Caliper
Figure48
1.Fillerneck(reservoir)3.DOT3brakeuid
2.Reservoircap
3.Lookattheoutlineoftheuidlevelatthesideofthe
reservoir(Figure49).
Note:ThelevelshouldbeabovetheMinimumline.
Figure49
1.Brake-uidreservoir
2.Minimumline
Note:Ifyoucannotadjusttheparkingbraketothe
requiredtension,thebrakepadsmaybewornandneed
tobereplace.ContactyourAuthorizedToroService
Dealerforassistance.
4.Iftheuidlevelislow,performthefollowing:
A.Cleantheareaaroundthereservoircapand
removethecap(Figure48).
41
Page 42
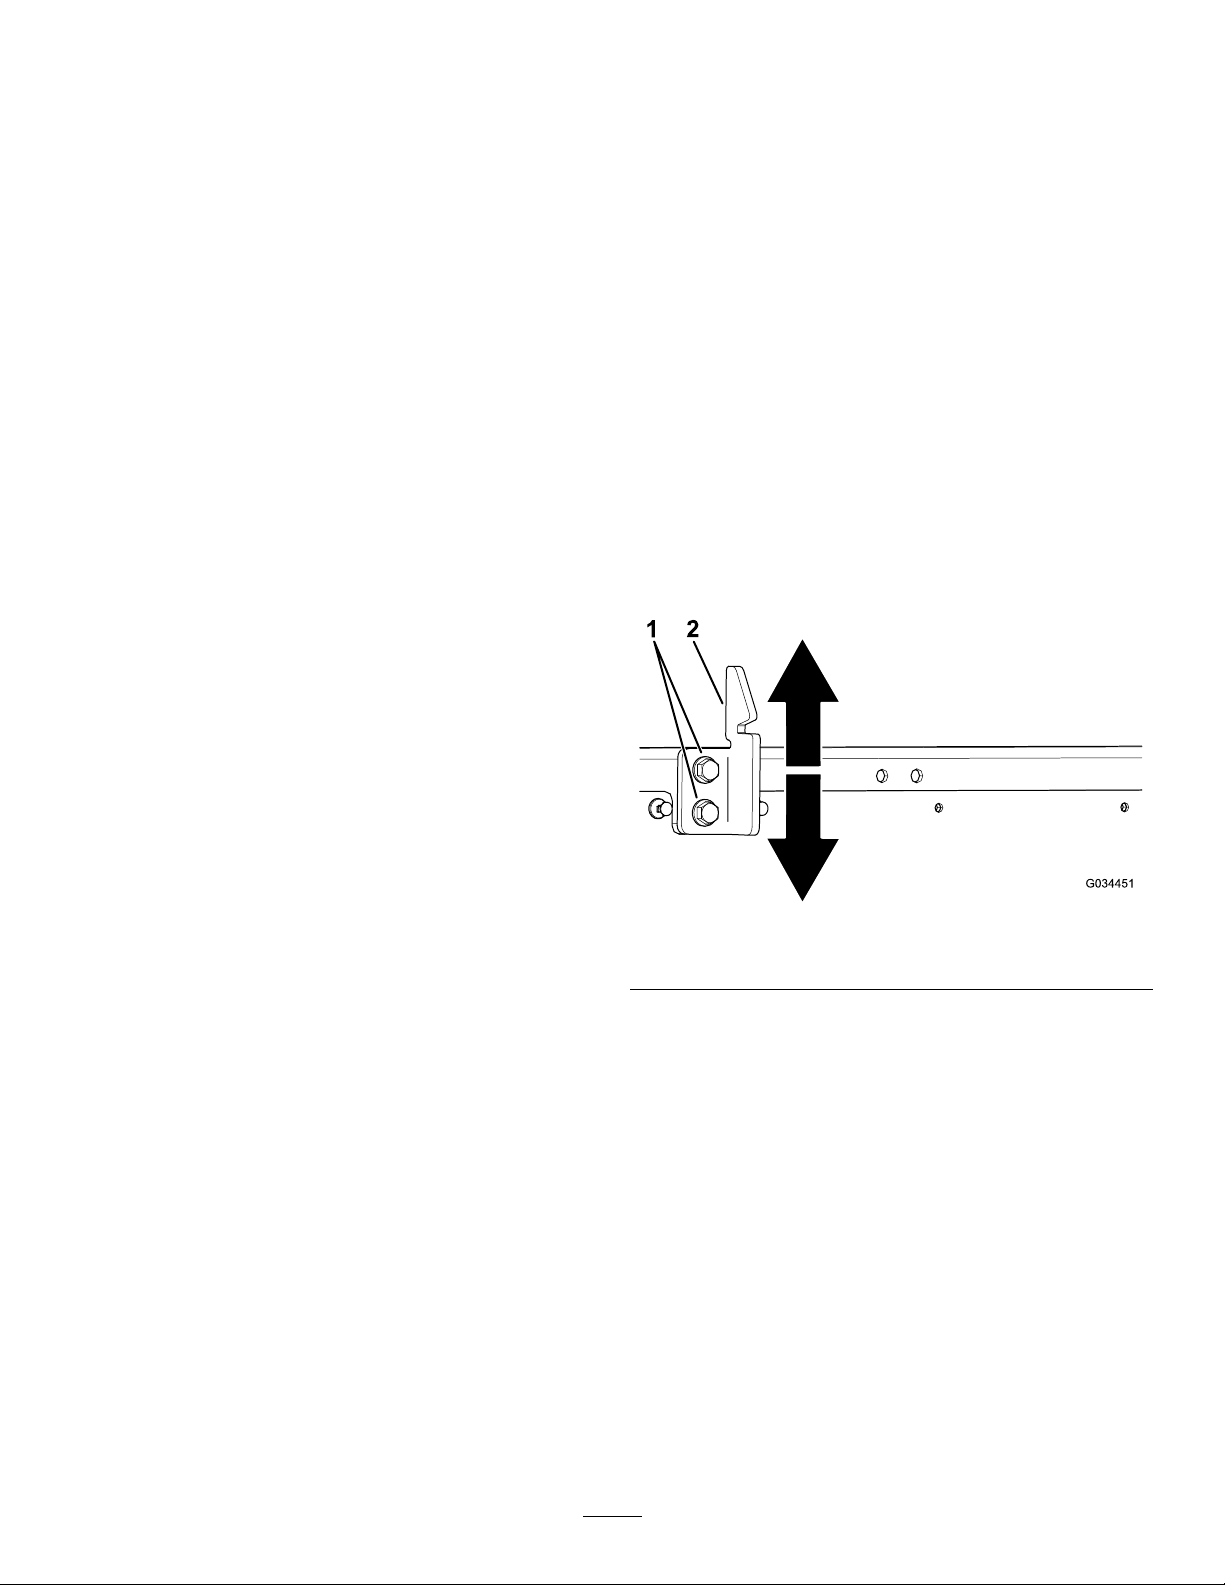
B.AddDOT3brakeuidtothereservoiruntilthe
uidlevelisabovetheMinimumline(Figure49).
ChassisMaintenance
Note:Donotoverllthereservoirwithbrake
uid.
C.Installthereservoircap(Figure48).
5.Closethehoodofthemachine.
InspectingtheBrakes
ServiceInterval:Every100hours
Brakesareacriticalsafetycomponentofthemachine.As
withallsafetycomponents,theyshouldbecloselyinspectedat
regularintervalstoensureoptimumperformanceandsafety.
•Inspectthebrakeshoesforwearordamage.Ifthelining
(brakepad)thicknessislessthan1.6mm(1/16inch),the
brakeshoesshouldbereplaced.
•Inspectthebackingplateandothercomponentsforsigns
ofexcessivewearordeformation.Ifanydeformationis
found,theappropriatecomponentsmustbereplaced.
•Checkthebrake-uidlevel;refertoCheckingthe
Brake-FluidLevel(page41).
AdjustingtheCargo-Box Latches
Ifthecargo-boxlatchisoutofadjustment,thecargobox
vibratesupanddownasyoudrivethemachine.Youcan
adjustthelatchpoststomakethelatchesholdthecargobox
snuglytothechassis.
1.Verifythatthecargoboxislatching.
Note:Ifthecargoboxdoesnotlatch,thebox-latch
strikerislikelytoolow .Ifthecargoboxlatches,but
vibratesupanddownasyoudrive,thebox-latchstriker
islikelytoohigh.
2.Raisethecargobox;RaisingtheCargoBoxtothe
DumpPosition(page18).
3.Loosenthe2boltsonthebox-latchstrikerandmove
thestrikerupordown,dependingonifthestrikeris
toohighortoolow(Figure50).
ReplacingtheServiceand Parking-BrakePads
ServiceInterval:Every400hours
ContactyourauthorizedAuthorizedT oroServiceDealerto
inspectandpossiblyreplacetheserviceandparking-brake
pads.
ChangingtheBrakeFluid
ServiceInterval:Every1,000hours
ContactyourauthorizedAuthorizedToroServiceDealer.
Figure50
1.Bolts2.Box-latchstriker
4.Tightenthe2boltsonthebox-latchstriker(Figure50).
5.Verifythattheadjustmentiscorrectbylatchingthe
cargoboxseveraltimes.
42
Page 43

Cleaning
WashingtheMachine
Storage
1.Parkthemachineonalevelsurface,engagetheparking
brake,shutoffthemachine,andremovethekey.
Washthemachineasneeded.Usewateraloneorwithamild
detergent.Youmayusearagwhenwashingthemachine;
however,thehoodwilllosesomeofitsluster.
Important:Pressurizedwaterisnotrecommended
whenwashingthemachine.Itmaydamagethe
electricalsystem,loosenimportantdecals,orwashaway
necessarygreaseatfrictionpoints.Avoidexcessiveuse
ofwater,especiallynearthecontrolpanel,motor,motor
controller,charger,backofthedashboard,andbatteries.
2.Cleandirtandgrimefromtheentiremachine,including
theoutsideofthemotorhousing.
Important:Youcanwashthemachinewithmild
detergentandwater.Donotusehighpressure
watertowashthemachine.Pressurewashing
maydamagetheelectricalsystemorwashaway
necessarygreaseatfrictionpoints.Avoidexcessive
useofwater,especiallynearthecontrolpanel,
lights,motor,andthebattery.
3.Inspectthebrakes;refertoInspectingtheBrakes(page
42).
4.Greasethemachine;refertoGreasingtheMachine
(page30).
5.Checkthetirepressure;refertoCheckingtheTire
Pressure(page21).
6.Checkandtightenallbolts,nuts,andscrews.Repairor
replaceanypartthatisdamaged.
7.Paintallscratchedorbaremetalsurfaces.
Note:PaintisavailablefromyourAuthorizedService
Dealer.
8.Storethemachineinaclean,drygarageorstoragearea.
9.Removethekeyandputitinasafeplaceoutofthe
reachofchildren.
10.Coverthemachinetoprotectitandkeepitclean.
BatteryStorage
1.Chargethebatteriesfullybeforeplacingthemachine
intostorage;refertoChargingtheBatteries(page33).
Plugthechargerintoawalloutletwhilethemachine
andbatteriesareinstorage.Leavethechargerplugged
intoawalloutletandchargingreceptacleduringstorage
toensurethatthebatteriesstaychargedanddonot
freeze;otherwise,chargethebatteriesmonthlyata
minimum.
2.Pluginthechargerduringstoragetomaintainfull
batterylife.
Important:Ifthemachinecannotbeplugged
induringstorage,fullychargethebatteriesat
leastonceamonth.Thebatteriesself-discharge
overlongperiodsoftime,whichmaydamagethe
batteriestothepointofbeingunusable,evenifthe
batteriesarenew.
3.Afterfullychargingthebatteries,llthebatterieswith
distilledordeionizedwaterbeforestoring;referto
AddingDistilledorDeionizedWatertotheBatteries
(page35).
43
Page 44

Troubleshooting
Machine-StatusLightFlashPattern
Problem
Themachine-statuslightisalways
illuminated.
Themachine-statuslightashed1time.1.Thereisacontroller-congurationfault.1.ContactyourAuthorizedToroService
Themachine-statuslightashed2times.
Themachine-statuslightashed3times.
Themachine-statuslightashed4times.1.Amain-contactorfaultoccurred.
Themachine-statuslightashed5times.
1.Thesystemisfunctioningproperly.
1.Theparkingbrakeisengagedwhilein
FORWARDorREVERSEposition.
2.Adrive-switchfaultoccurred.2.Turnoffthemachineandcheckthe
1.Themotorcurrentexceededthe
controller-ratedmaximum.
2.Thereisaninternal-powercomponent
fault.
1.Exceededthemaximummotorspeed.
PossibleCauseCorrectiveAction
1.None
Dealer.
1.Disengagetheparkingbrake.
functionalityoftheswitches.
1.TurnthekeyswitchtotheOFFposition,
waitafewseconds,andturnthekey
switchtotheONposition.Checkall
batteriesandhigh-currentcontroller
connectionsIftheconditioncontinues,
refertoyourAuthorizedService
Dealer.
2.ContactyourAuthorizedT oroService
Dealer.
1.Testthecontactwires,coiland
contactsfornormaloperation.
1.TurnthekeyswitchtotheOFFposition,
waitafewseconds,turnthekeyswitch
totheONposition,andcheckfor
normaloperation.
Themachine-statuslightashed6times.
Themachine-statuslightashed7times.
Themachine-statuslightashed8times.
Themachine-statuslightashed10times.1.Acontroller-congurationfault
1.Thethrottleispressedwhilestarting
themachine.
2.Thereisawirethatisnotmakinga
connection.
1.Theremainingchargeonthebatteries
islow .
2.Thebatteriesarefullydischarged.
3.Theinternalcapacitorhasapre-charge
oflessthan5V.
1.Thecontrollerormotorisoverheated
ortoocold.
occurred.
1.Releasethepedal,turnthekeyswitch
totheOFFposition,waitafewseconds,
turnthekeyswitchtotheONposition,
andcheckfornormaloperation.
2.Testthewiringbetweenthecontroller
andcontactor,switches,andthe
status-indicatorlight.
1.Stopoperation,driveslowlytoyour
nearestchargingstation,andcharge
thebatteriesfully .
2.Towthemachinetoyourcharging
stationandchargethebatteriesfully.
3.Fullychargethebatteries,turnthe
keyswitchtotheOFFposition,waita
fewseconds,turnthekeyswitchto
theONposition,andcheckfornormal
operation.
1.Determineifthemotororcontrolleris
veryhotorverycold,thenallowthe
machinetoreturntosafetemperatures
beforeresumingnormaloperation.
1.ContactyourAuthorizedT oroService
Dealer.
44
Page 45

Problem
PossibleCauseCorrectiveAction
Themachine-statuslightashed11times.
Themachine-statuslightashed12times.1.Acontroller-congurationfault
Themachine-statuslightashed13times.1.Aninternal-softwarefaultoccurred.1.ContactyourAuthorizedT oroService
Themachine-statuslightashed14times.1.Acommunicationfaultoccurred.1.ContactyourAuthorizedT oroService
Themachine-statuslightisnotilluminated.1.Thereiseithernopowertothe
1.Amotor-encoderfaultoccurred.1.Checkthemotor-encoder(speed
2.Exceededthemaximummotorspeed.
occurred.
controllerorthecontrollerhasfailed.
sensor)wiring.
2.TurnthekeyswitchtotheOFFposition,
waitafewseconds,turnthekeyswitch
totheONposition,andcheckfor
normaloperation.
1.ContactyourAuthorizedT oroService
Dealer.
Dealer.
Dealer.
1.ContactyourAuthorizedT oroService
Dealer.
45
Page 46

Notes:
Page 47

EuropeanPrivacyNotice
TheInformationToroCollects
ToroWarrantyCompany(Toro)respectsyourprivacy.Inordertoprocessyourwarrantyclaimandcontactyouintheeventofaproductrecall,weaskyou
tosharecertainpersonalinformationwithus,eitherdirectlyorthroughyourlocalT orocompanyordealer.
TheT orowarrantysystemishostedonserverslocatedwithintheUnitedStateswhereprivacylawmaynotprovidethesameprotectionasapplies
inyourcountry.
BYSHARINGYOURPERSONALINFORMATIONWITHUS,YOUARECONSENTINGTOTHEPROCESSINGOFYOURPERSONALINFORMA TION
ASDESCRIBEDINTHISPRIV ACYNOTICE.
TheWayT oroUsesInformation
Toromayuseyourpersonalinformationtoprocesswarrantyclaims,tocontactyouintheeventofaproductrecallandforanyotherpurposewhichwetell
youabout.ToromayshareyourinformationwithT oro'safliates,dealersorotherbusinesspartnersinconnectionwithanyoftheseactivities.Wewillnot
sellyourpersonalinformationtoanyothercompany.Wereservetherighttodisclosepersonalinformationinordertocomplywithapplicablelawsand
withrequestsbytheappropriateauthorities,tooperateoursystemsproperlyorforourownprotectionorthatofotherusers.
RetentionofyourPersonalInformation
Wewillkeepyourpersonalinformationaslongasweneeditforthepurposesforwhichitwasoriginallycollectedorforotherlegitimatepurposes
(suchasregulatorycompliance),orasrequiredbyapplicablelaw .
Toro'sCommitmenttoSecurityofYourPersonalInformation
Wetakereasonableprecautionsinordertoprotectthesecurityofyourpersonalinformation.Wealsotakestepstomaintaintheaccuracyandcurrent
statusofpersonalinformation.
AccessandCorrectionofyourPersonalInformation
Ifyouwouldliketorevieworcorrectyourpersonalinformation,[email protected].
AustralianConsumerLaw
AustraliancustomerswillnddetailsrelatingtotheAustralianConsumerLaweitherinsidetheboxoratyourlocalT oroDealer.
374-0282RevC
Page 48

TheT oroWarranty
ATwo-YearLimitedWarranty
ConditionsandProductsCovered
TheToroCompanyanditsafliate,T oroWarrantyCompany,pursuant
toanagreementbetweenthem,jointlywarrantyourT oroCommercial
product(“Product”)tobefreefromdefectsinmaterialsorworkmanship
fortwoyearsor1500operationalhours*,whicheveroccursrst.This
warrantyisapplicabletoallproductswiththeexceptionofAerators
(refertoseparatewarrantystatementsfortheseproducts).Wherea
warrantableconditionexists,wewillrepairtheProductatnocosttoyou
includingdiagnostics,labor,parts,andtransportation.Thiswarranty
beginsonthedatetheProductisdeliveredtotheoriginalretailpurchaser.
*Productequippedwithanhourmeter.
InstructionsforObtainingWarrantyService
YouareresponsiblefornotifyingtheCommercialProductsDistributoror
AuthorizedCommercialProductsDealerfromwhomyoupurchasedthe
Productassoonasyoubelieveawarrantableconditionexists.Ifyouneed
helplocatingaCommercialProductsDistributororAuthorizedDealer,or
ifyouhavequestionsregardingyourwarrantyrightsorresponsibilities,
youmaycontactusat:
ToroCommercialProductsServiceDepartment
ToroWarrantyCompany
811 1LyndaleAvenueSouth
Bloomington,MN55420-1196
952–888–8801or800–952–2740
E-mail:[email protected]
OwnerResponsibilities
AstheProductowner,youareresponsibleforrequiredmaintenanceand
adjustmentsstatedinyourOperator'sManual.Failuretoperformrequired
maintenanceandadjustmentscanbegroundsfordisallowingawarranty
claim.
ItemsandConditionsNotCovered
Notallproductfailuresormalfunctionsthatoccurduringthewarranty
periodaredefectsinmaterialsorworkmanship.Thiswarrantydoesnot
coverthefollowing:
•Productfailureswhichresultfromtheuseofnon-T ororeplacement
parts,orfrominstallationanduseofadd-on,ormodiednon-Toro
brandedaccessoriesandproducts.Aseparatewarrantymaybe
providedbythemanufactureroftheseitems.
•Productfailureswhichresultfromfailuretoperformrecommended
maintenanceand/oradjustments.Failuretoproperlymaintainyour
ToroproductpertheRecommendedMaintenancelistedinthe
Operator’sManualcanresultinclaimsforwarrantybeingdenied.
•ProductfailureswhichresultfromoperatingtheProductinanabusive,
negligent,orrecklessmanner.
•Partssubjecttoconsumptionthroughuseunlessfoundtobedefective.
Examplesofpartswhichareconsumed,orusedup,duringnormal
Productoperationinclude,butarenotlimitedto,brakepadsand
linings,clutchlinings,blades,reels,rollersandbearings(sealedor
greasable),bedknives,sparkplugs,castorwheelsandbearings,tires,
lters,belts,andcertainsprayercomponentssuchasdiaphragms,
nozzles,andcheckvalves,etc.
•Failurescausedbyoutsideinuence.Conditionsconsideredtobe
outsideinuenceinclude,butarenotlimitedto,weather,storage
practices,contamination,useofunapprovedfuels,coolants,lubricants,
additives,fertilizers,water,orchemicals,etc.
•Failureorperformanceissuesduetotheuseoffuels(e.g.gasoline,
diesel,orbiodiesel)thatdonotconformtotheirrespectiveindustry
standards.
•Normalnoise,vibration,wearandtear ,anddeterioration.
•Normal“wearandtear”includes,butisnotlimitedto,damagetoseats
duetowearorabrasion,wornpaintedsurfaces,scratcheddecalsor
windows,etc.
Parts
Partsscheduledforreplacementasrequiredmaintenancearewarranted
fortheperiodoftimeuptothescheduledreplacementtimeforthatpart.
Partsreplacedunderthiswarrantyarecoveredforthedurationofthe
originalproductwarrantyandbecomethepropertyofT oro.T orowillmake
thenaldecisionwhethertorepairanyexistingpartorassemblyorreplace
it.T oromayuseremanufacturedpartsforwarrantyrepairs.
DeepCycleandLithium-IonBatteryWarranty:
DeepcycleandLithium-Ionbatterieshaveaspeciedtotalnumberof
kilowatt-hourstheycandeliverduringtheirlifetime.Operating,recharging,
andmaintenancetechniquescanextendorreducetotalbatterylife.Asthe
batteriesinthisproductareconsumed,theamountofusefulworkbetween
chargingintervalswillslowlydecreaseuntilthebatteryiscompletelyworn
out.Replacementofwornoutbatteries,duetonormalconsumption,
istheresponsibilityoftheproductowner.Batteryreplacementmaybe
requiredduringthenormalproductwarrantyperiodatowner’sexpense.
Note:(Lithium-Ionbatteryonly):ALithium-Ionbatteryhasapartonly
proratedwarrantybeginningyear3throughyear5basedonthetime
inserviceandkilowatthoursused.RefertotheOperator'sManualfor
additionalinformation.
MaintenanceisatOwner’sExpense
Enginetune-up,lubrication,cleaningandpolishing,replacementoflters,
coolant,andcompletingrecommendedmaintenancearesomeofthe
normalservicesT oroproductsrequirethatareattheowner’sexpense.
GeneralConditions
RepairbyanAuthorizedToroDistributororDealerisyoursoleremedy
underthiswarranty.
NeitherTheToroCompanynorToroWarrantyCompanyisliablefor
indirect,incidentalorconsequentialdamagesinconnectionwiththe
useoftheToroProductscoveredbythiswarranty,includingany
costorexpenseofprovidingsubstituteequipmentorserviceduring
reasonableperiodsofmalfunctionornon-usependingcompletion
ofrepairsunderthiswarranty.ExceptfortheEmissionswarranty
referencedbelow,ifapplicable,thereisnootherexpresswarranty.All
impliedwarrantiesofmerchantabilityandtnessforusearelimitedto
thedurationofthisexpresswarranty.
Somestatesdonotallowexclusionsofincidentalorconsequential
damages,orlimitationsonhowlonganimpliedwarrantylasts,sotheabove
exclusionsandlimitationsmaynotapplytoyou.Thiswarrantygivesyou
speciclegalrights,andyoumayalsohaveotherrightswhichvaryfrom
statetostate.
Noteregardingenginewarranty:
TheEmissionsControlSystemonyourProductmaybecoveredby
aseparatewarrantymeetingrequirementsestablishedbytheU.S.
EnvironmentalProtectionAgency(EP A)and/ortheCaliforniaAirResources
Board(CARB).Thehourlimitationssetforthabovedonotapplytothe
EmissionsControlSystemWarranty.RefertotheEngineEmissionControl
WarrantyStatementsuppliedwithyourproductorcontainedintheengine
manufacturer’sdocumentationfordetails
CountriesOtherthantheUnitedStatesorCanada
CustomerswhohavepurchasedT oroproductsexportedfromtheUnitedStatesorCanadashouldcontacttheirT oroDistributor(Dealer)toobtain
guaranteepoliciesforyourcountry ,province,orstate.IfforanyreasonyouaredissatisedwithyourDistributor'sserviceorhavedifcultyobtaining
guaranteeinformation,contacttheT oroimporter.
374-0253RevD
 Loading...