

Page 1

Note: This is a pre-release document.
Therefore, the content of this document
is subject to change without notice.
Page 2

iii
i
IMPORTANT NOTICE TO INSTALLER:
ACCEPTANCE OF THE TERMS OF THIS SENTINEL WMS SOFTWARE END-USER
AGREEMENT IS REQUIRED PRIOR TO THE INSTALLATION OF THIS SOFTWARE.
This Sentinel WMS software (Software) End-User (Customer) License Agreement (License
Agreement) is a legal agreement between the Customer (either individually or acting as an agent
for a single entity) and The Toro Company. By installing, or otherwise using the Software, the
Customer agrees to be bound by the terms of this License Agreement. If the Customer does not
agree to its terms, the installation process should be exited and the Toro Distributor or The Toro
Company contacted.
1. Software License Grant
The Customer is granted a non-exclusive, non-transferable license to use the Software
subject to the restrictions and terms set forth in this License Agreement. Customer will not
use or make any copies of the Software, in whole or in part, except to the extent necessary
for the operation of a single actual or a single virtual irrigation system. Customer agrees
that this license is otherwise site-specific and shall not be used beyond one single pc-based
controller. Any copies allowed under this License Agreement must include all notices and
markings, including copyright, trademark, and other proprietary notices as on the
original, and must remain in the possession and control of the Customer.
2. Restrictions
The only right granted to Customer is the right to use the Software in accordance with this
License Agreement. All rights not expressly granted to Customer in this License
Agreement are specifically reserved to The Toro Company. Customer does not receive or
acquire any right, title, or interest to the Software, or to any applicable patents,
trademarks, copyrights, or trade-secrets. Customer may not remove or alter any
proprietary notices, labels, or trademarks on the Software or accompanying
documentation. Customer may not modify, translate, copy, reproduce, reverse engineer,
disassemble, decompile, or otherwise derive source code from the Software or
accompanying documentation, or use it as a basis for the preparation of other software
programs or derivative works, or use it in any manner that infringes the intellectual
property or other rights of The Toro Company or another party, except as permitted
hereunder or under applicable law. The Software may not be transmitted electronically,
including over the Internet, rented, loaned, leased, sold, distributed, made available,
directly or indirectly, for use by any other person or entity not covered by this License
Agreement, used by third parties in a service bureau or otherwise transferred, transmitted
or used without authorization under this License Agreement.
3. Termination
Any failure to comply with the terms and conditions of this License Agreement shall
result in automatic termination of this license, in which case the Customer must destroy
all copies of the Software and accompanying documentation.
4. Communication of License Agreement and Unauthorized Use and Compliance
Customer agrees to communicate the terms and restrictions contained in this License
Agreement to all persons under his or her employment, direction, or control who have
access to the Software or accompanying documentation.
Customer shall take reasonable efforts to prevent use of Software by any person or entity
other than Customer or employee(s) of Customer. Customer shall use all reasonable efforts
to see that employees, agents, assigns, or other person under the direction or control of
Customer who have access to the Software or accompanying documentation abide by the
terms and conditions of this License Agreement. Customer agrees to notify The Toro
Company immediately in writing of any unauthorized use.
5. Limited Warranty
The Toro Company warrants that the Software media (storage device for software
content, such as a CD) will be free from defects for the term of the warranty period as
stated in the Toro NSN
documentation are provided without warranty of any kind. The Toro Company
specifically does not warrant that the Software will run uninterrupted or error-free. The
sole and exclusive remedy for a defect in the Software media is for Customer to notify
Toro NSN
Company's sole obligation shall be to provide a Customer with a performing copy of the
Software media within a reasonable time after receiving notification of the defect.
6. Disclaimer of Other Warranties
THE LIMITED WARRANTY SET FORTH IN SECTION 5. IS IN LIEU OF ANY OTHER
WARRANTIES, INCLUDING ANY WARRANTIES PROVIDED BY DISTRIBUTORS OF
THE TORO COMPANY. THE SOFTWARE IS PROVIDED ON AN "AS IS" BASIS, AND
ALL OTHER WARRANTIES AND CONDITIONS, WHETHER EXPRESS, IMPLIED, OR
COLLATERALARE DISCLAIMED, INCLUDING, WITHOUT LIMITATION, NONINFRINGEMENT, COMPATIBILITY, OR THAT THE SOFTWARE IS ERROR-FREE, OR
THAT ERRORS CAN OR WILL BE CORRECTED. THE TORO COMPANY
SPECIFICALLY DISCLAIMS ANY IMPLIED WARRANTIES OF MERCHANTABILITY
AND FITNESS FOR A PARTICULAR PURPOSE. SOME JURISDICTIONS, STATES, OR
PROVINCES DO NOT ALLOW LIMITATIONS ON IMPLIED WARRANTIES, SO THE
ABOVE LIMITATION MAY NOT APPLY TO PARTICULAR CUSTOMERS.
7. Software Service Packs
At The Toro Company's sole discretion and in order to maintain the integrity of its
Software, The Toro Company may provide Customer with service packs (Software fixes
for recognized issues) at no charge. Customer may refuse to accept the service packs
should such service packs become available. The terms and conditions of this License
Agreement apply to any and all service packs and any additional terms and conditions
that may apply at that time.
Successive computer Software releases, in development at the time of issuance of this
License Agreement or to be developed at a later date, by any manufacturer are not
provided as a part of this License Agreement.
The Toro Company retains the right but not the obligation to provide at The Toro
Company's sole discretion, for a fee, Sentinel water management system enhancement
modules (Software enhancements that deliver additional functionality or support new
irrigation products connected to Sentinel). Customer is not under obligation by terms of
this License Agreement to purchase these enhancement modules should such modules
become available.
®
of the defect within the respective warranty period for replacement. The Toro
®
Service Agreement and Warranty. The Software and any related
Page 3

8. Customer Responsibility for the Software
Customer is solely responsible for selection of the Software to achieve Customer's
intended results or for particular applications. The Toro Company is not responsible for
lost or stolen Software.
9. Limitations of Liability
Regardless of whether any remedy fails of its essential purpose, in no event shall The Toro
Company or any entity which controls, is controlled by, or is under common control of
The Toro Company be liable to a Customer for any special, indirect, incidental,
consequential, or punitive damages, including, but not limited to, any lost data, lost fees,
lost revenue or profits, or expenses of any kind arising from installation or use of the
Software or accompanying documentation in any manner, however caused and on any
theory of liability. In any event, The Toro Company’s liability relating to the Software shall
be limited to $5.00 dollars. These limitations will apply even if The Toro Company or an
authorized distributor has been advised of such possible damages. Some jurisdictions,
states, or provinces do not allow the exclusion or limitation of incidental or consequential
damages, so the limitation or exclusion included in this License Agreement many not
apply to particular Customers.
10. Severability
If any provision of this License Agreement is declared by a court of competent jurisdiction
to be invalid for any reason, such invalidity shall not affect the remaining provisions.
11. Governing Law and Jurisdiction
This License Agreement shall be governed by the laws of the State of California. Customer
agrees that the District Court for the City and County of Riverside shall have jurisdiction
and venue over any dispute arising out of this License Agreement and Customer's use of
this Software. The prevailing party shall be awarded reasonable costs for any legal
proceedings relating to this License Agreement including reasonable attorney's fees and
costs.
12. Export Restrictions
Customer shall not export or transmit, directly or indirectly, any technical data or products
received from The Toro Company to any country to which such export or transmission is
restricted by regulation or statue of the United States government. Customer shall comply
with all applicable export regulations.
13. Geographic Restrictions
If the Software packaging includes a region description or definition, the Software is
licensed for use only in that geographic region. Customer agrees to use the Software only
in this geographic region. Any use of the Software outside of this geographic region
without the prior written consent of The Toro Company is strictly prohibited.
14. Survival
The provisions of Sections 2, 5, 6, 9, 10, 11 and 12 and any other provisions which by their
nature continue after termination, shall survive termination of this License Agreement.
15. Transfer/Assignment
Customer shall not assign or transfer this License Agreement, or any part thereof, whether
directly or indirectly (including, without limitation, through a transfer of Customer's
shares or for any other r
The Toro Company.
eason including bankr
uptcy) without the prior written consent of
16. Entire License Agreement
This License Agreement constitutes the entire agreement between parties pertaining to
the subject matter hereof and supercedes all prior representations, warranties,
conditions, agreements, and understandings, whether oral or written, expressed or
implied, relating to this License Agreement. No supplement, modifications, or waiver of
this License Agreement shall be effective unless it is provided or approved by an
authorized representative of The Toro Company in writing.
17. Copyright and Other Intellectual Rights
The Software is protected by copyright and other intellectual property laws and treaties.
The Toro Company or its suppliers own the title, copyright, and other intellectual
property rights in the Software. The Software is licensed, not sold.
18. Permission to Contact
Customer expressly grants permission to The Toro Company to contact Customer,
whether directly or electronically, regarding technical or product and service information regarding the Software or the central control system. Customer understands that
this permission can be revoked by contacting The Toro Company.
19. Clients Regulatory Responsibilities
Regarding all radio communications system(s) and related components purchased from
The Toro Company, it is the sole responsibility of the client, not Toro, to obtain and incur
the cost of all licenses and/or permits necessary to comply with all construction, zoning,
and clearance codes regulated by the city council, city zoning board, building/inspection
department, county commission, county zoning board, state and federal government
regulatory agencies including, but not limited to, the Federal Communications
Commission (FCC), the Federal Aviation Administration (FAA) and the Environmental
Protection Agency (EPA).
iiiii
i
Page 4

Table of Contents
iiv
v
End-user Agreement Terms. . . . . . . . . . . . . . . . . . . . . . . . . . ii
Welcome to Sentinel WMS . . . . . . . . . . . . . . . . . . . . . . . . . . 1
– Getting Started. . . . . . . . . . . . . . . . . . . . . . . . . . . . . . . . . 2
1
Part 1 – Hardware and Software Requirements . . . . . . . . . . . . . . . 2
Part 2 – Software Installation . . . . . . . . . . . . . . . . . . . . . . . . . . . . . . 2
– Sentinel WMS System Setup . . . . . . . . . . . . . . . . . . . . . 4
2
Part 1 – The Sentinel WMS Program Window . . . . . . . . . . . . . . . . . 4
Part 2 – Sentinel WMS Program Setup . . . . . . . . . . . . . . . . . . . . . . 5
– Satellite Setup . . . . . . . . . . . . . . . . . . . . . . . . . . . . . . . . . 8
3
Part 1 – Creating Satellites . . . . . . . . . . . . . . . . . . . . . . . . . . . . . . . . 8
Part 2 – Satellite Special Data Setup . . . . . . . . . . . . . . . . . . . . . . . . 9
Part 3 – Synchronize Time and Day . . . . . . . . . . . . . . . . . . . . . . . . 14
Part 4 – Zone Data Edeitor . . . . . . . . . . . . . . . . . . . . . . . . . . . . . . . 14
– Satellite Programming. . . . . . . . . . . . . . . . . . . . . . . . . . 16
4
Part 1 – Programming Satellites for Automatic Operations. . . . . 16
Part 2 – Checking Unsent Changes . . . . . . . . . . . . . . . . . . . . . . . . 21
– Satellite Systems . . . . . . . . . . . . . . . . . . . . . . . . . . . . . . 30
7
Part 1 – Creating Satellite Systems . . . . . . . . . . . . . . . . . . . . . . . . 30
Part 2 – Working with Multiple Satellites . . . . . . . . . . . . . . . . . . . . 31
– Sentinel Watcher Operations . . . . . . . . . . . . . . . . . . . . 32
8
Part 1 – Enabling the Sentinel Watcher . . . . . . . . . . . . . . . . . . . . . 32
Part 2 – Configuring Watcher Operations . . . . . . . . . . . . . . . . . . . 32
– Working with Weather Sources . . . . . . . . . . . . . . . . . . 34
9
Part 1 – Creating a Weather Station . . . . . . . . . . . . . . . . . . . . . . . . 34
Part 2 – Configuring a Weather Station . . . . . . . . . . . . . . . . . . . . . 35
Part 3 – Creating a Weather Monitor . . . . . . . . . . . . . . . . . . . . . . . 38
Part 4 – Checking the Weather Source . . . . . . . . . . . . . . . . . . . . . 39
– Satellite Reports . . . . . . . . . . . . . . . . . . . . . . . . . . . . . . 22
5
Part 1 – Hydro Report . . . . . . . . . . . . . . . . . . . . . . . . . . . . . . . . . . . 22
Part 2 – Flow Graph Report. . . . . . . . . . . . . . . . . . . . . . . . . . . . . . . 22
– Satellite Operation and Status . . . . . . . . . . . . . . . . . . . 24
6
Part 1 – Map View Features . . . . . . . . . . . . . . . . . . . . . . . . . . . . . . . 24
art 2 – Manual Operations/Output Status . . . . . . . . . . . . . . . . . . 25
P
Part 3 – Alarms . . . . . . . . . . . . . . . . . . . . . . . . . . . . . . . . . . . . . . . . . 26
. . . . . . . . . . . . . . . . . . . . . . . . . . . . . . . . . . . . . .
Part 4 – Rain Da
Part 5 – Percent Scale . . . . . . . . . . . . . . . . . . . . . . . . . . . . . . . . . . . 29
ys
28
Page 5

Welcome to Sentinel WMS Central System
The Challenge: Effective Water Management
Putting together an efficient irrigation system is no small task. Concerns such
as watering precision, broken pipes and mainlines or dealing with electrical
shorts and power outrages have been problematic for landscape managers for
decades. These, along with increased competition for water supplies, scarcity
of resources, and recent irrigation mandates, have left those in irrigation
management roles searching for the most efficient, yet simple way of
combating all of these issues.
The Solution: Sentinel WMS Central Control
Multiple Site Applications: Sentinel provides the ability to program, control
and monitor multiple remote controllers from one location. Whether controlling
one large, contiguous site like a sports complex or housing association, or
multiple remote sites like a school district or parks & recreation department, a
central control system provides easy, rapid access to the irrigation system from a
computer.
System Control: Sentinel WMS allows all irrigation control actions to be
carried out easily and efficiently from a central location. Control actions such as
adjusting run times to changing weather conditions or stopping irrigation in the
event of rain or high wind can be automatically accomplished without requiring
a technician to visit individual controllers. However, if a technician is on-site
and sees a need for programming changes, like shortening run times after a
grow-in period, true two-way communications allow changes to the program at
the field controller on-site and can also be uploaded to the central computer.
Sensor Integration: Sentinel can incorporate many different sensors,
including flow sensors, tipping rain cans, wind sensors, freeze sensors, and
full weather stations. These sensors and instruments monitor site and climate
conditions and report to the central computer. Run time adjustments are
automatically made based on these inputs and combined with information on
plant material and soil types. Sentinel Satellites can react automatically to
readings outside of pre-defined limits set by the system operator, like
isolating stations when excessive flow indicates a piping break.
Multiple Communication Options: A Sentinel WMS system consists of a
central computer, irrigation controllers, sensors, weather stations, and a
communication system that ties it all together. No matter whether the central
computer is located on site or at a r
like radio, telephone, and Ethernet can be mixed and matched to meet system
communication needs.
emote location, communication options
Ease of Use: Sentinel WMS is fully-featured yet intuitively designed for ease
of use, and it’s one of the most powerful irrigation control systems ever
offered. Information is graphically displayed—so it’s easy to see and use. All
similar functions are grouped together, making it simple to find, change and
enter data quickly.
Program Interface: The friendly design of the Sentinel WMS program
interface provides easy, point-and-click access to all programming functions—
no extra keystrokes or sequences required and no extensive searching for
functions.
Automatic Operations: Daily operations and scheduling are made quick and
easy with automatic operations. All essential programming information is
contained in one window so it’s easy to understand and manage.
Customer-driven Features for Optimal Water Management:
-based irrigation contr
ET
•
• Operating setup parameters to the station output level
• Robust alarm and reporting capabilities
ent and historical water-usage data review capabilities
• Curr
• Dynamic map-based operational reference capabilities
• Extensive use of visual cues and intuitive tool sets
ol featur
es
1
1
Page 6
1
4
2
5
6
3
7
8
11
10
9
Getting Started
1
2
2
In this Chapter:
Part 1 – Hardware/Software Requirements
Part 2 – Software Installation
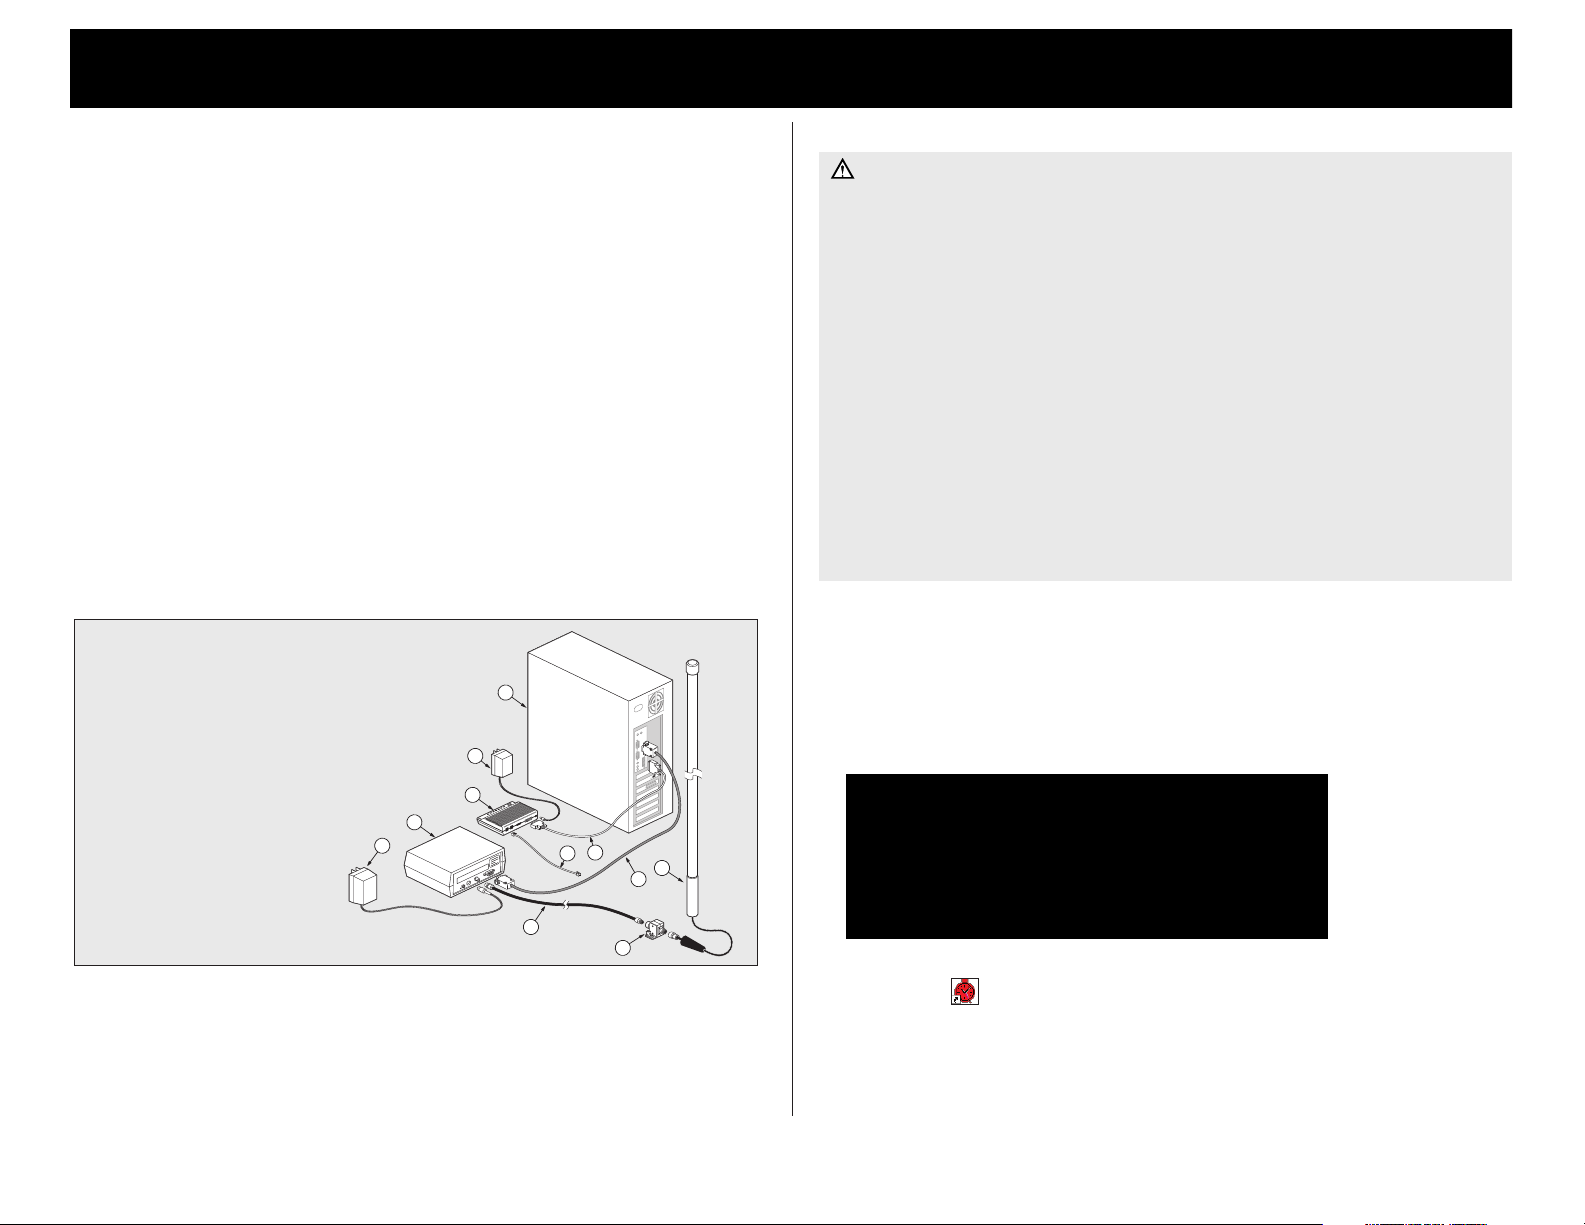
Sentinel Water Management System is comprised of the Sentinel WMS software
running on a central computer and a system of Sentinel field satellite controllers.
The central software and computer are used to program, monitor and remotely
operate the Sentinel field satellites.
Part 1 – Hardware/Software Requirements
The following recommended computer hardware and software components are
required for proper operation of the Sentinel WMS software the Sentinel WMS
irrigation control system.
• Pentium IV, 1.5GHz CPU (or equivalent)
• 512 MB of RAM
• 256 Color display with 1680 x 1050 (preferred) or 1280 x 1024 resolution.
• Dedicated serial port for central interface (primary method) or USB to serial
cable (secondary method)
• Network adapter
• CD ROM drive
1 – CPU
2 – CPU Serial Cable Assembly
3 – Phone Modem (56K or faster)
4 – Modem Power Supply
5 – Modem Serial Cable
6 – Modem Phone Line Cable
7 – Sentinel Central Interface Module
8 – Interface Module Power Supply
9 – Mast Antenna
10 – Antenna Surge Arrestor
11 – Antenna Cable
Part 2 – Software Installation
Important: If a previous version of the Sentinel program is installed,
remove the program using the Add/Remove Programs control panel
function. This process will leave the Sentinel folder intact, various support
files including the configuration file, database(s) and data log(s). To perform
a complete installation, delete the Sentinel folder after removing the
program.
The Sentinel WMS program is primarily designed to run on the Windows XP
operating system. Sentinel WMS software will run on Windows 2000 OS
if MDAC 2.6 SP1 framework is installed first. The MDAC 2.6 SP1 software
is provided in the Microsoft folder on the Sentinel WMS installation disk.
Microsoft .Net Framework 2.0 client must installed to enable Sentinel WMS
software installation. During the installation process, you will be prompted
to download and install the required software. If internet access is not
available, .Net Framework 2.0 client software is provided in the Microsoft
folder on the Sentinel WMS installation disk.
For technical assistance, contact the Toro National Support Network (NSN)
at 1-800-275-8676.
1. To begin, insert the Sentinel WMS software installation disk into the disk
drive. The Sentinel WMS Setup Wizard will open automatically to guide
you through the software setup process.
Note: During initial Sentinel WMS software startup, a dialog box will ask to
load the software configuration file. Simply choose OK to continue the
software setup process.
Software Requirements
• Microsoft®Windows®XP Operating System*
• Microsoft .NETTMFramework 2.0 (provided)
• Sentinel WMS 3.1 (provided)
*Windows is a registered trademark of Microsoft Corporation in the United States and other countries.
2. When the software installation is complete, the Sentinel WMS program
star
tup icon
will be installed on the desktop. Double-click the icon to
launch the Sentinel WMS program.
Page 7

3. The Software Setup window will automatically open the first time WMS
software is launched to enable a Sentinel database to be located or created.
4. Choose the Database tab to display the database setup options. To load
an existing database file (.mdb), browse to the file location, select the file
and choose Open. The file name will appear in the Location of Sentinel
Database
5. To create a new database file, choose the Create New Database button.
6. Browse to the Sentinel WMS folder (C:\Program Files\Sentinel WMS).
text field. Choose Save and Close, then continue on page 4.
8. The database file name will appear in the
text field. Choose Save and Close.
Note: When database setup has been completed, the Software Setup
window will close. The Software Setup window can be selected in the
Main Menu options or by choosing the Setup button in the program
window toolbar.
Location of Sentinel Database
7. Enter a database file name; i.e., Lakeside Park, then choose
Save.
3
3
Page 8

Sentinel WMS System Setup
2
4
4
In this Chapter:
Part 1 – The Sentinel WMS Program Window
Part 2 – Sentinel WMS Program Setup
The first part of this chapter provides an introduction to the Sentinel WMS
program interface features and walks you through the various setup and
configuration steps required for basic operations. The second part provides
the initial steps required to create satellite controllers in the Sentinel WMS
satellite database.
Part 1 – The Sentinel WMS Program Window
The program window consists of five main components as follows:
1 – Main Menu Bar and Toolbar
The Main Menu bar and toolbar provide access to all software- and systemlevel features and consists of the Main Menu options, Window configuration
options and Communication Send/Receive commands.
The toolbar buttons mirror the most commonly used functions of the Main
Menu bar in a point-and-click selection format.
The Setup button selects the Software Setup window for Sentinel WMS
program setup features and options.
The Manage button selects the Manage Systems and Units window used
for creating satellites and satellite systems in the Sentinel WMS database.
The Schedule button selects the Flow Optimizer/Scheduler window used
to optimize Program starts based on demand and flow limit without
changing station order within the Program.
The Log button selects to the Events Log file. Events are logged from any
window with the Log Results option selected as well as all scheduled
operations. Choosing the Log button opens the file in a Word document format.
The Send All and Receive All data transfer buttons apply to all open
windows for system-wide communications.
2 – The Selection Panel
The selection panel provides easy access to the irrigation operations database
entries for Satellites, Systems and Weather Sources. Access to the database is
provided through an expanding-tree format enabling all levels of data entry
to be easily defined and selected.
Note: The Selection panel Hide button toggles the panel open and closed.
The drop-down menu on the left side of the Status bar provides options to
open and close the Information panel, or close both panels simultaneously for
maximum Workspace area.
3 – The Workspace
The workspace is the area where all program windows are opened. Optional
colors and graphics can be selected in the Setup window to personalize this
area. An unlimited number of windows can be opened at the same time—
including multiple copies of the same window!
Several tools are provided to help manage the multi-window workspace:
Close All , Cascade , Tile Vertically and Tile Horizontally .
4 – The Information Panel
All program actions are displayed in the History tab of the Information Panel.
The information posted on this panel is for reference only, and is not saved.
The Data Table page lists all data sent and received when the Sentinel WMS
is open. Use the Erase tool to clear the Information Panel.
5 – The Status Bar
The Status Bar tracks and displays all actions, including alarms, that affect
the database. Since the status bar is always visible, the information displayed
is particularly useful when the information panel is hidden or messages are
olled out of view.
scr
Page 9

Part 2 – Sentinel WMS Program Setup
The following procedures describe how to set up various Sentinel WMS
program operating characteristics and user preferences.
1. To begin, choose the Setup button in the toolbar to open the Software
Setup window. The Software Setup window will open at the General tab.
The Watcher Operations Tabs
Note: Bypass the Watcher Operations tab at this time. Prior to using this
feature, refer to “Chapter 8 - Sentinel Watcher Operations” for details.
The Notifications Tab
1. Enter the SMTP Server Uniform Resource Locator (URL) address if you
have access to a SMTP Server for e-mail. Sentinel WMS can use the
server to send emails for weather related operations including the results
of nightly ET & Rain polling and rainfall monitoring activity.
Note: If the URL address is not known, refer your e-mail client application
settings. E-mail support is currently limited to e-mail notifications sent
during the ET based watering station polling and satellite upload.
The General
1. In the Organization Name text box, enter any designation that you prefer
to appear next to Sentinel WMS in the program window title bar.
2. To change the workspace
browse to the file (.jpg or .bmp) location and choose open.
3. To superimpose a watermark (logo) or other graphic image (.jpg or .bmp)
on the system Flow Graph image, the file must be located in
Files\Sentinel. Select the file and choose Open.
4. Select the number of Communication Re-attempts from None to 5.
5. The Schedule Reference Date (SRD) corresponds to a date during
week 1 of a 6-week schedule. The SRD allows the 6-week schedule to be
superimposed on the calendar. The software uses the SRD to calculate the
week number when synchronizing the time and date.
Note: Choose Save and the software will record changes made to all tabs.
If you intend to change the database, make the change and choose Save
before changing any others.
Tab
Background Image from the default Toro Logo,
C:\Program
2. E-mail notifications sent by Sentinel WMS will contain the Mail From:
address. Ideally, enter the e-mail address of the person maintaining the list
of e-mail recipients. If a user wishes to be removed from the mailing list,
they can simply reply to the notification.
Note: The Mail From address should be in the form of
<something>@your_domain.
(continued)
5
5
Page 10

3. Some SMTP servers require a user Authentication in order to send
e-mail. If required, select either SMTP or POP-before-SMTP. If not
required, select None Required from the drop down menu.
4. Both authentication options require a user name and password to be
entered. Enter a
5. Two Mail To options are provided. Select All notifications sent to: to direct
all e-mail to the address(es) entered in this window. Or select Notifications
sent to individual addresses specified for each station:
individual weather monitoring sources to specific e-mail address.
Note: When entering multiple e-mail address, a semicolon or comma must be
used (without spaces) between recipients. If you are not sure which separator
to use, some trial and error may be required to send a successful test e-mail.
User name and Password in the text boxes provided
to direct
2. For Log File Options, choose Append new logs to file to compile an allinclusinve file for data log entries, or Create a new log daily to record a
new data log file each day. (Daily log files will be dated for identification.)
3. Choose the Log Results box to automatically select data logging for all
screens that offer the Log Results option.
The Startup Tab
The settings on the Startup tab are used during startup and initialization.
6
6
6. Once all of the notification information is entered, choose the Send Test
Notification to these addresses:
Note: Sending e-mail in HTML format is not currently supported.
to verify proper set up and functionality.
Logging Tab
The setup options pr
log file and select the preferred method of organizing data entries.
1. Enter a name for the data log file (must have an .rtf file extension.)
ovided on the
Logging tab enable you to name the data
The selections in the
1.
database tree
Or, to filter (limit) the database tree to only satellites within a specific System,
choose the System Descr
.
Lea
e the
v
Unit List deter
Filter bo
iption from the drop-down menu.
mine the behavior of the Selection panel
lank to list all satellites in the database
x b
.
Page 11

2. Choose Unit List Sort Order by Unit Code number or Unit Description.
3. Choose the Allow multiple unit nodes to be expanded option to enable
the database tree to be expanded /collapsed when selecting a field unit.
Note: Skip the Watcher setup options at this time. Refer to “Chapter 8 -
Sentinel Watcher Operations” for detailed information.
4. English is the default screen Language. Use the drop-down menu to
select French, Italian, Spanish or Chinese as preferred.
Note: Sentinel WMS program must be restarted to initiate a change in the
language format.
5. Selecting Hide Information Panel on Startup prompts the Information Panel
to be hidden when launchig the WMS program.
The Database Tab
Note: Refer to page 3 for Database setup information.
3. Choose a color swatch or the Define Custom Colors button to display
and select from the advanced color-selection options.
4. Choose OK to close the window. The selected color will be shown in the
color box. Choose Save to display the changes.
The Units Tab
The options provided on the Units tab determine which measurement system
the Sentinel WMS software will use as a basis to calculate and display
measured or calculated data.
1. Choose the English or Metric Units System and Flow Units in GPM, LPM
or M3/H.
Note: Ensure the preferred units options are selected before performing
any satellite setup or programming procedures.
The View
The options provided on the View tab enable you to customize your workspace
by changing the color(s) and/or graphic image.
1. To change the workspace Background Image from the default Toro Logo,
browse to the file (.jpg or .bmp) location and choose open.
Note: The image file must be stored in the folder specified on software
setup. General tab - Map / Image file location.
2. To change the background color(s), choose the Color From or Color To
color box. The color-selection utility window will open automatically.
Note: Color From and Color To indicates the color gradation from top left
to botom right. If the selected image fills the entire workspace, the
background color will not be visible.
Tab
7
7
Page 12
Satellite Setup
3
8
8
In this Chapter:
Part 1 – Creating Satellites
Part 2 – Satellite Special Data Setup
Part 3 – Synchronize Time and Day
Part 4 – Zone Data Editor
The satellite operations database is comprised of four primary functions:
Setup, Programming, Reports, and Operations & Status. Within this chapter,
all of the required satellite Setup parameters will be completed in preparation
for the irrigation programming procedures.
Part 1 – Creating Satellites
Note: The terms “Satellite”, “Unit” and “Field Unit” are used synonymously within
the Sentinel WMS program interface and User Guide.
1. To begin, open the Manage - Systems and Units window by choosing the
Manage button in the Program Toolbar.
5. As shown in the example below, the satellite is now created in the Master
List of the satellite database file. Either minimize the window if additional
satellites will be created later in this session, or choose
Note: All data entry windows have standard-convention Windows control
buttons in the top right corner. When minimized, the window will align to the
lower edge of the workspace.
About Window Toolbar Features
Most of the Windows you will be working with in the Sentinel WMS program
setup and operation have the following set of toolbar buttons for easy access
to the most commonly used functions:
Receive – Directs Sentinel WMS software to receive data from
the selected satellite. The results of the data transfer are then displayed on
window a Results tab or panel.
Send
–
Sends the contents of the window to the selected satellite.
Close.
.
2. On the Master List (all units in database) side of the window, choose the
add button to display the Add New Unit window as shown below.
Note: Each satellite must have a unique,
3-digit code to be created in the satellite
database. If a description is also assigned,
be sure to use a naming convention that
will be consistent for all satellites, enabling
a thorough database search by satellite
code or description.
3. Enter a 3-digit Unit Code ranging from 001 to 999.
4. Enter a name or brief description of the satellite in the text box provided,
then choose
OK.
Save
Refresh – Reloads the last data saved from the window to the
database (or default settings if user settings have not been saved).
–
Saves the window content to the database.
Page 13

Part 2 – Satellite Special Data Setup
As you can see by the Satellite database tree represented in the example
below, the Special Data window is one of three satellite setup windows
within the main Setup directory. The majority of all required and optional
satellite operating and communication settings are located on the tabbed
pages of the Special Data window.
1. Select a field unit by either entering its 3-digit address code in the green
box next to Unit:, or choose the address code listed under All Units.
Note: The directory tree will expand/contract each time directory is selected.
Setup Communication Parameters
1. Choose the Comm Settings tab.
2. Choose the communication (Comm) port of the phone modem, central
interface, or satellite (if connected directly). If the Comm port number is
higher than 4, select the Connect Using option and enter the Comm
Port number; i.e., COM6.
2. Choose Special Data from the Setup directory to open the Special Data
window.
3. For 2-Wire TDC system (only), select
shown above.
Note: Two-way communications between the Sentinel WMS software and
the field control unit(s) must be established first to enable all remaining
setup selections to be entered.
Initial field unit setup procedures m
• Setup communication parameters
• Transfer the field unit firmware version
• Complete the required setup procedures.
2-Wire/Irritrol mode check box as
wing order:
ust be completed in the f
ollo
3. If applicable, select a Comm port setup profile from the drop-down menu.
4. Enter the Phone Modem Initialization String.
5. Enter to the Field Access Phone number of the satellite communicates
via a phone modem.
Note: If this setting is not known, try entering AT&FE0DT or ATE0DT,
or contact Toro NSN for assistance at 1-800-275-8676.
6. Enter the Field Access URL.
Note: This is the IP and Port address of an Ethernet connection,
for example, 10.0.0.4:10001. The address can also be entered in URL
format; i.e., www.hostname.com:10001.
7. Enter a Post Dial (initiation) String if applicable.
or MaxStream
F
8.
and the STL radio escape sequence.
9. Select
Choose Saveto enter the selections
10.
Packet Comm if applicable (firmware V1.43/2.43 and above).
TM
adio setup
r
,
enter the Destination radio sour
.
ce ad
dress
9
9
Page 14

110
0
Completing the Satellite Setup Procedures
To complete the satellite setup procedures, work through all tabbed pages of
Special Data window.
the
Note: Following the tabbed sequence of the Special Data window is
recommended to ensure that all data entry fields are completed as necessary.
The General Tab
This procedure will establish two-way communications as well as ensure that
the Sentinel WMS software will function properly with the current satellite
firmware version.
1. Choose the General tab. The Firmware Version and Checksum data
fields will be blank.
2. Choose the
Receive button to initiate the upload process from the satellite.
Important: When updating satellite firmware, the new firmware data
must be received by the Sentinel WMS software to ensure proper
operation.
4. Select the Max Stations On number based on the number of satellite
station outputs that can be operated simultaneously without exceeding the
capacity of the satellite.
Note: Exceeding the satellite capacity can trigger an alarm condition.
5. Choose the physical Station Count of the satellite.
6. Browse to the location of the map image file (.jpg or .bmp) to appear on
the map window and choose Open.
Note: The image file must be stored in the following location to be
accessible by the Sentinel software: C:\Program Files\Sentinel.
7. Enter the Day Change Time for Irrigation Day option best suited for
irrigation scheduling.
Note: This setting is critical when current Time and Day are synchronized
with the irrigation watering schedule.
The Global Tab
The settings in the Global page enable Precipitation Units, Flow Units and
Language preferences to be selected.
Note: It is recommended that you choose the same units settings selected
within the Software Setup>Units tab.
3. Upon receiving the firmware data from the satellite, choose
Note: The Receive and Send toolbar buttons will be grayed out (inactive)
until a communications link has been established. When communications
is confirmed, the arrow icons will become green (active).
If the arrows remain inactive, either the firmware data has yet not been
saved, or the firmware version is below the minimum requirements for
communications.
Save to continue.
Page 15

The Flow Meter Tab
The Alarm Input Tab
1. Enter the K- Factor and Offset values per the flowmeter specifications.
2. Select optional Flow Watch alarm parameters as applicable: Zero Flow,
Low Flow, High Flow, and Unexpected Flow>Mainline Alarm Transition
Threshold.
Note: Zero- and High-Flow options require firmware versions 1.43/2.43
and above. Unexpected Flow option requires version 1.41 and above.
Note: The Learn (Flow Watch) option requires each satellite station to
have a minimum run time of 3 minutes. The
option postpones flow meter data acquisition for a selected time period
(30-minute default).
Note: The Minimum Flow (Low Flow) value is used in Fixed mode only.
A flow rate below this value will set a Master Minimum flow alarm
Note: Flow rates above the Unexpected Flow>Mainline Alarm
alue will be considered mainline f
Transition Threshold
the
Master Maximum alarm to be set and further irrigation to be
suspended. Flows rates belowthis threshold will set the Une
Flow
alarm (infor
scheduled.
v
mational only), allo
wing irr
Flow Stabilization Delay(s)
, causing
ailures
xpected
igation to continue as
1. The Assert alarm on input change to options enable the alarm input to
be triggered when the sensor contacts open (normally-closed) or close
(normally-open). Select neither to ignore or external alarm input.
2. Choose to Start or Stop automatic programs as preferred.
Note: Alarm input options are based on program Clusters A, B, C and D, not
by individual program; i.e., Cluster A controls programs A1, A2, A3 and A4.
111
1
Page 16

112
2
The Field Modem Tab
The settings on this tab are provided for satellite communication using a
telephone modem connected via the serial interface.
The Auxiliary Pump Tab
The settings on this tab enable you to designate a specific station output
within a specific program (or programs) to activate auxiliary equipment, such
as a pump start relay.
1. The Field Modem Initialization String is sent to the modem upon power
reset of the satellite. Enter the modem initialization string or choose the
(...) button to select an option from the drop-down menu.
2. The paging functions require a satellite phone modem hardware
connection and active pager number. Enter the Number to page in the
text field.
3. Check the box of each Page On alarm code to be automatically forwarded
to the pager.
1. Enter the station number to be the Output designated as auxiliary pump
in the text field.
2. Select the associated Program check box for the
auxiliary pump.
Programs that activate
Page 17

The ET Tab
The settings on ET (evapotranspiration) tab are provided for programs that
utilize ET data to determine run time.
1. Enter the Maximum allowed program ET total value and the Default
daily ET value in the text fields provided.
The Global Tab
When a satellite is initially created, it defaults to the settings in the Software
Setup window. Those settings are shown as the choices under Precipitation
Units, Flow Units and Language. To choose units and language specific to the
satellite, select the options provided on this page.
Note: Selecting Units and Language options at the satellite level can be
problematic, and is not recommended. If the satellite does not enable global
settings to be specified, the settings on this page will be grayed out.
The Forwarding Tab
The Forwarding tab options enable the satellite to transfer stored data via
radio communication to other satellites in the network. (Refer to page 9 for
Target Device Comm Parameter setup procedures.)
Note: To enable satellite-to-satellite forwarding communications requires that
all satellites are utilzing firmware version 1.40. Upgrading to 1.40 firmware
requires changing to special centeral interface firmware that talks only to
verion 1.40 satellites
1. To populate the List Units To Forward To data fields, choose the Receive
Forwarding List button to choose from a list of available satellites.
Note: The satellite can forward data to a maximum of 10 satellites. If less
than 10 satellites are listed, the designation “FFF” must be entered in all
remaining open text fields.
2. Choose the Send Forwarding List button to upload the list.
113
3
Page 18

114
4
Part 3 –Synchronize Time and Day
Both the PC running the Sentinel WMS software and the satellite controllers
have time-keeping registers that must remain synchronized at all times to
maintain scheduled operations. The
options for the time/day synchronization feature.
1. To begin, open the Time & Day Unit: window by choosing Time & Day
under the Setup directory.
2. Basic results of the synchronization process will be displayed in the text
window. Select the Generate Detailed Results check box to display
the results in full detail.
3. Choose Receive Time/Day (report only) button to retrieve and display
the current synchronization results.
Note: The Sentinel WMS receives and logs the current satellite time and
day prior to sending a synchronization command to prevent a possible
satellite time-keeping malfunction from being masked.
4. Choose Send Time/Day (synchronize) to synchronize the satellite with the
Sentinel WMS software.
5. Select a
• Selecting the
synchronization to a time variation of three minutes or more.
• Selecting the
to occur regardless of time v
6. Select the
Send (synchronize) option based on the following criteria:
Synchronize as Needed option limits automatic
Synchronize Always option enables synchronization
Log Results option to record all synchronization results.
Time & Day window provides setup
iation.
ar
Part 4 – Zone Data Setup
The Zone Data window provides all zone setup parameters, conveniently
organized in spreadsheet format. The seven column-groups, color-coded by
function, can be viewed/hidden, edited, uploaded, saved and printed from
one convenient location.
1. To start, choose Zone Data from the Setup directory to open the
Zone Data window.
Note: The number of station data rows listed on the Zone Data spreadsheet
is defined by the station count selected on the General tab of the Special
Data window.
Note: To view the Zone Data window at the largest
scale, choose Min/Max Workspace from the
drop-down menu of the Status Bar (shown at left).
2. All column-groups are shown in the example above. To hide/show columns
as desired, click on the column group button(s), then click the All Columns
button to reconfigure the spreadsheet. To reinstate all columns, click the
All Columns button.
Note-TDC decoder system only: Ensure the Device Precode, Map Unit
and Map Station data matches the actual five-decoder unit address (etched
on the side of each decoder) and its corresponding field connections. The
Device Precode should be 0 + the first two digits, and Map Unit should be
the last three digits of the decoder address.
Station type must be selected
from the drop-down menu.
The example at right illustrates
station setup for a Toro 2-wire
decoder #66259 with f
outputs.
our station
Page 19

3. The example below shows Soil Data Station and Station Mapping columns
hidden from view.
Note-EICON special-build wireless system only: The Setup Wireless,
and Learn Current buttons in addition to the Nominal and Actual Current
data column are applicable to EICON wireless communication system
setup only.
(Requires satellite firmware version 2.43 or higher.)
Using the Multi-Station Editor
The Zone Data column headings are organized within the Multi-Station
Editor panel. Station setup information is entered in the Editor text fields,
then transferred to a selected station or selected group of stations.
1. Choose Hide/Show Editor button on the Zone Data toolbar to display the
Multi-station Editor panel.
7. Enter the Precipitation Rate value from 0–99.9 Inches/Hour.
(Required for ET-based run time calculations.)
8. Enter the Soil Infiltration Rate value from 0–99.9 Inches/Hour.
(Required for ET-based run time calculations.)
9. Enter the Water Holding Capacity value from 0–2.55 Inches.
10. Enter the
11. Using standard shift-click or ctrl-click keyboard commands, select all
station numbers to be edited simultaneously.
12. Edits can also be made for a specific column heading by dragging the
column heading box into the gray edit field as shown in the example
below.
Note: To revert to the default view, click and drag the column header out of
the gray field. Release the mouse button when the pointer changes to an X.
MapTo data Unit and Station numbers as applicable.
2. Enter a brief Station (Stn) Description and/or Type Description enabling
the station to be easily identified using the Station Search feature.
3. Choose the Station Type from the list-menu options. (Requires satellite
firmware version 1.41 or higher.)
4. Enter the Expected Flowr
Enter the Maxim
5.
6. Enter the
ET total value). (Required for ET-based run time calculations.)
um Flowrate
Plant Factor value from 0–255% (where 100% represents the
ate of the station.
wed for the station (alarm threshold).
allo
13. Identify the Editor column data to be transferred by selecting its check box.
The selected field color will change to yello
14. Choose Apply Checked Columns button to transfer the data.
w as shown the example above.
115
5
Page 20

Satellite Programming
4
116
6
In this Chapter:
Part 1 – Program Satellites for Automatic Operations
Part 2 – Checking Unsent Changes
This chapter provides the various satellite programming procedures required
to establish and configure automatic irrigation programs.
Part 1 – Programming for Automatic Operations
1. To begin, open the Program window by choosing the Automatic
Operations under the Programming directory.
The satellite Program setup window is comprised of five main sections as
illustrated below:
1 – Toolbar
2 – Program Tabs
3 – Start Times
4 – Parameters
5 – Schedule
6 – Station Slots
1 – Program Toolbar
Program Toolbar buttons provide easy access to the most commonly used
menu functions.
Note: The toolbar functions apply only to the program page currently being
edited.
Checkup - To view a detailed
report of the current program status,
choose the checkup button in the
toolbar to open the Checkup window.
The results provided in the Checkup
window is color coded: Green
indicates Ok, Blue and Black are
informational and Red indicates a
problem exists.
Description - To provide a program description, choose the Description
toolbar button to open the Description Editor dialog box window. Type in the
description(s) or, to select an existing description, use either the drop-down
menus or description tree.
Note: In the example above, the program has been named “Primary
Secondary.” After entering the description(s) choose Save and Close to exit
the descr
On the Program setup window,
choose Refresh.
name will no
the Program window title bar.
iption editor.
The prog
w be displa
r
ed on
y
am
Page 21

Help - Displays a quick
reference key for the
various symbols displayed
on the program tabs.
2 – Program Page Tabs
Each satellite is capable of having 16 individual irrigation programs. The
programs are organized in groups of four, called Clusters, with four programs
assigned to each Cluster. Clusters are identified as A, B C, and D. Programs
within the cluster are identified as 1, 2, 3 and 4. The Program window
provides a separate tabbed page for each program.
Since the program pages are stacked and viewed one at a time, a small icon
will be placed on each tab to identify certain helpful program details:
• A blue dot identifies an available or unused program position.
• A calendar identifies programs that share the same watering day
schedule assignment.
• A clipboard with check mark indicates that the program may have an
error or conflict in the programming setup and requires attention.
3 – Start Times
A Start Time initiates the automatic watering cycle. Each program can be
assigned to start up eight times within a 24-hour period.
Note: All start times must occur within the defined Water Window time frame.
When multiple start times are used, they must be spaced far enough apart to
enable the program irrigation cycle to be completed. The Sentinel WMS
program will alert you to all scheduling conflicts, and provide the corrective
measures required to resolve the problem.
1. To begin, select a Start Time check box. The selection
box with a default time will appear.
Highlight the por
2.
3. Use the scroll bars or enter the preferred time.
Note: Green bars on the chec
time will occur today.
4. When finished editing the Start Times, choose Save.
tion of the time display to be adjusted.
x indicate the start
k bo
4 – Program Parameters
The various settings within this portion of the Program window enable each
program to be modified as needed for optimum control. As settings are made,
the program setup status information will be displayed in the colored panel.
Green and Blue indicate the selected parameters are acceptable. When an
error or conflict is found, the cause/resolution will be flagged in Red.
Percent Scale - Adjusts the run time of all stations assigned to the program
by percentage ranging from 0 to 255% (100% = no change).
Cycle Delay - Places a delay period, ranging from 0 to 255 minutes, between
repeat watering cycles.
Repeats - Enables the watering cycle to be repeated from 1 to 250 times per
start time.
Water Window - The Water Window is the period of time in a 24-hour day
that automatic watering can occur. Selecting a From and To time defines the
Water Window start time, duration and end time. A program that is running at
the end of the Water Window is automatically terminated.
Selected Schedule - Up to 16 unique watering day schedules can be defined.
For identification, each schedule has a number assignment ranging from
1–16. To assign the program to one of the schedules, simply enter or scroll to
the corresponding number in the box.
Continuous Run - Selecting Continuous Run will automatically repeat the
ram cycle continuously for the defined Water Window duration.
prog
Activate Auxiliary Pump - Select this option to activate the auxiliary output
(designated in the Special Data window) at the beginning of the watering cycle.
117
7
Page 22

118
8
ET-based Run Time - Select this option to enable station run times to be
recalculated at the day change time based on the
Note: To utilize ET-based run time, a Plant Factor (other than 0) and an
Application Rate (entered in Zone Data or the Slot Editor) must be
selected. When the ET-based run times option is selected, the ET Total
selection box and Send button will be enabled.
1. Choose the Program toolbar Receive button to receive the ET Total data
from the satellite.
2. Send the ET Total to the satellite by
choosing the Send toolbar button.
3. Control/click on the ET value box to
recalculate and update station run time.
Takes starts and repeats into account and matches what the satellite unit
would recalculate using the same ET value.
ET-based stations will appear green in the Slot Editor as shown in the
example below.
Note: Run times shown are based on the following formula:
Run time = (ET Total/Precipitation Rate) x Plant Factor %.
ET Total for the program.
5 – Watering Day Schedules
All watering day schedules are defined within this form. Active days can be
scheduled by selecting individual check boxes or by selecting one of the
pre-configured schedules provided in the selection menu.
In the following step-by-step example, a 6-week rolling schedule is set to
water every third day (a three-day interval).
Note: Multiple 2-day and 3-day Interval
schedules are listed in the menu. For example,
Every Third Day is listed three times to provide
three initial start days of the interval period.
Scroll to
1.
option on the rolling menu.
2. Click on the selection to highlight it in blue.
Watering days are checked.
Note: The box highlighted by green bars
indicates the current day of the week (based
on a calender-date reference).
y Third Day - 3
Ever
schedule
3. Choose the Calendar tab to display
the watering day schedule in a
calendar-day format.
4. Choose the Overlay 6 Week button
at the bottom of the calender window.
The 6-week (every third day)
schedule will be overlaid on the
calendar, indicating the active days
in bold.
5. To name the schedule, enter a brief
description in the text box, then
choose
watering day schedule with its
schedule number and name are now
associated to the number indicated in
the Selected Schedule box.
6. To assign this schedule to another program (tab), simply select the number
in the Select Schedule scroll menu during program setup.
Note: Programs assigned to the same watering
day schedule are easily identified by the
Calendar icon next to the program identifier.
Note: With 16 different watering schedules available, it is possible for each
prog
programs share the same schedule, changing the shared schedule on any
program changes it in all programs sharing that schedule.
Save. As shown below, the
ram to have a unique watering day schedule. However, when
Page 23

6 – Program Slots
One of the most unique and powerful programming features of the Sentinel
WMS software is the method used to organize and control satellite station
outputs within each irrigation program. This method is referred to as
“Program Slots.”
Program Slots are organized in a sequential matrix, defined by 4 rows of 12
Slots, for a total of 48 slot positions. The program cycle operating sequence
begins at the first Slot in row 1, and ends at the last Slot in row 4.
Slots 1–12
Slots 13–24
Slots 25–36
Slots 37–48
The station number is assigned to a slot and assigned a run time duration
ranging from 0 to 255 minutes. Station numbers range from 0 (inactive) to 96.
Stations can be assigned to slots in any order and as many times as preferred.
If more than 48 Slots are required; i.e., for a 96-station satellite, an additional
program must be used to assign the remaining 48 stations.
When an irrigation program is running, any slot with 0 (or blank) run time is
ignored. A slot with an assigned run time duration ≥1 minute, but without a
station assignment, will create a pause in the watering cycle for the assigned
duration.
In the example below, the program cycle will run stations 1, 2 ,3 and 8 in
sequence for their allotted run time. The cycle will pause for 20 minutes (at
slot 5), then continue running stations 9–12 in sequence.
Editing Program Slots
Program Slot editing can be accomplished by simply highlighting a slot
placeholder, assigning a station number and a run time duration, then
applying and saving the data. However, in most cases the Slot Editor will also
be utilized to perform various other editing tasks.
The Slot Editor links directly to the satellite database, enabling resident and
new station setup parameters to be reviewed and updated. All changes applied
in the Slot Editor will be reflected in the Zone Data window and all other
database-linked windows. The Slot Editor also provides multiple-slot editing,
similar the the Multi-Station Editor tool provided in the Zone Data window.
Editing Single Slots
1. Select a slot by highlighting its placeholder (0) or the currently assigned
station number.
2. Choose the Slot Editor button to open the Slot Editor window.
Note: A key to using the Slots programming method, is to remember that the
number next to each slot is the assigned
The Slots Toolbar
The Slots toolbar works exclusively with the program slots matrix by
providing the tools commonly used during the slot editing procedure. In
addition to editing support tools, manual irrigation can be controlled with the
Start Now and Stop Nowbuttons.
Station number, not the slot number.
3. Choose Hide/Show Station Information button to display all station data.
4. Assign a Station number to the slot being edited (highlighted in orange),
using the text box scroll arrows or by keyboard entry.
5. All currently saved station data will be shown. Enter or edit data as
preferred. (Edits made within the Slot Editor will overwrite the information
in the Zone Data window.)
Note: All stations being edited require a precipitation and flo
The slot editor allows run time to be entered per Cycle, Start or Program,
mode and dynamically adjusts Precipitation and Flow rates accordingly.
6. Choose Apply Changes and Save.
w rate value.
119
9
Page 24

220
0
Editing Multiple Slots
When several slots will have station assignments that share common parameters
and Run Time values, editing the slots simultaneously as a group can be a great
time-saving tool to build programs rapidly.
Use the following procedure to select and edit multiple Slots.
1. To begin, all slots to be edited must have a station number assignment.
Either assign station numbers individually, or choose the Station Search
toolbar button to open the Station Search window.
Editing Station Information
Station database information can be conveniently changed and entered directly
within the Slot Editor and immediately reflected in the Zone Data window.
Note: When editing multiple stations simultaneously, changes made through
the Slot Editor are applied to all stations within the edit group.
1. To begin, select (highlight in orange) the Station number slot, or select
multiple slots to be edited simultaneously using the standard shift-click
and ctrl-click keyboard methods.
2. Choose
window will open automatically. Click on Hide/Show Information to expand
the Slot Editor window.
3. Enter the station information in the appropriate text boxes within the
Station Information area.
Note:VV(V
have dissimilar station information. If you prefer the stations veing edited to
have the same station information, you can overright the V.V. entry with the
desired value and select the Save button.
In the example below, station run time entered is 10 minutes and Type
description “N Park Strip” has been added to stations 4, 5, 15 and 16.
Add to Program button to populate the Slots fields. The Slot Editor
arying Values) will be displayed if stations in the slots being edited
2. Using the Station Search features, select stations to be entered on the
Slots by either matching the station Description or Type to compile a list
of stations, or select the station numbers from the number chart using
standard multi-selection keyboard methods: shift-click to select a
consecutive number of stations or ctrl-click for random selections.
3. Once the desired group of stations is selected, choose the
button to transfer the selections to the Slots fields. The slots to be edited will
be highlighted in orange and the Slot Editor window will open.
Add to Program
4. Choose Apply Changes to copy the per-cycle run time and Save.
Page 25

Clearing Slots
The Clear Slots tool removes Slots data incrementally as follows:
• Clears run time of all selected Slots (assigned station number in bold).
• Clears run time of all Slots with a 0 placeholder.
• Clears all Slots with blank run time.
• Clears all Slots data.
Note: Selecting the Refresh button returns all program data to the previously
saved settings.
The Compact Tool
The function of the Compact tool is to maximize the number of contiguous
Slots by relocating all unused slots in each row to the back of the matrix field.
Choosing the Compact button initiates the compaction process
manually, and can be selected at any time.
Note: Compaction will be initiated automatically when stations are added
through the Station Search window.
Manual Program Operations
The Start Now and Stop Now buttons are provided to
enable automatic irrigation programs to be manually controlled.
1. Choose the Start Now button to initiate the irrigation program at the first
slot position.
2. Choose the
Note: For advanced manual operations, right-click on the Start Now
button to open the Semi-Auto Start Details window.
3. Select the options provided in the Semi-Auto Start Details window and
choose the
4. Choose the
Stop Now button to terminate the manual operation.
Start as Indicated button to initiate the program operation.
Stop Now button to terminate the manual operation.
Part 2 – Checking Unsent Changes
As edits are made on screens that affect the satellite database, the Sentinel
WMS program flags the edits as they are made, then clears the flag when the
changes are successfully sent to the satellite.
A quick and efficient way to verify the results of the data transmissions is by
opening the Unsent Changes window.
1. Choose the Unsent Changes window from the Programming directory.
Unsent changes are indicated by a check mark in the box under the
associated Program Tab.
2. Select program(s) to update by choosing the associated program group
button (
program check box(es).
3. Choose Receive to receive and save metadata for all checked boxes.
Note: The exception is Special Data (SD). If the firmware version is blank,
receiving Special Data will only receive and save the firmware version.
4. Choose Update Metadata to sweep through all checked programs and
resave data. All calculations and/or flags will be brought up to date.
Note: Use the Update Metadata function when updating to a new version
of
5. Choose Send to update the satellite and generate a report in the Results
pane.
6. To open and review a Special Data (SD) and/or Zone Data (ZD), select the
associated check box, then choose Open.
Check A selected in example above) or by clicking on individual
WMS software to help identify changed or new metadata fields.
221
1
Page 26

5
Satellite
Reports
In this Chapter:
Part 1 – Hydro Report
Part 2 – Flow Graph Report
Part 1 – The Hydro Report
Hydro reports can be quickly generated from current and historic satellite
data including: Water Use, ET and/or Rainfall, in a convenient graphic
format. The reports can be viewed, printed and logged for future reference.
A data editor function enables the report data to be modified and sent back to
the field satellite.
1. To begin, choose Hydro Report under the Reports directory.
2. Select (highlight) the type of data report you wish to receive: Water Use,
ET and/or Rainfall.
3. Choose Receive to upload current data from the satellite.
A bar graph, such as the Water Use report shown in the example below,
provides the usage totals ,per month for the previous year, compared to
the current year (for each data type when multiple data types are selected).
The data is also represented in a spreadsheet format below the graph, to
provide comparison by percentage per month- and year-to-date totals.
5. Choose Water Use, ET or Rainfall data to edit from the drop down menu.
6. Edit the data fields as needed.
7. Choose
Send to upload edited data to satellite.
222
2
4. To edit the data, choose the Hide/Show Editor to include the Editor fields.
Part 2 – Flo
1. To begin, choose Flow Graph under the Reports directory.
2. Select the preferred Plot Element to Receive/Show options: Today,
Yesterday, Watermark and/or Theoretical.
Note: A Theoretical graph represents the calculated flow rate based on the
programmed operating parameters. Including a theoretical graph will
provide a visual baseline to compare actual flow rate for today and/or
yesterday.
Note: Programs that are blank, require checkup, or operate continuously,
will not be represented in the flo
w Graph Report
aph or listing windo
r
w g
ws
.
Page 27

2. Choose Receive or Refresh to plot the graph.
Note: Click-drag the pointer left to right and/or top to bottom to zoom in.
Click-drag pointer the opposite direction(s) to zoom out.
The Erase Tool
The Erase tool works progressively to clear various elements of the
graph.
1. Choose the Erase tool from the Flow Graph toolbar.
• Click once to delete all maker lines
• Click twice to delete all marker labels
• Click three times to delete all graph data.
Listing Window
Selecting Show Listing from the menu bar opens the Listing window to
display the Units, Programs, Stations and time interval that comprise the data
depicted on the flow graph report.
1. Selecting the Show On Now menu item displays the current list of station
operations represented in the flow graph.
• The Listing window can be printed by selecting the Print menu item.
2. To generate a new flow report and listing, use the To and From date fields
to define the satellite activity period to be reviewed.
3. Use the Program selection check boxes to include/exclude specific
Program data from the report:
• Use the Clear button to deselect all Programs
• Use the Set button to select all Programs.
4. Select Refresh.
• The Listing window can be printed by selecting the Print menu item.
5. Select Show Graph to generate a new report.
Note: To mark g
aph locations
r
, right-click on the location.
223
3
Page 28

Satellite Operations & Status
6
224
4
In this Chapter:
Part 1 – Map View Features
Part 2 – Manual Operations/Output Status
Part 3 – Alarms
Part 4 – Rain Days
Part 5 – Percent Scale
The Operations and Status windows provide various tools and functions to
help you achieve optimum water system management and control.
Part 1 – Map View Features
Note: To enable map view operations, the map file (.jpg or .bmp) must be
stored in the Sentinel folder: C:\Program Files\Sentinel (not Sentinel WMS).
Sample map images that can used for familiarization of the map view
features, are provided on the Sentinel WMS installation CD.
1. To begin, choose Special Data under the Setup directory to open the
Special Data window. The map image file description will be entered in
Image File field.
2. Browse to image file location, select it and choose Open. The file name
should now appear in the Image File text field.
The Unit Options Menu
When working with map images, hiding the Selection and Information panels
to increase the workspace area is often preferred. The satellite support features,
accessible from the Selection panel database tree, are listed in the Unit Options
drop-down menu to provide easy access to all support feature windows.
The Map Options Menu
Provided within the Map Options drop-down menu, are additional tools
utilized for viewing, setup and functionality of the Map feature.
3. Choose Save, then close the Special Data window.
4. Choose Map under the Operations & Status directory to open the Map
window.
Note: When the Map window opens, three additional menus appear in the
Program Menu bar: Unit Options, Map Options and Output.
• Toggle View Mode
These menu options enable the map image to be constrained to 100% or to
scale proportionately to fit the window size.
• Shadow View Mode
Choosing this menu option opens a small window containing 96 individual
drag-and-drop station markers used to identify and link satellite station
data to the map image.
• Asset Tracker (Not currently enabled)
Output Menu
ovided in this drop-down menu
Print and print pr
item.
eview options ar
e pr
Page 29

Placing Station Indicators on the Map
When station indicators are positioned on the map image, they are
dynamically linked to the Sentinel WMS software to reflect current operating
conditions. For example, during manual operations, the station indicator will
change from blue (inactive) to yellow (manual operation). During automatic
operation, active stations will be displayed in green.
1. Use either of the following methods to place station indicators on the map
image:
• By Numeric Sequence:
Click and drag an indicator from the blue stack in the upper left corner of
the map image, then drop the indicator at the corresponding map location.
• Station indicators are extracted from the stack in numeric sequence,
from 1 to 96.
• To remove an indicator from the map, simply drag it back to the corner
stack, then release.
Part 2 – Manual Operations/Output Status
The options provided in the Manual/Output Status enable individual satellite
stations to be started and stopped as needed. A temporary station run time is
assigned for manual operation, ranging from 1 to 255 minutes.
Manual Operations
1. To begin, choose Manual/Output Status window from the Operations &
Status directory.
Note: A Receive Flow button enables an immediate sampling and retrieval
of the flow rate (requires firmware versions 1.42/2.42 and above)
.2. Choose Receive to download current data from the satellite.
Note: Reference the color key to determine manual, automatic and
auxiliary pump operations indicated on station status fields.
• By Random Sequence:
Choose Shadow View from Map Options menu to open the Shadow
window.
Click and drag an indicator from the
Shadow window, then drop the indicator
at the corresponding map location.
• To remove a station number for the map
image, click on the corresponding
number in the Shadow window.
• To automatically locate a station
number on the map that is currently
k
right-c
,
hidden from vie
number in the Shadow window.
w
lic
on the
3. Select the station number to operate manually. An orange highlight will
appear on the number to indicate manual operation.
4. The run time of the manual operation is determined by the minutes setting
in the Time to run new manuals selection field. Select a run time from
1–255 minutes using the Up/Down arrow buttons or keyboard.
5. To activate a Master output, select the Master check box.
6. Choose Send to initiate the manual start. The stations will run for the
selected duration. To turn off a station at any time, simply click on the
station number and choose
Note: Ho
the current status
remaining run time will be displayed.
Note: The cum
displayed in the Flow data fields. The Actual Flow will be displayed by
choosing Receive dur
ver the mouse pointer over the active station number to review
or
Inf
.
e
ulativ
Send.
mation regarding prog
Expected Flowf
ing oper
ation.
or all selected stations will be
ram assignment and
225
5
Page 30

226
6
Automatic Operation Status
Any stations that are currently operating automatically will be highlighted in
Green. Station operation can be stopped by clicking on the station number
and choosing
Note: Stopping a station that is currently running within an automatic irrigation
program will stop the entire program.
Map Window Update
When the Manual/Output Status window is open and satellite data received,
the station indicators on the map change color to reflect the station status.
1. Choose the Receive button on this Map window to update the station
indicators to their current operating status.
Note: In the example below, station indicators 1 – 4 have been positioned
on the map. Stations 1 and 4 have changed from Blue to Yellow indicating
an active manual operation.
Send.
Part 3 – Alarms
The settings provided in the Alarms window, enable all critical satellite
operating parameters to be defined and monitored at all times. Any condition
that meets the Alarm criteria, is flagged and reported during routine polling
and specified polling communications.
Flagged conditions are easily identified on the Status Bar and the Selection
panel Database Tree with one of the following icons:
A Bell (alarm) icon (with satellite number and description in red)
indicates an alarm condition has occurred.
The alarm icon will override either of the following alert icons:
A Broken-link (alert) icon indicates a central/satellite communication
error has occurred.
An Umbrella (alert) icon is displayed when satellite operation is currently
suspended in the Rain-off mode.
Note: The satellite Alarm status is automatically updated each time
communication between the Sentinel WMS program and satellite is initiated.
The Results
1. To begin, choose Alarms window from the Operations & Status directory.
By default, the Results tab is displayed when the Alarms window is
opened. All current Alarm Reports are posted on this page.
2. Choose the Receive button to upload all current alarm status information.
The data received from the satellite will include specific details to identify
the Alarm source, cause and time of occurrence.
Tab
3. Choose the Send clear all button to clear and rearm the Alarm system at
the satellite.
4. Select the options check boxes as preferred:
• Clear alarms after receive automatically clears and rearms the alarm
system after it has been received.
• Log Results automatically logs the alarm results in a Word file format.
Page 31

The General Alarms Tab
The Alarm example below indicates the exact time and date a power failure
occurred and when power was restored.
1. Choose the Power Failure notification check box as preferred.
2. Choose External Alarm check box to enable a satellite-monitored
peripheral sensor to notify Sentinel WMS when conditions occur outside
the specified operating parameters.
The Remote Output Alarms Tab
The Alarm information and options on this tab apply to the Sentinel Map to
Universal controller.
Note: The options for 2-wire decoder are not currently enabled.
The Current & User Set Alarms Tab
When a station current overload or output fault is detected, all affected
station numbers will be indicated on this Alarm tab. The current overload
condition will be indicated with a White highlight, and an output fault will
be highlighted in Red. Selecting User Set outputs will highlight the check box
in blue.
1. Choose the Clear all current & user alarms button to clear all checked
boxes.
2. Choose the associated check box for any station or output you wish to
monitor.
3. Choose the
Send current & user alarms button to update the satellite.
1. Choose the station output check box associated with the alarm sensor.
2. Choose the
condition and rearm the associated sensor.
Send clear remote output alarms button to clear the alarm
The Flow Alarms Tab
All under- and over- flow conditions will be indicated on this tab.
1. Choose the Send clear flow alarms button to clear and rearm the flow
sensor(s).
227
7
Page 32

228
8
Part 4 - Rain Days
The Rain Days control feature enables program operation to be suspended
for a defined period of time, ranging from 0 to 250 consecutive days, then
automatically resume operation when the delay period elapses.
Rain Days mode can be implemented by any one of three optional methods:
The
Unit (all programs), Select Programs or program Description.
• Assigning Rain Days by Unit suspends automatic operation of all defined
irrigation programs.
• Using the Select Programs option enables Rain Days to be assigned to any
program Cluster(s) or individual program(s) within a Cluster.
• The Description option enables Rain Days to be assigned based on the
program’s
1. To begin, choose Rain Days under the Operations & Status directory to
open the Rain off window. The window will open at the Select programs &
Set Days Off tab and database tree expanded.
2. Choose
appear next to the selection.
3. Enter the number of Rain Days (1 to 250) in the text field.
Primary or Secondary description.
All Programs, Cluster or a specific Program. A text field will
The Rain Days Toolbar
Clear Selections clears all current selections.
Save enters the current selections into the database.
Refresh reloads the last saved database entry.
Delete removes all current selections from the database.
Rain Days Configuration Options
• After send, receive rain days for log - Checking this option prompts the
satellite to report back to the central after receiving a Rain Days upload. The
current Rain Delay status is posted in the Results window.
• Log Results automatically saves current results data to the events Log.
• Prior to send... restricts updates to the current Rain Days status to only
increase or cancel (zero) delay days .
Saved Shutdowns
The Saved Shutdowns feature enables the current Rain Day selections to be
saved and reloaded.
1. Once the Rain Day selections are made, enter a description text field, then
choose the Save button.
Note: When a Shutdown description is saved, it becomes available to load
into any satellite. Therefore, using a concise, specific description will help
determine if the particular Rain Day selections are applicable.
Only one Saved Shutdown entry (at a time) per satellite can be saved.
2. To load a Saved Shutdown entry, select the description from the drop-down
menu.
3. To delete a Saved Shutdown description and its associated selections,
choose the Delete button.
The Results Tab
1. Choose the Send and Receive buttons to update the program status.
2. Choose the
Results tab to view the results.
Note: In the example above, a 3-day Rain Days period is assigned to
Program A1. When saved, the assigned Rain Days number will be shown
in parentheses and bold type (see inset).
4. Press Return or choose Save to enter the selection(s).
Page 33

Part 5 - Percent Scale
The control features of the Percent Scale window are used to increase and
decrease Program Run Time by percentage from 0 to 255%.
The Percent Scale adjustment can be implemented by any one of three optional
methods: by Unit (all programs), by Select Programs or by program Description.
• Assigning Percent Scale adjustment by Unit scales the run time of all
defined irrigation programs.
• Using the Select Programs option enables a Percent Scale adjustment to
be assigned to program any cluster(s) or individual program(s) within a
cluster.
• The Description option enables Percent Scale to be assigned to programs
based on the program’s
Note: Percent Scale adjustments entered in the Percent Scale window will
override a Percent Scale factor selected in the Auto Operations window.
Percent Scaling Program Run Time
1. To begin, choose Percent Scale window from the Operations & Status
directory.
2. Choose Unit, Select Programs or Description. A text field will appear
next to the selection.
3. Enter the Percent Scale factor (0 to 255%) in the text field.
Primary or Secondary description.
The Percent Scale Toolbar
Choosing the Clear Selections button clears all current
Percent Scale selections.
Choosing the Delete deletes the current Percent Scale factor;
returning the Program Run Time to the 100% baseline.
Percent Scale Selection Options
Selecting the After send, receive all programs option prompts the satellite
to respond with the current Percent Scale information. The information is
posted on the Results tab for review.
Selecting the Log Results option automatically saves the results information
to the events Log file.
The Results Tab
1. Choose the Send and Receive buttons to review the results of the Percent
Scale selections.
2. Choose the Results tab to view the results.
Note: The baseline or non-adjusted Program Run Time is 100%. In the
example above, the run time of all satellite programs has been increased to
ed, the
When sa
er the 100% baseline
125% – a net 25% increase o
percent scaled increase will be shown in parentheses and bold type (see inset).
4. Press Return or choose Save.
v
.
v
229
9
Page 34

Satellite Systems
7
330
0
In this Chapter:
Part 1 – Creating Satellite Systems
Part 2 – Working with Multiple Satellites
A Satellite System is simply a collection or group of satellites that are given
the same name. Organizing satellites with the same operating parameters into
Systems enables edits and operational status checks to be performed on
multiple satellites simultaneously.
The procedure for creating Satellite Systems is basically the same procedure
used to create individual satellites. When setting up systems, you may find it
helpful to refer the additional details provided in Chapter 3, page 8.
Part 1 – Creating Satellite Systems
1. To begin, choose the Manage button in the main window toolbar to
open the
Note: For example purposes, the Master List in the following examples
has been populated with four example satellites. The actual master list will
include all satellites currently entered in the satellite database.
Manage - Systems and Units window.
Note: The System name will be added to the System list as well as to the
Systems tab of the Selection panel, as shown in the inset below.
4. To add a satellite to the new System, choose the satellite from the
Master List, then choose the Left Arrow button to transfer the
satellite to the System Contents list (center panel).
5. Repeat this process as needed to build the complete System Contents list.
2. Choose the Add Systems button
in the Systems field to open the
Add New System Window.
3. Type in a System description, and
choose
OK.
Note: The standard shift-click and ctrl-click multi-selection key
combinations can be used to select the satellites from the master list.
6. To transfer all listed satellites at the same time, choose the Double Left
Arrow button.
Page 35

7. To remove satellites from the System Contents list, use the same procedure
as adding satellites, with the exception of using the Right arrow buttons.
8. To change the System description,
Choose the Edit Systems button
open the
9. Type in a new System description, and
choose OK.
Edit Window.
Part 2 – Working with Multiple Satellites
The database tree in the Selection panel should now list all Systems by name.
The Systems Database Tree functions in the same manner as the Satellites
Database Tree.
As indicated in the in a side-by-side database tree comparison below, the
System shares the same database windows as the Satellites with the exception
of individual satellite setup, programming, map and graph features. In other
words, where Satellite operations are performed at the Program level, System
operations are performed at the Satellite level.
System Level Operations
1. Choose the Systems tab of the Selection panel.
2. Choose the
Note: In the following example, the Time & Day window is opened for a
System named East Park.
3. Choose the Time & Day window form the Setup directory to open the
Time & Day window.
4. Choose the Send Time/Day Synchronize button. The Sentinel WMS will
check and synchronize every satellite of the East Park system to the
computer’s time and day. An action report will be generated and displayed
in the Synchronize Results: panel.
Note: The results information is color coded: Green indicates Ok, Blue and
Black are informational and Red indicates a problem was identified.
System name to expand the database tree.
331
1
Page 36

Sentinel Watcher Operations
8
332
2
In this Chapter:
Part 1 – Enabling the Sentinel Watcher
Part 2 – Configuring Watcher Operations
Many of the system level operations, as well as weather source related
operations, can be scheduled to occur at a predefined time. In all cases,
the results of the Watcher operations are written to the Log file and various
windows Results tabs. If the e-mail feature is utilized, the results of some
operations can be e-mailed immediately after they occur.
Note: To enable the Watcher operations to occur, the Sentinel WMS software
must be running at the scheduled time of the event and the Sentinel Watcher
mode switched on.
When a Watcher polling or communication time is designated, it should
be close to, but sufficiently before the Satellite Day Change time to enable
communications with each satellite in the system to be completed before
the day change time occurs.
Part 1 – Enabling the Sentinel Watcher
1. To begin, choose Watcher > Start from the Main Menu.
Note: When the Sentinel Watcher is started, the Sentinel Clock icon
in the Windows Start Bar will change from Red to Green
Right-click on the Clock icon to open an options
menu enabling Watcher Start/Stop and Hide/Show
Sentinel WMS program shortcuts to be selected.
2. Choose Setup to open the Software Setup window.
3. From the Software Setup window, choose the Watcher Operations tab.
The Status Reports tab will be selected by default.
4. To automatically launch Watcher at
her On
program start up
option located on the Startup tab of the
Setup window. Refer to Star
page 6.
, select W
atc
tup Tab
on
.
Part 2 – Configuring Watcher Operations
The Watcher Operations tab provides configuration options organized on four
sub-category tabs: Status Reports, Weather Sources,Satellite Programming
Updates and Schedular/Optimizer.
Status Reports
1. Select the Retrieve Alarms options as preferred:
• To poll a specified Satellite System for alarm conditions, select
Retrieve Alarms.
• From the drop-down menu, select a Target System to poll.
• Enter the preferred polling start time.
• To automatically clear (do not log) the alarm report after the Watcher has
received the report, select
2. Select the Hydro Report options as preferred:
• From the drop-down menu, select a Target System to poll.
• Enter the preferred polling start time.
• Select data to be included in the report: Water Use, ET and/or Rainfall.
Clear Alarms After Reception.
Weather Source(s)
The options provided on the Weather Source(s) tab define and control
weather data source polling required by ET- and Rain-based irrigation
programs. Sending ET and Rain updates automatically recalculates run times
in the database for all programs in the target system.
Note: The weather source must be configured for polling to enable this
oper
4. Choose the Close watcher windows when complete option if
you prefer to have Watcher windows automatically close after data
is recorded and logged.
Configuring the
(See “
ation.
eather Station
W
on page 35.)
”
Page 37

1. Choose Enable or Disable polling option as preferred:
2. Enter the preferred polling start time.
Satellite Programming Updates
The options provided on this tab enable all changes made within the
Special Data, Zone Data or Automatic Operations windows (not yet uploaded
to the satellite system) to be uploaded at a specified time.
Time and day synchronization and reporting options are also provided,
enabling the Watcher to compare current time/day registers between
Sentinel WMS and the satellites.
Scheduler/Optimizer
The Watcher Operations provided on this tab are used in conjunction with the
Scheduler
is used to optimize programs based on demand and flow limit while leaving
the station operating order within the program unchanged. Access to this
feature from the Watcher simplifies scheduling; i.e., after an ET update.
1. Select Schedule/Optimize option.
• Enter the Optimization Start time.
• Select the Target System from the drop-down menu.
• Enter the Start of Irrigation time for Today or Tomorrow.
• Select the Flow Constraint option as preferred and enter a maximum
flow rate value.
2. Select the Use Adaptive Step Size (faster) option as preferred.
3. Choose Open Optimizer to open the Scheduler/Optimizer window.
(
Optimizer) window (main toolbar). The Scheduler/Optimizer
1. Select Send Changes To Field option as preferred.
• Enter the data upload start time.
• Select the
2. Select
• Select the Target System (to poll) from the drop-down menu.
• Enter the preferred upload star
3. Choose when to run synchronization:
• Only as needed
• Never (report only)
• Always.
Target System from the drop-down menu.
Synchronize Time/Day option as preferred.
t time.
4. Choose Enable Program Filter to include/exclude Programs to optimize.
w results log in the Progress and Status columns.
Vie
5.
333
3
Page 38

Working with Weather Sources
9
334
4
In this Chapter:
Part 1 – Creating a Weather Station
Part 2 – Configuring a Weather Station
Part 3 – Creating a Weather Monitor
Part 4 – Checking the Weather Source
Weather Sources provide weather-related data to the Sentinel WMS software.
This information can be used by the satellites to automatically adjust run
times based on ET demand and rainfall activity. Sentinel WMS can also
monitor weather parameters and react at preset thresholds. For example,
monitoring rainfall to automatically shut down a satellite System when
measured rainfall reaches a predefined amount.
Once created in the Sentinel WMS database, the Weather Station will be
shown in by description in the Weather Sources tab of the Selection panel.
Choosing the Weather Station description will expand the database tree,
providing access to the various setup, configuration monitor windows.
Part 1 – Creating a Weather Station
1. To begin, choose Create New Weather Station from the Main Menu.
3. When the Create New Weather Source window closes, the Create
Weather Station window opens automatically. The new Weather Station
name will be included in the Create Station window title bar, as shown in
the example below.
4. Choose Save to create the new Weather Station in the Sentinel WMS
database.
5. Choose Close to close the Create Station window.
2. The Create New Weather Source window will open automatically. Enter a
description for the Weather Source and choose the
Setup Station button.
6. Choose the Weather Sources tab of the Selection panel.
7. Choose the new Weather Station in the database tree to expand the
directory branches.
Page 39

Part 2 – Configuring the Weather Station
When configuring new or existing Weather Station, all setup parameters will be
accessed and defined on the tabbed pages of the
1. To begin, choose Properties under the Status & Setup directory to open
the Station Properties window.
Station Properties window.
3. Select the preferred
Note: The Sentinel WMS program uses weather history data from the
previous 24 hours to determine the 24-hour ET and rainfall values.
• Choose Obtain Rain for the measured rainfall value.
• Choose
4. To select System to update with weather data option, use the drop-down
menu to select a specific satellite System name.
Note: The specified System should contain a list of all satellites that
should receive the polled rainfall and/or ET values in the climate region of
this Weather Station. ET and rainfall data is sent to each of these satellites
immediately after obtaining the values from the Weather Station.
Obtain ET for ET-based values.
Weather Data to Retrieve options:
The Communication Settings Tab
The Weather Station is connected to the Sentinel WMS system in the same
manner as a satellite: by serial cable, phone modem, or Ethernet.
The ET & Rain Polling Tab
1. The ET & Rain Polling tab will be selected by default. The options
provided on this tab are used to designate if and when the Weather
Station should be polled to retrieve ET and Rainfall data.
• Select the
Station to be polled by the
2. Select Time to Retrieve Weather data option:
• Choose Poll at global polling time to enable polling at the time
specified in the
(Refer to “ET/Rain Based
• Choose
Weather Station.
• Enter the preferred polling start time.
Enable polling for this station option to enable the Weather
Sentinel Watcher.
Watcher Sources preferences.
atering
W
Poll at specified time to define a specific time to poll the
on page 33 f
”
or detailed information).
1. To begin, select the appropriate computer Comm Port number used for
Weather Station connection. If the Comm port number is higher than 4,
the
select the Connect Using option and type in the comm port number
for example, COM6.
Note: Field Unit Code is not supported at this time. (continued)
335
5
Page 40

336
6
The Communication Settings Tab (continued)
3. Enter to the Field Access Phone number if the Weather Station is
connected via a telephone modem.
4. Enter the Phone Modem Initialization String.
Note: If this setting is not known, try entering AT&FE0DT or ATE0DT,
or contact Toro NSN for assistance at 1-800-275-8676.
The Station Type Tab
1. Select the manufacturer and model of Weather Station instrument.
Note: If the of Weather Station instrument type or model is not listed, contact
Toro NSN for assistance at 1-800-275-8676.
2. Select English or Metric units.
Note: Units type must remain consistent throughout the Sentinel WMS
program and satellite setup windows for proper operation.
5. Enter the Field access URL.
Note: This is the IP and Port address of an Ethernet connection, for
example, 10.0.0.4:14001. The address can also be entered in a URL
format; i.e.,www.somewhere.com:14001.
6. Choose Save to enter the selections.
3. Choose Save to save the selections.
Page 41

The Notifications Tab
1. Select Enable Notifications option as preferred.
The Weather Monitor Settings Tab
The settings on this tab are used to specify the normal and accelerated polling
frequency rate of the Weather Station by the Sentinel WMS program.
The Weather Station continuously monitors specific data points calibrated for
various local weather and climate conditions. The Sentinel WMS polls the
weather station at two specified frequency rates to retrieve data for normal,
conditions and at a higher, more frequent rate, when monitored conditions
begin fluctuating.
2. If applicable
reporting.
Note: The option Notifications sent to individual addresses specified
for each station, provided on the Notifications tab of the Setup window,
must be selected as shown below.
N
ote: All Information sent through notification e-mail can be reviewed on
the
History tab of the Information panel. The information panel is cleared
when the Sentinel WMS program is closed.
, enter the
e-mail address(es) to receive Weather Station
1. Enter a Normal Polling Interval from 0 to 100 minutes.
Note: Entering 0, will set a 1-minute interval rate.
2. Enter an Accelerated Polling Interval from 0 to 100 minutes.
3. Choose Save to save the selections.
337
7
Page 42

338
8
Part 3 – Creating a Weather Monitor
Note: Currently, only Rainfall monitors can be created.
A unique Weather Monitor can be configured for each Weather Station polled
by the Sentinel WMS program. The Weather Monitor window provides a
convenient location to define a Weather Station by name, type, operating
parameters, monitored activities and threshold limits.
1. To begin, choose the Weather Monitors toolbar button on the Station
Properties window to open the Weather Monitor window.
8
1
4
9
3
5
6
7
2
1. Enter a Monitor Name.
2. Select the associated Weather Station name from the drop-down menu.
3. Select a Rain Threshold Value from 0.00 to100 inches (0.00 to 254 cm).
Note: The defined Rain Threshold Value will trigger the monitor Action
when reached. The Threshold Value corresponds to the rainfall measured
during the Sampling Window timeframe. The monitor will remain inactive
until the Reset Condition is met.
4. Choose a Sampling Window option:
• Select From Time to specify a time to begin measuring rainfall. The
rainfall measurement is taken between the specified time and the last poll
sent by the Weather Station.
• Select Sliding Window to define a fixed duration from 0 to 100 hours.
The rainfall measurement is recorded during the selected period.
5. Select the Action Name and Target System from the drop-down menus.
Note: The Action Name menu is comprised of Saved Shutdown names
entered on the Rain Days window under the Operations & Status directory.
6. Select the preferred Reset Condition option.
• Select Reset Daily to reset the monitor every day at a specified time.
• Enter the preferred Reset time.
• Select Manual to manually reset the monitor
7. Select Monitor Status: On or Off as preferred.
Note: The Threshold Reached and Action Taken boxes will be checked
for confirmation and cleared when the monitor is reset.
8. Choose Save.
9. To create a new Rainfall Monitor, choose the
button.
.
toolbar
Note: At a minimum, enter a Monitor Name and choose Save.
Once saved, the new monitor will be listed in the selection field at the
Clicking on the monitor name will
.
bottom of the W
open the Weather Monitor window saved for the Weather Station.
eather Monitor windo
w
Page 43

Part 4 – Checking the Weather Source
With the Weather Station and Weather Monitor parameters properly defined
in the Sentinel WMS program software, weather monitoring and reporting
should now be available.
To test and evaluate operation of a Weather Station, the Current Conditions
window should be opened to review all weather and climate-related data
retrieved from the weather station.
1. Choose Current Conditions under the Status & Setup directory to open
the Current Conditions window. The Weather Station name will be shown
in the window title bar.
Note: The Current Conditions window configuration is defined by the type
of weather station instrument selected on the Station Type tab of the
Station Properties window. The window in the following example is
configured specifically for the Davis VantagePro weather station.
5. To review the current Weather Monitor settings, choose the Station
Properties toolbar button to open the
Properties window.
Station
The History Tab
The current results of all Weather Station communications are posted for
immediate review on the History tab. The history data provides the necessary
information to calculate daily ET, rainfall and monitored weather conditions,
and includes all automatic and manual communication results.
2. Choose the Receive button to download all available weather data from
the Weather Station.
3. Choose the Blue arrowhead to open the Weather Monitor window.
4. Start and Stop the Sentinel
Main Menu or right-c
clock icon in the Windows Start Bar.
Watcher from the
lick
on the Sentinel
.
339
9
Page 44

440
0
Note:
Therefore, the content of this document
is subject to change without notice.
© 2008 The Toro Company, Irrigation Division • www.toro.com Form Number 373-0423 Pre-release
This is a pre-release document.
Count On It.
 Loading...