

Page 1
PowerClear180™Snowthrower
ModelNo.38272—SerialNo.310000001andUp
ModelNo.38282—SerialNo.310000001andUp
FormNo.3362-530RevA
Operator'sManual
Introduction
Thissnowthrowerisintendedtobeusedby
residentialhomeownersorprofessional,hired
operators.Itisdesignedprimarilyforremoving
snowfrompavedsurfaces,suchasdriveways
andsidewalks,andothersurfacesfortrafcon
residentialorcommercialproperties.Itisnot
designedforremovingmaterialsotherthansnow,
norisitdesignedforclearingoffgravelsurfaces.
Readthisinformationcarefullytolearnhowtooperate
andmaintainyourproductproperlyandtoavoidinjury
andproductdamage.Youareresponsibleforoperating
theproductproperlyandsafely.
YoumaycontactTorodirectlyatwww .Toro.comfor
productandaccessoryinformation,helpndinga
dealer,ortoregisteryourproduct.
Wheneveryouneedservice,genuineToroparts,or
additionalinformation,contactanAuthorizedService
DealerorToroCustomerServiceandhavethemodel
andserialnumbersofyourproductready.Figure1
identiesthelocationofthemodelandserialnumbers
ontheproduct.Writethenumbersinthespace
provided.
ModelNo.
SerialNo.
Thismanualidentiespotentialhazardsandhas
safetymessagesidentiedbythesafetyalertsymbol
(Figure2),whichsignalsahazardthatmaycauseserious
injuryordeathifyoudonotfollowtherecommended
precautions.
Figure2
1.Safetyalertsymbol
Thismanualuses2wordstohighlightinformation.
Importantcallsattentiontospecialmechanical
informationandNoteemphasizesgeneralinformation
worthyofspecialattention.
Safety
ThissnowthrowermeetsorexceedstheB71.3
specicationsoftheAmericanNationalStandards
Instituteineffectatthetimeofproduction.
1.Modelandserialnumberlocation
©2009—TheT oro®Company
8111LyndaleAvenueSouth
Bloomington,MN55420
Figure1
Registeratwww.Toro.com.
Readandunderstandthecontentsofthismanual
beforeyoustarttheengine.
Thisisthesafetyalertsymbol.Itisusedtoalert
youtopotentialpersonalinjuryhazards.Obeyall
safetymessagesthatfollowthissymboltoavoid
possibleinjuryordeath.
Improperlyusingormaintainingthissnowthrower
couldresultininjuryordeath.Toreducethis
potential,complywiththefollowingsafety
instructions.
Thissnowthroweriscapableofinjuringhandsand
feetandofthrowingobjects.Failuretoobservethe
followingsafetyinstructionscouldresultinserious
injury.
OriginalInstructions(EN)
PrintedintheUSA
AllRightsReserved
Page 2

Training
•Read,understand,andfollowallinstructionsonthe
machineandinthemanual(s)beforeoperatingthis
unit.Bethoroughlyfamiliarwiththecontrolsand
theproperuseoftheequipment.Knowhowtostop
theunitanddisengagethecontrolsquickly .
•Donotattempttoclearsnowfromagravelor
crushedrocksurface.Thisproductisintendedfor
useonlyonpavedsurfaces.
•Neverattempttomakeanyadjustmentswhile
theengineisrunning(exceptwhenspecically
recommendedbymanufacturer).
•Neverallowchildrentooperatetheequipment.
Neverallowadultstooperatetheequipmentwithout
properinstruction.
•Keeptheareaofoperationclearofallpersons,
particularlysmallchildren.
•Exercisecautiontoavoidslippingorfalling.
Preparation
•Thoroughlyinspecttheareawheretheequipmentis
tobeusedandremovealldoormats,sleds,boards,
wires,andotherforeignobjects.
•Donotoperatetheequipmentwithoutwearing
adequatewintergarments.Avoidloosetting
clothingthatcangetcaughtinmovingparts.Wear
footwearthatwillimprovefootingonslippery
surfaces.
•Handlefuelwithcare;itishighlyammable.
–Useanapprovedfuelcontainer.
–Neveraddfueltoarunningengineorhotengine.
–Fillfueltankoutdoorswithextremecare.Never
llfueltankindoors.
–Neverllcontainersinsideavehicleorona
truckortrailerbedwithaplasticliner.Always
placecontainersontheground,awayfromyour
vehicle,beforelling.
–Whenpractical,removegas-poweredequipment
fromthetruckortrailerandrefuelitonthe
ground.Ifthisisnotpossible,thenrefuelsuch
equipmentonatrailerwithaportablecontainer,
ratherthanfromagasolinedispensernozzle.
–Keepthenozzleincontactwiththerimof
thefueltankorcontaineropeningatalltimes,
untilrefuelingiscomplete.Donotuseanozzle
lock-opendevice.
–Replacegasolinecapsecurelyandwipeupspilled
fuel.
•Alwayswearsafetyglassesoreyeshieldsduring
operationorwhileperforminganadjustmentor
repairtoprotecteyesfromforeignobjectsthatmay
bethrownfromthemachine.
Operation
•Donotputhandsorfeetnearorunderrotatingparts.
Keepclearofthedischargeopeningatalltimes.
•Exerciseextremecautionwhenoperatingonor
crossinggraveldrives,walks,orroads.Stayalertfor
hiddenhazardsortrafc.
•Afterstrikingaforeignobject,stoptheengine,
removetheignitionkey,thoroughlyinspectthesnow
throwerforanydamage,andrepairthedamage
beforerestartingandoperatingthesnowthrower.
•Iftheunitshouldstarttovibrateabnormally,stop
theengineandcheckimmediatelyforthecause.
Vibrationisgenerallyawarningoftrouble.
•Stoptheenginewheneveryouleavetheoperating
position,beforeuncloggingtherotorbladehousing
ordischargechute,andwhenmakinganyrepairs,
adjustmentsorinspections.
•Whencleaning,repairing,orinspectingthesnow
thrower,stoptheengineandmakecertainthatthe
rotorbladesandallmovingpartshavestopped.
•Donotruntheengineindoors,exceptwhenstarting
theengineandfortransportingthesnowthrower
inoroutofthebuilding.Opentheoutsidedoors;
exhaustfumesaredangerous.
•Exerciseextremecautionwhenoperatingonslopes.
•Neveroperatethesnowthrowerwithoutproper
guardsandothersafetyprotectivedevicesinplace
andworking.
•Neverdirectthedischargetowardpeopleorareas
wherepropertydamagecanoccur.Keepchildren
andothersaway.
–Iffuelisspilledonclothing,changeclothing
immediately.
•Useextensioncordsandreceptaclesasspeciedby
themanufacturerforallunitswithelectricstarting
motors.
•Donotoverloadthemachinecapacitybyattempting
toclearsnowattoofastarate.
•Lookbehindandusecarewhenbackingupwiththe
snowthrower.
2
Page 3

•Disengagepowertotherotorbladeswhensnow
throweristransportedornotinuse.
•Neveroperatethesnowthrowerwithoutgood
visibilityorlight.Alwaysbesureofyourfooting,and
keeparmholdonthehandles.Walk;neverrun.
•Nevertouchahotengineormufer.
•Beforeadjusting,cleaning,repairing,andinspecting
thesnowthrower,andbeforeuncloggingthe
dischargechute,stoptheengine,removethekey,
andwaitforallmovingpartstostop.
•Beforeleavingtheoperatingposition,stopthe
engine,removetheignitionkey,andwaitforall
movingpartstostop.
ClearingaCloggedDischarge
Chute
Handcontactwiththerotatingrotorbladesinsidethe
dischargechuteisthemostcommoncauseofinjury
associatedwithsnowthrowers.Neveruseyourhandto
cleanoutthedischargechute.
Toclearthechute:
•Shuttheengineoff!
•Wait10secondstobesuretherotorbladeshave
stoppedrotating.
•Alwaysuseaclean-outtool,notyourhands.
MaintenanceandStorage
•Checkallfastenersatfrequentintervalsforproper
tightnesstobesuretheequipmentisinsafeworking
condition.
•Neverstorethemachinewithfuelinthefueltank
insideabuildingwhereignitionsourcesarepresent,
suchashotwaterheaters,spaceheaters,orclothes
dryers.Allowtheenginetocoolbeforestoringin
anyenclosure.
•Ifashield,safetydevice,ordecalisdamaged,
illegible,orlost,repairorreplaceitbeforebeginning
operation.Also,tightenanyloosefasteners.
•Donotsmokewhilehandlinggasoline.
•Donotusethesnowthroweronaroof.
•Donottouchtheenginewhileitisrunningorsoon
afterithasstoppedbecausetheenginemaybehot
enoughtocauseaburn.
•Performonlythosemaintenanceinstructions
describedinthismanual.Beforeperformingany
maintenance,service,oradjustment,stoptheengine
andremovethekey.Ifmajorrepairsareeverneeded,
contactanAuthorizedServiceDealer.
•Donotchangethegovernorsettingsontheengine.
•Whenstoringthesnowthrowerformorethan30
days,drainthefuelfromthefueltanktoprevent
apotentialhazard.Storefuelinanapprovedfuel
container.Removethekeyfromtheignitionswitch
beforestoringthesnowthrower.
•PurchaseonlygenuineTororeplacementpartsand
accessories.
•AlwaysrefertotheOperator’sManualforimportant
detailsifthesnowthroweristobestoredforan
extendedperiod.
•Maintainorreplacesafetyandinstructionlabels,as
necessary.
•Runthemachineafewminutesafterthrowingsnow
topreventfreeze-upoftherotorblades.
ToroSnowthrowerSafety
Thefollowinglistcontainssafetyinformationspecic
toToroproductsorothersafetyinformationthatyou
mustknow.
•Rotatingrotorbladescaninjurengersor
hands.Staybehindthehandlesandawayfromthe
dischargeopeningwhileoperatingthesnowthrower.
Keepyourface,hands,feet,andanyotherpart
ofyourbodyorclothingawayfrommovingor
rotatingparts.
3
Page 4
SafetyandInstructionalDecals
Important:Safetyandinstructiondecalsarelocatednearareasofpotentialdanger.Replacedamaged
decals.
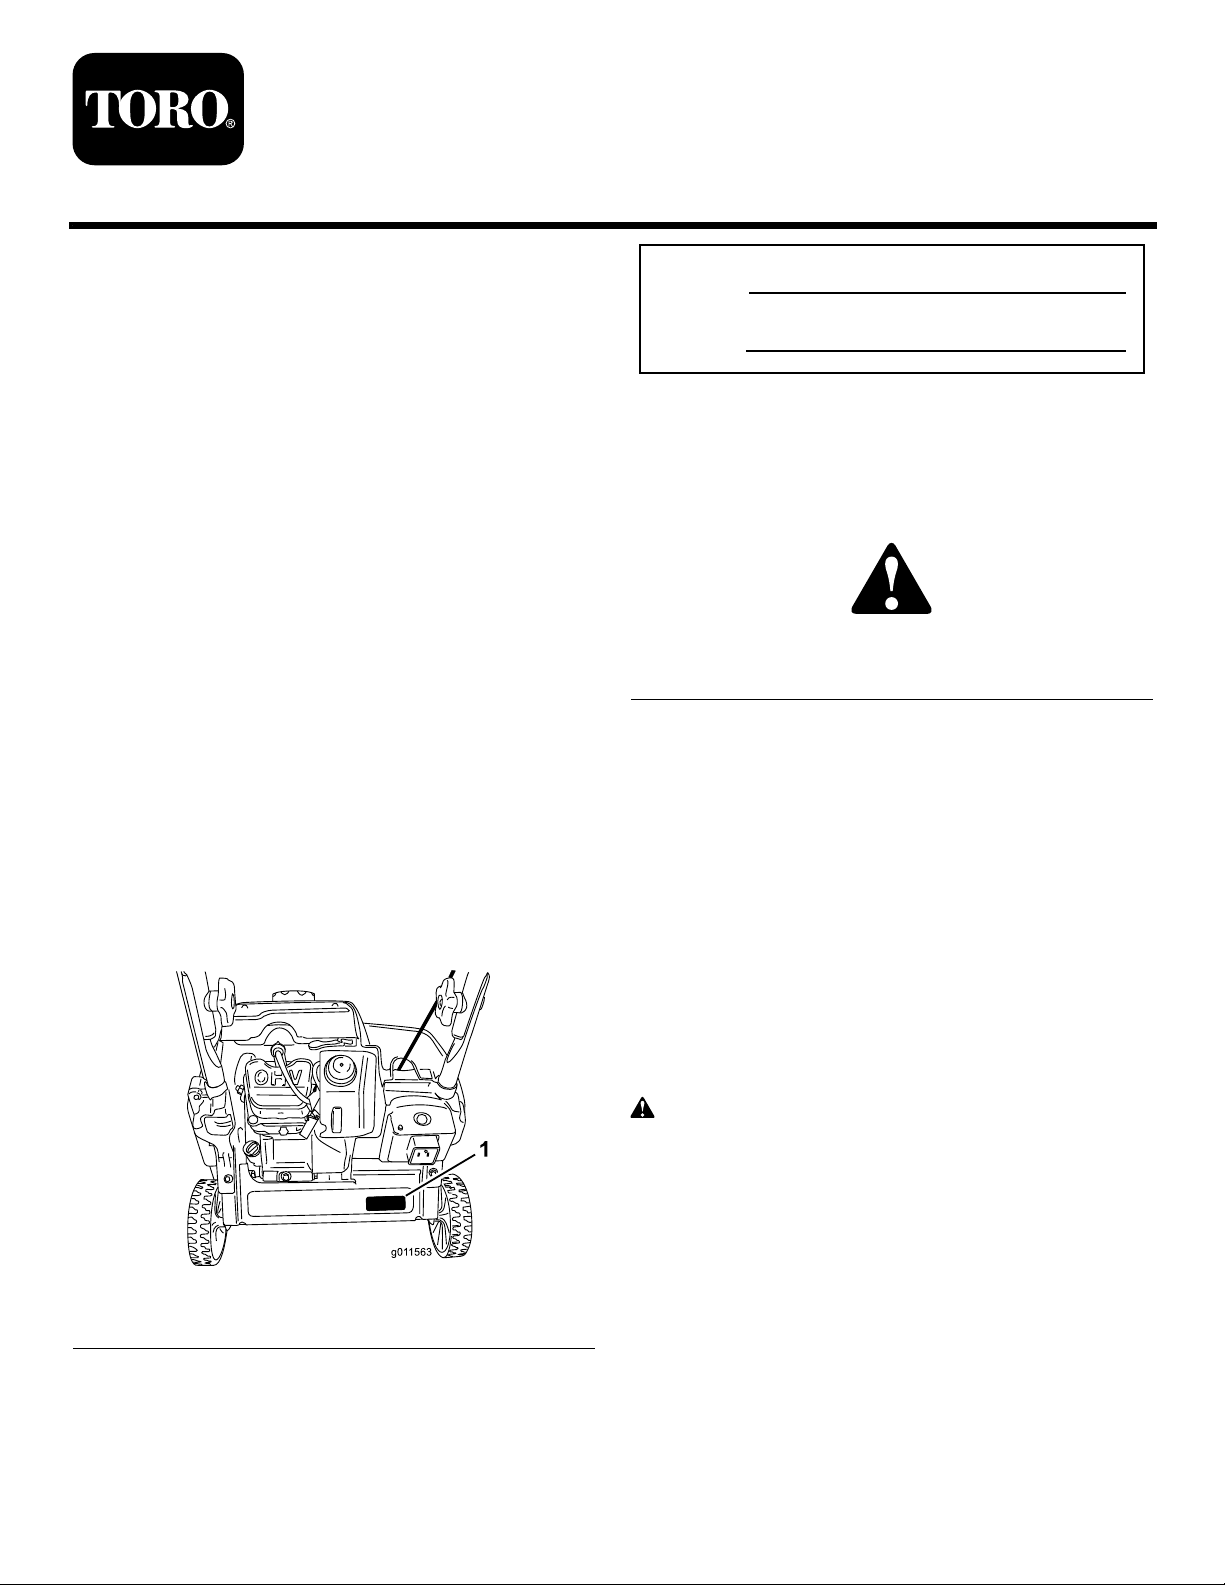
117-6047
1.Cuttingdismemberment,impellerandcutting
dismemberment,augerhazards—donotplaceyourhandin
thechute;removetheignitionkeyandreadtheinstructions
beforeservicingorperformingmaintenance.
117-7713
1.Warning—readtheOperator’sManual.4.Fuelspillhazard—donottipmachineforwardorbackward.
2.Cutting/dismembermenthazard,impeller—stoptheengine
beforeleavingthemachine.
3.Thrownobjecthazard—keepbystandersasafedistancefrom
themachine.
5.Toengagetheauger,squeezethecontrolbar.
6.Releasethecontrolbartodisengagetheauger.
117–7741
1.Primer
2.Pushtheprimertwotimestoprimetheengine.5.Removekeytolockmachine.
3.PushkeyintoswitchengineOn.6.ReadtheOperator’sManualbeforecheckingengineoillevel.
4.PullkeytoswitchengineswitchOff.
4
Page 5

Setup
LooseParts
Usethechartbelowtoverifythatallpartshavebeenshipped.
ProcedureDescription
1.
2.
3.
4.
5.
6.
1.InstallingtheHandle
2
Oval-headbolts
2
Curvedwashers
2Handleknobs
Oval-headbolts
Curvedwashers
Handleknobs2
Nopartsrequired
Dischargechuteassembly1
Screws
Washers2
Locknuts2
Knob1
Bottleofengineoil
Ignitionkey1
Lanyard1
Nopartsrequired
Qty.
2
2
–
2
1Filltheenginewithoil.
–
Installthehandle.
Installtherecoilstarterhandle.
Installthedischargechuteassembly.
Assembleandinserttheignitionkey.
Adjustthecontrolcable.
Use
Procedure
1.Positiontheendsoftheupperhandleontheinside
ofthelowerhandleandaligntheholes.
2.Inserttheoval-headboltsintothealignedholes,
withtheboltheadsontheoutsideofthehandle
(Figure3).
Figure3
1.Oval-headbolt(2)2.Curvedwashersand
handleknobs
3.Installthecurvedwashersandthehandleknobs
ontheoval-headboltsontheinsideofthehandle
(Figure3)andtightentheknobssecurely.
Important:Ensurethatyoudonotpinchor
kinkthecontrolcable.
5
Page 6

2.InstallingtheRecoilStarter
Handle
Procedure
Installtherecoilstarterhandleintheropeguideas
showninFigure4.
Important:Donotovertightenthelocknuts.
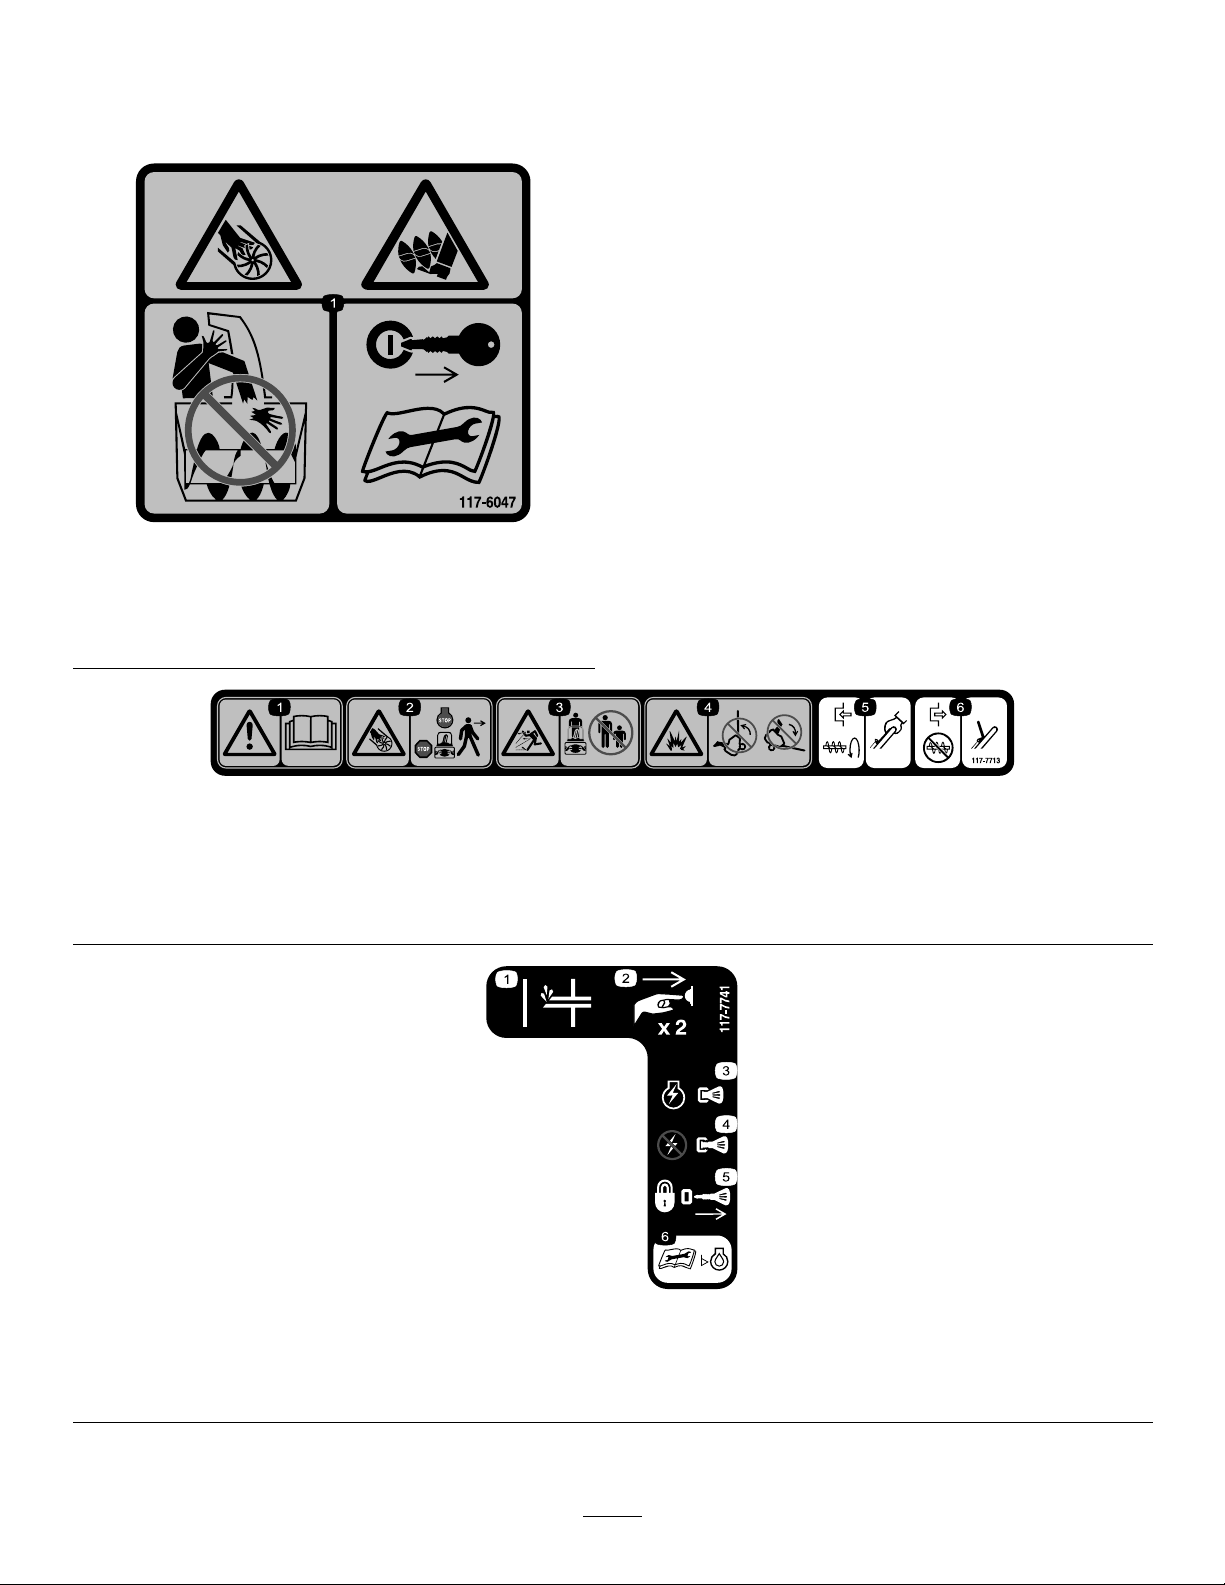
4.FillingtheEnginewithOil
1
Bottleofengineoil
Procedure
Yoursnowthrowerdoesnotcomewithoilintheengine,
butitdoescomewithabottleofoil.
Important:Beforestartingtheengine,llthe
enginewithoil.Donotoverll.
Maxll:12oz.(0.35l),type:automotivedetergentoil
withanAPIserviceclassicationofSJ,SL,orhigher.
Figure4
1.Ropeguide
3.InstallingtheDischarge
ChuteAssembly
1Dischargechuteassembly
2
Screws
2Washers
2Locknuts
1Knob
Procedure
Installthedischargechuteassemblyasshownin
Figure5.
UseFigure6toselectthebestoilviscosityforthe
outdoortemperaturerangeexpected:
Figure6
Note:0W30syntheticoilisacceptableforuseincold
temperatures.
1.Movethesnowthrowertoalevelsurface.
Figure5
1.Knob
2.Bolt(2),washer(2),and
locknut(2)
Note:Installtheboltsfromtheinsideofdischarge
chuteassemblysothatthewashersandlocknutsareon
theoutsideofthechute.
2.Cleanaroundtheoilllcap(Figure13).
3.Unscrewtheoilllcapandremoveit.
4.Slowlypouroilintotheoilllhole,andfrequently
checktheoillevelonthedipstickbywipingthe
dipstickcleanandtheninserting,butnotscrewing
in,theoilllcapintothehole.
Note:Todeterminetheproperoillevelonthe
dipstick,refertoFigure7.
6
Page 7
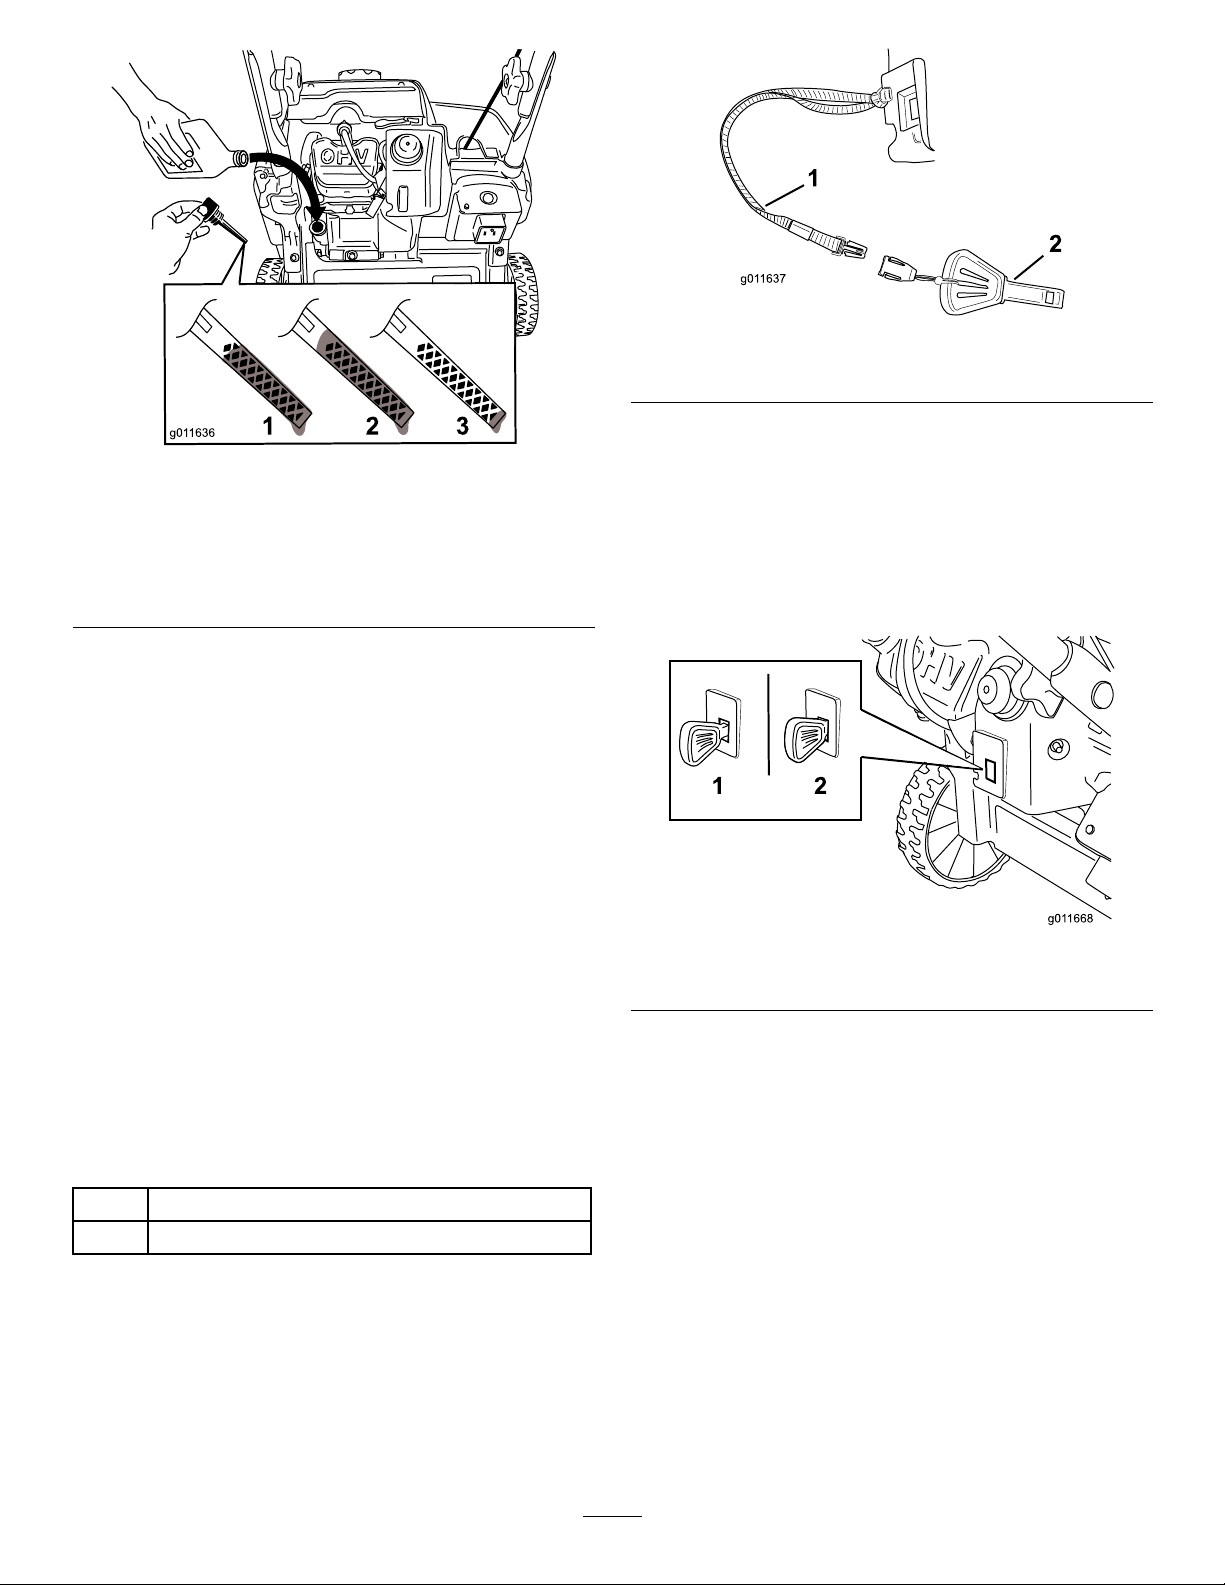
Figure7
1.Theoillevelisatits
maximum.
2.Theoillevelistoo
high—removeoilfrom
thecrankcase.
3.Theoillevelistoo
low—addoiltothe
crankcase.
Note:Filltheenginecrankcasewithoiluntilthe
dipstickindicatesthattheengineoilleveliscorrect
asshowninFigure7.Ifyouoverlltheenginewith
oil,removetheexcessoilasdirectedinChanging
theEngineOil.
Note:Y oumaytipthesnowthrowerforward
(handleup)alittletomakeaddingoileasier.
Remembertoreturnthesnowthrowertothe
operatingpositionbeforecheckingtheoillevel.
Figure8
1.Lanyard2.Ignitionkey
Note:Thelanyardhasaconnectorwhichallowsyou
toremovetheignitionkeywhenyouarenotusingthe
snowthrower.
InsertingtheIgnitionKey
InserttheignitionkeyintothekeyswitchtotheOff
position(Figure9).
Important:Donottipthesnowthrowerallthe
wayforwardontoitsnose,orfuelmayleakout
ofthesnowthrower.
5.Screwtheoilllcapintotheoilllholeandhand
tightenitsecurely.
5.AssemblingandInserting
theIgnitionKey
1Ignitionkey
1Lanyard
ConnectingtheLanyardtotheIgnition
Key
Connectthelanyardtotheignitionkey(Figure8)to
preventlosingthekey .
Figure9
1.Offposition2.Onposition
Note:Ifthekeyisdisconnectedfromthelanyard,
connectittothelanyardbypushingthetwohalvesof
theconnectortogether(Figure8).
6.AdjustingtheControlCable
CheckingtheControlCable
ServiceInterval:Afterthersthour—Check
thecontrolcableandadjustitif
necessary.
Yearly—Checkthecontrolcableand
adjustitifnecessary.
Important:Youmustcheckandmayneedto
adjustthecontrolcablebeforeyouoperatethe
snowthrowerforthersttime.
7
Page 8

Movethecontrolbarbacktowardthehandletoremove
theslackinthecontrolcable(Figure10).
Figure10
1.Controlbar2.1/16to1/8inch(2to3
mm)
Note:Ensurethatagapof1/16to1/8inch(2to
3mm)existsbetweenthecontrolbarandthehandle
(Figure10).
2.MovetheZ-ttingtoahigherorlowerholeonthe
adjusterlinkasneededtoobtainthe1/16-inchto
1/8-inch(2mmto3mm)gapbetweenthecontrol
barandthehandle(Figure11).
Note:MovingtheZ-ttinghigherdecreasesthe
gapbetweenthecontrolbarandthehandle;moving
itlowerincreasesthegap.
3.Hookthespringtotheadjusterlinkandslidethe
springcoverovertheadjusterlink.
4.Checktheadjustment;refertoCheckingtheControl
Cable.
Note:Thebeltmayslip(squeal)inwetconditions;
todryoutthedrivesystem,starttherotorandrun
itwithoutaloadfor30seconds.
Important:Thecontrolcablemustcontainsome
slackwhenyoudisengagethecontrolbarforthe
rotorbladestostopproperly.
AdjustingtheControlCable
1.Slideupthespringcoverandunhookthespring
fromtheadjusterlink(Figure11).
Figure11
1.Adjusterlink
2.Z-tting
3.Springcover
4.Unhookthespringhere.
Note:Youcanpulluptheadjusterlinkandcableto
makeunhookingthespringeasier.
8
Page 9

ProductOverview
Figure12
1.Controlbar6.Chutedeectortrigger
2.Recoilstarthandle
3.Springcover
4.Fueltankcap9.Rotorblades
5.Chutehandle
7.Chutedeector
8.Dischargechute
Operation
Note:Determinetheleftandrightsidesofthemachine
fromthenormaloperatingposition.
Gasolineisextremelyammableandexplosive.
Areorexplosionfromgasolinecanburnyou
andothers.
•Topreventastaticchargefromigniting
thegasoline,placethecontainerand/or
snowthroweronthegroundbeforelling,
notinavehicleoronanobject.
•Fillthetankoutdoorswhentheengineis
cold.Wipeupspills.
•Donothandlegasolinewhensmokingor
aroundanopenameorsparks.
•Storegasolineinanapprovedfuelcontainer,
outofthereachofchildren.
•Donottipthesnowthrowereitherforward
orbackwardwithfuelinthefueltank;
otherwise,fuelmayleakoutofthe
snowthrower.
Figure13
1.Sparkplug
2.Oilllcap
3.Oildrainplug
4.Chokelever8.Plug-inforelectricstart
5.Primer
6.Ignitionkey
7.Electric-startbutton
(model38282only)
FillingtheFuelTank
Fillthefueltankwithfreshunleadedgasolinehavingan
octaneratingatornear87fromamajorname-brand
servicestation(Figure14).
Figure14
1.1/2inch(13mm)
Important:Donotaddoiltothegasoline.
Important:DonotuseE85orE20fuel.Alternative
fuelswithhighalcoholcontentcancausehard
9
Page 10

starting,poorengineperformance,andmaycause
internalenginedamage.
Note:Forbestresults,purchaseonlythequantityof
gasolinethatyouexpecttousein30days.Otherwise,
youmayaddfuelstabilizertonewlypurchasedgasoline
tokeepitfreshforupto6months.
Note:Y oumaytipthesnowthrowerforward
(handleup)alittletomakeaddingoileasier.
Remembertoreturnthesnowthrowertothe
operatingpositionbeforecheckingtheoillevel.
Important:Donottipthesnowthrowerallthe
wayforwardontoitsnose,orfuelmayleakout
ofthesnowthrower.
CheckingtheEngineOilLevel
ServiceInterval:Beforeeachuseordaily—Check
theengineoillevelandaddoilif
necessary.
1.Ensurethatthefueltankisnotoverlled(referto
Figure14)andthatthefuelcapissecurelyinplace.
2.Movethesnowthrowertoalevelsurface.
3.Cleanaroundtheoilllcap(Figure13).
4.Unscrewtheoilllcapandremoveit.
5.Wipethedipstickontheoilllcapwithacleancloth.
6.Insert,butdonotscrewin,theoilllcapintothe
oilllhole.
7.Removetheoilllcapandcheckthedipstick.
8.Todeterminetheproperoillevelonthedipstick,
refertoFigure15.
Maxll:12oz.(0.35l),type:automotivedetergent
oilwithanAPIserviceclassicationofSJ,SL,or
higher.
UseFigure16toselectthebestoilviscosityforthe
outdoortemperaturerangeexpected:
Figure16
Figure15
1.Theoillevelisatits
maximum.
2.Theoillevelistoo
high—removeoilfrom
thecrankcase.
3.Theoillevelistoo
low—addoiltothe
crankcase.
9.Iftheoillevelislow ,slowlypouroilintotheoilll
hole,andfrequentlychecktheoillevelonthedipstick
bywipingthedipstickcleanandtheninserting,but
notscrewingin,theoilllcapintothehole.
Note:0W30syntheticoilisacceptableforusein
coldtemperatures.
Note:Filltheenginecrankcasewithoiluntilthe
dipstickindicatesthattheengineoilleveliscorrect
asshowninFigure15.Ifyouoverlltheenginewith
oil,removetheexcessoilasdirectedinChanging
theEngineOil.
10.Screwtheoilllcapintotheoilllholeandhand
tightenitsecurely.
10
Page 11

StartingtheEngine
1.PushtheignitionkeyfullyinwardtotheOnposition
(Figure17).
Figure17
Figure19
Note:Removeyourglovewhenyoupushinthe
primersothataircannotescapefromtheprimer
hole.
2.Movethechokeleverfullytotheright(Figure18).
Figure18
1.Chokelever
3.Firmlypushintheprimer2timeswithyourthumb,
holdingtheprimerinforasecondbeforereleasing
iteachtime(Figure19).
Important:Donotusetheprimerorthechoke
iftheenginehasbeenrunningandishot.
Excessiveprimingmayoodtheengineand
preventitfromstarting.
4.Connectanextensioncordtoapowersourceand
thesnowthrower,andpushtheelectric-startbutton
(model38282only)(Figure20),orpulltherecoil
starthandle(Figure21).
Figure20
1.Electric-startbutton
Note:UseonlyaUL-listed,16-gaugeextension
cordrecommendedforoutdoorusethatisnot
longerthan50feet(15m).
11
Page 12

Theelectricalcordcanbecomedamaged,
causingashockorre.
Thoroughlyinspecttheelectricalcordbefore
pluggingitintoapowersource.Ifthe
cordisdamaged,donotuseittostartthe
snowthrower.Replaceorrepairthedamaged
cordimmediately.ContactanAuthorized
ServiceDealerforassistance.
Ifyouleavethesnowthrowerpluggedintoa
powersource,someonecaninadvertentlystart
thesnowthrowerandinjurepeopleordamage
property(model38282only).
Unplugthepowercordwheneveryouarenot
startingthesnowthrower.
EngagingtheRotorBlades
Toengagetherotorblades,holdthecontrolbaragainst
thehandle(Figure22).
Figure21
Important:Runtheelectricstarternomore
than10timesatintervalsof5secondson,then
5secondsoff.Runningtheelectricstarter
extensivelycanoverheatanddamageit.Ifthe
enginedoesnotstartafterthisseriesofattempts,
waitatleast40minutestoallowthestarterto
coolbeforeattemptingtostartitagain.Ifthe
enginedoesnotstartafterthesecondseriesof
attempts,takethesnowthrowertoanAuthorized
ServiceDealerforservice(model38282only).
Note:Iftherecoilstarterdoesnotoperateproperly,
itmaybefrozen.Thawoutthestarterbefore
attemptingtostartthesnowthrower.
5.Whiletheengineisrunning,movethechokelever
graduallytotheleft.
6.Unplugtheextensioncordfromthepowersource
andthesnowthrower(model38282only).
Figure22
1.Controlbar
DisengagingtheRotorBlades
Todisengagetherotorblades,releasethecontrolbar
(Figure23).
Figure23
12
Page 13

StoppingtheEngine
Tostoptheengine,pulltheignitionkeyoutwarduntilit
clicksintotheOffposition(Figure24).
Figure26
1.Trigger
2.Chutedeector
Figure24
AdjustingtheDischargeChute
andChuteDeector
Toadjustthedischargechute,movethechutehandleas
showninFigure25.
Figure25
1.Chutehandle
Toraiseorlowertheangleofthechutedeector,press
thetriggeronthechutedeectorandmovethechute
deectorupordown(Figure26).Releasethetriggerto
lockthechutedeectorinplace.
ClearingaCloggedDischarge
Chute
Important:Handcontactwiththerotatingrotor
bladesinsidethedischargechuteisthemost
commoncauseofinjuryassociatedwithsnow
throwers.Neveruseyourhandtocleanoutthe
dischargechute.
Toclearthechute:
•Shuttheengineoff!
•Wait10secondstobesuretherotorbladeshave
stoppedrotating.
•Alwaysuseaclean-outtool,notyourhands.
Self-propellingthe
Snowthrower
Liftthesnowthrowerhandleuntilthewheelsarejust
offthegroundandthescraperandrotorbladestouch
theground,Thesnowthrowerwillpropelforward
(Figure27).
Figure27
1.Wheelsofftheground2.Scraperandrotorblades
13
incontractwiththeground
Page 14

Note:Byslightlyvaryingliftingforceonthehandle,
youcancontroltheforwardspeedofthesnowthrower.
Inheavysnow ,pushforwardonthehandle,ifnecessary,
butletthesnowthrowerworkatitsownpace.Donot
liftthehandleanymorethannecessary,becausethe
scraperwillliftoffthegroundandsnowwillescape
behindthesnowthrower.
whentryingtooperatefrozencontrols.Ifyouhave
difcultyoperatinganycontrolorpart,startthe
engineandletitrunforafewminutes.
OperatingTips
PreventingFreeze-upafter
Use
•Lettheenginerunforafewminutestoprevent
movingpartsfromfreezing.Stoptheengine,wait
forallmovingpartstostop,andremoveiceand
snowfromthesnowthrower.
•Cleanoffanysnowandicefromthebaseofthe
chute.
•Rotatethedischargechuteleftandrighttofreeit
fromanyicebuildup.
•WiththeignitionkeyintheOffposition,pull
therecoilstarterhandleseveraltimesorconnect
theelectricalcordtoapowersourceandthe
snowthrowerandpushtheelectricstartbuttononce
(model38282only)topreventtherecoilstarter
and/ortheelectricstarterfromfreezingup.
•Insnowyandcoldconditions,somecontrolsand
movingpartsmayfreeze.Donotuseexcessiveforce
Therotorbladescanthrowstones,toys,and
otherforeignobjectsandcauseseriouspersonal
injurytotheoperatorortobystanders.
•Keeptheareatobeclearedfreeofallobjects
thattherotorbladescouldpickupand
throw.
•Keepallchildrenandpetsawayfromthe
areaofoperation.
•Removethesnowassoonaspossibleafteritfalls.
•Overlapeachswathtoensurecompletesnow
removal.
•Dischargethesnowdownwindwheneverpossible.
Maintenance
Note:Determinetheleftandrightsidesofthemachinefromthenormaloperatingposition.
RecommendedMaintenanceSchedule(s)
MaintenanceService
Interval
Afterthersthour
Aftertherst2hours
Beforeeachuseordaily
Yearly
Yearlyorbeforestorage
MaintenanceProcedure
•Checkthecontrolcableandadjustitifnecessary.
•Checkforloosefastenersandtightenthemifnecessary.
•Changetheengineoil.
•Checktheengineoillevelandaddoilifnecessary .
•Checkthecontrolcableandadjustitifnecessary.
•InspecttherotorbladesandhaveanAuthorizedServiceDealerreplacetherotor
bladesandscraperifnecessary.
•Changetheengineoil.
•Servicethesparkplugandreplaceitifnecessary.
•Checkforloosefastenersandtightenthemifnecessary.
•HaveanAuthorizedServiceDealerinspectthedrivebeltandreplaceitifnecessary.
•Preparethesnowthrowerforstorage.
14
Page 15

AdjustingtheControlCable
RefertoAdjustingtheControlCableinSetup.
InspectingtheRotorBlades
Important:Donottipthesnowthrowerallthe
waybacktotheground,orfuelmayleakoutof
thesnowthrower.
4.Afterdrainingtheusedoil,returnthesnowthrower
totheoperatingposition.
ServiceInterval:Yearly—Inspecttherotorbladesand
haveanAuthorizedServiceDealer
replacetherotorbladesandscraperif
necessary.
Beforeeachsession,inspecttherotorbladesforwear.
Whenarotorbladeedgehasworndowntothewear
indicatorhole,haveanAuthorizedServiceDealer
replacetherotorbladesandthescraper(Figure28).
5.Installtheoildrainplugandtightenitsecurely.
6.Cleanaroundtheoilllcap(Figure13).
7.Unscrewtheoilllcapandremoveit.
8.Slowlypouroilintotheoilllhole,andfrequently
checktheoillevelonthedipstickbywipingthe
dipstickcleanandtheninserting,butnotscrewing
in,theoilllcapintothehole.
Note:Todeterminetheproperoillevelonthe
dipstick,refertoFigure29.
Figure28
1.Thewearindicatorholeis
intact;youdonotneedto
replacetherotorblades.
2.Thewearindicatorholeis
exposed;replacetherotor
bladesandscraper.
3.Scraper
ChangingtheEngineOil
ServiceInterval:Aftertherst2hours
Yearly
Runtheengineafewminutesbeforechangingtheoil
towarmit.Warmoilowsbetterandcarriesmore
contaminants.
1.Ensurethatthefueltankisnotoverlled(referto
Figure14)andthatthefuelcapissecurelyinplace.
2.Movethesnowthrowertoalevelsurface.
3.Placeanoildrainpanundertheoildrainplug
(Figure13),removetheoildrainplug,andtipthe
snowthrowerbackward(handledown)halfwaytothe
groundtodraintheusedoilintotheoildrainpan.
Figure29
1.Theoillevelisatits
maximum.
2.Theoillevelistoo
high—removeoilfrom
thecrankcase.
3.Theoillevelistoo
low—addoiltothe
crankcase.
Note:Y oumaytipthesnowthrowerforward
(handleup)alittletomakeaddingoileasier.
Remembertoreturnthesnowthrowertothe
operatingpositionbeforecheckingtheoillevel.
Important:Donottipthesnowthrowerallthe
wayforwardontoitsnose,orfuelmayleakout
ofthesnowthrower.
Maxll:12oz.(0.35l),type:automotivedetergent
oilwithanAPIserviceclassicationofSJ,SL,or
higher.
UseFigure30toselectthebestoilviscosityforthe
outdoortemperaturerangeexpected:
15
Page 16

Figure31
1.Centerelectrodeinsulator3.Airgap(nottoscale)
2.Sideelectrode
Figure30
Note:0W30syntheticoilisacceptableforusein
coldtemperatures.
Note:Filltheenginecrankcasewithoiluntilthe
dipstickindicatesthattheengineoilleveliscorrect
asshowninFigure29.Ifyouoverlltheengine
withoil,removetheexcessoilfromthedrainplug
intoanoildrainpan.
9.Screwtheoilllcapintotheoilllhole,andhand
tightenitsecurely.
10.Wipeupanyspilledoil.
11.Disposeoftheusedoilproperlyatalocalrecycling
center.
ServicingtheSparkPlug
ServiceInterval:Yearly—Servicethesparkplugand
replaceitifnecessary.
6.Installthesparkplugandtorqueitto20–22ft-lb
(27–30N-m).
7.Connectthewiretothesparkplug.
ReplacingtheDriveBelt
Ifdrivebeltbecomesworn,oil-soaked,excessively
cracked,frayed,orotherwisedamaged,replacethebelt.
1.Removethe4boltsthatholdthedrivebeltcover
(Figure32)inplace.
UseaTorosparkplug(PartNo.119-1961).
1.Stoptheengineandwaitforallmovingpartstostop.
2.Disconnectthewirefromthesparkplug(Figure13).
3.Cleanaroundthesparkplug.
4.Removethesparkplugfromthecylinderhead.
Important:Replaceacracked,fouled,or
dirtysparkplug.Donotcleantheelectrodes
becausegritenteringthecylindercandamage
theengine.
5.Setthegapontheplugto0.030inch(0.76mm)
(Figure31).
Figure32
1.Drivebeltcover
Note:Thelowerfrontcornerofthedrivebelt
coverisfasteneddownwithasmallerbolt,awasher,
andalocknut.
2.Removethebeltfromtherotorpulley.
16
Page 17

Figure33
1.Rotorpulley5.Idlerpulley
2.Idlerarmbrake6.Enginepulley
3.Drivebelt7.Tabsontheidlerarm
4.Idlerarm
3.Pressdownontheidlerarmandremovethebelt
frombetweenthetabontheidlerarmbrakeand
therotorpulley.
Note:Theenginepulleybeltguideisverycloseto
thepulley,andthebeltmaynottthroughthegap.
4.Twistthebeltoutinfrontofthebeltguidesothat
thebeltiswedgedbetweenthebeltguideandthe
enginepulley.
5.Insertascrewdriverintotheholeinthebeltguideas
showninFigure34,andexthebeltguidetoward
therotorpulleyenoughtopullthebeltthroughthe
gap.
Important:Ensurethatyouinstallthedrive
beltsothatitsitsabovethetwotabsontheidler
armandbelowtheidlerarmbrake(Figure33).
7.Installthedrivebeltcoverwiththefastenersthatyou
removedinstep1.
Storage
StoringtheSnowthrower
•Gasolinefumesarehighlyammable,
explosive,anddangerousifinhaled.Ifyou
storetheproductinanareawithanopen
ame,thegasolinefumesmayigniteand
causeanexplosion.
•Donotstorethesnowthrowerinahouse
(livingarea),basement,oranyotherarea
whereignitionsourcesmaybepresent,
suchashotwaterandspaceheaters,clothes
dryers,furnaces,andotherlikeappliances.
•Donottipthesnowthrowereitherforward
orbackwardwithfuelinthefueltank;
otherwise,fuelmayleakoutofthe
snowthrower.
•Donotstorethesnowthrowerwithitshandle
tippeddownontotheground,becauseoil
willleakintotheenginecylinderandonto
theground,andthesnowthrowerwillnot
startorrun.
Figure34
1.Beltguide2.Enginepulley
Note:Takecarenottodistortordamagethebelt
guide.
6.Toinstallthenewdrivebelt,reversethestepsabove.
1.Onthelastrefuelingoftheseason,addfuelstabilizer
tofreshfuelasdirectedbytheenginemanufacturer.
2.Runtheenginefor10minutestodistributethe
conditionedfuelthroughthefuelsystem.
3.Whiletheengineisstillwarm,changetheengineoil.
RefertoChangingtheEngineOil.
4.Drainthefuelfromthetankandcarburetorby
performingthefollowingsteps:
A.Loosenthefueltankcap.
B.Unscrew,butdonotremove,thesmallscrewon
thesideofthecarburetorfuelbowl(Figure35)
untilthefuelbeginstodrainfromthecarburetor.
Drainthefuelintoanapprovedfuelcontainer.
Important:Donotremovethecarburetor
bowlboltonthebottomofthecarburetor.
17
Page 18

Figure35
1.Carbureturbowlbolt—do
notremove
2.Smallscrewoncarburetor
C.Waitforafewminutesuntilthefuelhasdrained,
theninstallthefuelcapandtightenthesmall
screwonthecarburetor.
5.Disposeofunusedfuelproperly .Recycleitaccording
tolocalcodes,oruseitinyourautomobile.
6.Removethesparkplug.
7.Squirt2teaspoonsofoilintothesparkplughole.
8.Installthesparkplugbyhandandthentorqueitto
20–22ft-lb(27–30N-m).
9.WiththeignitionkeyintheOffposition,pullthe
recoilstarterslowlytodistributetheoilontheinside
ofthecylinder.
10.Disconnecttheignitionkeyfromthelanyardand
storetheignitionkeyinasafeplace.
11.Cleanthesnowthrower.
12.Touchupchippedsurfaceswithpaintavailable
fromanAuthorizedServiceDealer.Sandaffected
areasbeforepainting,andusearustpreventativeto
preventthemetalpartsfromrusting.
13.Tightenanyloosefasteners.Repairorreplaceany
damagedparts.
14.Coverthesnowthrowerandstoreitinaclean,dry
placeoutofthereachofchildren.Allowtheengine
tocoolbeforestoringitinanyenclosure.
18
Page 19

FederalEmissionControlWarrantyStatement
ATwo-YearLimitedWarranty
YourWarrantyRightsandObligations
TheU.S.EnvironmentalProtectionAgency(EP A),TheT oroCompany,and
itsafliate,T oroWarrantyCompany,arepleasedtoexplaintheemission
controlsystemwarrantyonyour2009andlaterutility/lawn/garden
equipmentengine.2009andlatermodelyearutility/lawn/garden
equipmentenginesmustbedesigned,builtandequipped,atthetime
ofsale,tomeettheU.S.EP Aregulationsforsmallnon-roadengines.
Theequipmentenginemustbefreefromdefectsinmaterialsand
workmanship,whichcauseittofailtoconformwithU.S.EP Astandards,
forthersttwoyearsofengineusefromthedateofsaletotheultimate
purchaser.TheToroCompanyanditsafliate,T oroWarrantyCompany,
warranttheemissioncontrolsystemonyourutility/lawn/gardenequipment
enginefortheperiodoftimelistedabove,providedtherehasbeenno
abuse,neglect,orimpropermaintenanceofyourutility/lawn/garden
equipmentengine.
Youremissioncontrolsystemmayincludepartssuchasthecarburetor
orfuelinjectionsystem,theignitionsystem,andcatalyticconverter.Also
includedmaybefuellines,fuellinefasteners,connectors,andother
emission-relatedassemblies.
Whereawarrantableconditionexists,TheToroCompanyanditsafliate,
ToroWarrantyCompany ,promisetorepairyourengineatnocosttoyou,
includingdiagnosis,parts,andlabor.
Manufacturer’sWarrantyCoverage
TheT oroCompanyanditsafliate,ToroWarrantyCompany,pursuant
toanagreementbetweenthem,jointlywarrantthe2009andlater
utility/lawn/gardenequipmentenginesfortwoyearsfromthedateof
delivery.Ifanyemission-relatedpartonyourengineisdefectivein
materialsorworkmanship,wewillrepairorreplacethepart,freeofcharge.
OwnerResponsibilities
Astheengineowner ,youareresponsiblefortheperformanceofthe
requiredmaintenancelistedinyourOperator’sManual.Werecommend
thatyouretainallreceiptscoveringmaintenanceonyourequipment,but
wecannotdenywarrantysolelyforthelackofreceiptsorforyourfailureto
ensuretheperformanceofallscheduledmaintenance.
Anyreplacementpartorservicethatisequivalentinperformanceand
durabilitymaybeusedinnon-warrantymaintenanceorrepairs,andshall
notreduceourwarrantyobligation.
Astheengineowner,youshouldbeawarethatwemaydenyyouwarranty
coverageifyourengineoraparthasfailedduetoabuse,neglect,
impropermaintenance,orunapprovedmodicationsorparts.
Youareresponsibleforpresentingyourequipmentenginetoan
AuthorizedServiceDealerassoonasaproblemexists.Thewarranty
repairsshouldbecompletedinareasonableamountoftime,notto
exceedthirty(30)days.
Ifyouhaveanyquestionsregardingyourwarrantyrightsand
responsibilities,contactusat:
CustomerCareDepartment,ConsumerDivision
ToroWarrantyCompany
811 1LyndaleAvenueSouth
Bloomington,MN55420-1196
Tollfreeat800–348–2424(U.S.customers)
Tollfreeat800–544–5364(Canadiancustomers)
WarrantedParts
Thewarrantyperiodbeginsonthedatetheengineorequipmentis
deliveredtoaretailpurchaser.TheToroCompanyanditsafliate,
ToroWarrantyCompany,jointlywarranttotheinitialownerandeach
subsequentpurchaserthattheengineisfreefromdefectsinmaterialsand
workmanship,whichcausetheenginetofailtoconformwithapplicable
regulations,foraperiodoftwoyears.
Failurescausedbyabuse,neglect,orimpropermaintenancearenot
covered.Theuseofadd-onormodiedpartscanbegroundsfor
disallowingawarrantyclaim.Wearenotliabletocoverfailuresof
warrantedpartscausedbytheuseofadd-onormodiedparts.Weare
liablefordamagestootherenginecomponentscausedbythefailureof
awarrantedpartstillunderwarranty.Theownerisresponsibleforthe
performanceoftherequiredmaintenance,asdenedintheOperator’s
Manual.
Anywarrantedpartwhichisnotscheduledforreplacementasrequired
maintenance,orwhichisscheduledonlyforregularinspectiontotheeffect
of“repairorreplaceasnecessary”shallbewarrantedforthewarranty
period.Anywarrantedpartwhichisscheduledforreplacementasrequired
maintenanceshallbewarrantedfortheperiodoftimeuptotherst
scheduledreplacementpointforthatpart.Coverageunderthiswarranty
extendsonlytothepartslistedbelow(theemissionssystemparts)tothe
extentthatthesepartswerepresentontheenginewhenpurchased.
•FuelMeteringSystem
—Coldstartenrichmentsystemincludingthechokemechanism
orprimingsystem
—Fuelpump
—Carburetorandinternalparts
•AirInductionSystem
—Aircleaner
—Intakemanifold
—Controlledhotairintakesystem
•IgnitionSystem
—Sparkplug(s)
—Ignitioncoilsandelectronics
—Advance/retardmechanisms
•Mufer
•MiscellaneousItemsUsedintheAboveSystems
—Vacuum,temperature,andtime-sensitivevalvesandswitches
—Hoses,connectors,andassembliesofsame
InstructionsforObtainingWarrantyService
IfyouthinkthatyourT oroProductcontainsadefectinmaterialsor
workmanship,followthisprocedure:
1.ContactanyAuthorizedT oroServiceDealertoarrangeserviceat
theirdealership.T olocateadealerconvenienttoyou,refertothe
YellowPagesofyourtelephonedirectory(lookunder“LawnMowers”)
oraccessourwebsiteatwww.Toro.com.Youmayalsocallthe
numberslistedabovetousethe24-hourToroDealerlocatorsystem.
2.Bringtheproductandyourproofofpurchase(salesreceipt)tothe
ServiceDealer.
Theownershallnotbechargedfordiagnosticlaborwhichleadstothe
determinationthatawarrantedpartisdefective,ifthediagnosticwork
isperformedatawarrantystation.
GeneralConditions
NeitherTheT oroCompanynorT oroWarrantyCompanyisliablefor
indirect,incidental,orconsequentialdamagesinconnectionwiththe
useoftheT oroProductscoveredbythesewarranties,includingany
costorexpenseofprovidingsubstituteequipmentorserviceduring
reasonableperiodsofmalfunctionornon-usependingcompletionof
repairsunderthesewarranties.
Allimpliedwarrantiesofmerchantability(thattheproductistforordinary
use)andtnessforuse(thattheproductistforaparticularpurpose)are
limitedtothedurationoftheexpresswarranty.
Somestatesdonotallowexclusionsofincidentalorconsequential
damages,sotheaboveexclusionsmaynotapplytoyou.
Thiswarrantygivesyouspeciclegalrights,andyoumayalsohaveother
rightswhichvaryfromstatetostate.
374-0267RevA
Page 20

TheToroTotalCoverageGuarantee
AT wo-YearFullWarranty(45DayLimitedWarrantyforCommercialUse)
PowerClear180
Single-StageSnowthrowers
ConditionsandProductsCovered
TheToroCompanyanditsafliate,T oroWarrantyCompany,pursuantto
anagreementbetweenthem,jointlypromisetorepairtheT oroProduct
listedbelowifusedforresidentialpurposes*,ifdefectiveinmaterialsor
workmanshiporifitstopsfunctioningduetothefailureofacomponent
fortheperiodlistedbelow.
Thiswarrantycoversthecostofpartsandlabor ,butyoumustpay
transportationcosts.
Thefollowingtimeperiodsapplyfromthedateofpurchase:
ProductsWarrantyPeriod
Powerclear180SnowthrowersandAttachments
2years
LimitedWarrantyforCommercialUse
Gas-poweredT oroProductsusedforcommercial,institutional,or
rentaluse,arewarrantedfor45daysagainstdefectsinmaterialsor
workmanship.Componentsfailingduetonormalweararenotcovered
bythiswarranty.
InstructionsforObtainingWarrantyService
IfyouthinkthatyourT oroProductcontainsadefectinmaterialsor
workmanship,followthisprocedure:
1.ContactanyAuthorizedT oroServiceDealertoarrangeserviceattheir
dealership.Tolocateadealerconvenienttoyou,refertotheYellow
Pagesofyourtelephonedirectory(lookunder“LawnMowers”)or
accessourwebsiteatwww.Toro.com.Youmayalsocallthenumbers
listedinitem#3tousethe24-hourT oroDealerlocatorsystem.
2.Bringtheproductandyourproofofpurchase(salesreceipt)tothe
ServiceDealer.Thedealerwilldiagnosetheproblemanddetermine
ifitiscoveredunderwarranty.
3.IfforanyreasonyouaredissatisedwiththeServiceDealer’s
analysisorwiththeassistanceprovided,contactusat:
CustomerCareDepartment,ConsumerDivision
TheT oroCompany
811 1LyndaleAvenueSouth
Bloomington,MN55420-1196
Tollfreeat866-336-5205(U.S.customers)
Tollfreeat866-854–9033(Canadiancustomers)
OwnerResponsibilities
YoumustmaintainyourT oroProductbyfollowingthemaintenance
proceduresdescribedintheOperator’sManual.Suchroutine
maintenance,whetherperformedbyadealerorbyyou,isatyourexpense.
•Costofregularmaintenanceorwearparts,suchasrotorblades
(paddles),scraperblades,belts,fuel,lubricants,oilchanges,spark
plugs,cable/linkageorbrakeadjustments
•Anyproductorpartwhichhasbeenalteredormisusedandrequires
replacementorrepairduetoaccidentsorlackofpropermaintenance
•Repairsnecessaryduetofailuretousefreshfuel(lessthanone
monthold),orfailuretoproperlypreparetheunitpriortoanyperiod
ofnon-useoveronemonth
•Pickupanddeliverycharges
•Operationalmisuse,neglect,oraccidents
•RepairsorattemptedrepairsbyanyoneotherthananAuthorized
ToroServiceDealer
•Repairsoradjustmentstocorrectstartingdifcultiesduetothe
following:
–failuretofollowpropermaintenanceprocedures
–snowthrowerauger/paddlesstrikinganobject
–contaminantsinthefuelsystem
–improperfuelorfuel/oilmixture(consultyourOperator’sManual
ifindoubt)
–failuretodrainthefuelsystempriortoanyperiodofnon-use
overonemonth
Ifyouarehavingdifcultystartingyourunit,pleasechecktheOperator’s
Manualtoensurethatyouareusingthecorrectstartingprocedures.This
cansaveanunnecessaryvisittoaServiceDealer .
GeneralConditions
Allrepairscoveredbythesewarrantiesmustbeperformedbyan
AuthorizedToroServiceDealerusingT oroapprovedreplacementparts.
RepairbyanAuthorizedToroServiceDealerisyoursoleremedyunder
thiswarranty .
NeitherTheT oroCompanynorT oroWarrantyCompanyisliablefor
indirect,incidental,orconsequentialdamagesinconnectionwiththe
useoftheT oroProductscoveredbythesewarranties,includingany
costorexpenseofprovidingsubstituteequipmentorserviceduring
reasonableperiodsofmalfunctionornon-usependingcompletionof
repairsunderthesewarranties.
Somestatesdonotallowexclusionsofincidentalorconsequential
damages,sotheaboveexclusionsmaynotapplytoyou.
Thiswarrantygivesyouspeciclegalrights,andyoumayalsohaveother
rightswhichvaryfromstatetostate.
ItemsandConditionsNotCovered
Thereisnootherexpresswarrantyexceptforspecialemissionsystem
coverageandenginewarrantycoverageonsomeproducts.Thisexpress
warrantydoesnotcoverthefollowing:
CountriesOtherthantheUnitedStatesorCanada
CustomerswhohavepurchasedT oroproductsexportedfromtheUnitedStatesorCanadashouldcontacttheirT oroDistributor(Dealer)toobtain
guaranteepoliciesforyourcountry,province,orstate.IfforanyreasonyouaredissatisedwithyourDistributor’sserviceorhavedifcultyobtaining
guaranteeinformation,contacttheToroimporter .Ifallotherremediesfail,youmaycontactusatT oroWarrantyCompany.
*Residentialpurposesmeansuseoftheproductonthesamelotasyourhome.Useatmorethanonelocation,orinstitutionalorrentaluse,isconsidered
commercialuse,andthecommercialusewarrantywouldapply .
374-0263RevB
 Loading...