

Page 1

OSMAC® G3 Satellite
User’s Guide
The OSMAC® G3 offers intuitive faceplate capabilities,
superior diagnostics and can be installed as a
complete satellite or as a retrofit faceplate upgrade
for existing E-OSMAC
• 16 to 64 stations in 8-station increments
• Field programmable for future upgrades
• Operates as a stand-alone controller or
under the management of a central computer
• Supports radio communications with the
central computer
• 12 irrigation programs
• Independent stand-alone and central operation
• Multi-Manual, Program Start and Syringe manual
operations
• Operates up to 16 stations simultaneously
®
satellites.
i
Page 2

Table of Contents
Introduction ----------------------------------------------------- 1
Home Screen - - - - - - - - - - - - - - - - - - - - - - - - - - - - - - - - - - - - - - - - - - - - - - - - - - - - - 1
Menu Navigation -------------------------------------------------- 1
Modes of Operation ------------------------------------------------ 2
Setting the Clock and Mode
Clock Set ------------------------------------------------- 2
Clock Mode ---------------------------------------------- 2–3
Setting the Date and Mode
Date ----------------------------------------------------- 3
Date Mode ------------------------------------------------ 3
Setting Scheduled Watering ------------------------------------------ 4
Setting OSMAC G3 for Radio Communications
Satellite Address -------------------------------------------- 6
Satellite Radio Frequency --------------------------------------- 6
Settings Menu
Station Settings --------------------------------------------- 7
Comm Mode ----------------------------------------------- 8
Reset Prg’s ------------------------------------------------ 8
Reset Sta’s ------------------------------------------------ 9
Reset Unit ------------------------------------------------- 9
Enable Sta’s ----------------------------------------------- 9
Clock Set ------------------------------------------------ 10
Clock Mode ----------------------------------------------- 10
Date Mode ----------------------------------------------- 10
Date ---------------------------------------------------- 11
Sat Address ---------------------------------------------- 11
Max Sim Sta ----------------------------------------------- 11
Display Adj ----------------------------------------------- 12
Radio Settings --------------------------------------------- 12
Manual Watering
M-Manual ------------------------------------------------ 14
Programs ------------------------------------------------ 14
Syringe -------------------------------------------------- 15
Communication
Page Monitor ---------------------------------------------- 15
Page History ---------------------------------------------- 15
Radio Menu ----------------------------------------------- 15
Sat Address ---------------------------------------------- 15
Comm Mode ---------------------------------------------- 16
What’s Running -------------------------------------------------- 16
Diagnostics
Revision ------------------------------------------------- 16
Event Codes ---------------------------------------------- 16
VA Monitor ----------------------------------------------- 16
Station Test ----------------------------------------------- 16
Seq Stations ---------------------------------------------- 17
Specifications --------------------------------------------------- 17
Electronic Compatibility -------------------------------------- Back Cover
ii
Page 3
Introduction
The Toro® OSMAC® G3 Satellite combines modular flexibility, ease of use and increased programmability in a
single controller.
Modularity means flexibility. The OSMAC G3 is available from 16 to 64 stations, and can expand in 8-station
increments to meet your needs. Optional station switch capability and surge protection provide simple operation
and added security.
The intuitive OSMAC G3 user interface is easy to use and includes a back light for improved visibility in low-light
conditions, yet it is completely viewable in direct sunlight. The faceplate’s simple navigation arrows and Select
button allows for easy navigation and faster menu selection.
With 12 irrigation programs, the OSMAC G3 satellite allows programming to the station level. Discrete local and
central modes make stand-alone and central controlled operations independent from one another, while the ability
to run up to 16 stations simultaneously lets you irrigate a wide variety of landscapes.
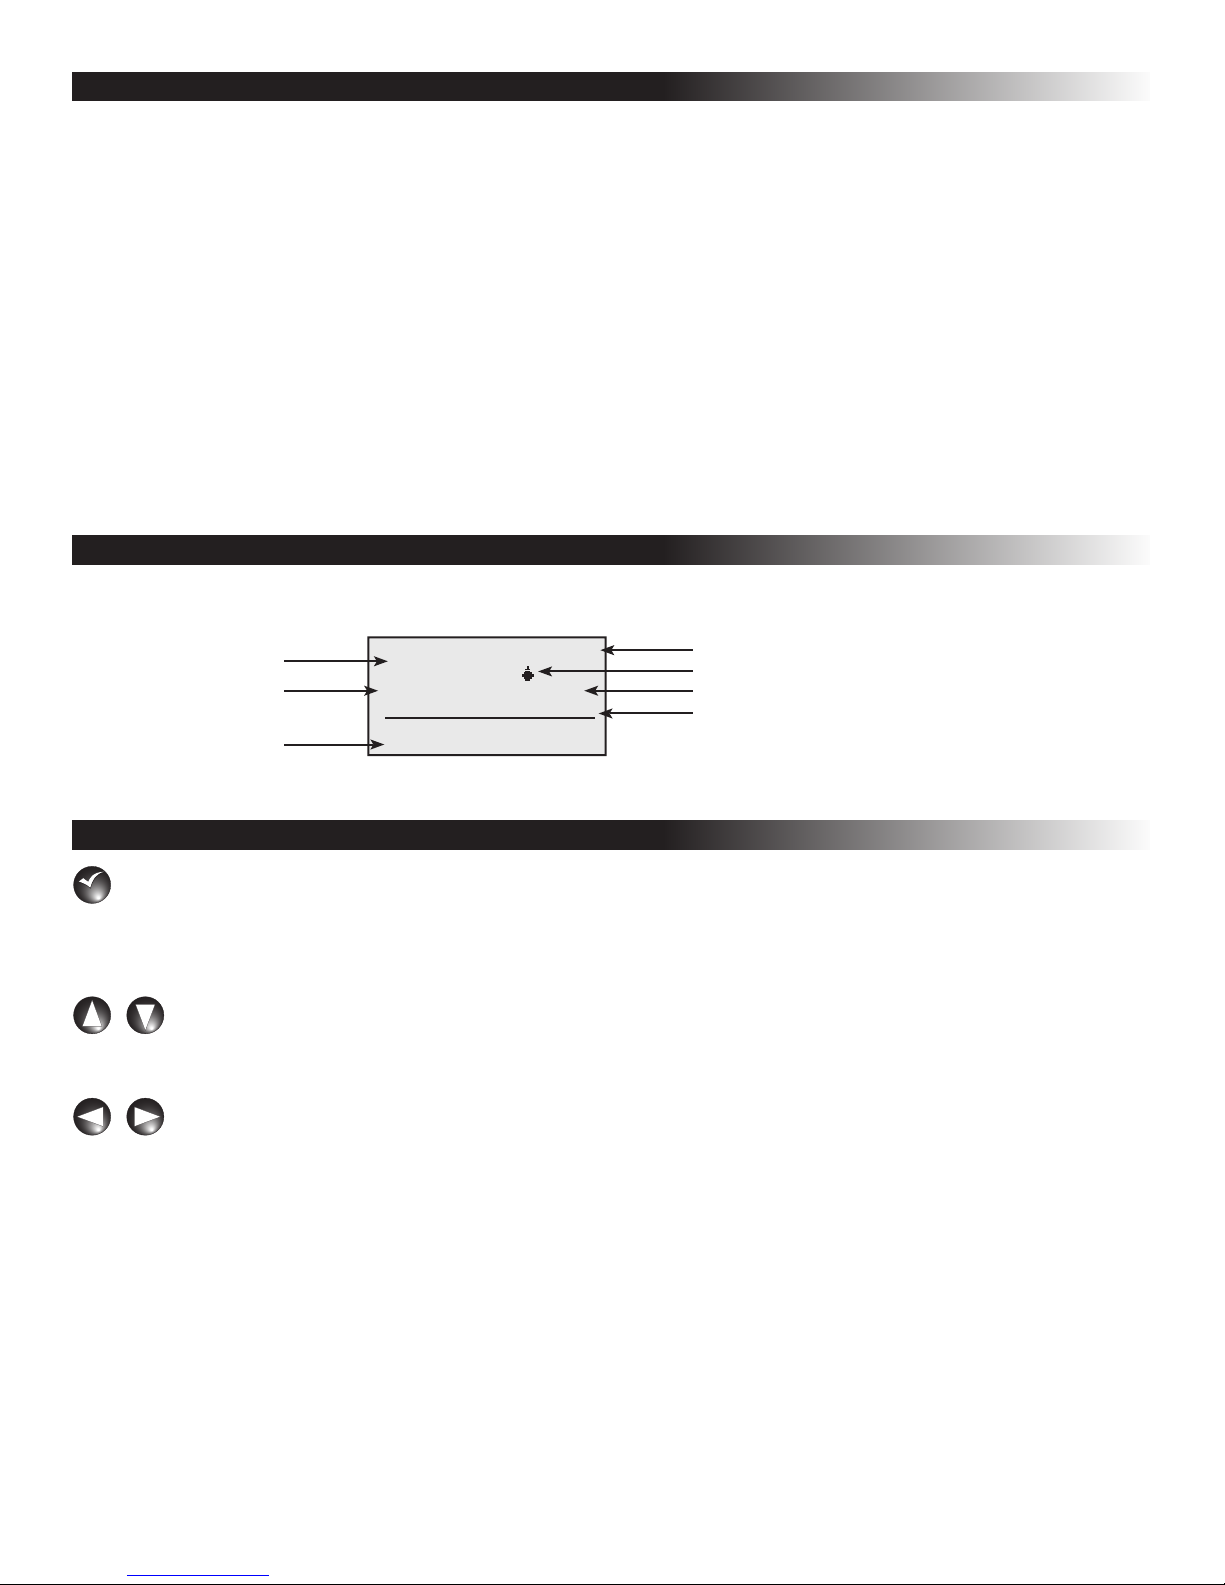
Home Screen
Press any button, except the left arrow, to access the menus and settings from the home screen.
Current Time
Current Date
Last Received Page
Central
11:30am
04/20/16 Wed Page Mode
OSMAC G3 Address: 001
7540, 10:17:54
26
Satellite Operating Mode
Watering Operation Indicator
Satellite is Ready to Receive Page
Satellite Address
Menu Navigation
Select button – Press the Select button to select a menu or change a setting or value. When a setting or
SELECT
SELECT
value is selected, the cursor changes to a dark background and the setting or value can be changed by using the
UP and DOWN buttons. Pressing the Select button again will return the UP and DOWN buttons to navigation
mode.
UP and DOWN button – In navigation mode, the UP and DOWN buttons navigate up and down
though the menu selections. In the edit mode, they change settings and values. Use the
Select button to change
between navigation and edit mode.
LEFT and RIGHT button – The LEFT and RIGHT buttons are used to navigate left and right in a menu.
LEFT button is also used as a back button to return to the previous menu. If the LEFT button is pressed in
The
the navigation mode, the menu will return to the previous one. To get back to the home screen, keep pressing the
LEFT button in the navigation mode.
1
Page 4
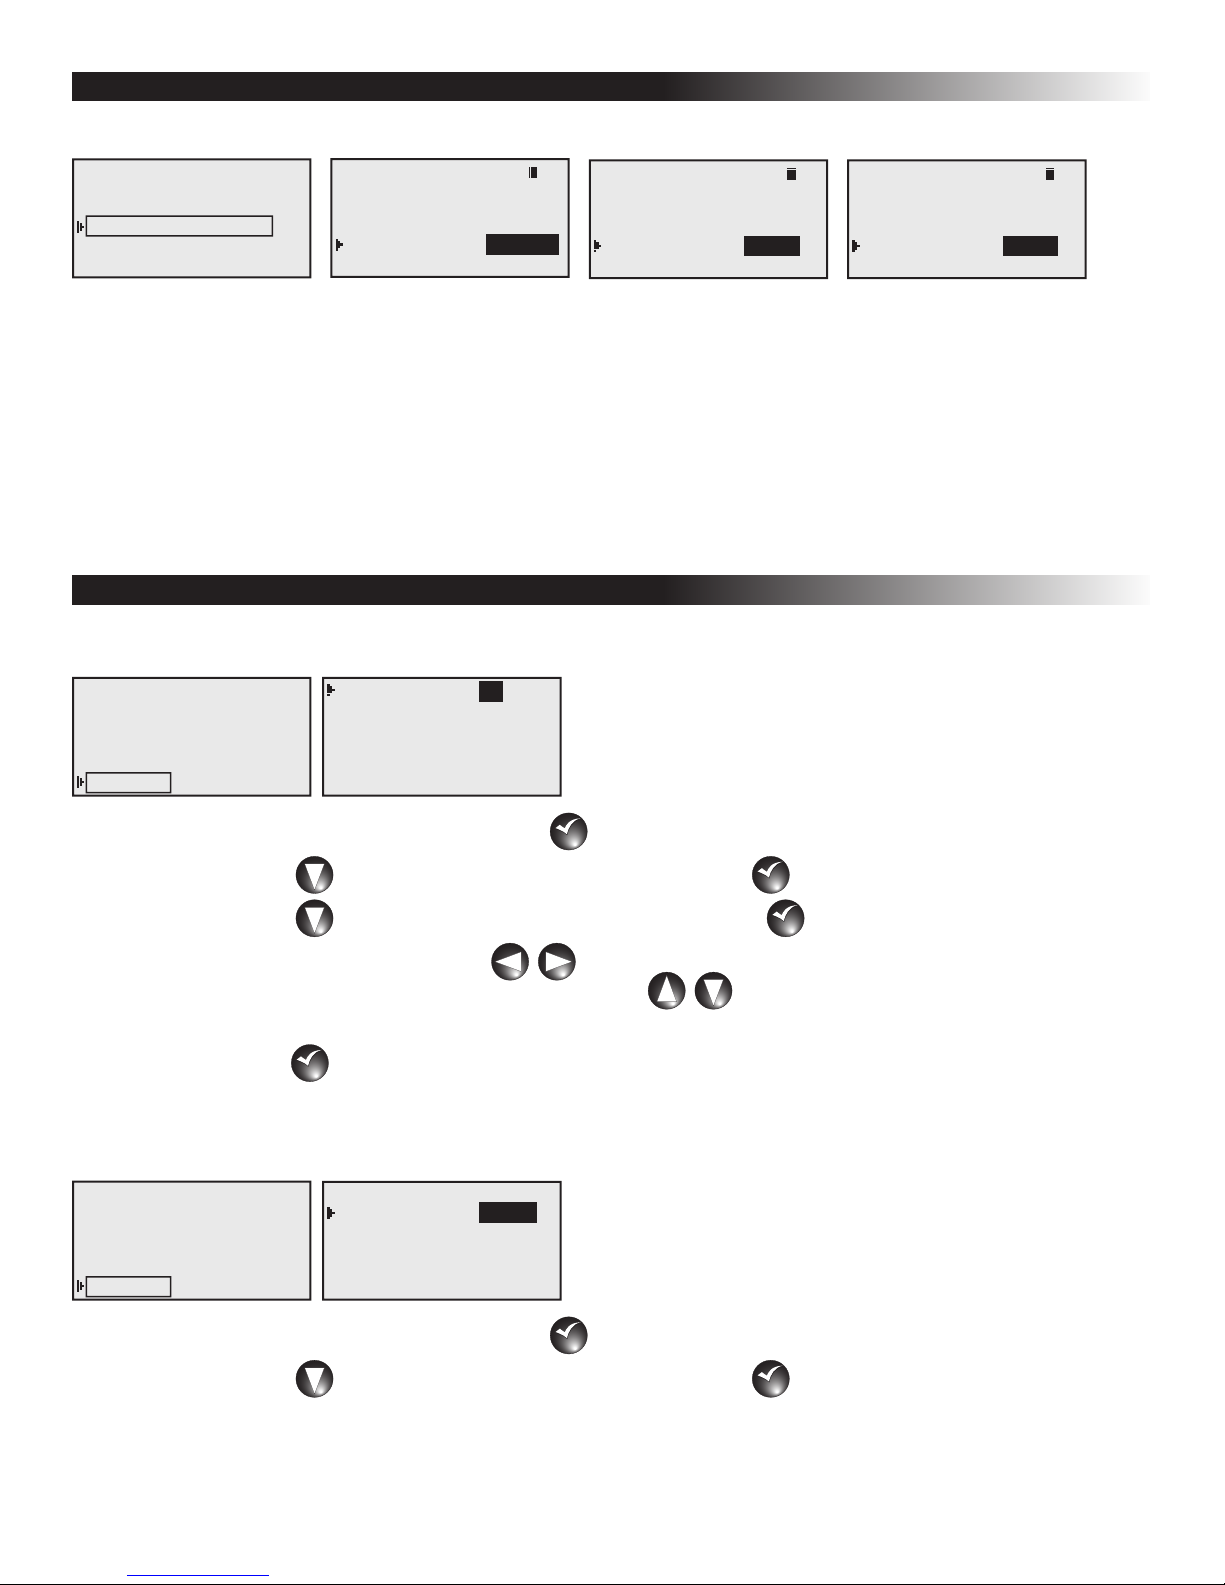
Modes of Operation
The Toro OSMAC G3 Satellite can be placed in three operating modes: Central mode, Local mode and Off mode.
What’s Running
Manual Watering
Scheduled Watering
Communication
Diagnostics
Settings
Radio Monitor Sig
Page History
Radio Menu
Sat Address: 001
Comm Mode: Central
Central
Receive Only Radio
Radio Monitor Sig
Page History
Radio Menu
Sat Address: 001
Comm Mode:
Receive Only Radio
Local
Radio Monitor Sig
Page History
Radio Menu
Sat Address: 001
Comm Mode:
Receive Only Radio
Off
Central Mode – When placed in Central mode, the OSMAC G3 satellite will wait and execute radio commands
sent by the central. The satellite will ignore all scheduled watering but will execute manual watering.
Local Mode – When placed in Local mode, the OSMAC G3 will execute scheduled watering as well as manual
watering. Radio commands will be ignored.
Off Mode – When placed in Off mode, the OSMAC G3 will not execute any watering operation whether it is
scheduled or manually initiated. Any watering operation will terminate once the satellite is placed in Off mode.
Watering operations will resume once the satellite is placed back to Central or Local mode.
Setting the Clock and Mode
Clock Set
What’s Running
Manual Watering
Scheduled Watering
Communication
Diagnostics
Settings
Clock Set: 11:15am
11
Clock Mode: Am/Pm
Date Mode: MMDDYY
Date: 01/01/16 Fri
Sat Address: 001
Max Sim Sta: 05
Step 1 – While at the Home display, press Select
Step 2 – Press DOWN until Settings is selected and press Select
Step 3 – Press DOWN until Clock Set is selected and press Select
to access the controller menu.
SELECT
SELECT
.
SELECT
SELECT
SELECT
SELECT
to edit.
Step 4 – Use the LEFT and RIGHT buttons to navigate between the HOURS and MINUTES parameters.
To edit the values, use the
UP and DOWN buttons to increase or decrease the HOURS and
MINUTES.
Step 5 – Press Select
once the correct time is set.
SELECT
SELECT
Clock Mode
What’s Running
Manual Watering
Scheduled Watering
Communication
Diagnostics
Settings
Clock Set: 11:15am
Clock Mode: Am/Pm
Am/Pm
Date Mode: MMDDYY
Date: 01/01/16 Fri
Sat Address: 001
Max Sim Sta: 05
Step 1 – While at the Home display, press Select
Step 2 – Press DOWN until Settings is selected and press Select
to access the controller menu.
SELECT
SELECT
.
SELECT
SELECT
2
Page 5
Step 3 – Press DOWN until Clock Mode is selected and press Select
SELECT
SELECT
to edit.
Step 4 – Use the UP and DOWN buttons to select between Am/Pm (12-Hour format) or 24 Hrs
(International format).
Step 5 – Press Select
once the correct format is selected.
SELECT
SELECT
Setting the Date and Mode
Date
What’s Running
Manual Watering
Scheduled Watering
Communication
Diagnostics
Settings
Clock Set: 11:15am
Clock Mode: Am/Pm
Date Mode: MMDDYY
Date: 01/01/16 Fri
01
Sat Address: 001
Max Sim Sta: 05
Step 1 – While at the Home display, press Select
Step 2 – Press DOWN until Settings is selected and press Select
Step 3 – Press DOWN until Date is selected and press Select
Step 4 – Use the LEFT and RIGHT buttons to navigate between the DAY, MONTH and YEAR.
To edit the values, use the
UP and DOWN buttons to increase or decrease until the correct
DAY, MONTH and YEAR is displayed.
Step 5 – Press Select
once the correct date is set.
SELECT
SELECT
to access the controller menu.
SELECT
SELECT
.
SELECT
SELECT
to edit.
SELECT
SELECT
Date Mode
What’s Running
Manual Watering
Scheduled Watering
Communication
Diagnostics
Settings
Clock Set: 11:15am
Clock Mode: Am/Pm
Date Mode: MMDDYY
MMDDYY
Date: 01/01/16 Fri
Sat Address: 001
Max Sim Sta: 05
Step 1 – While at the Home display, press Select
Step 2 – Press DOWN until Settings is selected and press Select
Step 3 – Press DOWN until Date Mode is selected and press Select
Step 4 – Use the UP and DOWN buttons to select between MMDDYY (Month/Day/Year) or DDMMYY
(Day/Month/Year) format.
Step 5 – Press Select
once the correct format is selected.
SELECT
SELECT
to access the controller menu.
SELECT
SELECT
.
SELECT
SELECT
SELECT
SELECT
to edit.
3
Page 6

Setting Scheduled Watering
What’s Running
Manual Watering
Scheduled Watering
Communication
Diagnostics
Settings
P01 100% 00:00:00
Days: SMTWTFSSMTWTFS
set>:
Start : 01 05:00am
01
Sta#: 01–05 05 min
Simult : 06
Note: In order to run Scheduled Watering, you must set the OSMAC G3 controller to Local mode operation.
Comm Mode under Settings Menu section.
See
Step 1 – While at the Home display, press Select
Step 2 – Press DOWN until Scheduled Watering is selected and press Select
to access the controller menu.
SELECT
SELECT
SELECT
SELECT
.
Step 3 – Use the UP, DOWN, LEFT and RIGHT arrows to navigate between the parameters.
P01 - Program Designation
Select the Program you want to edit by selecting P01 and pressing the Select button
DOWN arrows to increase or decrease the program number. The OSMAC G3 controller
and
will allow you to program up to 12 independent schedules. Press
Select
to make the selection.
SELECT
SELECT
. Use the UP
SELECT
SELECT
100% - Watering Percentage
Adjust the Schedule’s watering percentage by selecting 100% and pressing the Select button
UP and DOWN arrows to increase or decrease the watering percentage. Watering can
the
SELECT
SELECT
. Use
be increased up to 250% of the scheduled watering time or decreased down to 10% of the scheduled
watering time. Press
Select
to finalize the change.
SELECT
SELECT
Days / Water Every - Assigned Active Watering Days
Select the watering interval by selecting Days and pressing the Select button
between
Selecting
until
Days or Water Every option.
Days option allows you to select a unique 2-week watering combination. Press DOWN
set>: option is selected and press Select
DOWN arrows.
P01 100% 00:00:00
Days: SMTWTFSSMTWTFS
WEnd:
Start : 01 05:00am
Sta#: 01–05 05 min
Simult : 06
P01 100% 00:00:00
Days: SMTWTFSSMTWTFS
WDay:
Start : 01 05:00am
Sta#: 01–05 05 min
Simult : 06
None - disable all days for watering.
WEnd - Selects only Saturdays and Sundays for watering while weekdays are non-watering days.
WDay - Selects Monday through Friday for watering and weekends are non-watering days.
Alt1 - Selects every other day as active watering days starting with Sunday.
Alt2 - Selects every other day as active watering days starting with Monday.
All - Selects everyday as watering days.
set> - Allows you to activate and deactivate any of the days within the 2-week schedule. Use the LEFT
RIGHT arrows to navigate through the individual days and use the UP and DOWN
and
arrows to activate (solid box) or deactivate (empty box).
Press
Select
to finalize the change.
SELECT
SELECT
. You can select
SELECT
SELECT
. Scroll through the selection using the UP and
SELECT
SELECT
P01 100% 00:00:00
Days: SMTWTFSSMTWTFS
Alt1:
Start : 01 05:00am
Sta#: 01–05 05 min
Simult : 06
P01 100% 00:00:00
Days: SMTWTFSSMTWTFS
All:
Start : 01 05:00am
Sta#: 01–05 05 min
Simult : 06
4
Page 7
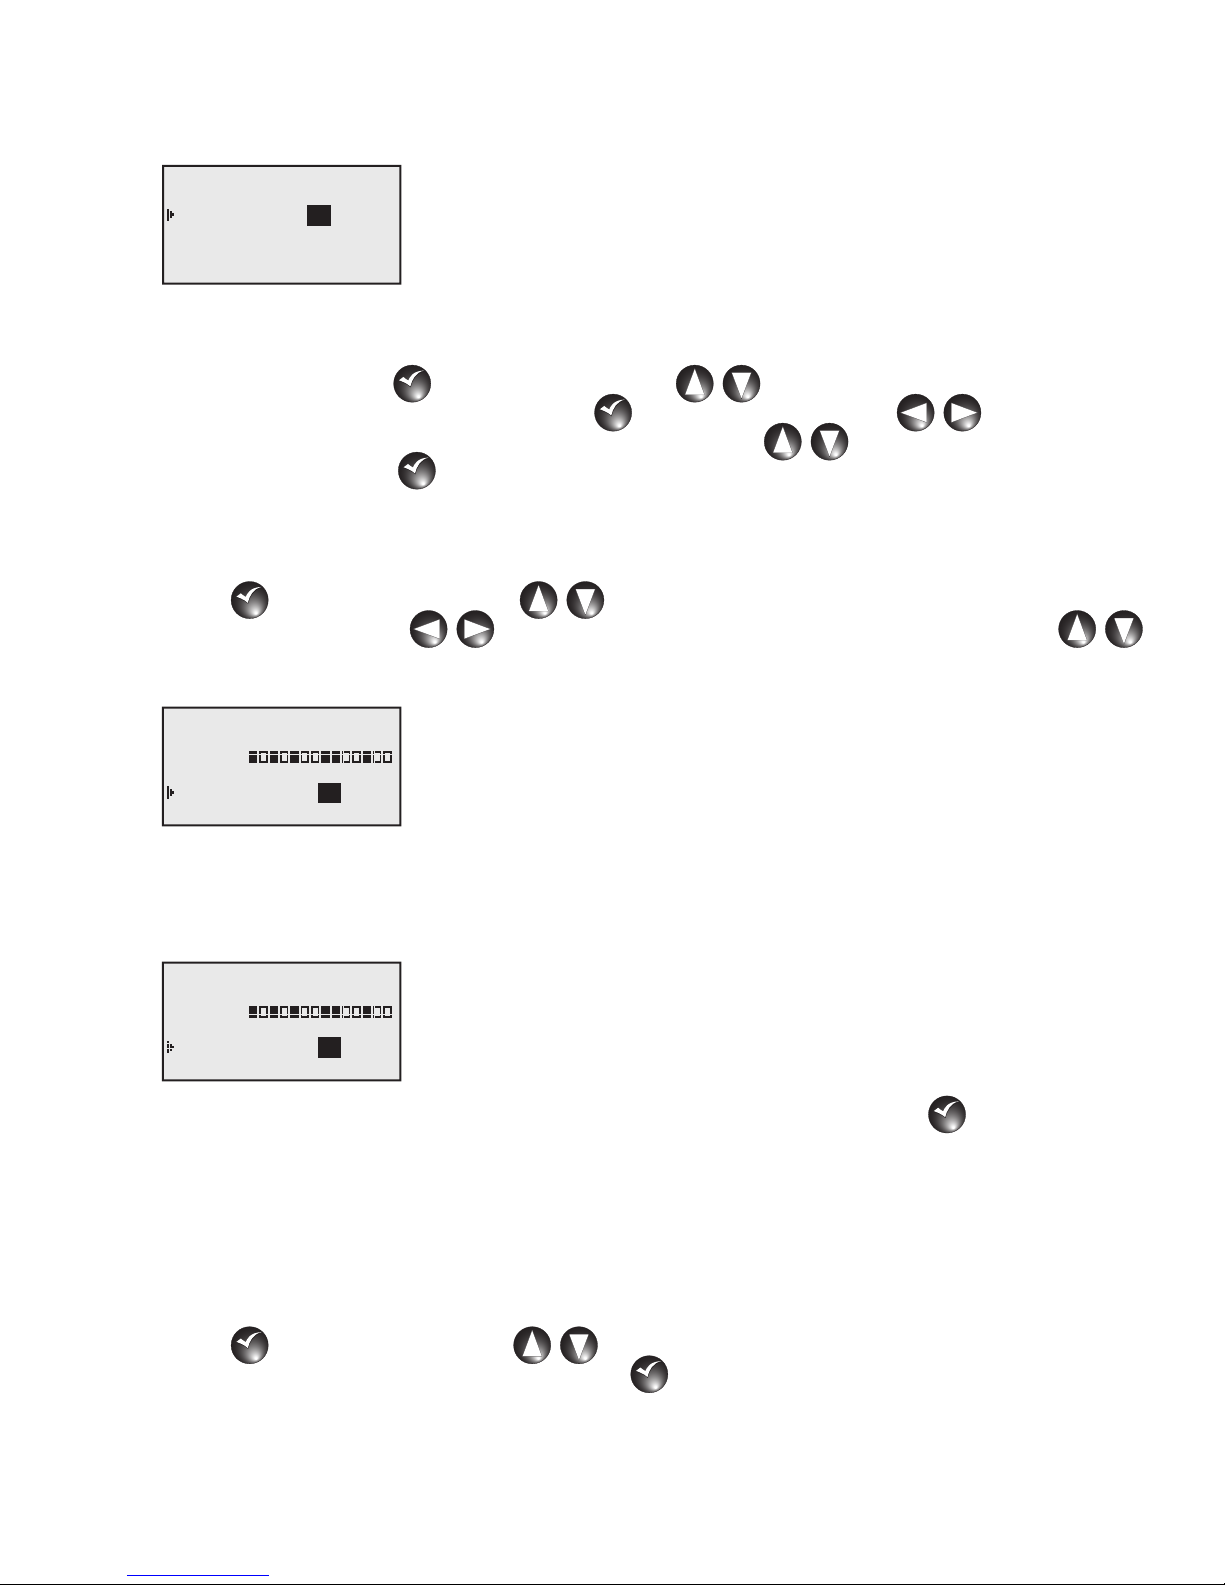
Selecting Water Every option allows you to adjust how many interval days between scheduled watering.
It also gives you the flexibility to set the position of the current day within the watering interval.
Example: Set watering to every 3 days with the current day being the 2nd day (water the next day).
P01 100% 00:00:00
Water Every: 03 Days
Today’s Day: 01
02
Start : 01 05:00am
Sta#: 01–05 05 min
Simult : 06
Start - Scheduled Start Times
The OSMAC G3 allows you to set up to 24 start times. Select the Start: to set or edit the start time and
press the
Select button
you want to edit and press the
. Use the UP and DOWN arrows to select the start time number
SELECT
SELECT
Select button
navigate between Minutes and Hours. Use the
and hours. Press
Select
when the desired start time is set. Repeat the Start procedure to add
SELECT
SELECT
additional start times.
Sta# - Assigned Station(s) and Runtime(s)
Set the stations you want to activate during the schedule by selecting Sta# and pressing the Select
button
use the
. Use the UP and DOWN arrows to select the station you want to activate, then
SELECT
SELECT
LEFT and RIGHT arrows to navigate to the runtime. Use the UP and DOWN
arrows to set the desired runtime for that station.
Example: Activate station 1 with 5-minute runtime.
P01 100% 00:00:00
Days: SMTWTFSSMTWTFS
set>:
Start : 01 05:00am
Sta#: 01–01 05 min
05
Simult : 06
. Use the LEFT and RIGHT arrows to
SELECT
SELECT
UP and DOWN arrows to adjust the minutes
If sequential stations will be running the same amount of runtime in the schedule, you can easily
accomplish this by setting the 1st station in the sequence followed by the last station in the sequence
and setting the runtime that each station will run.
Example: Activate stations 1 through 5 with 10-minute runtime per station.
P01 100% 00:00:00
Days: SMTWTFSSMTWTFS
set>:
Start : 01 05:00am
Sta#: 01–05 10 min
10
Simult : 06
Repeat the Sta# procedure to set additional stations and runtimes. Press Select
when all the
SELECT
SELECT
desired stations and runtimes are set.
Simult - Assigned the Maximum Number of Simultaneously Active Stations
Set the maximum number of stations that can simultaneously be activated. The OSMAC G3 controller
will allow you to set a maximum of 16 total stations that can run simultaneously. However, there may be
cases where less stations can be simultaneously activated.
Set the maximum number of simultaneously active stations by selecting
button
to activate simultaneously, then press the
. Use the UP and DOWN arrows to set the maximum number of station you want
SELECT
SELECT
Select
button to accept.
SELECT
SELECT
Simult: and pressing the Select
Step 4 – Repeat Setting Scheduled Watering procedure for setting additional programs.
5
Page 8

Setting OSMAC G3 for Radio Communications
In order to send page commands to the OSMAC G3 controller, you must set and coordinate the satellite address
and the transmitting and receiving frequency with the radio system being used.
Satellite Address - Satellite address is the identification that is given to a particular satellite. In order to
communicate with individual satellites, each satellite is given a unique satellite address. When a page is sent
to that satellite address, only the intended satellite will respond and the other satellites will ignore the page
command.
What’s Running
Manual Watering
Scheduled Watering
Communication
Diagnostics
Settings
Radio Monitor Sig
Page History
Radio Menu
Sat Address: 001
001
Comm Mode: Central
Receive Only Radio
Step 1 – While at the Home display, press Select
Step 2 – Press DOWN until Communication is selected and press Select
Step 3 – Press DOWN until Sat Address is selected and press Select
to access the controller menu.
SELECT
SELECT
SELECT
SELECT
SELECT
SELECT
.
.
Step 4 – Use the UP and DOWN arrows to select the satellite address you want to set.
Step 5 – Press Select
to finalize.
SELECT
SELECT
Satellite Radio Frequency - The OSMAC G3 radio is preprogrammed with 6 radio frequencies that are frequently
used in Toro irrigation systems. In cases where these preprogrammed frequencies are not suitable or available for
use in your area, each of the frequencies can be edited to the desired frequency.
What’s Running
Manual Watering
Scheduled Watering
Communication
Diagnostics
Settings
Step 1 – While at the Home display, press Select
Step 2 – Press DOWN until Communication is selected and press Select
Radio Monitor Sig
Page History
Radio Menu
Sat Address: 001
Comm Mode: Central
Receive Only Radio
Radio Frequency
Radio Information
Log All Sat: No
RSSI Enable: Yes
Reset Radio Defaults
to access the controller menu.
SELECT
SELECT
Channel: 1
1
Rx Freq1 462.2125MHz
Tx Freq1 462.2125MHz
.
SELECT
SELECT
Step 3 – Press DOWN until Radio Menu is selected and press Select
Step 4 – While Radio Frequency is selected, press Select
Step 5 – While Channel is selected, press Select
Step 6 – Use the UP and DOWN arrows to scroll through the frequency channel selections.
Step 7 – Press Select
once the proper frequency channel is selected.
SELECT
SELECT
Step 8 – If the 6 preprogrammed frequencies are not suitable for your use, you can edit any of the frequency
channels. Follow steps 5-7 to select the frequency channel you want to edit. Use the
arrows to select Rx (Receive) frequency, then press Select
Step 9 – Use the UP and DOWN arrows to modify the values and use the LEFT and RIGHT
arrows to navigate between values. Press
Repeat steps 8 and 9 for Tx (Transmit) frequency. Rx and Tx frequency should match for proper
operation.
.
SELECT
SELECT
Select
.
SELECT
SELECT
.
SELECT
SELECT
UP and DOWN
.
SELECT
SELECT
once the correct frequency value is set.
SELECT
SELECT
6
Page 9

Settings Menu
Station Settings
Station Settings allows you to configure each station as an irrigation station or a switch. When a station is
configured as a switch, that station is not affected by the rain delay function. When a switch is activated, it does
not activate the pump terminal.
Step 1 – While at the Home display, press Select
Step 2 – Press DOWN until Settings is selected and press Select
Step 3 – While Station Settings is selected and press Select
What’s Running
Manual Watering
Scheduled Watering
Communication
Diagnostics
Settings
Station Settings
Comm Mode: Central
Reset Pgr’s: No
Reset Sta’s: No
Reset Unit: No
Enable Sta’s: No
S01 - Select which station you want to edit. While S01 is selected, press Select
arrows to select the station number you want to edit. Press Select
to access the controller menu.
SELECT
SELECT
.
SELECT
SELECT
.
SELECT
SELECT
. Use the UP and DOWN
SELECT
SELECT
when the correct station
SELECT
SELECT
number is displayed.
S01
S01
Disable: No
Is Switch: No
Sched Today None
Water Today None
Water yestr None
Disable - Use this function when you need to disable a station from activation indefinitely. Once disabled,
the station will not activate for all scheduled and manual watering. Watering activity will only resume once the
station’s
Select
Disable function is set back to No. Use the UP and DOWN arrows to select Disable and press
. Use the UP and DOWN arrows to select Yes or No. Press Select
SELECT
SELECT
when the correct
SELECT
SELECT
selection is set.
S01
Disable: No
Yes
Is Switch: No
Sched Today None
Water Today None
Water yestr None
Is Switch - Set the station to switch when using it to activate a relay or any devices other than the irrigation
system. When the station is set to switch, it is not affected by the rain delay function. The pump terminal will also
not activate when the switch is activated. Use the
Select
. Use the UP and DOWN arrows to select Yes or No. Press Select
SELECT
SELECT
UP and DOWN arrows to select Is Switch and press
when the correct
SELECT
SELECT
selection is set.
Sched Today - Schedule today will indicate if the station is set to a schedule that will irrigate today. This is a
monitor only parameter and can not be modified.
Water Today - Water today will indicate if the station was activated today. This is a monitor only parameter and
can not be modified.
Water Ystr - Water yesterday will indicate if the station performed watering the day before. This is a monitor only
parameter and can not be modified.
7
Page 10
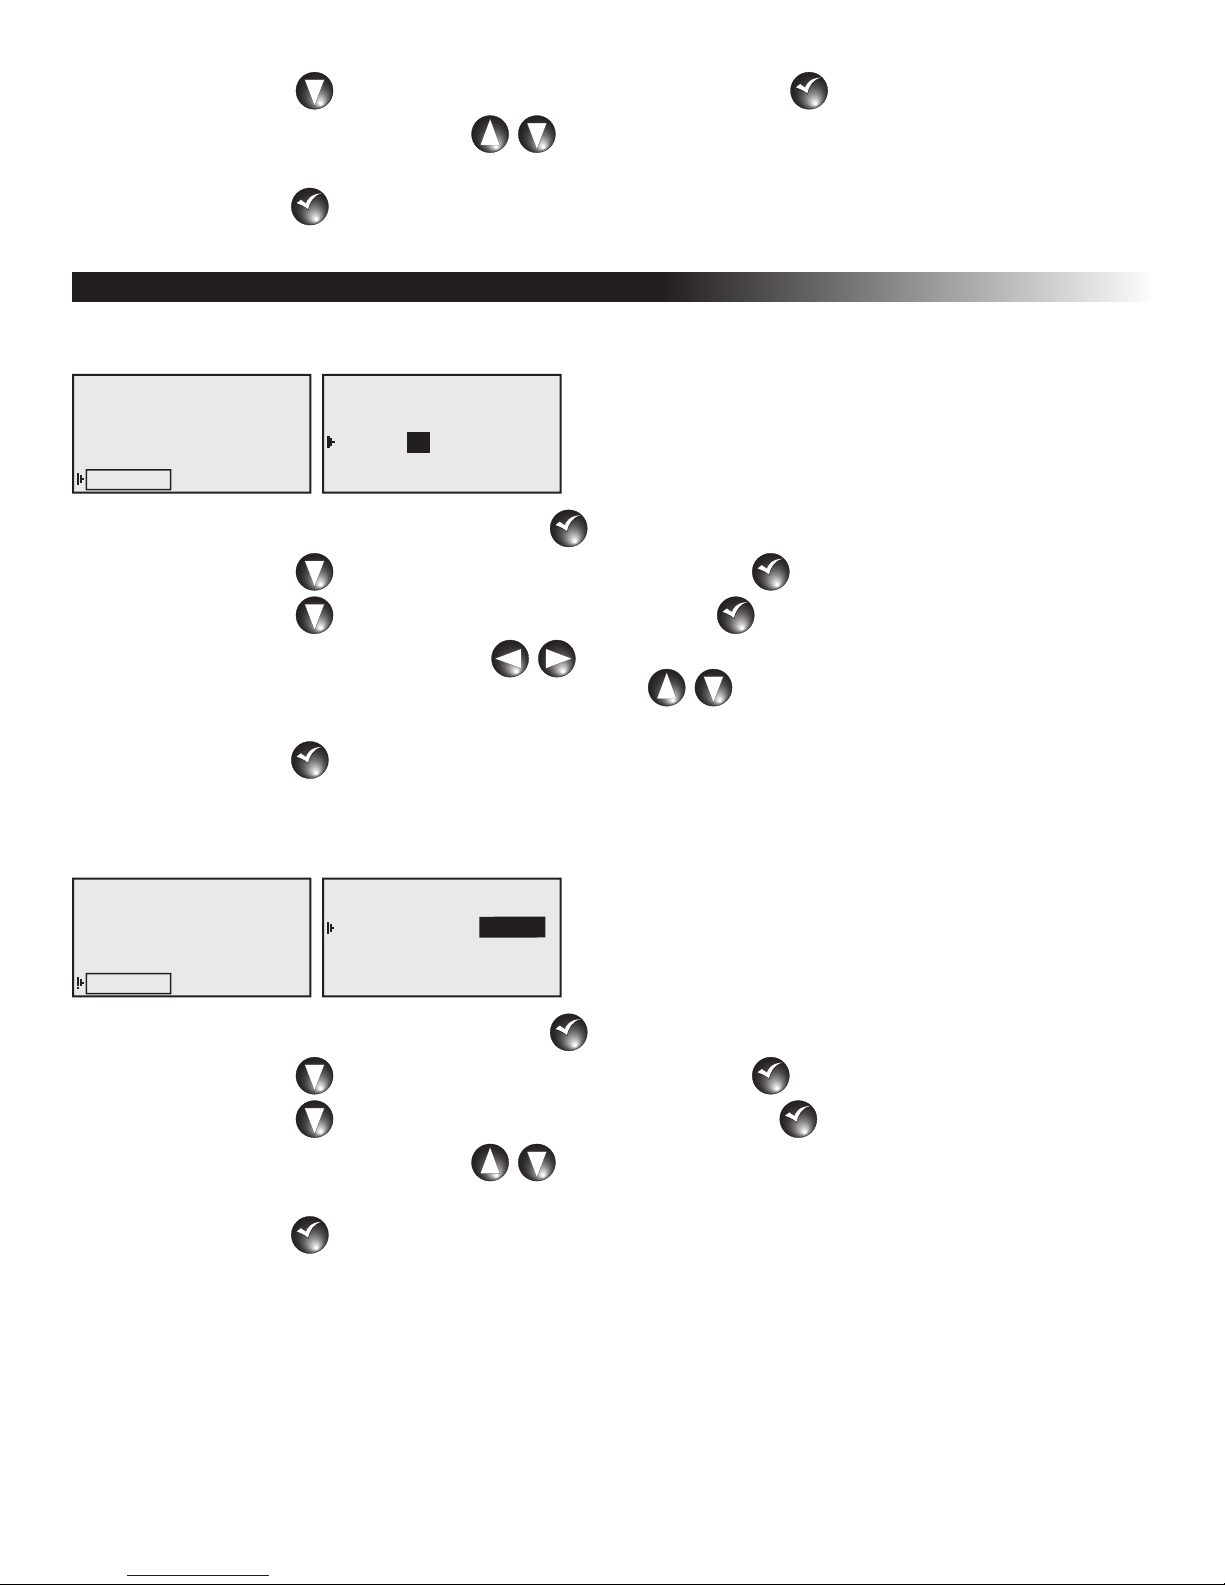
Comm Mode
What’s Running
Manual Watering
Scheduled Watering
Communication
Diagnostics
Settings
Station Settings
Comm Mode:
Reset Pgr’s: No
Reset Sta’s: No
Reset Unit: No
Enable Sta’s: No
Central
Central Mode – When placed in Central mode, the OSMAC G3 satellite will wait and execute radio commands
sent by the Central mode. The satellite will ignore all scheduled watering but will execute manual watering.
Local Mode – When placed in Local mode, the OSMAC G3 will execute scheduled watering as well as manual
watering. Radio commands will be ignored.
Off Mode – When placed in Off mode, the OSMAC G3 will not execute any watering operation whether it is
scheduled or manually initiated. Any watering operation will terminate once the satellite is placed in Off mode.
Watering operations will resume once the satellite is placed back to Central or Local mode.
Station Settings
Comm Mode:
Reset Pgr’s: No
Reset Sta’s: No
Reset Unit: No
Enable Sta’s: No
Local
Station Settings
Comm Mode:
Reset Pgr’s: No
Reset Sta’s: No
Reset Unit: No
Enable Sta’s: No
Off
Step 1 – While at the Home display, press Select
Step 2 – Press DOWN until Settings is selected and press Select
Step 3 – Press DOWN until Comm Mode is selected and press Select
to access the controller menu.
SELECT
SELECT
.
SELECT
SELECT
SELECT
SELECT
.
Step 4 – Use the UP and DOWN arrows to select between Central, Local and Off modes.
Step 5 – Press Select
when the proper mode of operation is set.
SELECT
SELECT
Reset Prg’s
Station Settings
Comm Mode: Central
Reset Pgr’s: No
Reset Sta’s: No
Reset Unit: No
Enable Sta’s: No
Selecting Yes to this menu will erase all scheduled programs and reset all their parameters to 100% watering
adjustment, everyday watering, no start time, no set station, and one simultaneous station only.
Step 1 – While at the Home display, press Select
Step 2 – Press DOWN until Settings is selected and press Select
Yes
to access the controller menu.
SELECT
SELECT
.
SELECT
SELECT
Step 3 – Press DOWN until Reset Prg’s is selected and press Select
Step 4 – Use the UP and DOWN arrows to select Yes.
Step 5 – Press Select
when finished.
SELECT
SELECT
.
SELECT
SELECT
8
Page 11

Reset Sta’s
Station Settings
Comm Mode: Central
Reset Pgr’s: No
Reset Sta’s: No
Reset Unit: No
Enable Sta’s: No
Selecting Yes to this menu will reset all the stations to the default settings. All the stations that were set as
switches will reset as stations once again. All the stations that were disabled will once again reset as active.
Yes
Step 1 – While at the Home display, press Select
Step 2 – Press DOWN until Settings is selected and press Select
Step 3 – Press DOWN until Reset Sta’s is selected and press Select
to access the controller menu.
SELECT
SELECT
.
SELECT
SELECT
SELECT
SELECT
.
Step 4 – Use the UP and DOWN arrows to select Yes.
Step 5 – Press Select
when finished.
SELECT
SELECT
Reset Unit
Station Settings
Comm Mode: Central
Reset Pgr’s: No
Reset Sta’s: No
Reset Unit: No
Enable Sta’s: No
Selecting Yes to this menu will reset the OSMAC G3 controller to factory default values. All the parameters will
reset except for satellite address, radio frequency and Communication mode.
Step 1 – While at the Home display, press Select
Step 2 – Press DOWN until Settings is selected and press Select
Step 3 – Press DOWN until Reset Unit is selected and press Select
Yes
to access the controller menu.
SELECT
SELECT
.
SELECT
SELECT
SELECT
SELECT
.
Step 4 – Use the UP and DOWN arrows to select Yes.
Step 5 – Press Select
when finished.
SELECT
SELECT
Enable Sta’s
Station Settings
Comm Mode: Central
Reset Pgr’s: No
Reset Sta’s: No
Reset Unit: No
Enable Sta’s: No
Selecting Yes to this menu will reset all the stations to active status. When a few stations are set to switches, you
can easily reset them to stations all at once by using
Step 1 – While at the Home display, press Select
Step 2 – Press DOWN until Settings is selected and press Select
Step 3 – Press DOWN until Reset Sta’s is selected and press Select
Step 4 – Use the UP and DOWN arrows to select Yes.
Step 5 – Press Select
Yes
when finished.
SELECT
SELECT
Enable Sta’s.
to access the controller menu.
SELECT
SELECT
.
SELECT
SELECT
SELECT
SELECT
9
.
Page 12

Clock Set
Clock Set: 12:00am
12:00am
Clock Mode: Am/Pm
Date Mode: MMDDYY
Date: 01/01/16 Fri
Sat Address: 001
Max Sim Sta: 06
Step 1 – While at the Home display, press Select
Step 2 – Press DOWN until Settings is selected and press Select
Step 3 – Press DOWN until Clock Set is selected and press Select
to access the controller menu.
SELECT
SELECT
.
SELECT
SELECT
SELECT
SELECT
.
Step 4 – Use the LEFT and RIGHT arrows to navigate between the hour and minute parameters.
Use the
Step 5 – Press Select
UP and DOWN arrows to set the correct hour and minute values.
when finished.
SELECT
SELECT
Clock Mode
Clock Set: 12:00am
Clock Mode: Am/Pm
Date Mode: MMDDYY
Date: 01/01/16 Fri
Sat Address: 001
Max Sim Sta: 06
Am/Pm
Step 1 – While at the Home display, press Select
Step 2 – Press DOWN until Settings is selected and press Select
Step 3 – Press DOWN until Clock Mode is selected and press Select
to access the controller menu.
SELECT
SELECT
.
SELECT
SELECT
SELECT
SELECT
.
Step 4 – Use the UP and DOWN arrows to select between Am/Pm (12-hour mode) and 24 Hrs
(24-hour mode).
Step 5 – Press Select
when finished.
SELECT
SELECT
Date Mode
Clock Set: 12:00am
Clock Mode: Am/Pm
Date Mode: MMDDYY
Date: 01/01/16 Fri
Sat Address: 001
Max Sim Sta: 06
Step 1 – While at the Home display, press Select
Step 2 – Press DOWN until Settings is selected and press Select
Step 3 – Press DOWN until Date Mode is selected and press Select
MMDDYY
to access the controller menu.
SELECT
SELECT
.
SELECT
SELECT
SELECT
SELECT
.
Step 4 – Use the UP and DOWN arrows to select between MMDDYY (Domestic mode) and DDMMYY
(International mode).
Step 5 – Press Select
when finished.
SELECT
SELECT
10
Page 13

Date
Clock Set: 12:00am
Clock Mode: Am/Pm
Date Mode: MMDDYY
Date: 01/01/16 Fri
Sat Address: 001
Max Sim Sta: 06
MMDDYY
Step 1 – While at the Home display, press Select
Step 2 – Press DOWN until Settings is selected and press Select
Step 3 – Press DOWN until Date is selected and press Select
to access the controller menu.
SELECT
SELECT
.
SELECT
SELECT
.
SELECT
SELECT
Step 4 – Use the LEFT and RIGHT arrows to navigate between the Day, Month and Year parameters.
Use the
Step 5 – Press Select
UP and DOWN arrows to set the correct Day, Month and Year.
when finished.
SELECT
SELECT
Sat Address
Clock Set: 12:00am
Clock Mode: Am/Pm
Date Mode: MMDDYY
Date: 01/01/16 Fri
Sat Address: 001
Max Sim Sta: 06
Step 1 – While at the Home display, press Select
Step 2 – Press DOWN until Settings is selected and press Select
Step 3 – Press DOWN until Sat Address is selected and press Select
001
to access the controller menu.
SELECT
SELECT
.
SELECT
SELECT
SELECT
SELECT
.
Step 4 – Use the UP and DOWN arrows to set the desired satellite address. For independent operation,
use a unique address from other satellites. If the satellite belongs to a group that will operate in
synchronous with each other, use the same address as the satellites within the group.
Step 5 – Press Select
when finished.
SELECT
SELECT
Max Sim Sta
Clock Set: 12:00am
Clock Mode: Am/Pm
Date Mode: MMDDYY
Date: 01/01/16 Fri
Sat Address: 001
Max Sim Sta: 06
Step 1 – While at the Home display, press Select
Step 2 – Press DOWN until Settings is selected and press Select
Step 3 – Press DOWN until Max Sim Sta is selected and press Select
Step 4 – Use the UP and DOWN arrows to set the number of maximum stations that are simultaneously
active. Depending on water source supply and power demand, you can set as many as 16 stations to be
active at the same time.
Am/Pm
to access the controller menu.
SELECT
SELECT
.
SELECT
SELECT
SELECT
SELECT
.
Step 5 – Press Select
when finished.
SELECT
SELECT
11
Page 14

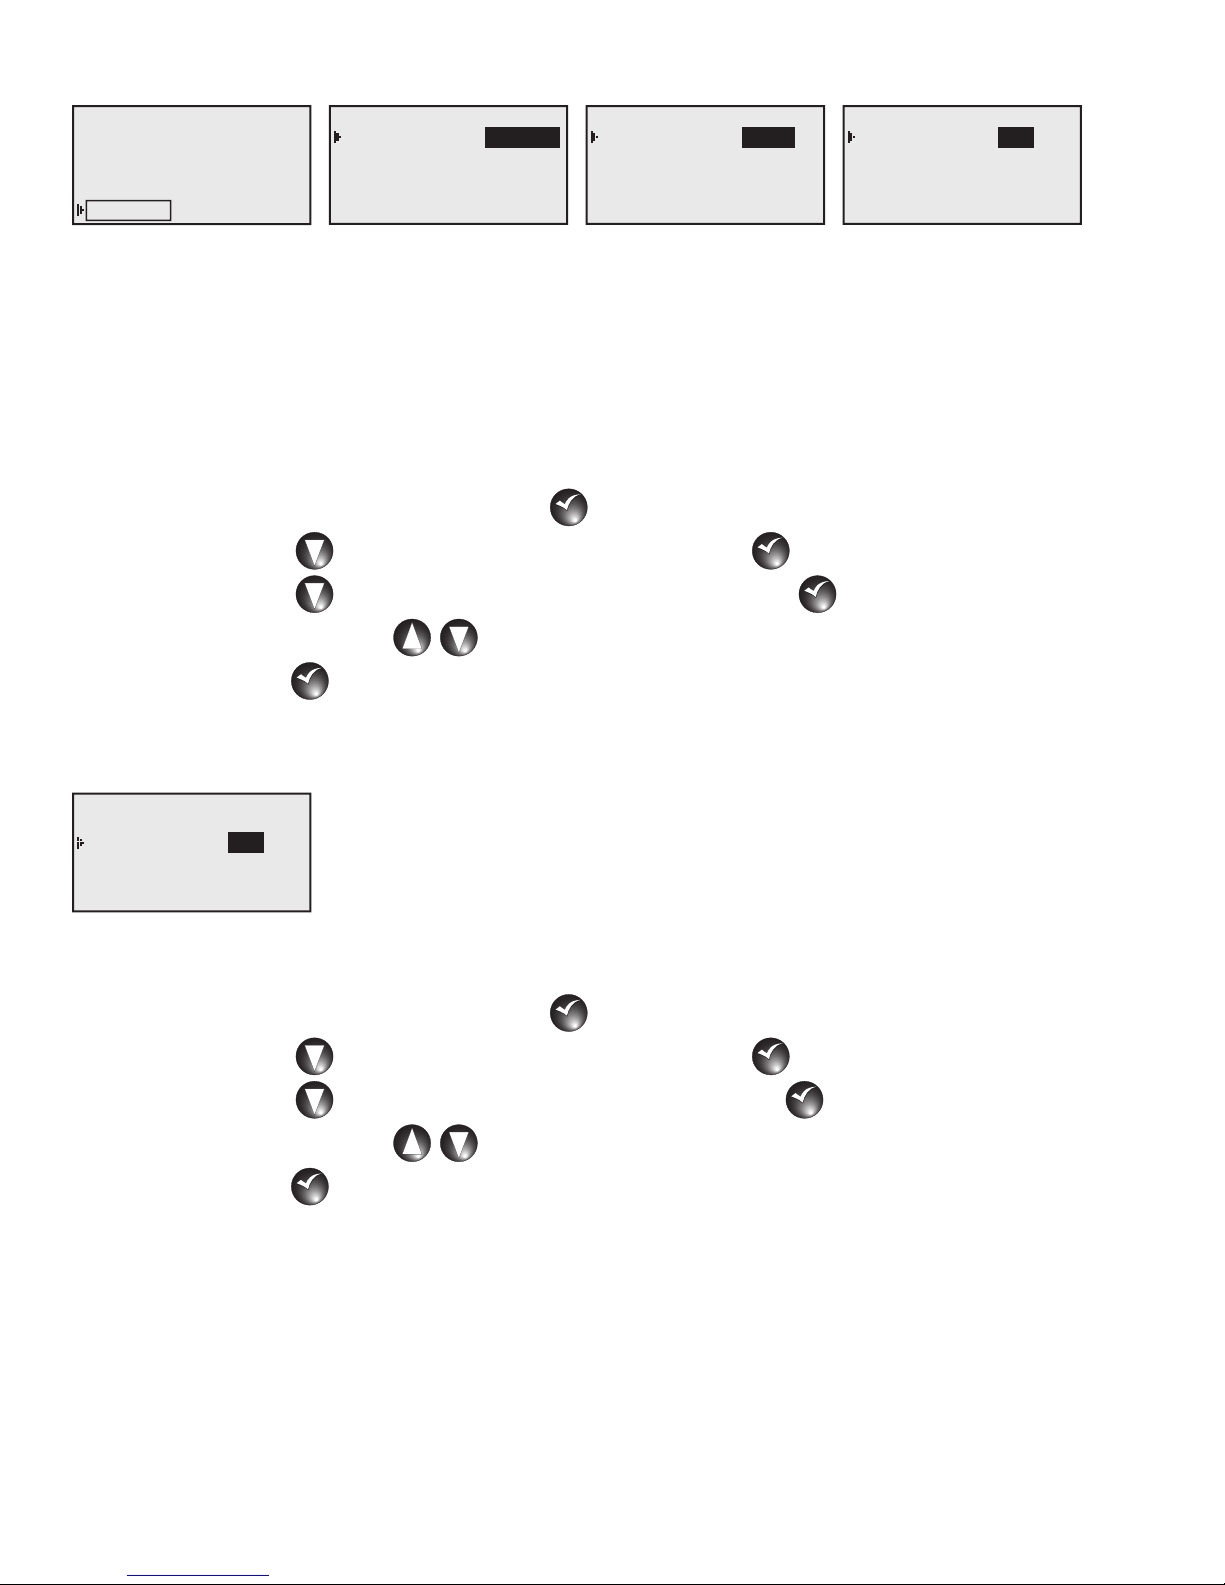
Display Adj
Date Mode: MMDDYY
Date: 01/01/16 Fri
Sat Address: 001
Max Sim Sta: 06
Display Adj: _______
Radio Settings
It is possible to adjust the contrast to the LCD screen if the clarity is poor.
darker
Step 1 – While at the Home display, press Select
Step 2 – Press DOWN until Settings is selected and press Select
Step 3 – Press DOWN until Display Adj is selected and press Select
to access the controller menu.
SELECT
SELECT
.
SELECT
SELECT
SELECT
SELECT
.
Step 4 – Adjust the display contrast by using the UP arrow to increase and DOWN arrow to decrease.
Step 5 – Press Select
when the desired display clarity is achieved.
SELECT
SELECT
Display Adj
Date Mode: MMDDYY
Date: 01/01/16 Fri
Sat Address: 001
Max Sim Sta: 06
Display Adj: _______
Radio Settings
It is possible to adjust the contrast to the LCD screen if the clarity is poor.
Step 1 – While at the Home display, press Select
Step 2 – Press DOWN until Settings is selected and press Select
Step 3 – Press DOWN until Display Adj is selected and press Select
darker
to access the controller menu.
SELECT
SELECT
.
SELECT
SELECT
SELECT
SELECT
.
Step 4 – Adjust the display contrast by using the UP arrow to increase and DOWN arrow to decrease.
Step 5 – Press Select
when the desired display clarity is achieved.
SELECT
SELECT
Radio Settings
Radio Settings allows you to set the communication frequency OSMAC G3 radio. OSMAC G3 radio is
preprogrammed with 6 radio frequencies that are commonly used in Toro irrigation systems. If the preprogrammed
frequencies are not suitable for your use, you can edit any of the frequencies to your desired radio frequency.
Step 1 – While at the Home display, press Select
Step 2 – Press DOWN until Settings is selected and press Select
Step 3 – While Radio Settings is selected and press Select
What’s Running
Manual Watering
Scheduled Watering
Communication
Diagnostics
Settings
Date Mode: MMDDYY
Date: 01/01/16 Fri
Sat Address: 001
Max Sim Sta: 06
Display Adj: ________
Radio Settings
to access the controller menu.
SELECT
SELECT
.
SELECT
SELECT
.
SELECT
SELECT
Radio Frequency
Radio Information
Log All Sat: No
RSSI Enable: Yes
Reset Radio Defaults
12
Page 15

Radio Frequency - Use this menu to select the radio frequency in order to be able to send a radio page
command to the OSMAC G3 controller. Use the
UP and DOWN arrows to select from the 6
preprogrammed frequencies. If the 6 preprogrammed frequencies are not suitable for your use, you can edit any
of the frequency channels. Use the
Select
. Use the UP and DOWN arrows to modify the values and use the LEFT and RIGHT
SELECT
SELECT
arrows to navigate between values. Press Select
UP and DOWN arrows to select Rx (Receive) frequency, then press
once the correct frequency value is set.
SELECT
SELECT
Radio Frequency
Channel: 1
1
Channel: 1
Radio Information
Log All Sat: No
RSSI Enable: Yes
Rx Freq1 462.2125MHz
Tx Freq1 462.2125MHz
Rx Freq1 462.2125MHz
4
Tx Freq1 462.2125MHz
Reset Radio Defaults
Radio Information - You can access the radio information when you select this menu. The radio Model, Firmware
Version, Serial Number and the last RSSI information will be provided. To access the radio module temperature,
input voltage and the current draw, press the
get the latest values, press
Radio Frequency
Select
Update Again:
while at the Update Again menu. Select Yes to refresh the information.
SELECT
SELECT
DOWN arrow and select Get Other, then press Select
Yes
SELECT
SELECT
. To
Radio Information
Log All Sat: No
RSSI Enable: Yes
Reset Radio Defaults
Temperature 23C
Input Volts 10.1V
Current Draw 90mA
Log All Sat - Used for troubleshooting at the direction of Toro support. Leave value at No.
RSSI Enable - Used for troubleshooting at the direction of Toro support. Leave value at Yes.
Reset Radio Defaults - Select Reset Radio Defaults and press Select
when you want to reset all radio
SELECT
SELECT
communication parameters. All radio parameters will revert back to factory defaults. All 6 frequencies will revert
back to their default values. If a unique frequency was set for any of the six frequency numbers, that frequency
will need to be entered and set again in order to be used.
Radio Frequency
Radio Information
Log All Sat: No
RSSI Enable: Yes
Reset Radio Defaults
13
Page 16

Manual Watering
M-Manual - Manually start a station or stations manually and specify a runtime.
What’s Running
Manual Watering
Scheduled Watering
Communication
STOP Watering
START M-Manual
START Programs
START Syringes
Manual : M-Manual
Sta#: 01-01 10 min
01
Simult : 05
START
Diagnostics
Settings
Step 1 – While at the Home display, press Select
Step 2 – Press DOWN until Manual Watering is selected and press Select
Step 3 – Press DOWN until START M-Manual is selected and press Select
to access the controller menu.
SELECT
SELECT
SELECT
SELECT
SELECT
SELECT
.
.
Step 4 – Use the UP and DOWN arrows to select the station you want to activate, then use the LEFT
RIGHT arrows to navigate to the runtime. Use the UP and DOWN arrows to set
and
the desired runtime for that station.
If sequential stations will be running the same amount of runtimes, you can easily accomplish this by
setting the first station in the sequence followed by the last station in the sequence and setting the
runtimes that each station will run.
Step 5 – Repeat Step 4 for additional station or group of stations.
Step 6 – Once all the stations you want to activate are set, press DOWN until START is selected and press
Select
to activate.
SELECT
SELECT
Programs - Manually start a scheduled program before the set start time.
What’s Running
Manual Watering
Scheduled Watering
Communication
STOP Watering
START M-Manual
START Programs
START Syringes
Manual : Start Prog
Program: 01
01
START
Diagnostics
Settings
Step 1 – While at the Home display, press Select
Step 2 – Press DOWN until Manual Watering is selected and press Select
Step 3 – Press DOWN until START Programs is selected and press Select
to access the controller menu.
SELECT
SELECT
SELECT
SELECT
SELECT
SELECT
.
.
Step 4 – Use the UP and DOWN arrows to select the scheduled program number you want to activate
and press
Select
Step 5 – Press DOWN until START is selected and press Select
SELECT
SELECT
.
to activate.
SELECT
SELECT
14
Page 17

Syringe - Manually start a scheduled program before the set start time with a different runtime.
What’s Running
Manual Watering
Scheduled Watering
Communication
STOP Watering
START M-Manual
START Programs
START Syringes
Manual : Syringe
Runtime: 01 min
01
Program: 01
START
Diagnostics
Settings
Step 1 – While at the Home display, press Select
to access the controller menu.
SELECT
SELECT
Step 2 – Press DOWN until Manual Watering is selected and press Select
Step 3 – Press DOWN until START Syringes is selected and press Select
Step 4 – Press DOWN until Runtime is selected and press Select
arrows to set the runtime duration and press
Select
SELECT
SELECT
.
Step 5 – Press DOWN until Program is selected and press Select
. Use the UP and DOWN
SELECT
SELECT
. Use the UP and DOWN
SELECT
SELECT
arrows to select the scheduled program number you want to syringe and press
Step 6 – Press DOWN until START is selected and press Select
Note: Only stations that are set in the selected scheduled program will activate.
to activate.
SELECT
SELECT
Communication
SELECT
SELECT
SELECT
SELECT
.
.
Select
SELECT
SELECT
.
What’s Running
Manual Watering
Scheduled Watering
Communication
Diagnostics
Settings
Page Monitor Sig
Page History
Radio Menu
Sat Address: 001
Comm Mode: Central
Receive Only Radio
Page Monitor - This menu is for troubleshooting and diagnostic servicing purposes only. It is used to monitor
real time radio page commands.
Page History - Select this menu to review all received radio page commands.
Radio Menu - This menu is a duplicate of the Radio Settings inside the Settings Menu.
Radio Settings on page 12.
See
Sat Address - Select this menu to set/edit the Satellite’s address. Satellite address is the identification that is
given to a particular satellite. In order to communicate with individual satellites, each satellite is given a unique
satellite address. When a page is sent to that satellite address, only the intended satellite will respond and the
other satellites will ignore the page command.
Step 1 – While at the Home display, press Select
Step 2 – Press DOWN until Communication is selected and press Select
Step 3 – Press DOWN until Sat Address is selected and press Select
to access the controller menu.
SELECT
SELECT
SELECT
SELECT
SELECT
SELECT
.
.
Step 4 – Use the UP and DOWN arrows to select the satellite address you want to set.
Step 5 – Press Select
to finalize.
SELECT
SELECT
15
Page 18

Comm Mode
- Select this menu to edit the OSMAC G3 controller’s communication mode.
Central Mode – When placed in Central mode, the OSMAC G3 satellite will wait and execute radio commands
sent by the central. The satellite will ignore all scheduled watering but will execute manual watering.
Local Mode – When placed in Local mode, the OSMAC G3 will execute scheduled watering as well as manual
watering. Radio commands will be ignored.
Off Mode – When placed in Off mode, the OSMAC G3 will not execute any watering operation whether it is
scheduled or manually initiated. Any watering operation will terminate once the satellite is placed in Off mode.
Watering operations will resume once the satellite is placed back to Central or Local mode.
Step 1 – While at the Home display, press Select
Step 2 – Press DOWN until Settings is selected and press Select
Step 3 – Press DOWN until Comm Mode is selected and press Select
to access the controller menu.
SELECT
SELECT
.
SELECT
SELECT
SELECT
SELECT
.
Step 4 – Use the UP and DOWN arrows to select between Central, Local and Off modes.
Step 5 – Press Select
when the proper mode of operation is set.
SELECT
SELECT
What’s Running
Select this menu item to monitor the current watering activity of the OSMAC G3 controller.
Diagnostics
Menu:
Revision: 1.00
Rev Date: 4/21/16
Menu:
Sta: Pump
Press to start
Revision
Station Test
Menu:
Clear log: No
Event Codes
Last code: 02, 002
01/02/16, 17:34:08
Menu:
Seq Stations
On each for: 1 sec
Press to start
Menu:
VA Monitor
RDV: 3.3 BV: 3.2
17V: 18.1 9V: 10.0
LCD: 31 C RSSV: 0.7
Menu:
Power Detect
Defaults Set
Detect: 64sta, 00sen
PD 01/07/16 08:00:00
PU 01/01/16 12:00:01
Slot 1 card: Output
Revision – Displays the firmware’s version number and date it was created.
Event Codes – Displays diagnostic codes that the OSMAC G3 controller encountered. The codes could help Toro
troubleshoot your system. Clear the codes by navigating to
VA Monitor – Displays the real time values of the following:
RDV - Radio Voltage BV - Battery Voltage
17V - 17-volt Terminals 9V - 9-volt Terminals
LCD - LCD Voltage RSSV - Signal Strength
Station Test – Utilize this function to test any of the OSMAC G3 controller outputs. You can activate the pump
and any stations by selecting
Sta and press Select
output terminal you want to test and press the
until you press the
LEFT arrow to turn off. While a station is active, you may test other stations by editing Sta
value.
Clear log, select Yes and press Select
. Use the UP and DOWN arrows to select the
SELECT
SELECT
SELECT
SELECT
.
RIGHT arrow to activate. The station will remain activated
16
Page 19

Seq Stations – Utilize this function to test all of the OSMAC G3 stations. To activate, navigate to On each for
and press
Select
to run, then press the
until the
LEFT arrow is pressed to cancel.
. Use the UP and DOWN arrows to set the amount of time for each of the stations
SELECT
SELECT
RIGHT arrow to activate. OSMAC G3 controller will continually sequence the stations
Specications
Line Voltage: 115-120 or 230-240 V a.c. 50/60 Hz (switchable), 130 VA
Current Draw (no load): 0.21A @ 115-120 V a.c., 60 Hz or 0.10A @ 230-240 V a.c., 50 Hz
Current Draw (maximum load): 0.91A @ 115-120 V a.c., 60 Hz or 0.45A @ 230-240 V a.c., 50 Hz
Secondary Voltage Output: 24 V a.c., 50/60 Hz, 3.0A (85 VA)
Maximum Load Per Station Output: 0.75A (18 VA)
Maximum Load Per Pump/Master Valve Output: 1A (24 VA)
Operating Temperature: -10°C to +60°C (14°F to 140°F)
Storage Temperature: -30°C to +65°C (-22°F to 149°F)
Power Supply:
1.5A On/Off Switch/Circuit Breaker – Main Power Input
3.2A Fuse – Power Supply (Slow Blow)
4.0A Circuit Breaker – Control Functions
Control Modules:
Pump – 1.0A Fuse (Fast Blow, Automotive Type)
Station Output – 3.0A Fuse (Fast Blow, Automotive Type)
17
Page 20

Electromagnetic Compatibility
Domestic: This equipment generates and uses radio frequency energy and if not installed and used properly,
that is, in strict accordance with the manufacturer’s instructions, may cause interference to radio and television
reception. It has been type tested and found to comply with the limits for a FCC Class B computing device
in accordance with the specifications in Subpart J of Part 15 of FCC Rules, which are designed to provide
reasonable protection against such interference in a residential installation. However, there is no guarantee
that interference will not occur in a particular installation. If this equipment does cause interference to radio or
television reception, which can be determined by turning the equipment off and on, the user is encouraged to try
to correct the interference by one or more of the following measures:
• Reorient the receiving antenna.
• Relocate the irrigation controller with respect to the receiver.
• Move the irrigation controller away from the receiver.
• Plug the irrigation controller into a different outlet so that the irrigation controller and receiver are on different
branch circuits.
If necessary, the user should consult the dealer or an experienced radio/television technician for additional
suggestions. The user may find the following booklet prepared by the Federal Communications Commission
helpful: “How to Identify and Resolve Radio-TV Interference Problems”. This booklet is available from the U.S.
Government Printing Office, Washington, DC 20402. Stock No. 004-000-00345-4.
International: This is a CISPR 22 Class B product
© The Toro Company • Irrigation Business • www.toro.com Part Number 373-0888 Revision A
18
 Loading...