

Page 1
FormNo.3363-985RevA
G132Rear-EngineRidingMower
H132Rear-EngineRidingMower
ModelNo.70185—SerialNo.310000001andUp
ModelNo.70186—SerialNo.310000001andUp
ToregisteryourproductordownloadanOperator'sManualorPartsCatalogatnocharge,gotowww.T oro.com.OriginalInstructions(EN)
Page 2
Introduction
Thisrotary-blade,ridinglawnmowerisintendedto
beusedbyresidentialhomeowners.Itisdesigned
primarilyforcuttinggrassonwell-maintained
lawnsonresidentialproperties.Itisnotdesigned
forcuttingbrushorforagriculturaluses.
Readthisinformationcarefullytolearnhowtooperate
andmaintainyourproductproperlyandtoavoidinjury
andproductdamage.Youareresponsibleforoperating
theproductproperlyandsafely.
YoumaycontactTorodirectlyatwww .T oro.comfor
productandaccessoryinformation,helpndinga
dealer,ortoregisteryourproduct.
Wheneveryouneedservice,genuineToroparts,or
additionalinformation,contactanAuthorizedService
DealerorToroCustomerServiceandhavethemodel
andserialnumbersofyourproductready .
identiesthelocationofthemodelandserialnumbers
ontheproduct.Writethenumbersinthespace
provided.
Figure1
1.Modelandserialnumberlocation
ModelNo.
SerialNo.
Thismanualidentiespotentialhazardsandhas
safetymessagesidentiedbythesafetyalertsymbol
(Figure2),whichsignalsahazardthatmaycauseserious
injuryordeathifyoudonotfollowtherecommended
precautions.
Figure1
Figure2
1.Safetyalertsymbol
Thismanualuses2otherwordstohighlightinformation.
Importantcallsattentiontospecialmechanical
informationandNoteemphasizesgeneralinformation
worthyofspecialattention.
Contents
Introduction.................................................................2
Safety...........................................................................3
SafeOperatingPractices.......................................3
ToroRidingMowerSafety....................................5
SoundPressure.....................................................5
SoundPower........................................................5
Vibration..............................................................5
SlopeIndicator.....................................................7
SafetyandInstructionalDecals.............................8
ProductOverview......................................................10
Controls.............................................................10
Specications.....................................................11
Operation...................................................................12
AddingFuel.......................................................12
CheckingtheEngineOilLevel............................13
StartingtheEngine.............................................13
StoppingtheEngine...........................................14
DrivingtheMachineForwardor
Backward.......................................................14
SelectingGroundSpeeds....................................14
DrivingtheMachineForwardor
Backward.......................................................14
StoppingtheMachine.........................................15
PushingtheMachineManually............................15
UsingtheSafetyInterlockSystem.......................15
TestingtheSafetyInterlockSystem.....................17
TestingtheSafetyInterlockSystem.....................17
EmptyingtheGrassCollector.............................18
InstallingtheRecyclerCover...............................18
InstallingtheDischargeChute............................19
OperatingTips...................................................20
Maintenance...............................................................21
RecommendedMaintenanceSchedule(s)................21
Lubrication.............................................................21
GreasingandLubricatingtheMachine................21
EngineMaintenance...............................................21
ServicingtheEngineOil.....................................21
ServicingtheAirCleaner....................................23
ServicingtheSparkPlug.....................................23
©2009—TheT oro®Company
8111LyndaleAvenueSouth
Bloomington,MN55420
Contactusatwww.T oro.com.
2
PrintedinItaly
AllRightsReserved
Page 3

FuelSystemMaintenance.......................................25
DrainingtheFuelTank.......................................25
ReplacingtheFuelFilter.....................................25
ElectricalSystemMaintenance................................26
ServicingtheBattery...........................................26
ServicingtheFuses.............................................27
BrakeMaintenance.................................................28
CheckingtheParkingBrake................................28
CheckingtheTirePressure.................................28
BladeMaintenance.................................................28
ServicingtheBlade.............................................28
LevelingtheMower............................................29
Cleaning.................................................................30
WashingundertheMower..................................30
WashingtheMachine..........................................31
Storage.......................................................................31
CleaningandStorage..........................................31
Troubleshooting.........................................................33
Schematics.................................................................35
..........................................................................39
ConditionsandProductsCovered.......................40
LimitedWarrantyforCommercialUse................40
InstructionsforObtainingWarranty
Service...........................................................40
OwnerResponsibilities.......................................40
ItemsandConditionsNotCovered.....................40
GeneralConditions............................................40
Safety
ThismachinemeetsorexceedsEuropeanStandardsin
effectatthetimeofproduction.However,improper
useormaintenancebytheoperatororownercan
resultininjury.Toreducethepotentialforinjury,
complywiththesesafetyinstructionsandalwayspay
attentiontothesafetyalertsymbol,whichmeans
CAUTION,W ARNING,orDANGER-"personalsafety
instruction."Failuretocomplywiththeinstructionmay
resultinpersonalinjuryordeath.
SafeOperatingPractices
ThefollowinginstructionsarefromtheCENstandard
EN836:1997.
Thisproductiscapableofamputatinghandsand
feetandthrowingobjects.Alwaysfollowallsafety
instructionstoavoidseriousinjuryordeath.
Training
•Readtheinstructionscarefully.Befamiliarwiththe
controlsandtheproperuseoftheequipment.
•Neverallowchildrenorpeopleunfamiliarwiththese
instructionstousethelawnmower.Localregulations
canrestricttheageoftheoperator.
•Nevermowwhilepeople,especiallychildren,orpets
arenearby .
•Keepinmindthattheoperatororuserisresponsible
foraccidentsorhazardsoccurringtootherpeopleor
theirproperty.
•Donotcarrypassengers.
•Alldriversshouldseekandobtainprofessional
andpracticalinstruction.Suchinstructionshould
emphasize:
–theneedforcareandconcentrationwhen
workingwithride-onmachines;
–controlofaride-onmachineslidingonaslope
willnotberegainedbytheapplicationofthe
controllevers.Themainreasonsforlossof
controlare:
◊insufcientwheelgrip,especiallyonwet
grass;
◊beingdriventoofast;
◊inadequatebraking;
◊thetypeofmachineisunsuitableforitstask;
◊lackofawarenessoftheeffectofground
conditions,especiallyslopes;
◊incorrecthitchingandloaddistribution.
3
Page 4

Preparation
•Whilemowing,alwayswearsubstantialfootwearand
longtrousers.Donotoperatetheequipmentwhen
barefootorwearingopensandals.
•Thoroughlyinspecttheareawheretheequipment
istobeusedandremoveallobjectswhichmaybe
thrownbythemachine.
•Warning–Fuelishighlyammable.
–Storefuelincontainersspecicallydesignedfor
thispurpose.
–Refueloutdoorsonlyanddonotsmokewhile
refuelling.
–Addfuelbeforestartingtheengine.Never
removethecapofthefueltankoraddfuelwhile
theengineisrunningorwhentheengineishot.
–Iffuelisspilled,donotattempttostartthe
enginebutmovethemachineawayfromthe
areaofspillageandavoidcreatinganysourceof
ignitionuntilfuelvaporshavedissipated.
–Replaceallfueltanksandcontainercapssecurely.
•Replacefaultysilencers.
•Beforeusing,alwaysvisuallyinspecttoseethatthe
blades,bladeboltsandcutterassemblyarenotworn
ordamaged.Replacewornordamagedbladesand
boltsinsetstopreservebalance.
•Onmulti-bladedmachines,takecareasrotatingone
bladecancauseotherbladestorotate.
Operation
•Bealert,slowdownandusecautionwhenmaking
turns.Lookbehindandtothesidebeforechanging
directions.
•Donotoperatetheengineinaconnedspacewhere
dangerouscarbonmonoxidefumescancollect.
•Mowonlyindaylightoringoodarticiallight.
•Beforeattemptingtostarttheengine,disengageall
bladeattachmentclutchesandshiftintoneutral.
•Donotuseonslopesgreaterthan15degrees.
•Rememberthereisnosuchthingasasafeslope.
Travelongrassslopesrequiresparticularcare.To
guardagainstoverturning:
–-donotstoporstartsuddenlywhenonaslope;
–-useslowspeedsonslopesandduringtight
turns;
–-stayalertforhumpsandhollowsandother
hiddenhazards;
•Usecarewhenpullingloadsorusingheavy
equipment.
–-Useonlyapproveddrawbarhitchpoints.
–-Limitloadstothoseyoucansafelycontrol.
–-Donotturnsharply.Usecarewhenreversing.
•Watchoutfortrafcwhencrossingornearroadways.
•Stopthebladesrotatingbeforecrossingsurfaces
otherthangrass.
•Whenusinganyattachments,neverdirectdischarge
ofmaterialtowardbystandersnorallowanyonenear
themachinewhileinoperation.
•Neveroperatethemachinewithdamagedguardsor
withoutsafetyprotectivedevicesinplace.
•Donotchangetheenginegovernorsettingsor
overspeedtheengine.Operatingtheengineat
excessivespeedcanincreasethehazardofpersonal
injury.
•Beforeleavingtheoperator’sposition:
–disengagethepowertake-offandlowerthe
attachments;
–changeintoneutralandsettheparkingbrake;
–stoptheengineandremovethekey .
•Disengagedrivetoattachments,stoptheengine,
anddisconnectthesparkplugwire(s)orremovethe
ignitionkey
–beforeclearingblockagesoruncloggingchute;
–beforechecking,cleaningorworkingonthelawn
mower;
–afterstrikingaforeignobject.Inspectthelawn
mowerfordamageandmakerepairsbefore
restartingandoperatingtheequipment;ifthe
machinestartstovibrateabnormally(check
immediately).
•Disengagedrivetoattachmentswhentransporting
ornotinuse.
•Stoptheengineanddisengagedrivetoattachment
–beforerefuelling;
–beforeremovingthegrasscatcher;
–beforemakingheightadjustmentunless
adjustmentcanbemadefromtheoperator’s
position.
•Reducethethrottlesettingduringenginerun-out
and,iftheengineisprovidedwithashut-offvalve,
turnthefueloffattheconclusionofmowing.
•Lightningcancausesevereinjuryordeath.If
lightningisseenorthunderisheardinthearea,do
notoperatethemachine;seekshelter.
MaintenanceandStorage
•Keepallnuts,boltsandscrewstighttobesurethe
equipmentisinsafeworkingcondition.
4
Page 5

•Neverstoretheequipmentwithfuelinthetank
insideabuildingwherefumescanreachanopen
ameorspark.
•Allowtheenginetocoolbeforestoringinany
enclosure.
•Toreducetherehazard,keeptheengine,silencer,
batterycompartmentandfuelstorageareafreeof
grass,leaves,orexcessivegrease.
•Checkthegrasscatcherfrequentlyforwearor
deterioration.
•Replacewornordamagedpartsforsafety .
•Ifthefueltankhastobedrained,thisshouldbe
doneoutdoors.
•Onmulti-bladedmachines,takecareasrotatingone
bladecancauseotherbladestorotate.
•Whenmachineistobeparked,storedorleft
unattended,lowerthecuttingmeansunlessapositive
mechanicallockisused.
ToroRidingMowerSafety
Thefollowinglistcontainssafetyinformationspecicto
Toroproductsorothersafetyinformationthatyoumust
knowthatisnotincludedintheCENstandard.
•Engineexhaustcontainscarbonmonoxide,whichis
anodorless,deadlypoisonthatcankillyou.Donot
runengineindoorsorinanenclosedarea.
•Keephands,feet,hairandlooseclothingawayfrom
attachmentdischargearea,undersideofmowerand
anymovingpartswhileengineisrunning.
•Donottouchequipmentorattachmentpartswhich
maybehotfromoperation.Allowtocoolbefore
attemptingtomaintain,adjust,orservice.
•Batteryacidispoisonousandcancauseburns.Avoid
contactwithskin,eyesandclothing.Protectyour
face,eyes,andclothingwhenworkingwithabattery.
•Batterygasescanexplode.Keepcigarettes,sparks
andamesawayfrombattery.
•UseonlygenuineTororeplacementpartstoensure
thatoriginalstandardsaremaintained.
•Donotmowslopeswhengrassiswet.Slippery
conditionsreducetractionandcouldcausesliding
andlossofcontrol.
•Donotmakesuddenturnsorrapidspeedchanges.
•Useawalkbehindmowerand/orahandtrimmer
neardrop-offs,ditches,steepbanksorwater.
•Reducespeedanduseextremecautiononslopes.
•Removeormarkobstaclessuchasrocks,treelimbs,
etc.fromthemowingarea.Tallgrasscanhide
obstacles.
•Watchforditches,holes,rocks,dips,andrisesthat
changetheoperatingangle,asroughterraincould
overturnthemachine.
•Avoidsuddenstartswhenmowinguphillbecause
themowermaytipbackwards.
•Beawarethatlossoftractionmayoccurgoing
downhill.Weighttransfertothefrontwheelsmay
causedrivewheelstoslipandcauselossofbraking
andsteering.
•Alwaysavoidsuddenstartingorstoppingona
slope.Iftireslosetraction,disengagethebladesand
proceedslowlyofftheslope.
•Followthemanufacturer’srecommendationsfor
wheelweightsorcounterweightstoimprovestability.
•Useextremecarewithgrasscatchersorother
attachments.Thesecanchangethestabilityofthe
machineandcauselossofcontrol.
SoundPressure
Thisunithasasoundpressurelevelattheoperator’s
earof86dBA,whichincludesanUncertaintyValue(K)
of1dBA.Thesoundpressurelevelwasdetermined
accordingtotheproceduresoutlinedinEN836.
SoundPower
Thisunithasaguaranteedsoundpowerlevelof100
dBA,whichincludesanUncertaintyValue(K)of1dBA.
Thesoundpowerlevelwasdeterminedaccordingtothe
proceduresoutlinedinISO11094.
•UseonlyToro-approvedattachments.Warrantymay
bevoidedifusedwithunapprovedattachments.
SlopeOperation
•Donotmowslopesgreaterthan15degrees.
•Donotmowneardrop-offs,ditches,steepbanks
orwater.Wheelsdroppingoveredgescancause
rollovers,whichmayresultinseriousinjury,death
ordrowning.
Vibration
Hand-Arm
•Measuredvibrationlevelforlefthand=1.9m/s
•Measuredvibrationlevelforrighthand=2.2m/s
•UncertaintyValue(K)=1.1m/s
Themeasuredvaluewasdeterminedaccordingtothe
proceduresoutlinedinEN836.
5
2
2
2
Page 6

WholeBody
•Measuredvibrationlevel=0.75m/s
•UncertaintyValue(K)=0.37m/s
Themeasuredvaluewasdeterminedaccordingtothe
proceduresoutlinedinEN836.
2
2
6
Page 7
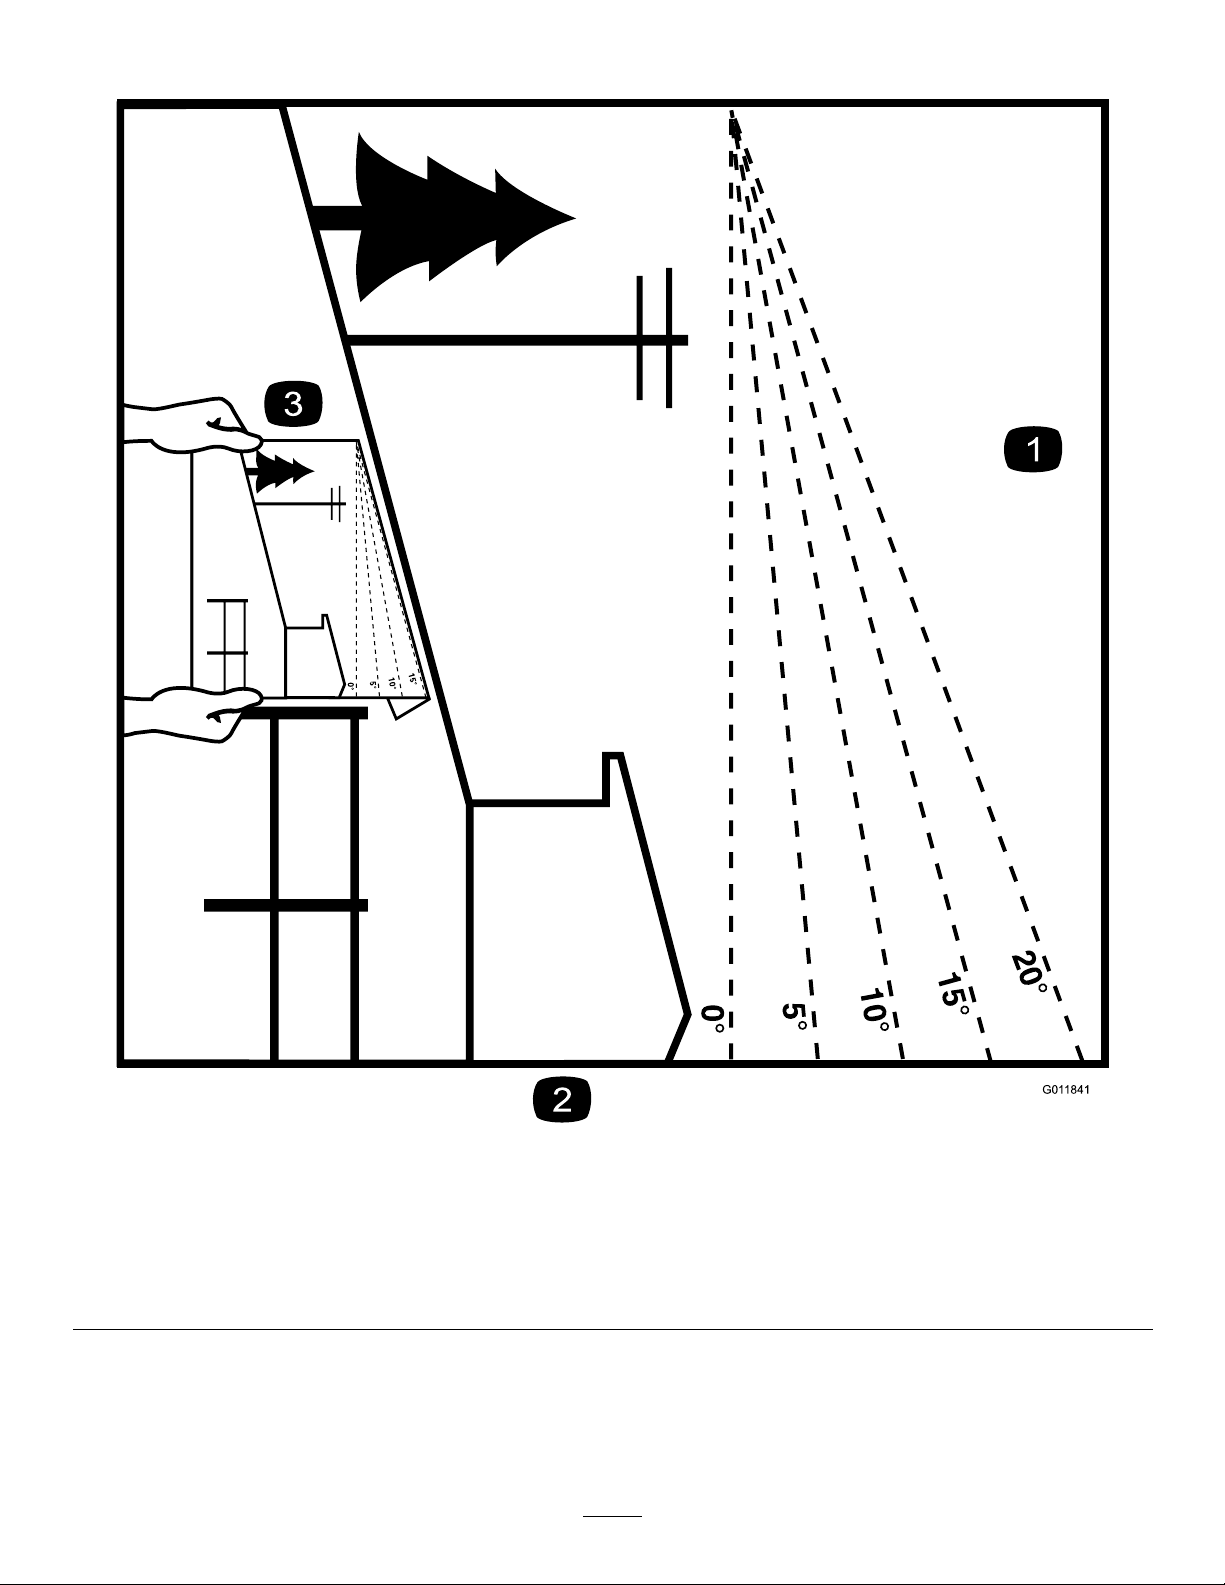
SlopeIndicator
G011841
Figure3
Thispagemaybecopiedforpersonaluse.
1.Themaximumslopeyoucansafelyoperatethemachineonis15degrees.Usetheslopecharttodeterminethedegreeofslope
ofhillsbeforeoperating.Donotoperatethismachineonaslopegreaterthan15degrees.Foldalongtheappropriateline
tomatchtherecommendedslope.
2.Alignthisedgewithaverticalsurface,atree,building,fencepole,etc.
3.Exampleofhowtocompareslopewithfoldededge.
7
Page 8
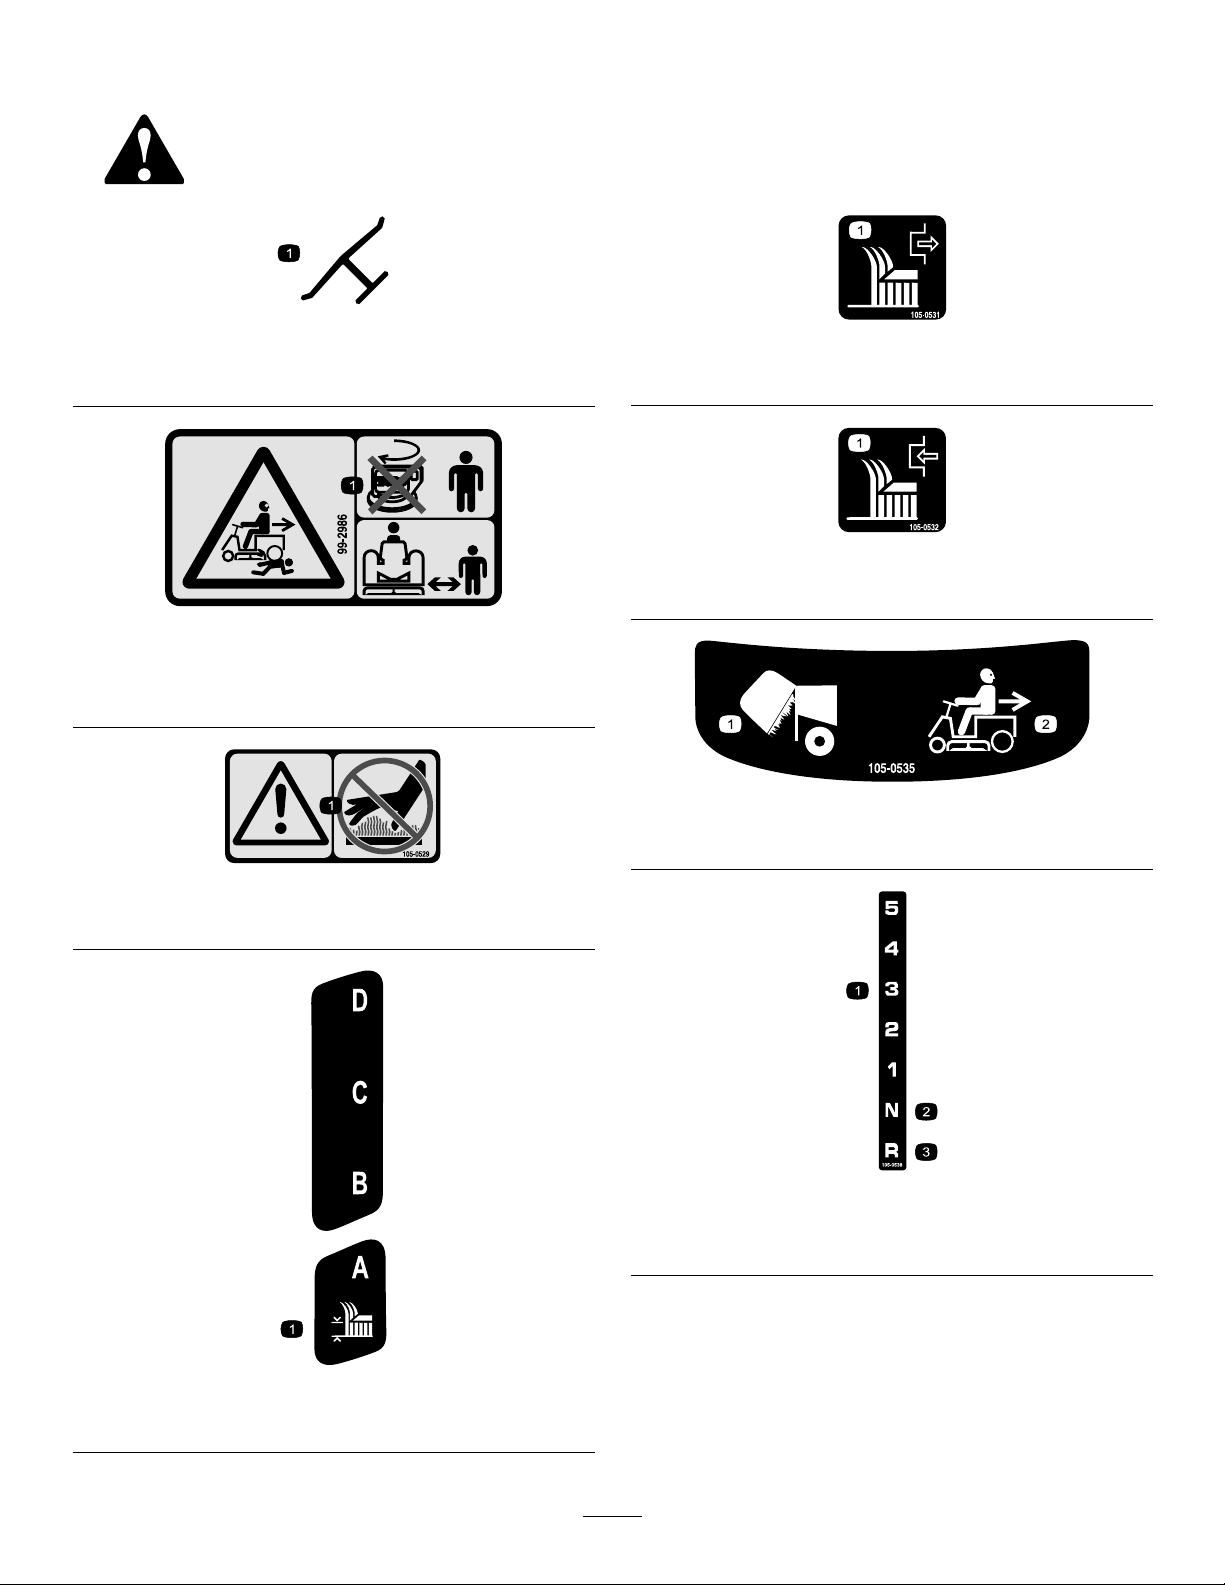
SafetyandInstructionalDecals
Safetydecalsandinstructionsareeasilyvisibletotheoperatorandarelocatednearanyareaof
potentialdanger.Replaceanydecalthatisdamagedorlost.
Manufacturer’sMark
1.Indicatesthebladeisidentiedasapartfromtheoriginal
machinemanufacturer.
99-2986
1.Crushing/dismembermenthazardofbystanders—donot
turnthekeywhilechildrenarepresent;keepchildrenasafe
distancefromthemachine.
105-0529
1.Warning—donottouchthehotsurfaces.
105-0531
1.Disengagethecuttingblade.
105-0532
1.Engagethecuttingblade.
105-0535
1.Grasscollectorfull2.Operatinginreverse
1.Heightofcut
105-0538
1.Transmissionspeeds3.Reverse
2.Neutral
105-0530
8
Page 9
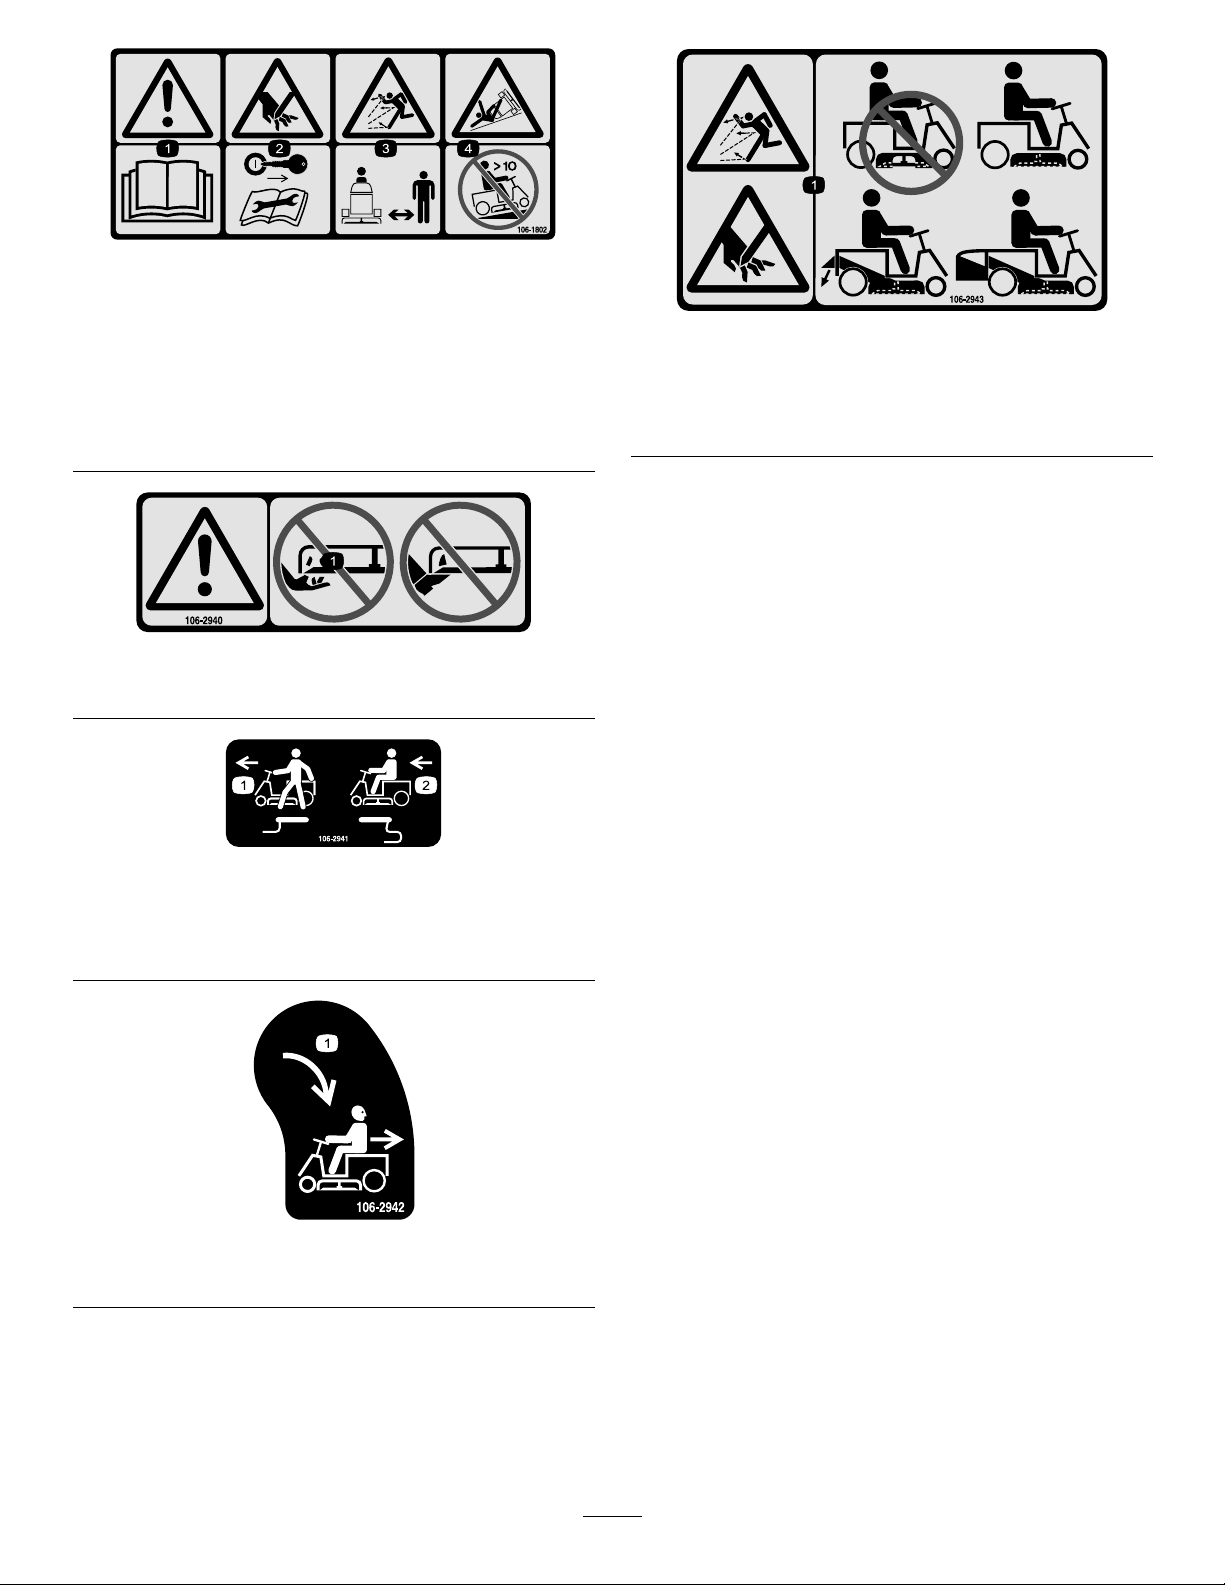
106-1802
1.Warning—readtheOperator’sManual.
2.Cutting/dismembermenthazardofhand—removethe
ignitionkeyandreadtheinstructionsbeforeservicingor
performingmaintenance.
3.Thrownobjecthazard—keepbystandersasafedistance
fromthemachine.
4.Tippinghazard—donotoperateonslopesgreaterthan10
degrees.
106-2940
1.Warning—donotplaceyouhandsorfeetunderthemower.
106-2943
1.Thrownobjecthazard;cutting/dismembermenthazard—do
notoperatethemachinewiththedischargeopening
uncovered;alwaysoperatethemachinewiththerecycling
cover,reardischargedeector,orgrasscollectorinstalled.
Model70186only
1.Pushtheleverintopushthemachine.
2.Pulltheleverouttodrivethemachine.
1.Turnthekeytomowinreverse.
106-2941
106-2942
9
Page 10
ProductOverview
Note:Thebrakepedalshouldstayinthedepressed
(locked)position.
ReleasingtheParkingBrake
1.Pushdownonthebrakepedal(Figure5)andholdit.
2.Pushtheparkingbrakelever(Figure5)downand
graduallyreleasethebrakepedal.
PositioningtheSeat
Theseatcanmoveforwardandbackward.Positionthe
seatwhereyouhavethebestcontrolofthemachineand
aremostcomfortable.
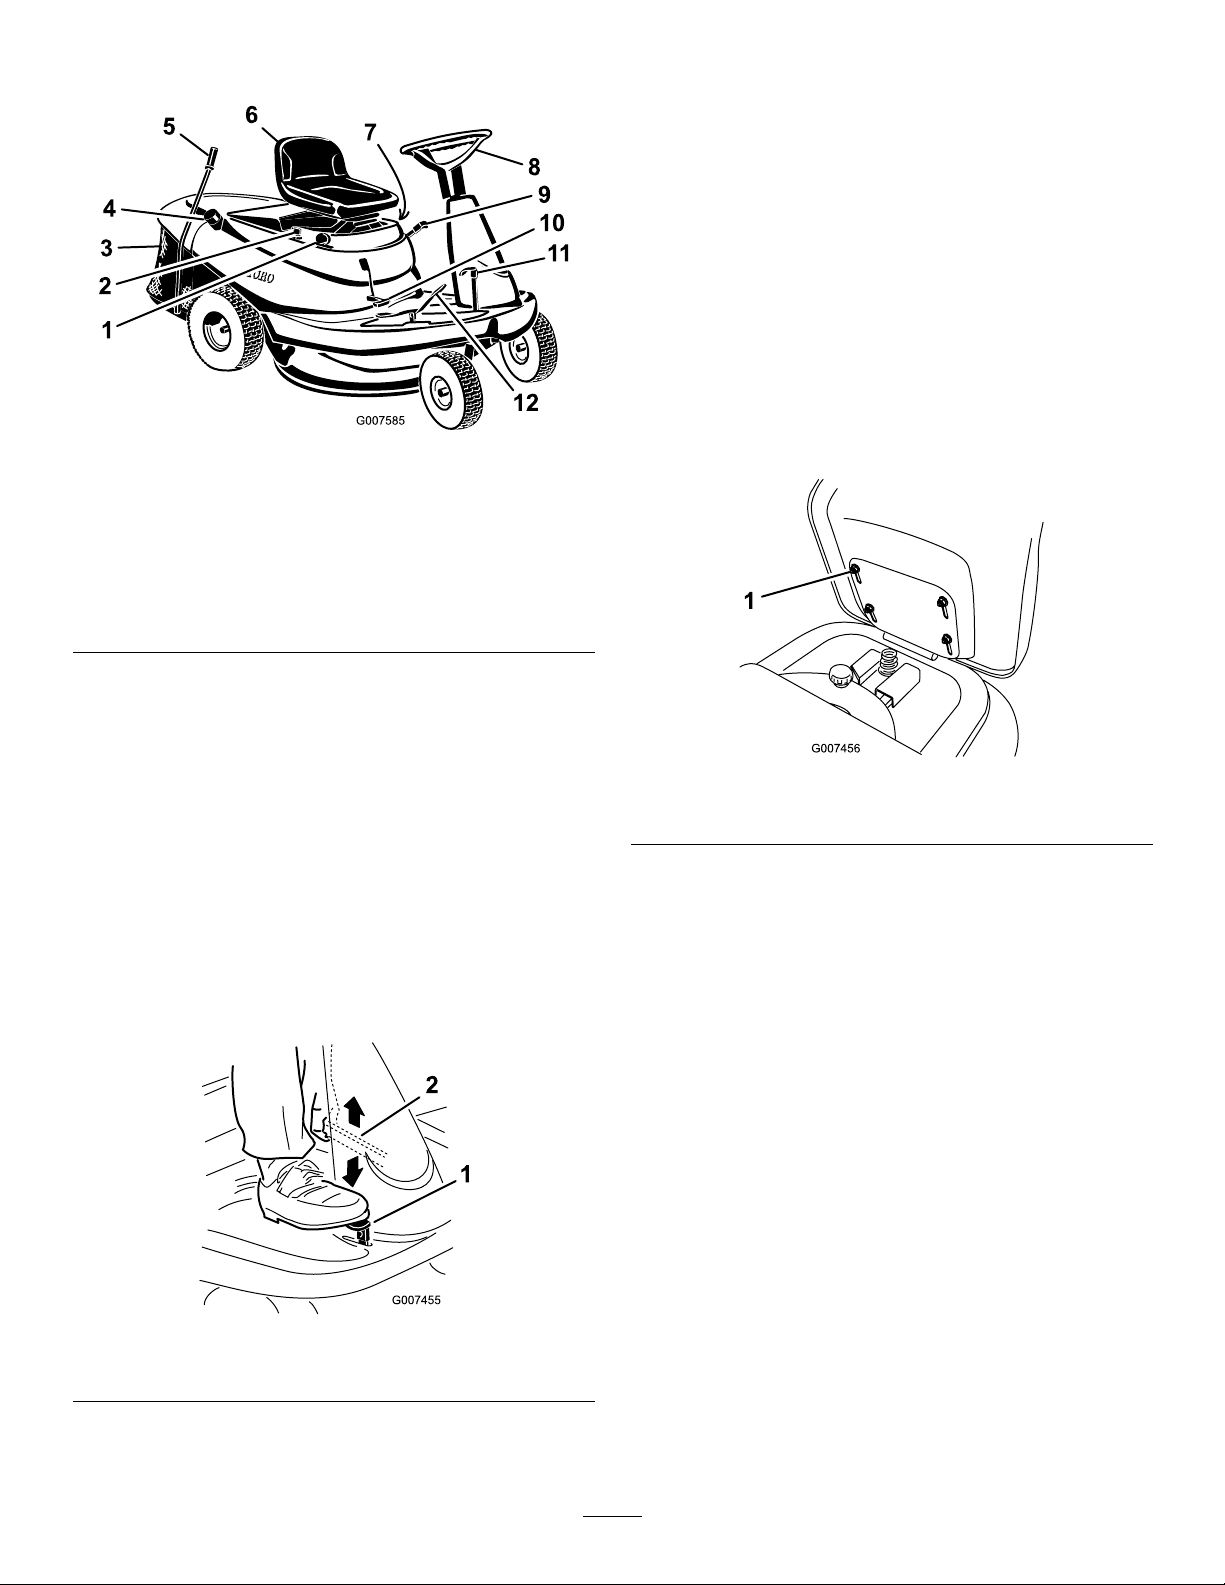
Figure4
1.Throttle
2.Ignitionkey
3.Collectorbin9.Height-of-cutlever
4.Fueltankcap
5.Collectorrod
6.Seat12.Groundspeedpedal
7.KeyChoiceswitch(not
shown)
8.Steeringwheel
10.Bladecontrol(PTO)
11.Brakepedal
Controls
Becomefamiliarwiththecontrolsbeforeyoustartthe
engineandoperatethemachine.
UsingtheParkingBrake
Alwayssettheparkingbrakewheneveryoustopthe
machineorleaveitunattended.
SettingtheParkingBrake
1.Pushthebrakepedaldownandholdit(Figure5).
1.Raisetheseatandloosenthe4bolts(Figure6).
Figure6
1.Bolt(4)
2.Movetheseattothedesiredpositionandtighten
thebolts.
UsingtheBladeControl(PTO)
Thebladecontrol(PTO)leverengagesanddisengages
powertotheblade.
Figure5
1.Brakepedal2.Parkingbrakelever
2.Lifttheparkingbrakelever(Figure5)upand
graduallytakeyourfootoffthebrakepedal.
EngagingtheBlade
1.Depressthebrakepedaltostopthemachine.
2.Slowlyshiftthebladecontrol(PTO)toEngage
Figure7).
(
10
Page 11
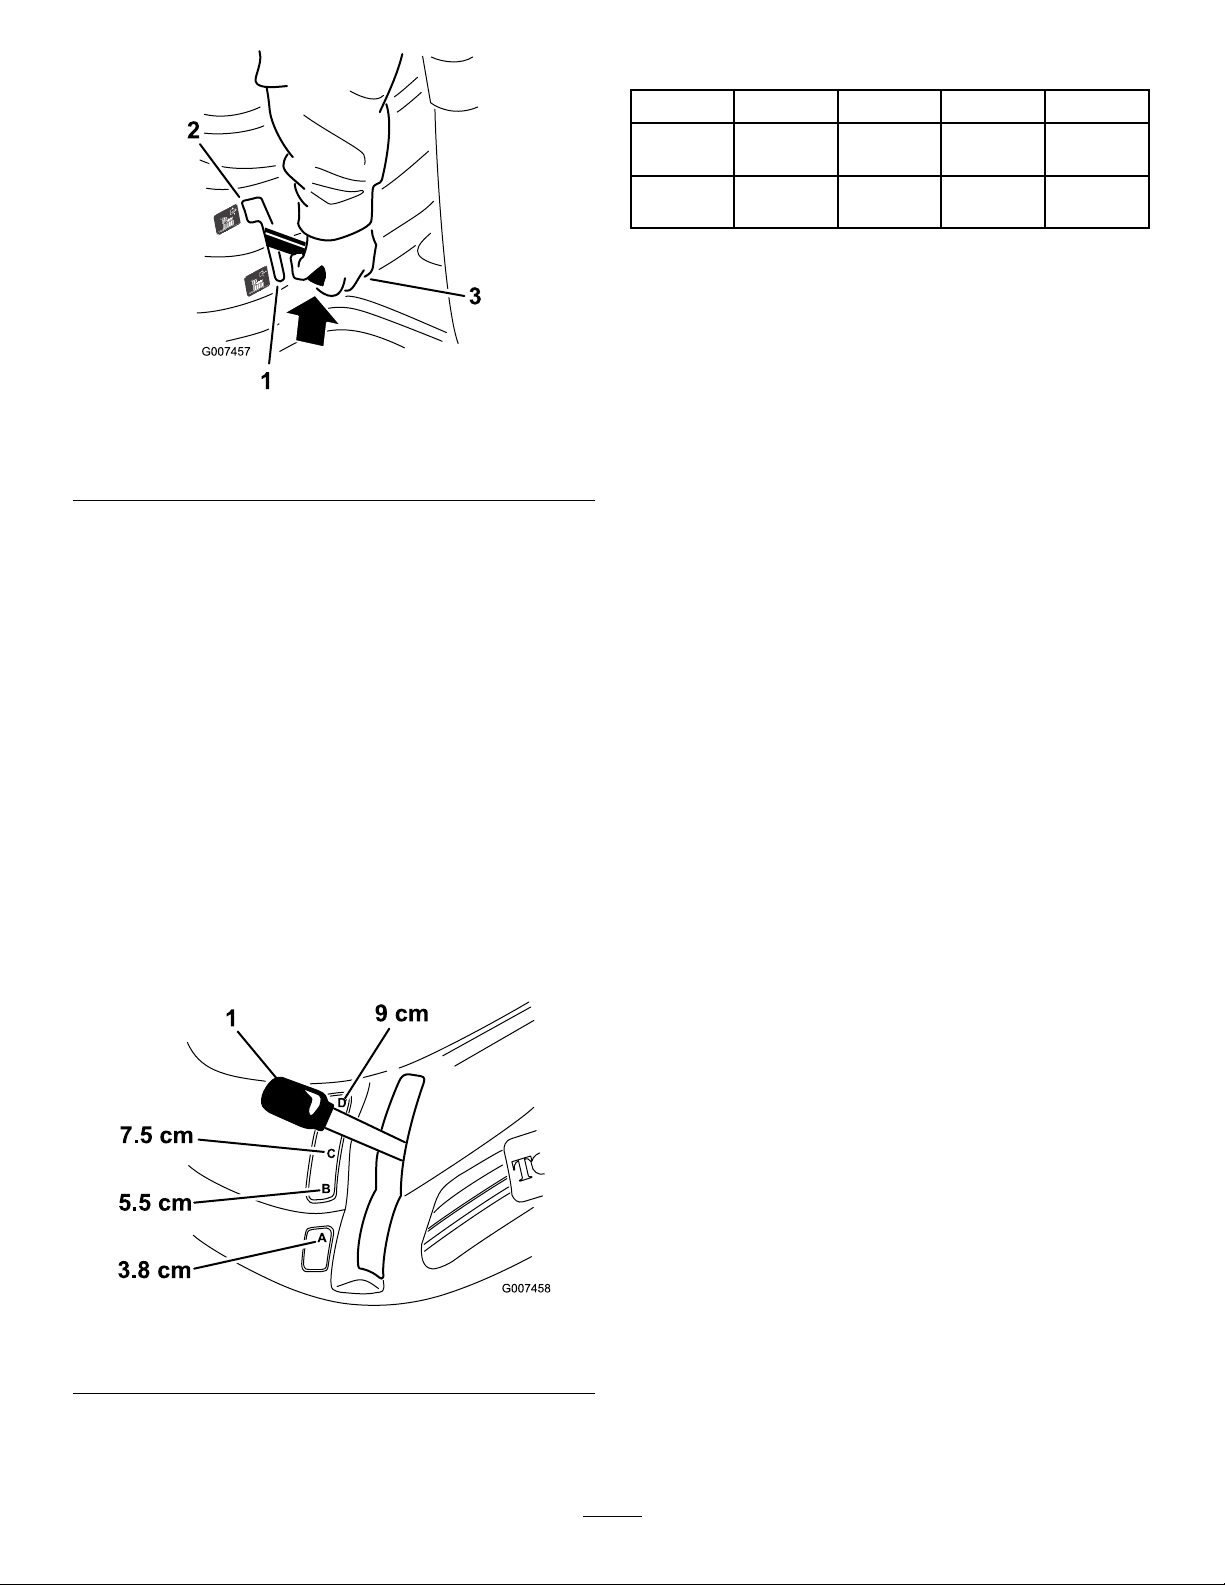
Figure7
1.Disengage
2.Engage
3.Bladecontrol(PTO)
DisengagingtheBlade
1.Depressthebrakepedaltostopthemachine.
2.Shiftthebladecontrol(PTO)toDisengage
(Figure7).
Specications
ModelWeightLengthWidthHeight
70185390lb
(177kg)
70186390lb
(177kg)
74in
(188cm)
74in
(188cm)
(86cm)
(86cm)
34in
34in
41in
(104cm)
41in
(104cm)
SettingtheHeightofCut
Usetheheight-of-cutlevertoraiseandlowerthemower
tothedesiredcuttingheight.Youcansetthecutting
heightto1of4positionsfromapproximately3.8to9
cm.
1.Disengagethebladecontrol(PTO).
2.Pullontheheight-of-cutlever,moveittothe
desiredposition,andreleaseitslowlyintothenotch
Figure8).
(
1.Height-of-cutlever
Figure8
11
Page 12

Operation
Note:Determinetheleftandrightsidesofthe
machinefromthenormaloperatingposition.
AddingFuel
UseUnleadedRegularGasolinesuitablefor
automotiveuse(85pumpoctaneminimum).Leaded
regulargasolinemaybeusedifunleadedregularisnot
available.
Important:Neverusemethanol,gasoline
containingmethanol,orgasoholcontainingmore
than10%ethanolbecausethefuelsystemcouldbe
damaged.Donotmixoilwithgasoline.
DANGER
Incertainconditions,gasolineisextremely
ammableandhighlyexplosive.Areorexplosion
fromgasolinecanburnyouandothersandcan
damageproperty.
•Fillthefueltankoutdoors,inanopenarea,
whentheengineiscold.Wipeupanygasoline
thatspills.
DANGER
Incertainconditionsduringfueling,static
electricitycanbereleasedcausingasparkwhich
canignitethegasolinevapors.Areorexplosion
fromgasolinecanburnyouandothersandcan
damageproperty.
•Alwaysplacegasolinecontainersontheground
awayfromyourvehiclebeforelling.
•Donotllgasolinecontainersinsideavehicle
oronatruckortrailerbedbecauseinterior
carpetsorplastictruckbedlinersmayinsulate
thecontainerandslowthelossofanystatic
charge.
•Whenpractical,removegas-powered
equipmentfromthetruckortrailerandrefuel
theequipmentwithitswheelsontheground.
•Ifthisisnotpossible,thenrefuelsuch
equipmentonatruckortrailerfromaportable
container,ratherthanfromagasolinedispenser
nozzle.
•Ifagasolinedispensernozzlemustbeused,
keepthenozzleincontactwiththerimofthe
fueltankorcontaineropeningatalltimesuntil
fuelingiscomplete.
•Neverllthefueltankinsideanenclosedtrailer.
•Donotllthefueltankcompletelyfull.Add
gasolinetothefueltankuntilthelevelis1/4to
1/2inch(6to13mm)belowthebottomofthe
llerneck.Thisemptyspaceinthetankallows
gasolinetoexpand.
•Neversmokewhenhandlinggasoline,andstay
awayfromanopenameorwheregasoline
fumesmaybeignitedbyaspark.
•Storegasolineinanapprovedcontainerand
keepitoutofthereachofchildren.Neverbuy
morethana30-daysupplyofgasoline.
•Donotoperatewithoutentireexhaustsystem
inplaceandinproperworkingcondition.
WARNING
Gasolineisharmfulorfatalifswallowed.
Long-termexposuretovaporscancauseserious
injuryandillness.
•Avoidprolongedbreathingofvapors.
•Keepfaceawayfromnozzleandgastankor
conditioneropening .
•Keepgasawayfromeyesandskin.
UsingStabilizer/Conditioner
Useafuelstabilizer/conditionerinthemachineto
providethefollowingbenets:
•Keepsgasolinefreshduringstorageof90daysor
less.Forlongerstorageitisrecommendedthatthe
fueltankbedrained.
•Cleanstheenginewhileitruns
•Eliminatesgum-likevarnishbuildupinthefuel
system,whichcauseshardstarting
Important:Donotusefueladditivescontaining
methanolorethanol.
Addthecorrectamountofgasstabilizer/conditioner
tothegas.
12
Page 13

Note:Afuelstabilizer/conditionerismosteffective
whenmixedwithfreshgasoline.Tominimizethe
chanceofvarnishdepositsinthefuelsystem,usefuel
stabilizeratalltimes.
FillingtheFuelTank
1.Shuttheengineoffandsettheparkingbrake.
2.Cleanaroundeachfueltankcapandremovethecap.
3.Addunleadedregulargasolinetobothfueltanks,
untilthelevelis1/4to1/2inch(6mmto13mm)
belowthebottomofthellerneck.
Thisspaceinthetankallowsgasolinetoexpand.
Donotllthefueltankscompletelyfull.
4.Installfueltankcapssecurely.
5.Wipeupanygasolinethatmayhavespilled.
CheckingtheEngineOilLevel
Beforeyoustarttheengineandusethemachine,check
theoillevelintheenginecrankcase;refertoChecking
OilLevelinMaintenance.
StartingtheEngine
1.Sitdownontheseat.
2.Settheparkingbrake;refertoSettingtheParking
Brake.
Note:Theenginewillnotstartunlessyouengage
theparkingbrake.
3.ShiftthegroundspeedleverintoNeutral(N)
Figure9).
(
Figure10
1.Disengage
2.Engage
3.Bladecontrol(PTO)
5.ShiftthethrottlelevertoChoke(Figure11).
Figure11
1.Choke3.Slow
2.Fast
Note:Anenginethathasbeenrunningandis
warmmaynotrequirethisstep.
Figure9
1.Groundspeedlever
4.Shiftthebladecontrol(PTO)levertoDisengage
(
Figure10).
6.Turntheignitionkeyclockwiseandholditinthe
Startposition(Figure12).Whentheenginestarts,
releasethekey .
13
Page 14

CAUTION
Suddenlyreleasingtheclutchpedalcould
causeyoutolosecontrolandsuddenlyputthe
machineinmotion.
Alwaysreleasetheclutchpedalslowlywhen
startingthemachineinmotion.
SelectingGroundSpeeds
Figure12
1.Start3.Stop
2.Run
Important:Iftheenginedoesnotstartafter
30secondsofcontinuouscranking,turnthe
ignitionkeytoStopandletthestartermotor
cool;refertoTroubleshooting.
7.Aftertheenginestarts,slowlyshiftthethrottlelever
toFast(
shiftthethrottleleverbacktoChokeforafew
secondsandthenshiftthethrottlelevertoFast.
Repeatthisstepasrequired.
Figure11).Iftheenginestallsorhesitates,
StoppingtheEngine
1.ShiftthethrottlelevertoSlow(Figure11).
2.TurntheignitionkeytoStop(Figure12).
3.Removetheignitionkey.
Model70185only
Important:T oavoidtransmissiondamage,always
depressthebrakepedalbeforeshiftingintoorout
ofReverse.
Alwaysstartthemachineinmotionbydepressingthe
brakepedalandshiftingintothedesiredspeed.Once
themachineisinmotion,youcanshiftintoanyforward
speedwithoutdepressingthebrakepedal.Inmost
conditions,themachineispowerfulenoughtomove
outinanyspeed.Ifitwillnotmoveoutinaselected
speedduetoaheavyload,shifttoalowerspeed.
Important:Donotshiftonslopes.Chooseaslow
speedsothatyouwillnothavetostoporshift
whileontheslope.
DrivingtheMachineForward
orBackward
Model70186only
DrivingtheMachineForward
orBackward
Model70185only
Thethrottlecontrolregulatestheenginespeedas
measuredinRPM(revolutionsperminute).
1.Releasetheparkingbrake;refertoReleasingthe
ParkingBrake.
2.Depressthebrakepedal.
3.Shiftthegroundspeedlevertothedesiredforward
speedortoReverse.
Note:Asyouslowlyreleasethepedal,themachine
willbegintomove.Steerthemachinewiththe
steeringwheel.
Thethrottlecontrolregulatestheenginespeedas
measuredinRPM(revolutionsperminute).
1.Releasetheparkingbrake;refertoReleasingthe
ParkingBrake.
2.Placeyourfootonthetractioncontrolpedal.
3.Slowlypressonthetopofthepedaltomovethe
machineforwardoronthebottomofthepedalto
movethemachinebackward.
Note:Thefartheryoumovethetractioncontrol
pedalineitherdirection,thefasterthemachine
movesinthatdirection.Toslowdown,releasethe
pressureonthepedal.Steerthemachinewiththe
steeringwheel.
Important:Toavoidtransmissiondamage,
alwaysreleasetheparkingbrakebeforemoving
thetractioncontrolpedal.
14
Page 15

CAUTION
Suddenlyreleasingthebrakepedalcould
causeyoutolosecontrolandsuddenlyputthe
machineinmotion.
Alwaysreleasethebrakepedalslowlywhen
startingthemachineinmotion.
StoppingtheMachine
1.Depressthebrakepedal(model70185only).
2.ShiftthegroundspeedleverintoNeutral(model
70185only).
3.Releasethetractioncontrolpedal(model70186
only).
4.Disengagethebladecontrol(PTO).
5.TurntheignitionkeytoOfftostoptheengine.
6.Waitforallmovingpartstostop.
7.Settheparkingbrakeifyouleavethemachine
unattended;refertoSettingtheParkingBrake.
8.Removetheignitionkeyfromtheswitch.
CAUTION
Childrenorbystandersmaybeinjuredifthey
moveorattempttooperatethemachinewhile
itisunattended.
Alwaysremovetheignitionkeyandsetthe
parkingbrakewhenleavingthemachine
unattended,evenifjustforafewminutes.
PushingtheMachineManually
Figure13
1.Pushposition
Note:Thisdisengagesthedrivesystemandallows
thewheelstoturnfreely.
6.Lowerthegrasscollector(model70186only).
7.Disengagetheparkingbrake.
Note:Tooperatethemachine:Raisethegrass
collector,slidethedrivecontrolrodtherightand
pullitout,andthenlowerthegrasscollector.
2.Operateposition
UsingtheSafetyInterlock
System
CAUTION
Ifthesafetyinterlockswitchesaredisconnectedor
damaged,themachinecouldoperateunexpectedly,
causingpersonalinjury.
•Donottamperwiththeinterlockswitches.
•Checktheoperationoftheinterlockswitches
dailyandreplaceanydamagedswitchesbefore
operatingthemachine.
Important:Alwayspushthemachinemanually.
Nevertowthemachinebecauseyoumaydamage
thetransaxle.
1.ShiftthegroundspeedleverintoNeutral(model
70185only).
2.Disengagetheblade(PTO).
3.Stoptheengineandwaitforallmovingpartsto
stop.
4.Removetheignitionkey.
5.Pushthedrivecontrolrodinandslideittotheleft
tolockitinplace(model70186only)(
Figure13).
UnderstandingtheSafetyInterlock
System
Thesafetyinterlocksystemisdesignedtopreventthe
enginefromstartingunless:
•Youaresittingontheseat.
•Thebrakepedalisdepressed.
•Thebladecontrol(PTO)leverisintheDisengage
position.
Thesafetyinterlocksystemisdesignedtostopthe
engineifyoudothefollowing:
•Yourisefromtheseatwhenthebrakepedalis
released.
•Yourisefromtheseatwhenthebladecontrol
(PTO)leverisintheEngageposition.
15
Page 16

•Youshiftintoreversewhilethebladecontrol
(PTO)leverisintheEngagepositionandthe
operating-in-reverseinterlockisnotdeactivated.
•Youremovethegrasscollectororthereardeector
whenthebladecontrol(PTO)leverisintheEngage
position.
DANGER
Youcouldbackoverachildorbystanderwhilethe
mowerbladeorotherattachmentisengagedand
causeseriousinjuryordeath.
•Donotmowinreverseunlessabsolutely
necessary.
SettingtheKeyChoice®Switchto
OperateinReverse
Aninterlockfeatureonthemachinepreventsthepower
take-off(PTO)fromoperatingwhenyoubackupthe
machine.Ifyouputthetractioncontrolpedalinto
ReversewiththePTOengaged(i.e.,withmowerblades
orotherattachmentrunning),theenginewillstop.Do
notmowinreverseunlessitisabsolutelynecessary.
Ifyouneedtousethebladecontrol(PTO)while
backingup,turnofftheinterlockfeatureusingthe
KeyChoiceswitchlocatedneartheseatbracket
Figure14).
(
•DonotinserttheKeyChoicekeyunlessitis
absolutelynecessary.
•Alwayslookbackwardanddownbefore
backingup.
•UsetheKeyChoiceswitchonlyifyouare
certainnochildrenorotherbystanderswill
enterthemowingarea.
•Beveryobservantafterdeactivatingthe
interlockbecausethesoundoftheengine
maypreventyoufromnoticingthatachildor
bystanderhasenteredtheworkarea.
•AlwaysremoveboththeignitionandKeyChoice
keysandputtheminasafeplaceoutofthe
reachofchildrenorunauthorizeduserswhen
leavingtheunitunattended.
1.Engagetheblade(PTO).
2.InserttheKeyChoicekeyintotheswitch(Figure14).
3.TurntheKeyChoicekey .
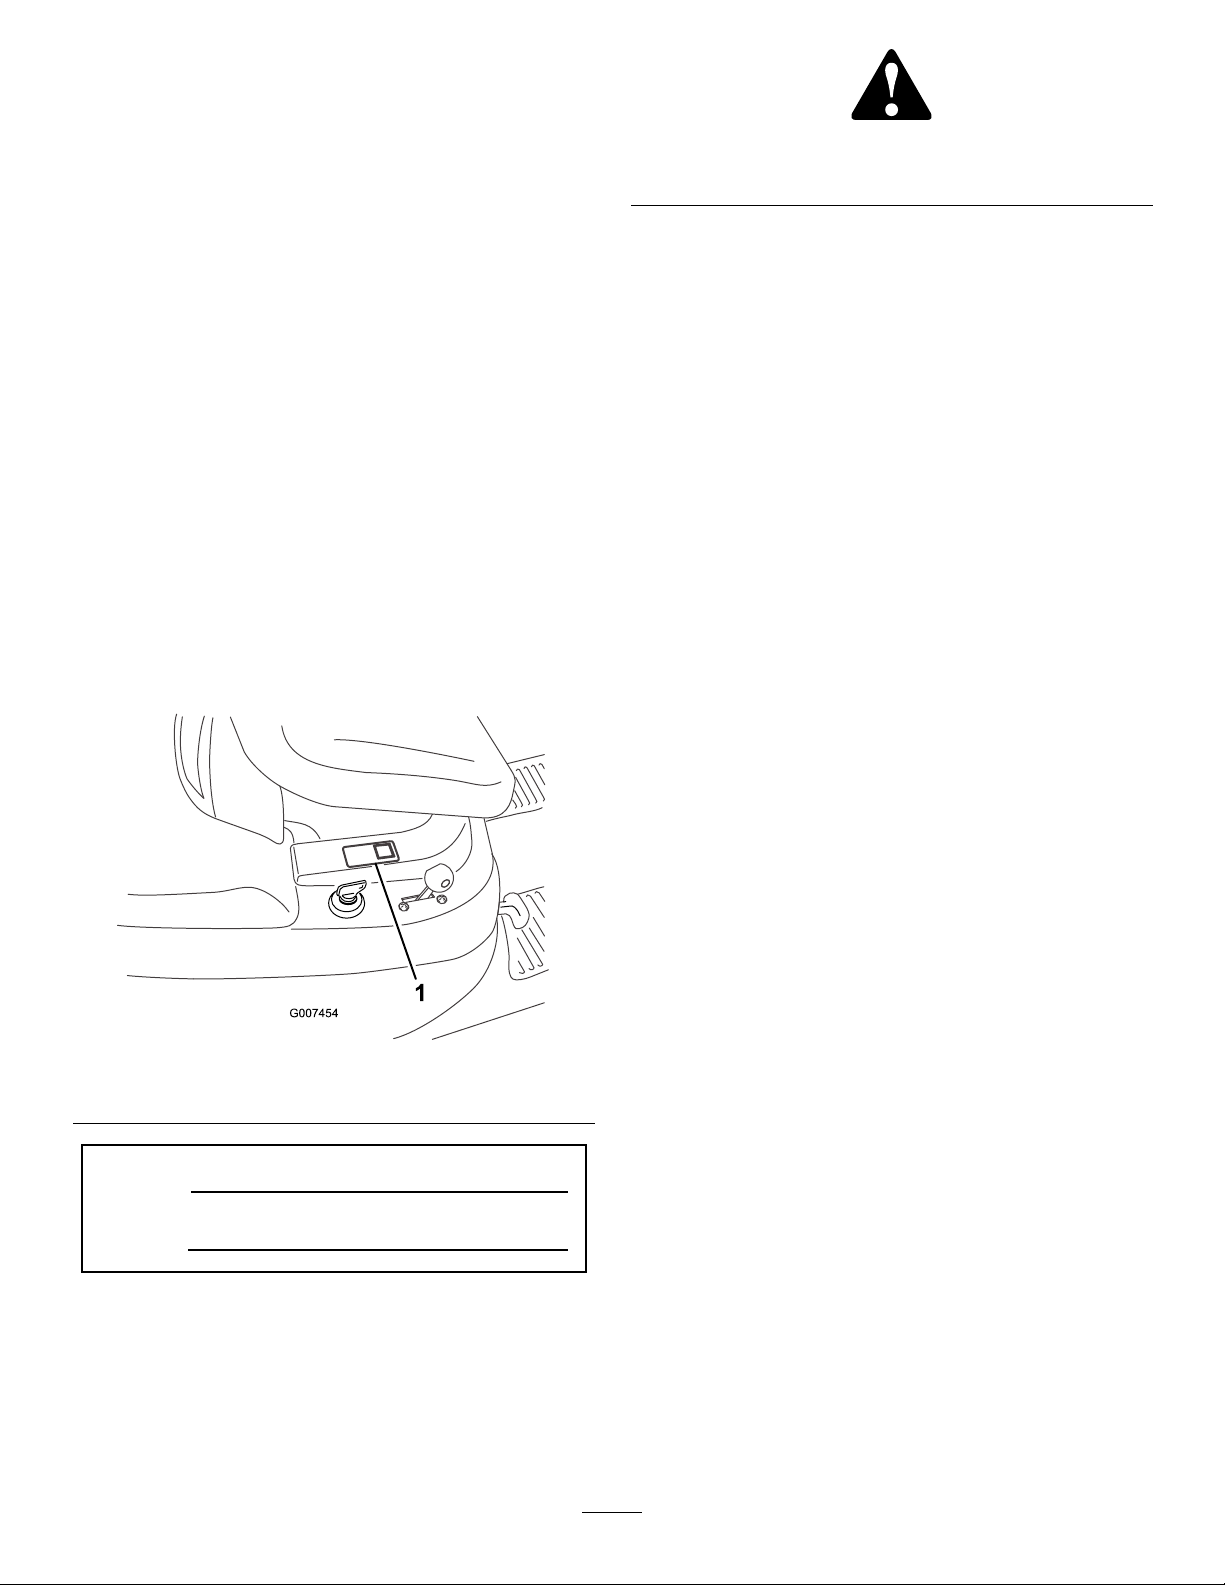
Note:Aredlightonthefrontconsole(Figure15)
turnson,indicatingthattheinterlockisdisabled.
1.KeyChoiceswitch
Figure14
Figure15
1.Operating-in-reverselight
4.ShiftthegroundspeedleverintoReverseand
completeyourtask(model70185only).
5.PutthetractioncontrolpedalintoReverseand
completeyourtask(model70186only).
16
Page 17

6.Disengagetheblade(PTO)toactivatetheinterlock.
7.RemovetheKeyChoicekeyandputitinasafeplace
outofthereachofchildren.
TestingtheSafetyInterlock
System
Model70185only
CAUTION
Ifsafetyinterlockswitchesaredisconnectedor
damaged,themachinecouldoperateunexpectedly,
causingpersonalinjury.
•Donottamperwiththeinterlockswitches.
•Checktheoperationoftheinterlockswitches
dailyandreplaceanydamagedswitchesbefore
operatingthemachine.
1.Testthesafetyinterlocksystembeforeyouusethe
machineeachtime.Ifthesafetyinterlocksystem
doesnotoperateasdescribedbelow ,havean
AuthorizedServiceDealerrepairitimmediately.
2.Shiftthebladecontrol(PTO)levertoEngage,sit
ontheseat,androtatetheignitionkeytoStart:
Theengineshouldnotcrank.Ifitdoescrank,the
safetyinterlocksystemismalfunctioningandmust
berepairedbyanAuthorizedServiceDealer.Ifthe
enginedoesnotcrank,gotostep
3.Shiftthebladecontrol(PTO)levertoDisengage,
sitontheseat,depressthebrakeandclutchpedals,
engagetheparkingbrake,shiftthegroundspeed
leverintogear,androtatetheignitionkeytoStart:
Theengineshouldnotcrank.Ifitdoescrank,the
safetyinterlocksystemismalfunctioningandmust
berepairedbyanAuthorizedServiceDealer.Ifthe
enginedoesnotcrank,gotostep
4.Sitontheseat,shiftthegroundspeedleverinto
Neutral,andshiftthebladecontrol(PTO)leverto
Disengage.Ensurethattheparkingbrakeisengaged
androtatetheignitionkeytoStart:Theengine
shouldstartandcontinuetorun.Thenengagethe
bladecontrol(PTO)leverandcarefullyrisefrom
theseat:Theengineshouldstop.Iftheengine
doesnotstoprunning,stoptheengine,waitforall
movingpartstostop,andhavethesafetyinterlock
systemrepairedbyanAuthorizedServiceDealer.If
theenginestopswhenyourisefromtheseat,the
safetyinterlocksystemisfunctioningproperly.
5.Shiftthebladecontrol(PTO)levertoDisengage,
shiftthegroundspeedleverintoNeutral,andstart
theengine.Whiletheengineisrunning,shiftthe
bladecontrol(PTO)levertoEngage,pushinthe
3.
4.
clutch,andshiftthegroundspeedlevertoReverse:
Theengineshouldstop.
6.Shiftthebladecontrol(PTO)levertoDisengage,
shiftthegroundspeedlevertoNeutral,andstart
theengine.Thenshiftthebladecontrol(PTO)lever
toEngageandturntheKeyChoicekeyandrelease
it:TheKeyChoicewarninglightshouldilluminate.
Shiftthebladecontrol(PTO)levertoDisengage:
TheKeyChoicewarninglightshouldturnoff.
TestingtheSafetyInterlock
System
Model70186only
CAUTION
Ifsafetyinterlockswitchesaredisconnectedor
damaged,themachinecouldoperateunexpectedly,
causingpersonalinjury.
•Donottamperwiththeinterlockswitches.
•Checktheoperationoftheinterlockswitches
dailyandreplaceanydamagedswitchesbefore
operatingthemachine.
Testthesafetyinterlocksystembeforeyouusethe
machineeachtime.Ifthesafetyinterlocksystemdoes
notoperateasdescribedbelow ,haveanAuthorized
ServiceDealerrepairitimmediately.
1.Shiftthebladecontrol(PTO)levertoEngage,sit
ontheseat,androtatetheignitionkeytoStart:
Theengineshouldnotcrank.Ifitdoescrank,the
safetyinterlocksystemismalfunctioningandmust
berepairedbyanAuthorizedServiceDealer.Ifthe
enginedoesnotcrank,gotostep
2.Shiftthebladecontrol(PTO)levertoDisengage,
sitontheseat,depressthebrakepedal,engagethe
parkingbrake,androtatetheignitionkeytoStart:
Theengineshouldnotcrank.Ifitdoescrank,the
safetyinterlocksystemismalfunctioningandmust
berepairedbyanAuthorizedServiceDealer.Ifthe
enginedoesnotcrank,gotostep
3.Sitontheseat,putthetractioncontrolpedalinto
Neutral,andshiftthebladecontrol(PTO)leverto
Disengage.Ensurethattheparkingbrakeisengaged
androtatetheignitionkeytoStart:Theengine
shouldstartandcontinuetorun.Thenengagethe
bladecontrol(PTO)leverandcarefullyrisefrom
theseat:Theengineshouldstop.Iftheengine
doesnotstoprunning,stoptheengine,waitforall
movingpartstostop,andhavethesafetyinterlock
systemrepairedbyanAuthorizedServiceDealer.If
2.
3.
17
Page 18

theenginestopswhenyourisefromtheseat,the
safetyinterlocksystemisfunctioningproperly.
4.Shiftthebladecontrol(PTO)levertoDisengage,
putthetractioncontrolpedalintoNeutral,and
starttheengine.Whiletheengineisrunning,shift
thebladecontrol(PTO)levertoEngageandput
thetractioncontrolpedaltoReverse:Theengine
shouldstop.
5.Shiftthebladecontrol(PTO)levertoDisengage,
andstarttheengine.Thenshiftthebladecontrol
(PTO)levertoEngageandturntheKeyChoicekey
andreleaseit:TheKeyChoicewarninglightshould
illuminate.Shiftthebladecontrol(PTO)leverto
Disengage:TheKeyChoicewarninglightshould
turnoff.
EmptyingtheGrassCollector
Whenthecollectorwarninglightonthefrontconsole
comeson,thegrasscollectorisfullandmustbe
emptied.
1.Disengagethebladecontrol(PTO).
2.Pullthecollectorrodforwardtotiltthecollection
Figure16).
bin(
DANGER
Withoutthegrassdeector,dischargecover,or
completegrasscatcherassemblymountedinplace,
youandothersareexposedtobladecontactand
throwndebris.Contactwiththerotatingmower
bladeandthrowndebriswillcauseinjuryordeath.
•Neverremovethegrassdeectorfromthe
mowerbecausethegrassdeectorroutes
materialdowntowardtheturf.Ifthe
grassdeectoriseverdamaged,replaceit
immediately.
•Neverputyourhandsorfeetunderthemower.
•Nevertrytoclearthedischargeareaormower
bladesunlessyoudisengagethepowertake-off
(PTO)andturntheignitionkeytoOff.Also
removethekeyanddisconnectthewirefrom
thesparkplug.
1.Parkthemachineonalevelsurface.
2.Disengagetheblade(PTO).
3.ShiftthegroundspeedleverintoNeutral(model
70185only).
4.Settheparkingbrake.
Figure16
1.Collectorrod2.Collectionbin
3.Shakethecollectionbinuntilitiscompletelyempty.
4.Slowlyreturnthecollectionrodtotheoperating
position.
InstallingtheRecyclerCover
ARecyclercoverisincludedwiththemachine.Youcan
useitwhenyoudonotwanttobagthegrassclippings.
5.Stoptheengineandwaitforallmovingpartsto
stop.
6.Removetheignitionkey.
7.Raisethegrasscollectorandremovethehairpin,
2washers,andclevispinthatsecurethedischarge
tubetotherearplate(
1.Rearplate4.Hairpin
2.Dischargetube5.Washers
3.Clevispin
Figure17).
Figure17
8.Removethenutandouterwasherthatsecurethe
dischargechutetothedischargetube(Figure18).
18
Page 19

Figure18
1.Dischargetube3.Dischargechute
2.Nutandouterwasher
9.Movetheheight-of-cutlevertothelowestposition.
12.Removethedischargechutefromthemower
housing.
Note:Attachthenutandouterwasherthatyou
removedtothedischargechutetopreventlosing
them.
13.InstalltheRecyclercoverontothemower.
14.Jointhe2strapendsaroundtheRecyclercoveras
shown(
Figure19).
15.Aligntheholesinthestrapendsandfastenthem
togethersnuglywiththebolt,washer,andnutyou
previouslyremoved.
16.Raisethegrasscollectorandinstalltheclevispin,2
washers,andhairpintosecurethedischargetubeto
therearplate(
Figure20).
10.Removethebolt,washer,andnutthatsecurethe2
strapendstogether(
1.Straps
2.Nut4.Bolt
Figure19).
Figure19
3.Washer
11.Movethestrapsawayfromthedischargechute.
Note:Donotremovethestrapsfromthemower
housing.Ifastrapcomesoffthehousing,insertit
asshownin(Figure20).
Figure20
1.Insertingthestrapintothe
slot
2.Thestrapisinsertedinto
theslot
InstallingtheDischargeChute
DANGER
Withoutthegrassdeector,dischargecover,or
completegrasscatcherassemblymountedinplace,
youandothersareexposedtobladecontactand
throwndebris.Contactwiththerotatingmower
bladeandthrowndebriswillcauseinjuryordeath.
•Neverremovethegrassdeectorfromthe
mowerbecausethegrassdeectorroutes
materialdowntowardtheturf.Ifthe
grassdeectoriseverdamaged,replaceit
immediately.
•Neverputyourhandsorfeetunderthemower.
•Nevertrytoclearthedischargeareaormower
bladesunlessyoudisengagethepowertake-off
(PTO)andturntheignitionkeytoOff.Also
removethekeyanddisconnectthewirefrom
thesparkplug.
1.Parkthemachineonalevelsurface.
2.Disengagetheblade(PTO).
3.ShiftthegroundspeedleverintoNeutral(model
70185only).
4.Settheparkingbrake.
5.Stoptheengineandwaitforallmovingpartsto
stop.
6.Removetheignitionkey.
7.Raisethegrasscollectorandremovethehairpin
andclevispinthatsecurethedischargetubetothe
rearplate(
8.Movetheheightofcutlevertothelowestposition.
9.Removethebolt,washer,andnutthatsecurethe2
strapendstogether(
Figure17).
Figure19).
19
Page 20

10.Movethestrapsawayfromthethedischargechute.
Note:Donotremovethestrapsfromthemower
housing.
11.RemovetheRecyclercoverfromthemower
housing.
12.Installthedischargechuteontothemower.
13.Raisethegrasscollectorandinstalltheclevispin
andhairpintosecurethedischargetubetotherear
Figure17).
plate(
14.Installthenutandouterwasherthatsecurethe
dischargechutetothedischargetube(
15.Jointhe2strapendsaroundthedischargechuteas
showninFigure19.
16.Aligntheholesinthestrapendsandfastenthem
togethersnuglywiththebolt,washer,andnutyou
previouslyremoved(
Figure19).
Figure18).
OperatingTips
•Forthebestperformance,operatetheengineat
themaximumspeed.Themowerrequiresairto
thoroughlycutgrassclippings,sodonotsetthe
height-of-cuttooloworcompletelysurroundthe
mowerinuncutgrass.Alwaysleaveonesideofthe
mowerfreefromuncutgrasstoallowtheairtobe
drawnintothemower.
–Engagethebladeandmovetoapreviouslycut
area.
–Dispersetheclippingsevenlybyraisingthe
mower1or2height-of-cutsettingswhiledriving
forwardwiththebladeengaged.
•Usethewashoutporttocleanclippingsanddirt
fromtheundersideofthemoweraftereachuse.If
grassanddirtbuildupinsidethemower,thecutting
qualitywilleventuallybecomeunsatisfactory.
•Maintainasharpbladethroughouttheseason.A
sharpbladecutsgrasscleanlywithouttearingor
shreddingthegrassblades.Tearingandshredding
thegrassturnsitbrownattheedges,whichslows
itsgrowthandincreasesthechanceofdisease.
Every30days,checkthebladeforsharpnessand
ledownanynicks.
•Cutthegrassslightlylongerthannormaltoensure
thatthecuttingheightofthemowerdoesnotscalp
anyunevenground.Whencuttinggrasslonger
than15cmtall,cutthelawntwicetoensurean
acceptableappearance.
•Itisbesttocutonlyabout1/3ofthegrassblade.
Donotcutmorethanthatunlessthegrassissparse
oritislatefallwhengrassgrowsmoreslowly .
•Alternatethemowingdirectiontokeepthegrass
standingstraight.Thisalsohelpsdisperseclippings
andenhancesdecompositionandfertilization.
•Grassgrowsatdifferentratesatdifferenttimesof
theseason.T omaintainthesamecuttingheight,
whichisagoodpractice,mowmoreofteninearly
spring.Asthegrassgrowthrateslowsinmid
summer,mowlessfrequently.
•Ifthegrassislongerthannormal,orifitcontains
ahighdegreeofmoisture,raisethecuttingheight
higherthanusual,cutthegrassatthatsetting,and
thencutthegrassagainatthelower,normalsetting.
•Ifyoumuststopthemachinewhilemowing,you
mayleaveaclumpofgrassclippingsonyourlawn.
Toavoidthis,dothefollowing:
20
Page 21

Maintenance
RecommendedMaintenanceSchedule(s)
MaintenanceService
Interval
Aftertherst5hours
Beforeeachuseordaily
Every25hours
Every50hours
Every100hours
Beforestorage
MaintenanceProcedure
•Changetheoil.
•Checktheoillevel.
•Greasethemachinewithageneral-purposegrease.
•Cleanthefoamelement.
•Checkthesparkplug.
•Changetheoil.
•Replacethepaperelement.
•Replacethesparkplug.
•Replacethefuellter.
•Chargethebattery .
CAUTION
Ifyouleavethekeyintheignitionswitch,someonecouldaccidentlystarttheengineandseriouslyinjure
youorotherbystanders.
Removethekeyfromtheignitionanddisconnectthewirefromthesparkplugbeforeyoudoany
maintenance.Setthewireasidesothatitdoesnotaccidentallycontactthesparkplug.
Lubrication
GreasingandLubricatingthe
Machine
ServiceInterval:Every25hours
1.Disengagetheblade(PTO).
2.ShiftthegroundspeedleverintoNeutral(model
70185only).
3.Settheparkingbrake.
4.Stoptheengineandwaitforallmovingpartstostop.
5.Removetheignitionkey.
6.Lubricatethefrontwheels.
7.Wipeupanyexcessgrease.
EngineMaintenance
ServicingtheEngineOil
OilType:Detergentoil(APIserviceSF ,SG,SH,SJ,or
higher)
CrankcaseCapacity:1400cc/1.4l
Viscosity:Seethetablebelow .
Figure21
21
Page 22

CheckingtheOilLevel
ChangingtheOil
ServiceInterval:Beforeeachuseordaily
1.Parkthemachineonalevelsurface.
2.Disengagetheblade(PTO).
3.ShiftthegroundspeedleverintoNeutral(model
70185only).
4.Settheparkingbrake.
5.Stoptheengineandwaitforallmovingpartstostop.
6.Removetheignitionkey.
7.Raisetheseat.
8.Cleanaroundtheoildipstick(
Figure22)sothatdirt
cannotfallintothelltubeanddamagetheengine.
ServiceInterval:Aftertherst5hours
Every50hours
1.Starttheengineandletitrunfor5minutes.
Note:Thiswarmstheoilsothatitdrainsbetter.
2.Parkthemachinesothattherightfrontsideis
slightlylowerthantheleftsidetoensurethattheoil
drainscompletely .
3.Disengagetheblade(PTO).
4.ShiftthegroundspeedleverintoNeutral.(model
70185only).
5.Settheparkingbrake.
6.Stoptheengineandwaitforallmovingpartstostop.
7.Removetheignitionkey.
8.Raisetheseat.
9.Insertthedrainingtubeontotheoildrainvalve
Figure23).
(
Figure22
1.Oildipstick/lltube
2.Metalend
9.Unscrewtheoildipstickandwipethemetalend
clean(Figure22).
10.Screwtheoildipstickfullyontothelltube
(
Figure22).Unscrewthedipstickagainandlookat
themetalend.Iftheoillevelislow ,slowlypouronly
enoughoilintothelltubetoraisetheleveltothe
Fullmarkonthedipstick.
Important:Donotoverllthecrankcasewith
oilandruntheengine;enginedamagemay
result.
Figure23
1.Oildrainvalve
2.Oildipstick/lltube
3.Drainingtube
10.Placeapanbelowthedrainingtube.
11.Opentheoildrainvalve(
Figure23).
12.Whentheoilhasdrainedcompletely,removethe
drainingtubeandclosetheoildrainvalve.
Note:Disposeoftheusedoilatacertiedrecycling
center.
13.Slowlypourapproximately80%ofthespecied
amountofoilintothelltube(Figure22).Check
theoillevel;refertosteps9and10ofCheckingthe
OilLevel.
22
Page 23

ServicingtheAirCleaner
ServiceInterval:Every25hours
Every100hours
RemovingtheFoamandPaper
Elements
1.Settheparkingbrake,stoptheengine,andremove
theignitionkey .
2.Cleanaroundtheaircleanertopreventdirt
fromgettingintotheengineandcausingdamage
Figure24).
(
CleaningtheFoamandPaperElements
FoamElement:
1.Washthefoamelementinliquidsoapandwarm
water.Whentheelementisclean,rinseitthoroughly.
2.Drytheelementbysqueezingitinacleancloth.Do
notoiltheelement.
Important:Replacethefoamelementifitis
tornorworn.
PaperElement:
1.Lightlytaptheelementonaatsurfacetoremove
dustanddirt.
2.Carefullycleantherubbersealonthepaperelement
topreventdebrisfromenteringtheengine.
3.Inspecttheelementfortears,anoilylm,and
damagetotherubberseal.
Important:Nevercleanthepaperelement
withpressurizedairorliquids,suchassolvent,
gasoline,orkerosene.Replacethepaper
elementifitisdamagedorcannotbecleaned
thoroughly.
Figure24
1.Aircleanercover2.Aircleanercoverhandle
3.Pullupontheaircleanercoverhandleandrotateit
towardtheengine(Figure24).
4.Removetheaircleanercover.
5.Carefullyslidethepaperelementandfoamelement
fromtheblowerhousing(
Figure25
1.Paperelement4.Tab
2.Foamelement
3.Aircleanercover
Figure25).
5.Slot
InstallingtheFoamandPaperElements
Important:Topreventenginedamage,always
operatetheenginewiththecompletefoamand
paperaircleanerassemblyinstalled.
1.Placethefoamelementandpaperelementintothe
blowerhousing.
Note:Ensurethattherubbersealisatagainstthe
aircleanerbase.
2.Alignthetabsontheaircleanercoverwiththeslots
oftheblowerhousing(
3.Hookthehandleontothecoverandpressdownon
thehandletolockthecoverinplace.
Figure25).
ServicingtheSparkPlug
ServiceInterval:Every25hours
Every100hours
InstallanewChampionRJ-19LMorequivalentspark
plug.Ensurethattheairgapbetweenthecenterandside
electrodesis0.76mmbeforeinstallingthesparkplug.
Useasparkplugwrenchforremovingandinstallingthe
sparkplugandagappingtoolorfeelergaugetocheck
andadjusttheairgap.
RemovingtheSparkPlug
1.Disengagetheblade(PTO).
23
Page 24

2.ShiftthegroundspeedintoNeutral(model70185
only).
3.Settheparkingbrake.
4.Stoptheengineandwaitforallmovingpartstostop.
5.Removetheignitionkey.
6.Reachunderthebodyofthemachineabovetheleft
rearwheelanddisconnectthewirefromthespark
Figure26).
plug(
Important:Donotcleanthesparkplug.Always
replacethesparkplugwhenithasablack
coating,wornelectrodes,anoilylm,orcracks.
2.Checkthegapbetweenthecenterandsideelectrodes
Figure27)andbendthesideelectrodeifthegap
(
isnotcorrect.
InstallingtheSparkPlug
1.Installthesparkplugandmetalwasher.
Note:Ensurethattheairgapissetcorrectly.
2.Tightenthesparkplugto20N-m.
Figure26
1.Spark-plugwire2.Sparkplug
7.Cleanaroundthesparkplugtopreventdirtfrom
fallingintotheengineandpotentiallycausing
damage.
8.Removethesparkplugandmetalwasher.
CheckingtheSparkPlug
1.Lookatthecenterofthesparkplug(Figure27).
Ifyouseelightbrownorgrayontheinsulator,the
engineisoperatingproperly .Ablackcoatingonthe
insulatorusuallymeansthattheaircleanerisdirty.
3.Connectthewiretothesparkplug(
Figure26).
Figure27
1.Centerelectrodeinsulator3.Airgap(nottoscale)
2.Sideelectrode
24
Page 25

FuelSystem
Maintenance
DrainingtheFuelTank
10.Installthefuellineontothelter.
11.Slidethehoseclampclosetotheltertosecurethe
fuellineandlter.
12.Installtheenginecover.
DANGER
Incertainconditions,gasolineisextremely
ammableandhighlyexplosive.Areorexplosion
fromgasolinecanburnyouandothersandcan
damageproperty.
•Draingasolinefromthefueltankwhenthe
engineiscold.Dothisoutdoorsinanopenarea.
Wipeupanygasolinethatspills.
•Neversmokewhendraininggasoline,andstay
awayfromanopenameorwhereasparkmay
ignitethegasolinefumes.
1.Parkthemachinesothattheleftfrontsideisslightly
lowerthantherightsidetoensurethatthefueltank
drainscompletely .
2.Disengagetheblade(PTO).
3.ShiftthegroundspeedleverintoNeutral(model
70185only).
4.Settheparkingbrake.
5.Stoptheengine.
6.Removetheignitionkey.
ReplacingtheFuelFilter
ServiceInterval:Every100hours
Note:Thebesttimetoreplacethefuellter(Figure28)
iswhenthefueltankisempty .Neverinstalladirtylter
ifitisremovedfromthefuelline.
1.Disengagetheblade(PTO).
2.ShiftthegroundspeedleverintoNeutral(model
70185only).
3.Settheparkingbrake.
4.Stoptheengine.
5.Removetheignitionkey.
6.Removetheenginecover.
7.Squeezetheendsofthehoseclampstogetherand
slidethemawayfromthelter(
8.Removethelterfromthefuellines.
9.Installanewlterandmovethehoseclampsclose
tothelter.
10.Installtheenginecover.
Figure28).
7.Removetheenginecover.
8.Squeezetheendsofthehoseclamptogether
andslideitupthefuellinetowardthefueltank
(Figure28).
Figure28
1.Hoseclamp3.Filter
2.Fuelline
9.Pullthefuellineoffthelter(Figure28)andallow
thegasolinetodrainintoagascanordrainpan.
Note:Nowisthebesttimetoinstallanewfuel
lterbecausethefueltankisempty.
25
Page 26

ElectricalSystem
Maintenance
9.Disconnectthepositive(red)cablefromthebattery
post.
10.Removethebatteryfromthebatterybox.
ServicingtheBattery
Alwayskeepthebatterycleanandfullycharged.Use
apapertoweltocleanthebatteryandbatterybox.If
thebatteryterminalsarecorroded,cleanthemwitha
solutionof4partswaterand1partbakingsoda.Apply
alightcoatingofgreasetothebatteryterminalsto
preventcorrosion.
Batteryvoltageandamperage:12volts,155
cold-crankingamps
RemovingtheBattery
WARNING
Batteryterminalsormetaltoolscouldshortagainst
metalmachinecomponents,causingsparks.Sparks
cancausethebatterygassestoexplode,resulting
inpersonalinjury.
•Whenremovingorinstallingthebattery,donot
allowthebatteryterminalstotouchanymetal
partsofthemachine.
•Donotallowmetaltoolstoshortbetween
thebatteryterminalsandmetalpartsofthe
machine.
1.Disengagetheblade(PTO).
2.ShiftthegroundspeedleverintoNeutral.
3.Settheparkingbrake.
4.Stoptheengineandwaitforallmovingpartstostop.
5.Removetheignitionkey.
6.Removetheenginecover.
7.Disconnectthenegative(black)groundcablefrom
thebatterypost.
WARNING
Incorrectbatterycableroutingcoulddamage
themachineandcables,causingsparks.
Sparkscancausethebatterygassestoexplode,
resultinginpersonalinjury.
•Alwaysdisconnectthenegative(black)
batterycablebeforedisconnectingthe
positive(red)cable.
•Alwaysconnectthepositive(red)battery
cablebeforeconnectingthenegative(black)
cable.
8.Slidetherubbercoverupthepositive(red)cable.
InstallingtheBattery
1.Putthebatteryintothebatteryboxinthechassis.
2.Usingthebolt,washers,andnut,connectthepositive
(red)cabletothepositive(+)batterypost.
3.Slidetherubbercoveroverthebatterypost.
4.Usingthebolt,washers,andnut,connectthe
negative(black)cabletothenegative(–)batterypost.
5.Installtheenginecover.
CheckingtheElectrolyteLevel
1.Removetheenginecover.
2.Lookatthesideofthebattery.Theelectrolytemust
beuptotheupperline(Figure29).
Figure29
1.Ventcaps3.Lowerline
2.Upperline
Note:Donotallowtheelectrolytetofallbelowthe
lowerline(Figure29).
3.Iftheelectrolyteislow,addtherequiredamountof
distilledwater;refertoAddingWatertotheBattery.
DANGER
Batteryelectrolytecontainssulfuricacid,a
deadlypoisonthatcanseverelyburnyouand
others.
•Donotdrinkelectrolyteandavoidcontact
withskin,eyesorclothing.Wearsafety
glassestoshieldyoureyesandrubbergloves
toprotectyourhands.
•Fillthebatterywherecleanwaterisalways
availableforushingtheskin.
AddingWatertotheBattery
Thebesttimetoadddistilledwatertothebatteryisjust
beforeyouoperatethemachine.Thisletsthewatermix
thoroughlywiththeelectrolytesolution.
26
Page 27

1.Removethebatteryfromthemachine;referto
RemovingtheBattery.
2.Cleanthetopofthebatterywithapapertowel.
Important:Neverllthebatterywithdistilled
waterwhilethebatteryisinstalledinthe
machine.Electrolytecouldbespilledonother
partsandcausecorrosion.
3.Removetheventcapsfromthebattery(
Figure29).
4.Slowlypourdistilledwaterintoeachbatterycelluntil
theelectrolytelevelisuptotheUpperline(Fig.19)
onthebatterycase.
Important:Donotoverllthebatterybecause
electrolyte(sulfuricacid)cancausesevere
corrosionanddamagetothechassis.
5.Wait5to10minutesafterllingthebatterycells.
Adddistilledwater,ifnecessary,untiltheelectrolyte
levelisuptotheUpperline(
Figure29)onthe
batterycase.
6.Installthebatteryventcaps.
ChargingtheBattery
ServiceInterval:Beforestorage
WARNING
Chargingthebatteryproducesgassesthatcan
explode.
Figure30
1.Positivebatterypost
2.Negativebatterypost
3.Red(+)chargerlead
4.Black(–)chargerlead
6.Installthebatteryinthemachineandconnectthe
batterycables;refertoInstallingtheBattery.
Note:Donotrunthemachinewiththebattery
disconnected;electricaldamagemayoccur.
ServicingtheFuses
Theelectricalsystemisprotectedby7.5amp,blade-type
fuses.Nomaintenanceisrequired,however,ifafuse
blows,checkthecircuitwiringforashort.
1.Pulloutthefuse(Figure31)toremoveitfromthe
socket.
Neversmokenearthebatteryandkeepsparksand
amesawayfrombattery.
Important:Alwayskeepthebatteryfullycharged
(1.260specicgravity).Thisisespeciallyimportant
topreventbatterydamagewhenthetemperatureis
below32°F(0°C).
1.Removethebatteryfromthechassis;referto
RemovingtheBattery.
2.Checktheelectrolytelevel;refertoCheckingthe
ElectrolyteLevel.
3.Ensurethattheventcapsareinstalledinthebattery.
Chargethebatteryfor1hourat25to30ampsor6
hoursat4to6amps.Donotoverchargethebattery.
4.Whenthebatteryisfullycharged,unplugthecharger
fromtheelectricaloutlet.
5.Disconnectthechargerleadsfromthebatteryposts
Figure30).
(
Figure31
1.Fuses(undertheseat)
2.Pushdownonthefusetoinsertit.
27
Page 28

BrakeMaintenance
BladeMaintenance
CheckingtheParkingBrake
Alwayssettheparkingbrakewhenyoustopthemachine
orleaveitunattended.Checktheparkingbrakedailyto
ensurethatitholdssecurely .
1.Parkthemachineonalevelsurface.
2.Disengagetheblade(PTO).
3.Settheparkingbrake.
4.Stoptheengineandwaitforallmovingpartstostop.
5.Removetheignitionkey.
6.Iftherearwheelslockandskidwhenyoutrytopush
themachineforward,youdonotneedtoadjustthe
parkingbrake.Butiftherearwheelsturnanddonot
lock,youneedtohaveanAuthorizedServiceDealer
adjusttheparkingbrake.
CheckingtheTirePressure
Maintaintheairpressureinthetiresat80kPa.Check
thetirepressureaftereachuse.Checkthetireswhen
theyarecoldtogetthemostaccuratepressurereading.
ServicingtheBlade
Toensureasuperiorqualityofcut,keepthebladesharp.
Forconvenientsharpeningandreplacement,youmay
wanttohaveanextrablade.
DANGER
Awornordamagedbladecanbreak,andapiece
ofthebladecouldbethrownintotheoperator’s
orbystander’sarea,resultinginseriouspersonal
injuryordeath.
•Inspectthebladeperiodicallyforwearor
damage.
•Replaceawornordamagedblade.
InspectingtheBlade
1.Inspectthecuttingedges(Figure32).Iftheedges
arenotsharporhavenicks,removethebladeand
sharpenthem;refertoSharpeningtheBlade.
Figure32
1.Cuttingedge3.Wear/slotforming
2.Curvedarea
2.Inspecttheblade,especiallythecurvedarea
Figure32).Ifyounoticeanydamage,wear,oraslot
(
forminginthisarea,immediatelyinstallanewblade.
RemovingtheBlade
1.Stoptheengineandwaitforallmovingpartstostop.
2.Removetheignitionkey.
3.Disconnectthewirefromthesparkplug.
4.Shiftthetransaxleintorstgear.
5.Settheparkingbrake.
6.Grasptheendofthebladeusingaragorthickly
paddedglove.Thenremovethebladebolt,curved
washer,bladestiffener,andblade(
blockofwoodmaybewedgedbetweentheblade
Figure33).A
28
Page 29

andthemowertolockthebladewhenyouare
removingthebolt.
Figure33
1.Blade3.Bladeboltandcurved
washer
2.Bladestiffener
SharpeningtheBlade
1.Usealetosharpenthecuttingedgeatbothends
oftheblade(Figure34).Maintaintheoriginalangle.
Thebladeretainsitsbalanceifthesameamountof
materialisremovedfrombothcuttingedges.
InstallingtheBlade
1.Installtheblade,bladestiffener,curvedwasher,and
bladebolt(Figure33).
Important:Thecurvedpartoftheblademust
bepointingtowardtheinsideofthemowerto
ensurepropercutting.
2.Tightenthebladeboltto61to82N-m.
Important:Ensurethatthecuttingedgeofthe
bladeisawayfromthemowerhousing.
LevelingtheMower
1.Ifthemowercutsunevenlyandthecuttingbladeis
notbent,youmustlevelthemower.
2.Settheparkingbrake.
3.Stoptheengineandwaitforallmovingpartstostop.
4.Removetheignitionkey.
5.Disconnectthewirefromthesparkplug.
6.Settheairpressureinthetirestotherecommended
level;refertoCheckingtheTirePressure.
7.Removethecotterpinatthefrontoftheadjusting
Figure36).
rod(
Figure34
1.Sharpenatoriginalangle
2.Checkthebalanceofthebladebyputtingitona
bladebalancer(Figure35).Ifthebladestaysina
horizontalposition,thebladeisbalancedandcanbe
used.Ifthebladeisnotbalanced,lesomemetal
offofthebacksideoftheblade.Repeatthisstep
untilthebladeisbalanced.
Figure35
1.Blade2.Balancer
Figure36
1.Adjustingrod3.Nut
2.Cotterpin
8.Loosenthenutattherearoftheadjustingrod
(Figure36).
Important:Ensurethatthecuttingedgeofthe
bladeisawayfromthemowerhousing.
9.Turntheadjustingrodtothedesiredlevel.
29
Page 30

10.Tightenthenut.
11.Installthecotterpin.
Cleaning
WashingundertheMower
1.Parkthemachineonahardlevelsurface.
2.Disengagetheblade(PTO).
3.Stoptheengineandwaitforallmovingpartstostop.
4.Removetheignitionkey.
5.Attachthehosecouplingtotheendofthe
mowerwashoutttingandturnthewateronhigh
Figure37).
(
Figure37
1.Washoutport3.Hose
2.Coupling
Note:Spreadpetroleumjellyonthewashouttting
o-ringtomakethecouplingslideoneasierandto
protecttheo-ring.
6.Setthemowertothesecondheight-of-cut(B)level.
7.Sitontheseatandstarttheengine.
8.Engagetheblade(PTO)andletthemowerrunfor
1to3minutes.
9.Disengagetheblade(PTO).
10.Stoptheengineandwaitforallmovingpartstostop.
11.Removetheignitionkey .
12.Shutoffthewaterandremovethecouplingfrom
thewashouttting.
Note:Ifthemowerisnotcleanafteronewashing,
soakitandletitstandfor30minutes.Thenrepeat
theprocess.
13.Runthemoweragainfor1to3minutestoremove
theexcesswater.
30
Page 31

WARNING
Abrokenormissingwashoutttingcould
exposeyouandotherstothrownobjectsorblade
contact.Contactwiththebladeorthrowndebris
contactmaycauseinjuryordeath.
•Replacebrokenormissingwashouttting
immediately,beforeusingmoweragain.
•Pluganyholesinmowerwithboltsand
locknuts.
•Neverputyourhandsorfeetunderthe
mowerorthroughopeningsinthemower.
WashingtheMachine
1.Stoptheengineandwaitforallmovingpartstostop.
2.Removetheignitionkey.
3.Wait10to15minutesfortheenginetocooldown.
4.Washthemachinewithmilddetergentandwater.
Important:Donotuseapressurewasher
towashthemachine.Pressurewashingmay
damagetheelectricalsystemorwashaway
necessarygreaseatfrictionpoints.Avoid
excessiveuseofwater,especiallynearthe
controlpanel,lights,engine,andbattery .
5.Starttheenginetodryitoff.
Storage
CleaningandStorage
1.Disengagetheblade(PTO).
2.Settheparkingbrake.
3.Stoptheengineandwaitforallmovingpartstostop.
4.Removetheignitionkey.
5.Removegrassclippings,dirt,andgrimefromthe
externalpartsoftheentiremachine,especiallythe
engine.Cleanthedirtandchafffromtheoutsideof
theenginecylinderheadnsandblowerhousing.
Important:Youcanwashthemachinewith
milddetergentandwater.Donotuseapressure
washertowashthemachine.Pressurewashing
maydamagetheelectricalsystemorwash
awaynecessarygreaseatfrictionpoints.Avoid
excessiveuseofwater,especiallynearthe
controlpanel,lights,engine,andbattery .
6.Checktheparkingbrake;refertoCheckingthe
ParkingBrake.
7.Servicetheaircleaner;refertoServicingtheAir
Cleaner.
8.Changetheengineoil;refertoServicingtheEngine
Oil.
9.Checkthetirepressure;refertoCheckingtheTire
Pressure.
10.Whenstoringthemachineforover30days,prepare
itasfollows:
A.Addapetroleumbasedstabilizer/conditionerto
thefuelinthetankaccordingtotheinstructions
fromthestabilizermanufacturer.Donot
useanalcoholbasedstabilizer(ethanolor
methanol).
Note:Afuelstabilizer/conditionerismost
effectivewhenmixedwithfreshgasolineand
usedatalltimes.
B.Runtheenginefor5minutestodistribute
conditionedfuelthroughthefuelsystem.
C.Stoptheengine,allowittocool,anddrainthe
fueltank;refertoDrainingtheFuelTank.
D.Starttheengineandrunituntilitstops.
E.Chokeorprimetheengine.
F.Startandruntheengineuntilitwillnotstart
again.
G.Recycletheoldfuelaccordingtolocalcodes.
Important:Donotstore
stabilizer/conditionedgasolineover90
days.
31
Page 32

11.Removeandinspectthesparkplug;refertoServicing
theSparkPlug.Withthesparkplugremovedfrom
theengine,pour2tablespoonsofengineoilintothe
sparkplughole.Usetheelectricstartertocrank
theengineanddistributetheoilinsidethecylinder.
Installthesparkplug,butdonotconnectthewireto
thesparkplug.
12.Disconnectthenegativebatterycable.Cleanthe
batteryandbatteryterminals.Checktheelectrolyte
levelandchargeitfully;refertoServicingtheBattery.
Leavethenegativebatterycabledisconnectedfrom
thebatteryduringstorage.
Important:Thebatterymustbefullycharged
topreventitfromfreezingandbeingdamaged
attemperaturesbelow32°F(0°C).Youcanstore
afullychargedbatteryduringthewinterwithout
recharging.
13.Checkandtightenallbolts,nuts,andscrews.Repair
orreplaceanypartthatiswornordamaged.
14.Paintallscratchedorbaremetalsurfaceswithpaint
availablefromanAuthorizedServiceDealer.
15.Storethemachineinaclean,drygarageorstorage
area.RemovetheignitionandKeyChoicekeysfrom
themowerandkeeptheminamemorableplace.
Coverthemachinetoprotectitandkeepitclean.
32
Page 33

Troubleshooting
Problem
Thestarterdoesnotcrank.
Theenginewillnotstart,startshard,or
failstokeeprunning.
PossibleCauseCorrectiveAction
1.Thebladecontrol(PTO)isengaged.1.Disengagetheblade(PTO).
2.Theparkingbrakeisnotengaged.
3.Thebatteryisdead.
4.Theelectricalconnectionsarecorroded
orloose.
5.Afuseisblown.5.Replacethefuse.
6.Arelayorswitchisdamaged.
1.Theoperatorisnotseated.
2.Thefueltankisempty.2.Fillthefueltankwithgasoline.
3.Theaircleanerisdirty.
4.Thesparkplugwireislooseor
disconnected.
5.Thesparkplugispitted,fouled,orthe
gapisincorrect.
6.Thechokeisnotclosing.6.Adjustthethrottlecable.
7.Thereisdirtinthefuellter.7.Replacethefuellter.
8.Theidlespeedistooloworthemixture
isincorrect.
9.Dirt,water,orstalefuelisinthefuel
system.
10.Theengineisooded.
11.Thebatteryisdead.
2.Settheparkingbrake.
3.Chargethebattery .
4.Checktheelectricalconnectionsfor
goodcontact.
6.ContactanAuthorizedServiceDealer.
1.Sitontheseat.
3.Cleanorreplacetheaircleaner
element.
4.Connectthewiretothesparkplug.
5.Installanew ,correctly-gappedspark
plug.
8.ContactanAuthorizedServiceDealer.
9.ContactanAuthorizedServiceDealer.
10.Removethesparkpluganddryitout.
11.Chargethebattery .
Theenginelosespower .
Theengineoverheats.
Thereisanabnormalvibration.
1.Theengineloadisexcessive.
2.Theaircleanerelementisdirty.
3.Theoillevelinthecrankcaseislow.3.Addoiltothecrankcase.
4.Thecoolingnsandairpassages
undertheengineblowerhousingare
plugged.
5.Thesparkplugispitted,fouled,orthe
gapisincorrect.
6.Thereisdirtinthefuellter.6.Replacethefuellter.
7.Dirt,water,orstalefuelisinthefuel
system.
1.Theengineloadisexcessive.
2.Theoillevelinthecrankcaseislow.2.Addoiltothecrankcase.
3.Thecoolingnsandairpassages
undertheengineblowerhousingare
plugged.
1.Thebladeisbentorunbalanced.1.Installanewblade.
2.Theblademountingboltisloose.2.Tightentheblademountingbolt.
3.Theenginemountingboltsareloose.3.Tightentheenginemountingbolts.
4.Thereisalooseenginepulley ,idler
pulley,orbladepulley.
5.Theenginepulleyisdamaged.
1.Shiftintoalowergeartoreducethe
groundspeed.
2.Cleantheaircleanerelement.
4.Removetheobstructionfromthe
coolingnsandairpassages.
5.Installanew ,correctly-gappedspark
plug.
7.ContactanAuthorizedServiceDealer.
1.Shiftintoalowergeartoreducethe
groundspeed.
3.Removetheobstructionfromthe
coolingnsandairpassages.
4.Tightentheappropriatepulley.
5.ContactanAuthorizedServiceDealer.
Thebladedoesnotrotate.
1.Thebladedrivebeltisworn,loose,or
broken.
2.Thebladedrivebeltisoffofthepulley.2.ContactanAuthorizedServiceDealer.
1.ContactanAuthorizedServiceDealer.
33
Page 34

Problem
PossibleCauseCorrectiveAction
Themachinedoesnotdrive.
Thecuttingheightisuneven.
Thecuttingqualityispoor.
Thegrasscollectorfailstoll.
1.Thetractionbeltisworn,loose,or
broken.
2.Thetractionbeltisoffthepulley.2.ContactanAuthorizedServiceDealer.
3.Thetransmissiondoesnotshift.3.ContactanAuthorizedServiceDealer.
1.Thetirepressureisincorrect.
2.Themowerisnotlevel.2.Levelthemower .
3.Theundersideofthemowerisdirty.3.Cleanunderthemower.
1.Thecuttingbladeisworn.
2.Thecuttingheightisincorrect.2.Adjustthecuttingheight.
1.Thecuttingheightistoolow.1.Raisethecuttingheight.
2.Thegrassistooheavyordamp.2.Waituntilthegrasshasdried.
3.Thecuttingbladeisworn.
4.Thegrassistoohigh.4.Raisethecuttingheight.
5.Thedischargeareaisblocked.
1.ContactanAuthorizedServiceDealer.
1.Setthetirepressure.
1.Sharpenorreplacethecuttingblade.
3.Sharpenorreplacetheblade.
5.Removetheobstructionfromthe
dischargearea.
34
Page 35

Schematics
Model70185(Rev.A)
35
Page 36

Model70186(Rev.A)
36
Page 37

Notes:
37
Page 38

Notes:
38
Page 39

InternationalDistributorList
Distributor:
AtlantisSuveSulamaSisstemleriLt
BalamaPrimaEngineeringEquip.HongKong85221552163
B-RayCorporation
CascoSalesCompany
CeresS.A.CostaRica
CSSCTurfEquipment(pvt)Ltd.SriLanka
CyrilJohnston&Co.
EquiverMexico525553995444
FemcoS.A.Guatemala
G.Y .K.CompanyLtd.
GeomechanikiofAthensGreece
GuandongGoldenStarChina
HakoGroundandGardenSweden
HakoGroundandGarden
HayterLimited(U.K.)
HydroturfInt.CoDubai
HydroturfEgyptLLC
IbeaS.P .A.
IrriamcPortugal351212388260
IrrigationProductsInt’lPvtLtd.India862283960789
JeanHeybroekb.v .Netherlands31306394611
Lely(U.K.)Limited
MaquiverS.A.Colombia
MaruyamaMfg.Co.Inc.
MetraKft
Mountelda.s.CzechRepublic
MunditolS.A.
OslingerTurfEquipmentSA
OyHakoGroundandGardenAb
ParklandProductsLtd.NewZealand6433493760
Prochaska&Cie
RTCohen2004Ltd.
Riversa
RothMotorgerateGmBh&Co.Germany
ScSvendCarlsenA/S
SolvertS.A.S.
SpyprosStavrinidesLimitedCyprus
SurgeSystemsIndiaLimited
T-MarktLogisticsLtd.Hungary3626525500
ToroAustraliaAustralia61395807355
ToroEuropeBVBABelgium3214562960
Country:
Turkey902163448674
Korea82325512076
PuertoRico7877888383
NorthernIreland442890813121
Japan81726325861
Norway4722907760
UnitedKingdom441279723444
UnitedArabEmirates97143479479
Egypt2025194308
Italy390331853611
UnitedKingdom441480226800
Japan81332522285
Hungary3613263880
Argentina541148219999
Ecuador59342396970
Finland35898700733
Austria4312785100
Israel97298617979
Spain
Denmark4566109200
France33130817700
India911292299901
PhoneNumber:
5062391 138
94112746100
5024423277
30109350054
862087651338
4635100000
5712364079
420255704220
34952837500
4971442050
35722434131
374-0269RevA
Page 40

TheT oroWarranty
ConditionsandProductsCovered
TheToro®Companyanditsafliate,T oroWarrantyCompany ,pursuantto
anagreementbetweenthem,jointlypromisetorepairtheToroProduct
listedbelowifusedforresidentialpurposes*ifdefectiveinmaterialsor
workmanship.
Thefollowingtimeperiodsapplyfromthedateofpurchase:
ProductsWarrantyPeriod
WalkPowerMowers2yearlimitedwarranty
RearEngineRiders2yearlimitedwarranty
Lawn&GardenTractors
ElectricHandHeldProducts2yearlimitedwarranty
Snowthrowers
ConsumerZeroTurn
*OriginalPurchasermeansthepersonwhooriginallypurchasedtheT oro
Product
*Residentialpurposesmeansuseoftheproductonthesamelotasyour
home.Useatmorethanonelocation,orinstitutionalorrentaluse,is
consideredcommercialuse,andthecommercialusewarrantywould
apply.
2yearlimitedwarranty
2yearlimitedwarranty
2yearlimitedwarranty
LimitedWarrantyforCommercialUse
ToroConsumerProductsandattachmentsusedforcommercial,
institutional,orrentaluse,arewarrantedagainstdefectsinmaterials
orworkmanshipforthefollowingtimeperiodsfromthedateoforiginal
purchase:
ProductsWarrantyPeriod
WalkPowerMowers90daywarranty
RearEngineRiders90daywarranty
Lawn&GardenTractors
ElectricHandHeldProducts90daywarranty
Snowthrowers
ConsumerZeroTurn
90daywarranty
90daywarranty
45daywarranty
InstructionsforObtainingWarrantyService
IfyouthinkthatyourT oroProductcontainsadefectinmaterialsor
workmanship,followthisprocedure:
1.Contactyoursellertoarrangeserviceoftheproduct.Ifforanyreason
itisimpossibleforyoutocontactyourseller,youmaycontactany
ToroAuthorizedDistributortoarrangeservice.
2.Bringtheproductandyourproofofpurchase(salesreceipt)tothe
ServiceDealer.IfforanyreasonyouaredissatisedwiththeService
Dealer’sanalysisorwiththeassistanceprovided,contactusat:
CustomerCareDepartment,ConsumerDivision
TheT oroCompany
811 1LyndaleAvenueSouth
Bloomington,MN55420-1196
Manager:T echnicalProductSupport:001–952–887–8248
SeeattachedDistributorList
OwnerResponsibilities
YoumustmaintainyourT oroProductbyfollowingthemaintenance
proceduresdescribedintheOperator’sManual.Suchroutine
maintenance,whetherperformedbyadealerorbyyou,isatyourexpense.
ItemsandConditionsNotCovered
Thisexpresswarrantydoesnotcoverthefollowing:
•Costofregularmaintenanceserviceorwearparts,suchasrotor
blades(paddles),scraperblades,belts,fuel,lubricants,oilchanges,
sparkplugs,cable/linkageorbrakeadjustments
•Anyproductorpartwhichhasbeenalteredormisusedandrequires
replacementorrepairduetoaccidentsorlackofpropermaintenance
•Repairsnecessaryduetofailuretousefreshfuel(lessthanone
monthold),orfailuretoproperlypreparetheunitpriortoanyperiod
ofnon-useoveronemonth
•Engineandtransmission.Thesearecoveredbytheappropriate
manufacturer’sguaranteeswithseparatetermsandconditions
Allrepairscoveredbythesewarrantiesmustbeperformedbyan
AuthorizedToroServiceDealerusingToroapprovedreplacementparts.
GeneralConditions
Thepurchaseriscoveredbythenationallawsofeachcountry.Therights
towhichthepurchaserisentitledwiththesupportoftheselawsarenot
restrictedbythiswarranty.
374-0268RevA
 Loading...