

Page 1
Part No. 04127SL (Rev. D)
Service Manual
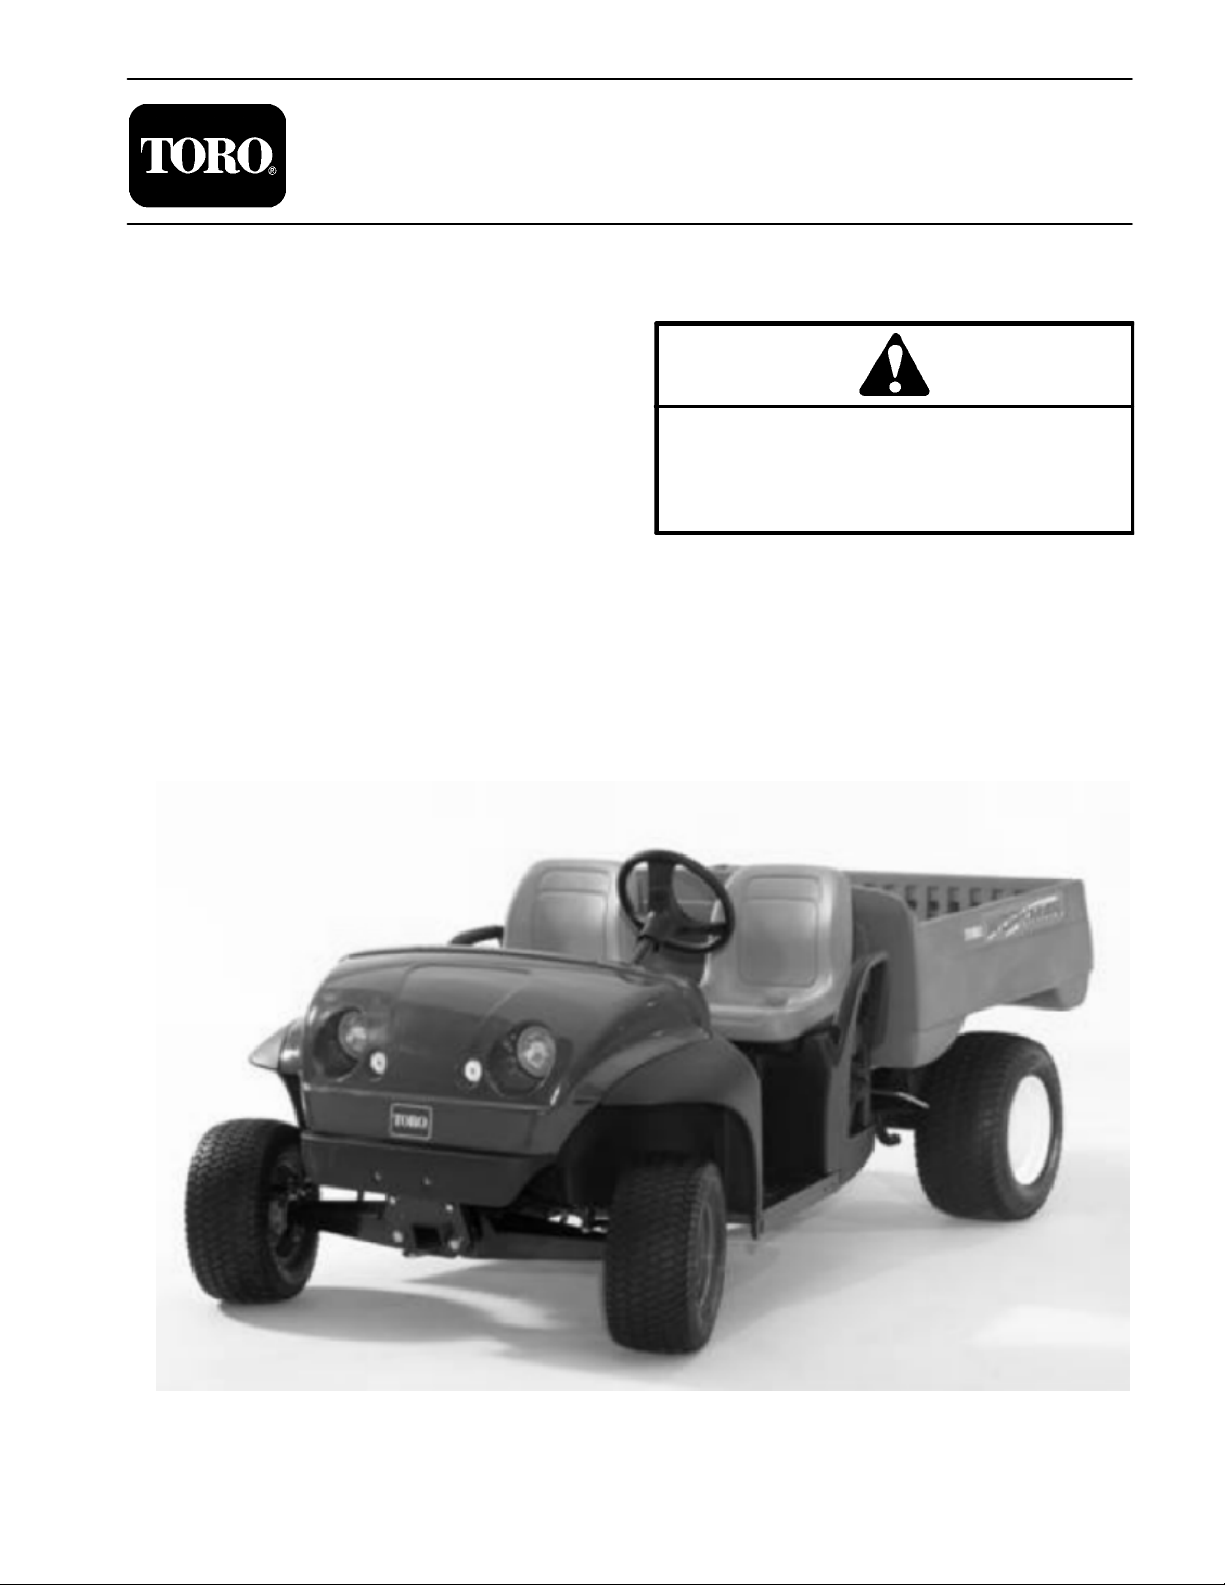
Workman
Preface
The purpose of this publication is to provide the service
technician with information for troubleshooting, testing
and repair of major systems and components on the
Workman e2050 and e2065.
REFER TO THE OPERATOR’S MANUAL FOR OPERATING, MAINTENANCE AND ADJUSTMENT INSTRUCTIONS. Space is provided in Chapter 2 of this
book to insert the Operator’s Manuals and Parts Catalogs for your machine. Replacement Operator’s Manuals are available on the Internet at www.toro.com.
The Toro Company reserves the right to change product
specifications or this publication without notice.
R
e2050 & e2065
This safety symbol means DANGER, WARNING
or CAUTION, PERSONAL SAFETY INSTRUCTION. When you see this symbol, carefully read
the instructions that follow. Failure to obey the
instructions may result in personal injury.
NOTE: A NOTE will give general information about the
correct operation, maintenance, service, testing or repair of the machine.
IMPORTANT: The IMPORTANT notice will give im portant instructions which must be followed to prevent damage to systems or components on the
machine.
E The Toro Company -- 2004, 2006, 2007, 2011
Page 2

This page is intentionally blank.
Workman e2050/e2065
Page 3

Table Of Contents
Chapter 1 – Safety
Safety Instructions 1 – 2. . . . . . . . . . . . . . . . . . . . . . . . . .
Jacking and Other Instructions 1 – 4. . . . . . . . . . . . . . .
Safety and Instruction Decals 1 – 5. . . . . . . . . . . . . . . .
Chapter 2 – Product Records and Maintenance
Product Records 2 – 1. . . . . . . . . . . . . . . . . . . . . . . . . . .
Equivalents and Conversions 2 – 2. . . . . . . . . . . . . . . .
Torque Specifications 2 – 3. . . . . . . . . . . . . . . . . . . . . . .
Maintenance 2 – 7. . . . . . . . . . . . . . . . . . . . . . . . . . . . . . .
Chapter 3 – Electrical System
Electrical Diagrams 3 – 2. . . . . . . . . . . . . . . . . . . . . . . . .
General Information 3 – 3. . . . . . . . . . . . . . . . . . . . . . . .
Vehicle Operation 3 – 4. . . . . . . . . . . . . . . . . . . . . . . . . .
Special Tools 3 – 5. . . . . . . . . . . . . . . . . . . . . . . . . . . . . .
Troubleshooting 3 – 8. . . . . . . . . . . . . . . . . . . . . . . . . . . .
Adjustments 3 – 11. . . . . . . . . . . . . . . . . . . . . . . . . . . . . .
Component Testing 3 – 14. . . . . . . . . . . . . . . . . . . . . . . .
Service and Repairs 3 – 28. . . . . . . . . . . . . . . . . . . . . . .
LESTER ELECTRICAL TECHNICIAN
SERVICE GUIDE
Chapter 4 – Transaxle and Brakes
SafetyProduct Records
and Maintenance
SystemBrakes
ElectricalChassisElectrical
Transaxle and
Specifications 4 – 3. . . . . . . . . . . . . . . . . . . . . . . . . . . . . .
Troubleshooting 4 – 4. . . . . . . . . . . . . . . . . . . . . . . . . . . .
Adjustments 4 – 6. . . . . . . . . . . . . . . . . . . . . . . . . . . . . . .
Service and Repairs 4 – 8. . . . . . . . . . . . . . . . . . . . . . . .
SPICER OFF–HIGHWAY COMPONENTS MODEL
12 (ELECTRIC) MAINTENANCE MANUAL
Chapter 5 – Chassis
Specifications 5 – 2. . . . . . . . . . . . . . . . . . . . . . . . . . . . . .
Troubleshooting 5 – 3. . . . . . . . . . . . . . . . . . . . . . . . . . . .
Service and Repairs 5 – 5. . . . . . . . . . . . . . . . . . . . . . . .
Chapter 6 – Electrical Diagrams
Electrical Schematic 6 – 3. . . . . . . . . . . . . . . . . . . . . . . .
Electrical Circuit Drawings 6 – 4. . . . . . . . . . . . . . . . . . .
Electrical Harness Drawings 6 – 7. . . . . . . . . . . . . . . . .
Diagrams
Workman e2050/e2065
Page 4

This page is intentionally blank.
Workman e2050/e2065
Page 5

Table of Contents
Chapter 1
Safety
Safety
SAFETY INSTRUCTIONS 2. . . . . . . . . . . . . . . . . . . . . .
Before Operating 2. . . . . . . . . . . . . . . . . . . . . . . . . . . .
While Operating 2. . . . . . . . . . . . . . . . . . . . . . . . . . . .
Maintenance and Service 3. . . . . . . . . . . . . . . . . . . .
JACKING AND OTHER INSTRUCTIONS 4. . . . . . . .
Jacking Vehicle 4. . . . . . . . . . . . . . . . . . . . . . . . . . . . .
Towing Vehicle 4. . . . . . . . . . . . . . . . . . . . . . . . . . . . . .
Transporting Vehicle 4. . . . . . . . . . . . . . . . . . . . . . . . .
SAFETY AND INSTRUCTION DECALS 5. . . . . . . . . .
Workman e2050/e2065 Page 1 – 1 Safety (Rev. B)
Page 6
Safety Instructions
The Workman e2050 and e2065 are designed and
tested to offer safe service when operated and maintained properly. Although hazard control and accident
prevention are partially dependent upon the design and
configuration of the machine, these factors are also dependent upon the awareness, concern and proper training of the personnel involved in the operation, transport,
maintenance and storage of the machine. Improper use
or maintenance of the machine can result in injury or
death. To reduce the potential for injury or death, comply
with the following safety instructions.
Before Operating
WARNING
To reduce the potential for injury or death,
comply with the following safety instructions.
1. Read and understand the contents of the Operator’s
Manual before starting and operating the machine. Become familiar with the controls and know how to stop the
machine quickly. A replacement Operator’s Manual is
available on the Internet at www.Toro.com.
While Operating
WARNING
The Workman e2050 and e2065 are off--highway
vehicles only. They are not designed, equipped
or manufactured for use on public streets, roads
or highways.
1. Sit on the operator seat when starting and operating
the vehicle.
2. Before starting the vehicle:
A. Make sure that the battery charger is disconnected from the vehicle charger receptacle.
2. Keep all shields, safety devices and decals in place.
If a shield, safety device or decal is defective, illegible or
damaged, repair or replace it before operating the machine. Also tighten any loose nuts, bolts or screws to ensure machine is in safe operating condition.
3. Before getting off the operator seat:
A. Stop vehicle, turn on/off switch OFF and remove
key from switch.
B. Set parking brake.
4. If vehicle is parked on incline, chock or block the
wheels after getting off the vehicle.
B. Engage the parking brake.
C. Make sure accelerator pedal is not depressed.
D. Check position of forward/reverse switch and Hi/
Low speed switch.
Rev. D
Workman e2050/e2065Page 1 -- 2Safety (Rev. B)
Page 7

Maintenance and Service
1. Before servicing or making adjustments to the vehicle, stop vehicle, turn on/off switch to OFF, engage
parking brake and remove key from the on/off switch.
2. Make sure machine is in safe operating condition by
keeping all nuts, bolts and screws tight.
3. Do not use open pans of flammable cleaning fluids
for cleaning parts.
4. Keep battery area free of excessive grease, grass,
leaves and dirt.
5. Disconnect batteries before servicing the machine.
Carefully remove one of the battery cables from the battery pack as the first step in any repair. Once a battery
cable has been removed, the electrical system on the
vehicle can be safely worked on. Take care during repairs, however, to not allow tools or vehicle components
to complete the battery circuit that was opened with the
cable removal. Reattach the removed cable to the battery pack as the last step in any repair.
6. When using metal, uninsulated tools around batteries, do not allow tools to contact both positive and negative battery terminals simultaneously.
7. Remove jewelry and watches before servicing electrical components of the vehicle.
8. Battery acid is poisonous and can cause burns.
Avoid contact with skin, eyes and clothing. Protect your
face, eyes and clothing when working with batteries.
10.Never use an open flame to check level or leakage
of battery electrolyte.
11. When connecting the battery charger to the vehicle,
connect the charger cord to the vehicle charger receptacle before plugging the charger power cord into an
outlet. After charging the vehicle batteries, unplug the
charger power cord from the outlet before disconnecting
the charger cord from the vehicle charger receptacle.
12.If major repairs are ever needed or assistance is desired, contact an Authorized Toro Distributor.
13.To assure optimum performance and continued
safety of the machine, use genuine Toro replacement
parts and accessories. Replacement parts and accessories made by other manufacturers may result in nonconformance with safety standards and the warranty
may be voided.
14.When raising the machine to change tires or to perform other service, use correct blocks, hoists and jacks.
Make sure machine is parked on a solid level surface
such as a concrete floor. Prior to raising the machine, remove any attachments that may interfere with the safe
and proper raising of the machine. Always chock or
block wheels. Use jack stands or solid wood blocks to
support the raised machine. If the machine is not properly supported by blocks or jack stands, the machine may
move or fall, which may result in personal injury (see
Jacking Instructions in the Operator’s Manual and in this
Chapter).
Safety
9. Battery gases can explode. Keep cigarettes, sparks
and flames away from the batteries. Always service,
store and charge the vehicle batteries in a well ventilated
area.
Workman e2050/e2065 Page 1 – 3 Safety (Rev. B)
Page 8

Jacking and Other Instructions
Jacking Vehicle
DANGER
POTENTIAL HAZARD
• A vehicle that is not properly supported
may become unstable.
WHAT CAN HAPPEN
• The vehicle may move or fall. Personal
injury or damage to the machine may result.
HOW TO AVOID THE HAZARD
• Make sure vehicle is parked on a solid level
surface, such as a concrete floor.
• Make sure On/Off switch is OFF and key is
removed from the switch before getting off
the vehicle.
• Before raising the vehicle, remove any
attachments that may interfere with the safe
and proper raising of the vehicle.
• Always chock or block wheels to prevent
the vehicle from rolling.
• Make sure proper hoists, solid wooden
blocks and jack stands are used to raise
and support the vehicle.
Jacking Locations
1. Jack front of the vehicle on the front of the frame behind the towing tongue (Fig. 1).
1
Figure 1
1. Front frame 2. Towing tongue
1
Figure 2
1. Axle tube 2. Transaxle case
2
2
1
2. Jack rear of the vehicle under each rear axle tube. Do
not jack vehicle below the transaxle case (Fig. 2).
Towing Vehicle
IMPORTANT: Frequent or long distance towing of
the Workman e2050/e2065 is not recommended.
In case of emergency, the vehicle can be towed for a
short distance. See Operator’s Manual for towing information.
Transporting Vehicle
When moving the vehicle long distances, use a trailer or
flatbed truck. Make sure vehicle is secured to the trailer
properly. See Operator’s Manual for transport information.
IMPORTANT: If vehicle is towed, make sure that on/
off switch is in the OFF position and key is removed
from switch.
Workman e2050/e2065Page 1 – 4Safety (Rev. B)
Page 9

Safety and Instruction Decals
There are several safety and instruction decals attached
to your Workman vehicle. If any decal becomes illegible
or damaged, install a new decal. Part numbers are listed
in the Parts Catalog. Order replacement decals from
your Authorized Toro Distributor.
Safety
Workman e2050/e2065 Page 1 – 5 Safety (Rev. B)
Page 10

This page is intentionally blank.
Workman e2050/e2065Page 1 – 6Safety (Rev. B)
Page 11

Product Records and Maintenance
Table of Contents
Chapter 2
PRODUCT RECORDS 1. . . . . . . . . . . . . . . . . . . . . . . . .
EQUIVALENTS AND CONVERSIONS 2. . . . . . . . . . .
Decimal and Millimeter Equivalents 2. . . . . . . . . . . .
U.S. to Metric Conversions 2. . . . . . . . . . . . . . . . . . .
TORQUE SPECIFICATIONS 3. . . . . . . . . . . . . . . . . . .
Fastener Identification 3. . . . . . . . . . . . . . . . . . . . . . .
Standard Torque for Dry, Zinc Plated and
Steel Fasteners (Inch Series) 4. . . . . . . . . . . . . . .
Product Records
Insert Operator’s Manual and Parts Catalog for your
Workman vehicle at the end of this chapter. Additionally,
if any optional equipment or accessories have been
installed to your Workman, insert the Installation Instructions, Operator’s Manuals and Parts Catalogs for
those options at the end of this chapter.
Standard Torque for Dry, Zinc Plated and
Steel Fasteners (Metric Fasteners) 5. . . . . . . . . .
Other Torque Specifications 6. . . . . . . . . . . . . . . . . .
Conversion Factors 6. . . . . . . . . . . . . . . . . . . . . . . . .
MAINTENANCE 7. . . . . . . . . . . . . . . . . . . . . . . . . . . . . .
and Maintenance
Product Records
Workman e2050/e2065 Page 2 – 1 Product Records and Maintenance (Rev. B)
Page 12

Equivalents and Conversions
0.09375
Workman e2050/e2065Page 2 – 2Product Records and Maintenance (Rev. B)
Page 13
Torque Specifications
Recommended fastener torque values are listed in the
following tables. For critical applications, as determined
by Toro, either the recommended torque or a torque that
is unique to the application is clearly identified and specified in this Service Manual.
These Torque Specifications for the installation and
tightening of fasteners shall apply to all fasteners which
do not have a specific requirement identified in this Service Manual. The following factors shall be considered
when applying torque: cleanliness of the fastener, use
of a thread sealant (Loctite), degree of lubrication on the
fastener, presence of a prevailing torque feature, hardness of the surface underneath the fastener’s head or
similar condition which affects the installation.
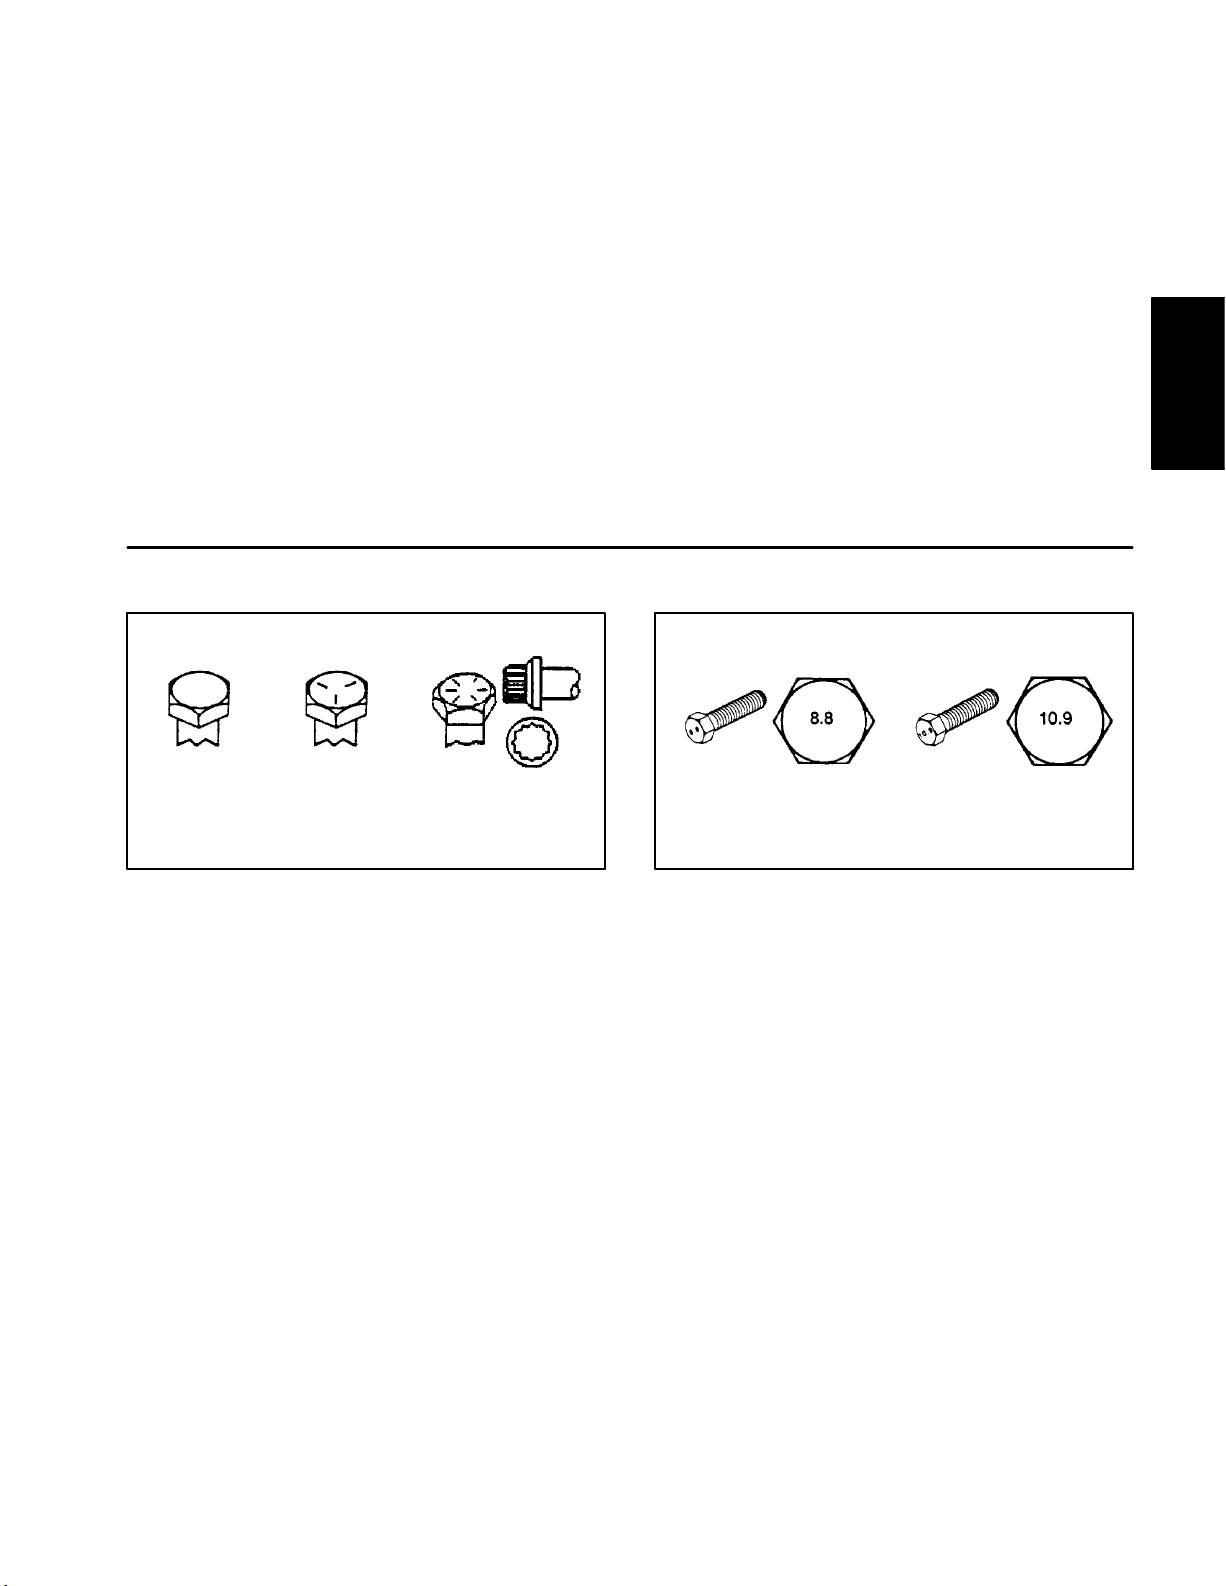
Fastener Identification
As noted in the following tables, torque values should be
reduced by 25% for lubricated fasteners to achieve
the similar stress as a dry fastener. Torque values may
also have to be reduced when the fastener is threaded
into aluminum or brass. The specific torque value
should be determined based on the aluminum or brass
material strength, fastener size, length of thread engagement, etc.
The standard method of verifying torque shall be performed by marking a line on the fastener (head or nut)
and mating part, then back off fastener 1/4 of a turn.
Measure the torque required to tighten the fastener until
the lines match up.
and Maintenance
Product Records
Grade 1 Grade 5 Grade 8
Inch Series Bolts and Screws
Figure 1
Class 8.8 Class 10.9
Metric Bolts and Screws
Figure 2
Workman e2050/e2065 Page 2 – 3 Product Records and Maintenance (Rev. B)
Page 14

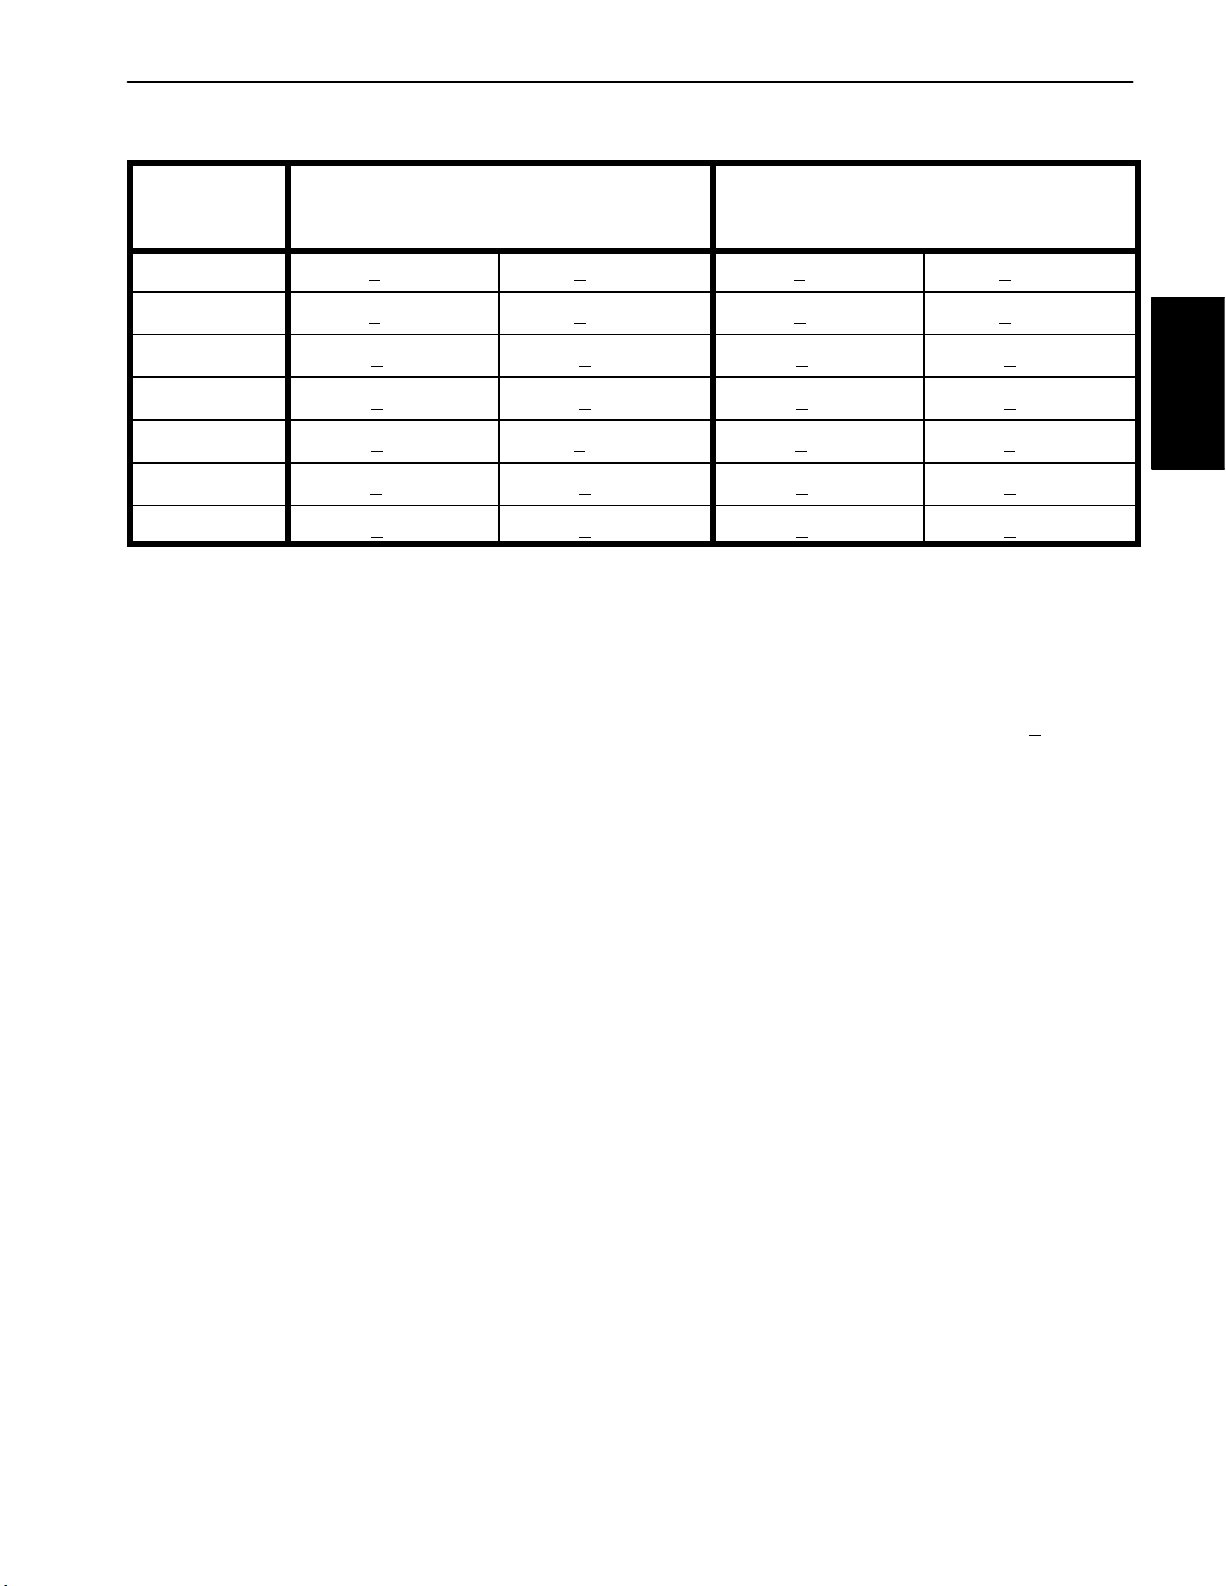
Standard Torque for Dry, Zinc Plated and Steel Fasteners (Inch Series)
Grade 1, 5, &
Thread Size
# 6 – 32 UNC
# 6 – 40 UNF
# 8 – 32 UNC
# 8 – 36 UNF
# 10 – 24 UNC
# 10 – 32 UNF
1/4 – 20 UNC 48 + 7 53 + 7 599 + 79 100 + 10 1125 + 100 140 + 15 1580 + 170
1/4 – 28 UNF 53 + 7 65 + 10 734 + 113 115 + 10 1300 + 100 160 + 15 1800 + 170
5/16 – 18 UNC 115 + 15 105 + 17 1186 + 169 200 + 25 2250 + 280 300 + 30 3390 + 340
5/16 – 24 UNF 138 + 17 128 + 17 1446 + 192 225 + 25 2540 + 280 325 + 30 3670 + 340
3/8 – 16 UNC 16 + 2 16 + 2 22 + 3 30 + 3 41 + 4 43 + 4 58 + 5
8 with Thin
Height Nuts
in–lb in–lb N–cm in–lb N–cm in–lb N–cm
10 + 2 13 + 2 147 + 23
13 + 2 25 + 5 282 + 30
18 + 2 30 + 5 339 + 56
ft–lb ft–lb N–m ft–lb N–m ft–lb N–m
SAE Grade 1 Bolts, Screws, Studs &
Sems with Regular Height Nuts
(SAE J995 Grade 2 or Stronger Nuts)
SAE Grade 5 Bolts, Screws, Studs &
Sems with Regular Height Nuts
(SAE J995 Grade 2 or Stronger Nuts)
15 + 2 170 + 20 23 + 2 260 + 20
17 + 2 190 + 20 25 + 2 280 + 20
29 + 3 330 + 30 41 + 4 460 + 45
31 + 3 350 + 30 43 + 4 485 + 45
42 + 4 475 + 45 60 + 6 675 + 70
48 + 4 540 + 45 68 + 6 765 + 70
SAE Grade 8 Bolts, Screws, Studs &
Sems with Regular Height Nuts
(SAE J995 Grade 5 or Stronger Nuts)
3/8 – 24 UNF 17 + 2 18 + 2 24 + 3 35 + 3 47 + 4 50 + 4 68 + 5
7/16 – 14 UNC 27 + 3 27 + 3 37 + 4 50 + 5 68 + 7 70 + 7 95 + 9
7/16 – 20 UNF 29 + 3 29 + 3 39 + 4 55 + 5 75 + 7 77 + 7 104 + 9
1/2 – 13 UNC 30 + 3 48 + 7 65 + 9 75 + 8 102 + 11 105 + 10 142 + 14
1/2 – 20 UNF 32 + 3 53 + 7 72 + 9 85 + 8 115 + 11 120 + 10 163 + 14
5/8 – 11 UNC 65 + 10 88 + 12 119 + 16 150 + 15 203 + 20 210 + 20 285 + 27
5/8 – 18 UNF 75 + 10 95 + 15 129 + 20 170 + 15 230 + 20 240 + 20 325 + 27
3/4 – 10 UNC 93 + 12 140 + 20 190 + 27 265 + 25 359 + 34 375 + 35 508 + 47
3/4 – 16 UNF 115 + 15 165 + 25 224 + 34 300 + 25 407 + 34 420 + 35 569 + 47
7/8 – 9 UNC 140 + 20 225 + 25 305 + 34 430 + 45 583 + 61 600 + 60 813 + 81
7/8 – 14 UNF 155 + 25 260 + 30 353 + 41 475 + 45 644 + 61 660 + 60 895 + 81
NOTE: Reduce torque values listed in the table above
by 25% for lubricated fasteners. Lubricated fasteners
on the fastener size, the aluminum or base material
strength, length of thread engagement, etc.
are defined as threads coated with a lubricant such as
oil, graphite or thread sealant such as Loctite.
NOTE: The nominal torque values listed above for
Grade 5 and 8 fasteners are based on 75% of the miniNOTE: Torque values may have to be reduced when
installing fasteners into threaded aluminum or brass.
The specific torque value should be determined based
mum proof load specified in SAE J429. The tolerance is
approximately +
10% of the nominal torque value. Thin
height nuts include jam nuts.
Workman e2050/e2065Page 2 – 4Product Records and Maintenance (Rev. B)
Page 15
Standard Torque for Dry, Zinc Plated and Steel Fasteners (Metric Fasteners)
Class 8.8 Bolts, Screws and Studs with
Thread Size Regular Height Nuts
(Class 8 or Stronger Nuts)
M5 X 0.8 57 + 5 in–lb 640 + 60 N–cm 78 + 7 in–lb 885 + 80 N–cm
M6 X 1.0 96 + 9 in–lb 1018 + 100 N–cm 133 + 13 in–lb 1500 + 150 N–cm
M8 X 1.25 19 + 2 ft–lb 26 + 3 N–m 27 + 2 ft–lb 36 + 3 N–m
M10 X 1.5 38 + 4 ft–lb 52 + 5 N–m 53 + 5 ft–lb 72 + 7 N–m
M12 X 1.75 66 + 7 ft–lb 90 + 10 N–m 92 + 9 ft–lb 125 + 12 N–m
M16 X 2.0 166 + 15 ft–lb 225 + 20 N–m 229 + 22 ft–lb 310 + 30 N–m
M20 X 2.5 325 + 33 ft–lb 440 + 45 N–m 450 + 37 ft–lb 610 + 50 N–m
NOTE: Reduce torque values listed in the table above
by 25% for lubricated fasteners. Lubricated fasteners
are defined as threads coated with a lubricant such as
oil, graphite or thread sealant such as Loctite.
NOTE: Torque values may have to be reduced when
installing fasteners into threaded aluminum or brass.
The specific torque value should be determined based
on the fastener size, the aluminum or base material
strength, length of thread engagement, etc.
NOTE: The nominal torque values listed above are
based on 75% of the minimum proof load specified in
SAE J1199. The tolerance is approximately +
nominal torque value.
Class 10.9 Bolts, Screws and Studs with
Regular Height Nuts
(Class 10 or Stronger Nuts)
10% of the
and Maintenance
Product Records
Workman e2050/e2065 Page 2 – 5 Product Records and Maintenance (Rev. B)
Page 16

Other Torque Specifications
SAE Grade 8 Steel Set Screws
Recommended Torque
Thread Size
Square Head Hex Socket
1/4 – 20 UNC 140 + 20 in–lb 73 + 12 in–lb
5/16 – 18 UNC 215 + 35 in–lb 145 + 20 in–lb
3/8 – 16 UNC 35 + 10 ft–lb 18 + 3 ft–lb
1/2 – 13 UNC 75 + 15 ft–lb 50 + 10 ft–lb
Thread Cutting Screws
(Zinc Plated Steel)
Type 1, Type 23 or Type F
Thread Size Baseline Torque*
No. 6 – 32 UNC 20 + 5 in–lb
Wheel Bolts and Lug Nuts
Thread Size
7/16 – 20 UNF
Grade 5
1/2 – 20 UNF
Grade 5
M12 X 1.25
Class 8.8
M12 X 1.5
Class 8.8
** For steel wheels and non–lubricated fasteners.
Thread Cutting Screws
(Zinc Plated Steel)
Thread
Size
No. 6 18 20 20 + 5 in–lb
Threads per Inch
Type A Type B
Recommended Torque**
65 + 10 ft–lb 88 + 14 N–m
80 + 10 ft–lb 108 + 14 N–m
80 + 10 ft–lb 108 + 14 N–m
80 + 10 ft–lb 108 + 14 N–m
Baseline Torque*
No. 8 – 32 UNC 30 + 5 in–lb
No. 10 – 24 UNC 38 + 7 in–lb
1/4 – 20 UNC 85 + 15 in–lb
5/16 – 18 UNC 110 + 20 in–lb
3/8 – 16 UNC 200 + 100 in–lb
Conversion Factors
in–lb X 11.2985 = N–cm N–cm X 0.08851 = in–lb
ft–lb X 1.3558 = N–m N–m X 0.7376 = ft–lb
No. 8 15 18 30 + 5 in–lb
No. 10 12 16 38 + 7 in–lb
No. 12 11 14 85 + 15 in–lb
* Hole size, material strength, material thickness & finish
must be considered when determining specific torque
values. All torque values are based on non–lubricated
fasteners.
Workman e2050/e2065Page 2 – 6Product Records and Maintenance (Rev. B)
Page 17

Maintenance
Maintenance procedures and recommended service intervals for the Workman e2050 and e2065 are covered
in the Operator’s Manual. Refer to that publication when
performing regular vehicle maintenance.
and Maintenance
Product Records
Workman e2050/e2065 Page 2 – 7 Product Records and Maintenance (Rev. B)
Page 18

This page is intentionally blank.
Workman e2050/e2065Page 2 – 8Product Records and Maintenance (Rev. B)
Page 19

Table of Contents
Chapter 3
Electrical System
ELECTRICAL DIAGRAMS 2. . . . . . . . . . . . . . . . . . . . .
GENERAL INFORMATION 3. . . . . . . . . . . . . . . . . . . . .
Opening Battery Circuit 3. . . . . . . . . . . . . . . . . . . . . .
VEHICLE OPERATION 4. . . . . . . . . . . . . . . . . . . . . . . .
SPECIAL TOOLS 5. . . . . . . . . . . . . . . . . . . . . . . . . . . . .
TROUBLESHOOTING 8. . . . . . . . . . . . . . . . . . . . . . . . .
General Run Problems 8. . . . . . . . . . . . . . . . . . . . . .
Battery Charger Operation 9. . . . . . . . . . . . . . . . . . .
Battery Charger Problems 10. . . . . . . . . . . . . . . . . . .
ADJUSTMENTS 11. . . . . . . . . . . . . . . . . . . . . . . . . . . . . .
Accelerator Switch Adjustment 11. . . . . . . . . . . . . . . .
Accelerator Potentiometer Adjustment 12. . . . . . . .
Accelerator System Calibration 13. . . . . . . . . . . . . .
COMPONENT TESTING 14. . . . . . . . . . . . . . . . . . . . . .
On/Off Switch 14. . . . . . . . . . . . . . . . . . . . . . . . . . . . . .
Battery Discharge Indicator and Hour
Meter Gauge 15. . . . . . . . . . . . . . . . . . . . . . . . . . . .
Vehicle Direction (Forward/Reverse) and
Headlight Switches 16. . . . . . . . . . . . . . . . . . . . . . .
Vehicle Status Light 17. . . . . . . . . . . . . . . . . . . . . . . .
Supervisor Speed Limit Switch (Workman e2050)18
Supervisor Speed Limit Switch (Workman e2065)18
Audio Alarm (Reverse) 18. . . . . . . . . . . . . . . . . . . . . .
Charger Interlock Switch 19. . . . . . . . . . . . . . . . . . . .
Main and Accessories Contactors 20. . . . . . . . . . . .
Fuses 22. . . . . . . . . . . . . . . . . . . . . . . . . . . . . . . . . . . .
Fusible Links 23. . . . . . . . . . . . . . . . . . . . . . . . . . . . . .
Accelerator Switch 24. . . . . . . . . . . . . . . . . . . . . . . . .
Accelerator Potentiometer 25. . . . . . . . . . . . . . . . . . .
Controller 26. . . . . . . . . . . . . . . . . . . . . . . . . . . . . . . . .
SERVICE AND REPAIRS 28. . . . . . . . . . . . . . . . . . . . .
Battery Service 28. . . . . . . . . . . . . . . . . . . . . . . . . . . .
Battery Specifications 28. . . . . . . . . . . . . . . . . . . . .
Removal 29. . . . . . . . . . . . . . . . . . . . . . . . . . . . . . . .
Installation 29. . . . . . . . . . . . . . . . . . . . . . . . . . . . . . .
Charging 30. . . . . . . . . . . . . . . . . . . . . . . . . . . . . . . .
Inspection and Maintenance 30. . . . . . . . . . . . . . .
Testing 31. . . . . . . . . . . . . . . . . . . . . . . . . . . . . . . . . .
Battery Storage 32. . . . . . . . . . . . . . . . . . . . . . . . . .
Traction Motor Brushes 33. . . . . . . . . . . . . . . . . . . . .
Traction Motor 34. . . . . . . . . . . . . . . . . . . . . . . . . . . . .
Traction Motor Service 38. . . . . . . . . . . . . . . . . . . . . .
Battery Charger 42. . . . . . . . . . . . . . . . . . . . . . . . . . . .
LESTER ELECTRICAL TECHNICIAN
SERVICE GUIDE
System
Electrical
Workman e2050/e2065
Page 3 – 1
Electrical System (Rev. B)
Page 20

Electrical Diagrams
The electrical schematic, circuit drawings and wire harness drawings for the Workman e2050 and e2065 are
located in Chapter 6 – Electrical Diagrams.
Electrical System (Rev. B)
Page 3 – 2
Workman e2050/e2065
Page 21
General Information
The Workman e2050 and e2065 use a 48 volt DC electrical system that is an isolated circuit. The vehicle frame
is not used for any ground connections.
The vehicle controller monitors operator and vehicle inputs to determine voltage to the traction motor. If a problem exists that will prevent normal vehicle operation, an
LED on the controller and the vehicle status light on the
dash panel will flash a fault code to assist in identifying
the problem.
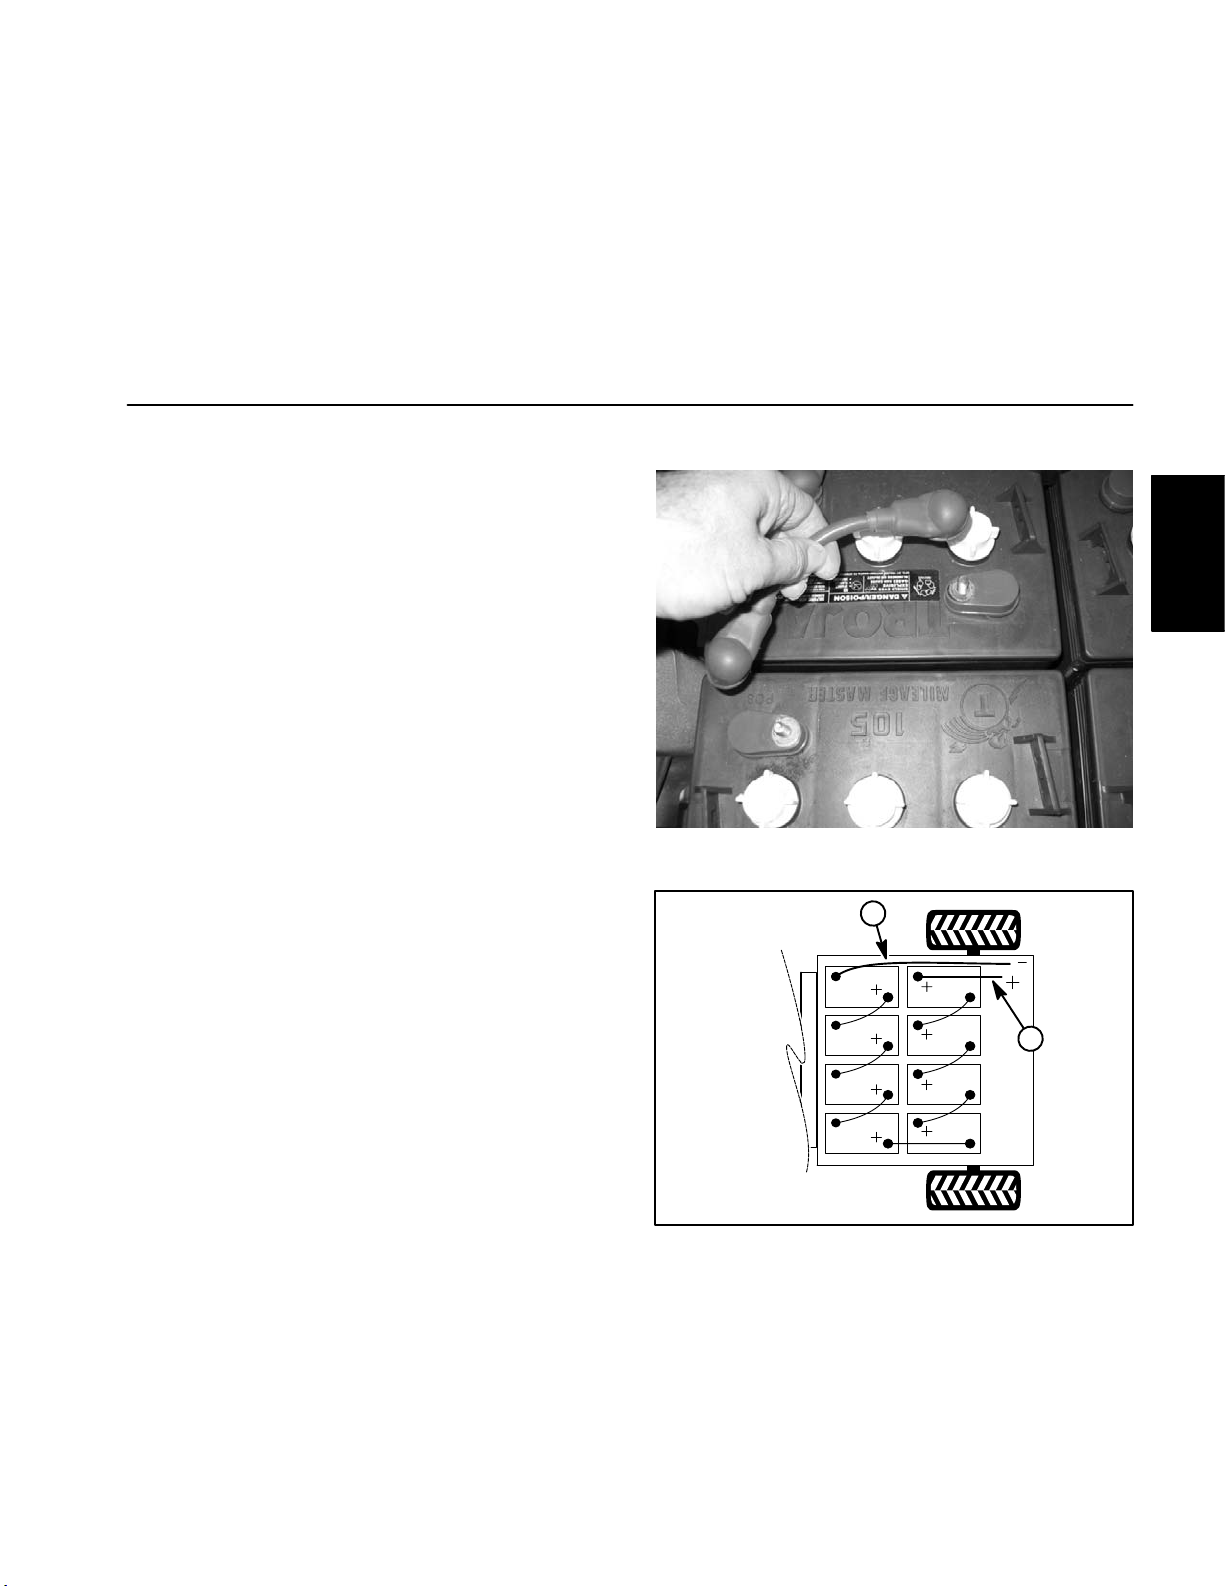
Opening Battery Circuit
To prevent allowing a current path through tools used
during vehicle electrical circuit repairs, remove one of
the battery cables from the battery pack as the first step
in any repair (Fig. 1). Once a cable has been removed,
the electrical system on the vehicle can be safely
worked on. Take care during repairs, however, to not allow tools or vehicle components to complete the battery
circuit that was opened with the cable removal.
Reattach the removed cable to the battery pack as the
last step in any repair. Secure cable on each battery terminal with lock washer and nut. Torque nuts from 115 to
125 in–lb (13 to 14.1 N–m).
After performing any repair on electrical components on
the vehicle, make sure that wiring is routed and secured
so as to prevent abrasion or contact with moving parts.
System
Electrical
Battery pack cable routing is shown in Figure 2.
Figure 1
1
2
A
4
Figure 2
1. Negative cable to vehicle 2. Positive cable to vehicle
Workman e2050/e2065
Page 3 – 3
Electrical System (Rev. B)
Page 22

Vehicle Operation
The Workman e2050 and e2065 electrical system use
a 48 volt battery pack, an electric traction motor, a vehicle controller and numerous other electrical components to allow vehicle operation.
Eight, 6 volt, deep cycle batteries that are connected in
series provide current for a 48 volt DC, high torque traction motor, the vehicle controller and vehicle accessories (headlights, horn, various optional accessories).
The batteries are discharged as the vehicle is used so
charging the batteries after using the vehicle is necessary. A battery discharge indicator gauge on the dash
provides the operator with information on battery charge
level. Demands on the vehicle during use (speed, payload, incline use), battery condition (age, charge level),
ambient temperature and vehicle condition will all put
constraints on how long a vehicle can be used before the
batteries are discharged.
An automatic, 115 VAC (230 VAC on international models) battery charger is included with the vehicle. An interlock switch on the vehicle charger receptacle prevents
the vehicle from operating when the charger cord is
plugged into the vehicle.
The electric traction motor directly drives a double reduction transaxle with differential. Operator inputs for
forward/reverse, supervisor switch position (high or low
speed) and accelerator pedal position are used by the
controller to determine voltage to the traction motor.
The vehicle controller is a sealed electronic logic device
that uses inputs from several vehicle components to
control motor speed and direction. These inputs include
several switches (on/off, forward/reverse, accelerator,
supervisor, charger), a motor temperature sensor, an
accelerator pedal potentiometer and the vehicle contactor (solenoid). The controller also provides regenerative
braking to assist in slowing the vehicle. The controller
has fault detection capabilities to help identify system
problems. Battery current is available to the controller
whenever the on/off switch is ON which energizes the
main contactor. A high current fuse protects this high
current circuit.
The Workman controller also provides a roll off warning
in instances when the vehicle begins to move (roll away)
after being stopped. On an incline and with the on/off
switch in the ON position, if the vehicle starts moving,
the alarm will sound warning the operator that the vehicle is moving. When the vehicle goes into this roll–off
mode, regenerative braking will limit vehicle speed.
Vehicle accessories include headlights, horn and optional electrical equipment. The accessories contactor
(solenoid) on the vehicle provides battery current to
these components when the on/off switch is ON. Fuses
provide circuit protection for these accessories.
The traction motor is cooled with an external fan. Additionally, the motor is protected from overheating by a
thermal switch in the motor housing. If unsafe motor
temperature is sensed by the switch, the controller is
signaled to limit vehicle speed and torque until the motor
temperature reduces to a normal level.
Electrical System (Rev. B)
Page 3 – 4
Workman e2050/e2065
Page 23
Special Tools
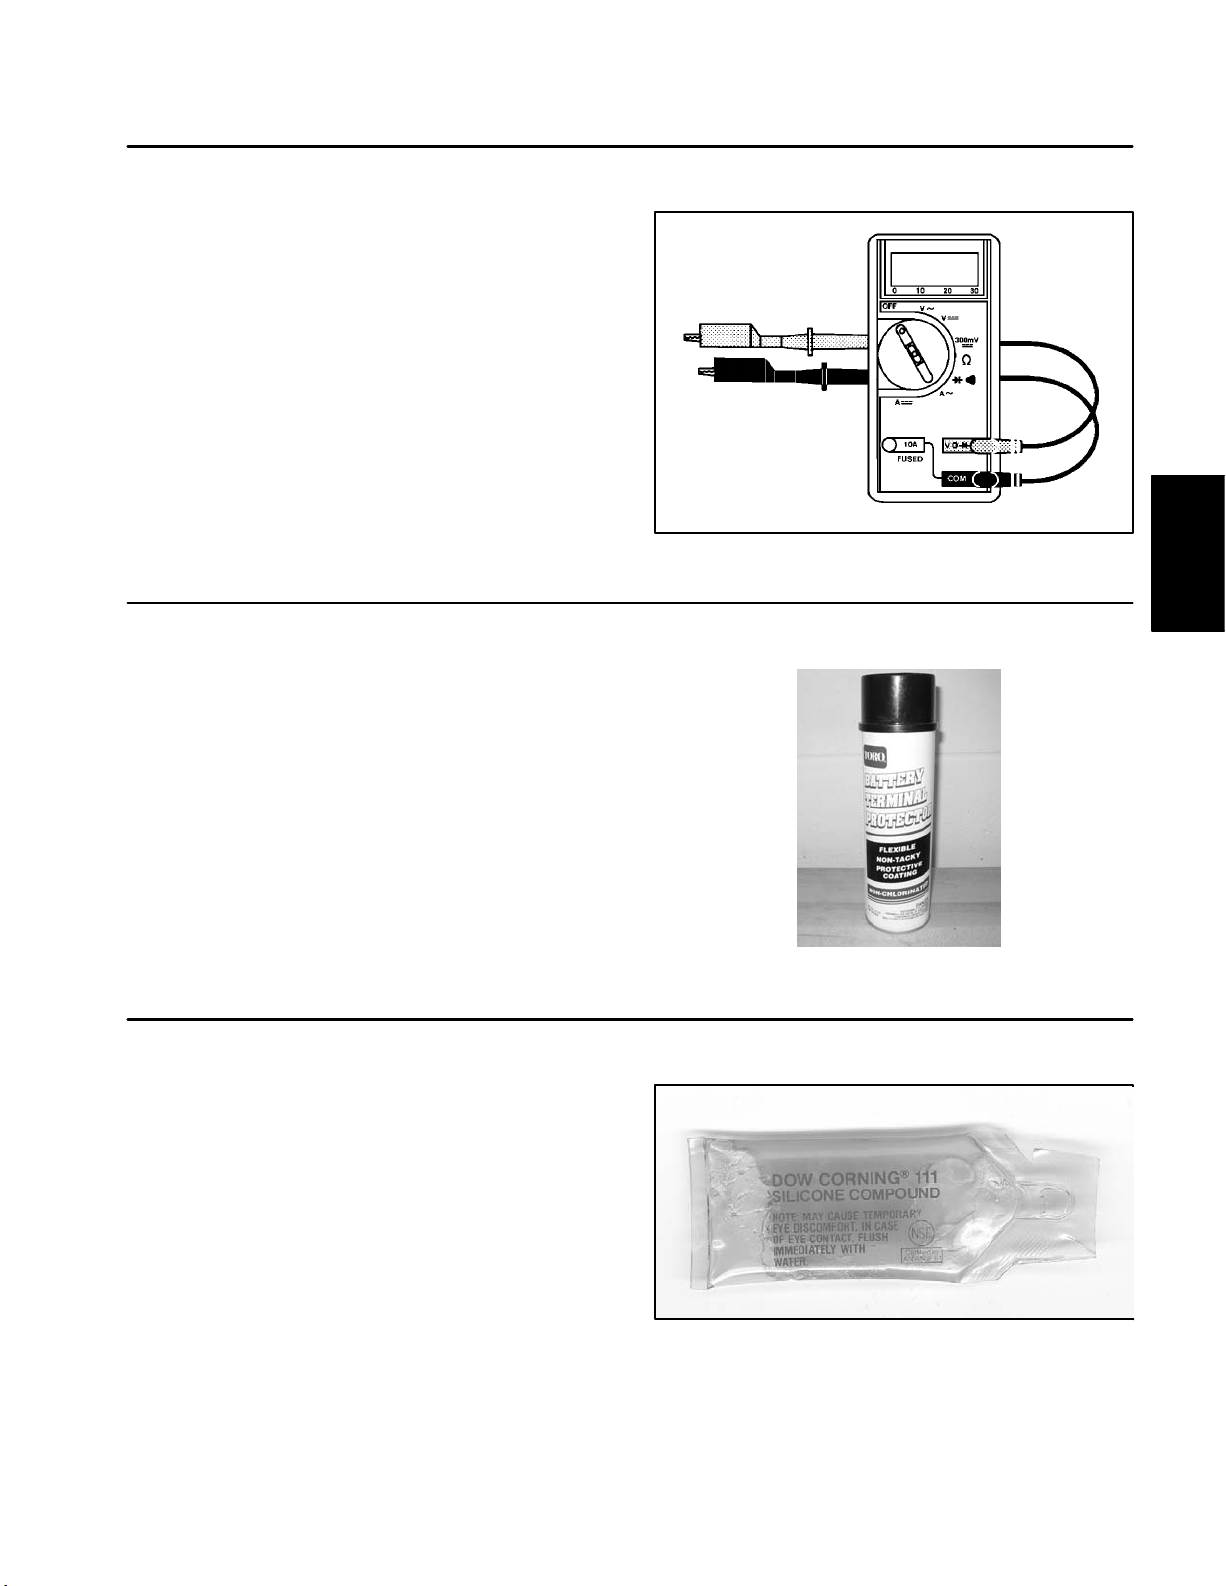
Multimeter
The multimeter can test electrical components and circuits for current, resistance or voltage.
NOTE: Toro recommends the use of a DIGITAL Volt–
Ohm–Amp multimeter when testing electrical circuits.
The high impedance (internal resistance) of a digital meter in the voltage mode will make sure that excess current is not allowed through the meter. This excess
current can cause damage to circuits not designed to
carry it.
NOTE: Workman e2050 and e2065 vehicles use a 48
volt, DC electrical system. If multimeter is not of the
auto–range type, make sure to properly set multimeter
range before performing any voltage test.
Battery Terminal Protector
Figure 3
System
Electrical
Battery Terminal Protector (Toro Part No. 107–0392) is
an aerosol spray that should be used on all battery and
controller terminals to reduce corrosion problems. Apply
terminal protector after cable has been secured to terminal.
Dielectric Gel
Dielectric gel (Toro Part No. 107–0342) should be used
to prevent corrosion of connection terminals. To ensure
complete coating of terminals, liberally apply gel to both
component and wire harness connector, plug connector
to component, unplug connector, reapply gel to both
surfaces and reconnect harness connector to component. Connectors should be thoroughly packed with gel
for effective results.
Figure 4
Workman e2050/e2065
Page 3 – 5
Figure 5
Electrical System (Rev. B)
Page 24
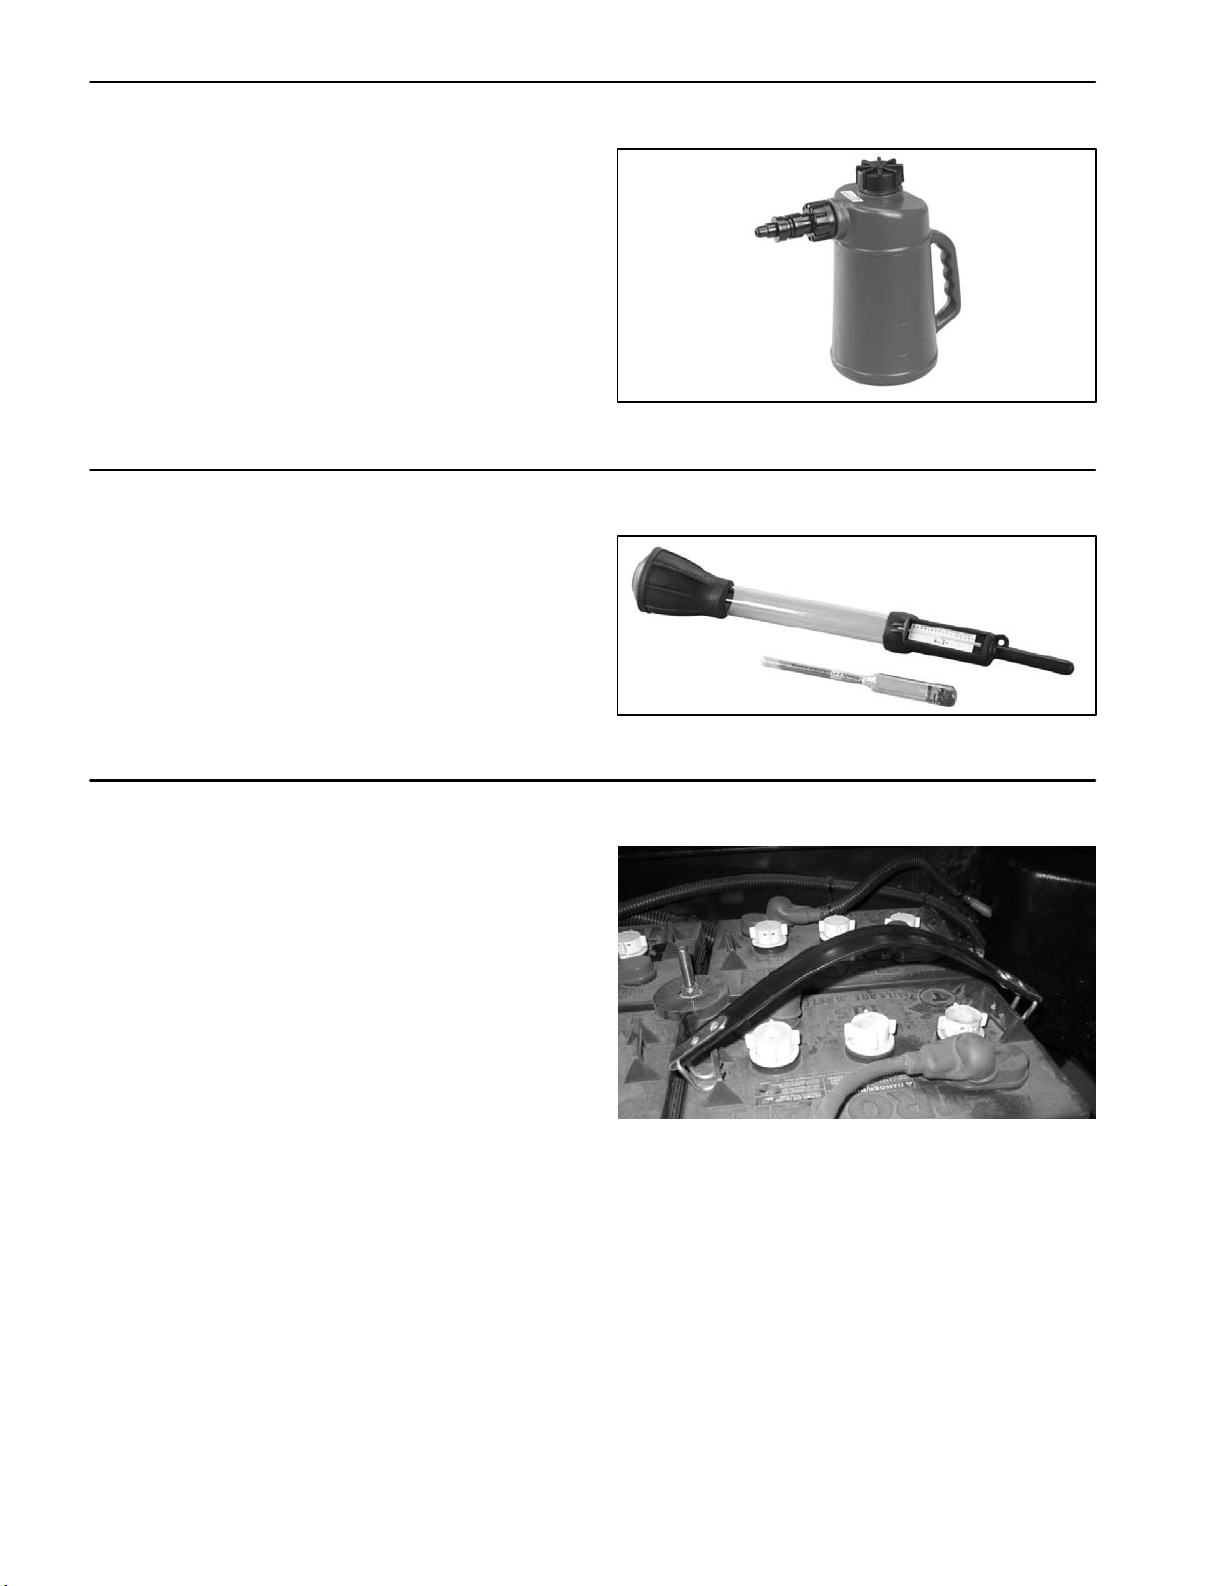
Battery Watering Dispenser
Use the battery watering dispenser when adding distilled water to vehicle batteries. Obtain watering dispenser locally.
Battery Hydrometer
Use the battery hydrometer when measuring specific
gravity of battery electrolyte. Obtain hydrometer locally.
Figure 6
Battery Lift Strap
Use the battery lift strap to remove and install batteries
from the vehicle. Lift strap allows use of case loops on
battery tops as safe battery lifting points. Obtain battery
lift strap locally.
Figure 7
Figure 8
Electrical System (Rev. B)
Page 3 – 6
Workman e2050/e2065
Page 25
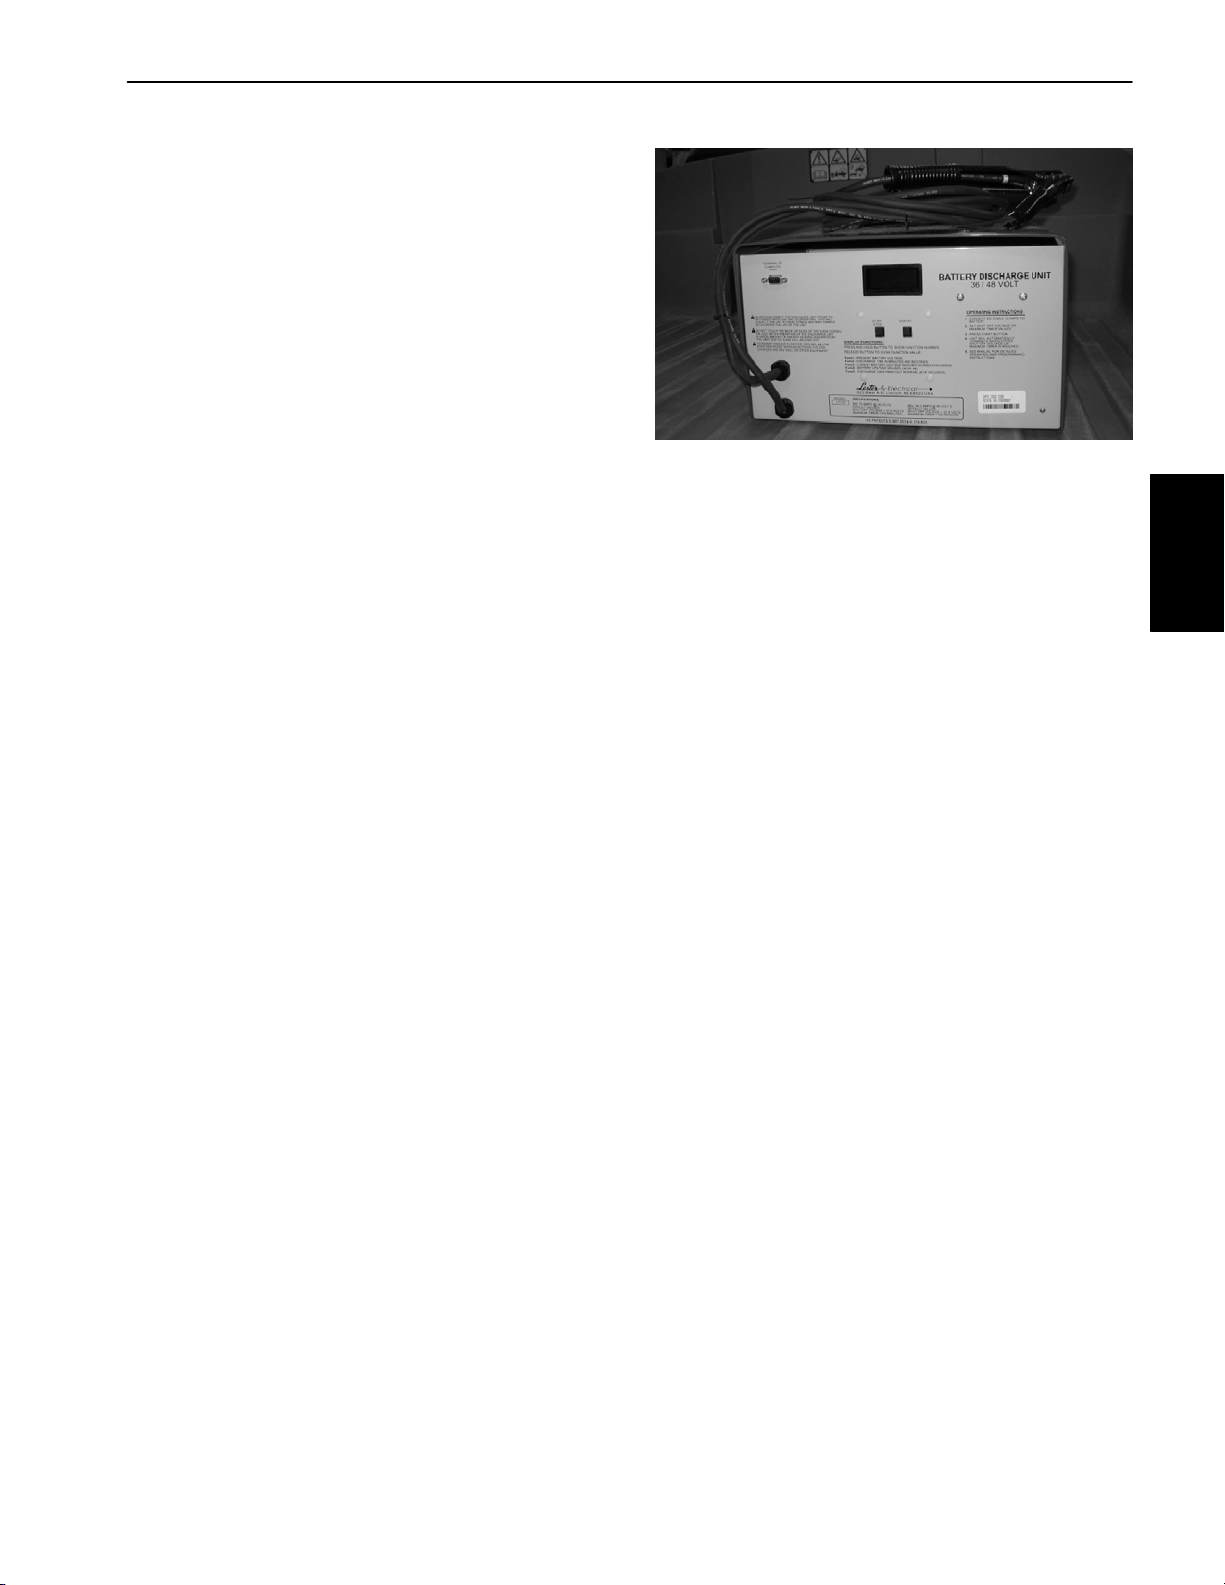
36/48 Volt Battery Discharge Unit
The 36/48 VoltBattery DischargeUnit (TOR4106) is recommended for quick and accurate load testing for the
batteries on the Workman e2050 and e2065. This tool
is used to determine the capacity of the Workman battery pack and also for finding faulty battery or batteries
in the battery pack.
Order the 36/48 Volt Battery Discharge Unit (TOR4106)
from your Toro Distributor.
Figure 9
System
Electrical
Workman e2050/e2065
Page 3 -- 7
Rev. D
Electrical System (Rev. B)
Page 26

Troubleshooting
CAUTION
Remove all jewelry, especially rings and
watches, before doing any electrical troubleshooting or testing. Disconnect a battery cable
from the battery pack to open the battery circuit
unless a test procedure requires battery voltage.
General Run Problems
NOTE: Check vehicle status light on dash panel and
controller LED for possible faults whenever diagnosing
vehicle problems (see Controller in the Component
Testing section of this chapter).
For effective troubleshooting and repairs, there must be
a good understanding of the electrical circuits and components used on this vehicle (see Electrical Schematic
in Chapter 6).
If the vehicle has any switches by–passed, they must be
reconnected for proper vehicle operation, troubleshooting and safety.
Problem
Main contactor clicks, but vehicle will not operate. Battery charge is low.
Nothing happens when on/off switch is turned to ON. Battery charge is extremely low.
Possible Causes
Battery cables are loose, corroded or damaged.
Cable connection(s) at controller is/are loose or
corroded.
Cable connection(s) at traction motor is/are loose or
corroded.
Traction motor is faulty.
Controller is faulty.
Battery cables are loose, corroded or damaged.
Cable connection(s) at controller is/are loose or
corroded.
10 ampere fuse (F2) to the on/off switch is loose or
blown.
Fusible link FL2 is faulty.
Electrical System (Rev. B)
Main fuse (F1) is loose or blown.
The on/off switch or circuit wiring is faulty.
Controller is faulty.
Page 3 – 8
Workman e2050/e2065
Page 27

General Run Problems (Continued)
Problem Possible Causes
Traction motor stops during operation. Wiring to the traction motor components (e.g. main
contactor, controller, traction motor) loose, corroded or
damaged (see Electrical Schematic in Chapter 6 –
Electrical Diagrams).
Battery cables are loose, corroded or damaged.
Controller is overheated.
Traction motor is overheated.
Traction motor is faulty.
Brake or transaxle problem (see Chapter 4 – Transaxle
and Brakes).
Vehicle runs slowly. Supervisor speed limit switch in slow position.
Tire pressure is low (see Chapter 5 – Chassis).
Brakes improperly adjusted (see Chapter 4 –
Transaxle and Brakes).
System
Electrical
Battery charge is extremely low.
Controller is overheated.
Traction motor is overheated.
Vehicle movement is erratic or jerky. Collar on throttle is loose.
Accelerator potentiometer is improperly adjusted.
Accelerator system is out of adjustment.
Battery Charger Operation
Light Status Indicates
Green light on battery charger illuminated (not
flashing).
Green light on battery charger flashing. Slow flash (once per second): Batteries being charged
Batteries is fully charged. Vehicle ready to operate.
(batteries less than 80% charged). Continue charging.
Rapid flash (four times per second): Batteries being
charged (batteries more than 80% charged). Continue
charging.
Red light on battery charger flashing. Rapid flash: Charger timer shutoff has occurred after
20 hours of charging.
Slow flash: No current to charger. Check AC outlet.
Workman e2050/e2065
Page 3 – 9
Electrical System (Rev. B)
Page 28

Battery Charger Problems
Problem Possible Causes
Battery charger does not turn on. AC outlet fuse/circuit breaker blown.
AC outlet is faulty.
Vehicle wiring is loose or damaged (see electrical
schematic in Chapter 6 – Electrical Diagrams).
Fusible link FL1 is damaged.
Vehicle charger interlock switch or circuit wiring faulty.
Vehicle charger receptacle or circuit wiring damaged.
Battery charger is faulty.
Battery charger does not turn off. Battery charger is faulty.
NOTE: Charging new batteries or charging batteries in
cold temperatures may require extended charge time
to achieve full charge.
Battery charger fuse blows. Vehicle battery polarity is reversed (vehicle battery
cables incorrectly attached).
The AC outlet circuit breaker or fuse blows when using
the battery charger.
Vehicle charger receptacle polarity is reversed.
Battery charger is faulty.
Overloaded AC circuit.
Battery charger is faulty.
Electrical System (Rev. B)
Page 3 – 10
Workman e2050/e2065
Page 29
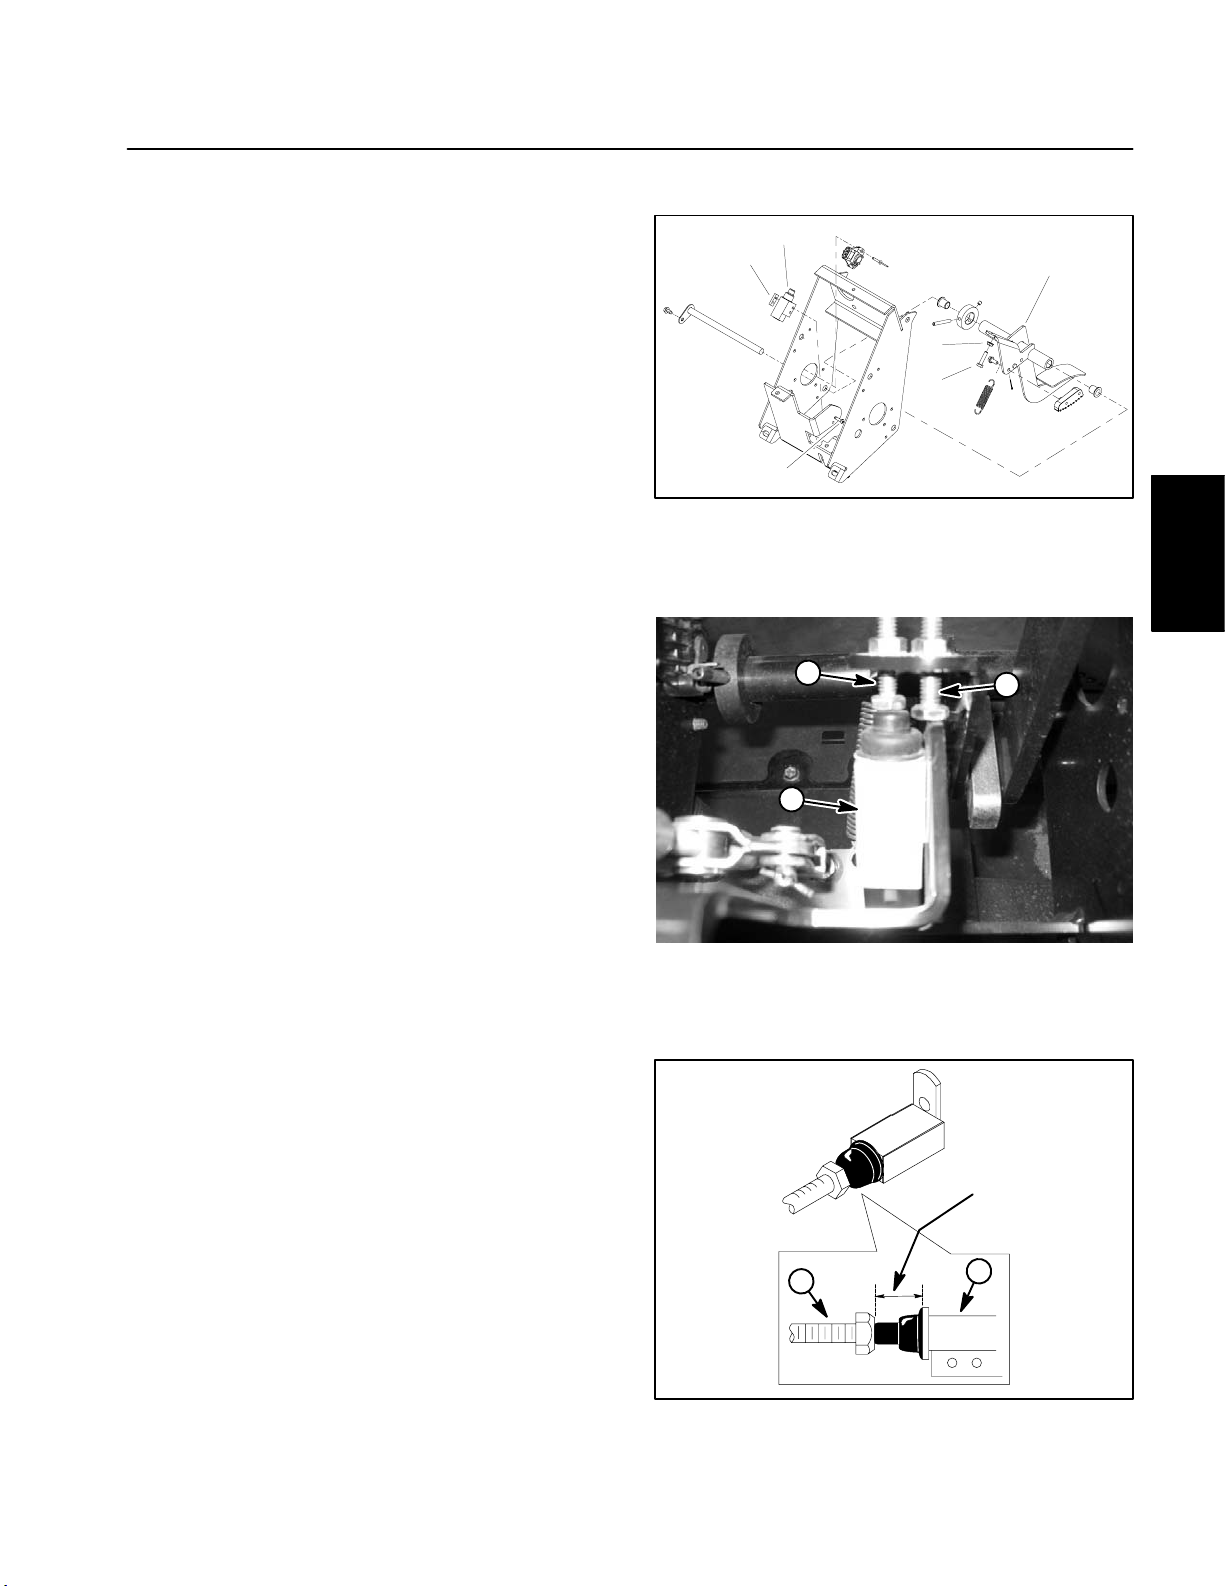
Adjustments
Accelerator Switch Adjustment
1. Position vehicle on a level surface, turn On/Off
switch OFF and remove key. Apply parking brake.
2. Make sure that at complete brake pedal travel, the
park detent and pawl are fully engaged. If needed, adjust the accelerator pedal stop cap screw to allow full engagement (Fig. 11).
3. Disengage the parking brake.
4. With the accelerator pedal released, check that the
distance between the head of the accelerator switch
stop cap screw and the body of the switch is 5/8 inch (1.6
cm) (Fig. 12).
5. If distance is incorrect, loosen lock nut and adjust accelerator switch stop cap screw position (Fig. 11).
6. After adjustment, make sure that switch plunger is
not bottomed out when accelerator pedal is released.
7. After adjustment to switch stop cap screw, make
sure that the switch does not open when the parking
brake is engaged. Readjust switch stop cap screw if required.
8. Calibrate accelerator system after adjusting accelerator switch (see Accelerator System Calibration in this
section).
2
3
4
1. Accelerator pedal
2. Accelerator switch
3. Plate
2
1
Figure 10
4. Screw (2 used)
5. Switch stop cap screw
6. Lock nut
1
6
5
System
Electrical
3
Workman e2050/e2065
Page 3 – 11
Figure 11
1. Accelerator switch
2. Switch stop cap screw
3. Accelerator stop cap screw
5/8 inch
(1.6 cm)
1
2
Figure 12
1. Switch stop cap screw 2. Accelerator switch
Electrical System (Rev. B)
Page 30
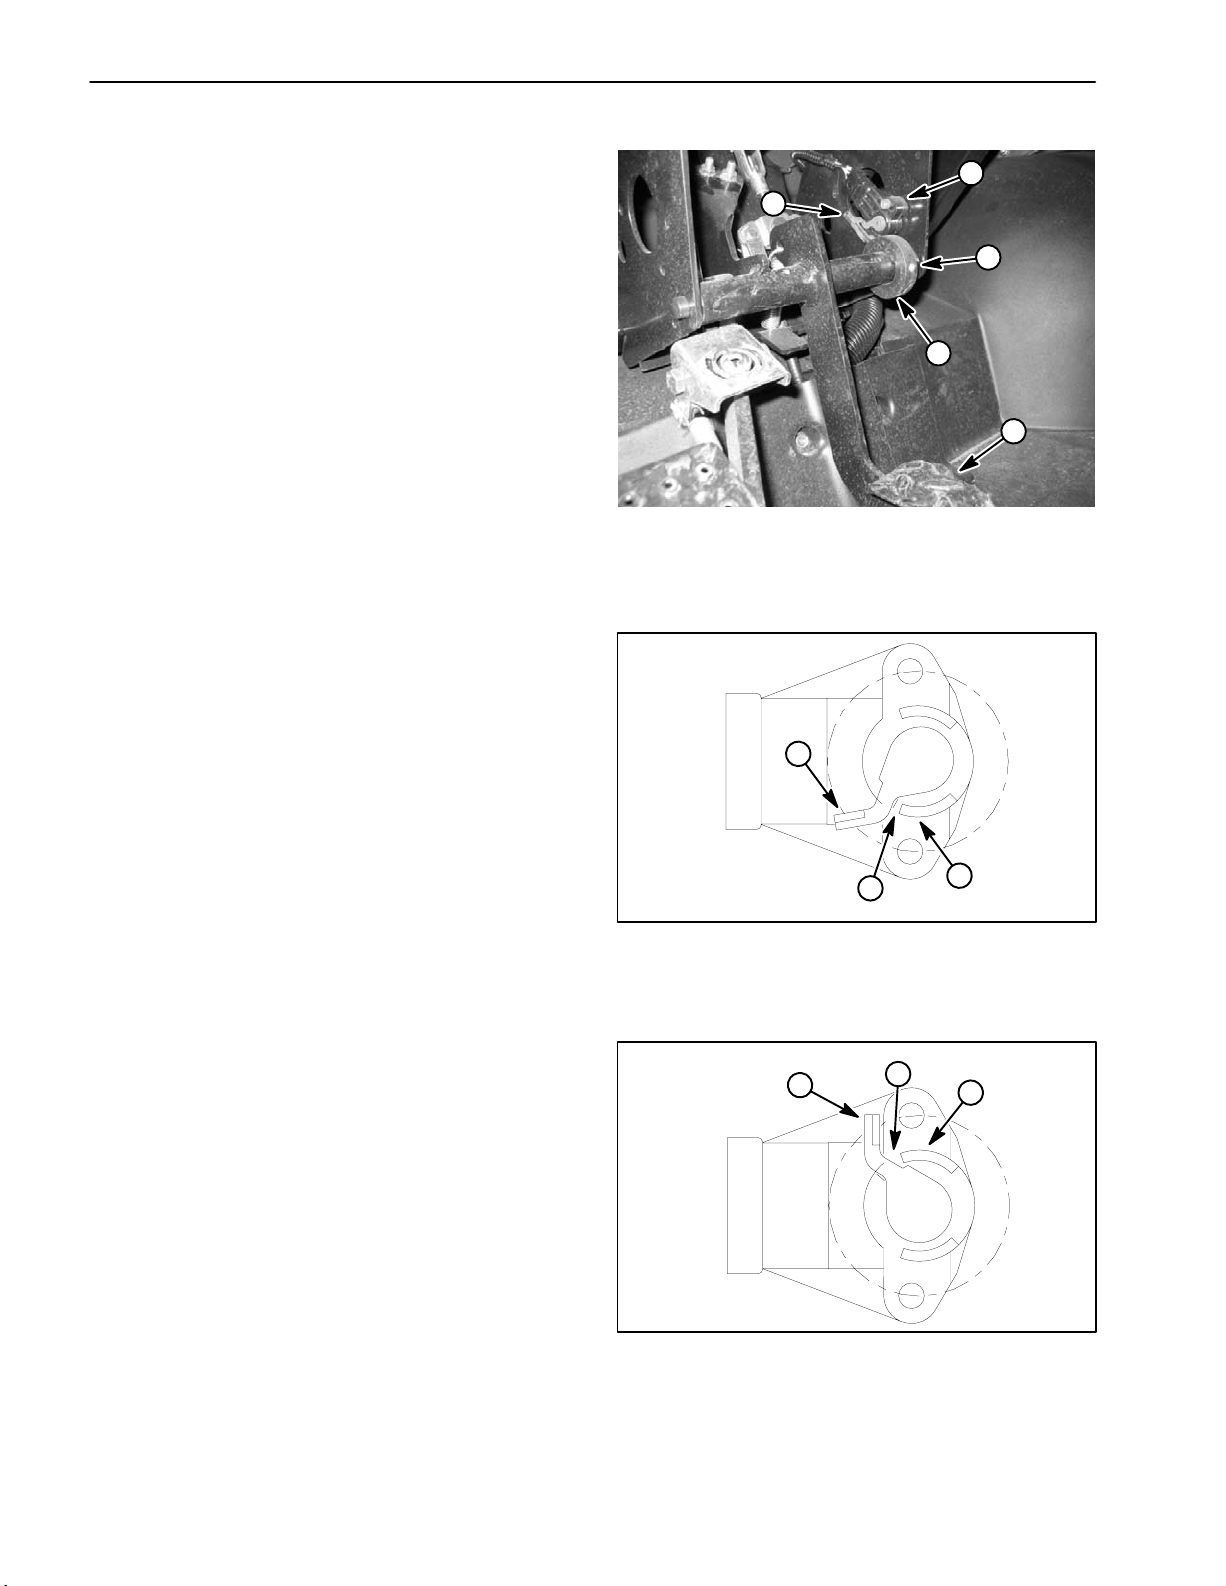
Accelerator Potentiometer Adjustment
The accelerator potentiometer is used as one of the inputs for the vehicle controller and is attached to the pedal frame under the dash (Fig. 13). A collar with roll pin on
the accelerator pedal shaft positions the accelerator potentiometer lever.
If the accelerator potentiometer is out of adjustment, the
diagnostic light on the dash will flash six (6) times. Additionally, if vehicle movement is erratic and jerky, potentiometer adjustment and calibration of the accelerator
system should be performed.
Adjustment
1. Position vehicle on a level surface, turn On/Off
switch OFF and remove key.
2. Make sure that accelerator potentiometer is securely
attached to the pedal frame of the machine.
3. Check accelerator switch adjustment and adjust if
necessary (see Accelerator Switch Adjustment in this
section).
4. Check movement of the accelerator potentiometer
lever:
A. With the accelerator pedal released, the roll pin
on the throttle position collar should keep the potentiometer lever from 0.050” to 0.100” (1.3 to 2.5 mm)
from the lower stop on the potentiometer body (Figure 14).
B. With the accelerator pedal fully depressed, the input lever of the potentiometer should not contact the
upper stop on the potentiometer body (Figure 15).
5. If potentiometer lever movement is incorrect, adjust
location of collar on accelerator pedal shaft:
1
4
3
Figure 13
1. Potentiometer
2. Accelerator pedal
3. Throttle position collar
4. Roll pin
5. Set screw (2 used)
1
3
2
Figure 14
1. Potentiometer lever (accelerator pedal released)
2. Potentiometer lower stop
3. Gap of 0.050” to 0.100” (1.3 to 2.5 mm)
5
2
A. Loosen two (2) set screws that secure throttle
position collar to throttle pedal shaft and reposition
collar to allow correct potentiometer movement.
Make sure that there is clearance between roll pin
and side of potentiometer lever to prevent binding.
B. Remove set screws one at a time from collar and
apply Loctite #242 (or equivalent) to set screw
threads. Install and tighten set screws to secure collar to accelerator pedal shaft.
C. Recheck potentiometer lever movement.
6. Calibrate accelerator system after any accelerator
potentiometer adjustment (see Accelerator System Calibration in this section).
Electrical System (Rev. B)
Page 3 – 12
1
3
2
Figure 15
1. Potentiometer lever (accelerator pedal fully depressed)
2. Potentiometer upper stop
3. No lever contact with stop
Workman e2050/e2065
Page 31

Accelerator System Calibration
The accelerator system on the Workman e2050 and
e2065 includes the accelerator pedal assembly, the accelerator potentiometer, the accelerator switch and the
controller. If any of these components are adjusted, removed or replaced, the following calibration procedure
should be performed. Additionally, if vehicle movement
is erratic and jerky or if the diagnostic light on the dash
is flashing six (6) times, calibration of the accelerator
system should be performed.
1. Position vehicle on a level surface, turn On/Off
switch OFF and remove key. Raise bed and secure with
prop rod. Remove controller cover.
2. Check accelerator switch adjustment and adjust if
necessary (see Accelerator Switch Adjustment in this
section).
3. Check accelerator potentiometer adjustment and
adjust if necessary (see Accelerator Potentiometer Adjustment in this section).
4. Using a jumper wire, connect gray controller lead to
ground post (B–) on controller (Fig. 16).
4
1. Controller
2. Gray controller lead
3
Figure 16
3. Ground post (B–)
4. Controller LED
1
2
System
Electrical
NOTE: During calibration, the vehicle status light on the
dash should flash the same as the controller LED.
5. Turn On/Off switch ON. The alarm should sound and
the controller LED should flash six (6) times.
6. Slowly depress accelerator pedal until the alarm momentarily stops and hold pedal in position. This should
take a very small movement of the pedal. Once alarm resumes, release accelerator pedal completely.
7. Depress and hold accelerator pedal fully. Alarm will
momentarily stop while controller calibration occurs.
Hold pedal fully depressed until alarm resumes and then
release pedal.
8. If calibration process was successful, alarm will chirp
and diagnostic light on the dash will be lit continuous (not
flashing). If alarm continues to sound or if diagnostic
light is flashing, turn On/Off switch OFF and repeat steps
5, 6 and 7.
9. Turn On/Off switch OFF and remove key. Disconnect
jumper wire from gray controller lead and controller
ground post (B–).
10.Install controller cover and lower bed.
11.If vehicle operation continues to be erratic after completing the accelerator system calibration procedure,
evaluate the components in the accelerator system: accelerator switch, accelerator potentiometer, accelerator
pedal, circuit wiring and controller.
Workman e2050/e2065
Page 3 – 13
Rev. A
Electrical System (Rev. B)
Page 32

Component Testing
For accurate resistance and/or continuity checks, electrically disconnect the component being tested from the
circuit (e.g. disconnect the harness wire connectors
from the vehicle on/off switch before doing a continuity
check on the on/off switch).
On/Off Switch
The Workman on/off switch is located on the dash panel
(Fig. 17). The switch has two (2) positions (OFF and ON)
and three (3) switch terminals. Only two of the terminals
are used on the Workman e2050 and e2065. The switch
terminals are positioned as shown in Figure 18.
Testing
CAUTION
CAUTION
When testing electrical components for continuity with a multimeter (ohms setting), make sure
that power to the circuit has been disconnected.
1
When testing the on/off switch for continuity
with a multimeter (ohms setting), make sure that
power to the circuit has been disconnected.
When the on/off switch is in the OFF position, no continuity should exist between the common (center) switch
terminal and the switched (side) terminal. In the ON
position, continuity should exist between the common
(center) switch terminal and the switched (side) terminal.
COMMON
TERMINAL
BACK OF
SWITCH
Figure 17
1. On/Off switch
SWITCHED
TERMINAL
NOT USED
Figure 18
Electrical System (Rev. B)
Page 3 – 14
Workman e2050/e2065
Page 33

Battery Discharge Indicator and Hour Meter Gauge
The combination battery discharge indicator and hour
meter gauge is located on the dash panel (Fig. 19).
The battery indicator identifies state of charge of the battery pack. The battery indicator reads full (10 bars) when
the battery pack is fully charged (approximately 51
volts). As battery pack voltage decreases with vehicle
use, fewer battery indicator bars are shown.
When the battery indicator reaches 2 bars, a warning
light illuminates and a battery icon flashes on the gauge
face to identify that battery charge level is extremely low.
At this point, the batteries should be charged.
If the battery indicator reaches 1 bar, the warning light
begins flashing and the vehicle will go into an energy
saving mode: vehicle speed will be reduced to 3 MPH.
At this point, the batteries should be charged to prevent
serious battery damage.
The hour meter registers operating time of the vehicle.
Whenever the vehicle is in motion, the hour meter increases one tenth every 6 minutes. If the vehicle remains stationary for 30 seconds (even if the on/off
switch is ON), the hour meter quits increasing.
BACK OF
The back of the gauge is shown in Figure 20. A wire harness connector plugs into the gauge. Terminals 1, 2 and
5 are not used on the Workman e2050/e2065. See
Chapter 6 – Electrical Diagrams for schematic and wire
harness information.
1
Figure 19
1. Battery discharge indicator and hour meter
85
14
GAUGE
Figure 20
System
Electrical
If the battery discharge indicator or the hour meter prove
to be inaccurate, the gauge should be replaced.
Workman e2050/e2065
Page 3 – 15
Electrical System (Rev. B)
Page 34

Vehicle Direction (Forward/Reverse) and Headlight Switches
The vehicle direction (forward/reverse) switch (Fig. 21)
and headlight switch (Fig. 22) are located on the control
panel. These two switches have identical logic.
The vehicle direction switch is one of several inputs for
the vehicle controller and allows the direction (forward/
reverse) of the vehicle to be changed by the operator.
The headlight switch allows the headlights to be turned
on and off.
NOTE: The headlight system on the Workman e2050
and e2065 consists of two (2) 24 volt lamps connected
in series. If one lamp is burned out or disconnected, neither lamp will illuminate.
Testing
The switch terminals for these switches are marked as
shown in Figure 23. The circuitry of the switch is shown
in the chart below. With the use of a multimeter (ohms
setting), the switch functions may be tested to determine
whether continuity exists between the various terminals
for each switch position. Verify continuity between
switch terminals.
1
1
Figure 21
1. Direction switch
SWITCH
POSITION
NORMAL
CIRCUITS
OTHER
CIRCUITS
OFF / FORWARD 1 + 2 4 + 5
ON / REVERSE 2 + 3 5 + 6
Figure 22
1. Headlight switch
56
1243
Figure 23
Electrical System (Rev. B)
Page 3 – 16
Workman e2050/e2065
Page 35

Vehicle Status Light
The vehicle status light is located on the control panel
(Fig. 24). During normal operation, the status light
should be continuously illuminated. A vehicle electrical
problem will be identified by a flashing status light.
The vehicle status light and LED on the vehicle controller should have the same condition (off, illuminated or
flashing). If the vehicle status light does not illuminate
when the on/off switch is turned ON, check the LED on
the vehicle controller to make sure it is illuminated. If the
controller LED is illuminated and the vehicle status light
is not illuminated, check the vehicle status light and circuit wiring.
1
See Controller (in this section) and your Operator’s
Manual for information on a flashing vehicle status light.
Testing
1. Make sure on/off switch is turned OFF. Remove key
from switch.
2. Disconnect wire harness from vehicle status light.
NOTE: The vehicle status light is a 12 volt DC component. Do not test the light using jumper wires from the
vehicle battery pack (48 VDC).
3. The terminals for the light are marked as shown in
Figure 25. Correctly connect 12 VDC source to the light
terminals.
4. Light should illuminate. Remove voltage source from
the light and reconnect wire harness. Replace status
light if needed.
Figure 24
1. Vehicle status light
1B (–)
1A (+)
Figure 25
System
Electrical
Workman e2050/e2065
Page 3 – 17
Electrical System (Rev. B)
Page 36

Supervisor Speed Limit Switch (Workman e2050)
The supervisor speed limit switch is open in Off position
(key vertical) and closed in On position (key rotated
clockwise). The speed limit switch is one of several inputs for the vehicle controller and allows the speed of the
vehicle to be limited.
Test the switch by disconnecting the wiring and connecting a continuity tester across the two switch terminals.
Rotate key to On position: there should be an indication
of continuity. Rotate key to Off position: there should be
no continuity.
Supervisor Speed Limit Switch (Workman e2065)
Figure 26
The supervisor speed limit switch is open in Off position
(key vertical) and closed in On position (key rotated
clockwise). The speed limit switch is one of several inputs for the vehicle controller and allows the speed of the
vehicle to be limited.
Test the switch by disconnecting the wiring and connecting a continuity tester across switch terminals A and D
(Fig. 27). Rotate key to On position: there should be an
indication of continuity. Rotate key to Off position: there
should be no continuity.
Audio Alarm (Reverse)
The audio alarm sounds when the forward/reverse
switch is placed in the reverse position. The alarm is located under the controller cover beneath the bed.
Testing
IMPORTANT: Make sure to observe polarity on the
alarm terminals when testing. Damage to the alarm
may result from an improper connection.
OFF
B&C
45
o
ON
A&D
B&C
Figure 27
3. Alarm should sound. Remove voltage source from
the alarm. Reconnect alarm to the circuit or replace
alarm if needed.
2
NOTE: The audio alarm is a 12 volt DC component. Do
not test the alarm using jumper wires from the vehicle
battery pack (48 VDC).
1. Make sure on/off switch is turned OFF. Remove key
from switch. Raise bed and remove controller cover.
2. Disconnect wire harness connectors from alarm
(Fig. 28). Using jumper wires, correctly connect 12VDC
source to the alarm terminals noting polarity shown on
alarm decal.
Electrical System (Rev. B)
Page 3 – 18
1
Figure 28
1. Controller 2. Audio alarm
Workman e2050/e2065
Page 37

Charger Interlock Switch
The charger interlock switch is located behind the charger receptacle plate on the front of the seat base (Fig.
29). When the battery charger is plugged into the charger receptacle, the interlock switch closes and provides
an input to the vehicle controller to inhibit vehicle operation.
NOTE: The vehicle should not operate if the charger plug is connected to the charger receptacle.
1. Make sure vehicle On/Off switch is OFF. Remove
key from switch.
2. Remove receptacle plate from front of seat base.
3. Locate charger interlock switch on rear of receptacle
plate. Disconnect harness connector from the switch.
4. Check the continuity of the switch by connecting a
multimeter (ohms setting) across the connector terminals.
5. When the switch plunger is extended there should
not be continuity between the switch terminals.
6. When the switch plunger is depressed, there should
be continuity between the switch terminals.
7. Reconnect harness connector to switch. Install receptacle plate to front of seat base.
1
4
2
3
1. Receptacle plate
2. Screw (4 used)
3
Figure 29
2
6
3. Charger receptacle
4. Charger interlock switch
1
4
5
System
Electrical
Workman e2050/e2065
Page 3 – 19
Figure 30
1. Charger interlock switch
2. Switch plate
3. Charger receptacle
4. Rivet (2 used)
5. Lock nut (2 used)
6. Socket head screw
Electrical System (Rev. B)
Page 38

Main and Accessories Contactors
Two contactors (solenoids) are used on the Workman
e2050 and e2065 for circuit control.
The main contactor provides current to the vehicle controller and is energized when the on/off switch is ON.
The main contactor is located under the controller cover
beneath the bed (Fig. 31).
5
4
1
2
The accessories contactor provides current to the headlights, horn and optional electrical accessories. The accessories contactor is energized when the on/off switch
is ON. The accessories contactor is located beneath the
dash panel.
Testing
NOTE: Prior to taking small resistance readings with a
digital multimeter, short the meter test leads together.
The meter will display a small resistance value (usually
0.5 ohms or less) that is due to the internal resistance of
the meter and test leads. Subtract this value from the
measured value of the component you are testing.
1. Make sure on/off switch is turned OFF. Open the battery circuit by removing one of the battery cables (see
Opening Battery Circuit in the General Information section of this chapter and Fig. 32).
2. Locate contactor that is to be tested. Disconnect all
vehicle harness electrical connections from contactor.
Note wire connector locations on contactor for reassembly purposes.
3. Using jumper wires, apply 48 VDC directly across the
contactor coil posts (Fig. 33). The contactor should click.
With the contactor coil energized, resistance across the
main contact posts should be less than 1 ohm.
3
6
Figure 31
1. Main contactor
2. Cable to controller B+
3. Wire harness connector
A
4. Fuse (F1)
5. Positive battery cable
6. Isolator
1
2
4
Figure 32
1. Negative cable to vehicle 2. Positive cable to vehicle
4. Remove voltage from contactor coil posts. The contactor should click. With the contactor coil not energized,
resistance across the main contact posts should be infi-
nite ohms.
5. Measure resistance across the contactor coil posts
(Fig. 33):
A. For the main contactor, the resistance should be
approximately 126 ohms.
B. For the accessories contactor, the resistance
should be approximately 200 ohms.
Electrical System (Rev. B)
Page 3 – 20
4
3
1
Figure 33
1. Main contactor
2. Accessories contactor
4
2
3
4
3. Main contact posts
4. Contactor coil posts
Workman e2050/e2065
3
4
3
Page 39

6. Replace contactor if necessary.
7. Reconnect electrical connections to contactor. If
main contactor connections were removed, use Figure
34 as a guide for reattaching cable and wire harness
connections.
3
5
4
6
4
3
8. Reconnect battery cable that was removed from battery pack.
7
8
1. Main contactor
2. Cable to controller B+
3. Lock nut
4. Flat washer
Figure 34
5. Wire harness connector
6. Fuse (F1)
7. Positive battery cable
8. Isolator
2
1
System
Electrical
Workman e2050/e2065
Page 3 – 21
Electrical System (Rev. B)
Page 40

Fuses
There are three (3) fuses in the Workman electrical system.
Two (2) of the fuses are located beneath the steering
column (Fig. 35). These fuses supply power to the following:
The upper 10 ampere fuse (F2) supplies power to the
on/off switch and switched circuits.
The lower 10 ampere fuse (F3) supplies power to optional accessories.
The third fuse (F1) is located under the controller cover
beneath the bed (Fig. 36). This fuse is rated at 355 amperes continuous and allows current flow between the
batteries and the vehicle. If this fuse has failed, vehicle
operation will not occur.
1. Fuse (F2)
1
2
Figure 35
2. Fuse (F3)
Testing
CAUTION
When testing fuses for continuity with a multimeter (ohms setting), make sure that fuse is removed from circuit.
IMPORTANT: Before removing fuse F1 (355 Amp)
for testing, open the battery circuit by removing one
of the battery cables (see Opening Battery Circuit in
the General Information section of this chapter).
Make sure on/off switch is turned OFF. Remove fuse to
check continuity. The test meter should read less than
1 ohm.
2
3
1. Controller
2. Fuse (F1)
1
Figure 36
3. Main contactor
Electrical System (Rev. B)
Page 3 – 22
Workman e2050/e2065
Page 41

Fusible Links
The wiring harness for the Workman includes three (3)
fusible links for circuit protection (Fig. 37).
Two fusible links attach to the same main contactor post
as the main fuse. One of these fusible links (FL2) is used
for the switched power circuit. The other fusible link
(FL1) protects the charger circuit.
The third fusible link (FL3) is attached to the controller
B+ terminal. This link provides protection for the charge
indicator/hour meter gauge.
3
1
2
If any of these fusible links should fail, the affected circuit
will not function. See Chapter 6 – Electrical Diagrams for
schematic and wire harness information.
4
Figure 37
1. Main contactor
2. Main fuse contactor post
3. Switched contactor post
5
4. Fusible links FL1 & FL2
5. Fusible link FL3
System
Electrical
Workman e2050/e2065
Page 3 – 23
Electrical System (Rev. B)
Page 42

Accelerator Switch
The accelerator switch is a four terminal, two circuit
switch that is located on the control pedal frame (Fig.
38). The Workman e2050 and e2065 use only one of the
switch circuits (terminals 3 and 4). When the accelerator
pedal is depressed, the switch allows a closed circuit (input) for the controller to allow traction motor operation.
When the accelerator pedal is released, the switch provides an open circuit (no input) for the controller to prevent traction motor operation.
Testing
2
3
1
6
5
1. Park vehicle on a level surface, turn On/Off switch
OFF and remove key from switch.
2. Locate accelerator switch on pedal frame under
dashboard of vehicle.
3. Unplug wiring harness connector from accelerator
switch.
4. With the use of a multimeter (ohms setting), the
switch functions may be tested to determine whether
continuity exists between the switch terminals for both
switch positions. Verify continuity between switch terminals using the following table:
PLUNGER
POSITION
CONTINUITY
NO
CONTINUITY
IN 1 and 2 3 and 4
OUT 3 and 4 1 and 2
5. When reconnecting wiring harness connector to
switch after testing, harness connector and switch terminal area should be filled with dielectric gel (see Special Tools) to prevent corrosion of connection terminals.
Apply gel fully to both harness connector and switch terminal area, plug harness connector into switch to distribute gel, unplug harness connector, reapply gel to both
surfaces and replug harness connector into switch.
4
1. Accelerator pedal
2. Accelerator switch
3. Plate
6
5
SIDE VIEW
1. Terminal 1
2. Terminal 2
3. Terminal 3
Figure 38
4. Screw (2 used)
5. Stop cap screw
6. Lock nut
1
4
6
Figure 39
4. Terminal 4
5. Switch plunger
6. Mounting tab
2
END VIEW
3
6. If switch replacement is needed, see Accelerator
Switch Adjustment procedure in the Adjustments section of this chapter.
Electrical System (Rev. B)
Page 3 – 24
Workman e2050/e2065
Page 43

Accelerator Potentiometer
The accelerator potentiometer is attached to the pedal
frame under the dash (Fig. 40). This potentiometer is
used as one of the inputs for the vehicle controller to
command vehicle speed. The accelerator pedal positions the accelerator potentiometer lever. When the operator presses or releases the accelerator pedal, the
potentiometer resistance changes. This resistance
change is used by the controller to determine current
flow to the traction motor.
If the accelerator potentiometer is out of adjustment, the
diagnostic light on the dash will flash six (6) times. Additionally, if vehicle movement is erratic and jerky, calibration of the accelerator system should be performed. See
Accelerator Potentiometer Adjustment and Accelerator
System Calibration in the Adjustments section of this
chapter.
Before suspecting a faulty potentiometer, follow adjustment procedures for the accelerator switch, accelerator
potentiometer and acceleration system calibration
found in the Adjustments section of this chapter.
4
1. Potentiometer
2. Accelerator pedal
Figure 40
3. Collar
4. Roll pin
1
3
2
System
Electrical
Workman e2050/e2065
Page 3 – 25
Electrical System (Rev. B)
Page 44

Controller
The Workman controller is secured to the rear frame under the controller cover beneath the bed (Fig. 41). The
controller uses inputs from several vehicle switches (on/
off, forward/reverse, accelerator pedal, supervisor,
charger interlock, motor temperature, accelerator potentiometer) to accurately control vehicle speed, vehicle
direction (forward and reverse) and regenerative braking. An internal thermal sensor prevents overheating of
the controller.
Cable connections for the controller are as follows:
Terminal B–: Negative (–) battery cable and wire
harness ground.
Terminal B+: Positive (+) cable from main contac-
tor post and wire harness fusible link (FL3).
Terminal M1: Cable to traction motor armature A2
post.
Terminal M2: Cable to traction motor armature A1
post.
Terminal F1: Cable to traction motor field F1 post.
Terminal F2: Cable to traction motor field F2 post.
When installing cables to controller, torque screws at
terminals B–, B+, M1 and M2 from 85 to 90 in–lb (9.6 to
10.2 N–m) and torque screws at terminals F1 and F2
from 55 to 60 in–lb (6.2 to 6.8 N–m) (Fig. 42). Apply Toro
battery terminal protector (see Special Tools) to controller connections after tightening terminal screws.
NOTE: If the controller LED and vehicle status light are
flashing, attempt to reset the controller by turning the
On/Off switch to OFF, waiting a few seconds and then
turning the switch to ON. If LED and status light continue
flashing, proceed with fault code identification and necessary action.
1
3
2
Figure 41
1. Controller
2. Controller LED
M2
3. Wire harness connector
UP
If wire harness connector is removed from controller,
both harness connector and controller socket should be
filled with dielectric gel to prevent corrosion of connection terminals and potential controller damage. Apply
gel fully to both harness connector and controller socket, plug harness connector into controller to distribute
gel, unplug harness connector, reapply gel to both surfaces and plug harness connector into controller.
M1
85 to 90 in–lb
(9.6 to 10.2 N–m)
B+
F1 F2
B–
A LED exists on the controller to identify normal operation or faults that will prevent the vehicle from operating
correctly. The vehicle status light on the dash panel displays the same information as the LED on the controller.
See chart below for light pattern fault codes identified by
55 to 60 in–lb
(6.2 to 6.8 N–m)
Figure 42
the controller LED and vehicle status light.
Light Pattern Cause Necessary Action
Always on (not
System functioning correctly. None
flashing)
Always off System inoperable. Check for low battery voltage, faulty fuse(s), loose
battery cable connections, damaged battery cables
and/or faulty main contactor.
If batteries, cables and other electrical components are
in good condition, controller replacement may be
necessary.
Electrical System (Rev. B)
Page 3 – 26
Workman e2050/e2065
Page 45

1 Flash
2 Flashes The accelerator pedal was
3 Flashes System inoperable. Turn on/off switch OFF, wait several seconds and turn
4 Flashes Main contactor malfunction. Turn on/off switch OFF, wait several seconds and turn
5 Flashes The charger cord is plugged
6 Flashes Accelerator control
7 Flashes Battery voltage is out of
8 Flashes The controller is overheated. The vehicle will continue to operate but at reduced
9 Flashes The traction motor is
System inoperable. Turn on/off switch OFF, wait several seconds and turn
on/off switch ON. If controller does not reset correctly,
controller replacement may be necessary.
Turn on/off switch OFF, release accelerator pedal and
depressed when on/off
switch was turned ON.
into the vehicle charger
receptacle.
(accelerator switch and
potentiometer) is out of
adjustment.
range.
overheated (battery
discharge indicator displays
more than 1 bar).
turn on/off switch to ON.
If controller does not reset correctly, accelerator switch
adjustment may be necessary or switch may be faulty.
on/off switch ON. If controller does not reset, check
battery pack voltage and all battery cable connections.
Also check main contactor wire and cable connections
and main contactor. NOTE: If main contactor audibly
clicks when on/off switch is turned ON, problem is most
likely a faulty wire or cable connection.
Controller replacement may be necessary.
on/off switch ON. If controller does not reset, inspect
main contactor (see Main and Accessories Contactors in
this section). Check main contactor wire and cable
connections.
If problem continues, contactor replacement may be
necessary.
Turn on/off switch OFF, unplug charger cord from vehicle
and turn on/off switch ON.
If controller does not reset correctly, check charger
interlock switch.
Adjust accelerator switch and potentiometer (see
Accelerator Switch and Accelerator Potentiometer
adjustment/calibration in the Adjustments section of this
chapter).
Inspect and test vehicle batteries and battery cable
connections (see Battery Service in the Service and
Repairs section).
power until the controller temperature lowers.
Stop vehicle and allow motor to cool before continuing
operation. Traction motor high temperature switch may
be faulty.
System
Electrical
Workman e2050/e2065
The battery is nearly
discharged and the vehicle
is in the energy saving mode
(reduced speed and battery
discharge indicator displays
1 bar with red light
illuminated).
Page 3 – 27
Charge the batteries immediately to prevent battery
damage.
Electrical System (Rev. B)
Page 46

Service and Repairs
Battery Service
115 to 125 in lb
(13to14.1N--m)
6
5
4
3
5
4
8
7
115 to 125 in-- lb
(13to14.1N--m)
9
11
12
10
1
RIGHT
2
FRONT
Figure 43
1. Battery (8 used)
2. Battery rod (2 used)
3. Negative cable to vehicle
4. Lock washer (2 used per battery)
5. Hex nut (2 used per battery)
6. Cable terminal boot
7. Battery cable (6 used)
8. Positive cable to vehicle
The batteries are the heart of the Workman electrical
system. With regular and proper service, battery life can
be extended. Additionally, battery and electrical component failure can be prevented.
Workman e2050 Battery Specifications:
Trojan model T--105 Battery (6 Volt Deep Cycle)
Weight: 62 lbs (28 kg)
Capacity: 140 minutes @ 56.25 amps discharge
9. Cable terminal boot
10. Battery retainer (2 used)
11. Flange nut (2 used)
12. Battery cable
Workman e2065 Battery Specifications:
Trojan model T--145 Battery (6 Volt Deep Cycle)
Weight: 72 lbs (33 kg)
Capacity: 210 minutes @ 56.25 amps discharge
NOTE: Trojan model T--145 batteries can be used in
the Workman e2050. These batteries have a higher capacity than the standard Workman e2050 batteries and
therefore, have a longer run time.
Electrical System (Rev. B)
Page 3 -- 28
Rev. D
Workman e2050/e2065
Page 47

Removal (Fig. 43)
2. Make sure the battery supports are clean and repainted if necessary. Make sure cables, terminals, rods
and hold down retainers are in good condition.
WARNING
POTENTIAL HAZARD:
The battery terminals, metal tools and metal ve-
hicle parts could short together.
WHAT CAN HAPPEN:
Sparks can cause the battery gasses to explode.
Damaged cables could short against metal ve-
hicle parts and cause sparks.
HOW TO AVOID THE HAZARD:
When removing or installing the batteries, do
not allow the battery terminals to short against
metal parts of the vehicle.
Do not allow metal tools or metal vehicle parts to
short between the battery terminals or battery
cables.
Always keep the battery retainers in place to
protect and secure the batteries.
IMPORTANT: Be careful not to damage terminal
posts or cable connectors when removing the battery cables.
1. Position vehicle on a level surface, set parking
brake, turn On/Off switch OFF and remove key.
2. Raise bed and secure with prop rod.
3. Open the battery circuit by carefully removing one of
the battery cables (see Opening Battery Circuit in the
General Information section of this chapter).
IMPORTANT: When installing batteries into vehicle,
do not lift batteries using battery terminals as lift
points: battery damage may occur.
3. Using case loops on battery tops as lifting points, set
batteries on the battery supports with battery posts
properly orientated (Fig. 45). Make sure that battery
rods are positioned to allow installation of retainers.
4. Install two (2) battery retainers and nuts to secure
batteries to vehicle (Fig. 44). Torque nuts from 115 to
125 in–lb (13 to 14.1 N–m).
5. Install all but one of the battery cables used to connect battery pack including the positive (red) cable and
negative (black) cable from vehicle (Figures 43 and 45).
Make sure that cables are connected to correct battery
terminal noting battery polarity. Install lock washer and
nut on each battery terminal. Torque nuts from 115 to
125 in–lb (13 to 14.1 N–m) to secure cables.
6. Connect final battery cable to battery terminals.
Install lock washer and nut on battery terminals. Torque
nuts from 115 to 125 in–lb (13 to 14.1 N–m).
7. Apply Toro battery terminal protector (see Special
Tools) to all battery posts and cable connectors to reduce corrosion after connections are made. Make sure
that terminal boots are positioned over all connections.
8. Lower bed.
System
Electrical
4. Once initial cable has been removed from vehicle,
disconnect and remove remaining battery cables from
all battery terminals.
5. Remove flange nuts (item 11) and battery retainers
(item 10) used to secure batteries to vehicle (Fig. 44).
6. Make sure that all battery filler caps are on tightly.
IMPORTANT: When removing batteries from vehicle, do not lift batteries using battery terminals as
lift points: battery damage may occur.
7. Using case loops on battery tops as lifting points, remove batteries from vehicle.
Installation (Fig. 43)
IMPORTANT: To prevent possible electrical problems, install only fully charged batteries.
1. Make sure vehicle on/off switch and all accessories
are OFF. Raise bed and secure with prop rod.
Workman e2050/e2065
Page 3 – 29
1
3
Figure 44
1. Negative cable to vehicle
2. Positive cable to vehicle
A
Figure 45
2
4
3. Flange nut
4. Battery retainer
4
Electrical System (Rev. B)
Page 48

Charging
When the vehicle is not in use, it is recommended to
keep the batteries charged by connecting the battery
charger that is included with the vehicle. The Workman
e2050/e2065 charger is designed to automatically
charge the batteries fully without overcharging. Indicator lights (green and red) and an ammeter on the charger give information about the charging operation.
Make sure to have the battery cell plates covered with
electrolyte before charging the batteries (Fig. 46). Periodically (at least every 50 operating hours) check electrolyte level in the batteries and add distilled water to
ensure proper charging and the best battery performance and life.
3. Check for signs of wetness or leakage on the top of
the battery which might indicate a loose or missing filler
cap, overcharging, loose terminal post or overfilling.
4. Check the battery case for dirt and oil. Clean the battery with a solution of baking soda and water, then rinse
battery with clean water.
5. Check that the battery cover seal is not broken away.
Replace the battery if the seal is broken or leaking.
IMPORTANT: Make sure the area around the battery
filler caps is clean before opening the caps.
IMPORTANT: Do not add acid to the battery. Use
only distilled water to adjust the electrolyte level.
Colder temperatures will increase the time needed to
fully charge the batteries. NEVER attempt to charge frozen batteries. Also, if temperatures below freezing are
expected, do not add water to battery after charging as
added water could freeze and damage battery.
For additional battery charging information, see your
Operator’s Manual and the Battery Charger Operating
Instructions.
Inspection and Maintenance
WARNING
POTENTIAL HAZARD:
Battery electrolyte contains sulfuric acid which
is a deadly poison and it causes severe burns.
WHAT CAN HAPPEN:
If you carelessly drink electrolyte you could die
or if it gets onto your skin you will be burned.
HOW TO AVOID THE HAZARD:
Do not drink electrolyte and avoid contact with
skin, eyes or clothing. Wear safety glasses to
shield your eyes and rubber gloves to protect
your hands.
Fill the battery where clean water is always
available for flushing the skin.
Follow all instructions and comply with all
safety messages on the electrolyte container.
6. Check the electrolyte level in each cell. If the level is
below the tops of the plates in any cell, add just enough
distilled water to the cell to cover the plates. Replace
filler caps and charge the battery (see Operator’s Manual). After charging, check electrolyte level in all cells and
add distilled water until the level is 1/8” (3 mm) below
the bottom of the fill well (Fig. 46).
2
4
1/8 inch
3
(3 mm)
1
Figure 46
1. Battery plates
2. Filler cap
3. Electrolyte level
4. Battery terminal
1. Check for cracks in battery case caused by overly
tight or loose hold–down retainer. Replace any battery
that is cracked and/or leaking.
2. Check battery terminal posts for corrosion. Use a terminal brush to clean corrosion from the battery terminal
posts.
IMPORTANT: Before cleaning the battery, make
sure the filler caps are on tightly.
Electrical System (Rev. B)
Page 3 – 30
Workman e2050/e2065
Page 49

Testing
When testing batteries in the Workman e2050 and
e2065, it is important to test all batteries. Proper performance of the vehicle depends on all batteries being in
good condition. Testing will determine if one (or more) of
the batteries needs to be replaced.
1. The preferred testing procedure is to use the Lester
Electrical 36/48 Volt Battery Discharge Unit (Model
17770). This instrument puts a known discharge load
(56.25 Amps) on the battery pack until the battery pack
reaches 42 volts. A timer incorporated into the discharger measures the time needed to reach that voltage level.
Battery capacity and remaining life can be determined
from the test results. Refer to Discharge Unit Operating
Instructions for further information.
A. Remove battery filler caps. Do not add water prior
to testing specific gravity of battery electrolyte. If
electrolyte level is low, add distilled water and
charge battery (see Operator’s Manual) before performing specific gravity test.
B. Measure the specific gravity of each cell with a
hydrometer. Fill and drain the hydrometer two to four
times before drawing a sample. At the same time,
take the temperature of the cell.
C. Have enough electrolyte in the hydrometer to
completely support the hydrometer float. Record the
hydrometer reading and return the electrolyte to the
battery cell.
D. Repeat test for remaining battery cells.
Other types of battery load testers can also be used to
test the Workman batteries. Many locally available battery load testers do not, however, have any adjustment
on the load that is put on the battery. Results received
from using load testers should follow the recommendations of the load tester manufacturer.
2. If the Lester Battery Discharge Unit (or other load
tester) is not available, an alternate battery test can be
done using a multimeter to perform a voltage test of
each battery. Use the following procedure:
A. For accurate voltage testing, allow batteries to remain idle (no charging, no discharging) for at least 6
hours and preferably 24 hours.
B. Open the battery circuit by carefully removing
one of the battery cables (see Opening Battery Circuit in the General Information section of this chapter). Then, disconnect both cables from battery to be
tested.
C. Measure the battery voltage with the multimeter.
Record battery voltage. The measured voltage will
determine battery state of charge.
D. If voltage readings below 70% charged (see Fig.
47) exist, charge battery (see Operator’s Manual)
and take voltage measurements again. If voltage remains low after charging, consider battery replacement.
3. A third option for battery testing is to perform a specific gravity test of the battery electrolyte using a hydrometer. Use the following procedure:
E. Temperature correct each cell reading. For each
o
10
F (5.5oC) above 80oF (26.7oC) add 0.004 to the
specific gravity reading. For each 10
o
80
F (26.7oC) subtract 0.004 from the specific grav-
o
F (5.5oC) below
ity reading.
Example: Cell Temperature 100oF
Cell Specific Gravity Reading 1.245
ADD (20o above 80oF) 0.008
Correction to 80oF 1.253
F. The specific gravity of all battery cells should be
1.277 +
.007. If low cell readings exist (see Fig. 47),
charge battery (see Operator’s Manual) and take
specific gravity readings again.
G. If specific gravity of any cells remain low after
complete charging, battery should be replaced.
Battery Charge
Level
Specific
Gravity
Open Circuit
Voltage
100% 1.277 6.37
90% 1.258 6.31
80% 1.238 6.25
70% 1.217 6.19
60% 1.195 6.12
50% 1.172 6.05
40% 1.148 5.98
30% 1.124 5.91
20% 1.098 5.83
10% 1.073 5.75
System
Electrical
IMPORTANT: Make sure the area around the battery
fill caps is clean before removing the caps.
Workman e2050/e2065
Page 3 – 31
Figure 47
Electrical System (Rev. B)
Page 50

Battery Storage
If the vehicle will be stored for any period of time, check
battery electrolyte level, adjust level if needed and then
connect battery charger to vehicle. Allow charger to remain connected to vehicle during storage to prevent battery discharge and potential battery damage.
If the vehicle will be stored for more than 30 days and the
battery charger cannot be used for some reason, charge
the batteries fully. Either store batteries on a shelf or in
the vehicle. Store the batteries in a cool atmosphere to
avoid quick deterioration of the charge in the batteries.
To prevent batteries from freezing, make sure they are
fully charged before storage. During the storage period,
charge the batteries at least once every three (3)
months to prevent battery damage. Before returning the
vehicle to service, make sure to fully charge the batteries.
Electrical System (Rev. B)
Page 3 – 32
Workman e2050/e2065
Page 51

Traction Motor Brushes
The traction motor in the Workman e2050/e2065 uses
eight (8) brushes. Traction motor brushes should be inspected every 500 hours of operation or annually.
Inspection
1. Make sure that on/off switch is OFF. Raise and latch
bed to allow access to traction motor.
2. Open the battery circuit by carefully removing one of
the battery cables (see Opening Battery Circuit in the
General Information section of this chapter).
3. Unlatch headband of traction motor and reposition
headband to allow inspection of a brush at the top of the
motor.
4. If end of brush is even with the brush holder (Figs. 48
and 50), brushes should be removed from motor for inspection and measurement (see Traction Motor Service
in this section).
5. In most instances, wear of all traction motor brushes
should be similar to wear found on the top brushes. If inspection of remaining brushes is needed or if brushes
require replacement, traction motor should be removed
from vehicle (see Traction Motor and Traction Motor
Service in this section).
1. Brush
2. Brush holder
2
3
Figure 48
3. Brush spring (tensioned)
4. Brush spring (released)
1
4
1
System
Electrical
6. If vehicle is often operated in severely dirty environments, brush should be removed from motor to allow inspection of mating surface of brush (Fig. 49). If brush
surface is rough, pitted, arced or scored, additional
brush and/or motor inspection should be completed
(see Traction Motor and Traction Motor Service in this
section).
7. Visually inspect commutator surface of motor armature. If commutator surface is rough, pitted, arced or
scored, additional motor inspection should be completed (see Traction Motor and Traction Motor Service
in this section).
8. After brush inspection, make sure brush is correctly
installed in brush holder and tensioned by spring. Refit
headband to traction motor and latch headband.
9. Carefully connect removed battery cable to battery
terminals. Install lock washer and nut on battery terminals. Torque nuts from 115 to 125 in–lb (13 to 14.1 N–m).
10.Lower bed.
2
Figure 49
1. Removed brush 2. Cap screw
4
4
Figure 50
1. Brush holder (side view)
2. Normal brush
3. Worn brush
4. Brush shunt wire
2
1
3
1
Workman e2050/e2065
Page 3 – 33
Electrical System (Rev. B)
Page 52

Traction Motor
14
115 to 125 in lb
(13 to 14.1 N–m)
18
15
16
19
15
16
17
3
4
5
6
7
5
8
9
1
10
11
12
2
13
RIGHT
FRONT
Figure 51
1. Socket head screw (6 used)
2. Flat washer (6 used)
3. Flange nut
4. Support bracket
5. Carriage screw
6. Transaxle mount plate
7. Rubber damper
8. Traction motor
9. Fan
10. Roll pin (2 used)
11. Washer
12. Socket head screw
13. Plastic cap (fits in rear frame)
Removal (Fig. 51)
1. Park vehicle on a level surface, turn on/off switch
OFF, set parking brake and remove key from switch.
2. Remove cargo bed from vehicle (see Cargo Bed Removal in Service and Repairs section of Chapter 5 –
Chassis).
3. Open the battery circuit by carefully removing one of
the battery cables (see Opening Battery Circuit in the
General Information section of this chapter).
14. Cable terminal boot
15. Hex nut
16. Lock washer
17. Positive battery cable
18. Cable terminal boot
19. Negative battery cable
NOTE: Label all electrical leads for reassembly pur-
poses.
IMPORTANT: When removing wires from motor terminals (A1, A2, F1 and F2), use a wrench to retain
lower nut while loosening upper nut (Fig. 53). If terminal studs are allowed to turn during upper nut removal, internal motor damage can occur.
Electrical System (Rev. B)
Page 3 – 34
Workman e2050/e2065
Page 53

4. Disconnect wires from traction motor (Fig. 52):
A. While retaining lower nut, remove upper nut and
wire connector from motor terminals A1, A2, F1 and
F2.
B. Unplug motor temperature sensor from vehicle
wire harness. Note location of cable tie that secures
temperature sensor wires to vehicle.
C. Position disconnected wires away from motor.
5. Remove plastic plug from rear frame to allow access
to socket head screw that retains fan to traction motor.
Remove screw and washer and then remove fan from
motor.
CAUTION
To prevent motor damage and personal injury,
make sure that traction motor is well supported
as it is removed. Motor weighs approximately 62
pounds (28.1 kg).
2. Make sure that rubber damper is installed into the
motor shaft internal spline with the damper flat side toward the motor (Fig. 52).
85 to 90 in–lb
(9.6 to 10.2 N–m)
1
55 to 60 in–lb
(6.2 to 6.8 N–m)
55 to 60 in–lb
(6.2 to 6.8 N–m)
2
3
4
Figure 52
1. Thermal switch
2. Motor shaft spline
3. Rubber damper
4. Transaxle input shaft
System
Electrical
6. Support traction motor to prevent it from falling. Two
suggestions for traction motor support are as follows:
IMPORTANT: Damage to traction motor field coils will
result if eyebolt is threaded into motor housing to far.
A. Remove silver flange head screw from top of motor and carefully install a 3/8 – 16 eyebolt into motor
(Fig. 54). Thread eyebolt into motor approximately
four (4) turns taking care to not bottom eyebolt into
internal field coils. Secure eyebolt with jam nut. Use
eyebolt for support and as a lifting point for motor removal.
B. Use lifting strap wrapped around motor housing
for support and as a lifting point for motor removal.
7. Remove six (6) socket head screws (item 1) and flat
washers (item 2) that secure motor to transaxle.
8. Slide motor away from transaxle to disengage motor
shaft from transaxle input shaft. Carefully lift motor from
vehicle. Take care to not damage thermal switch while
motor is removed.
9. Locate and retrieve rubber damper from motor shaft
internal spline.
1
2
Figure 53
1. Loosening/tightening wrench (upper nut)
2. Retaining wrench (lower nut)
1
2
10.If needed, remove two (2) roll pins from motor shaft.
Installation (Fig. 51)
1. If removed, install two (2) roll pins into motor shaft.
Workman e2050/e2065
Page 3 – 35
Figure 54
1. Eyebolt 2. Jam nut
Electrical System (Rev. B)
Page 54

3. Apply antiseize lubricant or axle grease to the
splines of the transaxle and motor shafts. Apply grease
to lip of seal in transaxle bore.
CAUTION
3
To prevent motor damage and personal injury,
make sure that traction motor is well supported as it is installed. Motor weighs approximately 62 pounds (28.1 kg).
4. Carefully lower motor into vehicle. Align motor shaft
with transaxle input shaft and slide motor to transaxle.
Take care to not damage thermal switch while installing
motor.
5. Align mounting holes of motor, transaxle and transaxle mount plate. Secure motor to transaxle with six (6)
socket head screws (item 1) and flat washers (item 2).
IMPORTANT: When connecting wires to motor terminals (A1, A2, F1 and F2), use a wrench to retain
lower nut while tightening upper nut (Fig. 53). If terminal studs are allowed to turn during upper nut
installation, internal motor damage can occur.
6. Connect wires to traction motor (Fig. 52):
A. Make sure that fasteners and cable connectors
are properly positioned on motor terminals (Fig. 56).
B. Install correct cable connector and nut to motor
terminals A1 and A2. While retaining lower nut,
torque upper nut on terminals A1 and A2 from 85 to
90 in–lb (9.6 to 10.2 N–m).
1
Figure 55
1. Transaxle
2. Screw/washer (6 used)
2
3
Figure 56
1. Upper nut
2. Cable connector
3. Lower nut
2
3. Transaxle mount plate
1
4
5
6
4. Flat washer
5. Insulating washer
6. Motor housing
C. Install correct wire connector and nut to motor terminals F1 and F2. While retaining lower nut, torque
upper nut on terminals F1 and F2 from 55 to 60 in–lb
(6.2 to 6.8 N–m).
D. Plug motor temperature sensor connector into
vehicle wire harness.
7. Position fan to traction motor and secure with socket
head screw and washer. Install plastic plug in hole in
rear frame.
8. Carefully connect removed battery cable to battery
terminals. Install lock washers and nuts on battery terminals. Torque nuts from 115 to 125 in–lb (13 to 14.1 N–m).
9. Install cargo box to the rear frame (see Cargo Box
Installation in Service and Repairs section of Chapter 5
– Chassis).
Electrical System (Rev. B)
Page 3 – 36
Workman e2050/e2065
Page 55

This page is intentionally blank.
System
Electrical
Workman e2050/e2065
Page 3 – 37
Electrical System (Rev. B)
Page 56

Traction Motor Service
14
120 to 140 in–lb
(13.6 to 15.8 N–m)
13
11
12
10
9
1. Frame and field assembly
2. Armature
3. Brush lead (2 used)
4. Cap screw (2 used per brush lead)
5. Cap screw (4 used)
15
8
Figure 57
6. Cap screw (8 used)
7. Brush (8 used)
8. High temperature sensor
9. Headband
10. Bolt (4 used)
1
3
2
5
4
6
7
18 to 22 in–lb
(2 to 2.5 N–m)
11. Commutator end head
12. Bearing
13. Retaining ring
14. Brush spring (8 used)
15. Brush box
Disassembly (Fig. 57)
1. Unlatch and slide headband from traction motor.
2. Pull back the brush springs and latch them in the
open position on the spring holders. Slide brushes from
the brush holders.
3. Use an arbor press or a bearing puller to remove the
armature from the commutator end head and frame and
field assembly (Fig. 58).
4. Remove four (4) bolts that secure the commutator
end head to the frame and field assembly. Remove commutator end head from frame and field assembly.
Electrical System (Rev. B)
Page 3 – 38
5. Remove the retaining ring and press bearing from
the commutator end head. Discard the bearing.
CAUTION
When using compressed air for cleaning motor
components, follow all safety instructions, including wearing eye and respiratory protection.
6. Carefully blow out any accumulated carbon dust and
dirt from the commutator end head and the frame and
field assembly using clean, oil free, compressed air.
Workman e2050/e2065
Page 57

Brush Service
1. Check the brush springs for correct alignment on the
back of the brush. A brush spring that does not apply
equal pressure on the center of the brush will cause the
brush to wear unevenly. Check for correct clearance and
freedom of brush movement in the holder.
2. Replace brushes that are worn to a length of 0.620”
(16 mm). Also, replace brushes if they show signs of uneven wear or show signs of overheating, such as discolored brush shunts and brush springs.
3. Brushes should always be replaced in complete sets
of eight. Use identical replacement parts; do not substitute brush grades as the brushes are matched to the
motor type and application to provide the best service.
Substituting brushes of the wrong grade can cause premature commutator failure and excessive brush wear.
Remove old brushes and replace with identical replacement parts. Hold brush shunts in position and torque
brush screws from 18 to 22 in–lbs (2 to 2.5 N–m) (Fig.
60). Make sure brushes move freely in the holders and
that shunts do not interfere with brush spring movement.
3. It is also recommended that the field be coated with
PD George 1000–70 or RanBar B–535–5S varnish for
proper insulation protection. Both recommended varnishes are Class H water–soluble varnishes. A similar
air–dry varnish may also be used providing it has a
Class H rating.
4. Screws securing the pole pieces to the frame should
be torqued from 250 to 300 in–lb (28.3 to 33.9 N–m) (Fig.
60).
2
3
1
Figure 58
1. Motor housing
2. Puller
3. Arbor press
System
Electrical
4. Make sure the brush box assembly is tight on the
commutator end head. Replace brush box assemblies
in the commutator end head if they are physically damaged or brush holders are loose on the brush plate.
5. Brush springs should be checked for proper tension
using the following procedure (Fig. 59):
A. Place paper strip between brush face and commutator. Hook spring scale as shown.
B. Pull spring scale on a line directly opposite the
line of force exerted by the brush spring. When the
paper strip begins to move freely, read the spring tension on the scale. Brush tension for a new brush
should be 65 ounces (1820 grams) and for a worn
brush should be 40 ounces (1120 grams).
Frame and Field Service
1. Motors that have been disassembled for servicing
should be given a complete inspection of the frame and
field assembly. If damage to the field coils or frame is
found, replace traction motor. Individual frame and field
components are not available.
2. Accumulated carbon dust, grease and other foreign
material can produce a ground path from the field winding to the frame. The frame and field should be cleaned
with Safety–Kleen 105 washing solvent or equivalent.
After cleaning, the frame and field must be oven–dried
for one hour at 300
o
F (148o C) to remove any cleaning
residue.
1
2
3
Figure 59
1. Spring scale
2. Brush spring
2
3. Paper
2
Figure 60
1. Brush screw 2. Pole piece screw
1
Workman e2050/e2065
Page 3 – 39
Electrical System (Rev. B)
Page 58

Commutator Service
1. Chuck armature on the commutator end–bearing
journal and support the drive end of armature using the
”live” center of the shaft. With the armature supported on
both ends, measure the commutator runout and the bar
to bar differences with a dial gauge. Total indicated runout should not exceed 0.003” (0.08 mm) and not more
than 0.0005” (0.013 mm) between any two bars. If the
readings fall outside this limit, the commutator must be
turned and re–undercut.
2. If the commutator must be turned, use only high
quality cutting tools with a controlled cutting rate. Remove only enough copper to bring total indicated runout
and bar to bar height differences into specification.
3. The minimum commutator diameter is 2.750” (70
mm). If the commutator diameter falls below this diameter after turning, the armature must be replaced.
MICA
COPPER SEGMENT
.040”
(1.0 mm)
BAD UNDERCUT BAD UNDERCUT
(CUT TOO WIDE) (CUT TOO NARROW)
GOOD UNDERCUT
MICA MICA
COPPER SEGMENT
COPPER SEGMENT
Figure 61
4. After the commutator is turned, undercut the mica to
a uniform depth of 0.040” (1.0 mm). Be careful to only cut
the mica and not increase the slot width (Fig. 61).
CAUTION
When using compressed air for cleaning motor components, follow all safety instructions,
including wearing eye and respiratory protection.
5. After undercutting, use No. 00 sandpaper to lightly
remove any burrs left from the undercutting operation.
Clean commutator with dry, oil free compressed air and
recheck commutator runout.
Armature Testing
Before an armature is reassembled into the motor, the
following tests should be performed:
NOTE: Armature is wave wound and can be short circuit tested in the following manner.
Traction Motor Specifications
BRUSH LENGTH
Maximum 1.300 in 33 mm
Minimum 0.620 in 16 mm
BRUSH SPRING
TENSION
New Brush 65 ounces 1820 grams
Worn Brush 40 ounces 1120 grams
COMMUTATOR
New Diameter 2.920 in 74 mm
Minimum Diame-
2.800 in 71 mm
ter for Reslotting
Reject Diameter 2.750 in 70 mm
1. Check for grounded circuits by placing one test lead
of a dielectric tester on the commutator and the other
lead at the armature shaft. If the test light comes on, the
armature is grounded.
2. Check for short circuits by placing the armature on a
growler. Use a long, flat piece of metal (such as a hacksaw blade) to locate any shorted windings.
If armature is found to be shorted, grounded or otherwise damaged, replace the traction motor.
Electrical System (Rev. B)
Page 3 – 40
Workman e2050/e2065
Page 59

Assembly (Fig. 57)
NOTE: After the motor has been disassembled, it is
recommended that a new commutator end head bearing be installed because removed bearing may have
been damaged during disassembly. Although the bearing may appear and feel good, the bearing could be ”brinelled” (races or balls deformed) and may exhibit noise
and vibration problems or fail within a relatively short period of service. When installing new bearing, always
press against the race that is absorbing the pressure or
bearing damage may occur.
PRESS FIXTURE
MUST PRESS
AGAINST
OUTER RACE
BEARING
END HEAD
MUST BE HELD
STATIONARY
ARMATURE
ASSEMBLY
BEARING AND
RETAINING RING
INSTALLED
IN END HEAD
PRESS FIXTURE
MUST HOLD
INNER RACE
STATIONARY
1. After servicing the commutator and brushes, re–assemble the wiring in the commutator end head as originally found. Ensure the wiring does not contact metal
and rotating parts. Also, make sure that the wiring allows
the brushes to move unrestricted in the brush holders.
2. Press a new bearing into the commutator end head,
pressing on the bearing outer race only (Fig. 62). Secure
bearing with retaining ring.
3. Position the commutator end head to the frame and
field assembly and secure with four (4) bolts. Torque
bolts from 120 to 140 in–lb (13.6 to 15.8 N–m).
4. Ensure the brushes are pushed out of the way.
5. While supporting the inner–race of the bearing in
commutator end head, carefully press the armature into
the end head and bearing assembly (Fig. 62).
6. Position brushes in brush holders and carefully release the brush springs allowing the brushes to contact
the commutator. Make sure brush shunts do not interfere with spring movement.
7. Repair or replace the headband if damaged. Install
the headband on the motor.
3
5
1. Terminal
2. Lower nut
3. Flat washer
1
Figure 62
Figure 63
4. Insulating washer
5. Motor housing
2
4
System
Electrical
2
1
3
4
8. Make sure that lower nuts are properly tightened on
traction motor terminals (Fig. 63 and 64). Lower nuts on
F1 and F2 terminals should be torqued from 50 to 60 in–
lb (5.7 to 6.8 N–m). Lower nuts on A1 and A2 terminals
should be torqued from 110 to 140 in–lb (12.4 to 15.8
N–m).
Workman e2050/e2065
Page 3 – 41
1. A2 terminal
2. F2 terminal
Figure 64
3. F1 terminal
4. A1 terminal
Electrical System (Rev. B)
Page 60

Battery Charger
1
2
12
11
10
9
Figure 65
1. Upper case
2. Transformer
3. Lower case
4. SCR assembly
5. Control board
6. Relay
7. Circuit breaker
8. AC cordset
For service of the battery charger, see the Lester Electrical Technician Service Guide at the end of this chapter.
3
4
5
8
7
6
9. DC cordset
10. Ammeter
11. Fuse
12. Diode assembly
Electrical System (Rev. B)
Page 3 – 42
Workman e2050/e2065
Page 61

Table of Contents
SPECIFICATIONS 3. . . . . . . . . . . . . . . . . . . . . . . . . . . .
TROUBLESHOOTING 4. . . . . . . . . . . . . . . . . . . . . . . . .
Brakes 4. . . . . . . . . . . . . . . . . . . . . . . . . . . . . . . . . . . . .
ADJUSTMENTS 6. . . . . . . . . . . . . . . . . . . . . . . . . . . . . .
Adjust Brakes (Workman e2050) 6. . . . . . . . . . . . . .
SERVICE AND REPAIRS 8. . . . . . . . . . . . . . . . . . . . . .
Rear Wheels and Brakes 8. . . . . . . . . . . . . . . . . . . . .
Brake Service (Workman e2050) 10. . . . . . . . . . . . .
Rear Brake Service (Workman e2065) 12. . . . . . . .
Hydraulic Brake System (Workman e2065) 14. . . .
Bleed Brake System (Workman e2065) 15. . . . . . .
Front Brake Calipers (Workman e2065) 16. . . . . . .
Brake Master Cylinder (Workman e2065) 18. . . . .
Brake Master Cylinder Service (Workman e2065)19
Parking Brake (Workman e2065) 20. . . . . . . . . . . . .
Transaxle 22. . . . . . . . . . . . . . . . . . . . . . . . . . . . . . . . .
Transaxle Service 26. . . . . . . . . . . . . . . . . . . . . . . . . .
SPICER OFF–HIGHWAY COMPONENTS MODEL
12 (ELECTRIC) MAINTENANCE MANUAL
Chapter 4
Transaxle and Brakes
Brakes
Transaxle and
Workman e2050/e2065 Transaxle and Brakes (Rev. B)Page 4 – 1
Page 62

This page is intentionally blank.
Transaxle and Brakes (Rev. B)
Page 4 – 2
Workman e2050/e2065
Page 63

Specifications
Item Description
Transaxle
Transaxle Fluid Capacity 2 quarts (1.9 liters)
Transaxle Fluid 10W–30 Motor Oil
Brakes
Transaxle and
Workman e2050/e2065 Transaxle and Brakes (Rev. B)Page 4 – 3
Page 64

Troubleshooting
Á
Á
Á
Á
Á
Á
Á
Á
Á
Á
Á
Á
Á
Á
Á
Á
Á
Á
Á
Á
Á
Á
Á
Á
Á
Á
Á
Á
Á
Á
Á
Á
Á
Á
Á
Á
Á
Á
Á
Á
Á
Á
Á
Á
Á
Á
Á
Á
Á
Á
Á
Á
Á
Á
Á
Á
Á
Á
Á
Á
Á
Á
Brakes
Problem
Brake pedal goes to the floor.
БББББББББББ
БББББББББББ
БББББББББББ
БББББББББББ
БББББББББББ
БББББББББББ
БББББББББББ
БББББББББББ
БББББББББББ
БББББББББББ
Brake pedal is spongy.
БББББББББББ
БББББББББББ
БББББББББББ
БББББББББББ
БББББББББББ
БББББББББББ
Possible Cause
Brakes are incorrectly adjusted (Workman e2050).
ББББББББББББББББББББ
ББББББББББББББББББББ
Brake cable is loose or broken (Workman e2050).
ББББББББББББББББББББ
Rear brake shoes are excessively worn.
ББББББББББББББББББББ
ББББББББББББББББББББ
Front brake pads are excessively worn (Workman e2065).
ББББББББББББББББББББ
Brake fluid level low (Workman e2065).
ББББББББББББББББББББ
ББББББББББББББББББББ
Brake fluid leak at hose, caliper or wheel cylinder (Workman
e2065).
ББББББББББББББББББББ
ББББББББББББББББББББ
Brake master cylinder faulty (Workman e2065).
Rear brake drums are excessively worn or cracked.
ББББББББББББББББББББ
Rear brake shoes are not burnished.
ББББББББББББББББББББ
ББББББББББББББББББББ
Brake cable is loose or broken (Workman e2050).
ББББББББББББББББББББ
Brakes are incorrectly adjusted (Workman e2050).
ББББББББББББББББББББ
ББББББББББББББББББББ
Air in brake lines (Workman e2065).
Brakes pull to either side.
БББББББББББ
БББББББББББ
БББББББББББ
БББББББББББ
БББББББББББ
БББББББББББ
БББББББББББ
БББББББББББ
Brakes squeal.
БББББББББББ
БББББББББББ
БББББББББББ
БББББББББББ
БББББББББББ
БББББББББББ
БББББББББББ
Transaxle and Brakes (Rev. B)
Tire pressure is incorrect or uneven between tires.
ББББББББББББББББББББ
Brake linings are contaminated.
ББББББББББББББББББББ
ББББББББББББББББББББ
Front wheel alignment (toe–in) is incorrect.
ББББББББББББББББББББ
Brake cable is binding, loose or broken (Workman e2050).
ББББББББББББББББББББ
ББББББББББББББББББББ
Brake shoes are distorted.
ББББББББББББББББББББ
Tires on same axle are unmatched.
ББББББББББББББББББББ
Brake lining is glazed or saturated.
ББББББББББББББББББББ
Rear shoe–to–shoe spring(s) is (are) weak or broken.
ББББББББББББББББББББ
Brake shoes are distorted.
ББББББББББББББББББББ
ББББББББББББББББББББ
Anchor plate is bent (Workman e2050).
ББББББББББББББББББББ
Brake drums and shoes are dusty.
ББББББББББББББББББББ
ББББББББББББББББББББ
Rear brake drums are scored or out–of–round.
Page 4 – 4
Workman e2050/e2065
Page 65

Brakes (continued)
Á
Á
Á
Á
Á
Á
Á
Á
Á
Á
Á
Á
Á
Á
Á
Á
Á
Á
Á
Á
Á
Á
Á
Á
Á
Á
Á
Á
Á
Á
Á
Á
Á
Á
Á
Á
Á
Á
Á
Á
Á
Á
Á
Á
Á
Á
Á
Á
Á
Á
Problem
Brakes drag.
БББББББББББ
БББББББББББ
БББББББББББ
БББББББББББ
БББББББББББ
БББББББББББ
БББББББББББ
БББББББББББ
БББББББББББ
БББББББББББ
БББББББББББ
Brake pedal is hard to push.
БББББББББББ
БББББББББББ
БББББББББББ
Wheels lock–up when braking.
БББББББББББ
БББББББББББ
БББББББББББ
БББББББББББ
БББББББББББ
БББББББББББ
БББББББББББ
Brakes fade.
БББББББББББ
Possible Cause
Parking brake is applied.
ББББББББББББББББББББ
ББББББББББББББББББББ
Brakes are incorrectly adjusted (Workman e2050).
ББББББББББББББББББББ
Rear shoe–to–shoe spring(s) is (are) weak or broken.
ББББББББББББББББББББ
ББББББББББББББББББББ
Brake pedal is binding.
ББББББББББББББББББББ
Brake cable is binding (Workman e2050).
ББББББББББББББББББББ
Brake linings are saturated.
ББББББББББББББББББББ
ББББББББББББББББББББ
Rear brake drums are bent or out–of–round.
ББББББББББББББББББББ
Front brake calipers or rotors are damaged (Workman e2065)
ББББББББББББББББББББ
Incorrect brake lining material.
ББББББББББББББББББББ
Brake pedal linkage is binding.
ББББББББББББББББББББ
Brake cable is binding (Workman e2050).
ББББББББББББББББББББ
Brake linings are contaminated.
ББББББББББББББББББББ
Brake linings are loose or damaged.
ББББББББББББББББББББ
ББББББББББББББББББББ
Wheel or transaxle bearings are damaged.
ББББББББББББББББББББ
Rear brake shoe–to–shoe springs are weak.
ББББББББББББББББББББ
Rear brake drums are grooved in the contact face with brake
ББББББББББББББББББББ
shoes.
ББББББББББББББББББББ
Brake drums or rotors are overheated.
ББББББББББББББББББББ
Brake linings are saturated.
Brakes
Transaxle and
Vehicle surges at slow speeds and
БББББББББББ
chatters at fast speeds.
Rear brakes do not self adjust.
БББББББББББ
БББББББББББ
Workman e2050/e2065 Transaxle and Brakes (Rev. B)Page 4 – 5
Brake drums or rotors are bent or out–of–round.
ББББББББББББББББББББ
Adjuster bolt is seized.
ББББББББББББББББББББ
ББББББББББББББББББББ
Adjuster lever does not engage star wheel.
Page 66

Adjustments
Adjust Brakes (Workman e2050)
The recommended brake pedal travel is from 1” to 1 1/2”
(25.4 to 38.1 mm) with a 75 to 100 pound (34 to 45.4 kg)
input force to the brake pedal.
Adjustment Procedure (Figures 1 and 2)
1. Park vehicle on a level surface, turn on/off switch
OFF and remove key from the on/off switch.
2. Depress brake pedal lightly (10 to 15 pound input
force) until resistance is achieved. Check the gap between the brake lever and the brake lever stop to determine the distance the brake equalizer needs to be
adjusted (Fig 2).
1
2
3
4
5
6
7
3. Remove the cotter pin and clevis pin that secure the
brake rod clevis to the brake lever.
4. Disconnect the spring from the hole near the end of
the brake rod.
5. Press the brake pedal down fully to raise the brake
lever away from the brake rod clevis.
6. Thread the brake rod in or out of the brake equalizer
as needed to remove the gap identified in Step 2. Do not
overtighten or brakes will drag and wear prematurely.
7. Reinstall the spring into the hole in the brake rod.
NOTE: Use a pry bar placed between the accelerator
pivot shaft and the brake equalizer to aid in installation
of the clevis pin that secures the brake rod clevis to the
brake lever.
8. Connect the brake rod clevis to the brake lever using
the clevis pin and cotter pin removed previously.
9. Verify that brake pedal travel is from 1” to 1 1/2” (25.4
to 38.1 mm) with a 75 to 100 pound (34 to 45.4 kg) input
force to the brake pedal.
7
1. Clevis pin/cotter pin
2. Brake lever
3. Brake rod clevis
4. Brake rod
1
2
8
Figure 1
5. Brake equalizer
6. Spring
7. Brake cable
8. Accelerator pedal shaft
3
4
5
Transaxle and Brakes (Rev. B)
Page 4 – 6
1. Brake lever
2. Brake lever stop
3. Clevis pin/cotter pin
Figure 2
4. Brake rod clevis
5. Brake equalizer
Workman e2050/e2065
Page 67

This page is intentionally blank.
Brakes
Transaxle and
Workman e2050/e2065 Transaxle and Brakes (Rev. B)Page 4 – 7
Page 68

Service and Repairs
Rear Wheels and Brakes
45 to 65 ft–lb
(61 to 88 N–m)
2
15 to 19 ft–lb
4
5
3
7
(20 to 26 N–m)
6
1
RIGHT
FRONT
1. Lug nut (5 used per wheel)
2. Wheel assembly
3. Brake drum
4. Axle shaft
5. Wheel stud (5 used per wheel)
6. Flange head screw (4 used per brake)
7. Brake assembly (RH shown)
8. Nut (4 used per brake)
9. Cotter pin
Removal (Fig. 3)
1. Park vehicle on a level surface, turn on/off switch
OFF and remove key from the on/off switch.
8
12
9
10
Figure 3
10. Clevis pin
11. Brake cable (RH shown)
12. Retaining ring
13. Transaxle
4. Remove the axle shaft from the transaxle (see the
Spicer Off–Highway Components Model 12 (Electric)
Maintenance Manual at the end of this chapter).
5. If necessary, remove brake assembly as follows:
13
11
WARNING
Before jacking up the vehicle, review and follow
Jacking Instructions in Operator’s Manual and
Chapter 1 – Safety.
2. Chock wheels not being jacked up. Lift rear wheel off
the ground using a jack and place jack stand or blocks
beneath the rear frame to support vehicle.
NOTE: To remove brake drum, it may be necessary to
loosen brake cable adjustment or remove brake cable
from brake actuator lever.
3. Remove five (5) lug nuts, wheel assembly and brake
drum from the wheel hub.
Transaxle and Brakes (Rev. B)
Page 4 – 8
A. Remove cotter pin and clevis pin securing the
brake cable bracket to the brake actuator lever (Fig.
4).
B. On Workman e2065, clean hydraulic brake line
area of rear brake cylinder to prevent contamination. Loosen and disconnect hydraulic brake line
from wheel cylinder. Plug brake line and position it
away from wheel cylinder.
C. Remove four (4) cap screws and nuts securing
the brake assembly to the transaxle. Remove brake
assembly from the transaxle.
Workman e2050/e2065
Page 69

Installation (Fig. 3)
Burnish Brake Shoes
IMPORTANT:On Workman e2050 vehicles, the brake
actuator levers must be positioned below the transaxle mount. On Workman e2065 vehicles, the levers
should be positioned above the transaxle mount.
When positioned correctly, the brake actuator levers will point toward the rear of the vehicle (Fig. 4).
1. If brake assembly was removed from axle, position
brake assembly to the transaxle.
A. Secure brake assembly to the transaxle with four
(4) cap screws and nuts. Torque screws from 15 to 19
ft–lb (20 to 26 N–m).
B. On Workman e2065, position hydraulic brake
line to wheel cylinder. Connect brake line to wheel
cylinder.
C. Secure brake cable bracket to the brake actuator
lever with clevis pin and cotter pin (Fig. 4).
2. Install axle shaft into transaxle (see the Spicer Off–
Highway Components Model 12 (Electric) Maintenance
Manual at the end of this chapter).
3. Slide brake drum onto wheel hub making sure that
hole in drum aligns with hole in wheel hub on axle.
4. Position wheel assembly to the vehicle with valve
stem facing out and secure with five (5) lug nuts. Torque
lug nuts in a criss–cross pattern from 45 to 65 ft–lb (61
to 88 N–m).
5. Lower vehicle to ground.
To provide maximum brake performance after rear
brake shoes are replaced, burnish new brake shoe linings.
IMPORTANT:To prevent brake overheating, do not
drive vehicle with the brakes applied.
IMPORTANT:When burnishing brake shoes, do not
allow the brakes to lock up. Also, allow brakes to
cool between stops.
1. Drive vehicle while making 6 to 7 normal stops at
about 200 ft (60 m) intervals while traveling at 10 to 15
mph (16 to 24 KPH).
2. Make several normal stops with the vehicle going in
the reverse direction. This will self adjust the clearance
between the brake shoes and drum.
Workman e2050 Shown
3
4
1
2
Brakes
Transaxle and
CAUTION
After servicing the brakes, always check the
brakes in a wide open, level area that is free of
other persons and obstructions.
6. Check and adjust brakes (see Operator’s Manual).
1. Cotter pin
2. Clevis pin
Figure 4
3. Brake cable bracket
4. Brake actuator lever
Workman e2050/e2065 Transaxle and Brakes (Rev. B)Page 4 – 9
Page 70

Brake Service (Workman e2050)
6
7
2
9
ROTATION TO
EXPAND BRAKE SHOES
9
7
10
19
1
4
7
7
2
1
9
6
5
3
7
12
3
18
11
7
17
16
15
14
8
7
5
6
17
13
1. Backing plate
2. Hold down pin
3. Bottom shoe–to–shoe spring
4. Top shoe–to–shoe spring
5. Auto adjust spring
6. Shoe cup (spring loaded)
7. Brake shoe
8
Transaxle and Brakes (Rev. B)
Figure 5
8. Actuator lever
9. Adjusting screw
10. PTFE coated washer
11. Push rod
12. Shim washer
13. Protective boot
Page 4 – 10 (Rev. C)
1
14. Pivot pin
15. Wave washer
16. Washer
17. Adjusting lever
18. Retaining clip
19. Anchor abutment
Workman e2050/e2065
Page 71

Disassembly (Fig. 5)
1. Remove auto adjust spring and shoe–to–shoe
springs from brake shoes.
2. Remove hold down pins and shoe cups securing the
brake shoes to the backing plate.
3. Remove brake shoes from backing plate.
Inspection
1. Inspect brake drums.
IMPORTANT:Brake drum machining is not recommended. Replace brake drums as a set to maintain
equal braking forces.
3. Inspect backing plate surfaces which contact with
the brake shoes for grooves that may restrict shoe
movement. Replace backing plate if grooves can not be
removed by light sanding with emery cloth or other suitable abrasive. Replace backing plate if cracked, warped
or excessively rusted.
4. Inspect anchor abutment and rivets for deformation.
Replace entire brake assembly if deformation or excessive rust is found.
5. Replace adjuster screw and shim washers if rusted,
corroded, bent or fatigued.
6. Replace brake cables if frayed, stretched or kinked.
Assembly (Fig. 5)
A. Clean drums with denatured alcohol. Check
braking surface diameter in at least three places. If
the diameter exceeds 6.320 inches (16.05 cm), replace both brake drums.
B. Replace drums that are cracked, deeply grooved,
tapered, significantly out–of–round, scored, excessively rusted or heat spotted.
C. Minor scoring can be removed with sandpaper.
2. Inspect brake shoe linings.
IMPORTANT:Replace brake shoes as a set (all four
shoes) to maintain equal braking forces.
A. Replace brake shoes if damaged or if lining is
worn to 1/16” (1.6 mm). Also, replace shoes if lining is
contaminated by oil, grease or other fluids.
NOTE: Overheated springs lose their tension and can
cause brake linings to wear out prematurely.
B. Inspect brake shoe webbing, shoe–to–shoe
springs and auto adjust spring for overheating. Overheating is indicated by a slight blue color. Inspect
brake shoe webbing for deformation. Replace parts
as necessary.
IMPORTANT:Brake shoe lining surfaces must be
free of grease, oil and other foreign matter.
1. Apply a light film of lubricant to the following:
A. Surfaces of the shoe web that contact the backing plate, push rod and adjusting screw.
B. Six ledges on which the brake shoes rest.
C. Entire surfaces of PTFE coated washers.
D. Entire surface of pivot pin.
E. Slot in push rod that contacts actuator lever.
F. Surfaces of adjusting lever that contact wave
washer, washer and pivot pin.
G. Surfaces of the actuator bracket that contact the
star wheel of the adjusting screw.
2. Position brake shoes to backing plate. Secure shoes
to plate with shoe cups and hold down pins.
3. Secure brake shoes with shoe–to–shoe springs and
auto adjust spring.
Brakes
Transaxle and
C. Inspect hold down pins and shoe cups for bends,
rust and corrosion. Replace as necessary.
Workman e2050/e2065 Transaxle and Brakes (Rev. B)Page 4 – 11 (Rev. C)
Page 72

Rear Brake Service (Workman e2065)
110 to 120 in–lb
(12.4 to 13.6 N–m)
110 to 120 in–lb
(12.4 to 13.6 N–m)
6
2
10
11
9
3
12
1. Brake backing plate
2. Washer head screw
3. Brake shoe
4. Lower spring
5. Wheel cylinder
13
7
8
5
1
7
8
(12.4 to 13.6 N–m)
4
3
12
11
10
110 to 120 in–lb
Figure 6
6. Parking brake lever (LH shown)
7. Belleville washer
8. Adjuster lever
9. Dust cover
10. Flat washer
11. Bolt
12. Shoe hold down cup and spring
13. Upper spring
Disassembly (Fig. 6)
CAUTION
Be careful when removing springs from brake
shoes. The springs are under heavy load and
may cause personal injury.
1. Remove upper and lower springs from brake shoes.
2. Remove shoe hold down cups and springs that secure the brake shoes to the backing plate.
3. Remove brake shoes from backing plate.
Transaxle and Brakes (Rev. B)
Page 4 – 12
4. If required, slide parking brake lever from slot and
dust cover in backing plate.
5. If necessary, remove two (2) washer head screws
that secure wheel cylinder to backing plate. Remove
wheel cylinder from backing plate.
6. If necessary, remove bolts and washers to allow adjuster levers to be separated from backing plate. Locate
and remove belleville washers from between adjuster
levers and backing plate.
Workman e2050/e2065
Page 73

Inspection (Fig. 6)
Assembly (Fig. 6)
1. Inspect brake drums.
IMPORTANT:Brake drum machining is not recommended. Replace brake drums as a set to maintain
equal braking forces.
A. Clean drums with denatured alcohol. Check
braking surface diameter in at least three places. If
the diameter exceeds 6.320” (16.05 cm), replace
both brake drums.
B. Replace drums that are cracked, deeply grooved,
tapered, significantly out–of–round, scored, heat
spotted or excessively rusted.
C. Minor scoring can be removed with sandpaper.
2. Inspect brake shoe linings.
IMPORTANT:Replace brake shoes as a set (all four
shoes) to maintain equal braking forces.
A. Replace brake shoes if damaged or if lining is
worn to 1/16” (1.6 mm). Replace if lining is contaminated by oil, grease, or other fluids.
IMPORTANT:Brake shoe lining surfaces must be
free of grease, oil and other foreign matter.
1. Apply a light film of lubricant to the following:
A. Ledges on which the brake shoes rest.
B. Pin surfaces on adjuster levers.
C. Anchor block surface that contacts shoe webs.
D. Both surfaces of belleville washers that are positioned between adjuster levers and backing plate.
2. If removed, position lubricated belleville washer between lever adjuster and backing plate. Secure adjuster
to backing plate with washer and bolt. Torque bolt from
110 to 120 in–lb (12.4 to 13.6 N–m).
3. If removed, secure wheel cylinder to backing plate
with two (2) washer head screws. Torque screws from
110 to 120 in–lb (12.4 to 13.6 N–m).
4. If removed from backing plate, slide parking brake lever into slot and dust cover in backing plate.
NOTE: Overheated springs lose their tension, and can
cause brake linings to wear out prematurely.
B. Inspect brake shoe webbing, upper and lower
springs, and shoe hold down springs for overheating. Overheating is indicated by a slight blue color. Inspect brake shoe webbing for deformation. Replace
parts as necessary.
C. Inspect hold down pins on adjuster levers for
bends, rust and corrosion. Replace as necessary.
3. Inspect backing plate surfaces, which contact with
the brake shoes for grooves that may restrict shoe
movement. Replace plate if grooves can not be removed by light sanding with emery cloth or other suitable abrasive. Replace plate if cracked, warped or
excessively rusted.
4. Inspect adjuster levers for deformation. Replace levers if deformation or excessive rust is found.
5. Replace parking brake cables if frayed, stretched or
kinked.
5. Position brake shoes to backing plate. Make sure
that each shoe is properly positioned at anchor block,
parking brake lever, wheel cylinder and pin on adjuster
lever. Secure shoes to backing plate with shoe hold
down cups and springs.
CAUTION
Be careful when installing springs to brake
shoes. The springs are under heavy load and
may cause personal injury.
6. Secure brake shoes with upper and lower springs.
Brakes
Transaxle and
Workman e2050/e2065 Transaxle and Brakes (Rev. B)Page 4 – 13
Page 74

Hydraulic Brake System (Workman e2065)
13
33
34
14
35
7
4
2
10
5
26
25
32
22
RIGHT
FRONT
1. Brake caliper (LH)
2. Brake caliper (RH)
3. Brake rotor (2 used)
4. Front brake tube
5. Front brake hose
6. Carriage screw
7. Rear brake tube
8. Carriage screw
9. Rear brake hose bracket
10. Cap screw
11. Thread forming screw (6 used)
12. Clip
13. Tee fitting
36
12
19
6
32
8
20
18
21
17
23
24
9
11
16
11
15
27
32
31
28
30
Loctite #242
29
3
37
1
Figure 7
14. Rear brake tube (RH)
15. Rear brake tube (LH)
16. Insulated clip (5 used)
17. Cap screw (2 used)
18. Flange nut (2 used)
19. Clevis pin
20. Cotter pin
21. Master cylinder
22. Union fitting
23. Rear brake tube
24. Rear brake hose
25. Hose bracket (2 used)
26. Tube clamp (2 used)
27. R–Clamp
28. Cap screw (2 per caliper used)
29. Lock washer (2 per caliper used)
30. Socket head screw (4 per rotor used)
31. Washer head screw (2 used)
32. Lock nut
33. Cap screw
34. Lock nut
35. Rear brake (RH)
36. Rear brake (LH)
37. Wheel hub assembly (2 used)
When performing service work on the Workman e2065
hydraulic brake system, make sure to thoroughly clean
components before disassembly. Use Figure 7 as a
guide for removal and installation of hydraulic brake
components.
Transaxle and Brakes (Rev. B)
Page 4 – 14
Workman e2050/e2065
Page 75

Bleed Brake System (Workman e2065)
1. Connect a suitable transparent hose to bleeder valve
on a wheel cylinder or caliper. Submerge other end of
hose in a glass container partially filled with clean brake
fluid.
2. Have a helper pump brake pedal several times, then
hold pedal down firmly.
3. With pedal firmly depressed, open bleeder valve until pedal fades to floor. Close bleeder valve before releasing pedal.
4. Repeat procedure until a continuous flow of brake
fluid, with no air bubbles, is released from bleeder valve.
Make sure fluid level is maintained in brake fluid reservoir at all times.
5. Repeat steps 1 to 4 for other brake cylinders and calipers.
CAUTION
After servicing the brakes, always check the
brakes in a wide open, level area that is free of
other persons and obstructions.
6. After bleeding of brakes is completed, test vehicle to
make sure brakes are operating correctly and brake
pedal is solid.
Brakes
Transaxle and
Workman e2050/e2065 Transaxle and Brakes (Rev. B)Page 4 – 15
Page 76

Front Brake Calipers (Workman e2065)
2
RIGHT
FRONT
13
10
To rear
brakes
9
Loctite #242
8
7
6
45 to 65 ft–lb
(61 to 88 N–m)
3
5
4
1
12
11
1. LH brake caliper
2. RH brake caliper
3. Lock washer (2 per caliper used)
4. Cap screw (2 per caliper used)
5. Wheel hub assembly
Transaxle and Brakes (Rev. B)
Figure 8
6. Brake rotor
7. Socket head screw (4 per rotor used)
8. Spindle (LH shown)
9. A–arm (LH shown)
Page 4 – 16
10. Brake master cylinder
11. Wheel assembly
12. Lug nut
13. Front brake hose
Workman e2050/e2065
Page 77

Removal (Fig. 8)
1. Park machine on a level surface, stop engine, set
parking brake and remove key from the ignition switch.
WARNING
Before jacking up the machine, review and follow
Jacking Instructions in Chapter 1 – Safety.
2. Chock wheels not being jacked up. Jack front wheel
off the ground and place blocks beneath the frame.
3. Remove front wheel from machine (see Lower
Steering and Front Wheel Removal).
4. Clean hydraulic brake line area of brake caliper to
prevent contamination. Loosen and disconnect brake
line from caliper. Plug brake line and position it away
from caliper.
5. Remove two (2) cap screws and lock washers that
secure the brake caliper to the spindle.
6. Slide brake caliper from brake rotor and remove caliper from machine.
7. If necessary, remove brake pads from caliper (Fig.
9):
3. Align caliper mounting holes with spindle. Secure
caliper with two (2) cap screws and lock washers.
4. Install brake hose to caliper.
5. Install front wheel assembly. Torque lug nuts from 45
to 65 ft–lb (61 to 88 N–m).
6. Lower machine to ground.
7. Bleed brakes (see Bleed Brake System in this section).
CAUTION
After servicing the brakes, always check the
brakes in a wide open, level area that is free of
other persons and obstructions.
8. Check brake operation.
3
2
Brakes
Transaxle and
A. Remove anti–rattle clip from caliper.
B. Remove pins from caliper by prying with a flat
blade screwdriver through loop in pins.
C. Slide brake pads from caliper. For assembly purposes, note orientation of inner and outer pads as
the pads are not the same.
D. Replace the brake pads if the friction material is
worn to less than 1/32” (0.8 mm).
Installation (Fig. 8)
1. If brake pads were removed from caliper, install pads
(Fig. 9):
A. If brake pads are being replaced, it will be necessary to push caliper pistons back into the caliper
bore before installing new pads.
B. Slide brake pads into caliper. Make sure that friction material on pads is toward brake rotor position.
C. Secure pads into caliper with two (2) pins. Make
sure that pins snap into caliper slots. Install anti–
rattle clip to caliper, pin and brake pads.
1. Brake pad
2. Pin (2 used)
1
Figure 9
3. Anti–rattle clip
2. Slide brake caliper onto brake rotor. Make sure that
rotor is between brake pads.
Workman e2050/e2065 Transaxle and Brakes (Rev. B)Page 4 – 17
Page 78

Brake Master Cylinder (Workman e2065)
4
5
6
7
1
2
3
RIGHT
FRONT
Figure 10
1. Master cylinder
2. Cap screw
3. Brake pedal
4. Clevis pin
5. Cotter pin
Removal (Fig. 10)
1. Remove front hood from machine.
2. Remove cotter pin from the clevis pin that connects
master cylinder to brake pedal.
3. Clean hydraulic brake line area of master cylinder to
prevent contamination. Remove both brake lines from
master cylinder. Cap ends of brake lines and position
them away from master cylinder.
4. Remove flange head nuts from cap screws that secure master cylinder to pedal frame.
5. Pull master cylinder from machine.
Transaxle and Brakes (Rev. B)
Page 4 – 18
6. Flange head nut
7. Pedal frame
Installation (Fig. 10)
1. Position master cylinder to pedal frame and secure
with cap screws and flange nuts.
2. Remove plugs from brake lines. Install brake lines to
master cylinder.
3. Connect master cylinder to brake pedal with clevis
pin and cotter pin.
4. Install front hood to machine.
5. Bleed brakes (see Bleed Brake System in this chapter). Check brake operation.
Workman e2050/e2065
Page 79

Brake Master Cylinder Service (Workman e2065)
Disassembly (Fig. 11)
1. Remove reservoir and flange seal. Push in on the
push rod so the stop pin can be removed.
2. Disconnect lower end of the dust cover from the
housing.
3. Push in on the push rod and remove circlip, then remove push rod with dust cover and clevis. Remove retainer washer.
4. Remove primary piston assembly and secondary
piston assembly from cylinder housing.
Inspection
1. Clean all metal parts with isopropyl alcohol, then
clean out and dry grooves and passageways with compressed air. Make sure cylinder bore and component
pieces are thoroughly clean.
2. Check cylinder bore, pistons and springs for damage
or excessive wear. Replace brake cylinder assembly if
signs of pitting, scoring or cracks are evident in cylinder
bore.
Assembly (Fig. 11)
1
2
3
11
Figure 11
1. Reservoir
2. Flange seal
3. Stop pin
4. Secondary piston assy
5. Clevis
6. Jam nut
12
4
10
9
8
7
7. Dust cover
8. Push rod
9. Circlip
10. Retainer washer
11. Primary piston assy
12. Cylinder housing
6
5
Brakes
Transaxle and
1. Apply a film of clean brake fluid to cylinder bore and
piston assemblies.
2. Install secondary piston assembly and primary piston assembly into cylinder.
3. Install retainer washer.
4. Install push rod and secure in place with circlip.
Install lower end of dust cover to housing.
5. Push in on push rod so stop pin can be installed to
retain secondary piston assembly, then install flange
seal and reservoir.
Workman e2050/e2065 Transaxle and Brakes (Rev. B)Page 4 – 19
Page 80

Parking Brake (Workman e2065)
11
10
9
8
7
6
5
17
16
1
2
3
RIGHT
FRONT
4
12
13
14
15
1. Parking brake cover
2. Operator seat
3. Seat base
4. Cable equalizer bracket
5. Parking brake lever
6. Curved washer
Transaxle and Brakes (Rev. B)
Figure 12
7. Lock nut
8. Flat washer
9. Flange head screw (4 used)
10. Flat washer (2 used)
11. Screw (2 used)
12. Cap screw
Page 4 – 20
13. Cotter pin
14. Clevis pin
15. Parking brake cable (2 used)
16. Parking brake support
17. Cable retaining ring (2 used)
Workman e2050/e2065
Page 81

Disassembly (Fig. 12)
Assembly (Fig. 12)
1. Park machine on a level surface, stop engine and remove key from the ignition switch. Chock wheels to prevent the machine from moving.
2. Disconnect both brake cables from rear of machine:
A. Remove cotter pin and clevis pin that secures
each brake cable end to brake lever.
B. Remove retaining ring that secures each brake
cable to frame.
C. Remove screw and flange nut that secure each
R–clamp to rear frame.
3. Note routing of brake cables for assembly purposes.
4. Remove parking brake cover from seat base.
5. Remove four (4) flange head screws that secure
parking brake support to seat base.
6. Carefully remove parking brake support and brake
cables from machine. Take care to not damage brake
cables while removing them from seat base opening.
7. Remove brake cables from parking brake support
and cable equalizer bracket using Figure 12 as a guide.
1. Secure brake cables to parking brake support and
cable equalizer bracket using Figure 12 as a guide.
2. Route brake cables through seat base opening taking care to not damage cables. Position parking brake
support to seat base.
3. Secure parking brake support to seat base with four
(4) flange head screws.
4. Position brake cables to rear brake assemblies using
cable routing noted during disassembly.
5. Secure brake cables to rear of machine:
A. Secure each R–clamp to rear frame with screw
and flange nut.
B. Secure each brake cable to frame with retaining
ring.
C. Secure each brake cable end to brake lever with
clevis pin and cotter pin.
6. Check parking brake operation and adjust if necessary.
Brakes
Transaxle and
Workman e2050/e2065 Transaxle and Brakes (Rev. B)Page 4 – 21
Page 82

Transaxle
v
115 to 125 in–lb
(13 to 14.1 N–m)
23
2
3
4
5
3
22
6
7
8
9
1
10
11
21
16
15
14
13
45 to 65 ft–lb
(61 to 88 N–m)
20
2
19
17
18
12
1. Socket head screw (6 used)
2. Flange nut
3. Carriage screw (5 used)
4. Support bracket
5. Transaxle mount plate
6. Rubber damper
7. Traction motor
8. Fan
Transaxle and Brakes (Rev. B)
Figure 13
9. Roll pin (2 used)
10. Washer
11. Socket head screw
12. Lug nut (5 used per wheel)
13. Wheel assembly
14. Brake drum
15. Transaxle
16. Flange head screw (4 used)
Page 4 – 22
17. Cotter pin
18. Clevis pin
19. Brake cable
20. Transaxle vent hose
21. Flat washer (6 used)
22. Negative battery cable
23. Positive battery cable
Workman e2050/e2065
Page 83

Removal (Fig. 13)
1. Park vehicle on a level surface, turn on/off switch
OFF, set parking brake and remove key from switch.
2. Remove cargo bed from vehicle (see Cargo Bed Removal in Service and Repairs section of Chapter 5 –
Chassis).
3. Open the battery circuit by carefully removing one of
the battery cables (see Opening Battery Circuit in the
General Information section of Chapter 3 – Electrical
System).
NOTE: Label all electrical leads for reassembly purposes.
IMPORTANT: When removing cables from traction
motor terminals (A1, A2, F1 and F2), use a wrench to
retain lower nut before loosening upper nut (Fig.
14). If terminal studs are allowed to turn during upper nut removal, internal motor damage can occur.
9. Loosen and remove two (2) flange nuts and carriage
screws that secure transaxle mount plate (item 5) to
support bracket (item 4) (Fig. 16).
10.Remove four (4) flange head screws and flange nuts
securing the transaxle to the rear frame.
11. Carefully lower transaxle and motor assembly from
the rear of the vehicle.
12.If necessary, remove traction motor from transaxle
(see Traction Motor Removal in Service and Repairs
section of Chapter 3 – Electrical System).
1
4. Disconnect cables from traction motor:
A. While retaining lower nut, remove upper nut and
cable connector from motor terminals A1, A2, F1 and
F2.
B. Unplug motor temperature sensor from vehicle
wire harness.
C. Position disconnected cables away from motor.
WARNING
Before jacking up the vehicle, review and follow
Jacking Instructions in Operator’s Manual and in
Chapter 1 – Safety.
5. Jack up rear of vehicle enough to remove rear
wheels.
A. Chock the front and rear of both front tires to prevent the vehicle from moving.
B. Support both sides of the rear frame with jackstands positioned just in front of the axle tubes. This
will allow the transaxle to be removed from the rear of
the vehicle.
2
Figure 14
1. Loosening/tightening wrench (upper nut)
2. Retaining wrench (lower nut)
3
2
Figure 15
1. Cotter pin
2. Clevis pin
3. Brake cable bracket
4. Brake actuator lever
Brakes
Transaxle and
4
1
6. Remove rear wheels from vehicle.
7. Remove cotter pins and clevis pins that secure brake
cables to brake actuator levers (Fig. 15). Position brake
cables away from transaxle assembly.
8. Attach hoist or chain fall to the transaxle and motor
assembly. Make sure lifting device is attached so it can
hold the full weight of the transaxle and motor.
Workman e2050/e2065 Transaxle and Brakes (Rev. B)Page 4 – 23
Page 84

Installation (Fig. 13)
1. If removed, install traction motor to transaxle (see
Traction Motor Installation in Service and Repairs section of Chapter 3 – Electrical System).
2. Position transaxle and motor assembly to the rear
frame. Loosely install all fasteners used to secure transaxle to vehicle. Tighten fasteners in the following order:
A. Tighten four (4) flange head screws and flange
nuts that secure transaxle to the rear frame.
B. Tighten two (2) flange nuts and carriage screws
that secure transaxle mount plate (item 5) to support
bracket (item 4).
3. Install brake cables to brake actuator levers with clevis pins and cotter pins.
1
1. Support bracket
2. Carriage screws/nuts
3
2
Figure 16
3. Transaxle mount plate
4. Position wheel assemblies to the vehicle with valve
stems facing out. Secure each wheel with five (5) lug
nuts. Torque lug nuts in a criss–cross pattern from 45 to
65 ft–lb (61 to 88 N–m).
5. Lower vehicle from jackstands.
6. Connect wires to traction motor (Fig. 17):
IMPORTANT: When connecting cables to motor terminals (A1, A2, F1 and F2), use a back–up wrench to
retain lower nut before tightening upper nut (Fig.
14). If terminal studs are allowed to turn during upper nut installation, internal motor damage can occur.
A. Install cable connector and upper nut to motor
terminals A1 and A2. While retaining lower nut,
torque upper nut on terminals A1 and A2 from 85 to
90 in–lb (9.6 to 10.2 N–m).
B. Install cable connector and upper nut to motor
terminals F1 and F2. While retaining lower nut,
torque upper nut on terminals F1 and F2 from 55 to
60 in–lb (6.2 to 6.8 N–m).
85 to 90 in–lb
(9.6 to 10.2 N–m)
55 to 60 in–lb
(6.2 to 6.8 N–m)
55 to 60 in–lb
(6.2 to 6.8 N–m)
Figure 17
C. Plug motor temperature sensor connector into
vehicle wire harness.
7. Carefully connect removed battery cable to battery
terminals. Install lock washers and nuts on battery terminals. Torque nuts from 115 to 125 in–lb (13 to 14.1 N–m).
8. Install cargo box to the rear frame (see Cargo Box
Installation in Service and Repairs section of Chapter 5
– Chassis).
9. Check brakes for proper adjustment (see Operator’s
Manual).
Transaxle and Brakes (Rev. B)
Page 4 – 24
Workman e2050/e2065
Page 85

This page is intentionally blank.
Brakes
Transaxle and
Workman e2050/e2065 Transaxle and Brakes (Rev. B)Page 4 – 25
Page 86

Transaxle Service
30
31
30
29
28
27
32
26
30
35
28
29
27
4
5
6
7
8
1
10
7
8
9
12
34
9
8
7
11
30
31
32
3
25
23
24
23
33
21
13
22
13
15
16
25
15
3
16
20
14
18
2
17
Figure 18
1. Oil seal
2. Wheel stud (5 used per side)
3. Axle shaft
4. Ball bearing
5. Input shaft
6. Ball bearing
7. O–ring
8. Retaining ring
9. Endcap plug
10. Ball bearing
11. Vent elbow
12. Transaxle housing
13. Bearing
14. Cap screw (4 used)
15. Bearing cap
16. Bearing cap bolt (2 used per cap)
17. Plug
18. Cover plate
19. Screw (10 used)
20. Lock nut (4 used)
21. Final drive gear
22. Differential assembly
23. O–ring
24. Intermediate shaft & gear
NOTE: For service of the transaxle, see the Spicer Off–
Highway Components Model 12 (Electric) Maintenance
Manual at the end of this chapter.
19
25. Flange head screw (4 per brake)
26. LH brake assembly
27. Oil seal
28. Retaining ring
29. Bearing retaining ring
30. Retaining ring
31. Ball bearing
32. Lock nut (4 used per brake)
33. Plug
34. Ball bearing
35. RH brake assembly
Transaxle and Brakes (Rev. B)
Page 4 – 26
Workman e2050/e2065
Page 87

Table of Contents
SPECIFICATIONS 2. . . . . . . . . . . . . . . . . . . . . . . . . . . .
TROUBLESHOOTING 3. . . . . . . . . . . . . . . . . . . . . . . . .
Suspension and Steering 3. . . . . . . . . . . . . . . . . . . .
SERVICE AND REPAIRS 5. . . . . . . . . . . . . . . . . . . . . .
Check Tire Pressure 5. . . . . . . . . . . . . . . . . . . . . . . . .
Inspect Tires and Wheels 5. . . . . . . . . . . . . . . . . . . .
Upper Steering 6. . . . . . . . . . . . . . . . . . . . . . . . . . . . .
Steering Gearbox 8. . . . . . . . . . . . . . . . . . . . . . . . . . .
Front Wheels (Workman e2050) 10. . . . . . . . . . . . .
Lower Steering (Workman e2050) 12. . . . . . . . . . . .
Front Wheels and Lower Steering (Workman
e2065) 14. . . . . . . . . . . . . . . . . . . . . . . . . . . . . . . . . .
A–arm and Frame Pivot Yoke 16. . . . . . . . . . . . . . . .
Seat Base 20. . . . . . . . . . . . . . . . . . . . . . . . . . . . . . . . .
Front Hood 22. . . . . . . . . . . . . . . . . . . . . . . . . . . . . . . .
Cargo Bed 24. . . . . . . . . . . . . . . . . . . . . . . . . . . . . . . .
Chapter 5
Chassis
Chassis
Workman e2050/e2065 Page 5 – 1 Chassis (Rev. B)
Page 88

Specifications
Item Description
Front tire (22 x 9.5 – 10, 4 ply) pressure 8 to 22 PSI (0.55 to 1.52 bar)
Rear tire (22 x 9.5 – 10, 4 ply) pressure 8 to 22 PSI (0.55 to 1.52 bar)
Front wheel cap screw torque (Workman e2050) 135 to 165 ft–lb (183 to 224 N–m)
Wheel lug nut torque (front and rear) 45 to 65 ft–lb (61 to 88 N–m)
Workman e2050/e2065Page 5 – 2Chassis (Rev. B)
Page 89

Troubleshooting
Á
Á
Á
Á
Á
Á
Á
Á
Á
Á
Á
Á
Á
Á
Á
Á
Á
Á
Á
Á
Á
Á
Á
Á
Á
Á
Á
Á
Á
Á
Á
Á
Á
Á
Á
Á
Á
Á
Á
Á
Á
Á
Á
Á
Á
Á
Á
Á
Á
Á
Á
Á
Á
Á
Á
Á
Á
Á
Suspension and Steering
Problem
Front end is noisy.
БББББББББББ
БББББББББББ
БББББББББББ
БББББББББББ
БББББББББББ
Rear end is noisy.
БББББББББББ
БББББББББББ
Excessive steering play.
БББББББББББ
БББББББББББ
БББББББББББ
БББББББББББ
БББББББББББ
БББББББББББ
Front end shimmies.
БББББББББББ
БББББББББББ
БББББББББББ
БББББББББББ
БББББББББББ
БББББББББББ
БББББББББББ
Possible Cause
Front wheel lug nuts are loose.
ББББББББББББББББББББ
ББББББББББББББББББББ
Front wheel bearings are loose or worn.
ББББББББББББББББББББ
Front end components are loose or worn.
ББББББББББББББББББББ
ББББББББББББББББББББ
Steering gear is loose.
Rear wheel lug nuts are loose.
ББББББББББББББББББББ
Transaxle problem (see Chapter 4 – Transaxle and Brakes).
ББББББББББББББББББББ
Front wheel lug nuts are loose.
ББББББББББББББББББББ
Front wheel bearings are loose or worn.
ББББББББББББББББББББ
ББББББББББББББББББББ
Steering linkage is loose or worn.
ББББББББББББББББББББ
Tie rod ends are loose or worn.
ББББББББББББББББББББ
Steering gear is incorrectly adjusted.
ББББББББББББББББББББ
Front wheel lug nuts are loose.
ББББББББББББББББББББ
Front wheel bearings are loose or worn.
ББББББББББББББББББББ
ББББББББББББББББББББ
Front wheel alignment (toe–in) is incorrect.
ББББББББББББББББББББ
Steering linkage is loose or worn.
ББББББББББББББББББББ
Tie rod ends are loose or worn.
ББББББББББББББББББББ
ББББББББББББББББББББ
Rubber insert in A–arm is worn.
Chassis
Vehicle is unstable or wanders.
БББББББББББ
БББББББББББ
БББББББББББ
БББББББББББ
БББББББББББ
БББББББББББ
БББББББББББ
БББББББББББ
БББББББББББ
Workman e2050/e2065 Page 5 – 3 Chassis (Rev. B)
Tire pressure is low or uneven between tires.
ББББББББББББББББББББ
ББББББББББББББББББББ
Wheel lug nuts are loose.
ББББББББББББББББББББ
Front wheel bearings are loose.
ББББББББББББББББББББ
Front wheel alignment (toe–in) is incorrect.
ББББББББББББББББББББ
ББББББББББББББББББББ
Steering column bushings are worn.
ББББББББББББББББББББ
Rubber insert in A–arm is worn.
ББББББББББББББББББББ
ББББББББББББББББББББ
Steering gear is incorrectly adjusted.
Page 90

Suspension and Steering (continued)
Á
Á
Á
Á
Á
Á
Á
Á
Á
Á
Á
Á
Á
Á
Á
Á
Problem
Steering is hard.
БББББББББББ
БББББББББББ
БББББББББББ
БББББББББББ
БББББББББББ
Vehicle pulls to one side when not
БББББББББББ
braking.
БББББББББББ
БББББББББББ
Possible Cause
Tire pressure is low or uneven between tires.
ББББББББББББББББББББ
ББББББББББББББББББББ
Front wheel alignment (toe–in) is incorrect.
ББББББББББББББББББББ
Steering linkage is binding or damaged.
ББББББББББББББББББББ
ББББББББББББББББББББ
Steering gear is damaged or worn.
Tire pressure is low or uneven between tires.
ББББББББББББББББББББ
Front wheel alignment (toe–in) is incorrect.
ББББББББББББББББББББ
ББББББББББББББББББББ
Steering or suspension component may be bent.
Workman e2050/e2065Page 5 – 4Chassis (Rev. B)
Page 91

Service and Repairs
Check Tire Pressure
The tire pressure range for front and rear tires is 8 to 22
PSI (0.55 to 1.52 bar). The tire pressure needed is determined by the payload carried.
The lower the air pressure, the less the compaction and
tire marks are minimized. Lower pressure should not be
used for heavy payloads at higher speeds.
Inspect Tires and Wheels
Operating accidents, such as hitting curbs, can damage
a tire or rim and also disrupt wheel alignment, so inspect
wheel condition (tire and rim) and wheel alignment (toe–
in) after any accident.
Check wheels to ensure they are mounted securely.
Torque wheel lug nuts (front and rear) from 45 to 65 ft-lb
(61 to 88 N–m). On Workman e2050 vehicles, the front
wheel cap screws should be torqued from 135 to 165 ftlb (183 to 224 N–m).
Higher pressures should be used for heavier payloads
at higher speeds. Do not exceed the maximum tire pressure.
If desired, tires can be moved from one position of the
vehicle to another to extend tread life (e.g. front tires to
rear and rear tires to front). All tires on the Workman
e2050 and e2065 are the same size.
Chassis
Workman e2050/e2065 Page 5 – 5 Chassis (Rev. B)
Page 92

Upper Steering
13
Antiseize
lubricant
11
10
14
9
8
7
6
10
12
4
1
2
3
13 to 17 ft–lb
(18 to 23 N–m)
16
1. Nut
2. Lock washer
3. Steering wheel
4. Flange lock nut
5. Steering gearbox
6. Cap screw
4
15
7. Lock washer
8. Steering shaft
9. Cap screw (3 used)
10. Upper steering bushing
11. Carriage bolt (4 used)
Antiseize
lubricant
5
Figure 1
12. Steering column
13. Dust cover
14. Collar
15. Pitman arm
16. Steering wheel cover
Workman e2050/e2065Page 5 – 6Chassis (Rev. B)
Page 93

Removal (Fig. 1)
1. Park vehicle on a level surface, turn on/off switch
OFF, set parking brake and remove key from the switch.
2. Open the battery circuit by carefully removing one of
the battery cables (see Opening Battery Circuit in the
General Information section of Chapter 3 – Electrical
System).
3. Remove front hood to gain access to the steering
mechanism (see Front Hood Removal in this section).
3. Insert steering shaft up through the steering column.
Place dust cover onto the shaft.
4. Secure steering column to the mounting plate on the
frame with four (4) carriage screws and flange lock nuts.
NOTE: Apply antiseize lubricant to the steering gearbox shaft before installing steering shaft knuckle.
5. Position knuckle of the lower steering shaft onto the
gearbox shaft. Secure knuckle to the steering gearbox
shaft with cap screw and lock washer.
4. Remove steering wheel cover carefully from the
steering wheel. Remove nut and lock washer securing
the steering wheel to the steering shaft. Pull steering
wheel from the shaft.
5. Remove cap screw and lock washer securing the
lower steering shaft knuckle to the steering gearbox
shaft. Pull knuckle from the gearbox shaft.
6. Remove four (4) flange lock nuts and carriage bolts
securing the steering column to the mounting plate on
the frame.
7. Remove dust cover from the steering shaft. Replace
cover if damaged. Slide steering shaft out of the steering
column.
8. Disconnect both tie rods from the Pitman arm on the
steering gearbox (see Lower Steering Removal in this
section).
9. Remove three (3) flange lock nuts and cap screws
securing the steering gearbox to the tower plate on the
front frame. Remove gearbox from the tower plate.
Installation (Fig. 1)
6. Connect both tie rods to the Pitman arm on the steering gearbox (see Lower Steering Installation in this section).
NOTE: Apply antiseize lubricant to the steering shaft
splines before installing the steering wheel.
7. Position front tires straight ahead. Position steering
wheel to the steering shaft so that the leg of the “Y”
formed by the wheel struts is directed towards the operator platform.
8. Secure steering wheel to shaft with lock washer and
nut. Torque nut from 13 to 17 ft–lb (18 to 23 N–m). Install
steering wheel cover to steering wheel.
9. Install front hood to the frame and fenders (see Front
Hood Installation in this section).
10.Reconnect removed battery cable to battery terminals. Install lock washer and nut on battery terminals.
Torque nuts from 115 to 125 in–lb (13 to 14.1 N–m).
11. Check front wheel alignment and adjust if required
(see Operator’s Manual).
Chassis
1. Position steering gearbox to the tower plate of the
front frame with the Pitman arm facing down and to the
rear. The gearbox shaft must be to the left side of the
tower.
2. Secure steering gearbox to the tower plate with three
(3) cap screws and flange lock nuts.
Workman e2050/e2065 Page 5 – 7 Chassis (Rev. B)
Page 94

Steering Gearbox
18
15
9
8
90 to 110 in–lb
(10.2 to 12.4 N–m)
3
27 to 33 ft–lb
(37 to 45 N–m)
6
2
17
10
1
4
1. Gasket
2. Hex washer head screw (4 used)
3. Seal
4. Sector gear
5. Flat washer
6. Ball bearing
7. Output shaft spacer
16
14
11
10
12
13
Note alignment marks
Figure 2
8. Stepped washer
9. Flange head screw with patch lock
10. Ball bearing
11. Input shaft spacer
12. Flat washer
13. Cap screw
7
6
5
175 to 225 in–lb
(19.8 to 25.4 N–m)
19
14. Grease fitting
15. Steering housing cover
16. Steering housing
17. Pinion gear
18. Oil seal
19. Pitman arm
Workman e2050/e2065Page 5 – 8Chassis (Rev. B)
Page 95

Disassembly (Fig. 2)
Assembly (Fig. 2)
IMPORTANT:Do not reuse flange head screw with
patch lock (item 9) after it has been removed.
1. Remove flange head screw with patch lock (item 9)
and stepped washer (item 8) from Pitman arm. Discard
flange head screw.
2. Remove cap screw (item 13) and flat washer (item
12) from pinion gear shaft.
3. Remove four (4) hex washer head screws (item 2)
securing the housing cover and gasket to the steering
housing. Remove cover and gasket from the housing.
Replace gasket if damaged.
4. Inspect gears. Sector and pinion gear teeth must be
free of damage that prevents them of free movement.
5. Remove pinion gear (item 17) from the housing.
IMPORTANT:Note alignment marks on Pitman arm
shaft and sector gear. If marks are not visible,
matchmark shaft and gear before disassembly.
Their position is critical during assembly.
6. Separate Pitman arm (item 19) from the sector gear
(item 4) and steering housing. Remove Pitman arm from
the housing.
7. Inspect bearings. Bearings must spin smoothly and
be free of damage. Press bearings and spacer out of
housing if necessary.
NOTE: If seals are removed, note orientation of seal
lips for installation purposes.
8. Inspect seals. Seals must be free of rips and tears.
Replace seals if necessary.
IMPORTANT:Always replace ball bearings as a set.
1. If ball bearings were removed:
A. Press new bearing into housing from the inside
first.
B. Turn housing over. Insert spacer and press new
bearing into housing.
2. If seals (items 3 and 18) were removed, press new
seals into housing. Install seals with seal lips up.
3. Place flat washer onto shaft of the Pitman arm. Insert
shaft into steering housing.
IMPORTANT:The position of the Pitman arm and
sector gear is critical during assembly. If either or
both of these parts is replaced, make sure their
alignment matches the alignment of the original
gear and Pitman arm.
4. Position sector gear onto the spline of the Pitman
arm shaft while aligning marks.
IMPORTANT:Make sure sector gear is centered to
the pinion gear.
5. Insert pinion gear into the small bearing in the steering housing.
6. Fill steering housing with number 2 general purpose
grease. Make sure all gear teeth on the sector and pinion gears are covered with grease.
7. Place gasket and steering housing cover onto the
housing. Secure cover to housing with four (4) hex
washer head screws. Torque screws from 90 to 110 in–
lb (10.2 to 12.4 N–m).
Chassis
IMPORTANT:Flange head screw with patch lock
(item 9) should be replaced whenever it is removed.
8. Secure flange head screw with patch lock (item 9)
and step washer (item 8) to the Pitman arm. Make sure
to position step washer as in Figure 2. Torque screw
from 27 to 33 ft–lb (37 to 45 N–m).
9. Secure cap screw (item 13) and flat washer (item 12)
to the pinion gear shaft. Torque cap screw from 175 to
225 in–lb (19.8 to 25.4 N–m).
Workman e2050/e2065 Page 5 – 9 Chassis (Rev. B)
Page 96

Front Wheels (Workman e2050)
Antiseize
Lubricant
1
RIGHT
FRONT
1. Spindle (LH shown)
2. Bearing (with retaining ring)
3. Wheel stud (5 per wheel)
4. Wheel hub
2
3
5
45 to 65 ft–lb
(61 to 88 N–m)
Figure 3
5. Spacer
6. Tire/wheel assembly
7. Lug nut (5 per wheel)
8. Flat washer
6
4
135 to 165 ft–lb
(183 to 224 N–m)
2
Loctite #242
7
9. Large flat washer
10. Cap screw
11. Dust cap
8
9
11
10
Workman e2050/e2065Page 5 – 10Chassis (Rev. B)
Page 97

Removal (Fig. 3)
1. Park vehicle on a level surface, turn on/off switch
OFF, set parking brake and remove key from the on/off
switch.
WARNING
3. Position wheel to studs in wheel hub and secure with
five (5) lug nuts. Torque lug nuts from 45 to 65 ft–lb (61
to 88 N–m).
4. Lower machine to ground. Remove chocks from
wheels.
Before jacking up the machine, review and follow
Jacking Instructions in Operator’s Manual and
Chapter 1 – Safety.
2. Chock wheels not being jacked up. Jack front wheel
off the ground and place blocks beneath the frame.
3. Loosen and remove five (5) lug nuts that secure
wheel to machine. Remove wheel from vehicle.
4. Remove wheel hub from spindle:
A. Carefully remove dust cap from the wheel to prevent damage to the cap.
B. Remove cap screw and two (2) washers that secure the wheel hub to the spindle. Slide wheel hub
from the spindle shaft.
5. If necessary, remove bearings from both sides of the
wheel hub (Fig. 4). Discard removed bearings. Retrieve
spacer from wheel hub. Clean the spacer and the inside
of the wheel hub.
Installation (Fig. 3)
2
3
1. Wheel hub
2. Bearing
3. Retaining ring
1
4
3
2
5
Figure 4
4. Spacer
5. Wheel stud
1. If bearings were removed from wheel hub, position
spacer in wheel hub and press new bearings into the
hub until the bearing retaining rings seat against hub
(Fig. 4).
2. Install wheel hub to spindle:
A. Apply antiseize lubricant to spindle shaft.
B. Slide wheel hub onto spindle shaft with the wheel
studs facing out.
NOTE: Apply Loctite #242 (or equivalent) to the
threads of the cap screw.
C. Place large washer and then small washer onto
the cap screw. Thread cap screw with washers into
the spindle shaft.
D. Torque cap screw from 135 to 165 ft–lb (183 to
224 N–m).
Chassis
Workman e2050/e2065 Page 5 – 11 Chassis (Rev. B)
Page 98

Lower Steering (Workman e2050)
19
18
17
16
20 to 25 ft–lb
(27 to 34 N–m)
RIGHT
FRONT
20
21
22
23
14
15
14
13
12
75 to 100 ft–lb
(102 to 136 N–m)
24
17
1
11
2
10
20 to 25 ft–lb
(27 to 34 N–m)
2
3
4
Antiseize
Lubricant
5
Loctite #242
135 to 165 ft–lb
(183 to 224 N–m)
6
7
8
9
1. Pitman arm
2. Grease fitting
3. Cap screw (king pin)
4. Spindle (LH)
5. Front wheel assembly
6. Flat washer
7. Large flat washer
8. Cap screw
9. Dust cap
10. Lock nut
11. A–arm (LH)
12. A–arm (RH)
13. Thrust washer
14. Bushing
15. Kingpin sleeve
16. Spindle (RH)
NOTE: Both tie rod assemblies consist of two ball joints
(items 19 and 23) with jam nuts, two slotted hex nuts
(item 17), two cotter pins (item 18) and tie rod (item 21).
Figure 5
17. Slotted hex nut (2 used per tie rod)
18. Cotter pin (2 used per tie rod)
19. Ball joint (RH thread)
20. Jam nut (RH thread)
21. Tie rod
22. Jam nut (LH thread)
23. Ball joint (LH thread)
24. Grease fitting
Workman e2050/e2065Page 5 – 12Chassis (Rev. B)
Page 99

Removal (Fig. 5)
Installation (Fig. 5)
1. Park vehicle on a level surface, turn on/off switch
OFF, set parking brake and remove key from the on/off
switch.
WARNING
Before jacking up the machine, review and follow
Jacking Instructions in Operator’s Manual and
Chapter 1 – Safety.
2. Chock wheels not being jacked up. Jack front wheel
off the ground and place blocks beneath the frame.
3. Remove front wheel assembly as follows:
A. Remove dust cap carefully from the wheel to prevent damage to the cap.
B. Remove cap screw and two (2) washers that secure the wheel assembly to the spindle. Slide wheel
assembly from the spindle shaft.
4. Remove spindle as follows:
A. Remove cotter pin and slotted hex nut that secure
tie rod ball joint to the spindle. Separate ball joint from
the spindle.
1. Install spindle as follows:
A. Position king pin sleeve into the pivot hub of the
A–arm. Spacer must extend through the bottom of
the hub.
B. Place thrust washer onto the bottom of the king
pin sleeve. Then position spindle over the hub, king
pin sleeve and thrust washer.
NOTE: Make sure cap screw (king pin) is inserted down
through the spindle and A–arm hub.
C. Secure spindle to A–arm hub with cap screw
(king pin) and lock nut. Torque lock nut from 75 to 100
ft–lb (102 to 136 N–m).
D. If tie rod was removed from Pitman arm, insert tie
rod ball joint up through Pitman arm and secure with
slotted hex nut.
E. Insert tie rod ball joint down through the spindle.
Secure with slotted hex nut.
F. Torque slotted hex nut(s) from 20 to 25 ft–lb (27 to
34 N–m) to secure ball joint to spindle (and Pitman
arm, if installed). If necessary, tighten nut to allow
cotter pin to be inserted. Install cotter pin to secure
assembly.
B. If necessary, remove tie rod from Pitman arm.
C. Remove lock nut and cap screw (king pin) securing the spindle to the A–arm. Separate spindle from
the A–arm. Locate and retrieve thrust washer (item
13).
2. Install front wheel assembly:
A. Place antiseize lubricant on spindle shaft.
B. Slide wheel assembly onto spindle shaft with the
valve stem facing out.
NOTE: Apply Loctite #242 (or equivalent) to the
threads of the cap screw.
C. Place large washer and then small washer onto
the cap screw. Thread cap screw with washers into
the spindle shaft.
D. Torque cap screw from 135 to 165 ft–lb (183 to
224 N–m).
3. Lower machine to ground. Remove chocks from
wheels.
4. Align steering and toe–in (see Operator’s Manual).
5. Lubricate tie rod ball joints and king pin (see Operator’s Manual).
Chassis
Workman e2050/e2065 Page 5 – 13 Chassis (Rev. B)
Page 100

Front Wheels and Lower Steering (Workman e2065)
Loctite #242
16
RIGHT
FRONT
23
45 to 55 ft–lb
(61 to 74 N–m)
20 to 25 ft–lb
(27 to 34 N–m)
30
34
35
20 to 25 ft–lb
(27 to 34 N–m)
28
27
39
25
24
24
38
25
31
36
22
21
33
29
26
32
15
45 to 55 ft–lb
(61 to 74 N–m)
11
19
14
20
9
18
13
12
7
5
10
See text for
tightening
procedure
8
1
6
3
2
45 to 65 ft–lb
(61 to 88 N–m)
37
1. Wheel assembly
2. Lug nut (5 used per wheel)
3. Dust cap
4. Cotter pin
5. Nut retainer
6. Jam nut
7. Tab washer
8. Bearing cone
9. Bearing cup
10. Wheel hub
11. Wheel stud (5 used per hub)
12. Bearing cup
13. Bearing cone
14. Seal
15. Brake rotor
16. Socket head screw (4 used per rotor)
17. Lock nut
18. LH spindle
19. Cap screw
20. Brake hose bracket
21. Bushing (2 used per A–arm)
22. Thrust washer
23. RH spindle
24. Castle nut
25. Cotter pin
26. Kingpin sleeve
NOTE: Both tie rod assemblies consist of the following
parts: ball joints (27 and 31), jam nuts (28 and 33), tie rod
tube (29) and grease fittings (32 and 36).
Removal (Fig. 6)
1. Park machine on a level surface, stop engine, set
parking brake and remove key from the ignition.
17
4
75 to 100 ft–lb
(102 to 136 N–m)
Figure 6
27. Ball joint (RH thread)
28. Jam nut (RH thread)
29. Tie rod tube
30. Pitman arm
31. Ball joint (LH thread)
32. Grease fitting
33. Jam nut (LH thread)
34. A–arm (RH)
35. A–arm (LH)
36. Grease fitting
37. Brake caliper (LH shown)
38. Lock washer (2 used per caliper)
39. Cap screw (2 used per caliper)
WARNING
Before jacking up the machine, review and follow
Jacking Instructions in Chapter 1 – Safety.
2. Chock wheels not being jacked up. Jack front wheel
off the ground and place blocks beneath the frame.
Workman e2050/e2065Page 5 – 14Chassis (Rev. B)
 Loading...