

Page 1

38inand42inTwinBagger
FormNo.3354-177RevC
forTimeCutter
ModelNo.79214—SerialNo.260000001andUp
ModelNo.79215—SerialNo.260000001andUp
®
ZRidingMowers
Registeratwww.T oro.com.OriginalInstructions(EN)
Page 2
Contents
Introduction
Readthisinformationcarefullytolearnhowtooperate
andmaintainyourproductproperlyandtoavoidinjury
andproductdamage.Youareresponsibleforoperating
theproductproperlyandsafely.
YoumaycontactTorodirectlyatwww.Toro.comfor
productandaccessoryinformation,helpndinga
dealer,ortoregisteryourproduct.
Wheneveryouneedservice,genuineToroparts,or
additionalinformation,contactanAuthorizedService
DealerorToroCustomerServiceandhavethemodel
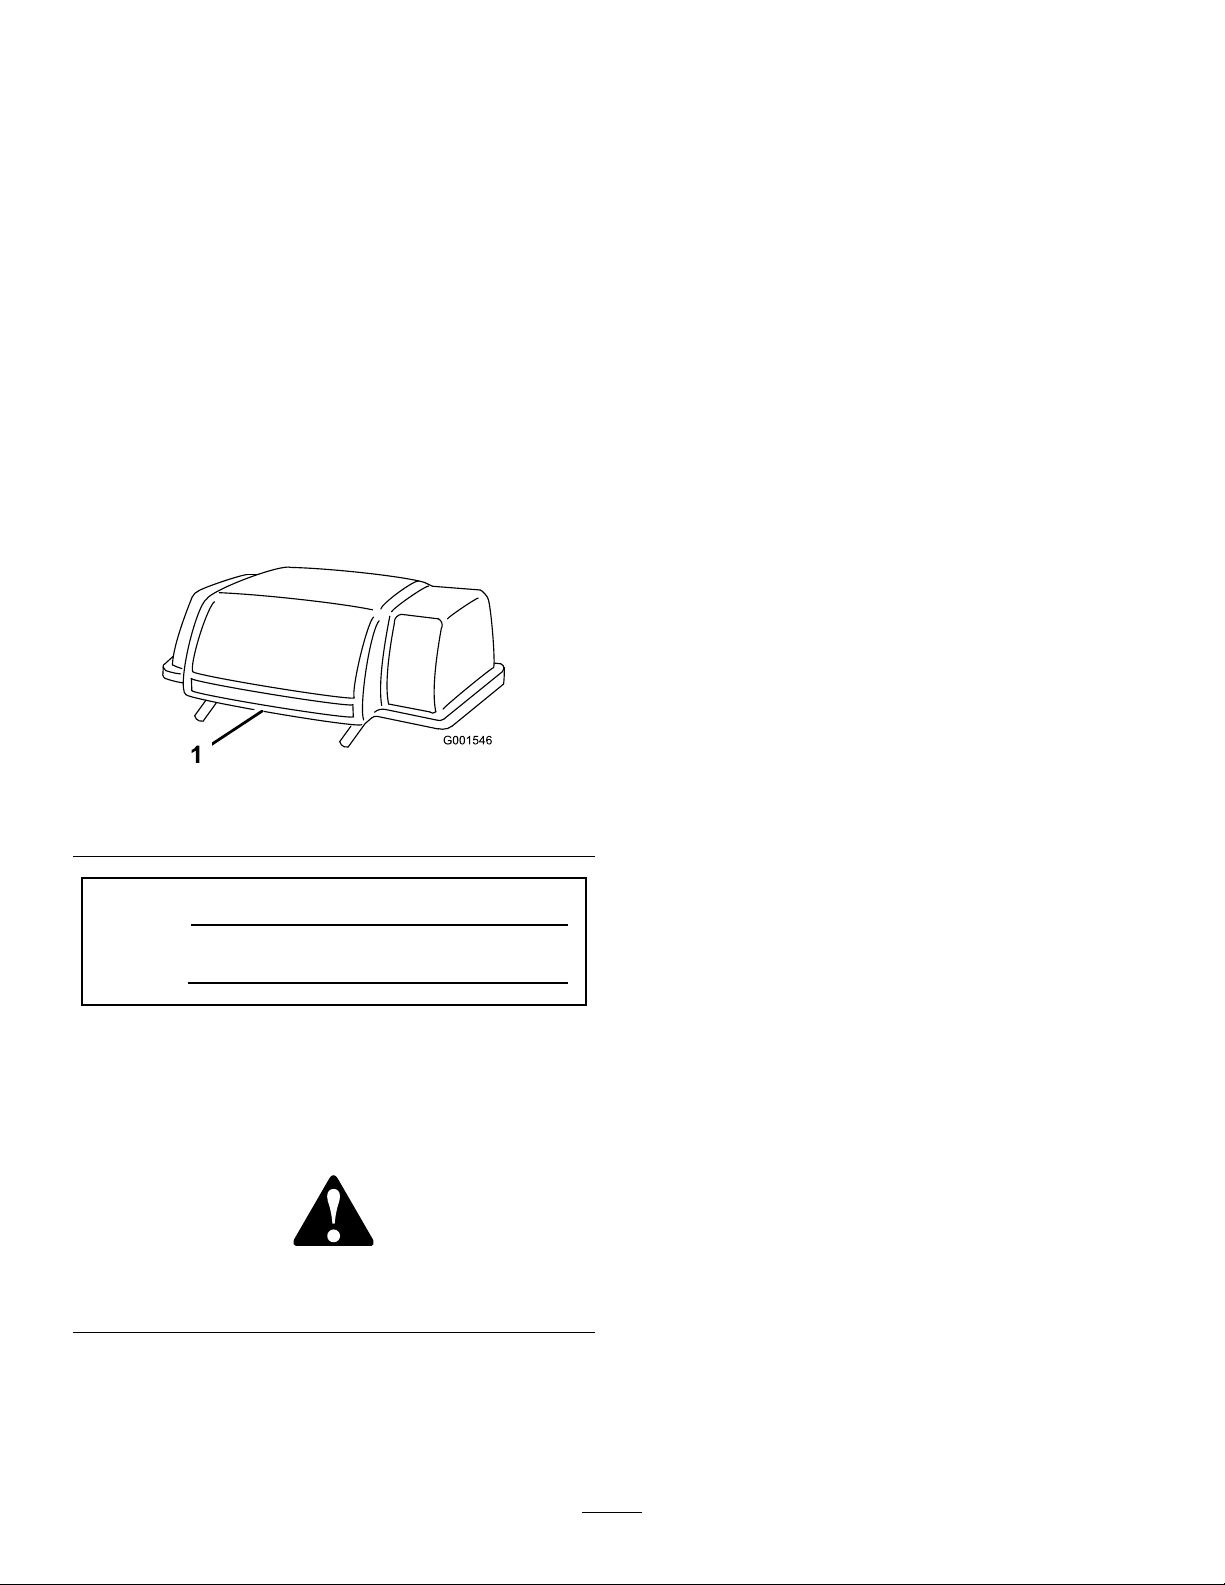
andserialnumbersofyourproductready .Figure1
identiesthelocationofthemodelandserialnumbers
ontheproduct.Writethenumbersinthespace
provided.
Figure1
1.Modelandserialnumberlocation
Introduction.................................................................2
Safety...........................................................................3
SafetyandInstructionalDecals.............................3
Setup............................................................................4
1InstallingtheWeight..........................................4
2InstallingtheQuickAttachBracket....................5
3AssemblingtheBagger......................................5
4InstallingtheBaggerAssembly...........................5
5InstallingtheNewPivotRod..............................6
6InstallingtheRingBafesfor42inch
MowerOnly.....................................................7
7InstallingtheBladesfor42inchMower
Only.................................................................7
8InstallingtheChuteandDischarge
Tube.................................................................8
Operation.....................................................................9
EmptyingtheGrassBags......................................9
ClearingObstructionsfromtheBagger...............10
RemovingtheBagger.........................................10
OperatingTips...................................................11
Maintenance...............................................................13
RecommendedMaintenanceSchedule(s)................13
InspectingtheBaggerAttachment......................13
InspectingtheMowerBlades..............................13
CaringfortheGrassBags...................................14
CleaningtheBaggerAttachment.........................14
Storage.......................................................................14
StoringtheBaggerAttachment...........................14
ModelNo.
SerialNo.
Thismanualidentiespotentialhazardsandhas
safetymessagesidentiedbythesafetyalertsymbol
(Figure2),whichsignalsahazardthatmaycauseserious
injuryordeathifyoudonotfollowtherecommended
precautions.
Figure2
1.Safetyalertsymbol
Thismanualuses2otherwordstohighlightinformation.
Importantcallsattentiontospecialmechanical
informationandNoteemphasizesgeneralinformation
worthyofspecialattention.
©2008—TheToro®Company
8111LyndaleAvenueSouth
Bloomington,MN55420
Contactusatwww.Toro.com.
2
PrintedintheUSA.
AllRightsReserved
Page 3

Safety
SafetyandInstructionalDecals
Safetydecalsandinstructionsareeasilyvisibletotheoperatorandarelocatednearanyareaof
potentialdanger.Replaceanydecalthatisdamagedorlost.
93-7320
1.Crushinghazardofhand—donotremovethewholebaggerfromthemachine;openthebaggertopandthenremovethebag(s)
fromthebagger .Donotremovethebaggertopwhenitisclosed;openthebaggertopandthenremoveit.
1.Thrownobjecthazard,
mower—keepthe
deectorinplace.
2.Thrownobject
hazard—Keepbystanders
asafedistancefrom
themachine;Donot
operatethewithoutgrass
collectionsysteminplace.
110-1868
3.Cutting/dismembermentof
handorfoot—stayaway
frommovingparts.
3
Page 4
Setup
LooseParts
Usethechartbelowtoverifythatallpartshavebeenshipped.
ProcedureDescription
1
2
3
4
5
6
7
8
Weight1
Bolt(3/8x2-1/4inch)
Washer(3/8inch)
Locknuts(3/8inch)
BaggerQuickAttachBracket
Bolt(3/8x1inch)
Locknut(3/8inch)
Washer(3/8inch)
Bolt(1/4x3/4inch)
Locknut(1/4inch)
Bagger1
GrassBag
Pivotrod1
Nut1
Ringbafe,front
Ringbafe,rear
Bolt,(1/4x5/8inch)
Locknut(1/4inch)
Blade2
Chute
Dischargetube1
Qty.
12
12
Use
2
4
2
1
4
4
4
2
2
2
2
2
1
Installtheweight.
Installthequickattachbracket.
AssembletheBagger
Installthebaggerassembly.
Installthenewpivotrod.
Installtheringbafes(42inchmower
only).
Installtheblades(42inchmoweronly).
Installthechuteanddischargetube.
1
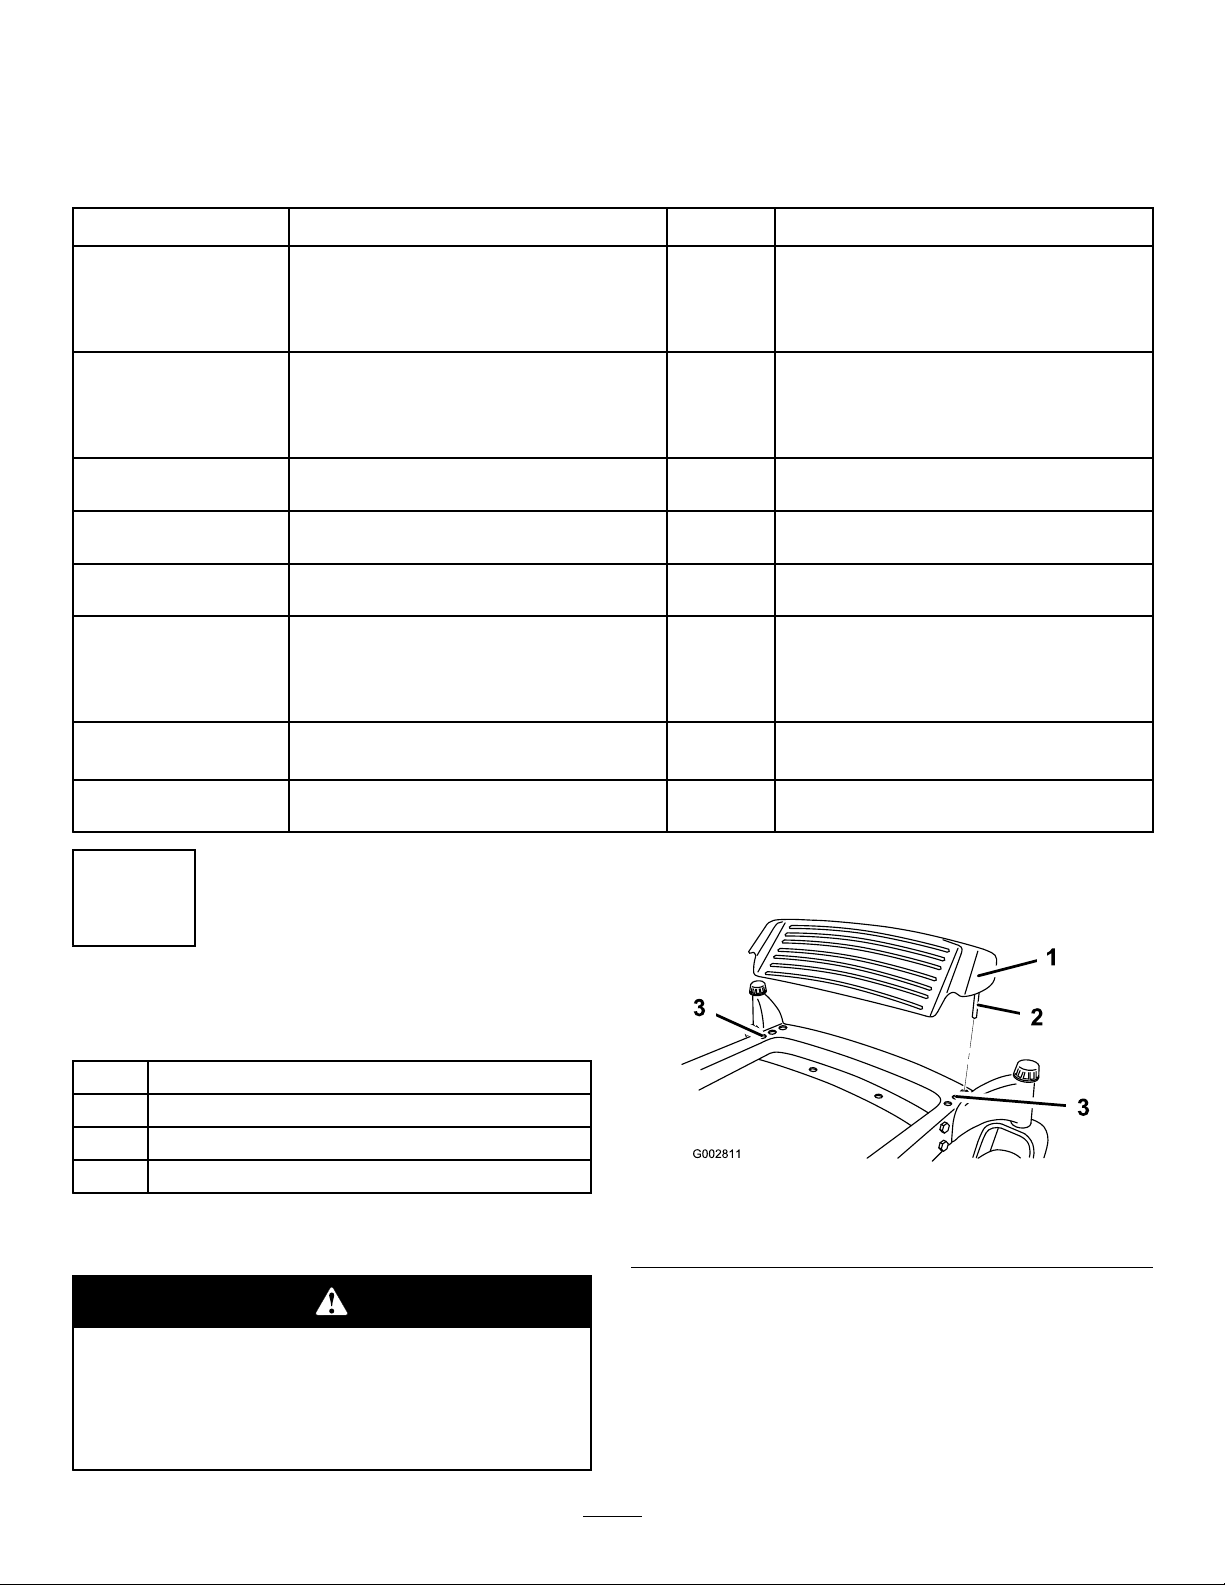
InstallingtheWeight
Partsneededforthisprocedure:
1Weight
2
Bolt(3/8x2-1/4inch)
4
Washer(3/8inch)
2
Locknuts(3/8inch)
Procedure
Thebaggeraddsalotofweighttotherear
ofthemachineandmaycauseanunstable
conditionwhichcouldresultinalossofcontrol.
1.Removethefootplatetoaccesstheexistingholesin
themachineframe(Figure3).
Figure3
1.Footrest3.Holepositions
2.Rod
2.Attachtheweighttothefrontofthemachineframe
withtwobolts(3/8x2-1/4inch),fourwashers
(3/8inch),andtwolocknuts(3/8inch)asshown
inFigure4.
Installthefrontweight.
4
Page 5
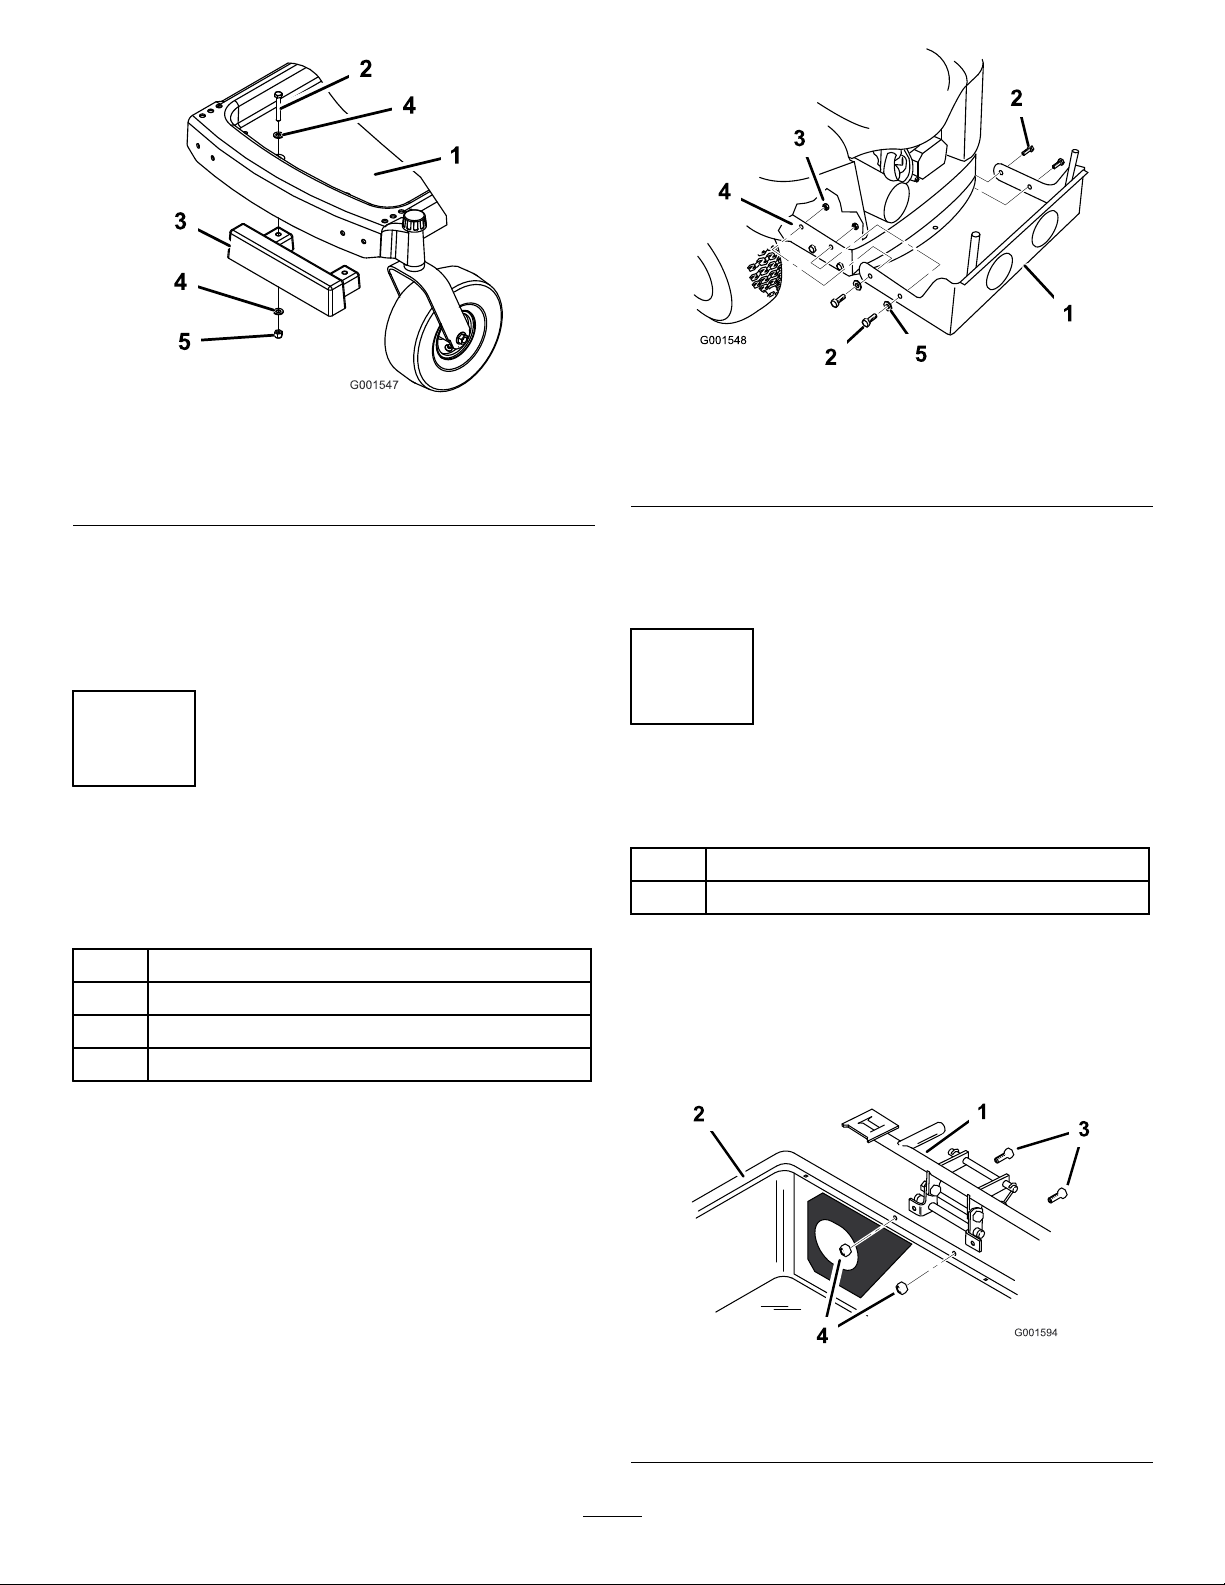
Figure4
1.Footrestframe4.Washer(3/8inch)
2.Bolt(3/8x2-1/4inch)5.Nut(3/8inch)
3.Frontweight
Figure5
1.Quickattachbracket4.Rearframe
2.Bolts(3/8x1inch)5.Washer(3/8inch)
3.Locknut(3/8inch)
3.Installthefootrestintothefootrestframewhile
placingtherodsinthesameholepositions
Important:Whenyouremovethetwinbagger,
remembertoremovethefrontweight.
2
InstallingtheQuickAttach
Bracket
Partsneededforthisprocedure:
1
BaggerQuickAttachBracket
4
Bolt(3/8x1inch)
4
Locknut(3/8inch)
4
Washer(3/8inch)
3.Securethebaggermountingbrackettotherear
framewith4bolts(3/8x1inch),4washers(3/8
inch),and4locknuts(3/8inch)(Figure5).
3
AssemblingtheBagger
Partsneededforthisprocedure:
2
Bolt(1/4x3/4inch)
2
Locknut(1/4inch)
Procedure
Ifnecessary,installthebaggerframetothecover.Attach
theframeassemblytothebaggercoverwithtwobolts
(1/4x3/4inch)andtwolocknuts(1/4inch)(Figure6).
Procedure
1.Fromthebackofthemower,slidethequickattach
bracketalongtheoutsideoftherearframe.
2.Aligntheholesintherearframeandthebagger
mountingbracket(Figure5).
5
1.Frameassembly
2.Baggercover
Figure6
3.Bolt,1/4x3/4inch
4.Locknut(1/4inch)
Page 6

4
InstallingtheBagger
Assembly
Partsneededforthisprocedure:
1Bagger
2
GrassBag
Procedure
1.Carefullyliftthebaggertopandslideitontothe
quickattachbracket(Figure7).Thebaggertopis
easiertoinstalliftwopeopleworktogether.
2.Installthebagsbyslidingthebagframehooksonto
theretainingbrackets(Figure8).
Figure8
1.Bagframehook
3.Lowerthebaggertopontothebags.Thenpush
downonbothbagretainerhandlesuntiltheylockon
thebagframe(Figure9).
2.Retainingbracket
Figure7
1.Baggertop
Ifyouremovethespring-loadedbaggertop
whenitisclosed(inthedownposition),thetop
maysuddenlyyopenandyouorsomeoneelse
maybebruised,pinched,orinjuredinanother
way.
Alwaysopen(raise)thebaggertopbeforeyou
removeorinstallitonthequick-attachbracket.
2.Quickattachbracket
Figure9
1.Baggertop2.Bagretainerhandles
5
InstallingtheNewPivotRod
Partsneededforthisprocedure:
1Pivotrod
1Nut
Procedure
1.Liftthegrassdeectorandremovethemulchplug,
ifpresent.
6
Page 7

2.Removethenut,underthemower,holdingthepivot
rodandgrassdeectortothemower(Figure10).
Figure10
1.Grassdeector
2.Pivotrod
3.Nut
4.O-ring
6
InstallingtheRingBafesfor
42inchMowerOnly
Partsneededforthisprocedure:
2
Ringbafe,front
2
Ringbafe,rear
12
Bolt,(1/4x5/8inch)
12
Locknut(1/4inch)
3.Removethepivotrodandgrassdeectorfromthe
mower(Figure10)
4.Insertthenewpivotrodintotheshortstand-offon
thedeck.Securetherearendofrodintothemower
withanut(3/8inch)(Figure11).
Figure11
1.Mower
2.Pivotrod5.Rightsideblade
3.Nut
4.Stand-off
Procedure
1.Installtwofrontringbafestothemowerasshown
inFigure12.Use6bolts(1/4x5/8inch)and6
locknuts(1/4inch)tosecurethebafestothe
mower.
Figure12
1.42mowerdeck
2.Frontringbafe5.Rearringbafe
3.Locknut(1/4inch)
4.Bolt,(1/4x5/8inch)
2.Installthetworearringbafestothemoweras
showninFigure12.Use6bolts(1/4x5/8inch)
and6locknuts(1/4inch)tosecurethebafesto
themower.
3.Torqueallfastenersto90-110ft-lb(122-150N⋅m).
7
Page 8

7
8
InstallingtheBladesfor42
inchMowerOnly
Partsneededforthisprocedure:
2Blade
Procedure
1.Holdthebladeusingaragorthickly-paddedglove
(Figure11andFigure13).
2.Removethebladebolt,curvedwasher,blade
stiffener,andbladefromthespindleshaft
(Figure13).
InstallingtheChuteand
DischargeTube
Partsneededforthisprocedure:
1
Chute
1Dischargetube
Procedure
1.Slidethechuteintopositionwiththerearhook
aroundthedeectorrodandthefrontlatchaligned.
Insertthelockingpin(Figure14).
Figure13
1.Sailareaofblade
2.Blade
3.Curvedwasher
3.Installthebladeontothespindleshaft(Figure13).
Important:Thecurvedpartofthebladeorsail,
mustbepointingupward,towardtheinsideof
themowertoensurepropercutting(Figure13).
4.Installthebladestiffener,thecurvedwasher(cupped
sidetowardtheblade),andthebladebolt(Figure13).
Torquethebladeboltto35-65ft-lb(47-88N⋅m).
5.Repeatthisprocedurefortheoppositeblade.
4.Bladebolt
5.Bladestiffener
Figure14
1.Chute4.Deectorrod
2.Lockingpin5.Flexiblelatch
3.Rearhook6.Notchedbracket
2.Hooktheexiblelatchonthechuteintothenotched
bracketonthebackofthemower(Figure14).
3.Slidethedischargetubeintotheopeninginthegrass
catcher(Figure15).
4.Slidethedischargetubeovertheendofthechute,
ensuringthatthetabonthechutesnapsintothe
squareholeinthedischargetube(Figure15).
8
Page 9

Figure15
1.Dischargetube3.Tab
2.Chute
Operation
Note:Determinetheleftandrightsidesofthe
machinefromthenormaloperatingposition.
Toavoidpersonalinjury,followthese
procedures:
•Becomefamiliarwithalloperatingand
safetyinstructionsinthe
forthemowerbeforeusingthisattachment.
•Neverremovethedischargetube,bags,
baggertop,orthechutewhiletheengineis
running.
•Alwaysshuttheengineoffandwaitforall
movingpartstostopbeforeclearingan
obstructionfromthebaggingsystem.
•Neverdomaintenanceorrepairswhilethe
engineisrunning.
Operator’ s Man ual
EmptyingtheGrassBags
Becarefulwhenliftingorhandlingagrassbagthatis
full.Toemptythegrassbags:
1.Stopthemower,settheparkingbrake,and
disengagethepowertakeoff(PTO).Stopthe
engineandremovetheignitionkey.
2.Pulluponbothbagretainerhandlesuntilthey
unlockfromthebagframe(Figure16).Open(raise)
thebaggertop.
Figure16
1.Baggertop2.Bagretainerhandles
3.Compressdebrisintothebags.Withbothhands,
liftuponthebagandunhookitfromtheretaining
bracket.Emptythebag.Repeattheprocedurefor
theotherbag.
9
Page 10

4.Installthebagsbyslidingthebagframehooksonto
theretainingbrackets(Figure17).
Figure17
1.Bagframehook
2.Retainingbracket
RemovingtheBagger
Anuncovereddischargeopeningcouldallow
thelawnmowertothrowobjectsintheoperator
orbystander’sdirectionandresultinserious
injury.Also,contactwiththebladecouldoccur.
Neveroperatethelawnmowerunlessyouinstall
acoverplate,amulchplate,oragrasschute
andcatcher.
1.Pushonthetabonthechuteandpullthedischarge
tubefreefromthechuteandgrasscatcher
(Figure15).
2.Releasetheexiblelatchandremovethelocking
pinsecuringthechutetothemower.Removethe
chutefromthemower(Figure14).
5.Lowerthebaggertopontothebags.Thenpush
downonbothbagretainerhandlesuntiltheylock
onthebagframe.
ClearingObstructionsfrom
theBagger
1.Stopthemower,shiftintoneutral,settheparking
brake,disengagethePTO,stoptheengine,and
removetheignitionkey.Waitforallmovingparts
tostop.
2.Checkthegrassbagsandemptythemiftheyarefull.
3.Removeandseparatethedischargetubeandchute
fromthebaggertopandmower.Usingastick
orsimilarobject,carefullyremoveandclearthe
obstructionfromthemower,dischargetube,chute,
andthebaggertop.
4.Afteryouremovetheobstruction,installthe
completebaggersystemandresumeoperation.
Ifyouremovethespring-loadedbaggertop
whenitisclosed(inthedownposition),thetop
maysuddenlyyopenandyouorsomeoneelse
maybebruised,pinched,orinjuredinanother
way.
Alwaysopen(raise)thebaggertopbeforeyou
removeorinstallitonthequick-attachbracket.
3.Raisethebaggertopandremovethegrassbags
fromthebagframe(Figure18).
Figure18
1.Baggertop2.Bagretainerhandles
4.Carefullyliftthebaggertopandslideitoffthequick
attachbracket(Figure19).Thebaggertopiseasier
toremoveiftwopeopleworktogether.
10
Page 11

1.Grassdeector
2.Pivotrod
Figure20
3.Nut
4.O-ring
Figure19
1.Baggertop
2.Quickattachbracket
5.Storeallbaggerpartsinaconvenientplace.
ReplacingtheGrassDeector
Anuncovereddischargeopeningcouldallow
thelawnmowertothrowobjectsintheoperator
orbystander’sdirectionandresultinserious
injury.Also,contactwiththebladecouldoccur.
Neveroperatethelawnmowerunlessyouinstall
acoverplate,amulchplate,oragrasschute
andcatcher.
1.Locatethegrassdeectorandhardwarein
Figure20.
2.Inserttherodatthefrontofgrassdeectorintothe
shortstand-offonthedeck.Securetherearpart
oftherodintothemowerwithanut(3/8inch)
(Figure20).
Important:Thegrassdeectormustbespring
loadedinthedownposition.Liftthedeector
uptotestthatitsnapstothefulldownposition.
OperatingTips
TipsforBagging
Size
Rememberthatthemowerislongerandwiderwiththis
attachmentinstalled.Byturningtoosharplyinconned
placesyoumaydamagetheattachment.
Trimming
Alwaystrimwiththeleftsideofthemower.Donot
trimwiththerightsideofthemowerbecauseyoucould
damagethebagger’schuteanddischargetube.
CuttingHeight
Donotsetthemowercuttingheighttoolowbecause
longgrasssurroundingthemowercanpreventairfrom
gettingunderthemowerandenteringthebagging
system.Ifenoughairdoesn’tgetunderthemower,the
baggingsystemwillplug.
CuttingFrequency
Cutthegrassoften,especiallywhenitgrowsrapidly.
Youwillhavetocutyourgrasstwiceifitgetsexcessively
long.
CuttingTechnique
Forbestlawnappearance,besuretoslightlyoverlap
themowerintothepreviouslycutarea.Thishelps
reducetheloadontheengineandreducesthechance
ofpluggingthechuteanddischargetube.
BaggingSpeed
Mostoftenyouwillbagwiththemowerthrottlein
theFastpositionanddriveatanormalgroundspeed.
11
Page 12

However,inextremelydryanddustygrass,youmay
wanttoslightlyreducethethrottlespeedandincrease
thegroundspeedofthemower.Thebaggingsystem
mayplugifyoudrivetoofastandtheenginespeed
getstooslow .Onhillsitmaybenecessarytoslowthe
mowergroundspeed.Thishelpsmaintaintheengine
speedandbaggingefciency.Mowdownhillwhenever
possible.
Asthebaggerlls,extraweightisaddedto
thebackofthemachine.Ifyoustopandstart
suddenlyonhills,youmaylosesteeringcontrol
orthemachinemaytip.
•Donotstartorstopsuddenlywhengoing
uphillordownhill.Avoiduphillstarts.
•Ifyoudostopthemachinewhengoing
uphill,disengagethePTO.Thenbackdown
thehillusingaslowspeed.
•Donotchangespeedsorstoponslopes.
BaggingLongGrass
BaggingLongGrassExcessivelylonggrassisheavyand
maynotbepropelledcompletelyintothegrassbags.If
thishappens,thedischargetubeandchutemayplug.
Toavoidpluggingthebaggingsystem,mowthegrass
atahighheightofcut,thenlowerthemowertoyour
normalcuttingheightandrepeatthebaggingprocess.
BaggingWetGrass
Alwaystrytocutgrasswhenitisdrybecauseyour
lawnwillhaveaneatappearance.Ifyoumustcutwet
grass,usetheconventionalsidedischargefeatureofthe
mower.Severalhourslater,whentheclippingsaredry,
installthecompletebaggerattachmentandvacuumup
thegrassclippings.
SignsofPlugging
Asyouarebagging,asmallamountofgrassclippings
normallyblowoutthefrontofthemower.Anexcessive
amountofclippingsblowingoutindicatesthatthebags
arefullorthesystemisplugged.
12
Page 13

Maintenance
Note:Determinetheleftandrightsidesofthemachinefromthenormaloperatingposition.
RecommendedMaintenanceSchedule(s)
MaintenanceService
Interval
Aftertherst10hours
Beforeeachuseordaily
Beforestorage
Ifyouleavethekeyintheignitionswitch,someonecouldaccidentlystarttheengineandseriously
injureyouorotherbystanders.
Removethekeyfromtheignitionanddisconnectthewirefromthesparkplugbeforeyoudoany
maintenance.Setthewireasidesothatitdoesnotaccidentallycontactthesparkplug.
Debrisbuiltupintheenginecompartment,ifnotremoved,couldbeignitedbyahotengine.Arein
theenginecompartmentcouldcanburnyouandothersandcandamageproperty.
•Beforeusingandwhiletheengineiscool,checkfordebrisintheenginecompartment.
MaintenanceProcedure
•Inspectthebagger
•Cleanthebagger
•Inspectthebagger
•Cleanthebagger
•Keepthemachinefreeofgrass,leaves,orotherdebrisbuild-up.
•Cleanupoilorfuelspillageandfuelsoakeddebris.
•Allowthemachinetocoolbeforestoring.
InspectingtheBagger
Attachment
ServiceInterval:Aftertherst10hours
Beforestorage
Inspectthebaggerattachmentaftertherst10hoursof
operation,andmonthlythereafter.
1.Checkthechute,dischargetube,andthebaggertop.
Replacethesepartsiftheyarecrackedorbroken.
2.Tightenallnuts,bolts,andscrews.
3.Inspectthegrassbagsfordeterioration.
Youorbystanderscouldbeseverelyinjuredby
yingdebrisorthrownobjectsthatmaypass
throughtorn,worn,ordeterioratedgrassbags.
•Frequentlycheckthegrassbagsforholes,
rips,wear,andotherdeterioration.
•Donotwashthegrassbags.
•Ifthebaghasdeteriorated,installnewgrass
bagssuppliedbythemanufacturerofthis
baggerattachment.
InspectingtheMowerBlades
Inspectthemowerbladesregularlyandwhenevera
bladestrikesaforeignobject.
13
Page 14

Ifthebladesarebadlywornordamaged,installnew
blades.RefertoyourmowerormowerOperator’ sManual
forcompleteblademaintenance.
Storage
StoringtheBaggerAttachment
CaringfortheGrassBags
Washingthegrassbagsisnotrecommended.
Topreventrapiddeteriorationofthebagmaterial,store
thebagswheretheywilldrycompletelyaftereachuse.
CleaningtheBagger
Attachment
ServiceInterval:Beforeeachuseordaily
Beforestorage
1.Aftereachuse,removeandwashtheinsideand
outsideofthebaggertop,dischargetube,chute,and
theundersideofthemower,usingwatersprayed
fromagardenhose.Useamildautomotivedetergent
toremovestubborndirt.
2.Makesureyouremovemattedgrassfromallparts.
3.Afterwashing,letallofthepartsdrythoroughly.Do
notwashthegrassbags.
1.Cleanthebaggerattachment;refertoCleaningthe
BaggerAttachment.
2.Inspectthebaggerattachmentfordamage;referto
InspectingtheBaggerAttachment.
3.Makesurethegrassbagsareemptyandthoroughly
dry.
4.Storethebaggerinaclean,dryplace,outofdirect
sunlight.Thisprotectstheplasticpartsandextends
thelifeofthebagger.Ifyoumuststorethebagger
outside,coveritwithaweatherproofcover.
14
Page 15

Notes:
15
Page 16

Consumer
TimeCutter
A Two-Year Full Warranty (Limited Warranty for Commercial Use)
The Toro Total Coverage Guarantee
Conditions and Products Covered
The Toro Company and its afliate, Toro Warranty Company,
pursuant to an agreement between them, jointly promise to
repair any Toro Product used for normal residential purposes*
if defective in materials or workmanship. The following time
periods apply from the date of purchase:
Products Warranty Period
All TimeCutter Mowers and
Attachments
All Batteries 1 year full warranty
This warranty covers both the cost of parts and labor, and
transportation within a fteen mile radius of the servicing dealer.
This warranty applies to all consumer TimeCutter Mowers and
their attachments.
N o r m a l r e s i d e n t i a l p u r p o s e s m e a n s u s e o f t h e p r o d u c t o n t h e s a m e l o t a s y o u r h o m e . U s e
a t m o r e t h a n o n e l o c a t i o n i s c o n s i d e r e d c o m m e r c i a l u s e , a n d t h e c o m m e r c i a l u s e w a r r a n t y
w o u l d a p p l y .
2 year full warranty
Limited Warranty for Commercial Use
Toro Consumer Products and attachments used for commercial,
institutional, or rental use are warranted against defects in
materials or workmanship for the following time periods from the
date of purchase:
Products Warranty Period
Air Cooled Gas Engines 90 day limited warranty
All other items 30 day limited warranty
Instructions for Obtaining Warranty Service
If you think that your Toro Product contains a defect in materials
or workmanship, follow this procedure:
1. Contact any Toro Authorized or Master Service Dealer
to arrange service at their dealership. To locate a dealer
convenient to you, refer to the Yellow Pages of your
telephone directory (look under “Lawn Mowers") or access
our website at www.Toro.com. U.S. Customers may also
call toll free: 866-854-9035 to use our 24-hour Toro dealer
locator system.
2. Bring the product and your proof of purchase (sales receipt)
to the Service Dealer.
If for any reason you are dissatised with the Service Dealer’s
analysis or with the assistance provided, contact us at:
Customer Care Department, Consumer Division
Toro Warranty Company
8111 Lyndale Avenue South
Bloomington, MN 55420-1196
Toll Free: 866-216-6029 (U.S. customers)
Toll Free: 866-216-6030 (Canada customers)
Owner Responsibilities
You must maintain your Toro Product by following the
maintenance procedures described in the operator’s manual.
Such routine maintenance, whether performed by a dealer or by
you, is at your expense.
Items and Conditions Not Covered
There is no other express warranty except for special emission
system coverage on some products. This express warranty does
not cover:
• Cost of regular maintenance service or parts, such as lters,
fuel, lubricants, tune-up parts, blade sharpening, brake and
clutch adjustments.
• Any product or part which has been altered or misused
or required replacement or repair due to normal wear,
accidents, or lack of proper maintenance.
• Repairs necessary due to improper fuel, contaminants in the
fuel system, or failure to properly prepare the fuel system
prior to any period of non-use over three months.
• Pickup and delivery charges for distances beyond a fteen
mile radius from an Authorized Toro Service Dealer.
All repairs covered by this warranty must be performed by an
Authorized Toro Service Dealer using Toro approved replacement
parts.
General Conditions
Repair by an Authorized Toro Service Dealer is your sole remedy
under this warranty.
Neither The Toro® Company nor Toro Warranty Company is liable
for indirect, incidental or consequential damages in connection
with the use of the Toro Products covered by this warranty,
including any cost or expense of providing substitute equipment
or service during reasonable periods of malfunction or non-use
pending completion of repairs under this warranty.
Some states do not allow exclusions of incidental or consequential
damages, or limitations on how long an implied warranty lasts,
so the above exclusions and limitations may not apply to you.
This warranty gives you specic legal rights, and you may also
have other rights which vary from state to state.
Countries Other than the United States or Canada
Customers who have purchased Toro products exported from the United States or Canada should contact their Toro Distributor
(Dealer) to obtain guarantee policies for your country, province, or state. If for any reason you are dissatised with your Distributor’s
service or have difculty obtaining guarantee information, contact the Toro importer. If all other remedies fail, you may contact us
at Toro Warranty Company.
374-0061 Rev A
 Loading...