

Page 1
48 Recycler Kit
2002 and Later Mowers for 260 Series Lawn and Garden
Tractor and 5xi Series Garden T ractor
Model No. 79196
Installation Instructions
Loose Parts
Note: Use the chart below to identify parts for assembly.
DESCRIPTION QTY. USE
Form No. 3327–235
Blade—center
Blade—outside
Baffle—discharge
Carriage bolt, 5/16 x 3/4 in.
Locknut, 5/16 in.
Baffle—front
Carriage bolt, 5/16 x 3/4 in.
Locknut, 5/16 in.
Kicker
Spacer
Bolt, 5/16 x 1 in.
Locknut, 5/16 in.
Decal—Recycler
Before Installation
1. Remove mower unit refer to; Operator ’s Manual for
instructions.
2. Thoroughly clean the mower. All debris must be
removed to ensure baffles will fit properly against
mower.
3. Repair all bent or damaged areas of mower and
replace any missing parts.
4. Tip mower upside down and block up ends to ease
installation.
5. Remove blades from spindles. Save for use when in
side discharge mode.
1
2
1
2
2
1
4
4
2
2
2
2
1 Installing the decal
Installing the blades
Installing the discharge baffle
Installing the front baffles
Installing the kickers
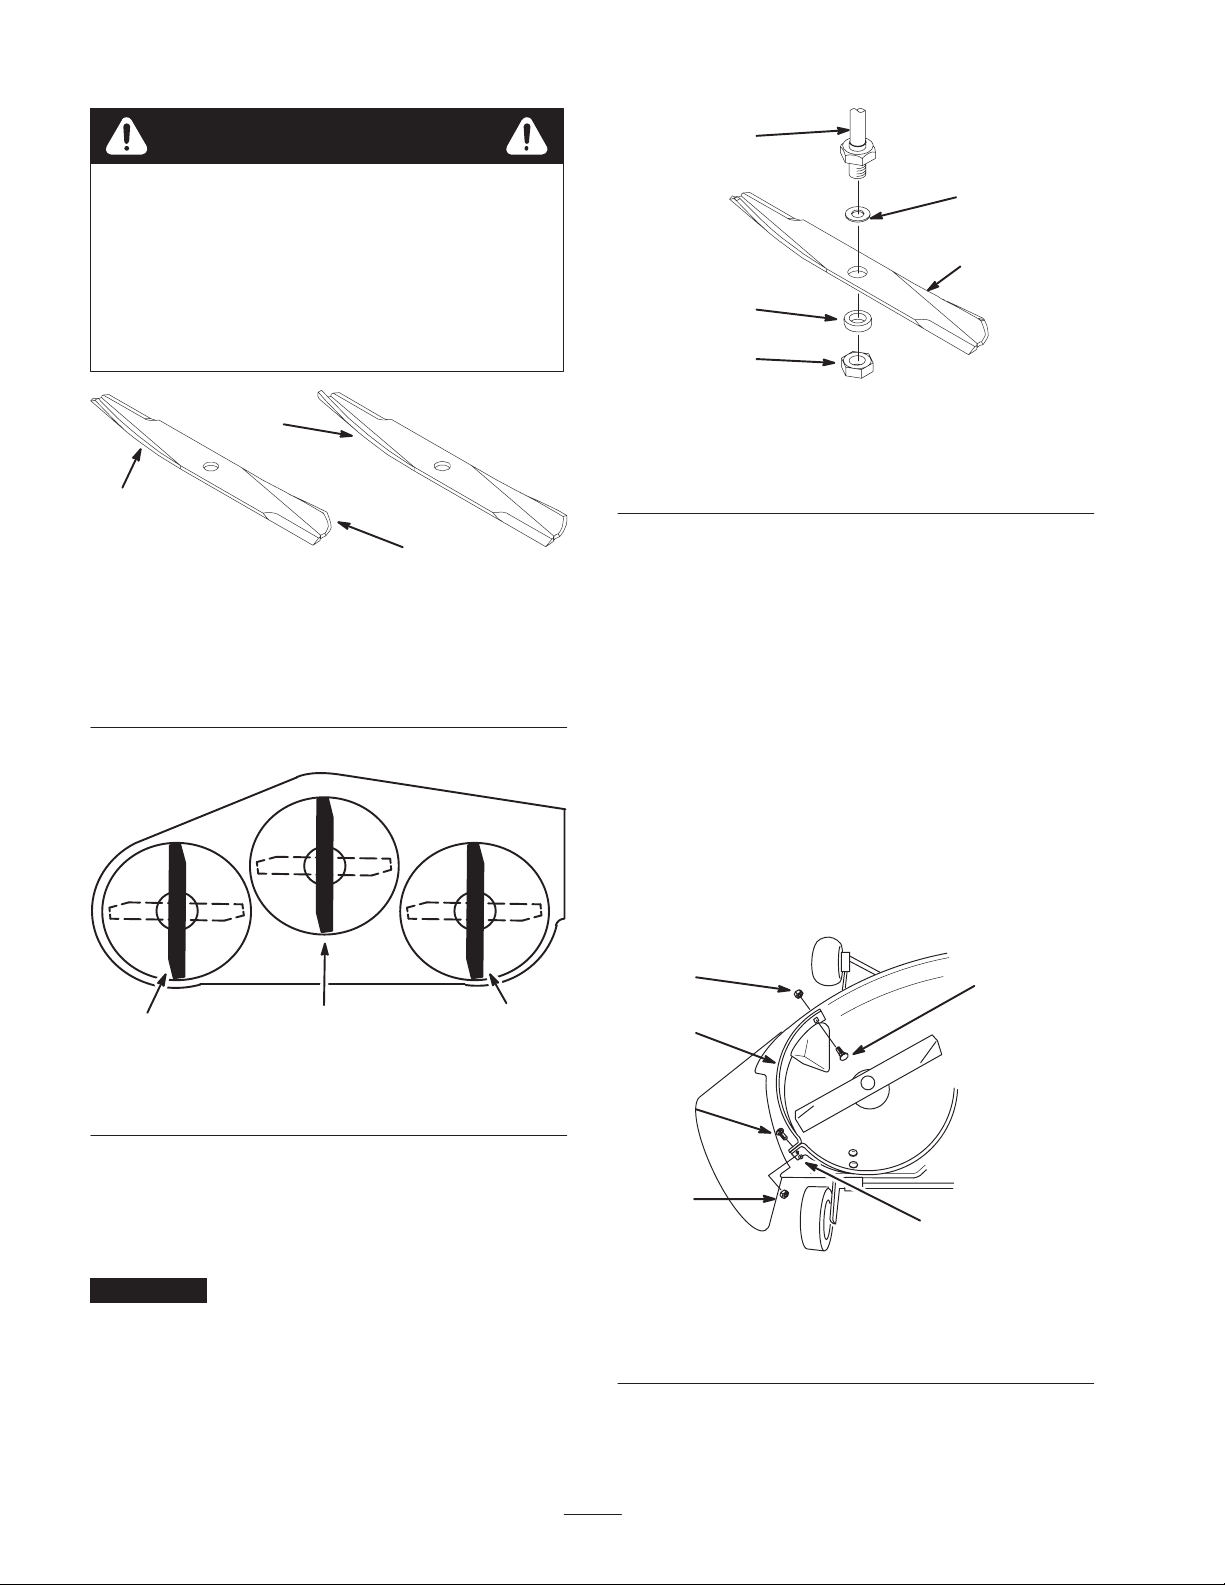
Installing the Blades
Important There are two different sizes and shapes of
blades. The shorter blade goes onto the center spindle.
The two longer blades go on the outside spindles (Fig. 2).
See figure 1 for the shape difference.
Warning
A worn or damaged blade can break, and a piece
of the blade could be thrown into the operator’s
or bystander’s area, resulting in serious personal
injury or death.
• Inspect the blade periodically for wear or
damage.
• Replace a worn or damaged blade.
2001 by The Toro Company
8111 Lyndale Avenue South
Bloomington, MN 55420-1196
All Rights Reserved
1
Printed in the USA
Page 2
Warning
5
A blade that is bent or damaged could break
apart and could seriously injure or kill you or
bystanders.
• Always replace bent or damaged blade with a
new blade.
• Never file or create sharp notches in the edges
or surfaces of blade.
2
1
3
Figure 1
1. Outside blade
2. Center blade
3. Angle on sail of blade
Front
m–5707
4
3
2
1
m–5711
Figure 3
1. Nut
2. Flat washer
3. Outside blade shown
4. Washer
5. Spindle
Installing the Discharge Baffle
1. Locate discharge baffle mounting hole in the front of
the mower. Remove and discard any existing hardware
filling the mounting hole.
2. Position discharge baffle in discharge opening. Engage
pin on discharge baffle flange into rear right baffle
(Fig. 4).
3. Secure flange hole of baffle to rear discharge baffle
with a carriage bolt (5/16 x 3/4 in.) and locknut
(5/16 in.) (Fig. 4).
1
2
1
m–1078
Figure 2
1. Long blade, 16–11/32 in. 2. Short blade, 15–27/32 in.
Note: Make sure the short blade is installed on the center
spindle.
1. Install the washer, blade, flat washer, and the blade nut
(Fig. 3).
Important The curved part of the blade must be
pointing toward the inside of the mower to assure proper
cutting.
2. Tighten the blade nut to 80-100 ft.–lb. (109-136 Nm).
3. Repeat for other blades.
4. Secure to front of mower with a carriage bolt
(5/16 x 3/4 in.), with head on the inside, and a locknut
(5/16 in.) (Fig. 4).
3
2
1
2
3
4
Figure 4
1. Discharge baffle
2. Carriage bolt, 5/16 x
3/4 in.
3. Locknut, 5/16 in.
4. Pin
m–3206
2
Page 3
Installing the Front Baffles
1. Locate front baffle mounting holes in the mower.
Remove and discard any existing hardware filling
mounting holes.
2. Place front baffle inside mower and align with
mounting holes (Fig. 5).
4
3
4
2
3. Install 2 carriage bolts (5/16 x 3/4 in.) with heads on
the inside of the cutting chamber (Fig. 5). Secure with
2 locknuts (5/16 in.) (Fig. 5).
4. Install 2 carriage bolts (5/16 x 3/4 in.) with heads on
the top of the mowing deck (Fig. 5). Secure with 2
locknuts (5/16 in.) (Fig. 5).
1
3
4
4
2
Figure 5
1. Front baffle 2. Carriage bolt, 5/16 x 3/4 in. 3. Carriage bolt, 5/16 x 3/4 in.,
Installing the Kickers
1. Locate kicker mounting holes in center and left
chambers (Fig. 6). Remove and discard any existing
hardware filling kicker mounting holes.
with head on top of mower
2. Place kickers tight against mower baffle (Fig. 6).
3. Install kickers with a carriage bolt (5/16 x 3/4 in.),
with head inside mowing chamber, and spacer between
kicker and mower. Secure with locknut (5/16 in.) on
top of the mower (Fig. 6).
m–3234
4. Locknut, 5/16 in.
3
Page 4

4
4
1
3
1
2
2
5
1. Kicker
2. Kicker mounting hole
3. Spacer 4. Bolt 5/16–18 x 1 in. (26 mm) 5. Locknut 5/16 in.
Installing the Decal
1. Install Recyclerdecal to left side of mower as shown
(Fig. 7).
2. Remove backing paper and apply decal, smooth from
center to edges to remove air bubbles.
3
5
m–3235
Figure 6
Removing the RecyclerBaffle
Note: Only the right side baffle need be removed for side
discharge mowing.
1. Thoroughly clean the mower.
2. Remove lock nuts and carriage bolts from front and
flange on the discharge baffle (Fig. 8). Lower baffle
and slide out of the discharge opening.
3. Install previously removed carriage bolts
(5/16 x 3/4 in.) and lock nuts (5/16 in.) into open holes
of mower (Fig. 8).
1
m–3228
Figure 7
1. Recycler decal
3. Install mower onto traction unit; refer to traction unit
Operator ’s Manual.
Danger
Open holes in the mower expose you and
others to thrown debris. Debris thrown out of
holes in the mower can cause injury.
• Install hardware in mounting holes when
recycle baffle is removed.
4
Page 5

1
3
4
1. Baffle right side
2. Flange pin
2
Figure 8
3. Bolt, 5/16 x 3/4 in.
4. Lock nut, 5/16 in.
Warning
into housing. When making an initial cut thru center of
uncut area, operate machine slower and back up if mower
4
m–3137
starts to clog.
Mow At Proper Intervals – Under most normal
conditions you’ll need to mow approximately every 4–5
days. But remember, grass grows at different rates at
different times. This means that in order to maintain the
same height-of-cut, which is a good practice, you’ll need
to cut more frequently in early spring; as the grass growth
rate slows in mid summer, cut only every 8–10 days. If
you are unable to mow for an extended period due to
weather conditions or other reasons, convert to side
discharge or bagging options or mow first with the
height-of-cut at a high level; then mow again 2–3 days
later with a lower height setting.
Note: When using mower in side discharge mode only
discharge baffle must be removed. Mounting hardware
must be installed in open holes.
Always Mow With Sharp Blades – A sharp blade cuts
cleanly and without tearing or shredding the grass blade
like a dull blade. Tearing and shredding causes the grass
to turn brown at the edges which impairs growth and
increases susceptibility to disease.
An uncovered discharge opening could allow the
lawn mower to throw objects in the operator’s or
bystander’s direction and result in serious injury.
Also, contact with the blade could occur.
• Never remove the grass deflector from the
mower because the grass deflector routes
material down toward the turf. If the grass
deflector is ever damaged, replace it
immediately.
• Never operate mower without grass
deflector or Recycler in place.
• Never put your hands or feet under the mower.
• Never try to clear discharge area or mower
blades unless you move the power take off
(PTO) to off and rotate the ignition key to off.
Also remove the key and pull the wire off the
spark plugs.
Recycling Tips
Selecting The Proper Height-Of-Cut Setting To Suit
Conditions – Remove approximately one inch or no more
that 1/3 of the grass blade when cutting. In exceptionally
lush and dense grass you may have to raise your
height-of-cut setting another notch or convert to side
discharge or bagging operations.
After Operating – To assure optimum performance, clean
underside of mower housing, especially around kickers
after each use. If residue is allowed to build up in mower
housing and on inserts, cutting performance will decrease.
Mowing In Extreme Conditions – Air is required to cut
and recut grass clippings in mower housing, so do not set
height–of–cut too low or totally surround housing by
uncut grass. Always try to have one side of the mower
housing free from uncut grass, allowing air to be drawn
5
Page 6

678
Page 7

Page 8

 Loading...