


FormNo.3447-879RevD
eS3000SD72VTORO
ModelNo.75500—SerialNo.321000001andUp
®
76cm
Registeratwww.T oro.com.
OriginalInstructions(EN)
*3447-879*

ModelNo.
SerialNo.
Introduction
Thisrotary-blade,ridinglawnmowerisintendedtobe
usedbyhomeownersinresidentialapplications.Itis
designedprimarilyforcuttinggrassonwell-maintained
lawns.Usingthisproductforpurposesotherthan
itsintendedusecouldprovedangeroustoyouand
bystanders.
Readthisinformationcarefullytolearnhowtooperate
andmaintainyourproductproperlyandtoavoid
injuryandproductdamage.Youareresponsiblefor
operatingtheproductproperlyandsafely .
Visitwww.Toro.comforproductsafetyandoperation
trainingmaterials,accessoryinformation,helpnding
adealer,ortoregisteryourproduct.
Wheneveryouneedservice,genuineToroparts,or
additionalinformation,contactanAuthorizedService
DealerorToroCustomerServiceandhavethemodel
andserialnumbersofyourproductready.Figure1
identiesthelocationofthemodelandserialnumbers
ontheproduct.Writethenumbersinthespace
provided.
Important:Withyourmobiledevice,youcan
scantheQRcodeontheserialnumberdecal(if
equipped)toaccesswarranty,parts,andother
productinformation.
Thismanualuses2wordstohighlightinformation.
Importantcallsattentiontospecialmechanical
informationandNoteemphasizesgeneralinformation
worthyofspecialattention.
Thesafety-alertsymbol(Figure2)appearsbothin
thismanualandonthemachinetoidentifyimportant
safetymessagesthatyoumustfollowtoavoid
accidents.Thissymbolwillappearwiththeword
Danger,Warning,orCaution.
•Dangerindicatesanimminentlyhazardous
situationwhich,ifnotavoided,willresultindeath
orseriousinjury.
•Warningindicatesapotentiallyhazardous
situationwhich,ifnotavoided,couldresultin
deathorseriousinjury.
•Cautionindicatesapotentiallyhazardoussituation
which,ifnotavoided,mayresultinminoror
moderateinjury.
sa-black
Figure2
1.Safety-alertsymbol
Figure1
1.Modelandserialnumberplate
Writetheproductmodelandserialnumbersinthe
spacebelow:
©2022—TheToro®Company
8111LyndaleAvenueSouth
Bloomington,MN55420
g345284
Contactusatwww.Toro.com.
2
PrintedintheUSA
AllRightsReserved

Contents
Safety
Safety.......................................................................3
GeneralPowerT oolSafetyWarnings..................3
LawnMowerSafetyWarnings............................5
AdditionalToroSafety.........................................6
SlopeIndicator.................................................10
SafetyandInstructionalDecals.........................11
Setup......................................................................13
1ConnectingtheBatteryCable........................13
2ChargingtheBatteries...................................13
3InstallingtheGrassDeector.........................13
ProductOverview...................................................14
Controls...........................................................14
Specications..................................................15
Attachments/Accessories.................................15
BeforeOperation.................................................16
PerformingDailyMaintenance..........................16
UsingtheSafety-InterlockSystem....................16
PositioningtheSeat..........................................17
ConvertingtheMowertoSide-Discharging
orMulching...................................................17
DuringOperation.................................................18
StartingtheMachine.........................................18
DrivingtheMachine..........................................18
ShuttingOfftheMachine..................................18
OperatingtheMowerBlade-ControlSwitch
(PTO)............................................................19
AdjustingtheHeightofCut...............................19
OperatingTips.................................................19
AfterOperation....................................................20
TransportingtheMachine.................................20
MovingaNon-FunctioningMachine..................22
Maintenance...........................................................23
RecommendedMaintenanceSchedule(s)...........23
Pre-MaintenanceProcedures..............................23
AccessingtheBatteries....................................23
Lubrication..........................................................25
GreasingtheFrontWheelBearings..................25
ElectricalSystemMaintenance...........................25
MaintainingtheBatteries..................................25
DriveSystemMaintenance..................................27
CheckingtheTirePressure...............................27
MowerMaintenance.............................................28
ServicingtheCuttingBlades.............................28
Cleaning..............................................................30
CleaningtheUndersideoftheMower
Deck..............................................................30
DisposingofWaste...........................................30
Storage...................................................................31
CleaningandStorage.......................................31
BatteryStorage................................................31
Troubleshooting......................................................32
Schematics.............................................................33
GeneralPowerToolSafety
Warnings
WARNING
Readallsafetywarnings,instructions,
illustrationsandspecicationsprovidedwith
thispowertool.
Failuretofollowthewarningsandinstructions
mayresultinelectricshock,reand/orserious
injury.
Theterm“powertool”inallofthewarningslisted
belowreferstoyourmains-operated(corded)power
toolorbattery-operated(cordless)powertool.
1.Workareasafety
A.Keepworkareacleanandwelllit.
Clutteredordarkareasinviteaccidents.
B.Donotoperatepowertoolsinexplosive
atmospheres,suchasinthepresence
ofammableliquids,gasses,ordust.
Powertoolscreatesparkswhichmayignite
thedustorfumes.
C.Keepchildrenandbystandersaway
whileoperatingapowertool.Distractions
cancauseyoutolosecontrol.
2.Electricalsafety
A.Powertoolplugsmustmatchtheoutlet.
Nevermodifythepluginanyway .Do
notuseanyadapterplugswithearthed
(grounded)powertools.Unmodied
plugsandmatchingoutletswillreducerisk
ofelectricshock.
B.Avoidbodycontactwithearthedor
groundedsurfaces,suchaspipes,
radiators,ranges,andrefrigerators.
Thereisanincreasedriskofelectricshock
ifyourbodyisearthedorgrounded.
C.Donotexposepowertoolstorainorwet
conditions.Waterenteringapowertool
willincreasetheriskofelectricshock.
D.Donotabusethecord.Neverusethe
cordforcarrying,pullingorunplugging
thepowertool.Keepcordawayfrom
heat,oil,sharpedges,ormovingparts.
Damagedorentangledcordsincreasethe
riskofelectricshock.
E.Whenoperatingapowertooloutdoors,
useanextensioncordsuitablefor
outdooruse.Useofacordsuitablefor
3

outdoorusereducestheriskofelectric
shock.
F.Ifoperatingapowertoolinadamp
locationisunavoidable,usearesidual
currentdevice(RCD)protectedsupply .
UseofanRCDreducestheriskofelectric
shock.
3.Personalsafety
A.Stayalert,watchwhatyouaredoing,
andusecommonsensewhenoperating
apowertool.Donotuseapowertool
whileyouaretiredorundertheinuence
ofdrugs,alcohol,ormedication.A
momentofinattentionwhileoperatingpower
toolsmayresultinseriouspersonalinjury .
B.Usepersonalprotectiveequipment.
Alwaysweareyeprotection.Protective
equipmentsuchasadustmask,non-skid
safetyshoes,orhearingprotectionusedfor
appropriateconditionswillreducepersonal
injuries.
C.Preventunintentionalstarting.Ensure
theswitchisintheoff-positionbefore
connectingtopowersourceand/or
batterypack,pickinguporcarryingthe
tool.Carryingpowertoolswithyournger
ontheswitchorenergisingpowertoolsthat
havetheswitchoninvitesaccidents.
D.Removeanyadjustingkeyorwrench
beforeturningthepowertoolon.A
wrenchorakeyleftattachedtoarotating
partofthepowertoolmayresultinpersonal
injury.
E.Donotoverreach.Keepproper
footingandbalanceatalltimes.This
enablesbettercontrolofthepowertoolin
unexpectedsituations.
F.Dressproperly.Donotwearloose
clothingorjewelry .Keepyourhairand
clothingawayfrommovingparts.Loose
clothes,jewelryorlonghaircanbecaught
inmovingparts.
G.Ifdevicesareprovidedforthe
connectionofdustextractionand
collectionfacilities,ensuretheseare
connectedandproperlyused.Useof
dustcollectioncanreducedust-related
hazards.
H.Donotletfamiliaritygainedfrom
frequentuseoftoolsallowyouto
becomecomplacentandignoretool
safetyprinciples.Acarelessactioncan
causesevereinjurywithinafractionofa
second.
4.Powertooluseandcare
A.Donotforcethepowertool.Usethe
correctpowertoolforyourapplication.
Thecorrectpowertoolwilldothejob
betterandsaferattherateforwhichitwas
designed.
B.Donotusethepowertooliftheswitch
doesnotturnitonandoff.Anypowertool
thatcannotbecontrolledwiththeswitchis
dangerousandmustberepaired.
C.Disconnecttheplugfromthepower
sourceand/orremovethebattery
pack,ifdetachable,fromthepower
toolbeforemakinganyadjustments,
changingaccessories,orstoringpower
tools.Suchpreventivesafetymeasures
reducetheriskofstartingthepowertool
accidentally.
D.Storeidlepowertoolsoutofthereach
ofchildrenanddonotallowpersons
unfamiliarwiththepowertoolorthese
instructionstooperatethepowertool.
Powertoolsaredangerousinthehandsof
untrainedusers.
E.Maintainpowertoolsandaccessories.
Checkformisalignmentorbindingof
movingparts,breakageofpartsand
anyotherconditionthatmayaffectthe
powertool’soperation.Ifdamaged,have
thepowertoolrepairedbeforeuse.Many
accidentsarecausedbypoorlymaintained
powertools.
F.Keepcuttingtoolssharpandclean.
Properlymaintainedcuttingtoolswithsharp
cuttingedgesarelesslikelytobindandare
easiertocontrol.
G.Usethepowertool,accessories,and
toolbitsetc.,inaccordancewiththese
instructions,takingintoaccountthe
workingconditionsandtheworkto
beperformed.Useofthepowertoolfor
operationsdifferentfromthoseintended
couldresultinahazardoussituation.
H.Keephandlesandgraspingsurfaces
dry,cleanandfreefromoilandgrease.
Slipperyhandlesandgraspingsurfacesdo
notallowforsafehandlingandcontrolof
thetoolinunexpectedsituations.
5.Batterytooluseandcare
A.Rechargeonlywiththechargerspecied
byamanufacturer.Achargerthatis
suitableforonetypeofbatterypackmay
createariskofrewhenusedwithanother
batterypack.
4

B.Usepowertoolsonlywithspecically
designatedbatteries.Useofanyother
batteriesmaycreateariskofinjuryandre.
C.Whenbatterypackisnotinuse,keep
itawayfromothermetalobjects,like
paperclips,coins,keys,nails,screws
orothersmallmetalobjects,thatcan
makeaconnectionfromoneterminal
toanother.Shortingthebatteryterminals
togethermaycauseburnsorare.
D.Underabusiveconditions,liquidmaybe
ejectedfromthebattery;avoidcontact.
Ifcontactaccidentallyoccurs,ushwith
water.Ifliquidcontactseyes,additionally
seekmedicalhelp.Liquidejectedfromthe
batterymaycauseirritationorburns.
E.Donotuseabatterypackortoolthat
isdamagedormodied.Damagedor
modiedbatteriesmayexhibitunpredictable
behaviorresultinginre,explosionorrisk
orinjury .
F.Donotexposeabatterypackortoolto
reorexcessivetemperature.Exposure
toretemperatureabove130°Cmaycause
anexplosion.
G.Followallcharginginstructionsand
donotchargethebatterypackortool
outsidethetemperaturerangespecied
intheinstructions.Changingimproperly
orattemperaturesoutsidethespecied
rangemaydamagethebatteryandincrease
theriskofre.
6.Service
A.Haveyourpowertoolservicedby
aqualiedrepairpersonusingonly
identicalreplacementparts.Thiswill
ensurethatthesafetyofthepowertoolis
maintained.
B.Neverservicedamagedbatterypacks.
Serviceofbatterypacksshouldbe
performedonlybythemanufactureror
authorizedserviceproviders.
C.Thoroughlyinspecttheareawhereyouwilluse
thelawnmowerandremoveallstones,sticks,
wires,bones,andotherforeignobjects.Thrown
objectscancausepersonalinjury.
D.Beforeusingthelawnmower,alwaysvisually
inspecttoseethatthebladeandtheblade
assemblyarenotwornordamaged.Wornor
damagedpartsincreasetheriskofinjury.
E.Keepguardsinplace.Guardsmustbein
workingorderandbeproperlymounted.Aguard
thatisloose,damaged,orisnotfunctioning
correctlymayresultinpersonalinjury.
F.Keepallcoolingairinletsclearofdebris.
Blockedairinletsanddebrismayresultin
overheatingorriskofre.
G.Donotoperatethelawnmoweronsteepslopes.
Thisreducestheriskoflossofcontrol,slipping,
andfalling,whichmayresultinpersonalinjury.
H.Whileoperatingthelawnmower,alwayswear
longtrousers.Exposedskinincreasesthe
likelihoodofinjuryfromthrownobjects.
I.Alwaysworkupordownthefaceofslopes,
neveracross,andexerciseextremecaution
whenchangingdirection.Thisreducestherisk
oflossofcontrol,slippingandfallingwhichmay
resultinpersonalinjury.
J.Donottouchbladesandotherhazardous
movingpartswhiletheyarestillinmotion.This
reducestheriskofinjuryfrommovingparts.
K.Beforeclearingjammedmaterialorcleaning
thelawnmower,turnoffallpowerswitches
andremovethekey.Unexpectedoperationof
thelawnmowermayresultinseriouspersonal
injury.
L.Ifthemachinestrikesanobjectorstartsto
vibrate,immediatelyturnoffthelawnmower,
removethekey(ifequipped),andwaitforall
movingpartstostopbeforeexaminingthe
machinefordamage.Makeallnecessary
repairsbeforeresumingoperation.
M.Beforestoringthelawnmower,cleangrass
anddebrisfromthecuttingunit,drives,grass
catcher,andmotortohelppreventres.
LawnMowerSafety
Warnings
A.Donotusethelawnmowerinbadweather
conditions,especiallywhenthereisariskof
lightning.Thisdecreasestheriskofbeingstruck
bylightning.
B.Thoroughlyinspecttheareaforwildlifewhere
youwillusethelawnmower.Wildlifemaybe
injuredbythelawnmowerduringoperation.
N.T oensureoptimumperformance,use
onlygenuineTororeplacementpartsand
accessories.Replacementpartsand
accessoriesmadebyothermanufacturerscould
bedangerous,andsuchusecouldvoidthe
productwarranty.
O.Replacewornordamagedbladesandboltsin
setstopreservebalance.
P .Onmulti-bladedmachines,takecareasrotating
onebladecancauseotherbladestorotate.
5

Q.Donotputyourhandsorfeetnearmoving
componentsofthemachine.
•Alwayslookdownandbehindyoubeforemoving
themachineinreverse.
R.Shutoffthelawnmower,removethekey ,and
waitforallmovingpartstostopbeforeyouleave
theoperator’sposition.Allowthemachineto
coolbeforeadjusting,servicing,cleaning,or
storingit.
S.Avoidmowingonwetgrassorintherain.Doing
somayincreasetheriskofelectricshock.
AdditionalToroSafety
GeneralSafety
Thisproductiscapableofamputatinghandsand
feetandofthrowingobjects.Alwaysfollowallsafety
instructionstoavoidseriouspersonalinjury.
•Donotallowchildrenoruntrainedpeopleto
operateorservicethemachine.Allowonlypeople
whoareresponsible,trained,familiarwiththe
instructions,andphysicallycapabletooperate
orservicethemachine.Localregulationsmay
restricttheageoftheoperator.
•Donotoperatethemachineneardrop-offs,
ditches,embankments,water,orotherhazards,or
onslopesgreaterthan12°.
BeforeOperationSafety
•Becomefamiliarwiththesafeoperationofthe
equipment,operatorcontrols,andsafetysigns.
•Checkthatoperator-presencecontrols,safety
switches,andguardsareattachedandworking
properly.Donotoperatethemachineunlessthey
arefunctioningproperly.
•Beforemowing,inspectthemachinetoensure
thatthecuttingassembliesareworkingproperly .
•Evaluatetheterraintodeterminetheappropriate
equipmentandanyattachmentsoraccessories
requiredtooperatethemachineproperlyand
safely.
•Donotcarrypassengersonthemachine.
DuringOperationSafety
•Theowner/operatorcanpreventandisresponsible
foraccidentsthatmaycausepersonalinjuryor
propertydamage.
•Keepyourhandsandfeetawayfromthecutting
units.Keepclearofthedischargeopening.
•Donotmowwiththedischargedeector
raised,removed,oralteredunlessthereisa
grass-collectionsystemormulchkitinplaceand
workingproperly.
•Useextremecarewhenapproachingblind
corners,shrubs,trees,orotherobjectsthatmay
blockyourview.
•Stopthebladeswheneveryouarenotmowing.
•Slowdownandusecautionwhenmakingturns
andcrossingroadsandsidewalkswiththe
machine.Alwaysyieldtheright-of-way.
•Beforeyouleavetheoperatingposition,dothe
following:
–Parkthemachineonalevelsurface.
–Disengagethepowertakeoff.
–Engagetheparkingbrake.
–Shutoffthemachineandremovethekey.
–Waitforallmovingpartstostop.
•Neverleavearunningmachineunattended.
•Beawareofthemowerdischargepathanddirect
thedischargeawayfromothers.Avoiddischarging
materialagainstawallorobstructionbecausethe
materialmayricochetbacktowardyou.
•Stoptheblades,slowdownthemachine,anduse
cautionwhencrossingsurfacesotherthangrass
orwhentransportingthemachinetoandfromthe
operatingarea.
•Childrenareoftenattractedtothemachineand
themowingactivity.Neverassumethatchildren
willremainwhereyoulastsawthem.
•Keepchildrenoutoftheoperatingareaandunder
thewatchfulcareofaresponsibleadultotherthan
theoperator.
•Bealertandshutoffthemachineifchildrenenter
theoperatingarea.
•Beforebackinguporturningthemachine,look
downandallaroundforsmallchildren.
•Donotcarrychildrenonthemachine,evenwhen
thebladesarenotmoving.Childrencouldfall
offandbeseriouslyinjuredorpreventyoufrom
safelyoperatingthemachine.Childrenwhohave
beengivenridesinthepastcouldappearinthe
operatingareawithoutwarningandberunoveror
backedoverbythemachine.
•Useextracarewithattachments.Theycan
changethestabilityofthemachine.
•Donotattempttostabilizethemachinebyputting
yourfootontheground.
SlopeSafety
•Slopesareamajorfactorrelatedtolossofcontrol
androlloveraccidents,whichcanresultinsevere
6

injuryordeath.Theoperatorisresponsiblefor
safeslopeoperation.Operatingthemachineon
anysloperequiresextracaution.Beforeusingthe
machineonaslope,dothefollowing:
–Reviewandunderstandtheslopeinstructions
inthemanualandonthemachine.
–Useanangleindicatortodeterminethe
approximateslopeangleofthearea.
–Neveroperatethelawnmoweronslopes
greaterthan12°.
–Evaluatethesiteconditionsofthedayto
determineiftheslopeissafeformachine
operation.Usecommonsenseandgood
judgmentwhenperformingthisevaluation.
Changesintheterrain,suchasmoisture,can
quicklyaffecttheoperationofthemachineon
aslope.
•Identifyhazardsatthebaseoftheslope.Do
notoperatethemachineneardrop-offs,ditches,
embankments,water,orotherhazards.The
machinecouldsuddenlyrolloverifawheelgoes
overtheedgeortheedgecollapses.Keepasafe
distance(twicethewidthofthemachine)between
themachineandanyhazard.Useawalk-behind
machineorahandtrimmertomowthegrassin
theseareas.
•Driveupanddownslopes,notacross.Exercise
extremecautionwhenchangingdirectionon
slopes.
•Avoidstarting,stopping,orturningthemachineon
slopes.Avoidmakingsuddenchangesinspeedor
direction;turnslowlyandgradually.
•Ifthemachinestopsgoinguphill,stoptheblades
andbackdownslowly.
•Donotoperateamachineunderanyconditions
wheretraction,steering,orstabilityisinquestion.
Beawarethatoperatingthemachineonwet
grass,acrossslopes,ordownhillmaycausethe
machinetolosetraction.Lossoftractiontothe
drivewheelsmayresultinslidingandalossof
brakingandsteering.Themachinecanslideeven
ifthedrivewheelsarestopped.
•Removeormarkobstaclessuchasditches,holes,
ruts,bumps,rocks,orotherhiddenhazards.T all
grasscanhideobstacles.Uneventerraincould
overturnthemachine.
•Ifpossible,keepthedeckloweredtotheground
whileoperatingonslopes.Raisingthedeckwhile
operatingonslopescancausethemachineto
becomeunstable.
AfterOperationSafety
1.SafeZone—usethe
machinehereonslopes
lessthan12°oratareas.
2.DangerZone—usea
walk-behindmowerand/or
ahandtrimmeronslopes
greaterthan12°andnear
drop-offsorwater.
3.Water
Figure3
4.W=Widthofthemachine
5.Keepasafedistance
(twicethewidthofthe
machine)betweenthe
machineandanyhazard.
Removethekeybeforestoringortransportingthe
machine.
BatteryandChargerSafety
General
•Useonlythesuppliedpowercordforbattery
charging.
•Conrmthevoltagethatisavailableinyour
countrybeforeusingthecharger.
•ForconnectiontoasupplynotintheUS,
useanattachmentplugadapteroftheproper
congurationforthepoweroutlet,ifneeded.
g231393
•Donotchargethemachineinrainorwet
conditions.
•Ariskofre,electricshock,orinjurymayresult
fromusinganaccessorynotrecommendedor
soldbyToro.
•T oreduceriskofabatteryexplosion,followthese
instructionsandtheinstructionsforanyequipment
thatyouintendtousenearthecharger.
•Donotopenbatteries.
•Intheeventthatabatteryleaks,avoidcontactwith
theliquid.Ifyouaccidentallycomeintocontact
withtheliquid,ushwithwaterandseekmedical
7

help.Liquidejectedfromthebatterymaycause
irritationorburns.
•RefertoanauthorizedT orodistributortoservice
orreplaceabattery.
Training
Neverallowchildrenoruntrainedpeopletooperate
orchargethemachine.Localregulationsmayrestrict
theageoftheoperator.Theownerisresponsiblefor
trainingalloperatorsandmechanics.
Preparation
•Keepbystandersandchildrenawaywhile
charging.
•Shutoffthemachineandwaituntilthemachine
hascompletelypowereddownbeforecharging.
Failuretodothismaycausearcing.
•Readandfollowallprecautionsforcharging.
•UseonlyapowercordapprovedbyToro.
Operation
•Readandunderstandthecharginginstructions
beforechargingthebatteries.Also,takethe
followingprecautionswhenchargingthebatteries:
–Turnoffthemachinebeforeconnectingthe
chargertoapowersource.
–Useonlythebatterychargersuppliedwiththe
machinetochargethebatteries.
–Chargethebatteryinanopen,well-ventilated
area,awayfromsparksandames.Unplug
thechargerbeforeconnectingordisconnecting
thebattery.Wearprotectiveclothinganduse
insulatedtools.
–Donotchargeadamagedorfrozenbattery.
–Alwaysunplugthepowercordfromthepower
outletbeforeunpluggingitfromthemachine
chargingreceptacletoavoidsparks.
–Ifabatterygetshotwhilecharging,begins
emittinglargeamountsofgasses,orspews
electrolyte,immediatelydisconnectthecharger
powercordfromthepoweroutlet.Havethe
machineservicedbyanAuthorizedService
Dealerbeforeusingitagain.
•Donotabusethepowersupplycordoryankon
ittodisconnectthechargerfromthereceptacle.
Keepthecordfromheat,oil,andsharpedges.
•Connectthechargerdirectlytoagrounding
receptacle.Donotchargeonanungrounded
outlet,evenwithanadaptor.
•Donotaltertheprovidedpowercordorplug.
•Useanappropriateextensioncord.
•Ifthepowersupplycordisdamagedwhileit
ispluggedin,disconnectthecordfromthe
wallreceptacleandcontactanauthorizedT oro
distributorforareplacement.
•Unplugthechargerfromtheelectricaloutletwhen
notinuse,beforemovingittoanotherlocation,or
priortoservicingit.
MaintenanceandStorage
•Unplugthepowercordfromtheoutletbefore
startinganymaintenanceorcleaningtoreduce
riskofelectricshock.
•Donotchargethebatterieswhileservicingthe
machine.
•Whenremovingorinstallingthebatteries,donot
allowthebatteryterminalstotouchanymetal
partsofthemachine.
•Alwayskeepthebatteryretainersinplaceto
protectandsecurethebatteries.
•Ifthechargerorpowercordisdamaged,donot
useit;takeittoanauthorizedTorodistributor.
•T oreducethepotentialforre,keepthebatteries
andmotorareafreeofexcessivegrease,grass,
leaves,andaccumulationofdirt.
•Donotchargewithadamagedcordorplug.
Replaceadamagedcordorplugimmediately.
•Maintainorreplacesafetyandinstructionlabels
asneeded.
•Storethemachineindoorsinadry,secureplace
thatisoutofthereachofunauthorizedusers.
MaintenanceSafety
•Ifyouleavethekeyintheswitch,someonecould
accidentlystartthemachineandseriouslyinjure
youorotherbystanders.Removethekeyfromthe
switchbeforeyouperformanymaintenance.
•Beforeyouleavetheoperator’sposition,dothe
following:
–Parkthemachineonalevelsurface.
–Disengagethedrives.
–Engagetheparkingbrake.
–Shutoffthemachineandremovethekey.
–Allowmachinecomponentstocoolbefore
performingmaintenance.
•Donotallowuntrainedpersonneltoservicethe
machine.
•Carefullyreleasepressurefromcomponentswith
storedenergy.
•Checktheparkingbrakeoperationfrequently.
Adjustandserviceitasrequired.
•Nevertamperwithsafetydevices.Checktheir
properoperationregularly.
8

•Donotrelyonhydraulicormechanicaljacksto
supportthemachine;supportthemachinewith
jackstandswheneveryouraisethemachine.
•Keepallpartsingoodworkingcondition
andallhardwaretightened,especiallythe
blade-attachmenthardware.Replaceallwornor
damageddecals.
•Disconnectthebatterybeforerepairingthe
machine.Disconnectthenegativeterminalrst
andthepositivelast.Connectthepositiveterminal
rstandthenegativelast.
•Inspectthebladesperiodicallyforwearordamage.
•Usecarewhencheckingtheblades.Wrapthe
bladesorweargloves,andusecautionwhen
servicingtheblades.Onlyreplaceorsharpenthe
blades;neverstraightenorweldthem.
StorageSafety
•Shutoffthemachine,removethekey ,andwait
forallmovingpartstostopbeforeyouleavethe
operator’sposition.Allowthemachinetocool
beforeadjusting,servicing,cleaning,orstoringit.
•Donotstorethemachinewherethereisanopen
ame,spark,orpilotlight,suchasonawater
heateroronotherappliances.
Saveallwarningsandinstructions
forfuturereference.
9

SlopeIndicator
Figure4
Youmaycopythispageforpersonaluse.
1.Themaximumslopeyoucanoperatethemachineonis12degrees.Usetheslopecharttodeterminethedegreeofslopeof
hillsbeforeoperating.Donotoperatethismachineonaslopegreaterthan12degrees.Foldalongtheappropriateline
tomatchtherecommendedslope.
2.Alignthisedgewithaverticalsurface,atree,building,fencepole,etc.
3.Exampleofhowtocompareslopewithfoldededge
10
g011841

SafetyandInstructionalDecals
Safetydecalsandinstructionsareeasilyvisibletotheoperatorandarelocatednearanyarea
ofpotentialdanger.Replaceanydecalthatisdamagedormissing.
134-6026
1.Batterycharge;readtheOperator’sManual.
134-6029
1.Parkingbrake—disengage2.Parkingbrake—engage
decal134-6026
decal134-6033
134-6033
1.Propel
decal134-6069
134-6069
1.Attention—donotspray.
decal134-6029
decal134-6070
134-6070
1.Batterypowered
134-6032
1.Brake
1.Thrownobjecthazard—keepbystandersawayfromthe
machine.
2.Thrownobjecthazard,raiseddeector—donotoperatethe
machinewithanopendeck;useadeector.
decal134-6032
decal134-6027
134-6027
3.Cutting/dismembermenthazardofhandorfoot,mower
blade—keepawayfrommovingparts;keepallguardsand
shieldsinplace.
11

decal134-6028
134-6028
1.USBplug
2.Forward
3.Reversewithoutmowing
4.Reversemowing
5.Cruisecontrol
134-6900
Note:Thismachinecomplieswiththeindustrystandardstabilitytestinthestaticlateralandlongitudinaltestswiththemaximum
recommendedslopeindicatedonthedecal.ReviewtheinstructionsforoperatingthemachineonslopesintheOperator’sManualas
wellastheconditionsinwhichyouwouldoperatethemachinetodeterminewhetheryoucanoperatethemachineintheconditionson
thatdayandatthatsite.Changesintheterraincanresultinachangeinslopeoperationforthemachine.
1.Warning—readtheOperator'sManual.5.Tippinghazard—donotturnsharplywhiletravelingfast;drive
2.Cutting/dismembermenthazardofhandorfoot,mower
blade—keepawayfrommovingparts;keepallguardsand
shieldsinplace.
3.Runoverhazard—donotcarrypassengers;lookbehindyou
whenmowinginreverse.
4.Thrownobjecthazard—pickupdebrisbeforeoperating;keep
thedeectorinplace;keepbystandersaway.
slowlywhenturning;onlyoperateupslopeslessthan12°;
onlyoperateacrossslopeslessthan12°.
6.Tippinghazard—donotusedualrampswhenloadingontoa
trailer;use1rampwideenoughforthemachine;usearamp
withaslopelessthan12°;backuptherampwhenloadingthe
machineanddriveforwardofftherampwhenunloading.
7.Caution—wearhearingprotection;weareyeprotection.
8.Caution—shutofftheengineandremovethekeybefore
performingmaintenance.
decal134-6900
12

Setup
2
1
ConnectingtheBattery
Cable
NoPartsRequired
Procedure
1.Tilttheseatforward.
2.Removetherearcovertoaccessthebatteries;
refertoAccessingtheBatteries(page23).
3.Connectthe2cables.
ChargingtheBatteries
NoPartsRequired
Procedure
RefertoChargingtheBatteries(page26).
3
InstallingtheGrass
Deector
NoPartsRequired
Procedure
RefertoConvertingtheMowertoSide-Dischargingor
Mulching(page17).
Figure5
4.Ensurethatallwiringissecure.
5.Installthetopcoverandsecureitwiththe4
screws.
6.Lowertheseat.
g343324
13

ProductOverview
1.Brakepedal
2.Tractionpedal
3.Mowerdeck
4.Anti-scalproller
5.Parking-brakelever
Figure6
6.Grassdeector
7.Controlpanel
8.Operatorseat
9.Height-of-cutlever
10.SteeringWheel
Blade-ControlSwitch(Power
Takeoff)
Theblade-controlswitch,representedbya
power-takeoff(PTO)symbol,engagesand
disengagespowertothemowerblades.
BrakePedal
Usethebrakepedaltostoporslowthemachine.
Parking-BrakeLever
Wheneveryoushutoffthemachine,engagethe
parkingbraketopreventaccidentalmovementofthe
machine.
g340907
•T oengagetheparkingbrake,pulltheparking-brake
leverup.
Controls
Becomefamiliarwithallthecontrolsbeforeyoustart
andoperatethemachine.
ControlPanel
Figure7
1.USBport
2.Drive-modeswitch6.Batterychargeindicator
3.Reverse-mowing
operationbutton
4.Cruise-controloperation
button
KeySwitch
Thekeyswitchhas2positions:ONandOFF.Usethe
keyswitchtostartorshutoffthemachine.
5.Blade-controlswitch
7.Keyswitch
g341485
Figure8
1.Engagetheparkingbrake.2.Disengagetheparking
brake.
•T odisengagetheparkingbrake,pressthebutton
ontheparking-brakeleverandthenpushthe
parking-brakeleverforward
g340906
Traction-ControlPedal
Usethetraction-controlpedaltovarytheground
speedofthemachine.Thefartheryoupressthe
pedal,thefasterthemachinemoves.
Drive-ModeSwitch
Thedrive-modeswitchhas3positions:FORWARD,
NEUTRAL,andREVERSE.Thedrive-modeswitchmust
beintheFORWARDpositionbeforeengagingthe
mowerblades.
Note:Anaudiblealarmsoundswhenthedrive-mode
switchisintheREVERSEposition.Themachinemoves
inreverseathalftheforwardspeed.
14

Reverse-MowingOperation(RMO)
Height-of-CutLever
Button
Usethereverse-mowingoperation(RMO)buttonto
operatethemowerbladeswhiledrivingthemachine
inreverse.
Engagethereverse-mowingmodeinthefollowing
ways:
•Beforeengagingtheblades
–Pressthereverse-mowingbutton,engage
themowerblades,thenmovethedrive-mode
switchtotheREVERSEposition.
–Engagethemowerblades,pressthe
reverse-mowingbutton,thenmovethe
drive-modeswitchtotheREVERSEposition.
•Whilemowingintheforwarddirection
–Pressthereverse-mowingbutton,thenmove
thedrive-modeswitchtotheREVERSEposition.
–Movethedrive-modeswitchtotheREVERSE
position,disengagethemowerblades,press
thereverse-mowingbutton,thenengagethe
mowerblades.
Cruise-ControlOperation(CCO)
Button
Usethecruise-control(CCO)buttontomaintainthe
tractionspeedwithoutyourfootonthepedal.
Pressthetraction-controlpedaltothedesired
speed,holdthecruise-controlbuttonapproximately3
seconds,thenreleaseyourfootfromthepedal.
Pressthetraction-controlpedalorbrakepedalto
disengagethecruisecontrol.
Usetheheight-of-cutlevertolowerandraisethedeck
fromtheseatedposition.Movingthelevertowardyou
raisesthedeckfromthegroundandmovingthelever
awayfromyoulowersthedecktowardtheground.
Adjusttheheight-of-cutonlywhilethemachineisnot
moving.
Specications
Note:Specicationsanddesignaresubjectto
changewithoutnotice.
Cuttingwidth76cm(30inches)
Widthwithoutdeector80cm(31inches)
Length
Weight
Height
Chargingtime
Attachments/Accessories
AselectionofT oroapprovedattachmentsand
accessoriesisavailableforusewiththemachine
toenhanceandexpanditscapabilities.Contact
yourAuthorizedServiceDealerorauthorizedT oro
distributororgotowww.Toro.comforalistofall
approvedattachmentsandaccessories.
Toensureoptimumperformanceandcontinuedsafety
certicationofthemachine,useonlygenuineT oro
replacementpartsandaccessories.Replacement
partsandaccessoriesmadebyothermanufacturers
couldbedangerous,andsuchusecouldvoidthe
productwarranty.
148cm(58inches)
188kg(414lb)
106cm(42inches)
11hours
Battery-DischargeIndicator
Thebattery-dischargeindicatordisplaystheremaining
chargeinthebatteries.Whenthebatteriesarefully
charged,10indicatorbarslightupanddisappear
asyouusethecharge.Whenthebatterychargeis
low,theindicatorlightsdisplayinredandthemower
bladesautomaticallydisengage;chargethebatteries
whenthisoccurs.
Note:Thebattery-dischargeindicatordoesnot
displayunlesstheoperatorissittingintheoperator’s
seat.
15

Operation
Note:Determinetheleftandrightsidesofthe
machinefromthenormaloperatingposition.
BeforeOperation
PerformingDaily
Maintenance
Beforestartingthemachineeachday ,performthe
EachUse/DailyprocedureslistedinMaintenance
(page23).
UsingtheSafety-Interlock
System
WARNING
Ifthesafety-interlockswitchesare
disconnectedordamaged,themachinecould
operateunexpectedly,causingpersonal
injury.
•Donottamperwiththeinterlockswitches.
1.Sitontheseat,engagetheparkingbrake,move
thedrive-modeswitchtotheFORWARDposition,
andmovetheblade-controlswitchtotheOFF
position.Trystartingthemachine;themachine
shouldnotstart.
2.Sitontheseat,disengagetheparkingbrake,
movethedrive-modeswitchtotheFORWARD
position,andmovetheblade-controlswitchto
theONposition.Trystartingthemachine;the
machineshouldnotstart.
3.Sitontheseat,disengagetheparkingbrake,
movethedrive-modeswitchtotheREVERSE
position,andmovetheblade-controlswitchto
theOFFposition.Trystartingthemachine;the
machineshouldnotstart.
4.Sitontheseat,disengagetheparkingbrake,
movethedrive-modeswitchtotheFORWARD
position,andmovetheblade-controlswitchto
theOFFposition.Startthemachine.Whilethe
machineisrunning,riseslightlyfromtheseat;
themachineshouldshutoff.
5.Sitontheseat,disengagetheparkingbrake,
movethedrive-modeswitchtotheFORWARD
position,andmovetheblade-controlswitchto
theOFFposition.Startthemachine.Whilethe
machineisrunning,engagetheblade-control
switch,andriseslightlyfromtheseat;themower
bladesandmachineshouldshutoff.
•Checktheoperationoftheinterlock
switchesdailyandreplaceanydamaged
switchesbeforeoperatingthemachine.
Understandingthe
Safety-InterlockSystem
Thesafety-interlocksystemisdesignedtopreventthe
machinefromstartingunless:
•Theblade-controlswitch(PTO)isdisengaged.
•Theparkingbrakeisdisengaged.
•Y ouareseatedintheoperator'sseat.
•Thedrive-modeswitchisintheFORWARDor
NEUTRALposition.
Thesafety-interlocksystemalsoisdesignedto
preventthemowerbladesfromengagingunlessthe
drive-modeswitchisintheFORWARDposition.
TestingtheSafety-Interlock
System
6.Sitontheseat,disengagetheparkingbrake,
movethedrive-modeswitchtotheFORWARD
position,andmovetheblade-controlswitchto
theOFFposition.Startthemachine.Whilethe
machineisrunning,engagetheblade-control
switch,andmovethedrive-modeswitchtothe
REVERSEposition;themowerbladesshould
shutoff.
Testthesafety-interlocksystembeforeyouusethe
machineeachtime.Ifthesafetysystemdoesnot
operateasdescribedbelow,haveanAuthorized
ServiceDealerrepairthesafetysystemimmediately .
16

PositioningtheSeat
ConvertingtheMower
Theseatcanmoveforwardandbackward.Position
theseatwhereyouhavethebestcontrolofthe
machineandaremostcomfortable.
Figure9
toSide-Dischargingor
Mulching
DANGER
Withoutagrassdeector,dischargecover,or
acompletegrass-catcherassemblymounted
inplace,youandothersareexposedtoblade
contactandthrowndebris.Contactwith
rotatingmowerblade(s)andthrowndebris
willcauseinjuryordeath.
•Neverremovethegrassdeectorfromthe
mowerdeckbecausethegrassdeector
routesmaterialdowntowardtheturf.Ifthe
grassdeectoriseverdamaged,replaceit
immediately.
g341496
•Neverputyourhandsorfeetunderthe
mowerdeck.
•Nevertrytoclearthedischargearea
ormowerbladesunlessyoumovethe
blade-controlswitch(PTO)totheOFF
position,rotatethekeyswitchtotheOFF
position,andremovethekeyfromthekey
switch.
•Makesurethatthegrassdeectorisinthe
downposition.
1.Parkthemachineonalevelsurface,disengage
theblade-controlswitch,andengagetheparking
brake.
2.Shutoffthemachineandremovethekey.
3.Convertthemowerdecktosidedischargingor
mulching.
•T oconvertthemowerdecktoside
discharging:
A.Presstheleveronthemulchingcover
toopenit.
17

Figure10
DuringOperation
StartingtheMachine
1.Sitontheoperator’sseat.
2.Releasetheparkingbrake.
3.Ensurethattheblade-controlswitch(PTO)is
disengaged.
4.Movethedrive-modeswitchtotheNEUTRAL
g341499
position.
5.TurnthekeyswitchtotheONposition.
B.Installthedischargedeectorunderthe
coversothatthedeectorissecuredby
themulchingcoverpegs.
DrivingtheMachine
Note:Alwaysusecautionwhenbackingupand
turning.
1.Disengagetheparkingbrake.
2.Movethedrive-modeswitchtotheFORWARDor
REVERSEposition.
3.Placeyourfootonthetraction-controlpedaland
slowlypressittostartdriving.
Note:Thefartheryoupressthepedal,the
fasterthemachinemoves.
4.Releasethetraction-controlpedalandslowly
pressthebrakepedaltostoporslowthe
machine.
Note:Stopthemachinebeforechanging
directiontoforwardorreverse.
ShuttingOfftheMachine
1.Parkthemachineonalevelsurface.
1.Mulchingcoverpeg
•T oconvertthemowerdecktomulching,
removethedeectorandclosethemulching
cover.
Note:Thecoverlocksautomaticallywhen
itisclosedfully.
Figure11
2.Disengagethemowerblades.
3.Engagetheparkingbrake.
g341498
4.TurnthekeyswitchtotheOFFpositionand
removethekey.
18
OperatingtheMower
AdjustingtheHeightofCut
Blade-ControlSwitch(PTO)
Theblade-controlswitch(PTO)startsandstopsthe
mowerblades.
EngagingtheBlade-Control
Switch(PTO)
Ensurethatthedrive-modeswitchisintheFORWARD
positionbeforeengagingthemowerblades.Referto
Reverse-MowingOperation(RMO)Button(page15)
formowinginreverse.
Figure12
DisengagingtheBlade-Control
Switch(PTO)
Note:Themowerbladesautomaticallydisengage
whenoperatingthemachineinreverse(whennot
usingthereverse-mowingbutton)orwhenthe
operatorrisesfromtheseat.
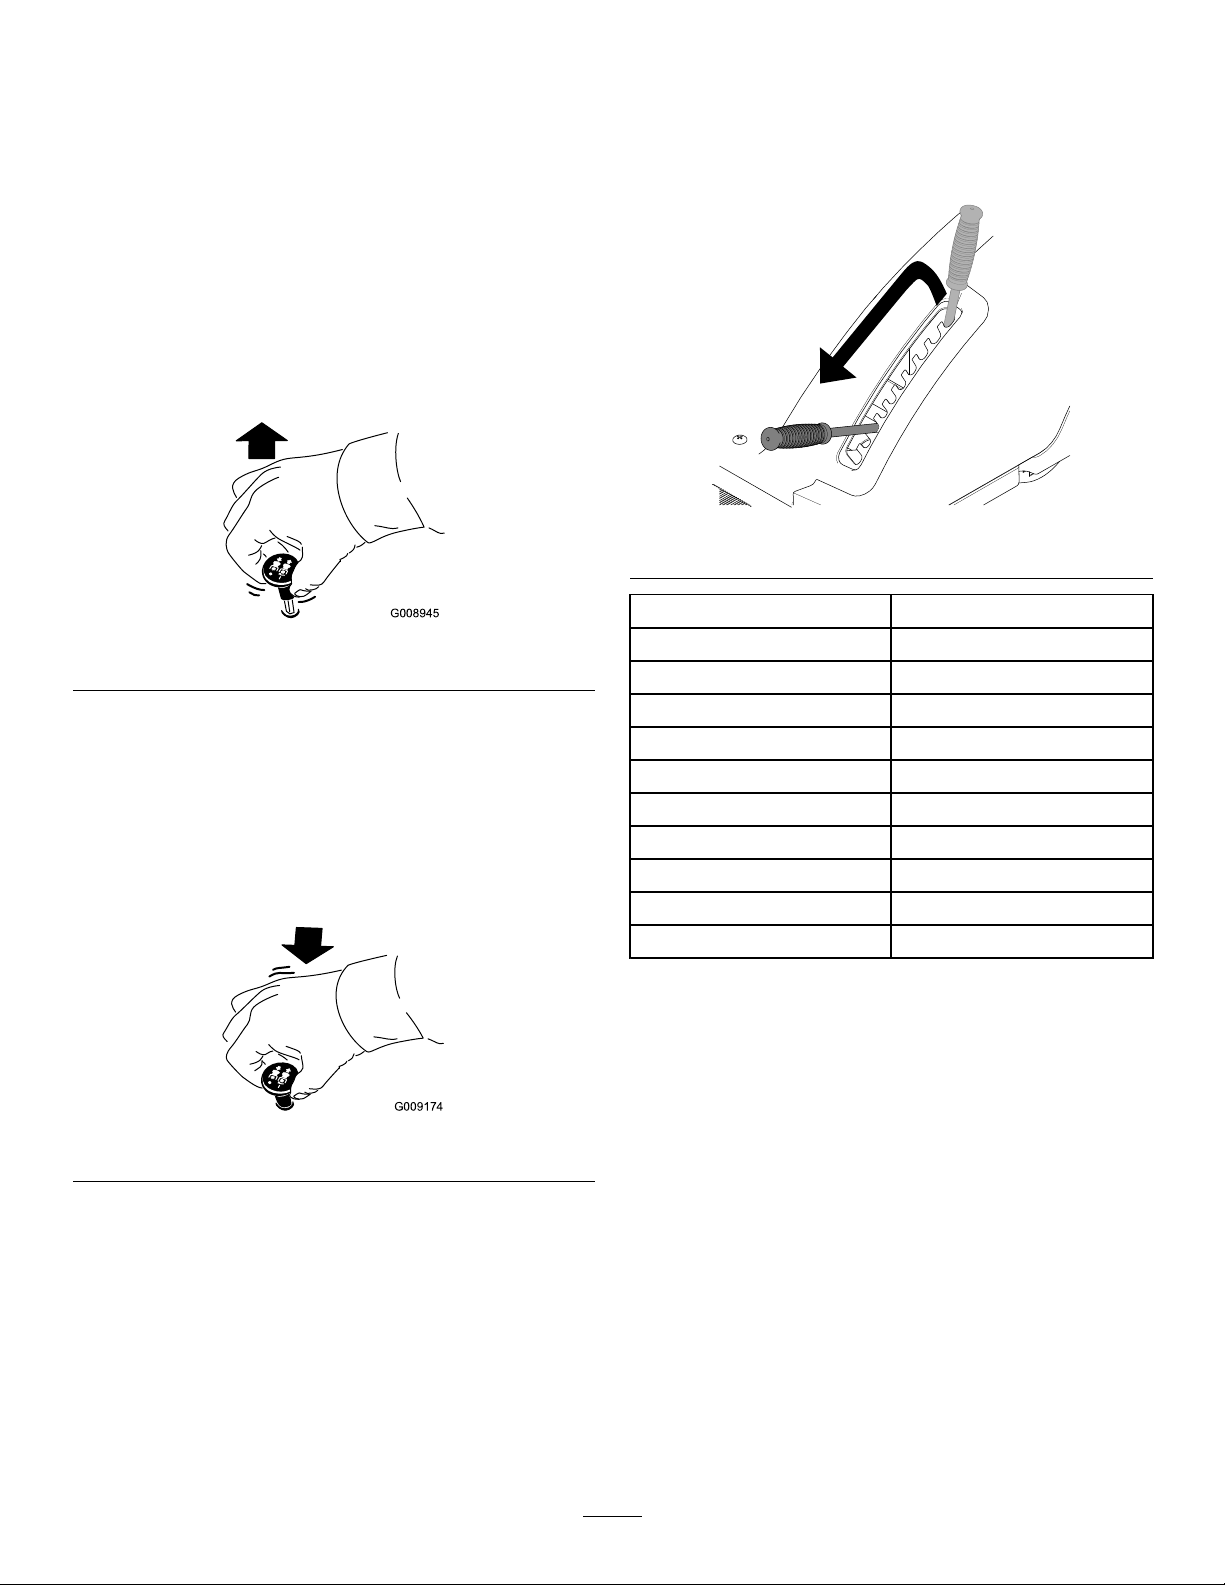
Youcanadjusttheheightofcutfrom25to104.7mm
(1to4.1inches).Pullthelevertotheright,moveitto
thedesiredheight,andreleasetheleverintotheslot.
Refertothetablefortheheight-of-cutpositions.
g343035
Figure14
g008945
Height-of-CutPosition
1
2
3
4
5
6
7
8
9
10
Height
25.0mm(1.0inch)
31.8mm(1.3inches)
40.7mm(1.6inches)
51.2mm(2.0inches)
62.4mm(2.5inches)
73.4mm(2.9inches)
83.4mm(3.3inches)
91.9mm(3.6inches)
99.0mm(3.9inches)
104.7mm(4.1inches)
Figure13
OperatingTips
CuttingaLawnfortheFirstTime
g009174
Cutgrassslightlylongerthannormaltoensurethat
thecuttingheightofthemowerdeckdoesnotscalp
anyunevenground.However,thecuttingheight
usedinthepastisgenerallythebestonetouse.
Whencuttinggrasslongerthan15cm(6inches)tall,
youmaywanttocutthelawntwicetoensurean
acceptablequalityofcut.
CuttingaThirdoftheGrassBlade
Itisbesttocutonlyaboutathirdofthegrassbladeor
nomorethan2.5cm(1inch)offtheheight.Cutting
morethanthatisnotrecommendedunlessgrassis
sparse,oritislateautumnwhengrassgrowsmore
slowly.
19

AlternatingtheMowingDirection
Alternatethemowingdirectiontokeepthegrass
standingstraight.Thisalsohelpsdisperseclippings,
whichenhancesdecompositionandfertilization.
MowingatCorrectIntervals
Grassgrowsatdifferentratesatdifferenttimesof
theyear.Tomaintainthesamecuttingheight,mow
moreofteninearlyspring.Asthegrassgrowthrate
slowsinmidsummer,mowlessfrequently.Ifyou
cannotmowforanextendedperiod,rstmowata
highcuttingheight,thenmowagain2dayslaterata
lowerheightsetting.
UsingaSlowerCuttingSpeed
Toimprovecutquality,useaslowergroundspeed
incertainconditions.
AvoidingCuttingTooLow
Whenmowinguneventurf,raisethecuttingheight
toavoidscalpingtheturf.
AfterOperation
TransportingtheMachine
Useaheavy-dutytrailerortrucktotransportthe
machine.Useafull-widthramp.Ensurethatthetrailer
ortruckhasallthenecessarybrakes,lighting,and
markingasrequiredbylaw.Pleasecarefullyreadall
thesafetyinstructions.Knowingthisinformationcould
helpyouorbystandersavoidinjury.Refertoyour
localordinancesfortrailerandtie-downrequirements.
WARNING
Drivingonthestreetorroadwaywithout
turnsignals,lights,reectivemarkings,ora
slow-moving-vehicleemblemisdangerous
andcanleadtoaccidents,causingpersonal
injury.
Donotdrivethemachineonapublicstreet
orroadway.
SelectingaTrailer
StoppingtheMachine
Ifyoumuststoptheforwardmotionofthemachine
whilemowing,aclumpofgrassclippingsmay
dropontoyourlawn.Toavoidthis,moveontoa
previouslycutareawiththebladesengagedoryou
candisengagethemowerdeckwhilemovingforward.
KeepingtheUndersideofthe
MowerDeckClean
Cleanclippingsanddirtfromtheundersideofthe
mowerdeckaftereachuse.Ifgrassanddirtbuildup
insidethemowerdeck,cuttingqualitywilleventually
becomeunsatisfactory.
MaintainingtheBlade(s)
Maintainasharpbladethroughoutthecuttingseason
becauseasharpbladecutscleanlywithouttearingor
shreddingthegrassblades.Tearingandshredding
turnsgrassbrownattheedges,whichslowsgrowth
andincreasesthechanceofdisease.Checkthe
mowerbladesaftereachuseforsharpness,and
foranywearordamage.Filedownanynicksand
sharpenthebladesasnecessary.Ifabladeis
damagedorworn,replaceitimmediatelywitha
genuineT ororeplacementblade.
WARNING
Loadingamachineontoatrailerortruck
increasesthepossibilityoftip-overandcould
causeseriousinjuryordeath(Figure15).
•Useonlyafull-widthramp;donotuse
individualrampsforeachsideofthe
machine.
•Donotexceeda12-degreeanglebetween
therampandthegroundorbetweenthe
rampandthetrailerortruck.
•Ensurethatthelengthoftherampisat
least4timesaslongastheheightofthe
trailerortruckbedtotheground.This
ensuresthattherampangledoesnot
exceed12degreesonatground.
20
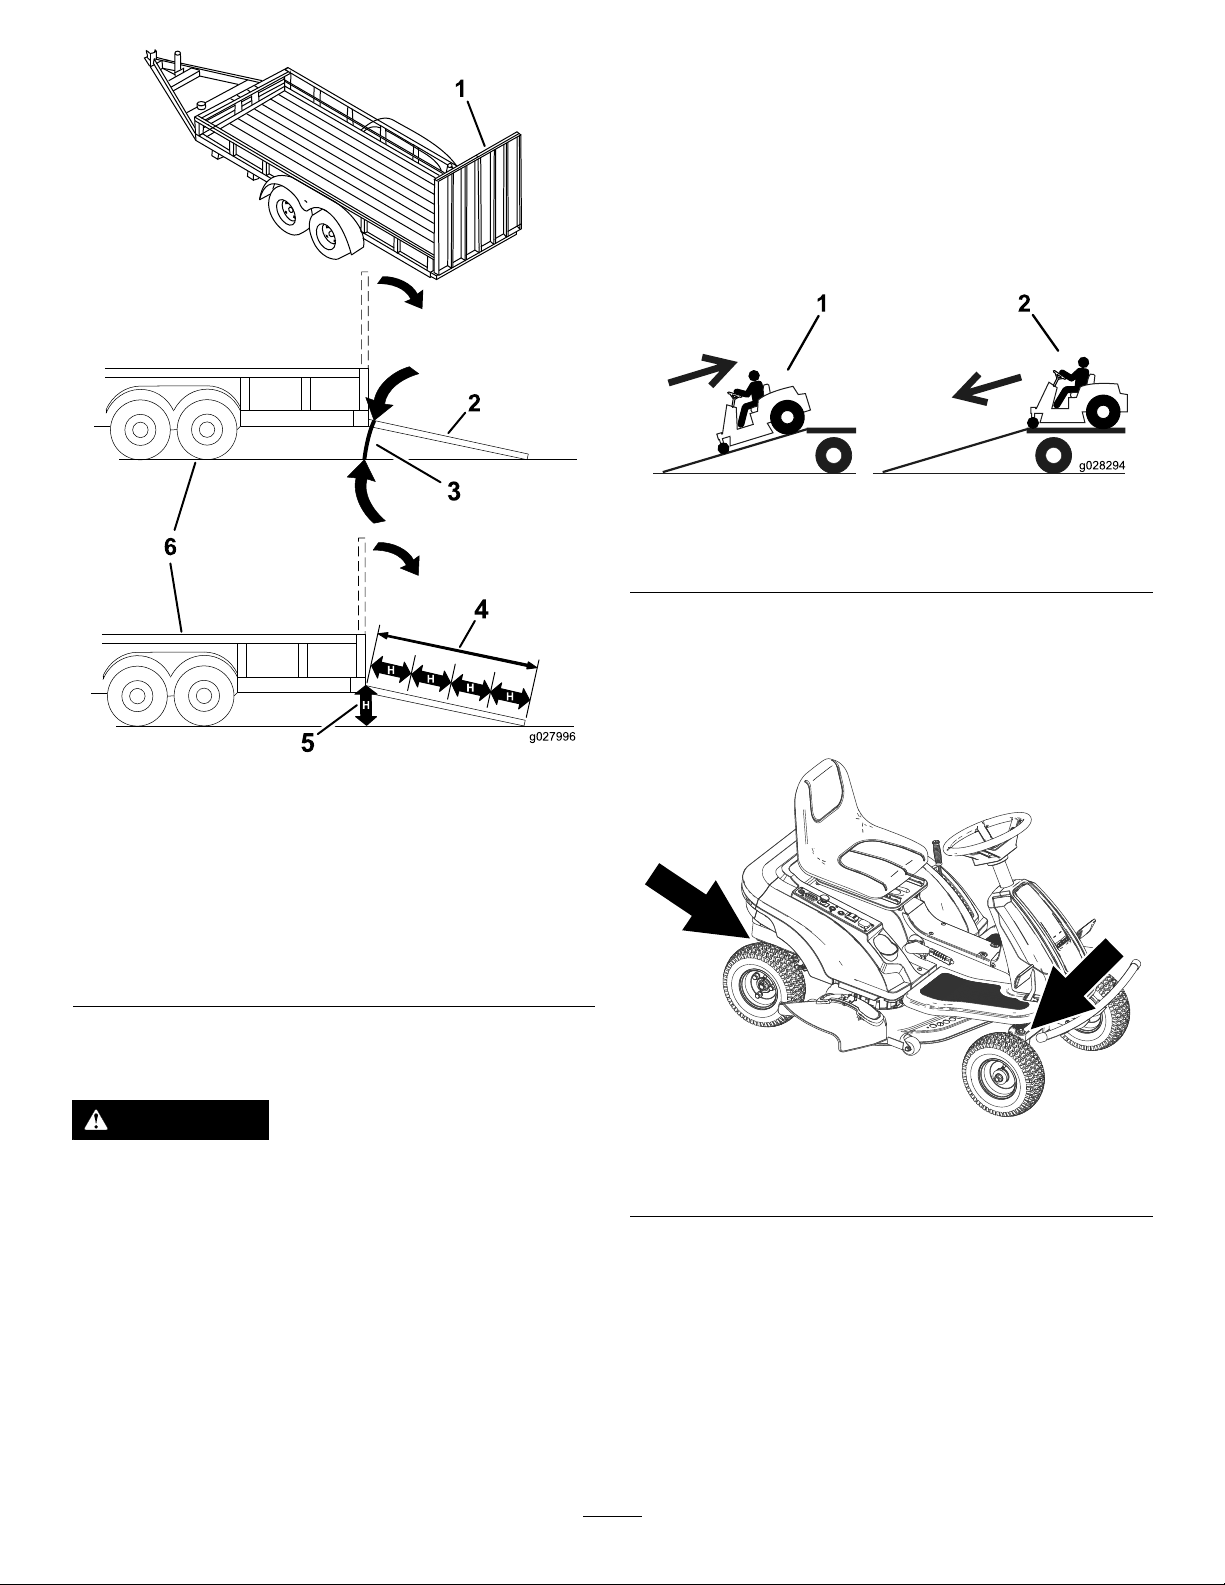
1.Ifusingatrailer,connectittothetowingvehicle
andconnectthesafetychains.
2.Ifapplicable,connectthetrailerbrakesand
lights.
3.Lowertheramp,ensuringthattheangle
betweentherampandthegrounddoesnot
exceed12degrees(Figure15).
4.Backthemachineuptheramp.
Figure16
g028294
1.Full-widthrampinstowed
position
2.Sideviewoffull-width
rampinloadingposition
3.Notgreaterthan
12degrees
LoadingtheMachine
Figure15
4.Rampisatleast4times
aslongastheheightof
thetrailerortruckbedto
theground
5.H=heightofthetraileror
truckbedtotheground
6.Trailer
1.Backthemachineupthe
ramp.
2.Drivethemachineforward
downtheramp.
5.Shutoffthemachine,removethekey,and
engagetheparkingbrake.
6.Tiedownthemachineatthefrontandrearaxles
withstraps,chains,cable,orropes.Referto
localregulationsfortie-downrequirements.
g027996
WARNING
Loadingamachineontoatrailerortruck
increasesthepossibilityoftip-overandcould
causeseriousinjuryordeath.
•Useextremecautionwhenoperatinga
machineonaramp.
•Backthemachineuptherampanddriveit
forwarddowntheramp.
•Avoidsuddenaccelerationordeceleration
whiledrivingthemachineonarampas
thiscouldcausealossofcontrolora
tip-oversituation.
g343282
Figure17
1.Tie-downpoints
UnloadingtheMachine
1.Lowertheramp,ensuringthattheangle
betweentherampandthegrounddoesnot
exceed12degrees(Figure15).
2.Drivethemachineforwarddowntheramp
(Figure16).
21

MovingaNon-Functioning
Machine
Themachinealertsyouwhenthebatterychargeis
lowsothatyouhaveenoughpowertoreturnittothe
charginglocation;refertoBattery-DischargeIndicator
(page15).
Ifyouneedtotowthemachine,disengagetheparking
brakeandtowthemachineatawalkingspeed.
22
Maintenance
Note:Determinetheleftandrightsidesofthemachinefromthenormaloperatingposition.
RecommendedMaintenanceSchedule(s)
MaintenanceService
Interval
Beforeeachuseordaily
Aftereachuse
Every25hours
Beforestorage
Monthly
Every2months
MaintenanceProcedure
•Checkthesafety-interlocksystem.
•Chargethebatteries.
•Inspecttheblades.
•Cleanthemower-deckhousing.
•Greasethefrontwheelbearings.
•Cleanthebatteries.
•Checkthetirepressure.
•Performallmaintenanceprocedureslistedabovebeforestorage.
•Paintanychippedsurfaces.
•Checkforbatteryleaks.
•Chargethebatterieswhennotinuse.
CAUTION
Ifyouleavethekeyintheswitch,someonecouldaccidentlystartthemachineandseriously
injureyouorotherbystanders.
Shutoffthemachineandremovethekeyfromtheswitchbeforeyouperformanymaintenance.
Pre-MaintenanceProcedures
AccessingtheBatteries
1.Parkthemachineonalevelsurface,disengage
theblade-controlswitch,andengagetheparking
brake.
2.Shutoffthemachineandremovethekey.
3.Tilttheseatforward.
4.Movetheheight-of-cutlevertothemiddle
positionandremovethehandle.
g358658
Figure19
Figure18
g358655
23
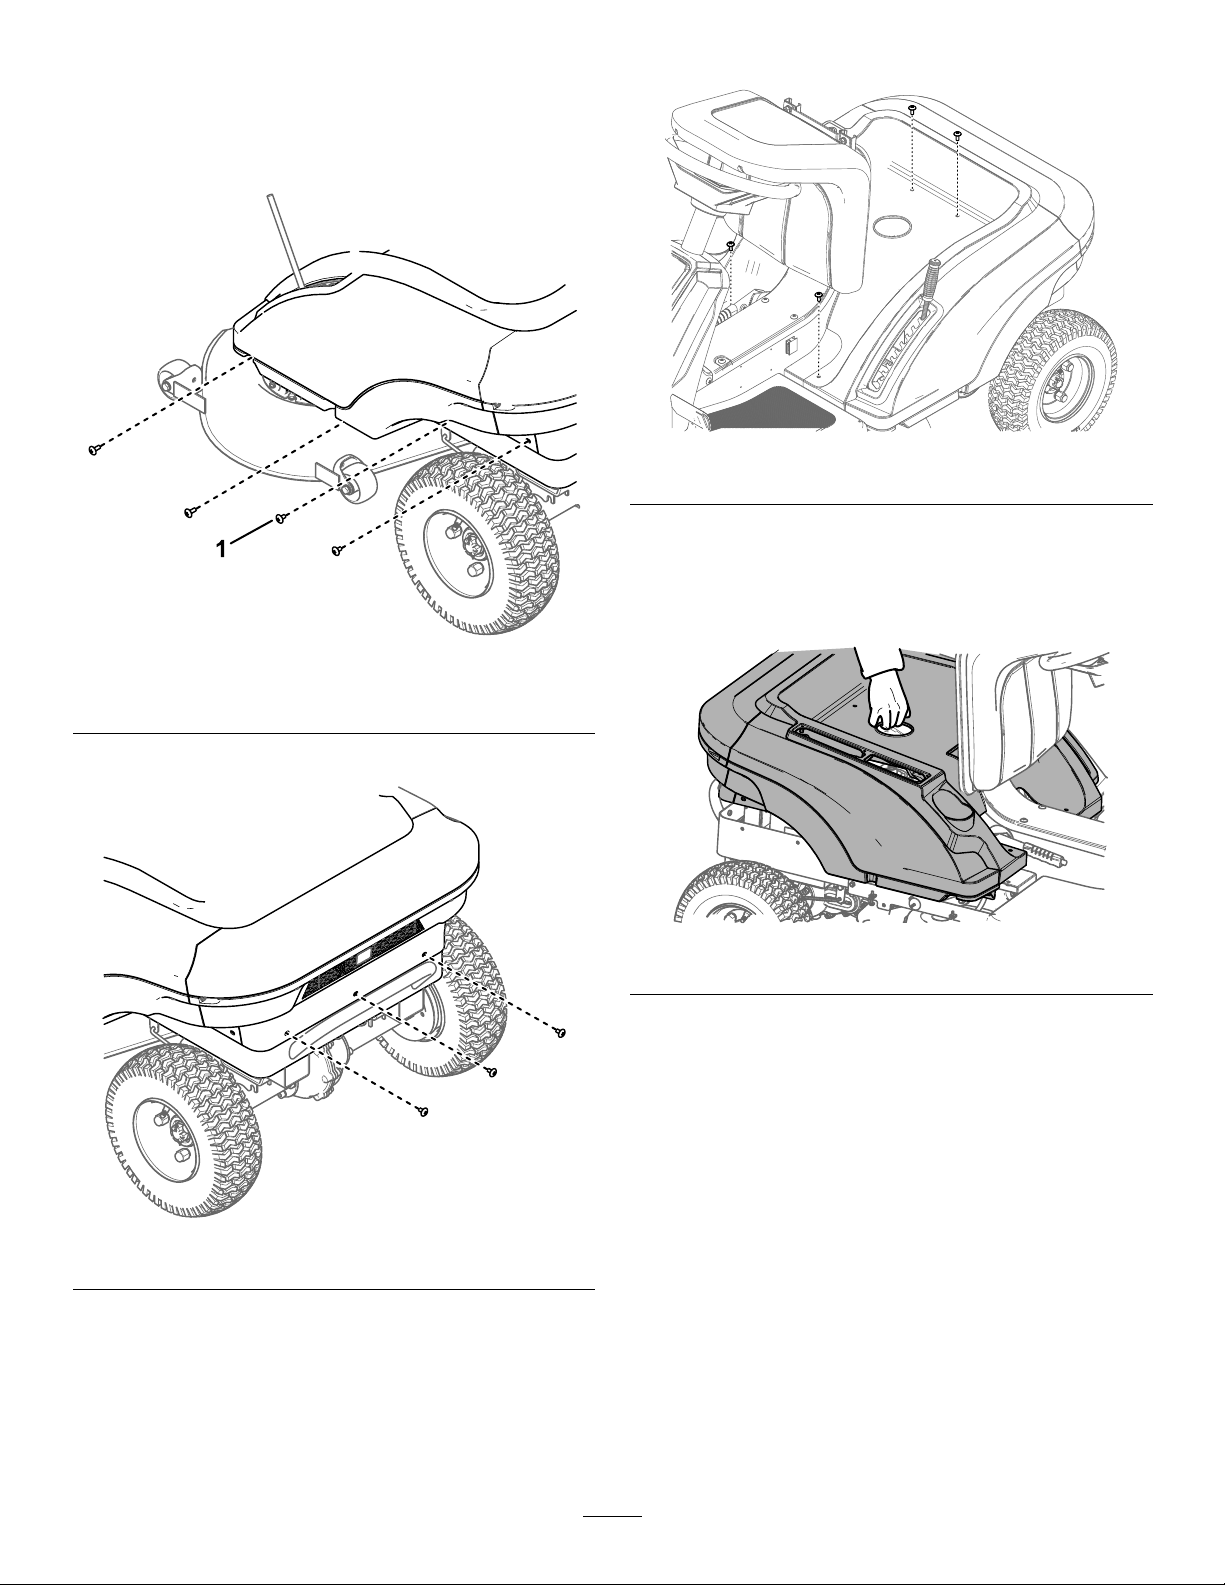
5.Insertthewireharnessconnectorsintothe
controlpanelhole.
6.Removethe4screwssecuringthecovertothe
leftsideofthemachine.Repeatfortheright
side.
Figure20
8.Removethe4topscrewsfromthecover.
g358654
Figure22
9.Carefullyliftthecoverandsetitdownnextto
themachine.
Note:Youdonotneedtodisconnectthewire
harnessfromthecontrols.
g358653
1.Hex-headscrew(4eachside)
7.Removethe3rearscrewsfromthecover.
Figure21
g358651
Figure23
10.Reversetheproceduretoinstallthecover.
Important:Aftermaintenance,ensurethatthere
arenoopencircuitsorloosewiring.
g358652
24
Lubrication
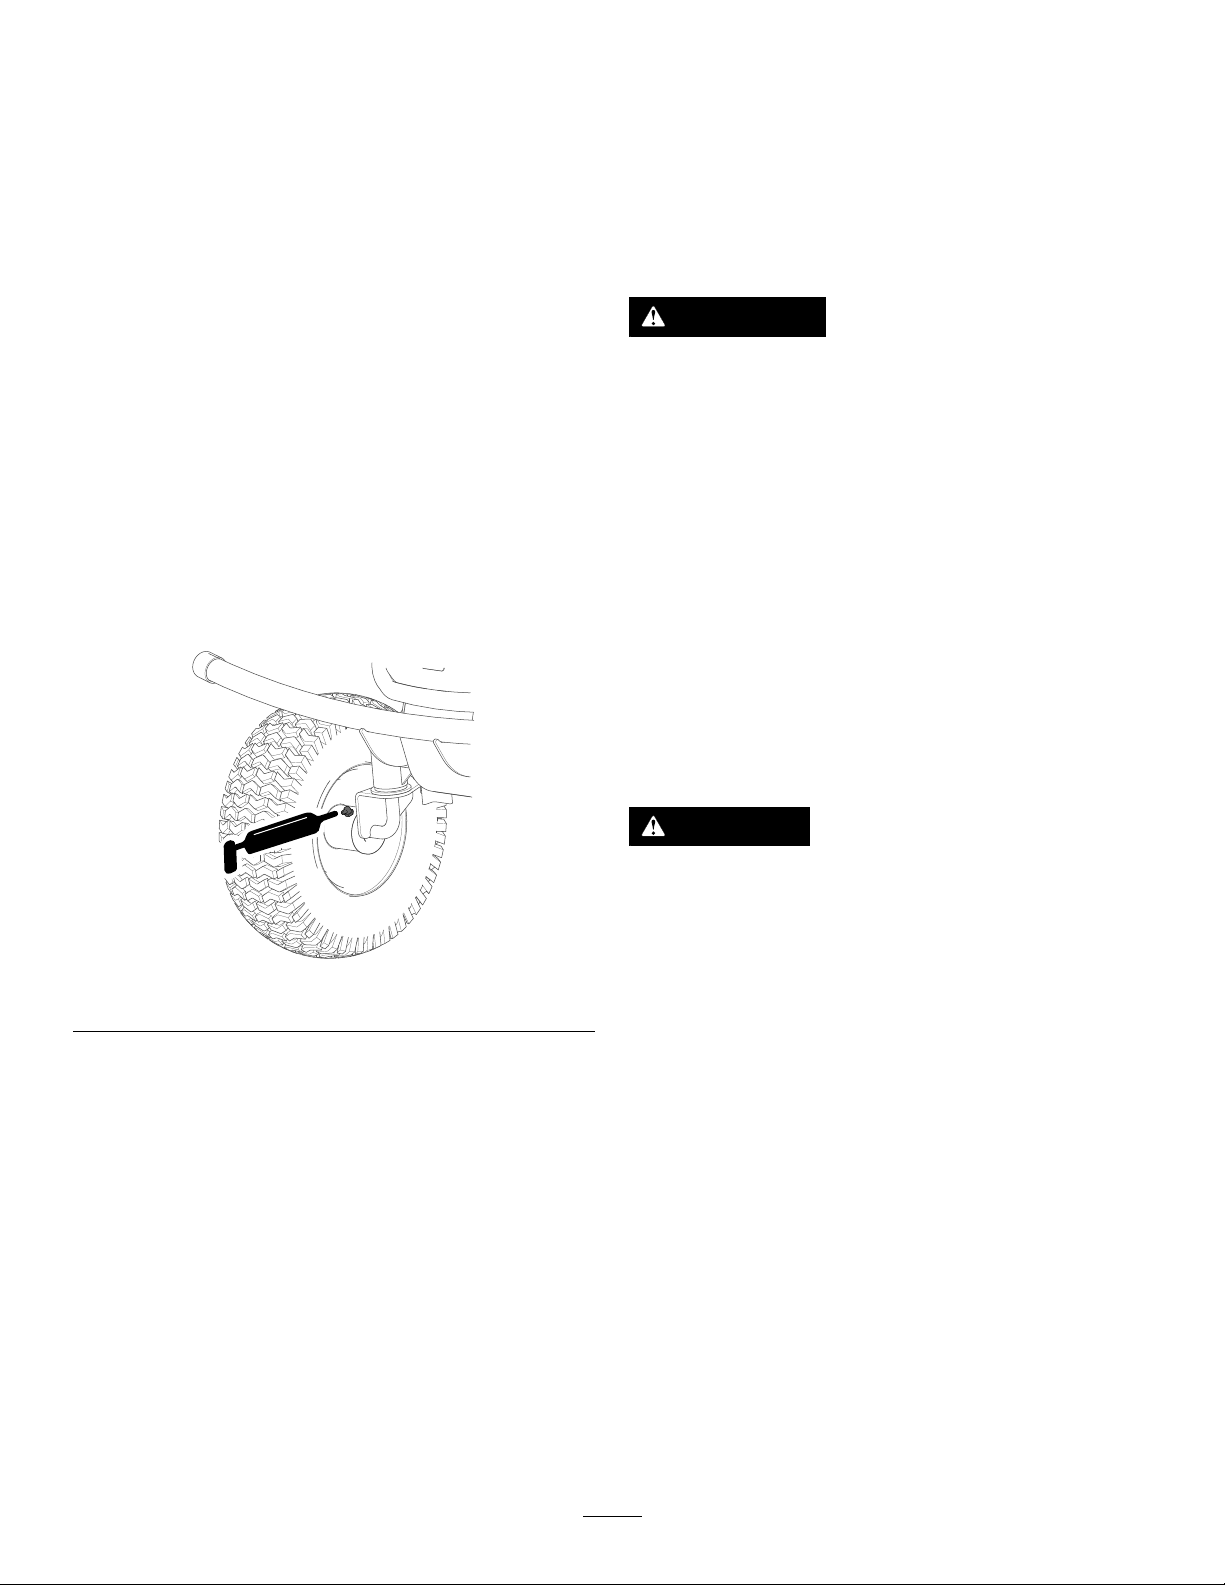
GreasingtheFrontWheel
ElectricalSystem
Maintenance
Bearings
ServiceInterval:Every25hours
Greasetype:General-purposegrease
1.Parkthemachineonalevelsurface,disengage
theblade-controlswitch,andengagetheparking
brake.
2.Shutoffthemachineandremovethekey.
3.Cleanthegreasettingswitharag.
Note:Makesuretoscrapeanypaintoffthe
frontofthetting(s).
4.Connectagreaseguntothetting.
5.Pumpgreaseintothettingsuntilgreasebegins
tooozeoutofthebearings.
6.Wipeupanyexcessgrease.
MaintainingtheBatteries
Note:Theoriginalbatteriesaremaintenance-free
anddonotrequireservice.
WARNING
Batteryterminalsormetaltoolscouldshort
againstmetalcomponentscausingsparks.
Sparkscancausethebatterygasesto
explode,resultinginpersonalinjury.
•Whenremovingorinstallingthebattery,
donotallowthebatteryterminalstotouch
anymetalpartsofthemachine.
•Donotallowmetaltoolstoshortbetween
thebatteryterminalsandmetalpartsofthe
machine.
•Useinsulatedtoolswhenmaintainingthe
batteries.
•Alwayskeepthebatteryretainersinplace
toprotectandsecurethebatteries.
Figure24
DANGER
Donottouchanyelectricalcomponentsor
contactsonthemotor.
Touchinganyofthesecomponentsor
g343313
contactscouldseriouslyinjureyouorcause
death.
CleaningtheBatteries
ServiceInterval:Every25hours
1.Ensurethatallthebatterycapsaretight.
2.Useapapertoweltocleanthebatteries.
3.Ifthebatteryterminalsarecorroded,cleanthem
withasolutionof4partswaterand1partbaking
soda.Also,cleanthepostsandcableclamps
withapostandclampcleaner.
Note:Thepostsandclampsshouldhavea
bright,metallicshine.
4.ApplyalightcoatingofT orobattery-terminal
protector.
25

ChargingtheBatteries
ServiceInterval:Beforeeachuseordaily
Formaximumbatterylife,drainthebatteriesaslow
aspossiblebeforeeachcharge.Chargethebatteries
immediatelyafterdepletingasubstantialamount
ofpower.Thebatterieswillproducemoreefcient
electricalproductionafteryouchargeanddeplete
themanumberofcycles.
Note:Normalchargetimeisapproximately11hours.
Important:Chargethebatteriesbetween0to
40°C(32to104°F).
WARNING
Chargingthebatteryproducesgasesthatcan
explode.
Neversmokenearthebatteriesandkeep
sparksandamesawayfromthem.
1.Parkthemachineonalevelsurface,ina
well-ventilatedareanearasuitablepoweroutlet.
g354110
2.Disengagetheblade-controlswitchandengage
theparkingbrake.
3.Shutoffthemachine,removethekey,andwait
forallmovingpartstostopbeforeleavingthe
operatingposition.
4.Connectthechargertothechargingreceptacle
androtatetheplugclockwisetosecureit(Figure
25).
Note:Thechargeplugonlytsonthemachine
1way .
Note:Ensurethatthecharger-voltagesetting
matchesthevoltageatthepoweroutletbeing
used.
Note:Ifthebatterychargeristoohot,itmay
notchargeproperly .Incoldtemperatures,itmay
takealongerforthebatteriestocharge.
g341469
Figure25
5.Plugthechargerpowercordintothepower
outlet.
Note:Thechargerlightwillilluminateredto
indicateaconnectionbetweenthebatteryand
charger.
6.Allowthebatterytocharge.
Note:Thebatteryisfullychargedonlywhen
thechargerlightilluminatesgreen.
7.Aftercharging,disconnectthecordfromthe
poweroutlet.
8.Slidebackthebuttonontheplug,turntheplug
counterclockwise,andpulltheplugoutofthe
socket(Figure26).
26

DriveSystem
Maintenance
CheckingtheTirePressure
ServiceInterval:Every25hours—Checkthetire
pressure.
Figure26
ReplacingtheBatteries
ContactyourAuthorizedServiceDealerforreplacing
thebatteries.
g341470
Maintaintheairpressureinthefrontandreartiresas
specied.Uneventirepressurecancauseanuneven
cut.Checkthepressureatthevalvestemwhen
thetiresarecoldtogetthemostaccuratepressure
reading.
Inatethetiresto138kPa(20psi).
g000554
Figure27
1.Valvestem
27

MowerMaintenance
ServicingtheCutting
Blades
CheckingforBentBlades
Note:Themachinemustbeonalevelsurfacefor
thefollowingprocedure.
1.Raisethemowerdecktothehighest
height-of-cutposition.
Toensureasuperiorqualityofcut,keeptheblades
sharp.Forconvenientsharpeningandreplacement,
keepextrabladesonhand.
BeforeInspectingorServicingthe
Blades
1.Parkthemachineonalevelsurface,disengage
theblade-controlswitch,andengagetheparking
brake.
2.Shutoffthemachineandremovethekey.
3.Raisethemachineoffthegroundsothatyou
canaccessbeneathit.Supportthemachine
usingjackstands.
WARNING
Mechanicalorhydraulicjacksmayfailto
supportthemachineandcauseserious
injury.
Usejackstandswhensupportingthe
machine.
2.Whilewearingthicklypaddedgloves,orother
adequatehandprotection,slowlyrotatethe
bladeintoapositionthatallowsyoutomeasure
thedistancebetweenthecuttingedgeandthe
levelsurfacethemachineison(Figure29).
g343366
Figure29
1.Deck3.Blade
2.Spindlehousing
3.Measurefromthetipofthebladetotheat
surface(Figure30).
InspectingtheBlades
ServiceInterval:Beforeeachuseordaily
1.Inspectthecuttingedges(Figure28).
2.Iftheedgesarenotsharporhavenicks,remove
andsharpentheblade;refertoSharpeningthe
Blades(page29).
3.Inspecttheblades,especiallyinthecurvedarea.
4.Ifyounoticeanycracks,wear,oraslotforming
inthisarea,immediatelyinstallanewblade
(Figure28).
Figure28
1.Cuttingedge3.Wear/slotforming
2.Curvedarea4.Crack
g343365
Figure30
1.Blade(inpositionformeasuring)
2.Levelsurface
3.Measureddistancebetweenbladeandthesurface(A)
4.Rotatethesameblade180degreessothat
theopposingcuttingedgeisnowinthesame
position(Figure31).
g006530
28

Figure31
1.Blade(sidepreviouslymeasured)
2.Measurement(positionusedpreviously)
3.Opposingsideofbladebeingmovedintomeasurement
position
5.Measurefromthetipofthebladetotheat
surface(Figure32).
Note:Thevarianceshouldbenomorethan
3mm(1/8inch).
RemovingtheBlades
Replacethebladesiftheyhitasolidobject,orifthe
bladeisoutofbalanceorbent.
1.Placeawoodblockbetweenthebladeand
mowerhousingtopreventthebladefrom
g343369
turning.
2.Holdthebladeendusingaragorthicklypadded
glove.
3.Removetheblade.
Figure32
1.Oppositebladeedge(inpositionformeasuring)
2.Levelsurface
3.Secondmeasureddistancebetweenbladeandsurface(B)
A.IfthedifferencebetweenAandBisgreater
than3mm(1/8inch),replacethebladewith
anewblade;refertoRemovingtheBlades
(page29)andInstallingtheBlades(page
30).
Note:Ifabentbladeisreplacedwitha
newblade,andthedimensionobtained
continuestoexceed3mm(1/8inch),the
bladespindlecouldbebent.Contactan
AuthorizedServiceDealerforservice.
B.Ifthevarianceiswithinconstraints,moveto
thenextblade.
6.Repeatthisprocedureoneachblade.
g343371
Figure33
g343365
1.Spindleshaft4.Curvedwasher
2.Adapter5.Nut
3.Blade
SharpeningtheBlades
1.Usealetosharpenthecuttingedgeatboth
endsoftheblade(Figure34).
Note:Maintaintheoriginalangle.
Note:Thebladeretainsitsbalanceifthesame
amountofmaterialisremovedfrombothcutting
edges.
g000552
Figure34
1.Sharpenatoriginalangle.
2.Checkthebalanceofthebladebyputtingitona
bladebalancer(Figure35).
Note:Ifthebladestaysinahorizontalposition,
thebladeisbalancedandcanbeused.
29

Note:Ifthebladeisnotbalanced,lesome
metalofftheendofthesailareaonly(Figure34).
Figure35
1.Blade2.Balancer
3.Repeatthisprocedureuntilthebladeis
balanced.
InstallingtheBlades
1.Installthebladeandadapterontothespindle
shaft(Figure36).
Important:Thecurvedpartoftheblade
mustbepointingupwardtowardtheinside
ofthemowertoensurepropercutting.
Cleaning
CleaningtheUndersideof
theMowerDeck
g000553
ServiceInterval:Aftereachuse—Cleanthe
mower-deckhousing.
Cleantheundersideofthemowerdeckaftereachuse
topreventgrassbuildupforimprovedmulchaction
andclippingdispersal.
Important:Donotusewatertocleanthemower
deck,otherwiseyoucoulddamagetheelectric
motors.
1.Parkthemachineonalevelsurface,disengage
theblade-controlswitch(PTO),andengagethe
parkingbrake.
2.Shutoffthemachine,removethekey,andwait
forallmovingpartstostopbeforeleavingthe
operatingposition.
3.Raisethemachineoffthegroundsothatyou
canaccessbeneathit.Supportthemachine
usingjackstands.
Figure36
1.Spindleshaft4.Curvedwasher
2.Adapter5.Nut
3.Blade
2.Installthecurvedwasher(cuppedsidetoward
theblade)andthenut.
3.T orquethenutto35N∙m(26ft-lb).
WARNING
Mechanicalorhydraulicjacksmayfailto
supportthemachineandcauseserious
injury.
Usejackstandswhensupportingthe
machine.
4.Scrapebuildupofgrassandotherdebrisfrom
g343371
themowerdeck,nishedsurfaces,andwheels.
DisposingofWaste
Engineoil,batteries,hydraulicuid,andengine
coolantarepollutantstotheenvironment.Disposeof
theseaccordingtoyourstateandlocalregulations.
30

Storage
CleaningandStorage
1.Parkthemachineonalevelsurface,disengage
theblade-controlswitch(PTO),andengagethe
parkingbrake
2.Shutoffthemachine,removethekey,andwait
forallmovingpartstostopbeforeleavingthe
operatingposition.
3.Removegrassclippings,dirt,andgrimefromthe
externalpartsoftheentiremachine,especially
themotor.
4.Checktheparkingbrakeoperation;referto
Parking-BrakeLever(page14).
5.Greasethemachine;refertoLubrication(page
25).
6.Checkthetirepressure;refertoCheckingthe
TirePressure(page27).
7.Chargethebatteries;refertoChargingthe
Batteries(page26).
8.Scrapeanyheavybuildupofgrassanddirtfrom
theundersideofthemower.
9.Checktheconditionoftheblades;referto
ServicingtheCuttingBlades(page28).
10.Checkandtightenallfasteners.Repairor
replaceanypartthatisdamaged.
11.Paintallscratchedorbaremetalsurfaces.Paint
isavailablefromyourAuthorizedServiceDealer.
12.Storethemachineinaclean,drygarageor
storagearea.Removethekeyfromtheswitch
andkeepitoutofreachofchildrenorother
unauthorizedusers.Coverthemachineto
protectitandkeepitclean.
BatteryStorage
ServiceInterval:Every2months
Important:Storethebatteriesbetween-10to
40°C(14to122°F).
1.Chargethebatteriesfullybeforeplacingthe
machineintostorage;refertoChargingthe
Batteries(page26).Disconnectthecharger
whenthebatteriesarefullycharged.
2.Chargethebatteryevery60daysataminimum.
Important:Donotleavethecharger
connectedtothemachinewhileinstorage.
31

Troubleshooting
Problem
Thedrivemotordoesnotstart.
Theblademotordoesnotstart.
Themachinedoesnotstart.
PossibleCauseCorrectiveAction
1.Thedrive-modeswitchisinthe
NEUTRALposition.
2.Theparkingbrakeisengaged.2.Disengagetheparkingbrake.
3.Thebrakepedalisengaged.3.Releasethebrakepedal.
4.Thetraction-controlpedalisengaged.4.Releasethetraction-controlpedal.
5.Theblademotorisblocked.
6.Thedrivemotorisblocked.
7.Batterychargeislow.
1.Thedrive-modeswitchisinthe
NEUTRALposition.
2.Theparkingbrakeisengaged.2.Disengagetheparkingbrake.
3.Theblademotorisblocked.
4.Batterychargeislow.
1.Thecontrollerormotorisdamaged.
2.Abatteryisdamaged.2.Replacethebattery.
1.Movethedrive-modeswitchtothe
FORWARDorREVERSEposition.
5.Turnoffthemachineandcleandebris,
orwaituntilthecontrollerautomatically
unlocksafter5seconds.
6.Removedebrisorobstaclesfromthe
drivemotor .
7.Chargethebatteries.
1.Movethedrive-modeswitchtothe
FORWARDposition.
3.Turnoffthemachineandcleandebris,
orwaituntilthecontrollerautomatically
unlocksafter5seconds.
4.Chargethebatteries.
1.Shutoffthemachineandstartitagain
after5seconds.Ifthemachinedoes
notstartafterseveralcycles,replace
thecontroller.
Themachinevibratesabnormally .
Thecuttingheightisuneven.
Themachinedoesnotdischargeorit
dischargesimproperly.
1.Thecuttingblade(s)is/arebentor
unbalanced.
2.Theblademountingboltisloose.2.Tightentheblademountingbolt.
3.Thebladespindleisbent.
4.Themotormountislooseorworn.
1.Acuttingblade(s)is/arenotsharp.1.Sharpentheblade(s).
2.Acuttingblade(s)is/arebent.2.Installanewcuttingblade(s).
3.Theundersideofthemowerdeckis
dirty.
4.Thetirepressureisincorrect.4.Adjustthetirepressure.
5.Abladespindleisbent.
1.Thegrassistooheavyortall.
2.Thegrassistoowet.2.Waituntilthelawnisdry .
1.Installnewcuttingblade(s).
3.ContactanAuthorizedServiceDealer.
4.ContactanAuthorizedServiceDealer.
3.Cleantheundersideofthemower
deck.
5.ContactanAuthorizedServiceDealer.
1.Mowonthehighestheightofcut;then
mowatthedesiredheight.
32
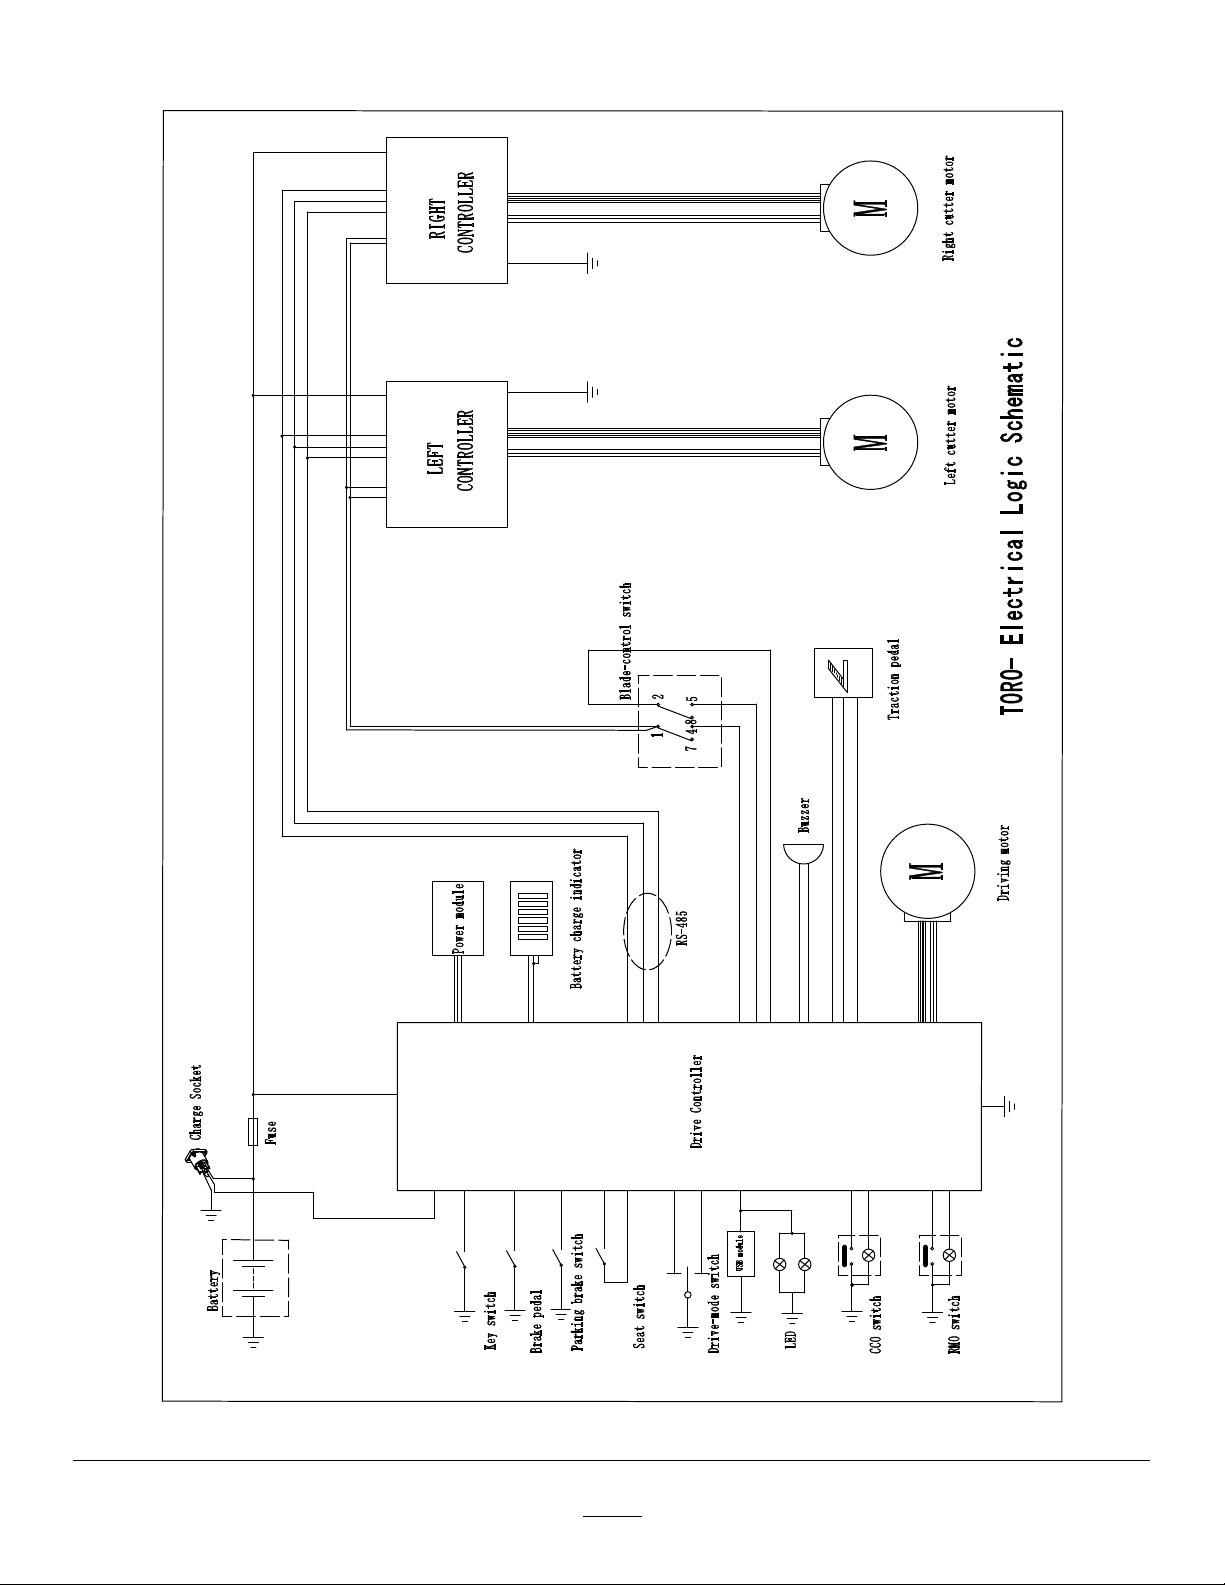
Schematics
ElectricalSchematic(Rev .A)
33
g355680

Notes:

Notes:

EEA/UKPrivacyNotice
Toro’sUseofYourPersonalInformation
TheT oroCompany(“T oro”)respectsyourprivacy.Whenyoupurchaseourproducts,wemaycollectcertainpersonalinformationaboutyou,eitherdirectly
fromyouorthroughyourlocalT orocompanyordealer.T orousesthisinformationtofullcontractualobligations-suchastoregisteryourwarranty ,
processyourwarrantyclaimortocontactyouintheeventofaproductrecall-andforlegitimatebusinesspurposes-suchastogaugecustomer
satisfaction,improveourproductsorprovideyouwithproductinformationwhichmaybeofinterest.T oromayshareyourinformationwithoursubsidiaries,
afliates,dealersorotherbusinesspartnersinconnectiontheseactivities.Wemayalsodisclosepersonalinformationwhenrequiredbylaworin
connectionwiththesale,purchaseormergerofabusiness.Wewillneversellyourpersonalinformationtoanyothercompanyformarketingpurposes.
RetentionofyourPersonalInformation
Torowillkeepyourpersonalinformationaslongasitisrelevantfortheabovepurposesandinaccordancewithlegalrequirements.Formoreinformation
aboutapplicableretentionperiodspleasecontactlegal@toro.com.
Toro’sCommitmenttoSecurity
YourpersonalinformationmaybeprocessedintheUSoranothercountrywhichmayhavelessstrictdataprotectionlawsthanyourcountryofresidence.
Wheneverwetransferyourinformationoutsideofyourcountryofresidence,wewilltakelegallyrequiredstepstoensurethatappropriatesafeguardsare
inplacetoprotectyourinformationandtomakesureitistreatedsecurely.
AccessandCorrection
Youmayhavetherighttocorrectorreviewyourpersonaldata,orobjecttoorrestricttheprocessingofyourdata.Todoso,pleasecontactusbyemail
atlegal@toro.com.IfyouhaveconcernsaboutthewayinwhichT orohashandledyourinformation,weencourageyoutoraisethisdirectlywithus.
PleasenotethatEuropeanresidentshavetherighttocomplaintoyourDataProtectionAuthority.
374-0282RevC
 Loading...