


FormNo.3443-227RevA
GrandStand
®
MowerWith122cmRearDischarge
TURBOFORCE
72542TE
GrandStand
®
RasenmäherMit122cmHeckauswurf
TURBOFORCE
72542TE
TondeuseGrandStand
FORCE
72542TE
GrandStand
®
de122cmàéjectionarrière
®
maaierMeteenTURBOFORCE
maai-eenheidvan122cmmetachteruitworp
72542TE
®
®
CuttingUnit
Mähwerk
®
avecunitédecoupeTURBO
®
www.T oro.com.
*3443-227*


FormNo.3443-215RevA
GrandStand
®
Mower
With122cmRearDischargeTURBOFORCE
CuttingUnit
ModelNo.72542TE—SerialNo.400000000andUp
®
Registeratwww.T oro.com.
OriginalInstructions(EN)
*3443-215*

ThisproductcomplieswithallrelevantEuropean
directives;fordetails,pleaseseetheseparateproduct
specicDeclarationofConformity(DOC)sheet.
ModelNo.
Pleaserefertotheenginemanufacturer’sinformation
includedwiththemachine.
Introduction
Thisrotary-blade,stand-onlawnmowerisintended
tobeusedbyprofessional,hiredoperators.Itis
designedprimarilyforcuttinggrassonwell-maintained
lawnsonresidentialorcommercialproperties.Using
thisproductforpurposesotherthanitsintendeduse
couldprovedangeroustoyouandbystanders.
Readthisinformationcarefullytolearnhowtooperate
andmaintainyourproductproperlyandtoavoid
injuryandproductdamage.Youareresponsiblefor
operatingtheproductproperlyandsafely.
Visitwww.Toro.comformoreinformation,including
safetytips,trainingmaterials,accessoryinformation,
helpndingadealer,ortoregisteryourproduct.
Wheneveryouneedservice,genuineToroparts,or
additionalinformation,contactanAuthorizedService
DealerorToroCustomerServiceandhavethemodel
andserialnumbersofyourproductready.Figure1
identiesthelocationofthemodelandserialnumbers
ontheproduct.Writethenumbersinthespace
provided.
SerialNo.
Thismanualidentiespotentialhazardsandhas
safetymessagesidentiedbythesafety-alertsymbol
(Figure2),whichsignalsahazardthatmaycause
seriousinjuryordeathifyoudonotfollowthe
recommendedprecautions.
g000502
Figure2
1.Safety-alertsymbol
Thismanualuses2wordstohighlightinformation.
Importantcallsattentiontospecialmechanical
informationandNoteemphasizesgeneralinformation
worthyofspecialattention.
Important:Withyourmobiledevice,youcan
scantheQRcodeontheserialnumberdecal(if
equipped)toaccesswarranty,parts,andother
productinformation.
Figure1
1.Locationofthemodelandserialnumbers
g235457
©2020—TheToro®Company
8111LyndaleAvenueSouth
Bloomington,MN55420
Contactusatwww.Toro.com.
2
PrintedintheUSA
AllRightsReserved

Contents
Safety.......................................................................4
GeneralSafety...................................................4
SafetyandInstructionalDecals..........................4
ProductOverview.....................................................8
Controls.............................................................8
Specications....................................................9
Attachments/Accessories...................................9
BeforeOperation.................................................10
BeforeOperationSafety...................................10
AddingFuel......................................................10
PerformingDailyMaintenance...........................11
BreakinginaNewMachine...............................11
UsingtheSafety-InterlockSystem.....................11
DuringOperation.................................................12
DuringOperationSafety...................................12
OperatingtheParkingBrake.............................14
OperatingtheMower-Blade-ControlSwitch
(PTO)............................................................14
OperatingtheThrottle.......................................15
OperatingtheChoke........................................15
OperatingtheIgnitionSwitch............................16
StartingtheEngine...........................................16
ShuttingOfftheEngine.....................................17
OperatingthePlatform......................................17
DrivingForwardorBackward............................18
AdjustingtheHeight-of-Cut...............................19
UsingWeights..................................................20
AfterOperation....................................................20
AfterOperationSafety......................................20
UsingtheFuel-ShutoffValve.............................21
PushingtheMachinebyHand..........................21
TransportingtheMachine.................................22
Maintenance...........................................................24
MaintenanceSafety..........................................24
RecommendedMaintenanceSchedule(s)...........24
Pre-MaintenanceProcedures..............................26
ReleasingtheCushionforRearAccess............26
OpeningtheEngineGuardandGuard
Extension......................................................26
ClosingtheEngineGuardandGuard
Extension......................................................27
RemovingtheLeftBeltCover...........................28
RemovingtheRightBeltCover.........................29
InstallingtheRightBeltCover...........................30
InstallingtheLeftBeltCover.............................31
Lubrication..........................................................32
GreasingtheMachine.......................................32
GreasingtheT orsionIdler.................................32
GreasingtheFrontCasterPivots......................33
GreasingtheCaster-WheelHubs.....................33
GreasingtheMotionControls...........................34
EngineMaintenance...........................................34
EngineSafety...................................................34
ServicingtheAirCleaner..................................34
ServicingtheEngineOil....................................35
ServicingtheSparkPlug...................................37
CheckingtheSparkArrester.............................38
FuelSystemMaintenance...................................39
DrainingtheFuelT ank......................................39
RemovingtheFuelT ank...................................39
ReplacingtheFuelFilter...................................40
ElectricalSystemMaintenance...........................40
ElectricalSystemSafety...................................40
ServicingtheBattery.........................................40
ServicingtheFuses..........................................42
DriveSystemMaintenance..................................43
AdjustingtheTracking......................................43
CheckingtheTirePressure...............................43
AdjustingtheCaster-PivotBearing...................44
ServicingtheCasterWheelsand
Bearings........................................................44
RemovingtheClutchShim...............................45
CheckingtheWheel-LugNuts..........................46
CoolingSystemMaintenance..............................47
CleaningtheAir-IntakeScreen.........................47
CleaningtheCoolingSystem............................47
BrakeMaintenance.............................................47
TestingtheParkingBrake.................................47
AdjustingtheBrakes.........................................47
BeltMaintenance................................................48
CheckingtheBelts............................................48
ReplacingtheMower-DeckBelt........................48
ReplacingtheTransmissionBelt......................49
ControlsSystemMaintenance.............................50
AdjustingtheMotion-ControlLevers.................50
HydraulicSystemMaintenance...........................51
HydraulicSystemSafety...................................51
HydraulicSystemSpecications.......................51
CheckingtheHydraulicFluid............................51
ReplacingtheHydraulicFluidand
Filters............................................................51
BleedingtheHydraulicSystem.........................52
MowerDeckMaintenance....................................53
BladeSafety.....................................................53
ServicingtheCuttingBlades.............................53
LevelingtheMowerDeck..................................55
AdjustingtheDeck-LiftSpring...........................57
Cleaning..............................................................58
CleaningundertheMowerDeck.......................58
CleaningtheRearWheelMotors......................58
DisposingofWaste...........................................58
Storage...................................................................58
StorageSafety..................................................58
CleaningandStorage.......................................58
Troubleshooting......................................................60
Schematics.............................................................62
3

Safety
Thismachinehasbeendesignedinconsideration
withENISO5395.
GeneralSafety
Thisproductiscapableofamputatinghandsand
feetandofthrowingobjects.Alwaysfollowallsafety
instructionstoavoidseriouspersonalinjury .
•Readandunderstandthecontentsofthis
Operator’sManualbeforestartingtheengine.
•Donotputyourhandsorfeetnearmoving
componentsofthemachine.
•Donotoperatethemachinewithoutallguards
andothersafetyprotectivedevicesinplaceand
functioningproperlyonthemachine.
•Keepclearofthedischargeopening.
SafetyandInstructionalDecals
•Keepbystandersandchildrenoutoftheoperating
area.Donotallowchildrentooperatethemachine.
Allowonlypeoplewhoareresponsible,trained,
familiarwiththeinstructions,andphysically
capabletooperatethemachine.
•Stopthemachine,shutofftheengine,andremove
theignitionkeybeforeservicing,fueling,or
uncloggingthemachine.
Improperlyusingormaintainingthismachinecan
resultininjury .T oreducethepotentialforinjury ,
complywiththesesafetyinstructionsandalways
payattentiontothesafety-alertsymbol
meansCaution,Warning,orDanger—personalsafety
instruction.Failuretocomplywiththeseinstructions
mayresultinpersonalinjuryordeath.
,which
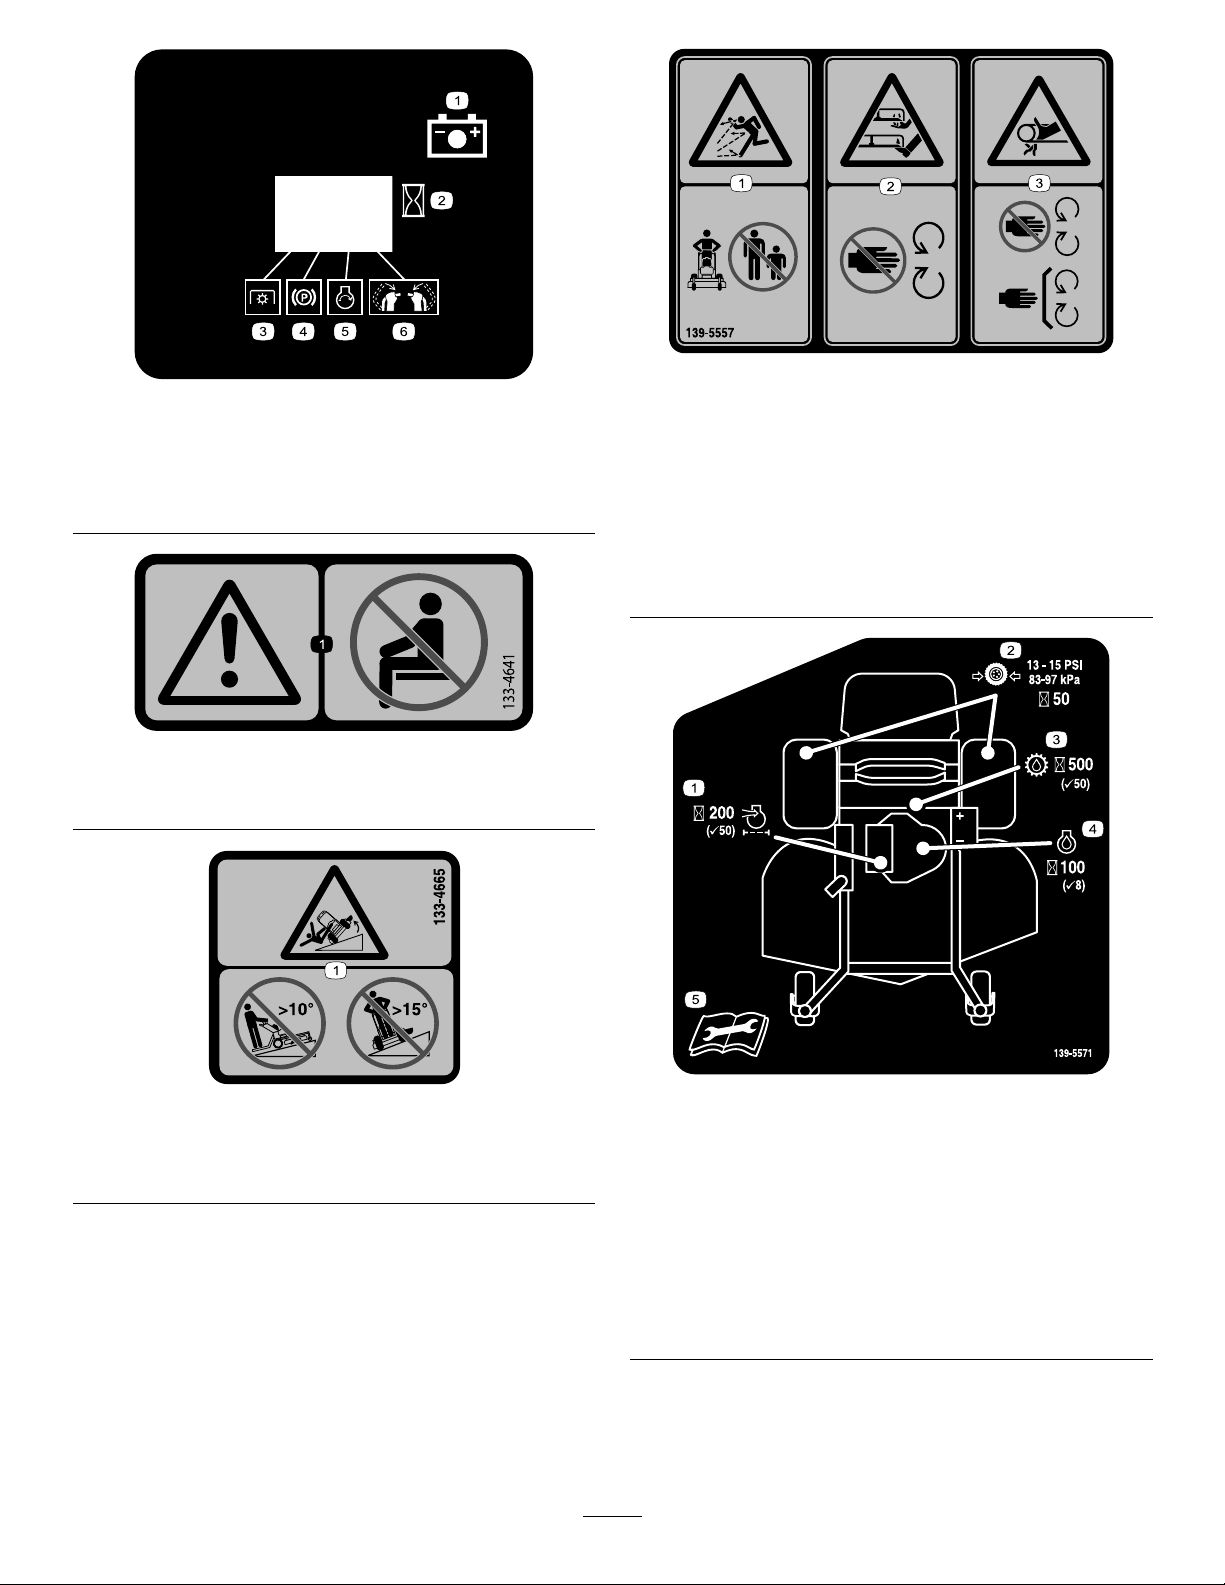
Safetydecalsandinstructionsareeasilyvisibleandarelocatednearareasofpotentialdanger.
Replaceeverydamagedormissingdecal.
decalbatterysymbols
BatterySymbols
Someorallofthesesymbolsareonyourbattery.
1.Explosionhazard6.Keepbystandersaway.
2.Nore,openames,or
smoking
3.Causticliquid/chemical
burnhazard
4.Weareyeprotection.9.Flusheyesimmediately
5.ReadtheOperator’s
Manual.
7.Weareye
protection—explosive
gasescancauseblindness
andotherinjuries.
8.Batteryacidcancause
severeburns.
withwaterandgetmedical
helpfast.
10.Containslead;donot
discard.
decaloemmarkt
Manufacturer'sMark
1.Thismarkindicatesthatthebladeisidentiedasapart
fromtheoriginalmachinemanufacturer.
decal106-5517
106-5517
1.Warning—donottouchthehotsurface.
4

116-8283
131-3528
15A 15A 10A
7.5A
1.Warning—readtheOperator'sManualforinstructionson
torquingthebladebolt/nutto75to81N∙m(55to60ft-lb).
116-8775
decal116-8283
decal131-3521
131-3521
1.Heightofcut
decal116-8775
1.ReadtheOperator’s
Manual.
1.ReadtheOperator's
Manual.
2.Warning—lltothebottom
131-3507
2.Belttensioner
ofthellerneck;donot
overllthetank.
decal131-3524
131-3524
1.ReadtheOperator's
Manual.
2.Transmissionuid
decal131-3507
3.Colduidlevel
decal131-3528
131-3528
1.Keyswitch—15A
2.Accessoryport—15A
3.Powertakeoff(PTO)—10
A
4.Infocenter—7.5A
5
131-3536
1.Battery4.Parkingbrake
2.Time5.Engine—start
3.Powertakeoff(PTO)
6.Engagethehandlebars.
133-4641
1.Warning—donotcarrypassengers.
decal139-5557
decal131-3536
1.Thrownobject
hazard—keepbystanders
away.
139-5557
3.Entanglementhazard,
belt—stayawayfrom
movingparts;keepall
guardsandshieldsin
place.
2.Cutting/dismemberment
hazardofhandorfoot,
mowerblade—stayaway
frommovingparts.
decal133-4641
133-4665
1.Tippinghazard—donotoperateupslopesgreaterthan10°;
donotoperateacrossslopesgreaterthan15°.
decal133-4665
1.Engineairlter—Check
every50hours;Change
every200hours
2.TirePressure—Check
every50hours
139-5571
4.Engineoillter—Check
every8hours;Change
every100hours
5.ReadtheOperator’s
Manualbeforeperforming
decal139-5571
maintenance.
3.Transmission
uid—Checkevery50
hours;Changeevery500
hours
6

decal131-3526
131-3526
1.Powertakeoff(PTO)—disengaged
5.Reverse
2.Fast6.Tractiondrive
3.Slow
7.Engagethehandles.
4.Neutral
139-5556
1.Warning—readtheOperator’sManual.
2.Warning—donotoperatethemachineunlessyouaretrained.
3.Warning—wearhearingprotection.7.Tippinghazard—whenloadingontoatrailer,donotusedual
4.Cutting/dismembermenthazardofhandorfoot,mower
blade—stayawayfrommovingparts;keepallguardsand
shieldsinplace.
5.Thrownobjecthazard—keepbystandersaway.
6.Warning—engagetheparkingbrake,shutofftheengine,and
removethekeybeforeleavingthemachineorperforming
maintenance.
ramps;onlyuseasingularrampwideenoughforthemachine;
backuptheramp(inreverse)anddriveforwardofftheramp.
8.Tippinghazard—donotoperatethemachineneardrop-offsor
water;stayawayfromdrop-offs.
decal139-5556
decal140-4258
140-4258
1.Parkingbrake—disengaged
2.Parkingbrake—engaged
3.On
4.Off
5.Enginespeed—fast
6.Enginespeed—slow
7

ProductOverview
ControlPanel
g301785
Figure4
Figure3
1.Frontcasterwheel
2.Engine7.Fueltank
3.Controlpanel8.Platform(downposition)
4.Motion-controllevers9.Battery
5.Hydraulictank10.Mowerdeck
6.Operatorcushion
Controls
Becomefamiliarwithallthecontrolsbeforeyoustart
theengineandoperatethemachine.
g273599
1.Fuelcap7.Keyswitch
2.Chokecontrol
3.Parking-brakelever
4.Hydraulic-tankcap
5.Hourmeter11.Motion-controllever
6.Power-takeoffswitch
(PTO)
8.Throttlecontrol
9.Height-of-cutlever
10.Height-of-cutpin
12.Referencebar
Power-TakeoffSwitch(PTO)
Usethepower-takeoffswitch(PTO)toengageand
disengagemowerbladesorstartandstoppowered
attachments(Figure4);refertoOperatingthe
Mower-Blade-ControlSwitch(PTO)(page14).
8

HourMeter
Motion-ControlLevers
Thehourmeterrecordsthenumberofhoursthe
enginehasoperated.Itoperateswhentheengine
isrunning.Usethesetimesforschedulingregular
maintenance(Figure5).
Figure5
1.Safety-interlocksymbols
2.Batterylight
3.Hourmeter
Safety-InterlockIndicators
Usethemotion-controlleverstodrivethemachine
forward,reverse,andturneitherdirection(Figure4).
Fuel-ShutoffValve
Closethefuel-shutoffvalvewhentransportingor
storingthemachine;refertoUsingtheFuel-Shutoff
Valve(page21).
Specications
Note:Specicationsanddesignaresubjectto
changewithoutnotice.
g216020
Cuttingwidth122cm(48inches)
Width
Lengthwithplatformdown191cm(75inches)
Lengthwithplatformup155cm(61inches)
Height
127cm(50inches)
122cm(48inches)
Symbolsonthehourmeterindicatewithablack
trianglethattheinterlockcomponentisinthecorrect
position(Figure5).
Battery-IndicatorLight
IfyouturnthekeytotheONpositionforafew
seconds,thebatteryvoltagedisplaysinthearea
wherethehoursarenormallydisplayed.
Thebatterylightturnsonwhenyouturnthekeytothe
ONpositionandwhenthechargeisbelowthecorrect
operatinglevel(Figure5).
ThrottleControl
Thethrottlecontrolstheenginespeed,andithasa
continuous-variablesettingfromtheSLOWtoFAST
position(Figure4).
ChokeControl
Usethechokecontroltostartacoldengine.Pullthe
chokecontroluptoengageit.Pushdownonthe
chokecontroltodisengageit.
Weight
415kg(915lb)
Attachments/Accessories
AselectionofT oroapprovedattachmentsand
accessoriesisavailableforusewiththemachine
toenhanceandexpanditscapabilities.Contact
yourAuthorizedServiceDealerorauthorizedT oro
distributororgotowww.T oro.comforalistofall
approvedattachmentsandaccessories.
Toensureoptimumperformanceandcontinuedsafety
certicationofthemachine,useonlygenuineT oro
replacementpartsandaccessories.Replacement
partsandaccessoriesmadebyothermanufacturers
couldbedangerous,andsuchusecouldvoidthe
productwarranty.
KeySwitch
Thekeyswitch,usedtostartandshutofftheengine,
has3positions:OFF,RUN,andSTART.Referto
StartingtheEngine(page16).
9

Operation
–Ifyouspillfuel,donotattempttostartthe
engine.Avoidcreatingasourceofignitionuntil
thefuelvaporshavedissipated.
BeforeOperation
BeforeOperationSafety
GeneralSafety
•Neverallowchildrenoruntrainedpeopletooperate
themachine.Localregulationsmayrestrictthe
ageoftheoperator.Theownerisresponsiblefor
trainingalloperatorsandmechanics.
•Becomefamiliarwiththesafeoperationofthe
equipment,operatorcontrols,andsafetysigns.
•Shutofftheengine,removethekey,andwait
forallmovingpartstostopbeforeleavingthe
operator’sposition.Allowthemachinetocool
beforeservicing,adjusting,fueling,cleaning,or
storingit.
•Knowhowtostopthemachineandshutoffthe
enginequickly.
•Checkthatoperator-presencecontrols,safety
switches,andguardsareattachedandfunctioning
properly.Donotoperatethemachineunlessthey
arefunctioningproperly.
•Beforemowing,alwaysinspectthemachineto
ensurethattheblades,bladebolts,andcutting
assembliesareingoodworkingcondition.
•Inspecttheareawhereyouwillusethemachine
andremoveallobjectsthatthemachinecould
throw.
•Evaluatetheterraintodeterminetheappropriate
equipmentandanyattachmentsoraccessories
requiredtooperatethemachineproperlyand
safely.
–Storefuelinanapprovedcontainerandkeep
itoutofthereachofchildren.
•Fuelisharmfulorfatalifswallowed.Long-term
exposuretovaporscancauseseriousinjuryand
illness.
–Avoidprolongedbreathingofvapors.
–Keepyourhandsandfaceawayfromthe
nozzleandthefuel-tankopening.
–Keepfuelawayfromyoureyesandskin.
•Donotstorethemachineorfuelcontainerwhere
thereisanopename,spark,orpilotlight,such
asonawaterheateroronotherappliances.
•Donotllcontainersinsideavehicleoronatruck
ortrailerbedwithaplasticliner.Alwaysplace
containersontheground,awayfromyourvehicle
beforelling.
•Removetheequipmentfromthetruckortrailer
andrefuelitwhileitisontheground.Ifthisisnot
possible,thenrefuelfromaportablecontainer
ratherthanafuel-dispensernozzle.
•Donotoperatethemachinewithouttheentire
exhaustsysteminplaceandinproperworking
condition.
•Keepthefuel-dispensernozzleincontactwith
therimofthefueltankorcontaineropeningat
alltimesuntilfuelingiscomplete.Donotusea
nozzlelock-opendevice.
•Ifyouspillfuelonyourclothing,changeyour
clothingimmediately.Wipeupanyfuelthatspills.
•Neveroverllthefueltank.Replacethefuelcap
andtightenitsecurely.
FuelSafety
•Fuelisextremelyammableandhighlyexplosive.
Areorexplosionfromfuelcanburnyouand
othersandcandamageproperty .
–Topreventastaticchargefromignitingthefuel,
placethecontainerand/ormachinedirectlyon
thegroundbeforelling,notinavehicleoron
anobject.
–Fillthefueltankoutdoors,inanopenarea,
whentheengineiscold.Wipeupanyfuelthat
spills.
–Donothandlefuelwhensmokingoraroundan
openameorsparks.
–Donotremovethefuelcaporaddfueltothe
tankwhiletheengineisrunningorhot.
AddingFuel
RecommendedFuel
•Forbestresults,useonlyclean,fresh(lessthan
30daysold),unleadedgasolinewithanoctane
ratingof87orhigher((R+M)/2ratingmethod).
•Ethanol:Gasolinewithupto10%ethanol
(gasohol)or15%MTBE(methyltertiarybutyl
ether)byvolumeisacceptable.Ethanoland
MTBEarenotthesame.Gasolinewith15%
ethanol(E15)byvolumeisnotapprovedforuse.
Neverusegasolinethatcontainsmorethan
10%ethanolbyvolume,suchasE15(contains
15%ethanol),E20(contains20%ethanol),orE85
(containsupto85%ethanol).Usingunapproved
gasolinemaycauseperformanceproblemsand/or
10
enginedamagewhichmaynotbecoveredunder
warranty.
•Donotusegasolinecontainingmethanol.
•Donotstorefueleitherinthefueltankorfuel
containersoverthewinterunlessyouuseafuel
stabilizer.
•Donotaddoiltogasoline.
PerformingDaily
Maintenance
Beforestartingthemachineeachday,performthe
EachUse/DailyprocedureslistedinMaintenance
(page24).
UsingStabilizer/Conditioner
Usefuelstabilizer/conditionerinthemachinetokeep
thefuelfreshlongerwhenusedasdirectedbythe
fuel-stabilizermanufacturer.
Important:Donotusefueladditivescontaining
methanolorethanol.
Addtheamountoffuelstabilizer/conditionertofresh
fuelasdirectedbythefuel-stabilizermanufacturer.
FillingtheFuelTank
1.Parkthemachineonalevelsurface,disengage
thePTO,movethemotion-controlleverstothe
NEUTRAL-LOCKposition,andengagetheparking
brake.
2.Shutofftheengine,removethekey ,andwait
forallmovingpartstostopbeforeleavingthe
operatingposition.
3.Cleanaroundthefuel-tankcapandremovethe
cap.
4.Fillthefueltanktothebottomofthellerneck.
BreakinginaNewMachine
Newenginestaketimetodevelopfullpower.Mower
decksanddrivesystemshavehigherfrictionwhen
new,placingadditionalloadontheengine.Allow
40to50hoursofbreak-intimefornewmachinesto
developfullpowerandbestperformance.
UsingtheSafety-Interlock
System
WARNING
Ifsafety-interlockswitchesaredisconnected
ordamaged,themachinecouldoperate
unexpectedly,causingpersonalinjury.
•Donottamperwiththeinterlockswitches.
•Checktheoperationoftheinterlock
switchesdaily,andreplaceanydamaged
switchesbeforeoperatingthemachine.
Note:Donotllthefueltankcompletelyfull.
Theemptyspaceinthetankallowsthefuelto
expand.
5.Installthefuel-tankcapsecurely.Wipeupany
spilledfuel.
Figure6
Understandingthe
Safety-InterlockSystem
Thesafety-interlocksystemisdesignedtoprevent
PTOfromengagingunlessyoudo1ofthefollowing:
•Moveeithermotion-controllevertothecenter,
unlockedposition.
•PresstheONpositiononthePTOswitch.
Thesafety-interlocksystemisdesignedtostop
theblades/attachmentifyoumoveorrelease
bothmotion-controlleversintotheNEUTRAL-LOCK
position.
Thehourmeterhassymbolstonotifytheuser
wheneachinterlockcomponentisinthecorrect
position.Whenthecomponentisinthecorrect
position,atrianglelightsupinthecorresponding
square(Figure7).
g038312
11

Figure7
Note:Theclutchandblades/attachmentshould
engage.
9.PresstheOFFpositiononthePTOswitch.
Note:Theblades/attachmentshouldstop.
10.Withtheenginerunning,presstheONposition
onthePTOswitchwithoutholdingeither
motion-controllevertothecenter,unlocked
position.
Note:Theblades/attachmentshouldnot
g031282
engage.
1.Thetriangleslightupwhentheinterlockcomponentsare
inthecorrectposition.
TestingtheSafety-Interlock
System
ServiceInterval:Beforeeachuseordaily
Testthesafety-interlocksystembeforeyouusethe
machineeachtime.
Note:Ifthesafetysystemdoesnotoperateas
describedbelow,haveanAuthorizedServiceDealer
repairthesafetysystemimmediately.
1.Starttheengine;refertoStartingtheEngine
(page16).
2.Movethemotion-controlleverstothecenter,
unlockedposition.
Note:Theblades/attachmentshouldstopand
theengineshouldstoprunning.
3.Starttheengineanddisengagetheparking
brake.
4.Moveeithermotion-controllevertothecenter,
unlockedposition.
5.Continueholdingthemotion-controlleverin
thecenter,unlockedpositionandpresstheON
positiononthePTOswitch.
Note:Theclutchandblades/attachmentshould
engage.
6.Moveorreleasethemotion-controlleversinto
theNEUTRAL-LOCKposition.
Note:Theblades/attachmentshouldstopand
theengineshouldcontinuetorun.
7.PresstheOFFpositiononthePTOswitchand
moveeithermotion-controllevertothecenter,
unlockedposition.
8.Continueholdingthemotion-controlleverin
thecenter,unlockedpositionandpresstheON
positiononthePTOswitch.
DuringOperation
DuringOperationSafety
GeneralSafety
•Theowner/operatorcanpreventandisresponsible
foraccidentsthatmaycausepersonalinjuryor
propertydamage.
•Wearappropriateclothing,includingeye
protection;longpants;substantial,slip-resistant
footwear;andhearingprotection.Tiebacklong
hairanddonotwearlooseclothingorloose
jewelry.
•Useyourfullattentionwhileoperatingthe
machine.Donotengageinanyactivitythat
causesdistractions;otherwise,injuryorproperty
damagemayoccur.
•Donotoperatethemachinewhileill,tired,or
undertheinuenceofalcoholordrugs.
•Nevercarrypassengersonthemachineandkeep
bystandersandpetsawayfromthemachine
duringoperation.
•Operatethemachineonlyingoodvisibilityand
appropriateweatherconditions.Donotoperate
themachinewhenthereistheriskoflightning.
•Wetgrassorleavescancauseseriousinjuryif
youslipandcontacttheblade.Avoidmowingin
wetconditions.
•Beforeyoustarttheengine,ensurethatalldrives
areinneutral,theparkingbrakeisengaged,and
youareintheoperatingposition.
•Ensurethatyouhavegoodfootingwhileusingthis
machine,especiallywhenbackingup.
•Keepyourhandsandfeetawayfromthecutting
units.Keepclearofthedischargeopeningatall
times.
•Lookbehindanddownbeforebackinguptobe
sureofaclearpath.
•Useextremecarewhenapproachingblind
corners,shrubs,trees,orotherobjectsthatmay
blockyourview.
12

•Stopthebladeswheneveryouarenotmowing.
•Stopthemachine,removetheignitionkey ,and
waitforallmovingpartstostopbeforeinspecting
themowerdeckorattachmentafterstrikingan
objectorifthereisanabnormalvibrationinthe
machine.Makeallnecessaryrepairsbefore
resumingoperation.
•Slowdownandusecautionwhenmakingturns
andcrossingroadsandsidewalkswiththe
machine.Alwaysyieldtheright-of-way.
•Disengagethecuttingunitandshutofftheengine
beforeadjustingtheheightofcut(unlessyoucan
adjustitfromtheoperatingposition).
•Operatetheengineonlyinwell-ventilatedareas.
Exhaustgasescontaincarbonmonoxide,which
islethalifinhaled.
•Neverleavearunningmachineunattended.
•Beforeleavingtheoperatingposition(including
toemptythecatchersortounclogthechute),do
thefollowing:
–Parkthemachineonalevelsurface.
–Disengagethepowertake-off.
–Engagetheparkingbrake.
–Shutofftheengineandremovetheignitionkey.
–Waitforallmovingpartstostop.
•Shutoffthemachineanddisengagethedriveto
thecuttingunitinthefollowingsituations:
–Beforefueling
–Beforeclearingblockages
–Beforechecking,cleaning,ormaintainingthe
cuttingunit
–Afterstrikingaforeignobjectorifanabnormal
vibrationoccurs.Inspectthecuttingunitfor
damageandmakerepairsbeforestartingand
operatingthemachine
–Beforeleavingtheoperatingposition
–Evaluatethesiteconditionsofthedayto
determineiftheslopeissafeformachine
operation.Usecommonsenseandgood
judgmentwhenperformingthisevaluation.
Changesintheterrain,suchasmoisture,can
quicklyaffecttheoperationofthemachineon
aslope.
•Operateacrossslopes,neverupanddown.Avoid
operationonexcessivelysteeporwetslopes.
•Identifyhazardsatthebaseoftheslope.Do
notoperatethemachineneardrop-offs,ditches,
embankments,water,orotherhazards.The
machinecouldsuddenlyrolloverifawheelgoes
overtheedgeortheedgecollapses.Keepasafe
distance(twicethewidthofthemachine)between
themachineandanyhazard.Useawalk-behind
machineorahandheldtooltooperateinthese
areas.
•Avoidstarting,stopping,orturningthemachineon
slopes.Avoidmakingsuddenchangesinspeedor
direction;turnslowlyandgradually.
•Donotoperateamachineunderanyconditions
wheretraction,steeringorstabilityisinquestion.
Beawarethatoperatingthemachineonwet
grass,acrossslopesordownhillmaycausethe
machinetolosetraction.Lossoftractiontothe
drivewheelsmayresultinslidingandalossof
brakingandsteering.Themachinecanslideeven
ifthedrivewheelsarestopped.
•Removeormarkobstaclessuchasditches,holes,
ruts,bumps,rocks,orotherhiddenhazards.Tall
grasscanhideobstacles.Uneventerraincould
overturnthemachine.
•Useextracarewhileoperatingwithaccessoriesor
attachments.Thesecanchangethestabilityof
themachineandcausealossofcontrol.Follow
directionsforcounterweights.
•Ifyoulosecontrolofthemachine,stepoffand
awayfromthedirectionoftravelofthemachine.
•Donotusethemachineasatowingvehicle.
•Useonlyaccessoriesandattachmentsapproved
byTheT oro®Company.
SlopeSafety
•Slopesareamajorfactorrelatedtolossofcontrol
androlloveraccidents,whichcanresultinsevere
injuryordeath.Youareresponsibleforsafeslope
operation.Operatingthemachineonanyslope
requiresextracaution.Beforeusingthemachine
onaslope,dothefollowing:
–Reviewandunderstandtheslopeinstructions
inthemanualandonthemachine.
13

OperatingtheParking
Operatingthe
Brake
Alwaysengagetheparkingbrakewhenyoushutoff
themachineorleaveitunattended.Beforeeachuse,
checktheparkingbrakeforproperoperation.
Iftheparkingbrakedoesnotholdsecurely,adjustit;
refertoAdjustingtheBrakes(page47).
Pulltheparking-brakeleverrearwardtoengageit
(Figure8).
Pushtheparking-brakeleverforwardtodisengageit.
Figure8
1.Parkingbrake—engaged2.Parking
brake—disengaged
Mower-Blade-Control
Switch(PTO)
Usetheblade-controlswitch(PTO)inconjunctionwith
themotion-controlleverstoengageanddisengage
themowerblades.
EngagingtheMowerBlades(PTO)
g009465
Figure9
g301277
14

DisengagingtheMowerBlades
(PTO)
Figure10andFigure11show2waystodisengage
themowerblades.
Figure10
OperatingtheChoke
Usethechoketostartacoldengine.
1.Pullupthechokeknobtoengagethechoke
beforeusingthekeyswitch(Figure13).
2.Pushdownthechokeknobtodisengagethe
chokeaftertheenginehasstarted(Figure13).
g301401
Figure11
Note:Ifyoudisengagethemowerbladesby
releasingthemotion-controllevers,youcanengage
thebladesagainbypressingtheONpositionofthe
switch(Figure9)withoutpressingtheOFFposition
rst.
OperatingtheThrottle
YoucanmovethethrottlecontrolbetweenFASTand
SLOWpositions(Figure12).
AlwaysusetheFASTpositionwhenengagingthePTO.
g031593
g008959
Figure13
1.ONposition2.OFFposition
Figure12
g008946
15

OperatingtheIgnition
StartingtheEngine
Switch
Important:Donotengagethestarterformore
than5secondsatatime.Iftheenginefailsto
start,wait15secondsbetweenattempts.Failure
tofollowtheseinstructionscanburnoutthe
startermotor.
Note:Y oumayneedtorepeatthecycleforstarting
theenginewhenyoustartitforthersttimeafteryou
havelledacompletelyemptyfuelsystemwithfuel.
Figure14
Important:Donotengagethestarterformore
than5secondsatatime.Iftheenginefailsto
start,wait15secondsbetweenattempts.Failure
tofollowtheseinstructionscanburnoutthe
startermotor.
Note:Y oumayneedtorepeatthecycleforstarting
theenginewhenyoustartitforthersttimeafteryou
havelledacompletelyemptyfuelsystemwithfuel.
g031239
Figure15
g031281
g339443
Figure16
16

ShuttingOfftheEngine
CAUTION
Childrenorbystandersmaybeinjuredifthey
moveorattempttooperatethemachinewhile
itisunattended.
Alwaysremovethekeyandengagethe
parkingbrakewhenleavingtheoperator’s
position.
OperatingthePlatform
Youcanusethemachinewiththeplatforminthe
upordownposition.Itisyourpreferenceonwhich
positiontouse.
WARNING
Theoperatorplatformisheavyandmaycause
injurywhenyouraiseorlowerit.Carefully
lowerorraisetheoperatorplatform,as
suddenlydroppingitcouldinjureyou.
Lettheengineidleatslowthrottle(turtle)for60
secondsbeforeturningthekeyswitchtotheOFF
position.
•Donotputyourhandsorngersinthe
platform-pivotareawhenloweringor
raisingtheoperatorplatform.
•Makesurethattheplatformissupported
whenyoupullthelatchpinout.
•Makesurethatthelatchsecuresthe
platformwhenfoldingitup.Pushittight
againstthecushionforthelatchpinto
lockintoplace.
•Keepbystandersawayfromthemachine
whenraisingorloweringtheplatform.
OperatingtheMachinewiththe
PlatformUp
Operatethemachinewiththeplatformupforthe
followingconditions:
•Usingthemachineneardrop-offs
•Usingthemachineinsmallareaswherethe
machineistoolarge
•Areaswithlow-hangingbranchesorobstacles
•Loadingthemachinefortransport
•Drivingupslopes
Figure17
Important:Makesurethatthefuel-shutoffvalve
isclosedbeforetransportingorstoringthe
machinetopreventafuelleak.Beforestoringthe
machine,disconnectthesparkplug(s)toprevent
thepossibilityofaccidentalstarting.
Toraisetheplatform,pullthebackoftheplatformup
g301288
sothatthelatchpinandknoblockitintoplace.Push
ittightagainstthecushionforthelatchpintolockit
intoplace.
OperatingtheMachinewiththe
PlatformDown
Operatethemachinewiththeplatformdownforthe
followingconditions:
•Usingthemachineinmostareas
•Drivingacrossslopes
•Drivingdownslopes
Tolowertheplatform,pushtheplatformforward
againstthecushiontoreleasepressureonthelatch
pin,thenpulltheknoboutandlowertheplatform
(Figure18).
17

Figure18
DrivingForward
1.Disengagetheparkingbrake;refertoOperating
theParkingBrake(page14).
2.Movethemotion-controlleverstothecenter,
unlockedposition.
g031026
1.Platformup
2.Platformdown
3.Pulltheknobouttorelease
theplatform.
DrivingForwardor
Backward
Thethrottlecontrolregulatestheenginespeedas
measuredinrpm(revolutionsperminute).Place
thethrottlecontrolintheFASTpositionforbest
performance.
Important:Backthemachineovercurbs,1wheel
atatime;drivingitforwardovercurbscould
damagethemachine.
CAUTION
Themachinecanspinveryrapidly,andyou
maylosecontrolofthemachine,causing
personalinjurytoyouanddamagetothe
machine.
Figure19
1.Frontreferencebar
2.Leftcontrollever
3.Rearreferencebar6.Leftcontrolleverinthe
4.Rightcontrollever
5.Rightcontrolleverinthe
NEUTRAL-LOCKposition
NEUTRAL-LOCKposition
3.Slowlypushthemotion-controlleversforward
(Figure20).
Note:Theengineshutsoffifyoumovea
motion-controlleverwhiletheparkingbrakeis
engaged.
Note:Thefartheryoumovethemotion-control
leversineitherdirection,thefasterthemachine
movesinthatdirection.
Note:T ostop,pullthemotion-controllevers
backtotheNEUTRALposition.
g030983
Slowdownthemachinebeforemakingsharp
turns.
18

Figure20
AdjustingtheHeight-of-Cut
Theheight-of-cutcanbeadjustedfrom38to127mm
(1-1/2to5inches)in6mm(1/4inch)increments.
Note:Usingaheight-of-cutunder51mm(2inches)
increasesthewearonthemower-deckbelt.Usea
height-of-cutthatisgreaterthan51mm(2inches)
wheneverpossible.
g273674
DrivingBackward
1.Movebothmotion-controlleverstothecenter,
unlockedposition.
2.Slowlypullthemotion-controlleversrearward
(Figure21).
Figure21
g273673
g267253
Figure22
19

UsingWeights
•Installweightstoimprovebalance.Youcanaddor
removeweightstocreateoptimizedperformance
underdifferentoperatingconditionsandforyour
preference.
AfterOperation
AfterOperationSafety
•Addorremoveweights1atatimeuntilyou
achievethedesiredhandlingandbalance.
•RefertotheOperator’sManualofattachmentsfor
recommendedweights.
Note:ContactanAuthorizedServiceDealertoorder
aweightkit.
WARNING
Excessiveweightchangescanaffectthe
handlingandoperationofthemachine.
Thiscouldcauseseriousinjurytoyouor
bystanders.
•Makeweightchangesinsmallincrements
only.
•Evaluatethemachineaftereachweight
changetoensurethatyoucanoperatethe
machinesafely.
GeneralSafety
•Alwaysshutoffthemachine,removetheignition
key,waitforallmovingpartstostop,andallow
themachinetocoolbeforeadjusting,servicing,
cleaning,orstoringit.
•Cleangrassanddebrisfromthecuttingunits,
mufers,andenginecompartmenttohelpprevent
res.Cleanupoilorfuelspills.
•Shutoffthefuelbeforestoringortransportingthe
machine.
•DisengagethePTOwheneveryouaretransporting
ornotusingthemachine.
•Neverstorethemachineorfuelcontainerwhere
thereisanopename,spark,orpilotlight,such
asonawaterheateroronotherappliances.
•Usefull-widthrampsforloadingthemachineinto
atrailerortruck.
•Tiethemachinedownsecurelyusingstraps,
chains,cable,orropes.Bothfrontandrearstraps
shouldbedirecteddownandoutwardfromthe
machine.
20

UsingtheFuel-Shutoff
PushingtheMachineby
Valve
Closethefuel-shutoffvalvefortransport,maintenance,
andstorage(Figure23).
Ensurethatthefuel-shutoffvalveisopenwhen
startingtheengine.
Hand
Thebypassvalvesallowyoutopushthemachineby
handwithouttheenginerunning.
Important:Alwayspushthemachinebyhand.
Donottowthemachine,becausehydraulic
damagemayoccur.
Important:Donotstartoroperatethemachine
withthebypassvalvesopen.Damagetosystem
mayoccur.
g273676
Figure23
1.ONposition2.OFFposition
g031238
g301290
Figure24
21

TransportingtheMachine
Useaheavy-dutytrailerortrucktotransportthe
machine.Useafull-widthramp.Ensurethatthetrailer
ortruckhasallthenecessarybrakes,lighting,and
markingasrequiredbylaw.Pleasecarefullyreadall
thesafetyinstructions.Knowingthisinformationcould
helpyouorbystandersavoidinjury.Refertoyour
localordinancesfortrailerandtie-downrequirements.
WARNING
Drivingonthestreetorroadwaywithout
turnsignals,lights,reectivemarkings,ora
slow-moving-vehicleemblemisdangerous
andcanleadtoaccidents,causingpersonal
injury.
Donotdrivethemachineonapublicstreet
orroadway.
SelectingaTrailer
WARNING
Loadingamachineontoatrailerortruck
increasesthepossibilityoftip-overandcould
causeseriousinjuryordeath(Figure25).
•Useonlyafull-widthramp;donotuse
individualrampsforeachsideofthe
machine.
•Ensurethatthelengthoframpisatleast4
timesaslongastheheightofthetraileror
truckbedtotheground.
Figure25
1.Full-widthrampinstowed
position
2.Rampisatleast4times
aslongastheheightof
thetrailerortruckbedto
theground
3.H=heightofthetraileror
truckbedtotheground
4.Trailer
LoadingtheMachine
WARNING
Loadingamachineontoatrailerortruck
increasesthepossibilityoftip-overandcould
causeseriousinjuryordeath.
•Useextremecautionwhenoperatinga
machineonaramp.
•Backthemachineuptherampandwalkit
forwarddowntheramp.
g229507
•Avoidsuddenaccelerationordeceleration
whiledrivingthemachineonarampas
thiscouldcausealossofcontrolora
tip-oversituation.
1.Ifusingatrailer,connectittothetowingvehicle
andconnectthesafetychains.
2.Ifapplicable,connectthetrailerbrakesand
lights.
3.Lowertheramp(Figure25).
4.Raisetheplatform.
Important:Alwayskeeptheplatformup
whenloadingandunloadingthemachine.
5.Backthemachineuptheramp(Figure26).
22

Figure26
g031405
1.Backthemachineupthe
ramp.
2.Walkthemachinedown
theramp.
6.Shutofftheengine,removethekey,andengage
theparkingbrake.
7.Tiedownthemachinenearthefrontcaster
wheelsandtherearbumperwithstraps,chains,
cable,orropes(Figure27).Refertolocal
regulationsfortie-downrequirements.
1.Tie-downloops
g273707
Figure27
23

Maintenance
Note:Determinetheleftandrightsidesofthemachinefromthenormaloperatingposition.
CAUTION
Ifyouleavetheignitionkeyintheswitch,someonecouldaccidentlystarttheengineand
seriousinjureyouorotherbystanders.
Removetheignitionkeyfromtheswitchbeforeyouperformanymaintenance.
MaintenanceSafety
•Beforeadjusting,cleaning,servicing,orleaving
themachine,dothefollowing:
–Parkthemachineonalevelsurface.
–Disengagethedrives.
–Engagetheparkingbrake.
–Shutofftheengineandremovetheignitionkey.
–Waitforallmovingpartstostop.
–Allowmachinecomponentstocoolbefore
performingmaintenance.
•Donotallowuntrainedpersonneltoservicethe
machine.
•Keepyourhandsandfeetawayfrommoving
parts.Ifpossible,donotmakeadjustmentswith
theenginerunning.
•Carefullyreleasepressurefromcomponentswith
storedenergy.
•Checktheparkingbrakeoperationfrequently.
Adjustandservicethebrakeasneeded.
•Nevertamperwithsafetydevices.Checktheir
properoperationregularly.
•Cleangrassanddebrisfromthecuttingunit,
drives,mufer,andenginetohelppreventres.
Cleanupoilorfuelspills.
•Checkthegrasscatchercomponentsfrequently
andreplacethemwhentheyarewornordamaged.
•Donotrelyonahydraulicsystemtosupportthe
machine;supportthemachinewithjackstands
wheneveryouraisethemachine.
•Keepallpartsingoodworkingconditionandall
hydraulicttingstight.Replaceallworn,damaged,
ormissingpartsanddecals.Keepallfasteners
tighttoensurethatthemachineisinsafeworking
condition.
•Toensureoptimumperformanceandcontinued
safetycerticationofthemachine,useonly
genuineT ororeplacementpartsandaccessories.
Replacementpartsandaccessoriesmadeby
othermanufacturerscouldbedangerous,and
suchusecouldvoidtheproductwarranty.
RecommendedMaintenanceSchedule(s)
MaintenanceService
Interval
Aftertherst8hours
Aftertherst50hours
Aftertherst100hours
Beforeeachuseordaily
Every50hours
MaintenanceProcedure
•Changetheengineoil.
•Checkthehydraulic-uidlevel.
•Changethehydraulicltersandhydraulicuid.
•Checkthewheel-lugnuts.
•Checkthesafety-interlocksystem.
•Checktheengine-oillevel.
•Cleantheair-intakescreen(moreoftenindirtyordustyconditions).
•Cleanthetransmissioncoolingfansandguards.
•T esttheparkingbrake.
•Inspecttheblades.
•Cleanunderthemowerdeck.
•Cleandebrisfromrearwheelmotors.
•Checkthesparkarrester(ifequipped).
•Checkthetirepressure.
•Checkthehydraulic-uidlevel.
24

MaintenanceService
Every100hours
Interval
MaintenanceProcedure
•Changetheengineoil.
•Check,cleanandgapthesparkplug.
•Checkthebattery.
•Checktheclutch.
•Checkandcleantheenginecoolingnsandshrouds(moreoftenindirtyordusty
conditions).
•Checkthemower-deckbelt(s).
Every200hours
Every250hours
Every300hours
Every500hours
Every800hours
Every1,000hours
Beforestorage
Yearly
•Changetheengine-oillter.
•Replacetheprimaryairlter(moreoftenindirtyordustyconditions).
•Checktheinnerairlter(moreoftenindirtyordustyconditions).
•Checkandadjustthevalveclearance.ContactanAuthorizedServiceDealer.
•Replacetheinnerairlter(moreoftenindirtyordustyconditions).
•Adjustthecaster-pivotbearing.
•Changethehydraulicltersandhydraulicuid.
•Replacethefuellter.
•Replacethetransmissionbelt.
•Paintchippedsurfaces.
•Performallmaintenanceprocedureslistedabovebeforestorage.
•Paintchippedsurfaces.
•Performallmaintenanceprocedureslistedabovebeforestorage.
•Greasethefrontcasterpivots(moreoftenindirtyordustyconditions).
•Greasethecaster-wheelhubs.
•Greasethemotioncontrols.
•Applyanti-seizecompoundtothecushionknobs.
Important:Refertoyourengineowner’smanualforadditionalmaintenanceprocedures.
25
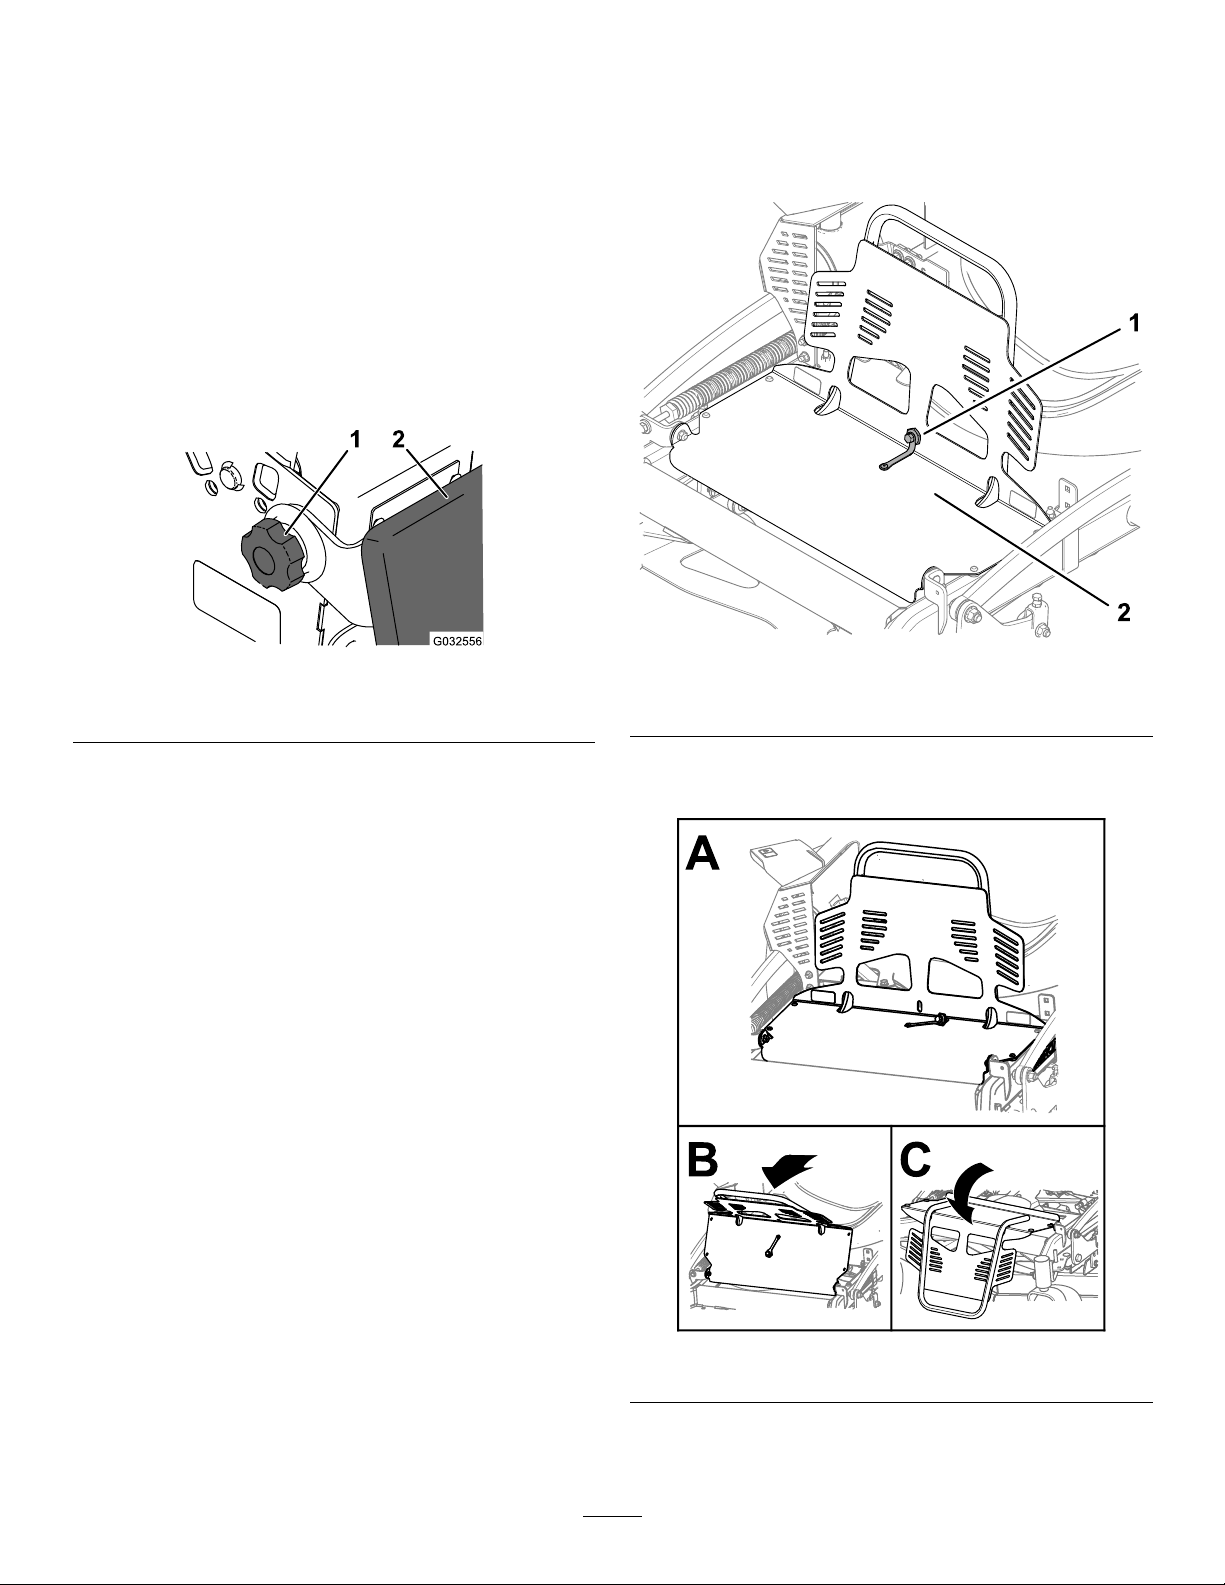
Pre-Maintenance
OpeningtheEngineGuard
Procedures
ReleasingtheCushionfor
RearAccess
Youcanreleasethecushionforrearaccesstothe
machineformaintenanceoradjustment.
1.Lowertheplatform.
2.Loosenthetwistknobsoneachsideofthe
machine(Figure28).
Figure28
1.Twistknob
2.Cushion
andGuardExtension
1.Removetheboltandshouldernutsecuringthe
engineguardtotheguardextension(Figure29).
g032556
1.Boltandshouldernut2.Engineguard
Figure29
g279539
3.Removethecushionandlowerittotheplatform.
4.Performanymaintenanceoradjustmentonthe
machine.
5.Raisethecushion,andslideitontothepinson
bothsidesofthemachine.
6.Tightenthetwistknobs.
2.Rotatetheengineguardforwardasshownin
Figure30.
g279542
Figure30
26

3.Removethe2bolts(5/16x1inch)andbelt
guard(Figure31).
Figure31
ClosingtheEngineGuard
andGuardExtension
1.InstalltheextensionguardasshowninFigure
32.T orquethenutsto20to25N∙m(15to18
ft-lb).
2.InstallthebeltguardasshowninFigure31.
Torquetheboltsto20to25N∙m(15to18ft-lb).
3.Rotatetheengineguardbackasshownin
Figure33.
g279540
1.Bolt—5/16x1inch(2)
2.Beltguard
4.Removethehexnut(5/16inch)nut(5/16inch)
securingtheguardextensiontothecarriage
bolts(Figure32).Removetheguardextension.
Figure32
1.Hexnut(5/16inch)3.Nut(5/16)
2.Guardextension4.Carriagebolt(5/16x4
inches)
g279543
Figure33
4.Securetheengineguardtotheextensionguard
usingtheboltandshouldernutasshownin
Figure29.
g279541
27
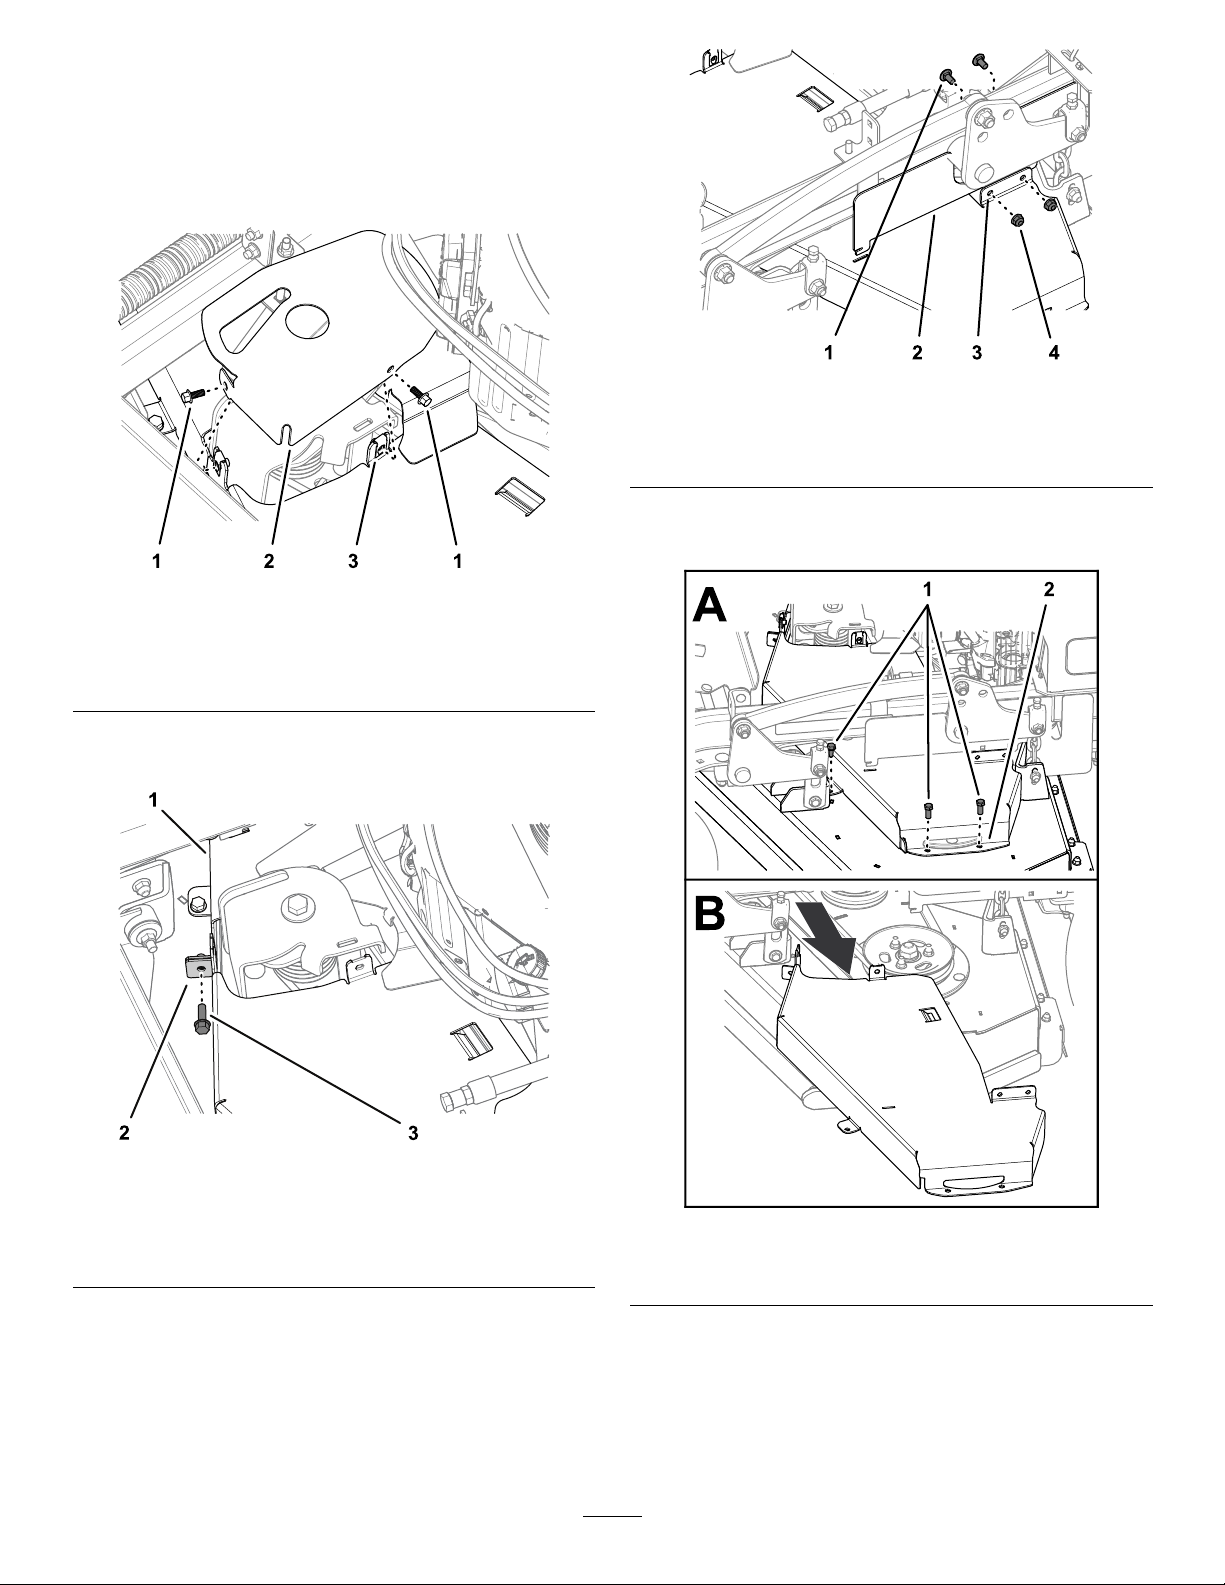
RemovingtheLeftBelt
Cover
1.Removethe2ange-headscrewsthatsecure
thetensionercovertotheleftbeltcover,and
removethetensionercover(Figure34).
Figure34
g270474
Figure36
1.Carriagebolt3.Leftbeltcover
2.LeftsideCEcover
4.Flangelocknut
4.Removethe3boltsthatsecuretheleftbeltcover
tothedeck,andremovethecover(Figure37).
g270487
1.Flange-headscrews(1/4
x5/8inch)
2.Tensionercover
3.Leftbeltcover
2.Removetheboltthatsecurethebeltcover
angesasshowninFigure35.
Figure35
1.Rightbeltcover
2.Flange(leftbeltcover)
3.Flange-headscrew(left
andrightbeltcover)
g270486
g270488
Figure37
1.Bolts
2.Leftbeltcover
3.Removethe2carriageboltsand2locknuts
thatsecuretheleftsideCEcovertotheleftbelt
cover(Figure36).
28

RemovingtheRightBelt
Cover
1.Removethe2carriageboltsand2locknutsthat
securetherightsideCEcovertotherightbelt
cover(Figure38).
Figure38
g270475
1.Flangelocknut
2.Rightbeltcover
3.RightsideCEcover
4.Carriagebolt
2.Removethe2boltsandange-headscrewthat
securetherightbeltcovertothedeck,and
removethecover(Figure39).
g270489
Figure39
1.Rightbeltcover3.Deck
2.Bolt4.Flange-headscrew
29

InstallingtheRightBelt
Cover
1.Assembletherightbeltcovertothedeck
(Figure40)withthe2boltsthatyouremovedin
RemovingtheLeftBeltCover(page28).
2.AssembletherightsideCEcovertotheright
beltcover(Figure41)withthe2carriagebolts
and2locknutsthatyouremovedinRemoving
theLeftBeltCover(page28).
g270475
Figure41
Figure40
1.Rightbeltcover3.Deck
2.Bolt4.Flange-headscrew
1.Flangelocknut
2.Rightbeltcover
g270504
3.RightsideCEcover
4.Carriagebolt
30

InstallingtheLeftBelt
Cover
1.Assembletheleftbeltcovertothedeck(Figure
42)withthe3boltsthatyouremovedin
RemovingtheLeftBeltCover(page28).
Figure43
1.Carriagebolt3.Leftbeltcover
2.LeftsideCEcover
4.Flangelocknut
3.Securethebeltcoverangeswiththe
ange-headscrew(Figure44)thatyouremoved
inRemovingtheLeftBeltCover(page28).
g270474
Figure42
1.Bolts
2.Leftbeltcover
2.AssembletheleftsideCEcovertotheleftbelt
cover(Figure43)withthe2carriageboltsand2
locknutsthatyouremovedinRemovingtheLeft
BeltCover(page28).
g270503
g270486
Figure44
1.Rightbeltcover
2.Flange(leftbeltcover)
3.Flange-headscrew(left
andrightbeltcover)
4.Assemblethetensionercovertotheleftbelt
coverwiththe2ange-headscrewsthatyou
removedinRemovingtheLeftBeltCover(page
28),asshowninFigure45.
31

1.Flange-headscrews(1/4
x5/8inch)
2.Tensionercover
Figure45
3.Leftbeltcover
Lubrication
GreasingtheMachine
GreasewithNo.2lithiumormolybdenumgrease.
1.DisengagethePTOandsettheparkingbrake.
2.Shutofftheengine,removethekey ,andwait
forallmovingpartstostopbeforeleavingthe
operatingposition.
3.Cleanthegreasettingswitharag.
Note:Makesuretoscrapeanypaintoffthe
g270487
frontofthetting(s).
4.Connectagreaseguntothetting.
5.Pumpgreaseintothettingsuntilgreasebegins
tooozeoutofthebearings.
6.Wipeupanyexcessgrease.
GreasingtheTorsionIdler
Important:Useonlyhigh-temperaturegrease.
Donotusegeneral-purposegrease.
1.Opentheengineguard;refertoOpeningthe
EngineGuardandGuardExtension(page26).
2.Removetheleftbeltcover;refertoRemoving
theLeftBeltCover(page28).
3.Greasethetorsionidleronthemowerdeck
usinghigh-temperaturegreaseatthegrease
ttingshowninFigure46.
Figure46
1.Greasetting
4.Installtheleftbeltcover;refertoInstallingthe
LeftBeltCover(page31).
5.Closetheengineguard;refertoClosingthe
EngineGuardandGuardExtension(page27).
32
g273838

GreasingtheFrontCaster
Pivots
ServiceInterval:Yearly
Greasetype:Lithiumormolybdenumgrease
Note:Thread-lockingadhesivehasbeen
appliedtolockthespacernutstotheaxle.
Removetheaxle(withtheotherspacernutstill
assembledtoit)fromthewheelassembly.
6.Pryouttheseals,inspectbearingsforwearor
damage,andreplacethemifnecessary .
1.Removethedustcapandadjustthecaster
pivots;refertoAdjustingtheCaster-Pivot
Bearing(page44).
Note:Keepthedustcapoffuntilyouhave
nishedgreasingthecasterpivots.
2.Removethehexplug.
3.Threadagreasetting(1/4inch–28taper
thread)intothehole.
4.Pumpgreaseintothettinguntilitoozesout
aroundthetopbearing.
5.Removethegreasettingfromthehole.
6.Installthehexpluganddustcap.
GreasingtheCaster-Wheel
Hubs
ServiceInterval:Yearly
Greasetype:Lithiumormolybdenumgrease
1.Parkthemachineonalevelsurface,disengage
thePTO,andengagetheparkingbrake.
7.Packthebearingswithageneral-purpose
grease.
8.Insert1bearingand1newsealintothewheel.
Note:Y oumustreplacetheseals.
9.Ifbothspacernutsintheaxleassembly
havebeenremoved(orbrokenloose),apply
athread-lockingadhesiveto1spacernut,
threadingitontotheaxlewiththewrenchats
facingoutward.
Note:Donotthreadthespacernutallof
thewayontotheendoftheaxle.Leave
approximately3mm(1/8inch)fromtheouter
surfaceofthespacernuttotheendoftheaxle
insidethenut.
10.Inserttheassemblednutandaxleintothewheel
onthesideofthewheelwiththenewsealand
bearing.
11.Withtheopenendofthewheelfacingup,ll
theareainsidethewheelaroundtheaxlefullof
general-purposegrease.
12.Insertthesecondbearingandthenewsealinto
thewheel.
2.Shutofftheengine,removethekey ,andwait
forallmovingpartstostopbeforeleavingthe
operatingposition.
3.Removethecasterwheelfromthecasterforks.
4.Removethesealguardsfromthewheelhub
(Figure47).
Figure47
1.Sealguard2.Spacernutwithwrench
ats
5.Remove1spacernutfromtheaxleassemblyin
thecasterwheel.
13.Applyathread-lockingadhesivetothesecond
spacernut,threadingitontotheaxlewiththe
wrenchatsfacingoutward.
14.Torquethenutto8to9N∙m(71to80in-lb),
loosenit,thentorqueitto2to3N∙m(20to25
in-lb).
Note:Makesurethattheaxledoesnotextend
beyondeithernut.
15.Installthesealguardsoverthewheelhuband
insertthewheelintothecasterfork.
16.Installthecasterboltandtightenthenutfully.
Important:Topreventsealandbearingdamage,
checkthebearingadjustmentoftenbyspinning
thecasterwheel.Thewheelshouldnotspinfreely
(morethan1or2revolutions)orhaveanyside
g006115
play.Ifthewheelspinsfreely,adjustthetorque
onthespacernutuntilthereisaslightamountof
drag,andapplythread-lockingadhesive.
33

GreasingtheMotion
Controls
ServiceInterval:Yearly
Greasetheoperator-presence-controlballjointand
themotion-controlbushingforbothlevers.
Note:Useanoildripbetweentheleverbracketsto
greasethebushing,locatedinthepivottube.
EngineMaintenance
EngineSafety
•Shutofftheenginebeforecheckingtheoilor
addingoiltothecrankcase.
•Keepyourhands,feet,face,clothing,andother
bodypartsawayfromthemuferandotherhot
surfaces.
ServicingtheAirCleaner
Every250hours—Replacetheprimaryairlter
(moreoftenindirtyordustyconditions).
Every250hours—Checktheinnerairlter
(moreoftenindirtyordustyconditions).
Every500hours—Replacetheinnerairlter
(moreoftenindirtyordustyconditions).
RemovingtheFilters
1.DisengagethePTO,movethemotion-control
leverstotheNEUTRAL-LOCKposition,and
engagetheparkingbrake.
2.Shutofftheengine,removethekey ,andwait
forallmovingpartstostopbeforeleavingthe
operatingposition.
3.Opentheengineguard;refertoOpeningthe
EngineGuardandGuardExtension(page26).
4.Releasetheretainingclampsontheaircleaner
andpulltheair-cleanercoverofftheair-cleaner
body(Figure49).
1.Operator-presencecontrol
balljoint
Figure48
2.Pivottube
g228034
g026970
Figure49
1.Air-cleanerclamps
2.Air-cleanercover
5.Cleantheinsideoftheair-cleanercoverwith
compressedair.
6.Gentlyslidetheprimarylteroutofthe
air-cleanerbody(Figure49).
3.Primarylter
4.Innerlter
34

Note:Avoidknockingthelterintothesideof
thebody.
ServicingtheEngineOil
7.Removetheinnerlteronlytoreplaceit.
InspectingtheFilters
1.Inspectthesafetylter.Ifitisdirty,replaceboth
thesafetyandprimarylters.
Important:Donotattempttocleanthe
safetylter.Ifthesafetylterisdirty,then
theprimarylterisdamaged.
2.Inspecttheprimarylterfordamagebylooking
intothelterwhileshiningabrightlightonthe
outsideofthelter.Iftheprimarylterisdirty,
bent,ordamaged,replaceit.
Note:Holesinthelterappearasbrightspots.
Donotcleantheprimarylter.
InstallingtheFilters
Important:Topreventenginedamage,always
operatetheenginewithbothairltersandthe
coverinstalled.
1.Ifyouareinstallingnewlters,checkeachlter
forshippingdamage.
Engine-OilSpecications
OilType:Detergentoil(APIserviceSJorhigher)
EngineOilCapacity:2.1L(71oz)withthelter;
1.8L(61oz)withoutthelter
Viscosity:Refertothetablebelow.
g004216
Figure50
Note:Donotuseadamagedlter.
2.Ifyouarereplacingtheinnerlter,carefullyslide
itintothelterbody(Figure49).
3.Carefullyslidetheprimarylteroverthesafety
lter(Figure49).
Note:Ensurethattheprimarylterisfully
seatedbypushingontheouterrimwhile
installingit.
Important:Donotpressonthesoft,inside
areaofthelter.
4.Installtheair-cleanercoverwiththebreathercap
down,androtatesothattheretainingclamps
lockthecoverinplace(Figure49).
5.Closetheengineguard;refertoClosingthe
EngineGuardandGuardExtension(page27).
CheckingtheEngine-OilLevel
ServiceInterval:Beforeeachuseordaily
Note:Checktheoilwhentheengineiscold.
WARNING
Contactwithhotsurfacesmaycausepersonal
injury.
Keepyourhands,feet,face,clothingand
otherbodypartsawaythemuferandother
hotsurfaces.
Important:Donotoverllthecrankcasewithoil
becausedamagetotheenginemayresult.Donot
runenginewithoilbelowthelowmarkbecause
theenginemaybedamaged.
1.Parkthemachineonalevelsurface,disengage
thePTO,andengagetheparkingbrake.
2.Shutofftheengine,removethekey ,andwait
forallmovingpartstostopbeforeleavingthe
operatingposition.
3.Checktheengine-oillevelasshownin(Figure
51).
35

ChangingtheEngineOil
ServiceInterval:Aftertherst8hours
Every100hours
Note:Disposeoftheusedoilatarecyclingcenter.
g273859
lowerthantheoppositesidetoassuretheoil
drainscompletely.
2.DisengagethePTO,movethemotion-control
leverstotheNEUTRAL-LOCKposition,and
engagetheparkingbrake.
3.Shutofftheengine,removethekey ,andwait
forallmovingpartstostopbeforeleavingthe
operatingposition.
4.ChangetheengineoilasshowninFigure52.
g273859
1.Parkthemachinesothatthedrainsideisslightly
Figure51
g307458
g031447
Figure52
5.Slowlypourapproximately80%ofthespecied
oilintothellertubeandslowlyaddthe
additionaloiltobringittotheFullmark(Figure
53).
36

Figure53
6.Starttheengineanddrivetoaatarea.
7.Checktheoillevelagain.
g273859
g027477
ChangingtheEngine-OilFilter
ServiceInterval:Every200hours
Note:Changetheengine-oilltermorefrequently
whenoperatingconditionsareextremelydustyor
sandy.
1.Draintheoilfromtheengine;refertoChanging
theEngineOil(page36).
2.Changetheengine-oillter(Figure54).
g027477
Figure54
Note:Ensurethattheoil-ltergaskettouches
theengine,thenrotatethelteranextra3/4turn.
3.Fillthecrankcasewiththepropertypeofnew
oil;refertoEngine-OilSpecications(page35).
ServicingtheSparkPlug
ServiceInterval:Every100hours
Ensurethattheairgapbetweenthecenterandside
electrodesiscorrectbeforeinstallingthesparkplug.
Useasparkplugwrenchforremovingandinstalling
thesparkplug(s)andagappingtool/feelergaugeto
checkandadjusttheairgap.Installanewspark
plug(s)ifnecessary.
Type:NGK®BPR4ESorequivalent
Airgap:0.75mm(0.03inch)
37

RemovingtheSparkPlug
1.Parkthemachineonalevelsurface,disengage
thePTO,andengagetheparkingbrake.
2.Shutofftheengine,removethekey ,andwait
forallmovingpartstostopbeforeleavingthe
operatingposition.
3.RemovethesparkplugasshowninFigure55.
InstallingtheSparkPlug
Figure55
CheckingtheSparkPlug
Important:Donotcleanthesparkplug(s).
Alwaysreplacethesparkplug(s)whenithasa
blackcoating,wornelectrodes,anoilylm,or
cracks.
Ifyouseelightbrownorgrayontheinsulator,the
engineisoperatingproperly.Ablackcoatingonthe
insulatorusuallymeanstheaircleanerisdirty.
Setthegapto0.75mm(0.03inch).
g273860
Figure57
g027661
CheckingtheSpark
Arrester
g027478
ForMachineswithaSpark
Arrester
ServiceInterval:Every50hours
WARNING
Hotexhaust-systemcomponentsmayignite
fuelvaporsevenafteryoushutofftheengine.
Hotparticlesexhaustedduringengine
operationmayigniteammablematerials,
resultinginpersonalinjuryorproperty
damage.
Donotrefuelorruntheengineunlessthe
sparkarresterisinstalled.
Figure56
1.Parkthemachineonalevelsurface,disengage
thePTO,andengagetheparkingbrake.
2.Shutofftheengine,removethekey ,andwait
forallmovingpartstostopbeforeleavingthe
operatingposition.
3.Waitforthemufertocool.
g206628
4.Ifyouseeanybreaksinthescreenorwelds,
replacethearrester.
5.Ifthescreenisplugged,removethearrester,
shakelooseparticlesoutofthearrester,and
cleanthescreenwithawirebrush(soakthe
screeninsolventifnecessary).
6.Installthearresterontheexhaustoutlet.
38

FuelSystem
Maintenance
DrainingtheFuelTank
Youcandrainthefueltankbyremovingitandpouring
thefueloutofthellneck;refertoRemovingtheFuel
Tank(page39).Youcanalsodrainthefueltankby
usingasiphoninthefollowingprocedure.
DANGER
Incertainconditions,fuelisextremely
ammableandhighlyexplosive.Areor
explosionfromfuelcanburnyouandothers
andcandamageproperty.
RemovingtheFuelTank
1.Lowertheplatform.
2.Releasethecushion;refertoReleasingthe
CushionforRearAccess(page26).
3.Removethecrossbracket.
•Drainfuelfromthefueltankwhenthe
engineiscold.Dothisoutdoorsinanopen
area.Wipeupanyfuelthatspills.
•Neversmokewhendrainingfuel,andstay
awayfromanopename,orwhereaspark
mayignitethefuelfumes.
1.DisengagethePTO,movethemotion-control
leverstotheNEUTRAL-LOCKposition,and
engagetheparkingbrake.
2.Shutofftheengine,removethekey ,andwait
forallmovingpartstostopbeforeleavingthe
operatingposition.
3.Cleanaroundthefuelcaptopreventdebrisfrom
gettingintothefueltank(Figure58).
4.Removethefuelcap.
5.Insertasyphonpumpintothefueltank.
6.Usingthesyphonpump,drainthefuelintoafuel
container.
7.Wipeupanyspilledfuel.
Figure59
1.Fueltank
4.Removethefueltankandsetitontheoperator
platform.
2.Crossbracket
Note:Ifyouwanttomovethefueltankfurther
fromthemachine,removethefuelandvent
linesfromthetopofthetank.
g031413
1.Fuelcap
g273861
Figure58
39

ReplacingtheFuelFilter
ElectricalSystem
ServiceInterval:Every800hours/Yearly(whichever
comesrst)
Donotinstalladirtylterifitisremovedfromthefuel
line.
Note:Wipeupanyspilledfuel.
1.Parkthemachineonalevelsurface,disengage
thePTO,andengagetheparkingbrake.
2.Shutofftheengine,removethekey ,andwait
forallmovingpartstostopbeforeleavingthe
operatingposition.
3.Closethefuel-shutoffvalve;refertoUsingthe
Fuel-ShutoffValve(page21).
4.ReplacethefuellterasshowninFigure60.
Maintenance
ElectricalSystemSafety
•Disconnectthebatteryorremovethespark-plug
wirebeforemakinganyrepairs.Disconnectthe
negativeterminalrstandthepositiveterminal
last.Connectthepositiveterminalrstand
negativelast.
•Chargethebatteryinanopen,well-ventilated
area,awayfromsparksandames.Unplugthe
chargerbeforeconnectingordisconnectingthe
battery.Wearprotectiveclothinganduseinsulated
tools.
ServicingtheBattery
ServiceInterval:Every100hours
Alwayskeepthebatterycleanandfullycharged.Use
apapertoweltocleanthebatterycase.Ifthebattery
terminalsarecorroded,cleanthemwithasolutionof
fourpartswaterand1partbakingsoda.Applyalight
coatingofgreasetothebatteryterminalstoprevent
corrosion.
Figure60
Voltage:12V
RemovingtheBattery
1.Parkthemachineonalevelsurface,disengage
thePTO,andengagetheparkingbrake.
2.Shutofftheengine,removethekey ,andwait
forallmovingpartstostopbeforeleavingthe
operatingposition.
3.RemovethebatteryasshowninFigure61.
g027518
40

ChargingtheBattery
WARNING
Chargingthebatteryproducesgassesthat
canexplode.
Neversmokenearthebatteryandkeepsparks
andamesawayfrombattery.
Important:Alwayskeepthebatteryfullycharged
(1.265specicgravity)topreventbatterydamage
whenthetemperatureisbelow0°C(32°F).
1.Removethebatteryfromthechassis;referto
RemovingtheBattery(page40).
2.Checktheelectrolytelevel.
3.Ensurethatthellercapsareinstalledonthe
battery.
4.Chargethebatteryfor1hourat25to30Aor6
hoursat4to6A.
5.Whenthebatteryisfullycharged,unplugthe
chargerfromtheelectricaloutlet,anddisconnect
thechargerleadsfromthebatteryposts(Figure
62).
Figure61
6.Installthebatteryontothemachineandconnect
thebatterycables;refertoInstallingtheBattery
(page42).
Note:Donotrunthemachinewiththebattery
g030988
disconnected;electricaldamagemayoccur.
Figure62
1.Positivebatterypost
2.Negativebatterypost
3.Red(+)chargerlead
4.Black(-)chargerlead
g000538
41

InstallingtheBattery
InstallthebatteryasshowninFigure63.
ServicingtheFuses
Theelectricalsystemisprotectedbyfuses.It
requiresnomaintenance.Ifafuseblows,checkthe
componentorcircuitforamalfunctionorshort.
1.Parkthemachineonalevelsurface,disengage
thePTO,andengagetheparkingbrake.
2.Shutofftheengine,removethekey ,andwait
forallmovingpartstostopbeforeleavingthe
operatingposition.
3.Releasetheoperatorcushionfromtherearof
themachine.
4.Ifyouneedtoaccessthechargefuse,remove
thefueltank;refertoRemovingtheFuelT ank
(page39).
5.Pulloutthefuseandreplaceit(Figure64).
Figure63
g031414
g030989
1.Keyswitchfuse(15A)4.Hourmeter(7.5A)
2.Accessoryport(15A)5.Chargefuse(30A)
3.Power-takeoff(PTO)fuse
(10A)
Figure64
6.Installthefueltank,ifremoved;referto
RemovingtheFuelTank(page39).
7.Installtheoperatorcushion.
42

DriveSystem
Maintenance
AdjustingtheTracking
Note:Ifyouareunabletoachieveproper
trackingbyadjustingtheleftcontrolrod,contact
yourAuthorizedServiceDealer.
6.Checkthatthemachinedoesnotcreepfrom
theneutralpositionwiththeparkbrakes
disengaged.
Ifyoupushbothmotion-controlleversforwardthe
samedistanceandthemachinepullsto1side,adjust
thetrackingasfollows.
1.Parkthemachineonalevelsurface,disengage
thePTO,andengagetheparkingbrake.
2.Shutofftheengine,removethekey ,andwait
forallmovingpartstostopbeforeleavingthe
operatingposition.
3.Releasethecushionfromtherearofthe
machine;refertoReleasingtheCushionfor
RearAccess(page26).
Note:Foreasieraccess,youcanalsoremove
thefueltank;refertoRemovingtheFuelT ank
(page39).
4.Rotatetheleftcontrolrodinquarter-turn
incrementsuntilthemachinetracksstraight
(Figure65).
Note:Ifthemachinepullstotheright,shorten
thecontrolrodbyrotatingittotheright.Ifthe
machinepullstotheleft,lengthentherodby
rotatingittotheleft.
7.Installthefueltank,ifyouremovedit.
8.Installthecushion.
CheckingtheTirePressure
ServiceInterval:Every50hours/Monthly(whichever
comesrst)
Maintaintheairpressureinthereartiresat83to97
kPa(12to14psi).
Important:Uneventirepressurecancausean
unevencut.
Note:Thefronttiresaresemi-pneumatictiresanddo
notrequireair-pressuremaintenance.
Note:Adjustonlytheleftcontrolrodtomatch
theleftwheelspeedtotherightwheelspeed.
Donotadjusttherightwheelspeed,asthis
positionstherightmotion-controlleveroutofthe
centerforthecontrolpanelneutral-lockslot.
Important:Donotrotatethecontrolrodtoo
far,asthismaycausethemachinetocreep
inneutral.
Figure65
1.Rotatelefttolengthenthe
rod.
2.Leftcontrolrod
3.Rotaterighttoshortenthe
rod.
g001055
Figure66
g031531
5.Checkforpropertracking,andadjusttherod
asnecessary.
43

AdjustingtheCaster-Pivot
ServicingtheCaster
Bearing
ServiceInterval:Every500hours/Yearly(whichever
comesrst)
1.Disengagetheblade-controlswitch(PTO),move
themotioncontrolleverstotheNEUTRAL-LOCK
position,andsettheparkingbrake.
2.Shutofftheengine,removethekey ,andwait
forallmovingpartstostopbeforeleavingthe
operatingposition.
3.Removethedustcapfromthecasterandtighten
thelocknut(Figure67).
4.Tightenthelocknutuntilthespringwashersare
at,andthenbackoffa1/4turntoproperlyset
thepreloadonthebearings(Figure67).
Important:Makesurethatthespring
washersareinstalledcorrectlyasshownin
Figure67.
5.Installthedustcap(Figure67).
WheelsandBearings
Thecasterwheelsrotateonarollerbearingsupported
byaspannerbushing.Ifthebearingiskeptwell
lubricated,wearwillbeminimal.Failuretokeepthe
bearingwelllubricatedcausesrapidwear.Awobbly
casterwheelusuallyindicatesawornbearing.
1.Removethelocknutandwheelboltholdingthe
casterwheeltothecasterfork(Figure68).
1.Springwashers
2.Locknut
Figure67
3.Dustcap
g009453
Figure68
1.Locknut4.Rollerbearing
2.Bushing
3.Spannerbushing
2.Remove1bushing,thenpullthespanner
bushingandrollerbearingoutofthewheelhub
(Figure68).
3.Removetheotherbushingfromthewheelhub
andcleananygreaseanddirtfromthewheel
g001297
hub(Figure68).
4.Inspecttherollerbearing,bushings,spanner
bushingandtheinsideofthewheelhubforwear.
5.Casterwheel
6.Wheelbolt
Note:Replaceanydamagedorwornparts
(Figure68).
5.Place1bushingintothewheelhub(Figure68).
6.Greasetherollerbearingandspannerbushing,
andslidethemintothewheelhub(Figure68).
7.Placethesecondbushingintothewheelhub
(Figure68).
8.Installthecasterwheelintothecasterforkand
secureitwiththewheelboltandlocknut(Figure
68).
44

9.Tightenthelocknutuntilthespannerbushing
bottomsagainsttheinsideofthecasterforks
(Figure68).
4.Checktheconditionofthewire-harnessleads,
connectors,andterminals.Cleanorrepairthem
asnecessary.
10.Greasethettingonthecasterwheel.
RemovingtheClutchShim
ServiceInterval:Every100hours
Whentheclutchbrakehasworntothepointwhere
theclutchnolongerengagesconsistently ,youcan
removetheshimtoextendtheclutchlife(Figure69).
Figure69
1.Armature5.Brakespacer
2.Fieldshell
3.Rotor7.Brakepole
4.Brake-mountingbolt
6.Shim.
5.Verifythat12Vispresentattheclutchconnector
whentheyouengagethePTOswitch.
6.Measurethegapbetweentherotorand
armature.Ifthegapisgreaterthan1mm(0.04
inch),proceedwiththefollowingsteps:
A.Loosenbothbrakemountingbolts1/2to1
fullturnasshowninFigure71.
Note:Donotremovethebrakepolefrom
theeldshell/armature.Thebrakepole
hasworntomatchthearmatureandneeds
tocontinuetomatchafteryouremovethe
shimtoensuretheproperbraketorque.
g302539
g302537
Figure71
1.Brake-mountingbolt
1.Parkthemachineonalevelsurface,disengage
thePTO,andengagetheparkingbrake.
2.Shutofftheengine,removethekey ,andwait
forallmovingpartstostopbeforeleavingthe
operatingposition.
3.Usinganaircompressor,blowoutanydebris
underthebrakepoleandaroundthebrake
spacers.
Figure70
B.Usingneedle-nosepliers,orbyhand,
removetheshim.
Note:Donotdiscardtheshimuntilyou
conrmthattheclutchfunctionsproperly.
g302538
Figure72
1.Shim
C.Usingapneumaticline,blowoutanydebris
g302534
underthebrakepoleandaroundthebrake
spacers.
D.Torqueeachbolt(M6x1)to12.3to13.7
N∙m(9.5to10.5ft-lb).
45

E.Usinga0.010inchthick-feelergauge,verify
thatagapispresentbetweentherotorand
armaturefaceonbothsidesofthebrake
poleasshowninFigure73andFigure74.
Note:Duetothewaytherotorand
armaturefaceswear(peaksandvalleys),it
issometimesdifculttomeasurethetrue
gap.
Figure73
1.Feelergauge
F.Performthefollowingsafetycheck:
i.Starttheenginefromtheoperator’s
position.
ii.Makesurethatthebladesdonot
engagewhenthePTOswitchisin
theOFFpositionandtheclutchis
disengaged.
Note:Iftheclutchdoesnot
disengage,installtheshim,andrefer
toTroubleshooting(page60).
iii.EngageanddisengagethePTO
switch10consecutivetimesto
ensurethattheclutchisfunctioning
properly.
Note:Iftheclutchdoesnotengage
g302536
properly,refertoTroubleshooting
(page60).
CheckingtheWheel-Lug
Nuts
1.Feelergauge
ServiceInterval:Aftertherst100hours—Checkthe
wheel-lugnuts.
Checkandtorquethewheel-lugnutsto115to142
N∙m(85to105ft-lb).
g302535
Figure74
•Ifthegapislessthan0.010inch,
theninstalltheshimandreferto
Troubleshooting(page60).
•Ifthegapissufcient,proceedtothe
safetycheckinstepF.
46

CoolingSystem
Maintenance
BrakeMaintenance
TestingtheParkingBrake
CleaningtheAir-Intake
Screen
ServiceInterval:Beforeeachuseordaily
Beforeeachuse,removeanybuildupofgrass,dirt,
orotherdebrisfromthecylinderandcylinder-head
coolingns,air-intakescreenontheywheelend,
andthecarburetor-governorleversandlinkage.This
helpsensureadequatecoolingoftheengineandthe
correctenginespeed,anditreducesthepossibilityof
overheatingormechanicaldamagetotheengine.
CleaningtheCooling
System
ServiceInterval:Every100hours—Checkand
cleantheenginecoolingnsand
shrouds(moreoftenindirtyordusty
conditions).
1.Parkthemachineonalevelsurface,disengage
thePTO,andengagetheparkingbrake.
2.Shutofftheengine,removethekey ,andwait
forallmovingpartstostopbeforeleavingthe
operatingposition.
ServiceInterval:Beforeeachuseordaily
Beforeeachuse,testtheparkingbrakeonbotha
levelsurfaceandslope.
Alwaysengagetheparkingbrakewhenyoustopthe
machineorleaveitunattended.Iftheparkingbrake
doesnotholdsecurely ,adjustit.
1.DisengagethePTOandengagetheparking
brake
2.Shutofftheengine,removethekey ,andwait
forallmovingpartstostopbeforeleavingthe
operatingposition.
3.Disengagetheparkingbrake.
4.Engagethebrakeleverandensurethatthe
machinedoesnotmove.
5.Adjustthebrakeifneeded.
AdjustingtheBrakes
1.Removethefueltank;refertoRemovingthe
FuelTank(page39).
2.Loosentheboltonthecableclampontheleft
sideofthemachine.
3.Removetheair-intakescreenandfanhousing
(Figure75).
4.Cleanthedebrisandgrassfromtheengine
parts.
5.Installtheair-intakescreenandfanhousing
(Figure75).
Figure75
1.Guardandengine
air-intakescreen
2.Fanhousing
g031396
Figure76
1.Cable
2.Cableclamp
g031343
3.Pulldownonthecablesuntiltheyaretaut.
4.Tightenthenut.
5.Installthefueltank,crossbracket,andcushion.
3.Boltandnut
47

BeltMaintenance
CheckingtheBelts
ServiceInterval:Every100hours—Checkthe
mower-deckbelt(s).
Checkbeltsforcracks,frayededges,burnmarks,
wear,signsofoverheating,oranyotherdamage.
Thesignsofawornmowerbeltaresquealingwhile
thebeltisrotating,bladesslippingwhileyouare
cuttinggrass,frayedbeltedges,burnmarks,and
cracks.Replacethemowerbeltifyoudetectanyof
thesesigns.
InstallingtheBelt
1.Assemblethebeltintothedeck(Figure78).
g270502
Figure78
ReplacingtheMower-Deck
Belt
RemovingtheBelt
1.Parkthemachineonalevelsurface,disengage
thePTO,andengagetheparkingbrake.
2.Shutofftheengine,removethekey ,andwait
forallmovingpartstostopbeforeleavingthe
operatingposition.
3.Opentheengineguardandguardextension;
refertoOpeningtheEngineGuardandGuard
Extension(page26).
4.Removetheleftbeltcover;refertoRemoving
theLeftBeltCover(page28).
5.Removetherightbeltcover;refertoRemoving
theRightBeltCover(page29).
6.Pulltheidlerpulleyandidler-pulleycovertoward
theengineandslipthebeltoffthepulleys
(Figure77).
2.RoutethebeltasshowninFigure79.
g270500
Figure79
3.Installtherightbeltcover;refertoInstallingthe
RightBeltCover(page30).
4.Installtheleftbeltcover;refertoInstallingthe
LeftBeltCover(page31).
5.Closetheengineguardandguardextension;
refertoClosingtheEngineGuardandGuard
Extension(page27).
Figure77
1.Idlerpulley2.Idler-pulleycover
7.Removethebeltfromthemachine.
g270501
48

ReplacingtheTransmission
CAUTION
Belt
ServiceInterval:Every1,000hours—Replacethe
transmissionbelt.
1.Removethefueltank;refertoRemovingthe
FuelTank(page39).
2.Removethehydraulic-reservoircap.
3.Locatethedrainplugsinthebottomofthe
transmissionandplaceadrainpanunderthe
plug(Figure80).
Figure80
Thespringisundertensionwhen
installedandcancausepersonalinjury.
Wearsafetyglassesandbecarefulwhen
removingthespring.
7.Removethetransmissionbeltfromtheclutch
andclutchstop(Figure81).
8.Installthenewbelt.
9.Installthetensionspringandlowerhydraulic
hose.
10.Installthedrainplugsandtorqueto22to27
N∙m(16to20ft-lb).
11.Addhydraulicuidtothelllevel.
12.Installthehydraulic-reservoircap.
13.Runthemachinefor10minutesandverifythat
thehydraulicuidisatthecorrectlevel.
g267274
1.Drainplug
4.Allowthehydraulicuidtodrainfromthe
machine.
5.Removethelowerhydraulichose(Figure81).
Figure81
1.Lowerhydraulichose3.Tensionspring
2.Transmissionbelt
g031345
6.Removethetensionspring(Figure81).
49

ControlsSystem
Maintenance
Adjustingthe
Motion-ControlLevers
Ifthemotion-controlleversdonotalignhorizontally,
adjustthemotion-controllevers.
1.Parkthemachineonalevelsurface,disengage
thePTO,andengagetheparkingbrake.
2.Shutofftheengine,removethekey ,andwait
forallmovingpartstostopbeforeleavingthe
operatingposition.
3.Pushthemotion-controlleversdownoutofthe
NEUTRAL-LOCKposition(Figure82).
4.Checkiftherightmotion-controlleveraligns
horizontallywiththeleftmotion-controllever
(Figure82).
Figure82
g031538
Figure83
1.Cam
7.Adjustthecamuntilitalignswiththeleft
motion-controlleverandtightenthenutforthe
cam.
2.Nut
Note:Movingthecamclockwise(inthevertical
position)lowersthehandle;movingthecam
counterclockwise(intheverticalposition)raises
thehandle.
Important:Ensurethattheatportionofthe
camdoesnotgoaboveaverticalposition
(rightorleft);otherwiseyoumaydamagethe
switch.
8.Repeatsteps3through7fortheleft
motion-controllever.
g009436
1.Leftmotion-controllever3.Checkthehorizontal
2.Rightmotion-controllever
intheNeutral-lockposition
alignmenthere
4.Rightmotion-controllever
Note:T oadjusttherightmotion-controllever
horizontally,adjustthecam.
5.Releasethecushionfromtherearofthe
machine.
6.Loosenthenutholdingthecam(Figure83).
50

HydraulicSystem
Maintenance
HydraulicSystemSafety
•Seekimmediatemedicalattentionifuidisinjected
intoskin.Injecteduidmustbesurgicallyremoved
withinafewhoursbyadoctor.
•Ensurethatallhydraulic-uidhosesandlinesare
ingoodconditionandallhydraulicconnections
andttingsaretightbeforeapplyingpressureto
thehydraulicsystem.
•Keepyourbodyandhandsawayfrompinhole
leaksornozzlesthatejecthigh-pressurehydraulic
uid.
•Usecardboardorpapertondhydraulicleaks.
•Safelyrelieveallpressureinthehydraulicsystem
beforeperforminganyworkonthehydraulic
system.
HydraulicSystem
Specications
HydraulicFluidType:T oro
hydraulicuid
HydraulicSystemFluidCapacity:4.7L(159oz)
Important:Usetheuidspecied.Otheruids
coulddamagethesystem.
®
HYPR-OIL
™
500
CheckingtheHydraulic
Fluid
ServiceInterval:Aftertherst8hours
Every50hours
Figure84
1.Hydraulic-tankcap
5.Removethecapfromthellerneck(Figure84).
Note:Lookinsidetochecktheuidlevelin
thereservoir.
6.Adduidtothereservoiruntilitreachesthe
reachestheminimumcoldlllevel.
7.Installthecaponthellerneck.
2.Colduidlevel
ReplacingtheHydraulic
FluidandFilters
ServiceInterval:Aftertherst50hours
Every500hours/Y early(whichevercomes
rst)—Changethehydraulicltersandhydraulic
uid.
Changethehydraulicuidmorefrequentlyinsevere
conditionsorinahotoperatingclimate.Contact
yourAuthorizedServiceDealerforahydraulickitto
replacethehydrauliclters.
g031401
Note:Checkthehydraulic-uidlevelwhentheuid
iscold.
1.Parkthemachineonalevelsurface,disengage
thePTO,andengagetheparkingbrake.
2.Shutofftheengine,removethekey ,andwait
forallmovingpartstostopbeforeleavingthe
operatingposition.
3.Waitforthemachinetocool.
4.Cleantheareaaroundthecapandthellerneck
ofthehydraulictank(Figure84).
WARNING
Hothydraulicuidcancausesevereburns.
Allowthehydraulicuidtocoolbefore
performinganymaintenanceonthehydraulic
system.
1.Parkthemachineonalevelsurface,disengage
thePTO,andengagetheparkingbrake.
2.Shutofftheengine,removethekey ,andwait
forallmovingpartstostopbeforeleavingthe
operatingposition.
3.Removethefueltank;refertoRemovingthe
FuelTank(page39).
51

4.Removethehydraulic-reservoircap.
5.Locatethedrainpluginthebottomofeach
transmissionandplaceadrainpanunderthe
plugs(Figure85).
Figure85
Important:Usetheuidspeciedin
HydraulicSystemSpecications(page51)or
equivalent.Otheruidscouldcausesystem
damage.
Important:Monitorthelevelofuidinthe
hydraulictanksothatyoudonotoverllit.
13.Tightentheventplugs.
14.Installthehydraulic-tankcap.
15.Installthefueltank.
16.Starttheengineandletitrunforabout2minutes
topurgeairfromthesystem.
17.Shutofftheengineandcheckforleaks.
Note:If1orbothwheelsdonotdrive,referto
g268090
BleedingtheHydraulicSystem(page52).
1.Drainplug
6.Removethedrainplugs.
7.Allowthehydraulicuidtofullydrainfromthe
machine.
8.Removethehydraulicltercapandlterfrom
eachtransmission.
9.Installnewhydrauliclterswiththespringside
facingoutandinstalltheltercaps.
10.Installthedrainplugsandtorqueto22to27
N∙m(16to20ft-lb).
11.Loosentheventplugineachtransmissionso
thatitislooseandwobbles(Figure86).
2.Hydrauliclter
Note:Thisallowsairtoescapethehydraulic
systemasyouaddhydraulicuid.
BleedingtheHydraulic
System
Thetractionsystemisself-bleeding,however,itmay
benecessarytobleedthesystemifuidischanged
orafterworkisperformedonthesystem.
1.Parkthemachineonalevelsurface,disengage
thePTO,andengagetheparkingbrake.
2.Shutofftheengine,removethekey ,andwait
forallmovingpartstostopbeforeleavingthe
operatingposition.
3.Raisetherearofthemachineontojackstands
highenoughtoraisethedrivewheelsoffthe
ground.
4.Starttheengineandmovethethrottlecontrolto
theidleposition.
Note:Ifthedrivewheeldoesnotrotate,assist
thepurgingofthesystembycarefullyrotating
thetireintheforwarddirection.
5.Checkthehydraulicuidlevelasitdrops,and
adduidasrequiredtomaintaintheproperlevel.
Figure86
Lefttransmissionshown
1.Ventplug
12.Slowlyadduidtothehydraulictankuntilit
startstocomeout1oftheventplugs.
6.Repeatthisprocedurefortheoppositewheel.
g031544
52

MowerDeck
Maintenance
BladeSafety
Awornordamagedbladecanbreak,andapieceof
thebladecouldbethrowntowardyouorbystanders,
resultinginseriouspersonalinjuryordeath.
•Inspectthebladesperiodicallyforwearordamage.
•Usecarewhencheckingtheblades.Wrapthe
bladesorweargloves,andusecautionwhen
servicingtheblades.Onlyreplaceorsharpenthe
blades;neverstraightenorweldthem.
•Alwaysinspectthemachinetoensurethatthe
bladesandbladeboltsarenotwornordamaged.
Replacewornordamagedbladesandboltsinsets
topreservebalance.
•Onmulti-bladedmachines,takecareasrotating1
bladecancauseotherbladestorotate.
g006530
Figure87
1.Cuttingedge3.Wear/slotforming
2.Curvedarea4.Crack
CheckingforBentBlades
1.Rotatethebladesuntiltheendsfaceforward
andbackward.
2.Measurefromalevelsurfacetothecutting
edge,positionA,oftheblades(Figure88).
ServicingtheCutting
Blades
Toensureasuperiorqualityofcut,keeptheblades
sharp.Forconvenientsharpeningandreplacement,
keepextrabladesonhand.
BeforeInspectingorServicingthe
Blades
1.Parkthemachineonalevelsurface,disengage
thePTO,andengagetheparkingbrake.
2.Shutofftheengine,removethekey,and
disconnectthespark-plugwiresfromthespark
plugs.
InspectingtheBlades
ServiceInterval:Beforeeachuseordaily
1.Inspectthecuttingedges(Figure87).
2.Iftheedgesarenotsharporhavenicks,remove
andsharpentheblade;refertoSharpeningthe
Blades(page54).
3.Inspecttheblades,especiallyinthecurvedarea.
4.Ifyounoticeanycracks,wear,oraslotforming
inthisarea,immediatelyinstallanewblade
(Figure87).
Figure88
1.Measureherefromblade
tohardsurface
3.Rotatetheoppositeendsofthebladesforward.
4.Measurefromalevelsurfacetothecuttingedge
ofthebladesatthesamepositionasinstep2
above.
2.PositionA
Note:Thedifferencebetweenthedimensions
obtainedinsteps2and3mustnotexceed3mm
(1/8inch).
Note:Ifthisdimensionexceeds3mm
(1/8inch),replacetheblade.
g000975
53

WARNING
Abladethatisbentordamagedcould
breakapartandcouldcriticallyinjure
youorbystanders.
•Alwaysreplaceabentordamaged
bladewithanewblade.
•Donotleorcreatesharpnotchesin
theedgesorsurfacesoftheblade.
RemovingtheBlades
Replacethebladesiftheyhitasolidobject,orifthe
bladeisoutofbalanceorbent.
1.Placeawrenchontheatofthespindleshaftor
holdthebladeendusingaragorthicklypadded
glove.
2.Removethebladebolt,bushing,andbladefrom
thespindleshaft(Figure89).
g000552
Figure90
1.Sharpenatoriginalangle.
2.Checkthebalanceofthebladebyputtingitona
bladebalancer(Figure91).
Note:Ifthebladestaysinahorizontalposition,
thebladeisbalancedandcanbeused.
Note:Ifthebladeisnotbalanced,lesome
metalofftheendofthesailareaonly(Figure90).
g000553
Figure91
1.Blade2.Balancer
Figure89
1.Sailareaoftheblade
2.Blade5.Bladebolt
3.Flatofthespindleshaft
4.Bushing
SharpeningtheBlades
3.Repeatthisprocedureuntilthebladeis
balanced.
InstallingtheBlades
1.Installthebushingthroughthebladewiththe
bushingangeonthebottom(grass)sideofthe
blade(Figure92).
g295816
g255205
Figure92
1.Bushing
2.Installthebushing/bladeassemblyintothe
spindleshaft(Figure93).
1.Usealetosharpenthecuttingedgeatboth
endsoftheblade(Figure90).
Note:Maintaintheoriginalangle.
Note:Thebladeretainsitsbalanceifthesame
amountofmaterialisremovedfrombothcutting
edges.
54

Figure93
1.Topspindlenut3.Bladebolt
2.Flatofthespindleshaft
3.Applycopper-basedlubricantorgreasetothe
threadsofthebladeboltasneededtoprevent
seizing.Installthebladeboltnger-tight.
4.Placeawrenchontheatofthespindleshaft
andtorquethebladeboltto75to81N∙m(55
to60ft-lb).
CheckingtheMowerDeck
Side-to-SideHeight
1.Adjusttherear-tirepressure.
2.Ensurethatthebladesarenotbent;referto
CheckingforBentBlades(page53).
3.Positionthebladessidetoside.
4.MeasureattheBandClocationsfromalevel
surfacetothecuttingedgeofbladetips(Figure
94).
g298850
g006888
Figure94
1.Measurefromalevel
surface
2.Measurethebladeat
pointsBandC
LevelingtheMowerDeck
PreparingtheMachine
Ensurethatthemowerdeckislevelanytimeyou
installthemowerdeckorwhenyouseeanuneven
cutonyourlawn.
Levelthemowerdecksidetosidebeforeadjusting
thefront-to-rearslope.
1.Parkthemachineonalevelsurface,disengage
thePTO,andengagetheparkingbrake.
2.Shutofftheengine,removethekey,and
disconnectthespark-plugwiresfromthespark
plugs.
3.Checkthetirepressureofbothdrivetires;refer
toCheckingtheTirePressure(page43).
4.Checkthemowerdeckforbentblades;remove
andreplaceanybentblades;refertoChecking
forBentBlades(page53).
5.Lowerthemowerdecktothe76mm(3inch)
height-of-cutposition.
5.ThedifferencebetweenmeasurementsBandC
shouldbenomorethan6mm(1/4inch).
Note:Ifitisnotcorrect,refertoLevelingthe
MowerDeckfromSidetoSide(page55).
LevelingtheMowerDeckfrom
SidetoSide
1.Loosenthesidenutandjamnutintheyokes
youwanttoadjust(Figure95).
55

Figure95
1.Topbolt
2.Jamnut5.Adjusttheseyokesto
3.Yoke6.Adjusttheseyokesto
4.Sidenut
adjusttherightsideofthe
mowerdeck.
adjusttheleftsideofthe
mowerdeck.
2.Rotatethetopboltoftheyokestoadjustthe
heightofthemowerdeck(Figure95).
Note:Rotatetheboltsclockwisetoraisethe
deck;rotatetheboltcounterclockwisetolowerit.
g273882
g001041
Figure96
1.Measurethebladeat
pointsAandB
2.Measurefromalevel
surface
4.Ifthefront-to-rearpitchisnotcorrect,referto
LevelingtheMowerDeckfromFronttoRear
(page56).
LevelingtheMowerDeckfrom
FronttoRear
3.Tightenthejamnutsandsidebolts.
4.Checktheside-to-sideheight;refertoChecking
theMowerDeckSide-to-SideHeight(page55).
CheckingtheMowerDeck
Front-to-RearPitch
1.Adjustthetirepressureinthereartirestothe
correctspecications.
2.Position1bladefront-to-rear.MeasureatAand
Blocationsfromalevelsurfacetothecutting
edgeofthebladetips(Figure96).
Note:Themowerbladeshouldbe6mm(1/4
inch)lowerinfrontatAthanintherearatB.
3.Rotatethebladesandrepeatforotherblades.
1.Loosenthejamnutandsideboltintheyokes
thatyouwanttoadjust(Figure97).
Figure97
1.Topbolt
2.Jamnut5.Adjusttheseyokesto
3.Yoke6.Adjusttheseyokesto
4.Sidenut
adjustthefrontsideofthe
mowerdeck.
adjusttherearsideofthe
mowerdeck.
g273883
2.Rotatethetopboltoftheyokestoadjustthe
heightofthemowerdeck(Figure97).
56

Note:Rotatetheboltclockwisetoraisethe
deck;rotatetheboltcounterclockwisetolowerit.
3.Tightenthejamnutsandsidebolts.
AdjustingtheDeck-Lift
Spring
4.Checkthefront-to-rearpitch;refertoChecking
theMowerDeckFront-to-RearPitch(page56).
MatchingtheHeight-of-Cut
1.Checkthereartirepressure.
2.Settheheight-of-cuttothe76mm(3inch)
position;refertoAdjustingtheHeight-of-Cut
(page19).
3.Withthemachineonlevelsurface,position1
bladefront-to-rear.
4.MeasureatA,andfromalevelsurfacetothe
cuttingedgeofthebladetips(Figure98).
Note:Themeasurementshouldbe76mm(3
inches).
Note:Adjustingthecompressionspringaltershow
muchthedeckoatsandtheamountofeffortneeded
toliftthedeckwhenusingtheheight-of-cutlever.
•Morespringextensionreducestheleverliftforce
requiredandcausesthedecktooatmore.
•Lessspringextensionincreasestheleverliftforce
requiredandcausesthedecktooatless.
1.Raisetheheight-of-cutleverandlockitintothe
transportposition.
2.Checkthedistancebetweenthespringnut
andtherearsideoftheweldedmountbracket
(Figure99).
3.Ensurethatthelengthisbetween47to50mm
(1.8to2inches)asshowninFigure99.
4.Ifneeded,adjustthedistancebyadjustingthe
boltonthefrontofthemountbracket(Figure99).
Figure98
1.Measurefromalevel
surface
2.Measurethebladeatpoint
A
5.Ifthemeasurementisnotcorrect,locatethe
front2yokesonthemachine(Figure97).
6.Loosenthesideboltandjamnutoftheyokes.
7.Adjustthetopboltoftheyokesuntiltheblade
tipsmatch76mm(3inches).
8.Tightenthejamnutsandsidebolts.
g000975
Figure99
1.Deck-liftspring
2.Springnut
3.Rearsideofthemount
bracket
4.Adjustmentbolt
5.Lengthisbetween47to
50mm(1.8to2inches).
g273894
5.Repeatthisprocedurefortheoppositedeck-lift
spring.
57

Cleaning
Storage
CleaningundertheMower
Deck
ServiceInterval:Beforeeachuseordaily
Removethegrassbuildupunderthemowerdaily.
1.Parkthemachineonalevelsurface,disengage
thePTO,movethemotion-controlleverstothe
NEUTRAL-LOCKposition,andengagetheparking
brake.
2.Shutofftheengine,removethekey,andwait
forallmovingpartstostopbeforeleavingthe
operatingposition.
3.Raisethefrontofthemachineandusejack
standstosupportthemower.
CleaningtheRearWheel
Motors
ServiceInterval:Beforeeachuseordaily
1.Parkthemachineonalevelsurface,disengage
thePTO,movethemotion-controlleverstothe
NEUTRAL-LOCKposition,andengagetheparking
brake.
2.Shutofftheengine,removethekey,andwait
forallmovingpartstostopbeforeleavingthe
operatingposition.
3.Raisetheoperator’splatformtoaccesstherear
wheelmotors.
StorageSafety
•Shutofftheengine,removethekey,andwaitfor
allmovingpartstostopleavingtheoperator’s
position.Allowthemachinetocoolbefore
servicing,adjusting,fueling,orstoringit.
•Lettheenginecoolbeforestoringthemachine.
•Donotstorethemachineorfuelnearamesor
drainthefuelindoors.
CleaningandStorage
ServiceInterval:Beforestorage
Beforestorage
1.Disengagethepowertakeoff(PTO),engagethe
parkingbrake,shutofftheengine,andremove
thekey.
2.Removegrassclippings,dirt,andgrimefromthe
externalpartsoftheentiremachine,especially
theengine.
Important:Youcanwashthemachine
withamilddetergentandwater.Donot
pressure-washthemachine.Avoidexcessive
useofwater,especiallynearthedrivesystem
andengine.Pressure-washingcanforcedirt
andwaterintocriticalparts,suchasspindle
bearingsandelectricalswitches.
3.Cleananydirtandchafffromtheoutsideofthe
enginecylinder-headnsandblowerhousing.
4.Checkthebrake;refertoT estingtheParking
Brake(page47).
DisposingofWaste
Engineoil,batteries,hydraulicuid,andengine
coolantarepollutantstotheenvironment.Disposeof
theseaccordingtoyourstateandlocalregulations.
5.Servicetheaircleaner;refertoServicingtheAir
Cleaner(page34).
6.Greasethemachine;refertoGreasingthe
Machine(page32).
7.Changetheengineoil;refertoChangingthe
EngineOil(page36).
8.Checkthetirepressure;refertoCheckingthe
TirePressure(page43).
9.Forlong-termstorage,dothefollowing:
A.Addfuelstabilizer/conditionertothefuelin
thetankasdirectedbythefuelstabilizer
manufacturer.
B.Runtheenginetodistributetheconditioned
fuelthroughthefuelsystemfor5minutes.
C.Shutofftheengine,allowittocool,and
drainthefueltank;refertoDrainingthe
FuelT ank(page39),oroperatetheengine
untilitshutsoff.
58

D.Starttheengineandallowittorununtilit
shutsoff.Repeatwiththechokeengaged(if
applicable)untiltheenginedoesnotstart.
E.Disposeoffuelproperly;recycleitaccording
tolocalregulations.
Important:Donotstorefuelcontaining
stabilizer/conditionerlongerthan
thedurationrecommendedbythe
fuel-stabilizermanufacturer.
10.Removethesparkplug(s)andcheckits
condition;refertoRemovingtheSparkPlug
(page38).
11.Withthesparkplug(s)removedfromtheengine,
pour15ml(2tablespoons)ofengineoilintothe
spark-plughole,andusethestartertocrankthe
engineanddistributetheoilinsidethecylinder.
12.Installthesparkplug(s)butdonotconnectthe
wiretothesparkplug(s).
13.Checkandtightenallfasteners.Repairor
replaceanypartthatisdamagedormissing.
14.Paintallscratchedorbaremetalsurfaceswith
paintfromanAuthorizedServiceDealer.
15.Storethemachineinaclean,dry,garageor
storagearea.Removethekeyfromtheswitch
andstoreitinamemorableplace.Coverthe
machinetoprotectitandkeepitclean.
59

Troubleshooting
Problem
Theenginedoesnotstart,startshard,or
failstokeeprunning.
Theenginelosespower.
PossibleCauseCorrectiveAction
1.Thefueltankisemptyortheshutoff
valveisclosed.
2.Thechokecontrolisnotengaged.2.Engagethechokecontrol.
3.Aspark-plugwireislooseor
disconnected.
4.Asparkplugispitted,fouled,orthe
gapisincorrect.
5.Theaircleanerisdirty.
6.Dirtisinthefuellter.6.Replacethefuellter .
7.Dirt,water,orstalefuelisinthefuel
system.
8.Thegapbetweenthesafety-interlock
switchesisnotcorrect.
1.Theengineloadisexcessive.1.Reducethegroundspeed.
2.Theaircleanerisdirty.
3.Theoillevelinthecrankcaseislow.3.Addoiltothecrankcase.
4.Thecoolingnsandairpassages
undertheengineblowerhousingare
plugged.
5.Asparkplugispitted,fouled,orthe
gapisincorrect.
6.Theventholeinthefuelcapisplugged.6.Cleanorreplacethefuelcap.
7.Dirtisinthefuellter.7.Replacethefuellter .
8.Dirt,water,orstalefuelisinthefuel
system.
1.Fillthefueltankwithfuelandopenthe
valve
3.Installthewireonsparkplug.
4.Installanew,correctlygappedspark
plug.
5.Servicetheair-cleanerelement.
7.ContactanAuthorizedServiceDealer.
8.ContactanAuthorizedServiceDealer.
2.Servicetheair-cleanerelement.
4.Removetheobstructionfromthe
coolingnsandairpassages.
5.Installanew,correctlygappedspark
plug.
8.ContactanAuthorizedServiceDealer.
Theengineoverheats.
Themachinedoesnotdrive.
Thereisabnormalvibration.
1.Theengineloadisexcessive.1.Reducethegroundspeed.
2.Theoillevelinthecrankcaseislow.2.Addoiltothecrankcase.
3.Thecoolingnsandairpassages
undertheengineblowerhousingare
plugged.
1.Thehydraulic-uidreservoirislow.1.Addhydraulicuidtothereservoir.
2.Airisinthehydraulicsystem.2.Bleedtheairoutthehydraulicsystem.
3.Apump-drivebeltslips.3.Replacethepump-drivebelt.
4.Apump-drivebeltidlerspringis
missing.
5.Thepump-bypassvalvesareopen.5.Tightenthebypassvalves.T orqueto
1.Cuttingblade(s)is/arebentor
unbalanced.
2.Ablade-mountingboltisloose.2.Tightentheblade-mountingbolt.
3.Theengine-mountingboltsareloose.3.Tightentheengine-mountingbolts.
4.Anenginepulley,idlerpulley,orblade
pulleyisloose.
5.Anenginepulleyisdamaged.
6.Abladespindleisbent.
3.Removetheobstructionfromthe
coolingnsandairpassages.
4.Replacethepump-drivebeltidler
spring.
12to15N∙m(9to11ft-lb).
1.Installnewcuttingblade(s).
4.Tightentheappropriatepulley.
5.
ContactanAuthorizedServiceDealer.
6.ContactanAuthorizedServiceDealer.
60

Problem
PossibleCauseCorrectiveAction
Thecuttingheightisuneven.
Thebladesdonotrotate.
1.Blade(s)arenotsharp.1.Sharpentheblade(s).
2.Cuttingblade(s)is/arebent.2.Installnewcuttingblade(s).
3.Themowerdeckisnotlevel.3.Levelthemowerdeckside-to-side
4.Themowerdeckpitchiswrong.
5.Theundersideofmowerdeckisdirty.5.Cleantheundersideofthemower
6.Thetirepressureisnotcorrect.6.Adjustthetirepressure.
7.Abladespindleisbent.
1.Apump-drivebeltisworn,looseor
broken.
2.Apump-drivebeltisoffpulley .
3.Amower-deckbeltisworn,looseor
broken.
4.Amower-deckbeltisoffthepulley.
5.Anidlerspringisbrokenormissing.5.Replacethespring.
6.Theelectricclutchisoutofadjustment.
7.Theclutchconnectororwireis
damaged.
8.Theelectricclutchisdamaged.
9.Thesafety-interlocksystemprevents
bladerotation.
10.ThePTOswitchismalfunctioning.10.ContactanAuthorizedServiceDealer.
position.
4.Adjustthefront-to-rearpitch.
deck.
7.ContactanAuthorizedServiceDealer.
1.Checkthebelttension.
2.Installthedrivebeltandcheckthe
adjustingshaftsandbeltguidesforthe
correctposition.
3.Installthenewdeckbelt.
4.Installthedeckpulleyandcheckthe
idlerpulley,idlerarmandspringforthe
correctpositionandfunction.
6.Adjusttheclutchairgap.
7.ContactanAuthorizedServiceDealer.
8.ContactanAuthorizedServiceDealer.
9.ContactanAuthorizedServiceDealer.
Theclutchdoesnotengage.
1.Thefuseisblown.
2.Thereislowvoltagesupplyatthe
clutch.
3.Thecoilisdamaged.3.Replacetheclutch.
4.Thereisinadequatecurrentsupply.4.Repairorreplacetheclutchlead
5.Therotor/armatureairgapistoolarge.
1.Replacethefuse.Checkthecoil
resistance,batterycharge,charging
system,andwiringconnections,and
replacecomponentsifnecessary.
2.Checkthecoilresistance,battery
charge,chargingsystem,andwiring
connectionsandreplacepartsif
necessary.
wireorelectricalsystem.Cleanthe
connectorcontacts.
5.Removetheshimorreplacetheclutch.
61

Schematics
ElectricalSchematicDWG131-1199(Rev.A)
62
g269997

Notes:

EEA/UKPrivacyNotice
Toro’sUseofYourPersonalInformation
TheT oroCompany(“Toro”)respectsyourprivacy.Whenyoupurchaseourproducts,wemaycollectcertainpersonalinformationaboutyou,eitherdirectly
fromyouorthroughyourlocalT orocompanyordealer.T orousesthisinformationtofullcontractualobligations-suchastoregisteryourwarranty,
processyourwarrantyclaimortocontactyouintheeventofaproductrecall-andforlegitimatebusinesspurposes-suchastogaugecustomer
satisfaction,improveourproductsorprovideyouwithproductinformationwhichmaybeofinterest.T oromayshareyourinformationwithoursubsidiaries,
afliates,dealersorotherbusinesspartnersinconnectiontheseactivities.Wemayalsodisclosepersonalinformationwhenrequiredbylaworin
connectionwiththesale,purchaseormergerofabusiness.Wewillneversellyourpersonalinformationtoanyothercompanyformarketingpurposes.
RetentionofyourPersonalInformation
Torowillkeepyourpersonalinformationaslongasitisrelevantfortheabovepurposesandinaccordancewithlegalrequirements.Formoreinformation
aboutapplicableretentionperiodspleasecontactlegal@toro.com.
Toro’sCommitmenttoSecurity
YourpersonalinformationmaybeprocessedintheUSoranothercountrywhichmayhavelessstrictdataprotectionlawsthanyourcountryofresidence.
Wheneverwetransferyourinformationoutsideofyourcountryofresidence,wewilltakelegallyrequiredstepstoensurethatappropriatesafeguardsare
inplacetoprotectyourinformationandtomakesureitistreatedsecurely.
AccessandCorrection
Youmayhavetherighttocorrectorreviewyourpersonaldata,orobjecttoorrestricttheprocessingofyourdata.T odoso,pleasecontactusbyemail
atlegal@toro.com.IfyouhaveconcernsaboutthewayinwhichTorohashandledyourinformation,weencourageyoutoraisethisdirectlywithus.
PleasenotethatEuropeanresidentshavetherighttocomplaintoyourDataProtectionAuthority .
374-0282RevC

FormNo.3443-217RevA
GrandStand
®
Rasenmäher
Mit122cmHeckauswurfTURBOFORCE
Mähwerk
Modellnr.72542TE—Seriennr.400000000undhöher
®
RegistrierenSieIhrProduktunterwww.T oro.com.
Originaldokuments(DE)
*3443-217*

DiesesProdukterfülltallerelevanteneuropäischen
Richtlinien;weitereDetailsndenSieinder
produktspezischenKonformitätserklärung(DOC).
WeitereInformationenndenSieinder
MotorbedienungsanleitungdesHerstellers,diemit
derMaschineausgeliefertwurde.
Einführung
DieserStehrasenmähermitSichelmessernsolltevon
LandschaftsbauernundgeschultenLohnarbeitern
verwendetwerden.EristhauptsächlichfürdasMähen
vonGrasaufgepegtenGrünächeninPrivat-oder
öffentlichenAnlagengedacht.WenndieseMaschine
füreinenanderenZweckalsvorgeseheneingesetzt
wird,kanndasfürSieundanderePersonengefährlich
sein.
LesenSiedieseInformationensorgfältigdurch,
umsichmitdemordnungsgemäßenEinsatzund
derWartungdesGerätsvertrautzumachenund
VerletzungenundeineBeschädigungdesGerätszu
vermeiden.SietragendieVerantwortungfüreinen
ordnungsgemäßenundsicherenEinsatzdesGeräts.
BesuchenSieToro.comfürweitereInformationen,
einschließlichSicherheitstipps,Schulungsunterlagen,
Zubehörinformationen,StandorteinesHändlersoder
RegistrierungIhresProdukts.
g235457
Bild1
1.PositionderModell-undSeriennummern
Modellnr.
Seriennr.
IndieserAnleitungwerdenpotenzielleGefahren
angeführtundSicherheitshinweisewerdenvom
Sicherheitswarnsymbol(Bild2)gekennzeichnet.
DiesesWarnsymbolweistaufeineGefahrhin,diezu
schwerenodertödlichenVerletzungenführenkann,
wennSiedieempfohlenenSicherheitsvorkehrungen
nichteinhalten.
WendenSiesichandenToro-Vertragshändler
oderKundendienst,wennSieeineServiceleistung,
OriginalersatzteilevonTorooderweitere
Informationenbenötigen.HabenSiedafürdieModellundSeriennummernderMaschinegriffbereit.Bild1
zeigtdiePositionderModell-undSeriennummern
amProdukt.TragenSiehierbittedieModell-und
SeriennummerndesGerätsein.
Wichtig:ScannenSiemitIhremMobilgerätden
QR-CodeaufdemSeriennummernaufkleber(falls
vorhanden),umaufGarantie-,Ersatzteil-oder
andereProduktinformationenzuzugreifen.
g000502
Bild2
1.Sicherheitswarnsymbol
IndieserAnleitungwerdenzweiBegriffezur
HervorhebungvonInformationenverwendet.Wichtig
weistaufspezielletechnischeInformationenhin,und
HinweishebtallgemeineInformationenhervor,die
IhrebesondereBeachtungverdienen.
©2020—TheToro®Company
8111LyndaleAvenueSouth
Bloomington,MN55420
KontaktierenSieunsunterwww.Toro.com.
2
AlleRechtevorbehalten
Druck:USA

Inhalt
Sicherheit..................................................................4
AllgemeineSicherheit.........................................4
Sicherheits-undBedienungsschilder.................5
Produktübersicht.......................................................9
Bedienelemente................................................9
TechnischeDaten............................................10
Anbaugeräte,Zubehör.....................................10
VordemEinsatz...................................................11
VordersicherenVerwendung............................11
Betanken..........................................................12
DurchführentäglicherWartungsarbei-
ten.................................................................12
EinfahreneinerneuenMaschine......................12
VerwendungderSicherheitsschalter................13
WährenddesEinsatzes.......................................14
HinweisezurSicherheitwährenddes
Betriebs.........................................................14
BetätigenderFeststellbremse..........................16
VerwendendesZapfwellenantriebsschal-
ters................................................................16
EinsetzenderGasbedienung...........................17
EinsetzendesChokes.....................................17
EinsetzenderZündung.....................................18
AnlassendesMotors........................................18
AbstellendesMotors........................................19
EinsetzenderPlattform....................................19
Vorwärts-undRückwärtsfahren........................20
EinstellenderSchnitthöhe................................21
VerwendenvonBallast.....................................22
NachdemEinsatz...............................................22
HinweisezurSicherheitnachdem
Betrieb..........................................................22
VerwendendesKraftstoffhahns........................23
SchiebenderMaschineperHand.....................23
TransportierenderMaschine............................24
Wartung..................................................................26
Wartungssicherheit...........................................26
EmpfohlenerWartungsplan.................................26
VerfahrenvordemAusführenvon
Wartungsarbeiten.........................................28
EntfernenSiedasKissen,umZugangzum
Heckzuhaben..............................................28
ÖffnendesMotorschutzesund
Schutzerweiterung........................................28
SchließendesMotorschutzesundder
Schutzverlängerung......................................29
EntfernenderlinkenRiemenabdeckung...........30
EntfernenderrechtenRiemenab-
deckung........................................................31
InstallierenderrechtenRiemenab-
deckung........................................................32
InstallierenderlinkenRiemenab-
deckung........................................................33
Schmierung.........................................................34
EinfettenderMaschine.....................................34
EinfettenderDrehspannscheibe......................34
EinfettendervorderenLaufradschwen-
karme............................................................35
EinfettenderLaufradnaben..............................35
EinfettendesFahrantriebs................................36
WartendesMotors..............................................37
SicherheitshinweisezumMotor........................37
WartendesLuftlters........................................37
WartendesMotoröls.........................................38
WartenderZündkerze......................................40
PrüfendesFunkenfängers...............................41
WartenderKraftstoffanlage.................................42
EntleerendesKraftstofftanks............................42
EntfernendesKraftstofftanks...........................43
AustauschendesKraftstofflters......................43
WartenderelektrischenAnlage...........................44
HinweisezurSicherheitderElektroan-
lage...............................................................44
WartenderBatterie...........................................44
WartenderSicherungen...................................46
WartendesAntriebssystems...............................46
EinstellenderSpurweite...................................46
PrüfendesReifendrucks..................................47
AnpassungdesLaufradschwenkarm-
Lagers...........................................................48
WartenderLaufräderund-lager.......................48
EntfernenderKupplungsbeilagscheibe............49
PrüfenderRadmuttern.....................................51
WartenderKühlanlage........................................51
ReinigungdesLuftansauggitters......................51
ReinigendesKühlsystems...............................51
WartenderBremsen...........................................52
ÜberprüfenderFeststellbremse.......................52
EinstellenderBremsen.....................................52
WartenderRiemen.............................................53
PrüfenderRiemen...........................................53
AustauschendesMähwerkriemens..................53
AustauschendesFahrantriebsriemens
......................................................................54
WartenderBedienelementanlage.......................55
EinstellenderFahrantriebshebel......................55
WartenderHydraulikanlage................................56
SicherheitderHydraulikanlage.........................56
TechnischeDatenderHydraulikanlage.............56
PrüfendesHydrauliköls....................................56
WechselndesHydraulikölsundder
-lter..............................................................57
EntlüftenderHydraulikanlage...........................58
WartendesMähwerks..........................................59
SicherheitshinweisezumMesser......................59
WartenderSchnittmesser................................59
NivellierendesMähwerks.................................61
EinstellenderMähwerkhubfeder......................64
Reinigung............................................................64
ReinigenderMähwerkunterseite......................64
ReinigenderHinterradmotoren........................64
BeseitigungvonAbfällen..................................64
Einlagerung............................................................65
SicherheitbeiderEinlagerung..........................65
3

ReinigungundEinlagerung..............................65
Fehlersucheund-behebung...................................66
Schaltbilder.............................................................69
Sicherheit
DieseMaschinewurdegemäßENISO5395
konstruiert.
AllgemeineSicherheit
DiesesProduktkannHändeundFüßeamputieren
undGegenständeaufschleudern.BefolgenSiezum
VermeidenvonschwerenVerletzungenimmeralle
Sicherheitshinweise.
•LesenundverstehenSievordemAnlassendes
MotorsdenInhaltdieserBedienungsanleitung.
•HaltenSieHändeundFüßevonbeweglichen
Teilenfern.
•BedienenSiedieMaschineniemals,wennnicht
alleSchutzvorrichtungenundAbdeckungen
angebrachtundfunktionstüchtigsind.
•BleibenSieimmervonderAuswurföffnungfern.
•HaltenSieUnbeteiligteundKindervom
Arbeitsbereichfern.DasFahrzeugdarfniemals
vonKindernbetriebenwerden.LassenSie
nurPersonenzu,dieverantwortungsbewusst,
geschult,mitdenAnweisungenvertraut,und
körperlichinderLagesind,dieMaschinezu
bedienen.
•HaltenSiedieMaschinean,stellenSiedenMotor
ab,undziehenSiedenZündschlüsselab,bevor
SieWartungsarbeitendurchführen,Kraftstoff
nachfüllen,oderBlockierungenbeseitigen.
DerunsachgemäßeEinsatzoderdiefalscheWartung
dieserMaschinekannzuVerletzungenführen.
BefolgenSiezurVerringerungdesVerletzungsrisikos
dieseSicherheitshinweiseundbeachtenSiedas
Warnsymbol
oderGefahr–Sicherheitsrisiko.WenndieseHinweise
nichtbeachtetwerden,kanneszuschwerenbis
tödlichenVerletzungenkommen.
mitderBedeutungAchtung,Warnung
4

Sicherheits-undBedienungsschilder
DieSicherheits-undBedienungsaufklebersindgutsichtbarundbendensichinderNähe
potentiellerGefahrenbereiche.ErsetzenSiebeschädigteoderfehlendeAufkleber.
decalbatterysymbols
Akkusymbole
DerAkkuweisteinigeoderallederfolgendenSymboleauf.
1.Explosionsgefahr6.HaltenSieUnbeteiligte
2.VermeidenSieFeuer,
offenesLichtundrauchen
Sienicht.
3.Verätzungsgefahr/Verbrennungsgefahr
durchChemikalien
4.TragenSieeine
Schutzbrille.
5.LesenSiedie
Bedienungsanleitung.
vonderMaschinefern.
7.TragenSieeine
Schutzbrille–explosive
GasekönnenBlindheit
undandereVerletzungen
verursachen.
8.DieSäureimAkkukann
schwerechemische
Verbrennungen
verursachen.
9.SpülenSiedieAugen
sofortmitWasserund
gehenSiesofortzumArzt.
10.Bleihaltig:Nicht
wegwerfen.
decal116-8283
116-8283
1.Warnung:LesenSieinderBedienungsanleitungnach,wie
SiedieSchnittmesserschraube/-mutterbisauf75-81N·m
anziehen.
decal116-8775
116-8775
Herstellermarke
1.DieseMarkegibtan,dassdasMesserT eilder
OriginalmaschinedesHerstellersist.
106-5517
1.Warnung:BerührenSienichtdieheißeOberäche.
decaloemmarkt
decal106-5517
1.LesenSiedie
Bedienungsanleitung.
1.LesenSiedie
Bedienungsanleitung.
2.Warnung:FüllenSie
biszurUnterkantedes
Füllstutzens.FüllenSie
nichtzuvielein.
decal131-3507
131-3507
2.Riemenspannvorrichtung
5

decal131-3521
131-3528
15A 15A 10A
7.5A
131-3521
1.Schnitthöhe
1.LesenSiedie
Bedienungsanleitung.
2.Getriebeöl
131-3524
3.ÖlstandimkaltenZustand
decal131-3524
131-3536
1.Batterie4.Feststellbremse
2.Uhrzeit
3.Zapfwelle
5.Motor:Start
6.Aktivierender
Steuerhebel.
133-4641
1.Warnung:NehmenSieniePassagieremit.
decal131-3536
decal133-4641
131-3528
1.Schlüsselschalter:15A3.Zapfwelle:10A
2.Zubehöranschluss:15A
4.InfoCenter:7,5A
decal131-3528
decal133-4665
133-4665
1.Kippgefahr:NichtanSteigungenmiteinemSteigungswinkel
vonmehrals10°hochfahren,nichtquerüberSteigungen
miteinemSteigungswinkelvonmehrals15°fahren.
6

decal139-5557
139-5557
1.Gefahrdurch
ausgeworfene
Gegenstände:Halten
SieUnbeteiligtefern.
2.Gefahrvon
Schnittverletzungen/einer
AmputationvonHänden
oderFüßendurch
Mähwerkmesser:Halten
Siesichvonbeweglichen
Teilenfern.
3.Verhedderungsgefahram
Riemen:HaltenSieeinen
Abstandzubeweglichen
TeilenundlassenSiealle
Schutzvorrichtungenund
Schutzblechemontiert.
1.Motorluftlter:Alle50
Stundenkontrollieren;alle
200Stundenwechseln
2.Reifenluftdruck:Alle50
Stundenkontrollieren
3.Getriebeöl:Alle50
Stundenkontrollieren;alle
500Stundenwechseln
decal139-5571
139-5571
4.Motoröllter:Alle8
Stundenkontrollieren;alle
100Stundenwechseln
5.LesenSiedie
Bedienungsanleitung
vorDurchführungvon
Wartungsarbeiten.
7

decal131-3526
131-3526
1.Zapfwelle:Ausgekuppelt
2.Schnell
3.Langsam
5.Rückwärts
6.Fahrantrieb
7.AktivierenderSteuerhebel.
4.Neutral
139-5556
1.Warnung:LesenSiedieBedienungsanleitung.5.GefahrdurchausgeworfeneGegenstände:HaltenSie
2.Warnung:VerwendenSiedasGeräterst,wennSiegeschult
wurden.
3.Warnung:TragenSieeinenGehörschutz.7.Kippgefahr:VerwendenSiebeimVerladenaufeinen
4.Schnitt-undVerletzungsgefahrfürHändeoderFüßebeim
Schnittmesser:BerührenSiekeinebeweglichenT eileund
nehmenSiekeineSchutzvorrichtungenundSchutzblecheab.
Unbeteiligtefern.
6.Warnung:AktivierenSiedieFeststellbremse,stellenSieden
Motorab,undziehenSiedenSchlüsselab,bevorSiedie
MaschineverlassenodereineWartungdurchführen.
AnhängernichtzweiRampensondernnureineRampe,die
fürdieMaschinebreitgenugist;fahrenSierückwärtsaufdie
RampeundfahrenSievorwärtsvonderRampe.
8.Kippgefahr:BetreibenSiedieMaschinenichtinderNähevon
AbhängenoderWasser;haltenSieeinensicherenAbstand
zuAbhängenein.
decal139-5556
140-4258
1.Feststellbremse:Ausgekuppelt4.Aus
2.Feststellbremse:Eingekuppelt
5.Motordrehzahl:Schnell
3.Ein6.Motordrehzahl:Langsam
8
decal140-4258

Produktübersicht
Bedienfeld
g301785
Bild4
Bild3
1.VorderesLaufrad
2.Motor
3.Armaturenbrett
4.Fahrantriebshebel9.Batterie
5.Hydraulikbehälter10.Mähwerk
6.Bedienerkissen
7.Kraftstofftank
8.Plattform(abgelassen)
Bedienelemente
MachenSiesichvordemStartdesMotorsundder
VerwendungderMaschinemitallenBedienelementen
vertraut.
g273599
1.Tankdeckel7.Zündschloss
2.Chokehebel8.Gasbedienungshebel
3.Feststellbremshebel
4.Hydraulikbehälterdeckel
5.Betriebsstundenzähler11.Fahrantriebshebel
6.Zapfwellenschalter
9.Schnitthöhenhebel
10.Schnitthöhenstift
12.Anschlagbügel
Zapfwellenschalter(PTO)
VerwendenSiedenZapfwellenschalter(PTO),
umSchnittmesserein-undauszuschaltenoder
Anbaugeräte(Bild4)zustartenundzustoppen;siehe
VerwendendesZapfwellenantriebsschalters(Seite
16).
9

Betriebsstundenzähler
Fahrantriebshebel
DerBetriebsstundenzählerzeichnetdieStunden
auf,diederMotorgelaufenist.Erläuft,wenn
derMotorläuft.RichtenSieIhreregelmäßigen
WartungsmaßnahmennachdieserAngabe(Bild5).
Bild5
1.Sicherheitssymbole
2.Batterielampe
3.Betriebsstundenzähler
Sicherheitsschalteranzeigen
AufdemBetriebsstundenzählerwerdenSymbole
angezeigt,diemiteinemschwarzenDreieckangeben,
dassderSicherheitsschalterinderrichtigenStellung
ist(Bild5).
MitdenFahrantriebshebelnfahrenSiedieMaschine
vorwärts,rückwärtsundwenden(Bild4).
Kraftstoffhahn
SchließenSiedenKraftstoffhahnvordemTransport
oderderEinlagerungderMaschine(Verwendendes
Kraftstoffhahns(Seite23)).
TechnischeDaten
Hinweis:T echnischeundkonstruktiveÄnderungen
vorbehalten.
g216020
Schnittbreite
Breite127cm
Längemitabgesenkter
Plattform
Längemitangehobener
Plattform
Höhe122cm
Gewicht415kg(915lb)
122cm
191cm
155cm
Batterieanzeigelampe
WennSiedenSchlüsselfüreinigeSekundenin
dieEIN-Stellungdrehen,wirddieBatterieladung
imBereichangezeigt,indemnormalerweisedie
Betriebsstundenangezeigtwerden.
DieAnzeigelampefürdieBatterieleuchtetbeim
EINschaltenderZündungaufundwenndieLadung
unterdemrichtigenBetriebsniveauist(Bild5).
Gasbedienung
DieGasbedienungsteuertdieMotordrehzahlund
hateinefortlaufendvariableEinstellungvonSLOW
(LANGSAM)bisFAST(SCHNELL)(Bild4).
Choke
LassenSieeinenkaltenMotormitdemChokean.
ZiehenSiedasChoke-Bedienelementheraus,umes
zuaktivieren.DrückenSiedenChokehinein,umihn
zudeaktivieren.
Anbaugeräte,Zubehör
EinSortimentanvonTorozugelassenen
AnbaugerätenundZubehörwirdfürdieseMaschine
angeboten,umdenFunktionsumfangdesGerätszu
erhöhenundzuerweitern.WendenSiesichaneinen
ofziellenT oro-VertragshändlerodernavigierenSie
aufwww.Toro.comfüreineListederzugelassenen
AnbaugeräteunddesZubehörs.
VerwendenSienurOriginalersatzteileund
-zubehörteilevonToro,umdieoptimaleLeistungund
Sicherheitzugewährleisten.ErsatzteileundZubehör
andererHerstellerkönnengefährlichseinundeine
VerwendungkönntedieGarantieungültigmachen.
Zündschloss
DasZündschloss,mitdemderMotorangelassenund
abgestelltwird,hatdreiStellungen:AUS,LAUFund
START.SieheAnlassendesMotors(Seite18).
10

Betrieb
–FüllenSiedenKraftstofftankimFreien
auf,wennderMotorkaltist.WischenSie
verschüttetenKraftstoffauf.
VordemEinsatz
Vordersicheren
Verwendung
AllgemeineSicherheit
•KinderodernichtgeschultePersonendürfendie
Maschinenichtverwenden.ÖrtlicheVorschriften
schränkenu.U.dasMindestaltervonBedienern
ein.DerBesitzeristfürdieSchulungaller
BedienerundMechanikerverantwortlich.
•MachenSiesichmitdemsicherenBetriebder
MaschinesowiedenBedienelementenund
Sicherheitssymbolenvertraut.
•StellenSievordemVerlassenderBedienerposition
denMotorab,ziehendenSchlüsselab,und
warten,bisallebeweglichenTeilezumStillstand
gekommensind.LassenSiedieMaschine
abkühlen,bevorSiesiewarten,einstellen,
betanken,reinigen,odereinlagern.
•Siemüssenwissen,wieSiedieMaschineschnell
anhaltenunddenMotorabstellenkönnen.
•PrüfenSie,oballeSitzkontaktschalter,
Sicherheitsschalter,undSchutzvorrichtungen
montiertundfunktionsfähigsind.NehmenSie
dieMaschinenurinBetrieb,wenndieserichtig
funktionieren.
•ÜberprüfenSievorjedemMähen,obdie
Schnittmesser,-schraubenunddieSchneideinheit
funktionsfähigsind.
•PrüfenSiedenArbeitsbereichgründlichund
entfernenSiealleObjekte,dievonderMaschine
aufgeschleudertwerdenkönnten.
•BeurteilenSiedasGelände,umfestzulegen,
welcheAnbaugeräteundZubehörerforderlich
sind,umdieMaschineordnungsgemäßundsicher
bedienenzukönnen.
Kraftstoffsicherheit
•Kraftstoffistextremleichtentammbar
undhochexplosiv.FeuerundExplosionen
durchKraftstoffkönnenVerbrennungenund
Sachschädenverursachen.
–StellenSiedenKanisterbzw.dieMaschine
vordemAuftankenaufdenBodenundnicht
aufeinFahrzeugoderaufeinObjekt,umeine
elektrischeLadungdurchdasEntzündendes
Kraftstoffszuvermeiden.
–RauchenSienichtbeimUmgangmitKraftstoff,
undgehenSienichtinderNähevonoffenem
FeueroderFunkenmitKraftstoffum.
–EntfernenSieniedenT ankdeckeloderfüllen
Kraftstoffein,wennderMotorläuftodernoch
heißist.
–WennSieKraftstoffverschütten,versuchen
Sienicht,denMotorzustarten.Vermeiden
Siees,Zündquellenzuschaffen,bisdie
Kraftstoffdämpfeverdunstetsind.
–BewahrenSieKraftstoffinvorschriftsmäßigen
KanisternfürKinderunzugänglichauf.
•KraftstoffistbeiEinnahmegesundheitsschädlich
odertödlich.WenneinePersonlangfristig
Benzindämpfenausgesetztist,kanndieszu
schwerenVerletzungenundKrankheitenführen.
–VermeidenSiedaslangfristigeEinatmenvon
Benzindämpfen.
–HaltenSieIhrGesichtundIhreHändevom
EinfüllstutzenundderÖffnungimKraftstofftank
fern.
–HaltenSieBenzinvonAugenundderHaut
fern.
•LagernSiewederdieMaschinenochden
KraftstoffkanisterinderNähevonoffenen
Flammen,FunkenoderZündammenwiez.B.bei
einemHeizkesselodersonstigenGeräten.
•FüllenSieKanisternieimFahrzeugoderauf
derLadepritscheeinesPritschenwagensoder
AnhängersmiteinerVerkleidungausKunststoff.
StellenSieKanistervordemAuffüllenimmervom
FahrzeugentferntaufdenBoden.
•NehmenSiedasGerätvomPritschenwagenbzw.
AnhängerundbetankenesaufdemBoden.Falls
dasnichtmöglichist,betankenSiesolcheGeräte
miteinemtragbarenKanisterundnichtaneiner
Zapfsäule.
•SetzenSiedieMaschinenichtohnevollständig
montierteundbetriebsbereiteAuspuffanlageein.
•DerStutzensolltedenRanddesBenzinkanisters
oderdieBehälteröffnungbeimAuftanken
ständigberühren.VerwendenSienichtein
Mundstück-Öffnungsgerät.
•WechselnSiesofortIhreKleidung,wenn
Kraftstoffdaraufverschüttetwird.WischenSie
verschüttetenKraftstoffauf.
•FüllenSiedenKraftstofftankniezuvoll.T auschen
SiedenTankdeckelausundziehenihnfest.
11

Betanken
4.FüllenSiedenKraftstofftankbiszurUnterseite
desEinfüllstutzens.
EmpfohlenerKraftstoff
•DiebestenErgebnisseerhaltenSie,wennSie
sauberes,frisches(nichtälterals30T age),
bleifreiesBenzinmiteinerMindestoktanzahlvon
87(R+M)/2verwenden.
•Ethanol:Kraftstoff,dermit10%Ethanoloder
15%MTBE(Volumenanteil)angereichertist,
istauchgeeignet.EthanolundMTBEsind
nichtidentisch.Benzinmit15%Ethanol
(E15)(Volumenanteil)istnichtzurVerwendung
zugelassen.VerwendenSieniemalsBenzin,
dasausmehrals10%Ethanol(Volumenanteil)
wieE15(aus15%Ethanol),E20(aus20%
Ethanol)oderE85(ausbiszu85%Ethanol)
besteht.DieVerwendungvonnichtzugelassenem
BenzinkannzuLeistungsproblemenund/oder
Motorschädenführen,dieggf.nichtvonder
Garantieabgedecktsind.
•VerwendenSiekeinmethanolhaltigesBenzin.
•LagernSiekeinenKraftstoffimKraftstofftankoder
inKraftstoffbehälternüberdenWinter,wennSie
keinenKraftstoffstabilisatorverwenden.
Hinweis:FüllenSiedenKraftstofftanknicht
ganzauf.IndiesemfreienPlatzimTankkann
sichderKraftstoffausdehnen.
5.BringenSiedenT ankdeckelwiederfestan.
WischenSieverschüttetenKraftstoffauf.
g038312
Bild6
•VermischenSienieBenzinmitÖl.
VerwendeneinesKraftstoffstabilisators
VerwendenSieeinenKraftstoffstabilisator/KonditioniererinderMaschine,umdenKraftstofflängerfrisch
zuhalten,wennergemäßdenAnweisungendes
Kraftstoffstabilisatorherstellersverwendetwird.
Wichtig:VerwendenSiekeineZusätze,die
MethanoloderEthanolenthalten.
GebenSiedieMengedesKraftstoffstabilisatorsbzw.
-konditionierersindenfrischenKraftstoff,wievom
HerstellerdesKraftstoffstabilisatorsvorgeschrieben.
Betanken
1.StellenSiedieMaschineaufeinerebenen
Flächeab,kuppelndieZapfwelleaus,stellen
dieFahrantriebshebelindieARRETIERTE
NEUTRAL-Stellungundaktivierendie
Feststellbremse.
Durchführentäglicher
Wartungsarbeiten
TäglichvordemStartderMaschinediefolgende
täglichePrüfroutinegemäßWartung(Seite26)
durchführen:
Einfahreneinerneuen
Maschine
NeueMotorenbrauchenetwasZeit,bevorsiedie
ganzeLeistungerbringen.NeueMähwerkeund
AntriebssystemehabeneinehöhereReibungund
belastendenMotormehr.DieEinfahrzeitfürneue
Maschinenbeträgtungefähr40bis50Stunden.
DanacherbringtderMotordieganzeLeistungund
bestePerformance.
2.StellenSievordemVerlassender
BedienungspositiondenMotorab,ziehenden
Schlüsselabundwarten,bisallebeweglichen
TeilezumStillstandgekommensind.
3.ReinigenSiedenBereichumdenTankdeckel
undnehmenSiedenDeckelab.
12

Verwendungder
TestenderSicherheitsschalter
Sicherheitsschalter
WARNUNG:
WenndieSicherheitsschalterabgeklemmt
oderbeschädigtwerden,setztsichdie
Maschinemöglicherweisevonalleinein
Bewegung,wasVerletzungenverursachen
kann.
•AndenSicherheitsschalterndürfenkeine
Veränderungenvorgenommenwerden.
•PrüfenSiedieFunktionder
Sicherheitsschaltertäglich,undtauschen
SievorBetriebderMaschinealledefekten
Schalteraus.
FunktionderSicherheitsschalter
DieSicherheitsschalterermöglichendasAktivieren
desZapfwellenschaltersnur,wenneinederfolgenden
Bedingungenauftritt:
•StellenSieeinenderFahrantriebshebelindie
mittlere,nichtarretierteStellung.
•SchaltenSiedenZapfwellenschalterindie
EIN-Stellung.
DieSicherheitsschalterstoppendie
Schnittmesser/Anbaugeräte,wennSie
beideFahrantriebshebelindieARRETIERTE
NEUTRAL-Stellungbewegenoderzurückgehen
lassen.
DerBetriebsstundenzählerhatSymbole,die
denBedienerdaraufhinweisen,dassder
SicherheitsschalterinderrichtigenStellungist.
WennderSchalterinderrichtigenStellungist,
leuchtetimrelevantenRechteckeinDreieckauf
(Bild7).
Wartungsintervall:BeijederVerwendungoder
täglich
ÜberprüfenSiedieFunktionderSicherheitsschalter
vorjedemEinsatzderMaschine.
Hinweis:LassenSie,wenndieSicherheitsschalter
nichtwienachstehendbeschriebenfunktionieren,
dieseunverzüglichvoneinemVertragshändler
reparieren.
1.PrüfenSiedenMotor;sieheAnlassendes
Motors(Seite18).
2.StellenSiedieFahrantriebshebelindiemittlere,
nichtarretierteStellung.
Hinweis:DieSchnittmesser/Anbaugeräte
solltenstoppenundderMotorsollteaufhören
zulaufen.
3.LassenSiedenMotoranundlösenSiedie
Feststellbremse.
4.StellenSieeinenderFahrantriebshebelindie
mittlere,nichtarretierteStellung.
5.HaltenSiedenFahrantriebshebelweiterinder
mittlerenentriegeltenStellungunddrückenSie
denZapfwellenschalterindieEIN-Stellung.
Hinweis:DieKupplungunddie
Schnittmesser/Anbaugerätesollteneinkuppeln.
6.SchiebenSieoderlassenSiedie
FahrantriebshebelindieARRETIERTE
NEUTRAL-Stellunggehen.
Hinweis:DieMesser/Anbaugerätesollten
stoppenundderMotorsollteweiterhinlaufen.
7.BetätigenSiedenZapfwellenschalterindie
AUS-StellungundbewegenSieeinenderbeiden
Fahrantriebshebelindiemittlereentriegelte
Stellung.
8.HaltenSiedenFahrantriebshebelweiterinder
mittlerenentriegeltenStellungunddrückenSie
denZapfwellenschalterindieEIN-Stellung.
Bild7
1.DieDreieckeleuchtenauf,wenndieSicherheitsschalterin
derrichtigenStellungsind.
Hinweis:DieKupplungunddie
Schnittmesser/Anbaugerätesollteneinkuppeln.
9.SchaltenSiedieZapfwellenschalterindie
AUS-Stellung.
Hinweis:DieSchnittmesser/Anbaugeräte
solltenstoppen.
g031282
10.SchaltenSiedenZapfwellenschalterbei
laufendemMotorindieEIN-Stellung,ohne
einenderFahrantriebshebelindermittleren,
entriegeltenStellungzuhalten.
13

Hinweis:DieSchnittmesser/Anbaugeräte
dürfensichnichtzuschalten.
undanderenObjektennähern,dieIhreSicht
behindernkönnen.
•StellenSiedieMesserab,wennSienichtmähen.
WährenddesEinsatzes
HinweisezurSicherheit
währenddesBetriebs
AllgemeineSicherheit
•DerBesitzerbzw.BedieneristfürUnfälleoder
VerletzungenvonDrittensowieSachschäden
verantwortlichundkanndieseverhindern.
•TragenSiegeeigneteKleidung,u.a.eine
Schutzbrille,langeHosen,rutschfeste
ArbeitsschuheundeinenGehörschutz.Binden
SielangeHaarehintenzusammenundtragenSie
keinenSchmuckoderweiteKleidung.
•KonzentrierenSiesichimmerbeiderVerwendung
derMaschine.TunSienichts,wasSieablenken
könnte,sonstkönnenVerletzungenoder
Sachschädenauftreten.
•BedienenSiedieMaschinenicht,wennSie
müdeoderkranksindoderunterAlkohol-oder
Drogeneinussstehen.
•NehmenSieniePassagiereaufderMaschinemit
undhaltenSiealleUnbeteiligtenundHaustiere
vonderverwendetenMaschinefern.
•SetzenSiedieMaschinenurbeiguten
Sichtverhältnissenundgeeigneten
Witterungsbedingungenein.FahrenSie
dieMaschineniebeiGewitter,bzw.wennGefahr
durchBlitzschlagbesteht.
•NassesGrasoderBlätterkönnenschwere
Verletzungenverursachen,wennSiedarauf
ausrutschenunddieKlingeberühren.Vermeiden
SiedasMähenunternassenBedingungen.
•StellenSievordemAnlassendesMotorssicher,
dassalleAntriebeinderNeutral-Stellungsind,
dassdieFeststellbremseaktiviertistundSieindie
Bedienungspositionsind.
•StellenSiesicher,dassSiebeimEinsatzdieser
Maschine,vorallembeimRückwärtsfahren,einen
gutenHalthaben.
•BerührenSiedieSchneideinheitennichtmit
HändenundFüßen.BleibenSieimmervonder
Auswurföffnungfern.
•SchauenSiehintersichundnachunten,umvor
demRückwärtsfahrensicherzustellen,dassder
Wegfreiist.
•SeienSieextremvorsichtig,wennSiesich
unübersichtlichenKurven,Sträuchern,Bäumen
•HaltenSiedieMaschinean,ziehenSieden
Zündschlüsselab,undwartenSie,bisalle
beweglichenT eilezumStillstandgekommen
sind,bevorSiedasMähwerkbzw.Anbaugerät
prüfen,wennSieeinObjektberührthabenoder
ungewöhnlicheVibrationenauftreten.FührenSie
alleerforderlichenReparaturendurch,eheSiedie
MaschinewiederinGebrauchnehmen.
•FahrenSiebeimWendenundbeimÜberqueren
vonStraßenundGehsteigenmitderMaschine
langsamundvorsichtig.GebenSieimmer
Vorfahrt.
•KuppelnSiedieSchneideinheitausundstellenSie
denMotorab,bevorSiedieSchnitthöheeinstellen
(wennSiesienichtvonderBedienerpositionaus
einstellenkönnen).
•BetreibenSiedenMotornuringutbelüfteten
Bereichen.DieAbgaseenthaltenKohlenmonoxid,
dasbeimEinatmentödlichist.
•LassenSieniemalseinelaufendeMaschine
unbeaufsichtigtzurück.
•FührenSiefolgendeSchrittevordemVerlassen
derBedienerposition(einschließlichdem
LeerendesGrasfangkorbsoderEntfernenvon
VerstopfungenimAuswurfkanal)aus:
–ParkenSiedieMaschineaufeinerebenen
Fläche.
–KuppelnSiedieZapfwelleaus.
–AktivierenSiedieFeststellbremse.
–StellenSiedenMotorabundziehenden
Zündschlüsselab.
–WartenSie,bisallebeweglichenTeilezum
Stillstandgekommensind.
•StellenSieindenfolgendenSituationendie
MaschineabundkuppelndenAntriebzur
Schneideinheitaus:
–VordemAuftanken.
–BevorSieVerstopfungenräumen.
–VordemPrüfen,ReinigenoderWartender
Schneideinheit
–NachdemKontaktmiteinemfremden
ObjektoderbeimAuftretenvonabnormalen
Vibrationen.PrüfenSiedieSchneideinheitauf
Beschädigungenundführendienotwendigen
Reparaturendurch,bevorSiedieMaschine
erneutstartenundeinsetzen
–VordemVerlassenderBedienerposition.
14

•VerwendenSiedieMaschinenichtals
Zugmaschine.
•VerwendenSienurvonTheT oro®Company
zugelassene(s)ZubehörundAnbaugeräte.
•EntfernenodermarkierenSieHindernisse,u.a.
Gräben,Löcher,Rillen,Bodenwellen,Steineoder
andereverborgeneGefahren.HohesGraskann
Hindernisseverdecken.DieMaschinekönntesich
inunebenemT errainüberschlagen.
SicherheitanHanglagen
•HanglagensindeinewesentlicheUrsachefür
denVerlustderKontrolleundUmkippunfälle,die
zuschwerenggf.tödlichenVerletzungenführen
können.SiesindfürdensicherenEinsatzan
Hanglagenverantwortlich.GehenSiebeiFahrten
anHanglagenbesondersvorsichtigvor.Vordem
EinsatzderMaschineaneinerHanglagetunSie
Folgendes:
–LesenundverstehenSiedieAnweisungenzu
HanglageninderBedienungsanleitungundan
derMaschine.
–PrüfenSiedieGeländebedingungenan
demTag,umzuermitteln,obdieMaschine
sicheraufderHanglageeingesetztwerden
kann.SetzenSieimmergesunden
Menschenverstandein,wennSiediese
Festlegungmachen.ÄnderungenimGelände,
z.B.Feuchtigkeit,könnendenBetriebder
MaschineaufeinerHanglagebeeinträchtigen.
•AnHängenimmerhorizontalfahren,nichtaufund
ab.VermeidenSiedenBetriebanübermäßig
steilenoderfeuchtenHängen.
•AchtenSieaufGefahrenuntenamHang.
SetzenSiedieMaschinenichtinderNähevon
Abhängen,Gräben,Böschungen,Gewässern
oderanderenGefahrenstellenein.DieMaschine
könnteplötzlichumkippen,wenneinRadüber
denRandfährtoderdieBöschungnachgibt.
HaltenSieeinenSicherheitsabstand(zweimaldie
BreitederMaschine)zwischenderMaschineund
jederGefahrenstelle.VerwendenSieinsolchen
BereicheneinenhandgeführtenRasenmäheroder
einandereshandgeführtesWerkzeug.
•VermeidenSiedasAnfahren,Anhaltenoder
WendenderMaschineanHanglagen.Vermeiden
SieeineplötzlicheÄnderungderGeschwindigkeit
oderRichtungundwendenSielangsamund
allmählich.
•SetzenSiedieMaschinenichtinBedingungen
ein,indenenderAntrieb,dieLenkungoder
StabilitätinFragegestelltwird.BeimEinsatzder
MaschineaufnassemGras,beimÜberquerenvon
HanglagenoderbeimFahrenhangabwärtskann
dieMaschinedieBodenhaftungverlieren.Wenn
dieAntriebsräderdieBodenhaftungverlieren,
kanndieMaschinerutschenundzueinemVerlust
derBremsleistungundLenkungführen.Die
Maschinekannrutschen,selbstwennsichdie
Antriebsrädernichtdrehen.
•GehenSiebeidemBetriebmitZubehöroder
Anbaugerätenvorsichtigvor.DieseGerätekönnen
dieStabilitätderMaschineändernundzueinem
VerlustderFahrzeugkontrolleführen.HaltenSie
dieAnweisungenfürGegengewichteein.
•WennSiedieKontrolleüberdieMaschine
verlieren,steigenSieabundverlassenSieden
Fahrbereich.
15

Betätigender
VerwendendesZapfwellen-
Feststellbremse
AktivierenSiestetsdieFeststellbremse,wennSie
dieMaschineausschaltenoderunbeaufsichtigt
lassen.PrüfenSiedieFeststellbremsevorjeder
InbetriebnahmeaufeinwandfreieFunktion.
WenndieFeststellbremsedenTraktornichtsicher
hält,mussdieseeingestelltwerdenEinstellender
Bremsen(Seite52).
ZiehenSiedenFeststellbremshebelnachhinten,um
diesezuaktivieren(Bild8).
DrückenSiedenFeststellbremshebelnachvorne,um
dieFeststellbremsezulösen.
Bild8
1.Feststellbremse:
Eingekuppelt
2.Feststellbremse:
Ausgekuppelt
antriebsschalters
MitdemZapfwellenantriebsschalterundden
FahrantriebshebelnkuppelnSiedieSchnittmesser
einundaus.
EinkuppelnderSchnittmesser
(ZWA)
g009465
g301277
Bild9
16

AuskuppelnderSchnittmesser
(ZWA)
InBild10undBild11sindzweiMethodenfürdas
AuskuppelnderSchnittmesserabgebildet.
Bild10
EinsetzendesChokes
LassenSieeinenkaltenMotormitChokean.
1.ZiehenSiedasChoke-Handradheraus,umden
Chokezuaktivieren,bevorSiedasZündschloss
verwenden(Bild13).
2.DrückenSiedasChokehandradherein,um
denChokezudeaktivieren,wennderMotor
angesprungenist(Bild13).
g301401
g031593
Bild11
Hinweis:WennSiedieMähmesserdurchdem
LoslassenderFahrantriebshebelauskuppeln,können
SiedieMesserdurchBetätigendesSchalters(Bild9)
indieEIN-Stellungwiedereinkuppeln,ohnevorher
denSchalterindieAUS-Stellungzubringen.
Einsetzender
Gasbedienung
BewegenSiedieGasbedienungzwischendie
SCHNELL-undLANGSAM-Stellung(Bild12).
BenutzenSieimmerdieSCHNELL-Stellung,wennSie
dieZapfwelleeinkuppeln.
g008959
Bild13
1.EIN-Stellung2.AUS-Stellung
Bild12
g008946
17

EinsetzenderZündung
AnlassendesMotors
Wichtig:LassenSiedenAnlasserniemalslänger
als5Sekundenlangununterbrochendrehen.
WennderMotornichtanspringt,lassenSie
denAnlasser15Sekundenzwischenweiteren
Versuchenabkühlen.DasNichtbefolgendieser
VorschriftkannzumDurchbrennendesAnlassers
führen.
Hinweis:UnterUmständenmüssenSiebeim
erstenAnlassendesMotorsnacheinemAbstellen
aufgrundvonKraftstoffmangelmehrereStartversuche
unternehmen.
Bild14
Wichtig:LassenSiedenAnlasserniemalslänger
als5Sekundenlangununterbrochendrehen.
WennderMotornichtanspringt,lassenSie
denAnlasser15Sekundenzwischenweiteren
Versuchenabkühlen.DasNichtbefolgendieser
VorschriftkannzumDurchbrennendesAnlassers
führen.
Hinweis:UnterUmständenmüssenSiebeim
erstenAnlassendesMotorsnacheinemAbstellen
aufgrundvonKraftstoffmangelmehrereStartversuche
unternehmen.
g031239
Bild15
g031281
g339443
Bild16
18

AbstellendesMotors
EinsetzenderPlattform
ACHTUNG
KinderundUnbeteiligtekönnenverletzt
werden,wennSiedieunbeaufsichtigt
zurückgelasseneMaschinebewegenoder
einsetzen.
ZiehenSieimmerdenSchlüsselabund
aktivierenSiedieFeststellbremse,wennSie
denBedienersitzverlassen.
LassenSiedenMotorfür60Sekundenimlangsamen
Leerlauf(Schildkröte)laufen,bevorSieden
ZündschlüsselindieAUS-Stellungdrehen.
DieMaschinekannbeiangehobeneroder
abgesenkterPlattformeingesetztwerden.Die
PositionderPlattformhängtvomBedienerab.
WARNUNG:
DiePlattformistschwerundkann
beimAnhebenoderAbsenkenVerletzungen
verursachen.HebenSiedieBedienerplattform
vorsichtiganodersenkensieab,daSie
beieinemplötzlichenFallenlassenverletzt
werdenkönnten.
•SteckenSiedieHändeoderFingernichtin
denPlattformgelenkbereich,wennSiedie
Bedienerplattformanhebenoderabsenken.
•StellenSiesicher,dassdiePlattform
abgestütztist,wennSiedenArretierbolzen
herausziehen.
•StellenSiesicher,dassderRiegel
diePlattformbefestigt,wennSiesie
hochklappen.DrückenSiesieenggegen
dasKissen,damitderArretierbolzen
einrastenkann.
Bild17
Wichtig:StellenSiesicher,dassder
KraftstoffhahnvordemTransportoderEinlagern
derMaschinegeschlossenist,sonstkann
Kraftstoffauslaufen.ZiehenSievordem
EinlagernderMaschinedieKerzensteckerab,
umeinemversehentlichenAnlassendesMotors
vorzubeugen.
•HaltenSieUnbeteiligtevonderMaschine
fern,wennSiediePlattformabsenken.
EinsetzenderMaschinemit
angehobenerPlattform
VerwendenSiedieMaschinemitangehobener
PlattforminfolgendenSituationen:
•EinsatzderMaschineinderNähevon
Abladestellen
•EinsatzderMaschineinkleinenBereichen,für
welchedieMaschinezugroßist
g301288
•BereichemittiefhängendenÄstenoder
Hindernissen
•VerladenderMaschinefürdenTransport
•HinauffahrenvonHanglagen
ZumAnhebenderPlattformziehenSiedasHeckder
Plattformhoch,damitderSperrstiftunddasHandrad
einrasten.DrückenSiesieenggegendasKissen,
damitderSperrstifteinrastenkann.
EinsetzenderMaschinemit
abgesenkterPlattform
VerwendenSiedieMaschinemitabgesenkter
PlattforminfolgendenSituationen:
•EinsatzderMaschineindenmeistenBereichen
19

•ÜberquerenvonHanglagen
•HinunterfahrenvonHanglagen
ZumAbsenkenderPlattformdrückenSiediePlattform
nachvornegegendasKissen,umdenDruckaufden
ArretierbolzenzulösenundziehendanndasHandrad
herausundsenkendiePlattformab(Bild18).
Vorwärtsfahren
1.LösenSiedieFeststellbremse,sieheBetätigen
derFeststellbremse(Seite16).
2.StellenSiedieFahrantriebshebelindiemittlere,
nichtarretierteStellung.
Bild18
1.AngehobenePlattform3.ZiehenSiedasHandrad
heraus,umdiePlattform
zulösen.
2.AbgesenktePlattform
Vorwärts-und
Rückwärtsfahren
SiekönnendieMotordrehzahlmitdem
Gasbedienungshebeleinstellen,dieinU/min
(UmdrehungenproMinute)gemessenwird.Stellen
SiedenGasbedienungshebelfürdieoptimale
LeistungindieSCHNELL-Stellung.
Wichtig:FahrenSiemitderMaschinerückwärts
überBordsteine,miteinemRadnachdem
anderen,dadieMaschinebeschädigtwerden
kann,wennSieBordsteinevorwärtsüberfahren.
g030983
Bild19
g031026
1.VordererAnschlagbügel
2.LinkerSteuerhebel5.RechterSteuerhebel
3.HintererAnschlagbügel
4.RechterSteuerhebel
inderARRETIERTEN
NEUTRAL-Stellung
6.LinkerSteuerhebel
inderARRETIERTEN
NEUTRAL-Stellung
3.SchiebenSiedieFahrantriebshebellangsam
nachvorne(Bild20).
Hinweis:DerMotorstelltab,wennSie
einenFahrantriebshebelbeiaktivierter
Feststellbremsebewegen.
Hinweis:JemehrSiedieFahrantriebshebelin
eineRichtungbewegen,destoschnellerfährt
dieMaschineindieserRichtung.
Hinweis:ZiehenSiedieFahrantriebshebel
zumAnhaltenaufdieNEUTRAL-Stellungzurück.
ACHTUNG
DieMaschinekannsichschnelldrehenund
Sieverlierenggf.dieKontrolleüberdie
MaschineundkönnenVerletzungenerleiden
oderdieMaschinebeschädigen.
ReduzierenSievorscharfenWendungendie
Geschwindigkeit.
20

Bild20
EinstellenderSchnitthöhe
DieSchnitthöhelässtsichin6mmSchrittenvon
38mmbis127mmeinstellen.
Hinweis:WennSieeineSchnitthöheunter51mm
verwenden,wirdderMähwerkriemenstärker
abgenutzt.VerwendenSiefallsmöglicheine
Schnitthöheüber51mm.
g273674
Rückwärtsfahren
1.StellenSiebeideFahrantriebshebelindie
mittlere,nichtarretierteStellung.
2.ZiehenSiedieFahrantriebshebellangsamnach
hinten(Bild21).
Bild21
g273673
g267253
Bild22
21

VerwendenvonBallast
•MontierenSieBallast,umdieAuswuchtungzu
verbessern.SiekönnenBallastfüreineoptimierte
LeistunginverschiedenenBetriebsbedingungen
undnachihrenWünschenhinzufügenoder
entfernen.
•FügenSiejeweilseinenBallasthinzuoder
entfernenihn,bisSiediegewünschte
HandhabungundAuswuchtungerzielthaben.
•DieempfohlenenGewichtendenSieinder
BedienungsanleitungderAnbaugeräte.
Hinweis:SiekönnenBallastbeimofziellen
Vertragshändlerbestellen.
WARNUNG:
SogroßeGewichtsänderungenkönnensich
aufdieHandhabungunddenBetriebder
Maschineauswirken.DieskannSieund
Unbeteiligteschwerverletzen.
•NehmenSieimmernurgeringe
Gewichtsveränderungenvor.
NachdemEinsatz
HinweisezurSicherheit
nachdemBetrieb
AllgemeineSicherheit
•StellenSieimmerdenMaschineab,ziehen
SiedenZündschlüsselab,wartenSie,bisalle
beweglichenT eilezumStillstandgekommensind,
undlassenSiedieMaschineabkühlen,bevorSie
sieeinstellen,warten,reinigen,odereinlagern.
•EntfernenSieGrasundSchmutzvonden
Mähwerken,denAuspuffenunddemMotorraum,
umeinemBrandvorzubeugen.WischenSieÖlundKraftstoffverschüttungenauf.
•SchließenSiedenKraftstoffhahn,bevorSiedie
Maschineeinlagernodertransportieren.
•SchaltenSiedenZapfwellenschalteraus,wenn
SiedieMaschinetransportierenodernicht
benutzen.
•PrüfenSiedieMaschinenachjeder
Gewichtsänderung,umsicherzustellen,
dassdieMaschinesicherbetriebenwerden
kann.
•LagernSiedieMaschineoderdenBenzinkanister
nieanOrtenmitoffenerFlamme,Funkenoder
Zündamme,z.B.Warmwasserbereiter,oder
andereGeräte.
•VerwendenSiedurchgehendenRampenfürdas
VerladenderMaschineaufeinenAnhängeroder
Pritschenwagen.
•VergurtenSiedieMaschinemitRiemen,Ketten,
KabeloderSeilen.Dievorderenundhinteren
Gurtesolltennachuntenundaußerhalbder
Maschineverlaufen.
22

Verwendendes
SchiebenderMaschineper
Kraftstoffhahns
SchließenSiedenKraftstoffhahnvordemTransport,
derWartungoderderEinlagerung(Bild23).
StellenSiesicher,dassderKraftstoffhahngeöffnet
ist,wennSiedenMotoranlassen.
Hand
DieSicherheitsventileermöglichen,dassSiedie
MaschinebeiabgestelltemMotormitderHand
schiebenkönnen.
Wichtig:SchiebenSiedieMaschineimmernur
mitderHand.SchleppenSiedieMaschinenie
ab,sonstkanneszuSchädenanHydraulikteilen
kommen.
Wichtig:DieMaschinedarfbeigeöffneten
Sicherheitsventilennichtgestartetodereingesetzt
werden.SonstkönntedasSystembeschädigt
werden.
g273676
Bild23
1.EIN-Stellung2.AUS-Stellung
g031238
g301290
Bild24
23

Transportierender
Maschine
VerwendenSieeinenrobustenAnhängeroder
PritschenwagenzumTransportierenderMaschine.
VerwendenSieeinedurchgehendeRampe.Stellen
Siesicher,dassderAnhängeroderLastwagenmit
dengesetzlicherforderlichenBremsen,Beleuchtung
undKennzeichnungenausgestattetist.Bittelesen
SiealleSicherheitsanweisungensorgfältig.Durch
KenntnisdieserInformationenkönnenSiesichund
UnbeteiligtevorVerletzungenschützen.Ziehen
SieinBezugaufAnforderungenfürAnhängerund
BefestigungengeltendeVorschriftenzurate.
WARNUNG:
DasFahrenaufStraßenundWegen
ohneBlinker,Lampen,Reektorenoder
einenAufkleberfürlangsameFahrzeuge
istgefährlichundkannzuUnfällenmit
Verletzungsgefahrführen.
FahrenSiedieMaschinenichtaufeiner
öffentlichenStraßeodereinemöffentlichen
Fahrweg.
AuswahleinesAnhängers
WARNUNG:
DasLadeneinerMaschineaufeinen
AnhängerodereinenLastwagenerhöhtdie
Umkippgefahrundkönnteschwereoder
tödlicheVerletzungenverursachen(Bild25).
•VerwendenSienureineeinzigeRampe
überdieganzeBreite,keineeinzelnen
RampenfürjedeMaschinenseite.
•StellenSiesicher,dassdieRampe
mindestensviermallängeristals
derAbstanddesAnhängersoder
PritschenwagensvomBoden.
Bild25
1.Rampeüberdieganze
BreiteinLagerstellung
2.Rampeistmindestens
viermallängeralsder
AbstanddesAnhängers
oderPritschenwagens
vomBoden.
3.H=HöhedesAnhängers
oderderAnhängerpritsche
zumBoden
4.Anhänger
LadenderMaschine
WARNUNG:
DasLadeneinerMaschineaufeinen
AnhängerodereinenLastwagenerhöht
dieUmkippgefahrundkannschwereoder
tödlicheVerletzungenverursachen.
•PassenSiebesondersbeimBedienender
MaschineaufeinerRampeauf.
•FahrenSiedieMaschineimmerrückwärts
eineRampehochundvorwärtsvonihr
herunterfahren.
•VermeidenSieplötzliche
Geschwindigkeitsänderungbeim
FahrenderMaschineaufeinerRampe,
daSiedadurchdieKontrolleverlieren
könntenundUmkippgefahrbesteht.
g229507
1.BeiderVerwendungeinesAnhängersdiesen
andasZugfahrzeuganhängenunddie
Sicherheitskettenverbinden.
2.FallszutreffenddieAnhängerbremsenund
Lichteranschließen.
3.SenkenSiedieRampe(Bild25).
4.KlappenSiediePlattformhoch.
24

Wichtig:HaltenSiediePlattformbeimBe-
undEntladenderMaschineangehoben.
5.FahrenSiedieMaschinerückwärtsdieRampe
hoch(Bild26).
Bild26
g031405
1.FahrenSiedieMaschine
rückwärtsdieRampe
hoch.
2.FahrenSiedieMaschine
vorwärtsvonderRampe
herunter.
6.StellenSiedenMotorab,ziehendenSchlüssel
abundaktivierendieFeststellbremse.
7.VergurtenSiedieMaschineinderNäheder
vorderenLaufräderundderhinterenStoßstange
mitRiemen,Ketten,KabelnoderSeilen(Bild
27).ZiehenSieinBezugaufAnforderungenfür
BefestigungengeltendeVorschriftenzurate.
g273707
Bild27
1.Vergurtungsstellen
25

Wartung
Hinweis:BestimmenSiedielinkeundrechteSeitederMaschineanhandderüblichenEinsatzposition.
ACHTUNG
WennSiedenZündschlüsselimZündschlosssteckenlassen,könnteeineanderePersonden
Motorversehentlichanlassen,undSieundUnbeteiligteschwerverletzen.
ZiehenSiedenZündschlüsselausdemZündschloss,bevorSieWartungsarbeitendurchführen.
Wartungssicherheit
•FührenSiefolgendeSchrittevordemEinstellen,
Reinigen,WartenoderVerlassenderMaschine
aus:
–ParkenSiedieMaschineaufeinerebenen
Fläche.
–KuppelnSiedieAntriebeaus.
–AktivierenSiedieFeststellbremse.
–StellenSiedenMotorabundziehenden
Zündschlüsselab.
–WartenSie,bisallebeweglichenTeilezum
Stillstandgekommensind.
–LassenSiealleMaschinenteileabkühlen,ehe
SiemitWartungsarbeitenbeginnen.
•DieMaschinesolltenievonungeschulten
Personengewartetwerden.
•HaltenSieIhreHändeundFüßevonden
beweglichenTeilenfern.BeilaufendemMotor
solltenkeineEinstellungsarbeitenvorgenommen
werden.
•LassenSiedenDruckausMaschinenteilenmit
gespeicherterEnergievorsichtigab.
•PrüfenSiedieFunktionderFeststellbremse
häug.StellenSiedieBremsenbeiBedarfein
oderwartensiediese.
•ModizierenSieaufkeinenFalldie
Sicherheitsvorkehrungen.PrüfenSiesie
regelmäßigaufihreeinwandfreieFunktion.
•EntfernenSieGrasundSchmutzvomMähwerk,
Antrieben,AuspuffundMotor,umeinem
Brandvorzubeugen.WischenSieÖl-und
Kraftstoffverschüttungenauf.
•ÜberprüfenSiedieKomponentendes
FangsystemsregelmäßigundtauschenSiesie
aus,wennsieabgenutztoderbeschädigtsind.
•StützenSiedieMaschinenichtmiteinem
Hydrauliksystemab,sondernverwendenSieeinen
Wagenheber,wennSiedieMaschineanheben.
•HaltenSiealleT eileingutemBetriebszustandund
alleHydraulik-Anschlussstückefestangezogen.
ErsetzenSiealleabgenutztenoderfehlenden
TeileundAufkleber.HaltenSiealleBefestigungen
festangezogen,damitdieMaschineineinem
sicherenBetriebszustandbleibt.
•VerwendenSienurOriginalersatzteileund
-zubehörteilevonT oro,umdieoptimaleLeistung
undSicherheitzugewährleisten.Ersatzteileund
ZubehörandererHerstellerkönnengefährlich
seinundeineVerwendungkönntedieGarantie
ungültigmachen.
EmpfohlenerWartungsplan
NachachtBetriebsstunden
Nach50Betriebsstunden
Nach100Betriebsstunden
BeijederVerwendung
Wartungsintervall
odertäglich
Wartungsmaßnahmen
•WechselnSiedasMotoröl.
•PrüfenSiedenStanddesHydrauliköls.
•WechselnSiedieHydrauliklterunddas-öl.
•PrüfenSiedieRadmuttern.
•PrüfenSiedieSicherheitsschalter.
•PrüfenSiedenÖlstandimMotor.
•ReinigenSiedasLuftansauggitter(häugerunterschmutzigenoderstaubigen
Bedingungen).
•ReinigenSiedieGetriebegebläseundSchutzvorrichtungen.
•ÜberprüfenSiedieFeststellbremse.
•PrüfenSiedieMesser.
•ReinigenderMähwerkunterseite.
•ReinigenSiedieHinterradmotoren.
26

Wartungsintervall
Alle50Betriebsstunden
Alle100Betriebsstunden
Wartungsmaßnahmen
•PrüfenSiedenFunkenfänger(fallsvorhanden).
•PrüfendesReifendrucks.
•PrüfenSiedenStanddesHydrauliköls.
•WechselnSiedasMotoröl.
•Prüfen,reinigenundstellenSiedenAbstandanderZündkerzeein.
•PrüfenSiedenZustandderBatterie.
•PrüfenSiedieKupplung.
•ÜberprüfenundreinigenSiedieKühlrippenundAbdeckungendesMotors(häuger
unterschmutzigenoderstaubigenBedingungen).
•PrüfenSieden/dieMähwerkriemen.
Alle200Betriebsstunden
Alle250Betriebsstunden
Alle300Betriebsstunden
Alle500Betriebsstunden
Alle800Betriebsstunden
Alle1000Betriebsstunden
VorderEinlagerung
Jährlich
•WechselnSiedenMotoröllter.
•WechselnSiedenprimärenLuftlteraus(häugerunterschmutzigenoder
staubigenBedingungen).
•ÜberprüfenSiedeninnerenLuftlter(häugerunterschmutzigenoderstaubigen
Bedingungen).
•PrüfenSiedenVentilabstandundstellenihnein.WendenSiesichanden
Toro-Vertragshändler.
•WechselnSiedeninnerenLuftlter(häugerunterschmutzigenoderstaubigen
Bedingungen).
•AnpassungdesLaufradschwenkarm-Lagers.
•WechselnSiedieHydrauliklterunddas-öl.
•T auschenSiedenKraftstofflteraus.
•T auschenSiedenFahrantriebsriemenaus.
•BessernSieabgeblätterteLackächenaus.
•FührenSievoreinerEinlagerungalleobenaufgeführtenWartungsschrittedurch.
•BessernSieabgeblätterteLackächenaus.
•FührenSievoreinerEinlagerungalleobenaufgeführtenWartungsschrittedurch.
•SchmierenSiedievorderenLaufradgelenkeein(häugerinschmutzigenoder
staubigenBedingungen).
•FettenSiedieLaufradnabenein.
•FettenSiedenFahrantriebein.
•TragenSiekorrosionshemmendesSchmiermittelaufdieFederköpfeauf.
Wichtig:WeitereInformationenzuWartungsarbeitenndenSieinderMotorbedienungsanleitung.
27

Verfahrenvordem
ÖffnendesMotorschutzes
Ausführenvon
Wartungsarbeiten
EntfernenSiedasKissen,
umZugangzumHeckzu
haben
DasKissenkannentferntwerden,umZugang
zumHeckderMaschinefürWartungsarbeitenoder
Einstellungenzuermöglichen.
1.SenkenSiediePlattformab.
2.LösenSiedieKnebelschalteranjederSeiteder
Maschine(Bild28).
undSchutzerweiterung
1.EntfernenSiedieSchraubeunddie
Ansatzmutter,diedenMotorschutzander
Schutzverlängerungbefestigen(Bild29).
g279539
Bild29
Bild28
1.Knebelschalter2.Kissen
3.EntfernenSiedasKissenundsenkendie
Plattformab.
4.FührenSiedieWartungsarbeitenoder
EinstellungenanderMaschinedurch.
5.HebenSiedasKissenanundschiebenesan
beidenSeitenderMaschineaufdieSplints.
6.ZiehenSiedieKnebelschalteran.
1.Schraubeund
Ansatzmutter
g032556
2.DrehenSiedenMotorschutznachvorne,wie
inBild30dargestellt.
2.Motorschutzvorrichtung
g279542
Bild30
28

3.EntfernenSiediebeidenSchrauben(5/16“x1“)
unddieRiemenschutzvorrichtung(Bild31).
Bild31
Schließendes
Motorschutzesundder
Schutzverlängerung
1.MontierenSiediehintereSchutzverlängerung,
wieinBild32dargestellt.ZiehenSiedieMutter
aufeinDrehmomentvon20-24Nman.
2.MontierenSiedieRiemenabdeckung,wieinBild
31dargestellt.ZiehenSiedieSchraubenmit
20-24N∙man.
3.DrehenSiedenMotorschutznachhinten,wie
inBild33dargestellt.
g279540
1.Schraube—5/16"x1“(2)
2.Riemenschutzvorrichtung
4.EntfernenSiedieSechskantmutter(5/16“),
mitderdieSchutzverlängerunganden
Schlossschraubenbefestigtist(Bild32).
EntfernenSiedieSchutzverlängerung.
Bild32
1.Sechskantmutter(5/16")3.Mutter(5/16")
2.Schutzverlängerung4.Schlossschraube
(5/16"x4")
g279543
Bild33
4.BefestigenSiedenMotorschutzmitder
g279541
SchraubeundderAnsatzmutterander
Schutzverlängerung,wieinBild29dargestellt.
29

Entfernenderlinken
Riemenabdeckung
1.EntfernenSiediebeidenBundkopfschrauben,
mitdenendieSpannerabdeckunganderlinken
Riemenabdeckungbefestigtist,undentfernen
SiedieSpannerabdeckung(Bild34).
denendielinkeCE-Abdeckunganderlinken
Riemenabdeckungbefestigtist(Bild36).
g270474
Bild36
Bild34
1.Bundkopfschrauben
(¼"x⅝")
2.Spannerabdeckung
3.LinkeRiemenabdeckung
2.EntfernenSiedieSchraube,mitderdie
FlanschverbindungenderRiemenabdeckung
befestigtsind,wieinBild35dargestellt.
1.Schlossschraube
2.LinkeCE-Abdeckung4.Sicherungsbundmutter
g270487
4.EntfernenSiediedreiSchrauben,mitdenendie
linkeRiemenabdeckungamMähwerkbefestigt
3.LinkeRiemenabdeckung
ist,undnehmenSiedieseab(Bild37).
Bild35
1.RechteRiemenabdeckung
2.Flanschverbindung(linke
Riemenabdeckung)
3.Bundkopfschraube
3.EntfernenSiediebeidenSchlossschrauben
unddiebeidenSicherungsmuttern,mit
(linkeundrechte
Riemenabdeckung)
g270486
g270488
Bild37
1.Schrauben
2.LinkeRiemenabdeckung
30

Entfernenderrechten
Riemenabdeckung
1.EntfernenSiediebeidenSchlossschrauben
unddiebeidenSicherungsmuttern,mitdenen
dielinkeCE-Abdeckunganderrechten
Riemenabdeckungbefestigtist(Bild38).
Bild38
g270475
1.Sicherungsbundmutter3.RechteCE-Abdeckung.
2.RechteRiemenabdeckung
4.Schlossschraube
2.EntfernenSiediebeidenSchraubenund
Bundkopfschrauben,mitdenendierechte
RiemenabdeckungamMähwerkbefestigtist,
undnehmenSiedieseab(Bild39).
1.RechteRiemenabdeckung3.Mähwerk
2.Schraube
g270489
Bild39
4.Bundbolzen
31

Installierenderrechten
Riemenabdeckung
1.MontierenSiedierechteRiemenabdeckungmit
denbeidenSchrauben,dieSieinEntfernender
linkenRiemenabdeckung(Seite30)entfernt
haben,andasMähwerk(Bild40).
2.MontierenSiedierechteSeitederCE-AbdeckunganderrechtenRiemenabdeckung(Bild
41)mitdenbeidenSchlossschraubenundden
beidenSicherungsmuttern,dieSieinEntfernen
derlinkenRiemenabdeckung(Seite30)entfernt
haben.
Bild41
1.Sicherungsbundmutter3.RechteCE-Abdeckung.
2.RechteRiemenabdeckung
4.Schlossschraube
g270475
1.RechteRiemenabdeckung3.Mähwerk
2.Schraube
g270504
Bild40
4.Bundbolzen
32

Installierenderlinken
Riemenabdeckung
1.MontierenSiedielinkeRiemenabdeckungmit
dendreiSchrauben,dieSieinEntfernender
linkenRiemenabdeckung(Seite30)entfernt
haben,andasMähwerk(Bild42).
g270474
Bild43
Bild42
1.Schrauben
2.LinkeRiemenabdeckung
2.MontierenSiedielinkeSeitederCE-Abdeckung
anderlinkenRiemenabdeckung(Bild43)mit
denbeidenSchlossschraubenunddenbeiden
Sicherungsmuttern,dieSieinEntfernender
linkenRiemenabdeckung(Seite30)entfernt
haben.
1.Schlossschraube
2.LinkeCE-Abdeckung4.Sicherungsbundmutter
3.LinkeRiemenabdeckung
3.BefestigenSiedieFlanschverbindungender
RiemenabdeckungmitderBundkopfschraube
(Bild44),dieSieinEntfernenderlinken
Riemenabdeckung(Seite30)entfernthaben.
g270503
g270486
Bild44
1.RechteRiemenabdeckung
2.Flanschverbindung(linke
Riemenabdeckung)
3.Bundkopfschraube
(linkeundrechte
Riemenabdeckung)
4.MontierenSiedieSpannerabdeckungan
derlinkenRiemenabdeckungmitdenbeiden
Bundkopfschrauben,dieSieinEntfernender
linkenRiemenabdeckung(Seite30)entfernt
haben,wieinBild45dargestellt.
33

Schmierung
EinfettenderMaschine
FettenSiemitNr.2FettaufLithium-oder
Molybdänbasisein.
1.KuppelnSiedieZapfwelleausundaktivieren
SiedieFeststellbremse.
2.StellenSievordemVerlassender
BedienungspositiondenMotorab,ziehenSie
denSchlüsselabundwartenSie,bisalle
g270487
Bild45
1.Bundkopfschrauben
(¼"x⅝")
2.Spannerabdeckung
3.LinkeRiemenabdeckung
beweglichenTeilezumStillstandgekommen
sind.
3.ReinigenSiedieSchmiernippelmiteinem
Lappen.
Hinweis:KratzenSiebeiBedarfFarbevorne
vondenNippelnab.
4.BringenSiedieFettpresseamNippelan.
5.FettenSiedieSchmiernippelein,bisdasFett
beginnt,ausdenLagernauszutreten.
6.WischenSieüberüssigesFettab.
EinfettenderDrehspannscheibe
Wichtig:VerwendenSienurHochtemperaturfett.
VerwendenSiekeinAllzweckfett.
1.ÖffnendesMotorschutzes,sieheÖffnendes
MotorschutzesundSchutzerweiterung(Seite
28).
2.EntfernenSiedielinkeRiemenabdeckung,
sieheEntfernenderlinkenRiemenabdeckung
(Seite30).
3.FettenSiedieDrehspannscheibeamMähwerk
mitHochtemperaturfettamSchmiernippelein,
wieinBild46abgebildet.
34
 Loading...