

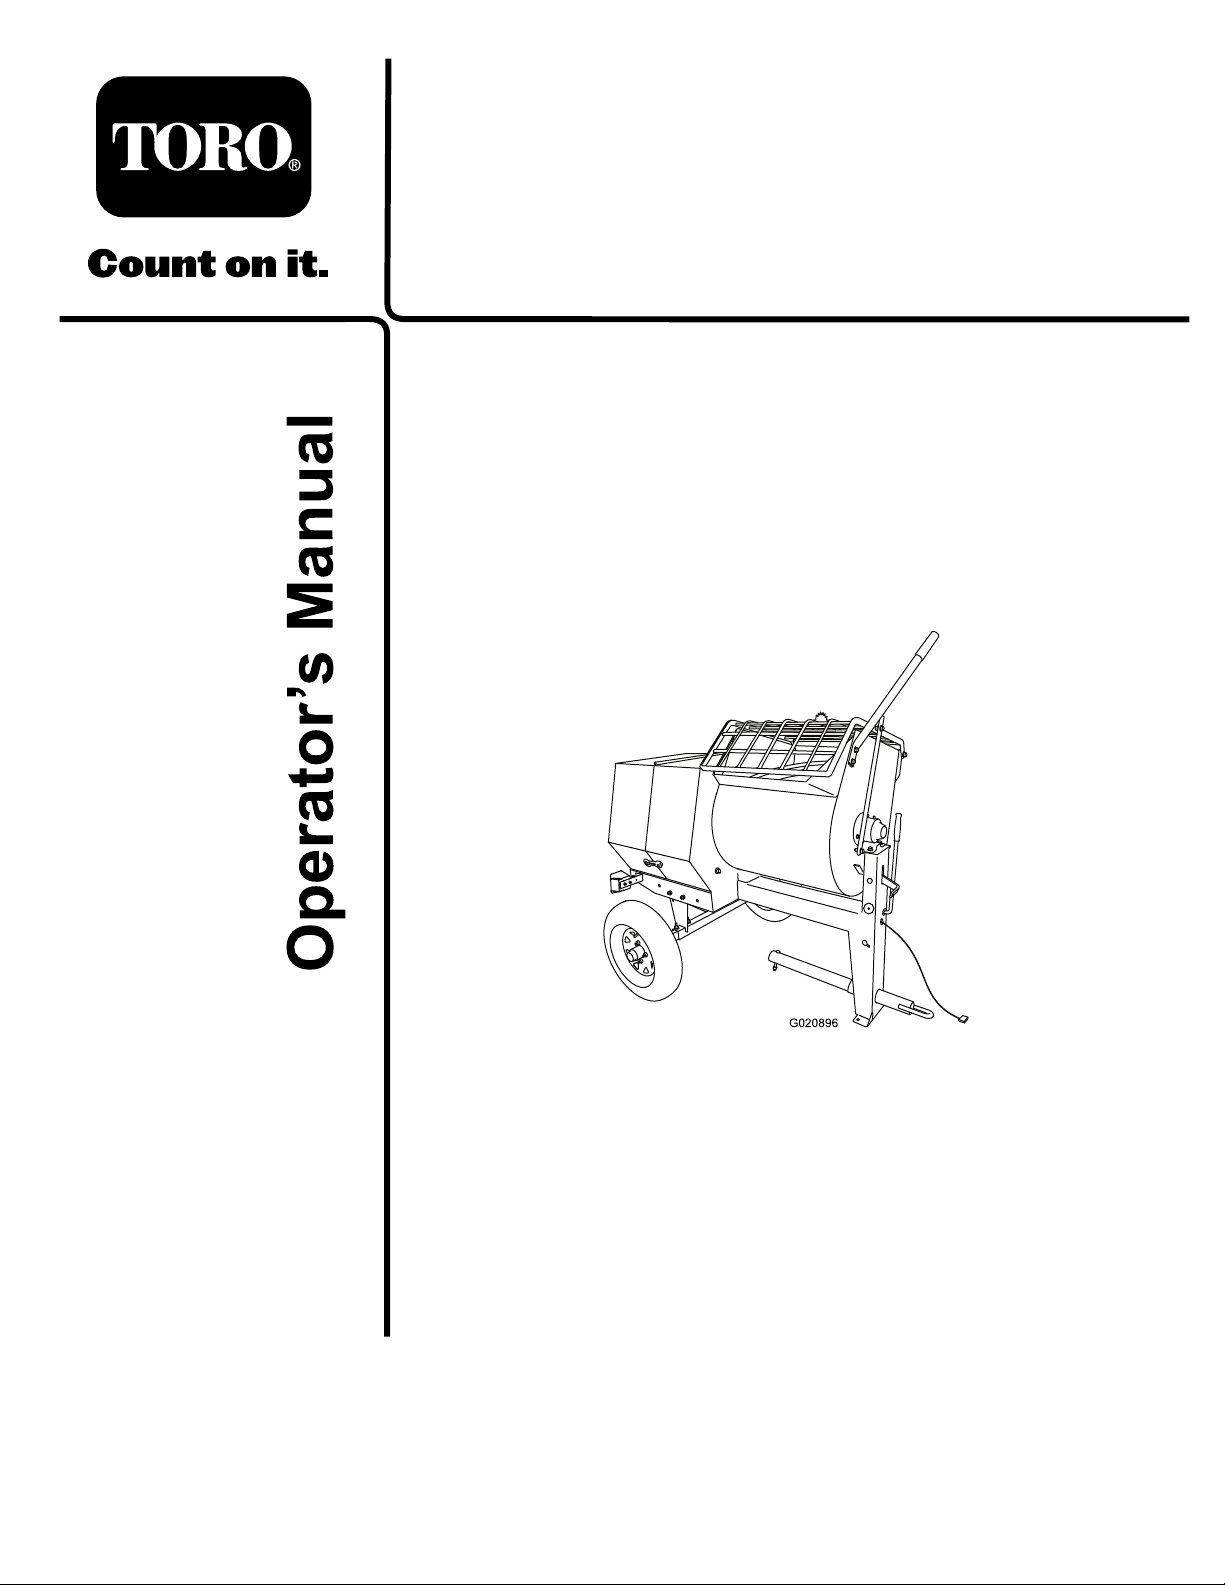
Toro 68012C, 68018C, 68019C Operator's Manual
FormNo.3390-595RevA
G020896
MM-650E-SandMM-850E-S
MortarMixer
ModelNo.68012C—SerialNo.315000001andUp
ModelNo.68018C—SerialNo.315000001andUp
ModelNo.68019C—SerialNo.315000001andUp
Registeratwww.T oro.com.
OriginalInstructions(EN)
*3390-595*A
WARNING
1
G020900
2
CALIFORNIA
Proposition65Warning
Thisproductcontainsachemicalorchemicals
knowntotheStateofCaliforniatocausecancer,
birthdefects,orreproductiveharm.
Useofthisproductmaycauseexposureto
chemicalsknowntotheStateofCalifornia
tocausecancer,birthdefects,orother
reproductiveharm.
Ifyoubelievethatyourmachinehasadefectwhichcould
causeacrashorcouldcauseinjuryordeath,youshould
immediatelyinformtheNationalHighwayTrafcSafety
Administration(NHTSA)ifyouliveintheUnitedStates,
orTransportCanadaifyouliveinCanada,inadditionto
notifyingTheToroCompany.
IfNHTSAorTransportCanadareceivessimilarcomplaints,
itmayopenaninvestigation,andifitndsthatasafetydefect
existsinagroupofmachines,itmayorderarecallandremedy
campaign.However,NHTSAorTransportCanadacannot
becomeinvolvedinindividualproblemsbetweenyou,your
dealer,orTheToroCompany.
YoumaycontactT orodirectlyatwww .Toro.comforproduct
andaccessoryinformation,helpndingadealer,ortoregister
yourproduct.
Wheneveryouneedservice,genuineT oroparts,oradditional
information,contactanAuthorizedServiceDealerorToro
CustomerServiceandhavethemodelandserialnumbersof
yourproductready .Writethenumbersinthespaceprovided.
•TocontactNHTSA,youmaycalltheV ehicle
SafetyHotlinetoll-freeat1-888-327-4236(TTY:
1-800-424-9153);gotohttp://www.safercar.gov;orwrite
to:Administrator,NHTSA,1200NewJerseyAvenue,
SEWestBuilding,Washington,DC20590.Youcanalso
obtainotherinformationaboutmotorvehiclesafetyfrom
http://www.safercar.gov.
•TocontactTransportCanada,youmaycall
1-800-333-0510or(819)994-3328;goto
http://www.tc.gc.ca/roadsafety/;writeto:Road
SafetyandMotorVehicleRegulationDirectorate,
TransportCanada,TowerC,PlacedeVille,330
SparksStreet,Ottawa,Ontario,K1A0N5;oremail
RoadSafety@tc.gc.ca.
Introduction
Thismachineisdesignedtomixmortar,plaster,reproong
material,grout,andothersmall-grainedcementproducts.A
vehicleequippedwithanappropriatepintlehitchorballhitch
cantowthemachine..
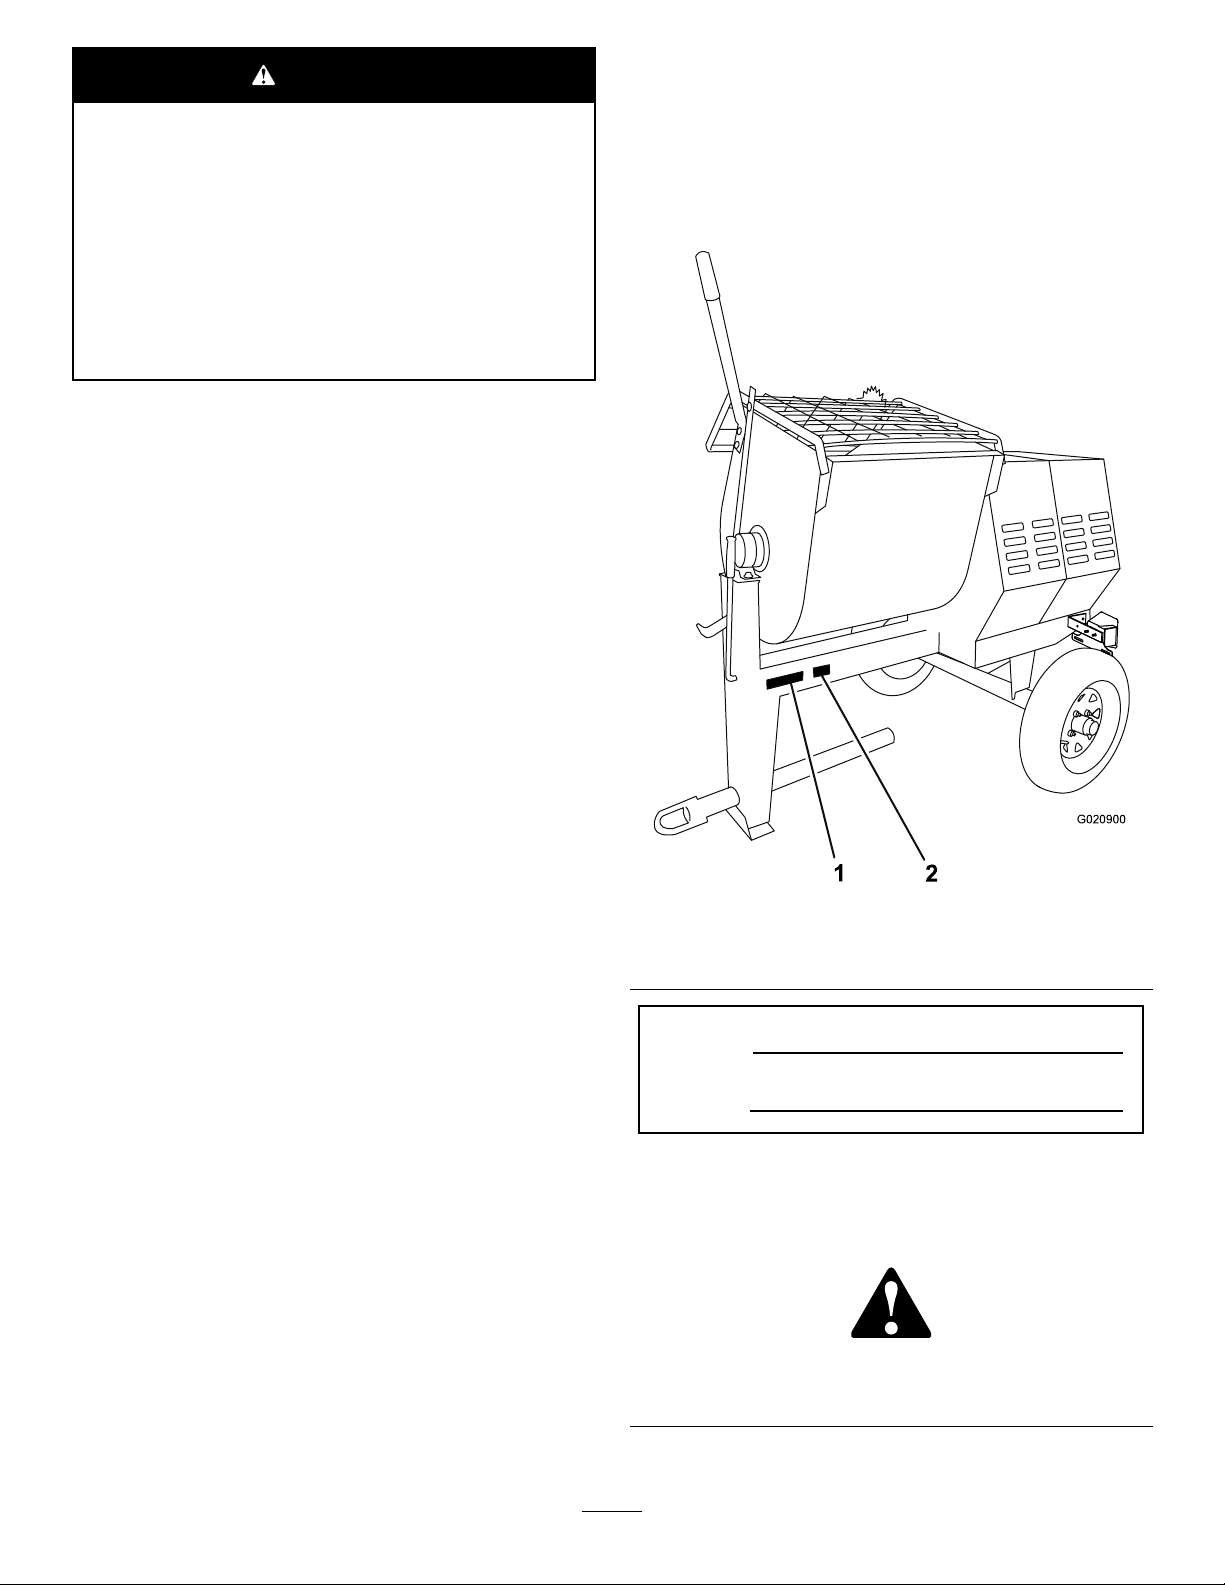
Figure1
1.Modelandserialnumber
location
ModelNo.
SerialNo.
2.Vehicleidentication
number(VIN)location
Thismanualidentiespotentialhazardsandhassafety
messagesidentiedbythesafetyalertsymbol(Figure2),
whichsignalsahazardthatmaycauseseriousinjuryordeath
ifyoudonotfollowtherecommendedprecautions.
Readthisinformationcarefullytolearnhowtooperateand
maintainyourproductproperlyandtoavoidinjuryand
productdamage.Youareresponsibleforoperatingthe
productproperlyandsafely.
©2014—TheToro®Company
8111LyndaleAvenueSouth
Bloomington,MN55420
2
Figure2
1.Safetyalertsymbol
Contactusatwww.Toro.com.
PrintedintheUSA
AllRightsReserved

Thismanualuses2wordstohighlightinformation.
Importantcallsattentiontospecialmechanicalinformation
andNoteemphasizesgeneralinformationworthyofspecial
attention.
TheDOTtireinformationislocatedonthesideofeachtire.
Thisinformationgivesloadandspeedratings.Replacement
tiresshouldhavethesameorbetterratings.
Note:Thevariousmachinesinthismanualhavedifferent
weights;refertoSpecications(page13)toensurethatthe
tiresonyourmachinemeetorexceedtheweightrequirements
ofyourmachine.
Contents
Safety...........................................................................4
SafeOperatingPractices...........................................4
SafetyandInstructionalDecals.................................7
Setup............................................................................8
1InstallingtheDumpHandle...................................8
2InstallingtheTowPole..........................................9
3InstallingtheSafetyChain......................................9
4InstallingtheLightAssembly.................................10
ProductOverview.........................................................12
Controls...............................................................12
Specications........................................................13
Operation....................................................................14
PreparingtoT owtheMachine..................................14
ExtendingtheAxle.................................................17
TowingtheMachine...............................................18
PreparingtoUsetheMachine...................................18
OpeningandClosingtheCowl.................................19
PoweringtheMachine.............................................19
StartingandStoppingtheMotor...............................20
ControllingthePaddles...........................................20
MixingtheMaterial.................................................21
UsingtheDrum.....................................................22
AdjustingthePaddleBlades.....................................22
Maintenance.................................................................24
RecommendedMaintenanceSchedule(s)......................24
PremaintenanceProcedures........................................24
PreparingtheMachineforMaintenance.....................24
RemovingandInstallingtheDividerPlate..................24
Lubrication...............................................................25
LubricatingtheBearingsandSeals............................25
LubricatingtheMotorBearings................................26
LubricatingtheDriveChain.....................................26
BeltMaintenance......................................................27
ServicingtheBelts..................................................27
ReplacingtheBelts.................................................28
AligningthePulleys................................................29
DriveChainMaintenance............................................30
CheckingandAdjustingtheDriveChain....................30
ReplacingtheLightBulbs............................................31
ReplacingtheRear-facingBulbs................................31
ReplacingtheSide-facingBulbs................................31
Cleaning...................................................................32
CleaningtheMachine..............................................32
Storage........................................................................33
StoringtheMachine................................................33
Troubleshooting...........................................................34
Schematics...................................................................35
3

Safety
Improperlyusingormaintainingthemachinecanresult
ininjury.Toreducethepotentialforinjury,complywith
thesesafetyinstructionsandalwayspayattentiontothe
safetyalertsymbol,whichmeans:
or
Danger
complywiththeinstructionmayresultinpersonalinjury
ordeath.
—personalsafetyinstruction.Failureto
SafeOperatingPractices
Thisproductiscapableofamputatinghands.Alwaysfollow
allsafetyinstructionstoavoidseriousinjuryordeath.
WARNING
Machiningorhandlingstone,masonry,concrete,
metal,andothermaterialscangeneratedust,mists,
andfumescontainingchemicals,suchassilica,
knowntocauseseriousorfatalinjuryorillness,
suchasrespiratorydisease,silicosis,cancer,birth
defects,orotherreproductiveharm.
•Controldust,mist,andfumesatthesource
wherepossible.Usewaterfordustsuppression,
whenfeasible.
•Usegoodworkpracticesandfollowthe
recommendationsofthemanufacturer
orsupplier,CCOHS,OSHA,andother
occupationalandtradeassociations.
•Alwaysfollowrespiratoryprecautions.
•Whenthehazardsfrominhalationcannotbe
eliminated,theoperatorandanybystanders
shouldweararespiratorapprovedbyCCOHSor
OSHAforthematerialbeinghandled.
Training
•ReadtheOperator'sManualandothertrainingmaterial.If
theoperator(s)ormechanic(s)cannotreadorunderstand
theinformation,itistheowner'sresponsibilitytoexplain
thismaterialtothem.
•Becomefamiliarwiththesafeoperationoftheequipment,
operatorcontrols,andsafetysigns.
•Alloperatorsandmechanicsshouldbetrained.The
ownerisresponsiblefortrainingtheusers.
•Neverletchildrenoruntrainedpeopleoperateorservice
theequipment.Localregulationsmayrestricttheageof
theoperator.
•Theowner/usercanpreventandisresponsiblefor
accidentsorinjuriestopeopleordamagetoproperty.
Towing
Checkwithyourlocalcountyorstatetowingsafety
regulations,inadditiontomeetingTransportCanada(or
Caution
,
W ar ning
DepartmentofTransportationifintheU.S.)towingsafety
regulations,beforetowingthemachine.
•Inordertoreducethepossibilityofanaccidentwhile
transportingthemachineonpublicroads,makesure
thetowingvehicleismechanicallysoundandingood
,
operatingcondition.
•Shutdowntheenginebeforetransportingthemachine.
•Whentowingwithaballhitch,ensurethattheballhitch
youareusingisthepropersizeforthehitchcoupleron
themachine.
•Whentowingwithapintlehitch,ensurethattheeyeof
thetowpoleisthecorrectdimensionforthepintlehook.
•Inspectthehitchandcouplingforwear.Nevertowthe
machinewithdamagedordefectivehitches,couplings,
chains,orothercomponents.
•Checkthetireairpressureonthetowingvehicleandthe
machine.
•Checkthetiretreadandsidewallfordamageandwear.
•Properlyattachthesafetychainstothetowingvehicle.
•Ensurethatthedirectionalandbrakelightsareworking
properly.
•Ensurethatthedirectional,backup,andbrakelightsof
thetowvehicleareworkingproperly.
•Beforetowingchecktomakecertainyourmachineis
correctlyandsecurelyattachedtothetowingvehicle.
•Ensurethatthesafetychainsareproperlysecuredtothe
vehicle,andleaveenoughslackforturning.
•Donotcarryanymaterialinthemachinewhentowing.
•Avoidsuddenstopsandstarts.Thiscancauseskidding,
orjackkning.Smooth,gradualstartsandstopswill
improvetowing.
•Avoidsharpturnstopreventrolling.Towonlywitha
vehiclethathasahitchdesignedfortowing.Donot
attachtowedequipmentexceptatthehitchpoint.
•Donottowthemachinefasterthan88km/h(55mph).
•Usecautionwhenbackingup;useaspotteroutsidethe
vehicletoguideyou.
•Donotallowanyonetositorrideonthemachine.
•Disconnectthemachinefromthetowvehiclebefore
usingit.
•Placechockblocksunderneaththetirestopreventthem
fromrollingwhilethemachineisparked.
Preparation
Becomefamiliarwiththesafeoperationoftheequipment,
operatorcontrols,andsafetysigns.
•Useonlyaccessoriesandattachmentsapprovedbythe
manufacturer.
•Wearpersonalprotectiveequipmentandappropriate
clothing,includingthefollowing:
4

–Hardhat
Operation
–Respiratorordustmask
–Faceshieldorsafetyglasses
–Hearingprotection
–Safetyshoes
–Longpants
–Shirtwithlongsleevesbuttonedatthewrists
–Tight-ttinggloveswithoutdrawstringsorloosecuffs
•Securelonghair,looseclothing,orjewelrythatmayget
tangledinmovingparts.
•Operatingtheequipmentsafelyrequiresthefullattention
oftheoperator.Donotwearradioormusicheadphones
whileoperatingthemachine.
•Ensurethatthemachineisonalevelsurfacebefore
operatingthemachine.
•Chockthetiresofthemachinetopreventunintended
movement.
•Beforeeveryuse,dothefollowing:
–Inspectthecoupler,ball,andhitch.
•Neverrunthemachineinapoorlyventilatedorenclosed
areawithoutproperrespiratoryprotection.Dustfrom
materialsbeingmixedcanbeveryharmfultooperators
andbystanders.
•Onlyoperatethemachineingoodlightingconditions.
•Beforestartingthemachine,makesurethatthereareno
personsorobstaclesnearorunderthemachine.
•Neverleavearunningmachineunattended.Alwaysstop
themotorandverifythatallmovingpartshavestopped.
•Chockthetiresofthemachineorkeepitattachedtothe
towingvehiclewhenitisnotinuse,topreventitfrom
rolling.
•Keephandsawayfromanymovingparts.Keepfeetaway
fromthetiresandthefrontpost.
•Donotoperatethemachineoutdoorsintherain.
•Donotoperatethemachineundertheinuenceof
alcoholordrugs.
•Ensurethattheareaisclearofotherpeopleorpetsbefore
operatingthemachine.Stopthemachineifanyoneenters
thearea.
–Ensurethatalllightsarefunctioningproperly(if
equippedwithalightkit).
–Ensurethatthetiresareproperlyinatedas
recommended.
–Ensurethatthelugnutsaretightandtorqued
properly.
–Ensurethatthemachineisproperlysecured.
•Neverplaceyourhandsoranysolidobjectintothedrum
whenthemachineisinoperation.
•Donottouchpartswhichmaybehotfromoperation.
Allowthemtocoolbeforeattemptingtomaintain,adjust,
orservicethemachine.
•Nevermovethemachinewhilethemotorisrunning.
•Keepthecowlclosedandlatchedduringoperation.
•Ensurethatalltheguardsandshieldsaresecurelyinplace
beforeoperatingthemachine.
•EnsurethattheOn/OffswitchisintheOffposition
beforeconnectingthemachinetotheelectricalsource.
•Ifthemixingpaddlesstrikeaforeignobjectorifthe
machineshouldstartmakinganunusualnoiseor
vibration,stopthemotorandemptythedrum.Waitfor
allmovingpartstocometoacompletestopandcool.
Vibrationisgenerallyawarningoftrouble.Inspectfor
cloggingordamage.Cleanandrepairand/orreplace
damagedparts.
•Lightningcancausesevereinjuryordeath.Ifyousee
lightningorhearthunderinthearea,donotoperatethe
machine;seekshelter.
5

MaintenanceandStorage
•Beforeperformingmaintenance,dothefollowing:
–Parkthemachineonlevelground.
–Stopthemotor.W aitforallmovementtostopbefore
adjusting,cleaning,orrepairing.
–Letthemotorcoolbeforeperformingmaintenance
orstoringthemachine.
–Unplugthemachinebeforemakinganyrepairs.
•Neverlubricate,service,repair,oradjustthemachine
whileitisrunning.
•Keepequipmentmaterialsclearfromthemotor.
•Neverallowuntrainedpersonneltoservicethemachine.
•Keephands,feet,andclothingawayfrommovingparts.
Ifpossible,donotmakeadjustmentswiththemotor
running.
•Keepallpartsingoodworkingconditionandallhardware
tightened.Replaceallwornordamageddecals.
•Removeanybuildupofgrease,oil,ordebrisfromthe
machine.
•Donotmodifytheelectricalconnectorsorwiring.
•Donotconnectthegroundcircuitofthemachinetothe
energizedcircuitoftheelectricalsource.
•Donottamperwithsafetydevices.
•Chockthetireswhenstoringthemachine.
•Keepallnuts,bolts,screws,andhoseclampssecurely
tightened.Keepequipmentingoodcondition.
•UseonlygenuineTororeplacementpartstoensurethat
theoriginalstandardsaremaintained.
6
SafetyandInstructionalDecals
Safetydecalsandinstructionsareeasilyvisibletotheoperatorandarelocatednearanyareaofpotential
danger.Replaceanydecalthatisdamagedorlost.
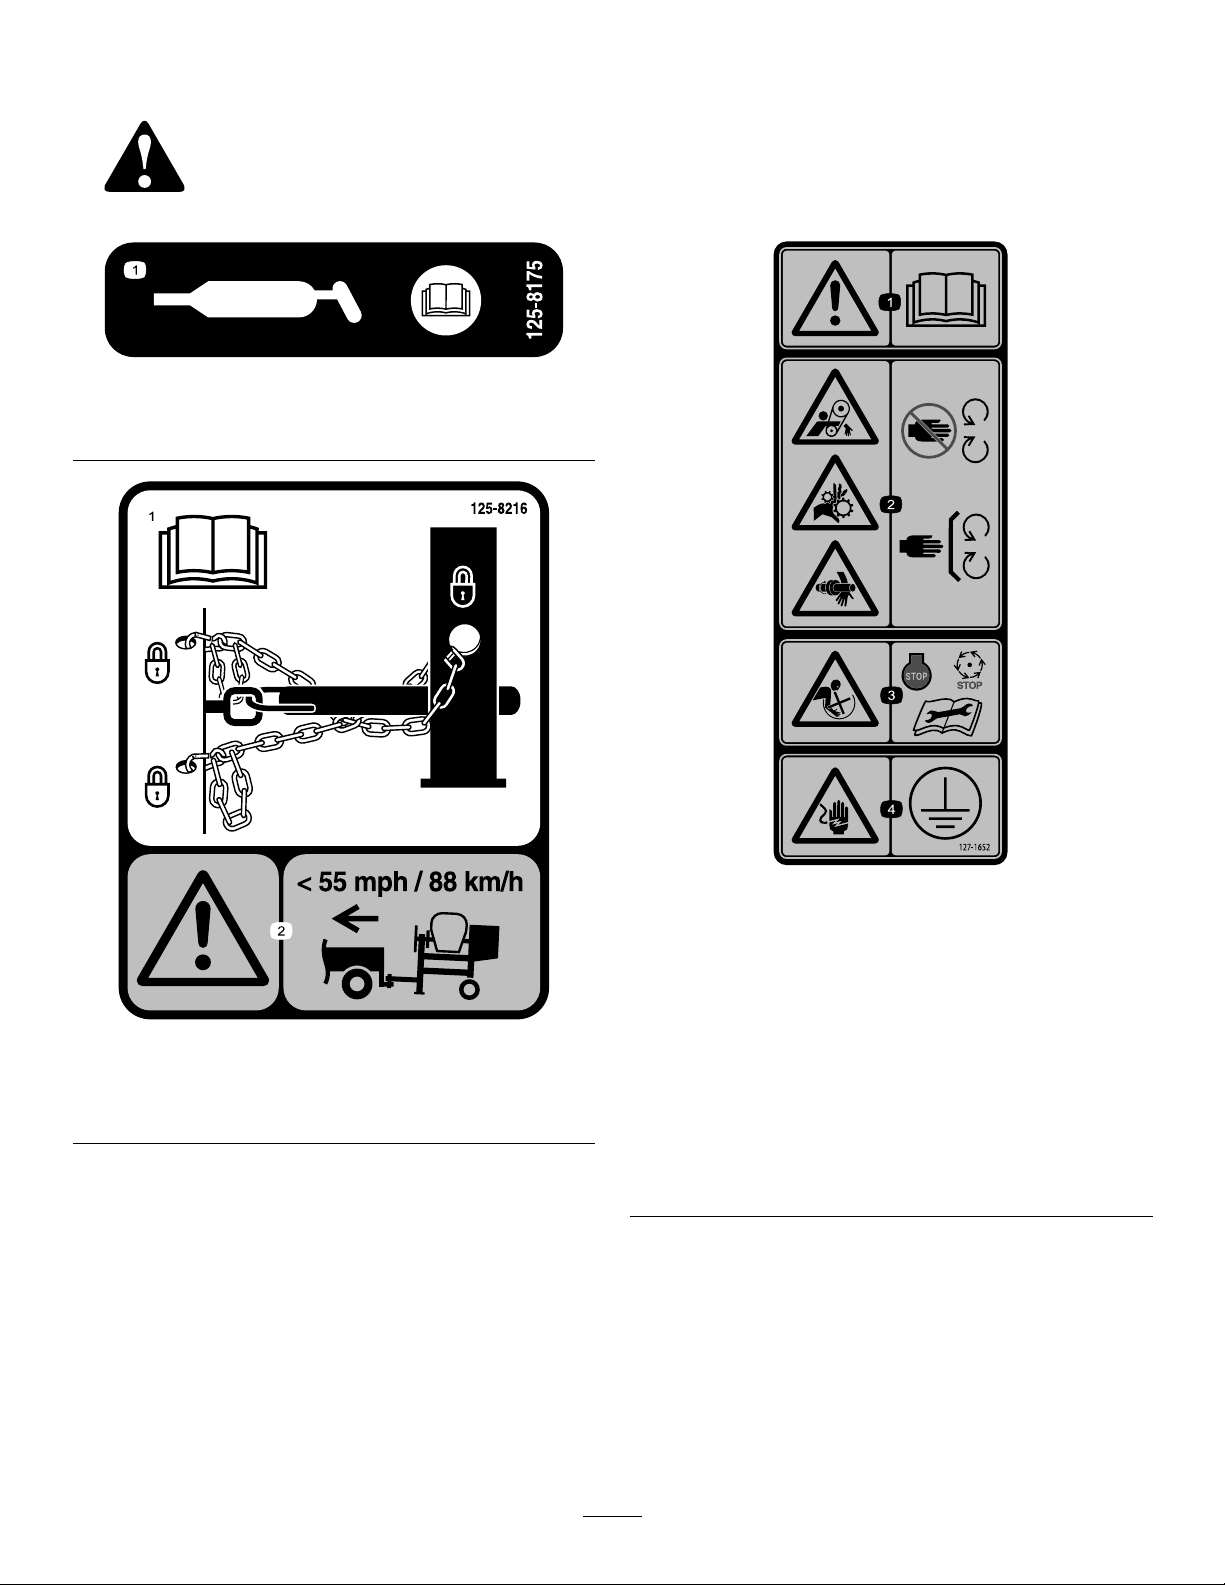
125–8175
1.ReadtheOperator’sManualforinformationongreasing
themachine.
1.ReadtheOperator’s
Manualforinformationon
howtotowthemachine.
125–8216
2.Warning—limittowing
speedtolessthan55mph
/88km/h.
1.Warning—readthe
Operator’sManual.
2.Handandarm
entanglementatthe
beltdrive;crushinghazard
ofhand;entanglement
hazardofhandatthe
shaft—keephandsaway
frommovingparts;keep
allguardsandsafetiesin
place.
127–1652
3.Entanglementhazardat
paddles—stopthemotor
andwaitforallmoving
partstostopbefore
servicingthemachine.
4.Shockhazard—makesure
themachineisgrounded
beforeoperation.
7
Setup
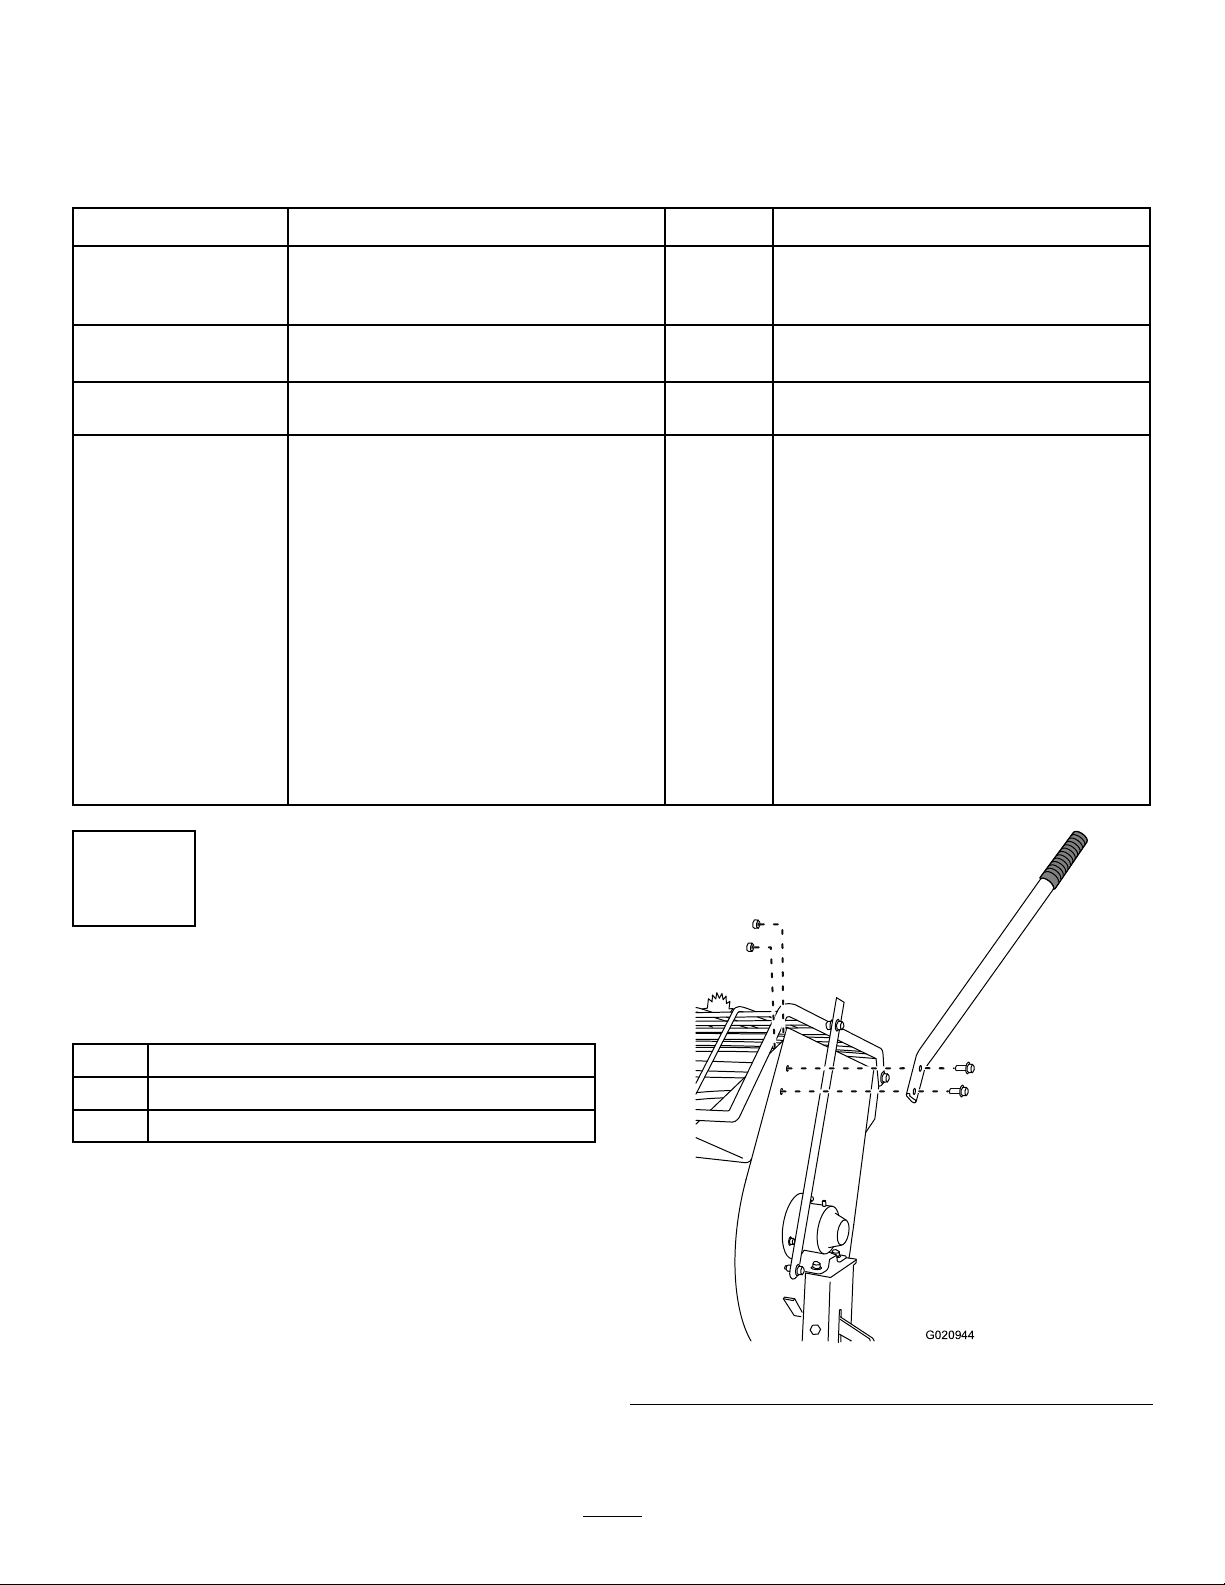
G020944
LooseParts
Usethechartbelowtoverifythatallpartshavebeenshipped.
ProcedureDescription
1
2
3
4
Dumphandle1
Bolt2
Nut2
Towpolekit(soldseparately)
Safetychain
Connectinglink
Grommet
Firtreeclip1
Cableclamp
Bracket2
Licenseplateholder1
Leftlightassembly
Rigtlightassembly1
Frontlightassembly2
Nuts11
Bolts
Edgeclips4
Wiringharness1
Grommet,small
Cableties
Qty.
Installthedumphandle.
1Installthetowpole.
1
2
1
5
1
7
2
5
Installthesafetychain.
Installthelightassembly .
Use
1
InstallingtheDumpHandle
Partsneededforthisprocedure:
1Dumphandle
2Bolt
2Nut
InstallingtheDumpHandletotheDrum
1.Cutthecabletiestoremovethedumphandlefrom
theundersideofthegrate.
2.Positionthedumphandlesothattheboltholesalign
withtheboltholesinthedrum(Figure3).
Figure3
3.Insertthe2boltsthroughtheboltholesinthedump
handleandthedrum(Figure3).
8
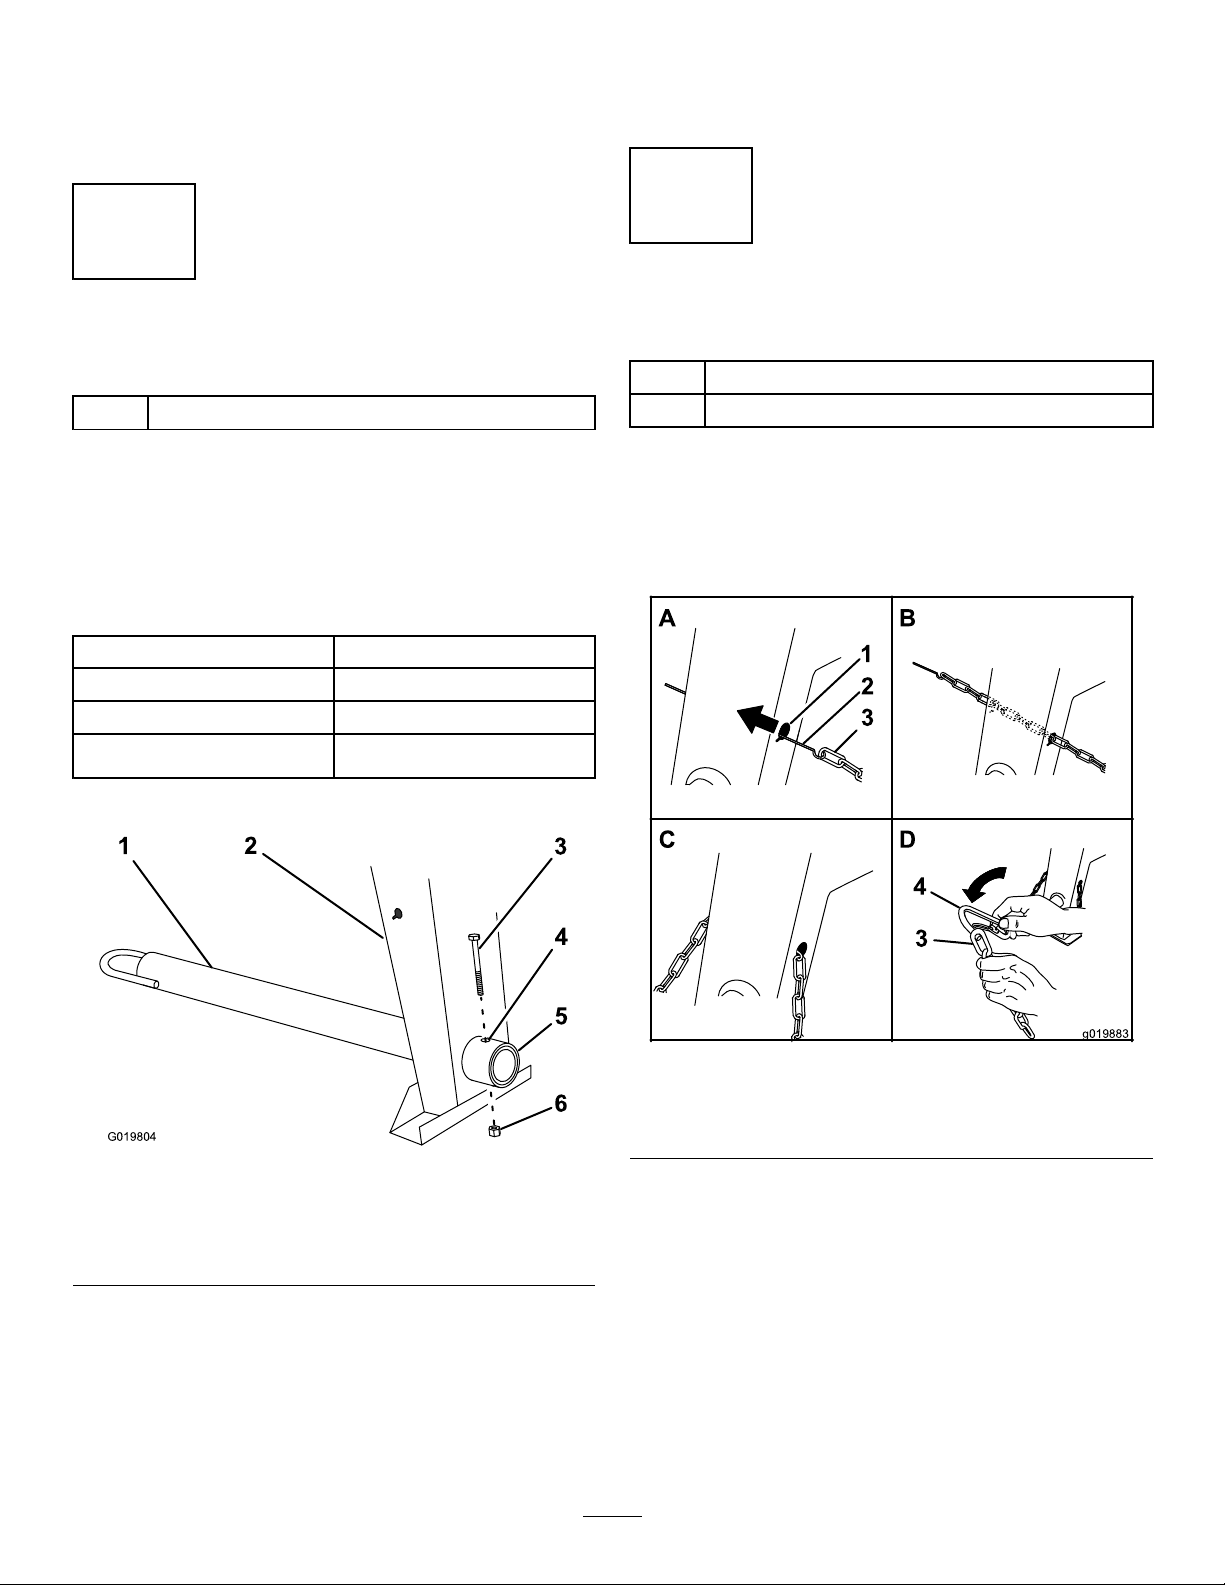
4.Installanutontoeachbolt,andtightenthembyhand
5
1
2
4
6
3
G019804
A
B
D
g019883
2
3
4
3
1
topreventcross-threading.
5.Tightenthenutswithawrenchwhileusinganother
wrenchtokeeptheboltsfromspinning.
Note:Iftheself-lockingnyloninsertinthelocknut
wearswithuse,replacethenutwithanewGrade5or
Grade8locknut.
3
2
InstallingtheTowPole
Partsneededforthisprocedure:
1
Towpolekit(soldseparately)
InstallingtheTowPoletotheMachine
Note:Thetowpoleispurchasedseparatelyandincludesthe
nutandboltneededforinstallation.SeeaToroauthorized
dealerforthetowpoleforyourmachine.
Themachinehasthefollowingtowpoleoptions:
HitchTypeLength
50mm(2inch)ball—stamped79cm(31inches)
50mm(2inch)ball—forged79cm(31inches)
Pintle
1.Removetheboltandnutfromthetowpole(Figure4).
79cm(31inches)
InstallingtheSafetyChain
Partsneededforthisprocedure:
1
Safetychain
2
Connectinglink
InstallingtheSafetyChain
1.Formahookontheendofabendablepieceofrod
orstiffwire(notincluded),andinsertitthroughboth
keyholesinthefrontpostofthemachine(Figure5A).
Figure4
1.Towpole4.Bolthole
2.Frontpost
3.Bolt6.Nut
2.Slidethetowpoleforwardandaligntheholeinthe
polewiththeholeintheframetting(Figure4).
3.Inserttheboltthroughtheholesinthettingandthe
pole(Figure4).
4.Threadthenutontotheboltandtightenthemuntil
theyaretightagainsttheframetting(Figure4).
5.Frametting
Figure5
1.Keyhole
2.Rodorwire(notincluded)4.Connectinglink
2.Attachthesafetychaintothelengthofrodorwire
(Figure5A).
3.Pulltherod,orwire,andthesafetychainthroughboth
keyholes(Figure5B).
Note:Ensurethatapproximatelyequallengthsof
safetychainextendfromeithersideofthefrontpost.
3.Safetychain
InstallingtheConnectingLinks
1.Aligntheconnectinglinktothelastlinkinoneendof
thesafetychain(Figure5D).
9
2.Inserttheconnectinglinkthroughthechainlinkuntil
g0278 56
theconnectinglinksnapsclosed.
3.Repeatsteps1and2toinstalltheotherconnectinglink
intheotherendofthesafetychain.
4
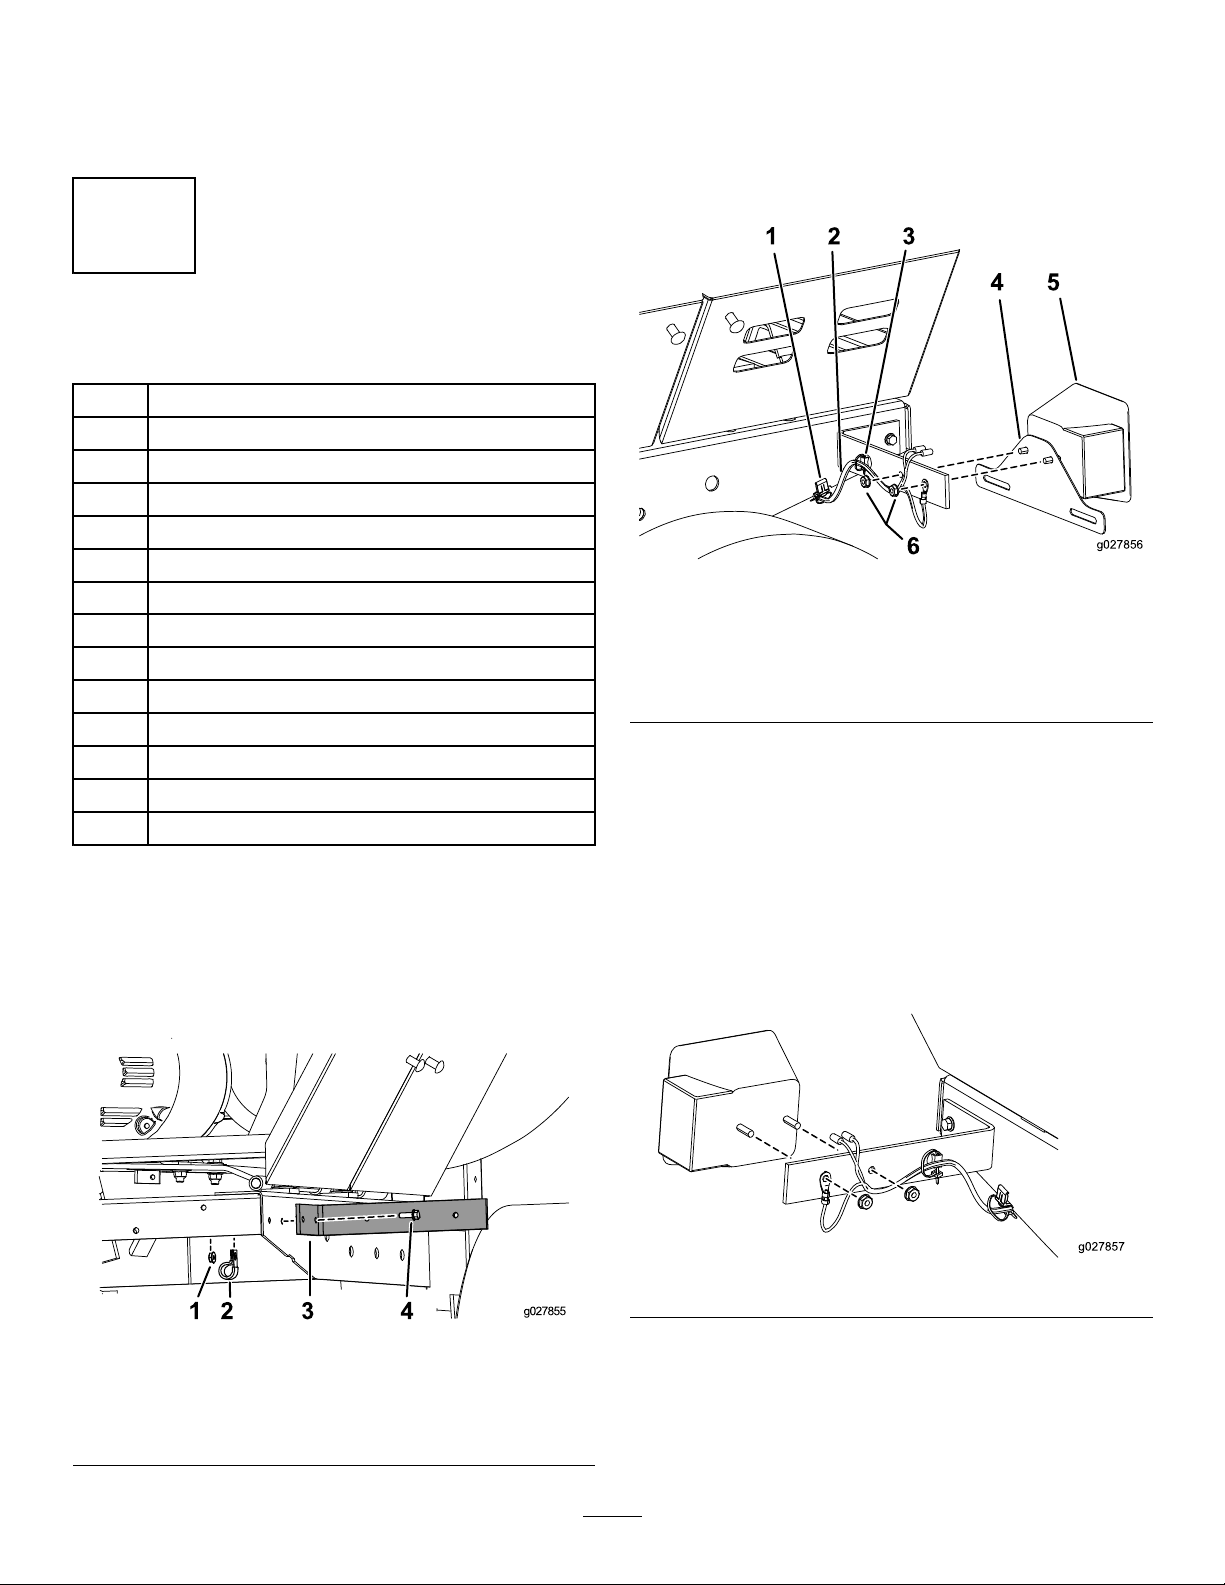
InstallingtheLightAssembly
Partsneededforthisprocedure:
1
Grommet
1Firtreeclip
5
Cableclamp
2Bracket
1Licenseplateholder
1
Leftlightassembly
1Rigtlightassembly
2Frontlightassembly
11Nuts
7
Bolts
4Edgeclips
1Wiringharness
2
Grommet,small
5
Cableties
2.Placethelicenseplateholderontotheleftlamp
assemblyandsecurethemtotheleftbracketusing2
nutsasshowninFigure7.
Note:Placetheterminalforthewiringharnessonthe
outsideprongofthewiringharnessbeforesecuringthe
nut(Figure7).
Figure7
1.Edgeclip4.Licenseplateholder
2.Wiringharness
3.Firtree(attachedtowiring
harness)
5.Leftlightassembly .
3.Insertthertreethatisattachedtothewiringharness
totheopenholeonthebracket(Figure7).
4.Securethewiringharnesstothesideofthemachine
usinganedgeclip(Figure7).
InstallingtheRearLightAssemblies
1.Installthebracketsontotheframeusing4bolts,2
cableclamps,and4nutsasshowninFigure6.
Note:Thecableclampsshouldbeinstalledonthe
boltsclosertothemiddleofthemachine.
Figure6
Rightbracketshown
1.Nut3.Bracket
2.Cableclamp
4.Bolt
5.Attachtherightlightassemblytotherightbracketas
showninFigure8using2nuts.
Note:Placetheterminalforthewiringharnessonthe
outsideprongofthewiringharnessbeforesecuringthe
nut(Figure8).
Figure8
6.Insertthertreethatisattachedtothewiringharness
totheopenholeonthebracket(Figure8).
7.Securethewiringharnesstothesideofthemachine
usinganedgeclip(Figure8).
10
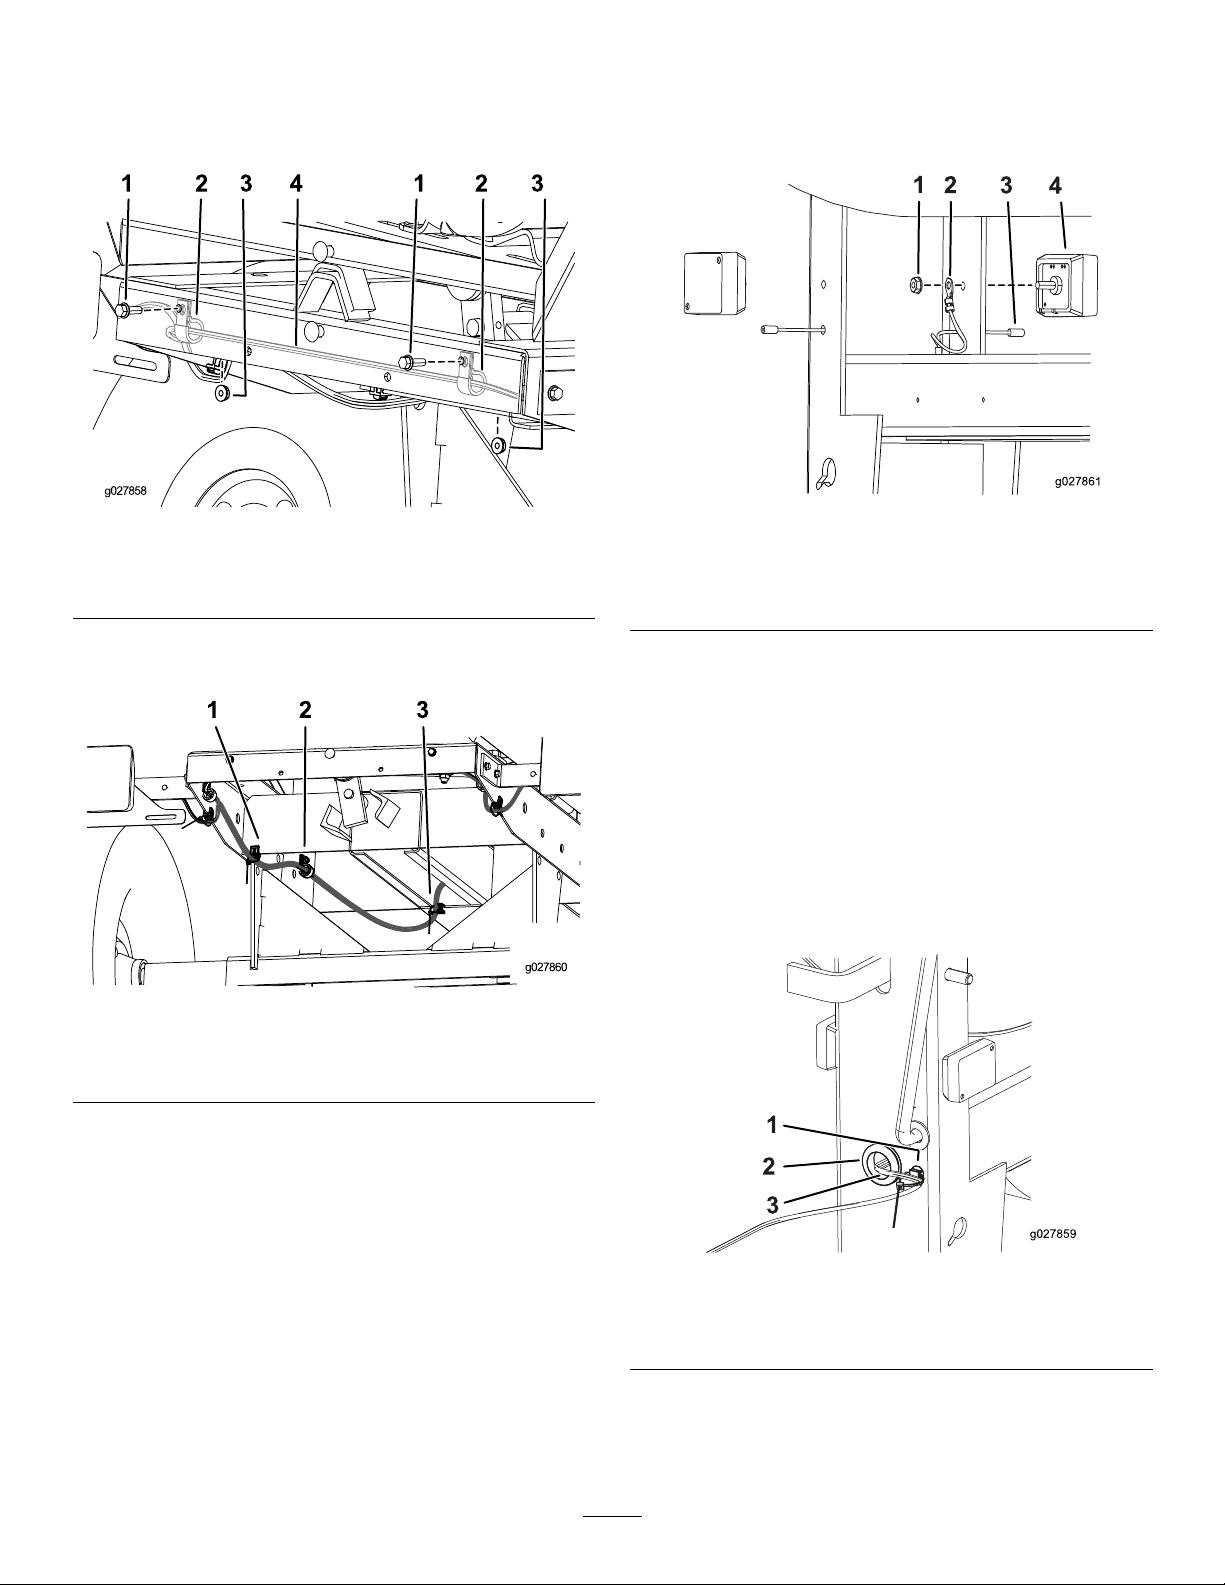
RoutingtheWiringHarness
1 2
3 4
g027861
1
2
3
g027859
InstallingtheFrontLightAssemblies
1.Securethewiringharnesstotherearofthemachine
using2cableclamps,2bolts,and2nutsasshownin
Figure9.
Figure9
1.Bolt3.Nut
2.Cableclamp
4.Wiringharness
2.Routethewiringharnessalongtheleftsideofthe
frameasshowninFigure10.
1.Feedthesmallersectionofthewiringharnessup
throughthehorizontalpostbelowthedrum,asshown
inFigure11.
Figure11
1.Nut(partofthefrontlight
assembly)
2.Wiringharness4.Lightassembly
3.Grommet,small
2.Placethesmallgrommetsoverthewiringharnessends
thatdonothavetheterminalsconnectedandpushthe
grommetsintothelowerhole(Figure11).
Figure10
1.Edgeclip3.Edgeclip
2.Cableclampassembly
3.Securethewiringharnesstotheleftsideoftheframe
using1edgeclipsecuredontothemiddlesupport
bracketasshowninFigure10;Callout1.
4.Securethewiringharnesstotheleftsideoftheframe
using1cableclamp,1bolt,and1nut(Figure10);
Callout2.
5.Securethewiringharnesstothefrontoftheunitwith
1edgeclipasshowninFigure10;Callout3.
6.Securetheexcessofthewiringharnesswiththe5zip
ties.
7.Routtheremainderofthewiringharnessthroughthe
horizontalpostunderneaththedrum.
3.Insertthelightassemblyintotheupperhole,through
thewiringharnessterminals,andsecurethelightswith
theboltsthatcameattachedtothelightassemblies
(Figure11).
4.Pulltherestofthewiringharnessoutthroughthehole
inthefrontpostofthemachine,throughthelarge
grommet,andinsertthelargegrommetinthehole
(Figure12).
Figure12
1.Firtree3.Wiringharness
2.Grommet,large
5.Insertthertreeintotheholenexttothegrommet
andsecurethewiringharnesstothisclip(Figure12).
11
 Loading...