

Toro 58602 Operator's Manual

FrontTineTiller
58602
Motoazada
58602
Motoculteuràdentsavant
58602
FormNo.3445-372RevA
www.T oro.com.
*3445-372*


FormNo.3443-828RevA
FrontTineTiller
ModelNo.58602—SerialNo.321000001andUp
Registeratwww.T oro.com.
OriginalInstructions(EN)
*3443-828*

ItisaviolationofCaliforniaPublicResourceCode
Section4442or4443touseoroperatetheengineon
anyforest-covered,brush-covered,orgrass-covered
landunlesstheengineisequippedwithaspark
arrester,asdenedinSection4442,maintainedin
effectiveworkingorderortheengineisconstructed,
equipped,andmaintainedforthepreventionofre.
WARNING
CALIFORNIA
Proposition65Warning
Theengineexhaustfromthisproduct
containschemicalsknowntotheStateof
Californiatocausecancer,birthdefects,
orotherreproductiveharm.
Useofthisproductmaycauseexposure
tochemicalsknowntotheStateof
Californiatocausecancer,birthdefects,
orotherreproductiveharm.
Introduction
Thistillerisintendedtobeusedbyresidential
homeownersorprofessional,hiredoperatorsto
breakthroughhardsoilconditionsforplantingand
cultivatinggardens.Usingthisproductforpurposes
otherthanitsintendedusecouldprovedangerousto
youandbystanders.
Readthisinformationcarefullytolearnhowtooperate
andmaintainyourproductproperlyandtoavoid
injuryandproductdamage.Youareresponsiblefor
operatingtheproductproperlyandsafely .
g355851
Figure1
1.Modelandserialnumberlocation
ModelNo.
SerialNo.
Thismanualidentiespotentialhazardsandhas
safetymessagesidentiedbythesafety-alertsymbol
(Figure2),whichsignalsahazardthatmaycause
seriousinjuryordeathifyoudonotfollowthe
recommendedprecautions.
g000502
Figure2
Safety-alertsymbol
Thismanualuses2wordstohighlightinformation.
Importantcallsattentiontospecialmechanical
informationandNoteemphasizesgeneralinformation
worthyofspecialattention.
Visitwww.Toro.comformoreinformation,including
safetytips,trainingmaterials,accessoryinformation,
helpndingadealer,ortoregisteryourproduct.
Wheneveryouneedservice,genuineToroparts,or
additionalinformation,contactanAuthorizedService
DealerorToroCustomerServiceandhavethemodel
andserialnumbersofyourproductready.Figure1
identiesthelocationofthemodelandserialnumbers
ontheproduct.Writethenumbersinthespace
provided.
©2021—TheToro®Company
8111LyndaleAvenueSouth
Bloomington,MN55420
Contactusatwww.Toro.com.
2
PrintedintheUSA
AllRightsReserved

Contents
Safety
Safety.......................................................................3
GeneralSafety...................................................3
SafetyandInstructionalDecals..........................4
Setup........................................................................6
1AssemblingtheTiller........................................6
2AddingOiltotheEngine...................................8
ProductOverview.....................................................9
Controls.............................................................9
Specications....................................................9
BeforeOperation.................................................10
BeforeOperationSafety...................................10
PerformingDailyMaintenance..........................10
ChangingtheTillingWidth................................10
DuringOperation..................................................11
DuringOperationSafety....................................11
StartingtheEngine...........................................12
ShuttingOfftheEngine.....................................12
AdjustingtheT ailMountPosition......................12
AdjustingtheDragStake..................................13
TillingSoil.........................................................13
AfterOperation....................................................13
AfterOperationSafety......................................13
Maintenance...........................................................14
MaintenanceSafety..........................................14
RecommendedMaintenanceSchedule(s)...........14
Pre-MaintenanceProcedures..............................15
PreparingforMaintenance...............................15
EngineMaintenance...........................................15
ServicingtheAirFilter.......................................15
ChangingtheEngineOil...................................16
ServicingtheSparkPlug...................................17
BeltMaintenance................................................18
CheckingandAdjustingtheBeltT ension...........18
ReplacingtheDriveBelt...................................19
Cleaning..............................................................21
CleaningtheTineAxleShaft.............................21
Storage...................................................................21
StorageSafety..................................................21
CleaningandStoringtheMachine....................21
Troubleshooting......................................................23
Thismachinehasbeendesignedinaccordancewith
ANSIB71.8-2016.
DANGER
Theremaybeburiedutilitylinesinthework
area.Diggingintothemmaycauseashock
oranexplosion.
Havethepropertyorworkareamarkedfor
buriedlinesanddonotdiginmarkedareas.
Contactyourlocalmarkingserviceorutility
companytohavethepropertymarked(for
example,intheUS,call811forthenationwide
markingservice).
GeneralSafety
Thisproductiscapableofamputatinghandsand
feetandofthrowingobjects.Alwaysfollowallsafety
instructionstoavoidseriouspersonalinjuryordeath.
•Read,understand,andfollowtheinstructions
andwarningsinthisOperator’sManualandon
themachineandattachmentsbeforestartingthe
engine.
•Bethoroughlyfamiliarwiththecontrolsandthe
properuseoftheequipment.Knowhowtostop
themachineanddisengagethecontrolsquickly .
•Donotputyourhands,feet,otherbodyparts,or
clothingnearorundertherotatingtinesorother
movingpartsofthemachine.
•Donotoperatethemachinewithoutallproper
shields,guards,andothersafetyprotective
devicesinplaceandfunctioningproperlyonthe
machine.
•Keepbystanders,especiallysmallchildren,and
petsoutoftheoperatingarea.
•Donotallowchildrentooperatethemachine.
Allowonlypeoplewhoareresponsible,trained,
familiarwiththeinstructions,andphysically
capabletooperatethemachine.
•Shutoffthemachineandwaitforallmovingparts
tostopbeforeyouleavetheoperator’sposition.
Disconnectthespark-plugwire,keepitawayfrom
theplugtopreventaccidentalstarting,andallow
themachinetocoolbeforeadjusting,fueling,
unclogging,servicing,cleaning,orstoringthe
machine.
Improperlyusingormaintainingthismachinecan
resultininjury .T oreducethepotentialforinjury,
complywiththesesafetyinstructionsandalways
payattentiontothesafety-alertsymbol,which
meansCaution,Warning,orDanger—personalsafety
3

instruction.Failuretocomplywiththeseinstructions
mayresultinpersonalinjuryordeath.
SafetyandInstructionalDecals
Safetydecalsandinstructionsareeasilyvisibletotheoperatorandarelocatednearanyarea
ofpotentialdanger.Replaceanydecalthatisdamagedormissing.
133-8062
144-4848
decal133-8062
decal144-4855
144-4855
1.Crushinghazardofhands—stayawayfrommovingparts.
decal144-4848
1.Squeezethethrottletoengagethetines.
144-4849
1.Transportposition
144-4853
1.Engine—shutoff
decal144-4849
2.Operatingposition
decal144-4853
144-4854
1.Tostartthemachine,movetheswitchtotheONposition,
releasethehandle(s),placeonehandonthemachineand
pulltherecoilhandle.
decal144-4854
4

decal148-4868
144-4856
1.Warning—readtheOperator’sManual.
2.Warning—alloperatorsshouldbetrainedbeforeoperating
themachine.
3.Warning—keepbystandersaway.
4.Warning—stayawayfrommovingparts;keepallguardsin
place.
5.Entanglementhazard,belt—stayawayfrommovingparts.
6.Warning—lookbehindyouwhenoperatingthemachinein
reverse.
7.Warning—donotoperateoverburiedlines.
8.Warning—keepfeetawayfrommovingparts.
9.Warning—shutofftheengineanddisconnectthespark
plugandreadtheOperator’sManualbeforeperforming
maintenance.
5

Setup
LooseParts
Usethechartbelowtoverifythatallpartshavebeenshipped.
ProcedureDescription
1
2
1
Qty.
Wheel2
Tineshield1
Bolt(M8x20mm)
Hairpincotter2
Lockpin1
Washer(M8)
Bolt(M8x45mm)
Locknut(M8)
Washer(12mm)
Bolt(M6x16mm)
Locknut(M6)
Dragstakehandleassembly1
Axle1
Leftoutertine
Rightoutertine1
Engineoil1Addoiltotheengine.
4
4
2
6
2
4
4
1
Assemblethetiller.
Procedure
1.Installtheaxleandwheelstothelowertail
mount.
Use
AssemblingtheTiller
Partsneededforthisprocedure:
2Wheel
1Tineshield
4
Bolt(M8x20mm)
2Hairpincotter
1Lockpin
4
Washer(M8)
2
Bolt(M8x45mm)
6
Locknut(M8)
2
Washer(12mm)
4
Bolt(M6x16mm)
4
Locknut(M6)
1Dragstakehandleassembly
1Axle
1
Leftoutertine
1Rightoutertine
1.Axle
2.Lowertailmount
3.Wheel(2)
g356258
Figure3
4.Washer—12mm(2)
5.Hairpincotter(2)
6

2.Installthetineshield.Aligntheslotsonboth
sidesoftheshieldandinsertthefasteners
beforetighteningthem.
Important:Ensurethatthedirtshieldis
betweentheengine-mountdeckandtine
shield.
4.Installtheupperhandleassemblyontothelower
loopmount.
Note:Installtheboltswiththeheadfacing
outward.
Figure4
1.Bolt—M6(4)
2.Tineshield5.Dirtshield
3.Locknut—M6(4)
4.Enginemountdeck
3.Installthetinestothedesiredposition;referto
ChangingtheTillingWidth(page10).
g356256
g356424
Figure5
1.Bolt—M8x20mm(2)3.Locknut—M8(2)
2.Washer—M8(2)
5.Rotatethehandletothedesiredpositionand
installtheupperfasteners.
Note:Usethefrontholeforthehighestposition;
usetherearholeforthelowestposition.Install
theboltswiththeheadfacingoutwardasshown
inFigure7.
Figure6
1.Highposition4.Upperbolt
2.Middleposition5.Lowerbolt
3.Lowposition6.Lowerloopmount
7
g356255

Figure7
1.Bolt—M8x20mm(2)3.Locknut—M8(2)
2.Washer—M8(2)
2
AddingOiltotheEngine
g356257
Partsneededforthisprocedure:
1Engineoil
6.Insertthedragstakethroughthebottomopening
inthelowertailmountandsecureitwiththe
lockpin.
Figure8
1.Lockpin2.Dragstake
7.Installthedragstakehandleassemblytothe
dragstake.
Procedure
Important:Iftheoillevelintheengineistoo
lowortoohighandyouruntheengine,youmay
damagetheengine.
1.Movethemachinetoalevelsurface.
2.Carefullypourabout3/4oftheenginecapacity
ofoilintotheoil-lltube.
3.Wait3minutesfortheoiltosettleintheengine.
4.Wipethedipstickcleanwithacleancloth.
g356254
g334792
Figure10
1.Dipstick3.Add
2.Full
Figure9
5.Insertthedipstickintotheoil-lltube,then
removethedipstick.
6.Readtheoillevelonthedipstick(Figure10).
•Iftheoillevelonthedipstickistoolow,
carefullypourasmallamountofoilintothe
oil-lltube,wait3minutes,andrepeatsteps
g356436
4through6untiltheoillevelonthedipstick
iscorrect.
•Iftheoillevelonthedipstickistoohigh,
draintheexcessoiluntiltheoillevelonthe
dipstickiscorrect.
Important:Iftheoillevelintheengineistoo
lowortoohighandyouruntheengine,you
maydamagetheengine.
7.Installthedipstickintotheoil-lltubesecurely.
8.Recycletheusedoilproperly.
8

ProductOverview
Specications
Specicationsanddesignaresubjecttochange
withoutnotice.
Figure11
1.Drive-controllever7.Tineshield
2.Adjustablecable8.Hingedtailmount
3.Bumper9.Wheel
4.Drivebeltcover10.Handlebarheight
5.Tines11.Handgrip
6.Tinewidthadjustment
adjustment
12.Engineon/offswitch
Height
Length
Width
Weight
Tillingwidth
Tillingdepth
117.9cm(46.4inches)
122.2cm(48.1inches)
55.9cm(22.0inches)
46.7kg(103lb)
28to53cm(11to21inches)
Upto28cm(1 1inches)
Toensureoptimumperformanceandcontinuedsafety
certicationofthemachine,useonlygenuineT oro
replacementpartsandaccessories.Replacement
partsandaccessoriesmadebyothermanufacturers
couldbedangerous,andsuchusecouldvoidthe
productwarranty.
g355853
Controls
Drive-ControlLever
Squeezethedrive-controllevertothehandgripto
engagethetines.Releaseittodisengagethetines.
EngineOn/OffSwitch
UsetheengineOn/Offswitchtoshuttheengineoff.
EnsurethattheswitchisintheONpositionbefore
startingtheengine.
9

Operation
Note:Determinetheleftandrightsidesofthe
machinefromthenormaloperatingposition.
BeforeOperation
BeforeOperationSafety
•Donotoverllthefueltank.Replacethefuelcap
andtightenitsecurelyafterfueling.Cleanup
spilledfuelbeforestartingtheengine.
•Donotllcontainersinsideavehicleoronatruck
ortrailerbedwithaplasticliner.Alwaysplace
containersontheground,awayfromthevehicle
beforelling.
•Removethemachinefromthetruckortrailer
beforellingthefueltank.Ifthisisnotpossible,
thenaddfuelfromaportablecontainerratherthan
fromafuel-dispensernozzle.
GeneralSafety
•Donotallowchildrenoruntrainedadultstooperate
orservicethemachine.Localregulationsmay
restricttheageoftheoperator.
•Usingthismachineisstrenuous.Youmustbein
goodphysicalconditionandmentallyalert.Ifyou
haveanyconditionthatmightbeaggravatedby
strenuouswork,checkwithyourdoctorbefore
operatingthemachine.
•Shutoffthemachineandwaitforallmovingparts
tostopbeforeyouleavetheoperator’sposition.
Disconnectthespark-plugwire,keepitawayfrom
theplugtopreventaccidentalstarting,andallow
themachinetocoolbeforeadjusting,fueling,
unclogging,servicing,cleaning,orstoringthe
machine.
•Becomefamiliarwiththesafeoperationofthe
equipment,operatorcontrols,andsafetysigns.
•Checkthatallguardsandsafetydevices,suchas
deectors,areinplaceandfunctioningproperly.
Donotoperatethemachineunlesstheyare
functioningproperly.
•Knowhowtoshutofftheenginequickly.
•Keepbystanders,especiallysmallchildren,and
petsoutoftheoperatingarea.
•Thoroughlyinspecttheareawhereyouwilluse
themachineandremoveallobjectsthatcould
interferewiththeoperationofthemachineorthat
themachinecouldthrow.
•Keepthefuel-dispensernozzleincontactwith
therimofthefueltankorcontaineropeningat
alltimesuntilfuelingiscomplete.Donotusea
nozzlelock-opendevice.
•Ifyouspillfuelonyourclothing,changeyour
clothingimmediately.
•Ifyouspillfuel,donotattempttostarttheengine;
movethemachineawayfromthespillandavoid
creatingasourceofignitionuntilthefuelvapors
havedissipated.
•Ifyoumustdrainthefueltank,doitoutdoors.
•Storefuelinafuelcontainerandkeepitoutofthe
reachofchildren.
•Donotstorethemachinewithfuelinthefueltank
orfuelcontainerwherethereisanopename,
spark,orpilotlight,suchasonawaterheateror
otherappliance.Allowtheenginetocoolbefore
storingthemachineinanyenclosure.
•Fuelisharmfulorfatalifswallowed.Long-term
exposuretovaporscancauseseriousinjuryand
illness.
–Avoidprolongedbreathingofvapors.
–Keepyourhandsandfaceawayfromthe
nozzleandthefuel-tankopening.
–Keepfuelawayfromyoureyesandskin.
PerformingDaily
Maintenance
FuelSafety
•Useextremecareinhandlingfuel.Itisextremely
ammableanditsvaporsareexplosive.
•Extinguishallcigarettes,cigars,pipes,andother
sourcesofignition.
•Useonlyanapprovedfuelcontainer.
•Donotremovethefuelcaporaddfueltothetank
whiletheengineisrunningorhot.
•Allowtheenginetocoolbeforellingthefueltank.
•Donotllthefueltankindoors.
Beforestartingthemachineeachday ,performthe
EachUse/DailyprocedureslistedinMaintenance
(page14).
ChangingtheTillingWidth
1.Movethemachinetoalevelsurface,shutoffthe
engine,andwaitforallmovingpartstostop.
2.Removethe2bolts(M8x45mm)and2locknuts
(M8)securingtheoutertinestothemachine.
3.Installtheoutertinestothedesiredposition.
10

Note:Thearrowonthetinesmustpoint
inthepointthedirectionofforwardrotation
(counterclockwise,whenviewedfromtheleft
side).
•Fora40.6cm(16inch)tillingwidth,install
theoutertineswiththeshortendofthetine
pipefacingtowardthecenterofthemachine.
Figure12
1.Boltandlocknut(2)
DuringOperation
DuringOperationSafety
GeneralSafety
•Useyourfullattentionwhileoperatingthe
machine.Donotengageinanyactivitythat
causesdistractions;otherwise,injuryorproperty
damagemayoccur.
•Donotoperatethemachinewhileill,tired,or
undertheinuenceofalcoholordrugs.
•Wearappropriateclothing,includingeye
protection;longpants;substantial,slip-resistant
footwear;hearingprotection;andgloves.Tieback
longhairanddonotwearlooseclothingorloose
jewelry.
•Keepyourhands,feet,otherbodyparts,and
clothingawayfromrotatingtinesandmovingparts
ofthemachine.Thetinesbeginrotatingwhen
youstarttheengineandmaycontinuetorotate
g356250
momentarilyafteryoushutofftheengine.
•Starttheenginecarefullyaccordingtoinstructions
inthisOperator’sManualandwithyourfeetwell
awayfromthetines.
•Fora53.3cm(21inch)tillingwidth,install
theoutertineswiththeshortendofthe
tinepipefacingtowardtheoutsideofthe
machine.
Figure13
1.Boltandlocknut(2)
•Useextremecautionwhenreversingorpulling
themachinetowardyou.T oavoidgettingpinned
againstastructure,allowenoughdistanceto
reversedirectionnearawallorfence.
•Keepbystandersoutoftheoperatingarea.Keep
smallchildrenoutoftheoperatingareaandunder
thewatchfulcareofaresponsibleadultwhois
notoperatingthemachine.Stopthemachineif
anyoneentersthearea.
•Beforeyoustarttheengine,ensurethatalldrives
areinneutralandyouareintheoperatingposition.
•Operatethemachineonlyingoodvisibilityand
appropriateweatherconditions.Donotoperate
themachinewhenthereistheriskoflightning.
•Donotattempttoadjustthemachinewhilethe
engineisrunning.
•Ifthemachinestrikesanobjectorstartstovibrate
abnormally,immediatelyshutofftheengine,wait
forallmovingpartstostop,anddisconnectthe
wirefromthesparkplugbeforeexaminingthe
g356253
machinefordamage.Vibrationisoftenawarning
signoftrouble.Makeallnecessaryrepairsbefore
resumingoperation.
•Donotoperatethemachineathightransport
speedsonhardorslipperysurfaces.
4.Securetheoutertinesusingthe2boltsand2
locknuts.
•Lookbehindanddownandusecarewhen
reversing.
11
•Donotoverloadthemachinecapacityby
attemptingtotillorcultivatetoodeepandattoo
fastarate.
•Donotpickuporcarryamachinewhiletheengine
isrunning.
sharply.Allowtheropetoreturntothehandle
slowly.
Note:Ifthemachinedoesnotstartafterseveral
attempts,contactanAuthorizedServiceDealer.
•Exercisecautionandbesureofyourfooting,
especiallywhenbackingup,toavoidslippingor
falling.
•Becarefulwhenoperatingthemachineinhard
ground.Thetinescancatchinthegroundand
propelthemachineforward.Ifthisoccurs,letgo
ofthemachine;donottrytorestrainit.
•Exerciseextremecautionwhencrossinggravel
surfaces.Stayalertforhiddenhazardsortrafc.
•Donotleavearunningmachineunattended.
•Shutoffthemachineandwaitforallmovingparts
tostopbeforeyouleavetheoperator’sposition.
Disconnectthespark-plugwire,keepitawayfrom
theplugtopreventaccidentalstarting,andallow
themachinetocoolbeforeadjusting,fueling,
unclogging,servicing,cleaning,orstoringthe
machine.
•Operatetheengineonlyinwell-ventilatedareas.
Exhaustgasescontaincarbonmonoxide,whichis
anodorless,deadlypoison.
•Useonlyaccessoriesandattachmentsapproved
byTheT oro®Company.
ShuttingOfftheEngine
1.Releasethedrive-controllever.
2.Movetheengineon/offswitchtotheOFF
position.
3.Waitforallmovingpartstostopbeforeleaving
theoperatingposition.
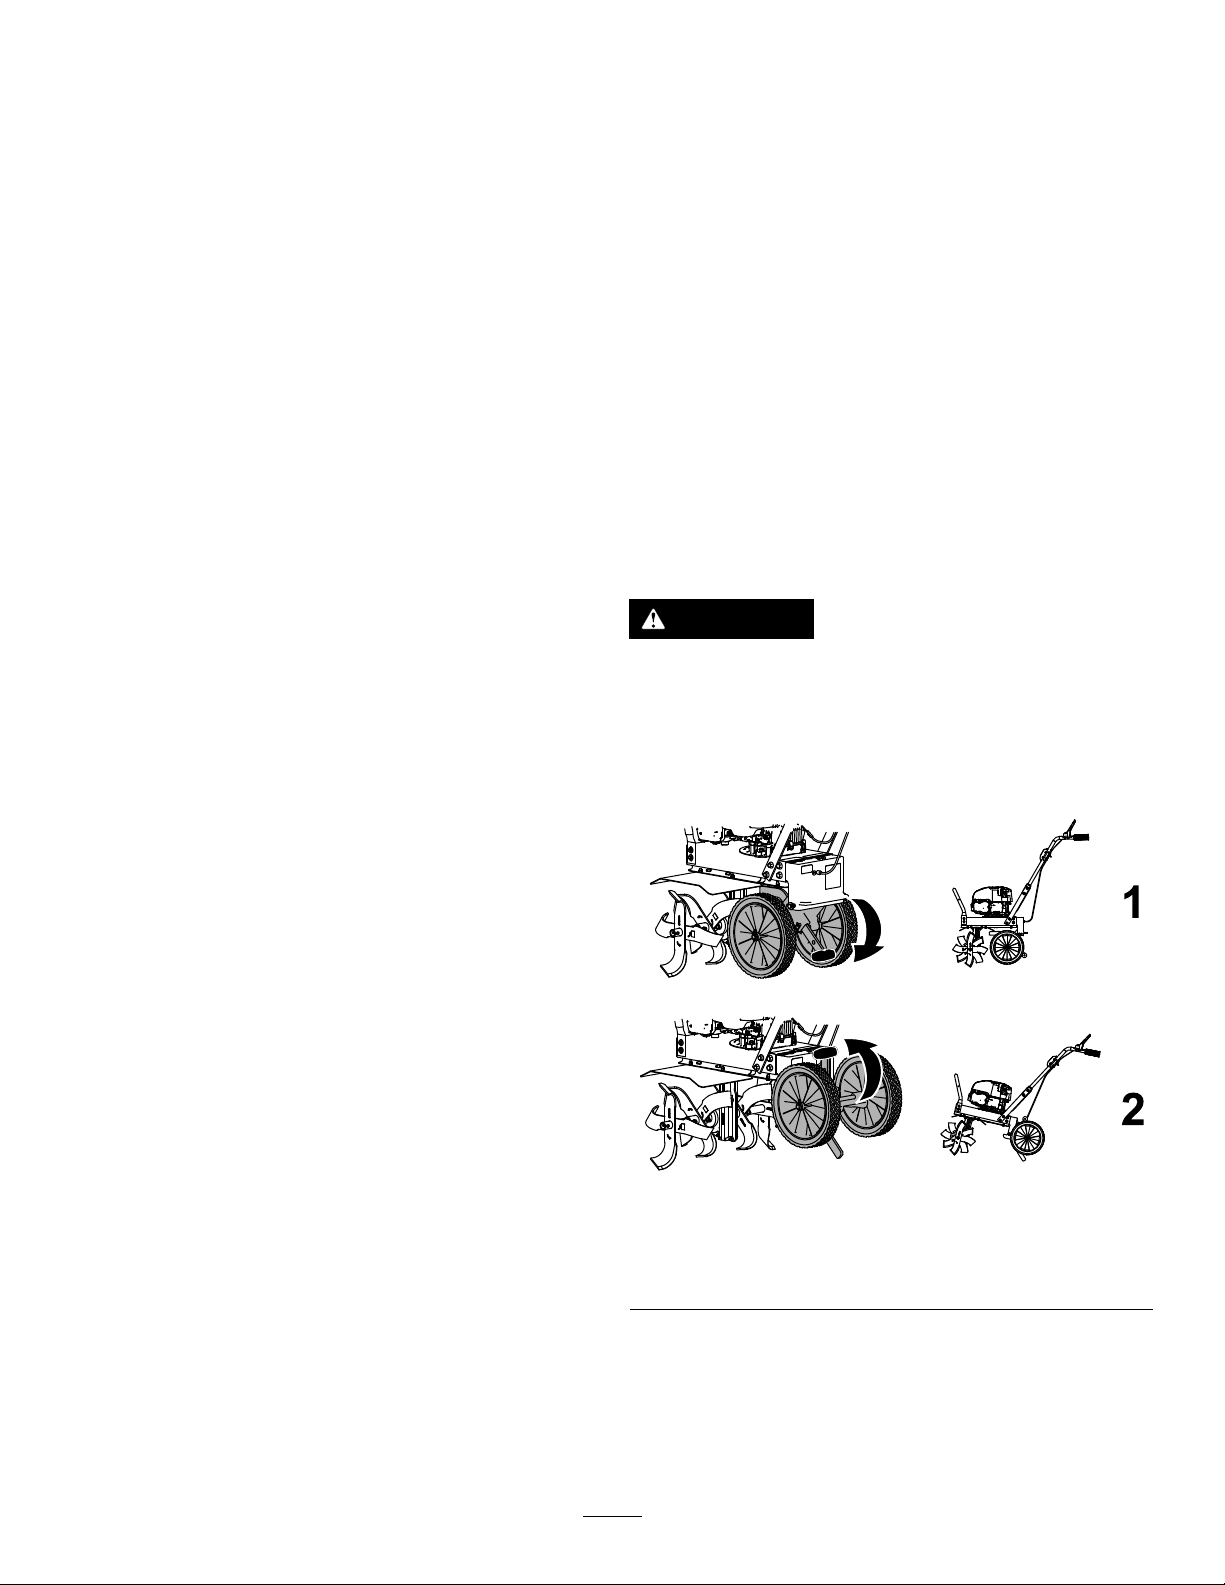
AdjustingtheTailMount
Position
Usethehandleonthedragstaketorotatethehinged
tailmounttotheTransportorOperatingpositions.
CAUTION
Rotatingthehingedtailmountcancreatea
pinchinghazardbetweentheupperandlower
portionsofthetailmount.
Keepawayfromthepivotpointswhen
adjustingthetailmountposition.
•Donotchangetheenginegovernorsettingsor
overspeedtheengine.
•Alwaysbesureofyourfooting;keeparmholdon
thehandleandwalk,neverrun.
•Allowthemuferandengineareatocoolbefore
touchingthem.
•Thetinesshouldnotrotatewhentheengineis
idling;iftheydorotate,contactyourAuthorized
ServiceDealer.
•Ifanobjectbecomeslodgedinthetines,shutoff
theengine,disconnectthewirefromthespark
plug,andallowtheenginetocoolbeforeremoving
theobject.
•Donotoperatethemachineonsteepslopes.T o
preventoverturning,operatethemachineupand
downtheslope.
StartingtheEngine
1.Settheengineon/offswitchtotheONposition.
2.Pulltherecoil-starthandle.
1.Transportposition—rotate
thehingedtailmount
downward
g356094
Figure14
2.Operatingposition—rotate
thehingedtailmount
upward
Note:Whenyoupulltherecoil-starthandle,
pullitlightlyuntilyoufeelresistance,thenpullit
12

AdjustingtheDragStake
Thedragstakehelpsregulatetillingdepthand
preventsthetillerfromjerkingforwardduring
operation.Setthedragstakeinthelowestposition
toincreaseresistancetoforwardmotionandtodig
deeper;raisethedragstakefortransport.
1.Movethemachinetoalevelsurface,shutoffthe
engine,andwaitforallmovingpartstostop.
2.Removethelockpin.
AfterOperation
AfterOperationSafety
GeneralSafety
•Shutoffthemachineandwaitforallmovingparts
tostopbeforeyouleavetheoperator’sposition.
Disconnectthespark-plugwire,keepitawayfrom
theplugtopreventaccidentalstarting,andallow
themachinetocoolbeforeadjusting,fueling,
unclogging,servicing,cleaning,orstoringthe
machine.
•Cleandebrisfromthemachinetohelpprevent
res.Cleanupoilorfuelspills.
HaulingSafety
•Disconnectthewirefromthesparkplugbefore
loadingthemachineforhauling.
Figure15
1.Dragstake2.Lockpin
3.Positionthedragstaketothedesireddepth.
Note:Adjustthedragstake1holeatatimeand
testthetilleroperationaftereachadjustment.
Raisingthedragstaketoohighcanresultinloss
ofcontrolofthetiller.
4.Securethedragstakewiththelockpin.
TillingSoil
1.Adjustthedragstaketothedesireddepth;refer
toAdjustingtheDragStake(page13).
2.Squeezethedrive-controllevertoengagethe
tines.
3.Tillsoilasrequired.
4.Releasethedrive-controllevertodisengagethe
tines.
g356423
•Usecarewhenloadingorunloadingthemachine.
13

Maintenance
MaintenanceSafety
•Inspectthemachinefrequentlytoensurethatit
isinsafeworkingconditionandthatshearbolts,
engine-mountingbolts,andotherfastenersare
properlytightened.
•Shutoffthemachineandwaitforallmovingparts
tostopbeforeyouleavetheoperator’sposition.
Disconnectthespark-plugwire,keepitawayfrom
theplugtopreventaccidentalstarting,andallow
themachinetocoolbeforeadjusting,fueling,
unclogging,servicing,cleaning,orstoringthe
machine.
•Wearglovesandeyeprotectionwhenservicing
themachine.
RecommendedMaintenanceSchedule(s)
•Nevertamperwithsafetydevices.Checktheir
properoperationregularly.
•Toensureoptimumperformanceofthemachine,
useonlygenuineT ororeplacementpartsand
accessories.Replacementpartsandaccessories
madebyothermanufacturerscouldbedangerous,
andsuchusecouldvoidtheproductwarranty.
•Replacetinesthatarebent,damaged,orloose;do
notrepairoralterthem.
•Keepthemachine,attachments,andaccessories
insafeworkingcondition.
•Donotattempttorepairthemachineunless
youhavethepropertoolsandinstructionsfor
disassembling,assembling,andrepairingthe
machine.
MaintenanceService
Interval
Beforeeachuseordaily
Every2hours
Every10hours
Every25hours
Every50hours
Every100hoursoryearly,
whichevercomesrst
Yearly
MaintenanceProcedure
•Checktheengine-oillevelandaddoilasneeded.
•Checkthebelttension.
•Cleandebrisfromcoolingns,airinletsandlinkages.
•Checkthebelttension.
•Cleanthetineaxleshaft.
•Servicetheairlter;serviceitmorefrequentlyindustyoperatingconditions.
•Replacethedrivebelt.
•Lubricatemovingpartsusing30-weightoil.
•Checkthesparkplug.
•Replacetheairlter;replaceitmorefrequentlyindustyoperatingconditions.
Important:Refertoyourenginemanualforadditionalmaintenanceprocedures
14

Pre-Maintenance
EngineMaintenance
Procedures
ServicingtheAirFilter
PreparingforMaintenance
1.Movethemachinetoalevelsurface,shutoffthe
engine,andwaitforallmovingpartstostop.
2.Disconnectthespark-plugwirefromthespark
plug.
Figure16
1.Spark-plugwire
3.Afterperformingthemaintenanceprocedure(s),
connectthespark-plugwiretothesparkplug.
Important:Beforetippingthemachine,
allowthefueltanktorundrythroughnormal
usage.Ifyoumusttipthemachinepriorto
runningoutoffuel,useahandfuelpumpto
removethefuel.
ServiceInterval:Every25hours
Yearly
1.Unclipthetopoftheair-ltercover.
g339525
g334791
Figure17
1.Clip3.Airlter
2.Air-ltercover
2.Removetheairlter.
3.Inspecttheairlter.
Note:Iftheairlterisexcessivelydirty,replace
itwithanewlter.Otherwise,gentlytaptheair
lteronahardsurfacetoloosendebris.
4.Installtheairlter.
5.Usethecliptoinstalltheair-ltercover.
15

ChangingtheEngineOil
Changingtheengineoilisnotrequired,butif
youwanttochangetheoil,usethefollowing
procedure.
Note:Runtheengineafewminutesbeforechanging
theoiltowarmit.Warmoilowsbetterandcarries
morecontaminants.
EngineOilSpecications
Engineoilcapacity
OilviscositySAE30orSAE10W-30
APIserviceclassicationSJorhigher
*Thereisresidualoilinthecrankcaseafteryoudrain
theoil.Donotpourtheentirecapacityofoilintothe
crankcase.Fillthecrankcasewithoilasdirectedin
thefollowingsteps.
0.44L(15oz)*
detergentoil
5.Afterdrainingtheusedoil,returnthemachineto
theoperatingposition.
6.Carefullypourabout3/4oftheenginecapacity
ofoilintotheoil-lltube.
7.Wait3minutesfortheoiltosettleintheengine.
8.Wipethedipstickcleanwithacleancloth.
9.Insertthedipstickintotheoil-lltube,then
removethedipstick.
10.Readtheoillevelonthedipstick.
•Iftheoillevelonthedipstickistoolow,
carefullypourasmallamountofoilintothe
oil-lltube,wait3minutes,andrepeatsteps
8through10untiltheoillevelonthedipstick
iscorrect.
•Iftheoillevelonthedipstickistoohigh,
draintheexcessoiluntiltheoillevelonthe
dipstickiscorrect.
1.Movethemachinetoalevelsurface.
2.RefertoPreparingforMaintenance(page15).
3.Removethedipstickbyrotatingthecap
counterclockwiseandpullingitout.
Figure18
1.Dipstick3.Add
2.Full
4.Tipthemachineontoitsside(sothattheairlter
isup)todraintheusedoilfromtheoil-lltube.
Important:Iftheoillevelintheengineistoo
lowortoohighandyouruntheengine,you
maydamagetheengine.
11.Installthedipstickintotheoil-lltubesecurely.
12.Recycletheusedoilproperly.
g334792
Figure19
g356437
16

ServicingtheSparkPlug
CheckingtheSparkPlug
ServiceInterval:Every100hoursoryearly,
whichevercomesrst
Ensurethattheairgapbetweenthecenterandside
electrodesiscorrectbeforeinstallingthesparkplug.
Useasparkplugwrenchforremovingandinstalling
thesparkplug(s)andagappingtool/feelergaugeto
checkandadjusttheairgap.Installanewspark
plug(s)ifnecessary.
Type:ChampionRN9YCorequivalent
Airgap:0.75mm(0.03inch)
RemovingtheSparkPlug
1.Disconnectthespark-plugwirefromthespark
plug.
Important:Donotcleanthesparkplug(s).
Alwaysreplacethesparkplug(s)whenithasa
blackcoating,wornelectrodes,anoilylm,or
cracks.
Ifyouseelightbrownorgrayontheinsulator,the
engineisoperatingproperly.Ablackcoatingonthe
insulatorusuallymeanstheaircleanerisdirty .
Setthegapto0.75mm(0.03inch).
g027479
Figure21
InstallingtheSparkPlug
Figure20
1.Spark-plugwire
2.Cleanaroundthesparkplugstopreventdirt
fromenteringtheengineandpotentiallycausing
damage.
3.Removethesparkplug.
g339525
g027480
Figure22
17

BeltMaintenance
CheckingandAdjustingthe
BeltTension
ServiceInterval:Beforeeachuseordaily
Every2hours
Thebelttensionmaydecreaseovertime.Y oumay
needtoadjustthebeltwithinthersthalfhourof
operation.
Important:Checkthebelttensionregularly.
Improperbelttensionmaycauseprematurebelt
wear.
Thebeltmayneedadjustmentifthereisaconstant
buzzingsoundwhilethetinesareengagedorifthere
isasquealingsoundwhenthetinesareengagedand
underload.
Note:Youmayhearashortbuzzingsoundafter
releasingthedrive-controlleverwhileusingthe
machine.Thisisnormalandiscausedbytheteethof
thecoggedbeltcontactingthewirebeltguidetostop
rotation.Youdonotneedtoadjustthebelttension
forthis.
1.Removethedirtshield.
2.Withthedrive-controlleverintheneutral
position,measurethelengthoftherelaxed
cablespring.
g356417
Figure24
1.Cablespring
3.Pulldownthedrive-controlleverandmeasure
thelengthoftheextendedcablespring.The
differenceshouldbe0.6cm(1/4inch).
4.Ifthebeltneedsadjustment,holdthelower
jamnutontheadjustablecableinplaceand
adjusttheupperjamnutin0.32cm(1/8inch)
increments.Checkthetensionagain,and
repeatasnecessary.
Figure23
1.Nut(4)3.Bolt(4)
2.Dirtshield
Note:Ifthetensionisincorrectandyoucannot
adjustthejamnutsfurther,movetheZ-bendend
ofthecabletothenextholeinthedrive-control
leverasshowninFigure26.Ifthetensionisstill
incorrect,replacethebelt.
g356421
Figure25
g356418
1.Upperjamnut2.Lowerjamnut
18

Figure26
ReplacingtheDriveBelt
ServiceInterval:Every50hours/Yearly(whichever
comesrst)
RemovingtheBelt
1.Removethedirtshield.
g361541
1.Z-bendendofcable
2.Movecabletothishole.
5.Installthedirtshield.
Figure27
1.Nut(4)3.Bolt(4)
2.Dirtshield
g356418
Figure28
1.Nut(4)3.Bolt(4)
2.Dirtshield
2.Removethedrivebeltcover.
g356418
Figure29
1.Bumper
2.Nut(4)
3.Washer(4)
4.Bolt(4)
5.Drivebeltcover
3.Gentlypulltheenginerecoilropetorotatethe
pulley.
19
g356422

4.Whilethepulleyturns,forcethebeltoffthe
V-groove.
5.Slidethebeltofftheenginepulley.
6.Pullthebeltdownandoutoftheway .
7.Pushthebeltforwardandoutthefrontofthe
machine.
InstallingtheBelt
1.Placebeltinthetransmissionpulleygroove.
2.Gentlypulltheenginerecoilropetorotatethe
enginepulleywhileforcingthebeltintothe
V-groove.
3.Installthedrivebeltcover.
4.Installthedirtshieldplate.
g356418
Figure31
1.Nut(4)3.Bolt(4)
2.Dirtshield
5.Checkthebelttension;adjustitasnecessary.
1.Bumper
2.Nut(4)
3.Washer(4)
g356422
Figure30
4.Bolt(4)
5.Drivebeltcover
20

Cleaning
Storage
CleaningtheTineAxle
Shaft
ServiceInterval:Every10hours
Removeallvegetation,string,wire,andothermaterial
thatmayhaveaccumulatedontheaxlebetweenthe
innertinesandthetransmissionhousing.
StorageSafety
•Shutoffthemachineandwaitforallmovingparts
tostopbeforeyouleavetheoperator’sposition.
Disconnectthespark-plugwire,keepitawayfrom
theplugtopreventaccidentalstarting,andallow
themachinetocoolbeforeadjusting,fueling,
unclogging,servicing,cleaning,orstoringthe
machine.
•Runtheenginedryorremovethefuelwithahand
pump;neversiphonthefuel.Ifyoumustdrainthe
fueltank,doitoutdoors.
•FollowtheinstructionsinthisOperator’sManual
tosafelyunload,transport,andstorethemachine.
•Donotstorethemachinewithfuelinthefuel
tankinsideabuildingwhereignitionsourcesare
present,suchashotwaterandspaceheatersand
clothesdryers.Allowtheenginetocoolbefore
storingthemachineinanenclosure.
•AlwaysrefertotheOperator’sManualfor
importantdetailsifthemachineistobestoredfor
anextendedperiod.
CleaningandStoringthe
Machine
1.Parkthemachineonalevelsurface,shutoff
theengine,andwaitforallmovingpartstostop
beforeleavingtheoperatingposition.
2.Removedebrisfromthetines,axle,transmission
housing,andengine.
Important:Youcanwashthemachine
withmilddetergentandwater.Donot
pressure-washthemachine.Avoid
excessiveuseofwater,especiallynearthe
engineandtransmission.
3.Coattheaxleslightlywithaxlegrease.
4.Servicetheairlter;refertoServicingtheAir
Filter(page15).
5.Preparethemachineforstorageforover
30daysasfollows:
A.Addfuelstabilizer/conditionertofreshfuel
inthetank.Followmixinginstructionsfrom
thefuelstabilizermanufacturer.Donot
useanalcohol-basedstabilizer(ethanolor
methanol).
B.Runtheenginetodistributeconditionedfuel
throughthefuelsystemfor5minutes.
C.Shutofftheengine,allowittocool,and
drainthefueltank.
D.Starttheengineandrunituntilitshutsoff.
21

E.Disposeoffuelproperly.Recyclethefuel
accordingtolocalcodes.
Important:Donotstorefuelcontaining
stabilizer/conditionerlongerthan
thedurationrecommendedbythe
fuel-stabilizermanufacturer.
6.Removeandchecktheconditionofthespark
plug;refertoCheckingtheSparkPlug(page17).
Withthesparkplugremovedfromtheengine,
pour15ml(1tablespoon)ofengineoilintothe
sparkplughole.Installthesparkplugandpull
therecoilrope3timestocoatthecylinderwith
oil.Donotinstallthewireonthesparkplug.
7.Checkandtightenallfasteners.Repairor
replaceanypartthatisdamaged.
8.Paintallscratchedorbaremetalsurfaces.Paint
isavailablefromyourAuthorizedServiceDealer.
9.Storethemachineinanuprightpositionina
clean,drygarageorstoragearea.Keepitout
ofreachofchildrenorotherunauthorizedusers.
Coverthemachinetoprotectitandkeepitclean.
22
 Loading...