

Toro 53008, 53009 Operator's Manual

Commercial SE Series
String Trimmer
Model No. 53008 — 990001 & Up
Model No. 53009 — 990001 & Up
16” & 18” Gas
Modèle No. 51903 — 790000001 et suivants
Modèle No. 51904 — 790000001 et suivants
Modèle No. 51906 — 790000001 et suivants
Modèle No. 51907 — 790000001 et suivants
FORM NO. 3322-188 Rev. A
16” & 18” Gas
Modelos N. 51903 — 790000001 y siguientes
Modelos N. 51904 — 790000001 y siguientes
Modelos N. 51906 — 790000001 y siguientes
Modelos N. 51907 — 790000001 y siguientes
Operator’s Manual
Manual del Usuario
Manuel de l’Utilisateur

WARNING:
The engine exhaust from this product
contains chemicals known to the State of
California to cause cancer, birth defects,
or other reproductive harm.

Contents
Contents 3. . . . . . . . . . . . . . . . . . . . . . . . . . . . . . . . . . . .
Introduction 4. . . . . . . . . . . . . . . . . . . . . . . . . . . . . . . . .
Safety 4. . . . . . . . . . . . . . . . . . . . . . . . . . . . . . . . . . . . . .
Operator Safety 4. . . . . . . . . . . . . . . . . . . . . . . . . . .
String Trimmer Safety 5. . . . . . . . . . . . . . . . . . . . . .
Fuel Safety 5. . . . . . . . . . . . . . . . . . . . . . . . . . . . . . .
Power String Trimmer Operating Safety 6. . . . . . . .
Safety and Instruction Decals 7. . . . . . . . . . . . . . . . .
Assembly 8. . . . . . . . . . . . . . . . . . . . . . . . . . . . . . . . . . .
Loop Handle Installation 8. . . . . . . . . . . . . . . . . . . .
Installing Trimmer Head Shield
(Straight Shaft Model) 9. . . . . . . . . . . . . . . . . . . .
Installing Trimmer Head Shield
(Curved Shaft Model) 9. . . . . . . . . . . . . . . . . . . .
Installing Trimmer Head (Straight Shaft Model) 10. .
Installing Trimmer Head (Curved Shaft Model) 10. .
Before Operation 11. . . . . . . . . . . . . . . . . . . . . . . . . . . . .
Oil and Fuel 11. . . . . . . . . . . . . . . . . . . . . . . . . . . . . .
Mixing Gasoline And Oil 12. . . . . . . . . . . . . . . . . . . .
Starting And Stopping 13. . . . . . . . . . . . . . . . . . . . . .
Page
Page
Operation 15. . . . . . . . . . . . . . . . . . . . . . . . . . . . . . . . . . .
Operating Position 15. . . . . . . . . . . . . . . . . . . . . . . . .
Cutting with Nylon Trimmer Line 16. . . . . . . . . . . . .
Maintenance 17. . . . . . . . . . . . . . . . . . . . . . . . . . . . . . . . .
Rewinding the Trimmer Spool 17. . . . . . . . . . . . . . . .
Air Filter 18. . . . . . . . . . . . . . . . . . . . . . . . . . . . . . . . .
Spark Plug 19. . . . . . . . . . . . . . . . . . . . . . . . . . . . . . .
Fuel Filter 20. . . . . . . . . . . . . . . . . . . . . . . . . . . . . . . .
Idle Speed Adjustment 20. . . . . . . . . . . . . . . . . . . . . .
Cylinder Cooling Fins 21. . . . . . . . . . . . . . . . . . . . . .
Spark Arrester 21. . . . . . . . . . . . . . . . . . . . . . . . . . . .
Gearcase Maintenance (Straight Shaft Model Only) 22. .
General Cleaning and Tightening 23. . . . . . . . . . . . .
Storage 23. . . . . . . . . . . . . . . . . . . . . . . . . . . . . . . . . . . . .
Accessories 24. . . . . . . . . . . . . . . . . . . . . . . . . . . . . . . . .
Troubleshooting 24. . . . . . . . . . . . . . . . . . . . . . . . . . . . . .
Specifications 25. . . . . . . . . . . . . . . . . . . . . . . . . . . . . . . .
53008/Commercial 25. . . . . . . . . . . . . . . . . . . . . . . . .
53009/Commercial 25. . . . . . . . . . . . . . . . . . . . . . . . .
Federal Emission Control Warranty Statement 26. . . . . .
Warranty Statement 28. . . . . . . . . . . . . . . . . . . . . . . . . . .
The Toro Company – 1998
All Rights Reserved
3
Printed in USA

Introduction
Thank you for purchasing a T oro product.
All of us at T oro want you to be completely satisfied with
your new product, so feel free to contact your local
Authorized Service Dealer for help with service, genuine
T oro parts, or other information you may require.
Whenever you contact your Authorized Service Dealer or
the factory, always know the model and serial numbers of
your product. These numbers will help the Service Dealer
or Service Representative provide exact information about
your specific product. You will find the model and serial
number decal located in a unique place on the product
(Fig. 1).
For your convenience, write the product model and serial
numbers in the space below.
Model No.
Serial No.
Read this manual carefully to learn how to operate and
maintain your product correctly. Reading this manual will
help you and others avoid personal injury and damage to
the product. Although T oro designs, produces and markets
safe, state-of-the-art products, you are responsible for
using the product properly and safely. You are also
responsible for training persons who you allow to use the
product about safe operation.
The Toro warning system in this manual identifies
potential hazards and has special safety messages that help
you and others avoid personal injury, even death.
DANGER, WARNING and CAUTION are signal words
used to identify the level of hazard. However, regardless
of the hazard, be extremely careful.
DANGER signals an extreme hazard that will cause
serious injury or death if the recommended precautions
are not followed.
1. Trimmer Head
2. Gearcase
3. Shaft Assembly
4. Loop Handle
5. Attachment Ring for
Shoulder Harness
6. Shaft Grip
7. Clutch Drum Housing
8. Engine
9. Model and Serial Number
Decal (on rear of engine
stand)
Figure 1
10. Air Filter
11. Trimmer Head Shield
12. Throttle Trigger and Stop
Switch
13. Throttle Cable and Stop
Switch Wire
14. Fuel Tank
15. Bearing Case
WARNING signals a hazard that may cause serious injury
or death if the recommended precautions are not followed.
CAUTION signals a hazard that may cause minor or
moderate injury if the recommended precautions are not
followed. T wo other words are also used to highlight
information. “Important” calls attention to special
mechanical information and “Note” emphasizes general
information worthy of special attention.
Safety
Operator Safety
1. Read and understand this Operator’s Manual before
using this product. Be thoroughly familiar with the
proper use of this product.
4

2. Always wear eye protection that complies with ANSI
(American National Standards Institute) Z87–1.
3. Always wear hearing protection.
7. Never use a cutting head or replacement parts that are
not approved by T oro.
8. Maintain the String Trimmer according to the
recommended maintenance intervals and procedures in
the Maintenance section on page 17.
9. Shut off the engine and wait until the trimmer head has
completely stopped moving before checking,
performing maintenance on or working on the String
Trimmer.
10.If running problems or excessive vibration occur, stop
immediately and inspect the unit for the cause. If the
cause cannot be determined or is beyond your ability
to correct, return the String Trimmer to your servicing
dealer for repair.
Fuel Safety
4. Always wear heavy, long pants, boots and gloves. Do
not wear loose clothing, jewelry, short pants, sandals,
or go barefoot. Secure hair so it is above shoulder
length.
5. Never operate this String Trimmer when you are tired,
ill, or under the influence of alcohol, drugs or
medication.
6. Never start or run the engine inside a closed room or
building. Breathing exhaust fumes can cause death.
7. Keep handles clean of oil, fuel and dirt.
String Trimmer Safety
1. Make sure the Trimmer is assembled correctly and that
the trimmer head is correctly installed and securely
fastened as instructed in the Assembly section.
2. Inspect the String Trimmer before each use. Replace
damaged parts. Check for fuel leaks. Make sure all
fasteners are in place and tightened securely. Follow
the maintenance instructions beginning on page 17.
1. Gasoline is highly flammable and must be handled and
stored carefully . Use a container approved for fuel for
storing gasoline and/or fuel/oil mixture.
2. Mix and pour fuel outdoors and where there are no
sparks or flames.
3. Do not smoke near fuel or String Trimmer, or while
using the String Trimmer.
4. Do not overfill the fuel tank. Stop filling 1/4–1/2 inch
(6mm–13mm) from the top of the tank.
5. Wipe up any spilled fuel before starting the engine.
6. Move the Trimmer at least 10 feet (3 m) away from
the fueling location before starting the engine (Fig. 2).
3. Make sure the trimmer head does not rotate at engine
idle speed. Refer to Idle Speed Adjustment, page 19.
4. Inspect the String Trimmer cutting head and replace
any parts that are cracked, chipped or damaged before
using the Trimmer.
5. Install the required shield before using the Trimmer.
6. Use only flexible, non–metallic, monofilament cutting
line of the correct diameter. Never use wire, rope,
string, etc.
Figure 2
1. 10 feet (3m) Minimum
5

7. Do not remove the Trimmer fuel tank cap while the
engine is running, or right after stopping the engine.
4. If you are approached while operating the Trimmer,
stop the engine and trimmer head rotation.
8. Allow the engine to cool before refueling.
9. Drain the tank and run the engine dry before storing
the unit.
10.Store fuel and String Trimmer away from open flame,
sparks and excessive heat. Make sure fuel vapors
cannot reach sparks or open flames from water heaters,
furnaces, electric motors, etc.
Power String Trimmer
Operating Safety
1. THIS STRING TRIMMER CAN CAUSE SERIOUS
INJURIES. Read the instructions carefully. Be familiar
with all controls and the proper use of the String
Trimmer.
2. Inspect your work area before you begin. Remove
objects such as broken glass, nails, wire and rocks
which can become dangerous projectiles if thrown by
the Trimmer. Remove string, rope or similar materials
which can become entangled in the trimmer head.
3. This Trimmer will throw objects and cut. Keep
children, bystanders and animals outside a 50 ft. (15
m) radius from the operator and Trimmer (Fig. 3).
Beyond the 50 ft. (15 m) there still may be a risk of
injury to bystanders from thrown objects. It is
recommended that bystanders wear eye protection. A
thrown object can ricochet.
5. Never allow children to operate the Trimmer.
6. Use the Trimmer only in daylight or good artificial
light.
7. Never operate the Trimmer without proper guards or
other protective safety devices in place.
8. Always keep the Trimmer on the right side of your
body (Fig. 4).
m-2968
Figure 4
9. Do not raise the trimmer head above waist level.
10.Keep all parts of your body away from the rotating
trimmer head and hot surfaces such as the muffler.
1. 50 ft. (15 m) Minimum
11. Keep firm footing and balance. Do not overreach.
12.Use the right tool for the job. Do not use the Trimmer
for any job that is not recommended by T oro.
m-2967
Figure 3
6

Safety and Instruction Decals
Safety decals and instructions are easily visible to the operator and are located near
any area of potential danger. Replace any decal that is damaged or lost.
(Part No. M221501)
(Part No. M221502)
ON SHAFT
ON SHAFT
7
Assembly
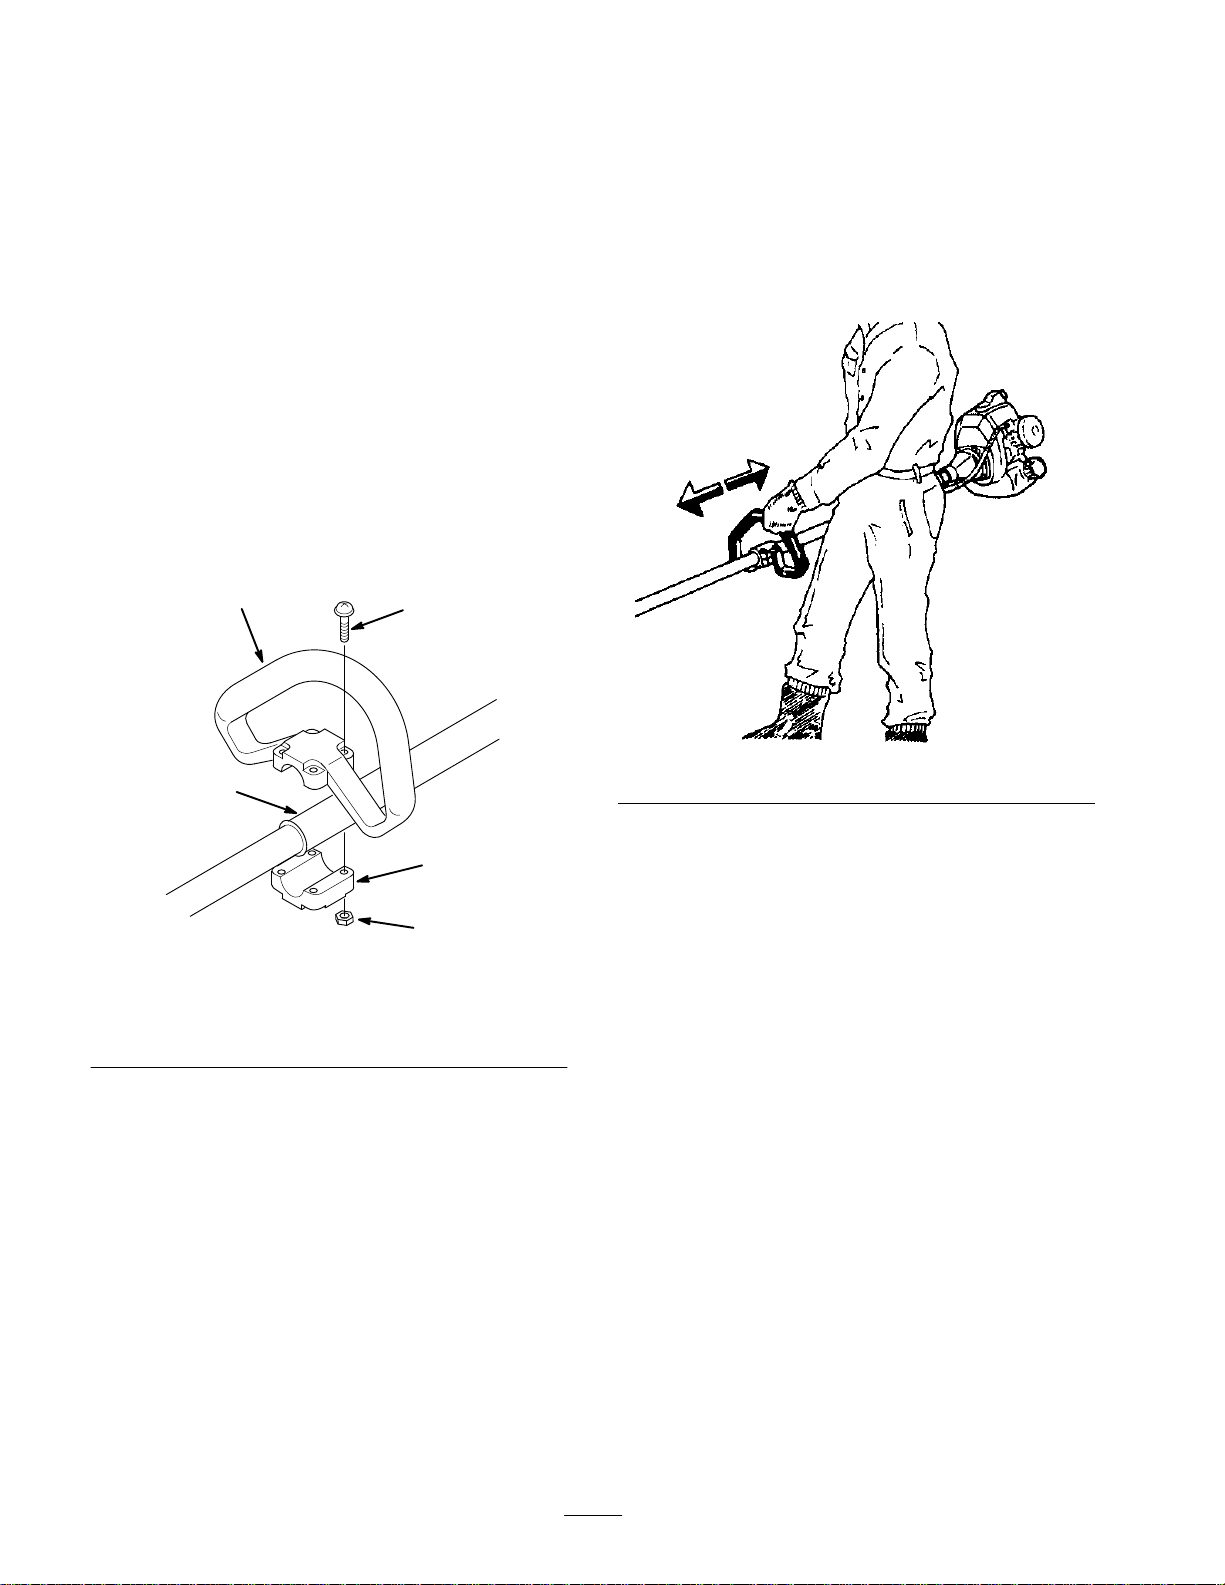
Loop Handle Installation
The loop handle kit contains a package of four screws and
nuts, a rubber sleeve and the bottom clamp for the loop
handle (Fig. 5).
1. Slip the rubber sleeve around the shaft approximately
9 inches (22.8 cm) from the end of the stop
switch/throttle trigger assembly for an initial handle
position (Fig. 5).
2. Rotate the rubber sleeve so the split is to one side
(Fig. 5).
3. Place the loop handle and the bottom clamp over the
rubber sleeve (Fig. 5).
4. Install the four screws and nuts. Leave the screws
finger-tight (Fig. 5).
5. Reposition the loop handle up or down the drive shaft
to the most comfortable position, but no closer than 9
inches (22.8 cm) from the end of the stop switch
(Figs. 5 and 6).
6. Tighten the screws and nuts (Fig. 5).
m-2971
1. Loop Handle
2. Screw (4)
3. Rubber Sleeve
Figure 5
4. Bottom Clamp
5. Nut (4)
m-2970
Figure 6
8

Installing Trimmer Head Shield
Installing Trimmer Head Shield
(Straight Shaft Model)
POTENTIAL HAZARD
• The cutoff blade is sharp.
WHAT CAN HAPPEN
• Contact with cutoff blade could cause serious
cuts or personal injury.
HOW TO AVOID THE HAZARD
• Keep hands, feet and clothing away from cutoff
blade.
1. Fasten the string cutoff blade to the trimmer head
shield with two M5 x 15 screws, lock washers and hex
nuts as shown (Fig 7).
POTENTIAL HAZARD
• Foreign objects can be thrown by Trimmer.
WHAT CAN HAPPEN
• Contact with thrown objects can cause personal
injury.
HOW TO AVOID THE HAZARD
• Never operate the Trimmer without the
trimmer head shield in place.
(Curved Shaft Model)
POTENTIAL HAZARD
• The cutoff blade is sharp.
WHAT CAN HAPPEN
• Contact with cutoff blade could cause serious
cuts or personal injury.
HOW TO AVOID THE HAZARD
• Keep hands, feet and clothing away from cutoff
blade.
1. Fasten the string cutoff blade to the trimmer head
shield with two M5 x 15 screws, lock washers and hex
nuts as shown (Fig 8).
POTENTIAL HAZARD
• Foreign objects can be thrown by Trimmer.
WHAT CAN HAPPEN
• Contact with thrown objects can cause personal
injury.
HOW TO AVOID THE HAZARD
• Never operate the Trimmer without the
trimmer head shield in place.
2. Attach the trimmer head shield to the gearcase with
the four M5 x 12 screws and lock washers as shown
(Fig 7).
m-2975
Figure 7
1. Gearcase
2. Trimmer Head Shield
3. M5 x 15 Screw (2)
4. Plate
5. Lock Washer
6. M5 x 12 Screw (4)
7. Hex Nut
8. String Cutoff Blade
2. Attach the trimmer head shield to the bearing case
with one M6 x 40 screw and locknut as shown (Fig 8).
Tighten only as needed.
Figure 8
1. String Cutoff Blade
2. Screw M6 x 40
3. Lock Washer
4. Hex Nut
5. Bearing case
6. Trimmer Head Shield
7. M6 x 40 Screw
8. Hex Nut
9
 Loading...